WIRELESS APP
FOR PERFECT AIRE BRAND WINDOW AIR CONDITIONERS,
PORTABLE AIR CONDITIONERS, AND MINI-SPLITS
OWNER’S MANUAL

3
TABLE OF CONTENTS
DECLARATION OF CONFORMITY:
Hereby, we declare that this WIRELESS MODULE is in compliance
with the essential requirements and other relevant provisions of
Directive 2014/53/EU. A copy of the full DOC is attached.
(European Union products only)
SPECIFICATION
Model: EU-SK105, US-SK105
Antenna Type: Printed PCB Antenna
Frequency Band: 2400-2483.5MHz
Operation Temperature: 32°F~113°F/0°C~45°C
Operation Humidity: 10%~85%
Power Input: DC 5V/500mA
Maximum TX Power: <20dBm
CONTENTS
PRECAUTIONS ................................................................................... 4
DOWNLOAD & INSTALL APP ........................................................5
INSTALL WIRELESS MODULE ......................................................6
USER REGISTRATION ...................................................................... 7
NETWORK CONFIGURATION .................................................... 10
HOW TO USE THE APP ................................................................ 18
SPECIAL FUNCTIONS .................................................................. 20
DECLARATIONS ............................................................................. 26

4 5
SAFETY & PRECAUTIONS
DOWNLOAD & INSTALL APP
PRECAUTIONS
APPLICABLE SYSTEM: iOS OR ANDROID
• Please keep your app up to date with the latest version.
• Due to special situation may be occurred, we explicitly claims below: Not all of the
Android and iOS system are compatible with app. We will not be responsible for any
issue as a result of the incompatibility.
WIRELESS SAFETY STRATEGY
• Wireless module only support WPA-PSK/WPA2-PSK encryption and none
encryption. WPA-PSK/WPA2-PSK encryption is recommended.
CAUTION
• Due to dierent network situation, control process may return time-out sometimes.
If this situation occurs, the display between board and app may not be the same,
please do not feel confused.
• Smartphone camera needs to be 5 million pixels or above to make sure scan
QR code well.
• Due to dierent network situation, sometimes, request time-out could happen,
thus, it is necessary to do network conguration again.
• The app system is subject to update without prior notice for product function
improvement. The actual network conguration process may be slightly dierent
from the manual, the actual process shall prevail.
• Please check the service website for more information.
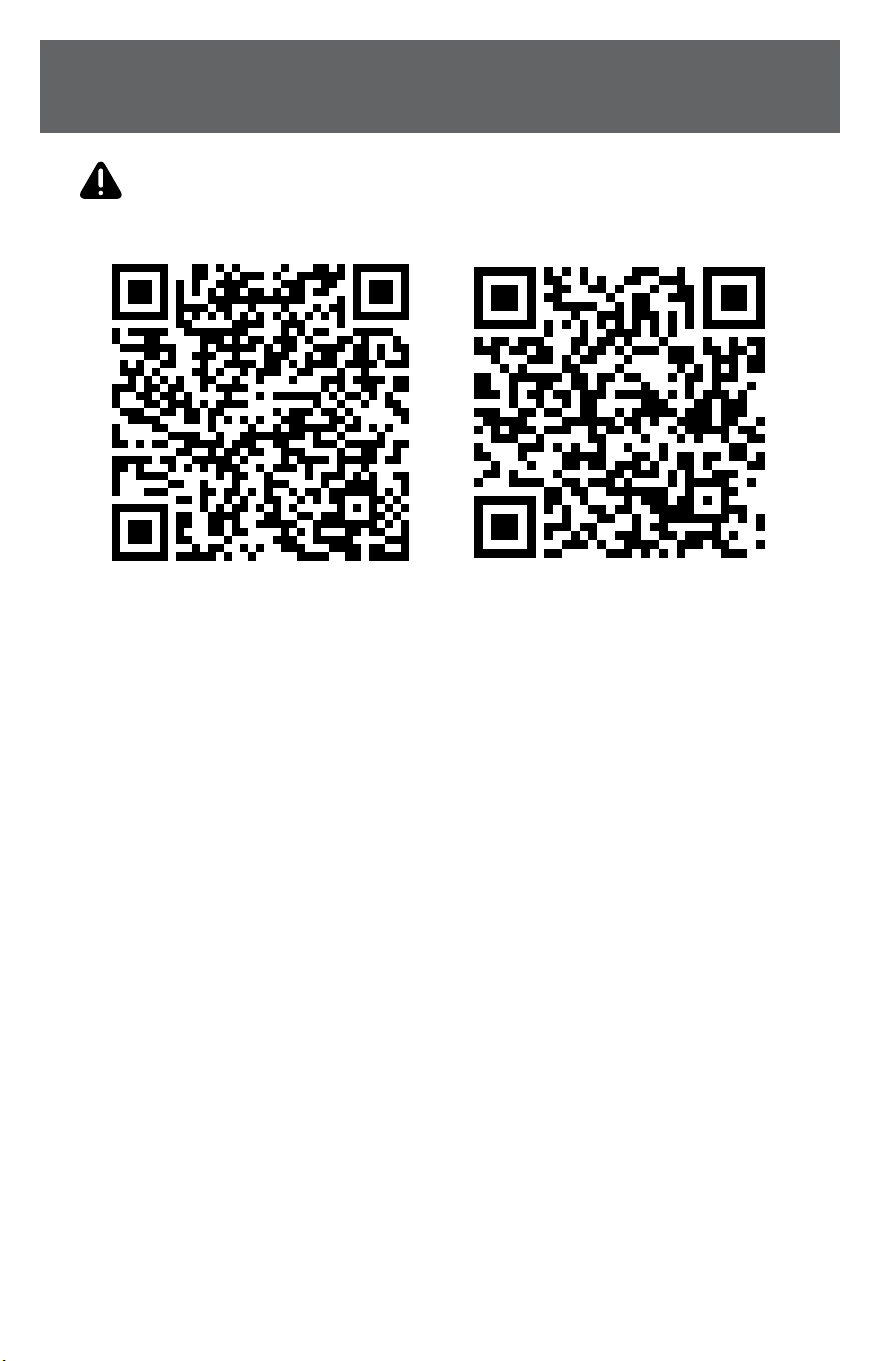
CAUTION The following QR code is only available for downloading app.
It is totally dierent with the QR code packed with WIRELESS MODULE.
• Android Phone users: scan Android QR code or go to Google Play,
search “Perfect Home Comfort” app and download it.
• iOS users: scan iOS QR code or go to App Store, search “Perfect Home Comfort ”
app and download it.
ANDROID iOS
4 5
SAFETY & PRECAUTIONS
DOWNLOAD & INSTALL APP
PRECAUTIONS
APPLICABLE SYSTEM: iOS OR ANDROID
• Please keep your app up to date with the latest version.
• Due to special situation may be occurred, we explicitly claims below: Not all of the
Android and iOS system are compatible with app. We will not be responsible for any
issue as a result of the incompatibility.
WIRELESS SAFETY STRATEGY
• Wireless module only support WPA-PSK/WPA2-PSK encryption and none
encryption. WPA-PSK/WPA2-PSK encryption is recommended.
CAUTION
• Due to dierent network situation, control process may return time-out sometimes.
If this situation occurs, the display between board and app may not be the same,
please do not feel confused.
• Smartphone camera needs to be 5 million pixels or above to make sure scan
QR code well.
• Due to dierent network situation, sometimes, request time-out could happen,
thus, it is necessary to do network conguration again.
• The app system is subject to update without prior notice for product function
improvement. The actual network conguration process may be slightly dierent
from the manual, the actual process shall prevail.
• Please check the service website for more information.
CAUTION The following QR code is only available for downloading app.
It is totally dierent with the QR code packed with WIRELESS MODULE.
• Android Phone users: scan Android QR code or go to Google Play,
search “Perfect Home Comfort” app and download it.
• iOS users: scan iOS QR code or go to App Store, search “Perfect Home Comfort ”
app and download it.
ANDROID iOS
6 7
SAFETY & PRECAUTIONS
USER REGISTRATION
INSTALL WIRELESS MODULE
• Please ensure your mobile phone is connect to wireless router. Also, the wireless
router has already connected to Internet before doing user registration and
network conguration.
• You can log in with your email or mobile account, or log in with a third-party
account.
• It needs to be selected according to the country and region where the air
conditioner is located in order to obtain better experience and service.
WARNING Before installing the wireless module, always turn o your air
conditioner and disconnect its power supply.
WARNING This interface is only compatible with wireless module provided
by the manufacturer.
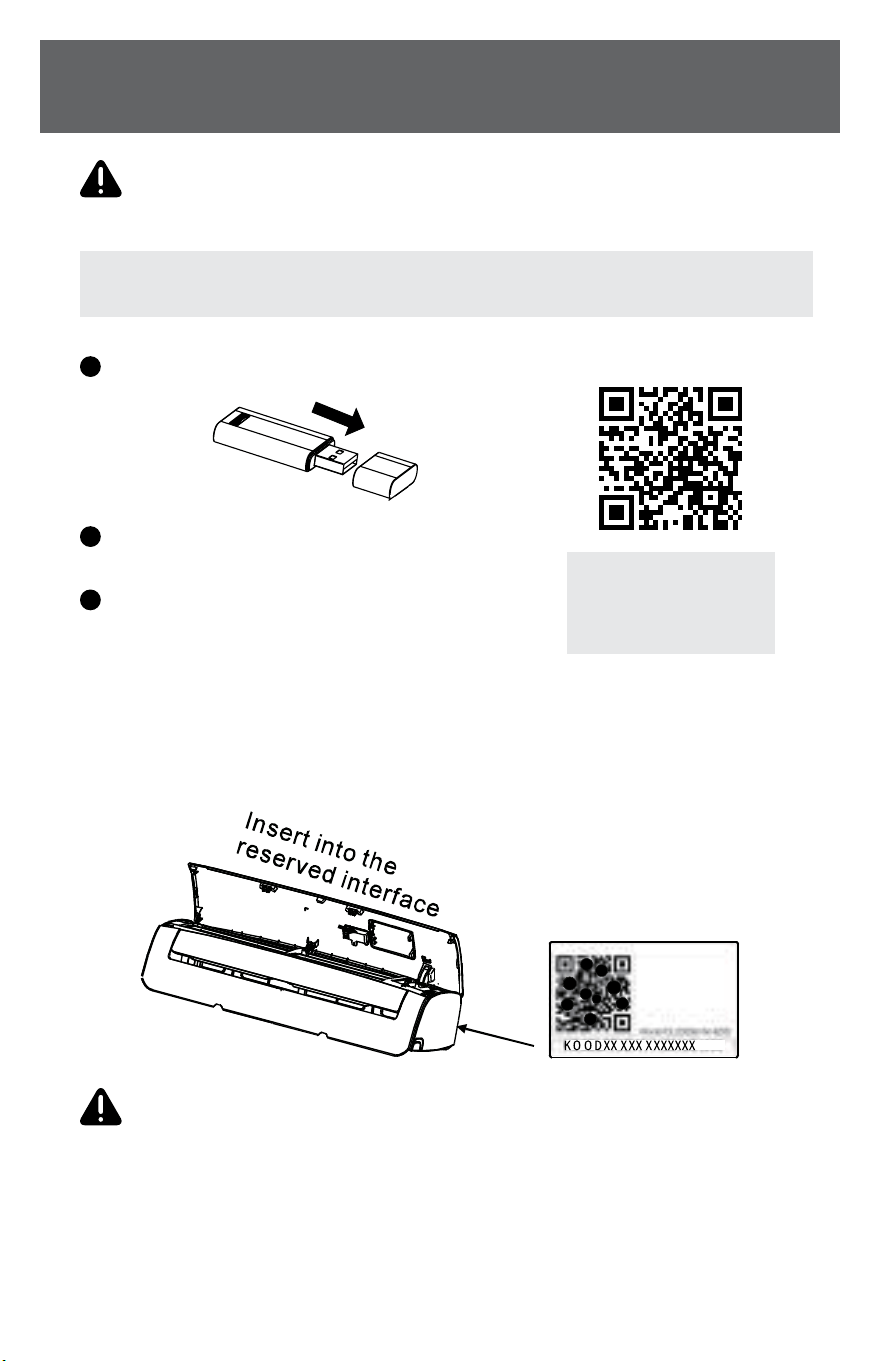
1
Remove the protective cap of the wireless module.
2
Open the front panel and insert the wireless
module into the reserved interface.
3
Attach the QR code packed with wireless module
to the side panel of the machine or other
convenient location, ensure it is convenience
to be scanned by the mobile phone.
Kindly reminder: It is better to reserve the other two QR Code in a safe place or take a
picture and save it in your own phone.
NOTE: For mini split models only. Window ACs & Portable ACs have built-in wireless.
Some models may require
additional installation steps.
Scan the QR code to view a
full installation video.
ANDROID & iOS
6 7
SAFETY & PRECAUTIONS
USER REGISTRATION
INSTALL WIRELESS MODULE
• Please ensure your mobile phone is connect to wireless router. Also, the wireless
router has already connected to Internet before doing user registration and
network conguration.
• You can log in with your email or mobile account, or log in with a third-party
account.
• It needs to be selected according to the country and region where the air
conditioner is located in order to obtain better experience and service.
WARNING Before installing the wireless module, always turn o your air
conditioner and disconnect its power supply.
WARNING This interface is only compatible with wireless module provided
by the manufacturer.
1
Remove the protective cap of the wireless module.
2
Open the front panel and insert the wireless
module into the reserved interface.
3
Attach the QR code packed with wireless module
to the side panel of the machine or other
convenient location, ensure it is convenience
to be scanned by the mobile phone.
Kindly reminder: It is better to reserve the other two QR Code in a safe place or take a
picture and save it in your own phone.
NOTE: For mini split models only. Window ACs & Portable ACs have built-in wireless.
Some models may require
additional installation steps.
Scan the QR code to view a
full installation video.
ANDROID & iOS
8 9
SAFETY & PRECAUTIONS
(Continued) (Continued)
USER REGISTRATIONUSER REGISTRATION
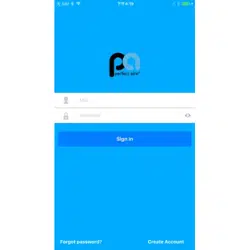
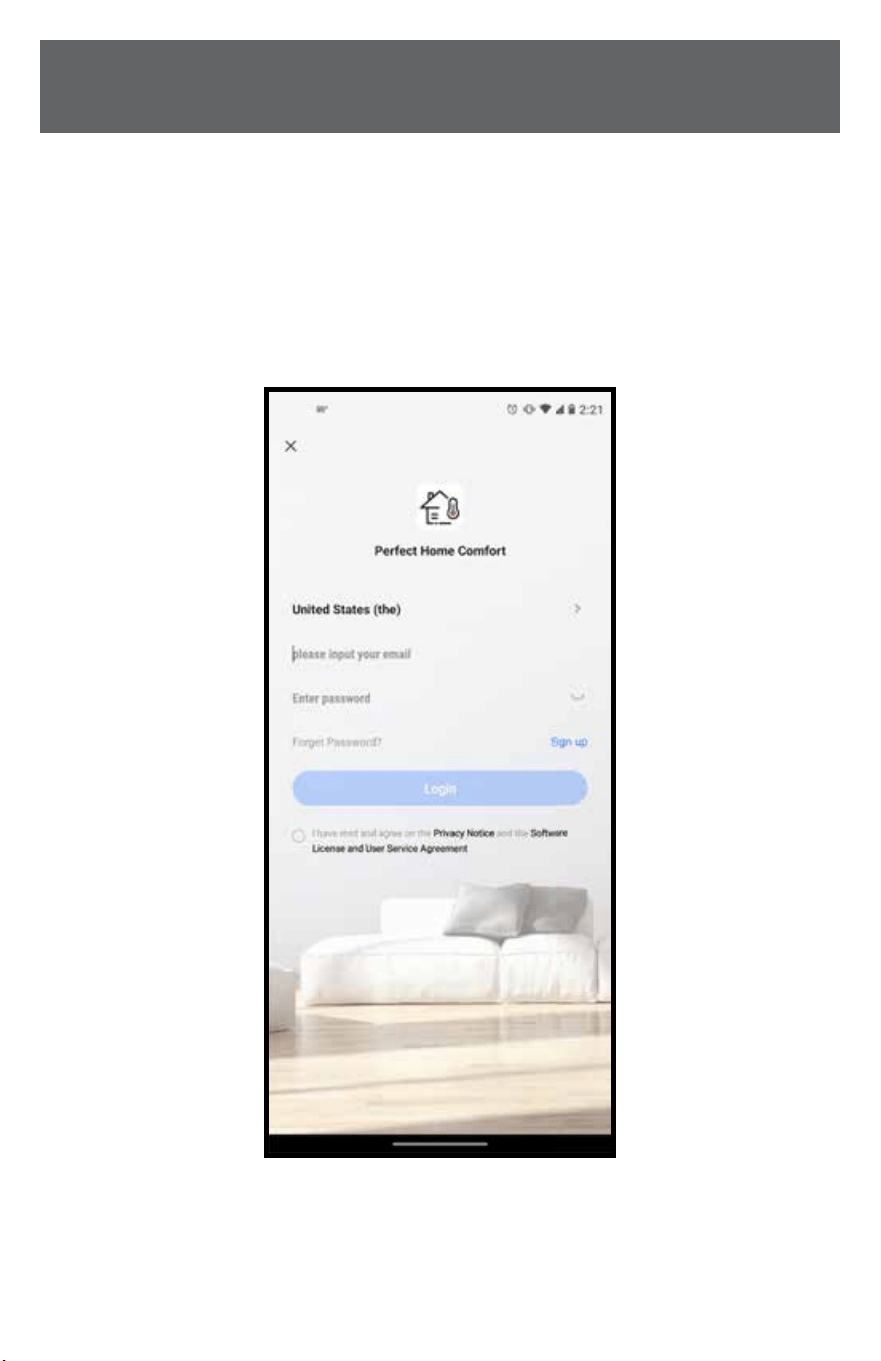
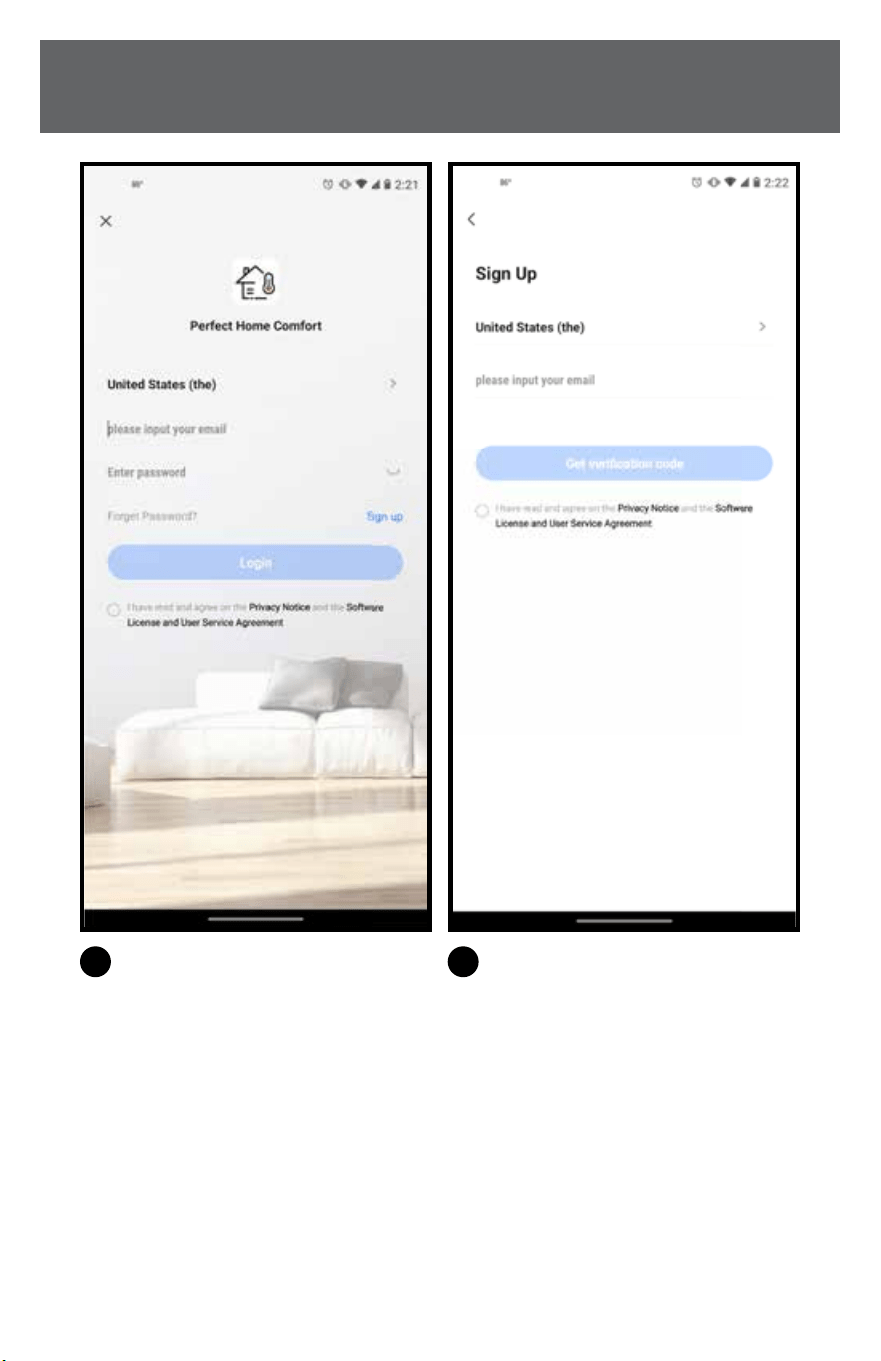
1
Click “Log in“.
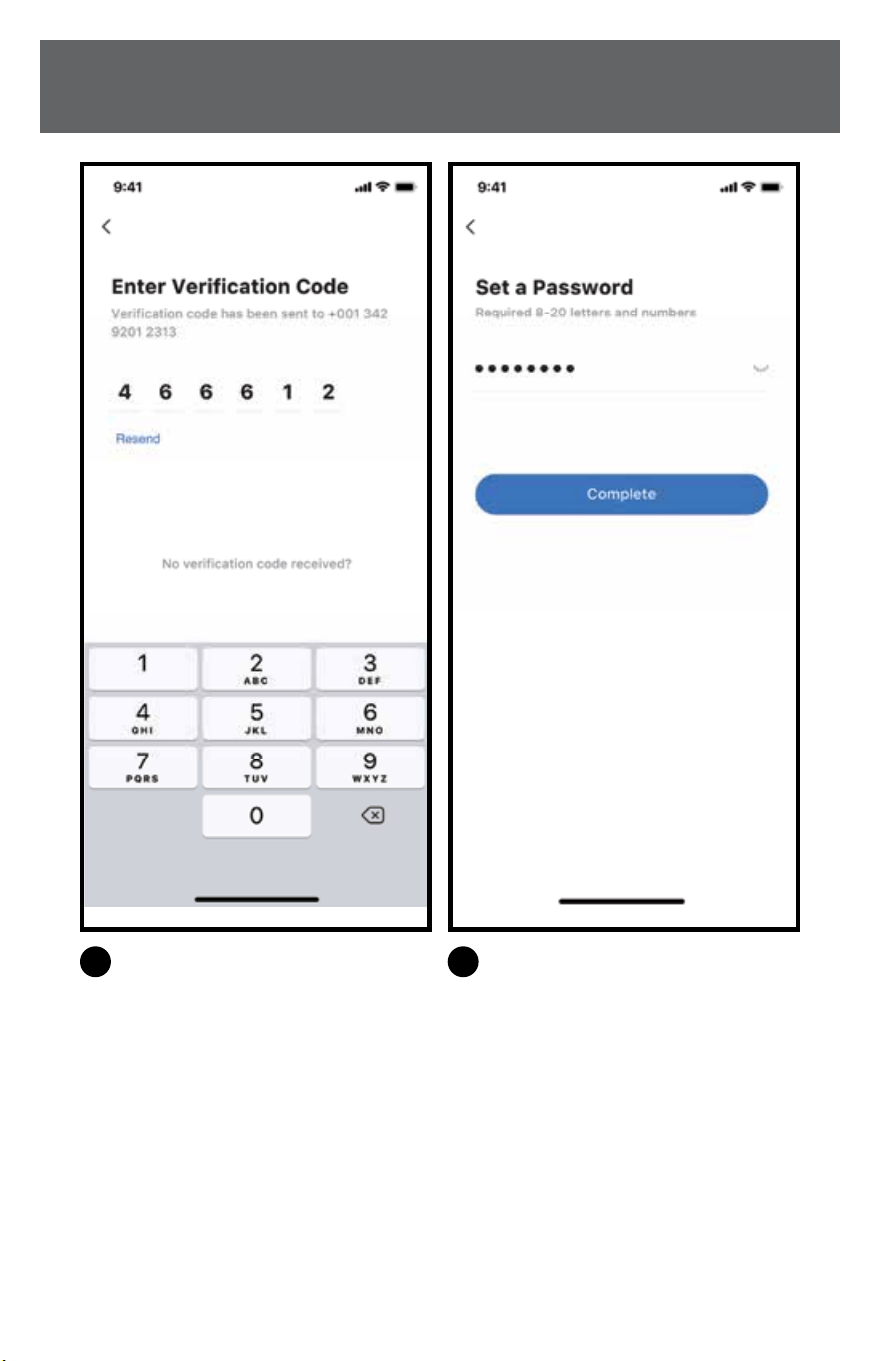
3
Enter the verication code,
the verication is successful and
automatically enter the next step.
2
Enter your email address or phone
number and then click “Get
verication code”.
4
Enter a password, format:
8-20 letters and numbers and
then click “Complete”.
8 9
SAFETY & PRECAUTIONS
(Continued) (Continued)
USER REGISTRATIONUSER REGISTRATION
1
Click “Log in“.
3
Enter the verication code,
the verication is successful and
automatically enter the next step.
2
Enter your email address or phone
number and then click “Get
verication code”.
4
Enter a password, format:
8-20 letters and numbers and
then click “Complete”.

10 11
SAFETY & PRECAUTIONS
(Continued)
NETWORK CONFIGURATIONNETWORK CONFIGURATION
CAUTION
• It is necessary to forget any other around network and make sure the Android or
iOS phone must connect to the wireless network you want to congure.
• Make sure the Android or iOS phone wireless function works well and can be
connected back to your original wireless network automatically.
Kindly reminder: The user must complete all steps within 8 minutes after the air
conditioner enters the distribution mode, otherwise the user needs to re-distribute the
network according to the following steps.
USING ANDROID OR IOS DEVICE
TO DO NETWORK CONFIGURATION
• Make sure your mobile phone has already been connected to the 2.4G WIRELESS
NETWORK which you want to use. Also, you need to forget other irrelevant wireless
network in case it inuences your conguration process.
• Power on the device and wait 5 seconds
•
1
Turn on the device after connecting the power supply.
2
Press and hold the “Power On” or “SWING” or app control button more than
3 seconds, or press the “LED Display” button on the remote 7 times until the
device shows “AP” on the display.
• The connection steps on your exact model may be slightly dierent, please refer
to your device’s user manual for exact instructions.
NETWORK CONFIGURATION BY BLUETOOTH SCAN
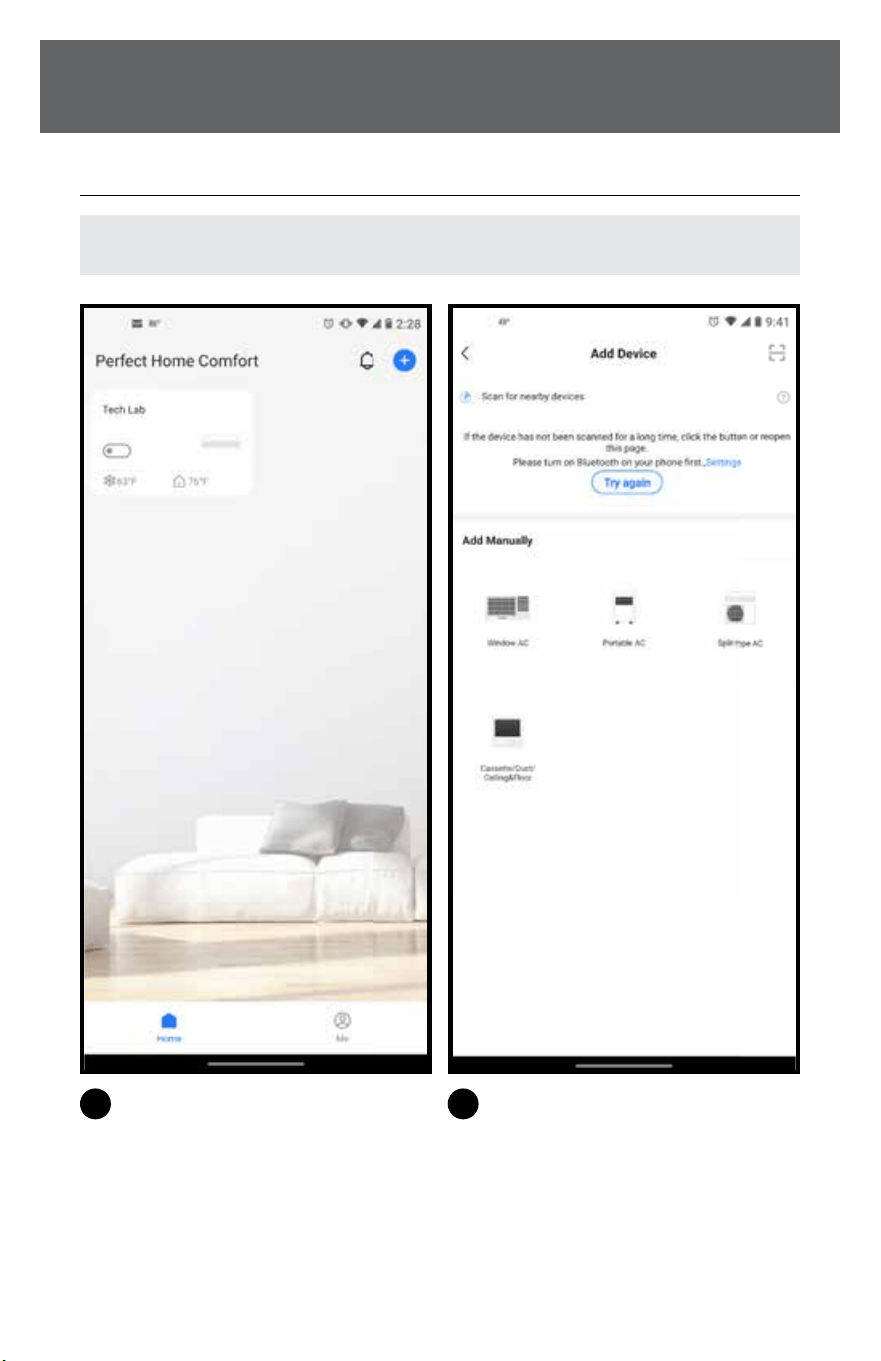
NOTE: There are two ways to nish the network conguration:
OPTION 1: Network conguration by Bluetooth scan
OPTION 2: Network conguration by select appliance type
NOTE: Make sure the Bluetooth of your mobile phone is working.
1
Press “+”.
2
Enter the current page to enable
automatic scanning.
10 11
SAFETY & PRECAUTIONS
(Continued)
NETWORK CONFIGURATIONNETWORK CONFIGURATION
CAUTION
• It is necessary to forget any other around network and make sure the Android or
iOS phone must connect to the wireless network you want to congure.
• Make sure the Android or iOS phone wireless function works well and can be
connected back to your original wireless network automatically.
Kindly reminder: The user must complete all steps within 8 minutes after the air
conditioner enters the distribution mode, otherwise the user needs to re-distribute the
network according to the following steps.
USING ANDROID OR IOS DEVICE
TO DO NETWORK CONFIGURATION
• Make sure your mobile phone has already been connected to the 2.4G WIRELESS
NETWORK which you want to use. Also, you need to forget other irrelevant wireless
network in case it inuences your conguration process.
• Power on the device and wait 5 seconds
•
1
Turn on the device after connecting the power supply.
2
Press and hold the “Power On” or “SWING” or app control button more than
3 seconds, or press the “LED Display” button on the remote 7 times until the
device shows “AP” on the display.
• The connection steps on your exact model may be slightly dierent, please refer
to your device’s user manual for exact instructions.
NETWORK CONFIGURATION BY BLUETOOTH SCAN
NOTE: There are two ways to nish the network conguration:
OPTION 1: Network conguration by Bluetooth scan
OPTION 2: Network conguration by select appliance type
NOTE: Make sure the Bluetooth of your mobile phone is working.
1
Press “+”.
2
Enter the current page to enable
automatic scanning.
12 13
SAFETY & PRECAUTIONS
(Continued) (Continued)
NETWORK CONFIGURATIONNETWORK CONFIGURATION
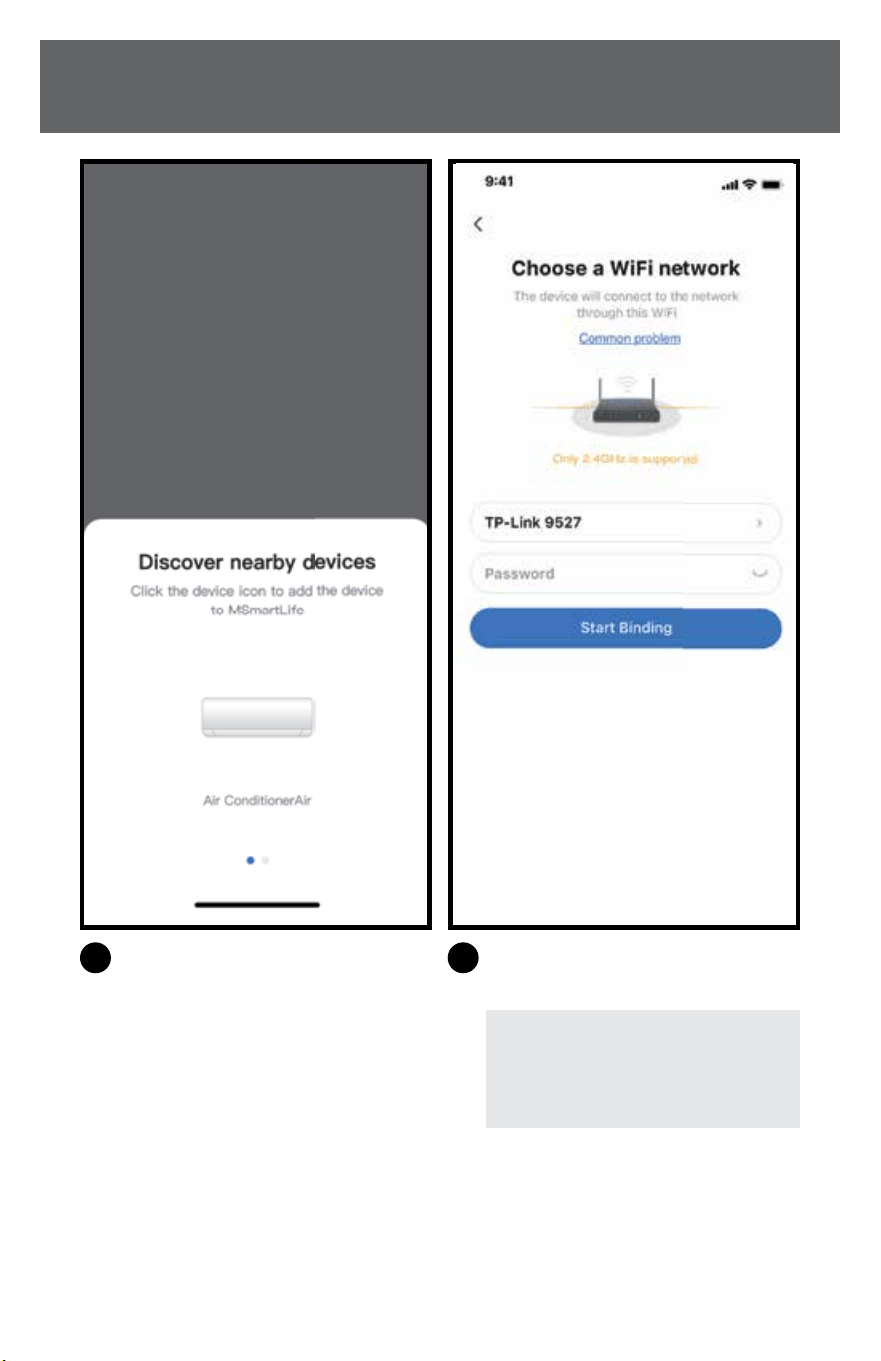
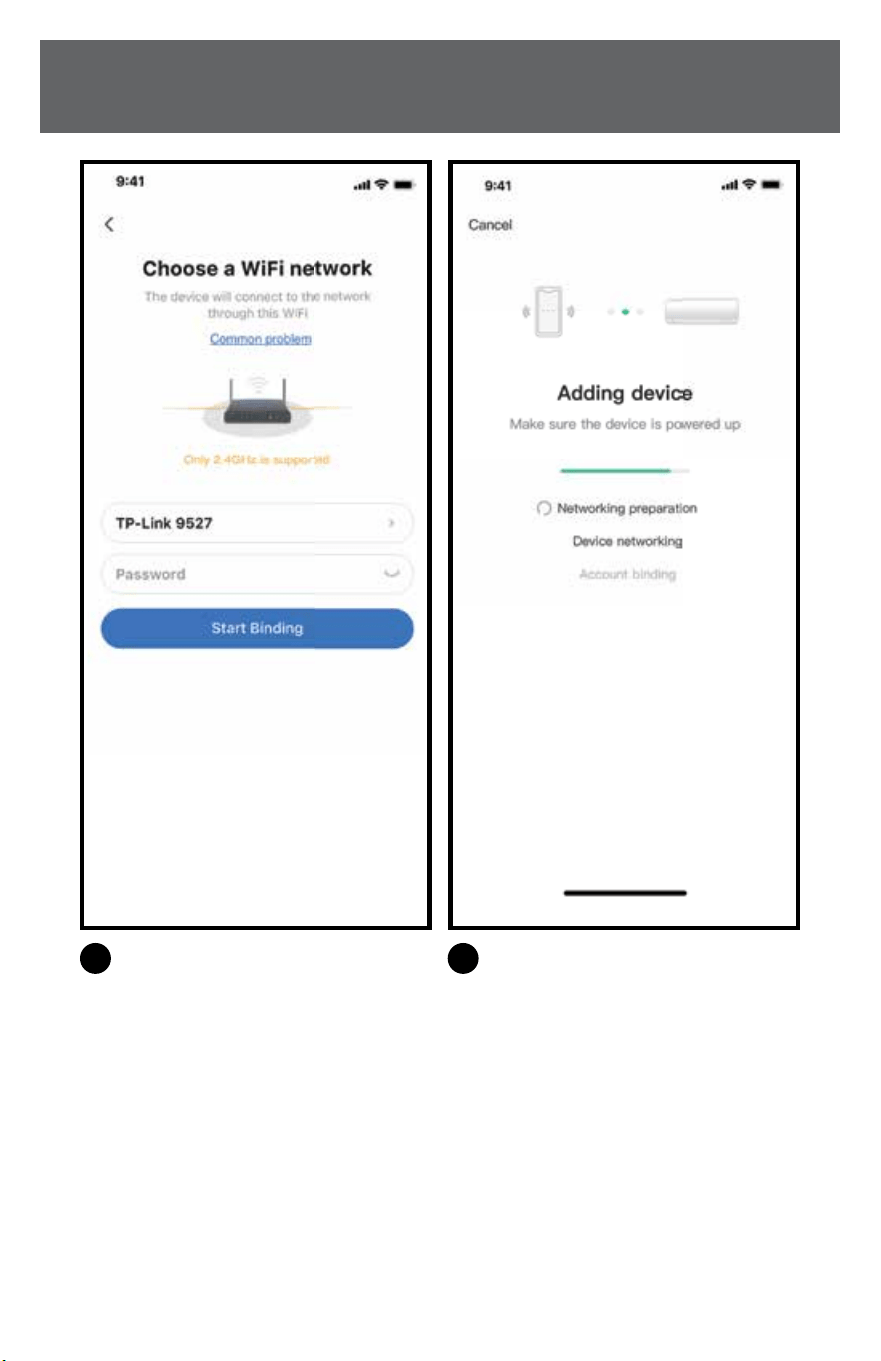
3
Wait for the app to nd smart device,
then click to add it.
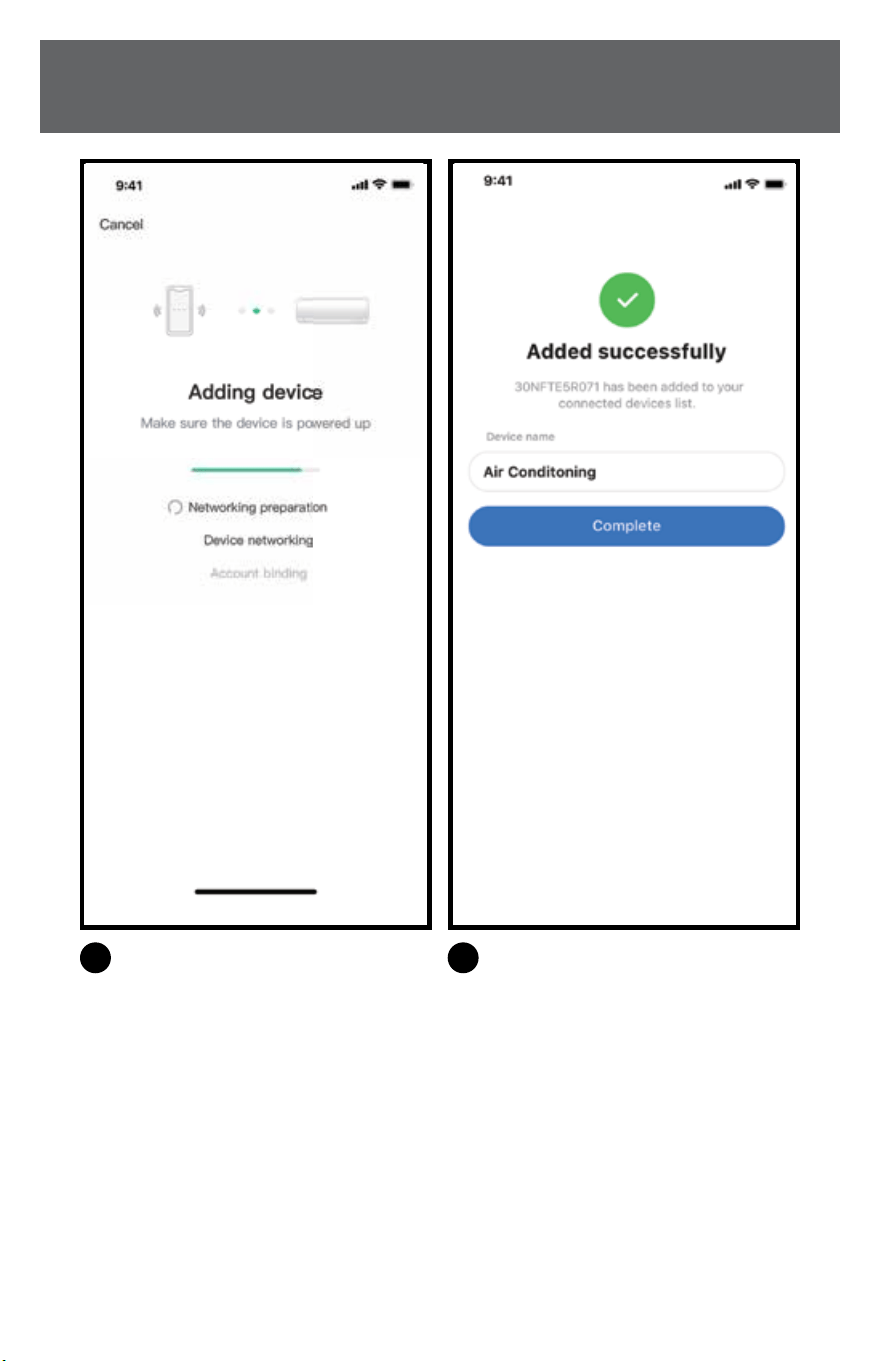
5
Wait for the network to connect.
4
Select home wireless network, enter
the password.
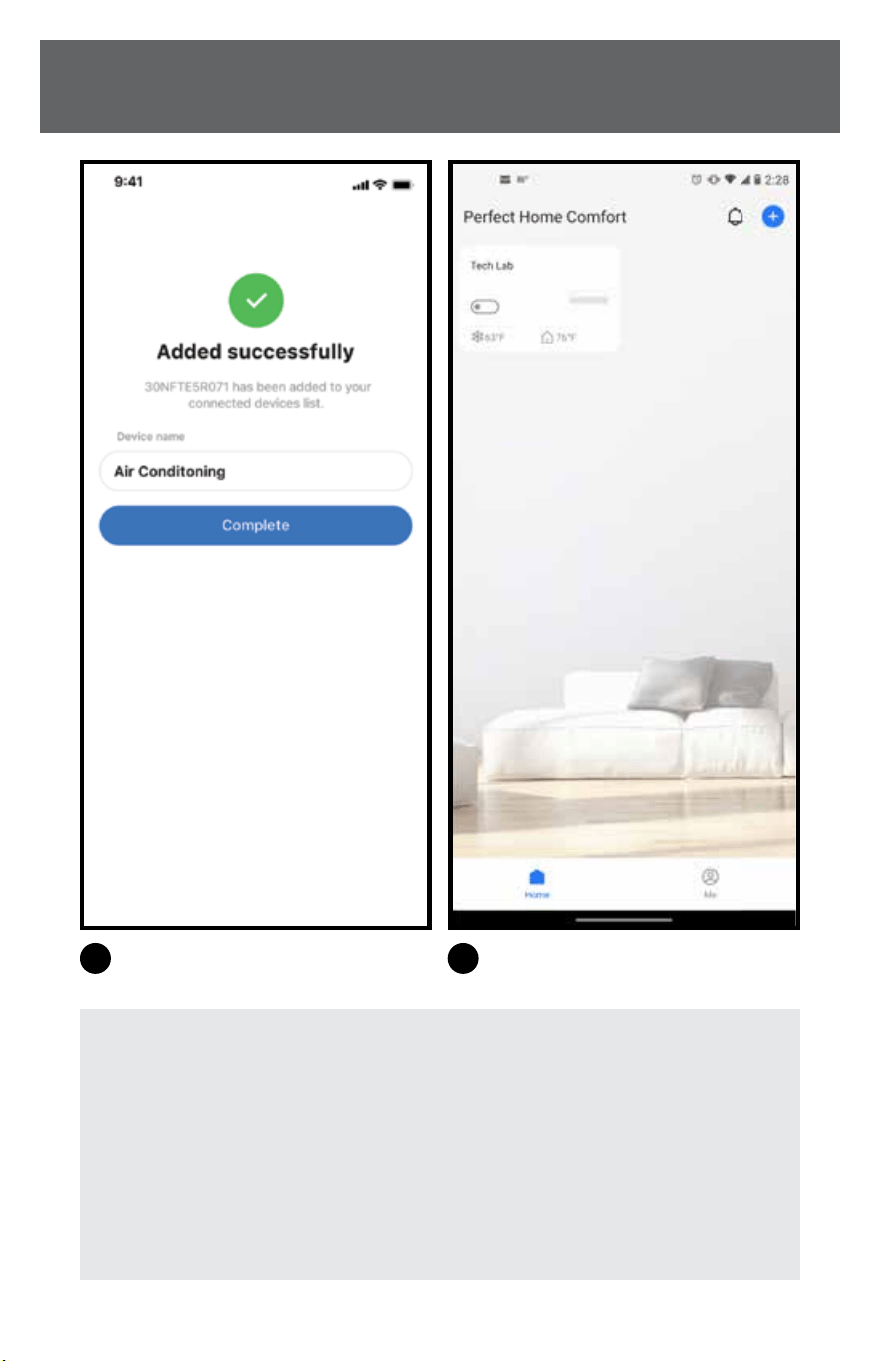
6
Conguration successful, now you
can modify the default name.
NOTE: Only 2.4GHz network is
supported by this app. It will not
connect to a 5GHz network.
12 13
SAFETY & PRECAUTIONS
(Continued) (Continued)
NETWORK CONFIGURATIONNETWORK CONFIGURATION
3
Wait for the app to nd smart device,
then click to add it.
5
Wait for the network to connect.
4
Select home wireless network, enter
the password.
6
Conguration successful, now you
can modify the default name.
NOTE: Only 2.4GHz network is
supported by this app. It will not
connect to a 5GHz network.
14 15
SAFETY & PRECAUTIONS
(Continued) (Continued)
NETWORK CONFIGURATIONNETWORK CONFIGURATION
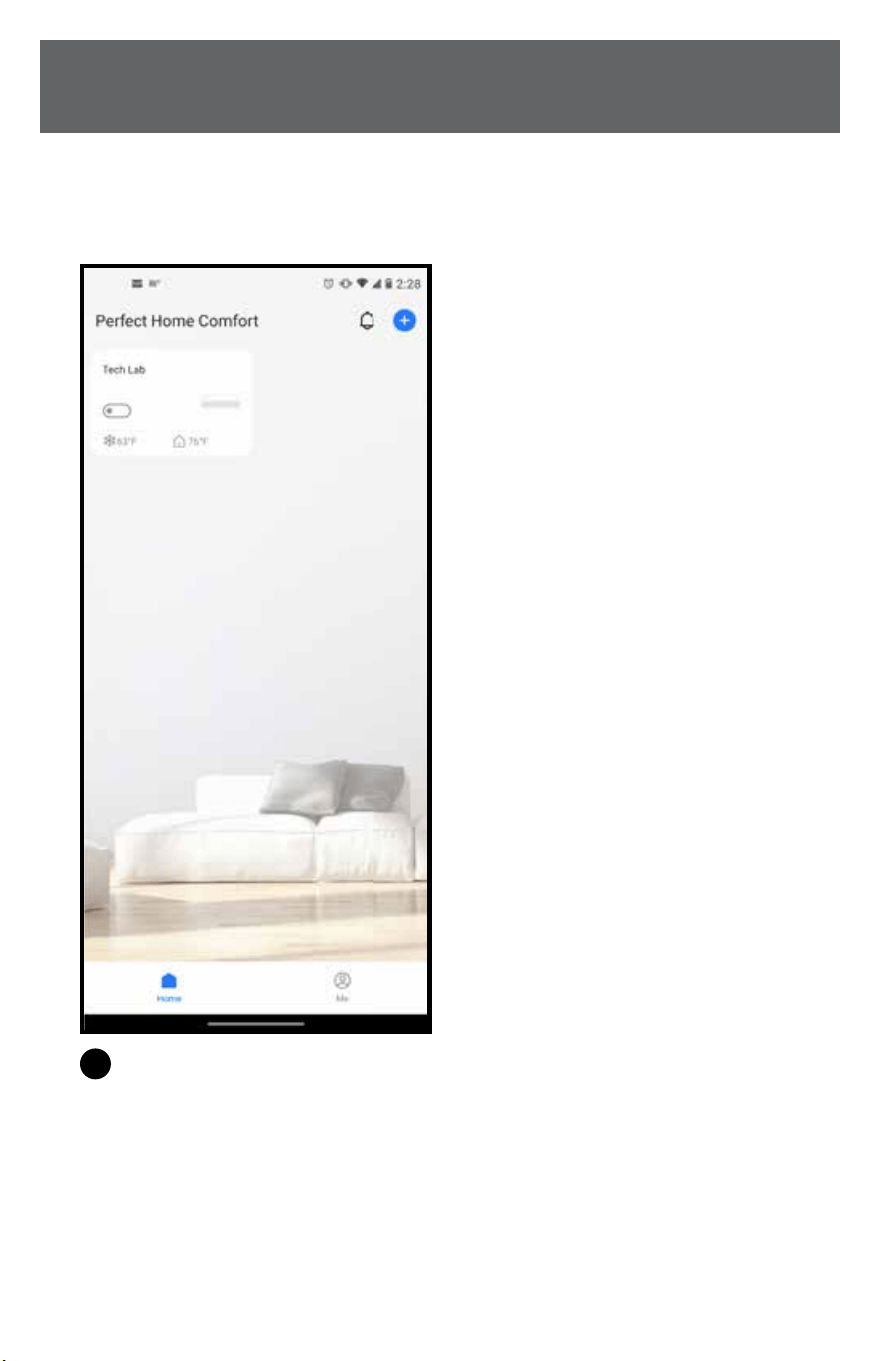
7
Bluetooth network conguration
is successful, now you can see the
device in the list.
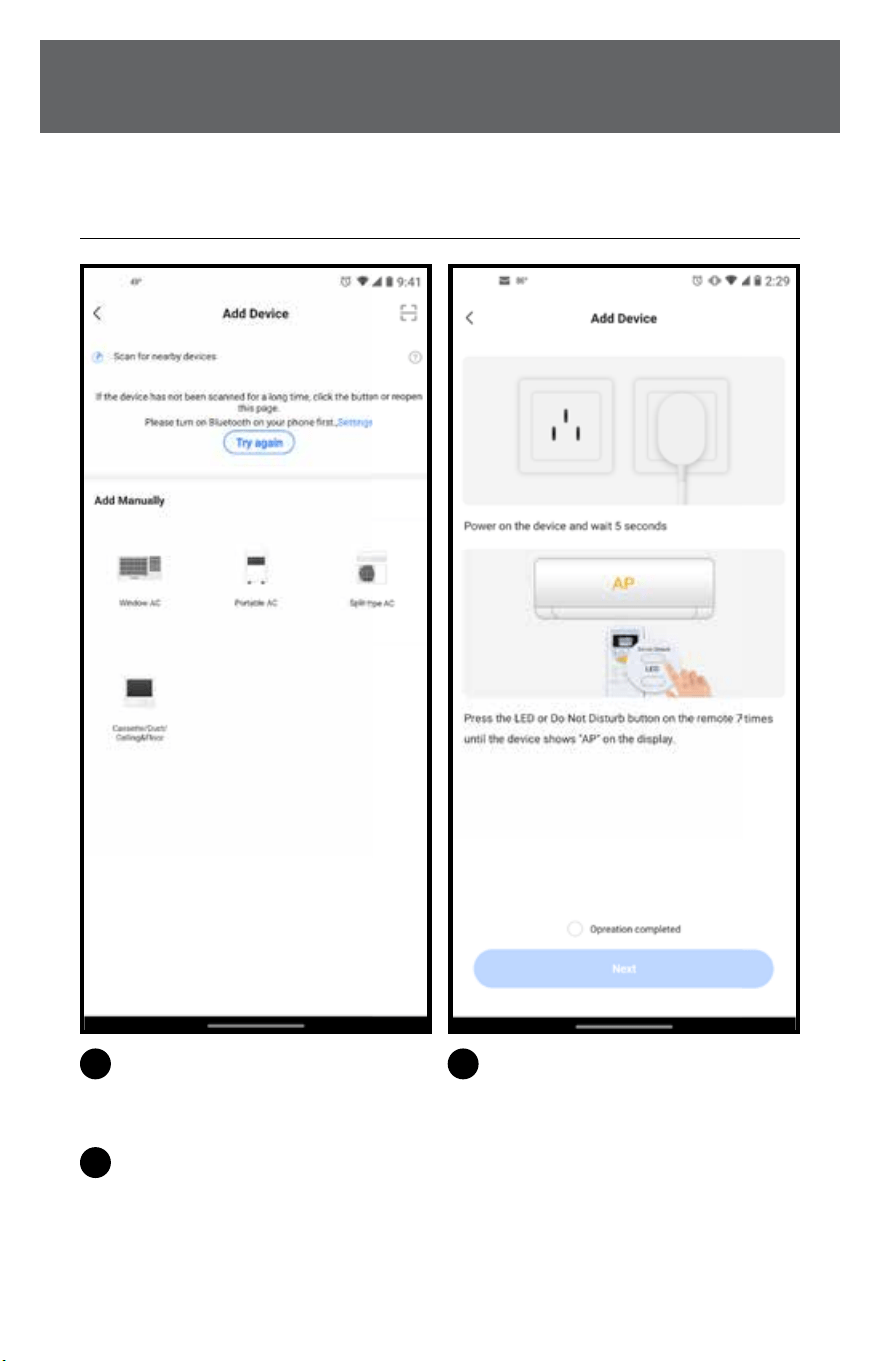
NETWORK CONFIGURATION BY SELECT
APPLIANCE TYPE
1
If the Bluetooth network
conguration is failure,
please select the appliance type.
2
Power on the device and wait 5
seconds.
3
a. Turn on the device after connecting
the power supply.
b. Press and hold the “Power On” or
“SWING” or app control button
more than 3 seconds, or press the
“LED Display” button on the remote
7 times until the device shows “AP”
on the display.
14 15
SAFETY & PRECAUTIONS
(Continued) (Continued)
NETWORK CONFIGURATIONNETWORK CONFIGURATION
7
Bluetooth network conguration
is successful, now you can see the
device in the list.
NETWORK CONFIGURATION BY SELECT
APPLIANCE TYPE
1
If the Bluetooth network
conguration is failure,
please select the appliance type.
2
Power on the device and wait 5
seconds.
3
a. Turn on the device after connecting
the power supply.
b. Press and hold the “Power On” or
“SWING” or app control button
more than 3 seconds, or press the
“LED Display” button on the remote
7 times until the device shows “AP”
on the display.
16 17
SAFETY & PRECAUTIONS
(Continued) (Continued)
NETWORK CONFIGURATIONNETWORK CONFIGURATION
4
Please enter password.
6
Network conguration is successful.
5
Add device.
7
Conguration successful, now you
can see the device in the list.
NOTE:
• When nishing network conguration, app will display success cue words on
the screen.
• DUETODIFFERENTINTERNETENVIRONMENTS,ITISPOSSIBLETHAT
THEDEVICESTATUSSTILLDISPLAYS“OFFLINE”.Ifthissituation
occurs,itisnecessarytopulldownandrefreshthedevicelistontheapp
andmakesurethedevicestatusbecomes“online”.Alternatively,usercan
turnotheACpowerandturnonitagain,thedevicestatuswillbecome
“online”afterfewminutes.
18 19
SAFETY & PRECAUTIONS
(Continued)
HOW TO USE THE APPHOW TO USE THE APP
Please ensure both your mobile phone and air conditioner are connected to the internet
before using app to control the air conditioner via internet, please follow the next steps:
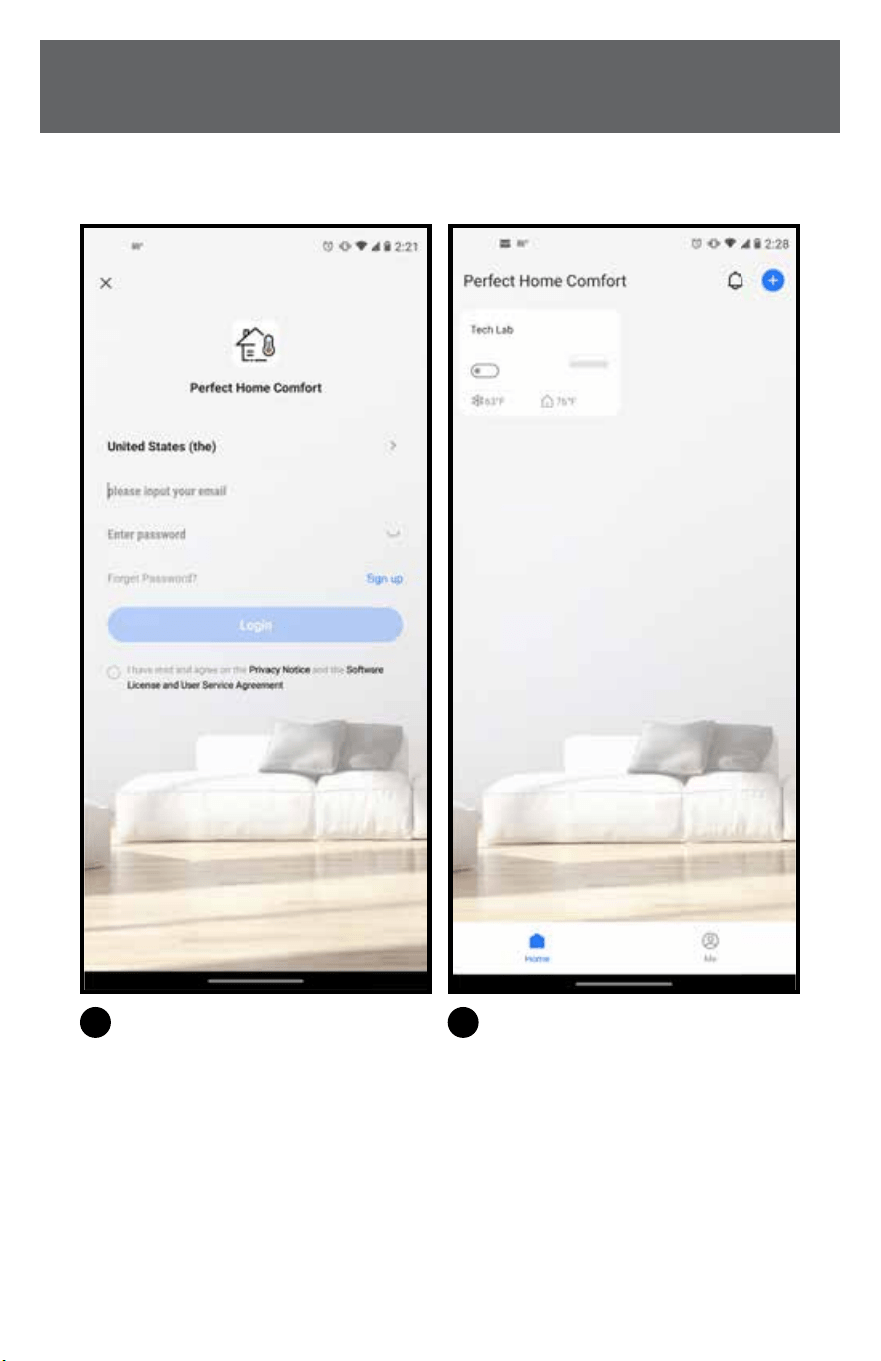
1
Click “Log in“.
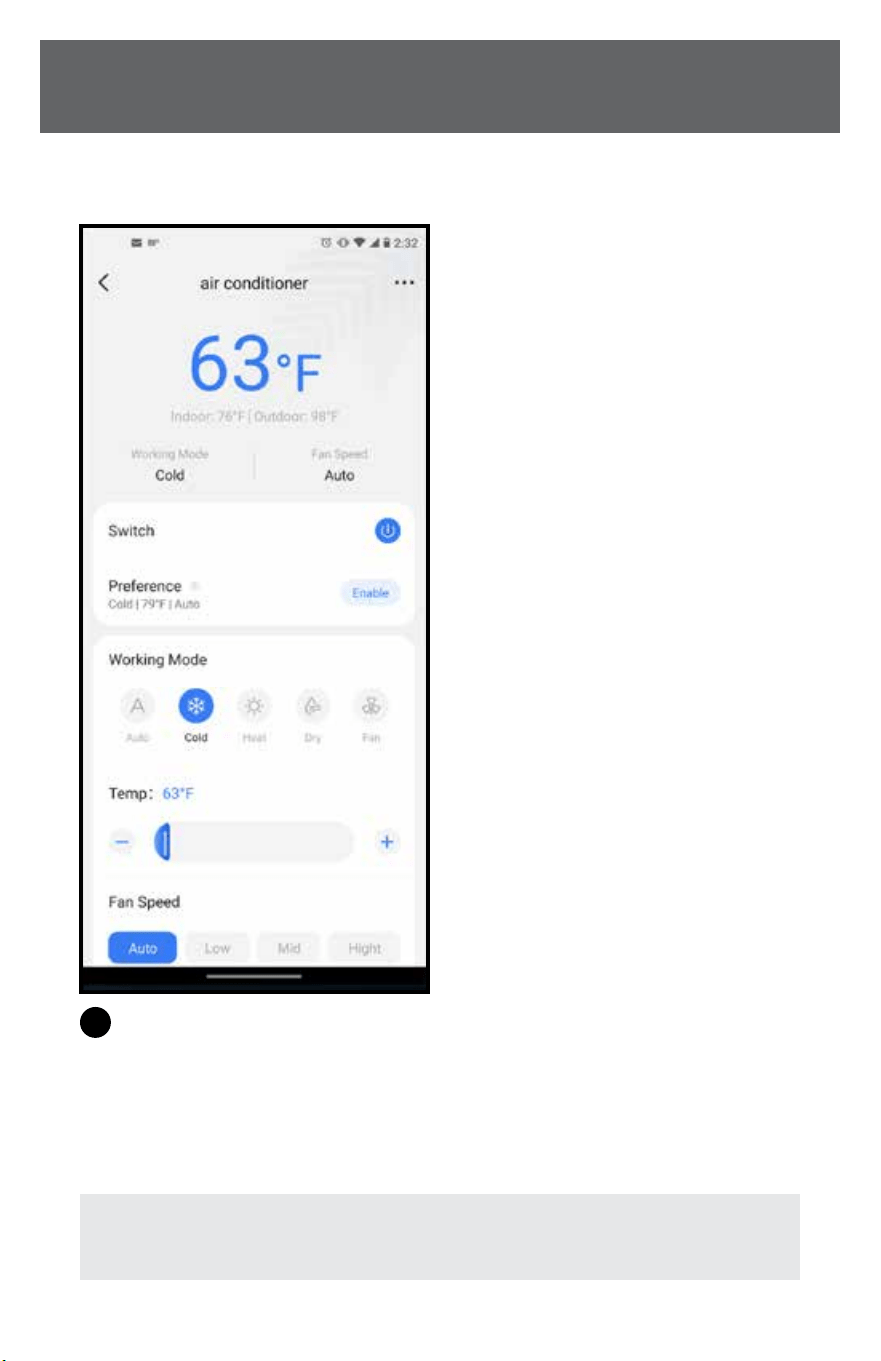
3
User can control air conditioners
on/o status, operation mode,
temperature, fan speed and so on.
2
Choose the device.
NOTE: Each device functions dierently, check the user manual for more
information.
18 19
SAFETY & PRECAUTIONS
(Continued)
HOW TO USE THE APPHOW TO USE THE APP
Please ensure both your mobile phone and air conditioner are connected to the internet
before using app to control the air conditioner via internet, please follow the next steps:
1
Click “Log in“.
3
User can control air conditioners
on/o status, operation mode,
temperature, fan speed and so on.
2
Choose the device.
NOTE: Each device functions dierently, check the user manual for more
information.
20 21
SAFETY & PRECAUTIONS
(Continued)
SPECIAL FUNCTIONSSPECIAL FUNCTIONS
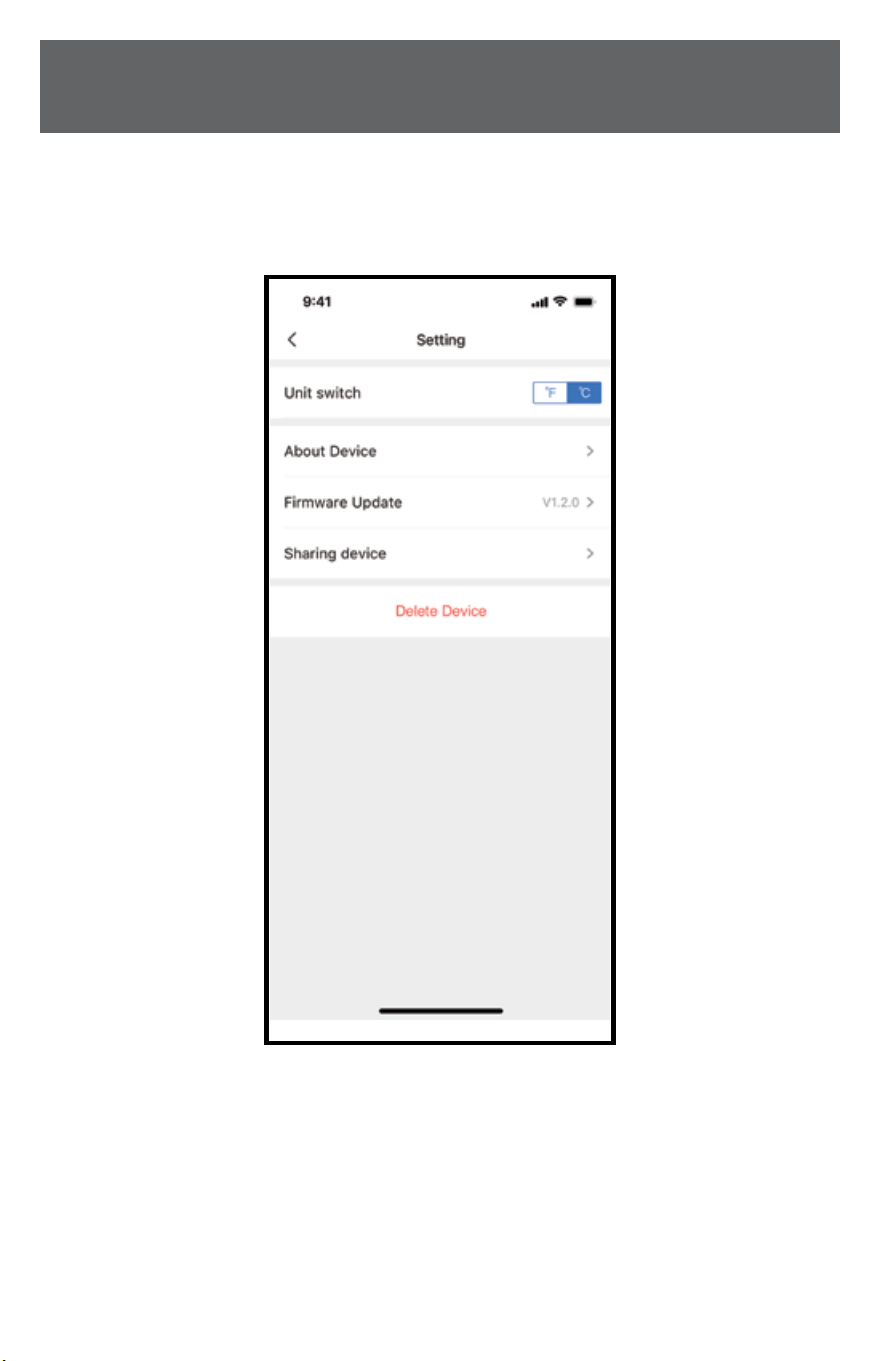
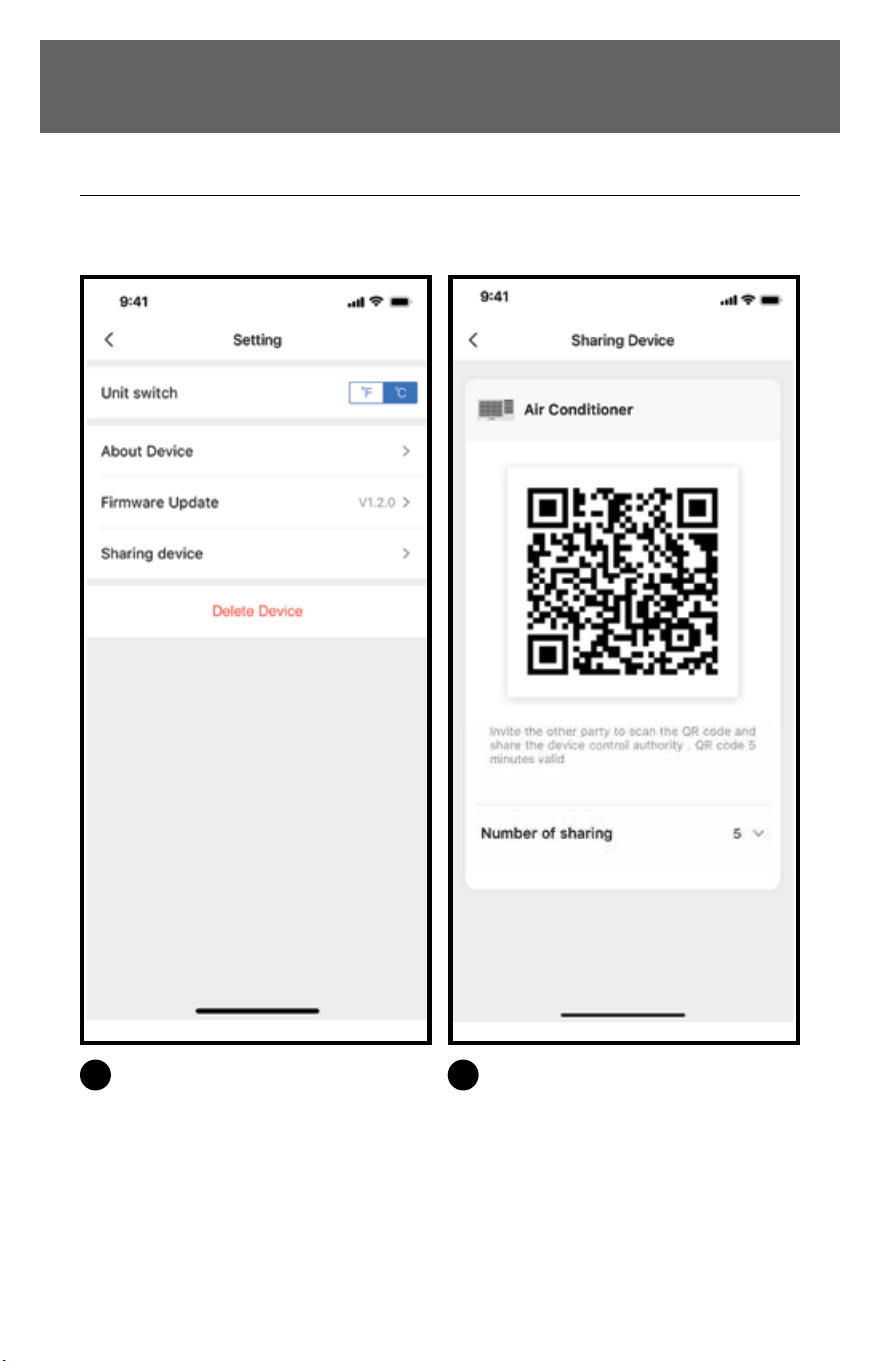
SHARE DEVICE
Through the shared device function, multiple users can control the device at the same
time.
1
Click “Sharing Device”.
2
Scan the device sharing code.
20 21
SAFETY & PRECAUTIONS
(Continued)
SPECIAL FUNCTIONSSPECIAL FUNCTIONS
SHARE DEVICE
Through the shared device function, multiple users can control the device at the same
time.
1
Click “Sharing Device”.
2
Scan the device sharing code.
22 23
SAFETY & PRECAUTIONS
(Continued) (Continued)
SPECIAL FUNCTIONSSPECIAL FUNCTIONS
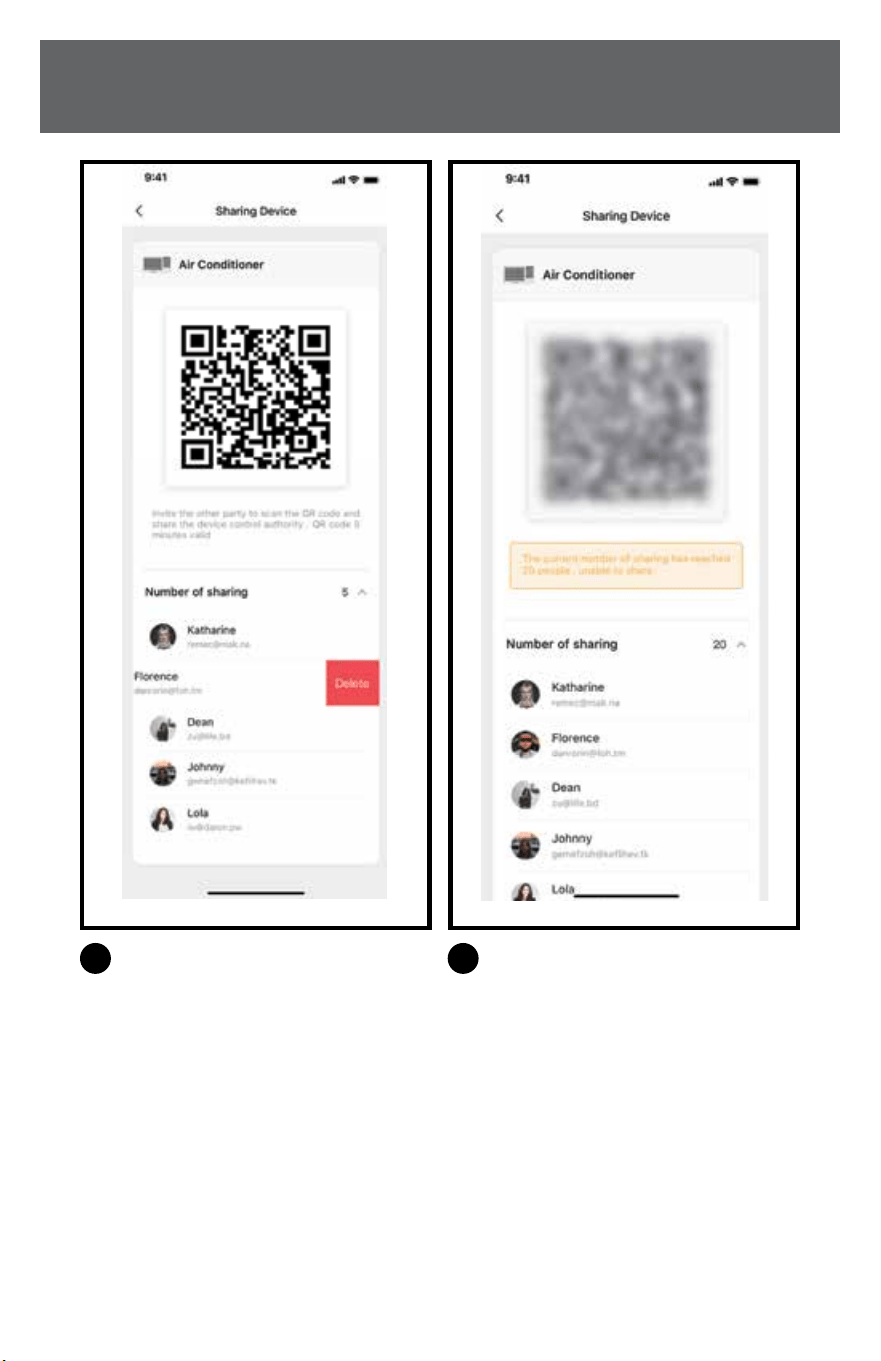
3
Swipe left on a member to delete.
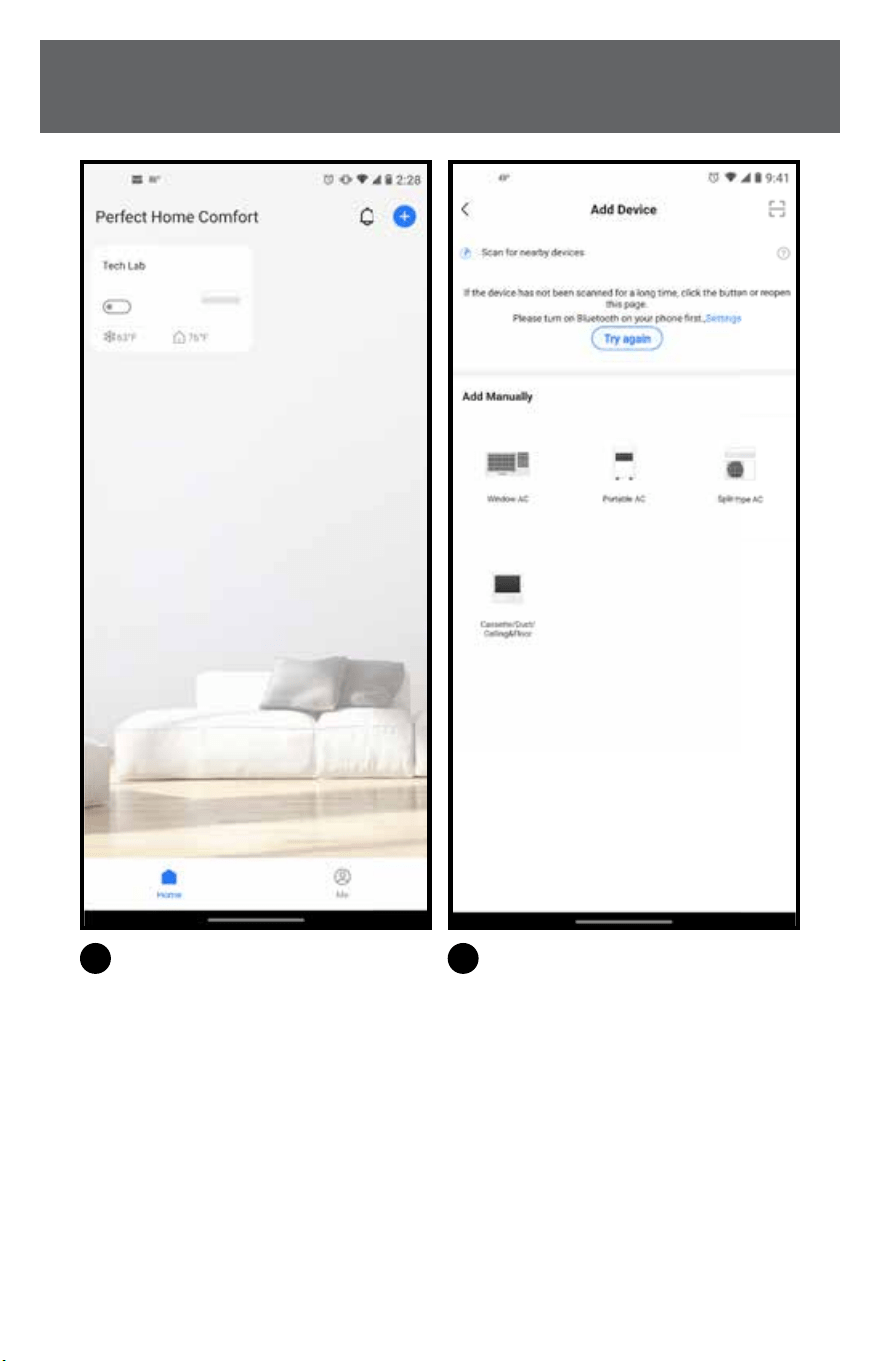
5
Other users must log in to the
“Perfect Home Comfort” app rst,
and click the “+” on the home page
to enter the scan entry page.
4
When the number of shared members
reaches 20, other users will not be
able to scan.
6
Now others can add shared devices by
clicking the scan symbol in the upper
right corner.
22 23
SAFETY & PRECAUTIONS
(Continued) (Continued)
SPECIAL FUNCTIONSSPECIAL FUNCTIONS
3
Swipe left on a member to delete.
5
Other users must log in to the
“Perfect Home Comfort” app rst,
and click the “+” on the home page
to enter the scan entry page.
4
When the number of shared members
reaches 20, other users will not be
able to scan.
6
Now others can add shared devices by
clicking the scan symbol in the upper
right corner.
24 25
SAFETY & PRECAUTIONS
(Continued) (Continued)
SPECIAL FUNCTIONSSPECIAL FUNCTIONS
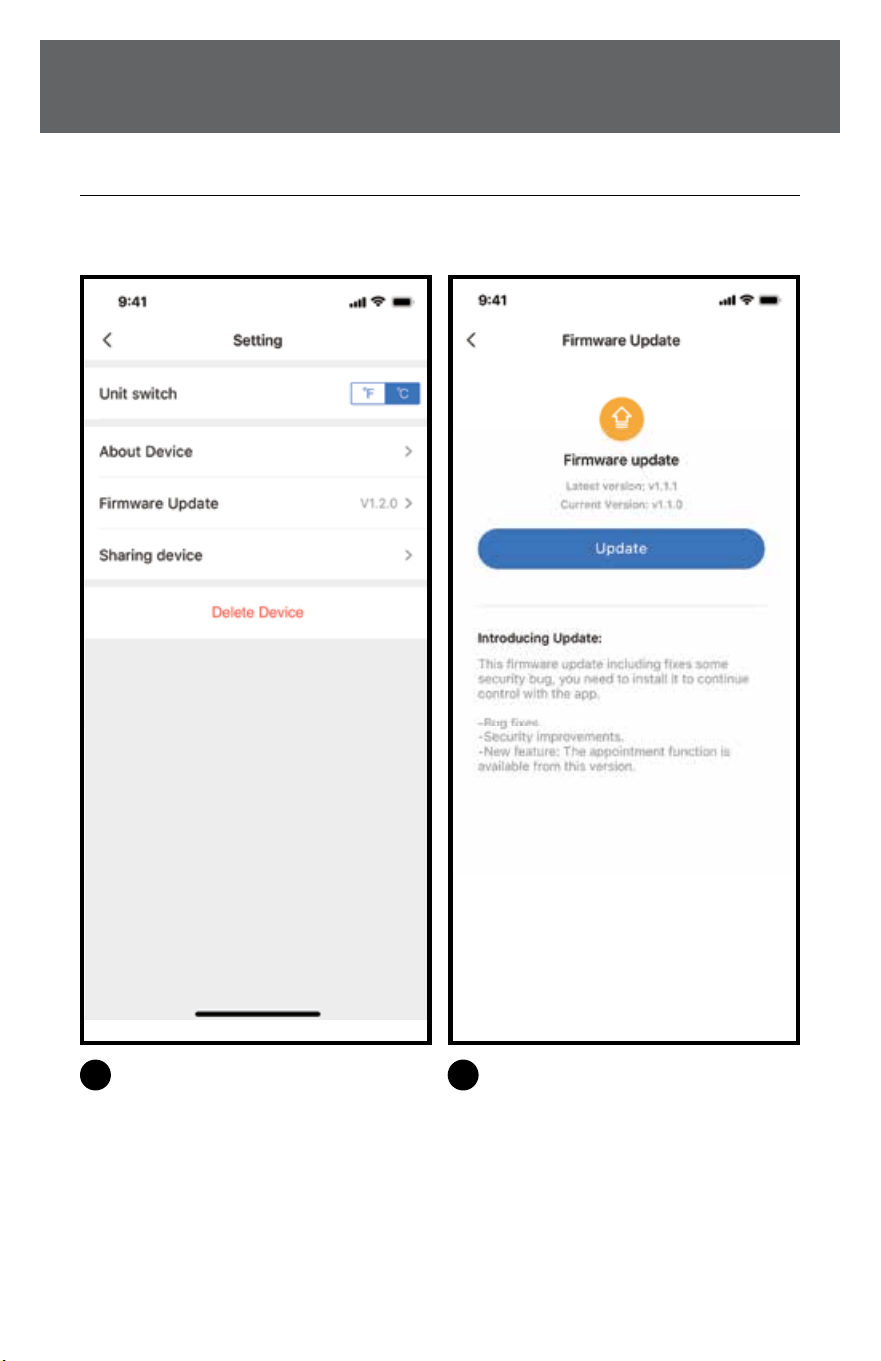
FIRMWARE UPDATE
Through this function, users can manually update the device rmware to ensure that the
device rmware is running with the latest version.
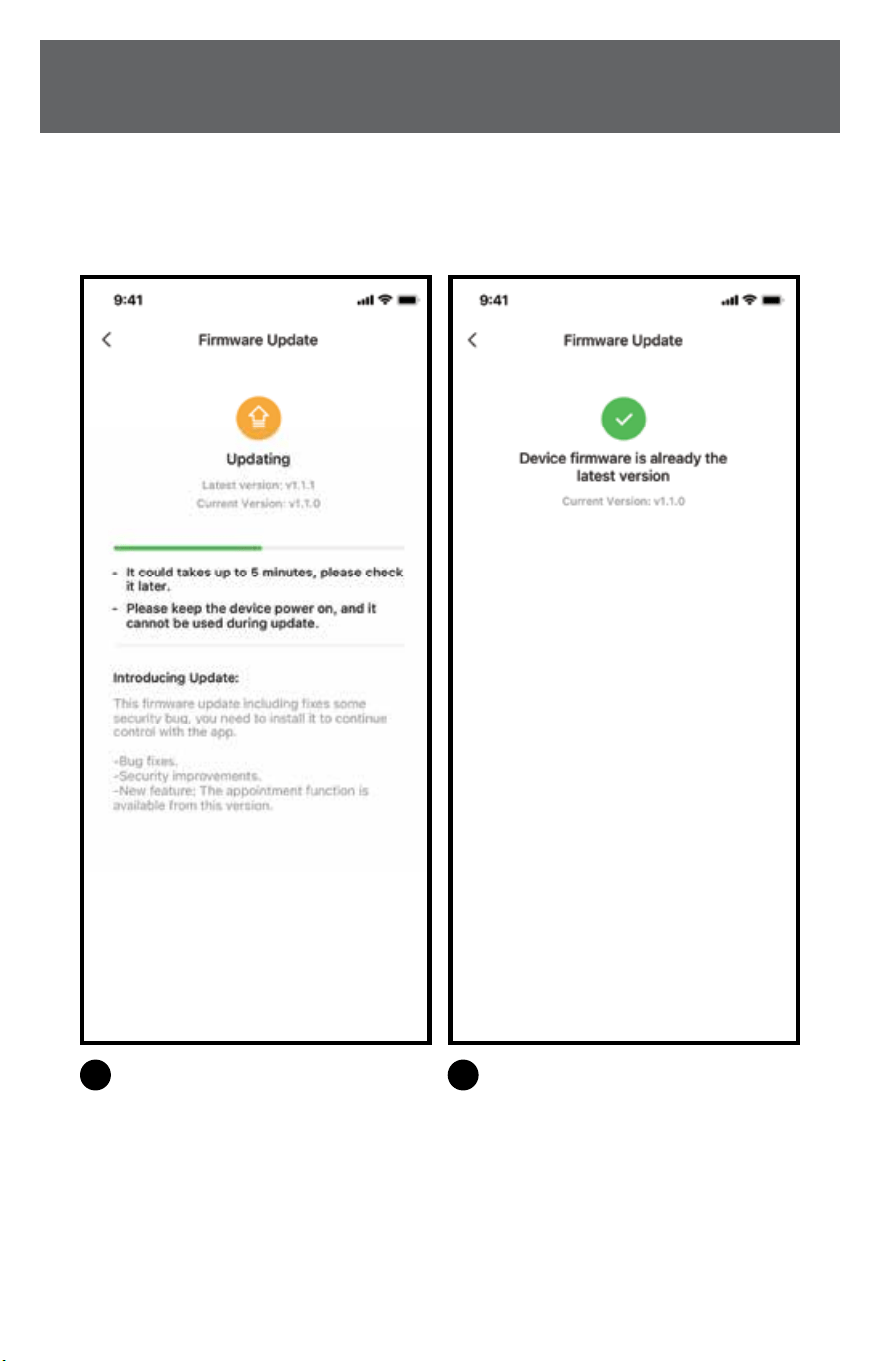
3
Check the upgrade status during the
upgrade, and go to the next step after
the upgrade is complete.
1
Click “Firmware Update”
4
The rmware upgrade is completed,
and the user can check the latest
rmware version. Or when the
rmware does not need to be
upgraded, it will also enter the
current page to view the latest
version number.
2
When there is a rmware upgrade,
you can see the rmware upgrade
prompt page. Click “Update”.
24 25
SAFETY & PRECAUTIONS
(Continued) (Continued)
SPECIAL FUNCTIONSSPECIAL FUNCTIONS
FIRMWARE UPDATE
Through this function, users can manually update the device rmware to ensure that the
device rmware is running with the latest version.
3
Check the upgrade status during the
upgrade, and go to the next step after
the upgrade is complete.
1
Click “Firmware Update”
4
The rmware upgrade is completed,
and the user can check the latest
rmware version. Or when the
rmware does not need to be
upgraded, it will also enter the
current page to view the latest
version number.
2
When there is a rmware upgrade,
you can see the rmware upgrade
prompt page. Click “Update”.

26 27
SAFETY & PRECAUTIONS
(Continued)
DECLARATIONSDECLARATIONS
For your records, staple your sales receipt
to this manual and record the following:
Date of Purchase: _______________________________________________
Place of Purchase: ______________________________________________
DECLARATION OF CONFORMITY
CONTAINS FCC ID: 2ADQOMDNA21
CONTAINS IC: 12575A-MDNA21
This device complies with Part 15 of the FCC Rules and it contains licence-exempt
transmitter(s)/receiver(s) that comply with Innovation, Science and Economic
Development Canada’s licence-exempt RSS(s).
Operation is subject to the following two conditions:
(1) This device may not cause interference; and
(2) This device must accept any interference, including interference that may cause
undesired operation of the device.
Only operate the device in accordance with the instructions supplied.
Changes or modications to this unit not expressly approved by the party responsible
for compliance could void the user’s authority to operate the equipment. This device
complies with FCC radiation exposure limits set forth for an uncontrolled environment.
In order to avoid the possibility of exceeding the FCC radio frequency exposure limits,
human proximity to the antenna shall not be less than 20cm (8 inches) during normal
operation.
NOTE: This equipment has been tested and found to comply with the limits
for a Class B digital device, pursuant to part 15 of the FCC Rules. These limits
are designed to provide reasonable protection against harmful interference
in a residential installation. This equipment generates, uses and can radiate
radio frequency energy and, if not installed and used in accordance with the
instructions, may cause harmful interference to radio communications. However,
there is no guarantee that interference will not occur in a particular installation. If
this equipment does cause harmful interference to radio or television reception,
which can be determined by turning the equipment o and on, the user is
encouraged to try to correct the interference by one or more of the following
measures:
--Reorient or relocate the receiving antenna.
--Increase the separation between the equipment and receiver.
-- Connect the equipment into an outlet on a circuit dierent from that to which the
receiver is connected.
--Consult the dealer or an experienced radio/TV technician for help.
Company will not be liable for any issues and problems caused by Internet,
Wireless Router and Smart Devices. Please contact the original provider to get
further help.
844-4PA-AIRE | 844-472-2473 | support@perfectaire.us
CANADA SUPPORT 877-997-2473 | supportcanada@perfectaire.us
www.perfectaire.us
5401 Dansher Road
Countryside, IL 60525
Printed in China | 1022_M996
NOTE: Proof of purchase is required for all warranty claims.
NOTE: As a result of continual improvements, the design and specications of
the product within may dier slightly to the unit illustrated within this manual.
THANK YOU FOR YOUR PURCHASE!
As a small business, reviews are everything!
We’d love to hear how you are enjoying your Perfect Aire product!
Please take a minute to tell us (and others) about your experience.
Thanks (again!)
SCAN CODE TO
LEAVE A REVIEW