WHEEL SKATE 570KG
MODEL NO: WS570.V2
Thank you for purchasing a Sealey product. Manufactured to a high standard, this product will, if used according to these instructions,
and properly maintained, give you years of trouble free performance.
IMPORTANT: PLEASE READ THESE INSTRUCTIONS CAREFULLY. NOTE THE SAFE OPERATIONAL REQUIREMENTS, WARNINGS & CAUTIONS. USE
THE PRODUCT CORRECTLY AND WITH CARE FOR THE PURPOSE FOR WHICH IT IS INTENDED. FAILURE TO DO SO MAY CAUSE DAMAGE AND/OR
PERSONAL INJURY AND WILL INVALIDATE THE WARRANTY. KEEP THESE INSTRUCTIONS SAFE FOR FUTURE USE.
Refer to
instruction
manual
Original Language Version
© Jack Sealey Limited
1. SAFETY
WARNING! Ensure health & safety, local authority, and general workshop practice regulations are adhered to when using this equipment.
9 Familiarise yourself with this products application and limitations, as well as the specific warnings below relating to their use.
9 Ensure the Wheel Skates are in sound condition and good working order. Take action for immediate repair or replacement of damaged
parts.
9 Use genuine parts only. The use of non-genuine parts may be dangerous and will invalidate the warranty.
9 Wheel Skates should only be used in suitable, well lit areas.
9 Wheel Skates must be used in pairs at either the front or rear of the vehicle.
9 Keep general area clean and tidy and free from obstructions.
9 Use Wheel Skates on level and solid ground, preferably concrete.
9 Avoid tarmacadam as Wheel Skates may sink in.
9 Keep hands and body clear of the mechanism when operating the Wheel
Skates.
9 Maintain the Wheel Skates in good condition (use an authorised service agent).
9 Ensure there are no passengers in the vehicle.
9 Ensure the Wheel Skates are free to move and that there are no obstructions
in the area of use.
9 When not in use store Wheel Skates in a safe, dry, childproof area.
8 DO NOT start or drive the vehicle whilst it is raised on wheel skates.
8 DO NOT use diagonally.
8 DO NOT use the Wheel Skates for purposes other than which they are intended.
8 DO NOT allow untrained persons to operate the Wheel Skates.
8 DO NOT leave the vehicle unattended whilst it is raised on the Wheel Skates.
8 DO NOT operate the Wheel Skates when you are tired, under the influence of alcohol, drugs or intoxicating medication.
8 DO NOT get the Wheel Skates wet or use in damp or wet locations or areas where there is condensation.
8 DO NOT exceed the rated capacity of the Wheel Skates. Remember that the front of a vehicle is usually heavier than the rear.
8 DO NOT use the Wheel Skates to lift or support a vehicle in order to do work underneath it.
9 Maintain correct balance and footing when moving vehicle. Ensure the floor is not slippery and wear non slip shoes.
9 Ensure there are no obstructions beneath the vehicle when it is to be lowered.
9 Ensure all non-essential persons keep a safe distance whilst the Wheel Skates are in use.
▲ IMPORTANT - We recommend that at least 2 persons are involved in manoeuvring the vehicle when supported on wheel skates. The
vehicle’s weight creates an inertia which has to be overcome to get the vehicle moving and more importantly, stopped.
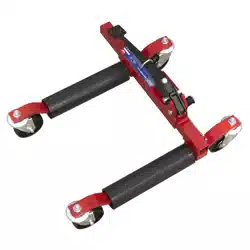
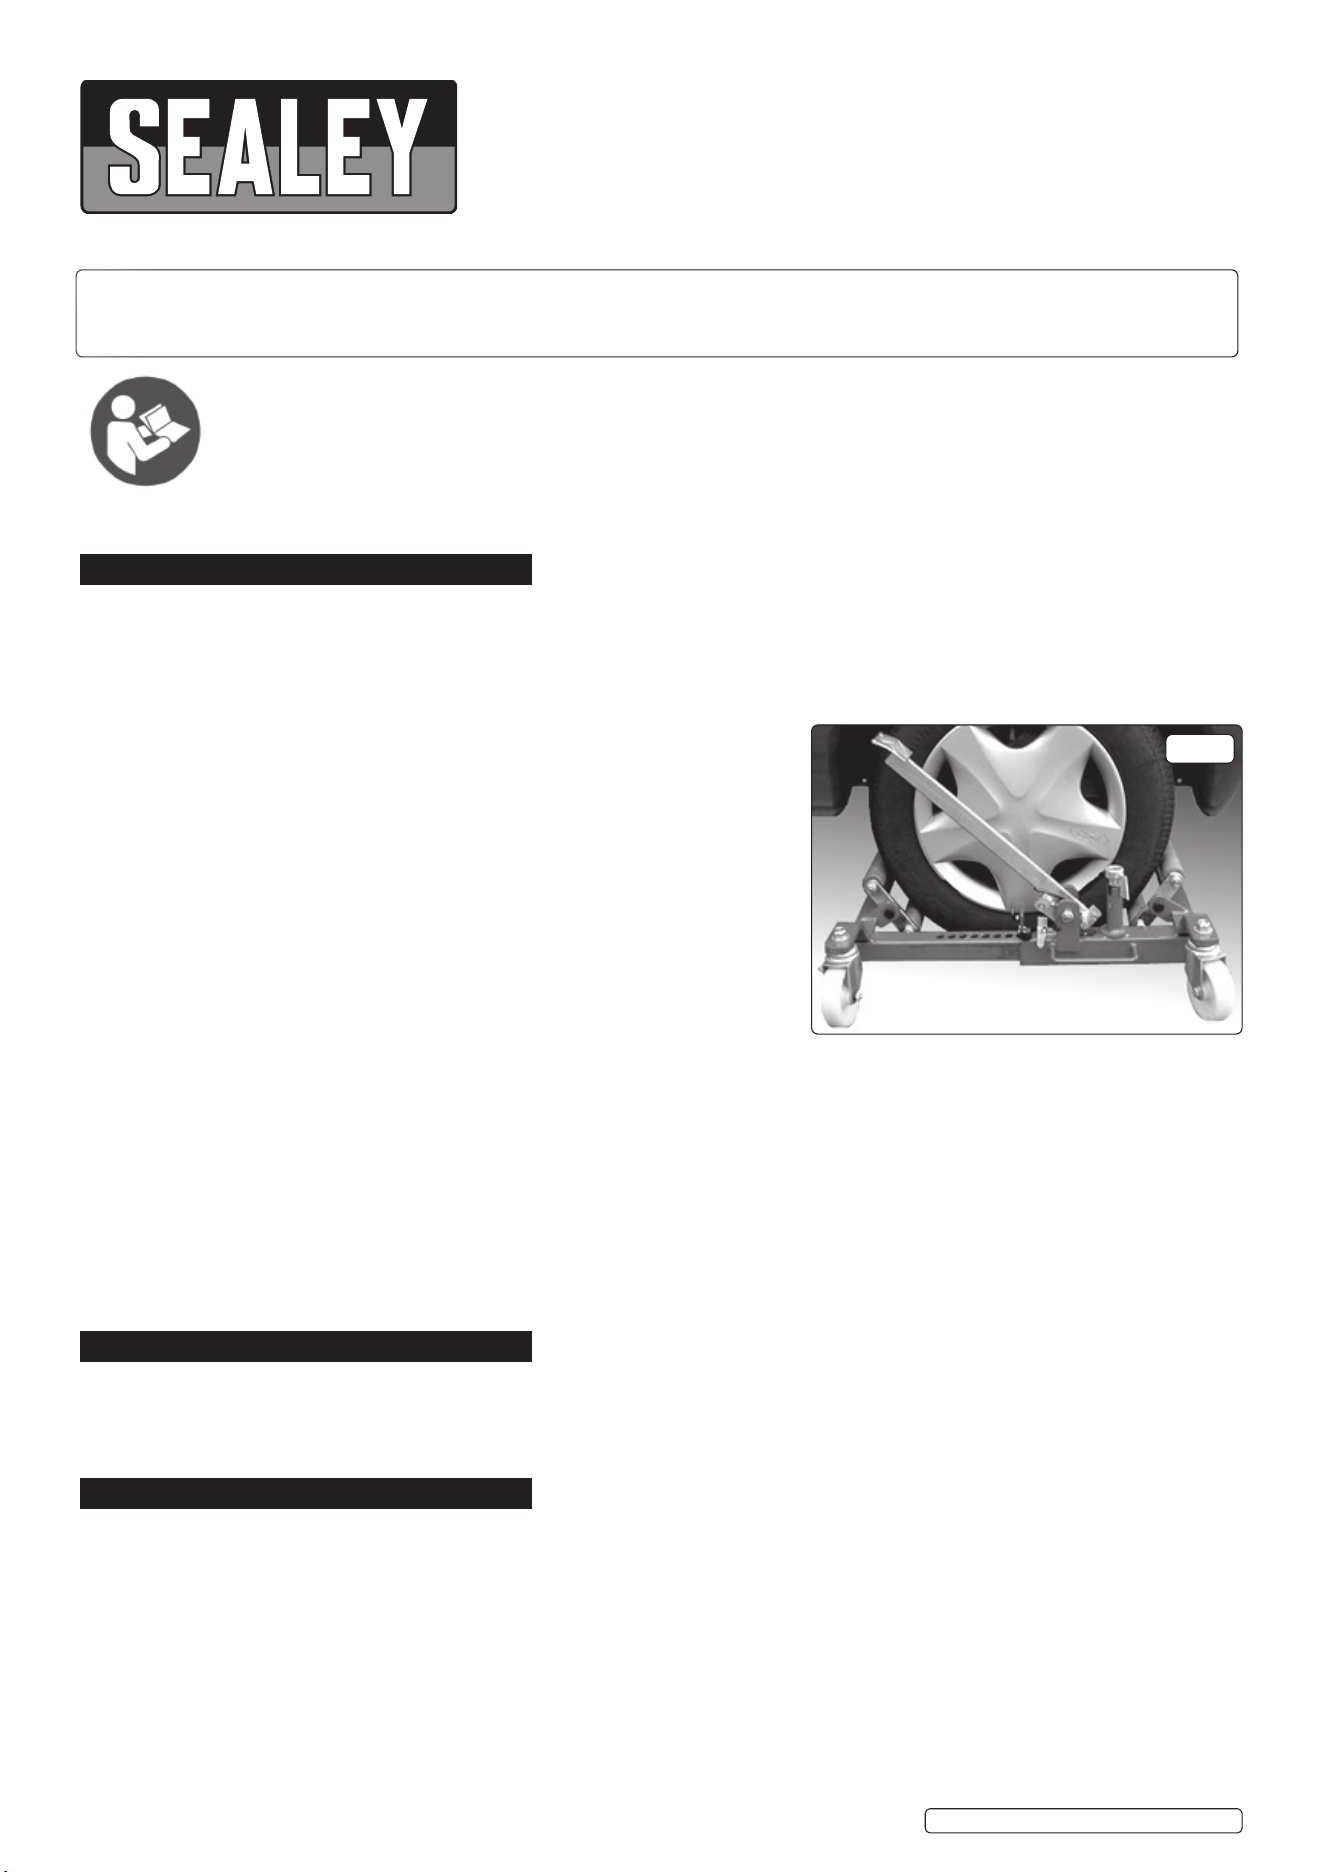
2. INTRODUCTION
Steel chassis with pedal operated mechanical lifting action. Skate sits on easy-rolling Ø100mm nylon castor wheels. Composite rollers
cradle vehicle’s tyre and are capable of handling up to 240mm widths. Suitable for bodyshops, garages, showrooms or anywhere an
immobile vehicle needs moving on an even surface.
NOTE: Skates sold as singles, but must be used in pairs.
3. SPECIFICATION
MODEL NO: .................................................. WS570.V2
Capacity: ..............................................................570kg
Castor Diameter: ............................................. Ø100mm
Maximum Opening: ............................................ 620mm
Maximum Tyre Width:.........................................240mm
WS570.V2 Issue: 4 (H,3,F) 11/09/23
g.1
4. OPERATION
4.1. PREPARATION.
4.1.1. Ensure that the area where the vehicle is to be moved is clear of any obstructions. The oorsurfaceshouldbe
surfaceshouldbesmoothandlevel.Takenoteofanyfeaturesintheoorthatmay
catchtheskatewheelssuchasoormountedpoweranddatapoints,roomdividertracks,
drainagefeatures,ordamagetotheoorsurface.
4.1.2. Enlistsufcientassistancetomovethevehiclesafely.Donotattempttomovethevehicle
intoanareawherethereisinsufcientspaceforpersonstomanoeuvrethevehiclesafely.
4.1.3. Prior to operation release the foot pedal from the transit hook by depressing the lever slightly
and moving the hook to one side to allow the lever to rise up.
4.1.4. The Wheel Skates should be used as a pair. Attach to the front wheels to swing the front
of the vehicle. ( Do not release the hand brake until both Skates are attached. Re-engage
the handbrake immediately after the movement has been made.) Attach to the back wheels
to swing the back of the vehicle. ( Ideally the front wheels should be straight.) If you intend
to use two pairs of skates to move a vehicle in one movement great care should be exercised in order to avoid injury to persons or
property. Read the safety instructions above.
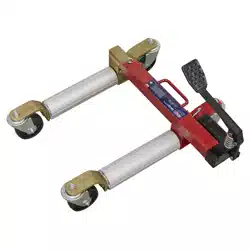
4.2. OPERATION
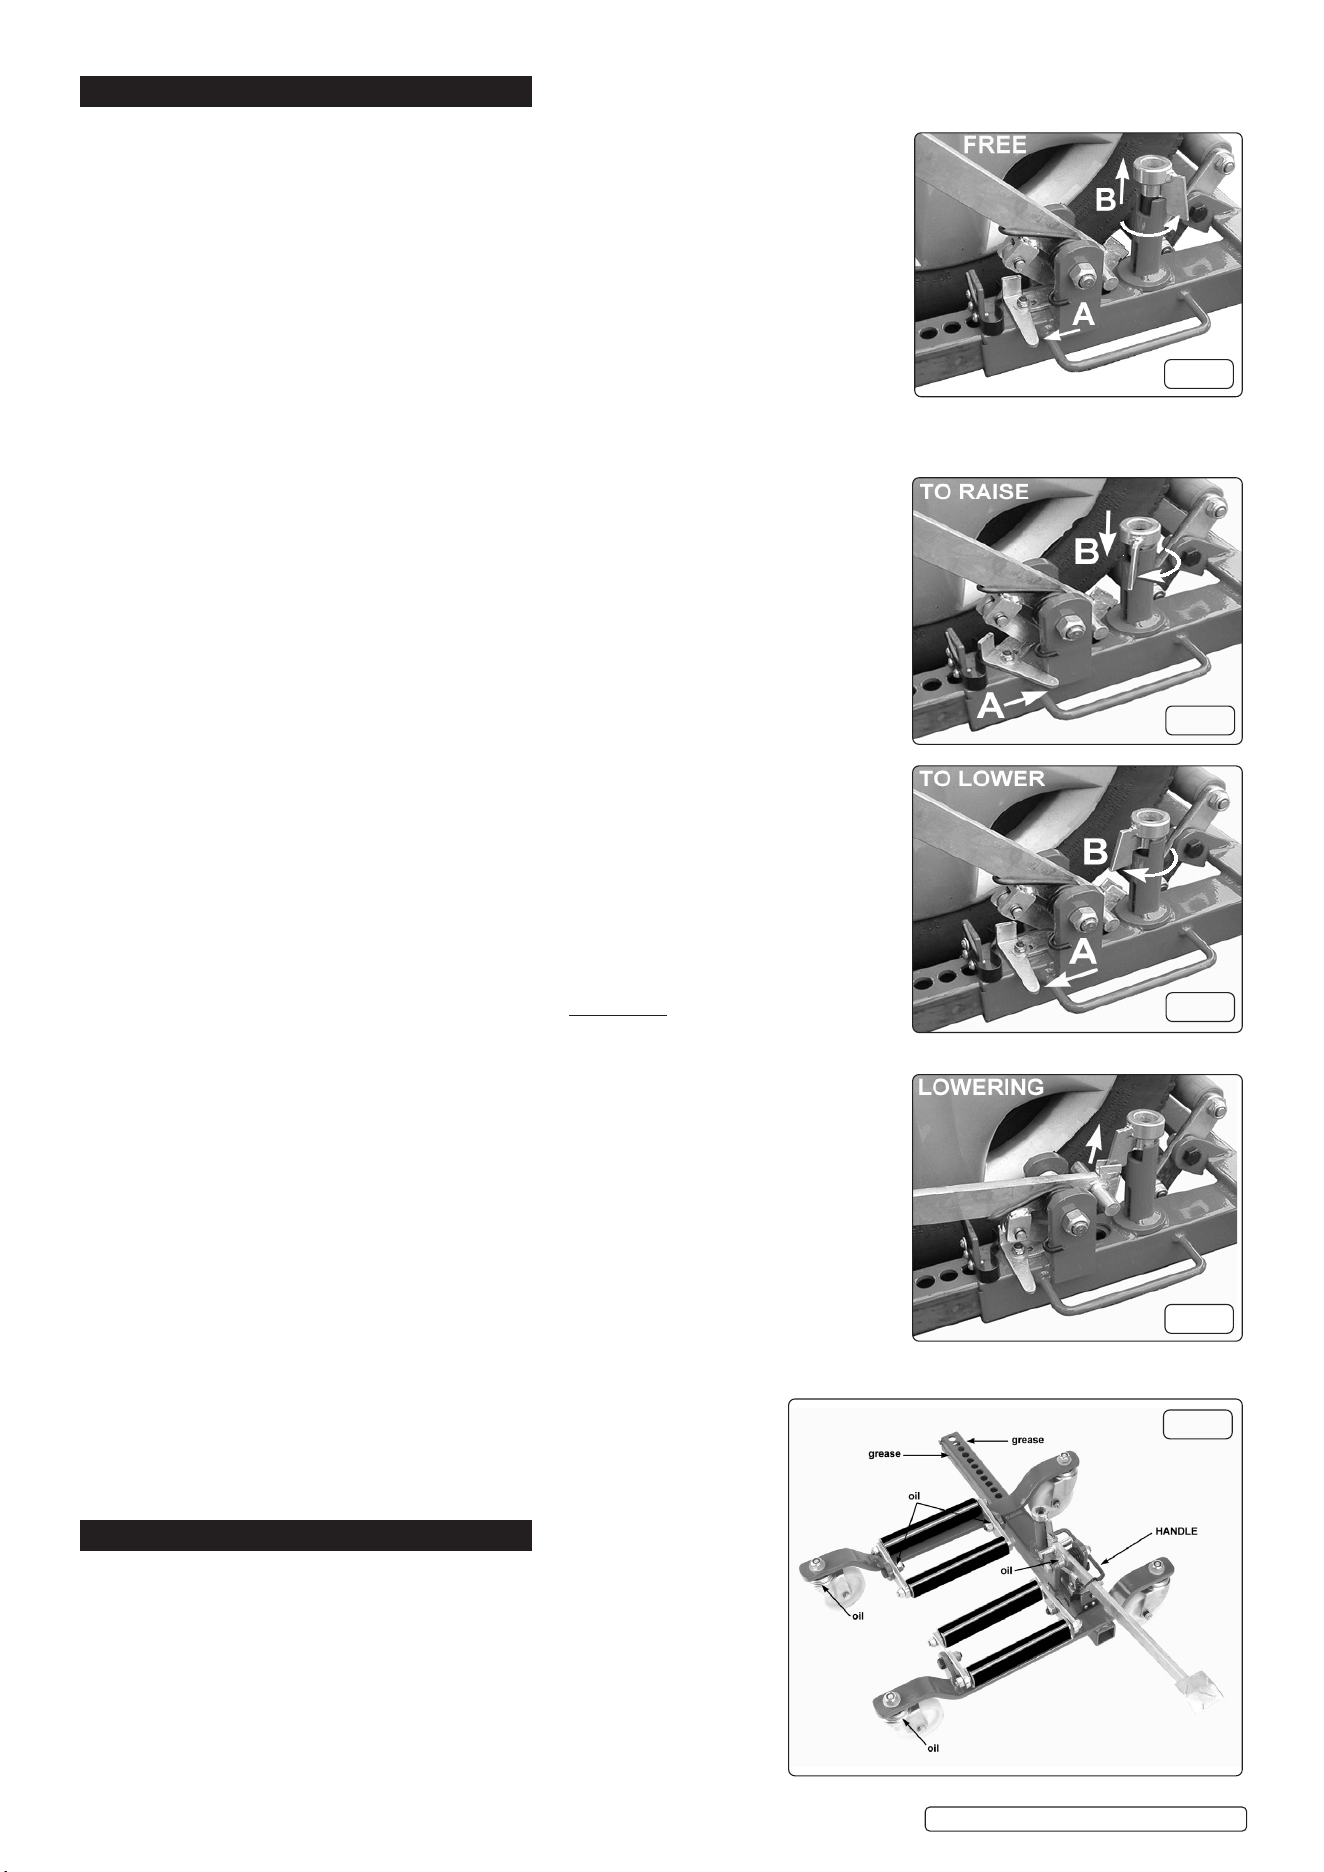
4.2.1. To fit a Skate to a wheel you must first disengage the ratchet and lift the locking pin.
4.2.2. Disengage the ratchet lever by moving it as far as it will go to the left.
See fig.2 - A. (FREE)
4.2.3. Lift the locking pin and tab and turn it anticlockwise so that it is no longer engaged in the
lockingpinslot.Seeg.2-B.(FREE).
4.3. POSITIONING THE SKATE.
4.3.1. Take hold of each side of the frame and expand the unit until it is wide enough to slide the rollers either side of the tyre.
(Seeg.1)Makesurethatbothsetsofrollersarecentredonthetyrethenpushtheunit
together again until each pair of rollers are in contact with it.
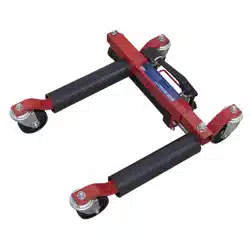
4.4. RAISING A WHEEL.
4.4.1. Now engage the ratchet by turning the ratchet lever as far as it will go to the right.
Seeg.3-A.(TORAISE).
4.4.2. Engage the locking pin by turning the tab clockwise until it drops into the slot. Once in the
slot the tab should be turned away from the pedal lever. Seefig.3-B.(TORAISE).
4.4.3. Operate the foot pedal lever to commence raising the wheel (IMPORTANT - Allow the
pedal to return through its full travel before commencing the next stroke.) 20mm clear of the
ground.
4.4.4. RaisethesecondwheeloffthegroundwiththeotherSkate.Bepreparedforany movement the
vehicle may make when the second wheel comes clear of the ground. This is particularly
important when using four skates. Providing the ground/floor is level the vehicle should remain
stable. ( Read safety precautions in Section 1.)
4.4.5. MOVING THE VEHICLE
4.4.6. Ensure that you have sufficient assistance to move and control the vehicle. Keep well away
from any sloping areas or entry ramps to the area however shallow they may appear. When
positioning a vehicle in relation to a wall or feature such as a pillar no persons or objects
should be situated between the vehicle and the feature. Sufficient space should be left
between the side of a vehicle and an adjacent wall or feature to allow the Skates to be
withdrawn sideways.
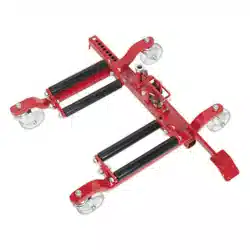
4.5. LOWERING WHEELS
4.5.1. Disengage the ratchet by turning the the ratchet lever to the left. See fig.4 - A (TO LOWER)
4.5.2. Turn the locking pin tab clockwise in its slot so that it is in line with the small ‘U’ shaped
channelatthebottomofthefootpedallever.Seefig.4-B.(TOLOWER)
4.5.3. Operate the foot pedal lever through its full travel to commence lowering in controlled
stages. The last movement of the lever will raise the locking pin (see fig.5 LOWERING) to
allow the unit to open whilst the ratchet lever acts as a stop to lock the unit in the next hole
down. Continue to operate the lever through its full travel, until the tyre is on the ground and no
longer exerting pressure on the rollers.
4.6. REMOVING THE SKATE
4.6.1. Lift the locking pin and tab and turn it anticlockwise until the tab is no longer engaged in the slot. The unit is now free to open.
4.6.2. Expand the unit sufficiently to clear the tyre and move it away from the wheel.
4.7. TO CARRY THE UNIT
4.7.1. With the locking pin and ratchet disengaged push the unit together as far as it
4.7.2. will go. Push the foot pedal down and engage the transit hook. For balanced
4.7.3. carrying use the handle welded on the side of the square tube. (See Fig.6.)
5. MAINTENANCE
5.1. Lubricate the wheels, roller pivots and the foot pedal lever pivot periodically
with oil as shown in fig.6. Grease the four faces of the square section tube
lightly as shown in fig.6 then open out the unit to its full extent and grease
the faces of the tube previously hidden.
g.2
g.4
g.5
© Jack Sealey Limited
Original Language Version
WS570.V2 Issue: 4 (H,3,F) 26/09/23
g.3
g.6

Sealey Group, Kempson Way, Suffolk Business Park, Bury St Edmunds, Suffolk. IP32 7AR
01284 757500 sales@sealey.co.uk www.sealey.co.uk
ENVIRONMENT PROTECTION
Recycle unwanted materials instead of disposing of them as waste. All tools, accessories and packaging should be sorted,
taken to a recycling centre and disposed of in a manner which is compatible with the environment. When the product
becomes completely unserviceable and requires disposal, drain any fluids (if applicable) into approved containers and
dispose of the product and fluids according to local regulations.
Original Language Version
© Jack Sealey Limited
REGISTER YOUR
PURCHASE HERE
Note: It is our policy to continually improve products and as such we reserve the right to alter data, specifications and component parts without prior
notice. Please note that other versions of this product are available. If you require documentation for alternative versions, please email or call
our technical team on technical@sealey.co.uk or 01284 757505.
Important: No Liability is accepted for incorrect use of this product.
Warranty: Guarantee is 12 months from purchase date, proof of which is required for any claim.
WS570.V2 Issue: 4 (H,3,F) 26/09/23