
Model: R5114
5100500XXXX V01
User Manual
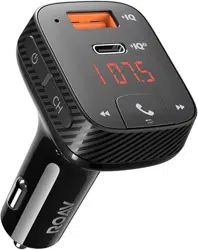
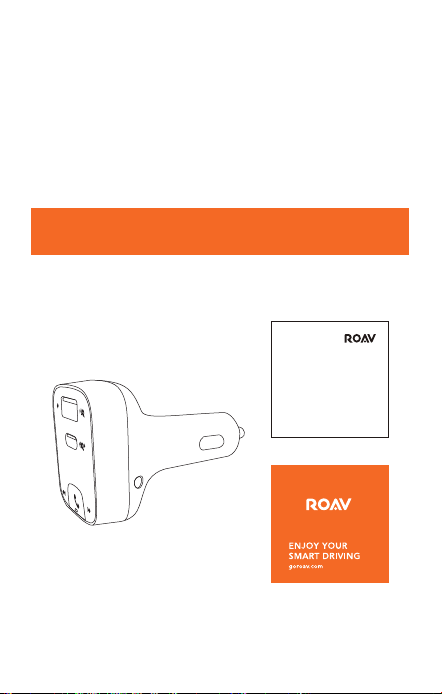
Roav SmartCharge T2

Model: R5114
5100500XXXX V01
User Manual
Roav SmartCharge T2

English 01
Table of Contents
02 Safety Instructions
03 Introduction
What’s Included
At a Glance
LED Indication
06
Getting Started
07 Customizing FM Channel
08 Using the Car Charger T2
Play Music
Make Hands-Free Calls
09
Charging Your Devices
10 Specifications
11 Notice
English
English 01
Deutsch 15
Español 25
Français 35
Italiano 45
日本語 55

English 01
Table of Contents
02 Safety Instructions
03 Introduction
What’s Included
At a Glance
LED Indication
06
Getting Started
07 Customizing FM Channel
08 Using the Car Charger T2
Play Music
Make Hands-Free Calls
09
Charging Your Devices
10 Specifications
11 Notice
English
English 01
Deutsch 15
Español 25
Français 35
Italiano 45
日本語 55

02 English English 03
• Use a soft, dry lint-free cloth to clean. Do not use any
corrosive cleaner or oil to clean.
• CAUTION - For continued protection against fire risk,
replace only with the same type and rating of fuse. The
fuse rating is 32V DC / 7A.
• Always obey trac laws and pay attention to the road.
Do not attempt to use this device while driving as some
features are limited while the vehicle is in motion. Failure
to pay full attention to the operation of your vehicle
could result in death, serious injury, or property damage.
You assume total responsibility and risk for using this
device.
Introduction
What’s Included
User Manual
Safety Instructions
SAVE THESE INSTRUCTIONS – This manual contains
important safety and operating instructions for Roav
SmartCharge T2 car charger (Model R5114).
Please read and understand all instructions before using
this product. If damage is caused by failure to follow the
instructions, the warranty does not apply.
• Read all instructions and cautionary markings before
using this product.
• Do not expose to rain, moisture, or snow.
• Use of attachments not recommended or sold by the
manufacturer may result in a risk of fire, electric shock,
or injury to persons.
• Do not operate this car charger if it has received a sharp
blow, been dropped, or otherwise damaged in any way;
take it to a qualified service person.
• Do not disassemble this car charger; take it to a qualified
service person when service or repair is required.
Incorrect reassembly may result in a risk of electric
shock or fire.
• To reduce the risk of electric shock, unplug this car
charger before attempting any maintenance or cleaning.
Turning o controls will not reduce this risk.
• To reduce the risk of fire or electric shock, do not
interconnect output terminations.
• Avoid long exposure to direct sunlight, which may cause
damage to the device.
• Exposing this product to open flames may cause it to
explode.
• Do not use this product in strong magnetic fields.
04 English English 05
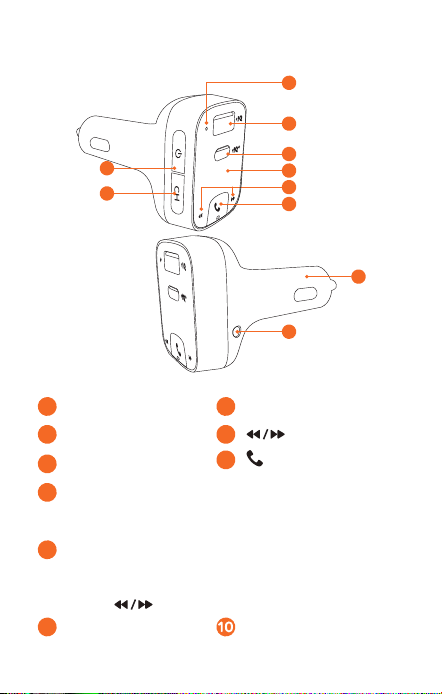
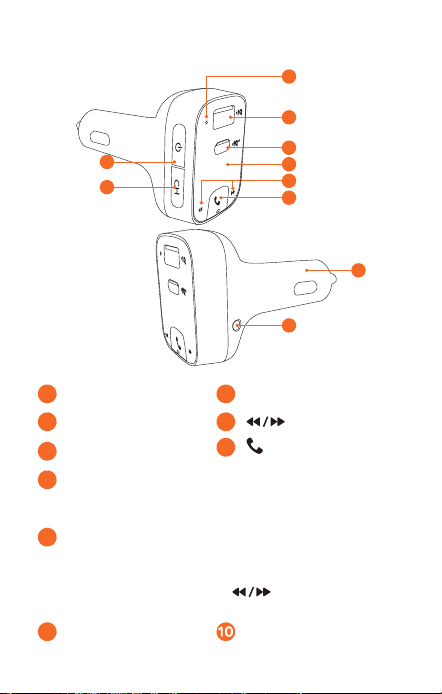
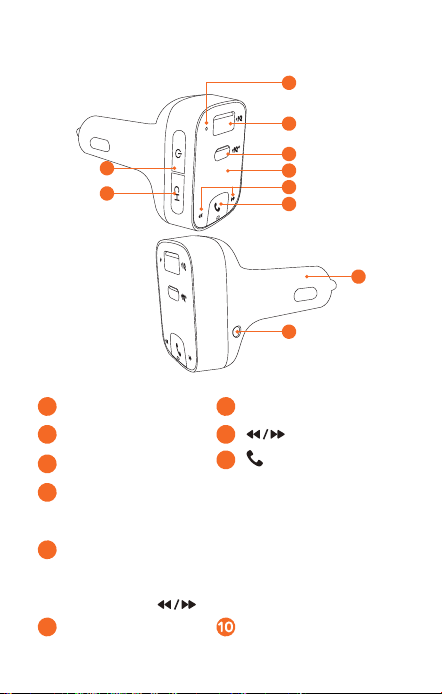
At a Glance
1
2
8
3
5
4
6
9
10
7
1
Microphone
4
LED display
2
USB-A port
5
3
USB-C port
6
/ Multi-function button
7
Power button
• Press to turn o LED display, disconnect Bluetooth, and
turn o FM transmitter.
8
Channel button
• Press to search for unoccupied FM frequencies.
• Press and hold for one second to activate FM mode.
Press to customize frequencies.
9
AUX-Out socket Adapter
Press and simultaneously for 3 seconds to
restore default settings.
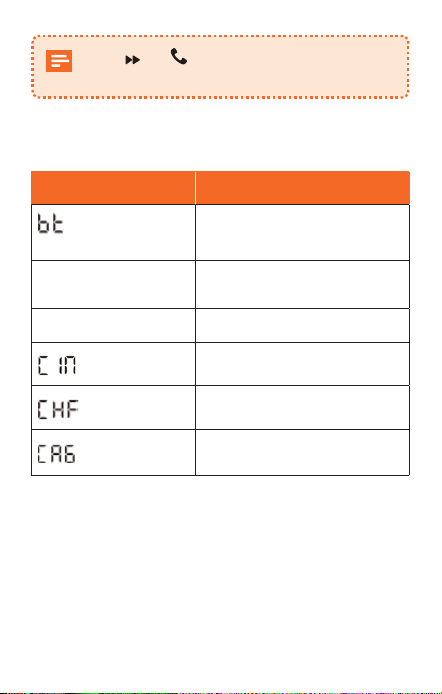
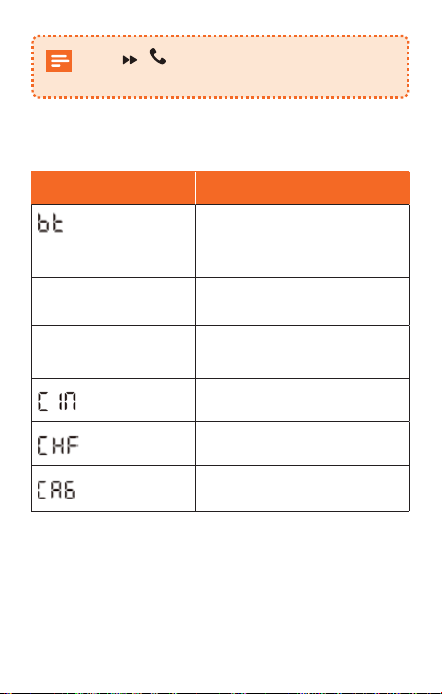
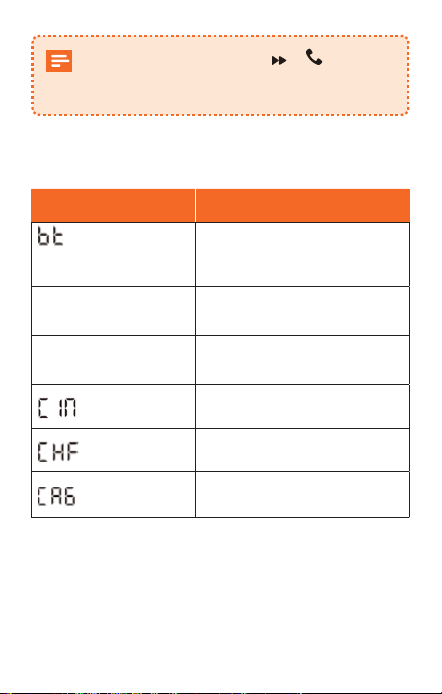
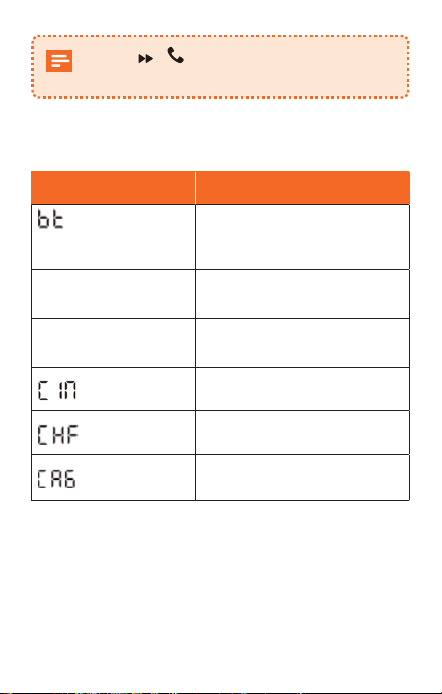
LED Indication
LED indicators Status
/ FM frequency
flashes alternately
No Bluetooth connection
detected
FM frequency is
displayed
Bluetooth connected
FM frequency flashes
Enter FM mode
Incoming call
In a call in hands-free mode
In a phone call
04 English English 05
At a Glance
1
2
8
3
5
4
6
9
10
7
1
Microphone
4
LED display
2
USB-A port
5
3
USB-C port
6
/ Multi-function button
7
Power button
• Press to turn o LED display, disconnect Bluetooth, and
turn o FM transmitter.
8
Channel button
• Press to search for unoccupied FM frequencies.
• Press and hold for one second to activate FM mode.
Press to customize frequencies.
9
AUX-Out socket Adapter
Press and simultaneously for 3 seconds to
restore default settings.
LED Indication
LED indicators Status
/ FM frequency
flashes alternately
No Bluetooth connection
detected
FM frequency is
displayed
Bluetooth connected
FM frequency flashes
Enter FM mode
Incoming call
In a call in hands-free mode
In a phone call
06 English English 07
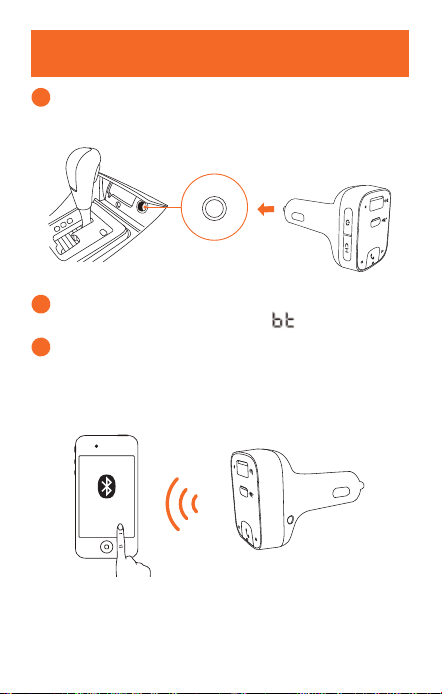
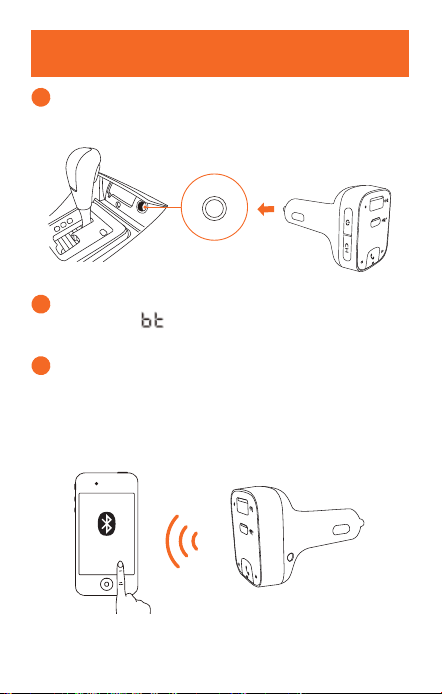
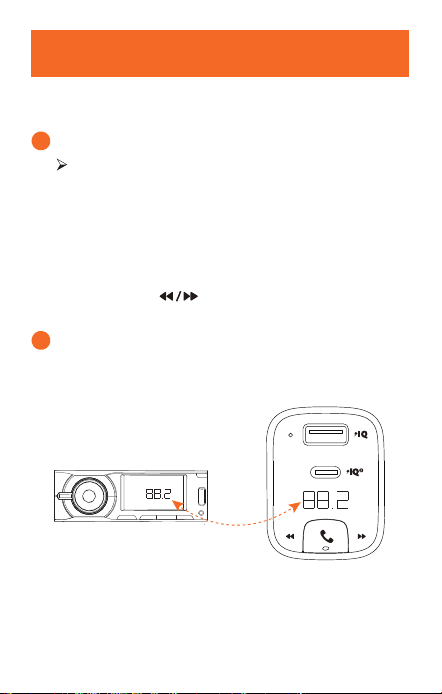
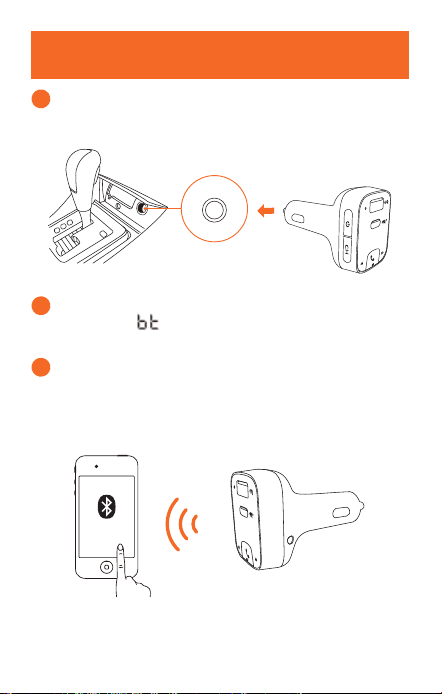
Getting Started
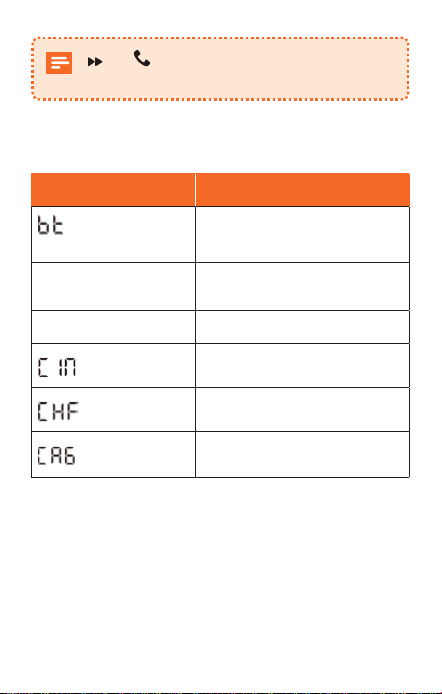
1
Plug Roav SmartCharge T2 into your vehicle’s cigarette
lighter socket.
2
Start your vehicle’s engine. The LED display will light
up, and / FM frequency will flash alternately.
3
Enable Bluetooth on your smartphone and search for
available Bluetooth devices. Select “Roav T2_XXXX”
and connect. Once successfully connected, the FM
frequency will be displayed.
Roav T2_XXXX
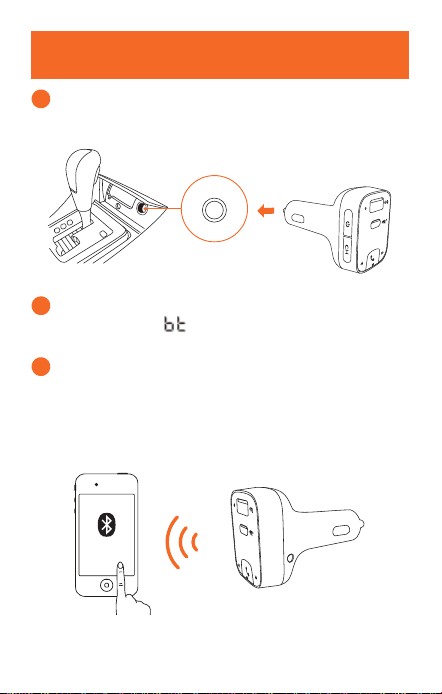
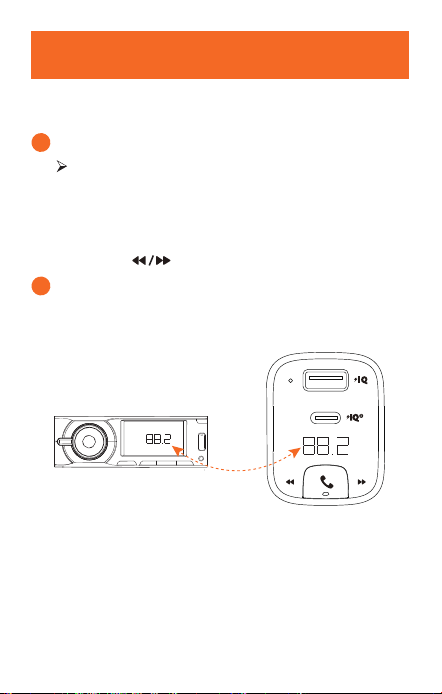
Customizing FM Channel
The Roav SmartCharge T2 allows you to connect your
phone to your car’s stereo via an FM signal.
1
Press CH.
T2 begins to search for an unoccupied FM
frequency.
Or select the channel manually:
a. Press and hold CH for one second. FM mode is
activated.
b. Press to select an FM frequency.
2
Turn on your car radio. Make sure the transmitting
frequency matches the frequency T2 is tuned to.
FM

06 English English 07
Getting Started
1
Plug Roav SmartCharge T2 into your vehicle’s cigarette
lighter socket.
2
Start your vehicle’s engine. The LED display will light
up, and / FM frequency will flash alternately.
3
Enable Bluetooth on your smartphone and search for
available Bluetooth devices. Select “Roav T2_XXXX”
and connect. Once successfully connected, the FM
frequency will be displayed.
Roav T2_XXXX
Customizing FM Channel
The Roav SmartCharge T2 allows you to connect your
phone to your car’s stereo via an FM signal.
1
Press CH.
T2 begins to search for an unoccupied FM
frequency.
Or select the channel manually:
a. Press and hold CH for one second. FM mode is
activated.
b. Press to select an FM frequency.
2
Turn on your car radio. Make sure the transmitting
frequency matches the frequency T2 is tuned to.
FM
08 English English 09
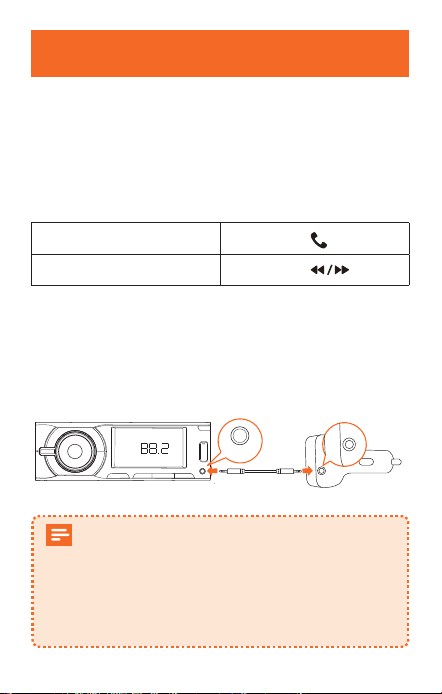
Using the Car Charger T2
Play Music
When T2 is successfully paired with your smartphone,
you can play music from your phone. Music can then be
streamed to your car’s audio system via an FM transmitter
or AUX-Out socket.
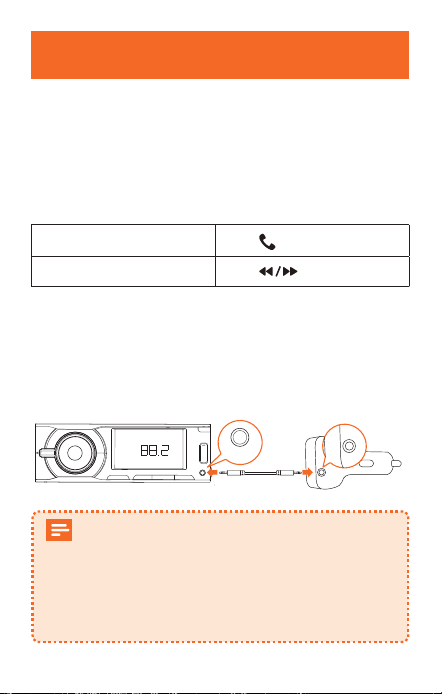
Play / Pause
Press
Previous / Next track
Press
To further reduce echo and cabin noise on your calls
and music, you can connect a 3.5 mm AUX cable (not
provided) to T2’s AUX-Out socket and the AUX-In socket
of your car’s audio system.
FM
AUX-Out
If Bluetooth is not connected within 30 minutes,
T2 will enter sleep mode and stop emitting FM
signals. Then you will listen to the local channel
with the LED display shut o.
When Bluetooth is re-connected, T2 will be
activated and resume operation.
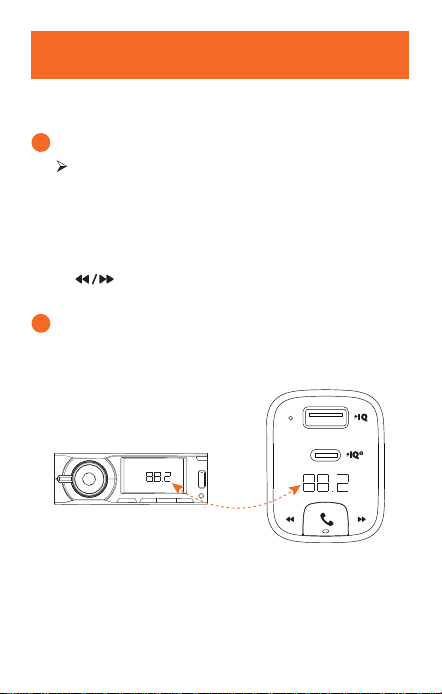
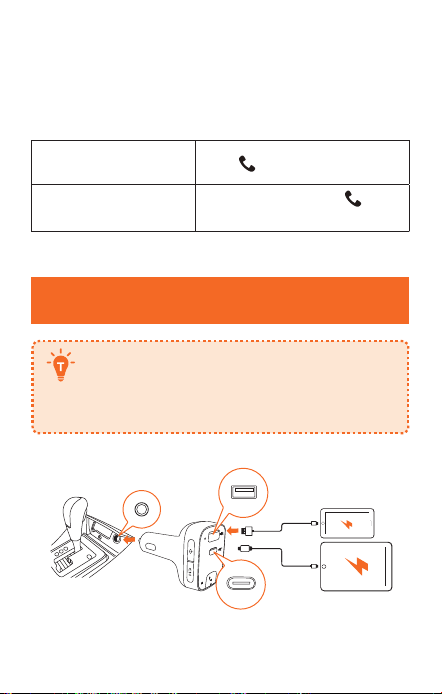
Make Hands-Free Calls
When T2 is successfully paired with your smartphone, you
can enjoy convenient hands-free calling.
Answer / End a call
Press
Reject a call
Press and hold
for 1 second
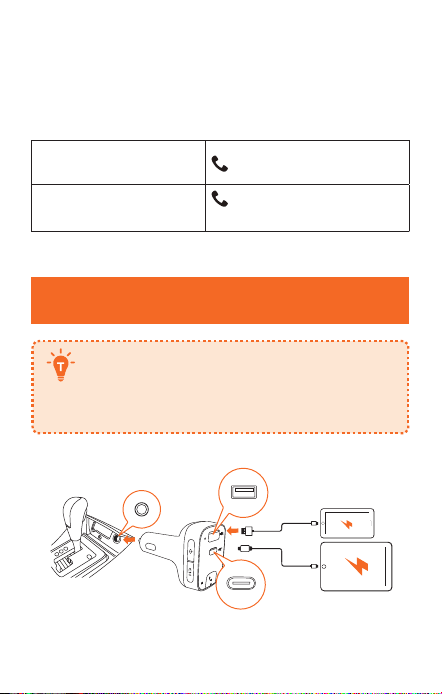
Charging Your Devices
Roav SmartCharge T2 has one USB-A and
one USB-C charging port. You can charge two
devices simultaneously with a maximum output
of 30W.
08 English English 09
Using the Car Charger T2
Play Music
When T2 is successfully paired with your smartphone,
you can play music from your phone. Music can then be
streamed to your car’s audio system via an FM transmitter
or AUX-Out socket.
Play / Pause
Press
Previous / Next track
Press
To further reduce echo and cabin noise on your calls
and music, you can connect a 3.5 mm AUX cable (not
provided) to T2’s AUX-Out socket and the AUX-In socket
of your car’s audio system.
FM
AUX-Out
If Bluetooth is not connected within 30 minutes,
T2 will enter sleep mode and stop emitting FM
signals. Then you will listen to the local channel
with the LED display shut o.
When Bluetooth is re-connected, T2 will be
activated and resume operation.
Make Hands-Free Calls
When T2 is successfully paired with your smartphone, you
can enjoy convenient hands-free calling.
Answer / End a call
Press
Reject a call
Press and hold
for 1 second
Charging Your Devices
Roav SmartCharge T2 has one USB-A and
one USB-C charging port. You can charge two
devices simultaneously with a maximum output
of 30W.

10 English English 11
Specifications
Specifications are subject to change without
notice.
DC
input: 12V - 24V
USB-C output: 5V 3A, 9V 2A
USB-A output: 5V 2.4A
Bluetooth: V5.0
Bluetooth transmission distance: 10 m / 393.7 in
FM frequency range: 88.1 - 107.9 MHz
FM transmission range: 2 m / 78.7 in
Operating temperature range: -4°F to 104°F / -20°C to 40°C
Storage temperature range: -40°F to 185°F / -40°C to 85°C
Notice
This product complies with the radio interference
requirements of the European Community.
Declaration of Conformity
Hereby, Anker Innovations Limited declares that this device
is in compliance with the essential requirements and other
relevant provisions of Directive 2014/53/EU. For the
declaration of conformity, visit: www.goroav.com.
This product can be used across EU member states.
The product shall only be connected to a USB Interface of
version 2.0 or higher.
The device complies with RF specifications when the
device used at 20 mm from your body.
BT Operating Frequency Range: 2402-2480 MHz; BT Max
Output Power: 8 dBm
The following importer is the responsible party (contact for
EU matters only).
Importer: Anker Technology (UK) Ltd
Importer Address:
Suite B, Fairgate House, 205 Kings Road, Tyseley,
Birmingham, B11 2AA, United Kingdom
This product is designed and manufactured with
high quality materials and components, which
can be recycled and reused.

12 English English 13
This symbol means the product must not be
discarded as household waste, and should be
delivered to an appropriate collection facility for
recycling. Proper disposal and recycling helps
protect natural resources, human health and the
environment. For more information on disposal
and recycling of this product, contact your local
municipality, disposal service, or the shop where
you bought this product.
FCC Statement
This device complies with Part 15 of the FCC Rules.
Operation is subject to the following two conditions: (1)
this device may not cause harmful interference, and (2)
this device must accept any interference received, including
interference that may cause undesired operation.
Warning: Changes or modifications not expressly approved
by the party responsible for compliance could void the
user's authority to operate the equipment.
Note: This equipment has been tested and found to comply
with the limits for a Class B digital device, pursuant to Part
15 of the FCC Rules. These limits are designed to provide
reasonable protection against harmful interference in a
residential installation.
This equipment generates uses and can radiate radio
frequency energy and, if not installed and used in
accordance with the instructions, may cause harmful
interference to radio communications. However, there
is no guarantee that interference will not occur in a
particular installation. If this equipment does cause harmful
interference to radio or television reception, which can be
determined by turning the equipment off and on, the user
is encouraged to try to correct the interference by one or
more of the following measures: (1) Reorient or relocate the
receiving antenna. (2) Increase the separation between the
equipment and receiver. (3) Connect the equipment into an
outlet on a circuit different from that to which the receiver
is connected. (4) Consult the dealer or an experienced
radio / TV technician for help.
FCC Radio Frequency Exposure Statement
The device has been evaluated to meet general RF
exposure requirements. The device can be used in fixed /
mobile exposure condition. The min separation distance
is 20cm.
The following importer is the responsible party:
Company Name: Fantasia Trading LLC
Address: 9155 Archibald Avenue, Suite 202,
Rancho Cucamonga , CA 91730, USA
Telephone: 1-909-484-1530
IC Statement
This device complies with Industry Canada license-
ICES-003. Operation is subject to the following two
conditions: (1) This device may not cause interference, and
(2) This device must accept any interference, including
interference that may cause undesired operation of the
device.
Le présent appareil est conforme aux CNR d'Industrie
Canada applicables aux appareils radio exempts de

Deutsch 15
14 English
Inhaltsverzeichnis
Deutsch
16 Sicherheitsinformationen
17 Vorstellung
Im Lieferumfang
Auf einen Blick
LED-Anzeige
20
Erste Schritte
21 Anpassen des UKW-Kanals
22 Verwenden des Kfz-Ladegeräts T2
Musik abspielen
Freisprechfunktion nutzen
23
Laden Ihrer Geräte
24 Technische Daten
licence. L'exploitation est autorisée aux deux conditions
suivantes: (1) l'appareil ne doit pas produire de brouillage,
et (2) l'utilisateur de l'appareil doit accepter tout brouillage
radioélectrique subi, même si le brouillage est susceptible
d'en compromettre le fonctionnement.
This Class B digital apparatus complies with Canadian
ICES-003.
Cet appareil numérique de la classe B est conforme à la
norme NMB-003 du Canada.
IC RF Statement:
When using the product, maintain a distance of 20cm
from the body to ensure compliance with RF exposure
requirements.
Lors de l'utilisation du produit, maintenez une distance de
20 cm du corps afin de vous conformer aux exigences en
matière d'exposition RF.
Trademark
Apple and the Apple logo are trademarks of Apple Inc.,
registered in the U.S. and other countries. App Store is a
service mark of Apple Inc., registered in the U.S. and other
countries.
Google Play and the Google Play logo are trademarks of
Google Inc.

16 Deutsch
Deutsch 17
Sicherheitsinformationen
DIESE INFORMATIONEN AUFBEWAHREN – Dieses Handbuch
enthält wichtige Informationen zur Sicherheit und zum Betrieb
des Kfz-Ladgeräts Roav SmartCharge T2 (Modell R5114).
Lesen Sie alle Anweisungen sorgfältig durch, bevor Sie dieses
Produkt verwenden. Die Garantie greift nicht, wenn Schäden
auf eine Missachtung der Anweisungen zurückzuführen sind.
• Lesen Sie alle Anweisungen und Sicherheitsangaben,
bevor Sie dieses Produkt verwenden.
• Setzen Sie das Gerät nicht Regen, Feuchtigkeit oder
Schnee aus.
• Die Verwendung von nicht vom Hersteller empfohlenen
oder vertriebenen Peripheriegeräten kann zu Brandgefahr,
Stromschlägen oder Verletzungen führen.
• Verwenden Sie dieses Kfz-Ladegerät nicht, wenn es
einem harten Schlag ausgesetzt war, fallen gelassen oder
anderweitig beschädigt wurde. Bringen Sie es zu einem
qualifizierten Servicetechniker.
• Nehmen Sie dieses Kfz-Ladegerät nicht auseinander;
bringen Sie es zu einem qualifizierten Servicetechniker,
wenn eine Wartung oder Reparatur erforderlich ist. Der
inkorrekte Zusammenbau kann einen Stromschlag oder
einen Brand verursachen.
• Um das Risiko eines Stromschlags zu reduzieren, müssen
Sie das Kfz-Ladegerät ausstecken, bevor Sie es zu
warten oder zu reinigen versuchen. Das Ausschalten der
Bedienelemente reduziert das Stromschlagrisiko nicht.
• Sie verringern das Brand- oder Stromschlagrisiko, indem
Sie Ausgangsanschlüsse nicht miteinander verbinden.
• Längere direkte Sonneneinstrahlung vermeiden, da sie
Schäden am Gerät verursachen kann.
• Wenn das Produkt oenen Flammen ausgesetzt wird,
besteht Explosionsgefahr.
• Das Produkt nicht in starken magnetischen Feldern verwenden.
• Mit einem weichen und fusselfreien Tuch reinigen. Weder
scharfe Reinigungsmittel noch Öl verwenden.
• VORSICHT - Zum Schutz vor Brandgefahr nur durch den
gleichen Sicherungstyp und -nennwert ersetzen. Die
Sicherungskennwerte sind 32 V DC/5 A.
• Stets die Verkehrsregeln befolgen und Ihre
Aufmerksamkeit auf die Straße richten. Das Gerät nicht
während der Fahrt bedienen, denn einige Funktionen
stehen nur beschränkt zur Verfügung, während das
Fahrzeug in Bewegung ist. Wenn Sie Ihre Aufmerksamkeit
nicht auf die Bedienung des Fahrzeugs richten, kann dies
zu Todesfällen, schweren Verletzungen oder Sachschäden
führen. Sie übernehmen die Gesamtverantwortung und
das Risiko für die Verwendung dieses Geräts.
Vorstellung
Im Lieferumfang
User Manual

18 Deutsch
Deutsch 19
Auf einen Blick
1
2
8
3
5
4
6
9
10
7
1
Mikrofon
4
LED-Display
2
USB-A-Ladeanschluss
5
3
USB-C-Anschluss
6
/ Multifunktionstaste
7
Ein- / Aus-Taste
• Um Ausschalten der LED-Anzeige, Trennen der
Bluetooth-Verbindung und Ausschalten des UKW-
Senders drücken.
8
Kanaltaste
• Zur Suche nach nicht belegten UKW-Frequenzen drücken.
• Zum Aktivieren des UKW-Modus drücken und halten.
Zum Anpassen der Frequenzen drücken.
9
AUX-Ausgangsbuchse Adapter
und gleichzeitig drücken, um die
Werkseinstellungen wiederherzustellen.
LED-Anzeige
LED-Anzeigen Status
/ UKW-Frequenz
blinken abwechselnd
Keine Bluetooth-Verbindung
erkannt
UKW-Frequenz wird
angezeigt
Bluetooth verbunden
UKW-Frequenz blinkt
UKW-Modus aufrufen
Eingehender Anruf
Aktiver Anruf mit Freisprechen
Aktiver Anruf
20 Deutsch
Deutsch 21
Erste Schritte
1
Den Roav SmartCharge T2 in die Zigarettenanzünder-
Buchse Ihres Fahrzeugs einstecken.
2
Motor des Fahrzeugs anlassen. Das LED-Display
leuchtet auf und / UKW-Frequenz blinken
abwechselnd.
3
Bluetooth an Ihrem Smartphone aktivieren und
nach verfügbaren Bluetooth-Geräten suchen. „Roav
T2_XXXX“ auswählen und Verbindung herstellen.
Nach erfolgreicher Verbindung wird die UKW-Frequenz
angezeigt.
Roav T2_XXXX
Anpassen des UKW-Kanals
Mit dem Roav SmartCharge T2 kann das Telefon über ein
UKW-Signal mit dem Autoradio verbunden werden.
1
CH drücken.
Der T2 beginnt mit der Suche nach einer nicht
belegten UKW-Frequenz.
Oder Kanal manuell auswählen:
a. CH 1 Sekunde lang gedrückt halten. UKW-Modus ist
aktiviert.
b. drücken, um eine UKW-Frequenz
auszuwählen.
2
Autoradio einschalten. Die Sendefrequenz des T2 muss
mit der Frequenz übereinstimmen, auf die das Radio
eingestellt ist.
FM

22 Deutsch
Deutsch 23
Verwenden des Kfz-Ladegeräts T2
Musik abspielen
Wenn der T2 erfolgreich mit Ihrem Smartphone gekoppelt
wurde, können Sie Musik von Ihrem Telefon abspielen. Die
Musik wird dann über den UKW-Sender oder den AUX-
Anschluss an das Autosystem übertragen.
Wiedergabe / Pause
drücken
Vorheriger / Nächster Titel
drücken
Um Echo und Fahrgeräusche bei Anrufen und bei der
Musikwiedergabe zu verringern, können Sie ein AUX-Kabel
mit 3,5-mm-Stecker (nicht im Lieferumfang enthalten)
verwenden, um den AUX-Anschluss des T2 mit dem AUX-
Eingang des Autoradios zu verbinden.
FM
AUX-Out
Wenn Bluetooth nicht innerhalb von 30 Minuten
verbunden ist, wechselt T2 in den Ruhemodus und
sendet keine UKW-Signale mehr. Dann hören Sie
den lokalen Kanal bei ausgeschalteter LED-Anzeige.
Wenn die Bluetooth-Verbindung wieder
hergestellt ist, wird T2 aktiviert und kehrt in den
Betriebsmodus zurück.
Freisprechfunktion nutzen
Wenn das T2 mit Ihrem Smartphone gekoppelt ist, können
Sie die Freisprechfunktion nutzen.
Anruf entgegennehmen
/ beenden
drücken
Anruf ablehnen
1 Sekunden lang gedrückt
halten
Laden Ihrer Geräte
Roav SmartCharge T2 hat einen USB-A- und
einen USB-C-Ladeanschluss. Sie können
zwei Geräte gleichzeitig laden. Die maximale
Ausgangsleistung beträgt 30 W.

Español 25
24 Deutsch
Technische Daten
Änderungen der technischen Daten ohne
Vorankündigung vorbehalten.
DC-E
ingang: 12–24 V
USB-C-Ausgang: 5 V 3 A, 9 V 2 A
USB-A-Ausgang: 5 V 2,4 A
Bluetooth: V5.0
Bluetooth-Übertragungsdistanz: 10 m / 393,7 in
UKW-Frequenzbereich: 88.1 - 107.9 MHz
UKW-Sendebereich: 2 m
Betriebstemperaturbereich: -20 °C bis 40 °C
Lagertemperaturbereich: -40 °C bis 85 °C
Tabla de contenidos
Español
26 Instrucciones de seguridad
27 Introducción
Contenido
Vista general
Indicación LED
30
Primeros pasos
31 Personalización del canal FM
32 Uso del cargador para coche T2
Reproducción de música
Realizar llamadas con manos libres
33
Carga de dispositivos
34 Especificaciones

26 Español
Español 27
Instrucciones de seguridad
CONSERVE ESTAS INSTRUCCIONES: este manual contiene
instrucciones de seguridad y funcionamiento importantes para
el cargador de coche Roav SmartCharge T2 (modelo R5114).
Lea y comprenda todas las instrucciones antes de utilizar
este producto. Si los daños son consecuencia de no seguir
las instrucciones, no se aplicará la garantía.
• Lea todas las instrucciones y marcas precaución antes de
utilizar este producto.
• No lo exponga a la lluvia, la humedad ni la nieve.
• El uso de accesorios no recomendados o vendidos por el
fabricante puede suponer un riesgo de incendio, descarga
eléctrica o lesiones.
• No utilice este cargador de coche si ha recibido un golpe
fuerte, ha sufrido una caída o ha resultado dañado de
cualquier otra forma. En ese caso, llévelo a un técnico de
servicio cualificado.
• No desmonte este cargador de coche; llévelo a un técnico
de servicio cualificado si necesita mantenimiento o una
reparación. Si se vuelve a montar de forma incorrecta, se
puede causar un riesgo de descarga eléctrica o incendio.
• Para reducir el riesgo de descarga eléctrica, desenchufe
este cargador de coche antes de intentar realizar cualquier
tipo de mantenimiento o limpieza. Apagar los controles no
reduce este riesgo.
• Para reducir el riesgo de incendio o de descarga eléctrica,
no interconecte los terminales de salida.
• Evite la exposición prolongada a la luz solar directa, que
puede provocar daños en el dispositivo.
• La exposición de este producto a llamas vivas puede hacer
que explote.
• No utilice este producto en campos magnéticos fuertes.
• Utilice un paño suave, limpio y sin pelusas para limpiarlo. No
utilice ningún aceite o limpiador corrosivo para limpiarlo.
• PRECAUCIÓN: para disponer de una protección continua
frente al riesgo de incendio, sustituya los fusibles
únicamente por otros del mismo tipo y potencia. La
potencia del fusible es de 32 V CC / 5 A
• Siga las leyes de tráfico y preste atención a la carretera. No
intente utilizar este dispositivo mientras conduce, ya que
algunas funciones se ven limitadas mientras el vehículo
se encuentra en movimiento. En caso de no prestar total
atención al conducir se podrían provocar lesiones graves,
daños materiales e incluso la muerte. El usuario asume
toda la responsabilidad y riesgo al utilizar este dispositivo.
Introducción
Contenido
User Manual

28 Español
Español 29
Vista general
1
2
8
3
5
4
6
9
10
7
1
Micrófono
4
Pantalla LED
2
Puerto de carga USB-A
5
3
Puerto USB-C
6
/ botón multifunción
7
Botón de encendido
• Pulse para apagar la pantalla LED, desconectar el
Bluetooth y apagar el transmisor FM.
8
Botón Canal
• Pulse para buscar frecuencias FM libres.
• Mantenga pulsado durante un segundo para activar el
modo FM. Pulse para personalizar frecuencias.
9
Toma de salida auxiliar Adaptador
Pulse y simultáneamente durante 3
segundos para restablecer los ajustes predefinidos.
Indicación LED
Indicadores LED Estado
/ frecuencia
FM parpadean
alternativamente
No se ha detectado ninguna
conexión Bluetooth
Se muestra la
frecuencia FM
Bluetooth conectado
La frecuencia FM
parpadea
Entra en modo FM
Llamada entrante
En una llamada en modo
manos libres
En una llamada telefónica
30 Español
Español 31
Primeros pasos
1
Conecte el Roav SmartCharge T2 en la toma del
encendedor de su coche.
2
Encienda el vehículo. La pantalla LED se encenderá y
parpadearán de forma alternativa / frecuencia FM.
3
Active la función Bluetooth en su smartphone y busque
los dispositivos Bluetooth disponibles. Seleccione
“Roav T2_XXXX” y conéctese. Una vez conectado con
éxito, se mostrará la frecuencia FM.
Roav T2_XXXX
Personalización del canal FM
El Roav SmartCharge T2 le permite conectar el teléfono al
sistema estéreo de su coche mediante señal FM.
1
Pulse CH.
El T2 comenzará a buscar una frecuencia FM libre.
O seleccione el canal de forma manual:
a. Mantenga pulsado CH durante 1 segundo. El modo
FM está activado.
b. Pulse para seleccionar una frecuencia FM.
2
Encienda la radio del coche. Asegúrese de que la
frecuencia de transmisión coincide con la frecuencia en
la que está sintonizada el T2.
FM
32 Español
Español 33
Uso del cargador para coche T2
Reproducción de música
Una vez conectado correctamente el T2 a su smartphone,
podrá reproducir música desde el teléfono. Podrá transmitir
música al sistema de audio de su coche a través del
transmisor FM o la toma de salida auxiliar.
Reproducir / Pausar
Pulse
Pista anterior / siguiente
Pulse
Para reducir aún más el eco y el ruido de fondo durante las
llamadas y la reproducción de música, puede conectar un
cable auxiliar de 3,5 mm (no incluido) de la toma auxiliar
del T2 a la toma de entrada auxiliar del sistema de audio
de su coche.
FM
AUX-Out
Si el Bluetooth no se conecta en 30 minutos, el
T2 entrará en modo de suspensión y dejará de
emitir señales FM. Después escuchará el canal
local con la pantalla LED apagada.
Cuando el Bluetooth vuelva a conectarse, el T2
se activará y volverá al modo de funcionamiento.
Realizar llamadas con manos libres
Una vez conectado correctamente el T2 a su smartphone,
podrá disfrutar de llamadas con manos libres.
Responder / finalizar
una llamada
Pulse
Rechazar una llamada
Mantenga presionado
durante 1 segundo
Carga de dispositivos
Roav SmartCharge T2 tiene un puerto de
carga USB-A y uno USB-C. Puede cargar dos
dispositivos al mismo tiempo con una salida
máxima de 30 W.

Français 35
Especificaciones
Las especificaciones están sujetas a cambios
sin previo aviso.
En
trada de CC: 12-24 V
Salida USB-C: 5 V 3 A, 9 V 2 A
Salida USB-A: 5 V 2,4 A
Bluetooth: V5.0
Distancia de transmisión Bluetooth: 10 m / 393,7 in
Rango de frecuencia FM: 88.1 - 107.9 MHz
Rango de transmisión FM: 2 m
Intervalo de temperatura de funcionamiento: De -20 °C a 40
°C (de -4 ºF a 104 ºF)
Intervalo de temperatura de almacenamiento: De -40 °C a
85 °C
34 Español
Table des matières
36 Consignes de sécurité importantes
37 Introduction
Contenu
Récapitulatif
Éclairage LED
40
Premiers pas
41 Personnalisation du canal FM
42 Utilisation du chargeur de voiture T2
Lecture de musique
Eectuer des appels mains libres
43
Recharge de vos appareils
44 Spécifications
Français

36 Français
Français 37
Consignes de sécurité importantes
CONSERVEZ CES CONSIGNES - Ce manuel contient
d'importantes instructions de sécurité et d'utilisation
relatives au chargeur de voiture modèle R5114.
Veuillez lire et comprendre toutes les instructions avant
d'utiliser ce produit. Si le non-respect des instructions
entraîne des dommages, la garantie ne s'appliquera pas.
• Lisez toutes les instructions et les mises en garde avant
d'utiliser ce produit.
• Ne pas exposer à la pluie, l'humidité ou la neige.
• L'utilisation d'un accessoire non recommandé ou vendu
par le fabricant peut entraîner un risque d'incendie, de
choc électrique ou de blessure.
• Ne pas utiliser ce chargeur de voiture s'il a reçu un
coup violent, s'il est tombé ou s'il a été endommagé de
quelque façon que ce soit ; l’apporter à un technicien
qualifié.
• Ne pas démonter ce chargeur de voiture ; l’apporter à un
technicien qualifié lorsqu’une réparation est nécessaire.
Un réassemblage incorrect peut entraîner un risque
d'électrocution ou d'incendie.
• Pour réduire les risques d'électrocution, débrancher le
chargeur de voiture avant d'eectuer toute opération
d'entretien ou de nettoyage. La désactivation des
commandes ne réduit pas ce risque.
• Pour réduire les risques d'incendie ou d'électrocution, ne
pas interconnecter les terminaisons de sortie.
• Éviter toute exposition prolongée à la lumière directe du
soleil, qui pourrait endommager l'appareil.
• L'exposition de ce produit à des flammes nues peut
provoquer son explosion.
• Ne pas utiliser ce produit dans des champs magnétiques
puissants.
• Utiliser un chion sec, doux et non pelucheux pour le
nettoyage. Ne pas utiliser de nettoyant corrosif ni d'huile.
• ATTENTION - Pour une protection continue contre
les risques d'incendie, ne remplacer le fusible que par
un fusible de même type et de même spécification. Le
fusible utilisé est de 32V DC / 5A.
Introduction
Contenu
User Manual
38 Français
Français 39
Récapitulatif
1
2
8
3
5
4
6
9
10
7
1
Microphone
4
Écran LED
2
Port de charge USB-A
5
3
Port USB-C
6
/ Bouton multifonction
7
Bouton d'alimentation
• Appuyez pour éteindre l'écran LED, déconnecter le
Bluetooth et désactiver le transmetteur FM.
8
Bouton de canal
• Appuyez pour rechercher des fréquences FM disponibles.
• Maintenez appuyé pendant une seconde pour activer
le mode FM. Appuyez sur pour personnaliser
les fréquences.
9
Prise de sortie AUX Adaptateur
Appuyez simultanément sur et pendant
3 secondes pour réinitialiser aux paramètres
par défaut.
Éclairage LED
Voyants LED État
/ fréquence
FM clignotent
alternativement
Aucune connexion Bluetooth
détectée
La fréquence FM est
achée
Bluetooth connecté
La fréquence FM
clignote
Entrer en mode FM
Appel entrant
En cours d'appel en mode
mains libres
En cours d'appel téléphonique
40 Français
Français 41
Premiers pas
1
Branchez le Roav SmartCharge T2 sur l'allume-cigare
de votre véhicule.
2
Démarrez le moteur de votre véhicule. L’écran LED
s’allumera et / la fréquence FM clignoteront
alternativement.
3
Activez le Bluetooth sur votre smartphone et
recherchez les appareils Bluetooth disponibles.
Sélectionnez « Roav T2_XXXX » et connectez-vous.
Une fois la connexion réussie, la fréquence FM sera
achée.
Roav T2_XXXX
Personnalisation du canal FM
Le Roav SmartCharge T2 vous permet de connecter votre
smartphone à la stéréo de votre voiture via le signal FM.
1
Appuyez sur CH.
Le T2 commence à rechercher une fréquence FM
disponible.
Vous pouvez également sélectionner le canal
manuellement :
a. Appuyez et maintenez CH enfoncé pendant une
seconde. Le mode FM est activé.
b. Appuyez sur pour sélectionner une fréquence
FM.
2
Allumez votre autoradio. Assurez-vous que la
fréquence de transmission correspond à la fréquence
définie sur le T2.
FM
42 Français
Français 43
Utilisation du chargeur de voiture T2
Lecture de musique
Lorsque le T2 est correctement jumelé à votre smartphone,
vous pouvez écouter de la musique de ce dernier. La
musique peut ensuite être diusée sur le système audio de
votre voiture via l'émetteur FM ou la prise de sortie AUX.
Lecture / pause
Appuyez sur
Piste précédente / suivante
Appuyez sur
Pour réduire encore davantage l'écho et les bruits de fond
sur vos appels et votre musique, vous pouvez connecter
un câble AUX de 3,5 mm (non fourni) à la prise de sortie
AUX du T2 et à la prise d'entrée AUX du système audio de
votre voiture.
FM
AUX-Out
Si aucun appareil Bluetooth n'est connecté dans les
30 minutes le T2 entrera en mode veille et arrêtera
l'émission de signaux FM. Vous entendrez ensuite
le canal local avec l'écran LED éteint.
Lors de la reconnexion du Bluetooth, le T2 sera
activé et reprendra son fonctionnement.
Effectuer des appels mains libres
Lorsque le T2 est correctement connecté à votre
smartphone, vous pouvez profiter des appels mains-libres.
Répondre / Terminer
un appel
Appuyez sur
Rejeter un appel
Appuyez et maintenez
enfoncé pendant 1 seconde
Recharge de vos appareils
Le Roav SmartCharge T2 dispose d'un port de
charge en USB-A et d'un autre en USB-C. Vous
pouvez charger deux appareils simultanément
avec une puissance de sortie maximale de 30 W.

Italiano 45
Spécifications
Les spécifications sont susceptibles d'être
modifiées sans préavis.
En
trée CC : 12 V - 24 V
Sortie USB-C : 5 V 3 A, 9 V 2 A
Sortie USB-A : 5 V 2,4 A
Bluetooth : 5.0
Distance de transmission Bluetooth : 10 m/393,7 po
Plage de fréquences FM : 88.1 - 107.9 MHz
Portée de la transmission FM : 2 m/78,7 po
Plage de températures de fonctionnement : de -20 °C à 40 °C
/ de -4 °F à 104 °F
Plage de températures de stockage : de -40°C à 85°C / de
-40°F à 185°F
44 Français
Sommario
Italiano
46 Informazioni sulla sicurezza
47 Introduzione
Contenuto della confezione
Descrizione del prodotto
Indicazione LED
50
Per iniziare
51 Personalizzazione canale FM
52 Utilizzo del caricabatterie per auto T2
Riproduzione musica
Eettuare chiamate in vivavoce
53
Ricarica dei dispositivi
54 Specifiche

46 Italiano
Italiano 47
Informazioni sulla sicurezza
CONSERVARE QUESTE ISTRUZIONI: il presente manuale
contiene importanti istruzioni per la sicurezza e il
funzionamento del caricabatterie per auto Roav SmartCharge
T2 (modello R5114).
Leggere e comprendere tutte le istruzioni prima di utilizzare
il prodotto. La garanzia non si applica in caso di danni causati
dal mancato rispetto delle istruzioni.
• Leggere tutte le istruzioni e le indicazioni di avvertimento
prima di utilizzare il prodotto.
• Non esporre a pioggia, umidità o neve.
• L'uso di accessori non consigliati o non venduti dal
produttore può comportare il rischio di incendi, scosse
elettriche o lesioni alle persone.
• Non azionare il caricabatterie per auto se è stato oggetto
di un forte urto, è caduto o risulta altrimenti danneggiato.
Rivolgersi a un tecnico qualificato per assistenza.
• Non disassemblare questo caricabatterie per auto. Rivolgersi
a un tecnico qualificato qualora sia necessario eseguire
manutenzione o riparazioni. Un riassemblaggio non corretto
può causare un rischio di scosse elettriche o incendio.
• Al fine di ridurre il rischio di scosse elettriche, scollegare
il caricabatterie per auto prima di eettuare qualsiasi
operazione di manutenzione o pulizia. Disattivare tutti i
comandi non consente di ridurre questo rischio.
• Per ridurre il rischio di incendi o scosse elettriche, non
collegare le terminazioni di uscita.
• Per scongiurare possibili danni, evitare di esporre il
prodotto alla luce diretta del sole.
• Il prodotto può esplodere se esposto a fiamme libere.
• Non utilizzare il prodotto all'interno di forti campi magnetici.
• Per la pulizia, utilizzare un panno asciutto, morbido e privo
di lanugine. Non utilizzare detergenti oppure oli corrosivi.
• ATTENZIONE: per una protezione costante contro il
rischio di incendio, sostituire il fusibile unicamente con un
altro di tipologia e valore nominale. Il valore nominale del
fusibile è 32 V CC/5 A.
• Rispettare sempre le norme di circolazione e prestare
attenzione alla strada. Non tentare di utilizzare il
dispositivo durante la guida, poiché alcune funzionalità
sono limitate quando il veicolo è in movimento. Distogliere
l'attenzione dalla guida del veicolo potrebbe provocare
morte, lesioni gravi o danni materiali. L'utente si assume
la completa responsabilità e il rischio legati all'utilizzo di
questo dispositivo.
Introduzione
Contenuto della confezione
User Manual
48 Italiano
Italiano 49
Descrizione del prodotto
1
2
8
3
5
4
6
9
10
7
1
Microfono
4
Display a LED
2
Porta di ricarica USB-A
5
3
Porta USB-C
6
/ Tasto multifunzione
7
Tasto di alimentazione
• Premere per spegnere il display a LED, scollegare il
Bluetooth e spegnere il trasmettitore FM.
8
Tasto canali
• Premere per cercare le frequenze FM libere.
• Tenere premuto per 1 secondo per attivare la modalità
FM. Premere per personalizzare le frequenze.
9
Presa AUX Out Adattatore
Premere e contemporaneamente per 3
secondi per ripristinare le impostazioni predefinite.
Indicazione LED
Indicatori LED Stato
/ Frequenza FM
lampeggia in maniera
alternata
Nessuna connessione
Bluetooth rilevata
Viene visualizzata la
frequenza FM
Bluetooth connesso
La frequenza FM
lampeggia
Attivare la modalità FM
Chiamata in arrivo
In una chiamata in vivavoce
In una chiamata
50 Italiano
Italiano 51
Per iniziare
1
Inserire Roav SmartCharge T2 nella presa
dell'accendisigari del veicolo.
2
Avviare il motore del veicolo. Il display a LED si
accenderà e / Frequenza FM lampeggeranno in
modo alternato.
3
Abilitare il Bluetooth sullo smartphone e cercare i
dispositivi Bluetooth disponibili. Selezionare "Roav
T2_XXXX" e connettersi. Una volta connessi, verrà
visualizzata la frequenza FM.
Roav T2_XXXX
Personalizzazione canale FM
La funzione Roav SmartCharge T2 consente di collegare il
telefono allo stereo dell'auto tramite un segnale FM.
1
Premere CH.
T2 inizia a cercare una frequenza FM libera.
Oppure a selezionare il canale manualmente:
a. Tenere premuto CH per 1 secondo. La modalità FM è
attivata.
b. Premere per selezionare una frequenza FM.
2
Accendere il sistema audio dell'auto. Accertarsi che
la frequenza di trasmissione corrisponda a quella di
sintonizzazione di T2.
FM

52 Italiano
Italiano 53
Utilizzo del caricabatterie per auto T2
Riproduzione musica
Quando T2 è correttamente associato allo smartphone, è
possibile riprodurre la musica dal telefono. La musica può
quindi essere trasmessa al sistema audio dell'auto tramite
il trasmettitore FM o la presa AUX Out.
Riproduzione / Pausa
Premere
Traccia precedente /
successiva
Premere
Per ridurre ulteriormente l'eco e il rumore di fondo delle
chiamate e della musica, è possibile collegare un cavo AUX
da 3,5 mm (non in dotazione) alla presa AUX Out di T2 e
alla presa AUX In del sistema audio dell'auto.
FM
AUX-Out
Se il Bluetooth non viene collegato entro 30 minuti,
T2 entrerà in modalità di sospensione e smetterà
di emettere segnali FM. Quindi, l'utente ascolterà il
canale locale con il display a LED spento.
Alla riconnessione Bluetooth, T2 sarà attivato e
tornerà alla modalità di funzionamento.
Effettuare chiamate in vivavoce
Quando T2 è associato correttamente allo smartphone, è
possibile usufruire di una comoda chiamata in vivavoce.
Rispondere a /
Terminare una
chiamata
Premere
Rifiutare una chiamata
Tenere premuto
per 1
secondo
Ricarica dei dispositivi
Roav SmartCharge T2 è dotato di una porta di
ricarica USB-A e una porta USB-C. È possibile
caricare due dispositivi contemporaneamente
con una potenza massima in uscita pari a 30 W.
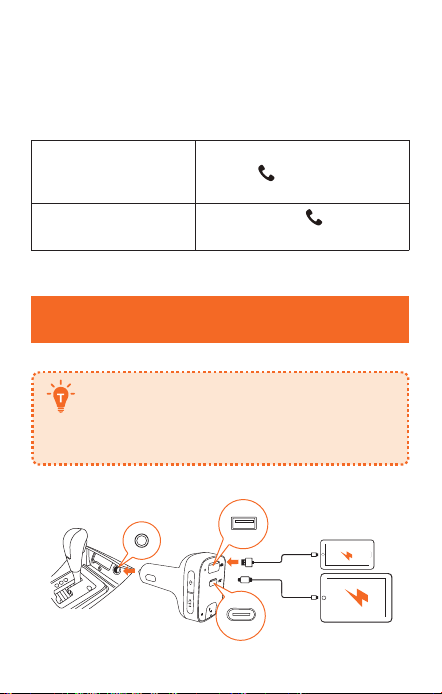

日本語
55
54 Italiano
Specifiche
Le specifiche sono soggette a modifiche senza
preavviso.
Ingre
sso CC: 12 V - 24 V
Uscita USB-C: 5 V 3 A, 9 V 2 A
Uscita USB-A: 5 V 2,4 A
Bluetooth: V5.0
Distanza di trasmissione Bluetooth: 10 m
Gamma di frequenza FM: 88.1 - 107.9 MHz
Gamma di trasmissione FM: 2 m
Intervallo della temperatura di esercizio: da -20 °C a 40 °C
Intervallo temperatura di conservazione: da -40 °C a 85 °C
日本語
目次
56 安全にご使用いただくために
57 概要
パッケージ内容
外観
LED表示
60 はじめに
61
FMチャンネルのカスタマイズ
62 本製品の使用方法
音楽再生
ハンズフリー通話を行う
63 機器を充電する
64 仕様

日本語
55
54 Italiano
Specifiche
Le specifiche sono soggette a modifiche senza
preavviso.
Ingre
sso CC: 12 V - 24 V
Uscita USB-C: 5 V 3 A, 9 V 2 A
Uscita USB-A: 5 V 2,4 A
Bluetooth: V5.0
Distanza di trasmissione Bluetooth: 10 m
Gamma di frequenza FM: 88.1 - 107.9 MHz
Gamma di trasmissione FM: 2 m
Intervallo della temperatura di esercizio: da -20 °C a 40 °C
Intervallo temperatura di conservazione: da -40 °C a 85 °C
日本語
目次
56 安全にご使用いただくために
57 概要
パッケージ内容
外観
LED表示
60 はじめに
61
FMチャンネルのカスタマイズ
62 本製品の使用方法
音楽再生
ハンズフリー通話を行う
63 機器を充電する
64 仕様

56
日本語
日本語
57
安全にご使用いただくために
本説明書には、Roav SmartCharge T2カーチャージャー (モ
デル R5114) に関する安全上および操作上の重要な説明が
含まれています。お読みになった後も、必ず保管してく
ださい。
本製品をご使用になる前に、必ず本説明書内のすべての項
目に目を通してください。説明書の記載に沿わないご使用
による故障については、保証の対象外となります。
• 本製品をご使用になる前に、すべての手順と注意事項を
お読みください。
• 雨や湿気、雪にさらさないでください。
• 非推奨の付属品を使用すると発火や感電、怪我をする危
険があります。
• 本製品が大きな衝撃を受けたり、落下したり、その他の
原因で傷ついた場合は使用せずに専門の修理業者に修理
を依頼してください。
• 本製品を分解しないでください。修理が必要になった場
合は専門の修理業者に修理を依頼してください。不適切
な改造は感電や発火の危険があります。
• 感電を防ぐため、本製品の掃除やメンテナンスの前には
プラグを抜いてください。電源を切るだけでは危険防止
になりません。
• 発火や感電を防ぐため、出力端子同士を接続しないで
ください。
• 長時間、直接日光の当たる環境下に置くことは避けてく
ださい。故障の原因となる場合があります。
• 爆発の危険性があるので、本製品を直接火に近づけな
いでください。
• 強い磁気のある場所では、本製品を使用しないでくだ
さい。
• 清掃する場合は、清潔で乾いた柔らかい布を使用してく
ださい。洗剤や油は使用しないでください。
• 注意 - 発火を防ぐため、ヒューズを交換する際には同じ
型で同じ規格のものと取り換えてください。ヒューズの
規格は32V DC / 7Aです。
• 道路交通法を常に遵守し、運転に集中するようにしてく
ださい。運転中にこの機器を操作しないでください。車
が移動している間、一部の機能は制限されます。運転中
の不注意は重大な事故、怪我につながる可能性がありま
す。運転中の本製品の使用はお客様の責任で、十分に注
意して行ってください。
概要
パッケージ内容
User Manual
Roav SmartCharge T2
取扱説明書
ハッピーカード
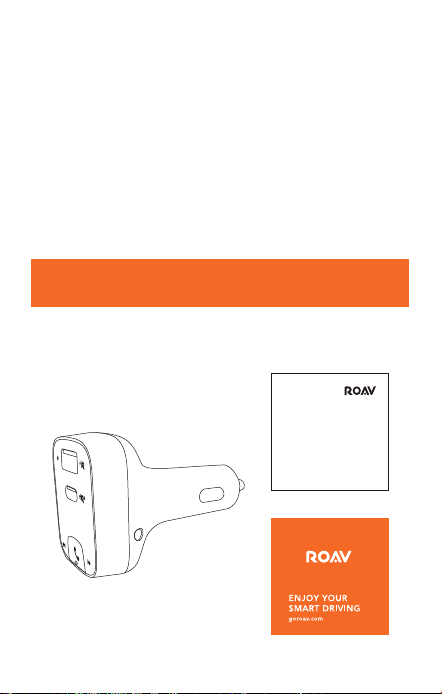
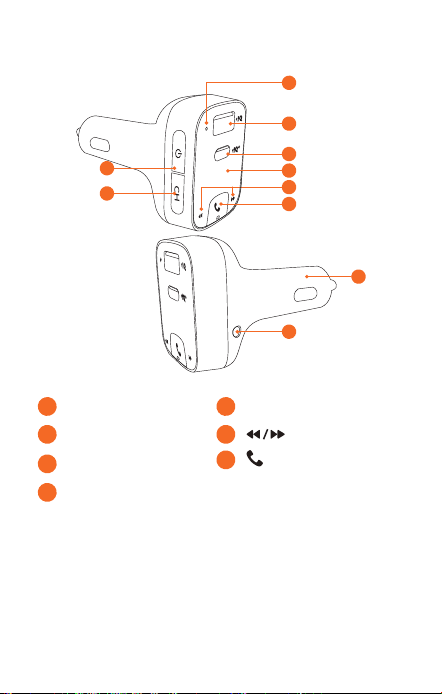
58
日本語
日本語
59
外観
1
2
8
3
5
4
6
9
10
7
1
マイク
4
LEDディスプレイ
2
USB-Aポート
5
3
USB-Cポート
6
/ 多機能ボタン
7
電源ボタン
• このボタンを押すと、LEDディスプレイをオンにす
る、Bluetoothを接続解除する、FMトランスミッタ
ーをオフにすることができます。
8
チャンネルボタン
• このボタンを押すと、接続可能なFM周波数が検索
されます。
• このボタンを1秒間押し続けると、FMモードが有効
になります。
を押すと、周波数をカスタマ
イズできます。
9
AUX出力 アダプター
と を同時に3秒間押すと、デフォルト
設定が復元されます。
LED 表示
LED表示 意味
/ FM周波数が交互
に点滅する
Bluetooth接続が検出されま
せん
FM周波数が表示される
Bluetoothが接続されました
FM周波数が点滅する
FMモードに切り替えます
着信
ハンズフリーモードで通話中
通話中
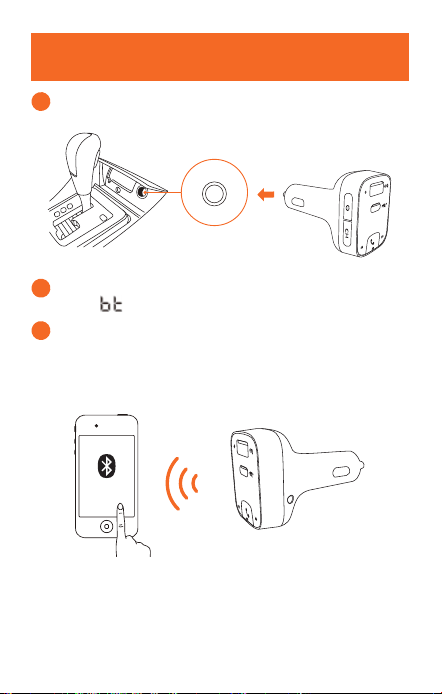
60
日本語
日本語
61
はじめに
1
本製品を車内のシガーソケットに挿入してください。
2
車両のエンジンを始動します。LEDディスプレイが点
灯し、
/ FM周波数が交互に点滅します。
3
お使いのスマートフォンでBluetoothを有効"にして、
使用可能なBluetooth対応機器を検索します。「Roav
T2_XXXX」を選択して接続します。正常に接続される
と、FM周波数が表示されます。
Roav T2_XXXX
FMチャンネルのカスタマイズ
本製品では、FM信号を使ってスマートフォンを車両のス
テレオに接続できます。
1
CH を押します。
本製品が、接続可能なFM周波数を検索し始めます。
または、手動でチャンネルを選択します。
a. CH を1秒間押し続けます。これで、FMモードが有
効になります。
b.
を押して、FM周波数を選択します。
2
車両のラジオをオンにします。送信周波数と、本製品
で合わせた周波数が一致するようにしてください。
FM
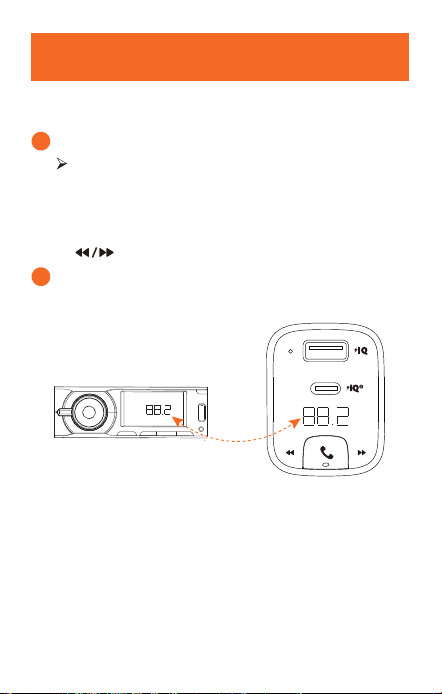
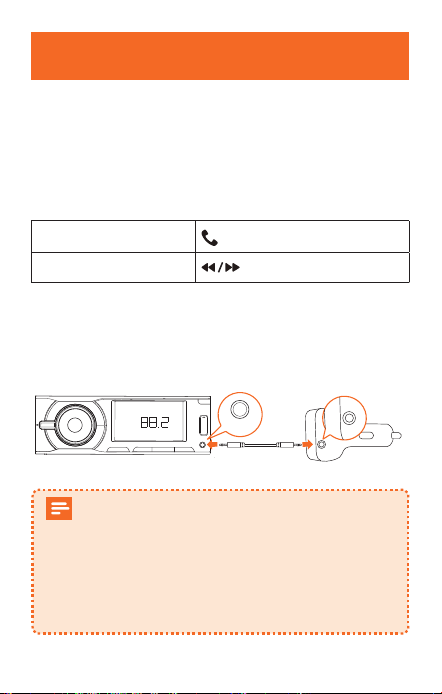
62
日本語
日本語
63
本製品の使用方法
音楽再生
本製品をスマートフォンに正常にペアリングすると、スマ
ートフォンから音楽を再生できます。音楽は、FMトラン
スミッターやAUX出力経由で車両のオーディオシステムに
ストリーミングされます。
再生 / 一時停止
をタップ
前の曲 / 次の曲
をタップ
通話中や音楽再生時のエコー音や車内騒音をさらに低減す
るには、本製品のAUX出力と、カーオーディオシステムの
AUX入力を、
3.5 mm AUXケーブル (付属していません) で
接続します。
FM
AUX-Out
30分間、Bluetoothが接続されない場合は、自動
的にスリープモードに切り替わり、FM信号の送
信が停止されます。その後は、LEDディスプレ
イを終了した状態でローカルチャンネルを聴く
ことができます。
Bluetoothを再度接続すると、本製品が有効にな
り、動作モードに戻ります。
ハンズフリー通話を行う
本製品をスマートフォンに正常にペアリングすると、便利
なハンズフリー通話が可能です。
着信に応答する / 通話
を終了する
をタップ
着信を拒否する
を1秒間長押し
機器を充電する
本製品には、USB-AとUSB-Cの充電ポートが1つ
ずつ備えられています。最大30Wの出力で、2
台の機器を同時に充電できます。
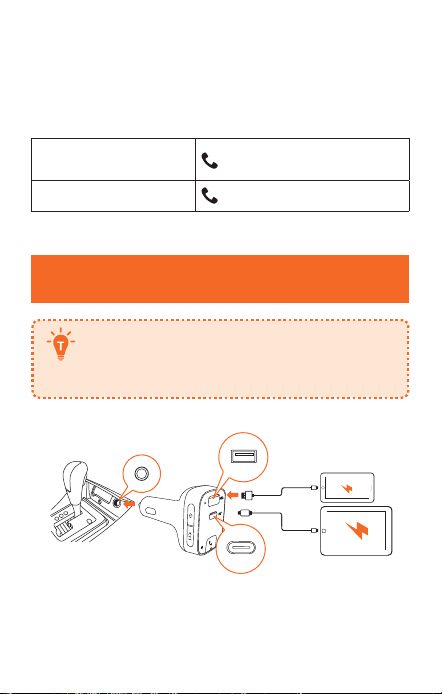

64
日本語
仕様
仕様は予告なく変更されることがあります。
DC入
力:12V〜24V
USB-C出力:5V 3A、9V 2A
USB-A出力:5V 2.4A
Bluetooth規格:バージョン5.0
Bluetooth通信距離:10 m
FM周波数範囲:88.1 - 107.9
MHz FM通信範囲:2 m
使用時温度範囲:-20°C - 40°C
保管温度範囲:-40°C - 85°C
Customer Service
Kundenservice | Servicio de atención al cliente | Service
client | Servizio clienti | カスタマーサポート
12-month limited warranty
12 Monate eingeschränkte Garantie
Garantía limitada de 12 meses
Garantie limitée de 12 mois
Garanzia limitata di 12 mesi
18ヶ月保証
Lifetime technical support
Technischer Support für die
Produktlebensdauer | Asistencia técnica de por
vida | Assistance technique à vie | Supporto
tecnico per l'intero ciclo di vita | ライフタイム
テクニカルサポート
support@anker.com
+1(800) 988 7973 (US) Mon-Fri 9:00-17:00 (PT)
(日本) +81 03 4455 7823 月-金 9:00-17:00
@GoRoav
@GoRoav