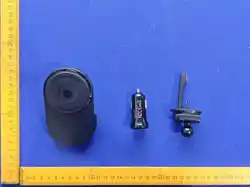

Package Contents
Contenido del paquete
EN
Model Name : ECA012
Rated Input : USB-C 5V/2A, 9V/2A
Mobile Phone Output : 15W / 10W / 7.5W / 5W
Dimensions : 60.5(L) × 60.5(W) × 28(H) mm
Weight : 50g ±10g
Made In China
Specifications :
ES
Nombre del modelo : ECA012
Entrada nominal : USB-C 5V/2A, 9V/2A
Salida para teléfono móvil : 15W / 10W / 7.5W / 5W
Dimensiones : 60.5 (L) × 60.5 (An) × 28 (Al) mm
Peso : 50 g ±10 g
Hecho en China
Especificaciones :
1
ECA012
2
User Manual
Manual de usuario
3
Charging Cable
Cable de carga
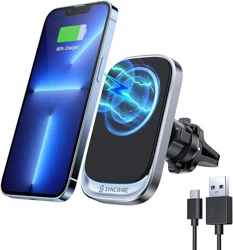
ECA012
Air Vent Mount
Soporte para
rejilla de ventilación
Dash Mount
Soporte para
tablero
Windshield Mount
Soporte para
parabrisas
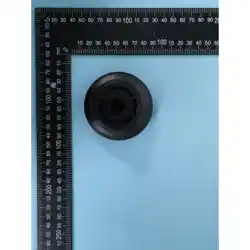
Magnetic Charging Pad
Base de carga magnética
USB-C Port
Puerto USB-C
How to Pick the Right Case
Please use compatible magnetic case for optimal results.
iPhone 11/X/8/SE series can charge wirelessly with a
magnetic case that’s compatible with the charging stand.
Cómo elegir la funda adecuada
Utilice una funda magnética compatible para obtener un
rendimiento óptimo. Las series iPhone 11/X/8/SE pueden
cargarse de forma inalámbrica con una funda magnética
compatible con el soporte de carga.
FCC ID : 2AU4P-ECA012
UM_2_ECA012_EN-ES_1.1
Guarantees against short circuit and
over-charging for your power bank
and devices.
PowerSafe Management
Customer Service
For any questions about the product,
please scan the QR code to visit our
Support Center. Thank you!
Warranty
All products from the date of purchase are qualified for limited time warranty.
For more warranty information, please visit: hמּp://www.energizerpowerpacks.com
Garantía
Todos los productos, a partir de la fecha de compra, cuentan con una garantía limitada
por un período determinado.
Para más información sobre la garantía, visite: hמּp://www.energizerpowerpacks.com
©2026 Energizer. Energizer, Energizer Character and certain graphic designs are
trademarks of Energizer Brands, LLC and related subsidiaries and are used under
license by TennRich International Corp..
Dispose the baמּery properly, seek for local disposal facility for advice.
Do not dispose, dissemble, damage, or incinerate the baמּery at all time.
Deseche la batería de forma adecuada; consulte con un centro local de eliminación para
obtener asesoramiento.
No deseche, desmonte, dañe ni incinere la batería en ningún momento.
ECA012
*AC WALL ADAPTER NOT INCLUDED. 18W POWER DELIVERY
ADAPTER REQUIRED FOR MAXIMUM SPEED.
*ADAPTADOR DE PARED AC NO INCLUIDO. SE REQUIERE UN
ADAPTADOR DE ENTREGA DE ENERGÍA DE 18W PARA ALCANZAR
LA VELOCIDAD MÁXIMA.
FCC Warning
This device complies with part 15 of the FCC Rules. Operation is
subject to the following two conditions:(1) This device may not cause
harmful interference, and (2) this device must accept any interference
received, including interference that may cause undesired operation.
Any Changes or modifications not expressly approved by the party
responsible for compliance could void the user's authority to operate
the equipment.
This equipment has been tested and found to comply with the limits
for a Class B digital device, pursuant to part 15 of the FCC Rules.
These limits are designed to provide reasonable protection against
harmful interference in a residential installation. This equipment
generates uses and can radiate radio frequency energy and, if not
installed and used in accordance with the instructions, may cause
harmful interference to radio communications. However, there is no
guarantee that interference will not occur in a particular installation.
If this equipment does cause harmful interference to radio or television
reception, which can be determined by turning the equipment off
and on, the user is encouraged to try to correct the interference by
one or more of the following measures:
• Reorient or relocate the receiving antenna.
• Increase the separation between the equipment and receiver.
• Connect the equipment into an outlet on a circuit different from that
to which the receiver is connected.
• Consult the dealer or an experienced radio/TV technician for help.
FCC RF Exposure Statement
The equipment complies with FCC radiation exposure limits set forth
for an uncontrolled environment. This equipment should be installed
and operated with minimum distance between 20cm the radiator
your body.
Safety Instructions
• Avoid water, heat, fire, penetration of the product, and severe drops
at all times.
• Do not insert other object to the USB ports other than the USB
connectors.
• During charging, your device and the product may feel slightly warm,
this is normal.
• Do not clean the product with water or other cleaning products,
clean the exterior with a lightly weמּed cloth or napkin.
• Any intentional and physical damage to the product will not be
under the warranty conditions.
• Do not place any metal or flammable object on top of this product.
• This product is not suitable for extreme climates, please store and
use this product properly.
Instrucciones de seguridad
• Evite en todo momento el agua, el calor, el fuego, la perforación del
producto y las caídas fuertes.
• No inserte otros objetos en los puertos USB que no sean
conectores USB.
• Durante la carga, su dispositivo y el producto pueden sentirse
ligeramente calientes; esto es normal.
• No limpie el producto con agua ni con otros productos de limpieza;
limpie el exterior con un paño o servilleta ligeramente humedecida.
• Cualquier daño físico intencional al producto no estará cubierto por
la garantía.
• No coloque objetos metálicos ni inflamables sobre este producto.
• Este producto no es apto para climas extremos; almacénelo y
utilícelo adecuadamente.
How to USE Cómo usar
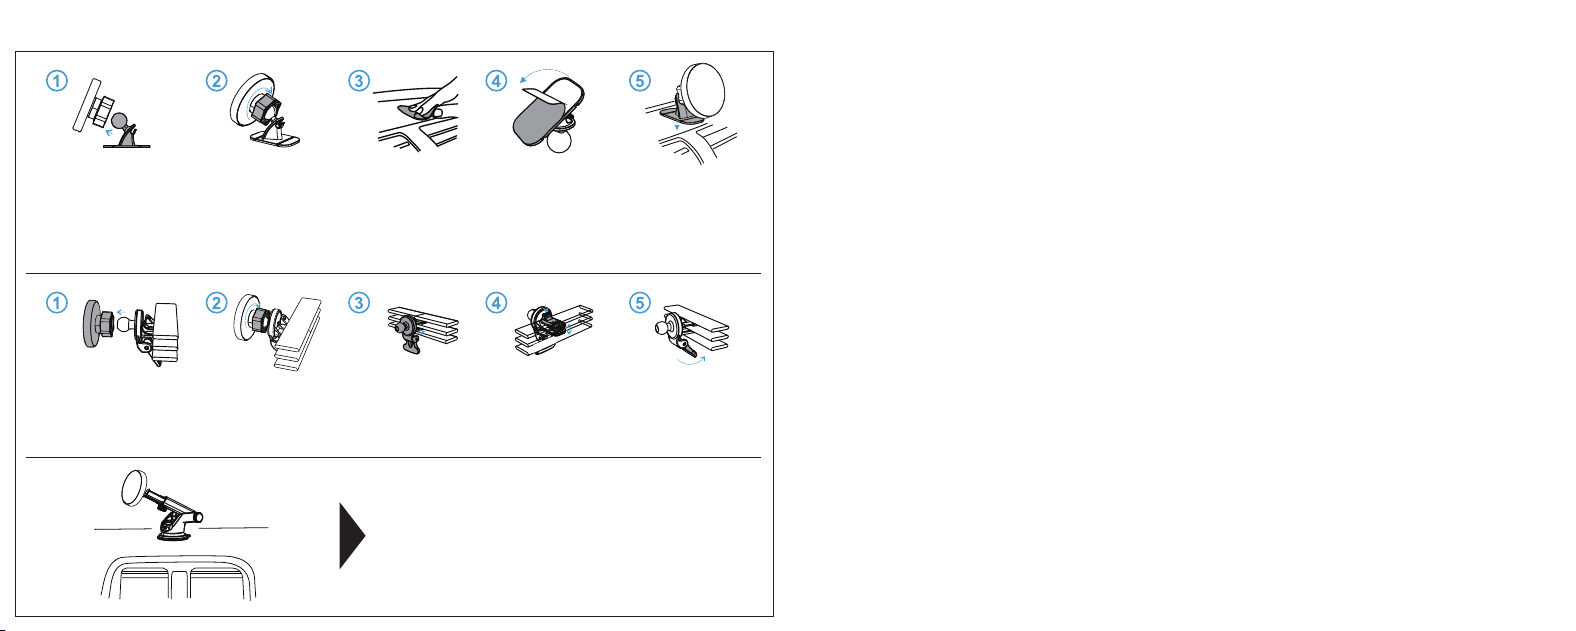
1. Install the charging pad onto the windshield mount.
2. Place your windshield mount on the windshield or dashboard.
3. Press down the clamp on the mount to aמּach tightly to the dashboard.
4. Connect USB charging cable to the charging pad to begin charging.
1. Instale la base de carga en el soporte para parabrisas.
2. Coloque el soporte en el parabrisas o en el tablero.
3. Presione la palanca del soporte para fijarlo firmemente al tablero.
4. Conecte el cable de carga USB a la base de carga para iniciar la carga.
1. Install the charging pad onto the dash mount.
2. Screw the charging pad tightly onto the dash mount.
3. Clean the surface to ensure beמּer aמּachment.
4. Remove the back of the sticker.
5. Place your dash mount where it’s suitable for your viewing.
6. Connect USB charging cable to the charging pad to begin
charging.
1. Instale la base de carga en el soporte para tablero.
2. Atornille firmemente la base de carga al soporte para tablero.
3. Limpie la superficie para asegurar una mejor adherencia.
4. Retire la película protectora del adhesivo.
5. Coloque el soporte en el tablero en una posición adecuada para su
visualización.
6. Conecte el cable de carga USB a la base de carga para iniciar la carga.
1. Install the charging pad onto the air vent clip.
2. Install the air vent clip to the air vent.
3. Screw tightly onto the air vent and adjust to your preferred angle.
4. Connect USB charging cable to the charging pad to begin charging.
1. Instale la base de carga en la pinza para rejilla de ventilación.
2. Coloque la pinza en la rejilla de ventilación.
3. Apriete firmemente y ajuste al ángulo deseado.
4. Conecte el cable de carga USB a la base de carga para iniciar la carga.