Please give us a chance to make it right and do better !
Contact our friendly customer service department for help first.
Replacements for missing or damaged parts will be shipped ASAP !
Contact Us!
Do NOT return this item.
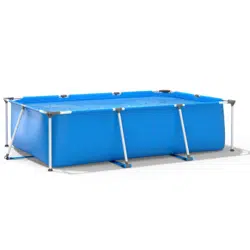
Rectangular Frame Pool
NP10374
USER’S MANUAL
THIS INSTRUCTION BOOKLET CONTAINS IMPORTANT SAFETY INFORMATION. PLEASE READ AND KEEP FOR FUTURE REFERENCE.
US office: Fontana UK office: Ipswich AU office: Truganina
DE office: Hamburg
FR office: Saint Vigor d'Ymonville
PL office: Gdańsk
US:cs.us@costway.com
UK:cs.uk@costway.com
Before You Start
Please read all instructions carefully.
Retain instructions for future reference.
Separate and count all parts and hardware.
Read through each step carefully and follow the proper order.
We recommend that, where possible, all items are assembled
near to the area in which they will be placed in use, to avoid
moving the product unnecessarily once assembled.
Always place the product on a flat, steady and stable surface.
Keep all small parts and packaging materials for this product
away from babies and children as they potentially pose a serious
choking hazard.
02 03
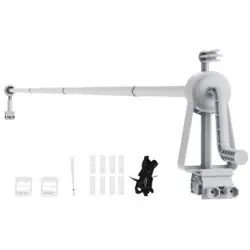
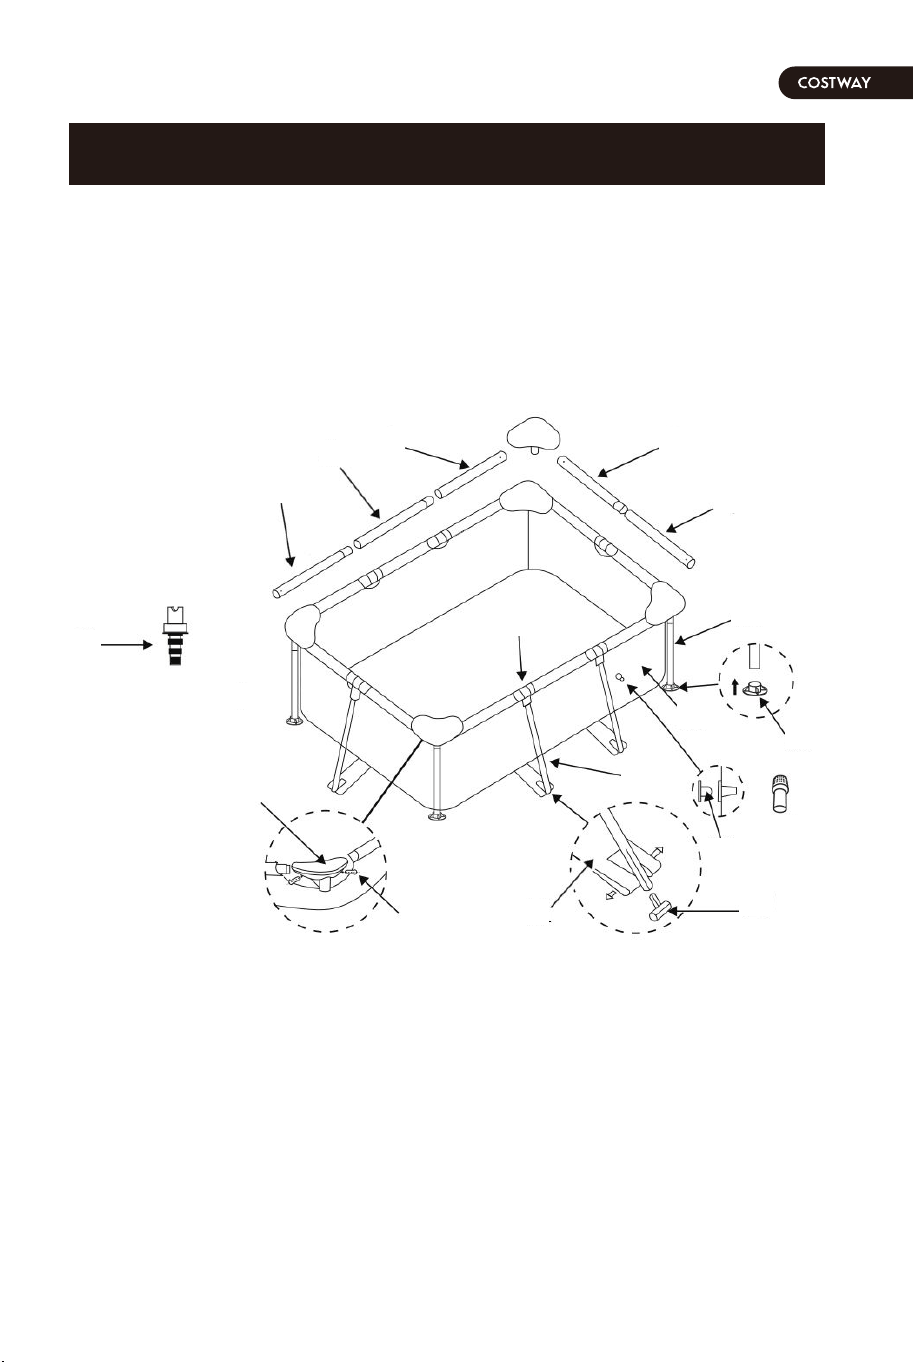
PARTS REFERENCE
FOR ABOVE RECTANGLE FRAME POOL
SIZE: 118* 79* 30 INCH
1
2
3
4
5
6
7
8
9
10
11
12
13
14
15
16
17
NOTE: Drawings for illustration purpose only. Actual product may vary.
Not to scale.
Before You Start
Please read all instructions carefully.
Retain instructions for future reference.
Separate and count all parts and hardware.
Read through each step carefully and follow the proper order.
We recommend that, where possible, all items are assembled
near to the area in which they will be placed in use, to avoid
moving the product unnecessarily once assembled.
Always place the product on a flat, steady and stable surface.
Keep all small parts and packaging materials for this product
away from babies and children as they potentially pose a serious
choking hazard.
02 03
PARTS REFERENCE
FOR ABOVE RECTANGLE FRAME POOL
SIZE: 118* 79* 30 INCH
1
2
3
4
5
6
7
8
9
10
11
12
13
14
15
16
17
NOTE: Drawings for illustration purpose only. Actual product may vary.
Not to scale.
04 05
POOL SETUP
1
2
3
4
5
6
7
8
9
10
11
12
13
14
15
16
17
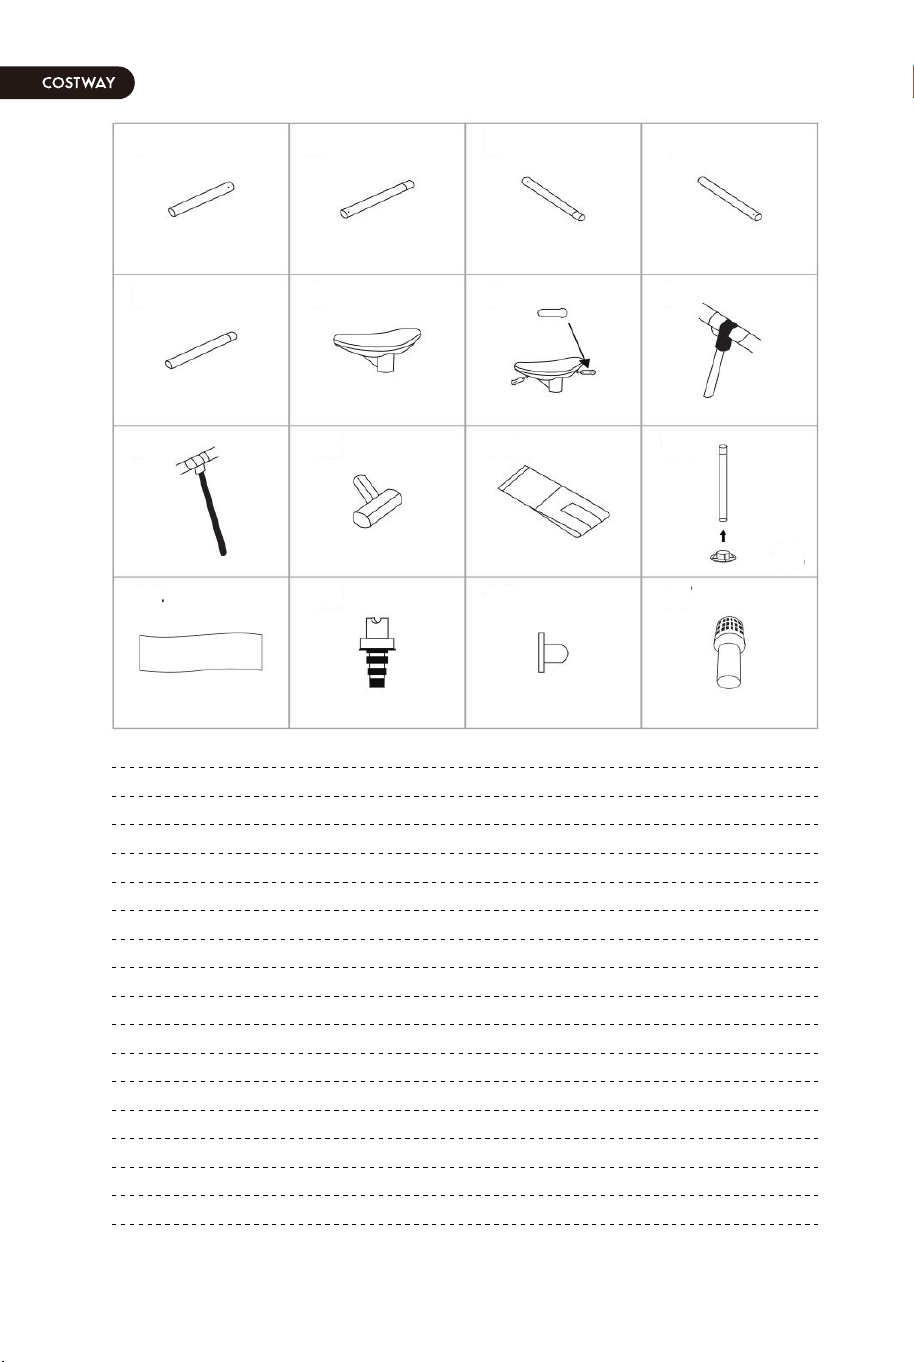
REF. NO
1
2
3
4
5
6
7
8
9
10
11
12
13
14
15
16
17
SIZE: 118* 79* 30 INCH
2
2
2
2
2
4
8
6
6
6
6
4
4
1
1
3
3
DESCRIPTION
HORIZONTAL BEAM WITH HOLE
HORIZONTAL BEAM WITH HOLE
HORIZONTAL BEAM WITH HOLE
HORIZONTAL BEAM WITH HOLE
HORIZONTAL BEAM WITHOUT HOLE
CORNER JOINT (WITH CORNER SEAT)
FASTENER
T-JOINT
SIDE LEG
" INVERTEDT " SIDE LEG END CAP
RESTRAINER STRAP
VERTICAL CORNER LEG
VERTICAL LEG END CAP
POOL LINER (DRAIN VALVE CAP INCLUDED)
DRAIN CONNECTOR
STRAINER HOLE PLUG
FILTER MASK
Before assembling your product, please take a few minutes to check the
contents and become familiar with all the parts.
WARNING · DO NOT overfill the pool or allow people to lay over or
sit on pool wall -DOING so CAN CAUSE PERMANENT INJURY!DRAIN pool to
the proper level after a heavy rain.
TIP: It will be much easier to install your pool if you unfold it and let it lay
in direct sunlight for about 2 hours prior to installation. This will help to
ensure a wrinkle-free fit because the pool material will be more pliable
allowing it to form into shape during installation.
WARNING -VERY IMPORTANT! SITE MUST BE LEVEL, STABLE,
COMPACTED SOIL.
- The pool must be assembled on a smooth and level site of firm soil that
is free of stones, gravel, sticks, blacktop, or other oil base compounds.
- Before setting up your pool, it is recommended that you clear the area of
hard grasses. Certain types of vigorous grasses such as St. Augustine and
Bermuda can grow through the liner. A ground cloth or tarp may be helpful
in preventing this from occurring.
- Do not install pool on a wooden deck or any type of wooden surface. You
cannot use sand and/or uncompacted soil to provide a level surface for this
pool; it will only wash out.
-FAILURE TO FOLLOW ALL OF THESE INSTRUCTIONS WILL CAUSE POOL
TO COLLAPSE!
SETUP INSTRUCTIONS
1.Locate a level and flat area to set up the pool. Make sure the ground is
free from stones, branches, or other sharp objects as they may puncture
the pool.
2.Take out the ground cloth and spread it over the cleared area, then take
out the pool liner and spread it over the ground cloth, inspect the seams.
3. It is recommended to assemble the pool after the pool liner is heated by
the sun. IMPORTANT: Always set up the pool unit with at least 2 persons.
Do not drag the liner across the ground as this can cause liner damage and
pool leakage.
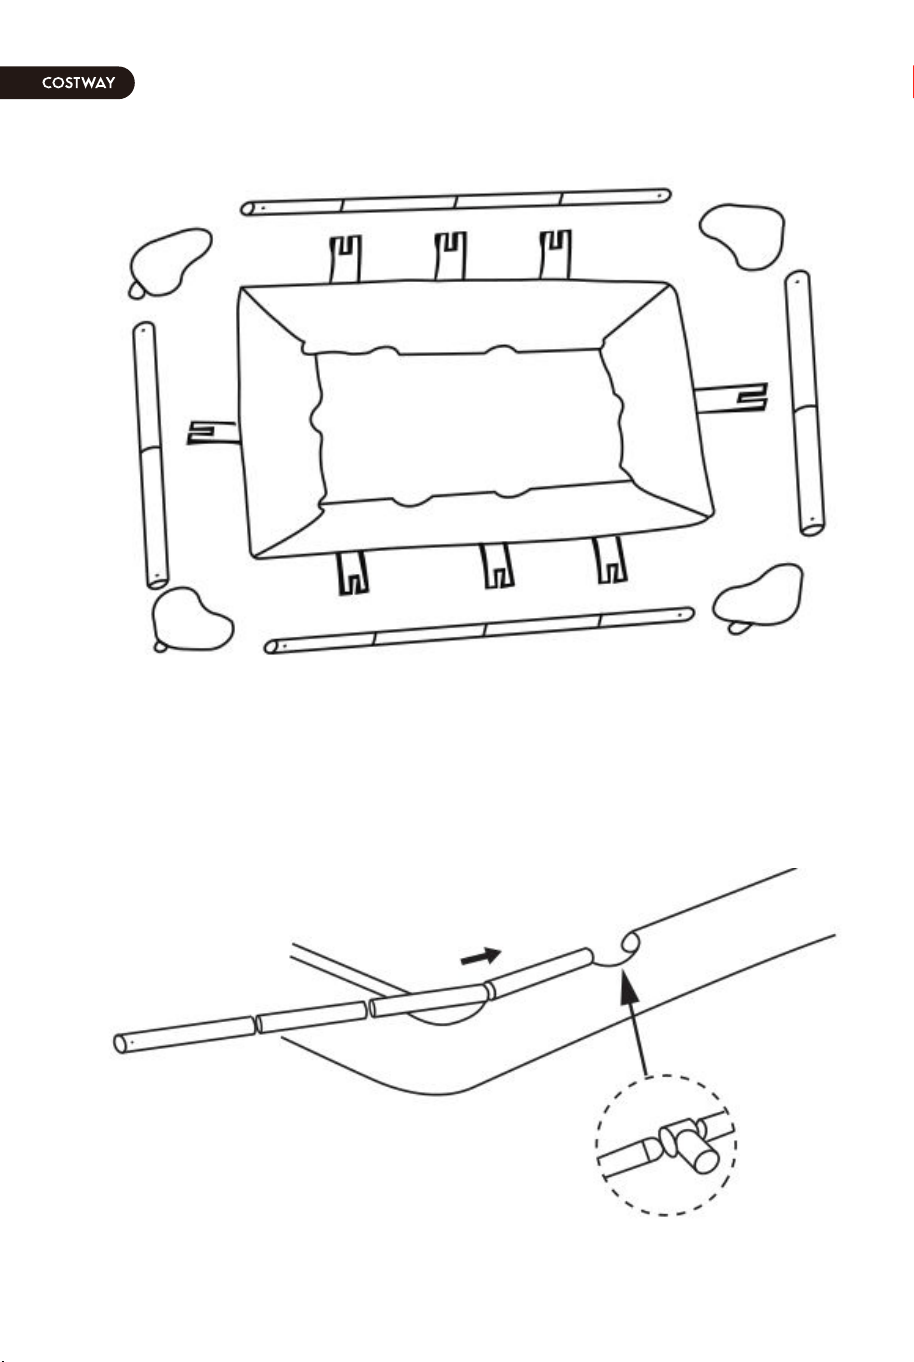
4. Lay all parts on the ground as shown below. Check the parts listing and
be sure all the pieces to be assembled are accounted for(see picture).
NOTE: All horizontal beams with hole must be placed near corner joints
(with corner seat).

04 05
POOL SETUP
1
2
3
4
5
6
7
8
9
10
11
12
13
14
15
16
17
REF. NO
1
2
3
4
5
6
7
8
9
10
11
12
13
14
15
16
17
SIZE: 118* 79* 30 INCH
2
2
2
2
2
4
8
6
6
6
6
4
4
1
1
3
3
DESCRIPTION
HORIZONTAL BEAM WITH HOLE
HORIZONTAL BEAM WITH HOLE
HORIZONTAL BEAM WITH HOLE
HORIZONTAL BEAM WITH HOLE
HORIZONTAL BEAM WITHOUT HOLE
CORNER JOINT (WITH CORNER SEAT)
FASTENER
T-JOINT
SIDE LEG
" INVERTEDT " SIDE LEG END CAP
RESTRAINER STRAP
VERTICAL CORNER LEG
VERTICAL LEG END CAP
POOL LINER (DRAIN VALVE CAP INCLUDED)
DRAIN CONNECTOR
STRAINER HOLE PLUG
FILTER MASK
Before assembling your product, please take a few minutes to check the
contents and become familiar with all the parts.
WARNING · DO NOT overfill the pool or allow people to lay over or
sit on pool wall -DOING so CAN CAUSE PERMANENT INJURY!DRAIN pool to
the proper level after a heavy rain.
TIP: It will be much easier to install your pool if you unfold it and let it lay
in direct sunlight for about 2 hours prior to installation. This will help to
ensure a wrinkle-free fit because the pool material will be more pliable
allowing it to form into shape during installation.
WARNING -VERY IMPORTANT! SITE MUST BE LEVEL, STABLE,
COMPACTED SOIL.
- The pool must be assembled on a smooth and level site of firm soil that
is free of stones, gravel, sticks, blacktop, or other oil base compounds.
- Before setting up your pool, it is recommended that you clear the area of
hard grasses. Certain types of vigorous grasses such as St. Augustine and
Bermuda can grow through the liner. A ground cloth or tarp may be helpful
in preventing this from occurring.
- Do not install pool on a wooden deck or any type of wooden surface. You
cannot use sand and/or uncompacted soil to provide a level surface for this
pool; it will only wash out.
-FAILURE TO FOLLOW ALL OF THESE INSTRUCTIONS WILL CAUSE POOL
TO COLLAPSE!
SETUP INSTRUCTIONS
1.Locate a level and flat area to set up the pool. Make sure the ground is
free from stones, branches, or other sharp objects as they may puncture
the pool.
2.Take out the ground cloth and spread it over the cleared area, then take
out the pool liner and spread it over the ground cloth, inspect the seams.
3. It is recommended to assemble the pool after the pool liner is heated by
the sun. IMPORTANT: Always set up the pool unit with at least 2 persons.
Do not drag the liner across the ground as this can cause liner damage and
pool leakage.
4. Lay all parts on the ground as shown below. Check the parts listing and
be sure all the pieces to be assembled are accounted for(see picture).
NOTE: All horizontal beams with hole must be placed near corner joints
(with corner seat).
06 07
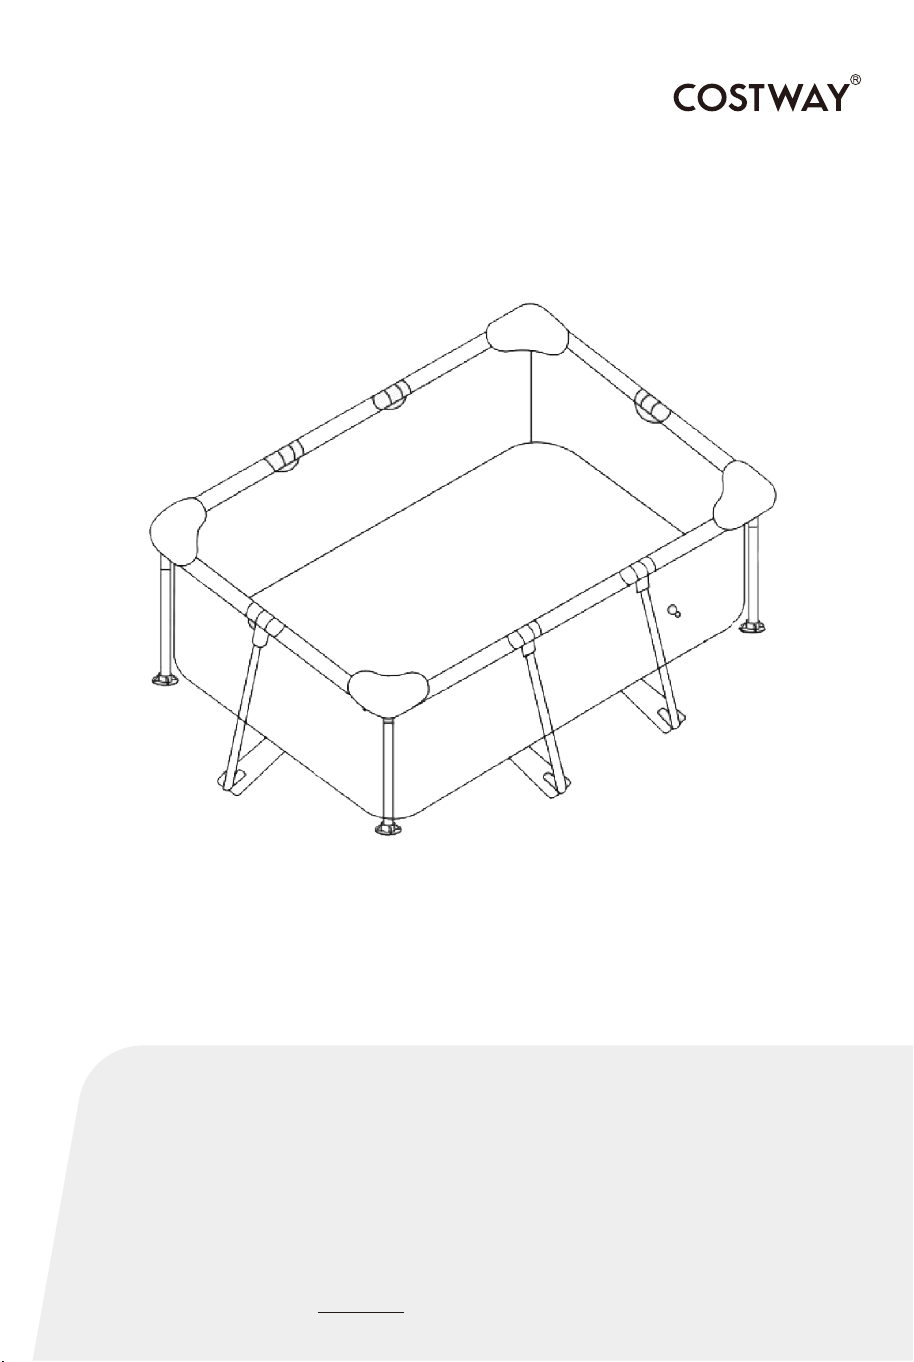
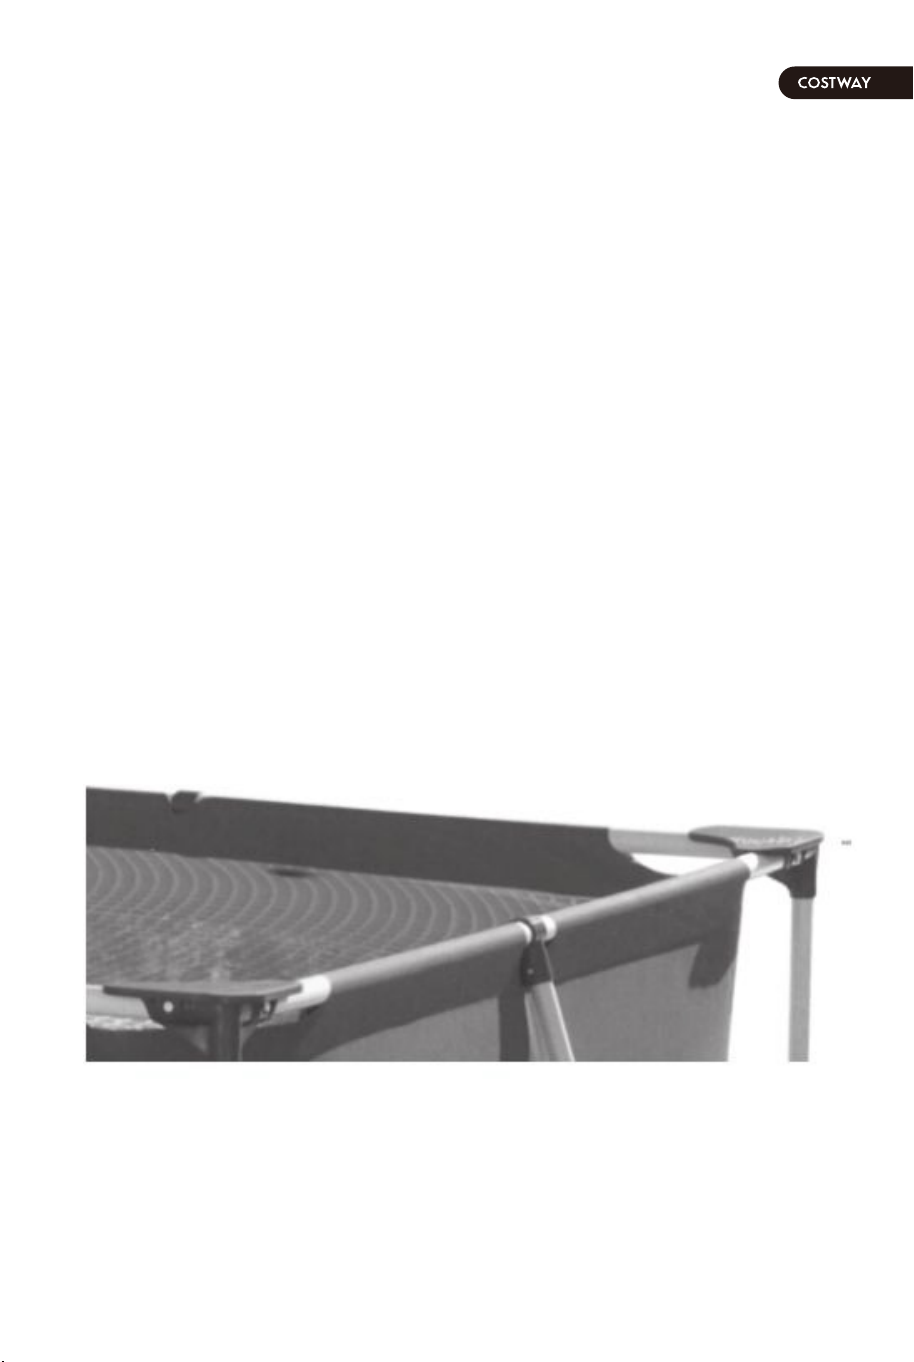
5. Slide all horizontal beams through each opening of the line sleeve and
connect them to each other through a T-joint placed in the middle opening
of the sleeve.
6. Connect the corner joints to the horizontal beams at 4 corners.Secure
the joints with the fastener by inserting them into the pre-drilled holes.
7. Attached the leg's end cap to the vertical corner legs. Connect the
vertical corner legs to the bottom of the corner joints.

06 07
5. Slide all horizontal beams through each opening of the line sleeve and
connect them to each other through a T-joint placed in the middle opening
of the sleeve.
6. Connect the corner joints to the horizontal beams at 4 corners.Secure
the joints with the fastener by inserting them into the pre-drilled holes.
7. Attached the leg's end cap to the vertical corner legs. Connect the
vertical corner legs to the bottom of the corner joints.
08 09
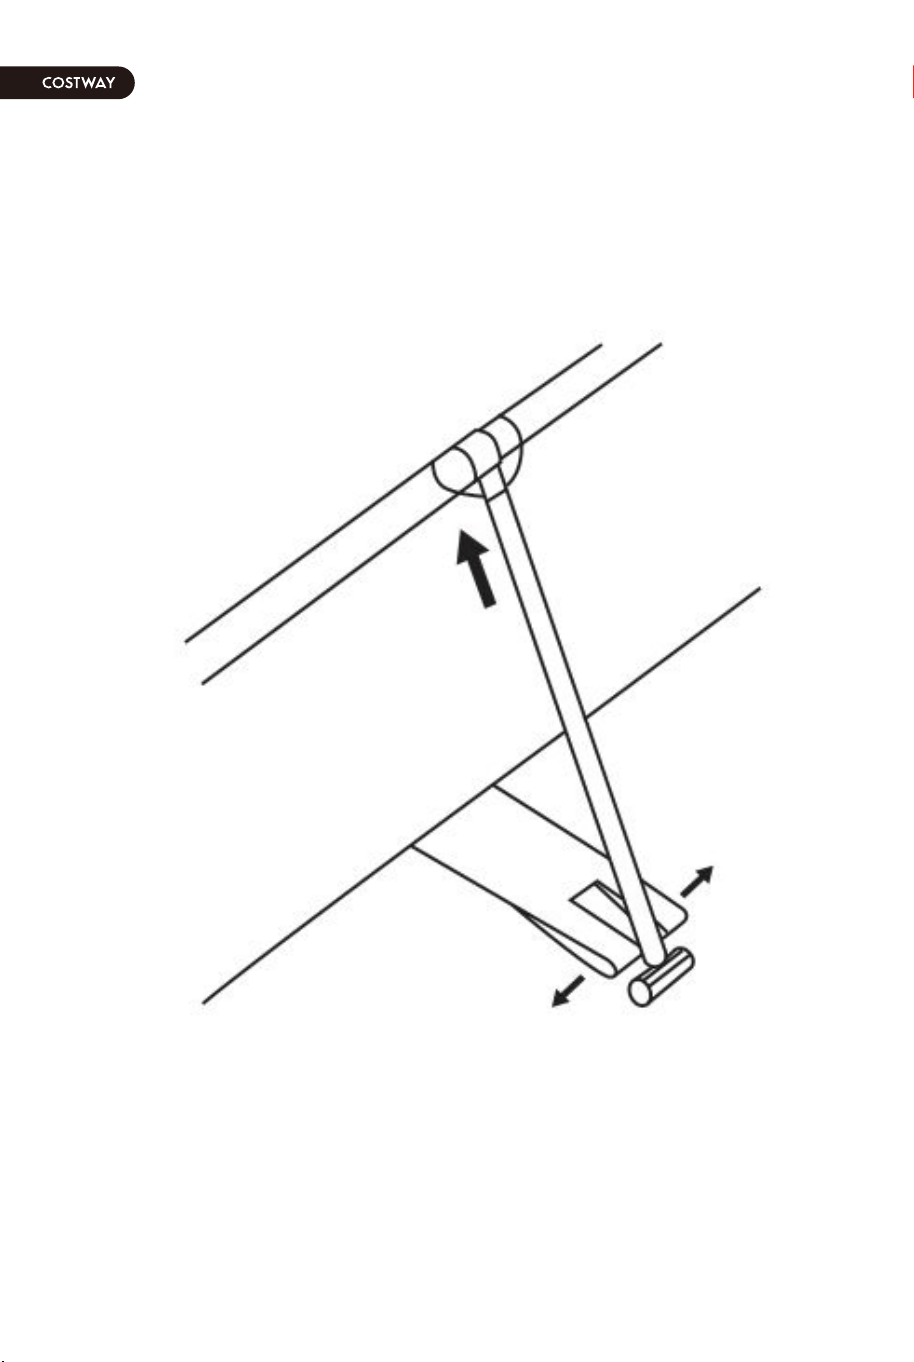
8. Pull the restrainer straps out from under the liner. Put the "inverted T"
side leg end cap into the restrainer strap, insert the side leg into the head
of the "inverted T" side leg end cap, and finally insert the side leg into the
upper T-joint.
9. Before filling the pool with water, ensure that the drain plug inside the
pool is closed and that the drain cap on the outside is screwed on tightly.
Fill the pool with no more than 1 inch (2.5 cm) of water. Check to see
whether the water is level. IMPORTANT: If the water in the pool flows to
one side, the pool is not completely level. Setting up the pool on unleveled
ground will cause the pool to tilt resulting in the sidewall material to bulge
and a potential collapse of the pool. lf the pool is not completely level, you
must drain the pool, level the area and re-fill the pool, following the above
directions.
10. Fill the pool with water up to just below the sleeve line.
08 09
8. Pull the restrainer straps out from under the liner. Put the "inverted T"
side leg end cap into the restrainer strap, insert the side leg into the head
of the "inverted T" side leg end cap, and finally insert the side leg into the
upper T-joint.
9. Before filling the pool with water, ensure that the drain plug inside the
pool is closed and that the drain cap on the outside is screwed on tightly.
Fill the pool with no more than 1 inch (2.5 cm) of water. Check to see
whether the water is level. IMPORTANT: If the water in the pool flows to
one side, the pool is not completely level. Setting up the pool on unleveled
ground will cause the pool to tilt resulting in the sidewall material to bulge
and a potential collapse of the pool. lf the pool is not completely level, you
must drain the pool, level the area and re-fill the pool, following the above
directions.
10. Fill the pool with water up to just below the sleeve line.

Please give us a chance to make it right and do better !
Contact our friendly customer service department for help first.
Replacements for missing or damaged parts will be shipped ASAP !
Contact Us!
Do NOT return this item.
Rectangular Frame Pool
NP10374
USER’S MANUAL
THIS INSTRUCTION BOOKLET CONTAINS IMPORTANT SAFETY INFORMATION. PLEASE READ AND KEEP FOR FUTURE REFERENCE.
US office: Fontana UK office: Ipswich AU office: Truganina
DE office: Hamburg
FR office: Saint Vigor d'Ymonville
PL office: Gdańsk
US:cs.us@costway.com
UK:cs.uk@costway.com