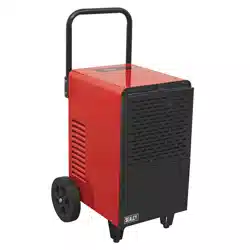
110V 50L INDUSTRIAL DEHUMIDIFIER
MODEL NO: SDH50110V
Thank you for purchasing a Sealey product. Manufactured to a high standard, this product will, if used according to these
instructions, and properly maintained, give you years of trouble free performance.
IMPORTANT: PLEASE READ THESE INSTRUCTIONS CAREFULLY. NOTE THE SAFE OPERATIONAL REQUIREMENTS, WARNINGS & CAUTIONS. USE
THE PRODUCT CORRECTLY AND WITH CARE FOR THE PURPOSE FOR WHICH IT IS INTENDED. FAILURE TO DO SO MAY CAUSE DAMAGE AND/OR
PERSONAL INJURY AND WILL INVALIDATE THE WARRANTY. KEEP THESE INSTRUCTIONS SAFE FOR FUTURE USE.
1. SAFETY
1.1. ELECTRICAL SAFETY
WARNING! It is the responsibility of the owner and the operator to read, understand and comply with the following:
You must check all electrical products, before use, to ensure that they are safe. You must inspect power cables, plugs, sockets and
any other connectors for wear or damage. You must ensure that the risk of electric shock is minimised by the installation of appropriate
safety devices. A Residual Current Circuit Breaker (RCCB) should be incorporated in the main distribution board. We also recommend
that a Residual Current Device (RCD) is used. It is particularly important to use an RCD with portable products that are plugged into a
supply which is not protected by an RCCB. If in any doubt consult a qualified electrician. You may obtain a Residual Current Device by
contacting your Sealey stockist.
9 You must also read and understand the following instructions concerning electrical
safety.
1.1.1. The Electricity at Work Act 1989 requires that all portable electrical appliances, if
used on business premises, are tested by a qualified electrician, using a Portable
Appliance Tester (PAT), at least once a year.
1.1.2. The Health & Safety at Work Act 1974 makes owners of electrical appliances
responsible for the safe condition of those appliances and the safety of the appliance
operators. If in any doubt about electrical safety, contact a qualified electrician.
9 Ensure that the insulation on all cables and on the appliance is safe before connecting
it to the power supply.
9 Ensure that cables are always protected against short circuit and overload.
9 Regularly inspect power supply cables and plugs for wear or damage and check all
connections to ensure that none are loose.
9 Ensure that the voltage marked on the appliance matches the power supply to be
used.
8 DO NOT pull or carry the appliance by its power supply lead.
8 DO NOT pull the plug from the socket by the power cable.
8 DO NOT use worn or damaged cables, plugs or connectors. Immediately have any
faulty item repaired or replaced by a qualified electrician.
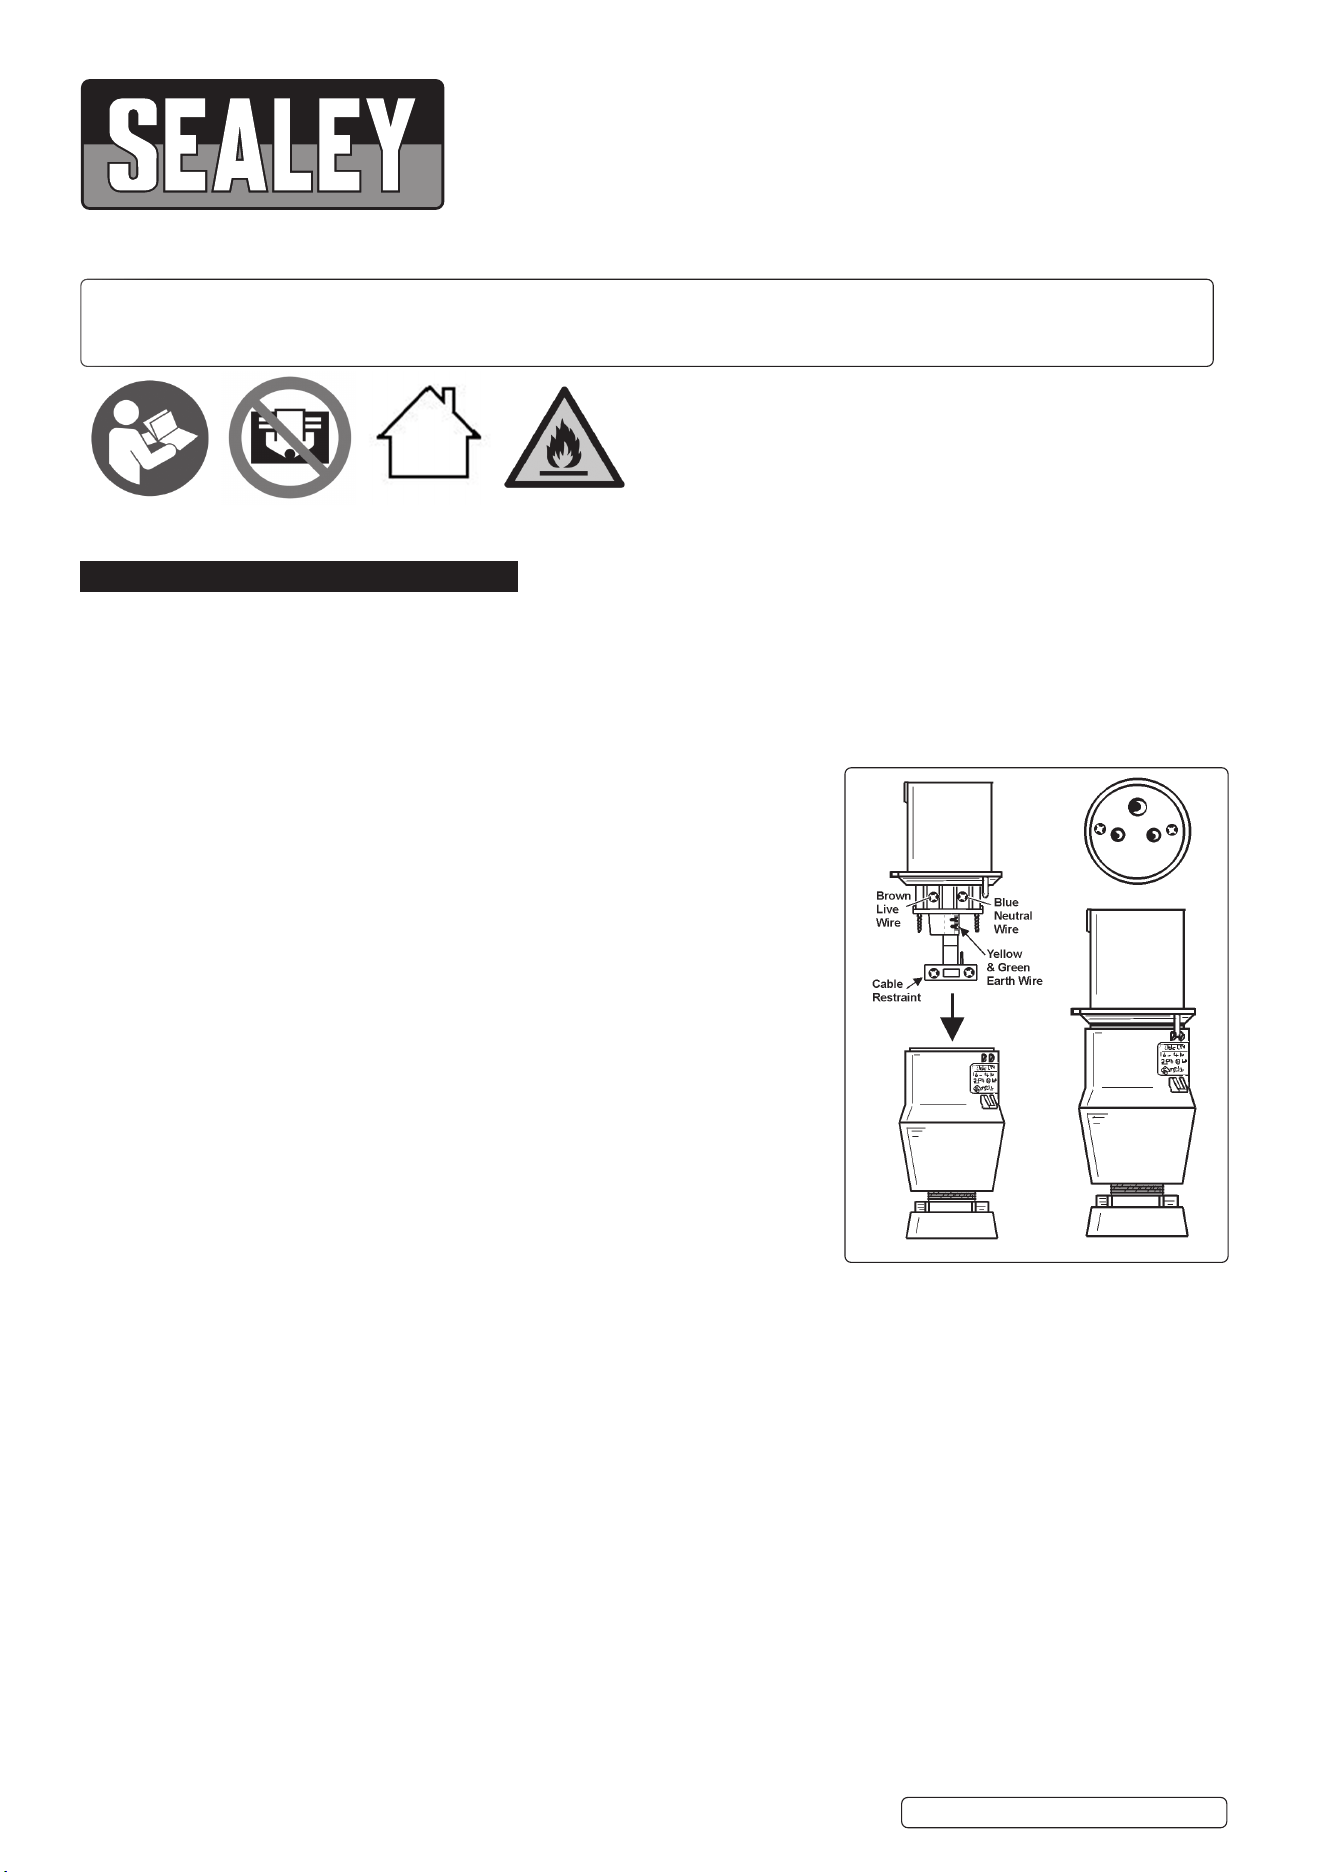
9 Ensure the unit is correctly earthed via a three-pin 110V plug.
a) Connect the GREEN/YELLOW earth wire to the earth terminal ‘PE’.
b) Connect the BROWN live wire to the live terminal ‘L/+’.
c) Connect the BLUE neutral wire to the neutral terminal.
d) After wiring, check that there are no bare wires, that all wires have been correctly connected, that the cable outer insulation extends
past the cable restraint and that the restraint is tight.
1.2. GENERAL SAFETY
9 Checkthatthedehumidierisinsoundconditionandgoodworkingorder.Takeimmediateactiontorepairorreplacedamagedparts.
9 Use recommended parts only. Unauthorised parts may be dangerous and will invalidate the warranty.
8 DO NOT stand or place any object less than 10cm from the front or rear of the unit.
8 DO NOTobstructtheairintakesoroutletsofthedehumidier.
8 DO NOT place any object into the outlets - the unit has a fan running at high speed, contact with this will cause injury.
8 DO NOToperatethedehumidierwhenyouaretiredorundertheinuenceofalcohol,drugsorintoxicatingmedication.
8 DO NOTswitchthedehumidierobydisconnectingitfromthemains.ALWAYSswitchtothe“OFF”positionrst.
8 DO NOTremovetheoatleverfromthewatercollectiontank.
8 DO NOT connect or disconnect the plug from the mains with wet hands.
9 Always discard the water from the collection tank, DO NOT use it for any other purpose.
9 Placethedehumidieronalevelandstablesurface.
8 DO NOTusethedehumidieratambienttemperaturesbelow5°C.
8 DO NOTusethedehumidieroutside.
8 DO NOT use means to accelerate the defrosting process or to clean, other than those recommended by the manufacturer.
9 Theapplianceshallbestoredinaroomwithoutcontinuouslyoperatingignitionsources(forexample:openames,anoperatinggas
appliance or an operating electric heater.)
8 DO NOT pierce or burn.
SDH50110VIssue3(2)16/05/2022
Original Language Version
© Jack Sealey Limited
Refer to
instructions
Do not cover
Indoor use only
Caution:
Riskofre
9 Be aware that refrigerants may not contain an odour.
9 When using continuous draining, make sure that the drain hose is positioned correctly.
9 Ensurethatheatingappliancesarenotexposedtotheowofairfromthedehumidier.
9 Beforeattemptingtomovethedehumidier,emptythecontentsofthecollectiontank.
9 Switchoanddisconnectitfromthemainsbeforeattemptinganycleaningorothermaintenancework.
9 Ensurethatthedehumidieriscorrectlyturnedowhennotinuse,andstoredinasafe,dryarea,outofreachofchildren.
This appliance can be used by children aged from 8 years and above and persons with reduced physical, sensory or mental
capabilities or lack of experience or knowledge if they have been given supervision or instruction concerning use of the appliance in
a safe way and understand the hazards involved. Children shall not play with the appliance. Cleaning and user maintenance shall
not be made by children without supervision.
WARNING: If the power cord is damaged, it must be replaced by a professionally trained person.
2. INTRODUCTION
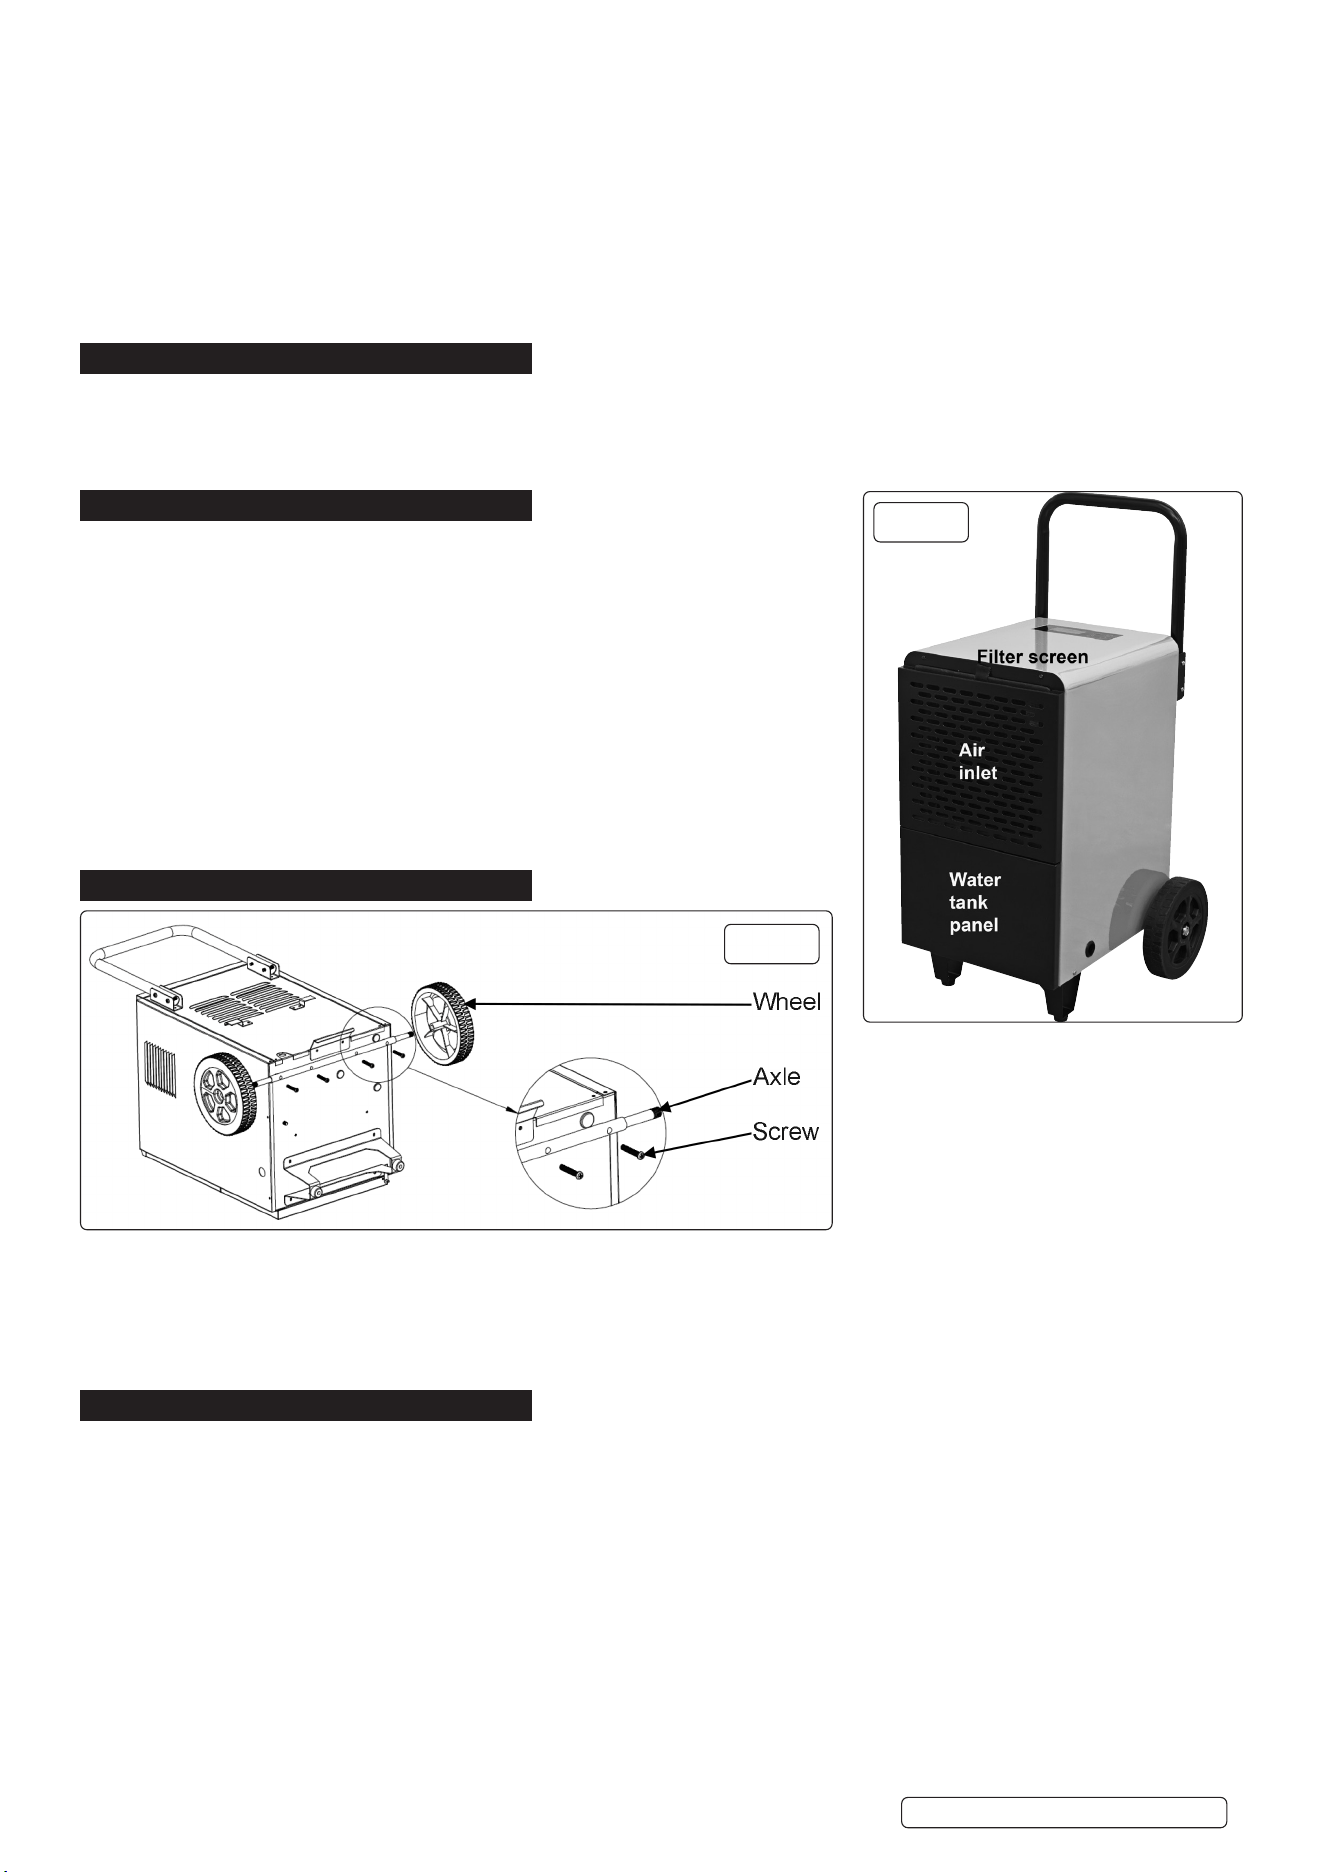
Powerfuldehumidicationcapacity,extractsupto50Lofwaterperday.Removesexcessmoisturefromair,preventingbuild-upofmildewand
mould.Featuresauto-defrostfunction,whichactivatesiftheroomtemperaturefallstoolow.Theunithasa24hrtimerfunctionfordelaystarting
andauto-shut-o.Washableairlter.RefrigerantisenvironmentallyfriendlyR290.Maybeconnectedtoadrainhoseforcontinuousoperation.
Mountedoncastorsformanoeuvrability.Fittedwith110Vplug.
3. SPECIFICATION
MODEL NO: .......................................................................................SDH50110V
CO
2
Equivalent: ..........................................................................................2.5MPa
Condensate Tank: ...............................................................7L(withAutoShut-O)
Dehumidifying Capacity: ..................................................... 50L/day(30°CRH80%)
Freezing Pressure (Max): ........................................................................... 2.5MPa
Global Warming Potential (Rating): .......................................................................3
IP Rating: ........................................................................................................IP22
MaximumAirow: .....................................................................................300m³/hr
Power: ................................................ 600W(27°CRH60%),800W(30°CRH80%)
Refrigerant: .......................................................................................... R290/0.2kg
Steaming Pressure (Max): ......................................................................... 1.0MPa
Supply: ............................................................................................................110V
Working Space: ....................................................................................... 50-120m³
Working Temperature: ................................................................................. 5-35°C
4. ASSEMBLY
4.1. WHEEL INSTALLATION: Take the machine body, wheel axle, wheel and screws out of the packaging case, and lay the machine
bodydown.AsshowninFig.2,xthewheelaxleonthemachinebodywith4screws,andxawheelatbothendoftheaxle.
Return the unit to an upright position after attaching the wheels.
4.2. HANDLE INSTALLATION:marryuptheholesinthebracketswiththeholesinthebottomofthehandle.Itmaybeusefultoxthe
screwsinthelowerholesrst,thenipthehandleupwards,andsecureitwiththescrewsintheupperholes.
Note: Once assembled, DO NOT use for 2 hours.
5. OPERATION
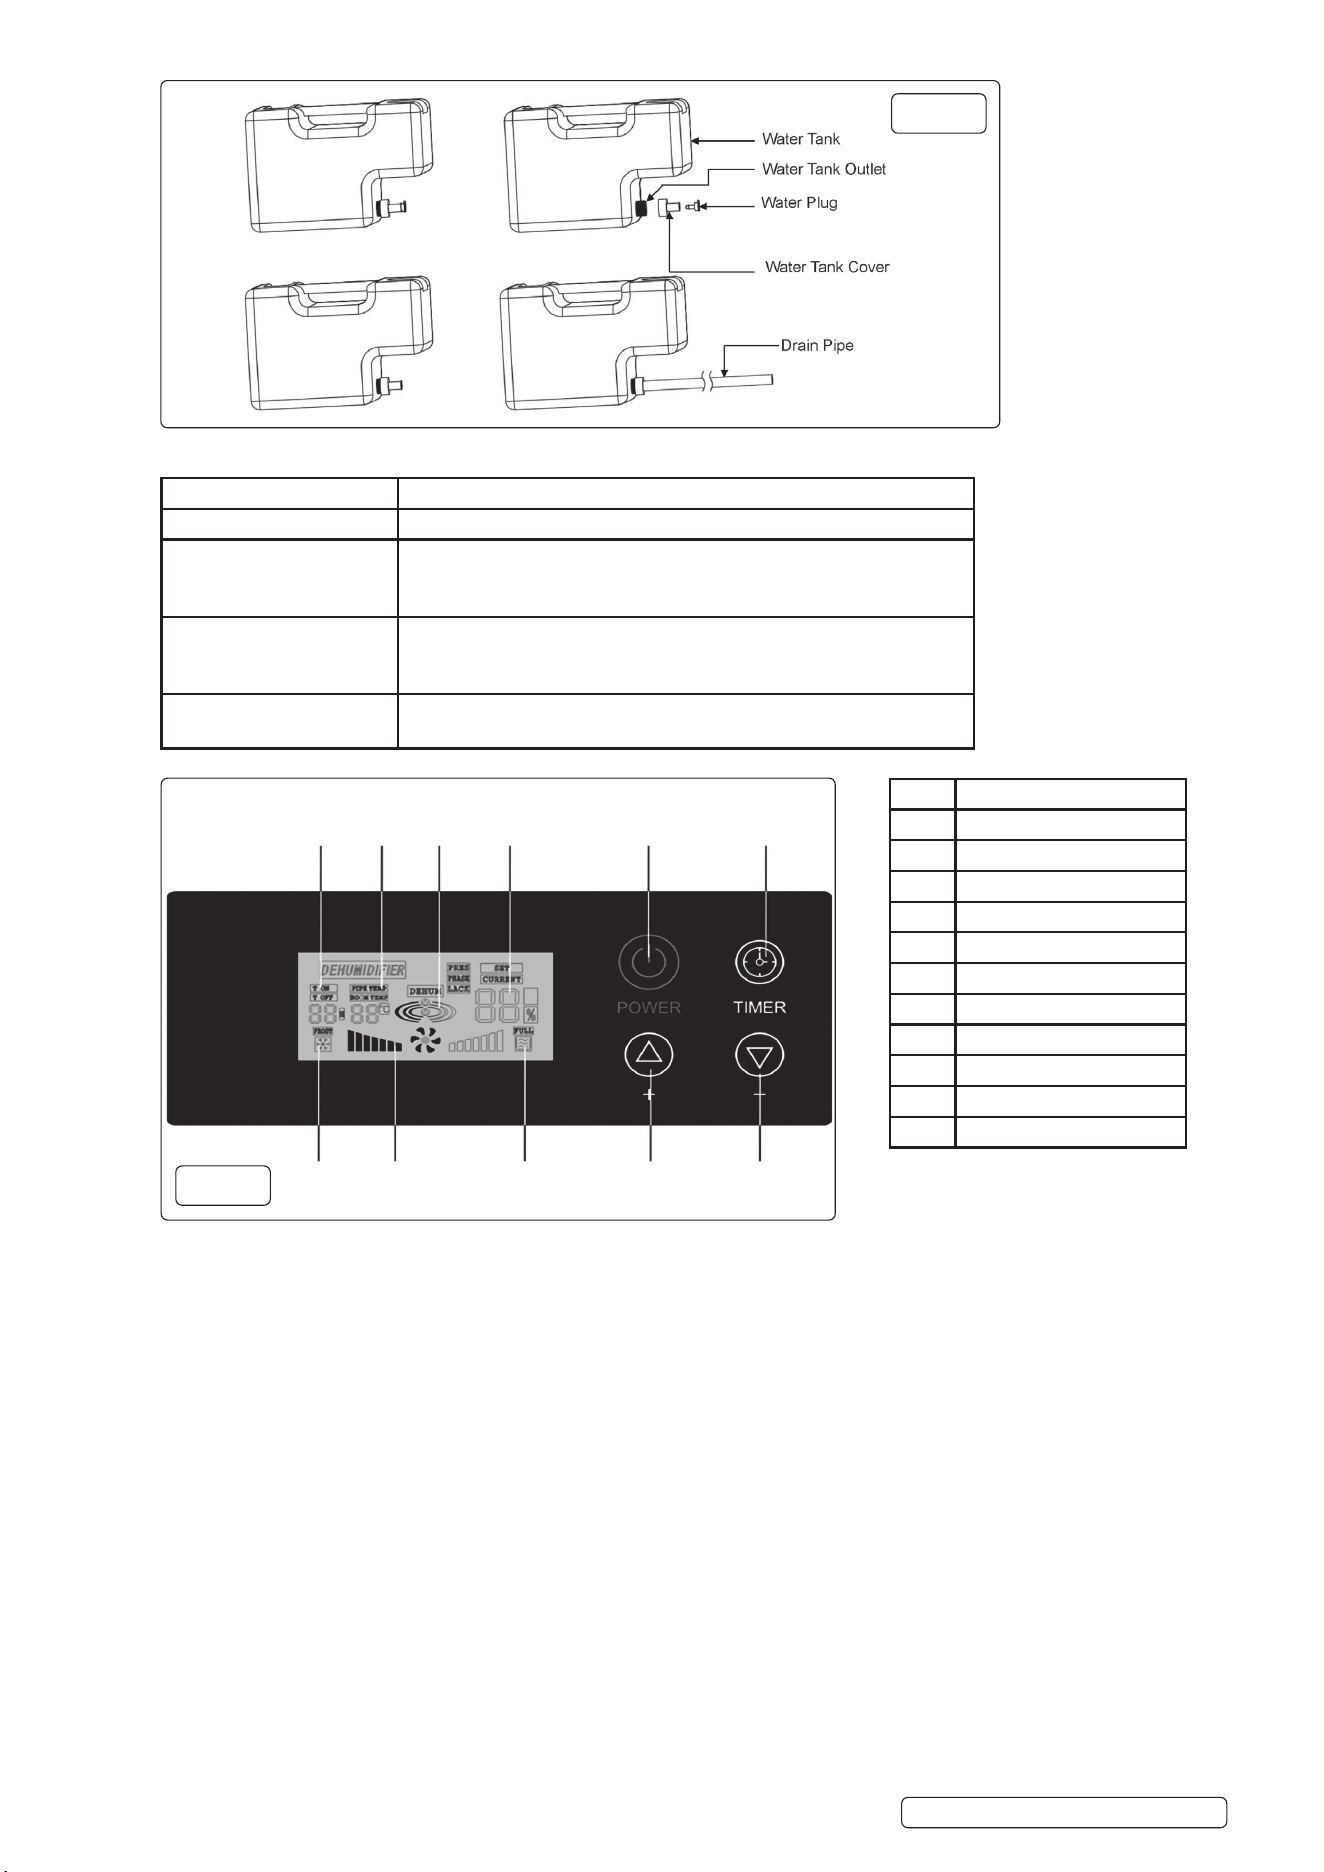
5.1. WATER TANK USAGE: You may use the water tank in two ways.
5.1.1. DIRECT USE. When the water tank is full, the machine automatically shuts down and enters the standby state, the LED displays
the“FullWater”signalandthedehumidierwillalarm.Whenthewatertankisemptiedandputinplaceagain,thedehumidiercan
continue its performance.
5.1.2. CONTINUOUS DRAINAGE.AsshowninFig.3,torestoretheperformanceofthewatertank,youneedtotakeoutthewatertank,
and mount the drain pipe.
Note: When using continuous drainage, the drainage pipe shall not be set higher than the water tank.
g.1
g.2
Original Language Version
© Jack Sealey Limited
SDH50110VIssue3(2)16/05/2022
g.1
5.2. FUNCTION DESCRIPTION
NOTE: Efficiencyofthedehumidifierisinfluencedbytheairoutsidetheroom.Foroperatingefficiency,trytoavoidopeningandclosingthe
windowsanddoors.Forbestperformance,operatethedehumidifierwithintheusableoperatingtemperature.
5.3. OPERATION
5.3.1. Plug the unit in to the mains socket, a beep will be heard when inserting the plug.
5.3.2. Pressthe“ON/OFF”switchandtheoperationlightwillilluminate,thehumiditydisplaywilllighttodisplaytheprevioussethumidity.
Theinitialsettingforhumidityis60%,after3secondsthedisplaywillshowthecurrenthumidity.
5.3.3. Press the humidity up or down buttons to adjust to the desired humidity required.
Iftherequiredhumidityis3%belowthecurrenthumiditytheunitwillstartautomatically,ifthesethumidityis3%morethanthecurrent
humidity the dehumidifier will automatically stop.
5.3.4. Whensettingthehumiditytolessthan30%,theunitwillruncontinuouslyandthedisplaywillread“CO”.
5.3.5. Toshutthedehumidifierdownpressthe“ON/OFF”switch.
NOTE: If the humidity setting is greater than the current humidity the unit will not run.
WARNING!Thefanmotorandcompressormustrunforatleast3minuteswhiledehumidifying.
8 DO NOTstartthedehumidierimmediatelyaftershuttingdown,allow3minutesbeforerestarting.
5.4. TIMER FUNCTION
5.4.1. TosetTimerforpowerONmode,withtheunitinpowerOFFstate,presstheTimerbutton(g.4.6).TheTimerONLED(g.4.1)will
ickerandthecurrentsettimewillbedisplayed.UsetheIncrease/Decreasebuttons(g.4.10,g.4.11)tosettherequiredvalueto
between0and24hours.After10secondstheselectedvalueissetandtheTimerONledwillicker.
5.4.2. TosettheTimerforpowerOFFmode,withtheunitinpowerONstate,presstheTimerbutton(g.4.6).TheTimerOFFLED(g.4.1)
willickerandthecurrentsettimewillbedisplayed.UsetheIncrease/Decreasebuttons(g.4.10,g.4.11)tosettherequiredvalueto
between0and24hours.After10secondstheselectedvalueissetandtheTimerOFFledwillicker.
BUTTON OPERATION INSTRUCTIONS
ON/OFF ChangesbetweenSwitchonandSwitcho.
+
Adjustdierentsetvaluesindierentstates;
1.Increasesthehumidityvalueset(RH10%to95%)
2.Increasesthetiming(hour)set(00to24)
-
Adjustdierentsetvaluesindierentstates;
1.Decreasesthehumidityvalueset(RH10%to95%)
2.Decreasesthetiming(hour)set(00to24)
Timing Shortpressthebuttontolaunchacycletoo.
Seton/oTimerandExit
Original Language Version
© Jack Sealey Limited
SDH50110VIssue3(2)16/05/2022
g.3
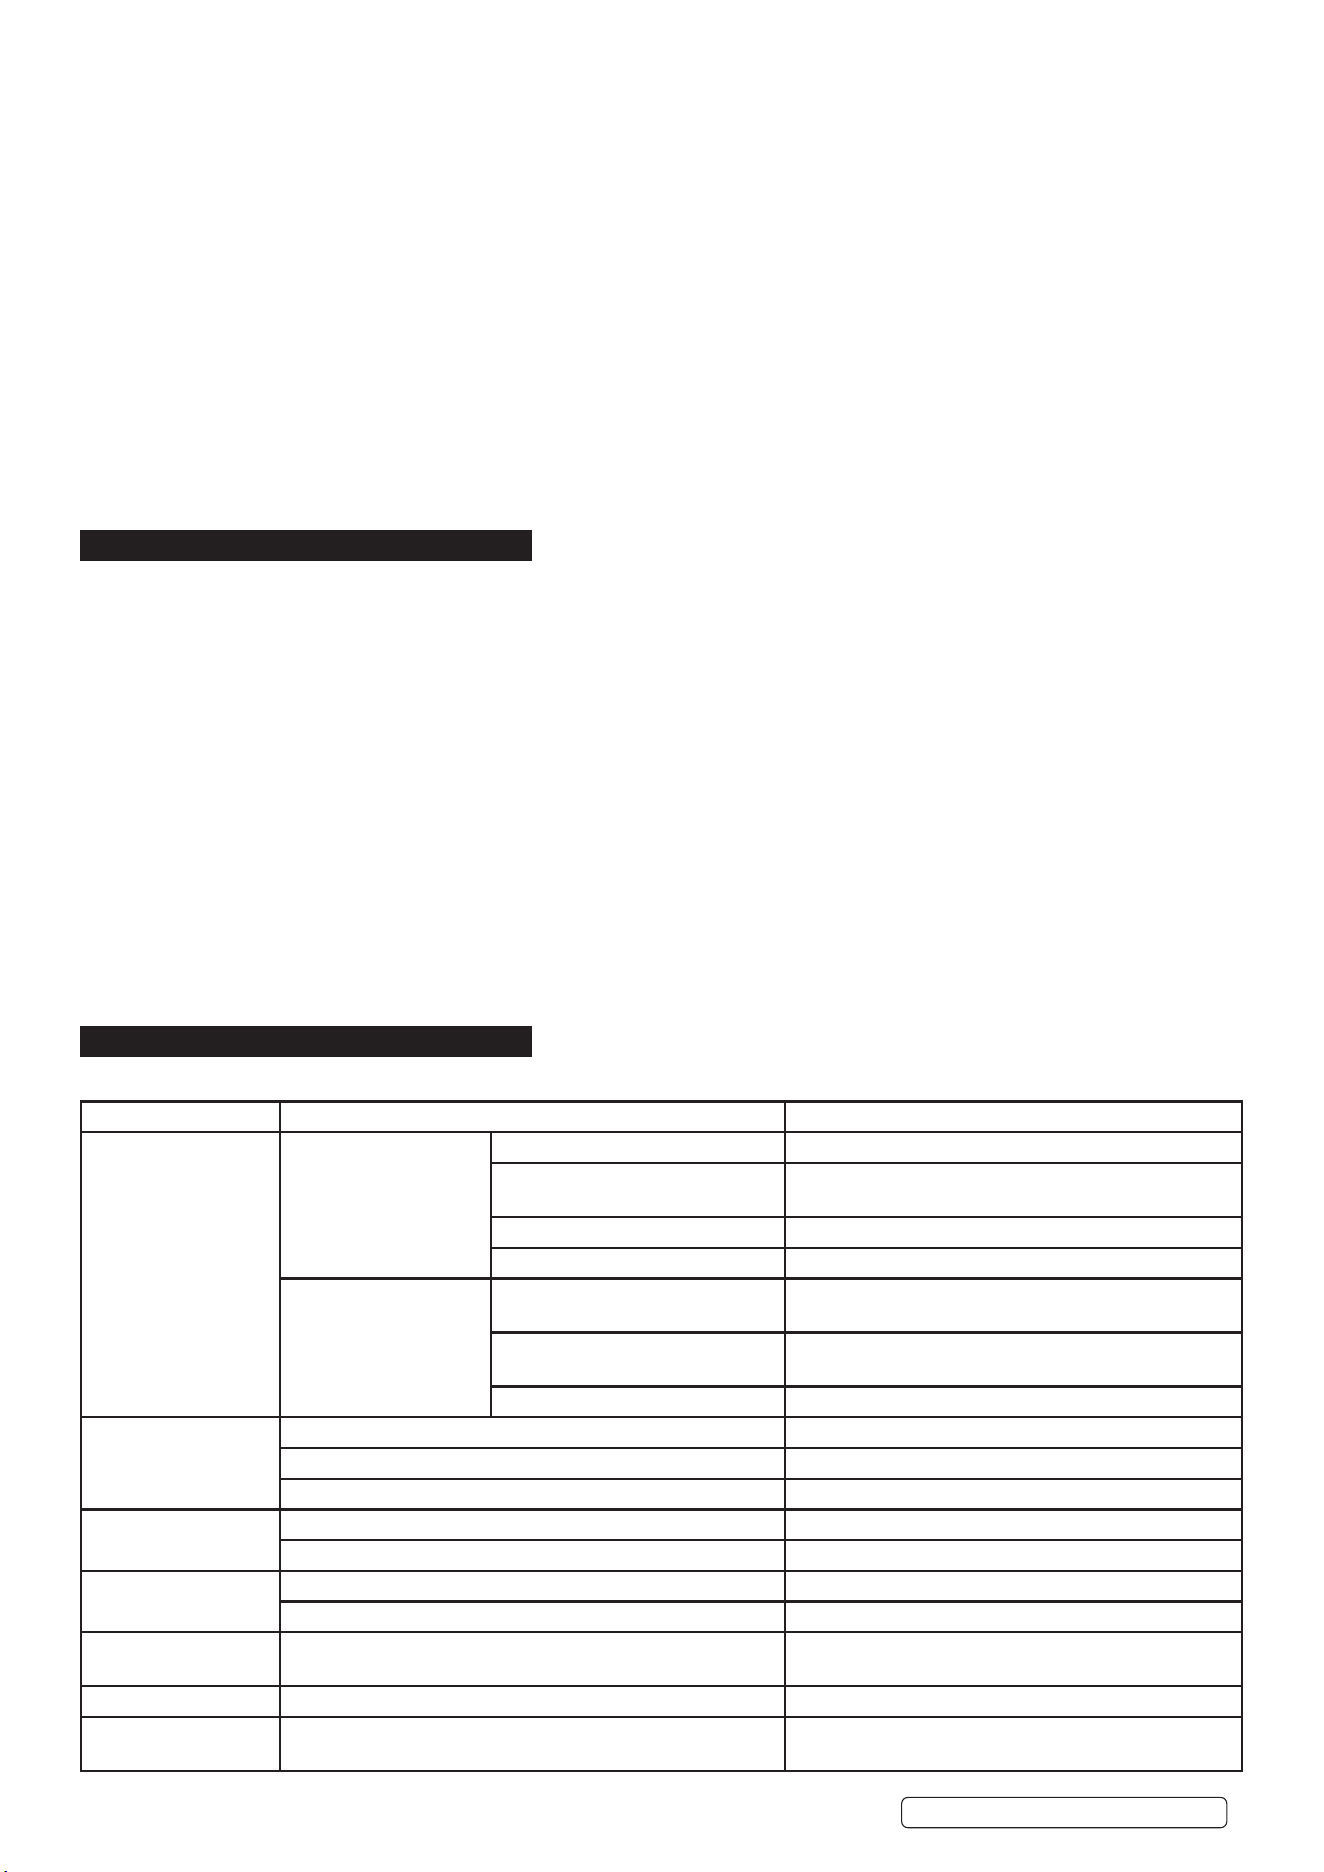
ITEM OPERATION
1 Timer Indicator
2 Temperature Indicator
3 DehumidicationIndicator
4 Humidity Indicator
5 ON/OFFControl
6 Time Set Control
7 Defrosting Indicator
8 Air Speed Indicator
9 WaterFullIndicator
10 Increase Control
11 Decrease Control
1
2
3 4 5 6
7
8
9
10 11
g.4
5.5. DEFROSTING
5.5.1. Thedefrostingdeviceworksautomaticallyatanintervalofapproximatelyevery30minutesforadurationofapproximately5minutes
when the coil temperature is tested to be <= minus 1
o
C.
The dehumidifying function will stop during the defrosting operation. DO NOT disconnect the plug or turn off the unit during the
defrostingoperation.Thedefrostingledlight(fig.4.7)willlightup.
NOTE: This dehumidifier does not have a cooling function, it produces heat during the operation and room temperature will rise
by1°Cto4°C.Thetemperaturegetshigherwhileitisoperatedinacloset,orsimilar.Furthermore,roomtemperaturewillrisebecause
doors and windows are closed and heat is produced from other appliances in the room and from sun radiation.
5.6. EMPTYING THE WATER COLLECTION TANK refer to fig.1
5.6.1. During the dehumidifying operation, water is collected in the water collection tank. When the tank is full of water, the dehumidifier stops
operating automatically and the warning buzzer beeps twice. The unit will not restart until water collection tank has been emptied.
5.6.2. Open the door and remove water collection tank from the dehumidifier by pulling it gently outwards by holding the sides of the tank.
5.6.3. Hold the tank by the handle and carry it carefully to an emptying point.
5.6.4. Remove the plug at the bottom of the tank and slowly empty the water out of the tank.
5.6.5. Replace the drain plug and refit the tank in the dehumidifier, making sure it is properly back in place as the unit will not restart if it is
not fitted correctly.
5.7. CONTINUOUS DRAINING
5.7.1. If there is a place suitable for draining, continuous draining can be carried out. The continuous operation enables the dehumidfying
operationtocontinueuninterrupted.SeeSection5.1.
6. MAINTENANCE
6.1. CLEANING THE AIR FILTER
6.1.1. The dehumidifying capacity is lowered when the air cleaning filter becomes clogged.
6.1.2. Open the front door of the unit.
6.1.3. Lift up the filter element from the bottom and lift out of the holder.
6.1.4. To dislodge the dust from the filter, use a vacuum cleaner or tap it lightly.
6.1.5. If the filter is very dirty, wash it carefully in water with a neutral detergent, then rinse well with clean water and leave until dry.
6.1.6. To refit the air filter locate the top of the element into the locating bracket at the top of the door and then locate the lower section into
the lower bracket.
6.1.7. Close the door of the dehumidifier.
6.2. STORAGE
6.2.1. Unplug the unit, bundle the power cord, and hang the bundled cord at the back of the unit.
6.2.2. Remove the water collection tank and empty the water out of it. Remove the tank cover and wash the inside of the tank with clean
water. The tank may be scratched if it is scrubbed strongly with a brush. DO NOT remove the float lever from the tank. Wipe off the
water on the outside of the tank with a cloth. Refit the tank cover onto the tank and replace the tank in position.
6.2.3. Cleantheairfilter(see6.1).
6.2.4. When the unit is to be stored for a long time, wipe the dehumidifier over with a dry soft cloth. To remove dirt, wipe over with a very
slightly dampened cloth (never use a wet cloth for cleaning the controls). To avoid deformation or cracking, do not use benzine,
thinner or liquid cleaners.
6.2.5. When storing, place in a safe, dry, childproof location. Stand the unit upright and avoid exposure to direct sunlight.
7. TROUBLE SHOOTING
7.1. Uponfaultofthedehumidier,pleasecutothepowersupplyimmediately,unplugtheplugandcheckthefollowingitems:
Faults Cause Analysis Solutions
Fails to turn on
Shown as no power
No power to the wall socket. Check the power supply.
Check the plug plugged in
properly.
Plug the power supply in the socket.
Check the fuse is not blown. Replace the fuse.
Power Transformer is broken. Replace the transformer.
Shown as power on
Environmental humidity lower
than the set value.
Set again according to the demand.
If the water tank is installed
correctly.
Place the water tank in right position.
If the entire machine is defrosting. Wait for the completion of defrosting cycle.
Unfavourable
dehumidifyingeect
If the air inlet/outlet is obstructed. Remove the obstacle.
If the door and window are open. Close the door and window.
If the indoor temperature is too low. Don’trunthedehumidier.
Heavy noise
Ifthegroundisrmandat. Resettlethedehumidier.
Dehumidierisstoodprecariously. Resettlethedehumidier.
Water leakage
Dehumidierstoodonanincline. Movedehumidiertoalevelsurface.
Drain pipe/outlet obstructed. Dismantle the front plate to eliminate blockages.
E1
Coil sensor fault Turn to timing for defrosting, to cancel system fault
function.
E2/E3 Fault of humidity & temperature sensor. Replace the humidity & temperature sensor.
EE
Refrigerant leakage. Start the machine after. Ask for help from
professionalsifthe“EE”signalremains.
Original Language Version
© Jack Sealey Limited
SDH50110VIssue3(2)16/05/2022

7.2. If the said methods still fail to eliminate the above problems, please directly contact the manufacturer or agents. DO NOT disassemble
thedehumidier,contactSealeyforrepairs.
Sealey Group, Kempson Way, Suffolk Business Park, Bury St Edmunds, Suffolk. IP32 7AR
01284 757500 01284 703534 sales@sealey.co.uk www.sealey.co.uk
ENVIRONMENT PROTECTION
Recycle unwanted materials instead of disposing of them as waste. All tools, accessories and packaging should be sorted, taken to
a recycling centre and disposed of in a manner which is compatible with the environment. When the product becomes completely
unserviceable and requires disposal, drain any fluids (if applicable) into approved containers and dispose of the product and fluids
according to local regulations.
Note: It is our policy to continually improve products and as such we reserve the right to alter data, specifications and component parts without prior
notice.
Important: No Liability is accepted for incorrect use of this product.
Warranty: Guarantee is 12 months from purchase date, proof of which is required for any claim.
Original Language Version
© Jack Sealey Limited
SDH50110VIssue3(2)16/05/2022
WEEE REGULATIONS
Dispose of this product at the end of its working life in compliance with the EU Directive on Waste Electrical and Electronic Equipment
(WEEE). When the product is no longer required, it must be disposed of in an environmentally protective way. Contact your local solid
waste authority for recycling information.