
LCD Display Controller V2.0
Operaon Manual

Legal Informaon
User Manual
©2019 Hangzhou Hikvision Digital Technology Co., Ltd.
About this Manual
This Manual is subject to domesc and internaonal copyright protecon. Hangzhou Hikvision
Digital Technology Co., Ltd. ("Hikvision") reserves all rights to this manual. This manual cannot be
reproduced, changed, translated, or distributed,
parally or wholly, by any means, without the
prior wrien permission of Hikvision.
Please use this user manual under the guidance of professionals.
Trademarks
and other Hikvision marks are the property of Hikvision and are
registered trademarks or the subject of applicaons for the same by Hikvision and/or its aliates.
Other trademarks menoned in this manual are the properes of their respecve owners. No right
of license is given to use such trademarks without express permission.
Disclaimer
TO THE MAXIMUM EXTENT PERMITTED BY APPLICABLE LAW, HIKVISION MAKES NO WARRANTIES,
EXPRESS OR IMPLIED, INCLUDING WITHOUT LIMITATION THE IMPLIED WARRANTIES OF
MERCHANTABILITY AND FITNESS FOR A PARTICULAR PURPOSE, REGARDING THIS MANUAL.
HIKVISION DOES NOT WARRANT, GUARANTEE, OR MAKE ANY REPRESENTATIONS REGARDING THE
USE OF THE MANUAL, OR THE CORRECTNESS, ACCURACY, OR RELIABILITY OF INFORMATION
CONTAINED HEREIN. YOUR USE OF THIS MANUAL AND ANY RELIANCE ON THIS MANUAL SHALL BE
WHOLLY AT YOUR OWN RISK AND RESPONSIBILITY.
REGARDING TO THE PRODUCT WITH INTERNET ACCESS, THE USE OF PRODUCT SHALL BE WHOLLY
AT YOUR OWN RISKS. HIKVISION SHALL NOT TAKE ANY RESPONSIBILITIES FOR ABNORMAL
OPERATION, PRIVACY LEAKAGE OR OTHER DAMAGES RESULTING FROM CYBER ATTACK, HACKER
ATTACK, VIRUS INSPECTION, OR OTHER INTERNET SECURITY RISKS; HOWEVER, HIKVISION WILL
PROVIDE TIMELY TECHNICAL SUPPORT IF REQUIRED.
SURVEILLANCE LAWS VARY BY JURISDICTION. PLEASE CHECK ALL RELEVANT LAWS IN YOUR
JURISDICTION BEFORE USING THIS PRODUCT IN ORDER TO ENSURE THAT YOUR USE CONFORMS
THE APPLICABLE LAW. HIKVISION SHALL NOT BE LIABLE IN THE EVENT THAT THIS PRODUCT IS USED
WITH ILLEGITIMATE PURPOSES.
IN THE EVENT OF ANY CONFLICTS BETWEEN THIS MANUAL AND THE APPLICABLE LAW, THE LATER
PREVAILS.
LCD Display Controller V2.0 Operaon Manual
i

Regulatory Informaon
FCC Informaon
Please take aenon that changes or modicaon not expressly approved by the party responsible
for compliance could void the user's authority to operate the equipment.
FCC compliance: This equipment has been tested and found to comply with the limits for a Class B
digital device,pursuant to part 15 of the FCC Rules. These limits are designed to provide reasonable
protecon against harmful interference in a residenal installaon. This equipment generates, uses
and can radiate radio frequency energy and, if not installed and used in accordance with the
instrucons, may cause harmful interference to radio communicaons. However, there is no
guarantee that interference will not occur in a parcular installaon. If this equipment does cause
harmful interference to radio or television
recepon, which can be determined by turning the
equipment o and on, the user is encouraged to try to correct the interference by one or more of
the following measures:
• Reorient or relocate the receiving antenna.
• Increase the
separaon between the equipment and receiver.
• Connect the equipment into an outlet on a circuit dierent from that to which the receiver is
connected.
• Consult the dealer or an experienced radio/TV technician for help.
FCC Condions
This device complies with part 15 of the FCC Rules. Operaon is subject to the following two
condions:
1. This device may not cause harmful interference.
2. This device must accept any interference received, including interference that may cause
undesired
operaon.
EU Conformity Statement
This product and - if applicable - the supplied accessories too are marked with
"CE" and comply therefore with the applicable harmonized European
LCD Display Controller V2.0 Operaon Manual
ii

standards listed under the EMC Direcve 2014/30/EU, the RoHS Direcve
2011/65/EU.
2012/19/EU (WEEE direcve): Products marked with this symbol cannot be
disposed of as unsorted municipal waste in the European Union. For proper
recycling, return this product to your local supplier upon the purchase of
equivalent new equipment, or dispose of it at designated
collecon points.
For more
informaon see: hp://www.recyclethis.info .
2006/66/EC (baery direcve): This product contains a baery that cannot be
disposed of as unsorted municipal waste in the European Union. See the
product documentaon for specic baery informaon. The baery is
marked with this symbol, which may include
leering to indicate cadmium
(Cd), lead (Pb), or mercury (Hg). For proper recycling, return the
baery to
your supplier or to a designated
collecon point. For more informaon see:
hp://www.recyclethis.info .
Industry Canada ICES-003 Compliance
This device meets the CAN ICES-3 (B)/NMB-3(B) standards requirements.
LCD Display Controller V2.0 Operaon Manual
iii

Preface
Applicable Models
This manual is applicable to the LCD displays.
Symbol Convenons
The symbols that may be found in this document are dened as follows.
Symbol Descripon
Danger
Indicates a hazardous situaon which, if not avoided, will or could
result in death or serious injury.
Cauon
Indicates a potenally hazardous situaon which, if not avoided, could
result in equipment damage, data loss, performance degradaon, or
unexpected results.
Note
Provides addional informaon to emphasize or supplement
important points of the main text.
Safety Precauons
Danger
• To reduce the risk of
re or electric shock, please do not expose the device to rain or humid
environment.
• Electric discharge may last for a short period of me aer the power is shut down. Please wait
two minutes aer the power is shut down before operang the device.
• To avoid the risk of electric shock, please do not operate when the power is on.
• This is a class A product and may cause radio interference in which case the user may be
required to take adequate measures.
• To avoid the risk of
re or electric shock, please do not use overloaded AC power socket or
extend the power cords.
• Do not cover or obstruct the vents and openings, because unobstructed
venlaon can lead to
overheang of the body, thus shorten the life of the product. Do not place products on sofas,
carpets or other similar surfaces, as they can obstruct the vents. Do not place products in
airght
LCD Display Controller V2.0 Operaon Manual
iv

spaces such as bookcases or luggage racks unless appropriate venlaon is provided or
manufacturer's instrucons are followed.
•
Inserng objects into vents or openings of the product is forbidden, as there exists high voltage
and current in the product. Inserng objects will lead to electric shock or short circuit of internal
parts. To avoid the risk of re or electric shock, please keep water or other liquids away from LCD
display, and please do not let objects such as paper clips or pins fall into the LCD display.
Cauon
• The LCD display is designed in accordance with
internaonal standards. However, improper use
can also lead to electric shock and re, causing personal injury and property loss. In order to
prevent potenal hazards, ensure your safety and extend the service life of the product, please
read and comply with the instrucons carefully when installing, using and cleaning the product.
• The product
instrucons must be properly preserved for future reference.
• Please put the device in a
venlated and dry place without strong vibraon while working.
• Do not expose the product to humidity, rain, sand, sun or other places with high temperature for
storage and usage.
• Do not use parts recommended by non-manufacturer and inappropriate use of parts can lead to
accidents.
• Please do not plug and unplug the power cord frequently when the power is on.
• Do not use the power cords of other devices. Replace with the power cords with the same
specicaons from regular channels only.
• Please lay the power cord correctly to prevent from trampling or placing arcles on it.
• Use standard 220 VAC power.
• Power
consumpon of the device depends on the type of product. When the device is not used
for a long
me, please turn o the power and unplug the power cords.
• If any of the following occurs, please unplug the power cords, and contact the service center.
• The power cord or plug is damaged.
• Liquid splashes on the product or an object falls into the product.
LCD Display Controller V2.0 Operaon Manual
v

• The product is exposed to rain or water.
• The product is not properly operated according to the user manual. Do not adjust the control
parts beyond the user manual. The inappropriate control of parts which are not described in
the user manual will lead to the damage of the product, and will bring a lot of adjustment
work to the technical personnel.
• The product falls down or damages.
• The product runs abnormally.
• When replacing the parts of the product, please ensure that maintenance personnel use the
parts designated by the manufacturer or the parts with the same performance as the original
parts, so as to avoid
re, electric shock or other damage caused by the use of unauthorized
parts.
•
Aer compleng service or maintenance, maintenance technicians are required to perform
safety checks to ensure stable operaon of the product.
• When installing the product on walls or ceilings, ensure that the product is installed in
compliance with the method recommended by the manufacturer.
• Please keep the product away from heat source, including radiators, heaters, stoves and other
heang products.
• Using the product in situaons with fatal dangers such as death, injury and serious personal
injury is forbidden.
LCD Display Controller V2.0 Operaon Manual
vi

Contents
Chapter 1 Overview .................................................................................................................... 1
1.1 Introducon ........................................................................................................................... 1
1.2 Key Features ........................................................................................................................... 1
Chapter 2 Remote Control .......................................................................................................... 2
2.1 Remote Control Funcons ..................................................................................................... 2
2.2 Screen Control ....................................................................................................................... 3
2.3 Virtual Remote Control .......................................................................................................... 3
Chapter 3 Installaon and Connecon ........................................................................................ 4
3.1
Installaon Noce .................................................................................................................. 4
3.2 Operaon Noce ................................................................................................................... 4
3.3 Power Cord Connecon ......................................................................................................... 5
3.4 System
Connecon ................................................................................................................ 5
3.5 Cleaning and Maintenance .................................................................................................... 6
Chapter 4 Client Conguraon and Operaon ............................................................................ 8
4.1 Register and login .................................................................................................................. 8
4.2 Basic
Conguraon ................................................................................................................ 9
4.2.1 Congure the Serial Port ............................................................................................... 9
4.2.2
Congure the Screen Layout ....................................................................................... 10
4.2.3 Match the Screen ID .................................................................................................... 10
4.3 Screen Management ............................................................................................................ 12
4.3.1 Switch the Signal Source ............................................................................................. 12
4.3.2 Join Screens ................................................................................................................. 14
4.3.3 Manage Scenes ........................................................................................................... 16
4.3.4 Screen Time Sync ........................................................................................................ 17
4.3.5 View Screen Status ...................................................................................................... 18
4.3.6
Congure Screen Parameters ...................................................................................... 19
LCD Display Controller V2.0 Operaon Manual
vii

4.4 Screen On/O ...................................................................................................................... 20
4.4.1 Turn On/O the Screen Manually ............................................................................... 20
4.4.2 Turn
On/O the Screen on Schedule .......................................................................... 20
4.5 Client Management ............................................................................................................. 22
4.5.1 Lock/Unlock the Client ................................................................................................ 22
4.5.2 Change Login Password ............................................................................................... 22
4.5.3 Enable/Disable Auto Login .......................................................................................... 23
4.5.4 View Client Informaon .............................................................................................. 23
4.5.5 View Open Source Soware Licenses ......................................................................... 23
LCD Display Controller V2.0 Operaon Manual
viii

Chapter 1 Overview
1.1 Introducon
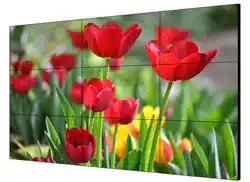
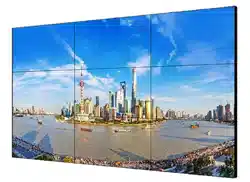
LCD displays use industrial ultra-narrow edge panel and full LED array backlight. It features ultra-
high brightness, more uniform brightness, no boundary shadow, long service life and so on. The
built-in splicing controller of the screen can realize the self-splicing of screens from the same
source signals. LCD displays have abundant interfaces to receive DVI, VGA, HDMI and other signal
sources, and supports a variety of control methods.
1.2 Key Features
• Full LED array backlight, more uniform brightness and no boundary shadow.
• Ultra-high
resoluon, exquisite image and rich colors.
• High denion, high brightness and high gamut.
• The screen is almost visible horizontally because of extremely wide view.
• Large display area, small size and light weight.
• Variable splicing modes can adapt to
dierent applicaons.
• Ultra narrow bezel.
• Stable operaon, low maintenance cost, 24-hour connuous work.
• Wall-mounted
installaon, rack installaon and cabinet installaon are available.
• Metallic casing features an-radiaon, an-magnec eld, an-interference of strong electric
eld.
• Real-me temperature monitoring and self-protecon from overheat to prevent panel burning.
• Screen control by the client.
LCD Display Controller V2.0 Operaon Manual
1
Chapter 2 Remote Control
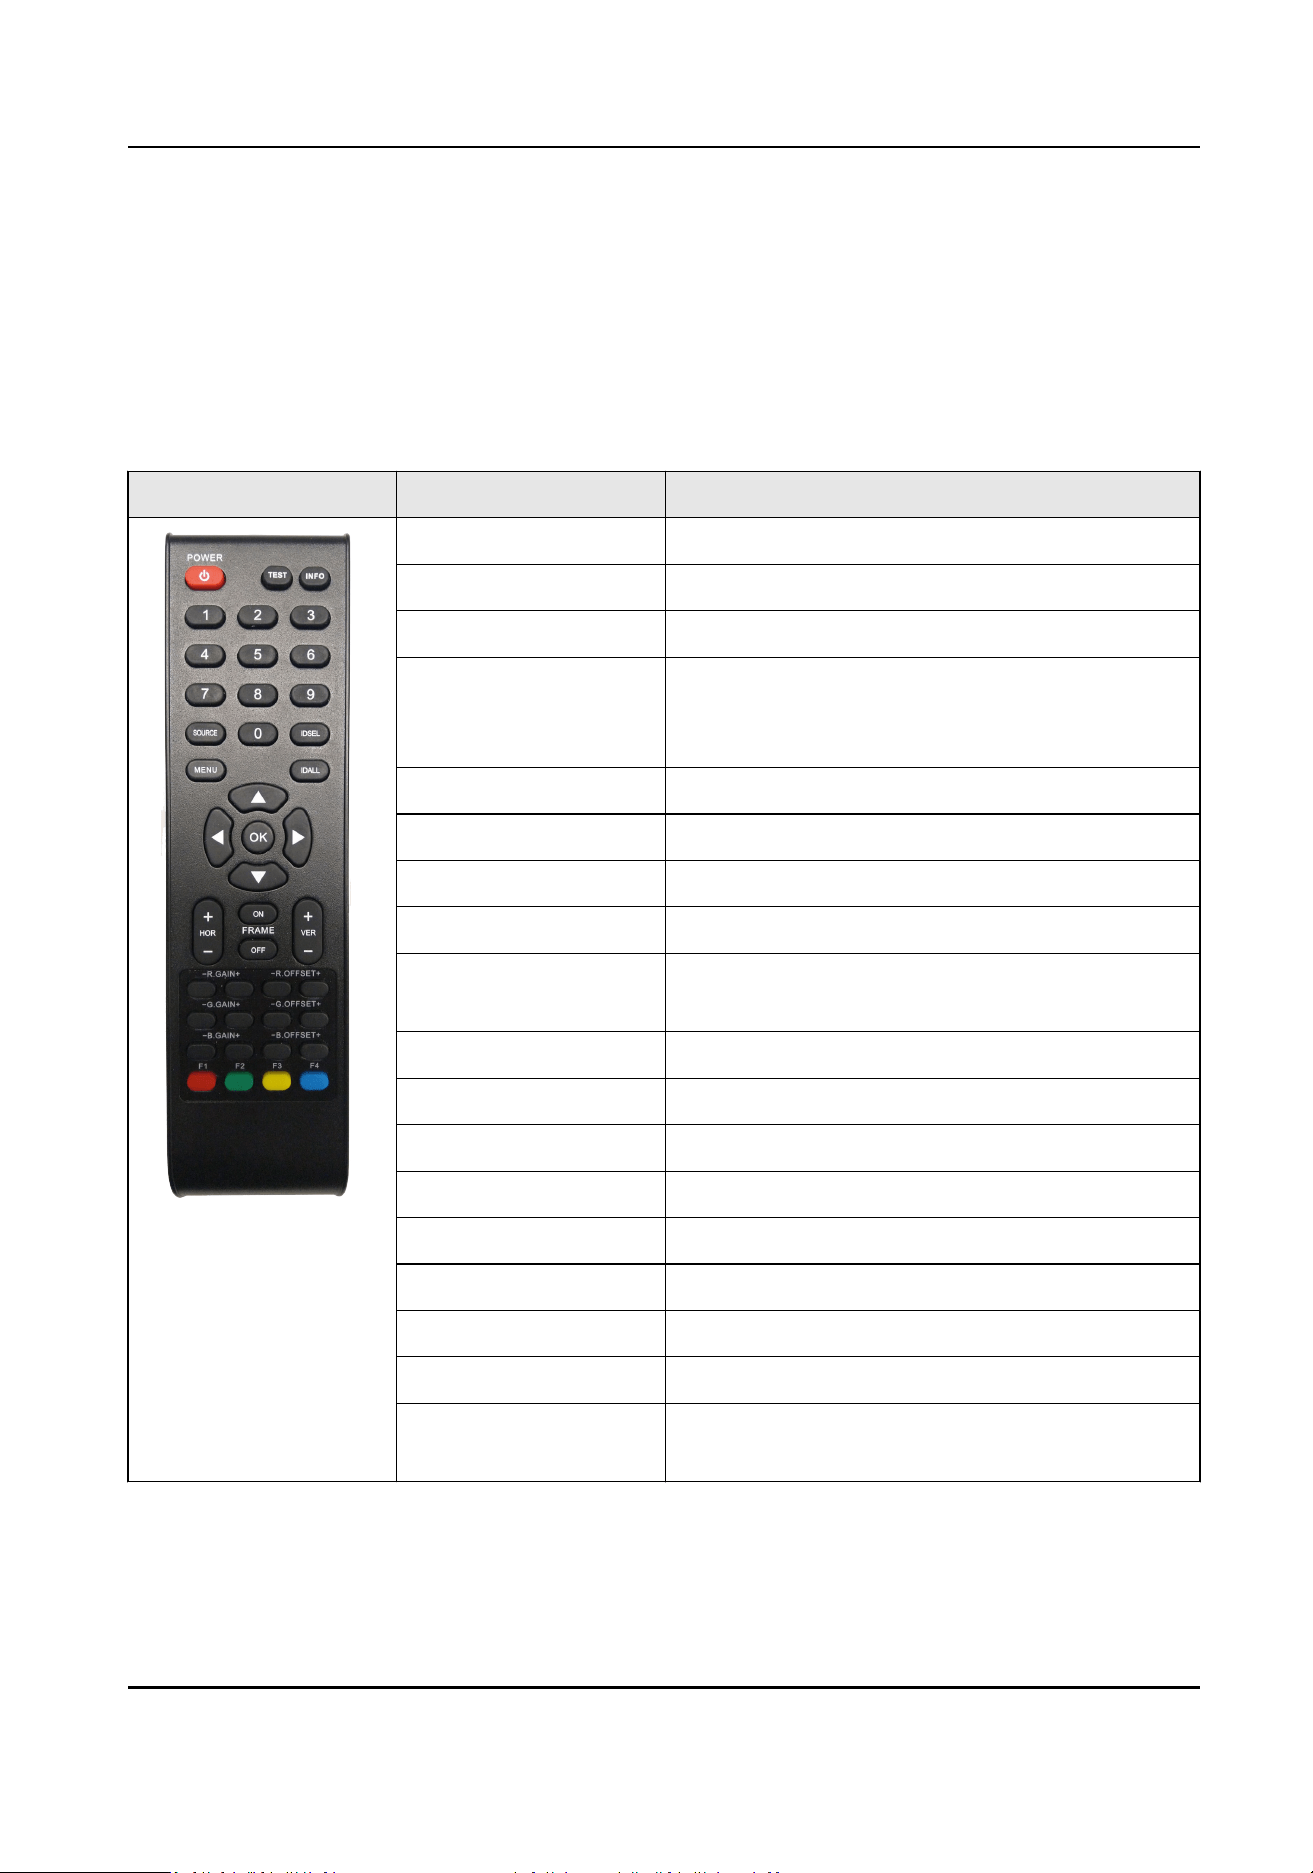
2.1 Remote Control Funcons
The following table describes the funcons of the remote control.
Table 2-1 Remote Control Funcons
Appearance Key Funcons
POWER Power switch.
TEST Enter the aging test.
INFO View system informaon.
0-9 Enter numbers to select the desired screen or
enter the special menu such as factory menu,
etc.
SOURCE Switch signal sources.
MENU Enter/Exit the menu.
IDSEL Select the desired display(s).
IDALL Select all displays.
Direcon Navigate between elds and menu items.
Adjust parameters.
OK Conrm selecon.
FRAME ON/OFF Turn frame on/o.
HOR+/- VER+/- Horizontal/vercal adjustment of the frame.
R、G、B GAIN +/- Adjust color gains.
R、G、B OFFSET +/- Adjust color osets.
F1 Turn image quiescence on/o.
F2 Switch white balance (for some displays only).
F3 Switch image mode.
F4 Switch illuminaon mode (for some displays
only).
LCD Display Controller V2.0 Operaon Manual
2

2.2 Screen Control
You can use remote control to control one screen, mulple screens or all screens.
To control one screen, press IDSEL to select screen ID.
To control mulple screens, press IDSEL to select screen IDs. For example, press IDSEL → 0101 → 2
to select screen 0101 and screen 0202.
Note
Only some LCD display models support mulple-screen control.
To control all screens, press IDSEL, and then press IDALL.
2.3 Virtual Remote Control
You can use Remote Control in the lower le corner of the client interface to control the display(s).
Figure 2-1 Virtual Remote Control
LCD Display Controller V2.0 Operaon Manual
3

Chapter 3 Installaon and Connecon
3.1 Installaon Noce
• The LCD display must be installed or moved by two or more persons.
• When moving the LCD display, ensure to grasp the grips at the rear and boom. Do not hold the
LCD screen as it may cause damage,
malfuncon or personal injury.
•
The LCD display should be mounted vercally relave to horizontal line.
• Mounng the LCD display on the wall requires special technologies, which must be done by
professionals. You should not aempt to mount the LCD display yourself. Our company is not
responsible for any accidents or personal injury caused by improper handling or mishandling.
• The LCD display should be used at room temperature from 0 °C to 40 °C. Leave enough space
around it for internal heat
dissipaon.
• Do not block the vents. It may cause a device excepon if the internal temperature of the LCD
display rises.
• Do not place the LCD display on a hot device.
• Please use the
mounng base and wall-mounng bracket which were specially designed for the
LCD display.
• Before installing, wipe the casing and the screen panel cleanly, otherwise it will aect the use of
the screen.
• Fix the screen but do not
ghten it too ghtly when installing the screen, otherwise the screen
may not work normally because of
deformaon.
• Improper handling during adjusng and using may result in equipment damage. The LCD display
can be used
connuously.
3.2
Operaon Noce
The LCD panel on the device is made by high-precision technology. However, ny spots on the
screen that are dim and dark may be observed, or when observed from side, the screen may be
colorful or the brightness may appear to be uneven. Yet the above phenomena are common
among LCD displays rather than faults and will not
aect the performance of the LCD display.
• The LCD display and its accessories in this manual are subject to change without prior noce.
• The LCD display should be used at room temperature from 0 °C to 40 °C.
• This LCD screen contains fragile materials, which can be damaged by dropping or impact, so
please take it lightly.
• Please do not let the screen display a
stac image for a long me, otherwise the "residual
image" will be
le on the screen to aect the normal use of the LCD display.
• It is strictly forbidden to scratch or tap the LCD display with hard objects. Do not switch on and
o frequently. Do not hit the device. The above acons may damage the device and accelerate
the aging of the device.
LCD Display Controller V2.0 Operaon Manual
4

• If your LCD display is not working normally, especially if an unusual smell is
emied from the
inside, unplug it immediately and contact your dealer.
• Please note that in addion to the compensaon provided by law, the company is not
responsible for errors caused by customers or third pares when using the machine, and is not
responsible for any other related
malfuncons or damages.
• Do not use the LCD display in environments with large amounts of dust, high humidity, or
possible exposure to oil and water vapor, as this may result in re or damage to the device.
• Do not place the LCD display on an unstable object or in an unsafe place. Do not subject the LCD
display to strong shock or vibraon. If the device is dropped, it may be damaged.
• Do not use the LCD display near heang facilies or any place where there may be high
temperature, as this may cause the machine to overheat and cause a re.
• Before installing the LCD display, please check if your accessories are missing. If there is any
shortage, please contact the seller.
3.3 Power Cord
Connecon
When connecng the power supply, plug one end of the power plug into the power input on the
rear panel of the LCD display, and the other end into a properly grounded power socket (AC 220 V,
50/60 Hz).
In the use of the power cord, the following points should be noted:
• If the LCD display is not to be used for a long
me, shut down the power of the device and
disconnect the power supply.
• Do not damage the power cord. Do not place heavy objects on the power cord, stretch the
power cord, or bend the power cord excessively. If the power cord is damaged, it may cause a
re or electric shock.
• Only use the original power cable delivered with the LCD display. Contact authorized dealer to
purchase power cable with same
specicaons.
• Do not connect DC power.
• Plug the power plug directly into an AC socket. If you add an addional extended power cord,
you may get a
re due to overheang.
• Do not remove or plug in the power plug with a wet hand. It may cause an electric shock.
• Do not
aempt to repair if the power cord is broken or malfunconing. Contact the service
center for repair.
3.4 System
Connecon
The LCD display achieves the video signal from the signal loop video input port (for example, the
DVI-IN), and send the signal to the next unit through the signal loop video output port. The 2 × 2
splicing is taken as an example for
descripon. Follow the wiring method shown in the gure below
to complete the connecon.
LCD Display Controller V2.0 Operaon Manual
5

Figure 3-1 Serial Port Connecon
Note
• The length of the cable as well as the environment
condion may aect the image quality.
• The DVI-IN interface is suggested to be used as the signal input port.
• When
operang on the cable connecons, you must turn o the main power switch and pull out
the power plug. Please read the Installaon Guide rst.
• Do not confuse the input and output interface, or it may cause the device
excepons or other
problems.
3.5 Cleaning and Maintenance
Note
Before cleaning the LCD display, be sure to unplug the power cord. Do not aempt to maintain it
yourself. Opening the casing will expose you to high voltage or other hazardous materials. The LCD
display must be maintained by professionals.
Clean the screen panel of the LCD display
• When wiping the screen, use a dry cloth that does not shrink, so as not to damage the surface
coang of the screen. Do not use chemical ber cloth or detergent, whose composion may
cause the screen surface to fade or be damaged. Do not wipe the screen with a hard cloth or a
rough and hard object, as this may damage the screen surface.
• If the surface of the screen is stained with grease, such as
ngerprints, wipe it with a non-
shrinking cloth diluted with neutral detergent, and then dry the screen with a so, dry cloth. Do
not use a spray cleaner as this may remove the
coang or cause the cleaner to enter the device,
which may cause malfuncons.
LCD Display Controller V2.0 Operaon Manual
6

Clean the casing of the LCD unit
• Do not use benzene, thinner or other chemical products to wipe the casing; do not spray
volale
solvents such as inseccide on the casing; do not leave the casing exposed to plasc or rubber
materials for a long me; do not use chemical ber cloth, detergent or paran. All of the above
behaviors may cause cracking, deformaon and stripping of the casing.
• Use a non-shrinking cloth to wipe the device casing and its remote control. If it is dirty, wipe it
with a
so damp cloth diluted with a mild detergent soluon, and then dry with a so, dry cloth.
• Do not use acidic/alkaline detergents, alcohol-based detergents, scouring agents, soap powders,
OA cleaners, car waxes, glass cleaners, etc., as they may cause cracking, discoloraon, and
scratching of the casing.
LCD Display Controller V2.0 Operaon Manual
7

Chapter 4 Client Conguraon and Operaon
4.1 Register and login
Steps
1. Double click LCD Display Controller.exe in the disk to install the client according to the Install
Shield Wizard.
Note
Recommended runme environment of the computer:
•
Operang system: Windows 7/Windows 8/Windows 8.1/Windows 10 (32/64-bit) English
system, and Windows 7 64-bit system recommended.
• CPU: Intel
Penum [email protected] GHz or above, and Core i3-2100 3.1 GHz recommended.
•
Memory: 2 GB or above, and 4 GB recommended.
• Graphics: RADEON X700 series or above, and NVDIA GeForce GT730 recommended.
• GPU: 256 MB or above, and 512 MB recommended.
2. You need to register the admin user at your rst login on the client. Enter the password and
conrm.
Figure 4-1 Register Interface
Note
We highly recommend you create a strong password of your own choosing (using a minimum of
8 characters, including upper case leers, lower case leers, numbers, and special characters) in
order to increase the security of your product.
3. Oponal: Check Save Password and Auto Login as required.
4. Click Register to enter the client.
LCD Display Controller V2.0 Operaon Manual
8

Note
If you forgot your password, you have to uninstall the client and reinstall it. You need to re-
congure the client.
4.2 Basic Conguraon
4.2.1 Congure the Serial Port
Aer registraon, Serial Port Conguraon interface will pop up. You need to rstly congure the
serial port to control screens. Incorrect serial port
conguraon may result in screen control
failure.
Before You Start
Ensure that the serial ports are already connected correctly, otherwise some
funcons will be
unavailable or abnormal.
Steps
Figure 4-2 Serial Port Conguraon
1. Select Serial Port. You can obtain your serial port in Computer Management → Device
Manager → Ports .
2. Select Baud Rate. 9600 is recommended.
3. Enable
Connecon.
Note
When Auto open when starng is checked, the serial port set here will be connected
automacally when you log in to the client next me.
LCD Display Controller V2.0 Operaon Manual
9

4.2.2 Congure the Screen Layout
Aer conguring the serial port, you need to congure the screen layout according to the actual
connecons.
Steps
1. Enter Number of Rows and Number of Columns in the upper right corner of the client.
Figure 4-3 Screen Layout Conguraon
2. Click OK to save the screen layout.
3.
Oponal: Click Refresh to get the newest screen status.
Note
Refresh is available only when the screen number is smaller than or equal to 9. When the
screen number is greater than 9, there is no Refresh buon on the client.
4.2.3 Match the Screen ID
You need to match the screen ID to disnguish the screens by manual match or auto match.
Note
Some LCD display models will restart automacally when screen ID matched.
Manual Match
Before You Start
Screen layout has been set.
LCD Display Controller V2.0 Operaon Manual
10

Steps
1. Click
in the upper right corner of the client.
2. In the pop-up window, click
Conrm to enter the technical page.
Figure 4-4 Prompt
Note
Click to go back to the home page.
3. Click Manual Match → Start Matching to match the screen ID manually.
Figure 4-5 Manual Match the Screen ID
4. Aer clicking Start Matching, the aribute code dening the screen will be displayed on the
upper le corner of every physical screen. According to the actual posion of the physical
screen, enter its
aribute code into the textbox of the virtual screen.
Note
When the screen layout is greater than 10 × 6, you need to click Match on the virtual screen,
and enter the aribute code into the pop-up textbox.
5. Click OK to nish the manual match of the rst screen.
6.
Aer all the screens are matched, click End Matching.
LCD Display Controller V2.0 Operaon Manual
11

Note
You can also match the screen ID using the remote control.
Auto Match
Before You Start
Screen layout has been set.
Steps
1. Click
in the upper right corner of the client.
2. In the pop-up window, click Conrm to enter the technical page.
3. Click Auto Match.
Figure 4-6 Auto Match Screen ID
4. Enter Number of Rows and Number of Columns according to the actual connecons.
Note
The numbers of rows and columns must be the same as the actual screen layout, otherwise an
error will occur during screen ID match.
5. Click Start Matching to nish screen ID auto match.
4.3 Screen Management
4.3.1 Switch the Signal Source
Steps
1. Select one or more virtual screens.
LCD Display Controller V2.0 Operaon Manual
12

2. You can switch the signal source using the following two ways.
-
Right-click and select Switch Signal Source to switch signal sources.
Figure 4-7 Switch Signal Sources by Right-click
-
Select one signal source in the drop-down list of Signal Source on the right of the client, and
click OK to switch signal sources.
LCD Display Controller V2.0 Operaon Manual
13

Figure 4-8 Switch Signal Sources by Drop-down List
Note
• The types of signals sources supported vary with LCD display model. The client will obtain the
types of signal sources supported from the LCD display when the serial port is connected.
• If a display does not send informaon about signal source types to the client, the client
provides only three default types for you to switch. The three types include HDMI, VGA, and
DVI.
4.3.2 Join Screens
Steps
1. Select the desired screens, and click Join on the right of the client to
nish screen splicing.
LCD Display Controller V2.0 Operaon Manual
14

Figure 4-9 Before Screen Splicing
LCD Display Controller V2.0 Operaon Manual
15
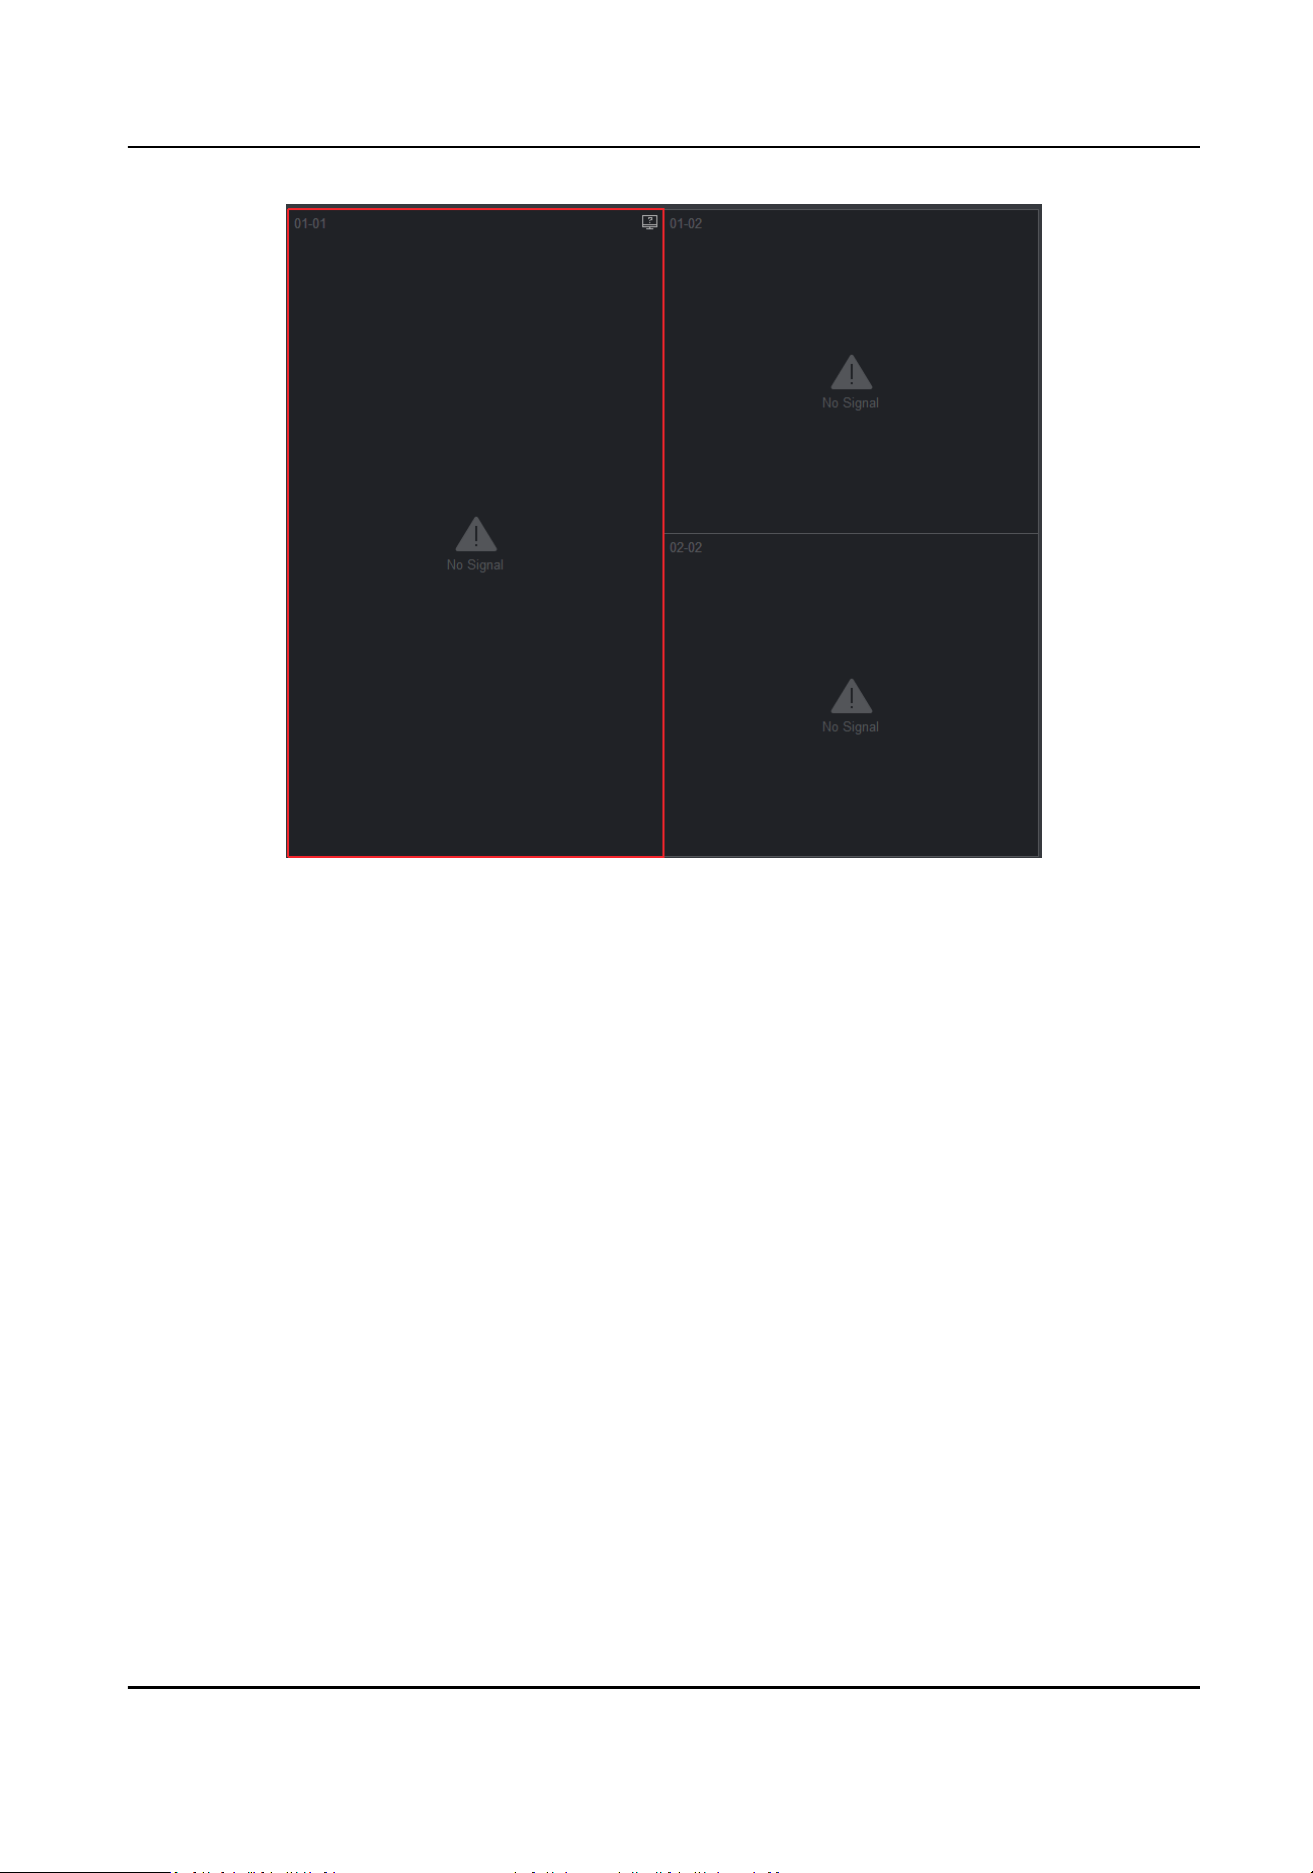
Figure 4-10 Aer Screen Splicing
Aer the screen splicing, mulple virtual screens are joined into one screen to display one signal
source image of the screen in the upper
le corner.
2. Oponal: Select the joined screen, and click Split on the right of the client to split the joined
screen.
4.3.3 Manage Scenes
You can set and call a scene to congure screens quickly.
LCD Display Controller V2.0 Operaon Manual
16

Figure 4-11 Scene Management
Table 4-1 Operaons of Scene Management
Operaon Step
Save a Scene Aer seng a scene, a prompt will pop up to remind you to save
the scene before you switch to other scenes.
Rename a Scene Select a scene, and click to rename it.
Call a Scene Select a scene, and click to call the scene. You can also double
click the scene to call it as desired.
Note
• The client supports 8 scenes at most.
• The default scene layout is 2 × 2.
4.3.4 Screen Time Sync
Before You Start
Ensure the LCD display supports sync
funcon.
Steps
1. Click
Sengs of Time Sync on the right of the client.
LCD Display Controller V2.0 Operaon Manual
17

Figure 4-12 Time Sync Sengs
2. You can set the screen me in either of the following two ways.
-
Click
to set the me and date.
-
Check Use Local Time to save the computer
me to the screen.
3. Click Save to
nish me sync.
4.3.5 View Screen Status
Select one virtual screen, and hover over in the upper right corner of the screen to view the
informaon.
Figure 4-13 View Screen Status
LCD Display Controller V2.0 Operaon Manual
18

Table 4-2 Descripon of Virtual Screen Color
Color Descripon
Green The screen signal source is normal.
Black The screen has no signal input.
The screen is powered o.
The serial port connecon is abnormal.
Grey The Screen status is unknown. Click Refresh to get the latest status
when the screen layout is less than 3 × 3.
Orange The screen temperature is too high.
4.3.6 Congure Screen Parameters
Only professionals are recommended to congure screen parameters.
Steps
1. Click to enter the technical page.
2. Select one or more screens as desired to congure.
3. Congure parameters on the right.
Figure 4-14 Screen Parameter Conguraon
LCD Display Controller V2.0 Operaon Manual
19

Color Temperature
You can congure red/green/blue gains or osets.
Backlight
You can increase or decrease the brightness of screen backlight.
Screen Type
Dierent images can be selected to adjust chromac aberraon.
4.4 Screen On/O
4.4.1 Turn On/O the Screen Manually
Before You Start
The serial port has already been congured correctly.
Steps
1. Select one or more screens.
2. You can turn
on/o the screens in either of the following two ways.
-
Right-click and select Turn on Screen/Turn
o Screen.
-
Click Screen On/Screen
O on the right of the client.
Note
Click All On/All O to turn on/o all the screens.
-
Press POWER on the remote control or click POWER on the virtual remote control.
Note
On/o commands are sent by the virtual remote control alternately. If you fail to turn on/o
the screen with the virtual remote control, try it again.
4.4.2 Turn On/O the Screen on Schedule
You can control the screen working me by seng its startup me.
Steps
1. Select one or more screens as desired.
2. Click
Sengs of Startup Time on the right of the client.
LCD Display Controller V2.0 Operaon Manual
20
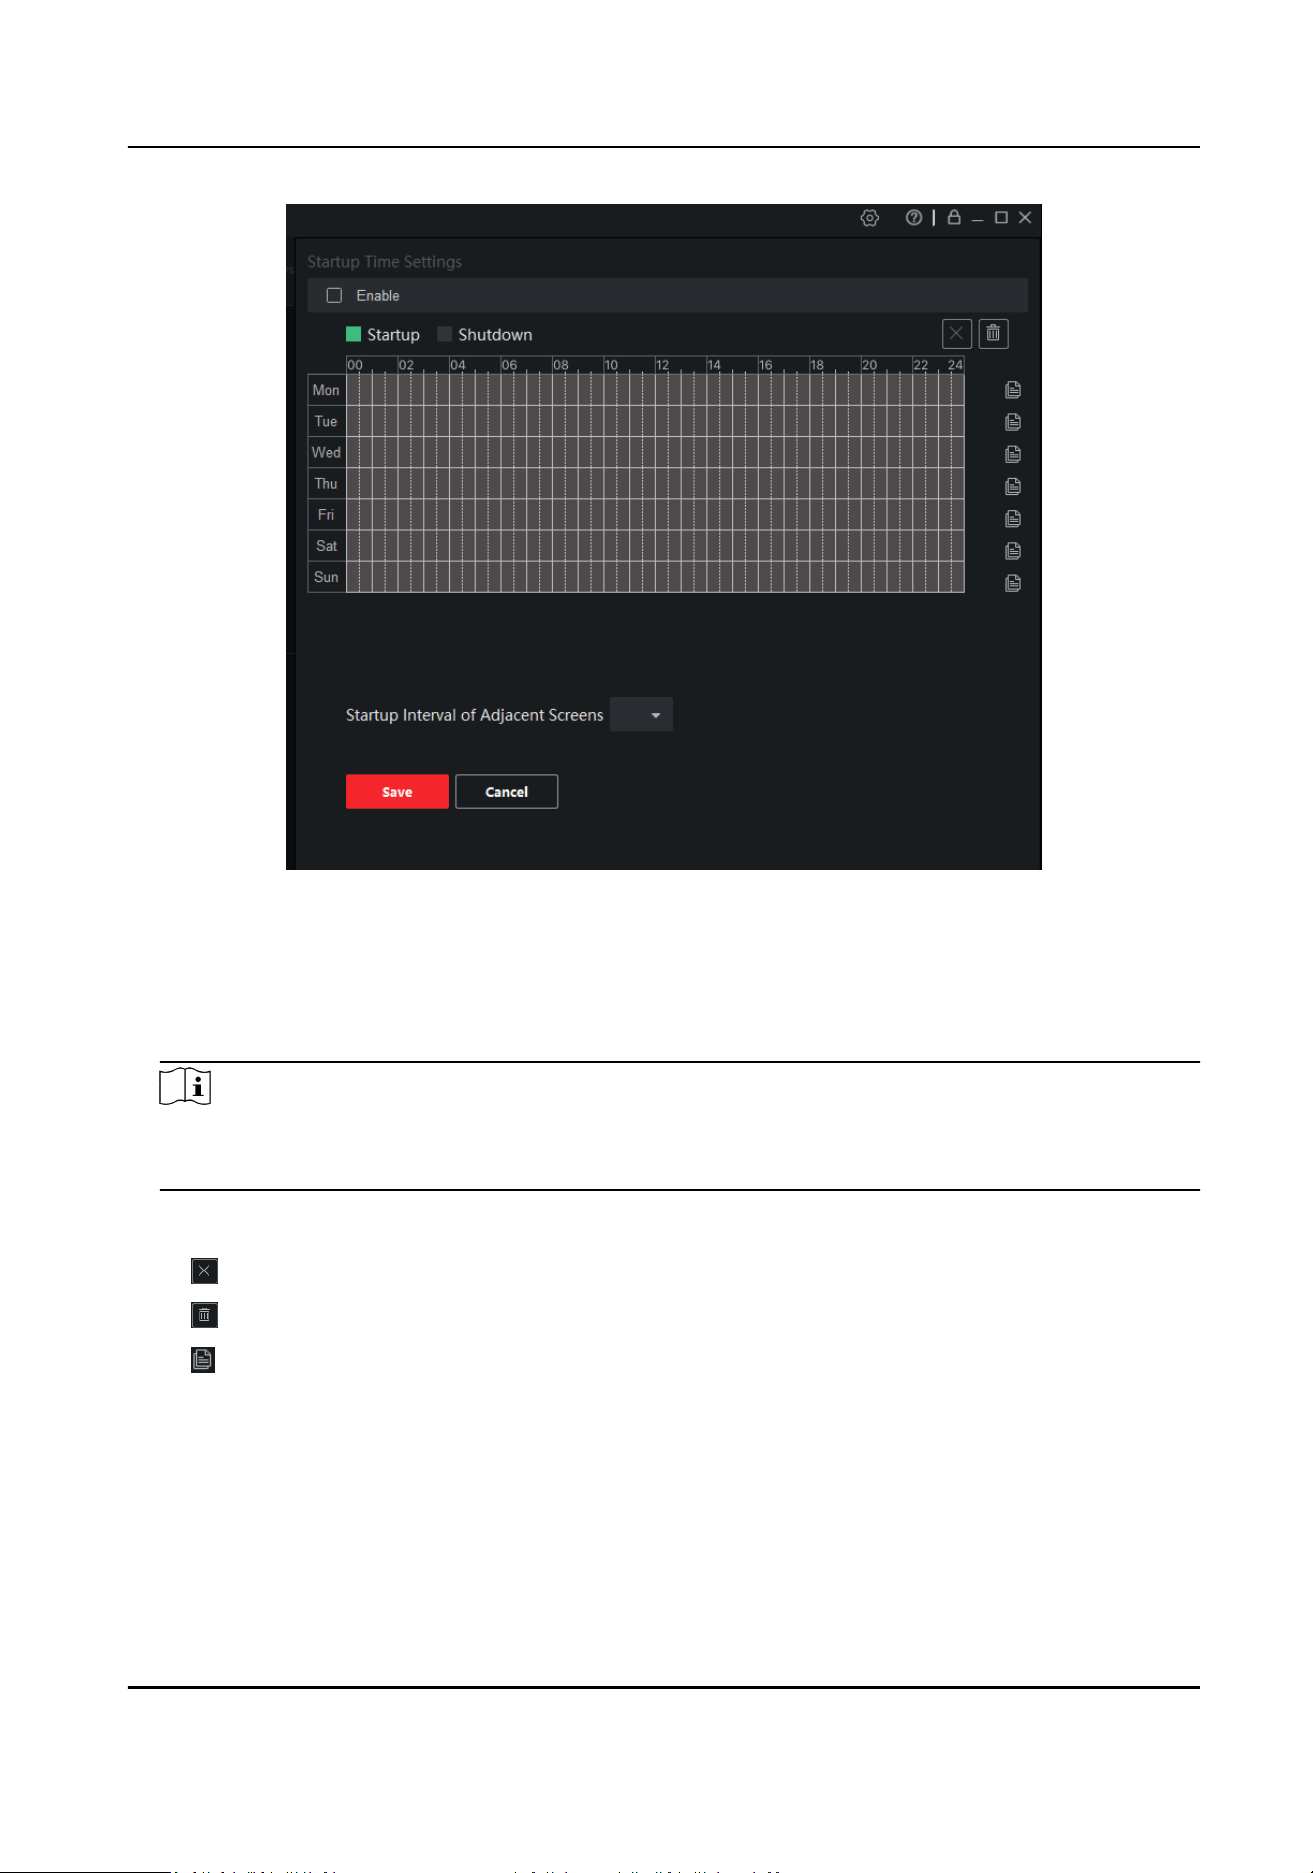
Figure 4-15 Startup Time Sengs
3. Drag and draw green bars in the days of a week. The area in green indicates the diaplay is
turned on. In other
duraon, the display turns o.
4. Select the green bars to precisely set the starng and ending me.
5. Repeat the operaons to set the schedule of the whole week.
Note
• Only 2 startup periods can be set at most.
• The interval between startup periods must be at least 2 minutes.
6. Oponal: The following operaons can also be performed in Startup Time Sengs.
Delete the selected period.
Delete all the set periods.
Copy the schedule of the day to other days of the week.
7. Oponal: Set a startup interval for adjacent screens to prevent damage to the circuit due to
current peaks.
8. Check Enable.
9. Click Save to
nish startup me sengs.
LCD Display Controller V2.0 Operaon Manual
21

Note
For some LCD display models, the startup me sengs take eect only when the client is
running.
4.5 Client Management
4.5.1 Lock/Unlock the Client
You can lock the client to prevent others from changing the conguraon.
Steps
1. Click in the upper right corner to lock the client.
What to do next
To unlock the client, you need to enter the login password, and then click Unlock.
Figure 4-16 Unlock the Client
4.5.2 Change Login Password
Steps
1. Click in the upper right corner of the client, and select Change Login Password.
Figure 4-17 Change Login Password
LCD Display Controller V2.0 Operaon Manual
22

2. Enter the Old Password, then set a New Password and
conrm.
3. Click Save to change the login password.
Note
You need to enter the new password when logging in next me. You need to check Save
Password and Auto Login again, too.
4.5.3 Enable/Disable Auto Login
Click in the upper right corner of the client, and select Enable/Disable Auto Login. Check/
Uncheck Auto Login.
4.5.4 View Client
Informaon
Click in the upper right corner of the client, and select About to view the name, version and etc.
4.5.5 View Open Source
Soware Licenses
Click in the upper right corner of the client, and select Open Source Soware Licenses to view
open source
soware licenses in the root directory.
LCD Display Controller V2.0 Operaon Manual
23

UD15070B