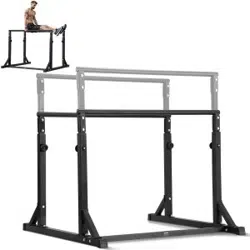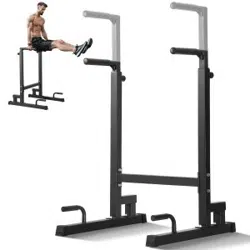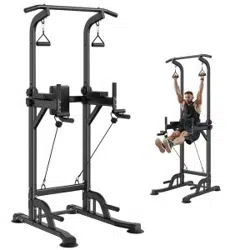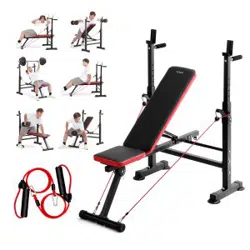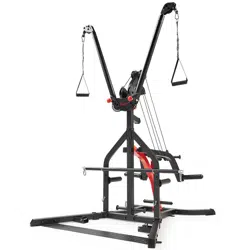
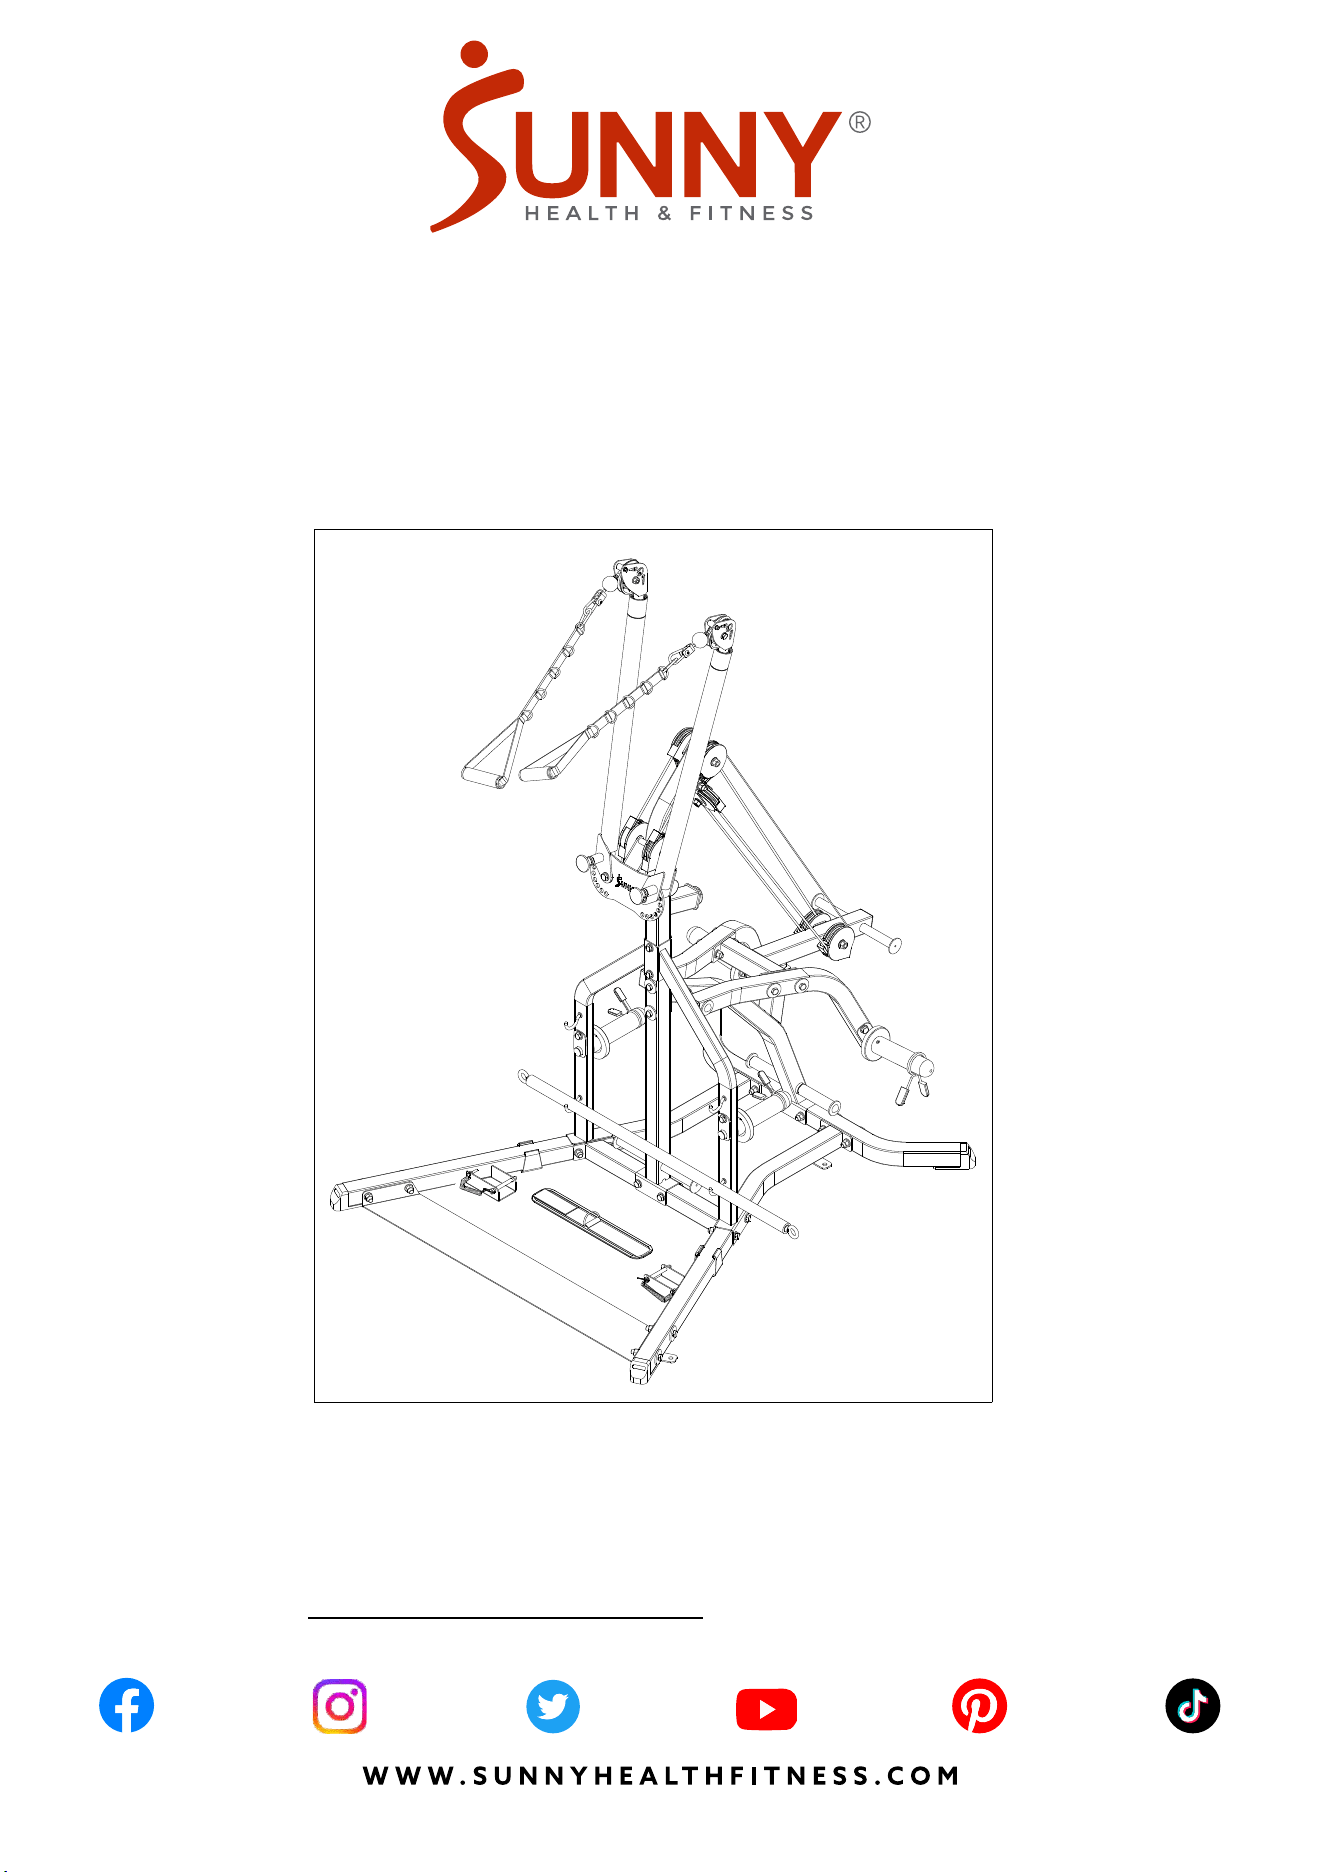
MULTIFUNCTIONAL STRENGTH
TRAINING HOME GYM
SF-HG92401
USER MANUAL
IMPORTANT! Please retain owner’s manual for maintenance and adjustment instructions. Your
satisfaction is very important to us, PLEASE DO NOT RETURN UNTIL YOU HAVE
CONTACTED US: [email protected] or 1-877-90SUNNY (877-907-8669).

1
IMPORTANT SAFETY INFORMATION
We thank you for choosing our product. To ensure your safety and health, please use this
equipment correctly. It is important to read this entire manual before assembling and using the
equipment. Safe and effective use can only be achieved if the equipment is assembled,
maintained, and used properly. It is your responsibility to ensure that all users of the equipment
are informed of all warnings and precautions.
1. Before starting any exercise program, you should consult your physician to determine if you
have any medical or physical conditions that could put your health and safety at risk or prevent
you from using the equipment properly. Your physician’s advice is essential if you are taking
medication that affects your heart rate, blood pressure, or cholesterol level.
2. Be aware of your body’s signals. Incorrect or excessive exercise can damage your health.
Stop exercising if you experience any of the following symptoms: pain, tightness in your chest,
irregular heartbeat, shortness of breath, lightheadedness, dizziness, or feelings of nausea. If
you do experience any of these conditions, you should consult your physician before
continuing with your exercise program.
3. Keep children and pets away from the equipment. The equipment is designed for adult use
only.
4. Use the equipment on a solid, flat level surface with a protective cover for your floor or carpet.
To ensure safety, the equipment should have at least 4 feet (120 cm) of free space all around
it.
5. Ensure that all nuts and bolts are securely tightened before using the equipment. The safety of
the equipment can only be maintained if it is regularly examined for damage and/or wear and
tear.
6. Always use the equipment as indicated. If you find any defective components while
assembling or checking the equipment, or if you hear any unusual noises coming from the
equipment during exercise, discontinue use of the equipment immediately and do not use until
the problem has been rectified.
7. Wear suitable clothing while using the equipment. Avoid wearing loose clothing that may
become entangled in the equipment.
8. Do not place fingers or objects into the moving parts of the equipment.
9. The maximum weight capacity of this unit is 500 lbs (225 kgs).
10. The equipment is not suitable for therapeutic use.
11. To avoid bodily injury and/or damage to the product or property, proper lifting and moving are
required.
12. Your product is intended for use in cool and dry conditions. You should avoid storage in
extreme cold, hot or damp areas as this may lead to corrosion and other related problems.
13. This equipment is designed for indoor and home use only; it is not intended for commercial
use.
2
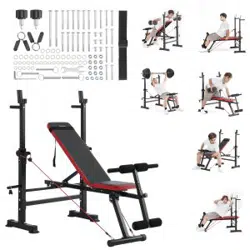
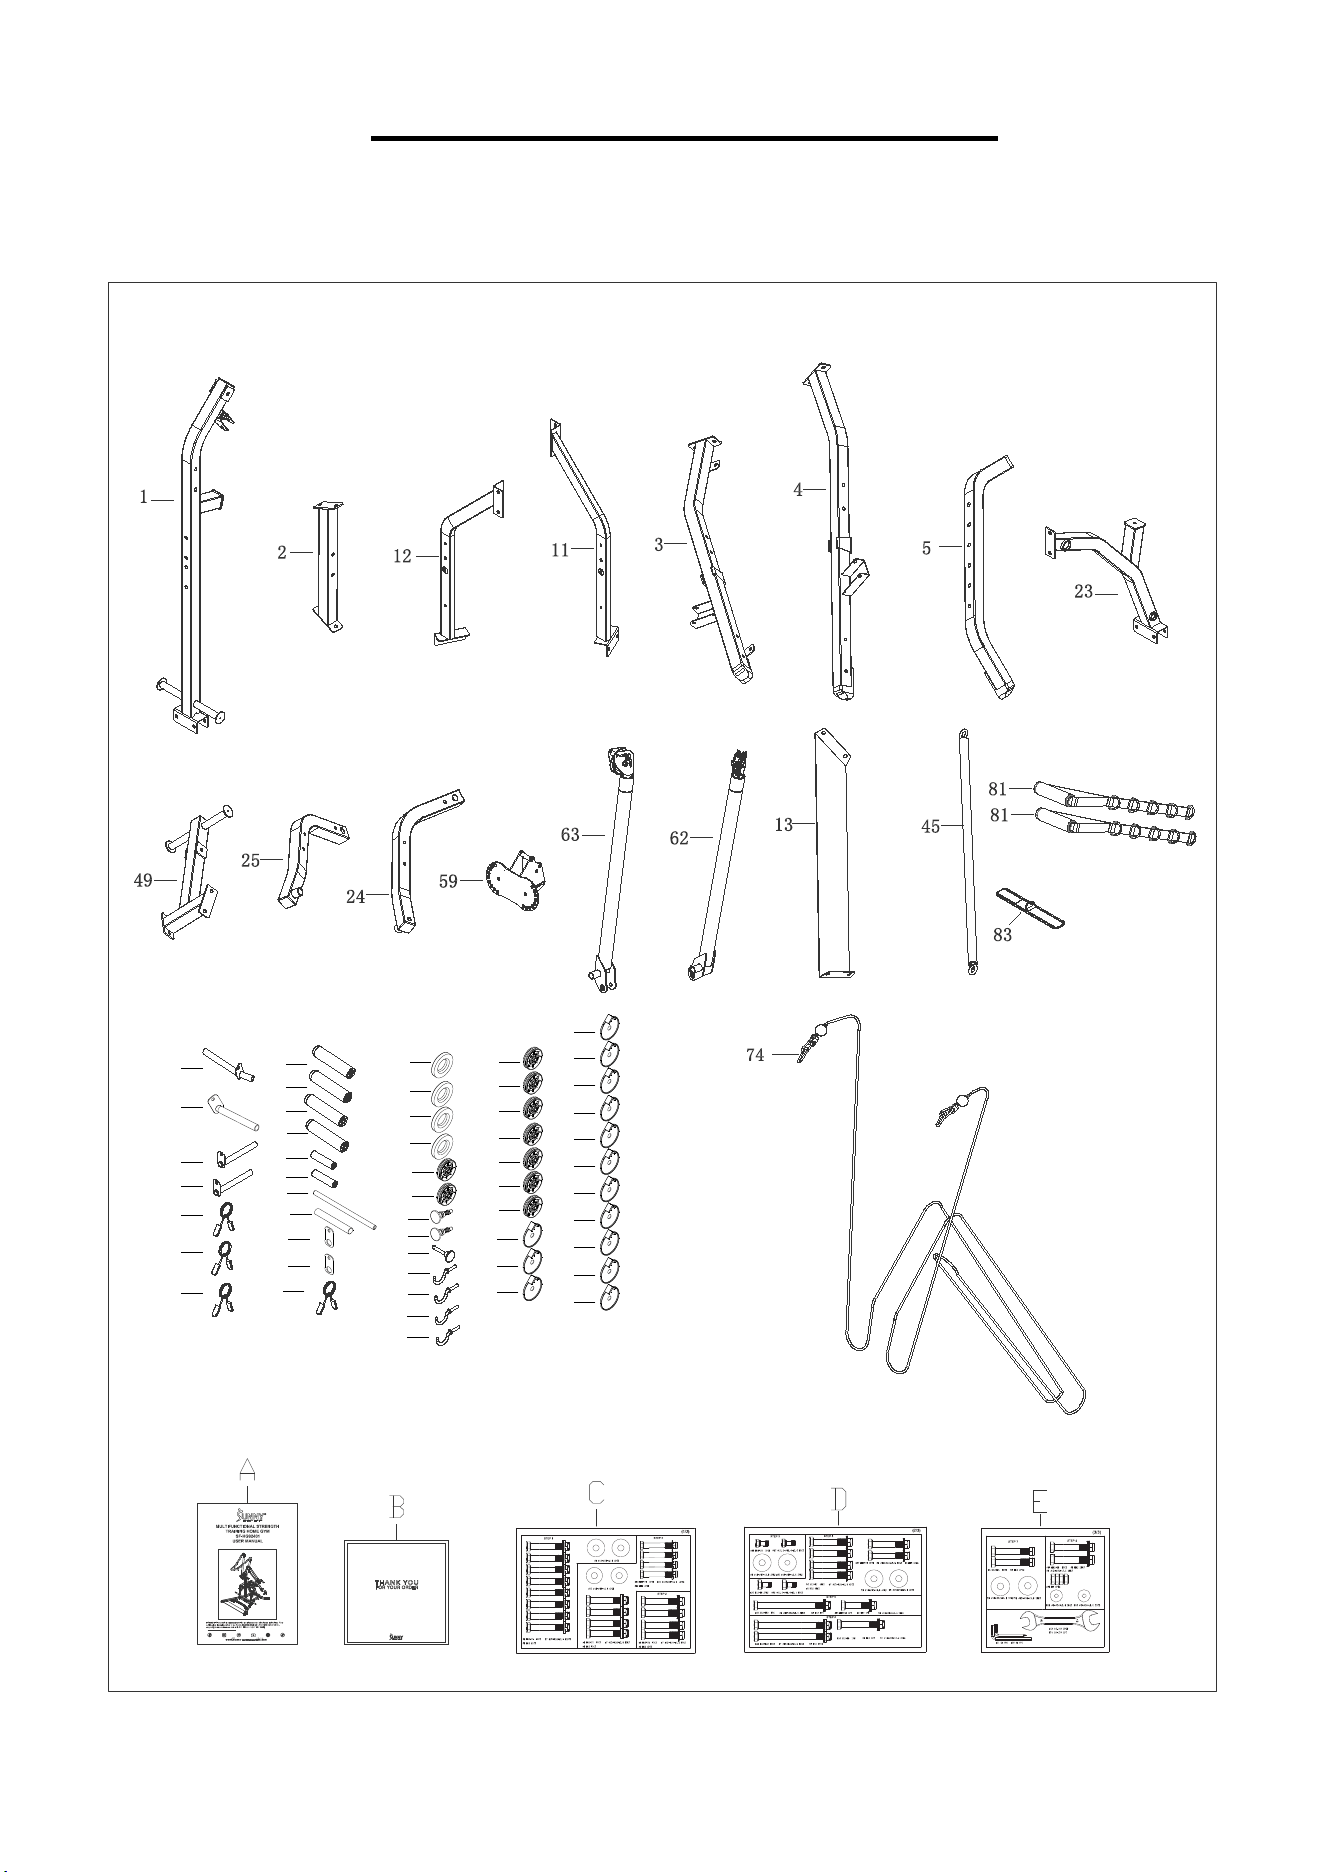
PRE-ASSEMBLY CHECK LIST
Before you start to assemble, please make sure all parts are included.
SF-HG92401 HARDWARE PACKAGE
SF-HG92401 HARDWARE PACKAGE
SF-HG92401 HARDWARE PACKAGE
20
19
18
34
28
29
22
48
47
60
61
15
17
32
57
84
15
17
18
18
18
19
19
19
20
20
20
34
57
60
84
84
84
48
48
48
48
48
48
47
47
47
47
47
47
47
47
47
47
47
47
47

3
No.
Description
Spec.
Qty.
No.
Description
Spec.
Qty.
1
Main Frame
1
34
Nylon Swivel Sleeve
Φ32*Φ17.2
*126.5
2
2
Front Stabilizer
1
45
Push Rod
1
3
Left Stabilizer
1
47
Pulley Cover
Φ90*Φ12.5
14
4
Right Stabilizer
1
48
Φ90 Pulley Assembly
Φ90*Φ12.5
*25.4
7
5
Rear Stabilizer
1
49
Resistance Belt Hanger
1
11
Left Support Tube
1
57
Φ70 Pulley Assembly
Φ70*12.1*26
2
12
Right Support Tube
1
59
Adjusting Seat
1
13
Foot Plate
1
60
Spring Bolt
Φ12*Φ25
*M20 *96
2
15
Counterweight
Hanging Rod
2
61
Steel Ball Bolt
Φ50*108.5
1
17
Fixed Piece
82*45*t3.0
2
62
Left Turning Arm
1
18
Crash Pad
Φ80*Φ50*16
4
63
Right Turning Arm
1
19
Barbell Support Rod
Φ100*Φ48
*200
4
74
Cable
Φ5*7420
1
20
Spring Clip
Φ48
4
81
Handle Assembly
2
22
Rotation Shaft
Φ25*228
1
83
Foot Cover Set
1
23
Slant Support Tube
1
84
Hanging Hook Assembly
4
24
Left Power Tube
1
A
Manual
1
25
Right Power Tube
1
B
Thank You Card
1
28
Left Barbell Plate
Hanging Rod
1
C
Hardware Package
1/3
1
29
Right Barbell Plate
Hanging Rod
1
D
Hardware Package
2/3
1
32
Resistance Belt
Tensioned Rod
Φ17*320
1
E
Hardware Package
3/3
1
4
HARDWARE PACKAGE
SF-HG92401 HARDWARE PACKAGE
SF-HG92401 HARDWARE PACKAGE
5
Ordering Replacement Parts (U.S. and Canadian Customers only)
Please provide the following information in order for us to accurately identify the part(s) needed:
✓ The model number (found on cover of manual)
✓ The product name (found on cover of manual)
✓ The part number found on the “EXPLODED DIAGRAM” (page 16) and “PARTS LIST” (page
17).
SF-HG92401 HARDWARE PACKAGE
6
ASSEMBLY INSTRUCTIONS
We value your experience using Sunny Health and Fitness products. For assistance with parts or
(877-907-8669).
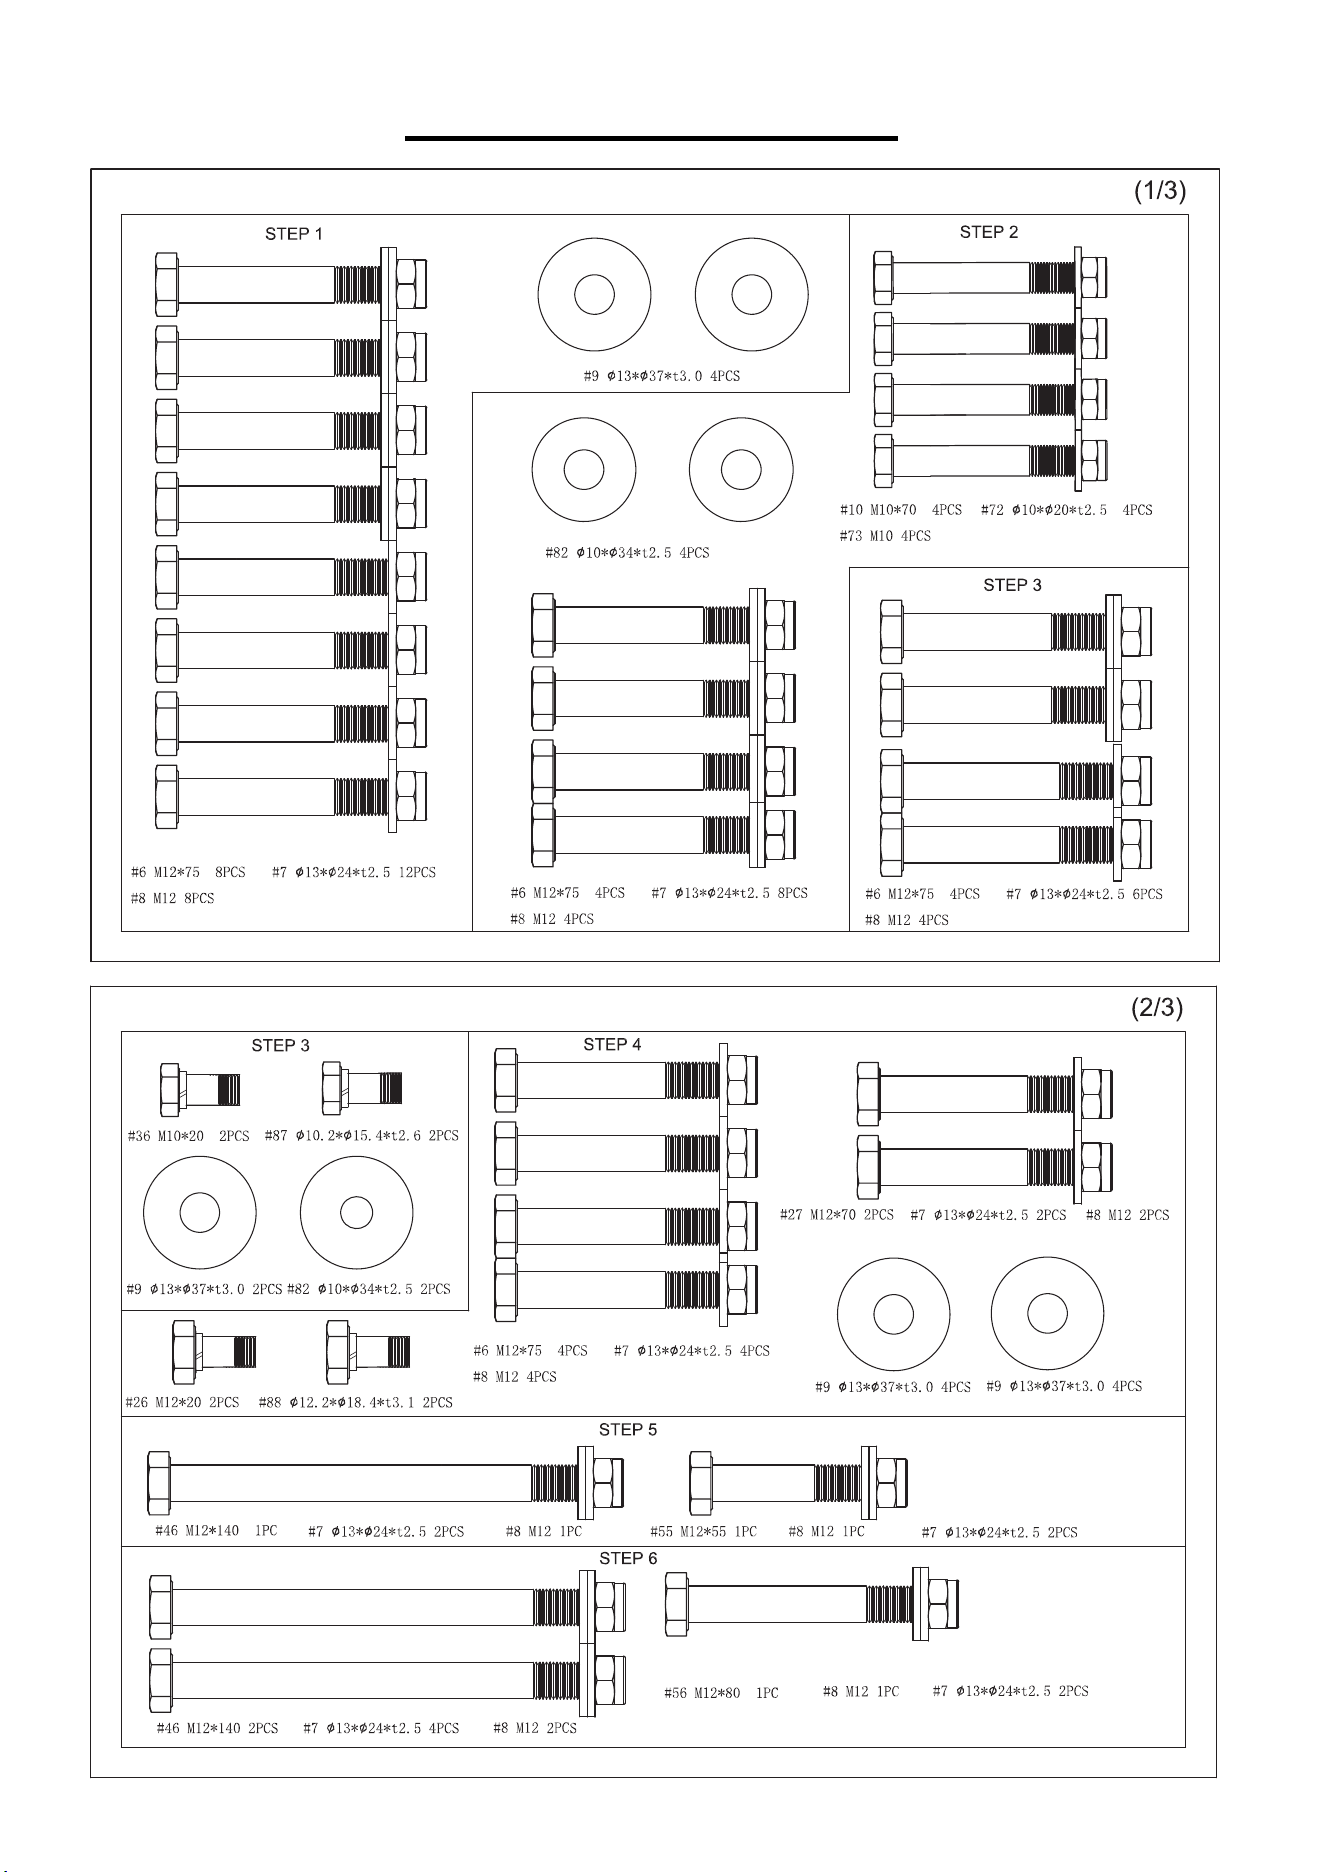
STEP 1:
NOTE: It is highly recommended that you
have assistance during the assembly.
Attach the Left Stabilizer (No. 3) and
Right Stabilizer (No. 4) to the Rear
Stabilizer (No. 5) using 4 Hexagon Bolts
(No. 6), 4 Large Flat Washers (No. 9), 4
Flat Washers (No. 7) and 4 Hex Lock
Nuts (No. 8). Pre-secure with 2 Open End
Wrenches (No. 53). Do not tighten 4
Hexagon Bolts (No. 6) during this step.
Attach the Left Stabilizer (No. 3), Right
Stabilizer (No. 4), Left Support Tube
(No. 11) and Right Support Tube (No. 12)
to the Front Stabilizer (No. 2) using 4
Hexagon Bolts (No. 6), 8 Flat Washers
(No. 7) and 4 Hex Lock Nuts (No. 8).
Pre-secure with 2 Open End Wrenches
(No. 53). Do not tighten 4 Hexagon Bolts
(No. 6) during this step.
Insert 2 Ring Steel Ball Plugs (No. 40)
into and through the round hole slots of the
Left Stabilizer (No. 3) and Right
Stabilizer (No. 4).
7
We value your experience using Sunny Health and Fitness products. For assistance with parts or
(877-907-8669).
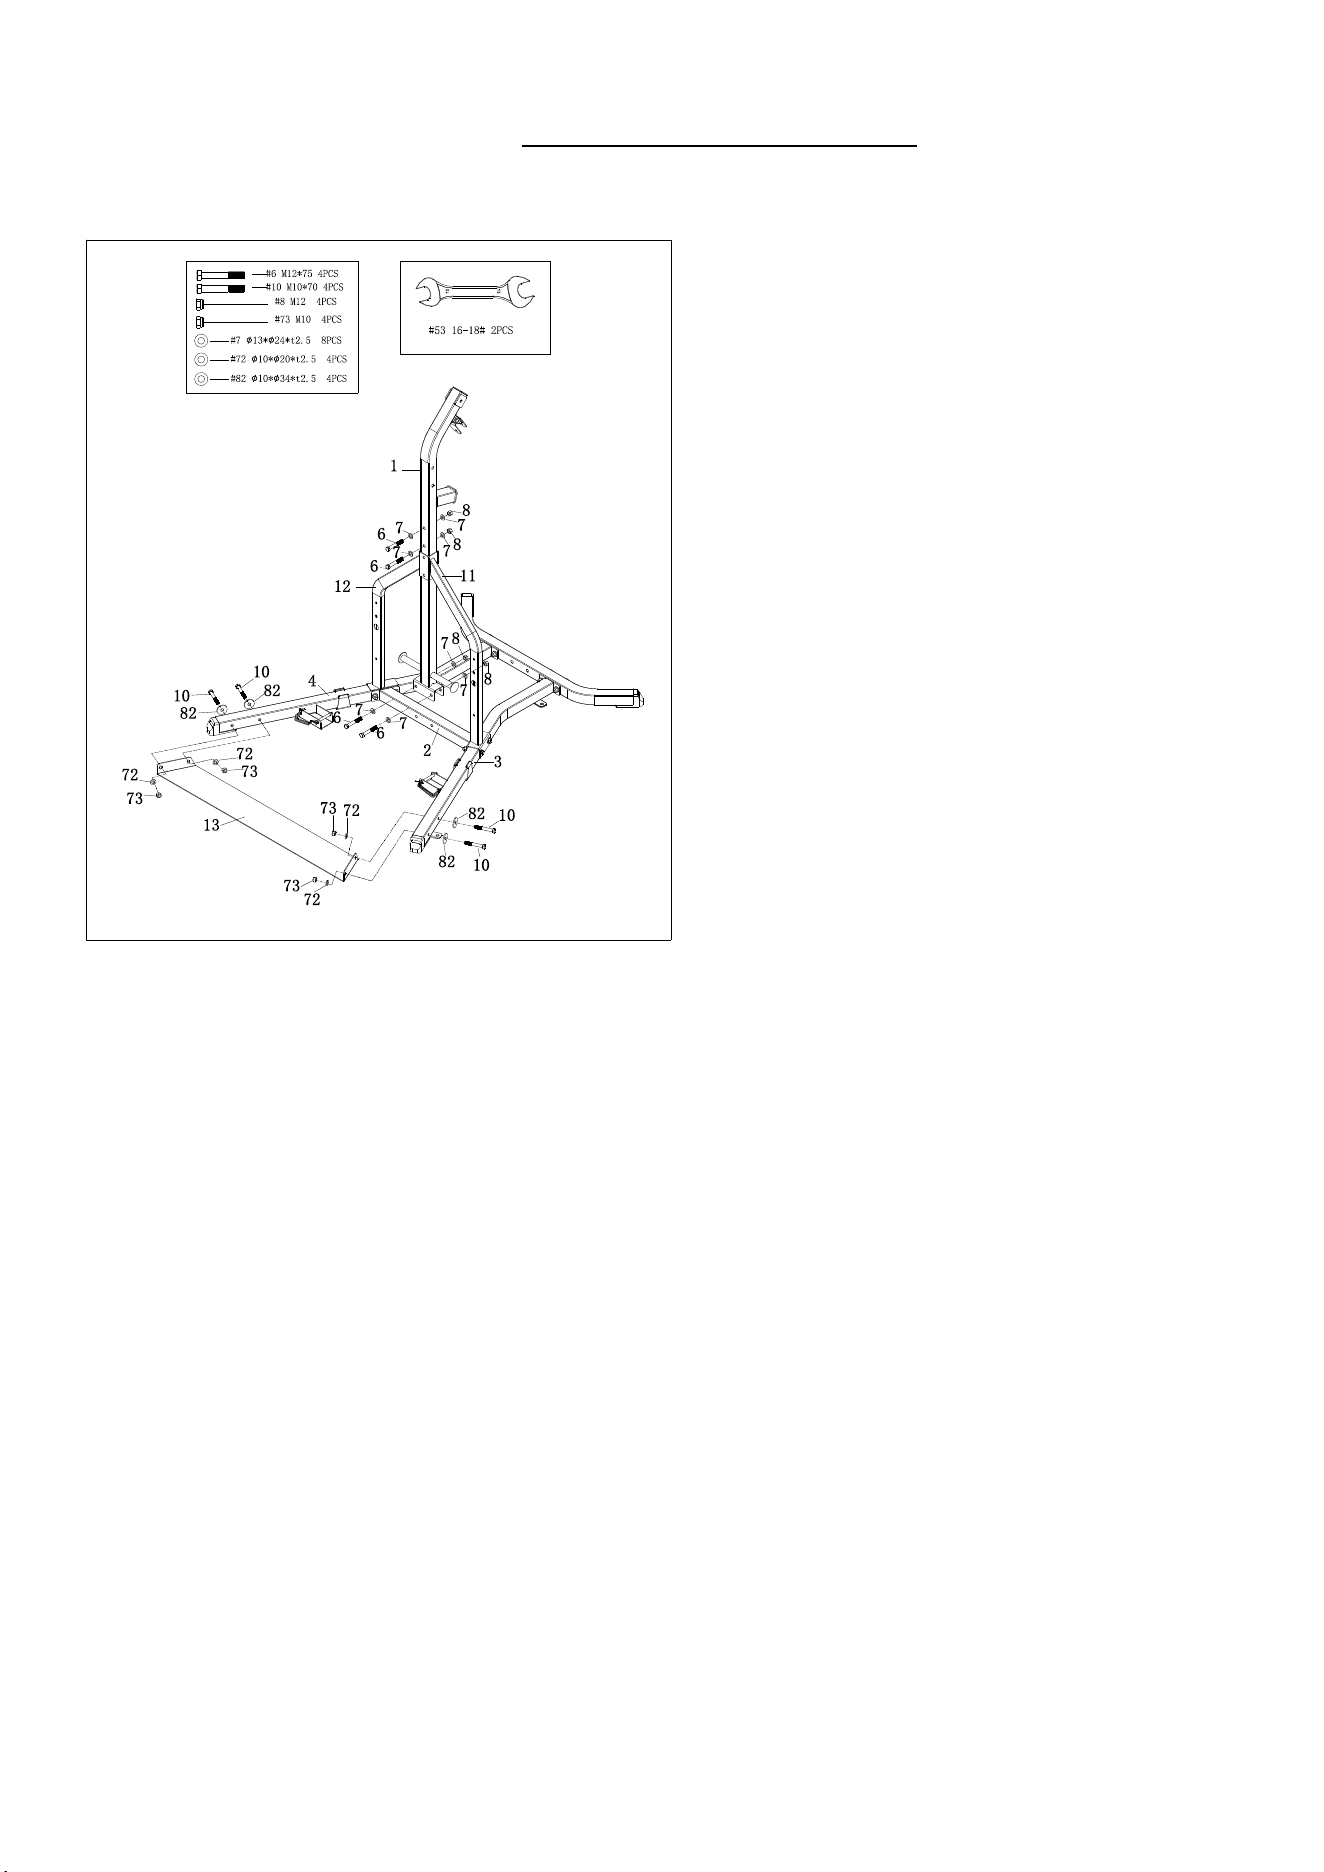
STEP 2:
Attach the Main Frame (No. 1) to the
Front Stabilizer (No. 2) using 2 Hexagon
Bolts (No. 6), 4 Flat Washers (No. 7) and
2 Hex Lock Nuts (No. 8). Pre-secure with
2 Open End Wrenches (No. 53). Do not
tighten 2 Hexagon Bolts (No. 6) during
this step.
Attach the Left Support Tube (No. 11),
Right Support Tube (No. 12) to the Main
Frame (No. 1) using 2 Hexagon Bolts
(No. 6), 4 Flat Washers (No. 7) and 2 Hex
Lock Nuts (No. 8). Pre-secure with 2
Open End Wrenches (No. 53). Do not
tighten 2 Hexagon Bolts (No. 6) during
this step.
Attach the Left Stabilizer (No. 3) and
Right Stabilizer (No. 4) to the Foot Plate
(No. 13) using 4 Hexagon Bolts (No. 10),
4 Flat Washers (No. 82), 4 Flat Washers
(No. 72) and 4 Hex Lock Nuts (No. 73).
Pre-secure with 2 Open End Wrenches
(No. 53). Do not tighten 4 Hexagon Bolts
(No. 10) during this step.
And then tight and secure with 2 Open
End Wrenches (No. 53) for above STEP 1
and STEP 2.
8
We value your experience using Sunny Health and Fitness products. For assistance with parts or
(877-907-8669).
STEP 3:
Attach the Main Frame (No. 1) and Rear
Stabilizer (No. 5) to the Slant Support
Tube (No. 23) using 4 Hexagon Bolts
(No. 6), 2 Large Flat Washers (No. 9), 6
Flat Washers (No. 7) and 4 Hex Lock
Nuts (No. 8). Tighten and secure with 2
Open End Wrenches (No. 53).
Attach the Resistance Belt Tensioned
Rod (No. 32) and 2 Nylon Swivel Sleeves
(No. 34) to Slant Support Tube (No. 23)
using 2 Hexagon Bolts (No. 36), 2 Spring
Washers (No. 87) and 2 Flat Washers
(No. 82). Tighten and secure with 2 Open
End Wrenches (No. 53).
9
We value your experience using Sunny Health and Fitness products. For assistance with parts or
(877-907-8669).
STEP 4:
Attach the Rotation Shaft (No. 22) and
Left Power Tube (No. 24) and Right
Power Tube (No. 25) to Slant Support
Tube (No. 23) using 2 Hexagon Bolts
(No. 26), 2 Spring Washers (No. 88) and
2 Large Flat Washers (No. 9). Tighten
and secure with 2 Open End Wrenches
(No. 53).
Attach the Left Power Tube (No. 24) and
Right Power Tube (No. 25) to the
Resistance Belt Hanger (No. 49) using 4
Hexagon Bolts (No. 6), 4 Large Flat
Washers (No. 9), 4 Flat Washers (No. 7)
and 4 Hex Lock Nuts (No. 8). Tighten and
secure with 2 Open End Wrenches (No.
53).
Attach the Left Barbell Plate Hanging
Rod (No. 28) and the Right Barbell Plate
Hanging Rod (No. 29) to the Left Power
Tube (No. 24) and the Right Power Tube
(No. 25) using 2 Hexagon Bolts (No. 27),
2 Large Flat Washers (No. 9), 2 Flat
Washers (No. 7) and 2 Hex Lock Nuts
(No. 8). Tighten and secure with 2 Open
End Wrench (No. 53).
Attach 2 Barbell Support Rods (No. 19)
to the Left Barbell Plate Hanging Rod
(No. 28) and the Right Barbell Plate
Hanging Rod (No. 29) respectively.
Fasten the setting screws on the 2 Barbell
Support Rods (No. 19) with Allen
Wrench (No. 52). Then put 2 Crash Pads
(No. 18) and 2 Spring Clips (No. 20) to 2
Barbell Support Rods (No. 19)
respectively.
10
We value your experience using Sunny Health and Fitness products. For assistance with parts or
(877-907-8669).
STEP 5:
Attach 2 Pulley Covers (No. 47) and 1
Φ90 Pulley Assembly (No. 48) to the
Main Frame (No. 1) using 1 Outer
Hexagon Bolt (No. 55), 2 Flat Washers
(No. 7) and 1 Hex Lock Nut (No. 8).
Tighten and secure with 2 Open End
Wrenches (No. 53).
Attach 4 Pulley Covers (No. 47) and 2
Φ90 Pulley Assemblies (No. 48) to the
Resistance Belt Hanger (No. 49) using 1
Outer Hexagon Bolt (No. 46), 2 Flat
Washers (No. 7) and 1 Hex Lock Nut (No.
8). Tighten and secure with 2 Open End
Wrenches (No. 53).
STEP 6:
Attach 4 Pulley Covers (No. 47) and 2
Φ90 Pulley Assemblies (No. 48) to the
Main Frame (No. 1) using 1 Outer
Hexagon Bolt (No. 46), 2 Flat Washers
(No. 7) and 1 Hex Lock Nut (No. 8).
Tighten and secure with 2 Open End
Wrenches (No. 53).
Attach Adjusting Seat (No. 59) to the
Main Frame (No. 1) using 1 Outer
Hexagon Bolt (No. 56), 2 Flat Washers
(No. 7) and 1 Hex Lock Nut (No. 8).
Tighten and secure with 2 Open End
Wrenches (No. 53).
Attach 4 Pulley Covers (No. 47) and 2
Φ90 Pulley Assemblies (No. 48) to the
Adjusting Seat (No. 59) using 1 Outer
Hexagon Bolt (No. 46), 2 Flat Washers
(No. 7) and 1 Hex Lock Nut (No. 8).
Tighten and secure with 2 Open End
Wrenches (No. 53).
Insert Steel Ball Bolt (No. 61) into
Adjusting Seat (No. 59) and Main Frame
(No. 1).
11
We value your experience using Sunny Health and Fitness products. For assistance with parts or
(877-907-8669).
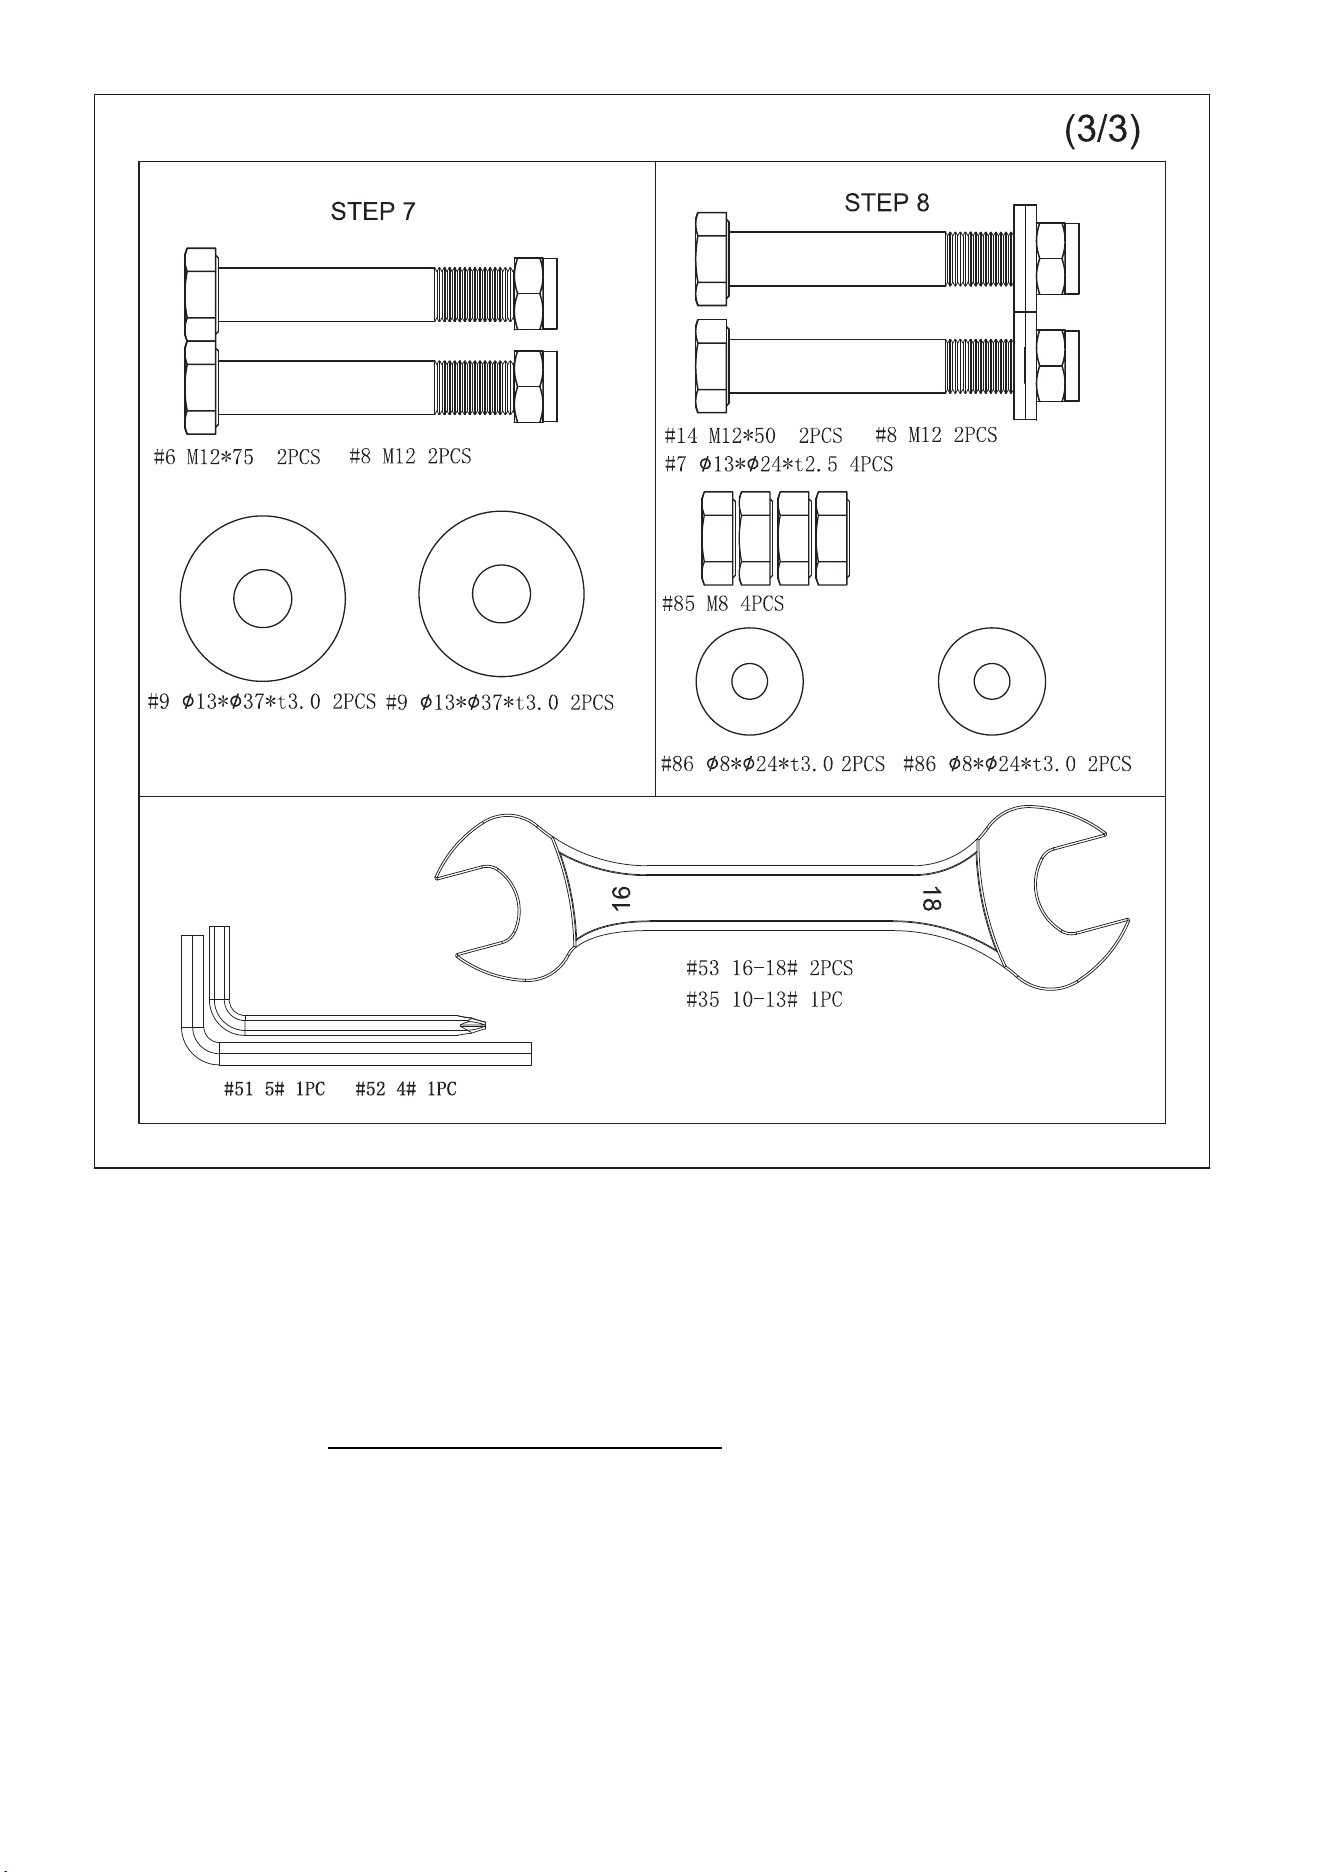
STEP 7:
NOTE: The installation of the spring bolt
does not come with a tool, and it can be
screwed into place by hand, but cannot
be tightened.
Attach pre-installed 2 Iron Based
Metallurgical Sleeves (No. 58), 1 Φ70
Pulley Assembly (No. 57) and 1 Left
Turning Arm (No. 62) to the Adjusting
Seat (No. 59) using 1 Hexagon Bolt (No.
6), 2 Large Flat Washers (No. 9) and 1
Hex Lock Nut (No. 8). Tighten and
secure with 2 Open End Wrenches (No.
53).
Attach pre-installed 2 Iron Based
Metallurgical Sleeves (No. 58), 1 Φ70
Pulley Assembly (No. 57) and 1 Right
Turning Arm (No. 63) to the Adjusting
Seat (No. 59) using 1 Hexagon Bolt (No.
6), 2 Large Flat Washers (No. 9) and 1
Hex Lock Nut (No. 8). Tighten and
secure with 2 Open End Wrenches (No.
53).
Screw the 2 Spring Bolts (No. 60) into
the Left Turning Arm (No. 62) and the
Right Turning Arm (No. 63) respectively
by hand and pass through the adjustment
hole of the Adjusting Seat (No. 59).
12
We value your experience using Sunny Health and Fitness products. For assistance with parts or
(877-907-8669).
STEP 8:
Clamp the 4 Hanging Hook Assemblies
(No. 84) into the Left Support Tube (No.
11) and the Right Support Tube (No. 12)
respectively, using 4 Flat Washers (No.
86) and 4 Hex Lock Nuts (No. 85). Tighten
and secure with Open End Wrench (No.
35).
Attach 2 Counterweight Hanging Rods
(No. 15) and 2 Fixed Pieces (No. 17) to
the Left Support Tube (No. 11) and the
Right Support Tube (No. 12) using 2
Hexagon Bolts (No. 14), 4 Flat Washers
(No. 7) and 2 Hex Lock Nuts (No. 8).
Tighten and secure with 2 Open End
Wrenches (No. 53).
Attach 2 Barbell Support Rods (No. 19)
to 2 Counterweight Hanging Rods (No.
15) respectively. Fasten the setting screws
on the 2 Barbell Support Rods (No. 19)
with Allen Wrench (No. 52). Then put 2
Crash Pads (No. 18) and 2 Spring Clips
(No. 20) to 2 Barbell Support Rods (No.
19) respectively.
13
We value your experience using Sunny Health and Fitness products. For assistance with parts or
(877-907-8669).
STEP 9:
Remove 1 Special Bolt (No. 77), 2 Flat
Washers (No. 78) and 1 Cap Nut (No. 79)
from one end of Cable (No. 74) using
Allen Wrench (No. 51) and Open End
Wrench (No. 35). Then remove Cable
Connection U (No. 76), Cable Ball (No.
75) and 2 Gourd Hooks (No. 80) from
Cable (No. 74).
Insert the Cable (No. 74) into the top of
Left Turning Arm (No. 62), Wrap the
Cable (No. 74) around the arrows shown.
NOTE: When assembling the Cable (No.
74) around the Right Turning Arm (No.
63), please connect the Cable (No. 74)
with the Mini Wire (No. F) in the bottom of
Right Turning Arm (No. 63). Then pull the
top end Mini Wire (No. F) out of the Right
Turning Arm (No. 63) along with the
Cable (No. 74) and then remove the Mini
Wire (No. F).
Attach the Cable (No. 74) to Cable Ball
(No. 75), Cable Connection U (No. 76)
and 1 Gourd Hook (No. 80) using 2 Flat
Washers (No. 78), 1 Cap Nut (No. 79)
and 1 Special Bolt (No. 77) that were just
removed. Tighten and secure with Allen
Wrench (No. 51) and Open End Wrench
(No. 35). Then attach 2 Gourd Hooks
(No. 80) on the two ends of Cable (No. 74)
to 2 Handle Assemblies (No. 81).
NOTE: Check and make sure all bolts are
fully locked.
The assembly is complete!
63
63
10
13
#35 10-13# 1PC
#51 5# 1PC
#77
Φ
8*34.4*M6
1PC
#79 M6 1PC
F
74
#78 Φ8.4*Φ16*t1.6 2PCS
62
74
76
77
78
79
78
80
75
74
80
80
80
81
81
80
The assembly is complete!
14
ADJUSTMENTS AND USAGE GUIDE
When adjusting the Left Turning Arm (No.
62) or the Right Turning Arm (No. 63), the
hand should hold onto the Left Turning Arm
(No. 62) or the Right Turning Arm (No. 63)
first, then pull out the Spring Bolts (No. 60),
now the Left Turning Arm (No. 62) or the
Right Turning Arm (No. 63) can be adjusted
up and down according to the arrow shown in
the diagram. Reinsert the Spring Bolts (No.
60) after adjusting to the proper position.
When adjusting the Adjusting Seat (No. 59),
the hand should hold the Left Turning Arm
(No. 62) first, then pull out the Steel Ball Bolt
(No. 61), now the Adjusting Seat (No. 59)
can be adjusted according to the arrow shown
in the diagram. Reinsert the Steel Ball Bolt
(No. 61) after adjusting to the proper position.
15
MAINTENANCE INSTRUCTIONS
DAILY MAINTENANCE
Inspect and tighten all parts regularly. (Nuts, Bolts, Rubber Pads, Steel Brackets…etc.)
Replace any worn or torn parts immediately.
Check and ensure the equipment is leveled at all time.
Check and tighten all adjustment pins/knobs regularly.
WEEKLY MAINTENANCE
Use damp cloth on plastic parts only, use dry cloth on metal frames.
Inspect the metal frame structure of the equipment.
DOWNLOAD SUNNYFIT - FOR HOME FITNESS
SunnyFit is an all-in-one home fitness app designed to empower users of all levels to achieve
their fitness goals. Discover over 1,000 free on-demand workout video courses crafted by
certified trainers, tailored for various exercise equipment such as indoor bikes, treadmills, rowers,
ellipticals, dumbbells, bodyweight, and even resistance band exercises. Whether you have
equipment or not, SunnyFit offers the perfect workout for every fitness level and preference. You
can enjoy a collection of over 300 free workout courses that require nothing more than your body
and the SunnyFit app.
USAGE GUIDE
The Multifunctional Strength Training Home Gym allows you to work out in multiple ways.
Please scan the QR code below:

16
EXPLODED DIAGRAM
17
PARTS LIST
Version: 1.1
No.
Description
Spec.
Qty.
No.
Description
Spec.
Qty.
1
Main Frame
1
46
Outer Hexagon Bolt
M12*140
3
2
Front Stabilizer
1
47
Pulley Cover
Φ90*Φ12.5
14
3
Left Stabilizer
1
48
Φ90 Pulley Assembly
Φ90*Φ12.5*25.4
7
4
Right Stabilizer
1
49
Resistance Belt Hanger
1
5
Rear Stabilizer
1
50
Metallurgical Sleeve
Φ25*Φ20.8*Φ12.5
*10*3
2
6
Hexagon Bolt
M12*75
23
51
Allen Wrench
5#
1
7
Flat Washer
Φ13*Φ24*t2.5
48
52
Allen Wrench
4#
1
8
Hex Lock Nut
M12
32
53
Open End Wrench
16-18#
2
9
Large Flat Washer
Φ13*Φ37*t3.0
18
54
Rotating Pulley Seat II
8#
1
10
Hexagon Bolt
M10*70
4
55
Outer Hexagon Bolt
M12*55
1
11
Left Support Tube
1
56
Outer Hexagon Bolt
M12*80
1
12
Right Support Tube
1
57
Φ70 Pulley Assembly
Φ70*Φ12.1*26
2
13
Foot Plate
1
58
Iron Based Metallurgical
Sleeve
Φ38*Φ22*Φ12.1*8
4
14
Hexagon Bolt
M12*50
2
59
Adjusting Seat
1
15
Counterweight Hanging
Rod
2
60
Spring Bolt
Φ12*Φ25 *M20
*96
2
16
Round Inner Tube Plug
Φ25
4
61
Steel Ball Bolt
Φ50*108.5
1
17
Fixed Piece
82*45*t3
2
62
Left Turning Arm
1
18
Crash Pad
Φ80*Φ50*16
4
63
Right Turning Arm
1
19
Barbell Support Rod
Φ100*Φ48*200
4
64
Circlip for Shaft
Φ25
2
20
Spring Clip
Φ48
4
65
Circlip for Hole
Φ42
2
21
Bearing
61805-2Z
2
66
Bearing
61905-2Z
4
22
Rotation Shaft
Φ25*228
1
67
Shaft Spacer Sleeve
Φ32*Φ25.5*32
2
23
Slant Support Tube
1
68
Rotating Pulley Seat
2
24
Left Power Tube
1
69
Φ90 Pulley Assembly
Φ90*Φ10.5 *25.4
2
25
Right Power Tube
1
70
Anti-Collision Spacer
Φ17*Φ11*25
2
26
Hexagon Bolt
M12*20
2
71
Outer Hexagon Bolt
M10*45
2
27
Hexagon Bolt
M12*70
2
72
Flat Washer
Φ10*Φ20*t2.5
8
28
Left Barbell Plate Hanging
Rod
1
73
Hex Lock Nut
M10
6
29
Right Barbell Plate
Hanging Rod
1
74
Cable
Φ5*7420
1
30
Outer Hexagon Nut
M10
4
75
Cable Ball
Φ39
2
31
Adjusting Foot Pad
Φ52*19-M10*28
2
76
Cable Connection U
88*20*t3
2
32
Resistance Belt Tensioned
Rod
Φ17*320
1
77
Special Bolt
Φ8*34.4*M6
2
33
Bearing
61803-2Z
2
78
Flat Washer
Φ8.4*Φ16*t1.6
4
34
Nylon Swivel Sleeve
Φ32*Φ17.2*126.5
2
79
Cap Nut
M6
2
35
Open End Wrench
10-13#
1
80
Gourd Hook
Φ8*80
4
36
Hexagon Bolt
M10*20
2
81
Handle Assembly
2
37
Foot Cover
50*50*1.5
4
82
Flat Washer
Φ10*Φ34*t2.5
6
38
Middle Foot Pad
50*50*t5.0
2
83
Foot Cover Set
1
39
Pin Cable Assembly
Φ3*Φ13*105
2
84
Hanging Hook Assembly
4
40
Ring Steel Ball Plug
Φ10*98
2
85
Hex Lock Nut
M8
4
41
Outer Hexagon Bolt
M6*10
2
86
Flat Washer
Φ8*Φ24*t3.0
4
42
Hex Lock Nut
M6
2
87
Spring Washer
Φ10.2*Φ15.4
*t2.6
2
43
Eye Bolt
M10
2
88
Spring Washer
Φ12.2*Φ18.4
*t3.1
2
44
Foam Grip
Φ24*Φ30*450
1
89
Square Inner Tube Plug
50*50*t2.0
1
45
Push Rod
1
90
Square Inner Tube Plug
50*50*t1.5
5