User’s Manual
XD5-40d Series
Thermal Label Printer
Ver. 1.02
http://www.bixolon.com

Ver. 1.02
- 2 -
XD5-40d Series
Table of Contents
Copyright ............................................................................................................................ 4
WARNING & CAUTION ....................................................................................................... 7
Manual Introduction ......................................................................................................... 9
Printer Introduction ........................................................................................................ 10
1. Content Confirmation ................................................................................................. 11
2. Product Part Names .................................................................................................... 12
3. Installation & Usage .................................................................................................... 13
3-1 Printer Installation Placings ........................................................................................... 13
3-2 Power Connection ........................................................................................................... 14
3-3 Interface............................................................................................................................ 16
3-3-1 Standard Interface (USB & USB HOST) ................................................................... 17
3-3-2 Optional Interface (USB & USB HOST & Serial & Ethernet) .................................. 18
3-4 Media Installation ............................................................................................................ 19
3-5 Button & LED (Standard Model) ..................................................................................... 21
3-5-1 Button Operations..................................................................................................... 21
3-5-2 LED Indicator For Various Printer Statuses ............................................................ 22
3-6 Button & LCD (LCD Model) ............................................................................................. 23
3-6-1 Button Operation ...................................................................................................... 23
3-6-2 Interface Status Icon ................................................................................................. 24
3-6-3 Menu Composition .................................................................................................... 25
3-6-4 Setting Menu Explanation ........................................................................................ 28
3-6-5 Interface Menu Explanation ..................................................................................... 32
3-6-6 Sensor Menu Explanation ........................................................................................ 37
3-6-7 Tools Menu Explanation ........................................................................................... 37
3-6-8 Information Menu Explanation ............................................................................... 43
4. Self-test ......................................................................................................................... 44
5. Detailed Features ........................................................................................................ 45
5-1 Stand-alone Configuration Mode .................................................................................. 45
5-1-1 Start Stand-alone Configuration Mode and execute each function .................... 45
5-1-2 Function List Of Stand-alone Configuration Mode ................................................ 45
5-2 Pause/Cancel .................................................................................................................... 46
5-2-1 Pause/Resume Function ........................................................................................... 46

Ver. 1.02
- 3 -
XD5-40d Series
5-2-2 Print Cancellation ...................................................................................................... 47
5-3 Smart Media Detection ................................................................................................... 48
5-4 Gap Sensor Auto Calibration Mode ............................................................................... 48
5-5 B/M Sensor Auto Calibration Mode ............................................................................... 49
5-6 Media Sensor Manual-Calibration ................................................................................. 50
5-7 Data Dump Mode ............................................................................................................ 51
5-8 Factory Reset .................................................................................................................... 52
5-9 SWC (Simple Wi-Fi Connect) ........................................................................................... 53
5-10 Print Standby Mode ....................................................................................................... 54
5-10-1 About Print Standby Mode ..................................................................................... 54
5-10-2 How to switch the printer from Standby Mode to Print Ready Mode ............... 54
5-11 Media Installation Method of Peeler (Option) Model ............................................... 55
5-12 Using Fan-Fold or External Media ................................................................................ 57
5-12-1 When using Fan-Fold media .................................................................................. 58
5-12-2 When using Large media roll (Optional) .............................................................. 59
5-13 Auto Cutter (Option) ...................................................................................................... 60
6. Printer Maintenance ................................................................................................... 61
6-1 Cleaning Printer Head ..................................................................................................... 61
6-2 Cleaning Sensors, Roller or/and media Path ................................................................ 62
6-3 Replacing Roller ............................................................................................................... 63
7. Specifications ............................................................................................................... 64
7-1 Printer Specifications....................................................................................................... 64
7-2 Label Types Specifications .............................................................................................. 65

Ver. 1.02
- 4 -
XD5-40d Series
Copyright
© BIXOLON Co., Ltd. All rights reserved.
This user manual and all property of the product are protected under copyright law.
It is strictly prohibited to copy, store, and transmit the whole or any part of the manual
and any property of the product without the prior written approval of BIXOLON Co., Ltd.
The information contained herein is designed only for use with this BIXOLON product.
BIXOLON is not responsible for any direct or indirect damages, arising from or related to
use of this information.
• The BIXOLON logo is the registered trademark of BIXOLON Co., Ltd.
• All other brand or product names are trademarks of their respective companies or
organizations.
BIXOLON Co., Ltd. maintains ongoing efforts to enhance and upgrade the functions and
quality of all our products.
In the following, product specifications and/or user manual content may be changed
without prior notice.
Notice - EU
This wireless device is class A that is considered to be used in an industrial environment.
Caution
Some semiconductor devices are easily damaged by static electricity. You should turn the
printer “OFF”, before you connect or remove the cables on the rear side, in order to guard
the printer against the static electricity. If the printer is damaged by the static electricity,
you should turn the printer “OFF”.

Ver. 1.02
- 5 -
XD5-40d Series
Compliance information
This device complies with Part 15 of the FCC Rules. Operation is subject to the following
two conditions: (1) This device may not cause harmful interference, and (2) This device
must accept any interference received, including interference that may cause undesired
operation.
This equipment has been tested and found to comply with the limits for a Class A digital
device pursuant to Part 15 of the FCC Rules. These limits are designed to provide
reasonable protection against harmful interference when the equipment is operated in a
commercial environment. This equipment generates uses, and can radiate radio
frequency energy and, if not installed and used in accordance with the instruction manual,
may cause harmful interference to radio communications. Operation of this equipment
in a residential area is likely to cause harmful interference in which case the user will be
required to correct the interference at his own expense.
Caution: Exposure to Radio Frequency Radiation.
To comply with FCC RF exposure compliance requirements, a separation distance of at
least 20 cm must be maintained between the antenna of this device and all persons.
Caution: Any Changes or modifications not expressly approved by the manufacturer could
void the user's authority to operate the equipment.
Class A Digital Device : Wired Device
This Apparatus complies with class “A” limits for radio interference as specified in the
Canadian department of communications radio interference regulations.
This Class A digital apparatus complies with Canadian ICES-003.
Appareil numérique de classe A: appareil filaire
Get appareil est conforme aux normes class “A” d’interference radio tel que specifier par
ministre canadien des communications dans les reglements d’interference radio.
Cet appareil numérique de la classe A est conform à la norme NMB-003 du Canada.
Waste Electrical and Electric Equipment (WEEE)
This marking shown on the product or its literature, indicates that is should not
be disposed with other household wastes at the end of its working life, To
prevent possible harm to the environment or human health from uncontrolled
waste disposal, please separate this from other types of wastes and recycle it

Ver. 1.02
- 6 -
XD5-40d Series
responsibly to promote the sustainable reuse of material resources. Household users
should contact either the retailer where they purchased this product, or their local
government office, for details of where and how they can take this item for
environmentally safe recycling. Business users should contact their supplier and check
the terms and conditions of the purchase contract. This product should not be mixed with
other commercial wastes for disposal.

Ver. 1.02
- 7 -
XD5-40d Series
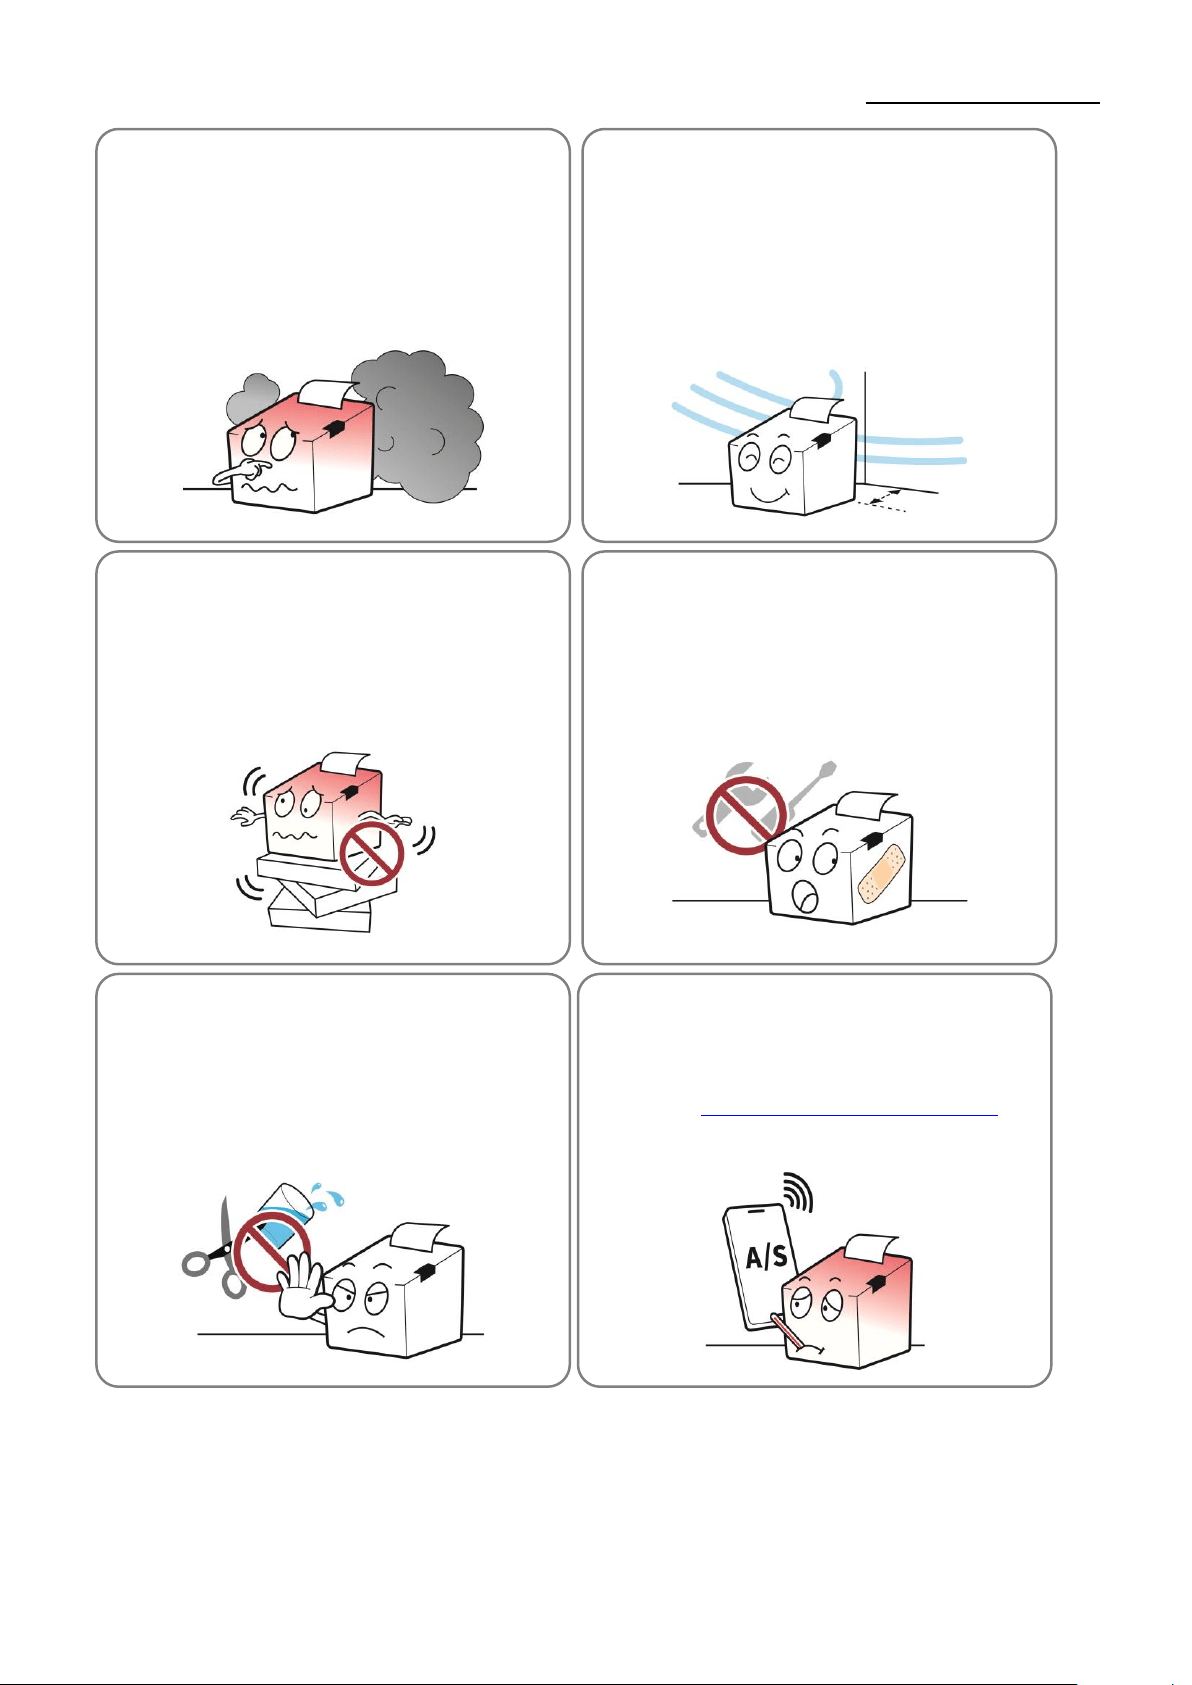
WARNING & CAUTION
It describes death, physical injuries, serious financial losses, and damage
to data etc. that can be caused to the user.
Do not connect multiple products to one
single power outlet. Do not connect the
product to a loose power outlet.
Use only power outlets that meet the
standard. Connect the power cord only to a
grounded power outlet. Noncompliance
may cause electric shock or fire.
Use only authentic products from
BIXOLON. The company will not provide
post-sale support for damage or other
quality issues that any fake
(refurbished) products may incur.
Do not bend or strain the power cord
excessively. Push the power cord all the way
into the power outlet lest it remain loose. Make
sure to hold the cord tight when separating it
from the power outlet. Do not remove the
power cord while the product is in use.
Noncompliance may cause electric shock or
fire.
Keep small accessories or other packaging
materials away from young children.
Beware: children may swallow them.
Mishandling the product may incur
injuries. If a child has swallowed any
such thing, see a doctor at once.
Do not touch the power cord with wet
hands when pulling it from a power outlet.
If the power plug or outlet is smeared with
extraneous matter, wipe it with a dry cloth.
Noncompliance may cause electric shock
or fire.
Do not allow the product to be
damaged by heavy objects.
Noncompliance may cause electric
shock or fire.
Ver. 1.02
- 8 -
XD5-40d Series
If the product emits a strange sound, burning
smell, or smoke, turn off the power immediately
and unplug the power cord. If the product is
dropped or its exterior is damaged, turn off the
power immediately and unplug the power cord.
Do not subject the product to shock. It may
start a fire. It may damage the product.
Install the product in a well-ventilated place by keeping it
a certain distance from the wall. The product installed in
certain places such as where a lot of fine dust is generated,
where the temperature is too high or too low, where there is
a lot of moisture or water, and at airports or stations that are
used continuously for a long time may suffer serious quality
problems due to the influence of the surrounding
environment. An increase in internal temperature may
start a fire. Be sure to contact the place of purchase
before installing the product.
Install the product in a fixed place
preventing it from tipping over. When
moving the product, turn off the power and
disconnect all cables connected to the
product, including the power cord. It may
damage the product.
Never disassemble, repair, or modify
the product at your own discretion.
When repair is necessary, contact the
place of purchase.
Do not let any foreign substances
enter the product. Do not place heavy
objects, liquids, or metals on the
product. It may start a fire.
It may damage the product.
If there is a problem with the
product, please contact the place of
purchase. In addition, Bixolon
website (http://www.bixolon.com)
provides product repair.

Ver. 1.02
- 9 -
XD5-40d Series
Manual Introduction
This manual provides basic information on printers and provides ways to install, use, and
check them.
In order to protect the safety of users and prevent property damage, be fully familiar with
this manual before using the product. Please use it.
1. Windows Driver Manual
This manual provides information on the installation instructions and main
functions of the windows driver.
2. Unified Label Utility-II Manual
This manual provides information on the usage of software for function
selection of this product, operating condition modification, etc.
3. Programming(SLCS) Manual
This manual provides information on label printer commands.
4. True Font Downloader Manual
This manual provides information on the usage of the font downloader that
can download true type fonts and facilitate their usage as device fonts.
5. Network Connection Manual
This manual provides information on the configuration and usage of
network interface.
6. Bluetooth Connection Manual
This manual provides information on connection instructions the Bluetooth
interface.
7. Label Design Program Manual
This manual provides information on the usage of the Windows PC
program that can make labels by adding text, graphics, or barcodes at
desired positions.
Manual Symbol Introduction
Precaution
& Warning
It describes death, physical injuries, serious financial losses,
and damage to data etc. that can be caused to the user.
Note
It provides additional information on the function and
performance of the product.
Ver. 1.02
- 10 -
XD5-40d Series
Printer Introduction
XD5-40d series printers have been designed to be connected to various types of electronic
devices such as computer peripheral devices.
The main features of the printer are as follows
1. XD5-40d : Maximum 178mm/s(Max 7ips) printing speed
XD5-43d : Maximum 127mm/s(Max 5ips) printing speed
2. 4inch THERMAL LABEL PRINTER
3. 194 x 248 x 169 (W x D x H)
4. Support for multiple interfaces
- Standard(Wire): USB & USB HOST
- Option(Wire): USB & USB HOST & Serial & Ethernet
- Option(Wireless): Bluetooth, WLAN
5. Easy media loading
6. Can print a range of barcodes
7. Option : Peeler, Auto Cutter
8. Option : LCD
Product Symbol Introduction
DC (Direct current)
USB
Ethernet
Ver. 1.02
- 11 -
XD5-40d Series
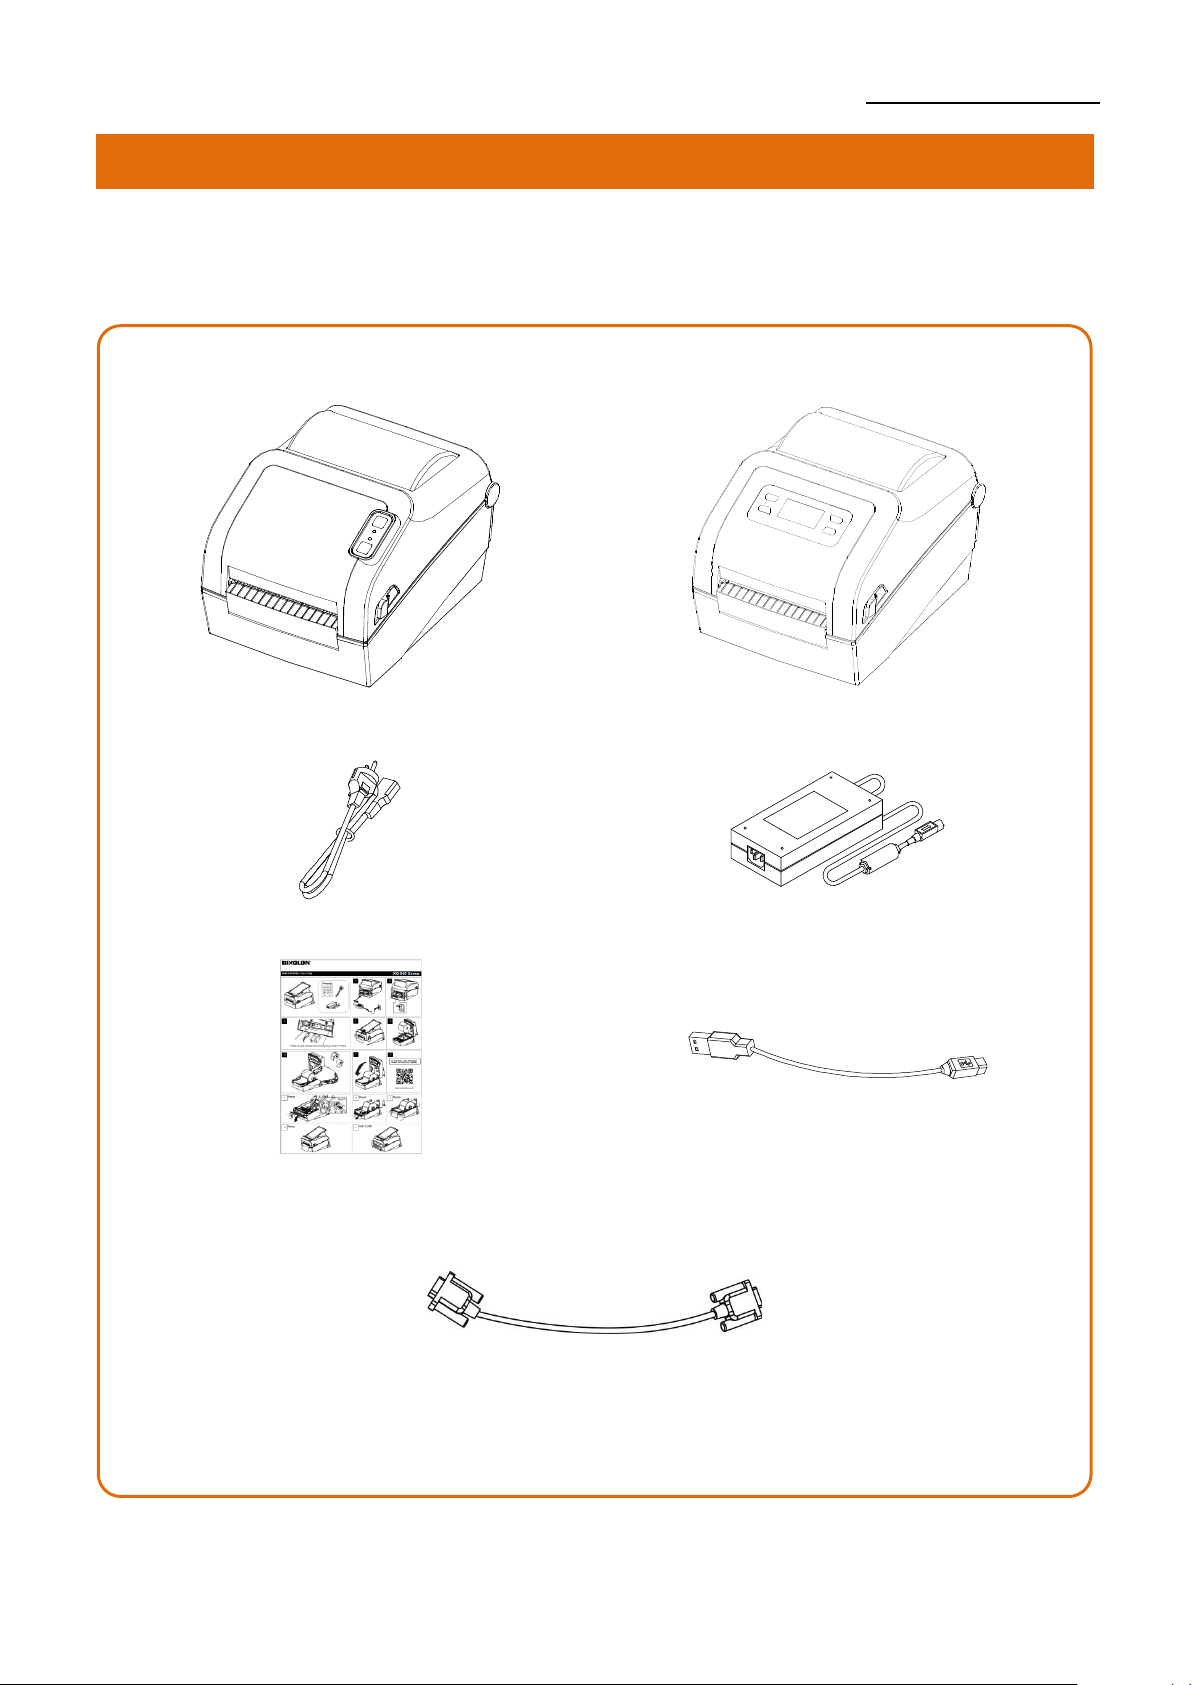
1. Content Confirmation
The following items should all be contained in the printer package.
Contact the dealer from which the purchase was made if any item is damaged or missing.
Product
XD5-40d/43d
XD5-40d/43d LCD Model(Option)
Power Cord
AC/DC Adapter
Quick Manual
USB Cable
※ Optional
Serial(RS-232C) Cable

Ver. 1.02
- 12 -
XD5-40d Series
2. Product Part Names
Feed/Cancel Button
Cover Lever
Printer Head
Media Holder
Sensor
Media Cover
Cover STD
Pause Button

Ver. 1.02
- 13 -
XD5-40d Series
3. Installation & Usage
3-1 Printer Installation Placings
• Install the printer in a location that meets the following conditions.
- Allow sufficient space around the printer for proper ventilation.
- Install the printer on a flat and level surface.
- Avoid humid environment.

Ver. 1.02
- 14 -
XD5-40d Series
3-2 Power Connection
• Connect power to the printer as shown below.
1) Turn off the printer power switch.
2) Check to see that the AC/DC adapter voltage matches that of the power source.
3) Connect the AC/DC adapter jack to the printer power port.
4) Connect the power cord to the AC/DC adapter.
5) Connect the power cord to a power source/outlet.
Power Switch
AC/DC Adapter
Power Cord

Ver. 1.02
- 15 -
XD5-40d Series
- Only use a power supply provided by BIXOLON.
BIXOLON shall bear no responsibility for damage caused
by using a third-party power supply.
- Check the power supply’s label to check its electronic specs.
- For the safety of people and equipment, please use the appropriate
power cord for your country or region.
- When removing the power supply, make sure you have a firm
grasp of power connector and the printer, then pull horizontally.
- Pay attention to the direction in which you insert the power cable.
- Be sure to turn off the printer before connecting the power connector
to the printer. This can cause serious electrical damage and bodily
injury.
- Do not operate the printer and power supply in a humid
environment. This can cause serious electrical damage and bodily
injury.
- Do not connect an input voltage beyond the specifications of
the power supply. This may result in product damage and fire.
Ver. 1.02
- 16 -
XD5-40d Series
3-3 Interface
Shielded cables must be used to prevent radiation and reception of electrical
noise. Use the shortest possible communication cable to minimize the detection
of electrical noise in the cable.
- Serial(RS-232C) Cable (1.8m or less recommended)
- USB B-Type Cable (1.8m or less recommended)
- LAN(Ethernet) Cable (3m or less, CAT-5 or higher UTP Cable)
- Connecting unshielded communication cables is in violation of EMC
standards. Use the cable approved by us.
- Do not bundle the communication cable with objects that may
cause electrical noise and interference. The printer may be damaged.
- After turning off the power switch of printer, connect and
disconnec the communication cable.
This can cause serious electrical damage and bodily injury.
Ver. 1.02
- 17 -
XD5-40d Series
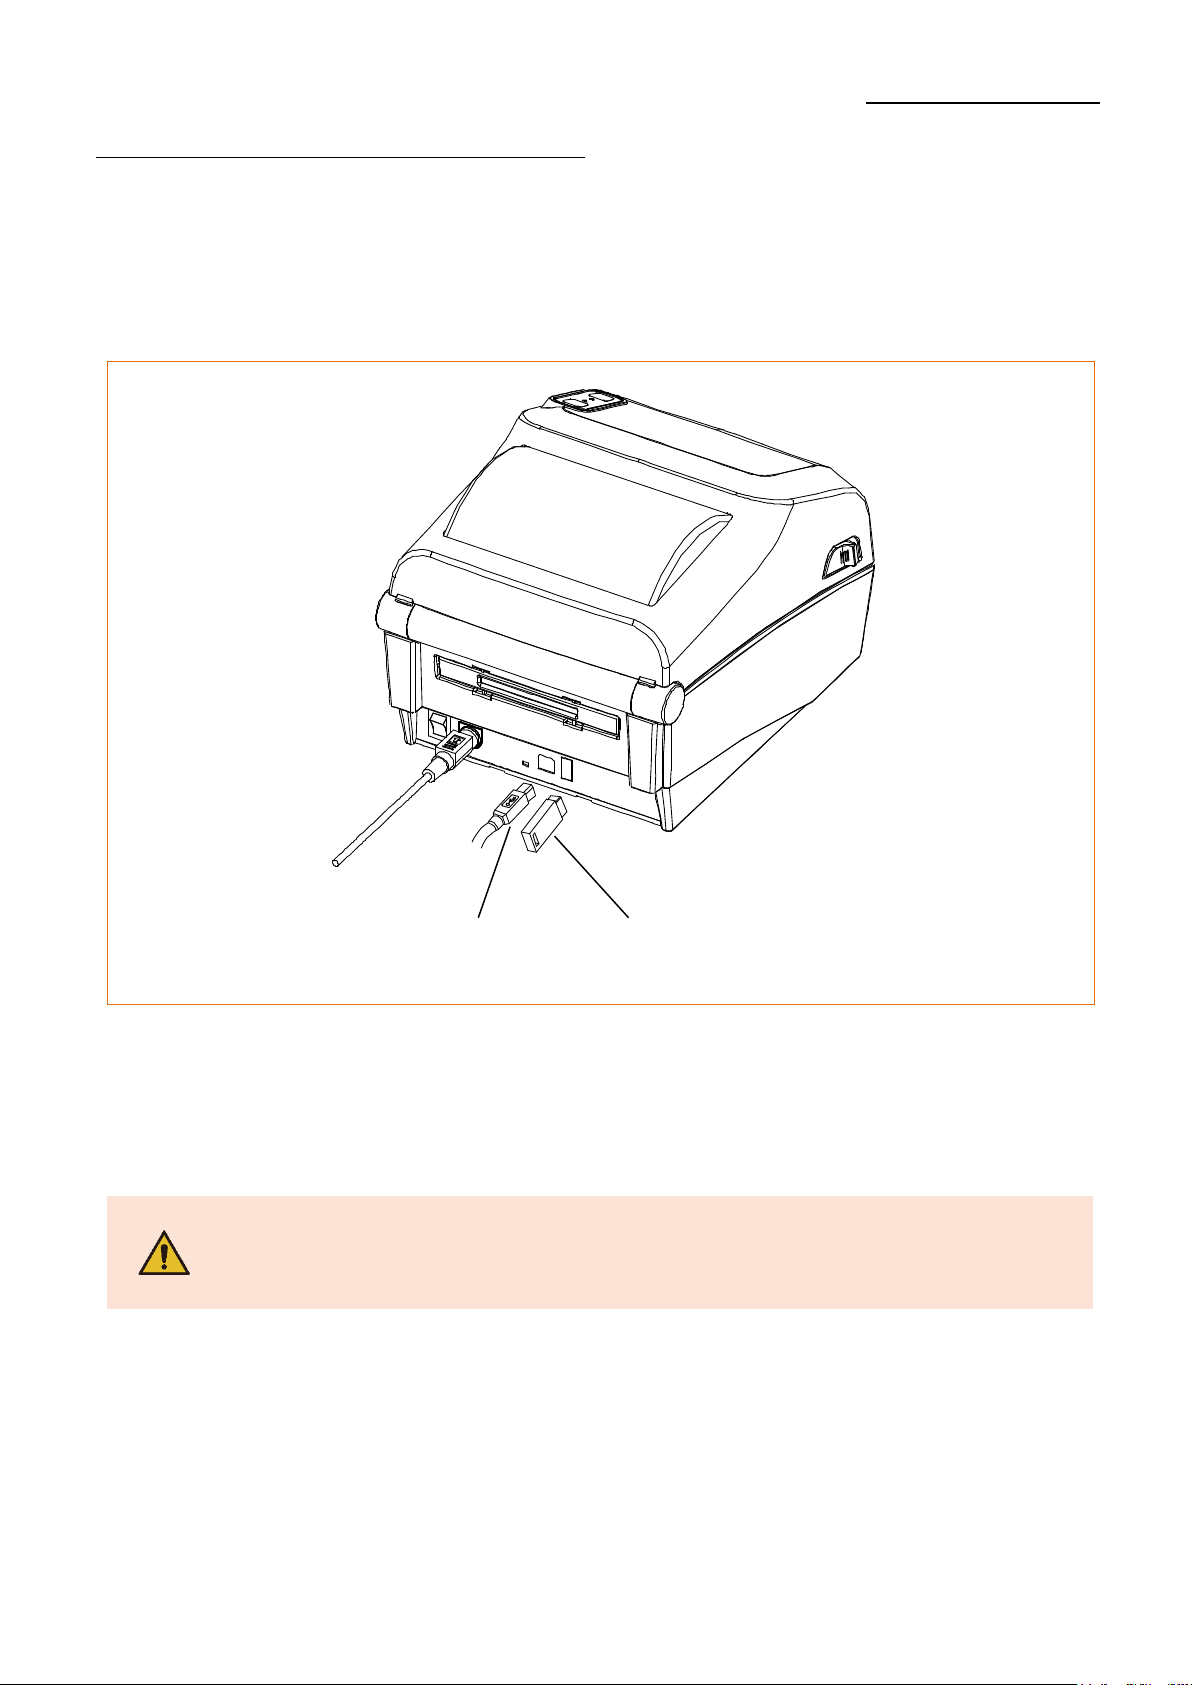
3-3-1 Standard Interface (USB & USB HOST)
Connect the interface cable as shown below.
This printer supports the following communications interface standards.
- USB B-Type Cable
- USB A-Type (storage)
1) Turn off the power switch.
2) Connect the communication cable to the printer communication port to be used.
- Connect USB B-Type cable to the USB port.
Be aware that the product's electronic components may be damaged
due to discharging of electrostatic energy that accumulates on the
surface of the body or other objects.
USB B-Type Cable
USB A-Type
Ver. 1.02
- 18 -
XD5-40d Series
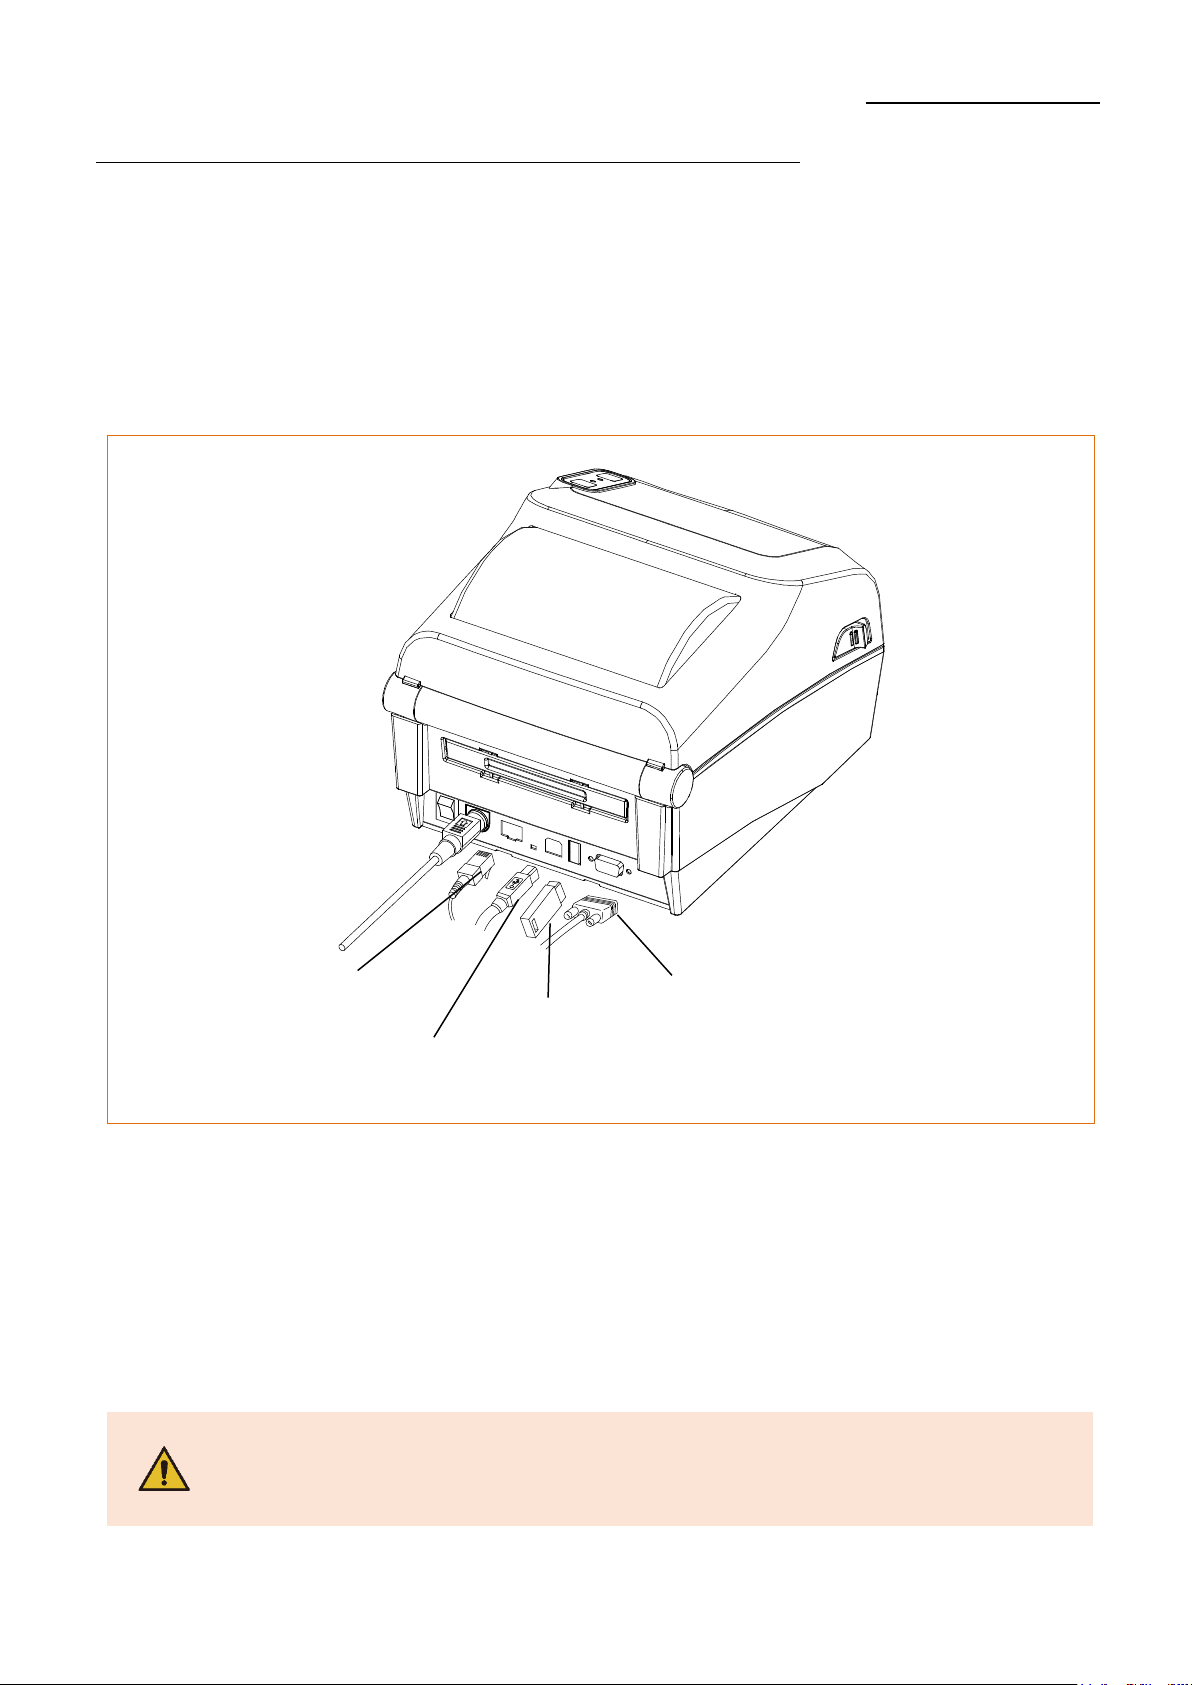
3-3-2 Optional Interface (USB & USB HOST & Serial & Ethernet)
Connect the interface cable as shown below.
This printer supports the following communications interface standards.
- Serial(RS-232C) Cable
- LAN(Ethernet) Cable
- USB B-Type Cable
- USB A-Type (storage)
1) Turn off the power switch.
2) Connect the communication cable to the printer communication port to be used.
- Connect the serial(RS-232C) cable to the serial port and tighten the screw
on both sides.
- Connect the LAN(Ethernet) cable to the Ethernet port.
- Connect USB B-Type cable to the USB port.
Be aware that the product's electronic components may be damaged
due to discharging of electrostatic energy that accumulates on the
surface of the body or other objects.
USB B-Type Cable
Serial(RS-232C) Cable
LAN(Ethernet) Cable
USB A-Type
Ver. 1.02
- 19 -
XD5-40d Series
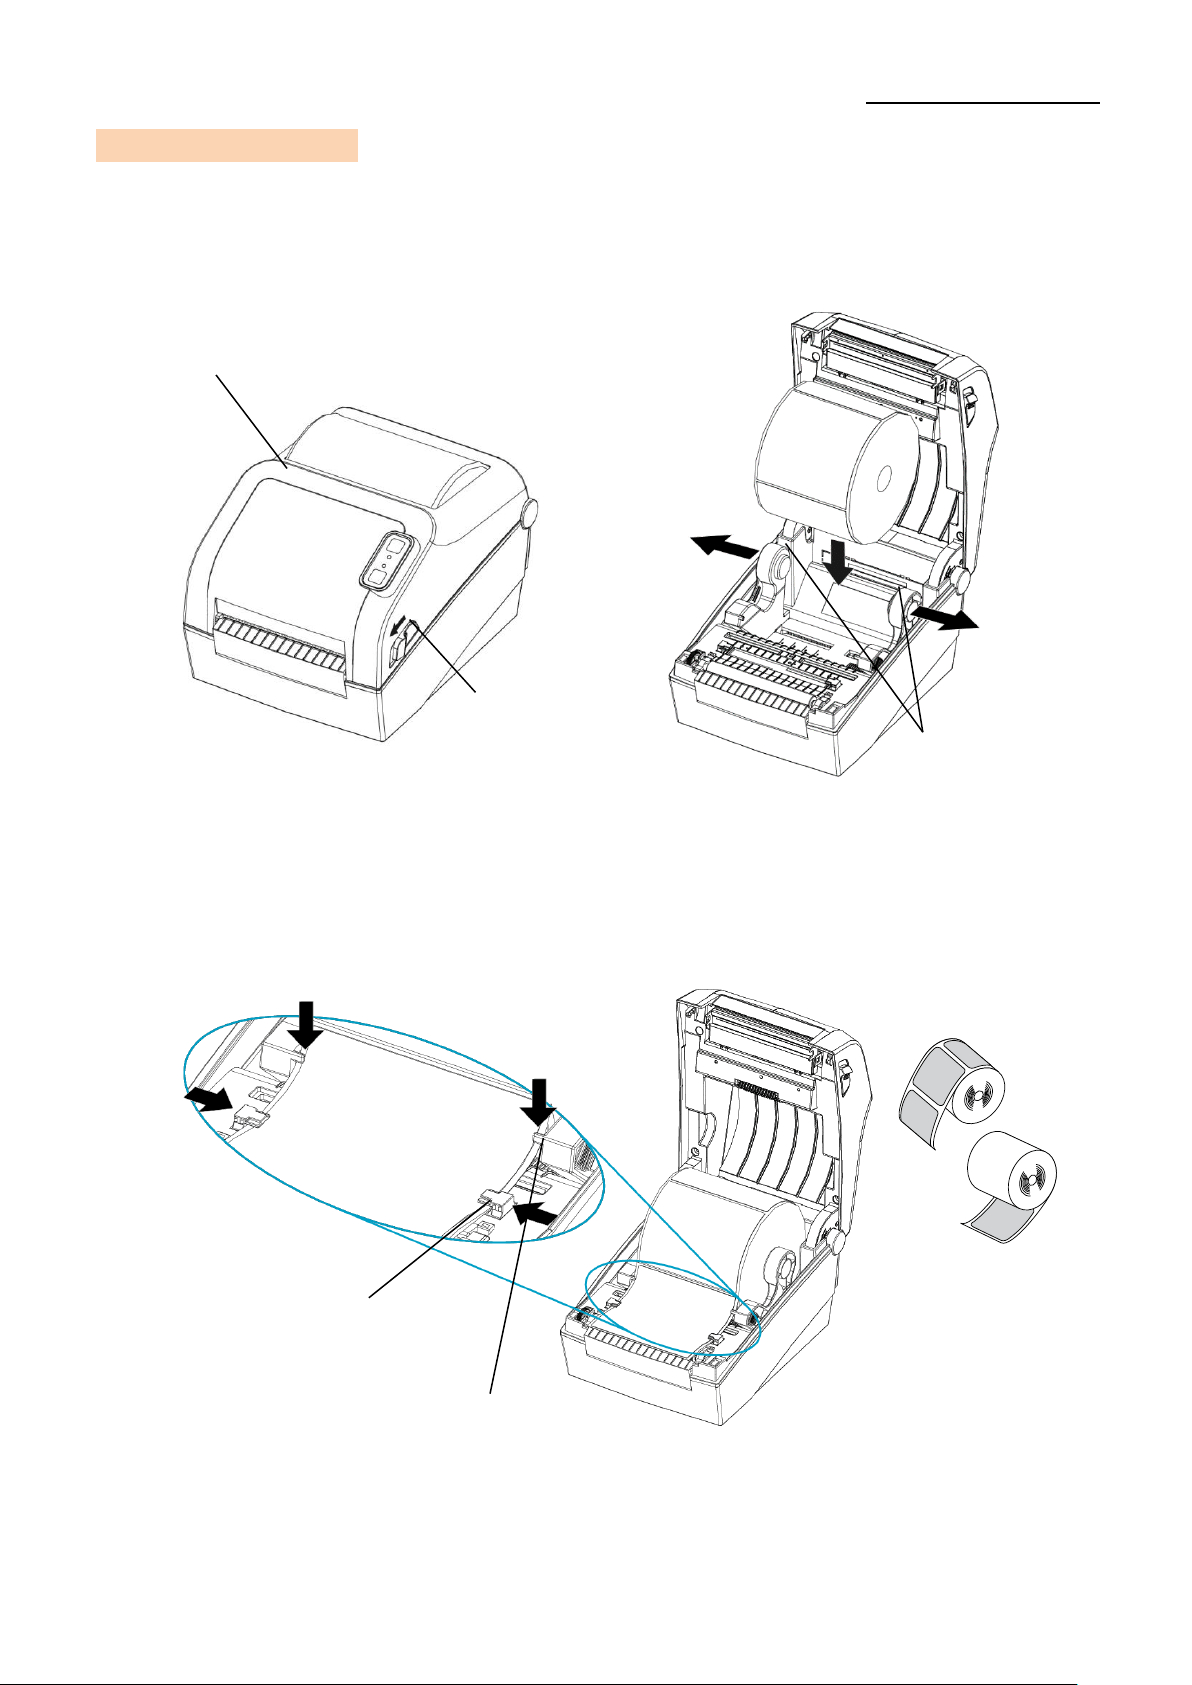
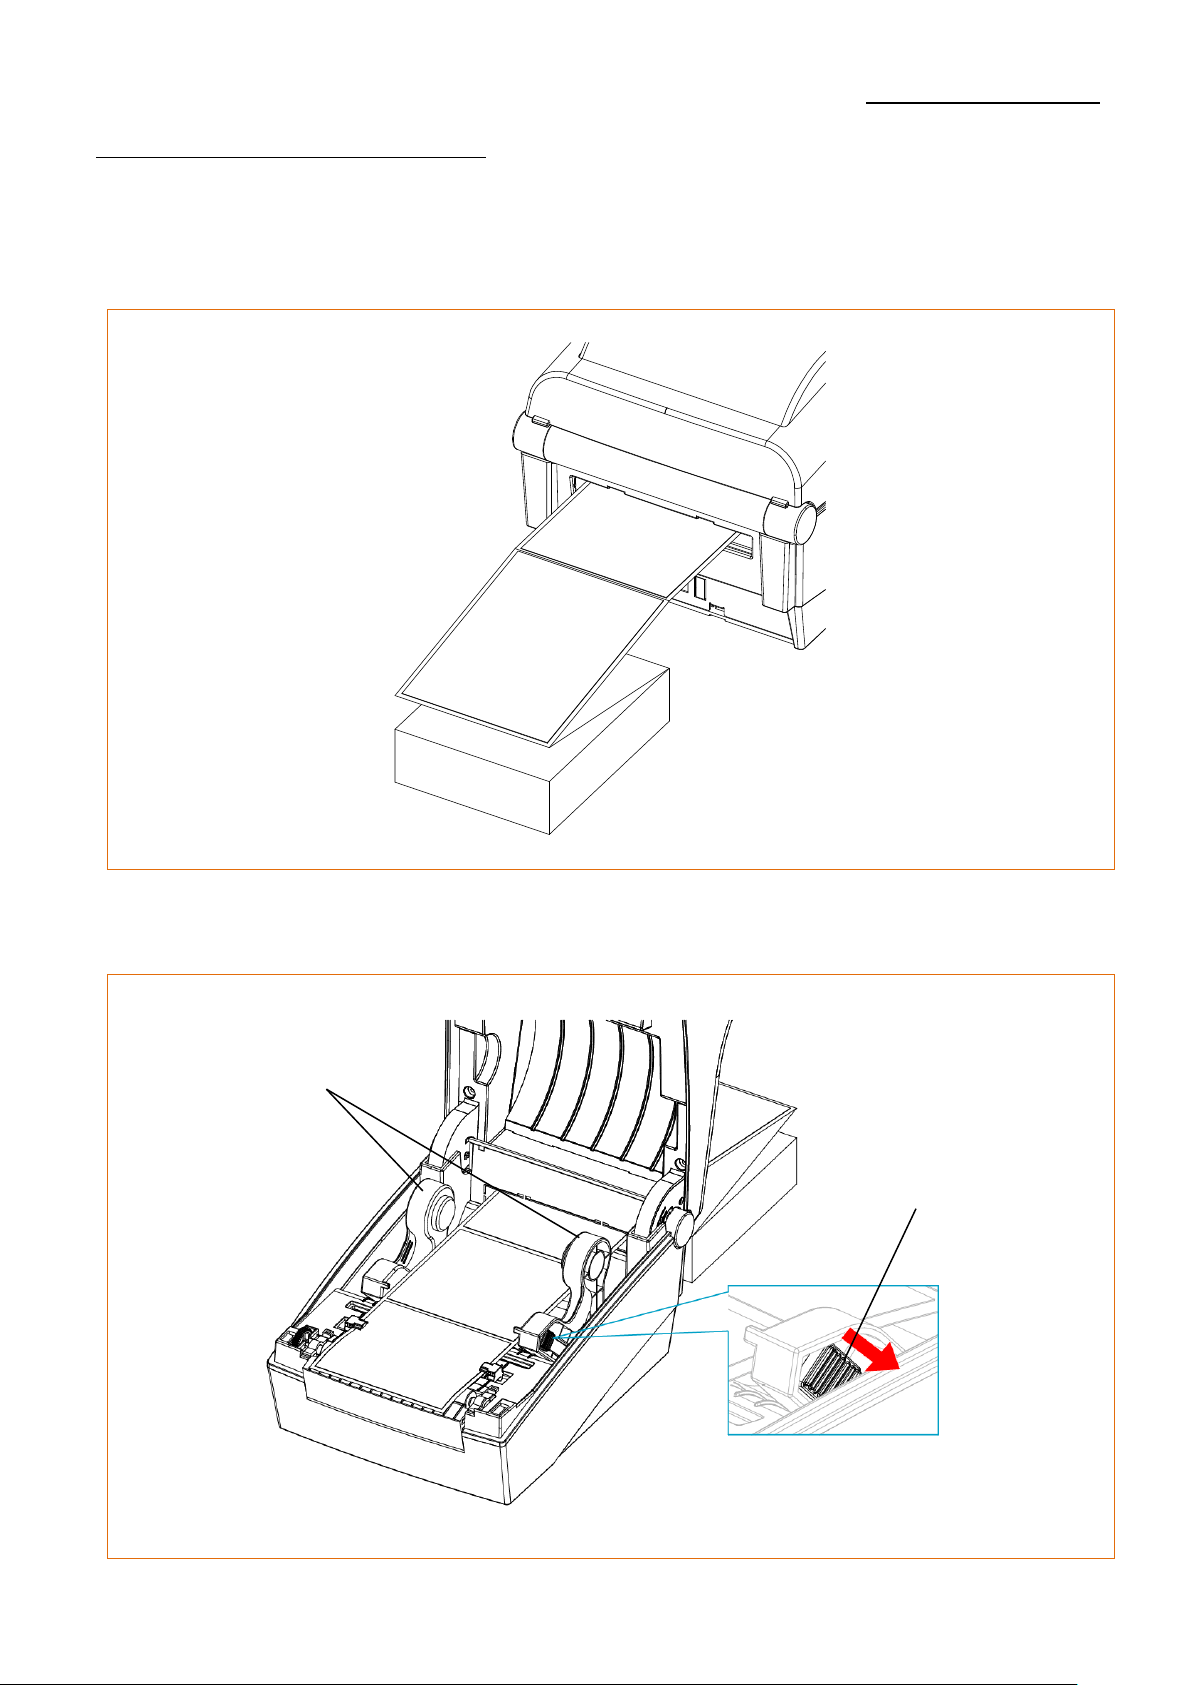
3-4 Media Installation
1) Pull the cover levers on both sides
of the media cover and open
the media cover.
2) Spread the media holder and insert
media as shown.
3) Pull the media out to the front of printer.
Insert the media under both sides of Media Holder Guide.
Adjust the media guides to the width of the media.
* Whether the media is rolled outside or inside, the printing side must faced up.
Media Holder
Media Cover
Cover Lever
Media Guide
Media Holder Guide
Ver. 1.02
- 20 -
XD5-40d Series
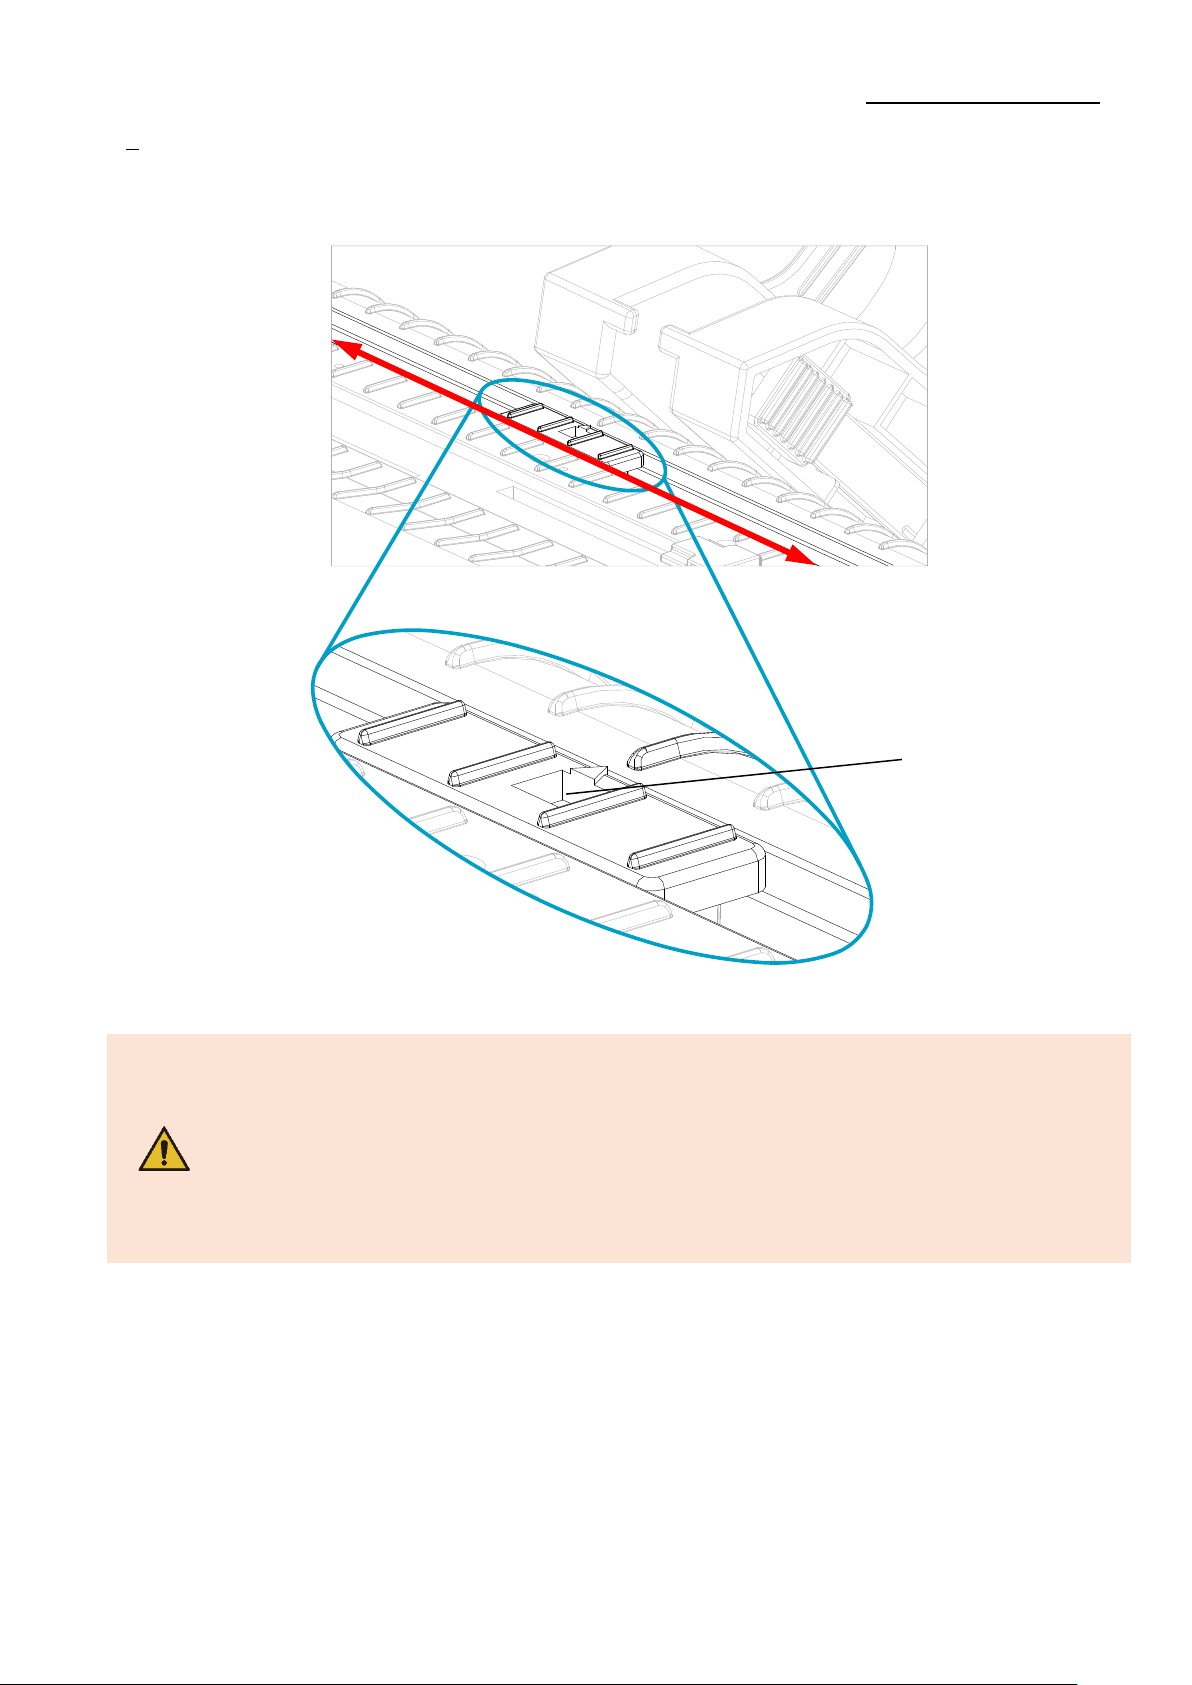
4) After Installation the media, lift the media and manually set the sensor(Black-Mark
& Notch Sensor) to the correct position
- When opening or closing the cover, be careful not to pinch your fingers.
- Do not open the print head levers while the printer is printing.
The printer may be damaged.
- Change the media when the printer is not receiving data, or data may
be lost.
- The print head gets extremly hot while printing or after the printing,
this can cause serious burns. Do not touch the print head.
Black Mark &
Notch Sensor
Ver. 1.02
- 21 -
XD5-40d Series
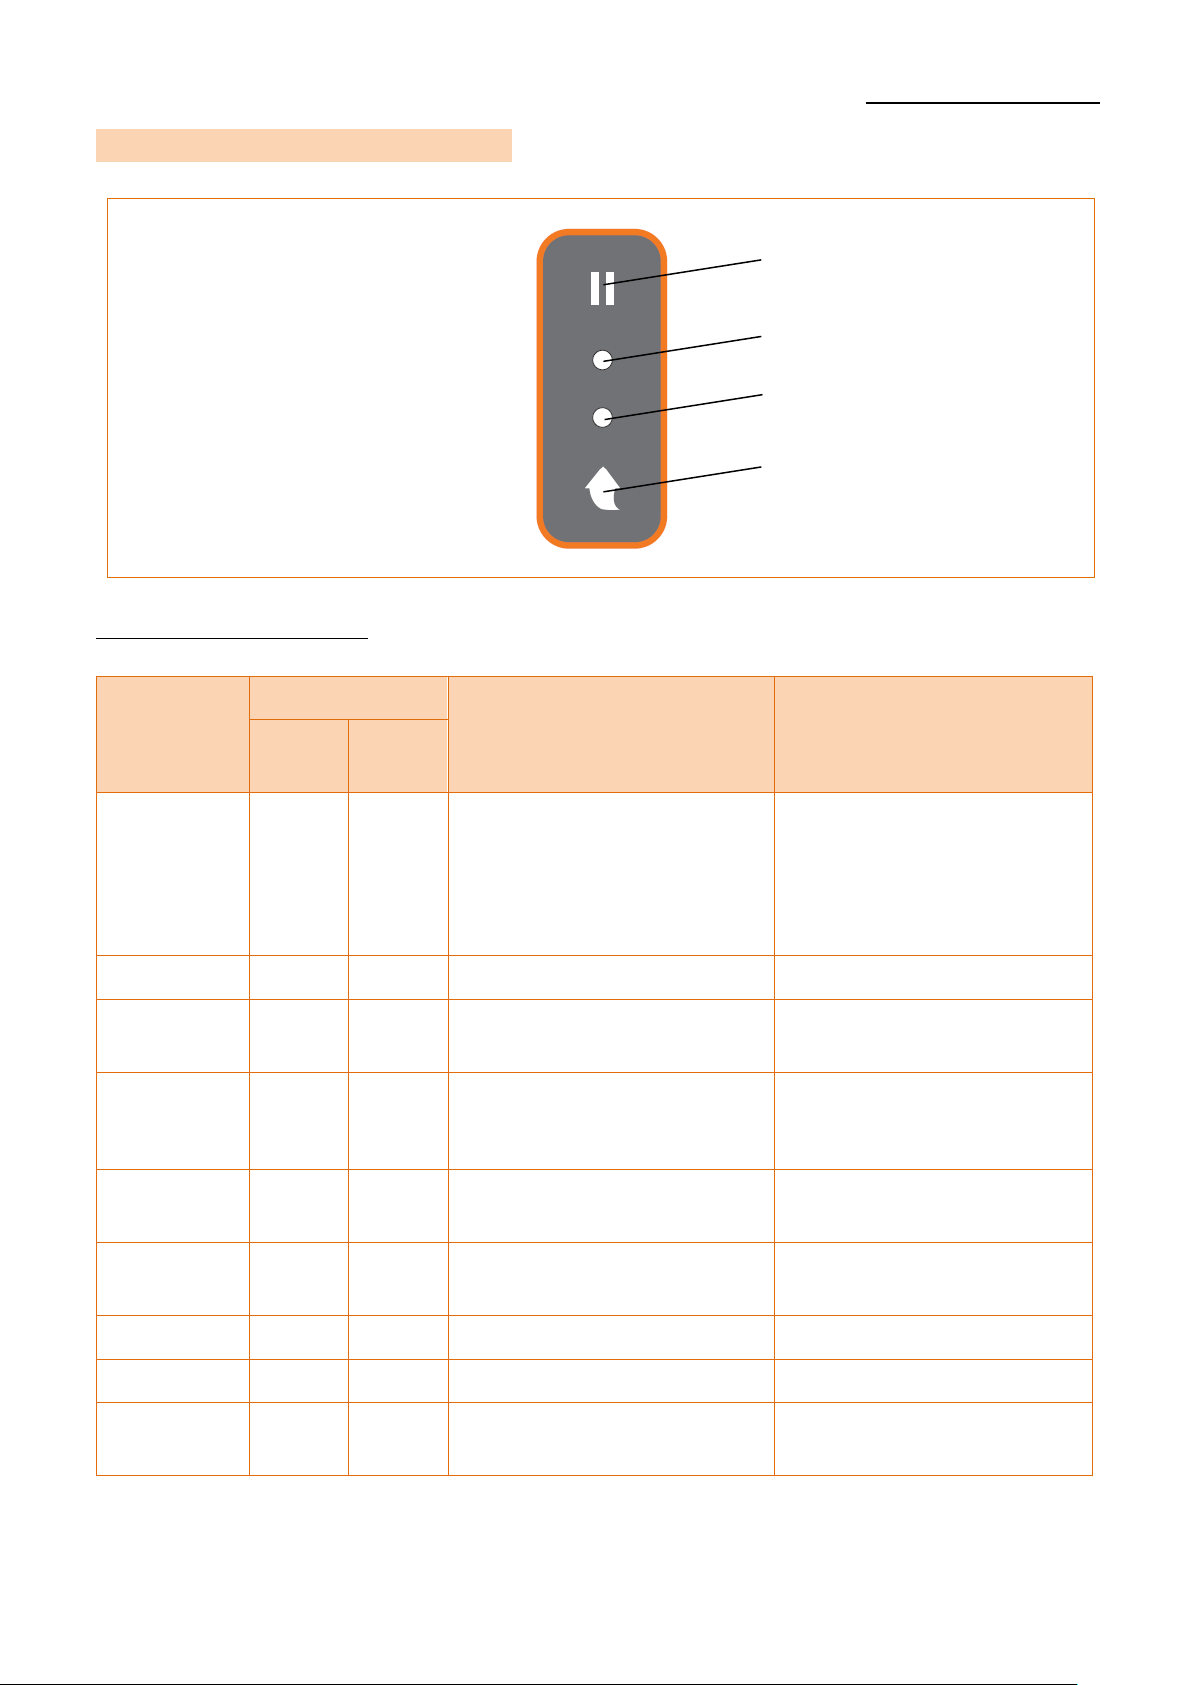
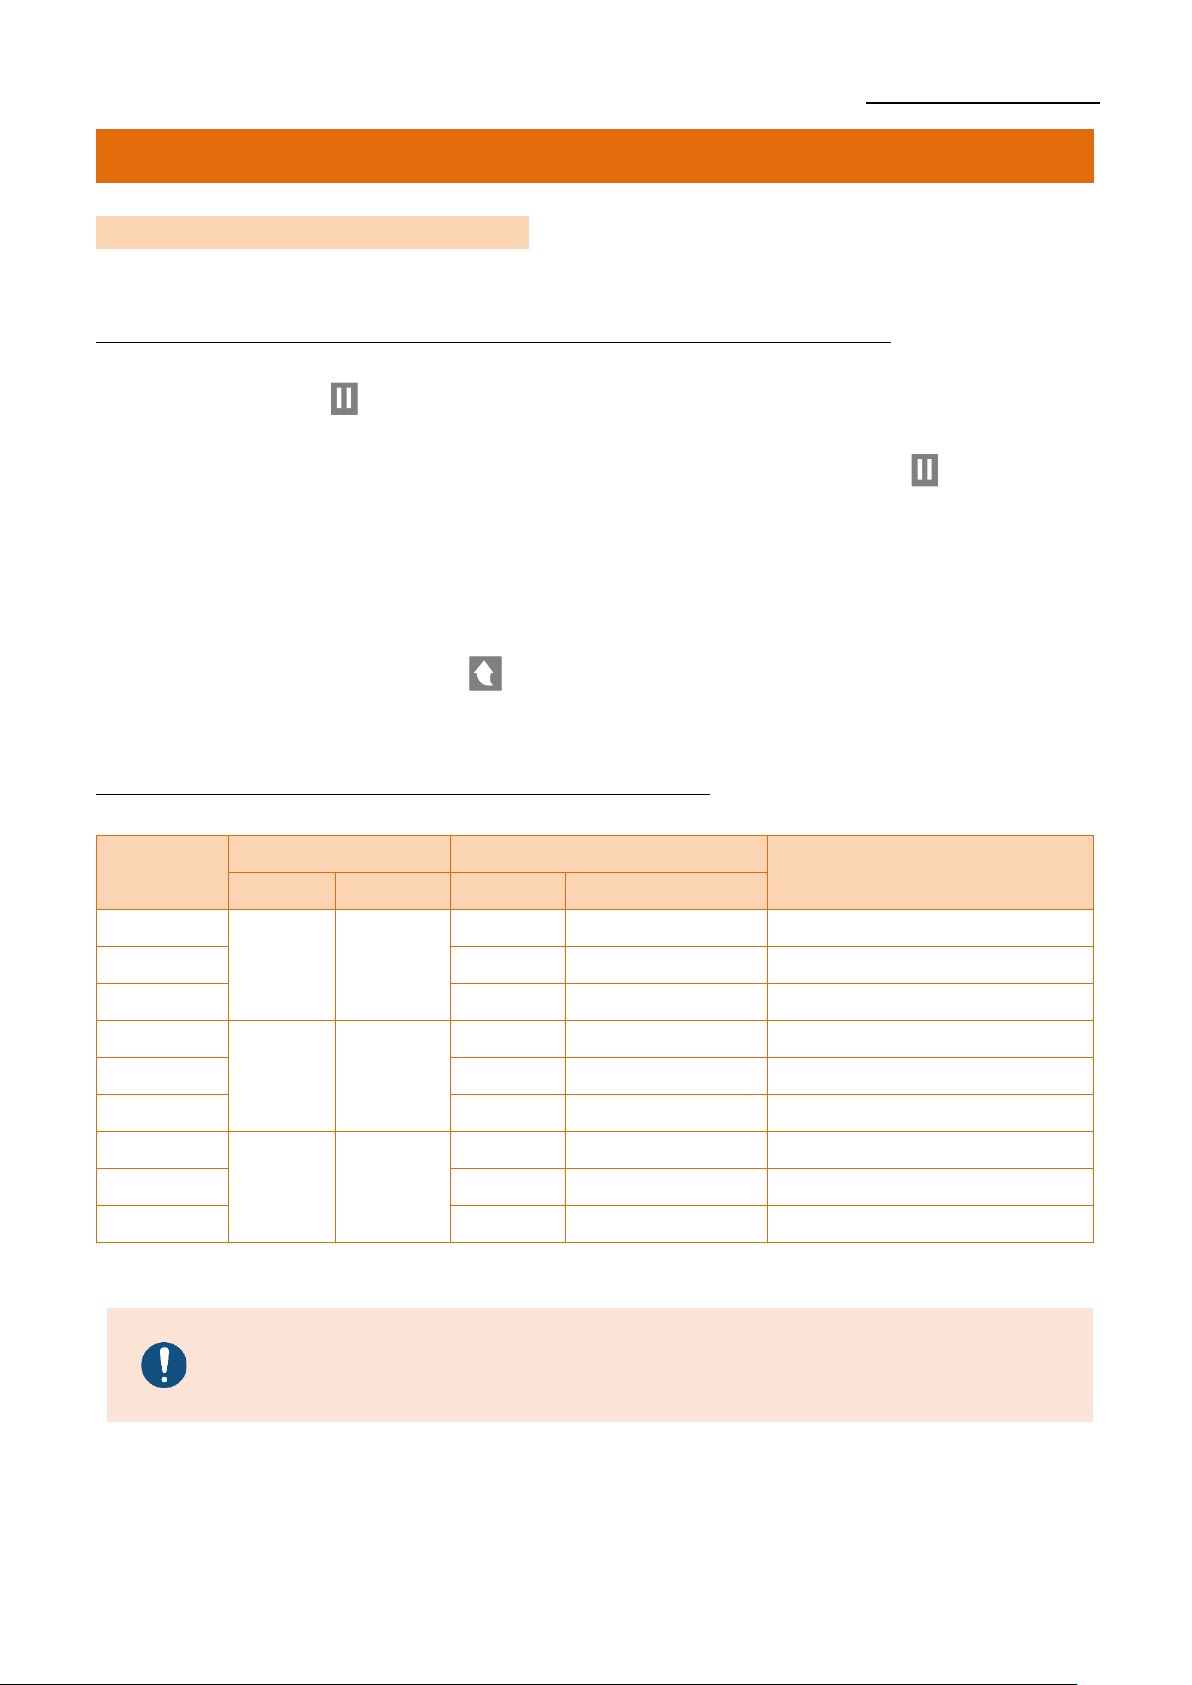
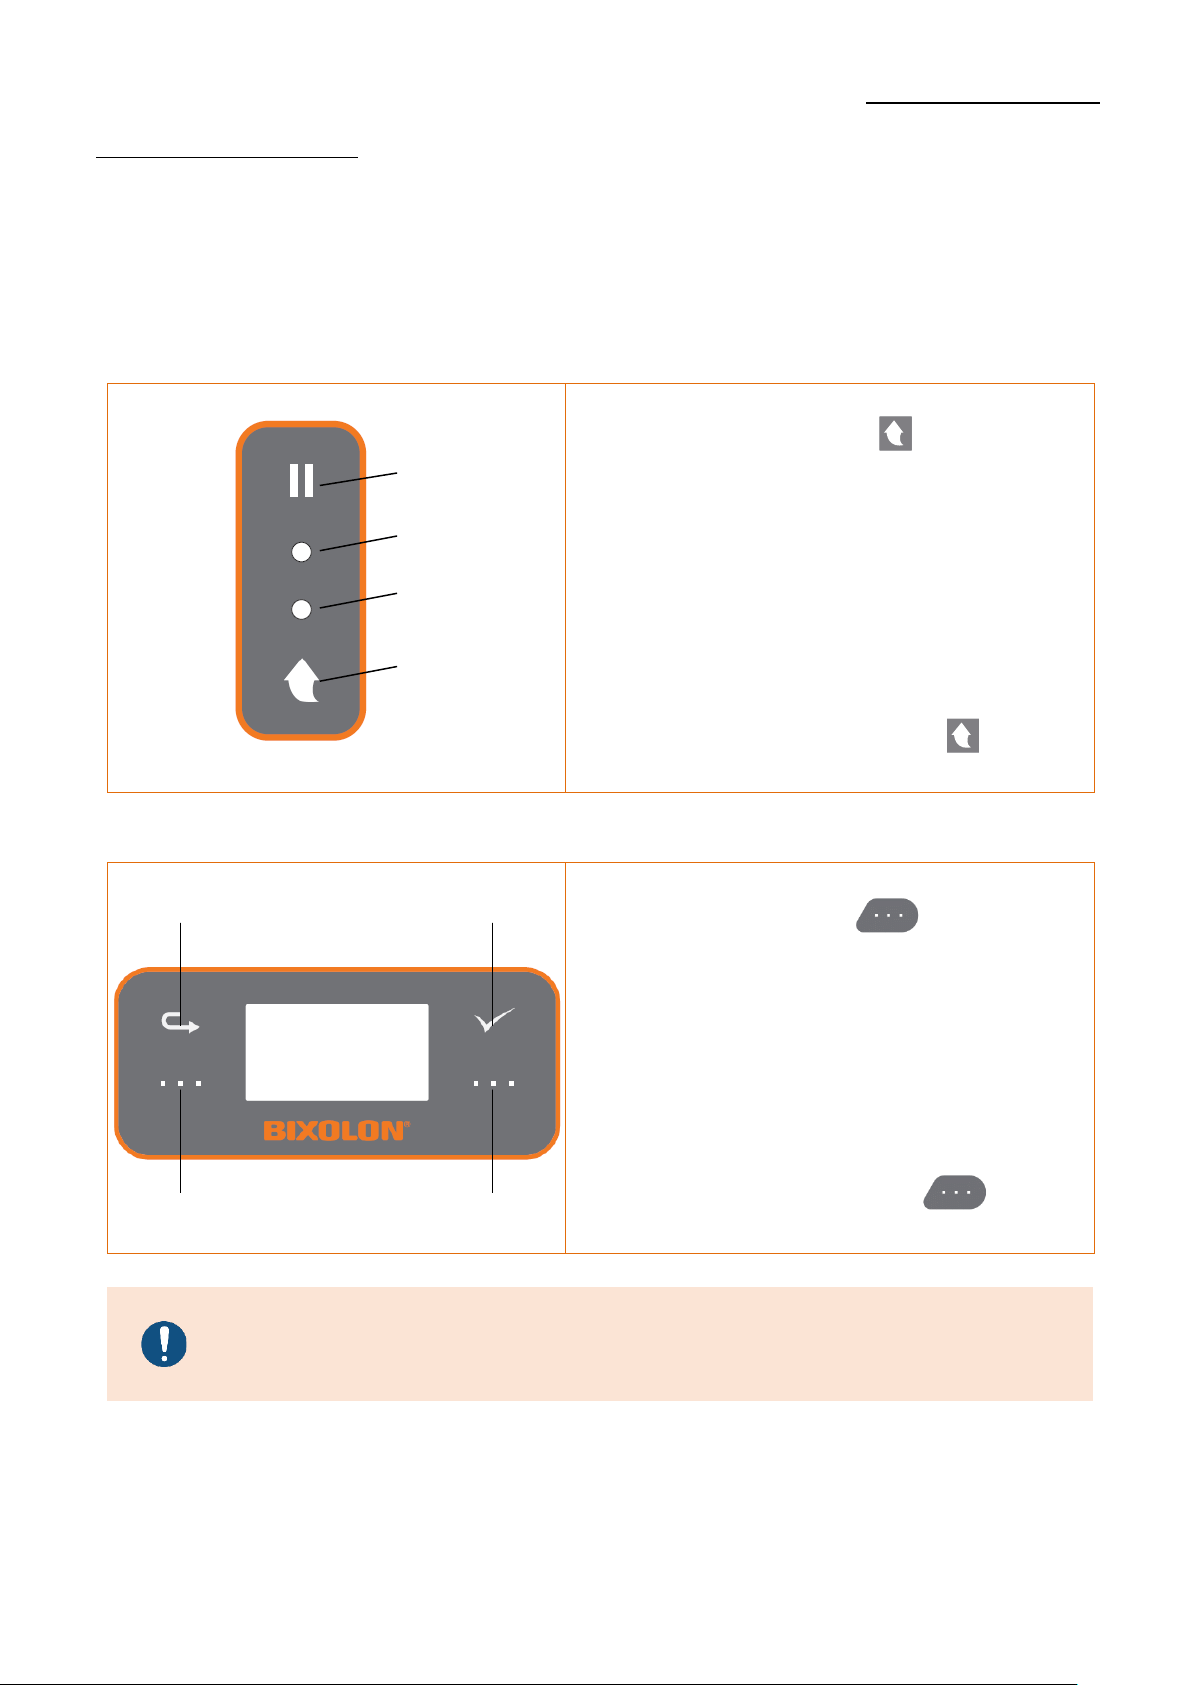
3-5 Button & LED (Standard Model)
3-5-1 Button Operations
Printer state
before
operation
Button
Operation procedure
Printer operation mode
Feed/
Cancel
Pause
Power OFF
Press
-
Apply power while
pressing the button
(Hold the button until the
printer starts self-test
printing)
Self-test Printing
Print Ready
Press
-
Press the button
Feed
Print Ready
Press
-
Press the button for three
seconds
Execute SWC
(Refer 5-9)
Print Ready
-
Press
Press the button for two
seconds
Stand-alone
Configuration Mode
(Refer 5-1)
During
Printing
-
Press
Press the button for two
Seconds
Pause mode
During
Printing
Press
-
Press the button for two
Seconds
Cancel mode
Pause mode
-
Press
Press the button
Print Resume
Pause mode
Press
-
Press the button
Print Cancel
Cancel
mode
Press
-
Press the button
Print Cancel
LED 1
Feed/Cancel Button
LED 2
Pause Button
Ver. 1.02
- 22 -
XD5-40d Series
3-5-2 LED Indicator For Various Printer Statuses
LED 1
LED 2
Printer Operation
Status
Color
Status
Color
Color
Green
On
Green
On
Print Ready Mode
Ready Mode
Green
On
Red
Blink
Print Cancel Mode
Wait For Button Input
Green
Blink
Red
On
Print Is Paused
Temporarily
Wait For Button Input
Green
Blink
Green
Blink
Print Standby
Mode
Wait For Button Input
Orange
On
Orange
On
Mode Switching
Mode Switching Notification
Red
On
Orange
On
Error Mode
Media Jam (gap/black mark
is not recognized)
Red
On
Green
Blink
Error Mode
Printer Head Overheating
Red
On
Orange
Blink
Error Mode
No Media
Red
On
Red
Blink
Error Mode
Media Cover Open
Red
On
-
Off
Error Mode
Media Calibration Failure
Red
Blink
Red
Blink
Error Mode
Auto-Cutter Error
Ver. 1.02
- 23 -
XD5-40d Series
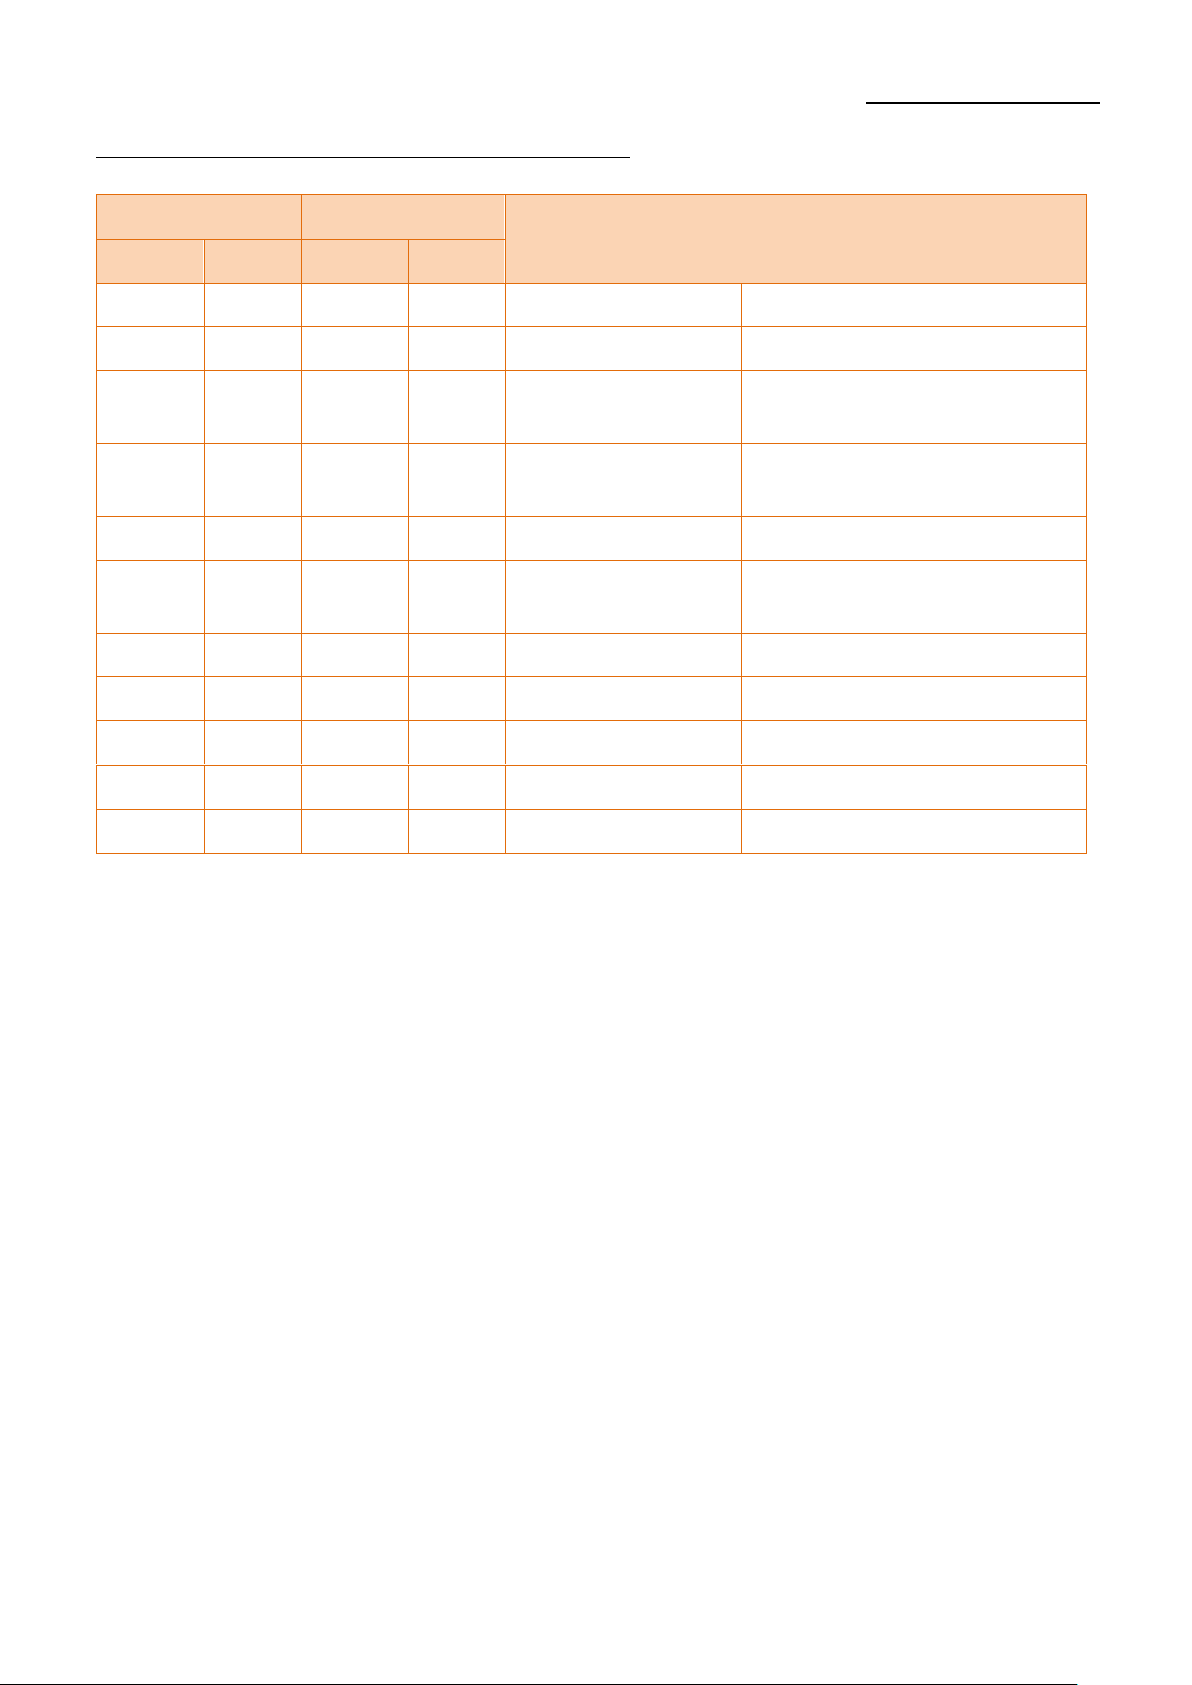
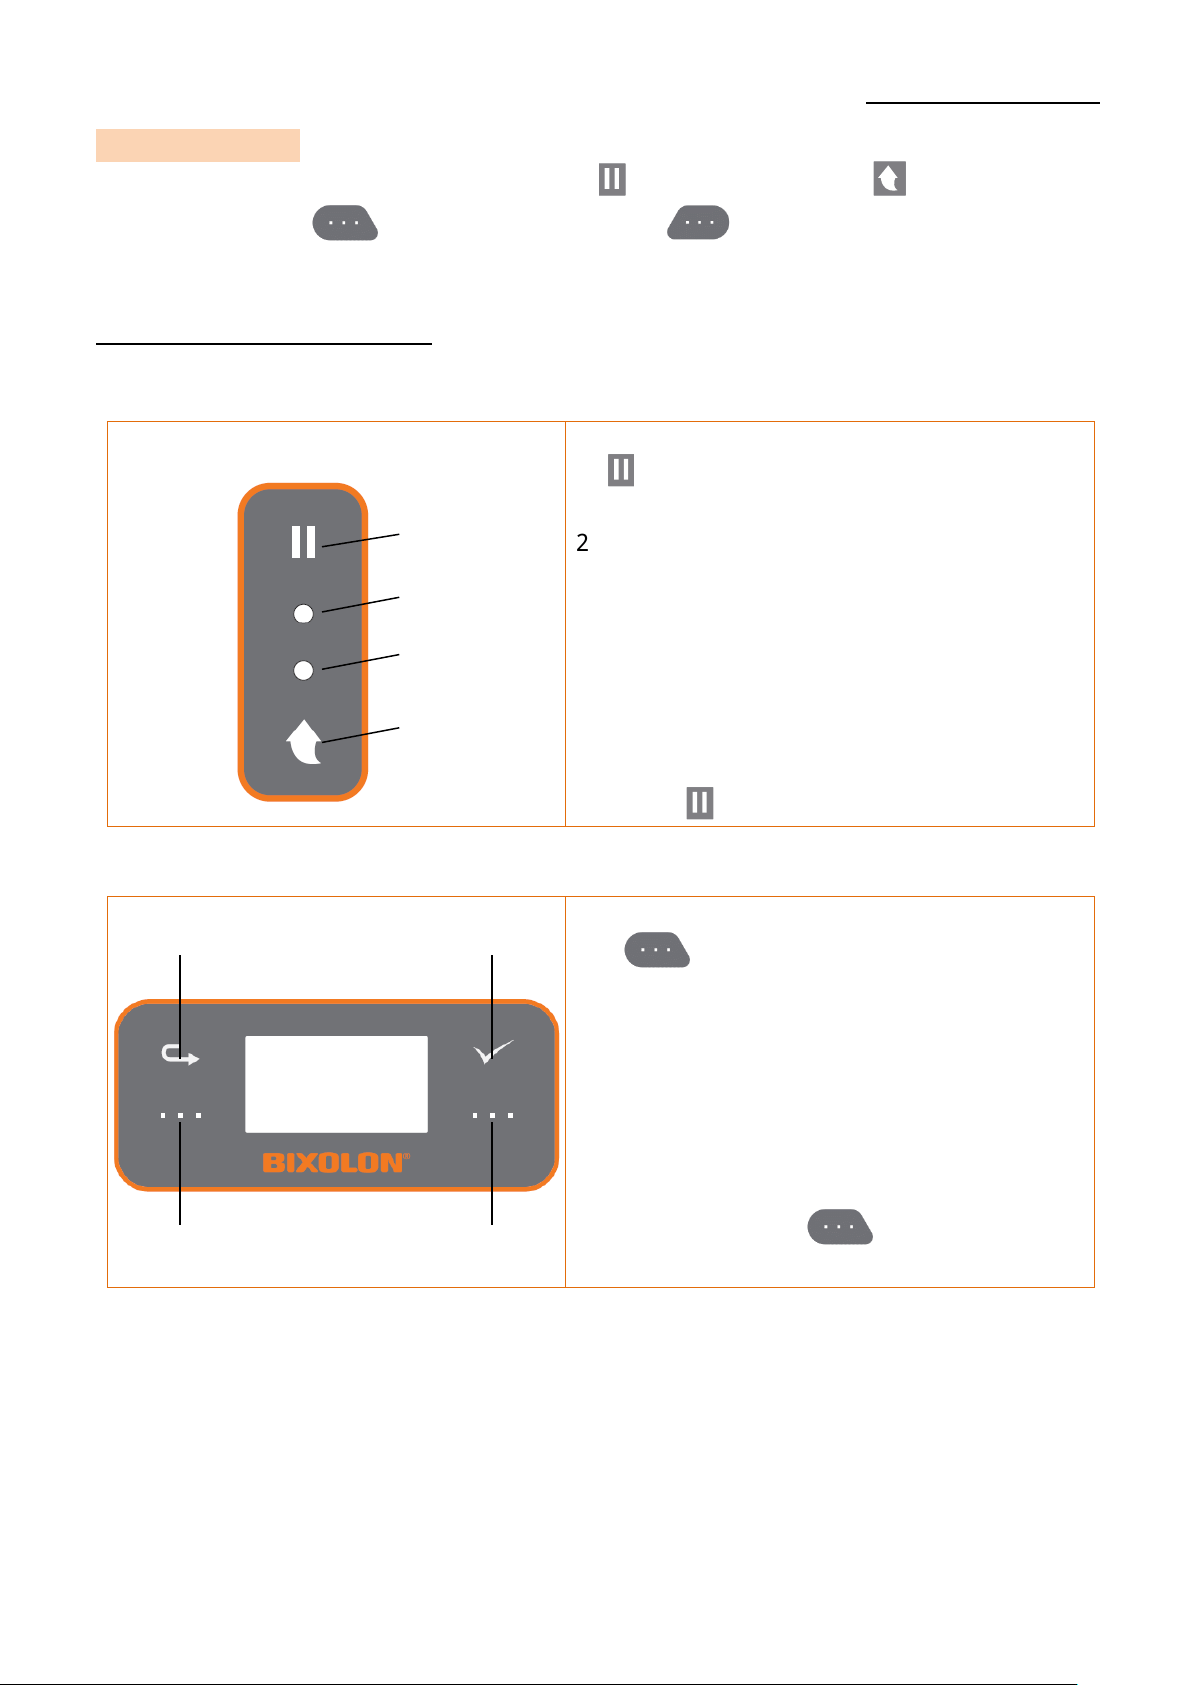
3-6 Button & LCD (LCD Model)
3-6-1 Button Operation
Printer state
before
operation
Button
Explanation
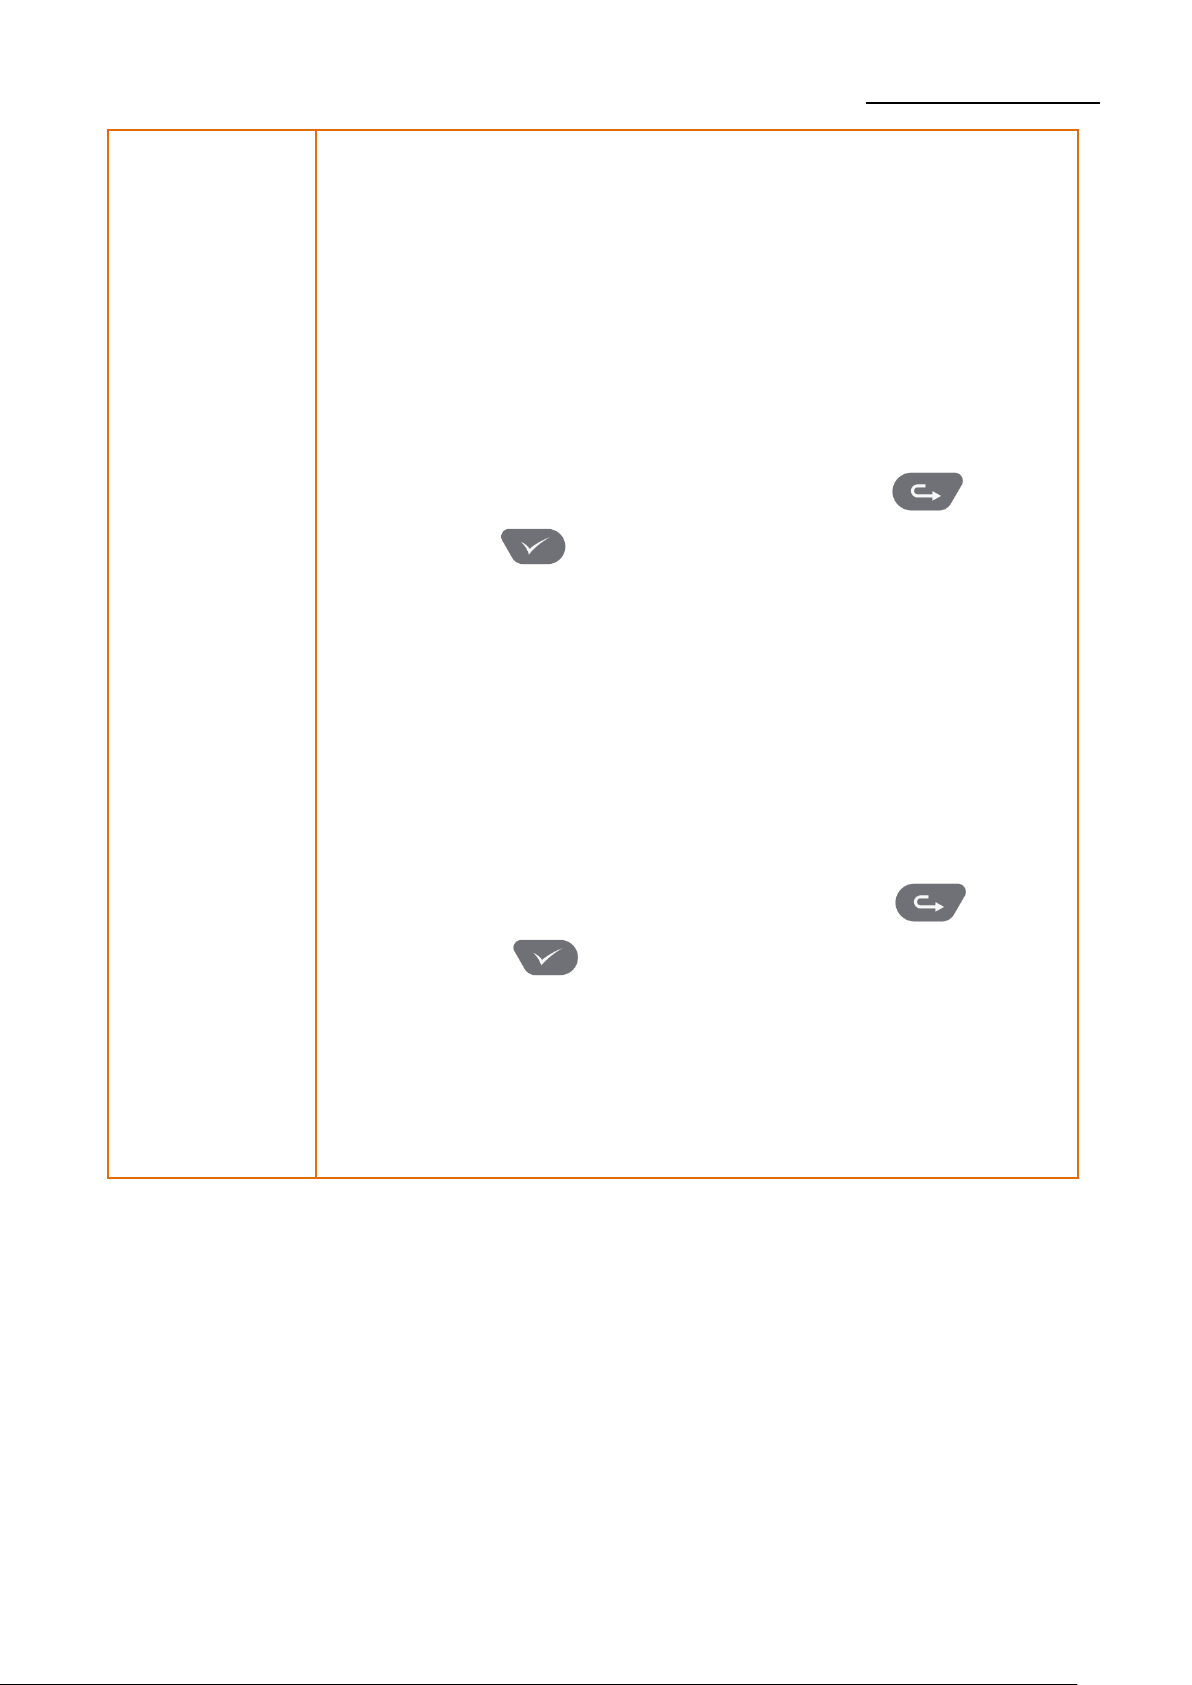
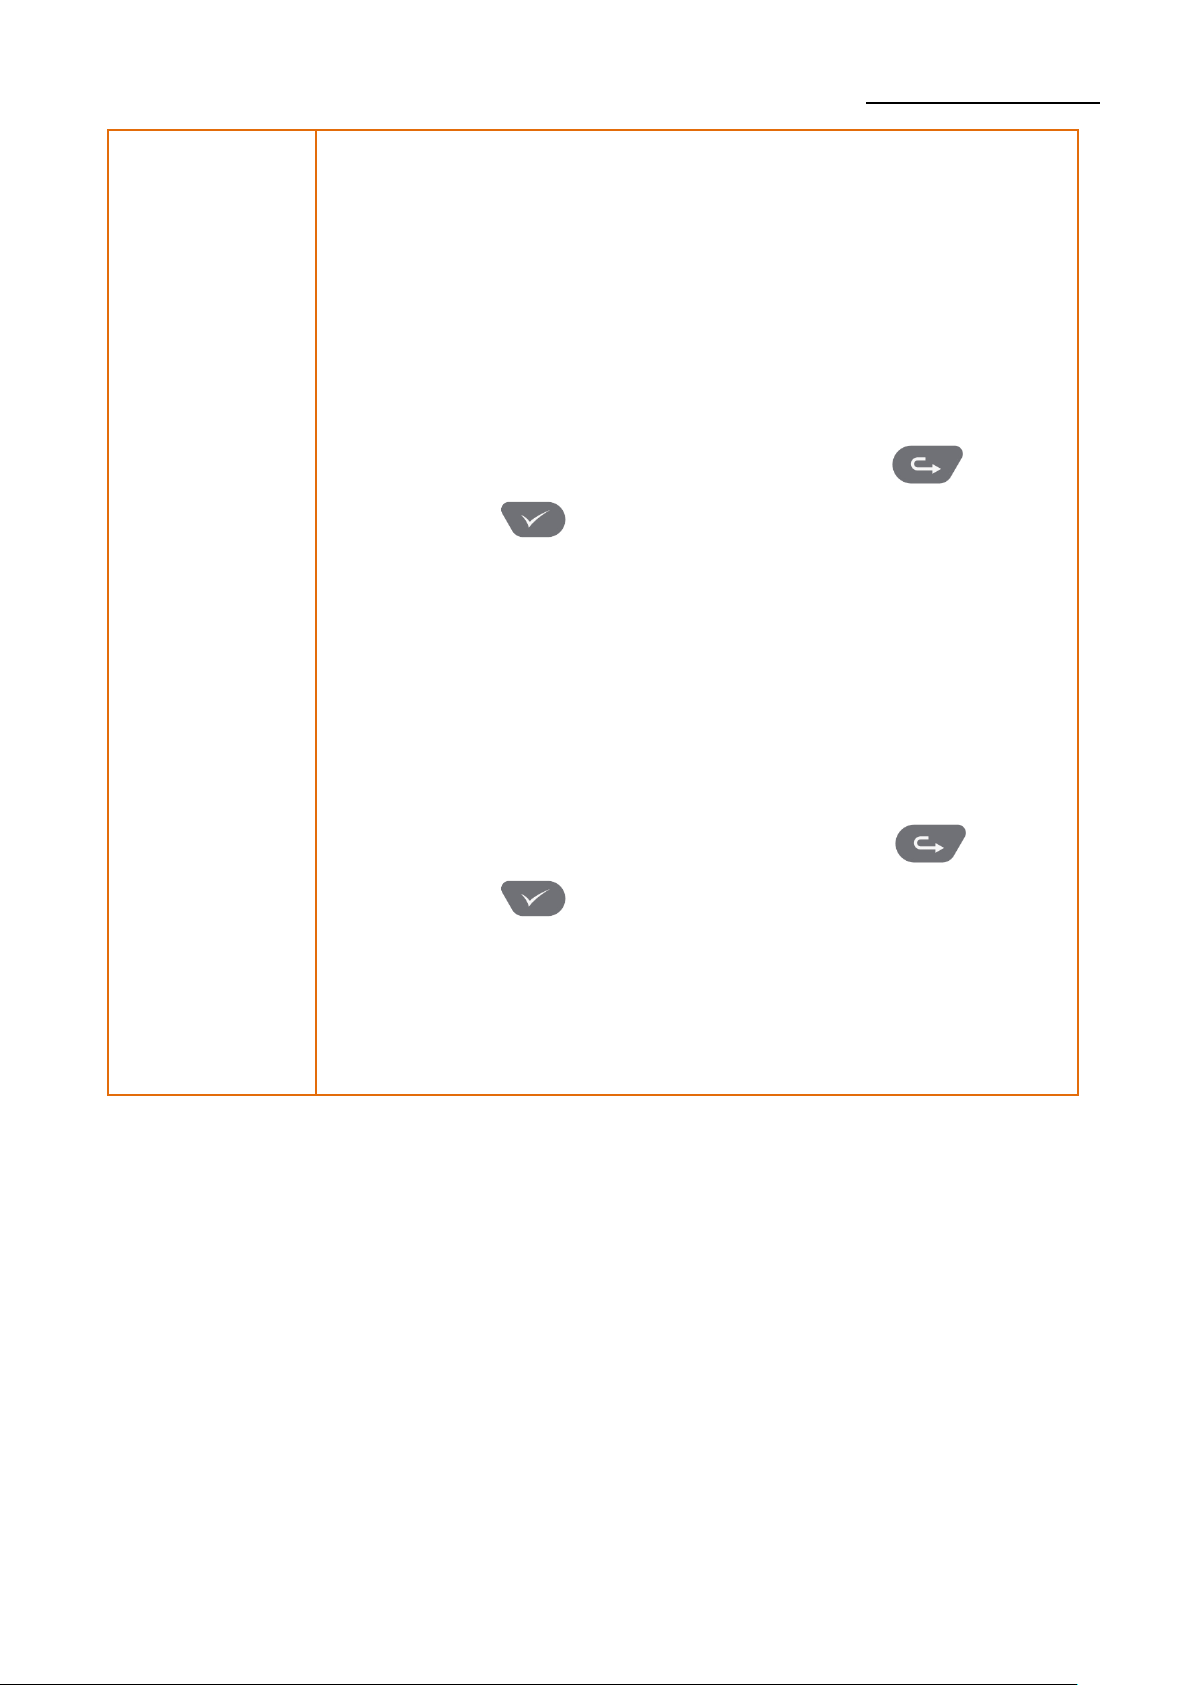
Print Ready
Menu Move
Move to the next menu
(The menu moves from the top left to the bottom
right)
Print Ready
Menu Select
Select menu or change value
In Menu or
Print Ready
Function
Button 1
Pause , Print, Save, Main screen display
In Menu or
Print Ready
Function
Button 2
Feed, Cancel, Previous screen display
Menu
Move
Function
Button 1
Menu
Select
Function
Button 2
Ver. 1.02
- 24 -
XD5-40d Series
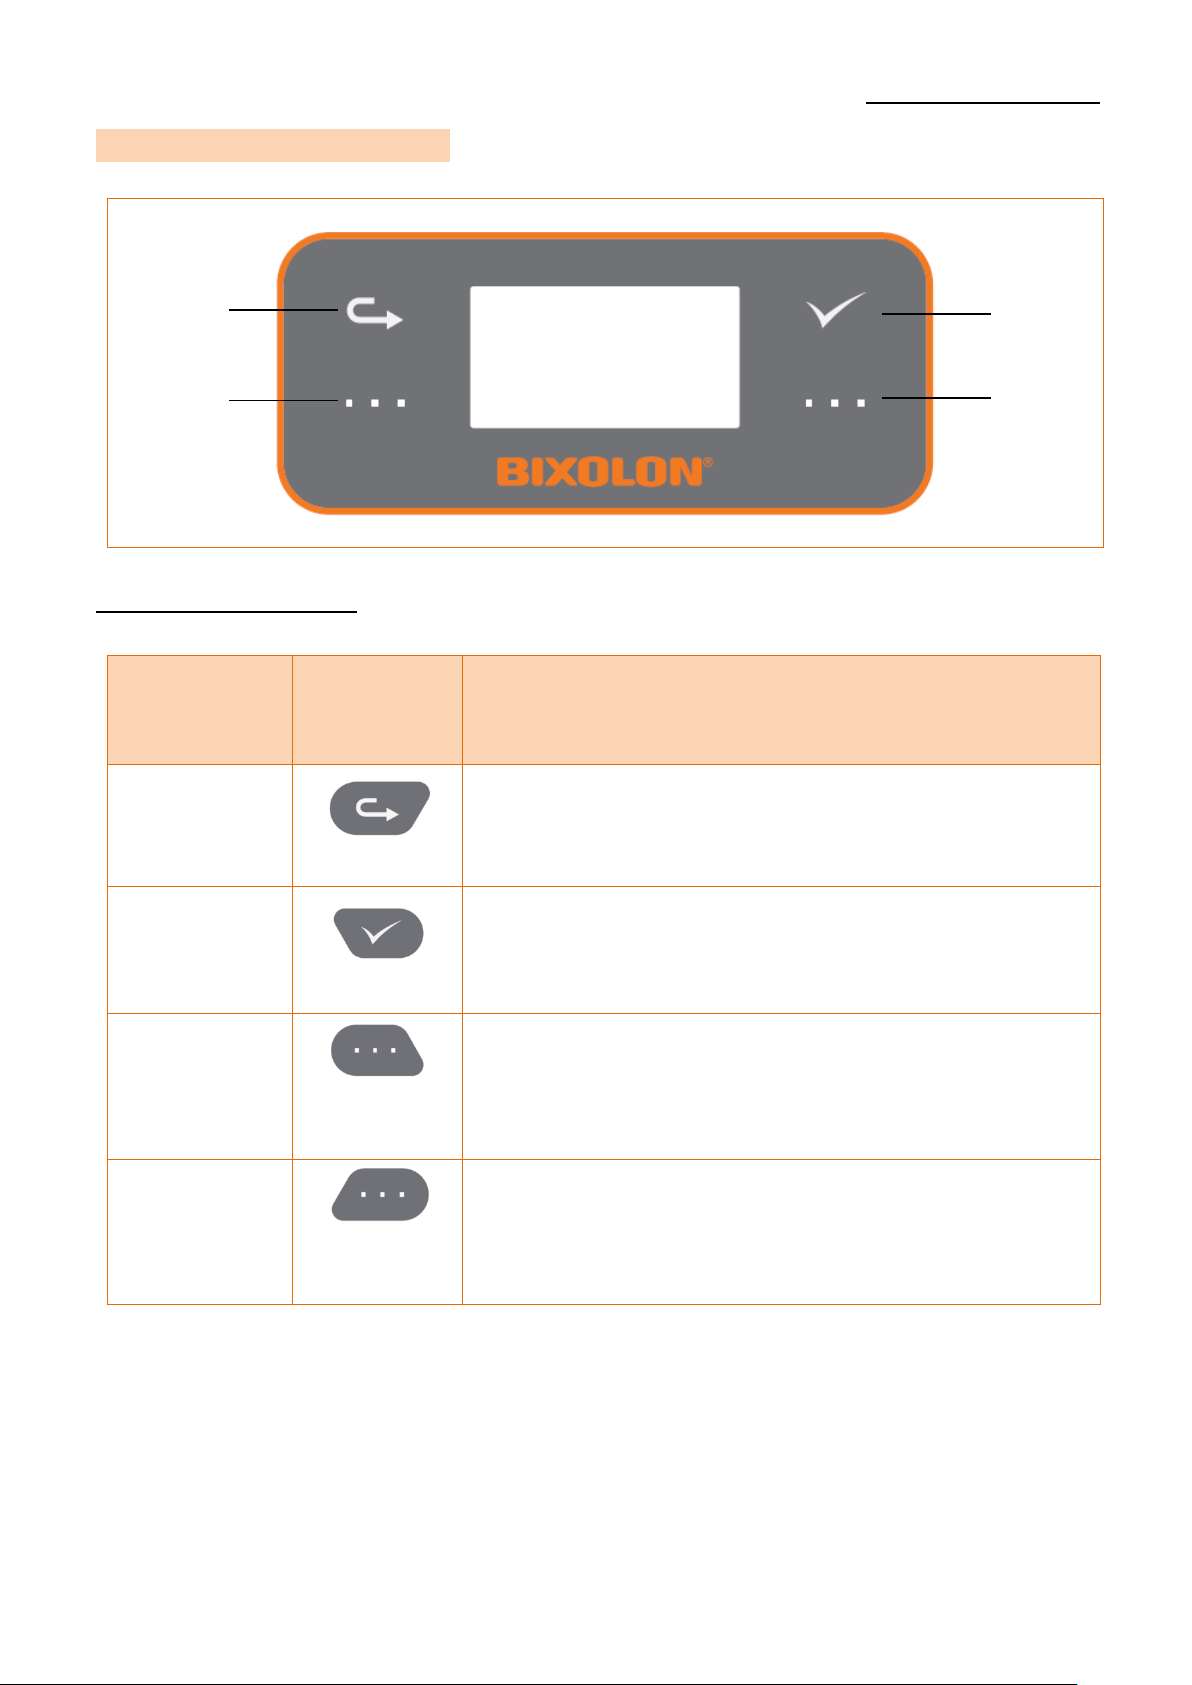
3-6-2 Interface Status Icon
User can check the status and setting information through the LCD.
Icon
Explanation
Bluetooth is not connected to the host
Bluetooth is connected to the host
Authentication is failed
Not connected to AP
Connected to AP, Strength: 4
Connected to AP, Strength: 3
Connected to AP, Strength: 2
Connected to AP, Strength: 1
Ethernet is connected
USB storage is connected

Ver. 1.02
- 25 -
XD5-40d Series
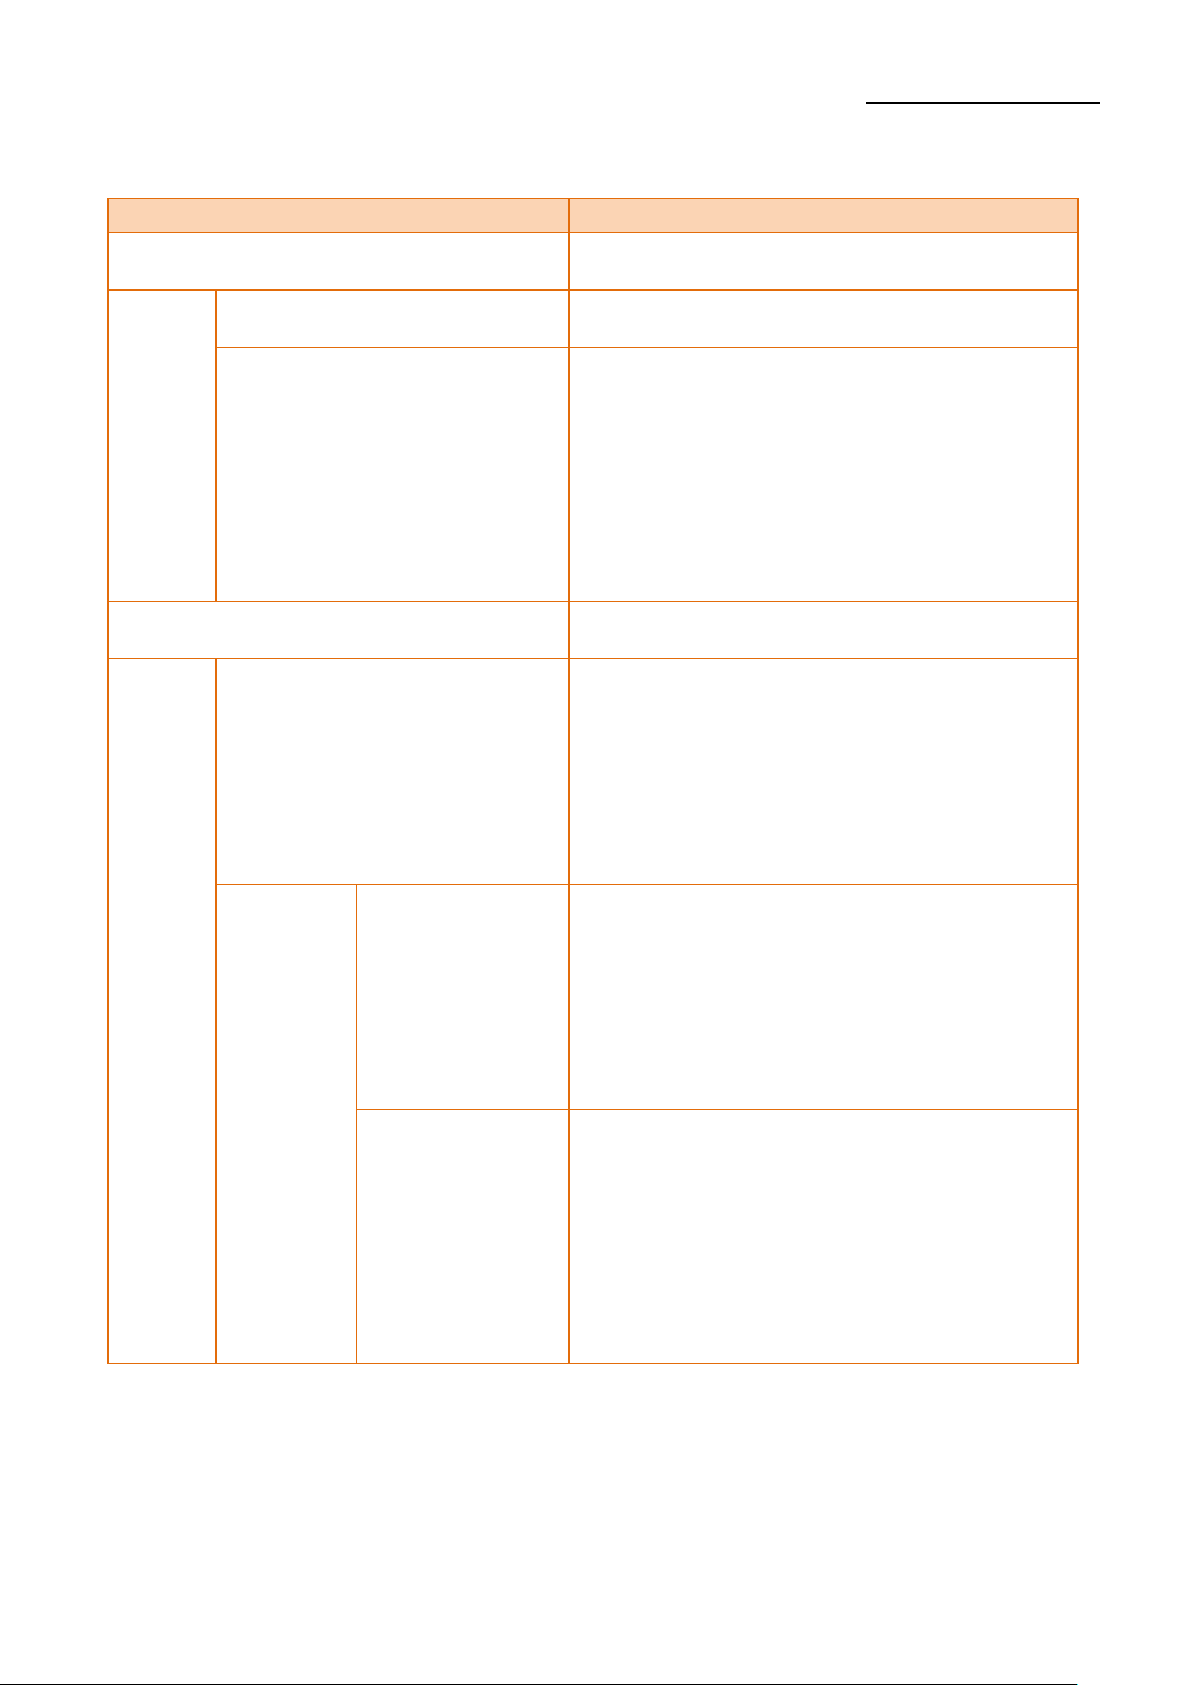
3-6-3 Menu Composition
Setting
Sub menu
Width (Print Width)
Length (Print Length)
Direct (Print Direction)
Speed (Print Speed)
Density (Print Density)
Method (Print Method)
Type (Media Type)
Tear off (Tear Off)
Offset (Print Offset)
Mode (Print Mode)
Pwr act (Power Up Action)
Head cls (Print Head Close)
Ver. 1.02
- 26 -
XD5-40d Series
Interface
Sub menu
Serial
Baud Rate
Data Bit
Parity
Stop Bit
Handshk (Host Handshake)
Ethernet
IP Protocol
IP Address
Subnet Mask
Gateway
MAC Address
WLAN
Channel
Network
ESSID (AP ID)
Auth (Authentication)
Encrypt (Encryption)
WEP Password
PSK Password
IP Protocol
IP address
Subnet Mask
Gateway
SWC
(Simple Wi-Fi
Connect)
Execute SWC
Print App URL
Bluetooth
Device Name
Pairing
Pincode
SSP (Secure Simple Pairing)
MAC Address
Mode
BLE (Bluetooth Low Energy)
STD
(Standard
Mode)
Connect Mode
Auth&Enc
(Authentication
& Encryption)
Ver. 1.02
- 27 -
XD5-40d Series
Sensor
Sub menu
Gap Cal (Gap Calibration)
Black Mark Cal (Black Mark Calibration)
Tools
Sub menu
Self prt (Self-Test)
Reset (Factory Reset)
Dump (Data Dump Mode)
Head Chk (Printer Head Check)
USB Num (USB Serial Number)
Demo prt (Demo Print)
Files
Saved
(Saved File)
Template
Image
Fonts (Download Fonts)
E Drive (Flash Memory)
A Drive (USB Storage)
Twin
(Twin Function)
PRT Set (Printer Setting)
Template
Image
Fonts (Download Fonts)
F/W Update
Information
Sub menu
Info (Printer Info)
Support

Ver. 1.02
- 28 -
XD5-40d Series
3-6-4 Setting Menu Explanation
Menu
Explanation
Width
(Print Width)
Explanation
Setting media width[dots]
Function to adjust image buffer size according to print width
Default Value
- 203dpi : 864 dots (108mm)
- 300dpi : 1,248 dots (105.7mm)
Maximum Value
- 203dpi : 864 dots (108mm)
- 300dpi : 1,248 dots (105.7mm)
Length
(Print Length)
Explanation
Setting media length[dots]
Function to adjust image buffer size according to print length
Default Value
203dpi : 1,225 dots (153mm)
300dpi : 1,811 dots (153mm)
Maximum Value
- 203dpi : 8,000 dots (1,000mm)
- 300dpi : 11,820 dots (1,000mm)
Ver. 1.02
- 29 -
XD5-40d Series
Direct
(Print Direction)
Explanation
Setting print direction
Top to bottom: Printing from top to bottom
Bottom to Top: Printing from bottom to top
Default Value
Bottom to Top
Variable Value
Bottom to Top, Top to Bottom
Speed
(Print Speed)
Explanation
Setting print speed[ips]
Default Value
203dpi : 6ips
300dpi : 4ips
Variable Value
- 203dpi : 3~7ips
- 300dpi : 2~5ips
Top to bottom
)
Bottom to top
Printing Direction

Ver. 1.02
- 30 -
XD5-40d Series
Density
(Print Density)
Explanation
Setting print density
Default Value
203dpi : 20
300dpi : 20
Variable Value
0~30
Method
(Print Method)
Explanation
Setting print method
* This function is not supported in this model.
Default Value
Direct (Direct Thermal)
Variable Value
Direct (Direct Thermal)
Type
(Media Type)
Explanation
Setting media type
Default Value
Gap
Variable Value
- Gap
- Black Mark
- Continuous
Tear off
Explanation
Setting media position[dots] for tear off after printing or feed
Default Value
0
Variable Value
-100 ~ 100

Ver. 1.02
- 31 -
XD5-40d Series
Offset
(Print Offset)
Explanation
Setting top print position[dots]
Default Value
0
Variable Value
-100 ~ 100
Mode
(Print Mode)
Explanation
Setting print mode suitable to the printer option
Default Value
Tear off
Variable Value
Tear off, Cutter
Pwr act
(Power Up
Action)
Explanation
Setting the action for the printer after the power-up sequence.
Default Value
NO FEED
Variable Value
NO FEED, FEED, CAL LENGTH (Media Calibration),
LABEL LENGTH (Setting Media Length)
Head cls
(Print Head
Close)
Explanation
Setting the action for the printer when you close the printer
cover.
Default Value
STANDBY
Variable Value
STANDBY, NO FEED, FEED, CAL LENGTH (Media Calibration),
LABEL LENGTH (Setting Media Length)
Ver. 1.02
- 32 -
XD5-40d Series
3-6-5 Interface Menu Explanation
3-6-5-1 Serial
List
Explanation
Baud Rate
Explanation
Setting the baud rate
Default Value
115200
Variable Value
9600, 19200, 38400, 57600, 115200
Data Bit
Explanation
Setting the data bit
Default Value
8
Variable Value
7, 8
Parity
Explanation
Setting the parity
Default Value
None
Variable Value
Even, Odd, None
Stop Bit
Explanation
Setting the stop bit
Default Value
1BIT
Variable Value
1BIT, 2BIT
Handshk
(Handshake)
Explanation
Setting the handshake
Default Value
RTS_CTS
Variable Value
RTS_CTS, DTR_DSR, XON_XOFF

Ver. 1.02
- 33 -
XD5-40d Series
3-6-5-2 Ethernet
List
Explanation
IP Protocol
Explanation
Setting IP assignment method
Default Value
DHCP
Variable Value
DHCP, Static IP
IP Address
Explanation
Setting IP Address method
Default Value
Static IP: 192.168.192.123
DHCP: 0.0.0.0
Variable Value
0 ~ 255
Subnet Mask
Explanation
Setting subnet mask
Default Value
Static IP: 255.255.255.0
DHCP: 0.0.0.0
Variable Value
0 ~ 255
Gateway
Explanation
Setting gateway
Default Value
Static IP: 192.168.192.254
DHCP: 0.0.0.0
Variable Value
0 ~ 255
MAC Address
Explanation
Indicating MAC address

Ver. 1.02
- 34 -
XD5-40d Series
3-6-5-3 WLAN
List
Explanation
Channel
Explanation
Setting channel when creating Adhoc network
Default Value
6
Variable Value
1 ~ 14
Network
Explanation
Setting WLAN operation mode
Default Value
SoftAP
Variable Value
SoftAP, Infra(Infra structure), Adhoc, P2P
ESSID
(AP ID)
Explanation
Setting the ID of AP to be accessed
Auth
(Authentication)
Explanation
Setting WLAN authentication method
Default Value
Open
Variable Value
Open, Shared Key, WPA1PSK, WPA2PSK, WPA1EAP, WPA2EAP
Encrypt
(Encryption)
Explanation
Setting WLAN encryption method
Default Value
None
Variable Value
None, WEP64/128, TKIP, AES, AES+TKIP
WEP Password
Explanation
Setting WEP password
PSK Password
Explanation
Setting PSK password

Ver. 1.02
- 35 -
XD5-40d Series
IP Protocol
Explanation
Setting IP assignment method
Default Value
DHCP
Variable Value
DHCP, Static IP
IP address
Explanation
Setting IP address
Default Value
Static IP: 192.168.1.1
DHCP: 0.0.0.0
Variable Value
0 ~ 255
Subnet Mask
Explanation
Setting subnet mask
Default Value
Static IP: 255.255.255.0
DHCP: 0.0.0.0
Variable Value
0 ~ 255
Gateway
Explanation
Setting gateway
Default Value
Static IP: 192.168.1.254
DHCP: 0.0.0.0
Variable Value
0 ~ 255
SWC
Execute SWC
Explanation
Connect the printer to a network using
SWC(Simple Wi-Fi Connect) mode.
Print App URL
Explanation
Site linking(QR code) for SWC technical
support
Ver. 1.02
- 36 -
XD5-40d Series
3-6-5-4 Bluetooth
List
Explanation
Device Name
Explanation
Name of Device
Pairing
Pincode
Explanation
Changes required pin code to connect
SSP
(Secure simple pairing)
Explanation
Secure simple pairing
Default Value
Disable
Variable Value
Disable, Just Works, Numeric Comparison,
Passkey Entry
MAC Address
Explanation
Bluetooth device MAC address
Mode
BLE
(Bluetooth
Low Energy)
Explanation
Bluetooth Low Energy
Default Value
Disable
Variable Value
Disable, Enable
STD
(Standard
Mode)
Connect Mode
Explanation
Setting Bluetooth connection mode
Default Value
Mode2
Variable Value
Mode1, Mode2, Mode3
Auth&Enc
(Authentication
&Encryption)
Explanation
Setting Bluetooth authentication and
encryption function
Default Value
Enable
Variable Value
Enable, Disable
Ver. 1.02
- 37 -
XD5-40d Series
3-6-6 Sensor Menu Explanation
List
Explanation
Gap Cal
(Gap Calibration)
Explanation
Detect media gap automatically.
Black Mark Cal
(Black Mark
Calibration)
Explanation
Detect media black mark automatically.
3-6-7 Tools Menu Explanation
List
Explanation
Self prt
(Print Self-Test)
Explanation
Prints for self-test
Reset
(Factory Reset)
Explanation
Initializes the printer settings to factory default
Dump
(Data Dump Mode)
Explanation
The received data check when the printer does not work
properly.
Default Value
Disable
Variable Value
Disable, Enable
Head Chk
(Print Head Check)
Explanation
Dot-out check of head through printing
USB Num
(USB Serial
Number)
Explanation
Checks USB serial number
Demo prt
(Demo Print)
Explanation
Demo format printing function
Ver. 1.02
- 38 -
XD5-40d Series
Files
Saved
(Saved File)
Template
Refer
3-6-7-1
Saved File
Image
Fonts (Download Fonts)
E Drive (Flash Memory)
A Drive (USB Storage)
Twin
(Twin
Function)
PRT Set (Printer Setting)
Refer
3-6-7-2
Twin Function
Template
Image
Fonts (Download Fonts)
F/W Update
Refer
3-6-7-3
F/W Update
3-6-7-1 Saved File
Displays the list of object files stored in the printer.
List
Explanation
Template
Template list stored in the printer
Image
Image list stored in the printer (*.pcx)
Fonts
(Download Fonts)
Download font list stored in the printer
E Drive
(Flash memory)
Saved object files in E drive
A Drive
(USB memory)
Saved object files in A drive
Ver. 1.02
- 39 -
XD5-40d Series
3-6-7-2 Twin Function
Saves the current printer settings, save files (templates, images, download fonts) to
another printer using USB, or loads the settings of another printer.
List
Explanation
PRT Set
(Printer
Setting)
Explanation
Save printer settings to a USB storage device, or load the print
settings from USB storage.
File path
F:\configuration
• Save Function Explanation
- Connect a USB storage to the printer.
- Select Save on the menu using the move button( ) and
select button( ).
- The printer_config file is created in the configuration folder of
USB storage device.
(The configuration folder is automatically created)
• Load Function Explanation
- Check whether the printer_config file exists in the configuration
folder of the USB storage device.
- Connect the USB storage to the printer.
- Select Load on the menu using the move button( ) and
select button( ).
- Loading message(Loading…) is displayed while loading, and
when loading is completed, USB loading completion(Load Ok)
message is displayed.
- Check the changes of the printer's settings.
Ver. 1.02
- 40 -
XD5-40d Series
Template
Explanation
Save template files to a USB storage device, or load the templates
from USB storage.
File path
F:\ USER_AREA_TEMPLATES
• Save Function Explanation
- Connect a USB storage to the printer.
- Select Save on the menu using the move button( ) and
select button( ).
- Template files are stored in the USER_AREA_TEMPLATES folder of
USB storage device.
(USER_AREA_TEMPLATES folder is automatically created)
• Load Function Explanation
- Check whether a template files exist in the
USER_AREA_TEMPLATES folder of the USB storage device.
- Connect the USB storage to the printer.
- Select Load on the menu using the move button( ) and
select button( ).
- Loading message(Loading…) is displayed while loading,
and when loading is completed, USB loading completion
(Load Ok) message is displayed.
- Go to Save File menu then, check the template files are saved
to the printer.

Ver. 1.02
- 41 -
XD5-40d Series
Image
Explanation
Save image files to a USB storage device, or load the images from
USB storage (*.pcx)
File path
F:\ USER_AREA_PCXImages
• Save Function Explanation
- Connect a USB storage to the printer.
- Select Save on the menu using the move button( ) and
select button( ).
- Image files are stored in the USER_AREA_PCXImages folder of
USB storage device.
(USER_AREA_PCXImages folder is automatically created)
• Load Function Explanation
- Check whether the image files exist
in the USER_AREA_PCXImages folder of the USB storage device.
- Connect the USB storage to the printer.
- Select Load on the menu using the move button( ) and
select button( ).
- Loading message(Loading…) is displayed while loading,
and when loading is completed, USB loading completion
(Load Ok) message is displayed.
- Go to Save File menu then, check the image files are saved to
the printer.
Ver. 1.02
- 42 -
XD5-40d Series
Fonts
(Download
Fonts)
Explanation
Save download font files to a USB storage device, or load the
download font from USB storage.
File path
F:\ USER_AREA_FONTS
• Save Function Explanation
- Connect a USB storage to the printer.
- Select Save on the menu using the move button( ) and
select button( ).
- Download Font files are stored in the USER_AREA_FONTS folder
of USB storage device.
(USER_AREA_FONTS folder is automatically created)
• Load Function Explanation
- Check if the downloaded font files exist in the USER_AREA_FONTS
folder of the USB storage device.
- Connect the USB storage to the printer.
- Select Load on the menu using the move button( ) and
select button( ).
- Loading message(Loading…) is displayed while loading,
and when loading is completed, USB loading completion
(Load Ok) message is displayed.
- Go to Save File menu then, check the download font files are
saved to the printer.
Ver. 1.02
- 43 -
XD5-40d Series
3-6-7-3 F/W Update
Firmware can be updated through USB storage.
F/W Update
Explanation
Printer firmware update available using the USB storage
directly without any communication.
File path
F:\ FW_DOWNLOAD
File name
“XD5-4xd_Vxx.xx_STD_mmddyy.fls” in F:\ FW_DOWNLOAD
folder.
( 203dpi : x is 0 / 300dpi : x is 3)
• Download process explanation
- Check firmware file(*.fls) is in FW_DOWNLOAD folder
of USB storage.
- Connect USB storage to the printer.
- Select “F/W Update” from the “Files” menu.
- Select “Start” from the “F/W Update” menu using
the function button 1 ( ).
- If message “F/W Update” is displayed, the firmware download
has started normally.
- After firmware update complete successfully, printer will be
rebooted automatically.
3-6-8 Information Menu Explanation
List
Explanation
Info
Explanation
Checking the printer usage information
Support
Explanation
Site linking(QR code) for technical support.
Ver. 1.02
- 44 -
XD5-40d Series
4. Self-test
• This function is supported on standard model(without LCD) only.
The self-test checks whether the printer has any problems.
The self-test checks the following;
1) Make sure that the media has been installed properly.
2) Turn on the power while holding down the Feed/Cancel button( ).
The self-test begins.
(It takes about 10 seconds before starting self-test)
3) The self-test prints the current printer configuration information.
4) After the self-test results are printed, a printer enters into print ready mode.
If the printer does not function properly, contact an authorized dealer.
Ver. 1.02
- 45 -
XD5-40d Series
5. Detailed Features
5-1 Stand-alone Configuration Mode
• This function is supported on standard model(without LCD) only.
5-1-1 Start Stand-alone Configuration Mode and execute each function
1) The Pause button( ) is pressed for two seconds while in Print Ready Mode.
2) Both LEDs will change to orange color, then release the Pause button( )
The printer will be set to Stand-alone configuration mode.
3) When the printer enters into this mode, the status of LED 1 and LED 2 are changed
sequentially.
4) When the Feed/Cancel button( ) is pressed at specific LED color combination, the
corresponding printer operation will be executed.
5-1-2 Function List Of Stand-alone Configuration Mode
Sequence
Number
LED 1
LED 2
Printer Operation
Color
Status
Color
Status
1
Green
On
Green
Blink4 times
Self Test
2
Orange
Blink4 times
Print File List
3
Red
Blink4 times
Factory Reset
4
Orange
On
Green
Blink4 times
Gap Calibration
5
Orange
Blink4 times
Black Mark Calibration
6
Red
Blink4 times
Data Dump Mode
7
Red
On
Green
Blink4 times
Demo Mode
8
Orange
Blink4 times
Reserved
9
Red
Blink4 times
Delete Downloaded Items
* This information can be printed out by printer self-test.
Contact the customer center if the printer does not enter
stand-alone configuration mode.
Ver. 1.02
- 46 -
XD5-40d Series
5-2 Pause/Cancel
• During multiple-page print jobs, the Pause( ), Feed/Cancel button( ),
Function button 1( ) and Function button 2( ) can be used to pause printing
and cancel the print job altogether, respectively.
5-2-1 Pause/Resume Function
1) Standard Model
1) When printing, press the Pause button
( )
2) The printer will pause after finishing the
current media printing and the status of
LED will be as follows.
- LED 1: Green Blink
- LED 2: Red On
3) While the print job is paused, press the
Pause
button ( ) again to resume printing.
2) LCD Model
1) When printing, press the Function button
1( ).
2) The printer will pause after finishing the
current media printing and the status of
LCD will be as follows.
- LCD Display: PAUSE
3) While the print job is paused, press the
Function button 1( ) again to resume
printing.
LED 1
Feed/Cancel
Button
LED 2
Pause Button
Menu Move
Function Button 1
Menu Select
Function Button2
Ver. 1.02
- 47 -
XD5-40d Series
5-2-2 Print Cancellation
• The following processes occur in the print cancellation mode.
- All label printing cancelled
- All data received in the printer communications buffer deleted.
- All received data deleted.
1) Standard Model
1) During printing and/or pause mode, press
the Feed/Cancel button ( ) enters the
print cancellation mode.
2) The LED Status in the print cancellation
mode can be as follows.
- LED 1: Green On
- LED 2: Red Blink
3) While in the print cancellation mode,
press the Feed/Cancel button ( ) again
to return to print ready mode.
2) LCD Model
1) During printing and/or pause mode, press
the Function button 2( ) enters the
print cancellation mode.
2) The LCD Status in the print cancellation
mode can be as follows.
- LCD Display: Press Cancel
3) While in the print cancellation mode,
press the Function button 2( ) again
to return to print ready mode.
Contact the authorized dealer if the printer does not execute
pause/resume function.
LED 1
Feed/Cancel
Button
LED 2
Pause Button
Menu Move
Function Button 1
Menu Select
Function Button 2

Ver. 1.02
- 48 -
XD5-40d Series
5-3 Smart Media Detection
• Media with gap and black mark can be identified without additional settings.
• 3~5 pages of media will be used depending on the types of media.
• Smart Media Detection function is executed in the followings cases
- When the printer is installed first time, it is executed by pressing the Feed/Cancel
button( ) for LED model, pressing Function button 2( ) for LCD model.
- If the printer is installed first time, printer command will execute Smart Media
Detection.
- When change of media length or type is detected during feeding or printing.
- When the different media type command is entered from the configured media type.
- After factory reset.
If smart media detection fails, please proceed gap or B/M sensor
auto-calibration accordingly
5-4 Gap Sensor Auto Calibration Mode
• Gap sensor auto calibration mode is used when the printer does not detect a gap on the
media correctly.
Generally a printer is set to detect most types of gap but sometimes it fails to detect and
keep feeding the media without a stop when special media used. In such case, use gap
sensor auto calibration mode function for a proper detection.
1) Make sure that media roll has been installed properly.
(1) Standard Model
Using stand-alone configuration mode, press the Feed/Cancel button( )
at sequence number 4 gap sensor auto calibration mode (refer to 5-1).
(2) LCD Model
In print ready mode the setting menu and move to Sensor Gap Cal(Gap Calibration)
and press Function button 1( ) to process gap sensor auto calibration
* Please refer Tools Menu Explanation (3-6) for more information.
Contact the customer center if the printer does not execute
gap sensor auto calibration mode function.
Ver. 1.02
- 49 -
XD5-40d Series
5-5 B/M Sensor Auto Calibration Mode
• Black mark sensor auto calibration mode is used when the printer does not detect
a black mark on the media correctly.
Generally a printer is set to detect most types of black mark but sometimes it fails to
detect and keep feeding the media without a stop when special media used. In such case,
use black mark sensor auto calibration mode function for a proper detection.
1) Make sure that media roll has been installed properly.
(1) Standard Model
Using stand-alone configuration mode, press the Feed/Cancel button( )
at sequence number 5 black mark sensor auto calibration (refer to 5-1).
(2) LCD Model
In print ready mode the setting menu and move to Sensor Black Mark Cal(Black
Mark Calibration) and press Function button 1( ) to process black mark sensor
auto calibration
* Please refer Tools Menu Explanation (3-6) for more information.
Contact the customer center if the printer does not execute
black mark sensor auto calibration mode function.
Ver. 1.02
- 50 -
XD5-40d Series
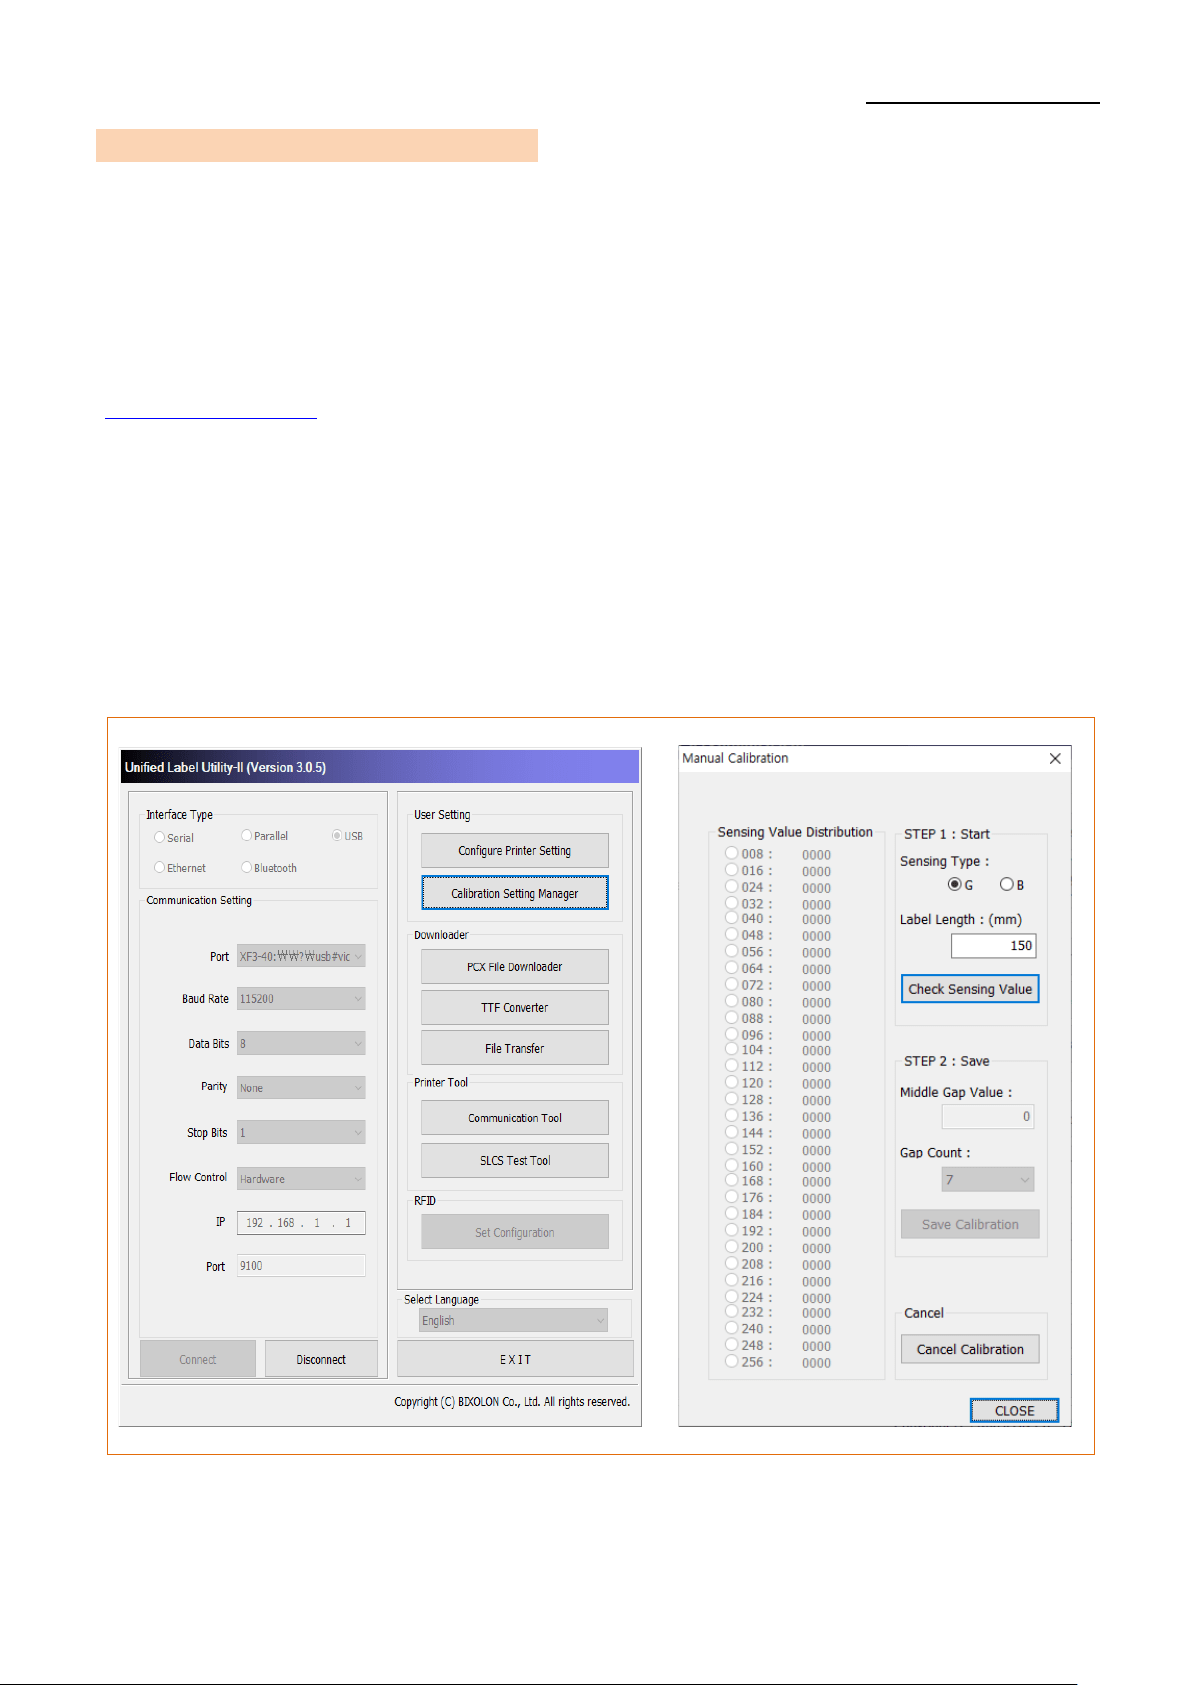
5-6 Media Sensor Manual-Calibration
• Manual-calibration of media detection can be used when the printer cannot detect a
media gap (or black mark) even after auto-calibration has been executed.
Users can calibrate sensor parameters in detail by using the Unified Label Utility-II
program provided by the manufacturer.
The Unified Label Utility-II can be downloaded from the BIXOLON website.
(www.bixolon.com/)
Users can calibrate printer to detect gap (or black mark) manually by using the Unified
Label Utility-II.
For More information, please refer Unified Label Utility-II manual.
Please make sure the printer is connected and execute the Unified Label Utility-II
program. Please the “Calibration Setting Manager” Button after setting the interface
type.

Ver. 1.02
- 51 -
XD5-40d Series
1) Select the sensing type and input the label length by millimeter and click “Check
Sensing Value” button. Then printer starts calibration.
2) Once the calibration is done, scanned values will appear on the screen after calibration.
3) Optimal sensing values will appear in black bold letters on the left of the utility screen
and select one of the values and click on “Save Calibration”
4) If chosen value does not work properly, please try the other values among the black
bold letters.
5) To go back to the initial value, please click on “Cancel Calibration”
Contact the customer center if the printer does not enter
media sensor manual-calibration mode.
5-7 Data Dump Mode
• This function can be used to diagnose the communication issues when the printer
does not work properly.
In this mode, the received data are not analyzed and printed, instead they are dumped
in hex format without processing.
Turn the printer off and on to recover to the print ready mode.
1) Standard Model
Using stand-alone configuration mode, press the Feed/Cancel button ( )
at sequence number 6 data dump mode (refer to 5-1).
2) LCD Model
In print ready mode the setting menu and move to Tools Dump Dump Enable
and press Function button 1( ) to run dump mode
* Please refer Tools Menu Explanation (3-6) for more information.
Contact the customer center if the printer does not enter
data dump mode.
Ver. 1.02
- 52 -
XD5-40d Series
5-8 Factory Reset
• This function is used to factory reset the printer settings.
1) Make sure that media roll has been installed properly.
(1) Standard Model
Use Auto Calibration Mode(depends on the media type) for Factory Reset.
* Please refer Tools Menu Explanation (5-1) for more information.
* The printer will be rebooted automatically.
(2) LCD Model
In print ready mode the setting menu and move to Tools Reset and press
Function button 1( ) to reset the printer to Factory default.
* Please refer Tools Menu Explanation (3-6) for more information.
* The printer will be rebooted automatically.
Contact the customer center if the printer does not enter
factory reset function.

Ver. 1.02
- 53 -
XD5-40d Series
5-9 SWC (Simple Wi-Fi Connect)
• Connect the printer to a network using SWC(Simple Wi-Fi Connect) mode.
** blink rate of “Pulse” is slower than blink rate of “Flash”
• Make sure that media roll has been installed properly.
1) Standard Model
(1) Press the Feed/Cancel button( ) for more than 3 seconds
to enter SWC(Simple Wi-Fi Connect) Mode
(2) The LED status in the SWC mode ready can be as follows.
- LED 1: Green On
- LED 2: Red Blink(pulse)
(3) Printer’s LED1 Green pulse indicates that the printer is in SWC Mode.
you can set network through Host Devices.
- LED 1: Green Blink(Flash pulse)
- LED 2: Green On
(4) Once the network is not set correctly, LED1 will flash Orange,
and try entering SWC Mode again.
- LED 1: Orange Blink(pulse)
- LED 2: Green On
2) LCD Model
(1) Enter SWC(Simple Wi-fi Connect) Mode using buttons. Print ready
Interface WLAN SWC Execute SWC and press Function 1 button( )
(2) Printer’s LCD Display “SWC Mode” indicates that the printer is in SWC Mode.
You can set network through Host Devices
- LCD Display: ”Preparing…” ”SWC Mode”
(3) Once the network is not set correctly, LCD will Display Error Message,
and try entering SWC Mode again.
- LCD Display: ”Password Error Return to SWC mode”
Ver. 1.02
- 54 -
XD5-40d Series
5-10 Print Standby Mode
5-10-1 About Print Standby Mode
The printed area may become out of range of media if the media is not in the accurate
printing position when the cover is opened and closed.
The printer is put into print standby mode instead of print ready mode when the cover is
closed in order to prevent this problem, and it waits for additional user input.
1) Standard Model
The LED status in the print standby mode can be as follows.
- LED 1: Green Blink
- LED 2: Green Blink
2) LCD Model
The LCD status in the print standby mode can be as follows.
- LCD Display: STANDBY
The data received during print standby mode will be printed after the printer recovers to
print ready mode.
5-10-2 How to switch the printer from Standby Mode to Print Ready Mode
1) Standard Model
- Press the Pause button ( ) to switch to print ready mode without feeding any media.
- Press the Feed/Cancel button ( ) to feed one page to align the media position and
switch to the print ready mode.
2) LCD Model
- Press “Function button 1( )” to switch to print ready mode without feeding any
media.
- Press “Function button 2( )” to feed one page to align the media position and
switch to the print ready mode.
Contact the customer center if the printer does not execute
print standby mode function.

Ver. 1.02
- 55 -
XD5-40d Series
5-11 Media Installation Method of Peeler (Option) Model
• Use a peeler to separate the printed media from the liner automatically.
To use peeler, install media in the following ways:
1) Open the media cover.
2) Open the peeler cover.
3) Set the peeler switch ‘ON’ position and check to LED has turned on.
LED
Peeler Switch
ON

Ver. 1.02
- 56 -
XD5-40d Series
4) Remove the media and insert the media through the slot.
5) Close the peeler cover until a click sound is heard.
6) Close the media cover until a click sound is heard.
- When opening or closing the cover, be careful not to pinch your fingers.
- The peeler function is only available for Gap media.
- When the peeler is switched on, the next label will not be printed
unless the printed label is removed from the peeler.
- When the peeler is switched off, the peeler does not work.
- The print head gets extremly hot while printing or after the printing,
this can cause serious burns. Do not touch the print head.
( O )
( X )
Remove
Ver. 1.02
- 57 -
XD5-40d Series
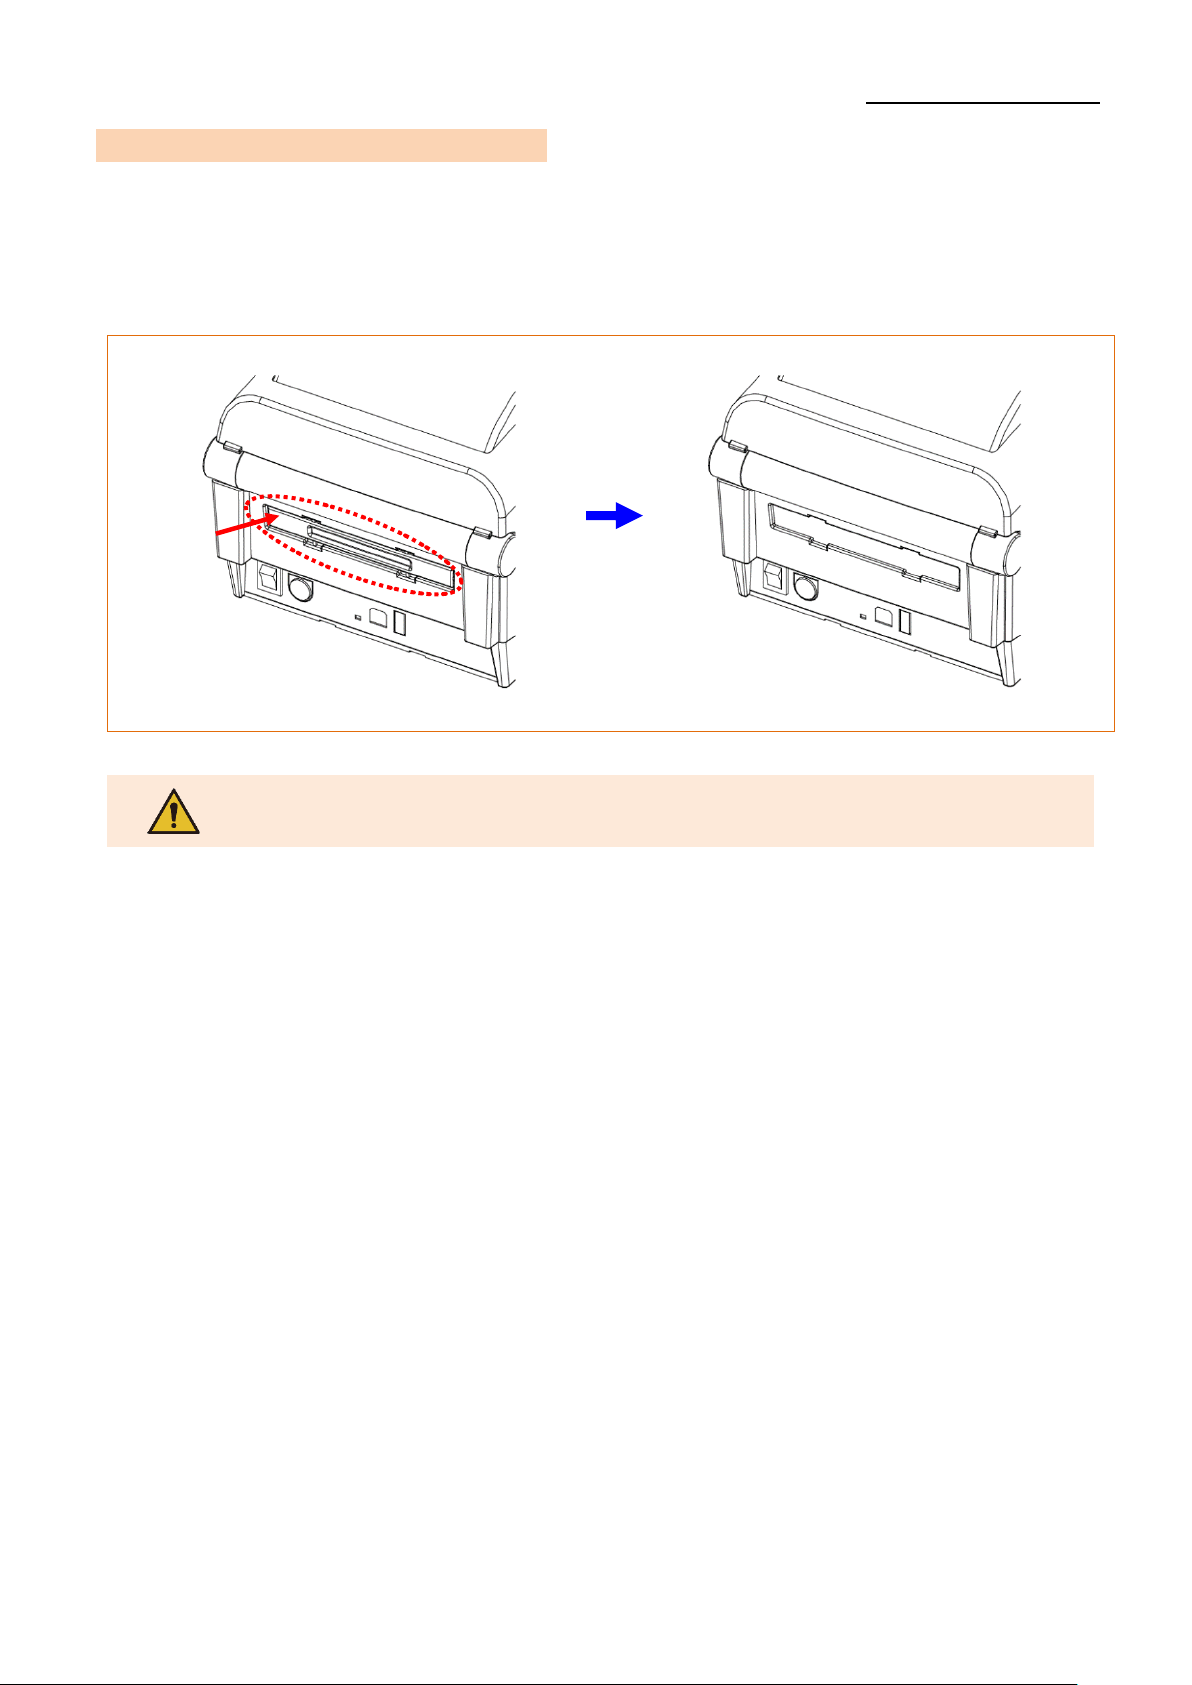
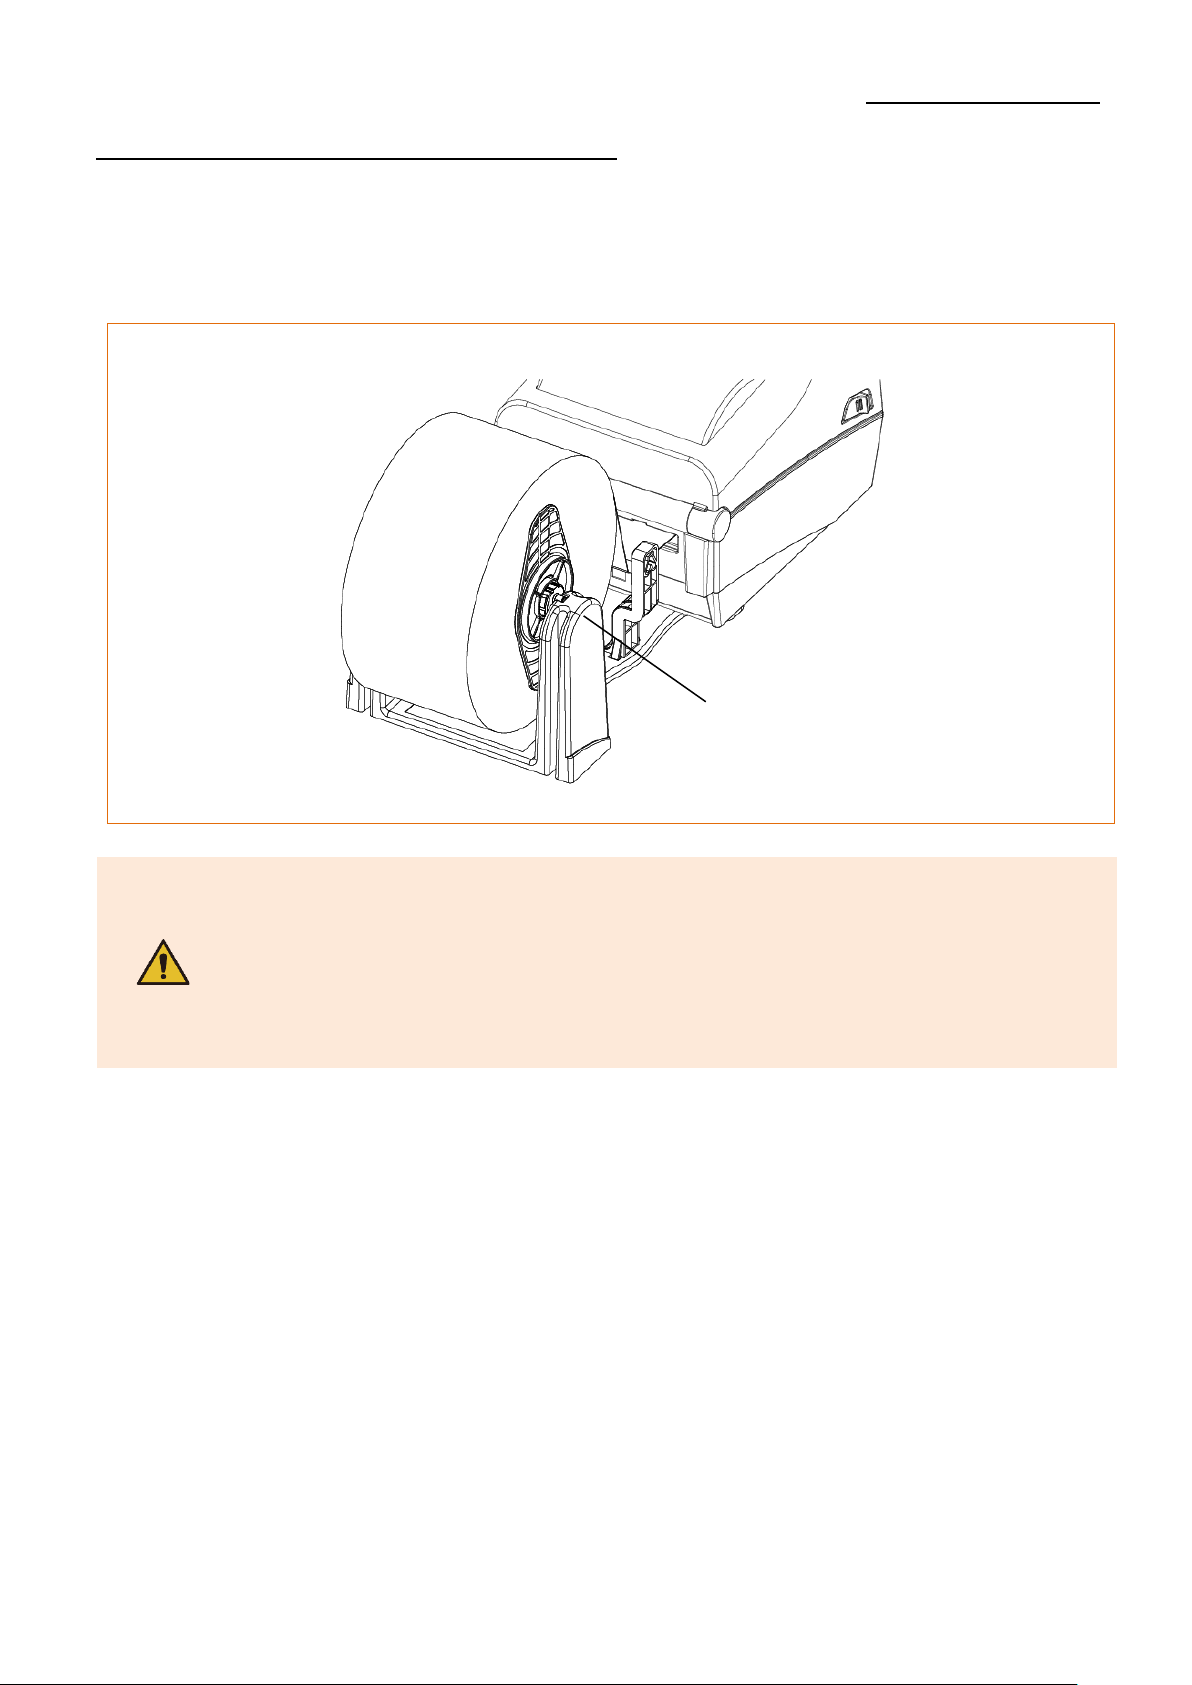
5-12 Using Fan-Fold or External Media
• Supplying media to the printer externally is done as follows.
• Remove the rear media supply cover on the back side of the printer with a cutting
instrument.
Take care not to injure the hands and/or any other part of the body
when performing this step
Remove
Ver. 1.02
- 58 -
XD5-40d Series
5-12-1 When using Fan-Fold media
Supplying fan-fold media to the printer externally is done as follows.
1) Insert the media to at the rear of the printer as shown below.
2) Adjust media holders to the media width by using the fix tool.
Fix Tool
Media Holder
Ver. 1.02
- 59 -
XD5-40d Series
5-12-2 When using Large media roll (Optional)
Install the external media supplier(LES-400G) as shown below and adjust media holders
to the media with Fix Tool.
- Do not open the print cover while the printer is operating,
otherwise the printer may be damaged.
- To prevent data loss, replace media only when the printer is
not receiving any data.
- Be aware of physical damage caused by external media when
operating the printer
External Media Supplier
(LES-400G)
Ver. 1.02
- 60 -
XD5-40d Series
5-13 Auto Cutter (Option)
• For auto media cutting, products equipped with auto cutter are available.
Auto-Cutter can be controlled by command.
The media installation method is the same as media with no auto cutter.
Please refer CUT(Auto-cutter Enable/Disable) of Programming
(SLCS) Manual or Unified Label Utility-II Manual for more information.
- When opening or closing the cover, be careful not to pinch your fingers.
- Do not open the media cover while the printer is operating.
The printer may be damaged.
- Change the media when the printer is not receiving data, or data may
be lost.
- Never insert objects or fingers while performing the cutting function.
This can cause serious bodily injury.
- Be careful not to touch the cutter blade with your hand.
There may be a risk of personal injury.
- The print head gets extremly hot while printing or after the printing,
this can cause serious burns. Do not touch the print head.
Ver. 1.02
- 61 -
XD5-40d Series
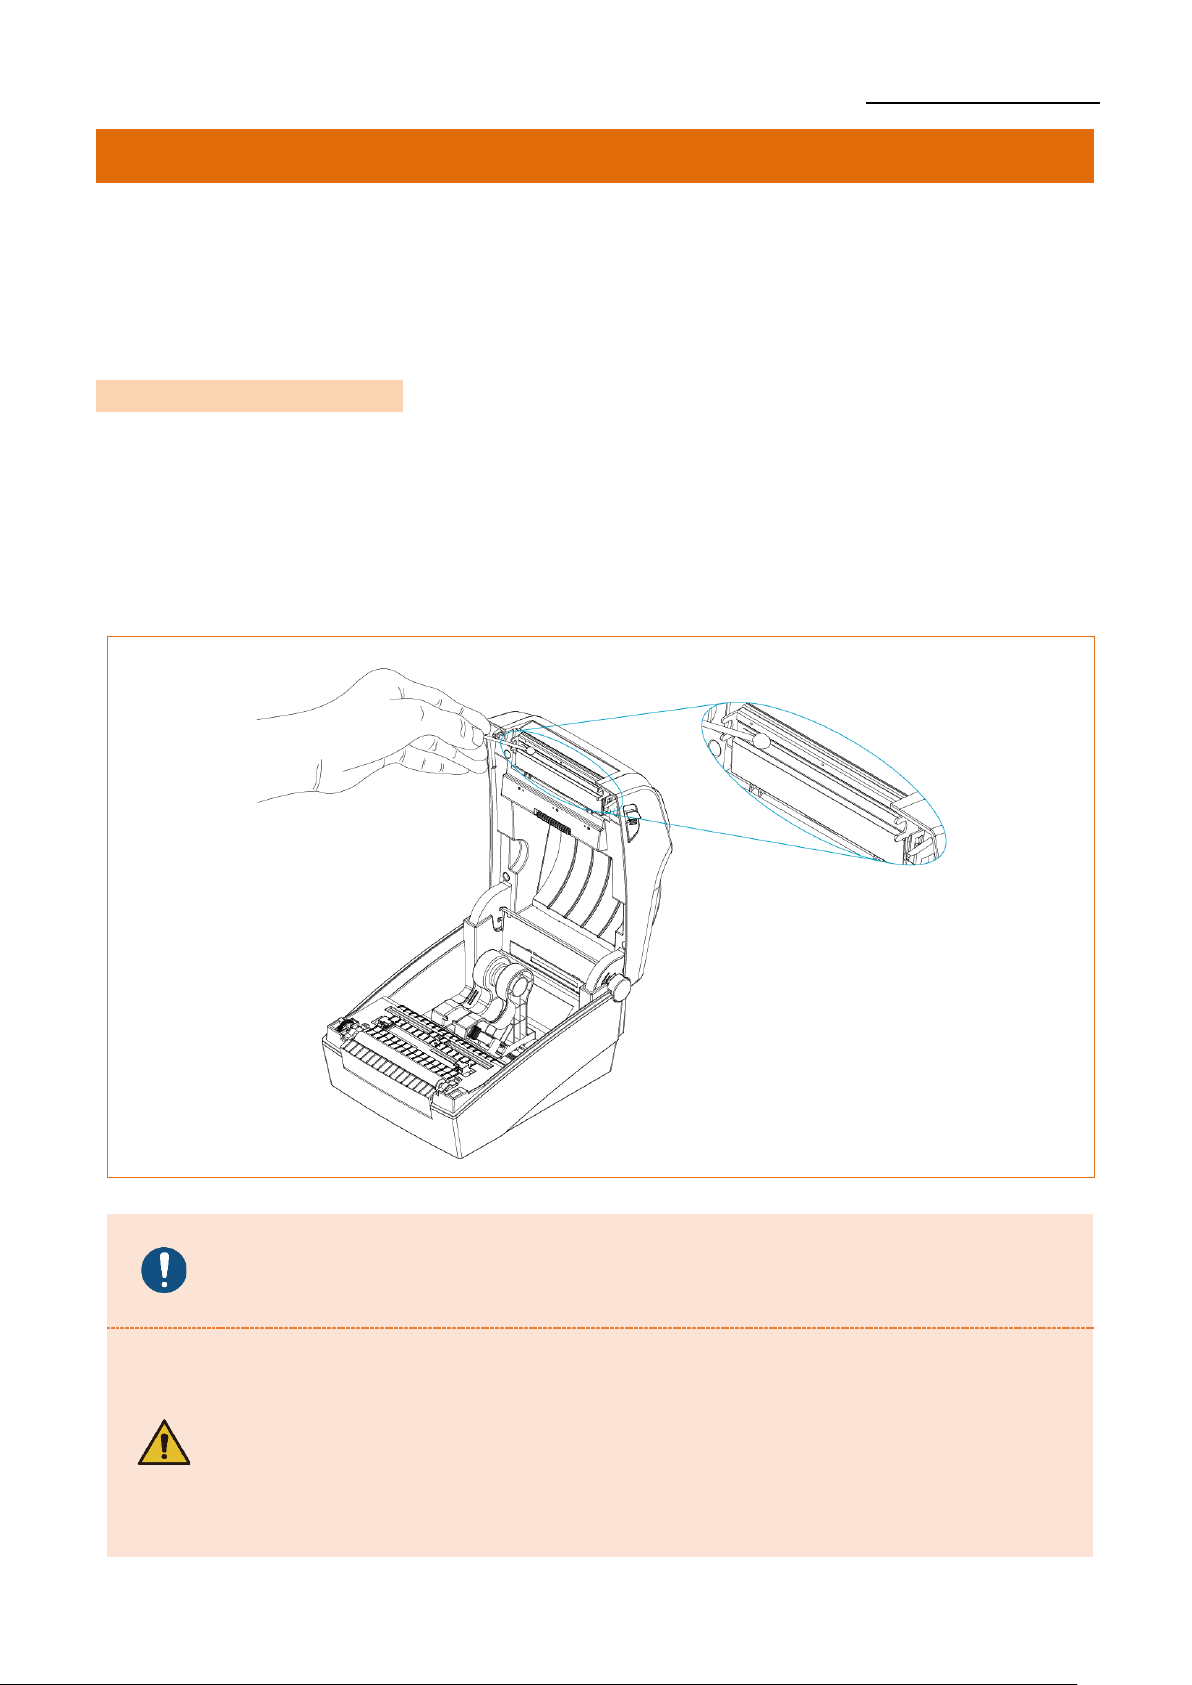
6. Printer Maintenance
Printing quality might be degraded by dust, foreign substance, adhesive substance, or
other pollution materials stuck in the printer head or inside the printer.
When dirty, clean the print head as follows
6-1 Cleaning Printer Head
• Be sure to turn the printer off.
1) Open the media cover and then remove adhesive foreign substances or
other pollution materials with the cloth or cotton swab soaked in alcohol for medical.
2) After cleaning the head, do not use the printer until the alcohol used for cleaning
evaporates completely. (1~2 min)
Perform the cleaning process each time the media roll is replaced to prevent
print quality deterioration.
- Be sure to clean after turning the printer off.
- Be careful not to leave scratches in the print head.
The printer may be damaged.
- The print head gets extremly hot while printing or after the printing,
this can cause serious burns. Do not touch the print head.
- Do not touch heated area of print–head when cleaning.
Personal injury may result from static electricity, etc.
Ver. 1.02
- 62 -
XD5-40d Series
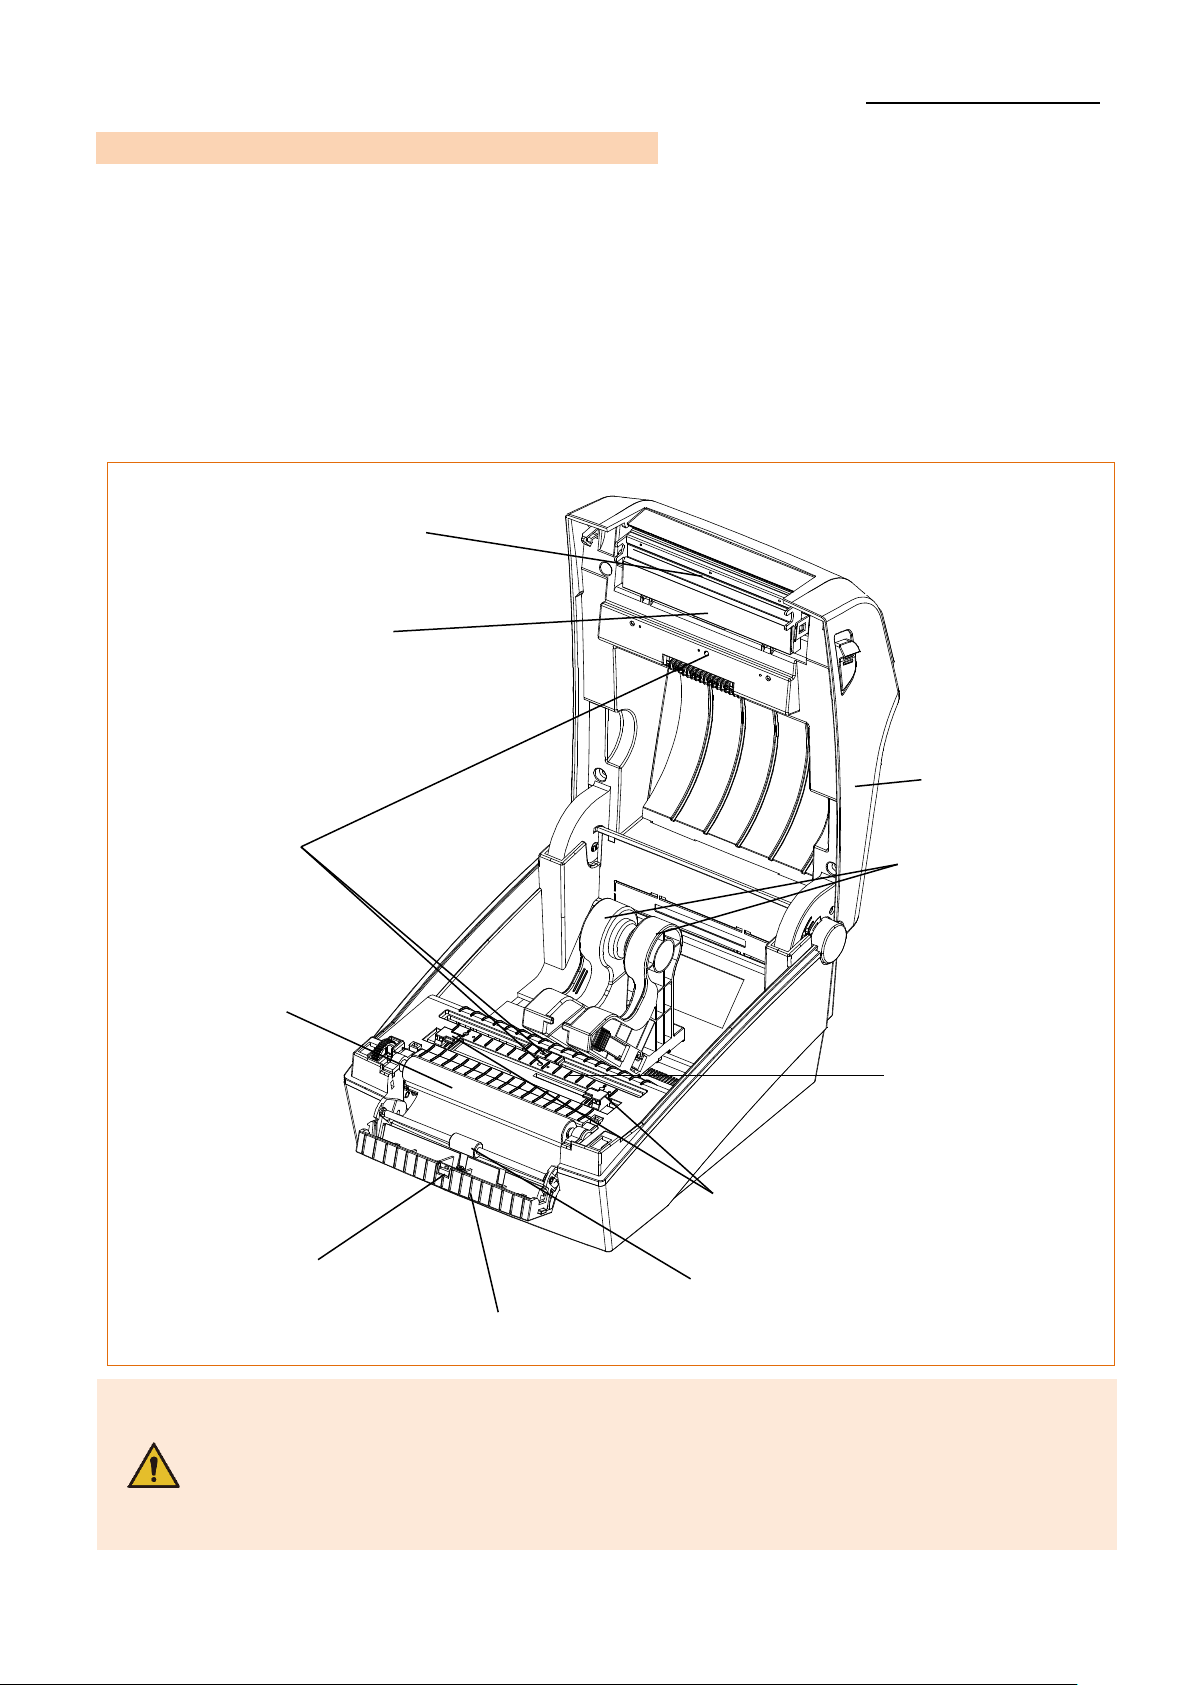
6-2 Cleaning Sensors, Roller or/and media Path
• Be sure to turn the printer off.
1) Open the media cover and remove the media.
2) Remove any dust or foreign substance using dry cloth or cotton swab.
3) Soak the cloth or cotton swab in alcohol for medical use and use it to remove adhesive
foreign substances or other pollution materials.
- Clean the parts when there is a degradation of performance in
printing quality or media detection.
- After cleaning the parts, do not use the printer until the alcohol
evaporates completely (1~2 min) and the printer has completely dried.
- Be sure to use medical alcohol only. If not, it may cause printer damage.
Media Cover
Media Holder
Peeler Roller
Ridges
Peeler Sensor
Platen Roller
Ridges
Printer Head
Head Cover
Sensor
Media Guide
Ver. 1.02
- 63 -
XD5-40d Series
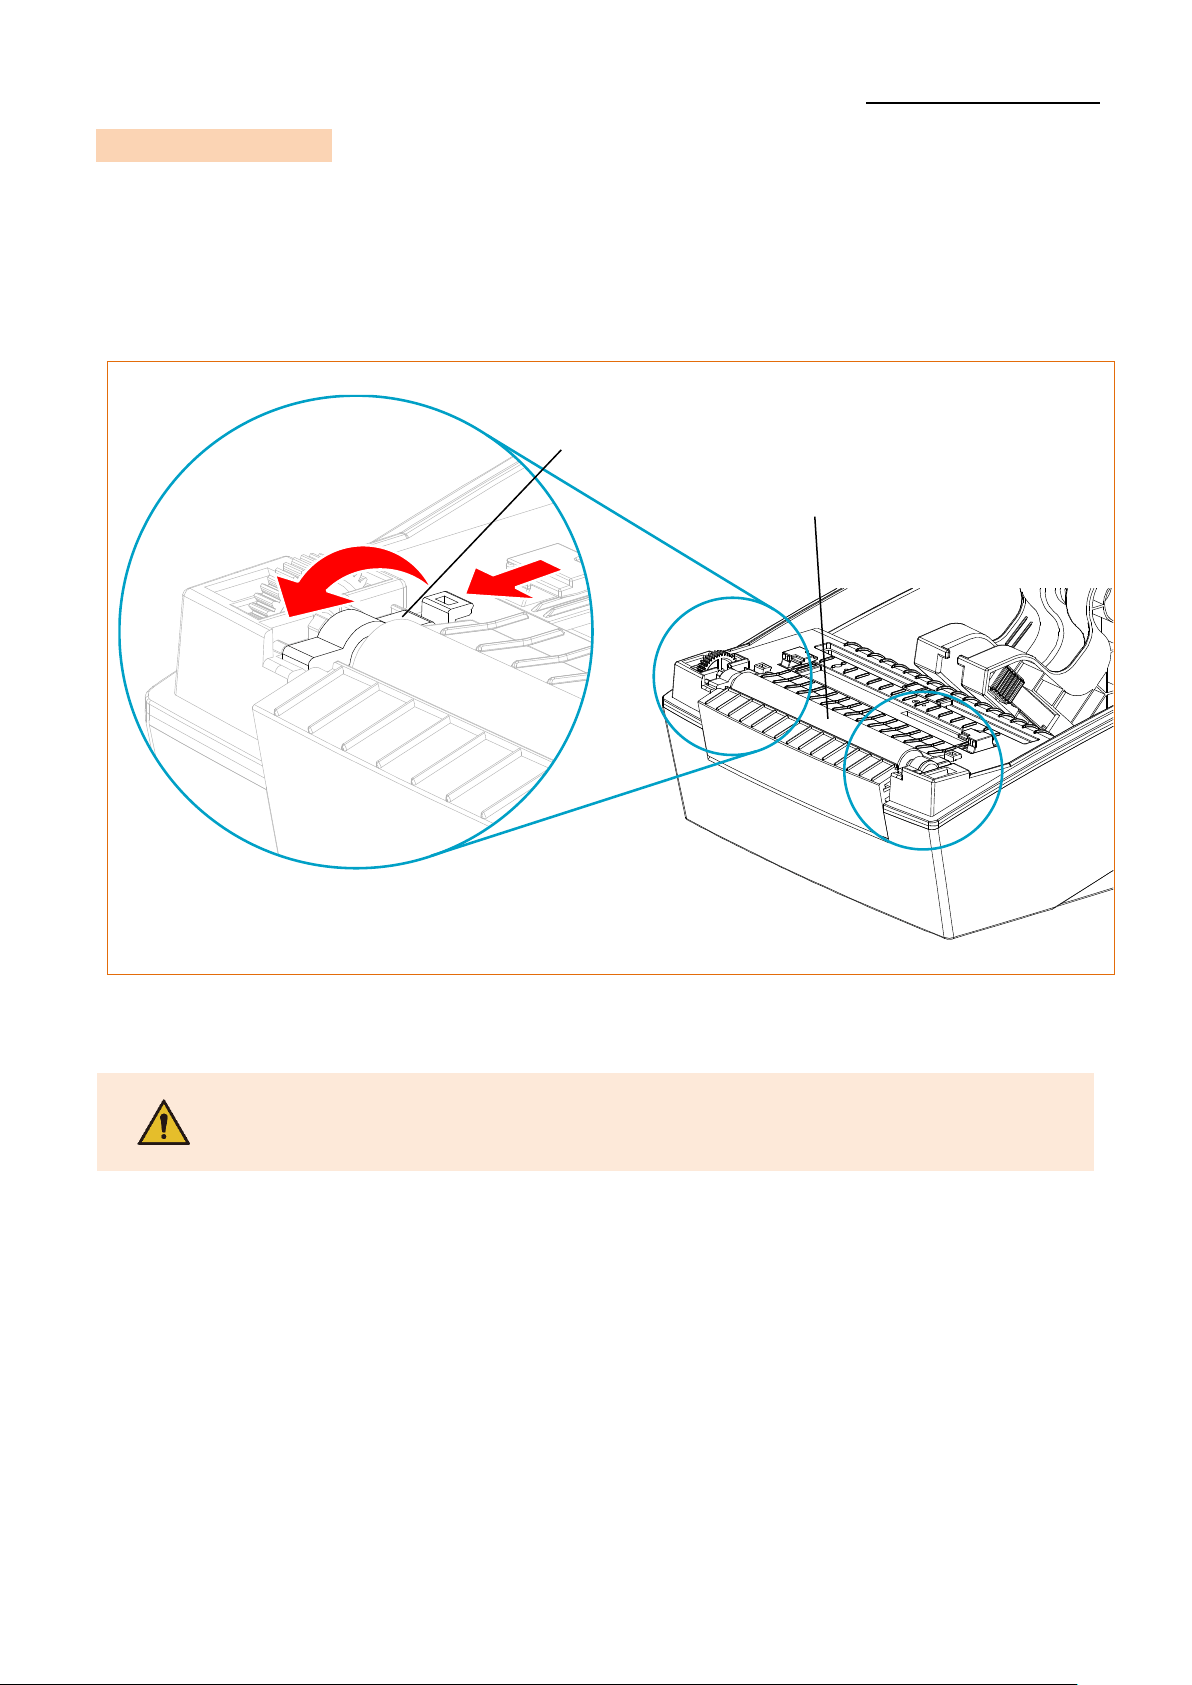
6-3 Replacing Roller
• Be sure to turn the printer off.
1) Open the media cover and remove the media.
2) Pull the roller holders and separate the roller assembly.
3) Assemble new roller assembly in reverse order.
- Make sure to turn the printer power off prior to cleaning.
- The print head gets extremly hot while printing or after the printing,
this can cause serious burns. Do not touch the print head.
Roller Holder
Roller Assembly
Ver. 1.02
- 64 -
XD5-40d Series
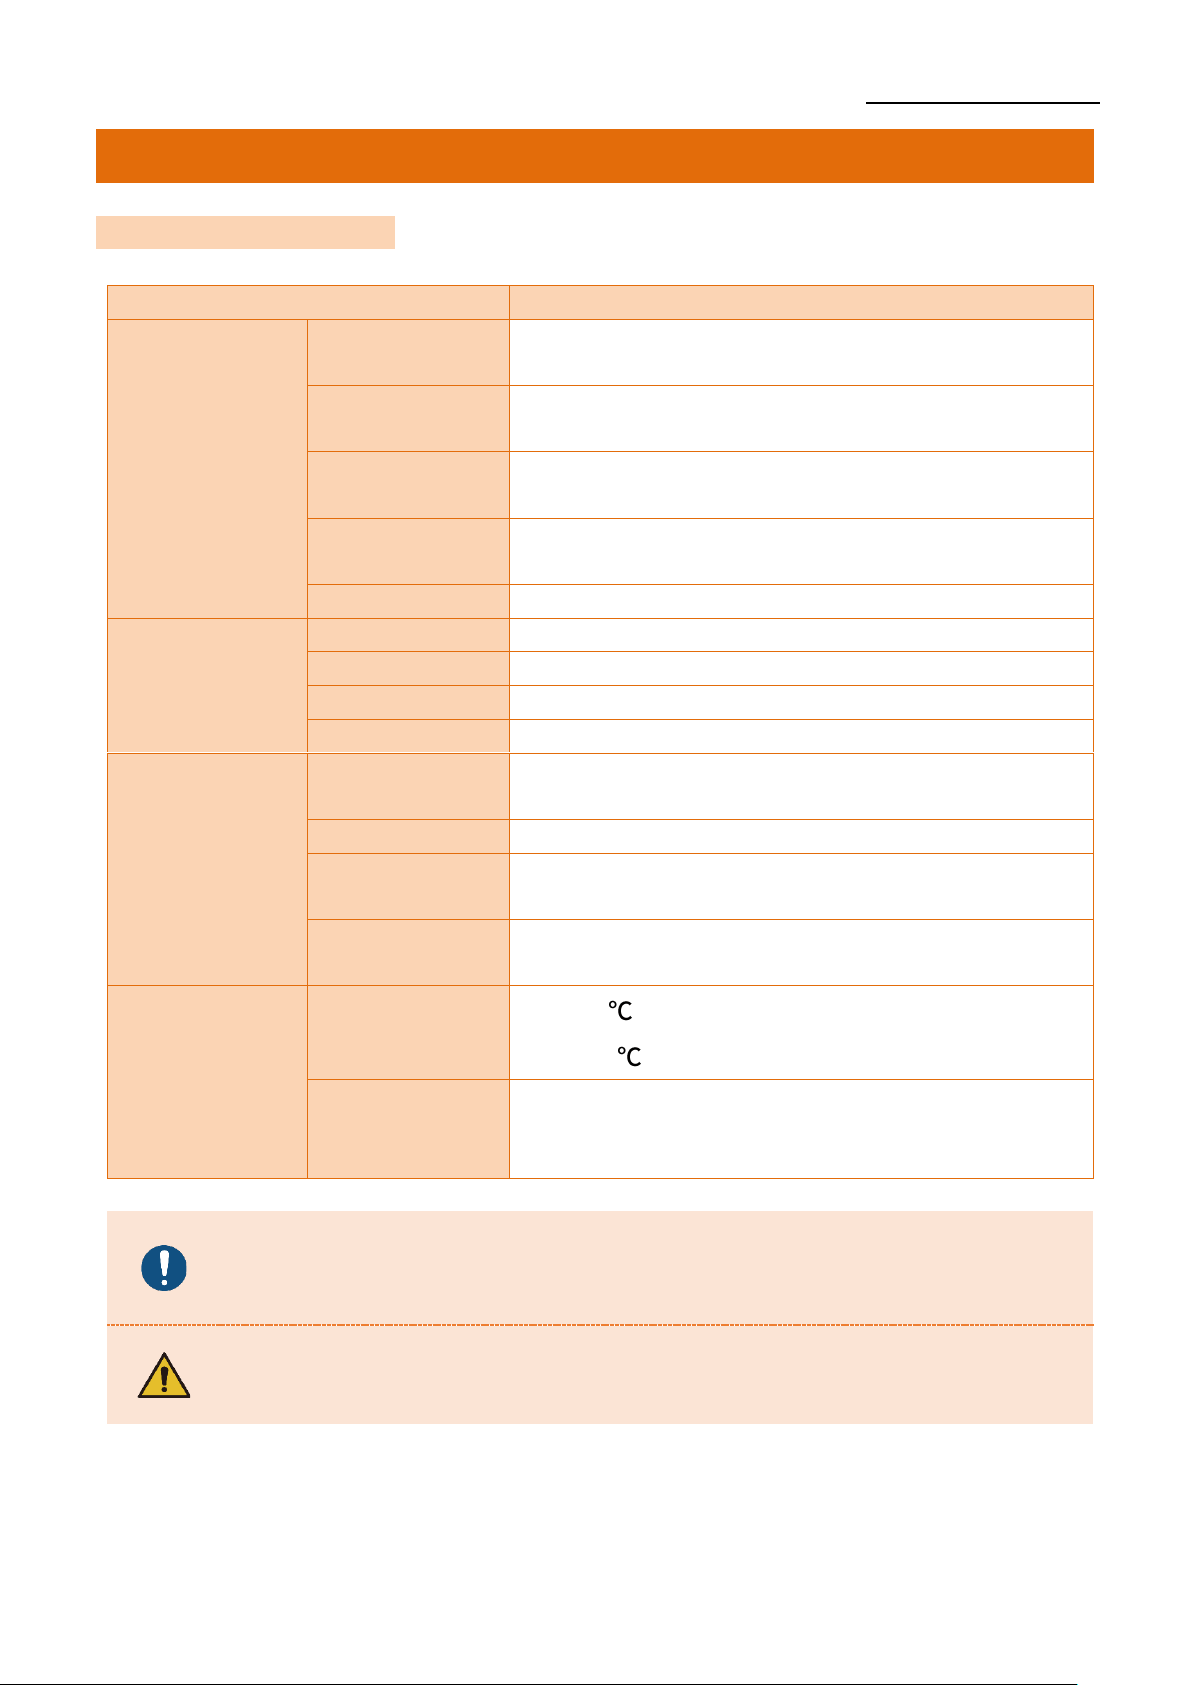
7. Specifications
7-1 Printer Specifications
Item
Description
Printer
Printing
Method
Direct Thermal Printing
Dot Density
XD5-40d: 203 dpi (8 dot/mm)
XD5-43d: 300 dpi (11.8 dot/mm)
Printing Width
XD5-40d: Max. 108 mm (Max. 4.25”)
XD5-43d: Max. 105.7 mm (Max. 4.16”)
Printing Speed
XD5-40d: Max. 178 mm/sec (Max. 7ips)
XD5-43d: Max. 127 mm/sec (Max. 5ips)
Printing Length
Up to 1,000mm
Media
Roll Width
15 ~ 118 mm (0.59 ~ 4.64”)
Roll
Max. 127 mm (Max. 5”)
Core
25.4 ~ 38.1 mm (1” ~ 1.5”)
Thickness
0.06 ~ 0.20mm
AC
Adapter
SMPS Input
Voltage
AC 100 - 240V
Frequency
50/60 Hz
SMPS Output
Voltage
DC 24V ±5%
SMPS Output
Current
2.5A
Usage
Conditions
Temperature
0 ~ 40 (Operating)
-20 ~ 60 (Storage)
Humidity
(except for
media)
10 ~ 80 % RH (Operating)
10 ~ 90 % RH (Storage)
Print speed may vary depending on the data transfer speed and the
combination of command.
- In case of danger, turn off the power to cut the connection.
- The power cord must be grounded to ensure safety and reduce
electromagnetic interference

Ver. 1.02
- 65 -
XD5-40d Series
7-2 Label Types Specifications
The label types used with this printer are as follows.
• Control Labels: PET
• Other Labels: PET
Ver. 1.02
- 66 -
XD5-40d Series
Revision History
Ver.
Date
Description
1.00
2019-10-10
New
1.01
2019-12-30
Caution and warning text added
Media guide explanation revised
LCD model button image revised
Status and setting information image revised
Sensor menu added and tools menu revised
‘This function is not supported in this model’ added
Smart connection explanation revised
Bluetooth table revised
Revised how to use media auto calibration
‘The printer will be rebooted automatically’ added
'Be sure to turn the printer off' added
Caution text revised
1.02
2022-08-12
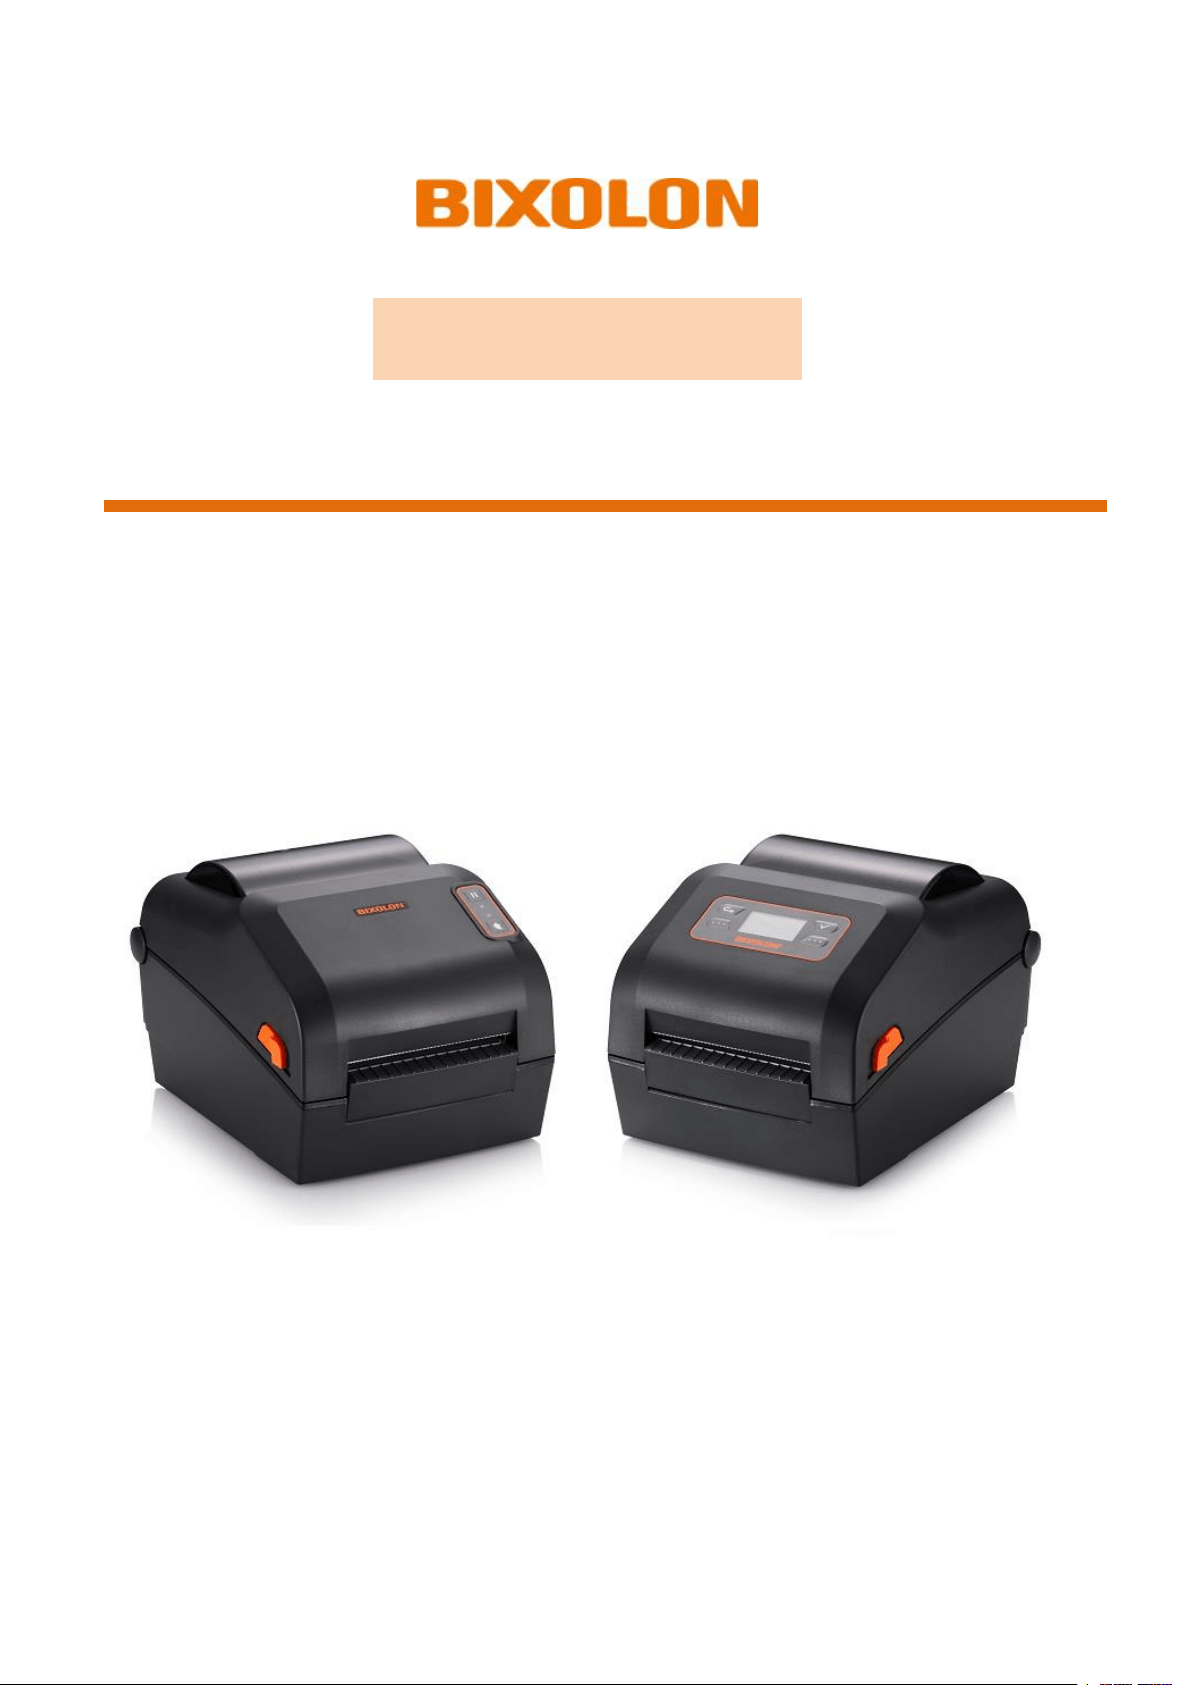
LCD model printer photo added
SWC added
Document format revised