www.kucht.com
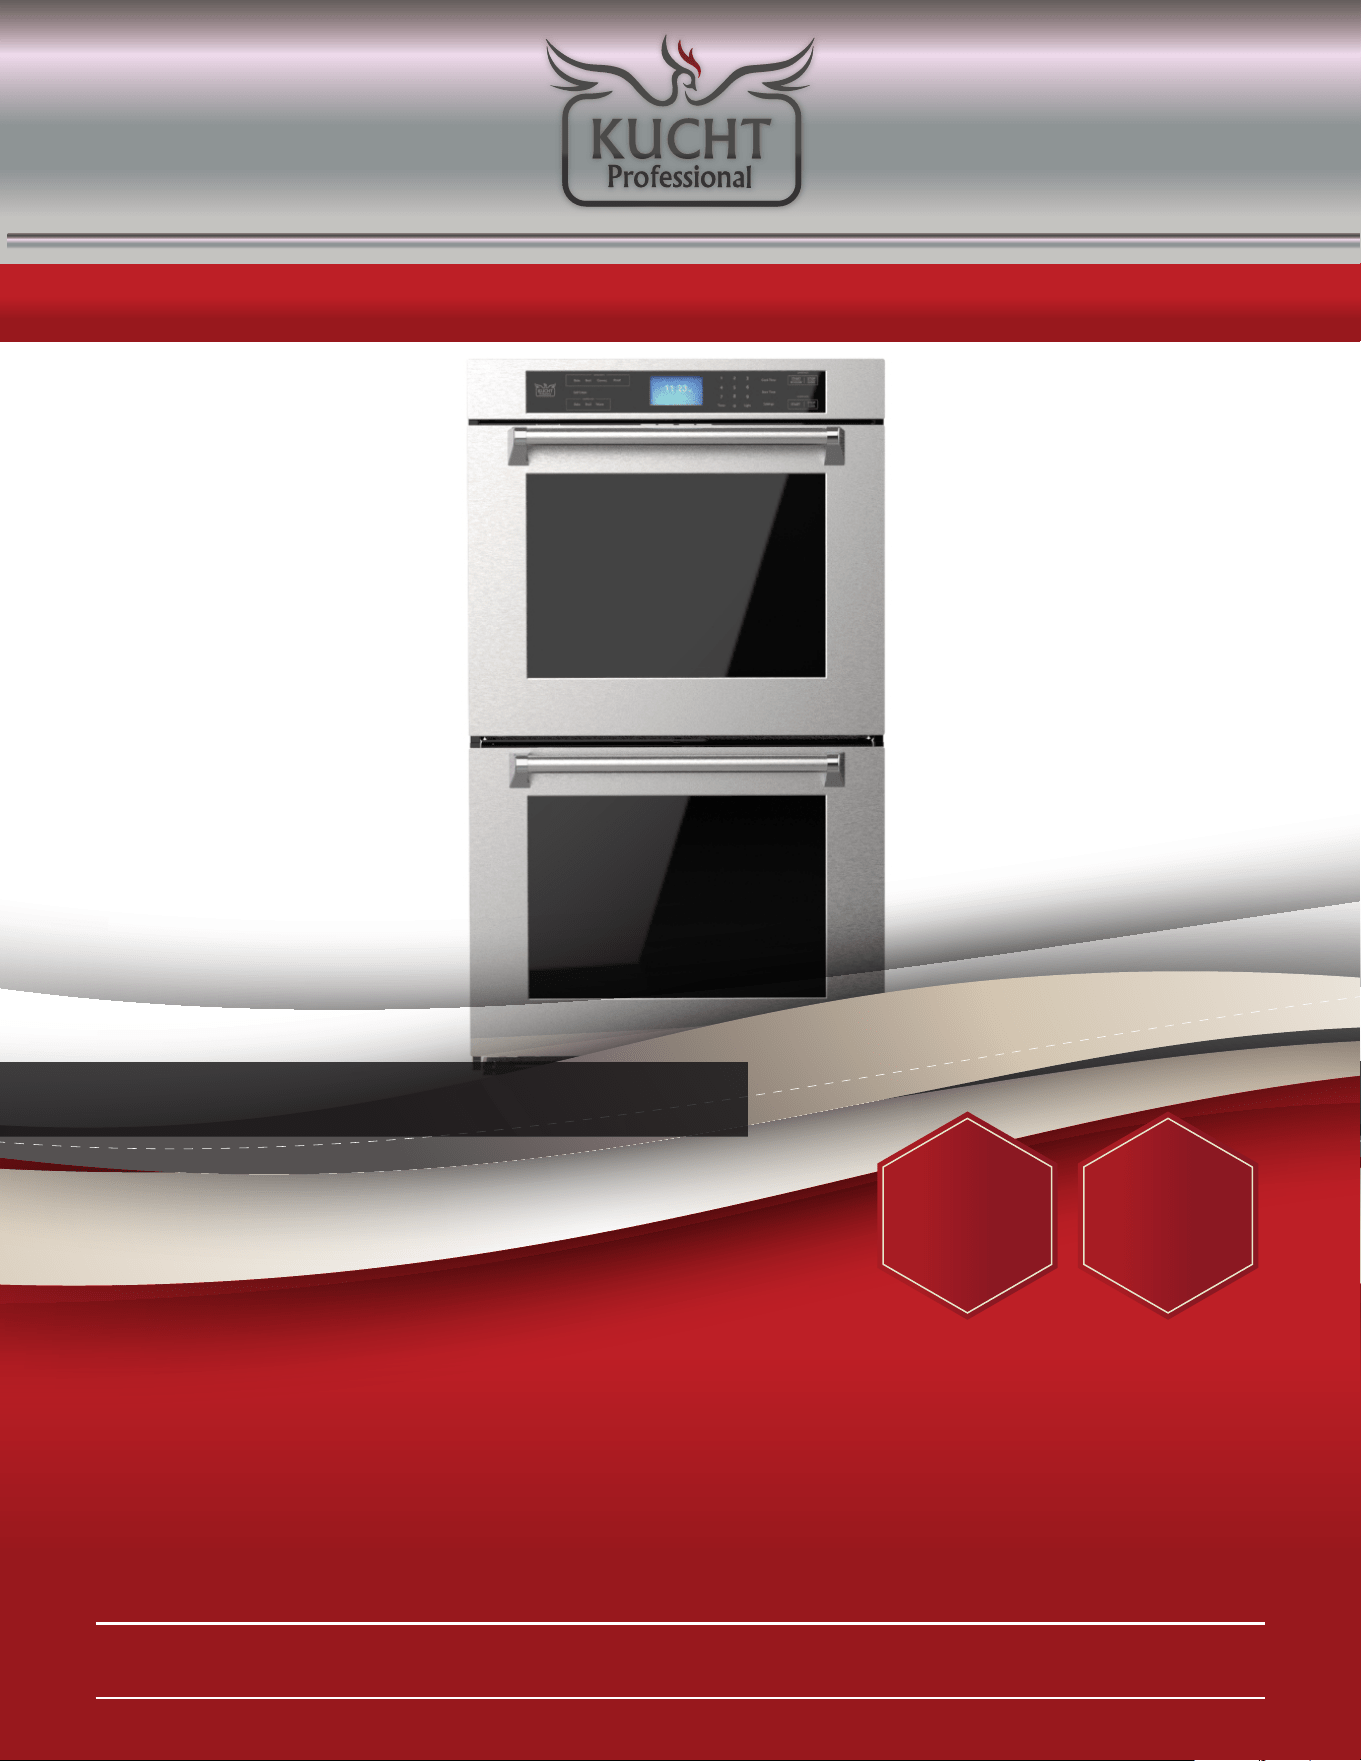
APPLICABLE MODEL: KWO620
BE A PRO IN YOUR KITCHEN
30”
240V
DOUBLE WALL OVEN
KWO620
USER MANUAL


: Models SWB3052DS, SWB3062GS
CONSUMER LIMITED WARRANTY ..................................4
RETURN POLICY ......................................................5
OVEN SAFETY ......................................................... 6
WARNINGS FOR ELECTRIC INSTALLATION ........................... 6
IMPORTANT SAFETY INSTRUCTIONS .............................. 7
PARTS AND FEATURES ............................................. 9
CONTROL PANEL. ................................................... 10
OVEN MODE CONTROLS .................................................... 10
DISPLAY .............................................................................. 10
START/CONTROL LOCKOUT ................................................. 10
STOP/CLEAR ......................................................................... 10
LIGHT .................................................................................... 10
TIMER ................................................................................... 10
COOK TIME ......................................................................... 10
START TIME ........................................................................ 11
SETTINGS ........................................................................... 11
SELF-CLEAN ........................................................................ 12
BRIGHTNESS ...................................................................... 12
DEMO MODE ........................................................................ 12
OVEN USE ............................................................ 13
BEFORE USING THE OVEN .................................................. 13
GENERAL .............................................................................. 13
OVEN TEMPERATURE CONTROL ......................................... 14
OVEN MODES ..................................................................... 14
CONVECTION ...................................................................... 16
BAKE TIPS .......................................................................... 17
CONVECTION BAKE TIPS ..................................................... 18
CONVECTION ROAST TIPS ................................................... 19
CONVECTION BROIL TIPS .................................................... 20
DEHYDRATE TIPS ................................................................. 21
BROIL TIPS .......................................................................... 22
FOOD SERVICE TEMPERATURE GUIDELINES FROM FSIS ... 23
OVEN CARE ...........................................................23
GENERAL CLEANING ........................................................... 23
AUTOMATIC SELF-CLEANING .............................................. 24
OVEN DOOR REMOVAL ........................................................ 25
REPLACING AN OVEN LIGHT ................................................ 26
TROUBLESHOOTING ................................................27
BAKING AND ROASTING ....................................................... 27
OPERATION ......................................................................... 27
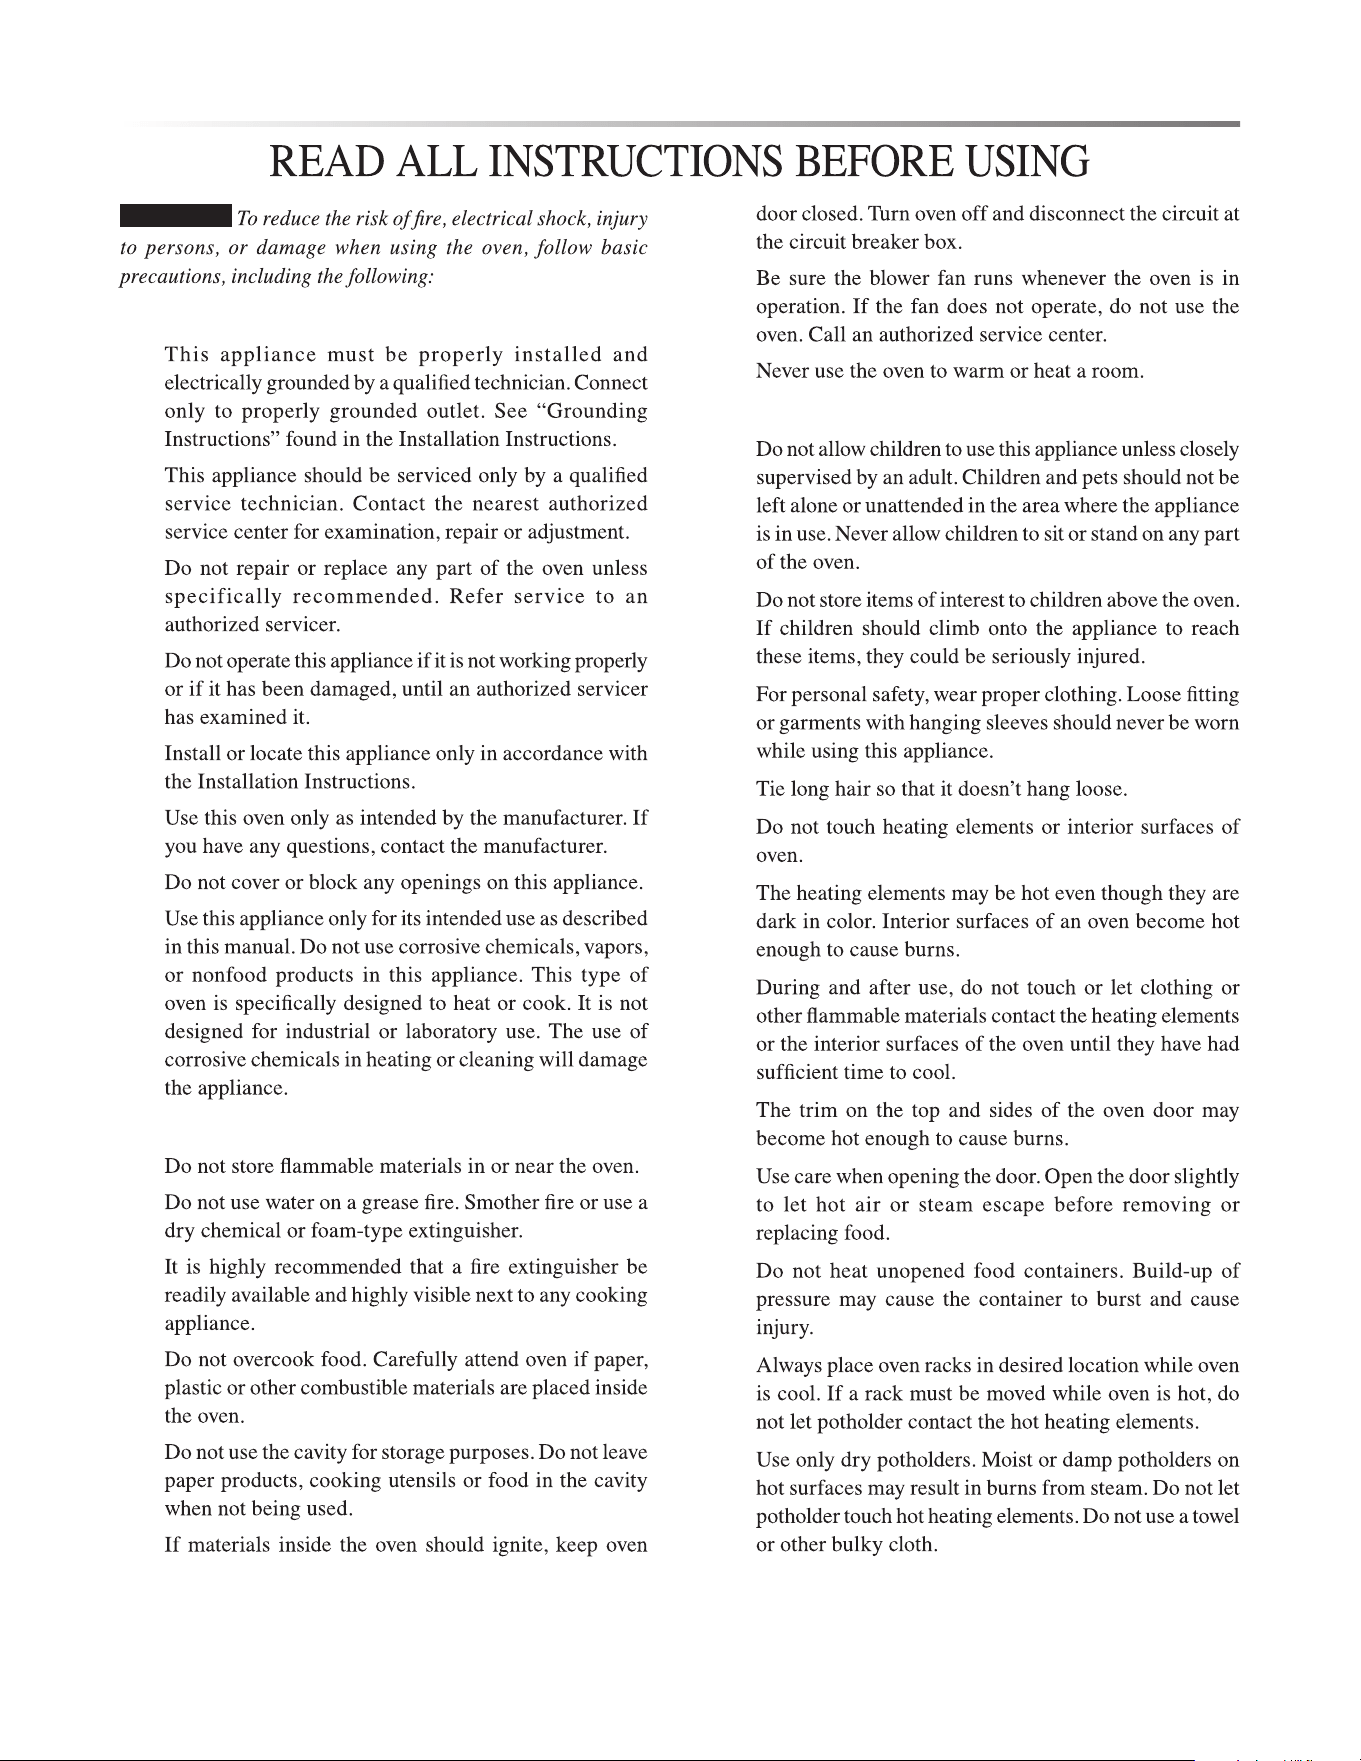
IMPORTANT SAFETY INSTRUCTIONS
Carefully read the important information regarding installation, safety and maintenance.
Keep these instructions for future reference.
E
E
E
E
E
OPERATION MANUAL
DOUBLE WALL OVEN
KWO620
INDEX

CONSUMER LIMITED WARRANTY
4
E
E
E
E
E
The main objective of KUCHT is to meet the needs and expectations of our customers. For this reason, all our products are subjected to rigorous security and
quality controls to be above the North American safety standards.
KUCHT Warranty covers defects in Parts and Labor for functional parts that are the result of normal usage for a period of time of 4 Years for Parts and Labor*
from date of purchase in the U.S. and 2 Years for Parts and Labor from date of purchase in Canada. Functional parts are those components parts that are critical
to the performance of the product’s essential function.
Nonfunctional parts are those that are not critical like knobs, handles, or cosmetic parts. KUCHT will repair or replace the unit or any parts, therefore, as required,
subject to these terms and conditions.
(*): Valid for every appliance bought after September 1st, 2020 – Not valid for accessories, parts, or wine coolers. All the appliances acquired before September
1st, 2020, and Wine Coolers, are covered with a 2-year warranty for parts and labor.
Unlimited lifetime online support
In addition, we give full unlimited lifetime support. This means that if our customers come across any problem after the warranty has expired, a qualified Kucht
member will assist you or your trusted technician using video chat in any repair process. You will also have access to repair videos, tutorials, manuals, and any
extra help that is available.
General Conditions:
a. Warranty does not cover failure as a result of misuse, abuse, rust or corrosion, spilled liquids or foreign objects found inside the unit; repair of damage caused
by accident, theft, fire, flood, external causes such as, but not limited to, blow fuses, inadequate electrical power, water and gas lines beyond the equipment, or
any use of the product not authorized by the manufacturer.
b. The maximum liability of the warranty for product replacement or repair shall not exceed the original purchase price of the product.
c. KUCHT reserves the right to repair or replace the covered product with a comparable feature model of like kind.
d. Warranty does not cover deterioration of the appearance of the product, any cosmetic part such as paint, porcelain, glass, dents, scratches, chips, rust or
peeling.
e. Any damage resulting from unauthorized replacement parts, improper service, or modifications made to the covered product are not covered.
f. KUCHT is released from all liability due to indirect, consequential, or incidental damages.
g. This warranty does not cover any damage to the product due to lightning, over-voltage, under-voltage, accident, misuse, abuse, negligence, or any damage
caused by the use of the product by the purchaser or others. This warranty does not cover non-EWP products that have been exposed to wet or corrosive
environments. This warranty does not cover stainless steel surfaces that have not been properly maintained.
h. Kucht Products are certified for use according to U.S. and Canada standards. The warranty coverage is limited to U.S. and Canada only. Kucht will not provide
technical service or support in other countries. Replacement parts will only be shipped to continental U.S. and Canada addresses.
Limit of Liability:
Our Liability is limited to the original price of the covered equipment. Addional losses, damages or injuries caused by product malfunction or defects will not be
covered.
To Arrange for Service:
Prior approval from Customer Service is required prior to start the service. To initiate a service claim please Submit a Support Ticket on www.kuchtcare.com or
contact KUCHT for assistance on how to initiate a service claim. Please have your original bill of sale and Serial Number of the unit available so our customer
service representative is able to quickly arrange for service.
Warranty Exclusions
The Kucht LLC Limited Warranty covers residential installations only and is non-transferable to any other party.
Warranty is void when the product is installed in common areas where more than a single party has rightful access
to its use or in locations considered beyond normal residential use.
Warranty does not apply to products installed in any commercial or non-residential application. Examples of
excluded applications include, but are not limited to day care centers, schools, bed and breakfast centers, churches,
private clubs, fire stations, club houses, common areas in multi-family dwellings, restaurants, bakeries, hotels,
nursing homes, food service locations and institutional food service locations.
FOR MORE INFORMATION VISIT: WWW.KUCHT.COM/ONLINE/WARRANTY/

E55
Kucht will accept return requests for purchases within the first 90 days after delivery. Shipping discrepancies or products that arrive damaged must be reported
to Kucht Customer Support within 5 business days of delivery in order to be eligible for a full refund.
Once a return request is approved, Kucht will send a Return Merchandise Authorization (RMA). From this time, the customer will have 15 calendar days to return
the item to Kucht.
All merchandise returned to Kucht must be in original packaging with all original items (e.g., manuals, remotes, cables, etc.) that came in the box. Returns with
missing or damaged items will result in a partial refund.
Products and or Part(s) must be returned in new condition, including: all components, manuals, registration cards, and original undamaged packaging.
After we receive and inspect the item(s), the refund will be processed, minus the original shipping cost.
Kucht won´t refund the original shipping cost in any case. The return shipping cost might be covered by Kucht depending on the situation, in which case, Kucht
will send a Bill Of Lading and handle the shipping arrangements. There will not be refunds or compensations related to the shipping and handling of the products
under any circumstances.
Returns without an RMA number will not be accepted and a credit will not be issued.
Additional shipping charges apply with shipments outside the 48 contiguous United States, expedited shipping and oversized items. These additional shipping
charges, such as taxes, custom duties and fees are the responsibility of the purchaser.
RETURN POLICY
6E
OVEN SAFETY
YOUR SAFETY AND THE SAFETY OF OTHERS ARE VERY IMPORTANT.
DANGER
WARNING
CAUTION
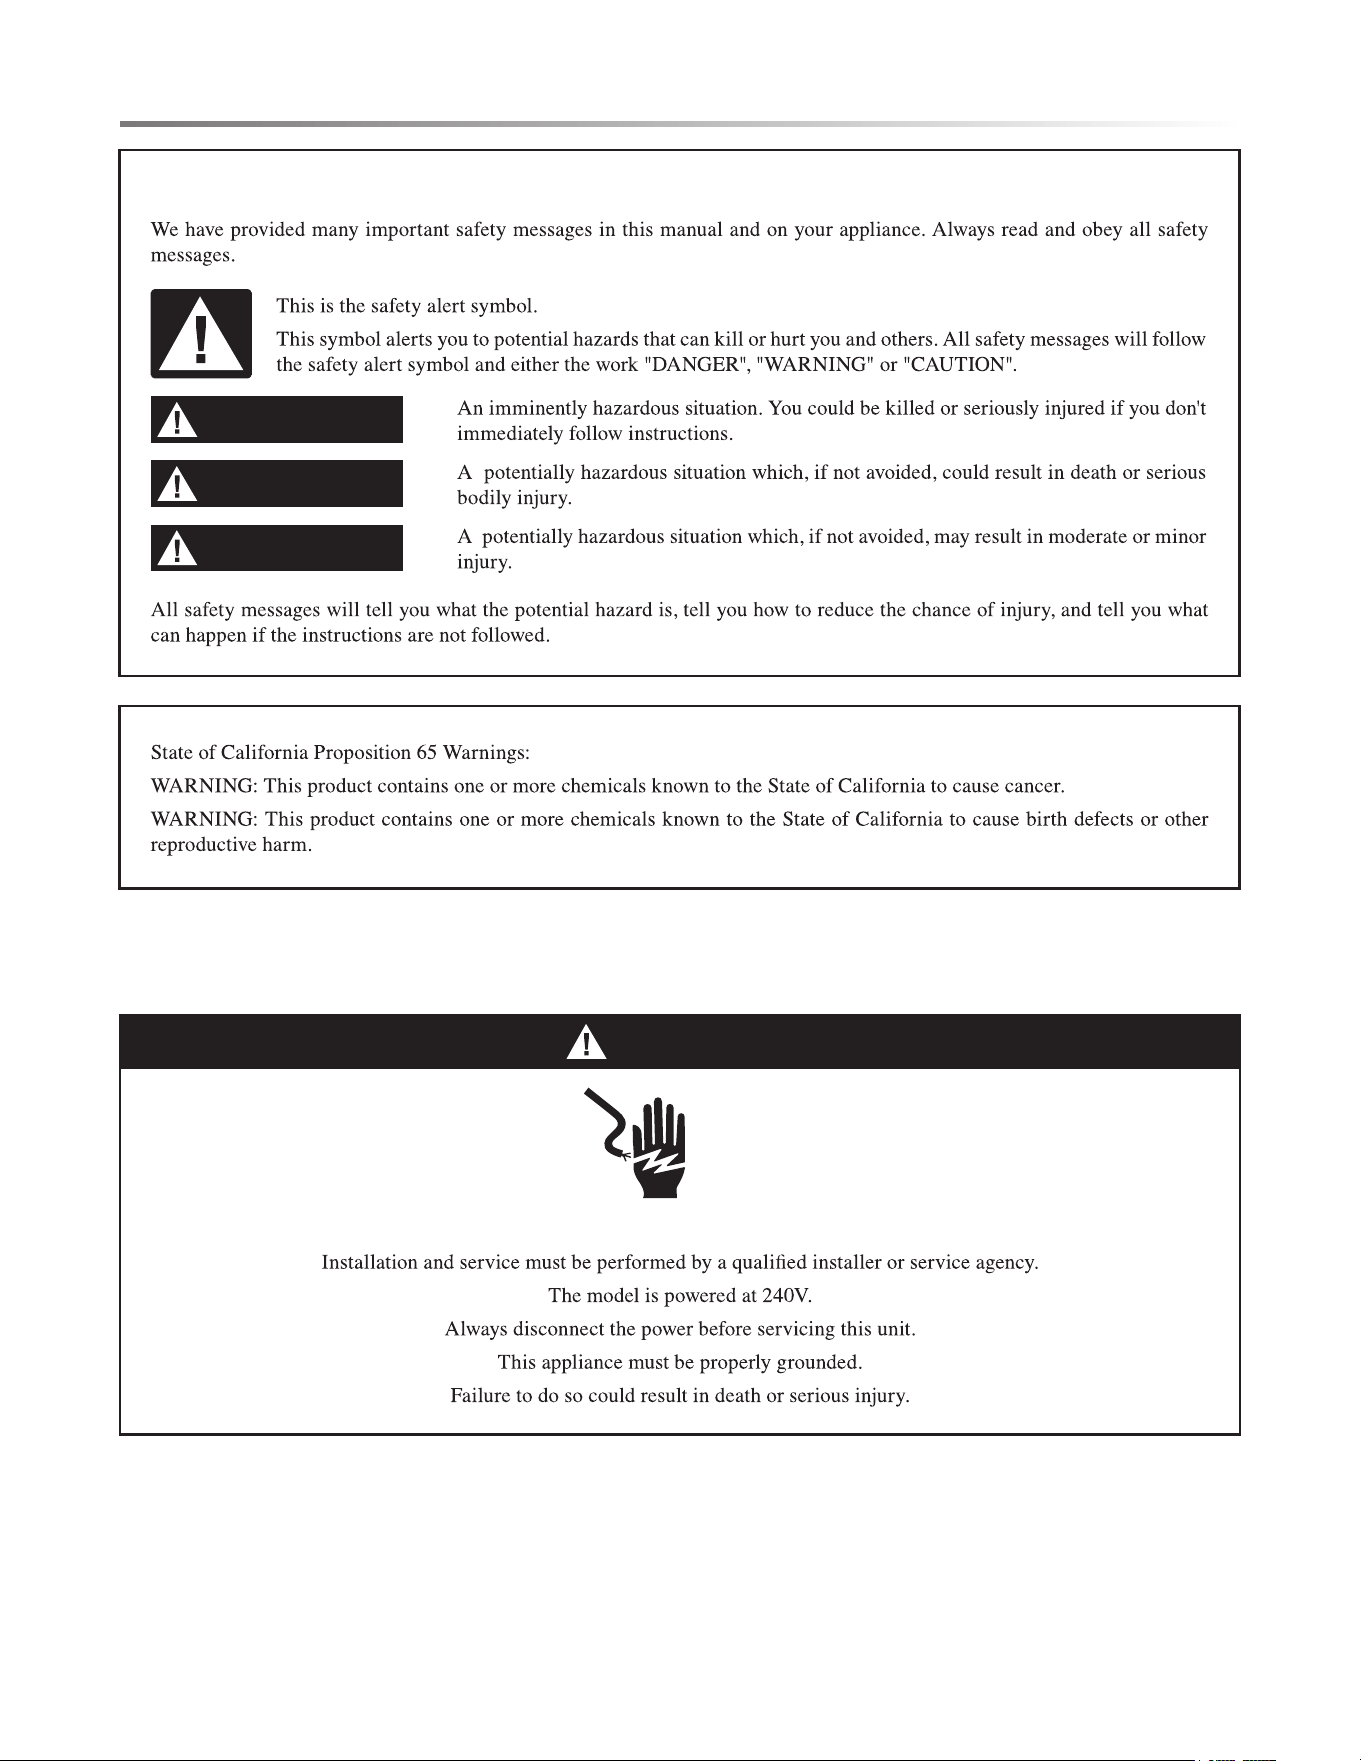
WARNINGS FOR ELECTRIC INSTALLATION
WARNING
ELECTRICAL SHOCK HAZARD
E
E
E
E
E
E7
WARNING
PROPER INSTALLATION:
1
2
3
4
5
6
7
8
TO REDUCE THE RISK OF FIRE IN THE OVEN CAVITY:
1
2
3
4
5
6
7
8
PERSONAL SAFETY:
1
2
3
4
5
6
7
8
9
10
11
12
IMPORTANT SAFETY INSTRUCTIONS
8E
SAFETY FOR THE SELF-CLEANING OVEN:
1
2
3
4
5
6
IMPORTANT SAFETY INSTRUCTIONS
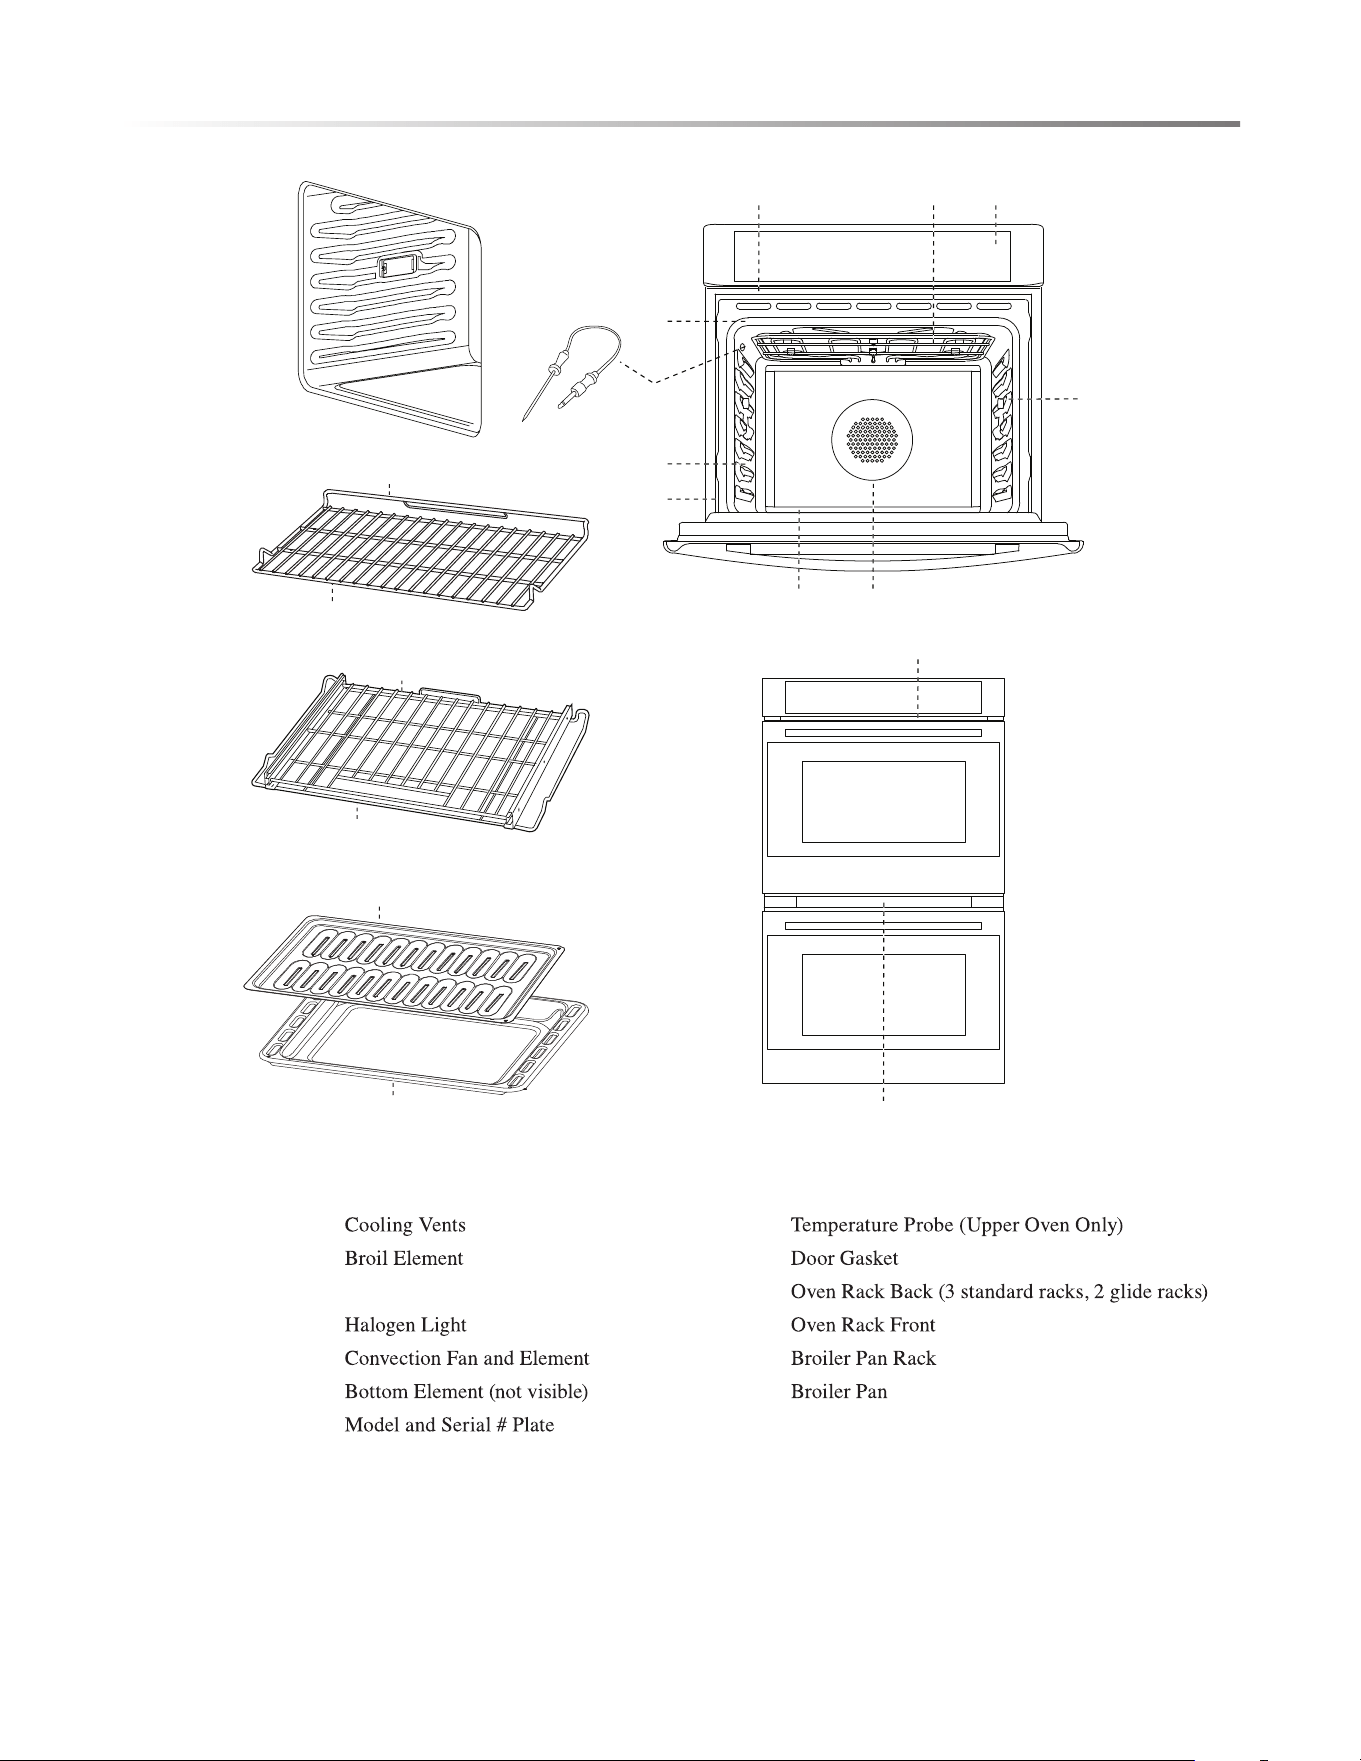
A
B
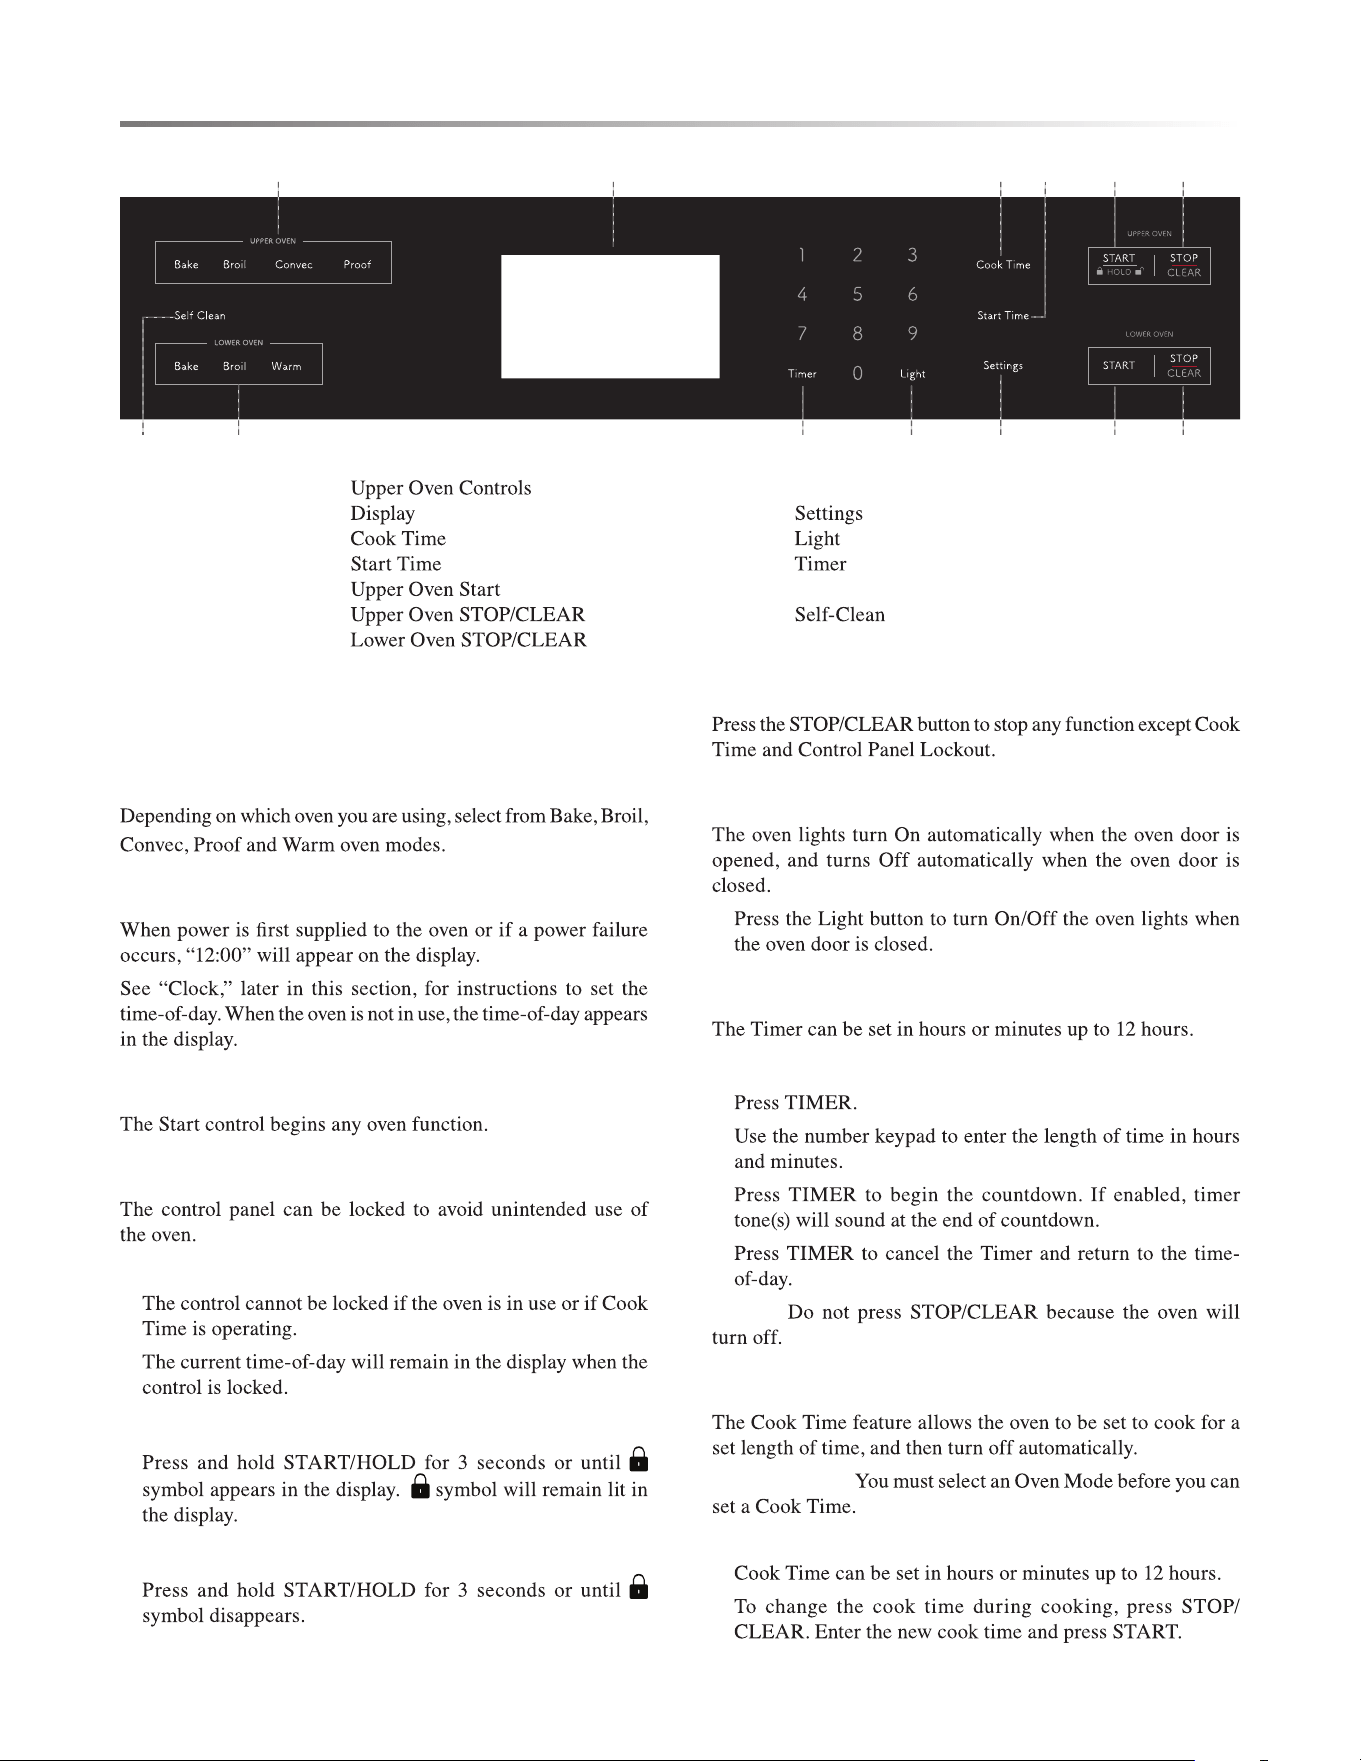
C Control Panel
D
E
F
G
H
I
J
K
L
M
A B C
G
F E
D
D
H
I
A
A
J
K
L
M
J
K
6
5
3
2
1
4
E9
PART AND FEATURES
OVEN MODE CONTROLS -
UPPER OVEN: BAKE, BROIL,
CONVEC, PROOF
LOWER OVEN: BAKE, BROIL, WARM
DISPLAY
START
CONTROL PANEL LOCKOUT
NOTES:
•
•
TO LOCK CONTROL PANEL:
•
TO UNLOCK CONTROL PANEL:
•
STOP/CLEAR
LIGHT
•
TIMER
TO SET THE TIMER:
1
2
3
4
NOTE:
COOK TIME
IMPORTANT:
NOTES:
•
•
A
B
C
D
E
F
G
H Lower Oven Start
I
J
K
L Lower Oven Controls
M
10E
A B C D E F
H GIJKLM
CONTROL PANEL
E11
CONTROL PANEL
•
TO SET COOK TIME:
1
2
3
4
NOTES:
•
•
START TIME
IMPORTANT:
1
2
3
4
5
WARNING
FOOD POISONING HAZARD
6
7
NOTE:
SETTINGS
1
2
3 Sound
4
5
6
7 Sabbath
8
9
0
CLOCK
TO SET THE CLOCK:
NOTE
1
2
3
4
5
6
TO CHANGE THE CLOCK TO 24-HOUR FORMAT:
1
2
3
4
TONES
Number of tones: 1
•
•
•
Number of tones: 2
•
Number of tones: 3
•
Number of tones: 4
•
TO TURN ON/OFF SOUND:
1
2
3
4
12E
CONTROL PANEL
5
6
TO ADJUST SOUND VOLUME:
1
2
3
4
5
6
DEGREES FAHRENHEIT AND CELSIUS
1
2
3
4
5
6
SABBATH MODE
NOTE:
TO TURN ON/OFF SABBATH MODE:
1
NOTE:
2
3
4
TO BAKE WHILE THE OVEN IS IN SABBATH MODE:
1
2
3
4
ONLY THE STOP/CLEAR CONTROL IS FUNCTIONAL.
•
NOTE:
LANGUAGE
SELF-CLEAN
BRIGHTNESS
1
2
3
4
CALIBRATION
DEMO MODE
1
2
3
4
NOTE:

E13
BEFORE USING THE OVEN
1
2
3
NOTE:
4
GENERAL
IMPORTANT:
1
2
3
4
PREHEATING THE OVEN
•
•
•
•
•
•
•
OPERATIONAL SUGGESTIONS
•
•
•
TEMPERATURE PROBE
WARNING
BURN HAZARD
IMPORTANT:
TO USE THE TEMPERATURE PROBE:
1
NOTE:
2
3
4
5
6
NOTES:
•
•
7
NOTE:
UTENSILS
•
•
•
HIGH ALTITUDE BAKING
OVEN USE
14E
OVEN USE
OVEN RACKS
IMPORTANT:
•
•
•
•
TO REMOVE OVEN RACKS:
•
TO REPLACE OVEN RACKS:
•
COMPONENT COOLING FAN
OVEN DOOR
•
•
•
•
OVEN VENTS
•
•
OVEN CONDENSATION AND TEMPERATURE
•
•
•
OVEN TEMPERATURE CONTROL
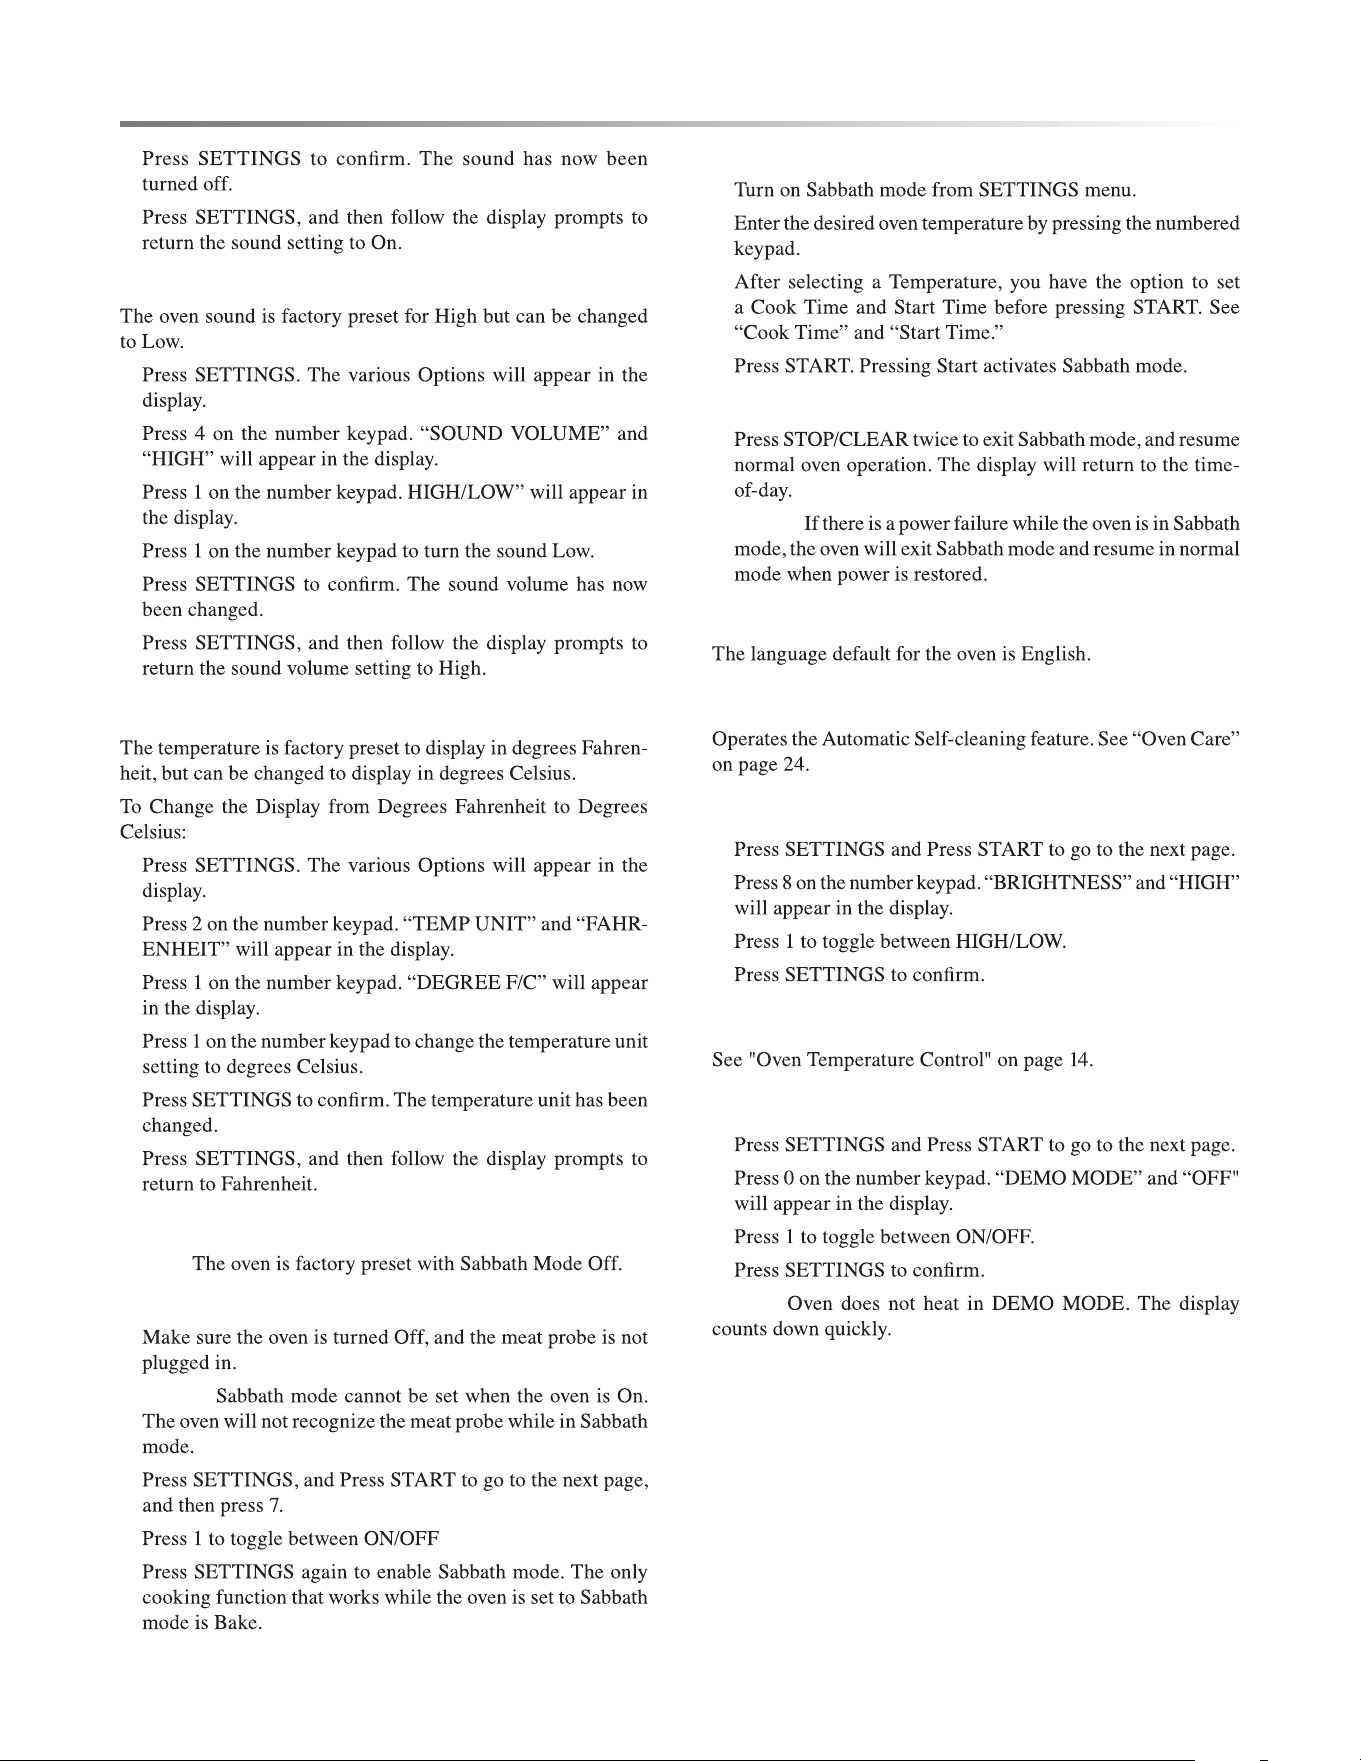
ADJUSTMENT °F
(ADJUSTMENT °C)
COOKS FOOD
TO ADJUST OVEN TEMPERATURE CALIBRATION:
1
2
3
4
OVEN MODES
NOTE:
BAKE
E15
1
2
OR
NOTES:
•
•
3
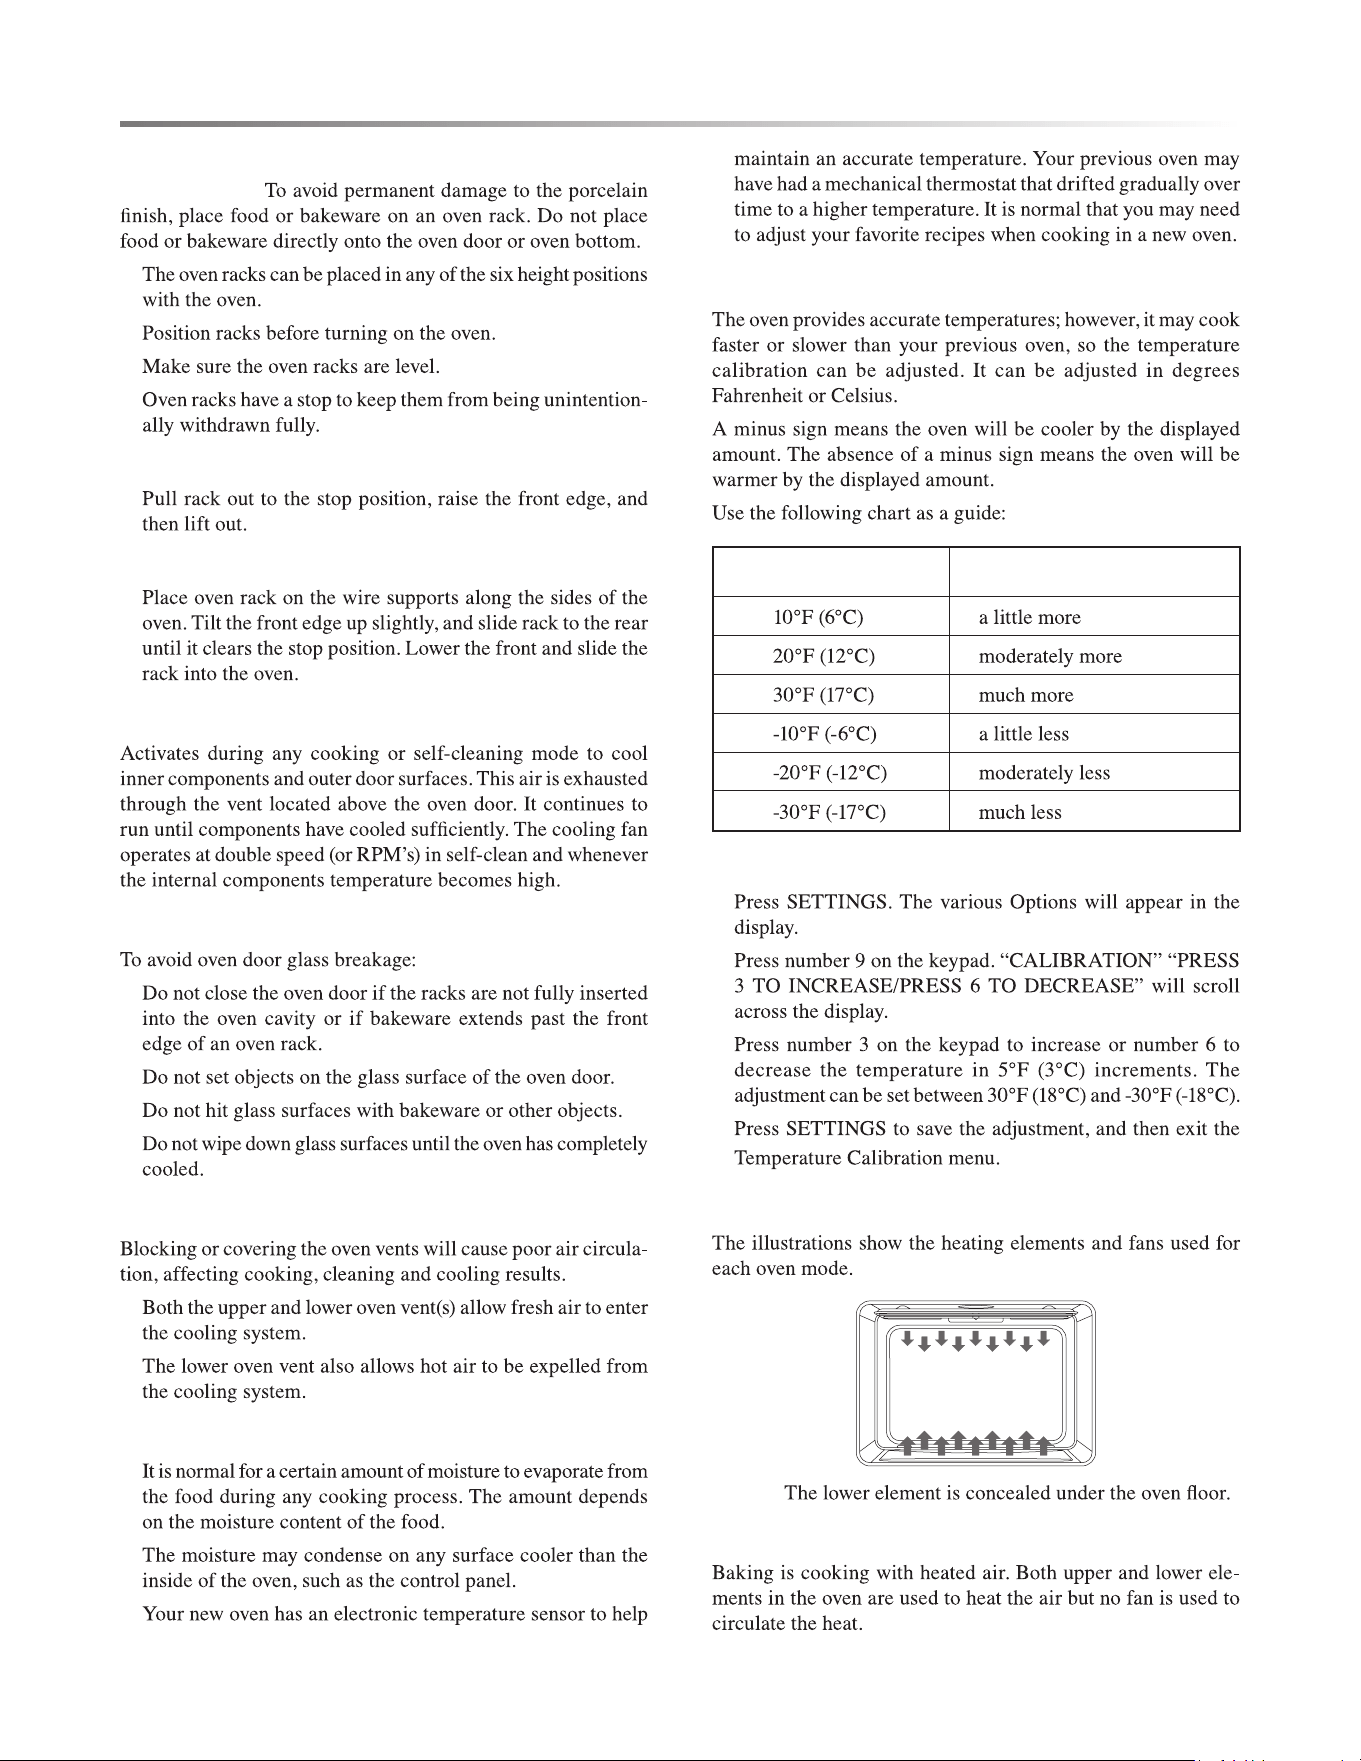
BROIL
•
•
•
•
•
TO BROIL:
1
NOTE:
2
3
OR
4
NOTES:
•
•
5
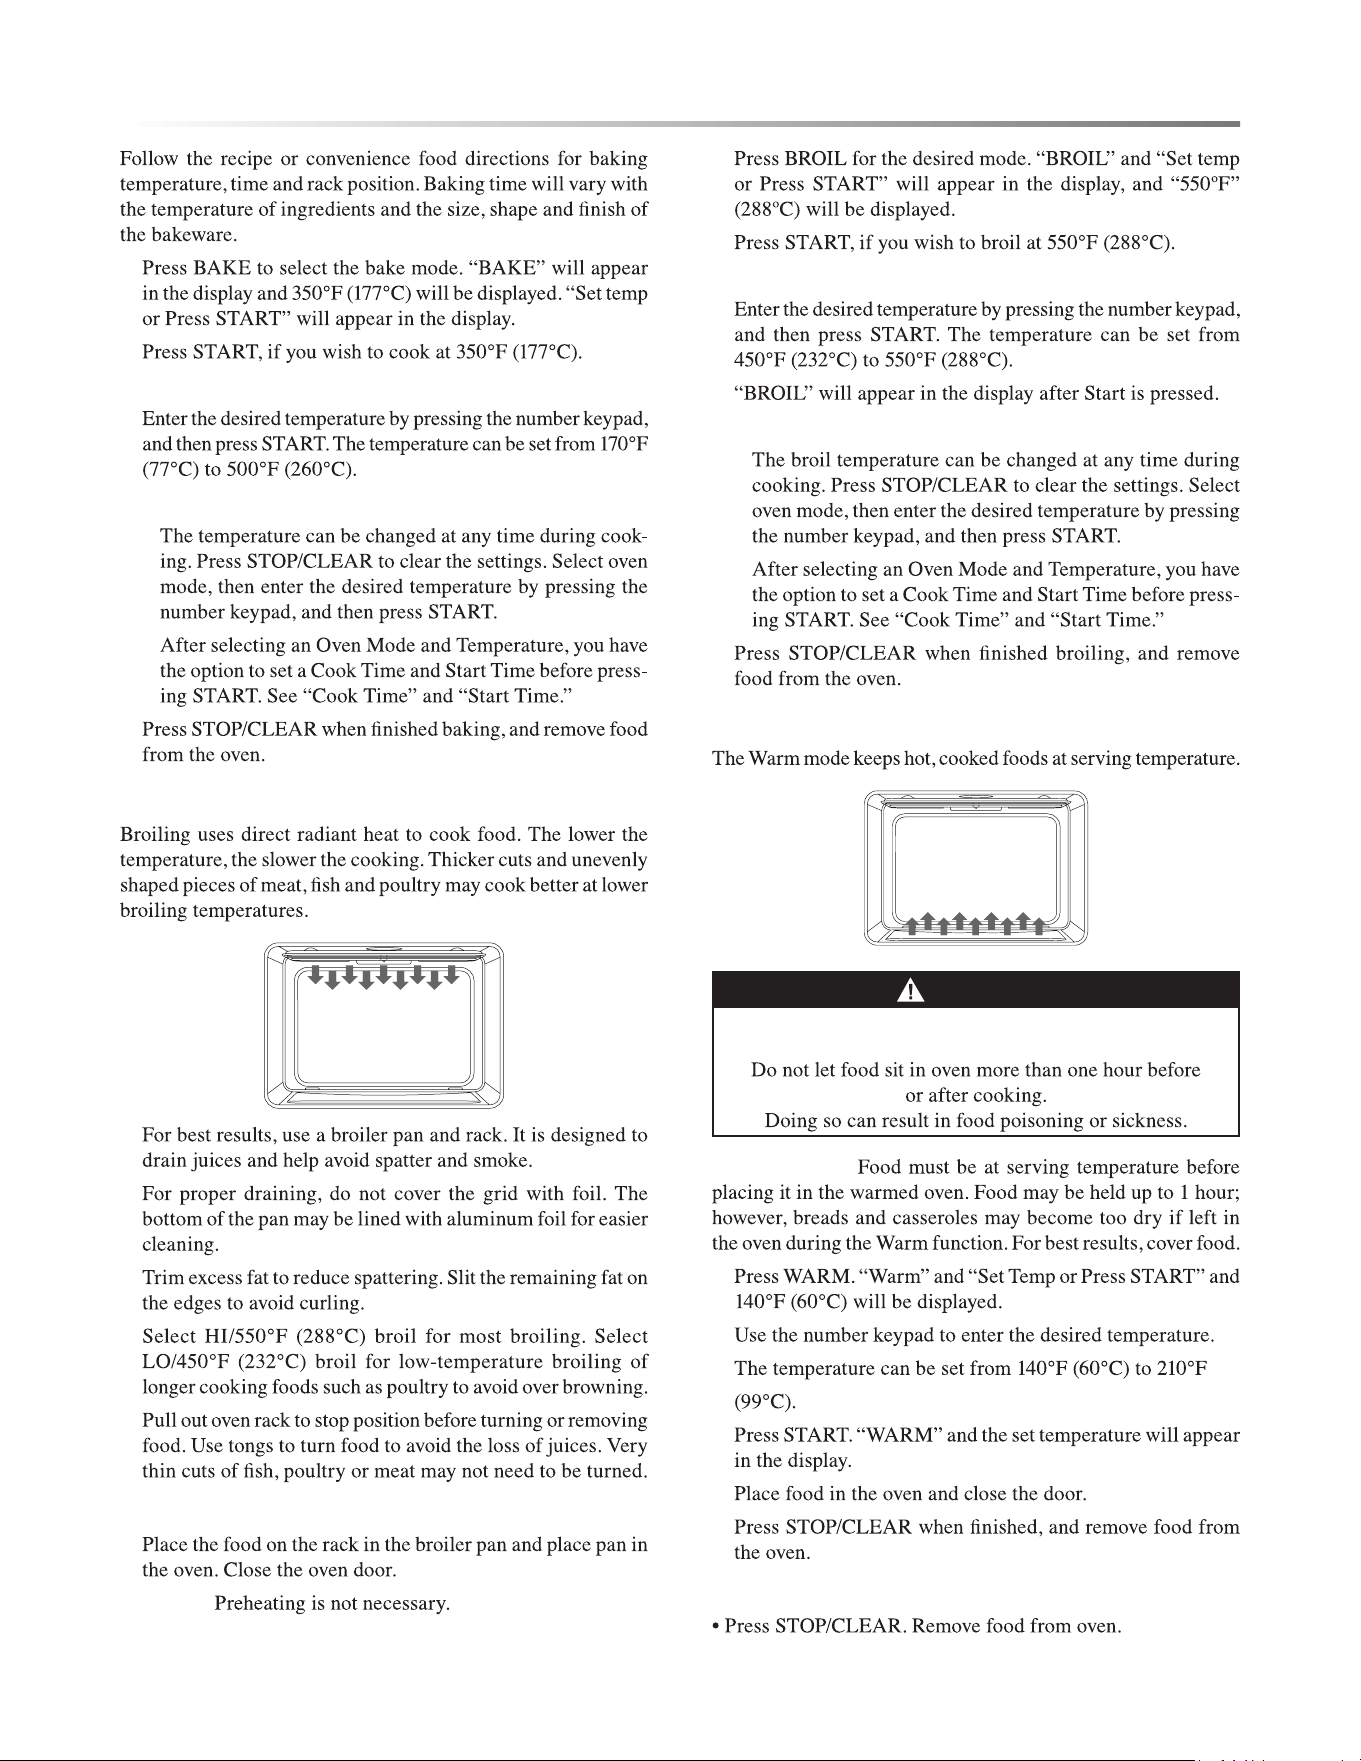
WARM (LOWER OVEN)
WARNING
FOOD POISONING HAZARD
IMPORTANT:
1
2
3
4
5
TO CANCEL WARM FEATURE:
OVEN USE
16E
OVEN USE
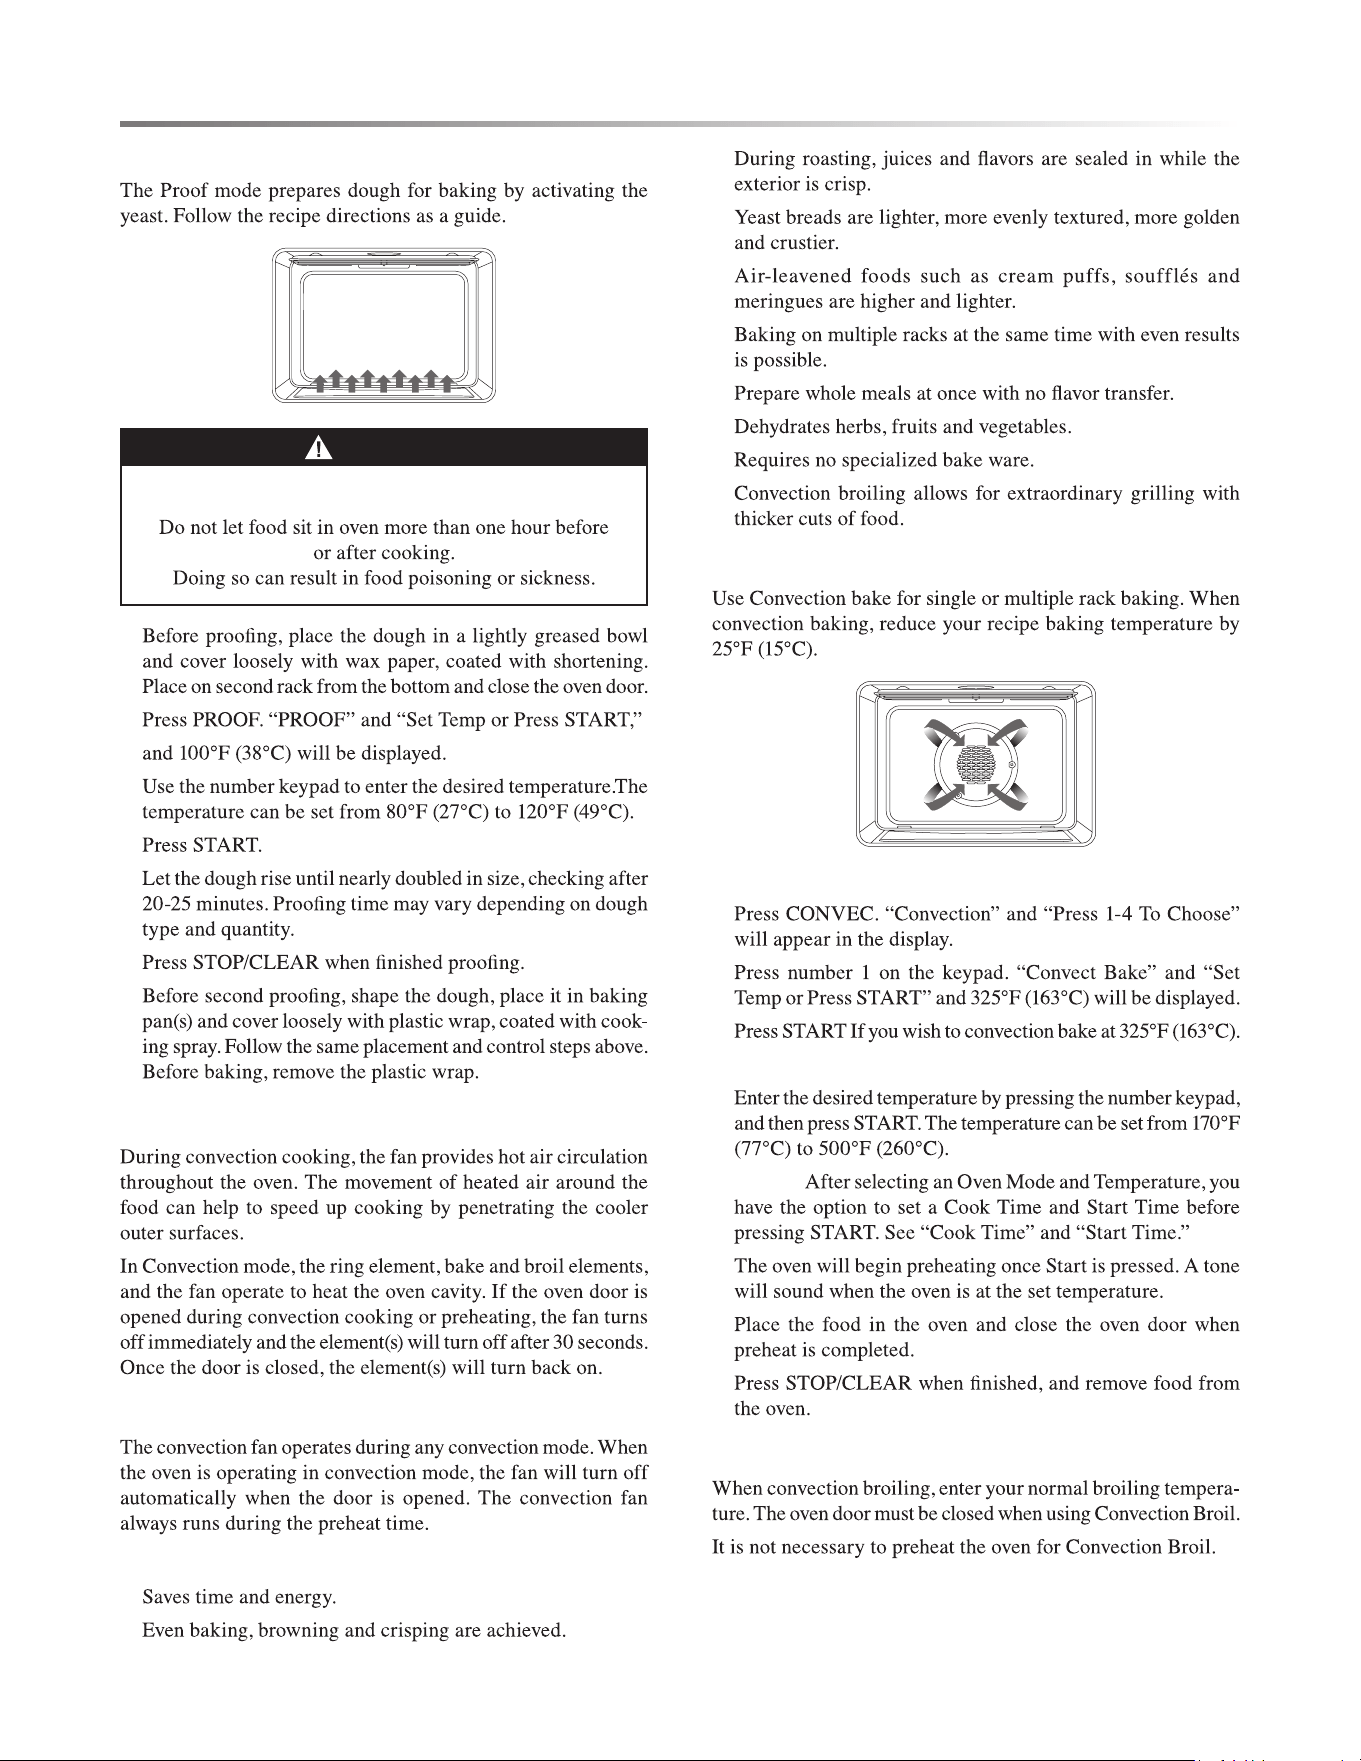
PROOF (UPPER OVEN)
WARNING
FOOD POISONING HAZARD
1
2
3
4
5
6
7
CONVECTION (UPPER OVEN ONLY)
CONVECTION FAN
ADVANTAGES OF CONVECTION COOKING
•
•
•
•
•
•
•
•
•
•
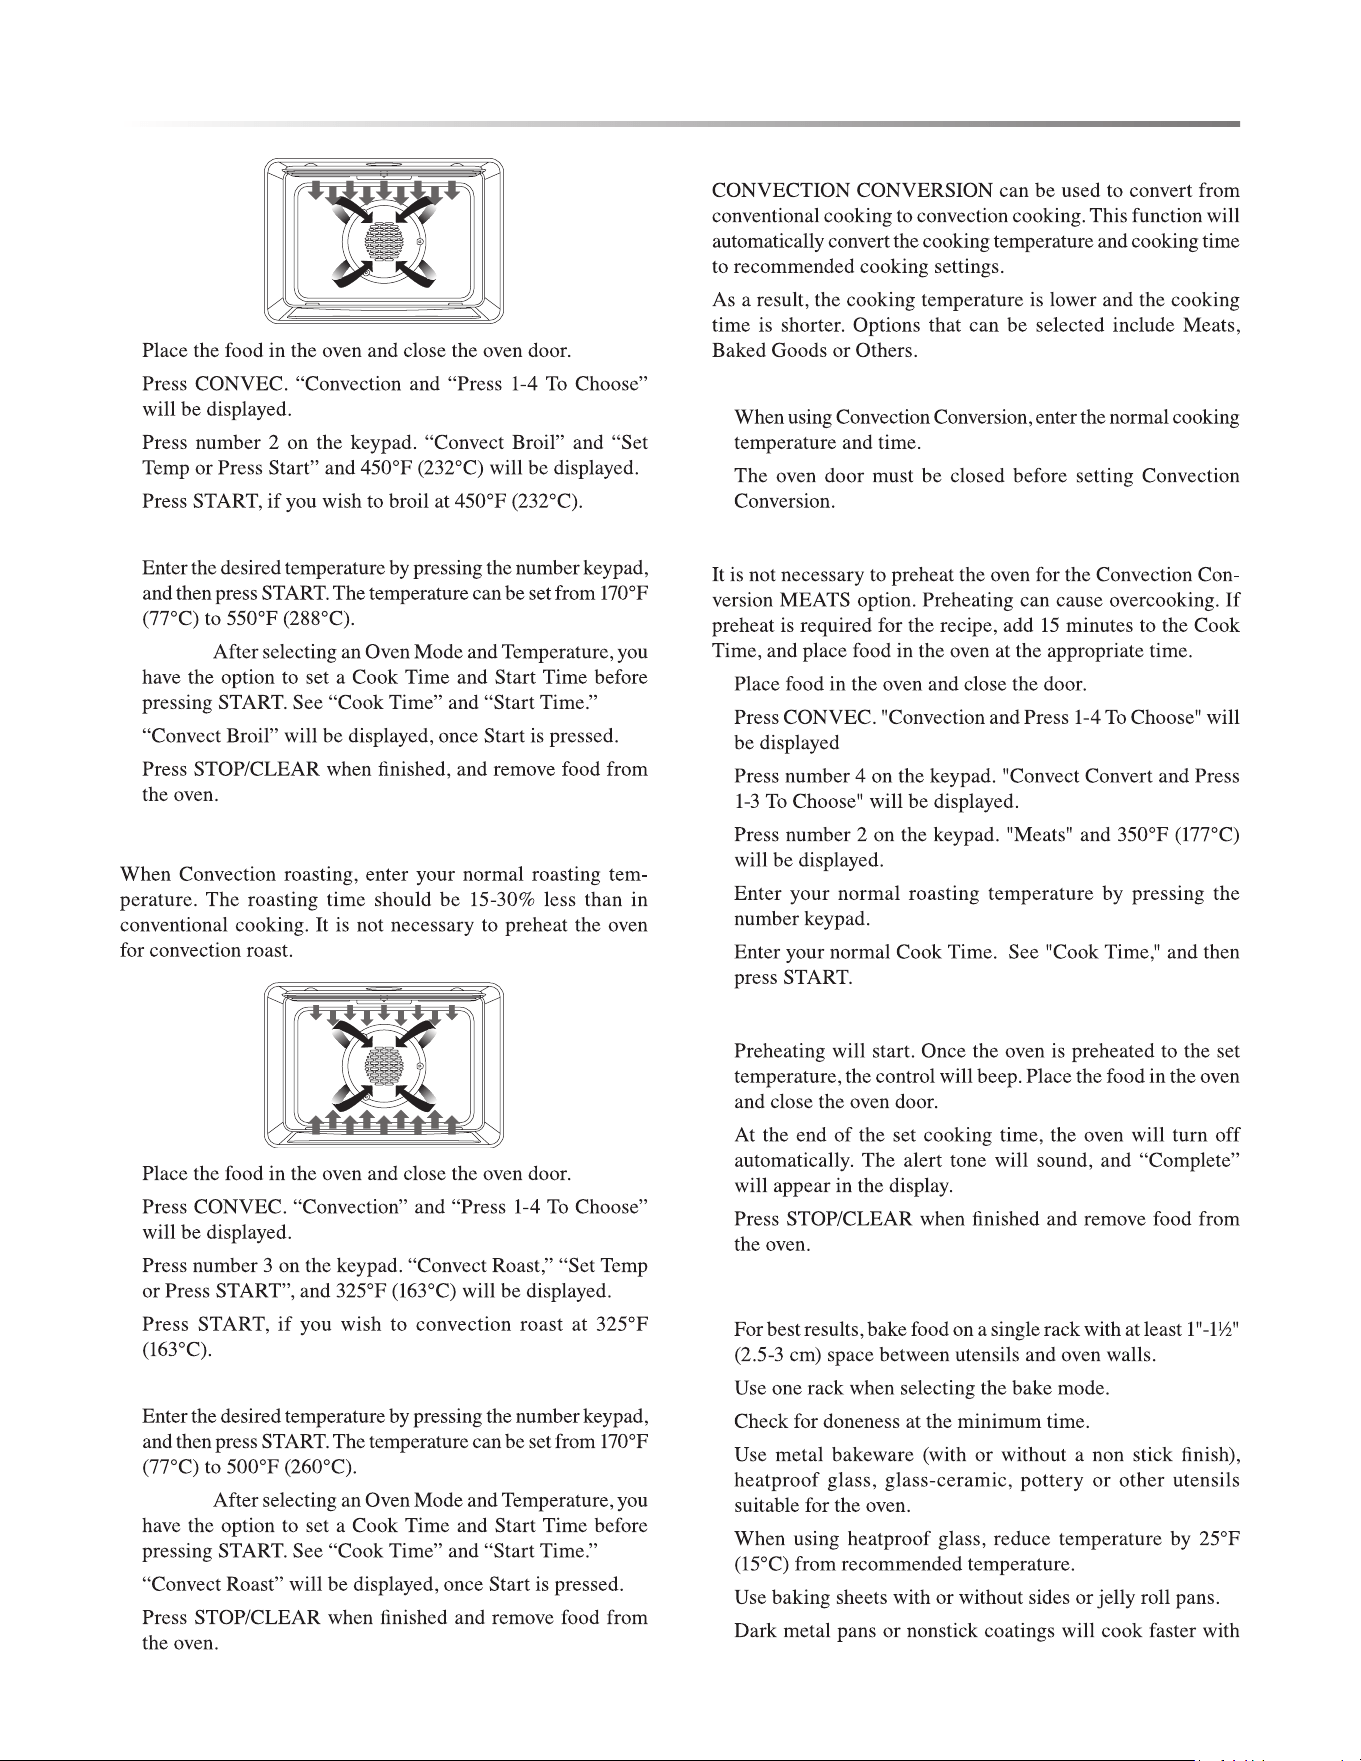
CONVECTION BAKE
TO SET CONVECTION BAKE:
1
2
3
OR
NOTE:
4
5
6
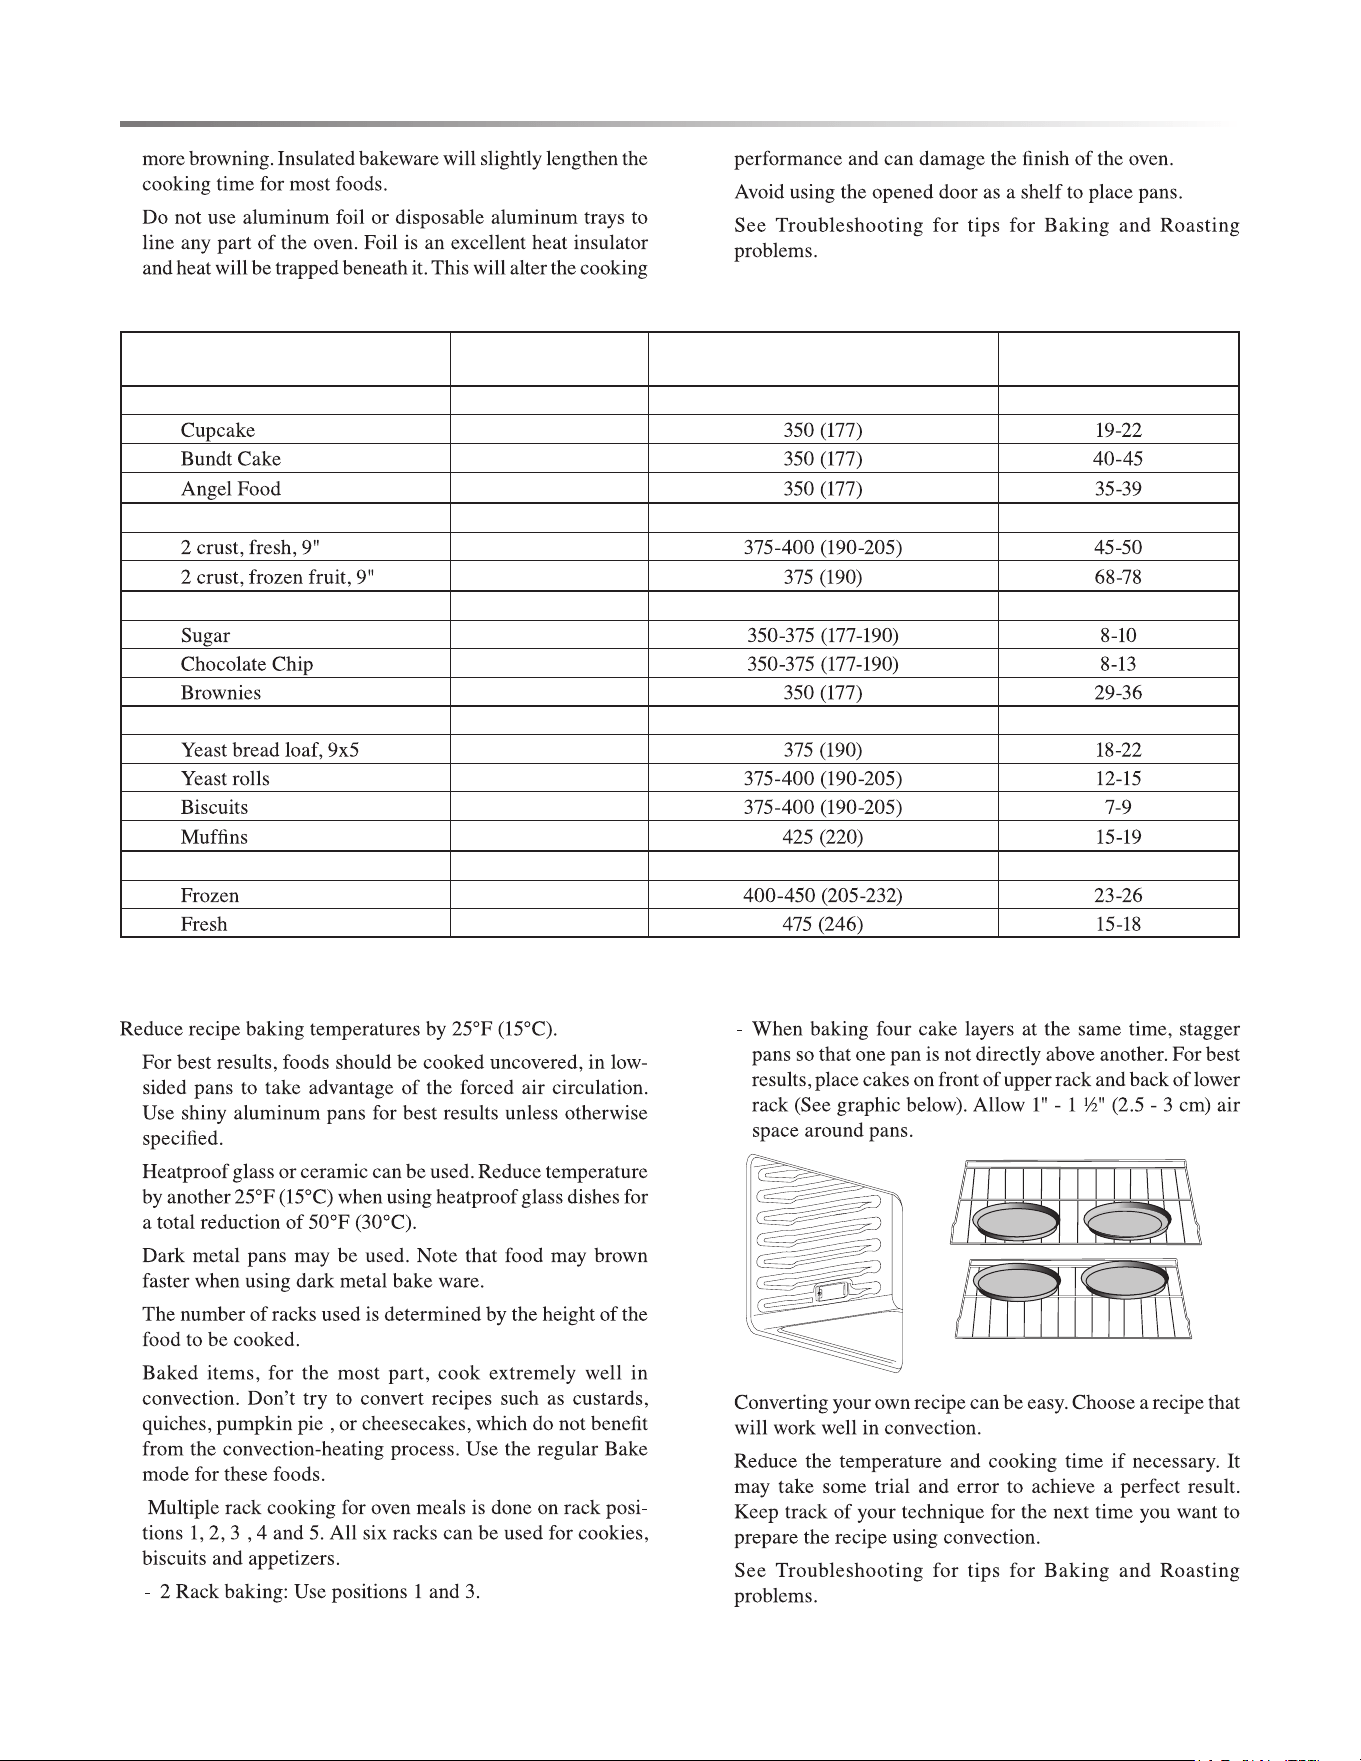
CONVECTION BROIL
E17
1
2
3
4
OR
NOTE:
5
6
CONVECTION ROAST
1
2
3
4
OR
NOTE:
5
6
CONVECTION CONVERSION
NOTES:
•
•
MEATS (ONLY)
1
2
3
4
5
6
BAKED GOODS AND OTHERS (ONLY)
1
2
3
BAKE TIPS
•
•
•
•
•
•
•
OVEN USE
18E
OVEN USE
•
•
•
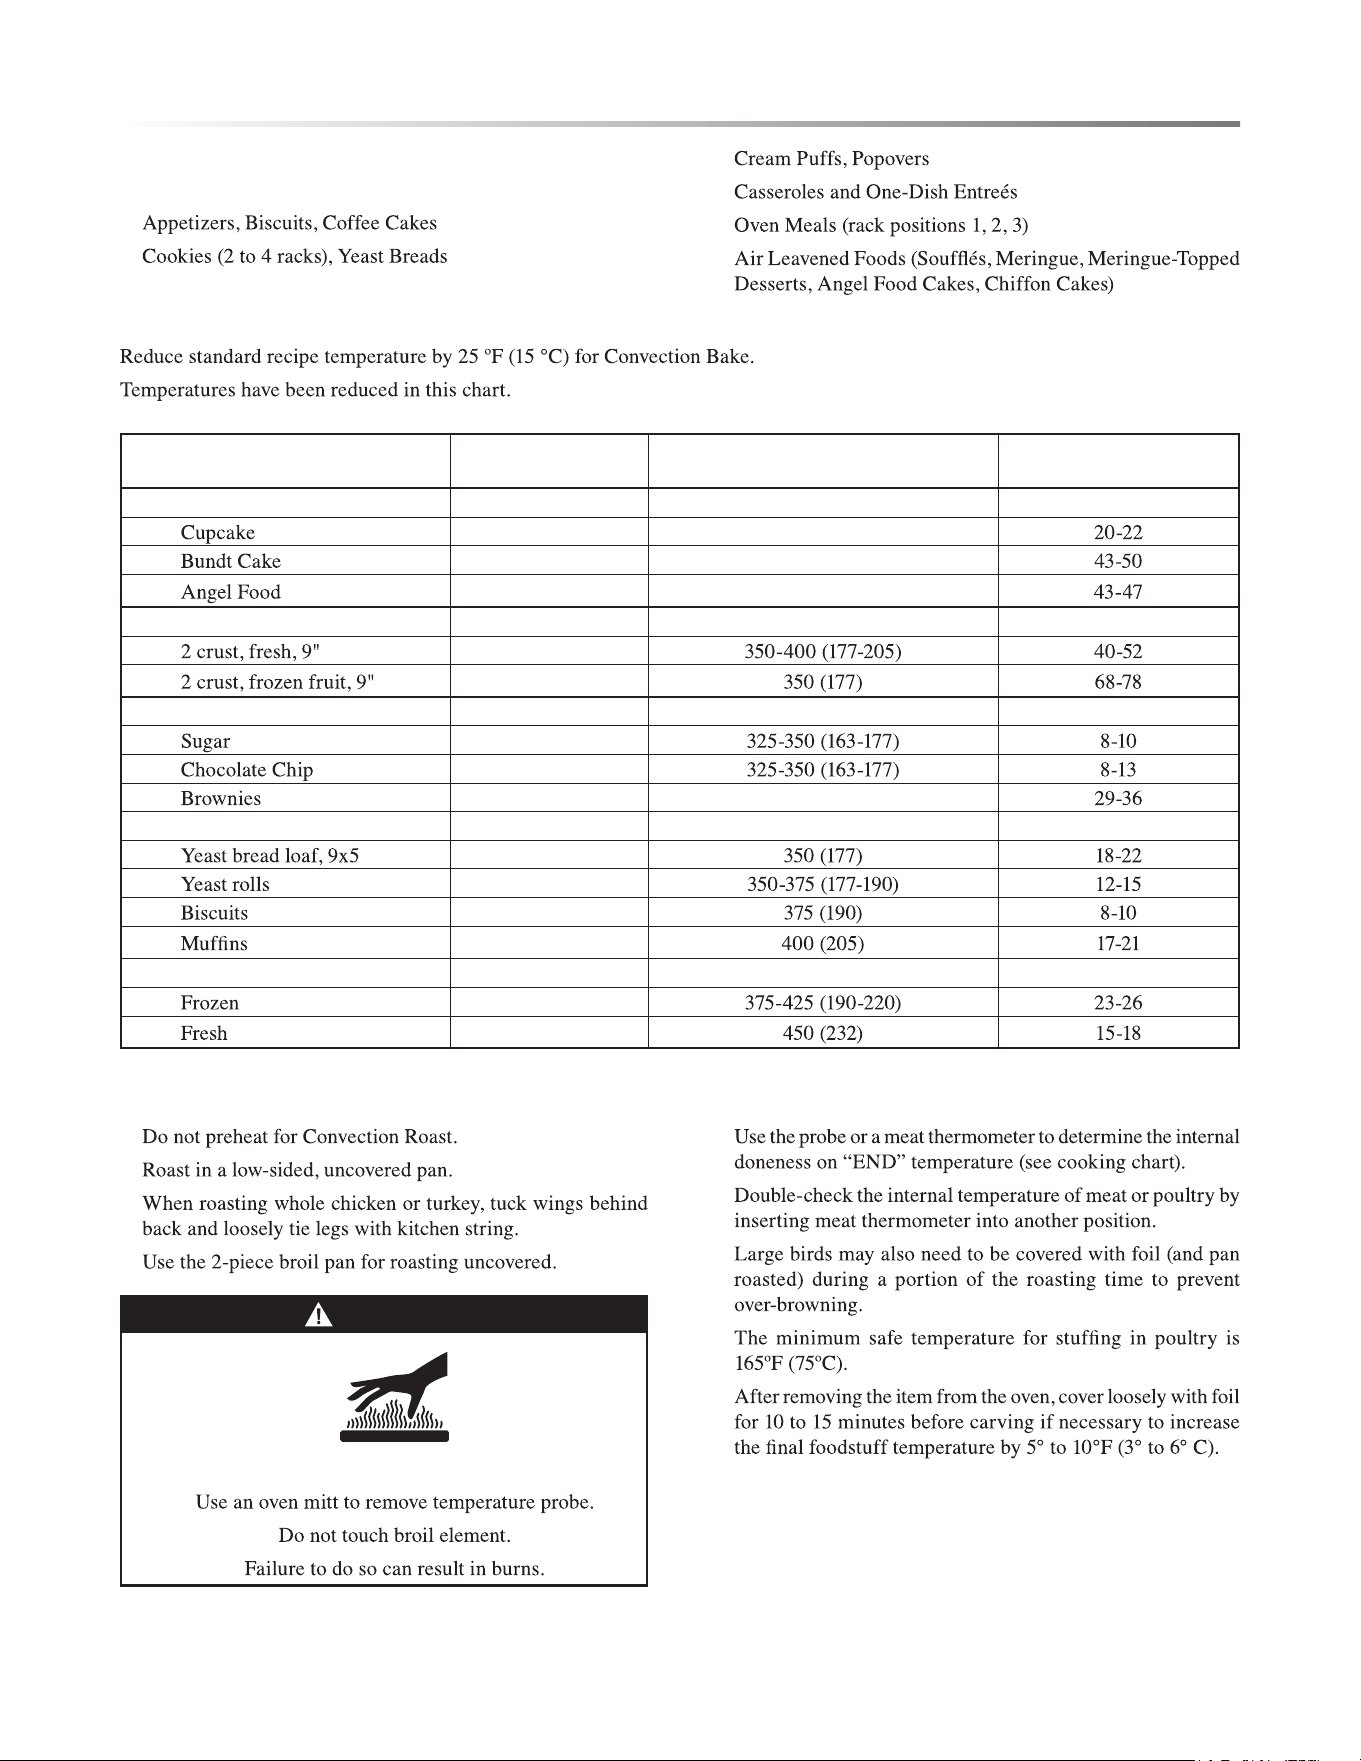
BAKE CHART
FOOD ITEM RACK POSITION
TEMP. °F (°C)
(PREHEATED OVEN)
TIME (MIN.)
Cake
•
2
• 1
• 1
Pie
•
2
• 2
Cookies
•
2
• 2
• 2
Breads
•
2
• 2
• 2
• 2
Pizza
•
2
• 2
CONVECTION BAKE TIPS
•
•
•
•
•
•
4
6
5
3
2
1
•
•
•
E19
CONVECTION BAKE CHART
FOOD ITEM RACK POSITION
TEMP. °F (°C)
(PREHEATED OVEN)
TIME (MIN.)
Cake
•
2 325 (163)
• 1 325 (163)
• 1 325 (163)
Pie
•
2
• 2
Cookies
•
2
• 2
• 2 325 (163)
Breads
•
2
• 2
• 2
• 2
Pizza
•
2
• 2
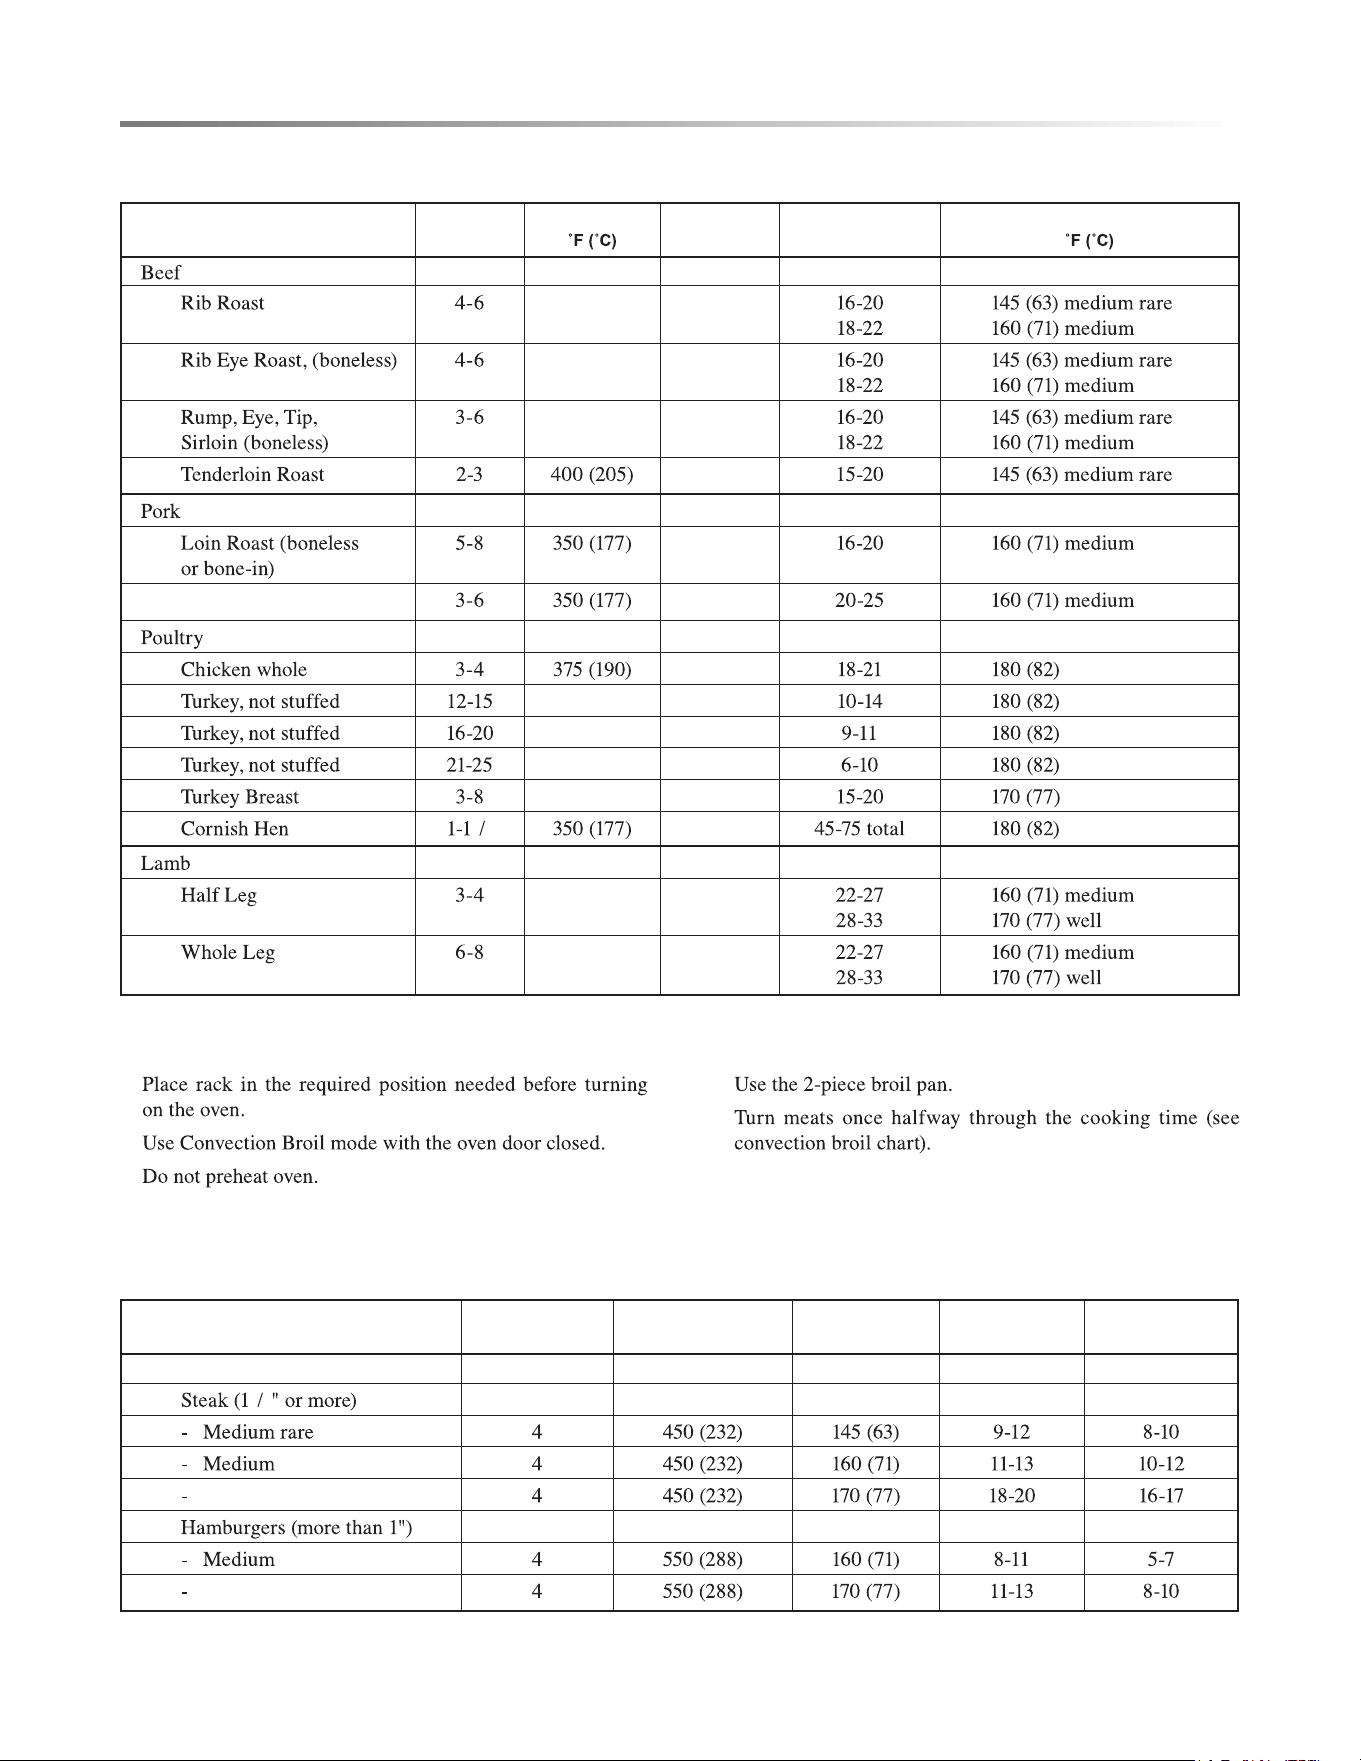
CONVECTION ROAST TIPS
•
•
•
•
WARNING
BURN HAZARD
•
•
•
•
•
FOODS RECOMMENDED FOR
CONVECTION BAKE MODE:
•
•
•
•
•
•
OVEN USE
20E
OVEN USE
CONVECTION ROAST CHART
MEAT
WEIGHT
(LB)
OVEN TEMP. RACK
POSITION
TIME
(MIN. PER LB)
INTERNAL TEMP.
• 325 (163) 2
• 325 (163) 2
• 325 (163) 2
• 2
• 2
• Shoulder 2
• 2
• 325 (163) 1
• 325 (163) 1
• 325 (163) 1
• 325 (163) 1
•
1
2 2
• 325 (163) 2
• 325 (163) 1
CONVECTION BROIL TIPS
•
•
•
•
•
CONVECTION BROIL CHART
FOOD AND THICKNESS
RACK
POSITION
BROIL SETTING
°F (°C)
INTERNAL
TEMP. °F (°C)
TIME SIDE 1
(MIN.)*
TIME SIDE 2
(MIN.)*
Beef
•
1
2
Well
•
Well
E21
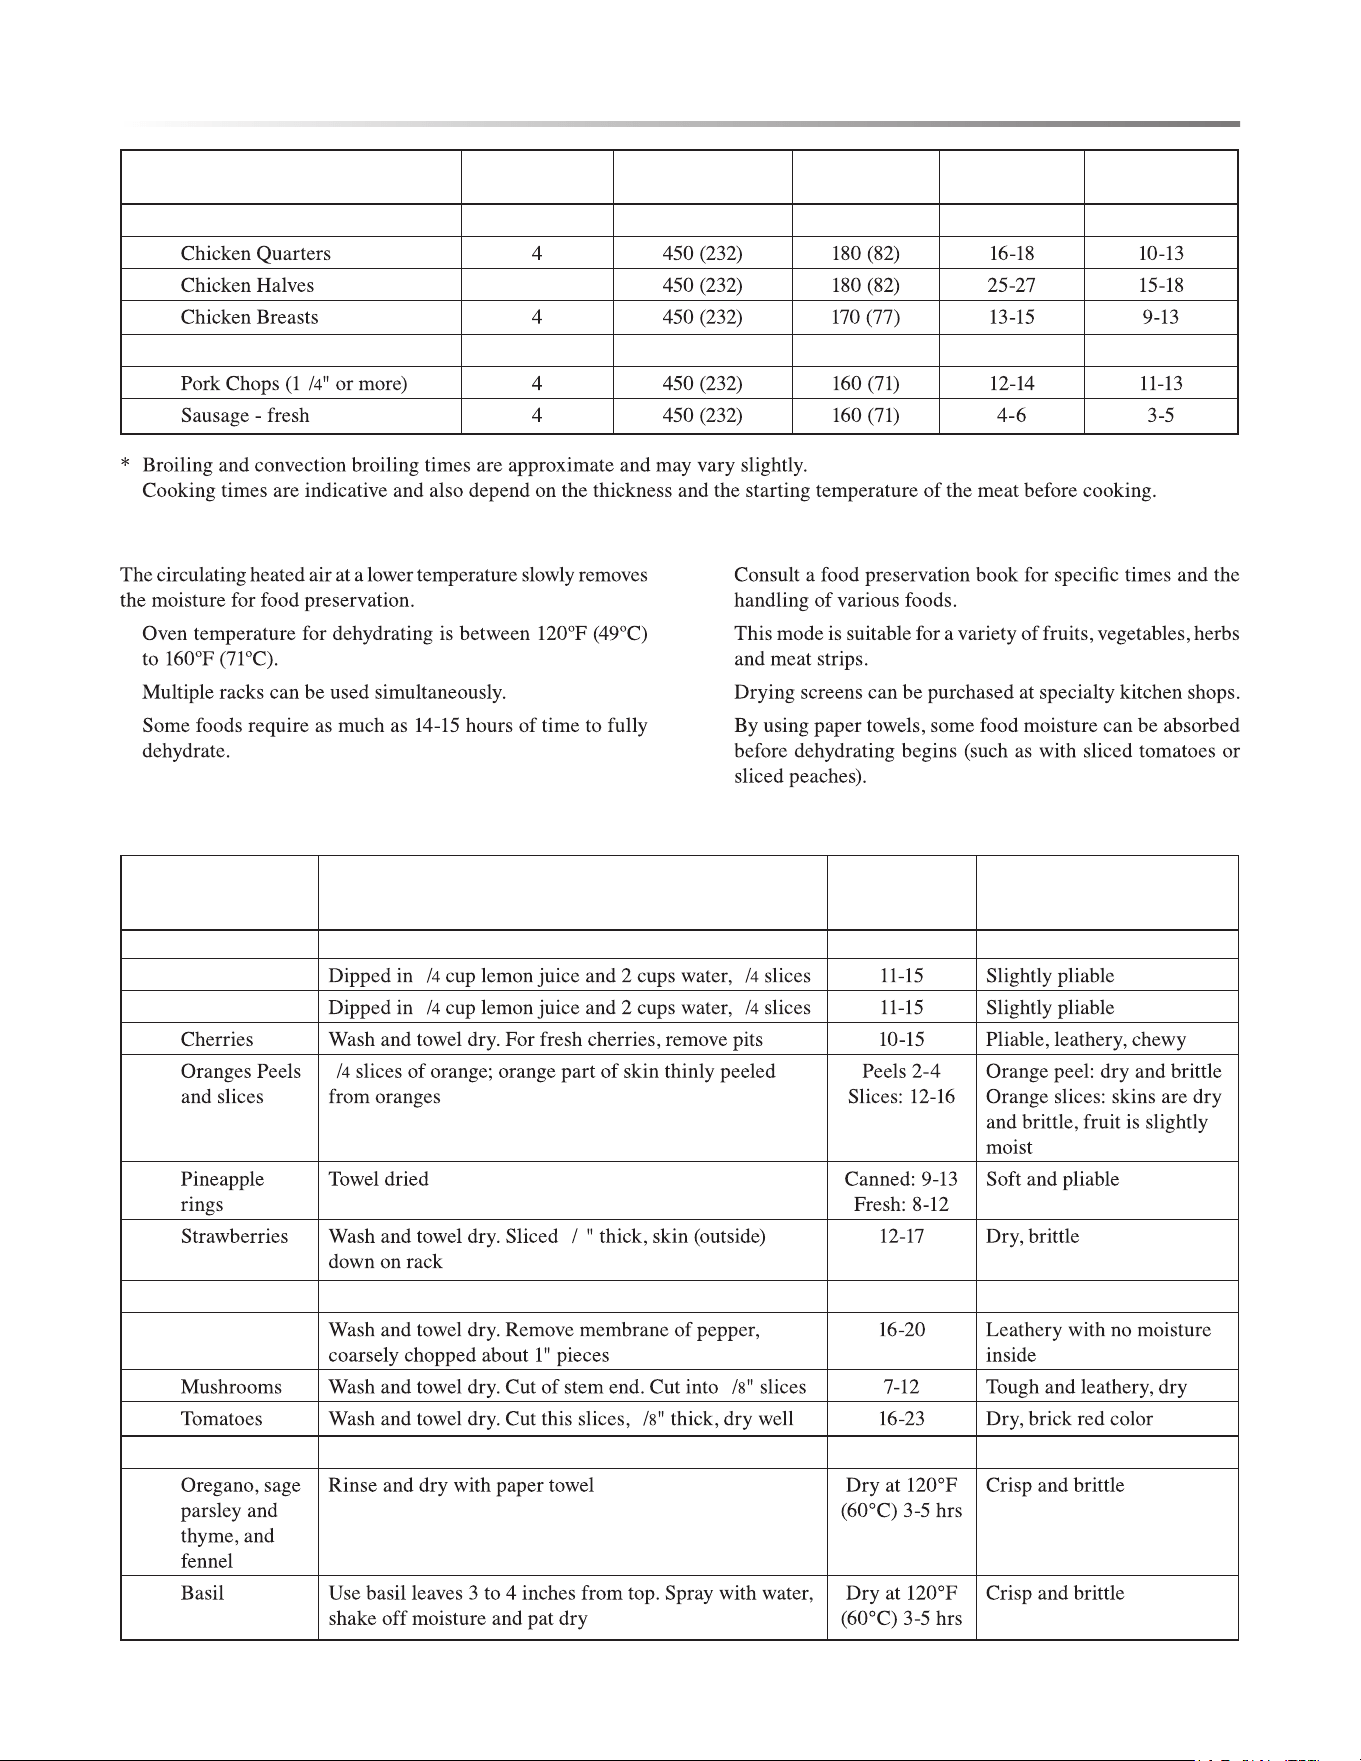
DEHYDRATE TIPS
•
•
•
•
•
•
•
DEHYDRATE CHART
FOOD PREPARATION
APPROXIMATE
DRYING TIME
(HRS)
TEST FOR DONENESS
Fruit
• Apple
1 1
• Bananas
1 1
•
•
1
•
•
1
2
Vegetable
• Peppers
•
1
•
1
Herbs
•
•
FOOD AND THICKNESS
RACK
POSITION
BROIL SETTING
°F (°C)
INTERNAL
TEMP. °F (°C)
TIME SIDE 1
(MIN.)*
TIME SIDE 2
(MIN.)*
Poultry
•
• 3
•
Pork
•
1
•
OVEN USE
22E
OVEN USE
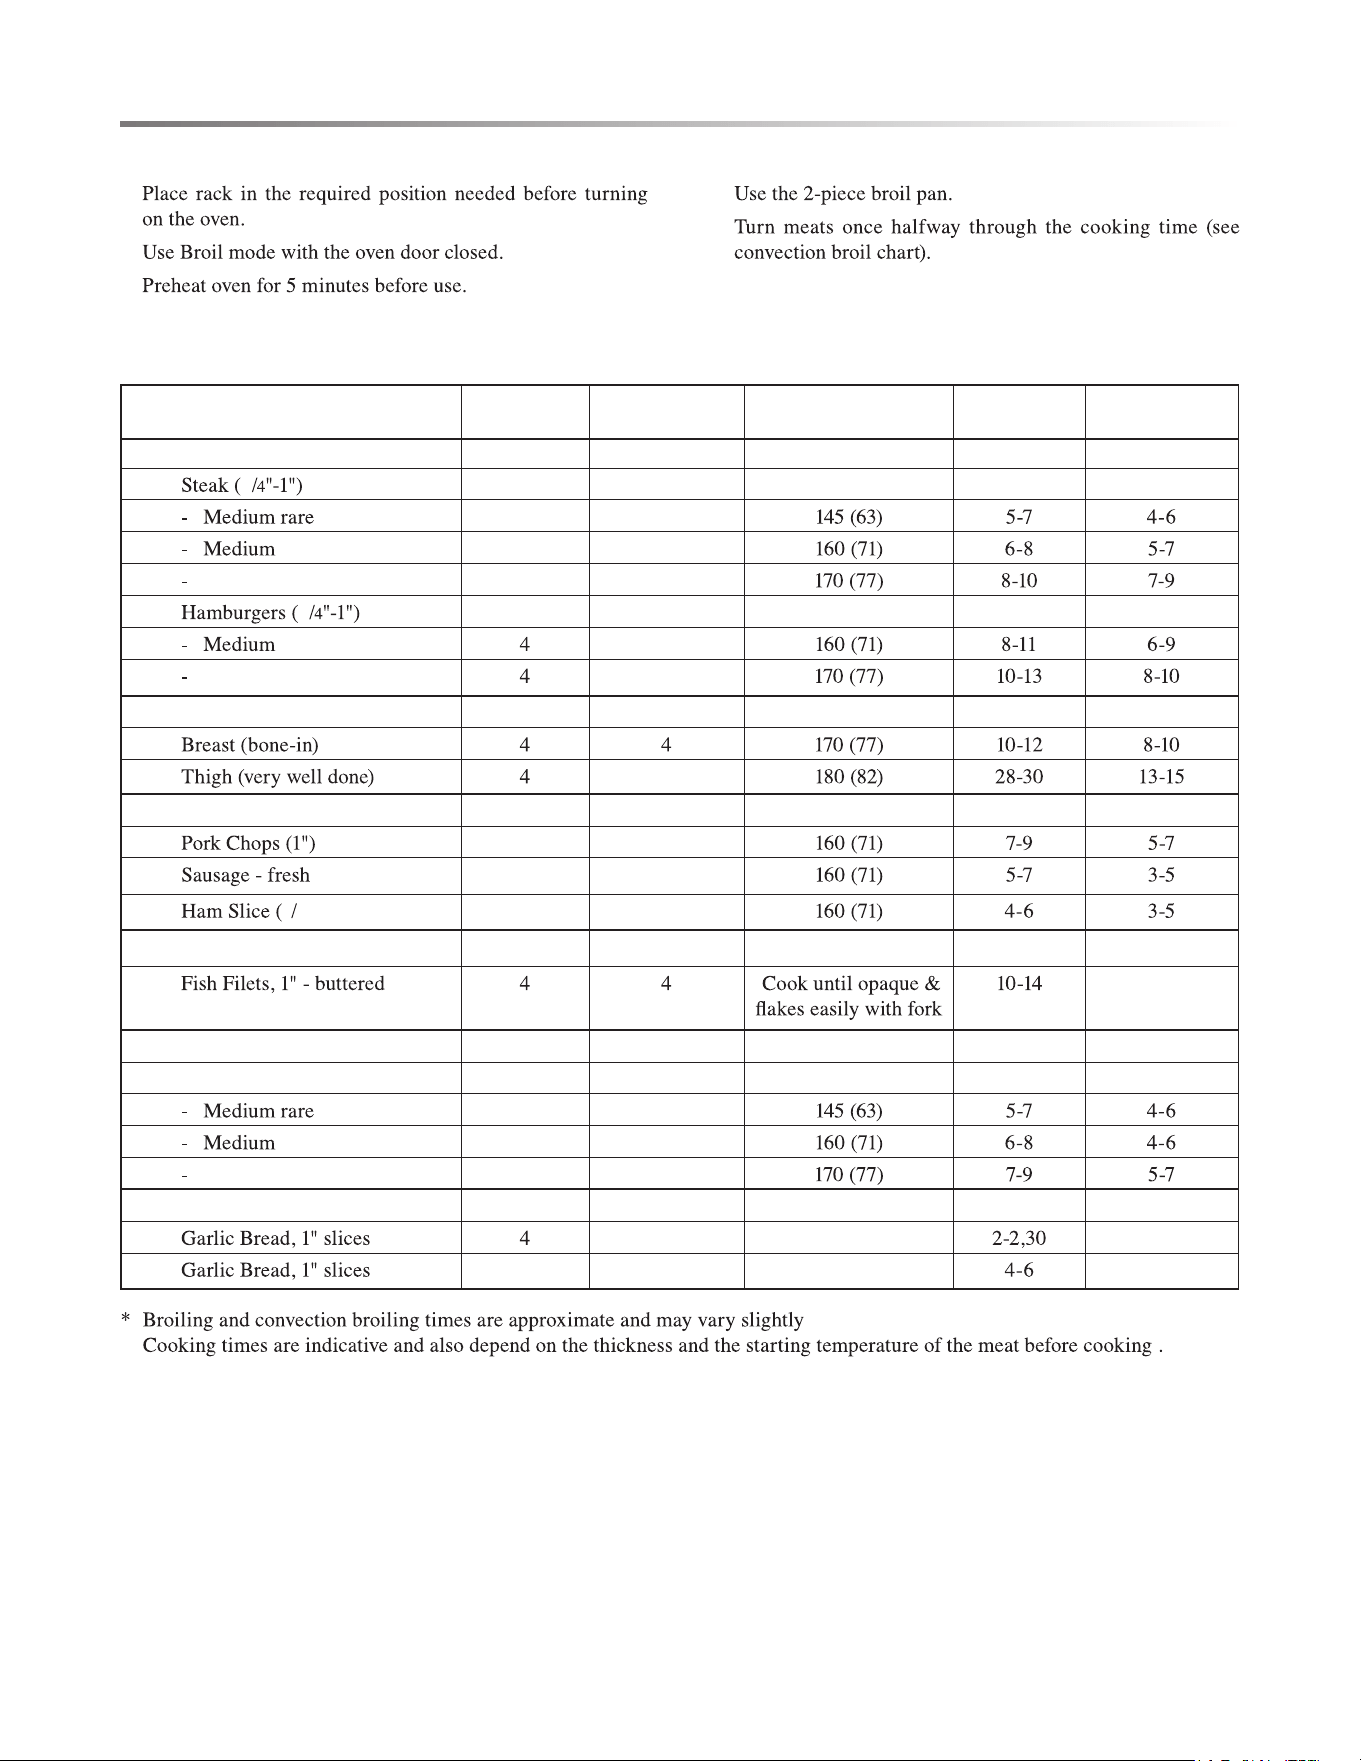
BROIL TIPS
•
•
•
•
•
BROIL CHART
FOOD AND THICKNESS
RACK
POSITION
BROIL SETTING
INTERNAL
TEMP. °F (°C)
TIME SIDE 1
(MIN.)*
TIME SIDE 2
(MIN.)*
Beef
•
3
5 5
5 5
Well 5 5
•
3
5
Well 5
Poultry
•
• 3
Pork
•
5 5
• 5 5
•
1
2") 5 5
Seafood
• Do not turn
Lamb
• Chops (1")
5 5
5 5
Well 5 5
Bread
•
5
• 3 5
E23
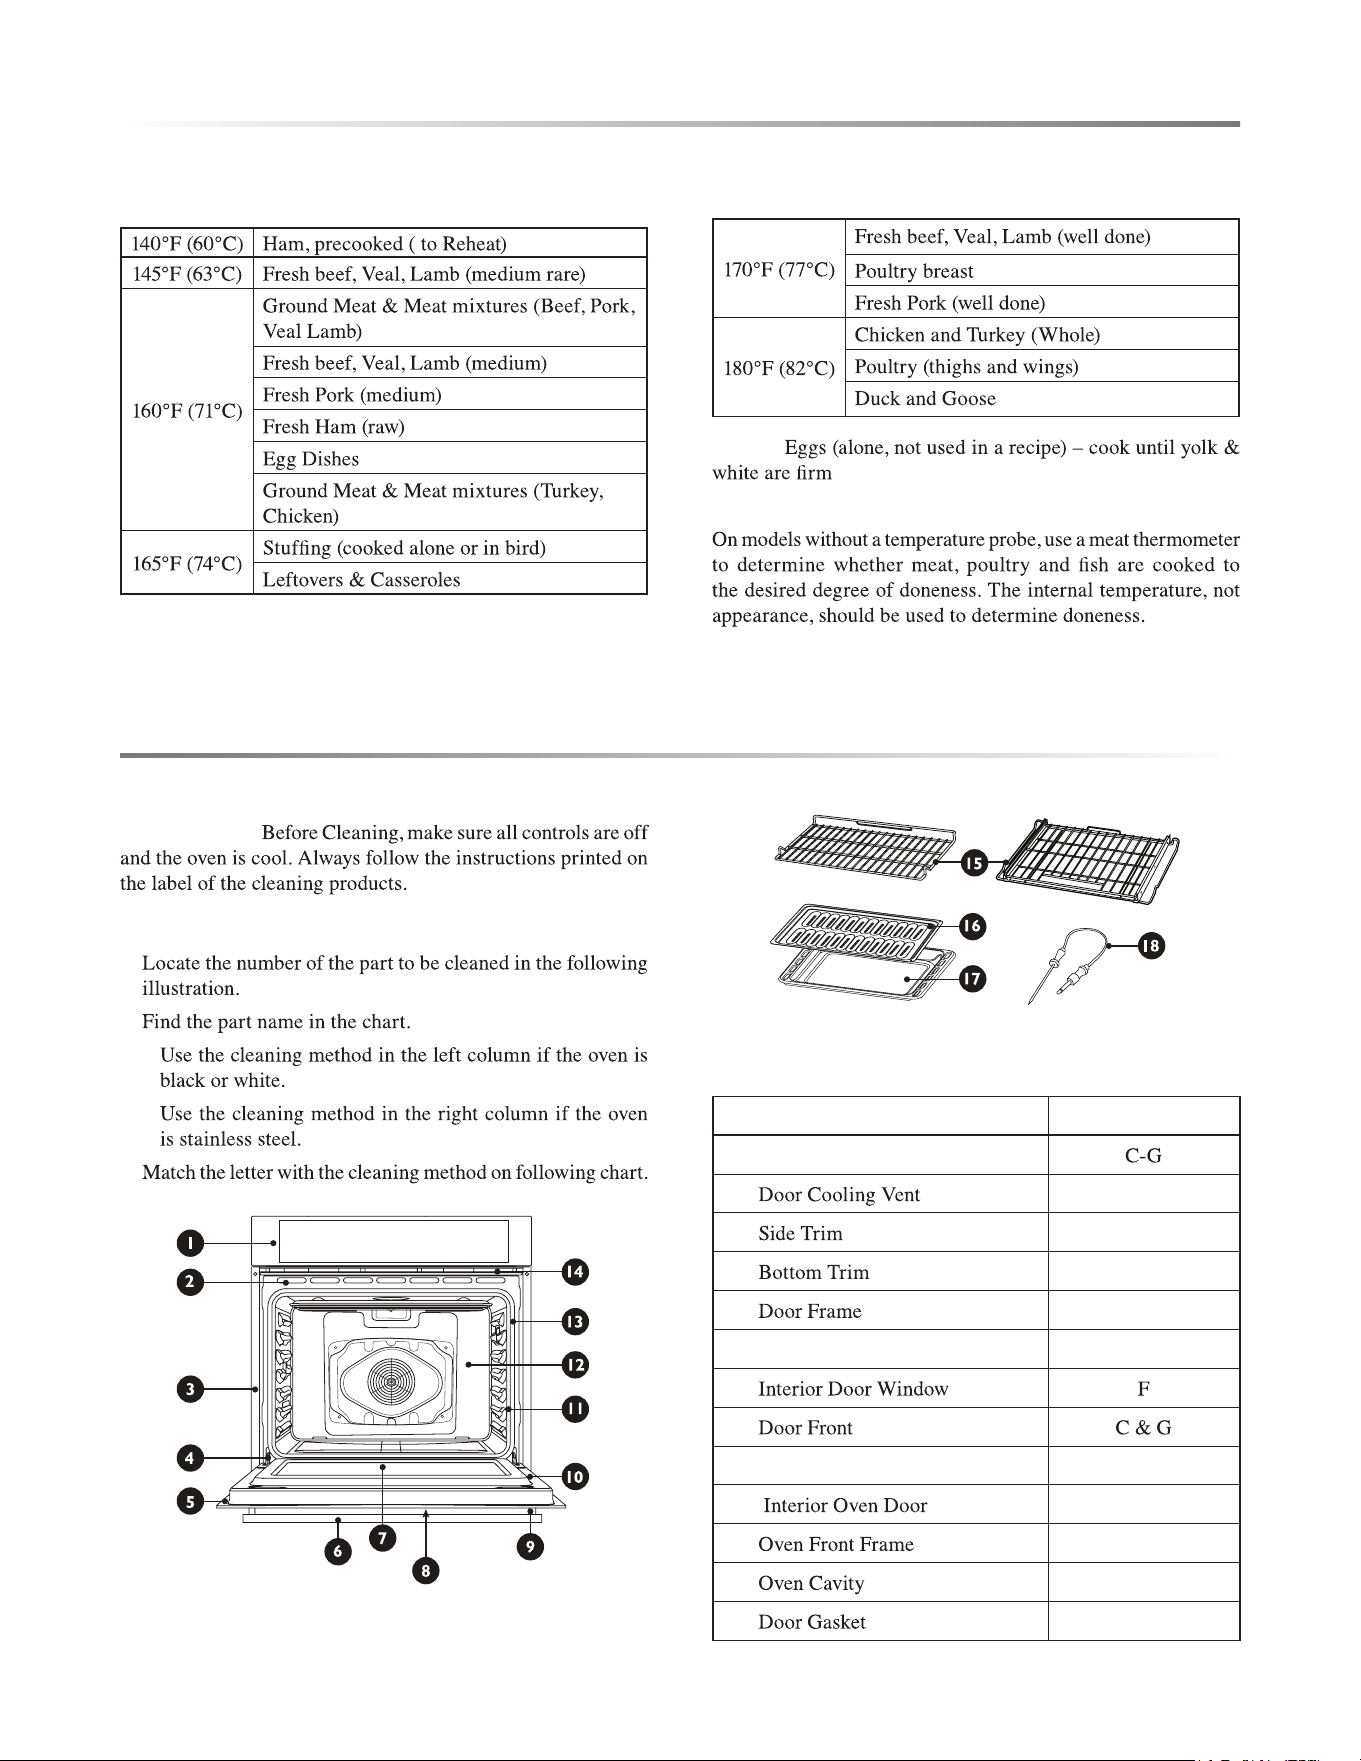
FOOD SERVICE TEMPERATURE GUIDELINES FROM FSIS (USDA FOOD SAFETY &
INSPECTION SERVICE)
NOTE:
Meat Thermometer
OVEN USE
OVEN CARE
GENERAL CLEANING
IMPORTANT:
USING THE CLEANING CHART
1
2
•
•
3
STAINLESS STEEL OVEN
PART CLEANING METHOD
1 Control Panel
2 E
3 D
4 D
5 E
6 Door Handle G
7
8
9 End Caps D
10 E
11 E
12 E
13 B
24E
OVEN CARE
PART CLEANING METHOD
14 D
15 A
16 E
17 E
18 A
OVEN FINISHES / CLEANING METHODS
•
•
•
•
•
PART CLEANING METHOD
A
Plated
®
,
® ® ® ® ®
®
or Dow
®
B
C Glass
®
or Glass Plus
®
® ®
D
® ®
E
® ®
to
® ®
PART CLEANING METHOD
F
Glass
® ®
G
® ®
®
® ®
, Bar
®
Steel Cleaner
®
AUTOMATIC SELF-CLEANING
WARNING
BURN HAZARD
IMPORTANT:
•
•
•
•
•
•
E25
•
•
•
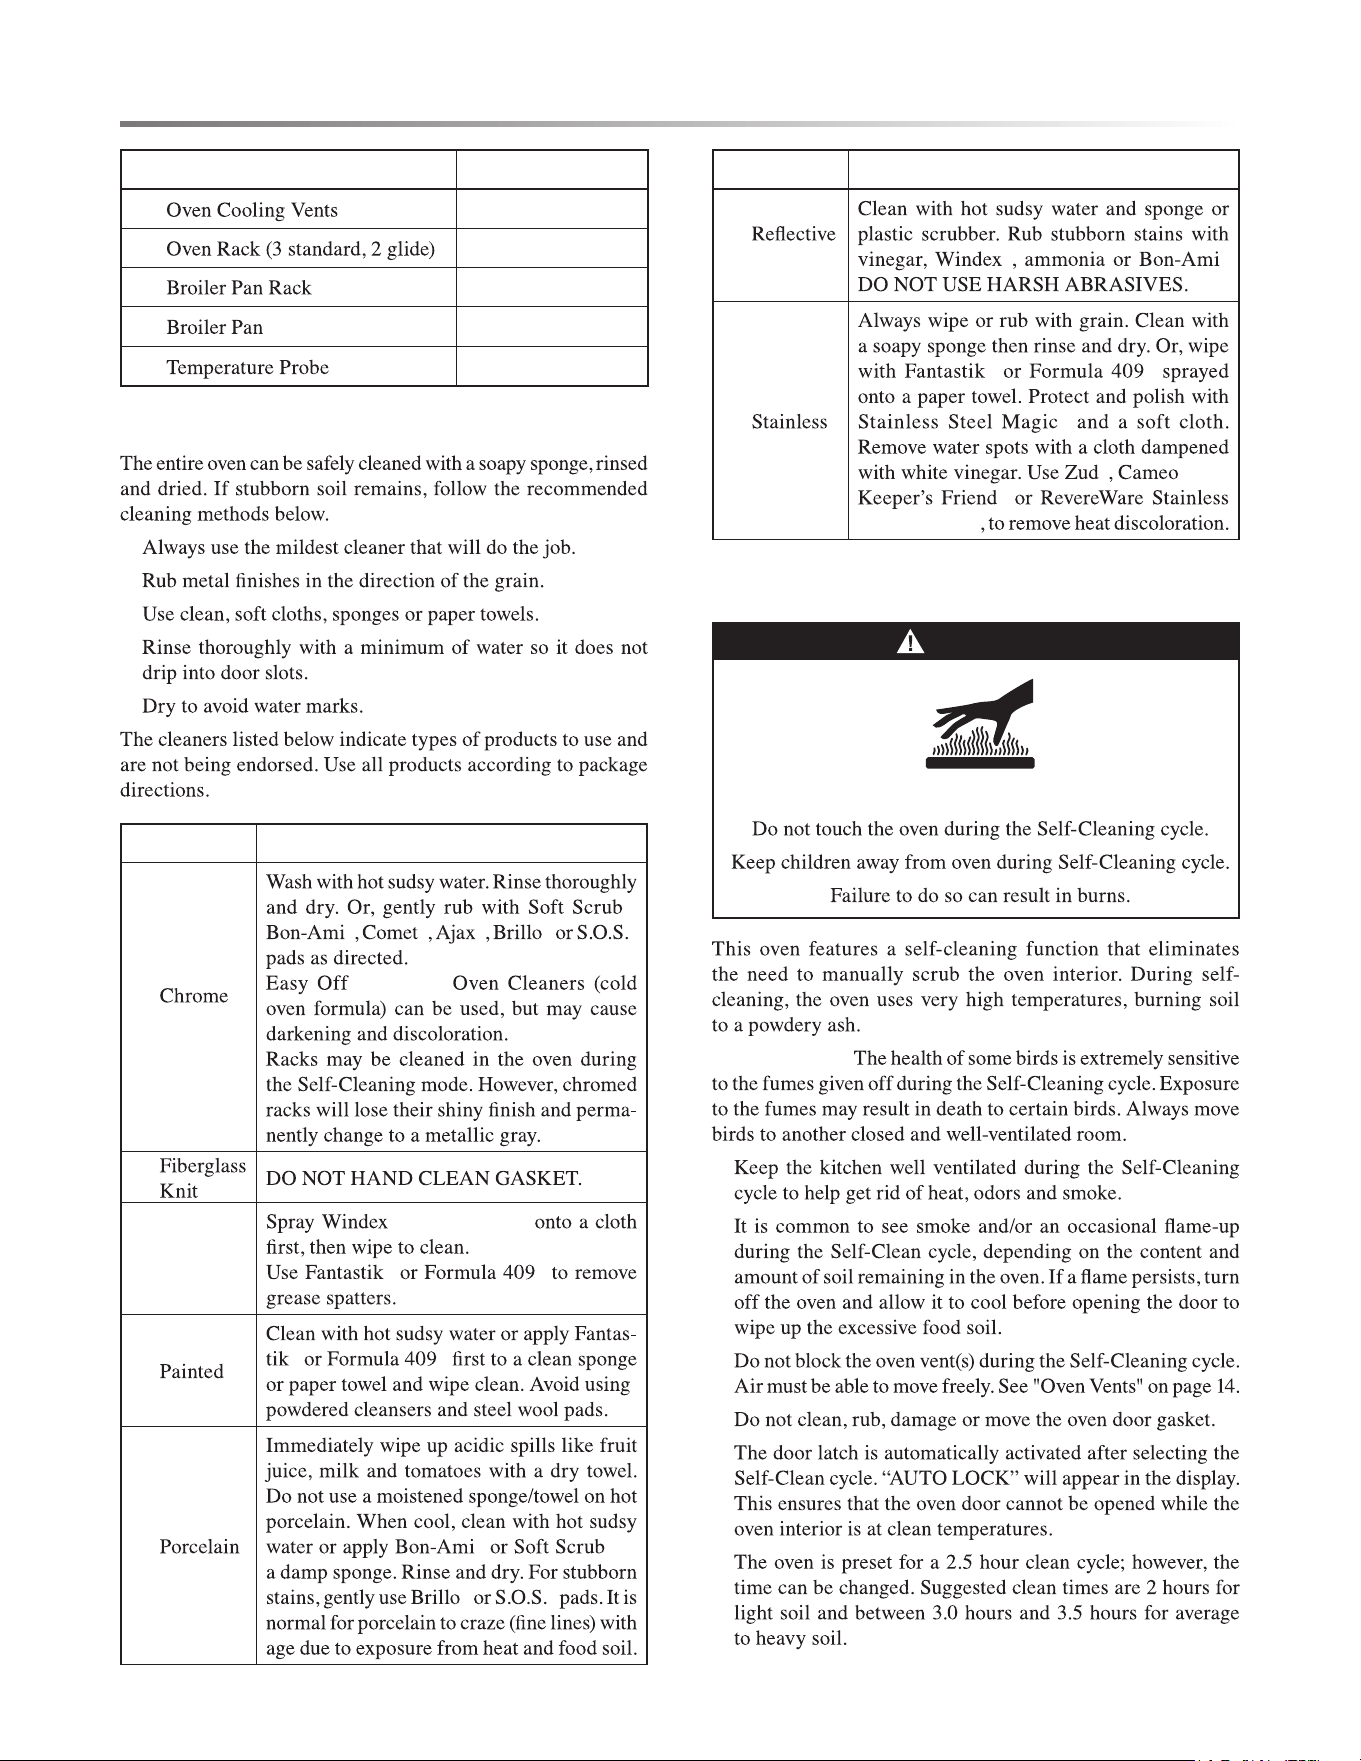
BEFORE SELF-CLEANING
1
2
3
4
5
1
2
NOTE:
Hand clean
frame area
out side
gasket
Hand clean 1”
(2 cm) from
rack guides to
front of oven
cavity
Hand clean
door window
Hand clean
door area
out side
gasket
DO NOT
hand clean
gasket
SELF-CLEAN CYCLE
TO SELF-CLEAN:
1
2
3
4
5
6
7
NOTE:
8
NOTE:
OVEN DOOR REMOVAL
IMPORTANT:
•
•
•
•
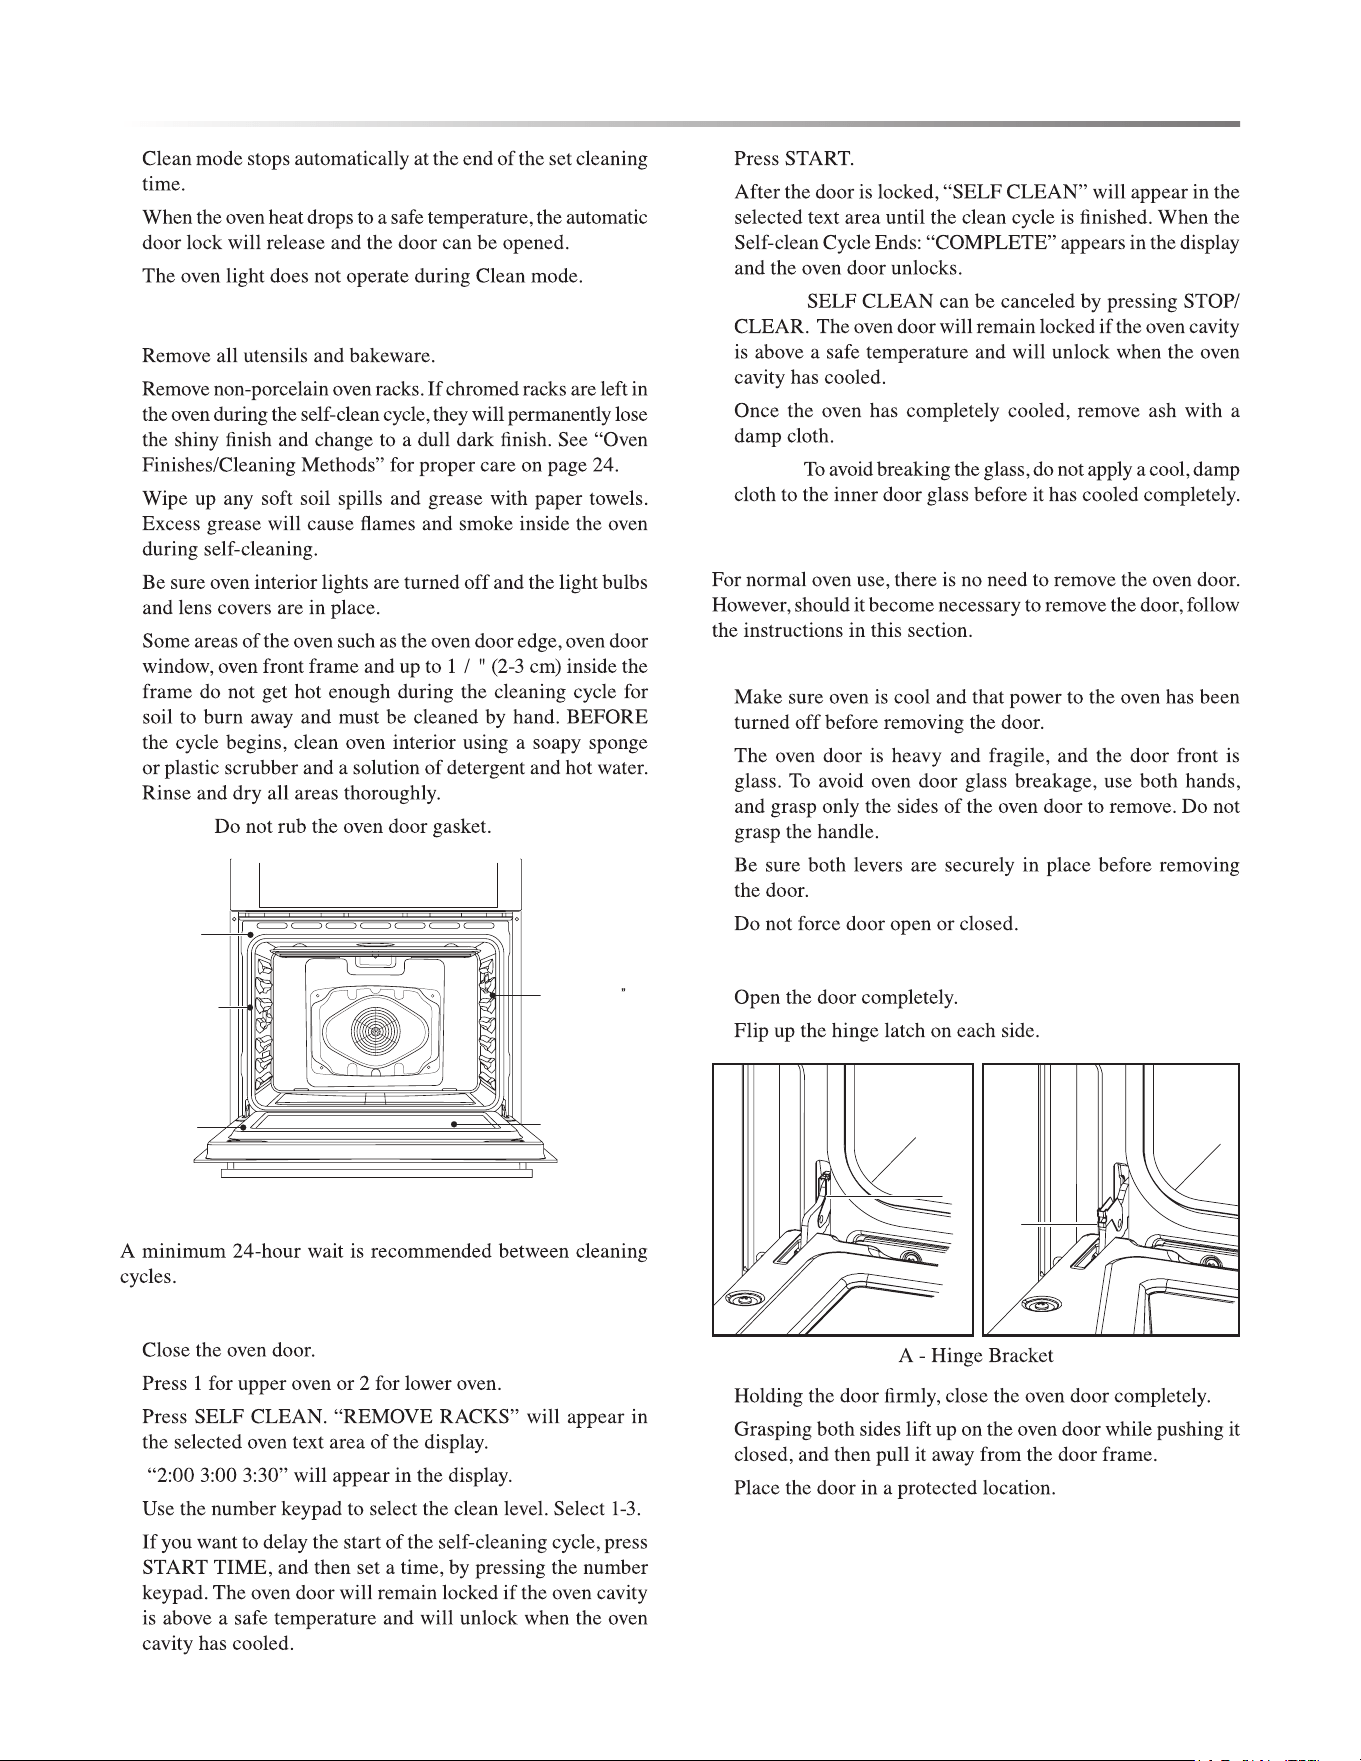
TO REMOVE THE OVEN DOOR:
1
2
A
A
3
4
5
OVEN USE
26E
OVEN CARE
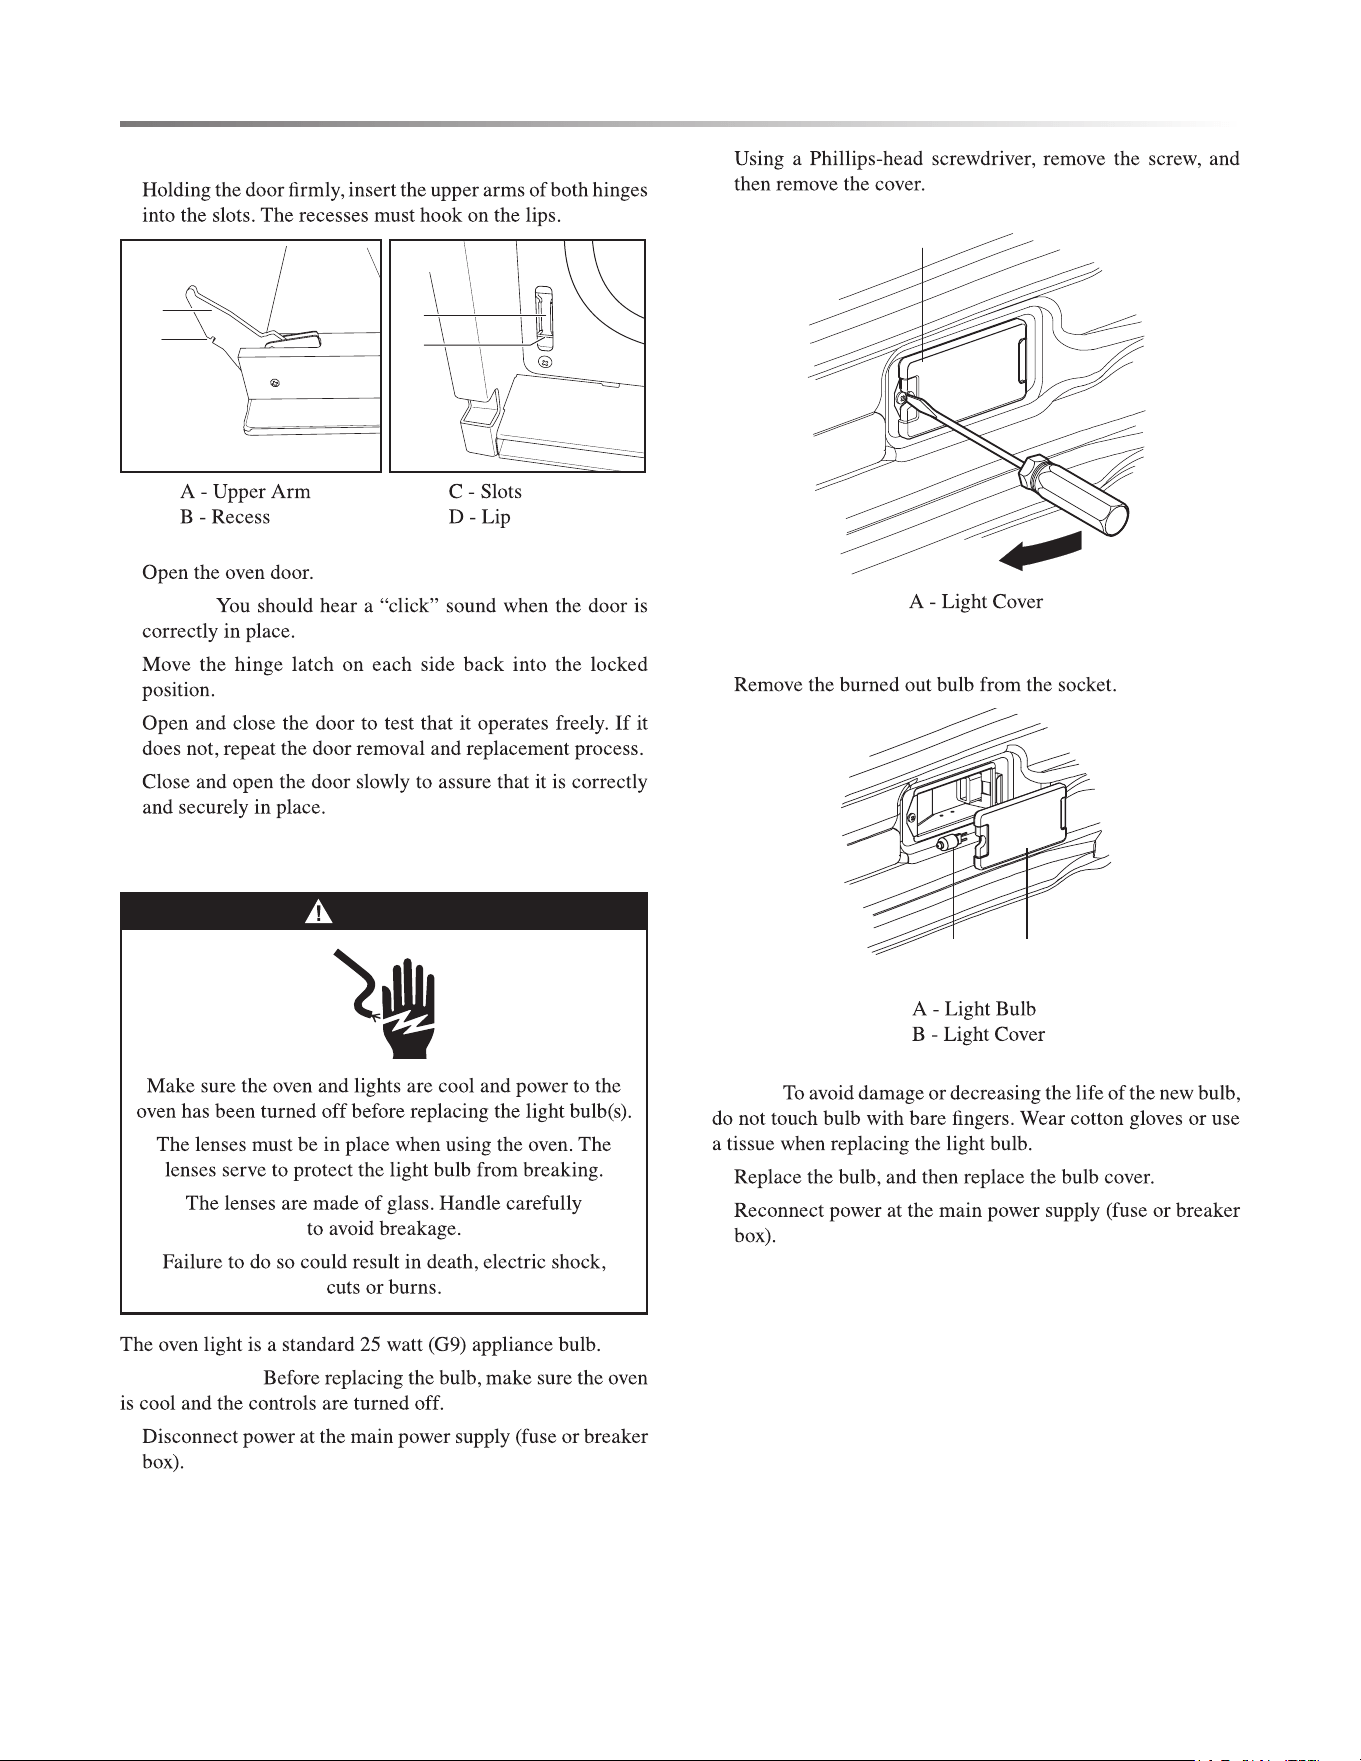
TO REPLACE THE OVEN DOOR:
1
C
D
A
B
2
NOTE:
3
4
5
REPLACING AN OVEN LIGHT
WARNING
IMPORTANT:
1
2
A
3
A B
NOTE:
4
5
E27
TROUBLESHOOTING
BAKING AND ROASTING
BAKING PROBLEM CAUSE
• Oven not preheated
•
•
•
• Oven not preheated
•
•
•
•
•
•
•
•
• Oven not preheated
•
•
•
•
•
•
•
•
•
•
•
•
•
•
•
•
•
•
•
OPERATION
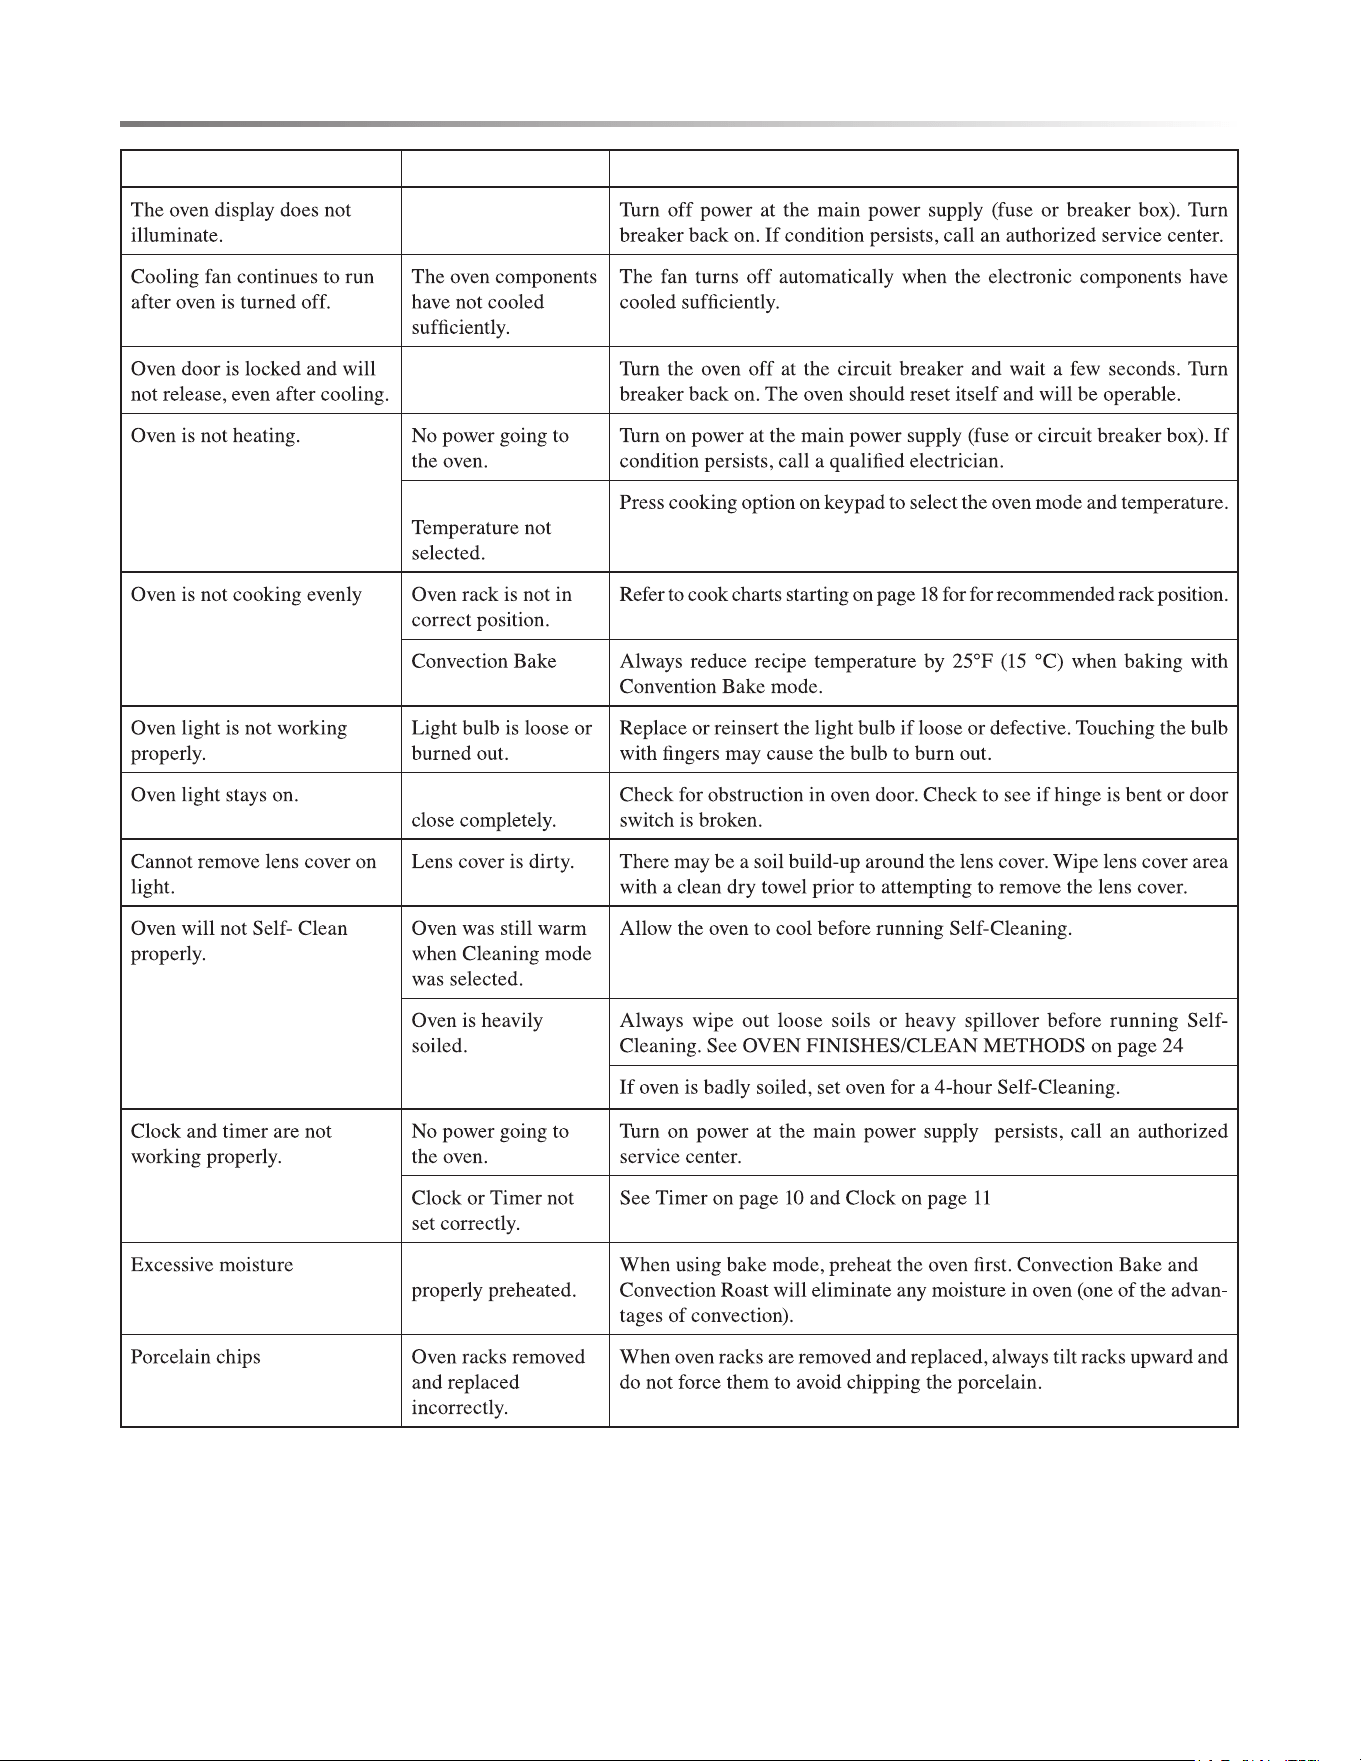
PROBLEM POSSIBLE CAUSE SOLUTION
28E
TROUBLESHOOTING
PROBLEM POSSIBLE CAUSE SOLUTION
Oven Mode or
Mode
Oven door does not
Oven was not

E
E E E E E E E E E E E E E E E E E E
www.kucht.com
APPLICABLE MODEL: KWO620
BE A PRO IN YOUR KITCHEN
30”
240V
DOUBLE WALL OVEN
KWO620
MANUAL D´UTILISATION

E E E E E E E E E E E E E E E E E E
E E E E E E E E E E E E E E E E E E
SÉCURITÉ DU FOUR ............................................ 4
CARACTÉRISTIQUES DE VOTRE FOUR ......................... 7
TABLEAU DE COMMANDE ....................................... 8
COMMANDES D’ACTIVATION DES MODES DU FOUR :
BAKE, BROIL, CONVEC, WARM/PROOF .................................. 8
AFFICHAGE ............................................................................. 8
VERROUILLAGE DU TABLEAU DE COMMANDE ...................... 8
START (MISE EN MARCHE) .................................................... 8
VERROUILLAGE DU TABLEAU DE COMMANDE ...................... 8
STOP/CLEAR (ARRÊT/REMISE À ZÉRO) ................................. 8
LIGHT (LAMPE) ...................................................................... 8
TIMER (MINUTERIE) ............................................................... 8
COOK TIME (DURÉE DE CUISSON) ....................................... 9
START TIME (HEURE DE DÉMARRAGE) ................................. 9
SETTINGS (RÉGLAGES) .......................................................... 9
SELF-CLEAN (AUTONETTOYAGE) .......................................... 11
LUMINOSITÉ ......................................................................... 11
ÉTALONNAGE ........................................................................ 11
MODE DE DÉMONSTRATION ................................................ 11
UTILISATION DU FOUR
........................................ 11
AVANT D’UTILISER LE FOUR ................................................ 11
GÉNÉRAL .............................................................................. 11
COMMANDE DE LA TEMPÉRATURE DU FOUR ..................... 13
MODES DU FOUR ................................................................. 13
CONVECTION ........................................................................ 15
CONSEILS ET TECHNIQUES DE CUISSON ............................ 17
CONSEILS DE CONVECTION ................................................. 17
ALIMENTS RECOMMANDÉS POUR LE MODE CONVECTION
EUROPÉENNE : ..................................................................... 18
CONSEILS DE CUISSON À CONVECTION.............................. 19
CONSEILS ET TECHNIQUES POUR LE GRIL À CONVECTION 20
CONSEILS ET TECHNIQUES POUR LE RÔTISSAGE À
CONVECTION ........................................................................ 20
CONSEILS ET TECHNIQUES DE DÉSHYDRATATION ............ 20
CONSEILS DE GRIL .............................................................. 21
GUIDE DE TEMPÉRATURE DE SERVICE DE LA FSIS (SERVICE
D’INSPECTION ET SÉCURITÉ DES ALIMENTS USDA) .......... 22
ENTRETIEN DU FOUR
..........................................23
NETTOYAGE GÉNÉRAL .......................................................... 23
AUTONETTOYAGE AUTOMATIQUE ......................................... 24
RETRAIT DE LA PORTE DU FOUR ......................................... 25
REMPLACEMENT D’UNE AMPOULE DU FOUR ..................... 26
DÉPANNAGE
....................................................27
CUISSON ET RÔTISSAGE ...................................................... 27
FONCTIONNEMENT ............................................................... 28
BIENVENUE
DANS LA
FAMILLE KUCHT
DOUBLE WALL OVEN
KWO620
MANUEL D'UTILISATION

E
E E E E E E E E E E E E E E E E E E
IMPORTANTES CONSIGNES DE SÉCURITÉ
Lisez attentivement les informations importantes concernant l'installation, la sécurité et la maintenance.
Conservez ces instructions pour référence future.

4F
SÉCURITÉ DE DE FOUR
Votre sécurité et celle des autres est très importante.
DANGER
ADVERTISSEMENT
ATTENTION
AVERTISSEMENTS POUR L’INSTALLATION ÉLECTRIQUE
AVERTISSEMENT
RISQUE DE CHOC ÉLECTRIQUE
F55
AVERTISSEMENT
INSTALLATION CORRECTE
1
2
3
4
5
6
7
8
POUR RÉDUIRE LE RISQUE D’INCENDIE DANS LA
CAVITÉ DU FOUR :
1
2
3
4
5
6
7
8
SÉCURITÉ PERSONNELLE :
1
2
3
4
5
6
7
IMPORTANTES INSTRUCTIONS DE SÉCURITÉ
6F
8
9
10
11
12
SÉCURITÉ DU FOUR EN MODE D’AUTONETTOYAGE :
1
IMPORTANTES INSTRUCTIONS DE SÉCURITÉ
2
3
4
5
6
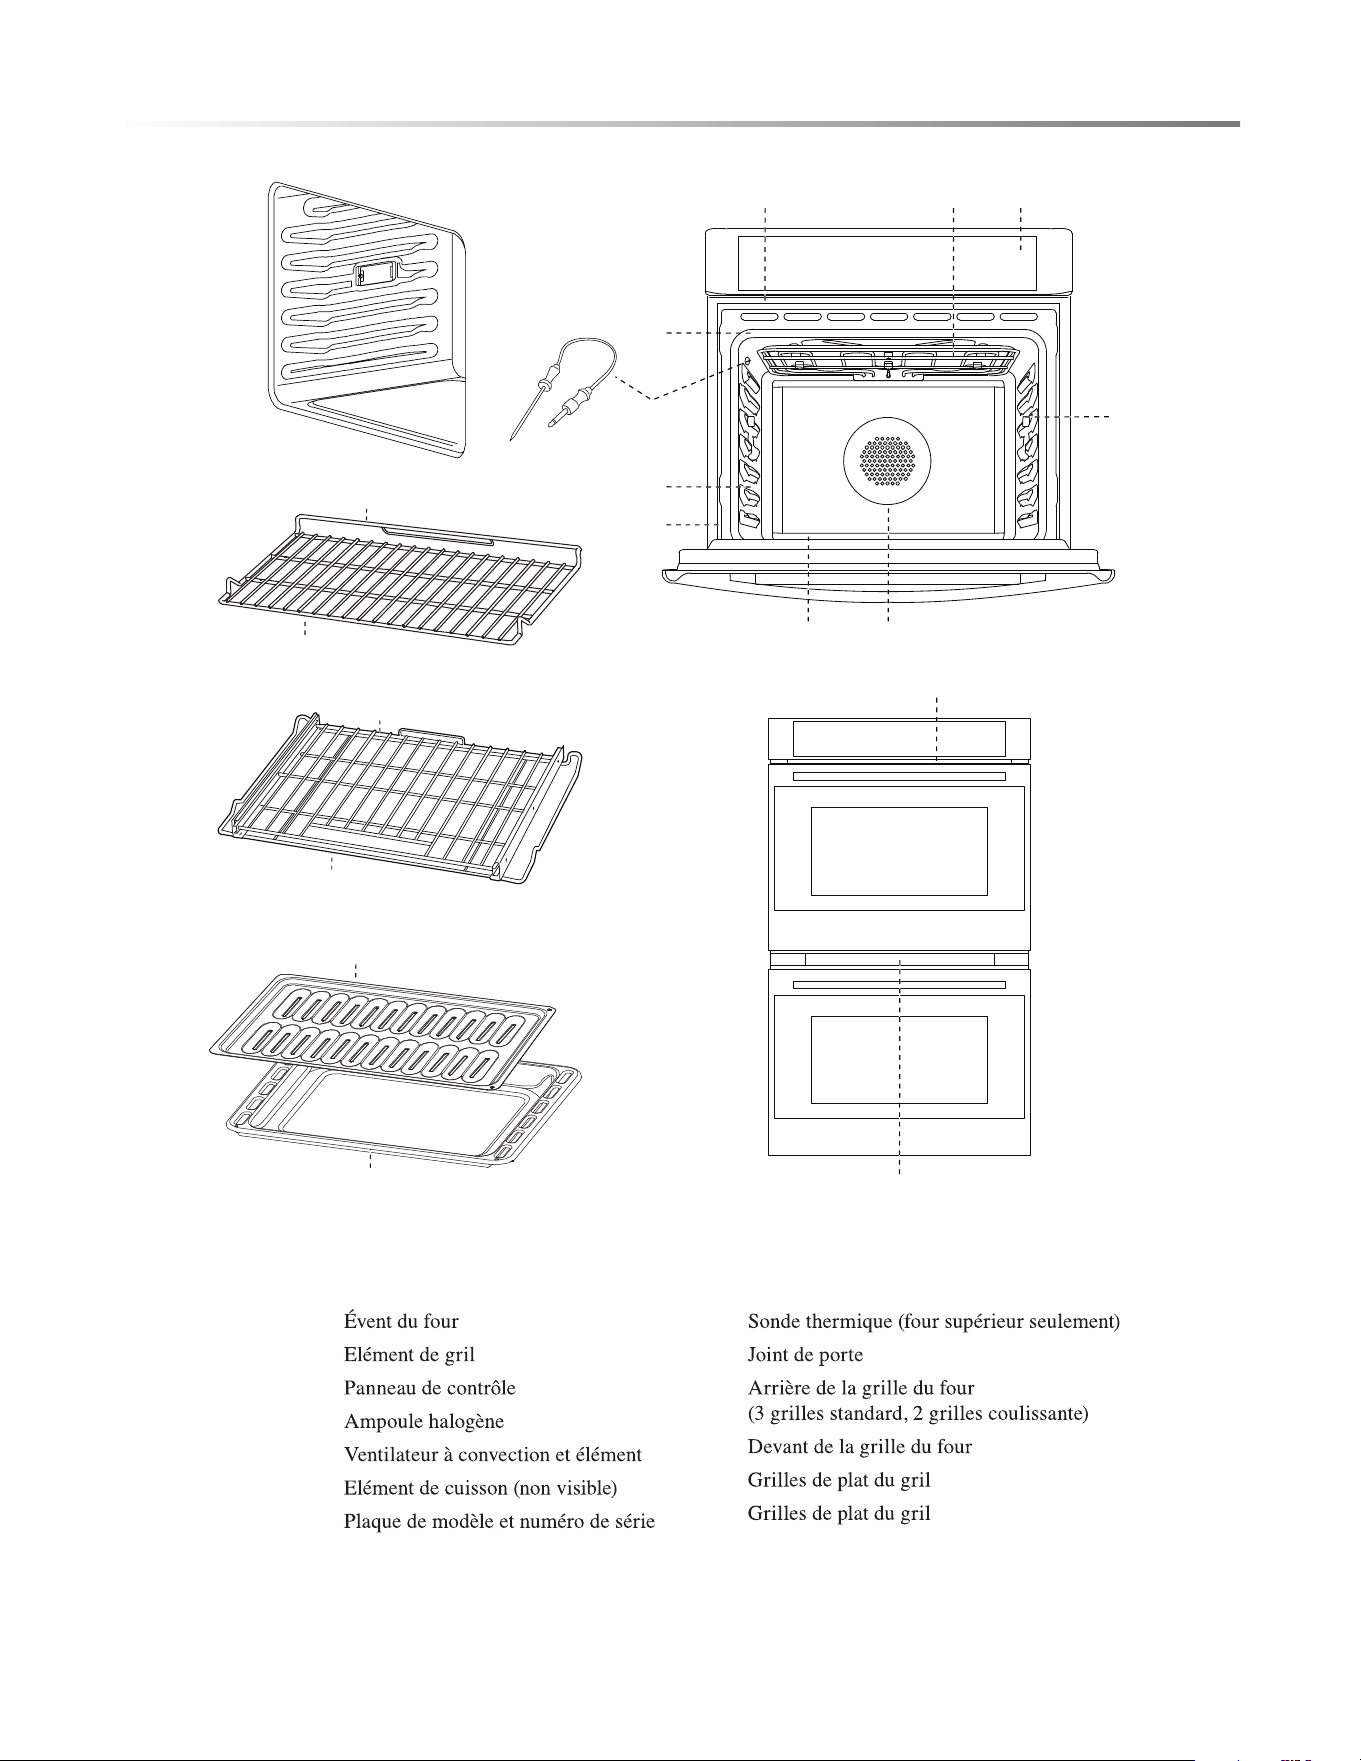
A
B
C
D
E
F
G
H
I
J
K
L
M
CARACTÉRISTIQUES DE VOTRE FOUR
A B C
G
F E
D
D
H
I
A
A
J
K
L
M
J
K
6
5
3
2
1
4
F7
LOWER OVEN
Broil ConvecBake Proof
Self Clean
Bake
UPPER OVEN
Broil Warm
C ook T ime
UPPER OVEN
12 3
45 6
78
0
9
Timer Light
Settings
Start Time
STOP
CLEAR
STAR T
HOLD
LOWER OVEN
STOP
C LEAR
STAR T
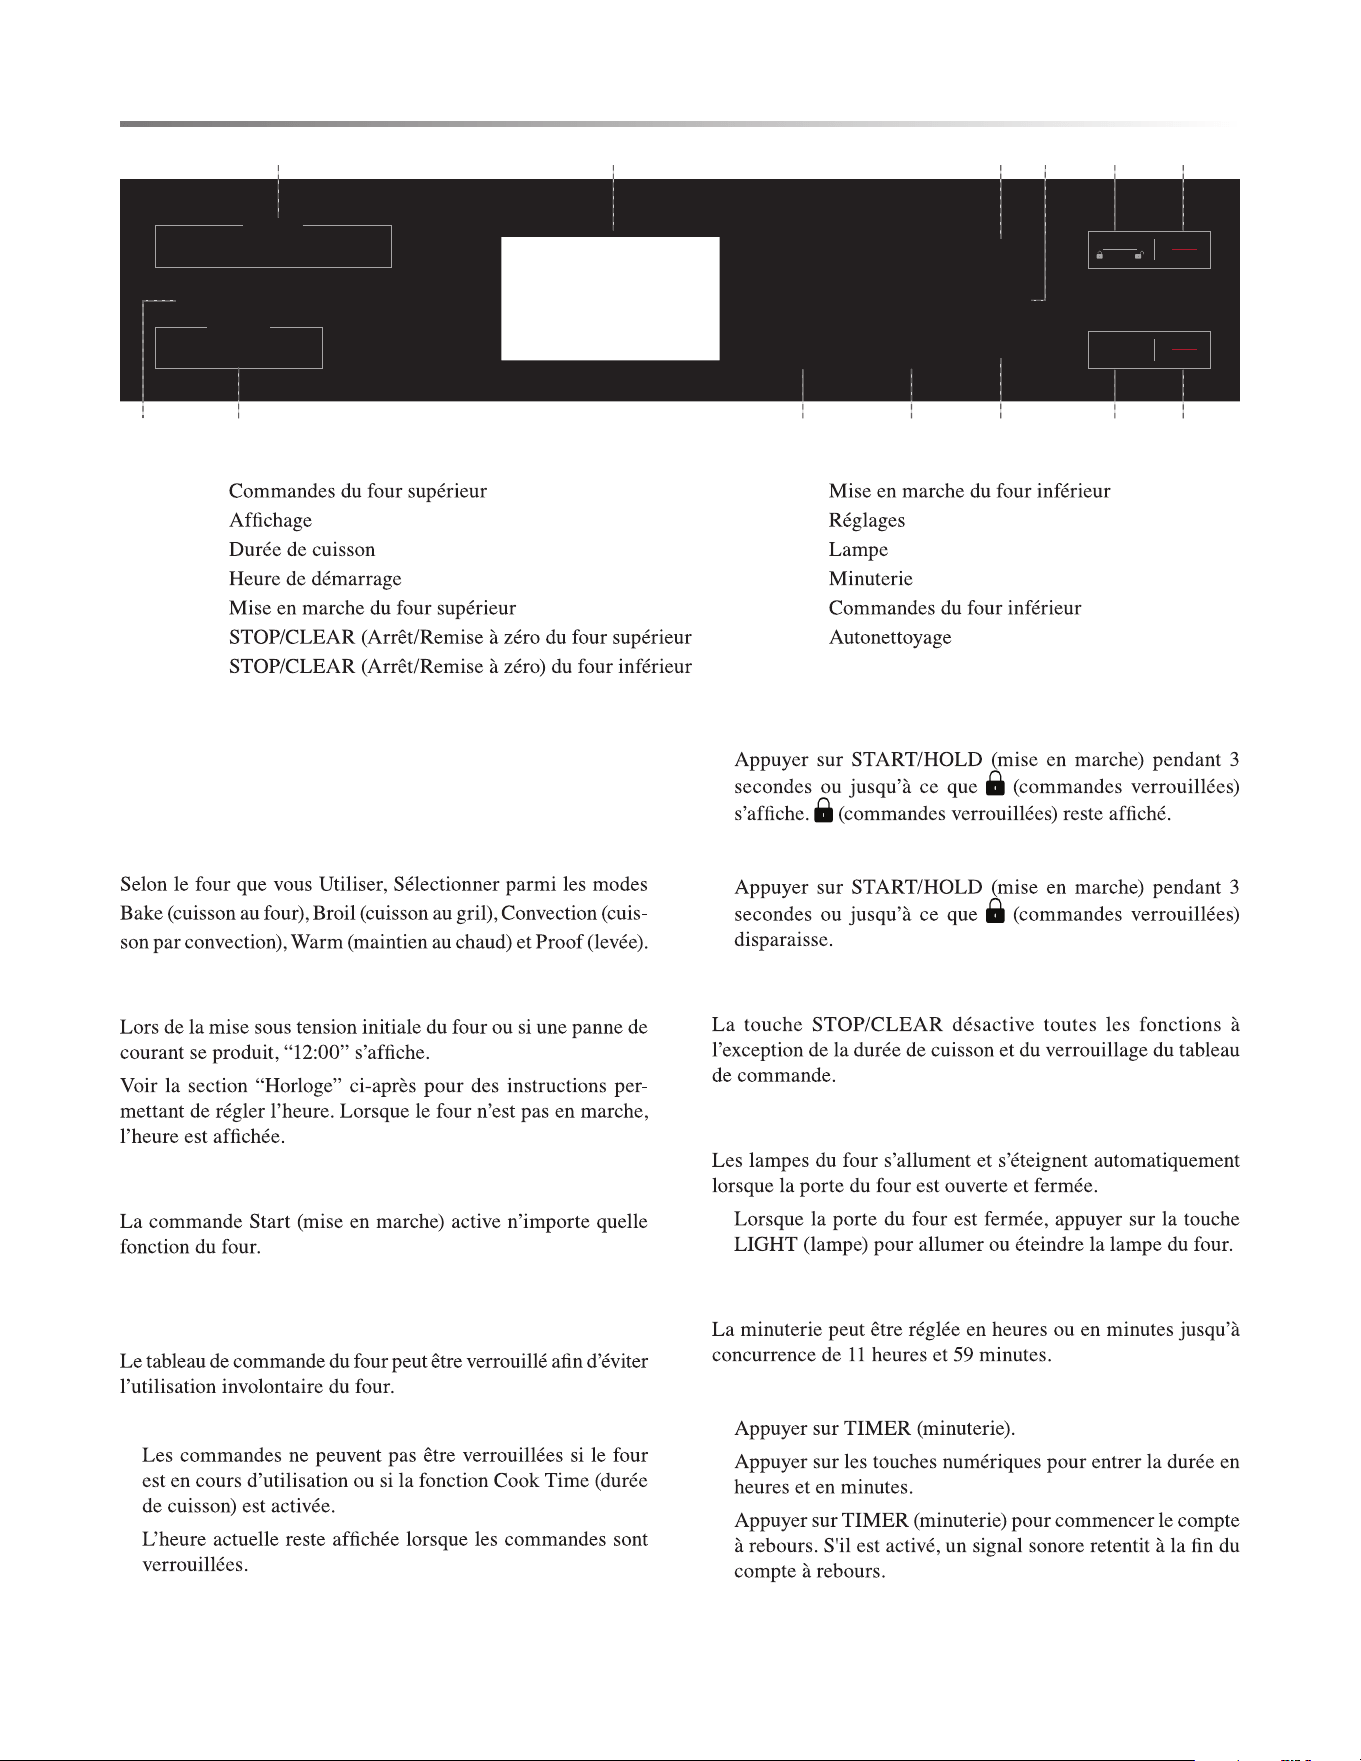
COMMANDES DU MODE DU FOUR -
FOUR SUPÉRIEUR : BAKE, BROIL,
CONVEC, PROOF
FOUR INFÉRIEUR : BAKE, BROIL,
WARM
AFFICHAGE
START (MISE EN MARCHE)
VERROUILLAGE DU TABLEAU DE
COMMANDE
REMARQUES :
•
•
VERROUILLAGE DU TABLEAU DE COMMANDE :
•
DÉVERROUILLAGE DU TABLEAU DE COMMANDE :
•
STOP/CLEAR (ARRÊT/REMISE À ZÉRO)
LIGHT (LAMPE)
•
TIMER (MINUTERIE)
RÉGLAGE DE LA MINUTERIE :
1
2
3
A
B
C
D
E
F
G
H
I
J
K
L
M
TABLEAU DE COMMANDE
A B C D E F
H GIJKLM
8F
F9
TABLEAU DE COMMANDE
4
REMARQUE :
COOK TIME (DURÉE DE CUISSON)
IMPORTANT :
REMARQUES :
•
•
•
RÉGLAGE D’UNE DURÉE DE CUISSON :
1
2
3
4
REMARQUES :
•
•
START TIME (HEURE DE DÉMARRAGE)
IMPORTANT :
1
2
3
4
5
AVERTISSEMENT
RISQUE D’INTOXICATION ALIMENTAIRE
6
7
REMARQUE :
SETTINGS (RÉGLAGES)
1
2
3 Sound (Son)
4
5
6
7 Sabbath (Sabbat)
8
9
0
•
CLOCK (HORLOGE)
RÉGLAGE DE L’HORLOGE :
REMARQUE :
1
2
3
4
5
6
10F
TABLEAU DE COMMANDE
POUR FAIRE PASSER L’HORLOGE AU FORMAT DE
24 HEURES :
1
2
3
4
SIGNAUX SONORES
Nombre de signaux sonores : 1
•
•
•
Nombre de signaux sonores : 2
•
Nombre de signaux sonores : 3
•
Nombre de signaux sonores : 4
•
ACTIVATION/DÉSACTIVATION DU SON :
1
2
3
4
5
6
RÉGLAGE DU VOLUME SONORE :
1
2
3
4
5
6
DEGRÉS FAHRENHEIT ET CELSIUS
1
2
3
4
5
6
MODE SABBAT
REMARQUE :
ACTIVATION/DÉSACTIVATION DU MODE SABBAT :
1
REMARQUE :
2
3
CUISSON AU FOUR AVEC LE MODE SABBAT ACTIVÉ :
1
2
3
4
F11
SEULE LA FONCTION STOP/CLEAR EST
OPÉRATIONNELLE.
•
REMARQUE :
LANGUE
SELF-CLEAN (AUTONETTOYAGE)
LUMINOSITÉ
1
2
3
4
ÉTALONNAGE
LE MODE DE DÉMONSTRATION
1
2
3
4
REMARQUE :
UTILISATION DU FOUR
AVANT D’UTILISER LE FOUR
1
2
3
REMARQUE :
4
GÉNÉRAL
IMPORTANT :
1
2
3
4
PRÉCHAUFFAGE DU FOUR
•
•
•
•
•
•
•
SUGGESTIONS D’UTILISATION
•
•
•
SONDE THERMIQUE
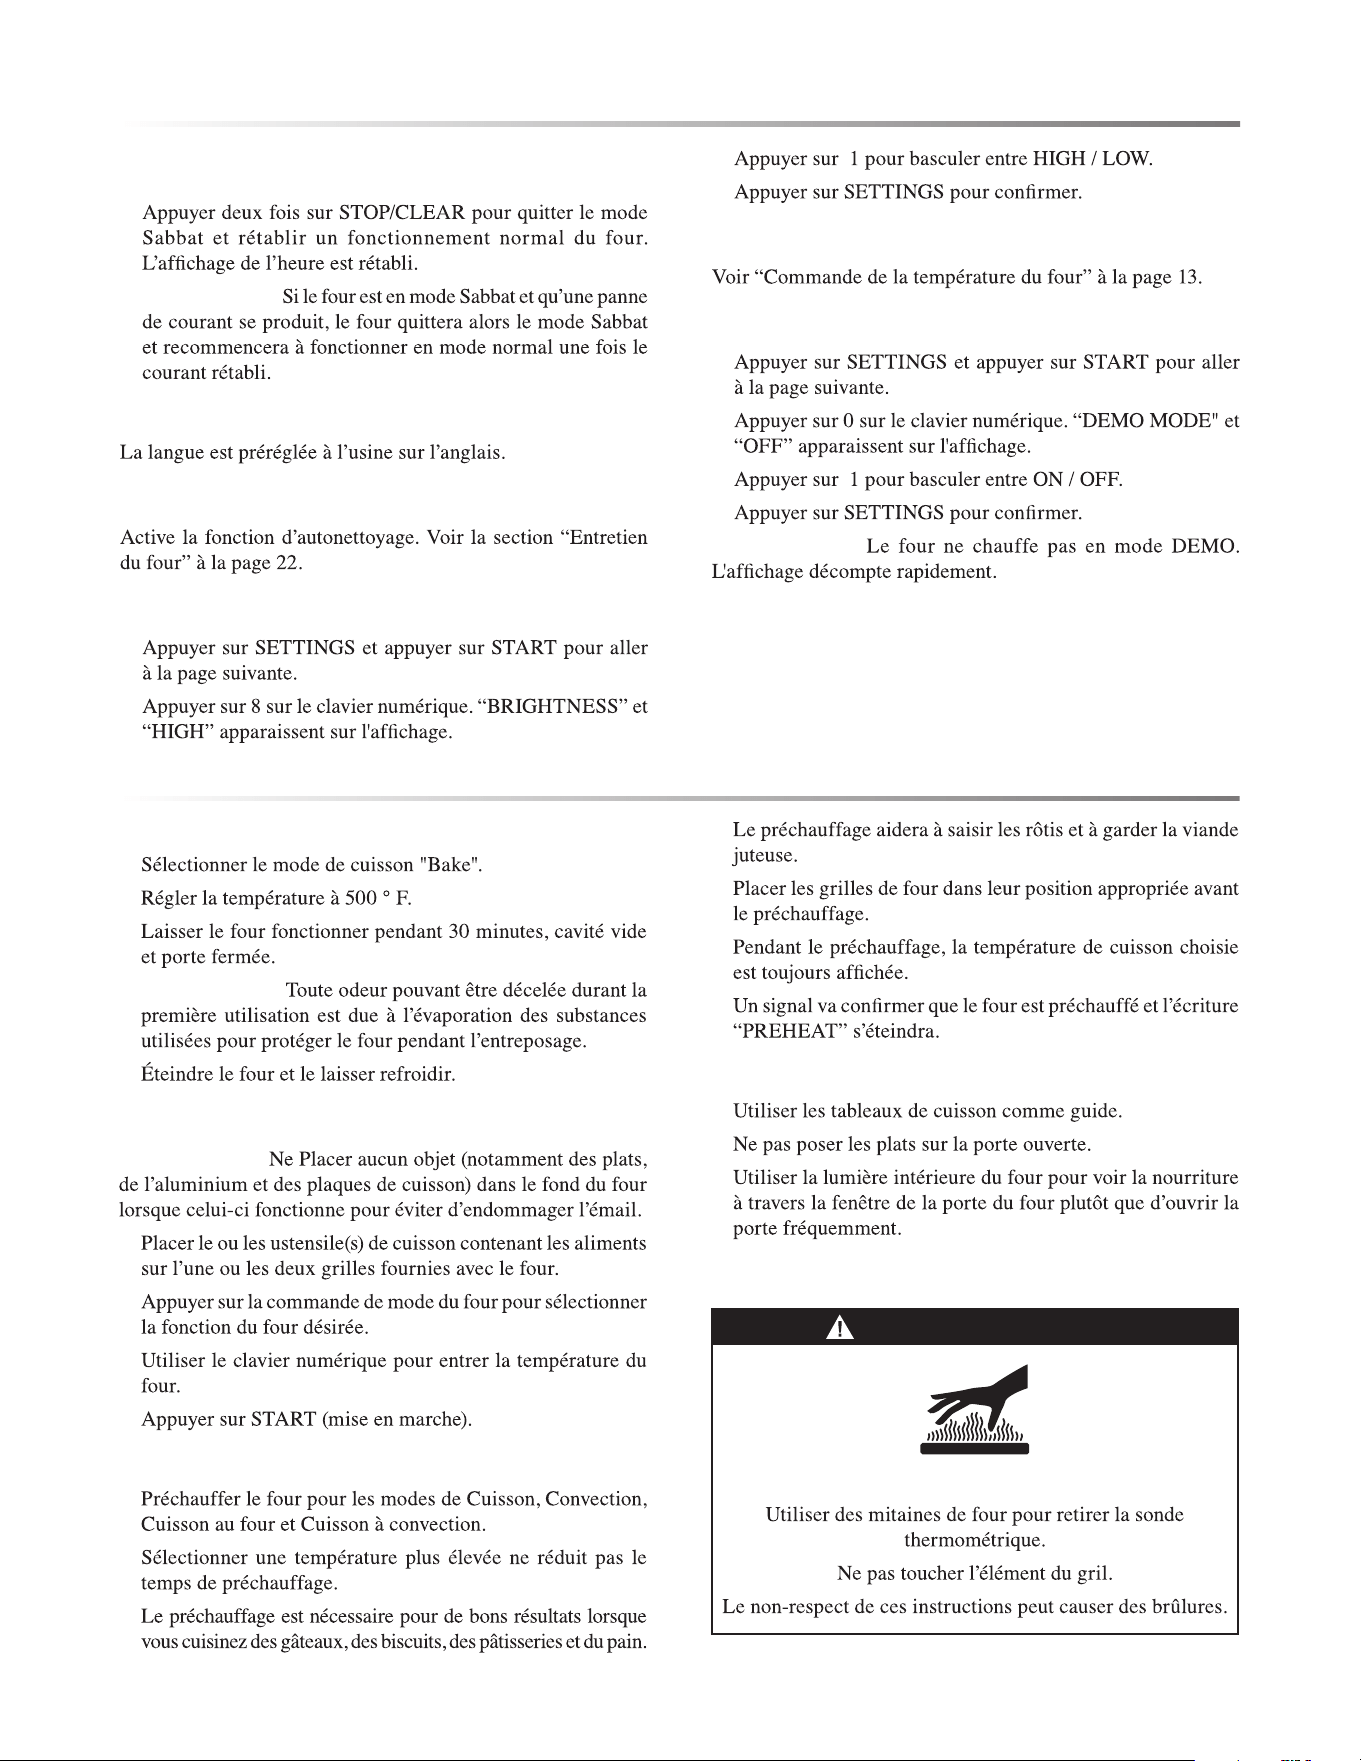
AVERTISSEMENT
RISQUE DE BRÛLURES
TABLEAU DE COMMANDE
12F
UTILISATION DU FOUR
IMPORTANT :
UTILISATION DE LA SONDE THERMIQUE :
1
REMARQUE :
2
3
4
5
6
REMARQUES :
•
•
7
REMARQUE :
USTENSILES
•
•
•
CUISSON À HAUTE ALTITUDE
GRILLES DE FOUR
IMPORTANT :
•
•
•
•
POUR ENLEVER LES GRILLES:
•
POUR REMPLACER UNE GRILLE:
•
VENTILATEUR DE REFROIDISSEMENT
VITRE DE LA PORTE DU FOUR
•
•
•
•
ÉVENTS DU FOUR
F13
UTILISATION DU FOUR
•
•
CONDENSATION DU FOUR ET TEMPÉRATURE
•
•
•
COMMANDE DE LA TEMPÉRATURE DU
FOUR
AJUSTMENT EN °F
(AJUSTEMENT EN °C)
CUIT LES ALIMENTS
un peu plus
AJUSTEMENT DU CALIBRAGE DE LA TEMPÉRATURE
DU FOUR :
1
2
3
4
MODES DE FOUR
REMARQUE :
BAKE (CUISSON AU FOUR)
1
2
REMARQUES :
•
•
3
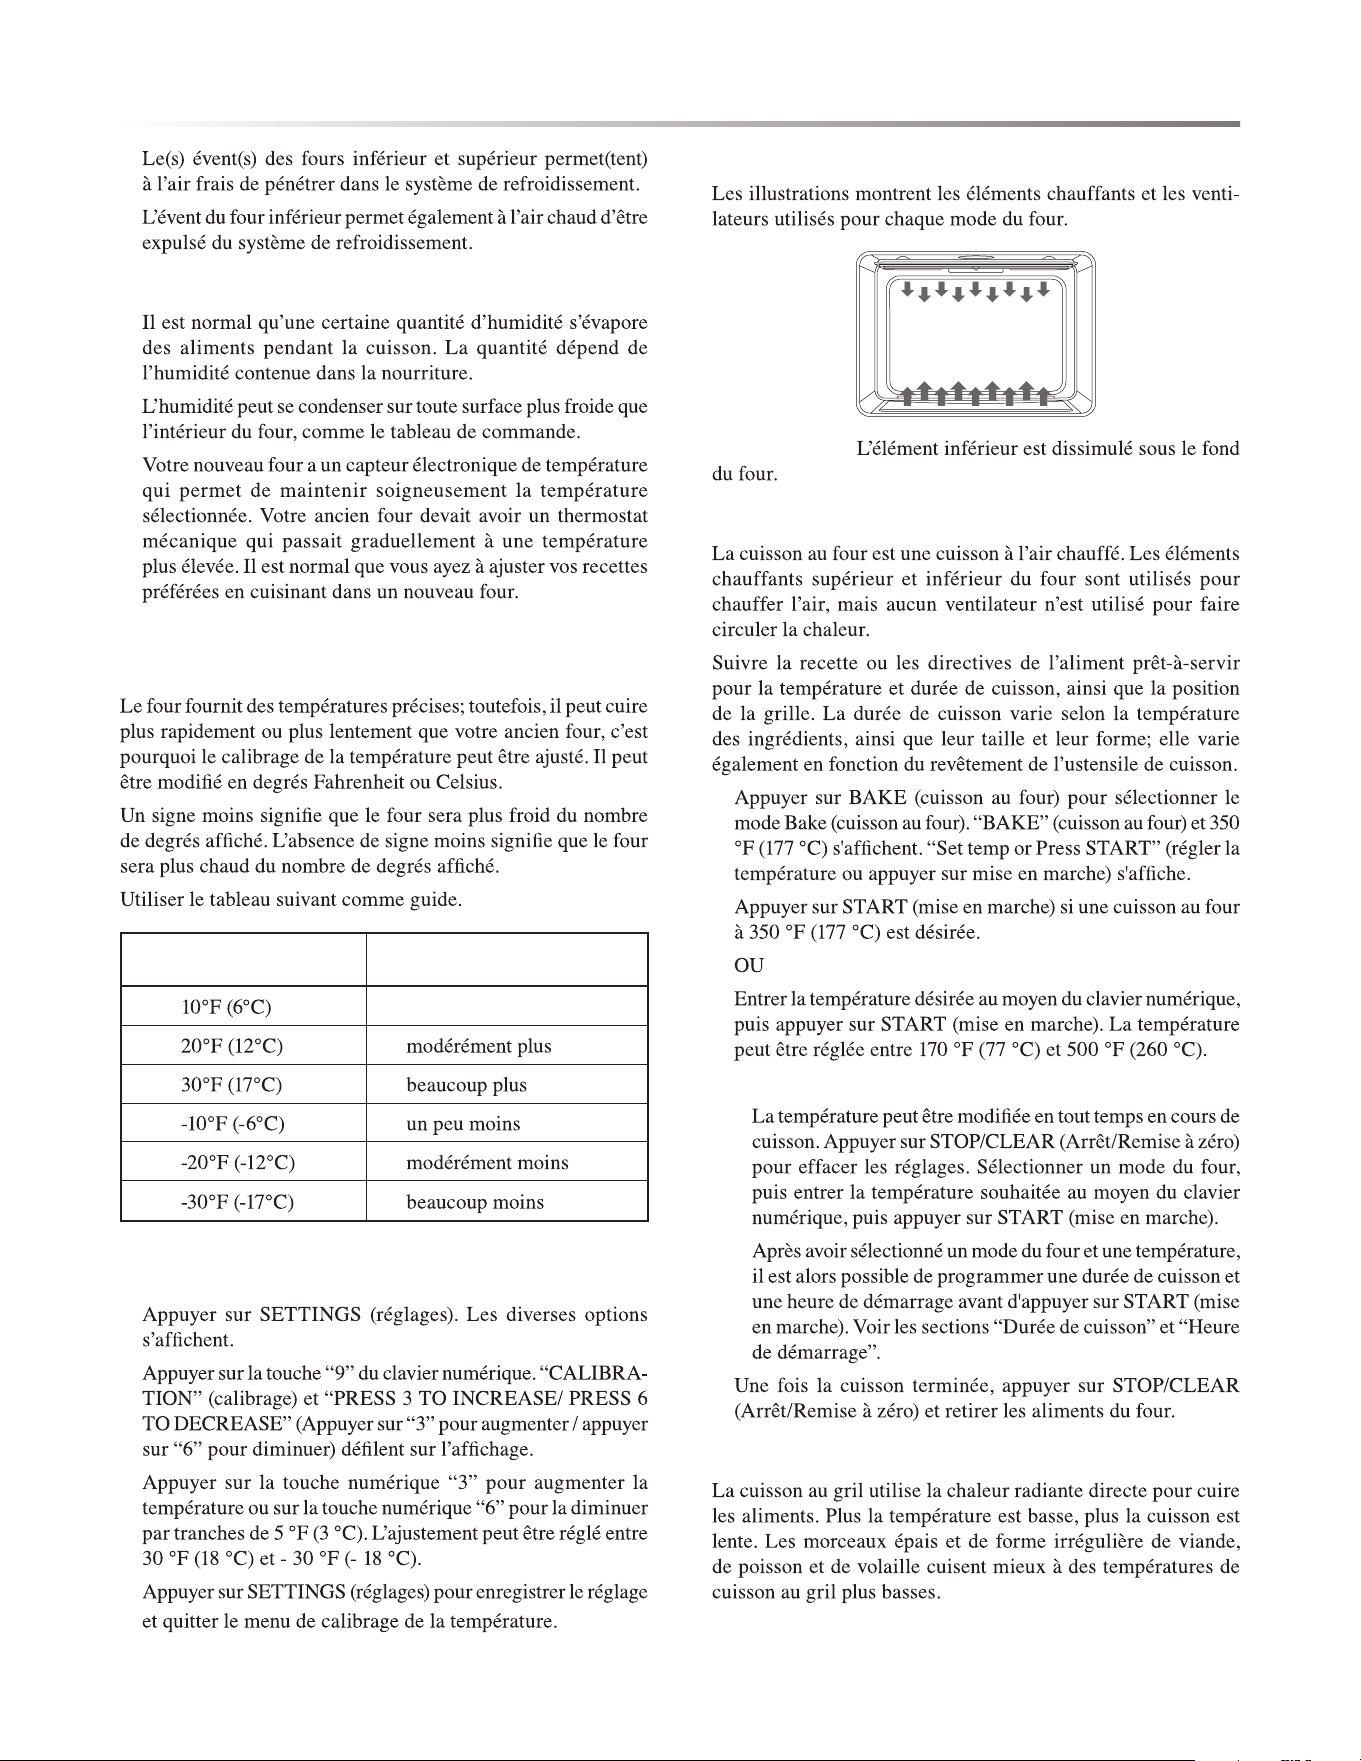
BROIL (GRIL)
14F
UTILISATION DU FOUR
•
•
•
•
•
CUISSON AU GRIL :
1
REMARQUE :
2
3
4
REMARQUES :
•
•
5
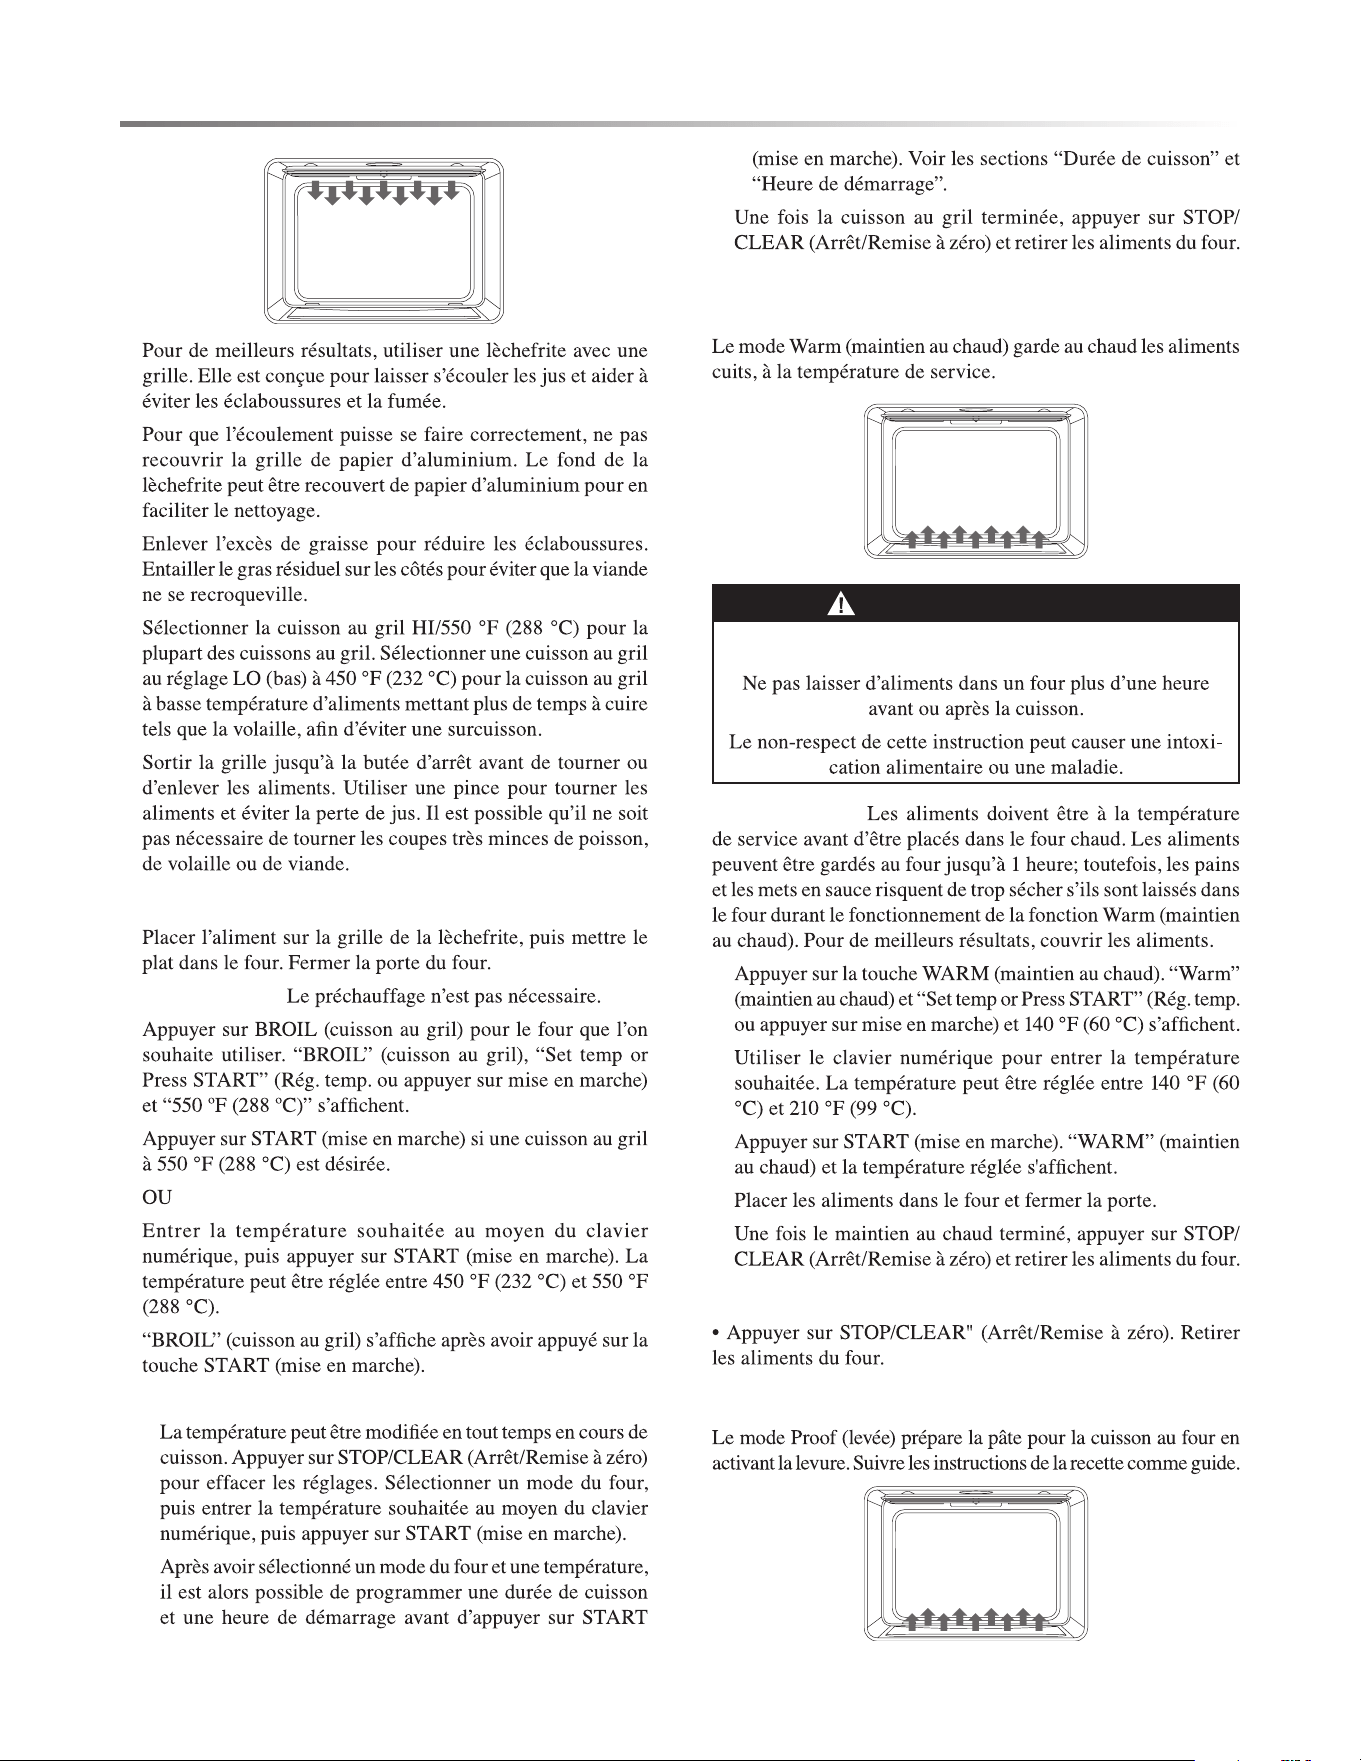
WARM (MAINTIEN AU CHAUD) -
FOUR INFÉRIEUR
AVERTISSEMENT
RISQUE D’INTOXICATION ALIMENTAIRE
IMPORTANT :
1
2
3
4
5
ANNULATION DE LA FONCTION DE MAINTIEN AU CHAUD :
PROOF (LEVÉE) - FOUR SUPÉRIEUR
F15
AVERTISSEMENT
RISQUE D’INTOXICATION ALIMENTAIRE
1
2
3
4
5
6
7
CONVECTION (FOUR SUPÉRIEUR
UNIQUEMENT)
VENTILATEUR DE CONVECTION
AVANTAGES DE LA CUISSON PAR CONVECTION
•
•
•
•
•
•
•
•
•
•
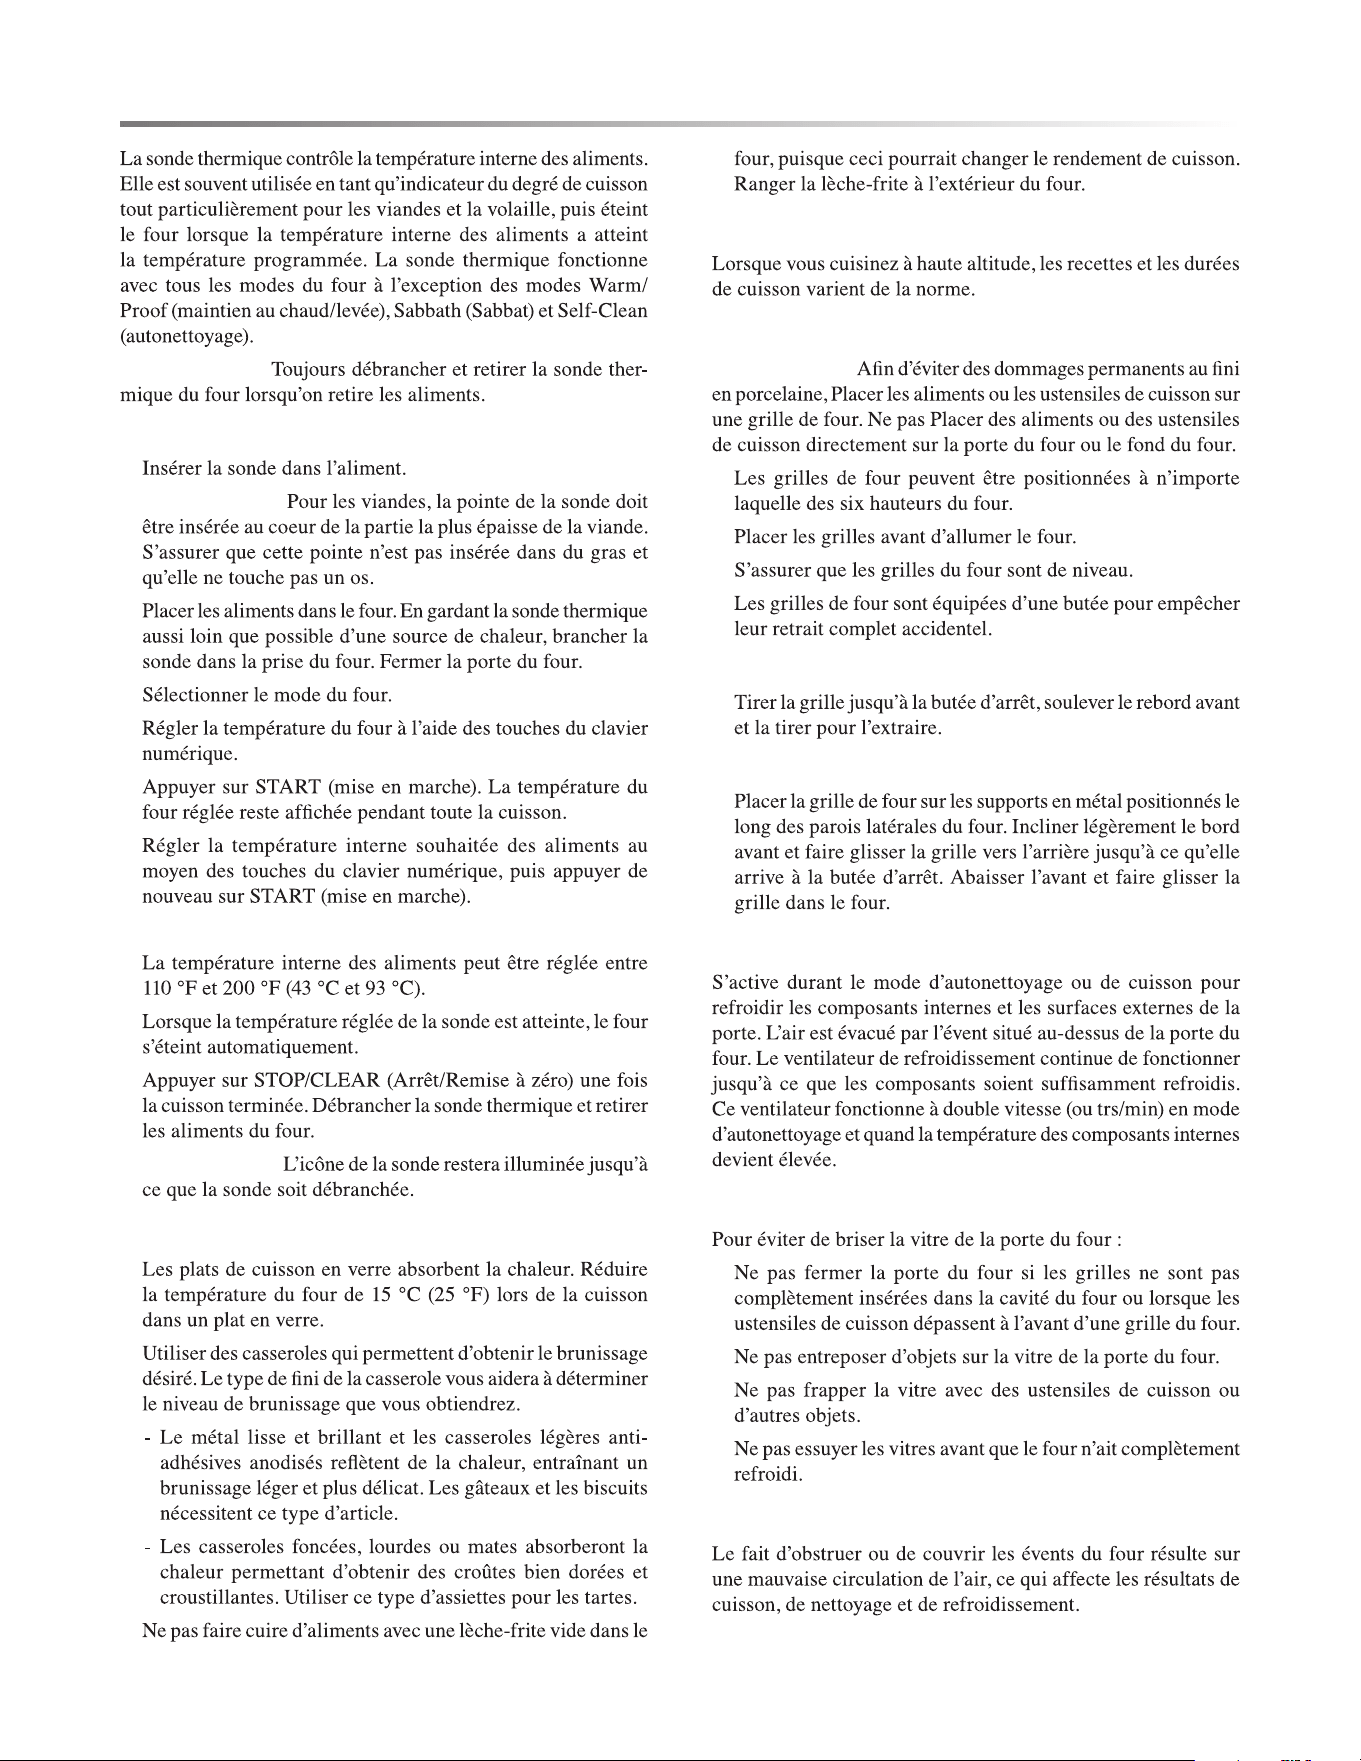
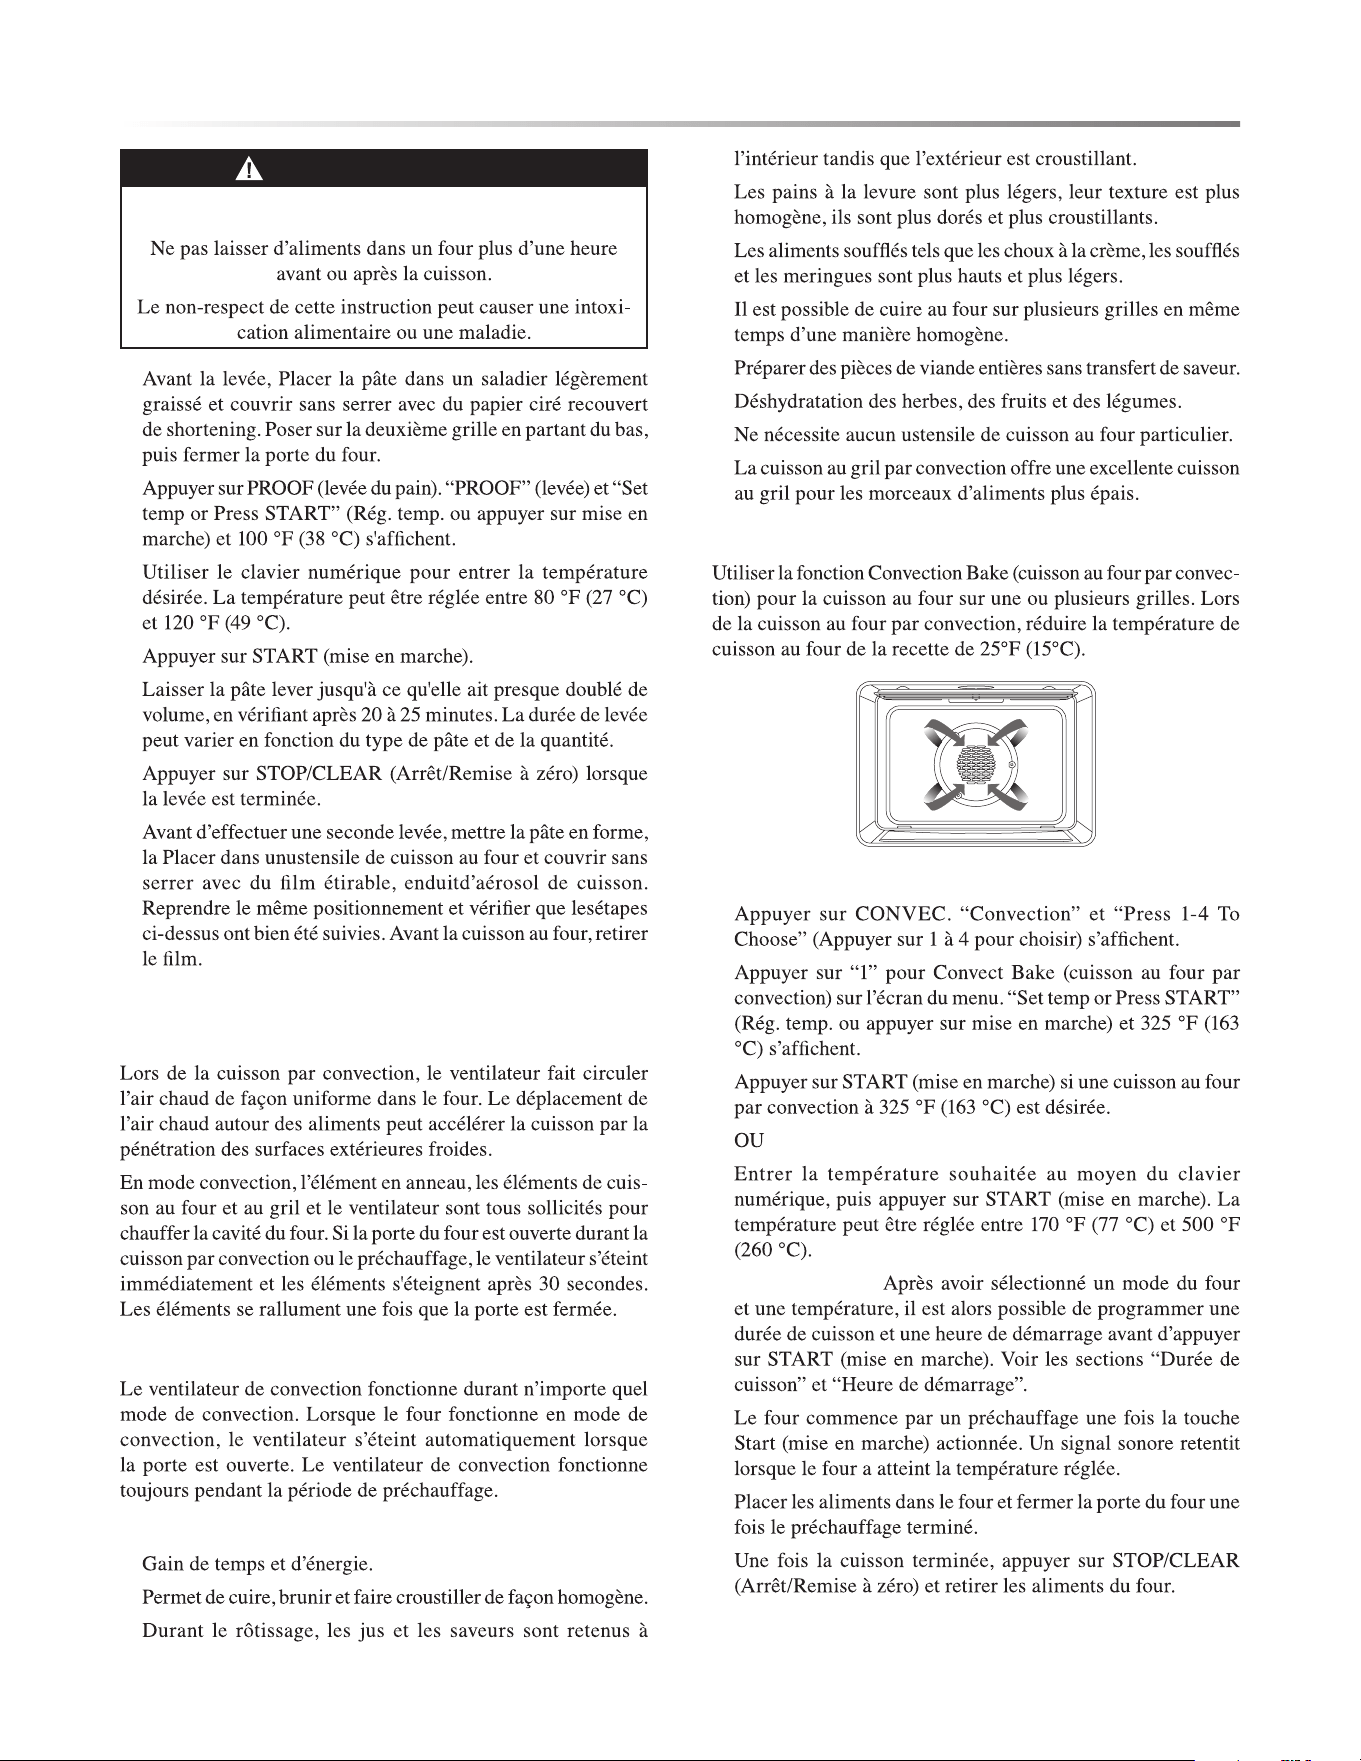
CUISSON AU FOUR PAR CONVECTION
RÉGLAGE DE LA CUISSON AU FOUR PAR CONVECTION :
1
2
3
REMARQUE :
4
5
6
UTILISATION DU FOUR
16F
UTILISATION DU FOUR
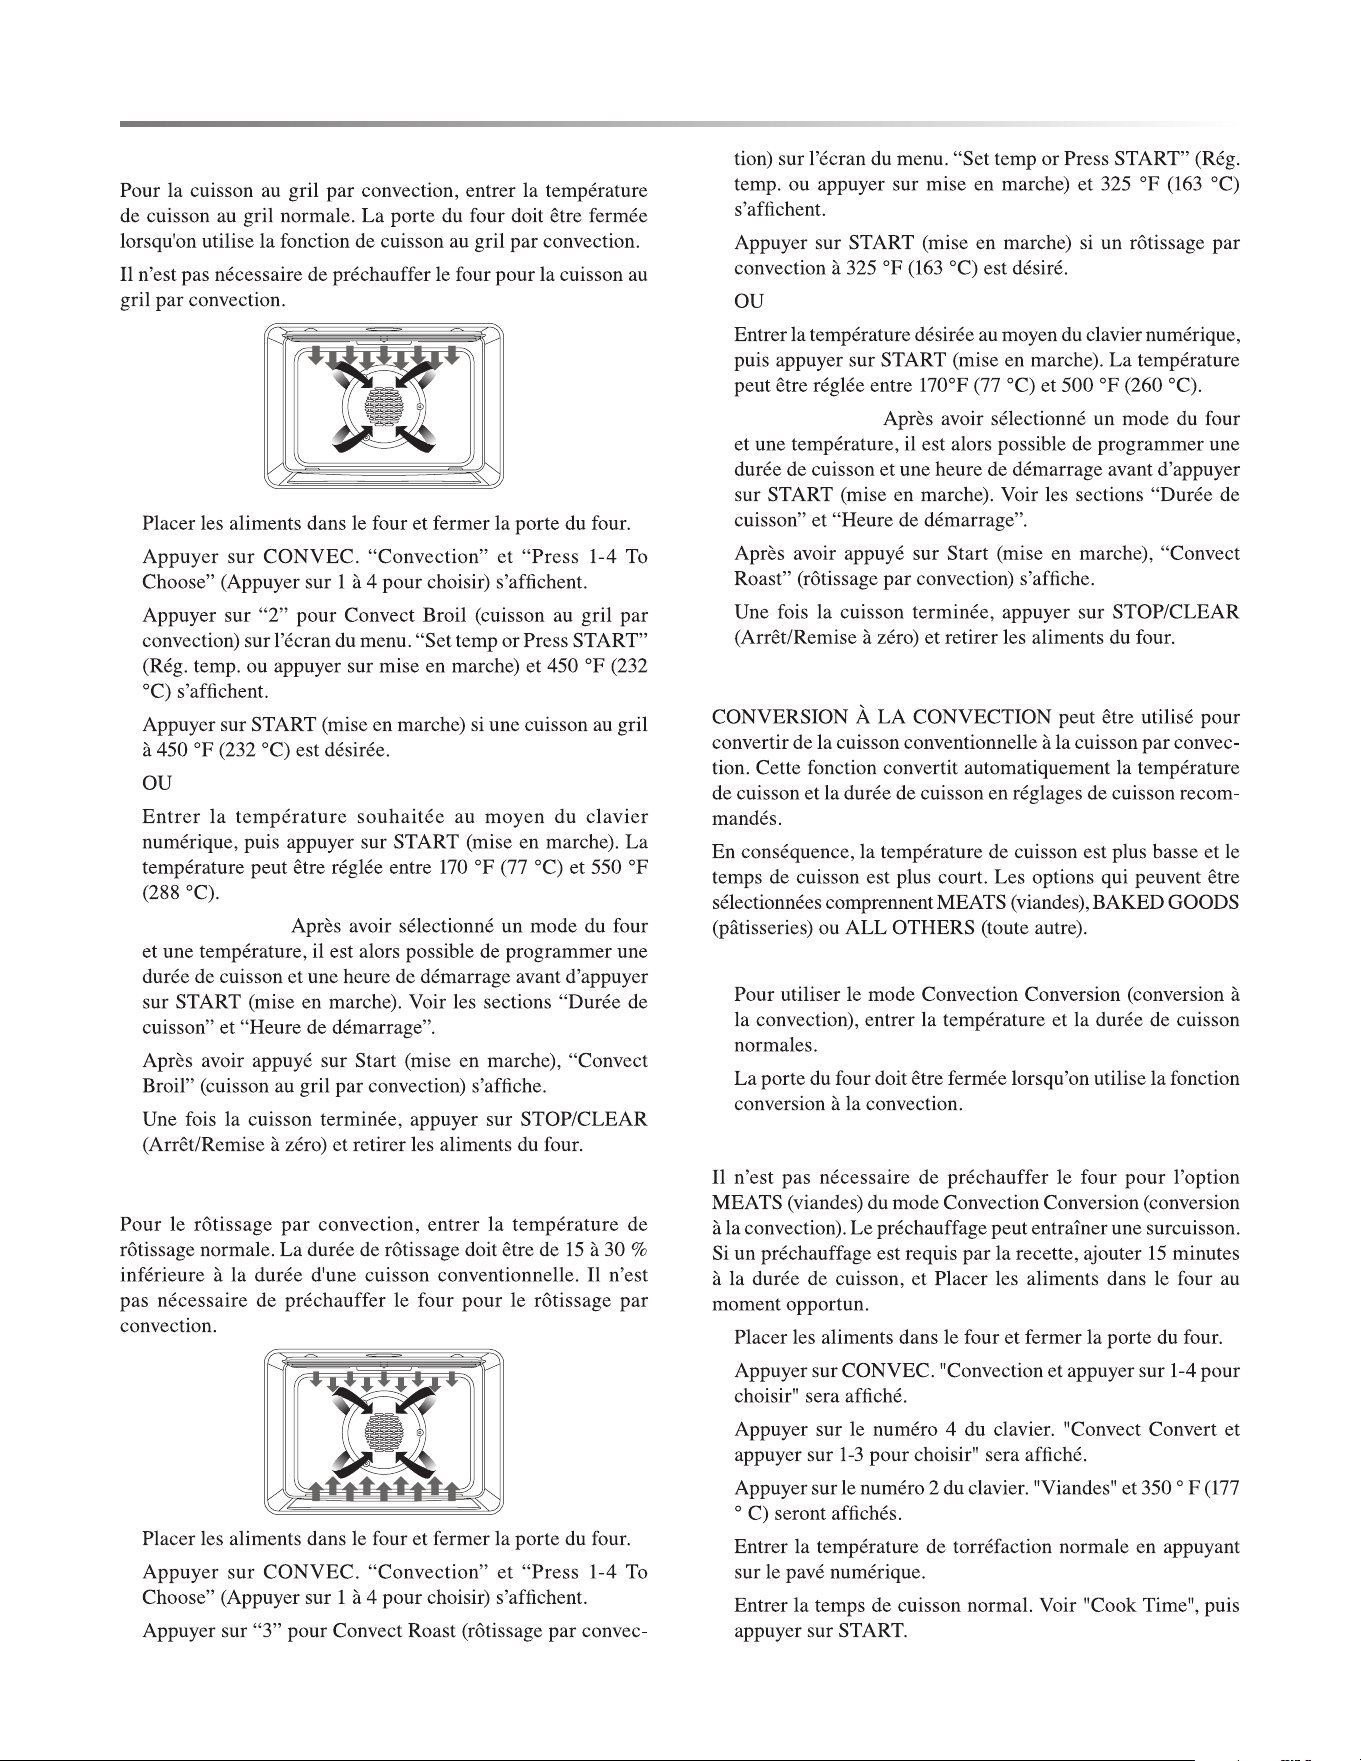
CUISSON AU GRIL PAR CONVECTION
1
2
3
4
REMARQUE :
5
6
RÔTISSAGE PAR CONVECTION
1
2
3
4
REMARQUE :
5
6
CONVERSION À LA CONVECTION
REMARQUES :
•
•
VIANDES (SEULEMENT)
1
2
3
4
5
6
F17
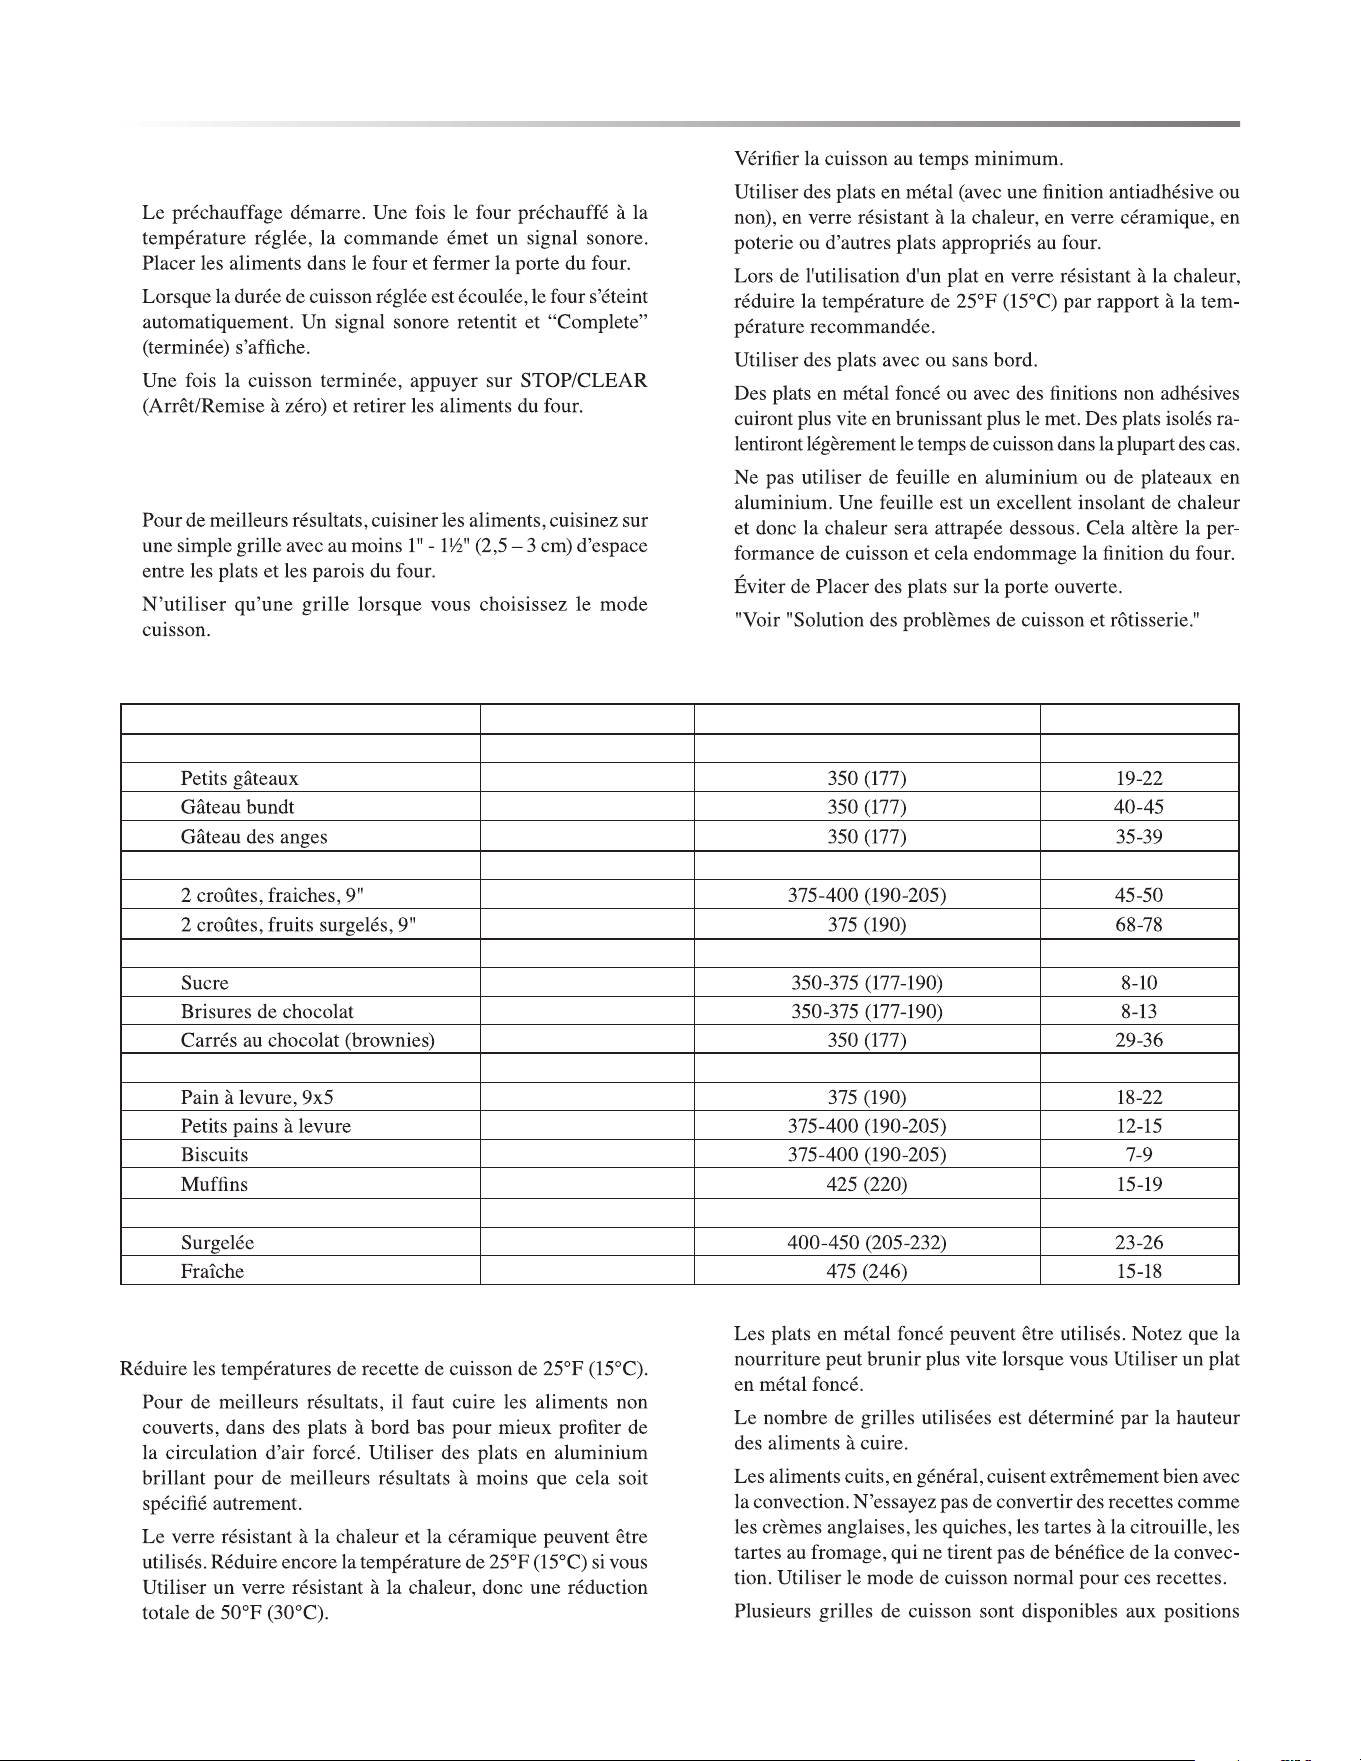
TABLEAU DE CUISSON
ALIMENTS POSITION DE GRILLE TEMP. °F (°C) (FOUR PRÉCHAUFFE) TEMPS (MIN)
Gâteau
•
2
• 1
• 1
Tarte
•
2
• 2
Biscuit
•
2
• 2
• 2
Pains
•
2
• 2
• 2
• 2
Pizza
•
2
• 2
CONSEILS DE CONVECTION
•
•
•
•
•
•
PRODUITS DE BOULANGERIE ET TOUTE AUTRE
(SEULEMENT)
1
2
3
CONSEILS ET TECHNIQUES DE
CUISSON
•
•
•
•
•
•
•
•
•
•
UTILISATION DU FOUR
18F
UTILISATION DU FOUR
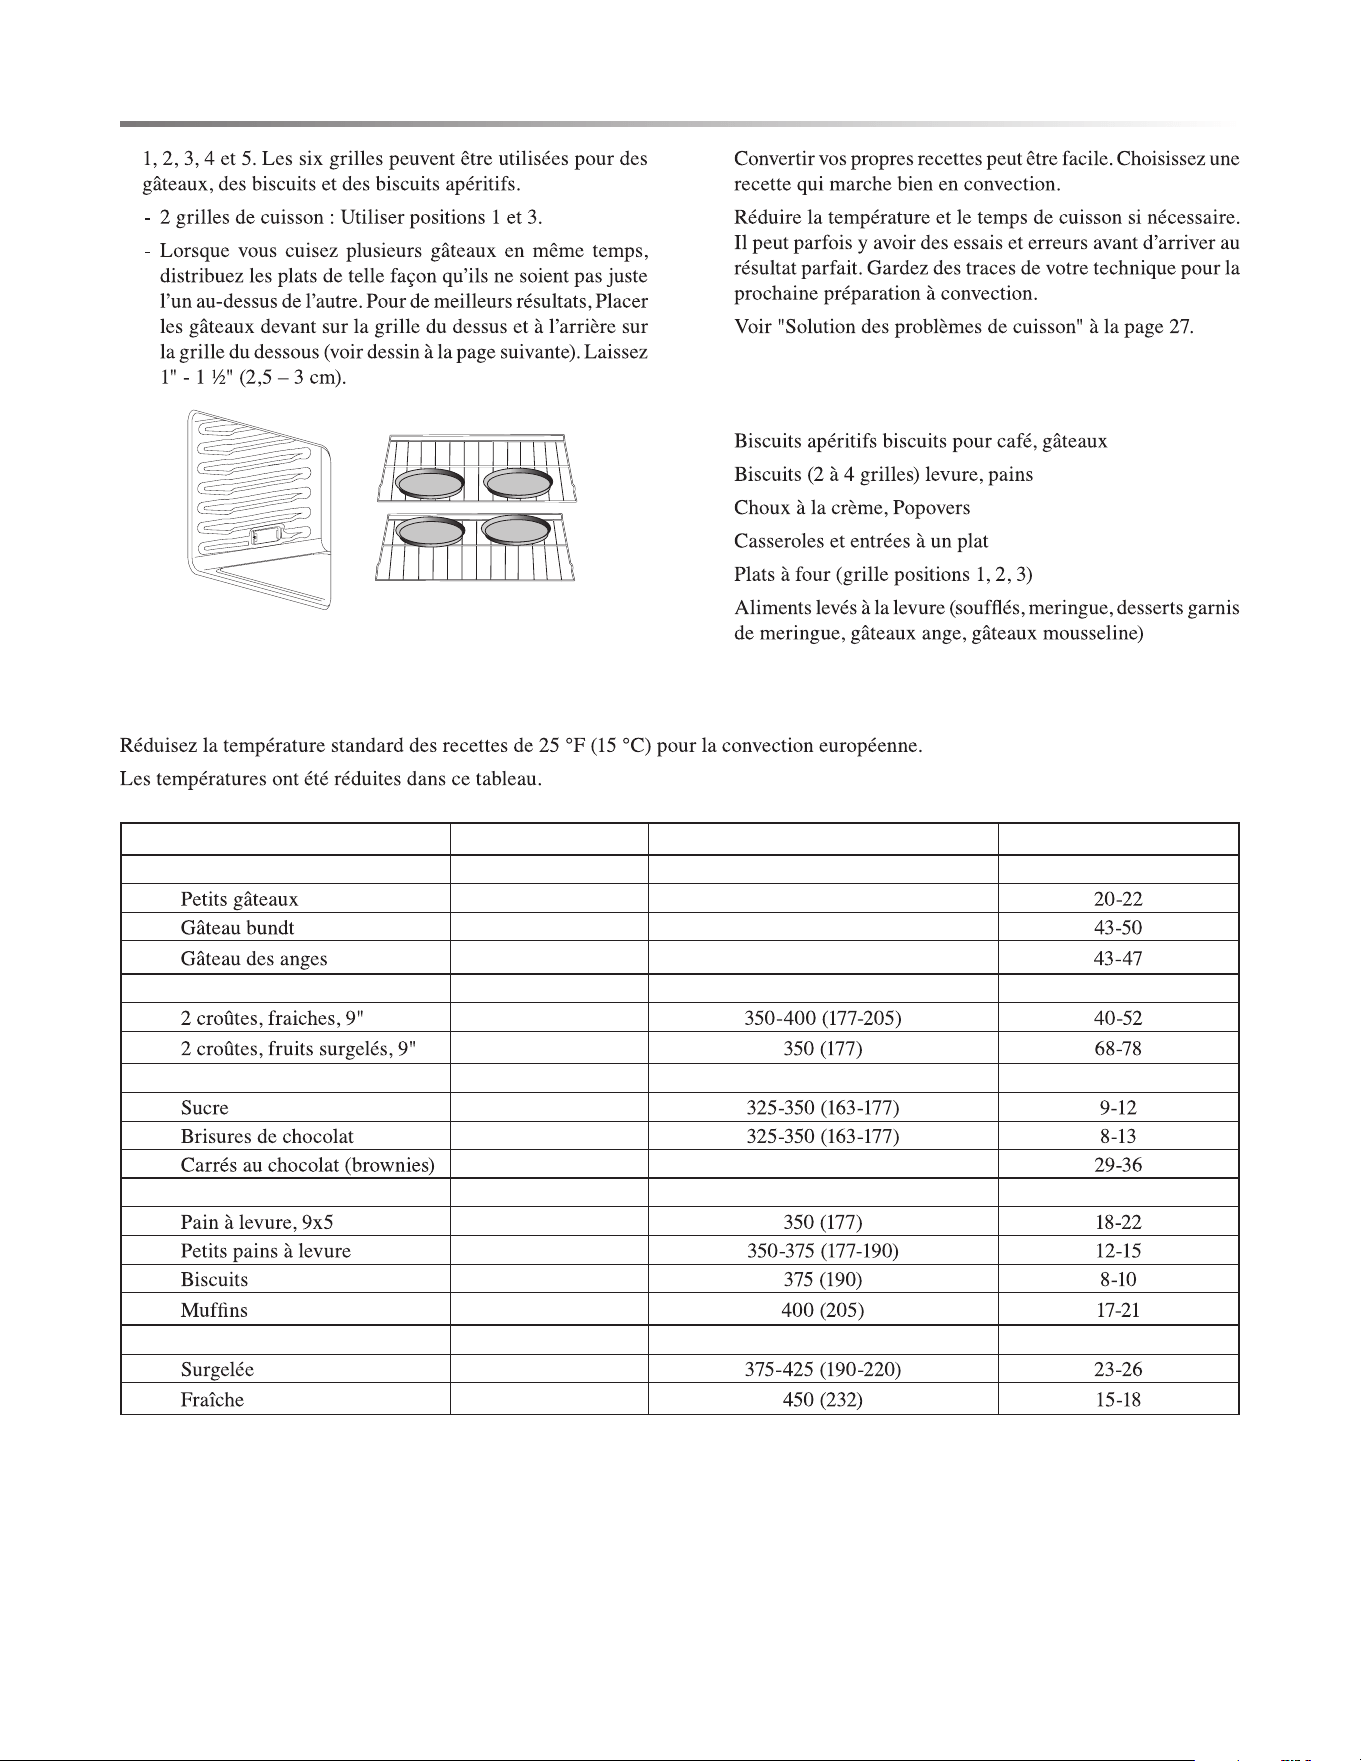
TABLEAU DE CONVECTION
ALIMENTS POSITION DE GRILLE TEMP. °F (°C) (FOUR PRÉCHAUFFE) TEMPS (MIN)
Gâteau
•
2 325 (163)
• 1 325 (163)
• 1 325 (163)
Tarte
•
2
• 2
Biscuit
•
2
• 2
• 2 325 (163)
Pains
•
2
• 2
• 2
• 2
Pizza
•
2
• 2
4
6
5
3
2
1
•
•
•
ALIMENTS RECOMMANDÉS POUR LE
MODE CONVECTION EUROPÉENNE :
•
•
•
•
•
•
F19
CONSEILS DE CONVECTION CUISSON
•
•
•
•
AVERTISSEMENT
RISQUE DE BRÛLURES
•
•
•
•
•
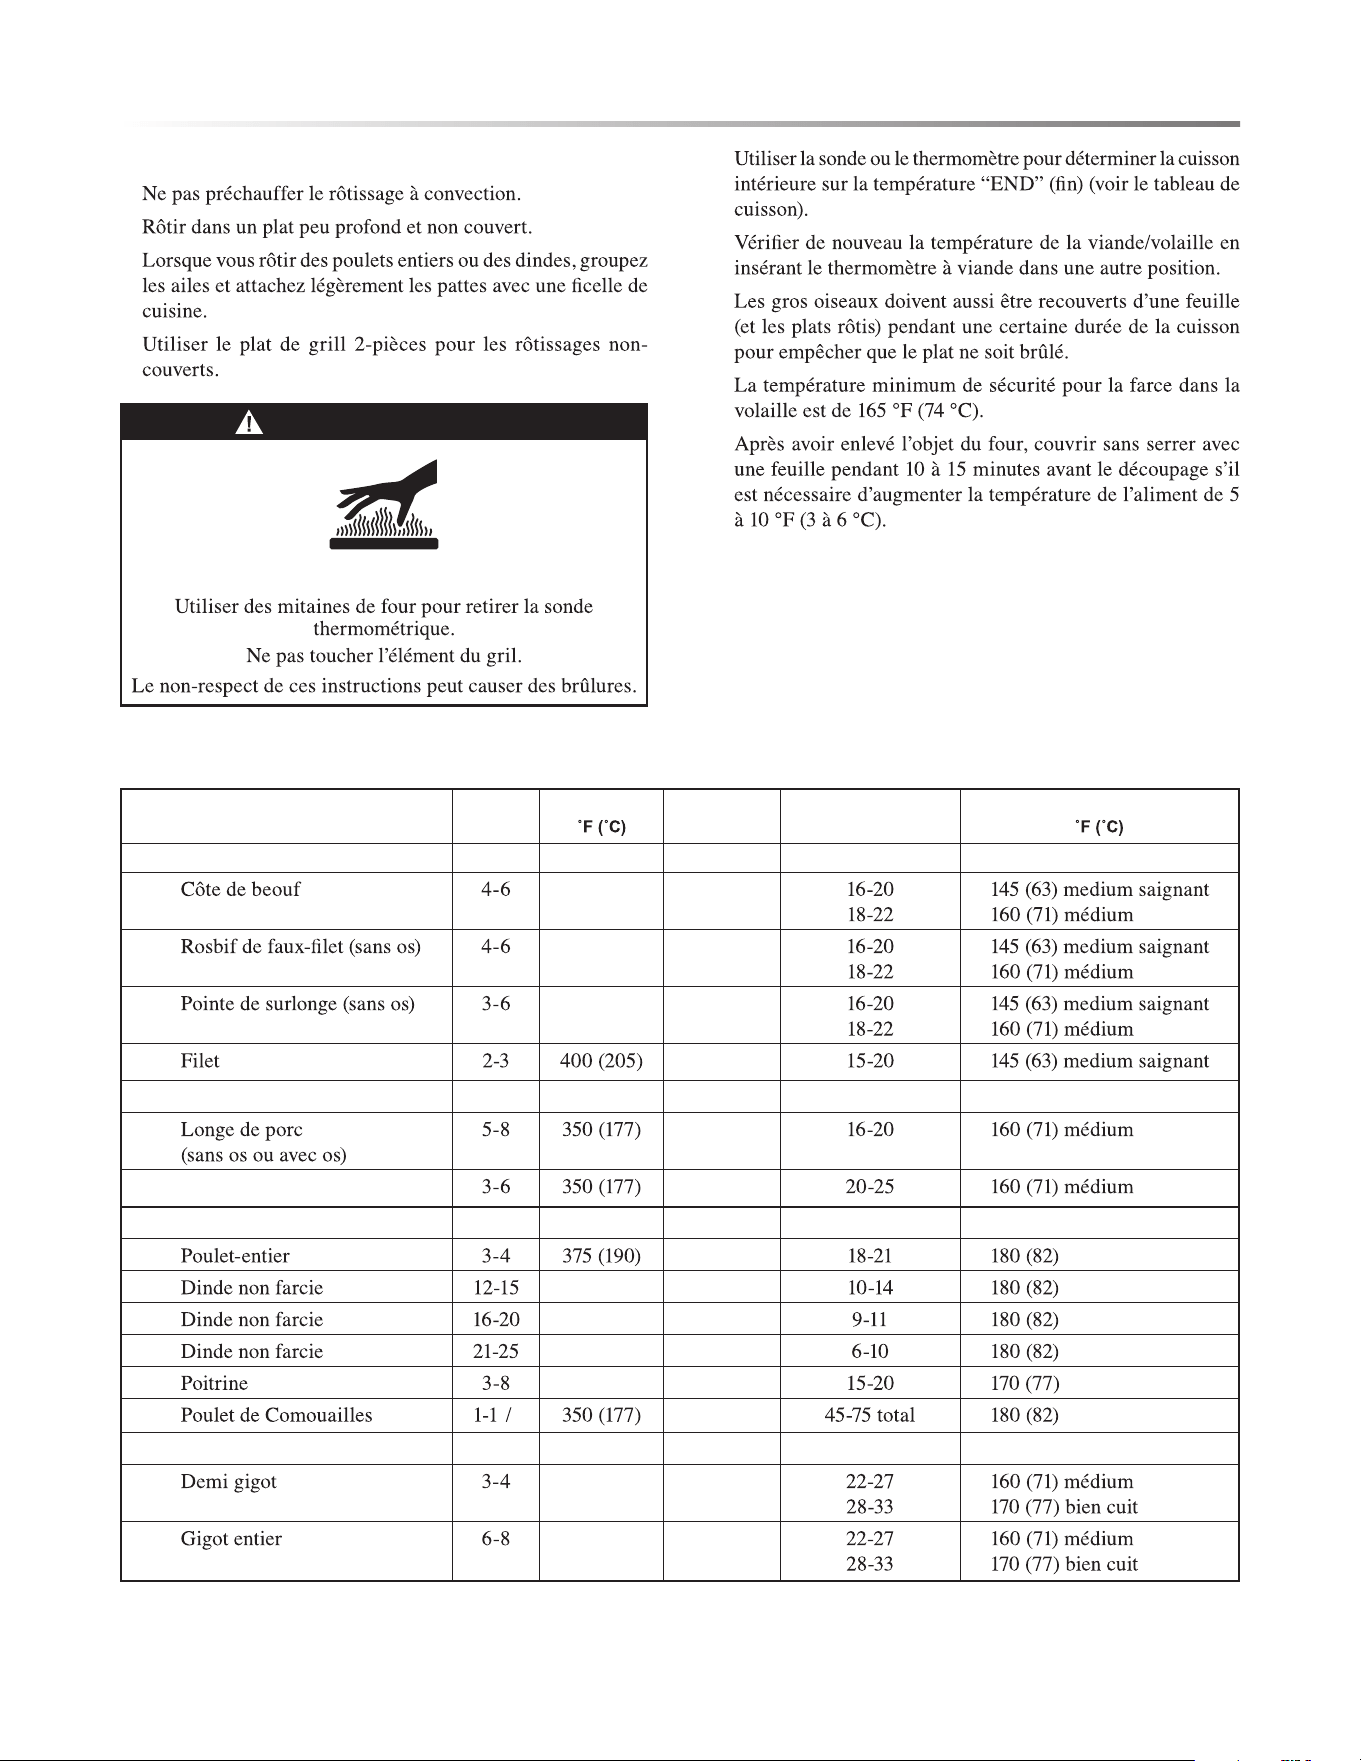
TABLEAU DE CONVECTION CUISSON
VIANDES
POIDS
(LB)
TEMP.FOUR POSITION
GRILLE
TEMPS RÔTISSAGE
(MIN. PER LB)
TEMP. INTERNE
Bœuf
•
325 (163) 2
• 325 (163) 2
• 325 (163) 2
• 2
Porc
•
2
• Épaule 2
Volaille
•
2
• 325 (163) 1
• 325 (163) 1
• 325 (163) 1
• 325 (163) 1
•
1
2 2
Agneau
•
325 (163) 2
• 325 (163) 1
UTILISATION DU FOUR
20F
UTILISATION DU FOUR
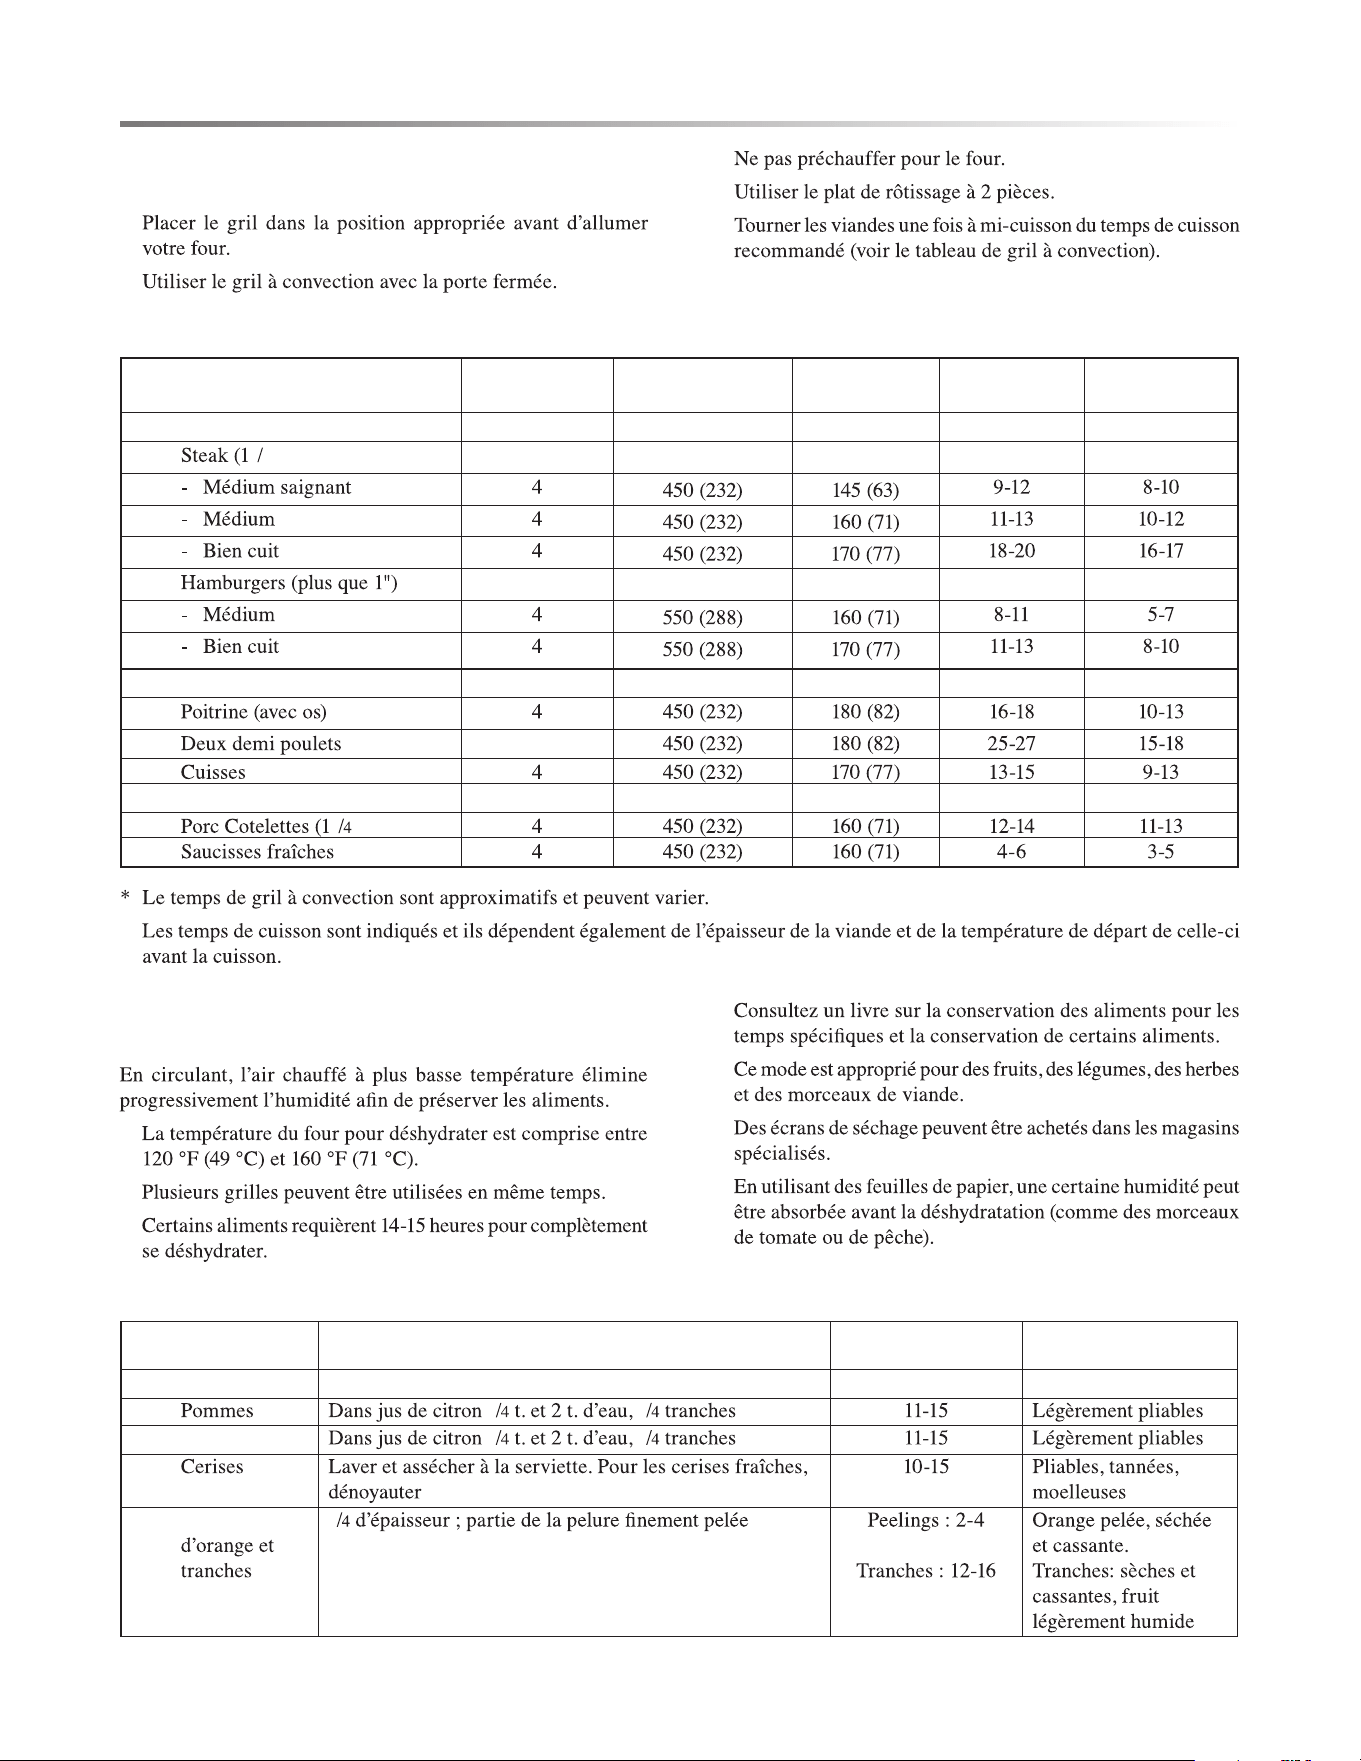
CONSEILS ET TECHNIQUES POUR LE
GRIL À CONVECTION
•
•
•
•
•
TABLEAU DE GRIL À CONVECTION
ALIMENTS ET ÉPAISSEUR
POSITION DE
GRILLE
RÉGLAGE DU GRIL
°F (°C)
TEMP. INTERNE
°F (°C)
TEMPS CÔTÉ 1
(MIN.)*
TEMPS CÔTÉ 2
(MIN.)*
Bœuf
•
1
2" ou plus)
•
Volaille
•
• 3
•
Porc
•
1
" ou plus)
•
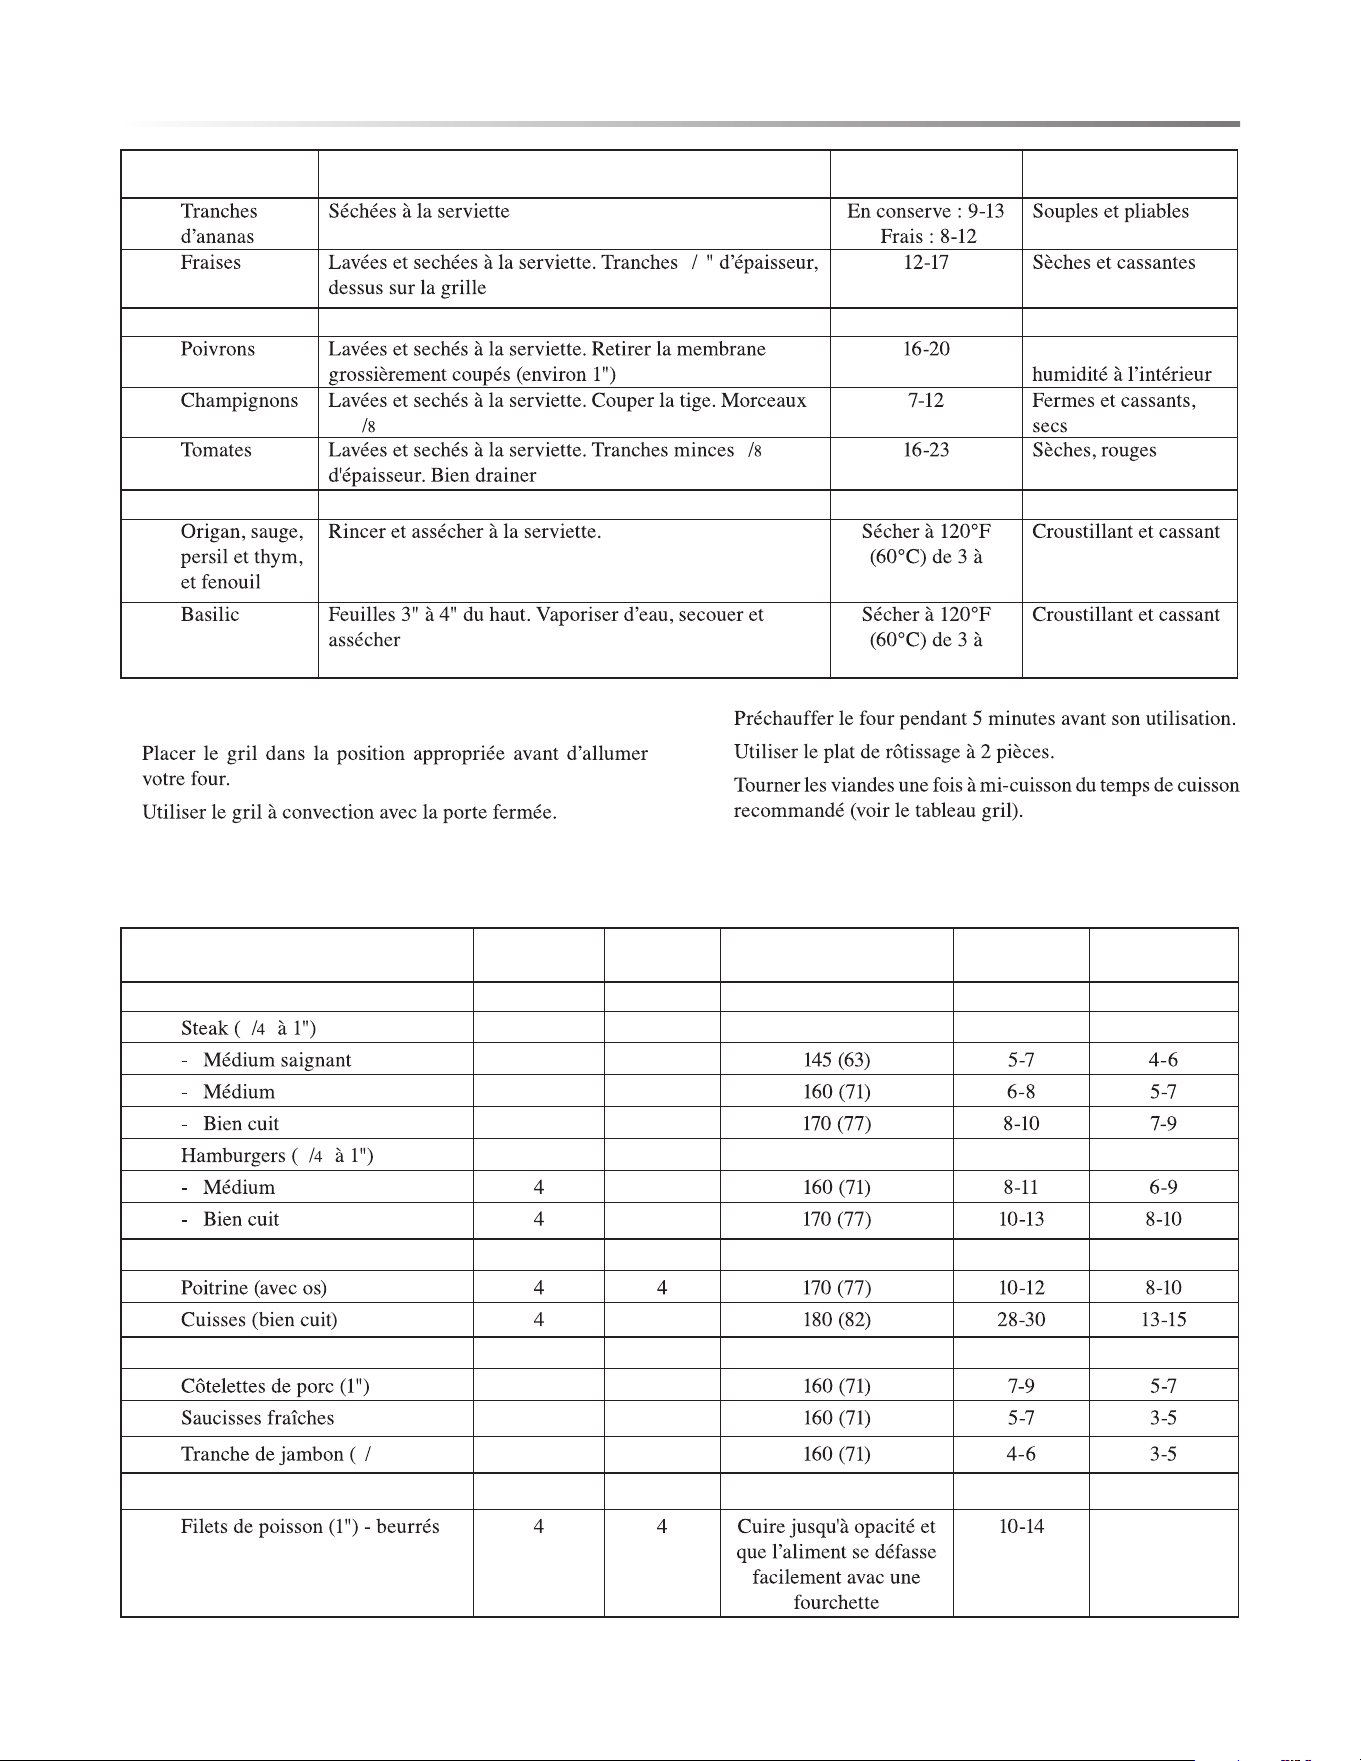
CONSEILS ET TECHNIQUES DE
DÉSHYDRATATION
•
•
•
•
•
•
•
TABLEAU DE GRILLADE À DÉSHYDRATATION
ALIMENT PRÉPARATION
TEMPS DE SÉCHAGE
APPROX.* (HEURES)
VÉRIFIER LA CUISSON
Fruit
•
1 1
• Bananes
1 1
•
• Pelures
1
F21
ALIMENT PRÉPARATION
TEMPS DE SÉCHAGE
APPROX.* (HEURES)
VÉRIFIER LA CUISSON
•
•
1
2
Légumes
•
Cassants sans
•
de
1
"
•
1
"
Fines herbes
•
5 heures
•
5 heures
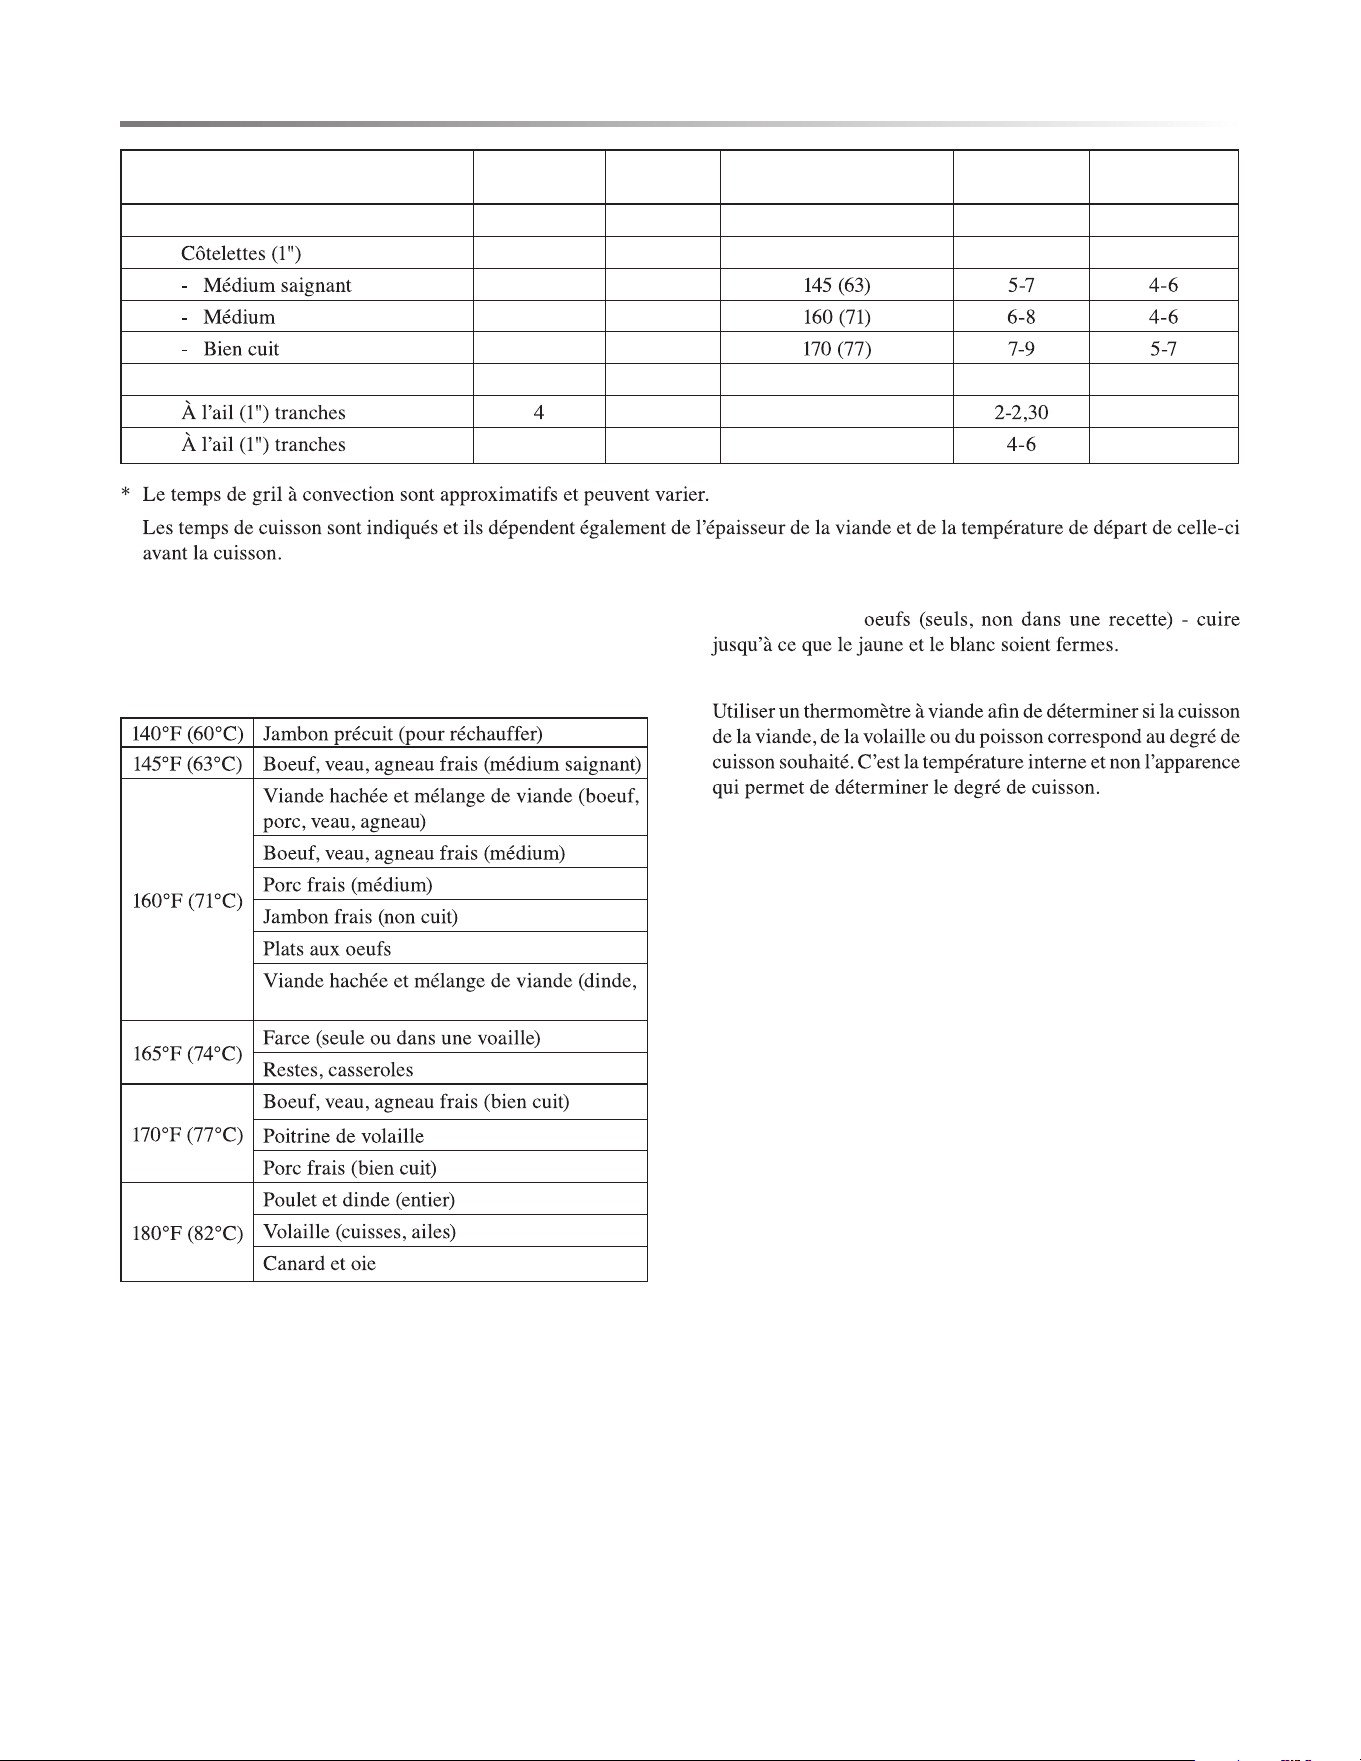
CONSEILS DE GRILL
•
•
•
•
•
TABLEAU DE GRILL
ALIMENTS ET ÉPAISSEUR
POSITION DE
GRILLE
RÉGLAGE
DU GRIL
ITEMP. INTERNE
°F (°C)
TEMPS CÔTÉ 1
(MIN.)*
TEMPS CÔTÉ 2
(MIN.)*
Boeuf
•
3
"
5 5
5 5
5 5
•
3
"
5
5
Volaille
•
• 3
Porc
•
5 5
• 5 5
•
1
2") 5 5
Fruits de mer
• Ne pas tourner
UTILISATION DU FOUR
22F
UTILISATION DU FOUR
GUIDE DE TEMPÉRATURE DE SERVICE
DE LA FSIS (SERVICE D’INSPECTION
ET SÉCURITÉ DES ALIMENTS USDA)
poulet)
REMARQUE :
Thermomètre à viande
ALIMENTS ET ÉPAISSEUR
POSITION DE
GRILLE
RÉGLAGE
DU GRIL
ITEMP. INTERNE
°F (°C)
TEMPS CÔTÉ 1
(MIN.)*
TEMPS CÔTÉ 2
(MIN.)*
Agneau
•
5 5
5 5
5 5
Pain
•
5
• 3 5
F23
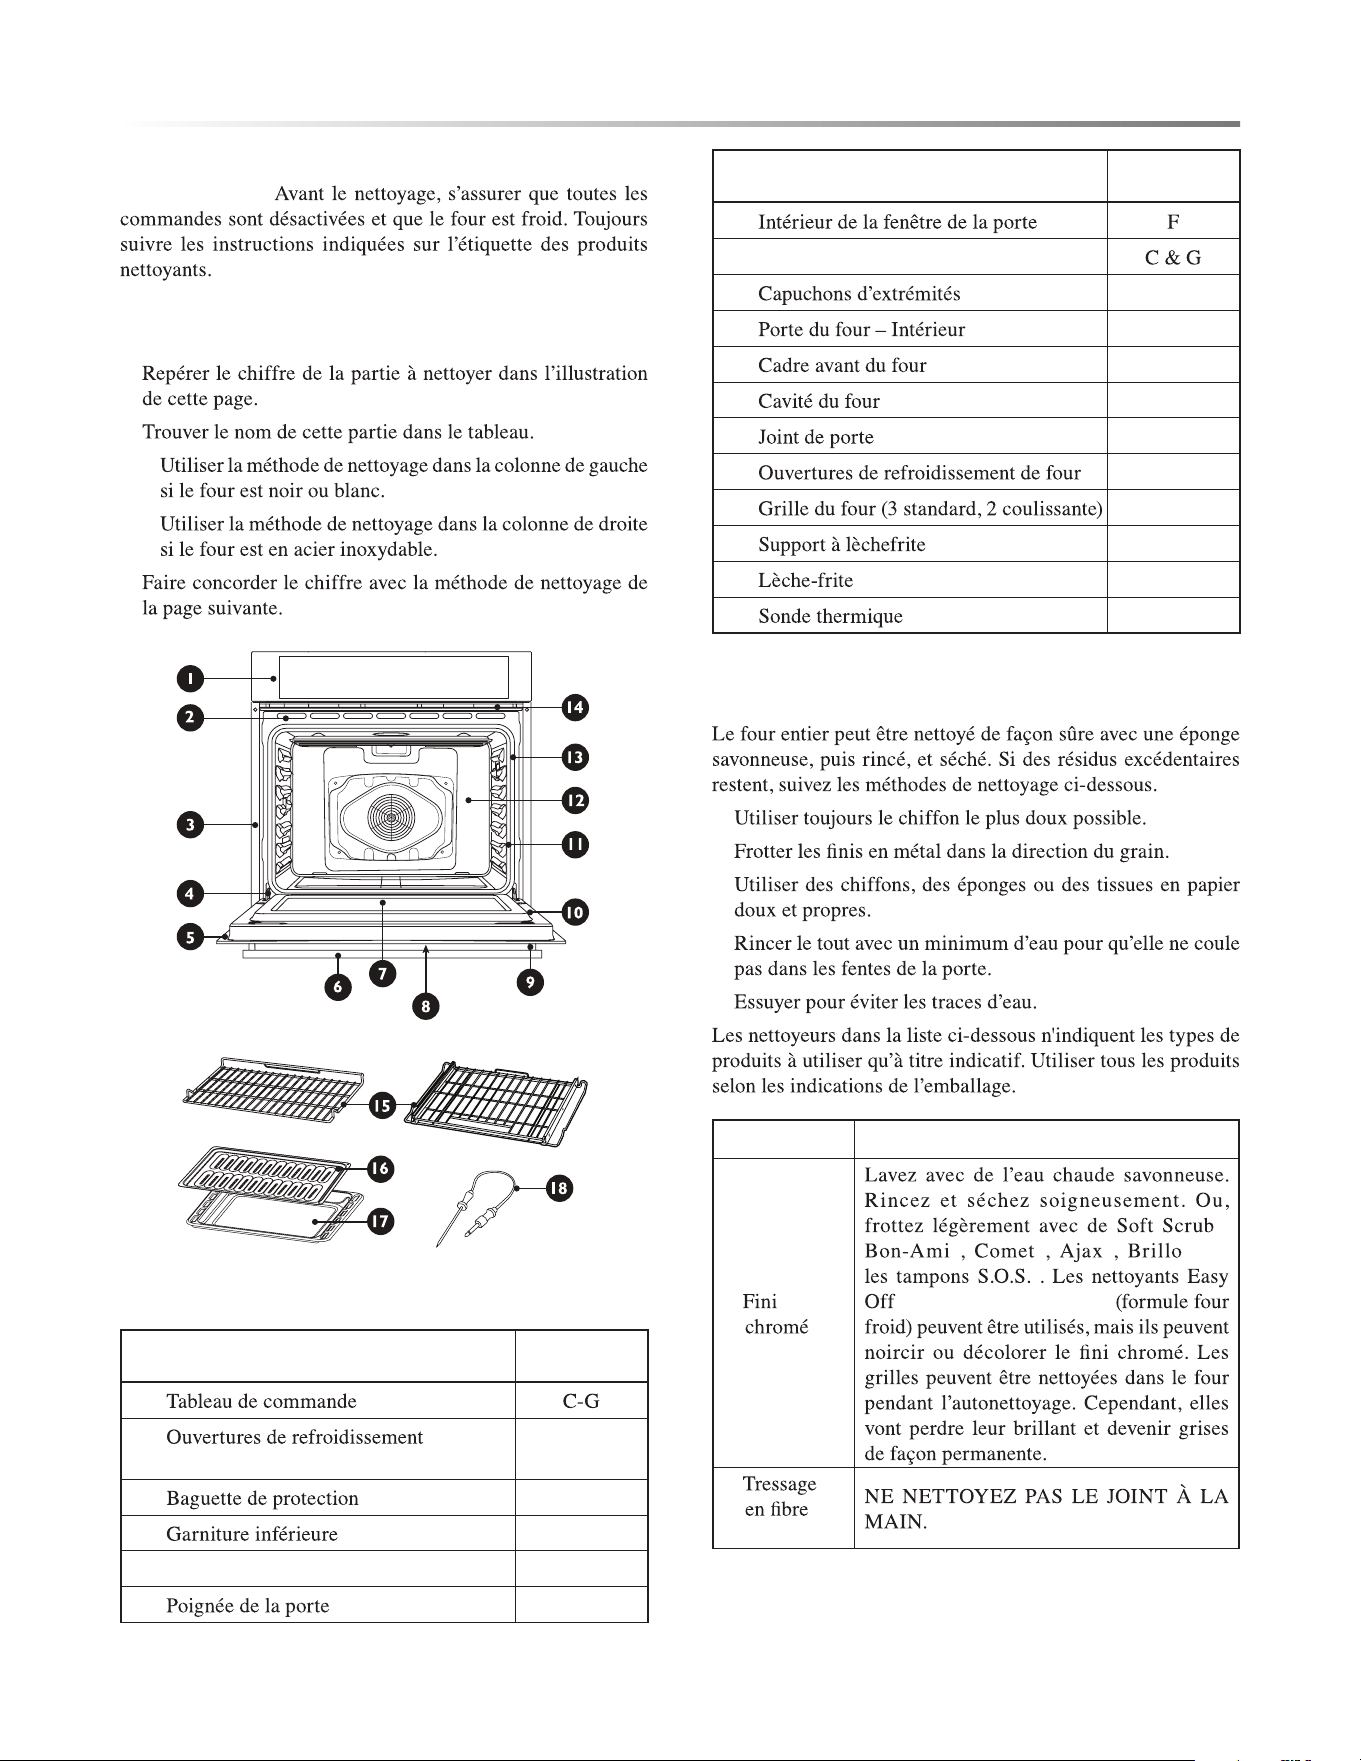
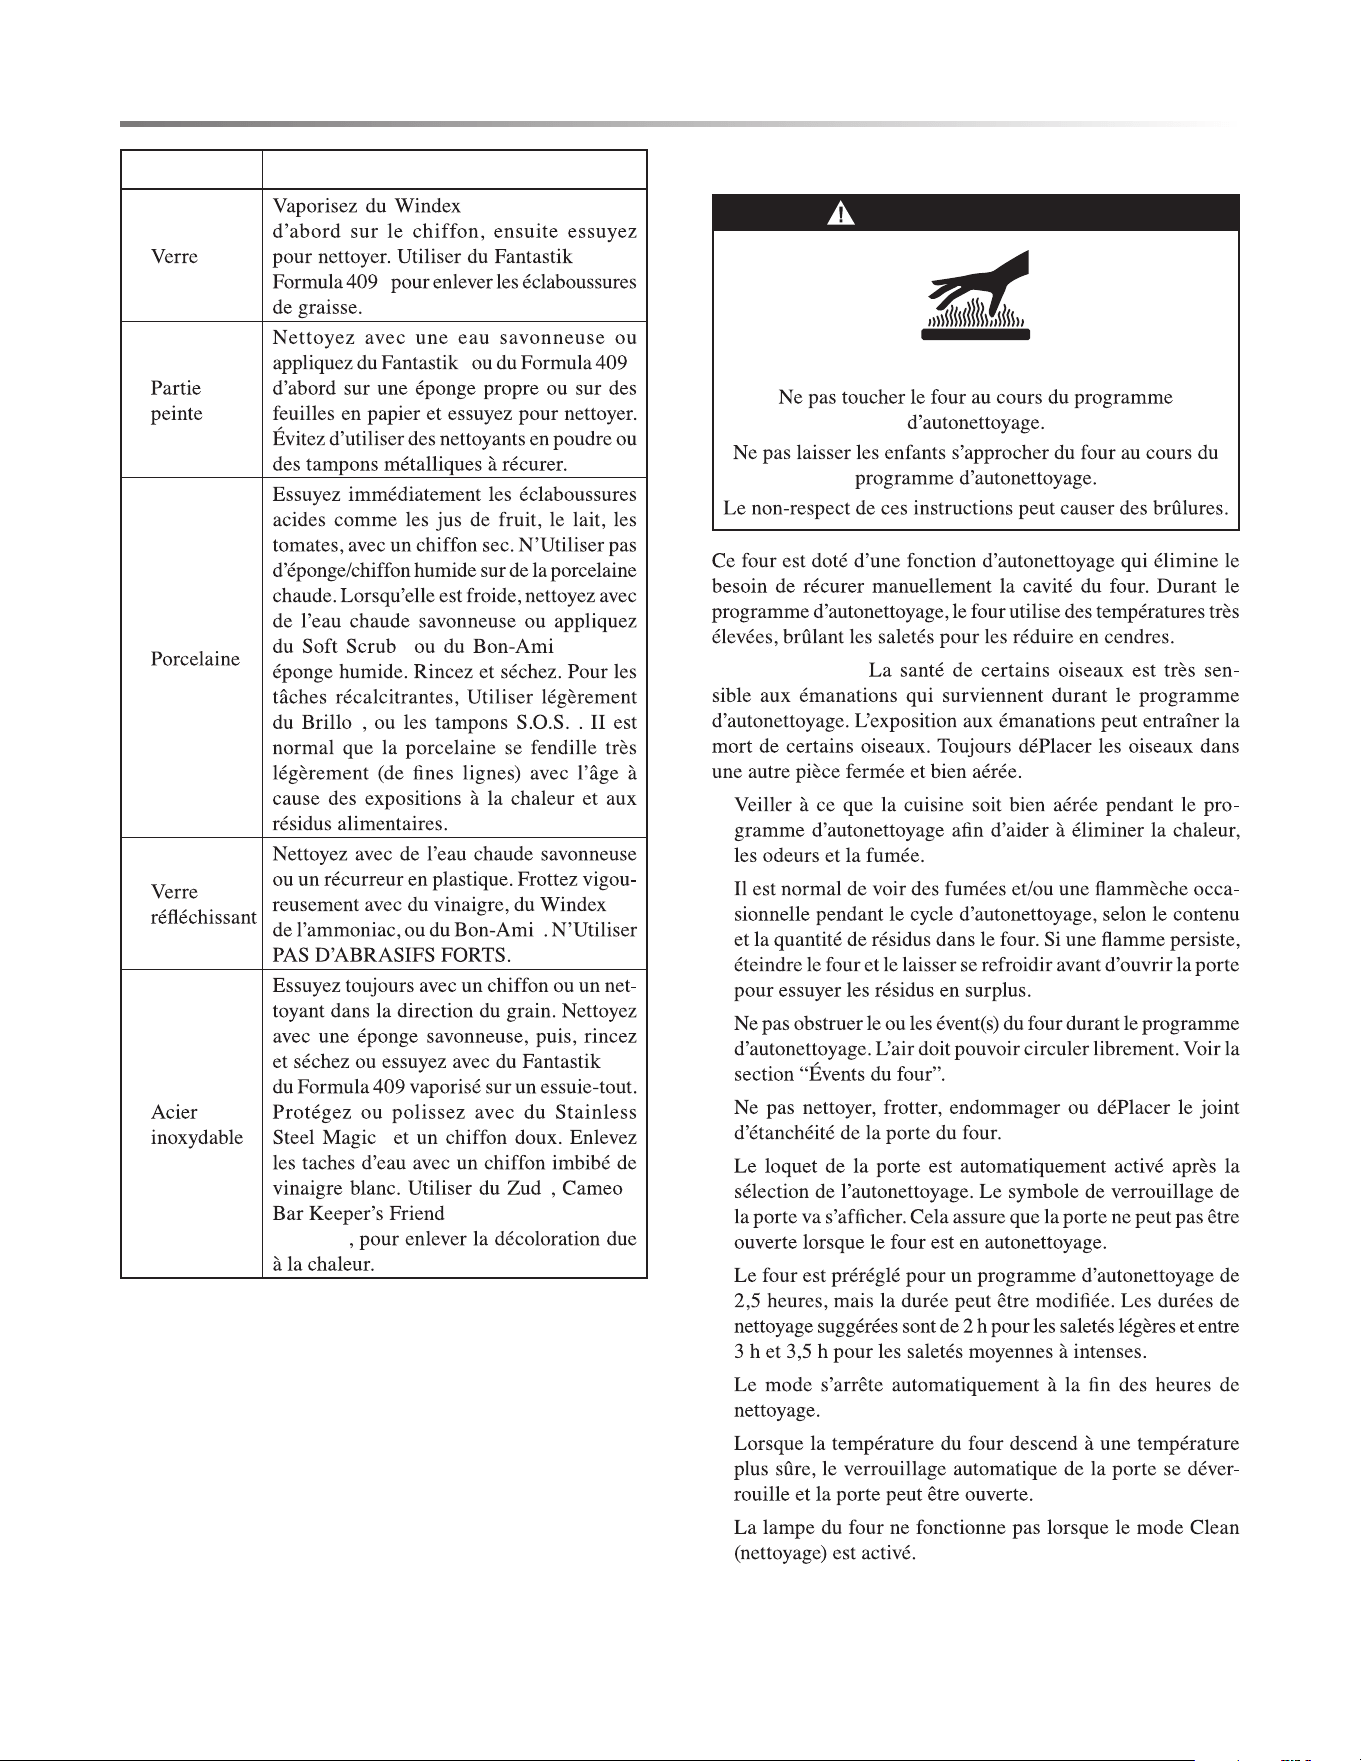
NETTOYAGE GÉNÉRAL
IMPORTANT :
COMMENT UTILISER LE TABLEAU DE
NETTOYAGE DU FOUR
1
2
•
•
3
FOUR EN ACIER INOXYDABLEA
PIÈCE
MÉTHODE DE
NETTOYAGE
1
2
de la porte
E
3 D
4 D
5 Cadre de la porte E
6 G
PIÈCE
MÉTHODE DE
NETTOYAGE
7
8 Devant de la porte
9 D
10 E
11 E
12 E
13 B
14 D
15 A
16 E
17 E
18 A
FINITIONS DU FOUR / MÉTHODES DE
NETTOYAGE
•
•
•
•
•
PIÈCE MÉTHODE DE NETTOYAGE
A
®
,
® ® ® ®
, ou
®
®
ou Dow aven Cleaners
®
B
de verre
ENTRETIEN DU FOUR
24F
ENTRETIEN DU FOUR
PIÈCE MÉTHODE DE NETTOYAGE
C
®
ou du Glass Plus
®
®
ou du
®
D
® ®
E
® ®
sur une
® ®
F
®
,
®
G
®
ou
®
® ®
,
®
ou RevereWare Steel
Cleaner
®
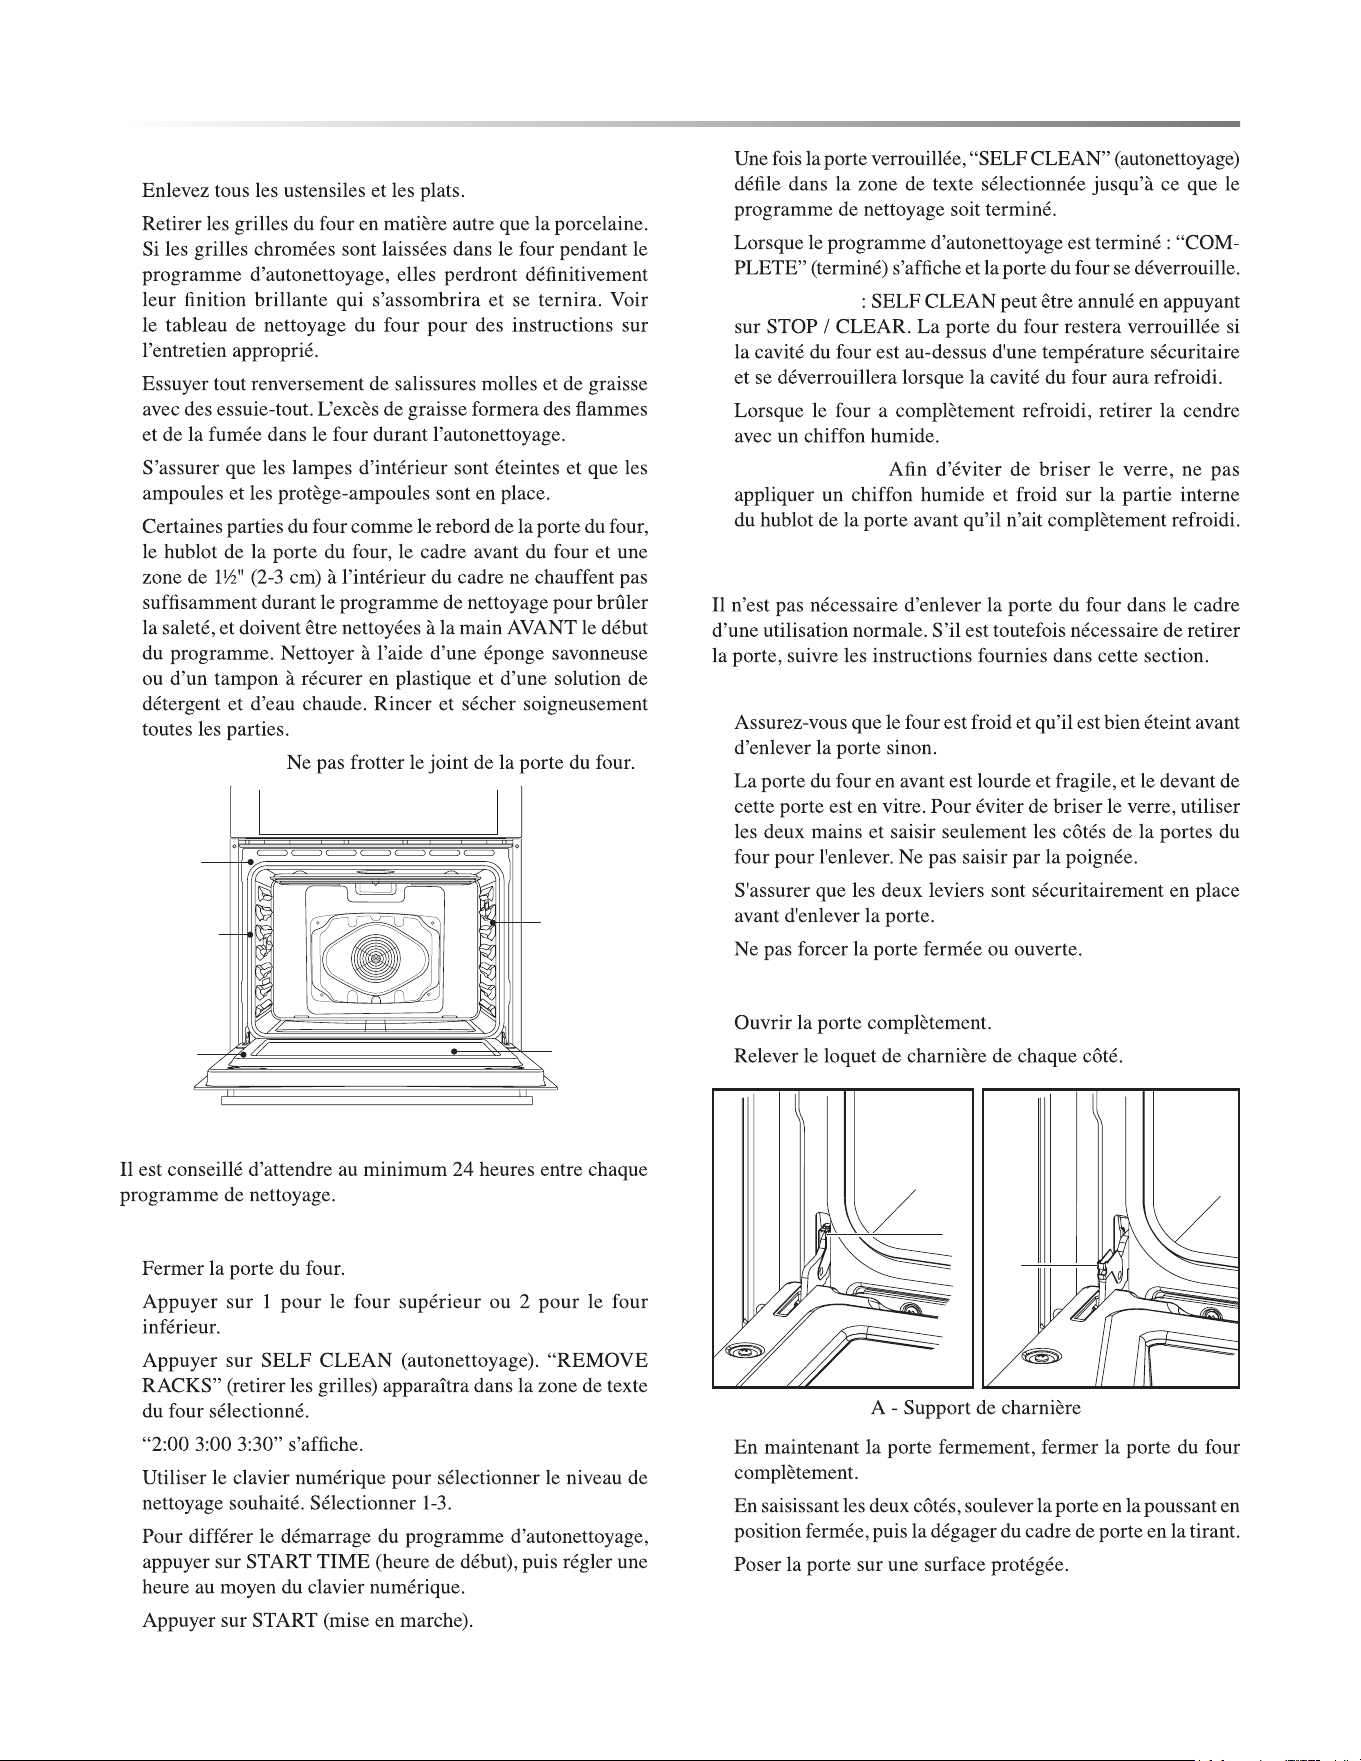
AUTONETTOYAGE AUTOMATIQUE
AVERTISSEMENT
RISQUE DE BRÛLURES
IMPORTANT :
•
•
•
•
•
•
•
•
•
F25
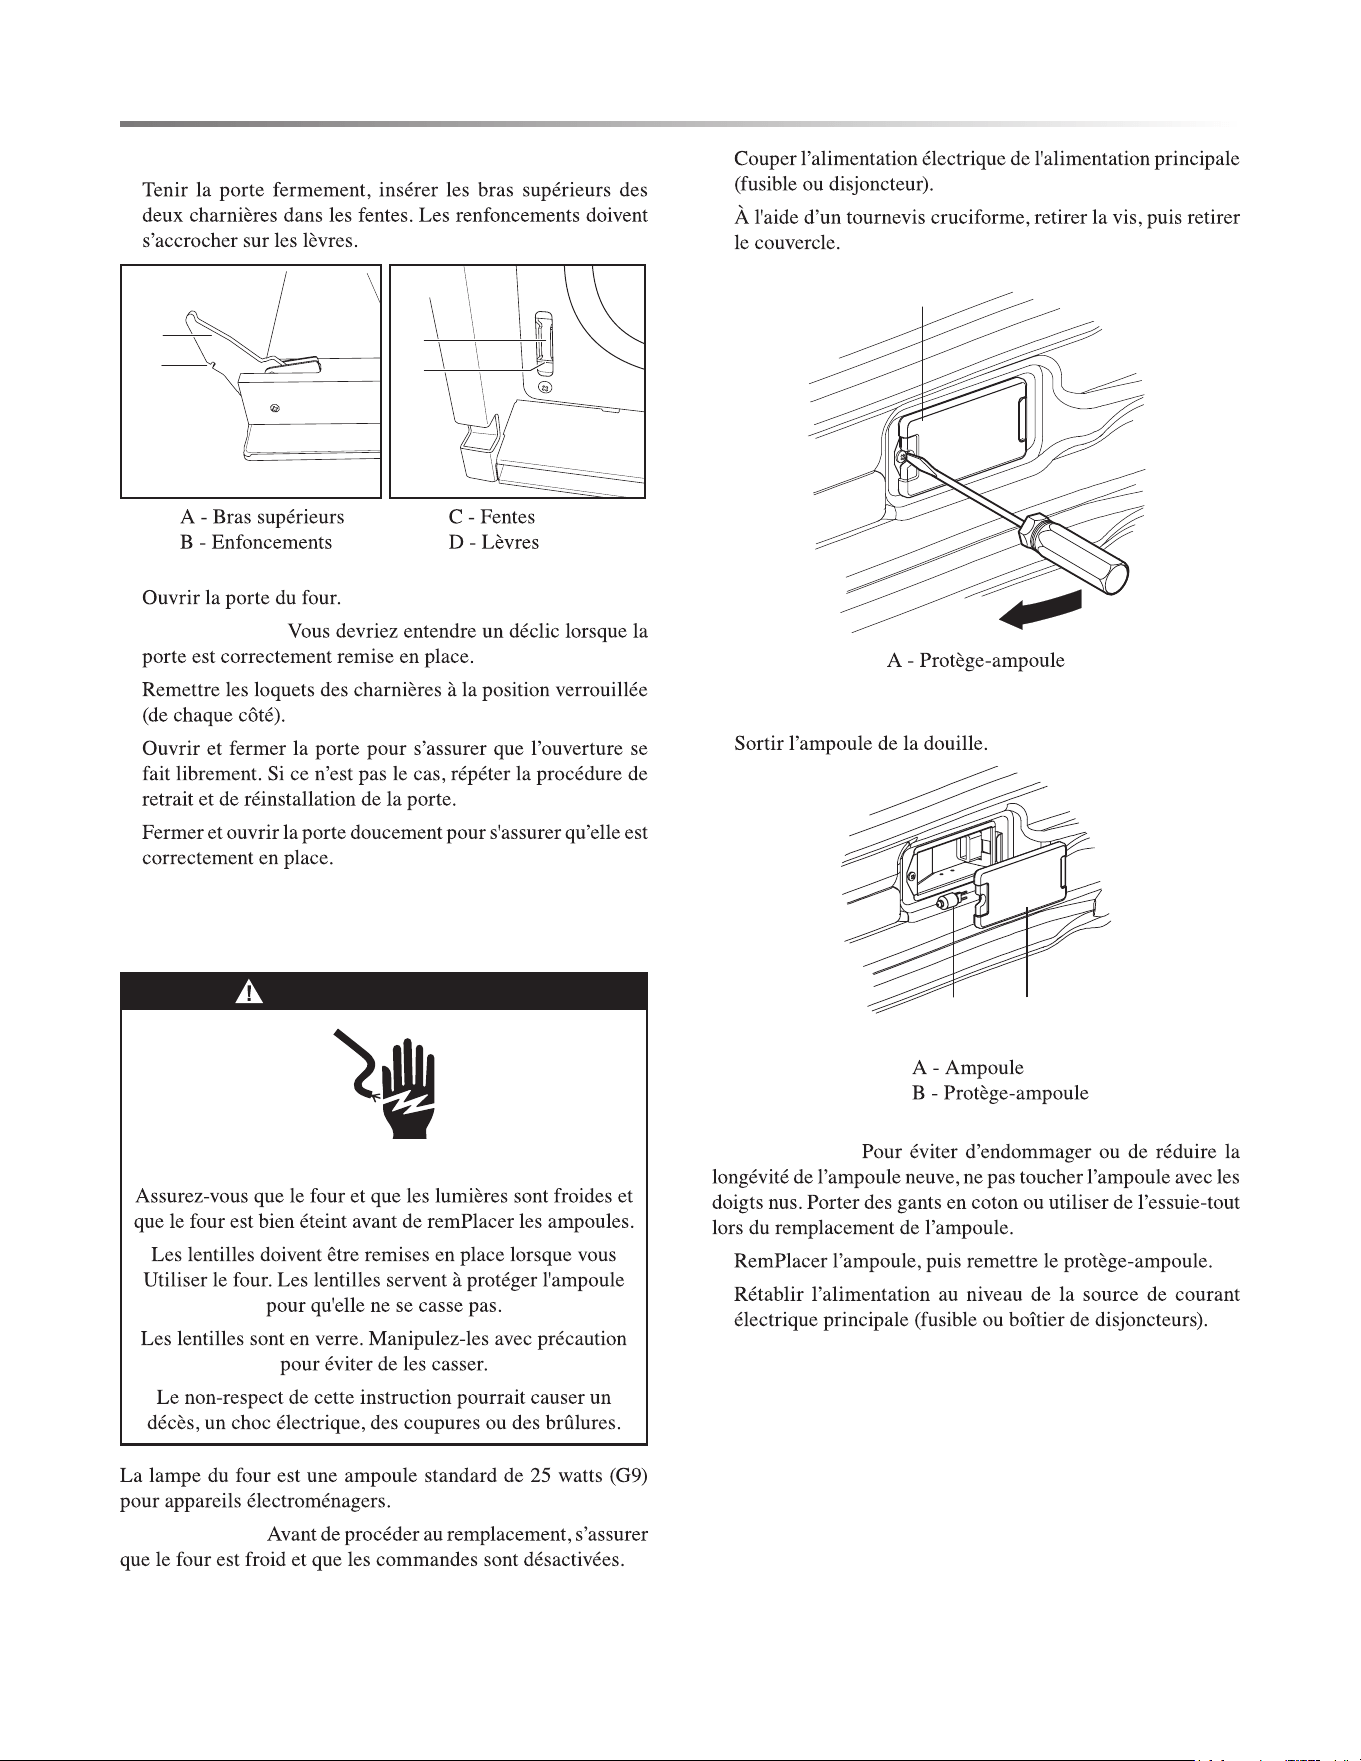
AVANT L’AUTONETTOYAGE
1
2
3
4
5
REMARQUE :
Nettoyez á
la main joint
extérieur
du cadre
Nettoyez á
1 po (2 cm)
des guides
de grille au
devant de la
cavité du four
Nettoyez á
la main la
fenêtre de
la porte
Ne nettoyez
pas le joint
á la main
Nettoyez
á la main
le joint
extérieur de
la porte
PROGRAMME D’AUTONETTOYAGE
AUTONETTOYAGE :
1
2
3
4
5
6
7
REMARQUE
8
REMARQUE :
RETRAIT DE LA PORTE DU FOUR
IMPORTANT :
•
•
•
•
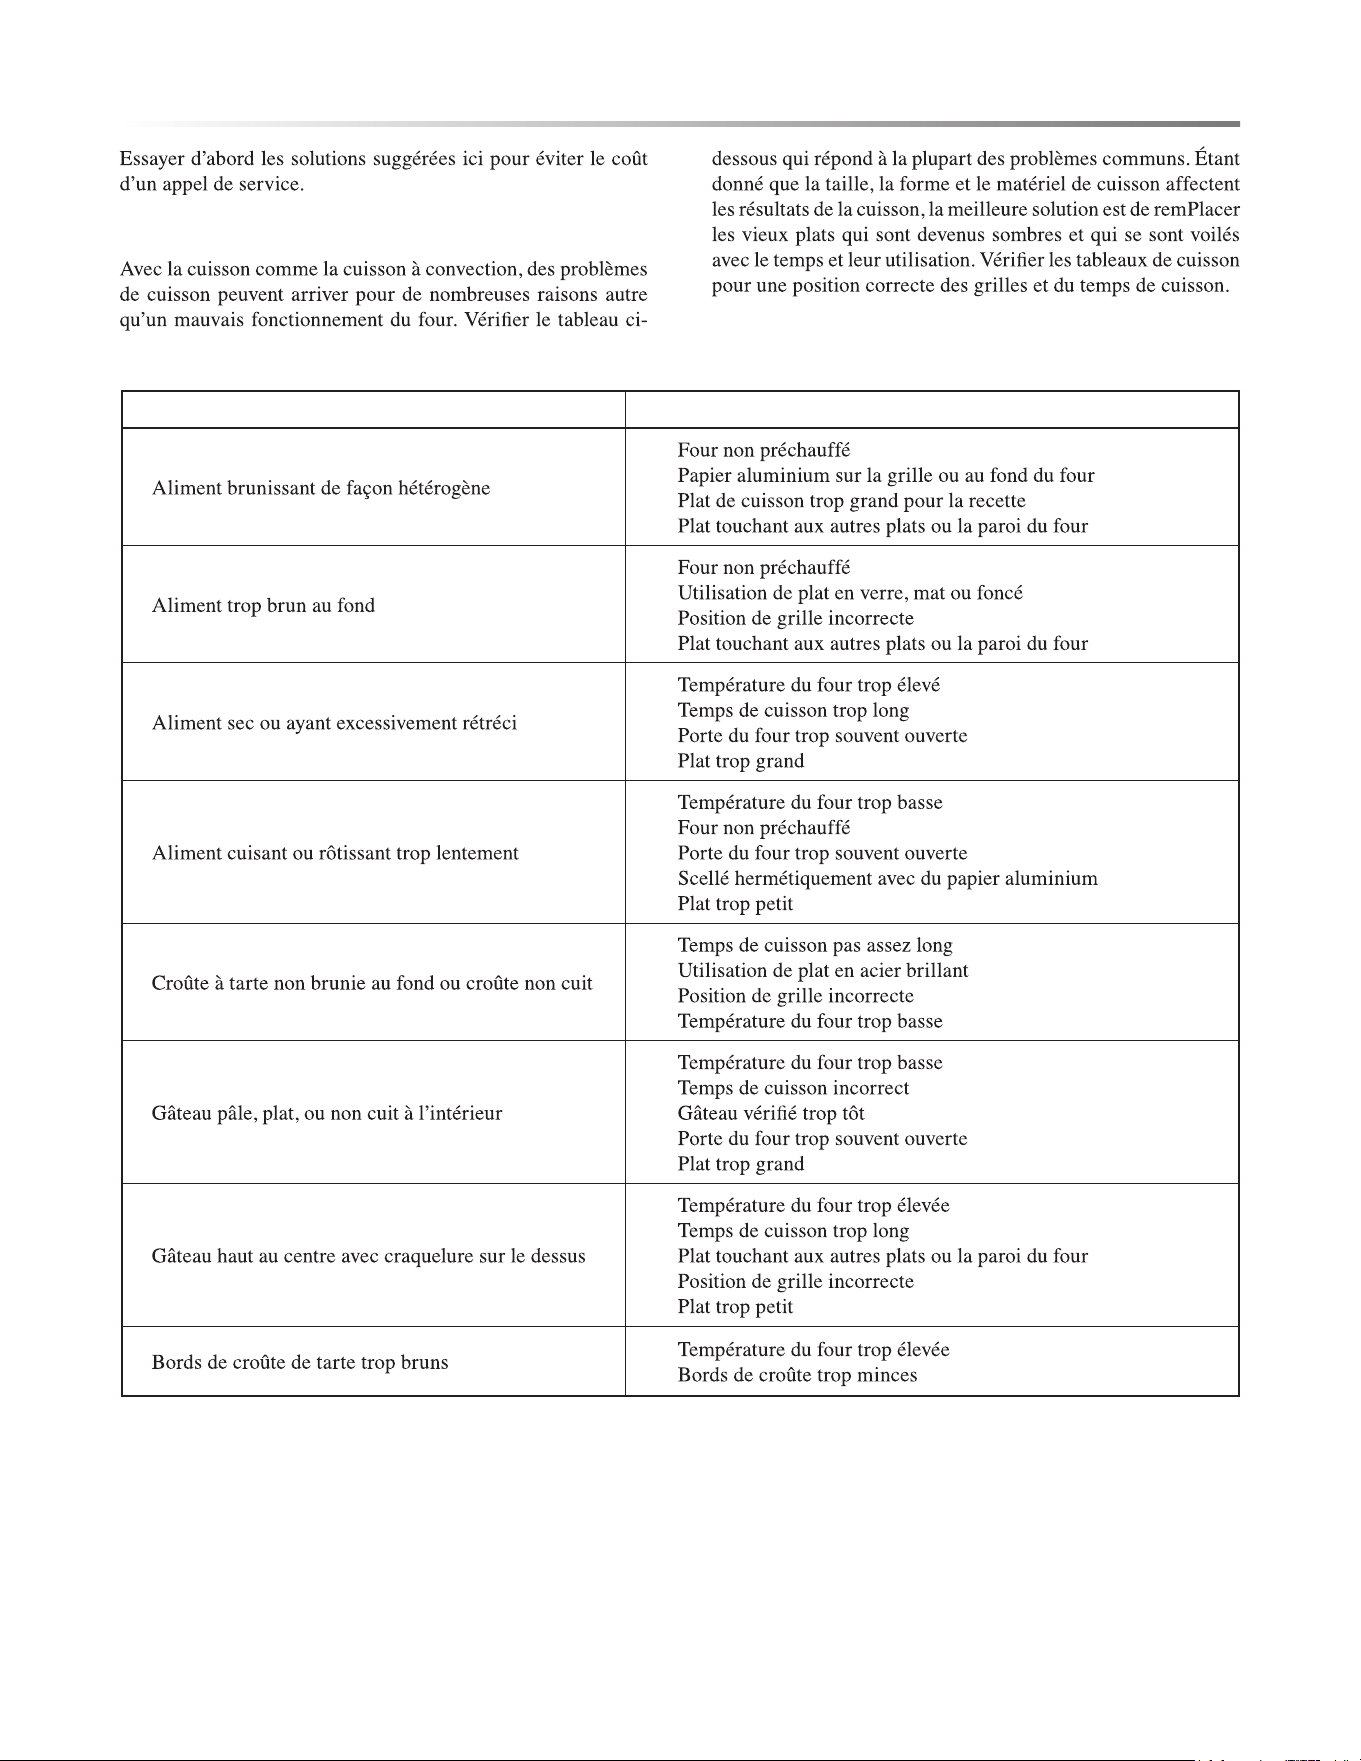
RETRAIT DE LA PORTE DU FOUR :
1
2
A
A
3
4
5
ENTRETIEN DU FOUR
26F
ENTRETIEN DU FOUR
RÉINSTALLATION DE LA PORTE DU FOUR :
1
C
D
A
B
2
REMARQUE :
3
4
5
REMPLACEMENT D’UNE AMPOULE DU
FOUR
AVERTISSEMENT
RISQUE DE CHOC ÉLECTRIQUE
IMPORTANT :
1
2
A
3
A B
REMARQUE :
4
5
F27
DÉPANNAGE
CUISSON ET RÔTISSAGE
PROBLÈME DE CUISSON CAUSE
•
•
•
•
•
•
•
•
•
•
•
•
•
•
•
•
•
•
•
•
•
•
•
•
•
•
•
•
•
•
•
•
•
28F
DÉPANNAGE
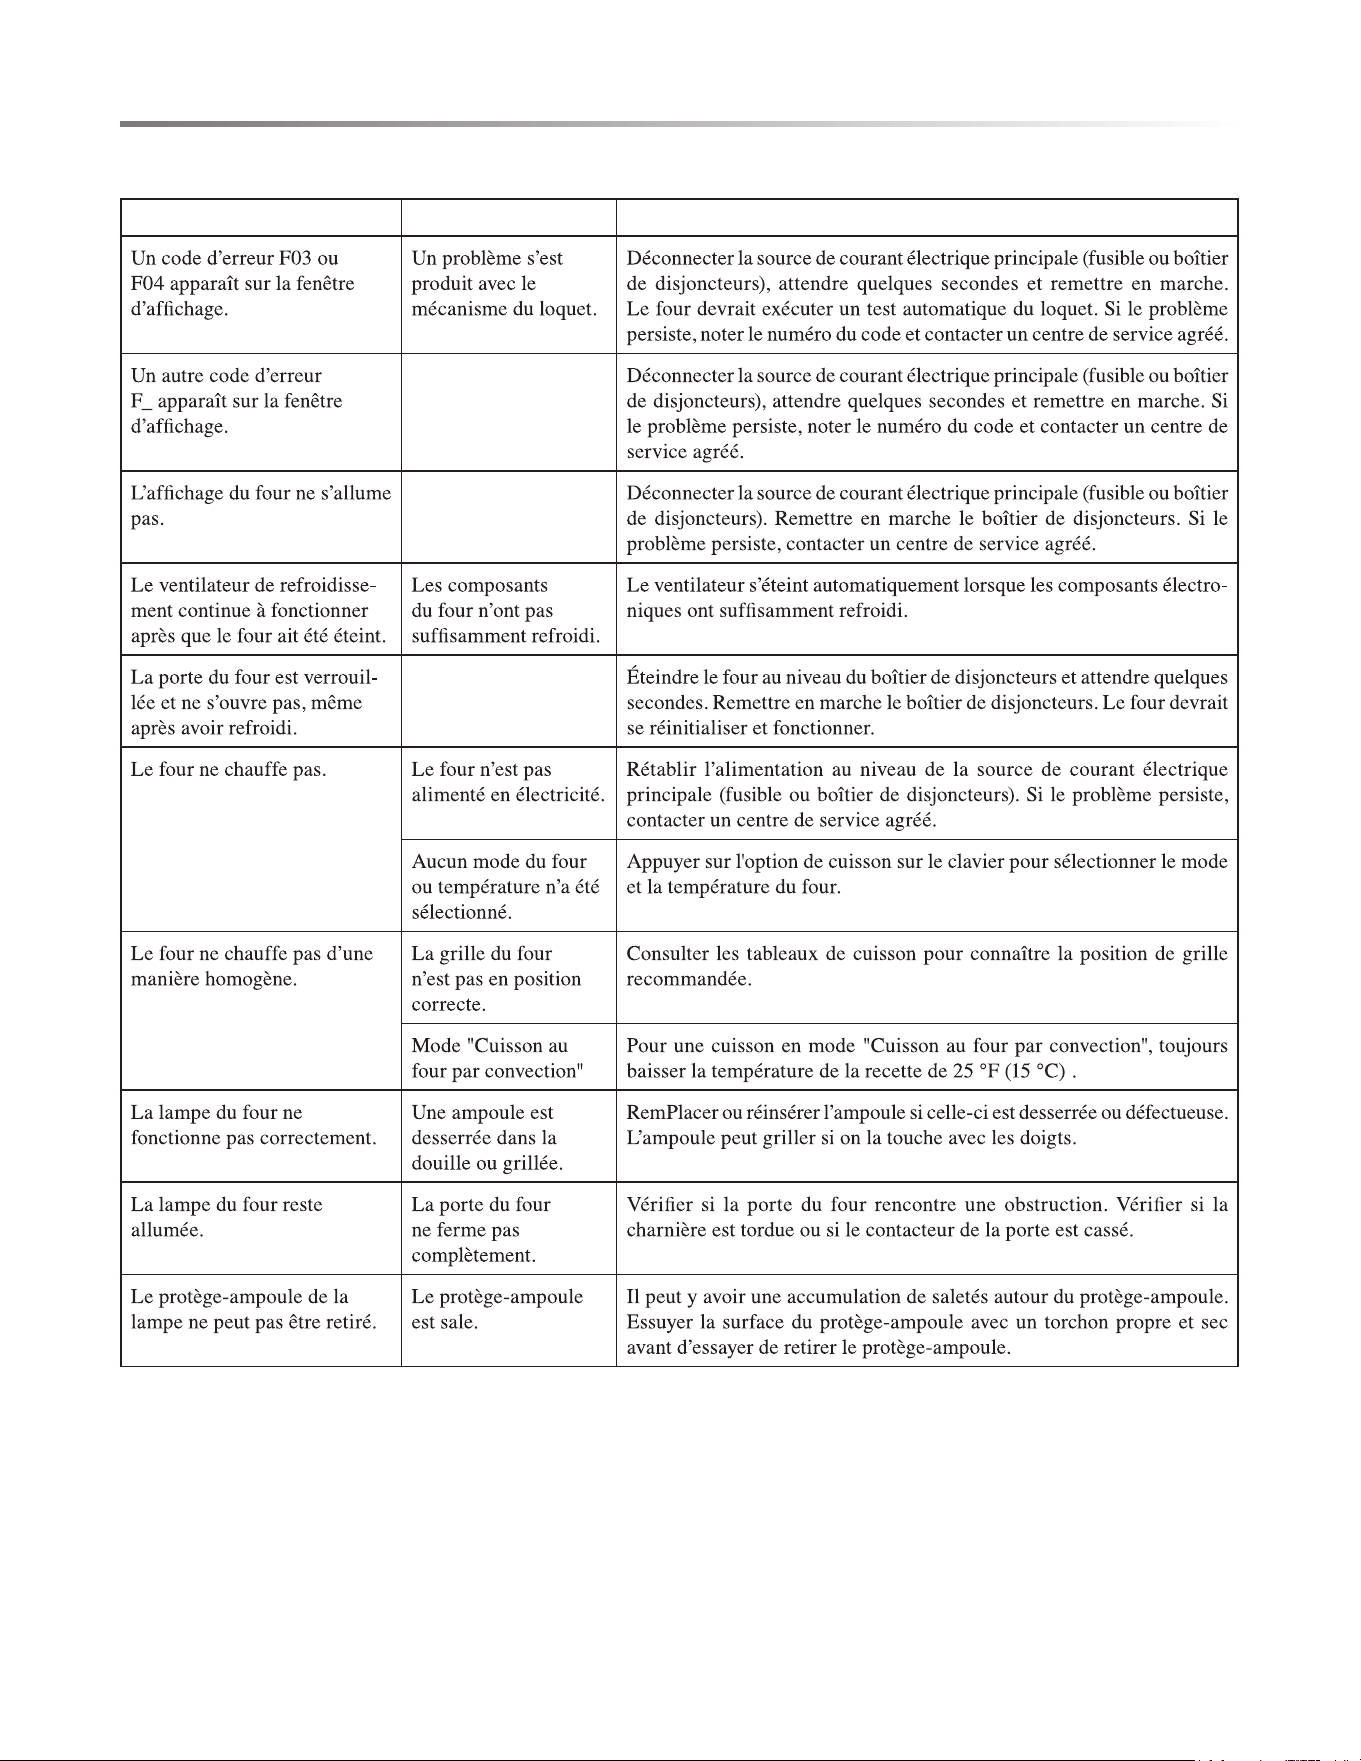
FONCTIONNEMENT
PROBLÈME CAUSE POSSIBLE SOLUTION

F29
PROBLÈME CAUSE POSSIBLE SOLUTION
DÉPANNAGE


FOR MORE DETAILS AND INFORMATION, PLEASE VISIT OUR WEBSITE WWW.KUCHT.COM
WE TRANSFORM A SIMPLE KITCHEN INTO A PRO ONE.
THIS IS WHY WE CARE ABOUT MAKING VERY HIGH PERFORMANCE
RANGES AND HOODS, TO MAKE YOU FEEL LIKE A PRO AND STYLISH COOKER.
DESIGN: LONDON DC - WWW.LONDON-DC.COM