Product At A Glance
Check List
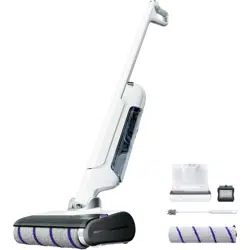
Main components
Accessories
Main unit ×1
(including roller brush ×1, filter ×1)
Adapter×1 Disinfection filter × 1
(Accessory)
Disinfection roller brush × 1
(Accessory)
Floor detergent×1
(Accessory)
Cleaning brush×1
(Accessory)
Handle ×1 Self-cleaning base×1
en
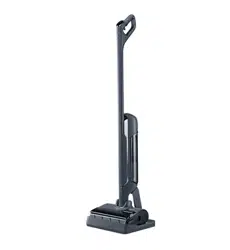
Main Parts
Vacuum Mop
LCD screen and buons
Trigger buon
Power On/O buon
Screen
Mode buon
Self-Cleaning buon
Handle
Detergent window
Heating plate
(DO NOT touch,
otherwise, you
may get burned)
Roller brush cover
Roller brush
Detergent dispenser
Clean water tank
(including silver
ion module)
Speaker
Dirty water tank,
Filter,
Solid waste box
Roller
Charging contacts
Power cord
Cable organizer
Power interface
Self-cleaning base
03

Product At A Glance
Check List
Main components
Accessories
Main unit ×1
(including roller brush ×1, filter ×1)
Adapter×1 Disinfection filter × 1
(Accessory)
Disinfection roller brush × 1
(Accessory)
Floor detergent×1
(Accessory)
Cleaning brush×1
(Accessory)
Handle ×1 Self-cleaning base×1
en
Main Parts
Vacuum Mop
LCD screen and buons
Trigger buon
Power On/O buon
Screen
Mode buon
Self-Cleaning buon
Handle
Detergent window
Heating plate
(DO NOT touch,
otherwise, you
may get burned)
Roller brush cover
Roller brush
Detergent dispenser
Clean water tank
(including silver
ion module)
Speaker
Dirty water tank,
Filter,
Solid waste box
Roller
Charging contacts
Power cord
Cable organizer
Power interface
Self-cleaning base
03

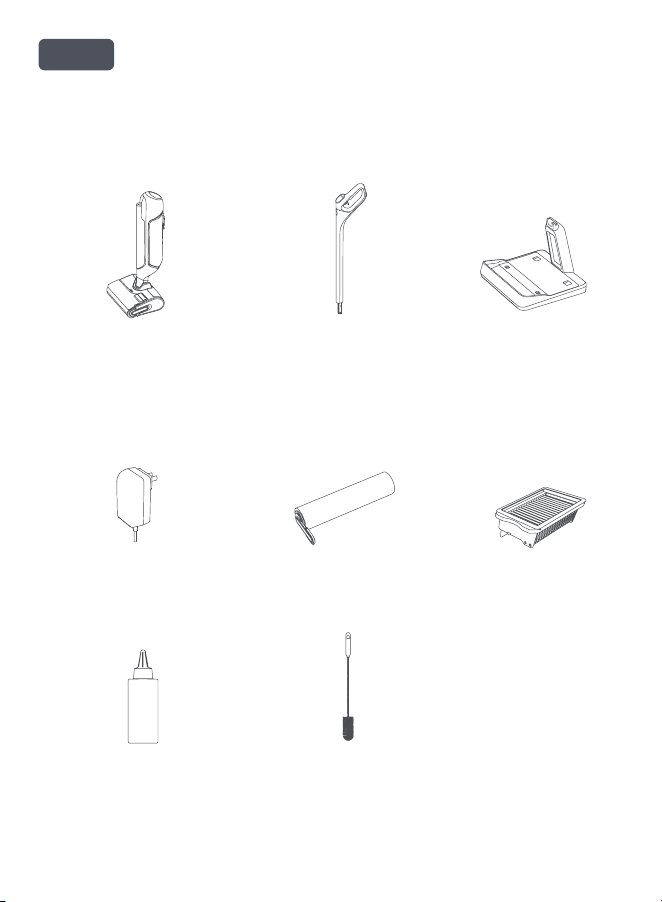
Insert the end of the handle vertically into the main unit until it clicks
into place. Make sure the handle is firm without loosening.
How to Use
First-Time Use
How to install the handle
How to remove:Please use a hard object to
insert into the hole on the side of the machine
and keep pressing while pulling up the handle
to remove it.
Click
After the self-cleaning base is connected to a power supply, put the vacuum mop on
the base. When it rings ding-dong, the screen shows the charging animation, and
charging starts.
How to charge the product
How to fill the clean water tank
1. Take out the clean water tank
3. Add detergent
Pull out the clean water tank to take it out.
•Slightly press the right buon to pull up the roller brush
cover.
•Please check the see-through window and add detergent
as needed when the color changes from orange to white.
Note: When the detergent is added, the window will only change to
orange when the vacuum works for a period of time (15-120s). This
is normal and the product performance remains unaected.
•Open the detergent dispenser.
2. Add clean water
Open the sealing cover and fill water from the tank opening.
Clean water
tank latch
•Pour detergent into the detergent dispenser (Please
use the detergent from Narwal, otherwise, the device
may be damaged). The detergent is full when at the MAX
level. A full dispenser can last around 40 days (approx.
20 tanks of water).
Note: There detergent has a sealing film. Please unscrew the
cap and remove it.
When cleaning the floor
During self-cleaning or iron drying
When cleaning the floor
During self-cleaning or charging
with the screen on
During charging with the screen on
When cleaning the floor
Trigger buon
(Below the handle)
Status
Power On/
O buon
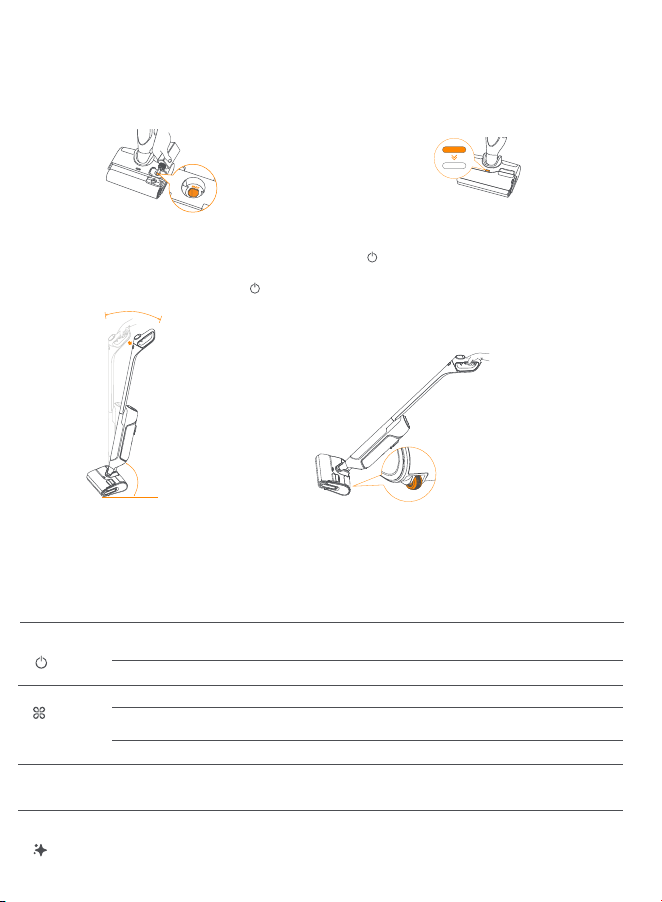
Gently press the
handle to pull it
(Unlocked when the angle is <90°)
UnlockLock
Mode buon
Self-Cleaning
buon
Action Function
Instructions for Use
Buon functions
*Note: When the vacuum mop is on the base and the screen is dark, you can press any buon to wake up the screen.
When the machine is locked (the handle being
upright), you can recline it to set the rollers
under the clean water tank on the floor. Then
you can push or pull it back to the cleaning base
like handling a suitcase.
Remove the machine from the self-cleaning base. Short press the Power On/O buon and then follow the voice
prompts to slightly press and recline the handle to start cleaning (locked when the handle is upright). You can also
recline the handle and then short press the Power On/O buon to use the machine.
How to unlock and start the machine
Short press: start self-cleaning and ironing&drying (ironing&
drying will start after self-cleaning is completed)
Press and hold for 2s: start self-cleaning only
During charging with the screen on
Short press: power on/pause
Press and hold for 2s: power o
Short press: end the current task
Short press: switch the mode (Smart/Turbo/Quiet/Suction)
Short press: start iron drying only
Press and hold for 2s: Switch volume (high/low/mute)
Press and hold: start MAX enhancement; release to end MAX
enhancement
Double tap: turn on/o auto detergent filling
04
Insert the end of the handle vertically into the main unit until it clicks
into place. Make sure the handle is firm without loosening.
How to Use
First-Time Use
How to install the handle
How to remove:Please use a hard object to
insert into the hole on the side of the machine
and keep pressing while pulling up the handle
to remove it.
Click
After the self-cleaning base is connected to a power supply, put the vacuum mop on
the base. When it rings ding-dong, the screen shows the charging animation, and
charging starts.
How to charge the product
How to fill the clean water tank
1. Take out the clean water tank
3. Add detergent
Pull out the clean water tank to take it out.
•Slightly press the right buon to pull up the roller brush
cover.
•Please check the see-through window and add detergent
as needed when the color changes from orange to white.
Note: When the detergent is added, the window will only change to
orange when the vacuum works for a period of time (15-120s). This
is normal and the product performance remains unaected.
•Open the detergent dispenser.
2. Add clean water
Open the sealing cover and fill water from the tank opening.
Clean water
tank latch
•Pour detergent into the detergent dispenser (Please
use the detergent from Narwal, otherwise, the device
may be damaged). The detergent is full when at the MAX
level. A full dispenser can last around 40 days (approx.
20 tanks of water).
Note: There detergent has a sealing film. Please unscrew the
cap and remove it.
When cleaning the floor
During self-cleaning or iron drying
When cleaning the floor
During self-cleaning or charging
with the screen on
During charging with the screen on
When cleaning the floor
Trigger buon
(Below the handle)
Status
Power On/
O buon
Gently press the
handle to pull it
(Unlocked when the angle is <90°)
UnlockLock
Mode buon
Self-Cleaning
buon
Action Function
Instructions for Use
Buon functions
*Note: When the vacuum mop is on the base and the screen is dark, you can press any buon to wake up the screen.
When the machine is locked (the handle being
upright), you can recline it to set the rollers
under the clean water tank on the floor. Then
you can push or pull it back to the cleaning base
like handling a suitcase.
Remove the machine from the self-cleaning base. Short press the Power On/O buon and then follow the voice
prompts to slightly press and recline the handle to start cleaning (locked when the handle is upright). You can also
recline the handle and then short press the Power On/O buon to use the machine.
How to unlock and start the machine
Short press: start self-cleaning and ironing&drying (ironing&
drying will start after self-cleaning is completed)
Press and hold for 2s: start self-cleaning only
During charging with the screen on
Short press: power on/pause
Press and hold for 2s: power o
Short press: end the current task
Short press: switch the mode (Smart/Turbo/Quiet/Suction)
Short press: start iron drying only
Press and hold for 2s: Switch volume (high/low/mute)
Press and hold: start MAX enhancement; release to end MAX
enhancement
Double tap: turn on/o auto detergent filling
04

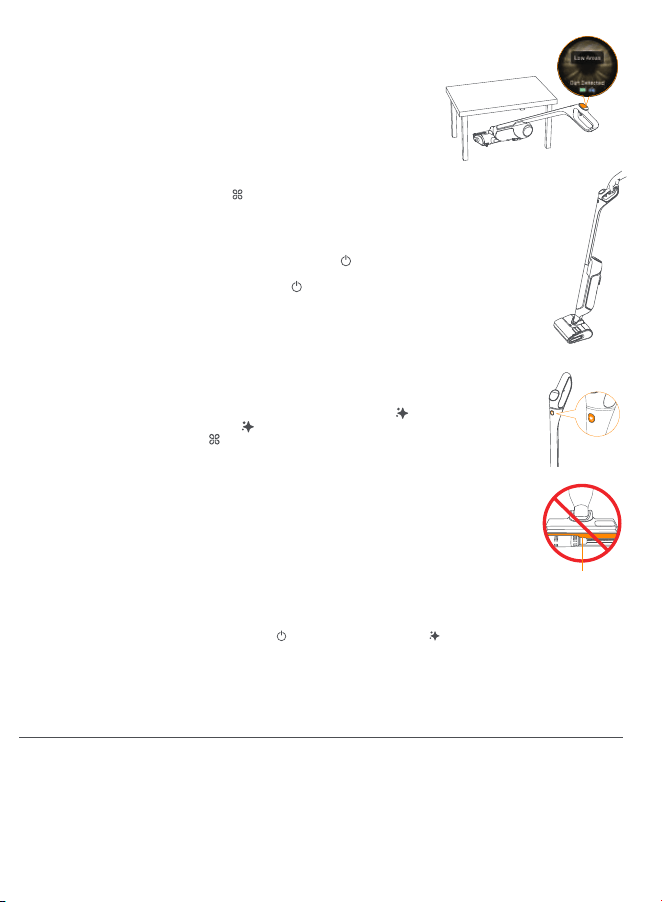
About the screen
Smart dirt level display
Dirt detected: The washer will detect the floor dirt
level in real time. When the floor or the roller brusher
is found to be dirty and the screen animation shows a
yellow background, and you are recommended to clean
the current location repeatedly. If the background remains
yellow when the floor is already clean, you should start
self-cleaning.
High dirt level: When the floor or the roller brush is found
to be dirty and the screen animation shows a red background,
and you are recommended to switch to Turbo Mode to clean
the current location. If the background remains red when the
floor is already clean, you should start self-cleaning as
prompted or manually clean the pipe and the roller brush.
Smart Mode: Auto adaption to a variety of dirty surfaces
powered by smart detection of floor dirt level and smart
adjustment of suction power, clear water volume, and other
indicators.
Suction Mode: Used to remove water buildup on the floor.
Turbo Mode: Tailored for stubborn stains through increased
water and suction power.
MAX Enhancement: The most powerful cleaning performance
to tackle extremely stubborn stains.
Quiet Mode: Suitable for relatively clean floors to deliver
a noise-free experience and secure a longer baery life
to clean more floors.
Washer Mode
Shows the cleaning mode/dirt level
Remaining baery power
Current cleaning mode
Auto detergent filling
Dirty water tank
Filter
Roller brush cover
Rroller brush
Pipe
Clean after every use
Clean after every use and replace every 3-6 months
Clean regularly on demand
Clean regularly on demand and replace every 3-6 months
The vacuum mop can intelligently detect the roller brush wearing and
reminds the user to replace it timely
Clean regularly on demand
Cleaning and Maintenance
Suggested Maintenance Cycle
Main Part
Vacuum Mop
Part Suggested maintenance cycle
End self-cleaning and iron drying
To end self-cleaning or iron drying, short press the Power On/O buon or the Self-Cleaning buon.
About self-cleaning and drying
•When self-cleaning starts, the vacuum mop will intelligently select the right cleaning strategy based
on the dirt level, including high-temperature roller brush disinfection and cleaning, pipe disinfection
and cleaning, and intensive disinfection.
•When iron drying starts, the vacuum mop will iron dry the roller brush and hot-air dry the pipe and filter by default.
Note: Self-cleaning intelligently lasts for 3-5 minutes depending on the dirt level and clean water volume.
Note: Iron drying lasts for at least 30 minutes, and the vacuum intelligently adjusts the time based on the roller
brush humidity and wearing.
Warning: DO NOT touch the heating plate during or shortly after iron dying, otherwise, you may get burned.
Heating plate
Self-cleaning and Iron Drying
Start self-cleaning and iron drying
Please put the vacuum mop back onto the self-cleaning base for self-cleaning and iron drying.
•To start self-cleaning and drying at the same time, please short press the Self-Cleaning buon;
•To start self-cleaning only, press and hold the Self-Cleaning buon for 2s;
•To start drying only, short press the Mode buon;
Pause/End Cleaning
•To pause the machine during cleaning, please short press the Power On/O buon or pull the handle
upright to lock it;
•To shut o the machine, please press and hold the Power On/O buon for 2s. You can also pause
the machine and place it on the self-cleaning base. The machine will start charging and turn on the screen
automatically. After charging is completed, the machine will turn it o automatically.
Note: When pausing/turning o the machine, the motor will keep running for a while to remove residual water.
Floor Cleaning
Low Areas Mode
When the angle between the handle and the floor is below 25°, the vacuum mop
will automatically switch to the Low Areas Mode. As such areas are generally
filled with lots of hairs, dust, and flu, the machine will intelligently adjust the
suction power to avoid dust floating around.
Note: DO NOT lay the machine horizontally when not in use to prevent backflow of sewage
and damage to the machine.
Cleaning Mode Switch
•During cleaning, you can short press the Mode buon to switch the mode(Smart/Turbo/Quiet/Suction);
•During cleaning, you can activate MAX enhancement by pressing and holding the Mode buon for
maximum cleaning strength to remove extremely stubborn stains.
05
Pipe
•If the machine prompts a high dirt level when the floor is
free from obvious dirt and several rounds of self-cleaning
have been completed, the pipe may be dirty;
•The vacuum mop prompts that the pipe gets clogged.
(Use the cleaning brush to clean the pipe for the above two
situations)
Vacuum mop and self-cleaning base
•To ensure optimal performance, you are recommended to maintain all parts regularly;
•Before cleaning any part, please turn o the machine and unplug the power cord;
•Use a clean and dry cloth to scrub clean the machine and the base and prevent water ingress into electrical components;
DO NOT rinse with water
2.Stick the brush inside to clean
the interior of the pipe.
In case of any fault when the product is working (no action or fault prompt on the screen or via voice), please refer to the
following table:
Problem Analysis and Troubleshooting
FAQ
Description
Possible causes or solutions
The vacuum voice prompts "Roller brush not in place"
The vacuum voice prompts "Roller brush stuck. Please clean it"
The vacuum voice prompts "Filter of the dirty water tank
not in place. Please install it and check the dirty water
tank"
The vacuum mop voice prompts "Dirty water tank full.
Please empty it" and pauses
The vacuum mop voice prompts "Clean water tank short of
water. Please refill it" and pauses
The vacuum voice prompts "Pipe clogged. Please manually
clean the pipe and the roller brush" during cleaning or
self-cleaning
The vacuum voice prompts "Uneven roller brush iron drying.
Please check whether it is installed properly"
There is residual water inside the vacuum after
unboxing
The floors get dirtier when the vacuum is working
The vacuum loses suction power after a period of time
The roller brush suddenly stops rotating when the vacuum
is working
Check whether the roller brush is properly installed
Manually clean the pipe and roller brush
Check whether the dirty water tank is installed properly
Rinse the dirty water tank and the filter
Fill water into the clean water tank or check whether the
clean water tank is installed properly
As a consistently high dirt level is detected, there
may be residual dirt in the pipe. You are recommended to
clean the pipe with the cleaning brush.
Check whether the roller brush is properly installed
Each vacuum will receive strict functional tests before
delivery, and there may be a small amount of water
remaining, which will not aect the vacuum
There is too much dirt on the roller brush, so it is
recommended that you put the vacuum back on the
base for self-cleaning
There may be stubborn stains and waste residue
aecting the normal performance of the washer. It is
recommended that you remove and clean the roller
brush cover, roller brush, pipe, and filter.
The roller brush may be entangled with or the space between
the roller brush and the cover is clogged with foreign objects,
causing the roller brush to stop rotating. You can turn o the
vacuum mop and remove the roller brush cover and the roller
brush to clear the foreign objects. It is recommended to put
away the data cables, plastic bags, and shoelaces on the
floor before cleaning, to prevent them from entangling the
roller brush and stopping its rotation, which may damage
both the vacuum mop and items on the floor
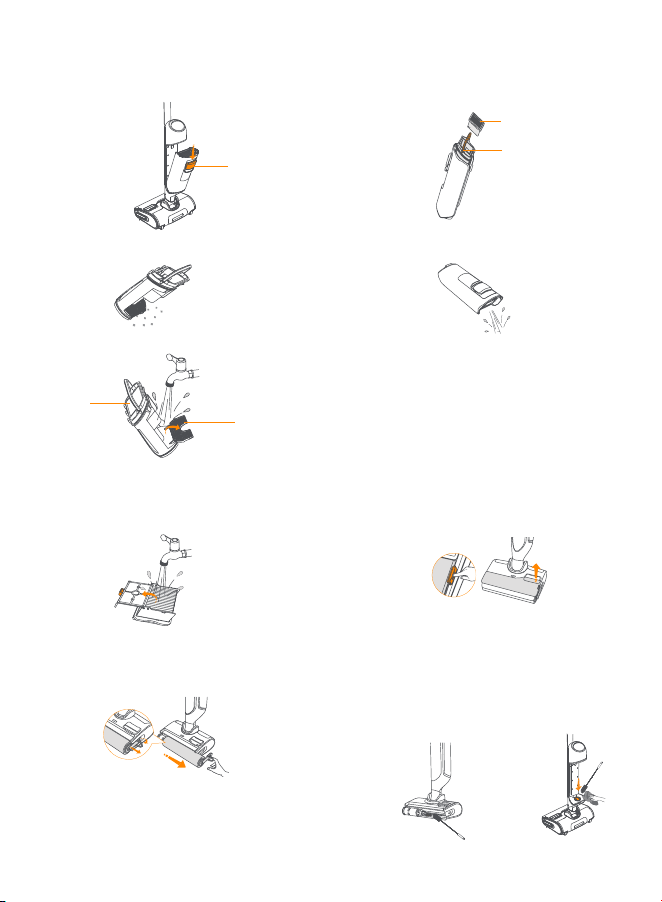
Dirty water tank
Filter
•Remove the dirty water tank, filter, and solid waste box in order.
•Clean up the filter with clean water. You can open the
filter cover. Shake dry the filter and then put it back into
the machine for filter drying.
Roller brush cover
•Slightly press the roller brush release buon to remove
the roller brush cover.
Roller brush
•Grab the tab on the right and pull it out gently, and then
clean the roller brush.
•Empty the solid waste box. •Empty and rinse the dirty water tank.
•Rinse the solid waste box and the filter slot.
Maintenance Methods
Press the dirty water tank
release buon to remove
the dirty water tank.
Pull out the filter from the top of the
solid waste box.
Pull up to remove the solid waste box.
You can open it to clean
1. Push down to open it
2. Pull it up
Please rinse
the filter slot
You can open it to rinse
1. Clean the dirt suction port.
DO NOT rinse it.
06
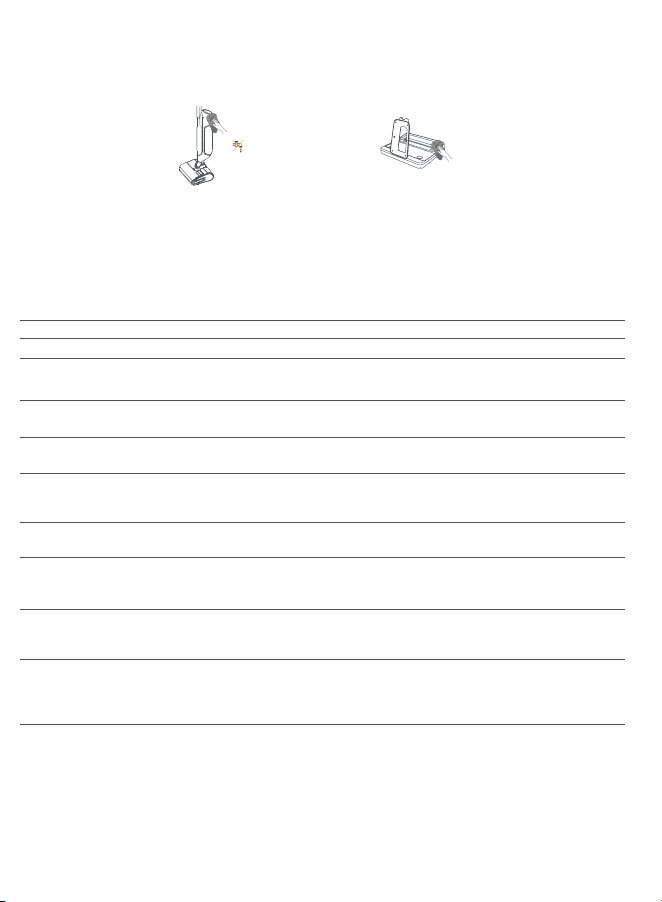
Pipe
•If the machine prompts a high dirt level when the floor is
free from obvious dirt and several rounds of self-cleaning
have been completed, the pipe may be dirty;
•The vacuum mop prompts that the pipe gets clogged.
(Use the cleaning brush to clean the pipe for the above two
situations)
Vacuum mop and self-cleaning base
•To ensure optimal performance, you are recommended to maintain all parts regularly;
•Before cleaning any part, please turn o the machine and unplug the power cord;
•Use a clean and dry cloth to scrub clean the machine and the base and prevent water ingress into electrical components;
DO NOT rinse with water
2.Stick the brush inside to clean
the interior of the pipe.
In case of any fault when the product is working (no action or fault prompt on the screen or via voice), please refer to the
following table:
Problem Analysis and Troubleshooting
FAQ
Description
Possible causes or solutions
The vacuum voice prompts "Roller brush not in place"
The vacuum voice prompts "Roller brush stuck. Please clean it"
The vacuum voice prompts "Filter of the dirty water tank
not in place. Please install it and check the dirty water
tank"
The vacuum mop voice prompts "Dirty water tank full.
Please empty it" and pauses
The vacuum mop voice prompts "Clean water tank short of
water. Please refill it" and pauses
The vacuum voice prompts "Pipe clogged. Please manually
clean the pipe and the roller brush" during cleaning or
self-cleaning
The vacuum voice prompts "Uneven roller brush iron drying.
Please check whether it is installed properly"
There is residual water inside the vacuum after
unboxing
The floors get dirtier when the vacuum is working
The vacuum loses suction power after a period of time
The roller brush suddenly stops rotating when the vacuum
is working
Check whether the roller brush is properly installed
Manually clean the pipe and roller brush
Check whether the dirty water tank is installed properly
Rinse the dirty water tank and the filter
Fill water into the clean water tank or check whether the
clean water tank is installed properly
As a consistently high dirt level is detected, there
may be residual dirt in the pipe. You are recommended to
clean the pipe with the cleaning brush.
Check whether the roller brush is properly installed
Each vacuum will receive strict functional tests before
delivery, and there may be a small amount of water
remaining, which will not aect the vacuum
There is too much dirt on the roller brush, so it is
recommended that you put the vacuum back on the
base for self-cleaning
There may be stubborn stains and waste residue
aecting the normal performance of the washer. It is
recommended that you remove and clean the roller
brush cover, roller brush, pipe, and filter.
The roller brush may be entangled with or the space between
the roller brush and the cover is clogged with foreign objects,
causing the roller brush to stop rotating. You can turn o the
vacuum mop and remove the roller brush cover and the roller
brush to clear the foreign objects. It is recommended to put
away the data cables, plastic bags, and shoelaces on the
floor before cleaning, to prevent them from entangling the
roller brush and stopping its rotation, which may damage
both the vacuum mop and items on the floor
Dirty water tank
Filter
•Remove the dirty water tank, filter, and solid waste box in order.
•Clean up the filter with clean water. You can open the
filter cover. Shake dry the filter and then put it back into
the machine for filter drying.
Roller brush cover
•Slightly press the roller brush release buon to remove
the roller brush cover.
Roller brush
•Grab the tab on the right and pull it out gently, and then
clean the roller brush.
•Empty the solid waste box. •Empty and rinse the dirty water tank.
•Rinse the solid waste box and the filter slot.
Maintenance Methods
Press the dirty water tank
release buon to remove
the dirty water tank.
Pull out the filter from the top of the
solid waste box.
Pull up to remove the solid waste box.
You can open it to clean
1. Push down to open it
2. Pull it up
Please rinse
the filter slot
You can open it to rinse
1. Clean the dirt suction port.
DO NOT rinse it.
06