Safety•Set-Up•Operation•Adjustments•Maintenance•Troubleshooting•PartsLists•Warranty
PRINTEDINU.S.A.MTDProductsLtd.,P.O.Box1386,KITCHENER,ONTARION2G
OPERATOR’SMANUAL
IMPORTANT:
READSAFETYRULESANDINSTRUCTIONS
CAREFULLYBEFOREOPERATINGEQUIPMENT.
21”SelfPropelledMower—ModelSeries560
772C0830
12/06/05
2
FindingandRecordingModelNumber
Pleasedo
NOT
returntheunittotheretailerfromwhichitwaspurchased,
withoutfirstcontactingCustomerSupport.
TableofContents
BEFOREYOUSTARTASSEMBLING
YOURNEWEQUIPMENT,
pleaselocatethemodelplateontheequipmentandcopythe
themodelnumberandtheserialnumbertothesamplemodel
plateprovidedtotheright.Youcanlocatethemodelplateby
standingattheoperatingpositionandlookingdownattherear
ofthemachine.
ThisOperator’sManualisanimportantpartofyournewequipment.Itwillhelpyouassemble,
prepareandmaintaintheunitforbestperformance.Pleasereadandunderstandwhatitsays.
CustomerSupport
SlopeGauge.......................................................3
SafeOperationPractices...................................4
Set-Up&Adjustments........................................6
Operation.............................................................8
Maintenance&Off-SeasonStorage................10
TroubleShooting..............................................12
Warranty............................................................13
IllustratedPartsLists.......................................14
Ifyouhavedifficultyassemblingthisproductorhaveanyquestionsregardingthecontrols,operationormaintenanceofthisunit,
Youcanseekhelpfromtheexperts.choosefromtheoptionsbelow:
1.Visitwww.troybilt.caformanyusefulsuggestions,clickonCustomerSupportbutton.
2.CallaCustomerSupportRepresentativeat1-800-668-1238.
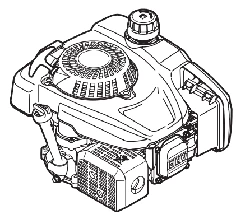
3.Theenginemanufacturerisresponsibleforallengine-relatedissueswithregardstoperformance,power-rating,specifica-
tions,warrantyandservice.Pleaserefertotheenginemanufacturer’sOwner’s/Operator’sManual,packedseparatelywith
yourunit,formoreinformation.
Pleasehaveyourunit’smodelnumberandserialnumberreadywhenyoucall.Seeprevioussectiontolocatethisinformation.
Youwillbeaskedtoentertheserialnumberinordertoprocessyourcall.

3
1
Slope
Gauge
WARNING
Donotmowoninclines
withaslopeinexcess
of15degrees(arise
ofapproximately
2-1/2feetevery10
feet).Aridingmower
couldoverturnand
causeseriousinjury.
Ifoperatingawalk-
behindmoweronsuch
aslope,itisextremely
difficulttomaintainyour
footingandyoucould
slip,resultinginserious
injury.
OperateRIDING
mowersupanddown
slopes,neveracross
thefaceofslopes.
Operate
WALK-BEHIND
mowersacrossthe
faceofslopes,never
upanddownslopes.
Usethispageasaguidetodetermineslopeswhereyoumaynotoperatesafely.Donotoperate
yourlawnmoweronsuchslopes.
4
2
Safe
Operation
Practices
GeneralOperation
1. Readthisoperator’smanualcarefullyinitsentiretybefore
attemptingtoassemblethismachine.Read,understand,
andfollowallinstructionsonthemachineandinthe
manual(s)beforeoperation.Becompletelyfamiliarwith
thecontrolsandtheproperuseofthismachinebefore
operatingit.Keepthismanualinasafeplaceforfuture
andregularreferenceandfororderingreplacementparts.
2.Thismachineisaprecisionpieceofpowerequipment,
notaplaything.Therefore,exerciseextremecautionatall
times.Yourunithasbeendesignedtoperformonejob:to
mowgrass.Donotuseitforanyotherpurpose.
3.Neverallowchildrenunder14yearsoldtooperatethis
machine.Children14yearsoldandovershouldreadand
understandtheinstructionsinthismanualandshould
betrainedandsupervisedbyaparent.Onlyresponsible
individualswhoarefamiliarwiththeserulesofsafe
operationshouldbeallowedtousethismachine.
4.Thoroughlyinspecttheareawheretheequipmentisto
beused.Removeallstones,sticks,wire,bones,toysand
otherforeignobjectswhichcouldbetrippedoverorpicked
upandthrownbytheblade.Thrownobjectscancause
seriouspersonalinjury.Planyourmowingpatterntoavoid
dischargeofmaterialtowardroads,sidewalks,bystanders
andthelike.Also,avoiddischargingmaterialagainsta
wallorobstructionwhichmaycausedischargedmaterial
toricochetbacktowardtheoperator.
5.Tohelpavoidbladecontactorathrownobjectinjury,
stayintheoperatorzonebehindthehandlesandkeep
children,bystanders,helpersandpetsatleast75feet
fromthemowerwhileitisinoperation.Stopmachineif
anyoneentersthearea.
6.Alwayswearsafetyglassesorsafetygogglesduring
operationandwhileperforminganadjustmentorrepair
toprotectyoureyes.Thrownobjectswhichricochetcan
causeseriousinjurytotheeyes.
7.Wearsturdy,rough-soledworkshoesandclose-fitting
slacksandshirts.Shirtsandpantsthatcoverthearms
andlegsandsteel-toedshoesarerecommended.Never
operatethismachineinbarefeet,sandals,slipperyorlight
weight(e.g.canvas)shoes.
8.Donotputhandsorfeetnearrotatingpartsorunderthe
cuttingdeck.Contactwiththebladecanamputatehands
andfeet.
9.Amissingordamageddischargecovercancauseblade
contactorthrownobjectinjuries.
10.Manyinjuriesoccurasaresultofthemowerbeingpulled
overthefootduringafallcausedbyslippingortripping.
Donotholdontothemowerifyouarefalling;releasethe
handleimmediately.
11.Neverpullthemowerbacktowardyouwhileyouare
walking.Ifyoumustbackthemowerawayfromawallor
obstructionfirstlookdownandbehindtoavoidtripping
andthenfollowthesesteps:
a.Stepbackfromthemowertofullyextendyourarms.
b.Besureyouarewellbalancedwithsurefooting.
c.Pullthemowerbackslowly,nomorethanhalfway
towardyou.
d.Repeatthesestepsasneeded.
12.Donotoperatethemowerwhileundertheinfluenceof
alcoholordrugs.
13.Donotengagetheself-propelledmechanismonunitsso
equippedwhilestartingengine.
14.Thebladecontrolhandleisasafetydevice.Neverattempt
tobypassitsoperation.Doingsomakesthesafetydevice
inoperativeandmayresultinpersonalinjurythrough
contactwiththerotatingblade.Thebladecontrolhandle
mustoperateeasilyinbothdirectionsandautomatically
returntothedisengagedpositionwhenreleased.
15.Neveroperatethemowerinwetgrass.Alwaysbesureof
yourfooting.Aslipandfallcancauseseriouspersonal
injury.Ifyoufeelyouarelosingyourfooting,releasethe
bladecontrolhandleimmediatelyandthebladewillstop
rotatingwithinthreeseconds.
16.Mowonlyindaylightoringoodartificiallight.Walk,never
run.Stopthebladewhencrossinggraveldrives,walksor
roads.
17.Iftheequipmentshouldstarttovibrateabnormally,stopthe
engineandcheckimmediatelyforthecause.Vibrationis
generallyawarningoftrouble.
18.Shuttheengineoffandwaituntilthebladecomesto
acompletestopbeforeremovingthegrasscatcheror
uncloggingthechute.Thecuttingbladecontinuestorotate
forafewsecondsaftertheengineisshutoff.Neverplace
anypartofthebodyinthebladeareauntilyouaresurethe
bladehasstoppedrotating.
19.Neveroperatemowerwithoutpropertrailshield,discharge
cover,grasscatcher,bladecontrolhandleorothersafety
protectivedevicesinplaceandworking.Neveroperate
mowerwithdamagedsafetydevices.Failuretodoso,can
resultinpersonalinjury.
20.Mufflerandenginebecomehotandcancauseaburn.Do
nottouch.
21.Onlyusepartsandaccessoriesmadeforthismachineby
themanufacturer.Failuretodosocanresultinpersonal
injury.
22.Ifsituationsoccurwhicharenotcoveredinthismanual,use
careandgoodjudgment.Callcustomerassistanceforthe
nameofyournearestservicingdealer.
SlopeOperation
Slopesareamajorfactorrelatedtoslipandfallaccidentswhich
canresultinsevereinjury.Operationonslopesrequiresextra
caution.Ifyoufeeluneasyonaslope,donotmowit.Foryour
safety,usetheslopegaugeincludedaspartofthismanualto
measureslopesbeforeoperatingthisunitonaslopedorhilly
area.Iftheslopeisgreaterthan15degrees,donotmowit.
WARNING:EngineExhaust,someofitsconstituents,andcertainvehiclecomponentscontainor
emitchemicalsknowntoStateofCaliforniatocausecancerandbirthdefectsorotherreproduc-
tiveharm.
WARNING
Thissymbolpoints
outimportantsafety
instructionswhich,if
notfollowed,could
endangerthepersonal
safetyand/orproperty
ofyourselfandothers.
Readandfollowall
instructionsinthis
manualbeforeat-
temptingtooperate
thismachine.Failure
tocomplywiththese
instructionsmayresult
inpersonalinjury.When
youseethissymbol.
HEEDITSWARNING!
YourResponsibility
Restricttheuse
ofthispowermachine
topersonswhoread,
understand
andfollowthewarnings
andinstructions
inthismanual
andonthemachine.
DANGER:Thismachinewasbuilttobeoperatedaccordingtotherulesforsafeoperationinthismanual.Aswith
anytypeofpowerequipment,carelessnessorerroronthepartoftheoperatorcanresultinseriousinjury.This
machineiscapableofamputatinghandsandfeetandthrowingobjects.Failuretoobservethefollowingsafety
instructionscouldresultinseriousinjuryordeath.

5
Do:
1. Mowacrossthefaceofslopes;neverupanddown.
Exerciseextremecautionwhenchangingdirectionon
slopes.
2.Watchforholes,ruts,rocks,hiddenobjects,orbumpswhich
cancauseyoutosliportrip.Tallgrasscanhideobstacles.
3.Alwaysbesureofyourfooting.Aslipandfallcancause
seriouspersonalinjury.Ifyoufeelyouarelosingyour
balance,releasethebladecontrolhandleimmediately,and
thebladewillstoprotatingwithin3seconds.
DoNot:
1. Donotmowneardrop-offs,ditchesorembankments,you
couldloseyourfootingorbalance.
2.Donotmowslopesgreaterthan15degreesasshownon
theslopegauge.
3.Donotmowonwetgrass.Unstablefootingcouldcause
slipping.
Children
Tragicaccidentscanoccuriftheoperatorisnotalerttothe
presenceofchildren.Childrenareoftenattractedtothemower
andthemowingactivity.Theydonotunderstandthedangers.
Neverassumethatchildrenwillremainwhereyoulastsaw
them.
1. Keepchildrenoutofthemowingareaandunderthewatch-
fulcareofaresponsibleadultotherthantheoperator.
2.Bealertandturnmoweroffifachildentersthearea.
3.Beforeandwhilemovingbackwards,lookbehindanddown
forsmallchildren.
4.Useextremecarewhenapproachingblindcorners,
doorways,shrubs,trees,orotherobjectsthatmayobscure
yourvisionofachildwhomayrunintothemower.
5.Keepchildrenawayfromhotorrunningengines.Theycan
sufferburnsfromahotmuffler.
6.Neverallowchildrenunder14yearsoldtooperateapower
mower.Children14yearsoldandovershouldreadand
understandtheoperationinstructionsandsafetyrulesin
thismanualandshouldbetrainedandsupervisedbya
parent.
Service
SafeHandlingOfGasoline:
1. Toavoidpersonalinjuryorpropertydamageuseextreme
careinhandlinggasoline.Gasolineisextremelyflammable
andthevaporsareexplosive.Seriouspersonalinjurycan
occurwhengasolineisspilledonyourselforyourclothes
whichcanignite.
2.Washyourskinandchangeclothesimmediately.
3.Useonlyanapprovedgasolinecontainer.
4.Neverfillcontainersinsideavehicleoronatruckortrailer
bedwithaplasticliner.Alwaysplacecontainersonthe
groundawayfromyourvehiclebeforefilling.
5.Removegas-poweredequipmentfromthetruckortrailer
andrefuelitontheground.Ifthisisnotpossible,thenrefuel
suchequipmentonatrailerwithaportablecontainer,rather
thanfromagasolinedispensernozzle.
6.Keepthenozzleincontactwiththerimofthefueltankor
containeropeningatalltimesuntilfuelingiscomplete.Do
notuseanozzlelock-opendevice.
7.Extinguishallcigarettes,cigars,pipesandothersourcesof
ignition.
8.Neverfuelmachineindoorsbecauseflammablevapors
willaccumulateinthearea.
9.Neverremovegascaporaddfuelwhiletheengineis
hotorrunning.Allowenginetocoolatleasttwominutes
beforerefueling.
10.Neveroverfillfueltank.Filltanktonomorethan½inch
belowbottomoffillernecktoprovideforfuelexpansion.
11.Replacegasolinecapandtightensecurely.
12.Ifgasolineisspilled,wipeitofftheengineandequipment.
Moveunittoanotherarea.Wait5minutesbeforestarting
theengine.
13.Neverstorethemachineorfuelcontainernearanopen
flame,sparkorpilotlightasonawaterheater,space
heater,furnace,clothesdryerorothergasappliances.
14.Toreducefirehazard,keepmowerfreeofgrass,leaves,
orotherdebrisbuild-up.Cleanupoilorfuelspillageand
removeanyfuelsoakeddebris.
15.Allowamowertocoolatleast5minutesbeforestoring.
GeneralService:
1. Neverrunanengineindoorsorinapoorlyventilatedarea.
Engineexhaustcontainscarbonmonoxide,anodorless
anddeadlygas.
2.Beforecleaning,repairing,orinspecting,makecertainthe
bladeandallmovingpartshavestopped.Disconnectthe
sparkplugwireandgroundagainsttheenginetoprevent
unintendedstarting.
3.Checkthebladeandenginemountingboltsatfrequent
intervalsforpropertightness.Also,visuallyinspectblade
fordamage(e.g.,bent,cracked,worn)Replacebladewith
theoriginalequipmentmanufacture’s(O.E.M.)bladeonly,
listedinthismanual.“Useofpartswhichdonotmeetthe
originalequipmentspecificationsmayleadtoimproper
performanceandcompromisesafety!”
4.Mowerbladesaresharpandcancut.Wrapthebladeor
weargloves,anduseextracautionwhenservicingthem.
5.Keepallnuts,bolts,andscrewstighttobesurethe
equipmentisinsafeworkingcondition.
6.Nevertamperwithsafetydevices.Checktheirproper
operationregularly.
7.Afterstrikingaforeignobject,stoptheengine,discon-
nectthesparkplugwireandgroundagainsttheengine.
Thoroughlyinspectthemowerforanydamage.Repairthe
damagebeforestartingandoperatingthemower.
8.Neverattempttomakeawheelorcuttingheightadjust-
mentwhiletheengineisrunning.
9.Grasscatchercomponents,dischargecover,andtrail
shieldaresubjecttowearanddamagewhichcould
exposemovingpartsorallowobjectstobethrown.For
safetyprotection,frequentlycheckcomponentsandre-
placeimmediatelywithoriginalequipmentmanufacturer’s
(O.E.M.)partsonly,listedinthismanual.“Useofparts
whichdonotmeettheoriginalequipmentspecifications
mayleadtoimproperperformanceandcompromise
safety!”
10.Donotchangetheenginegovernorsettingoroverspeed
theengine.Thegovernorcontrolsthemaximumsafe
operatingspeedoftheengine.
11.Maintainorreplacesafetylabels,asnecessary.
12.Observeproperdisposallawsandregulations.Improper
disposaloffluidsandmaterialscanharmtheenvironment.
2
Safe
Operation
Practices
WARNING
Thissymbolpoints
outimportantsafety
instructionswhich,if
notfollowed,could
endangerthepersonal
safetyand/orproperty
ofyourselfandothers.
Readandfollowall
instructionsinthis
manualbeforeat-
temptingtooperate
thismachine.Failure
tocomplywiththese
instructionsmayresult
inpersonalinjury.When
youseethissymbol.
HEEDITSWARNING!
YourResponsibility
Restricttheuse
ofthispowermachine
topersonswhoread,
understand
andfollowthewarnings
andinstructions
inthismanual
andonthemachine.
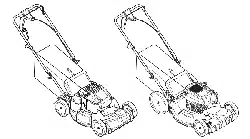
Theunitsillustratedmayvaryslightlyfromyour
unit.
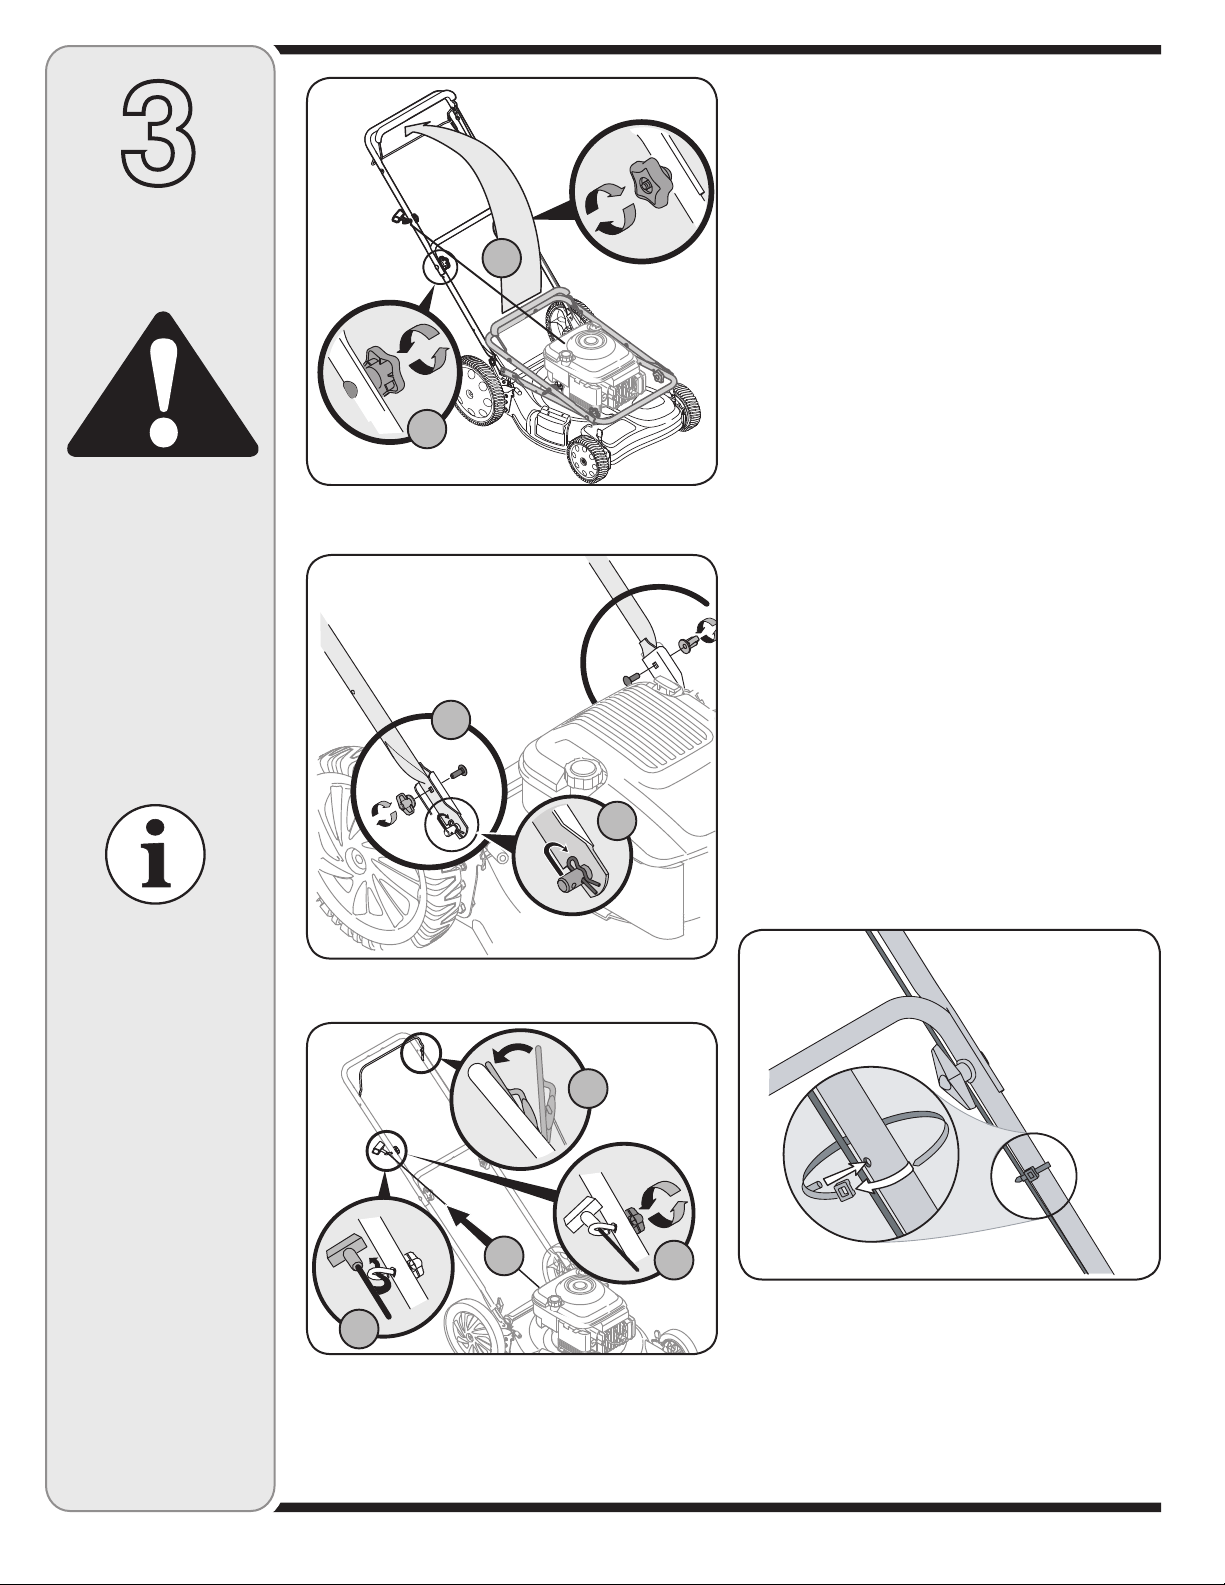
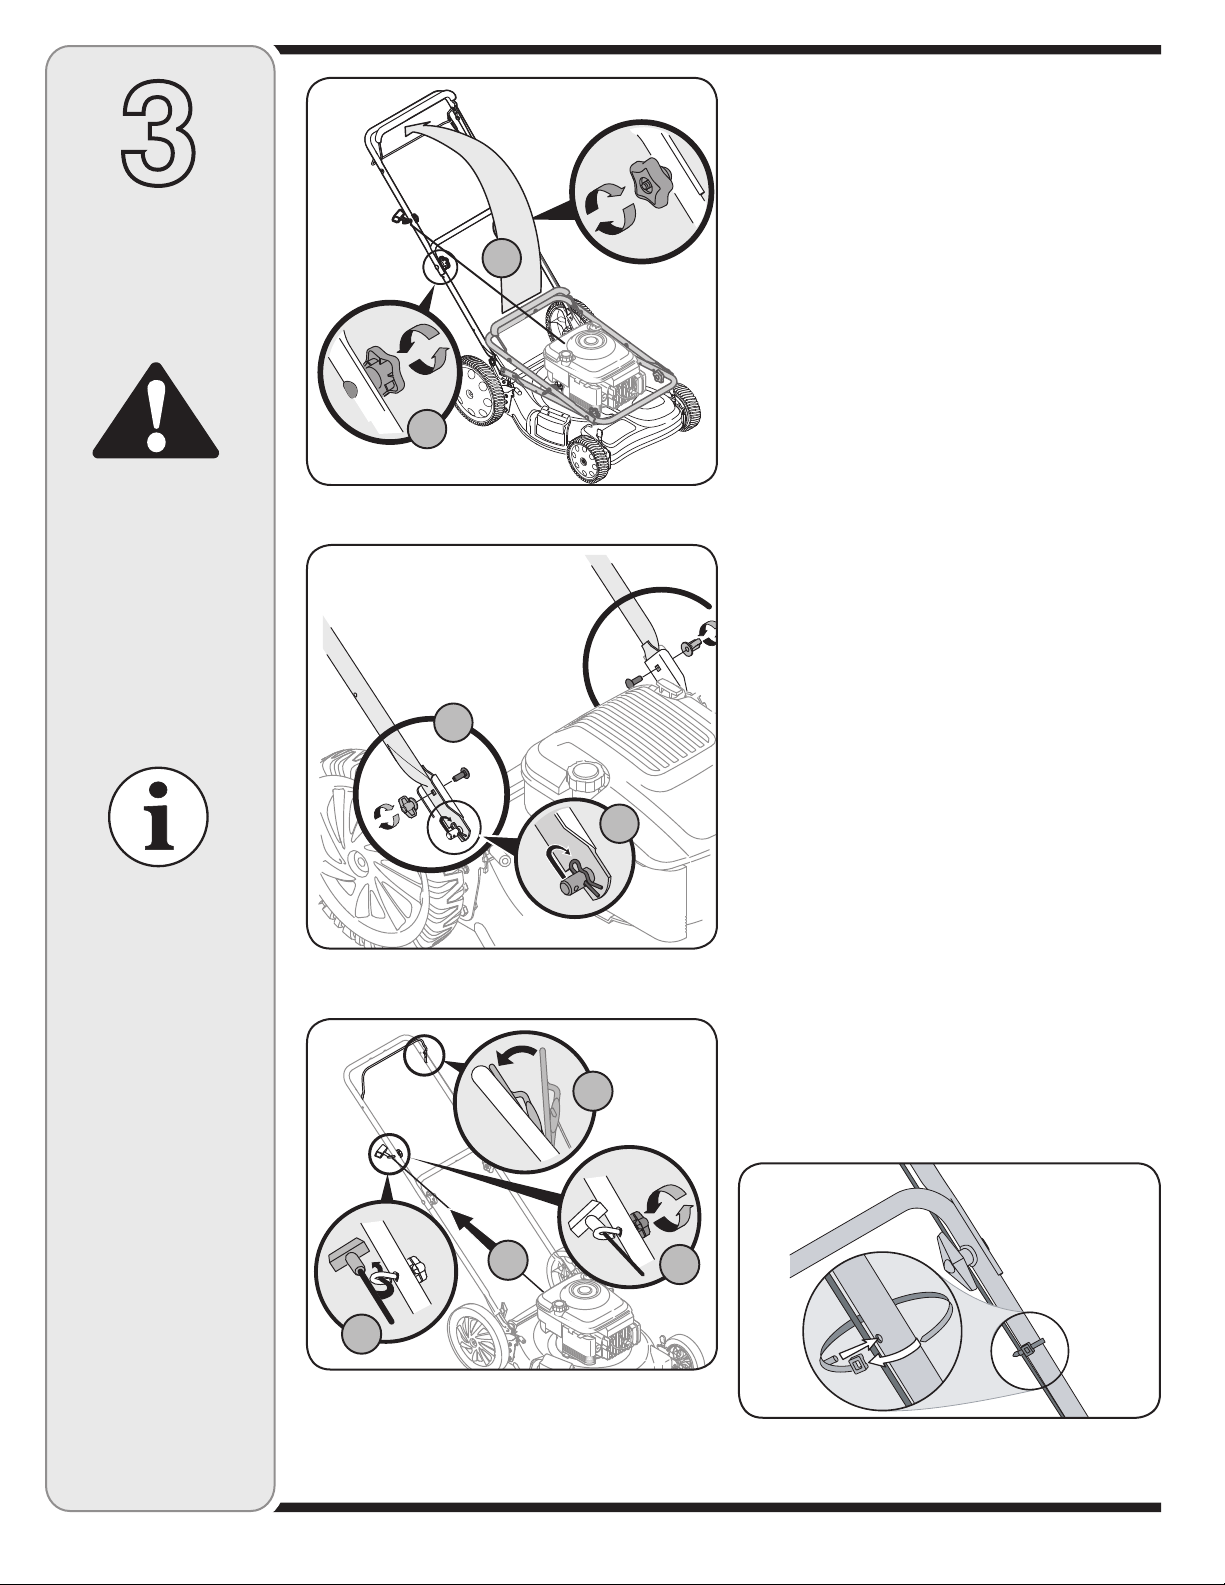
1.Removeloosepartsandanypackingmaterialwhich
maybebetweenupperandlowerhandles.
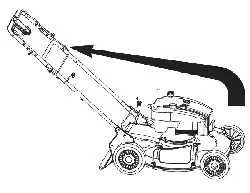
a.Pullupandbackontheupperhandletoraisethe
handlefrompositionAintotheoperatingposition
B.SeeFigure1.
b.Tightenhandknobs(starknobs)securingupper
handletolowerhandle.Makesurethateach
carriageboltisseatedproperlyinthehandle.
NOTE:Onsomemodelswingnutshavebeenreplaced
withstarknobs.Figuresshowwingnutsonly.
2.Locatehairpinclipinoneholeontheweldpinoneach
sideoflowerhandle.
a.Removehairpinclipfromthishole.Usingapairof
pliers,inserthairpinclipintotheotherholeonthe
weldpin.Repeatonotherside.
b.Placeonecarriagebolt(foundinthehardware
packincludedwithyourunit)intheupperholeof
therighthandlemountingbracketfromtheinside
outward.SeeFigure2.Securewithonewingnut
(starknobs).Repeatprocessontheleftside.
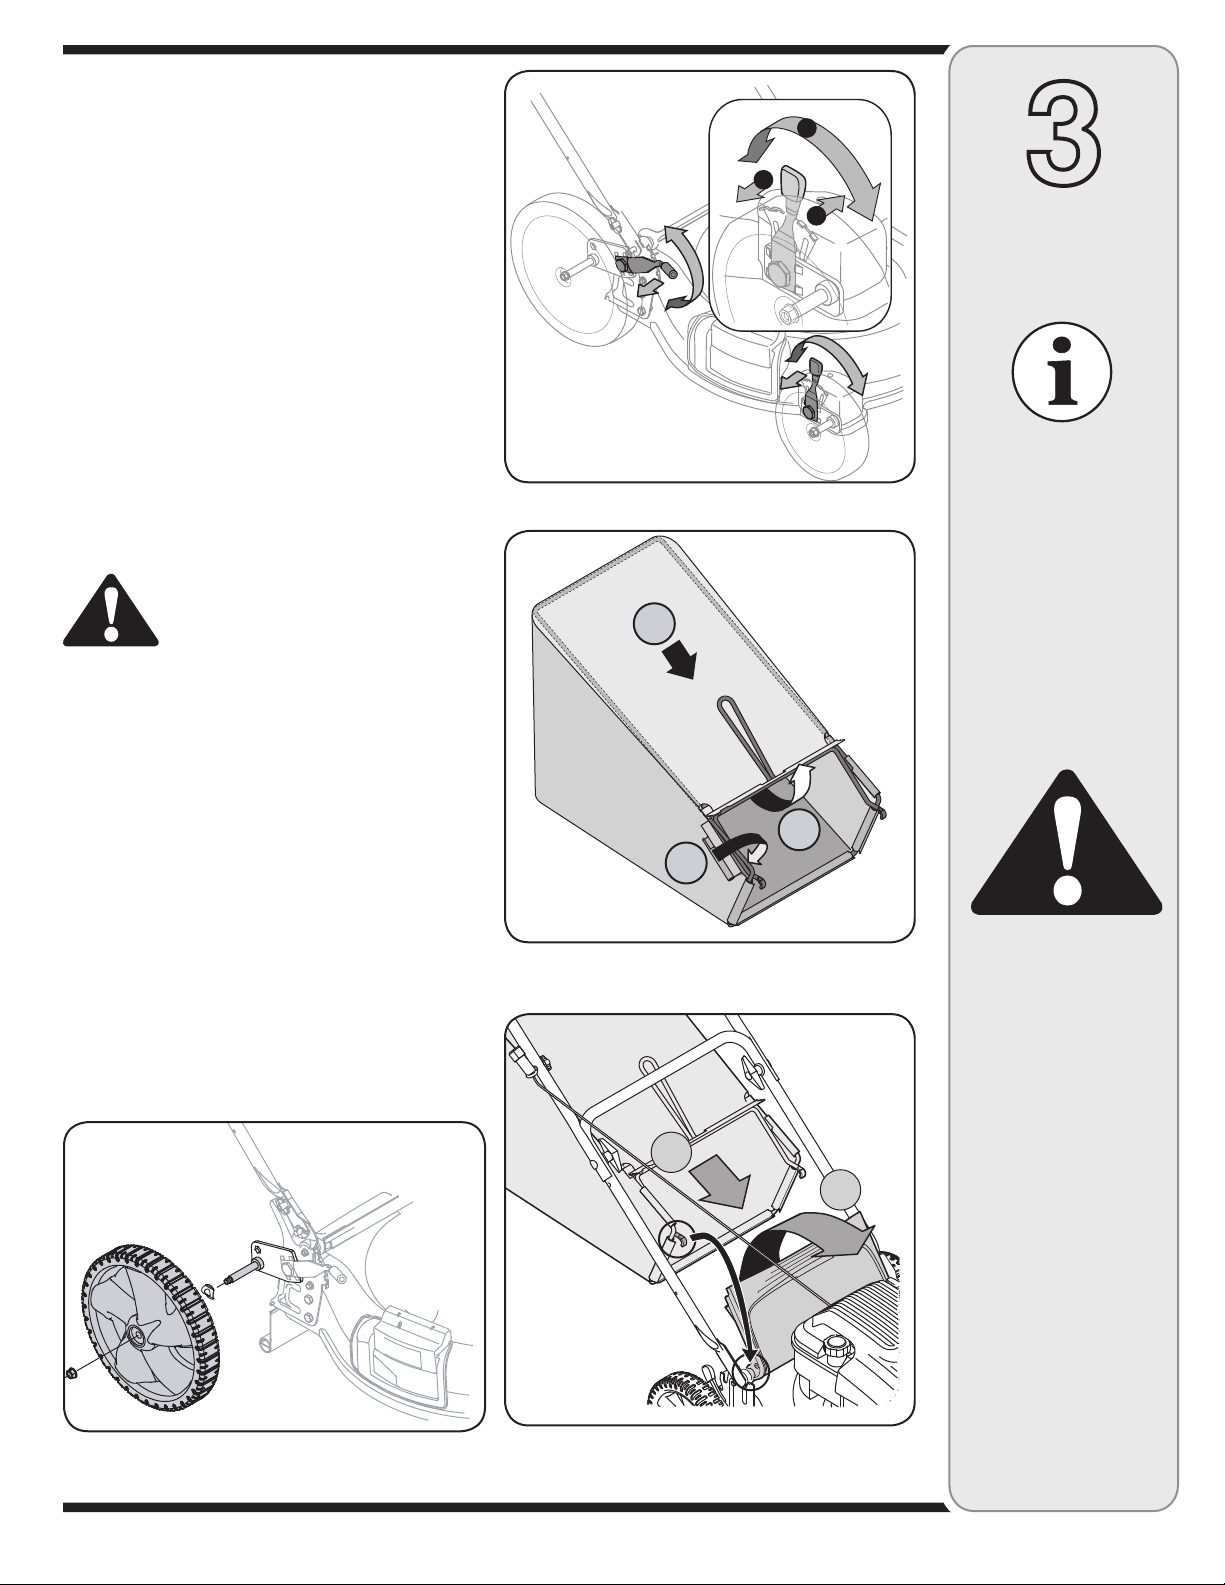
3.RopeguideSetupasfollows,seeFigure3:
a.Holdthebladecontrolagainsttheupperhandle.
PositionA.
b.Slowlypullstarterropeoutofengine.PositionB.
c. Slipstarterropeintotheropeguide.PositionC.
d.Tightenropeguidewingnut(starknobs).PositionD.
4.Insertpostoncabletiesintoholesprovidedonthe
lowerhandle.Pullcabletietightandtrimexcess.See
Figure4.
Disconnectand
groundthespark
plugwireasinstruct-
edintheseparate
enginemanual.
IMPORTANT
Thisunitisshipped
WITHOUTGASOLINE
orOIL.Afterassem-
bly,serviceengine
withgasolineand
oilasinstructedin
theseparateengine
manualpackedwith
yourunit.
Yourmowerisshipped
withthehandleinthe
higherheightposition.
NOTE:Eachendof
thelowerhandlemust
beplacedinthesame
relativeposition.
NOTE:Makecertain
bagisturnedrightside
outbeforeassembling
(warninglabelwillbeon
theoutside).
NOTE:Makecertain
cablesareroutedtothe
outsideofthehandleso
theyarenotintheway
whenattachingthegrass
catcher.
Neveroperatemower
unlessthehookson
thegrasscatcherare
firmlyseatedonthe
pivotrod,andthe
reardischargedoor
restsfirmlyagainst
topofthegrass
catcher.
Allmowersare
equippedwitharear
protectiveguard.The
guardhelpseliminate
projectilesthrown
bythebladefrom
injuringtheoperator.
DONOTREMOVE
THISGUARD.
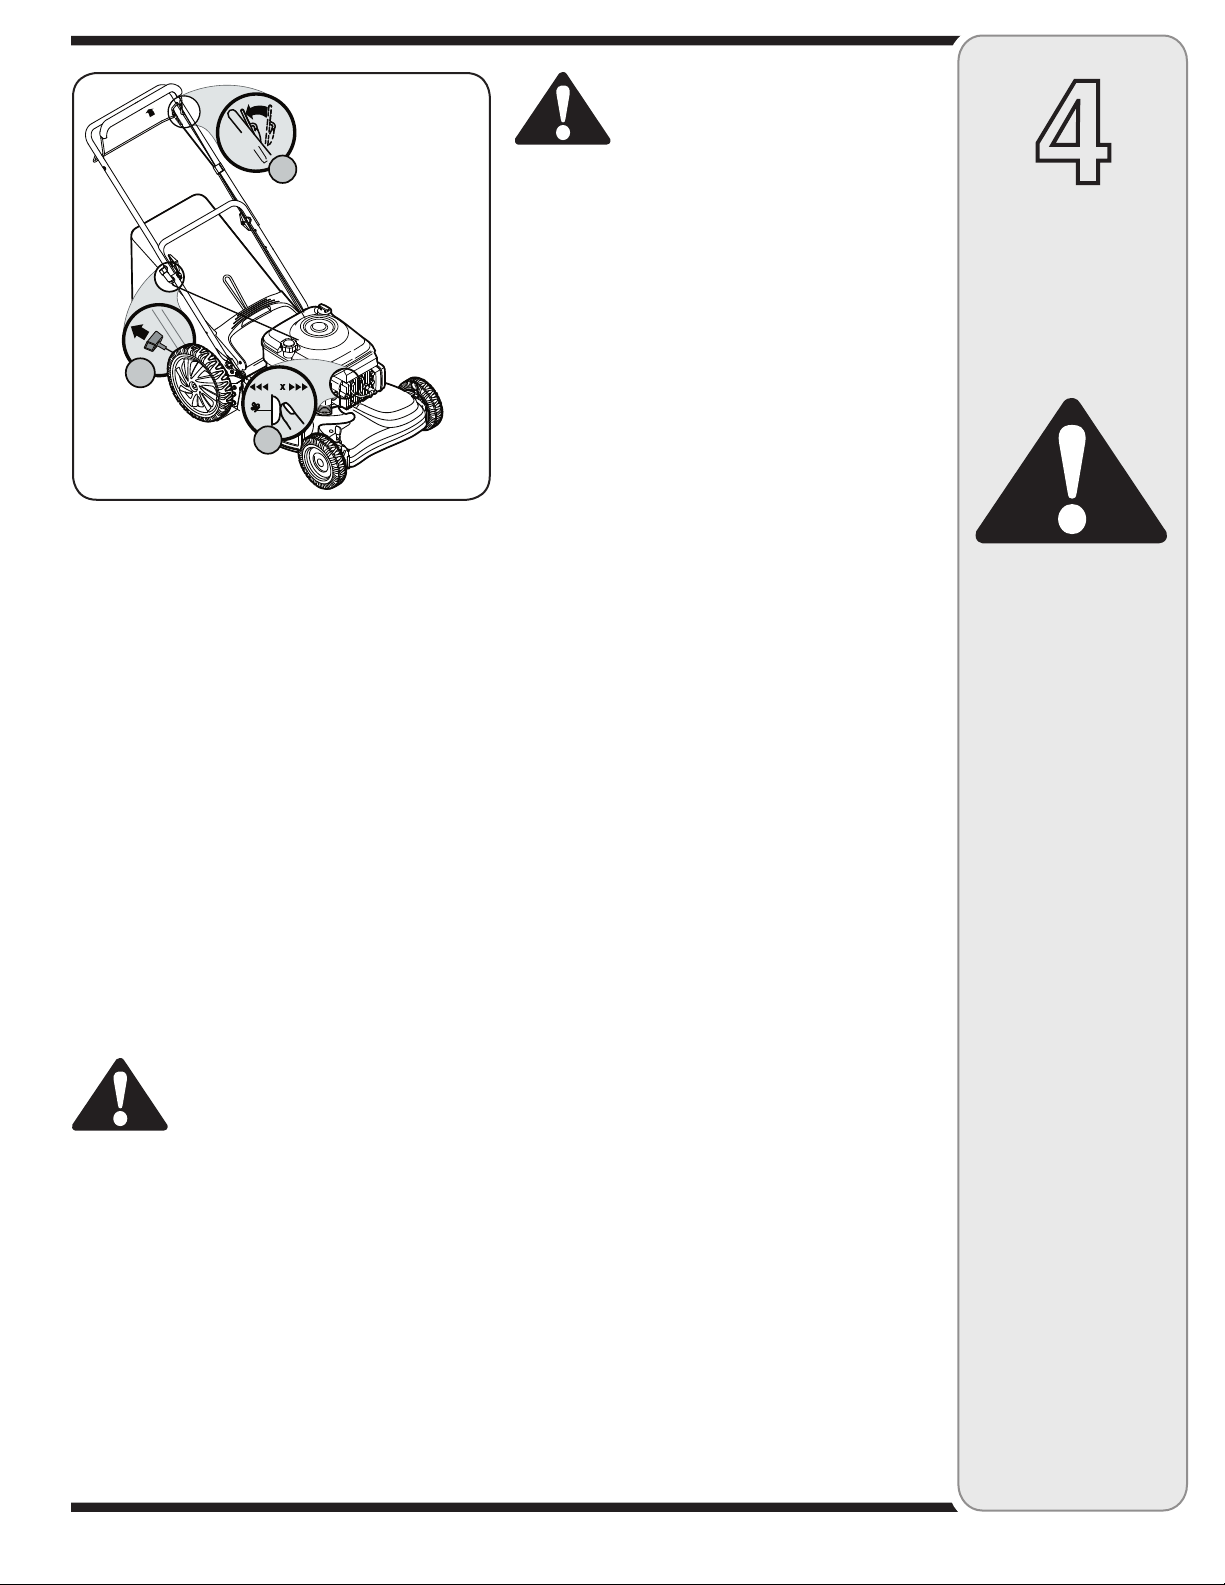
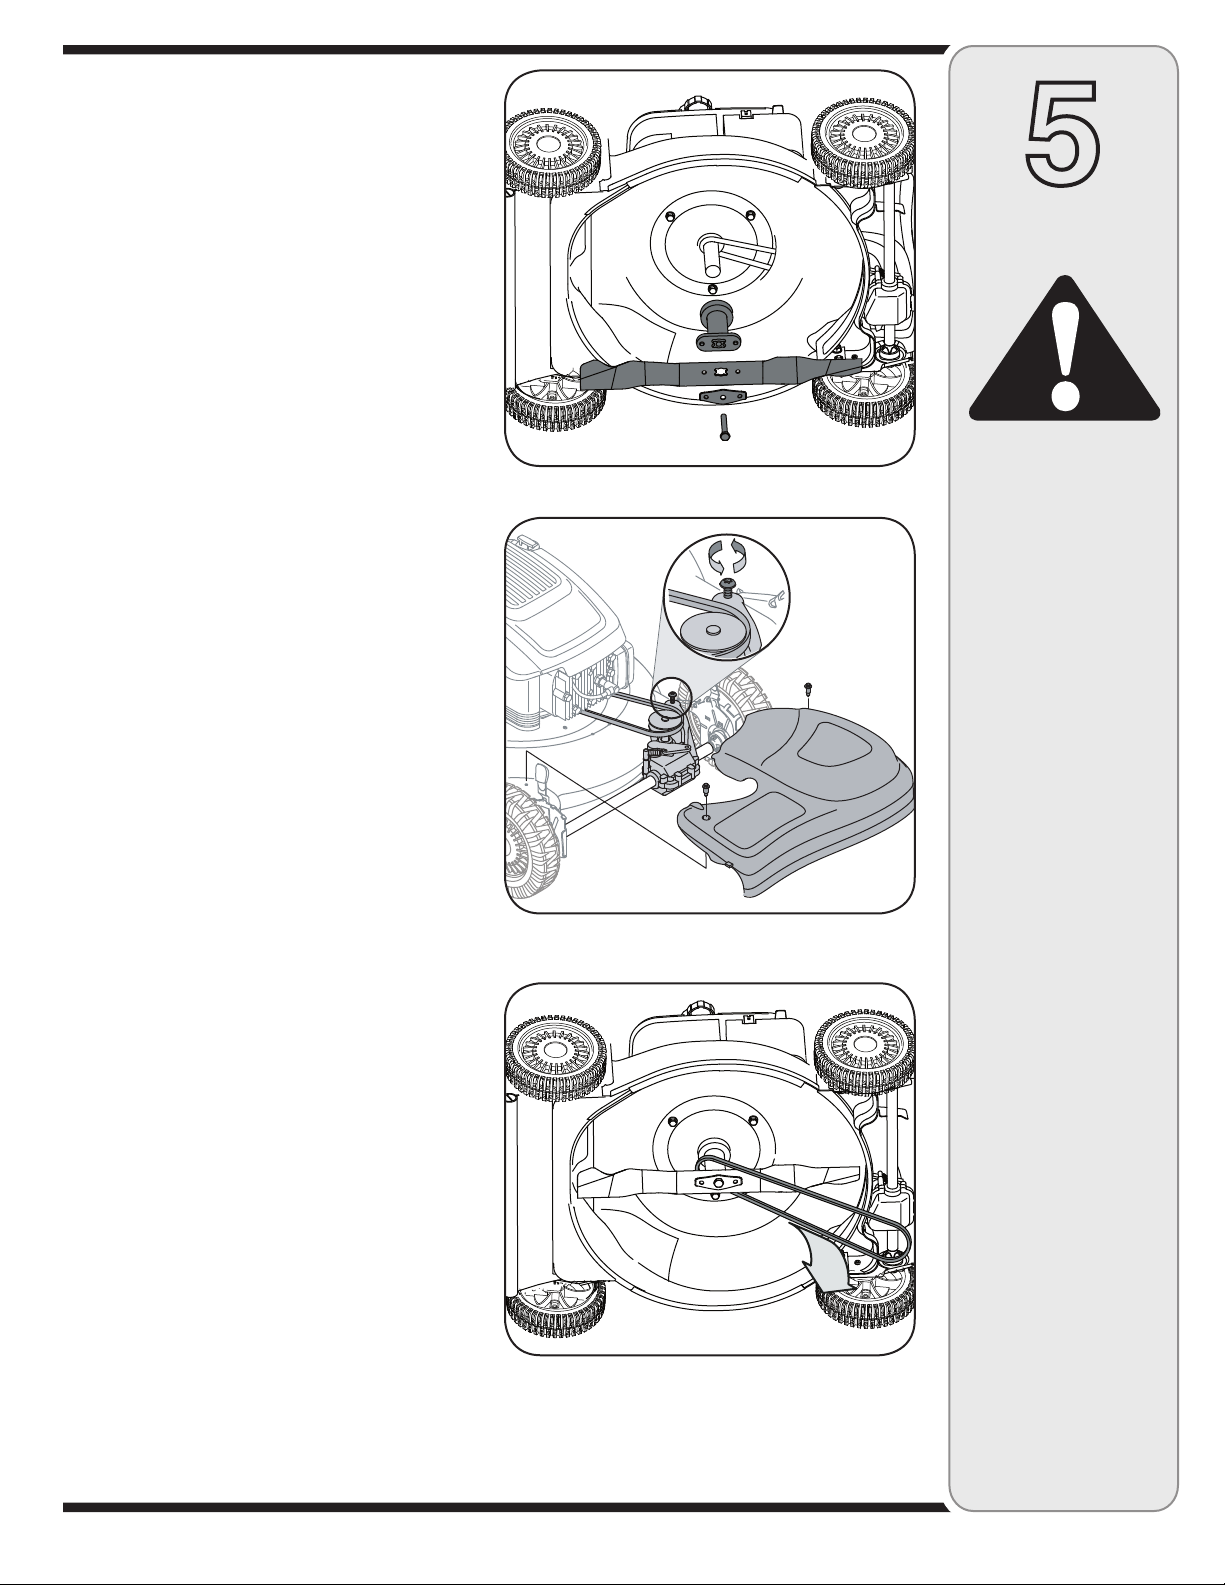
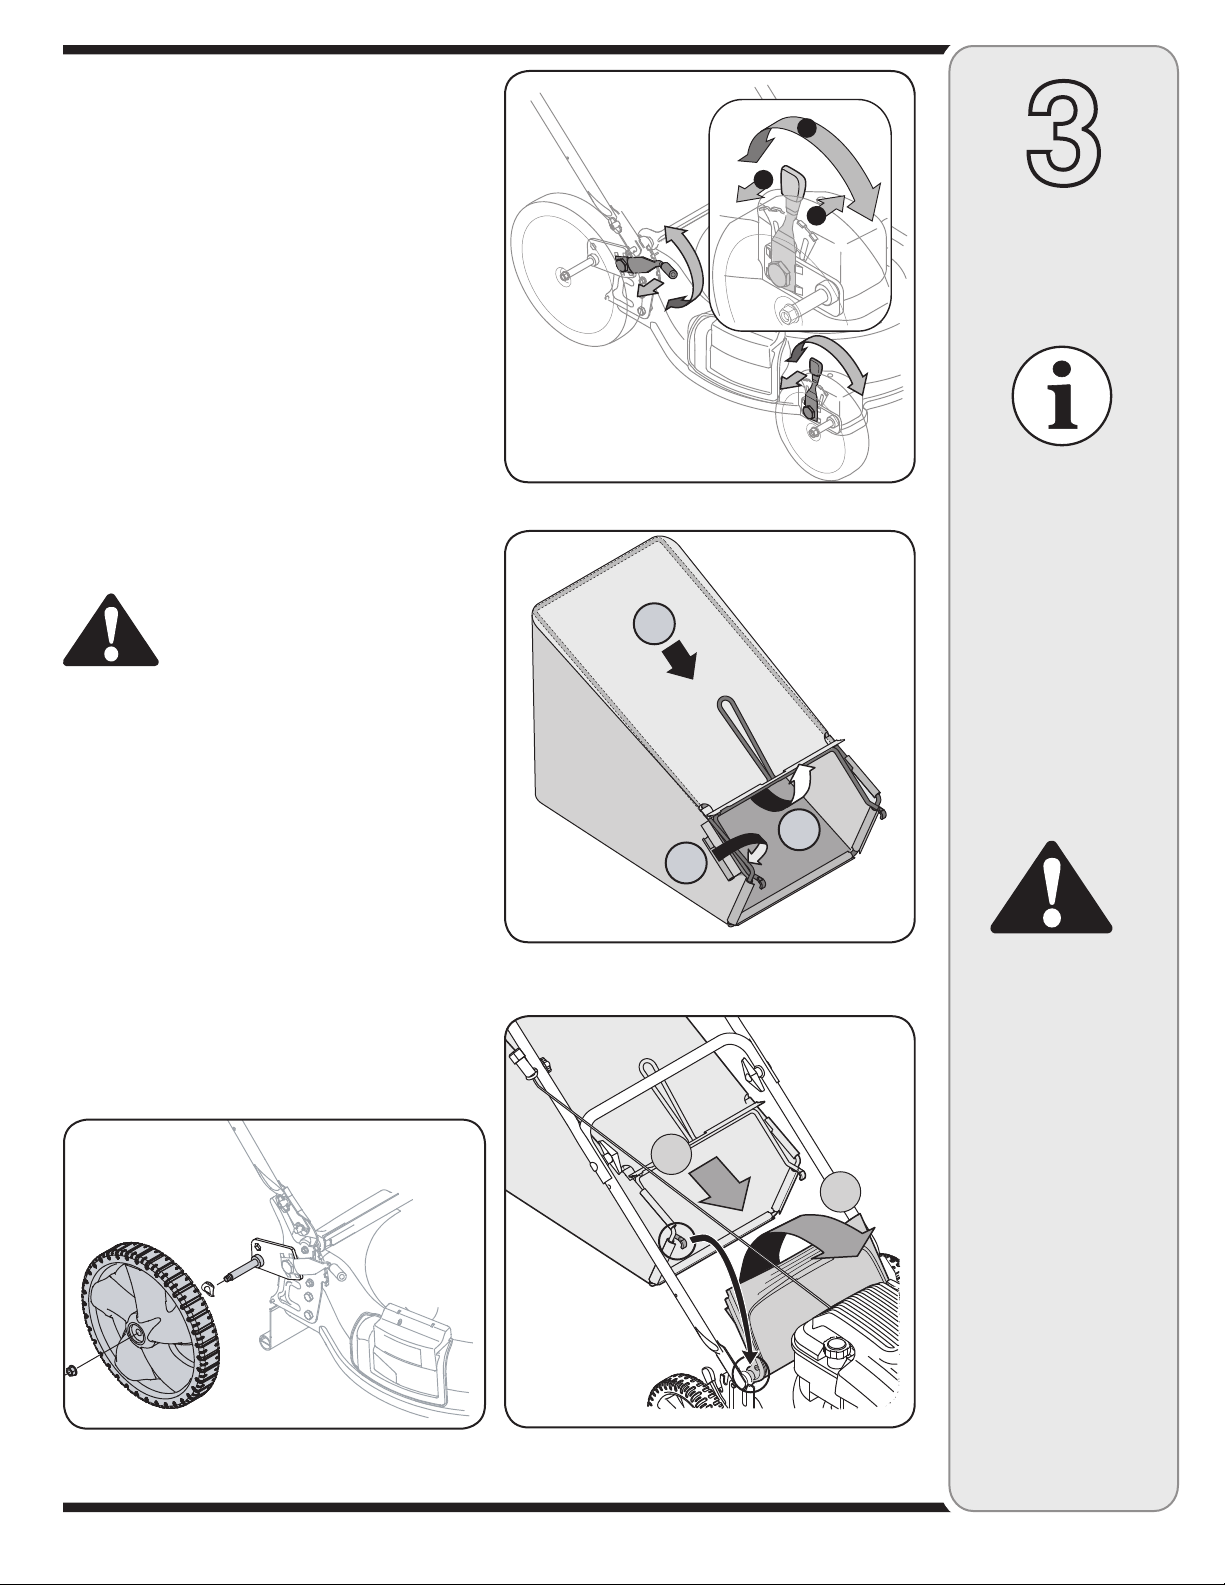
5.
Eachwheelhasaheightadjustmentlevertochange
thecuttingheightofthemower.Tochangetheheight
ofcut,squeezeadjusterlevertowardthewheel,
movingupordowntoselectedheight.SeeFigure5.
6.Toassemblethegrasscatcher:
a.Placebagoverframe(blackplasticsideisthe
bottomofbag.)Insertthehooksontheframe
throughtheholesinthesideplasticchannelsof
thebag.SeeFigure6.
b.Securebagtoframebyworkingtheplastic
channelsonbagoverframeasshowninFigure6.
Alloftheplasticchannelsexceptcentertopofbag
attachfromtheoutsideofbag.Centertopofbag
attachesfromtheinsideofbag.
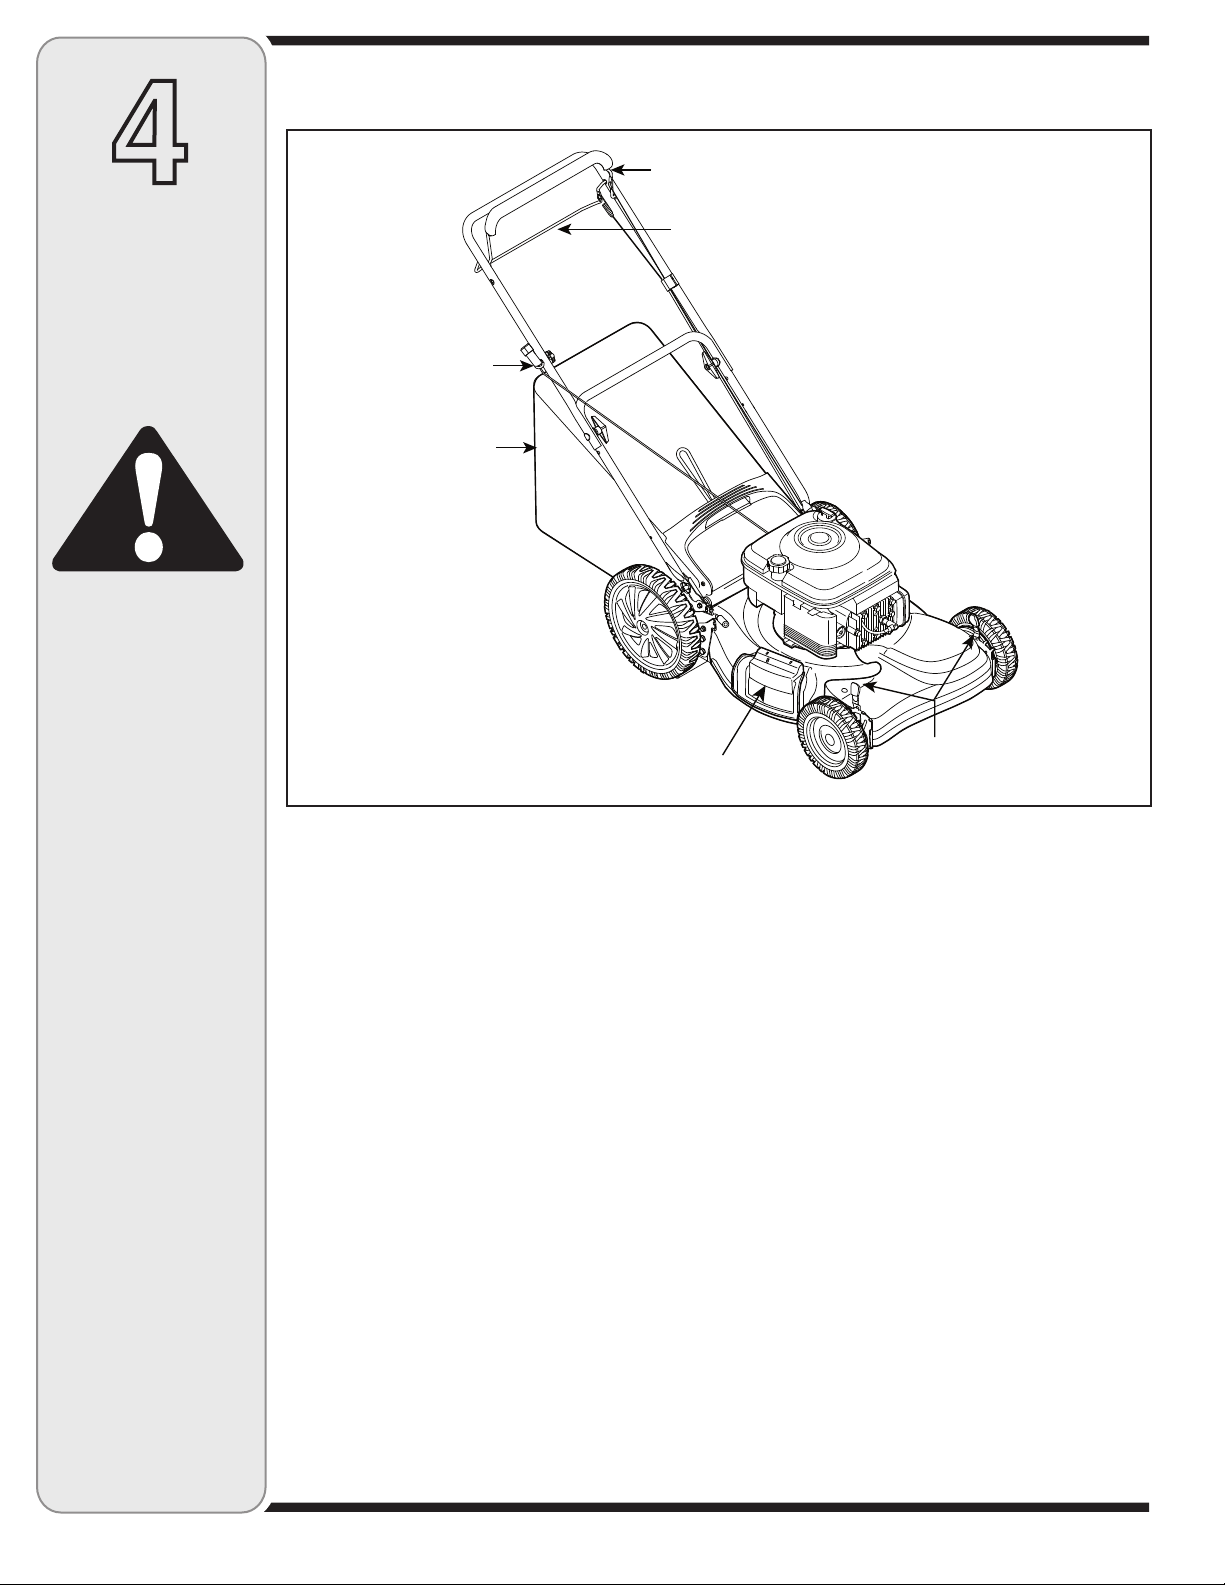
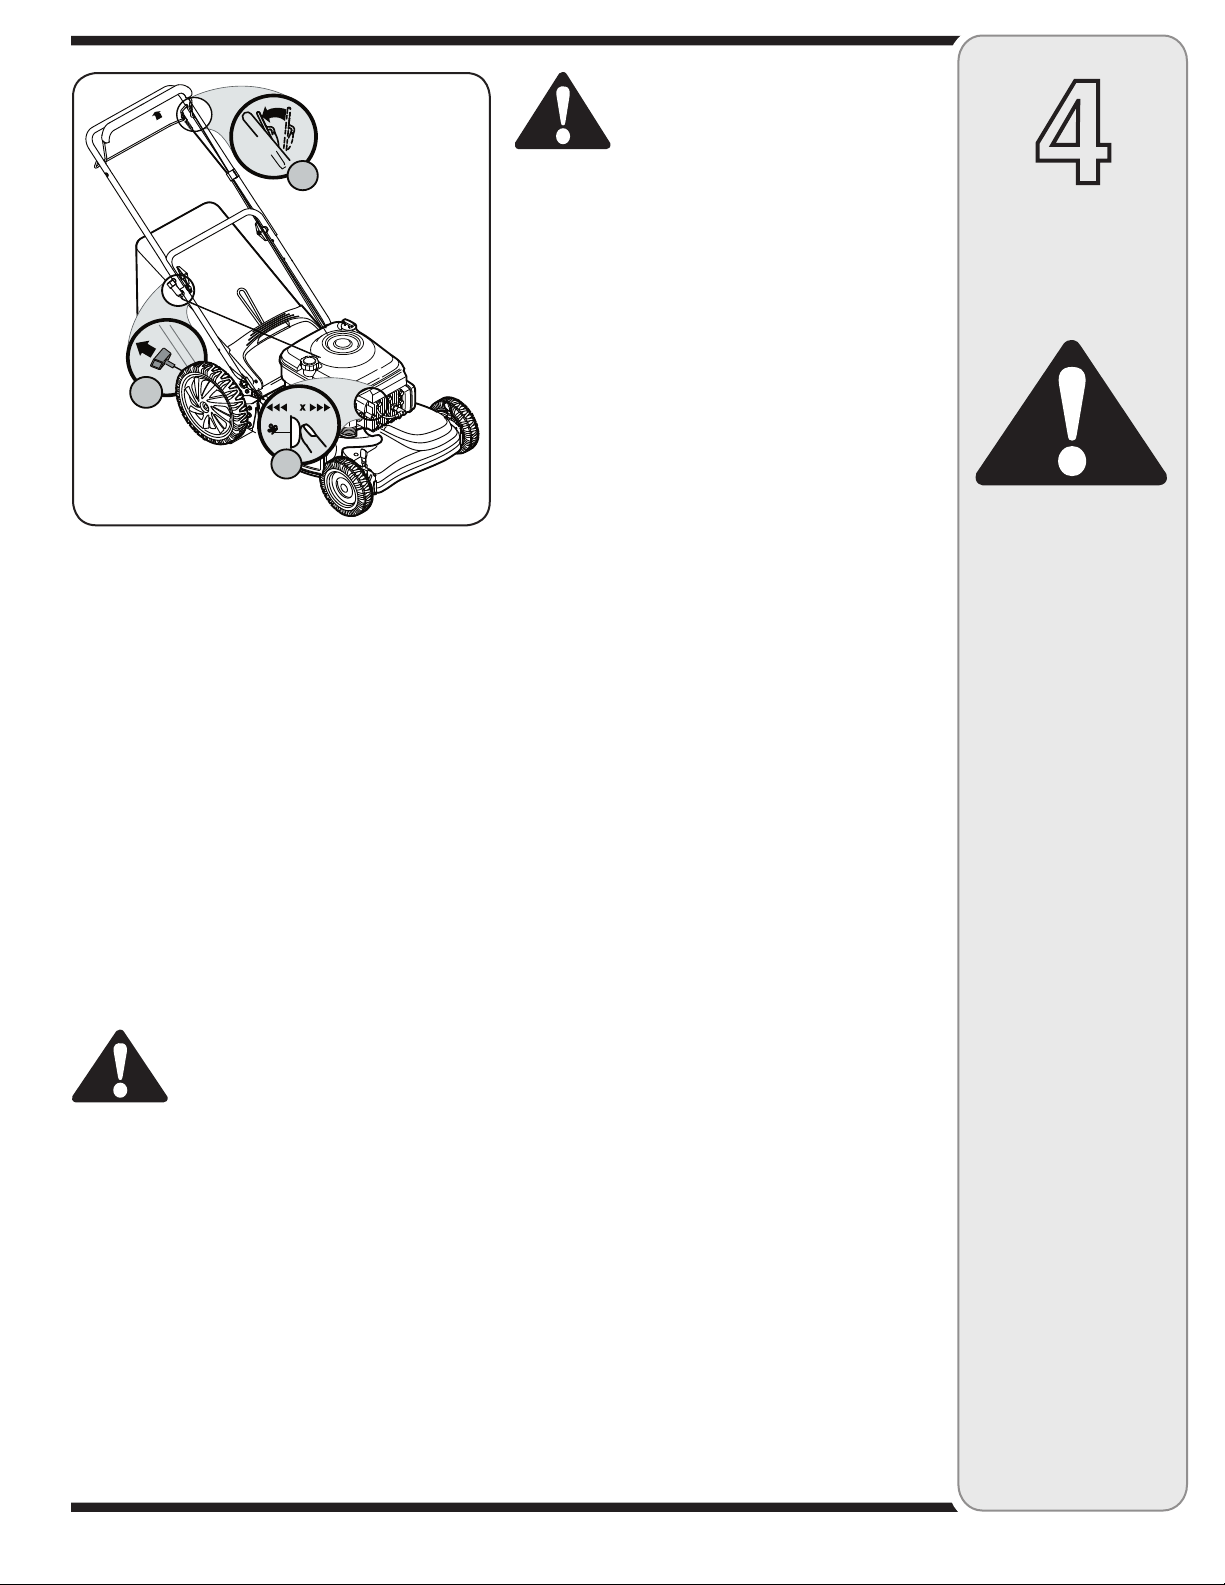
7.AttachingGrassCatchertoMower
a.Liftthereardischargedooronthemower,and
placethegrasscatcheronthepivotrod.Letgo
ofdischargedoorsothatitrestsonthegrass
catcher.SeeFigure7.
WARNING:Neveroperatemower
unlessthehooksonthegrass
catcherarefirmlyseatedonthe
pivotrod,andthereardischarge
doorrestsfirmlyagainsttopof
thegrasscatcher.
8.Toremovegrasscatcherandutilizethemulching
feature:
a.Liftreardischargedooronthemowerasshownin
Figure7.Liftgrasscatcherupandout,offofthe
pivotrod.Releasereardischargedoortoallowitto
closerearopeningofmower.
9.AttachingRearWheels(IfNotAlreadyAttached)
Removethehexflangednutontherearaxlefrom
eachsideandplacetherearwheelontheaxle.Make
surethespringwasherisontheinsideofthewheel
betweenthewheelandthelawnmower.SeeFigure8.
Reinserttheflangednutintotheaxleasshown,and
tightensecurely.Repeatonotherside.
8
4
Operating
YourLawn
Mower
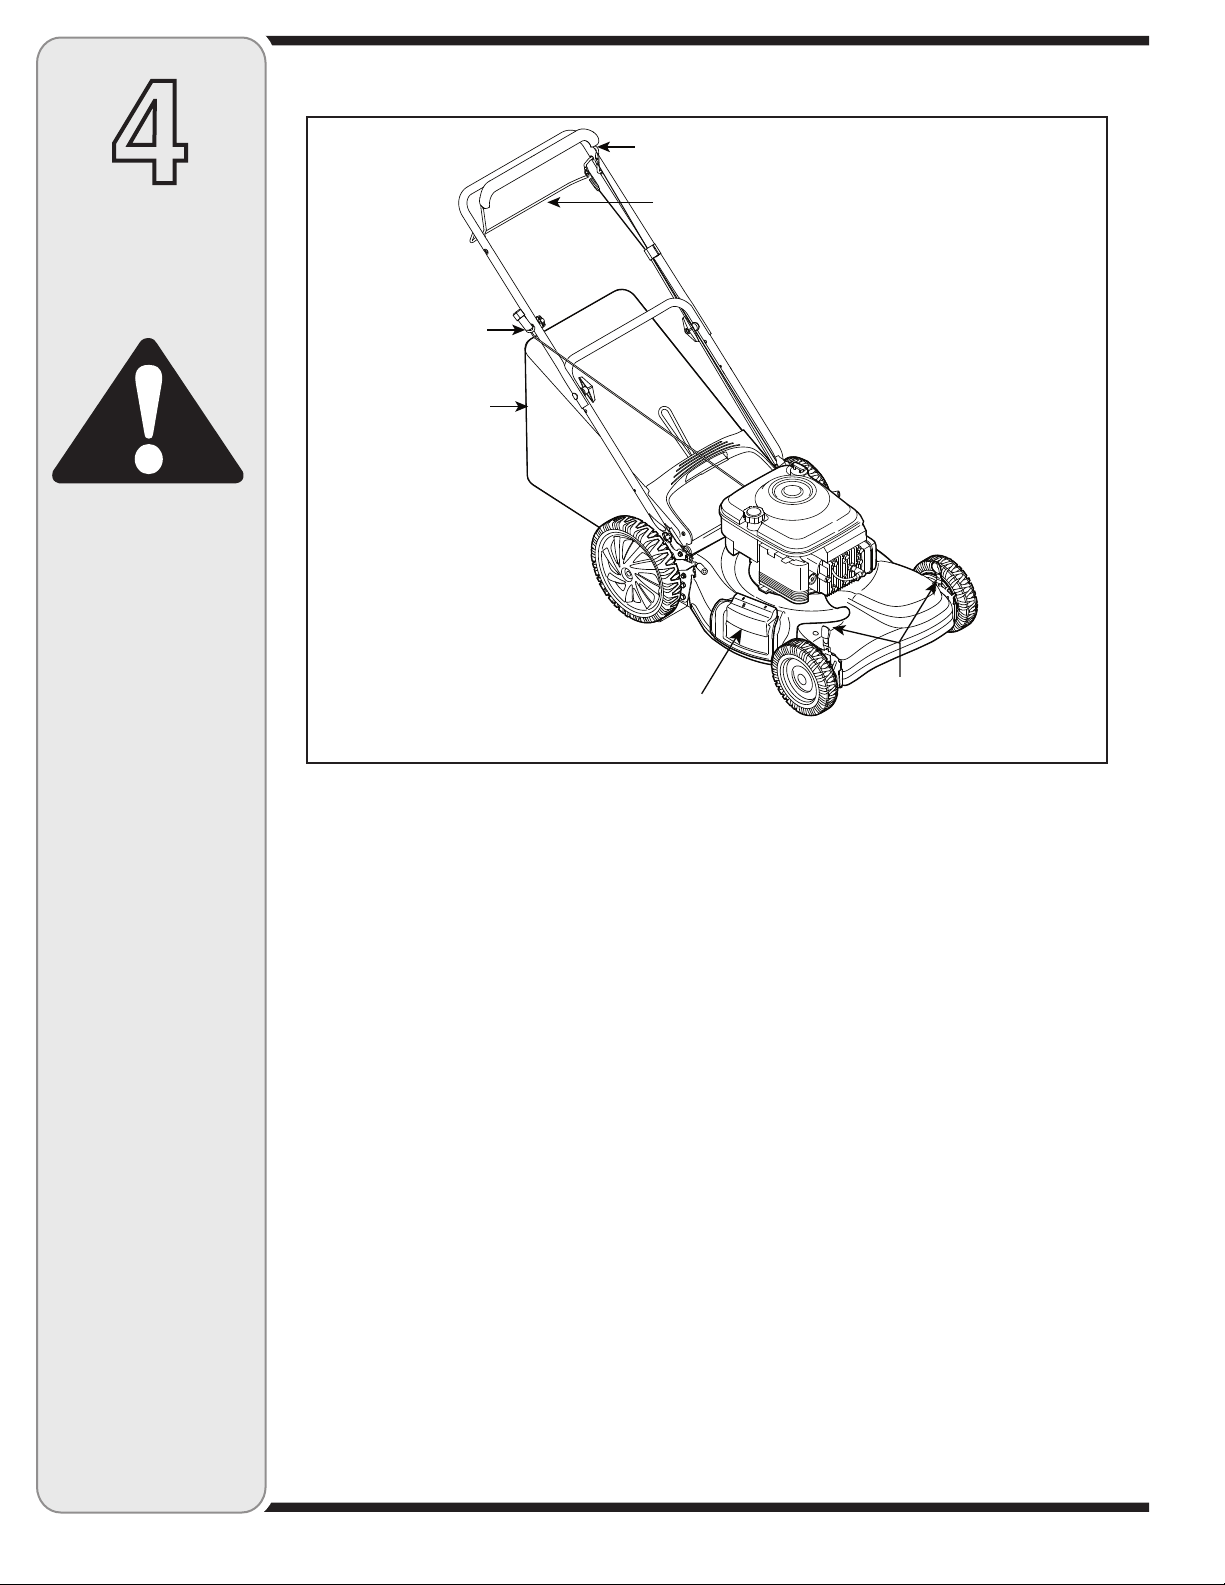
BladeControlHandle
Thebladecontrolhandleislocatedontheupperhandle
ofthemower.SeeFigure9.Thebladecontrolhandle
mustbedepressedinordertooperatetheunit.Release
thebladecontrolhandletostoptheengineandblade.
DriveControlHandle
Thedrivecontrolhandleislocatedontheupperhandle.
Squeezethedrivecontrolhandleagainsttheupper
handletoengagedrivesystem.Releasethecontrol
handletodisengagethedrivesysteminordertostop,
slowdown,orbackup.
MulchingPlug(optional)
Themulchingplugisusedtoclosethesidedischarge
chuteopeningwhenmulchingorbagginggrass.Do
notremovethehingedmulchingplugatanytime,even
whenyouarenotmulching.
RecoilStarter
Therecoilstarterisattachedtotherightupperhandle.
Standbehindtheunitandpulltherecoilstarterropeto
starttheunit.
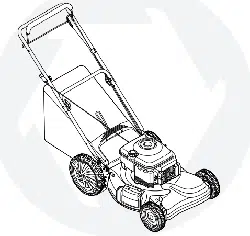
KnowYourLawnMower
CuttingHeightAdjustmentLevers
Oneadjustmentleverislocatedoneachwheelandis
usedtoadjustthecuttingheight.Allfourlevershavetobe
atthesamerelativepositiontoensureuniformcut.
BeforeStarting
1.Servicetheenginewithgasolineandoilasinstructed
intheseparateenginemanual.
2.Attachsparkplugwiretosparkplug.Ifunitis
equippedwitharubberbootovertheendofthespark
plugwire,makecertainthemetalloopontheendof
thesparkplugwire(insidetherubberboot)isfastened
securelyoverthemetaltiponthesparkplug.
3.Beforeeachuse,checkforproperdriveclutchopera-
tionbyperformingthefollowingbeforestartingthe
engine:
a.Withthedrivecontrolreleased,pushmower
forward.Itshouldmovefreely.Pullmowerback-
ward.Itshouldmovewithonlyasmallamountof
resistance.
WARNING
Figure9
Read,understand,
andfollowallinstruc-
tionsandwarnings
onthemachineand
inthismanualbefore
operating.
Thisbladecontrol
mechanismisa
safetydevice.Never
attempttobypassits
operations.
Useextremecare
whenhandling
gasoline.Gasolineis
extremelyflammable
andthevaporsare
explosive.Neverfuel
themachineindoors
orwhiletheengine
ishotorrunning.
Extinguishcigarettes,
cigars,pipesand
othersourcesof
ignition.
9
4
Operating
YourLawn
Mower
WARNING
Theoperationofany
lawnmowercanresult
inforeignobjects
beingthrowninto
theeyes,whichcan
damageyoureyes
severely.Alwayswear
safetyglasseswhile
operatingthemower,
orwhileperforming
anyadjustmentsor
repairsonit.
Besurenooneother
thantheoperatoris
standingnearthelawn
mowerwhilestarting
engineoroperating
mower.Neverrun
engineindoorsor
inenclosed,poorly
ventilatedareas.En-
gineexhaustcontains
carbonmonoxide,an
odorlessanddeadly
gas.Keephands,feet,
hairandlooseclothing
awayfromanymoving
partsonengineand
lawnmower.
Figure10
3
b.Ifitdoesnottheclutchmaynotbereleasing
completely.Donotstarttheengineuntilcorrec-
tionshavebeenmade.Checkthecontrolcable
forseverebend,kinksandbinding.Alsocheckfor
grassbuild-uparoundthebelt.
ToStartEngine
1.Ifyourunitisequippedwithaprimer,primeengineas
instructedintheseparateenginemanualpackedwith
yourunit.
2.Standingbehindtheunit,depressthebladecontrol
handleandholditagainsttheupperhandleasshown
inFigure10.
3.Graspthestarterhandleasshownandpullslowly
untilresistanceisfelt,thenpullrapidlytostartengine
andavoidkickback.Returnitslowlytotheropeguide.
ToStopEngine
1.Releasethebladecontrolhandletostoptheengine
andblade.
WARNING:Thebladecontinues
torotateforafewsecondsafter
theengineisshutoff.
2.Disconnectandgroundthesparkplugwireas
instructedintheseparateenginemanualtoprevent
accidentalstartingwhileequipmentisunattended.
UsingYourLawnMower
Besurethelawnisclearofstones,sticks,wire,orother
objectswhichcoulddamagethelawnmowerorthe
engine.Suchobjectscouldbeaccidentlythrownbythe
mowerinanydirectionandcauseseriouspersonalinjury
totheoperatorandothers.
WARNING:Ifyoustrikeaforeign
object,stoptheengine.Remove
wirefromthesparkplug,thor-
oughlyinspectthemowerforany
damage,andrepairthedamage
beforerestartingandoperating
themower.Extensivevibration
ofthemowerduringoperationis
anindicationofdamage.Theunit
shouldbepromptlyinspected
andrepaired.
OperatingTips
1.Toengagethedrive,squeezethedrivecontrolhandle
towardstheupperhandle.Releasethedrivecontrol
toslowdownwhennegotiatinganobstacle,makinga
turn,orstopping.
2.Forbestresultsdonotcutwetgrass.
3.Newgrass,thickgrass,orwetgrassmayrequirea
narrowercut.
4.Forahealthierlawn,nevercutoffmorethanone-third
ofthetotallengthofthegrass.
5.Yourlawnshouldbecutinthefallaslongasthere
isgrowth.
6.Ifthegrasshasbeenallowedtogrowinexcessof4
inches,mulchingisnotrecommended.Mowusing
thesidedischargetoreducethegrassheightto3-1/4
inchesorlessbeforemulching.
GeneralRecommendations
1.Alwaysobservesafetyruleswhenperforming
anymaintenance.
2.Thewarrantyonthislawnmowerdoesnotcover
itemsthathavebeensubjectedtooperatorabuse
ornegligence.Toreceivefullvaluefromwarranty,
operatormustmaintainthelawnmoweras
instructedhere.
3.Changingofengine-governedspeedwillvoid
enginewarranty.
4.Alladjustmentsshouldbecheckedatleastonceeach
season.
5.Periodicallycheckallfastenersandmakesurethese
aretight.
NOTE:Tooperateyourunitusingthegrasscatcher,
mulcheroroptionalsidedischargerefertopage7.
10
5
WARNING
Figure11
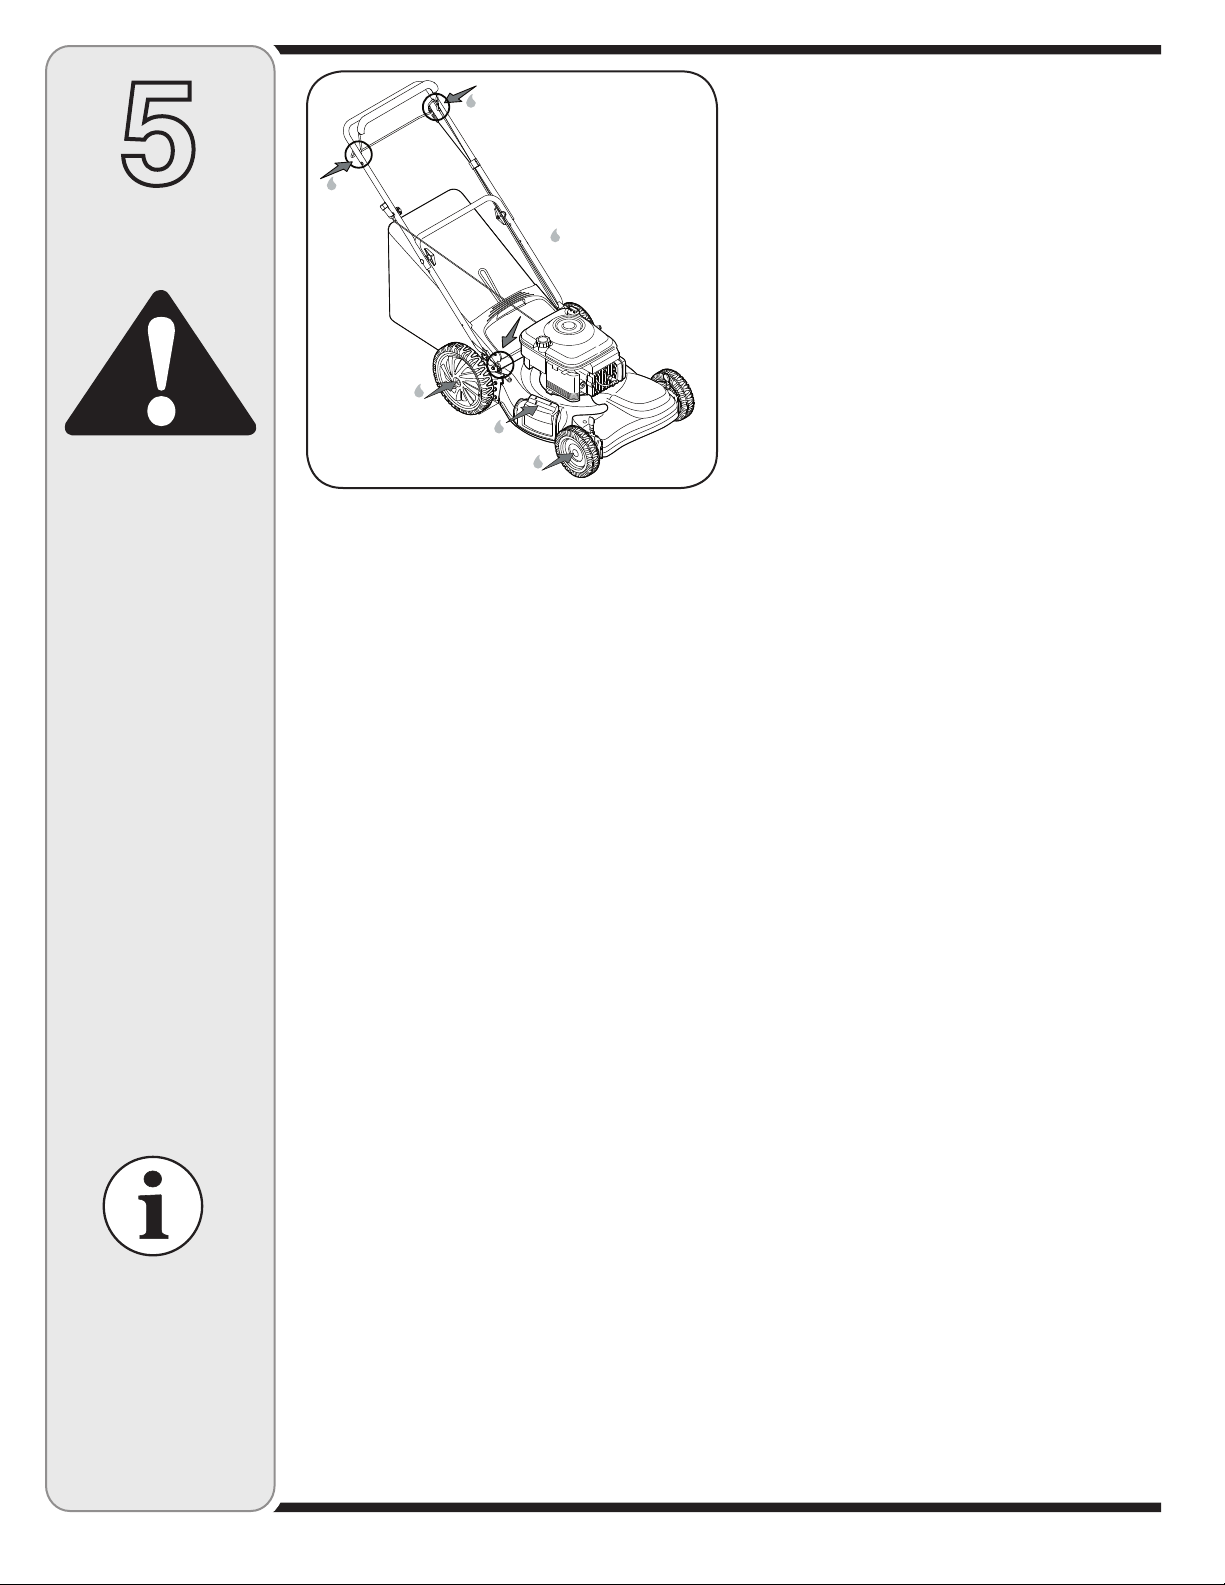
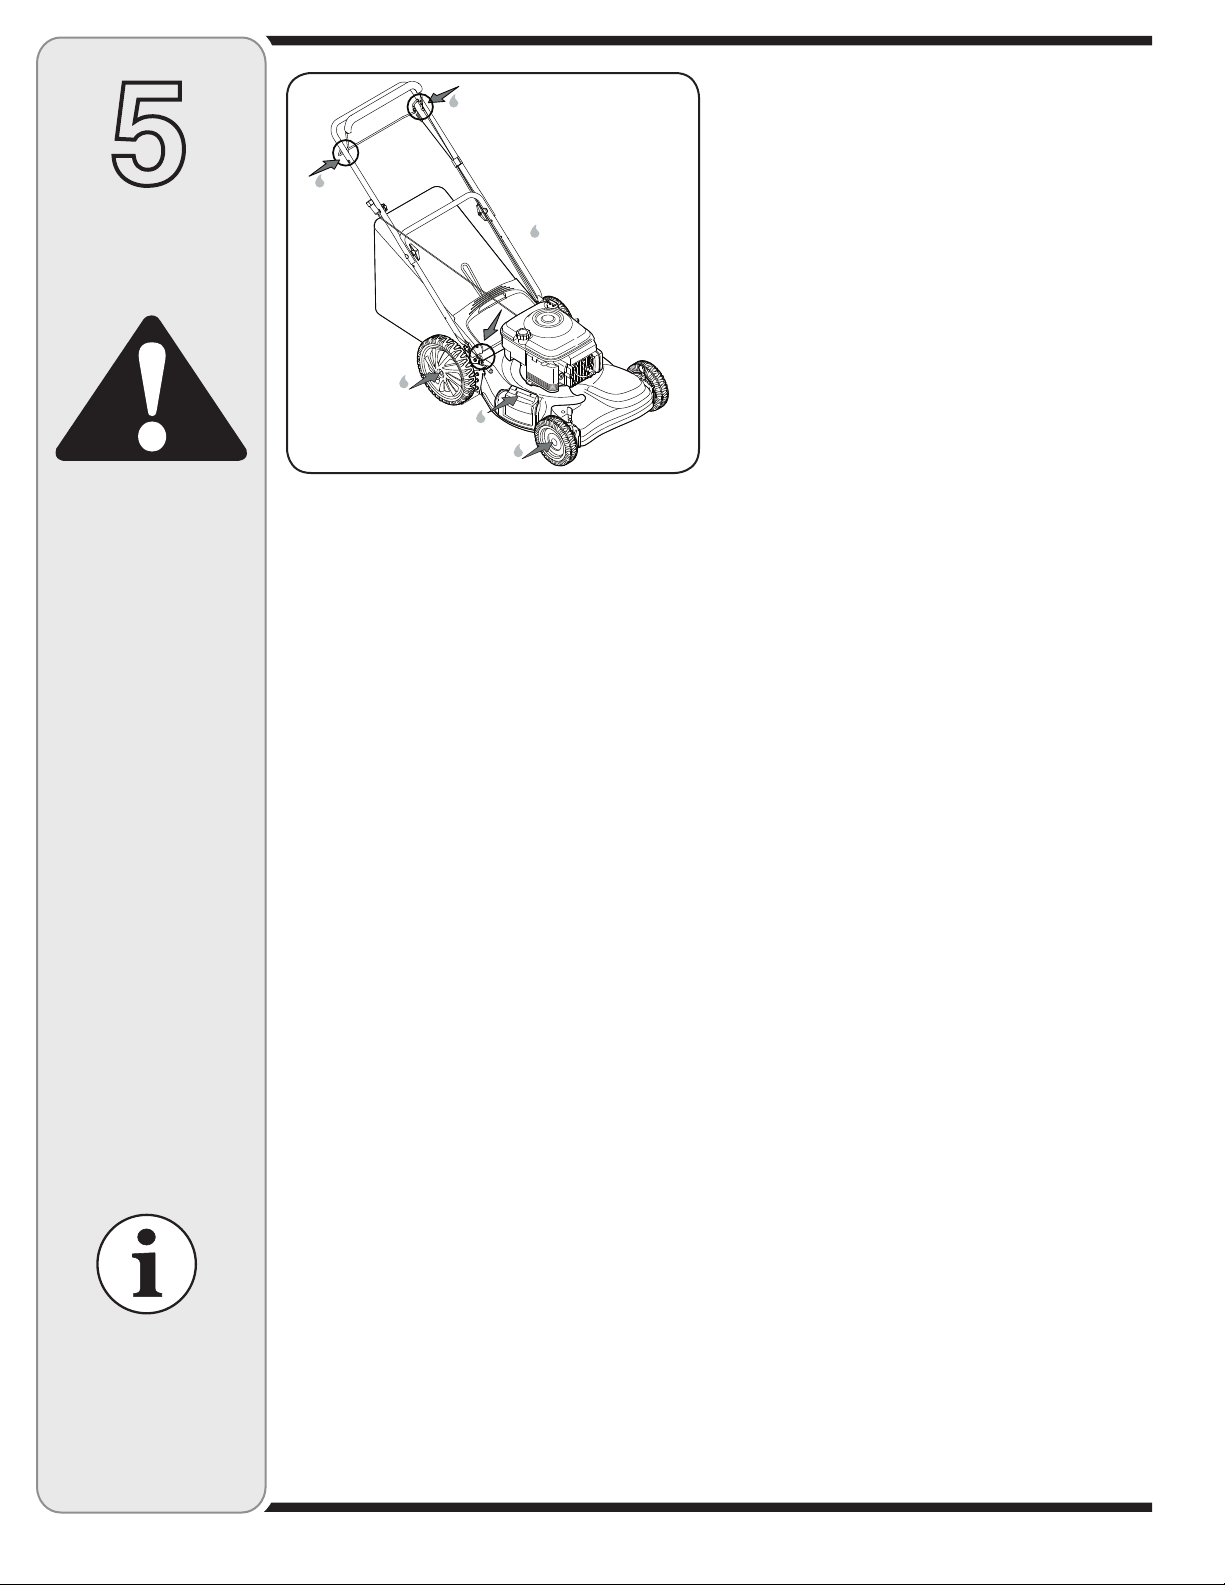
Lubrication
1.Lubricatethepivotpointsonthebladecontrolhandle
atleastonceaseasonwithlightoil.Theblade
controlmustoperatefreelyinbothdirections.See
Figure11.
2.Ifyourmowerisequippedwithballbearingwheels,
lubricateatleastonceaseasonwithalightoil,all
othertypesrequirenolubrication.However,ifthe
wheelsareremovedforanyreason,lubricatethe
surfaceoftheaxleboltandtheinnersurfaceofthe
wheelwithlightautomotiveoil.
3.Lubricatethetorsionspringandpivotpointperiodi
-
callywithlightoiltopreventrust.SeeFigure11.
4.Thetransmissionispre-lubricatedandsealedatthe
factoryanddoesnotrequirelubrication.
5.Followtheaccompanyingenginemanualforlubrica-
tionscheduleandinstruction.
Engine
1.Refertotheseparateenginemanualforengine
maintenanceinstructions.
2.Maintainengineoilasinstructedintheseparate
enginemanualpackedwithyourunit.Readand
followinstructionscarefully.
3.Undernormalconditionsserviceaircleanerasin-
structedintheseparateenginemanualpackedwith
yourunit.Cleaneveryfewhoursunderextremely
dustyconditions.Poorengineperformanceand
floodingusuallyindicatesthattheaircleanershould
beserviced.
4.Thesparkplugshouldbecleanedandthegap
resetonceaseason.Sparkplugreplacementis
recommendedatthestartofeachmowingseason;
checkenginemanualforcorrectplugtypeandgap
specifications.
NOTE:Thissparkignitionsystemmeetsallrequire
-
mentsoftheCanadianInterference-CausingEquipment
Regulations.
5.Cleantheengineregularlywithaclothorbrush.
Keepthecoolingsystem(blowerhousingarea)clean
topermitproperaircirculationwhichisessentialto
engineperformanceandlife.Becertaintoremoveall
grass,dirtandcombustibledebrisfrommufflerarea.
Deck
Theundersideofthemowerdeckshouldbecleanedafter
eachusetopreventabuildupofgrassclippings,leaves,
dirtorothermatter.Ifthisdebrisisallowedtoaccumulate,
itwillinviterustandcorrosion,andmaypreventproper
mulching.
Thedeckmaybecleanedbytiltingthemowerandscrap-
ingcleanwithasuitabletool(makecertainthesparkplug
wireisdisconnected).
ReplacingRearFlap
Therearflapisattachedtothebackofthemowerdeck.If
therearflapbecomesdamaged,replaceitbycuttingoff
theflatendofthewirerodwhichsecuresittothedeck
usingapairofside-cutters.Attachthenewrearflapusing
thenewrodprovidedwiththerearflap,bendingtheends
oftherodovertosecure.
BladeCare
Periodicallyinspectthebladeadapterforcracks,
especiallyifyoustrikeaforeignobject.Replacewhen
necessary.Followthestepsbelowforbladeservice:
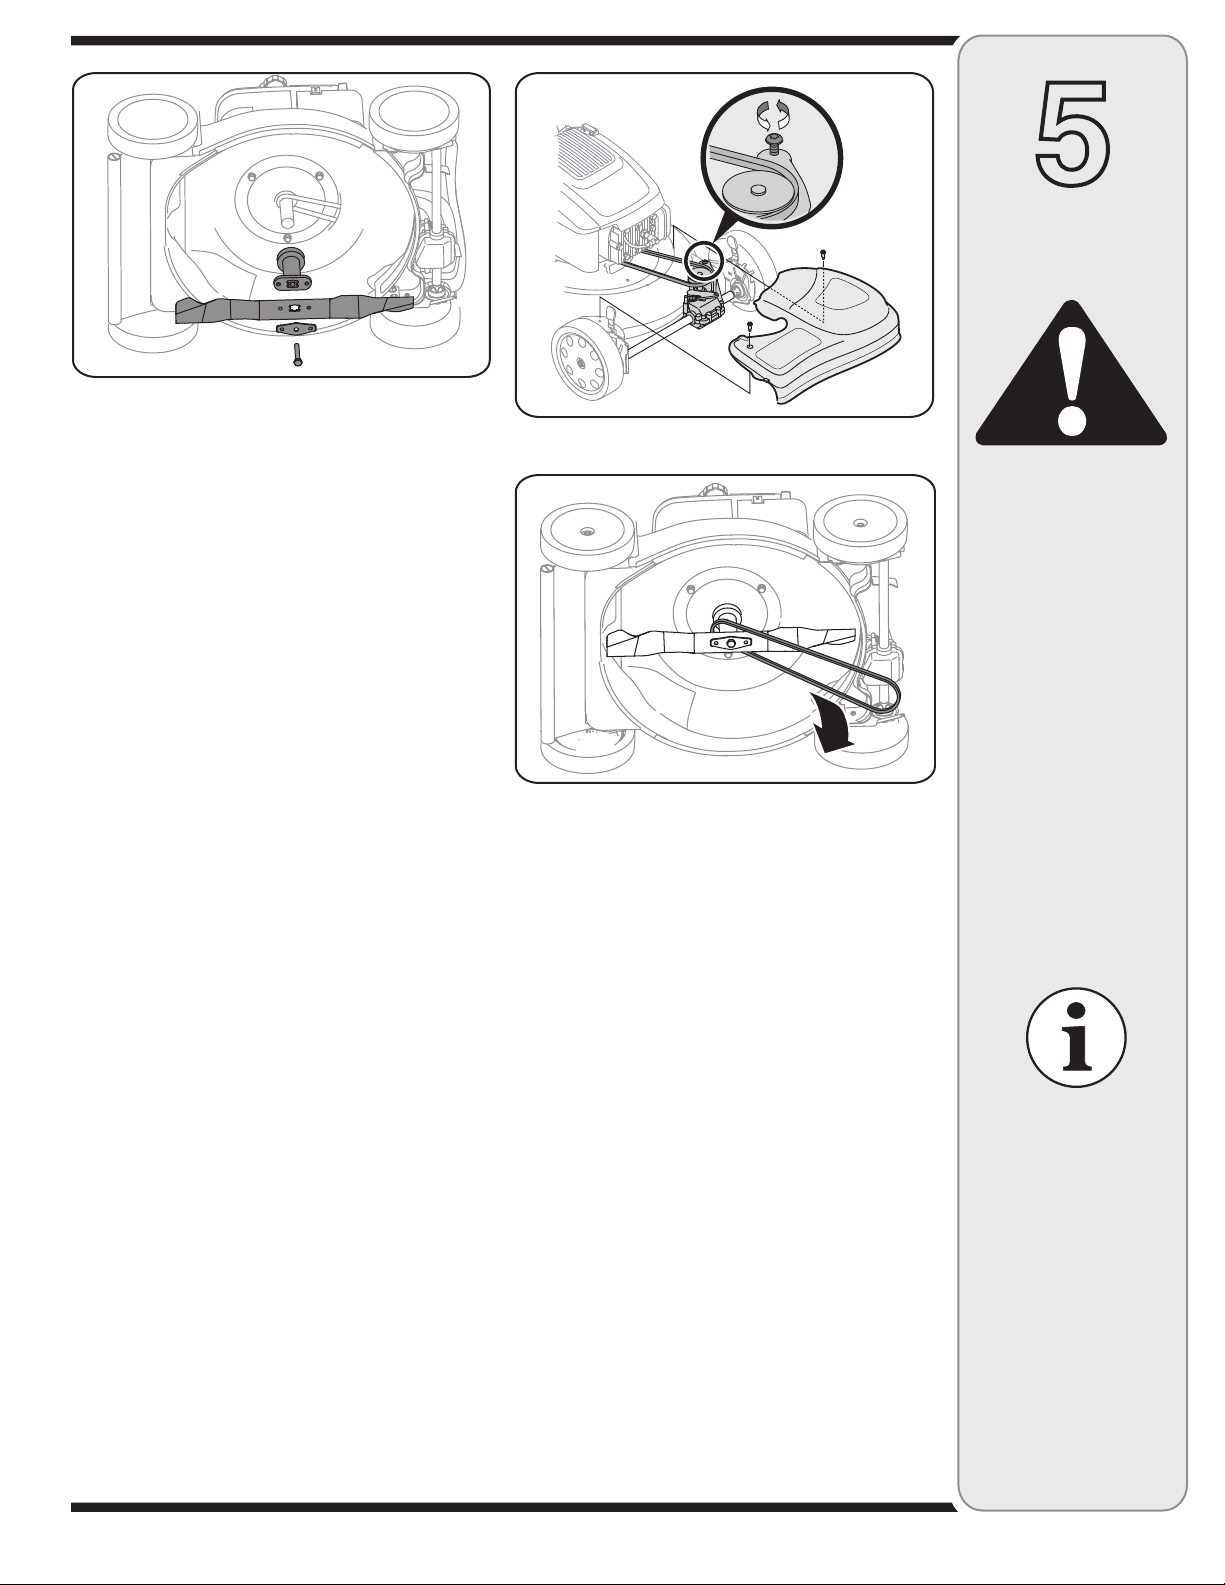
1.Removetheboltandthebladebellsupportwhich
holdthebladeandthebladeadaptertotheengine
crankshaft.SeeFigure12.
2.Removebladeandadapterfromthecrankshaft.
3.Theblademayberesharpenedbyremovingitand
eithergrindingorfilingthecuttingedgekeepingas
closetotheoriginalbevelaspossible.Donotattempt
tosharpenthebladewhileitisstillonthemower.
4.Itisextremelyimportantthateachcuttingedge
receivesanequalamountofgrindingtopreventan
unbalancedblade.
NOTE:Improperbladebalancewillresultinexcessive
vibrationcausingeventualdamagetotheengineand
mower.Besuretocarefullybalancebladeaftersharpen
-
ing.Possibledamageresultingfrombladeunbalance
conditionisnottheresponsibilityofthemanufacturer.
NOTE:Alwaysremovebladefromtheadapterfortesting
balance.
5.Thebladecanbetestedforbalancebybalancingit
onaroundshaftscrewdriver.Removemetalfromthe
heavysideuntilitbalancesevenly.
6Beforereassemblingthebladeandthebladeadapter
totheunit,lubricatetheenginecrankshaftandthe
innersurfaceofthebladeadapterwithlightoil.
Alwaysstopengine,
disconnectspark
plug,andground
againstenginebefore
cleaning,lubricating
ordoinganykindof
maintenanceonyour
machine.
Cuttinggrassin
sandysoilcondition
causesabrasivewear
totheblade.
Ifunitistippedfor
easieraccessto
bladeorbelt,tip
mowerasspecified
inseparateengine
manual.Ifitdoesnot
specifyturnmower
onitssidemaking
surethattheairfilter
andthecarburetor
areup.
Maintenance
11
5
WARNING
Figure12
Figure14
Figure13
7.Installthebladeadapteronthecrankshaftwiththe
“star”awayfromtheengine.SeeFigure12.Place
thebladewiththesidemarked“bottom”(orwithpart
number)facingawayfromtheadapter.Aligntheblade
bellsupportoverthebladewiththetabsintheholes
ofthebladeandinsertthehexbolt.
8.Tightenthehexbolttothetorquelistedbelow:
BladeMountingTorque
CenterBolt450in.lb.min.,600in.lb.max.
Toinsuresafeoperationofyourunit,ALLnutsandbolts
mustbecheckedperiodicallyforcorrecttightness.
BeltCare
1.Removetwoshoulderscrewssecuringfrontdrive
covertomowerdeck.SeeFigure13.Pressinwardon
sidesoffrontdrivecoverandreleasetabsthatsecure
ittotheheightadjusterbrackets.Removedrivecover
frommower.
2.Loosenscrewholdingbelttensionspringtotransmis-
sion.SeeFigure13inset.Donotremovescrew
completely.Asyouloosenit,tensiononthebeltwillbe
released.
3.Pushtransmissionupalittleandslidebeltoffthe
transmissionpulley.Liftmowertoaccessbeltfrom
undersideofmower.Slidebeltoffofenginepulleyand
aroundtheblade.SeeFigure14.
4.Replacewithnewbelt,workingaroundblade.Make
surebeltisfirmlyseatedonenginepulleywhilepulling
fromtheothersideandslidingitaroundthetransmis
-
sionpulley.Tightenscrewloosenedearliertosecure
belttensionspringtothetransmission.Reassemble
frontdrivecover.
Off-SeasonStorage
Thefollowingstepsshouldbetakentoprepareyourlawn
mowerforstorage.
1.Cleanandlubricatemowerthoroughlyasdescribedin
thelubricationinstructions.
2.Wedonotrecommendtheuseofapressurewasher
orgardenhosetocleanyourunit.
3.Refertoenginemanualforcorrectengine
storageinstructions.
4.Coatmower’scuttingbladewithchassisgreaseto
preventrusting.
5.Storemowerinadry,cleanarea.Donotstorenextto
corrosivematerials,suchasfertilizer.
NOTE:Whenstoringanytypeofpowerequipmentin
apoorlyventilatedormetalstorageshed,careshould
betakentorust-prooftheequipment.Usingalightoilor
silicone,coattheequipment,especiallycablesandall
movingpartsofyourlawnmowerbeforestorage.
Maintenance
Wedonotrecommend
theuseofpressure
washersorgarden
hosetocleanyour
unit.Thesemaycause
damagetoelectrical
components,spindles,
pulleys,bearings,or
theengine.Theuse
ofwaterwillresultin
shortenedlifeand
reduceserviceability.
Whenremovingthe
cuttingbladeorbelt,
protectyourhands
withapairofheavy
glovesoruseaheavy
ragtoholdtheblade.
Anunbalancedblade
willcauseexcessive
vibrationwhenrotat-
ingathighspeeds.It
maycausedamage
tomower,andcould
breakcausingper-
sonalinjury.
12
Forrepairsbeyond
theminoradjust-
mentslistedhere,
contactanauthorized
servicedealer.
6
Trouble
Shooting
CauseProblem
Remedy
Enginefailstostart
1. Bladecontrolhandledisengaged.
2.Sparkplugwiredisconnected.
3.Fueltankemptyorstalefuel.
4.Enginenotprimed.
5.Faultysparkplug.
6.Blockedfuelline.
7.Engineflooding.
1. Engagebladecontrolhandle.
2.Connectwiretosparkplug.
3.Filltankwithclean,freshgasoline.
4.Refertoenginemanual.
5.Clean,adjustgap,orreplace.
6.Cleanfuelline.
7.Waitafewminutestorestart,butdonotprime.
Enginerunserratic1. Connectandtightenspark
plugwire.
2.Cleanfuelline;filltankwithclean,fresh
gasoline.
3.Clearvent.
4.Drainfueltankandcarburetor.Refillwithfresh
fuel.
5.Refertoenginemanual.
6.Refertoenginemanual.
1. Sparkplugwireloose.
2.Blockedfuellineorstalefuel.
3.Gascapventplugged.
4.Waterordirtinfuelsystem.
5.Dirtyaircleaner.
6.Carburetoroutofadjustment.
Engineoverheats
1. Fillcrankcasewithproperoil.
2.Refertotheenginemanualpackedwithyour
unit.
3.Removeblowerhousingandclean.
4.Refertoenginemanual.
1. Engineoillevellow.
2.Dirtyairfilter.
3.Airflowrestricted.
4.Carburetornotadjustedproperly.
Occasionalskip(hesitates)
athighspeed
1. Adjustgapto.030”.Refertoenginemanual.
2.Refertoenginemanual.
1. Sparkpluggaptooclose.
2.Carburetoridlemixtureadjustment
improperlyset.
Idlespoorly
1. Resetgapto.030”orreplacesparkplug.
Refertoenginemanual.
2.Refertoenginemanual.
3.Refertoenginemanual.
1. Sparkplugfouled,faultyorgaptoo
wide.
2.Carburetorimproperlyadjusted.
3.Dirtyaircleaner.
1. CuttingBladelooseorunbalanced.
2.Bentcuttingblade.
1. Tightenbladeandadapter.Balanceblade
2.Replaceblade.
Excessivevibration
1. Wheelsnotpositionedcorrectly.
2.Dullblade.
Unevencut
1. Placeallfourwheelsinsameheightposition.
2.Sharpenorreplaceblade.
1. Wetgrass.
2.Excessivehighgrass.
3.Dullblade.
1. Donotmowwhengrassiswet;
waituntillatertocut.
2.Mowonceatahighcuttingheight,thenmow
againatdesiredheightormakeanarrower
cuttingpath.
3.Sharpenorreplaceblade.
Mowerwillnotmulch
grass
1. Beltnotinstalledproperly.
2.Debriscloggingdriveoperation.
1. Checkingbeltforproperpulleyinstallationand
movement.
2.Cleanoutdebris.
Wheelswillnotpropel

13
TWOYEARSUPREMEWARRANTY:
FortwoyearsfromdateofretailpurchasewithinCanada,MTDPRODUCTS
LIMITEDwill,atitsoption,repairorreplace,fortheoriginalpurchaser,freeof
charge,anypartorpartsfoundtobedefectiveinmaterialorworkmanship.This
warrantycoversunitswhichhavebeenoperatedandmaintainedinaccordancewith
theowner’sinstructionsfurnishedwiththeunit,andwhichhavenotbeensubject
tomisuse,abuse,commercialuse,neglect,accidentimpropermaintenanceor
alteration.Normalwearpartsorcomponentsthereofaresubjecttospecialtermsas
notedbelowintheNOFAULTNinetyDayConsumerWarrantyclause.
Theengine,startermotororcomponentpartsthereofcarryseparatewarrantiesfrom
theirmanufacturers.Pleaserefertotheapplicablemanufacturer’swarrantypolicyfor
theseitems.
NOFAULTNinetyDayConsumerWarrantyonNormalWearParts:Allnormal
wearpartfailureswillbecoveredonthisproductforaperiodof90daysregardless
ofcause.After90daysbutwithinthetwoyearwarrantyperiod,normalwearpart
failureswillbecoveredifcausedbydefectsinmaterialorworkmanshipofother
componentparts.Normalwearpartsaredefinedasbatteries,belts,blades,blade
adaptors,grassbags,riderdeckwheels,seats,tiresandclutchparts(friction
wheels).
FullNinetyDayWarrantyonBattery:Forninety(90)daysfromthedateof
retailpurchase,ifanybatteryincludedwiththisunitprovesdefectiveinmaterialor
workmanshipandourtestingdeterminesthebatterywillnotholdacharge,MTD
PRODUCTSLIMITEDwillreplacethebatteryatnochargetotheoriginalpurchaser.
AdditionalLimitedThirtyDayWarrantyonBattery:Afterninety(90)daysbut
withinonehundredtwenty(120)daysfromthedateofpurchase,MTDPRODUCTS
LIMITEDwillreplacethedefectivebattery,fortheoriginalpurchaser,foracostof
one-half(½)ofthecurrentretailpriceofthebatteryineffectatthedateofreturn.
HowtoObtainService:Warrantyserviceisavailable,withproofofpurchase,
throughyourlocalMTDAuthorizedServiceDealer.Ifyoudonotknowthedealer
inyourarea,pleasewritetotheServiceDepartmentofMTDPRODUCTSLIMITED,
P.O.BOX1386,KITCHENER,ONTARION2G4J1.Thereturnofacompleteunitwill
notbeacceptedbythefactoryunlesspriorwrittenpermissionhasbeenextendedby
MTDPRODUCTSLIMITED.
OtherWarranties:Allotherwarranties,expressorimplied,includinganyimplied
warrantyofmerchantabilityislimitedinitsdurationtothatsetforthinthisexpress
limitedwarranty.Theprovisionsassetforthinthiswarrantyprovidethesoleand
exclusiveremedyofMTDPRODUCTSLIMITEDobligationsarisingfromthesale
ofitsproducts.MTDPRODUCTSLIMITEDwillnotbeliableforincidentalor
consequentiallossordamage.
7
Warranty
Failuretocomply
withsuggested
maintenance
andlubrication
specificationswill
voidwarranty.

Forpartsand/or
accessoriesreferto
customersupporton
page2.
Adressez-vousau
«Serviceaprès-vente»
àlapage2pourcequi
concernelespièces
et/ouaccessoires.
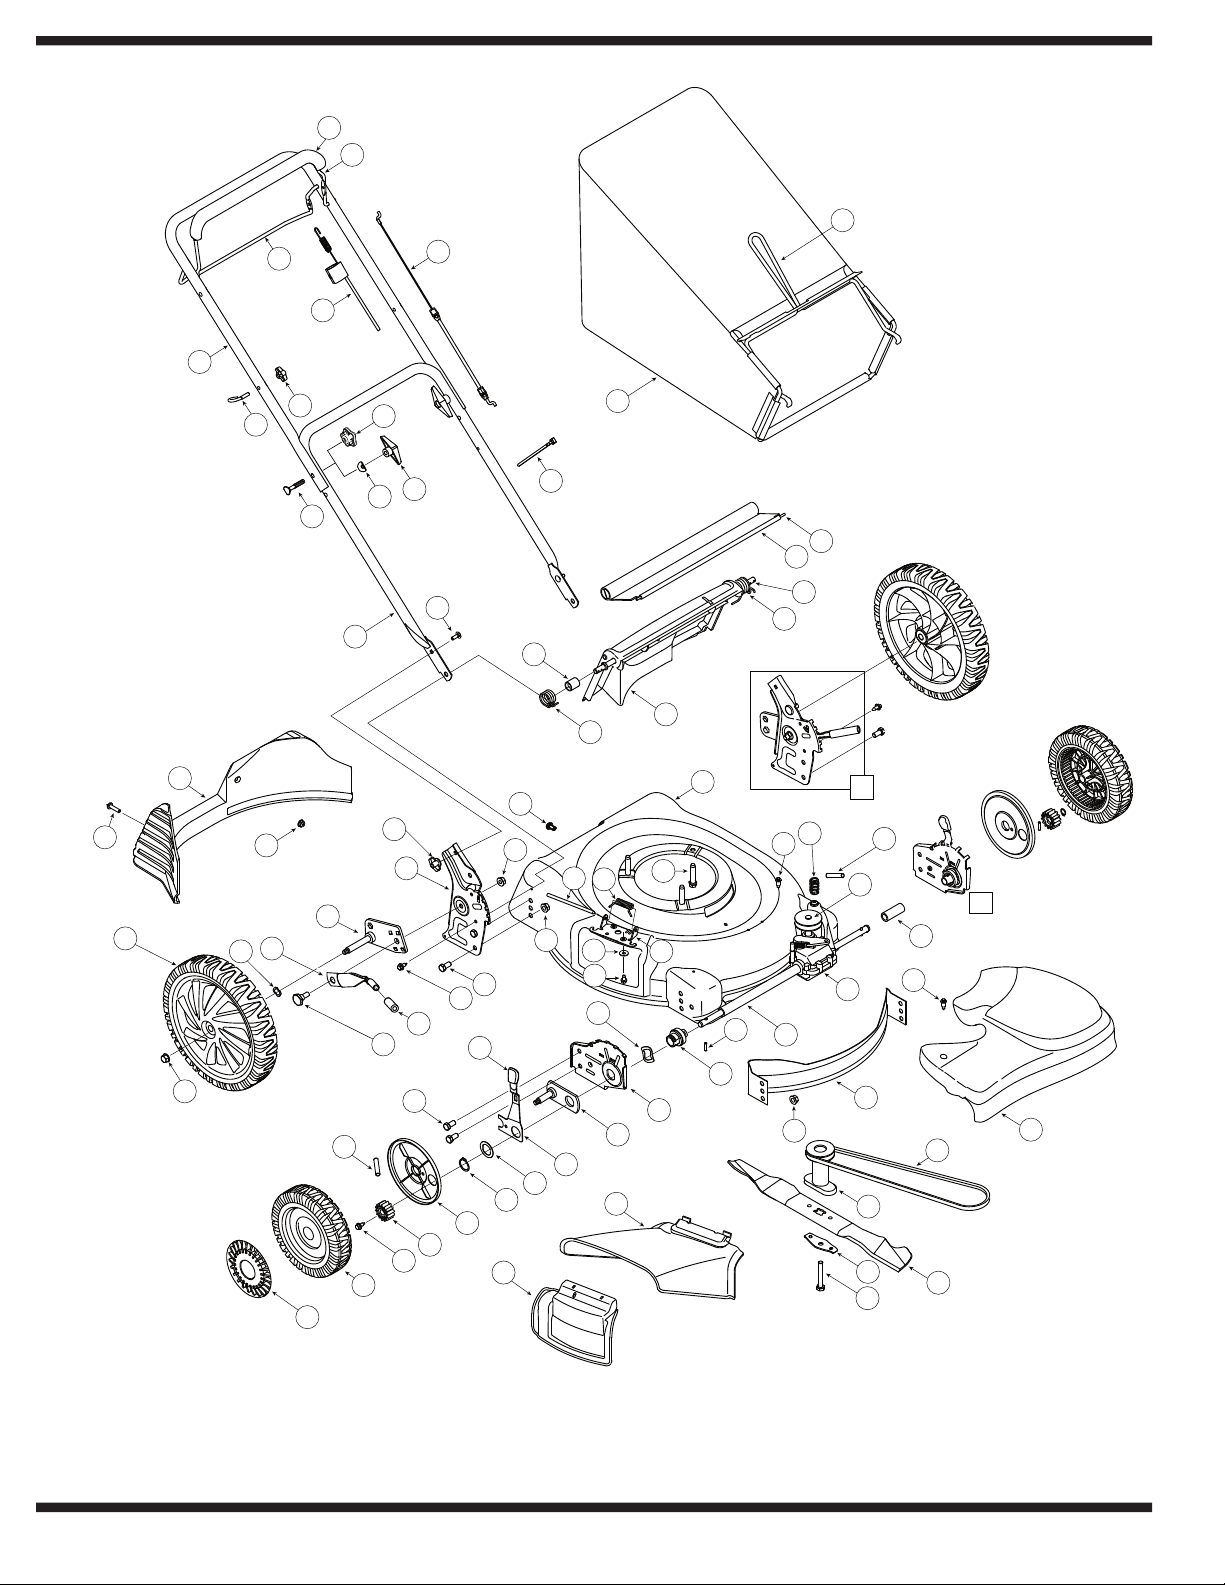
1731-1214DriveControlHandlePoignéedecommanded’embrayagedel’entr.
2710-0599HexWashS-TappScr1/4-20x.50Visautotaraudeuseàrondellehex.1/4-20x0,50
3736-0270CuppedWasher.265IDx.75ODx.062Rondellecreuse0,265DIx0,75DEx0,062
417032AChuteHingeCharnièrededéflecteur
5732-1014TorsionSpringRessortdetorsion
6731-04204BailCover-RedCouvercle-rouge
7747-1161ABladeControlHandlePoignéedecommandedelalame
8749-1092AUpperHandleGuidonsupérieur
9731-04177ChuteDeflectorDéflecteurdelagoulotte
10687-02055CompleteMulchPlugPlaquededéchiquetagecomplet
11747-0710HingePinAxedecharnière
12682-0015FrontBearingAss’yRoulement-avant
748-0355BearingSupportSupportderoulement
741-0604ABearingSleeveManchonderoulement
732-0708BearingRetainerRetenuederoulement
13720-0279KnobBouton
14720-0284HandleKnobAssemblyBouton
15710-1205RopeGuideBoltBoulondeguidagedecordon
16746-1114ControlCable50.56"Lg.Câbledecommandedelalame50,56podelg.
17710-1174CarriageBolt5/16-18x2.0Boulonordinaire5/16-18x2,0
18687-02192RHHandleBracketSupportdeguidonCD
18687-02191LHHandleBracketSupportdeguidonCG
19726-0240CableTieAttachecâble
20714-0104Int.CotterPin.072x1.13"Lg.Goupillefendueint.0,072x1,13podelg.
21710-0654AHexWashHDTapScr3/8-16x.88Visautotaraudée3/8-16x0,88
22746-04203DriveCableCâbledelacommande
23664-04011GrassBag(Troy-Bilt)Sacàherbe(Troy-Bilt)
24710-1650Self-tappingScr.,5/16-18x.875Visautotaraudeusede5/16-18x0,875po
25710-0286TrussMachScr1/4-20x.50Visderenforcementàtêtecintrée1/4-20x0,50
26710-04371HexLockScrew1/4-15Visàtêtehex.1/4-15
27787-0127821"DeckPlateaudecoupede21po
28731-04150CRearBaffle21"RearDischargeDéflecteurarrière21poéjectionarrière
29710-0216HexCapScrew3/8-16x.75Visàchapeauàsixpansde3/8-16x0,75
30732-04090ATorsionSpringRHRessortdetorsionCD
31712-04065Hex.FlangedL-Nut3/8-16Gr.FContre-écrouàembase3/8-16Qual.F
32731-05013TransmissionCover(Black)Couvercledelatransmission(noir)
32731-05020ATransmissionCover(Troy-Bilt
)Couvercledelatransmission(Troy-Bilt)
32731-05021ATransmissionCover(Yellow)Couvercledelatransmission(jaune)
33782-5002BFrontBaffleDéflecteuravant
34754-04101V-BeltCourroietrapézoïdale
35736-0447WaveWasherRondelleondulée
36750-04594SleeveSpacer8.985"Lg.Entretoise8,985podelg.
37748-04015ABladeAdapterw/PulleyAdaptateurdelalameavecpoulie
38742-074121"MulchingBladeLamedéchiquetage21po
39736-0524BBladeBellSupportSupportdelalame
40687-02044HeightAdjusterPivotPlateAss'yPlaquedepivot-réglagedehauteur
41710-1257HexBolt3/8-24x2.5"Lg.Boulonhex.3/8-24x2,50podelg.
42749-0928ALowerHandleGuidoninférieur
43750-04595SleeveSpacer1.4"Lg.Entretoise1,4podelg.
44732-04089ATorsionSpringLHRessortdetorsionCG
45734-04018AWheelAss'y8x2.125,GearS-WaveEnsemblederoue8x2,125,pignon
46710-04531PanScr.1/4-20x.390Vis1/4-10x0,390
47717-1762SpurGear14TRHEngrenage14dentsdroite
47717-1761SpurGear14TLHEngrenage14dentsgauche
48747-04080GrassBagFrameBâtidesacàherbe
49736-0451SaddleWash..320IDx.937ODRondelleselle0,320DIx0,937DE
52687-02056RHHandleBracketAssemblyEnsembledesupportduguidonCD
52687-02057LHHandleBracketAssemblyEnsembledesupportduguidonCG
53715-0221PinGoupille
54736-0474FlatWasher1.5ODx.03Rondelleplate1,50DEx0,03
55687-02039APivotArmAssembly-RHEnsembledebrasdepivot-CD
55687-02040APivotArmAssembly-LHEnsembledebrasdepivot-CG
56732-0866RearSpringLeverLevierderessortarrière
57720-0426HeightAdjusterKnobBouton
58738-0507BShoulderScrew.50Dia.Visàépaulement0,50dia.
60787-01298HeightAdjusterPlate-RHPlaquederéglagedehauteur-CD
60787-01299HeightAdjusterPlate-LHPlaquederéglagedehauteur-CG
61732-0706SpringLeverFrontRHLevierderessortavant-CD
61732-0707SpringLeverFrontLHLevierderessortavant-CG
62732-0700WireFil
63731-04998TrailShieldAbattantdeprotectionarrière
64747-0996PivotRodTigedepivot
65716-0102SnapRingfor1.0"shaftJoncd’arrêtpourarbre1,0PO
66731-04134ARearDischargeDoorPorted’éjectionarrière
67750-04162WheelDustCapChapeaudemoyeu
68712-04065HexL-FlangeNut3/8-16Gr.F,NylonContre-écrouàembase3/8-16Qual.F,nylon
69750-0996Spacer.375x.50x1.02"Lg.Entretoise0,375x0,50x1,02podelg.
71710-0703CarriageBolt1/4-10x.75Boulonordinaire1/4-20x0,75
72712-0397WingNutÉcrouàoreilles
73618-04376TransmissionAssemblyEnsembledelatransmission
74732-1043CompressionSpringRessrotdecompression
76687-02194RHHeightAdjustmentAssemblyEnsemblederéglagedehauteur-CD
76687-02193LHHeightAdjustmentAssemblyEnsemblederéglagedehauteur-CG
77731-0981AHubCapGreyRadialMoyeudechapeau-gris
78720-0312FoamGripPoignéedemousse
79734-04019WheelAss'yComp/12x2.125Ensemblederoue12x2,125
80736-0182SpringWasher.50IDx1.0ODx.022Rondelleressort0,50DIx1,0DEx0,022
12A-565
12.06.05

13
GARANTIESUPRÈMEDEDEUXANS
MTDPRODUCTSLIMITEDs’engageàréparerouàremplacergratuitement,àsonchoix,
àl’acheteurinitial,laoulespiècesquis’avèrentdéfectueusesenraisond’unvicede
matièreoudefabricationdanslesdeuxansquisuiventladated’achataudétailauCanada.
Cettegaranties’appliqueseulementauxmachinesquiontétéutiliséesetentretenues
conformémentauxinstructionspubliéesdanslanoticed’utilisationaccompagnantla
machine,quin’ontpasfaitl’objetd’unemploiincorrectouabusif,denégligence,d’un
entretieninadéquatoudemodification,quin’ontpasétéaccidentéesetquin’ontpasété
utiliséesàdesfinscommerciales.Lespiècescourantesfontl’objetdeconditionsspéciales
énuméréesci-dessousdanslaclause«Garantiesansdéfautdequatre-vingt-dixjoursau
consommateur».
Lemoteur,lemoteurdedémarrageainsiquesescomposantsfontl’objetd’unegarantie
séparéedeleursfabricantsrespectifs.Veuillezconsulterlesconditionsdegarantiedu
fabricantencequiconcernecespièces.
«Garantiesansdéfautdequatre-vingt-dixjoursauconsommateur»despièces
courantes:Touteslespiècescourantessontprotégéespendant90jours,quellequesoitla
causedeleurdéfaillance.Àl’expirationdudélaide90jours,maisavantlafindelapériode
degarantiededeuxans,lespiècescourantessontprotégéessileurdéfaillancerésultedu
vicedematièreoudefabricationd’uneautrepièce.Parpiècescourantes,onentendles
batteries,lescourroies,leslames,lesadaptateursdelames,lessacsàherbe,lesrouesdes
tondeuses,lessièges,lespneusetlespiècesdel’embrayage(rouesdefrottement).
Garantiecomplètedequatre-vingt-dixjourssurlabatterie:MTDs’engageàremplacer
gratuitementàl’acheteurinitialtoutebatteriefournieaveccettemachinequis’avère
défectueuseenraisond’unvicedematièreoudefabricationetaprèsquenostestsaient
confirméqu’ellenepeutmaintenirunecharge.
Garantielimitéesupplémentairedetrentejourssurlabatterie:MTDs’engage,à
l’expirationdelapériodedequatre-vingt-dix(90)joursetavantlafind’unepériodede
centvingt(120)joursàcompterdeladated’achat,àremplacerlabatteriedéfectueuseà
l’acheteurinitial,pourlamoitié(1/2)duprixdedétailenvigueurdelabatterieàladatedu
retourdecelle-ci.
Pourobtenirleservicesousgarantie:Toutconcessionnaire-réparateuragrééparMTD
estenmesured’assurertoutservicesousgarantiesurprésentationd’unepreuved’achat.Si
vousneconnaissezpasleconcessionnaire-réparateurdevotrelocalité,adressez-vousau
serviceaprès-vente,MTDPRODUCTSLIMITED,C.P.1386,KITCHENER(ONTARIO)N2G
4J1.Unemachinecomplètenepeutêtreretournéeàl’usinequesielleestaccompagnée
d’uneautorisationécritepréalabledeMTDPRODUCTSLIMITED.
Autresgaranties:Touteslesautresgaranties,expriméesoutacites,ycomprislesgaranties
tacitesdequalitémarchande,selimitentàladuréestipuléedanslagarantielimitée
exprimée.Lesconditionsstipuléesdanscettegarantiereprésententlesseulesobligations
deMTDPRODUCTSLIMITEDdécoulantdelaventedesesproduits.MTDPRODUCTS
LIMITEDn’estpasresponsabledetoutepertenidetoutdommageindirectouaccidentel.
7
Garantie
Lenon-respectdes
conseilsd’entretien
etdelubrification
annulelagarantie.
12
Pourtoute
réparationautre
quelesajustements
mineursénuméré
ici,adressez-vousà
lastationtechnique
agréée.
6
Dépannage
CauseProblèmeSolution
Lemoteurne
démarrepas.
Lemoteurtourne
irrégulièrement.
1. Branchezetserrezlefildelabougie.
2.Nettoyezlacanalisation.Faitesleplein
avecuneessencepropreetfraîche.
3.Débouchezl’évent.
4.Videzleréservoiràcarburant.Faites
lepleinavecuneessencefraîche.
5.Consultezlanoticed’utilisationdu
moteur.
6.Consultezlanoticed’utilisationdu
moteur.
1. Fildelabougiedesserré.
2.Lacanalisationdecarburantestbouchée
oul’essenceesteventée.
3.L’eventducapuchonduréservoirest
bouché.
4.Del’eauouunesaletéestprésentedans
lesystème.
5.Lefiltreàairestsale.
6.Lecarburateurestmalrégle.
1. Lapoignéedecommandedelalamen’est
pasembrayée.
2.Fildelabougiedébranché.
3.Leréservoirestvideoul’essenceest
éventée.
4.Moteurnonamorcé.
5.Labougieestdéfectueuse.
6.Canalisationdecarburantbouchée.
7.Lemoteurestnoyé.
1. Embrayezlapoignéedecommandede
lalame.
2.Branchezlefilàlabougie.
3.Faiteslepleinavecuneessencepropre
etfraîche.
4.Consultezlanoticed’utilisationdu
moteur.
5.Nettoyez,réglezl’écartementou
replacezlabougie.
6.Nettoyezlacanalisation.
7.Attendezquelquesminutesavant
d’essayerdefairedémarrerlemoteur
sansl’amorcer.
Lemoteursurchauffe.1. Faiteslepleind’huileducarter.
2.Consultezlanoticed’utilisationdu
moteur.
3.Démontezl’habitacleduventilateuret
nettoyez-le.
4.Consultezlanoticed’utilisationdu
moteur.
1. Niveaud’huiletropbas.
2.Lefiltreàairestsale.
3.Lacirculationd’airestgênée.
4.Lacarburateurestmalrégle.
Lemoteurhésiteparfoisà
régimeélevé.
1. Réglezl’écartementà0,030po.Con-
sultezlanoticed’utilisationdumoteur
2.Consultezlanoticed’utilisationdu
moteur.
1. Labougieestsale,défectueuseou
l’écartementesttropgrand.
2.Lecarburateurestmalréglé.
3.Lefiltreàairestsale.
1. L’écartementdelabougieesttroppetit.
2.Mélangeduralentiducarburateurmal
réglé.
Lemoteurtourne
irrégulièrement.
1. Réglezl’écartementà0,030poou
remplacezlabougie.Consultezla
noticed’utilisationdumoteur.
2.Consultezlanoticed’utilisationdu
moteur.
3.Consultezlanoticed’utilisationdu
moteur.
Vibrationsexcessives.1. Serrezlalameetl’adaptateur.
Équilibrezlalame.
2.Remplacezlalame.
1. Lalameestdesserréeoumaléquilibrée.
2.Lalameestdéformée.
Lacoupeestirrégulière1. Placezlesquatrerouesàlamême
hauteur.
2.Aiguisezouremplacezlalame.
1. Lesrouesnesontpasbien
positionnées.
2.Lalameestémoussée.
Latondeusene
déchiquettepasl’herbe.
1. Netondezpasquandl’herbeestmouil-
lée.Attendezqu’ellesèche.
2.Coupezl’herbeàunréglageélevé,puis
tondezànouveauàlahauteurvoulueou
surunelargeurplusétroite.
3.Aiguisezouremplacezlalame.
1. L’herbeestmouillée.
2.L’herbeesttrophaute.
3.Lalameestémoussée.
Lesrouesnefontpas
avancerlatondeuse.
1. Vérifiezquelacourroieestbieninstallée
surlapoulieetqu’elletrournedansle
bonsens.
2.Nettoyezlatransmission.
1. Lacourroien’estpasbieninstallée.
2.Desdébrisgênentlefonctionnementde
latransmission.
11
L’utilisationd’unnettoyeur
pressuriséoud’unboyau
d’arrosagepournettoyer
latondeuseestdécon-
seillée.Celarisqueen
effetd’endommagerles
composantsélectriques,
lesfusées,lespoulies,
lesroulementsoule
moteur.L’emploid’eau
atendanceàraccourcir
laviedelatondeuse
etàlimitersafacilité
d’entretien.
5
Entretien
Enenlevantlalame
oulacourroie,portez
toujoursdesgants
épaisouutilisezun
chiffonépaispourtenir
lalame.
Silalameest
déséquilibrée,ellefera
vibrerlatondeusede
façonexcessive,mais
ellepourraitaussi
causerdesdommages
àlatondeuseoumême
casserpendantqu’elle
tourne,etcauserde
sérieusesblessuresà
l’utilisateur.
Figure12
6.Avantderemonterlalameetsonadaptateursur
latondeuse,lubrifiezlevilebrequinetlasurface
intérieuredel’adaptateuravecunehuilelégère.
7.Placezl’adaptateurdelalamesurlevilebrequin,
«l’étoile»àl’opposédumoteur.VoirlaFigure
12.Placezlalame,lecôtésurlequellamention
«Bottom»(oulenumérodepièce)apparaît,à
l’opposédel’adaptateur.Alignezlesupportdelalame
surcelle-cienenfonçantlespattesdanslestrousde
lalame,puisinsérezleboulonhex.
8.Serrezleboulonhex.aucouplerecommandé
ci-dessous:
Coupledemontagedelalame
Bouloncentrale450po-lbmin.,600po-lbmax.
VérifiezpériodiquementqueTOUSlesécrousetboulons
delamachinesontbienserrés.
Démontageetremplacementdelacourroie
1.Enlevezlesdeuxboulonsàépaulementqui
maintiennentlecouvercleavantdelatransmission
surlatondeuse.VoirlaFigure13.Appuyezde
chaquecôtéducouvercleavantdelatransmission
pourdégagerlestaquetsquiretiennentlecouvercle
surlessupportsderéglagedelahauteur.Retirezle
couvercledelatondeuse.
2.Desserrezlavisretenantleressortdetensiondela
courroiesurlatransmission.VoirlaFigure13.Ne
retirezpascomplètementlavis.Latensiondela
courroieestrelâchéeaufuretàmesurequelavisest
desserrée.
3.Soulevezlégèrementlatransmissionetdégagezla
courroiedelapouliedelatransmission.Soulevezla
tondeusepouratteindrelacourroieparledessousde
latondeuse.Dégagezlacourroiedelapouliemotrice
etdelalame.VoirlaFigure14.
4.Installezlacourroieneuveautourdelalame.Vérifiez
qu’elleestbieninstalléesurlapouliemotriceet
placez-lasurlapouliedelatransmissionenlatirant
del’autrecôté.Serrezlavisdesserréeprécédemment
pourattacherleressortdetensiondelacourroiesur
latransmissionetremontezlecouvercleavantdela
transmission.
Remisagehorssaison
Procédezdelamanièresuivantepourpréparervotre
tondeusepourunentreposageprolongé.
1.Nettoyezetlubrifiezsoigneusementlatondeuseselon
lesinstructionsdelubrification.
2.L’utilisationd’unnettoyeursouspressionoud’un
boyaud’arrosagepournettoyerlatondeuseest
déconseillée.
3.Consultezlanoticed’utilisationdumoteurquantaux
instructionsd’entreposagedumoteur.
4.Enduisezlalamedelatondeused’unegraisseà
châssispourl’empêcherderouiller
5.Entreposezlatondeusedansunendroitsecetpropre.
Nelaremisezpasprèsdeproduitscorrosifs,comme
desengraise.
REMARQUE:Ilesttrèsimportantdebienprotégerle
matérielcontrelarouilles’ildoitêtreentreposédansun
abrimétalliquenonventilé.Enduiseztoutelamachine,
enparticulierlescâblesettouteslespiècesmobiles,
avecunehuilelégèreoudelasilicone.
AVERTISSEMENT
Figure13
Figure14
10
5
Entretien
Arrêteztoujoursle
moteuretdébranchez
lefildelabougieet
mettez-leàlamasse
contrelemoteur
avanttoutnettoyage,
toutelubrificationou
autreentretiensurla
machine.
Figure11
Lubrification
1.Lubrifiezlespointsdepivotdelapoignéede
commandedelalameaumoinsunefoisparsaison
avecunehuilelégère.Lacommandedelalamedoit
fonctionnerfacilementdanslesdeuxsens.Voirla
Figure11.
2.Lubrifiezlesroulementsàbillesdesrouesaumoins
unefoisparsaisonavecdel’huilefluide,tousles
autresgenresn’ontpasbesoind’êtrelubrifiées.
Toutefois,siellesdoiventêtredémontéespourune
raisonquelconque,lubrifiezlasurfaceduboulon
d’essieuetlasurfaceintérieuredelaroueavecune
huileautomobilelégère.
3.Leressortdetorsionetlepointdepivotement
doiventêtrelubrifiésrégulièrementavecunehuile
légèrepourempêcherlarouille.VoirlaFigure11.
4.Letransmissionaétélubrifiéeetscelléeàl’usineet
iln’estpasnécessairedelalubrifierrégulièrement
danslecadred’unprogrammed’entretien.
5.Consultezlanoticed’utilisationdumoteurpourles
instructionsdelubrification.
Moteur
1.Consultezlanoticed’utilisationdumoteurpourtout
cequiconcernel’entretiendumoteur.
2.Utilisezl’huileàmoteurrecommandéedanslanotice
d’utilisationdumoteurfournieaveclatondeuse.
Lisezattentivementlesinstructionsetsuivez-les.
3.Dansdesconditionsnormalesnettoyezlefiltreà
airrecommandéedanslanoticed’utilisationdu
moteurfournieaveclatondeuse.Nettoyez-leà
intervallesplusrapprochésdansdesconditions
trèspoussiéreuses.Unemauvaiseperformancedu
moteuretsa«noyade»sontdesindicationsquele
filtreàairdoitêtrenettoyé.
4.Nettoyezlabougieetajustezl’écartementunefois
parsaison.Ilestrecommandéderemplacerla
bougieaudébutdechaquesaison.Vérifiezletype
debougieàutiliseretl’écartementcorrectdansla
noticed’utilisationdumoteur.
AVERTISSEMENT
REMARQUE:Cesystèmed’allumageparétincellede
véhiculerespectetouteslesexigencesduRèglementsur
lematérielbrouilleurduCanada.
5.Nettoyezlemoteurrégulièrementavecunlingeou
unebrosse.Gardezlesystèmederefroidissement(à
proximitéduventilateur)proprepourassurerlabonne
circulationd’airessentielleauxbonnesperformances
etàlalongévitédumoteur.Enleveztouslesbrins
d’herbe,lasaletéetautresdébriscombustiblesse
trouvantàproximitédusilencieux.
Plateaudecoupe
Nettoyezledessousduplateaudecoupeaprèschaque
utilisationpourempêcherlesbrinsd’herbe,lesfeuillesou
lasaletédes’yaccumuler.Touteaccumulationfavorisela
rouilleetlacorrosionetpeutempêcherledéchiquetage
efficace.Inclinezlatondeuseetgrattezledessousdu
plateaudecoupeavecunoutilapproprié(aprèsavoir
vérifiéquelabougieestdébranchée)pournettoyerle
plateaudecoupe.
Remplacementdudéflecteurarrière
Ilestinstallésurl’arrièreduplateaudecoupe.Remplacez
ledéflecteurarrières’ildevientendommagé.Retirezle
déflecteuruséencoupantl’extrémitéplatedelatige
métalliquequilemaintientsurleplateaudecoupe.
Servez-vousdecisailles.Installezledéflecteurarrière
neufaveclanouvelletigefournieetpliezlesextrémités
pourlamaintenirenplace.
Entretienetremplacementdelalame
Examinezpériodiquementl’adaptateurdelamepoury
détectertoutfendillementéventuel,surtoutaprèsavoir
heurtéunobjet.Remplacez-leaubesoin.Procédez
commesuitpourl’entretiendelalame:
1.Enlevezleboulonetlesupportdelalamequi
maintiennentlalameetl’adaptateursurlevilebrequin.
VoirlaFigure12.
2.Dégagezlalameetl’adaptateurduvilebrequin.
3.Pourl’affûterànouveau,démontez-lapuismeulezou
limezlesbordstranchantsenmaintenantl’angleaussi
prèsquepossibledubiseauoriginal.N’essayezpas
d’aiguiserlalameencoreinstalléesurlatondeuse.
4.Ilestessentielquechaquetranchantsoitaffûté
égalementpournepasavoirunelamedéséquilibrée.
REMARQUE:Unelamedéséquilibréecausedesvibra-
tionsquipeuventendommagerlemoteuretlatondeuse.
Assurez-vousdebienrééquilibrerlalameaprèsl’avoir
aiguisée.Lefabricantdelatondeusenepeutêtretenu
responsabledesdégâtscausésparlemauvaiséquilibre
delalame.
REMARQUE:Démonteztoujourslalamedeson
adaptateurpourvérifiezsonbonéquilibre.
5.Vouspouvezvérifierl’équilibredelalameenlaplaçant
suruntournevisàtigeronde.Limezlemétalducôté
lepluslourdjusquàcequelalamesoitparfaitement
équilibrée.
Lefaitdecouper
l’herbesurunsol
sablonneuxprovoque
l’usuredelalamepar
abrasion.
Silamachineest
basculéepourper-
mettreunaccèsplus
facileàlalameoula
courroie,basculezla
tondeuseselonles
instructionsdansla
noticed’utilisationdu
moteur.S’iln’yapas
d’instructionsspéci-
fiques,basculezla
tondeuseaveclefiltre
àairetlecarburateur
surlehaut.
9
4
Lesobjetsprojetés
parunetondeuse
peuventatteindreles
yeuxetcauserdes
blessuresgraves.
Porteztoujours
deslunettesde
sécuritéenutilisant
latondeuse,ouenef-
fectuanttoutentretien
outouteréparation.
Assurez-vousque
seulleconducteur
setrouveàproximité
delatondeuseau
momentdesamise
enrouteoupendant
sonutilisation.
Nefaitesjamais
fonctionerlamachine
dansunlocalcloset
malaéré,carlesgaz
d’échappementdu
moteurcontiennent
dumonoxydede
carbone,ungazino-
doretrèsdangereux.
N’approchezpasles
mains,pieds,cheveux
etvêtementslâches
despiècesenmouve-
mentdumoteuretde
latondeuse.
Figure10
3
Utilisation
AVERTISSEMENT
AVERTISSEMENT:Arrêtezle
moteursivousheurtezunobjet
quelconque.Débranchezlefilde
labougie,cherchezsoigneuse-
menttoutsignededégâtàla
tondeuseetréparez-laavantde
laremettreenmarcheetdevous
enservir.Desvibrationsimpor-
tantesdelatondeuseindiquent
desdégâts.Faitesexamineret
réparerlamachinerapidement.
Conseild’utilisation
1.Pourenclencherl’entraînement,pressezlapoignée
decommandedel’embrayageversleguidon
supérieur.Lâchezlacommandedel’embrayagepour
ralentirpourcontournerunobstacle,tourneroupour
arrêter.
2.Pourobtenirlesmeilleursrésultatsetdéchiqueter
efficacement,necoupezpasl’herbemouillée.
3.Unetonteplusétroitepeutêtrenécessairesil’herbe
estnouvelle,drueouhumide.
4.Votrepelouseseraplussainesivousnetondez
jamaisplusd’untiersdelalongueurtotaledesbrins
d’herbe.
5.Continuezàtondrelapelouseàl’automnejusqu’àce
qu’ellecessedepousser.
6.Sil’herbeaétépermisdepousserenexcèsde4
pouces,ledéchiquetageestdéconseillé.Utilisez
d’abordledéflecteurdelagoulottelatéralpourréduire
lahauteurdel’herbeà3-1/4poucesoumoins,avant
dedéchiqueterl’herbe.
Recommandationsd’ordregénéral
1.Suiveztoujourslesconsignesdesécuritélorsdetout
entretien.
2.Lagarantiedecettetondeusenes’appliquepasà
toutepiècequiafaitl’objetd’unemploiabusifou
d’unenégligence.Pourbénéficieraumaximumde
lagarantie,l’utilisateurdoitentretenirlatondeuse
conformémentauxinstructionsdecettenotice.
3.Lagarantieseranulleetnonavenuesiunemodifica-
tionestapportéeaurégulateurdumoteur.
4.Vérifieztouslesréglagesaumoinsunefoispar
saison.
5.Vérifezrégulièrementquetoutelaboulonnerieest
bienserrée.
REMARQUE:Voirlapage7pourutiliserlatondeuse
aveclesacàherbe,l’ensemblededéchiquetageou
l’ensembled’éjectionlatérale.
Miseenmarchedumoteur
1.Sivotretondeuseestéquipéed’unamorceur,
amorcezlemoteurensuivantlesinstructionsdela
noticed’utilisationdumoteur.
2.Tenez-vousderrièrelamachine,appuyezsurla
poignéedecommandedelalameetmaintenez-la
contreleguidonsupérieur,commeàlaFigure10.
3.Prenezlapoignéedudémarreuràlanceurdelafaçon
illustréeettirez-lalentementjusqu’àcequevous
sentiezunelégèrerésistance.Tirezalorsrapidement
pourfairedémarrerlemoteuretpouréviterlerecul.
Laissezlapoignéerevenirlentementjusqu’auboulon
deguidagedelacorde.
Arrêtdumoteur
1.Lâchezlapoignéedecommandedelalamepour
arrêterlemoteuretlalame.
AVERTISSEMENT:Lalame
continueàtournerpendant
quelquessecondesaprèsquele
moteurs’estéteint.
2.Débranchezlefildelabougieetmettez-leàlamasse
contrelemoteurpourempêchertoutdémarrage
accidentellorsquelamachinen’estpassurveillée.
Utilisationdelatondeuse
Vérifiezqu’iln’yaplusdepierres,demorceauxdebois,
defilsmétalliquesouautresobjetssurlapelouse,qui
risquentd’endommagerlatondeuseoulemoteur.Ces
objetspourraientêtreprojetésparlatondeusedans
unedirectionouuneautreetblessergrièvementle
conducteuroutouteautrepersonneprésente.
8
4
Utilisation
Poignéedecommandedelalame
Lapoignéedecommandedelalamesetrouvesurle
guidonsupérieurdelatondeuse.VoirlaFigure9.Il
fautserrercettepoignéecontreleguidonpourquela
tondeusefonctionne.Lefaitdelâcherlapoignéearrête
lemoteuretlalame.
Poignéedecommanded’embrayage
del’entraînement
Lapoignéedecommanded’embrayagede
l’entraînementsetrouvesurlapoignéesupérieur.Serrez
lacommanded’embrayagedel’entraînementcontrele
guidonsupérieurpourembrayerl’entraînement.Lâchez
lapoignéedecommandepourarrêter,pourralentirou
pourreculer.
Bouchondedéchiquetage(enoption)
Cebouchonsertàfermerl’ouverturedelagoulotte
d’éjectionlatéralependantledéchiquetageoulamise
ensacdel’herbecoupée.Neretirezjamaislebouchon
àcharnière,mêmesivousnedéchiquetezpasl’herbe.
Démarreuràlanceur
Ilestinstallésurladroiteduguidonsupérieur.Tenez-
vousderrièrelatondeuseettirezsurledémarreurà
lanceurpourfairedémarrerlatondeuse.
Commandes
Leviersderéglagedelahauteurdecoupe
Unlevierderéglagedelahauteursetrouvesurchacune
desroues.Lesquatreleviersdoiventsetrouveràlamême
positionrelativepourassurerunecouperégulière.
Avantdefairedémarrerlemoteur
1.Faiteslespleinsd’essenceetd’huileselonlesinstruc-
tionsfourniesdanslanoticed’utilisationdumoteurqui
accompagnel’équipment.
2.Branchezlefildelabougiesurcettedernière.Siune
gaineencaoutchoucrecouvrel’extrémitédufildela
bougie,assurez-vousquelabouclemétallique,aubout
dufildelabougie(danslagaineencaoutchouc),est
bienfixéesurl’emboutmétalliquedelabougie.
3.Vérifieztoujourslebonfonctionnementdel’embrayage
d’entraînementavantd’utiliserlatondeuse:
a.Lâchezlacommanded’embrayagede
l’entraînementetpoussezlatondeusequidoitse
déplacerfacilement.Tirezlatondeuse.Elledoit
pouvoirbougersansgranderésistance.
b.Danslecascontraireilsepeutquel’embrayage
neserelâchepascomplètement.Nemettezpas
lemoteurenroutetantqueceproblèmen’estpas
corrigé.Vérifiezquelecâbledecommanden’est
pasplié,pincéoucoincé.Assurez-vousaussi
qu’iln’yapasd’accumulationd’herbeautourdela
courroie.
Figure9
AVERTISSEMENT
Lisez,comprenez,
etsuiveztoutesles
instructionsetles
consignessurla
machineetdans
cenoticeavantle
fonctionnement.
Cemécanismede
commandeestun
dispositifdesécurité.
N’essayezjamais
d’évitersonemploi.
Faitestrèsattention
enmanipulantde
l’essence.L’essence
estextrêmement
inflammableetlesva-
peurssontexplosif.
Nefaitesjamaisle
pleind’essenceà
l’intérieur,pendant
quelemoteurtourne
ouquandlemoteur
estchaud.Éteignez
toutecigarettesou
pipe,toutcigareou
touteautresource
incandescente.
REMARQUE:Vérifiez
quelesacàherbeest
bienàl’endroitavant
l’assemblage(l’étiquette
d’avertissementdoitse
trouversurl’extérieur)
REMARQUE:Assurez-
vousquelescâblessont
accrochéssurl’extérieur
duguidonpourqu’ils
negênentpaslorsde
l’installationdusacà
herbe.
N’utilisezjamaislaton-
deusesilescrochets
dusacàherbenesont
pasenfoncésdansla
tigedepivotementet
sileclapetarrièrene
reposepascontrele
hautdusacàherbe.
Touteslestondeuses
sontéquipéesd’un
dispositifdeprotection
àl’arrière.Ilempêche
lesprojectilessou
-
levésparlalamede
blesserl’utilisateur
delatondeuse.NE
DÉMONTEZPASCE
DISPOSITIFDESÉCU-
RITÉ.
5.Unlevierderéglagesetrouvesurchacunedes
rouesetpermetdemodifierlahauteurdecoupe
delatondeuse.Pourchangerlahauteurdecoupe,
poussezlelevierderéglagedesrouesverslaroueet
déplacez-leverslehautoulebasàlahauteurchoisie.
VoirlaFigure5.
6.Assemblagedusacàherbe:
a.Glissezlesacsurl’armature(côtéenplastique
noirsurledessous).Enfoncezlescrochetsde
l’armaturedanslestrousdesglissièresenplastique
dusacàherbe.VoirlaFigure6.
b.Attachezlesacsurl’armatureenaccrochantles
glissièressurl’armature,commeàlaFigure6.
Touteslesglissièresenplastique,saufcelledu
dessusdusac,s’accrochentdel’extérieurdusac.
Lehautdusacs’attachedel’intérieurdecelui-ci.
7.Assemblagedusacàherbesurlatondeuse
a.Relevezleclapetd’éjectionarrièredelatondeuse
etplacezlesacàherbesurlatigedepivotement.
Lâchezleclapetpourqu’ilreposesurlesacà
herbe.VoirlaFigure7.
AVERTISSEMENT:N’utilisezjamais
latondeusesilescrochetsdusacà
herbenesontpasenfoncésdansla
tigedepivotementetsileclapetarrière
nereposepascontrelehautdusacà
herbe.
8.Pourenleverlesacàherbeetutiliserl’ensemblede
déchiquetage:
a.Relevezleclapetd’éjectionarrièredelatondeuse,
commeàlaFigure7.Relevezlesacàherbeet
dégagez-ledelatigedepivotement.Lâchezle
clapetd’éjectionarrièrepourfermerl’ouverturesur
l’arrièredelatondeuse.
9.Installationdesrouesarrière(siellesnelesont
pasdéjà)
Dégagezl’écrouàsixpansàbridequisetrouvesur
l’essieuarrièreetplacezlarouearrièresurl’essieu.
Vérifiezquelarondelleonduléesetrouvesurl’intérieur
delaroue,entrelaroueetlatondeuse.VoirlaFigure
8.Repositionnezl’écrouàbridesurl’essieudelafaçon
indiquéeetserrezàfond.Répétezl’opérationdel’autre
côté.
AVERTISSEMENT
Lesmodèlesreprésentéspeuventêtre
légèrementdifférentsdevotretondeuse.
1.Retirezlespiècesdétachéesetlesgarnitures
d’emballagequipeuventsetrouverentrelesguidons
supérieuretinférieur.
a.Redressezleguidonsupérieurversvouspourle
fairepasserdelapositionAàlapositiondetravail
B.VoirlaFigure1.
b.Serrezlesécrousàoreilles(boutonsenforme
d’étoile)quimaintiennentleguidonsupérieursur
leguidoninférieur.Assurez-vousqueleboulon
ordinaireestbienenfoncédansleguidon.
REMARQUE:Surcertainsmodèles,lesécrousàoreilles
ontétéremplacéspardesboutonsenformed’étoile.Les
figuresnereprésententquelesécrousàoreilles.
2.Placezunegoupille-épingledansl’undestrousdela
goupillesoudéedechaquecôtéduguidoninférieur.
a.Enlevezlesgoupillesfenduesplacéesdansletrou
extérieurdesgoupillessoudéessurlessupports
demontageduguidon.Placezlesgoupilles
fenduesdansletrouintérieur.VoirlaFigure2.
b.Placezunboulonordinaire(danslesachetde
boulonneriefourniaveclamachine)dansletrou
supérieurdusupportdemontagededroitedu
guidon,enprocédantdel’intérieurversl’extérieur.
VoirlaFigure2.Maintenez-leenplaceavecun
écrouàoreillesenplastique(boutonsenforme
d’étoile).Répétezdel’autrecôté.
3.Installationduguidedelacorde.VoirlaFigure3.
a.Pressezlamanettedecommandedelalame
contreleguidonsupérieur.PositionA.
b.Sortezlentementlacordedudémarreurdu
moteur.PositionB.
c.Glissezlacordedudémarreurdansleguide.
PositionC.
d.Serrezl’écrouàoreilles(boutonsenformed’étoile)
duguidedelacorde.PositionD.
4.Enfoncezlestaquetsdesattache-câblesdanslestrous
aménagésdansleguidoninférieur.Serrezl’attache-
câbleetcoupezlesurplus.VoirlaFigure4.
Pourl’expédition,le
guidondelatondeuse
estplacéàlaplus
hauteposition.
REMARQUE:Les
deuxextrémitésdu
guidoninférieurdoivent
êtreplacéesàlamême
positionrelative.
IMPORTANT
Cettemachineest
expédiéeSANS
HUILENIESSENCE.
Aprèsl’assemblage,
faiteslespleins
d’essenceetd’huile
conformémentaux
instructionsdela
noticed’utilisationdu
moteurfournieavec
lamachine.
Débranchezlefil
delabougieet
mettez-leàlamasse
conformémentaux
instructionsdela
noticed’utilisationdu
moteurfournieavecla
machine.
AVERTISSEMENT

5
danslanoticed’utilisationpourmesurerlapenteduterrainavantde
commenceràtravailler.Siselonl’inclinomètre,lapenteestsupérieure
à15°,n’utilisezpaslatondeusepourévitertouteblessuregrave.
ÀFAIRE:
1.Travaillerparallèlementàlapente,jamaisperpendiculairement,
Faitestrèsattentionenchangeantdedirectionsurunepente.
2.Faitesattentionauxtrousetornières.Lamachinepeutseretourner
surunterrainaccidenté.Desherbeshautespeuventcacherdes
obstacles.
3.Vérifiertoujoursvotreéquilibre.Vousrisquezdeglisseretde
tomberetdevousblessergrièvement.Sivoussentezquevous
allezperdrevotreéquilibre,lâchezimmédiatementleguidon,etla
lamearrêteradetournerdanstroissecondes.
ÀNEPASFAIRE:
1.Netondezpasprèsd’unefalaiseoud’untalus.Leconducteurpeut
facilementperdrel’équilibre.
2.Netondezpassurunepentesupérieureà15°selonl’inclinomètre.
3.Netondezpasdel’herbemouillée.Latractionréduitepeut
provoquerundérapage.
Enfant
Unaccidentgraverisquedeseproduiresileconducteurn’estpas
toujoursvigilantenprésenced’enfants.Lesenfantssontsouvent
attirésparlamachineetlatontedel’herbe.Ilsnecomprennentpasles
dangers.Nesupposezjamaisqu’ilsvontresterlàoùvouslesavezvus.
1.Éloignezlesenfantsdelazonedetravailetplacez-lessousla
surveillanced’unadulteautrequeleconducteurdelamachine.
2.Restezvigilantetarrêtezlamachinesidesenfantss’approchentde
lazonedetravail.
3.Regardeztoujoursderrièrevousetparterreavantdereculereten
reculant.
4.Faitestrèsattentionenapprochantd’anglesmorts,debuissons,
d’autresobjetsquipeuventgênervotrevisibilité.
5.Tenirdesenfantsloindemoteurschaudsoutournants.Ilspeuvent
subirdesbrûluresgravesd’unsilencieuxchaud.
6.Nepermettezjamaisàdesenfantsdemoinsde14ansd’utiliser
latondeuse.Desadolescentsâgésde14ansouplusdoivent
lirelanoticed’utilisation,biencomprendrelefonctionnementde
lamachineetrespecterlesconsignesdesécurité.Ilsdoivent
apprendreàutiliserlamachineets’enservirsouslasurveillance
étroited’unadulte.
ENTRETIEN
Manipulationdel’essence:
1.Pourévitertouteblessureoudégâtmatériel,faitestrèsattention
enmanipulantdel’essence.Ils’agitd’unproduitextrêmement
inflammableetlesvapeursrisquentd’exploser.Vouspouvezêtre
grièvementblessésideséclaboussuressurvotrepeauousurvos
vêtementss’enflammaient.
2.Rincezvotrepeauetchangezimmédiatementdevêtements.
3.Remissezlecarburantdansdesbidonshomologuésseulement.
4.Nefaitesjamaislepleindansunvéhicule,niàl’arrièred’une
camionettedontleplancherestrecouvertd’unrevêtementen
plastique.Placeztoujourslesbidonsparterreetloindevotre
véhiculeavantdelesremplir.
5.Danslemesuredupossible,déchargezl’équipementmotoriséde
laremorqueetfaiteslepleinparterre.Sicelan’estpaspossible,
faiteslepleinavecunbidonplutôtquedirectementdelapompeà
essence.
6.Maintenezlegicleurencontactaveclebordduréservoird’essence
ouavecl’ouverturedubidonjusqu’àcequelepleinsoitterminé.
N’utilisezpasungicleuréquipéd’undispositifdeblocageen
positionouverte.
7.Éteigneztoutecigaretteoupipe,toutcigareoutouteautrechaleur
incandescente.
8.Nefaitesjamaislepleinàl’intérieur.
9.N’enlevezjamaislecapuchond’essenceetn’ajoutezpas
d’essencependantquelemoteurtourneous’ilestchaud.
Laissezlemoteurrefroidirpendantaumoinsdeuxminutesavant
defaireleplein.
10.Nefaitesjamaisdéborderleréservoir.Laissezunespaced’un
demi-pouceenvironpourpermettrel’expensionducarburant.
11.Resserrezbienlecapuchond’essence.
12.Encasdedébordement,essuyeztouteéclaboussures
decarburantoud’huileetenleveztouslesdébrisimbibés
d’essence.Déplacezlamachineàuneautreendroit.Attendez5
(cinq)minutesavantdemettreenmarchelemoteur.
13.Neremisezjamaislamachineoulesbidonsd’essenceà
l’intérieurs’ilyauneflamme,uneétincelle(chauffe-eauàgaz,
radiateur,sèche-linge,etc.).
14.Limitezlesrisquesd’incendieendébarrassantlemoteurdes
brinsd’herbe,feuillesetautressaletés.Essuyezleséclabous-
suresdecarburantoud’huileetenleveztouslesdébrisimbibés
d’essence.
15.Laissezlamachinerefroidirpendantaumoins5minutesavant
delaremiser.
Entretiengénéral:
1.Nefaitesjamaisfonctionerlamachinedansunlocalcloscar
lesgazd’échappementdumoteurcontiennentdumonoxydede
carbone,ungazinodoretrèsdangereux.
2.Avantdenettoyer,derépareroud’examinerlamachine,vérifiez
quelalameettouteslespiècesmobilessesontimmobilisées.
Débranchezlefildelabougieetmettez-leàlaterrecontrele
moteurpourempêchertoutdémarrageaccidentel.
3.Verifiezsouventquelalameetlesboulonsdemontagedu
moteursontbienserrés.Examinezvisuellementlalamepour
détectertouteusureexcessive,toutfendillement.Remplacez-la
avecunelameauthentiqueseulement(dulistedepiècesquise
trouvedanscettenotice).«L’emploidepiècesnonconformes
auxcaractéristiquesdel’équipementd’originepeutcauserdes
performancesinférieuresetréduirelasécurité.»
4.Lalameestcoupanteetpeutcauserdesblessuresgraves.
Enveloppezlalameavecunchiffonouportezdesgantsetfaites
trèsattentionenlemanipulant.
5.Assurez-vousquetouslesécrous,boulonsetvissontbienser-
réspourquel’équipementsoittoujoursenbonétatdemarche.
6.Nemodifiezjamaislesdispositifsdesécurité.Vérifiezsouvent
qu’ilsfonctionnentbien.
7.Sivousheurtezunobjet,arrêtezimmédiatementlemoteur,
débranchezlefildelabougieetexaminezsoigneusementla
machine.Réparezlesdégâtséventuelsavantderemettrela
machineenmarche.
8.N’essayezjamaisd’ajusteruneroueoudechangerlahauteurde
coupependantquelamoteurtourne.
9.Lesélémentsdusacàherbeetleclapetdelagoulotted’éjection
peuvents’useretêtreendommagéset,parconséquent,exposer
lespiècesmobilesoucauserlaprojectiondedébris.Parmesure
desécurité,vérifiezsouventlesélémentsetremplacez-les
immédiatementavecdespiècesauthentiqueseulement(duliste
depiècesquisetrouvedanscettenotice).«L’emploidepièces
nonconformesauxcaractéristiquesdel’équipementd’origine
peutcauserdesperformancesinférieuresetréduirelasécurité.»
10.Nemodifiezpasleréglagedurégulateuretnelaissezpasle
moteurs’emballer.Lerégulateurmaintientlemoteuràson
régimemaximaldefonctionnementsansdanger.
11.Prenezsoindesétiquettesd’instructionsetremplacez-lesau
besoin.
12.Respectezlesrèglementsconcernantl’éliminationdesdéchets
etliquidesquirisquentdenuireàlanatureetàl’environement.
Cesymboleattire
votreattentionsurdes
consignesdesécurité
importantesqui,sielles
nesontpasrespectées,
peuventmettreen
dangernonseulement
votrepersonneetvos
biens,maisaussiceux
d’autrui.Prièredelire
touteslesinstructions
figurantdanscette
noticed’utilisationavant
d’essayerdevous
servirdecettemachine.
Lenon-respectde
cesinstructionspeut
entraînerdesblessures
corporelles.
RESPECTEZ
L’AVERTISSEMENT
QUIACCOMPAGNE
CESYMBOLE!
Votreresponsabilité
Cettemachinenedoit
êtreutiliséequepardes
personnesquipeuvent
lire,comprendreet
respecterlesavertisse
-
mentsetinstructions
quifigurentdanscette
noticeetsurlamachine.
Consignes
de
sécurité
AVERTISSEMENT
2
4
Utilisationengénéral
1.Veuillezlireattentivementlanoticed’utilisationavantd’essayer
d’assemblerlamachine.Assurez-vousdelireetdebien
comprendretouteslesinstructionsquifigurentsurlamachine
etdanslanoticed’utilisationavantdelamettreenmarche.Fa-
miliarisez-vousaveclescommandesetlesconseilsd’utilisation
delamachineavantdevousenservir.Conservezcettenotice
d’utilisationàunendroitsûrpourtouteconsultationultérieureet
pourcommanderdespiècesderechange.
2.Cettemachinemotoriséeestunoutildeprécision,pasunjouet.
Soyezparconséquenttoujourstrèsprudent.Leseulrôledecette
machineestdetondrelegazon.Nel’utilisezjamaisdansun
autrebut.
3.Nepermettezjamaisàdesenfantsdemoinsde14ansdese
servirdelamachine.Desadolescentsplusâgésdoiventlire
lanoticed’utilisation,biencomprendrelefonctionnementde
lamachineetrespecterlesconsignesdesécurité.Ilsdoivent
apprendreàutiliserlamachineets’enservirsouslasurveillance
étroited’unadulte.Seulesdespersonnesmûresayantpris
connaissancedesconsignesdesécuritédoiventêtreautorisées
àutilisercettemachine.
4.Examinersoigneusementlazonedetravail.Ramasseztous
lespierres,bâtons,filmétalliquesos,jouetsetautreobjetsqui
pourraientvoustrébuchezouquirisqued’êtreramasséset
projetésparlalame.Lesobjetsprojetésparlamachinepeuvent
causerdesblessuresgraves.Prévoyezdetravaillerenévitantde
projeterl’herbeversdesrues,destrottoirs,desspectateurs,etc.
Évitezd’éjecterl’herbeendirectiond’unmuroud’unobstacle.
Decettefaçon,lesdébriséventuelsnerisquepasdericocheret
deblesserquelqu’un.
5.Pourévitertoutrisquedecontactaveclalameoudeblessure
parunprojectile,éloignezlesenfants,passantsetautresà
aumoins75piedsdelatondeusependantqu’ellefonctionne.
Arrêtezlamachinesiquelqu’uns’approche.
6.Porteztoujoursdeslunettesdesécuritéenutilisantlamachine
oueneffectuantunréglageouuneréparation.Unobjetpeuten
effetêtreprojeté,ricocheretvousblesserauxyeux.
7.Portezdeschaussuresrobustesàsemelleépaisseetdes
vêtementbienajustés.Unechemiseetunpantalonquiprotègent
lesbrasetlesjambesetdeschaussuresàboutd’aciersont
recommandés.N’utilisezjamaislatondeusesivousêtespieds
nusousivousportezdessandalesoudestennis.
8.Neplacezjamaisvosmainsouvospiedsprèsd’unepièceen
mouvementousousleplateaudecoupe.Lalamepeutamputer
mainsetpieds.
9.L’absenceduclapetdelagoulotted’éjectionouunclapetendom-
magépeutcauserdesblessuresencasdecontactaveclalame
ouprojeterdesobjets.
10.Denombreusesblessuresseproduisentlorsquelatondeuse
passesurlepiedàlasuited’unechute.Neretenezpasla
tondeusesivoustombez.Lâchezimmédiatementleguidon.
11.Netirezjamaislatondeuseversvousenmarchant.S’ilfautfaire
reculerlatondeuseprèsd’unmurd’unautreobstacle,regardez
d’abordparterreetderrièrevous,puisprocédezcommesuit:
a.Éloignez-vousdelatondeuseàboutdebras.
b.Assurezvotrestabilité.
c.Reculezlatondeuselentementetd’unedemi-longeurde
brasseulement.
d.Répétezselonlesbesoin.
12.N’utilisezjamaislatondeuseenétatd’ébriétéousivousprenez
desmédicamentsralentissantlesréactions.
13.Dégagezledispositifd’auto-propulsionoul’embrayage
d’entraînement,lecaséchéant,avantdefairedémarrerle
moteur.
14.Lapoignéedecommandedelalameestundispositifde
sécurité.Netenezjamaisdecontournersonrôle.Ceci
empêcheledispositifdesécuritédefonctionnercorrectement
etpeutcauserdesblessuresencasdecontactaveclalame.
Lapoignéedecommandedelalamedoitbougerfacilement
danslesdeuxsensetrevenirautomatiquementàlaposition
nonéclenchéequandonlalâche.
15.N’utilisezjamaislatondeusesilegazonestmouillé.Soyez
toujoursbienenéquilibre.Faitesattentiondenepasglisser
etdenepastomberpouréviterdesblessuresgraves.Sivous
estimezquevousperdezvotreéquilibre,lâcherlapoignéede
commandedelalameimmédiatementetlalamearrêterade
tournerdanstroissecondes.
16.Utilisezlatondeuseseulementdanslalumièredujouroudans
labonnelumièreartificielle.Marchez,necourrezpas.Arrêtez
lalameavantdetraverserdesallées,trottoirsouchemins
recouvertsdegravier.
17.Silamachinecommenceàvibrerd’unemanièreanormale,
arrêterlemoteuretcherchez-enimmédiatementlacause.En
général,toutevibrationindiqueunproblème.
18.Arrêtezlemoteuretattendezquelalamesesoitimmobilisée
avantdedétacherlesacàherbeoudedéboucherlagoulotte.
Lalamecontinueàtournerpendantquelquessecondesaprès
quelemoteurs’estéteint.Neplacezjamaisaucunepartiedu
corpsdanslesecteurdelameavantquevousnesoyezsûrs
quelalameaarrêtédetourner.
19.N’utilisezjamaislatondeusesansavoirl’abattantde
protectionarrière,lagoulotted’éjection,unsacàherbe,la
poignéedecommandedelalameoud’autresdispositifsde
sécuritéappropriée,enplaceetquifonctionnentcorrectement.
N’utilisezjamaislatondeuseavecdesdispositifsdesécurité
endommagés.Lenon-respectdecesconsignespeutcauserdes
blessuresgraves.
20.Lesilencieuxetlemoteurdeviennenttrèschaudsetpeuvent
causerdesbrûlures.Nelestouchezpas.
21.N’utilisezquedesaccessoiresrecommandésparlefabricant
delamachine.Lenon-respectdececonsignepeutcauserdes
blessuresgraves.
22.Encasdesituationsquinesontpasmentionnéesdanscette
notice,soyezprudentetfaitespreuvedebonsens.Contactez
votredépartementdeserviceàlaclientèlespourlenomde
votreconcessionairelocal.
Utilisationsurunepente
Lesaccidentsprovoquéspartomberetdeglisser,quise
produisentsouventsurdespentes,peuventcauserdesblessures
graves.Travaillersurunterrainenpentedemandedesprécautions
supplémentaires.Sivousnesentezpasàl’aisesurlapente,n’y
travaillezpas.Parmesuredesécuritéutilisezl’inclinomètrefourni
AVERTISSEMENT:Lesgazd’échappementdeceproduitcontiennentdesproduitschimiques
reconnusdansl’ÉtatdeCaliforniecommecausantlecancer,desanomaliescongénitalesou
d’autresproblèmesliésàlareproduction.
DANGER:Cettemachinedoitêtreutiliséeconformémentauxconsignesdesécuritéquifigurentdanslanotice
d’utilisation.Commeavectoutappareilmotorisé,unenégligenceouuneerreurdelapartdel’utilisateurpeut
entraînerdesblessuresgraves.Cettemachinepeutamputermainsetpiedsetprojeterdesdébris.Parconséquent,
lenon-respectdecesconsignespeutcauserdesblessurescorporellesgravesetmêmemortelles.
2
Consignes
de
sécurité
AVERTISSEMENT
Cesymboleattire
votreattentionsurdes
consignesdesécurité
importantesqui,sielles
nesontpasrespectées,
peuventmettreen
dangernonseulement
votrepersonneetvos
biens,maisaussiceux
d’autrui.Prièredelire
touteslesinstructions
figurantdanscette
noticed’utilisationavant
d’essayerdevous
servirdecettemachine.
Lenon-respectde
cesinstructionspeut
entraînerdesblessures
corporelles.
RESPECTEZ
L’AVERTISSEMENT
QUIACCOMPAGNE
CESYMBOLE!
Votreresponsabilité
Cettemachinenedoit
êtreutiliséequepardes
personnesquipeuvent
lire,comprendreet
respecterlesavertisse
-
mentsetinstructions
quifigurentdanscette
noticeetsurlamachine.
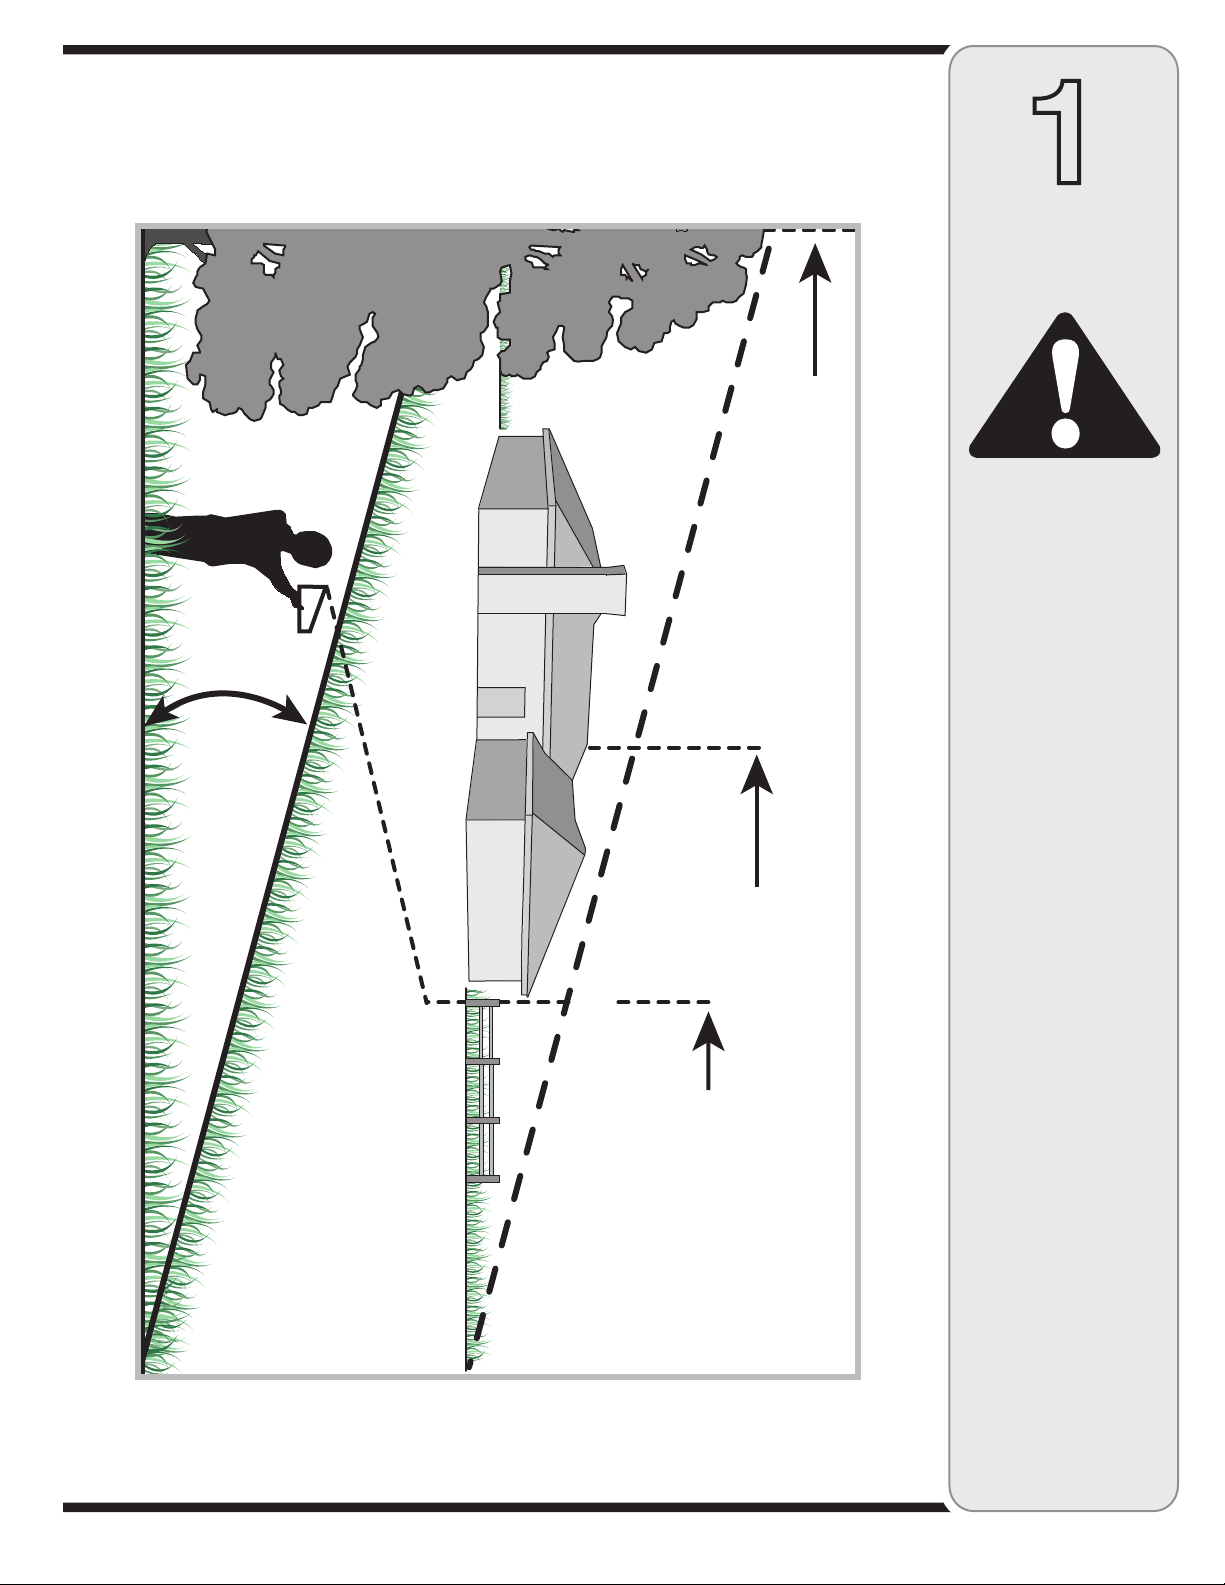
3
1
Inclinomètre
Nevoustondezpassur
despentessupérieures
à15°(soitunedéclivité
de2-1/2pipar10pi).
Untracteuràsiège
risqueeneffetde
seretourneretson
conducteurpeutêtre
gravementblessé.Ilest
égalementdifficilede
conserverunbonappui
enmarchantderrièrela
tondeuse.Vousrisquez
deglisseretdevous
blesser.
UtilisezlestracteursÀ
SIÈGEparallèlement
àlapente,jamaisen
travers.
UtilisezlestracteursÀ
POUSSERperpendicu-
lairementàlapente,
jamaisparallèlement.
Server-vousdecetinclinomètrepourdéterminerlespentessurlesquellesilseraitdangereuxde
travailler.N’utillisezpascettetondeusesurdetellespentes.
AVERTISSEMENT
2
Veuillezretournerlamachineaudétaillantquivousl’avendue,
sansvousadresserd’abordauserviceaprès-vente.
Tabledesmatières
Cettenoticed’utilisationestunepièceimportantedevotrenouveléquipement.Ellevousfournitlesrenseignements
nécessairesàl’assemblage,àlapréparationetàl’entretiendevotremachine.Veuillezdonclalireattentivementet
vousassurerdebiencomprendretouteslesinstructions.
Serviceaprès-vente
Pourtrouverlenumérodemodèle
AVANTDEPROCÉDERÀL’ASSEMBLAGEDEVOTRE
NOUVELÉQUIPMENT,
localiserlaplaquesignalétiquesurl’équipement,etrecopier
lenumérodemodèleetlenumérodesériesurlemodèle
deplaquesignalétiquefournisurladroite.Pourlocaliserla
plaquesignalétique,placez-vousderrièrelamachineàla
postedeconduiteetregardezàl’arrièredelamachine.
Inclinomètre........................................................3
Importantconsignesdesécurité......................4
Instructionsdemontageetréglages................6
Utilisation............................................................8
EntretienetRemisagehorssaison.................10
Dépannage........................................................12
Garantie.............................................................13
Piècesdétachées(voirlapage14
delaversionanglaisedecettenotice
d’utilisation).
Sil’assemblagedecettemachinevousposedesproblèmesoupourtoutequestionconcernantlescommandes,lefonc-
tionnementoul’entretiendelamachine,lesspécialistessontàvotredisposition.Choisissezl’unedesoptionsci-dessous:
1.Visitezlesitewww.troybilt.caoùvoustrouverezdenombreusessuggestionsutiles.CliquezsurleboutonServiceaprès-
vente.
2.Appelezunagentduserviceaprès-venteau1-800-668-1238.
3.Lefabricantdumoteurestresponsabledetouteslesquestionsconcernantlesperformances,lapuissanceindiquée,les
caractéristiquestechniques,lagarantieetleserviceaprès-ventedumoteur.Pourplusderenseignementsàcesujet,veuillez
consulterlanoticed’utilisationdumoteurfournieavecvotremachine.
Préparezvosnumérosdemodèleetdesérieavantdetéléphoner.Veuillezlirelechapitreprécédentpourdéterminer
l’emplacementdecesnuméros.Onvousdemanderad’enregistrerlenumérodesérieavantdepouvoirpoursuivrevotreconsul-
tation.
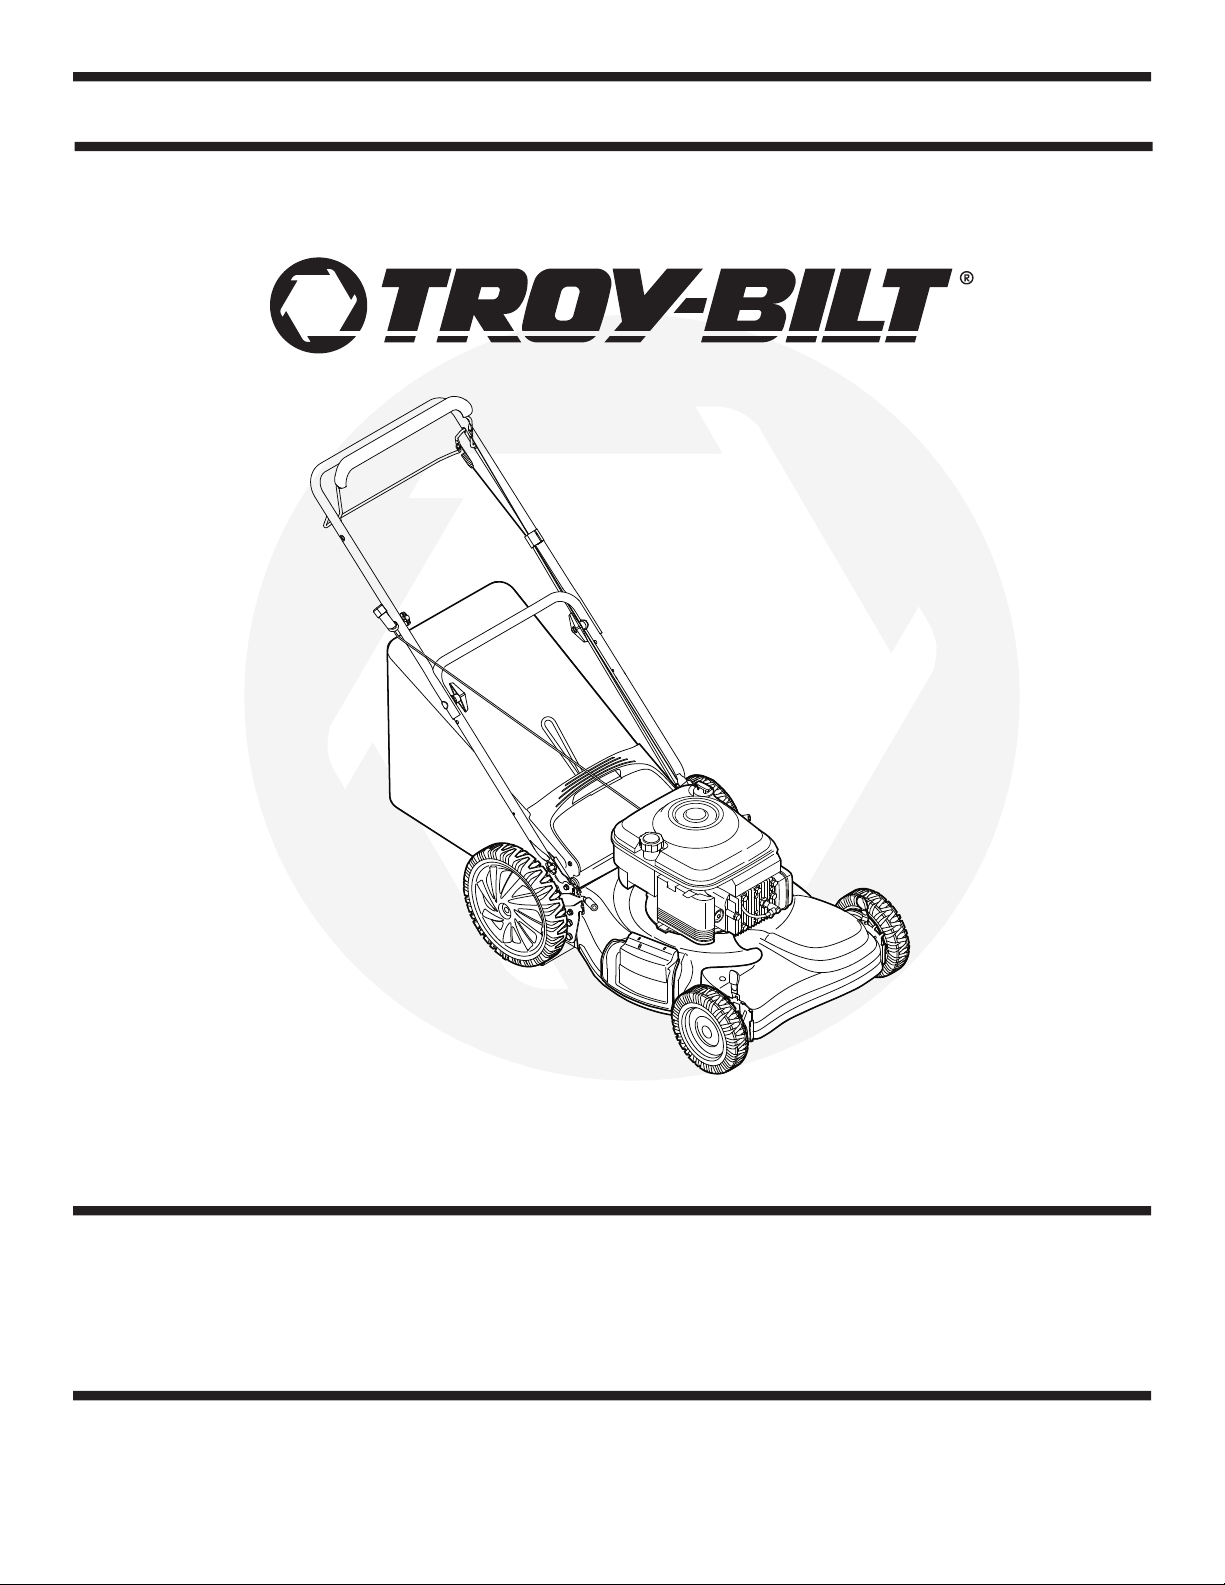
IMPRIMÉAUXÉTATS-UNISMTDProductsLtd.,P.O.Box1386,KITCHENER,ONTARION2G4J1
IMPORTANT:
LISEZATTENTIVEMENTLESRÈGLESDESÉCURITÉETLES
INSTRUCTIONSAVANTDEMETTREENMARCHELAMACHINE.
772C0830
12/5/2005
Tondeuseauto-motricede21po-Séries560
Sécurité*Montage*Fonctionnement*Réglages*Entretien
Dépannage*Listesdespiècesdétachées*Garantie
NOTICED’UTILISATION