INSTRUCTION MANUAL
MODEL # 51635

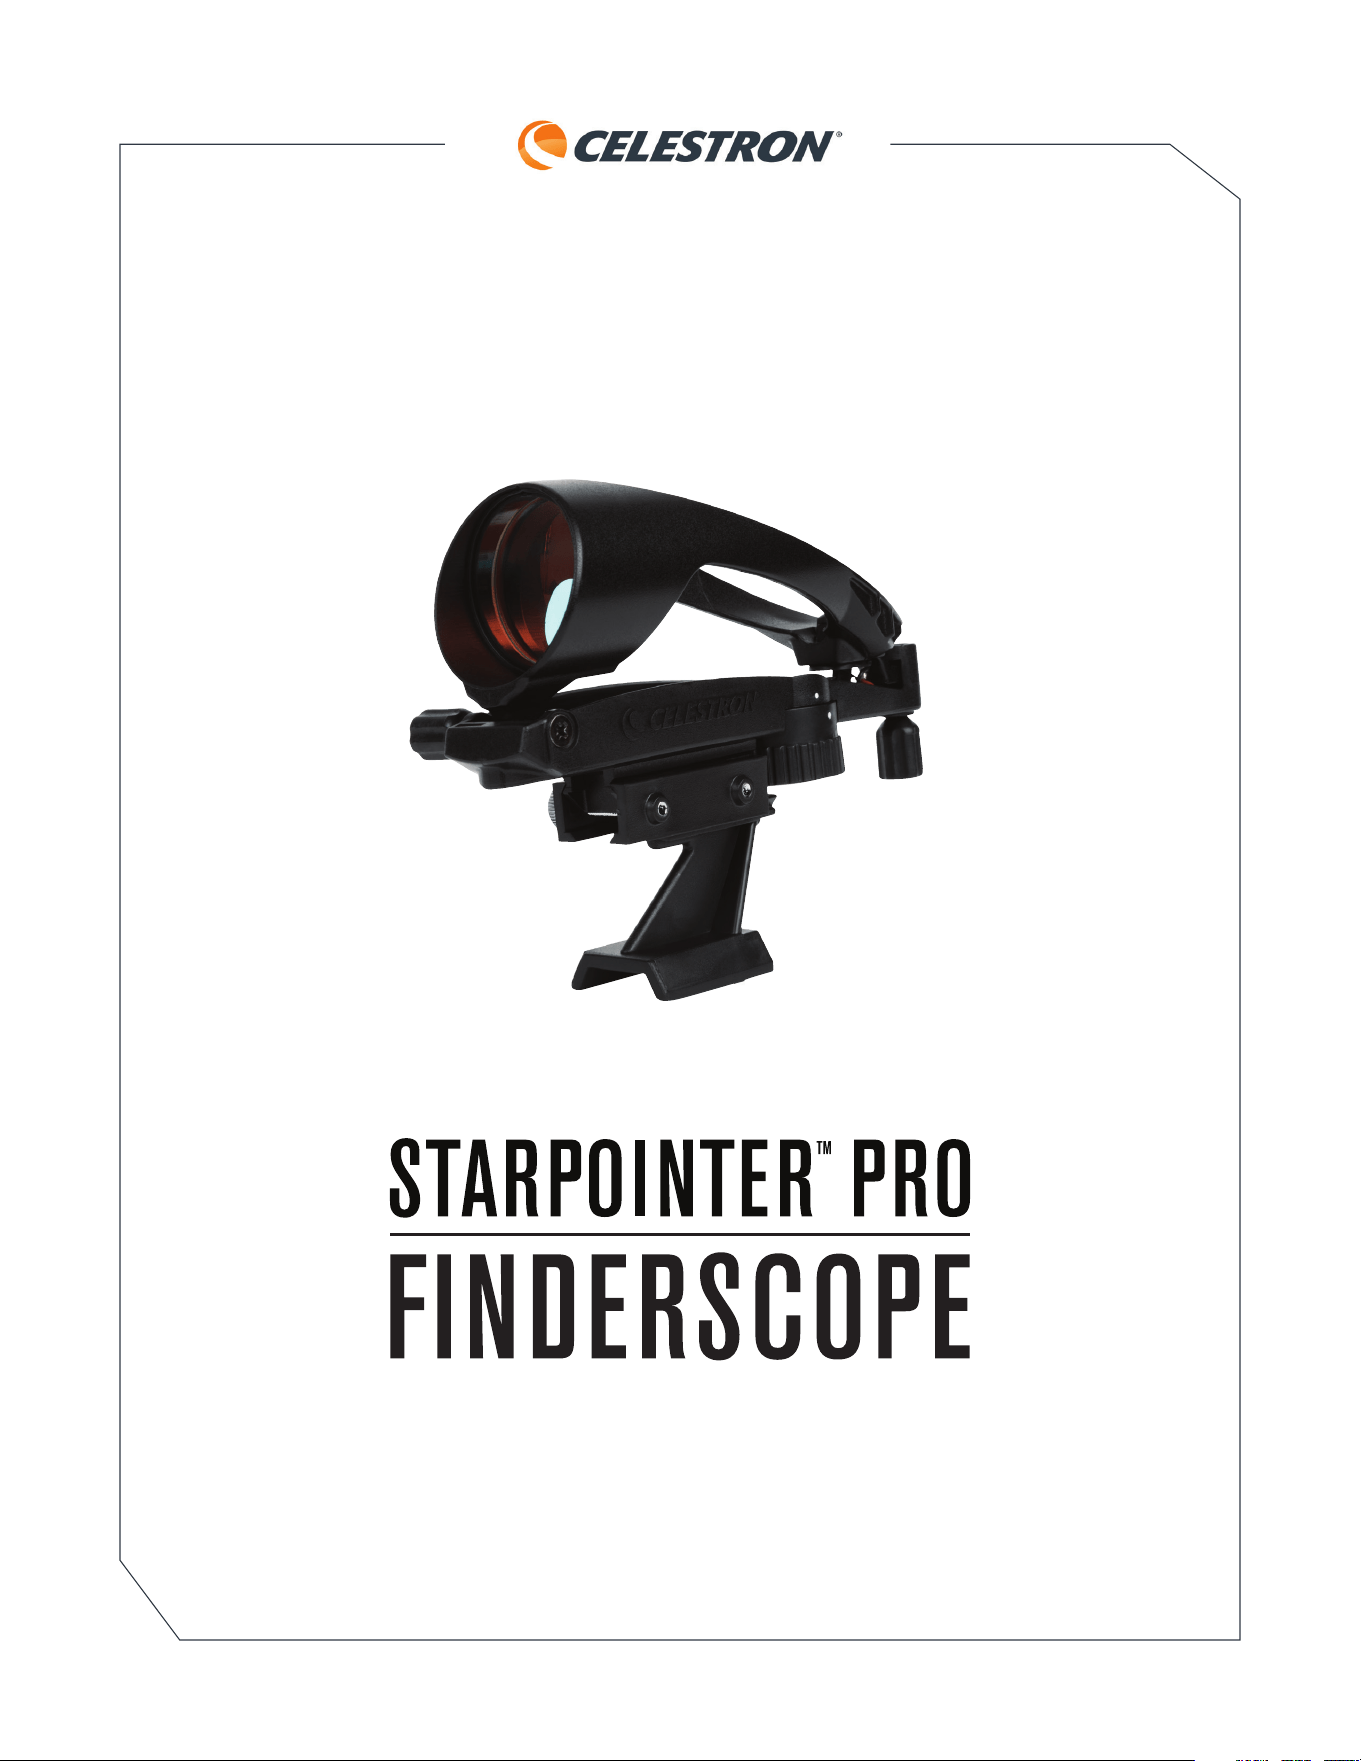
StarPointer
TM
Pro Finderscope
2 | ENGLISH
PARTS LIST
6
1
2
3
4
7
8 9
10
1. Front lens
2. Altitude (up-and-down)
adjustment knob
3. On/off/brightness switch &
battery compartment
4. Mounting screws
5. Azimuth (left-and-right)
adjustment knob
6. Small Schmidt-Cassegrain bracket
7. Large Schmidt-Cassegrain bracket
8. Mounting bracket for small telescopes with dovetails
9. Mounting bracket for small telescopes with screw holes
10. Metal multi-tool
5
StarPointer
TM
Pro Finderscope
ENGLISH | 3
11
55
22
33
44
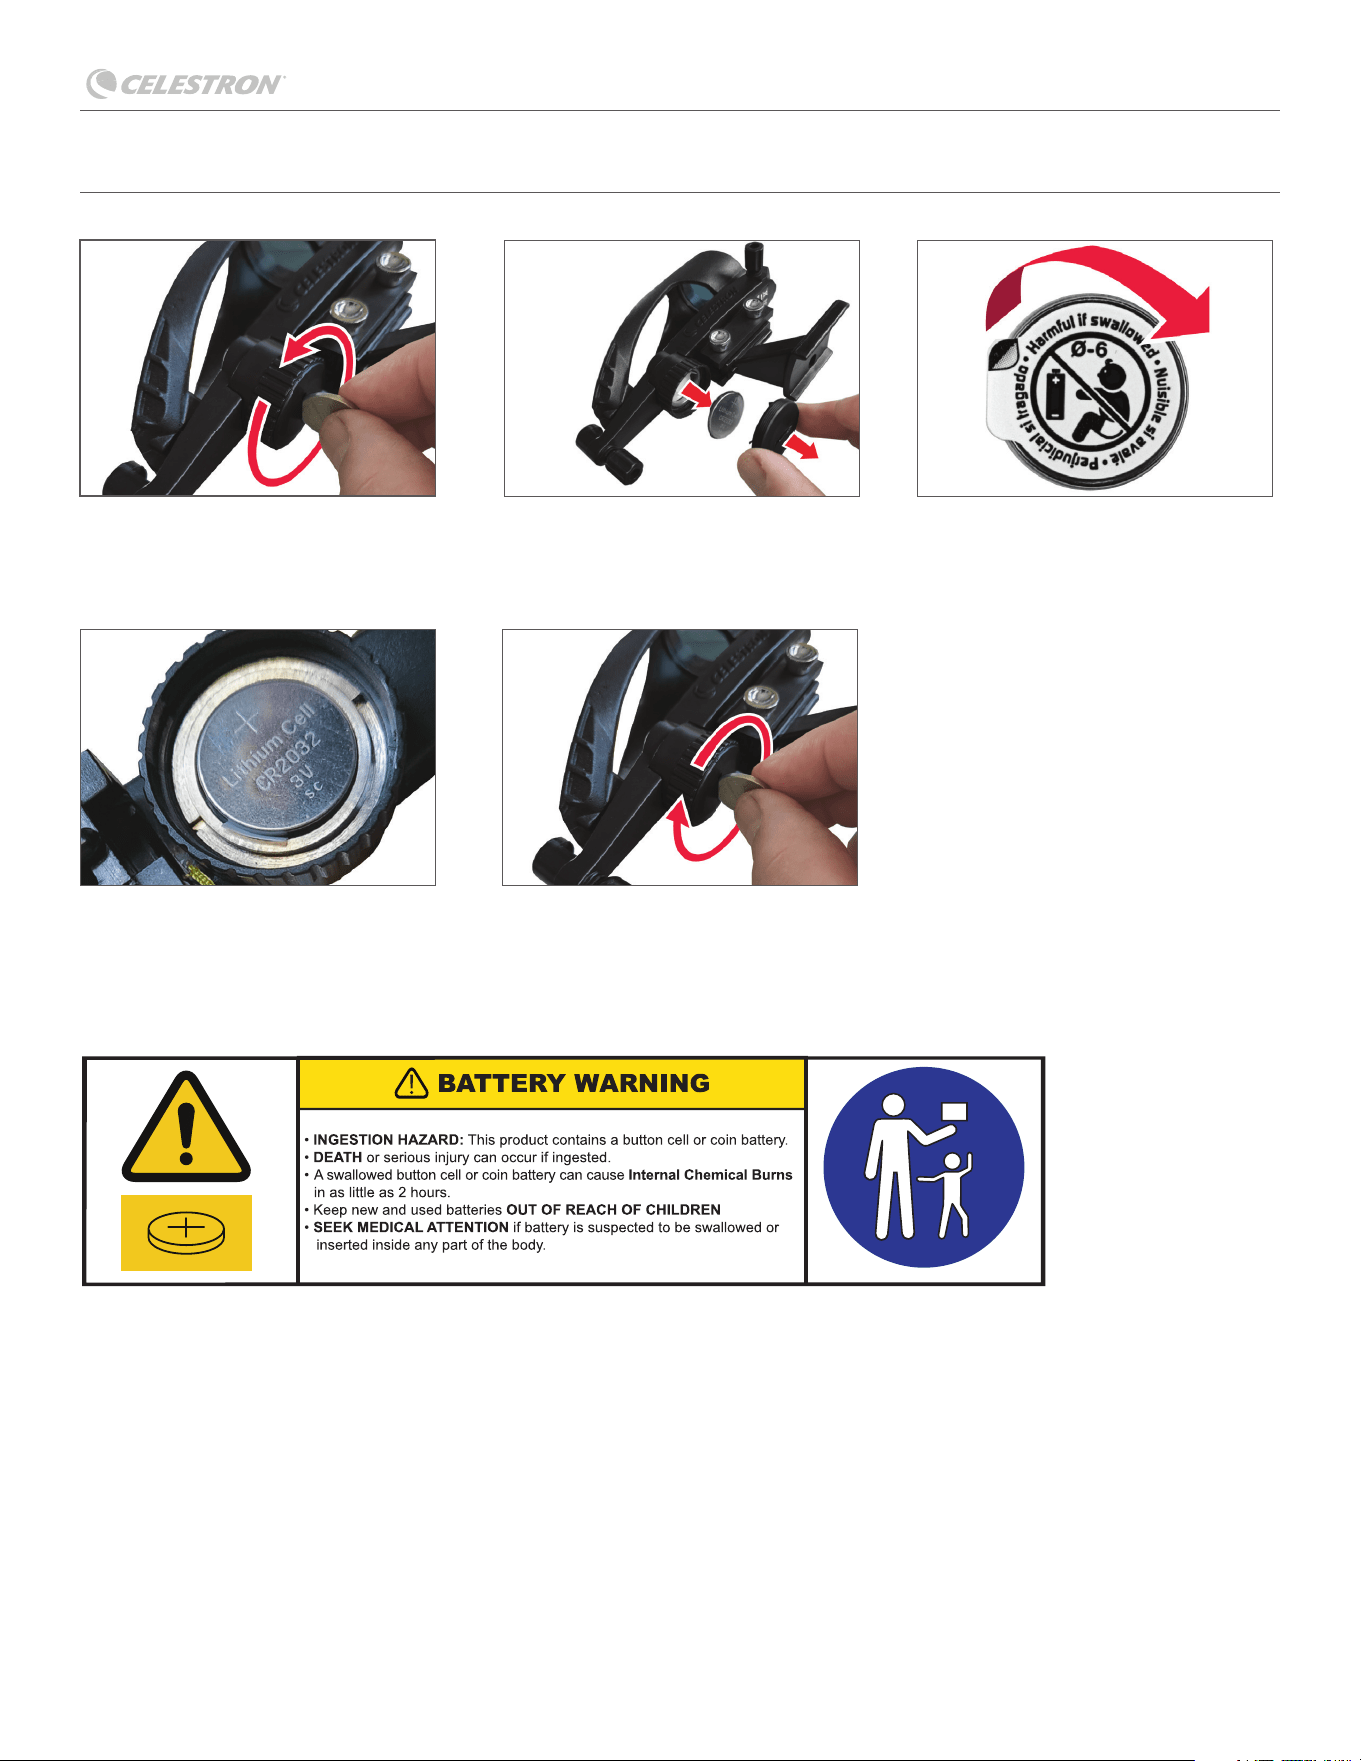
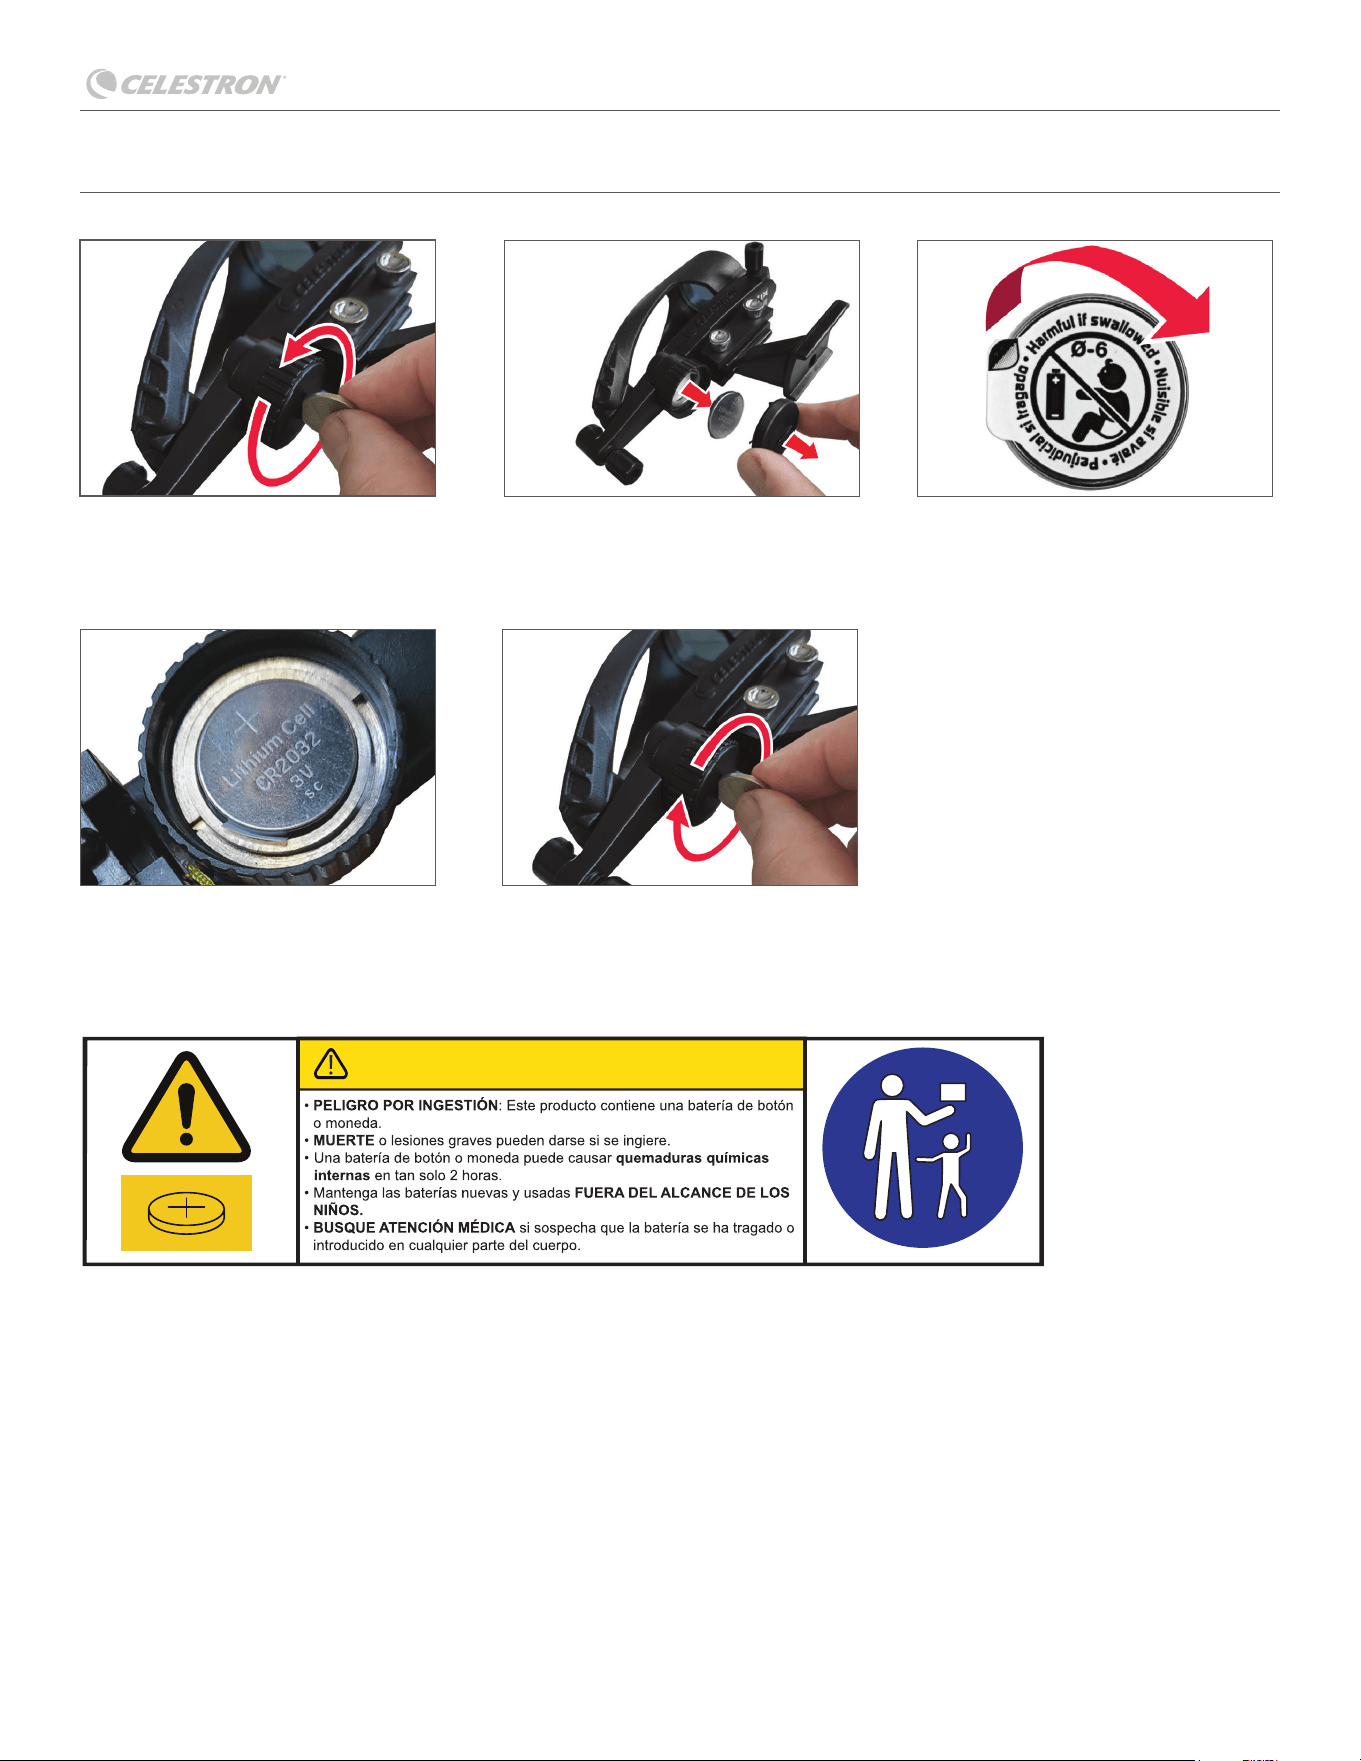
PREPARE TO USE YOUR FINDERSCOPE
4. Place the battery back in the battery
compartment with the positive (+) side
facing up.
1. Open the battery compartment lid
using a coin, the included multi-tool,
or other fl at tool.
5. Using the coin or tool you used
previously, screw the lid down tight.
2. Remove the CR2032 battery from
compartment.
3. Peel off the sticker that is blocking the
CR2032 battery’s circuit.
SAFETY INSTRUCTIONS
• There is a risk of explosion if the battery is replaced with an incorrect type.
• The included battery is not rechargeable.
• Only use the battery as originally intended to avoid a short circuit. Connecting the conductive material
directly to the battery’s positive and negative sides will cause a short circuit.
• Do not use a damaged battery.
• Do not store the battery in an extremely cold or hot environment. Doing so can reduce battery life.
• When replacing the battery, refer to the instruction manual and ensure the positive and negative sides are
oriented correctly.
• Do not put the battery in fi re.
• Dispose of the battery according to local regulations.
StarPointer
TM
Pro Finderscope
4 | ENGLISH
* SOLAR WARNING! Never attempt to view the Sun through this fi nderscope or any telescope without a solar fi lter!
OR
11
44
22
55
33
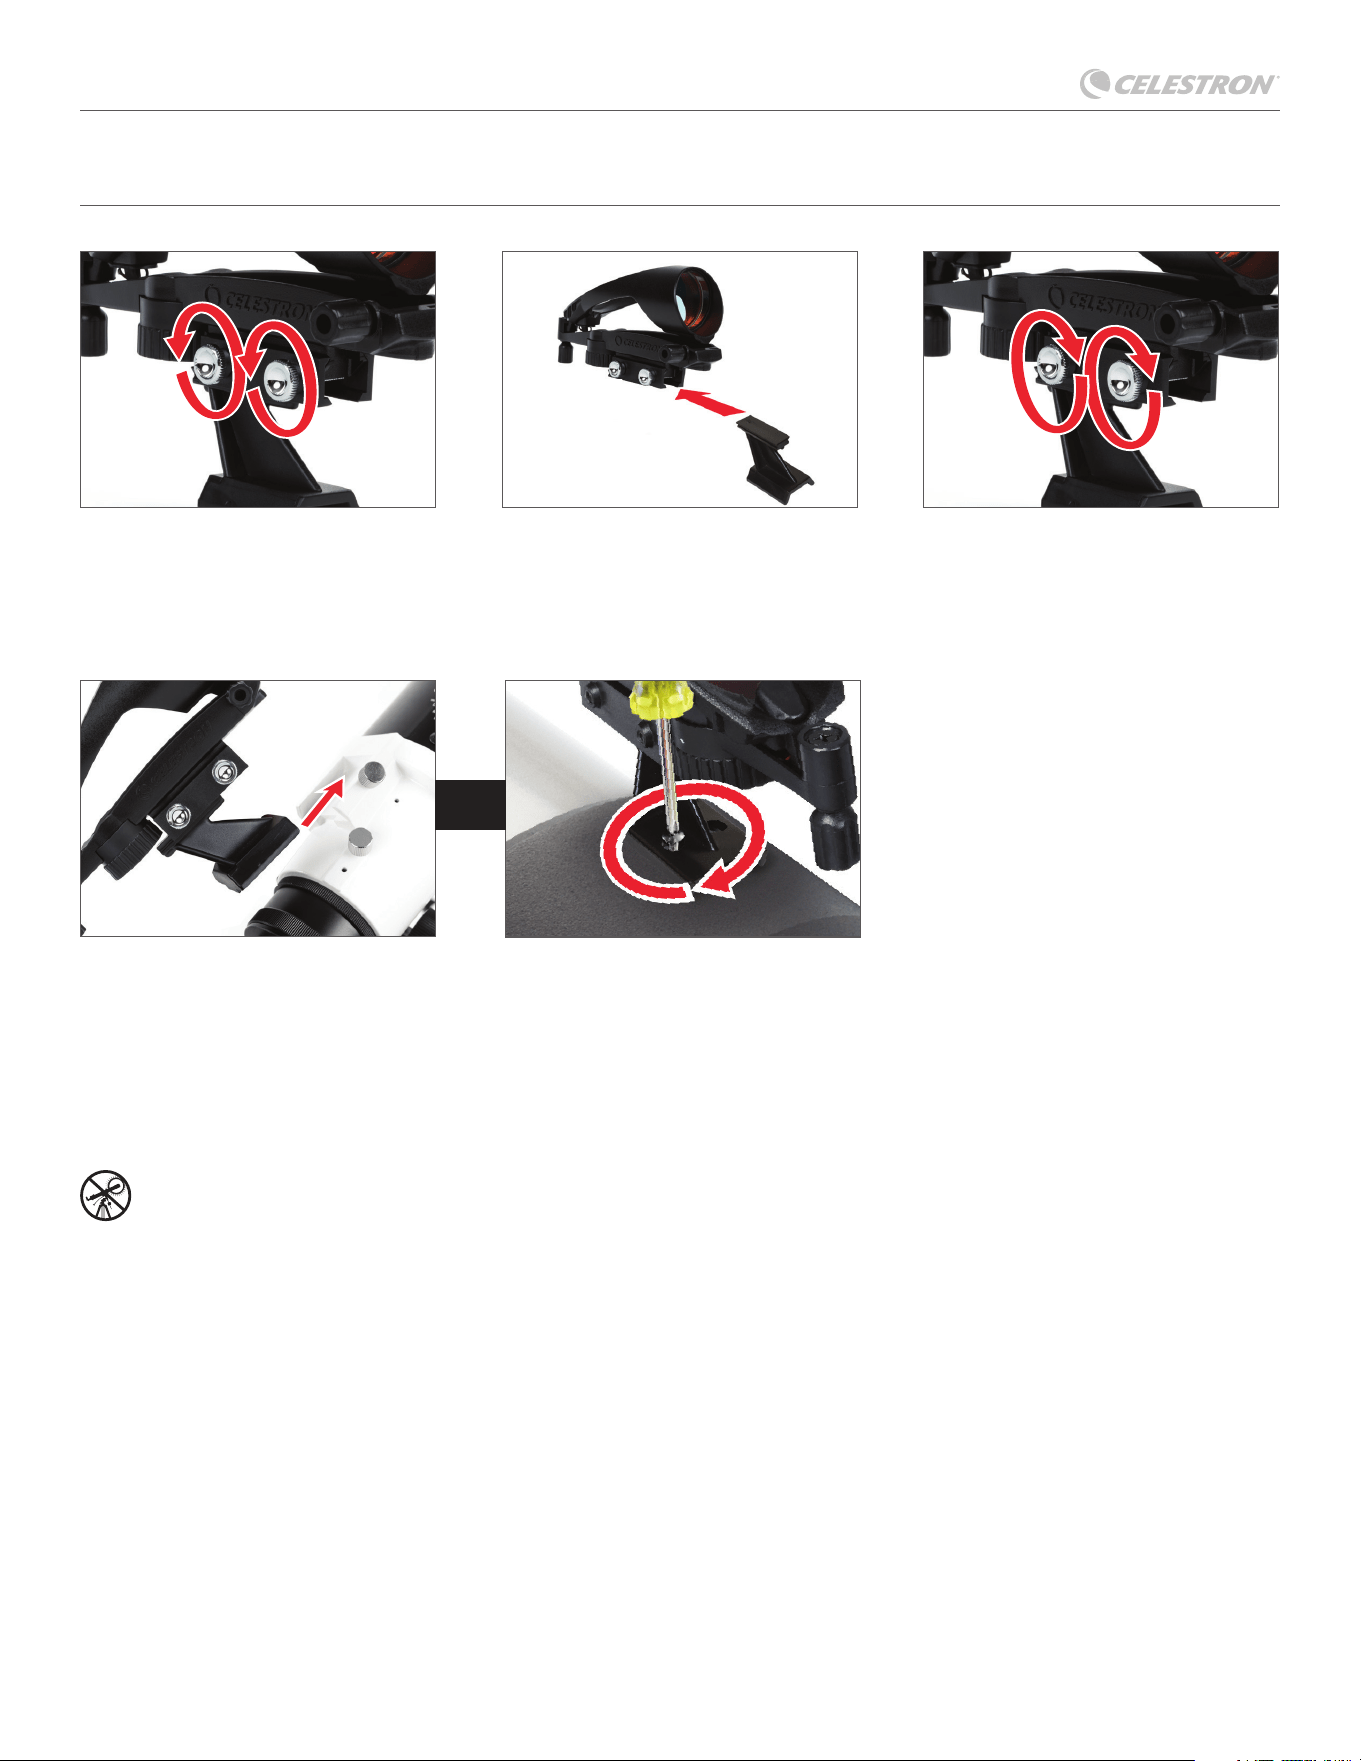
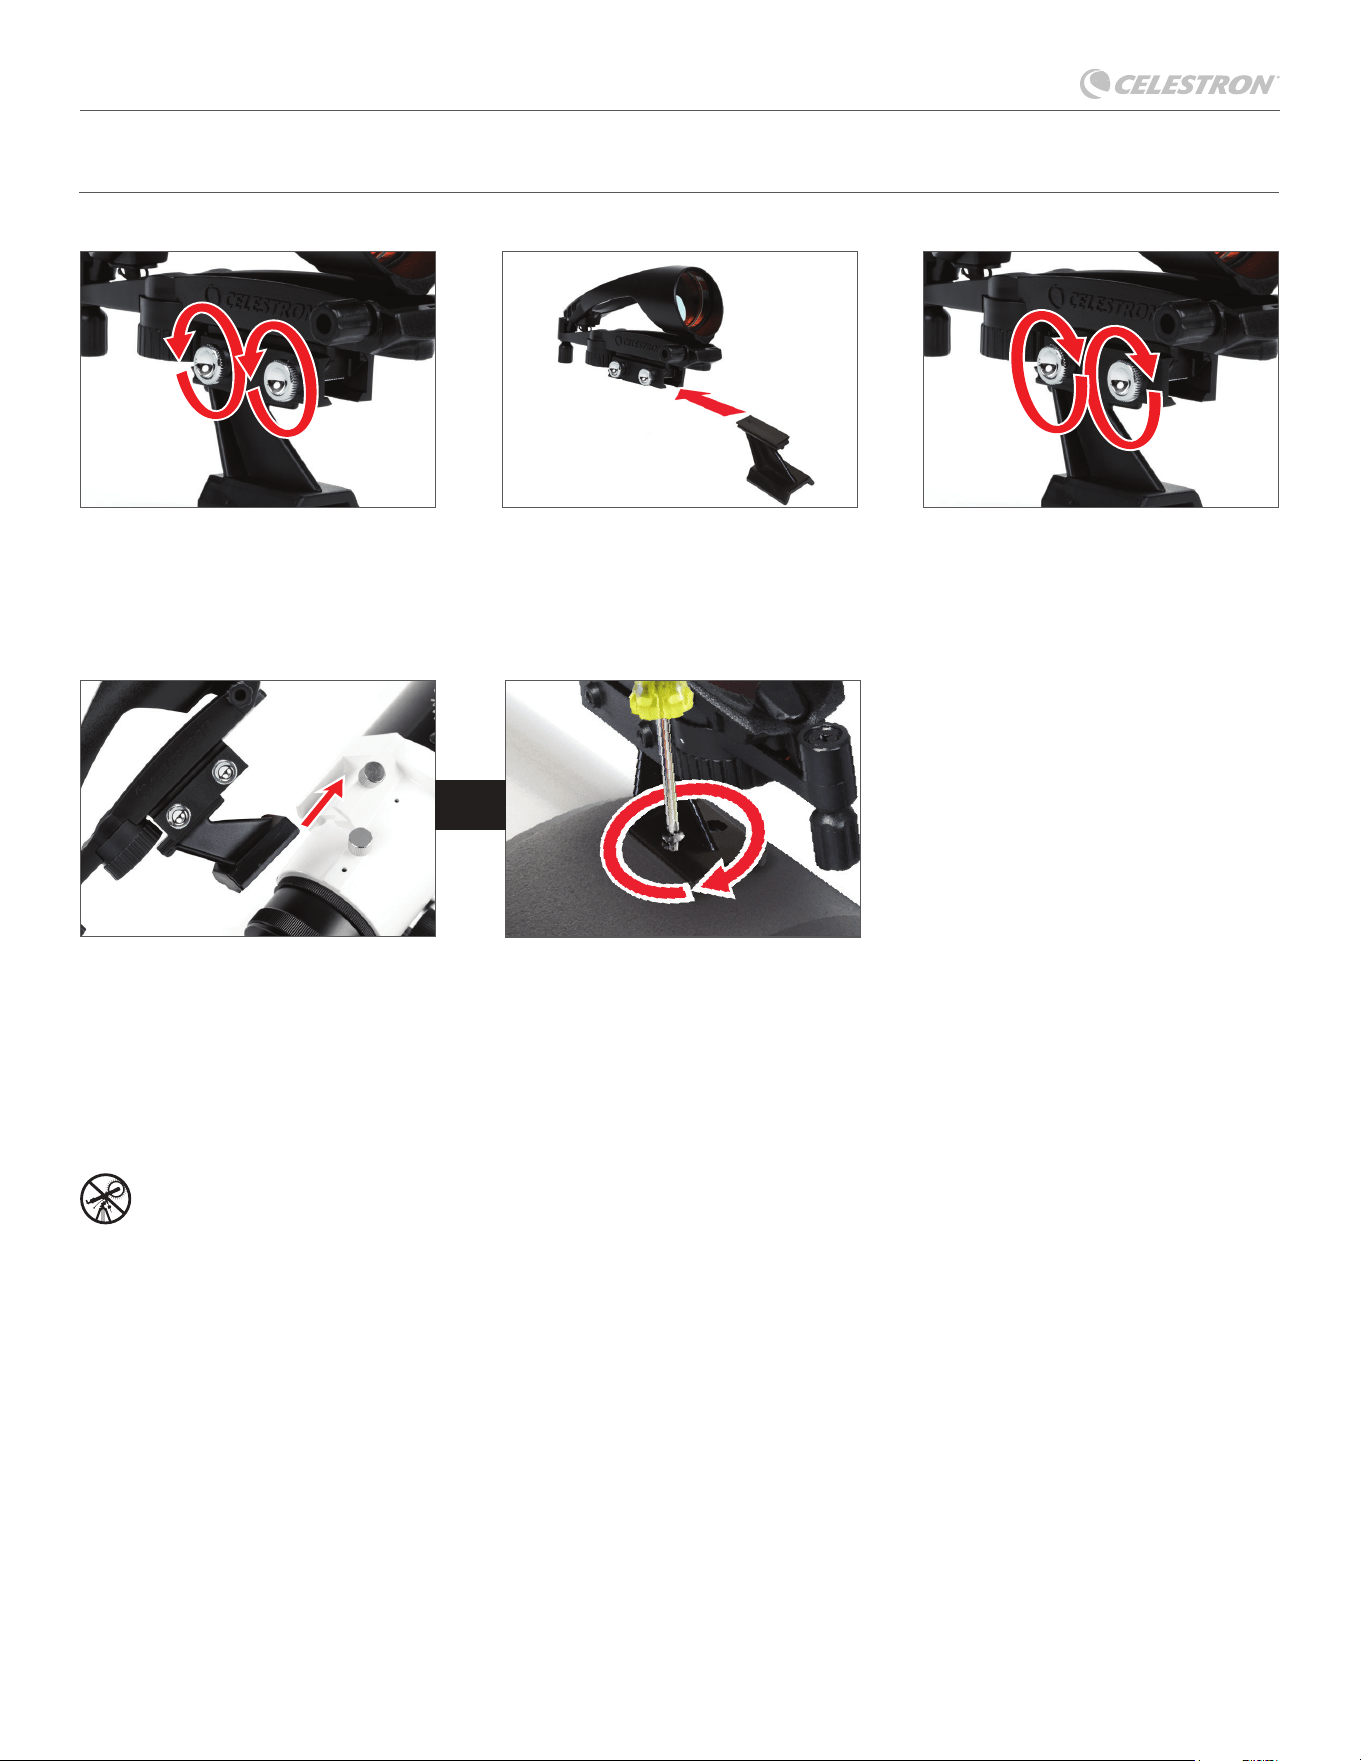
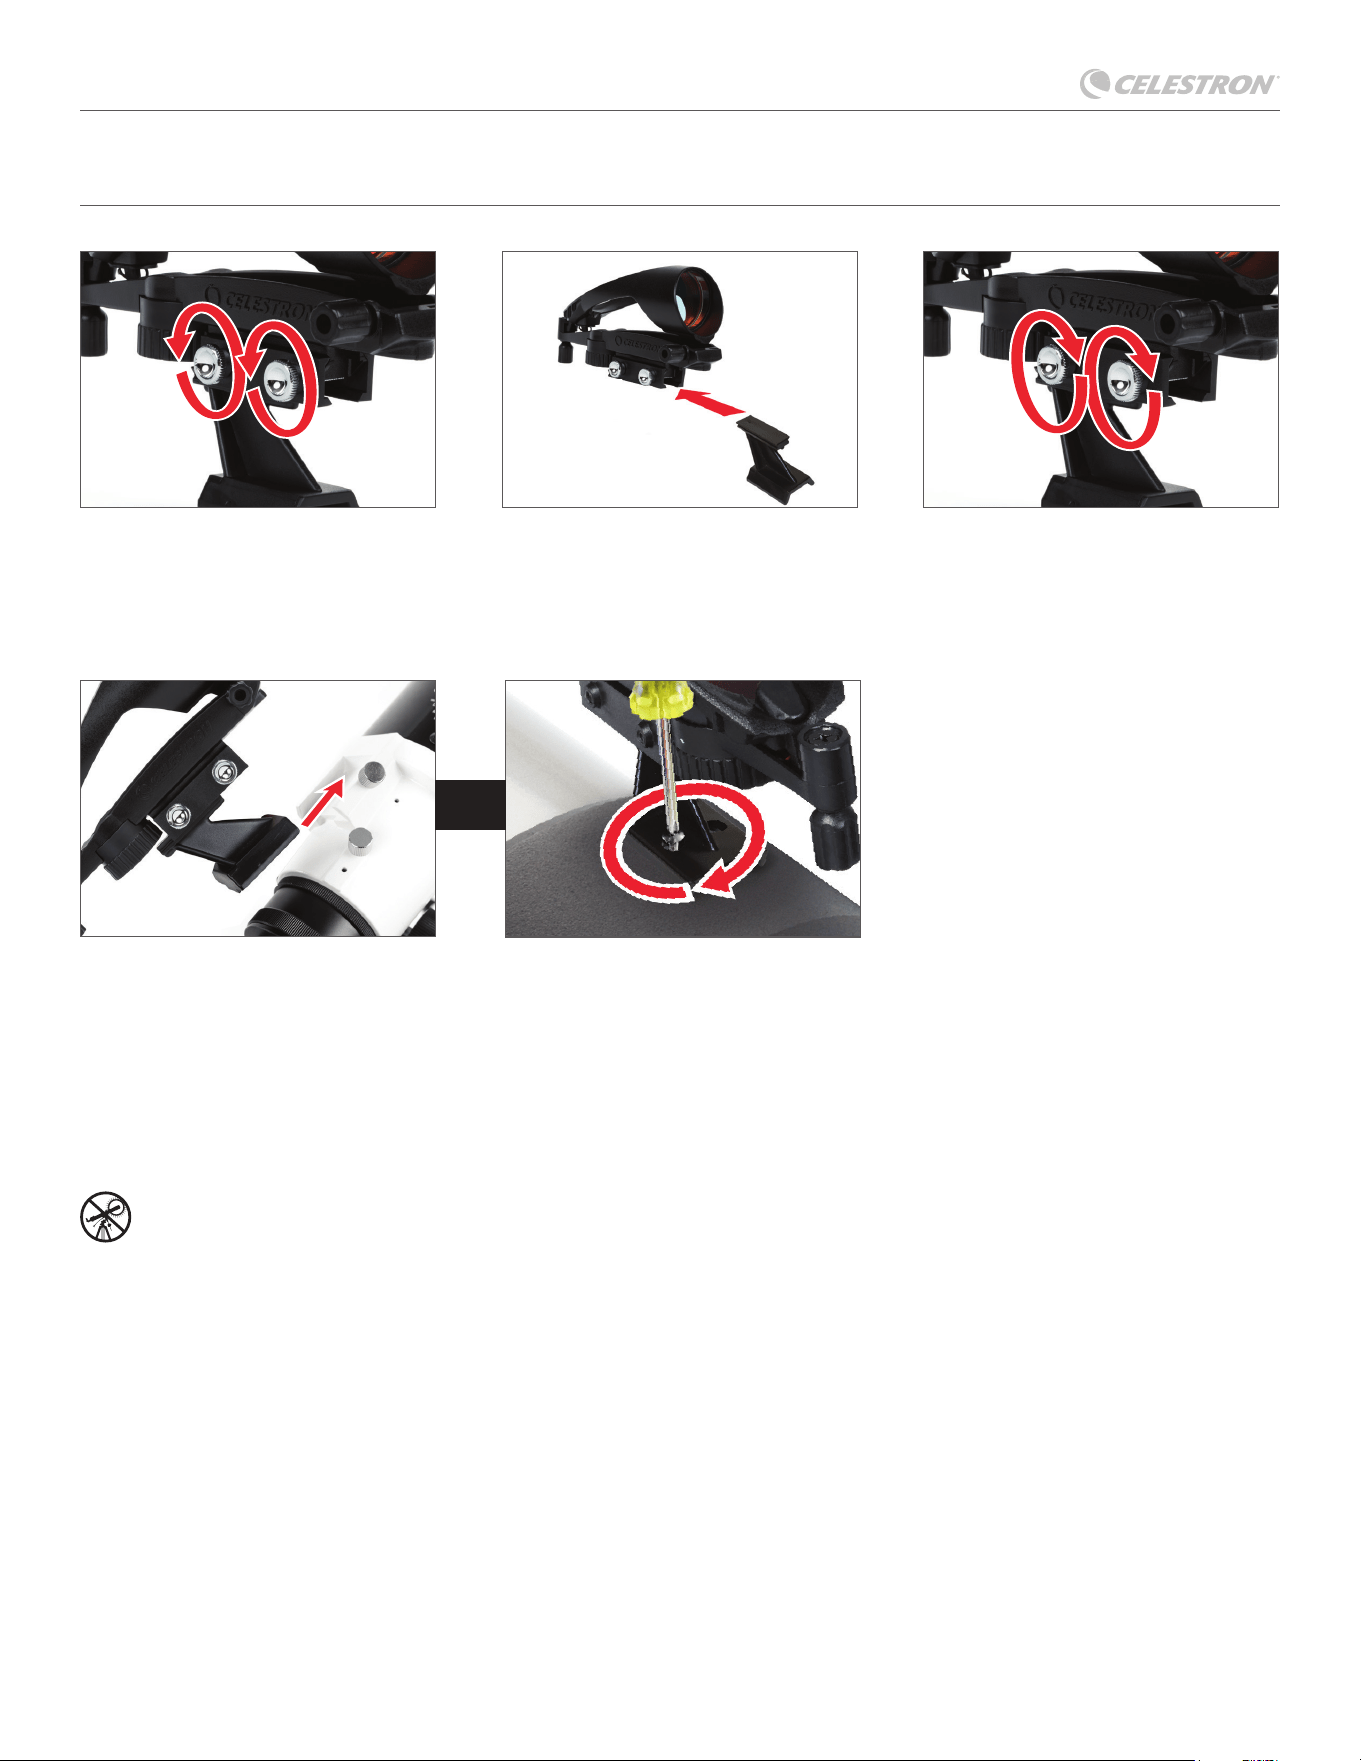
INSTALLING THE STARPOINTER PRO FINDERSCOPE
3. Tighten the chrome mounting screws
to secure the bracket in place.
1. Loosen the two chrome mounting
screws near the bottom of the
fi nderscope.
4. If your bracket is the dovetail type,
loosen the setscrew on the telescope
mounting bracket, slide the base of
the fi nderscope into the bracket and
tighten the setscrew.
2. Choose the correct bracket for your
telescope and attach it to the base of
the fi nderscope.
If your bracket is the screw-on type,
remove the two Phillips-head screws or
thumb screws from the telescope. Place
the fi nder over the screw holes or posts.
Tighten the screws or thumb screws
down to secure the fi nderscope in place.
StarPointer
TM
Pro Finderscope
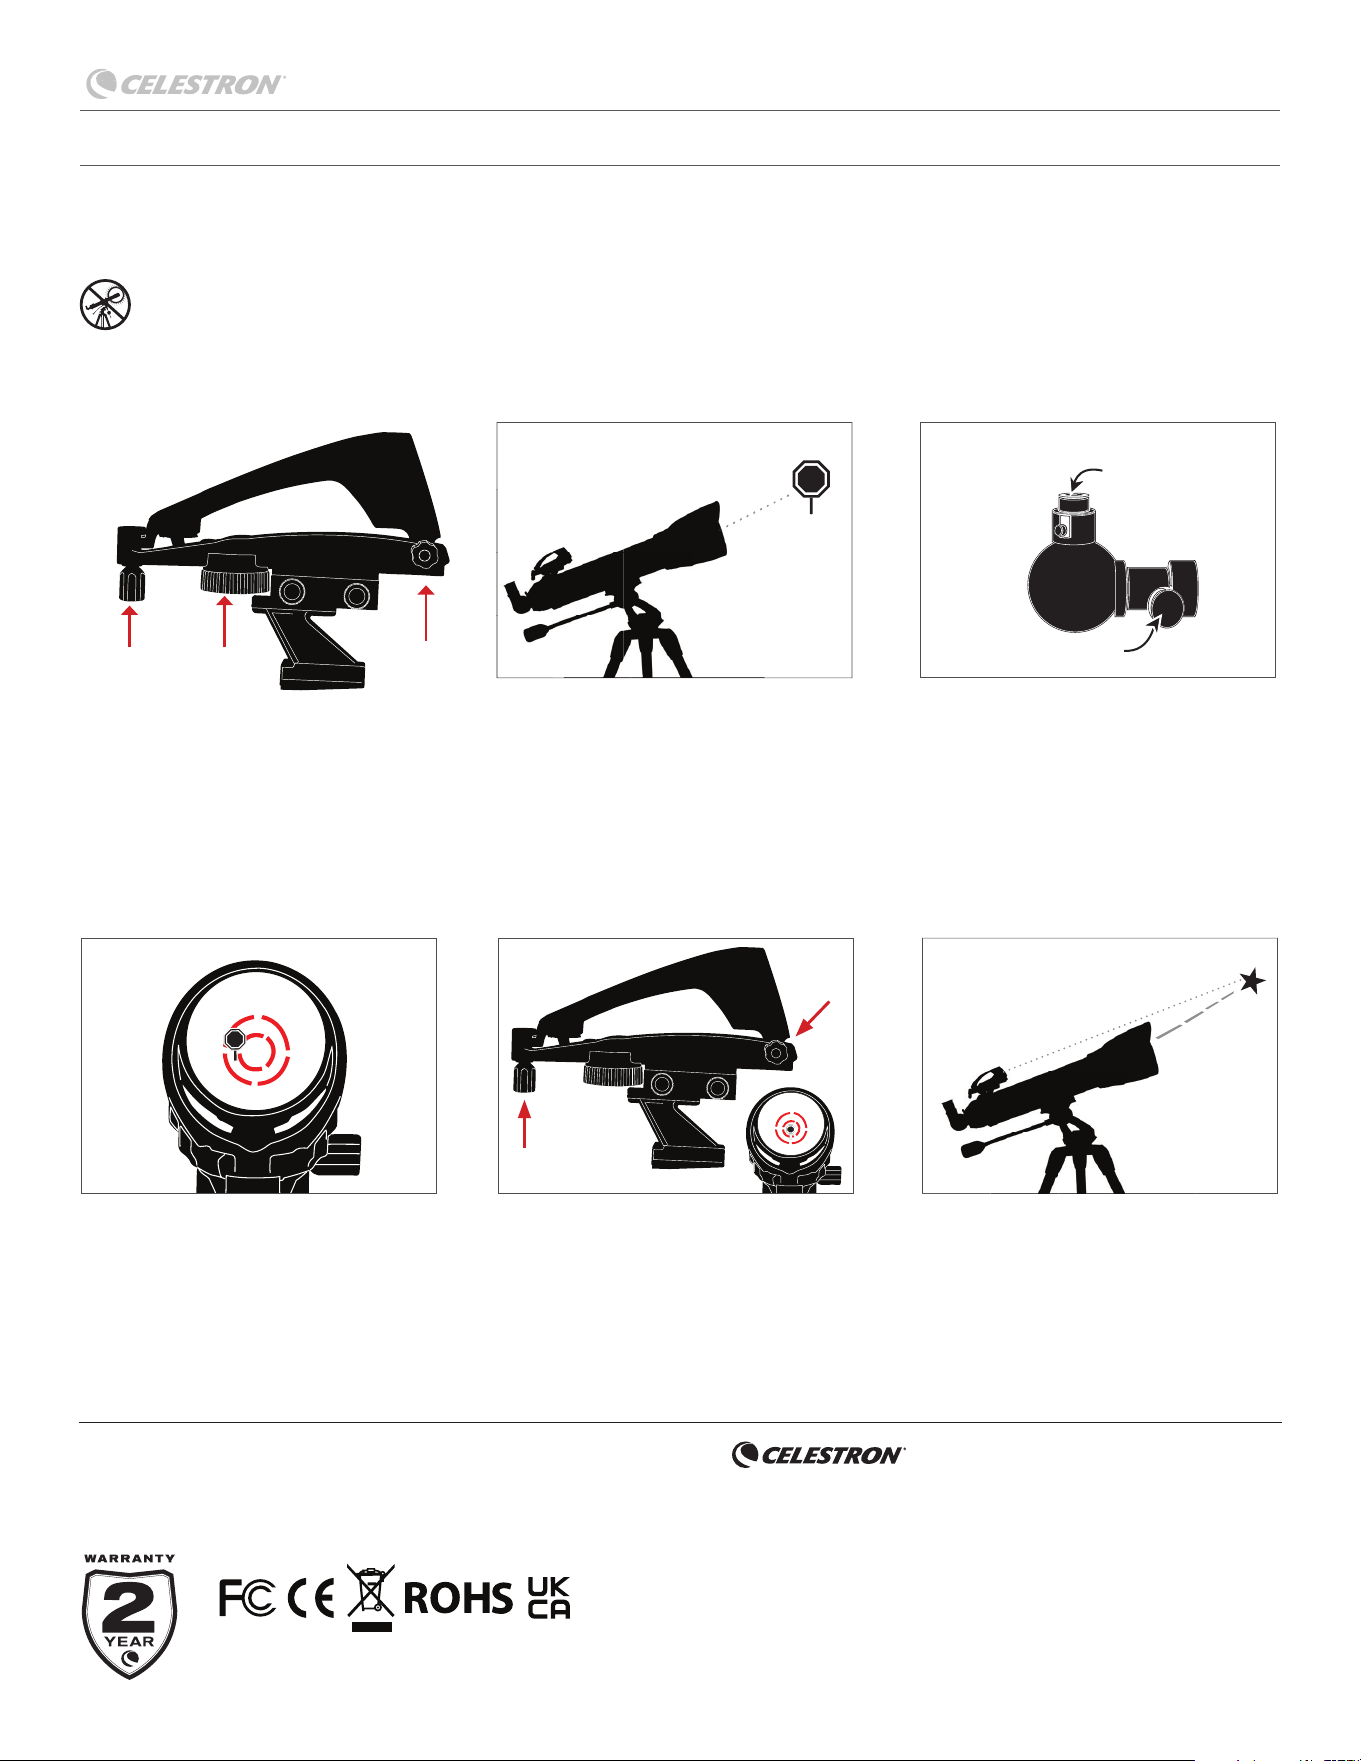
LOOK THROUGH THE FINDERSCOPE
3. With the object precisely centered
in the eyepiece, look through the
fi nderscope’s optical window and
locate the red reticle.
FCC NOTICE: This device complies with Part 15 of the FCC Rules. Operation
is subject to the following two conditions: (1) This device may not cause
harmful interference, and (2) this device must accept any interference received,
including interference that may cause undesired operation.
www.celestron.com/pages/warranty
©2023 Celestron. Celestron and Symbol are trademarks of Celestron,
LLC. All rights reserved. Celestron.com
2835 Columbia Street, Torrance, CA 90503 USA
Product design and specifi cations are subject to change without prior
notifi cation.
This product is designed and intended for use by those 14 years of age
and older.
Made in China 11-23
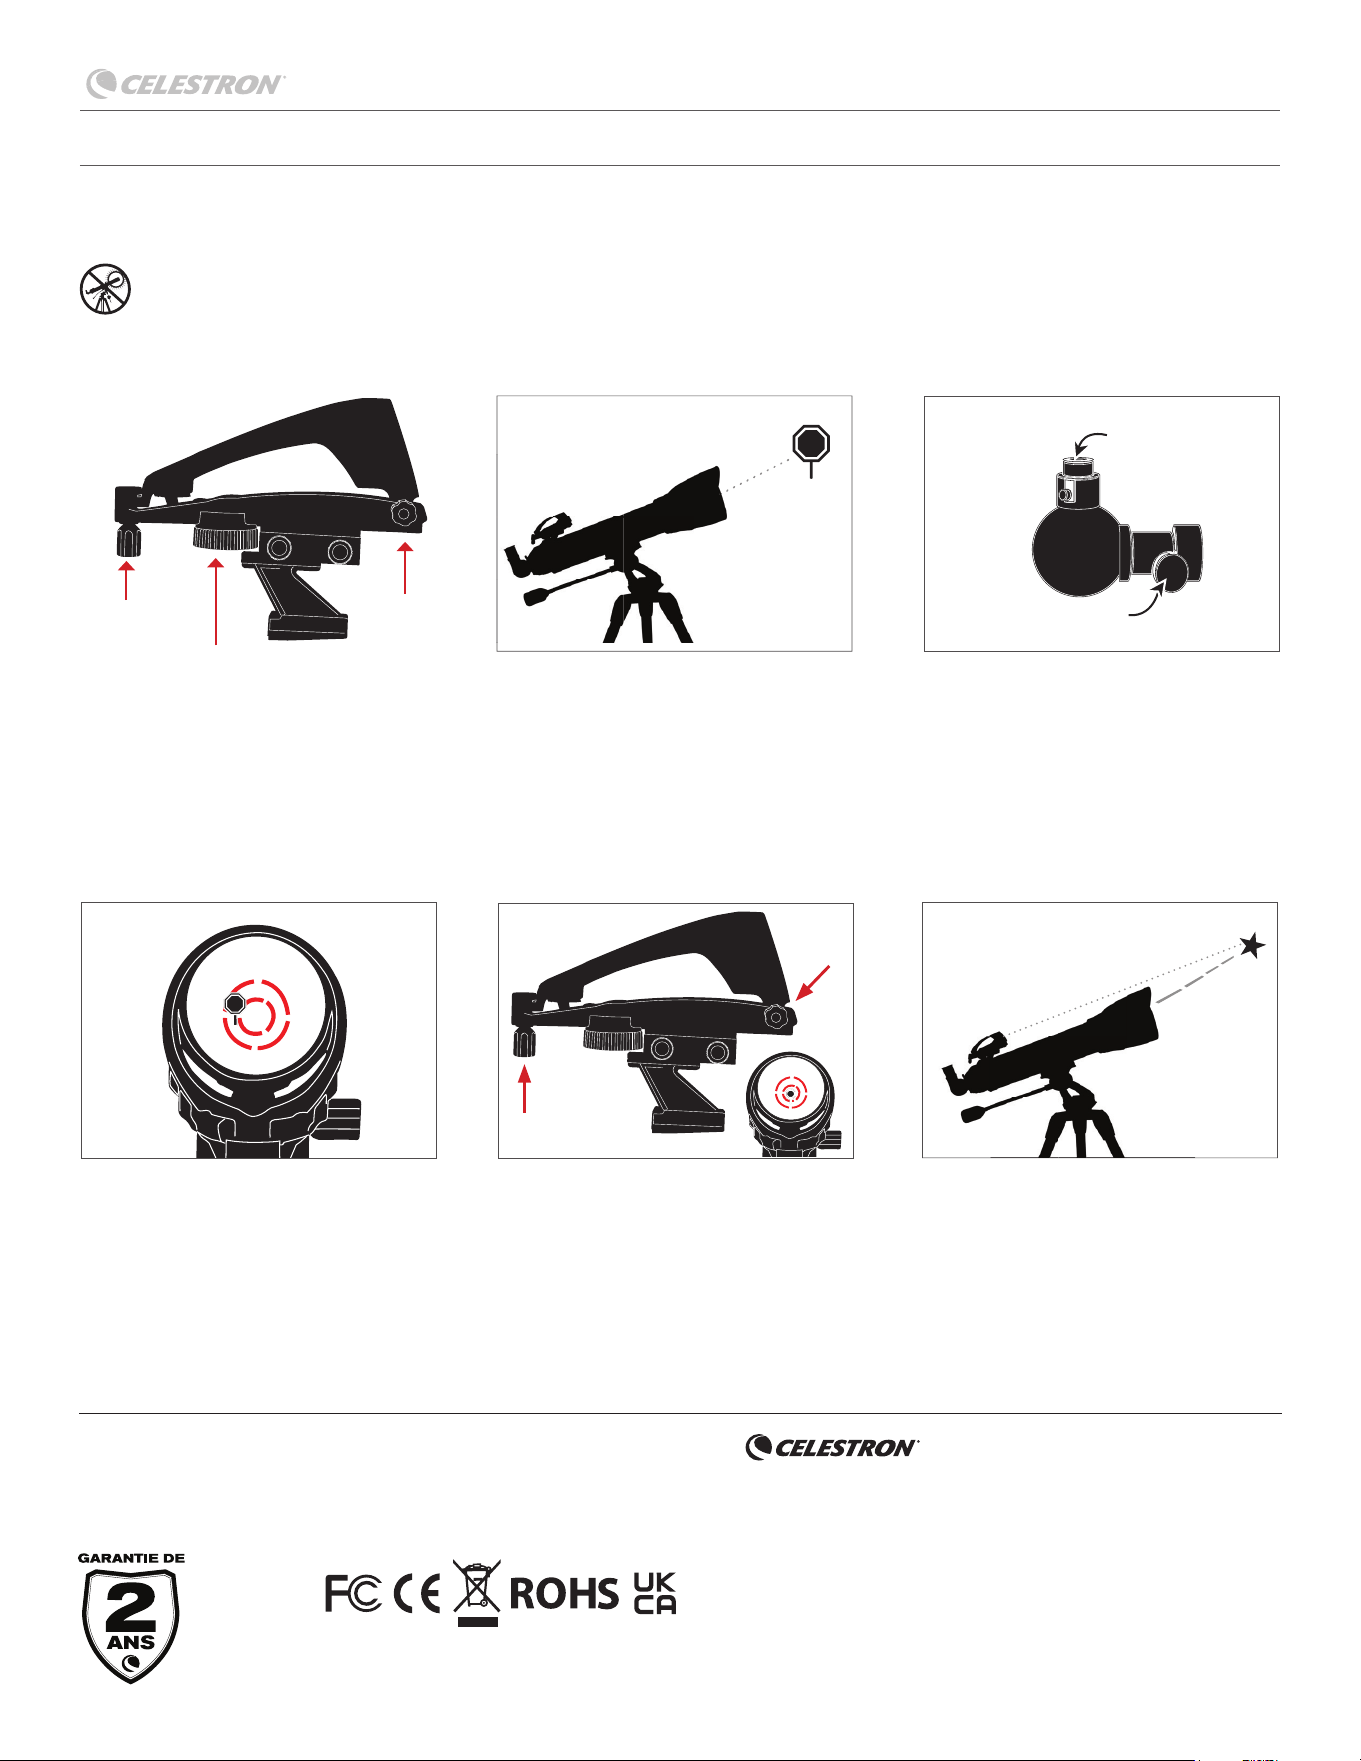
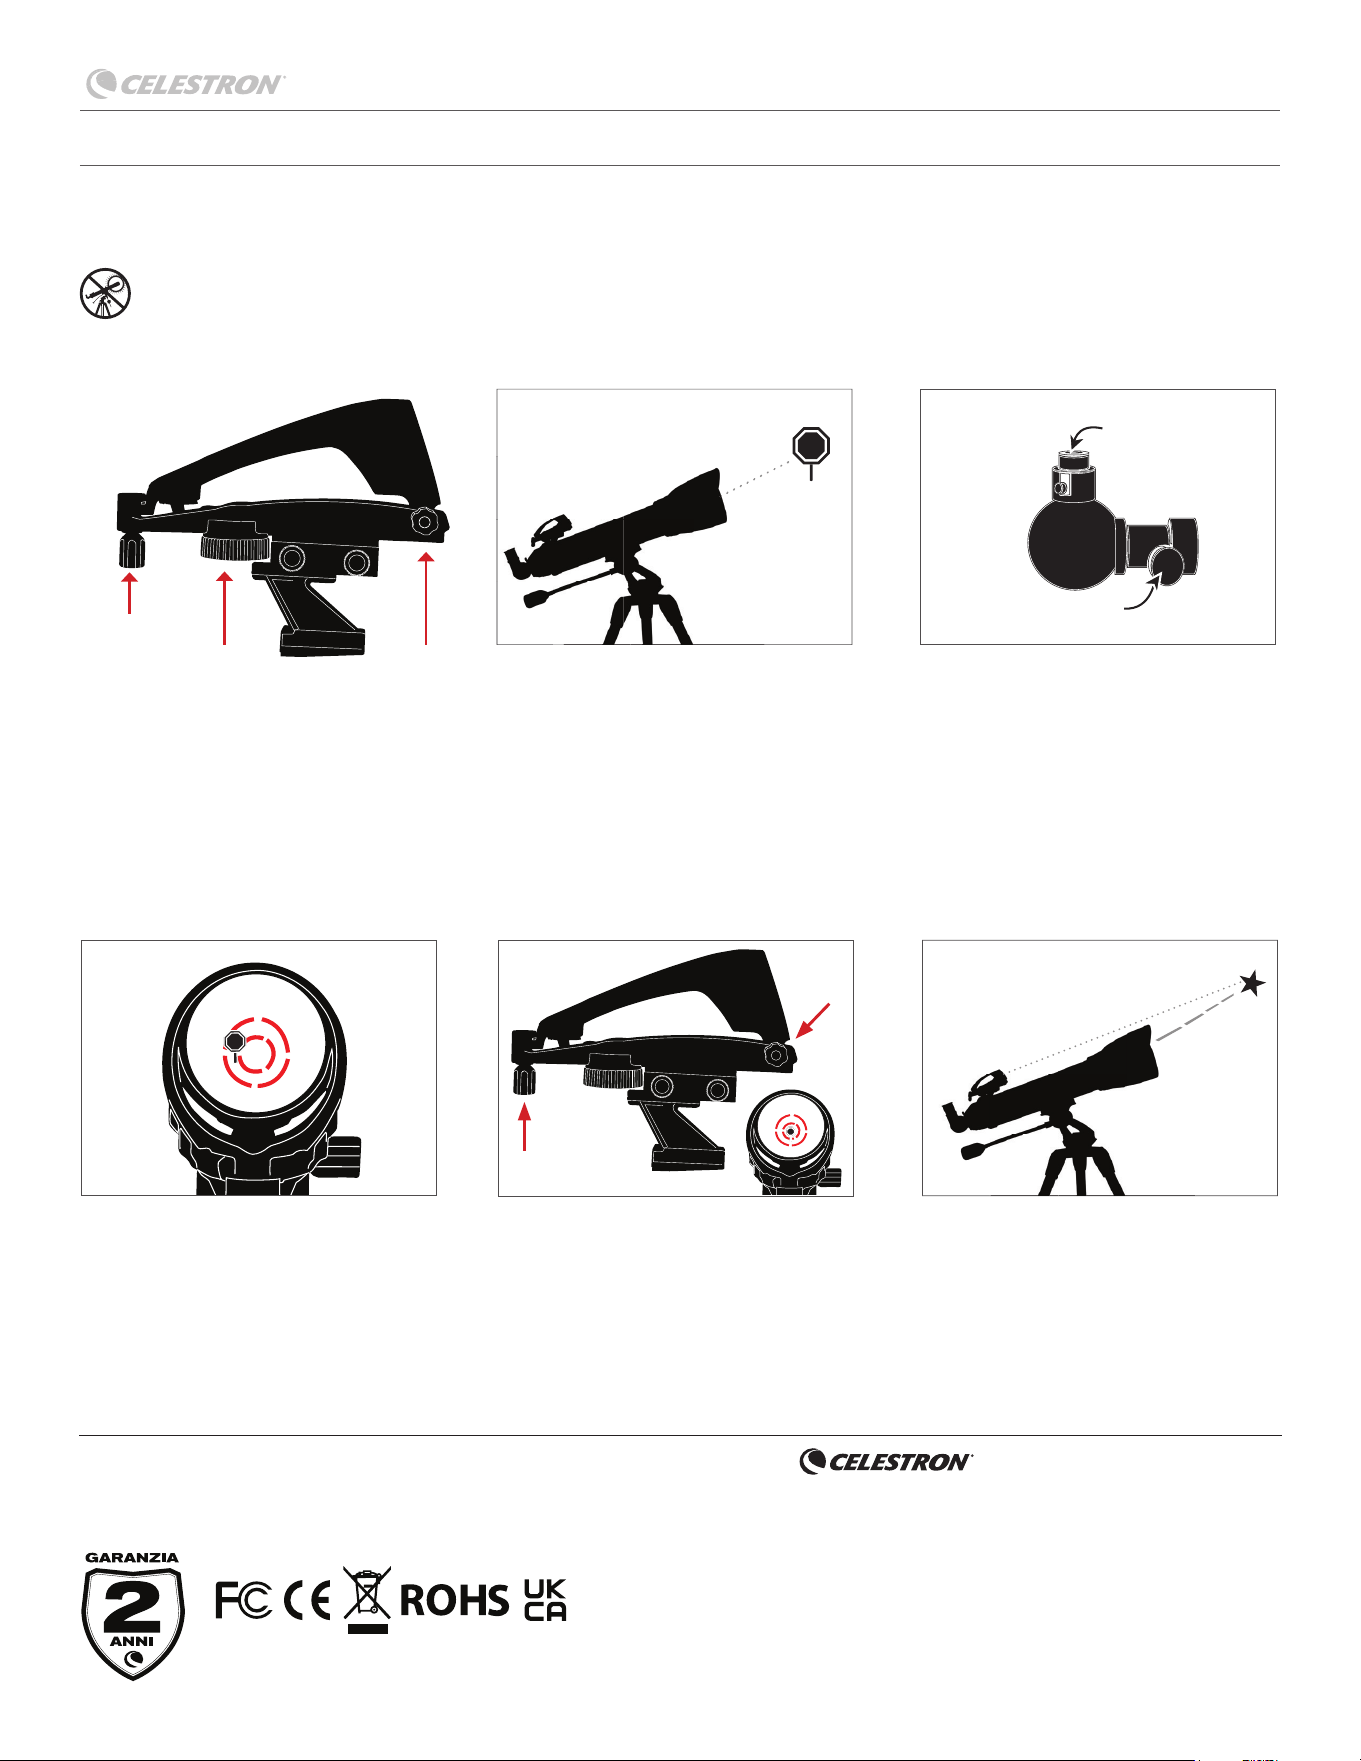
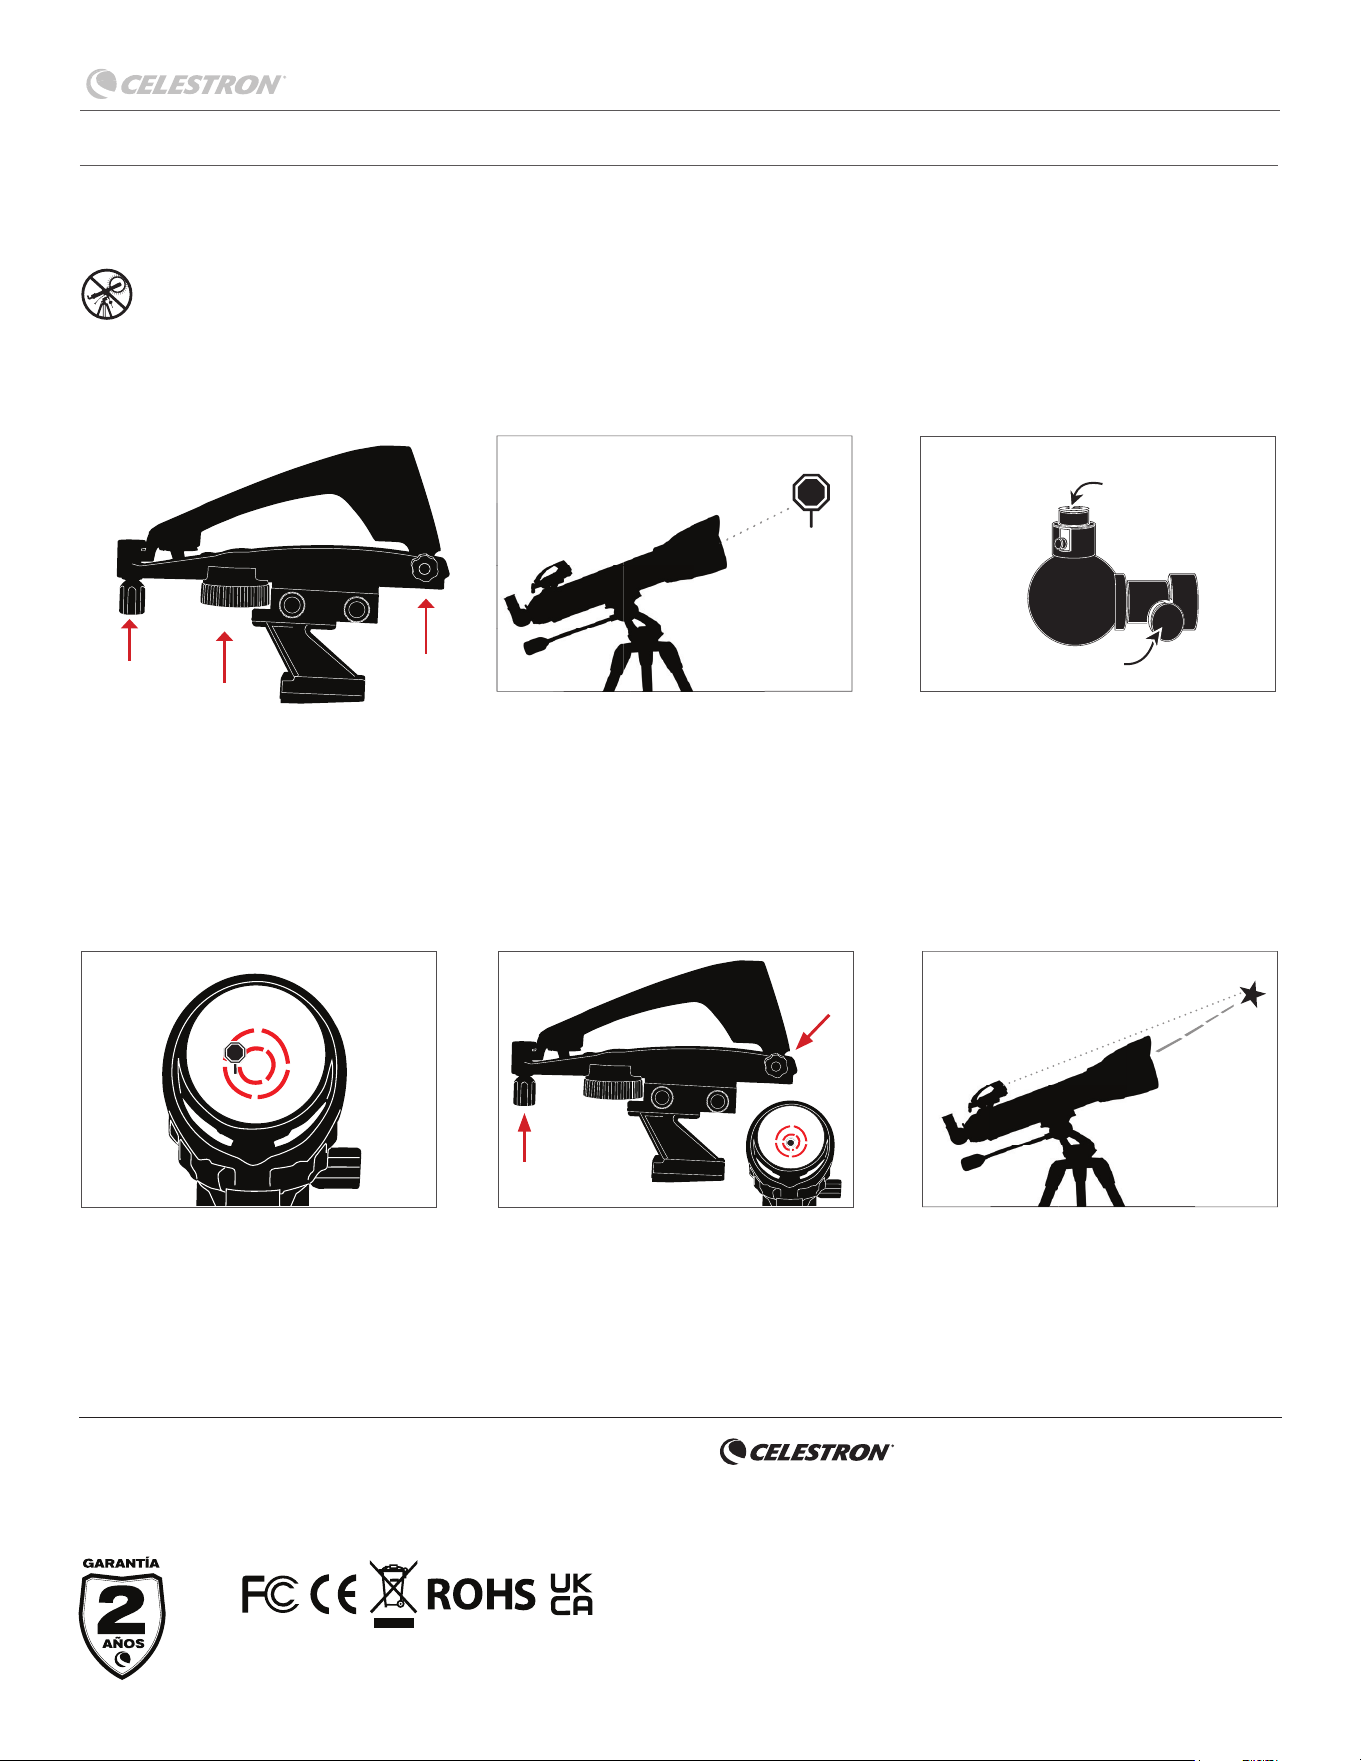
ALIGNING THE STARPOINTER PRO FINDERSCOPE
The fi nderscope is one of the most important parts of your telescope. It helps you locate objects and center them in the eyepiece.
The fi rst time you assemble your telescope, you’ll need to align the fi nderscope with the telescope’s main optics. It’s best to do this during
the day* using land-based targets.
* SOLAR WARNING! Never attempt to view the Sun through this finderscope or any telescope without a solar filter.
YOUR FINDERSCOPE IS NOW ALIGNED!
5. It should not require realignment unless
it is bumped or dropped. If you want
to test the alignment, point the reticle
at another land-based target. Then
verify the object is in the center of the
eyepiece’s fi eld of view.
Eyepiece
Focus Knobs
CENTER THE TARGET IN THE EYEPIECE
2. Look through the telescope using your
lowest power eyepiece. Move the
telescope until your chosen object lies
in the center of the view. If the image
is blurry, turn the focus knob until it
comes into sharp focus.
22
5533
Altitude
adjustment knob
(up-and-down)
Left and right
adjustment knob
Power knob
CHOOSE A TARGET
1. Take the telescope outside during the
day and turn on the fi nderscope using
the power knob. Find an easily
recognizable object, such as a
streetlight, car license plate, or sign.
The object should be as far away
as possible but at least a quarter
mile away.
ADJUST THE FINDERSCOPE
4. Without moving the telescope, use the
fi nderscope’s two adjustment knobs to
move it around until the reticle appears
centered over the object you are
observing in the eyepiece.
11
44
NOTE: Be sure to turn off the StarPointer Pro fi nderscope when not in use to conserve battery power.
New batteries can be purchased online or at watch/electronic stores.
MODE D'EMPLOI
MODÈLE #51635

7 | FRANÇAIS
Chercheur StarPointer
TM
Pro
6
1
2
3
4
7
8 9
10
1. Lentille frontale
2. Molette de réglage d'altitude
(haut et bas)
3. Bouton Marche/Arrêt/Luminosité
et compartiment des piles
4. Vis de monture
5. Molette de réglage d'azimuth
(gauche et droite)
6. Petit support Schmidt-Cassegrain
7. Grand support Schmidt-Cassegrain
8. Support de montage pour les petits télescopes avec queue d'aronde
9. Support de montage pour les petits télescopes avec trous de vis
10. Outil multifonction en métal
5

FRANÇAIS | 8
Chercheur StarPointer
TM
Pro
11
55
22
33
44
PRÉPARATION DE VOTRE CHERCHEUR
4. Placez la pile dans le compartiment à
pile, le côté (+) orienté vers le haut.
1. Ouvrez le couvercle du compartiment
à pile à l'aide d'une pièce, l'outil
multifonction, ou un autre outil plat.
5. Utilisez la pièce ou l'outil que vous
avez utilisé précédemment pour visser
fermement le couvercle.
2. Retirez la pile CR2032 du
compartiment.
3. Décollez l'autocollant bloquant le
circuit de la pile CR2032.
INSTRUCTIONS DE SÉCURITÉ
• Risque d’explosion si la pile est remplacée par un type incorrect.
• La pile incluse n’est pas rechargeable.
• N’utilisez la pile que de la manière prévue pour éviter les court-circuits. Si un matériau conducteur met
directement en contact les pôles positifs et négatifs d’une pile, cela crée un court-circuit.
• N’utilisez pas une pile endommagée.
• Ne stockez pas la pile dans un lieu extrêmement froid ou chaud. Ceci pourrait réduire sa durée de vie.
• Avant de remplacer la pile, consultez le mode d'emploi et faites attention au sens positif et négatif de la pile.
• Ne jetez pas la pile au feu.
• Jetez la pile dans le respect de la réglementation
AVERTISSEMENT SUR LA PILE
9 | FRANÇAIS
Chercheur StarPointer
TM
Pro
* AVERTISSEMENT SUR LE SOLEIL! N’essayez jamais d’observer le soleil avec le chercheur sans utiliser de fi ltre solaire.
OU
11
44
22
55
33
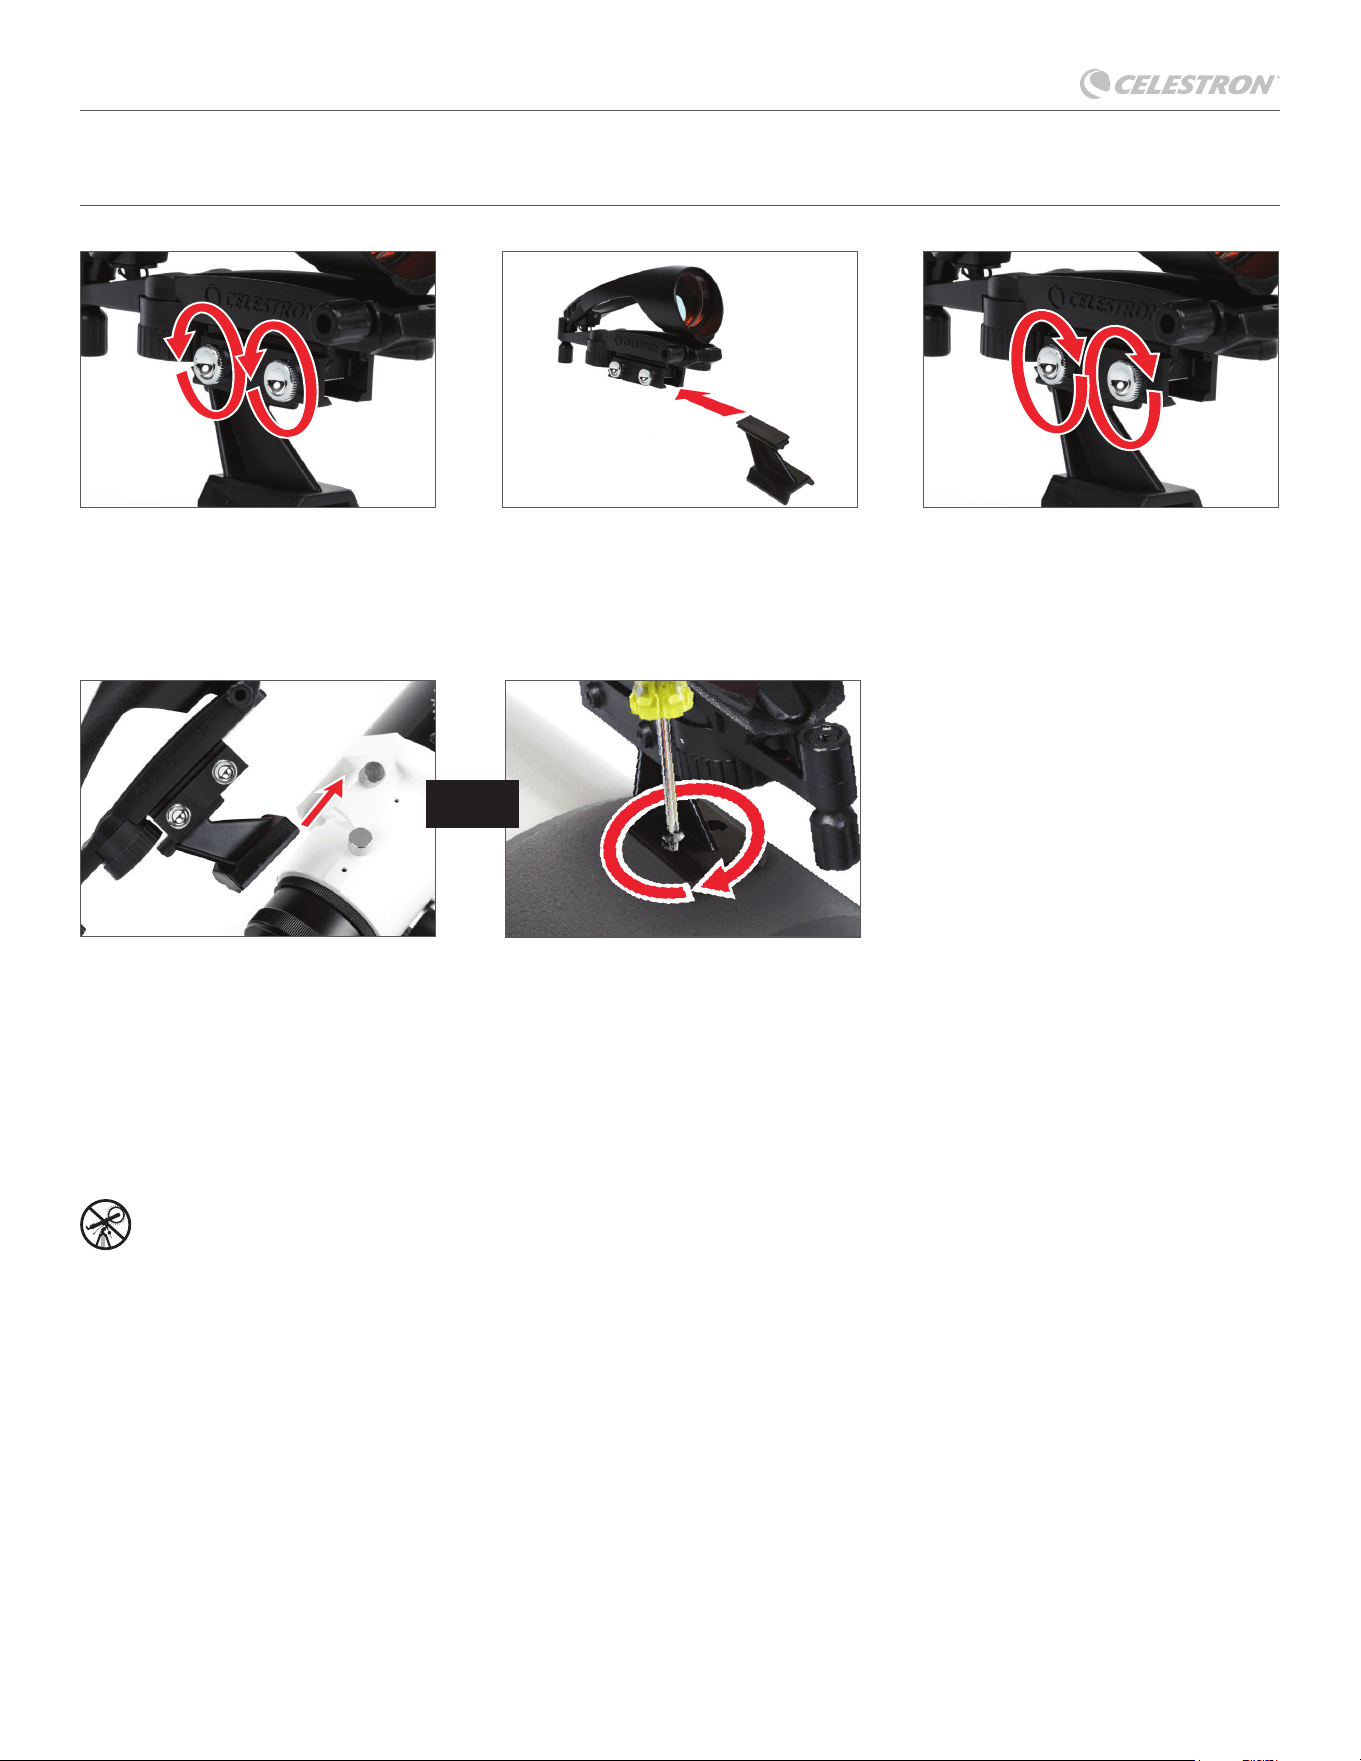
3. Serrez les vis de monture chromées
pour sécuriser le support en place.
1. Desserrez les deux vis de monture
chromées situées proche du dessous
du chercheur.
4. Si votre support est du type à queue
d'aronde, desserrez la vis de fi xation
sur le support de montage du
télescope, faites glisser la base du
chercheur dans le support et serrez la
vis de réglage.
2. Choisissez le support correct pour
votre télescope et attachez-le à la
base du chercheur.
Si votre support est du type à visser,
retirez les deux vis à tête cruciforme ou
les vis à oreilles du télescope. Placez le
chercheur sur les trous de vis ou tiges.
Serrez les vis ou les vis à oreilles pour
fi xer le chercheur en place.
INSTALLATION DU CHERCHEUR STARPOINTER PRO
Chercheur StarPointer
TM
Pro
REGARDER DANS LE CHERCHEUR
3. Une fois l'objet centré avec précision
dans l'oculaire, regardez à travers
la fenêtre optique du chercheur et
localisez le point rouge.
Déclaration de la FCC: Cet appareil respecte la section 15 des règles de la
FCC. Son utilisation est sujette aux deux conditions suivantes: (1) Cet appareil ne
doit pas causer d'interférences nuisibles et (2) cet appareil doit accepter toutes
les interférences reçues, y compris celles pouvant entraîner un fonctionnement
indésirable.
www.celestron.com/pages/warranty
©2023 Celestron. Celestron et le Symbol sont des marques
déposées de Celestron, LLC. • Tous droits réservés Celestron.com
2835 Columbia Street, Torrance, CA 90503 USA
Le design et les spécifi cations du produit sont sujettes à modifi cation
sans préavis.
Ce produit est conçu et prévu pour être utilisé par des
personnes âgées de 14 ans et plus.
Fabriqué en Chine 11-23
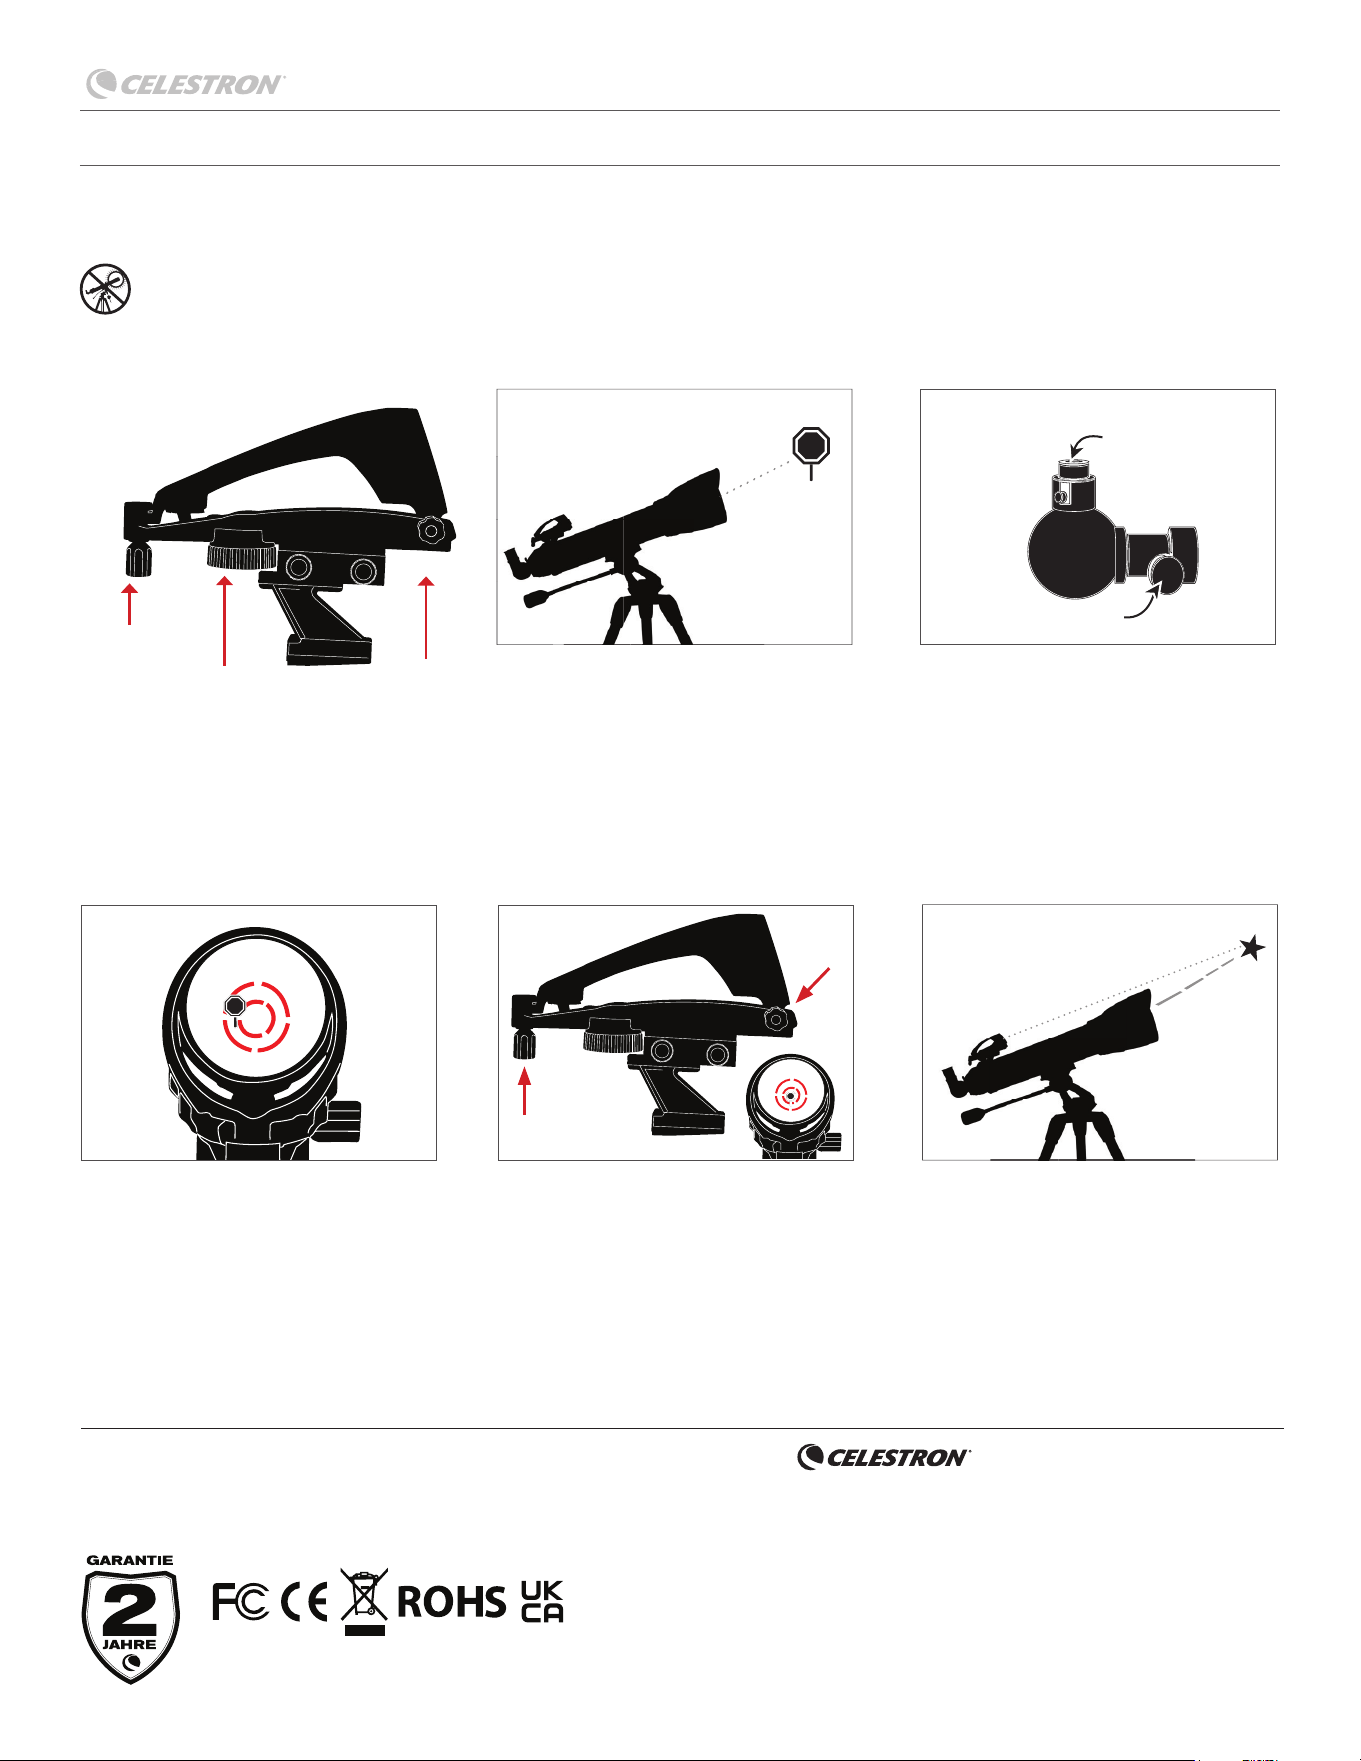
ALIGNER LE CHERCHEUR STARPOINTER PRO
Le chercheur est l'un des composants les plus impor tants de votre télescope. Il vous aide à localiser des objets et à les centrer dans votre oculaire.
La première fois que vous assemblez votre télescope, vous devez aligner le chercheur avec le système optique principal du télescope. Il
est préférable de faire ceci pendant la journée* en utilisant des cibles terrestres.
* AVERTISSEMENT SUR LE SOLEIL! N’essayez jamais d’observer le soleil à l’aide avec ce chercheur ou n'importe quel type de télescope sans utiliser de fi ltre solaire.
VOTRE CHERCHEUR EST MAINTENANT
ALIGNÉ!
5. Il n'aura pas besoin d'être aligné de
nouveau tant qu'il n'aura pas subi un choc
ou qu'il sera tombé. Si vous souhaitez
tester l'alignement, pointez réticule sur
une autre cible terrestre. Vérifi ez ensuite
que l'objet se trouve au centre du champ
de vision de l'oculaire.
Oculaire
Molette de mise au point
CENTRER LA CIBLE DANS L'OCULAIRE
2. Regardez dans le télescope en
utilisant votre oculaire de la plus basse
puissance. Déplacez le télescope
jusqu'à que l'objet choisi se trouve au
centre du champ de vision. Si l’image
est fl oue, faites doucement tourner la
molette de mise au point jusqu’à ce
que l’image soit nette.
22
5533
Molette de réglage
d’altitude
(Haut et bas)
Molette de
réglage gauche
et droite
Molette
d'alimentation
CHOISIR UNE CIBLE
1. Sortez le télescope pendant la journée
et allumez le chercheur à l'aide de
la molette d'alimentation. Trouvez
un objet facilement reconnaissable,
tel qu'un lampadaire, une plaque
d'immatriculation ou une enseigne.
L’objet doit se situer aussi loin que
possible, mais à au moins un quart de
mile de vous.
AJUSTER LE CHERCHEUR
4. Sans déplacer le télescope, utilisez
les deux molettes d’ajustement pour
déplacer le chercheur jusqu’à que le
point rouge s’aligne sur l’objet observé
dans l’oculaire.
11
44
REMARQUE: Assurez-vous d'éteindre le chercheur StarPointer lorsque vous ne l'utilisez pas pour économiser l'énergie de la pile. Vous pouvez acheter des
piles de remplacement en ligne ou dans les magasins de montres/de produits électroniques.

BEDIENUNGSANLEITUNG
MODELLNR. 51635

StarPointer
TM
Pro Sucherfernrohr
12 | DEUTSCH
TEILELISTE
6
1
2
3
4
7
8 9
10
1. Vordere Linse
2. Höhenverstellknopf
(nach oben und unten)
3. Ein-/Aus-/Helligkeitsschalter und
Batteriefach
4. Befestigungsschrauben
5. Azimut (links und rechts)
Einstellknopf
6. Kleine Schmidt-Cassegrain-Klammer
7. Große Schmidt-Cassegrain-Klammer
8. Montagehalterung für kleine Teleskope mit Schwalbenschwanz
9. Montagehalterung für kleine Teleskope mit Schraubenlöchern
10. Multitool aus Metall
5

StarPointer
TM
Pro Sucherfernrohr
DEUTSCH | 13
BATTERIEWARNUNG
11
55
22
33
44
DIE VERWENDUNG IHRES SUCHERFERNROHRS VORBEREITEN
4. Legen Sie die Batterie mit der positiven
(+) Seite nach oben wieder in das
Batteriefach ein.
1. Öffnen Sie den Deckel des
Batteriefachs mit einer Münze, dem
mitgelieferten Multitool der einem
anderen fl achen Werkzeug.
5. Schrauben Sie den Deckel mit der
Münze oder dem Werkzeug, das Sie
zuvor verwendet haben, wieder fest.
2. Nehmen Sie die CR2032-Batterie aus
dem Fach.
3. Ziehen Sie den Aufkleber ab, der den
Stromkreis der CR2032-Batterie
blockiert.
SICHERHEITSHINWEISE
• Es besteht eine Explosionsgefahr, wenn die Batterie durch einen falschen Batterietyp ersetzt wird.
• Die mitgelieferte Batterie ist nicht wiederaufl adbar.
• Verwenden Sie die Batterie nur wie ursprünglich vorgesehen, um einen Kurzschluss zu vermeiden. Das
direkte Anschließen des leitenden Materials an die positiven und negativen Seiten der Batterie führt zu einem
Kurzschluss.
• Verwenden Sie keine beschädigte Batterie.
• Lagern Sie die Batterie nicht in einer extrem kalten oder heißen Umgebung. Dies kann die Batterielebensdauer
verringern.
• Beachten Sie beim Ersetzen der Batterie die Bedienungsanleitung und sorgen Sie dafür, dass die positiven
und negativen Pole richtig ausgerichtet sind.
• Werfen Sie die Batterie nicht ins Feuer.
• Entsorgen Sie die Batterie gemäß den örtlichen Vorschriften.
StarPointer
TM
Pro Sucherfernrohr
14 | DEUTSCH
* SONNENSTRAHLEN-WARNHINWEIS! Versuchen Sie niemals, die Sonne ohne Sonnenfi lter durch dieses Sucherfernrohr oder ein anderes
Teleskop zu betrachten!
ODER
11
44
22
55
33
INSTALLIEREN DES STARPOINTER PRO SUCHERFERNROHRS
3. Ziehen Sie die verchromten
Befestigungsschrauben fest, um die
Halterung zu befestigen.
1. Lösen Sie die beiden verchromten
Befestigungsschrauben unten am
Sucherfernrohr.
4. Wenn es sich bei Ihrer Halterung um
eine Schwalbenschwanzhalterung
handelt, lösen Sie die Stellschraube
an der Teleskophalterung, schieben
die Basis des Sucherfernrohrs in die
Halterung und ziehen die Stellschraube
fest.
2. Wählen Sie die richtige Halterung für
Ihr Teleskop und befestigen Sie sie an
der Basis des Sucherfernrohrs.
Wenn es sich bei Ihrer Halterung um eine
Schraubhalterung handelt, entfernen
Sie die beiden Kreuzschlitzschrauben
oder Rändelschrauben vom Teleskop.
Setzen Sie den Sucher über die
Schraubenlöcher oder Stifte. Ziehen Sie
die Schrauben oder Rändelschrauben
fest, um das Sucherfernrohr zu
befestigen.
StarPointer
TM
Pro Sucherfernrohr
DURCH DAS SUCHERFERNROHR
SCHAUEN
3. Schauen Sie mit genau zentriertem
Objekt im Okular durch das optische
Fenster des Sucherfernrohrs und
lokalisieren das rote Fadenkreuz.
FCC-HINWEIS: Dieses Gerät entspricht Teil 15 der FCC-Bestimmungen. Der Betrieb
unterliegt den folgenden beiden Bedingungen: (1) Dieses Gerät darf keine schädlichen
Störungen erzeugen und (2) dieses Gerät muss Störungen von außen akzeptieren, dazu
gehören solche Störungen, die einen unerwünschten Betrieb verursachen.
celestron.com/pages/warranty
©2023 Celestron. Celestron und Symbol sind Warenzeichen
von Celestron, LLC. Alle Rechte vorbehalten. Celestron.com
2835 Columbia Street, Torrance, CA 90503 USA
Produktdesign und technische Daten können ohne vorherige
Ankündigung geändert werden.
Dieses Produkt ist für die Verwendung durch Personen ab 14
Jahren konzipiert und vorgesehen.
Hergestellt in China 11-23
AUSRICHTEN DES STARPOINTER PRO SUCHERFERNROHRS
Der Sucher ist eines der wichtigsten Teile Ihres Teleskops. Es hilft Ihnen, Objekte zu suchen und im Okular zu zentrieren.
Wenn Sie das Teleskop zum ersten Mal zusammenbauen, müssen Sie das Sucherfernrohr nach der Hauptoptik des Teleskops ausrichten.
Am besten tun Sie dies tagsüber* mit Zielen auf der Erde.
* WARNUNG BEI SONNENBEOBACHTUNG! Versuchen Sie niemals, die Sonne ohne Sonnenfi lter durch dieses Sucherfernrohr oder ein anderes Teleskop zu betrachten.
IHR SUCHERFERNROHR IST JETZT
AUSGERICHTET!
5. Es sollte keine Neuausrichtung
erforderlich sein, es sei denn, es wird
gestoßen oder fallen gelassen. Wenn Sie
die Ausrichtung testen möchten, richten
Sie das Fadenkreuz auf ein anderes
Landziel. Überprüfen Sie dann, ob sich
das Objekt in der Mitte des Sichtfelds
des Okulars befi ndet.
Okular
Fokussierknöpfe
ZENTRIEREN SIE DAS ZIEL IM OKULAR
2. Schauen Sie mit Ihrem Okular mit der
niedrigsten Vergrößerung durch das
Teleskop. Bewegen Sie das Teleskop,
bis Ihr ausgewähltes Objekt in der
Mitte der Ansicht liegt. Wenn das
Bild unscharf ist, drehen Sie den
Fokussierknopf so lange, bis das Bild
scharf ist.
22
5533
Höhe
Einstellknopf
(auf und ab)
Einstellknopf
links und rechts
Ein-/Aus-Knopf
WÄHLEN SIE EIN ZIEL
1. Nehmen Sie das Teleskop tagsüber
mit nach draußen und schalten Sie
das Sucherfernrohr mit dem Ein-/
Aus-Knopf ein. Suchen Sie nach
einem leicht erkennbaren Objekt,
beispielsweise einer Straßenlaterne,
einem Autokennzeichen oder einem
Schild. Das Objekt sollte so weit wie
möglich entfernt sein, mindestens 400
Meter entfernt.
SUCHERFERNROHR AUSRICHTEN
4. Ohne das Teleskop zu bewegen,
verwenden Sie die beiden
Einstellknöpfe des Sucherfernrohrs,
um es zu bewegen, bis das Fadenkreuz
über dem Objekt erscheint, das Sie im
Okular beobachten.
11
44
HINWEIS: Schalten Sie das StarPointer Pro Sucherfernrohr unbedingt aus, wenn Sie es nicht verwenden, um die Batterien zu schonen.
Neue Batterien können Sie online oder in Uhren-/Elektronikgeschäften kaufen.

MANUALE DI ISTRUZIONI
MODELLO N. 51635

17 | ITALIANO
Cercatore StarPointer
TM
Pro
ELENCO COMPONENTI
6
1
2
3
4
7
8 9
10
1. Lente frontale
2. Manopola di regolazione altitudine
(su e giù)
3. Interruttore di accensione/spegnimento/
luminosità & vano batteria
4. Viti di montaggio
5. Manopola di regolazione azimuth sinistra e destra
6. Staffa piccola Schmidt-Cassegrain
7. Staffa grande Schmidt-Cassegrain
8. Staffa di montaggio per piccoli telescopi con code di rondine
9. Staffa di montaggio per piccoli telescopi con fori per viti
10. Attrezzo multiuso in metallo
5

ITALIANO | 18
Cercatore StarPointer
TM
Pro
AVVERTENZA BATTERIA
11
55
22
33
44
PREPARAZIONE ALL’UTILIZZO DEL CERCATORE
4. Sistemare nuovamente la batteria
nell’apposito vano con il polo positivo
(+) rivolto verso l’alto.
1. Aprire il coperchio del vano batteria
con una moneta, l’attrezzo multiuso in
dotazione o un altro attrezzo piatto.
5. Mediante la moneta o l’attrezzo usati
in precedenza, avvitare saldamente la
vite verso il basso.
2. Rimuovere la batteria CR2032 dal
vano.
3. Tirare la linguetta che blocca il circuito
della batteria CR2032.
ISTRUZIONI DI SICUREZZA
• Rischio di esplosione se la batteria è sostituita con un tipo di batteria non corretto.
• La batteria in dotazione non è ricaricabile.
• Utilizzare la batteria esclusivamente come previsto originariamente per evitare un corto circuito. Quando il
materiale conduttivo è in contatto diretto con il polo positivo e negativo della batteria si ha un corto circuito.
• Non usare una batteria danneggiata.
• Non conservare la batteria in un ambiente eccessivamente freddo o caldo. Ciò può ridurre la durata della
batteria.
• Quando si sostituisce la batteria, consultare il manuale di istruzioni e assicurarsi che i poli positivo e negativo
siano orientati correttamente.
• Non gettare la batteria nelle fi amme.
• Smaltire la batteria in conformità ai regolamenti locali.

19 | ITALIANO
Cercatore StarPointer
TM
Pro
* AVVERTENZA SOLARE! Non tentare mai di osservare il Sole attraverso un cercatore o un telescopio senza un fi ltro solare adeguato!
OPPURE
11
44
22
55
33
INSTALLAZIONE DEL CERCATORE STARPOINTER PRO
3. Serrare le viti di montaggio cromate
per fi ssare la staffa in posizione.
1. Allentare le due viti di montaggio
cromate vicino alla base del cercatore.
4. Se la staffa è del tipo a coda di
rondine, allentare la vite sulla staffa
di montaggio del telescopio, fare
scorrere la base del cercatore nella
staffa e serrare la vite.
2. Scegliere la staffa corretta per il
telescopio e fi ssarla alla base del
cercatore.
Se la staffa è del tipo a viti, rimuovere le
due viti a croce o ad alette dal telescopio.
Sistemare il cercatore sui fori delle viti o
sulle aste. Serrare le viti o le viti ad alette
per fi ssare il cercatore in posizione.
Cercatore StarPointer
TM
Pro
OSSERVARE ATTRAVERSO IL
CERCATORE
3. Con l’oggetto centrato precisamente
nell’oculare, guardare attraverso
la fi nestrella ottica del cercatore e
localizzare il reticolo rosso.
NOTA FCC: Il presente dispositivo è conforme alla Parte 15 delle Norme FCC. L'utilizzo
è soggetto alle seguenti due condizioni: (1) Il presente dispositivo non deve causare
interferenze dannose, e (2) il presente dispositivo deve accettare qualsiasi interferenza
ricevuta, comprese interferenze che potrebbero causare un funzionamento indesiderato.
celestron.com/pages/warranty
©2023 Celestron. Celetron e Symbol sono marchi di
Celestron, LLC. • Tutti i diritti riservati. Celestron.com
2835 Columbia Street, Torrance, CA 90503 Stati Uniti
Il design del prodotto e le specifi che sono soggetti a
modifi che senza previa notifi ca.
Questo prodotto è progettato per essere utilizzato da
persone di età pari o superiore ai 14 anni.
Prodotto in Cina 11-23
ALLINEAMENTO DEL CERCATORE STARPOINTER PRO
Il cercatore è uno dei componenti più importanti del telescopio. Aiuta a localizzare gli oggetti e a centrarli nell'oculare.
Al primo assemblaggio del telescopio è necessario allineare il cercatore con le ottiche principali del telescopio. È preferibile eseguire
questa operazione durante il giorno* con obiettivi terrestri.
* AVVERTENZA SOLARE! Non tentare mai di osservare il Sole attraverso questo cercatore o un telescopio senza un fi ltro solare.
IL CERCATORE È ORA ALLINEATO!
5. Non occorre effettuare un nuovo
allineamento salvo colpi o cadute. Se
si desidera verifi care l’allineamento,
puntare il reticolo su un altro obiettivo
terrestre. Verifi care che l'oggetto
si trovi all'interno del campo visivo
dell'oculare.
Oculare
Manopole di messa a fuoco
CENTRARE L'OGGETTO NELL'OCULARE
2. Guardare attraverso il telescopio
utilizzando l'oculare con minore
ingrandimento. Muovere il telescopio
fi no a quando l'oggetto prescelto
si trova al centro del campo visivo.
Se l'immagine è sfocata, ruotare le
manopole di messa a fuoco fi no a
quando l'immagine non è nitida.
22
5533
Manopola
regolazione
altitudine
(su e giù)
Manopola di
regolazione
sinistra/destra
Manopola di
alimentazione
SCEGLIERE UN OGGETTO DA
OSSERVARE
1. Portare il telescopio all'esterno di giorno
e accendere il cercatore mediante la
manopola di alimentazione. Individuare
un oggetto facilmente riconoscibile,
come ad esempio un semaforo,
la targa di un'auto o un cartello.
L'oggetto dovrebbe trovarsi il più
lontano possibile, minimo a 400 metri.
REGOLARE IL CERCATORE
4. Senza spostare il telescopio, usare
le due manopole di regolazione per
spostarlo fi no a quando il reticolo
appare al centro sull’oggetto che si sta
osservando attraverso l’oculare.
11
44
NOTA: per risparmiare batteria, assicurarsi di spegnere il cercatore StarPointer Pro quando non in uso.
È possibile acquistare nuove batterie online o nei negozi di elettronica.

MANUAL DE INSTRUCCIONES
MODELO # 51635

22 | ESPAÑOL
Localizador StarPointer
TM
Pro
LISTA DE PIEZAS
6
1
2
3
4
7
8 9
10
1. Lente anterior
2. Mando de ajuste de altitud
(arriba y abajo)
3. Interruptor de encendido/apagado/brillo
y compartimiento de batería
4. Tornillos de montaje
5. Mando de ajuste de azimut
(izquierda y derecha)
6. Soporte Schmidt-Cassegrain pequeño
7. Soporte Schmidt-Cassegrain grande
8. Soporte de montaje para telescopios pequeños con machihembrado
9. Soporte de montaje para telescopios pequeños con huecos para tornillos
10. Multiherramienta metálica
5
ESPAÑOL | 23
Localizador StarPointer
TM
Pro
ADVERTENCIAS DE LA BATERÍA
11
55
22
33
44
PREPARACIÓN PARA USAR SU LOCALIZADOR
4. Vuelva a poner la batería en el
compartimiento de batería con el lado
positivo (+) orientado hacia arriba.
1. Abra la tapa del compartimiento
de batería usando una moneda, la
multiherramienta incluida, u otra
herramienta plana.
5. Usando la moneda o herramienta que
haya usado anteriormente, enrosque la
tapa.
2. Retire la batería CR2032 del
compartimiento.
3. Quite el adhesivo que bloquea el
circuito de la batería CR2032.
INSTRUCCIONES DE SEGURIDAD
• Riesgo de explosión si se sustituye la batería por un tipo incorrecto.
• La batería incluida no es recargable.
• Use la batería exclusivamente del modo originalmente pretendido para evitar un cortocircuito. Cuando el
material conductor se conecte directamente al positivo y negativo de la batería causará un cortocircuito.
• No use una batería dañada.
• No guarde la batería en un entorno extremadamente frío o cálido. Hacerlo puede reducir la duración de la
batería.
• Cuando cambie la batería, consulte el manual de instrucciones y asegúrese de que los lados positivo y
negativo estén correctamente orientados.
• No ponga las baterías en el fuego.
• Deseche la batería según la normativa local.
24 | ESPAÑOL
Localizador StarPointer
TM
Pro
* ¡AVISO SOLAR! ¡No intente nunca observar el Sol por este localizador ni ningún telescopio sin un fi ltro solar!
O
11
44
22
55
33
INSTALAR EL LOCALIZADOR STARPOINTER PRO
3. Apriete los tornillos de montaje
cromados para asegurar el soporte en
posición.
1. Afl oje los dos tornillos de montaje
cromados cerca de la parte inferior
del localizador.
4. Si su soporte es de tipo
machihembrado, afl oje el tornillo del
soporte de montaje del telescopio,
deslice la base del localizador en el
soporte y apriete el tornillo.
2. Seleccione el soporte correcto para su
telescopio e instálelo en la base del
localizador.
Si su soporte es de tipo atornillado,
retire los dos tornillos de cabezal Phillips
o tornillos manuales del telescopio.
Coloque el localizador sobre los
agujeros para tornillo o postes. Apriete
los tornillos o tornillos manuales para
asegurar el localizador en posición.
Localizador StarPointer
TM
Pro
MIRAR POR EL LOCALIZADOR
3. Con el objeto centrado con precisión
en el ocular, mire por la ventana óptica
del localizador y encuentre la retícula
roja.
NOTIFICACIÓN FCC: Este dispositivo cumple con el apartado 15 de las
normas FCC. Su uso está sujeto a las dos condiciones siguientes: (1) este
dispositivo no puede causar interferencias nocivas, y (2) este dispositivo
debe admitir cualquier interferencia recibida, incluidas las interferencias
que puedan causar un funcionamiento indeseado.
www.celestron.com/pages/warranty
©2023 Celestron. Celestron y su símbolo son marcas comerciales de
Celestron, LLC. • Todos los derechos reservados. Celestron.com
2835 Columbia Street, Torrance, CA 90503 EE.UU.
El diseño y las especifi caciones del producto están sujetos a cambios
sin notifi cación previa.
Este producto ha sido diseñado y está pensado para ser usado por
personas de 14 años o más de edad.
Fabricado en China 11-23
ALINEAR EL LOCALIZADOR STARPOINTER PRO
El localizador es una de las piezas más importantes de su telescopio. Le ayuda a localizar objetos y centrarlos en el ocular.
La primera vez que monte el telescopio, deberá alinear el localizador con la óptica principal del telescopio. Es preferible hacerlo de día*
usando objetivos terrestres.
* ¡AVISO SOLAR! No intente nunca observar el Sol por este localizador ni ningún telescopio sin un fi ltro solar.
SU LOCALIZADOR ESTÁ ALINEADO.
5. No debería necesitar realinearse, a
menos que reciba golpes o caiga. Si
quiere probar la alineación, apunte
la retícula a otro objetivo terrestre.
Compruebe que el objeto esté en el
centro del campo de visión del ocular.
Ocular
Mandos de enfoque
CENTRAR EL OBJETO EN EL OCULAR
2. Mire por el telescopio usando el
ocular con menor potencia. Mueva el
telescopio hasta que el objeto elegido
quede en el centro de la vista. Si la
imagen está borrosa, gire suavemente
el mando de enfoque hasta que quede
bien enfocada.
22
5533
Mando de
ajuste de
altitud (arriba
y abajo)
Mando
de ajuste
izquierda
y derecha
Mando de
encendido
ELEGIR UN OBJETO
1. Saque el telescopio al exterior de día
y encienda el localizador con el mando
de encendido. Localice un objeto
fácilmente identifi cable, como una
farola, matrícula de coche o señal.
El objeto debe estar lo más lejos
posible, al menos a 400 m.
AJUSTAR EL LOCALIZADOR
4. Sin mover el telescopio, use los dos
mandos de ajuste del localizador para
moverla hasta que la retícula aparezca
centrada sobre el objeto que observa
en el ocular.
11
44
NOTA: Asegúrese de apagar el localizador StarPointer Pro cuando no lo use para conservar energía de la batería.
Puede adquirir nuevas baterías por Internet o en tiendas de relojes/electrónica.