© 2024 Samsung Electronics Co., Ltd. All rights reserved.
User Guide
HW-LS60D
To receive more complete service, please register your product at
www.samsung.com/register
Figures and illustrations in this User Guide are provided for
reference only and may differ from the actual product appearance.
Product design and specications may change without notice.

ENG - 2
CONTENTS
01 Checking the Components 3
02 Assembling Music Frame 3
Attaching the Stand . . . . . . . . . . . . . . . . . . . . . . . . . . . . . . . . . . . . . . . 3
Attaching the Photo Frame . . . . . . . . . . . . . . . . . . . . . . . . . . . . . . . . . 4
Changing the photo from the Photo Frame . . . . . . . . . . . . . . . . . . 4
Inserting an Art Panel. . . . . . . . . . . . . . . . . . . . . . . . . . . . . . . . . . . . . . 5
03 Product Overview 6
Front . . . . . . . . . . . . . . . . . . . . . . . . . . . . . . . . . . . . . . . . . . . . . . . . . . . . . 6
Rear . . . . . . . . . . . . . . . . . . . . . . . . . . . . . . . . . . . . . . . . . . . . . . . . . . . . . . 6
04 Connecting Electrical Power 7
05 Connecting a Mobile Device 7
Method 1. Connecting the SmartThings App
(Wireless Network) . . . . . . . . . . . . . . . . . . . . . . . . . . . . . . . . . . . . . . . . 7
Using Group Play . . . . . . . . . . . . . . . . . . . . . . . . . . . . . . . . . . . . . . . . . . 8
Using the SmartThings Hub . . . . . . . . . . . . . . . . . . . . . . . . . . . . . . . . 9
Connecting via Apple AirPlay . . . . . . . . . . . . . . . . . . . . . . . . . . . . . . . 9
Method 2. Connecting via Bluetooth. . . . . . . . . . . . . . . . . . . . . . . . 10
Using the Tap Sound . . . . . . . . . . . . . . . . . . . . . . . . . . . . . . . . . . . . . . 11
06 Connecting to a TV 12
Connecting via Wi-Fi . . . . . . . . . . . . . . . . . . . . . . . . . . . . . . . . . . . . . . 12
Connecting to a TV that supports Dolby Atmos . . . . . . . . . . . . . . 12
Using the Q-Symphony Function . . . . . . . . . . . . . . . . . . . . . . . . . . . 13
Connecting via Bluetooth . . . . . . . . . . . . . . . . . . . . . . . . . . . . . . . . . 13
Connecting using an Optical Cable . . . . . . . . . . . . . . . . . . . . . . . . . 14
Using the Spacet sound . . . . . . . . . . . . . . . . . . . . . . . . . . . . . . . . . . 15
07 Connecting an External Device 15
Connecting using an Optical Cable . . . . . . . . . . . . . . . . . . . . . . . . . 15
08 Additional Features 16
Adjusting the Wireless Speaker volume with a TV remote
control. . . . . . . . . . . . . . . . . . . . . . . . . . . . . . . . . . . . . . . . . . . . . . . . . . . 16
Activate/Deactivate Wi-Fi and Bluetooth . . . . . . . . . . . . . . . . . . . 16
09 Installing the Wall Mount 17
Installation Precautions . . . . . . . . . . . . . . . . . . . . . . . . . . . . . . . . . . . 17
Wallmount Components . . . . . . . . . . . . . . . . . . . . . . . . . . . . . . . . . . 17
10 Software Update 19
Auto Update . . . . . . . . . . . . . . . . . . . . . . . . . . . . . . . . . . . . . . . . . . . . . 19
USB Update . . . . . . . . . . . . . . . . . . . . . . . . . . . . . . . . . . . . . . . . . . . . . . 19
Reset . . . . . . . . . . . . . . . . . . . . . . . . . . . . . . . . . . . . . . . . . . . . . . . . . . . . 19
Security updates information . . . . . . . . . . . . . . . . . . . . . . . . . . . . . . 19
11 Troubleshooting 20
12 License 21
ENG - 3
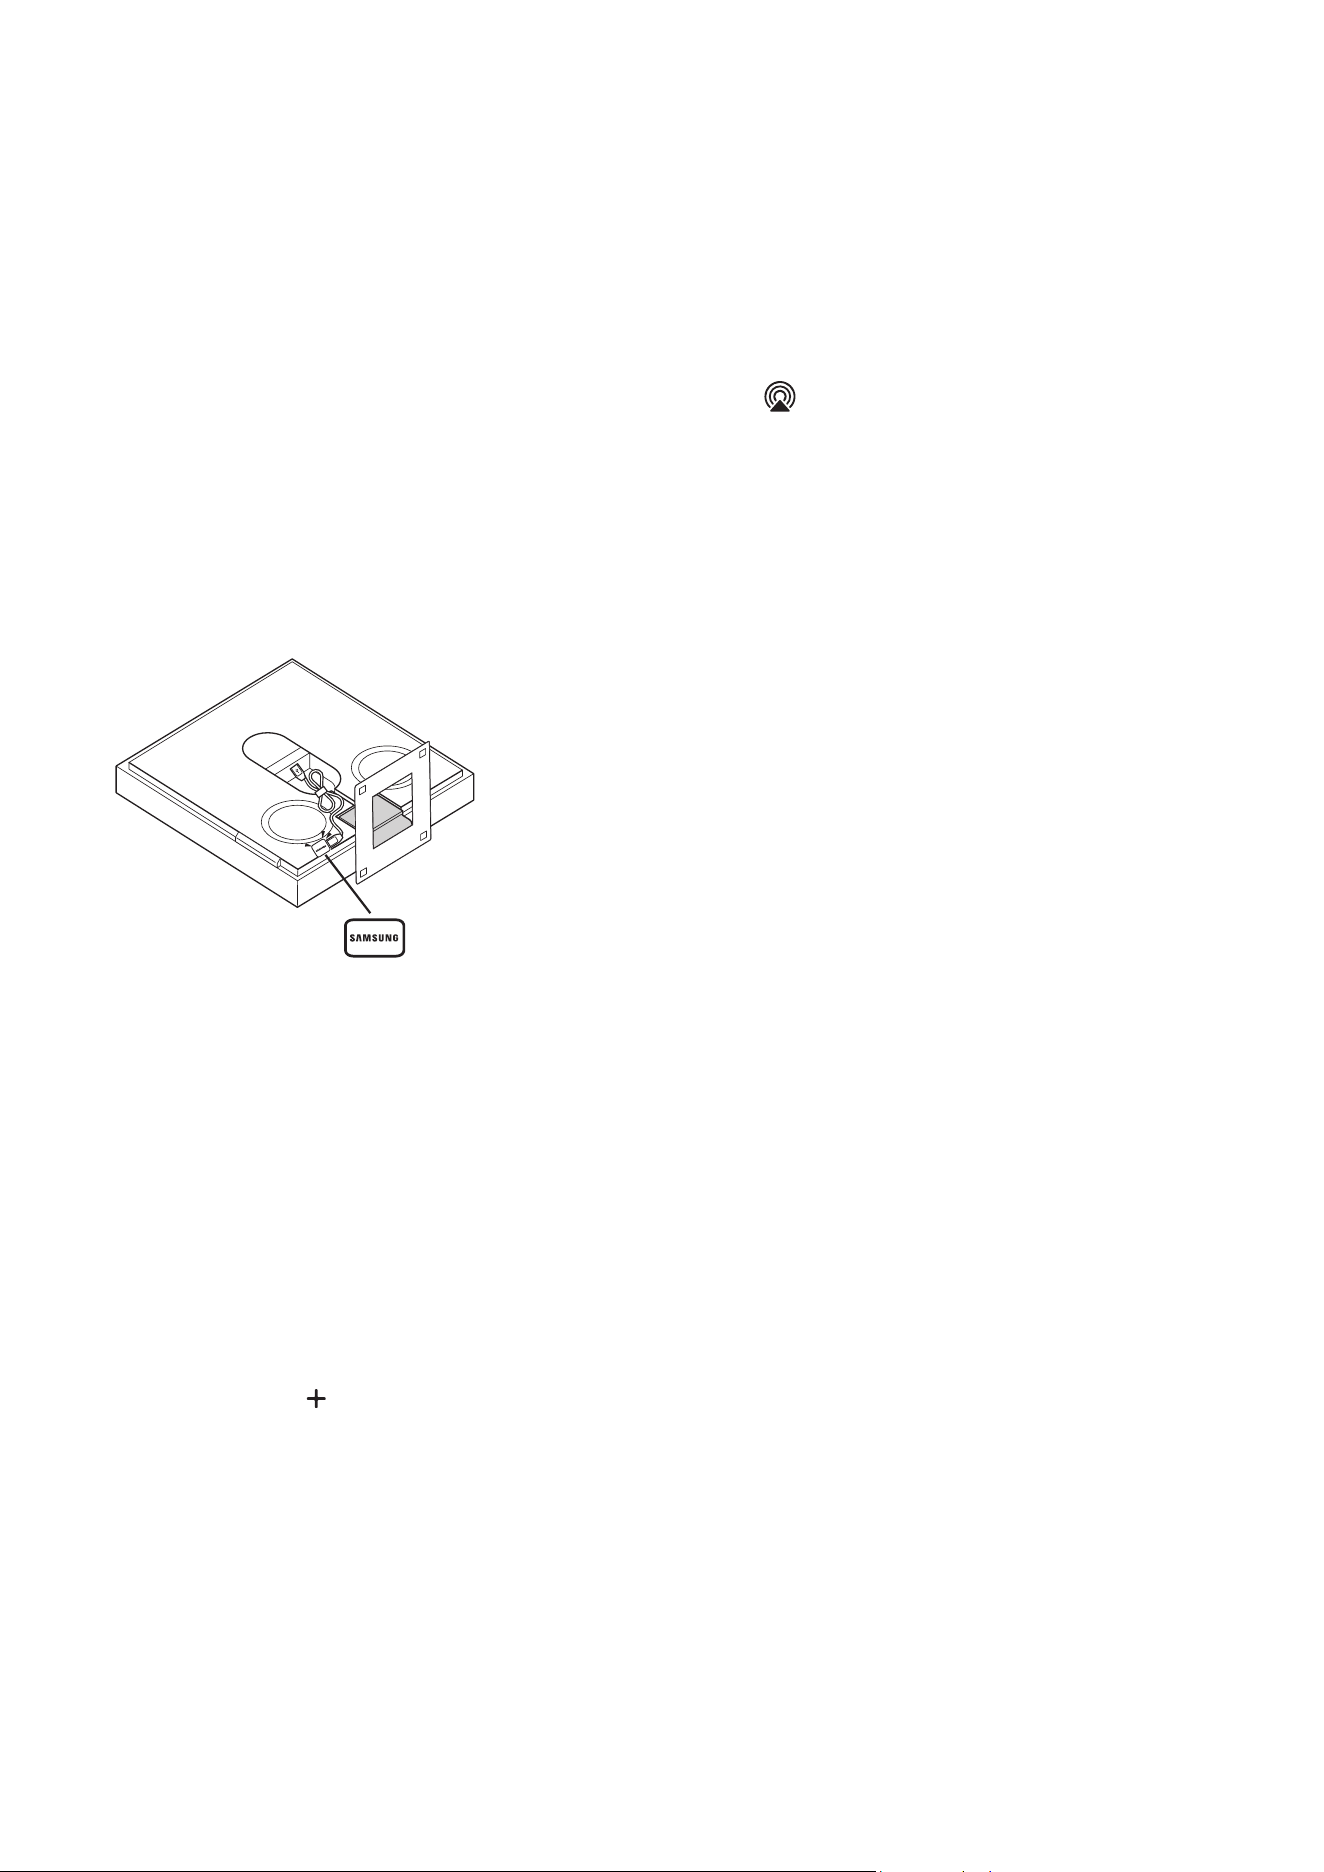
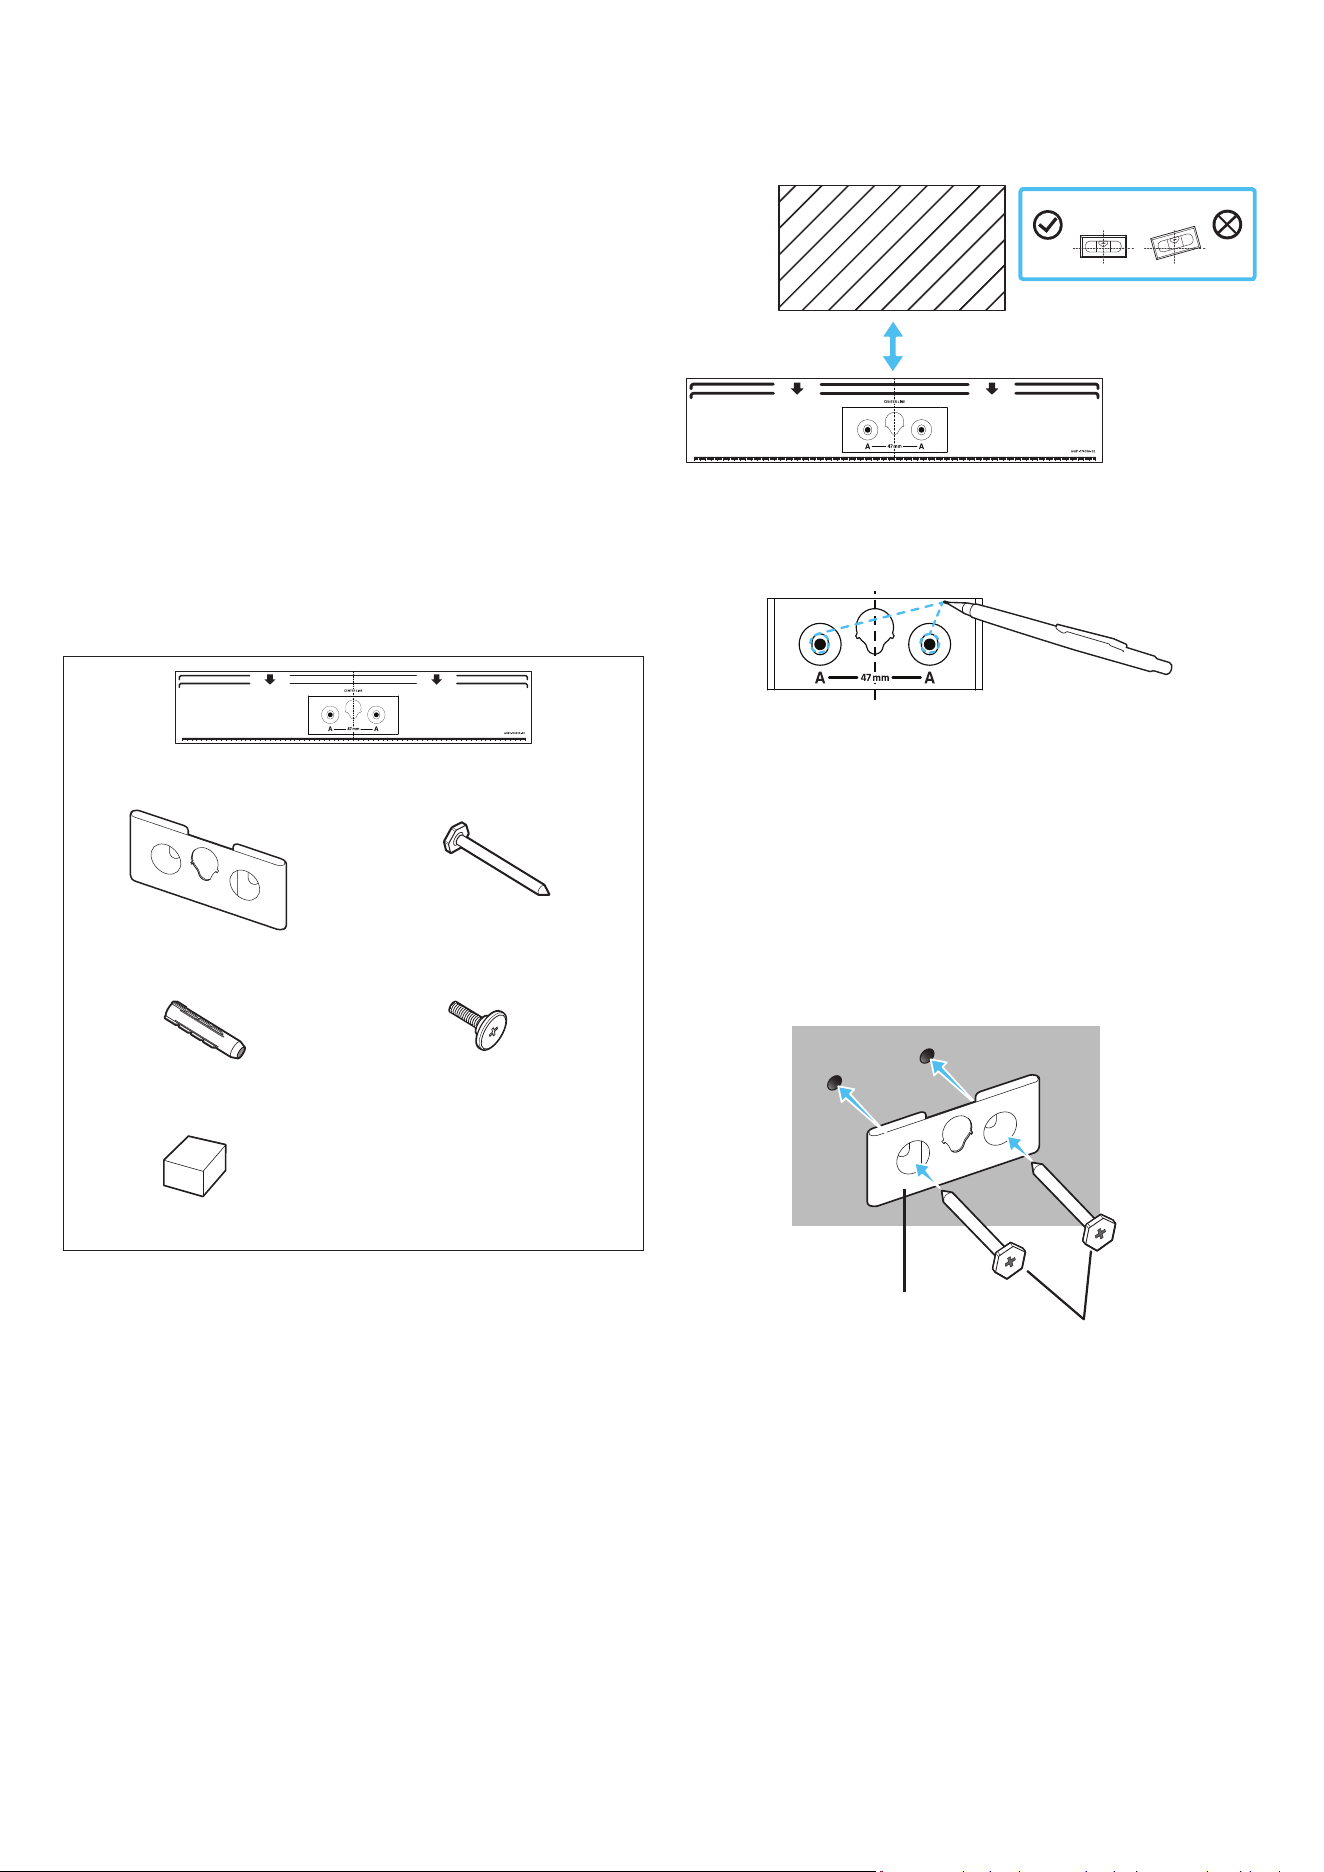
01 CHECKING THE
COMPONENTS
Wireless Speaker
main unit
AC/DC Adapter Power Cord
x 2
(M5 X L55)
Photo Frame Stand Screw
x 2
x 1
x 1
Anchor Holder-Screw Bracket-Wall Rear
x 2
x 4
x 1
Spacer Holder-Plate Holder-Guide
Wall Mount Guide
• For more information about the power supply and power
consumption, refer to the label attached to the product.
(Label: Rear of the Wireless Speaker Main Unit)
• To purchase additional components or optional cables, contact a
Samsung Service Center or Samsung Customer Care.
• For more information about the wallmount or rubber-foot, see
pages 17~18.
• The appearance of the accessories may differ slightly from the
illustrations above.
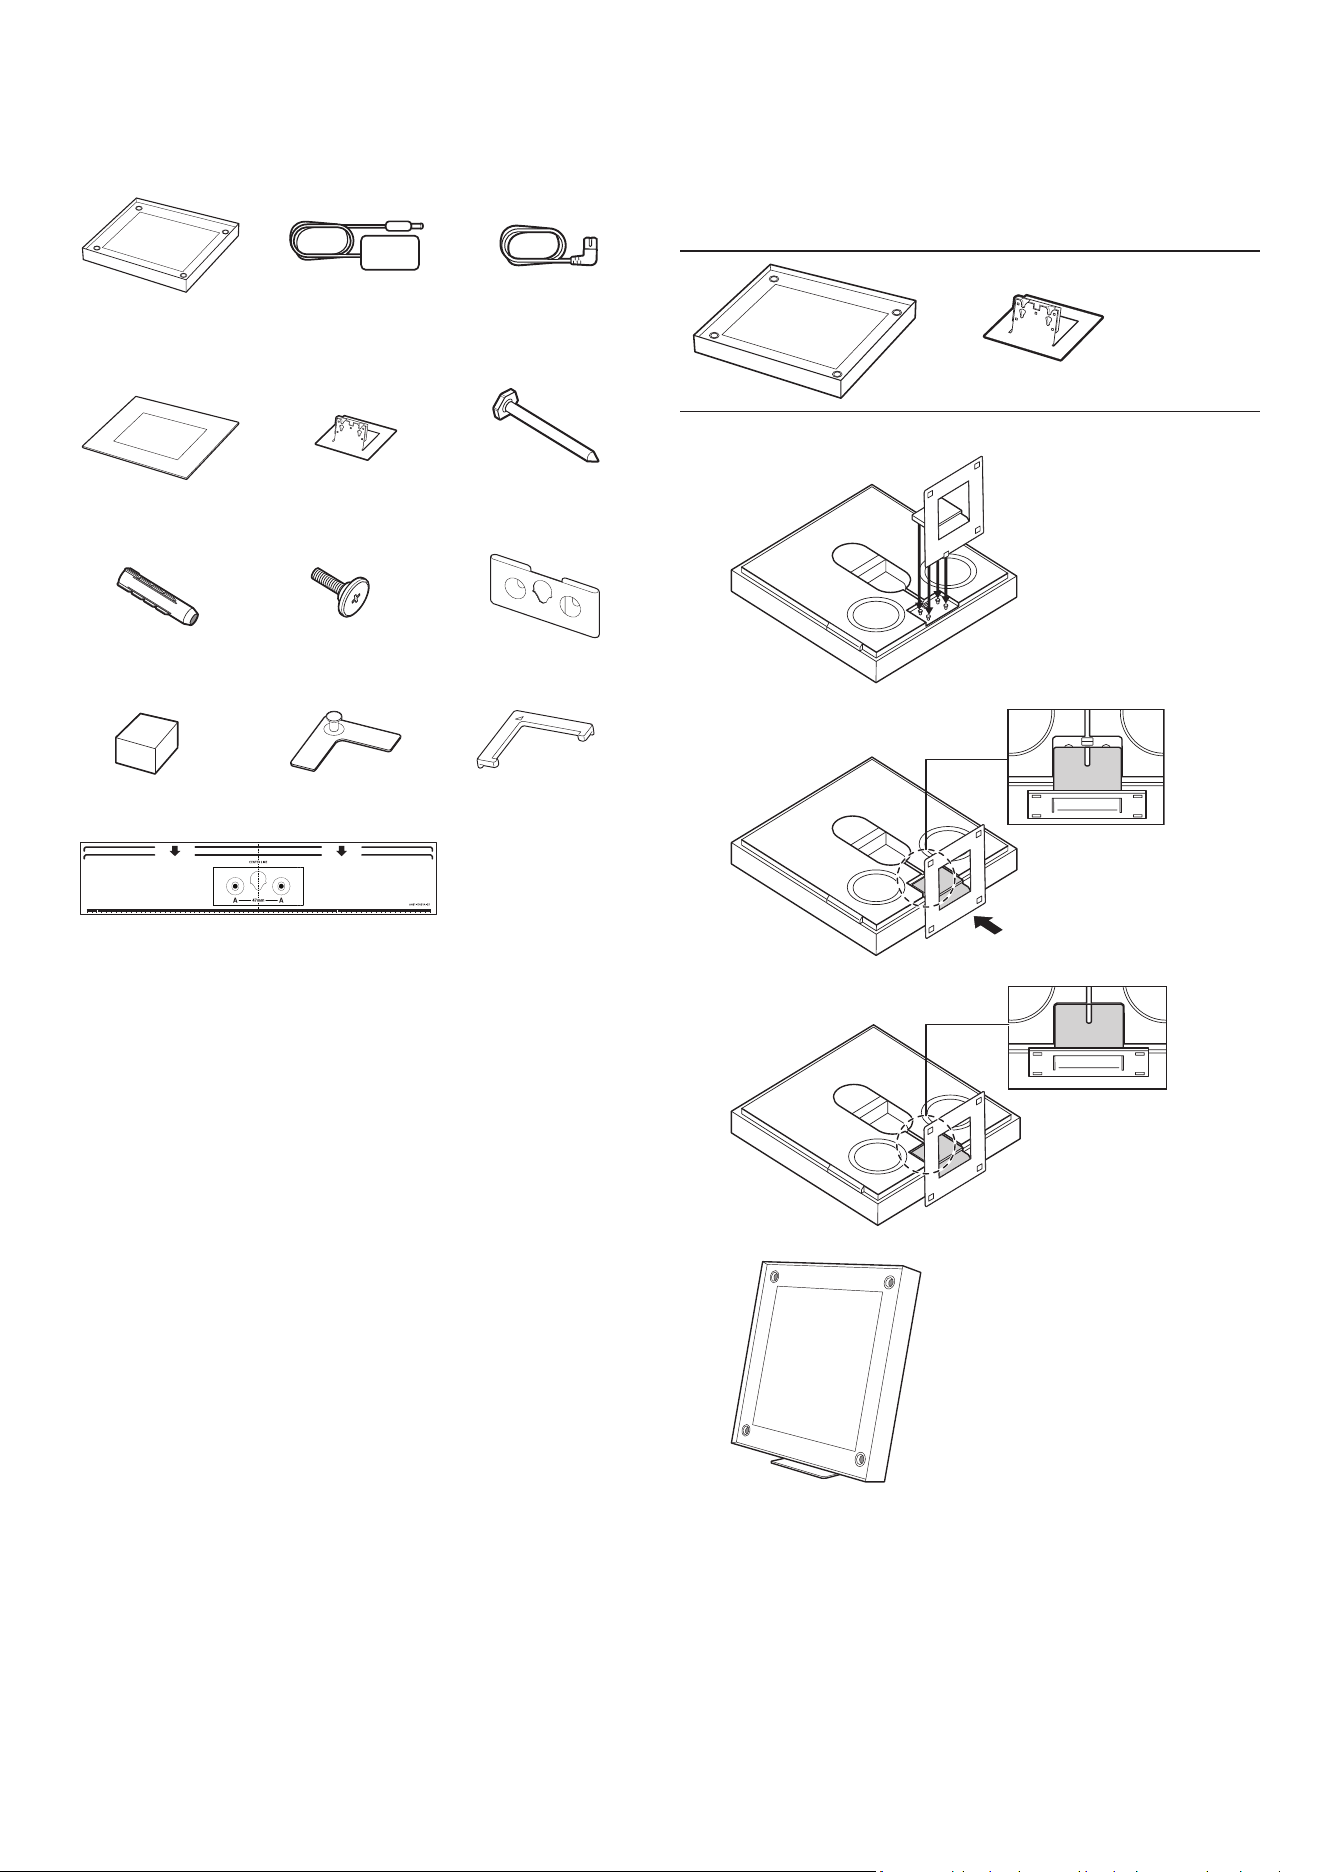
02 ASSEMBLING MUSIC
FRAME
Attaching the Stand
1.
2.
3.
4.

ENG - 4
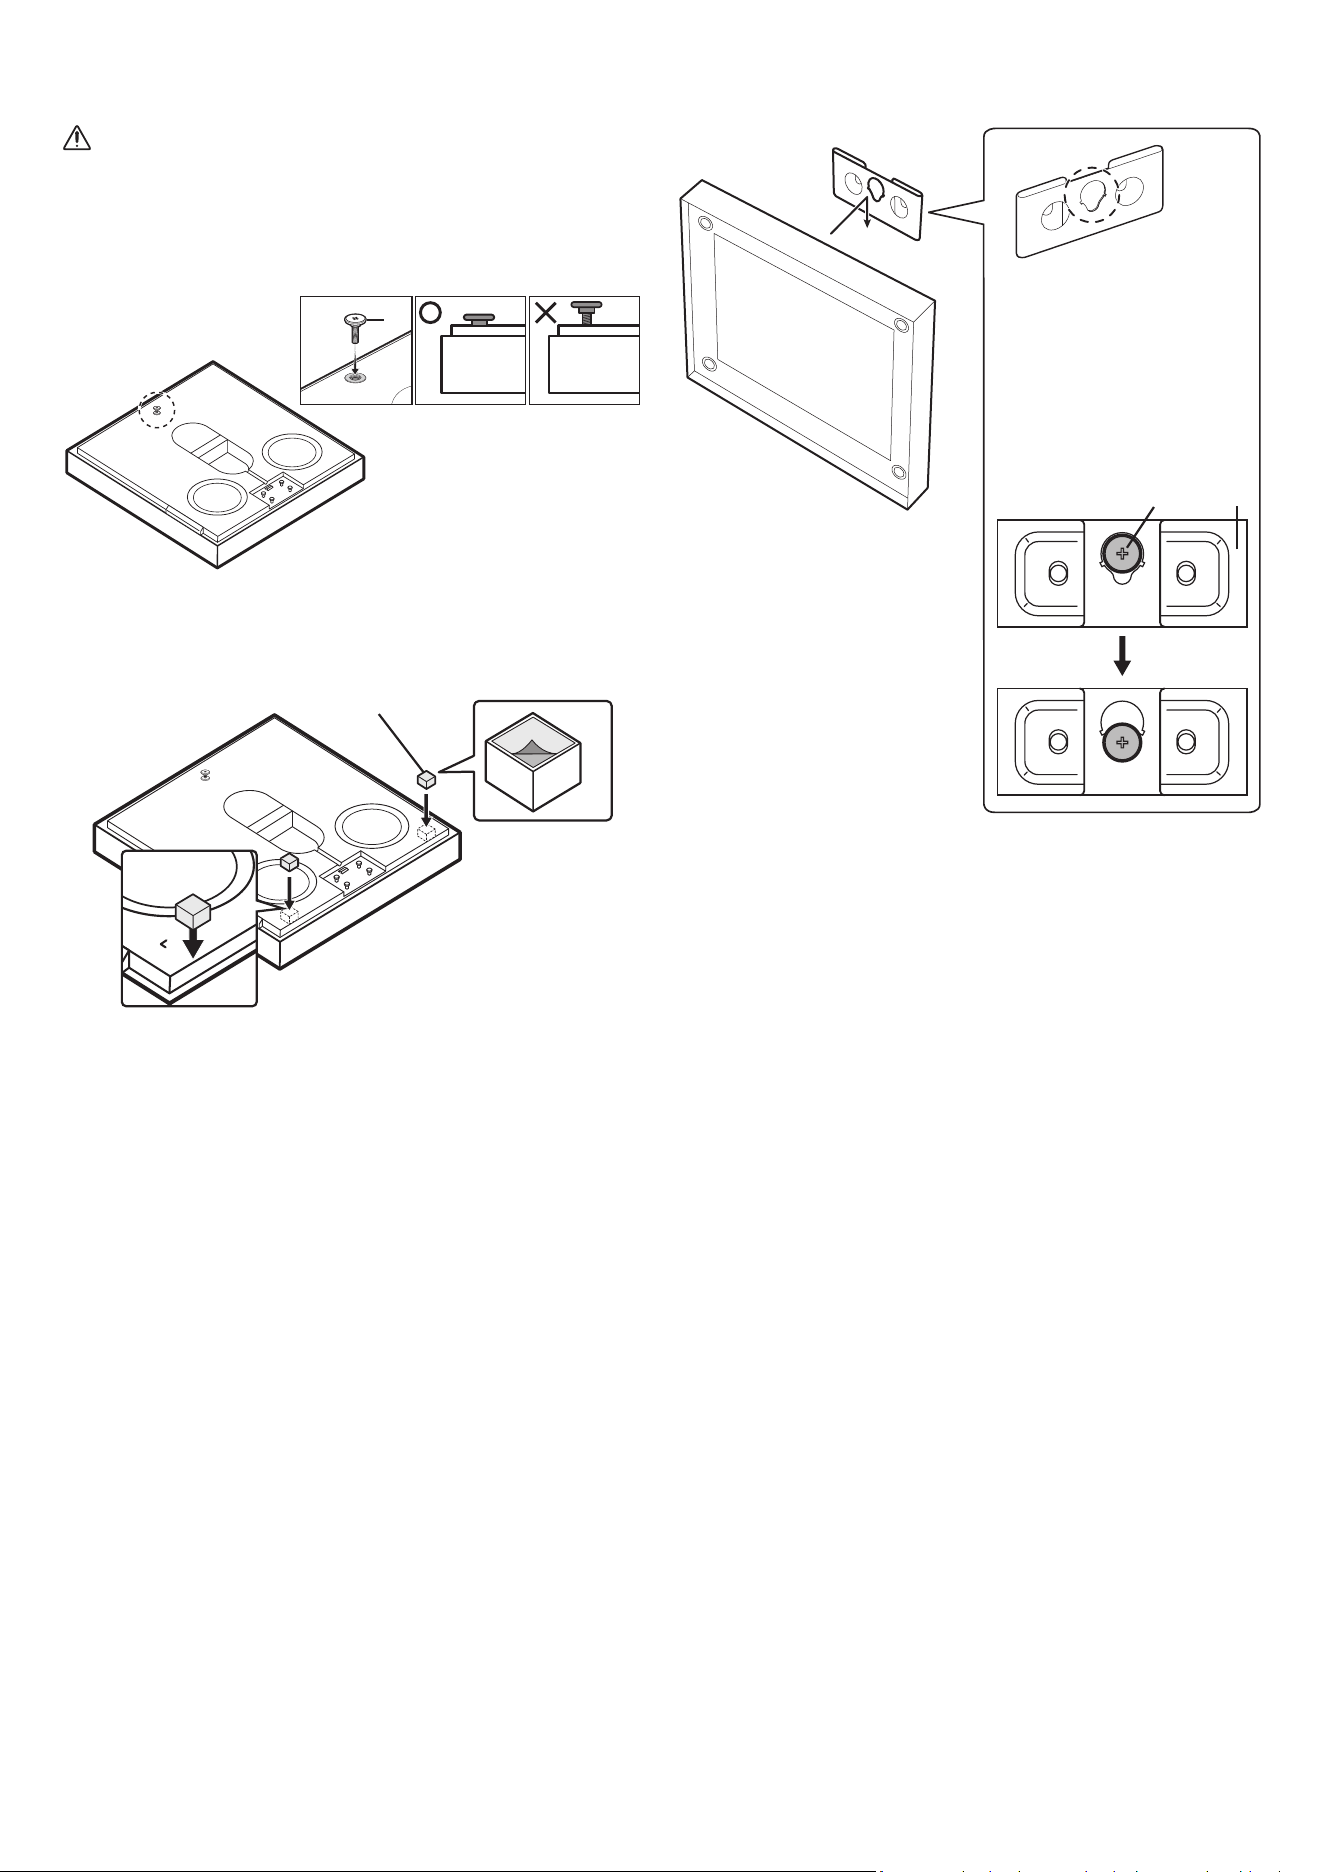
Attaching the Photo Frame
• Be sure to secure the photo frame properly. Otherwise, it may fall
off and cause damage or physical injury. Any accident resulting
from carelessness by the user shall not be covered by the warranty.
Detaching the Photo Frame
Changing the photo from the Photo Frame
You can change the picture anytime you want. (Size: 20x25 cm)
1. Press one of the marked positions with your nger to remove the
cover.
2. Slide out the old photo and insert a new one.
Photo
3. Close the cover and press the four locking tabs to lock.
ENG - 5
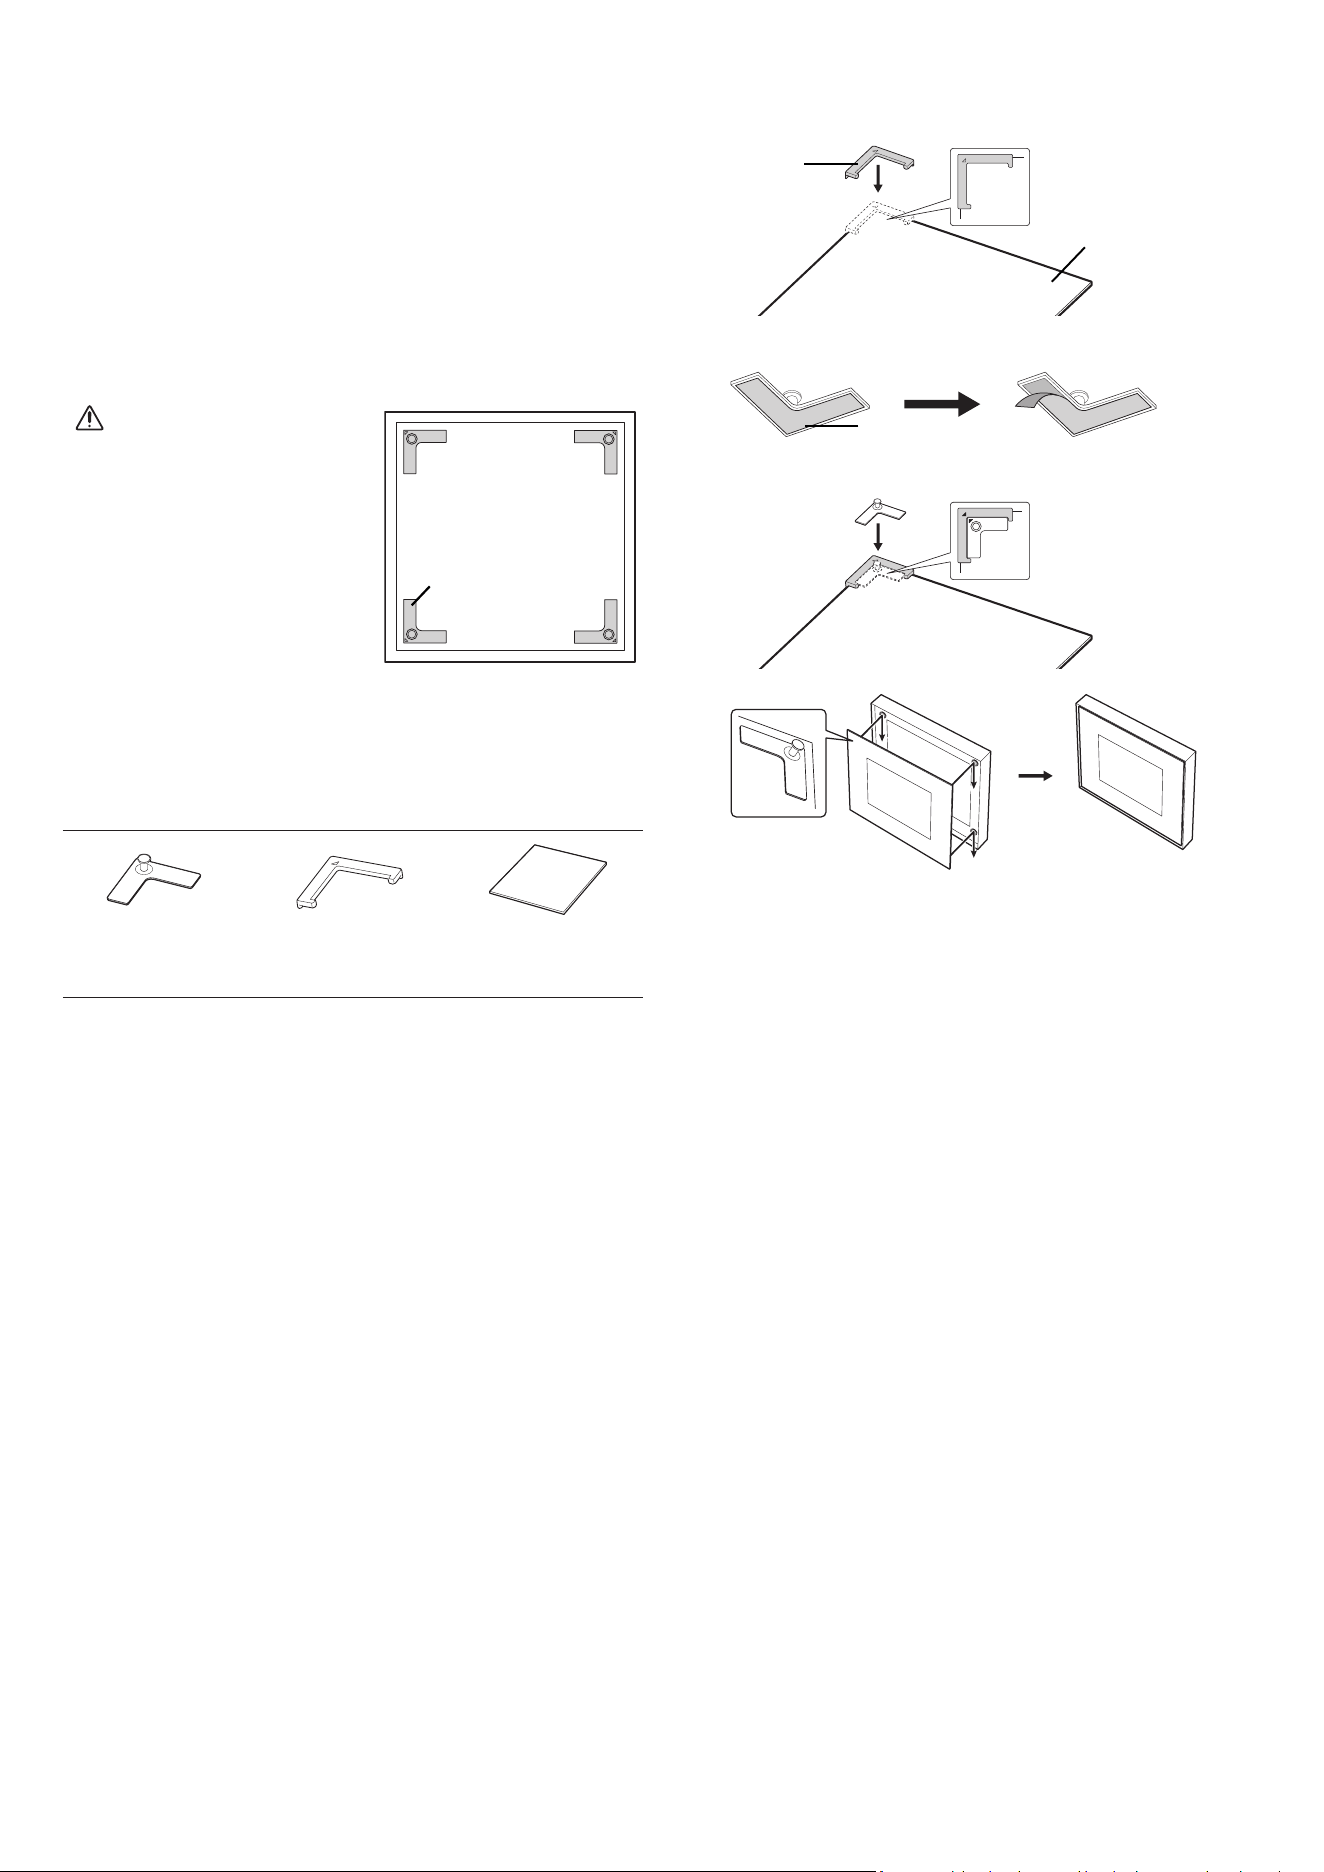
Inserting an Art Panel
You can insert an art panel (not included) into the music frame.
• panel size: 330.0 mm x 330.0 mm x 5.0 mm
• The art panel is available on the Marpple online shop
(https://www.marpple.com/musicframe), and the availability
may differ with your region. For regional retailers, visit your local
Samsung web site (www.samsung.com).
• Distribution of the art panel is performed by third-part businesses
that has nothing to do with the company. And the panel’s quality
and safety is solely subject to the third-party businesses. Regional
retailers may change depending on their business situation.
CAUTION
• Attach the plate (G) on a site
without scratches or impurities.
Otherwise, the plate (G) may
fall off.
• Make sure you secure the plate
(G) rmly.
• Use the acrylic Diasec panel
only. Other panels may have
the risk of detaching the holder,
which leads to the panel falling
off. Any accident regarding
improper material shall not be
covered by the warranty.
(G)
x 4
x 1
(G) (H) Art Panel (sold
separately)
Use the Holder-Guide (H) to attach the Holder-Plate (G) in every
corner of the art panel.
1.
(H)
Art Panel
(sold separately)
2.
(G)
x 4
3.
4.
ENG - 6
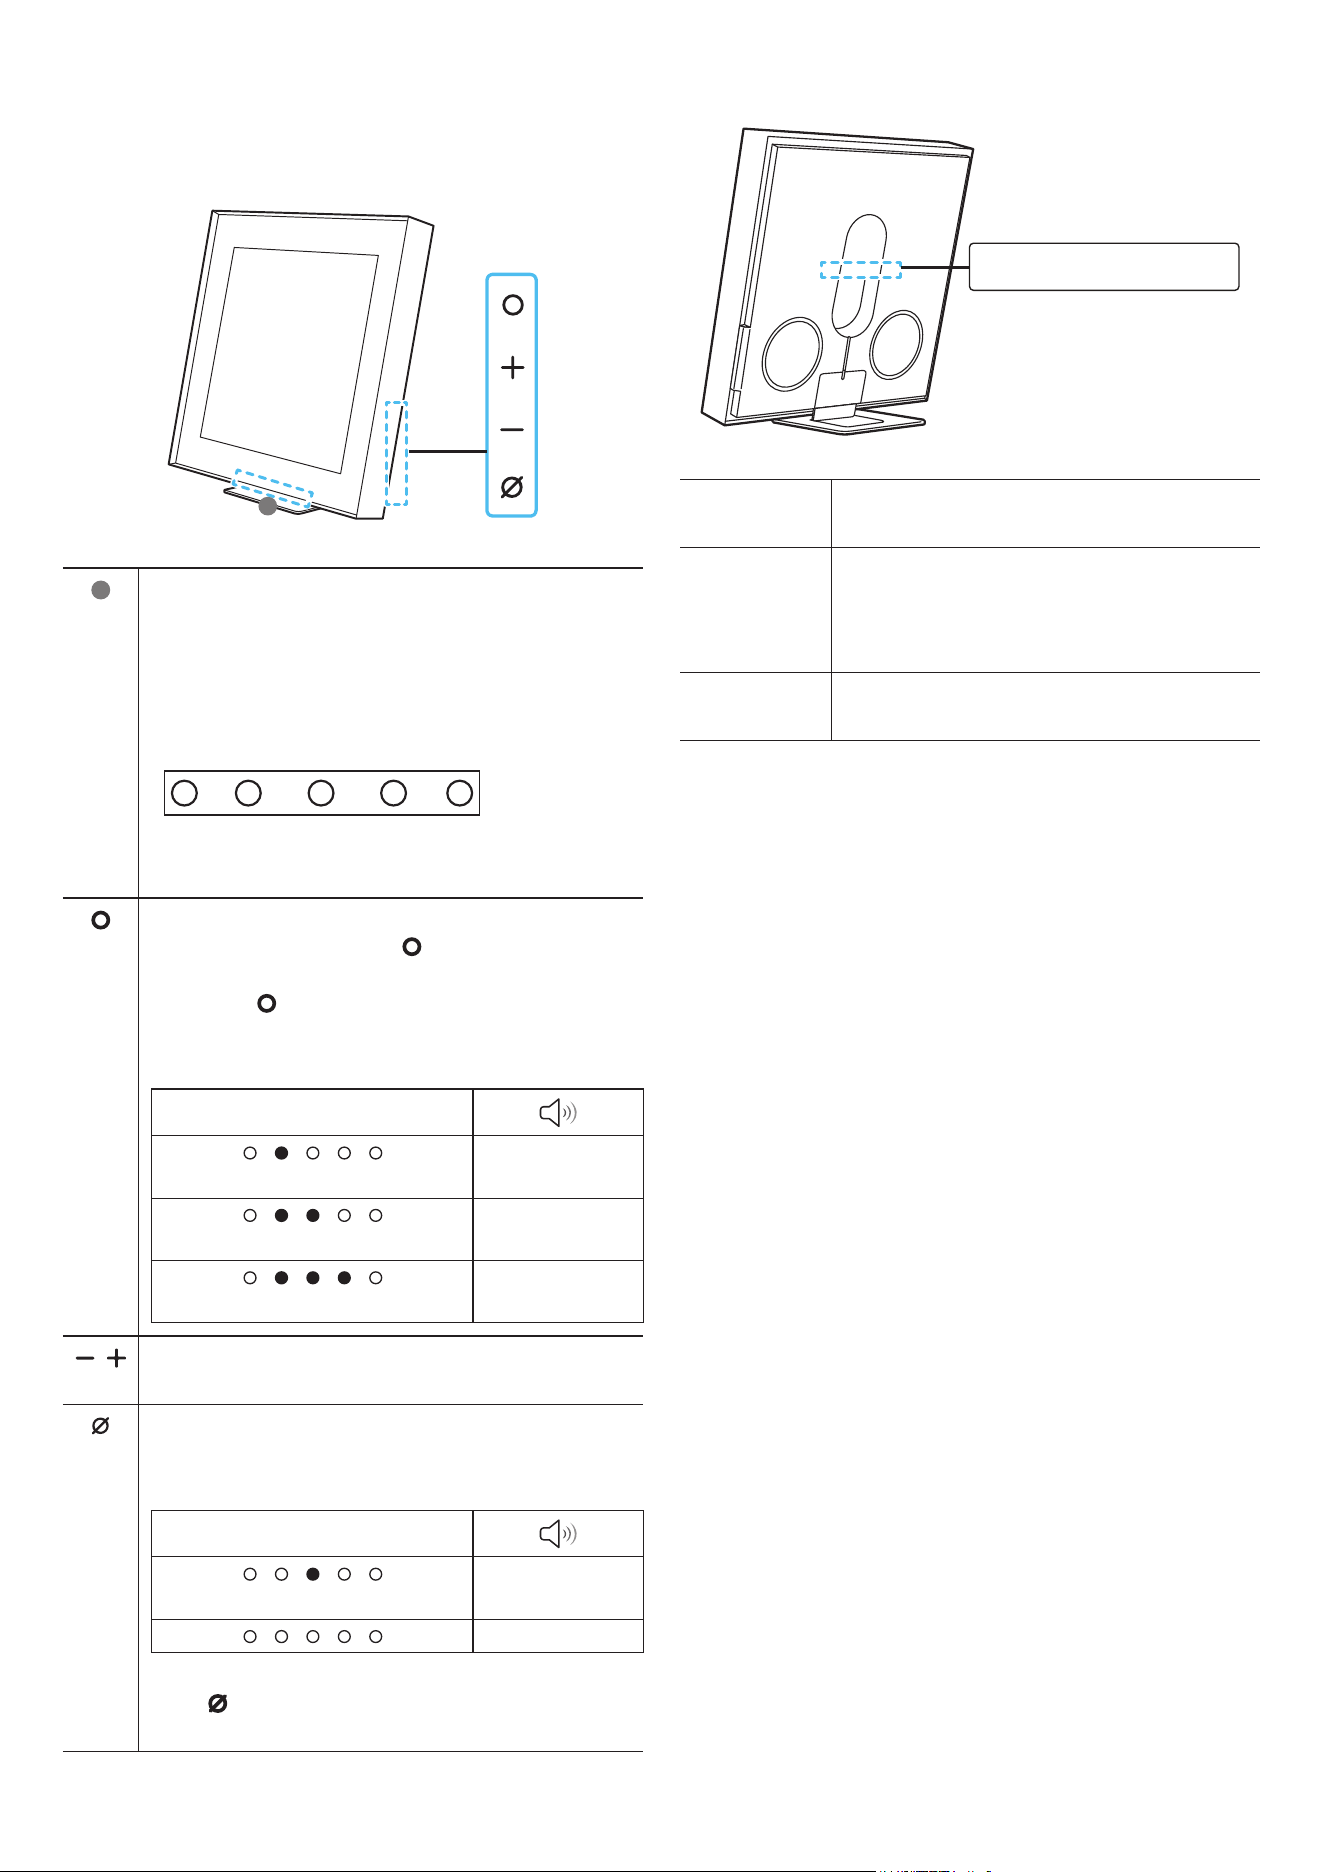
03 PRODUCT OVERVIEW
Front
1
1
LED indicator
The LED Indicator ashes, glows, or changes color
depending on the Wireless Speaker’s current mode or
status. The color of the LED indicator and the number of
lights indicate the active mode as described below.
LED indicator (W : White, M : Multicolor)
W
W M W W
• The Multicolor LED changes to White, Cyan, Green,
Red, and Blue depending on the mode or status.
(Multi Function) Button
• In standby mode, press the (Multi Function) button
to turn on the Wireless Speaker.
• Press the (Multi Function) button to change the
mode. Each time you change the mode, the LED lights
in white and then turns off.
LED indicator
White On → Off
Wi-Fi
White On → Off
Bluetooth
White On → Off
Digital Audio In
(Volume) Button
Adjusts the volume.
(Mic On/Off) Button
Press the button to turn the microphone on or off. When
the microphone is off, the LED indicator will light red.
LED indicator
Red On
Mic Off
Mic On
• To switch to Bluetooth Pairing state, press and hold
the
(Mic On/Off) button on the side of the Wireless
Speaker for more than 5 seconds.
Rear
D.IN
(OPTICAL)
SMARTTHINGS
DONGLE
DC 19V
D. IN
(OPTICAL)
Connect to the digital (optical) output of an
external device. (See page 14)
SMARTTHINGS
DONGLE
Connect the SmartThings dongle (Purchase
separately) to use the SmartThings Hub
function.
(See page 9)
DC 19V Connect the AC/DC power adapter. (Power
Supply In) (See page 7)
• When disconnecting the power cable of the AC/DC power adaptor
from a wall outlet, pull the plug.
Do not pull the cable.
• Do not connect this unit or other components to an AC outlet until
all connections between components are complete.
• When you plug in the AC cord, the power button will begin working
in 4 to 6 seconds.
• When you turn on this unit, there will be a 4 to 5 second delay
before it produces sound.
ENG - 7
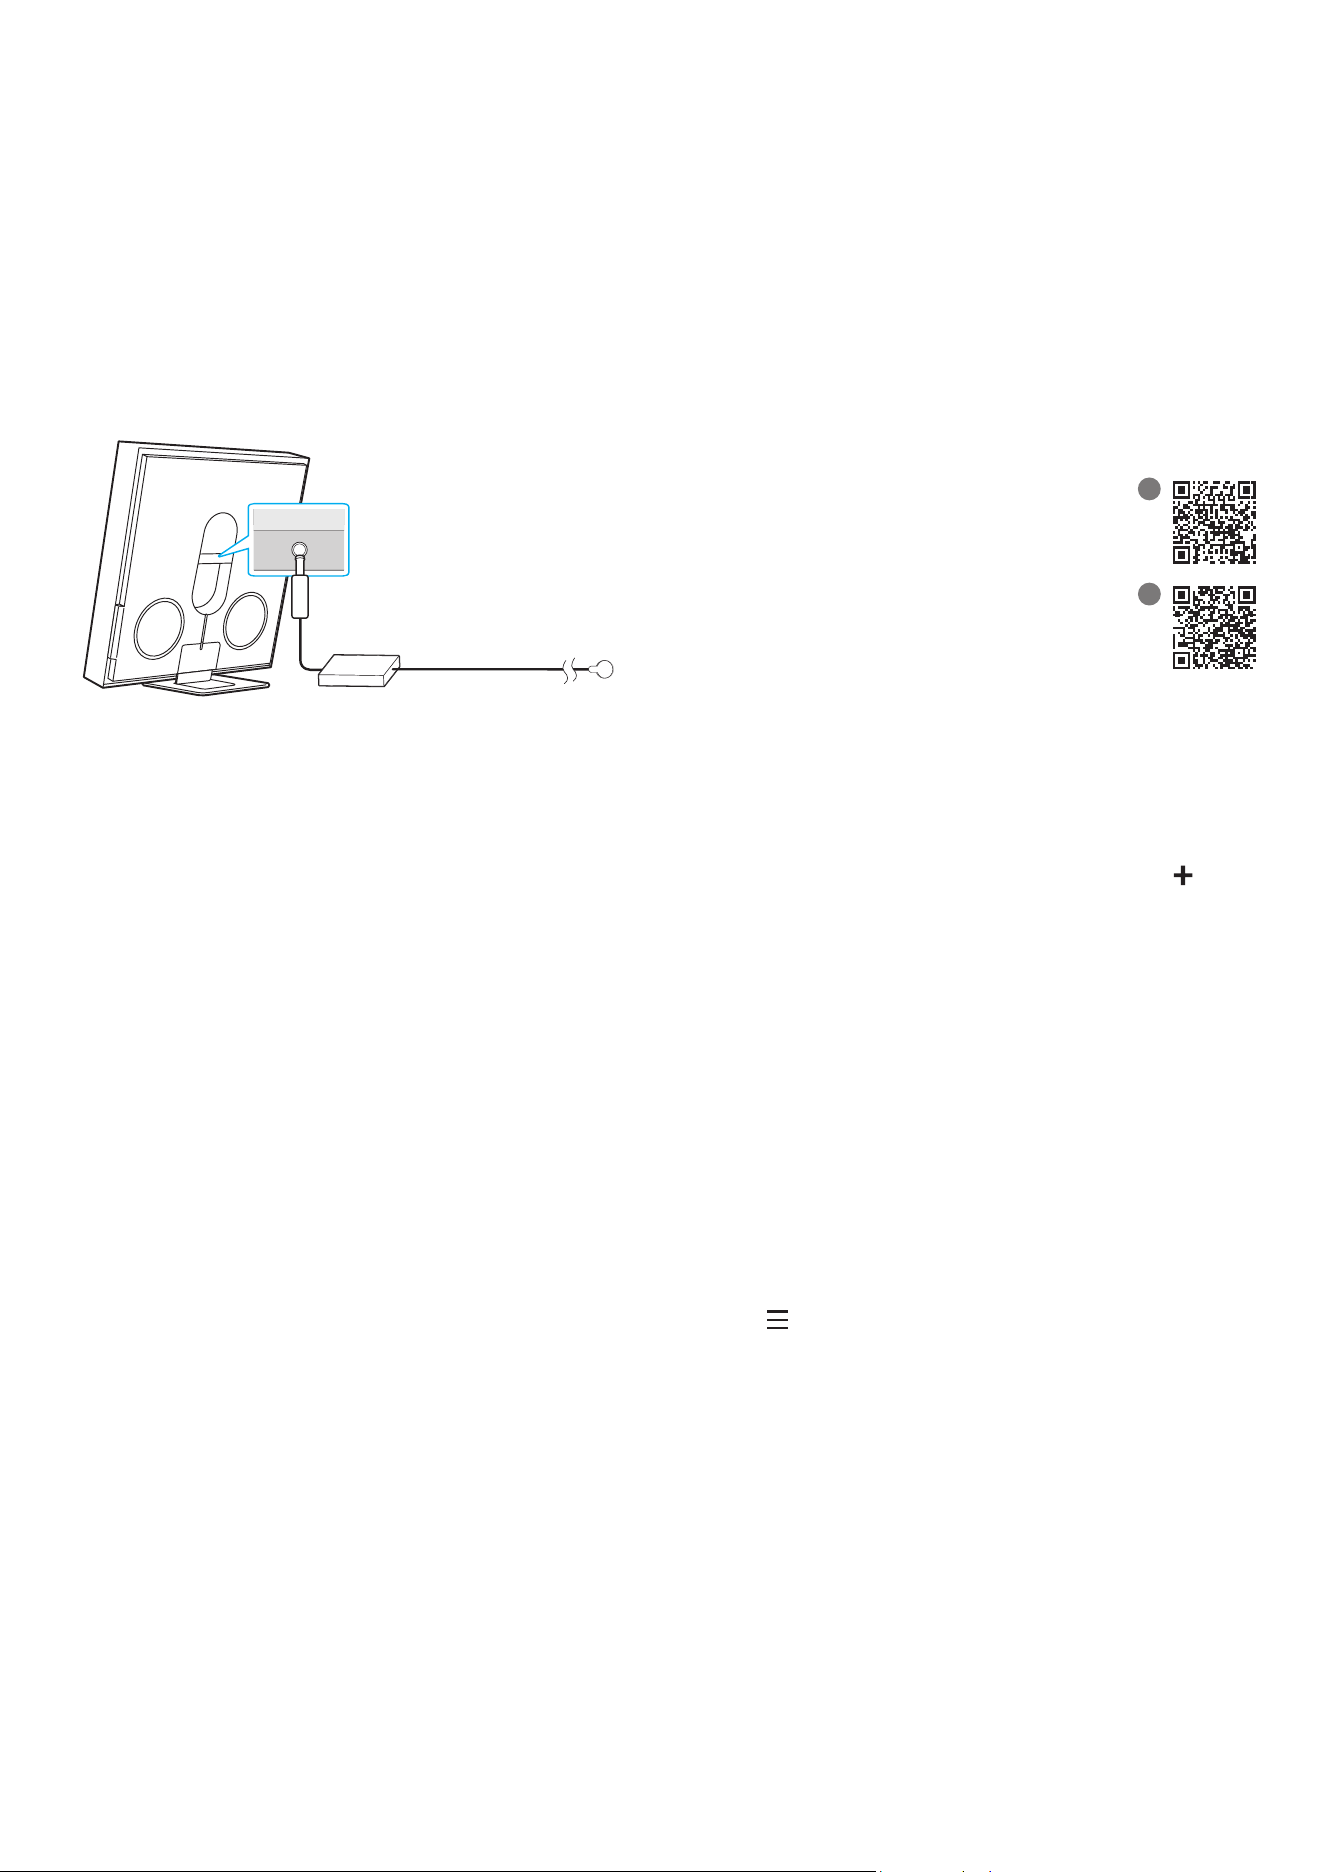
04 CONNECTING ELECTRICAL
POWER
Use the power components to connect the Wireless Speaker to an
electrical outlet in the following order:
• For more information about the required electrical power and
power consumption, refer to the label attached to the product.
(Label: Rear of the Wireless Speaker Main Unit)
1. First connect the power cable to the AC/DC adapter.
Connect the AC/DC adapter (with the power cable) to the Wireless
Speaker.
2. Connect the power cord to a wall socket.
DC 19V
Rear of the Wireless
Speaker
Power Cord
AC/DC Adapter
NOTE
• If you unplug and reconnect the power cord when the product is
turned on, the Wireless Speaker turns on automatically.
• Make sure to rest the AC/DC Adapter at on a table or the oor.
If you place the AC/DC Adapter so that it is hanging with the AC
cord input facing upwards, water or other foreign substances could
enter the Adapter and cause the Adapter to malfunction.
05 CONNECTING A MOBILE
DEVICE
Method 1. Connecting the SmartThings
App (Wireless Network)
To connect a Wireless Speaker to a mobile device via a wireless
network (Wi-Fi), the SmartThings app is required.
‒ It is required to have a certain higher version of OS for the smooth
use of SmartThings. For more version informations, please refer to
the SmartThings App description in the OS-specic market.
1 - Installation
• The SmartThings app allows you to control the
functionality of and adjust the settings of the
Wireless Speaker.
• Download the SmartThings app from the app
store of your mobile device, or simply scan the
provided QR code and download the app.
• QR 1: Video Guide for SmartThings App
Connection
• QR 2: Download SmartThings App
1
2
2 - Device registration
1. Run the SmartThings app on your mobile device.
2. Follow the on screen instructions and add the product to your
mobile device.
If the automatic pop-up window does not appear, press ( ) on the
Home screen to register the product.
If device search is not possible
1. Connect the Wireless Speaker from the mobile device to Bluetooth.
2. Tap “Devices” on the SmartThings App.
3. Slide the screen to the left to select the Wireless Speaker card
from “Personal Devices” and click “Register device in Samsung
account” to register the device.
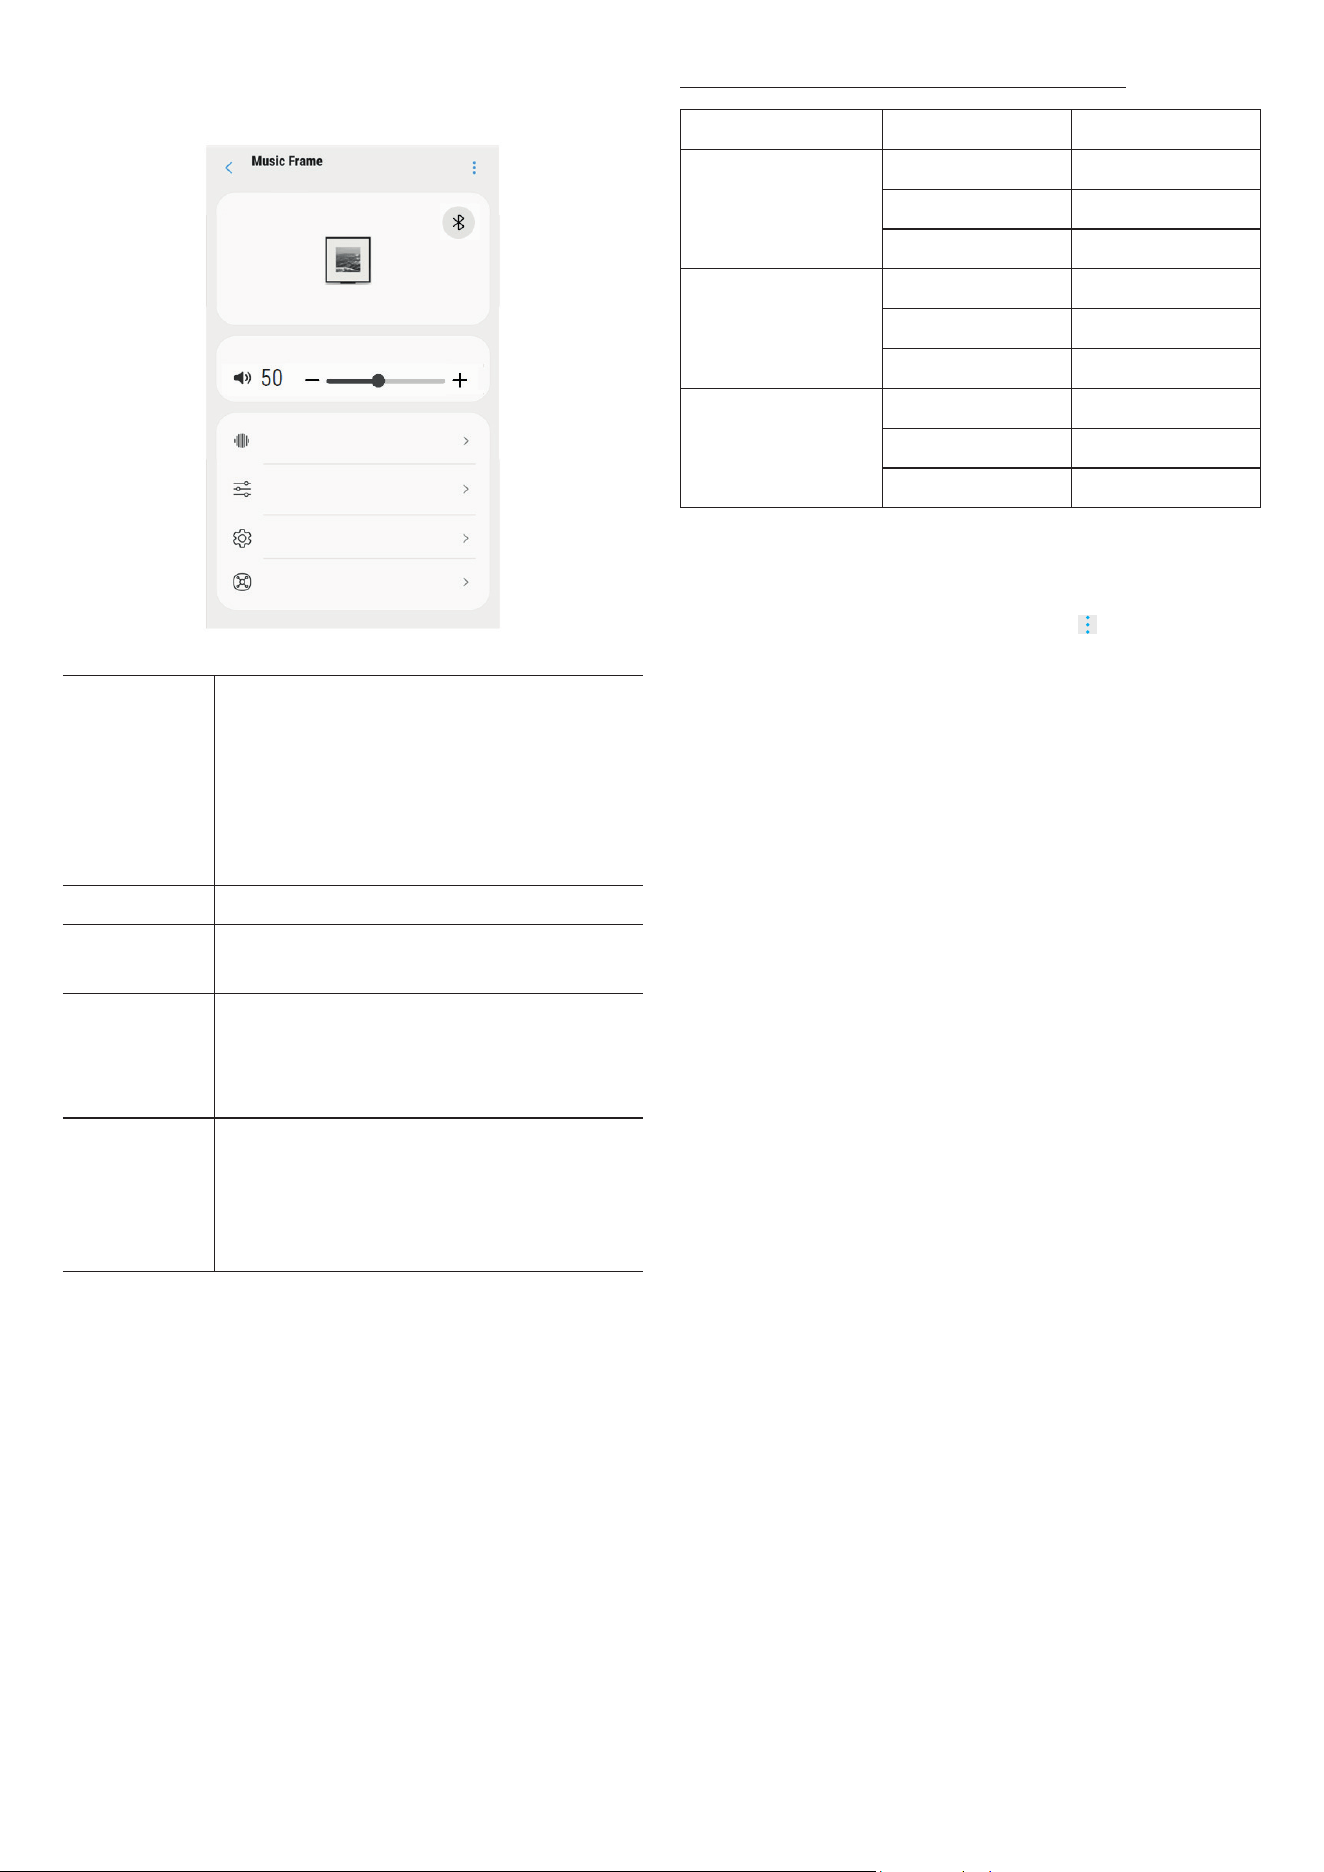
3 - Control with SmartThings
1. With the SmartThings app open on your device, select the Wireless
Speaker that you have added.
2. The settings menu of the Wireless Speaker appears, where you
can adjust the various settings including volume, sound mode or
ne-tuning.
• For other users who want to control the Music Frame, tap
Menu (
) on the SmartThing app of their mobile device and go to
‘How to use’ > ‘Share control of devices’ for reference.
ENG - 8
NOTE
• The illustration below may differ with the app version.
Sound Mode
Equalizer
Advanced Sound Settings
SmartThings Hub
Sound Mode • Music : Provides more natural and room
lling sound for music content.
• Standard : Outputs the original sound.
• Adaptive Sound : Analyzes the content in real
time and automatically provides the optimal
sound eld based on the characteristics of
the content.
Equalizer You can set the Bass and Treble.
SpaceFit
Sound
Provides optimized sound quality by analyzing
the listening spaces.
Active Voice
Amplier
Analyzes external noise in real time while
Wireless Speaker is playing, so that voice audio
can always be heard clearly.
‒ No data is saved during the analysis
Advanced
Sound
Settings
• Voice enhancement makes it easier to hear
spoken dialog in movies and TV.
• Night mode is optimized for night time with
the settings adjusted to bring the volume
down but keep the dialog clear.
Output specications for the SOUND MODE
Effect Input Output
Adaptive Sound
2.0 ch 2.0 ch
5.1 ch 2.0 ch
Dolby Atmos® 2.0 ch
Music
2.0 ch 2.0 ch
5.1 ch 2.0 ch
Dolby Atmos® 2.0 ch
Standard
2.0 ch 2.0 ch
5.1 ch 2.0 ch
Dolby Atmos® 2.0 ch
To change your Wi-Fi connection
1. Launch the SmartThings app from your mobile device (smartphone
or tablet).
2. Tap the Wireless Speaker’s card and tap the (
) icon.
3. Go to Device Settings > Network Status > Change Wi-Fi network,
and follow the onscreen instructions.
Using Group Play
• To benet from this feature, add your Wireless Speaker to the
SmartThings app.
• To enable this, connect at least two audio devices to the same Wi-
Fi network at 5 GHz.
• This is available on Samsung Sound devices that support Wi-Fi
released year 2024 or later.
• This feature does not support TV sound.
Conguring Group Play
1. Run the SmartThings app on your mobile device.
2. Add the Wireless Speaker in the SmartThings app according to the
instructions in the “Method 1. Connecting the SmartThings App
(Wireless Network) > 2 - Device registration” section.
3. Tap the Wireless Speaker’s card.
4. On your mobile device, tap Create Group under the audio device
icon.
• Create Group button appears only when Wireless Speaker is in
Wi-Fi mode.
• If the Wireless Speaker is playing the TV sound, the connection
to the TV is disconnected when creating a group.
5. Enable Group Play.
6. Select a desired device in the list, and tap Apply.
• You can add a maximum of 4 devices.
• With Group Play, the audio will be output through the host
device alone.
• When a device connected to the host device switches to a
different source, the device will be deleted from the group
automatically.
• When the host device is connected to a TV, the generated group
will be deleted automatically.
ENG - 9
Disabling Group Play
1. Tap the audio device’s card.
2. On your mobile device, tap Edit Group under the audio device icon.
3. Disable Group Play.
• To disable an individual device, uncheck the device from the list
and tap Apply.
Using the SmartThings Hub
• This feature is available only with connection to the Samsung
SmartThings dongle. The dongle is not included with this product,
and may not be available depending on the region.
• You can use the Wireless Speaker’s SmartThings Hub function to
connect the IoT devices (bulbs, plugs, sensors etc.) that require
SmartThings Hub.
• To use the SmartThings Hub function, you must register the
Wireless Speaker in the SmartThings app.
Connecting the SmartThings dongle
1. Connect the SmartThings dongle (VG-STDB10A, sold separately)
to the USB port on the Wireless Speaker. SmartThings Hub is
automatically registered.
SmartThings Dongle
(VG-STDB10A, sold
separately)
Registering an IoT device on the SmartThings app
1. On the mobile device, run the SmartThings app.
2. Add the Wireless Speaker in the SmartThings app according to the
instructions in the “Method 1. Connecting the SmartThings App
(Wireless Network) > 1 - Installation” section.
3. Tap the Wireless Speaker device card.
4. Tap SmartThings Hub at the bottom of the screen.
5. Tap Using SmartThings Hub, and then tap Set up to activate the
SmartThings Hub function.
• When the SmartThings Hub function activates, unset changes
to using.
• SmartThings Hub device card will appear next to the Wireless
Speaker device card.
6. On the Home screen, tap “
” to add an IoT device.
• An IoT device card appears on the app when you successfully
add an IoT device.
• If you unplug the Wireless Speaker, devices connected through
the SmartThings Hub may be disconnected. You must reconnect
the devices once they get disconnected.
Deleting SmartThings Hub from the SmartThings app
1. On the devices screen , tap the Wireless Speaker device card.
2. Tap SmartThings Hub at the bottom of the screen.
3. Tap Removing SmartThings Hub to deactivate the SmartThings
Hub function.
• When the SmartThings Hub function deactivates, using
changes to unset.
Connecting via Apple AirPlay
With AirPlay, you can enjoy music, podcasts, and other audio on your
Samsung Wireless Speaker, right from your Apple devices.
1. Select
from an AirPlay-supported app or Control Center on
your iPhone, iPad, or Mac.
2. Select the Wireless Speaker from the list of available devices to
play the current audio to.
• This feature may not be available in some countries.
• To use AirPlay with your Samsung Wireless Speaker, the latest
version of iOS, iPadOS, or macOS is recommended.
• To enable AirPlay in your Wireless Speaker, you must rst register
the device with the Samsung Smart Things app by agreeing with
the app’s terms and conditions.
• Make sure the Wireless Speaker is powered on and connected to
the same Wi-Fi network as your Apple® device.
ENG - 10
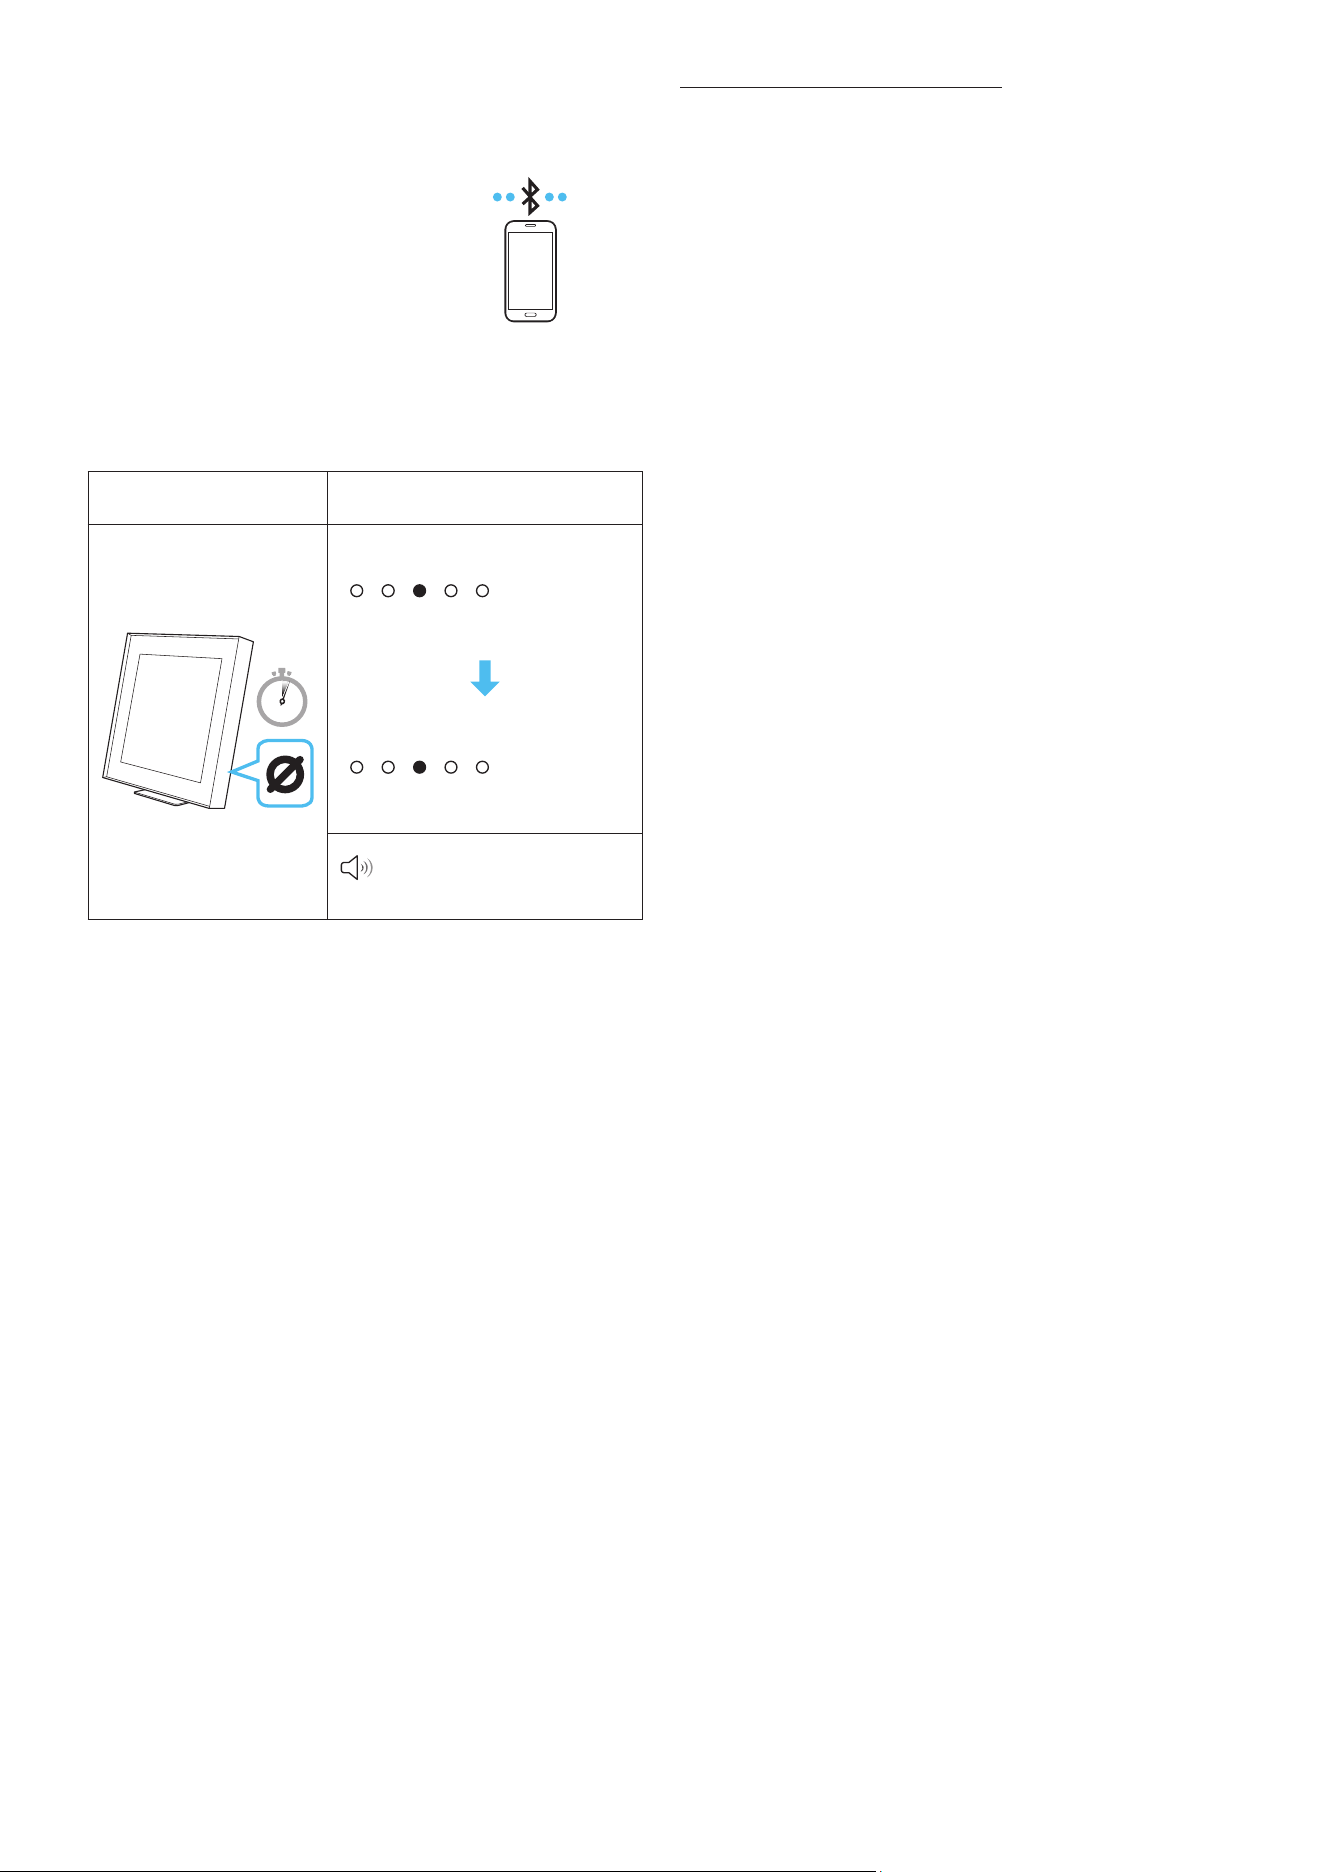
Method 2. Connecting via Bluetooth
When a mobile device is connected using Bluetooth, you can hear
stereo sound without the hassle of cabling.
• When you connect a paired Bluetooth
device with the Wireless Speaker off,
the Wireless Speaker automatically
turns on.
Mobile device
The initial connection
When connecting to a new Bluetooth device, make sure the device is
within 1 m distance.
1.
Bluetooth Pairing button LED Indicator
5 Sec
[Pairing]
‒ Red → Green → Blue Blinks
[Connection is complete]
‒ Cyan Blinks X3
Ready to connect via
Bluetooth.
1.
2. On your device, select “Music Frame” from the list that appears.
3. Play music les from the device connected via Bluetooth through
the Wireless Speaker.
If the device fails to connect
• If you have an existing Wireless Speaker (e.g., “Music Frame”) in the
list of speakers on the Mobile device, delete it.
• Repeat steps 1 and 2.
Notes on Bluetooth connection
• Locate a new device within 1 m to connect via Bluetooth
communication.
• If asked for a PIN code when connecting a Bluetooth device, enter
<0000>.
• The Wireless Speaker automatically turns off after 18 minutes in
the Ready state.
• The Wireless Speaker may not perform Bluetooth search or
connection correctly under the following circumstances:
‒ If there is a strong electrical eld around the Wireless Speaker.
‒ If several Bluetooth devices are simultaneously paired with the
Wireless Speaker.
‒ If the Bluetooth device is turned off, not in place, or
malfunctions.
• Electronic devices may cause radio interference. Devices that
generate electromagnetic waves must be kept away from the
Wireless Speaker main unit - e.g., microwaves, wireless LAN
devices, etc.
• The Wireless Speaker supports SBC data (44.1kHz, 48kHz).
• Connect only to a Bluetooth device that supports the A2DP (AV)
function.
• You cannot connect the Wireless Speaker to a Bluetooth device
that supports only the HF (Hands Free) function.
• When connecting the Wireless Speaker to a Bluetooth device, place
them as close to each other as possible.
• The farther the Wireless Speaker and Bluetooth device are from
each other, the lower the sound quality will become.
The Bluetooth connection may break when the devices are out of
the effective range.
• The Bluetooth connection may not function as intended in areas
with poor reception.
• A Bluetooth device may experience noise or malfunction under in
the following conditions:
‒ When the body is in contact with the signal transceiver on the
Bluetooth device or Wireless Speaker
‒ In corners or when there is an obstacle in proximity, such as a
wall or partition, where electrical changes may occur.
‒ When exposed to radio interferences by other products
operating on the same frequency ranges, such as medical
equipment, microwave ovens, and wireless LAN devices.
‒ Obstacles such as doors and walls may still impact the sound
quality even when the devices are within the effective range.
• Note that your Wireless Speaker cannot be paired with other
Bluetooth devices while using the Bluetooth option.
• This wireless device may cause electrical interference during
operation.
ENG - 11
Disconnecting the Bluetooth device from a Wireless
Speaker
You can disconnect a Bluetooth device from the Wireless Speaker. For
instructions, see the Bluetooth device’s user manual.
• The Wireless Speaker will be disconnected.
• If the Wireless Speaker is disconnected from the Bluetooth device,
the multicolor LED indicator on the Wireless Speaker blinks “Red”
three times.
Disconnecting the Wireless Speaker from the Bluetooth
device
Press the
(Multi Function) button on the side of the Wireless
Speaker to switch the mode from “Bluetooth”.
• Disconnecting takes time because the Bluetooth device must
receive a response from the Wireless Speaker. (Disconnection time
may differ, depending on the Bluetooth device)
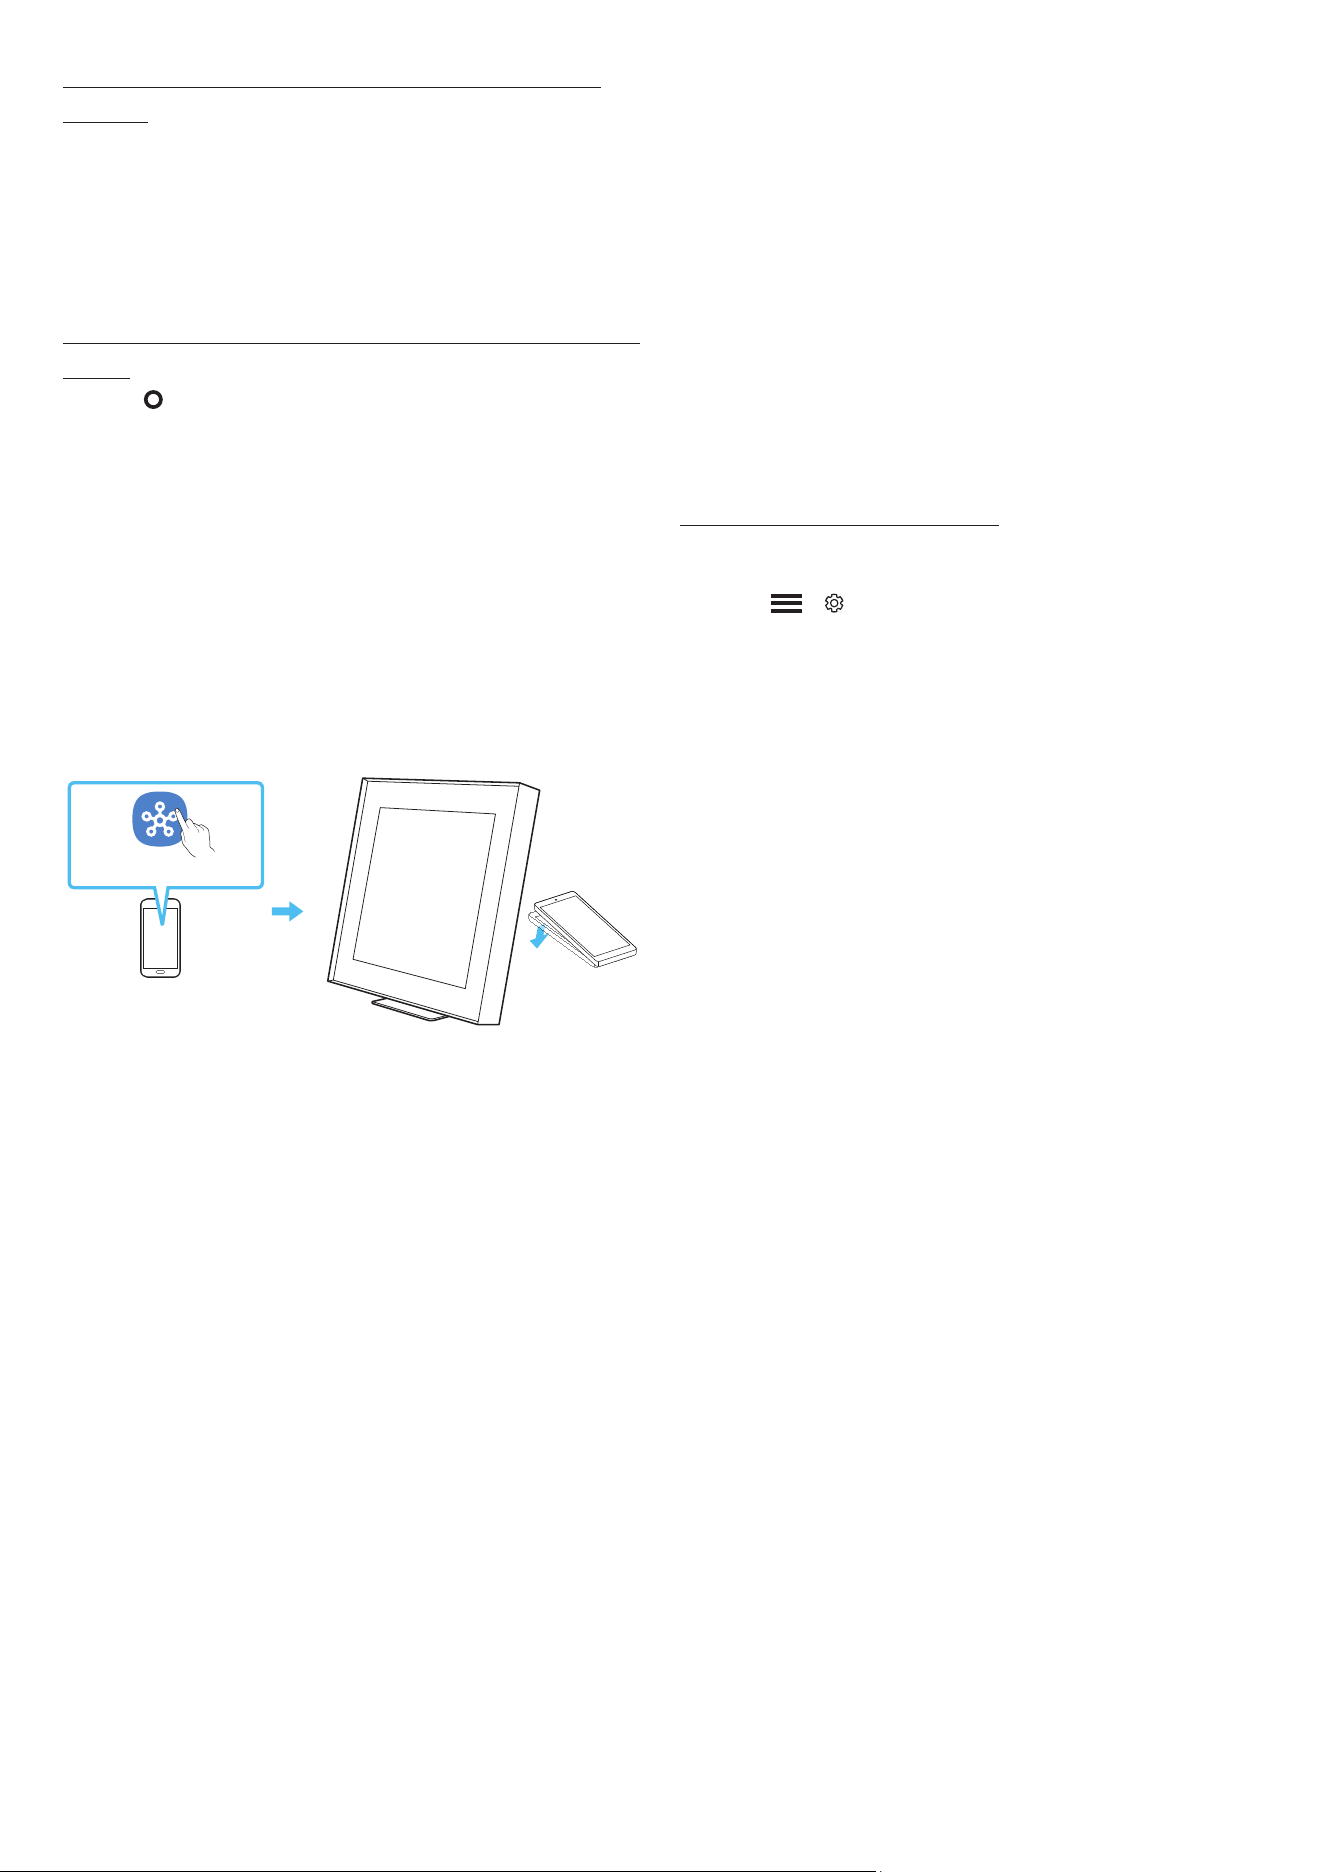
Using the Tap Sound
Tap the Wireless Speaker with your mobile device to play the sound of
content on the mobile device through the Wireless Speaker.
• This function may not be supported, depending on the mobile
device.
• This function is only compatible with Samsung mobile devices with
Android 8.1 or later.
Mobile device
SmartThings App
1. Turn on the Tap Sound function on your mobile device.
• For details on how to turn on the function, refer to “Setting the
Tap Sound function” below.
2. Tap the Wireless Speaker with the mobile device. Select “Start
now” in the displayed message window.
A connection is established between the mobile device and
Wireless Speaker via Bluetooth.
3. Play the sound of content on the mobile device through the
Wireless Speaker.
• This function connects a mobile device to the Wireless Speaker
via Bluetooth by detecting vibration that occurs when the
device touches the Wireless Speaker.
• Make sure the mobile device does not tap a sharp corner of the
Wireless Speaker. The Wireless Speaker or mobile device may
become scratched or damaged.
• It is recommended that the mobile device be covered with
a case. Lightly tap the wide area in the upper portion of the
Wireless Speaker, without using excessive force.
• To use this function, update the SmartThings app to the latest
version.
The function may not be supported, depending on the app
version.
Setting the Tap Sound function
Use the SmartThings app to turn on the Tap View, Tap Sound function.
1. On the mobile device, run the SmartThings app.
2. Select (
→ ) in the SmartThings app screen displayed on the
mobile device.
3. Set “Tap View, Tap Sound” to On to allow the function to work when
a mobile device moves close to the Wireless Speaker. The function
is turned on.
NOTE
• When the mobile device is in power-saving mode, the Tap Sound
function does not work.
• The Tap Sound function may not work if there are devices near the
Wireless Speaker that cause radio interference such as electric
devices. Make sure devices that may cause radio interference are
placed at a sufcient distance away from the Wireless Speaker.
ENG - 12
06 CONNECTING TO A TV
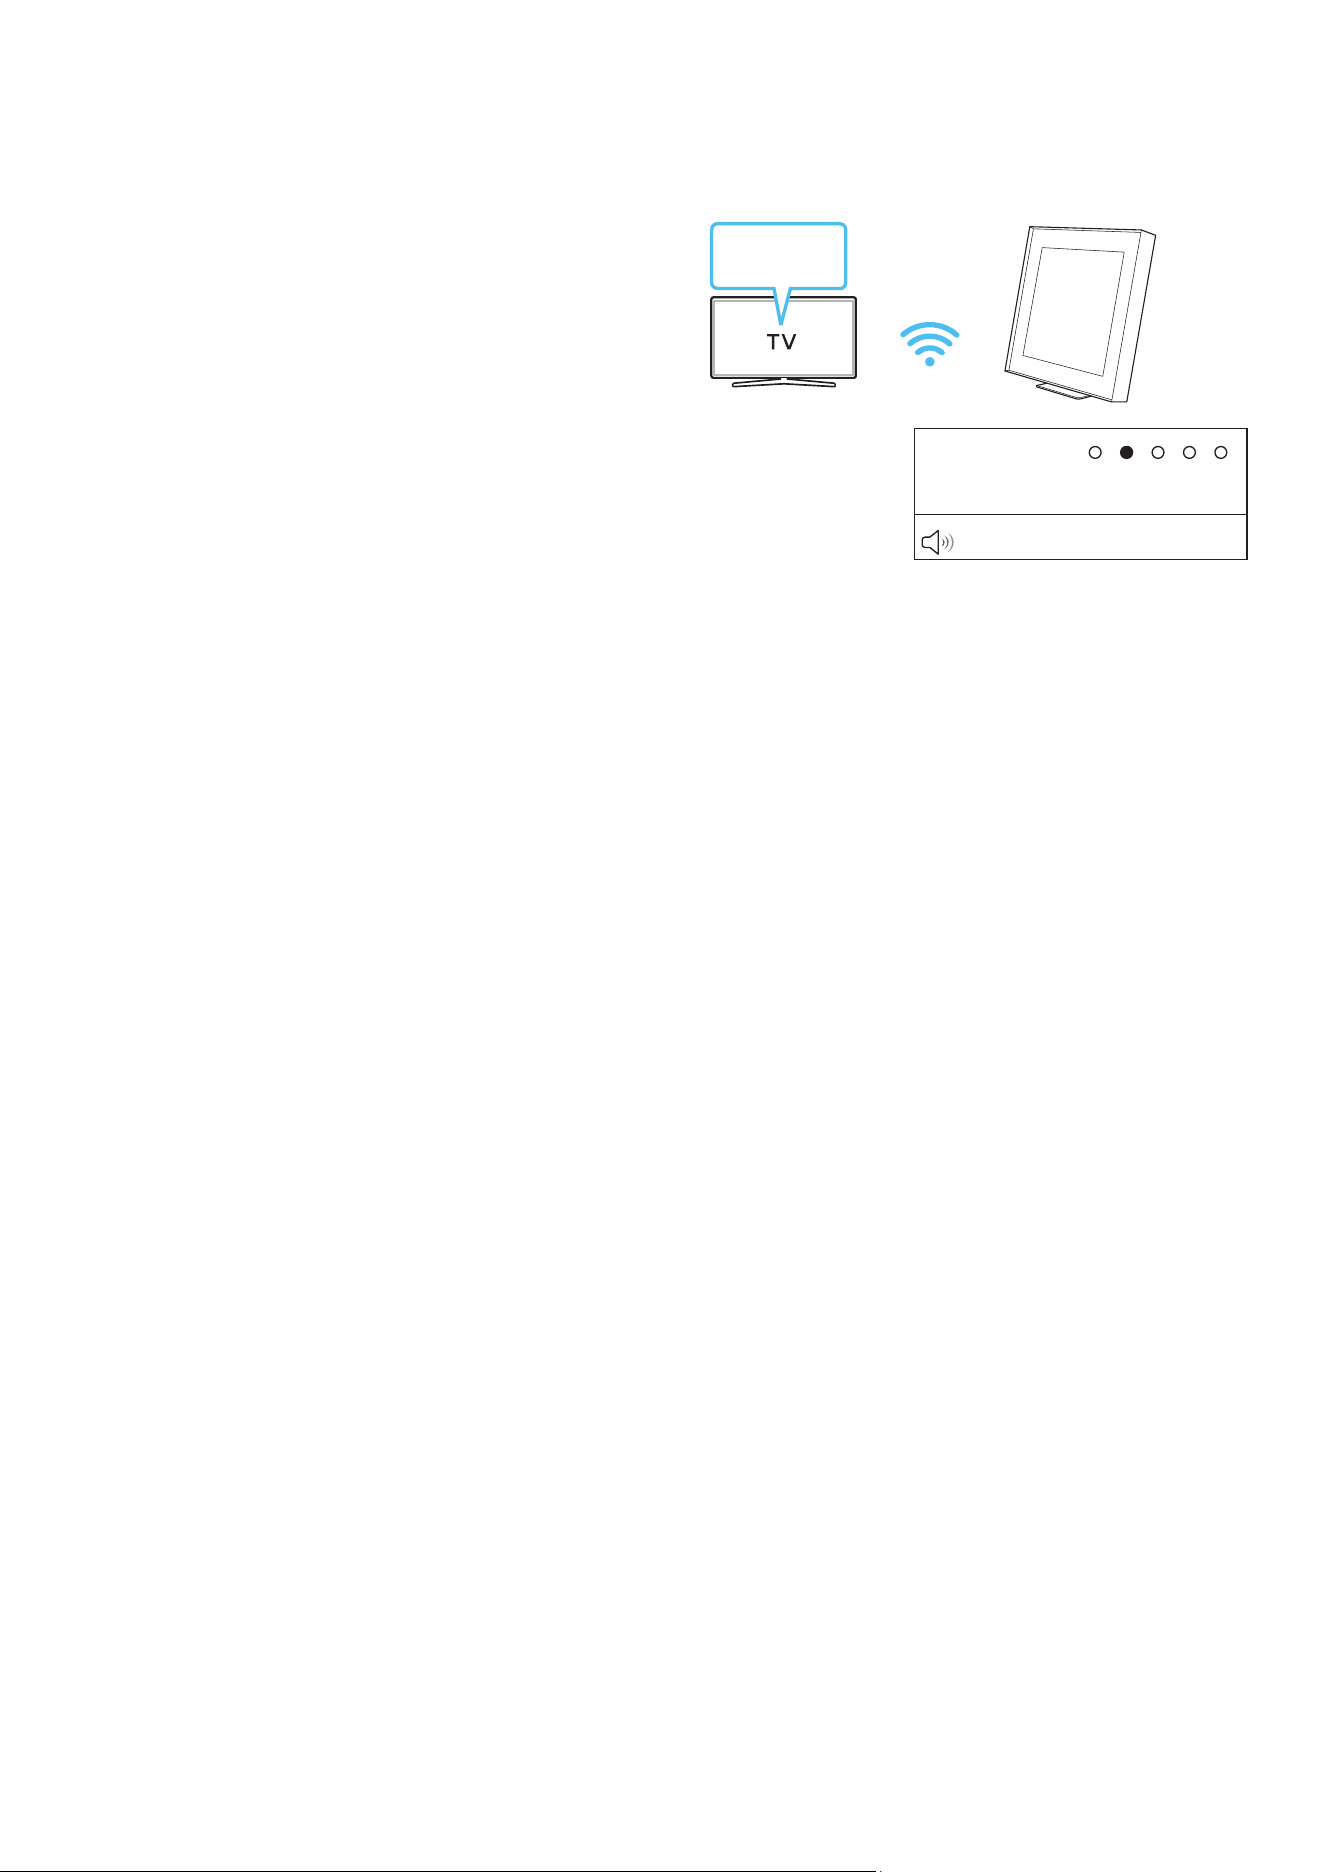
Connecting via Wi-Fi
Pre-connection Checklist
• Wi-Fi connection is available only on Samsung TV.
• Check whether the wireless router (Wi-Fi) is turned on and the TV
is connected to the router.
• The TV and Wireless Speaker must be connected to the same
wireless network (Wi-Fi).
• If your wireless router (Wi-Fi) uses a DFS channel, you will not be
able to establish a Wi-Fi connection between the TV and Wireless
Speaker. Contact your Internet service provider for details.
• Because the menus may differ depending on the year of
manufacture, refer to your TV manual.
1. For more information about Wi-Fi connection to the Wireless
Speaker, see page 7, “Method 1. Connecting the SmartThings App
(Wireless Network)”.
2. Change the input source of the TV by using the Audio menu to
Wireless Speaker.
• Samsung TVs released in 2017 or later
Sound → Sound Output → Music Frame (Wi-Fi)
Connecting to a TV that supports Dolby
Atmos
Pre-connection Checklist
• Make sure that the content supports Dolby Atmos®.
TV menu
Wi-Fi
LED indicator :
‒ White On → Off
Wi-Fi
1. Connect the Wireless Speaker and TV to the same wireless network
(Wi-Fi).
2. For sound output of the TV, select Wireless Speaker.
3. TV sound is output from the Wireless Speaker.
NOTE
• When you use Dolby Atmos®: If the input source is Dolby Atmos®,
refer to “Output specications for the SOUND MODE” on page 8.
• Conguring Dolby Atmos® on your BD player or other device
connected to the TV.
Open the audio output options on the settings menu of your
BD player or other device and make sure that “No Encoding” is
selected for Bitstream. For example, on a Samsung BD Player, go to
Home Menu → Sound → Digital Output and then select Bitstream
(unprocessed).
• This function is available in some Samsung TVs and some Wireless
Speaker models.
ENG - 13
Using the Q-Symphony Function
• When the Wireless Speaker connects to a Samsung TV that
supports the Q-Symphony function you can play the sound
simultaneously through the Wireless Speaker and the TV. If you
use the Q-Symphony function, the surround sound played on the
TV allows you to enjoy a richer, more three-dimensional surround
sound effect.
• When the Wireless Speaker is connected “Q-Symphony” menu
appears on the TV.
Settings (
) → All Settings ( ) → Sound → Sound Output
• You can adjust the placement of the Wireless Speaker on the
Q-Symphony Setup menu.
TV menu
Wi-Fi
LED indicator :
‒ White On → Off
Wi-Fi
NOTE
• It can operate according to the Codec supported by TV.
• This function is supported only when both the wireless speaker and
the TV are connected to the same Wi-Fi network.
• It is available with new Samsung TV models to be released 2024.
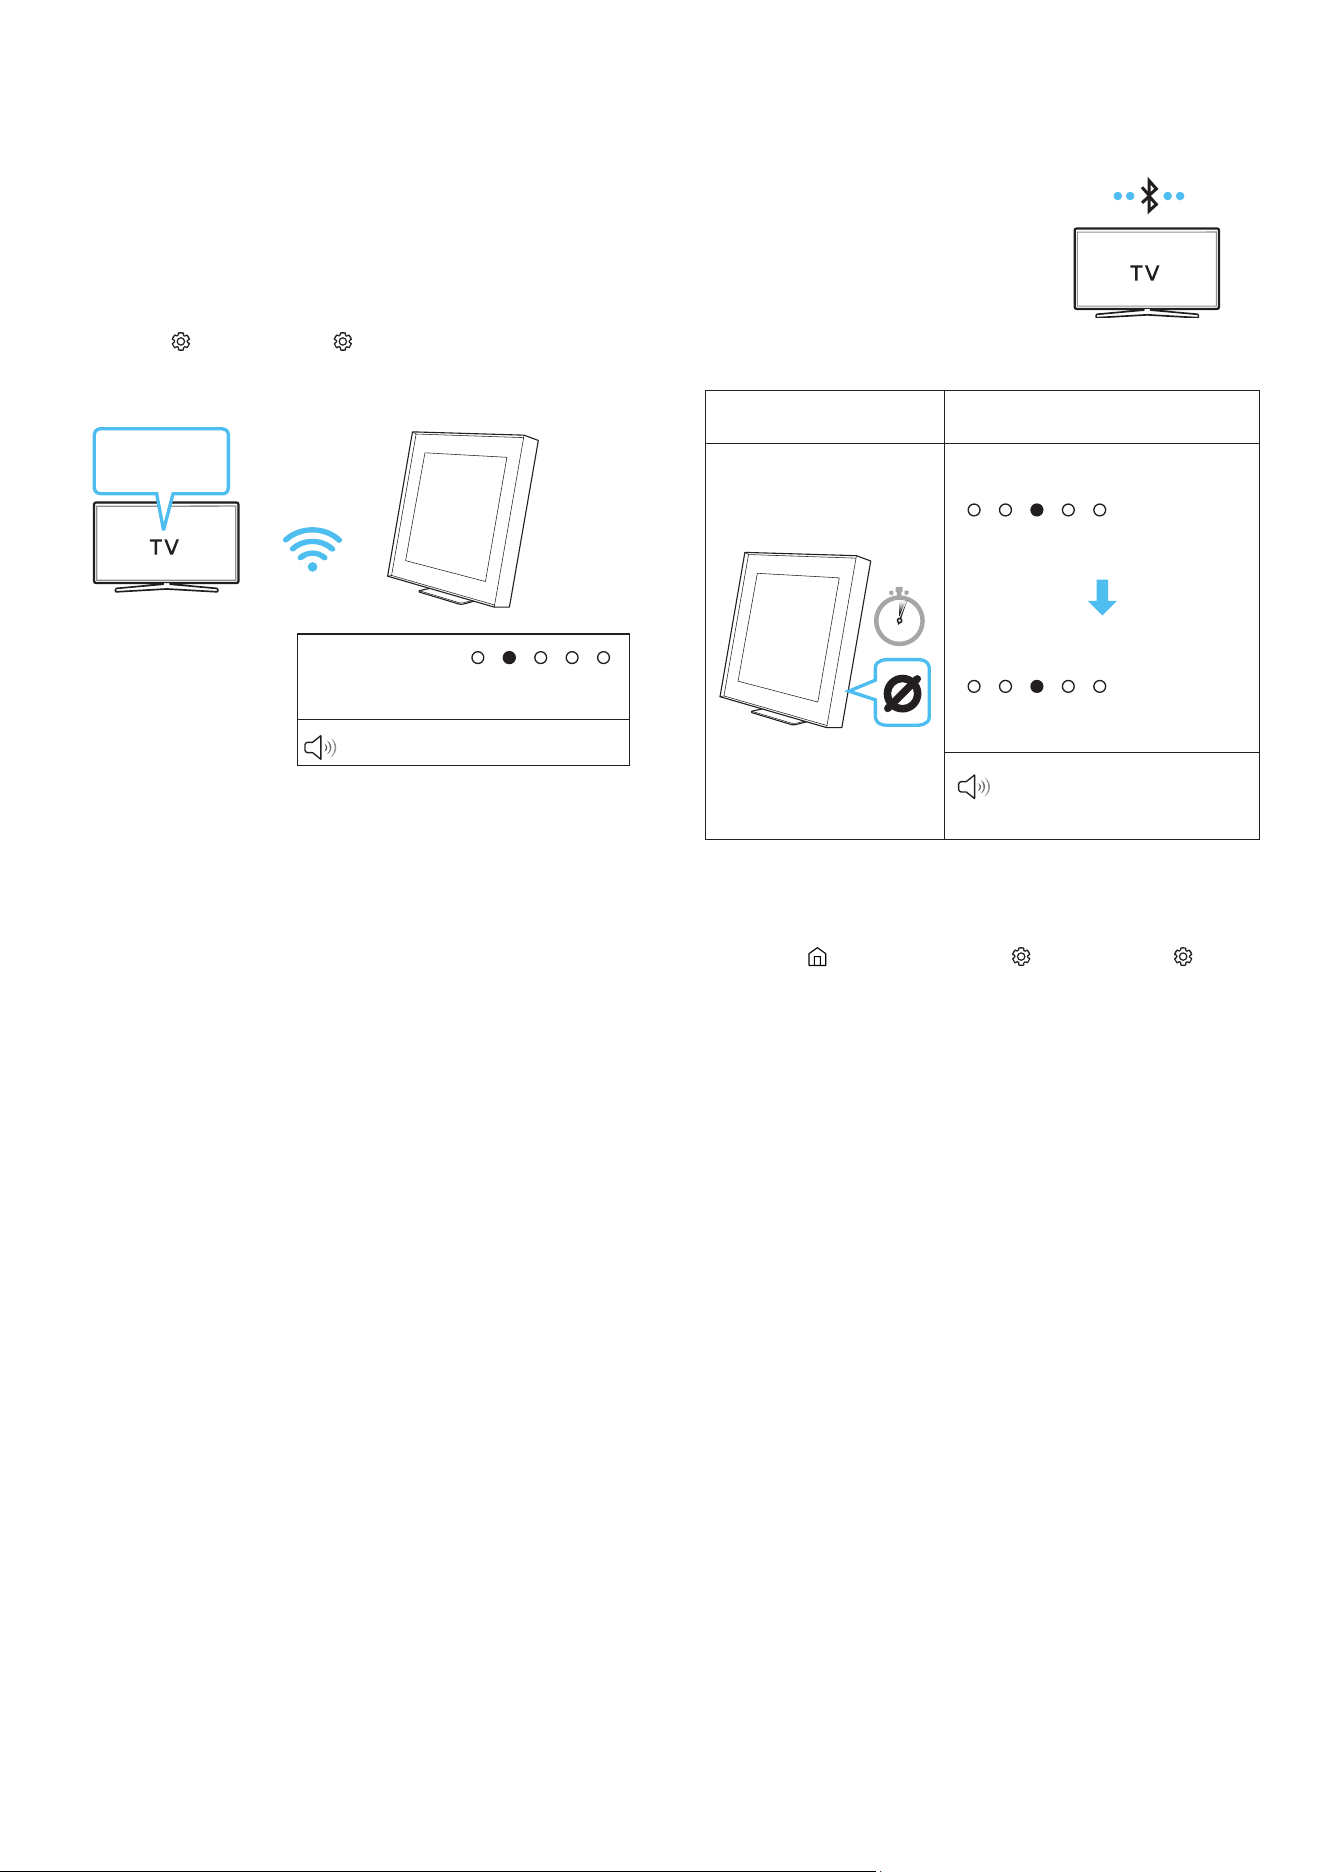
Connecting via Bluetooth
When a Samsung TV is connected using Bluetooth, you can hear
stereo sound without the hassle of cabling.
• Only one Samsung TV can be connected
at a time.
• Samsung TV that supports Bluetooth
can be connected. Check the
specications of your TV.
The initial connection
1.
Bluetooth Pairing button LED Indicator
5 Sec
[Pairing]
‒ Red → Green → Blue Blinks
[Connection is complete]
‒ Cyan Blinks X3
Ready to connect via
Bluetooth.
• Until pairing is complete, the Multicolor LED changes as Red →
Green → Blue in turn.
1.
2. Select Bluetooth mode on the Samsung TV.
(e.g. Home ( ) → Menu → Settings ( ) → All Settings ( ) →
Sound → Sound Output → Bluetooth Speaker List → Music Frame
(Bluetooth))
3. Select “Music Frame” from the list on TV’s screen.
An available Wireless Speaker is indicated with Need Pairing or
Paired on the TV’s Bluetooth device list. To connect the Samsung
TV to the Wireless Speaker, select the message, and then establish
a connection.
4. You can now hear Samsung TV sound from the Wireless Speaker.
‒ If there is a connection log between the Wireless Speaker and
Samsung TV, the Wireless Speaker is automatically connected
by changing its mode to Bluetooth.
If the device fails to connect
• If you have an existing Wireless Speaker (e.g., Music Frame) on the
list of speakers on the Samsung TV, delete it.
• Then repeat steps 1 through 3.
ENG - 14
Disconnecting the Wireless Speaker from the Samsung
TV
Press the
(Multi Function) button at the side of the Wireless
Speaker to select the mode other than “Bluetooth”.
• Disconnecting takes time because the Samsung TV must receive a
response from the Wireless Speaker. (The time required may differ,
depending on the Samsung TV model.)
Notes on Bluetooth connection
• Locate a new device within 1 m to connect via Bluetooth
communication.
• If asked for a PIN code when connecting a Bluetooth device, enter
<0000>.
• The Wireless Speaker automatically turns off after 18 minutes in
the Ready state.
• The Wireless Speaker may not perform Bluetooth search or
connection correctly under the following circumstances:
‒ If there is a strong electrical eld around the Wireless Speaker.
‒ If several Bluetooth devices are simultaneously paired with the
Wireless Speaker.
‒ If the Bluetooth device is turned off, not in place, or
malfunctions.
• Electronic devices may cause radio interference. Devices that
generate electromagnetic waves must be kept away from the
Wireless Speaker main unit - e.g., microwaves, wireless LAN
devices, etc.
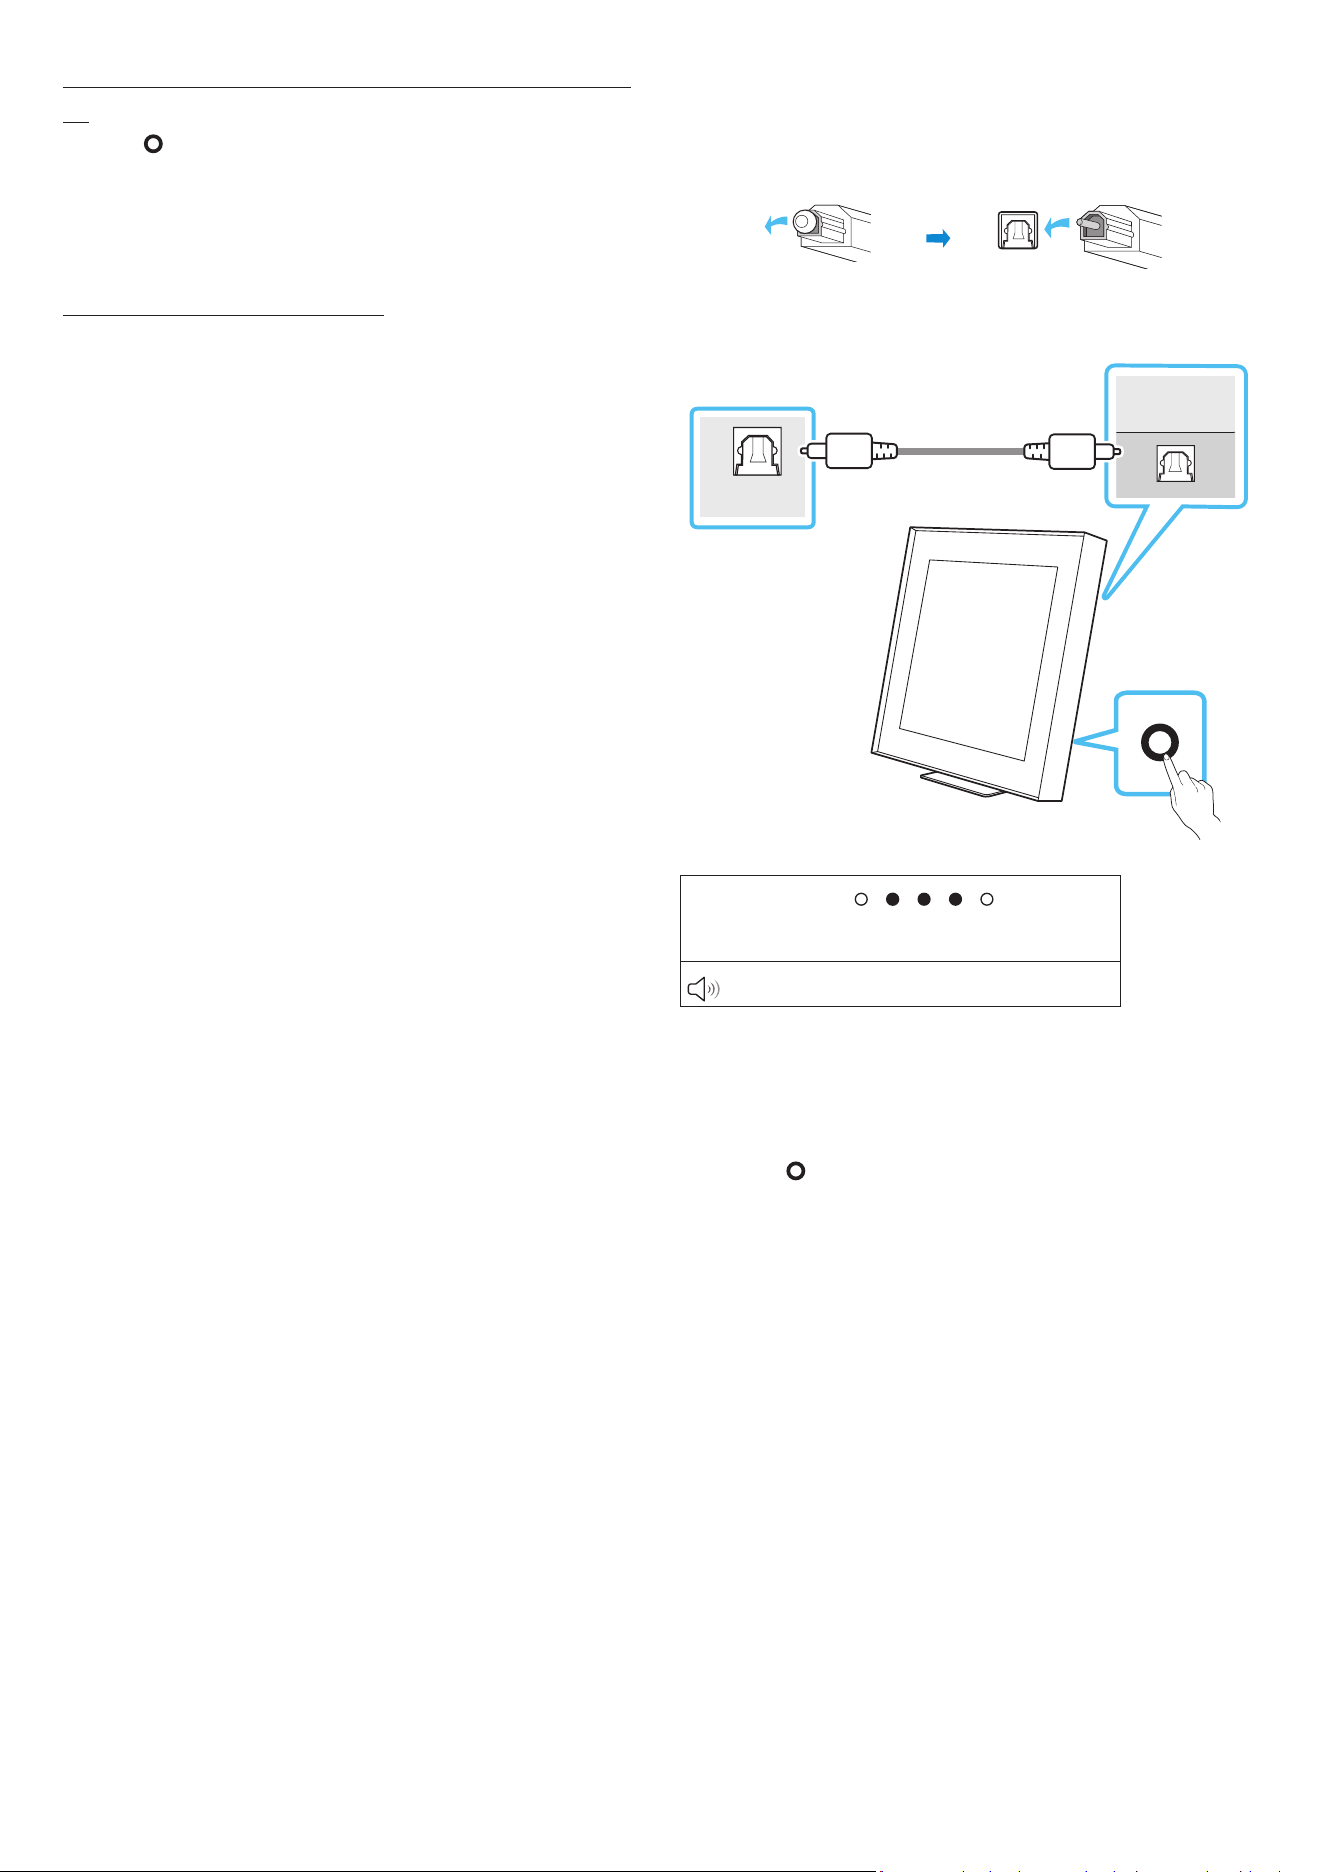
Connecting using an Optical Cable
Pre-connection Checklist
When you use an optical cable and the terminals have covers, be sure
to remove the covers.
OPTICAL OUT
D.IN
(OPTICAL)
Optical Cable (not supplied)
Rear of the
Wireless Speaker
TV
LED indicator :
‒ White On → Off
Digital Audio In
1. With the TV and Wireless Speaker turned off, connect the D.IN
(OPTICAL) port on the Wireless Speaker and the OPTICAL output
port on the TV with the optical cable (not supplied), as shown in
the gure.
2. Turn on the Wireless Speaker and TV.
3. Press the
(Multi Function) button on the Wireless Speaker
unit and then select the “Digital Audio In” mode. Then the
announcement, “Digital Audio In” is output.
4. The TV sound is output from the Wireless Speaker.
ENG - 15
Using the Spacet sound
Provides optimized sound quality by analyzing the listening spaces.
Method 1. Connecting via Wireless Speaker
1. Run the SmartThings app on your mobile device.
2. Tap Wireless Speaker’s card.
3. Enable Spacet sound.
• This is available in all Sound modes.
Method 2. Connecting via TV
To enable this function, turn on the Adaptive Sound+ mode on your
Samsung TV menu.
(Home (
) → Menu → Settings ( ) → All Settings ( ) → General →
Intelligent Mode Settings → Adaptive Sound+)
• The sound mode on your Wireless Speaker will automatically
change to Adaptive Sound+ if you enable the Adaptive Sound+
mode on your TV.
NOTE
• This function works when the Wireless Speaker connects to some
of the Samsung TVs.
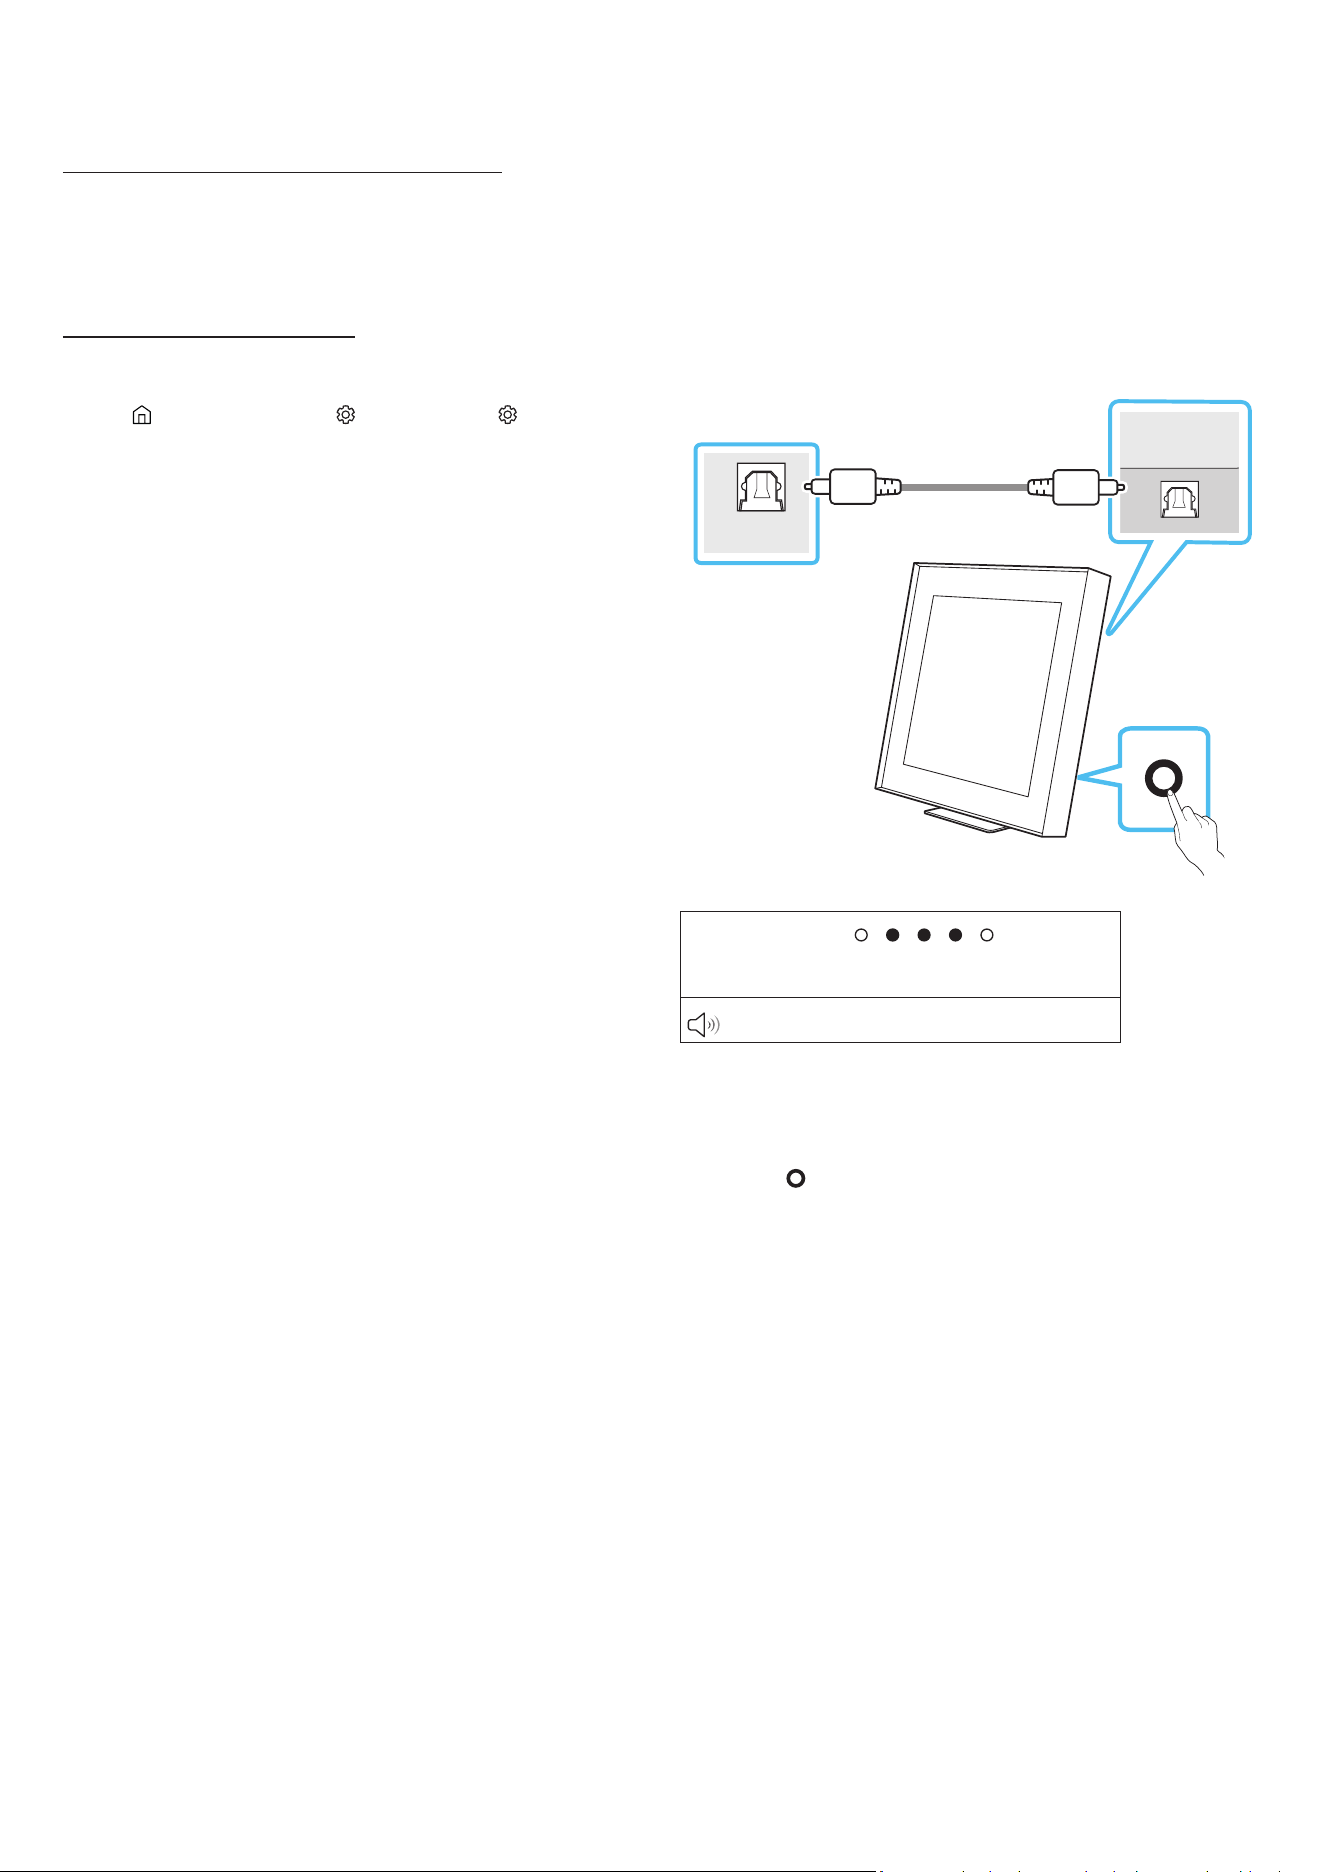
07 CONNECTING AN
EXTERNAL DEVICE
Connecting using an Optical Cable
Pre-connection Checklist
Make sure both the external device and the Wireless Speaker are
turned off.
OPTICAL OUT
D.IN
(OPTICAL)
Optical Cable
(not supplied)
Rear of the
Wireless Speaker
BD / DVD player /
Set-top box /
Game console
LED indicator :
‒ White On → Off
Digital Audio In
1. Use an optical cable (not supplied) to connect the D.IN (OPTICAL)
port of the Wireless Speaker and the optical output port of the
external device. See the gure below.
2. Turn on both the Wireless Speaker and the external device.
3. Press the
(Multi Function) button on the Wireless Speaker
unit and then select the “Digital Audio In” mode. Then the
announcement, “Digital Audio In” is output.
4. The audio signal of the external device will sound from the
Wireless Speaker.
ENG - 16
08 ADDITIONAL FEATURES
Adjusting the Wireless Speaker volume
with a TV remote control
Adjust the Wireless Speaker volume using the TV’s remote control.
• This function can be used with IR remote controls only. Bluetooth
remote controls (remote controls that require pairing) are not
supported.
• Set the TV speaker to External Speaker to use this function.
• Manufacturers supporting this function:
Samsung, VIZIO, LG, Sony, Sharp, PHILIPS, PANASONIC, TOSHIBA,
Hisense, RCA
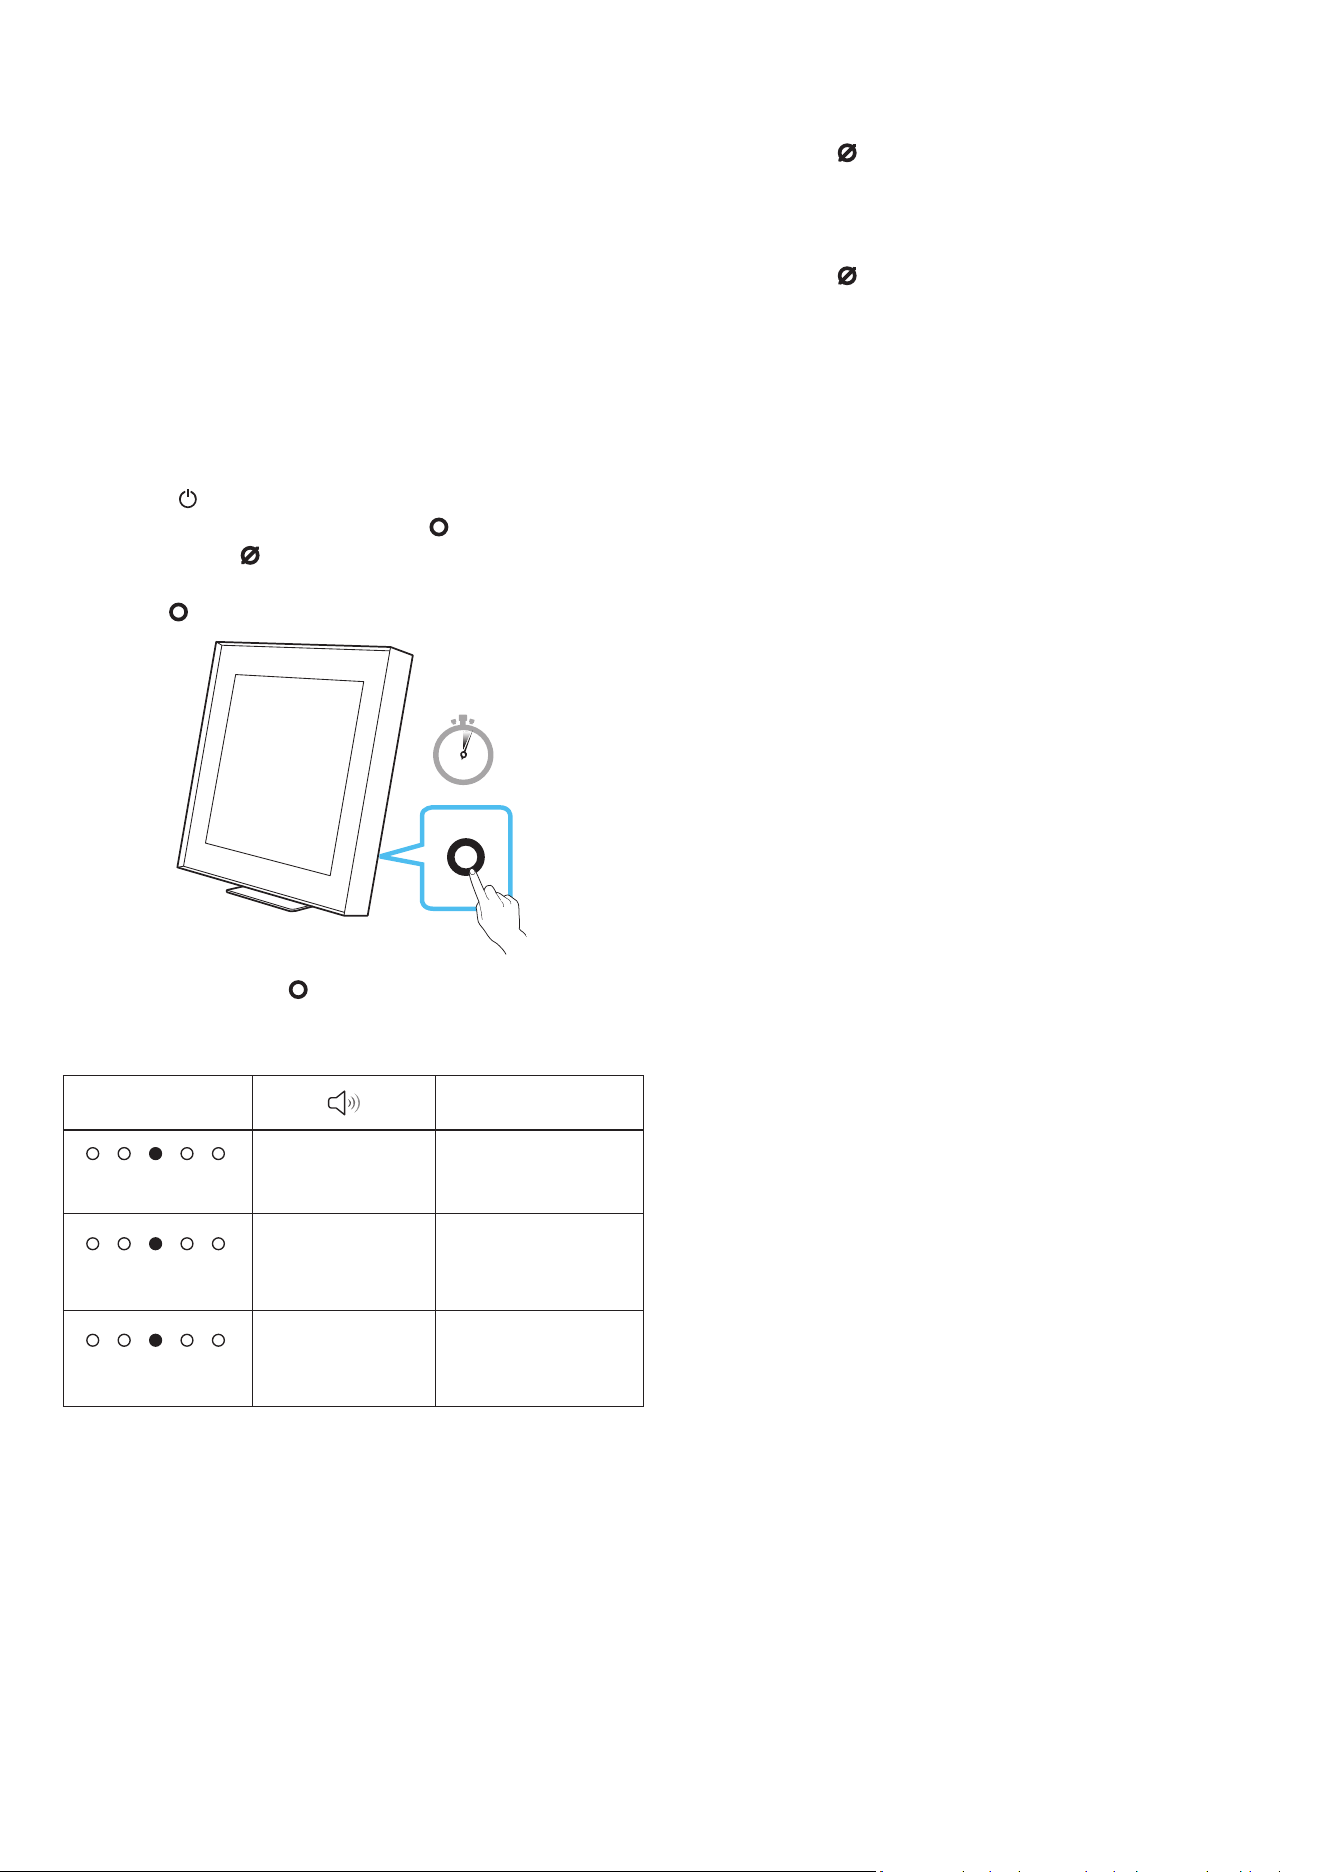
1. Turn Off the Wireless Speaker.
• Tap the
(Power) button on the SmartThings app.
Alternatively, press and hold both the (Multi Function)
button and the (Mic On/Off) button simultaneously on the
Wireless Speaker for 5 seconds.
2. Press the (Multi Function) button on the unit for 5 seconds.
5 Sec
• Each time you press the (Multi Function) button for 5 seconds,
the mode switches in the following order: “OFF-TV REMOTE”
(Default mode), “SAMSUNG-TV REMOTE”, “ALL-TV REMOTE”.
LED Indicator Status
‒ Red Blinks X1
Off-TV Remote
(Default mode)
Disable the TV remote
control.
‒ Cyan Blinks X1
Samsung-TV
Remote
Enable a Samsung
TV’s IR remote
control.
‒ Blue Blinks X1
All-TV Remote
Enable a third-party
TV’s IR remote
control.
Activate/Deactivate Wi-Fi and Bluetooth
To activate/deactivate Wi-Fi connection
Press and hold the
(Mic On/Off) button and the (-) button on the
side panel simultaneously for more than 30 seconds. This will turn on
or off the Wi-Fi connection.
To activate/deactivate Bluetooth connection
Press and hold the
(Mic On/Off) button and the (+) button on the
side panel simultaneously for more than 30 seconds. This will turn on
or off the Bluetooth connection.
• The Wireless Speaker will restart automatically when the Wi-Fi or
Bluetooth function is activated or deactivated.
ENG - 17
09 INSTALLING THE WALL
MOUNT
Installation Precautions
• Install on a vertical wall only.
• Do not install in a place with high temperature or humidity.
• Verify whether the wall is strong enough to support the product’s
weight. If not, reinforce the wall or choose another installation
point.
• Connect cables from the unit to external devices before you install
the Wireless Speaker on the wall.
• Make sure the unit is turned off and unplugged before you install
it. Otherwise, it may cause an electric shock.
• Make sure you use the wall-mount component parts provided with
this product. Under any circumstances, any accident resulting from
using third-party parts shall not be covered by the warranty.
Wallmount Components
(A) Wall Mount Guide
x 1
x 2
(M5 X L55)
(B) Bracket-Wall Mount (C) Screw
x 2
x 1
(D) Screw Anchor (E) Holder-Screw
x 2
(F) Spacer
1. Place the Wall Mount Guide against the wall surface.
• The Wall Mount Guide must be level.
• If you are mounting a device below a mounted object, install at
least 10 cm apart.
10 cm or more
2. Use a pen to mark the positions of the holes and remove the Wall
Mount Guide.
3. Using an appropriately sized drill bit, drill a hole in the wall at each
marking.
• If the markings do not correspond to the positions of studs,
make sure you insert appropriate anchors or mollies into the
holes before you insert the support screws. If you use anchors
or mollies, make sure the holes you drill are large enough for
the anchors or mollies you use.
4. Push a screw (not supplied) through each Screw, and then screw
each screw rmly into a support screw hole.
(B)
(C)
ENG - 18
5. Tighten the wall-mounting holder screw (E) on the back of the
product.
CAUTION
• Tighten the screw rmly until it does not move at all.
Otherwise, the product may fall off and cause damage
or physical injury. Any accident resulting from improper
installation shall not be covered by the warranty.
(E)
6. Remove the liners (x2) of the double-sided adhesive tape from the
spacers (F). Then, put them on the marked sites (x2) on the back of
the product.
x 2
(F)
• The part (F) must be attached to prevent the product from moving
out of the wall-mount installation. On the stand installation, it
must be kept safely for later use. When reusing it, use a double-
sided adhesive tape for attachment.
7. Place the Wireless Speaker on the wall-mount bracket. Make sure
the holder screw is inserted properly on the Wireless Speaker.
Back View
(E) (B)
On the wall-mount
installation, make sure
the screw (E) is secured
to the center hole of the
bracket (B).
ENG - 19
10 SOFTWARE UPDATE
Auto Update
When the Wireless Speaker is connected to the Internet, software
updates automatically occur even when the Wireless Speaker is
turned off.
• To use the Auto Update function, the Wireless Speaker must be
connected to the Internet.
The Wi-Fi connection to the Wireless Speaker will be terminated
if the Wireless Speaker’s power cord is disconnected or the power
is cut off. If the power is cut off, when the power comes back on or
you reconnect the power cord, turn on the Wireless Speaker, and
then reconnect it to the Internet.
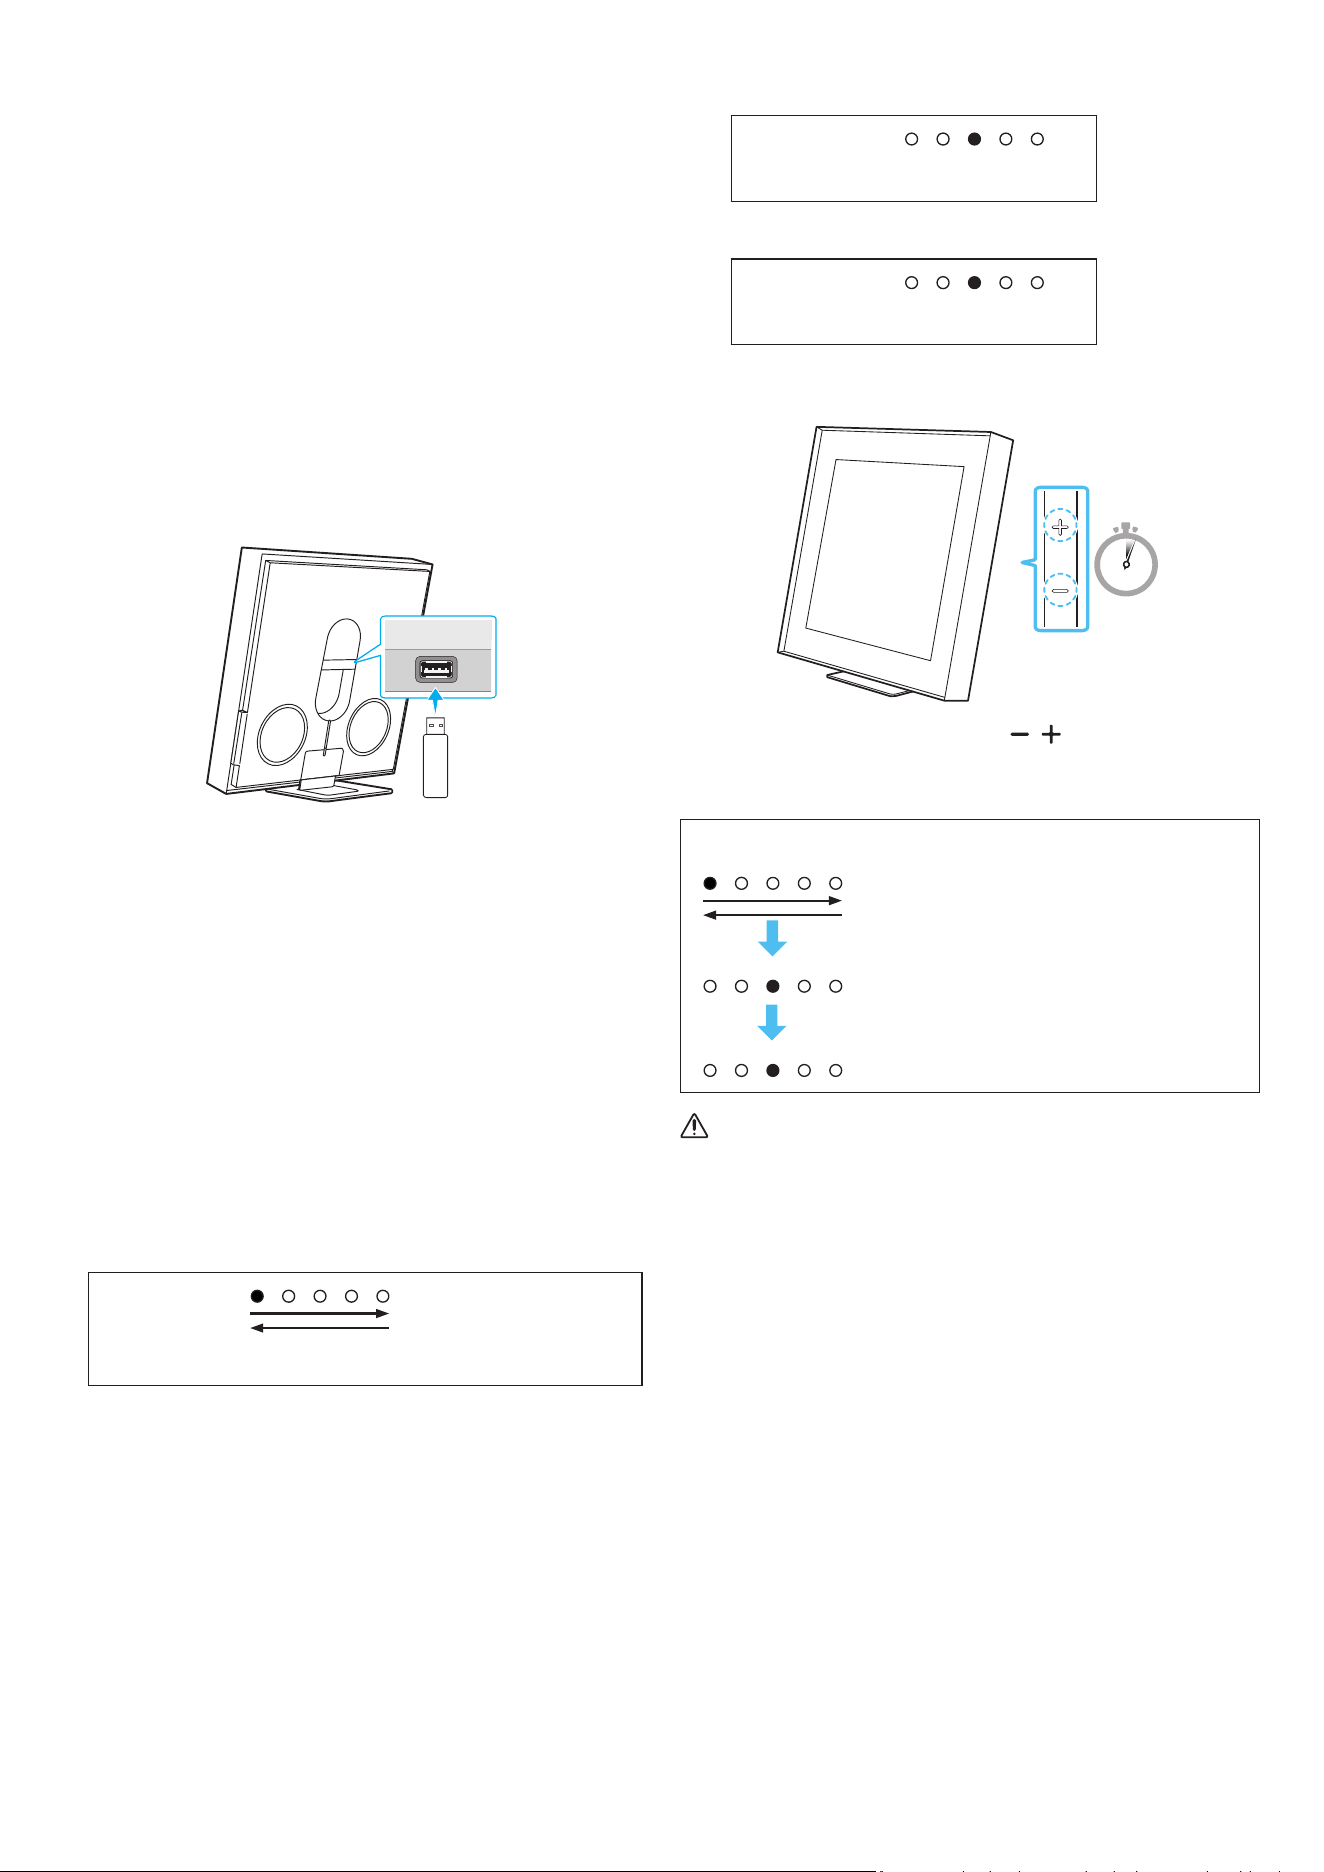
USB Update
SMARTTHINGS
DONGLE
Rear of the Wireless
Speaker
Samsung may offer updates for the Wireless Speaker’s system
rmware in the future.
When an update is available, you can update the Wireless Speaker by
connecting the USB drive that contains the update rmware to the
SMARTTHINGS DONGLE port of the Wireless Speaker.
1. Go to (www.samsung.com) → search for the model name from the
customer support menu option.
• For more information about update, refer to Upgrade Guide.
2. Download the upgrade le (USB type).
3. Unzip the le to create a folder with the le name.
4. Store the created folder in a USB and then connect it to the
Wireless Speaker.
5. Turn on the Wireless Speaker. Then the product is updated within
3 minutes.
LED indicator :
‒ White moves from left to right and right to left
• During update, do not turn it off or remove the USB.
• If the yellow LED is on after the software update is completed,
this means that an additional update is in progress. When this
happens, don’t turn off the power or remove the USB.
• If update does not proceed, reconnect the Wireless Speaker
power cord.
• When the latest version is installed, no update is performed.
• Depending on the USB type, update may not be supported.
• If there is no update le available, the indicator blinks red
3 times.
LED indicator :
‒ Red Blinks X3
• If the update le is in the same or lower version than the
existing, the indicator blinks cyan 3 times.
LED indicator :
‒ Cyan Blinks X3
Reset
5 Sec
With the Wireless Speaker on, press the (Volume) buttons on
the body at the same time for at least 5 seconds. The LED indicator
changes as shown below and then the Wireless Speaker is reset.
LED indicator
‒ White moves from left to right and
right to left
‒ Cyan Blinks X3
‒ Red Blinks X3
CAUTION
• All the settings of the Wireless Speaker are reset. Be sure to
perform this only when a reset is required.
Security updates information
Security updates are provided to strengthen the security of your
device and protect your personal information. For more information
on security updates, visit https://security.samsungtv.com.
• The website supports only some languages.
ENG - 20
11 TROUBLESHOOTING
Before seeking assistance, check the following.
Wireless Speaker does not turn on.
• Check whether the power cord of the Wireless Speaker is
correctly inserted into the outlet.
Wireless Speaker works erratically.
• After removing the power cord, insert it again.
• Power cycle the external device and try again.
• If there is no signal, the Wireless Speaker automatically turns off
after a certain period of time. Turn on the power.
The Wireless Speaker indicator turns solid red.
• The microphone is turned off.
Turn on the microphone. (See page 6.)
Sound is not output from the Wireless Speaker.
• The volume of the Wireless Speaker is too low or muted. Adjust
the volume.
• When any external device (STB, Bluetooth device, mobile device,
etc.) is connected, adjust the volume of the external device.
• For sound output of the TV, select Wireless Speaker. (Samsung
TV: Home (
) → Menu → Settings ( ) → All Settings ( ) →
Sound → Sound Output → Select Wireless Speaker)
• The cable connection to the Wireless Speaker may not be loose.
Remove the cable and connect again.
• Remove the power cord completely, reconnect, and turn the
power on.
• Reset the product and try again. (See page 19.)
I want to hear the audio signal from the Wireless Speaker alone.
• If you hear sounds from both the TV and Wireless Speaker, go to
the Settings menu for the TV audio and change the TV speaker to
External Speaker.
Wireless Speaker will not connect via Bluetooth.
• When connecting a new device, switch to “Bluetooth Pairing” for
connection. (Press the
(Mic On/Off) button on the body for at
least 5 seconds.)
• If the Wireless Speaker is connected to another device,
disconnect that device rst to switch the device.
• Reconnect it after removing the Bluetooth speaker list on the
device to connect. (Samsung TV: Home ( ) → Menu →
Settings ( ) → All Settings ( ) → Sound → Sound Output →
Bluetooth Speaker List)
• Remove and reconnect the power plug, then try again.
• Reset the product and try again. (For more information, refer to
“Reset”.)
Sound drops out when connected via Bluetooth.
• Some devices can cause radio interference if they are located too
close to the Wireless Speaker. e. g. microwaves, wireless routers,
etc.
• If your device that is connected via Bluetooth moves too far away
from the Wireless Speaker, it may cause the sound to drop out.
Move the device closer to the Wireless Speaker.
• If a part of your body is in contact with the Bluetooth transceiver
or the product is installed on metal furniture, the sound may drop
out. Check the installation environment and conditions for use.
Wireless Speaker will not connect to Wi-Fi.
• Check whether your wireless router is on.
• Turn off the router, turn it back on, and then try again.
• The Wireless Speaker will not connect if the wireless signal is too
weak. Try moving the router closer to the Wireless Speaker, or
eliminating any obstacles that are between the Wireless Speaker
and the router, if possible.
• If your wireless router is new, you will need to recongure the
speaker’s network settings.
• Wireless Speaker does not support Wi-Fi 6.
The Wireless Speaker does not turn on automatically with the TV.
• When you turn off the Wireless Speaker while watching TV, power
synchronization with the TV is disabled. First turn off the TV.
The AVA function is not available in the following cases.
• The AVA function will not be available using Q-symphony
function.
• The AVA function will not be available when the microphone is
turned off.
After connecting the TV to the Wireless Speaker, I switched the
Wireless Speaker mode. Then no sound is output from the TV.
• If you connect your Wireless Speaker to a mobile device while the
Wireless Speaker is connected to the TV, the Wireless Speaker
outputs sound from the mobile device while keeping the TV
connection. So the TV sound will not be delivered anywhere.
• Disconnect the mobile device, and the TV sound will be output
from the Wireless Speaker again.
Group Play is not enabled
• Check if the audio devices are newer models released year 2024
or later.
• Check if the host device is connected to a Wi-Fi network as
source.
• Make sure that all audio devices are connected to the same Wi-Fi
network (at 5 GHz).
ENG - 21
12 LICENSE
Dolby, Dolby Atmos, and the double-D symbol are registered
trademarks of Dolby Laboratories Licensing Corporation.
Manufactured under license from Dolby Laboratories. Condential
unpublished works. Copyright © 2012-2021 Dolby Laboratories. All
rights reserved.
• Apple and AirPlay are trademarks of Apple Inc., registered in the
U.S. and other countries and regions.
• Use of the Works with Apple AirPlay badge means that an
accessory has been designed to work specically with the
technology identied in the badge and has been certied by
thedeveloper to meet Apple performance standards.
• Use your phone, tablet or computer as a remote control for
Spotify. Go to spotify.com/connect to learn how
• The Spotify Software is subject to third party licenses found here:
https://www.spotify.com/connect/third-party-licenses.
Being Roon Tested means that Samsung and Roon have collaborated
to ensure you have the best experience using Roon software and
Samsung equipment together, so you can just enjoy the music.
Open Source License Notice
Open Source used in this product can be found on the following
webpage (
http://opensource.samsung.com).