Loading ...
Loading ...
Loading ...

13
Step 4
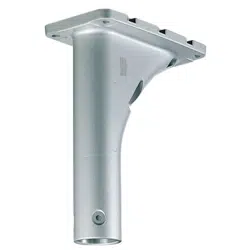
When attaching the camera to the housing base, the posi-
tioning pin shall be on the "REAR" side.
Make sure that the camera is securely attached to the
mount bracket by turning the camera counterclockwise
(seen from below).
Tighten them firmly with the 3 screws* that have been
removed in Step 1 of "[1] How to detach the housing base".
* Special screw (fixing screw): These screws are hexagon
screws. Use a hexagon wrench.
There are 2 types of wrenches to be used; one is hexago-
nal wrench "for M5" and the other is hexagonal wrench
"for M6". Refer to the Operating Instructions of the camera
for the wrench to be used, which depends on models.
(Recommended tightening torque (for common use in M5
and M6): 2.45 N·m {1.81 lbf·ft})
* The illustration above is provided for describing the top of
the camera, and therefore, this bracket is omitted.
Fixing screws (3 pcs.)
Housing base
Positioning
pin
Camera
Protection cover
Protection cover
Tape
Housing base
Step 5
Mount the front/rear sunshields
*
1
, and then remove the pro-
tection cover*
2
.
Refer to the Operating Instructions of the camera for further
information.
*1 The front/rear sunshield may not be provided with the
camera, depending on the model of the camera.
**2 Removal of the protection cover is described only for rain
wash coating model.
Front/rear sunshields
(When provided with the camera)
Loading ...
Loading ...
Loading ...