
MANUALE D’USO
IT
FORNO D’APPOGGIO COMBINATO A VAPORE
INSTRUCTION MANUAL
EN
COUNTERTOP COMBI STEAM OVEN
MANUEL D’UTILISATION
FR
FOUR À POSER COMBINÉ À VAPEUR
BEDIENUNGSHANDBUCH
DE
KOMBI-STANDBACKOFEN MIT DAMPFGARER
GEBRUIKSAANWIJZING
NL
GECOMBINEERDE STOOMOVEN
MANUAL DE USO
ES
HORNO DE SOBREMESA COMBINADO A VAPOR
MANUAL DE UTILIZAÇÃO
PT
FORNO DE APOIO COMBINADO A VAPOR
Informazioni importanti per l’utente
Important information for the user
Informations importantes pour l’utilisateur
Wichtige Informationen für den Benutzer
Belangrijke informatie voor de gebruiker
Información importante para el usuario
Informações importantes para o utilizador
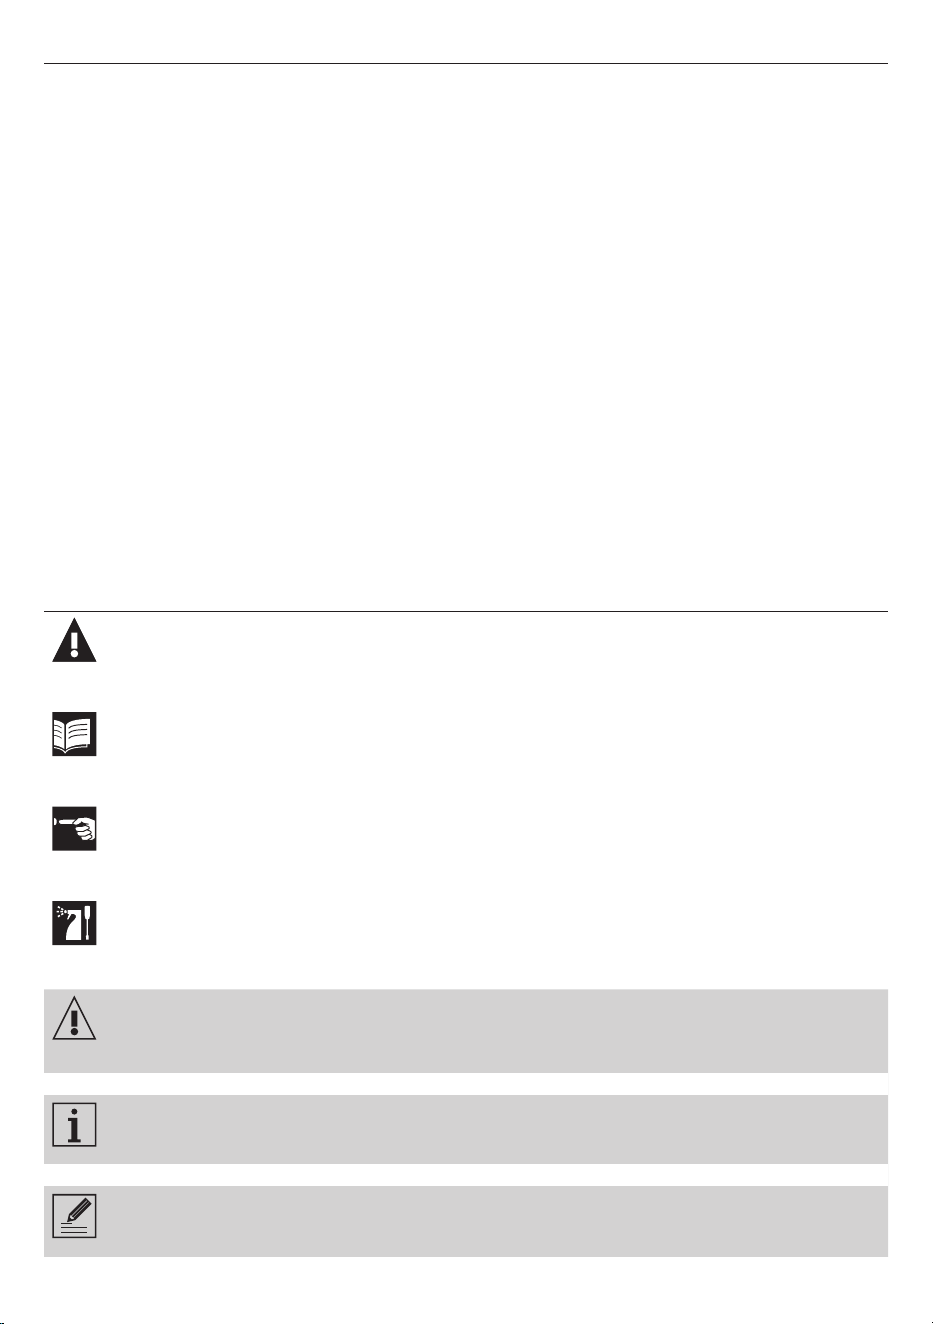
Avvertenze / Recommendations / Avertissements / Hinweise /
Waarschuwingen / Advertencias / Advertências
Descrizione / Description / Description / Beschreibung / Beschrijving /
Descripción / Descrição
Uso / Use / Utilisation / Gebrauch / Gebruik / Uso / Utilização
Pulizia e manutenzione / Cleaning and care / Nettoyage et entretien /
Reinigung und Wartung / Reiniging en onderhoud / Limpieza y mantenimiento /
Limpeza e manutenção
Avvertenza di sicurezza / Safety instructions / Consignes de sécurité /
Sicherheitshinweise / Veiligheidswaarschuwingen / Advertencia de seguridad /
Advertências de segurança
Informazione / Information / Information / Information / Informatie /
Información / Informação
Suggerimento / Advice / Conseil / Empfehlungen / Aanbeveling / Sugerencia /
Sugestões

Gentile Cliente,La ringraziamo vivamente per il Suo acquisto. I nostri prodotti sono unici perché uniscono una spiccata
ricerca estetica alla progettazione tecnica innovativa. Essi sono coordinati con altri prodotti in gamma e possono costituire
elementi d’arredo e di design. Augurandole di apprezzare appieno le funzionalità del Suo elettrodomestico, Le porgiamo
i nostri più cordiali saluti.
Dear Customer, Thank you for purchasing one of our appliances. Our products are unique because they combine iconic
style with innovative technical solutions. They match perfectly with other products in our range and work equally well as a
standalone design objects in your kitchen. We hope you enjoy using your new appliance! Best regards.
Cher client, merci beaucoup pour votre achat. Nos produits sont uniques car ils combinent une forte recherche esthétique
avec une conception technique innovante. Ils sont coordonnés avec d’autres produits de la gamme et peuvent constituer
des éléments d’ameublement et de design. En espérant que vous pourrez apprécier pleinement votre nouvel appareil
électroménager, nous vous adressons nos meilleures salutations.
Sehr geehrter Kunde, wir danken Ihnen herzlichst für den Kauf. Unsere Produkte sind einzigartig, da sich in ihnen eine
gewissenhafte Designforschung und eine innovative technische Planung vereinen. Sie sind mit anderen Produkten des
Sortiments kombinierbar und stellen ausgefallene Einrichtungs- und Designgegenstände dar. Wir hoffen, dass Sie Ihr neues
Haushaltsgerät voll und ganz schätzen werden und verbleiben mit freundlichen Grüßen.
Beste klant, hartelijk dank voor uw aankoop. Onze producten zijn uniek omdat ze esthetiek combineren met innovatief
technisch ontwerp. De producten zijn uitstekend te combineren andere producten van het assortiment en kunnen worden
gebruikt als meubel- en designelementen. We hopen dat u volop van uw nieuwe huishoudelijke apparaat zult genieten.
Met vriendelijke groet
Estimado cliente, le damos las gracias por su compra. Nuestros productos son únicos porque combinan una notable
búsqueda estética con un diseño técnico innovador. Se combinan con otros productos de la gama y se pueden utilizar
como elementos de decoración y diseño. Le deseamos que pueda apreciar plenamente su nuevo electrodoméstico. Le
enviamos nuestros saludos más cordiales.
Prezado cliente, Muito obrigado pela sua compra. Os nossos produtos são únicos porque combinam uma forte busca
estética com um desenho técnico inovador. São coordenados com outros produtos da linha e podem constituir elementos
de decoração e design. Esperando que possa desfrutar totalmente das funcionalidades do seu eletrodoméstico, enviamos-
lhe os nossos melhores cumprimentos.
SMEG S.p.A.
Model: COF01
12
5
8
6
7
13
14
1
9
2
10
3 4 15 1626 17 18 19 25
27
11
1
6
2
4
5
3
8
9
10
7
12
13
11
14
A
B
C
2023 21
28
24 22
B
C
15
Model: COF01
D
E

29
EN
Instructions
1 Instructions
This user manual is an integral part of the
appliance and must therefore be kept in its
entirety and within the user’s reach for the
whole working life of the appliance.
1.1 Intended use
Failure to comply with the safety instructions
and failure to read the instructions for the
countertop combi oven may lead to the
appliance being used incorrectly and
cause personal injury.
• Do not use the appliance for purposes
other than those for which it was designed.
Improper use could cause injury.
• The appliance is not designed to operate
with external timers or with remote-control
systems.
• Use the appliance indoors, protected
from weather conditions.
• This appliance is intended for cooking
food in domestic and similar environments,
such as:
- staff kitchen areas in shops, offices and
other working environments
- by guests in hotels, motels and other
residential accommodations
- bed and breakfast facilities / farm
accommodation
- any other use, for example in
restaurants, bars and coffee shops is
considered improper.
1.2 General safety instructions
Follow all safety instructions in order to use
the appliance safely:
• When in use, the appliance and its
accessible parts become very hot. Small
children should be kept away from the
appliance. Never touch the heating
elements during use.
• Protect your hands by wearing oven
gloves when moving food inside the
oven.
• Never try to put out a fire or flames with
water: Turn off the appliance and smother
the flames with a fire blanket or other
appropriate cover.
• This appliance may be used by children
aged at least 8 and by people of reduced
physical, sensory or mental capacity,
or lacking in experience in the use of
electrical appliances, provided that they
are supervised or instructed by adults
who are responsible for their safety.
• Children must not play with the appliance.
• Keep children under the age of 8 away
from the appliance and power cable
unless they are constantly supervised.

30
Instructions
• Keep children under the age of 8 away
from the appliance when it is in use.
• Cleaning and maintenance must not be
carried out by unsupervised children.
• The cooking process must always be
monitored. A short cooking process must
be continuously monitored.
• Never leave the appliance unattended
during cooking operations where fats or
oils could be released, as these could
then heat up and catch fire.
• Be very careful.
• Do not pour water directly onto very hot
trays.
• Keep the oven door closed during
cooking.
• If you need to move food or at the end of
cooking, open the door 5 cm for a few
seconds, let the steam come out, then
open it fully.
• The appliance and its parts become very
hot during use. Never touch the heating
elements during use.
• After use, allow the appliance to cool
down. Do not touch the surfaces inside
the oven or the heating elements, as they
could be very hot. Danger of burns or
scalds!
• Do not insert pointed metal objects
(cutlery or utensils) into the slots in the
appliance.
• Switch off the appliance immediately
after use.
• Do not use or store flammable materials
near the appliance.
• Do not use aerosols in the vicinity of this
appliance whilst it is in use.
• Do not modify this appliance.
• Installation and servicing should be
carried out by qualified personnel in
accordance with current standards.
• Do not try to repair the appliance yourself
or without the assistance of a qualified
technician.
• Do not pull the cable to unplug the
appliance.

31
EN
Instructions
1.3 Caution when using this
appliance
• Do not use abrasive or corrosive
detergents (e.g. powder products, stain
removers and metallic sponges), rough
materials or sharp metal scrapers on glass
parts as they may scratch the surface and
cause the glass to shatter. Use wooden
or plastic utensils.
• Do not sit on the appliance.
• Do not use cleaning products containing
chlorine, ammonia or bleach on parts
made of steel or that have metallic
surface finishes (e.g. anodizing, nickel- or
chromium-plating).
• Racks and trays should be inserted as far
as they will go into the side guides.
• Do not use steam jets to clean the
appliance.
• Do not spray any spray products near the
appliance.
• Do not obstruct ventilation openings and
heat dispersal slots.
• Fire hazard: never leave objects in the
oven cavity.
• Do not use the appliance to heat rooms
for any reason.
• Do not use plastic cookware or containers
when cooking food.
• Do not put sealed tins or containers in the
oven.
• Remove all trays and racks which are not
required during cooking.
• Do not cover the bottom of the oven
cavity with aluminium or tin foil sheets.
• Do not place pans or trays directly on the
bottom of the oven cavity.
• If you wish to use greaseproof paper,
place it so that it will not interfere with the
hot air circulation inside the oven.
• Do not use the open door to rest pans or
trays on the internal glass pane.
• Never use the oven door to lever the
appliance into place when fitting.
• Avoid exerting too much pressure on the
oven door when open.
• Do not use the handle to lift or move the
appliance.
• Do not rest any weight or sit on the open
door of the appliance.
• Take care that no objects are stuck in the
doors.
• Do not install / use the appliance
outdoors.
• When cooking with steam functions, be
careful not to overfill the tray (800 ml).
• Install / use the appliance on a flat,
stable surface.
• In the case of vertical combustible walls,
install / use the appliance at a minimum
distance of 8 cm.
• This appliance must not be installed in
boats or caravans.
32
Instructions
1.4 Connecting the appliance
Make sure that the voltage and frequency
of the power supply correspond to those
indicated on the data plate on the bottom
of the appliance.
If the plug of the appliance is not compatible
with the socket, contact our Technical
Assistance service for a replacement.
Make sure the power cable
connector is fully inserted into the
connector on the product.
• Children must not play with this appliance.
• Keep the appliance and its power cable
out of the reach of children.
• Always unplug the appliance from the
power socket if it is to be left unattended
and before assembly, disassembly or
cleaning.
• Switch off the appliance and disconnect
it from the power supply before changing
the accessories or approaching moving
parts when in use.
• The appliance must not be installed on a
pedestal.
• Do not immerse the appliance, the power
cord or the plug in water or any other
liquid.
• Avoid spilling liquids onto the power plug
and base.
• If the power cable becomes damaged,
contact technical support immediately to
arrange for it to be replaced in order to
avoid possible hazards.
• Always use any necessary/required
personal protective equipment (PPE)
before performing any work on the
appliance (installation, maintenance,
positioning or movement).
• Before performing any work on the
appliance, switch off the power supply.
• Allow the appliance to be disconnected
after installation, via an accessible plug.
• Before replacing the oven light bulb,
make sure that the appliance has been
switched off and disconnected from the
mains power supply or that the mains
power supply has been switched off in
order to avoid electric shocks.
• The bulbs used in this appliance are
specific for household appliances; do
not use them for home lighting.
• This appliance can be used up to a
maximum altitude of 4,000 metres above
sea level.
33
EN
Instructions
1.5 Manufacturer liability
The manufacturer declines any liability for
damage to persons or property caused by:
• Use of the appliance other than the one
envisaged
• Not having read the user manual
• Tampering with any part of the appliance
• Use of non-original spare parts
• Failure to comply with the safety
instructions
Please store these instructions
carefully. If the appliance is
transferred to others, they should
also be given this instructions
booklet.
These instructions can be downloaded from
the Smeg website “www.smeg.com”.
1.6 Disposal
Electrical appliances must not be disposed
of together with household waste.
Devices marked with this symbol
are subject to European Directive
2012/19/EU requirements.
• All waste electrical and electronic
appliances must be disposed of
separately from household waste and
taken to authorised waste disposal
facilities. Disposing of the used appliance
correctly will help to safeguard the
environment and human health. For
further information regarding the disposal
of used appliances, please contact your
local authority waste disposal department
or the shop where the appliance was
purchased.
1.7 To save energy
• Unless otherwise indicated on the
package, defrost frozen foods before
placing them in the oven.
• When cooking several types of food it
is recommended to cook the foods one
after the other to make the best use of the
already hot oven.
• Use dark metal moulds: they help to
absorb the heat better.
• Remove all trays and racks which are not
required during cooking.
• Stop cooking a few minutes before the
time normally used. Cooking will continue
for the remaining minutes with the heat
which has accumulated inside the oven.
• Reduce any opening of the door to a
minimum to avoid heat dispersal.
• Keep the inside of the oven clean at all
times.
1.8 Light sources
• This appliance contains user replaceable
light sources.
• The light sources contained in the
product are suitable for use in ambient
temperatures of ≥300°C and intended
for use in high temperature applications
such as ovens.
• This appliance contains efficiency class
“G” light sources.

34
Description
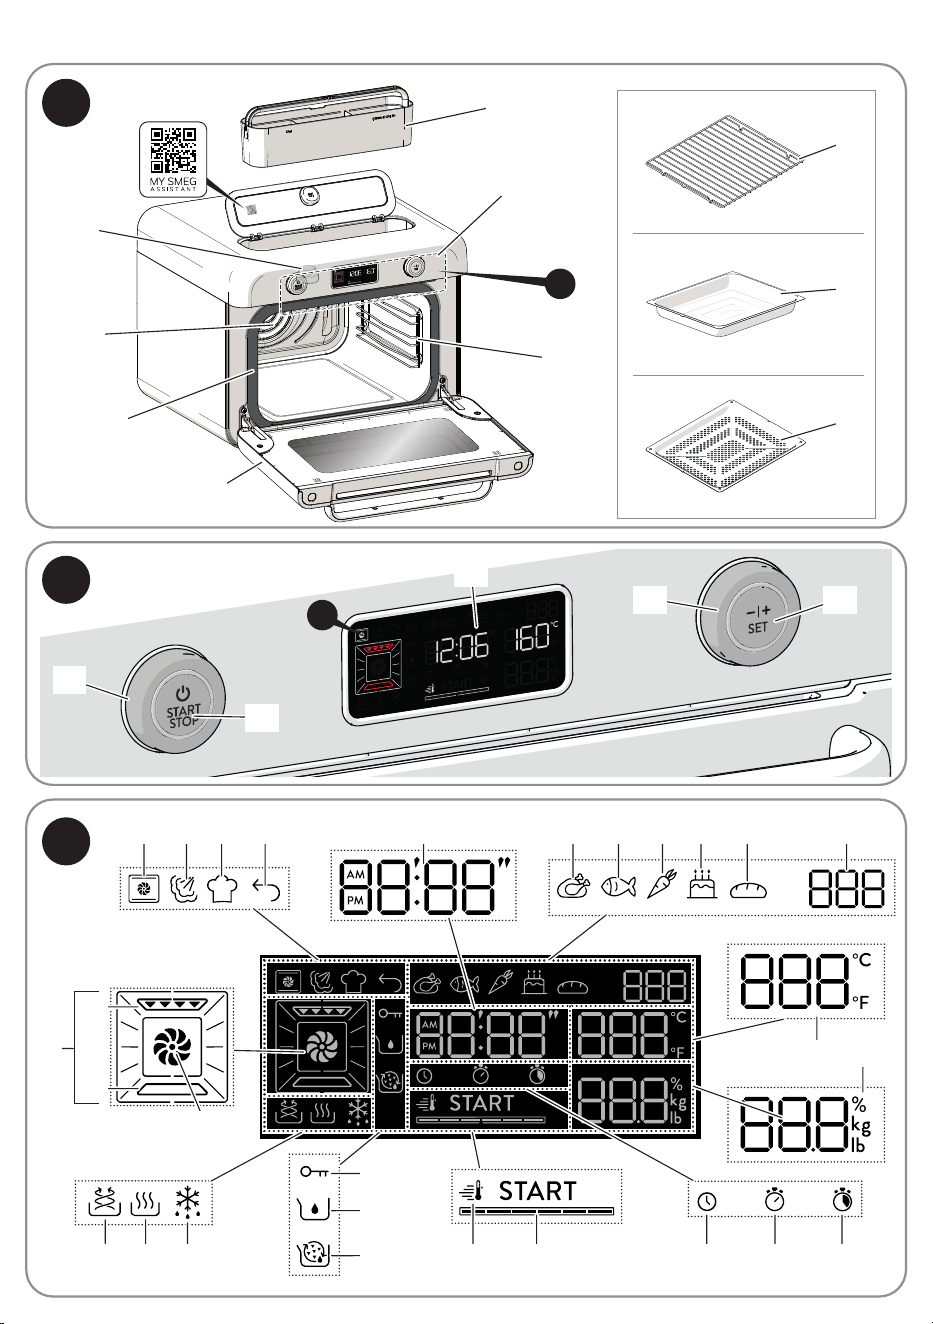
2 Appliance description
(Fig. A)
1) Control panel and display
2) Seal
3) Oven light
4) Door
5) Fan
6) Positioning guides
7) Removable water reservoir
8) Rack
9) Enamelled tray
10) Perforated tray
2.1 Before first use
Danger of burns
High temperature inside the oven
during use.
• Do not remove the earth prong.
• Do not use an adapter.
• Do not use an extension cord.
• Failure to follow these
instructions could result in death,
fire, or electrical shock.
• Remove any protective film from the
outside or inside of the appliance,
including accessories.
• Remove any labels (apart from the
technical data plate) from the accessories
and shelves.
• Remove and wash all the appliance
accessories (see chapter “4 Cleaning
and maintenance”).
• The current time must be set in order to
start using the appliance (see “3.2 Using
the oven (Fig. B - Fig. C)”).
Before use, make sure that all the
components are intact.
2.2 Description of the parts (Fig. A)
Water reservoir (7)
Removable water reservoir for steam
cooking.
Light (3)
The appliance’s interior lighting comes on:
• When the door is opened.
• during cooking.
Internal fan (5)
The fan cools the appliance and comes into
operation during cooking.
The fan causes a steady outflow of air from
above the door which may continue for
a short time even after the appliance has
been switched off.
Positioning guides (6)
The appliance has 3 shelves on which to
position trays and racks at different heights.
The positions are indicated from the bottom
upwards.

35
EN
Description
2.3 Description of accessories
(Fig. A)
Rack (8)
Used as a support surface for oven proof
containers, moulds or casserole dishes.
Enamelled tray (9)
Tray recommended for traditional cooking
of cakes, pizza and baked desserts.
Also useful for collecting fat from foods
placed directly on the rack.
Perforated tray (10)
Perforated tray recommended for steam
only or combination steam cooking e.g. for
fish and vegetables.
Can also be used as an accessory for air-
frying already breaded, pre-cooked and/
or frozen foods (chips, potato or meat
croquettes, bite-size mozzarella etc.).
The accessories intended to
come into contact with food are
made of materials that comply
with the provisions of current
legislation.
Cooking containers
• You may also use your own containers
for cooking, as long as they are resistant
to high temperatures.
• For steam cooking, the use of metal
containers is recommended. Metal
facilitates better distribution of heat to the
foods.
• It is normal for metal containers to deform
somewhat during high-temperature
cooking, but they will return to their
original shape when they cool down.
• Thick ceramic plates may require more
heat than normal. Longer cooking times
may be necessary.
36
Description
2.4 Description of the controls
(Fig. B)
Menu navigation knob (11)
Allows you to navigate through the various
menus and submenus on the user interface.
The relative LED has a steady light when
you are using the knob.
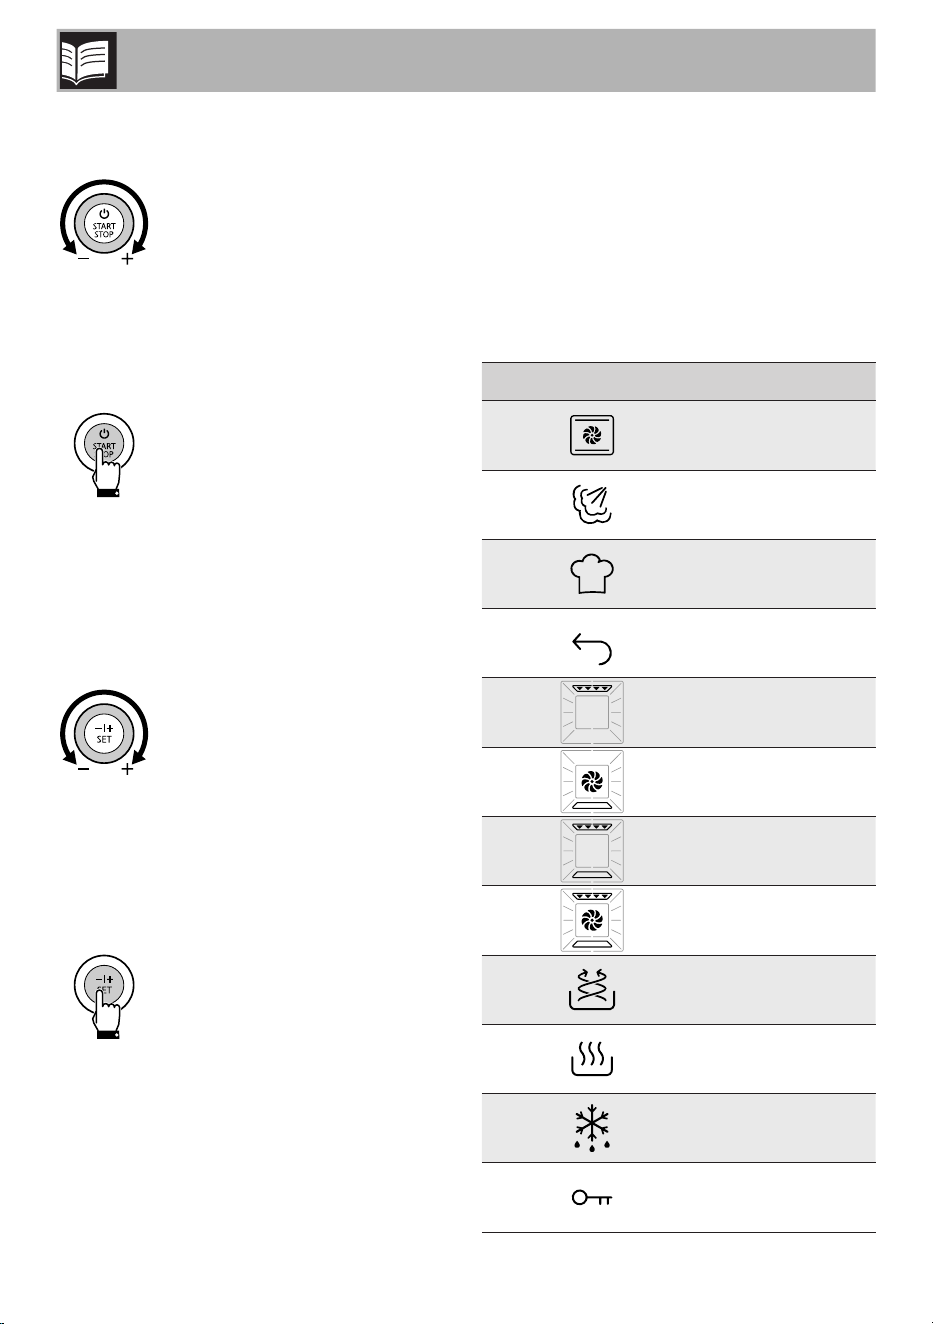
START/ STOP button (12)
Allows you to confirm the menu and/or the
required function (short press) and to start
or stop cooking (long press). The relative
LED has a steady light when cooking has
started and switches off when the cooking
cycle has ended.
Parameter navigation knob
(13)
Allows you to navigate through the various
cooking settings that are shown on the
display.
The relative LED lights up during
configuration.
SET button (14)
Confirms the value that has been set. It
displays the settings menu if pressed for at
least 3 seconds when the oven is in clock
mode. The relative LED lights up when
cooking has started and switches off when
it has ended.
Display (15)
The display shows the functions, parameters
and the values of the cooking settings.
2.5 Description of the display
(Fig. C)
Display icons
Icon Meaning
1
Traditional Cooking
menu
2 Steam Cooking menu
3 Chef Menu
4 Back
5 Grill
6
Bottom fan-assisted
cooking
7 Static cooking
8 Fan-assisted cooking
9 Air-Fry
10 Warm
11 Defrost
12 Child lock
37
EN
Description / Use
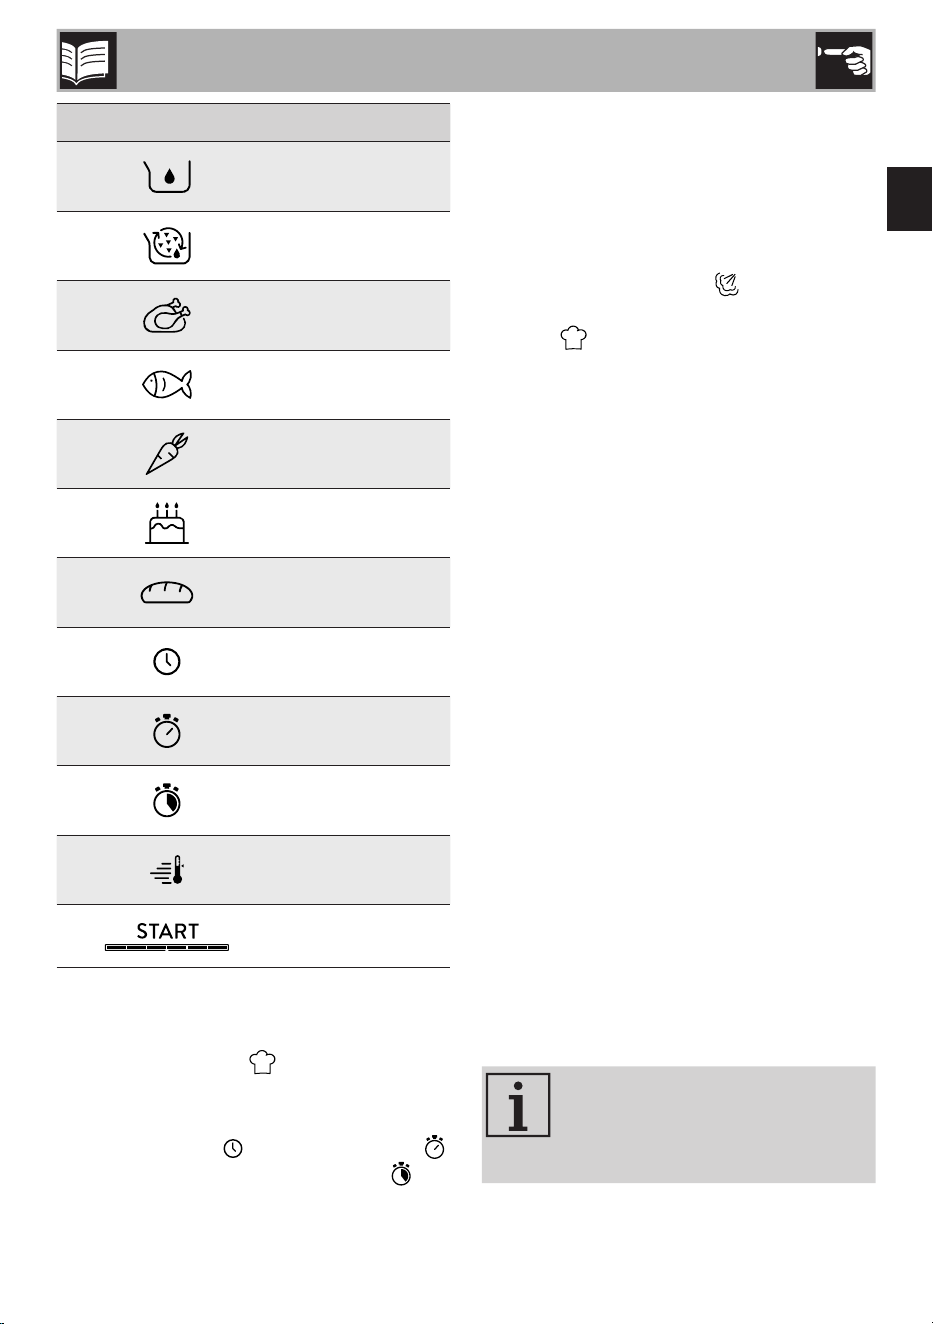
Icon Meaning
13
Water reservoir empty
alarm
14 Descaling alarm
15 Meat and poultry
16 Fish and shellfish
17
Vegetables and side
dishes
18 Cakes and sweets
19
Bread, pizza and
pies/flans
20 Clock
21 Cooking timer
22
Programmed cooking
timer
23 Pre-heating
24 Start + progress bar
Recipe number (25)
Displays the number of the recipe selected
from the Chef Menu .
Clock and Timer (26)
Displays the time , the cooking time
and the programmed cooking timer .
Temperature (27)
Displays the cooking temperature (in °C or
°F).
Steam/weight percentage indicator (28)
Displays the percentage (%) of steam
used for steam cooking or the weight
(in kg or lb) of the food in the Chef Menu
function .
3 Use
3.1 First use
• Set a cooking time of at least one hour
(see “3.2 Using the oven (Fig. B - Fig.
C)”).
• Heat the empty oven to the maximum
temperature to burn off any residues left
by the manufacturing process.
• Ventilate the room and leave the room
while the appliance is heating up.
• When the appliance is used for the
first time, when heating, it may give off
unpleasant smells due to manufacturing
residues remaining on some components.
These smells usually disappear after the
appliance has been heated for the first
time.
Using the accessories
Rack and trays have to be inserted into the
side guides until they come to a complete
stop.
Clean the trays before using them
for the first time to remove any
residues left by the manufacturing
process.

38
Use
3.2 Using the oven (Fig. B - Fig. C)
Setting the time
When connecting the appliance for the first
time or after a power failure, the flashing
time
12:00
and the clock symbol
appear on the display. The current time has
to be set in order to start a cooking function:
1) Turn the right knob to set the hour to the
required value.
2) Confirm using the SET button.
3) Repeat the procedure to set the minutes
and confirm the selected time.
To set the current time and/or the
display format (12h/24h) see
“3.3 Settings Menu”.
Selecting the menu and cooking functions
The required menu and, consequently, the
cooking function have to be selected in
order to start using the oven.
Traditional Cooking menu
Steam Cooking menu
Chef Menu
Go back to the previous menu
or level
To select the required menu and function:
1) Turn the left knob until you reach the
required menu.
2) Confirm using the START/STOP button.
3) Turn the left knob to navigate through
the functions available in the selected
menu.
4) If you do not wish to modify the cooking
settings, start cooking using the START/
STOP button.
5) If you wish to change the selected
function once cooking has already
started: turn the left knob to navigate
through the functions available and
confirm using the START/STOP button.
39
EN
Use
Menu Function Description
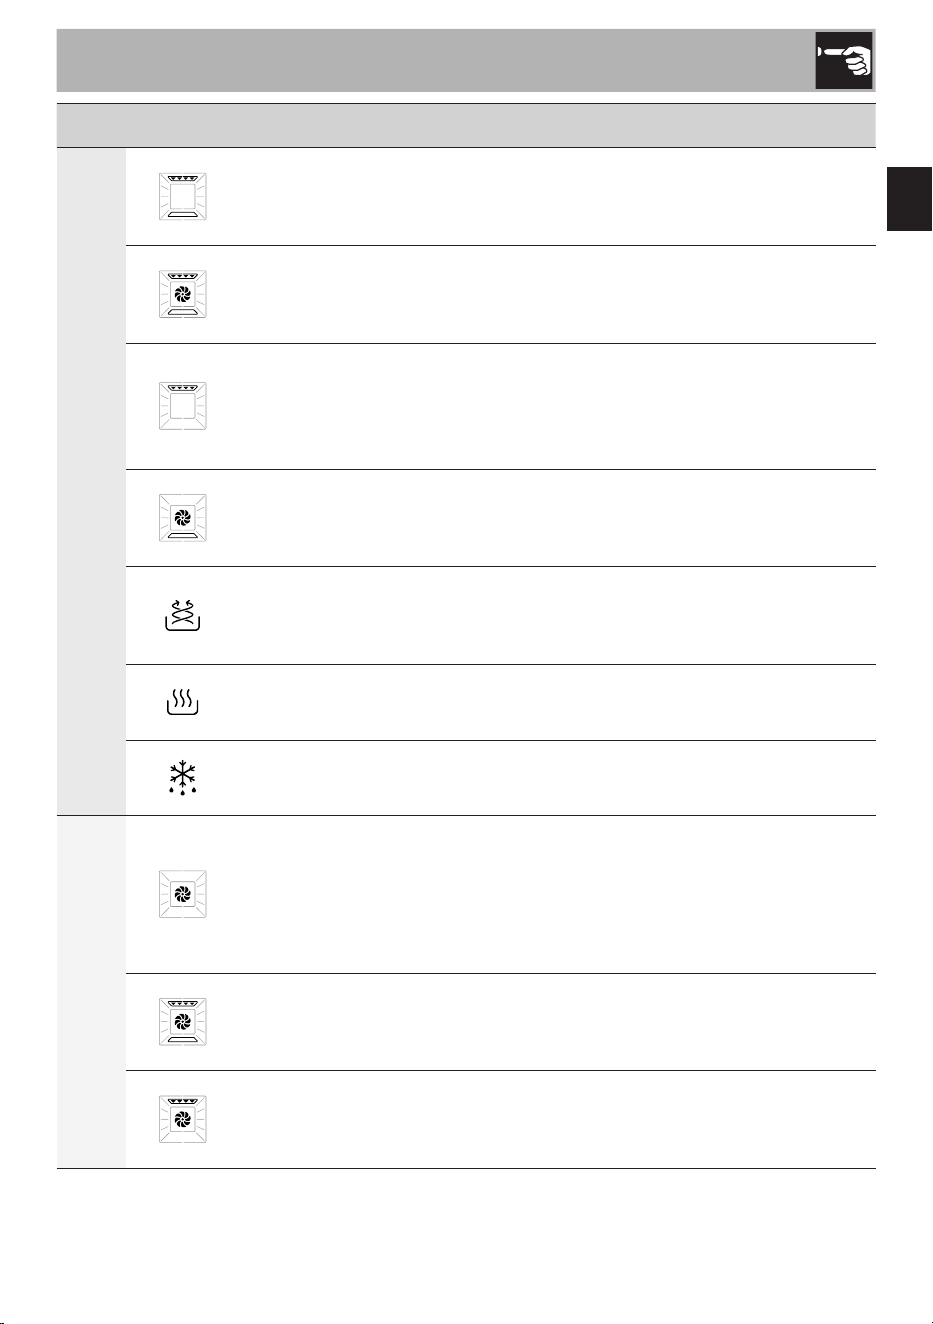
TRADITIONAL COOKING
Static
Traditional cooking, ideal for preparing a single dish. For example
cooking roast meats, fatty meats, bread, pies.
Fan-assisted
Intense and uniform cooking. Ideal for biscuits, cakes and cooking on
more than one level.
Grill
Produces excellent grilling and gratinating results. When used at the
end of cooking, gives a uniform browning to dishes.
Bottom fan-assisted
The heat comes from the bottom of the cavity. Perfect for cakes, pies,
tarts and pizzas.
Air-Fry
Useful for frying without oil or with a small amount of oil.
We recommend using the special perforated tray.
Warm
Useful for reheating or keeping food warm.
Defrost
Useful for defrosting frozen foods.
STEAM COOKING
Pure steam cooking
Pure steam cooking (100%) ideal for fish, vegetables, chicken,
rice, potatoes and desserts. At low temperatures, it can be used to
help dough to rise more quickly. We recommend using the special
perforated tray.
Fan + steam
Combination fan-assisted and steam cooking (steam level adjustable
from 20-70%).
Fan grill + steam
Combination fan-assisted grill and steam cooking (steam level
adjustable from 20-70%).
After selecting the cooking function, it will be possible to set the temperature, cooking
duration and programmed cooking values, if you wish to do so (see the following pages).
40
Use
Various recipes can be selected for each
food category in the Chef menu.
The recipes have been designed
by Smeg chefs to prepare the
most popular dishes in less time.
By selecting the type and weight
of the dish, the appliance selects
the most suitable function, time
and temperature.
Small variations in time
are possible according to
the ingredients or cooking
accessories used, as well as the
degree of browning required.
We recommend that you always
check the food at the end of the
preset cooking time.
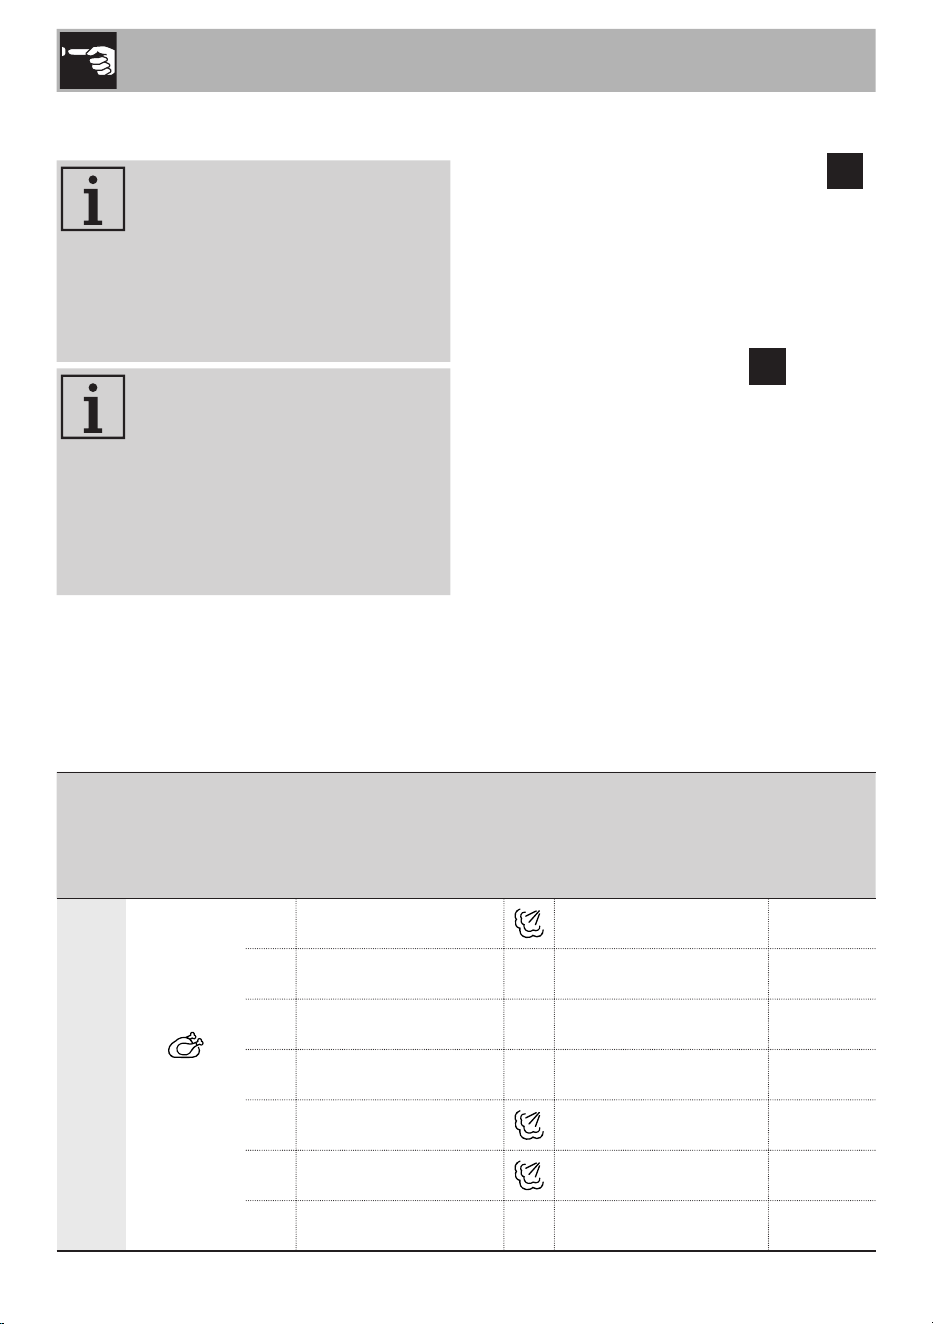
Menu Category Recipes Accessory
Shelf
indicated
from the
bottom
upwards
CHEF
Meat and
poultry
P01
Pork spare ribs Enamelled tray 1
P02 Pork sausages Perforated tray 2
P03 Roast pork
Enamelled tray 1
P04 Roast beef Enamelled tray 1
P05 Duck stew, in pieces Enamelled tray 1
P06
Whole roast chicken
Enamelled tray 1
P07 Chicken nuggets Perforated tray 1
1) Select the menu and the food category.
2) Turn the right knob to set the required
recipe. The recipe indicator
P
flashes.
3) If you do not wish to modify the cooking
settings, start cooking using the START/
STOP button.
4) If you wish to change the recipe once
cooking has already started:
• Press the SET button. The
P
indicator
flashes.
• Turn the right knob to select a new
recipe.
• Confirm using the START/STOP
button or wait 5 seconds for automatic
confirmation.
41
EN
Use
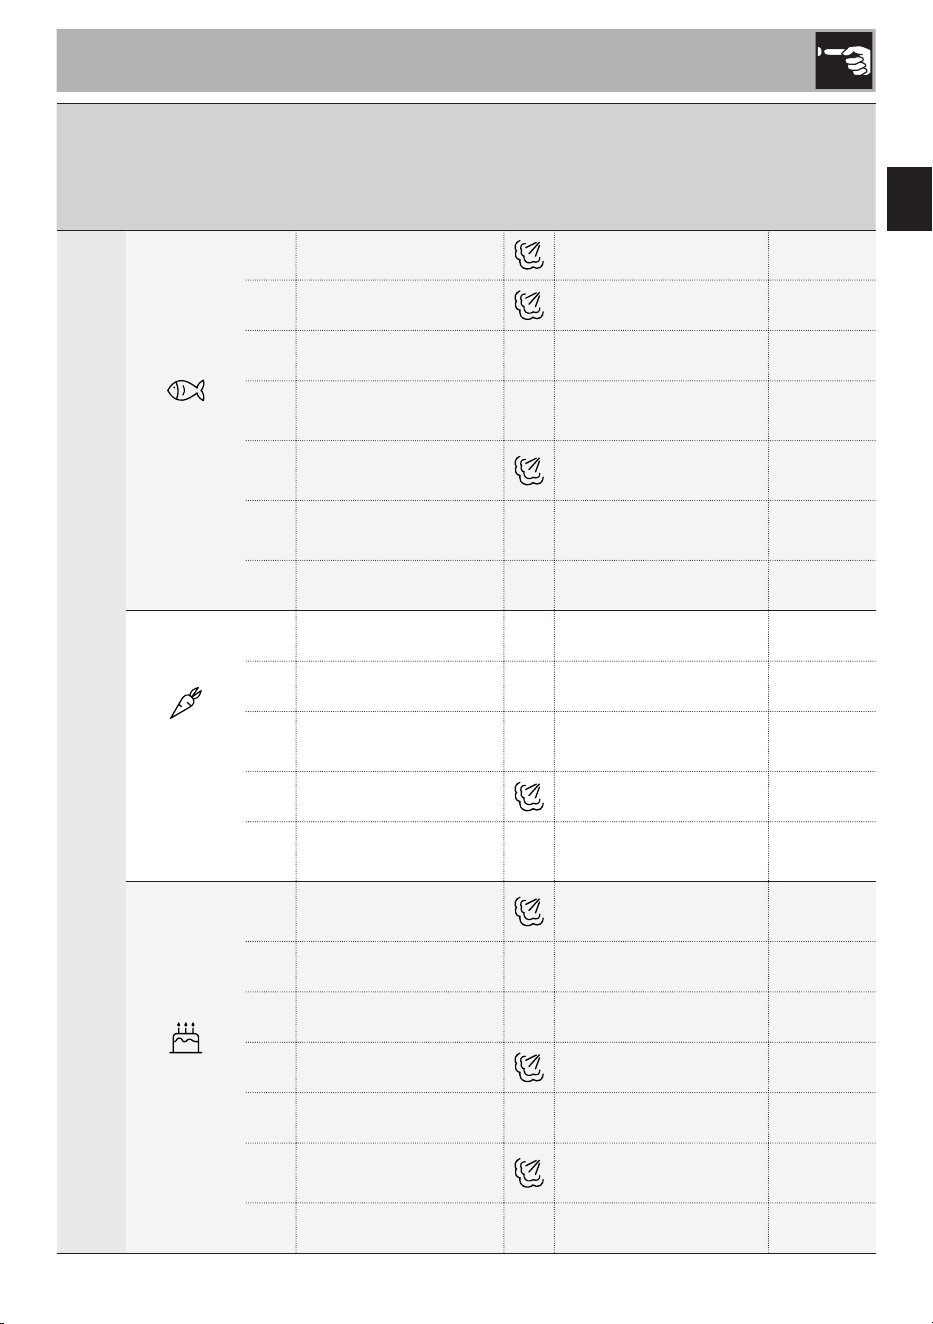
Menu
Category
Recipes Accessory
Shelf
indicated
from the
bottom
upwards
CHEF
Fish and
shellfish
P08 Salmon fillet/steak Perforated tray 2
P09 Whole fish Enamelled tray 1
P10 Cod au gratin Perforated tray 1
P11
Sea bream /
sea bass en papillote
Enamelled tray
1
P12
Calamari/squid/
cuttlefish
Perforated tray 2
P13
Scallops/
mussels au gratin
Perforated tray 2
P14 Breaded prawns Perforated tray 2
Vegetables
and side
dishes
P15 Roast potatoes Enamelled tray 1
P16 Vegetables au gratin Enamelled tray 1
P17
Mixed roasted
vegetables
Perforated tray 1
P18 Stuffed vegetables Enamelled tray 1
P19
Chips/potato
croquettes, frozen
Perforated tray 2
Cakes and
sweets
P20
Chocolate fondant
Moulds on
perforated tray
1
P21 Apple pie Cake tin on rack 1
P22 Tart Cake tin on rack 1
P23 Sponge cake Cake tin on rack 1
P24 Cheesecake Cake tin on rack 1
P25 Muffin/cupcakes
Moulds on
perforated tray
1
P26 Biscuits Enamelled tray 1
42
Use
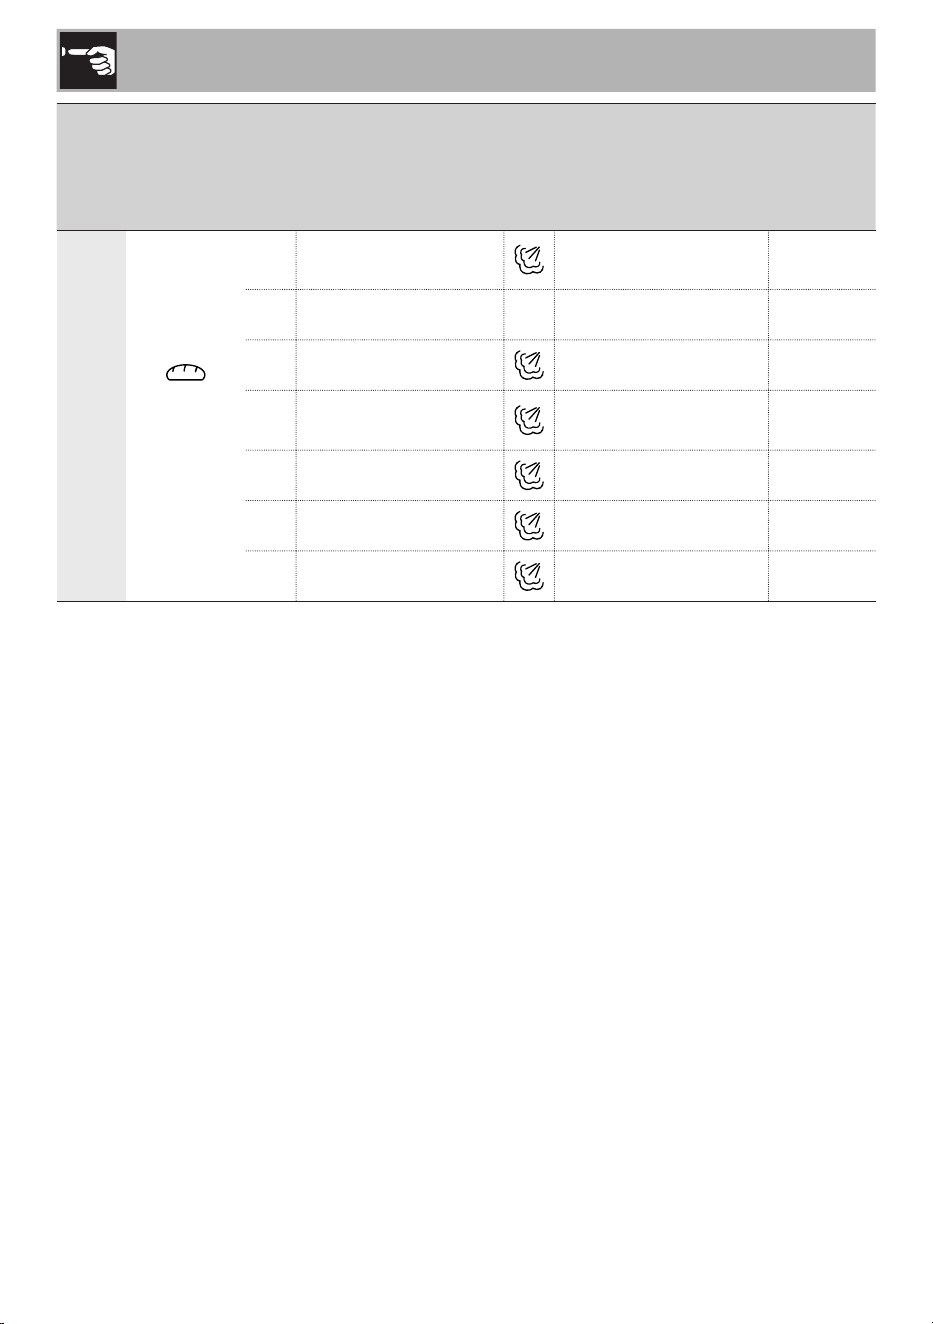
Menu
Category
Recipes Accessory
Shelf
indicated
from the
bottom
upwards
CHEF
Bread,
pizza and
pies/flans
P27
Dough proving
Bowl on the bottom of
the oven
1
P28 Pan baked pizza Enamelled tray 1
P29 Lasagne/pasta bake Enamelled tray 1
P30
Potato gnocchi/
pot stickers
Perforated tray 2
P31
Leavened bread Enamelled tray 1
P32 Focaccia Enamelled tray 1
P33 Vegetable tart Cake tin on rack 1
Once the recipe has been selected, it will
be possible to modify the weight that has
been set (see “Modifying the weight”) and
select a programmed start time (see “Setting
a programmed cooking cycle”) if you wish
to do so. The cooking duration is calculated
automatically according to the weight that
has been selected, but you can change it
if you want to (see “Setting a programmed
cooking cycle”).
43
EN
Use
Modifying the cooking temperature
Setting not available in the Chef
Menu
Before starting the function:
1) Select the menu and the required
function.
2) Turn the right knob to increase to
decrease the temperature (the degrees
indicator flashes).
3) Press the START/STOP button to start
the function.
During cooking:
1) Press the SET button.
2) Turn the right knob to increase to
decrease the temperature (the degrees
indicator flashes).
3) Confirm using the START/STOP button
or wait 5 seconds for cooking to restart
automatically with the new values that
have been set (the degree indicator
stops flashing).
Setting the cooking duration
Setting not available in the Chef
Menu
1) Press the SET button until the timer icon
flashes.
2) Turn the right knob to set the cooking
duration.
3) Confirm using the START/STOP button.
If the cooking duration is changed
while a function is in progress, follow
the instructions above to set the new
values and wait 5 seconds for cooking
to resume automatically with the new
settings.
The remaining cooking time is indicated by
the progressive emptying of the progress
bar.
44
Use
Setting a programmed cooking cycle
Programmed cooking allows the cooking to
be stopped at a time set by the user. The
appliance programs the start of cooking
time automatically, according to the
duration set by the user and the selected
cooking end time.
The time required for pre-heating
is already included in the end-of-
cooking time.
1) Press the SET button until the flashing
programmed cooking icon is
displayed.
2) Turn the right knob to set the cooking
end time.
3) Confirm using the START/STOP button.
The appliance waits for the set start
time.
• It is not possible to set the
cooking end time without
having set the cooking
duration.
• It is not possible to set a
programmed cooking cycle if
cooking has already started.
To cancel a programmed cooking cycle:
1) Press the SET button until the flashing
programmed cooking icon is
displayed.
2) Turn the right knob anticlockwise until
you reach the current time and reset
programmed cooking.
3) Confirm using the START/STOP button.
Changing the level of steam
Setting available only in the
Steam Cooking menu
In the combination cooking functions (fan-
assisted and grill) the steam level can
be adjusted from a minimum of 20% to a
maximum of 70%:
1) Press the SET button until the % indicator
appears and flashes.
2) Turn the right knob to increase or
decrease the steam level required.
3) Confirm using the START/STOP
button. If the steam level is changed
while a function is in progress, follow
the instructions above to set the new
values and wait 5 seconds for cooking
to resume automatically with the new
settings.
Modifying the weight
Setting available only in the Chef
menu
1) Press the SET button until the unit of
measurement (kg/lb) appears and
flashes.
2) Turn the right knob to modify the weight
that has been set (the cooking duration
will be updated automatically).
3) Confirm using the START/STOP button.
If the weight is changed while a function
is in progress, follow the instructions
above to set the new values and wait
5 seconds for cooking to resume
automatically with the new settings.
45
EN
Use
End of cooking
If a cooking duration has been set, it ends
automatically. The text
End
, appears
on the display, the timer icon flashes and
a buzzer sounds, which can be deactivated
using the START/STOP button.
To end cooking manually and go back
to the clock display, press and hold the
START/STOP button for at least 3 seconds.
Residual heat
After you have finished using the appliance,
if the oven is still hot, the residual heat
indicator will appear on the display.
The indicated heat level decreases
automatically as the temperature decreases,
until it switches off.
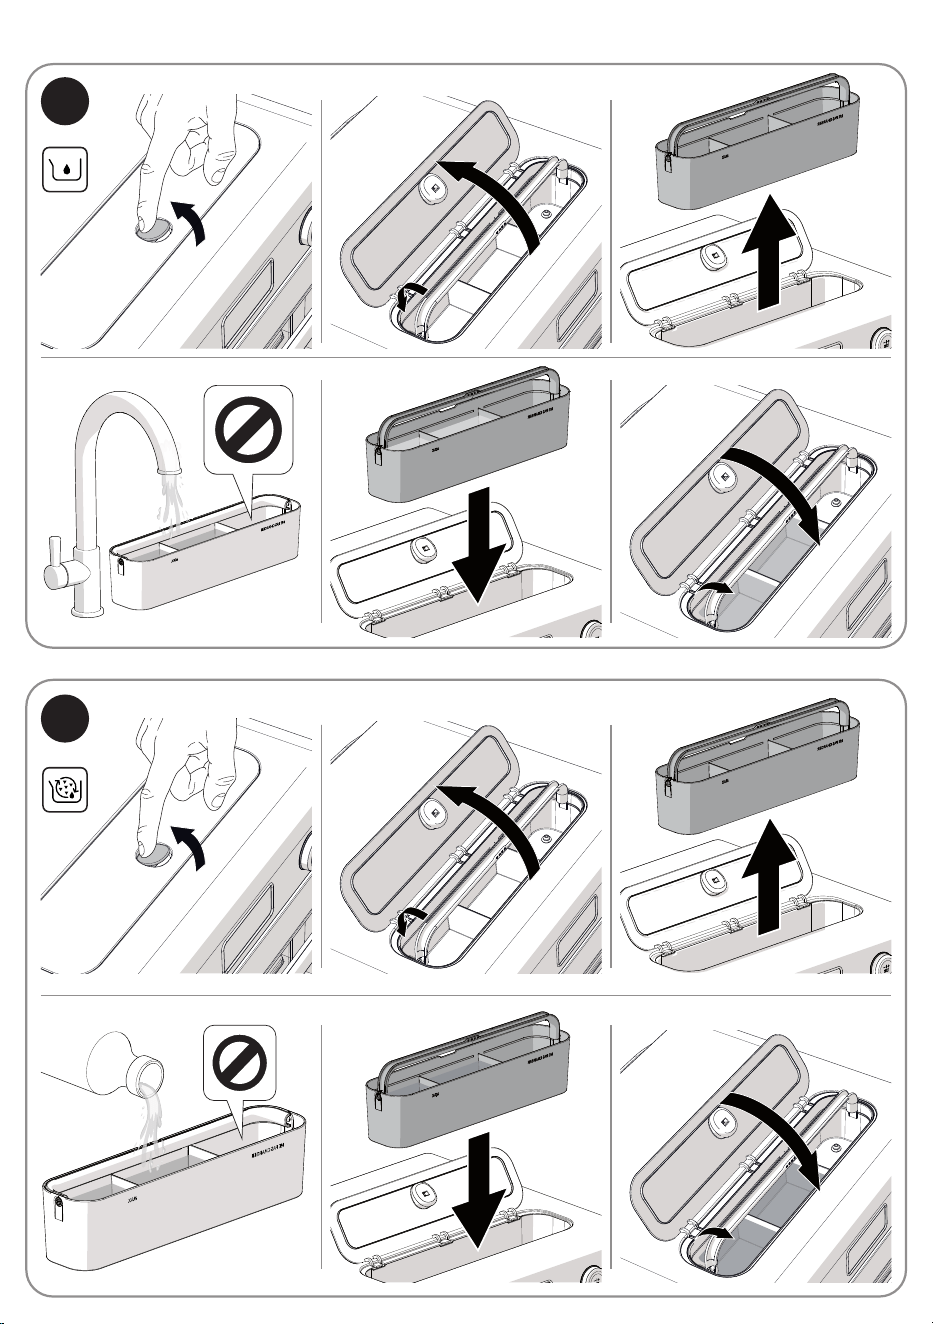
Filling the reservoir for steam cooking
(Fig. D)
If there is no water in the reservoir,
it is indicated by the flashing
light.
1) Press the release button on top of the lid
and pull to open.
2) Lift the handle and remove the reservoir.
3) Fill the left filling compartment with
water up to the MAX level indicated on
the reservoir.
Preheating stage
Cooking is always preceded by a
preheating stage , which allows
the appliance to heat to the cooking
temperature more quickly.
During this stage, the indicator lights up
and the progressive temperature level that
has been reached is shown.
Unless otherwise indicated in the
recipe, it is not recommended to
place food in the oven during the
preheating stage.
When the preheating stage has finished,
a buzzer will sound to indicate that the
cooking phase is starting. This must be
confirmed by pressing the START/STOP
button or by placing the dish in the oven.
If a cooking timer has been
set, the countdown will start
automatically once confirmed at
the end of the preheating phase.
Starting cooking
1) Open the door.
2) Place the food to be cooked in the
oven.
3) Close the door. Cooking starts
automatically and the indicator
switches off.
If the dish has already been
placed in the oven, the START/
STOP button (13) has to be
pressed in order for cooking to
start, also after the preheating
stage has finished.
46
Use
Use cold tap water which is not
too hard, softened water or still
mineral water.
Do not use distilled water, tap
water with a high chloride
content (> 40 mg/l), or other
liquids.
4) Place the reservoir in the oven
compartment and close the lid.
5) When finished, confirm using the
START/STOP button.
Caution
Do not fill the compartment on the
right, which is used exclusively
for draining water (or other
liquids) in the reservoir.
If the water reservoir is empty
during steam cooking, the
cooking process stops and
remains in standby for a
maximum of 5 minutes.
Cooking resumes once
confirmation has been received
that the reservoir has been filled.
If, at the end of the maximum
standby time of 5 minutes, the
water reservoir has not been
filled, the appliance continues
cooking without steam or, in the
case of the pure steam function, it
finishes cooking.
3.3 Settings Menu
The settings menu can only be
accessed when the oven is in
clock mode.
1) Press the SET button for at least
3 seconds.
2) Turn the left knob to navigate through
the items in the menu.
3) Turn the right knob to set the required
value and confirm using the SET button.
4) Press the SET button for at least
3 seconds to save the configuration
and exit from the menu.
Loc
Child lock
This function allows the appliance to lock
(On) the controls.
When the function is active, the indicator
lights up on the display.
To disable the function, go back
to the Settings menu and select
OFF.
Snd
Sound
Enables (On) or disables (OFF) the sounds
emitted by the oven.
CLoC
Clock format
Sets the time display to a 12 (12H) or
24 hour (24H) format.
The factory default time Format
function is set to 24h.
47
EN
Use
Modifying the time
1) The clock icon appears on the
display and the hours start to flash.
2) Turn the right knob to the required value.
3) Confirm using the SET button.
4) Repeat the procedure to set the minutes.
This setting can also be accessed
by pressing the START/STOP
button for at least 3 seconds with
the oven in clock mode.
unit
Setting the units of measurement
Set the units of measurement for temperature
and weight (for the Chef Menu) according
to the following table:
Hardness
level
Temperature Weight
EU °C kg
US °F lb
brl
Display brightness
This allows you to select the brightness of
the display according to the following table:
Hardness
level
Display brightness
1 25%
2 35%
3 50%
4 70%
5 90%
The factory default Display
brightness function is set to 5.
ELCd
Display ECO function
If enabled (On), it allows the brightness of
the display to be lowered automatically
when the oven is in clock mode.
It has no effect if the brightness
of the display is already set to 1.
HArd
Water hardness
Allows you to set the level of water hardness
in order to optimise the descaling process.
The factory default water
Hardness function is set to
medium 3.
The frequency with which you are promoted
to run a descaling cycle depends on the
water hardness setting.
The number of hours of use of the steam
functions, at the end of which descaling will
be requested, is as follows:
Hardness level Hours
1 18
2 12
3 9
4 6
5 4
dESC
Descaling
If enabled (On) it allows you to start a
descaling cycle (see “4.1 Descaling (Fig.
E)”.

48
Cleaning and maintenance
4 Cleaning and maintenance
The instructions manual contains cleaning
and maintenance instructions and
recommendations from the manufacturer to
the customer. Any other intervention should
be carried out by an authorised service
centre.
Before cleaning, ALWAYS remove the plug
from the mains power supply and allow the
appliance to cool down.
Caution
• Do not use steam jets to clean
the appliance.
• Do not use cleaning products
containing chlorine, ammonia
or bleach on steel parts or
parts with metallic surface
finishes.
• Do not use abrasive or
corrosive detergents.
• Do not use rough or abrasive
materials or sharp metal
scrapers.
• Clean the components and
accessories regularly after
each use.
Cleaning the surfaces
To keep the surfaces in good condition,
they should be cleaned regularly after use.
Let them cool first.
Ordinary daily cleaning
Always and only use specific products that
do not contain abrasives or chlorine-based
acids.
Pour the product onto a damp cloth and
wipe the surface, rinse thoroughly and dry
with a soft cloth or a microfibre cloth.
Food stains or residues
Do not use steel sponges and sharp
scrapers as they will damage the surface.
Use normal, non-abrasive products and a
wooden or plastic tool, if necessary. Rinse
thoroughly and dry with a soft cloth or a
microfibre cloth.
Do not allow residues of sugary foods (such
as jam) to set inside the oven. If left to set
for too long, they might damage the enamel
lining of the oven.

49
EN
Cleaning and maintenance
Cleaning the accessories
Wash all accessories in warm soapy water
with a soft sponge or a soft cloth. Rinse
and dry thoroughly. Do not use abrasive
detergents, metallic sponges or metal
tools to clean the accessories as they may
damage the surfaces.
In order to extend the life of the accessories,
it recommended not to wash them in a
dishwasher.
Cleaning the door glazing
The glass in the door should always be kept
perfectly clean. Use absorbent kitchen roll.
In case of stubborn dirt, wash with a damp
sponge and an ordinary detergent.
Cleaning the oven cavity
In order to keep your oven in the best
possible condition, clean it regularly after
letting it cool down.
Avoid letting food residue dry inside the
oven cavity, as this could damage the
enamel.
For easier cleaning, we recommend that
you remove the side guides.
Simply pull the frame, carefully, to release
it from the fastenings at the side. To reinstall
it, just insert it into the side fastenings and
apply light pressure.
Using the steam function for assisted
cleaning
The steam function can be used to soften
any cooking residues, making it easier to
remove them.
Before starting the function, we recommend
that you spray a solution of water and
washing up liquid onto the side walls of the
cooking compartment.
1) Select the pure Steam function from the
Steam cooking menu.
2) Set the temperature to 100°C for
18 minutes.
3) Press the START/STOP button to start
the function; when the preheating stage
has finished, press the START/STOP
button again.
4) When a function ends, open the door
and use a microfibre cloth to finish
cleaning the inside of the oven.
Drying
Cooking food generates moisture inside the
appliance. This is a normal phenomenon
and does not affect the appliance's
operation in any way.
Each time you finish cooking:
1) Let the appliance cool down.
2) Remove any dirt from inside the
appliance.
3) Dry the inside of the appliance with a
soft cloth.
4) Leave the door open until the inside of
the appliance has dried completely.
50
Cleaning and maintenance
4.1 Descaling (Fig. E)
Whenever the icon appears steadily
lit on the display, it is highly recommended
that you descale the boiler.
Whenever the flashing icon appears
on the display, it means that the boiler has
to be descaled and that it is not possible
to select cooking cycles that use steam until
this step has been completed.
The frequency with which
descaling is requested varies
according to the water
hardness that has been set (see
“3.3 Settings Menu”).
If considered appropriate, it
is always possible to run the
descaling cycle in advance.
Caution
Scale build-up due to lack of
descaling can compromise
the correct operation of the
appliance in the long term.
1) To access the descaling function, enter
the settings Menu (see “3.3 Settings
Menu”).
2) Turn the left knob until the display shows
dESC
.
3) Turn the right knob to enable the function
(On) and confirm using the SET button to
start the descaling cycle.
4) To cancel the descaling cycle, press
the START/STOP button for at least 3
seconds.
Caution
Once the descaling cycle has
been started, it can only be
stopped before the container
filling cycle with descaler
solution ends (see following
paragraph St2). Afterwards, the
appliance will not allow you to
run any other function until the
descaling process has finished.
The entire duration of the cycle is
approximately 40 minutes.
The user should remain next
to the appliance for the entire
duration of the descaling cycle,
as user interventions may be
required, such as topping-up the
reservoir.
The cycle consists of 6 steps,
indicated by the progressive
emptying of the progress bar
(24) and by the indicators on the
display St1, St2, ... .
51
EN
Cleaning and maintenance
Draining residual water (St1)
1) The appliance removes the residual
water by draining it into the compartment
on the right.
2) Press the release button on top of the lid
and pull to open.
3) Lift the handle, remove the reservoir and
empty it.
Caution
The water may be very hot.
Filling the reservoir with descaler solution
(St2)
1) Fill the filling compartment on the left
with a solution of water and descaler
according to the manufacturer’s
recommendations.
Caution
Do not fill the water drainage
compartment on the right.
Use cold tap water which is not
too hard, softened water or still
mineral water.
Do not use distilled water, tap
water with a high chloride
content (> 40 mg/l), or other
liquids.
2) Place the reservoir in the oven
compartment and close the lid.
It is now no longer possible to
cancel the descaling cycle.
Starting the descaling function (St3)
1) Press the SET button to confirm.
2) The appliance starts the boiler cleaning
procedure and the display shows the
entire duration of the procedure.
During the descaling process,
the appliance will pause a few
times to allow the descaler to act
effectively. Wait for the cycle to
end.
Draining the descaler solution (St4)
1) At the end of the cleaning process,
the appliance drains the remaining
descaler solution into the drainage
compartment of the reservoir.
2) Remove the reservoir and empty the
descaler solution.
Caution
The descaler solution may still be
very hot.
52
Cleaning and maintenance
Filling the reservoir with clean water
(St5)
1) Clean the reservoir and fill the left filling
compartment with clean water up to the
MAX level.
2) Place the reservoir in the oven
compartment and close the lid.
3) Press the SET button to confirm.
Rinsing the water circuit (St6)
1) The appliance starts the water circuit
cleaning procedure and the display
shows the entire duration of the
procedure.
2) At the end of the rinse cycle,
End
is shown on the display and a buzzer
sounds.
3) Press the START/STOP button for
at least 3 seconds to exit from the
descaling function.
Seal maintenance
The seal should be soft and elastic.
To keep the seal clean, use a non-abrasive
sponge and wash with lukewarm water.
Replacing the internal light bulb
Caution
• Unplug the appliance.
• Use protective gloves.
• Let the appliance cool down.
1) Completely remove all accessories
from inside the oven.
2) Unscrew the bulb cover by hand and
remove it.
Pay attention not to scratch the
oven cavity enamel.
3) Slide out and remove the light bulb.
4) Reinstall the protective cover after
replacing the bulb.

53
EN
What to do if...
Problem Possible cause Solution
The oven does not switch
on.
The plug has not been
properly inserted into the
power socket.
Make sure the plug has been
inserted properly into the
power socket.
The cable is defective.
Contact your local technical
support centre.
No power.
Make sure that the power
supply is working properly.
If the problem persists, contact
a qualified electrician.
The display does not turn
on.
The plug has not been
properly inserted into the
power socket.
Make sure the plug has been
inserted properly into the
power socket.
Possible electronic board
failure.
Contact your local technical
support centre.
The oven light does not
switch on.
The plug has not been
properly inserted into the
power socket.
Make sure the plug has been
inserted properly into the
power socket.
Possible bulb or oven door
sensor failure.
Replace the oven light
bulb (see “4 Cleaning and
maintenance”). If the problem
persists, contact your local
technical support centre.
Cooking does not start.
Failure to confirm after
preheating ( lit).
Make sure that you confirm
the cooking phase when the
preheating stage ends (see
“3.2 Using the oven (Fig. B -
Fig. C)”).
The oven door is not
closed.
Make sure that the oven door
is closed.
Possible oven door sensor
failure.
Contact your local technical
support centre.

54
What to do if...
Problem Possible cause Solution
Cooking has started but
the oven does not heat up.
The oven door is not
closed.
Make sure that the oven door
is closed.
Possible heating elements
or oven door sensor failure.
Contact your local technical
support centre.
The sound of a fan can
be heard even after the
power has been turned
off.
The fan continues to run to
cool the appliance until the
internal temperature is low
enough.
Wait for the time necessary for
the appliance to cool down.
If the fan does not switch off
after this time, contact your
local technical support centre.
When in operation, hot air
escapes from above the
oven door.
It is normal for hot air to
escape from above the
door to cool the appliance
whilst it is in operation.
Wait for the appliance to cool
down normally.
If the hot air continues to
escape or if it escapes from
other parts of the oven,
contact your local technical
support centre.
There is a burning smell
when the oven is in
operation.
There may be a burning
smell when using the
appliance for the first time.
Make sure you have followed
the instructions when using
the appliance for the first time
(see “3.1 First use”).
Possible food residues
inside the appliance in
contact with the heating
elements.
Make sure you follow the
cleaning and maintenance
instructions correctly (see “4
Cleaning and maintenance”).
55
EN
What to do if...
Problem Possible cause Solution
The oven does not
generate steam.
The water reservoir has not
been inserted correctly in
the oven compartment.
Make sure that the water
reservoir has been inserted
correctly in the oven
compartment.
The water reservoir is
empty or not full enough
(flashing alarm).
Fill the reservoir with water up
to the MAX level indicated on
the reservoir.
The filling compartment of
the water reservoir has not
been filled.
Make sure that the left filling
compartment of the reservoir
has been filled with water.
Mandatory descaling
required (flashing
alarm).
Run a descaling cycle (see
“4.1 Descaling (Fig. E)”).
Possible boiler failure.
Contact your local technical
support centre.
When in use, steam
escapes from above the
oven door.
It is normal for steam to
escape from above the
door to cool the appliance
whilst it is in operation
and to control the steam
cooking cycle.
Wait for the appliance to cool
down normally.
If steam continues to escape
or if it escapes from other
parts of the oven, contact your
local technical support centre.

56
What to do if...
Problem Possible cause Solution
Water drips onto the
shelf from under the door
during operation.
During operation, food
with a high moisture content
(such as frozen bread) may
create condensation that
slides down the inside of
the door and drips onto the
shelf.
If excessive water leaks
persist, contact your local
technical support centre.
The oven door is opened
frequently while the oven is
in use.
Reduce the number of times
the oven door is opened or
closed during cooking.
Possible problem with the
seal.
Contact your local technical
support centre.
The water reservoir
does not fit into the oven
compartment.
The water reservoir has not
been inserted the correct
way round.
Make sure that the water
reservoir is inserted the correct
way round and that the door
is closed.
One of the following error
codes appears on the
display:
Err1 / Err2 / Err3 / Err4
/ Err 5
Possible internal fault.
Contact your local technical
support centre.
If the problem has not been resolved or in the case of other types of fault,
contact your local technical support centre.

Notes
Scansiona il QR code per un accesso rapido al portale My Smeg Assistant
Scan the QR code for quick access to the My Smeg Assistant portal
Scannez le code QR pour un accès rapide au portail My SMEG Assistant
Für den schnellen Zugriff auf das Portal My Smeg Assistant scannen Sie einfach den QR-Code
Scan de QR-code voor de Handleiding voor Snelle Installatie en Onderhoud
Escanee el código QR para acceder rápidamente al portal My Smeg Assistant
Leia o Código QR para ter acesso rápido ao portal My Smeg Assistant

ll costruttore si riserva di apportare senza preavviso tutte le modifiche che riterrà utili al miglioramento dei propri prodotti.
Le illustrazioni e le descrizioni contenute in questo manuale non sono quindi impegnative ed hanno solo valore indicativo.
The manufacturer reserves the right to make any changes deemed necessary for the improvement of its products without
prior notice. The illustrations and descriptions contained in this manual are therefore not binding and are merely indicative.
Le fabricant se réserve la faculté d’apporter, sans préavis, toutes les modifications qu’il jugera utiles pour l’amélioration de
ses produits. Les illustrations et les descriptions figurant dans ce manuel ne sont pas contraignantes et n’ont qu’une valeur
indicative.
Der Hersteller behält sich vor, ohne vorherige Benachrichtigung alle Änderungen vorzunehmen, die er zur Verbesserung
seiner Produkte für nützlich erachtet. Die in diesem Handbuch enthaltenen Illustrationen und Beschreibungen sind daher
unverbindlich und dienen nur zur Veranschaulichung.
De fabrikant behoudt zich het recht voor zonder waarschuwing alle wijzigingen aan te brengen die hij nodig acht om zijn
producten te verbeteren. De afbeeldingen en de beschrijvingen die aanwezig zijn in deze handleiding zijn niet bindend, en
hebben enkel een aanduidende waarde.
El fabricante se reserva el derecho a aportar sin aviso previo todas las modificaciones que considere útiles para la mejora
de sus propios productos. Las ilustraciones y las descripciones contenidas en este manual no son vinculantes y tienen solo
valor indicativo.
O fabricante reserva-se o direito de efetuar, sem aviso prévio, qualquer modificação que vise o melhoramento dos
respetivos produtos. As ilustrações e descrições contidas neste manual não são, por isso, vinculativas e possuem apenas
valor indicativo.