1
Step 2
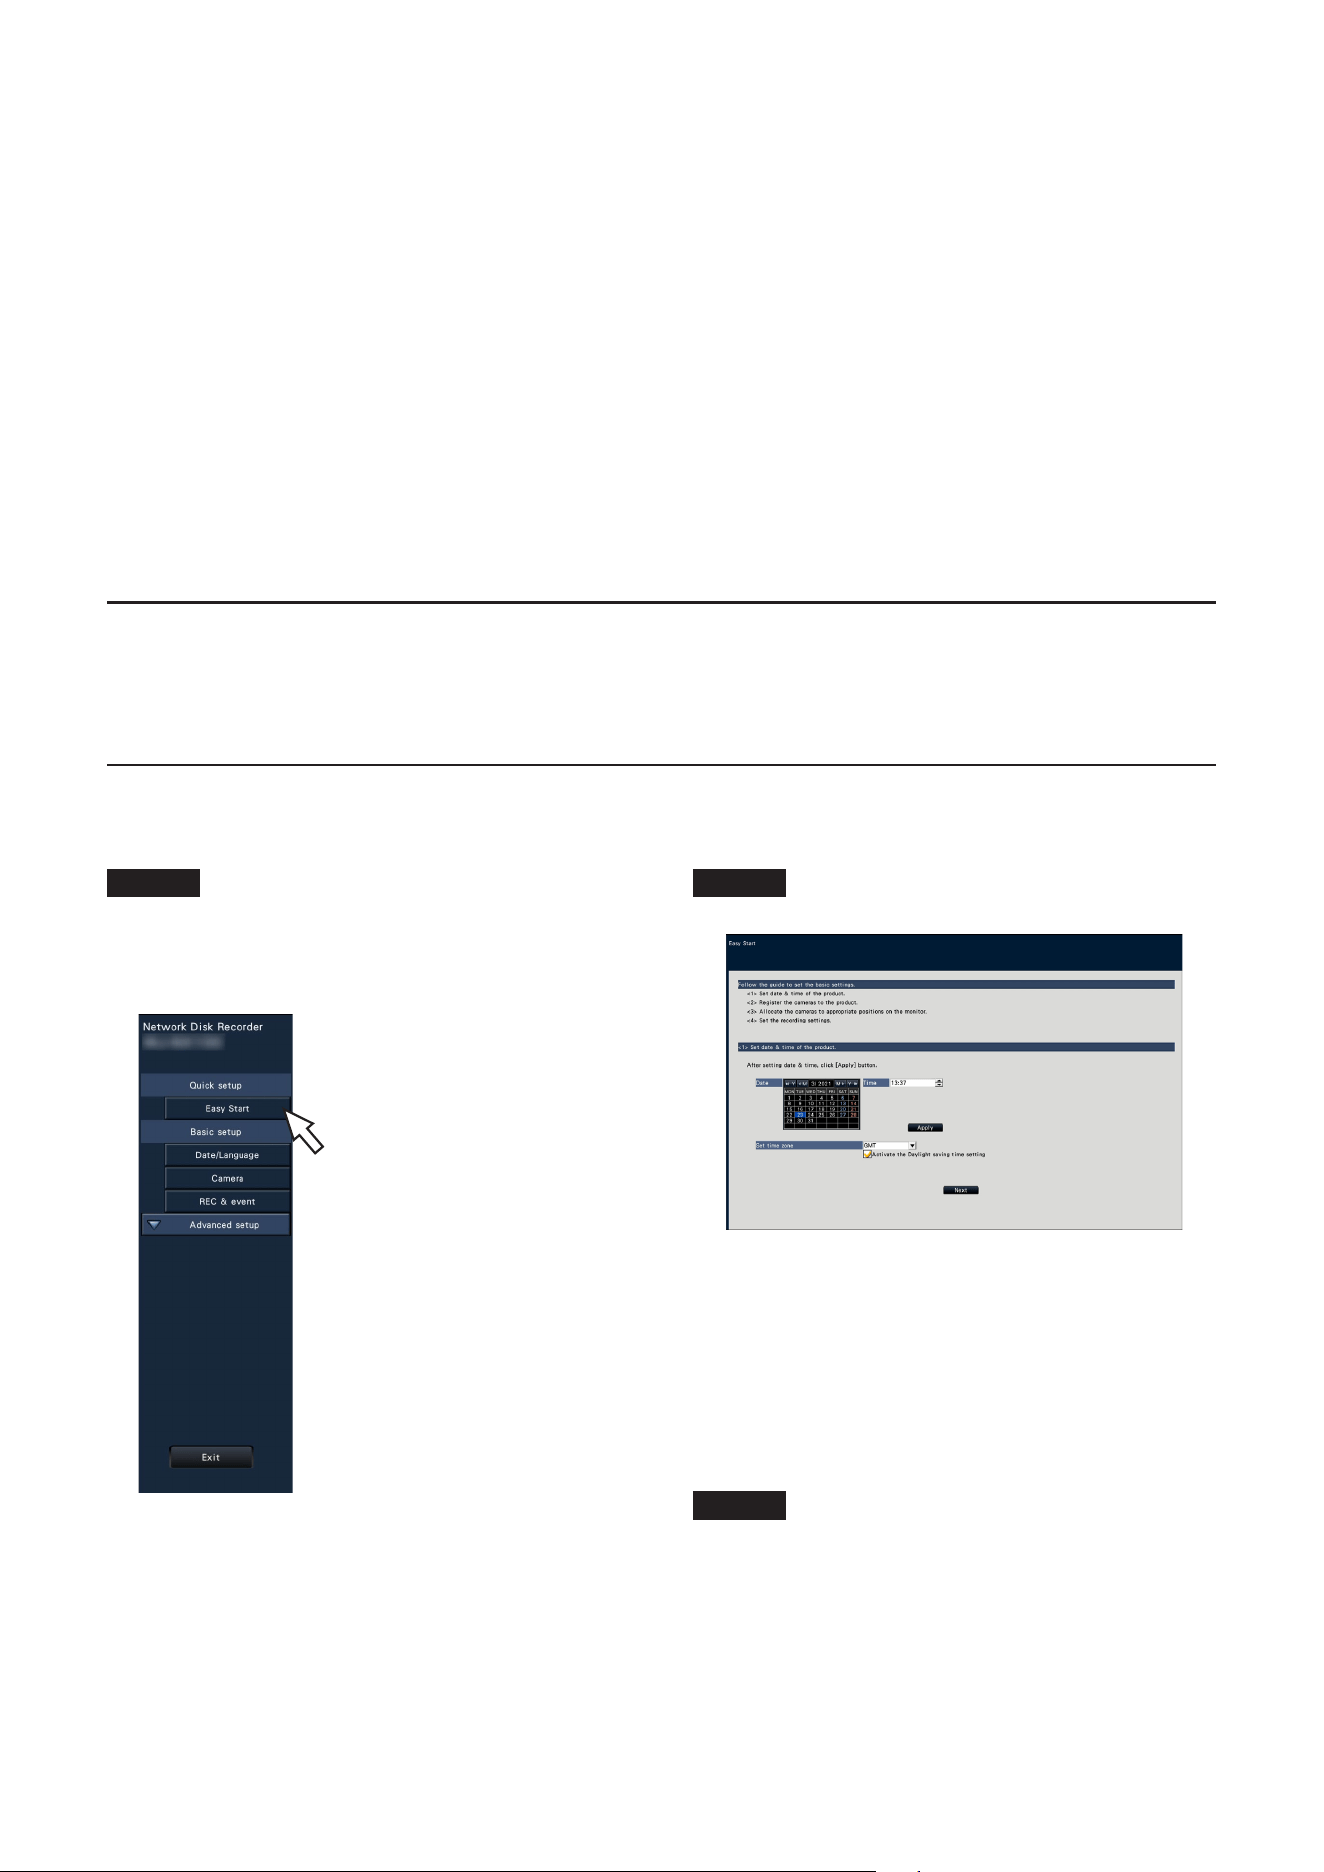
Set the date & time.
[Date]
Set the current date. Select the year and month using the
buttons of the calendar and click the date.
[<<Y]/[Y>>] button: Selects the previous or next year.
[<M]/[M>] button: Selects the previous or next month.
[Time]
Set the current time.
Step 3
Click the [Apply] button after setting the date & time.
→ The second will be set to "00".
[Set time zone]
Select your time zone.
GMT-12:00 - GMT+13:00
Default: GMT
Marking the checkbox for [Activate the Daylight saving time
setting] will active daylight saving time.
This section describes [Easy Start] for WJ-NU101K Series, WJ-NU201K Series, WJ-NU300K Series, WJ-NU301K Series,
WJ-NX310K Series, WJ-NX410K Series, WJ-NX510K Series.
The minimum settings required to operate the recorder, such as the date & time, camera registration, recording, can be
configured on the setup menu - the "Quick setup" menu - "Easy Start".
First, configure the minimum settings on "Easy Start", and to configure more advanced settings, go to each setup page.
Step 1
Click the [Easy Start] button on the top screen of the
setup menu.
Refer to "Basic operations" of Installation Guide for how to
display the setup menu.
→ The setup menu for the date & time will be displayed.
Available settings on "Easy Start"
• Date & time of the recorder
• Camera registration
• Order change of the registered camera numbers
• Recording frame rate, image quality Smart coding (GOP
control) and audio
* Other settings will remain default or will be conformed to the camera settings.
* To apply 25, 50 or 60 ips for the recording frame rate, configure on the advanced recording setup (for each camera) on the
"Recording setup" tab under "REC & event" of "Basic setup", but not on Easy Start.
* To reset the time, do not use "Easy Start", and go to "Basic setup" menu - "Date/Language" page.
Important:
• Refer to our support website for knowing the cameras that can be registered.
• If you are using a non-Panasonic camera with an ONVIF connection, it is not possible to start operation just with Easy Start.
Set up the date & time, a static IP address, the user name/password, etc. on the camera side in advance, or register the
camera with the recorder by detecting the camera or changing the registration information from [Basic setup] - [Camera] -
[Camera registration].
The descriptions and screens in this manual are based on WJ-NU300K Series as an example.
Easy Start Guide
2
Note:
• The camera number detected at Easy Start does not
match the camera port number (P1 - P4 or P8, P16) on
the rear panel of the recorder. Follow STEP 8 to replace
the camera number if you want to match the camera
number and the port number. (NU Series)
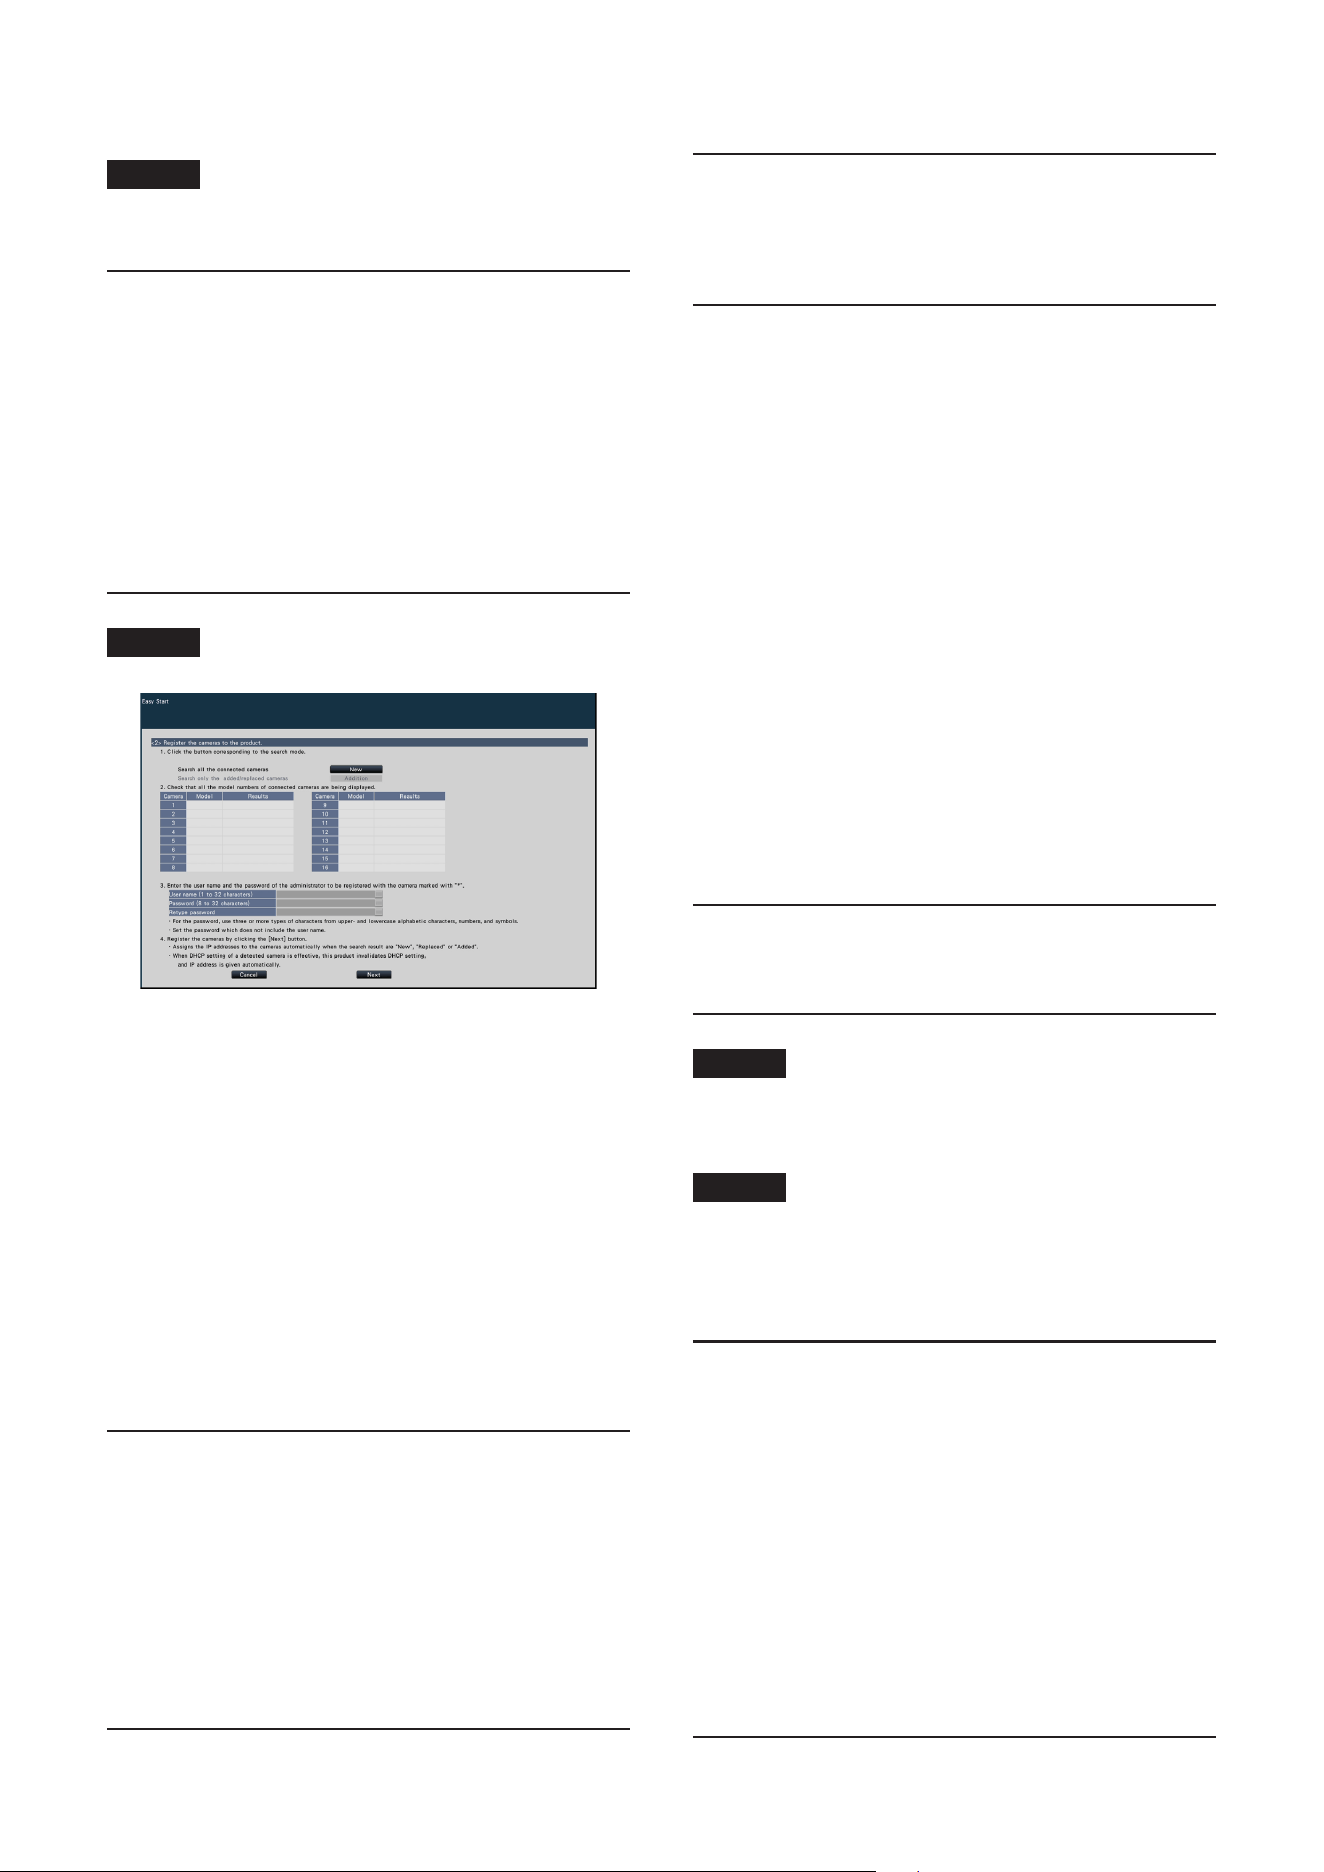
[Camera]
The number of cameras can be configured according to the
license of the additional camera kit. (NX series)
[Model]
When Panasonic cameras are used, the model numbers will
be displayed.
[Results]
New: Displayed when the camera is newly connected to
the recorder.
Replaced: Displayed when the camera has been
replaced by another one.
Added: Displayed when the camera connection is added
to the recorder.
Registered: Displayed when the camera has already
been registered.
Lost:
Displayed when the registered camera is not detected.
Blank: No camera is detected.
*: Administrator not registered
Note:
• If "Lost" is displayed or the column is left blank, check if
the power of the camera is turned on, and make sure
that cables are properly connected.
Step 6
Enter a user name and a password to register for a camera
with "*" in the results.
Step 7
Click the [Next] button.
→ IP address will be given to the cameras newly
connected, replaced or added, and the images from the
camera will be displayed on the operational screen.
Note:
• On "Easy Start", it is impossible to register the camera in
a different network via the same router.
• For the security enhancement, changing of the IP
address of the camera will become impossible when 20
minutes have passed after the power is turned on.
Perform the camera detection within 20 minutes, or turn
off the power of the camera and turn it on again if more
than 20 minutes has passed. Refer to the operating
instructions of the camera for further information.
• When "On" is selected for the "DHCP" setting of the
detected cameras, the recorder will forcibly change the
setting to "Off" to give the IP addresses automatically.
• When the [Cancel] button is clicked, the top screen of
"Easy Start" (the menu to set the date & time) without
applying the camera detection result will be displayed.
Step 4
Click the [Next] button.
→ The camera registration window opens.
Note:
• To use the existing IP address of the connected cameras,
refer to "Detect cameras for registration [Detect cameras]"
(☞ Operating Instructions) instead of "Easy Start".
• Before the settings, register the cameras into the
network.
• Only the cameras added by license registration will be
detected even though more cameras than the registered
license number are connected. It is recommended to
disconnect unnecessary cameras. (NX series)
• Cameras shall be connected to the Camera/PC port.
Cameras will not be detected if they are connected to
the PC port. (NX series)
Step 5
Register the cameras connected to the recorder.
[New] button
Usually use it with no camera registered in the recorder.
Detects all the connected cameras.
The models and results of the detected cameras will be displayed.
Make sure that the model numbers of all the connected
cameras are being displayed.
[Addition] button
Usually use it when there are added or replaced cameras
during operation.
Detects only the added or replaced cameras.
The models and results of the detected cameras will be displayed.
Make sure that the model numbers of all the added or
replaced cameras are being displayed.
Important:
• When there are cameras in use, the system can overwrite
the registered information and assign new IP addresses
to all connected cameras (including cameras currently in
use) by clicking the [New] button.
• Cameras newly added after the operation start will be
registered in the default settings. To conform the
settings to those of the registered cameras, perform the
settings for the added cameras.
• For the video encoder (WJ-GXE500), only the camera
connected to CH1 will be detected. The channels CH2
to CH4 are needs to be registered from the setup menu.

3
Step 8
When you wish to change the registered camera numbers,
it is possible to change the order of the camera numbers.
To interchange camera numbers, drag the camera image to
be moved with the mouse and drop on the desired position.
If the camera titles are to be interchanged as well, mark the
"Also change camera titles" checkbox.
[Camera status]
The model numbers and statuses of each camera will be
displayed in a list.
Displaying image: Displays the images from the camera
using the IP address that is newly registered or that
has already been registered.
Changing IP address: Images are being obtained from
the camera whose IP address has been changed.
Undetectable: Cannot obtain images from the camera.
Authentication error: Failed in the authentication to
display images from the camera.
Important:
• If "Undetectable" is displayed, check the camera
connections, and retry the camera registration.
• If "Authentication error" is displayed, initialized the
camera and retry the camera registration by referring to
the operating instruction of the camera.
• If the registered camera is not correctly detected or if
you wish to change the camera settings, change the
registered information on the "Basic setup" menu - the
"Camera" page - the "Camera registration" tab.
(☞ Operating Instructions)
[Refresh] button
Obtain the latest camera image after interchanging cameras.
[Exit] button
Exits the setup menu and returns to the top screen of the
setup menu.
[Next] button
Proceeds to the settings for recording.
Step 9
Perform the settings for recording. If the settings are
performed on "Easy Start", the settings will be applied
to all the cameras.
[Frame rate]
Select the recording frame rate.
1 ips/ 3 ips/ 5 ips/ 10 ips/ 15 ips/ 30 ips
Default: 10 ips
Important:
• To apply 60 ips, congure on "[Advanced >] of the
"Recording setup (All cameras)" on the "Recording
setup" tab under "REC & event" of "Basic setup".
• For a camera whose compression method is [MJPEG],
"10 ips / 15 ips / 30 ips" cannot be selected.
• If a camera whose compression method is [MJPEG] is
included, [MJPEG] camera is set to "5 ips" even if "10
ips / 15 ips / 30 ips" is set by slider bar of frame rate
setting. You can conrm the current setting value with
[Advanced >] in Recording setup (All cameras).
[Image quality]
Selects the image quality of recorded images.
NQ (Normal): Standard quality
FQ (Fine): High quality
SF (Super Fine): Super fine quality
XF (Extra Fine): Extra fine quality
Default: FQ
Important:
• For a camera whose compression method is [MJPEG],
"XF" cannot be set.
• If a camera whose compression method is [MJPEG] is
included, [MJPEG] camera is set to "SF" even if "XF" is
set by slider bar of image quality setting. You can
conrm the current setting value with [Advanced >] in
Recording setup (All cameras).

4
[Smart coding (GOP control)]
Select when you use the smart coding (GOP control)
function of the camera.
On(Advanced): Uses the smart coding.
Off: Does not use the smart coding.
Default: Off
Refer to the operating instructions of the camera for this
function.
[Audio]
Select whether or not to record audio together with images.
On(AAC-LC): Audio will be recorded. (AAC-LC format)
Off: Audio will not be recorded.
Default: Off
[Referenced recording days]
Calculates and displays the total number of days for which
recording on the hard disk drives is available.
Note:
• The referenced recording days will be calculated based
on the assumption that recording is started on Monday.
• The HDD consumption for the event recording will be
excluded.
• If you use a third-party camera that connects via ONVIF
or RTSP, the value of "Referenced recording days" will
not be displayed.
• When congured to perform recording in high resolution
and high quality, recording may sometimes not be
performed at the specied rate.
When there may be possibility to fail recording at the
specified rate while not using third-party camera that
connects via ONVIF or RTSP, the confirmation window
will be displayed.
Step 10
Click the [Exit] button.
→ Saves the settings and returns to the top screen of the
setup menu.
When the camera image is displayed on the main monitor or
the web browser on the PC and can be recorded or played,
the recorder is ready for operation.
Ls1222-2103 Printed in China