Before attempting to connect or operate this product,
please read these instructions carefully and save this manual for future use.
The model number is abbreviated in some descriptions in this manual.
Important Information
Network Disk Recorder
Model No. WJ-NX510K Series
WJ-NX410K Series
For professional use only
WJ-NX510K Series refer to WJ-NX510K, WJ-NX510KG and WJ-NX510KGV.
WJ-NX410K Series refer to WJ-NX410K, WJ-NX410KG and WJ-NX410KGV.
2
Important Safety Information
FOR YOUR SAFETY PLEASE READ THE FOLLOWING TEXT
CAREFULLY.
This appliance is supplied with a moulded three pin mains plug for your
safety and convenience.
A 5 amp fuse is fitted in this plug.
Should the fuse need to be replaced please ensure that the replacement
fuse has a rating of 5 amp and that it is approved by ASTA or BSI to
BS1362.
Check for the ASTA mark
or the BSI mark on the body of the
fuse.
If the plug contains a removable fuse cover you must ensure that it is
refitted when the fuse is replaced.
If you lose the fuse cover the plug must not be used until a replacement
cover is obtained.
A replacement fuse cover can be purchased from your local our dealer.
IF THE FITTED MOULDED PLUG IS UNSUITABLE FOR THE
SOCKET OUTLET IN YOUR HOME THEN THE FUSE SHOULD BE
REMOVED AND THE PLUG CUT OFF AND DISPOSED OF SAFELY.
THERE IS A DANGER OF SEVERE ELECTRICAL SHOCK IF THE CUT
OFF PLUG IS INSERTED INTO ANY 13 AMP SOCKET.
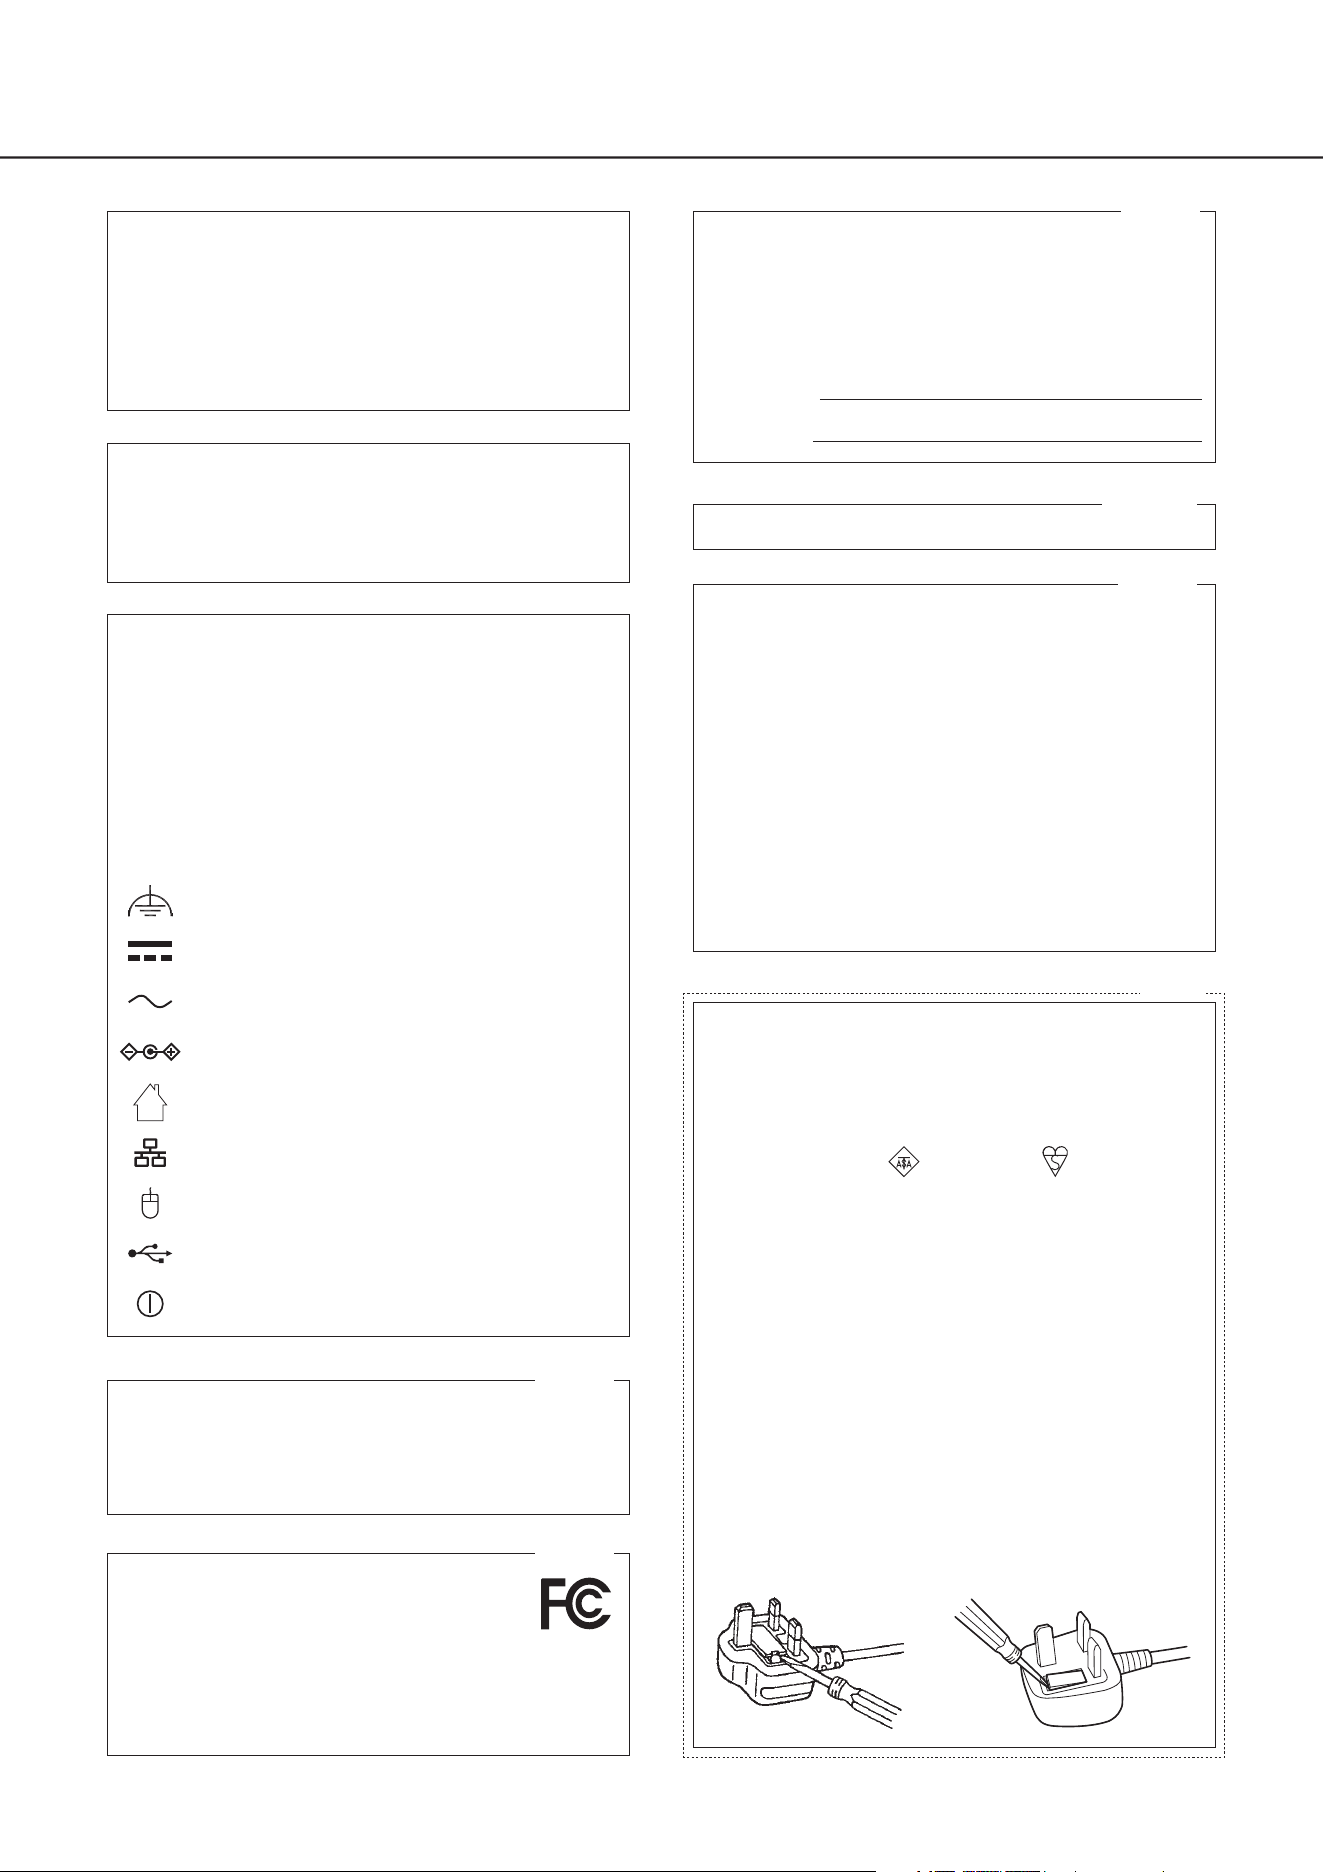
How to replace the fuse
The location of the differs according to the type of AC mains plug (fig-
ures A and B).
Confirm the AC mains plug fitted and follow the instructions below.
Illustrations may differ from actual AC mains plug.
Open the fuse cover with a screwdriver and replace the fuse and close
or attach the fuse cover.
Figure A Figure B
For U.K.
The model number and serial number of this product may
be found on the surface of the unit.
You should note the model number and serial number of
this unit in the space provided and retain this book as a
permanent record of your purchase to aid identification in
the event of theft.
Model No.
Serial No.
For U.S.A.
Note:
This equipment has been tested and found to
comply with the limits for a Class A digital device, pursuant
to Part 15 of the FCC Rules. These limits are designed to
provide reasonable protection against harmful interference
when the equipment is operated in a commercial
environment. This equipment generates, uses, and can
radiate radio frequency energy and, if not installed and
used in accordance with the instruction manual, may
cause harmful interference to radio communications.
Operation of this equipment in a residential area is likely to
cause harmful interference in which case the user will be
required to correct the interference at his own expense.
FCC Caution:
Changes or modifications not expressly approved by the
party responsible for compliance could void the user's
authority to operate the equipment.
For U.S.A.
CAN ICES-3(A)/NMB-3(A)
For Canada
Caution:
• This recorder is only intended for a connection to an ethernet
or PoE network without routing to the outside plant.
• Be sure to install disconnect devices such as a circuit breaker
to shut down the main power of power supplying equipment
to this product.
• The socket-outlet shall be easily accessible.
• Before attempting to connect or operate this product, please
read these instructions carefully.
Notice:
• This product is not suitable for use in locations where children
are likely to be present.
• For information about screws and other parts required for
installation, refer to the corresponding section of this
document.
• The power supply cord is used as the main disconnect
device, ensure that the socket-outlet is located/installed near
the equipment and is easily accessible.
• This product is a professional equipment.
: Functional earthing; functional grounding(US) symbol
: Direct current symbol
: Alternation current symbol
: Polarity of d.c. power connector
: For indoor use only
: Computer network
: Mouse port
: USB port
: "ON"/"OFF" (push-push)
This device complies with part 15 of the FCC Rules.
Operation is subject to the following two conditions: (1)
This device may not cause harmful interference, and (2)
this device must accept any interference received,
including interference that may cause undesired operation.
For U.S.A.
Supplier's Declaration of Conformity
Trade Name: i-PRO
Model No. : WJ-NX410K, WJ-NX510K
Responsible Party: i-PRO Americas Inc.
8550 Fallbrook Drive, Suite 200
Houston,
Texas 77064
Support Contact: 1-800-513-5417
For U.S.A.
WARNING:
• All work related to the installation and earthing of this product
should be made by qualified service personnel or system
installers.
• Operation of this product in a residential environment could
cause radio interference.

3
Contents
Important Safety Information ................................................................................................. 2
Introduction .............................................................................................................................. 4
Preface ......................................................................................................................................................................................4
Features ....................................................................................................................................................................................4
System requirements for a PC .................................................................................................................................................. 6
Trademarks and registered trademarks ....................................................................................................................................6
About HEVC (High Efficiency Video Coding) patents ...............................................................................................................6
Copyright ..................................................................................................................................................................................6
Disclaimer of warranty ..............................................................................................................................................................7
Network security .......................................................................................................................................................................7
Limitation of liability ..................................................................................................................................................................7
Precautions .............................................................................................................................. 8
Major operating controls and their functions ..................................................................... 11
Front view ................................................................................................................................................................................11
Inside the front cover ..............................................................................................................................................................13
Rear view ................................................................................................................................................................................14
User/Host management ........................................................................................................ 16
When operating from a PC via a network ...............................................................................................................................16
HDD unit ................................................................................................................................. 17
Handle the HDD units .............................................................................................................................................................17
HDD unit holding bracket ........................................................................................................................................................17
When you transport the recorder ............................................................................................................................................ 18
Install the HDD unit in recorder ............................................................................................................................................... 19
Remove the HDD units from recorder .....................................................................................................................................19
Remove the extension unit from recorder ...............................................................................................................................19
Specifications ........................................................................................................................ 20

4
Preface
Features
The network disk recorders WJ-NX510K Series equipped H.265 CODEC and are designed for use within a H.265 surveillance
system, and record images/audio from up to 64 network cameras (hereinafter, cameras) on the hard disk drives (HDDs).
Number of cameras to be used in the system can be increased to 128 (maximum) by purchasing the Additional Camera Kit
(WJ-NXE52W, WJ-NXE53W).
The WJ-NX410K Series record images/audio from up to 32 cameras on the HDDs.
Number of cameras can be increased to 64 (maximum) by purchasing the Additional Camera Kit (WJ-NXE42W).
The optional HDDs encased in the included HDD canisters (hereinafter referred as HDD units) can easily be installed/removed in/
from this recorder.
This recorder can connect the extension unit WJ-HXE410 (option) up to five and support up to 54 HDDs.
Hereinafter, WJ-NX510K referred to NX510, WJ-NX410K referred to NX410, and they are collectively referered to the recorder.
This recorder supports connection with a monitor equipped with the HDMI (High-Definition Multimedia Interface) connector.
Connection using an HDMI cable (optional) offers display of playback/live images with superior quality.
It is possible to display images from multiple cameras, switch those images and perform basic operation of the camera.
High-definition image monitoring is available
Images from up to 128 cameras (NX510), up to 64 cameras (NX410) with the image capture size of 4K can be saved as video
data.
This recorder also supports the HDMI output to 2 monitors that can display recorded images and live images from the cameras
in high definition.
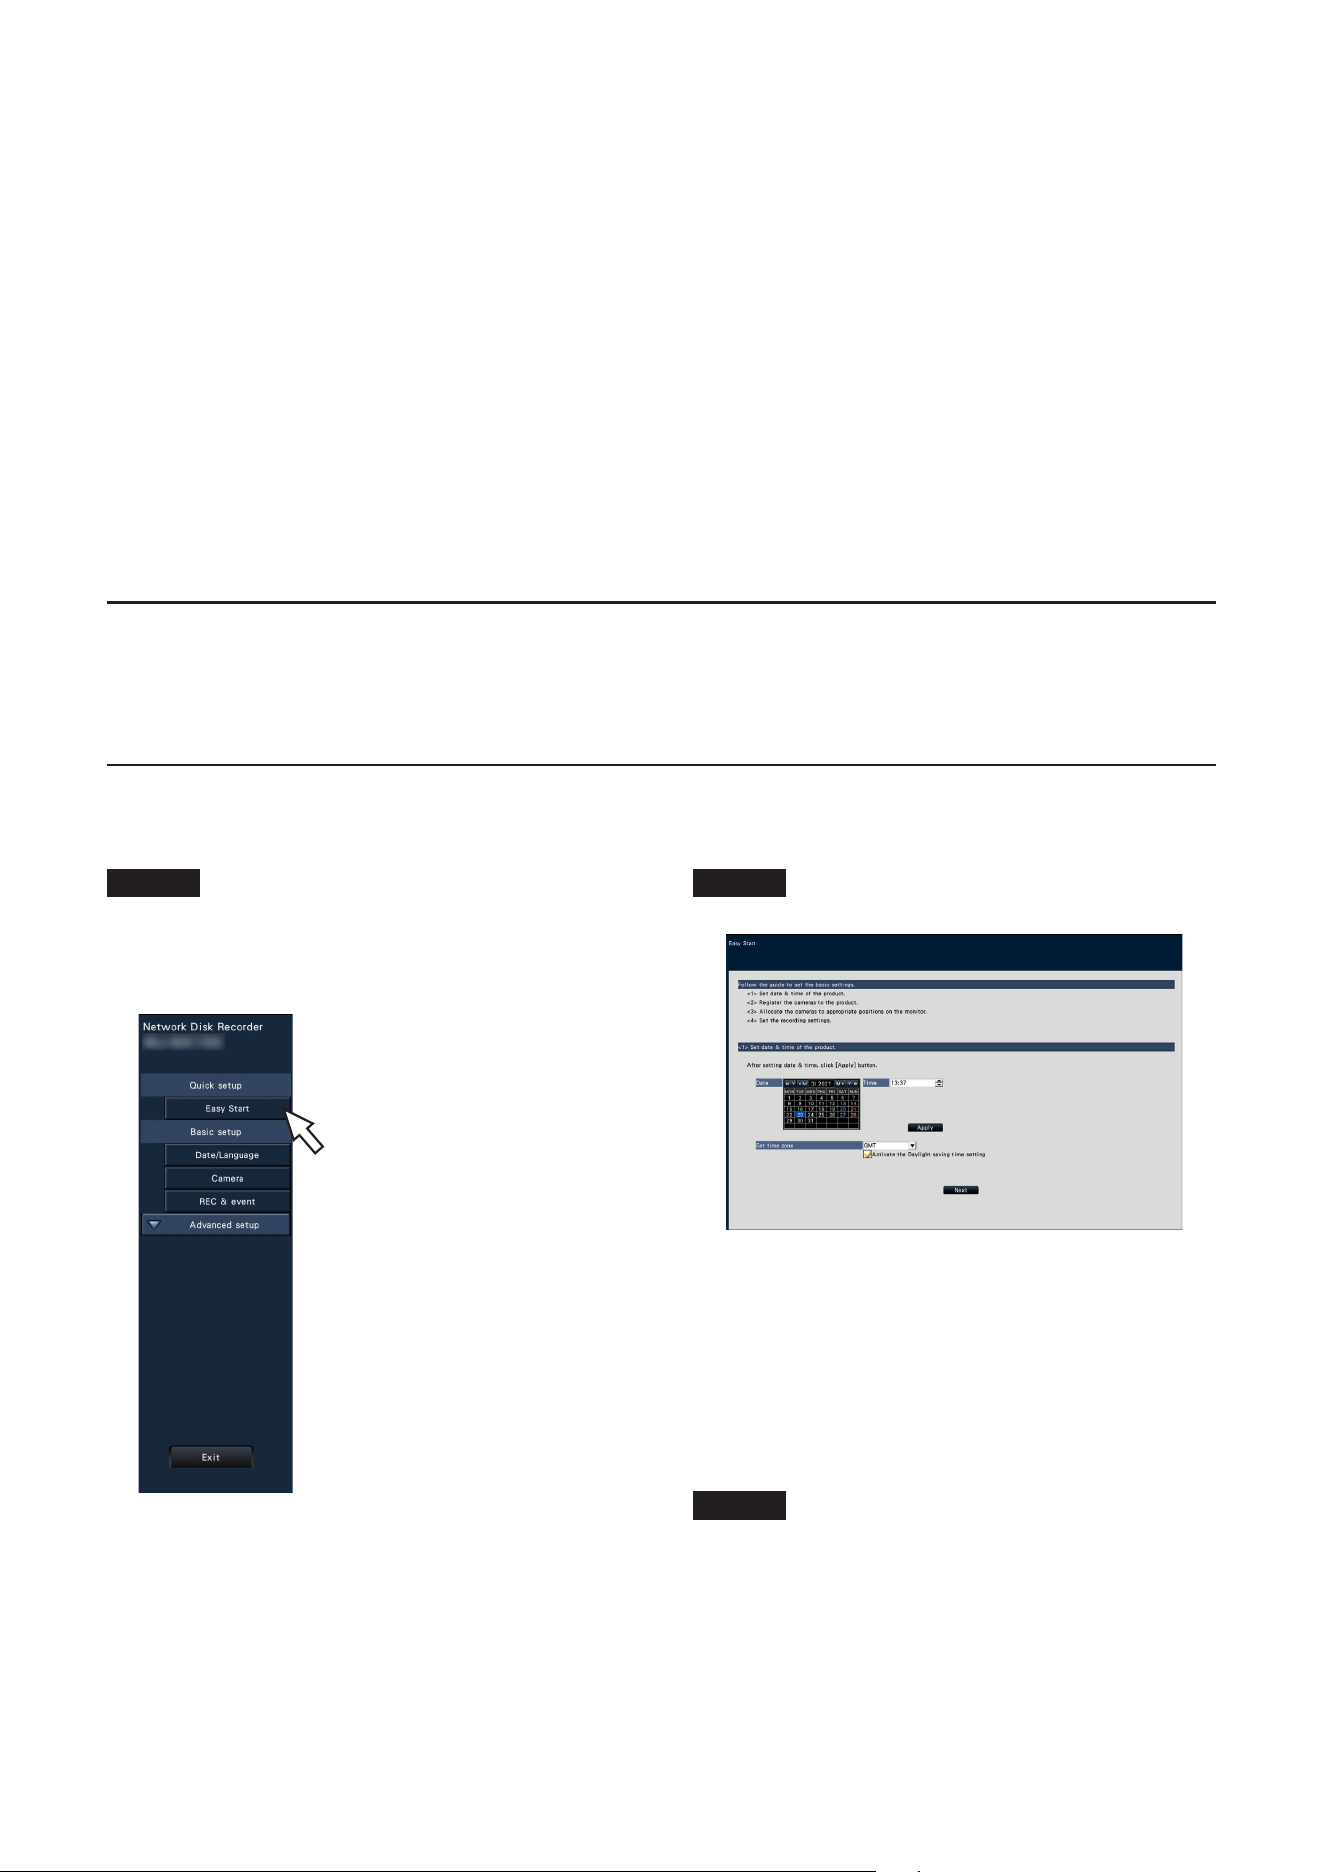
Quick setup and operations
By connecting a mouse (accessory) to this recorder, quick operations are available while viewing a monitor.
By using "Easy Start", the cameras are automatically recognized and settings can be configured without operations from a PC*1.
Recorded images can easily be searched using calendar or time line.
* A PC will be necessary for some of the camera settings and viewing the instruction manual.
RAID function
This recorder enables operation of RAID 1/RAID 5/RAID 6.
HDD stand-by control function
By temporarily pausing HDDs other than those which are recording or waiting for recording, set a mode not to count the
operation time of a hard disk drive and extend the time it takes to replace the HDD.
*This function requires 3 or more HDDs (for single mode) or 3 or more RAID units (for RAID1,5,6 mode).
Connection of extension units
This recorder can connect the extension unit WJ-HXE410 (option) up to five units.
The copy port equipped
You can copy the images recorded on the camera with an external HDD and USB memory (sold separately).
The copied images can be played, printed or saved using the dedicated viewer software.
Secure communication function
The SSL communication can be used for communication between the recorder and camera, and between the recorder and PC.
Also, by registering a license of a secure communication kit (option), you can use the function to encrypt the video data itself.
Introduction
5
Introduction (continued)
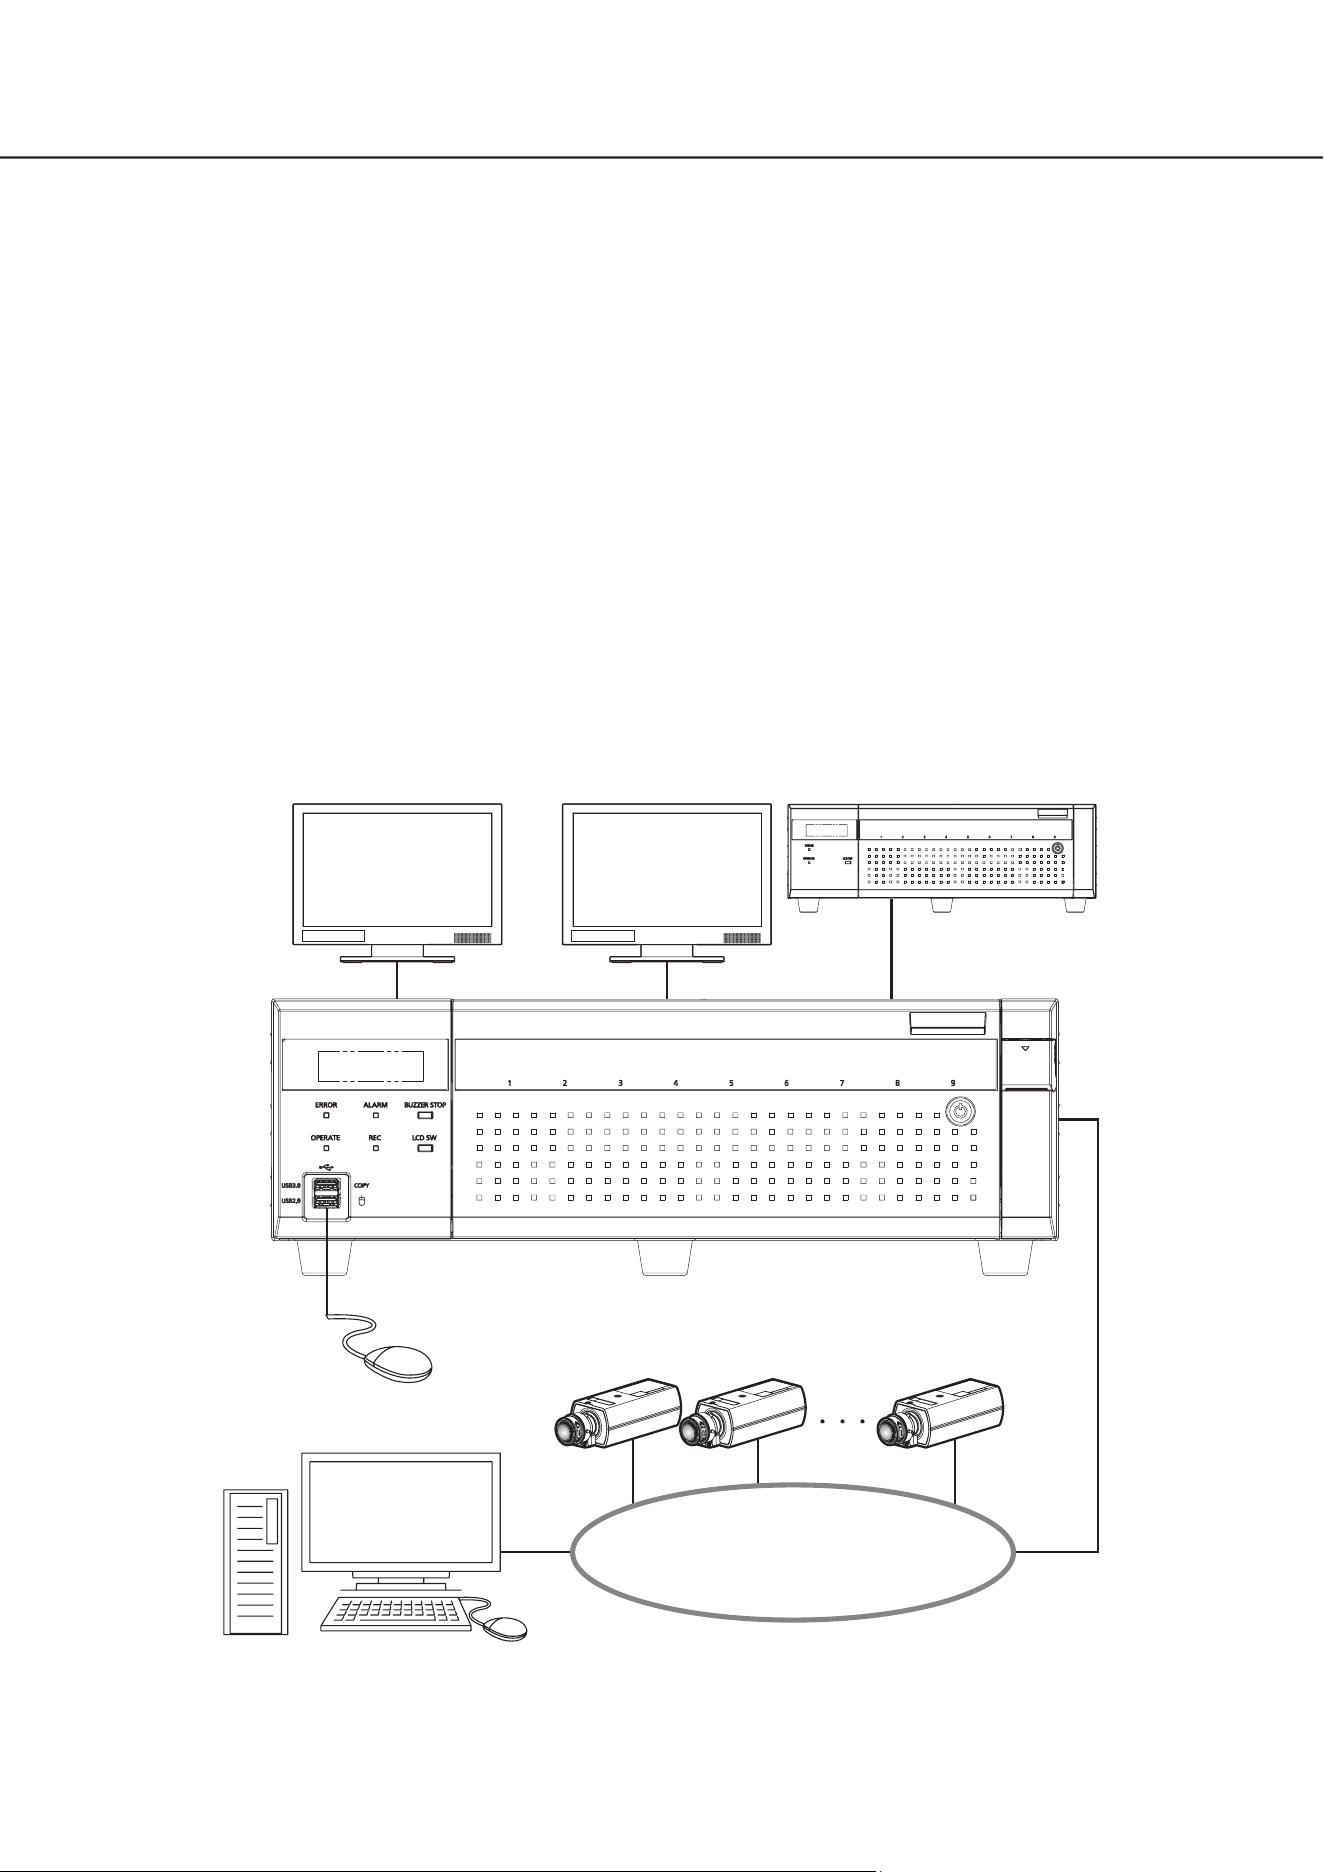
System Configuration
Cameras × 128 max. (NX510)
Cameras × 64 max. (NX410)
Network
PC
Mouse (included)
Main monitor (HDMI) Sub monitor (HDMI) Extension Unit × 5 max.
MP4 download function
Recorded camera images can be copied to USB media or downloaded to a PC in MP4 format.
Third-party cameras can be connected
In addition to our cameras, third-party ONVIF
®
compatible cameras can be connected. Third-party cameras can also be
connected via RTSP by specifying the URL.
* ONVIF is a trademark of ONVIF, Inc.
Protection against power failure
The built-in function protects the equipment and recorded data in the event of AC power interruption such as sudden power
failure. This function makes it possible to turn off the AC power without having to stop recording or perform other operations.
*It does not guarantee that the equipment will not malfunction in the event of all possible power interruptions.
In addition, there is a possibility that the data recorded immediately prior to the power failure will not be saved.
If it is necessary to guarantee the operation of the equipment or to continue recording operation even in the event of a power
failure, use an uninterruptible power supply or similar device in combination.

6
Trademarks and registered trademarks
• Adobe, Acrobat, and Reader are either registered trademarks or trademarks of Adobe in the United States and/or other
countries.
• Microsoft, ActiveX , DirectX, Edge and Windows are either registered trademarks or trademarks of Microsoft Corporation in
the United States and/or other countries.
• Microsoft product screen shot(s) reprinted with permission from Microsoft Corporation.
• Intel and Intel Core are trademarks of Intel Corporation or its subsidiaries in the U.S. and/or other countries.
• Google Chrome are trademarks of Google LLC.
• Firefox is a trademark of the Mozilla Foundation in the US and other countries.
• The terms HDMI, HDMI High-Definition Multimedia Interface, and the HDMI Logo are trademarks or registered trademarks of
HDMI Licensing Administrator, Inc. in the United States and other countries.
• All other trademarks identified herein are the property of their respective owners.
Introduction (continued)
System requirements for a PC
It is recommended to operate this unit using a PC that meets the following system requirements.
OS: Microsoft Windows 10, Microsoft Windows 11
Web browser: Microsoft Edge, Google Chrome™, Mozilla Firefox
CPU: Intel
®
Core
TM
i7-860
Memory: 4 GB or more
Monitor: 1920 × 1080 pixels or more, 24-bit True color or better
Network interface: 10BASE-T/100BASE-TX/1000BASE-T 1 port
Audio: Sound card (When using the audio function)
Others: DirectX
®
9.0c or later
Adobe
®
Reader
®
or Acrobat Reader
®
(for viewing the manuals)
Important:
• If using a PC that does not meet the above system requirements, it may cause problems such as slow imaging or the
browser becomes inoperable.
About HEVC (High Efficiency Video Coding) patents
Covered by one or more claims of the HEVC patents listed at patentlist.accessadvance.com.
Copyright
Except for open source software licensed under GPL/LGPL and so on, distributing, copying, disassembling, reverse compiling
and reverse engineering of the software provided with this product are all expressly prohibited. In addition, exporting any
software provided with this product violating export laws is prohibited.

7
Disclaimer of warranty
Introduction (continued)
IN NO EVENT SHALL i-PRO Co., Ltd. BE LIABLE TO ANY PARTY OR ANY PERSON, EXCEPT FOR REPLACEMENT OR
REASONABLE MAINTENANCE OF THE PRODUCT, FOR THE CASES, INCLUDING BUT NOT LIMITED TO BELOW:
(1) ANY LOSS OR DAMAGE, INCLUDING WITHOUT LIMITATION, DIRECT OR INDIRECT, SPECIAL, CONSEQUENTIAL OR
EXEMPLARY, ARISING OUT OF OR RELATING TO THE PRODUCT;
(2) ANY INCONVENIENCE, LOSS, OR DAMAGE CAUSED BY INAPPROPRIATE USE OR NEGLIGENT OPERATION OF THE
USER;
(3) ALL MALFUNCTIONS OR TROUBLES FROM UNAUTHORIZED DISASSEMBLE, REPAIR OR MODIFICATION OF THE
PRODUCT BY THE USER, REGARDLESS OF THE CAUSE OF THE MALFUNCTION OR TROUBLE;
(4) INCONVENIENCE OR ANY LOSS ARISING WHEN IMAGES ARE NOT DISPLAYED, DUE TO ANY REASON OR CAUSE
INCLUDING ANY FAILURE OR PROBLEM OF THE PRODUCT;
(5) ANY PROBLEM, CONSEQUENTIAL INCONVENIENCE, OR LOSS OR DAMAGE, ARISING OUT OF THE SYSTEM
COMBINED BY THE DEVICES OF THIRD PARTY;
(6) ANY CLAIM OR ACTION FOR DAMAGES BROUGHT BY ANY PERSON OR ORGANIZATIO AS A PHOTOGRAPHED
SUBJECT DUE TO VIOLATION OF PRIVACY CONCERNING A SURVEILLANCE CAMERA'S PICTURE OR SAVED DATA,
FOR SOME REASON (INCLUDING USE WHEN USER AUTHENTICATION ON THE AUTHENTICATION SETTING SCREEN IS
SET TO OFF), BECOMING PUBLIC OR BEING USED FOR ANY PURPOSE;
(7) LOSS OF REGISTERED DATA CAUSED BY ANY FAILURE (INCLUDING REPAIR OR INITIALIZATION OF THE PRODUCT
DUE TO FORGOTTEN AUTHENTICATION INFORMATION SUCH AS A USER NAME AND PASSWORD).
Limitation of liability
THIS PUBLICATION IS PROVIDED "AS IS" WITHOUT WARRANTY OF ANY KIND, EITHER EXPRESS OR IMPLIED, INCLUDING
BUT NOT LIMITED TO, THE IMPLIED WARRANTIES OF MERCHANTABILITY, FITNESS FOR ANY PARTICULAR PURPOSE, OR
NON-INFRINGEMENT OF THE THIRD PARTY’S RIGHT.
THIS PUBLICATION COULD INCLUDE TECHNICAL INACCURACIES OR TYPOGRAPHICAL ERRORS.
CHANGES ARE ADDED TO THE INFORMATION HEREIN, AT ANY TIME, FOR THE IMPROVEMENTS OF THIS PUBLICATION
AND/OR THE CORRESPONDING PRODUCT (S).
Network security
As you will use this unit connected to a network, your attention is called to the following security risks.
① Leakage or theft of information through this unit
② Use of this unit for illegal operations by persons with malicious intent
③ Interference with or stoppage of this unit by persons with malicious intent
It is your responsibility to take precautions such as those described below to protect yourself against the above network security
risks.
• Use this unit in a network secured by a firewall, etc.
• If this unit is connected to a network that includes PCs, make sure that the system is not infected by computer viruses or
other malicious entities (using a regularly updated anti-virus program, anti-spyware program, etc.).
• Protect your network against unauthorized access by restricting users to those who log in with an authorized user name and
password set by using user authentication.
• Apply measures such as user authentication to protect your network against leakage or theft of information, including image
data, authentication information (user names and passwords), alarm mail information, FTP server information and DDNS
server information.
• After the unit is accessed by the administrator, make sure to close the browser.
• Keep the authentication information (your user name and password) in a safe place free from public view.
• Do not install the camera in locations where the camera or the cables can be destroyed or damaged by persons with malicious intent.

8
Refer installation work to the dealer.
Installation work requires technique and experiences. Failure
to observe this may cause fire, electric shock, injury, or
damage to the product.
• Be sure to consult the dealer.
Do not disassemble nor alter this product.
Failure to observe this may cause fire or electric shock.
• Ask your dealer for inspection and repair.
Do not insert any foreign objects.
Do not allow any foreign object or liquid such as water, a
metallic part, etc. to enter since it may cause fire or electric
shock.
• If it happens, disconnect the power plug from the
electric outlet immediately and contact your dealer.
Stop the operation immediately when something is
wrong with this product.
When smoke goes up from the product or the smell of
smoke comes from the product, continued use will result in
fire, injury, or damage to the product.
• Turn off the power of this product immediately, and then
contact your dealer.
Avoid placing receptacles that contain liquids such as
water on/near this product.
If liquid spills onto this product, it may cause fire or an
electric shock.
• If it happens, disconnect the power plug from the
electric outlet immediately and contact your dealer.
Clean the power plug periodically to keep it dust free.
Dust can cause the insulation to be damaged and cause a fire.
• When cleaning, disconnect the power plug and wipe
with a clean dry cloth.
Do not install this product in an unstable location.
Selecting an inappropriate installation surface may cause the
product to fall down or topple over, resulting in injury.
Do not touch this product, power cord and connected
cables when thunder is heard.
Failure to observe this may cause electric shock.
Do not connect/disconnect the power plug with wet
hands.
Failure to observe this may cause electric shock.
Avoid doing anything that can damage the power
cord/plug.
Do not damage, modify, forcefully bend, twist, stretch or
bundle the power cord, and do not put a heavy thing on the
power cord.
Using a damaged power cord can cause electric shock,
short circuit, fire, etc.
• Contact your dealer for repair of the power cord and
plug.
Grounding
Use this product after confirming that grounding is properly
installed.
If grounding is not installed properly, it may cause ground
leakage or damage the product resulting in electric shock.
• Contact the dealer for details. (The grounding installation
cost is not included in the price of this product.)
Do not engage in work related to the installation and
wiring during the power is on.
Failure to observe this may cause fire or electric shock.
Hold the power plug to disconnect the power cord.
Do not pull the power cord since it can cause fire, electric
shock, etc.
Connect the power plug firmly.
If the power plug is not connected firmly, it can cause fire,
electric shock, etc.
• Do not use the damaged power cord and loose electric
outlets.
Do not connect to outlets or wiring device if their
ratings are beyond the specified rating.
If the rating goes over the specified rating such by putting
many loads on one electric outlet, it can cause generation of
heat resulting in fire.
Do not strike or give a strong shock to this product
Failure to observe this may cause fire or electric shock.
Avoid placing this product in locations which are
subject to humidity and dust.
Failure to observe this may cause fire or electric shock.
Do not block the ventilation holes.
Doing so can cause fire since it can raise the temperature
inside this product high.
Precautions

9
Power source
The input power source for this product is 100 V - 240 V AC
50 Hz/ 60 Hz.
Do not connect to the outlet that provides the power to
equipment that requires a measurable amount of power
(such as a copy machine, air conditioner, etc.). Avoid placing
this product in locations where is subject to water.
* The included power cord(s) is (are) dedicated to the use
with this product. Do not use with any other device. Also,
do not use any other power cord with this product.
Ambient operating temperature
Use this product at temperatures between 0 °C to +45 °C.
Failure to do so may damage the internal parts or cause
malfunction.
* Performance and lifetime of hard disk drives are easily
affected by heat (used at high temperature). It is
recommended to use this product at a temperature of
approx. +25°C.
To cut the power supply
To cut the power supply, unplug the power plug of the
product from the AC outlet. If the power cord cannot be
unplugged easily due to installation condition, connect the
power cord to an AC outlet via a distribution board circuit
breaker with a cut-off capacity.
Built-in backup battery
• Do not expose the built-in battery to excessive heat such
as sunlight, fire, etc.
Static electricity
When installing, maintaining, or operating this product, in
order to remove the static electricity before touching, touch
a metal object (steel desk, doorknob, etc.) with your hand
first.
Static electricity can cause malfunction or failure of this
product.
About protection against lightning
If cables are pulled in from outdoors, they may be affected
by lightning. In that case, install a lightning arrester in the
immediate vicinity of the unit and wire the network cable
length between the unit and the lightning arrester as short as
possible to avoid being affected by lightning.
Hard disk drive (HDD)
• Hard disk drives are precision devices. Handle them with
care. It is possible to damage them if they are moved
while their motors are still running.
• Please be forewarned that any loss of information on the
HDD is not guaranteed under any circumstances.
• Do not move or install this product just after turning the
power on or off (for around 30 seconds.) The hard disk
drives are running.
• The HDD is consumable and the lifetime differs depending
on the operational environment. Write errors may occur
frequently after around 20000 hours of each HDD
operation and head and motor deterioration may occur
after around 30000 hours of operation. They will reach
the end of their lifetime after 30000 hours of operation if
they have been used at the recommended ambient
temperature (approx. +25 °C).
• To prevent data loss from disk crashes, it is
recommended to keep the ambient operating
temperature at approx. +25 °C and to replace them after
around 18000 hours of operation.
You can check the operating time of each HDD in
"Operation" of the "HDD information" tab under
"Maintenance" under "Advanced" from the setup menu.
• When hard disk drive trouble occurs, replace it
immediately. Contact your dealer about servicing.
About external storage devices (External HDD and
USB memory)
• Use external storage devices formatted in exFAT, FAT
(FAT16) or FAT32.
• External storage devices requiring password
authentication or a special driver or using an encryption
function cannot be used.
Prevent condensation from forming
If this happens, it can cause malfunction.
Leave it switched off for around 2 hours in the following
cases.
• When this product is placed in an extremely humid
place.
• When this product is placed in a room where a heater
has just been turned on.
• When this product is moved from an air-conditioned
room to a humid and high-temperature room.
Cleaning
• Turn the power off, and then use a soft cloth to clean
this product.
• Do not use strong or abrasive detergents when cleaning
the body.
• When using a chemical cloth for cleaning, read the
caution provided with the chemical cloth product.
Precautions for use
Precautions (continued)

10
Precautions (continued)
Product disposal/transfer
Images saved on the storage device used with this product
may lead to personal information leakage. When it is
necessary to dispose or give this product to someone, even
when for repair, make sure that there is no data on the hard
disk drives.
Also, be sure to delete device and user information
registered with external services and applications that use
this puroduct.
Indication label
Refer to the indication label placed on the top cover or
bottom of this product for the equipment classification and
power source, etc.
About reboot of this product
In the following cases, this product will automatically reboot
to continue recording.
• When the software of this product has detected the
internal error and reboot becomes necessary.
Disclaimer of warranty on recoded data
i-PRO Co., Ltd. assumes no responsibility or liability, directly
or indirectly, for failure of recording or editing including loss
of data due to any reason or cause which does not exclude
repair or maintenance of this product regardless whether the
subject is hard disk or other parts.
Packing box, Cushion, HDD unit holding bracket
When transporting the recorder, it is necessary the Packing
case, Cushion and HDD unit holding bracket to prevent the
recorder from damage by fall or vibration. Keep them
properly to use again.
While operating this product, remove the HDD unit holding
bracket.
About transportation
The recorder weighs over 10 kg {22.1 lbs}. Be careful not to
drop the recorder when installing it into a rack. Dropping
may cause damage, deformation of the recorder, or injury.
About CR Coin Cell Lithium Battery
This product contains a CR Coin Cell Lithium Battery which
contains Perchlorate Material – special handling may apply.
See www.dtsc.ca.gov/hazardouswaste/perchlorate.
About use of external services, etc.
Functions that use external services or other devices may
stop or malfunction due to external influences.
About portrait rights
It is the customer's responsibility to install the camera and
use the footage, taking into consideration the privacy and
portrait rights of the subject.
About temperature sensor
This product has a temperature sensor to measure the
internal temperature.
11
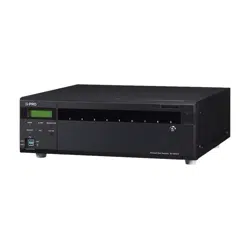
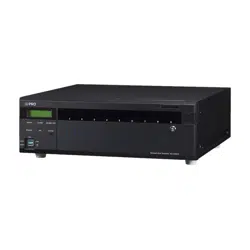
Major operating controls and their functions
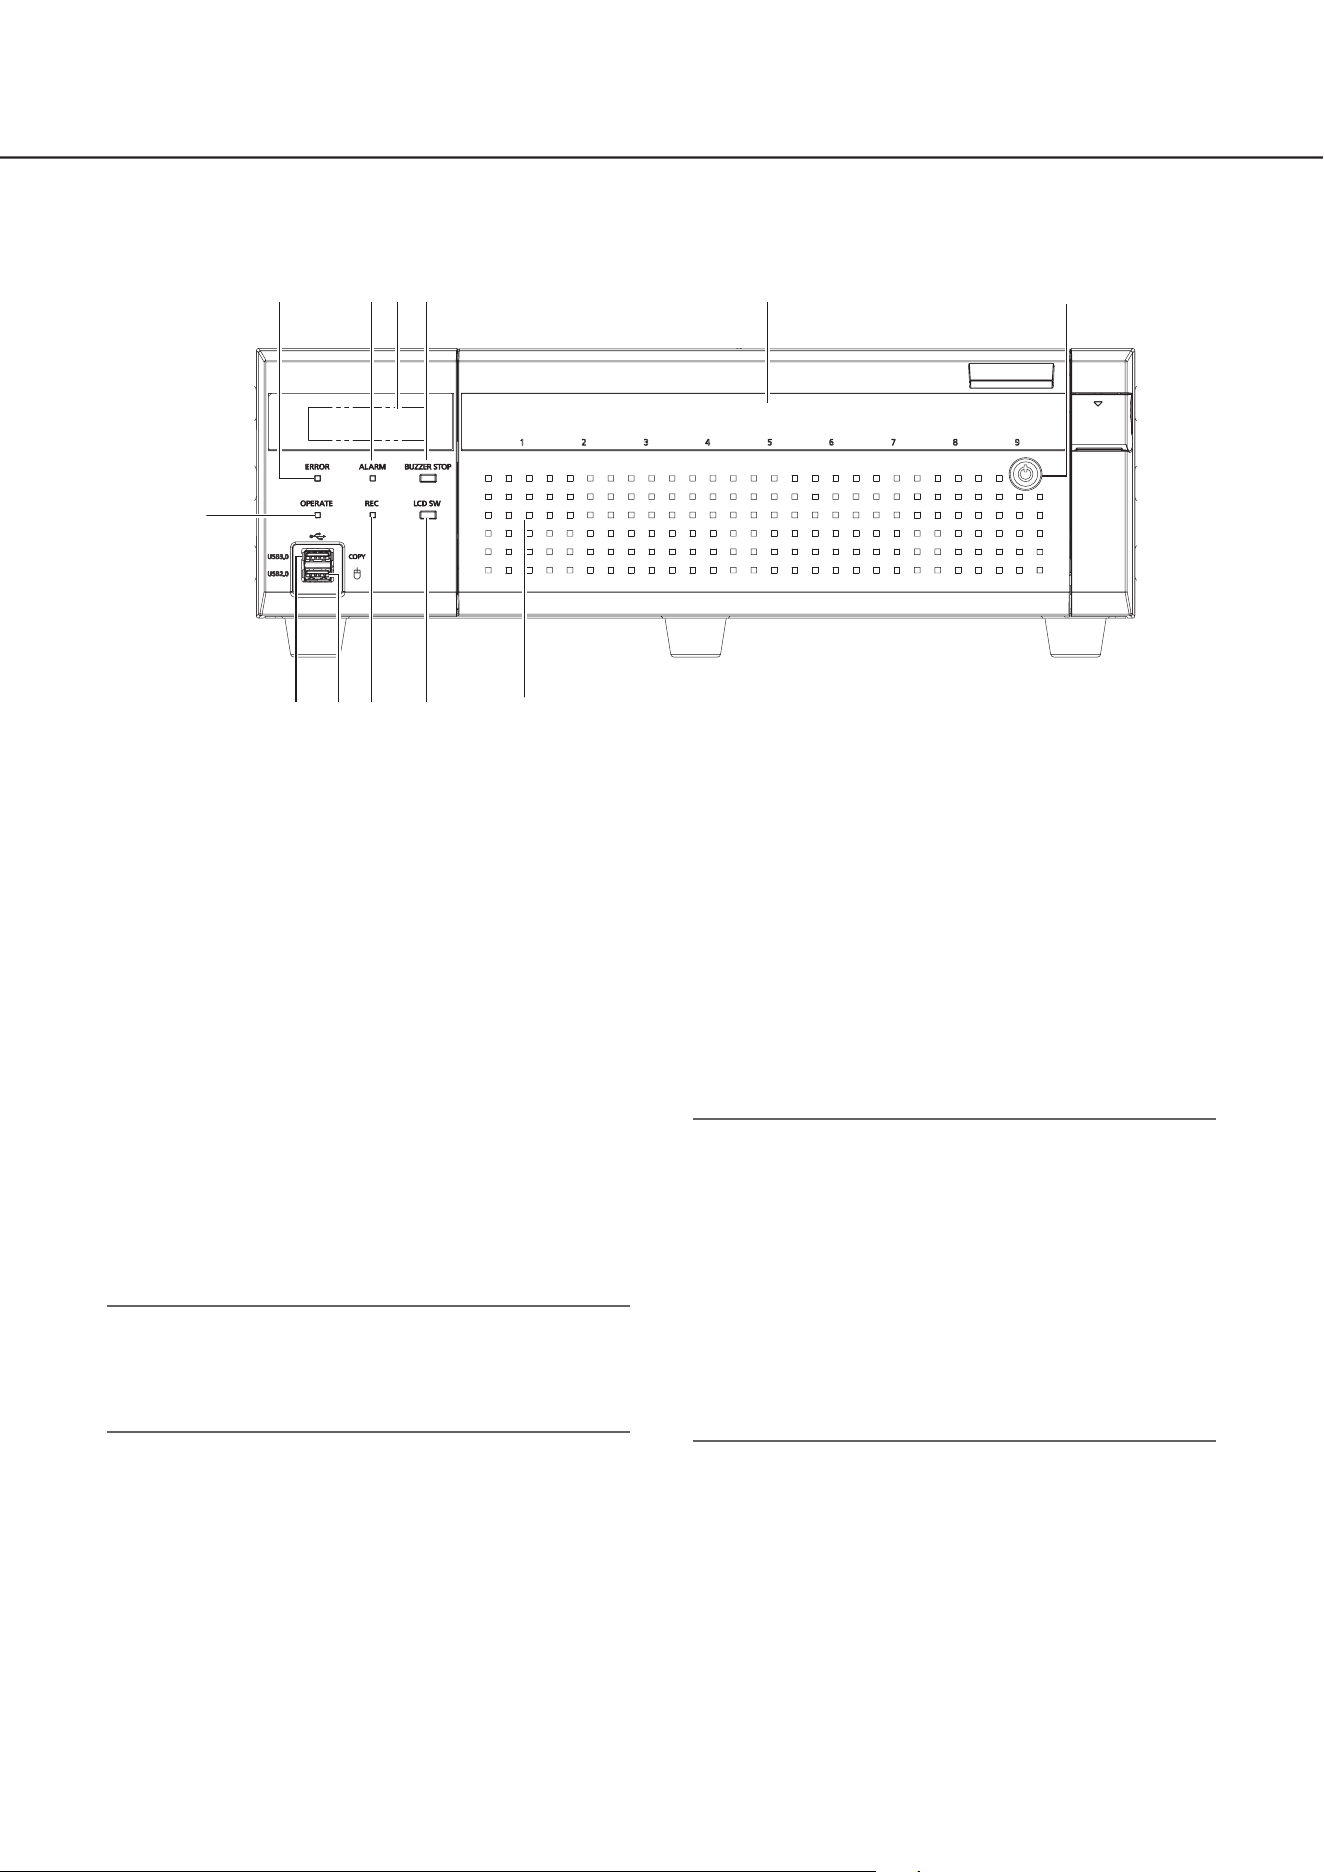
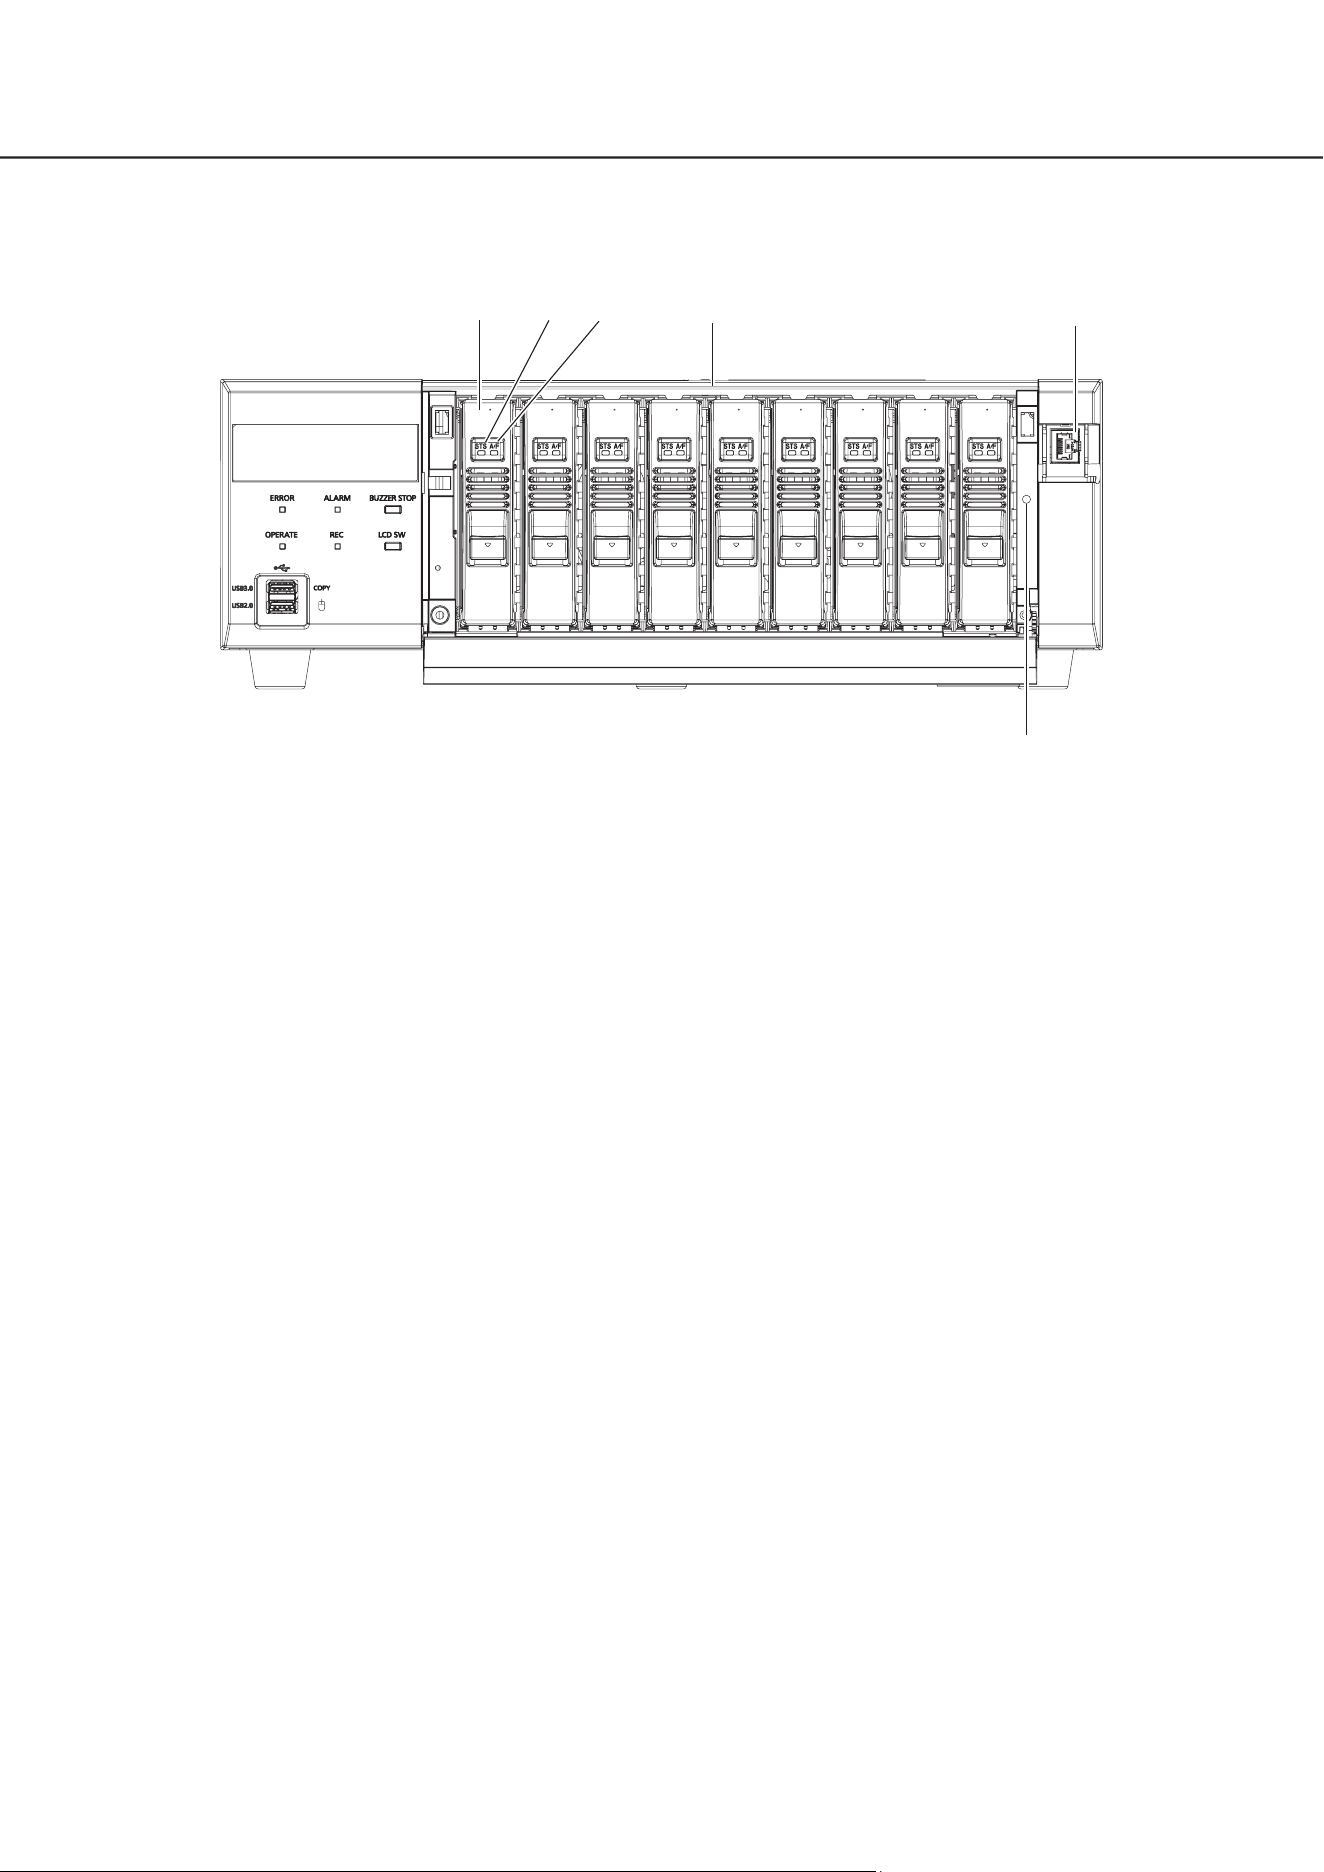
Front view
① Error indicator [ERROR]
Blinks when an error that can become a problem for the
recorder to run the system occurs.
Blinks red: System error (Network link error, HDD error,
Recording error, etc.)
Blinks orange: Thermal error, cooling fan malfunction, etc.
Shows a solid light when automatically reset from an error status.
② Alarm indicator [ALARM]
Blinks when an alarm occurs, and lights when the alarm
output stops. This indicator will go off when the [Reset]
button (☞ Operating Instructions) is clicked.
③ LCD
Indicates the day and time, the status of the recorder (error
status, etc.), or the name of the functions available using
the buttons on the front panel of the recorder. The recorder
requires a main monitor or a PC for settings. You cannot
setup the settings using the LCD of the recorder only.
Note:
• Due to the difference in internal structure, the
temperatures displayed on the LCD will differ between
the extension unit and this product even under the same
environment.
④ Buzzer stop button [BUZZER STOP]
Press this button to stop the buzzer that started sounding at
an alarm/error occurrence. Refer to the Operating
Instructions for further information about alarms and errors.
⑤ HDD access indicator [1]~[9]
It transmits the HDD status indicator and the HDD
access indicator installed in the front cover.
HDD status indicator (left side)
Indicates the operational status of the respective hard
disk drive. (☞ Page 13)
HDD access indicator (right side)
Indicates the status (access/failure) of the respective
hard disk drive. (☞ Page 13)
Basically, each indicator will indicate the status of the
respective HDD units (HDD unit 1 to 9), but each
indicator will be the same when the system error occurs.
Important:
• When the indicator lights red in the RAID1/RAID5/RAID6
mode, replace the HDD unit with the error immediately.
Contact your dealer about replacing the HDD unit.
• In the RAID5 mode:
When 2 or more HDD access indicators light/blink red, it
may be impossible to recover data on the respective
hard disk drives.
• In the RAID6 mode:
When 3 or more HDD access indicators light/blink red, it
may be impossible to recover data on the respective
hard disk drives.
⑥ Key hole
Use the included key to open/close the front cover. Keep
the key in a safe place.
Lock the front cover: Insert, push and turn the key to the
left.
Unlock the front cover: Insert, push and turn the key to
the right.
⑦ Operation indicator [OPERATE]
Lights when the power is on.
➀
⑦
⑧
⑨ ⑩ ⑪
⑫
➁ ➃ ⑥➄➂

12
⑧ Copy port (USB3.0) [COPY]
Connect an external storage device (external Hard disk
drive, USB memory) to this port and copy images and
audio recorded on the hard disk drive. An external
storage device can also be connected to the copy port
on the rear. Use one of them.
⑨ Mouse connection port (USB2.0) [
]
The included mouse is connected to this port.
⑩ Recording indicator [REC]
Lights orange when recording is being performed.
⑪ LCD menu switching button [LCD SW]
Use this button to switch menus on LCD, i.e. from/to the
date/time display (default) to/from the IP address display
of the recorder.
If an error message is displayed on the LCD, the
message will be deleted if this button is pushed and it
will return to the date/time display.
⑫ Front cover
Open the front cover when adding/replacing the HDD
unit.
Keep this cover closed and locked during normal
operation.
Major operating controls and their functions (continued)
13
Major operating controls and their functions (continued)
Inside the front cover
① HDD units [Option]
Only the hard disk drive encased in the dedicated hard
disk drive canister (HDD units) can be installed in the
recorder.
Contact your dealer about purchasing, installing, and
replacing the hard disk drives.
② HDD status indicator [STS]
Indicates the operational status of the respective hard
disk drive.
Lights green: Indicates that the power of the (formatted)
hard disk is on.
Blinks green: Indicates that the respective hard disk
drive is for playback use only.
(Recording is unavailable using the respective hard
disk drive.)
Blinks orange: Indicates that the respective hard disk
drive is currently being formatted, added or removed.
Blinks red: Indicates that formatting of the hard disk
drive has failed.
Off: Indicates that the power of the hard disk drive is off,
Indicates that the hard disk drive is not connected/
recognized.
③ HDD access/failure indicator [A/F]
Indicates the status (access/failure) of the respective
hard disk drive.
When an HDD failure (error) occurs during operation in
the RAID1/RAID5/RAID6 mode, the indicator will light/
blink red.
Blinks green: Indicates that the respective hard disk
drive is being accessed.
Off: Indicates that the respective hard disk drive is not
being accessed.
Lights red: Indicates that the respective hard disk drive
is faulty (which can be recovered by replacing the
hard disk drive)
In the RAID1/RAID5 mode, it indicates that the
respective hard disk drive is the first faulty drive.
In the RAID6 mode, it indicates that the respective
hard disk drives are the first and second faulty drive.
Blinks red: Indicates that the respective hard disk drive
is faulty (which cannot be recovered even by replac-
ing the hard disk drive)
In the RAID5 mode, it indicates that the respective
hard disk drive is the second faulty drive.
In the RAID6 mode, it indicates that the respective
hard disk drive is the third faulty drive.
Blinks orange: Indicates the drive in data recovery in
RAID1/RAID5/RAID6 mode (it may appear that the
indicator lights orange when recovery is being pro-
cessed at high speed)
④ HDD slots
Up to 9 HDD units can be installed.
⑤ Maintenance port (For maintenance purpose only)
Use this port to connect directly to a PC and perform
maintenance operations. Do not use for normal
operation.
⑥ HDD unit holding bracket fixing thread hole
Use this hole to fix the HDD unit holding bracket when
transporting the recorder.
* The following illustration shows that 9 HDD units are installed with the "HDD unit holding brackets" removed.
➀ ➁ ➂
➃
➄
⑥

14
Major operating controls and their functions (continued)
Rear view
① Alarm/Control connector ALARM/CONTROL
This connector is used when connecting with an external
device such as a sensor or anti-theft door switch that
output alarm signals, or when connecting an alarm device
such as a buzzer or a lamp to the external equipment.
The two included terminal plug (12 pin) can be mounted.
② Alarm In connector ALARM IN
It is used when connecting with an external device such as
a sensor or anti-theft door switch that output alarm signals.
The two included terminal block plugs (16) can be mounted.
③ Security wire hole
Mount the lock device for the anti-theft security wire.
④ Main monitor output connector (HDMI) [A/V MAIN]
This connector is used to connect to an HDMI-ready
monitor (the main monitor). It displays live images,
recorded images, or the setup menu of the recorder.
⑤ Sub monitor output connecter (HDMI) [VIDEO
SUB]
This connector is used to connect to an HDMI-ready
monitor (sub monitor). Only the live images will be
displayed.
⑥ Cable clamp fixing hole (for fixing terminal block
cable)
This is a fitting hole for the (included) clam to tie and fix the
terminal block cables. Refer to ☞ page 15 for fitting.
⑦ Copy port (USB3.0) COPY [1] [2]
Connect an external storage device (external Hard disk
drive, USB memory) to this port and copy images and
audio recorded on the hard disk drive. An external
storage device can also be connected to the copy port
on the front. Use one of them.
⑧ Clamp mount (for fixing USB cable)
Fit the power cord clamp (included) to fix the USB cable.
Refer to
☞
page
15
for fixing.
⑨ Network port (PC port) [PC]
Connect the recorder with a PC via a network
compatible with 10BASE-T, 100BASE-TX or
1000BASE-T. Use this port when the cameras and the
PC are connected to different network.
⑩ Network port (Camera/PC port) [CAMERA/PC]
Connect the recorder with a PC and cameras via a
network compatible with 10BASE-T, 100BASE-TX or
1000BASE-T. When the port is being accessed, the
access indicator (green) blinks. When the port is being
linked, the link indicator (orange) lights.
Camera/PC
PC
(10/100/1000 BASE-T)
⑪
External storage connector EXTENSION UNIT [1]~[5]
Connect the optional extension unit to this connector
using the dedicated connection cable included in the
extension unit.
Make sure to connect the extension units in order from
external storage connector number 1.
⑫ Cable clamps fixing holes
Fit the cable clamp (include in the extension unit) to fix the
connection cable. Refer to the operating instructions of
the extension unit for further information.
⑬ Clamp mount (for fixing power cord)
Fit the power cord clamp (included) to fix the power cord.
Refer to
☞
page
15
for fixing.
➀
⑧ ⑨ ⑩ ⑪ ⑫ ⑬ ⑭
⑮
➁
➄ ⑥
➂
➃
⑯
⑦
⑰
15
Major operating controls and their functions (continued)
⑭ Power cord inlet [AC IN]
Connect the included power cord to this inlet.
⑮ [POWER] switch
Press it to turn on the power. Press it again to turn off
the power.
Important:
• Turn on the power of all extension units first if
connected, and then turn on the power of the recorder.
• Turn off the power of the recorder first when turning off
the power.
⑯ SIGNAL GND terminal [SIGNAL GND]
Connect this terminal with the SIGNAL GND terminals of
the devices in the system for signal ground. When
operating the recorder and the devices in the system
without signal ground, noise may be produced.
⑰ Cooling fan outlet
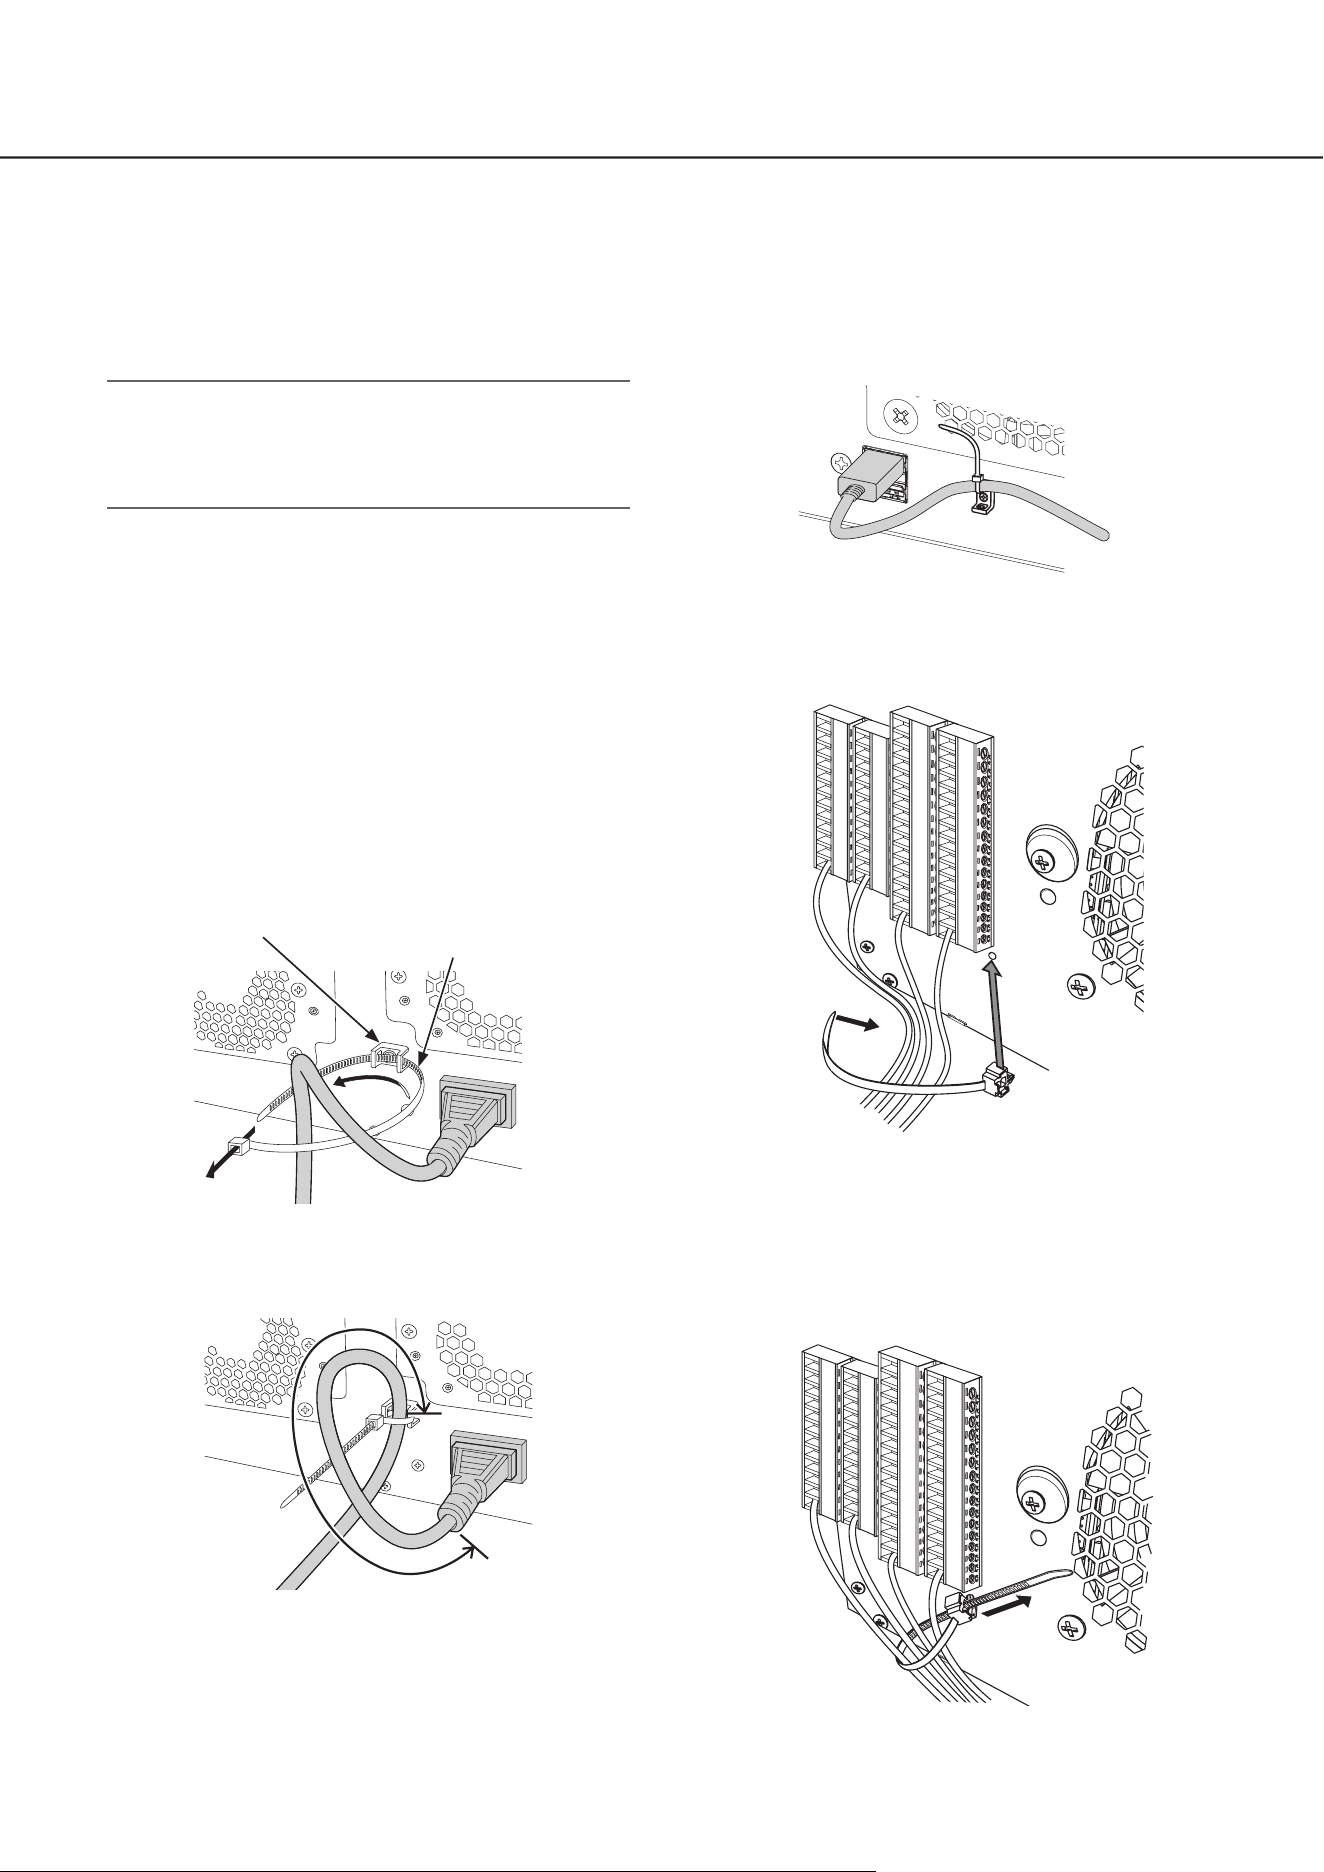
How to fix the power cord
Fix the power cord at 15 cm to 20 cm {5-7/8 to 7-7/8 inches}
from the connector with the included power cord clamp
passed through the clamp mount.
Fix the power cord so that it does not block the cooling fan
outlet.
⋇
⋈
Clamp mount
Power cord clamp
① Pass the power cord clamp through the clamp mount.
② Make a ring with the power cord clamp as shown in
the illustration to tighten the power cord.
⋉
15 cm to 20 cm
{5-7/8 to 7-7/8 inches}
③ Tighten the power cord at 15 cm to 20 cm {5-7/8 to
7-7/8 inches} from the connector and fix it to the
clamp mount.
Cut the unnecessary part of the power cord clamp as
necessary.
How to fix the USB cable
Fix the USB cable with the included power cord clamp
passed through the slot on either the top or bottom of the
clamp mount (for fixing USB cable) as shown below.
Cut the unnecessary part of the power cord clamp as
necessary.
Fitting of the cable clamp (for
fixing the terminal block cables)
⋇
⋈
① Insert the (included) cable clamp into the cable clamp
fitting hole.
② Tie cables of the ALARM/CONTROL terminals and of
the ALARM IN terminal with the cable tie of the cable
clamp (included).
Tie the cables to the downward-right so that they do
not block the network port.
⋉
③ Fasten the cable tie of the cable clamp (included) and
fix it to the upward-right.

16
It is necessary to register users who directly operate this product, or PCs (hosts) that access through the network such as LAN.
Up to 32 users can be registered.
It is possible to register the following for the user information.
Item Description
User name User name is to be registered to log in to the recorder. The user name will be entered at the time
of login.
Password Password is to be registered to log in to the recorder together with the user name. The pass-
word will be entered at the time of login.
Level Users are classified into the following levels depending on the available operations.
Administrator/Manager/Operator/Viewer/Logged out
The administrators can perform all the configurations and operations. It is possible to select in
advance the functions that can be controlled by users at other levels. (☞ Operating Instructions )
Priority level Priority level indicates the operational priority. Users at each level are assigned the fixed priorities
ranging from "0" (Highest) to "4" (Low).
Administrator 0 Highest
Manager 1 High
Operator 2
Viewer 3
Logged out 4 Low
When the two or more users at the same level perform the same operation, the recorder will be
controlled in accordance with the latest operation.
Default screen Select the live image display screen of the main monitor/PC screen to be displayed immediately
after login.
When operating from a PC via a network
Operation of the recorder can be made using a PC via a network. Up to 16 hosts (PCs) can access the recorder at the same
time.
When another host (PC) tries to log in to the recorder after 16 hosts (PCs) have already logged in, the user with the lowest priority
will be logged out. When the user who is trying to log in has the same priority as the users who have already logged in, the user
whose login is the earlier is logged out.
When accessing the recorder from a PC via a network, the log-in authentication method is different as follows depending on the
"User authentication" settings of the "Basic" tab under "User management" under "Advanced" from the setup menu.
(☞ Operating Instructions)
User authentication setting User/Host to log in Remarks
Off Log in as an administrator.
On (default) Log in as a registered user. The login window will be displayed.
User/Host management
17
To install a hard disk drive in the recorder, it is necessary to assemble an HDD unit (encase the hard disk drive in the HDD canister).
The HDD unit is designed to easily install/remove the hard disk drive in/from the recorder.
Contact your dealer about purchasing, installing, and replacing the hard disk drives.
Important:
• The HDD unit is a precision device. Handle them with care. Vibration and shocks may cause failure of the HDD unit.
• Before transportation, read "HDD unit holding bracket" (this page) and "When you transport the recorder" (☞ Page 18).
• Do not move or install this product just after turning the power on or off (for around 30 seconds.) The hard disk drives are
running.
• Install the HDD units in order starting with disk slot 1.
• Once the operation has started in RAID1*, RAID5* or RAID6* mode, do not change the position of the HDD unit. If they are
changed, it may become impossible to read recorded data.
* Refer to Operation/Settings of the Operating Instructions for RAID mode.
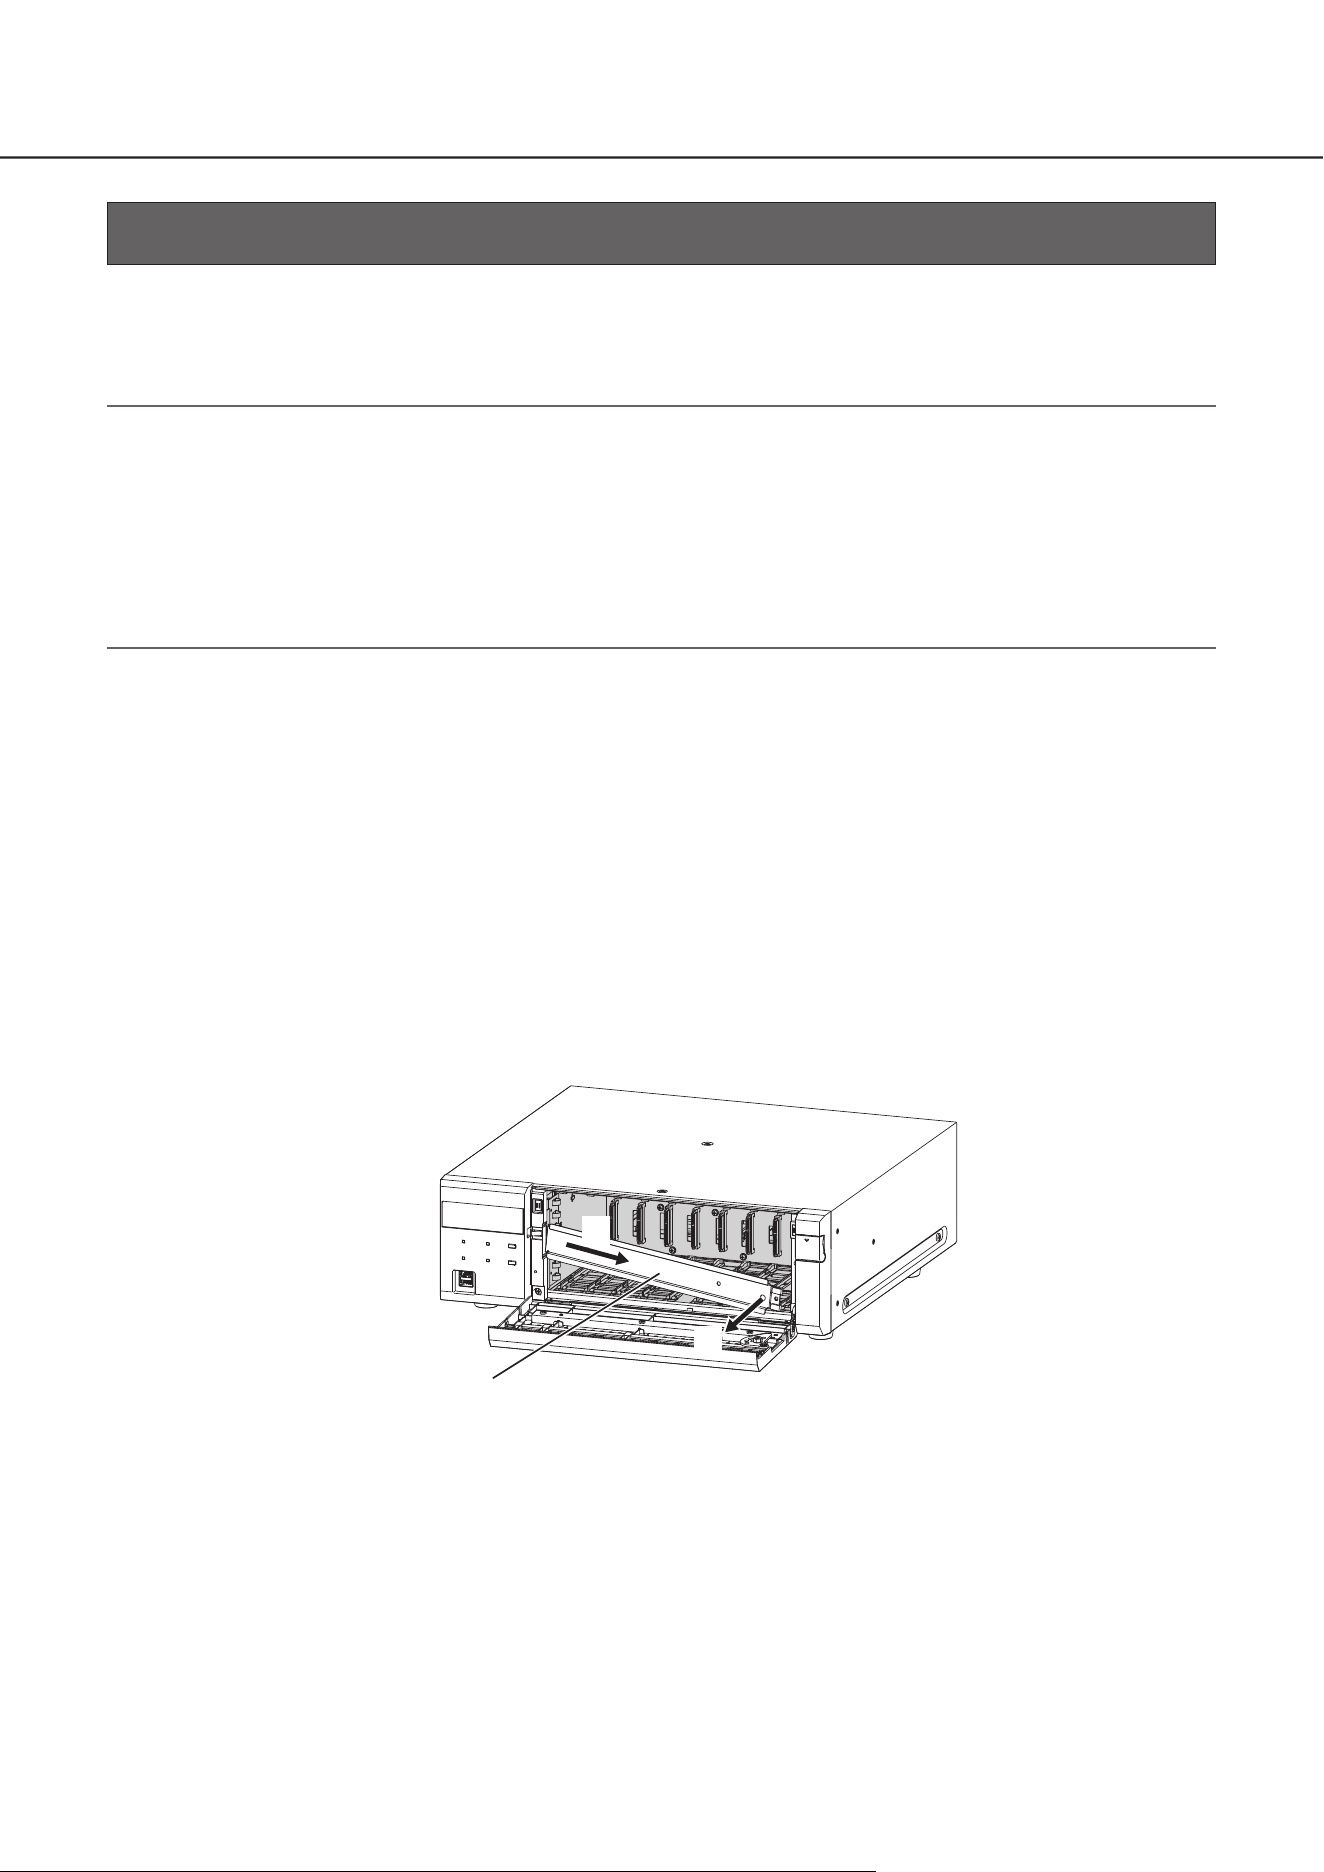
HDD unit holding bracket
The recorder has the "HDD unit holding bracket" in the HDD unit slot, screwed in at the factory before shipment. To install the
HDD unit in the recorder, remove the "HDD unit holding bracket" first.
The "HDD unit holding bracket" and the screw for fixing the bracket are necessary to prevent the HDD unit from falling off during
transportation. Keep them properly.
Do not use an electric screwdriver to avoid impact on the HDD.
How to remove the HDD unit holding bracket
① Remove the fixing screw for bracket.
② Slide the HDD unit holding
bracket to the right and
remove it.
HDD unit holding bracket
②
①
Handle the HDD units
HDD unit
18
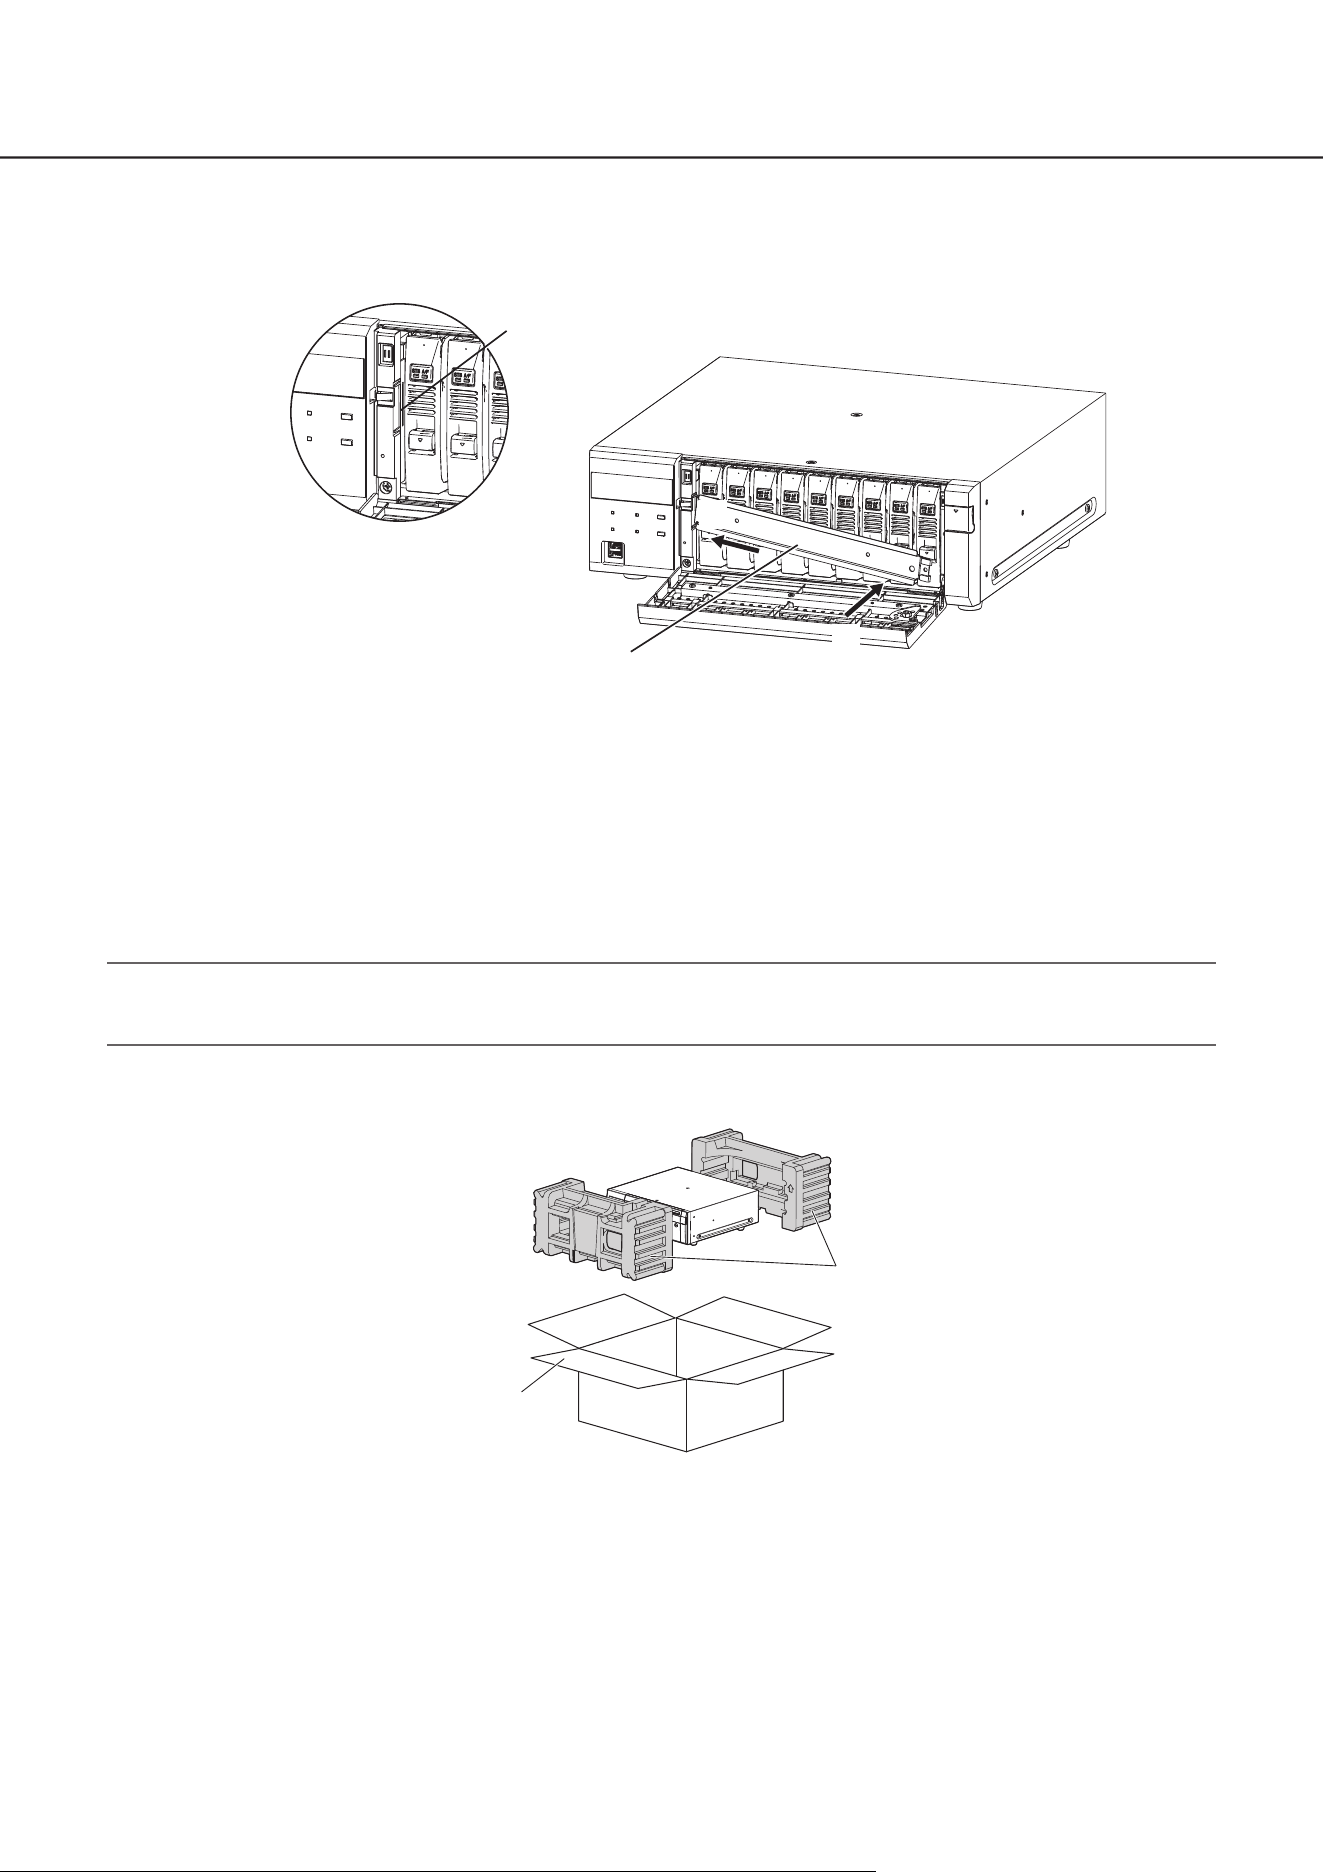
How to attach the HDD unit holding bracket
Angle
① Insert the HDD unit holding
bracket into the angle hole.
② Fix the HDD unit holding
bracket with a screw while
sliding it to the left.
HDD unit holding bracket
②
①
When you transport the recorder
(
1
) Remove all the HDD units in the recorder or fit the HDD unit holding brackets and fix them with screws. Do not use an electric
screwdriver to avoid impact on the HDD.
(
2
) Put the recorder between the cushions and insert together into the packing box.
Important:
㍟ The recorder weighs over 10 kg
{22.1 lbs}
. Be careful not to drop the recorder when installing it into a rack. Dropping may cause
damage, deformation of the recorder, or injury.
Packing box
Cushion
HDD unit (continued)
19
When removing the HDD unit, it is necessary to perform the removal process in advance. When replacing the HDD unit, it is
necessary to perform the removal process/the link process.
Important:
• Consult the dealer for the removal process/removal and the link process/installation of the HDD unit.
• Once the installation process is completed, the data in the HDD unit is deleted.
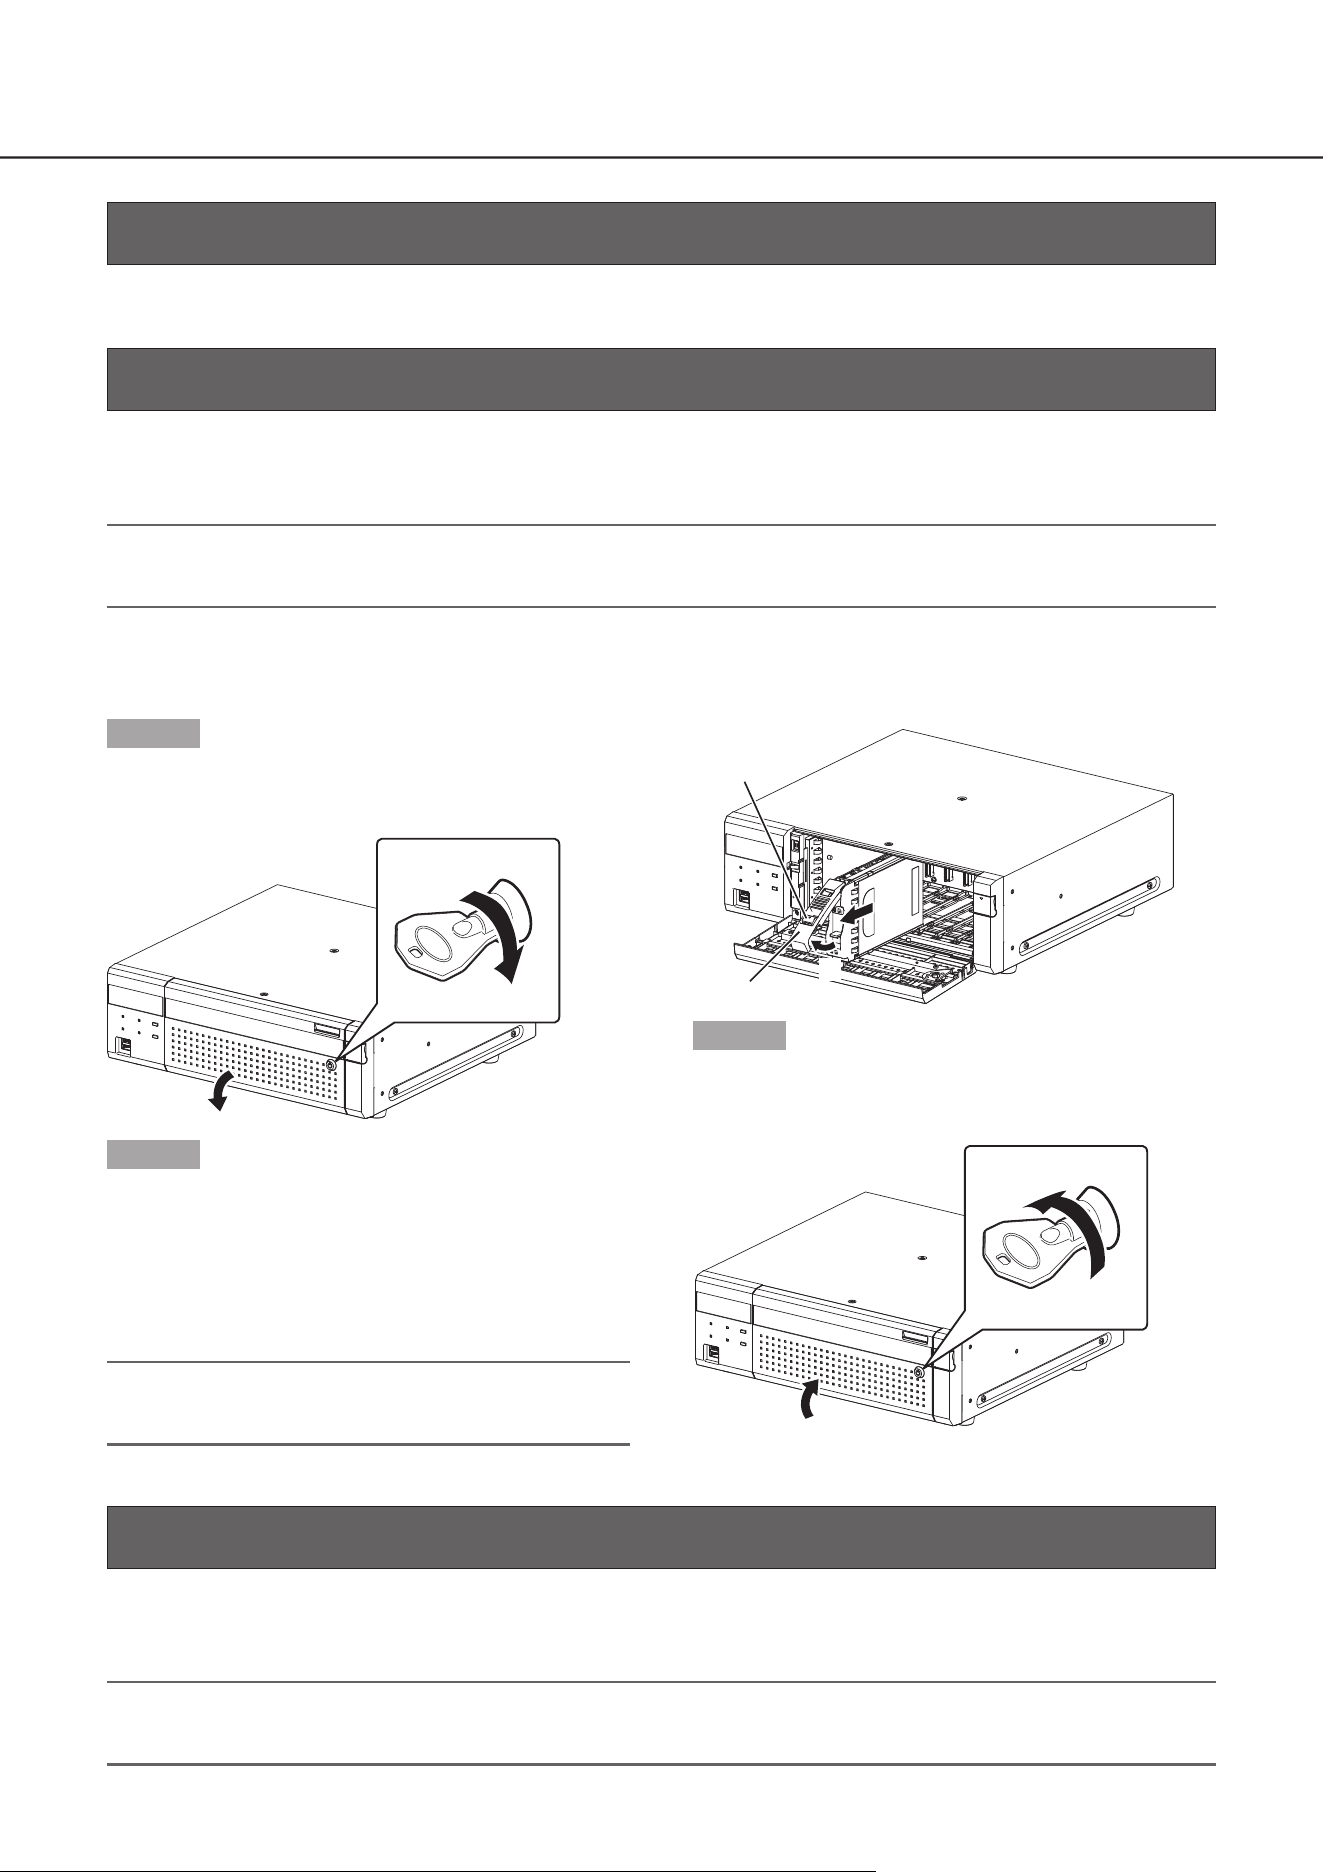
After the removing process is completed, the HDD unit can be removed even if the recorder is operating. The following explains
procedures for how to remove the HDD unit after the removing process.
Step 1
After inserting the included key into the key hole on
the front cover, push and turn it to the right to open
the front cover.
Step 2
Remove the HDD unit.
①
Pull the lever up while holding down the removal knob on
the HDD unit.
② Pull the HDD unit out from the HDD slot.
Pull the HDD unit out carefully so as not to drop it and
handle it gently so as not to give it a shock or vibration.
Important:
• When removing the HDD unit, be careful not to pinch
your fingers with the lever.
Lever
①
Removal knob
②
Step 3
Close the front cover and lock it by pushing and turn-
ing the key to the left.
Keep the key in a safe place.
When removing the extension unit, it is necessary to perform the removal process in advance. When replacing the extension unit,
it is necessary to perform the removal process/the link process.
Important:
• Consult the dealer for the removal process/removal and the link process/installation of the extension unit.
• Once the installation process is completed, the data in the HDD unit of the extension unit is deleted.
Remove the HDD units from recorder
Remove the extension unit from recorder
Refer to the Installation Guide for installing the HDD unit to this recorder.
HDD unit (continued)
Install the HDD unit in recorder

20
• General
Power source: 100 V - 240 V AC 50 Hz/ 60 Hz
Power consumption: 145 W (150 VA)
Ambient operating temperature: Main body: 0 °C - +45 °C {32 °F - 113 °F}
Mouse (included): +5 °C - +40 °C {41 °F - 104 °F}
Ambient operating humidity: 5 % to 90 % (non condensing)
Maximum operating altitude: 2000 m {6562 feet} above sea level
Recording compression method: H.265, H.264, JPEG
Dimensions: 430 mm (W) . 132 mm (H) . 413 mm (D) {16-15/16 inches (W) . 5-3/16 inches (H) .
16-1/4 inches (D)} (From Rack Mount Bracket 400 mm {15-3/4}) (excluding rubber
feet and projections)
Mass: When no HDD is installed: 13.0 kg {28.7 lbs}
When 9 HDDs are installed: 20 kg {44.1 lbs}
Finish: Front view: Solid black coating, Resin
Top cover: Solid black coating, Zinc-coated steel
Rear view: Zinc-coated steel
• Hard disk drive (Contact your dealer about purchasing hard disk drives.)
Hard disk drive: 3.5-inch hard disk drive (Up to 9 hard disk drives can be installed.)
RAID function: RAID1 (Available only when 2 or more hard disk drives are installed.)
RAID5 (Available only when 3 or more hard disk drives are installed.)
RAID6 (Available only when 4 or more hard disk drives are installed.)
• Input/Output
Monitor (HDMI) connector: HDMI (19 pin, type A), ×2
Main monitor
3840 × 2160 (4K) p/30 Hz
3840 × 2160 (4K) p/25 Hz
1920 × 1080 p/60 Hz
1920 × 1080 p/50 Hz
Sub monitor
1920 × 1080 p/60 Hz
1920 × 1080 p/50 Hz
Mouse connection port: High-speed serial interface, USB2.0, ×1
Copy port: High-speed serial interface, USB3.0, ×3
Alarm IN connector: Alarm input 1-32*1 (Terminal plug (16-pin) ×2)
Alarm/Control connector: Network error output*
2
, Alarm reset input*
1
, Emergency recording input*
1
, Outage detection input*
2
,
External recording mode switching input*
1
, HDD error output*
2
, Camera error output*
2
, Recorder
error output*
2
, Recording error output*
2
, Alarm output*
2
, Outage processing end output*
4
, +5 V
output*
3
(Terminal plug (12 pin) ×2)
Network port (Camera/PC): 10BASE-T/100BASE-TX/1000BASE-T (RJ-45) ×1
Network port (PC): 10BASE-T/100BASE-TX/1000BASE-T (RJ-45) ×1
Security wire hole: 7 mm × 3 mm {9/32 inches × 1/8 inches}
Support protocols: HTTP, HTTPS, RTP, RTSP, TCP/IP, UDP/IP, SMTP, NTP (Server, Client), DNS, SNMP, POP3,
DHCP, MQTTS
Support web browsers: Microsoft Edge*
5
, Google Chrome™, Mozilla Firefox
*1 Non-voltage make contact input +3.3 V pull-up Approx. 23 kΩ
*2 Open collector output 24 V DC max., –200 mA max.
*3 +5 V ±0.5 V 200 mA max.
*4 High (ON) DC 5 V/Low (OFF) DC 0 V
*5 Internet Explorer compatibility mode of Microsoft Edge is not supported.
Specifications

21
• Option (as of October 2023)
Additional Camera Kit (license for 32 cameras) WJ-NXE42W (NX410)
Additional Camera Kit (license for 32 cameras) WJ-NXE52W (NX510)
Additional Camera Kit (license for 64 cameras) WJ-NXE53W (NX510)
Secure Communication Kit (license for 1 camera) WJ-NXS01W
Secure Communication Kit (license for 4 cameras) WJ-NXS04W
Secure Communication Kit (license for 16 cameras) WJ-NXS16W
Secure Communication Kit (license for 32 cameras) WJ-NXS32W
HDD Unit WJ-HDU42/2 (2 TB), WJ-HDU42/4 (4 TB), WJ-HDU42/6 (6 TB),
WJ-HDU42/8 (8 TB)
WJ-HDU41MUX (1 TB), WJ-HDU41NUX (2 TB), WJ-HDU41QUX (3 TB),
WJ-HDU41SUX (4 TB)
Extension Unit WJ-HXE400 (Up to 5 units can be connected, For U.S.)
WJ-HXE400/G (Up to 5 units can be connected, For Europe)
*Contact your dealer when using WJ-HXE400, WJ-HXE400/G.
WJ-HXE410 (Up to 5 units can be connected, For U.S.)
WJ-HXE410G (Up to 5 units can be connected, For Europe)
WJ-HXE410GV (Up to 5 units can be connected, For Europe)
PoE Camera Power Unit WJ-PU201 (For U.S.)
WJ-PU201/G (For Europe)
WJ-PU201F/G (For Europe)
Specifications (continued)

Tokyo, Japan
https://www.i-pro.com/
© i-PRO Co., Ltd. 2023 L1023-1064 PGQP3684YA
Authorised Representative in EU:
i-PRO EMEA B.V.
Laarderhoogtweg 25, 1101 EB
Amsterdam, Netherlands
i-PRO EMEA B.V. UK Branch
1010 Cambourne Business Park,
Cambridgeshire CB23 6DP