Loading ...
Loading ...
Loading ...
Napoleon.com | Rogue® Series Grills
Operation |
9
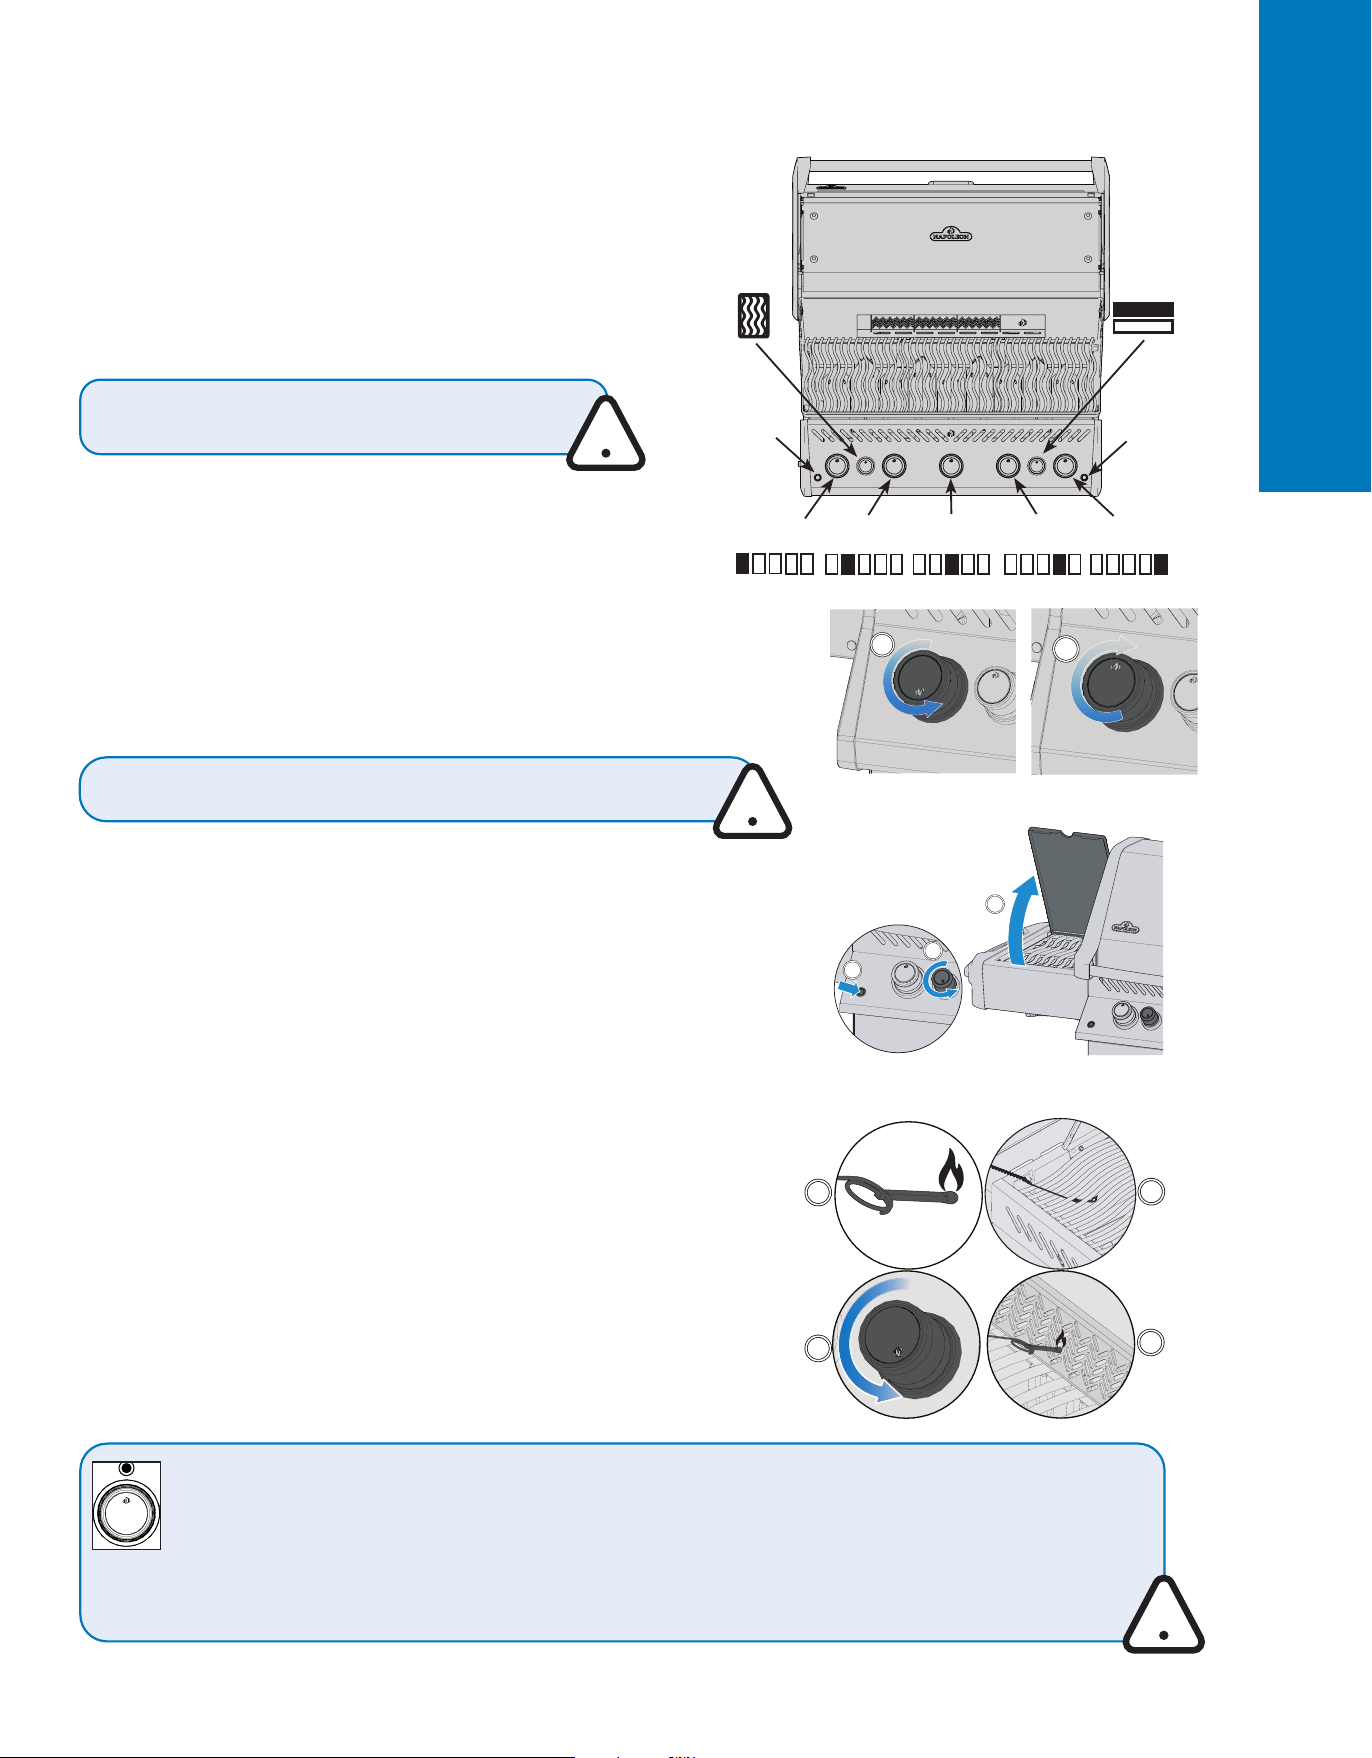
Side Burner
Igniter
Right Centre
Main Burner
Left Centre
Main Burner
Left
Main Burner
Right
Main Burner
Centre
Main Burner
Rear Burner
Lights
Operation
WARNING! Ensure all burner controls are in the OFF position before slowly turning on gas supply valve.
WARNING! Follow the lighting instructions carefully.
WARNING! Make sure the lid of the grill is OPEN while igniting.
WARNING! Do not adjust the cooking grids while the grill is hot, or operating.
WARNING! Never grill food directly on the flame side burner. It is designed for use with pots and pans only.
!
1
2
3
4
3
1
2
2
3
Fig. 1
Fig. 2
Fig. 3
WARNING! Do not use the rear burner while operating the main burner.
LIGHTING YOUR GRILL
Is it the very first time? Perform a Burn-off
Remove warming rack and run the main burners on high for
30 minutes. It is normal for the grill to emit an odor the first
time it is lit. This odor is caused by the “burn-off” of internal
paints and lubricants used in the manufacturing process and
will not occur again.
Main Burner Lighting
1. Open grill lid.
2. Push and slowly turn any main burner knob counter clockwise to
HIGH position until pilot lights. Continue to push down on the
control knob until the burner lights and then release.
3. If the pilot does not light – immediately turn the control knob
clockwise to the OFF position. Repeat step 2.
4. If the pilot and burner will not light in 5 seconds – turn the
control knob clockwise to the OFF position. Wait 5 minutes for gas
to dissipate. Repeat steps 2 and 3, or light with a match.
(Fig. 1) .
WARNING! Do not operate the rear or side burner while
performing a Burn-Off.
!
!
Rear Burner Lighting (if equipped)
1. Open grill lid.
2. Remove warming rack.
3. Push and slowly turn rear burner knob counter clockwise to HIGH
position.
4. Press and hold igniter button until the burner lights, or light by match.
5. If the burner will not light – turn burner control knob clockwise to the
OFF position. Wait 5 minutes. Repeat step 3 and 4
. (Fig. 1)
Side Burner Lighting (if equipped)
1. Open burner cover.
2. Push and slowly turn side burner knob counter clockwise to HIGH
position.
3. Press and hold igniter button until the burner lights, or light by match.
4. If the burner will not ignite – turn burner control knob clockwise to the
OFF position. Wait 5 minutes. Repeat step 2 and 3.
(Fig. 2)
Lighting with a match
1. Clip the match into the supplied lighting rod.
2. Insert the lit match through the cooking grids and sear plates
3. While turning the corresponding burner knob to high. (Fig. 3)
Operation
Loading ...
Loading ...
Loading ...