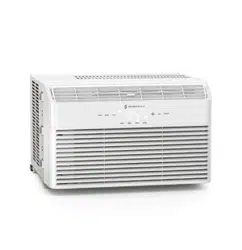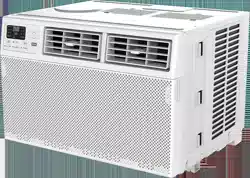

Model: PE-AC001
User Guide
Questions or Concerns?
WINDOW
AIR CONDITIONER
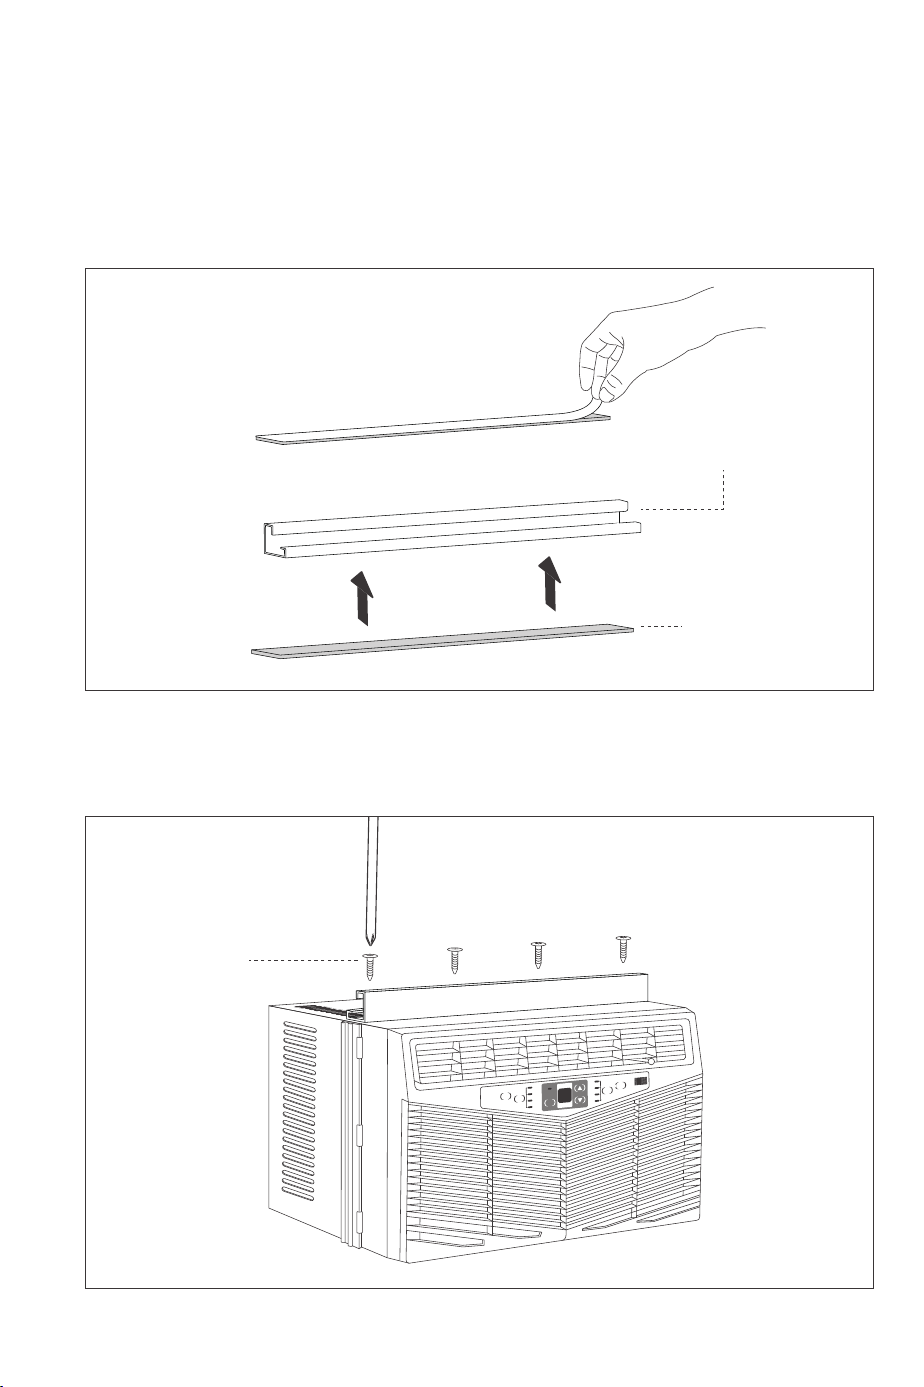
Step 1: Install Top Mounting Rail
1. Tear off the paster at back side of top mounting rail seal strip, and then align it at the bottom edge
of top mounting rail to stick the top mounting rail seal strip at the bottom of top mounting rail.
2. Use 4 type A screws to fix the top mounting rail at the outer case of air condition.
Timer
Fan
Speed
Power
Mode
Auto
High
Med
Low
Cool
Dry
Filter
Check
top mounting rail
top mounting rail
seal strip
type A screw
Fan
Only
Energy
Saver
Install Your Air Conditioner
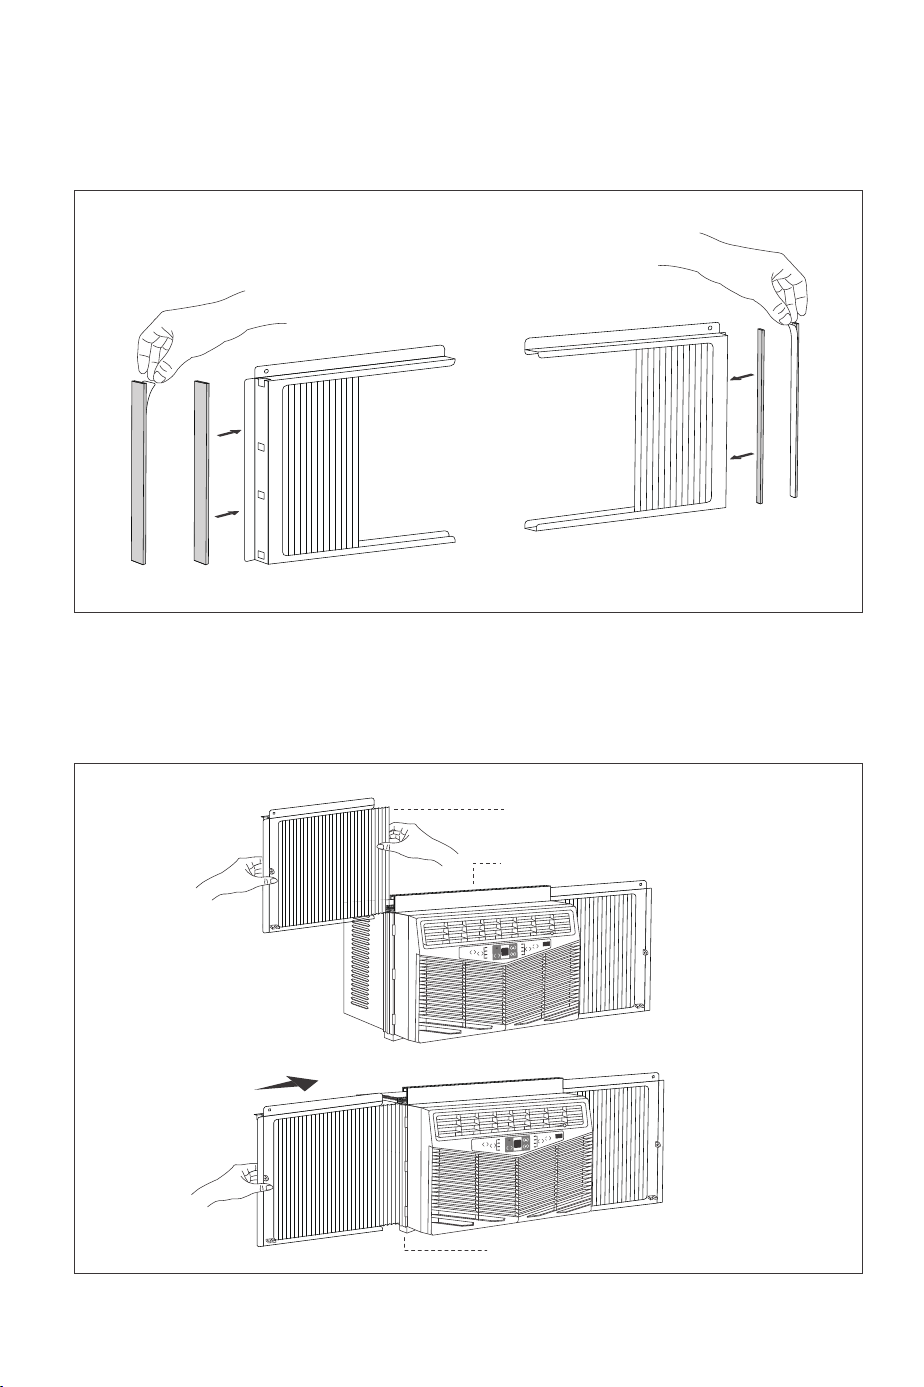
Step 2: Install Accordion Panel
1. Stick one accordion panel seal respectively on the left side and right side of accordion panel
installation frame.
2. Undraw the accordion panel, install the accordion panel marked with “LEFT” and “RIGHT” at both
sides of the air conditioner respectively.
Timer
Fan
Speed
Power
Mode
Auto
High
Med
Low
Cool
Dry
Filter
Check
Timer
Fan
Speed
Power
Mode
Auto
High
Med
Low
Cool
Dry
Filter
Check
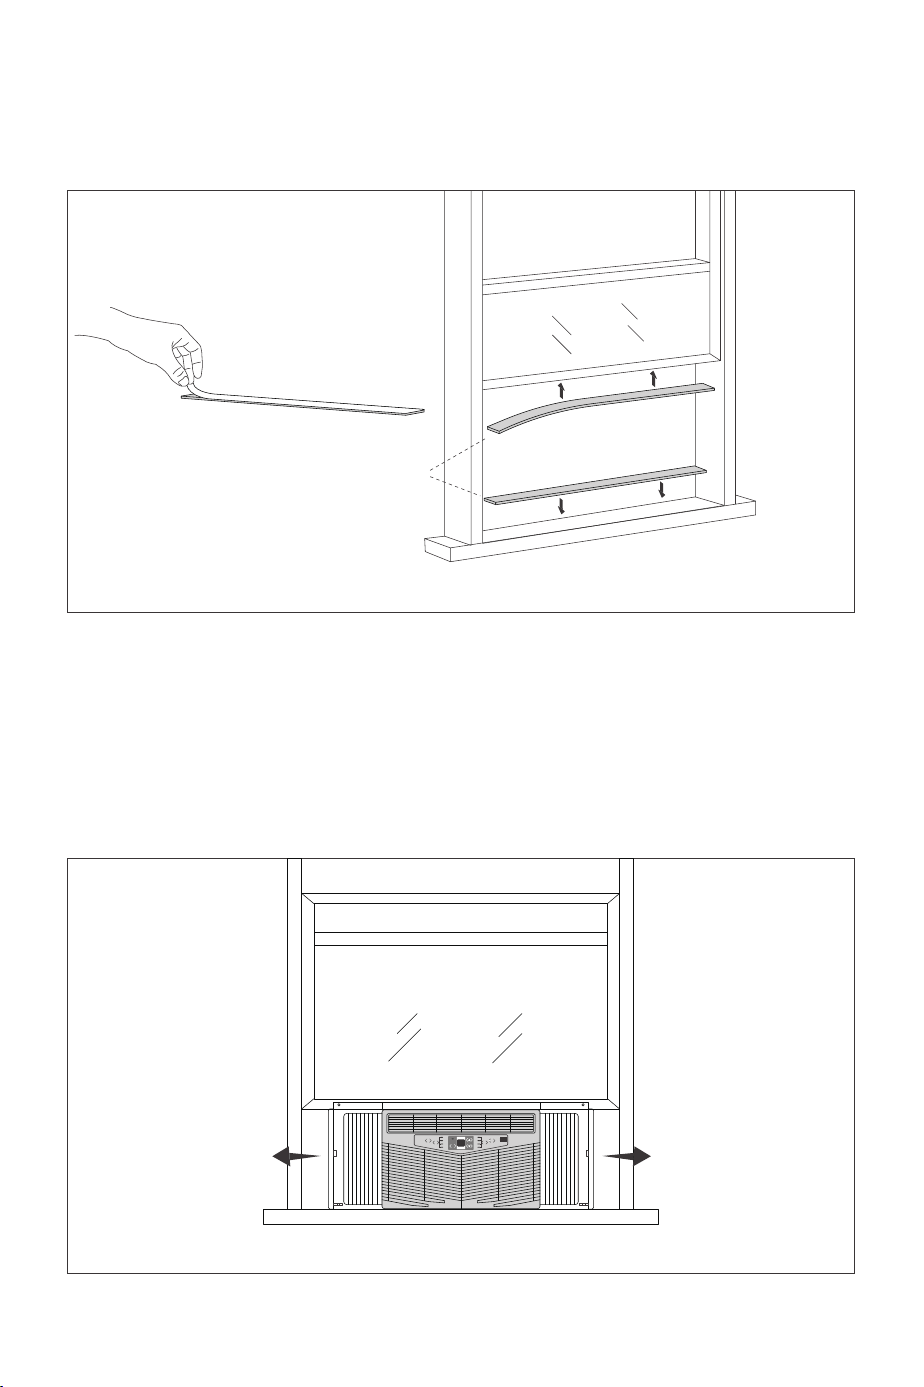
Step 3: Stick Window Sill and Sash Seal
Cut the Window sill and sash seal into proper length. Tear off the paster and then stick the seal at the
lower part of the window frame.
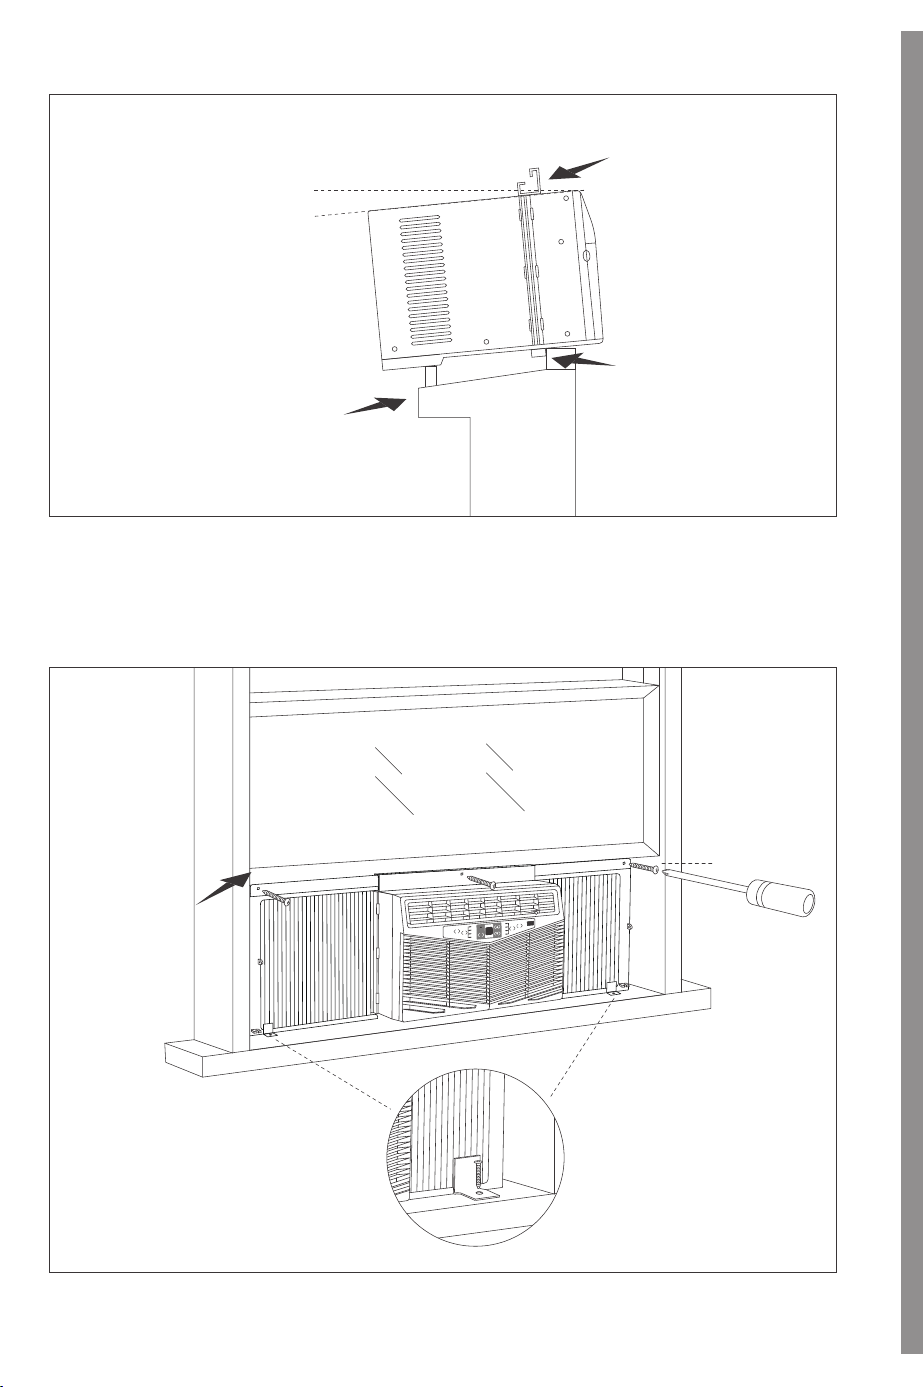
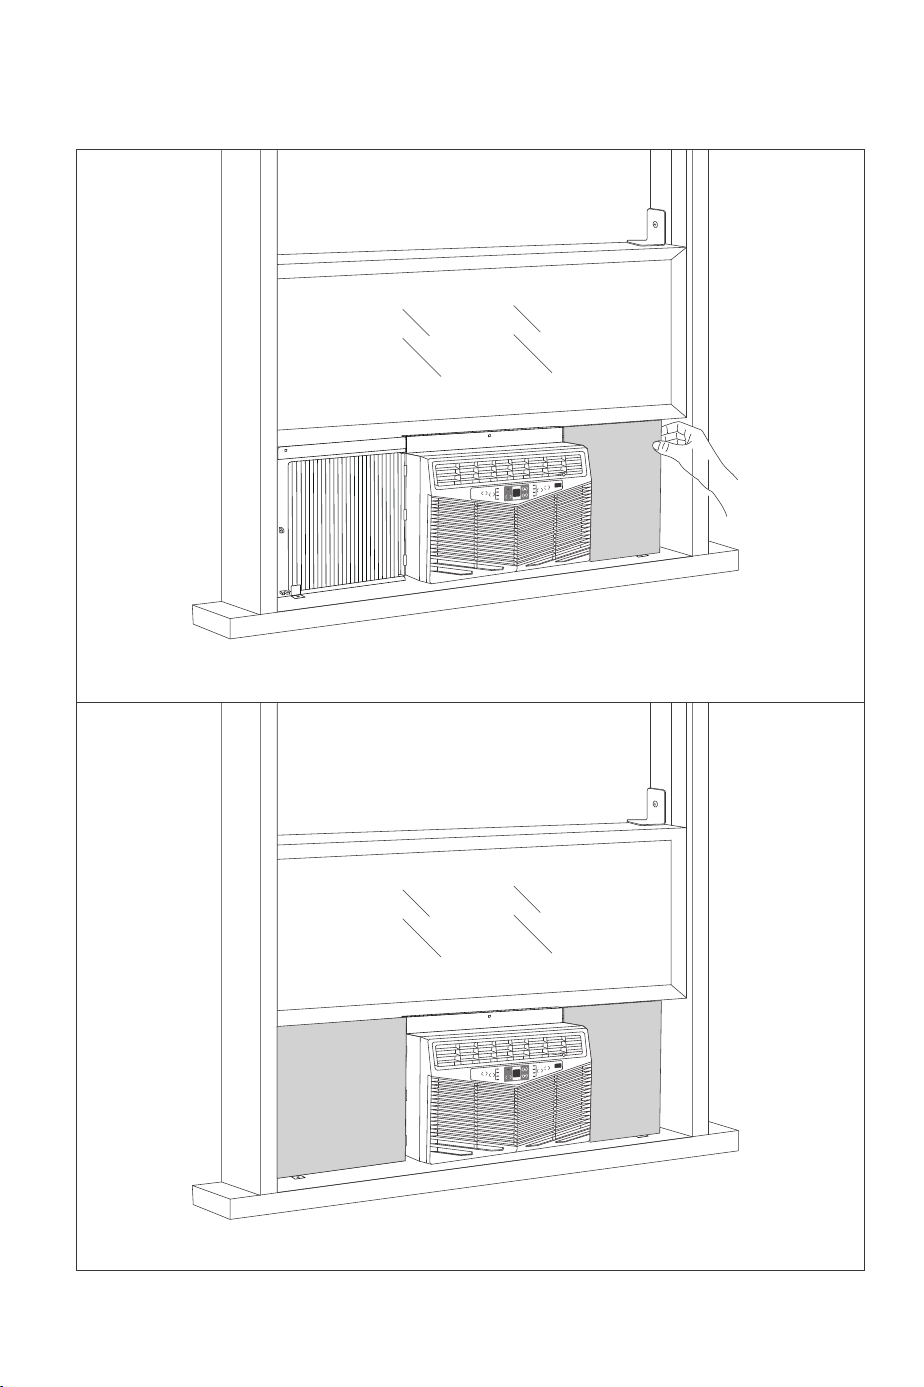
Step 4: Place Air Conditioner
1. Ask 2 persons to put the air conditioner at the windowsill, and the lower guide rail should be stick
at the windowsill. Top mounting rail stays at the middle lower side of window and then window
can stick to the top mounting rail when closing it. Please note that the air conditioner should be
placed at horizontal place or inclined outwards slightly.
Timer
Fan
Speed
Power
Mode
Auto
High
Med
Low
Cool
Dry
Filter
Check
Front
accordion panel
top mounting rail
Lower Guide Rail
Window sill and sash seal
LEFT
RIGHT
RIGHT
LEFT
LEFTLEFT
Fan
Only
Energy
Saver
Fan
Only
Energy
Saver
Fan
Only
Energy
Saver
Window Frame
Lower Guide Rail
Top Mounting Rail
about 3°
horizontal or inclined
about 3°
Inner Wall Side
Side
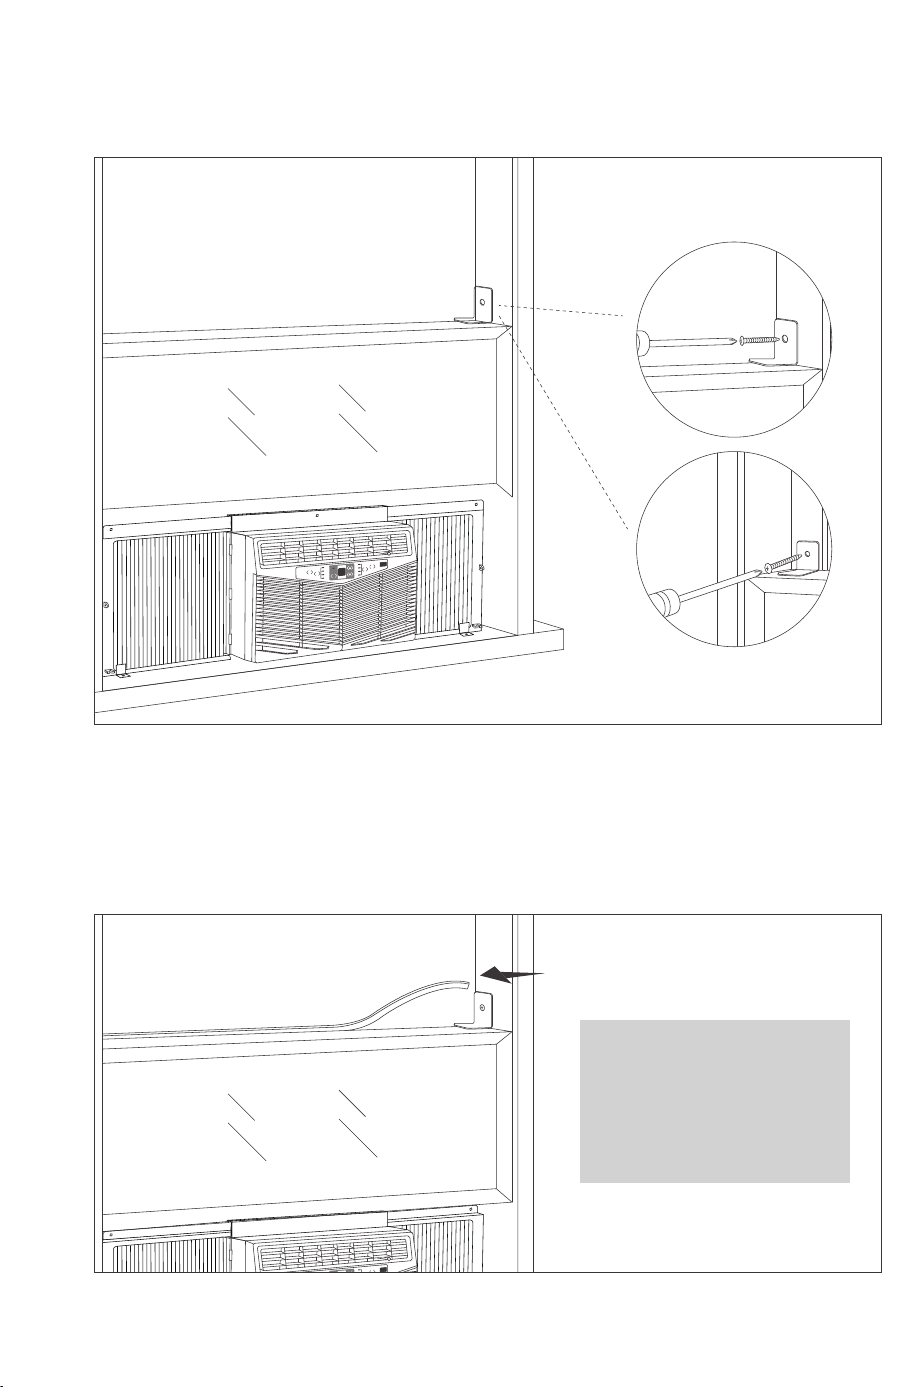
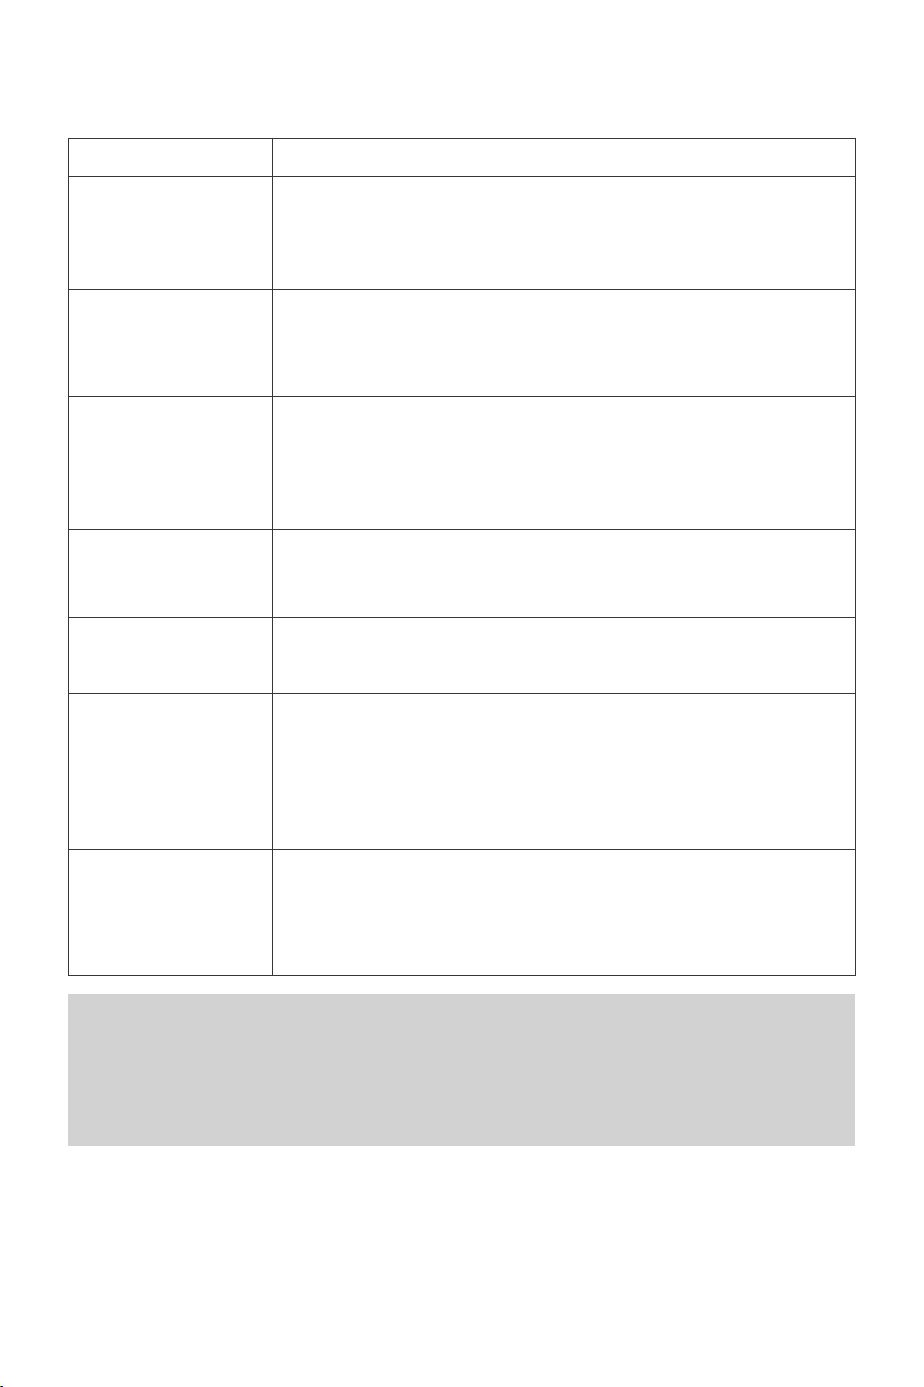
2. Pull the window, undraw accordion panels at both sides to keep it vertical to the window frame
and then use 5 type B screws to fix the frame of accordion panel at window frame and windowsill.
Timer
Fan
Speed
Power
Mode
Auto
High
Med
Low
Cool
Dry
Filter
Check
Window Frame
type B screw
type B screw
LEFT
RIGHT
Fan
Only
Energy
Saver
Model: PE-AC001
User Guide
Questions or Concerns?
WINDOW
AIR CONDITIONER
Step 1: Install Top Mounting Rail
1. Tear off the paster at back side of top mounting rail seal strip, and then align it at the bottom edge
of top mounting rail to stick the top mounting rail seal strip at the bottom of top mounting rail.
2. Use 4 type A screws to fix the top mounting rail at the outer case of air condition.
Timer
Fan
Speed
Power
Mode
Auto
High
Med
Low
Cool
Dry
Filter
Check
top mounting rail
top mounting rail
seal strip
type A screw
Fan
Only
Energy
Saver
Install Your Air Conditioner
Step 2: Install Accordion Panel
1. Stick one accordion panel seal respectively on the left side and right side of accordion panel
installation frame.
2. Undraw the accordion panel, install the accordion panel marked with “LEFT” and “RIGHT” at both
sides of the air conditioner respectively.
Timer
Fan
Speed
Power
Mode
Auto
High
Med
Low
Cool
Dry
Filter
Check
Timer
Fan
Speed
Power
Mode
Auto
High
Med
Low
Cool
Dry
Filter
Check
Step 3: Stick Window Sill and Sash Seal
Cut the Window sill and sash seal into proper length. Tear off the paster and then stick the seal at the
lower part of the window frame.
Step 4: Place Air Conditioner
1. Ask 2 persons to put the air conditioner at the windowsill, and the lower guide rail should be stick
at the windowsill. Top mounting rail stays at the middle lower side of window and then window
can stick to the top mounting rail when closing it. Please note that the air conditioner should be
placed at horizontal place or inclined outwards slightly.
Timer
Fan
Speed
Power
Mode
Auto
High
Med
Low
Cool
Dry
Filter
Check
Front
accordion panel
top mounting rail
Lower Guide Rail
Window sill and sash seal
LEFT
RIGHT
RIGHT
LEFT
LEFTLEFT
Fan
Only
Energy
Saver
Fan
Only
Energy
Saver
Fan
Only
Energy
Saver
Window Frame
Lower Guide Rail
Top Mounting Rail
about 3°
horizontal or inclined
about 3°
Inner Wall Side
Side
2. Pull the window, undraw accordion panels at both sides to keep it vertical to the window frame
and then use 5 type B screws to fix the frame of accordion panel at window frame and windowsill.
Timer
Fan
Speed
Power
Mode
Auto
High
Med
Low
Cool
Dry
Filter
Check
Window Frame
type B screw
type B screw
LEFT
RIGHT
Fan
Only
Energy
Saver
Step 5: Install Window Locking Bracket
Install the window locking bracket at the window frame to fix the window.
Timer
Fan
Speed
Power
Mode
Auto
High
Med
Low
Cool
Dry
Filter
Check
Plastic
window
Wooden
window
Step 6: Plug Foam Top Window Gasket
Cut the foam top window gasket into the length same to the width of window. Plug the foam
between glasses and window to prevent rain and insects getting into the room.
Timer
Fan
Speed
Power
Mode
Auto
High
Medi
Low
Cool
Dry
Filter
Check
foam top window gasket
Note:
If Foam top window gasket is
not proper to your window,
you can select other proper
materials to replace it.
type B screw
RIGHT
LEFT
Fan
Only
Energy
Saver
1.Install accordion panel sub-assy. After finishing installation, measure the width L between outer
case of air conditioner and window frame.
Timer
Fan
Speed
Power
Mode
Auto
High
Med
Low
Cool
Dry
Filter
Check
L
Timer
Fan
Speed
Power
Mode
Auto
High
Med
Low
Cool
Dry
Filter
Check
2. Take out foam insulation from the package. Cut off the foam insulation in rectangular shape
with scissors.
L
3. Stick foam insulation evenly on the accordion panel and the screen of window frame. The redundant
2~3mm of foam insulation in height can be stuffed into the frame for fixing.
Timer
Fan
Speed
Power
Mode
Auto
High
Med
Low
Cool
Dry
Filter
Check
Step 7: Sponge Sticking Method and Procedures
LEFT
RIGHT
LEFT
Fan
Only
Energy
Saver
Fan
Only
Energy
Saver
Fan
Only
Energy
Saver
Control Panel
Function
· Turn the unit ON or OFF.
· Turning on the unit via Control Panel, the unit will operate in Energy
Saver mode automatically.
· Timer Setting: Display time.
· Auto, Cool, Energy Saver and Dry Mode: Display set temperature.
· Fan Mode: Display room temperature.
· Timer Setting: Increase the delay time.
· Cool, Energy Saver and Dry Mode: Increase the set temperature.
· Timer Setting: Decrease the delay time.
· Cool, Energy Saver and Dry Mode: Decrease the set temperature.
Adjust the fan speed: Low, Med, High, Auto.
Cycle through modes: Cool, Energy Saver, Fan Only, Dry, Auto.
Button
① Power Button
② Digital Display
③ Temperature/Timer
Increase Button
④ Temperature/Timer
Decrease Button
⑤ Fan Speed Button
⑥ Mode Button
· When the unit is OFF, it can be set to automatically turn ON the air
conditioner under Energy Saver mode from 0.5 (30 minutes) to 24 hours.
· When the unit is ON, it can be set to automatically turn OFF the air
conditioner from 0.5 (30 minutes) to 24 hours.
· Press ▲ / ▼ buttons to adjust the Auto-ON/OFF time.
After the unit operates for 250 hours, Filter Check indicator will light
up to notify that the filter needs to be cleaned.
After the filter is cleaned and re-installed, press the Filter Check Button
to clear the operation time. The Filter Check indicator will turn off.
⑦ Timer Button
⑧ Filter Check Button
Note:
The temperature is displayed in degree Fahrenheit (°F) by default. To change to degree
Celsius (°C), press and hold the Temp Increase and Temp Decrease buttons simultaneously
for 3 seconds. Repeat the process to change it back to degree Fahrenheit (°F).
Remote Control
Function
· Turn the unit ON or OFF.
· Turning on the unit via Remote Control, the unit will operate in Energy
Saver mode automatically.
· Cycle through modes: AUTO, COOL, SAVE, FAN and DRY.
Temperature Adjustment:
· Press the button once to increase or decrease the set temperature by 1°F (°C).
· Press and hold the button for 2s to quickly adjust the set temperature.
Time Adjustment:
· Press the button once to increase or decrease the time by 0.5h.
· Press and hold the button for 2s to quickly adjust the time.
Adjust the fan speed:
· Press to activate I FEEL function.
· If controller receives I FEEL order, it will work under ambient temperature
value sent by remote control every 10 minutes.
· After 11 minutes, if controller does not receive ambient temperature value
sent by remote control, it will run with AC ambient temperature.
· If I FEEL is not set, the ambient temperature will adopt sampling value of
AC temperature sensor.
· If power off happens, this function will not be memorized.
· Press to enter SLEEP mode. Press it again to cancel.
· This function is available in COOL, SAVE or DRY mode to maintain the most
comfortable temperature for you.
· Press the button once to activate Auto-ON/ Auto-OFF timer.
· Press the button twice to cancel Auto-timer.
· Press “+” and “-” buttons simultaneously to turn on/ off Child Lock function.
· When the function is activated, LOCK indicator on remote control will turn ON.
When the unit is OFF, press the “-” button and “MODE” button simultaneously
to switch between °C and °F.
Press and hold the "+" and "FAN" buttons simultaneously for 3 seconds to
turn the light on or off.
Button
① ON/OFF Button
② MODE Button
③ + / - Button
④ Fan Button
⑤ I FEEL Button
⑥ SLEEP Button
⑦ Timer Button
Child Lock
Temperature
Display Switchover
Light Function
AUTO
Manufacturer: Shenzhen NearbyExpress Technology
Development Co.,Ltd.
Address: Floor 7, Building E, Galaxy World Phase II,
Shenzhen, China
www.parisrhone.co
Made In China
Rev_1.0_EN

Model: PE-AC001
User Guide
Questions or Concerns?
WINDOW
AIR CONDITIONER
Step 1: Install Top Mounting Rail
1. Tear off the paster at back side of top mounting rail seal strip, and then align it at the bottom edge
of top mounting rail to stick the top mounting rail seal strip at the bottom of top mounting rail.
2. Use 4 type A screws to fix the top mounting rail at the outer case of air condition.
Timer
Fan
Speed
Power
Mode
Auto
High
Med
Low
Cool
Dry
Filter
Check
top mounting rail
top mounting rail
seal strip
type A screw
Fan
Only
Energy
Saver
Install Your Air Conditioner
Step 2: Install Accordion Panel
1. Stick one accordion panel seal respectively on the left side and right side of accordion panel
installation frame.
2. Undraw the accordion panel, install the accordion panel marked with “LEFT” and “RIGHT” at both
sides of the air conditioner respectively.
Timer
Fan
Speed
Power
Mode
Auto
High
Med
Low
Cool
Dry
Filter
Check
Timer
Fan
Speed
Power
Mode
Auto
High
Med
Low
Cool
Dry
Filter
Check
Step 3: Stick Window Sill and Sash Seal
Cut the Window sill and sash seal into proper length. Tear off the paster and then stick the seal at the
lower part of the window frame.
Step 4: Place Air Conditioner
1. Ask 2 persons to put the air conditioner at the windowsill, and the lower guide rail should be stick
at the windowsill. Top mounting rail stays at the middle lower side of window and then window
can stick to the top mounting rail when closing it. Please note that the air conditioner should be
placed at horizontal place or inclined outwards slightly.
Timer
Fan
Speed
Power
Mode
Auto
High
Med
Low
Cool
Dry
Filter
Check
Front
accordion panel
top mounting rail
Lower Guide Rail
Window sill and sash seal
LEFT
RIGHT
RIGHT
LEFT
LEFTLEFT
Fan
Only
Energy
Saver
Fan
Only
Energy
Saver
Fan
Only
Energy
Saver
Window Frame
Lower Guide Rail
Top Mounting Rail
about 3°
horizontal or inclined
about 3°
Inner Wall Side
Side
2. Pull the window, undraw accordion panels at both sides to keep it vertical to the window frame
and then use 5 type B screws to fix the frame of accordion panel at window frame and windowsill.
Timer
Fan
Speed
Power
Mode
Auto
High
Med
Low
Cool
Dry
Filter
Check
Window Frame
type B screw
type B screw
LEFT
RIGHT
Fan
Only
Energy
Saver