Refer to instruction
manual
Wear eye
protection
Wear protective
gloves
Thank you for purchasing a Sealey product. Manufactured to a high standard, this product will, if used according to these instructions,
and properly maintained, give you years of trouble free performance.
IMPORTANT: PLEASE READ THESE INSTRUCTIONS CAREFULLY. NOTE THE SAFE OPERATIONAL REQUIREMENTS, WARNINGS & CAUTIONS. USE
THE PRODUCT CORRECTLY AND WITH CARE FOR THE PURPOSE FOR WHICH IT IS INTENDED. FAILURE TO DO SO MAY CAUSE DAMAGE AND/OR
PERSONAL INJURY AND WILL INVALIDATE THE WARRANTY. KEEP THESE INSTRUCTIONS SAFE FOR FUTURE USE.
TP17 Issue:2 (HF SAE) - 08/10/18
Original Language Version
© Jack Sealey Limited
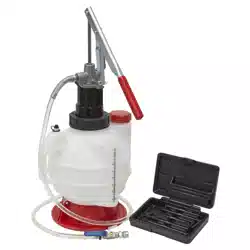
MOBILE GEAR OIL DISPENSING UNIT (20LTR)
MODEL No: TP17
g.1
g.2
1. SAFETY
WARNING! Ensure health & safety, local authority, and general workshop practice regulations are strictly adhered to when
using this equipment.
Familiariseyourselfwithproductapplicationandlimitations,aswellasthespecicpotentialhazardspeculiartothisproduct.
Maintainthepumpingoodcondition(useanauthorisedserviceagent).
Replaceorrepairdamagedparts.Use genuine parts only. Non authorised parts will invalidate the warranty.
UseonlytopumpoilsuptoSAE80viscosity.
Ensuresafetyeyeprotectionandprotectiveclothingarewornwhenusingthisproduct.
Keeptheworkareaclean,unclutteredandensurethereisadequatelighting.
Maintaincorrectbalanceandfooting.Ensuretheoorisnotslipperyandwearnonslipshoes.
Keepchildrenandunauthorisedpersonsawayfromtheworkingarea.
Disposeofwasteliquidsinaccordancewithlocalauthorityregulations.
DO NOT usetoextractcorrosiveuids.
DO NOTdismantle,tamperwithoradaptthepumpforanypurposeotherthanforwhichitisdesigned.
DO NOT usetheunitifithasbeendroppedormishandled,checktheunittoensurethereisnodamage.
Keepthepumpcleanandstoreinasafe,dry,childprooflocation.
WARNING! DO NOT allowuncontrolleddischargeofuidsthuspollutingtheenvironment.
2. INTRODUCTION
Steelconstructionself-primingleverpump.Featuresheavy-dutywheelsandgrippedhandleforeaseofmanoeuvrability.Suppliedwitha20ltr
reservoir,1.9mtrdeliveryhoseandowcontroltapwithangledspout.Spoutholderwithinbucketcoverfortidystoragewhennotinuse.Suitable
forgearoilanduidswithsimilarviscosity.
3. ASSEMBLY
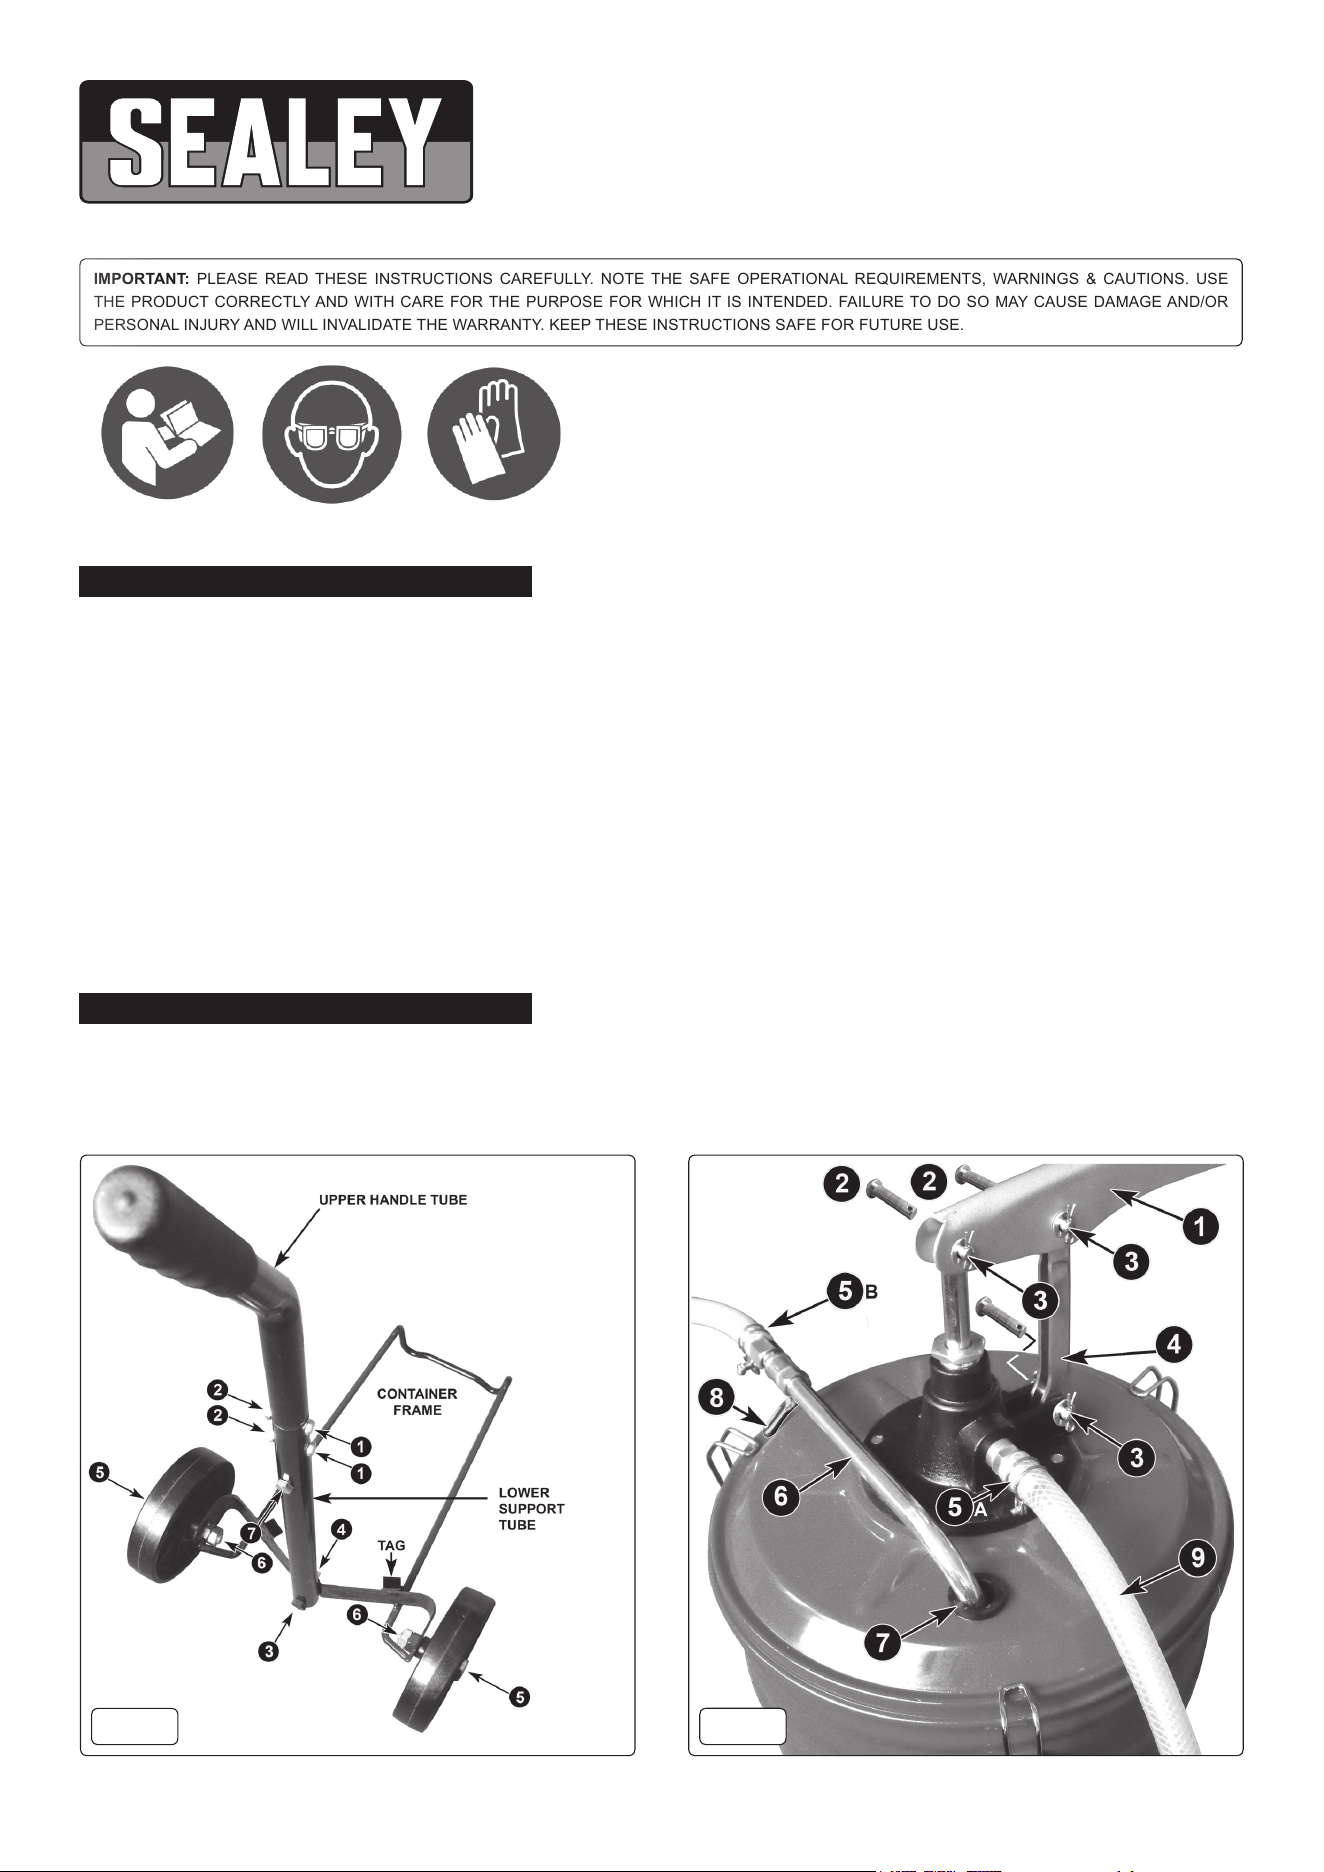
3.1. ASSEMBLING THE CONTAINER FRAME.
Referringtog.1takethecontainerframeandattachthewheelstoitasfollows:
3.1.1. PassanM12x62mmbolt(5)througheachwheelandscrewthemintothethreadedbushesoneithersideoftheframe.
Backoffeachboltslightlytoallowthewheelstorotatefreely.LockeachboltbythreadinganM12nut(6)ontoeachprotrudingboltand
tighten.
3.1.2. Takethelowersupporttubeandxittotheframeasfollows.ThereisanM10boltweldedatthebaseofthetube,see(3)ing.1.
Placethetubeintotheindentinthecontainerframewiththeboltprotrudingthroughtheholeintheframe.Passawasheroverthebolt
followedbyanM10nut.See(4)ing.1.Tightenthenut.
3.1.3. Inserttheupperhandletubeintothelowersupporttubeandaligntheholesinthetwocomponents.PassanM6x30mmbolt
througheachhole(1)andscrewanM6nut(2)ontoeachprotrudingboltandtighten.
3.2. ASSEMBLING THE CONTAINER TO THE FRAME.
3.2.1. Standthecontainerontothecontainerstandsothattheupperhandletuberestsintothebracketonthecontainer.Passan
M8x44mmbolt(fig.1.7)throughthetubeandbracketandsecureitwithaflatwasher,splitwasherandM8nut.
3.3. ASSEMBLING THE DISCHARGE HOSE.
3.3.1. Referringtog.2,slideawirehoseclipoveroneendofthedischargehose(9)andpushthehoseontotheoutletonthecastinginthe
centreofthelid.Slidethehoseclipontothettingandtightenittoretainthehose.See(5A)ing.2.
3.3.2. Slidetheotherhoseclipovertheotherendofthedischargehoseandpushitontothedispensingtube(6)adjacenttothevalve.
Retainthehosebytighteningthewireclip,see(5B)ing.2.Thedispensingtube(6)isshownpartiallyinsertedintothestowage
grommet(7).Thetubecanbefullyinsertedintothelidwhennotrequired.
3.4. ASSEMBLING THE PUMPING HANDLE.
3.4.1. Attachthehandle(1)andlink(4)tothelidandpumpasshowninfig.2using3pivotpins(2).Placeaflatwasherovereach
protrudingpinandretaineachpinwithan‘R’clip.See3infig.2.
4. OPERATION
4.1. FILLING
4.1.1. Releasethethreeclipswhichretainthelidandliftitoffcompletewiththepumpwhichisontheundersideofthelid.
4.1.2. Fillthecontainertwothirdsfullwithoil.Themaximumlevelshouldbeabout2cmbelowthemiddleridgewithinthecontainer.
Donotllabovethislevelastheoilmayspillduringtransportation.
Note: OnlyuseoilsuptoSAE80viscosity.
4.1.3. Replacethelidandrotateitsothatthepumpinghandleisconvenientlysituatedforoperation.Fastentheliddownwiththethreeclips.
Closethevalveonthedispensingtube.
4.2. DISPENSING
4.2.1. Insertthedispensingtubeintothegearboxtobelled.Openthevalveonthedispensingtube.
4.2.2. Pumphandletodispenseoil.
4.2.3. Whenthedesiredamounthasbeendispensed,closethevalveandstowthedispensingtubeintheholeinthelid.
Sealey Group, Kempson Way, Suffolk Business Park, Bury St Edmunds, Suffolk. IP32 7AR
01284 757500 01284 703534 sales@sealey.co.uk www.sealey.co.uk
Note: It is our policy to continually improve products and as such we reserve the right to alter data, specifications and component parts without prior
notice.
Important:NoLiabilityisacceptedforincorrectuseofthisproduct.
Warranty:Guaranteeis12monthsfrompurchasedate,proofofwhichisrequiredforanyclaim.
ENVIRONMENT PROTECTION
Recycleunwantedmaterialsinsteadofdisposingofthemaswaste.Alltools,accessoriesandpackagingshouldbesorted,takento
arecyclingcentreanddisposedofinamannerwhichiscompatiblewiththeenvironment.Whentheproductbecomescompletely
unserviceable and requires disposal, drain any fluids (if applicable) into approved containers and dispose of the product and fluids
accordingtolocalregulations.
TP17 Issue:2 (HF SAE) - 08/10/18
Original Language Version
© Jack Sealey Limited