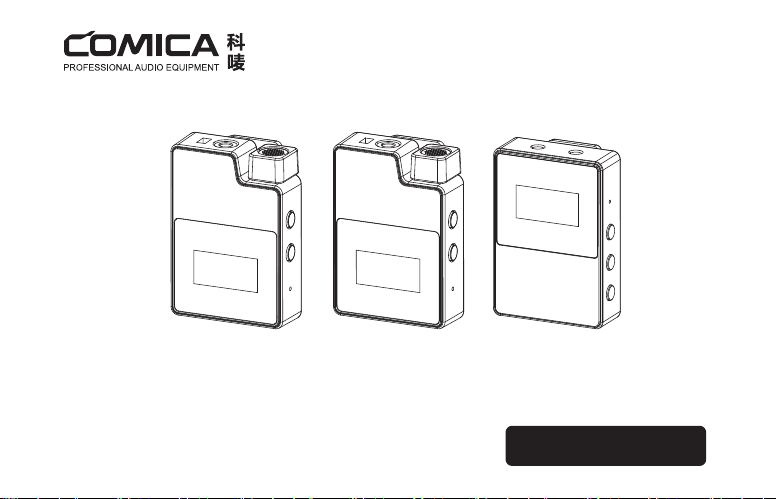
BoomX-D PRO
User Manual
2.4G Dual-channel On-board Recording Wireless Microphone


FCC statement
This device complies with Part 15 of the FCC rules. Operation is subject to the following two conditions: 1) this
device may not cause harmful interference, and 2) this device must accept any interference received, including
interference that may cause undesired operation.
Note: This equipment has been tested and found to comply with the limits for a Class B digital device, pursuant to
part 15 of the FCC Rules. These limits are designed to provide reasonable protection against harmful interference
in a residential installation. This equipment generates uses and can radiate radio frequency energy and, if not
installed and used in accordance with the instructions, may cause harmful interference to radio communications.
However, there is no guarantee that interference will not occur in particular installation. If this equipment does
cause harmful interference to radio or television reception, which can be determined by turning the equipment off
and on, the user is encouraged to try to correct the interference by one or more of the following measures:
--Reorient or relocate the receiving antenna.
--Increase the separation between the equipment and receiver.
--Connect the equipment into an outlet on a circuit different from that to which the receiver is connected.
--Consult the dealer or an experienced radio/TV technician for help.
Changes or modifications not expressly approved by the party responsible for compliance could void the user’s
authority to operate the equipment.
FCC Radiation Exposure Statement
This device complies with FCC RF radiation exposure limits set forth for an uncontrolled environment. This transmit-
ter must not be co-located or operating in conjunction with any other antenna or transmitter.

IC
This device complies with Industry Canada’s licence-exempt RSSs. Operation is subject to the following two
conditions:
(1) This device may not cause interference; and
(2) This device must accept any interference, including interference that may cause undesired operation of the
device.
Le présent appareil est conforme aux CNR d'Industrie Canada applicables aux appareils radio exempts de
licence. L'exploitation est autorisée aux deux conditions suivantes:
(1) l'appareil ne doit pas produire de brouillage.
(2) l'utilisateur de l'appareil doit accepter tout brouillage radioélectrique subi, même si le brouillage est suscepti
ble d'en compromettre le fonctionnement.

Foreword
Main Features
Thanks for purchasing COMICA BoomX-D PRO
. 2.4G Digital Dual-channel Wireless microphone, Global Free Frequency
. 48kHz/16bits Audio Recording, Intelligent Denoise
. Support On-board Recording with 8G Internal Memory
(
About 24 hours
)
. Support Recording File's High-speed Transmission and Copy
. Support Digital&Analog Output Mode, Universal for Camera, Phone and Computer
. Safety Channel for Ultimate Flexibility in Post-production
. Visual Power, Audio Dynamic Monitor and Other Display Functions
. M/S Switch, Real-time Audio Monitor
. Internal and External MIC Two Input Modes
. RF Technology, Auto Freq. Adjustment, Stable Transmission
. Low Latency < 20ms, Working Range Up to 100m
. Designed with Multi-functional Belt Clip and Compact
1

Notice
Due to 2.4G wireless characteristics, it's better to keep face to face when use it, and don’t turn your back to the
receiver, otherwise it is easy to generate breakpoints, which is a normal phenomenon
Don't block the antenna position to avoid any poor signal generated
Please attention that it can not realize STEREO function when in single-channel and safety mode
When you need to continuously record, a new recording file will be saved every 2 hours of recording, and the
total recording time is 24 hours. When the 8G memory is full, the new recording file will overwrite the old recording
file
The recording and copy function can’t be used at the same time
3.5mm TRS-TRS Audio Cable is suitable for Canon, Nikon and other cameras with low sensitivity
3.5mm TRS-TRS Audio Output Cable with Impedance is suitable for Sony, Panasonic, Fujifilm and other cameras
with high sensitivity(3.5mm TRS-TRS Audio Output Cable with Impedance is recommended to be used if there is
sound explosive in recording )
This product belongs to high-precision instruments, please avoid falling, collision or pounding
Do not use this equipment in the vicinity of heat source or interference source, such as radiator, oven, refrigerator
or air conditioner
If the pick-up distance is close or when used outdoors, please put on the wind muff to prevent sound burst or
reduce wind noise
Do not use the equipment in rain or in a damp environment to avoid short-circuit danger
Please keep the product in a dry environment
2
Tips
1. BoomX-D PRO is universal for USB and 3.5mm interface devices. When used in smartphone, the system will
compulsorily choose BoomX-D PRO as audio input and output device
2. When used in computer, please follow the steps below:
①
Insert BoomX-D PRO into the computer
②
Click sound setting and set the “Comica_ BoomX-D_PRO” as the input and output device
Sound
Output
Choose your output device
Comica_BoomX-D_PRO
Input
Choose your input device
Comica_BoomX-D_PRO
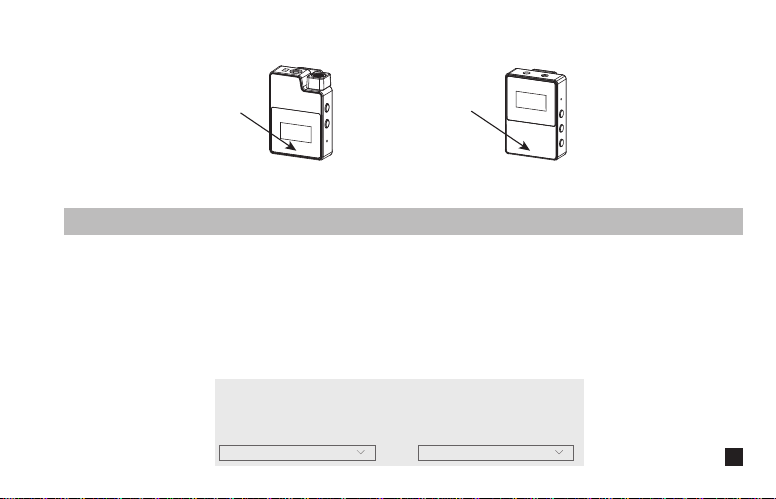
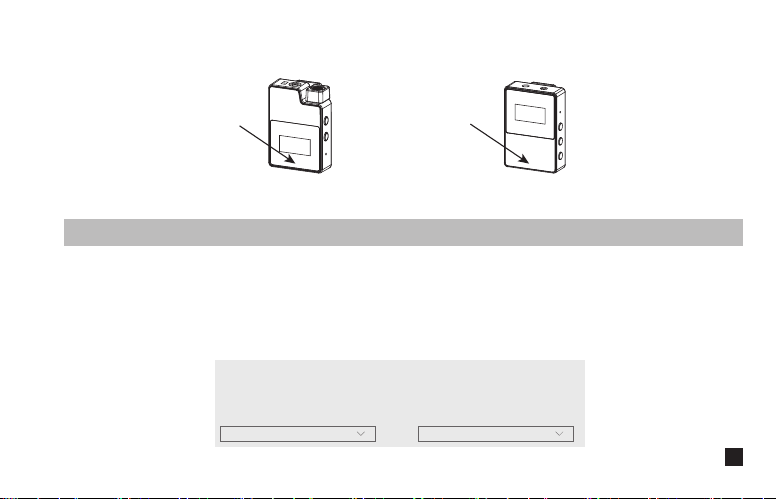
Receiver (RX)Transmitter(TX)
Don't block the antenna position to avoid any poor signal generated
Antenna position
Antenna position
3
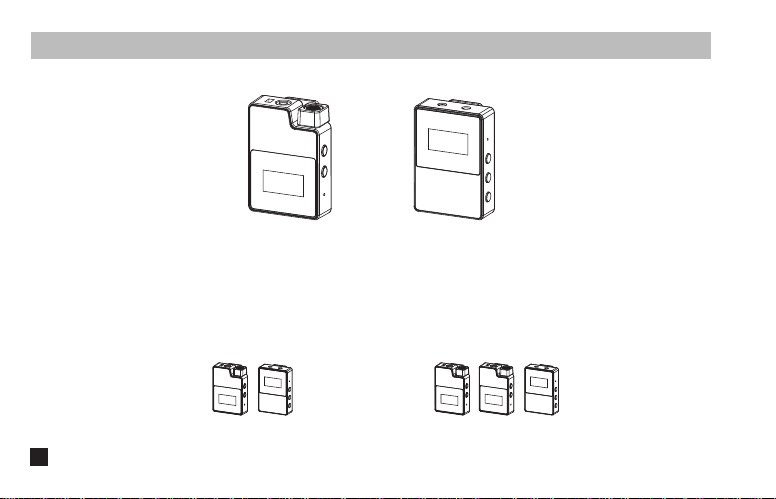
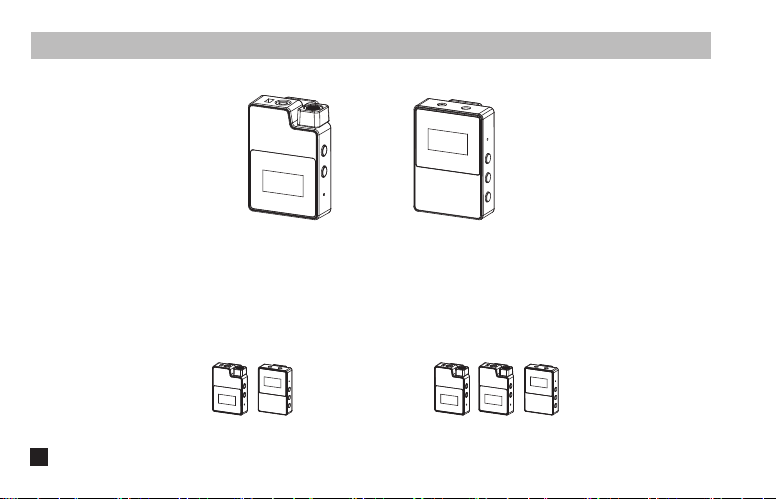
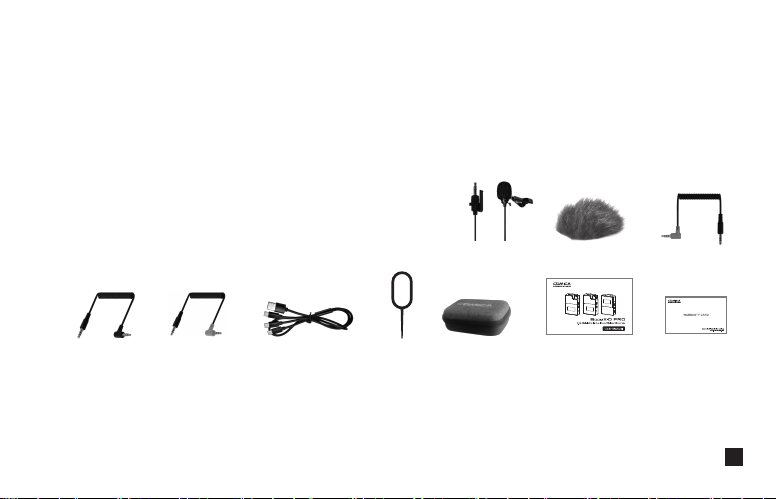
Packing List
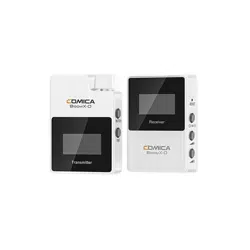
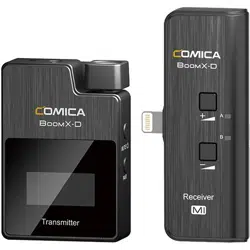
BoomX-D PRO D1 = TX + RX
(
Black/White
)
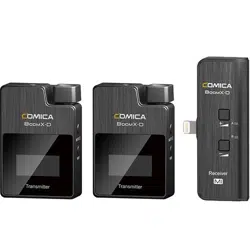
BoomX-D PRO D2 = TX + TX + RX
(
Black/White
)
Receiver (RX)Transmitter(TX)
Purchase Options:
Main Parts:
4
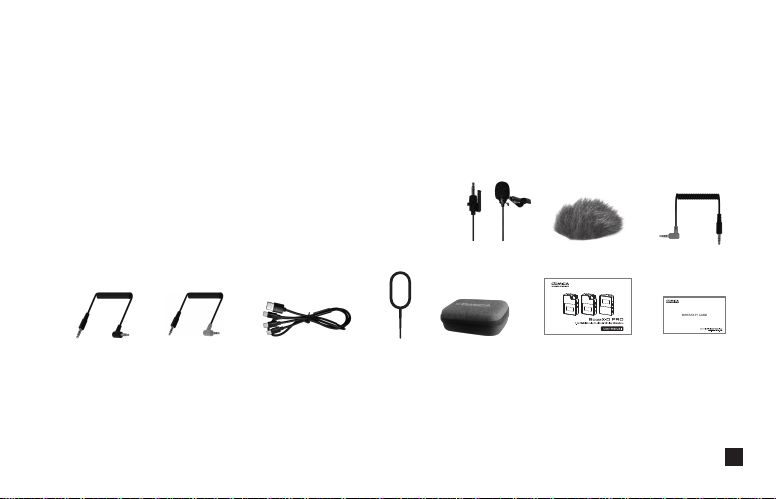
①
3.5mm Mic Audio Input Cable
②
Wind Muff
③
3.5mm TRS-TRRS Audio Cable(For Smartphone)
④
3.5mm TRS-TRS Audio Cable(For Canon, Nikon, etc.)
⑤
3.5mm TRS-TRS Audio Cable with Impedance(For Sony, Panasonic, Fujifilm, etc.)
⑥
3 in 1 Charging/Output Cable (the orange cable can be used for charging and data transmitting,
the black cable can only be used for charging )
⑦
Reset Pin
⑧
Carry Case
⑨
User Manual
⑩
Warranty Card
The accessories of each combination include:
Accessories:
① + ② + ③ + ④ + ⑤ + ⑥ + ⑦ + ⑧ + ⑨ + ⑩
BoomX-D PRO D1=
①x2 + ②x2 + ③ + ④ + ⑤ + ⑥ + ⑦ + ⑧ + ⑨ + ⑩
BoomX-D PRO D2=
① ② ③
④ ⑤ ⑥⑦⑧⑨⑩
5

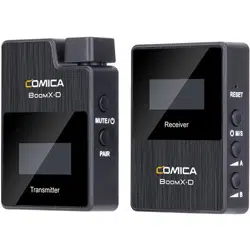
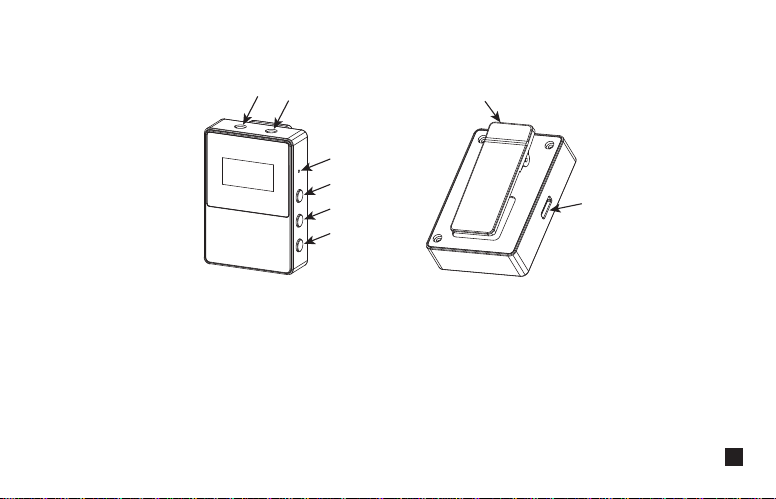
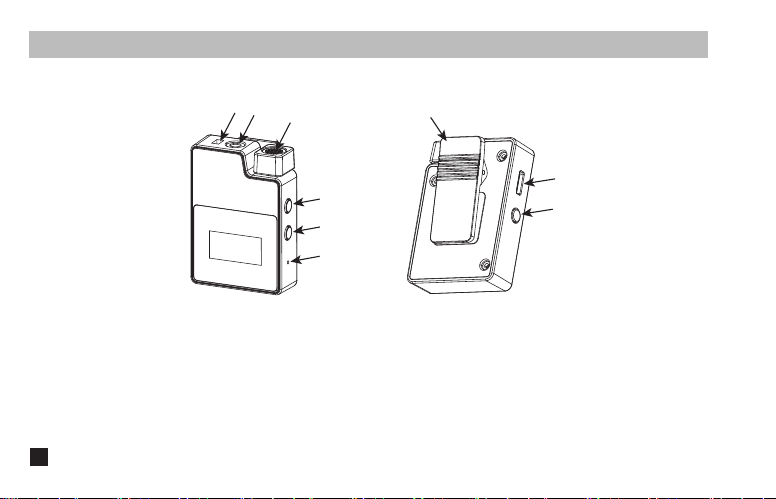
Components and Instruction
Transmitter (TX)
1. External Mic Locking Buckle
2. 3.5mm TRS Port of External Mic
3. Internal Mic
4. Power/Muting Button
5. Pair Button
6. Reset Hole
7. Belt Clip
8. USB-C Charging/Copy Port
9. REC Button
①
②
③
⑨
⑧
⑦
④
⑤
⑥
6
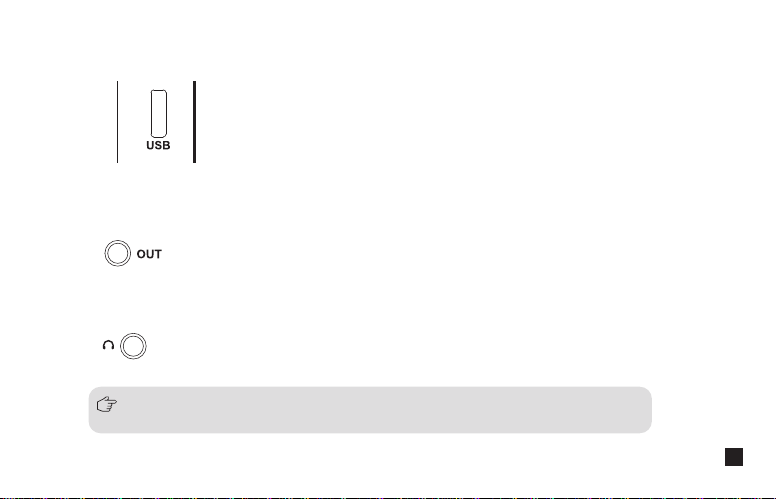
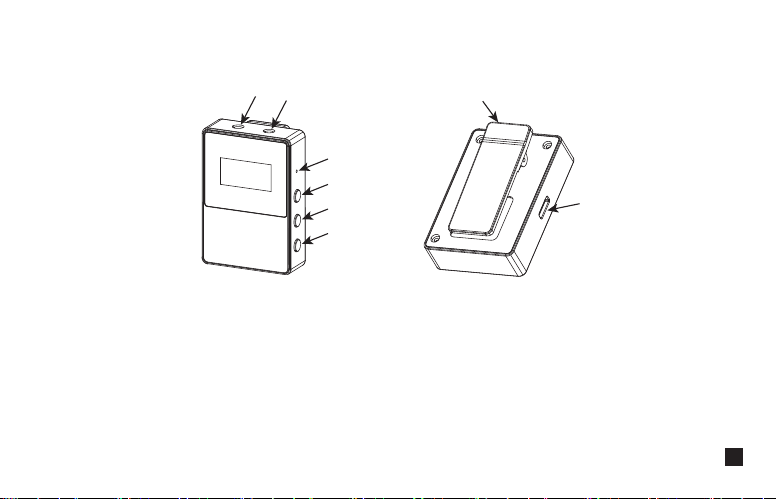
Receiver (RX)
1. 3.5mm TRS/TRRS Monitoring Headphone Port
2. 3.5mm TRS Audio Output Port
3. Reset Hole
4. Power/Mono/Stereo/Safety Mode Switch Button
5. A Channel Output Gain Control Button
6. B Channel Output Gain Control Button
7. Belt Clip
8. USB-C Charging/Output Port
①
②
③
⑧
⑦
④
⑤
⑥
7
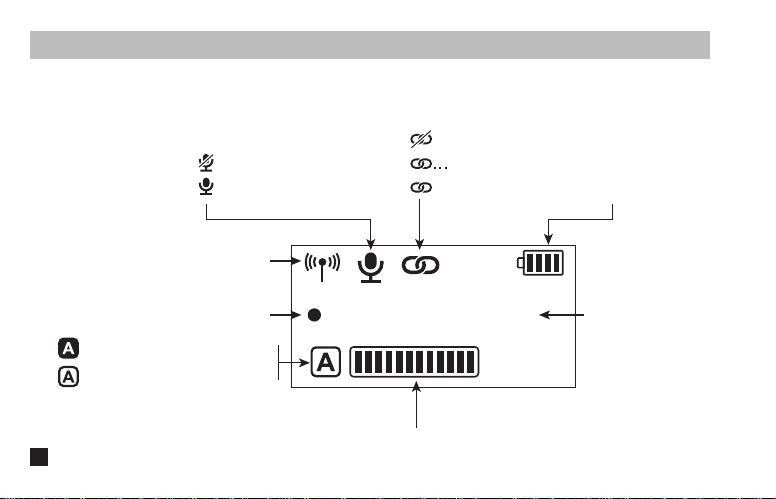
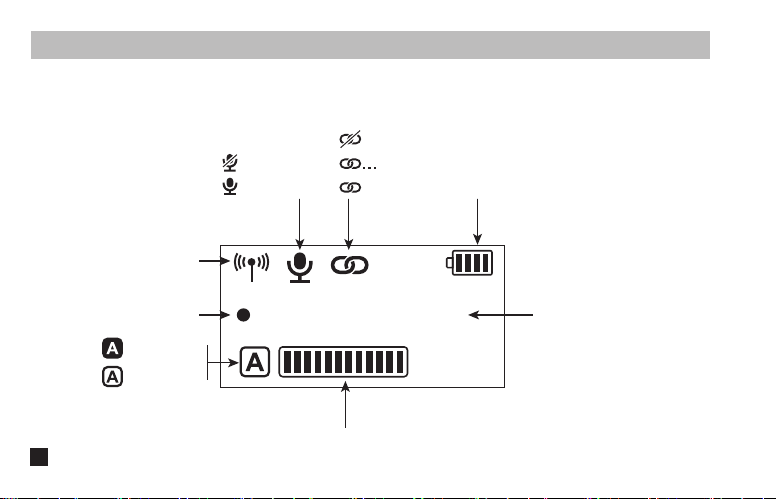
Screen Display and Function Instruction
Transmitter(TX)
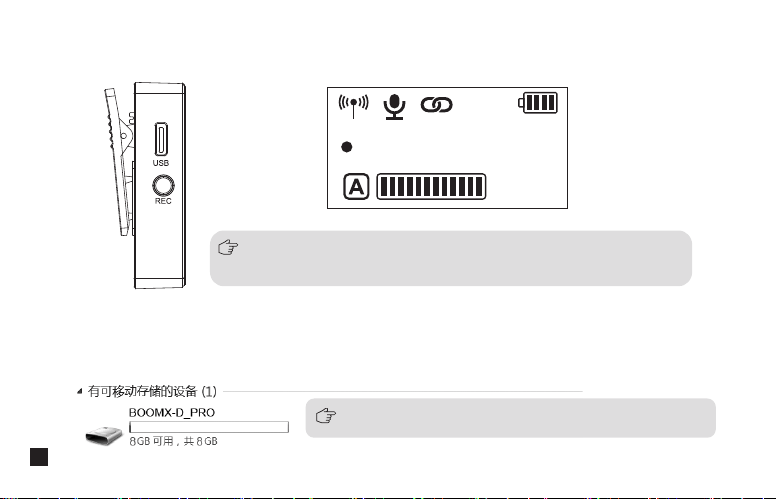
1.Screen Display Instruction:
Flash
:
Recording
Recorded Time
REC
00
:
00
:
00
A/B Channel Microphone Audio Dynamic Bar
Muting
Microphone Normal Working
Unpaired
in the Pairing
Paired
Transmitter Battery Status
Signal Strength
A/B Channel is Connected
A/B Channel is not Connected
8

2.Function Introduction:
Long press for On/Off; Short press for muting switch
2.1. Power/Muting Button
Long press for pairing with receiver
2.2. Pair Button
If there is an abnormal phenomenon such as the device is crash or unable to turn on it, then insert the
reset pin into the reset hole to reset it
2.3. Reset Hole
9

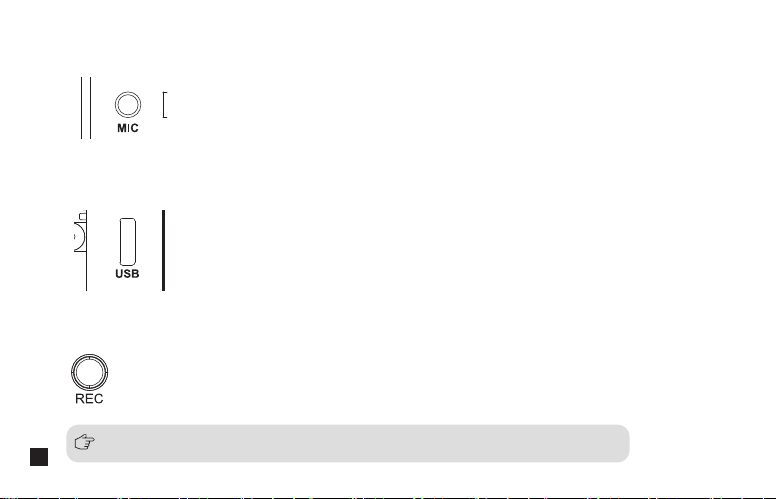
Long press to start or stop the recording when the screen is on
2.6. REC Button
Connect the transmitter with the power or computer through 3 in 1 charging/output cable to charge or copy
recording file
2.5. USB-C Charging/Copy Port
Insert the 3.5mm TRS microphone input cable, and you can use the external lavalier microphone for
recording. At this time, the internal microphone of this device is turned off
2.4. 3.5mm TRS Microphone Port
All the function adjustments are only available when the screen is on, and if the
screen is dimmed, press any button to light up the screen and then adjust again
10
Mono
Stereo
Safety (It will output dual-channel audio in mono in safety mode, one channel is normal audio,
another channel is the safe audio reduced with -6dB based on the normal audio)
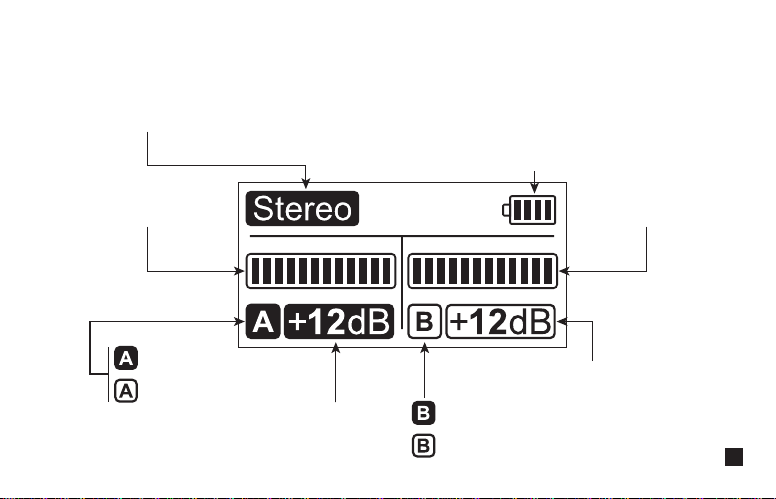
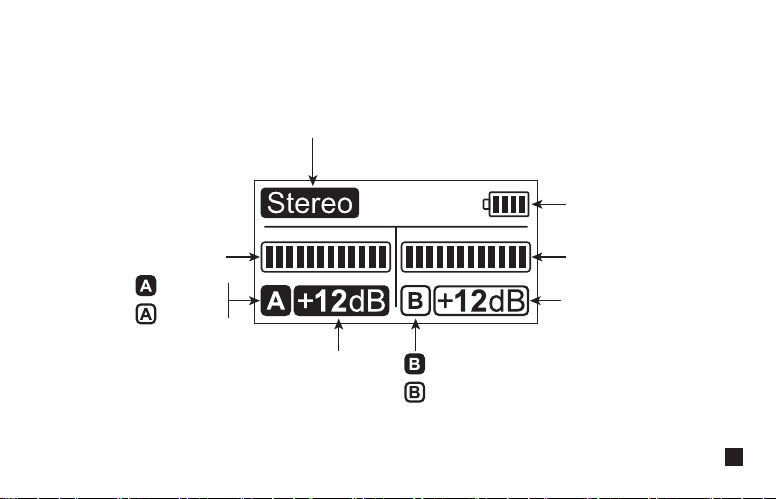
Receiver(RX)
1.Screen Display Instruction:
Receiver Battery Status
A channel is connected
A channel is not connected
A Channel Microphone
Audio Dynamic Bar
B Channel Microphone
Audio Dynamic Bar
Group A Output Volume
Group B Output Volume
B channel is connected
B channel is not connected
11

2. Function Introduction:
Long press for On/Off; Short press for mono/stereo/safety mode switch. Please attention that it can not realize
STEREO function when in single-channel and safety mode
2.2. Power/Mono/Stereo/Safety Mode Switch Button
Short press to cyclically adjust the A/B channel output volume. In the mono mode, the A/B channel output
volume is adjusted synchronously
2.3. A/B Channel Output Volume Adjustment Button
If there is an abnormal phenomenon such as the device is crash or unable to turn on it, then insert the
reset pin into the reset hole to reset it
2.1. Reset Hole
12
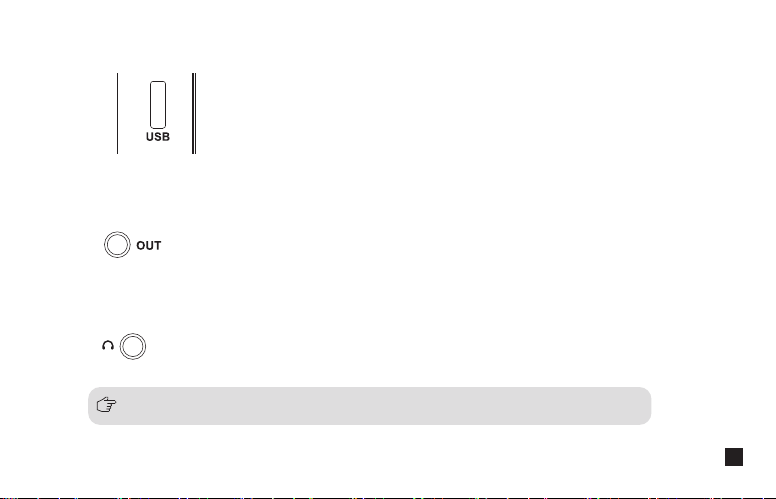
Connect with mobile phone through the 3.5mm TRS-TRRS audio cable; Connect with camera through the
3.5mm TRS-TRS audio cable
All the function adjustments are only available when the screen is on, and if the
screen is dimmed, press any button to light up the screen and then adjust again
2.5. 3.5mm TRS Audio Output Port
Insert headphone to monitor
2.6. 3.5mm TRS/TRRS Monitoring Port
Connect the receiver with the power or USB interface devices through 3 in 1 charging/output cable to
charge or output
2.4. USB-C Charging/Output Port
13
Installation and Usage
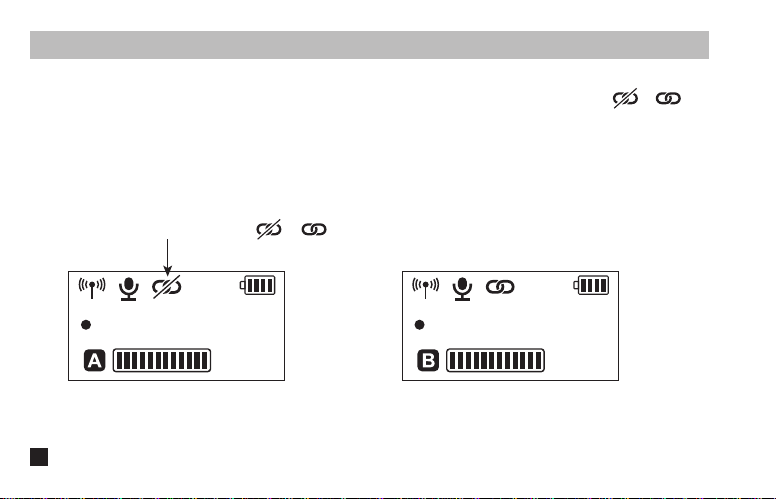
Pairing Method
(All have been paired at the factory. If you need to re-pair, please follow the description)
REC
00
:
00
:
00
Transmitter (TX)
REC
00
:
00
:
00
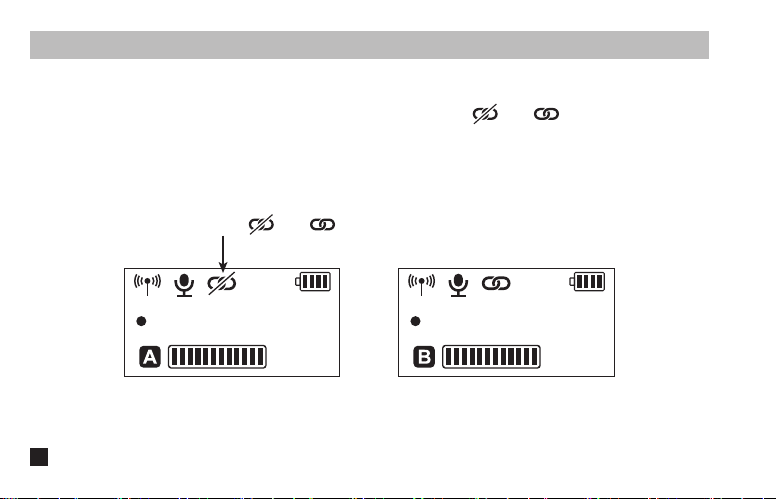
Long press the pair button of the transmitter to pair when the screen is on, the icon changes from to after
pairing successfully, the first paired transmitter as channel A(left channel), and the second paired transmitter as
channel B(right channel)
The screen icon changes from to after pairing
14
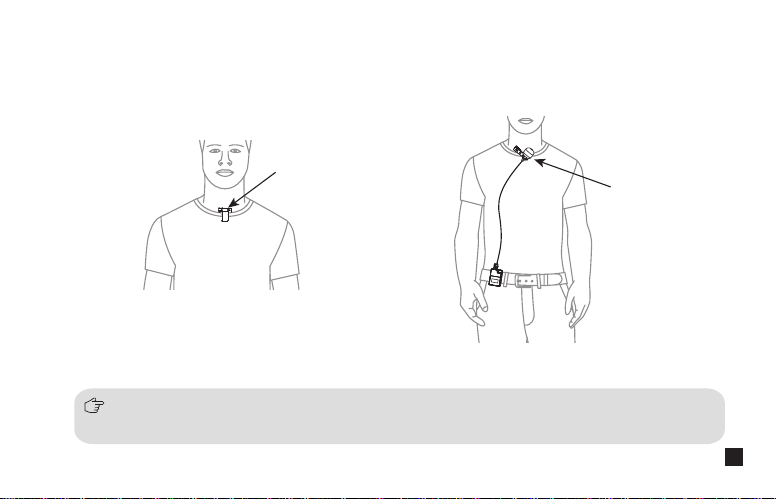
Transmitter(TX)
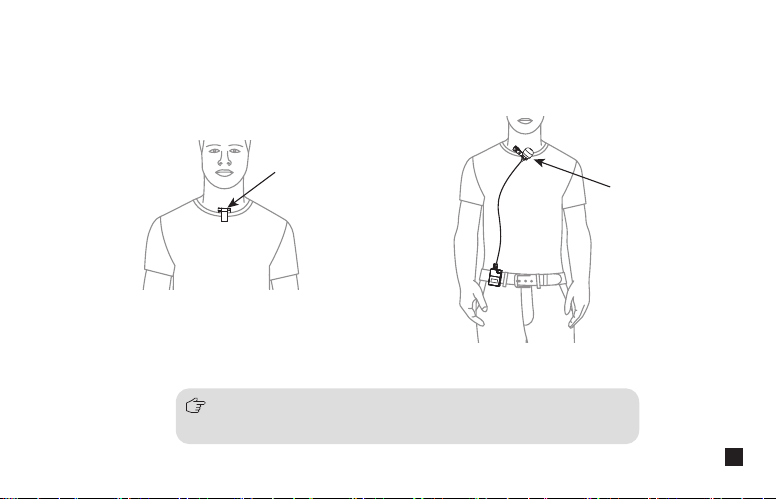
1. Use the internal/external mic according to your need
Internal Mic
External Mic
1.For better concealment during use, it is recommended that the belt clip is fixed and used outwards
2.When using an external microphone, the internal microphone is automatically turned off
15
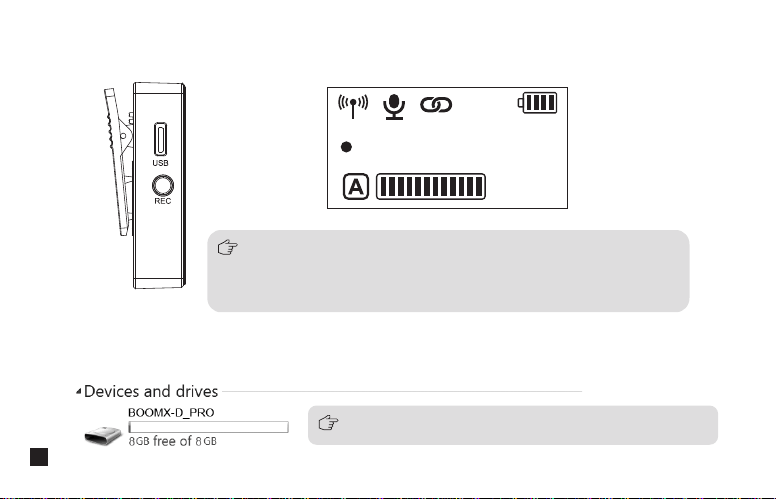
BOOMX-D_PRO disk appears after BoomX-D PRO is connected with the computer, then you can copy the
recording file
When you need to continuously record, a new recording file will be
saved every 2 hours of recording, and the total recording time is 24
hours. When the 8G memory is full, the new recording file will overwrite
the old recording file
Long press to start or stop the recording when the screen is on
2. Use the REC function according to your need
REC
00
:
00
:
00
3. Copy recording file according to your need
Please keep the TX turned on when copying recording files
16
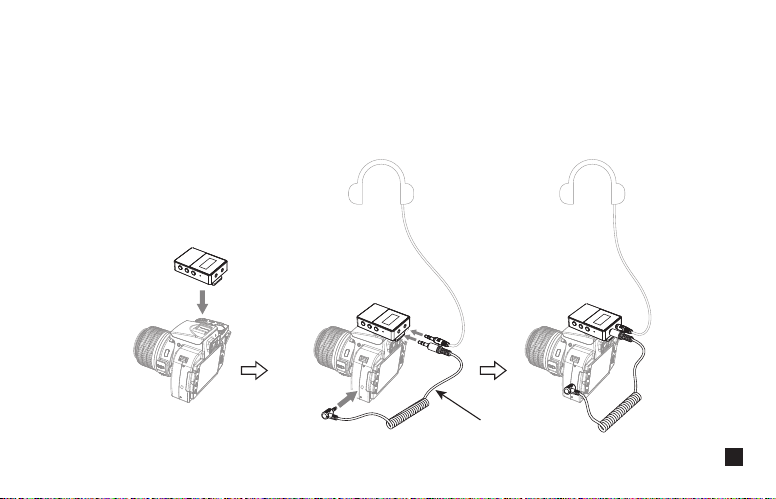
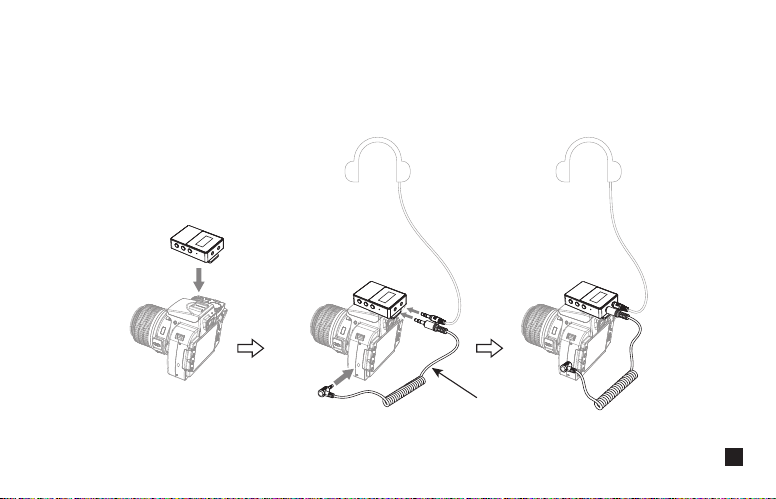
1. Analog Output
:
1.1 Work with Camera
Fix the receiver through the belt clip to the camera's hot shoe mount, then connect the receiver with
camera through the 3.5mm TRS-TRS audio cable; Insert the headphone into the monitoring headphone
port for monitoring
Receiver(RX)
3.5mm TRS-TRS audio cable
17
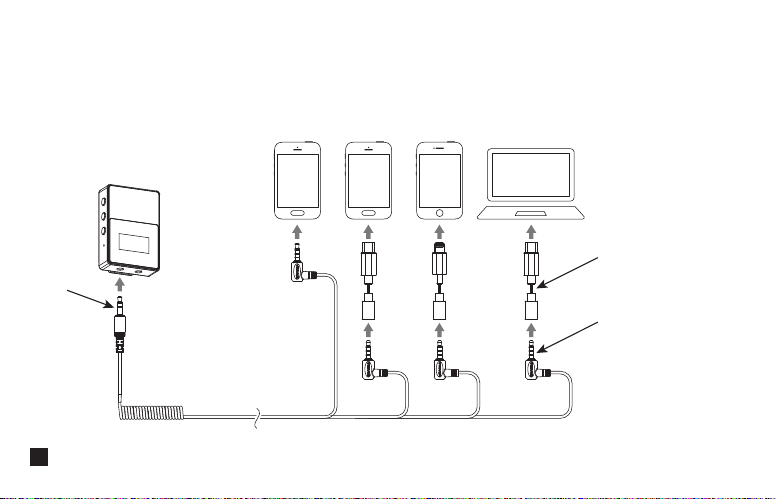
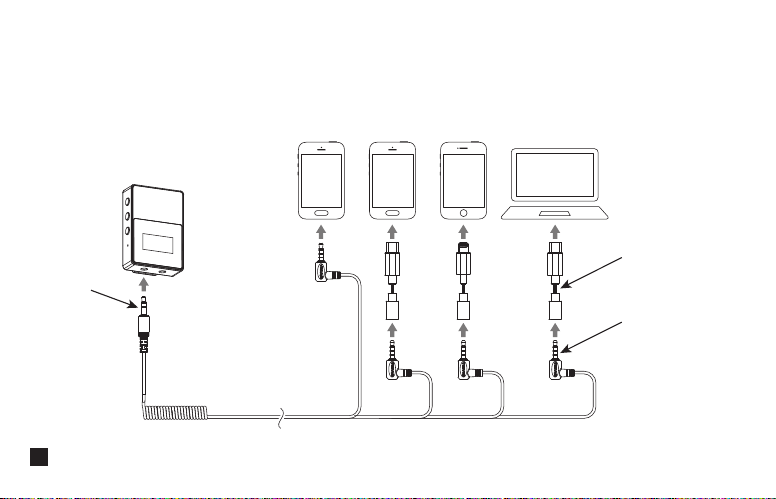
1.2. Work with Smartphone/Computer
Connect the receiver with smartphone/computer through the 3.5mm TRS-TRRS audio cable and
corresponding audio adapter cable, then insert headphone to monitor according to your need (Please
purchase audio adapter cable by yourself )
TRRS Plug
Audio adapter cable
TRS Plug
18
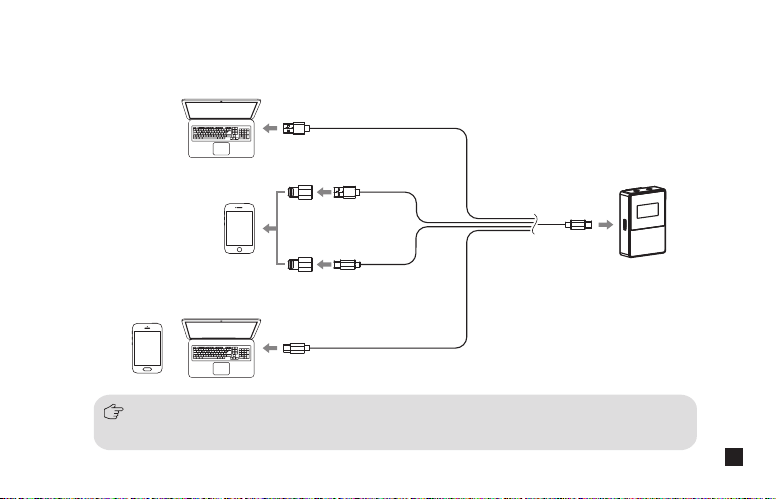
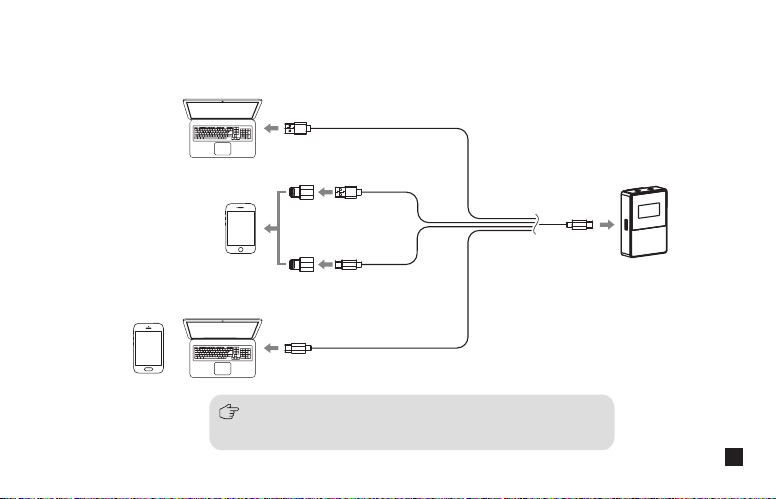
2. Digital Output:
Connect the receiver with the USB interface devices through the corresponding audio cable and audio adapter,
then insert the headphone to monitor according to your need
BoomX-D PRO is equipped with a USB C-USB A audio cable(the orange cable of the 3 in 1
charging/output cable) , please purchase other audio cable and audio adapter by yourself
19
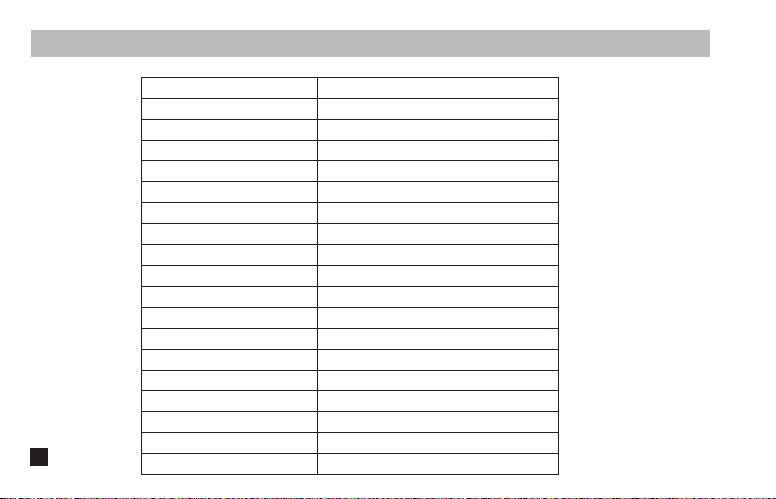
Specifications
Transmitter (TX)
Wireless Band
Transmitting Power
Receiving Sensitivity
Antenna
Polar Pattern
Frequency Response
Sound Pressure Level
S/N
Equivalent Noise
Dynamic Range
Sound Delay
External Mic Input Interface
Battery
Battery Life
Recording Time
Net Weight
Dimension
Operating Temperature
Storage Temperature
2400~2483.5MHz
+10dBm
-86dBm
PCB Antenna
Omnidirectional
80Hz ~ 20kHz
100dB
70dB
24dBA
76dB
<20ms
3.5mm TRS
Built-in Li-ion Battery 330mAh 3.7V
4.5 Hours
24 Hours
29g
39x22x55mm
0
℃
~ 50
℃
-20
℃
~ 60
℃
20

Receiver (RX)
Wireless Band
Transmitting Power
Receiving Sensitivity
Antenna
Audio Output Adjustment
S/N
Equivalent Noise
Dynamic Range
Sound Delay
Audio Output Interface
Digital Output
Monitor Interface
Battery
Battery Life
Net Weight
Dimension
Operating Temperature
Storage Temperature
2400~2483.5MHz
+10dBm
-86dBm
PCB Antenna
-12dB~+12dB
70dB
24dBA
76dB
<20ms
3.5mm TRS&USB-C
48kHz 24bits
3.5mm TRS/TRRS
Built-in Li-ion Battery 330mAh 3.7V
6 Hours
29g
39x22x55mm
0
℃
~ 50
℃
-20
℃
~ 60
℃
21

用户使用手册
2.4G 双通道板载录音无线麦克风
BoomX-D PRO


前言
产品主要功能
感谢您购买科唛
BoomX-D PRO
. 2.4G
数字双通道无线麦克风,全球通用频段
. 48kHz/16bits
录音,智能降噪
.
支持
8G
内存板载录音及高速传输拷贝(约24小时)
.
数字
&
模拟双模式输出,通用于相机,手机,电脑
.
安全音轨模式,便于后期剪辑
.
可视化电量,音频动态监控等屏显功能
.
单声道
/
立体声输出,支持实时监听
.
内置和外置
MIC
两种输入方式
.
自动调频,传输稳定
.
低音频延迟
< 20ms
,传输距离稳定高达
100m
.
多功能背夹,小巧精悍
1

注意事项
由于
2.4G
无线特性,使用时尽量保持面对面,避免背对的情况,否则容易产生断点,属正常现象
使用时避免任何物体遮挡天线位置,以免信号不良
单通道以及安全音轨模式下,立体声(STEREO)功能不可实现
当持续录音时,每录满2小时会新存为一个录音文件,总录音时长为24小时,当8G内存录满时,新录音文件会覆盖
旧录音文件
录音功能和拷贝功能不可同时使用
3.5mm TRS-TRS
音频连接线适用于佳能、尼康等收音灵敏度较弱的相机
3.5mm TRS-TRS
阻尼音频连接线适用于索尼、松下、富士等收音灵敏度较强的相机
(
如连接设备后出现声音过爆现象,此时建议使用
3.5mm TRS-TRS
阻尼音频连接线
)
本产品属于高精密仪器类产品,请避免使用时掉落、碰撞或重击
请勿将本设备放置在热源或干扰源附近使用,如散热器、烤箱等
如拾音距离较近或于户外使用时,请套上麦克风防风毛,防止声音爆裂或降低风噪
不要在雨中或潮湿的环境中使用该设备,否则会有短路的危险
请在干燥环境中对该产品进行保存
2
提示
接收器(
RX
)发射器(
TX
)
使用时避免任何物体遮挡天线位置,以免信号不良
天线位置
天线位置
1. BoomX-D PRO
通用于
USB
和
3.5mm
接口的设备。当用于手机时,系统会强制性使用
BoomX-D PRO
2.
当用于电脑时,请按以下步骤进行操作:
①
将
BoomX-D PRO
插入电脑
②
打开声音设置界面,选择
“Comica_BoomX-D_PRO”
为输出和输入设备
声音
输出
选择输出设备
Comica_BoomX-D_PRO
输入
选择输入设备
Comica_BoomX-D_PRO
3
包装清单
BoomX-D PRO D1 = TX + RX
(黑色
/
白色)
BoomX-D PRO D2 = TX + TX + RX
(黑色
/
白色)
接收器(
RX
)发射器(
TX
)
搭配选择
:
主体
:
4
①
3.5mm
麦克风输入线
②
防风毛
③
3.5mm TRS-TRRS
音频连接线(手机适配线)
④
3.5mm TRS-TRS
音频连接线(适配佳能、尼康等相机)
⑤
3.5mm TRS-TRS
阻尼音频连接线(适配索尼、松下、富士等相机)
⑥
三合一充电
/
输出线(其中橙色线具备充电和数据传输功能,另外两条黑色线只具备充电功能)
⑦
复位针
⑧
便携包
⑨
说明书
⑩
保修卡
每一个型号的配件包括:
配件
:
① + ② + ③ + ④ + ⑤ + ⑥ + ⑦ + ⑧ + ⑨ + ⑩
BoomX-D PRO D1=
①x2 + ②x2 + ③ + ④ + ⑤ + ⑥ + ⑦ + ⑧ + ⑨ + ⑩
BoomX-D PRO D2=
① ② ③
④ ⑤ ⑥⑦⑧⑨⑩
5
部件介绍及说明
发射器(
TX
)
1.
外置麦克风插头卡扣
2. 3.5mm TRS
外置麦克风插孔
3.
内置麦克风
4.
电源
/
静音按钮
5.
配对按钮
6.
复位孔
7.
背夹
8. USB-C
充电
/
拷贝插口
9.录音按钮
①
②
③
⑨
⑧
⑦
④
⑤
⑥
6
接收器(
RX
)
1. 3.5mm TRS/TRRS
耳机监听插孔
2. 3.5mm TRS
音频输出插孔
3.
复位孔
4.
电源/单声道/立体声/安全音轨切换按钮
5. A
通道输出音量调节按钮
6. B
通道输出音量调节按钮
7.
背夹
8. USB-C
充电
/
输出插口
①
②
③
⑧
⑦
④
⑤
⑥
7
屏显与功能介绍
发射器(
TX
)
1.
屏幕显示
:
A/B通道麦克风音频动态条
静音
麦克风正常工作
未配对
配对中
已配对
发射器电池电量
信号强度
A/B通道已连接
A/B通道未连接
闪烁:正在录音 已录音时长
REC
00
:
00
:
00
8

2.
功能介绍
:
长按开机
/
关机,短按进行静音切换
2.1. 电源/静音按钮
长按与接收器进行配对
2.2. 配对按钮
如出现死机或开不了机等异常现象,使用复位针插入复位孔即可复位
2.3. 复位孔
9
在屏幕亮显的情况下长按进行录音或者停止录音
2.6.
录音按钮
使用三合一充电/
输出
线连接发射器可充电和拷贝录音文件
2.5. USB-C
充电
/
拷贝插口
插入
3.5mm TRS
麦克风输入线,即可使用外置领夹麦克风进行录音,此时本机的内置麦克风被关闭
2.4. 3.5mm TRS麦克风插孔
所有功能调节需在屏幕亮显时才可用,如果屏幕暗显,请先按任何按键使屏幕亮显再操作
10
Mono:
Stereo:
Safety:
接收器电池电量
A通道已连接
A通道未连接
A通道麦克风
音频动态条
B通道麦克风
音频动态条
B通道输出音量
A通道输出音量
单声道
立体声
安全模式(该模式下为单声道输出,输出两路音频,一路为正常音频,
一路为正常音轨降低-6dB后的安全音频)
B通道已连接
B通道未连接
接收器(
RX
)
1.
屏幕显示
:
11

2.
功能介绍
:
长按开机/关机,短按进行单声道、立体声与安全模式切换。单通道以及安全音轨模式下,立体声(STEREO)功
能不可实现
2.2. 电源/单声道/立体声/安全音轨切换按钮
短按可循环调节A/B通道输出音量;在单声道模式下,A/B通道输出音量同步调节
2.3. A/B通道输出音量调节按钮
如出现死机或开不了机等异常现象,使用复位针插入复位孔即可复位
2.1. 复位孔
12
通过
3.5mm TRS-TRRS
音频连接线与手机进行连接;通过
3.5mm TRS-TRS
音频连接线与相机进行连接
(
如连接设备后出现声音过爆现象,此时建议使用
3.5mm TRS-TRS
阻尼音频连接线
)
2.5. 3.5mm TRS音频输出插孔
插入
3.5mm TRS/TRRS
耳机即可监听
2.6. 3.5mm TRS/TRRS耳机监听插孔
通过三合一充电/输出线连接接收器可充电或数字输出到USB接口的设备
2.4. USB-C
充电
/
输出插口
所有功能调节需在屏幕亮显时才可用,如果屏幕暗显,请先按任何按键使屏幕亮显再操作
13
安装与使用方法
发射器(
TX
)
在发射器屏幕亮显的情况下长按配对按钮进行配对,配对成功后屏幕图标由 变成 ,先配对成功的发射器
为A通道(左声道),后配对成功的发射器为B通道(右声道)
配对成功后屏幕图标由
变成
配对方法(出厂时默认配对,如需重新配对,请根据以下说明操作)
REC
00
:
00
:
00
REC
00
:
00
:
00
14
发射器(
TX
)
1.
根据个人需求选择使用内置
/
外置麦克风
内置麦克风
外置麦克风
1.在使用内置麦克风时,为了更好的隐蔽性,建议将背夹朝外固定使用
2.当使用外置麦克风时,内置麦克风会自动关闭
15
通过
TX
的
USB-C
接口连接电脑后出现一个盘符
BOOMX-D_PRO
,录制的音频文件可从盘符中拷出
在屏幕亮显的情况下长按
REC
进行录音或停止录音
2.根据个人需求选择是否开启录音功能
持续录音时,每录满2小时会新存为一个录音文件,总录音时长为24小时,
当8G内存录满时,新录音文件会覆盖旧录音文件
REC
00
:
00
:
00
3.根据个人需求选择是否拷贝录音文件
拷贝录音文件时,
TX
需保持开机状态,否则将无法拷贝
16
1.
模拟输出
:
1.1
搭配相机
把接收器通过背夹夹到相机的热靴座固定;通过
3.5mm TRS-TRS
音频连接线连接接收器和相机;把耳机插入
耳机监听插孔进行监听
接收器(
RX
)
3.5mm TRS-TRS音频连接线
17
1.2.
搭配手机/电脑
通过
3.5mm TRS-TRRS
音频连接线和相关音频转接线连接接收器和手机
/
电脑,可根据个人需求选择是否进
行监听(转接线请自行购买)
四节TRRS插头
转接线
三节TRS插头
18
2.
数字输出
:
USB C-USB A
音频连接线可用三合一充电
/
输出线中的橙色线,
其他音频连接线及转接头需自行购买
通过相关音频连接线及转接头连接接收器和
USB
接口的设备,根据个人需求选择是否进行监听
19
技术规格
发射器(
TX
)
无线频段
发射功率
接收灵敏度
天线
麦克风指向性
麦克风频响
声压级
系统信噪比
系统等效噪声
系统动态范围
声音延迟
外置输入接口
电池
续航时间
录音时间
净重
尺寸
工作温度
存储温度
2400~2483.5MHz
+10dBm
-86dBm
PCB
天线
全指向
80Hz ~ 20kHz
100dB
70dB
24dBA
76dB
<20ms
3.5mm TRS
锂聚合物
330mAh 3.7V
4.5
小时
24
小时
29g
39x22x55mm
0
℃
~ 50
℃
-20
℃
~ 60
℃
20

接收器(
RX
)
无线频段
发射功率
接收灵敏度
天线
音频输出调节
系统信噪比
系统等效噪声
系统动态范围
声音延迟
音频输出接口
数字输出
监听接口
电池
续航时间
净重
尺寸
工作温度
存储温度
2400~2483.5MHz
+10dBm
-86dBm
PCB
天线
-12dB~+12dB
70dB
24dBA
76dB
<20ms
3.5mm TRS&USB-C
48kHz 24bits
3.5mm TRS/TRRS
锂聚合物
330mAh 3.7V
6
小时
29g
39x22x55mm
0
℃
~ 50
℃
-20
℃
~ 60
℃
21