ES600 Series | Owner’s Guide
General Precautions
1 To eliminate a choking hazard for young children, discard all packaging materials immediately upon unpacking.
2 This appliance can be used by persons with reduced physical, sensory, or mental capabilities or lack of experience and knowledge if they
have been given supervision or instruction concerning use of the appliance in a safe way and understand the hazards involved.
3 Keep the appliance and its cord out of reach of children. DO NOT allow the appliance to be played with or be used by children. Close
Supervision is necessary when used near children.
4 To protect against fire, electric shock, and injury to persons, DO NOT immerse cord, plugs, or body of machine in water or other liquid.
5 Never carry the appliance by the power cord or pull it to disconnect from electrical socket; instead grasp the plug and pull to disconnect.
6 DO NOT operate any appliance with a damaged cord or plug, or after the appliance malfunctions, or has been dropped or damaged in
any manner. Contact SharkNinja Operating LLC for service.
7 For household and countertop use only. DO NOT let the power cord hang over the edge or touch hot surfaces such as the stove.
8 NEVER use socket below counter.
9 To avoid risk of fire, electrical shock, or damage to the brewer, DO NOT use brewer in an appliance garage or under a wall cabinet.
10 Unplug from socket when the appliance is not ins use, and before cleaning.
11 Never leave an appliance unattended while in use.
12 Appliances are not intended to be operated by means of an external timer or separate remote-control system.
13 DO NOT place on top of any other appliance.
14 The appliance shall not be placed in a cabinet when in use.
15 DO NOT use any accessory not recommended by the manufacturer as this may result in injury or damage to the appliance.
IMPORTANT SAFETY INSTRUCTIONS
PLEASE READ CAREFULLY BEFORE USE • FOR HOUSEHOLD USE ONLY
WARNING
To reduce the risk of injury, fire, electrical shock or property damage, basic safety precautions must always be followed,
including the following numbered warnings and subsequent instructions. Do not use appliance for other than intended use.
Read all instructions before using your Ninja Luxe Espresso Bar
Indicates the presence of a hazard that can cause personal injury, death or substantial property damage if the warning
included with this symbol is ignored.
Avoid contact with hot surface. Always use hand protection to avoid burns.
For indoor and household use only.
READ AND SAVE THESE INSTRUCTIONS
PREMIER SERIES
THANK YOU
for purchasing the Ninja Luxe Café
PLEASE READ CAREFULLY AND KEEP FOR FUTURE REFERENCE.
These instructions are designed to help you get a complete understanding of your new Ninja Luxe Espresso
Machine. If you have any questions, please call our Customer Service line at 0800 862 0453.
TECHNICAL SPECIFICATIONS
Voltage: 220-240V~ 50-60Hz
Power: 1800W
Water Reservoir
Capacity: 2L
TIP: You can find the model and serial numbers on the
QR code label located on the back of the unit by the
power cord.
RECORD THIS INFORMATION
Model Number: �������������������������
Serial Number: ��������������������������
Date of Purchase: �����������������������
(Keep receipt)
Store of Purchase: �����������������������
REGISTER YOUR PURCHASE
www.ninjakitchen.co.uk/register
0800 862 0453
Scan QR code using mobile device
Ninja is a registered trademark in the United Kingdom of SharkNinja Operation LLC.
SharkNinja Europe Ltd, 1st/2nd Floor Building 3150,
Thorpe Park, Century Way, Leeds, England, LS15 8ZB
Telephone: 0800 862 0453
ninjakitchen.co.uk
SharkNinja Germany GmbH, Rotfeder-Ring 9,
60327 Frankfurt am Main, Germany
Illustrations may dier from actual product. We are constantly striving to improve our products, therefore the
specifications contained herein are subject to change withoutnotice.
© 2024 SharkNinja Operating LLC
ES601UK�IB�MP�240620�Mv1
@ninjakitchen

4
ninjakitchen.co.uk
3
ninjakitchen.co.uk
Operating Notice
• Power the machine o and unplug from the wall socket.
• The use of an accessory not recommended by the manufacturer may create an overflow condition and scalding hazard, or result in
fire, electric shock, or personal injury.
• ALWAYS use machine on a clean, dry, level surface.
• DO NOT place on or near a hot gas or electric burner or in a heated oven.
• DO NOT use this machine for anything other than its intended use.
• DO NOT use outdoors.
• DO NOT touch hot surfaces. Use handles or knobs. Avoid contacting moving parts.
• ALWAYS place a cup or vessel appropriate for output volume selection beneath the portafilter when brewing.
• DO NOT run the machine without water.
• DO NOT overfill the water reservoir. Fill water only to the maximum fill line.
• Keep lid on water reservoir when brewing.
• Keep bean hopper lid on when grinding to prevent access to moving parts.
• DO NOT remove portafilter when brewing as machine is under pressure. Removal while brewing can lead to scalding or injury.
• DO NOT reach in or touch steam wand or frother jug when in operation. Hot steam and hot liquids will cause burns and scalds.
Care & Maintenance
• To prevent microbial growth in the machine, follow all cleaning instructions in the Cleaning & Maintenance section of this Owner’s
Guide.
• For best results, ensure you are using a clean machine.
• If the product is not operating properly, visit ninjakitchen.co.uk or contact SharkNinja Operating LLC for examination, repair, or
adjustment.
• Children shall not engage with cleaning and maintenance activities.
• When portafilter is in use, ensure it is tightened in the group head to prevent spillover of hot liquid.
• DO NOT pick up the machine by the grinding cradle. This apparatus is not meant to hold weight of product.
Cord Statement
• A short power-supply cord is provided to reduce the risks resulting from becoming entangled in or tripping over a longer cord.
• DO NOT use extension cords with this product.
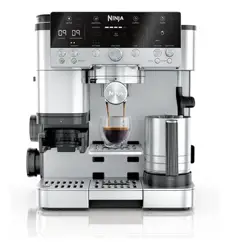
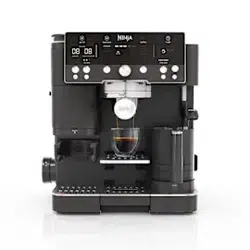
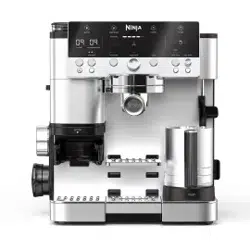
A Bean Hopper
B Water Reservoir
C Cup Warmer
D Control Panel
E Accessory Storage
F Steam Wand
G Group Head
H Milk Jug with Integrated Whisk
I Adjustable Cup Tray
J Grinding Cradle
K Main Drip Tray
L Assisted Tamper Storage
M Funnel Storage
N Grind Dial
O Integrated Conical Burr Grinder
A
O
D
F
E
H
K IJ
G
N
M
L
B C
IMPORTANT SAFETY INSTRUCTIONS
PLEASE READ CAREFULLY BEFORE USE • FOR HOUSEHOLD USE ONLY
WARNING
To reduce the risk of injury, fire, electrical shock or property damage, basic safety precautions must always be followed,
including the following numbered warnings and subsequent instructions. Do not use machine for other than intended use.
READ AND SAVE THESE INSTRUCTIONS
PARTS
DRIP TRAY COMPONENTS
K Main Drip Tray
K1 Empty Indicator
K2 Main Grate
K3 Centre Drip Tray
K4 Centre Grate
K5 Milk Jug Platform
K3K K2 K5K1 K4
4
ninjakitchen.co.uk
3
ninjakitchen.co.uk
Operating Notice
• Power the machine o and unplug from the wall socket.
• The use of an accessory not recommended by the manufacturer may create an overflow condition and scalding hazard, or result in
fire, electric shock, or personal injury.
• ALWAYS use machine on a clean, dry, level surface.
• DO NOT place on or near a hot gas or electric burner or in a heated oven.
• DO NOT use this machine for anything other than its intended use.
• DO NOT use outdoors.
• DO NOT touch hot surfaces. Use handles or knobs. Avoid contacting moving parts.
• ALWAYS place a cup or vessel appropriate for output volume selection beneath the portafilter when brewing.
• DO NOT run the machine without water.
• DO NOT overfill the water reservoir. Fill water only to the maximum fill line.
• Keep lid on water reservoir when brewing.
• Keep bean hopper lid on when grinding to prevent access to moving parts.
• DO NOT remove portafilter when brewing as machine is under pressure. Removal while brewing can lead to scalding or injury.
• DO NOT reach in or touch steam wand or frother jug when in operation. Hot steam and hot liquids will cause burns and scalds.
Care & Maintenance
• To prevent microbial growth in the machine, follow all cleaning instructions in the Cleaning & Maintenance section of this Owner’s
Guide.
• For best results, ensure you are using a clean machine.
• If the product is not operating properly, visit ninjakitchen.co.uk or contact SharkNinja Operating LLC for examination, repair, or
adjustment.
• Children shall not engage with cleaning and maintenance activities.
• When portafilter is in use, ensure it is tightened in the group head to prevent spillover of hot liquid.
• DO NOT pick up the machine by the grinding cradle. This apparatus is not meant to hold weight of product.
Cord Statement
• A short power-supply cord is provided to reduce the risks resulting from becoming entangled in or tripping over a longer cord.
• DO NOT use extension cords with this product.
A Bean Hopper
B Water Reservoir
C Cup Warmer
D Control Panel
E Accessory Storage
F Steam Wand
G Group Head
H Milk Jug with Integrated Whisk
I Adjustable Cup Tray
J Grinding Cradle
K Main Drip Tray
L Assisted Tamper Storage
M Funnel Storage
N Grind Dial
O Integrated Conical Burr Grinder
A
O
D
F
E
H
K IJ
G
N
M
L
B C
IMPORTANT SAFETY INSTRUCTIONS
PLEASE READ CAREFULLY BEFORE USE • FOR HOUSEHOLD USE ONLY
WARNING
To reduce the risk of injury, fire, electrical shock or property damage, basic safety precautions must always be followed,
including the following numbered warnings and subsequent instructions. Do not use machine for other than intended use.
READ AND SAVE THESE INSTRUCTIONS
PARTS
DRIP TRAY COMPONENTS
K Main Drip Tray
K1 Empty Indicator
K2 Main Grate
K3 Centre Drip Tray
K4 Centre Grate
K5 Milk Jug Platform
K3K K2 K5K1 K4
S + M + L + XL
6
ninjakitchen.co.uk
USING THE CONTROL PANEL
*
5
ninjakitchen.co.uk
A POWER Button
B START GRIND Button
C Progress Bar
D Froth Dial/START FROTH Button
E PURGE Button
F CLEAN Button
G MILK TYPE Button
H SIZE Selection Button
I Centre Dial/START BREW Button
J STRENGTH Button
K DESCALE Button
C
I H FK J G
B
D
E
A
4
8
7
1 Single Basket *
(not available on all models)
2 Double Basket
3 Luxe Basket
4 Portafilter
5 Cleaning Disc
6 Cleaning Brush
7 Funnel
8 Assisted Tamper
9 Cleaning Tablets
10 Descale Powder
11 Water Hardness Test Strip
12 Water Filter Insert
13 Water Filter Housing
1 2 3
ACCESSORIES
5
6
9
10
11
INTELLIGENT NOTIFICATIONS
The machine will display an intelligent notification if an action is needed:
*The CLEAN and DESCALE buttons will illuminate to let you know you need to run the respective cycle.
• ADD BEANS
• INSTALL PORTAFILTER
• INSTALL FUNNEL
• INSTALL HOPPER
• AD D WATER
• INSTALL JUG
• RINSE
• PURGE
• DESCALE*
• CLEAN*
*Functions may vary by model.
*Single basket not compatible with all models.
12
13
87
ninjakitchen.co.uk
ninjakitchen.co.uk
NOTE: If you need to change the hardness level,
purchase another test strip at ninjakitchen.
co.uk/ninja-parts-accessories/. For more
instructions on how to reset the water hardness,
refer the Additional Settings section.
REMOVE ACCESSORIES & PARTS FROM
PACKAGING
• To start, remove all accessories and parts from
packaging. Ensure that all accessories and
parts are removed from the packaging before
discarding packaging.
• When removing the machine from packaging,
be sure to remove all tape from machine. Tape
will be on all sides of the machine.
CLEAN ACCESSORIES BEFORE USE
• After removing all accessories and parts from
the packaging, thoroughly clean all parts by
hand-washing and dry thoroughly.
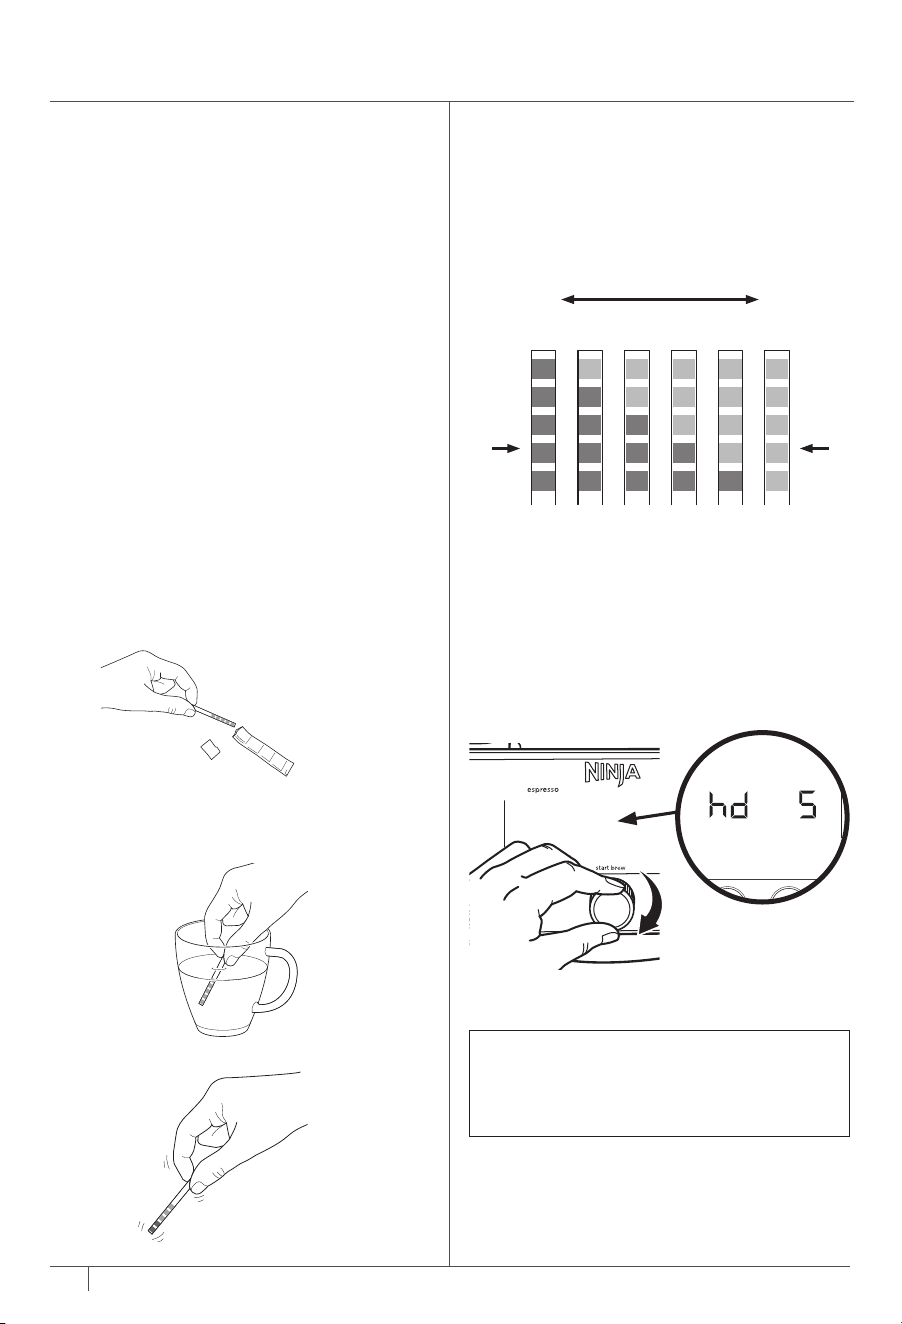
WATER HARDNESS TEST
All water has minerals that can cause buildup in the
machine over time. These minerals are referred to
as water hardness, and will impact how often you
will need to descale the machine. Doing this test
will ensure the machine recommends a descale at
the right time.
1 Remove test strip from pack.
3 Pull test strip out and lightly shake it.
4 Place test strip on a dry, flat surface and wait 1
minute for test strip to display results.
5 After 1 minute, you will see 0–5 purple squares
appear. This will indicate the water hardness
level of the water (0 purple squares=level 0,
5 purple squares=level 5, etc.)
6 After identifying the water hardness level, plug in
the machine.
7 Look at the left side of the control panel. It will
display hd 5.
8 Rotate the centre dial to program the water
hardness level by matching the number of
purple squares on the test strip to the number
displayed. (e.g., if the result is level 1, change the
setting to hd 1).
9 Press centre dial to confirm your setting.
Green
Squares
Purple
Squares
Very
Soft
Very
Hard
hd 0 hd 1 hd 2 hd 3 hd 4 hd 5
2 Completely submerge the water test strip in the
water you plan on using with the machine for
5–10 seconds.
GETTING STARTED: BEFORE YOUR FIRST BREW
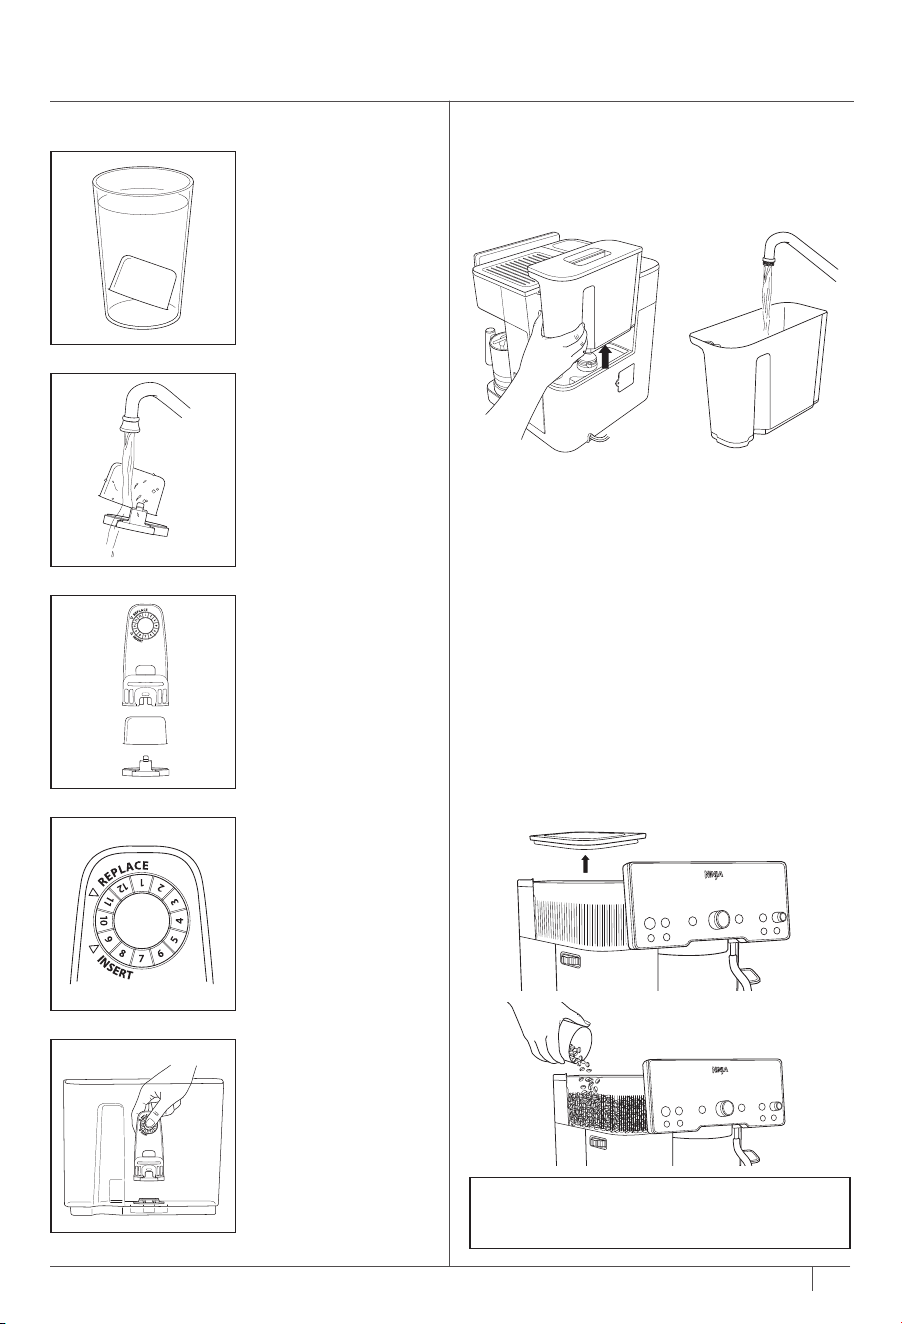
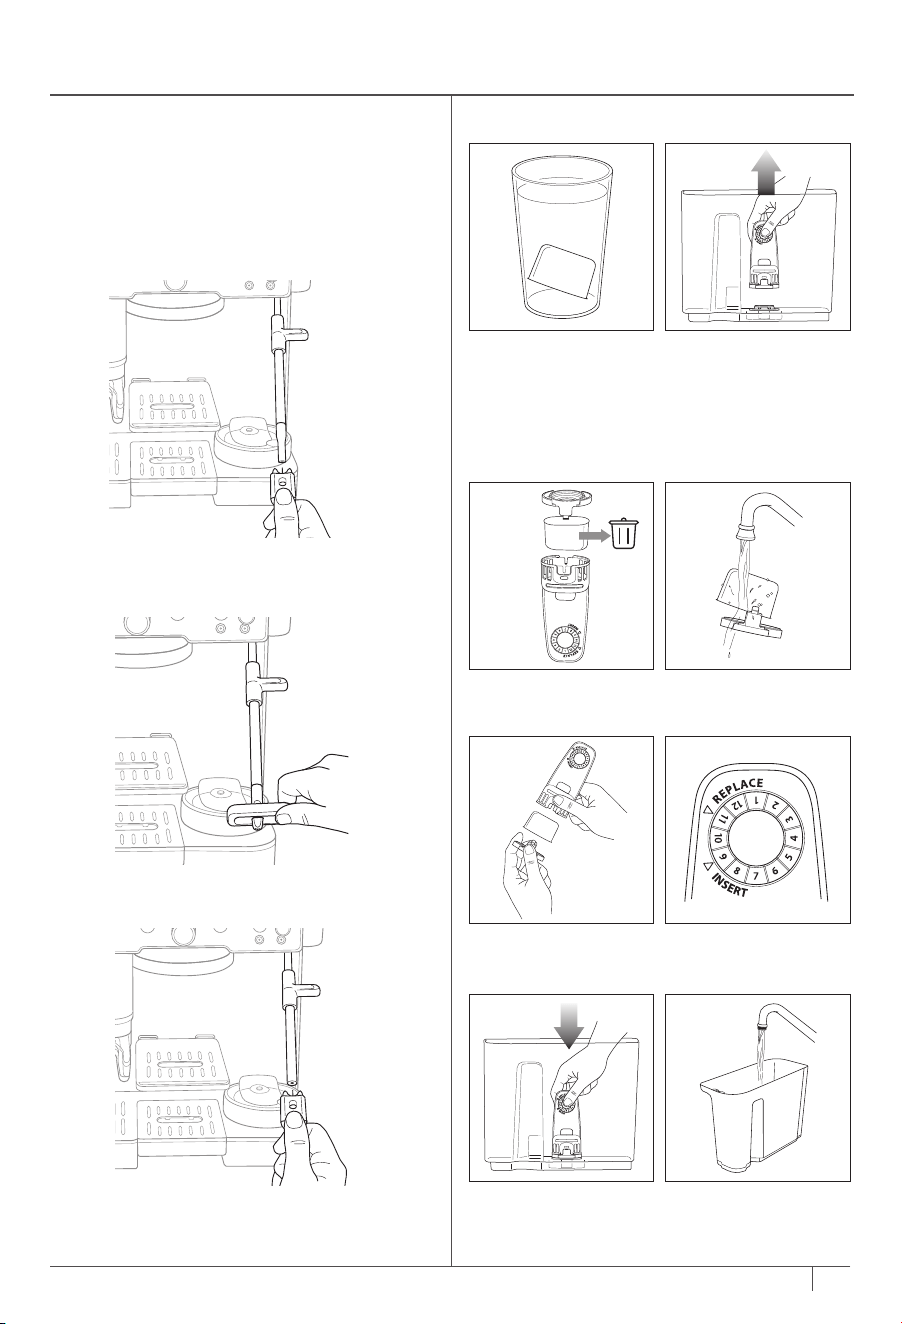
WATER FILTER INSTALLATION
1 Soak Water Filter
for 5 minutes.
3 Secure filter into
filter housing
5 Install filter housing
into reservoir.
2 Rinse water filter
and mesh for 60
seconds.
4 Set date 2 months
ahead.
NOTE: DO NOT put any water in the grinder.
If water does get in the grinder, please call us
at 0800 862 0453 immediately.
FILL THE BEAN HOPPER
• Ensure that the bean hopper is filled with
beans (the hopper will be locked into place
out of box). Remove the lid of the hopper,
fill with beans and ensure the lid is placed
securely back on the hopper. Make sure the
bean hopper is locked into place (the bean
hopper comes locked out of box), and the lid
is placed securely back on top.
FILL THE WATER RESERVOIR
• Before you begin the brew, make sure the
water reservoir is full of room temperature
or cold water. Be sure to fill up to but not
exceeding the maximum fill line.
If there's not enough water in the reservoir to
brew your selected drink, your unit will indicate
that you must ADD WATER. If you get an ADD
WATER notification while brewing, add water to
the reservoir and press brew.
• When filling the water reservoir, be sure to
use room temperature or cold water. If you
use hot water, you may get an ADD WATER
notification
87
ninjakitchen.co.uk
ninjakitchen.co.uk
NOTE: If you need to change the hardness level,
purchase another test strip at ninjakitchen.
co.uk/ninja-parts-accessories/. For more
instructions on how to reset the water hardness,
refer the Additional Settings section.
REMOVE ACCESSORIES & PARTS FROM
PACKAGING
• To start, remove all accessories and parts from
packaging. Ensure that all accessories and
parts are removed from the packaging before
discarding packaging.
• When removing the machine from packaging,
be sure to remove all tape from machine. Tape
will be on all sides of the machine.
CLEAN ACCESSORIES BEFORE USE
• After removing all accessories and parts from
the packaging, thoroughly clean all parts by
hand-washing and dry thoroughly.
WATER HARDNESS TEST
All water has minerals that can cause buildup in the
machine over time. These minerals are referred to
as water hardness, and will impact how often you
will need to descale the machine. Doing this test
will ensure the machine recommends a descale at
the right time.
1 Remove test strip from pack.
3 Pull test strip out and lightly shake it.
4 Place test strip on a dry, flat surface and wait 1
minute for test strip to display results.
5 After 1 minute, you will see 0–5 purple squares
appear. This will indicate the water hardness
level of the water (0 purple squares=level 0,
5 purple squares=level 5, etc.)
6 After identifying the water hardness level, plug in
the machine.
7 Look at the left side of the control panel. It will
display hd 5.
8 Rotate the centre dial to program the water
hardness level by matching the number of
purple squares on the test strip to the number
displayed. (e.g., if the result is level 1, change the
setting to hd 1).
9 Press centre dial to confirm your setting.
Green
Squares
Purple
Squares
Very
Soft
Very
Hard
hd 0 hd 1 hd 2 hd 3 hd 4 hd 5
2 Completely submerge the water test strip in the
water you plan on using with the machine for
5–10 seconds.
GETTING STARTED: BEFORE YOUR FIRST BREW
WATER FILTER INSTALLATION
1 Soak Water Filter
for 5 minutes.
3 Secure filter into
filter housing
5 Install filter housing
into reservoir.
2 Rinse water filter
and mesh for 60
seconds.
4 Set date 2 months
ahead.
NOTE: DO NOT put any water in the grinder.
If water does get in the grinder, please call us
at 0800 862 0453 immediately.
FILL THE BEAN HOPPER
• Ensure that the bean hopper is filled with
beans (the hopper will be locked into place
out of box). Remove the lid of the hopper,
fill with beans and ensure the lid is placed
securely back on the hopper. Make sure the
bean hopper is locked into place (the bean
hopper comes locked out of box), and the lid
is placed securely back on top.
FILL THE WATER RESERVOIR
• Before you begin the brew, make sure the
water reservoir is full of room temperature
or cold water. Be sure to fill up to but not
exceeding the maximum fill line.
If there's not enough water in the reservoir to
brew your selected drink, your unit will indicate
that you must ADD WATER. If you get an ADD
WATER notification while brewing, add water to
the reservoir and press brew.
• When filling the water reservoir, be sure to
use room temperature or cold water. If you
use hot water, you may get an ADD WATER
notification
WATER FLUSH
Before you make your first drink, you must flush
the machine. This is to condition the machine to
prepare for brewing.
1 With the double basket installed, place
portafilter in group head by aligning orange
dot on portafilter with orange dot on group
head.
2 Fasten portafilter into group head until
orange dot on portafilter aligns with lock
arrow on group head.
5 Place 415ml or greater cup underneath the
portafilter.
4 Press the SIZE button to adjust drink size to
M+. Ensure you have at least 415ml of water
in the reservoir.
S+ M+ L+ XL
3 Turn the centre dial to select CLASSIC.
6 Press START BREW. The machine will beep
to signal the brew has started. The progress
bar will illuminate to indicate the status of the
brew. When finished, the machine will beep
again.
7 Dispose the water you brewed and wash the
cup.
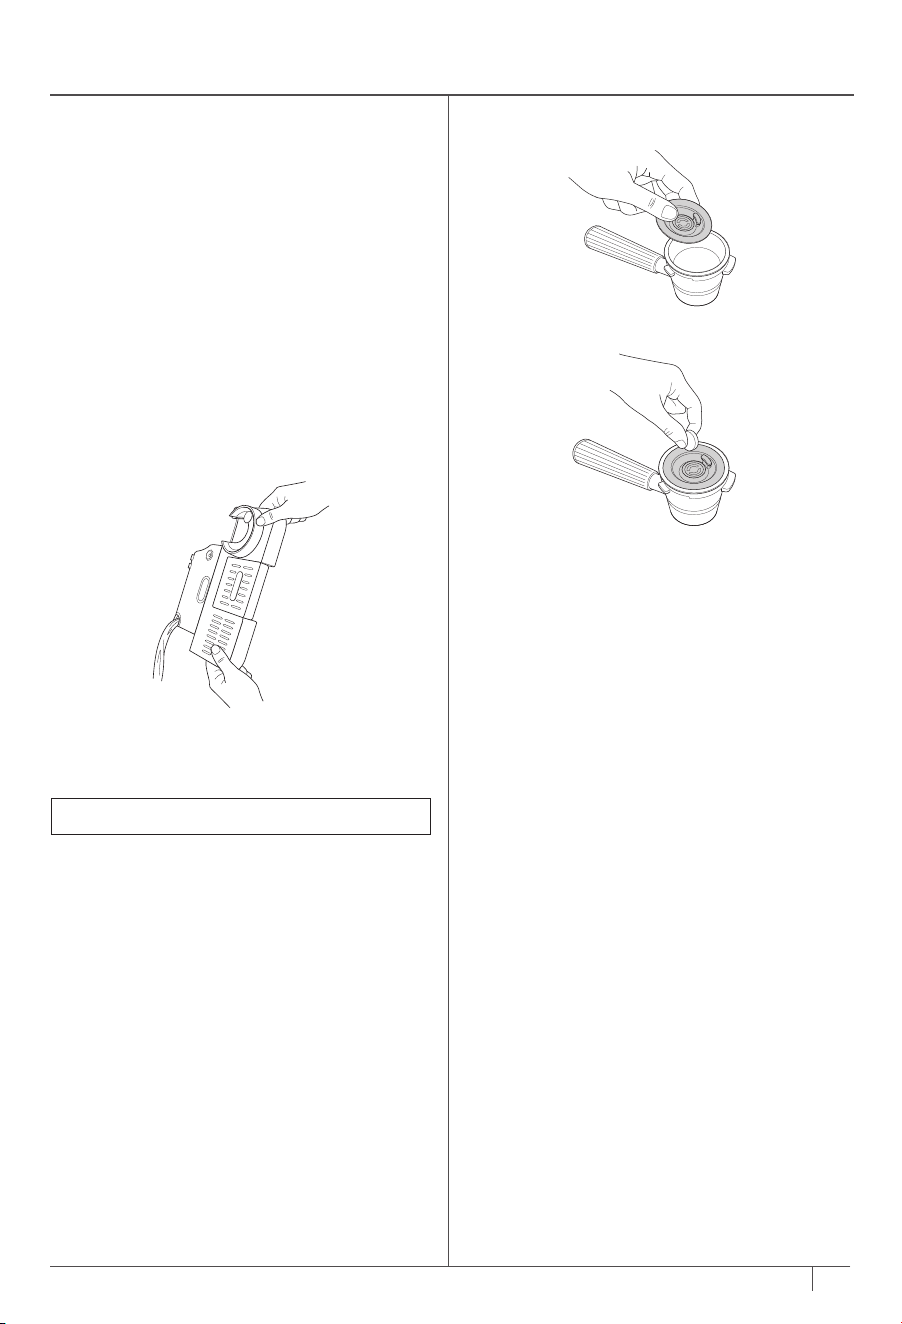
PORTAFILTER INSTALL ATION
1 Place funnel on portafilter, aligning the
notches on the funnel with the notches
on the portafilter. Push down until funnel
locks into place in the portafilter. The funnel
prevents grounds from overflowing during
grinding and allows for a cleaner tamping
process.
NOTE: If you do not see this animation,
remove the portafilter from the grinding
cradle, power the machine o and on, and
reinstall the portafilter in the grinding cradle,
ensuring it is level and pushed all the way in.
2 With the funnel on top of the portafilter,
insert into the grinding cradle. Make sure
it is level and fits securely. Once portafilter
is installed in grinding cradle, it will be
weighed. To ensure accurate weight, let go
of portafilter.
3 The machine will detect which basket is
locked into it. The machine will display an
animation. This is to indicate the machine is
taring the portafilter to ensure it is dispensing
the right amount of grounds. Then the
control panel will illuminate the selectable
brew options based on the basket that is
installed.
4 Turn the centre dial to your desired brew.
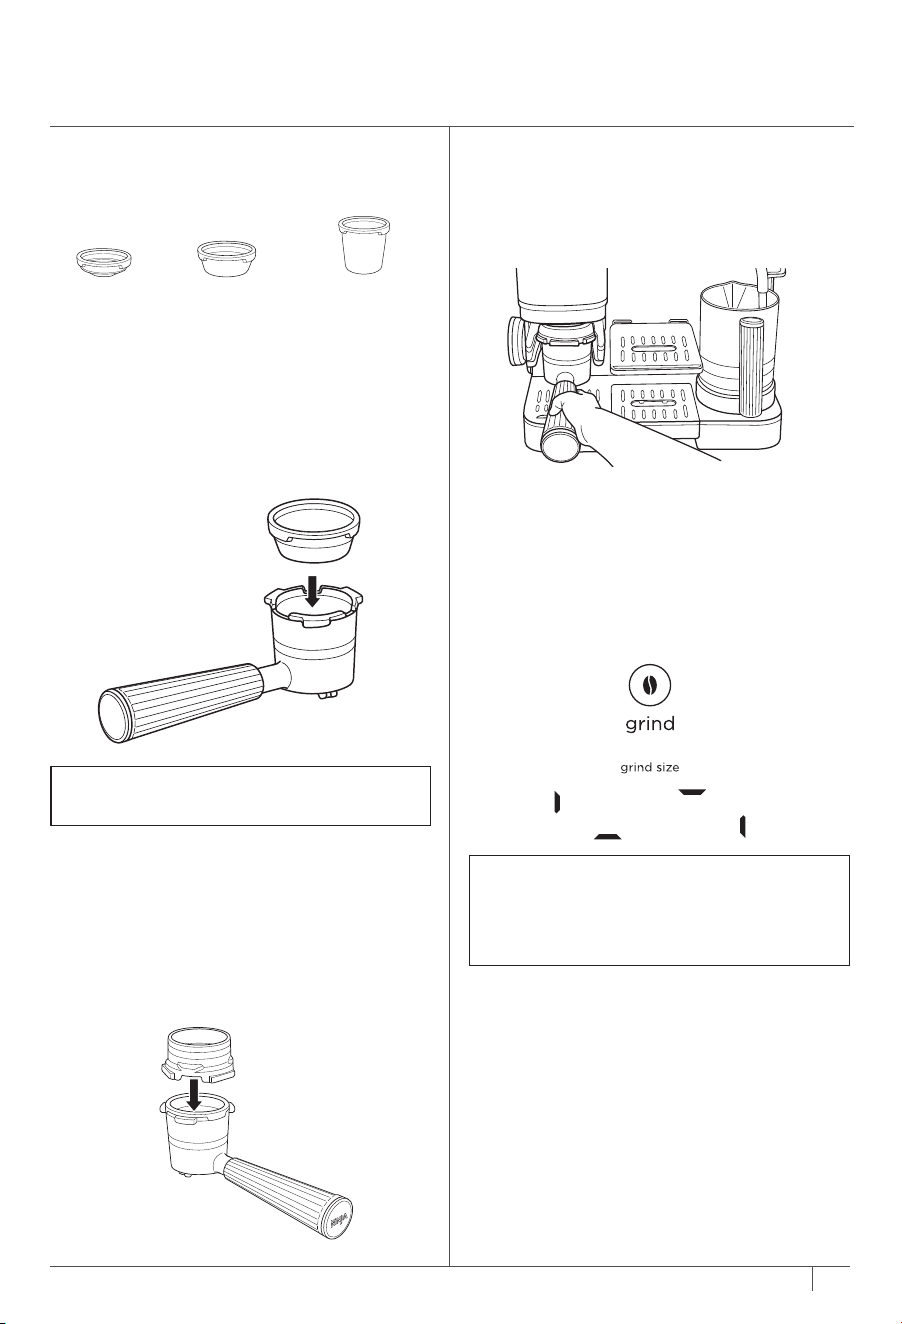
2 Choose a basket based on what drink you
would like, then insert into the portafilter.
Ensure that the large tab on the basket aligns
with the large tab on the portafilter, and then
press firmly into place.
ESPRESSO/COFFEE BASKETS
1 The Starter Kit contains the baskets. There
are three baskets (single, double, and luxe
baskets may vary per model).
*Single basket not
compatible with all models.
DoubleSingle* Luxe
Espresso,
Cold-Pressed
Espresso,
Cold-Pressed
Quad,
Cold-Pressed,
all coee-based
drinks
BREWING ESPRESSO, DRIP COFFEE,
AND COLD DRINKS
109
ninjakitchen.co.uk
ninjakitchen.co.uk
GETTING STARTED:
BEFORE YOUR FIRST BREW CONT.
NOTE: Double basket comes pre-installed
in portafilter.
WATER FLUSH
Before you make your first drink, you must flush
the machine. This is to condition the machine to
prepare for brewing.
1 With the double basket installed, place
portafilter in group head by aligning orange
dot on portafilter with orange dot on group
head.
2 Fasten portafilter into group head until
orange dot on portafilter aligns with lock
arrow on group head.
5 Place 415ml or greater cup underneath the
portafilter.
4 Press the SIZE button to adjust drink size to
M+. Ensure you have at least 415ml of water
in the reservoir.
S+ M+ L+ XL
3 Turn the centre dial to select CLASSIC.
6 Press START BREW. The machine will beep
to signal the brew has started. The progress
bar will illuminate to indicate the status of the
brew. When finished, the machine will beep
again.
7 Dispose the water you brewed and wash the
cup.
PORTAFILTER INSTALL ATION
1 Place funnel on portafilter, aligning the
notches on the funnel with the notches
on the portafilter. Push down until funnel
locks into place in the portafilter. The funnel
prevents grounds from overflowing during
grinding and allows for a cleaner tamping
process.
NOTE: If you do not see this animation,
remove the portafilter from the grinding
cradle, power the machine o and on, and
reinstall the portafilter in the grinding cradle,
ensuring it is level and pushed all the way in.
2 With the funnel on top of the portafilter,
insert into the grinding cradle. Make sure
it is level and fits securely. Once portafilter
is installed in grinding cradle, it will be
weighed. To ensure accurate weight, let go
of portafilter.
3 The machine will detect which basket is
locked into it. The machine will display an
animation. This is to indicate the machine is
taring the portafilter to ensure it is dispensing
the right amount of grounds. Then the
control panel will illuminate the selectable
brew options based on the basket that is
installed.
4 Turn the centre dial to your desired brew.
2 Choose a basket based on what drink you
would like, then insert into the portafilter.
Ensure that the large tab on the basket aligns
with the large tab on the portafilter, and then
press firmly into place.
ESPRESSO/COFFEE BASKETS
1 The Starter Kit contains the baskets. There
are three baskets (single, double, and luxe
baskets may vary per model).
*Single basket not
compatible with all models.
DoubleSingle* Luxe
Espresso,
Cold-Pressed
Espresso,
Cold-Pressed
Quad,
Cold-Pressed,
all coee-based
drinks
BREWING ESPRESSO, DRIP COFFEE,
AND COLD DRINKS
109
ninjakitchen.co.uk
ninjakitchen.co.uk
GETTING STARTED:
BEFORE YOUR FIRST BREW CONT.
NOTE: Double basket comes pre-installed
in portafilter.
12
ninjakitchen.co.uk
11
BREWING ESPRESSO, DRIP COFFEE,
AND COLD DRINKS CONT.
NOTE: Once a grind is complete, the machine
will be set to the brew style and size that was
selected for that grind. To change style and
size, pour grounds out of portafilter, power
the machine o and on, and select your
desired brew.
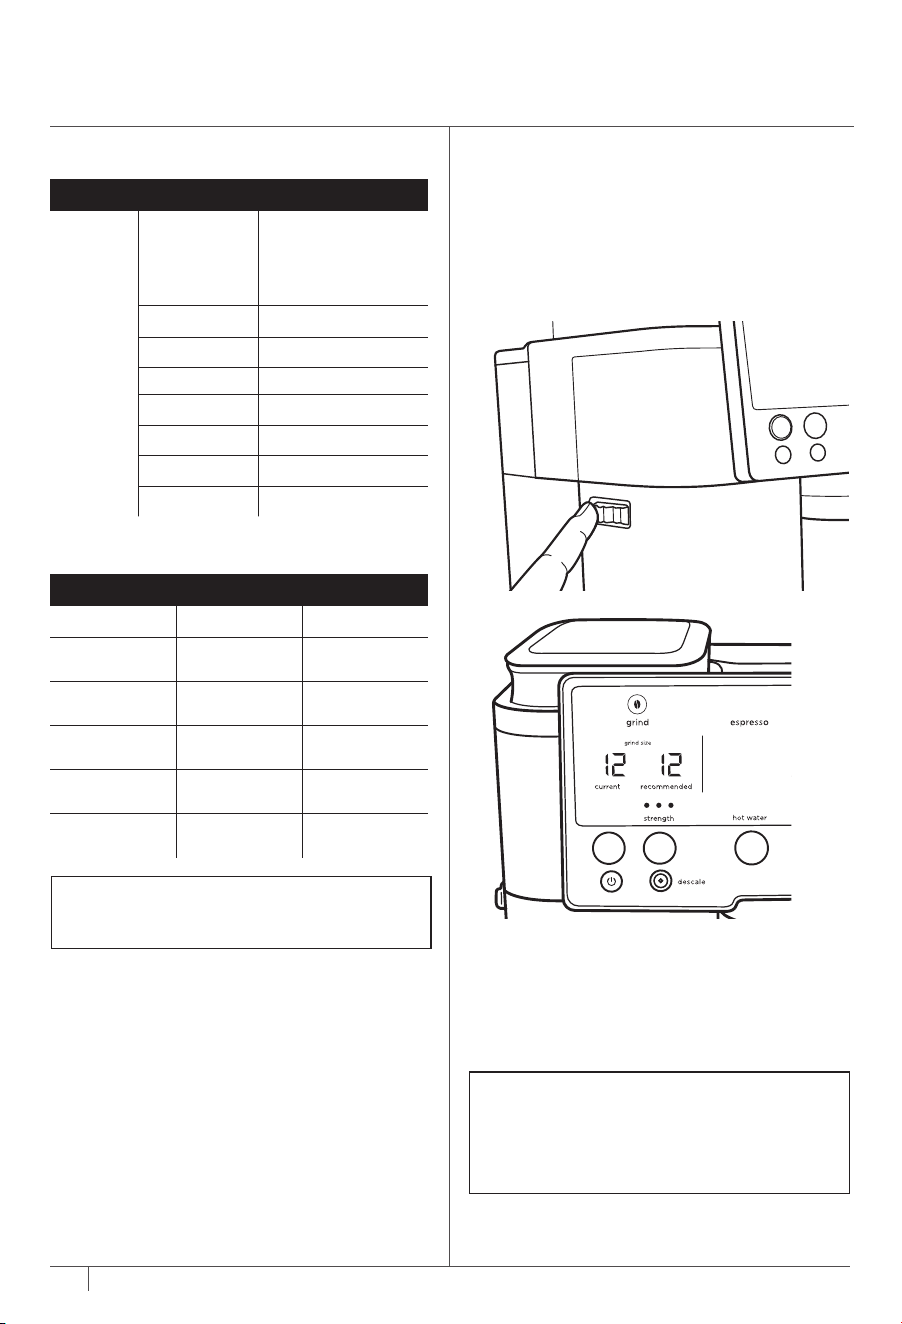
USING THE GRINDER
1 Once a brew is highlighted, Barista Assist
Technology will recommend a grind size based
on the beans and previous brew output. If
you wish to follow the recommended size, use
the grind dial on the side of the machine to
change the CURRENT grind size to match the
RECOMMENDED grind size.
2 Once you have selected your desired grind
setting, press START GRIND to begin
grinding. The machine will beep to indicate
that grinding has started. When finished, the
machine will beep again signifying grinding is
complete. The control panel will flash TAMP,
signifying that you must tamp the grounds.
UNDERSTANDING THE GRIND SETTINGS
What do the grind settings mean?
• The numbers on the left side of the control
panel represent how coarse or fine the grind
will be, with 25 being the coarsest and 1
being the finest. Coarser settings will work
better for coee drinks, and finer settings will
work better for espresso drinks.
• Matching the recommended setting: this will
bring the best flavours out of your chosen
beans. The machine will adjust based on
what beans you're using to ensure you are
not over extracting or under extracting.
NOTE: When changing from very coarse to
very fine (or vice versa), you may hear the
grinder turn on. This is to help prevent jamming
in the grinder. This will only happen when the
portafilter is installed in the grinding cradle.
DIALING IN THE GRINDER FOR PROPER
EXTRACTION
For espresso brews only
You may notice the recommended grind setting
change. This is Barista Assist Technology
adjusting the recommended grind setting to
help you get proper espresso extraction. When
using new beans for the first time or adding
more beans, it may take 2–3 brews to reach
the optimal grind setting. Over time, you may
notice the recommended grind setting change
to account for aging beans. This is normal.
Ensure the current grind size matches the
recommended grind size for proper espresso
extraction.
NOTE: When brewing a quad shot, tamp
the grounds normally with the funnel on the
portafilter. After that, remove the funnel and
tamp down the grounds one more time.
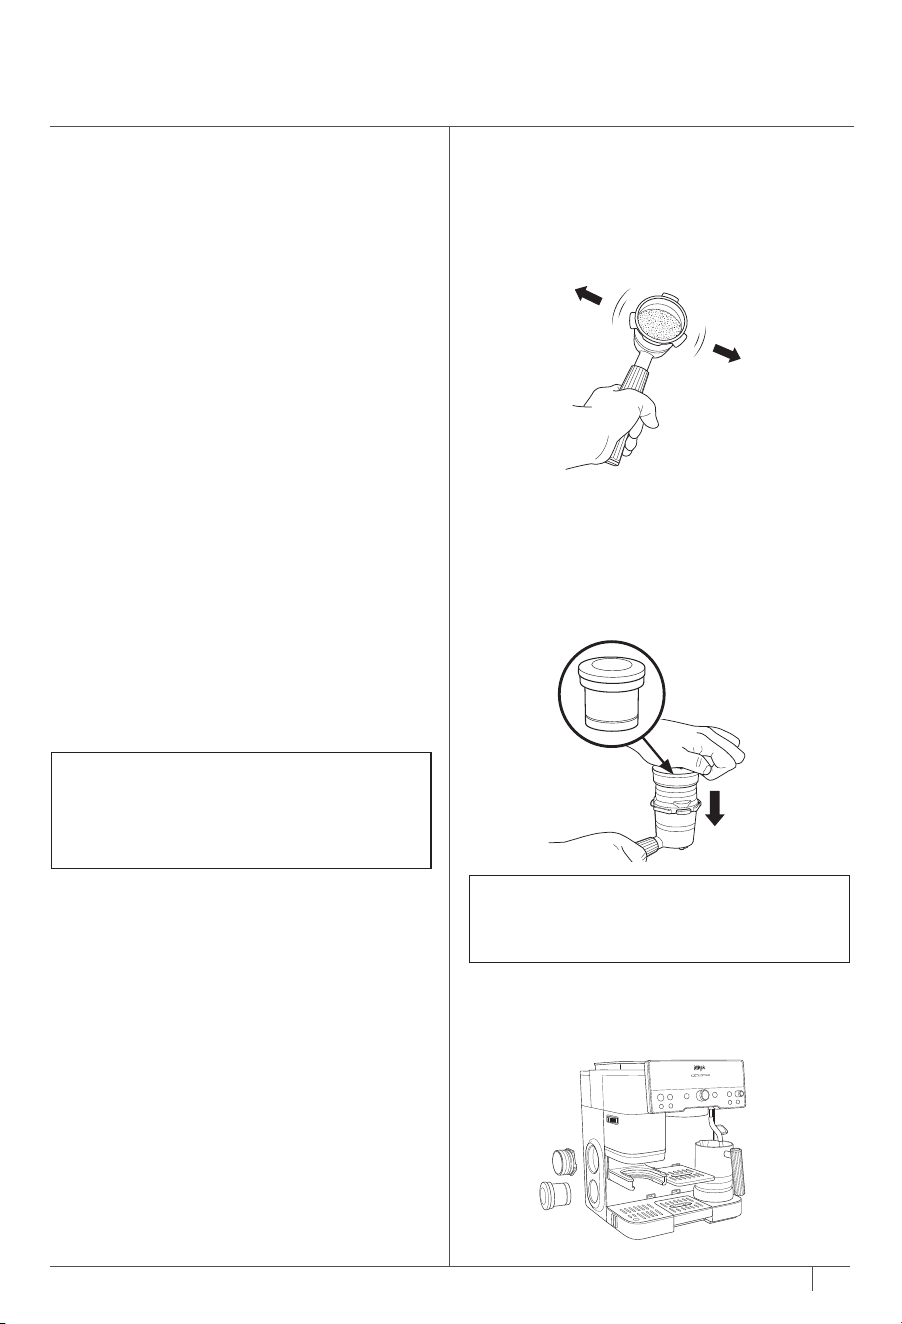
1 When grinding is complete remove the
portafilter from the grinding cradle. Keep the
funnel attached to the portafilter.
2 Place the portafilter on a solid, level surface,
then place the assisted tamper inside the
funnel. Ensure there is protection between
the portafilter and surface. Press tamper all
the way down until it meets the funnel.
TAMPING
Be sure to tamp on all espresso drinks, as well
as L+ and XL coee drinks; this is to ensure no
grounds spill over the edge of the portafilter.
For S to L coee drinks, lightly shake the
portafilter to level coee grounds and then
proceed to brewing.
3 Now that tamping is complete, remove both
the tamper and funnel from the portafilter
and store in their respective locations on the
left side of the machine.
NOTE: These are the preset espresso outputs.
To adjust output, please refer to the Additional
Settings section.
COFFEE VOLUMES
SIZES
Classic
Rich
Over Ice
Cold Brew
(Must Fill with Ice
Before Brewing)
S 175ml
S+ 235ml
M 295ml
M+ 355ml
L 415ml
L+ 475ml
XL 530ml
ESPRESSO VOLUMES
Grounds Dose Output Volume
Single
Espresso
9g 22.5ml
Double
Espresso
18g 45ml
Double
Cold-Pressed
18g 45ml
Quad
Espresso
40g 90ml
Quad
Cold-Pressed
40g 90ml
APPROXIMATE BREW VOLUMES
12
ninjakitchen.co.uk
11
BREWING ESPRESSO, DRIP COFFEE,
AND COLD DRINKS CONT.
NOTE: Once a grind is complete, the machine
will be set to the brew style and size that was
selected for that grind. To change style and
size, pour grounds out of portafilter, power
the machine o and on, and select your
desired brew.
USING THE GRINDER
1 Once a brew is highlighted, Barista Assist
Technology will recommend a grind size based
on the beans and previous brew output. If
you wish to follow the recommended size, use
the grind dial on the side of the machine to
change the CURRENT grind size to match the
RECOMMENDED grind size.
2 Once you have selected your desired grind
setting, press START GRIND to begin
grinding. The machine will beep to indicate
that grinding has started. When finished, the
machine will beep again signifying grinding is
complete. The control panel will flash TAMP,
signifying that you must tamp the grounds.
UNDERSTANDING THE GRIND SETTINGS
What do the grind settings mean?
• The numbers on the left side of the control
panel represent how coarse or fine the grind
will be, with 25 being the coarsest and 1
being the finest. Coarser settings will work
better for coee drinks, and finer settings will
work better for espresso drinks.
• Matching the recommended setting: this will
bring the best flavours out of your chosen
beans. The machine will adjust based on
what beans you're using to ensure you are
not over extracting or under extracting.
NOTE: When changing from very coarse to
very fine (or vice versa), you may hear the
grinder turn on. This is to help prevent jamming
in the grinder. This will only happen when the
portafilter is installed in the grinding cradle.
DIALING IN THE GRINDER FOR PROPER
EXTRACTION
For espresso brews only
You may notice the recommended grind setting
change. This is Barista Assist Technology
adjusting the recommended grind setting to
help you get proper espresso extraction. When
using new beans for the first time or adding
more beans, it may take 2–3 brews to reach
the optimal grind setting. Over time, you may
notice the recommended grind setting change
to account for aging beans. This is normal.
Ensure the current grind size matches the
recommended grind size for proper espresso
extraction.
NOTE: When brewing a quad shot, tamp
the grounds normally with the funnel on the
portafilter. After that, remove the funnel and
tamp down the grounds one more time.
1 When grinding is complete remove the
portafilter from the grinding cradle. Keep the
funnel attached to the portafilter.
2 Place the portafilter on a solid, level surface,
then place the assisted tamper inside the
funnel. Ensure there is protection between
the portafilter and surface. Press tamper all
the way down until it meets the funnel.
TAMPING
Be sure to tamp on all espresso drinks, as well
as L+ and XL coee drinks; this is to ensure no
grounds spill over the edge of the portafilter.
For S to L coee drinks, lightly shake the
portafilter to level coee grounds and then
proceed to brewing.
3 Now that tamping is complete, remove both
the tamper and funnel from the portafilter
and store in their respective locations on the
left side of the machine.
NOTE: These are the preset espresso outputs.
To adjust output, please refer to the Additional
Settings section.
COFFEE VOLUMES
SIZES
Classic
Rich
Over Ice
Cold Brew
(Must Fill with Ice
Before Brewing)
S 175ml
S+ 235ml
M 295ml
M+ 355ml
L 415ml
L+ 475ml
XL 530ml
ESPRESSO VOLUMES
Grounds Dose Output Volume
Single
Espresso
9g 22.5ml
Double
Espresso
18g 45ml
Double
Cold-Pressed
18g 45ml
Quad
Espresso
40g 90ml
Quad
Cold-Pressed
40g 90ml
APPROXIMATE BREW VOLUMES
14
ninjakitchen.co.uk
13
ninjakitchen.co.uk
3 The brew style and size that was ground will
still be selected on the control panel. Place
a cup under the portafilter and press START
BREW.
4 The machine will beep to indicate that the
brew has started. The progress bar will
illuminate indicating the status of the brew.
When finished, the machine will beep again
signifying the brew is complete.
NOTE: If you are using a smaller cup, use the
adjustable cup tray to lift your cup closer to
the group head to reduce splatter. If you are
using a larger mug or travel mug, remove
the centre drip tray to create space.
NOTE: For quad espresso shots and quad
cold-pressed shots, there may be some water
on the puck after brewing. This is normal.
NOTE: Temperature control not available for
over ice, cold brew, and cold-pressed.
NOTE: DO NOT brew without the main drip
tray inserted.
NOTE:
1 Hold the SIZE button for 3 seconds.
2 Rotate the centre dial to �h06, then press the
centre dial to select.
3 Rotate the centre dial to select your desired
setting, then press the centre dial to select.
LO: Low temperature
M: Medium temperature (default)
HI: Hight temperature.
The temperature of the drink will aect the
extraction of the espresso and the flavour
of your drink. For best results and proper
extraction, we recommend a low or medium
temperature for darker roasts, and a medium or
high temperature for lighter roasts.
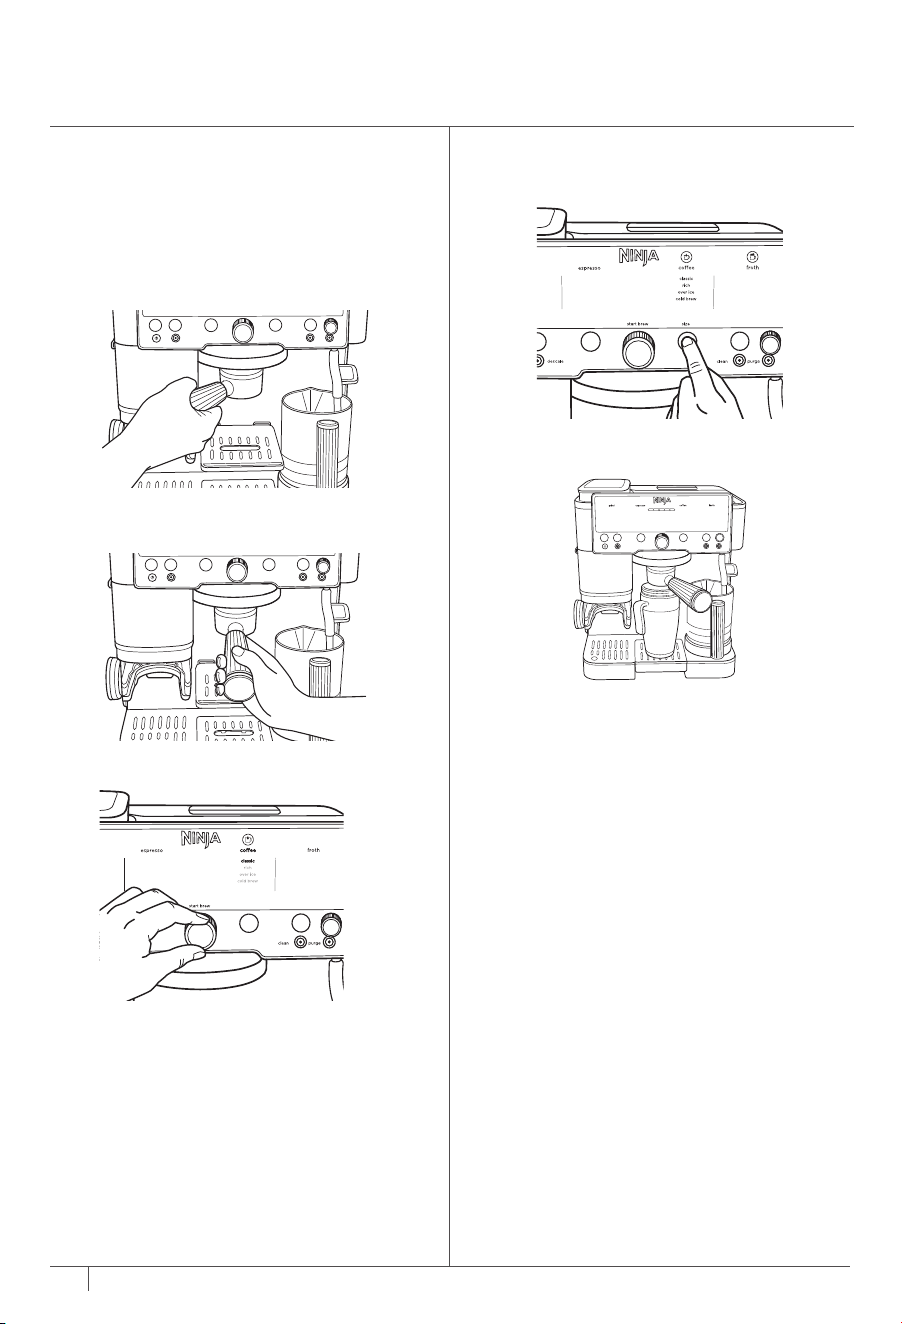
BREWING
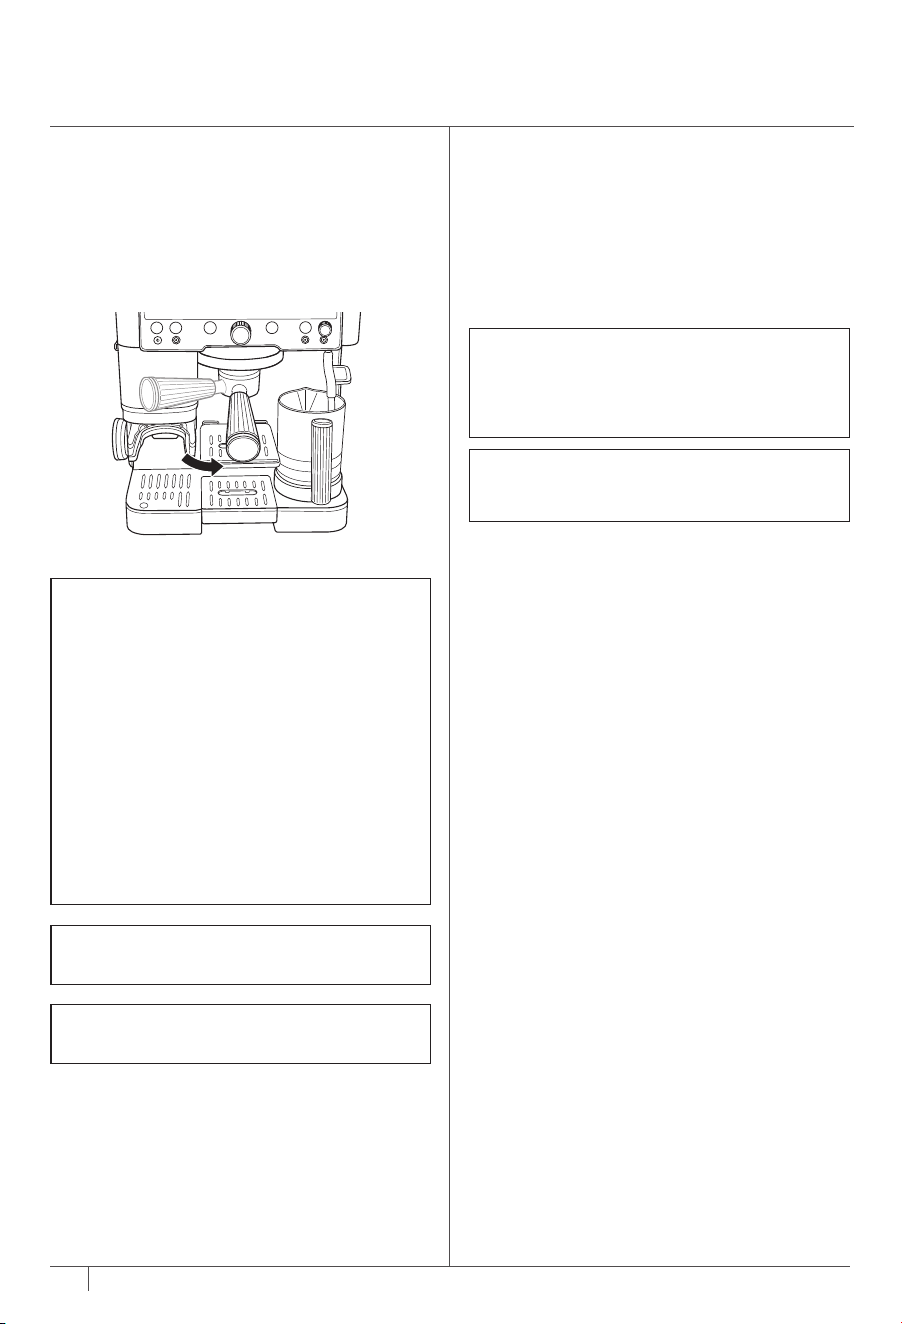
1 Place portafilter in group head by aligning
orange dot on portafilter with orange dot on
group head.
2 Fasten portafilter into group head until
orange dot on portafilter aligns with lock
arrow on group head.
BREWING ESPRESSO, DRIP COFFEE,
AND COLD DRINKS CONT.
AFTER YOUR BREW
1 When brew is complete, carefully remove
portafilter from group head. Dispose of
grounds by tapping the surface of the
basket over a container or knock box (sold
separately).
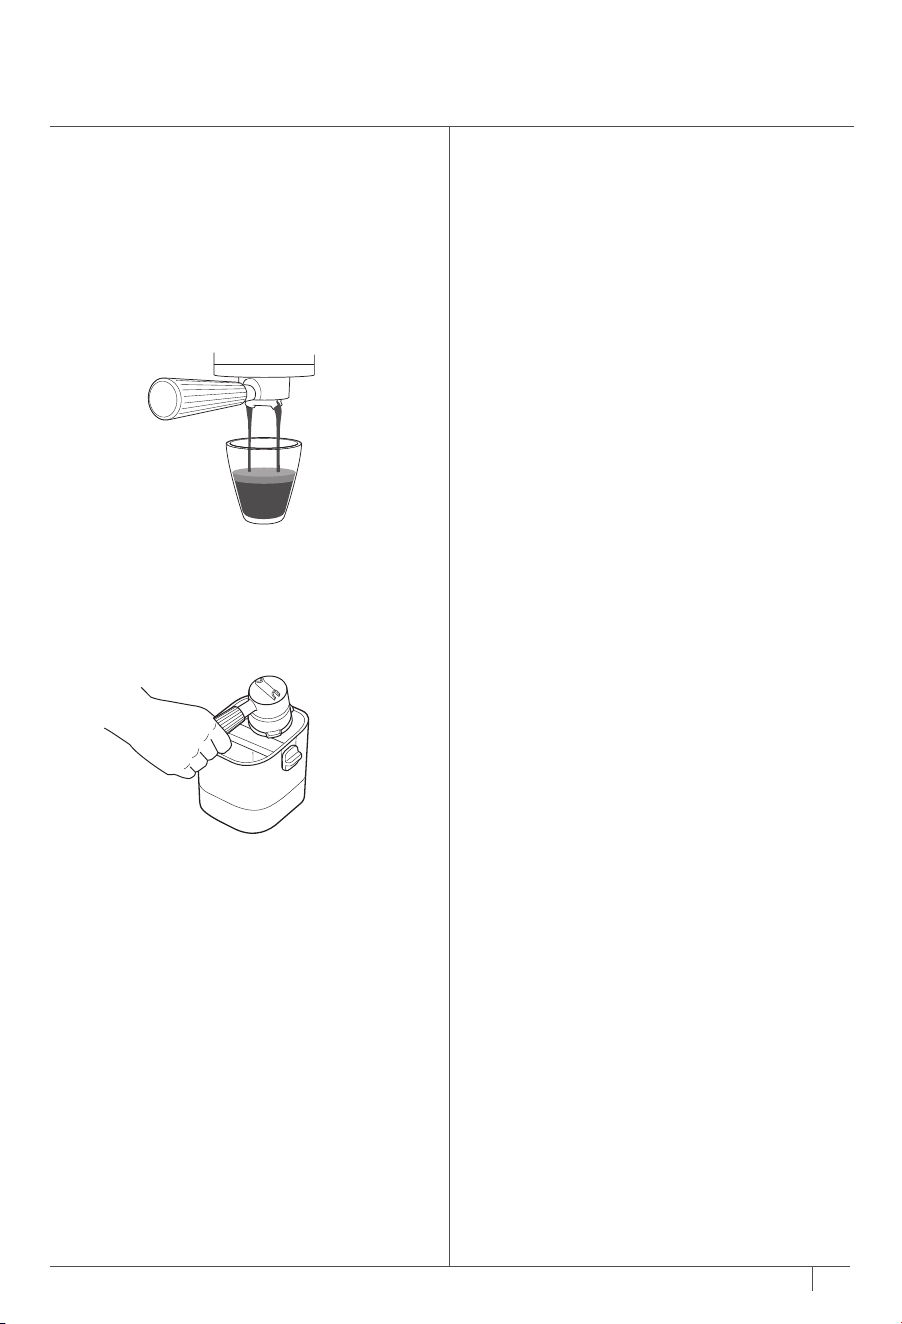
PROPER EXTRACTION
• Drink will pour out at a slow, consistent rate.
• You will see a caramel-coloured liquid pouring
out. That is the crema.
• There will be a layer of crema on top of your
drink. Feel free to tilt your cup to see if the
layer of crema is still completely visible. If you
can still only see that caramel colour, you have
a properly extracted espresso shot.
RINSE NOTIFICATION
If you attempt to make a cold drink immediately
after making a hot drink, you will get a RINSE
notification above the centre dial.
Be sure that the portafilter is not installed in the
group head before proceeding.
1 Put a cup (that can hold at least 355ml)
below the group head.
2 Press START BREW and allow the machine
to rinse and get to the right temperature.
3 The machine will rinse approximately 237ml
of water through the group head.
4 The machine will beep to indicate that the
brew has started. The progress bar will
illuminate indicating the status of the brew.
When finished, the machine will beep again
signifying the brew is complete. After the
machine beeps a second time, remove the
cup and dispose of the water.
To avoid the RINSE process, brew all desired
cold drinks before proceeding to hot drinks.
14
ninjakitchen.co.uk
13
ninjakitchen.co.uk
3 The brew style and size that was ground will
still be selected on the control panel. Place
a cup under the portafilter and press START
BREW.
4 The machine will beep to indicate that the
brew has started. The progress bar will
illuminate indicating the status of the brew.
When finished, the machine will beep again
signifying the brew is complete.
NOTE: If you are using a smaller cup, use the
adjustable cup tray to lift your cup closer to
the group head to reduce splatter. If you are
using a larger mug or travel mug, remove
the centre drip tray to create space.
NOTE: For quad espresso shots and quad
cold-pressed shots, there may be some water
on the puck after brewing. This is normal.
NOTE: Temperature control not available for
over ice, cold brew, and cold-pressed.
NOTE: DO NOT brew without the main drip
tray inserted.
NOTE:
1 Hold the SIZE button for 3 seconds.
2 Rotate the centre dial to �h06, then press the
centre dial to select.
3 Rotate the centre dial to select your desired
setting, then press the centre dial to select.
LO: Low temperature
M: Medium temperature (default)
HI: Hight temperature.
The temperature of the drink will aect the
extraction of the espresso and the flavour
of your drink. For best results and proper
extraction, we recommend a low or medium
temperature for darker roasts, and a medium or
high temperature for lighter roasts.
BREWING
1 Place portafilter in group head by aligning
orange dot on portafilter with orange dot on
group head.
2 Fasten portafilter into group head until
orange dot on portafilter aligns with lock
arrow on group head.
BREWING ESPRESSO, DRIP COFFEE,
AND COLD DRINKS CONT.
AFTER YOUR BREW
1 When brew is complete, carefully remove
portafilter from group head. Dispose of
grounds by tapping the surface of the
basket over a container or knock box (sold
separately).
PROPER EXTRACTION
• Drink will pour out at a slow, consistent rate.
• You will see a caramel-coloured liquid pouring
out. That is the crema.
• There will be a layer of crema on top of your
drink. Feel free to tilt your cup to see if the
layer of crema is still completely visible. If you
can still only see that caramel colour, you have
a properly extracted espresso shot.
RINSE NOTIFICATION
If you attempt to make a cold drink immediately
after making a hot drink, you will get a RINSE
notification above the centre dial.
Be sure that the portafilter is not installed in the
group head before proceeding.
1 Put a cup (that can hold at least 355ml)
below the group head.
2 Press START BREW and allow the machine
to rinse and get to the right temperature.
3 The machine will rinse approximately 237ml
of water through the group head.
4 The machine will beep to indicate that the
brew has started. The progress bar will
illuminate indicating the status of the brew.
When finished, the machine will beep again
signifying the brew is complete. After the
machine beeps a second time, remove the
cup and dispose of the water.
To avoid the RINSE process, brew all desired
cold drinks before proceeding to hot drinks.

16
ninjakitchen.co.uk
15
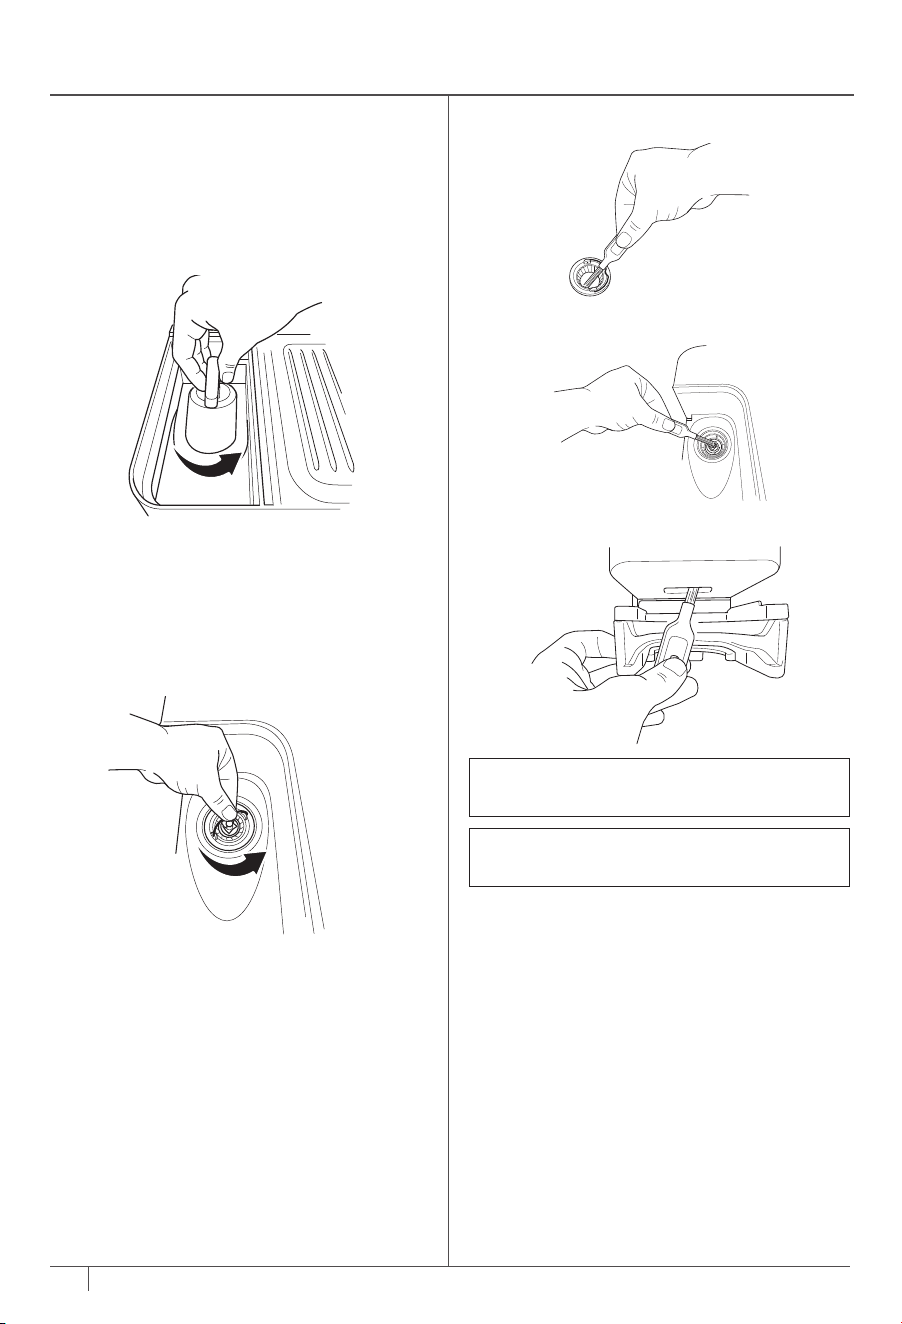
SWITCHING OUT BEANS
1 Unlock bean hopper by rotating handle
counterclockwise.
2 Remove the bean hopper and pour out any
leftover beans.
3 Place the hopper back on the machine.
4 Lock bean hopper back in by rotating handle
clockwise.
5 Place the portafilter with the funnel attached
in the grinding cradle.
6 Press and hold START GRIND button to clear
any leftover beans.
7 Add new beans into the bean hopper.
ADJUSTING YOUR BREW TEMP AND STRENGTH SWITCHING OUT BEANS
TEMPERATURE
There are several methods and practices to help
get your preferred temperature.
STRENGTH
If you find your brew is tasting too weak or too
strong for your liking, you can use the strength
adjustment button.
Adjusting Brew Strength:
To adjust brew strength, press the STRENGTH
button. The strength adjustment will work
dierently depending on if you are brewing
espresso or coee.
Espresso Strength Adjustments:
•
Taller, less concentrated: 4:1 water to
grounds ratio
• •
Default: 2.5:1 water to grounds ratio
• • •
Shorter, more concentrated: 2:1 water to
grounds ratio
Coee Strength Adjustments:
•
Mild: Less beans will be ground.
• •
Default
• • •
Bold: More beans will be ground.
Adjusting Brew Temperature:
1 Hold the SIZE button for 3 seconds.
2 Rotate the centre dial to �h06, then press the
centre dial to select.
3 Rotate the centre dial to select your desired
setting, then press the centre dial to select.
LO: Low temperature
M: Medium temperature (default)
HI: High temperature
The temperature of the drink will aect the
extraction of the espresso and the flavour
of your drink. For best results and proper
extraction, we recommenced a low or medium
temperature for darker roasts, and a medium or
high temperature for light roasts.
• Choosing the Right Cup:
Ensure the cup you are using is appropriate for
the size of your drink. For a hotter drink, use a
cup that is a similar size to your drink.
The thickness of the material your cup is made
of will also aect the temperature of your drink.
For a hotter drink, use a cup made of thinner
material.
• Pre-Heating Before You Brew:
Running hot water through the group head and
portafilter will help pre-heat them, as well as the
machine for future brews. To further increase
the temperature of your drink, run a water-only
double shot of espresso through the portafilter
into the cup you would like to brew your drink
in. The temperature of your cup will impact the
temperature of your drink. Discard the water,
then dry the cup and portafilter. Then, proceed
to brewing. See Water Flush for instructions.

16
ninjakitchen.co.uk
15
SWITCHING OUT BEANS
1 Unlock bean hopper by rotating handle
counterclockwise.
2 Remove the bean hopper and pour out any
leftover beans.
3 Place the hopper back on the machine.
4 Lock bean hopper back in by rotating handle
clockwise.
5 Place the portafilter with the funnel attached
in the grinding cradle.
6 Press and hold START GRIND button to clear
any leftover beans.
7 Add new beans into the bean hopper.
ADJUSTING YOUR BREW TEMP AND STRENGTH SWITCHING OUT BEANS
TEMPERATURE
There are several methods and practices to help
get your preferred temperature.
STRENGTH
If you find your brew is tasting too weak or too
strong for your liking, you can use the strength
adjustment button.
Adjusting Brew Strength:
To adjust brew strength, press the STRENGTH
button. The strength adjustment will work
dierently depending on if you are brewing
espresso or coee.
Espresso Strength Adjustments:
•
Taller, less concentrated: 4:1 water to
grounds ratio
• •
Default: 2.5:1 water to grounds ratio
• • •
Shorter, more concentrated: 2:1 water to
grounds ratio
Coee Strength Adjustments:
•
Mild: Less beans will be ground.
• •
Default
• • •
Bold: More beans will be ground.
Adjusting Brew Temperature:
1 Hold the SIZE button for 3 seconds.
2 Rotate the centre dial to �h06, then press the
centre dial to select.
3 Rotate the centre dial to select your desired
setting, then press the centre dial to select.
LO: Low temperature
M: Medium temperature (default)
HI: High temperature
The temperature of the drink will aect the
extraction of the espresso and the flavour
of your drink. For best results and proper
extraction, we recommenced a low or medium
temperature for darker roasts, and a medium or
high temperature for light roasts.
• Choosing the Right Cup:
Ensure the cup you are using is appropriate for
the size of your drink. For a hotter drink, use a
cup that is a similar size to your drink.
The thickness of the material your cup is made
of will also aect the temperature of your drink.
For a hotter drink, use a cup made of thinner
material.
• Pre-Heating Before You Brew:
Running hot water through the group head and
portafilter will help pre-heat them, as well as the
machine for future brews. To further increase
the temperature of your drink, run a water-only
double shot of espresso through the portafilter
into the cup you would like to brew your drink
in. The temperature of your cup will impact the
temperature of your drink. Discard the water,
then dry the cup and portafilter. Then, proceed
to brewing. See Water Flush for instructions.
18
ninjakitchen.co.uk
17
FROTHING
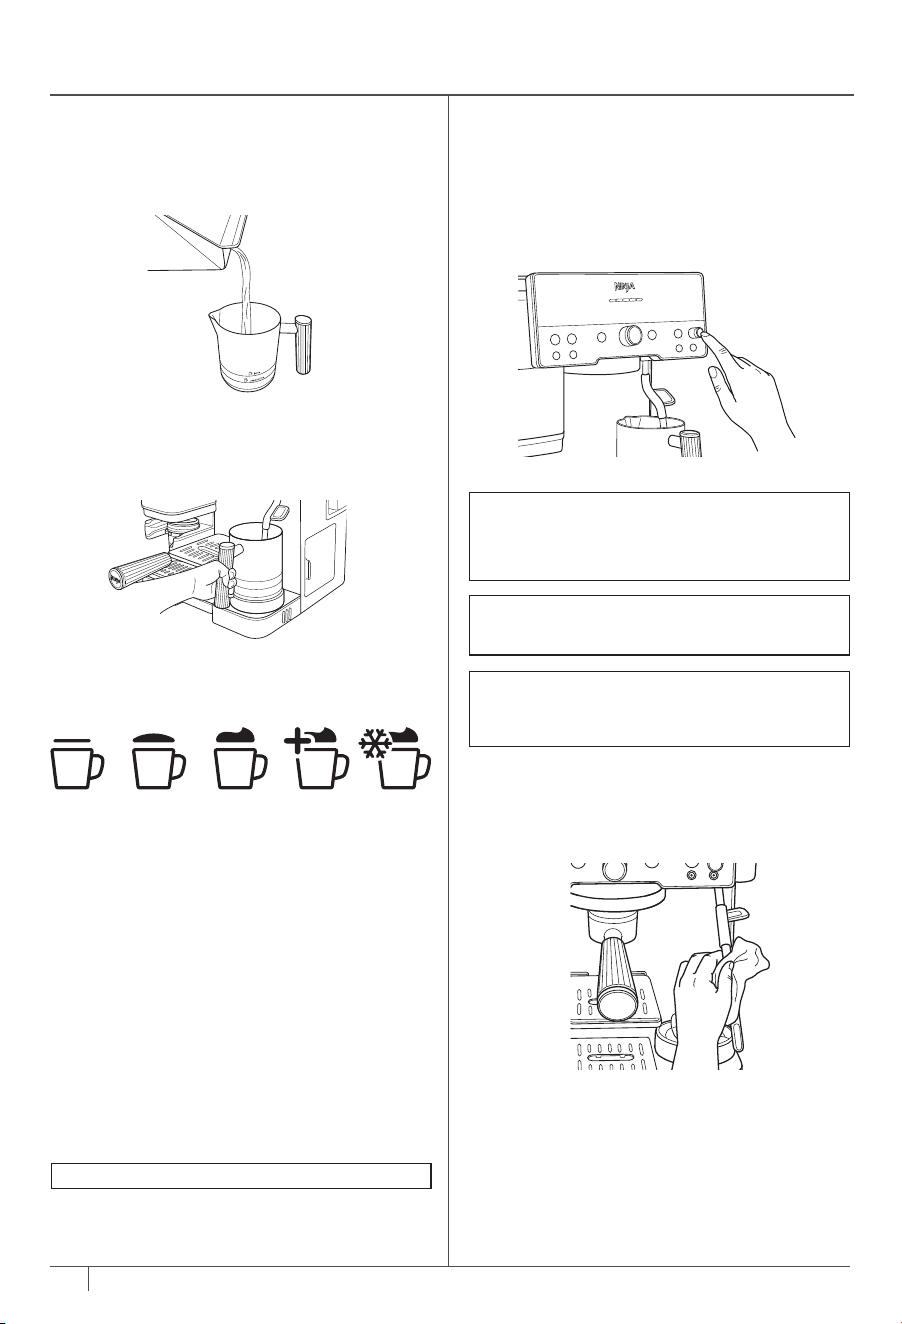
3 On the control panel, use the froth dial to
highlight the desired froth style.
FROTH STYLES
Steamed Milk
Gently steam milk to an ideal drinking
temperature without whisking. Great for coee.
Thin Froth
A thin layer of foam for lattes.
Thick Froth
A classic layer of fluy froth to top any drink.
Great for cappuccinos.
Extra-Thick Froth*
A large layer of froth, ideal for cappuccinos and
other drinks with less volume.
Cold Foam
A classic layer of cold froth to top any iced
coee or espresso drink.
2 Ensure that the bottom of the milk jug is dry.
Place the milk jug on the milk jug platform with
the steam wand inserted into the milk jug.
FROTHING
1 Fill the milk jug with the desired amount
of milk, but do not exceed the max fill line.
Ensure that whisk is installed.
FROTH QUEUING
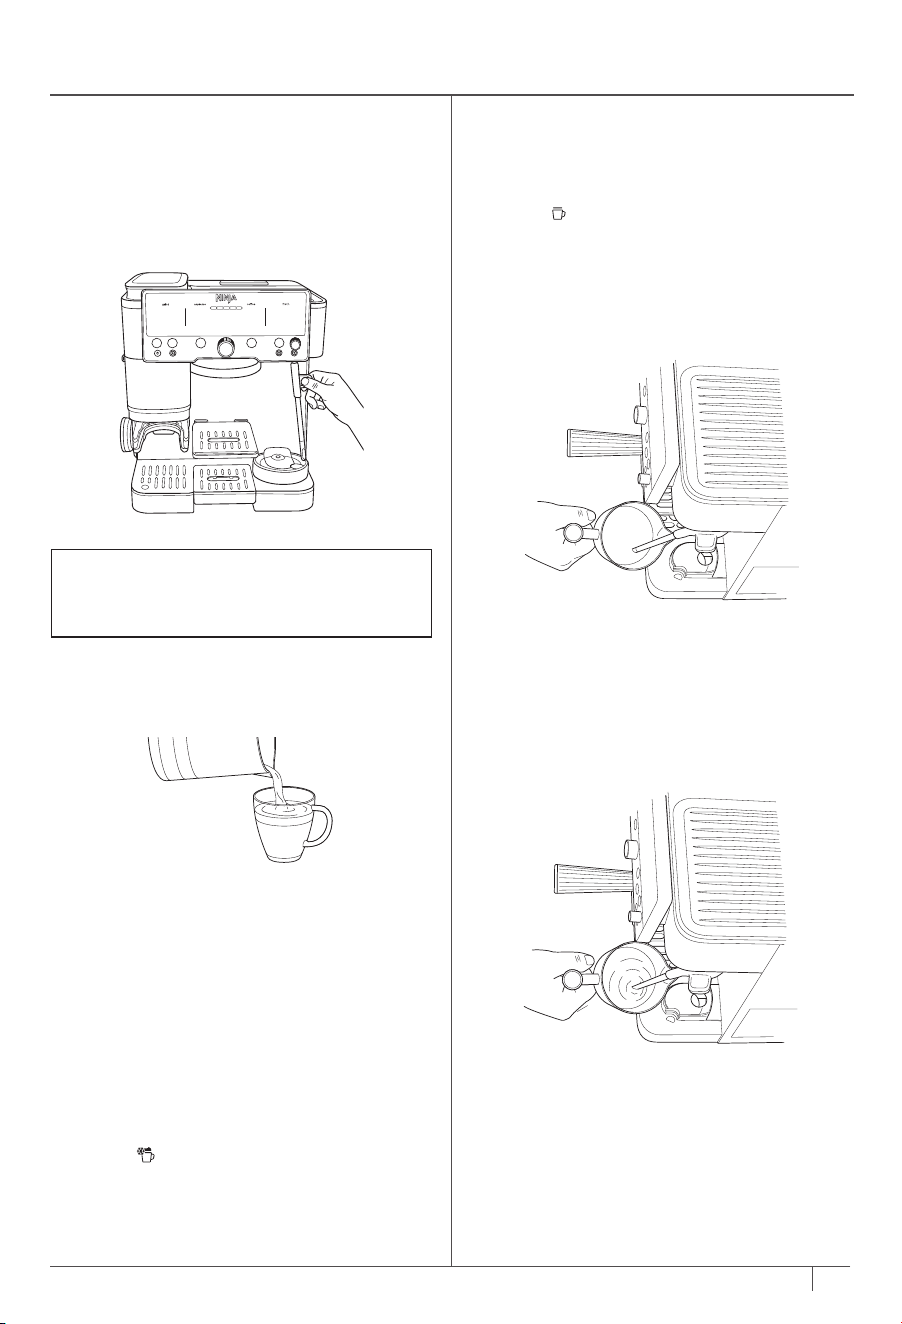
After you have started your brew, you are able
to queue up your froth to start immediately
after the brew is finished.
1 Fill the milk jug with the desired amount of
milk, but do not exceed the max fill line.
2 While brewing, select DAIRY or PLANT-
BASED milk with the MILK TYPE button and
froth setting with the froth dial.
3 Press START FROTH.
Cold foam
does not need to be queued and
can froth while the machine is brewing.
7 Before pouring milk, tap the jug on a flat surface
and swirl around to remove large bubbles. Pour
frothed milk over espresso or coee and enjoy.
AFTER YOU FINISH FROTHING
5 Once you remove the milk jug, immediately
wipe the steam wand with a damp cloth
before pushing it back down into its down
position.
6 When the steam wand is pushed back into its
down position, auto purging will occur. This
is to clean the inside of the steam wand. The
machine will beep to signal that the purge
has started. When finished, the machine
will beep again. You can purge at any time
by pressing the PURGE button when steam
wand is in down position.
4 Next, select DAIRY or PLANT-BASED milk
with the MILK TYPE button based on the
milk that is in the milk jug. Press START
FROTH. The machine will beep to signal
that the frothing has started. The progress
bar will illuminate to indicate the status of
the frothing. The machine will beep again to
signify the froth is complete.
NOTE: DO NOT froth milk directly into the
espresso or coee; always froth in the milk jug
and pour the froth into the espresso or coee
base afterwards.
NOTE: When out of water, the machine
will not purge. Be sure to press the PURGE
button when adding more water in to
complete purge.
NOTE: DO NOT froth without the main drip
tray inserted.
NOTE: If you would like to change the
temperature of your froth, see Additional
Settings.
7 Once you feel comfortable with the volume
of milk, move the jug up so the steam wand is
further below the surface. This is to heat your
drink up.
8 Stay in that position until the jug is too hot
to hold with your hand, then press START
FROTH to turn the function o.
MANUAL FROTHING
1 Fill the milk jug as desired in between the min
and max fill lines.
2 Make sure you are on the steamed milk
setting
.
3 Pull the steam wand out. Place the steam
wand inside the milk jug so that the wand is
resting within the milk jug spout.
4 Angle the milk jug slightly to the left or right
so that the steam wand is about a finger’s
width away from the wall of the milk jug.
5 Hold START FROTH for 3 seconds. The
machine will beep to indicate that frothing
has started and steam will start to generate
from the wand.
6 Place wand just below the surface of the
milk to start incorporating air to stretch the
volume milk. This should start to create a
whirlpool with the milk.
Thin
Froth
Thick
Froth
Extra-Thick
Froth*
Cold
Foam
Steamed
Milk
* Not available on all models
18
ninjakitchen.co.uk
17
FROTHING
3 On the control panel, use the froth dial to
highlight the desired froth style.
FROTH STYLES
Steamed Milk
Gently steam milk to an ideal drinking
temperature without whisking. Great for coee.
Thin Froth
A thin layer of foam for lattes.
Thick Froth
A classic layer of fluy froth to top any drink.
Great for cappuccinos.
Extra-Thick Froth*
A large layer of froth, ideal for cappuccinos and
other drinks with less volume.
Cold Foam
A classic layer of cold froth to top any iced
coee or espresso drink.
2 Ensure that the bottom of the milk jug is dry.
Place the milk jug on the milk jug platform with
the steam wand inserted into the milk jug.
FROTHING
1 Fill the milk jug with the desired amount
of milk, but do not exceed the max fill line.
Ensure that whisk is installed.
FROTH QUEUING
After you have started your brew, you are able
to queue up your froth to start immediately
after the brew is finished.
1 Fill the milk jug with the desired amount of
milk, but do not exceed the max fill line.
2 While brewing, select DAIRY or PLANT-
BASED milk with the MILK TYPE button and
froth setting with the froth dial.
3 Press START FROTH.
Cold foam
does not need to be queued and
can froth while the machine is brewing.
7 Before pouring milk, tap the jug on a flat surface
and swirl around to remove large bubbles. Pour
frothed milk over espresso or coee and enjoy.
AFTER YOU FINISH FROTHING
5 Once you remove the milk jug, immediately
wipe the steam wand with a damp cloth
before pushing it back down into its down
position.
6 When the steam wand is pushed back into its
down position, auto purging will occur. This
is to clean the inside of the steam wand. The
machine will beep to signal that the purge
has started. When finished, the machine
will beep again. You can purge at any time
by pressing the PURGE button when steam
wand is in down position.
4 Next, select DAIRY or PLANT-BASED milk
with the MILK TYPE button based on the
milk that is in the milk jug. Press START
FROTH. The machine will beep to signal
that the frothing has started. The progress
bar will illuminate to indicate the status of
the frothing. The machine will beep again to
signify the froth is complete.
NOTE: DO NOT froth milk directly into the
espresso or coee; always froth in the milk jug
and pour the froth into the espresso or coee
base afterwards.
NOTE: When out of water, the machine
will not purge. Be sure to press the PURGE
button when adding more water in to
complete purge.
NOTE: DO NOT froth without the main drip
tray inserted.
NOTE: If you would like to change the
temperature of your froth, see Additional
Settings.
7 Once you feel comfortable with the volume
of milk, move the jug up so the steam wand is
further below the surface. This is to heat your
drink up.
8 Stay in that position until the jug is too hot
to hold with your hand, then press START
FROTH to turn the function o.
MANUAL FROTHING
1 Fill the milk jug as desired in between the min
and max fill lines.
2 Make sure you are on the steamed milk
setting
.
3 Pull the steam wand out. Place the steam
wand inside the milk jug so that the wand is
resting within the milk jug spout.
4 Angle the milk jug slightly to the left or right
so that the steam wand is about a finger’s
width away from the wall of the milk jug.
5 Hold START FROTH for 3 seconds. The
machine will beep to indicate that frothing
has started and steam will start to generate
from the wand.
6 Place wand just below the surface of the
milk to start incorporating air to stretch the
volume milk. This should start to create a
whirlpool with the milk.
Thin
Froth
Thick
Froth
Extra-Thick
Froth*
Cold
Foam
Steamed
Milk
* Not available on all models
20
ninjakitchen.co.uk
19
ninjakitchen.co.uk
IMMEDIATELY AFTER BREW CLEANING
• When brew is complete, carefully remove
portafilter from group head. Dispose of
grounds by tapping the surface of the
basket over a container or knock box (sold
separately).
• For best results, be sure to clean out the
portafilter and basket between each brew.
• Remove basket from portafilter. Hand-wash
both items with soapy water to remove all
coee oils. Be sure basket is dry before
brewing again.
• After you froth, wipe the wand with a damp
cloth before pushing it back into its down
position.
• Push steam wand into its down position to
initiate an auto purge.
• Empty the drip tray when the orange empty
indicator rises enough to become visible.
• Periodically hand-wash the drip tray and air-
dry thoroughly.
• Periodically clean the base of the machine
with a damp cloth.
EMPTYING THE DRIP TRAY
As you brew, the drip tray will fill up. When
the orange empty indicator rises enough to be
visible, it's time to empty the main drip tray.
1 Remove the main drip tray from the machine
by pulling tray away.
2 Carefully move the main drip tray to the sink
and pour water out through the pour spout.
3 Insert drip tray back into the machine.
PERIODIC MAINTENANCE
CLEANING THE ACCESSORIES
Dishwasher-Safe Parts:
Funnel, whisk, cleaning disc, water reservoir,
bean hopper, and all drip tray components.
REMOVING THE SHOWER SCREEN AND
REPLACING THE RUBBER GASKET
If you notice your brew quality diminish over
time, remove the shower screen and clean it
thoroughly.
If you experience leaking around the portafilter
during a brew when the handle is fully tight, you
may need to replace the gasket.
Be sure that the machine is turned o and
unplugged before proceeding.
1 Using a Phillips-head screwdriver, remove
central screw on shower screen, then remove
shower screen.
2 Once removed, clean the shower screen with
soap and water.
3 Remove rubber gasket from group head
with flathead screwdriver. Inspect gasket for
any wear or tearing, and replace with a new
gasket if needed (available for purchase on
ninjakitchen.co.uk/ninja-parts-accessories/ ).
4 Insert shower screen back into group head
and secure in position with screw.
NOTE: Empty indicator is removable.
22
ninjakitchen.co.uk
21
PERIODIC MAINTENANCE CONT.
CLEANING THE STEAM WAND
Over time, material can build up in the steam
wand.
1 Remove the cap on the bottom of the
cleaning brush to access the needle.
2 Use the needle to remove any material from
the steam wand tip.
3 For a deeper clean, use the wrench in the
middle of the cleaning brush to remove the
steam wand tip.
4 Use the needle to remove any material from
inside the steam wand and steam wand tip.
5 After cleaning, run a purge to clear out any
excess material.
CLEANING THE CONICAL BURR GRINDER
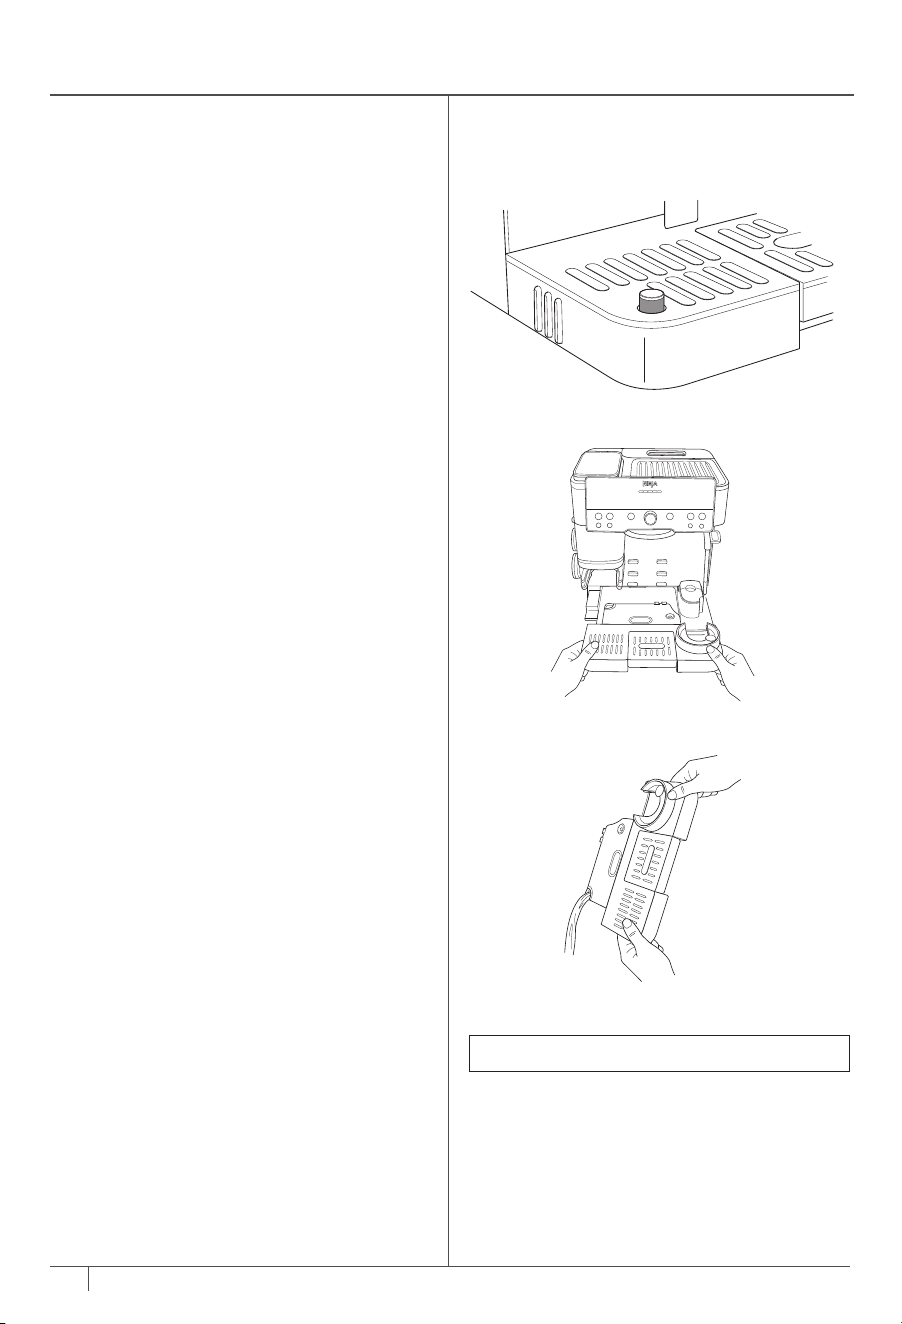
Be sure that the machine is turned o and
unplugged before proceeding.
1 Remove all beans from the bean hopper. See
Switching Out Beans for reference.
2 Remove bean hopper by lifting handle and
turning to counterclockwise.
6 Be sure to clean the inside of the grinding
cradle as well.
5 Then, clean burr grinder attached to machine
with cleaning brush.
4 Clean removed burr grinder with brush.
NOTE: DO NOT allow burrs to come into
contact with water.
NOTE: When cleaning the burr grinder attached
to the machine, only use the cleaning brush.
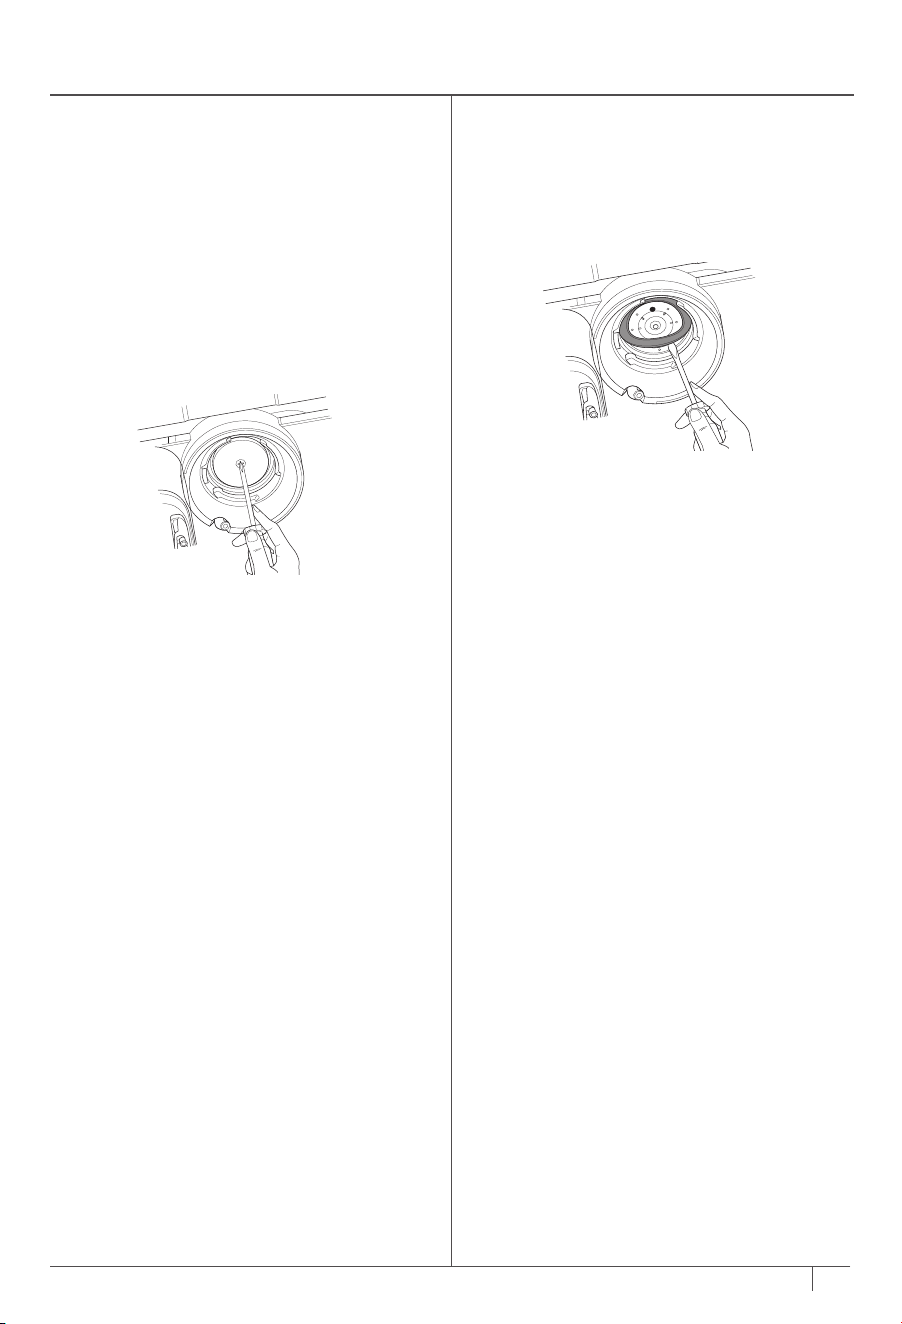
3 Remove upper burr by rotating
counterclockwise, aligning the orange arrow
on the burr grinder with the orange arrow
labeled ALIGN on the machine. Once aligned,
lift upper burr out.
WATER FILTER REPLACEMENT
1 Remove new filter
from its packaging
and soak for 5 mins.
3 Remove used water
filter and discard.
5 Secure new filter
into filter housing.
7 Install filter housing
into reservoir.
2 Whilst filter is
soaking, remove
water reservoir
from machine
and remove filter
housing from
reservoir.
4 Rinse new water
filter and mesh.
6 Set date 2 months
ahead.
8 Fill reservoir with
water and return to
unit.
22
ninjakitchen.co.uk
21
PERIODIC MAINTENANCE CONT.
CLEANING THE STEAM WAND
Over time, material can build up in the steam
wand.
1 Remove the cap on the bottom of the
cleaning brush to access the needle.
2 Use the needle to remove any material from
the steam wand tip.
3 For a deeper clean, use the wrench in the
middle of the cleaning brush to remove the
steam wand tip.
4 Use the needle to remove any material from
inside the steam wand and steam wand tip.
5 After cleaning, run a purge to clear out any
excess material.
CLEANING THE CONICAL BURR GRINDER
Be sure that the machine is turned o and
unplugged before proceeding.
1 Remove all beans from the bean hopper. See
Switching Out Beans for reference.
2 Remove bean hopper by lifting handle and
turning to counterclockwise.
6 Be sure to clean the inside of the grinding
cradle as well.
5 Then, clean burr grinder attached to machine
with cleaning brush.
4 Clean removed burr grinder with brush.
NOTE: DO NOT allow burrs to come into
contact with water.
NOTE: When cleaning the burr grinder attached
to the machine, only use the cleaning brush.
3 Remove upper burr by rotating
counterclockwise, aligning the orange arrow
on the burr grinder with the orange arrow
labeled ALIGN on the machine. Once aligned,
lift upper burr out.
WATER FILTER REPLACEMENT
1 Remove new filter
from its packaging
and soak for 5 mins.
3 Remove used water
filter and discard.
5 Secure new filter
into filter housing.
7 Install filter housing
into reservoir.
2 Whilst filter is
soaking, remove
water reservoir
from machine
and remove filter
housing from
reservoir.
4 Rinse new water
filter and mesh.
6 Set date 2 months
ahead.
8 Fill reservoir with
water and return to
unit.
24
ninjakitchen.co.uk
23
ninjakitchen.co.uk
5 Place 1 cleaning tablet in the centre of the
cleaning disc.
6 Fasten the portafilter in the group head.
7 Press the CLEAN button, then press the
centre dial to start the clean cycle.
8 The machine will start the process of
backflushing the shower screen and group
head and depositing the water and sediment
from the clean cycle into the main drip tray.
9 The clean cycle will take approximately
6 minutes to complete. The machine will beep
when the clean cycle is complete.
10 After the clean cycle is complete, remove
both the portafilter and main drip tray with
caution, as there may be water in both. Hand-
wash with warm soapy water.
4 Place the cleaning disc on top of the double
basket, with the handle facing up.
DESCALING AND CLEAN CYCLE
DESCALING
Time to complete: approximately 90 minutes.
When the DESCALE light illuminates, you must run
a descale cycle. If a descale isn’t performed after
the light turns on, drink quality will diminish and the
machine may clog and stop working.
Descaling breaks down and removes limescale
and mineral buildup inside the machine. Doing this
will help maintain peak performance if routinely
performed with a descale solution whenever the
DESCALE light turns on
1 Ensure the main drip tray is completely emptied,
as some of the water brewed from the descale
cycle will be deposited into the main drip tray.
Not emptying the main drip tray may cause
overflow.
OR
Fill the water reservoir with 474ml of white
vinegar, then fill the reservoir to the Descale line
with water.
3 Insert the double basket into the portafilter.
4 Fasten the portafilter into the group head.
5 Ensure milk jug is placed on the milk jug platform
with the steam wand inside.
6 Place an empty cup (at least 533ml) under the
portafilter. You may have to remove the centre
drip tray.
7 Press the DESCALE button, then press the
centre dial to start the descale cycle.
8 The machine will start the descale cycle. The
machine will flush solution through the steam
wand and portafilter for approximately 90
minutes. The machine will count down the
remaining time on the control panel.
9 The machine will beep indicating when the
descale cycle is complete.
10 After the cycle is complete, remove the
portafilter, main drip tray, and milk jug with
caution, as there will be water in each.
11 Empty the contents of each and hand-wash with
warm, soapy water to remove any solution that
could aect the flavour of your coee.
12 Fill the reservoir with fresh water up to, but not
exceeding, the Max Fill line.
13 Install the main drip tray back on the machine
and install the portafilter in the group head. Do
not install the milk jug.
14 Flush the group head by running a M+
CLASSIC brew.
15 Then, with the milk jug uninstalled, flush the
steam wand by pressing the PURGE button.
2 Dissolve the provided Ninja descale powder
in a separate container with 1.1L of water. Pour
solution mixture into water reservoir.
RUNNING A CLEAN CYCLE
Time to complete: approximately 6 minutes
A clean cycle flushes out residual oils or
grounds that are built up in and around the
group head. The CLEAN light will automatically
illuminate to indicate when a clean cycle is
required. You may also run a clean cycle if you
notice a change in brew quality. The clean cycle
requires the cleaning disc (included with the
machine and storable in the accessory storage)
and a cleaning tablet (also included and
available for purchase on
ninjakitchen.co.uk/ninja-parts-accessories/ ).
Follow these steps to run a clean cycle:
1 Ensure the main drip tray is completely
empty as the water brewed from the clean
cycle will be deposited into the main drip tray.
Not emptying the main drip tray may cause
overflow.
2 Fill the water reservoir up to but not
exceeding the Max Fill line.
3 Insert the double basket in the portafilter.
NOTE: Empty indicator is removable.

26
ninjakitchen.co.uk
25
ninjakitchen.co.uk
• For best results, use freshly roasted coee beans.
• When purchasing coee beans, it’s best to buy a bag with a “Roasted On” date rather than a
“Best Before” date to ensure quality and freshness.
• We recommend you use any coee beans within 20 days of the “Roasted On” date.
• When changing to a dierent bean, fully remove previous beans before proceeding. See the
Switching Out Beans section for more information.
• Always match the current to the recommended grind setting.
• To increase the brew temperature, run a water flush before making your drink.
• Keep your machine clean by using the brush to wipe o any debris.
• Use filtered water.
• Dial in the grinder whenever switching out beans.
• Keep machine on a stable surface.
• Empty and clean drip tray frequently.
• After you grind and before you start brewing, the machine will start to heat up. Place your mug on
the heated cup tray to warm it up.
• For best results with plant-based milk, use the barista or full-fat version.
• For dairy milk, we recommend using whole milk.
• Milks that are UHT-treated (Ultra High Temperature) may have varying results.
• Coconut milk can be heated up but will not make stable froth.
• If you would like to adjust milk temperature, please see Additional Settings section.
• For best results use cold milk or milk out of the refrigerator.
• For best results make sure the milk jug is at room-temperature before frothing.
• Ensure both the milk jug platform and the bottom of the milk jug are dry and clean before placing
on the milk jug platform.
• Wipe steam wand with a clean damp cloth immediately after use to prevent milk from sticking.
• Before turning o the machine, push the steam wand back into the down position to allow it to purge.
• For a deeper clean of the whisk and steam wand, fill milk jug to the max line with water and a drop
of dish soap and run the THIN FROTH
program.
• For best foams and latte art, tap and swirl the milk jug prior to pouring milk.
• For best plant-based froth, use the PLANT-BASED setting.
BEST BREWING PRACTICES BEST FROTHING PRACTICES

28
ninjakitchen.co.uk
27
Why is there no water coming out of the portafilter?
Several factors could aect the volume of water dispensing from the portafilter:
• Not enough water in the reservoir: Ensure the water reservoir is adequately filled. When using the luxe
basket, 533ml of water is required. When using the double or single basket, fill to the min. line.
• The water reservoir is not seated firmly: Check that the water reservoir is firmly seated in its place on
the back of the machine.
• The machine is warming up/reaching the operating temperature: Please allow a short time for the
machine to warm up before it dispenses.
• The grind size is too fine: Let the brew time out and follow the recommended grind setting on your
next brew.
• The machine needs to be descaled: Follow the instructions under the Cleaning & Maintenance section.
Why is the espresso stream small/flowing slowly?
There could be several reasons behind this.
• The grind size is too fine: Let the brew time out and follow the recommended grind setting on your
next brew.
• Basket cleanliness: Before grinding, ensure the basket is free of any clogs or debris that could impede
the flow.
• The machine needs to be descaled: Follow the instructions under the Cleaning & Maintenance section.
Why is the espresso stream flowing very fast?
• The grind size is too coarse: Let the brew time out and follow the recommended grind setting on your
next brew.
• Coee is tamped too lightly: When tamping, make sure to place the portafilter on a level surface.
Place the assisted tamper inside the funnel and push down on it until you feel the tamper contact the
funnel.
Why does the espresso run around the edge of the portafilter?
• Portafilter is not inserted into the group head correctly: Place portafilter into group head by aligning
orange dot on portafilter with orange dot on group head. Fasten portafilter into group head until
orange dot on portafilter aligns with lock arrow on group head.
• There are coee grounds around the basket rim: Clean unwanted grounds from the edge of the
basket and portafilter to ensure portafilter sits properly in group head.
• The group head seal needs to be replaced: Call Customer Service at 0800 862 0453.
Frothing does not start.
• Machine has not reached operating temperature: Please allow a short time for the machine to warm
up before frothing begins.
• Not enough water in the reservoir: Ensure the water reservoir is filled up to the min. line.
• The water reservoir is not seated firmly: Check that the water reservoir is firmly seated in its place on
the back of the machine.
• Wand is not inserted down: Ensure the steam wand is inserted into the milk jug, with the milk jug
properly seated on the platform.
• Not enough milk in the milk jug: Ensure milk is filled up to the min. line.
Coee is not hot enough.
• Preheat the portafilter: Rinse the portafilter under hot water before grinding. Please make sure that
the basket is completely dry before grinding.
• Preheat the cup: Rinse the cup under hot water before brewing to increase the temperature of the
brew.
• Adjust water temperature: Increase the temperature of the brew by using the BREW TEMP button on
the control panel.
• Use heated froth settings: All froth settings are heated except cold foam, which is denoted with a
snowflake.
• The machine needs to be descaled: Follow the instructions under the Cleaning & Maintenance section.
TROUBLESHOOTING GUIDE
The additional settings menu oers additional options to customise your machine and is accessible
by pressing and holding the SIZE button for 3 seconds.
1 Navigate through these topics by turning the centre dial. Press START BREW to select your
desired topic.
2 Once you select into a topic, turn the centre dial to get to your desired option and press
START BREW to make your selection.
3 After a selection is made, you will hear a beep and return to the menu screen. Please note that the
machine will not beep if beeps are turned o.
4 You can exit the menu by pressing the SIZE button again.
Item Number Topic Options
_h01 Beeps: Turns all beeps on or o.
ON: Leaves beeps on (Default)
OFF: Turns beeps o
_h02
Eco Mode: Saves power by turning boiler o
after brewing.
ON: Turns Eco Mode on
OFF: Leaves Eco Mode o (Default)
_h03
Recommended Grind Size: Turns
recommended grind setting display on or o.
ON: Leaves display on (Default)
OFF: Turns display o
_h04
Barista Assist Technology Reset: Resets
recommended grind setting to default setting.
NO: Keeps your current settings (Default)
YES: Resets your settings
_h05
Factory Settings Reset: Reset all variables
on the machine to default settings.
NO: Keeps your current settings
YES: Resets your settings
_h06
Brew Temperature: Adjusts the
temperature of your drink.
LO: Low temperature
M: Medium temperature (default)
HI: High temperature
_h07
Froth Temperature: Adjusts the temperature
of your froth.
LO: Low temperature
M: Medium temperature (default)
HI: High temperature
_h08
Hard Water: Brings the hard water test menu
up to reset your water hardness
hd 0: Strip has 0 purple boxes
hd 1: Strip has 1 purple box
hd 2: Strip has 2 purple boxes
hd 3: Strip has 3 purple boxes
hd 4: Strip has 4 purple boxes
hd 5: Strip has 5 purple boxes
ADDITIONAL SETTINGS

30
ninjakitchen.co.uk
29
Why am I not getting any crema?
• Coee is tamped too lightly: When tamping, make sure to place the portafilter on a level surface.
Place the assisted tamper inside the funnel and push down on the tamper until you feel it contact the
funnel.
• The grind size is too coarse: Let the brew time out and follow the recommended grind setting on your
next brew.
• Coee beans are not fresh: Bean freshness will impact the crema quality. When purchasing coee
beans, it’s best to buy a bag with a “Roasted On” date rather than a “Best Before” date to ensure
quality and freshness. We recommend you use coee beans within 20 days of the “Roasted On” date.
• Basket may be clogged/holes are blocked: Ensure you are cleaning the baskets frequently. Make sure
none of the holes in the bottom of the basket are clogged with grounds.
Why does the drip tray fill quickly?
• To ensure the machine maintains the ideal pressure for espresso, during a brew, some water will
bypass into the main drip tray. This is normal.
• The machine will automatically purge water from the steam wand into the main drip tray after each
froth. This is to clean the inside of the steam wand.
• The main drip tray is designed to hold the water bypass from the creation of up to 6 cappuccinos.
Why does the machine make a pulsing/thumping sound while brewing?
• Not enough water in the reservoir: Ensure the water reservoir is filled up to the min. line.
• The water reservoir is not seated firmly: Check that the water reservoir is firmly seated in its place on
the back of the machine.
• If the reservoir has water filled over the min. line and is seated firmly, some water pump noise is
considered normal.
• You may also hear this noise while frothing. This is normal.
Machine is leaking.
• The machine will automatically purge water from the steam wand into the main drip tray after each
froth. This is to clean the inside of the steam wand.
• Drip tray is full: Check the empty indicator to see if you need to empty the main drip tray. Follow the
instructions under the Cleaning & Maintenance section.
• The water reservoir is not seated firmly: Check that the water reservoir is firmly seated in its place on
the back of the machine.
• Group head seal needs to be replaced: Call Customer Service at 0800 862 0453.
Machine has no power.
• Ensure the machine is plugged into a working socket.
• After plugging the machine in, press the POWER button.
• To save power, the machine will automatically shut o after 20 minutes.
There are no coee grounds coming from the grinder.
• Check if you have beans in the bean hopper.
• Press START GRIND to begin grinding.
• If there are beans in the bean hopper and you are getting an ADD BEANS notification, unplug the
machine and gently push the beans down toward the burrs.
• Ensure the bean hopper is securely and properly inserted.
• Ensure the portafilter with the funnel assembled is properly installed into the grinding cradle. Remove
and reinsert to ensure it is installed correctly.
• Using the cleaning brush, clear out any material sitting inside the grinding cradle.
Grinder is making a loud noise.
• If the grinder is making a loud noise, it could be due to unintended debris. Use only whole beans in
the grinder and avoid putting cold or frozen beans in.
Portafilter will not insert into group head.
• Portafilter is not properly aligned: Place the portafilter into the group head by aligning the orange dot
on the portafilter with the orange dot on the group head. Fasten the portafilter into the group head
until the orange dot on the portafilter aligns with the lock arrow on the group head.
• Coee is tamped too lightly: When tamping, place the portafilter on a level surface. Place the assisted
tamper inside the funnel and push down on the tamper until you feel it contact the funnel.
Unable to lock bean hopper in position.
• This may be caused by the grinder being blocked by beans or moisture clogging the grinder. Try
clearing any beans blocking the grinder and ensure the grinder is dry and free from moisture.
TROUBLESHOOTING GUIDE CONT.
I matched the grind setting, but the output was not good.
• Refer to Dialing in Your Grinder for Proper Extraction section.
Bean hopper will not fit back onto the machine.
• Ensure beans on top of the grinder are not blocking the hopper from seating properly. If beans are
blocking the hopper, you may need to clear them before reseating the hopper on the machine.
Milk froth is not hot enough.
• The milk froth temperature is dependent on the froth style selected. COLD FOAM, denoted by a
snowflake next to the milk jug, will not get hot.
• Steam wand is clogged.
• Remove tip of wand with the wrench on the brush.
• Use needle on the bottom of cleaning brush to clean inside of wand.
• The Additional Settings menu oers options to customise the froth temperature and is accessible by
pressing and holding the SIZE button for 3 seconds.
• Select option _h07 Froth Temperature: this allows you to adjust the frother temperature to low (L),
medium (M), or high (H). Use the centre dial to make your selection, then hold the SIZE button for
3 seconds to exit the menu.
Milk froth is too thin or thick.
• Change the froth setting using the froth dial. Refer to the Frothing section for more information on
froth settings.
• Milk type: Dierent milks have dierent fat contents. The higher the fat content of the milk, the thicker
the froth will be.
• Dairy vs Plant Based: To improve the overall quality of the froth, select DAIRY or PLANT-BASED milk
with the MILK TYPE button based on the milk type you are frothing.
• For additional froth information, refer to the Best Frothing Practices section.
My drink is smaller/larger than expected.
• If you’re brewing an espresso drink, you can change the grounds-to-water ratio. Please refer to the
Additional Settings section.
• If you’re brewing a coee drink, select the desired size using the SIZE button before grinding.
• Basket may be clogged/holes are blocked: Ensure you are cleaning the baskets frequently. Make sure
none of the holes in the bottom of the basket are clogged with grounds.
• The machine needs to be descaled: Follow the instructions under the Cleaning & Maintenance section.
My drink is too bitter/acidic.
• Match grind setting: Use the grind dial on the side of the machine to match the Current grind setting
to the Recommended grind setting on the control panel before grinding.
• Change ratio: To increase/decrease the grounds-to-water ratio, please refer to the Additional Settings
section.
• Change the brew temperature: For dark-roast beans, we recommend using the low or medium
temperature setting. For medium- or light-roast beans, we recommend using the medium or high
temperature setting.

32
ninjakitchen.co.uk
31
To order additional parts and accessories, visit
ninjakitchen.co.uk/ninja-parts-accessories/
or
contact Customer Service at 0800 862 0453.
REPLACEMENT PARTS
Please visit registeryourninja.com or call 0800 862 0453 to register your new Ninja® product within
twenty-eight (28) days of purchase. You will be asked to provide the store name, date of purchase, and
model number along with your name and address.
The registration will enable us to contact you in the unlikely event of a product safety notification. By
registering, you acknowledge you have read and understood the instructions for use and warnings set
forth in the accompanying instructions.
PRODUCT REGISTRATION
TROUBLESHOOTING GUIDE CONT.
ALL ERROR MESSAGES (ADD WATER, ADD BEANS, ETC.)
ADD WATER notification.
• Ensure there is water in the reservoir. If the reservoir is empty, add fresh water to the reservoir and
then press START BREW to resume the brew.
• If the reservoir is filled with water, remove and reseat the reservoir and then press START BREW to
resume the brew.
ADD BEANS notification
• Check if there are enough beans in the bean hopper to make your drink.
• If there are beans in the bean hopper, and you are getting an ADD BEANS notification, unplug the
machine and gently push the beans down toward the burrs.
INSTALL PORTAFILTER notification
• Make sure the portafilter is sitting flat on the grinding cradle.
• Make sure portafilter is pushed all the way back in grinding cradle.
• Use the cleaning brush to ensure grinding cradle is clear of any grounds.
• Unplug the machine and plug it back in.
INSTALL FUNNEL notification
• Ensure funnel is properly installed on portafilter by aligning the notches on the funnel with the
notches on the portafilter.
• When inserting portafilter into grinding cradle, ensure funnel is attached to portafilter.
• Unplug the machine and plug it back in.
INSTALL HOPPER notification
• Lock bean hopper in by rotating handle clockwise.
• If issue continues, please unlock the hopper by turning the handle counterclockwise. Lift the bean
hopper o the base and reseat it firmly onto the base. You may need clear beans from the top of
the grinder before reinstalling the bean hopper in order to seat it properly. Lock the bean hopper by
turning the handle clockwise.
INSTALL JUG notification
• Ensure milk jug is on platform when frothing.
• Make sure both the bottom of the jug and milk jug platform are dry and clean.
RINSE notification
• If you try to brew a cold drink after a hot drink, you may get a RINSE notification. Refer to RINSE
notification in the Using The Machine section.
DESCALE notification
• It is time to descale the machine. Refer to Descaling in the Cleaning & Maintenance section.
CLEAN notification
• It is time to run a clean cycle. Refer to Running a Clean Cycle in the Cleaning & Maintenance section.
Er
• If the control panel displays “Er” and then a number (ex. “Er 03”), contact Customer Service at
0800 862 0453.
MANUFACTURER’S GUARANTEE
The Ninja® 2 Year Guarantee
When a consumer buys a product in the UK, they get the benefit of legal rights relating to the quality
of the product (your “legal rights”). You can enforce your legal rights against your retailer, including
Ninja® if you bought your Ninja® kitchen appliance from ninjakitchen.co.uk. However, at Ninja® we are so
confident about the quality of our products that we give the owner an additional, free parts and labour
manufacturer’s guarantee of up to 2 years.
The guarantee it comes with is an important consideration - and reflects how much confidence the
manufacturer has in its product and manufacturing quality.
The manufacturer’s guarantee does not aect your legal rights.
How long are new Ninja® machines guaranteed for?
Our manufacturer’s guarantee lasts for one year from the date of purchase as standard, or for two years if
you register your purchase with us within 28 days.
How do I register my Ninja® guarantee?
If you have purchased your Ninja® kitchen appliance directly from ninjakitchen.co.uk your guarantee is
registered automatically. If you bought it from anywhere else in the UK, you can register your guarantee
online within 28 days of purchase.
• To register online, please visit www.ninjakitchen.co.uk/register-guarantee or scan the QR code on the
back cover.
• Keep a note of the date you purchased the machine.
IMPORTANT:
• Keep your receipt if you bought your Ninja® kitchen appliance from anywhere except ninjakitchen.co.uk.
You will need it to claim under your guarantee.
• The free Ninja® guarantee only applies in the UK.
What are the benefits of registering my free Ninja® guarantee?
When you register your guarantee, you will get an extra year of cover. We’ll also have your details to hand
if we ever need to get in touch. If you further agree to receive communications from us, you can also
receive tips and advice on how to get the best out of your Ninja® kitchen appliance and hear the latest
news about new Ninja® technology and launches.
What is covered by the free Ninja® guarantee?
Repair or replacement (at Ninja®’s discretion) of your Ninja® machine, including all parts and labour.
What is not covered by the free Ninja® guarantee?
• Normal wear and tear.
• Accidental damage or faults caused by negligent use or care, misuse, neglect, careless operation or
handling of the Ninja® kitchen appliance which is not in accordance with the Ninja® Operating Manual
supplied with your machine.
• Damage caused by use of the Ninja® kitchen appliance for anything other than normal domestic
household purposes.
• Damage caused by use of parts not assembled or installed in accordance with the operating
instructions.
• Damage caused by use of parts and accessories which are not Ninja® Genuine Components
• Faulty installation (except where installed by Ninja®).
• Repairs or alterations carried out by parties other than Ninja® or its agents.
How can I claim under the free Ninja® guarantee?
Contact our customer service helpline on 0800 862 0453. For service hours please visit our website
under ‘Contact Us’. It’s free to call, and you’ll be put straight through to a Ninja® representative. You’ll
also find online support at https://support.ninjakitchen.co.uk/. The Ninja® representative will go
through some troubleshooting with you, and if we conclude that the item has failed, we will send you a
replacement part or a returns label to send the defective item back to us free of charge. When you have
delivered the defective product to us, we will send you a replacement.
Please remember that the item will need to be boxed when you return it to us. It can be any suitable
box, it does not have to be the original packaging.
Where can I buy genuine Ninja® spares and accessories?
Ninja® spares and accessories are developed by the same engineers who developed your Ninja® kitchen
appliance. You’ll find a full range of Ninja® spares, replacement parts and accessories for all Ninja®
machines at www.ninjakitchen.co.uk. Please remember that damage caused by the use of non-Ninja®
spares may not be covered under your guarantee.

ES600 Series | Owner’s Guide
General Precautions
1 To eliminate a choking hazard for young children, discard all packaging materials immediately upon unpacking.
2 This appliance can be used by persons with reduced physical, sensory, or mental capabilities or lack of experience and knowledge if they
have been given supervision or instruction concerning use of the appliance in a safe way and understand the hazards involved.
3 Keep the appliance and its cord out of reach of children. DO NOT allow the appliance to be played with or be used by children. Close
Supervision is necessary when used near children.
4 To protect against fire, electric shock, and injury to persons, DO NOT immerse cord, plugs, or body of machine in water or other liquid.
5 Never carry the appliance by the power cord or pull it to disconnect from electrical socket; instead grasp the plug and pull to disconnect.
6 DO NOT operate any appliance with a damaged cord or plug, or after the appliance malfunctions, or has been dropped or damaged in
any manner. Contact SharkNinja Operating LLC for service.
7 For household and countertop use only. DO NOT let the power cord hang over the edge or touch hot surfaces such as the stove.
8 NEVER use socket below counter.
9 To avoid risk of fire, electrical shock, or damage to the brewer, DO NOT use brewer in an appliance garage or under a wall cabinet.
10 Unplug from socket when the appliance is not ins use, and before cleaning.
11 Never leave an appliance unattended while in use.
12 Appliances are not intended to be operated by means of an external timer or separate remote-control system.
13 DO NOT place on top of any other appliance.
14 The appliance shall not be placed in a cabinet when in use.
15 DO NOT use any accessory not recommended by the manufacturer as this may result in injury or damage to the appliance.
IMPORTANT SAFETY INSTRUCTIONS
PLEASE READ CAREFULLY BEFORE USE • FOR HOUSEHOLD USE ONLY
WARNING
To reduce the risk of injury, fire, electrical shock or property damage, basic safety precautions must always be followed,
including the following numbered warnings and subsequent instructions. Do not use appliance for other than intended use.
Read all instructions before using your Ninja Luxe Espresso Bar
Indicates the presence of a hazard that can cause personal injury, death or substantial property damage if the warning
included with this symbol is ignored.
Avoid contact with hot surface. Always use hand protection to avoid burns.
For indoor and household use only.
READ AND SAVE THESE INSTRUCTIONS
PREMIER SERIES
THANK YOU
for purchasing the Ninja Luxe Café
PLEASE READ CAREFULLY AND KEEP FOR FUTURE REFERENCE.
These instructions are designed to help you get a complete understanding of your new Ninja Luxe Espresso
Machine. If you have any questions, please call our Customer Service line at 0800 862 0453.
TECHNICAL SPECIFICATIONS
Voltage: 220-240V~ 50-60Hz
Power: 1800W
Water Reservoir
Capacity: 2L
TIP: You can find the model and serial numbers on the
QR code label located on the back of the unit by the
power cord.
RECORD THIS INFORMATION
Model Number: �������������������������
Serial Number: ��������������������������
Date of Purchase: �����������������������
(Keep receipt)
Store of Purchase: �����������������������
REGISTER YOUR PURCHASE
www.ninjakitchen.co.uk/register
0800 862 0453
Scan QR code using mobile device
Ninja is a registered trademark in the United Kingdom of SharkNinja Operation LLC.
SharkNinja Europe Ltd, 1st/2nd Floor Building 3150,
Thorpe Park, Century Way, Leeds, England, LS15 8ZB
Telephone: 0800 862 0453
ninjakitchen.co.uk
SharkNinja Germany GmbH, Rotfeder-Ring 9,
60327 Frankfurt am Main, Germany
Illustrations may dier from actual product. We are constantly striving to improve our products, therefore the
specifications contained herein are subject to change withoutnotice.
© 2024 SharkNinja Operating LLC
ES601UK�IB�MP�240620�Mv1
@ninjakitchen