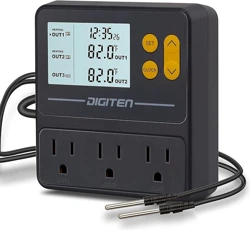
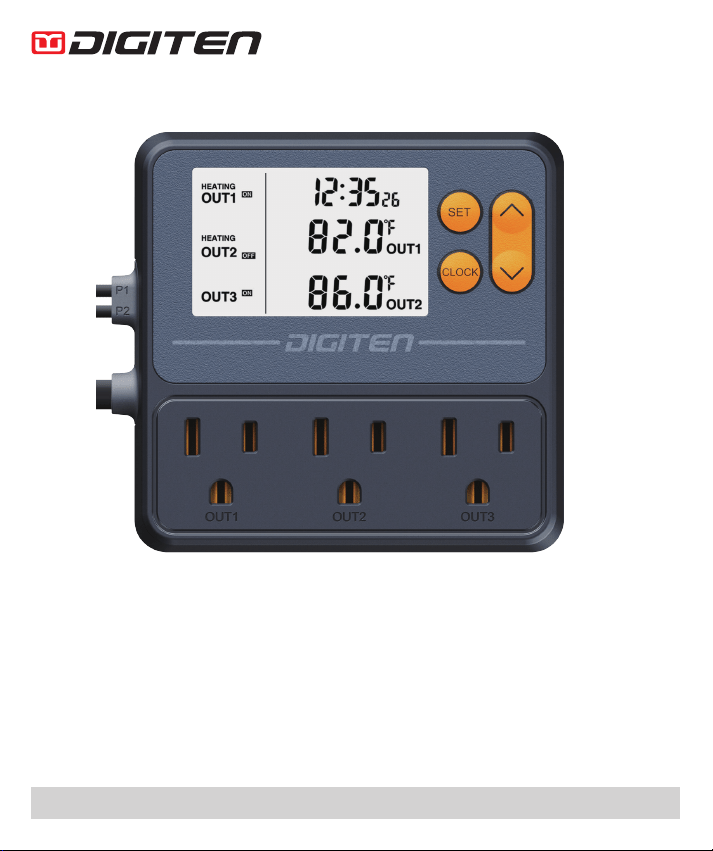
Temperature Controller with Timer
Modell: TTC-1003
Making Life Better
www.digit-en.com service@digit-en.com
The thermostat with timer is specially designed for pet breeders. The large
LCD display makes your settings or monitoring clear at a glance. Two sets of
probes can control dierent pets respectively. The controller has three outlets,
the rst and second are temperature control and time control, the third is timing
switch control, and the three work independently without interfering with each
other. Dierent temperature or lighting needs can be set for your pet during the
day and night. Intelligent control allows pets to live in a comfortable environ-
ment forever.
FEATURE
● The timer is for day and night temperature control.
● T
he three outlets work independently without interfering with each other.
● A button battery is included to store the current time.
● Power-o memory function, all settings will be saved when power is o.
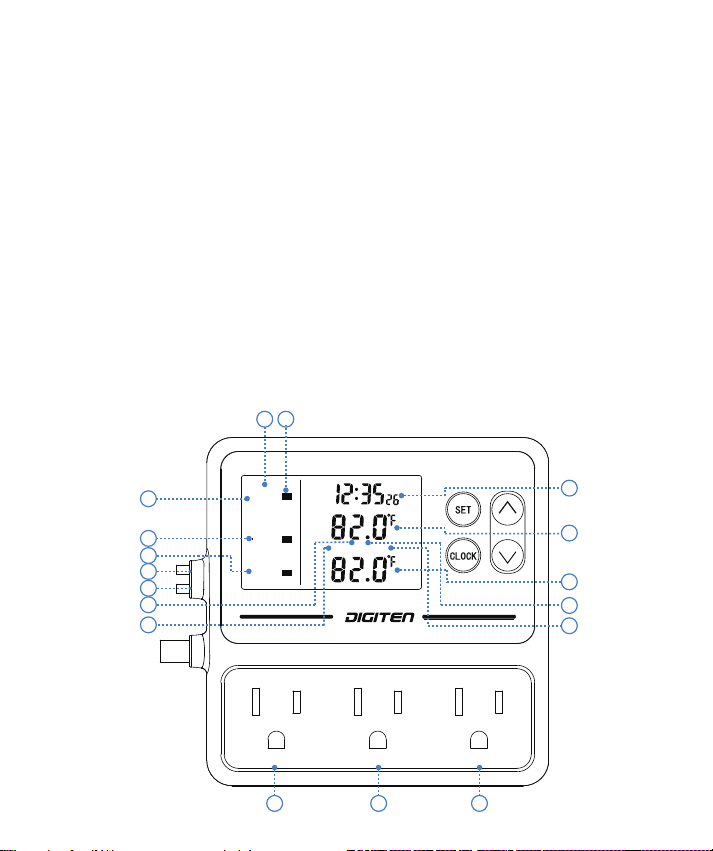
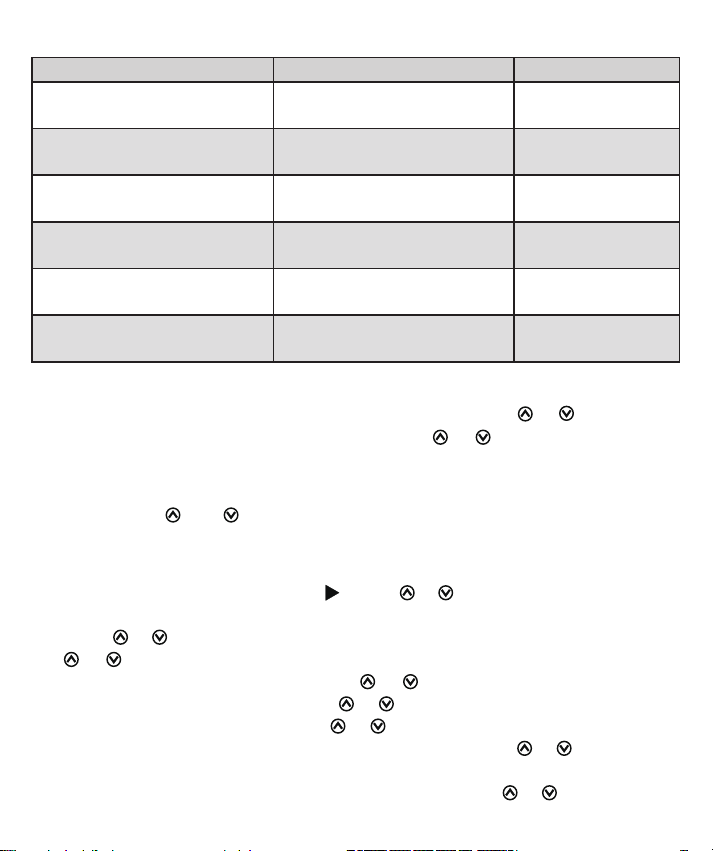
OVERVIEW
1
1
2
2
3
3
4
5
6
7
8
9
10
11
12
13
14
OFF
OFF
ON
HEATING
OUT2
OUT3
HEATING
OUT1
OUT1
OUT1 OUT2 OUT3
OUT2
P1
P2
AH AL CA DP
①.OUT1: Outlet 1#, Temperature Controller & Timer
②.OUT2: Outlet 2#, Temperature Controller & Timer
③.OUT3: Outlet 3#, Timer
④. P1: Probe for OUT1
⑤. P2: Probe for OUT2
⑥. HEATING/COOLING: Working Mode of OUT1/OUT2
⑦. : Working Status of OUTs
⑧. Current Time
⑨. OUT1 Current Temperature
⑩. OUT2 Current Temperature
⑪. AH: High Temperature Alarm
⑫. AL: Low Temperature Alarm
⑬. CA: Temperature Calibration
⑭. DP: Time of Compressor Delay Starting
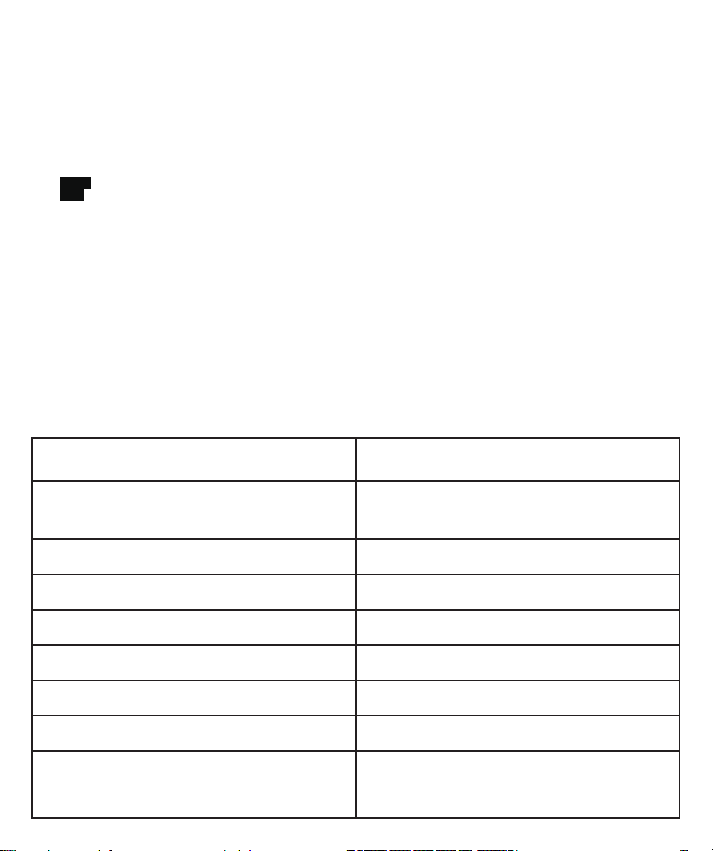
SPECIFICATION
OFF
ON
Power Requirement
100-240VAC
Load Capacity
100-240VAC 10A Per Outlet
1100W@110V, 2200W@220V
Temperature Control Range
-10℃~ 120℃ /14 ℉~ 248 ℉
Measuring Accuracy
±1℃/±1℉
Probe Sensor Type
NTC 3950, R25=10K
Probe Sensor Length
2m/6.56ft
Power Cable Length
1.4m/4.6ft
Measurement
105mm(L)X105mm(W)X32mm(H)
Operation Environment
Temperature:
0-50℃ /32-122 ℉
Relative Humidity: <85%
SETTING RANGE
Function Setting range Default
Temperature ON Value
-10℃~ 120℃ / 14 ℉~ 248 ℉ 28℃ /82 ℉
Temperature OFF Value
-10℃~ 120℃ / 14 ℉~ 248 ℉ 30℃ /86 ℉
AH high temp alarm
-10℃~ 120℃ / 14 ℉~ 248 ℉
OFF
AL low temp alarm
-10℃~ 120℃ / 14 ℉~ 248 ℉
OFF
CA calibration
-15℃~ 15℃ / -15 ℉~ 15 ℉
0.0
DP compressor delay start
-10℃~ 120℃ / 14 ℉~ 248 ℉
0
SET CURRENT TIME
Press and hold CLOCK until the current time ashes, press
or
to adjust the
hour, press CLOCK to set the minute and press
or
to adjust it, then press
CLOCK to save and exit.
CHANGE TEMPERAURE UNIT
Press and hold
and
simultaneously for about 3s to switch between Fah-
renheit and Celsius units.
SET OUT1/OUT2
1. Press SET until the LCD display , press
or
to choose the OUT1/OUT2.
2. To set OUT1, press and hold SET for about 3s, the ON time will ash,
press
or
to adjust the hour, then press SET to set the minute and press
or
to adjust it.
3. Press SET to set OFF time, press
or
to adjust the hour, then press
SET to set the minute and press
or
to adjust it.
● If you don›t need a timer, press
or
to adjust time to -- : --.
4. Press the SET to set the ON temperature value, press
or
to adjust the
value you desired.
5. Press SET to set the OFF temperature value and press
or
to adjust it.
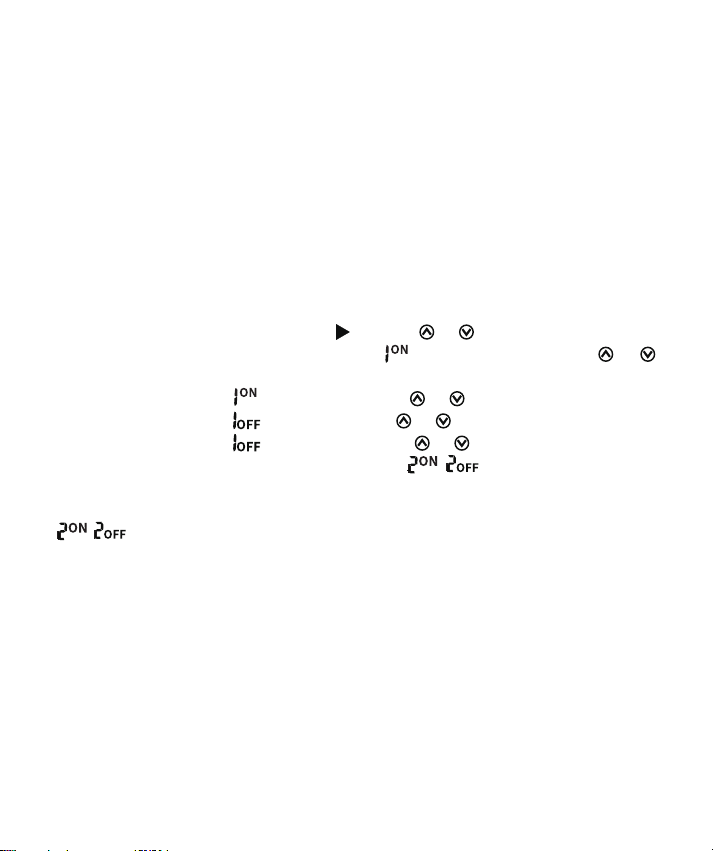
● To set ON value > OFF value, it will be in cooling mode, COOLING icon will
be displayed under OUT icon on the left of the display.
● To set ON value < OFF value, it will be in heating mode, HEATING icon will
be displayed above OUT icon on the left of the display.
6.
Press SET to set the AH if you need. The default value of OFF is perman
ently o.
7.
Press SET to set the AL if you need.
8.
Press SET to set the CA if you need.
9.
Press SET to set the DP if you set it COOLING mode.
10. Press SET to the last value or press and hold the SET to save and exit.
11. Set the OUT2 according to steps 1~10.
SET OUT3
1. Press SET until the LCD display , press
or
to choose the OUT3.
2. Press and hold SET for about 3s, the
hour will ash, press
or
to
adjust it,
3. Press SET to set the
minute and press
or
to adjust it.
4. Press SET to set the
hour and press
or
to adjust it.
5. Press SET to set the
minute and press
or
to adjust it.
6. Press SET to set the second time period(
/ ) if you need, and repeat
steps 2 to 5 to set hour and minute.
● If only one time period needs to be set, after setting the rst time period, adjust
/ to -- : --, you can long press SET to save and exit.
FUNCTION INTRODUCTION
Heating Mode
To set ON < OFF, the OUT1 (OUT2) will start to work when the current temperature is
lower than the ON value, and won’t stop working until the current temperature reaches
the OFF value.
Cooling Mode
To set ON > OFF, the OUT1 (OUT2) will start to work when the current temperatu-
re is higher than the ON value, and won’t stop working until the current temperature
reaches the OFF value.
High/low temperature alarm

When current temperature ≥ AH temperature, high temperature alarm will be triggered.
When current temperature ≤ AL temperature, low temperature alarm will be triggered.
You can press any button to stop the alarm beep, or set AH/AL to OFF to perman-
ently turn o the alarm.
Calibration (CA)
When the current temperature deviates from the actual temperature, it can be cor-
rected with the temperature calibration function.
Correct temperature = temperature before calibration + calibration value (CA), the
calibration value can be positive, negative, or 0.
Time of Compressor Delay Starting (DP)
After power-on, in cooling mode, if the current temperature ≥ OFF value, the co-
oling device will wait for a delay time (DP) before starting.
When the time interval between two cooling operations is greater than the delay
time (DP), the cooling device will work immediately.
When the time interval between two cooling operations is less than the delay time
(DP), the cooling device will not start until it reaches the delay time (DP).
When the cooling device stops instantaneously, the stop time will be recorded as
the time comparison point for the next start.
RESTORE TO FACTORY SETTING
First unplug the controller to turn o the power, then press and hold SET, and
then re-plug in the power again, the controller will restore to factory settings after
a ''beep''.
WARRANTY
The DIGITEN products are guaranteed to the original owner for one year against
defects in workmanship and materials.
If you encounter any problems while using our products, please feel free to contact us.
www.digit-en.com/support
COPYRIGHT 2022 DIGITEN INC. ALLRIGHTS RESERVED
