
AXIS Body W or n Manager Pr o
Intr oduction
Intr oduction
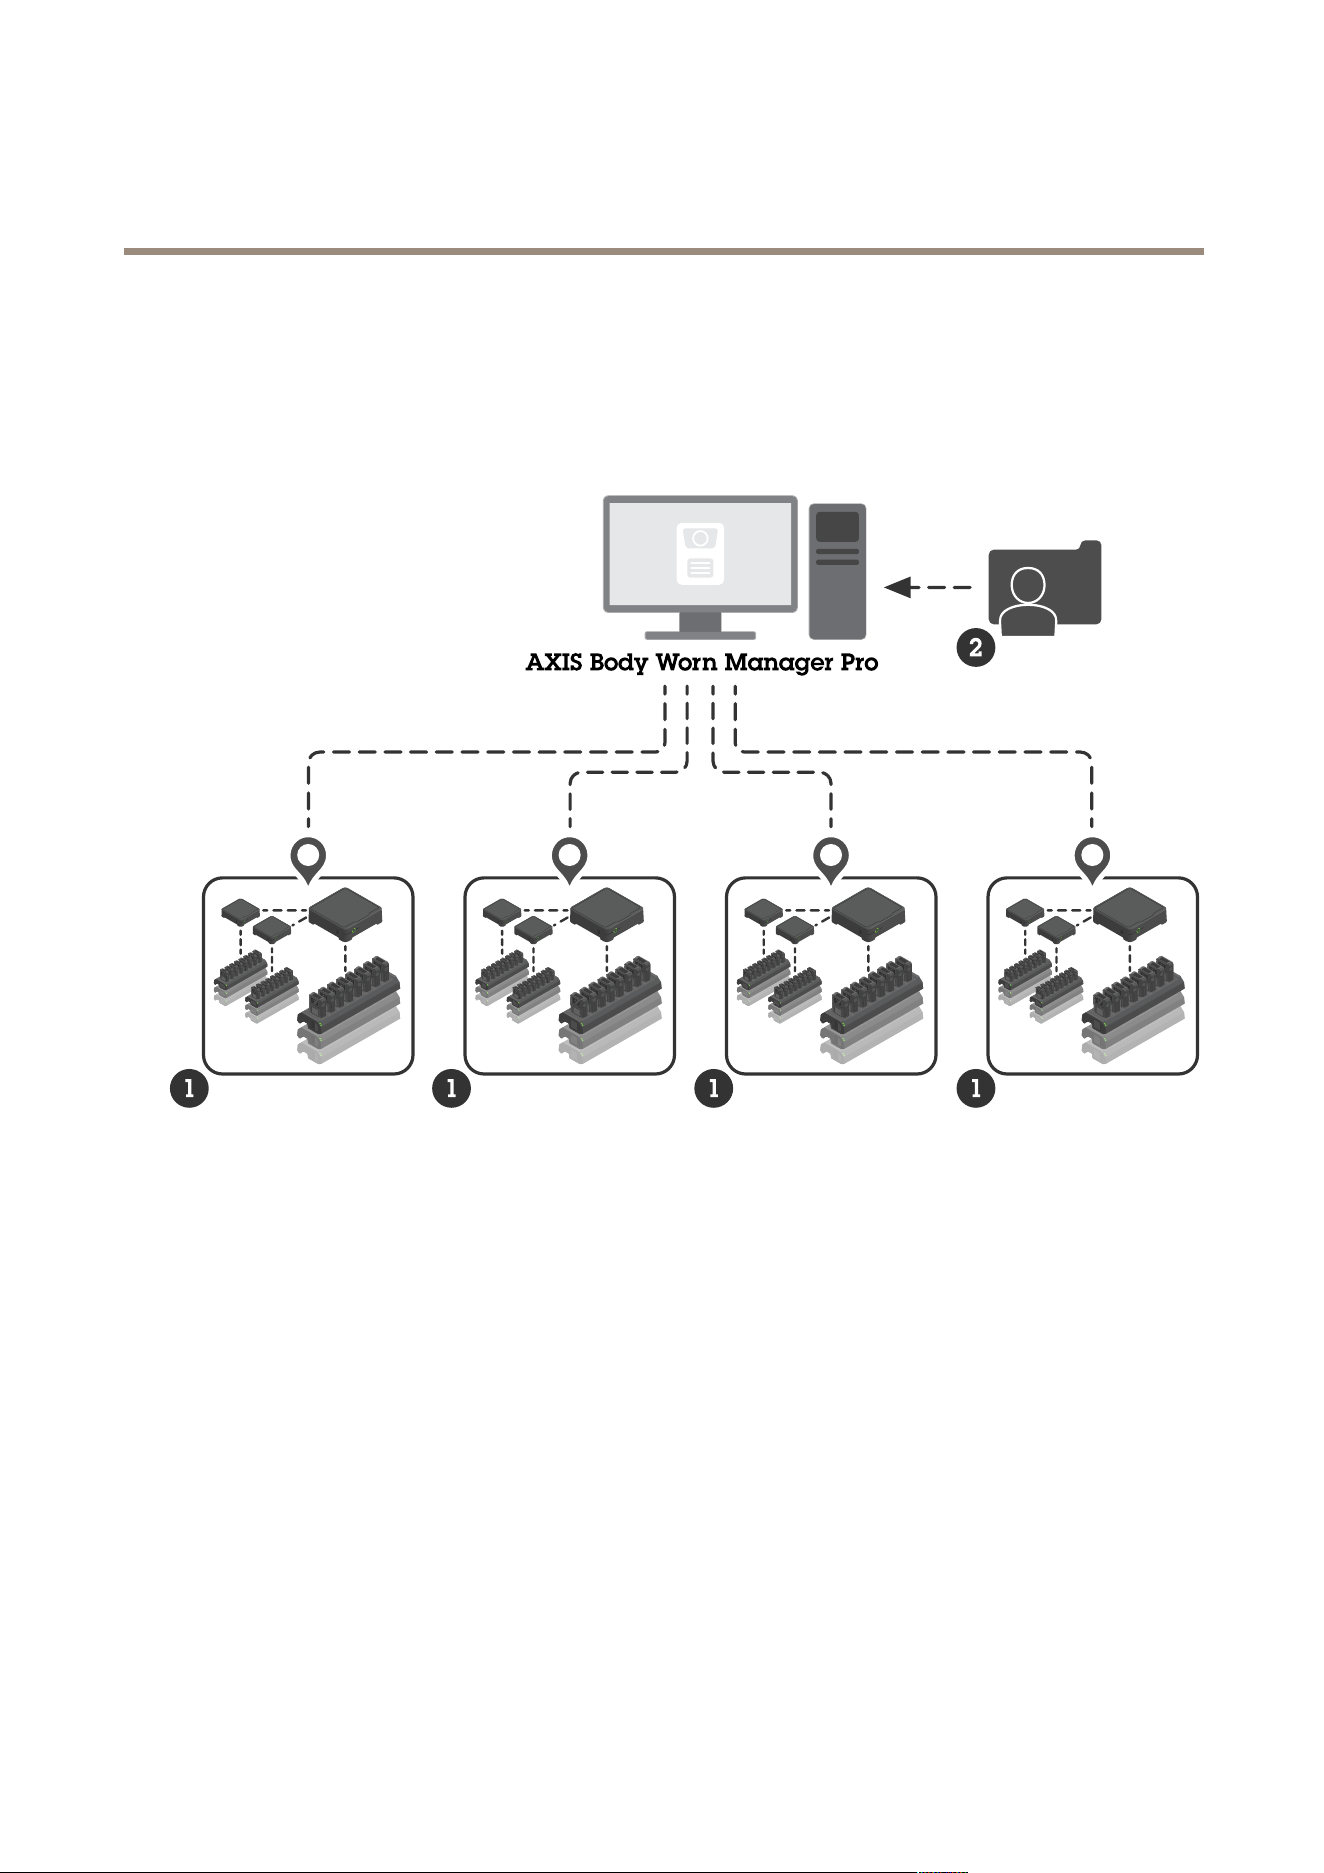
AXIS Body W orn Manager Pro lets you centrally manage system controllers and camera proles for several body worn systems (1). It’s
connected to Active Directory (2), where all camera user administration is done. AXIS Body W orn Manager Pro regularly synchronizes
the different camera user groups dened in Active Directory with each body worn system.
1
Body worn systems
2
Active Directory
Each body worn system must be connected to its own content destination. All content destinations must be of the same type.
2

AXIS Body W or n Manager Pr o
Befor e you start
Befor e you start
Windows® conguration
Y ou install AXIS Body W orn Manager Pro on a computer that runs Microsoft® Windows. The computer must be part of a domain that
has access to an Active Directory (AD) server . The service uses Windows APIs to discover the AD server at startup and establishes an
LDAP connection over TLS to the server . It doesn’t require any certicates.
Y ou must allow AXIS Body W orn Manager Pro to run as a service with LocalSystem privileges.
Network conguration
AXIS Body W orn Manager Pro requires two ports to be open:
Default port number
Protocol
Inbound/outbound
Used by
Comments
1 0443
HTTPS
Inbound W eb browser When the service starts
for the rst time, a
self - signed certicate
and a private key are
created and stored in
C:\ProgramData
\AXIS
Communications
\AXIS Body
Worn Manager
Pro\certs .
8643
TLS
Inbound
System controllers
When you add a
body worn system
to AXIS Body W orn
Manager Pro, the
system controller sends
a certicate signing
request to the service,
which returns a signed
certicate. This process
requires human - assisted
ngerprint verication
to rule out an ongoing
man - in - the - middle
attack.
T o change the default ports, click the system tray arrow in the Windows® taskbar and click the AXIS Body W orn Manager Pro icon.
Active Directory conguration
There must be an Active Directory group containing the administrators that are allowed to log in to AXIS Body W orn Manager Pro.
For each body worn system, there must be a unique Active Directory group that contains the camera users. T o minimize license
costs in the video management software or evidence management software, every system must have its own group, and a camera
user shouldn’t belong to more than one system.
AXIS Body W orn Manager Pro doesn’t require any special naming conventions or locations in the Active Directory structure.
3

AXIS Body W or n Manager Pr o
Befor e you start
Active Directory usage
Important
AXIS Body W orn Manager Pro doesn’t support ADFS, OpenID Connect, Entra ID, or other identity management solutions.
AXIS Body W orn Manager Pro regularly fetches the following Active Directory attributes:
• Groups
- objectGUID
- name
- sAMAccountName
• Users
- object GUID
- userPrincipalName
- displayName
- mail (useful to cloud - based evidence management software)
- userAccountControl
- expires
- RFID attribute (optional, dened during setup)
Stored data
Note
Axis doesn’t store any personal data.
The table provides an overview of what data is saved where.
Data Active Directory
AXIS Body W orn Manager
Pro
AXIS Body W orn Manager
Camera user’s name
X X X
Camera user’s email adress
X X X
Prole settings
-
X X
Assigned prole
-
X X
Self - assign RFID tag
(optional)
X X
AXIS Body W orn Assistant
pairing
- -
X
Holster pairing
- -
X
P ersonal WiFi information
- -
X
Active Directory group name X X
-
4

AXIS Body W or n Manager Pr o
Get started
Get started
T o get started with AXIS Body W orn Manager Pro, you must connect to Active Directory:
1. Open the settings for AXIS Body W orn Manager Pro from the system tray in Windows® or by double - clicking the icon on
your desktop.
2. In Settings > Login Active Directory group , type the administrator’s Active Directory group.
3. Click Apply .
4. Click Start .
Add a body worn system
Note
The manual comparison of thumbprints helps prevent a man - in - the - middle attack.
T o add a body worn system to AXIS Body W orn Manager Pro:
1. In AXIS Body W orn Manager Pro, click > About .
2. Copy the thumbprint.
3. In AXIS Body W orn Manager of the system to add, click > AXIS Body W orn Manager Pro .
4. Enter [hostname or IP address of the PC that runs AXIS Body W orn Manager Pro]:[TLS port] and the copied thumbprint
and click Connect .
For more information about the TLS port, see .
5. In AXIS Body W orn Manager Pro, go to and click New (1) .
6. Enter the name of the Active Directory group to which the system should be linked.
7. Click V erify .
8. Click Add .
9. Read the information, select I have read and understand the consequences and click Add .
The body worn system is now visible in the list of systems. Click the system name to see detailed system information, compliance
status, and to update the Active Directory group.
Remove a body worn system
Important
After you remove a body worn system from AXIS Body W orn Manager Pro, you have to reset that system to factory default
settings. For instructions, see Reset system .
T o remove a body worn system from AXIS Body W orn Manager Pro:
1. Go to .
2. On the system you want to remove, click .
5

AXIS Body W or n Manager Pr o
Get started
3. Select Remove .
Certicates
Certicates enable encrypted web browsing using HTTPS. If you want, you can replace the default certicate with you own, self - signed
or issued by your organization. The private key must be in PKCS #1 format, and it can’t be encrypted or password - protected.
T o replace the default certicate:
1. Go to > Server certicate .
2. Click Replace .
3. Upload the certicate and the key .
4. Click Install .
5. Restart the browser .
License
T o license AXIS Body W orn Manager Pro, you must export a system le, upload it to AXIS License Manager to generate a license
le, and then import that le.
1. In AXIS Body W orn Manager Pro, go to > License .
2. Click Add licenses to expand the instructions.
3. Click Export and save the system le to your PC.
4. Log in to AXIS License Manager .
5. Upload the system le in AXIS License Manager . For instructions, see License ofine systems in My Systems user manual.
6. Start your subscription, see Start a subscription .
7. Buy licenses, see Buy licenses .
8. Redeem your license key , see Redeem license key .
9. Go to Systems setup and click your system name.
1 0. Click Download license le .
1 1. In AXIS Body W orn Manager Pro, click Import .
6

AXIS Body W or n Manager Pr o
Daily use
Daily use
Access the service
T o access the service, open a web browser and type https://[hostname or IP address of the PC that runs AXIS Body W orn
Manager Pro]:[HTTPS port] .
For more information about the HTTPS port, see .
Manage camera proles
Y ou can congure up to ve different camera proles in the camera proles page. AXIS Body W orn Manager Pro regularly pushes the
proles to the connected body worn systems.
Note
System - specic parameters, for example the wireless network selected for AXIS Body W orn Live, are still handled separately
in each body worn system.
Edit a camera prole
1. Go to and select one of the pre - congured camera proles from the drop down menu.
2. Click to update the selected camera prole.
3. Update the camera prole’s name.
4. Enter a description for the camera prole.
5. Select the camera models available for camera assignment.
6. Click Done .
7. Expand the devices in the list to edit the camera prole settings. For more information about the different settings,
see Camera prole settings .
Manage users
User administration is handled through Active Directory . In AXIS Body W orn Manager Pro, you assign camera proles and RFID tags
(for systems with self - assign camera assignment) to users.
Y ou can read more about camera proles and different ways to assign a user to a camera in the user manual for Axis body worn solution .
Assign a camera prole to users
1. Go to .
2. Select the users that you want to assign the camera prole to.
3. Click Assign camera prole and select a prole.
4. Click Assign .
It takes about 30 seconds before the prole is updated in AXIS Body W orn Manager .
7

AXIS Body W or n Manager Pr o
Daily use
Set up self - assign camera assignment
1. Connect the RFID reader to a system controller . W ait for the LED on the reader to light up green, which takes about 15
seconds. The reader now has the correct device software and is ready for use.
2. Disconnect the RFID reader from the system controller .
3. Connect the RFID reader to the computer that you use for accessing AXIS Body W orn Manager Pro.
Note
Setup through remote desktop solutions isn’t supported. The RFID reader must be connected directly to the computer
that you use for accessing AXIS Body W orn Manager Pro.
4. In AXIS Body W orn Manager Pro, go to .
5. Select the user that you want to pair the self - assign tag with.
6. Click .
7. T o register the self - assign tag, tap it on the RFID reader . K eep tapping until all the dots in the user interface turn yellow .
8. Click Done .
It takes about 30 seconds until the pairing is available in AXIS Body W orn Manager . After that, the camera user can use the tag
to self - assign a body worn camera.
For more information about self - assign camera assignment, see the user manual for Axis body worn solution .
Synchronize with Active Directory
AXIS Body W orn Manager Pro synchronizes automatically with Active Directory every 1 0 minutes. T o synchronize manually:
1. Go to > Active Directory .
2. Click Synchronize .
Manage device software
If the device software version bundled in AXIS Body W orn Manager Pro is more recent than the versions in the connected body worn
systems, you can upgrade them from AXIS Body W orn Manager Pro.
Important
AXIS Body W orn Manager Pro only supports the active AXIS OS track. For more information, see AXIS OS lifecycle .
Upgrade device software
1. Go to .
2. Select the body worn systems with in the Device software column.
3. Click Upgrade systems .
4. Click Upgrade .
Note
During the upgrade process, the system controller restarts and the system becomes unavailable for a moment.
8

AXIS Body W or n Manager Pr o
Daily use
5. When a system has been upgraded, the disappears from the Device software column.
9

AXIS Body W or n Manager Pr o
Maintain your system
Maintain your system
Download system report
Y ou can download a system report. Axis support uses the report for troubleshooting. A system report contains information about the
server that runs AXIS Body W orn Manager Pro, as well as logs and database content.
1. Go to > System report .
2. Click System report .
3. Send the le to Axis support.
If you can’t open AXIS Body W orn Manager Pro, you can download a limited report from the system tray in Windows®.
1. Click the system tray arrow in the Windows® taskbar .
2. Click the AXIS Body W orn Manager Pro icon.
3. Click System report .
4. Send the le to Axis support.
1 0

User manual V er . M1.17
AXIS Body W orn Manager Pro Date: September 20 24
© Axis Communications AB, 20 24
P art no. T1 0 20 2672