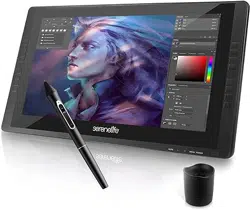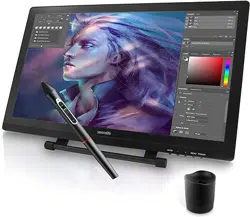

21.5'' Dual Mode Graphic Tablet Monitor
SLGTTS21
Pro Drawing Pen Display Monitor with Capacitive
Touch Screen and Wireless Passive Pen

www.SereneLifeHome.com
2
In order for you to better understand and use your Graphic tablet
monitor, please be sure to read this manual carefully before use.
CONTENTS
Precautions
Chapter 1 Product Introduction
Chapter 2 Accessories Description
Chapter 3 How the pen display is connected
Chapter 4 Driver Installation
Chapter 5 Pen display function settings
Chapter 6 Driver Uninstall
Chapter 7 Screen Adjustment
Chapter 8 Product Specications
Chapter 9 FAQs
3
4
5
6
7
9
19
20
22
23

www.SereneLifeHome.com
3
Precautions
1. Please read this manual carefully before using, and keep it in a safe place
for future reference.
2. Before cleaning the Graphic tablet monitor please unplug the USB cable and
wipe with a soft damp cloth, do not use any kind of detergents.
3. Please don’t place the Graphic tablet monitor near water sources such as bathtub,
washbasin, sinks, washing machine, damp basement, swimming pool, etc.
4. Do not place this product on an unstable surface. Do not use this product in a
location frequented by little children. Make sure that a child does not put the pen
or pen tip in his/her mouth. The pen tip or side switch cover could be detached
and be accidentally swallowed.
5. Do not place the Graphic tablet monitor and digital pen close to the magnetic eld.
6. The grooves and holes on the back case are designed for ventilation to prevent
the Graphic tablet monitor from overheating. Please don’t place the Graphic
tablet monitor on beds, sofas, carpets or in embedded device.
7. Only power supplies shown on the nameplate can be used for the display.
8. To protect your Graphic tablet monitor, please switch o the power when it is
not in use. During blackouts or when not in use for a long time, please unplug
the Graphic tablet monitor from the socket.
9. Don’t overload the socket or lengthen the power wire, it may lead to electric shocks.
10. Make sure no foreign objects get inside the monitor through grooves and
prevent liquid from splashing on the display. This is to prevent short-circuit or
re.
11. If the Graphic tablet monitor has a breakdown, do not open the main case and
try to repair it by yourself. Please ask for a service for proper repair and
maintenance.
12. When the following situations occur, please unplug the power adapter.
You may need a service for full repair and maintenance:
A. The power wire or plug is damaged or worn out;
B. There is liquid splashed inside of the display;
C. The Graphic tablet monitor has fallen or the LCD is broken;
D. When obvious abnormalities occur to the display.
13. While getting the components replaced, you are supposed to guarantee that
the repairman is using the substitute components specied by the manufacturer.
Unauthorized component replacement might cause re, electric shocks or
other dangers.

www.SereneLifeHome.com
4
Chapter 1 Product Introduction
1. About the Product
This product doesn’t only achieve paperless digital painting, but also the
introduction of advanced electromagnetic induction technology, so as to bring
you more convenient creation, painting experience. Users can connect it to a
computer, directly with a pressure-sense pen on the Graphic tablet monitor input.
Drawing operations, can be used in multimedia painting, teaching and related
elds.
2. What's in the Box
Before using this product, make sure that the accessories listed below are in
the box.
• Wireless Charger Pen
• Charge Cable
• Pen Holder
• Clip (inside the pen holder)
If the above accessories are missing or damaged, please contact your point of
purchase, if the problem can not be resolved, please contact the after-sales service
center.
3. Product Diagram
4. Induction Area
• (8) Nibs (inside the pen holder)
• USB Cable
• HDMI Cable

1 USB cable (USB A TO USB B) 1 HDMI cable
1 VGA cable 1 Power cord + Power Adapter
www.SereneLifeHome.com
5
5.Wiring
6.System Requirements
• Operating system:
PC: Windows XP/vista/7/8/10(32/64bit);
Mac:Mac OS X 10.8 or above;
• Processor:Pentium 233MHz
• Memory:64MB or more;
• Hard disk space: more than 128MB of free space;
• Interfaces: USB,HDMI,VGA,DVI interface.
Chapter 2 Accessories Description
1. Press Pen
2nd. key
1st. key
Nib
Note:
1. The rst key, the second key by the user set
the key function, please refer to the fth
chapter of this note section 1, section 3 key
settings.
2. DO NOT disassemble and assemble the
pressure pen in any form.
3. This pressure pen is an active pressure pen, it
is recommended to charge it for 2 hours
before use.

www.SereneLifeHome.com
6
2. Replace the pen nib
a. Use the nib removal tool to remove your pen nib.
b. Get a replacement nib and slide the end of the new nib straight into the
barrel of the pen.
c. Push the nib in slowly and rmly until it stops.
3. Double-click on the tip of the pen
Double-click the digital screen sensing area with a pressure-sensitive pen, the
tip of the pen is equivalent to the left mouse button double-click function, the
rst touch of the tip of the pen after the shortest time to perform another tip
touch.
Chapter 3 How the pen display is connected
Interface Diagram
1. USB connector
2. Power connector
3. HDMI interface
4. DVI interface
5. VGA interface
How to Connect
1.Connect the Graphic Tablet Monitor to your computer with attached power
adapter, HDMI cable and USB Cable.
2.Press the power button on the bottom of the Graphic Tablet Monitor to power
ON the display.
4.Checkifall ports are connected, make sure that there is no sign of loosening,
turn ON the Graphic Tablet Monitor power switch. When the screen lights up
and syncs the computer screen or expansion screen, you are properly connected
to the Graphic Tablet Monitor.
1 2 4 5
3

www.SereneLifeHome.com
7
Note:
If you are using a desktop with a discrete graphics card installed, connect the
HDMI plug to a discrete graphics card.
Chapter 4 Driver Installation
Precautions before installation
1. Remove any existing tablet drivers before installing the pen driver. This includes
any pen tablet driver from other manufacturers. This is to ensure your driver’s
performance will not be aected.
2. Be sure to turn o the rewall, antivirus software, and related applications
before installing.
3. Please connect the Graphic Tablet Monitor to your computer correctly.
Windows Driver Installation
1. Insert the Graphic Tablet Monitor CD into CD-ROM drive.
Double-click on "setup.exe" or "setup" le for installation and click next step in
turn according to the prompt. Follow the steps to install until you're done, then
restart the computer.
2. After the computer recognizes the graphics tablet, the driver icon in the
system tray changes from gray to color, and the driver interface displays
‘The graphics tablet is connected’ , which proves that the driver has been
successfully mounted on the graphics tablet. Now, the graphics tablet can be
used.
3. After the successful installation, you can double-click the small pen screen icon,
open the settings page. Press the nib on the tablet to test the nib touch Settings.
The pressure gauge displays the amount of pressure passed to the application
under the current setting.
4. After the pressure test, you can open the drawing software to start drawing.

www.SereneLifeHome.com
8
MAC Driver Installation
1.Insert the Graphic Tablet Monitor CD into the computer optical drive,
double-click to open the disc, run "setup.exe" or "setup" les for installation.
Follow the steps to install until you're done, then restart the computer.
2.After restarting the computer,Open[Finder]→[application]→[Pen Tablet]→
[Pen Tablet Setting]. Open the driver settings interface, the pressure sensor
progress bar will show the current pressure. The pressure sensitivity will be
changed by dragging the slider up and down, the smaller the value, the more
pressure sensitive.
3.After the pressure test, you can open the drawing software to start drawing.

www.SereneLifeHome.com
9
Chapter 5 Pen display function settings
Setup guide under Windows system
The rst step in setting up the pen display feature or diagnosing a problem
with the pen display: Open the pen display control panel.
1. Turn ON the pen display control panel
Tap the small digital screen icon in the lower right corner of the computer system
taskbar with a press-inducing pen.
2. Control Panel Overview
The pen screen control panel is divided into nine area settings: pen settings,
screen mapping, pressure adjustment, mouse mode, screen calibration, display
settings, quick settings, restore defaults, import and export congurations.
I. Pen settings: Set the basic functions of the pen and pen keys custom function
settings.
II. Screen mapping: Digital screen to screen mapping. By default, the entire active
area of the digital screen is mapped to the entire display. If you use multiple
displays, you can optionally map one or more displays.
III. Pressure adjustment: Press the tip of the pen in the range of the drive panel, if
the applied force is relatively displayed in the current pressure. The pressure
gauge indicates that the digital screen pressure sensing function is normal.

IV. Mouse mode:
Absolute (Pen) Mode: Standard tablet mode; Each point of the tablet’s work area
corresponds to an absolute point on your computer display.
Relative (Mouse) Mode: Mouse mode; The tablet’s work area does not correspond
to absolute points on your computer display and your pen works as a standard
mouse.
V. Screen Calibration: Click on this option to enter the screen calibration interface
for adjusting the digital screen.
VI. Screen Settings: Click on this option to access the screen to adjust the color
temperature, brightness and other display parameters interface.
VII. Quick Settings: Click on this option to enter Custom Settings for Adjusting
Digital Screen Shortcuts.
VIII. Restore default:Click on this option to restore the default settings for the
Digital Screen function.
IX. Click on this option to restore the default settings for the Digital Screen function.
3.Pen Settings
Pen settings can set the pressure pen button function. The key function of the
pressure pen is similar to the mouse button function, which can completely
replace the mouse operation function.
I. The rst key and the second key can be set according to personal usage habits.
Select the corresponding function in the drop-down box, you can make
corresponding adjustments to the pen key function. After setting, press the key
to execute the instructions.
II. The tip of the pen corresponds to the function of the mouse:
When the pen click on the digital screen, the default is the left mouse button
click function.
III. Use of pen/eraser function
When the pen button is set to "pen/eraser" function, the pen button can be
used to switch the pen/eraser mode. In the sensing area, press the pen button
once to switch the digital screen from the current state of use to the eraser
function, and then press the eraser function back to the previous tool.
4. Screen Mapping
Screen mapping can set the size of the mapping area controlled by the digital
screen.
www.SereneLifeHome.com
10

www.SereneLifeHome.com
11
I. By default, the digital screen sensing area is fully mapped to the entire display
area. If you use multiple monitors, you can optionally map one or more displays.
II. When using multiple monitors and in extended mode, select the All Screen
option. The mapping of digital screens will be extended to all displays as
shown in the gure:

www.SereneLifeHome.com
12
III. When screen mapping is switched to screen 1, the mapping of the digital
screen will correspond only to screen 1 as shown in the gure.
IV. When screen mapping is switched to screen 2,the mapping of the digital
screen will correspond only to screen 2 as shown in the gure.

www.SereneLifeHome.com
13
5.Pressure Regulate
Press the tip of the pen in the range of the drive panel, and if the applied force is
relatively displayed on the current pressure gauge, the digital screen pressure
sensing function is normal at this time.
6.Mode Selection
I. Windows Ink: The digital screen supports Windows Vista/7/8/10 and other
systems with Tablet PC ink writing function.
II. Mouse mode: The current option sets the use of Absolute Coordinates and
Relative Coordinates modes.
Absolute Coordinates and Relative Coordinates: Dierent ways to position the
screen cursor. Select Relative Coordinates to move the screen cursor by hovering
the pen, similar to using the mouse. Select Absolute Coordinates, and the screen
cursor will be positioned exactly according to the corresponding position of the
pen and the pen screen. By default, the pen display uses absolute coordinates..
7.Screen calibration
This option can be used to adjust the oset options of the digital screen
pressure pen.

www.SereneLifeHome.com
14
Go to the Screen Calibration page and click on the red dot of the calibration page
with a pressure-sense pen in accordance with your normal personal habit of
holding the pen position to calibrate.
8. Software Update: In case of networking, when the server is updated, an update
prompt for "detect a new version" appears at the bottom of the control panel
interface. Click the blue arrow to enter the update interface, download the
installation package according to the prompt to install until the update is
complete.
Setup guidelines under MAC system
Turn on the pen display control panel
Open the Finder program,enter the Application- > [Pen Tablet] open [Pen Tablet
Setting].
Set the options
Pen Tablet Setting interface is divided into ve functional categories, including:
Pen functions, screen settings, shortcut settings, calibration pages, version
information

www.SereneLifeHome.com
15
Pen Function
• Both the rst key and the second key can be set according to personal usage
habits. Select the corresponding function in the drop-down box to adjust the key
function accordingly. Once set, press the pen button to execute the instructions.
• The function of the nib corresponds to the function of the mouse:
When the nib clicks on the pen screen, the default is the function of left mouse
click.
• Use of pen/eraser function
When the pen button is set to "pen/eraser" function, the pen button can be used
to switch the pen / eraser mode. In the sensing area, press the pen button once
to switch the digital screen from the current state of use to the eraser function,
and then press the eraser function back to the previous tool.
Screen Settings
Under this settings page, you can set the active area of the pen display.
You can set up controls for the corresponding screen when using multiple screens.
a. Single-screen mode
Enter the appropriate coordinates of the screen in the right-hand box to control
the active area of the pen display within the coordinates.

www.SereneLifeHome.com
16
b. Dual-screen mode (more screens are also set below)
In dual-screen mode, you can click the drop-down box at the screen to select
the corresponding screen that you need to control.
Shortcut Settings
Under this settings page, you can set up the hard shortcut function of the pen
display. Key default features are commonly used shortcuts in drawing software, or
you can customize the hot keys you need.
How to customize your settings:
a. Select the key drop-down box and select the keys that need to be set.
b. The drop-down box to the right of the key opens and chooses to change the
consumer customization.

www.SereneLifeHome.com
17
c. In the pop-up settings interface, you can set up open applications, customize
hotkeys, open web pages, and implement mouse functionality as needed.

www.SereneLifeHome.com
18
Calibration Page
Under this settings page, digital screen calibration and screen rotation are available.
The display can choose to rotate 0, 90, 180, 270 degrees, the default is 0 degrees
do not rotate, select the rotation angle, the pen coordinates will also rotate.
Version Information
Digital Screen Driver Version Information.

www.SereneLifeHome.com
19
Chapter 6 Driver Uninstall
Windows System
There are three ways to uninstall:
1. Open the Start Menu → [program] → [Pen tablet] → [Uninstall Pen Tablet],
follow the uninstall prompt until the uninstall program is complete.
2. Open the [Control Panel] → [Programs and Features]→[Add or remove programs]
nd “Pen Tablet” select[Change/Uninstall],follow the uninstall prompt until the
program uninstalls.
3.Double-click the installer, then enter uninstall mode and wait for the program to
uninstall until the uninstall program is over.
Mac System
1.Open[Finder] → [Application] → [Pen Tablet] → [Uninstall Pen Tablet].
Follow the uninstall prompt until the program unloads.

www.SereneLifeHome.com
20
Chapter 7 Screen Adjustment
Menu Button
Digital Front Control Key and Features
1. POWER
Role one:Turn the pen display power on/o;
2. MENU
Role one: Pop-up screen adjustment menu;
Role two: Conrmation key of each setting;
3. “+”
Role one: Increase the brightness;
Role two: Right switch on the screen menu panel options and parameters;
4. “-”
Role one: Reduce the brightness;
Role two: Left switch on the screen menu panel options and parameters;
5. AUTO
Role one: Turn o the screen adjustment menu;
6. “LED light”
• When the light is green, the pen display is powered on;
• When the indicator is red, there is currently no signal input on the pen display;
•When the light is not on, the pen display is powered o.
Menu Description
The user can call up the pen display menu description page by clicking on the pen
display "MENU" button.
PICTURE
Brightness: You can change the brightness of the picture by using the / button,
and then press the "menu" key to save it.

www.SereneLifeHome.com
21
Contrast: The / button can be manipulated to change the contrast of the screen,
and then press the "menu" key to save.
Gamma: You can use the / button to turn it on or o, and then press "menu" to
save it.
COLOR
Color Temperature: Used to adjust the temperature and coldness of the screen
display, if you want to set the color temperature yourself You can adjust the RGB
value after "User" and use the / button to adjust the value, and then press "menu"
to save it.
Red: Percentage of red tone in color temperature adjustment, left/right / key to
adjust the value, determine and press "menu" key is saved.
Green: Percentage of green tone in color temperature adjustment, / key to adjust
the value, determine and press "menu" key is saved.
Blue: Percentage of blue tones in color temperature adjustment, left/right / key to
adjust the value, after determining the "menu" key to save.
OSD
Horizontal: The / button can be manipulated to adjust the horizontal position of
the menu in the display. Once you're sure, press "menu" to save.
Vertical: The / button can be manipulated to adjust the vertical position of the
menu in the display, and then press the "menu" key to save.
Transparency: You can manipulate the left/right / button to adjust the
transparency of the menu interface, and then press "menu" key is saved.
OSD Time Out: The / button can be manipulated to set how many seconds the
menu displays and then closes automatically.
SETUP: MENU SETTINGS
Language: Enter language mode and use the left/right / button to switch
between dierent language types.
Input: Enter the select able pen display to receive the signal and automatically
switch to the connected video cable by default. The source to which it belongs.
DCR: Enters the contrast between the white and black brightness of the adjustable
screen.
www.SereneLifeHome.com
22
Display Size: Enter the adjustable screen display, which defaults to full-screen
display.
Reset: This key resets the system menu data and presses the menu key to conrm.
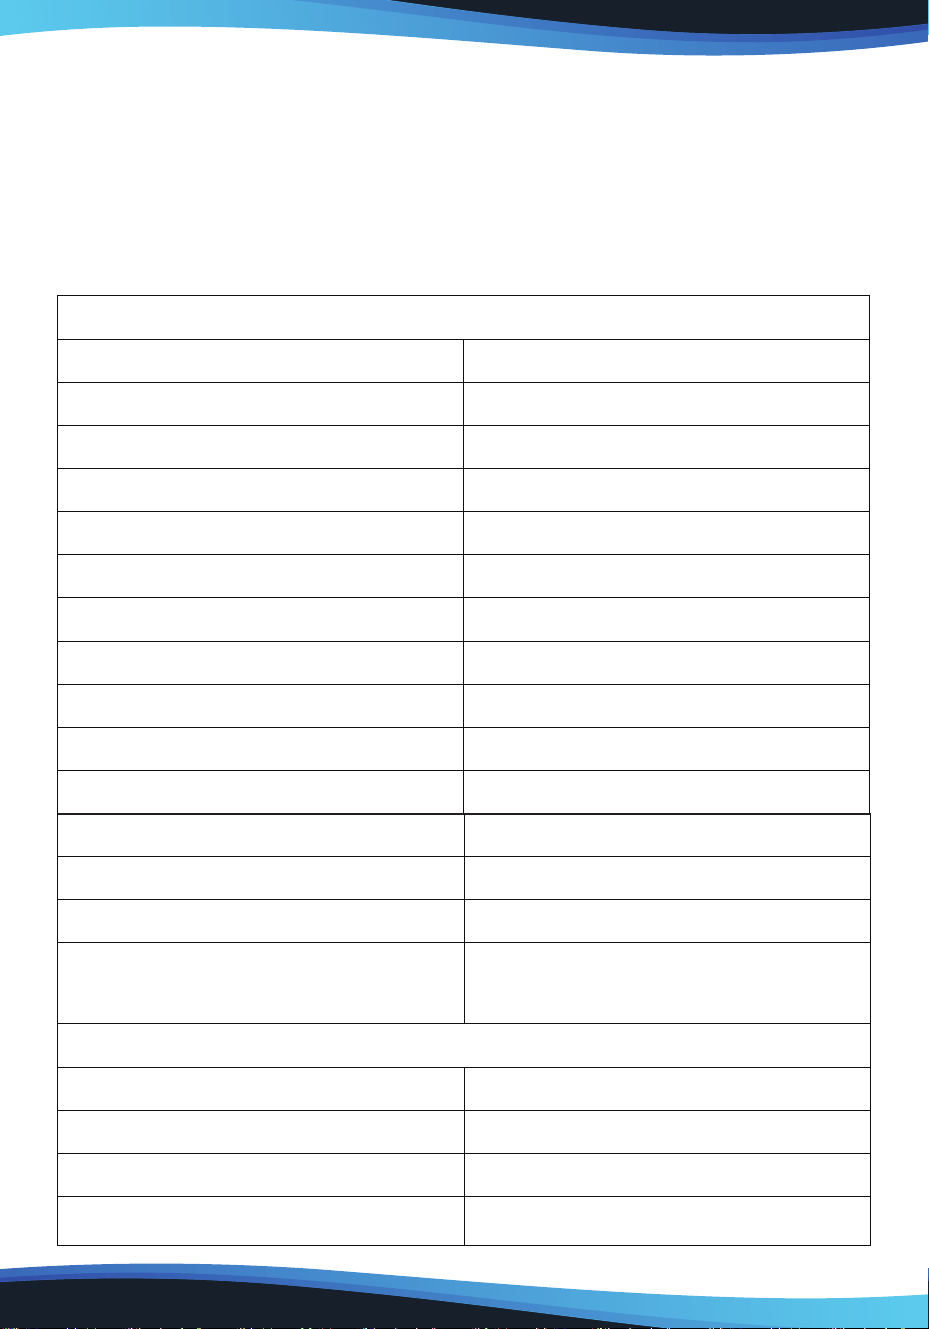
Chapter 8 Product Specications
Specication parameters of display screen
Specication parameters of display screen
Appearance dimensions 527 × 323 × 30mm
Response area 467*273*11mm
Display size 21.5inches
Display screen IPS display
Resolution ratio 1920*1080
Pigment gure 16.7M
Response time
18MS(Typ)
Pressure level 8192level
Reading speed 220Point/second
Read resolution 2540LPI
Response high 10mm
Induction accuracy ±0.5mm
interface type
USB、HDMI、VGA、DVI
support
adjustable extent:10°-40°
Compatibility system
Windows10/8/7/Vista/XP(32/64bit)
MAC OS X10.8or above
Specication parameters of Pressure Pen
Pressure pen P55A Pressure Pen
Induction mode electromagnetic induction
Battery working hours 220 hours
USB cable 1m

www.SereneLifeHome.com
23
Chapter 9 FAQs
Q1: How do I update the latest version of the driver?
Answer: Contact customer service for the latest version of the driver.
Q2: How do I explain that the drive is installed?
Answer: After the driver is installed correctly, insert the pen display and the
computer taskbar will appear a small driver icon ( ), the pressure sensor pen can
control the cursor normally when used on the digital screen, and the pressure
sense is in the drive control panel pressure test.
Q3: After the drive installation is complete, the small pen display icon does not
appear in the computer taskbar, what should I do?
Answer: At this point, you can connect the USB connector of the pen display to
your computer, restart your computer, and let the driver complete the initial
installation.
Q4: Digital screen pressure pen can not be used properly, how to determine whether
the failure is a hardware or software problem?
Answer: When the pen display is not working properly, you can test it using the
following methods:
Transfer the pen display to another computer for testing, without installing a driver,
if the pen screen and pressure pen can be used on other computers like a mouse,
indicating that the fault is caused by the driver, operating system, applications, etc.
Q5: How does the pen display achieve painting creation?
Answer: As a kind of computer input device, the pen display belongs to the
hardware, not the drawing software. If you need to paint, you need to use the
appropriate drawing software to achieve drawing creation, it is recommended
that you purchase or network download and other ways to obtain the relevant
drawing software.