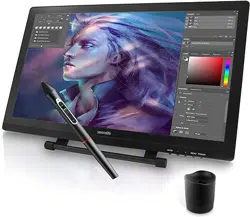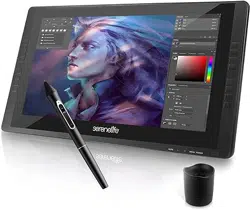

22'' Graphics Tablet Monitor
SLGT22
Full-Laminated Technology Drawing Monitor with 8 Buttons
Each Frame and Wireless Pen

www.SereneLifeHome.com
2
In order for you to better understand and use your graphics tablet,
please be sure to read this manual carefully before use.
CONTENTS
Precautions
Part 1. Product Overview
Part 2. Connecting the Monitor
Part 3. Driver Installation
Part 4. Driver Setting
Part 5. Driver Uninstallation
Part 6. OSD KEY and Display Stand
Part 7. Troubleshooting
3
4
7
8
10
17
18
23

www.SereneLifeHome.com
3
Precautions
1. Please read this manual carefully before using, and keep it well for future
reference.
2. Before cleaning the display please unplug the USB cable and wipe with a soft
damp cloth, do not use any kind of detergents.
3. Please don’t place the display near water sources such as bathtub, washbasin,
sinks, washing machine, damp basement, swimming pool, etc.
4. Do not place the display on where is unstable or a height for children reaching
easily in order to avoid danger.
5. Do not place the display and digital pen close to the magnetic eld.
6. The grooves and holes on the back case is designed for ventilation to prevent
the monitor from overheating. Please don’t place the display on beds, sofas,
carpets or in embedded device.
7. Only power supplies shown on the nameplate can be used for the display.
8. To protect your display, please switch o the power when it is not in use.
During blackouts or not using for long time, please unplug the display from the
socket.
9. Don’t overload the socket or lengthen the power wire, which may lead to
electric shocks.
10. Make sure no foreign bodies get inside the monitor through grooves and
prevent liquid from splashing on the display as to prevent short-circuit or re.
11. If the display has a breakdown, do not open the main case and try to repair it
by yourself. Please ask for a service for proper repair and maintenance.
12. When the following situations occur, please unplug the power adapter and
you may need a service for full repair and maintenance:
A. The power wire or plug is damaged or worn out;
B. There is liquid splashed inside of the display;
C. The display has fallen or the LCD is broken;
D. When obvious abnormalities occur to the display.
13. While getting the components replaced, you are supposed to guarantee that
the repairman is using the substitute components specied by the manufacturer.
Unauthorized component replacement might cause re, electric shocks or
other dangers.
www.SereneLifeHome.com
4
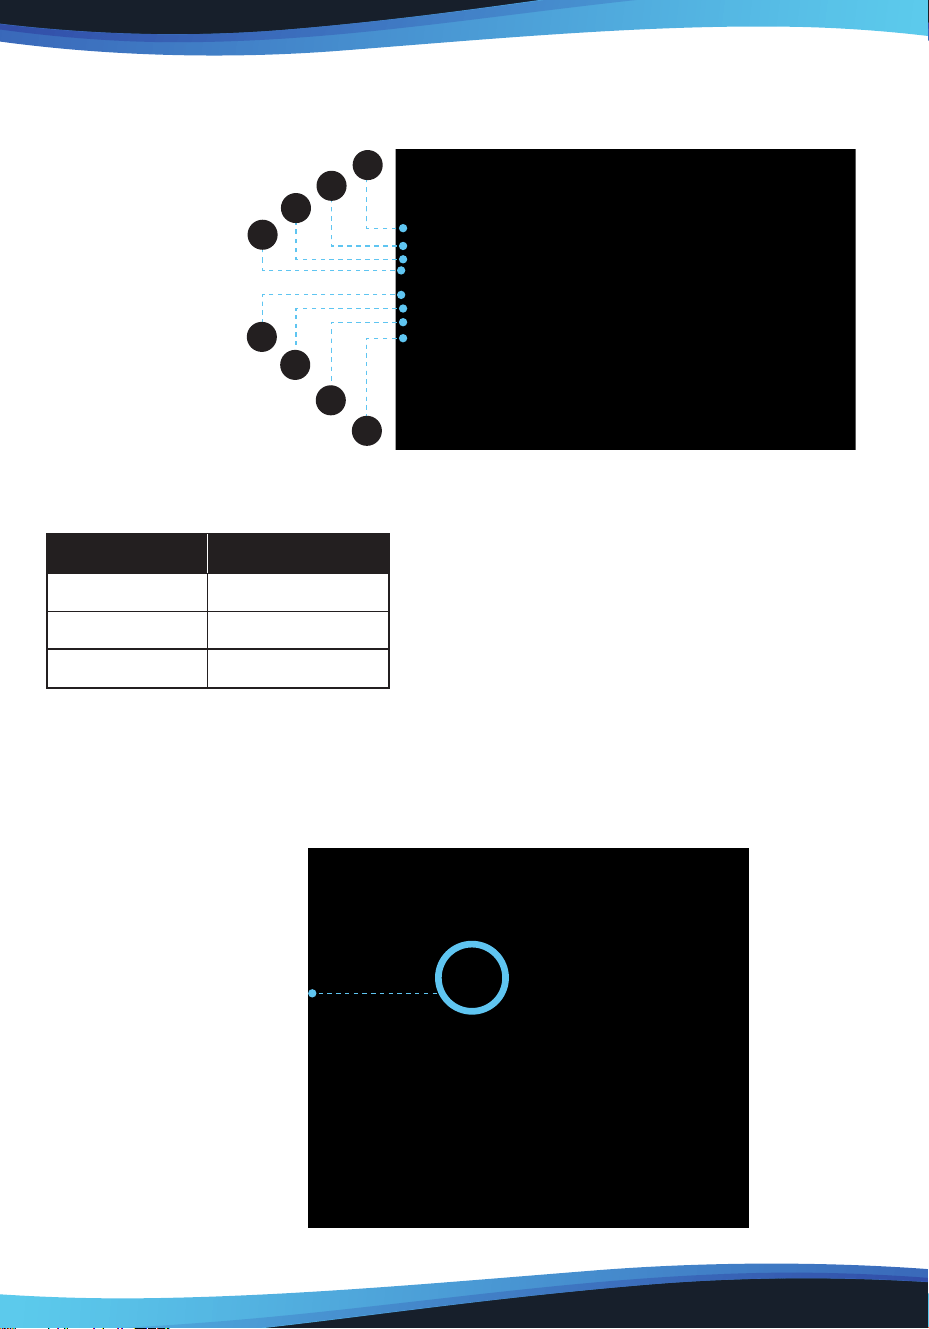
Part 1. Product Overview
1.1 Overview
1. Display/Working area
2. Express key
3. Power indicator light
a. On, Blue: The monitor is connected to your computer and powered on
b. On, Red:The monitor is powered on, but not connected to a computer
c. O: The monitor is powered o.
4. Power button
5. Menu button
6. + button
7. - button
8. Display auto adjust button
9. USB port
10. Power jack
11. HDMI port
12. DVI port
13. VGA port
14. Stand adjustment lever
15. Stand
1
2
3
8
7 6
5
4
9
10
11
12
13
14
15

www.SereneLifeHome.com
5
1.2 Active area
1.3 Package Contents
After receiving the product, please inventory the contents to ensure you have all
the proper parts, as listed below. If anything is missing or damaged, please contact
SereneLife Customer Service for a replacement.
Menu
Ac�ve area
1 monitor LED Display
1 USB cable (USB A TO USB B)
1 Pressure pen
1 HDMI cable

www.SereneLifeHome.com
6
1.4 System requirements
• Windows 10,8, or 7/Mac OS X 10.8 or above
• Pentium 233MHz or higher
• 64MB of Ram (128MB recommended)
• 4X speed CD ROM or higher
• USB port
1.5 Pressure pen
1 VGA cable 1 power cord + 1 12V3A Adapter
1 Pen Charging cable
1 Pen Holder
(contains pen Nibs & clipper)
1. Pen tip
2. Power indicator
a. On/red: Low battery
b. On/green: Battery is charging
c. O: Battery Is fully charged
3. Barrel button 2
4. Barrel button 1
5. Charger port
6. Charger USB cable
1
3
2 4
5
6
www.SereneLifeHome.com
7
Notes:
Barrel button functions can be customized in the tablet's driver settings.
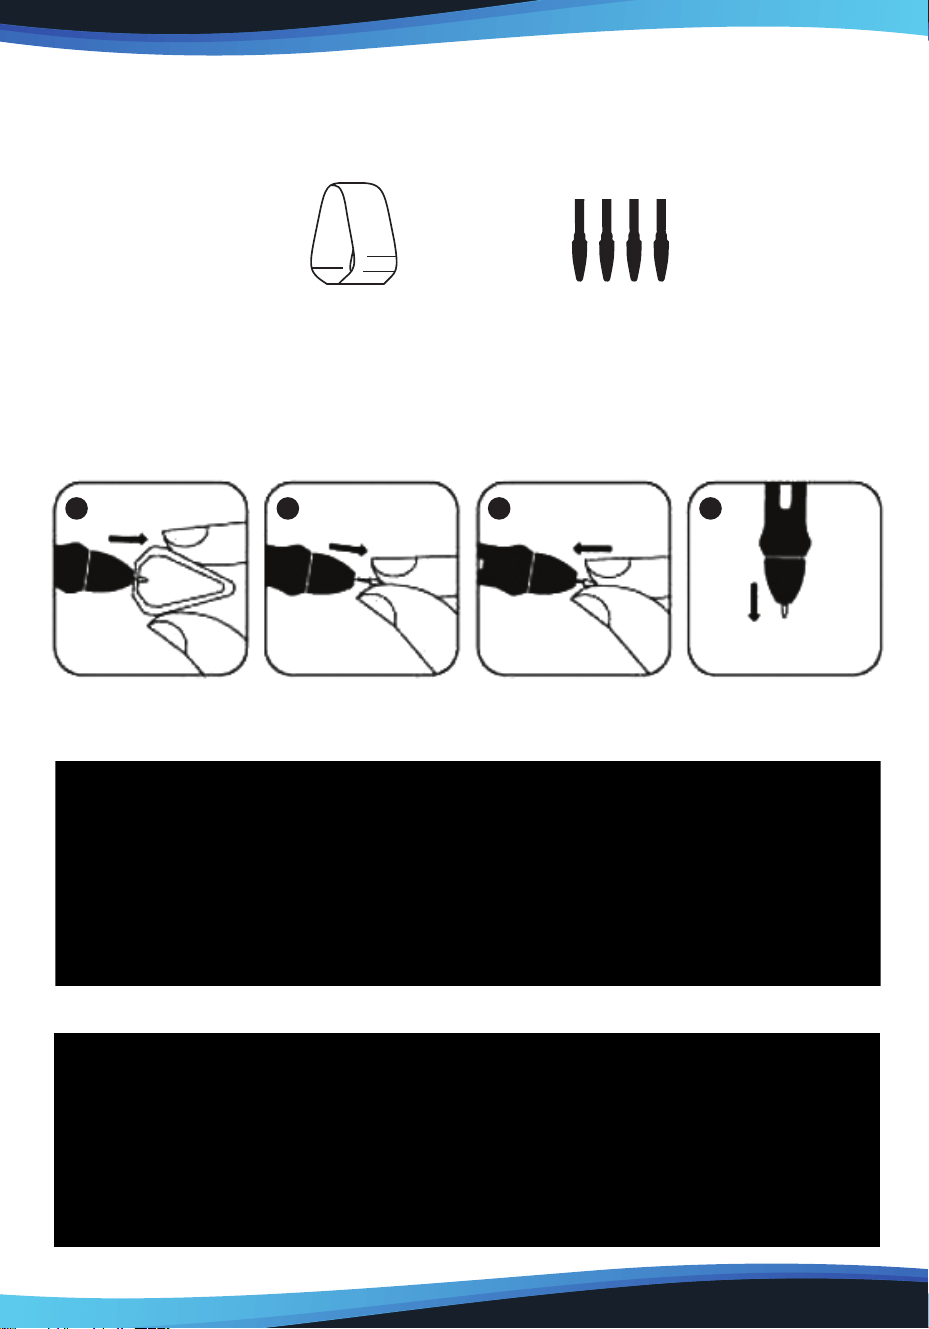
Pen Nib Remove and Pen Nibs
Pen Nib replacement
1. You will need the Pen nib removal tool.
2. For monitor, use the pen nib removal tool to pull out the pen nib.
3. Push the new pen Nib into tip into the Pen.
Part 2. Connecting the Monitor
Connect the monitor to your computer via the Included USB cord.
Connect the monitor to your computer via the included HDMI (or VGA) cord.
Pen Nib Remover Pen Nibs
1 2 3 4

www.SereneLifeHome.com
8
Connect the monitor's power cord. Plug the cord into the included adapter, then
into a wall outlet.
1. VGA
2. DVI
3. HDMI
4. Power jack
5. USB
Part 3. Driver Installation
3.1 Instructions
1. Disable any antivirus or rewall software and close any non-essential background
software before beginning the installation. Some software, such as OneDrive and
Dropbox, may monopolize important les and prevent a successful installation.
On Windows computers, check the system tray on the bottom-right of the screen
and close any software unrelated to your computer hardware.
2. Uninstall any existing tablet software before attempting to install the monitor
driver. Other tablet drivers will conict with the monitor driver or prevent
installation entirely.
3. You can download the latest driver version from our website, If you choose to
download the driver from the website, be sure to extract the zip le contents
before running ".exe“ or ".pkg".
3.2 Windows
1. Connect the monitor to your computer using the included HDMI, USB & Power
cords. Turn on the tablet.
2. Please download the monitor latest driver from the support section of our website.
3. Extract the ”.zip" le contents before running “zip".
4. After a successful installation, the driver's icon ( ) will appear in your system
tray and on your desktop. If the icon is not present, uninstall the driver, reboot,
and repeat step 2.
5 4 3 2 1

www.SereneLifeHome.com
9
5. (Recommended) Open [Control Panel] > [Display], then set Change the size of
text, apps, and other items to 100%.
6. In [Control Panel] > [Display], change your dual monitor settings to Extend
mode/Extend these displays.
7. In Extend mode, set your monitor to monitor 2 and choose a resolution of
1920 x 1080.
8. In Duplicate these displays mode, set both of your monitors' resolutions to
1920 x 1080.
3.3 MAC
1. Connect the monitor to your computer using the Included HDMI, USB & Power
cords. Turn on the tablet.
2. Please download the monitor latest driver from the support section of our
website.
3. Extract the ".zip" le contents before running ".pkg”.

3. Extract the ".zip" le contents before running ".pkg”.
Part 4. Driver Setting
Notes:
a. The monitor's express keys are designed to work with US English keyboards.
Keys may not function correctly with the other keyboard languages.
b. By default, the monitor express keys are mapped to standard Photoshop
keyboard shortcuts. Keys can be customized to function eciently in other
software.
4.1 Windows
The monitor's driver settings can be opened in two ways: Double-click the driver's
icon ( ) in system tray or your desktop.
www.SereneLifeHome.com
10

www.SereneLifeHome.com
11
Barrel Button Settings
You may customize the functions of your
tablet pen's barrel buttons here.
Use the “Function Key" option to program
custom keystrokes.
Click Sensitivity & Current Pen Pressure
You can adjust pen pressure to "Output" or
“Press” sensitivity on here. Current Pen
Pressure shows the current pressure level
being exerted on your tablet and can be
used to test pen pressure.
Current Screen
The monitor may be congured for use with monitor 1 or monitor 2.

www.SereneLifeHome.com
12
Mouse Mode
Absolute (Pen) Mode: Standard tablet mode; Each point of the tablet's work area
corresponds to an absolute point on your computer display. Relative (Mouse)
Mode: Mouse mode; The tablet's work area does not correspond to absolute
points on your computer display and your pen works as a standard mouse.
Windows Ink
Windows Ink capability can be toggled on and o here. Enabling this will allow
support for Windows Ink and applications that run using Windows Ink.
Calibration
The Calibration tab allows you to set up calibration for your tablet.
Shortcut Keys setting
In this tab, you may edit the functions of the monitor’s shortcut keys.
Use the denition option to program custom keystrokers.
Disable express keys:
When you enable it all of the express keys function will be disabled.
Hide hints:
When you enable it, and click any express keys the message will not popup on the
bottom of screen.
Windows Ink

www.SereneLifeHome.com
13
4.2 MAC
To open the monitor's driver settings, open Finder > Applications > Pen Tablet
Setting.

www.SereneLifeHome.com
14
Pen
In this tab, you may customize the functions of your stylus' barrel buttons, adjust
pressure sensitivity, and test your pen pressure.
Pressure No Support function can disable pen pressure when drawing.
Click “Default Button Setting" to revert to manufacturer settings.
Note:
Pen/Eraser Toggle
With the stylus In range of the monitor's working area, press the assigned barrel
button to toggle between pen and eraser modes in compatible drawing software.
The current mode will briey be displayed on your monitor.

www.SereneLifeHome.com
15
Monitor
The “Monitor” tab allows you to congure your tablet for use monitor 1 or monitor 2.

www.SereneLifeHome.com
16
Calibration
The Calibration tab allows you to calibrate your tablet or rotate your display.
To calibrate, click Calibration and follow the on-screen instructions.
Rotate: You may rotate the monitor's display in this tab.
Shortcut Keys setting
In this tab, you may edit the functions of the monitor’s shortcut keys.

www.SereneLifeHome.com
17
About
This tab displays the current version of your driver software.
Part 5. Driver Uninstallation
5.1 Windows
In the Start menu, open [Settings] — [Apps & features]. Find "Pentablet" and dick
"Uninstall” Follow the on-screen instructions.
5.2 MAC
Open [Finder] > [Application] > [Pen Tablet], then click "Uninstall Pen Tablet" and
follow the on screen instructions.

www.SereneLifeHome.com
18
NOTE:
When attempting to reinstall the monitor driver, be sure to reboot your computer
after the uninstall is complete.
Part 6. OSD KEY and Display Stand
6.1 OSD KEY & Display Stand
OSD KEY
The monitor's controls are on right of the display bezel.
The ve buttons have the following functions:
1. AUTO: When using the VGA input, pressing the AUTO button automatically
adjusts the display to the optimal settings. When in any menu, pressing the AUTO
button selects the currently highlighted entry for editing or sets the currently
highlighted value.
2.
- : Pressing the - button displays the Input Selection menu. When in any menu,
pressing the - button scrolls the highlight down or decreases the currently
selected value.
3.
+ : Pressing the + button displays the Brightness control. When in any menu
(including the Brightness control), pressing the + button moves the highlight up
one position or increases the currently selected value.
4. MENU: Pressing the MENU button displays the OSD menu. When in any menu,
pressing the MENU button backs up to the previous menu or closes the menu, if
already at the rst page.
5. POWER: Pressing the POWER button turns the monitor on and o.
www.SereneLifeHome.com
19
6.2 The Express Keys
1.Brush Size +
2.Brush Size -
3.Zoom In
4.Zoom Out
5.Undo
6.Hand
7.Brush
8.Eraser
6.3 LED
6.4 Display Stand
Adjusting the Display Stand level
To adjust the tablet monitor in an optimum tilt position for dierent applications
1
2
3
4
5
6
7
8
Color
Green
Red
—
Status
Power on
No Signal
Power o
Display Stand

www.SereneLifeHome.com
20
6.5 MENU Description
Luminance
Brightness
Adjusts the brightness of the display.
The adjustment range is from 0 to 100.
Contrast
Adjusts the image contrast.
The adjustment range is from 0 to 100.
Gamma
Turns gamma decoding on or o.
Picture
Phase
Allows adjustment of the monitor's Phase
setting. On a grey test screen, an incorrect
Phase setting will manifest itself as a series
of horizontal lines. The Clock should be
corrected before attempting to correct
the Phase.
Clock
Allows adjustment of the monitor's Clock frequency. On a grey test screen, an
incorrect Clock setting will manifest itself as large vertical lines and the display
may have an incorrect width. The Clock should be corrected before attempting to
correct the Phase.
H. Position
Allows adjustment of the horizontal position of the image on the screen.
V. Position
Allows adjustment of the vertical position of the image on the screen.

www.SereneLifeHome.com
21
Color
Color Temperature
Allows you to select a xed color temperature value (6500K, 7500K, or 9300K) or
select the User setting to allow adjustment of the individual Red, Green, and Blue
levels.
RGB
When the Color Temperature is set to User, you can edit the Red, Green, and Blue
level in the image. The adjustment range is from 0 to 100.
OSD Setting
Horizontal
Adjusts the horizontal position of the OSD
menu on screen. The adjustment range is
from 0 to 100.
Vertical
Adjusts the vertical position of the OSD
menu on screen. The adjustment range is
from 0 to 100.
Transparency
Adjusts how opaque or transparent the OSD menu will appear on screen.
The adjustment range is from 0 (opaque) to 4 (transparent). The default is 0.
OSD Time Out
Adjusts how long the OSD will continue to display with no input.
The adjustment range is from 5 to 60 seconds. The default is 5 seconds.

www.SereneLifeHome.com
22
Setup
Language
Allows selection of the language to use in
the OSD menu. The available options are
English, Spanish, French, German, Italian,
Portuguese, Korean, and Chinese. The
default is English.
Input
Allows selection of which video input to
use, VGA, DVI, or HDMI.
Reset
Resets the monitor to its default settings.
Display Size
Allows you to set the Aspect Ratio. The available options are Full Screen and 4:3.
The default is Full Screen.
www.SereneLifeHome.com
23
Condition
NO Signal
Check point
• Check to make sure the signal cable is rmly seated in the
socket
• Check that the power is ON at computer.
• Check that the brightness or contrast control is at the
appropriate position. Not at the minimum
The screen is not
synchronized
• Check to make sure the signal cable is rmly is seated in
the socket
• Make sure the signal timings of the computer system are
with the specication of the monitor.
The position of
the screen is not
in the center
• Adjust the H. position and V. position or perform the
AUTO adjustment.
The Pen sensor is
not synchronized
• Please check if the tablet icon appears on right-button
position of the screen. If YES, please recharge the pen.
• If NOT,re-plug in the USB cable or restart the tablet
driver or remove possible conict software in your PC.
The cursor moves
incorrectly
• Re-plug in the USB cable or restart the computer.
Part 7. Troubleshooting
If your tablet monitor fails to operate correctly, consult the following table
for possible solution before calling for repairs.