Loading ...
Loading ...
Loading ...
Rails en
31
3.
Remove limescale marks with a cloth soaked in vin-
egar, then wipe with clean water and dry with a soft
cloth.
4.
Leave the cooking compartment to dry with the ap-
pliance door open for 1hour or use "Drying func-
tion".
→"Setting 'Drying function'", Page31
22.2 Setting "Drying function"
Requirement:→"Drying the cooking compartment",
Page30
1.
Press "Cleaning".
2.
Press "Drying function".
a The duration appears on the display. You cannot
change the duration of the drying function.
3.
Start the drying function using
.
a A notification stating that you should carry out the
necessary preparatory work for the drying function
appears on the display.
4.
Press "OK" to confirm the notification.
a The drying function starts. The duration counts down
on the display.
a Once the drying function has run through to the
end, an audible signal sounds.
5.
Leave the appliance door open for 1-2minutes so
that the cooking compartment dries completely.
23 Rails
To thoroughly clean the rails and the cooking compart-
ment, or to replace the rails, you can remove the rails.
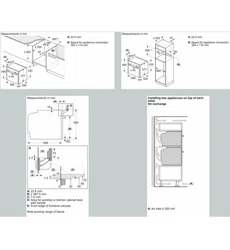
23.1 Detaching the rails
WARNING‒Risk of burns!
The shelf supports get very hot
▶ Never touch the shelf supports when hot.
▶ Always allow the appliance to cool down.
▶ Keep children at a safe distance.
1.
Lift the rail forwards slightly and detach it .
2.
Pull the whole rail to the front and remove it.
3.
Clean the rail.
→"Cleaning products", Page26
23.2 Attaching the rails
Notes
¡ The rails only fit on the right or left.
¡ For both rails, ensure that the curved rods are at the
front.
1.
First, push the rail into the middle of the rear
socket
until the rail rests against the cooking
compartment wall, and then push this back .
2.
Push the rail into the front socket until the rail
also rests against the cooking compartment wall,
and then press this downwards .
24 Appliance door
To clean the appliance door thoroughly, you can disas-
semble the appliance door.
WARNING‒Risk of injury!
If the hinges are not secured due to an incomplete
lock, they can snap shut with great force.
▶ To detach or attach the appliance door, always turn
the two locks as far as they will go.
▶ If the hinge snaps closed when detaching or attach-
ing the appliance door, do not reach into the hinge
– call the after-sales service.
Note:
Further information:
Loading ...
Loading ...
Loading ...