0099002403-03
Lithium Ion Jump Starter
and USB Power Source
OWNERS MANUAL
FOR MODELS
SL1596
SL1610
SL1611
SL1612
PLEASE SAVE THIS OWNERS MANUAL AND READ BEFORE EACH USE. This
manual will explain how to use the unit safely and effectively. Please read and follow
these instructions and precautions carefully.

• 2 •
CONTENTS
IMPORTANT SAFETY INSTRUCTIONS – SAVE THESE INSTRUCTIONS. ................................................................................................................... 3
PERSONAL SAFETY PRECAUTIONS ............................................................................................................................................................................ 3
FEATURES ....................................................................................................................................................................................................................... 4
CONTROL PANEL ............................................................................................................................................................................................................ 4
CHARGING THE INTERNAL BATTERY OF THE JUMP STARTER ................................................................................................................................ 4
OPERATING INSTRUCTIONS ......................................................................................................................................................................................... 5
MAINTENANCE AND STORAGE ..................................................................................................................................................................................... 5
TROUBLESHOOTING ..................................................................................................................................................................................................... 5
REPLACEMENT PARTS .................................................................................................................................................................................................. 5
SPECIFICATIONS ............................................................................................................................................................................................................ 5
BEFORE RETURNING FOR REPAIRS ........................................................................................................................................................................... 5
LIMITED WARRANTY ...................................................................................................................................................................................................... 5
TABLE DES MATIÈRES
CONSIGNES DE SÉCURITÉ IMPORTANTES – CONSERVEZ CES CONSIGNES. ..................................................................................................... 5
MESURES DE SÉCURITÉ PERSONNELLES ................................................................................................................................................................. 5
ATTRIBUTS ...................................................................................................................................................................................................................... 6
TABLEAU DE COMMANDE............................................................................................................................................................................................. 6
RECHARGE DU BLOC--PILES INTERNE DU DÉMARREUR D’APPOINT ................................................................................................................... 6
INSTRUCTIONS DE FONCTIONNEMENT ....................................................................................................................................................................... 7
ENTRETIEN ET ENTREPOSAGE ................................................................................................................................................................................... 8
DÉPANNAGE ................................................................................................................................................................................................................... 8
PIÈCES DE RECHANGE ................................................................................................................................................................................................. 8
FICHE TECHNIQUE ........................................................................................................................................................................................................ 8
AVANT DE RENVOYER POUR RÉPARATION ............................................................................................................................................................... 9
GARANTIE LIMITÉE ........................................................................................................................................................................................................ 9

• 3 •
1. IMPORTANT SAFETY INSTRUCTIONS – SAVE THESE INSTRUCTIONS.
WARNING: RISK OF EXPLOSIVE GASES.
WORKING IN THE VICINITY OF A LEAD-ACID BATTERY IS DANGEROUS. BATTERIES GENERATE EXPLOSIVE GASES DURING NORMAL OPERATION.
IT IS IMPORTANT THAT YOU FOLLOW THESE INSTRUCTIONS EACH TIME YOU USE THE UNIT.
To reduce the risk of battery explosion, follow these instructions and those published by the battery manufacturer and the manufacturer of any
equipment you intend to use in the vicinity of a battery. Review cautionary markings on these products and on the engine.
WARNING! RISK OF ELECTRIC SHOCK OR FIRE.
1.1 Keep out of reach of children.
1.2 Do not disassemble the jump starter. Take it to a qualied service professional if service or repair is required. Incorrect assembly may result in re or electrical shock.
1.3 Do not use the jump starter to jump a vehicle while charging the internal battery.
1.4 Do not recharge the jump starter with a damaged USB cable.
1.5 The jump starter gets hot during charging and must have proper ventilation.
1.6 Do not set the jump starter on ammable materials, such as carpeting, upholstery, paper, cardboard, etc.
1.7 Place the jump starter as far away from the battery being jumped as the cables will permit.
1.8 Do not expose the jump starter to rain or snow.
1.9 Never attempt to jump start a frozen battery.
1.10 Never place the jump starter directly above battery being jumped.
1.11 To prevent arcing, never allow the clamps to touch together or to contact the same piece of metal.
1.12 Use of an attachment not recommended or sold by the jump starter manufacturer may result in damage to the unit or personal injury.
1.13 Never operate the jump starter if it is damaged.
1.14 If someone else uses the jump starter, ensure they are well informed on how to use it safely, and have read and understood the operating instructions.
1.15 The jump starter is NOT designed to be installed as a replacement for a vehicle battery.
1.16 Use ONLY on vehicles, boats and garden tractors powered with a 12V DC battery system.
1.17 If the engine fails to start after the recommended number of attempts, disconnect the unit and look for other problems that may need to be corrected.
1.18 Use the jump starter for jump starting lead-acid batteries only. Do not use for dry cell batteries that are commonly used with home appliances.
2. PERSONAL SAFETY PRECAUTIONS
2.1 Wear complete eye protection and protective clothing when working near lead-acid batteries. Always have someone nearby for help.
2.2 Have plenty of fresh water, soap and baking soda nearby for use, in case battery acid contacts your eyes, skin, or clothing. Wash immediately with soap and water and
seek medical attention.
2.3 If battery acid comes in contact with eyes, ush eyes immediately and get medical attention.
2.4 Neutralize any acid spills thoroughly with baking soda before attempting to clean up.
2.5 Remove all personal metal items from your body, such as rings, bracelets, necklaces and watches. A battery can produce a short circuit current high enough to weld a ring
to metal, causing a severe burn.
2.6 Never smoke or allow a spark or ame in the vicinity of the battery or engine.
2.7 This product contains a lithium ion battery. In case of re, you may use water, a foam extinguisher, Halon, CO
2
, ABC dry chemical, powdered graphite, copper powder
or soda (sodium carbonate) to extinguish the re. Once the re is extinguished, douse the product with water, an aqueous-based extinguishing agent, or other nonalcoholic
liquids to cool the product and prevent the battery from re-igniting. NEVER attempt to pick up or move a hot, smoking, or burning product, as you may be injured.
2.8 Changes or modications not expressly approved by Schumacher Electric could void the user’s authority to operate this device.
2.9 NOTE: This equipment has been tested and found to comply with the limits for a Class B digital device, pursuant to part 15 of the FCC Rules. These limits are designed to
provide reasonable protection against harmful interference in a residential installation. This equipment generates, uses, and can radiate radio frequency energy and, if not
installed and used in accordance with the instructions, may cause harmful interference to radio communications. However, there is no guarantee that interference will not
occur in a particular installation. If this equipment does cause harmful interference to radio or television reception, which can be determined by turning the equipment off
and on, the user is encouraged to try to correct the interference by one or more of the following measures:
• Reorient or relocate the receiving antenna.
• Increase the separation between the equipment and receiver.
• Connect the equipment into an outlet on a circuit different from that to which the receiver is connected.
• Consult the dealer or an experienced radio/TV technician for help.
Lithium Ion Jump Starter and USB Power Source
OWNERS MANUAL
PLEASE SAVE THIS OWNERS MANUAL AND READ BEFORE EACH USE. This manual will explain how to use the jump starter
safely and effectively. Please read and follow these instructions and precautions carefully.
FOR MODELS
SL1596
SL1610
SL1611
SL1612

• 4 •
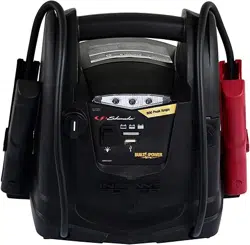
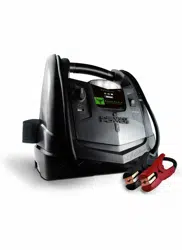
3. FEATURES
1. Light/USB Power button
2. Ready LED
3. Jump start button
4. Battery status indicators
5. 12V DC car charger
6. USB charging cable
7. Port cover
8. USB output port
9. 12V input port
10. USB input port
11. Built-in work light
12. Fault LED
13. Battery clamps
14. Not shown:
Carry bag
1 2 3 4
1213
5
6
1011 9 8 7
4. CONTROL PANEL
4.1 LED INDICATOR
Battery status LED (WHITE) ashing: The internal battery is charging.
Ready LED (GREEN) solid: The unit is ready to jump start.
Ready LED (GREEN) ashing: The unit is ready to override.
Fault LED (RED) solid: Short circuit connected or clamps reversed.
4.2 FUNCTION BUTTONS
Light/USB Power button: Press the button to turn on the power and check the battery status. Press the button and hold to turn on the work light.
NOTE: The unit will automatically turn off if not used for 30 seconds.
Jump start: Press the button to jump start your vehicle. Press the Light/USB Power and Jump Start buttons and hold for 5 seconds, to jump start your vehicle
with low voltage. See section 6.2 for expanded instructions.
5. CHARGING THE INTERNAL BATTERY OF THE JUMP STARTER
IMPORTANT: CHARGE IMMEDIATELY AFTER PURCHASE, AFTER EACH USE AND EVERY 30 DAYS, TO KEEP THE JUMP STARTER’S INTERNAL BATTERY FULLY
CHARGED AND PROLONG BATTERY LIFE.
5.1 CHECKING THE LEVEL OF THE INTERNAL BATTERY
Press the
Light/USB Power button on the front of the unit. The LEDs will indicate the current charge level as follows:
● ● ● ● 100% charged
● ● ● 75% charged
● ● 50% charged
● 25% charged
Charge the internal battery if the LEDs indicate less than 75%.
5.2 CHARGING THE INTERNAL BATTERY
NOTE: Use a 2A USB charger (not included), or a 2A USB charging port to quickly recharge the jump starter. Using a charger with less than 2A will increase charge time.
1. Plug the
USB end of a charging cable into the input port. Next, plug the USB end of the charging cable into your charger’s USB port.
2. Plug your charger into a live AC or DC power outlet.
3. Approximate time to fully charge the jump starter (with 2A charger):
SL1596: 7-8 hours
SL1610: 4-5 hours
SL1611: 5-6 hours
SL1612: 6-7 hours
When the unit is fully charged, all four white LEDs turn solid for a short time, and then shut off.
4. When the battery is fully charged, disconnect your charger from the outlet and then remove the charging cable from the charger and the unit.
5. Charge the unit as soon as possible after use.
5.3 CHARGING THE INTERNAL BATTERY WHILE DRIVING
You may also charge the internal batteries while driving, using the 12V DC car charger (included).
1. Make sure the car is running.
2. Plug the 12V DC adaptor cable into the unit’s 12V input socket.
3. Insert the other end of the accessory cable into the vehicle’s accessory outlet.
4. Approximate time to fully charge the jump starter:
SL1596: 4 hours
SL1610: 2 hours
SL1611: 3 hours
SL1612: 3.5 hours
When the unit is fully charged, all four white LEDs turn solid for a short time, and then shut off.
5. When the battery is fully charged, disconnect your charger from the power source and then remove the charging cable from the charger and the unit.
6. Charge the unit as soon as possible after use.
NOTE: Completely disconnect the charger cable when the engine is not running.
• 5 •
6. OPERATING INSTRUCTIONS
6.1 JUMP STARTING A VEHICLE
IMPORTANT: Using the jump starter without a battery installed in the vehicle will damage the vehicle’s electrical system.
1. Turn the ignition OFF.
2. Lay the DC cables away from any fan blades, belts, pulleys and other moving parts.
NOTE: Make sure all of the vehicle’s electrical devices are turned off.
3. For a negative-ground vehicle (as in most vehicles), connect the jump starter’s POSITIVE (RED) clamp to the POSITIVE (POS, P, +) battery post. Next, connect the
NEGATIVE (BLACK) clamp to the vehicle chassis or engine block, away from the battery.
4. For a positive-ground vehicle, connect the jump starter’s NEGATIVE (BLACK) clamp to the NEGATIVE (NEG, N, -) battery post. Next, connect the POSITIVE (RED)
clamp to the vehicle chassis or engine block away from the battery.
5. Press the
Jump start button to turn on the jump starter. The green Ready LED will light.
6. It is best to wait 30 seconds after clamp connection to attempt to start the vehicle. Crank for up to 5 seconds. If engine does not start, wait 30 seconds before cranking again.
7. After the engine starts, press the
Jump start button to turn the jump starter off, and then disconnect the black clamp (-) and the red clamp (+), in that order.
8. Recharge the unit as soon as possible after each use. NOTE: Recharge the unit when all Battery Status LEDs are off.
6.2 STARTING A BATTERY WITH LOW VOLTAGE
If the vehicle’s battery voltage is too low for the jump starter to detect that the clamps are connected, there is a manual start procedure to enable the jump start function.
1. Make sure the clamps are correctly connected.
2. Press the
Jump start button. Next, press the Jump start and the Light/USB Power buttons. Hold both for 5 seconds to turn on the override mode. The
green Ready LED will ash.
WARNING! This overrides a safety feature. It will energize the clamps and cause sparking if they are touched together. If the clamp connections are shorted or reversed,
damage to the unit, battery and possibly the car’s electrical system will occur.
6.3 USING THE USB PORT
The USB port provides up to 2.4A at 5V DC.
1. Ensure the battery clamps are securely clipped on the storage holders.
2. Press the
Light/USB Power button on the front of the unit to turn on the power.
3. Plug your device into the USB port.
4. Turn on the USB device, if necessary.
5. When nished using the USB port, turn off the device (if necessary) and unplug the device.
6. Recharge the unit as soon as possible after each use. NOTE: Recharge the unit when all Battery Status LEDs are off.
6.4 USING THE WORK LIGHT
1. Position the jump starter on a at, stable surface near the intended work area.
2. Ensure the battery clamps are securely clipped on the storage holders.
3. Hold the
Light/USB Power button on the front of the unit for 0.75 second, to cycle through the following modes:
• Steady glow
• Flash for an SOS signal
• Flash in strobe mode
4. When nished using the work light, press and hold the
Light/USB Power button for 0.75 second, to turn off the work light.
5. Recharge the unit as soon as possible after each use.
7. MAINTENANCE AND STORAGE
7.1 Clean the clips and the case each time you are nished using it.
7.2 Charge battery to full capacity before storage.
7.3 Store this unit at the temperatures between 14°F to 113°F (-10 ˚C to 45 ˚C).
7.4 Store clips on their support posts, to ensure they do not come into contact with any metallic surface.
7.5 Never completely discharge the internal battery.
7.6 Charge after each use.
7.7 Charge at least once every month, if not in frequent use, to prevent over-discharge.
8. TROUBLESHOOTING
PROBLEM POSSIBLE CAUSE SOLUTION
The jump starter won’t jump start my car. Clamps are not making a good connection to the
battery.
Connections are reversed.
The jump starter’s battery is not charged.
The vehicle’s battery is defective.
The jump starter is not turned on.
Check for poor connection to battery and frame.
Make sure connection points are clean.
Disconnect the jump starter and reverse the clamps.
Press the
Light/USB Power button on the front
of the unit. The LEDs will indicate the status of
charge.
Have the battery checked.
Press the
Jump start button to turn on the jump
starter.
The jump starter will not operate. The internal battery voltage is to too low. Use the USB adaptor to charge and activate.
The battery in the jump starter won’t hold a charge. The battery is bad (will not accept a charge). Have the battery checked.

• 6 •
Ready/Fail LED Behavior
Green LED lit solid Ready to jump start
Green LED ashing Ready to override
Red LED lit solid and buzzer sounds continuously Short circuit or reverse polarity protection
No LED lit and no buzzer beep Battery exhausted
Red LED ashing and buzzer sounds every second Temperature protection for unit
Battery Status LED Behavior
Four White LEDs ash at the same time. Temperature protection for unit
9. REPLACEMENT PARTS
USB charging cable ................................................................................................................ 3899004188Z
12V DC car charger ................................................................................................................ 2299002681Z
Carry bag ................................................................................................................................ 5899000044Z
10. SPECIFICATIONS
SL1596
Internal battery type ....................................................................................................... Lithium ion polymer
Battery Capacity ..........................................................................................................................13400mAh
Cranking Current ....................................................................................................................... 2500A peak
USB input ...................................................................................................................................... 5V DC, 2A
USB output ................................................................................................................................5V DC, 2.4A
12V DC input ...........................................................................................................................12V DC, 1.5A
Charging temperature ..................................................................................... 32°F to 113°F (0 ˚C to 45 ˚C)
Discharging temperature ............................................................................ -4°F to 140°F (-20 ˚C to 60 ˚C)
Storage temperature ...................................................................................14°F to 113°F (-10 ˚C to 45 ˚C)
SL1610
Internal battery type ....................................................................................................... Lithium ion polymer
Battery Capacity ............................................................................................................................8000mAh
Cranking Current ....................................................................................................................... 1000A peak
USB input ...................................................................................................................................... 5V DC, 2A
USB output ................................................................................................................................5V DC, 2.4A
12V DC input ...........................................................................................................................12V DC, 1.5A
Charging temperature ..................................................................................... 32°F to 113°F (0 ˚C to 45 ˚C)
Discharging temperature ............................................................................ -4°F to 140°F (-20 ˚C to 60 ˚C)
Storage temperature ...................................................................................14°F to 113°F (-10 ˚C to 45 ˚C)
SL1611
Internal battery type ....................................................................................................... Lithium ion polymer
Battery Capacity ..........................................................................................................................10000mAh
Cranking Current ....................................................................................................................... 1500A peak
USB input ...................................................................................................................................... 5V DC, 2A
USB output ................................................................................................................................5V DC, 2.4A
12V DC input ...........................................................................................................................12V DC, 1.5A
Charging temperature ..................................................................................... 32°F to 113°F (0 ˚C to 45 ˚C)
Discharging temperature ............................................................................ -4°F to 140°F (-20 ˚C to 60 ˚C)
Storage temperature ...................................................................................14°F to 113°F (-10 ˚C to 45 ˚C)
SL1612
Internal battery type ....................................................................................................... Lithium ion polymer
Battery Capacity ..........................................................................................................................12000mAh
Cranking Current ....................................................................................................................... 2000A peak
USB input ...................................................................................................................................... 5V DC, 2A
USB output ................................................................................................................................5V DC, 2.4A
12V DC input ...........................................................................................................................12V DC, 1.5A
Charging temperature ..................................................................................... 32°F to 113°F (0 ˚C to 45 ˚C)
Discharging temperature ............................................................................ -4°F to 140°F (-20 ˚C to 60 ˚C)
Storage temperature ...................................................................................14°F to 113°F (-10 ˚C to 45 ˚C)
11. BEFORE RETURNING FOR REPAIRS
For REPAIRS OR RETURNS, visit 365rma.com
Visit schumacherelectric.com for Replacement Parts.
12. LIMITED WARRANTY
For information on our one-year limited warranty, please visit schumacherelectric.com or call 1-800-621-5485 to request a copy.
Go to schumacherelectric.com to register your product online.
The Schumacher logo is a registered trademark of Schumacher Electric Corporation.

• 7 •
1. CONSIGNES DE SÉCURITÉ IMPORTANTES – CONSERVEZ CES CONSIGNES.
AVERTISSEMENT : DANGER DE GAZ EXPLOSIFS.
LE TRAVAIL PRÈS D’ACCUMULATEURS ACIDE-PLOMB EST DANGEREUX. CES ACCUMULATEURS GÉNÈRENT DES GAZ EXPLOSIFS DURANT LEUR
FONCTIONNEMENT NORMAL DE RECHARGE. IL SERA IMPORTANT QUE VOUS SUIVIEZ CES DIRECTIVES À CHAQUE UTILISATION DE L’UNITÉ.
Pour prévenir le danger d’explosion, suivez les présentes instructions ainsi que celles publiées par le fabricant de l’accumulateur et le fabricant de
tout équipement que vous avez l’intention d’utiliser à proximité d’un accumulateur. Passez en revue les autocollants de précautions apposés sur
ces produits et sur le moteur.
AVERTISSEMENT! DANGER DE SECOUSSE ÉLECTRIQUE OU D’INCENDIE.
1.1 Garder hors de portée des enfants.
1.2 Ne pas ouvrir l’unité de démarrage d’appoint. Si une réparation ou entretien s’impose, amenez-la à un professionnel de maintenance qualié. Un montage incorrect
pourrait conduire à un incendie ou une électrocution.
1.3 Ne pas utiliser le démarreur d’appoint lors de la recharge du bloc-piles interne.
1.4 Ne pas recharger le démarreur d’appoint avec un câble USB endommagé.
1.5 Ne pas placer le démarreur d’appoint sur des matières inammables comme les tapis, meubles rembourrés, le papier ou carton, etc.
1.6 Placez le démarreur d’appoint aussi loin de l’accumulateur assisté que ses câbles le permettront.
1.7 Ne pas exposer le démarreur d’appoint à la pluie ou la neige.
1.8 Ne jamais tenter de survolter un accumulateur gelé avec le démarreur d’appoint.
1.9 Ne jamais asseoir le démarreur d’appoint directement sur l’accumulateur assisté.
1.10 L’utilisation d’un accessoire non recommandé ou vendu par le fabricant du démarreur d’appoint pourrait résulter en un endommagement de l’unité ou des blessures aux
personnes.
1.11 Ne jamais utiliser le démarreur d’appoint s’il est endommagé.
1.12 Si d’autres personnes que vous utilisent le démarreur d’appoint, assurez-vous qu’elles sont bien informées sur comment l’utiliser de façon sécuritaire et qu’elles ont lu et
compris les instructions de fonctionnement.
1.13 Le démarreur d’appoint n’est PAS conçu pour remplacer un accumulateur d’automobile.
1.14 Utiliser SEULEMENT sur les véhicules, bateaux et tracteurs de jardin équipés d’un accumulateur de 12 Vc.c.
1.15 Si le moteur ne démarre pas après le nombre de tentatives recommandé, débranchez l’unité et recherchez d’autres problèmes devant être corrigés.
1.16 Utiliser le démarreur d’appoint uniquement pour assister des accumulateurs acide et plomb. Ne pas utiliser sur des piles sèches communes servant à alimenter les
appareils domestiques.
1.17 Ne pas se servir d’un bloc-piles ou d’un appareil qui a été modié ou qui est endommagé. Les blocs-piles modiés ou endommagés pourraient réagir de façon imprévisible et prendre feu,
exploser ou causer des blessures.
1.18 Pour éviter le danger de secousse électrique, débranchez l’unité d’alimentation de la prise de courant avant de faire tout entretien dirigé selon les instructions.
1.19 Ne pas modier ou tenter de réparer l’unité d’alimentation, sauf selon les instructions données sous la rubrique Utilisation et soins.
1.20 Une utilisation extérieure temporaire de l’équipement est permise si les instructions ci-dessous sont suivies :
a) l’appareil devra avoir été remisé à l’intérieur et protégé des éléments;
b) l’appareil ne devra pas être rechargé à l’extérieur;
c) lors de l’utilisation à l’extérieur, des mesures devront être prises pour réduire l’exposition à la pluie, la neige et giboulée, et d’autres sources d’humidité.
2. MESURES DE SÉCURITÉ PERSONNELLES
2.1 Lors du travail près d’accumulateurs acide-plomb, portez une protection oculaire sûre et des vêtements de protection complète. Toujours garder quelqu’un à proximité pour
assistance.
2.2 Garder à porter de main une source d’eau fraîche, de savon et de bicarbonate de soude pour utilisation en cas de contact avec l’acide de l’accumulateur dans les yeux,
sur la peau ou vos vêtements. Laver sur le champ à l’eau avec savon et obtenir une attention médicale.
2.3 S’il y a contact de l’acide avec les yeux, rincer sur le champ à l’eau courante et obtenir une attention médicale.
2.4 Dans les cas où un courant excessif circulerait, si l’accumulateur est défectueux, le liquide interne pourrait être éjecté; évitez tout contact. En cas de contact accidentel, rincez à l’eau
courante. En cas de contact du liquide avec les yeux, obtenez une assistance médicale. Le liquide éjecté de l’accumulateur pourrait causer une irritation ou des brûlures.
2.5 Neutraliser complètement tout déversement d’acide à l’aide de bicarbonate de soude avant de commencer le nettoyage.
2.6 Retirez tous les articles métalliques portés (bagues, bracelets, colliers et montres). Un accumulateur avec lequel ces pièces entreraient en contact pourrait décharger un
courant sufsant pour souder une bague, causant de graves brûlures.
2.7 Pour prévenir les étincelles, ne jamais laisser les pinces de l’unité se toucher ou de faire contact avec une même pièce de métal.
2.8 Ne jamais fumer ou laisser se produire des étincelles ou des ammes à proximité de l’accumulateur ou du moteur.
2.9 Durant la recharge, le démarreur d’appoint s’échauffe et nécessite une aération appropriée.
2.10 Ne pas exposer l’unité d’alimentation au feu ou à une température excessive. L’exposition aux ammes ou à une température dépassant 130 °C (265 °F), pourrait causer une explosion.
2.11 Prendre toutes les précautions requises pour éviter le contact d’outils métalliques avec les bornes de l’accumulateur. Ceci pourrait causer une étincelle ou un court-circuit
sur l’accumulateur ou sur toute autre pièce électrique car ceci pourrait causer une explosion.
2.12 Pour le service, faites-le faire par un réparateur qualié utilisant des pièces de remplacement identiques. Ceci assurera que la sécurité du produit est conservée.
Démarreur d’appoint au lithium-ion avec source d’alimentation USB
MANUEL DU PROPRIÉTAIRE
VEUILLEZ SAUVEGARDER LE PRÉSENT MANUEL ET LE LIRE AVANT CHAQUE UTILISATION. Le présent manuel
expliquera comment utiliser le démarreur d’appoint efcacement et de façon sécuritaire. Veuillez le lire attentivement et
vous conformer à ses directives et mesures de prévention.
POUR LES MODÈLES
SL1596
SL1610
SL1611
SL1612

• 8 •
2.13 Les changements ou modications non approuvées expressément par Schumacher Electric Corporation pourraient annuler l’autorisation de l’utilisateur de faire fonctionner
ce dispositif.
2.14 Ce produit contient des piles lithium-ion. Pour éteindre tout incendie déclaré, vous pouvez utiliser de l’eau, de la mousse d’extinction, le Halon, le CO2, les poudres
chimiques ABC, le graphite en poudre, la poudre de cuivre ou le bicarbonate de soude. Après l’extinction des ammes, asperger le produit avec de l’eau, un agent
extincteur à base d’eau ou d’autres liquides sans alcool pour refroidir le produit et prévenir le ré-allumage des matériaux. Ne JAMAIS tenter de ramasser ou de déplacer
tout produit en feu, chaud ou fumant car des brûlures ou un incendie pourrait s’ensuivre.
2.15 Les changements ou modications non approuvées expressément par Schumacher Electric Corporation pourraient annuler l’autorisation de l’utilisateur de faire fonctionner
ce dispositif.
2.16 REMARQUE : Cet équipement a passé les tests de conformité au règlement FCC section 15 concernant les limites d’émissions électromagnétiques de dispositifs
numériques de classe B. Ces limites visent à procurer une protection raisonnable contre toute interférence dérangeante dans un environnement résidentiel. Le présent
appareil, génère, utilise et irradie de l’énergie électromagnétique et, s’il n’est pas installé et utilisé selon les instructions, pourrait causer de l’interférence dérangeante aux
communications radiophoniques. Cependant, aucune garantie n’est donnée qu’il n’y aura pas d’interférence causée dans des cas particuliers. Si cet appareil cause de
l’interférence aux ondes radio et télévisuelles, ceci pouvant être déterminé en arrêtant l’appareil, vériant la réception hertzienne et remettant l’appareil en fonction pour
conrmer qu’il en est la cause, et l’interférence pourra être résolue par une ou plusieurs des mesures suivantes :
• Réorienter ou relocaliser l’antenne de réception hertzienne.
• Augmenter la distance entre l’appareil de recharge et le poste récepteur (radio/téléviseur).
• Raccorder l’appareil ou le poste récepteur sur un circuit électrique différent.
• Consulter un concessionnaire ou un technicien radio/TV expérimenté pour assistance.
3. ATTRIBUTS
1. Bouton
d’alimentation
Éclairage/USB
2. DEL ‘Prêt’
3. Bouton de
démarrage
d’appoint
4. Indicateurs d’état
du bloc-piles
5. Chargeur
automobile 12
V c.c.
6. Câble de recharge
USB
7. Couvercle de port
8. Port de sortie USB
9. Port d’entrée de
12 V
10. Port d’entrée USB
11. Torche d’éclairage
intégrée
12. DEL de défaut
13. Pinces pour
accumulateur
14. Non montré :
Sac de remise/
transport
1 2 3 4
1213
5
6
1011 9 8 7
4. TABLEAU DE COMMANDE
4.1 TÉMOIN DEL
DEL d’état du bloc-piles en clignotement (BLANCHE) : Le bloc-piles interne est en recharge.
DEL ‘Prêt’ (VERTE) allumée en continu : L’unité est prête pour une assistance de démarrage.
DEL ‘Prêt’ (VERTE) en clignotement : L’unité est prête pour un contournement.
DEL de défaut (ROUGE) allumée en continu : Court-circuit présent ou pinces en connexion inversée.
4.2 BOUTONS DE FONCTIONS
Bouton d’alimentation Éclairage/USB : Actionner le bouton pour mettre l’unité sous tension et vérier l’état de l’accumulateur Pour allumer la torche d’éclairage,
maintenir le bouton enfoncé.
REMARQUE : Si l’unité n’est pas utilisée durant 30 secondes elle s’éteindra automatiquement.
Bouton de démarrage d’appoint: Pour faire le démarrage d’appoint, appuyer sur le bouton. Pour démarrer un véhicule avec accumulateur à plat, actionner le bouton
d’alimentation d’éclairage/USB
ainsi que le bouton de démarrage d’appoint durant 5 secondes. Pour des instructions détaillées, voir le chapitre 6.2.
5. RECHARGE DU BLOC--PILES INTERNE DU DÉMARREUR D’APPOINT
IMPORTANT : POUR GARDER LE BLOC-PILES INTERNE DU DÉMARREUR D’APPOINT PLEINEMENT CHARGÉ ET PROLONGER SA VIE UTILE, RECHARGEZ-LE
SUR LE CHAMP À SA SORTIE DE L’EMBALLAGE, APRÈS CHAQUE UTILISATION ET À TOUS LES 30 JOURS.
5.1 CONTRÔLE DU NIVEAU DE CHARGE DU BLOC-PILES INTERNE
Actionner le bouton « Power/light » (alimentation/éclairage) sur la façade de l’unité. Les témoins DEL indiqueront le niveau de charge comme suit :
● ● ● ● 100 % rechargé
● ● ● 75 % rechargé
● ● 50 % rechargé
● 25 % rechargé
Si les DEL indiquent moins de 75 %, rechargez le bloc-pile interne.
5.2 RECHARGE DU BLOC-PILES INTERNE
REMARQUE : Utilisez un chargeur USB de 2 A (non compris) ou un port de charge USB de 2 A pour recharger rapidement le démarreur d’appoint. L’utilisation d’un
chargeur d’une capacité de moins de 2 A augmentera le temps de recharge.
1. Branchez l’extrémité à connecteur
USB du câble de recharge dans le port d’entrée. Ensuite, branchez l’extrémité à connecteur USB du câble de recharge dans le
port USB de votre chargeur.
2. Branchez le chargeur dans une prise de courant c.a. ou c.c. sous tension.

• 9 •
3. Le temps approximatif de recharge complète du démarreur d’appoint (avec chargeur de 2 A) :
SL1596: 7-8 heures
SL1610: 4-5 heures
SL1611: 5-6 heures
SL1612: 6-7 heures
Lorsque l’unité sera pleinement rechargée, les quatre DEL blanches s’allumeront pour un court moment puis s’éteindront.
4. Lorsque le bloc-piles sera entièrement rechargé, débranchez le chargeur de sa prise de courant, puis débranchez le câble de recharge entre le chargeur et l’unité.
5. Après son utilisation, rechargez l’unité aussitôt que possible.
5.3 RECHARGE DU BLOC-PILES INTERNE DURANT LA CONDUITE
Le bloc-piles interne de l’unité peut aussi être rechargé en utilisant le chargeur automobile 12 V c.c. (fourni).
1. S’assurer que le moteur est en marche.
2. Branchez le câble de l’adaptateur 12 Vc.c. dans la prise d’entrée de 12 V de l’unité.
3. Insérez l’autre extrémité du câble dans la prise pour accessoires du véhicule.
4. Le temps approximatif de recharge complète du démarreur d’appoint :
SL1596: 4 heures
SL1610: heures
SL1611: heures
SL1612: 3.5 heures
Lorsque l’unité sera pleinement rechargée, les quatre DEL blanches s’allumeront pour un court moment puis s’éteindront.
5. Lorsque le bloc-piles sera entièrement rechargé, débranchez le chargeur de la source d’alimentation, puis débranchez le câble de recharge du chargeur et de l’unité.
6. Après son utilisation, rechargez l’unité aussitôt que possible.
REMARQUE : Lorsque le moteur est arrêté, débranchez tous les câbles du chargeur.
6. INSTRUCTIONS DE FONCTIONNEMENT
IMPORTANT :
NE PAS MODIFIER OU TENTER DE RÉPARER L’UNITÉ D’ALIMENTATION, SAUF SELON LES INSTRUCTIONS DONNÉES SOUS LA RUBRIQUE UTILISATION ET
SOINS.
UNE UTILISATION EXTÉRIEURE TEMPORAIRE DE L’ÉQUIPEMENT EST PERMISE SI LES INSTRUCTIONS CI-DESSOUS SONT SUIVIES :
A) L’APPAREIL DEVRA AVOIR ÉTÉ REMISÉ À L’INTÉRIEUR ET PROTÉGÉ DES ÉLÉMENTS;
B) L’APPAREIL NE DEVRA PAS ÊTRE RECHARGÉ À L’EXTÉRIEUR;
C) LORS DE L’UTILISATION À L’EXTÉRIEUR, DES MESURES DEVRONT ÊTRE PRISES POUR RÉDUIRE L’EXPOSITION À LA PLUIE, LA NEIGE ET GIBOULÉE, ET D’AUTRES
SOURCES D’HUMIDITÉ.
6.1 DÉMARRAGE D’APPOINT D’UN VÉHICULE
IMPORTANT: L’utilisation d’un démarreur d’appoint sans accumulateur installé dans le véhicule endommagera le système électrique du véhicule.
1. Coupez le contact du véhicule.
2. Passez les câbles c.c. en position dégagée de toute pale de ventilateur, poulie, courroie ou autre pièce mobile.
REMARQUE : Assurez-vous que tous les accessoires électriques du véhicule sont éteints.
3. Pour un véhicule à masse négative (la plupart des véhicules), connectez la pince POSITIVE du démarreur d’appoint (ROUGE) à la borne POSITIVE de l’accumulateur
(marquée POS, P ou +). Connectez ensuite la pince NÉGATIVE (NOIRE) au châssis ou au bloc moteur du véhicule à un endroit éloigné de l’accumulateur.
4. Pour un véhicule à masse positive, connectez la pince NÉGATIVE du démarreur d’appoint (NOIRE) à la borne NÉGATIVE de l’accumulateur (marquée NEG, N ou -).
Connectez ensuite la pince POSITIVE (ROUGE) au châssis ou au bloc moteur du véhicule à un endroit éloigné de l’accumulateur.
5. Pour mettre le démarreur d’appoint en fonction, appuyez sur le bouton «
Jumpstart » (démarrage d’appoint). La DEL « Ready » (prêt) verte s’allumera.
6. Il est préférable d’attendre 30 secondes après avoir installé les pinces avant d’essayer de faire démarrer le véhicule. Lancez le moteur jusqu’à cinq secondes. Si le moteur ne
démarre pas, attendez 30 secondes avant de faire un autre essai.
7. Après le démarrage du moteur, actionnez le bouton «
Jumpstart » pour éteindre le démarreur d’appoint, puis débranchez la pince noire (-) avant de débrancher la pince
rouge (+).
8. Après chaque utilisation, rechargez l’unité aussitôt que possible. REMARQUE : Si tous les témoins sous « Battery Status » (état du bloc-piles) sont éteints, rechargez
l’unité.
6.2 ASSISTANCE D’APPOINT D’UN ACCUMULATEUR DE TENSION FAIBLE
Si la tension de l’accumulateur est trop basse pour que l’unité détecte que les pinces sont raccordées, il y a une procédure de contournement manuel de mise en fonction
pour le démarrage d’appoint.
1. Assurez-vous que le raccordement des pinces est fait sur les polarités appropriées de l’accumulateur/véhicule.
2. Actionner le bouton de démarrage d’appoint
. Pour activer le mode de contournement (en cas d’accumulateur à plat), actionnez simultanément les boutons « Light/
USB Power »
et « Jump start » durant 5 secondes. La DEL « Ready » (prêt), verte, clignotera.
AVERTISSEMENT! Ceci contourne une des mesures logiques de sécurité et mettra les pinces sous tension. Prévenez qu’elles se touchent car ceci causera des étincelles
de court-circuit. Si ceci se produit ou si le raccordement des pinces est de mauvaise polarité, des dommages à l’unité, à l’accumulateur et possiblement au système
électrique du véhicule pourrait survenir.
6.3 UTILISATION DU PORT USB
Le port USB fournira jusqu’à 2,4 A à 5 Vc.c.
1. S’assurer que les pinces d’accumulateur sont bien xées sur leurs support d’entreposage.
2. Actionner le bouton «
Light/USB Power » (alimentation/éclairage) sur la façade de l’unité pour activer la mise sous tension du port.
3. Branchez votre dispositif dans le port USBt.
4. Au besoin, mettez le dispositif en fonction.
5. Après l’utilisation du port USB, mettez le dispositif hors fonction (au besoin) et puis débranchez-le.
6. Après chaque utilisation, rechargez l’unité aussitôt que possible. REMARQUE : Si tous les témoins sous « Battery Status » (état du bloc-piles) sont éteints, rechargez
l’unité.

• 10 •
6.4 UTILISATION DE LA TORCHE D’ÉCLAIRAGE
1. Placez le démarreur d’appoint sur une surface plane et stable près de l’aire de travail.
2. S’assurer que les pinces d’accumulateur sont bien xées sur leurs support d’entreposage.
3. Actionner de façon répétée le bouton «
Power/Light » (alimentation/éclairage) sur la façade de l’unité.pour trouver le mode d’éclairage désiré parmi les suivants :
• Éclairage continu
• Clignotement de signal S.O.S.
• Fonctionnement stroboscopique
4. Lorsque vous n’avez plus besoin de la lampe de travail, appuyez de nouveau brièvement sur le bouton « Light/USB »
pour l’éteindre
5. Après chaque utilisation, rechargez l’unité aussitôt que possible.
7. ENTRETIEN ET ENTREPOSAGE
7.1 Nettoyez les pinces et le boîtier après chaque utilisation.
7.2 Avant d’entreposer l’appareil, rechargez-le à pleine capacité.
7.3 Entreposez cet appareil entre -10 ˚C et 45 ˚C (14˚ F et 113˚ F).
7.4 Rangez les pinces sur leurs bornes de soutien pour être certain qu’elles ne touchent à aucune surface métallique.
7.5 Ne jamais utiliser l’unité jusqu’à ce que son bloc-piles interne soit à plat.
7.6 Recharger après chaque utilisation.
7.7 Pour être prêt en cas de besoin, (et prévenir une trop grande décharge interne), rechargez au moins à tous les 30 jours.
8. DÉPANNAGE
PROBLÈME CAUSE POSSIBLE SOLUTION
Le démarreur d’appoint ne lance pas le moteur de
mon véhicule.
Les pinces ne sont pas en contact ferme avec
l’accumulateur.
Les polarités sont inversées.
Le bloc-piles du démarreur d’appoint n’est pas
rechargé.
L’accumulateur du véhicule est défectueux.
Le démarreur d’appoint n’est pas en fonction.
Vériez la fermeté de contact des pinces sur
l’accumulateur et le châssis automobile. S’assurer
que les points de contact sont propres.
Déconnecter le démarreur d’appoint et inverser les
pinces.
Actionner le bouton « Power/light » (alimentation/
éclairage) sur la façade de l’unité. Les DEL
indiqueront l’état de charge.
Faites vérier l’accumulateur.
Pour mettre le démarreur d’appoint en fonction,
appuyez sur le bouton « Jumpstart/Override »
(démarrage d’appoint / contournement).
Le démarreur d’appoint ne fonctionne pas. La tension du bloc-piles interne est trop basse. Utilisez l’adaptateur USB pour recharger et activer
l’unité.
Le bloc-piles du démarreur d’appoint ne garde pas
sa charge.
Le bloc-piles est défectueux (ne se recharge pas). Faites vérier l’accumulateur.
Comportement du témoin DEL Ready/Fail (Prêt/Échec)
Témoin DEL vert allumé en continu Prêt pour le démarrage d’appoint
Témoin DEL vert en clignotement Prêt à un contournement
Témoin DEL rouge allumé en continu avec avertisseur sonore retentissant Protection de court-circuit ou d’inversion de polarité déclenchée
Aucun témoin DEL allumé, sans avertisseur sonore Vie d’accumulateur expirée
Témoin DEL rouge clignotant et avertisseur sonore retentissant une fois par
seconde
Protection de surchauffe de l’unité déclenchée
Comportement du témoin DEL d’état de batterie
Les quatre témoins DEL blancs clignotent en même temps. Protection de surchauffe de l’unité déclenchée
9. PIÈCES DE RECHANGE
Câble de recharge USB .......................................................................................................... 3899004188Z
Chargeur automobile 12 V c.c. ............................................................................................... 2299002681Z
Sac de remise/transport .......................................................................................................... 5899000044Z
10. FICHE TECHNIQUE
Type de piles internes ................................................................................................... Polymère lithium-Ion
Entrée USB ................................................................................................................................. 5 Vc.c., 2 A
Sortie USB ............................................................................................................................... 5 Vc.c., 2,4 A
Entrée 12 Vc.c. ...................................................................................................................... 12 Vc.c., 1,5 A
Température de recharge .....................................................................................0 à 45 ˚C (32˚ F à 113˚ F)
Température de décharge ..................................................................................-20 à 60 ˚C (-4˚ F à 140˚ F)
Température d’entreposage ...............................................................................-10 à 45 ˚C (14˚ F à 113˚ F)
SL1596
Capacité du bloc-piles ................................................................................................................13400 mAh
Courant de démarrage .............................................................................................................. 2500 A crête

• 11 •
SL1610
Capacité du bloc-piles ..................................................................................................................8000 mAh
Courant de démarrage .............................................................................................................. 1000 A crête
SL1611
Capacité du bloc-piles ................................................................................................................10000 mAh
Courant de démarrage .............................................................................................................. 1500 A crête
SL1612
Capacité du bloc-piles ................................................................................................................12000 mAh
Courant de démarrage .............................................................................................................. 2000 A crête
11. AVANT DE RENVOYER POUR RÉPARATION
Pour les RETOURS OU RÉPARATIONS, visitez 365rma.com
Pour les pièces de rechange, visitez schumacherelectric.com.
12. GARANTIE LIMITÉE
Pour l’information sur notre garantie limitée d’un an, veuillez visiter schumacherelectric.com ou composez le 1-800-621-5485 pour en demander un exemplaire.
Pour enregistrer votre produit en ligne, naviguez à schumacherelectric.com.
Le logo Schumacher est une marque de commerce déposée de Schumacher Electric Corporation.