
HU10330
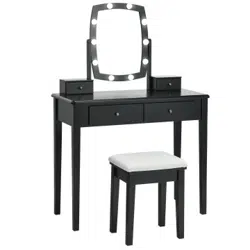
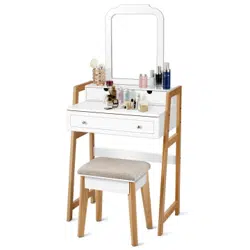
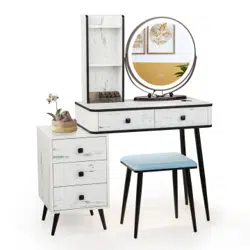
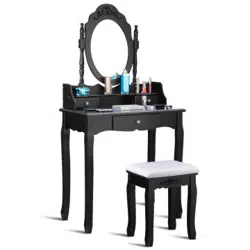
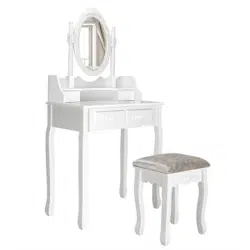
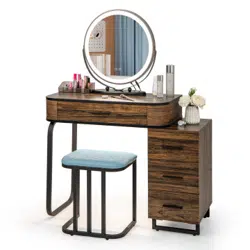
Vanity Set with Mirror
Coiffeuse avec Miroir
THIS INSTRUCTION BOOKLET CONTAINS IMPORTANT SAFETY INFORMATION. PLEASE READ AND KEEP FOR FUTURE REFERENCE.
If you're having difficulty, our friendly
customer team is always here to help.
USA office: Fontana AUS office: Truganina
GBR office: Ipswich FRA office: Saint Vigor d'Ymonville
AUS:cs.au@costway.com
GBR:cs.uk@costway.com
FRA:cs.fr@costway.com
Before You Start
Please read all instructions carefully.
Retain instructions for future reference.
Separate and count all parts and hardware.
Read through each step carefully and follow the proper order.
We recommend that, where possible, all items are assembled near to the area in
which they will be placed in use, to avoid moving the product unnecessarily once
assembled.
Always place the product on a flat, steady and stable surface.
Keep all small parts and packaging materials for this product away from babies
and children as they potentially pose a serious choking hazard.
FR
Veuillez lire attentivement toutes les instructions.
Conservez les instructions pour vous y référer ultérieurement.
Vérifiez toutes les pièces et les accessoires.
Lisez attentivement chaque étape et suivez l’ordre correct.
Nous recommandons que, dans la mesure du possible, tous les produits
soient assemblés à proximité de la zone où ils seront utilisés, afin d’éviter tout
déplacement inutile du produit une fois assemblé.
Placez toujours le produit sur une surface plane et stable.
Conservez toutes les petites pièces de ce produit et les matériaux d’emballage
hors de portée des bébés et des enfants, car ils pourraient présenter un risque
d’étouffement.
Avant de Commencer
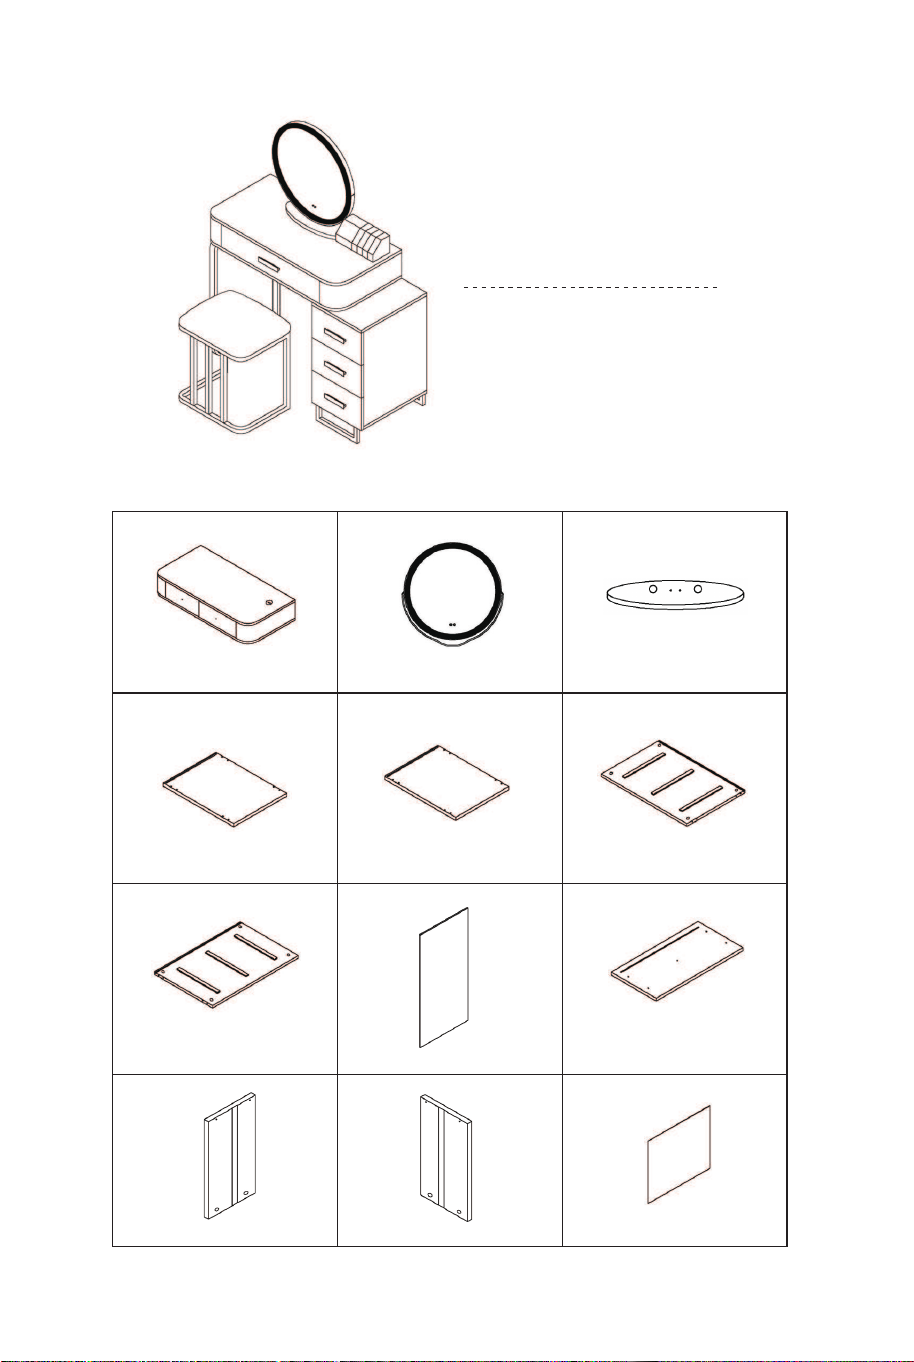
Vanity Set with Mirror
Coiffeuse avec Miroir
Hardware list / Liste du matériel
EN
A B C
D E F
G H Ix3
Jx3 Kx3 Lx3
02 03
Before You Start
Please read all instructions carefully.
Retain instructions for future reference.
Separate and count all parts and hardware.
Read through each step carefully and follow the proper order.
We recommend that, where possible, all items are assembled near to the area in
which they will be placed in use, to avoid moving the product unnecessarily once
assembled.
Always place the product on a flat, steady and stable surface.
Keep all small parts and packaging materials for this product away from babies
and children as they potentially pose a serious choking hazard.
FR
Veuillez lire attentivement toutes les instructions.
Conservez les instructions pour vous y référer ultérieurement.
Vérifiez toutes les pièces et les accessoires.
Lisez attentivement chaque étape et suivez l’ordre correct.
Nous recommandons que, dans la mesure du possible, tous les produits
soient assemblés à proximité de la zone où ils seront utilisés, afin d’éviter tout
déplacement inutile du produit une fois assemblé.
Placez toujours le produit sur une surface plane et stable.
Conservez toutes les petites pièces de ce produit et les matériaux d’emballage
hors de portée des bébés et des enfants, car ils pourraient présenter un risque
d’étouffement.
Avant de Commencer
Vanity Set with Mirror
Coiffeuse avec Miroir
Hardware list / Liste du matériel
EN
A B C
D E F
G H Ix3
Jx3 Kx3 Lx3
02 03
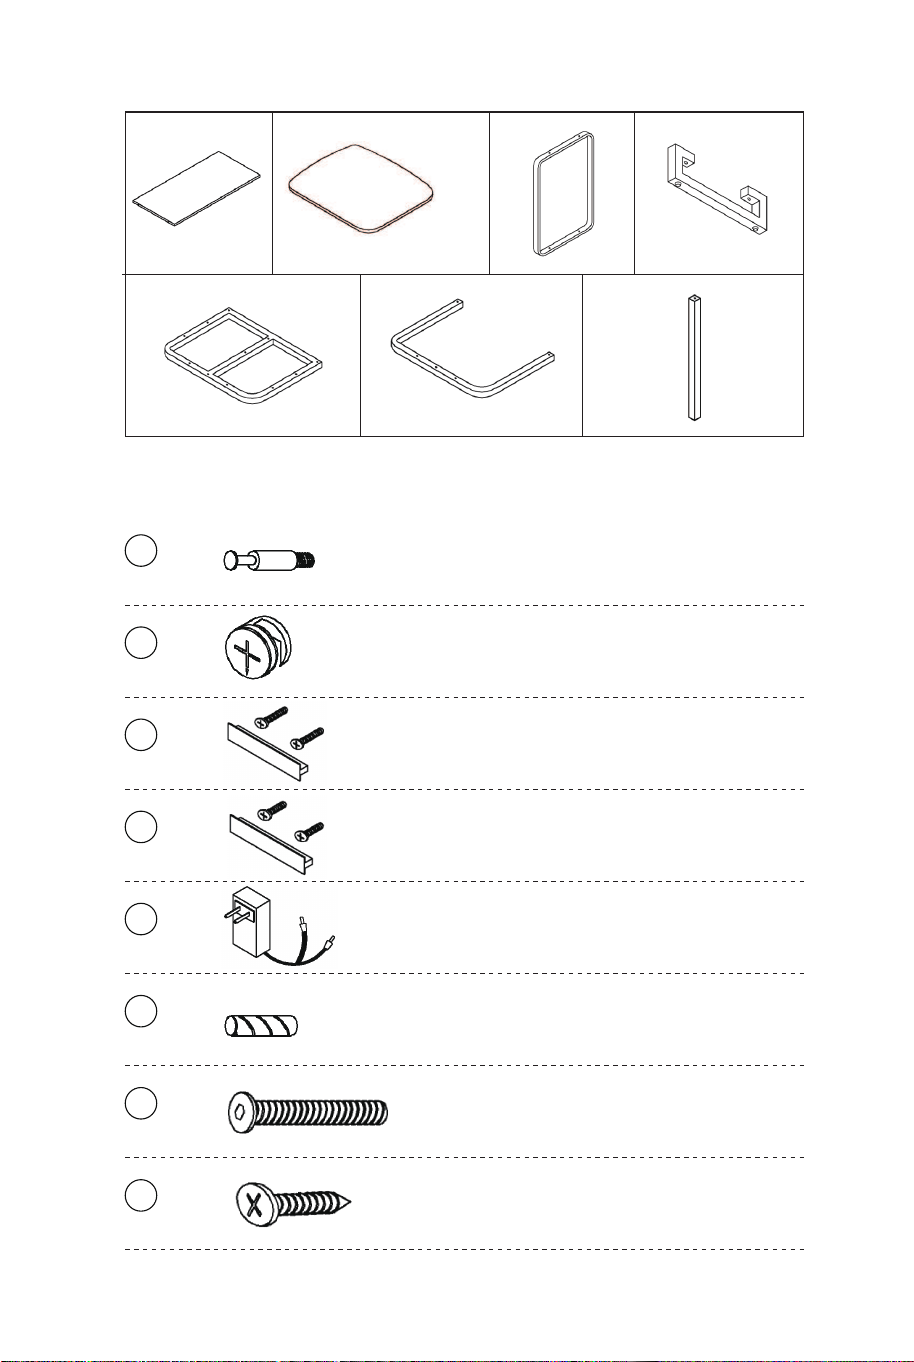
Accessories list / Liste des Accessoires
Mx3 N O Px2
Q R Sx5
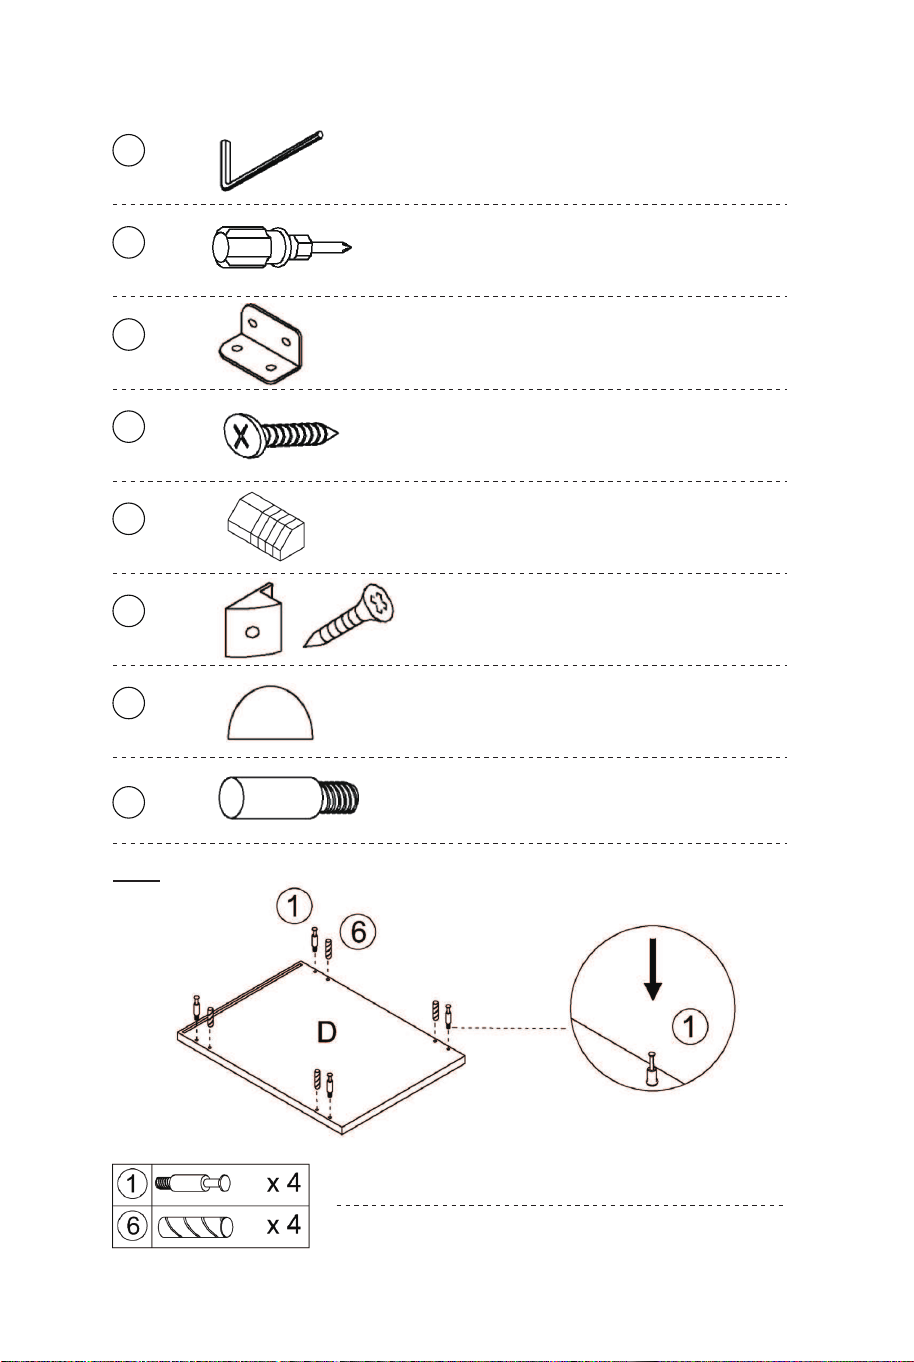
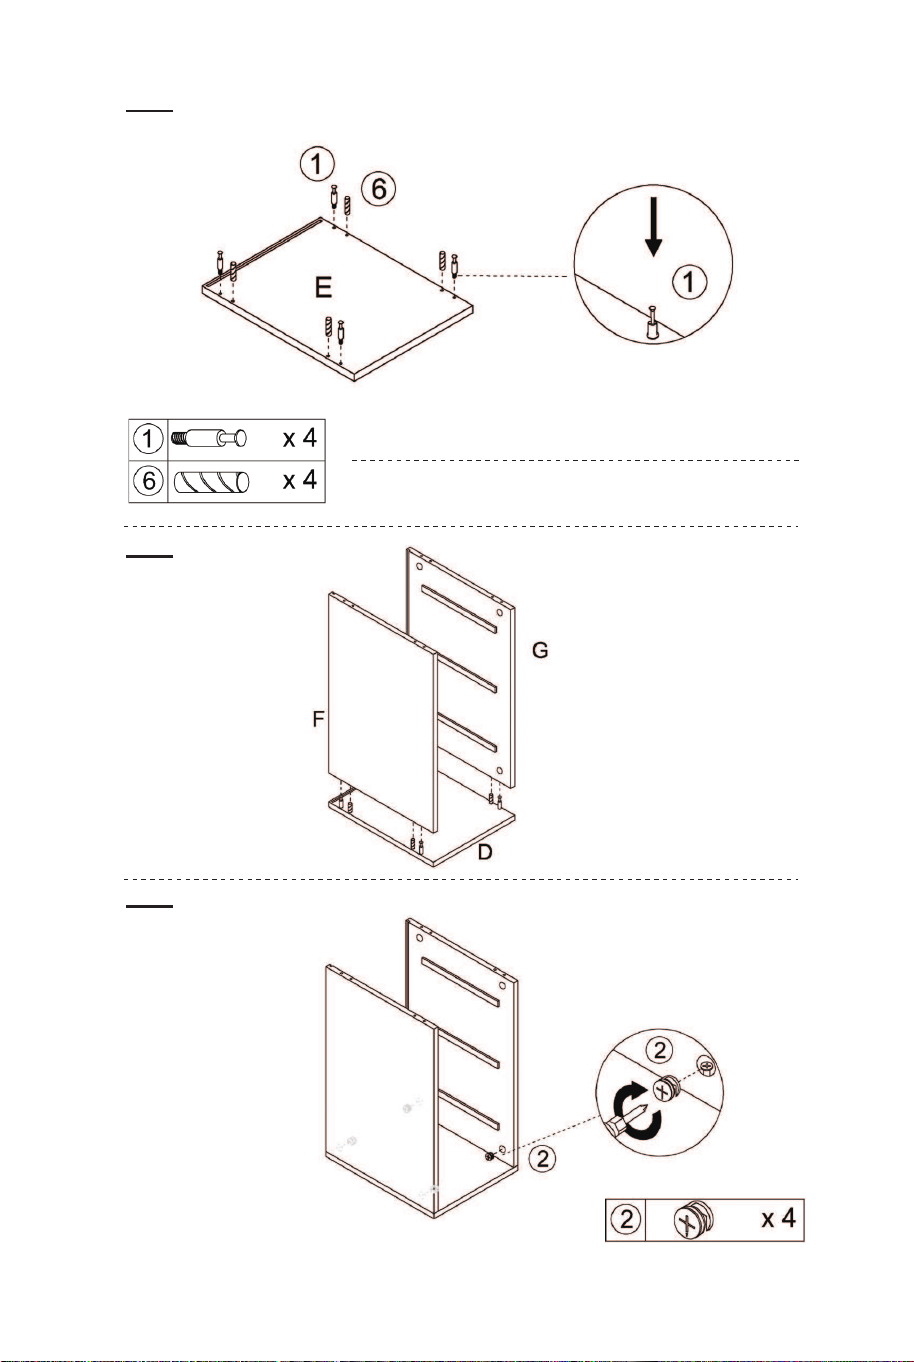
1 x20
10x38mm
Two in one screw
Vis deux en un
2 x20
10x14mm
Two in one nut
Écrou deux en un
3 x1
4x28mm
Cross machine wire
Fil de machine croisé
4 x3
4x18mm
Cross machine wire
Fil de machine croisé
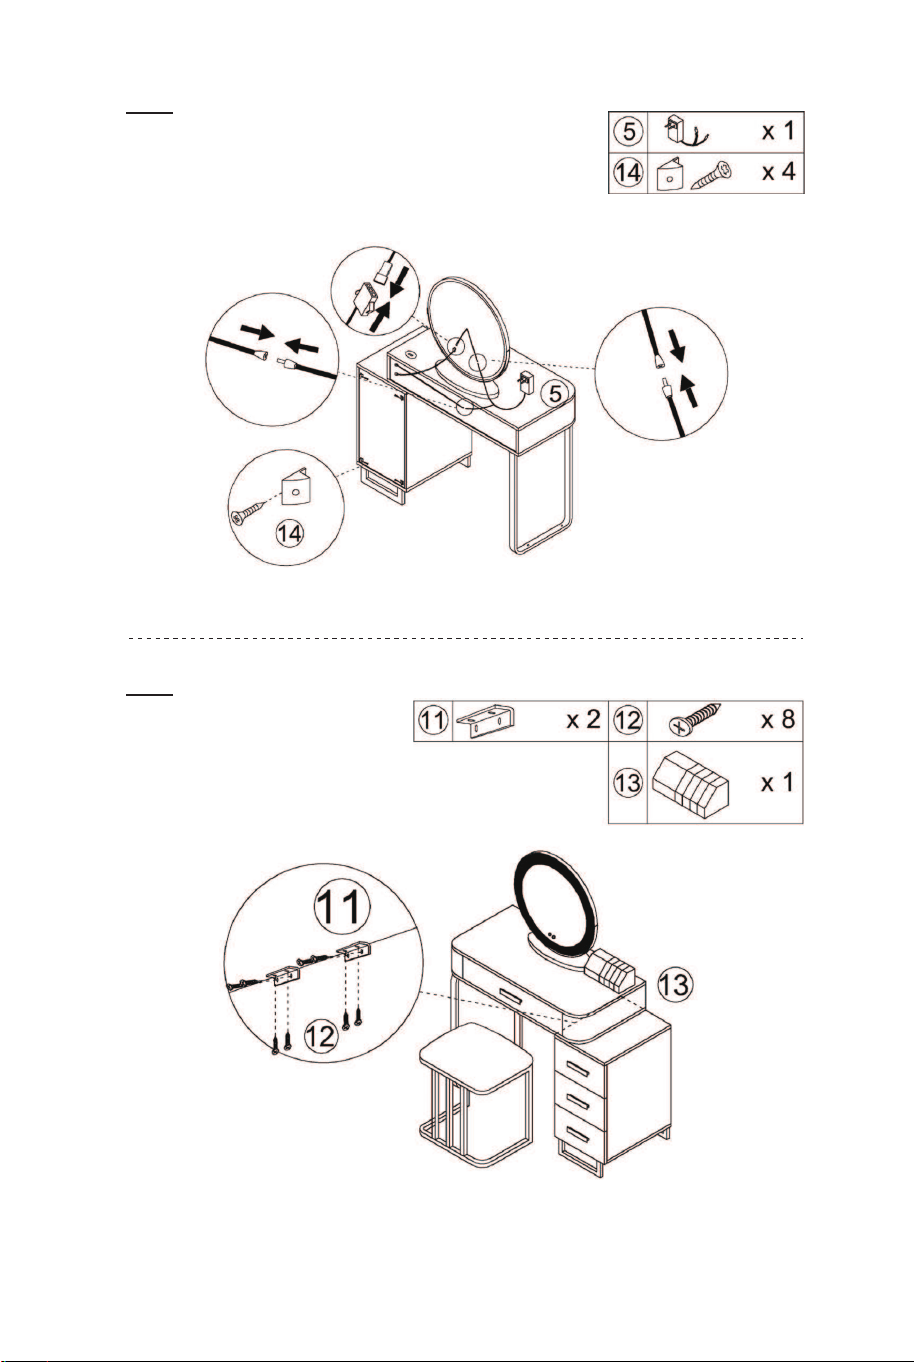
5 x1
The power adapter
Adaptateur secteur
6 x8
6x30mm
Wood chipping
Copeaux de bois
7 x20
6x30mm
Hexagonal machine wire
Fil de machine hexagonal
8 x12
3.5x30mm
Countersunk head tapping screw
Vis à tôle à tête fraisée
9 x1
Hexagon socket screwdriver H4
Tournevis à six pans creux H4
10 x1
Cross screwdriver
Tournevis cruciforme
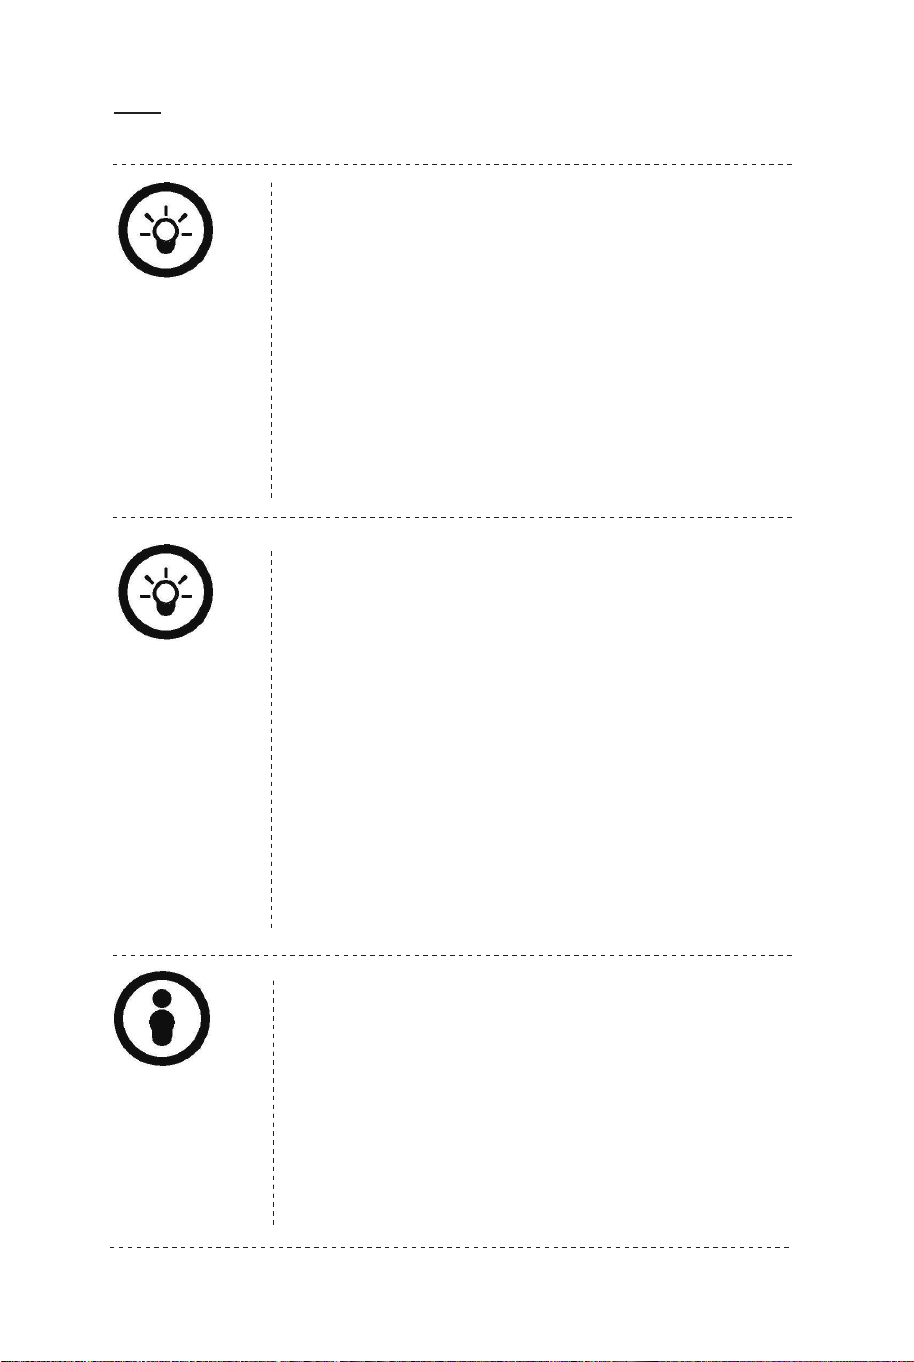
11 x2
Corner Code
Code d'angle
12 x8
3x16mm
3.5x12mm
Self tapping screw
Vis autotaraudeuse
13 x1
Lipstick storage box
Boîte de rangement de rouge à lèvres
14 x4
Back plate buckle & Screw
Boucle de plaque arrière et vis
15 x2
EVA Sponge stciker
Autocollant éponge EVA
16 x6
lron bar
Barre de fer
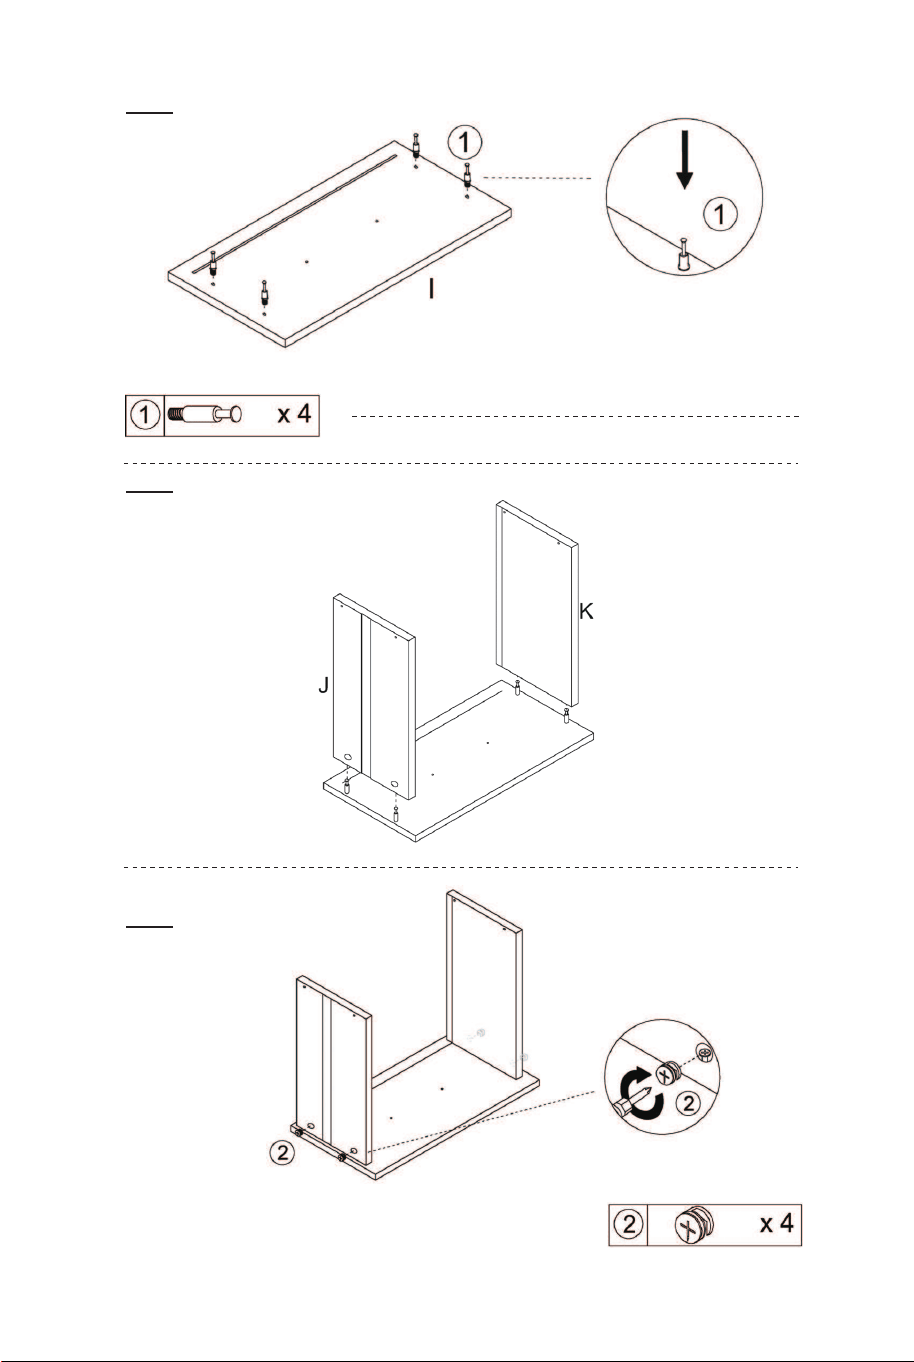
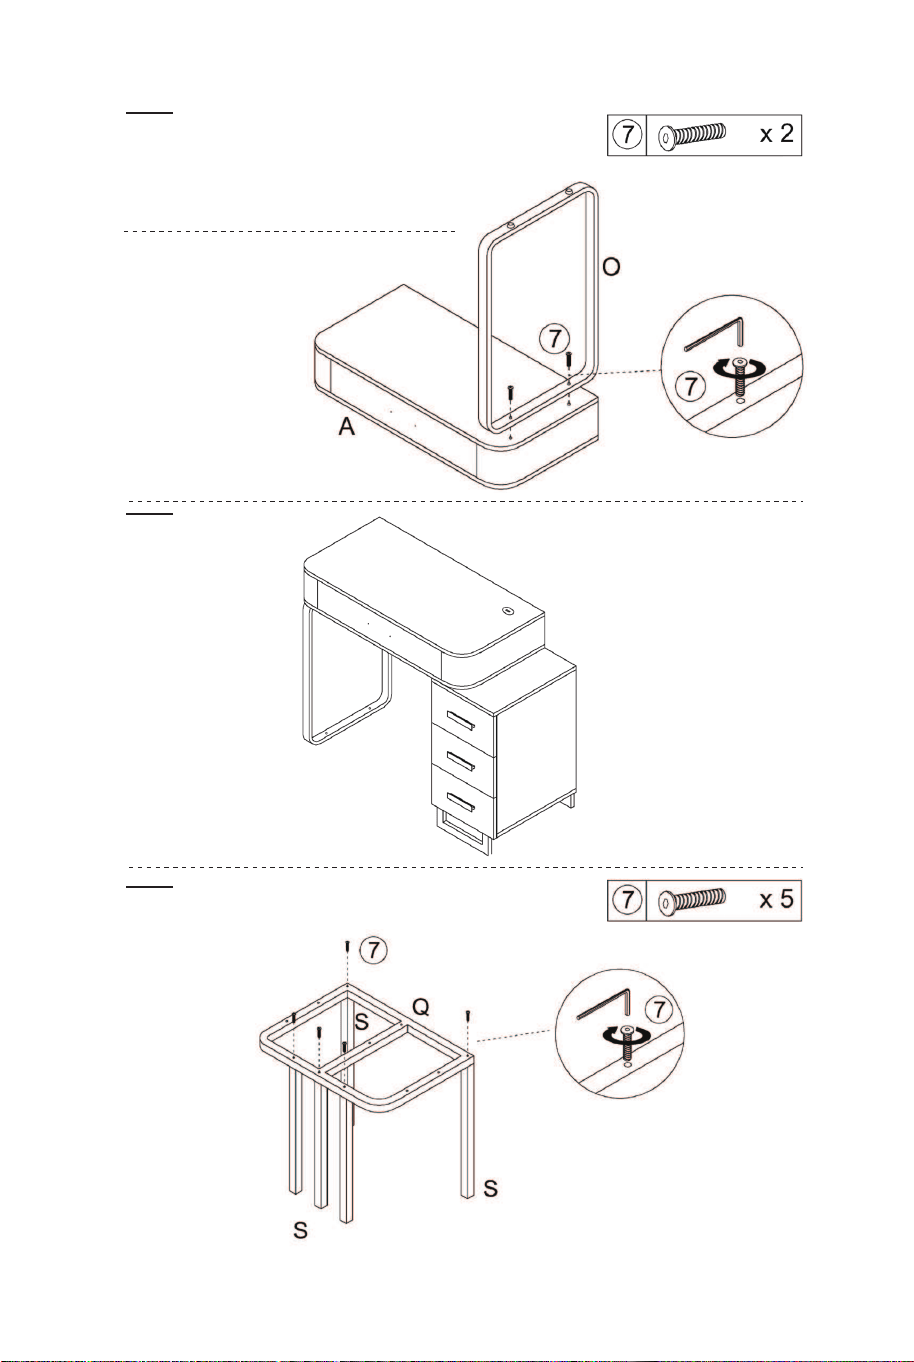
The threaded part has been installed into the hole.
La partie filetée a été installée dans le trou.
01
04 05
Accessories list / Liste des Accessoires
Mx3 N O Px2
Q R Sx5
1 x20
10x38mm
Two in one screw
Vis deux en un
2 x20
10x14mm
Two in one nut
Écrou deux en un
3 x1
4x28mm
Cross machine wire
Fil de machine croisé
4 x3
4x18mm
Cross machine wire
Fil de machine croisé
5 x1
The power adapter
Adaptateur secteur
6 x8
6x30mm
Wood chipping
Copeaux de bois
7 x20
6x30mm
Hexagonal machine wire
Fil de machine hexagonal
8 x12
3.5x30mm
Countersunk head tapping screw
Vis à tôle à tête fraisée
9 x1
Hexagon socket screwdriver H4
Tournevis à six pans creux H4
10 x1
Cross screwdriver
Tournevis cruciforme
11 x2
Corner Code
Code d'angle
12 x8
3x16mm
3.5x12mm
Self tapping screw
Vis autotaraudeuse
13 x1
Lipstick storage box
Boîte de rangement de rouge à lèvres
14 x4
Back plate buckle & Screw
Boucle de plaque arrière et vis
15 x2
EVA Sponge stciker
Autocollant éponge EVA
16 x6
lron bar
Barre de fer
The threaded part has been installed into the hole.
La partie filetée a été installée dans le trou.
01
04 05
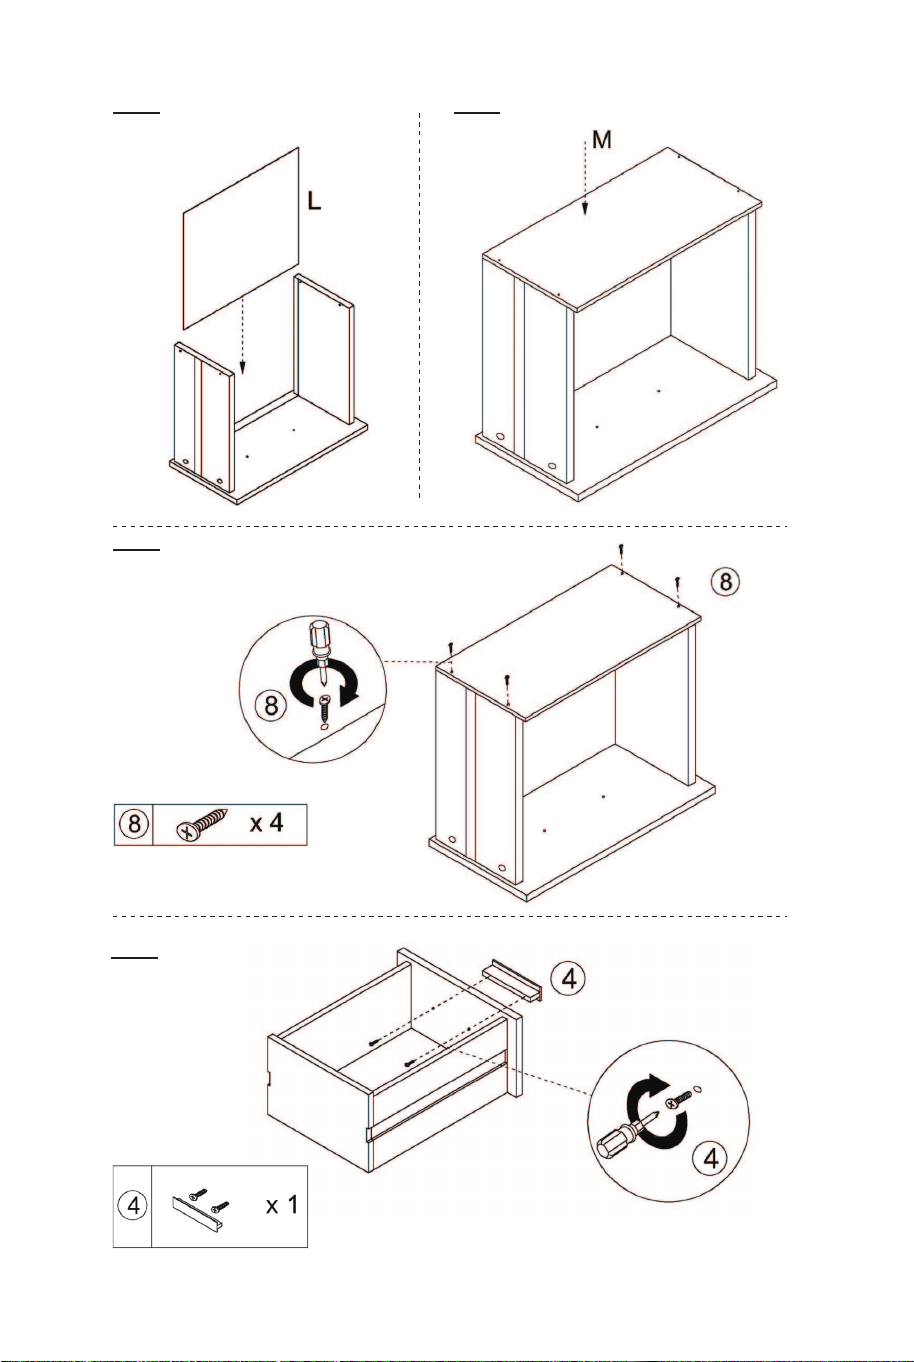
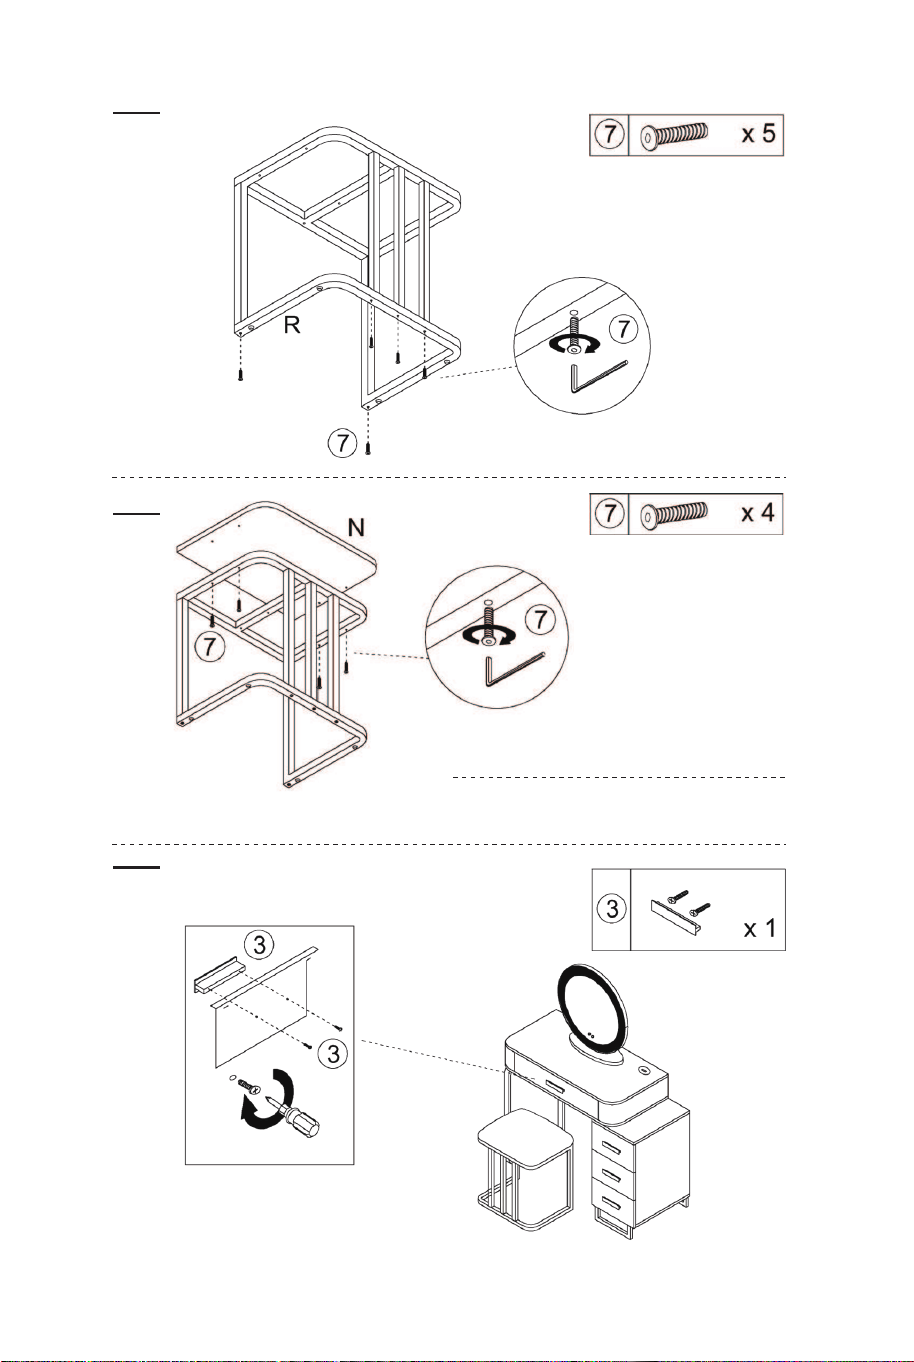
The threaded part has been installed into the hole.
La partie filetée a été installée dans le trou.
02
03
04
05 06
07
08
06 07
Note that the foot pad at the bottom of the
iron frame P can be rotated and adjusted
according to the actual situation.
Notez que le repose-pieds au bas du
cadre en fer P peut être tourné et ajusté
en fonction de la situation réelle.
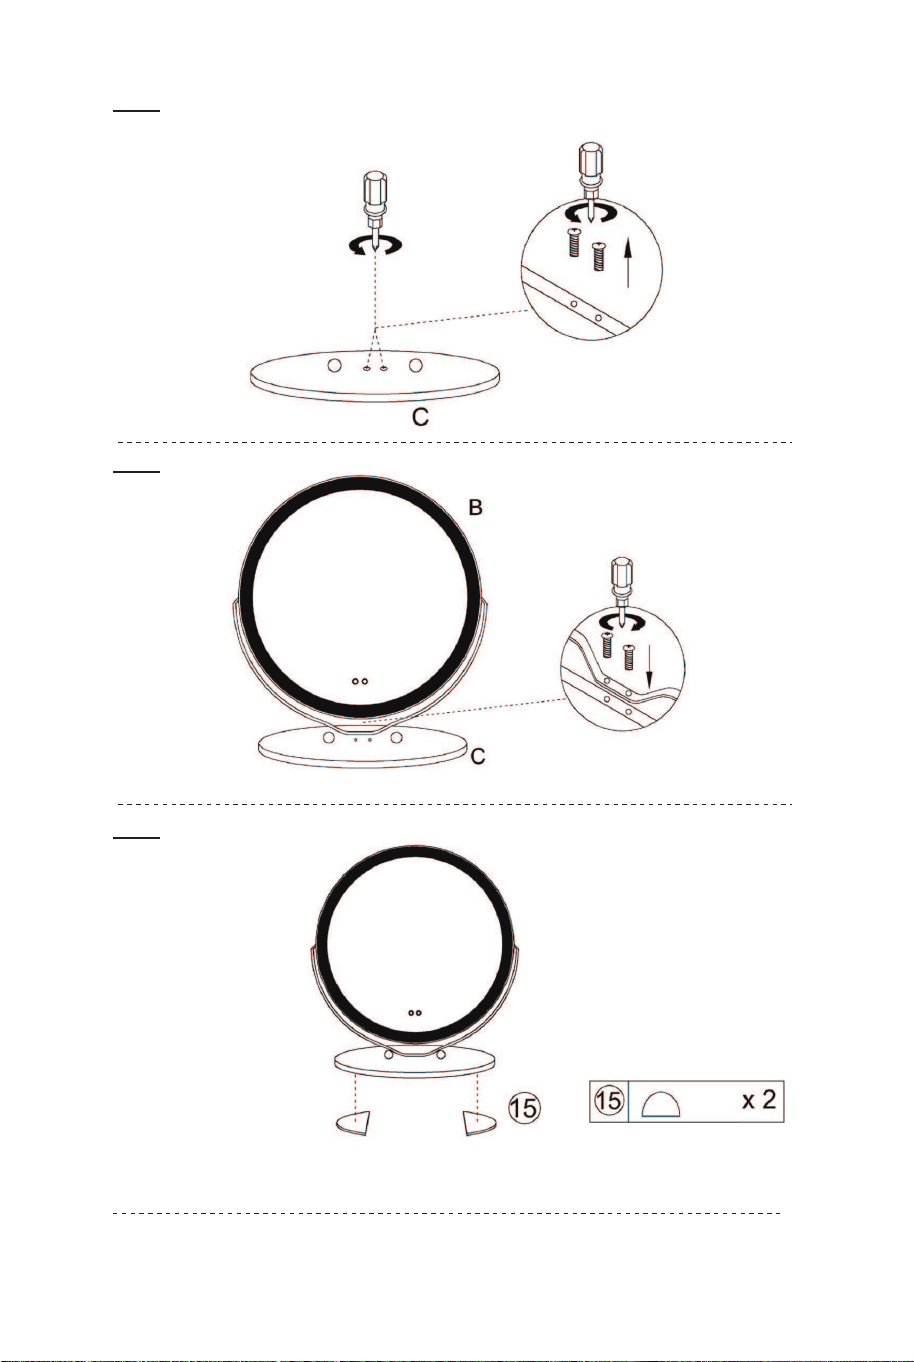
The threaded part has been installed into the hole.
La partie filetée a été installée dans le trou.
10 X3
11 X3
12 X3 13 X3
14 X3
15 X3
08 09
09 X3
The threaded part has been installed into the hole.
La partie filetée a été installée dans le trou.
10 X3
11 X3
12 X3 13 X3
14 X3
15 X3
08 09
09 X3
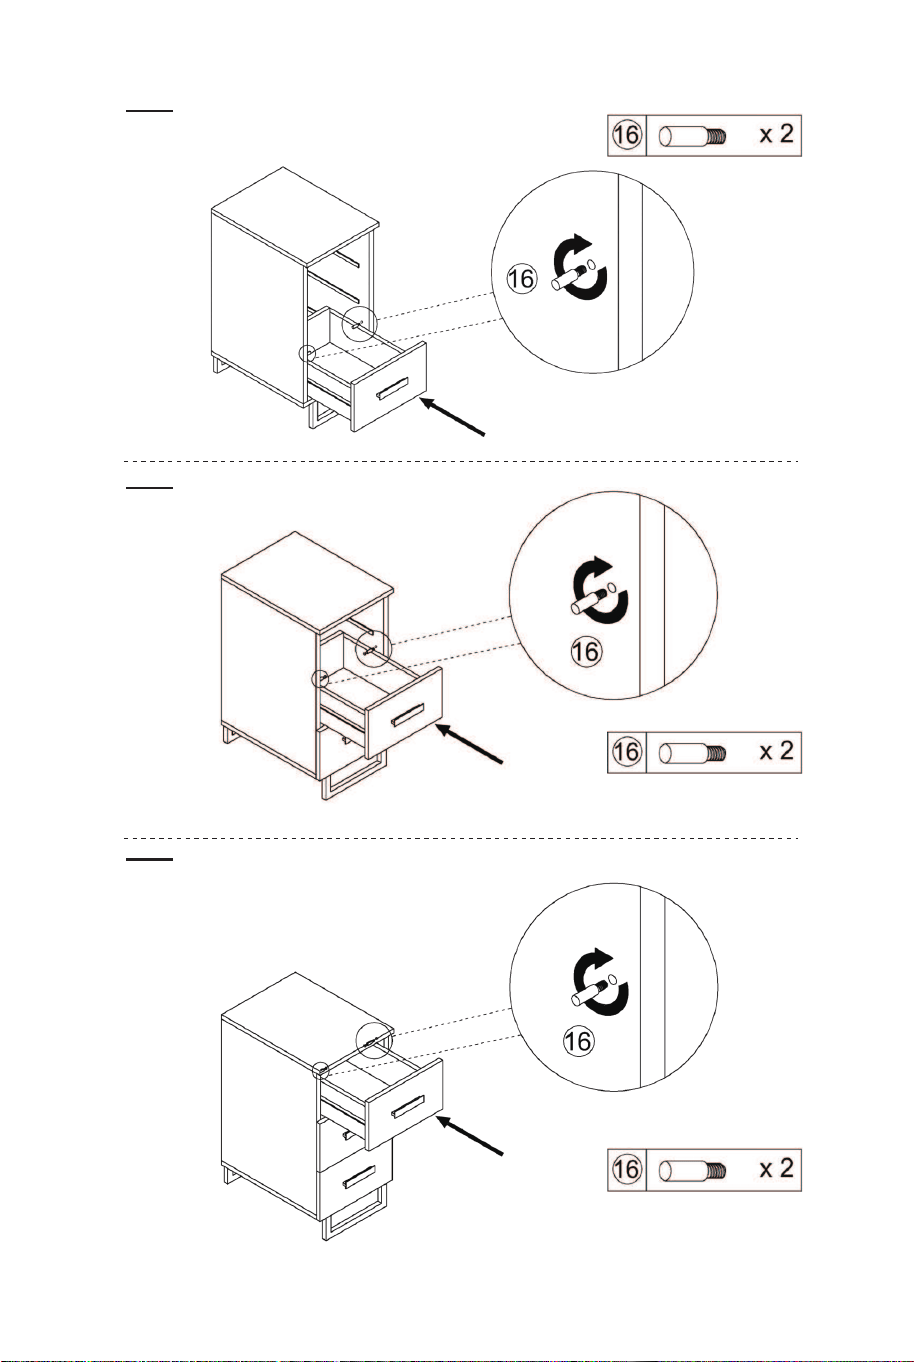
16
17
18
19
20
Tear off the white paper on both sides of the accessory⑮ and stick it on the bottom
Déchirez le papier blanc des deux côtés de l'accessoire⑮et collez-le sur le fond
21
10 11
16
17
18
19
20
Tear off the white paper on both sides of the accessory⑮ and stick it on the bottom
Déchirez le papier blanc des deux côtés de l'accessoire⑮et collez-le sur le fond
21
10 11
22
23
24
25
26
27
12 13
Note that the foot pad at the bottom of the
iron frame P can be rotated and adjusted
according to the actual situation.
Notez que le repose-pieds au bas du
cadre en fer P peut être tourné et ajusté
en fonction de la situation réelle.
Note that the foot pad at the bottom of the
iron frame R can be rotated and adjusted
according to the actual situation.
Notez que le repose-pieds au bas du
cadre en fer R peut être tourné et ajusté
en fonction de la situation réelle.
A.Short press the button to switch light colors.
B.Press the button twice to turn off the light. With a
memory function, after being powered off and restarted,
the mirror will restore the last used state.
C.Long press the button to adjust light brightness from
dark to brightest. If you do not use the mirror for a long
time, you can long press this button to turn off the
indicator light, and click it again to turn on the indicator
light.
28
29
OPERATION / OPÉRATION
EN
Light Control Button
FR
Bouton de Contrôle de la Lumière
30
This touch button is used to turn on/off, change colors,
and adjust brightness.
Ce bouton tactile est utilisé pour allumer/éteindre,
changer les couleurs et régler la luminosité.
A.Appuyez brièvement sur le bouton pour changer les
couleurs de la lumière.
B. Appuyez deux fois sur le bouton pour éteindre la
lumière. Avec une fonction de mémoire, après avoir été
éteint et redémarré, le miroir restaurera le dernier état
utilisé.
C. Appuyez longuement sur le bouton pour régler la
luminosité de la lumière du plus sombre au plus
lumineux. Si vous n'utilisez pas le miroir pendant une
longue période, vous pouvez appuyer longuement sur
ce bouton pour éteindre le voyant et cliquer à nouveau
dessus pour allumer le voyant.
A.Short press to turn on the induction function. It can
auto-turn on the light when people are close to the
mirror within 1 meter. It can auto-turn off the light
when people are far away from the mirror after 30
seconds.
B.Short press again to turn off the induction function.
Induction Button
This touch button is used to turn on/off the induction
function.
EN
14 15
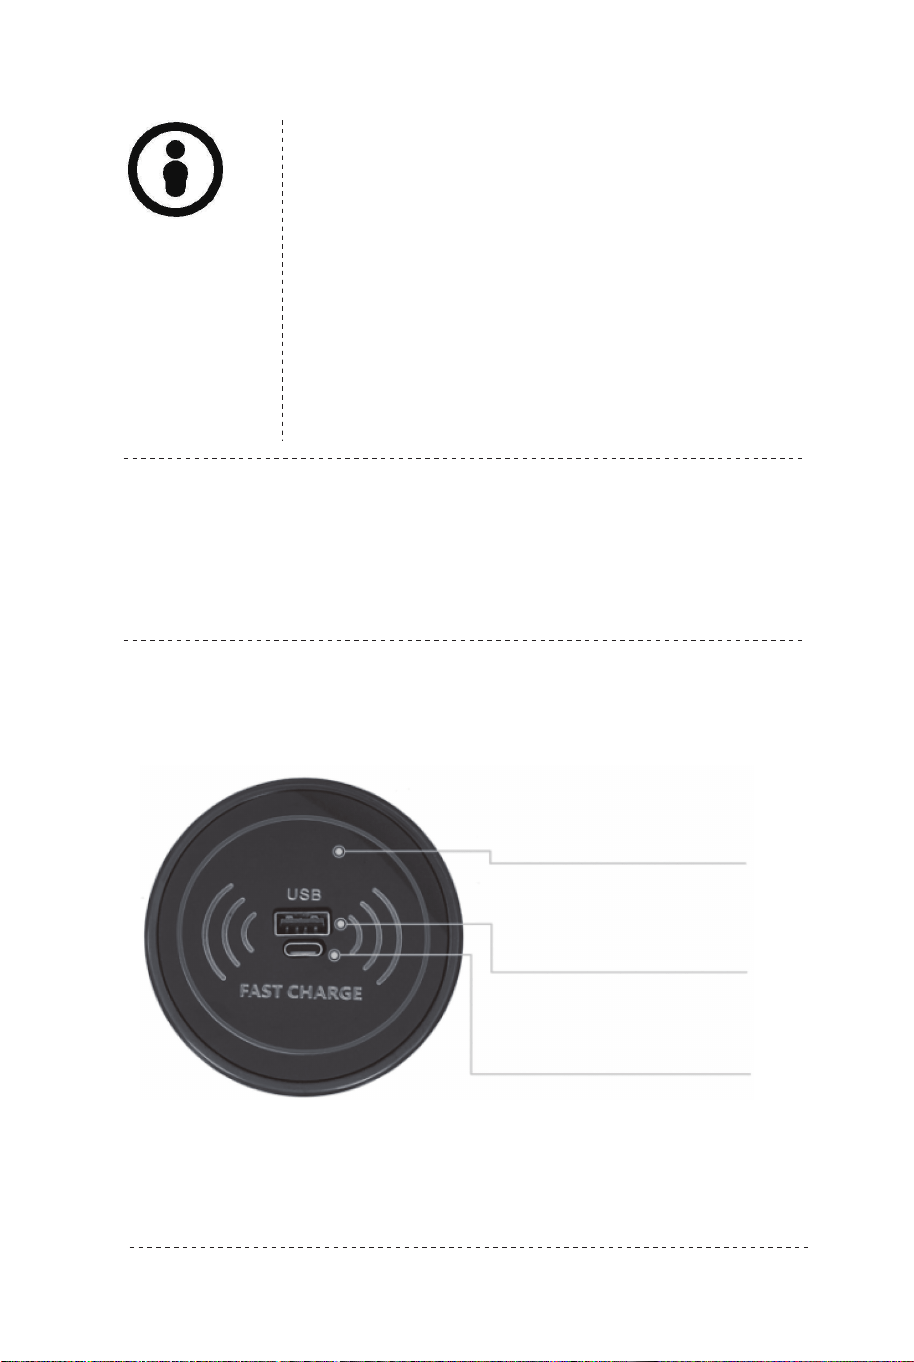
15W CHARGING STATION / BORNE DE RECHARGE 15W
parameters and instructions: / Paramètres et instructions :
Wireless Fast Charging
Charge rapide sans fil
USB Charging Interface
Interface de charge USB
Type-C Interface
Interface de type C
A. Appuyez brièvement pour activer la fonction
d'induction. Il peut allumer automatiquement la
lumière lorsque des personnes se trouvent à
proximité du miroir à moins de 8,5cm. Il peut éteindre
automatiquement la lumière lorsque les personnes
sont éloignées du miroir après 30 secondes.
B. Appuyez à nouveau brièvement pour désactiver la
fonction d'induction.
Bouton d'Induction
Ce bouton tactile est utilisé pour activer/désactiver la
fonction d'induction.
FR
Product model: 15W wireless charger
Wireless charging output: 15W/1 0W/7.5W/5W charging efficiency;
Wired charging output: 10W charging efficiency
Wireless charging standard: Compatible with WPCv1.2.4 standard;
Wireless charging receiver: Support wireless-charging mobile phone
and QI standard receiver
Support 5W, Apple 7.5W, Samsung 10W charging
Input voltage and current: DC9-12V/2-3A
Wired USB /TYPE-C charging Power: 5V 2A, 10W
IF USB and TYPE-C charging at the same time, the charging power
is 5V 1A
Working frequency: 100kHz 205kHz
Charging distance: When using wireless charging, it needs to be
placed on the front of the charger. It is recommended to contact the
charger at zero distance.
Safety protection: Built-in smart chip and software that effectively
prevent from over-current, short-circuit, over-temperature, etc.
NOTE:
1. This charging station should be kept away from high temperature
(>113℉) and low
temperature (< -4℉) environment and children.
2. Please use a soft, dry cloth to clean the surface. Chemicals,
soaps or detergents are forbidden.
EN
16 17

Instructions De Retour / Réclamation De Dommages
Dans le cas où un retour est requis, l'article doit être retourné dans sa boîte
d'origine. Sans cela, votre retour ne sera pas accepté.
NE PAS jeter la boîte/l'emballage d'origine.
Prenez une photo des marquages de la boîte.
Prenez une photo des dommages (le cas échéant).
Envoyez-nous un e-mail avec les images demandées.
Une photo des marquages (texte) sur le côté de la boîte est requise au cas où
une pièce serait nécessaire pour le remplacement. Cela aide notre personnel à
identifier votre numéro de produit pour s'assurer que vous recevez les bonnes
pièces.
Une photo des dommages est toujours requise pour déposer une réclamation et
obtenir rapidement votre remplacement ou votre remboursement. Assurez-vous
d'avoir la boîte même si elle est endommagée.
Envoyez-nous un e-mail directement depuis le marché où votre article a été
acheté avec les images ci-jointes et une description de votre réclamation.
FR
In case a return is required, the item must be returned in original box. Without this
your return will not be accepted.
DO NOT discard the box / original packaging.
Take a photo of the box markings.
Take a photo of the damaged part (if applicable).
Send us an email with the images requested.
A photo of the markings (text) on the side of the box is required in case a part is
needed for replacement. This helps our staff identify your product number to
ensure you receive the correct parts.
A photo of the damage is always required to file a claim and get your replacement
or refund processed quickly. Please make sure you have the box even if it is
damaged.
Email us directly from marketplace where your item was purchased with the
attached images and a description of your claim.
EN
Return / Damage Claim Instructions
Instructions De Retour / Réclamation De Dommages
Modèle de produit : chargeur sans fil 15 W
Sortie de charge sans fil : efficacité de charge 15 W/10 W/7,5 W/5
W ;
Sortie de charge filaire : efficacité de charge de 10 W
Norme de charge sans fil : compatible avec la norme WPCv1.2.4 ;
Récepteur de charge sans fil : prend en charge les téléphones
mobiles à charge sans fil et le récepteur standard QI
Prend en charge 5 W, Apple 7,5 W, charge Samsung 10 W
Tension et courant d'entrée : DC9-12V/2-3A
Puissance de charge filaire USB/TYPE-C : 5 V 2 A, 10 W.
Si USB et TYPE-C chargent en même temps, la puissance de
charge est de 5V 1A
Fréquence de travail : 100 kHz-205 kHz
Distance de charge : lors de l'utilisation de la charge sans fil, elle
doit être placée à l'avant du chargeur. Il est recommandé de
contacter le chargeur à distance zéro.
Protection de sécurité : puce intelligente et logiciel intégrés qui
empêchent efficacement les surintensités, les courts-circuits, les
surchauffes, etc.
REMARQUE:
1. Cette station de charge doit être tenue à l'écart des
environnements à haute température (>45 ℃) et à basse
température (<-20℃) et des enfants.
2. Veuillez utiliser un chiffon doux et sec pour nettoyer la surface.
Les produits chimiques, savons ou détergents sont interdits.
FR
18 19
Instructions De Retour / Réclamation De Dommages
Dans le cas où un retour est requis, l'article doit être retourné dans sa boîte
d'origine. Sans cela, votre retour ne sera pas accepté.
NE PAS jeter la boîte/l'emballage d'origine.
Prenez une photo des marquages de la boîte.
Prenez une photo des dommages (le cas échéant).
Envoyez-nous un e-mail avec les images demandées.
Une photo des marquages (texte) sur le côté de la boîte est requise au cas où
une pièce serait nécessaire pour le remplacement. Cela aide notre personnel à
identifier votre numéro de produit pour s'assurer que vous recevez les bonnes
pièces.
Une photo des dommages est toujours requise pour déposer une réclamation et
obtenir rapidement votre remplacement ou votre remboursement. Assurez-vous
d'avoir la boîte même si elle est endommagée.
Envoyez-nous un e-mail directement depuis le marché où votre article a été
acheté avec les images ci-jointes et une description de votre réclamation.
FR
In case a return is required, the item must be returned in original box. Without this
your return will not be accepted.
DO NOT discard the box / original packaging.
Take a photo of the box markings.
Take a photo of the damaged part (if applicable).
Send us an email with the images requested.
A photo of the markings (text) on the side of the box is required in case a part is
needed for replacement. This helps our staff identify your product number to
ensure you receive the correct parts.
A photo of the damage is always required to file a claim and get your replacement
or refund processed quickly. Please make sure you have the box even if it is
damaged.
Email us directly from marketplace where your item was purchased with the
attached images and a description of your claim.
EN
Return / Damage Claim Instructions
Instructions De Retour / Réclamation De Dommages
Modèle de produit : chargeur sans fil 15 W
Sortie de charge sans fil : efficacité de charge 15 W/10 W/7,5 W/5
W ;
Sortie de charge filaire : efficacité de charge de 10 W
Norme de charge sans fil : compatible avec la norme WPCv1.2.4 ;
Récepteur de charge sans fil : prend en charge les téléphones
mobiles à charge sans fil et le récepteur standard QI
Prend en charge 5 W, Apple 7,5 W, charge Samsung 10 W
Tension et courant d'entrée : DC9-12V/2-3A
Puissance de charge filaire USB/TYPE-C : 5 V 2 A, 10 W.
Si USB et TYPE-C chargent en même temps, la puissance de
charge est de 5V 1A
Fréquence de travail : 100 kHz-205 kHz
Distance de charge : lors de l'utilisation de la charge sans fil, elle
doit être placée à l'avant du chargeur. Il est recommandé de
contacter le chargeur à distance zéro.
Protection de sécurité : puce intelligente et logiciel intégrés qui
empêchent efficacement les surintensités, les courts-circuits, les
surchauffes, etc.
REMARQUE:
1. Cette station de charge doit être tenue à l'écart des
environnements à haute température (>45 ℃) et à basse
température (<-20℃) et des enfants.
2. Veuillez utiliser un chiffon doux et sec pour nettoyer la surface.
Les produits chimiques, savons ou détergents sont interdits.
FR
18 19

HU10330
Vanity Set with Mirror
Coiffeuse avec Miroir
THIS INSTRUCTION BOOKLET CONTAINS IMPORTANT SAFETY INFORMATION. PLEASE READ AND KEEP FOR FUTURE REFERENCE.
If you're having difficulty, our friendly
customer team is always here to help.
USA office: Fontana AUS office: Truganina
GBR office: Ipswich FRA office: Saint Vigor d'Ymonville
AUS:cs.au@costway.com
GBR:cs.uk@costway.com
FRA:cs.fr@costway.com