INSTRUCTION MANUAL
ITM. / ART. 1776312
Thank you for choosing BLACK+DECKER!
PLEASE READ BEFORE RETURNING THIS PRODUCT FOR
ANY REASON.
If you have a question or experience a problem with your BLACK+DECKER
purchase, go to www.blackanddecker.com/instantanswers
If you can’t find the answer or do not have access to the Internet, call
844-299-0879 from 10:30 a.m. to 6:30 p.m. EST Mon. - Fri. to speak with an
agent. Please have the catalog number available when you call.
SAVE THIS MANUAL FOR FUTURE REFERENCE.
CATALOG NUMBER
BP05JWAWF
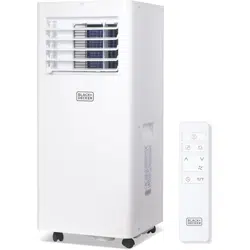
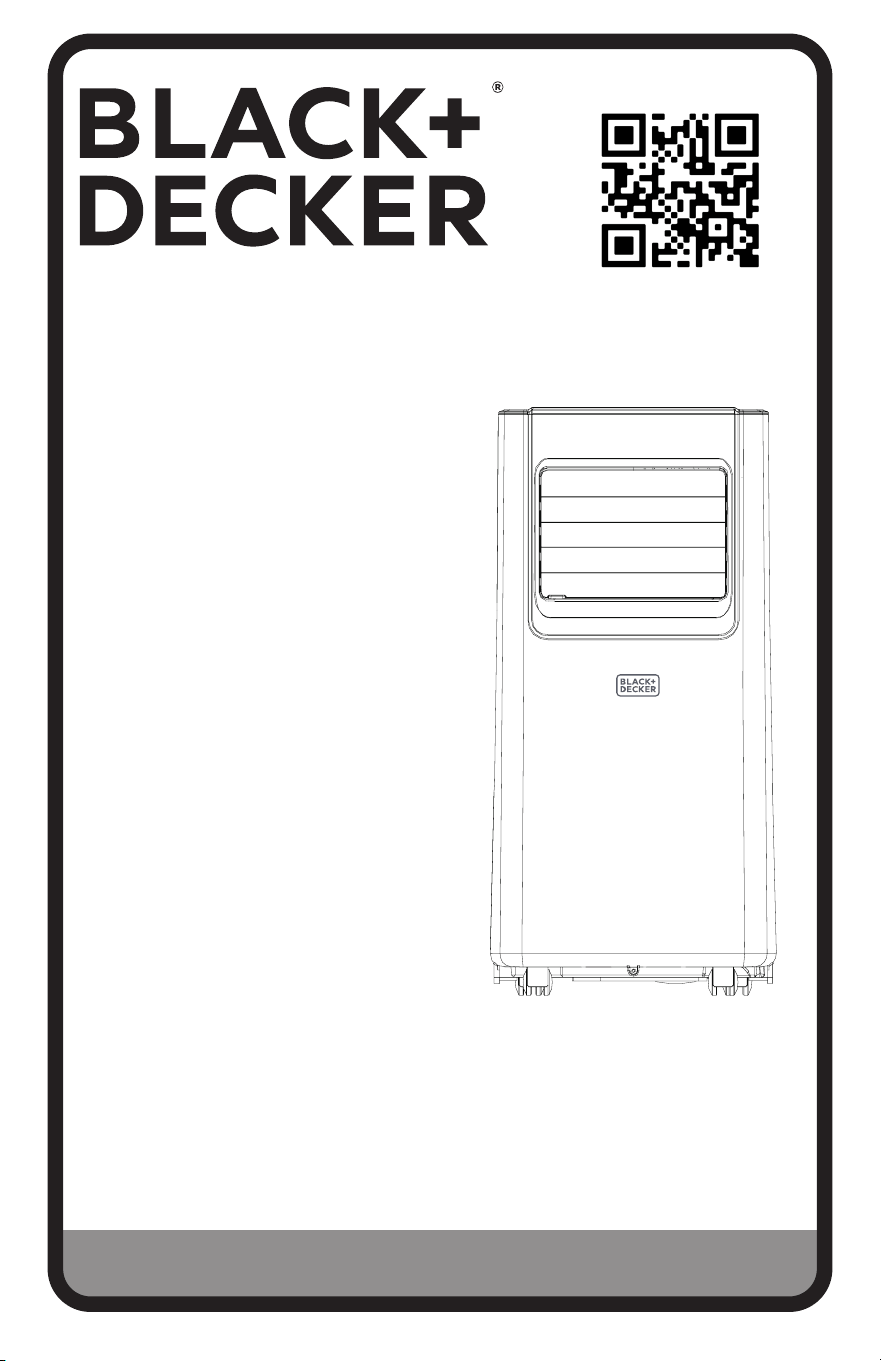
SMART PORTABLE
AIR CONDITIONER

Page 2
Thank you for purchasing our
BLACK+DECKER product. This
easy-to-use manual will guide you
in getting the best use of your air
conditioner.
Remember to record the model and
serial numbers. They are on a label
on the rear.
Staple your receipt to your manual.
You will need it to obtain warranty service.
Model number
Serial number
Date of purchase
PRODUCT REGISTRATION
CONTENTS
SAFETY INFORMATION
Important Safety Instructions ..........................................................................................................................................3-4
Grounding Instructions ......................................................................................................................................................... 5
LCDI Power Cord and Plug ................................................................................................................................................ 6
Safety Guidelines ................................................................................................................................................7-11
SET UP & USE
Parts & Features ......................................................................................................................................................................12
Installation Guide ...................................................................................................................................................13
Window Slider Kit Installation ...........................................................................................................................14
Exhaust Hose Installation .................................................................................................................................... 15
Control Panel ..................................................................................................................................................... 16-18
Downloading the App and Operating with Wi-Fi ..............................................................................19-33
Connect Using Bluetooth .................................................................................................................................. 34
Controlling the Portable Air Conditioner with the App .................................................................. 35-36
Voice Control Device Settings ..................................................................................................................37-38
Set up Voice Control with Alexa .............................................................................................................. 39-42
Set up Voice Control with Google Assistant ...................................................................................... 43-46
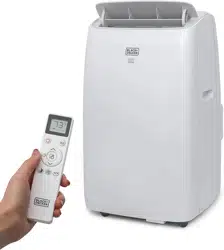
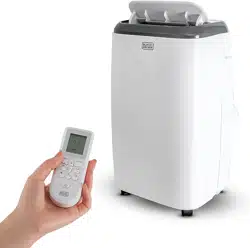
Operating from the Remote Control .......................................................................................................47-51
Water Drainage .....................................................................................................................................................52
CLEANING & CARE .............................................................................................................................................53
TROUBLESHOOTING & WARRANTY
Before You Call For Service ............................................................................................................................. 54
Customer Service ................................................................................................................................................. 54
Troubleshooting ............................................................................................................................................. 55-57
Limited Warranty .................................................................................................................................................................. 58
Page 3
SAFETY INFORMATION
IMPORTANT SAFETY INSTRUCTIONS
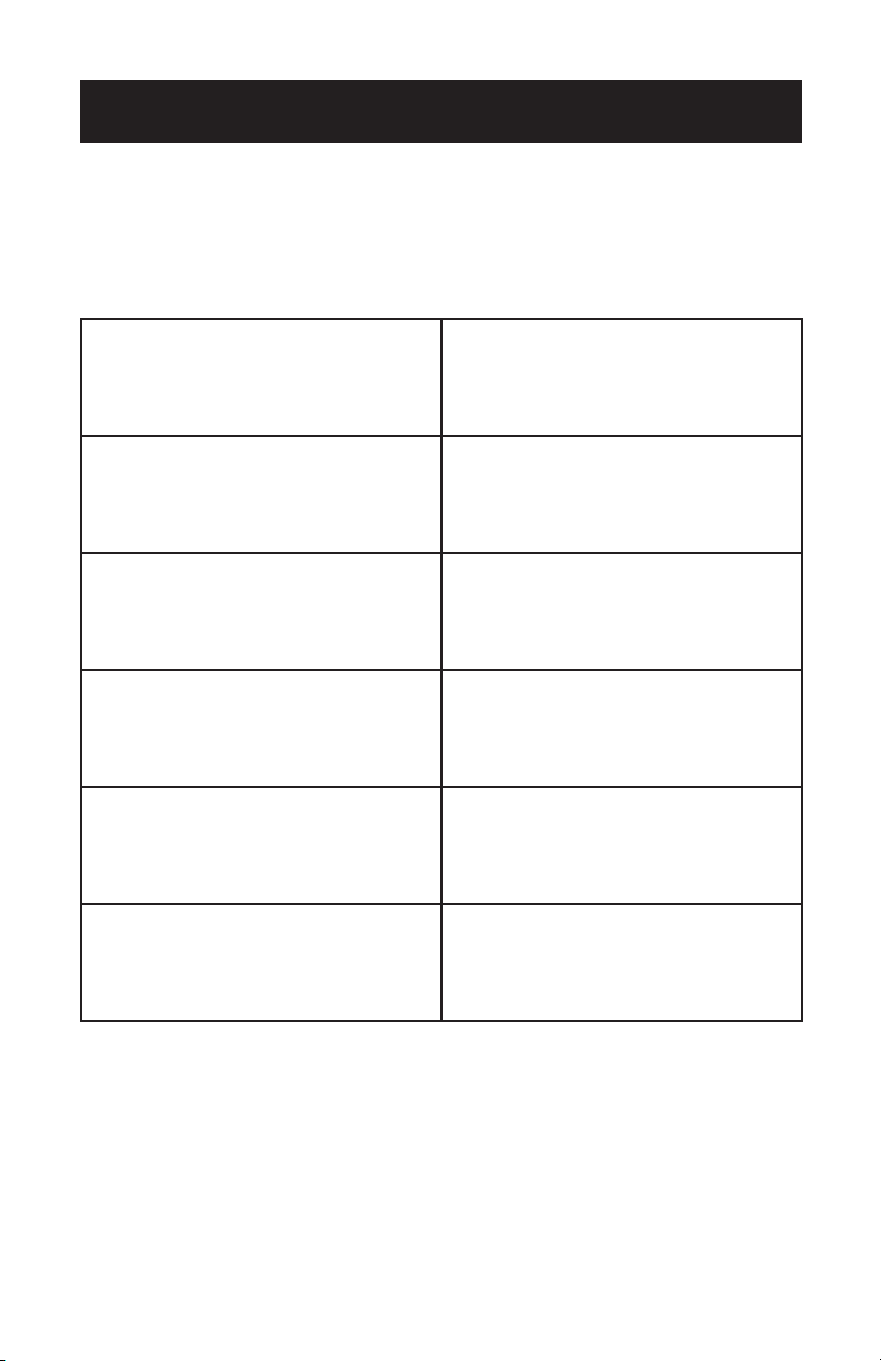
WARNING
WARNING - Hazards or unsafe
practices which COULD result in
severe personal injury or death
DANGER
DANGER - Immediate hazards
which WILL result in severe
personal injury or death
CAUTION
CAUTION - Hazards or unsafe
practices which COULD result in
minor personal injury
WARNING
When using electrical appliances, basic safety precautions
should be followed, including the following
1. To reduce risk of injury, read this guide before using the appliance.
2. The air conditioner must be connected to the correct electrical outlet and
electrical supply.
3. Proper grounding must be ensured to reduce the risk of shock and fire. DO NOT
CUT OR REMOVE THE GROUNDING PRONG. If you do not have a
three-prong electric receptacle outlet in the wall, have a certified electrician
install the proper receptacle. The wall receptacle MUST be properly grounded.
4. Do not operate air conditioner if power cord is frayed or otherwise damaged.
Avoid using it if there are any cracks or abrasion damage along the length, plug
connector or if the unit malfunctions or is damaged in any manner.
Contact an authorized service technician for examination, repairs or
adjustments.
5. DO NOT USE AN ADAPTER OR AN EXTENSION CORD.
6. Do not block airflow around the air conditioner. The exhaust hose should be free
of any obstructions.
7. Always unplug the air conditioner before servicing it or moving it.
8. Do not install or use the air conditioner in any area where the atmosphere
contains combustible gases or where the atmosphere is oily or sulphurous.
Avoid any chemical coming in contact with your air conditioner.
9. Do not place any object on the top of the unit.
10. Never operate the air conditioner without filters in place.
11. Do not use the air conditioner near a bathtub, shower or wash basin.
12. This appliance is not intended for use by persons (including children) with
reduced physical sensory or mental capabilities or lack of experience &
knowledge, unless they have been given supervision or instruction
concerning use of the appliance by a person responsible for their safety.
13. Children should be supervised to ensure that they do not play with the
appliance.
14. If the SUPPLY CORD is damaged, it must be replaced by the manufacturer, a
service agent or similarly qualified persons in order to avoid a hazard.
15. The air conditioner shall be installed in accordance with national wiring
regulations.

Page 4
HANDLING ALKALINE BATTERIES
WARNING
When handling alkaline batteries, basic safety precautions
should be followed, including the following
SAFETY INFORMATION
1. Should uid from the battery accidentally get into your eyes, there is a threat
of loss of eyesight, do not rub them. Immediately rinse your eyes with clean tap
water and then consult a physician immediately.
2. Do not put the battery in a re, expose it to heat, dismantle or modify it. If the
insulation or safety valve is damaged, the battery may leak uid, overheat or
explode.
3. Do not insert the battery with the polarities reversed. Doing so may cause some
abnormality or a short and the battery may leak uid, overheat or explode.
4. Keep the battery out of the reach of children. If the battery is swallowed, contact
a physician immediately.
5. If the alkali uid gets in your mouth, rinse your mouth with water and contact a
physician immediately.
6. If the alkali uid gets on your skin or clothes, it may burn your skin, thoroughly
rinse the affected area with tap water.
7. Do not mix new and old batteries or other makes of batteries. The different
attributes may cause the battery to leak uid, overheat or explode.
8. This battery was not made to be recharged. Recharging this battery may damage
the insulation or internal structure and may cause the battery to leak uid,
overheat or explode.
9. Do not damage or remove the label on the exterior of the battery. Doing so may
cause the battery to short, leak uid, overheat or explode.
10. Do not drop, throw or expose the battery to extreme impact. Doing so may cause
the battery to leak uid, overheat or explode.
11. Do not alter the shape of the battery. If the insulation or safety valve is damaged,
the battery may leak uid, overheat or explode.
12. Immediately remove batteries when they have lost all power. Leaving the
batteries in the unit for a long time may cause the batteries to leak uid, overheat
or explode due to gas that is generated by the batteries.
13. Remove the batteries from the unit when not using the unit for an extended
period of time. The batteries may leak uid, overheat or explode due to gas that
is generated by the batteries.
14. Do not apply solder directly to the batteries. The heat may cause the batteries to
leak uid, overheat or explode.
15. Do not get the batteries wet. Doing so may cause the batteries to overheat.
16. Store batteries someplace out of direct sunlight where the temperature and
humidity are not high. Not doing so may cause the batteries to leak uid,
overheat or explode. Also, it may cause the life and performance of the batteries
to decline.
17. Follow the regulations of the local government when disposing of these batteries.
18. NEVER mix alkaline, standard (carbon-zinc), rechargeable (nickel-cadmium)
batteries with this product.
19. Clean the battery contacts and also those of the device prior to battery
installation.
SAVE THESE INSTRUCTIONS
HOUSEHOLD USE ONLY
Page 5
SAFETY INFORMATION
GROUNDING INSTRUCTIONS
ELECTRICAL REQUIREMENTS
In the event of malfunction or breakdown, grounding provides a path of least
resistance for electric current to reduce the risk of electric shock. The appliance
must be connected to a cord having an equipment-grounding conductor
and a grounding plug. The plug must be plugged into an appropriate outlet
that is properly installed and grounded in accordance with all local codes and
ordinances.
DANGER - Improper connection of the equipment grounding conductor can
result in a risk of electric shock. The conductor with insulation having an outer
surface that is green with or without yellow stripes is the equipment grounding
conductor. If repair or replacement of the cord or plug is necessary, do not
connect the equipment-grounding conductor to a live terminal. Check with
a qualied electrician or service person if the grounding instructions are not
completely understood, or if in doubt as to whether the appliance is properly
grounded. Do not modify the plug connected to the appliance - if it will not t
the outlet, have a proper outlet installed by a qualied electrician.
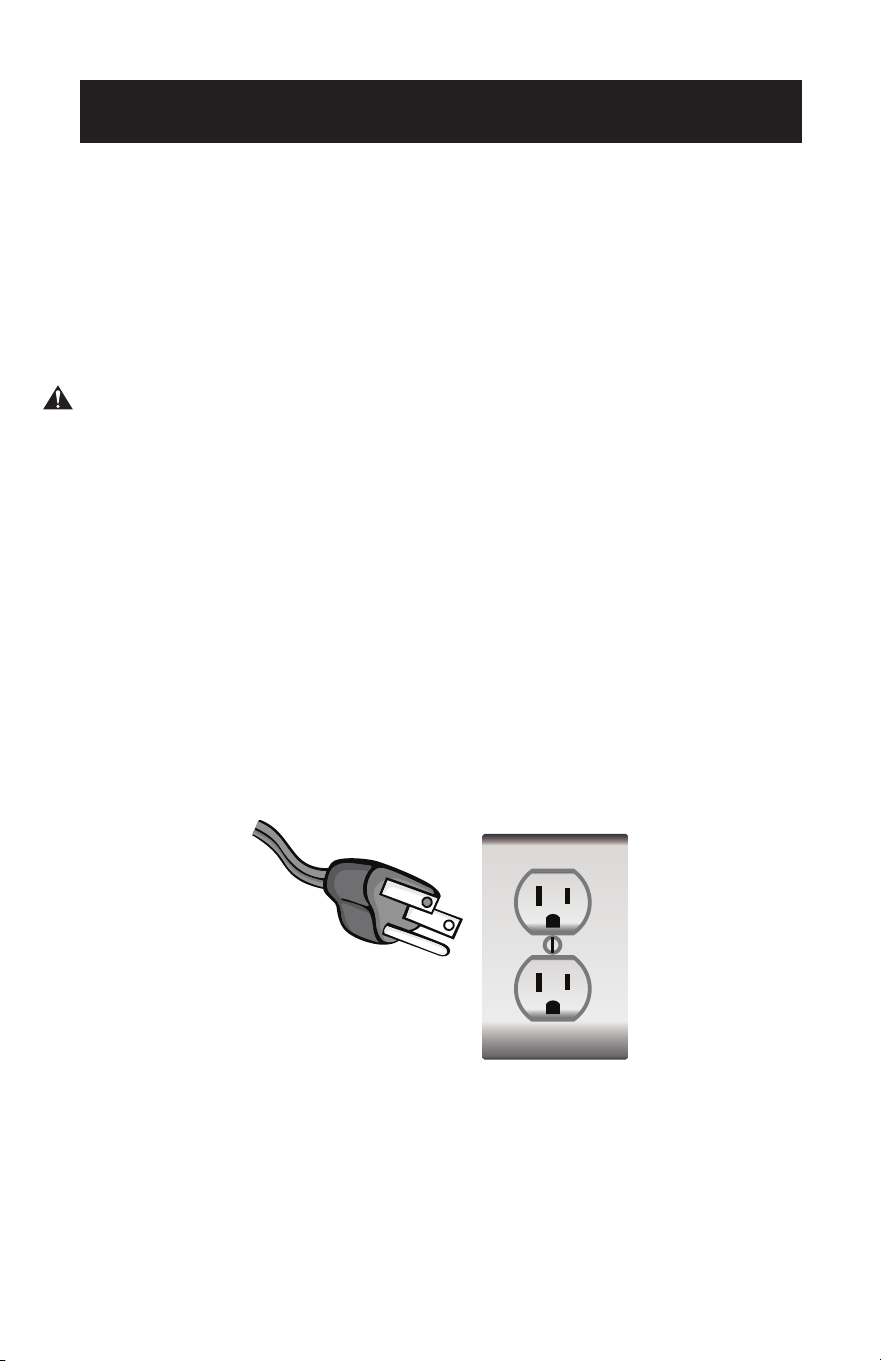
FOR GROUNDED, CORD-CONNECTED APPLIANCE RATED LESS THAN 15A
AND INTENDED FOR USE ON A NOMINAL 120V SUPPLY CIRCUIT
The appliance is for use on a nominal 120V circuit and should be connected
to a grounding outlet that looks like the one illustrated below. The use of a
temporary adapter is not recommended.
Page 6
SAFETY INFORMATION
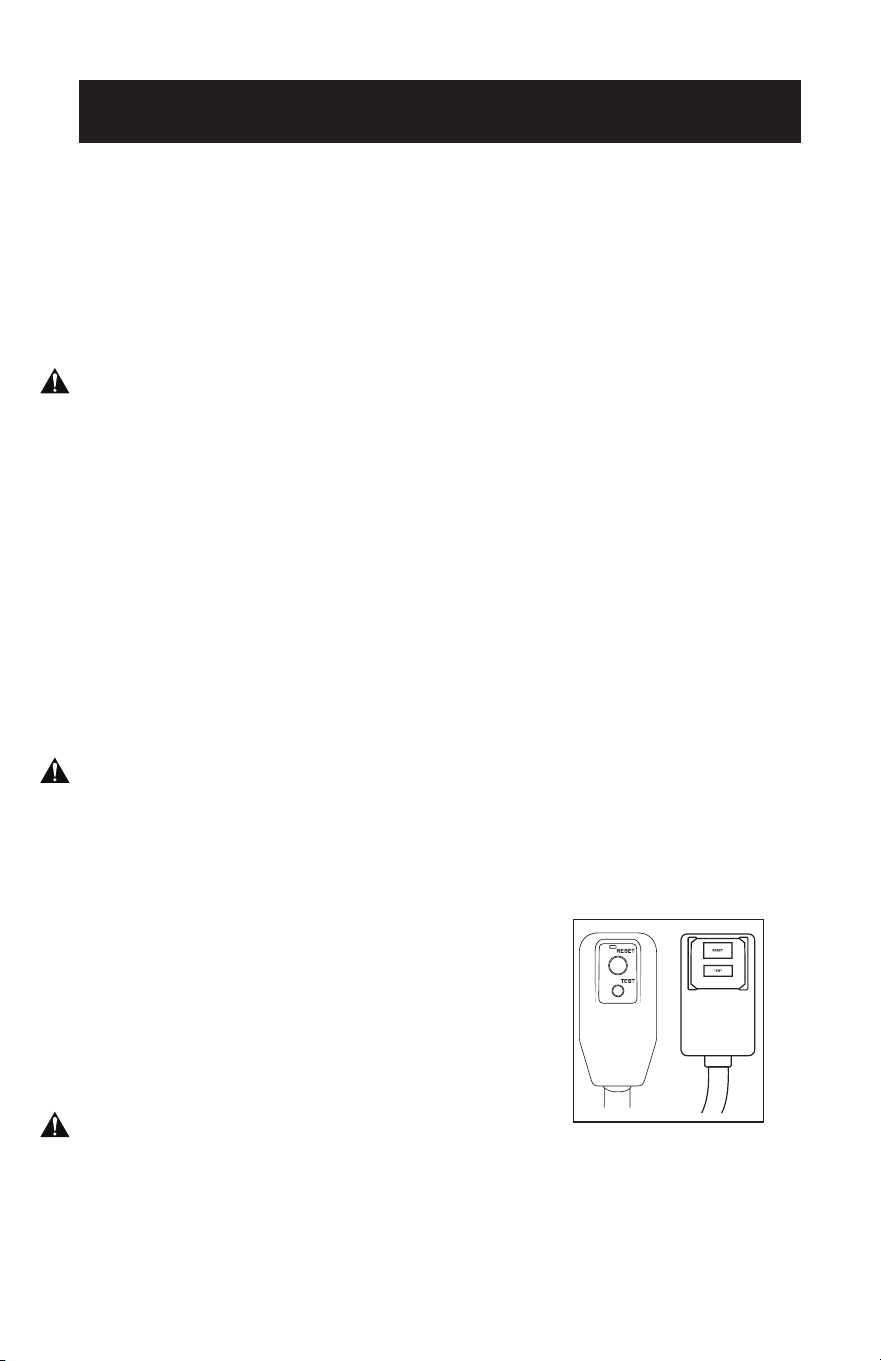
LCDI POWER CORD AND PLUG
This air conditioner is equipped with an LCDI (Leakage Current Detection and
Interruption) power cord that is required by UL. This power supply cord contains
state-of-the-art electronics that sense leakage current. If the cord is damaged and
leakage occurs, power will be disconnected from the unit.
The test and reset buttons on the LCDI Plug are used to check if the plug is
functioning properly.
WARNING: Test LCDI before each use.
To test the plug:
1. Plug power cord into a grounded 3-prong outlet.
2. Press RESET (on some units a green light will turn on).
3. Press the TEST button, the circuit should trip and cut all power to the air
conditioner (on some units green light may turn o).
4. Press the RESET button for use. You will hear a click and the A/C is ready for use.
5. The power supply cord must be replaced if it fails to trip when the TEST button
is pressed and the unit fails to reset.
NOTE:
• Do not use this device to turn the unit on or o.
• Always make sure the reset button is pushed in for correct operation.
WARNING:
• The power supply cord must be replaced if it fails to reset when either the test
button is pushed, or it cannot be reset.
• If power supply cord is damaged, it can not be repaired.
• It must be replaced by one obtained from the product manufacturer.
WARNING - RISK OF FIRE
• It is important the plug fits tightly into the wall outlet.
• If the plug does not fit securely and appears loose, it should not be used.
• Have a licensed electrician replace the receptacle.

Page 7
SAFETY INFORMATION
SAFETY GUIDELINES
WARNING: To prevent injury to the user or other people and property damage,
the following instructions must be followed. Incorrect operation due to
ignoring of instructions may cause harm or damage.
ALWAYS DO THIS NEVER DO THIS ENERGY SAVE
• Your air conditioner should be
used in such a way that it is
protected from moisture.
e.g. condensation, splashed
water, etc. Do not place or
store your air conditioner
where it can fall or be pulled
into water or any other liquid.
Unplug immediately.
• Always transport your air
conditioner in a vertical
position and stand on a stable,
level surface during use.
• If the unit has been transported
on it’s side, make sure to stand
in an upright position for 6
hours before turning on unit.
• Turn o the product when not
in use.
• Always use the switch on the
control panel to start or shut
o the unit.
• Always contact a qualified
person to carry out repairs. If
the supply cord is damaged it
must be repaired by a qualified
technician.
• Keep an air path of at least 12
inches all around the unit from
walls, furniture and curtains.
• If the air conditioner is knocked
over during use, turn o the
unit and unplug from the
power supply immediately.
• Do not operate your
air conditioner in a wet
room such as a
bathroom or laundry
room.
• Do not touch the unit
with wet or damp hands
or when barefoot. Do
not press the buttons
on the control panel
with anything other than
your fingers.
• Do not remove any
fixed covers. Never use
this appliance if it is not
working properly, or if
it has been dropped or
damaged.
• Never use the plug to
start and stop the unit.
• Do not cover or
obstruct the inlet or
outlet grilles.
• Do not use hazardous
chemicals to clean or
come into contact with
the unit. Do not use the
unit in the presence of
flammable substances
or vapor such as alcohol,
insecticides, gasoline
etc.
• Do not allow children to
operate the unit
unsupervised.
• Do not use this product
for functions other than
those described in this
instruction manual.
• Locate the unit where
furniture cannot
obstruct the air flow.
• Keep blinds / curtains
drawn.
• Keep the filters clean.
• Keep doors and windows
closed to keep cool air in
and warm air out.

Page 8
SAFETY INFORMATION
IMPORTANT SAFEGUARD
WARNING:
• This hermetically sealed system contains fluorinated greenhouse gases.
ENVIRONMENTAL INFORMATION: This unit contains fluoridated greenhouse gases
covered by the Kyoto Protocol.
• Do not use this unit for functions other than those described in this instruction
manual.
• Make sure the plug is plugged firmly and completely into the outlet. It can result in
the risk of electric shock or fire.
• Do not plug other appliances into the same outlet, it can result in the risk of electric
shock.
• Do not disassemble or modify the appliance or the power cord, it can result in the
risk of electric shock or fire. All other services should be referred to a qualified
technician.
• Do not place the power cord or appliance near a heater, radiator, or other heat
source. It can result in the risk of electric shock or fire.
• This unit is equipped with a cord that has an earthed wire connected to an earthed
pin or grounding tab. The plug must be plugged into a socket that is properly
installed and earthed. Do not under any circumstances cut or remove the earthed
pin or grounding tab from this plug.
• The unit should be used or stored in such a way that it is protected from moisture
e.g. condensation, splashed water, etc. Unplug unit immediately if this occurs.
• Always transport your appliance in a vertical position and place on a stable, level
surface during use. If the unit is transported laying on its side it should be stood
up and left unplugged for at least 6 hours.
• Always use the switch on the control panel or remote controller to turn the unit o,
and do not start or stop operation by plugging in or unplugging the power cord. It
can result in the risk of electric shock.
• Do not touch the buttons on the control panel with wet and damp fingers.
• Do not use hazardous chemicals to clean or come into contact with the unit. To
prevent damage to the surface finish, use only a soft cloth to clean the appliance,
Do not use wax, thinner, or a strong detergent. Do not use the unit in the presence
of inflammable substance or vapor such as alcohol, insecticides, gasoline, etc.
• If the appliance is making unusual sounds or is emitting smoke or an unusual odor,
unplug it immediately.
• Do not clean the unit with water. Water can enter the unit and damage the
insulation, creating a shock hazard. If water enters the unit, unplug it immediately
and contact Customer Service.
• Utilize two or more people to lift and install the unit.
• Always grasp the plug when plugging in or unplugging the appliance. Never unplug
by pulling on the cord. It can result in the risk of electrical shock and damage.
• Install the appliance on a sturdy, level floor capable of supporting up to 110 lbs
(50kg). Installation on a weak or unlevel floor can result in the risk of property
damage and personal injury.
ELECTRICAL CONNECTIONS
Before plugging the appliance into the mains socket, check that:
• The mains power supply corresponds to the value indicated on the rating plate on
the back of the appliance.
• The power socket and electrical circuit are adequate for the appliance.
• The mains socket matches the plug. If this is not the case, have the plug replaced.
• The mains socket is adequately earthed. Failure to follow these important safety
instructions absolves the manufacturer of all liability.
Page 9
SAFETY INFORMATION
WARNING:
• This appliance is not intended for use by persons (including children) with
reduced physical, sensory or mental capabilities, or lack of experience and
knowledge, unless they have been given supervision or instruction concerning
use of the appliance by a person responsible for their safety.
• Children should be supervised to ensure that they do not play with the appliance.
• If the SUPPLY CORD is damaged, it must be replaced by the manufacturer, its
service agent or similarly qualified persons in order to avoid a hazard.
• The appliance shall be installed in accordance with national wiring regulations.
• Do not use means to accelerate the defrosting process or to clean, other than
those recommended by the manufacturer.
• The appliance shall be stored in a room without continuously operating ignition
sources (for example open flames, an operating gas appliance or an operating
electric heater).
• Do not pierce or burn.
• Be aware that refrigerants may not contain an odor.
• The handling, installation, storage, servicing and disposal must comply with the
provisions of gas-related national laws and regulations, and also national wiring
regulation.
• It is necessary to clear away the refrigerant in the system when maintaining or
scrapping an appliance.
• Ventilated area (open doors and Windows)
Ensure that the working area is open or well ventilated before turning on
the system or performing hot work. Ventilation should be maintained during
operation. Ventilation quickly displaces safely diluted leaked refrigerant into the
atmosphere.
• Flammable refrigerant R32/R290 is used within appliance. Please follow the
instructions carefully to handle, install, clean, and service the appliance to
avoid damage or hazard. Do not dispose of appliance in regular trash. Contact
qualified agency for proper disposal.
• Servicing shall be performed only as recommended by the manufacturer.

Page 10
SAFETY INFORMATION
FCC Caution
This device complies with part 15 of the FCC Rules. Operation is subject to the
following two conditions:
(1) This device may not cause harmful interference, and (2) this device must accept
any interference received, including interference that may cause undesired operation.
Any changes or modifications not expressly approved by the party responsible for
compliance could void the user’s authority to operate the equipment.
NOTE: This equipment has been tested and found to comply with the limits for a
Class B digital device, pursuant to part 15 of the FCC Rules. These limits are
designed to provide reasonable protection against harmful interference in
a residential installation. This equipment generates uses and can radiate
radio frequency energy and, if not installed and used in accordance with
the instructions. may cause harmful interference to radio communications.
However, there is no guarantee that interference will not occur in a particular
installation. This equipment does cause harmful interference to radio or
television reception, which can be determined by turning the equipment o
and on, the user is encouraged to try to correct the interference by one or
more of the following measures:
• Reorient or relocate the receiving antenna.
• Increase the separation between the equipment and receiver.
• Connect the equipment into an outlet on a circuit dierence from that which the
receiver is connected.
• Consult the dealer or an experienced radio/TV technician for help. The distance
between user and device should be no less than 8” (20 cm).
FCC ID: 2ANDL-WBR3

Page 11
SAFETY INFORMATION
OPERATION CONDITION
The air conditioner must be operated within the temperature range indicated below:
NOTE: Unit performance may be affected when in use outside of these operating
temperatures.
MODE ROOM TEMPERATURE
COOL 64°F (18°C) ~ 95°F (35°C)
DRY 64°F (18°C) ~ 95°F (35°C)
Never Transport or turn the appliance upside down or on its side. If this occurs
wait at least 6 hours before turning the appliance on, 24 hours is recommended.
After the unit has been on its side, oil needs to return to the compressor to
ensure proper function. Without allowing 6-24 hours before turning on, the unit
may function for only a short time, and then the compressor will break down
from lack of oil.
The air conditioner should be operated in the relative humidity range of
30%~90% RH.
Page 12
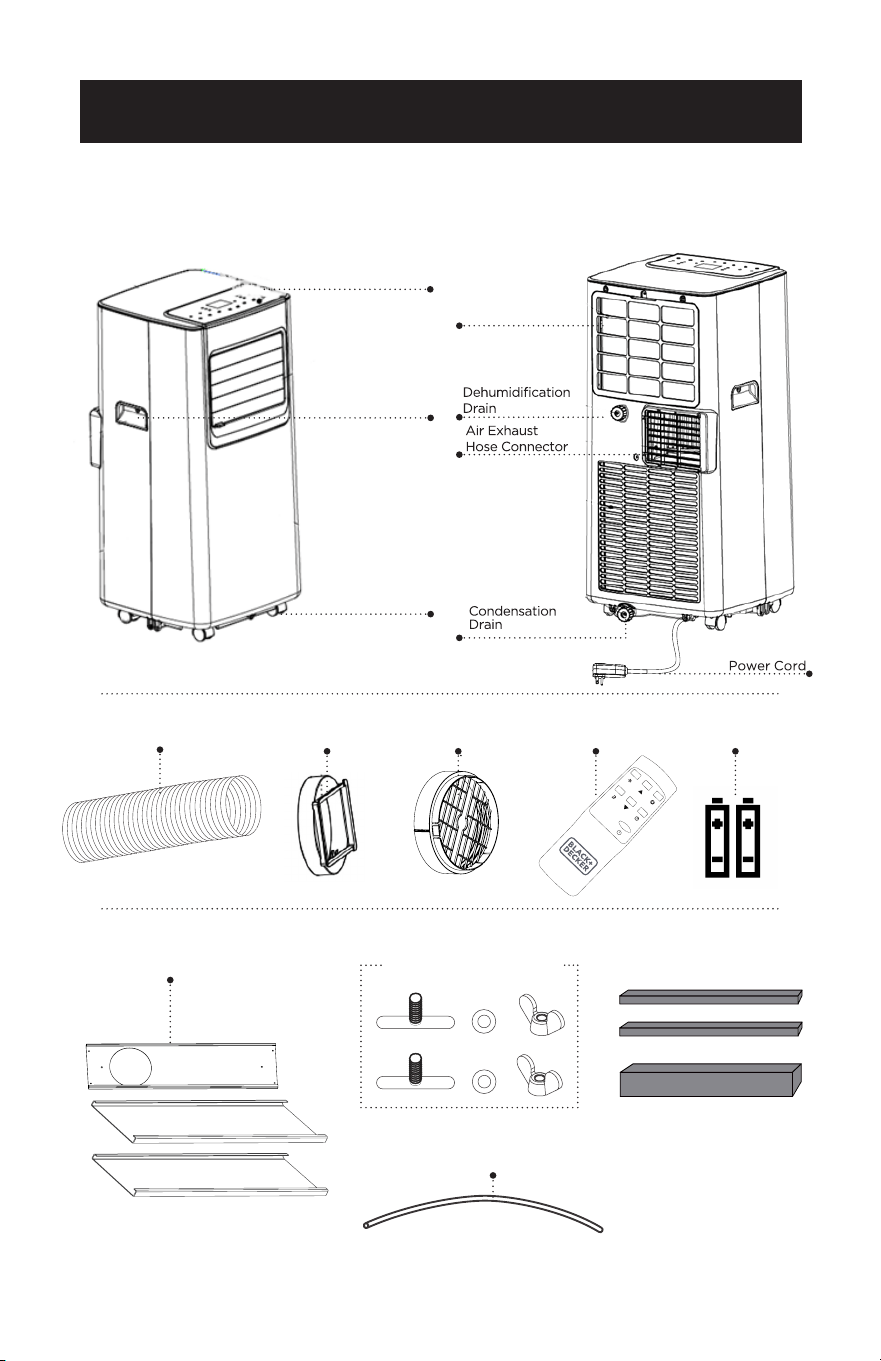
PARTS & FEATURES
Air Exhaust Hose
Hose OutletHose Inlet
Remote Control
2 x Wing Nut and Bolt
Foam Strip
Drain Hose
2 ft/0.6 m
SET UP & USE
Window Panel 3 PCS
Control
Panel
Evaporator
Filter
Handle
Casters (4)
2 AAA batteries

Page 13
SET UP & USE
INSTALLATION GUIDE
LOCATION
• The air conditioner should be placed on a rm oor to minimize noise and
vibration. For safe and secure positioning, place the unit on a smooth, level oor
strong enough to support the unit.
• The unit has casters to aid placement, but it should be rolled on smooth, at
surfaces. Use caution when rolling on carpet surfaces. Do not attempt to roll the
unit over objects.
• The unit must be placed within reach of a properly rated grounded socket.
• Never place any obstacles around the air inlet or outlet of the unit.
• It is recommended to allow at least 31.5 inches of clearance between the sides of
the portable air conditioner and at least 19.7 inches of space between the top of
the portable air conditioner and any adjacent obstacles for optimal air ow.
SUGGESTED TOOLS FOR WINDOW KIT INSTALLATION
• Screwdrivers (medium size Phillips)
• Tape measure or ruler
• Knife or scissors
• Saw (In the event that the window kit needs to be cutdown in size because the
window is too narrow for direct installation)

Page 14
WINDOW SLIDER KIT INSTALLATION
Your window slider kit has been designed to t most standard “Vertical” and
“Horizontal” window applications; however, it may be necessary for you to
improvise/modify some aspect of the installation procedures for certain types of
window. Minimum and maximum window openings:
MAXIMUM: 59” (150 cm) MINIMUM: 29.5” (75 cm)
NOTE: Adjust the length of the window slider kit according to the window width or height,
and secure it with the provided locking screws.
NOTE: If the window opening is less than 29.5” the minimum length of the window slider kit,
measure and cut the panel with a hole in it to t the window opening. Never cut out
the hole in the window slider kit.
DOUBLE-HUNG SASH/SLIDING CASEMENT
WINDOW INSTALLATION
1. Cut the foam seal (adhesive type) to the proper length and attach it to the
window sash.
2. Attach the window slider kit to the
window sash. Adjust the length of
the window slider kit according to
the width of window. Shorten the
adjustable window kit if the width
of window is less than 29.5”.
3. Cut the foam seal (adhesive type)
to the proper length and attach it
on the bottom side of the window.
Insert the window slider kit into the
window track.
4. Close the window to secure the
window slider kit in place.
5. Cut the foam seal to an
appropriate length and seal the
open gap between the top window
frame and outer window frame.
Horizontal WindowVertical Window
Window Slider Kit
SET UP & USE
Foam
Seal
Foam
Seal
Foam
Seal
Window
Slider Kit
Window
Slider Kit
29.5”– 59”
Foam
Seal
Window
Slider Kit
Window
Slider Kit
29.5”– 59”
Window Sash
Window slider kit can be secured
by inserting the bolt.
Put the nut on opposite side of
the hole.
Page 15
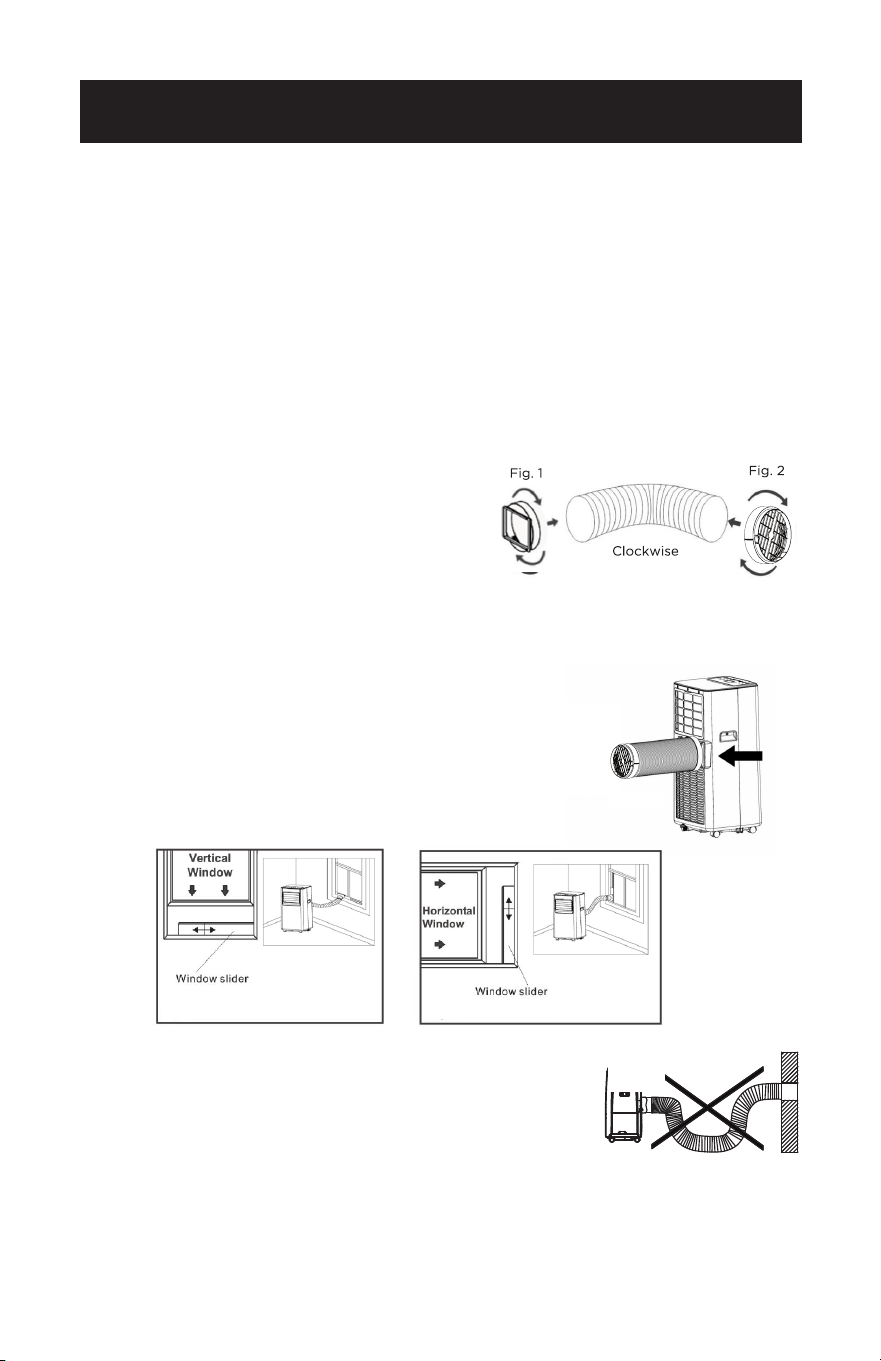
EXHAUST HOSE INSTALLATION
The air exhaust hose and hose inlet must be installed or removed from the portable
air conditioner in accordance with the way it is being used:
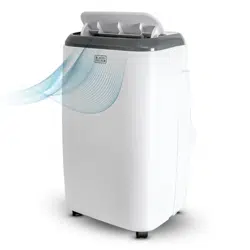
COOL, DRY:
Air exhaust hose and hose inlet should be connected to the portable air conditioner.
FAN: Air exhaust hose and hose inlet should be disconnected from the portable air
conditioner.
1. Connect hose inlet to one end of air exhaust hose. Push hose inlet over the end of
the hose, push in slightly and then start threading it on in a clockwise direction.
(see Fig. 1)
2. Connect hose outlet to other end of air exhaust hose. Push hose outlet over the
end of the hose, push in slightly and then start threading it on in a clockwise
direction. (see Fig. 2)
3. Align the tabs on the hose inlet into the slots over
the air outlet, insert and push down. (see Fig. 3)
4. Insert the hose outlet into the window panel.
5. Afx the hose outlet into the window slider kit and
seal. (Fig. 4 & 5)
NOTE: The exhaust hose can be compressed or extended
moderately, but it is desirable to keep the length to a
minimum. Also make sure that the hose does not
have any sharp bends.
Hook
SET UP & USE
Fig. 4 Fig. 5
Fig. 3
NOTE: Extend the exhaust hose to
the required length prior to
connecting the hose inlet and
outlet.
Page 16
Press the Increase Button and the Decrease Button at the same time to change from Fahrenheit to
Celsius.
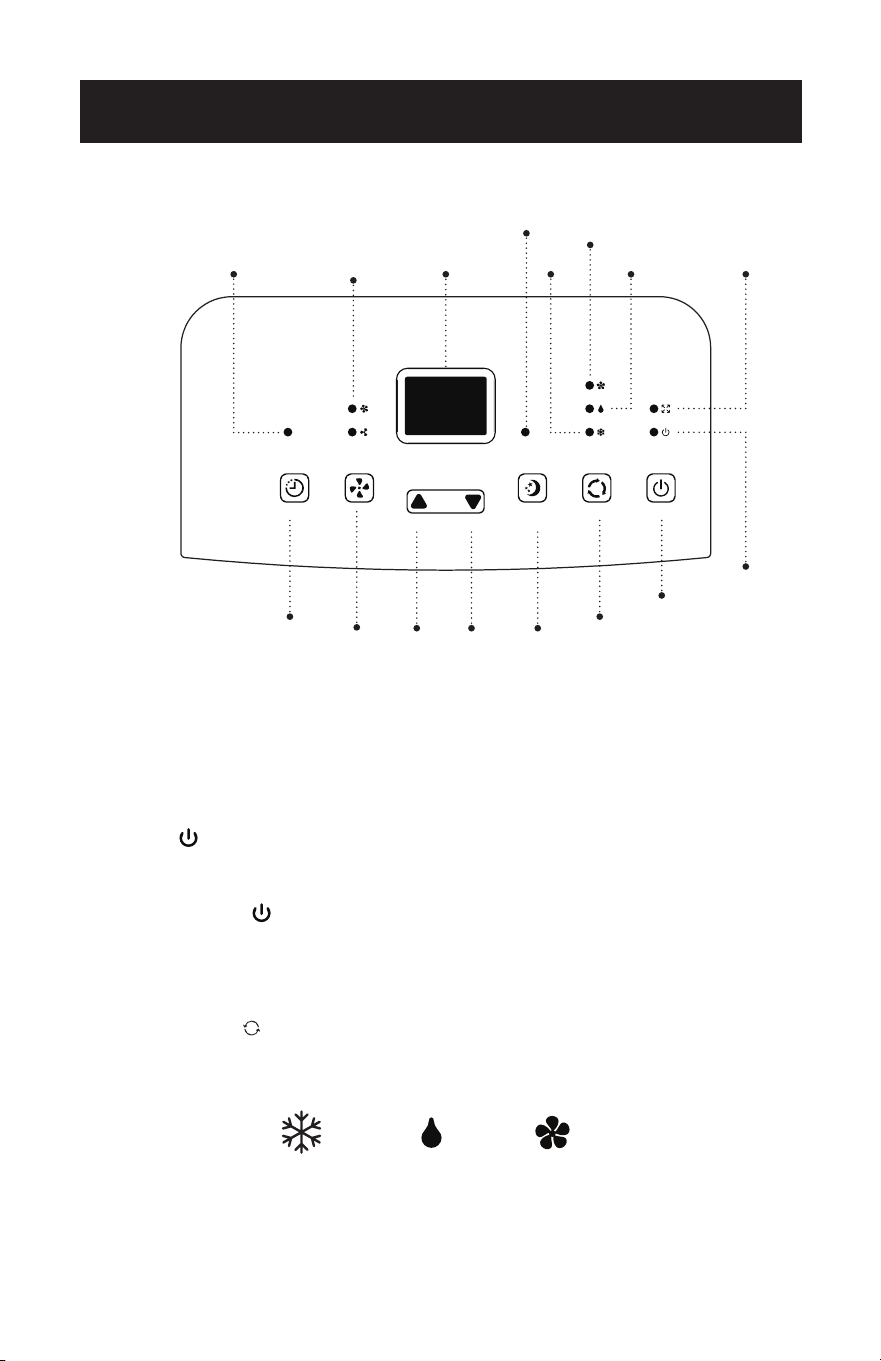
CONTROL PANEL
TURNING THE APPLIANCE ON
• Plug into the dedicated electrical outlet.
• Press the button until the appliance comes on. The last function active when
it was turned off will appear.
* Never turn the air conditioner off by unplugging from the outlet. Always press
the power button , then wait for a few minutes before unplugging. This
allows the appliance to perform a cycle of checks to verify operation.
NOTE: Before pressing Power button make sure the condensate drain plug in the
rear of the unit is securely in place to avoid any leaking.
• Press the MODE button until the light corresponding to the required Mode
lights up.
SET UP & USE
Power
Button
Sleep
Button
Mode
Selection
Button
Fan Speed
Indicator Light
Display
Area
Full Tank
Indicator Light
Power On
Indicator Light
Cool
Fan
Dry
Speed
Button
Timer
Button
Timer
Indicator Light
Decrease
Button
Increase
Button
COOL FANDRY
Sleep Mode
Indicator Light

Page 17
COOL MODE
Ideal for hot weather when
you need to cool the room.
To set operation of the appliance
correctly, press the or buttons until
the desired temperature is displayed.
(See Fig. 7)
Then select the fan speed by pressing
the Fan Speed Button until the light
corresponding to the required fan speed
lights up:
HIGH: The Fan operates at maximum
to reach the required
temperature as rapidly as
possible.
LOW: For quiet operation.
DRY
Press the “MODE” button until the Dry
Indicator light illuminates and “dh”
appears on the digital display.
• Under this mode, you cannot select a
fan speed or adjust the temperature.
The fan motor operates at LOW speed.
• Keep window and door closed for the
best dehumidifying effect.
• Exhaust hose attachment is not
required to reduce humidity, however
it is recommended in very humid
rooms so the warm air can be
exhausted outside.
DRAINING IN DRY MODE
• It is recommended that the
dehumidication drain and drain hose
can be used for continuous drainage.
• FULL TANK
- When the water level
reaches a predetermined level, the
“full tank” indicator light on the control
panel will blink. A buzzer will sound
and the unit will shut off. The unit will
have to be drained.
NOTE: Refer to Water Drainage section.
(page 52)
FAN MODE
• Press the “MODE” button until the
“FAN” indicator light comes on.
• Press the speed button to select HIGH,
or LOW fan speed. The temperature
cannot be adjusted.
• Exhaust hose attachment is not
required in this mode.
SET UP & USE

Page 18
SET UP & USE
TIMER
• To set the AUTO STOP timer.
When the unit is ON, press the
TIMER button.
• Press the or button to select the
AUTO TIME by 1 hour increments,
up to 24 hours. The LED Display will
indicate the remaining time. Press
the TIMER button again. The TIMER
indicator light illuminates to show
that the AUTO STOP program is
initiated.
• To set the AUTO START timer.
When the unit is OFF, press the
TIMER button.
• Press the or button to select the
AUTO TIME by 1 hour increments,
up to 24 hours. The LED Display will
indicate the remaining time. Press
the TIMER button again. The TIMER
indicator light illuminates to show
that the AUTO START program is
initiated.
• Pressing the POWER button or the
TIMER button will cancel the AUTO
START/STOP timed program and
the timer indicator light will not be
illuminated.
SLEEP
The SLEEP function gradually adjusts
the temperature of the room to
provide a comfortable environment.
Press the SLEEP button to activate.
In COOL mode, the fan will operate at
a lower speed and the temperature will
increase 1°F after an hour and 2°F after
2 hours.
To cancel this setting press the SLEEP
button again.
°C / °F
Press the Increase Button and the
Decrease Button on the control panel
at the same time to change the unit
of temperature from Fahrenheit to
Celsius.
Page 19
DOWNLOADING THE APP AND OPERATING
WITH Wi-Fi
SET UP & USE
FCC CAUTION (FCC ID: 2ANDL-WBR3)
• This device complies with part 15 of the FCC Rules. Operation is subject to the
following two conditions: (1) This device may not cause harmful interference, and
(2) this device must accept any interference received, including interference that
may cause undesired operation.
• Any Changes or modications not expressly approved by the party responsible for
compliance could void the user’s authority to operate the equipment.
NOTE: This equipment has been tested and found to comply with the limits for a
Class B digital device, pursuant to part 15 of the FCC Rules. These limits are
designed to provide reasonable protection against harmful interference in
a residential installation. This equipment generates, uses and can radiate
radio frequency energy and, if not installed and used in accordance with
the instructions, may cause harmful interference to radio communications.
However, there is no guarantee that interference will not occur in a particular
installation. If this equipment does cause harmful interference to radio or
television reception, which can be determined by turning the equipment off
and on, the user is encouraged to try to correct the interference by one or
more of the following measures:
-Reorient or relocate the receiving antenna.
-Increase the separation between the equipment and receiver.
- Connect the equipment into an outlet on a circuit different from that to which the
receiver is connected.
- Consult the dealer or an experienced radio/TV technician for help. The distance
between user and device should be no less than 7.87” (20 cm) .
• If the appliance has the Wi-Fi function, the transmission power: less than 20dBm,
and the radio frequency range is: 2412MHz - 2472MHz.
Operation
Steps
Operation
Items
New Account
Re-install APP
(registered before)
Step 1
Download and
Install APP
YES YES
Step 2 Registration Account YES NO
Step 3 Login YES YES
Step 4
Add Device to
control
YES
Registered Device
will remain.
Page 20
SET UP & USE
Wi-Fi MODULE SPECIFICATION AND BASIC INFORMATION
1. Minimum specifications on a Smart phone:
Android 5.0 version or higher
IOS 10.0 version or higher
2. Basic parameters for Wi-Fi:
Parameters Details
Network frequency 2.400 - 2.500GHz
Standards of WLAN IEEE 802.11 b/g/n(channels 1-14)
Protocol stack support
IPv4/IPv6/TCP/UDP/HTTPS/
TLS/Multicast DNS
Security support WEP/WPA/WPA2/AES128
Network type support STA/AP/STA+AP
While pairing the appliance to the network, press and hold the fan button on the
control panel of the appliance, for three seconds when prompted in the APP.
If you are changing modes, this sequence will need to be performed twice.
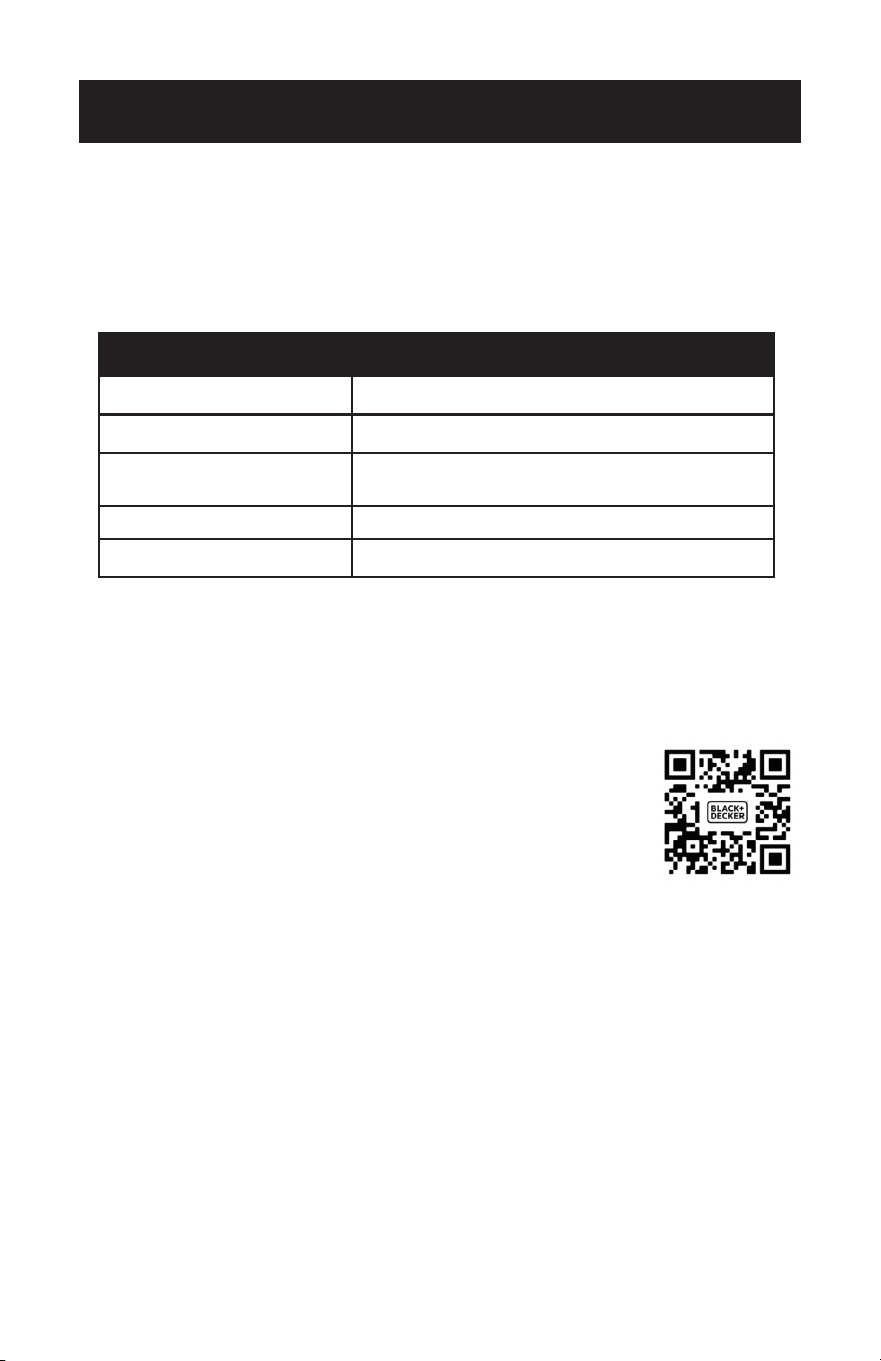
DOWNLOAD AND INSTALL THE APP
Option 1: Scan the QR code with the camera APP from a
smartphone. Download and install the APP.
Option 2: For Android smart phone, open the Google
“Play Store” on your smart phone and search
“BLACK+DECKER Home”, download and install the APP.
For IOS smart phone, open the Apple “APP STORE” on
your smart phone and search “BLACK+DECKER Home”,
download and install the APP.
NOTE: Updates to the APP design may occur. This manual is for reference.
Follow prompts in the APP.

Page 21
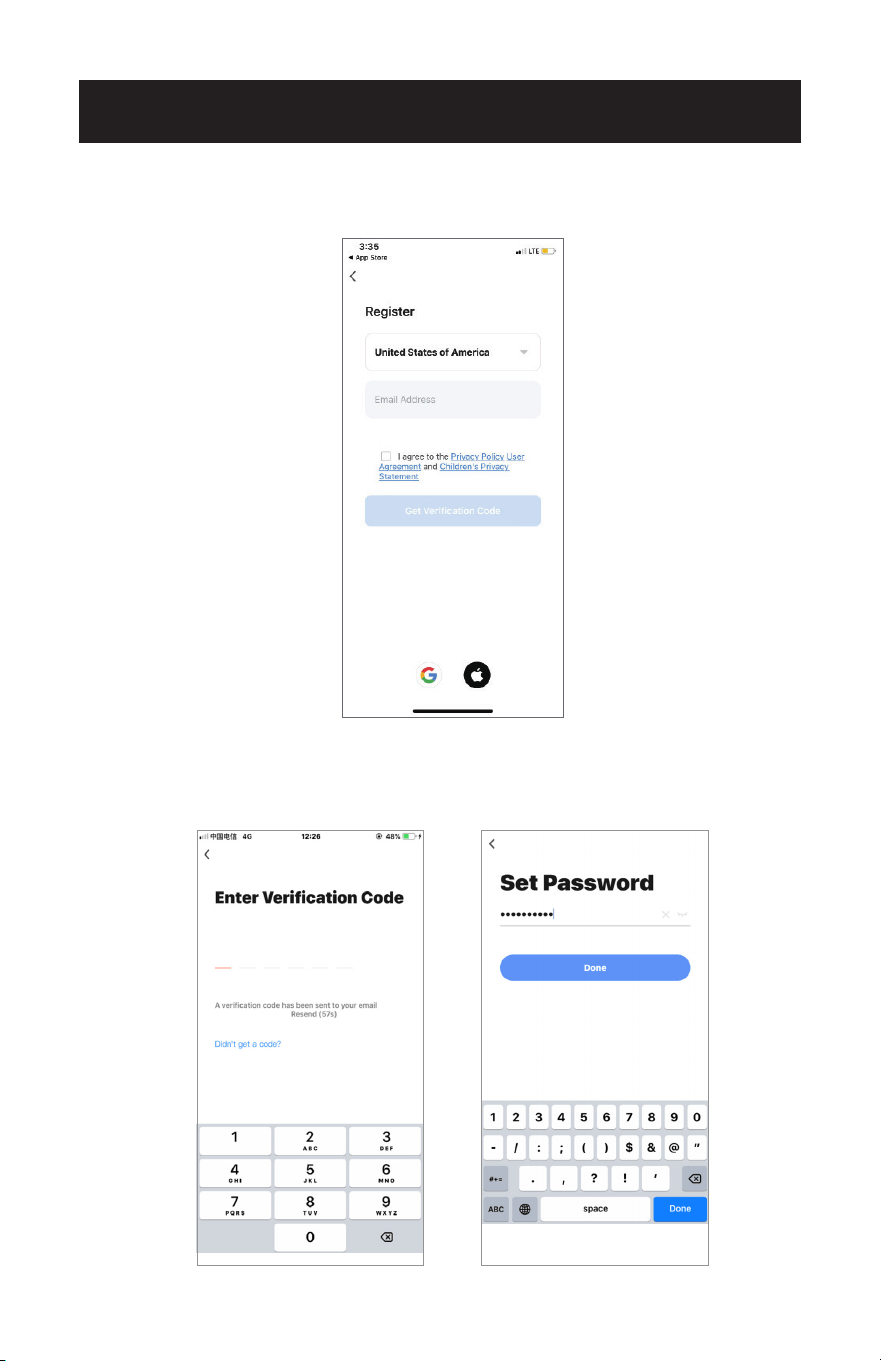
Wi-Fi CONNECTION METHODS
1. If you don’t have an account please tap button “Sign Up”.
2. Read the Privacy Policy and tap “Agree”.
3. Tap“▼” and choose the country.
SET UP & USE
Scroll to choose
the country.
Page 22
SET UP & USE
4. Enter your E-mail address.
5. Tap the button “Get verification code”.
6. Enter the verication code you received from E-mail.
7. Set the password with 6-20 characters including characters and numbers.
8. Tap “Done”.

Page 23
SET UP & USE
LOG IN
1. If you already have account, tap “Log In”.
2. Enter your registered account and password.
3. Tap “Log In” button.
RESETTING THE PASSWORD
If you forgot the password or you want to reset the password, operate as below:
1. Tap “Forgot Password”.
2. Enter your account (E-mail address) and tap button “Get Verication Code”.
3. Enter the verication code received by your E-mail.
4. Set the new password and tap button “Done”.
1. 2. 3. 4.
Page 24
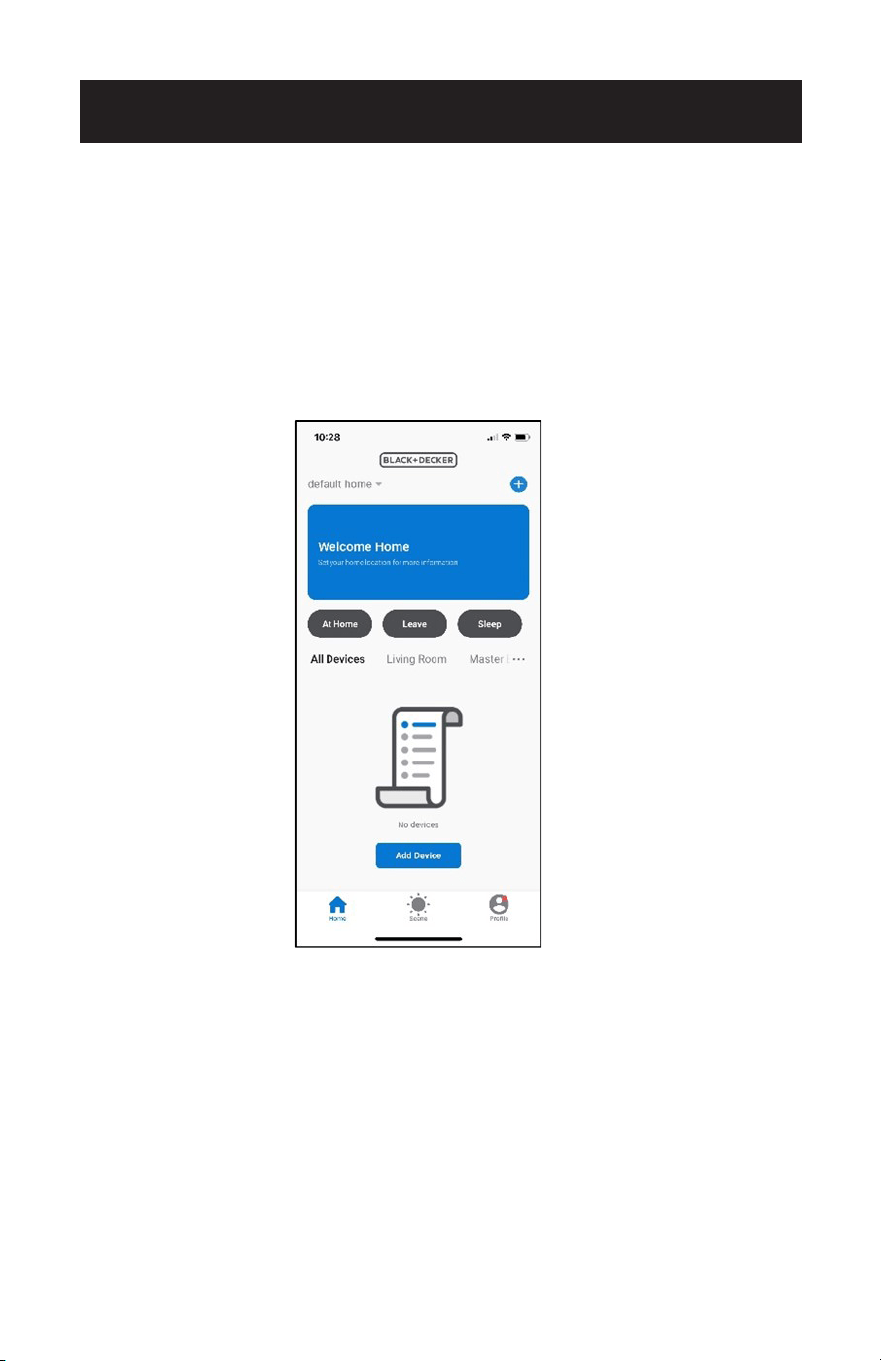
ENABLE LOCATION SETTINGS
SET UP & USE
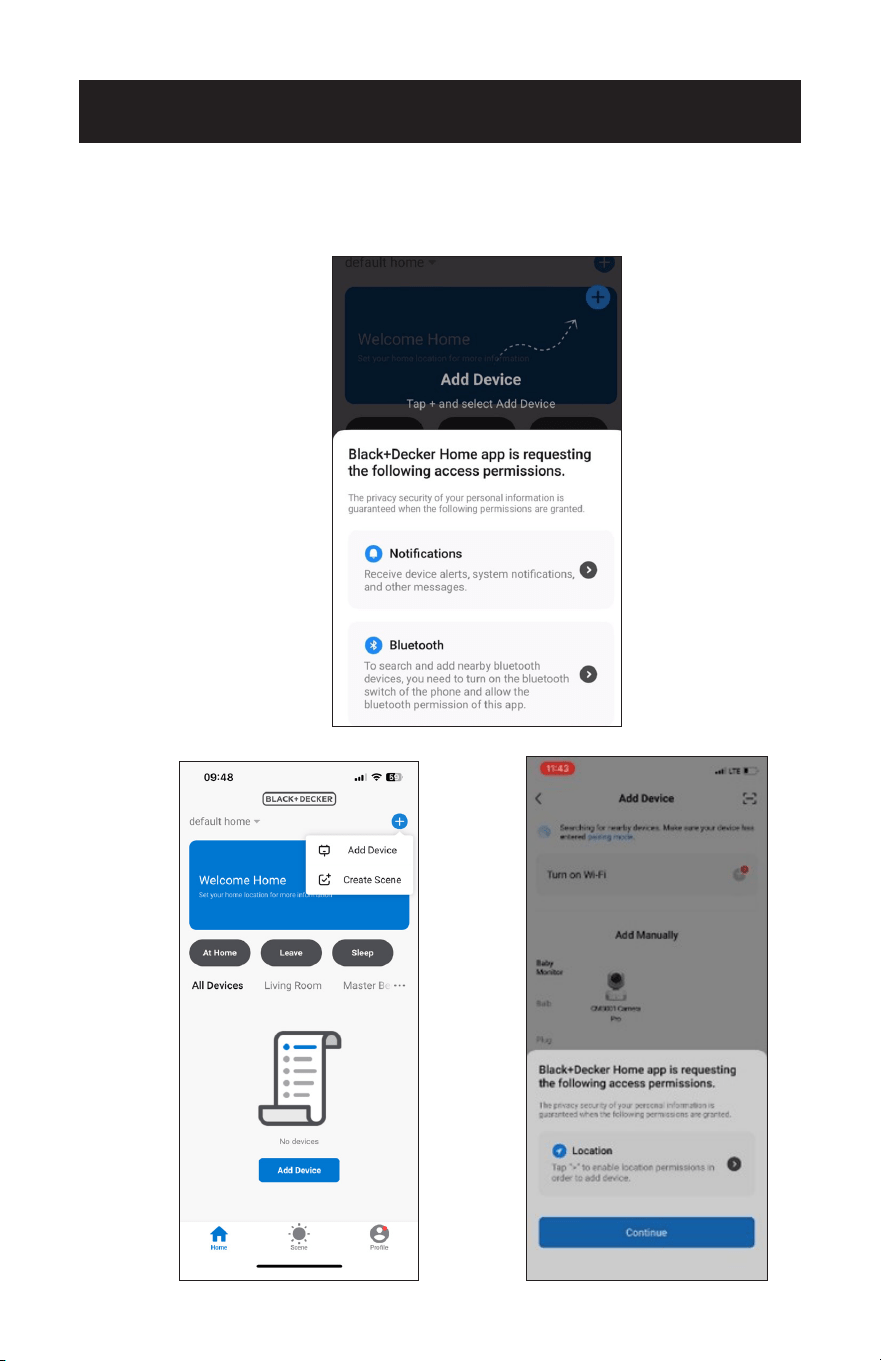
1. Once logged into the app, ensure that Bluetooth is enabled on your phone and that
permissions are enabled.
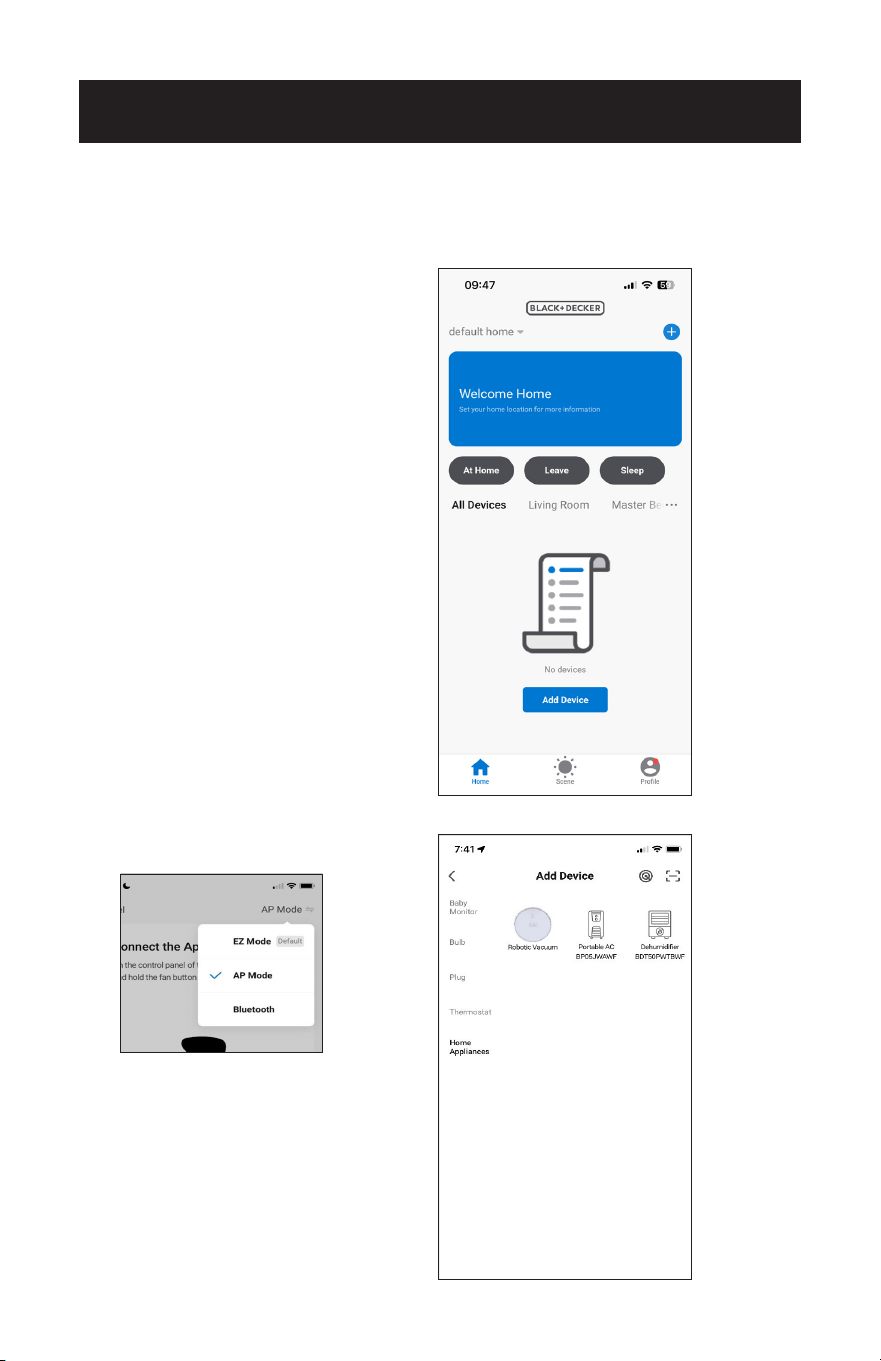
2. Tap on "Add Device" located in the top right corner of the screen.
Page 25
SET UP & USE
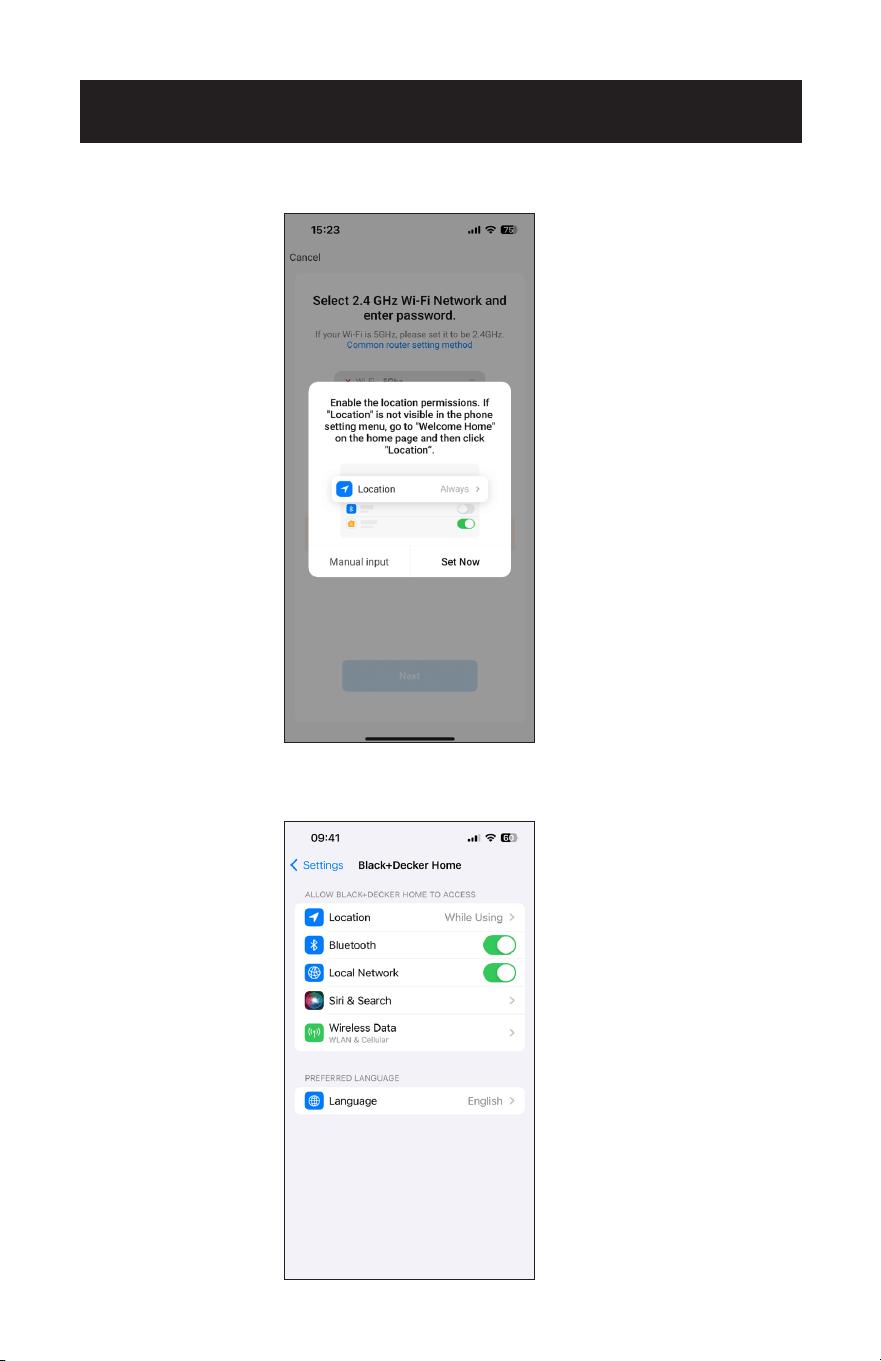
3. When location services are enabled, tap on "Set Now".
4. If there is diculty connecting to the app automatically, please ensure that
location services on your phone are turned "on" or "enabled".
Page 26
SET UP & USE
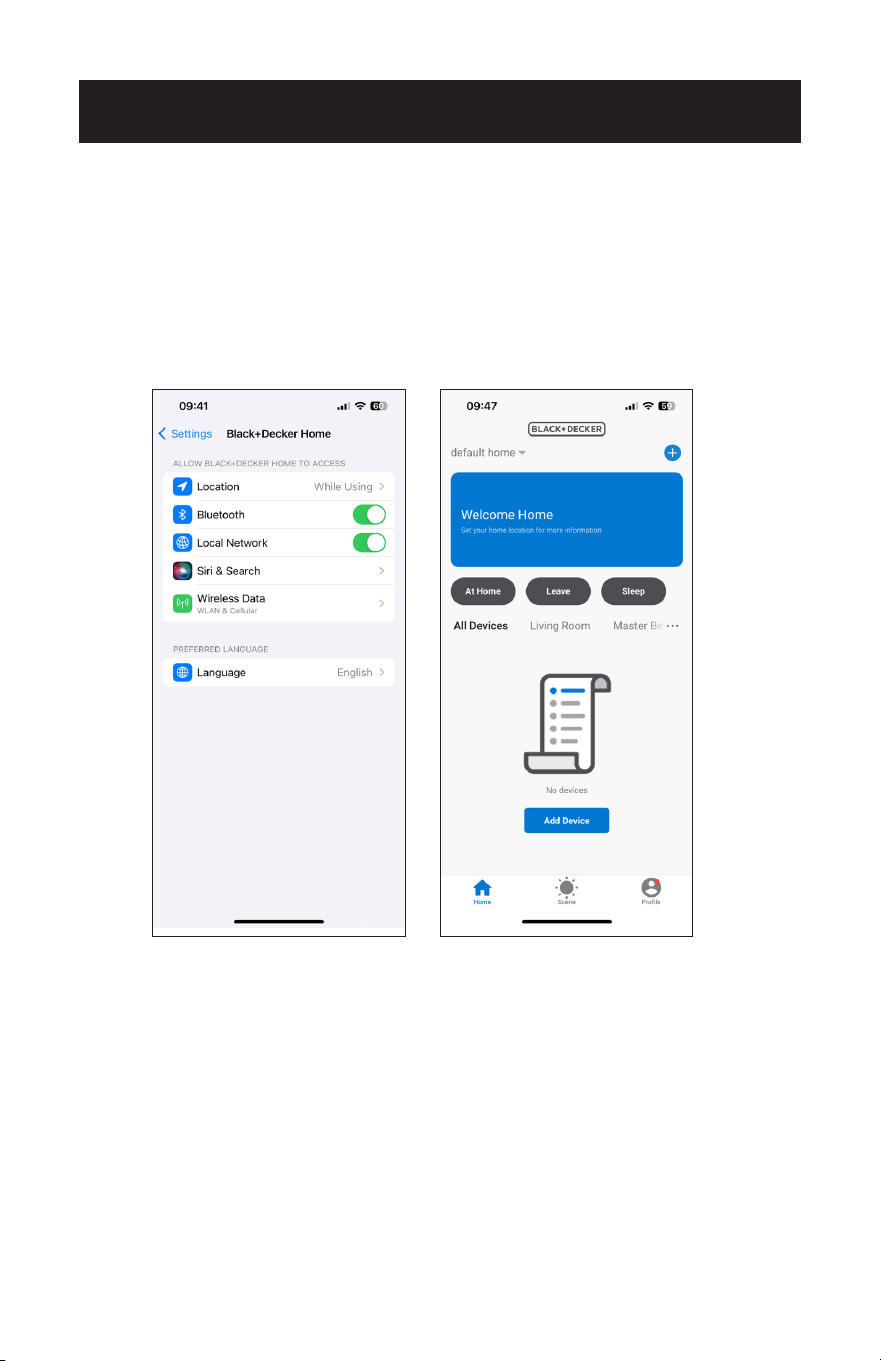
5. location settings, enable location services by accessing the Welcome Home Screen
within the app.
6. On the Welcome Home Screen, tap on "Location" and manually enter your current
location.
7. Follow the prompts to set up family member management, which allows dierent
profiles to control appliances according to their preferences.
8. Use the "Rooms" feature to organize multiple appliances by room.

Page 27
CONNECTING TO THE APPLIANCE USING EZ MODE
1. Click "+" in the upper right corner of the "Home" screen and select "Add device".
CONNECTION METHODS
SET UP & USE
There are two ways to connect the appliance to the APP.
EZ mode is the simplest and fastest way to connect.
AP mode is an alternate method to connect directly to the appliance.
Please make sure the appliance is plugged into a wall outlet and is in standby mode
before connecting it to the APP. Do not press the power button.

Page 28
2. Tap “Home Appliances”.
3. Tap “Portable AC BP05JWAWF”.
4. Tap “Set Now”.
5. Input the Wi-Fi name and password when prompted, then tap "Next".
SET UP & USE
Make sure to enable location. This will
allow the APP to automatically search
for the device.
LTE CPE_0A00
Page 29
SET UP & USE
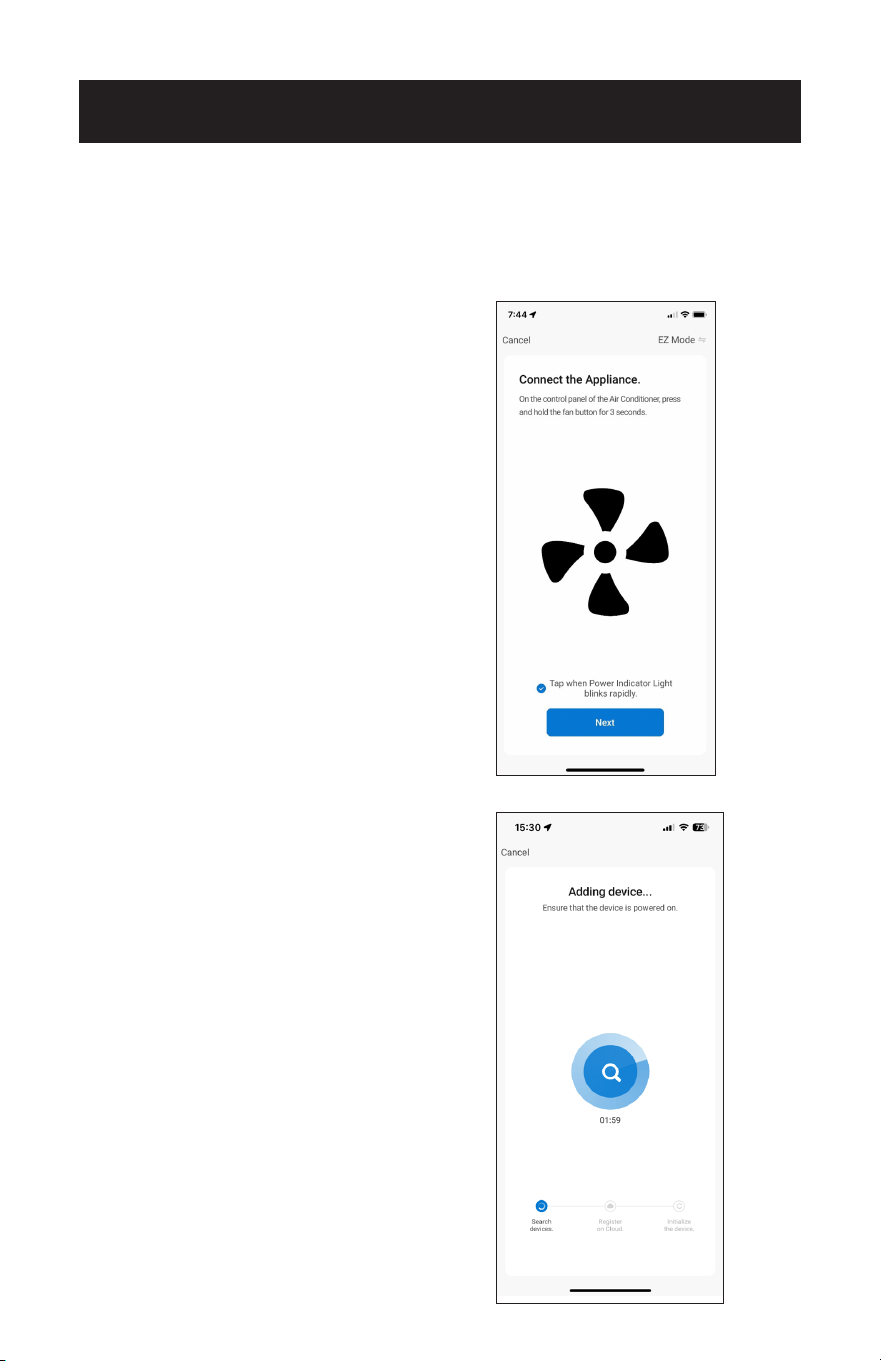
6. On the control panel, press and hold the fan button on the control panel of the
appliance, for 3 seconds when prompted in the APP.
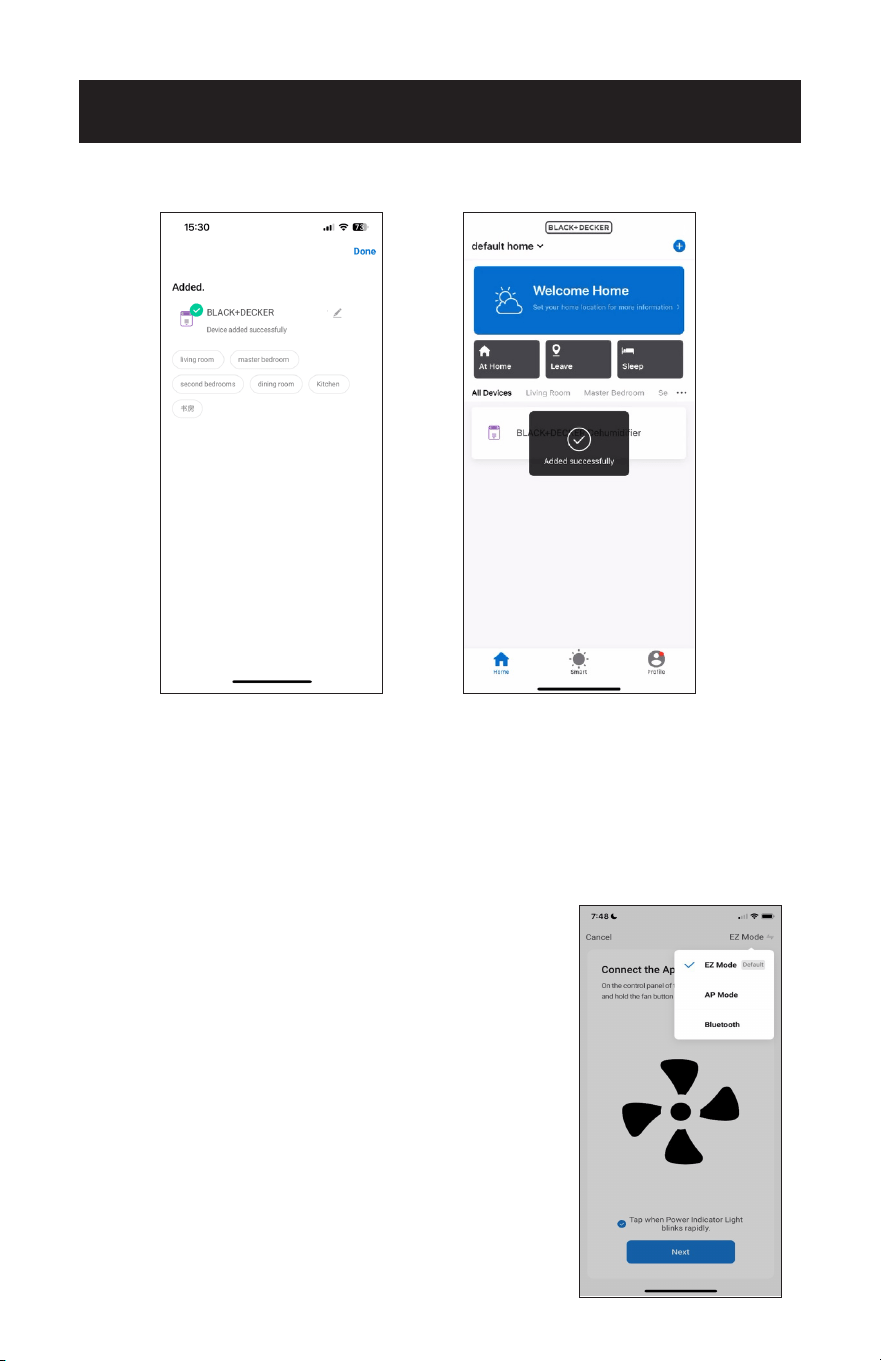
7. The power indicator light on the control panel of the unit will blink rapidly. Tap on
the phrase located on the bottom of the screen “Tap when Power Indicator Light
blinks rapidly”. Tap “Next”.
NOTE: The power indicator light on the
control panel of the unit will blink
rapidly. If it blinks slowly or does
not connect, repeat the process of
pressing and holding the fan button
for 3 seconds.
8. Wait for appliance to connect. This may take several seconds.
Page 30
9. Once connected, the Portable Air Conditioner can be controlled by the APP.
NOTE: If the APP is not connecting to the appliance in EZ mode, connect using AP
mode.
SET UP & USE
CHANGING MODES
1. Tap on the mode shown on the top right corner of the screen to access a window
displaying both EZ Mode and AP Mode.
2. Tap on a mode to change it. A checkmark shows the mode in use.
NOTE: In EZ mode, the power indicator light
on the control panel of the unit will blink
rapidly. If it blinks slowly or does not
connect, repeat the process of pressing and
holding the fan button for 3 seconds.
Portable AC
Page 31
SET UP & USE
CONNECTING TO THE APPLIANCE USING AP MODE
1. Click “+” in the upper right corner of the “Home” screen or tap “Add device”.
2. Tap “Home Appliances”.
3. Tap “Portable AC BP05JWAWF”.
Select "AP Mode" on the top right
corner of the screen.
Page 32
SET UP & USE
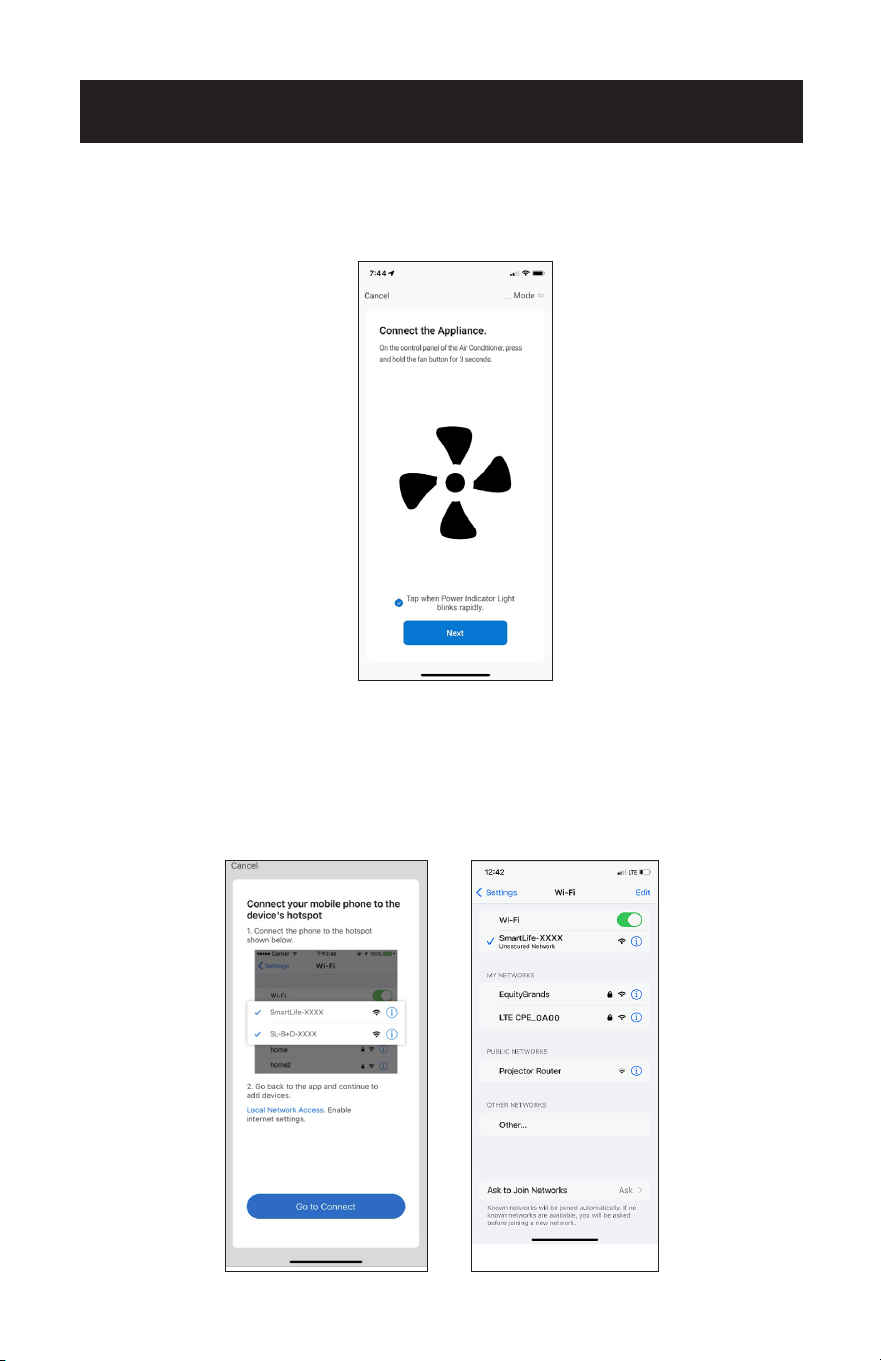
4. On the control panel, press and hold the fan button for 3 seconds.
5. The power indicator light on the control panel of the unit will blink slowly. Tap on
the phrase located on the bottom of the screen “Tap when Power Indicator Light
blinks slowly”. Tap “Next”.
NOTE: If the power indicator light on the control panel blinks rapidly. or does not
connect, repeat the process of pressing and holding the fan button for 3
seconds.
6. Input the Wi-Fi name and password when prompted, then tap “Next”.
7. Tap “Go to Connect”.
8. Select the SmartLife-XXXX hotspot.
AP

Page 33
9. Return to the APP. Wait for appliance to connect.
SET UP & USE
10. Once connected, the Portable Air Conditioner can be controlled by the APP.
Portable AC
Page 34
SET UP & USE
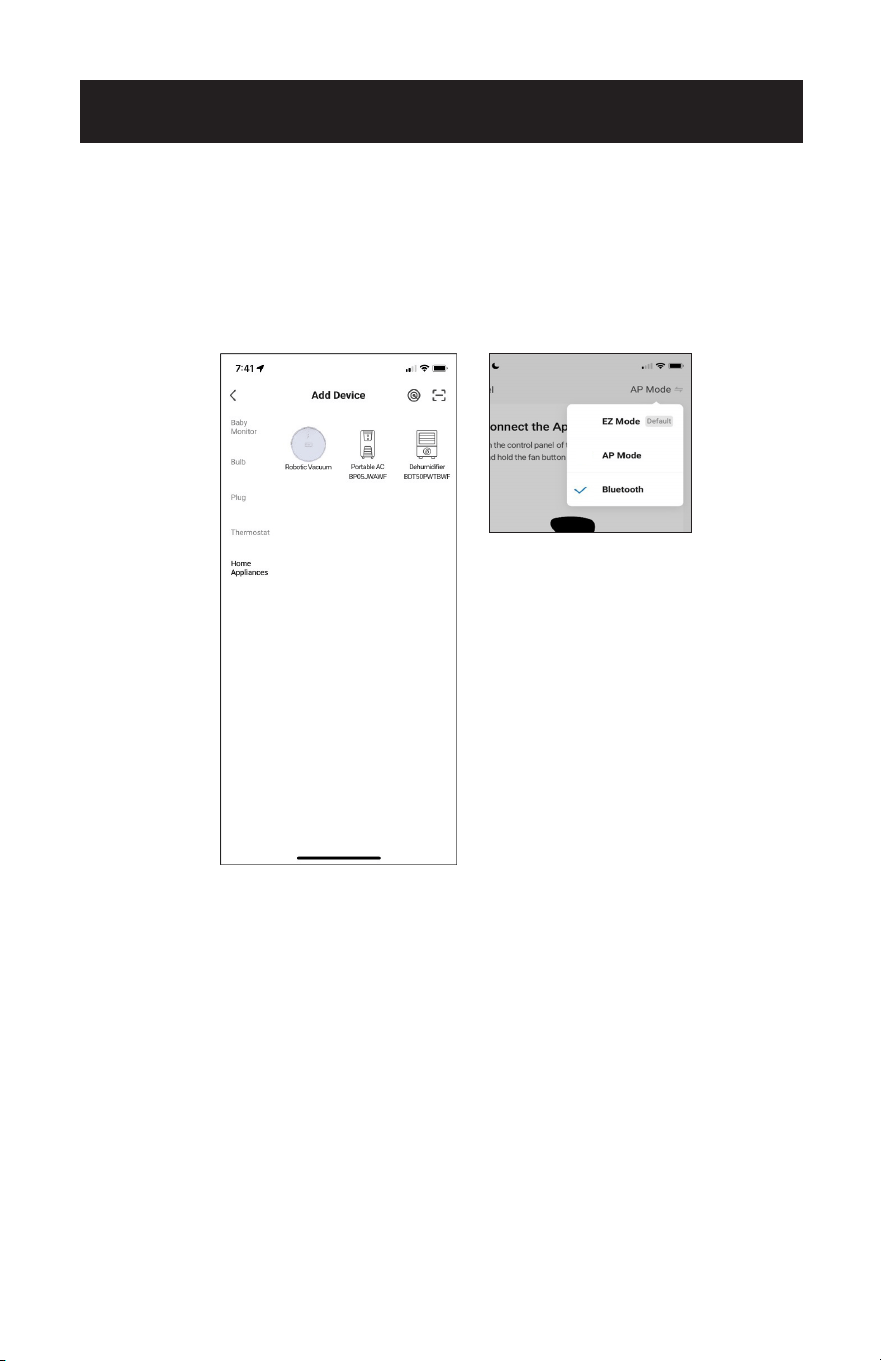
CONNECT USING BLUETOOTH
1. Tap “Home Appliances”.
2. Tap “Portable AC BP05JWAWF”.
3. Select “Bluetooth” on the top right corner of the screen.
4. Press and hold the fan button on the control panel of the appliance, for 3 seconds
when prompted in the APP.
5. The power indicator light on the control panel of the unit will blink rapidly. Tap on
the phrase located on the bottom of the screen “Tap when Power Indicator Light
blinks rapidly”. Tap “Next”.
6. Wait for the appliance to connect. This may take several seconds.
7. Once connected, the Portable Air Conditioner can be controlled by the APP.
Page 35
SET UP & USE
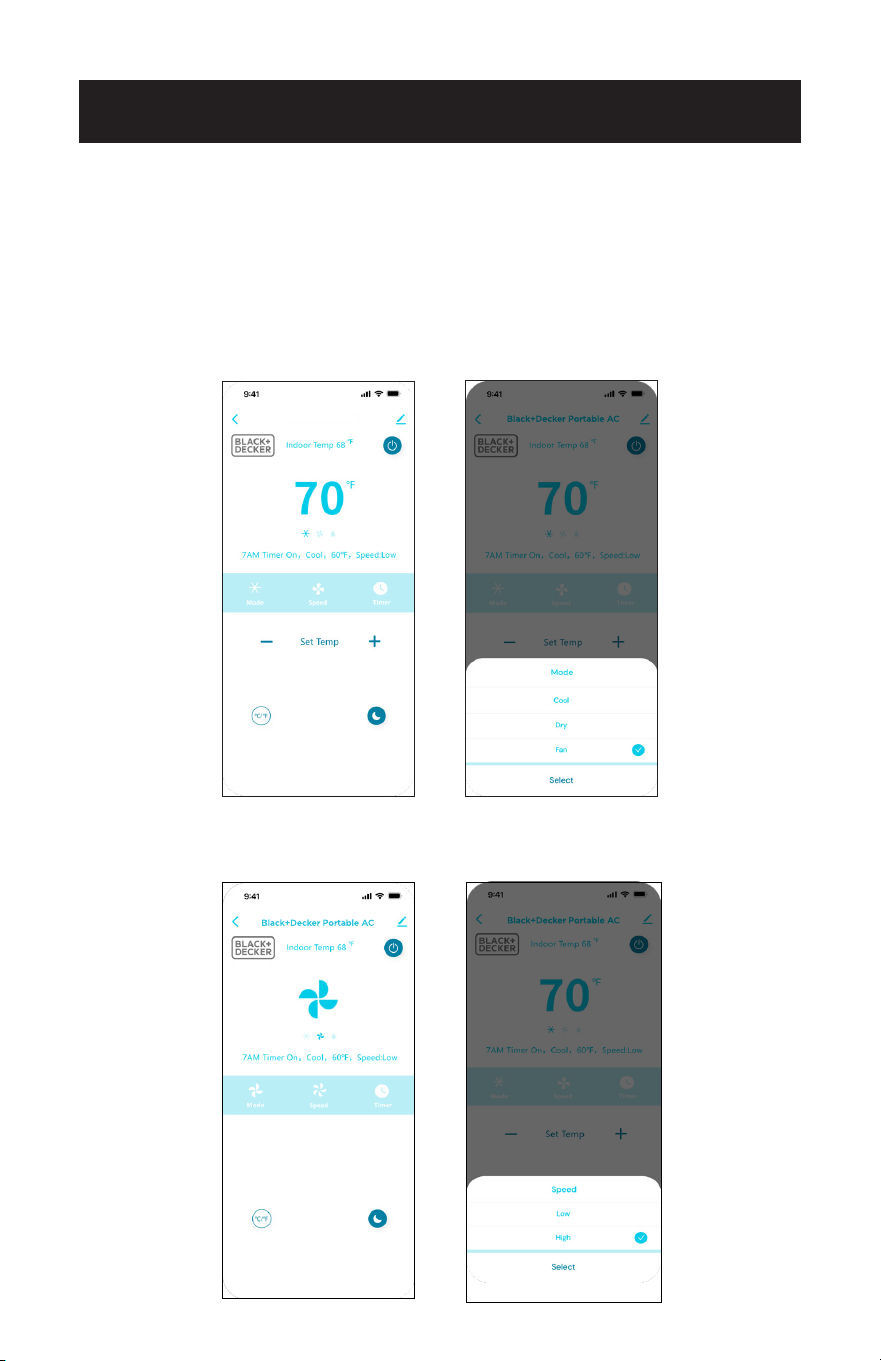
CONTROLLING THE PORTABLE AIR CONDITIONER WITH
THE APP
Tap the power symbol on the top right of the screen to power on the air conditioner.
Tap “Mode”.
Select Cool, Dry or Fan.
Tap – or + to select temperature.
Tap Speed.
Select Low or High Speed.
Black+Decker Portable AC
Page 36
SET UP & USE
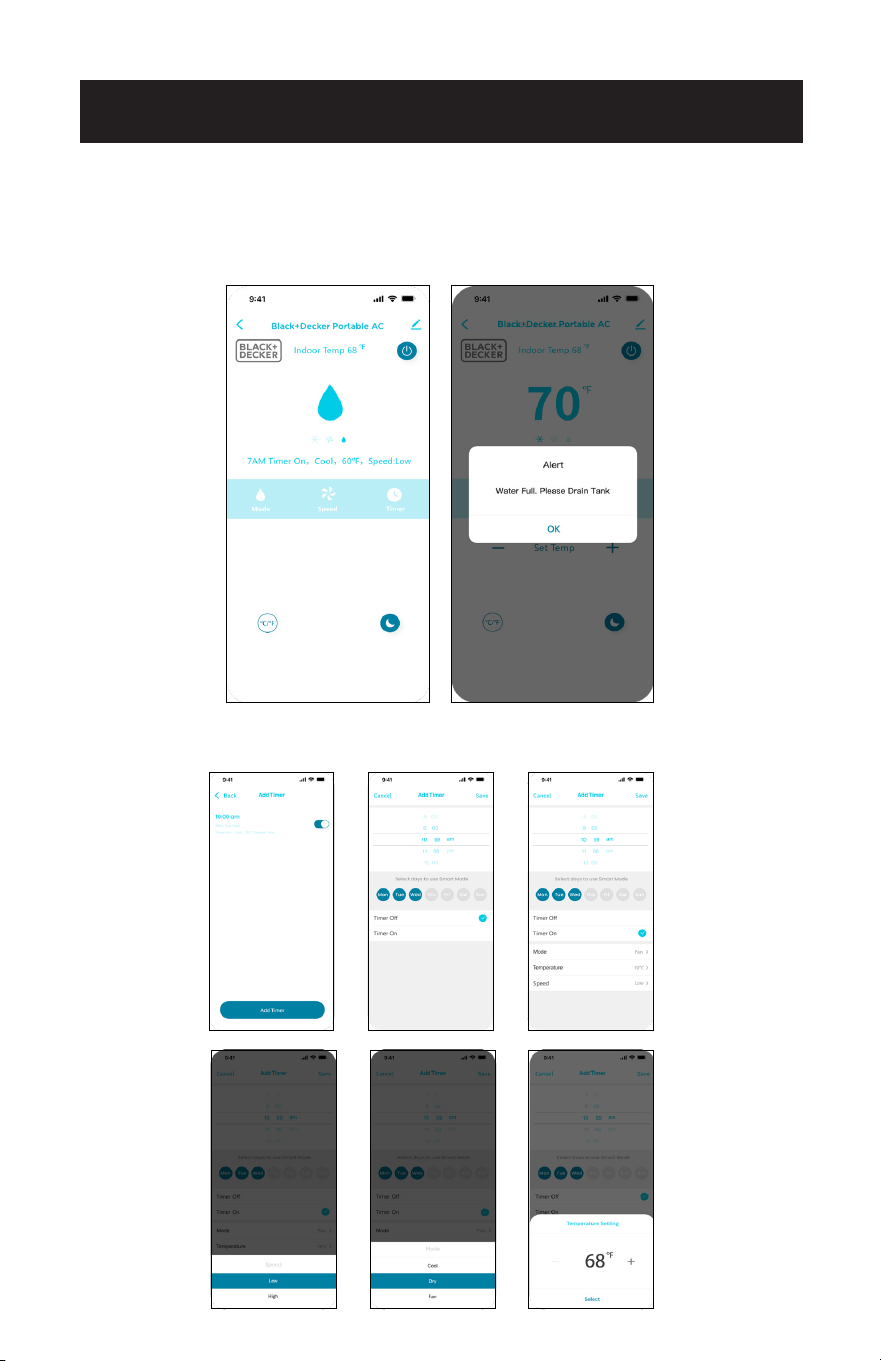
In Dry mode, the unit automatically selects a low fan speed.
An alert will indicate if the water tank needs to be drained.
See drainage instruction on page 52.
Tap Timer.
Make selections to schedule the Timer ON and OFF.

Page 37
SET UP & USE
Follow pairing instructions to connect the Air Conditioner to the Black + Decker APP
using the same Wi-Fi Network.
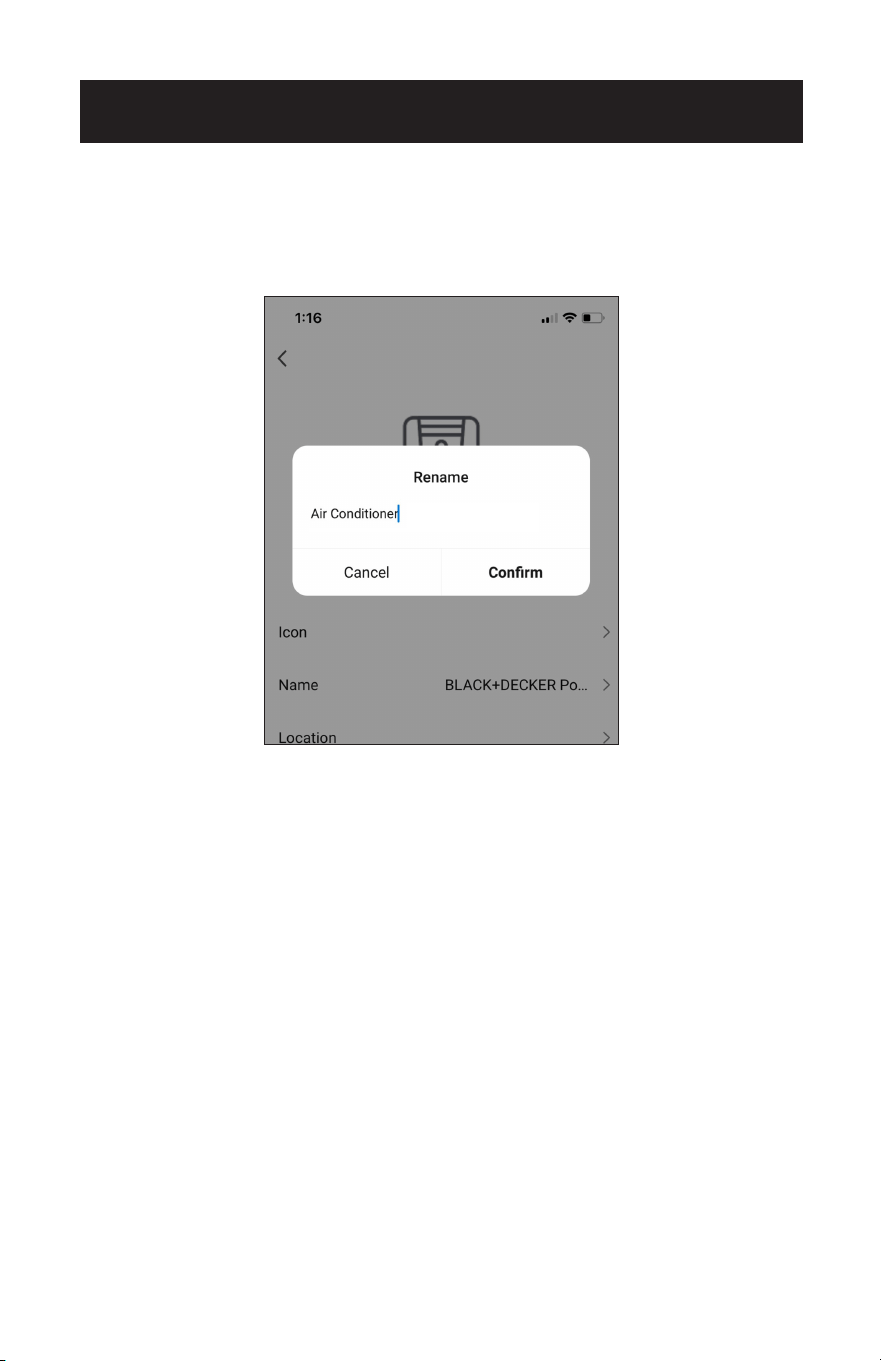
The Default name when using voice control is “Portable AC” as shown on the top of
the screens. Tap the edit symbol to to right of it in order to change the device name.
On the next screen, tap the edit symbol to right of the default name again.
VOICE CONTROL DEVICE SETTINGS
Portable AC
Portable AC
Portable AC
Page 38
SET UP & USE
A pop up window will appear. Type in the new name.
The name should be easy to remember and dierent than other connected devices
using voice control.
Tap “Confirm”.
Page 39
SET UP & USE
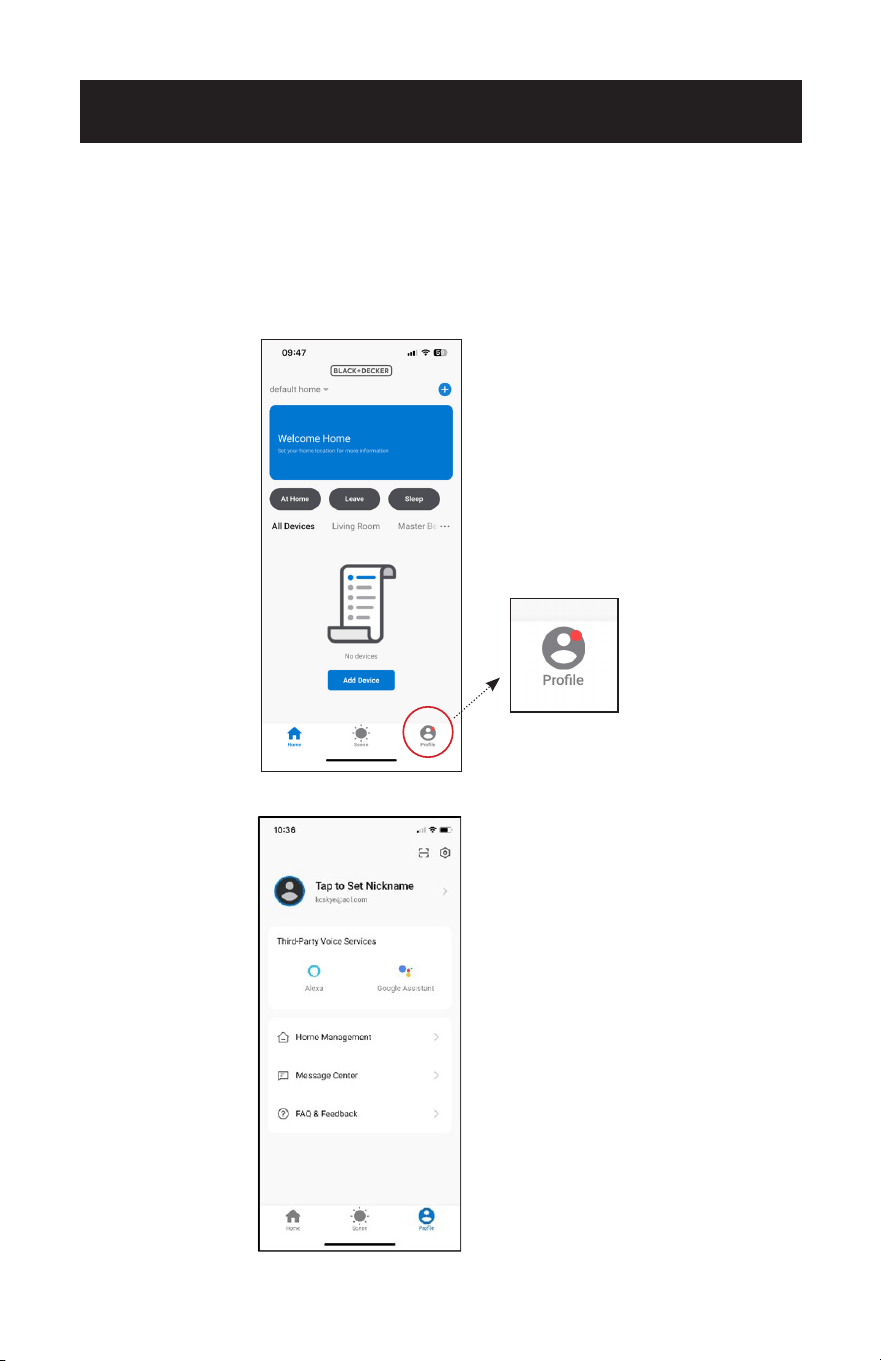
SET UP VOICE CONTROL WITH ALEXA
You will need an Alexa device such as Amazon Echo, Echo Dot set up with the Alexa
APP according to manufacturer’s instructions. The device should be powered on and
connected to a Wi-Fi network.
On the homepage of the Black + Decker APP tap “Profile” on the bottom right corner.
Tap “Alexa”.

Page 40
SET UP & USE
Tap “Sign in with Amazon”. Sign in and use the same password used for the Alexa
APP.
Tap “Link”.

Page 41
Open the Alexa APP and enable “Smart Home Skills” for Black + Decker Home.
Alexa can locate the device when you say “Alexa, discover my device”.
Follow the prompts in the Alexa APP to manage the device and control the air
conditioner using the voice commands.
SET UP & USE
Page 42
SET UP & USE
ALEXA VOICE COMMANDS
To turn the unit ON/OFF. “Alexa, turn on the Portable AC.”
“Alexa, turn o the Portable AC.”
To find out the current indoor
temperature.
“Alexa, what is the temperature of the Portable
AC?”
“Alexa, what is the Portable AC temperature?”
To select a mode.
(Choose Cool, Dry or Fan)
“Alexa, set the Portable AC to cool.”
“Alexa, change the Portable AC to dry mode.”
“Alexa, what is the mode set to on the Portable
AC?”
Check the current set
temperature and select a set
temperature.
(Choose temperature values
between 61˚F – 88˚F).
The unit must be set to Cool
Mode.
“Alexa, what is the target temperature of the
Portable AC?”
“Alexa, what is the Portable AC set to?”
“Alexa, set Portable AC to 70˚F.”
“Alexa, set Portable AC to 68˚F.”
Check the current fan speed
and select a fan speed.
(Choose fan speeds “low” or
“high”).
The unit must be set to Cool
Mode.
“Alexa, what’s the fan speed on the Portable
AC?”
“Alexa, what’s the fan speed set to, on the
Portable AC?”
“Alexa, set the fan speed on the Portable AC to
low.”
“Alexa, set the low fan speed to high on the
Portable AC.”
Sleep mode control.
The unit must be set to Cool
Mode.
“Alexa, turn on sleep mode on the Portable AC.”
“Alexa, turn o sleep mode on the Portable AC.”
The following examples use the device name “Portable AC”. Refer to the “Voice
control device settings” section for instructions on how to change the device name.
Page 43
SET UP & USE
SET UP VOICE CONTROL WITH GOOGLE
ASSISTANT
You will need a device such as Google Nest, Google Nest mini set up with the Google
Home APP according to manufacturer’s instructions. The device should be powered
on and connected to a Wi-Fi network.
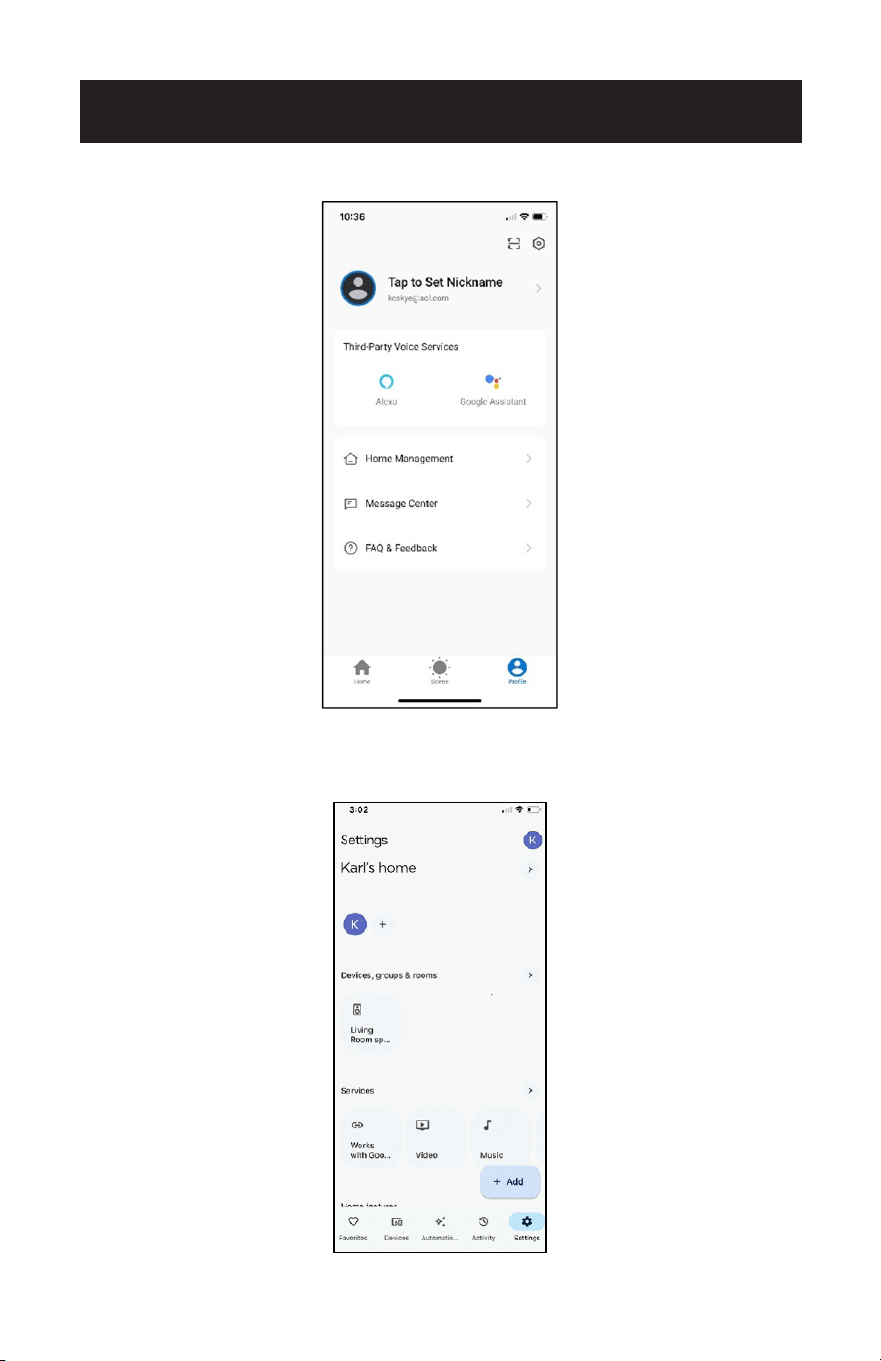
On the homepage of the Black + Decker APP tap “Profile” on the bottom right corner.
Page 44
SET UP & USE
Tap “Google Assistant”.
Open the Google Home App and tap settings on the bottom, right of the screen.
Tap “Works with Google”.
Page 45
SET UP & USE
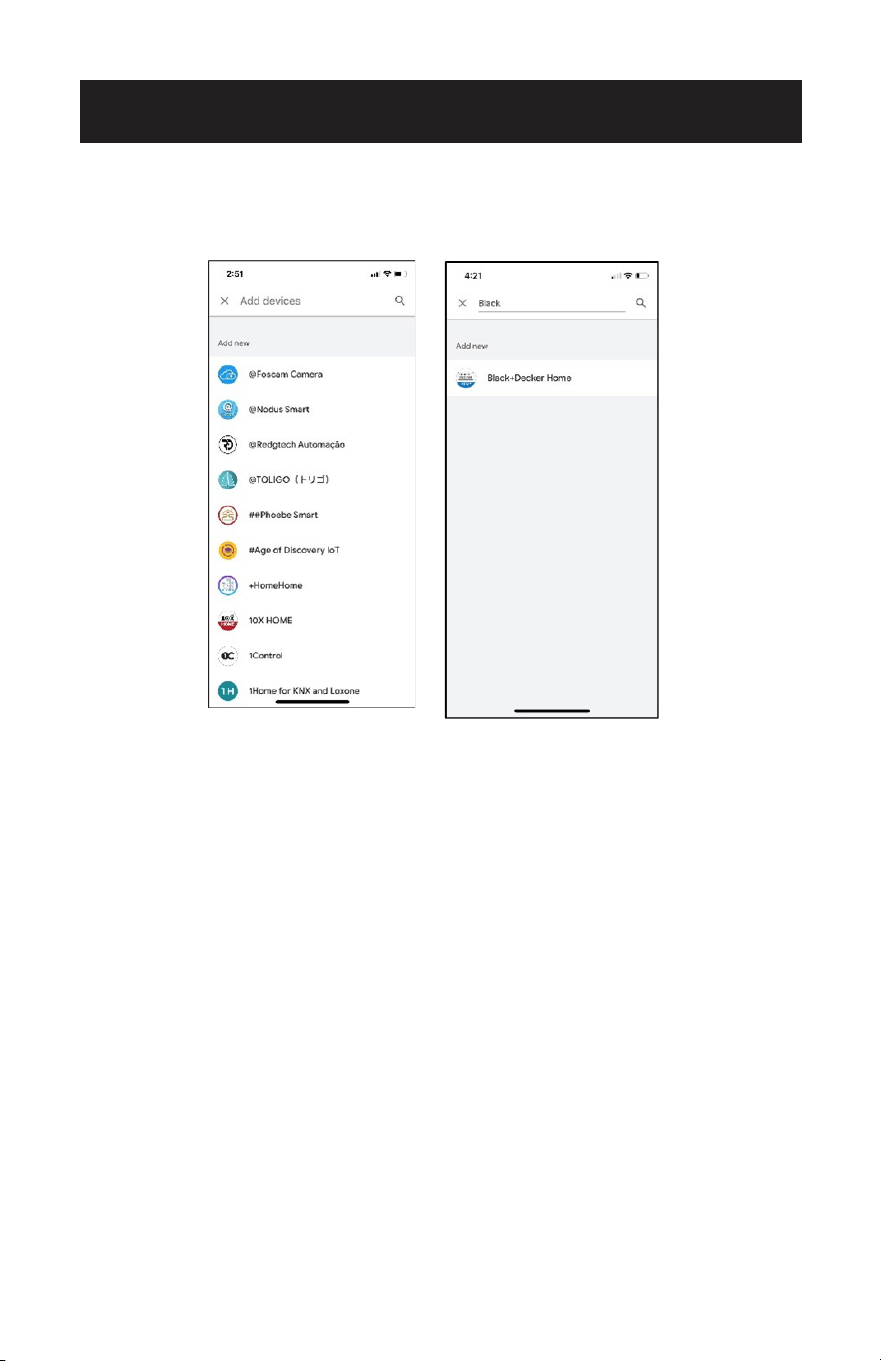
Search for “Black + Decker Home” by typing it in the search bar.
Tap to select “Black + Decker Home”.
The Google APP will show prompts to link with a verification code from the
Black + Decker Home APP or link with account Password. Use the same e-mail and
password as the Black + Decker Home APP to complete the Authorization.
Once linked, open the Google Assistant App and tap Black + Decker Home. Select
“Check for new devices” Follow the Google Home prompts to control the portable air
conditioner.
Page 46
SET UP & USE
GOOGLE ASSISTANT VOICE COMMANDS
To turn the unit ON/OFF. “OK Google, turn on the Portable AC.”
“OK Google, turn o the Portable AC.”
To find out the current indoor
temperature.
“OK Google, what is the temperature of
the Portable AC?”
“OK Google, what is the Portable AC
temperature?”
To select a mode.
(Choose Cool, Dry or Fan).
“OK Google, set the Portable AC mode
to cool.”
“OK Google, set the Portable AC mode
to dry.”
Check the current set temperature and
select a set temperature.
(Choose temperature values between
61˚F – 88˚F).
The unit must be set to Cool Mode.
“OK Google, what is the Portable AC set
to?”
“OK Google, set Portable AC to 70.”
“OK Google, set Portable AC to 68
degrees.”
Check the current fan speed and select
a fan speed.
(Choose fan speeds “low” or “high”).
The unit must be set to Cool Mode.
“OK Google, set the Portable AC to low.”
“OK Google, set the fan speed on the
Portable AC to high.”
“OK Google, what is the fan speed on the
Portable AC.”
Sleep mode control.
The unit must be set to Cool Mode.
“OK Google activate sleep mode for the
Portable AC.”
“OK Google, cancel sleep mode for the
Portable AC.”
The following examples use the device name “Portable AC”. Refer to the “Voice
control device settings” section for instructions on how to change the device name.

Page 47
SET UP & USE
OPERATING FROM THE REMOTE CONTROL
BATTERY INSTALLATION (BATTERIES INCLUDED)
(1) Slide open the battery compartment cover.
(2) Insert 2 × “AAA” batteries as shown.
(3) Slide back the battery cover.
CAUTION: Use only AAA or IEC R03 1.5V alkaline batteries. Remove the batteries if
the remote is not used for a month or longer. Do not attempt to recharge
the batteries. Both batteries should be replaced at the same time. Do not
dispose of the batteries in a re as they may explode.
Point the remote control at the receiver on the appliance. The remote control must
be no more than 16 feet away from the appliance (without obstacle between the
remote control and the receiver).
The remote control must be handled with extreme care. Do not drop it or expose it
to direct sun light or sources of heat.
16 Feet
Page 48
SET UP & USE
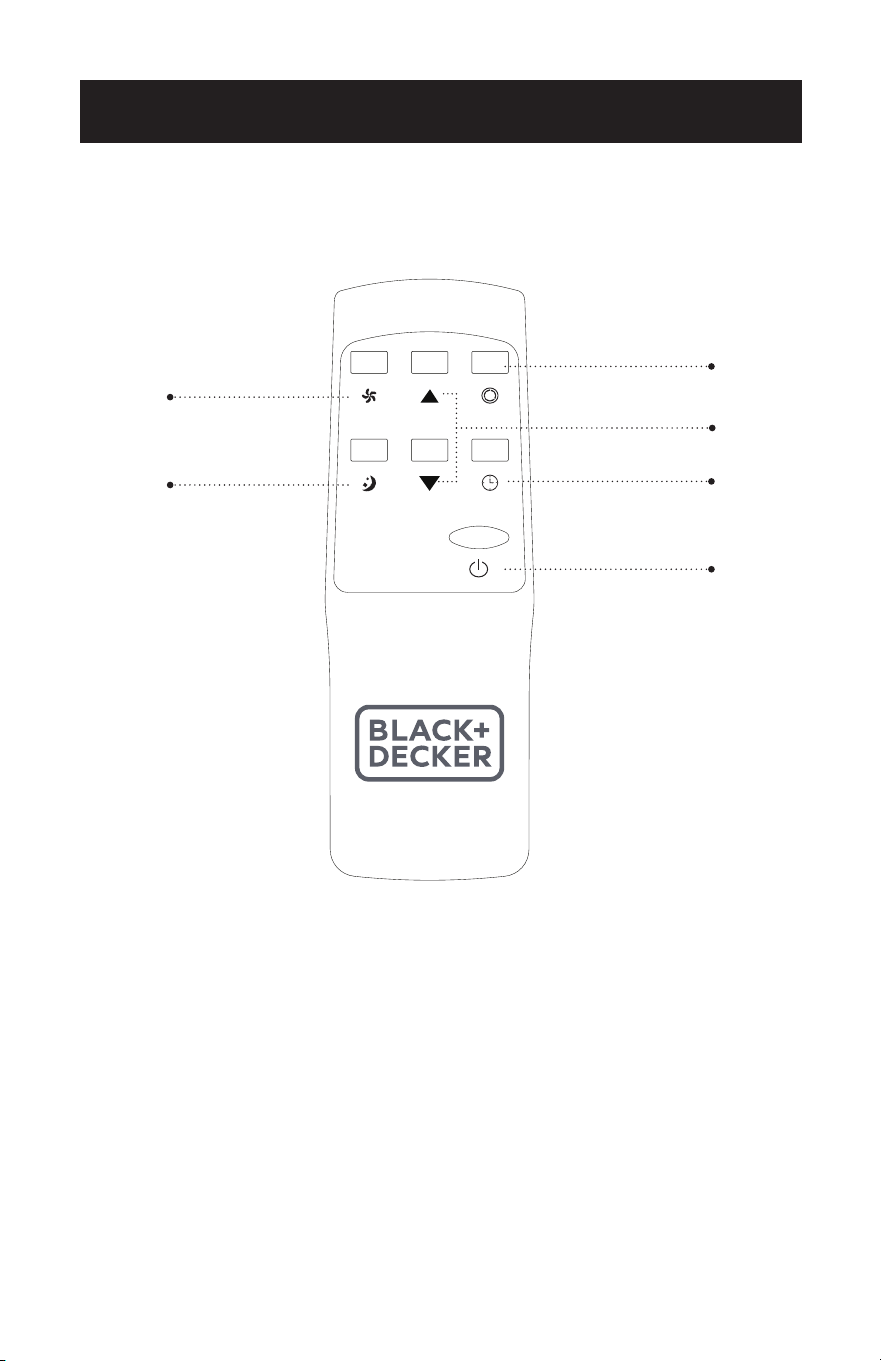
REMOTE CONTROL
POWER BUTTON: Press to Turn ON or OFF.
TIMER BUTTON: Used to set a delay start or shut down time.
MODE BUTTON: Each time you press the button COOL, DRY, FAN.
INCREASE: Increase the temperature setting.
DECREASE: Decrease the temperature setting.
FAN SPEED BUTTON: Used to select the HIGH or LOW Fan speed.
SLEEP BUTTON: Gradually adjusts the temperature.
Timer Button
Increase / Decrease
Button
Mode Button
Fan Speed Button
ON / OFF
Sleep Button

Page 49
SET UP & USE
POWER BUTTON
• Press to Turn Air Conditioner ON or OFF.
MODE BUTTON
• Press the mode button to scroll through COOL, DRY, FAN.
• The corresponding symbol will illuminate on the LED display to indicate which
mode is selected.
COOL
• Select the target temperature 61˚F – 88˚F (16˚C – 31˚C) by pressing the
or buttons until the desired temperature is displayed on the LED screen.
• Press the Fan Speed Button to select HIGH or LOW Speed.
DRY
Ideal for reducing humidity. When selected, the Dry Indicator light illuminates and
“dh” appears on the digital display. Under this mode, you cannot select fan speed or
adjust the temperature.
• Keep window and door closed for the best dehumidifying effect.
• Exhaust hose attachment is not required to reduce humidity, however it is
recommended in very humid rooms so the warm air can be exhausted outside.
Draining in Dehumidifying mode
• It is recommended that the dehumidification drain and drain hose be used for
continuous drainage.
• FULL TANK
- When the water level reaches a predetermined level, the “full tank”
indicator light on the control panel will blink. A buzzer will sound
and the unit will shut off. The unit will have to be drained.
NOTE: Refer to Water Drainage section (page 52).
• In this mode, fan speed is selected automatically by the appliance and cannot be
set manually.
FAN
• Press the Fan Speed Button to select HIGH or LOW Speed.

Page 50
TIMER
• To set the AUTO STOP timer. When the unit is ON, press the TIMER button.
• Press the or button to select the AUTO TIME by 1 hour increments, up to 24
hours. The control panel will indicate the selected time. Press the TIMER button
again to set the selected time. The TIMER indicator light will be illuminated on the
control panel of the unit to show that the AUTO STOP program is initiated.
• To set the AUTO START timer. When the unit is OFF, press the TIMER button.
• Press the or button to select the AUTO TIME by 1 hour increments, up to 24
hours. The control panel will indicate the selected time. Press the TIMER button
again to set the selected time. The TIMER indicator light will be illuminated on the
control panel of the unit to show that the AUTO START program is initiated.
• Pressing the POWER button or the TIMER button will cancel the AUTO START/
STOP timed program and the timer indicator light will not be illuminated.
SLEEP
• The SLEEP function gradually adjusts the temperature of the rooms to provide a
comfortable environment. Press the SLEEP button to activate.
• In COOL mode, the temperature will increase 1°F after an hour and 2°F after 2
hours.
• To cancel this setting press the SLEEP button again.
SET UP & USE

Page 51
SET UP & USE
PROTECTION FUNCTIONS
• Frost Protection Function:
In a cold environment, if the temperature of the EVA pipe sensor is too low, the
machine will automatically enter protection status; if the temperature of the EVA
pipe sensor rises to a certain temperature (50°F), it can automatically revert to
normal operation.
• Overow Protection Function:
When water in the water tank exceeds the warning level, the machine will
automatically sound an alarm and stop working, and the Full Tank indicator will
ash. At this time, you need to drain the water (see Drainage Instructions at the end
of this chapter).
After the water is drained, the unit will revert to normal operation.
• Protection Function of the Compressor:
To increase the service life of the compressor, it has a 3-minute delay booting
protection function after the compressor is turned off.
Page 52
WATER DRAINAGE
This air conditioner is equipped with auto water evaporation so the water
compartment would not typically ll in cooling mode unless there is high
humidity. Water drainage will generally only be required at the end of the season.
(see START-END OF SEASON OPERATIONS, Page 53).
NOTE: FULL TANK
- When the water level reaches a predetermined level, the
“full tank” indicator light located on the control panel of the unit will blink.
A buzzer will sound and the unit will shut off. The unit will have to be
drained.
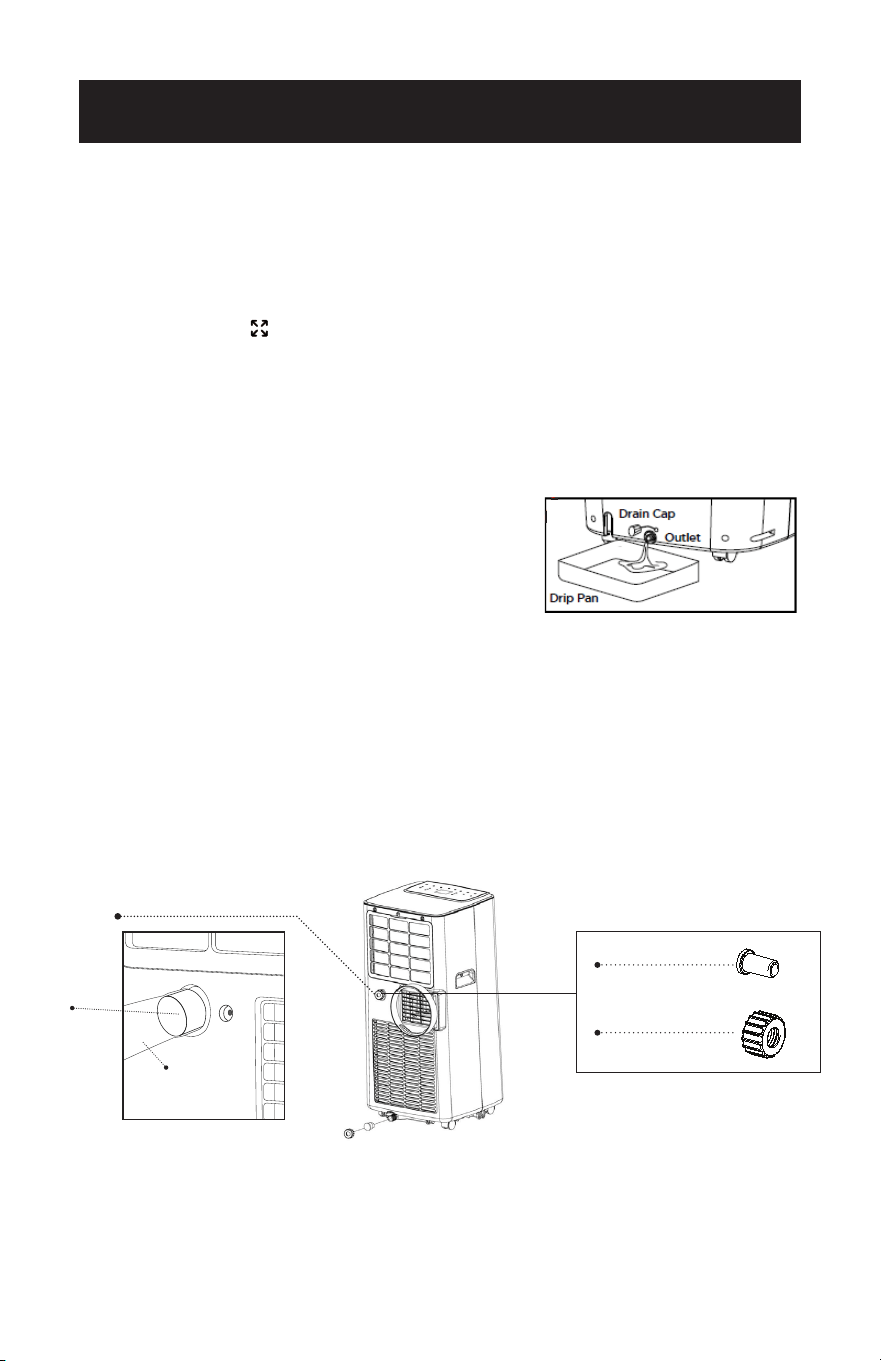
Intermittent Draining
• Unplug the unit from the power source. Carefully move the unit to a drain area
over your basement oor or drip pan (not included). Remove the bottom drain
cap.
• Let the water drain away and replace the drain
cap. Restart the machine. Normal operation will
resume once the unit is drained.
NOTE: Be sure to reinstall the bottom drain plug
before using the unit.
Continuous Draining
• It is recommended to use the continuous drainage method in dehumidication
mode.
• Unplug the unit from the power source. Remove the bottom drain cap. While
doing this operation some residual water may spill so have a drip pan (not
supplied) to collect the water.
• Connect the drain hose (supplied) as shown in the diagram. The water can be
continuously drained through the hose into a oor drain or drip tray.
•Turn on the unit.
WAIT 3 MINUTES BEFORE RESUMING OPERATION
• After the unit has stopped, it cannot be restarted for 3 minutes. Operation will
automatically restart after 3 minutes.
SET UP & USE
Drain Plug
Drain Cap
Dehumidication Drain
Dehumidication
Drain
Drain Hose
Page 53
CLEANING
WARNING: Before cleaning or maintenance, turn the appliance off by
pressing the button on the control panel or button on the
remote control. Unplug from the electrical outlet.
CLEANING THE CABINET
You should clean the appliance with a slightly damp cloth then dry with a dry
cloth.
• Never saturate the air conditioner with water.
• Never use petrol, alcohol or solvents to clean the appliance.
• Never spray insecticide liquids or similar near the air conditioner.
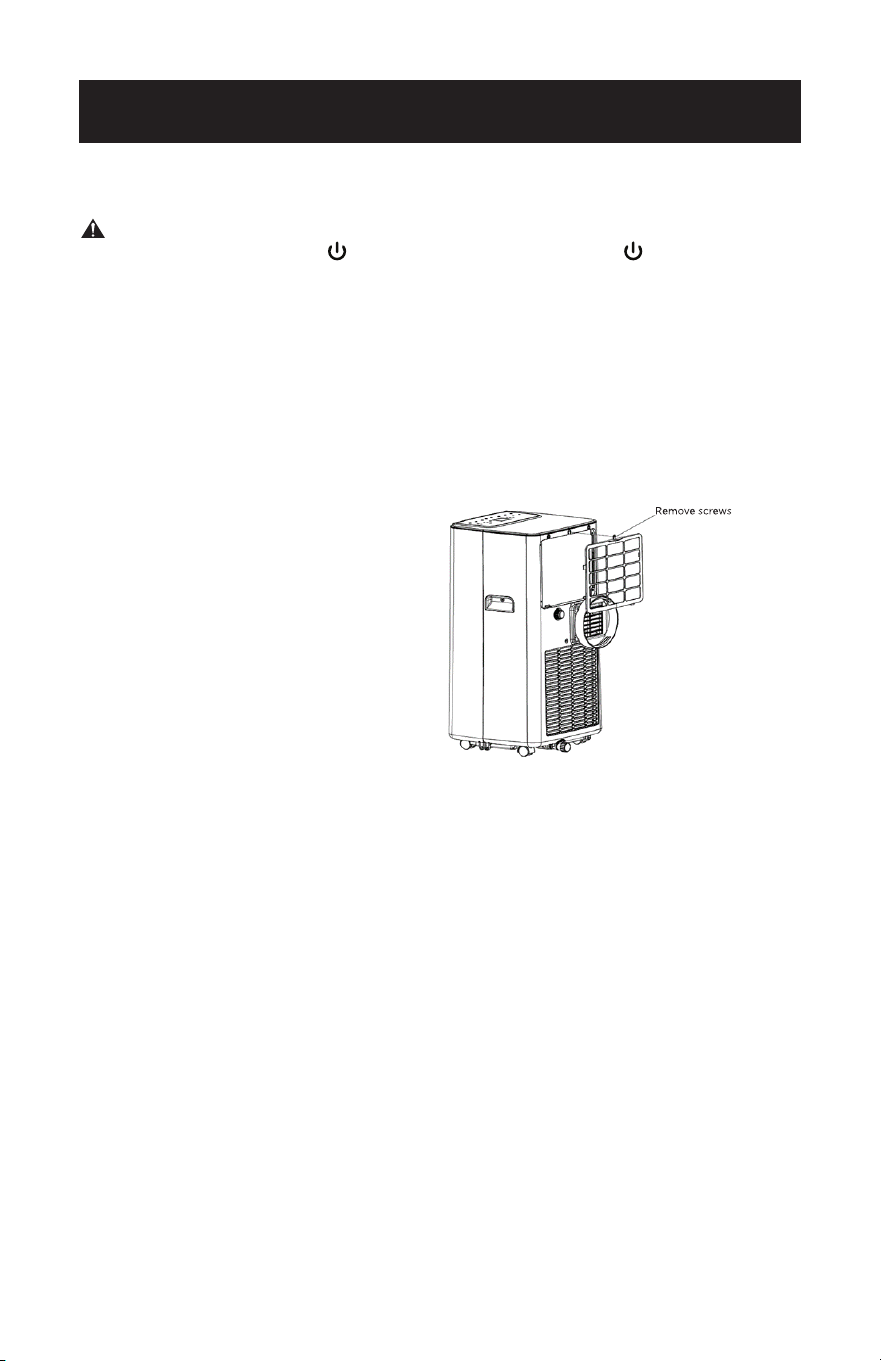
CLEANING THE FILTER
To keep your air conditioner working
efciently, you should clean the
evaporator lter every 2 weeks,
when the unit is being operated
continuously.
Use a vacuum cleaner to remove
dust accumulations from the lter.
If it is very dirty, immerse in warm
water and rinse a number of times.
The water should be luke warm.
After washing, allow the lter to dry
completely. Insert the bottom tabs
and replace the screws.
START - END OF SEASON OPERATIONS
START OF SEASON CHECKS
Make sure the power cable and plug are undamaged.
Follow the installation instructions precisely.
END OF SEASON OPERATIONS
See Water Drainage section to make sure the air conditioner is completely
drained of water.
Clean the lter and dry thoroughly before reinstalling.
CLEANING & CARE

Page 54
TROUBLESHOOTING & WARRANTY
BEFORE YOU CALL FOR SERVICE
IF THE AIR CONDITIONER FAILS TO OPERATE:
A) Check to make sure that the air conditioner is plugged in securely. If it is
not, remove the plug from the outlet, wait 10 seconds and plug it in again
securely.
B) Check for a blown circuit fuse or a tripped main circuit breaker. If these seem
to be operating properly, test the outlet with another appliance.
WARNING
IF NONE OF THE ABOVE SOLVES THE PROBLEM, CONTACT A QUALIFIED
TECHNICIAN. DO NOT TRY TO ADJUST OR REPAIR THE AIR CONDITIONER
YOURSELF. Any person who is involved with working on or breaking into a
refrigerant circuit should hold a current valid certicate from an industry-
accredited assessment authority, which authorizes their competence to handle
refrigerants safely in accordance with an industry recognized assessment
specication.
WARNING
Do not use means to accelerate the defrosting process or to clean other than those
recommended by the manufacturer.
WARNING
Servicing shall only be performed as recommended by the equipment
manufacturer. Maintenance and repair requiring the assistance of other skilled
personnel shall be carried out under the supervision of the person competent in
the use of the ammable refrigerants.
CUSTOMER SERVICE
IMPORTANT
If you have a problem with this product, please contact the
BLACK+DECKER Customer Satisfaction Center at
844-299-0879. DATED PROOF OF PURCHASE, MODEL # AND
SERIAL # REQUIRED FOR WARRANTY SERVICE
IMPORTANT NOTE: Read this manual
carefully before installing or operating
your new air conditioning unit. Make sure
to save this manual for future reference.
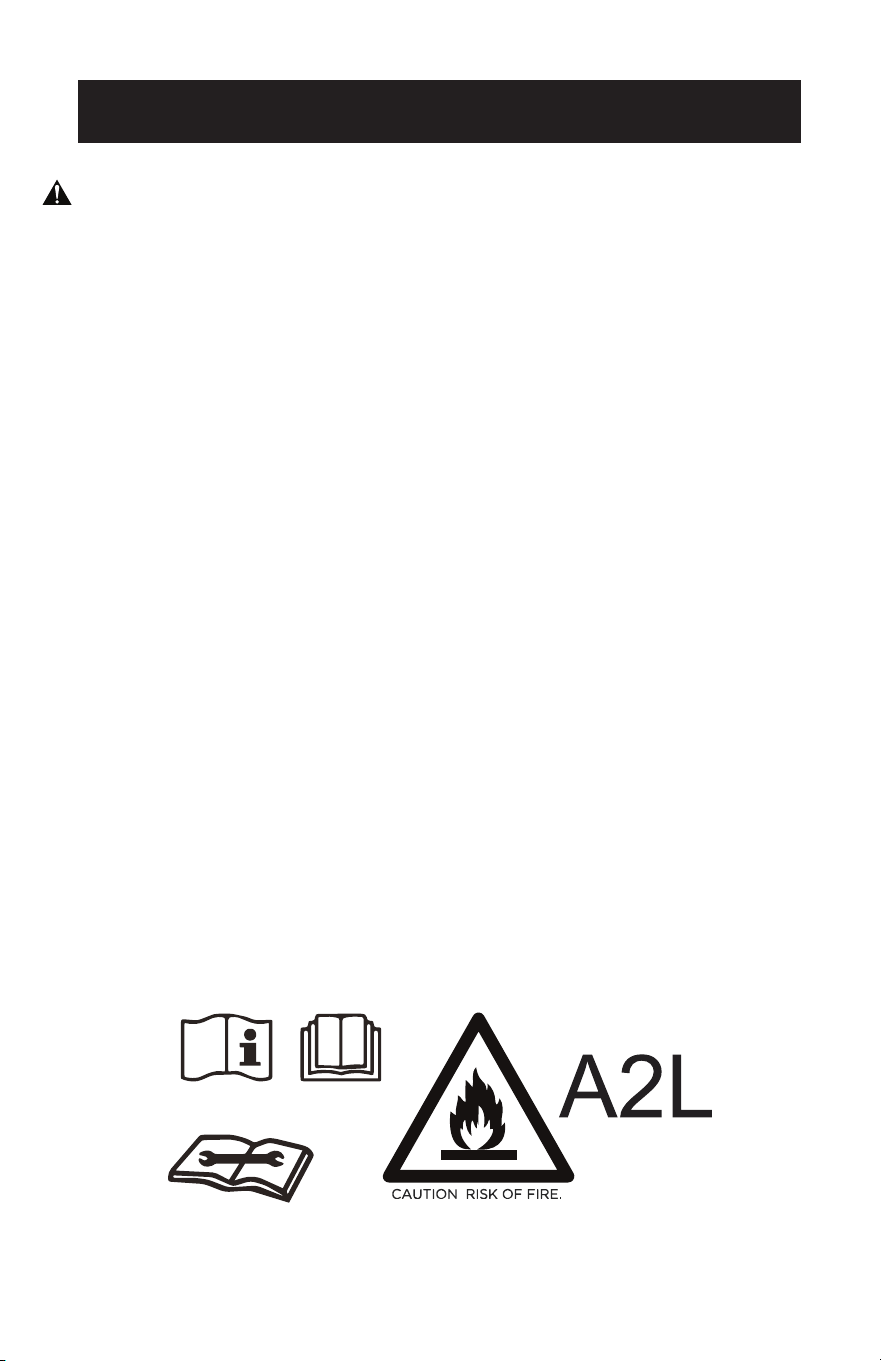
Caution: Risk of re/
ammable materials
(Required for R32/R290 units only)
Page 55
TROUBLESHOOTING & WARRANTY
Troubleshoot your problem by using the chart below. If the air conditioner still does
not work properly, contact BLACK+DECKER customer service center or the nearest
authorized service center. Customers must never troubleshoot internal components.
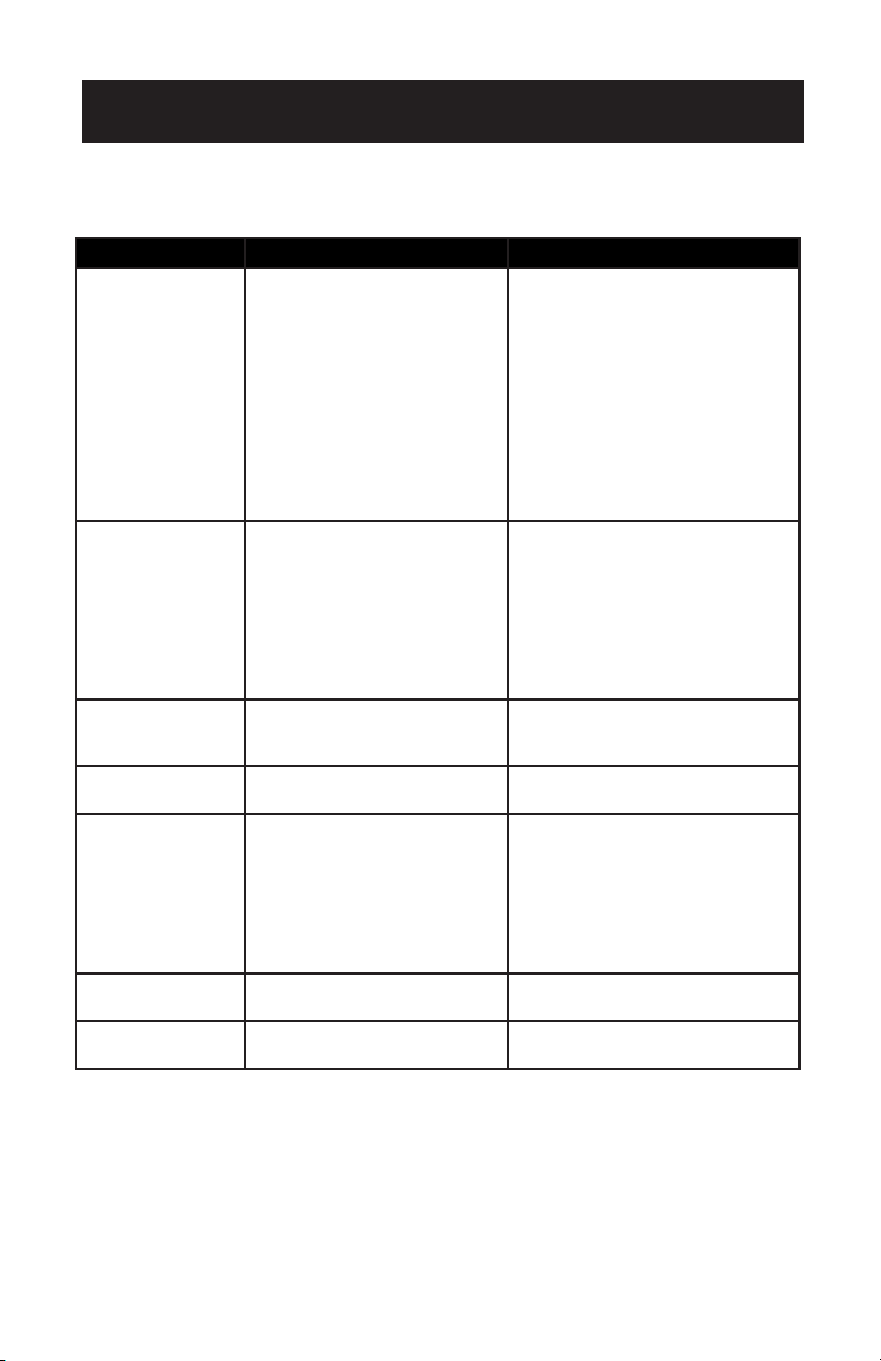
TROUBLE POSSIBLE CAUSE POSSIBLE REMEDY
The air conditioner
does not work.
A. There is no electricity.
B. The unit may need to be
drained. The “Full Tank”
indicator light will blink. A
buzzer will sound and the
unit will shut off.
C. The ambient temperature is
too low or too high.
D. In cooling mode, the room
temperature is lower than
the set temperature.
E. In Dry mode, the ambient
temperature is low.
A. Turn unit on after connecting it
to a socket with electricity.
B. Drain the unit, according to the
water drainage instructions.
C. Run the unit within the ambient
temperature range of 64°F
(18°C)~95°F (35°C).
D. Change the set temperature.
E. Place the unit in a room with an
ambient temperature of greater
than 64°F (18°C).
The cooling effect
is not good.
A. There is direct sunlight.
B. Doors or windows are open;
there are a lot of people
in the room; or in cooling
mode, there are other
sources of heat.
C. The lter screen is dirty.
D. The air inlet or outlet is
blocked.
A. Pull the room curtain closed.
B. Close doors and windows, and
add new air conditioner.
C. Clean or replace the lter
screen.
D. Clear obstructions.
Loud Noise A. The air conditioner is not
placed on a at surface.
A. Put the air conditioner on a
at and hard place (to reduce
noise).
Compressor
does not work.
A. Overheat protection is
active.
A. Wait for 3 minutes until unit
cools, then restart.
The remote control
does not work.
A. The distance between the
unit and the remote control
is too far.
B. The remote control is not
aligned with the direction of
the remote control receiver.
C. Batteries are dead.
A/B. Move the remote control
closer to the air conditioner,
and make sure that the
remote control directly faces
in the direction of the remote
control receiver on the unit.
C. Replace batteries.
Display reads E2 A. The coil temperature sensor
is malfunctioning.
A. Contact the BLACK+DECKER
Customer Satisfaction Center.
Display reads E1 A. The room temperature sensor
is malfunctioning.
A. Contact the BLACK+DECKER
Customer Satisfaction Center.
Page 56
TROUBLESHOOTING & WARRANTY
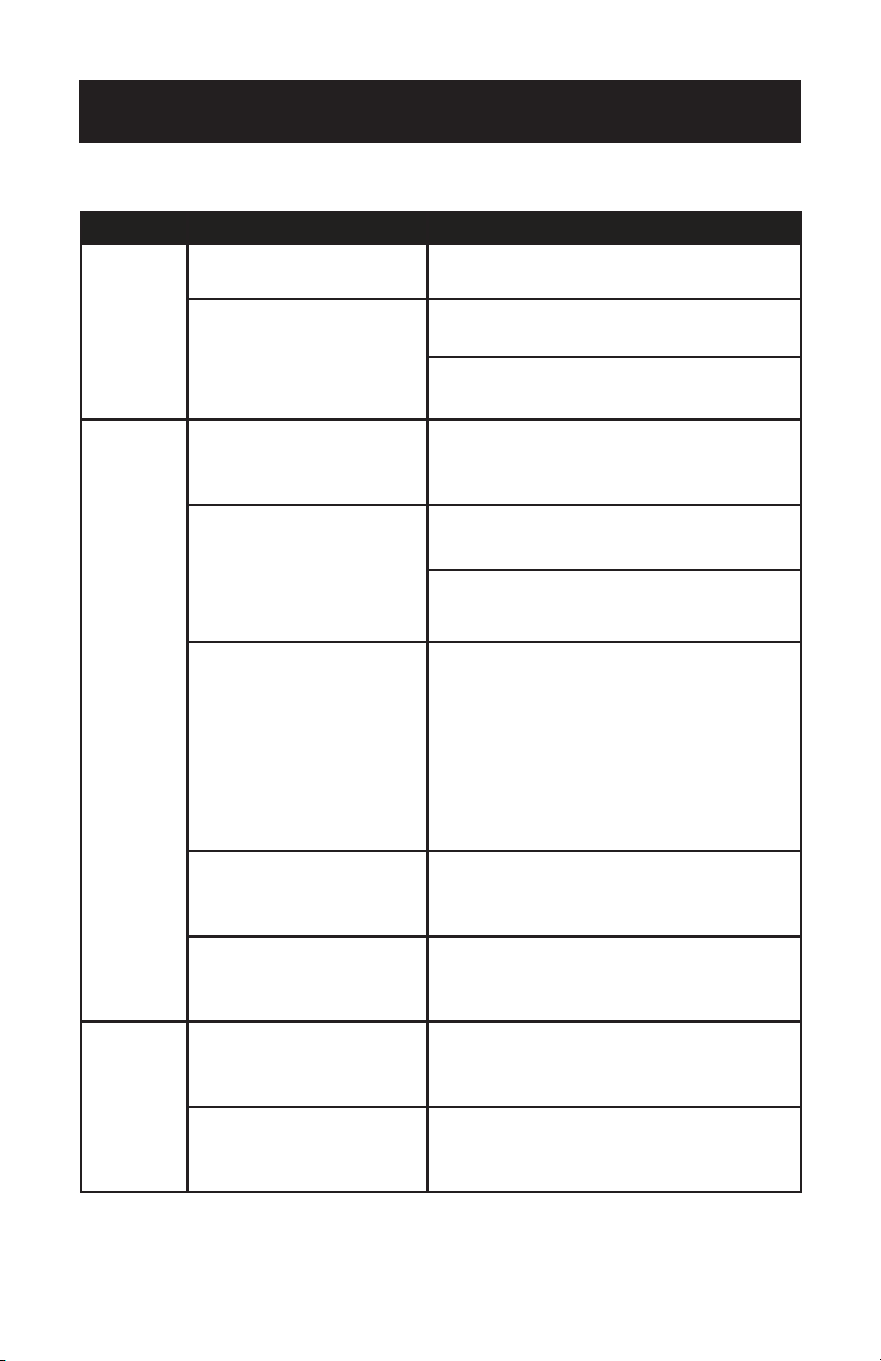
TROUBLE POSSIBLE CAUSE POSSIBLE REMEDY
Unable to
register or
login to
account.
The Wi-Fi is not enabled on the
cellphone.
Turn on the cell phone’s Wi-Fi.
Wi-Fi signal is weak.
Install a Wi-Fi extender (not included).
Move the appliance closer to the Wi-Fi router.
Appliance is
not
connecting
with the App.
Appliance is either not plugged in,
or the power was turned on.
Connect the appliance to the wall outlet but do not
press the power button. The unit will be in standby
mode.
Wi-Fi signal is weak.
Install a Wi-Fi extender (not included).
Move the appliance closer to the Wi-Fi router.
The default pairing mode does
not work.
Make sure Bluetooth is enabled on the phone and
permissions are enabled.
Make sure location settings are enabled in EZ mode.
For detailed instructions see ENABLE LOCATION
SETTINGS on page 24.
In EZ mode, the power indicator light on the control
panel of the unit will blink rapidly. If it blinks slowly,
repeat the process of pressing and holding the fan
button for 3 seconds.
In AP mode, the power indicator light on the control
panel of the unit will blink slowly. If it blinks rapidly,
repeat the process of pressing and holding the fan
button for 3 seconds.
Wi-Fi connection frequency is
incorrect.
Select a 24 GHz Wi-Fi network.
The encryption method of the
router’s wireless setting is wrong.
Set the encryption method of the router’s wireless
setting to “WPA2-Psk” and the authentication type to
“AEs” or both are set as automatic.
NOTE: 80211n only” is not allowed in wireless mode.
Voice Control
is not working.
Alexa or Google Assistant device
may not be working correctly or
may not be connected to the same
network as the appliance.
Make sure the Alexa or Google Assistant device is
working correctly and connected to the same network
as the appliance. Follow the on screen prompts and
manufacturer’s troubleshooting for the device.
The Black + Decker APP Account
may not be linked correctly to the
voice assistant’s account.
Check the voice assistant APP to make sure the correct
appliance has been linked. Use the Black + Decker user
name and password when prompted in the voice
assistant APP to link the account.
APP AND VOICE CONTROL TROUBLESHOOTING
Page 57
TROUBLESHOOTING & WARRANTY
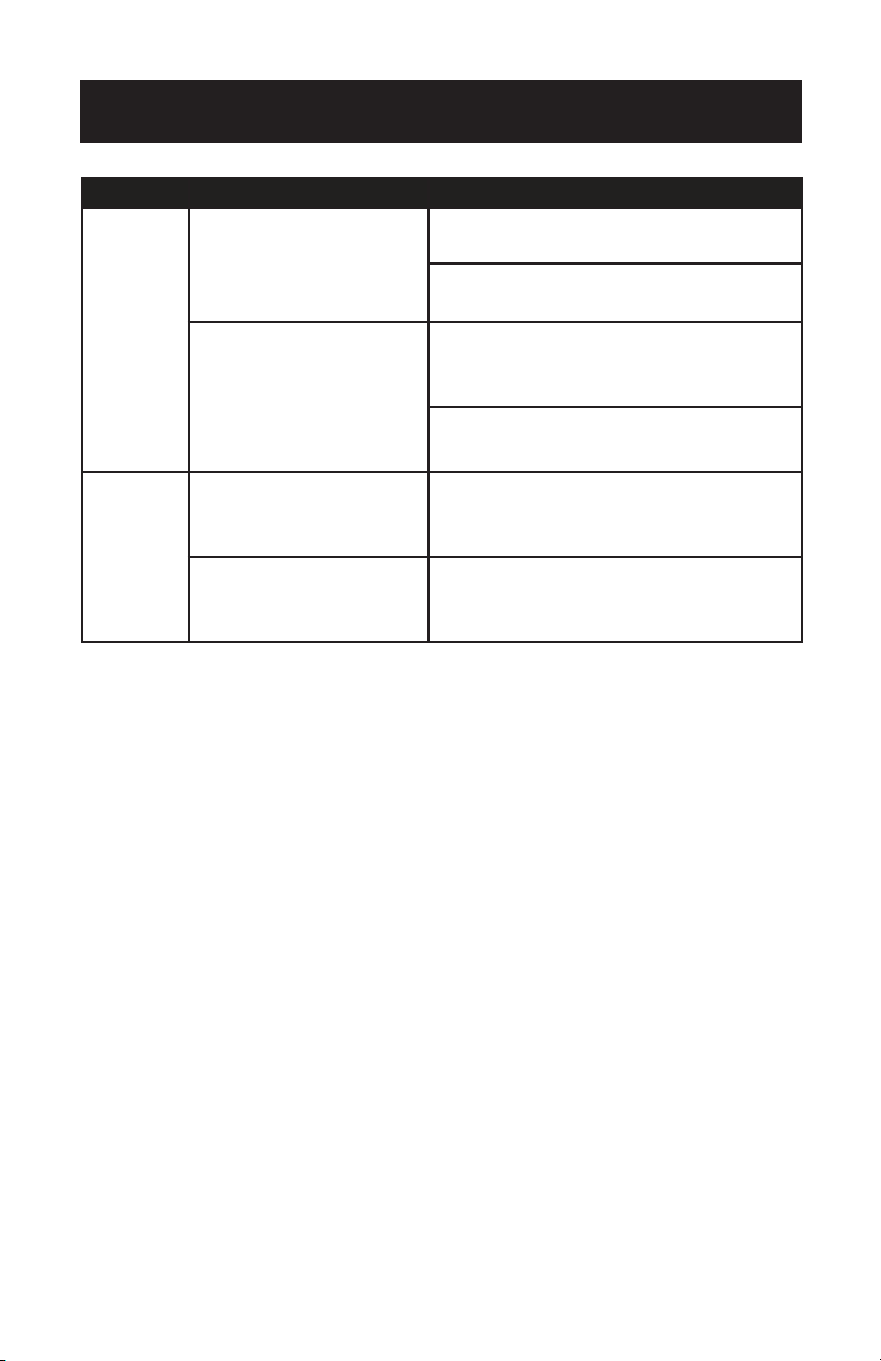
TROUBLE POSSIBLE CAUSE POSSIBLE REMEDY
Appliance is
not connecting
with the App.
The number of connected devices
reached the limit of the router.
Turn o the Wi-Fi functions of some of the connected
devices.
Re-configure the router.
The router has enabled the
wireless MAC address filter.
Remove the device from the MAC address filter on the
router.
Ensure the device is not prohibited by the router to
connect to the network.
App is not
controlling
appliance.
Wi-Fi connection has been lost.
Reconnect the appliance with the App. If EZ mode is
not working, connect using AP mode. Prior to
accessing network or changing modes, press and hold
the fan button for 3 seconds.
Power disruption to the appliance.
The app will no longer stay connected to the appliance
3 minutes after power failure. Restore power to the
appliance and reconnect to Wi-Fi.

Page 58
TROUBLESHOOTING & WARRANTY
LIMITED WARRANTY
Any repair, replacement, or warranty service,
and all questions about this product should be
directed to W Appliance Co. at 844-299-0879
from the USA or Puerto Rico.
W Appliance Co. warrants to the original purchaser
that the product will be free from defects in material,
parts and workmanship for the period designated for
this product. The warranty commences the day the
product is purchased and covers up to a period of
1 year (12 months) for labor/1 year (12 months) for
parts (manufacturing defects only)/and a total of 5
years (60 months) for compressor part only.
W Appliance agrees that it will, at its option,
replace the defective product with either a new
or remanufactured unit equivalent to your original
purchase during the warranty period.
Exclusions: This warranty does not apply to the
below:
1. If the appearance or exterior of
the product has been damaged or
defaced, altered or modified in design or
construction.
2. If the product original serial number
has been altered or removed or cannot
be readily determined.
3. If there is damage due to power line
surge, user damage to the AC power
cord or connection to improper voltage
source.
4. If damage is due to general misuse,
accidents or acts of God.
5. If repair attempts are done by
unauthorized service agents, use of
parts other than genuine parts or parts
obtained from persons other than
authorized service companies.
6. On units that have been transferred
from the original owner.
7. On products that have been purchased
as refurbished, like new, second-hand, in
a “As-Is” or “Final Sale” terms.
8. To products used in a commercial or
rental setting.
9. To products used in settings other than
ordinary household use or used other
than in accordance with the provided
instructions.
10. To damages for service calls for
improper installations.
11. Transportation and shipping costs
associated with the replacement of the
unit.
12. Service calls to instruct you how to use
your product.
13. Service calls to repair or replace the
house fuse, reset the circuit breaker or
correct the wiring in the house.
REPAIR OR REPLACEMENT AS PROVIDED UNDER
THIS WARRANTY IS THE EXCLUSIVE REMEDY OF
THE CUSTOMER; W APPLIANCE Co.. SHALL NOT BE
LIABLE FOR ANY INCIDENTAL OR CONSEQUENTIAL
DAMAGES FOR BREACH OF ANY EXPRESS OR
IMPLIED WARRANTY ON THIS PRODUCT, EXCEPT
TO THE EXTENT PROHIBITED BY APPLICABLE LAW.
ANY IMPLIED WARRANTY OF MERCHANTABILITY
OF FITNESS FOR A PARTICULAR PURPOSE ON THIS
PRODUCT IS LIMITED TO THE DURATION OF THE
WARRANTY.
Some states do not allow the exclusion or limitations
of incidental or consequential damages, or limitations
on how long the warranty lasts. In these cases the
above exclusions or limitations may not apply to you.
This warranty gives you specific legal rights and you
may also have other rights which vary from state to
state.
Obtaining Service: To obtain service, product
literature, supplies or accessories please call
844-299-0879 to create a ticket for exchange/repair.
Please make sure to provide the date of purchase,
model number and a brief description of the problem.
Our customer service representative will contact you
or send detailed return instructions.
W Appliance Co. does not warrant that the appliance will work
properly in all environmental conditions, and makes no warranty
and representation, either implied or expressed, with respect
to the quality, performance, merchantability, or fitness for a
particular purpose other than the purpose identified within this
user’s manual. W Appliance Co. has made every eort to ensure
that this user’s manual is accurate and disclaims liability for any
inaccuracies or omissions that may have occurred. Information in
this user’s manual is subject to change without notice and does
not represent a commitment on the part of W Appliance.
W Appliance Co. reserves the right to make improvements to
this user’s manual and/or to the products described in this user’s
manual at any time without notice. If you find information in this
manual that is incorrect, misleading, or incomplete, please contact
us at 844-299-0879.
W Appliance Co.
1356 Broadway
New York, NY 10018

BLACK & DECKER, BLACK+DECKER, the BLACK & DECKER and
BLACK+DECKER logos and product names are trademarks of
The Black & Decker Corporation, used under license. All rights reserved.
Product in this box may differ slightly from that pictured. Does not affect
function. Not all accessories shown in photography are included in this
package.
Imported by W Appliance, Inc., 1356 Broadway, New York, NY 10018
December 2023 Printed in China
Page 60
MANUAL DE INSTRUCCIONES
ITM. / ART. 1776312
NÚMERO DE CATÁLOGO
BP05JWAWF
AIRE ACONDICIONADO
PORTÁTIL INTELIGENTE
¡Gracias por elegir BLACK+DECKER!
POR FAVOR, LEA ANTES DE DEVOLVER ESTE PRODUCTO
POR CUALQUIER MOTIVO.
Si tiene una pregunta o experimenta un problema con su compra
BLACK+DECKER, ingrese a www.blackanddecker.com/instantanswers.
Si no encuentra la solución o no cuenta con acceso a Internet, llame al
844-299-0879 de 10:30 a.m. a 6:30 p.m. EST de lunes a viernes para hablar con
un agente. Tenga a la mano el número de catálogo cuando llame.
GUARDE ESTE MANUAL PARA FUTURAS CONSULTAS.

Page 61
CONTENIDO
INFORMACIÓN DE SEGURIDAD
Instrucciones de seguridad importantes ............................................................................................................. 62-63
Instrucciones de puesta a tierra ...................................................................................................................................... 64
Cable de alimentación y enchufe LCDI ........................................................................................................................ 65
Pautas de seguridad ...................................................................................................................................... 66-70
CONFIGURACIÓN Y USO
Piezas y características .......................................................................................................................................................... 71
Guía de instalación .................................................................................................................................................72
Instalación del kit de ventana ..........................................................................................................................73
Instalación del ducto de ventilación ..............................................................................................................74
Panel de control ............................................................................................................................................. 75-77
Descarga de la aplicación y uso mediante Wi-Fi ..............................................................................78-92
Conexión bluetooth .............................................................................................................................................93
Control del aire acondicionado portátil mediante la aplicación .................................................94-95
Conguración del dispositivo para control por voz ......................................................................... 96-97
Conguración del control por voz con Amazon Alexa ..................................................................98-101
Conguración del control por voz con el Asistente de Google .............................................. 102-105
Operación desde el control remoto .................................................................................................... 106-110
Drenaje de agua .................................................................................................................................................... 111
LIMPIEZA Y CUIDADO ..................................................................................................................................112
SOLUCIÓN DE PROBLEMAS Y GARANTÍA
Antes de llamar al servicio técnico ................................................................................................................... 113
Atención al cliente ............................................................................................................................................... 113
Solución de problemas ...............................................................................................................................114-116
Garantía limitada ................................................................................................................................................................... 117
REGISTRO DEL PRODUCTO
Adjunte el recibo a su manual.
Lo necesitará para obtener el servicio de
garantía.
Gracias por adquirir nuestro
producto BLACK+DECKER. Este
manual de fácil uso le guiará
para obtener el mejor uso de su
producto.
Recuerde registrar los números de
modelo y de serie. Se encuentran en
una etiqueta en la parte posterior
del producto.
_____________________________
Número de modelo
_____________________________
Número de serie
_____________________________
Fecha de compra
Page 62
INFORMACIÓN DE SEGURIDAD
ADVERTENCIA
Al usar aparatos eléctricos, se deben tomar ciertas precauciones
básicas de seguridad, incluidas las siguientes:
1. Para reducir el riesgo de lesiones, lea este manual antes de utilizar el aparato.
2. El aire acondicionado debe estar conectado a la toma de corriente y al
suministro eléctrico correctos.
3. Debe garantizarse una conexión a tierra adecuada para reducir el riesgo de
electrocución e incendio. NO CORTE NI RETIRE LA CLAVIJA DE CONEXIÓN
A TIERRA. Si no dispone de una toma de corriente de tres clavijas en la pared,
solicite a un electricista certificado que instale la toma adecuada. La toma de
pared DEBE estar correctamente conectada a tierra.
4. No utilice el aire acondicionado si el cable de alimentación está deshilachado o
dañado. Evite utilizarlo si hay grietas o daños por abrasión a lo largo del cable,
el conector del enchufe o si el aparato funciona mal o está dañado de alguna
manera. Póngase en contacto con un técnico de servicio autorizado para su
revisión, reparación o ajuste.
5. NO UTILICE ADAPTADORES NI ALARGADORES.
6. No impida el flujo de aire alrededor del aire acondicionado. El ducto de
ventilación no debe presentar ninguna obstrucción.
7. Desenchufe siempre el aire acondicionado antes de repararlo o moverlo.
8. No instale ni utilice el aire acondicionado en zonas donde la atmósfera contenga
gases combustibles o donde la atmósfera sea aceitosa o sulfurosa. Evite que
cualquier producto químico entre en contacto con su aire acondicionado.
9. No coloque ningún objeto en la parte superior del aparato.
10. Nunca use el aire acondicionado sin los filtros colocados.
11. No utilice el aire acondicionado cerca de una bañera, ducha o lavabo.
12. Este aparato no está diseñado para ser utilizado por personas (incl. niños) con
capacidades físicas, sensoriales o mentales reducidas o con falta de experiencia
y/o conocimientos, a menos que sean supervisadas o instruidas acerca del uso
del aparato por una persona responsable de su seguridad.
13. Los niños deben ser vigilados para evitar que jueguen con el aparato.
14. Si el cable de alimentación está dañado, debe ser sustituido por el fabricante, un
agente de servicio o personas con similar cualificación para evitar riesgos.
15. El aire acondicionado debe instalarse de acuerdo con la normativa nacional
sobre cableado.
PELIGRO
PELIGRO - Peligros inmediatos
que PROVOCARÁN lesiones
personales graves o la muerte
ADVERTENCIA
ADVERTENCIA - Peligros o prácticas
inseguras que PODRÍAN provocar
lesiones personales graves o la muerte
PRECAUCIÓN
PRECAUCIÓN - Peligros o
prácticas inseguras que PODRÍAN
provocar lesiones personales leves
INSTRUCCIONES DE SEGURIDAD IMPORTANTES
Precaución, riesgo de incendio

Page 63
MANIPULACIÓN DE PILAS ALCALINAS
ADVERTENCIA
Al manipular pilas alcalinas, deben tomarse ciertas precauciones
básicas de seguridad, entre las que se incluyen las siguientes:
INFORMACIÓN DE SEGURIDAD
1. Si el líquido de las pilas entra accidentalmente en contacto con los ojos, existe
el riesgo de pérdida de la visión, no se los frote. Enjuáguese inmediatamente los
ojos con agua limpia del grifo y consulte inmediatamente a un médico.
2. No arroje las pilas al fuego, no las exponga al calor, no las desmonte ni las
modique. Si el aislamiento o la válvula de seguridad están dañados, las pilas
pueden perder líquido, sobrecalentarse o explotar.
3. No introduzca la pilas con las polaridades invertidas. Si lo hace, puede
provocar alguna anomalía o un cortocircuito y las pilas pueden perder líquido,
sobrecalentarse o explotar.
4. Mantenga las pilas fuera del alcance de los niños. En caso de ingestión de una pila,
acuda inmediatamente a un médico.
5. Si el líquido alcalino entra en contacto con la boca, enjuáguese la boca con agua y
póngase en contacto con un médico inmediatamente.
6. Si el líquido alcalino entra en contacto con la piel o la ropa, puede quemar la piel,
enjuage a fondo la zona afectada con agua del grifo.
7. No mezcle pilas nuevas y viejas ni pilas de marcas diferentes. Los diferentes
atributos pueden hacer que las pilas pierdan líquido, se sobrecalienten o exploten.
8. Estas pilas no son recargables. Recargar estas pilas puede dañar el aislamiento
o la estructura interna y puede provocar que las pilas pierdan líquido, se
sobrecalienten o exploten.
9. No dañe ni retire la etiqueta del exterior de las pilas. De lo contrario, las pilas
podrían sufrir un cortocircuito, perder líquido, sobrecalentarse o explotar.
10. No deje caer, lance ni exponga las pilas a impactos extremos. De lo contrario, las
pilas podrían perder líquido, sobrecalentarse o explotar.
11. No altere la forma de las pilas. Si el aislamiento o la válvula de seguridad se dañan,
las pilas pueden perder líquido, sobrecalentarse o explotar.
12. Retire inmediatamente las pilas cuando hayan perdido toda su potencia. Dejar
las pilas en el aparato durante mucho tiempo puede hacer que las pilas pierdan
líquido, se sobrecalienten o exploten debido al gas que generan las pilas.
13. Retire las pilas del aparato cuando no vaya a utilizarlo durante un periodo
prolongado de tiempo. Las pilas pueden perder líquido, sobrecalentarse o
explotar debido al gas que generan.
14. No aplique soldadura directamente a las pilas. El calor puede hacer que las pilas
pierdan líquido, se sobrecalienten o exploten.
15. No moje las pilas. De lo contrario, las pilas podrían sobrecalentarse.
16. Guarde las pilas en un lugar alejado de la luz solar directa, donde la temperatura
y la humedad no sean elevadas. De lo contrario, las pilas podrían perder líquido,
sobrecalentarse o explotar. Además, puede hacer que la vida útil y el rendimiento
de las pilas disminuyan.
17. Siga la normativa de la administración local a la hora de desechar estas pilas.
18. NUNCA mezcle pilas alcalinas, estándar (carbono-zinc), recargables
(níquel-cadmio) en este producto.
19. Limpie los contactos de la batería y también los del dispositivo antes de la
instalación de la batería.
GUARDE ESTAS INSTRUCCIONES
SÓLO PARA USO DOMÉSTICO

Page 64
INFORMACIÓN DE SEGURIDAD
INSTRUCCIONES DE PUESTA A TIERRA
REQUISITOS ELÉCTRICOS
En caso de mal funcionamiento o avería, la conexión a tierra proporciona un
camino de menor resistencia para la corriente eléctrica con el n de reducir
el riesgo de electrocución. El aparato debe conectarse a un cable con un
conductor de puesta a tierra y un enchufe con toma de tierra. El enchufe debe
conectarse a una toma de corriente adecuada que esté correctamente instalada
y conectada a tierra de acuerdo con todos los códigos y ordenanzas locales.
PELIGRO - Una conexión incorrecta del conductor de puesta a tierra del equipo
puede provocar un riesgo de electrocución. El conductor con aislamiento cuya
supercie exterior es de color verde con o sin rayas amarillas es el conductor
de puesta a tierra del equipo. Si es necesario reparar o sustituir el cable o el
enchufe, no conecte el conductor de puesta a tierra del equipo a un terminal
con corriente. Consulte a un electricista o técnico cualicado si no comprende
completamente las instrucciones de conexión a tierra o si tiene dudas sobre
si el aparato está correctamente conectado a tierra. No modique el enchufe
conectado al aparato; si no encaja en la toma de corriente, haga instalar una
toma de corriente adecuada por un electricista cualicado.
PARA APARATOS CON TOMA DE TIERRA Y CONEXIÓN POR CABLE CON
UNA POTENCIA NOMINAL INFERIOR A 15A Y DESTINADOS A UTILIZARSE EN
UN CIRCUITO DE ALIMENTACIÓN DE 120V NOMINALES
El aparato debe utilizarse en un circuito de 120V nominales y debe conectarse
a una toma de corriente con toma de tierra similar a la que se ilustra a
continuación. No se recomienda el uso de un adaptador temporal.
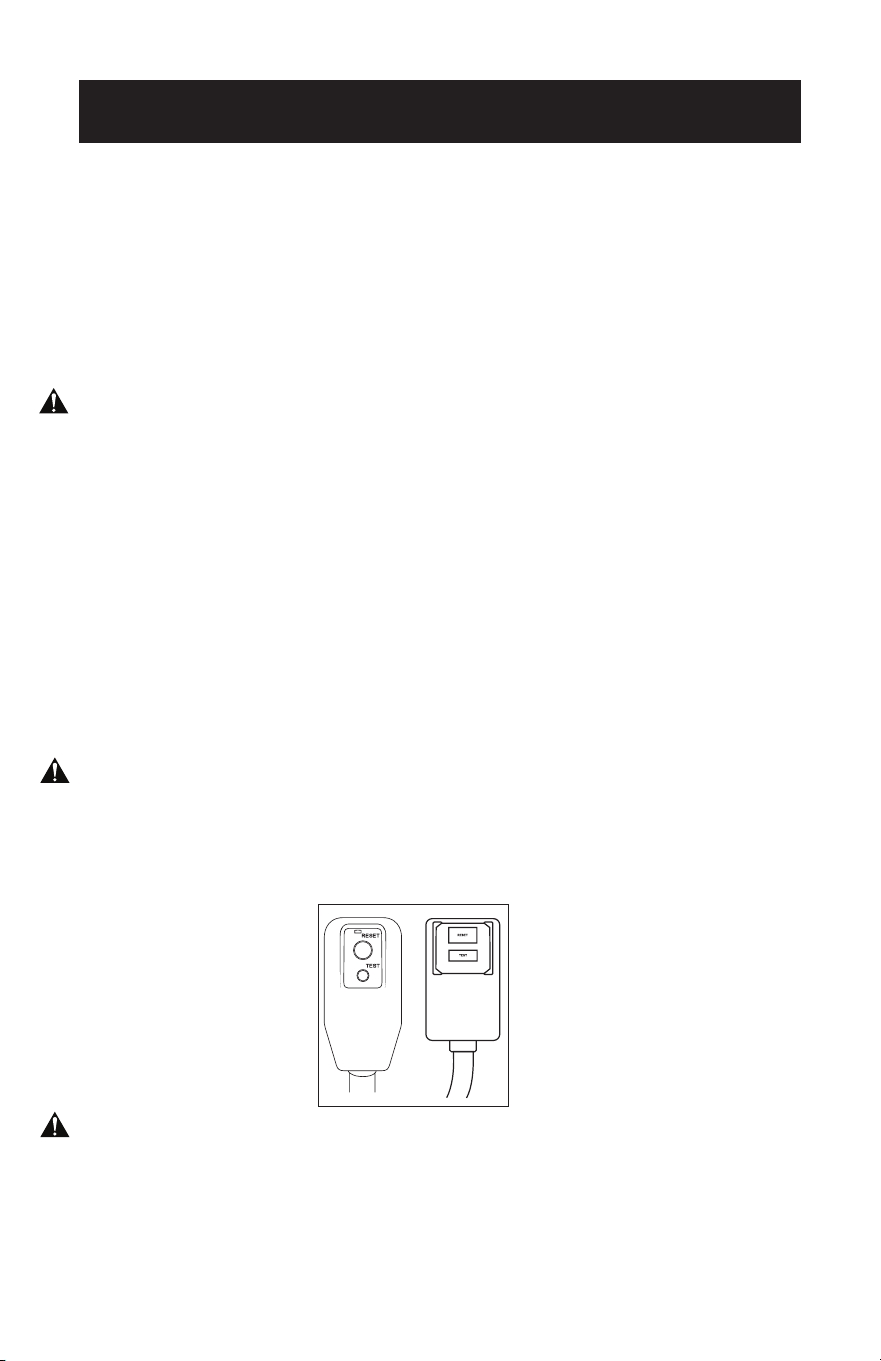
Page 65
INFORMACIÓN DE SEGURIDAD
CABLE DE ALIMENTACIÓN Y ENCHUFE LCDI
Este aire acondicionado está equipado con un cable de alimentación LCDI (Detección
e Interrupción de Fugas de Corriente) como es requerido por UL. Este cable de
alimentación contiene componentes electrónicos de última generación que detectan
las fugas de corriente. Si el cable está dañado y se producen fugas, se desconectará
la alimentación de la unidad.
Los botones de prueba y reinicio del enchufe LCDI se utilizan para comprobar si el
enchufe funciona correctamente.
ADVERTENCIA: Pruebe el LCDI antes de cada uso.
Para probar el enchufe:
1. Enchufe el cable de alimentación a una toma de 3 clavijas con toma de tierra.
2. Pulse RESET (en algunas unidades se encenderá una luz verde).
3. Pulse el botón TEST, el circuito debería dispararse y cortar toda la alimentación
del aire acondicionado (en algunas unidades la luz verde puede apagarse).
4. Pulse el botón RESET para utilizarlo. Oirá un clic y el aire acondicionado estará
listo para su uso.
5. El cable de alimentación debe sustituirse si no se dispara al pulsar el botón TEST
y el aparato no se reinicia.
NOTA:
• No utilice este dispositivo para encender o apagar el aparato.
• Asegúrese siempre de que el botón de reinicio está pulsado para un
funcionamiento correcto.
ADVERTENCIA:
• El cable de alimentación debe sustituirse si no se restablece al pulsar el botón de
prueba o si no puede restablecerse.
• Si el cable de alimentación está dañado, no se puede reparar.
• Debe sustituirse por uno obtenido del fabricante del producto.
ADVERTENCIA - RIESGO DE INCENDIO
• Es importante que el enchufe encaje bien en la toma de corriente.
• Si el enchufe no encaja bien y parece flojo, no debe utilizarse.
• Haga que un electricista autorizado sustituya el receptáculo.
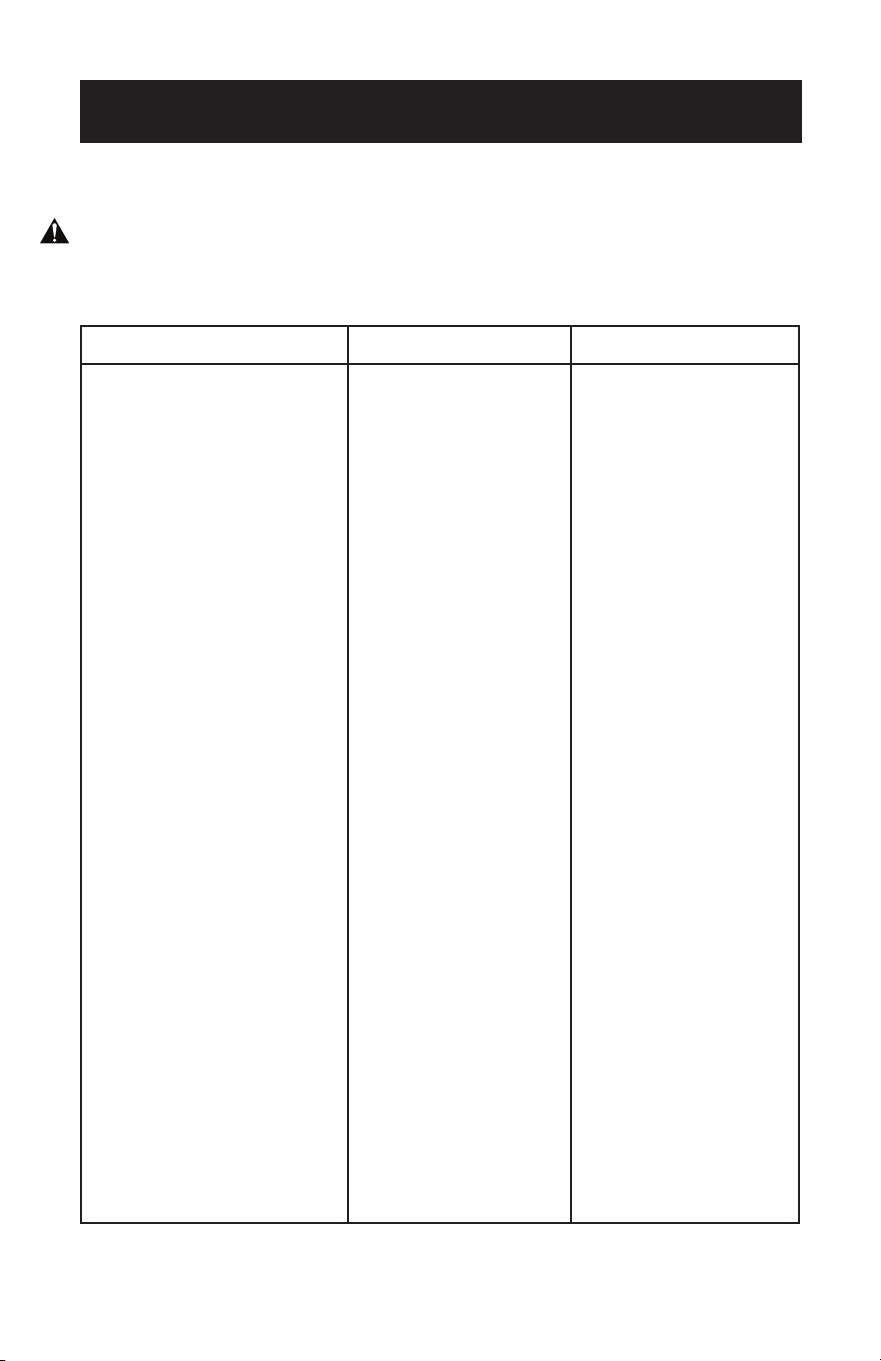
Page 66
INFORMACIÓN DE SEGURIDAD
PAUTAS DE SEGURIDAD
ADVERTENCIA: Para evitar lesiones al usuario o a otras personas y daños materiales,
deben seguirse las siguientes instrucciones. El funcionamiento
incorrecto debido a la ignorancia de las instrucciones puede causar
daños.
HAGA SIEMPRE ESTO NUNCA HAGA ESTO AHORRO DE ENERGÍA
• El aire acondicionado debe
utilizarse de forma que esté
protegido de la humedad
como por ejemplo
condensación, salpicaduras
de agua, etc. No coloque ni
guarde el aire acondicionado
donde pueda caerse al agua o
cualquier otro líquido.
Desenchúfalo inmediatamente.
• Mueva el aire acondicionado
siempre en posición vertical y
colóquelo sobre una superficie
estable y nivelada durante su
uso.
• Si el aparato se ha
transportado de lado,
asegúrese de colocarlo en
posición vertical durante 6
horas antes de encenderlo.
• Apague el aparato cuando no
lo utilice.
• Utilice siempre el interruptor
del panel de control para
encender o apagar la unidad.
• Póngase siempre en contacto
con una persona cualificada
para llevar a cabo las
reparaciones. Si el cable de
alimentación está dañado,
debe ser reparado por un
técnico cualificado.
• Mantenga un perímetro libre
de al menos 30 cm alrededor
del aparato, lejos de paredes,
muebles y cortinas.
• Si el aire acondicionado
sufre un golpe durante su uso,
apáguelo y desenchúfelo de la
red eléctrica inmediatamente.
• No encienda el aire
acondicionado en una
habitación húmeda,
como un cuarto de baño
o una lavandería.
• No toque el aparato con
las manos mojadas o
húmedas ni cuando esté
descalzo. No presione
los botones del panel
de control con otra cosa
que no sean los dedos.
• No retire ninguna
cubierta fija. No utilice
nunca este aparato si no
funciona
correctamente o si se ha
caído o dañado.
• No utilice nunca el
enchufe para arrancar y
parar la unidad.
• No cubra ni obstruya
las rejillas de entrada o
salida.
• No utilice productos
químicos peligrosos
para limpiar ni permita
que éstos entren en
contacto con el aparato.
No utilice el aparato en
presencia de sustancias
o vapores inflamables
como alcohol,
insecticidas, gasolina,
etc.
• No permita que los
niños utilicen el aparato
sin supervisión.
• No utilice este producto
para funciones distintas
de las descritas en este
manual de instrucciones.
• Ubique el aparato donde
los muebles no puedan
obstruir el flujo de aire.
• Mantenga las persianas /
cortinas recogidas.
• Mantenga limpios los
filtros.
• Mantenga cerradas
puertas y ventanas para
que entre el aire fresco y
salga el aire caliente.

Page 67
INFORMACIÓN DE SEGURIDAD
PRECAUCIÓN IMPORTANTE
ADVERTENCIA:
• Este sistema herméticamente cerrado contiene gases fluorados de efecto invernadero.
INFORMACIÓN MEDIOAMBIENTAL: Esta unidad contiene gases fluorados de efecto
invernadero cubiertos por el Protocolo de Kioto.
• No utilice este aparato para funciones distintas de las descritas en este manual de
instrucciones.
• Asegúrese de que el enchufe esté bien insertado en la toma de corriente. Puede ser un
riesgo de electrocución o incendio.
• No enchufe otros aparatos en la misma toma de corriente, puede ser un riesgo de
electrocución.
• No desmonte ni modifique el aparato ni el cable de alimentación, puede ser un riesgo de
electrocución o incendio. Toda reparación y servicio deberá ser realizado por un técnico
cualificado.
• No coloque el cable de alimentación ni el aparato cerca de un calefactor, radiador u otra
fuente de calor. Puede ser un riesgo de electrocución o incendio.
• Este aparato está equipado con un cable con conexión a tierra conectado a una clavija
con pata a tierra o a una lengüeta de conexión a tierra. El enchufe debe conectarse a una
toma de corriente correctamente instalada y conectada a tierra. En ningún caso corte o
retire la clavija con toma de tierra o la lengüeta de conexión a tierra de este enchufe.
• El aparato debe utilizarse o almacenarse de forma que quede protegido de las
humedades como por ejemplo la condensación, salpicaduras de agua, etc. Desenchufe el
aparato inmediatamente si esto ocurre.
• Transporte siempre su aparato en posición vertical y colóquelo sobre una superficie
estable y nivelada durante su uso. Si el aparato se transporta tumbado, debe ponerlo de
pie y dejarlo desenchufado durante al menos 6 horas.
• Utilice siempre el interruptor del panel de control o del mando a distancia para apagar el
aparato y no inicie ni detenga el funcionamiento enchufando o desenchufando el cable
de alimentación. Esto es un riesgo de electrocución.
• No toque los botones del panel de control con los dedos mojados y/o húmedos.
• No utilice productos químicos peligrosos para limpiar ni permita que éstos entren en
contacto con el aparato. Para no dañar el acabado de la superficie, utilice sólo un paño
suave para limpiar el aparato. No utilice cera, diluyente ni detergentes fuertes. No utilice
el aparato en presencia de sustancias o vapores inflamables como alcohol, insecticidas,
gasolina, etc. Si el aparato emite sonidos extraños o emite humo u olores extraños,
desenchúfelo inmediatamente.
• No limpie el aparato con agua. El agua puede entrar en el aparato y dañar el aislamiento,
creando un riesgo de electrocución. Si entra agua en el aparato, desenchúfelo
inmediatamente y póngase en contacto con el servicio de atención al cliente.
• Utilice dos o más personas para levantar e instalar el aparato.
• Sujete siempre el enchufe cuando enchufe o desenchufe el aparato. Nunca lo desenchufe
tirando del cable. Esto es un riesgo de electrocución y/o daños.
• Instale el aparato sobre un suelo resistente y nivelado capaz de soportar hasta 50 kg (110
lbs). La instalación sobre un suelo débil o desnivelado puede provocar daños materiales
y personales.
CONEXIONES ELÉCTRICAS
Antes de enchufar el aparato a la red eléctrica, compruebe que:
• La alimentación de la red corresponde al valor indicado en la placa de características
situada en la parte posterior del aparato.
• La toma de corriente y el circuito eléctrico son adecuados para el aparato.
• La toma de corriente coincide con el enchufe. De no ser así, haga cambiar el enchufe.
• La toma de corriente está debidamente conectada a tierra. El incumplimiento de estas
importantes instrucciones de seguridad exime al fabricante de toda responsabilidad.
Page 68
INFORMACIÓN DE SEGURIDAD
ADVERTENCIA:
• Este aparato no está destinado a ser utilizado por personas (incluidos niños) con
capacidades físicas, sensoriales o mentales reducidas, o con falta de experiencia
y conocimientos, a menos que hayan sido supervisadas o instruidas acerca del
uso del aparato por una persona responsable de su seguridad.
• Los niños deben ser vigilados para evitar que jueguen con el aparato.
• Si el cable de alimentación está dañado, debe ser sustituido por el fabricante,
su agente de servicio o personas con cualificación similar con el fin de evitar un
peligro.
• El aparato debe instalarse de acuerdo con la normativa nacional sobre cableado.
• No utilice medios para acelerar el proceso de descongelación o para limpiar,
distintos de los recomendados por el fabricante.
• El aparato debe almacenarse en una sala sin fuentes de ignición en
funcionamiento continuo (por ejemplo, llamas abiertas, un aparato de gas en
funcionamiento o un calentador eléctrico en funcionamiento).
• No perforar ni quemar.
• Tenga en cuenta que los refrigerantes pueden carecer de olor.
• La manipulación, la instalación, el almacenamiento, el mantenimiento y la
eliminación de este aparato deben cumplir las disposiciones de las leyes y
normativas nacionales relacionadas con el gas, así como la normativa nacional
sobre cableado.
• Es necesario eliminar el refrigerante del sistema cuando se realiza el
mantenimiento o el desguace de un aparato.
• Zona ventilada (puertas y ventanas abiertas)
• Asegúrese de que la zona de trabajo está abierta o bien ventilada antes
de encender el sistema o realizar trabajos en caliente. Debe mantenerse la
ventilación durante el funcionamiento. La ventilación desplaza rápidamente a la
atmósfera el refrigerante fugado diluido de forma segura.
• En el aparato se utiliza el refrigerante inflamable R32/R290. Siga atentamente
las instrucciones para manipular, instalar, limpiar y realizar el mantenimiento
del aparato para evitar daños o peligros. No tire el aparato a la basura normal.
Póngase en contacto con una agencia cualificada para su correcta eliminación.
• El mantenimiento se realizará únicamente según las recomendaciones del
fabricante.
PRECAUCIÓN RIESGO DE INCENDIO

Page 69
INFORMACIÓN DE SEGURIDAD
Precaución de la FCC
Este dispositivo cumple la parte 15 de las normas de la FCC. El funcionamiento está
sujeto a las dos condiciones siguientes:
(1) Este dispositivo no puede causar interferencias perjudiciales, y (2) este dispositivo
debe aceptar cualquier interferencia recibida, incluidas las interferencias que puedan
causar un funcionamiento no deseado. Cualquier cambio o modificación no aprobado
expresamente por la parte responsable del cumplimiento podría anular la autoridad
del usuario para utilizar el equipo.
NOTA:
• Este equipo ha sido probado y cumple los límites establecidos para los
dispositivos digitales de Clase B, de conformidad con el apartado 15 de las
normas de la FCC. Estos límites están diseñados para proporcionar una
protección razonable contra interferencias perjudiciales en una instalación
residencial. Este equipo genera, utiliza y puede irradiar energía de
radiofrecuencia y, si no se instala y utiliza de acuerdo con las instrucciones,
puede causar interferencias perjudiciales en las comunicaciones por radio.
Sin embargo, no hay garantía de que no se produzcan interferencias en una
instalación concreta. Este equipo produce interferencias perjudiciales para
la recepción de radio o televisión, que pueden determinarse apagando y
encendiendo el equipo, se recomienda al usuario que intente corregir las
interferencias mediante una o varias de las siguientes medidas:
• Reorientar o reubicar la antena receptora.
• Aumente la separación entre el equipo y el receptor.
• Conecte el equipo a una toma de corriente de un circuito distinto al que está
conectado el receptor.
• Consulte al distribuidor o a un técnico experto en radio/TV para obtener ayuda.
La distancia entre el usuario y el dispositivo no debe ser inferior a 20 cm.
FCC ID: 2ANDL-WBR3

Page 70
INFORMACIÓN DE SEGURIDAD
CONDICIÓN DE FUNCIONAMIENTO
El aire acondicionado debe funcionar dentro del intervalo de temperaturas indicado
a continuación.
NOTA: El rendimiento de la unidad puede verse afectado cuando se utiliza fuera de
estas temperaturas de funcionamiento.
MODO TEMPERATURA AMBIENTE
FRÍO 64°F (18°C) ~ 95°F (35°C)
SECAR 64°F (18°C) ~ 95°F (35°C)
No transporte ni ponga nunca el aparato boca abajo o de lado. Si esto ocurre,
espere al menos 6 horas antes de encender el aparato; se recomiendan 24 horas.
Después de que el aparato haya estado de lado, es necesario que el aceite vuelva
al compresor para garantizar su correcto funcionamiento. Si no se deja pasar de 6
a 24 horas antes de encenderlo, es posible que el aparato funcione durante poco
tiempo y, a continuación, el compresor se averiará por falta de aceite.
El aire acondicionado debe funcionar en un rango de humedad relativa de entre
30% y 90%.

Page 71Page 71
PIEZAS Y CARACTERÍSTICAS
Ducto de escape de
aire Salida del ducto
Entrada del
ducto
Control remoto
2XTuerca de mariposa
y tornillo
Tira de espuma
Manguera de drenaje
2 ft/0.6 m
CONFIGURACIÓN Y USO
Panel de ventana 3 piezas
Panel de
control
Filtro del
evaporador
Mango
Ruedas (4)
2 pilas AAA
Drenaje de
deshumidi-
ficación

Page 72
CONFIGURACIÓN Y USO
GUÍA DE INSTALACIÓN
UBICACIÓN
• El aire acondicionado debe colocarse sobre un suelo rme para minimizar el
ruido y las vibraciones. Para una colocación segura, ubique el aparato sobre un
suelo liso y nivelado lo sucientemente fuerte como para soportar la unidad.
• El aparato tiene ruedas para facilitar su colocación, pero debe rodar sobre
supercies lisas y planas. Tenga cuidado al deslizar el aparato sobre supercies
alfombradas. No intente hacer rodar el aparato sobre objetos.
• El aparato debe colocarse al alcance de una toma de corriente con conexión a
tierra.
• No coloque nunca ningún obstáculo alrededor de la entrada o salida de aire del
aparato.
• Se recomienda dejar al menos 31,5 pulgadas de espacio libre alrededor del aire
acondicionado portátil y al menos 19,7 pulgadas de espacio entre la parte supe-
rior del aire acondicionado portátil y cualquier obstáculo adyacente para un ujo
de aire óptimo.
HERRAMIENTAS SUGERIDAS PARA LA INSTALACIÓN DEL KIT DE
VENTANA
• Destornilladores (Phillips de tamaño medio)
• Cinta métrica o regla
• Cuchillo o tijeras
• Sierra (en caso de que sea necesario reducir el tamaño del kit de ventana
porque la ventana es demasiado estrecha para la instalación directa)

Page 73
INSTALACIÓN DEL KIT DE VENTANA
El kit de ventana ha sido diseñado para adaptarse a la mayoría de las ventanas
“Verticales” y “Horizontales”; sin embargo, puede ser necesario que usted
improvise/modique algún aspecto de los procedimientos de instalación para
ciertos tipos de ventanas. Aberturas mínimas y máximas de las ventanas:
MÁXIMO: 59 pulgadas o 150 cm MÍNIMO: 29.5 pulgadas o 75 cm
NOTA: Ajuste la longitud del kit de deslizamiento de la ventana en función de la anchura o la
altura de la ventana y fíjelo con los tornillos suministrados.
NOTA: Si la abertura de la ventana es inferior a 29,5”, la longitud mínima del kit de corredera
de ventana, mida y corte el panel con un oricio para ajustarlo a la abertura de la
ventana. Nunca recorte el extremo con el oricio del kit de ventana.
VENTANA CORREDERA/DE GUILLOTINA
INSTALACIÓN EN VENTANA
1. Corte la junta de espuma (tipo adhesivo)
a la longitud adecuada y fíjela a la
hoja de la ventana.
2. Fije el kit de ventana a la hoja de la
ventana. Ajuste la longitud del kit de
ventana en función del ancho de la
ventana. Acorte el kit de ventana
ajustable si el ancho de la ventana
es inferior a 29,5”.
3. Corte la junta de espuma
(tipo adhesivo) a la longitud
adecuada y fíjela en la parte inferior
de la ventana. Inserte el kit de ventana
en el riel de la ventana.
4. Cierre la ventana para jar el kit de
ventana en su sitio.
5. Corte la junta de espuma a una
longitud adecuada y selle el hueco
abierto entre el marco superior de
la ventana y el marco exterior.
Ventana horizontalVentana vertical
Kit de ventana
CONFIGURACIÓN Y USO
Sello de
espuma
Sello de
espuma
Sello de
espuma
Kit de control
deslizante de
ventana
Kit de control
deslizante de
ventana
Kit de control
deslizante de
ventana
Kit de control
deslizante de
ventana
29.5”– 59”
Sello de
espuma
29.5”– 59”
Marco de ventana
El kit de ventana puede jarse
insertando el perno.
Coloque la tuerca en el lado
opuesto del agujero.
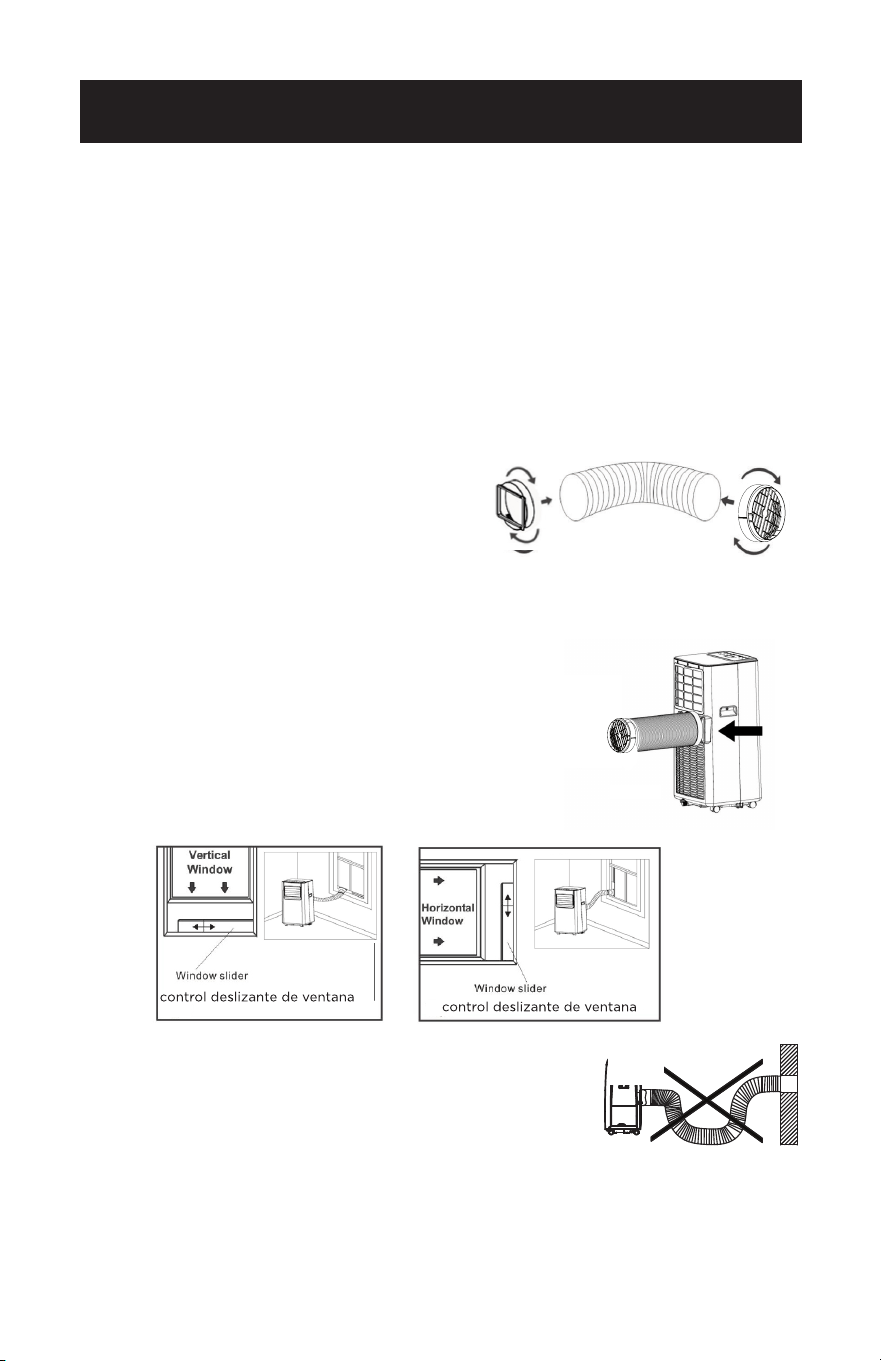
Page 74
2. Conecte el ducto de salida a la salida por el otro extremo. Empuje la salida de
aire sobre el extremo del ducto de salida de aire, empújela ligeramente y, a
continuación, comience a enroscarla en sentido
horario (ver Fig. 2).
3. Alinee las lengüetas de la entrada de aire con las
ranuras sobre la salida de aire, inserte y empuje
hacia abajo (ver Fig. 3).
4. Inserte el ducto de salida en el panel de la ventana.
5. Fije el ducto de salida al kit de ventana y selle
(Figs. 4 y 5).
NOTA: El ducto de salida de aire puede comprimirse o
alargarse moderadamente, pero es conveniente
mantener la longitud al mínimo. Asegúrate también
de que el ducto no tenga curvas cerradas.
Hook
CONFIGURACIÓN Y USO
Fig. 4 Fig. 5
Fig. 3
INSTALACIÓN DEL DUCTO DE SALIDA DE AIRE
El ducto de salida de aire y la toma de aire deben instalarse o retirarse del aire
acondicionado portátil de acuerdo con el modo en que se esté utilizando:
ENFRIAR, SECAR: El ducto de salida de aire y la toma de aire deben conectarse al
aire acondicionado portátil.
VENTILADOR: El ducto de salida de aire y la toma de aire deben conectarse al aire
acondicionado portátil.
1. Conecte la toma de aire al extremo del ducto de salida aire. Empuje la toma de aire
sobre el extremo del ducto de salida de aire, empújela ligeramente y, a continuación,
comience a enroscarla en sentido horario (ver Fig. 1).
Fig. 2
Agujas del reloj
Fig. 1
NOTA: Extienda la manguera de
escape a la longitud requerida
antes de conectar la entrada y
salida de la manguera.
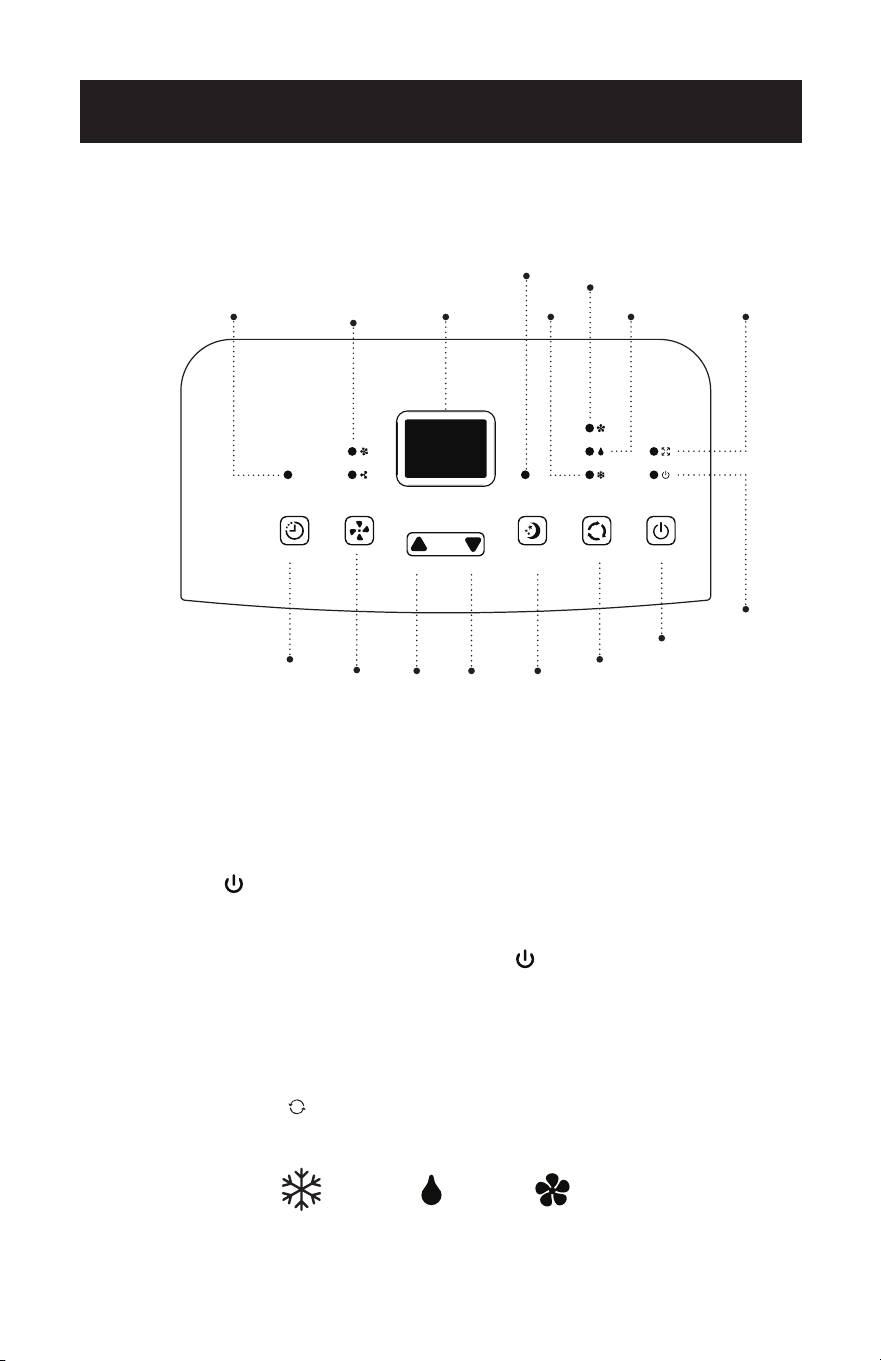
Page 75
Pulse el botón de aumentar y el botón de disminuir al mismo tiempo para cambiar de Fahrenheit
a Celsius.
PANEL DE CONTROL
ENCENDIDO DEL APARATO
• Enchúfelo a la toma de corriente especíca.
• Pulse el botón hasta que se encienda el aparato. Aparecerá la última función
activa cuando éste se apagó.
• No apague nunca el aire acondicionado desenchufándolo de la toma de
corriente. Pulse siempre el botón de encendido , y espere unos minutos
antes de desenchufarlo. Esto permite que el aparato realice un ciclo de
comprobaciones para vericar el funcionamiento.
NOTA: Antes de pulsar el botón de encendido, asegúrese de que el tapón
de drenaje de condensación de la parte trasera del aparato esté bien
colocado para evitar fugas.
• Pulse el botón MODE hasta que se encienda la luz correspondiente al modo
deseado.
CONFIGURACIÓN Y USO
Botón de
encendido
Botón
de
dormir
Botón de
selección
de modo
Indicador luminoso
de velocidad del
ventilador
Pantalla
Indicador
luminoso
de
depósito
lleno
Indicador
luminoso
de
encendido
Frío
Ventilador
Secar
Botón de
velocidad
Botón de
temporizador
Indicador luminoso del
temporizador
Botón de
disminuir
Botón de
aumentar
FRESCO ADMIRADORSECO
Luz indicadora
del modo de
reposo

Page 76
MODO FRÍO
Ideal para cuando hace calor
y se necesita refrescar la
habitación. Para ajustar correctamente
el funcionamiento del aparato, pulse
los botones o hasta que aparezca la
temperatura deseada (ver Fig. 7).
A continuación, seleccione la velocidad
del ventilador pulsando el botón
correspondiente hasta que se encienda
la luz indicadora en la velocidad del
ventilador deseada:
ALTO: El ventilador funciona al
máximo para alcanzar la
temperatura deseada lo más
rápidamente posible.
BAJA: Para un funcionamiento
silencioso.
SECAR
Pulse el botón “MODE” hasta que se
encienda la luz indicadora de secado y
aparezca “dh” en la pantalla digital.
• En este modo, no se puede seleccionar
la velocidad del ventilador ni ajustar la
temperatura. El motor del ventilador
funciona a velocidad BAJA.
• Mantenga las ventanas y puertas
cerradas para obtener el mejor efecto
deshumidicador.
• El ducto de salida de aire no es
necesario para reducir la humedad;
sin embargo, se recomienda en
habitaciones muy húmedas para que el
aire caliente pueda salir al exterior.
DRENAJE EN EL MODO SECAR
• Se recomienda utilizar el desagüe de
deshumidicación y la manguera de
desagüe para un drenaje continuo.
• TANQUE LLENO
- Cuando el
nivel de agua alcanza un nivel
predeterminado, la luz indicadora de
“tanque lleno” del panel de control
parpadeará. Sonará un zumbador y la
unidad se apagará. Tendrá que vaciar
la unidad.
NOTA: Consulte la sección de drenaje
del agua (página 52).
MODO VENTILADOR
• Pulse el botón “MODE” hasta que se
encienda la luz indicadora “FAN”.
• Pulse el botón de velocidad para
seleccionar la velocidad ALTA o BAJA
del ventilador. No se puede ajustar la
temperatura.
• En este modo no es necesario el ducto
de salida de aire.
CONFIGURACIÓN Y USO

Page 77
CONFIGURACIÓN Y USO
TEMPORIZADOR
• Para ajustar el temporizador de
PARADA AUTOMÁTICA. Cuando
el aparato esté encendido, pulse el
botón TIMER.
• Pulse los botones o para
seleccionar el TIEMPO AUTO en
incrementos de 1 hora, hasta 24
horas. La pantalla LED indicará
el tiempo restante. Pulse de
nuevo el botón TIMER. La luz
indicadora del TEMPORIZADOR se
enciende para mostrar que se ha
iniciado el programa de PARADA
AUTOMÁTICA.
• Para ajustar el temporizador de
INICIO AUTOMÁTICO. Cuando la
unidad esté apagada, pulse el botón
TIMER.
• Presione el botón o para
seleccionar el TIEMPO DE
AUTOMATIZACIÓN en incrementos
de 1 hora, hasta 24 horas. La pantalla
LED indicará el tiempo restante.
Pulse de nuevo el botón TIMER. La
luz indicadora del TEMPORIZADOR
se enciende para mostrar que se
ha iniciado el programa de INICIO
AUTOMÁTICO.
• Al pulsar el botón POWER o el botón
TIMER se cancelará el programa de
INICIO/PARADA AUTOMÁTICA y la
luz indicadora del temporizador se
apagará.
DORMIR
La función DORMIR ajusta
gradualmente la temperatura de
la habitación para proporcionar un
ambiente confortable. Pulse el botón
SLEEP para activarla.
En el modo FRÍO, el ventilador
funcionará a menor velocidad y la
temperatura aumentará 1°F después
de una hora y 2°F después de 2 horas.
Para cancelar este ajuste pulse de
nuevo el botón SLEEP.
°C / °F
Pulse el botón de aumento y el botón
de disminución del panel de control
al mismo tiempo para cambiar la
unidad de temperatura de Fahrenheit
a Celsius.

Page 78
DESCARGA DE LA APLICACIÓN Y USO
MEDIANTE WI-FI
CONFIGURACIÓN Y USO
PRECAUCIÓN FCC (FCC ID: 2ANDL-WBR3)
• Este dispositivo cumple la parte 15 de las normas de la FCC. El funcionamiento
está sujeto a las dos condiciones siguientes: (D) Este dispositivo no puede
causar interferencias perjudiciales, y (2) este dispositivo debe aceptar cualquier
interferencia recibida, incluidas las interferencias que puedan causar un
funcionamiento no deseado.
• Cualquier cambio o modicación no aprobado expresamente por la parte
responsable del cumplimiento podría anular la autoridad del usuario para utilizar el
equipo.
NOTA: Este equipo ha sido probado y cumple los límites establecidos para los
dispositivos digitales de Clase B, de conformidad con el apartado 15 de las normas
de la FCC. Estos límites están diseñados para proporcionar una protección razonable
contra interferencias perjudiciales en una instalación residencial. Este equipo
genera, utiliza y puede irradiar energía de radiofrecuencia y, si no se instala y utiliza
de acuerdo con las instrucciones, puede causar interferencias perjudiciales en las
comunicaciones por radio. Sin embargo, no hay garantía de que no se produzcan
interferencias en una instalación concreta. Si este equipo causa interferencias
perjudiciales en la recepción de radio o televisión, lo que puede determinarse
apagando y encendiendo el equipo, se recomienda al usuario que intente corregir la
interferencia mediante una o más de las siguientes medidas:
- Reorientar o reubicar la antena receptora.
- Aumente la separación entre el equipo y el receptor.
- Conecte el equipo a una toma de corriente de un circuito distinto al que está
conectado el receptor.
- Consulte al distribuidor o a un técnico experto en radio/TV para obtener ayuda. La
distancia entre el usuario y el dispositivo no debe ser inferior a 7,87” (20 cm).
• Si el aparato tiene la función Wi-Fi, la potencia de transmisión es de menos de
20dBm, y el rango de radiofrecuencia es de 2412MHZ - 2472MHz.
Pasos a
seguir
Artículos de
funcionamiento
Cuenta nueva
Vuelva a instalar
la APP (registrada
anteriormente)
Paso 1
Descargar e instalar
la aplicación
SÍ SÍ
Paso 2 Cuenta de registro SÍ NO
Paso 3 Inicio de sesión SÍ SÍ
Paso 4 Inicio de sesión SÍ
El dispositivo
registrado
permanecerá.

Page 79
CONFIGURACIÓN Y USO
ESPECIFICACIONES E INFORMACIÓN BÁSICA DEL MÓDULO
WI-FI
1. Especificaciones mínimas del teléfono inteligente:
Android versión 5.0 o superior
IOS versión 10.0 o superior
2. Parámetros básicos para Wi-Fi:
Parámetros Detalles
Frecuencia de la red 2.400 - 2.500GHz
Estándares de WLAN IEEE 802.11 b/g/n(channels 1-14)
Soporte de protocolos
IPv4/IPv6/TCP/UDP/HTTPS/
TLS/Multicast DNS
Soporte de seguridad WEP/WPA/WPA2/AES128
Compatibilidad con
tipos de red
STA/AP/STA+AP
Mientras conecta el aparato a la red, mantenga presionado el botón del ventilador
en el panel de control durante tres segundos cuando se lo pida la APP. Si va a
cambiar de modo, deberá realizar esta secuencia dos veces.
DESCARGAR E INSTALAR LA APLICACIÓN
Opción 1: Escanee el código QR con la APP de la cámara desde un
smartphone. Descargue e instale la APP.
Opción 2: Para smartphones Android, abra Google “Play Store”
en su smartphone y busque “BLACK+DECKER Home”,
descargue e instale la APP.
Para teléfonos inteligentes iOS de Apple, abra la
“APP STORE” de Apple en su smartphone y busque
“BLACK+DECKER Home”, descargue e instale la APP.
NOTA: Es posible que se produzcan actualizaciones en el diseño de la APP. Este
manual sirve de referencia. Sigue las indicaciones de la APP.
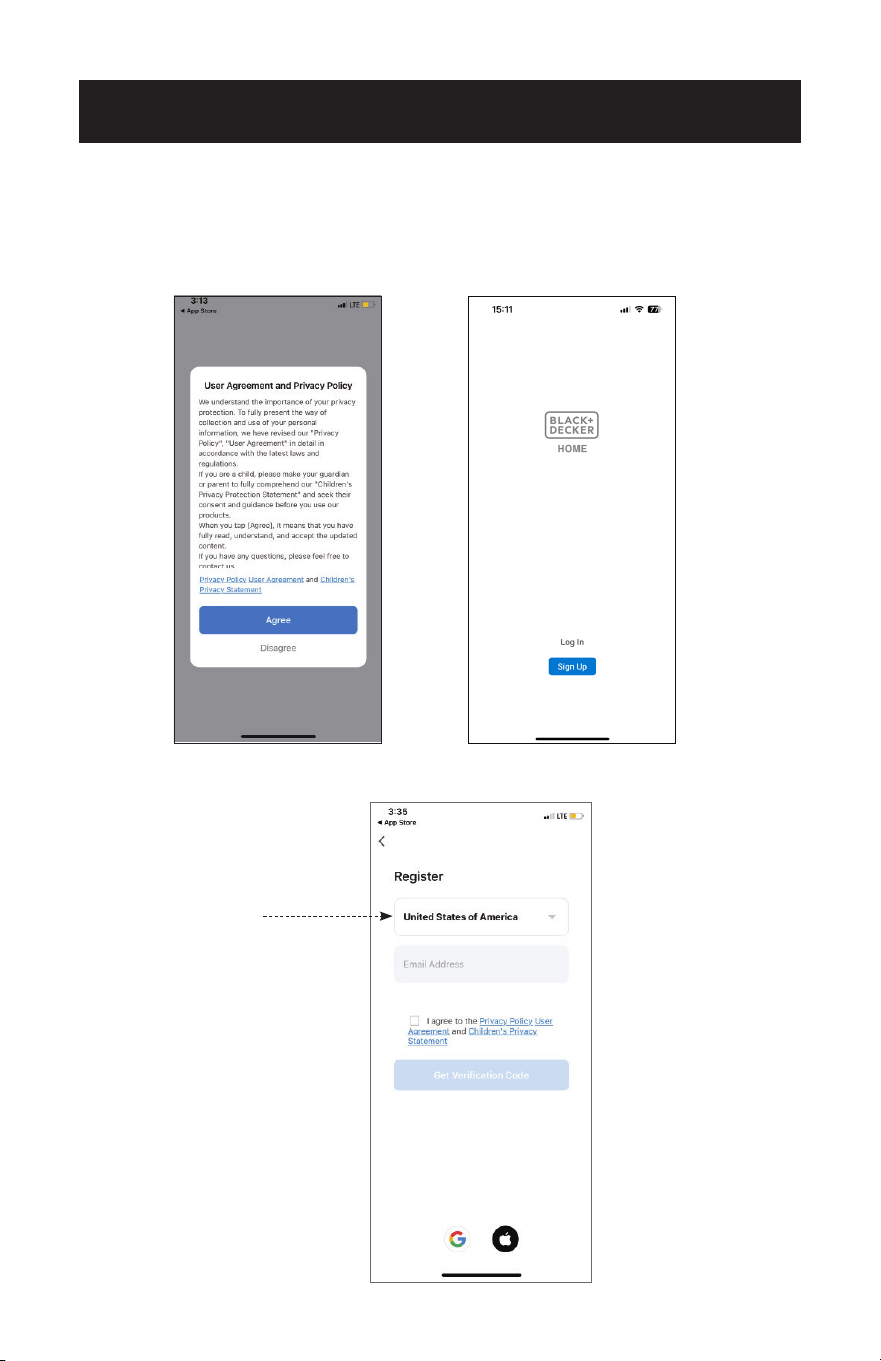
Page 80
MÉTODOS DE CONEXIÓN WI-FI
1. Si no tiene una cuenta, pulse el botón “Registrarse”.
2. Lea la Política de Privacidad y pulse “Aceptar”.
3. Pulse “▼” y elija el país (desplácese para elegir el país).
CONFIGURACIÓN Y USO
Scroll to choose
the country.

Page 81
CONFIGURACIÓN Y USO
4. Introduzca su dirección de correo electrónico.
5. Pulse el botón “Obtener código de verificación”.
6. Introduzca el código de vericación que ha recibido por correo electrónico.
7. Establezca una contraseña con 6-20 caracteres, incluidos caracteres y números.
8. Pulse “Listo”.
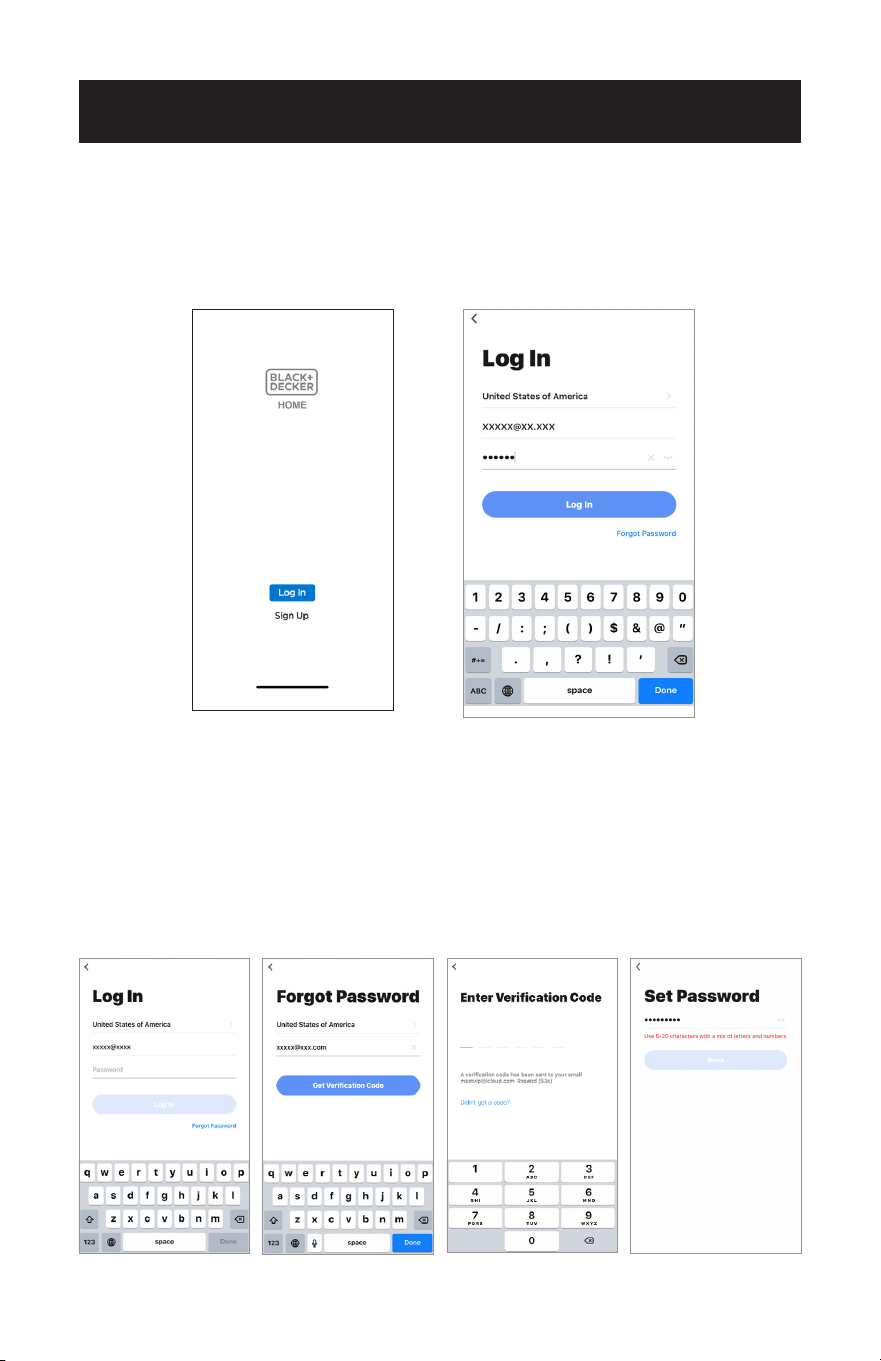
Page 82
CONFIGURACIÓN Y USO
INICIO DE SESIÓN
1. Si ya tiene cuenta, pulse “Iniciar sesión”.
2. Introduzca su cuenta registrada y su contraseña.
3. Pulse el botón “Iniciar sesión”.
RESTABLECER LA CONTRASEÑA
Si ha olvidado la contraseña o desea restablecerla, proceda como se indica a
continuación:
1. Pulse “Olvidé la contraseña”.
2. Introduzca su cuenta (dirección de correo electrónico) y pulse el botón “Obtener
código de vericación”.
3. Introduzca el código de vericación recibido por correo electrónico.
4. Establezca la nueva contraseña y pulse el botón “Listo”.
1. 2. 3. 4.

Page 83
ACTIVAR LA CONFIGURACIÓN DE UBICACIÓN
CONFIGURACIÓN Y USO
1. Una vez iniciada la sesión en la aplicación, asegúrese de que el Bluetooth esté acti-
vado en su smartphone y de que los permisos están activados.
2. Pulse “Añadir dispositivo” en la esquina superior derecha de la pantalla.

Page 84
CONFIGURACIÓN Y USO
3. Cuando los servicios de ubicación estén activados, pulse “Establecer ahora”.
4. Si tiene dificultades para conectarse automáticamente a la aplicación,
asegúrese de que los servicios de ubicación de su smartphone estén activados.

Page 85
CONFIGURACIÓN Y USO
5. Active los servicios de ubicación accediendo a la pantalla de inicio de la aplicación.
6. En la pantalla de inicio, pulse sobre “Ubicación” e introduzca manualmente su
ubicación actual.
7. Siga las instrucciones para configurar la gestión de los miembros de la familia, que
permite a los distintos perfiles controlar los aparatos según sus preferencias.
8. Utilice la función “Habitaciones” para organizar varios aparatos por habitación.
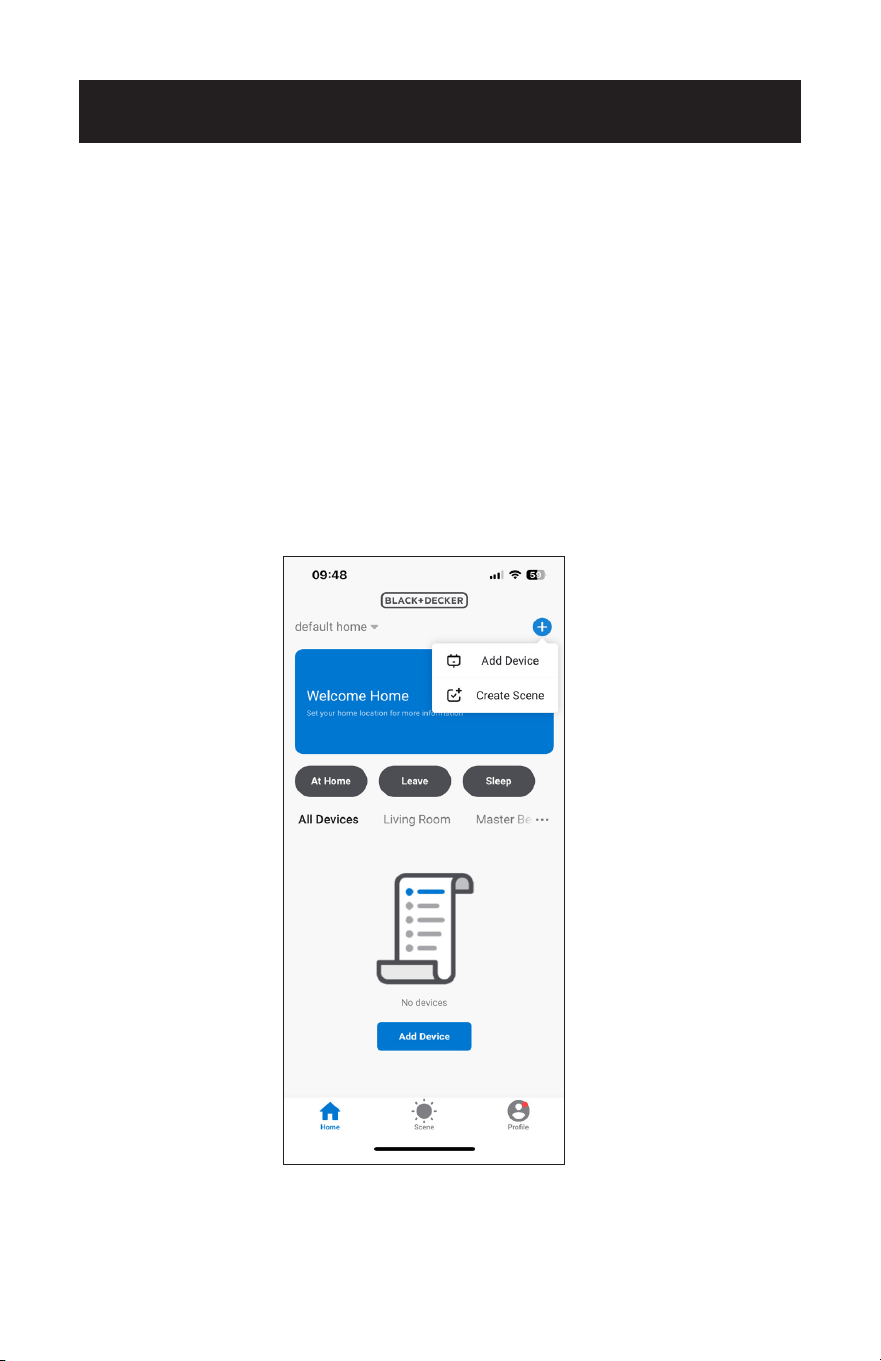
Page 86
CONEXIÓN AL APARATO MEDIANTE EL MODO EZ
1. Haga clic en “+” en la esquina superior derecha de la pantalla “Inicio” y seleccione
“Añadir dispositivo”.
MÉTODOS DE CONEXIÓN
CONFIGURACIÓN Y USO
Hay dos formas de conectar el aparato a la APP.
El modo EZ es la forma más sencilla y rápida de conectarse.
El modo AP es un método alternativo para conectarse directamente al aparato.
Asegúrese de que el aparato esté enchufado a una toma de corriente y en modo de
espera antes de conectarlo a la APP. No pulse el botón de encendido.
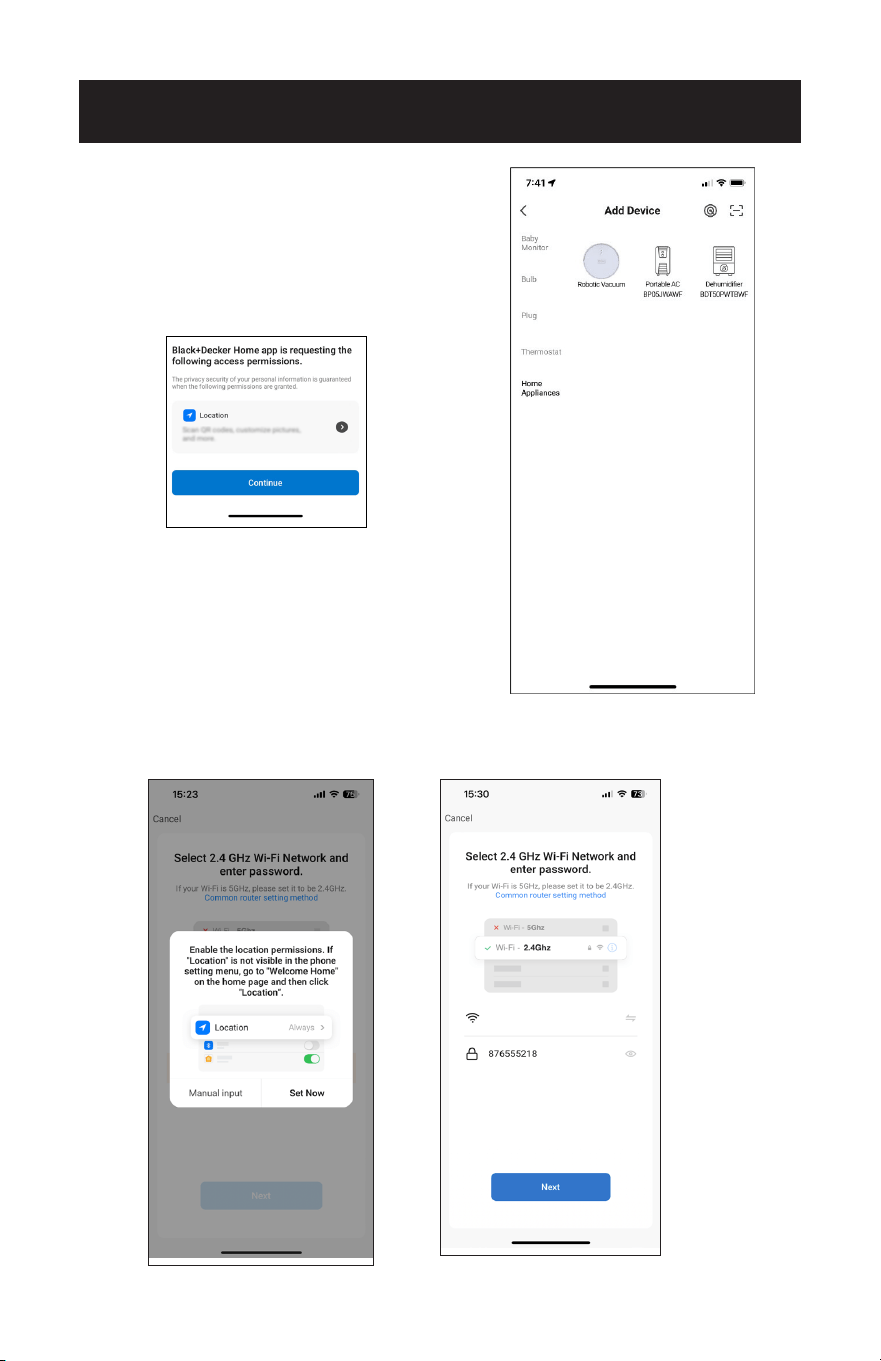
Page 87
2. Pulse “Electrodomésticos”.
3. Pulse “Portable AC BPO5JWAWF”.
4. Pulse “Establecer ahora”.
5. Introduzca el nombre y la contraseña de la red Wi-Fi cuando se le solicite y, a
continuación, pulse “Siguiente”.
CONFIGURACIÓN Y USO
Asegúrese de activar la ubicación. Esto
permitirá que la APP busque
automáticamente el dispositivo.
LTE CPE_0A00

Page 88
CONFIGURACIÓN Y USO
6. En el panel de control, pulse y mantenga pulsado el botón del ventilador durante 3
segundos cuando se le solicite en la APP.
7. La luz indicadora de encendido del panel de control del aparato parpadeará rápida-
mente. Pulse sobre la frase situada en la parte inferior de la pantalla “Pulse cuando
la luz indicadora de encendido parpadee rápidamente”. Pulse “Siguiente”.
NOTA: La luz indicadora de encendido en
el panel de control de la unidad
parpadeará rápidamente. Si
parpadea lentamente o no se
conecta, repita el proceso de
presionar y mantener presionado
el botón del ventilador durante 3
segundos.
8. Espere a que el aparato se conecte. Esto puede tardar varios segundos.

Page 89
9. Una vez conectado, el aire acondicionado portátil puede ser controlado por la APP.
NOTA: Si la APP no se conecta al aparato en modo EZ, conéctese utilizando el modo
AP.
CONFIGURACIÓN Y USO
CAMBIAR DE MODO
1. Pulse sobre el modo mostrado en la esquina superior derecha de la pantalla para
acceder a una ventana que muestra tanto el Modo EZ como el Modo AP.
2. Pulse sobre un modo para cambiarlo. Una marca de vericación muestra el modo
en uso.
NOTA: En el modo EZ, la luz indicadora de
encendido del panel de control de la unidad
parpadeará rápidamente. Si parpadea
lentamente o no se conecta, repita el
proceso de mantener presionado el botón
del ventilador durante 3 segundos.
Portable AC

Page 90
CONFIGURACIÓN Y USO
CONEXIÓN AL DISPOSITIVO MEDIANTE EL MODO AP
1. Haga clic en “+” en la esquina superior derecha de la pantalla “Inicio” o toque
“Añadir dispositivo”.
2. Pulse “Electrodomésticos”.
3. Toque “Portable AC BPO5JWAWF” y
seleccione “Modo AP” en la esquina
superior derecha de la pantalla.
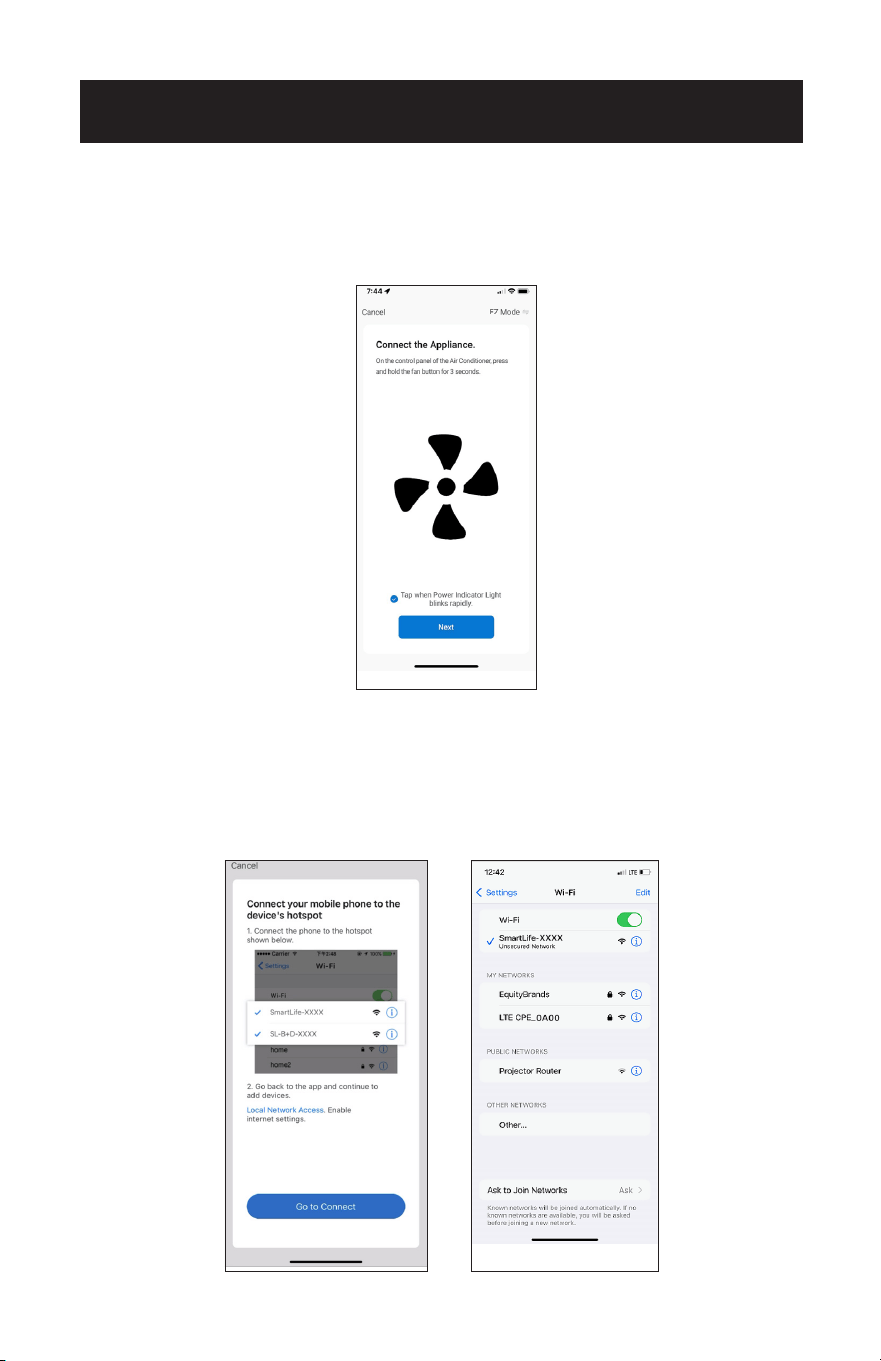
Page 91
CONFIGURACIÓN Y USO
4. En el panel de control, mantenga presionado el botón del ventilador durante 3
segundos.
5. La luz indicadora de encendido del panel de control de la unidad parpadeará
lentamente. Pulse sobre la frase situada en la parte inferior de la pantalla “Pulse
cuando la luz indicadora de encendido parpadee lentamente”. Pulse “Siguiente”.
NOTA: Si la luz indicadora de encendido del panel de control parpadea rápidamente
o no se conecta, repita el proceso manteniendo presionado el botón del
ventilador durante 3 segundos.
6. Introduzca el nombre y la contraseña de la red Wi-Fi cuando se le solicite y, a
continuación, pulse “Siguiente”.
7. Pulse “Ir a conectar”.
8. Seleccione el punto de acceso SmartLife-XXXX.
AP
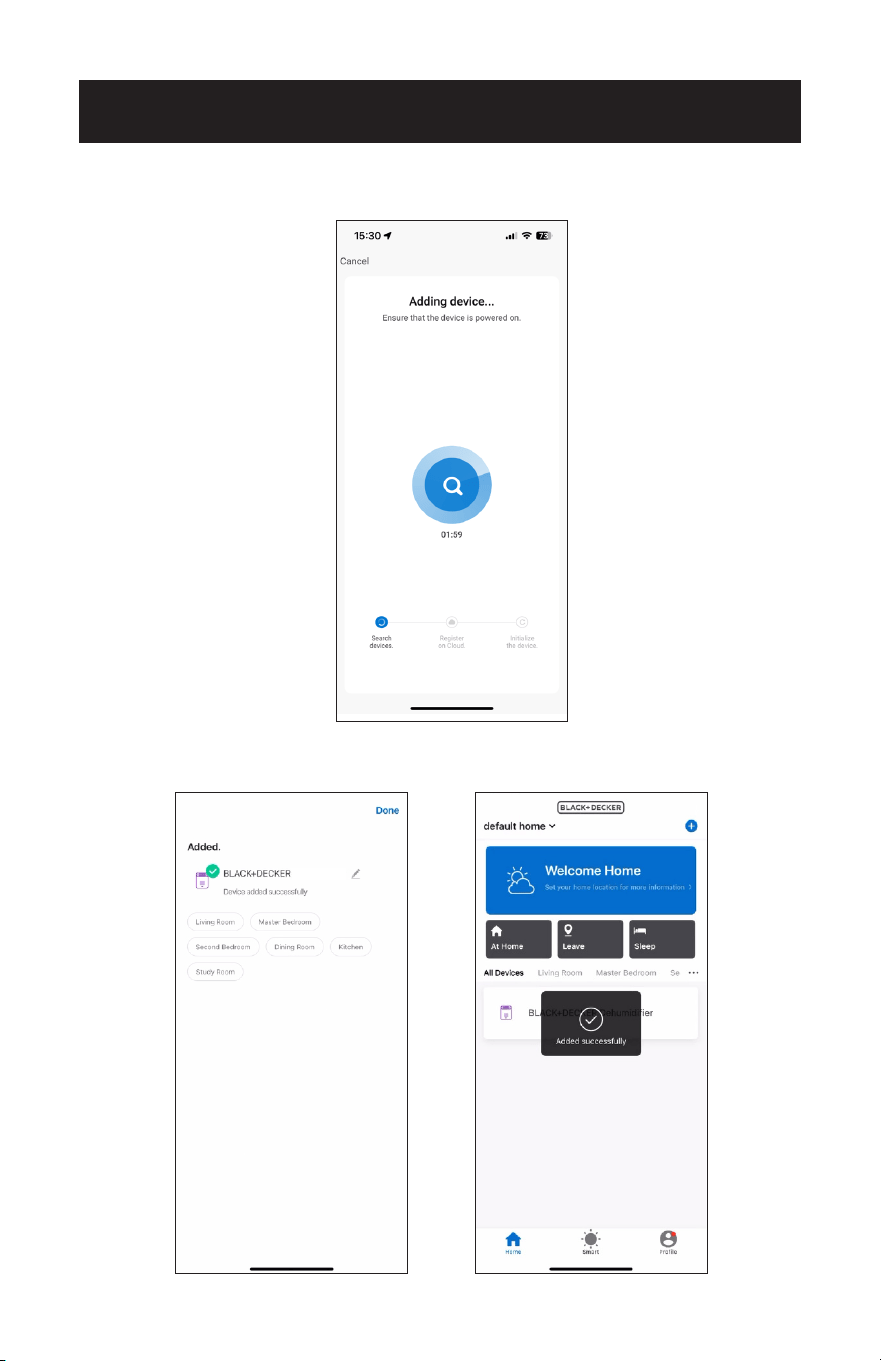
Page 92
9. Vuelva a la APP. Espere a que el aparato se conecte.
CONFIGURACIÓN Y USO
10. Una vez conectado, el aire acondicionado portátil puede ser controlado por la
APP.
Portable AC
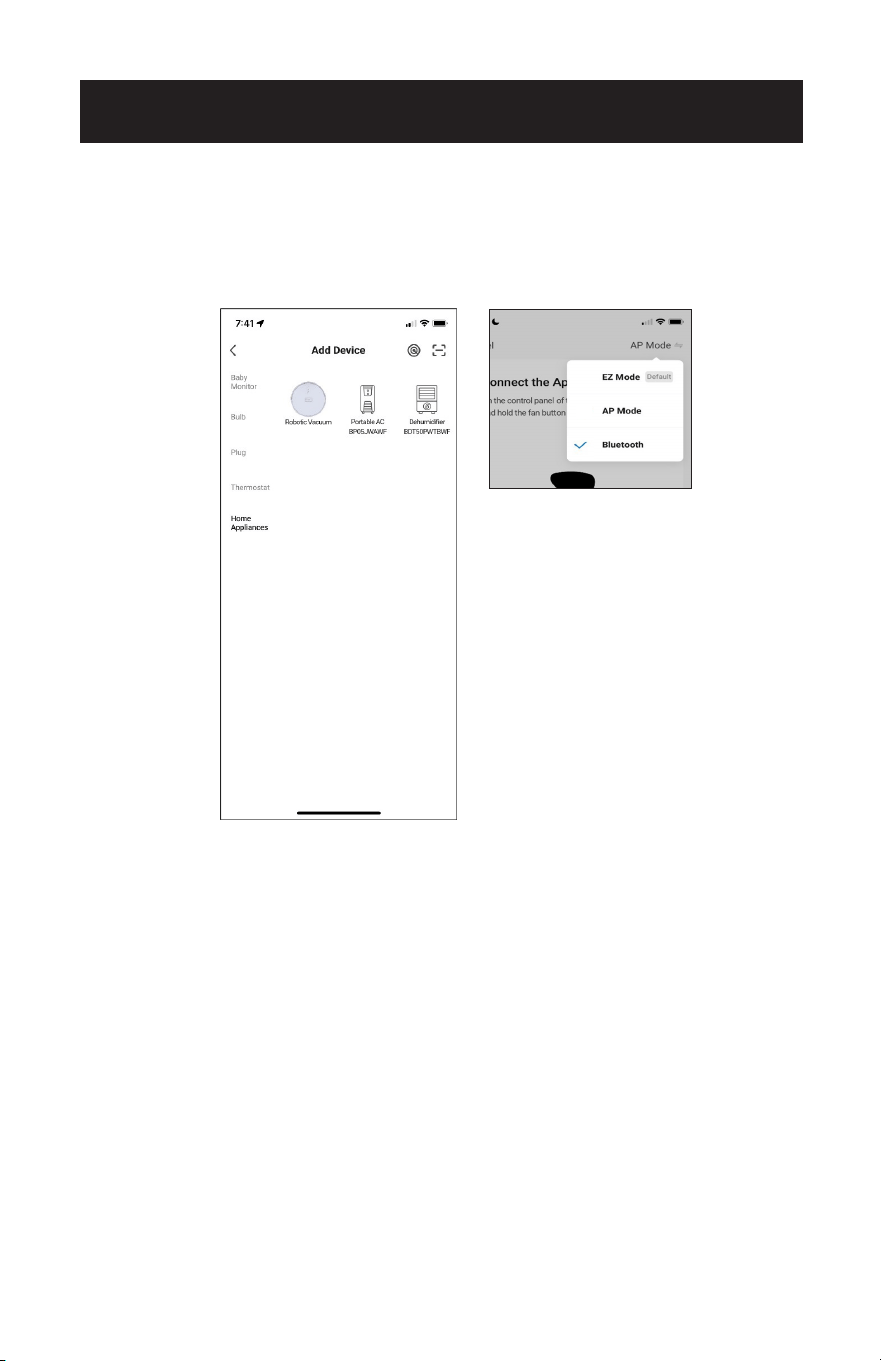
Page 93
CONFIGURACIÓN Y USO
CONEXIÓN BLUETOOTH
1. Pulse “Electrodomésticos”.
2. Pulse “Portable AC BPO5JWAWF”.
3. Selecciona “Bluetooth” en la esquina superior derecha de la pantalla.
4. Pulse y mantenga presionado el botón del ventilador en el panel de control del
aparato, durante 3 segundos cuando se le indique en la APP.
5. La luz indicadora de encendido del panel de control del aparato parpadeará
rápidamente. Pulse sobre la frase situada en la parte inferior de la pantalla “Pulse
cuando la luz indicadora de encendido parpadee rápidamente”. Pulse “Siguiente”.
6. Espere a que el aparato se conecte. Esto puede tardar varios segundos.
7. Una vez conectado, el aire acondicionado portátil puede ser controlado por la APP.

Page 94
CONFIGURACIÓN Y USO
CONTROLAR EL AIRE ACONDICIONADO PORTÁTIL CON LA
APLICACIÓN
Toque el símbolo de encendido en la parte superior derecha de la pantalla para
encender el aire acondicionado.
Pulse “Modo”.
Seleccione Frío, Secar o Ventilador.
Pulse - o + para seleccionar la temperatura.
Toque “Velocidad”.
Seleccione Baja o Alta Velocidad.
Black+Decker Portable AC

Page 95
CONFIGURACIÓN Y USO
En el modo Secar, la unidad selecciona automáticamente una velocidad baja del
ventilador.
Una alerta indicará si es necesario vaciar el depósito de agua.
Consulte las instrucciones de drenaje en la página 52.
Toque Temporizador.
Seleccione para programar el encendido y apagado con el temporizador.

Page 96
CONFIGURACIÓN Y USO
Siga las instrucciones de emparejamiento para conectar el aire acondicionado a la
APP Black + Decker utilizando la misma red Wi-Fi.
El nombre predeterminado cuando se utiliza el control por voz es “Portable AC”,
como se muestra en la parte superior de la pantalla. Pulse el símbolo de edición
situado a su derecha para cambiar el nombre del dispositivo.
En la pantalla siguiente, vuelva a pulsar el símbolo de edición situado a la derecha del
nombre predeterminado.
CONFIGURACIÓN DEL DISPOSITIVO PARA CONTROL POR
VOZ
Portable AC
Portable AC
Portable AC

Page 97
CONFIGURACIÓN Y USO
Aparecerá una ventana emergente. Escriba el nuevo nombre.
El nombre debe ser fácil de recordar y diferente del de otros dispositivos conectados
que utilicen el control por voz.
Pulse “Confirmar”.

Page 98
CONFIGURACIÓN Y USO
CONFIGURACIÓN DEL CONTROL POR VOZ
CON AMAZON ALEXA
Necesitará un dispositivo Alexa como Amazon Echo o Echo Dot configurado con la
APP Alexa según las instrucciones del fabricante. El dispositivo debe estar encendido
y conectado a una red Wi-Fi.
En la página de inicio de la APP Black + Decker, pulse “Perfil” en la esquina inferior
derecha.
Pulse “Alexa”.

Page 99
CONFIGURACIÓN Y USO
Pulse “Iniciar sesión con Amazon”. Inicie sesión y utilice la misma contraseña que para
la APP de Alexa.
Pulse “Vincular”.
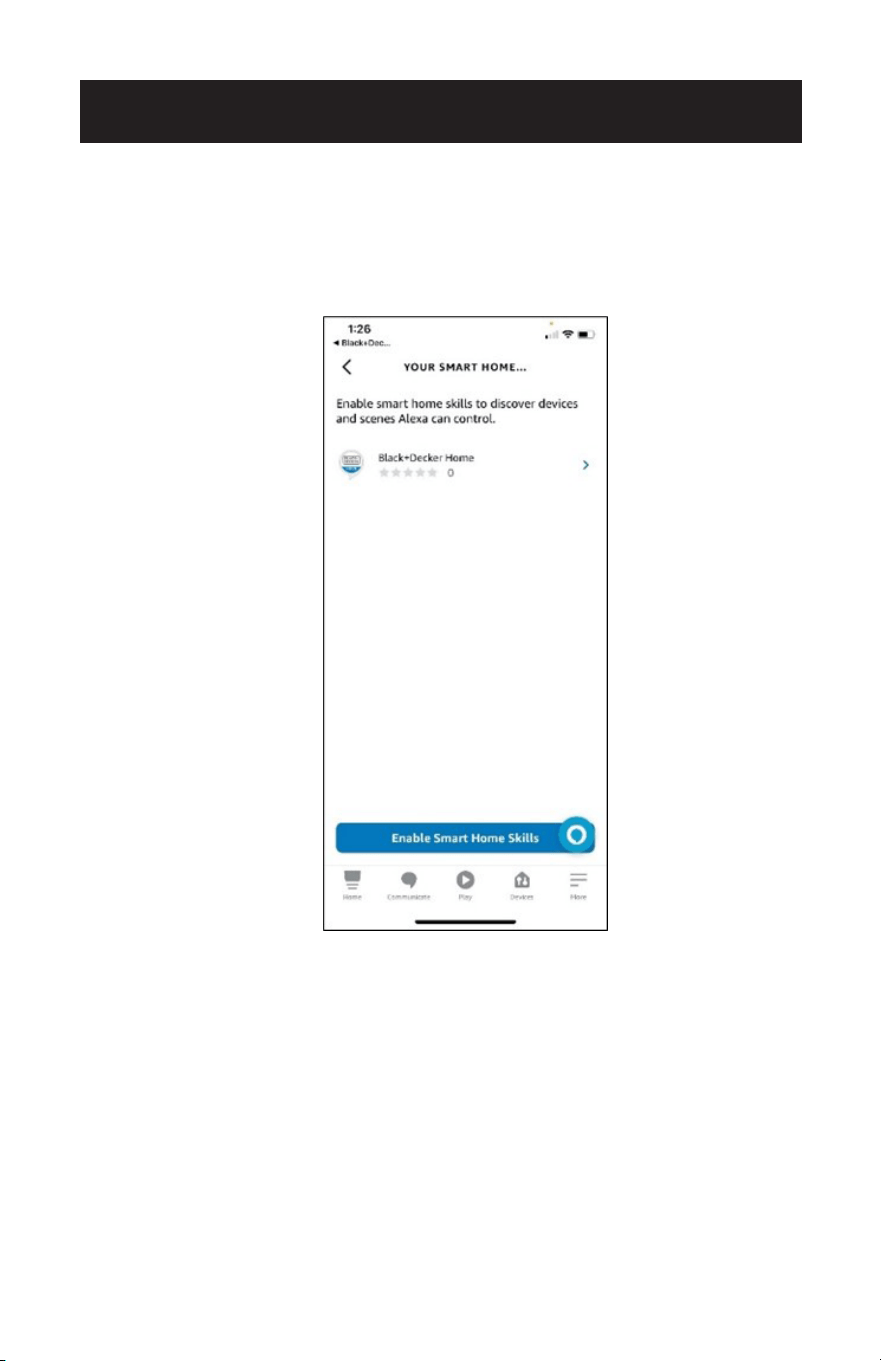
Page 100
Abra la APP Alexa y active “Smart Home Skills” para Black + Decker Home. Alexa
puede localizar el dispositivo cuando diga “Alexa, descubre mi dispositivo”. Siga las
indicaciones de la APP Alexa para gestionar el dispositivo y controlar el aire
acondicionado mediante los comandos de voz.
CONFIGURACIÓN Y USO
Page 101
CONFIGURACIÓN Y USO
COMANDOS DE VOZ ALEXA
Para encender y apagar la
unidad.
“Alexa, enciende el aire acondicionado portátil”.
“Alexa, apaga el aire acondicionado portátil”.
Para conocer la temperatura
interior actual.
“Alexa, ¿cuál es la temperatura del aire
acondicionado portátil?”.
“Alexa, ¿a qué temperatura está el aire
acondicionado portátil?”
Para seleccionar un modo (Frío,
Secar o Ventilador).
“Alexa, pon el aire acondicionado portátil en
frío.”
“Alexa, cambia el aire acondicionado portátil a
modo secar”.
“Alexa, ¿en qué modo está configurado el aire
acondicionado portátil?”
Compruebe la temperatura
actual y seleccione una
temperatura (elija valores de
temperatura entre 61ºF y 88ºF).
El aparato debe estar en modo
Frío.
“Alexa, ¿cuál es la temperatura objetivo del aire
acondicionado portátil?”
“Alexa, ¿a qué temperatura está configurado el
aire acondicionado portátil?”
“Alexa, pon el aire acondicionado portátil a
70ºF.”
“Alexa, pon el aire acondicionado portátil a
68ºF.”
Compruebe la velocidad actual
del ventilador y seleccione una
velocidad del ventilador.
(Elija las velocidades del
ventilador “baja” o “alta”).
El aparato debe estar en modo
Frío.
“Alexa, ¿cuál es la velocidad del ventilador del
aire acondicionado portátil?”
“Alexa, ¿a qué velocidad está el ventilador del
aire acondicionado portátil?”
“Alexa, pon la velocidad del ventilador del aire
acondicionado portátil en baja”.
“Alexa, pon la velocidad baja del ventilador del
aire acondicionado portátil en alta”.
Control del modo dormir.
El aparato debe estar en modo
Frío.
“Alexa, activa el modo dormir en el aire
acondicionado portátil”.
“Alexa, desactiva el modo dormir en el aire
acondicionado portátil”.
En los siguientes ejemplos se utiliza el nombre de dispositivo “aire acondicionado
portátil”. Consulte la sección “Configuración del dispositivo de control por voz” para
obtener instrucciones sobre cómo cambiar el nombre del dispositivo.

Page 102
CONFIGURACIÓN Y USO
CONFIGURACIÓN DEL CONTROL POR VOZ
CON EL ASISTENTE DE GOOGLE
Necesitará un dispositivo como Google Nest o Google Nest mini configurado con la
APP Google Home según las instrucciones del fabricante. El dispositivo debe estar
encendido y conectado a una red Wi-Fi.
En la página de inicio de la APP Black + Decker, pulse “Perfil” en la esquina inferior
derecha.
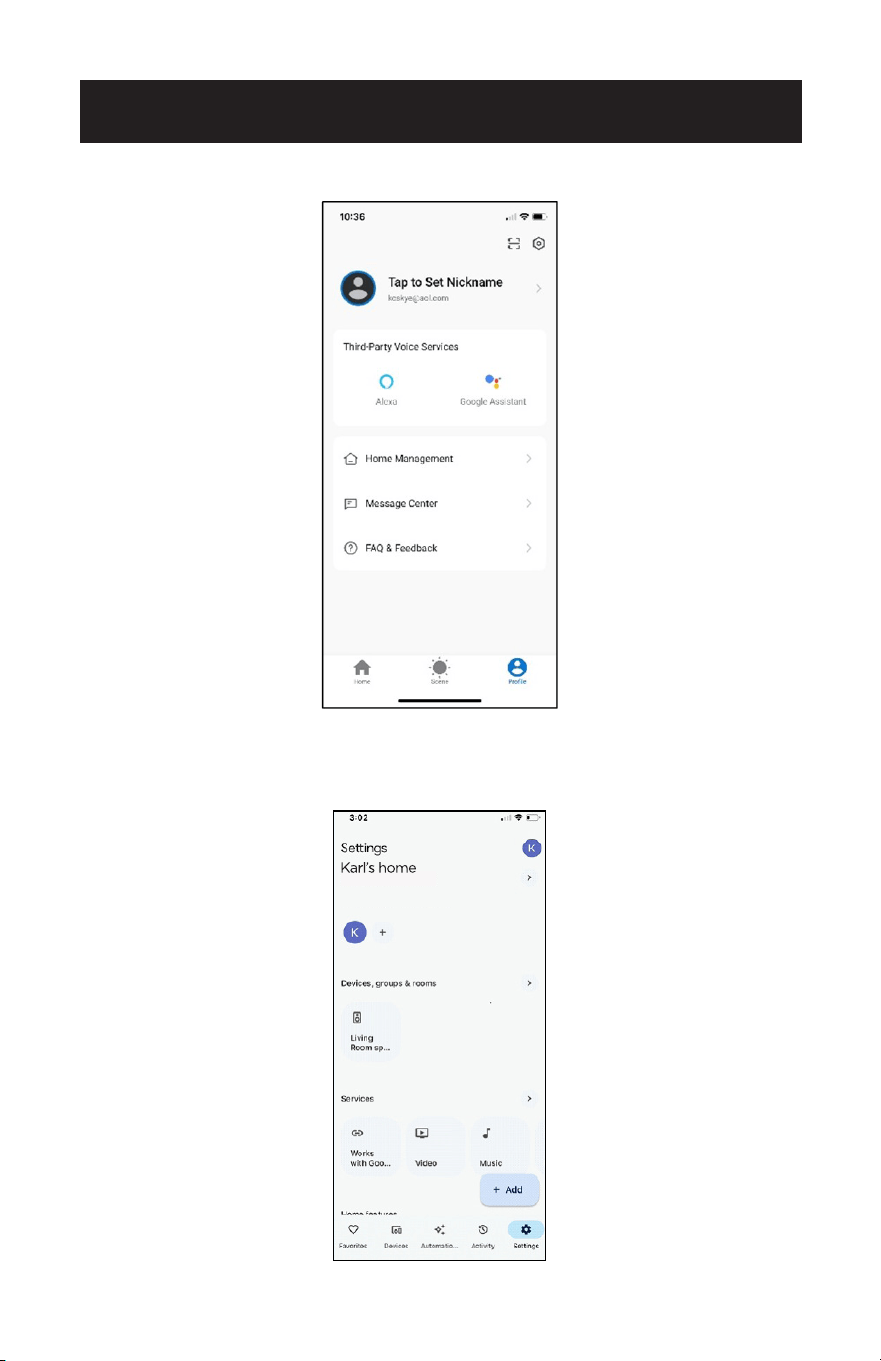
Page 103
CONFIGURACIÓN Y USO
Toque “Asistente de Google”.
Abra la aplicación Google Home y toque Configuración en la parte inferior derecha
de la pantalla.
Toque “Funciona con Google”.

Page 104
CONFIGURACIÓN Y USO
Busque “Black + Decker Home” escribiéndolo en la barra de búsqueda.
Pulse para seleccionar “Black + Decker Home”.
La APP de Google mostrará indicaciones para enlazar con un código de verificación
de la APP Black + Decker Home o enlazar con la contraseña de la cuenta. Utilice el
mismo correo electrónico y contraseña de la APP Black + Decker Home para comple-
tar la autorización.
Una vez vinculado, abra la aplicación Google Assistant y toque Black + Decker Home.
Seleccione “Buscar nuevos dispositivos” y siga las indicaciones de Google Home para
controlar el aire acondicionado portátil.
Page 105
CONFIGURACIÓN Y USO
COMANDOS DE VOZ DEL ASISTENTE DE GOOGLE
Para encender y apagar la unidad. “Ok Google, enciende el aire
acondicionado portátil”.
“OK Google, apaga el aire acondicionado
portátil”.
Para conocer la temperatura interior
actual.
“OK Google, ¿cuál es la temperatura del
aire acondicionado portátil?”
“OK Google, ¿a qué temperatura está el
aire acondicionado portátil?”
Para seleccionar un modo (Frío, Secar o
Ventilador).
“OK Google, pon el modo del aire
acondicionado portátil en frío”.
“OK Google, pon el modo del aire
acondicionado portátil en secar”.
Compruebe la temperatura actual y se-
leccione una temperatura (elija valores
de temperatura entre 61ºF y 88°F). El
aparato debe estar en modo Frío.
“OK Google, ¿a qué temperatura está
configurado el aire acondicionado
portátil?”
“OK Google, pon el aire acondicionado
portátil a 70.”
“OK Google, pon el aire acondicionado
portátil a 68 grados.”
Compruebe la velocidad actual del
ventilador y selecciónela.
(Elija las velocidades del ventilador
“baja” o “alta”).
El aparato debe estar en modo Frío.
“Ok Google, pon el aire acondicionado
portátil en bajo”.
“OK Google, pon la velocidad del
ventilador del aire acondicionado portátil
en alta”.
“Ok Google, ¿cuál es la velocidad del
ventilador del aire acondicionado
portátil”.
Control del modo dormir.
El aparato debe estar en modo Frío.
“OK Google activar el modo dormir para
el aire acondicionado portátil.”
“OK Google, cancela el modo dormir para
el aire acondicionado portátil”.
En los siguientes ejemplos se utiliza el nombre de dispositivo “aire acondicionado
portátil”. Consulte la sección “Configuración del dispositivo de control por voz” para
obtener instrucciones sobre cómo cambiar el nombre del dispositivo.
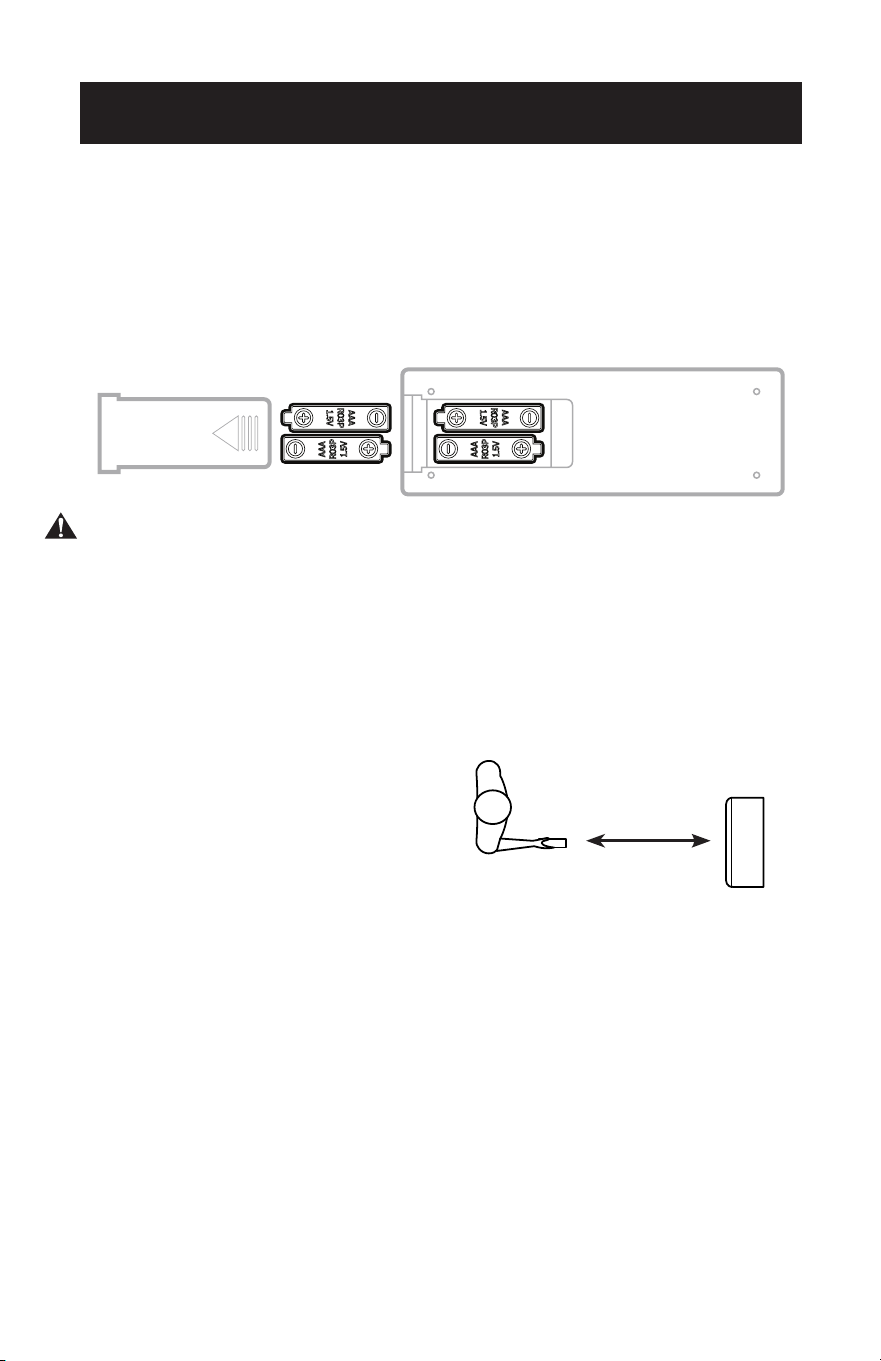
Page 106
CONFIGURACIÓN Y USO
OPERACIÓN DESDE EL CONTROL REMOTO
INSTALACIÓN DE LAS PILAS (PILAS INCLUIDAS)
(1) Abra la tapa del compartimento de las pilas.
(2) Inserte 2 pilas “AAA” como se muestra.
(3) Deslice hacia atrás la tapa de la batería.
PRECAUCIÓN: Utilice sólo pilas alcalinas AAA o IEC RO3 de 1,5 V. Retire las pilas si
el mando a distancia no se utiliza durante un mes o más. No intente
recargar las pilas. Las dos pilas deben sustituirse al mismo tiempo. No
arroje las pilas al fuego, ya que podrían explotar.
Apunte con el mando a distancia al receptor del aparato. El mando a distancia no
debe estar a más de 16 pies del aparato (sin obstáculos entre el mando a distancia y
el receptor).
El mando a distancia debe manipularse con sumo cuidado. No lo deje caer ni lo
exponga a la luz directa del sol o a fuentes de calor.
16 Feet

Page 107
CONFIGURACIÓN Y USO
CONTROL REMOTO
BOTÓN DE ENCENDIDO: Pulsar para encender o apagar
BOTÓN TEMPORIZADOR: Permite programar un temporizador de arranque o de
parada.
BOTÓN MODO: Cada vez que pulse el botón FRÍO, SECAR. VENTILADOR.
AUMENTAR: Aumenta el ajuste de temperatura.
DISMINUIR: Disminuye el ajuste de temperatura.
BOTÓN DE VELOCIDAD DEL VENTILADOR: Permite seleccionar la velocidad ALTA o
BAJA del ventilador.
BOTÓN DORMIR: Ajusta gradualmente la temperatura.
Botón de
temporizador
Botón Aumentar /
Disminuir
Botón de modo
Botón de velocidad
del ventilador
ENCENDIDO/
APAGADO
Botón de dormir

Page 108
CONFIGURACIÓN Y USO
BOTÓN DE ENCENDIDO
• Pulse para encender o apagar el aire acondicionado.
BOTÓN DE MODO
• Pulse el botón de modo para cambiar entre FRÍO, SECAR, y VENTILADOR.
• El símbolo correspondiente se iluminará en la pantalla LED para indicar el modo
seleccionado.
FRÍO
• Seleccione la temperatura objetivo 61ºF - 88ºF (6ºC - 31ºC) pulsando los botones
o hasta que aparezca la temperatura deseada en la pantalla LED.
• Pulse el botón de velocidad del ventilador para seleccionar la velocidad ALTA o
BAJA.
SECAR
• Ideal para reducir la humedad. Cuando se selecciona, se enciende la luz indicadora
de secado y aparece “dh” en la pantalla digital. En este modo, no se puede
seleccionar la velocidad del ventilador ni ajustar la temperatura.
• Mantenga las ventanas y puertas cerradas para obtener el mejor efecto
deshumidificador.
• El ducto de salida de aire no es necesario para reducir la humedad; sin embargo, se
recomienda en habitaciones muy húmedas para que el aire caliente pueda salir al
exterior.
Drenaje en modo deshumidificación
• Se recomienda utilizar el desagüe de deshumidificación y la manguera de desagüe
para un drenaje continuo.
• DEPÓSITO LLENO
- Cuando el nivel de agua alcanza un nivel predeterminado, el
“indicador luminoso de depósito lleno” del panel de control
parpadea. Sonará un zumbador y la unidad se apagará.
Tendrá que vaciar la unidad.
NOTA: Consulte la sección Drenaje del agua (página 52).
• En este modo, la velocidad del ventilador es seleccionada automáticamente por el
aparato y no puede ajustarse manualmente.
VENTILADOR
• Pulse el botón de velocidad del ventilador para seleccionar la velocidad ALTA o
BAJA.

Page 109
TEMPORIZADOR
• Para ajustar el temporizador de PARADA AUTOMÁTICA. Cuando el aparato esté
encendido, pulse el botón TIMER.
• Pulse el botón o para seleccionar el TIEMPO AUTO en incrementos de 1 hora,
hasta 24 horas. El panel de control indicará el tiempo seleccionado. Pulse de
nuevo el botón TIMER para ajustar el tiempo seleccionado. La luz indicadora del
TEMPORIZADOR se iluminará en el panel de control del aprato para mostrar que se
ha iniciado el programa de PARADA AUTOMÁTICA.
• Para ajustar el temporizador de INICIO AUTOMÁTICO. Cuando la unidad esté
apagada, pulse el botón TIMER.
• Presione el botón o para seleccionar el TIEMPO AUTO en incrementos de 1
hora, hasta 24 horas. El panel de control indicará el tiempo seleccionado. Pulse de
nuevo el botón TIMER para ajustar el tiempo seleccionado. La luz indicadora del
TEMPORIZADOR se iluminará en el panel de control del aparato para mostrar que
se ha iniciado el programa de INICIO AUTOMÁTICO.
• Al pulsar el botón POWER o el botón TIMER se cancelará el programa de INICIO/
PARADA AUTOMÁTICA y la luz indicadora del temporizador se apagará.
DORMIR
• La función SLEEP ajusta gradualmente la temperatura de las habitaciones para
proporcionar un ambiente confortable. Pulse el botón SLEEP para activarlo.
• En el modo DORMIR, la temperatura aumentará 1°F después de una hora y 2°F
después de 2 horas.
• Para cancelar este ajuste pulse de nuevo el botón SLEEP.
CONFIGURACIÓN Y USO

Page 110
CONFIGURACIÓN Y USO
FUNCIONES DE PROTECCIÓN
• Función de protección contra congelamiento:
En un entorno frío, si la temperatura del sensor de la tubería EVA es demasiado
baja, el aparato entrará automáticamente en estado de protección: si la
temperatura del sensor de la tubería EVA sube a una temperatura determinada
(50°F), puede volver automáticamente al funcionamiento normal.
• Función de protección contra desbordamiento.
Cuando el agua del depósito supere el nivel de advertencia, el aparato emitirá
automáticamente una alarma y dejará de funcionar, y el indicador de depósito lleno
parpadeará. Deberá vaciar el agua (consulte las instrucciones de vaciado al nal de
este capítulo).
Después de vaciar el agua, el aparato volverá a funcionar normalmente.
• Función de protección del compresor:
Para aumentar la vida útil del compresor, el aparato dispone de una función de
protección de arranque retardado de 3 minutos después de apagar el compresor.
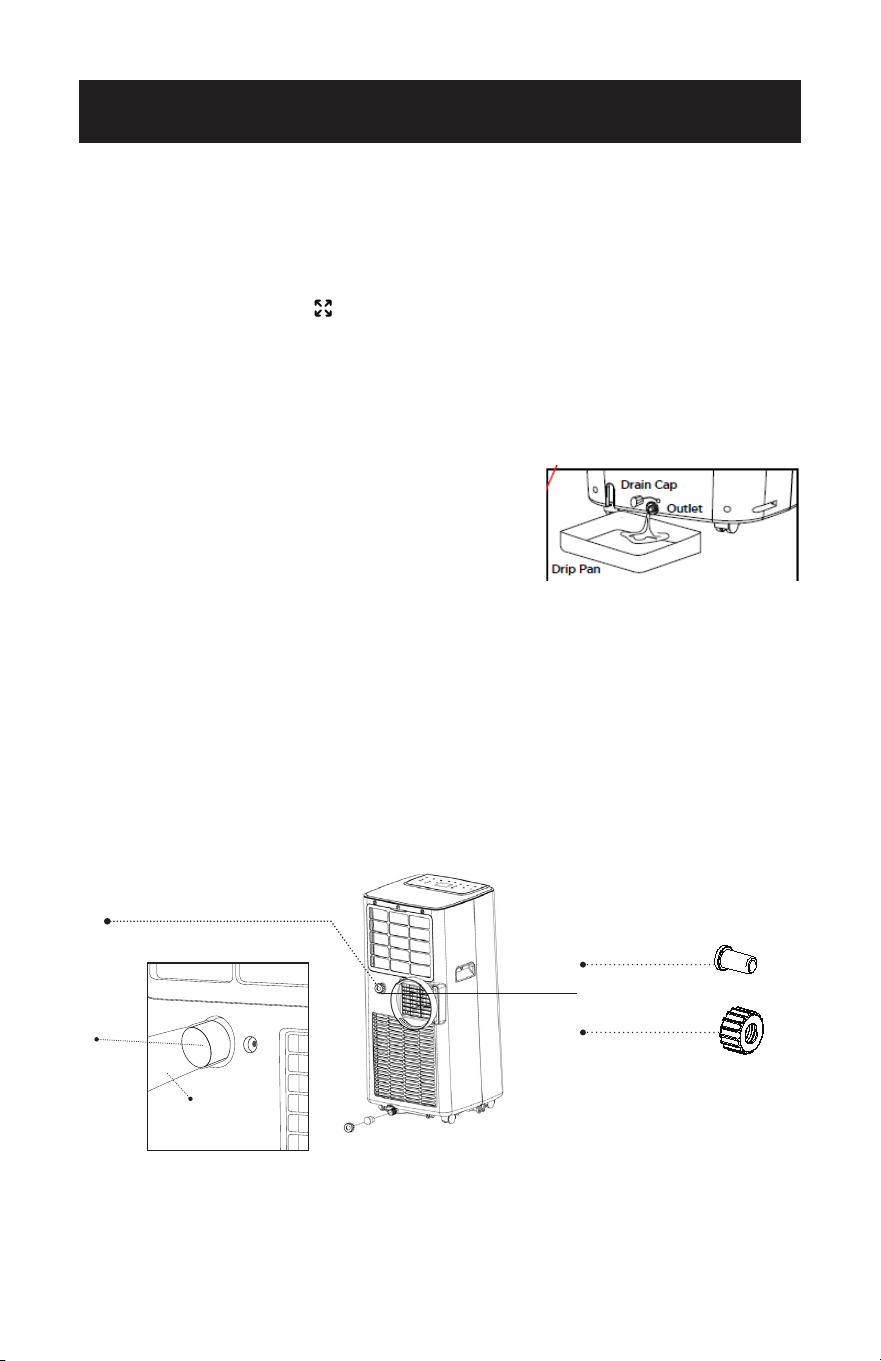
Page 111
CONFIGURACIÓN Y USO
Tapón de drenaje
Tapa de drenaje
Drenaje de deshumidicación
DRENAJE DE AGUA
Este aire acondicionado está equipado con evaporación automática de agua,
por lo que el compartimento de agua no se llenaría normalmente en el modo de
refrigeración a menos que haya mucha humedad. Por lo general, el drenaje del
agua sólo será necesario al nal de la temporada (véase MEDIDAS DE INICIO-
FINAL DE TEMPORADA, página 53).
NOTA: DEPÓSITO LLENO
- Cuando el nivel de agua alcance un nivel
predeterminado, parpadeará la luz indicadora de “depósito lleno” situada
en el panel de control de la unidad. Sonará un zumbador y la unidad se
apagará. Tendrá que vaciar la unidad.
Drenaje intermitente
• Desenchufe el aparato de la fuente de alimentación. Muévalo con cuidado a un
área de drenaje sobre el suelo o sobre bandeja de goteo (no incluida). Retire el
tapón de vaciado inferior.
• Deje que salga el agua y vuelva a colocar el
tapón de vaciado. Reinicie el aparato. El
funcionamiento normal se reanudará una vez
vaciado el aparato.
NOTA: Asegúrese de volver a instalar el tapón
de drenaje inferior antes de utilizar el aparato.
Drenaje continuo
• Se recomienda utilizar el método de drenaje continuo en el modo de
deshumidicación.
• Desenchufe el aparato de la fuente de alimentación. Retire el tapón de vaciado
inferior. Al realizar esta operación puede derramarse algo de agua residual, por
lo que debe disponer de una bandeja de goteo (no incluída) para recoger el
agua.
• Conecte la manguera de desagüe (incluída) como se muestra en el diagrama. El
agua puede drenarse continuamente a través de la manguera hasta un desagüe
en el suelo o una bandeja de goteo.
• Encienda el aparato.
ESPERE 3 MINUTOS ANTES DE REANUDAR EL FUNCIONAMIENTO
• Después de que el aparato se haya detenido, no se puede reiniciar durante
3 minutos. El funcionamiento se reiniciará automáticamente transcurridos 3
minutos.
Drenaje de
deshumidicación
Manguera de
drenaje
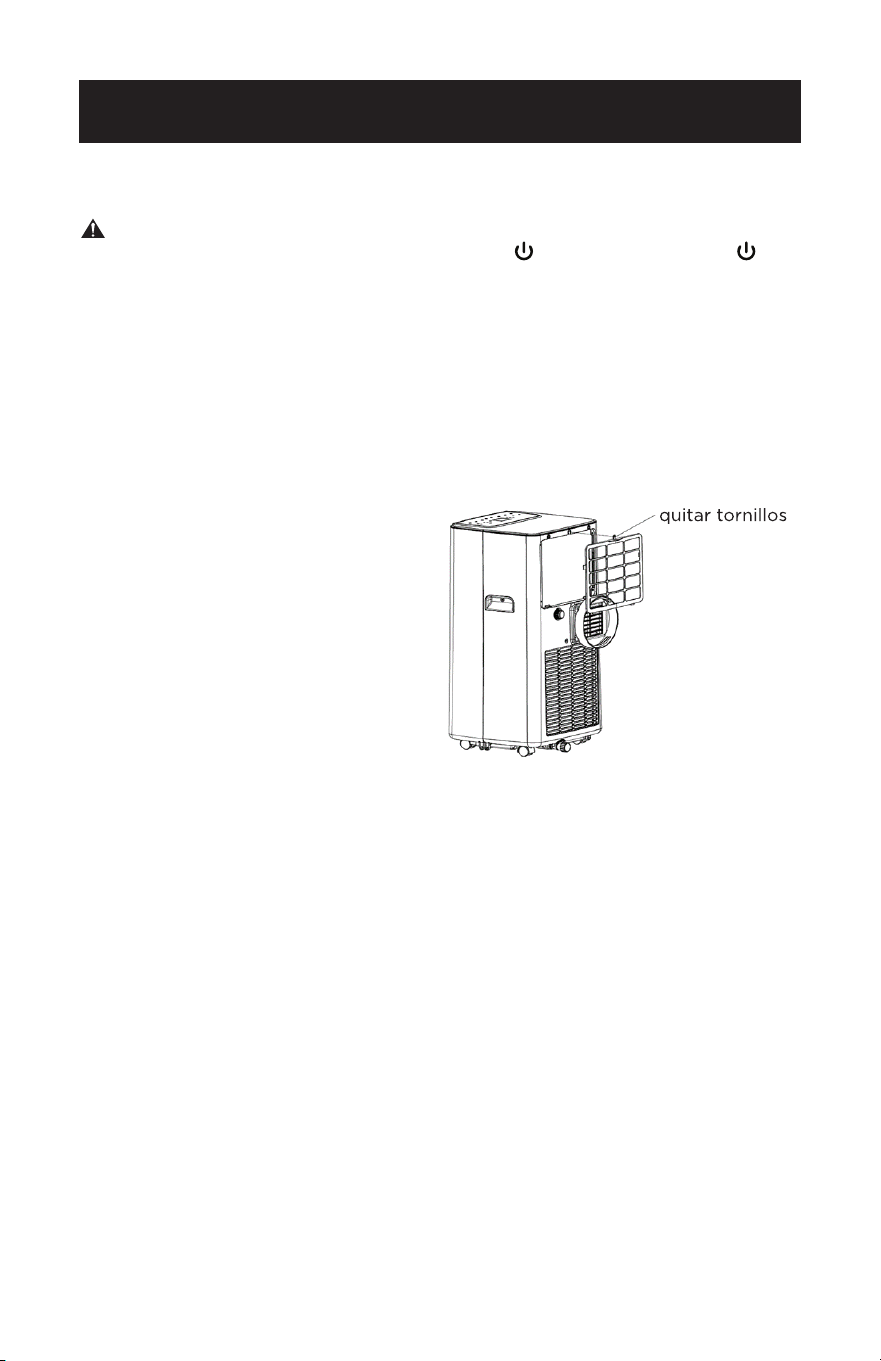
Page 112
LIMPIEZA
ADVERTENCIA: Antes de limpiar o realizar tareas de mantenimiento, apague
el aparato pulsando el botón del panel de control o del
mando a distancia. Desenchúfelo de la toma de corriente.
LIMPIEZA DE LA CARCAZA
Limpie el aparato con un paño ligeramente humedecido y séquelo con un paño
seco.
• Nunca empape el aire acondicionado con agua.
• No utilice nunca gasolina, alcohol ni disolventes para limpiar el aparato.
• Nunca rocíe líquidos insecticidas o similares cerca del aire acondicionado.
LIMPIEZA DEL FILTRO
Para que su aparato de aire
acondicionado funcione ecazmente,
debe limpiar el ltro del evaporador
cada 2 semanas, cuando la unidad
esté en funcionamiento continuo.
Utilice un aspirador para eliminar las
acumulaciones de polvo del ltro. Si
está muy sucio, sumérjalo en agua
caliente y aclare varias veces. El agua
debe estar tibia.
Después del lavado, deje que el ltro
se seque completamente. Inerte
las lengüetas inferiores y vuelva a
colocar los tornillos.
MEDIDAS DE INICIO Y FIN DE TEMPORADA
INICIO DE TEMPORADA
Asegúrese de que el cable de alimentación y el enchufe no estén dañados.
Siga al pie de la letra las instrucciones de instalación.
FIN DE TEMPORADA
Consulte la sección sobre drenaje del agua para asegurarse de que el aire
acondicionado esté completamente drenado de agua.
Limpie el ltro y séquelo bien antes de volver a instalarlo.
LIMPIEZA Y CUIDADO
Page 113
SOLUCIÓN DE PROBLEMAS Y GARANTÍA
ANTES DE LLAMAR AL SERVICIO TÉCNICO
SI EL AIRE ACONDICIONADO NO FUNCIONA:
A) Compruebe que el aire acondicionado esté bien enchufado. Si no es así,
desenchufe el aparato de la toma de corriente, espere 10 segundos y vuelva a
enchufarlo rmemente.
B) Compruebe si hay un fusible fundido o un disyuntor principal disparado. Si
parece que funcionan correctamente, pruebe la toma con otro aparato.
ADVERTENCIA
SI NADA DE LO ANTERIOR RESUELVE EL PROBLEMA, PÓNGASE EN
CONTACTO CON UN TÉCNICO CUALIFICADO. NO INTENTE AJUSTAR O
REPARAR EL AIRE ACONDICIONADO USTED MISMO. Toda persona que
trabaje o intervenga en un circuito de refrigerante debe estar en posesión de
un certicado válido de una autoridad de evaluación acreditada por la industria,
que autorice su competencia para manipular refrigerantes de forma segura de
acuerdo con una especicación de evaluación reconocida por la industria.
ADVERTENCIA
No utilice medios para acelerar el proceso de descongelación o para limpiar que
no sean los recomendados por el fabricante.
ADVERTENCIA
El mantenimiento sólo se realizará según las recomendaciones del fabricante
del equipo. El mantenimiento y la reparación que requieran la asistencia de otro
personal cualicado se realizarán bajo la supervisión de la persona competente
en el uso de los refrigerantes inamables.
ATENCIÓN AL CLIENTE
IMPORTANTE
NO DEVUELVA ESTE PRODUCTO A LA TIENDA
Si tiene algún problema con este producto, póngase
en contacto con el centro de satisfacción del cliente
de BLACK+DECKER llamando al 844-299-0879. SERÁ
OBLIGATORIO PRESENTAR UNA PRUEBA DE COMPRA CON
FECHA, EL NÚMERO DE MODELO Y EL NÚMERO DE SERIE
PARA EL SERVICIO DE GARANTÍA.
NOTA IMPORTANTE: Lea este manual
atentamente antes de instalar u operar
su nueva unidad de aire acondicionado.
Asegúrese de guardar este manual para
consultarlo en el futuro.
Precaución: Riesgo de incendio/
materiales inamables
(Requerido sólo para unidades R32/R290)
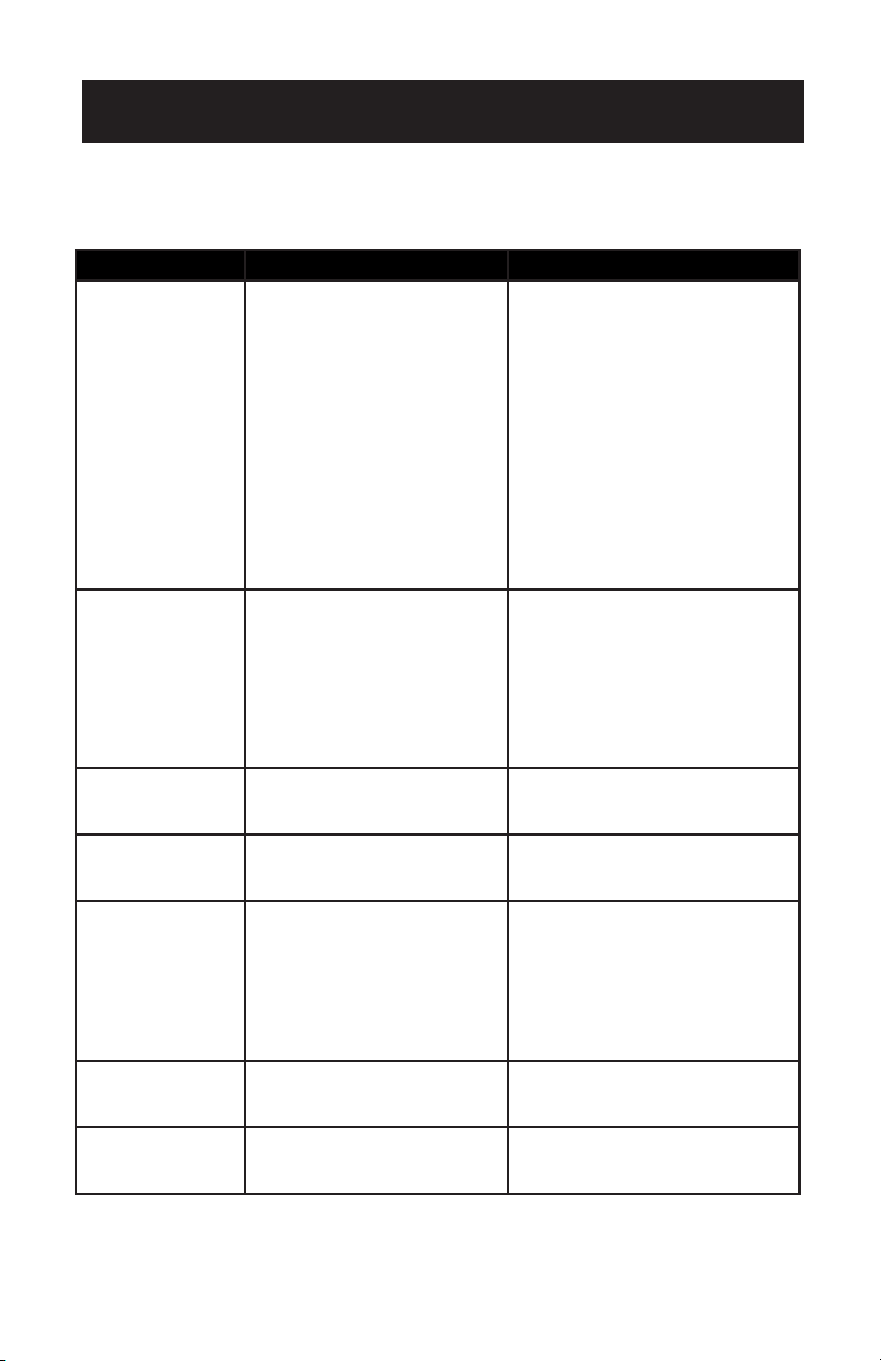
Page 114
SOLUCIÓN DE PROBLEMAS Y GARANTÍA
Solucione su problema utilizando la tabla siguiente. Si el aire acondicionado sigue sin
funcionar correctamente, póngase en contacto con el centro de atención al cliente
BLACK+DECKER o con el centro de servicio autorizado más cercano. Los clientes
nunca deben reparar los componentes internos.
PROBLEMA POSIBLE CAUSA POSIBLE SOLUCIÓN
El aire
acondicionado no
funciona.
A. No hay electricidad.
B. Puede que sea necesario
vaciar la unidad. El indicador
luminoso de depósito lleno
está parpadeando. Sonará
un zumbador y la unidad se
apagará.
C. La temperatura ambiente es
demasiado baja o demasiado
alta.
D. En modo frío, la temperatura
ambiente es inferior a la
temperatura programada.
E. En modo secar, la
temperatura ambiente es
baja.
A. Encienda el aparato después
de conectarlo a una toma con
electricidad.
B. Drene el aparato, de acuerdo
con las instrucciones de drenaje
de agua.
C. Haga funcionar la unidad dentro
del rango de temperatura
ambiente de 64°F(18°C) a
95°F(35ºC)
D. Cambie la temperatura
programada.
E. Coloque el aparato en una
habitación con una temperatura
ambiente superior a 64ºF(18ºC).
El efecto
refrigerante no es
bueno.
A. Hay luz solar directa.
B. Las puertas o ventanas están
abiertas; hay mucha gente
en la habitación; o en modo
refrigeración, hay otras
fuentes de calor.
C. La rejilla del ltro está sucia.
D. La entrada o salida de aire
está bloqueada.
A. Cierre la cortina de la
habitación.
B. Cerrar puertas y ventanas y
añadir un nuevo aparato de aire
acondicionado.
C. Limpie o sustituya la rejilla del
ltro.
D. Despeje los obstáculos.
Ruido fuerte A. El aire acondicionado no
está colocado sobre una
supercie plana.
A. Coloque el aire acondicionado
en un lugar plano y duro (para
reducir el ruido).
EL compresor
no funciona.
A. La protección contra
sobrecalentamiento está
activada.
A. Espere 3 minutos hasta que
el aparato se enfríe y vuelva a
arrancar.
El mando a
distancia no
funciona.
A. La distancia entre el aparato
y el mando a distancia es
demasiado grande.
B. El mando a distancia no está
alineado con el receptor del
mando a distancia.
C. Baterías agotadas.
A/B. Acerque el mando a distancia
al aire acondicionado y
asegúrese de que el mando
a distancia esté orientado
directamente en la dirección
del receptor del mando a
distancia del aparato.
C. Cambie las pilas.
La pantalla indica
E2
A. El sensor de temperatura
de la bobina no funciona
correctamente.
A. Póngase en contacto con el
centro de satisfacción del
cliente BLACK+DECKER.
La pantalla indica E1 A. El sensor de temperatura
ambiente no funciona
correctamente.
A. Póngase en contacto con el
centro de satisfacción del cliente
BLACK+DECKER.
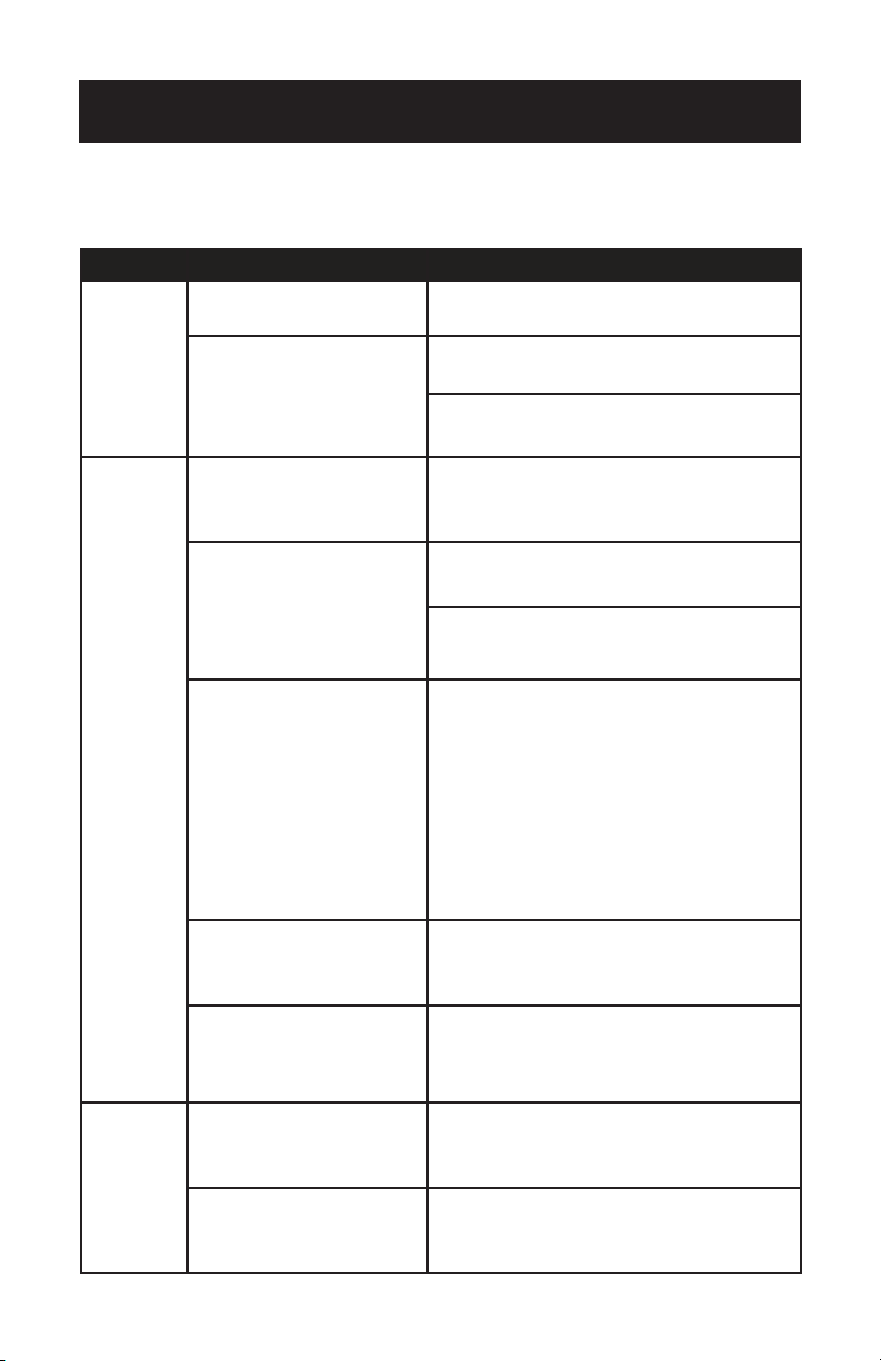
Page 115
SOLUCIÓN DE PROBLEMAS Y GARANTÍA
PROBLEMA POSIBLE CAUSA POSIBLE SOLUCIÓN
No es posible
registrarse o
acceder a la
cuenta.
El Wi-Fi no está activado en el
smartphone.
Enciende el Wi-Fi del smartphone.
La señal Wi-Fi es débil.
Instale un extensor Wi-Fi (no incluido).
Acerque el aparato al router Wi-Fi.
El aparato no
se está
conectando
con la App.
El aparato no está enchufado o se
ha encendido.
Conecte el aparato a la toma de corriente, pero no
pulse el botón de encendido. El aparato estará en
modo de espera.
La señal de la Wi-Fi es débil.
Instale un extensor Wi-Fi (no incluido).
Acerque el aparato al router Wi-Fi.
El modo de emparejamiento por
defecto no funciona.
Asegúrese de que el Bluetooth esté activado en el
smartphone y de que los permisos estén activados.
Asegúrese de que los ajustes de ubicación estén
activados en el modo EZ. Para obtener instrucciones
detalladas, consulte HABILITAR AJUSTES DE
UBICACIÓN en la página 24.
En el modo EZ, la luz indicadora de encendido del
panel de control de la unidad parpadeará rápidamente.
Si parpadea lentamente, repita el proceso de mantener
pulsado el botón del ventilador durante 3 segundos.
En el modo AP, la luz indicadora de encendido del
panel de control de la unidad parpadeará lentamente.
si parpadea rápidamente, repita el proceso de
mantener pulsado el botón del ventilador durante 3
segundos.
La frecuencia de conexión Wi-Fi es
incorrecta.
Selecciona una red Wi-Fi de 2.4 GHz.
El método de cifrado de la
configuración inalámbrica del
router es incorrecto.
Establezca el método de cifrado de la configuración
inalámbrica del router en “WPA2-PSK” y el tipo de
autenticación en “AES”, o bien establezca ambos como
automáticos.
NOTA: “Solo 80211n” no está permitido en el modo
inalámbrico.
El control
por voz no
funciona.
Es posible que el dispositivo
Alexa o asistente de Google no
funcione correctamente o no esté
conectado a la misma red que el
aparato.
Asegúrese de que el dispositivo Alexa o asistente de
Google funcione correctamente y esté conectado a
la misma red que el aparato. Siga las indicaciones de
la pantalla y las instrucciones del fabricante para la
solución de problemas del dispositivo.
Es posible que la cuenta de la APP
Black + Decker no esté vinculada
correctamente a la cuenta del
asistente de voz.
Compruebe la APP del asistente de voz para
asegurarse de que se ha vinculado el aparato correcto.
Utilice el nombre de usuario y la contraseña de
Black + Decker cuando se le solicite en la APP del
asistente de voz para vincular la cuenta.
SOLUCIÓN DE PROBLEMAS DE APLICACIONES Y
CONTROL DE VOZ

Page 116
SOLUCIÓN DE PROBLEMAS Y GARANTÍA
PROBLEMA POSIBLE CAUSA POSIBLE SOLUCIÓN
El aparato no
se conecta con
la aplicación.
El número de dispositivos co-
nectados ha alcanzado el límite
del router.
Desactive las funciones Wi-Fi de algunos de los dis-
positivos conectados.
Vuelva a configurar el router.
El router ha activado el filtro de
direcciones MAC inalámbricas.
Elimine el dispositivo del filtro de direcciones MAC del
router.
Asegúrese de que el router no prohíbe al dispositivo
conectarse a la red.
La aplicación
no controla el
aparato.
Se ha perdido la conexión WI-FI.
Vuelva a conectar el aparato con la App. Si el modo EZ
no funciona, conéctese utilizando el modo AP. Antes
de acceder a la red o cambiar de modo, mantenga
pulsado el botón del ventilador durante 3 segundos.
Interrupción del suministro eléc-
trico al aparato.
La aplicación dejará de estar conectada al aparato 3
minutos después de un corte de corriente. Restablezca
la alimentación del aparato y vuelva a conectarlo a la
red Wi-Fi.

Page 117
SOLUCIÓN DE PROBLEMAS Y GARANTÍA
GARANTÍA LIMITADA
La marca comercial Chef se usa bajo licencia.
Cualquier servicio de reparación, reemplazo
o garantía, y todas las preguntas sobre
este electrodoméstico deben dirigirse a W
Appliance Co. al 1 (855) 855-0294 desde EE.
UU. o Puerto Rico.
W Appliance Co. garantiza al comprador original
que el electrodoméstico estará libre de defectos en
materiales, piezas y mano de obra durante el período
designado para este electrodoméstico. La garantía
comienza el día en que se compra el electrodoméstico
y cubre hasta un período de 1 año (12 meses) por
mano de obra/1 año (12 meses) por piezas (solo
defectos de fabricación).
W Appliance Co. acepta que, a su elección,
reemplazará el electrodoméstico defectuoso con
un electrodoméstico nuevo o remanufacturado
equivalente a su compra original durante el período
de garantía.
Exclusiones: Esta garantía no se aplica a lo siguiente:
1. Si la apariencia o el exterior del
producto han sido dañados o
modificados, alterados o cambiados en
su diseño o construcción.
2. Si el número de serie original del
producto ha sido alterado o eliminado
o no puede determinarse fácilmente.
3. Si se produce algún daño debido
a una sobretensión en la línea de
alimentación, daño por el usuario
en el cable de alimentación de CA
o conexión a una fuente de tensión
inadecuada.
4. Si los daños se deben a un mal uso
general, accidentes o casos fortuitos.
5. Si los intentos de reparación son
realizados por agentes de servicio
no autorizados, el uso de piezas que
no sean piezas originales o piezas
obtenidas de personas que no sean
empresas de servicio autorizadas.
6. En unidades que han sido transferidas
del propietario original.
7. En productos que hayan sido
adquiridos como reacondicionados,
“como nuevos”, de segunda mano, en
condiciones “tal cual” o “venta final”.
8. Para productos utilizados en un
entorno comercial o de alquiler.
9. A productos utilizados en entornos
distintos al uso doméstico ordinario
o utilizados de forma distinta a las
instrucciones proporcionadas.
10. A daños y perjuicios por llamadas de
servicio por instalaciones inadecuadas.
11. Gastos de transporte y envío asociados
a la sustitución del aparato.
12. Llamadas del servicio técnico para
enseñarle a utilizar su producto.
13. Llamadas de servicio para reparar
o sustituir el fusible de la casa,
restablecer el disyuntor o corregir el
cableado de la casa.
LA REPARACIÓN O EL REEMPLAZO SEGÚN LO
DISPONE EN ESTA GARANTÍA ES EL RECURSO
EXCLUSIVO DEL CLIENTE; W Appliance Co. NO SERÁ
RESPONSABLE DE NINGÚN DAÑO INCIDENTAL
O CONSECUENTE POR EL INCUMPLIMIENTO DE
CUALQUIER GARANTÍA EXPLÍCITA O IMPLÍCITA
DE ESTE Aparato, EXCEPTO EN LA MEDIDA EN
QUE LO PROHÍBA LA LEY APLICABLE. CUALQUIER
GARANTÍA IMPLÍCITA DE COMERCIABILIDAD O
IDONEIDAD PARA UN PROPÓSITO EN PARTICULAR
DE ESTE Aparato ESTÁ LIMITADA A LA DURACIÓN
DE LA GARANTÍA.
Algunos estados no permiten la exclusión o limitación
de daños incidentales o consecuentes, o limitaciones
sobre la duración de la garantía. En estos casos, es
posible que las exclusiones o limitaciones anteriores
no se apliquen a usted. Esta garantía le otorga
derechos legales especícos y también puede tener
otros derechos que varían de un estado a otro.
Obtención de servicio: Para obtener servicio, folletos
sobre electrodomésticos, suministros o accesorios,
llame al 1 (855) 855-0294 para crear un ticket de
cambio/reparación. Asegúrese de proporcionar la
fecha de compra, el número de modelo y una breve
descripción del problema. Nuestro representante de
servicio al cliente se comunicará con usted o le enviará
instrucciones detalladas de devolución.
W Appliance Co. no garantiza que el electrodoméstico funcione
correctamente en todas las condiciones ambientales, y no ofrece
ninguna garantía ni representación, ya sea implícita o expresa,
con respecto a la calidad, el rendimiento, la comerciabilidad o la
idoneidad para un propósito particular que no sea el propósito
identicado en este manual del usuario. W Appliance Co. ha
hecho todo lo posible para garantizar que este manual del
usuario sea preciso y se exime de responsabilidad por cualquier
inexactitud u omisión que pueda haber ocurrido. La información
de este manual del usuario está sujeta a cambios sin previo aviso
y no representa un compromiso por parte de W Appliance Co..
W Appliance Co. se reserva el derecho de realizar mejoras en
este manual del usuario y/o en los dispositivos descritos en este
manual del usuario. manual en cualquier momento sin previo
aviso. Si encuentra información en este manual incorrecta,
engañosa o incompleta, comuníquese con nosotros al 1-855-
855-0294.
W Appliance Co.,
1356 Broadway
New York, NY 10018

BLACK & DECKER, BLACK+DECKER, los logotipos y nombres de productos
de BLACK & DECKER y BLACK+DECKER son marcas comerciales de
The Black & Decker Corporation, utilizado bajo licencia. Reservados todos los
derechos.
El producto de esta caja puede diferir ligeramente del que se muestra en la
imagen. No afecta la función. No todos los accesorios que se muestran en la
fotografía están incluidos en este paquete.
Importado por W Appliance, Inc., 1356 Broadway, Nueva York, NY 10018
Diciembre de 2023 Impreso en China