OWNER'S MANUAL
CERAMIC-GLASS
RADIANT COOKTOP
Read this owner's manual thoroughly before operating the
appliance and keep it handy for reference at all times.
ENGLISH
LSCE305STE LSCE365STE
MFL54169117
Rev.00_022924
www.lg.com
Copyright © 2024 LG Electronics Inc. All Rights Reserved.
Scan to see the online manual.

TABLE OF CONTENTS
2
3 IMPORTANT SAFETY
INSTRUCTIONS
3 READ ALL INSTRUCTIONS BEFORE USE
3 WARNING STATEMENTS
6 CAUTION STATEMENTS
8 PRODUCT OVERVIEW
8 Product Features
9 INSTALLATION
9 Before Installing
13 Installing the Cooktop
18 OPERATION
18 Cookware
20 Control Panel
26 MAINTENANCE
26 Care and Cleaning
28 TROUBLESHOOTING
28 Before Calling for Service
30 LIMITED WARRANTY
30 USA
3IMPORTANT SAFETY INSTRUCTIONS
ENGLISH
IMPORTANT SAFETY INSTRUCTIONS
READ ALL INSTRUCTIONS BEFORE USE
Safety Messages
Your safety and the safety of others are very important.
We have provided many important safety messages in this manual and on your appliance. Always read and
follow all safety messages.
Download this owner's manual at http://www.lg.com
All safety messages will tell you what the potential hazard is, tell you how to reduce the chance of injury,
and tell you what may happen if the instructions are not followed.
WARNING STATEMENTS
WARNING
• To reduce the risk of explosion, fire, death, electric shock, scalding or injury to persons when using this
product, follow basic precautions, including the following:
Installation
• Be sure your appliance is properly installed and grounded by a qualified technician in accordance with
the National Electrical Code ANSI/NFPA No. 70, latest edition in the United States, and all local code
requirements. Install only per installation instructions.
• The safety aspects of this appliance comply with accepted technical standards.
• Never modify or alter the construction of an appliance such as removal of panels, wire covers or any
other permanent part of the product.
• Remove all tape and packaging wrap before using the appliance. Destroy the carton and plastic bags
after unpacking the appliance. Never allow children to play with packaging material.
• The installation and connection of the new appliance must only be carried out by qualified personnel.
Operation
• Know how to disconnect the electrical power to the appliance at the circuit breaker or fuse box in case of
an emergency. Mark the breaker or fuse for ease of identification and swift action if necessary.
• Never use your appliance for warming or heating a room.
• DO NOT touch cooking zones or areas near these surfaces. Cooking zones may be hot from residual heat
even though they are dark in color. Areas near the cooking zones may become hot enough to cause
This is the safety alert symbol.
This symbol alerts you to potential hazards that can kill or injure you and others. All safety messages
will follow the safety alert symbol and either the word WARNING or CAUTION.
These words mean:
WARNING
You may be killed or seriously injured if you do not follow instructions.
CAUTION
You may be injured or cause damage to the product if you do not follow instructions.

4 IMPORTANT SAFETY INSTRUCTIONS
burns. During and after use, do not touch, or let clothing or other flammable materials touch these areas
until they have had sufficient time to cool.
• Never wear loose fitting or hanging garments while using this appliance.
• Always turn off all controls when cooking is completed.
• Do not use water or flour on grease fires. Smother the fire with a pan lid, or use baking soda or a dry
chemical or foam-type extinguisher.
• Use only dry pot holders. Moist or damp pot holders on hot surfaces may result in burns from steam. Do
not let pot holders touch hot surface units. Do not use a towel or other bulky cloth instead of a pot
holder.
• Do not heat unopened food containers. A buildup of pressure may cause the container to burst and
result in injury.
• Flammable materials should not be stored near or on the cooking surface. This includes paper, plastic
and cloth items, such as cookbooks, plasticware and towels, as well as flammable liquids. Do not store
explosives, such as aerosol cans, on or near the appliance. Flammable materials may explode and result
in fire or property damage.
• Do not store or use gasoline or other flammable vapors and liquids in the vicinity of this or any other
appliance.
• Never place combustible items on the cooktop.
• Never keep any combustible items or aerosol cans in a drawer located under the cooktop.
• When heating fat or grease, watch it closely. Fat or grease may catch fire if allowed to become too hot.
• Overheated fats and oils catch fire quickly. You should supervise cooking when preparing foods in fat or
oil.
• Use a deep fat thermometer, if possible, to prevent overheating fat beyond the smoking point.
• If the surface is cracked, switch off the appliance to avoid the possibility of electric shock. Do not reuse
your cooktop until the glass surface has been replaced.
• When using the cooktop, never use aluminum foil, products wrapped in aluminum foil, or deep-frozen
food in aluminum cookware.
• This appliance is not intended for use by young children or infirm persons unless they have been
adequately supervised by a responsible person to ensure that they can use the appliance safely.
• Young children should be supervised to ensure that they do not play with the appliance.
• Accessible parts may become hot during use. Young children should be kept away.
• Items of interest to children should not be stored in cabinets above a cooktop or on the backsplash of a
cooktop – children climbing on the cooktop to reach items could be seriously injured.
• Children should not be left alone or unattended in the area where an appliance is in use. They should
never be allowed to sit or stand on any part of the appliance.
• Take care when plugging in electric appliances near the cooktop. Cords must not come into contact with
the hot surface. Doing so could cause damage to the cooktop and cable insulation.
• After use, switch off the cooktop element by its control and do not rely on the pan detector.
• Avoid placing metal objects such as knives, forks, spoons and lids on the cooking surface areas. Metal
objects can become hot and cause burns.
• Do not place any object on or near the display area in order to prevent accidental activation of the
cooktop controls.
• Cookware handles should be turned inward and not extend over adjacent surface units. To reduce the
risk of burns, ignition of flammable materials, and spillage due to unintentional contact with the
cookware, the handles of cookware should be positioned so that they are turned inward, and do not
extend over adjacent surface units.
• Never leave prepared food on the cooking zones. Boilovers cause smoking and greasy spillovers that
may ignite, or a pan that has boiled dry may melt or become damaged.

5IMPORTANT SAFETY INSTRUCTIONS
ENGLISH
• Do not use aluminum foil to line any part of the cooktop. Only use aluminum foil as recommended after
the cooking process, if used as a cover to be placed over the food. Any other use of aluminum foil may
result in the risk of electric shock, fire or short circuit.
• Do not clean or operate a broken cooktop. If the cooktop breaks, cleaning solutions and spillovers may
penetrate the broken cooktop and create a risk of electric shock. Contact a qualified technician
immediately.
• Never leave surface units unattended at high heat settings. Boilover causes smoking and greasy
spillovers that may ignite.
• Always turn off all controls when cooking is completed.
• Keep pets away from the product to avoid risk of fire or burns. Do not allow pets to climb on the product
even when it is not in operation.
• Liquids such as water, coffee or tea are able to be overheated beyond the boiling point without
appearing to be boiling, due to surface tension of the liquid. Visible bubbling or boiling is not always
present when the container is removed from the cooktop. This could result in very hot liquids suddenly
boiling over when the container is disturbed or a spoon or other utensil is inserted into the liquid. To
reduce the risk of injury to persons:
- Do not overheat the liquid.
- Stir the liquid both before and halfway through heating it.
- Do not use straight-sided containers with narrow necks.
- After heating, allow the container to stand on the cooktop for a short time before moving the
container.
- Use extreme care when inserting a spoon or other utensil into the container after heating.
• Do not use the cooktop as a work surface or storage space.
• Do not operate the cooking zones with empty pots or pans.
• Do not turn on the cooking zones with no pots or pans on the element.
• The cooking process has to be supervised. A short term cooking process has to be supervised
continuously.
• The appliance must not be installed behind a decorative door in order to avoid overheating.
Maintenance
• Do not repair or replace any part of the appliance. All servicing should be done only by a qualified
technician to avoid the risk of personal injury and damage to the appliance.
• Take care to avoid steam burns if using a wet sponge or cloth to wipe spills on a hot cooking area.
• Wait for the cooktop to cool before using cooktop cleaners. Some cleaners can produce NOXIOUS
FUMES if applied to a hot surface.
• If the supply cord is damaged, it must be replaced by the manufacturer, its service agent or similarly
qualified persons in order to avoid a hazard.
• If your appliance malfunctions or fractures, switch off all cooking zones, and contact an LG Customer
Information Center for service.
• Always keep the control panel clean and dry. Do not let liquids or grease remain on the cooktop display
area. Spilled or burnt-on foods can activate or deactivate the appliance. Clean the display area
thoroughly to resume normal operation of the appliance.
• Clean the appliance regularly to keep all parts free of grease that could catch fire. Exhaust fan ventilation
hoods and grease filters should be kept clean. Do not allow grease to accumulate on the hood or filters.
Greasy deposits in the fan could catch fire. Refer to the hood manufacturer's instructions for cleaning.

6 IMPORTANT SAFETY INSTRUCTIONS
CAUTION STATEMENTS
CAUTION
• To reduce the risk of minor or moderate injury to persons, malfunction, or damage to the product or
property when using this product, follow basic precautions, including the following:
Operation
• This appliance may only be used for normal cooking and frying in the home. It is not designed for
commercial or industrial purposes.
• Use proper pan sizes. This appliance is equipped with one or more surface units of different sizes.
• Select cookware having flat bottoms large enough to cover the cooking zones.
• Only certain types of glass, glass/ceramic, ceramic, earthenware, or other glazed cookware are suitable
for rangetop service without breaking due to the sudden change in temperature. Check the
manufacturer’s recommendations for cooktop use.
• Do not place hot cookware on cold cooktop glass. This could cause the glass to break.
• Do not slide pans across the cooktop surface. They may scratch the cooktop surface.
• Do not let pans boil dry. This may cause permanent damage in the form of breakage, fusion, or marking
that can affect the ceramic-glass cooktop. (This type of damage is not covered by your warranty.)
• Cook meat and poultry thoroughly, meat to at least an INTERNAL temperature of 160 ℉ and poultry to at
least an INTERNAL temperature of 180 ℉. Cooking to these temperatures usually protects against food-
borne illnesses.
• Prior to using the cooktop for the first time, apply the recommended cooktop cleaning cream to the
ceramic surface. Buff with a non-abrasive cloth or pad. This will make cleaning easier when the cooktop
gets soiled from cooking. The special cooktop cleaning cream leaves a protective finish on the glass to
help prevent scratches and abrasions.
• Please be careful of the cooktop edges when moving pots and pans.
• Ceramic glass is very tough, and impervious to sharp temperature changes, but is not unbreakable. It
can be damaged if hard or sharp objects fall on it.
• Be very cautious if using pots made of cast iron, or other pots with rough edges or burrs. Moving these
can cause scratches on the glass.
• Do not slide metal or glass across the cooktop surface.
• Do not use cookware with any dirt buildup on the bottom.
• Do not use cookware with rough or uneven bottoms. This cookware can mark and scratch the cooktop
surface.
• Do not use the glass cooktop surface as a cutting board.
• The appliance is not intended to be operated by means of an external timer or separate remote-control
system.
Maintenance
• Always switch off the appliance before cleaning.
• For safety reasons, do not clean the appliance with a steam jet or high-pressure cleaner.
• Clean the cooktop in accordance with the maintenance and cleaning instructions in this manual.
• Do not use harsh abrasive cleaners or rough metal scrapers to clean the cooktop glass since they can
scratch the surface, which may result in shattering of the glass.
• Clean the cooktop cautiously. Do not use sponges or cloth to wipe spills on a hot cooking area. Use a
proper metal scraper.

7IMPORTANT SAFETY INSTRUCTIONS
ENGLISH
SAVE THESE INSTRUCTIONS
• If sugar or a mixture containing sugar falls onto a hot cooking zone and melts, remove it with a metal
scraper immediately, while still hot. If left to cool down, it may damage the surface when removed. Use
caution and wear an oven mitt to avoid burns.
• Keep meltable objects or materials away from the ceramic glass surface, for example, plastic utensils,
aluminum foil, or cooking wraps. If any materials or foodstuffs melt on the ceramic-glass surface, these
should be cleaned up immediately.
• Use oven mitts to avoid burns when using a metal scraper on a hot cooking zone.
• Refer to the Maintenance section for proper cleaning and maintenance of the cooktop.
Disposal of Old Appliances
To protect the environment, it is important that worn-out appliances are disposed of in the correct
manner.
• The appliance must not be disposed of with household rubbish.
• You can obtain information about collection dates or public refuse disposal sites from your local
government or waste collection service.
• Before disposing of old appliances make them inoperable so they cannot be a source of danger. To do
this, have a qualified person disconnect the appliance from the house circuitry.
8 PRODUCT OVERVIEW
PRODUCT OVERVIEW
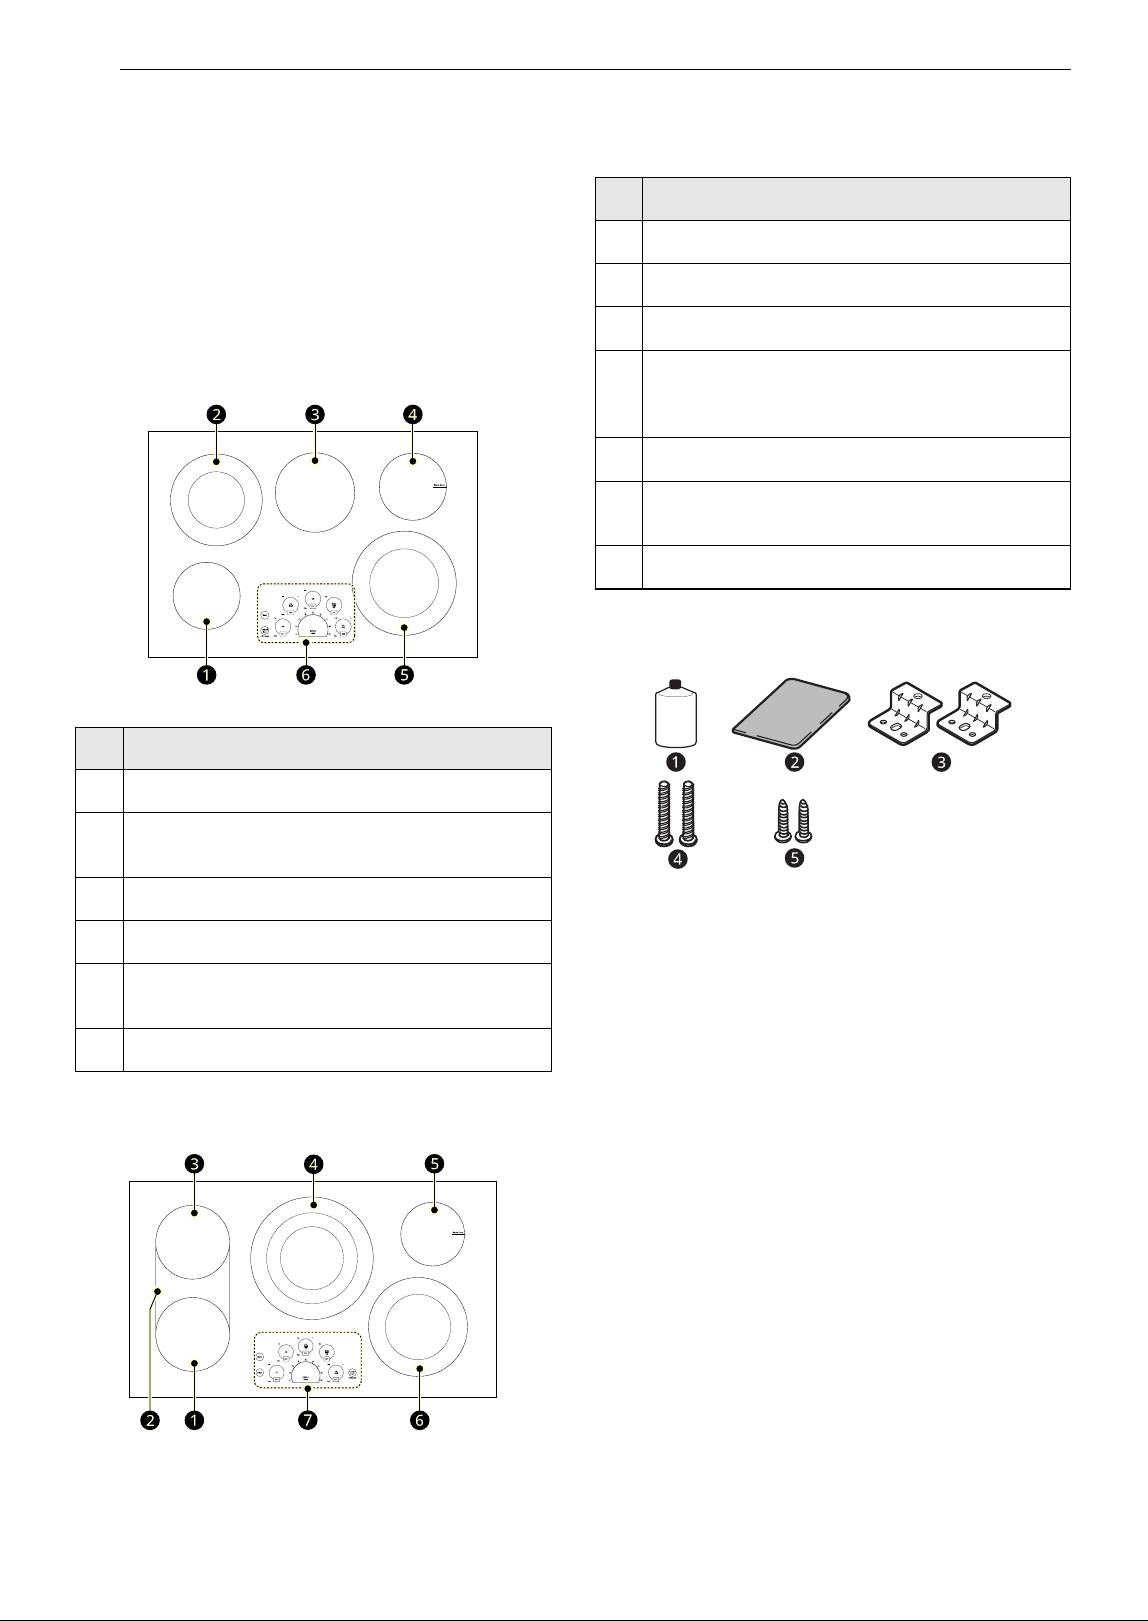
Product Features
Parts and Features
Throughout this manual, features and appearance
may vary from your model.
LSCE305STE
LSCE365STE
Accessories
a Cooktop Cleaner (1 ea)
b Non-scratch Scouring Pad (1 ea)
c Retainer Brackets (2 ea)
d Bolts (2 ea)
e Type A Screws (2 ea)
Parts and Features
a
Single Cooking Zone 6 7/16" (163 mm)
b
Dual Cooking Zone 8 3/4" / 5 3/8" (223 mm/
137 mm)
c
Single Cooking Zone 7 5/8" (193 mm)
d
Warming Zone 6 7/16" (163 mm)
e
Dual Cooking Zone 9 15/16″ / 6 9/16″ (253
mm/167 mm)
f
Control Panel
Parts and Features
a
Single Cooking Zone 7 7/16" (189 mm)
b
Bridge Cooking Zone
c
Single Cooking Zone 7 7/16" (189 mm)
d
Triple Cooking Zone
12 5/16" / 9 1/8" / 6 5/16" (313 mm/232 mm/
161 mm)
e
Warming Zone 6 7/16" (163 mm)
f
Dual Cooking Zone 9 15/16″ / 6 9/16″ (253
mm/167 mm)
g
Control Panel
Cleaner
9INSTALLATION
ENGLISH
INSTALLATION
Before Installing
Before You Begin
Installation and service must be performed by a
qualified installer.
Important: Save these instructions for the local
electrical inspector’s use. Read and save these
instructions for future reference.
Read these instructions completely and carefully.
CAUTION
• If storage is located under the cooktop, do not
use it to store flammable or heat-sensitive items
such as detergents, aerosols, cleaners, water,
food, or plastics.
NOTE
Installer:
• Read all installation instructions before installing
the cooktop.
• Remove all packing material before connecting
the electrical supply to the cooktop.
• Observe all governing codes and ordinances.
• Only certain cooktop models may be installed
over certain built-in electric oven models.
• Be sure to leave these instructions with the
consumer.
NOTE
Consumer:
• Keep the owner's manual and installation
instructions for future reference.
NOTE
• This appliance must be properly grounded.
• Damage caused by failure to follow these
instructions is not covered by the cooktop
warranty.
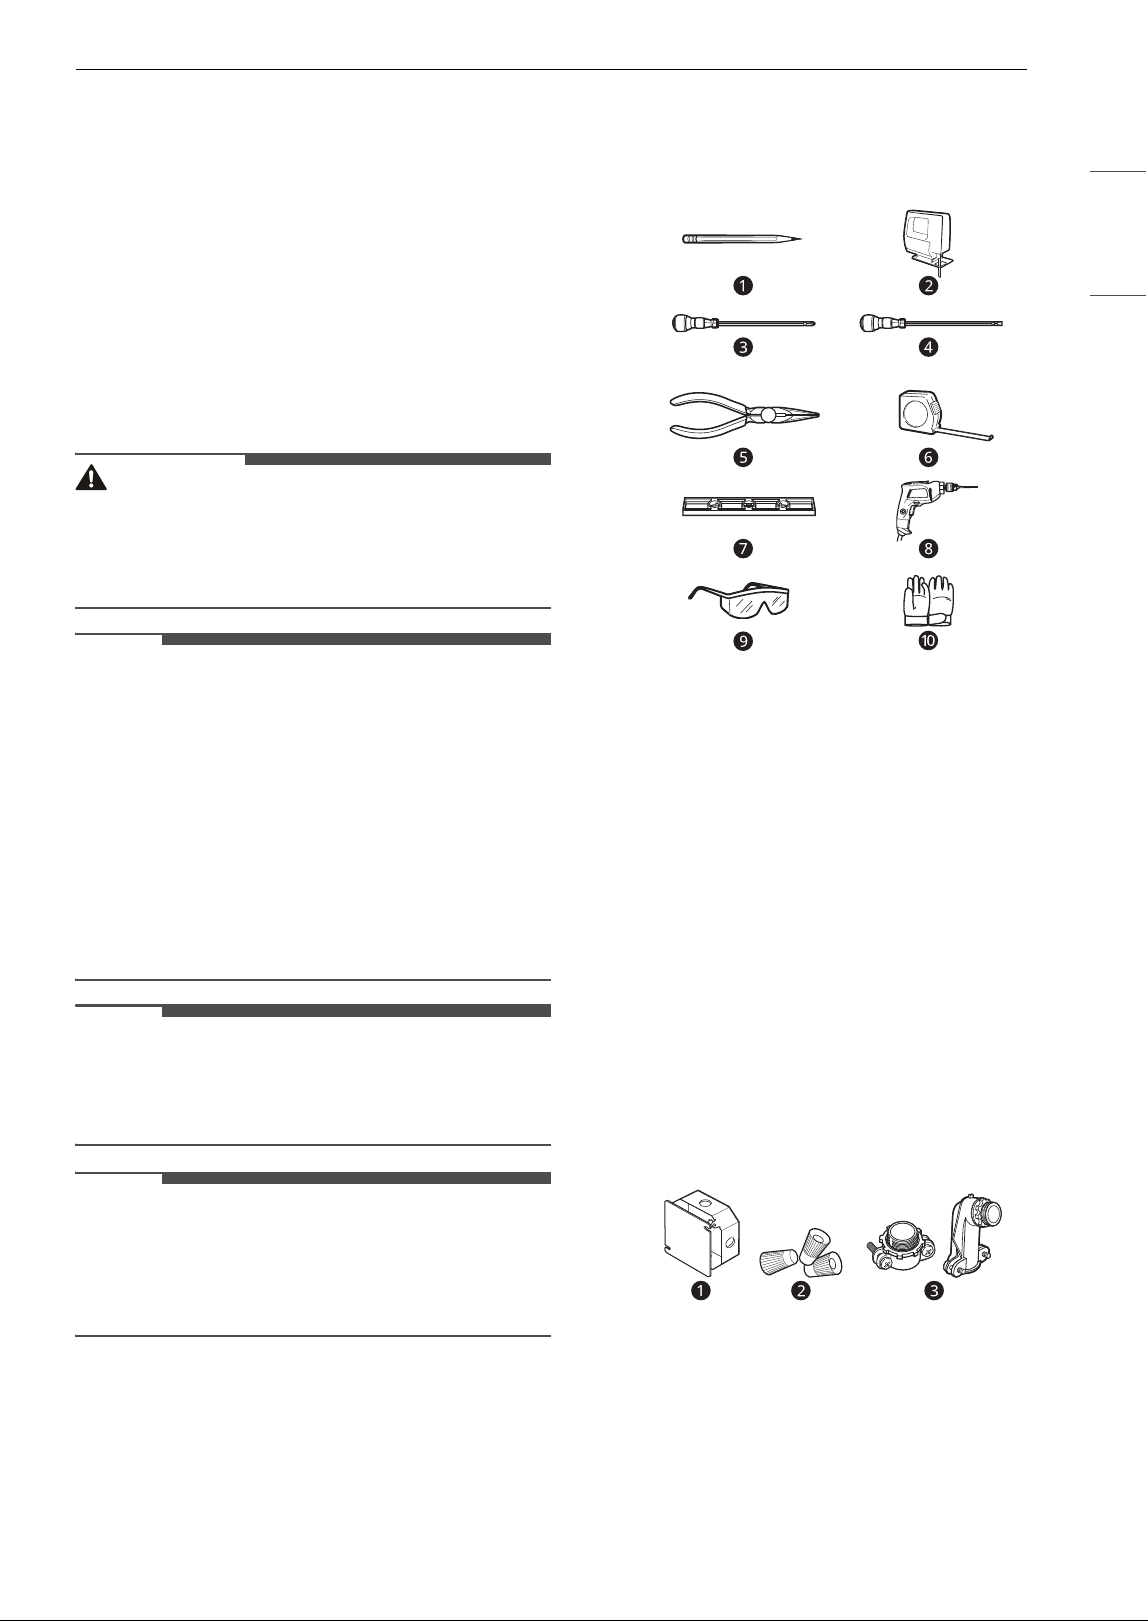
Tools Needed
a Pencil
b Saber Saw
c Phillips Screwdriver
d Flat-Blade Screwdriver
e Pliers
f Tape Measure
g Level
h Drill
i Safety Glasses
j Gloves
Parts not Provided
a Junction Box
b Wire Nuts
c Strain Relief (Conduit Connector)
10 INSTALLATION
Unpacking the Cooktop
1 Unpack and visually inspect the cooktop for
any damage or missing components.
2 Be sure the bottle of cleaner and conditioner
packed in the literature bag is left where the
user can find it easily. It is important that the
ceramic-glass cooktop be pretreated before
use. See Care and Cleaning.
Model and Serial Number Location
The model and serial numbers are located on a
plate on the bottom of the cooktop. Please record
them in this guide; you will need them for
warranty registration.
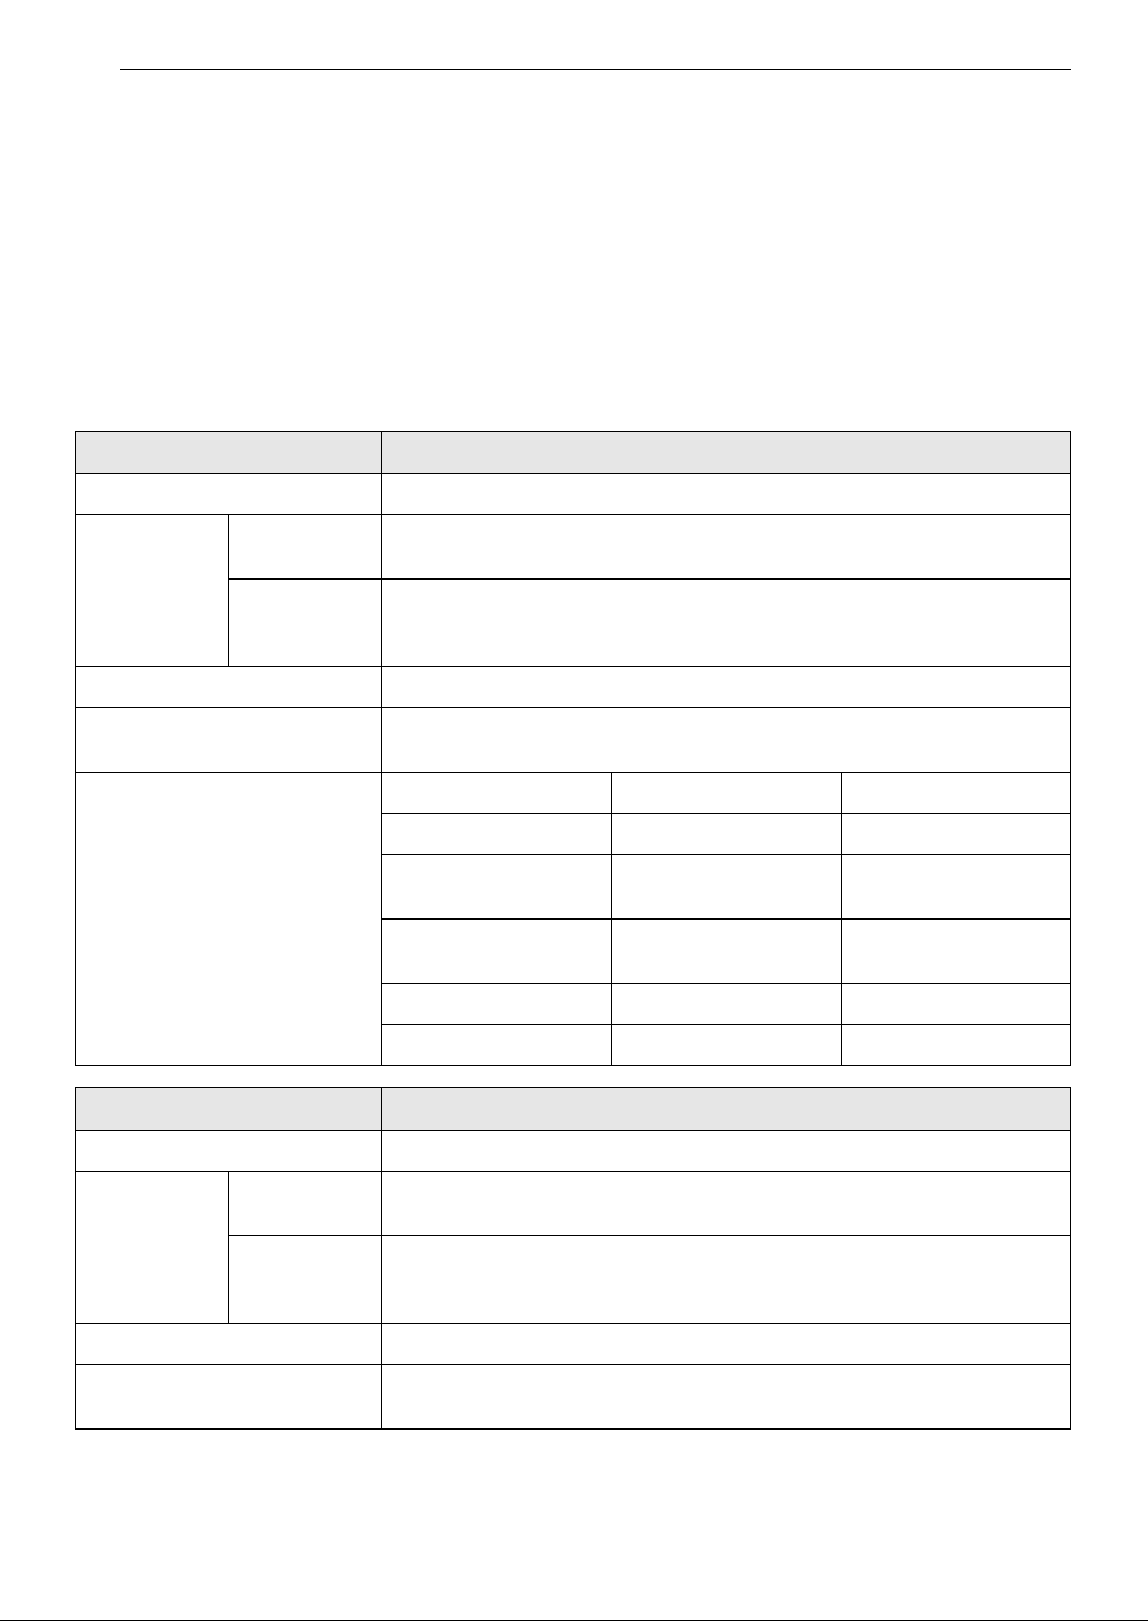
Technical Specifications
Models LSCE305STE
Description Radiant Cooktop
Electrical
Specifications
Connection
voltage
240/208 VAC 60 Hz., 32.1 A/27.9 A
Maximum
connected
power load
7700 W/5800 W
Cooktop Dimensions 30 3/4" (781 mm) (W) x 4" (101.6 mm) (H) x 21 7/16" (544.5 mm) (D)
Countertop Cutout
Dimensions
Standard Installation
29 3/8" (746 mm) (W) x 20 1/4" (515 mm) (D)
Cooking Zones
Position Size Power
Front Left 6 7/16" (163 mm) 1200 W
Front Right
9 15/16" / 6 9/16" (253
mm/167 mm)
3000 W/1400 W
Rear Left
8 3/4" / 5 3/8" (223
mm/137 mm)
1900 W/950 W
Rear Right 6 7/16" (163 mm) 100 W (Warm)
Center 7 5/8" (193 mm) 1500 W
Models LSCE365STE
Description Radiant Cooktop
Electrical
Specifications
Connection
voltage
240/208 VAC 60 Hz., 43.8 A/38.0 A
Maximum
connected
power load
10500 W/7900 W
Cooktop Dimensions 36 5/8" (930 mm) (W) x 4" (101.6 mm) (H) x 21 15/16" (557 mm) (D)
Countertop Cutout
Dimensions
Standard Installation
34 9/16" (878 mm) (W) x 20 3/8" (517 mm) (D)
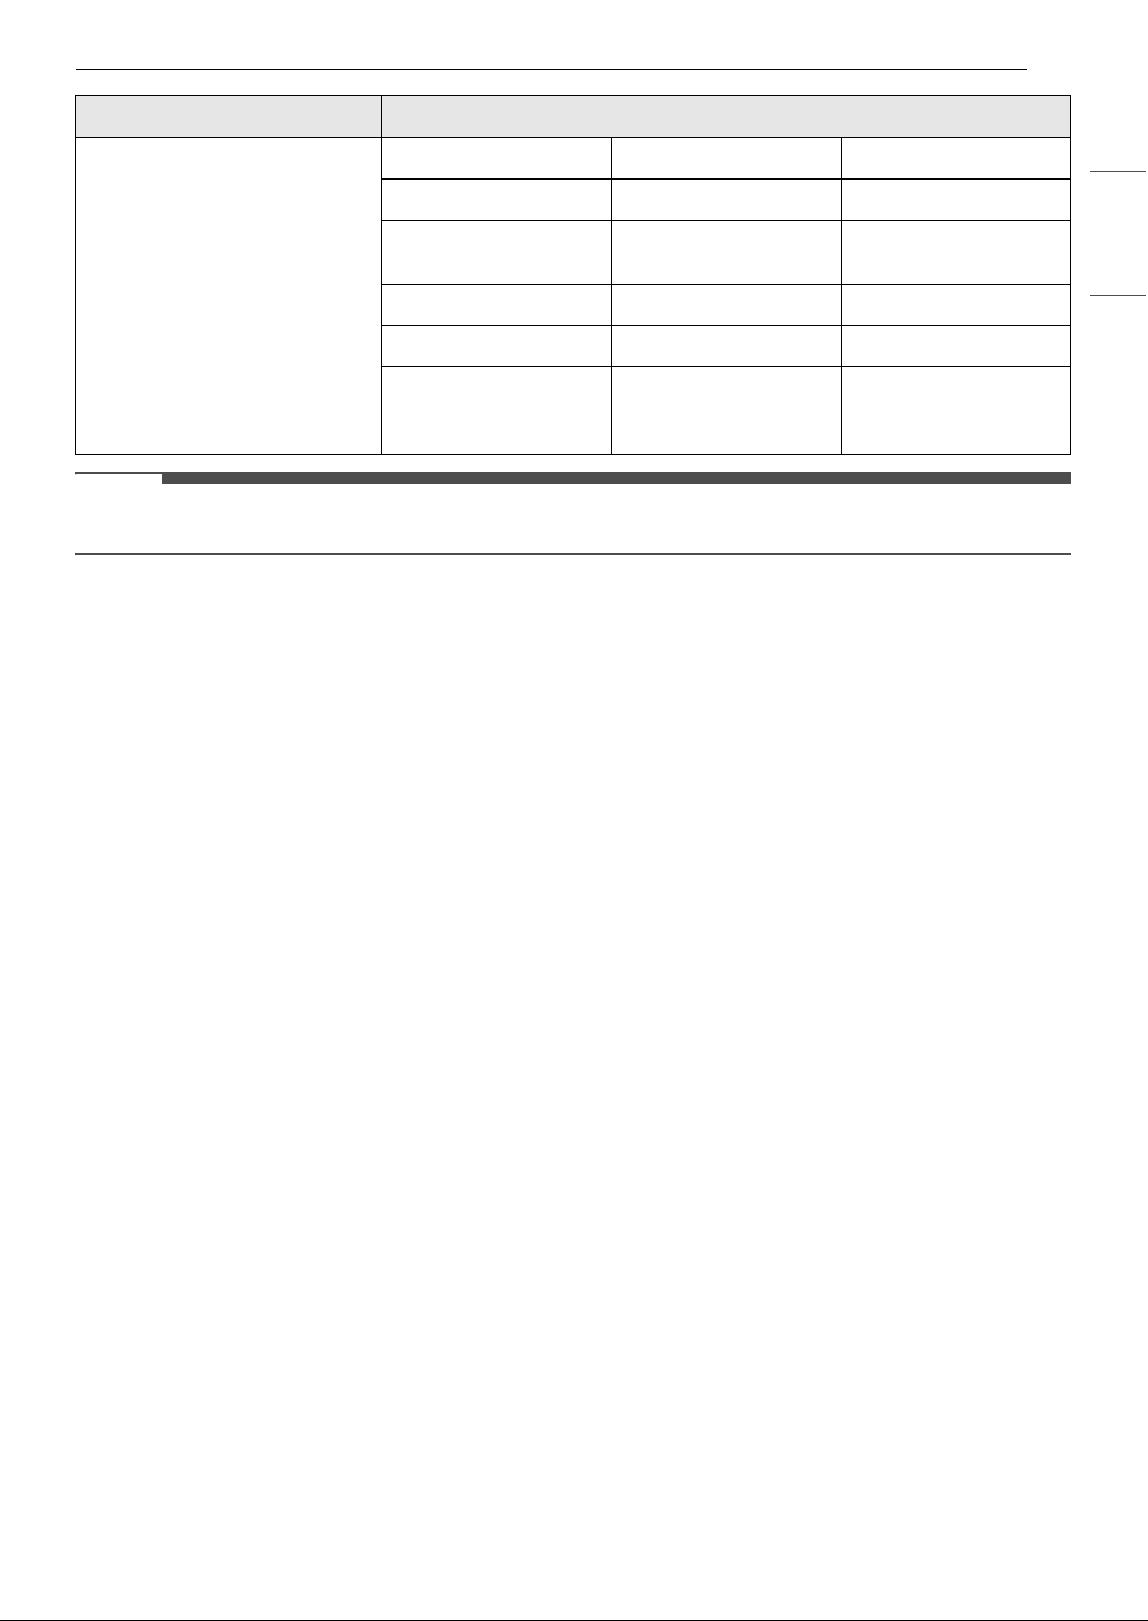
11INSTALLATION
ENGLISH
NOTE
• The maximum power of each cooking zone depends on the size and material of the cookware used.
Cooking Zones
Position Size Power
Front Left 7 7/16" (189 mm) 1800 W (Bridge)
Front Right
9 15/16" / 6 9/16" (253
mm/167 mm)
3000 W/1400 W
Rear Left 7 7/16″ (189 mm) 1800 W+800 W (Bridge)
Rear Right 6 7/16" (163 mm) 100 W (Warm)
Center
12 5/16" / 9 1/8" / 6 5/
16" (313 mm/232 mm/
161 mm)
3000 W/2200 W/1100
W
Models LSCE365STE
12 INSTALLATION
Preparing the Installation Location
Important Installation Information
• All electric cooktops run off a single phase, three-wire or four-wire cable, 240/208 volt, 60 hertz, AC-only
electrical supply with ground.
• Minimum distance between cooktop and overhead cabinetry is 30" (762 mm).
• Make sure the cabinets and wall coverings around the cooktop can withstand the temperatures (up to 93
℃ [200 ℉]) generated by the cooktop.
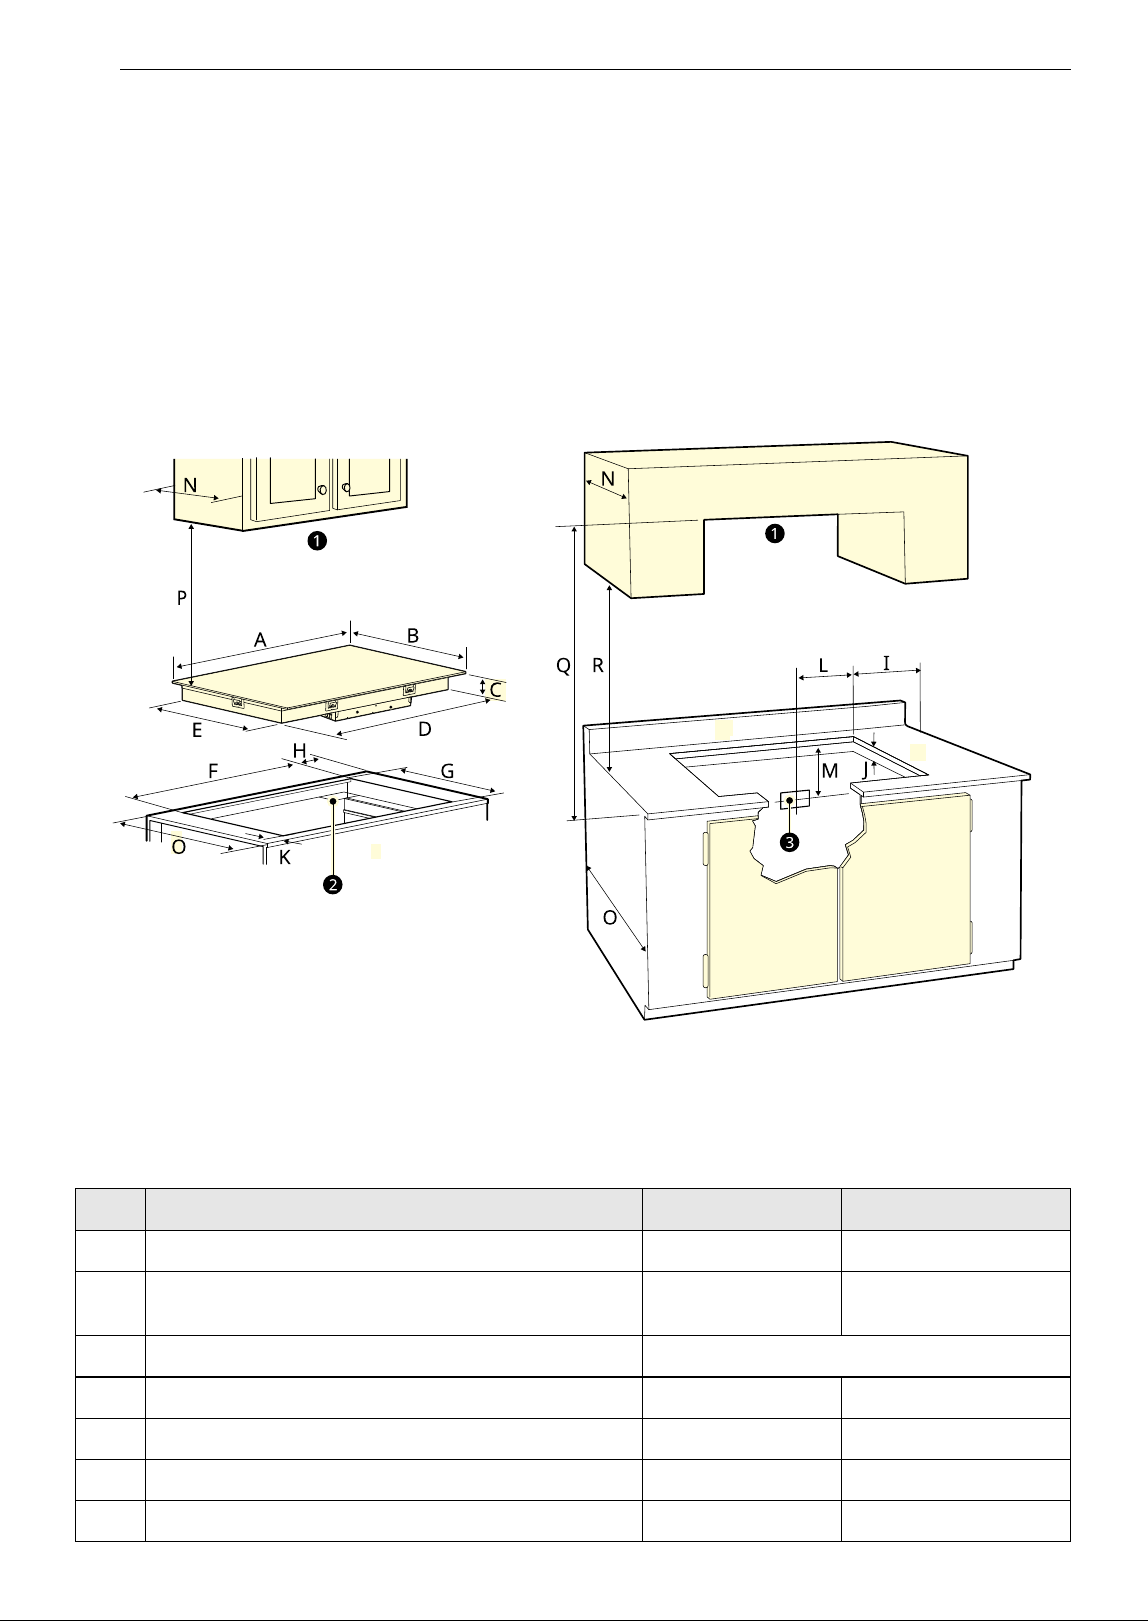
Dimensions and Clearances
a Do not obstruct these areas.
b 4″ X 8″ (102 mm x 203 mm) opening to route armored cable if panel is present.
c Approximate location of junction box
- Dimension/Clearance LSCE305STE LSCE365STE
A Width of upper plate 30 3/4" (781 mm) 36 5/8" (930 mm)
B Depth of upper plate 21 7/16" (544.5
mm)
21 15/16" (557 mm)
C Height of cooktop base 3 3/4" (95 mm)
D Width of cooktop base 28 13/16" (732 mm) 33 27/32" (860 mm)
E Depth of cooktop base 19 5/8" (498 mm) 19 25/32" (502 mm)
F Width of cutout 29 3/8" (746 mm) 34 9/16" (878 mm)
G Depth of cutout 20 1/4" (515 mm) 20 3/8" (517 mm)
13INSTALLATION
ENGLISH
All dimensions are stated in inches and millimeters (mm).
Allow 2" (50 mm) below the armored cable opening to clear the electric cable and allow space for
installation of the junction box on the wall at the back of the cooktop.
CAUTION
• To eliminate the risk of burns or fire by reaching over heated surfaces, cabinet storage space located
above the cooktop should be avoided. If cabinet storage is provided, risk can be reduced by installing a
range hood that projects horizontally a minimum of 5" (127mm) beyond the face of the cabinets.
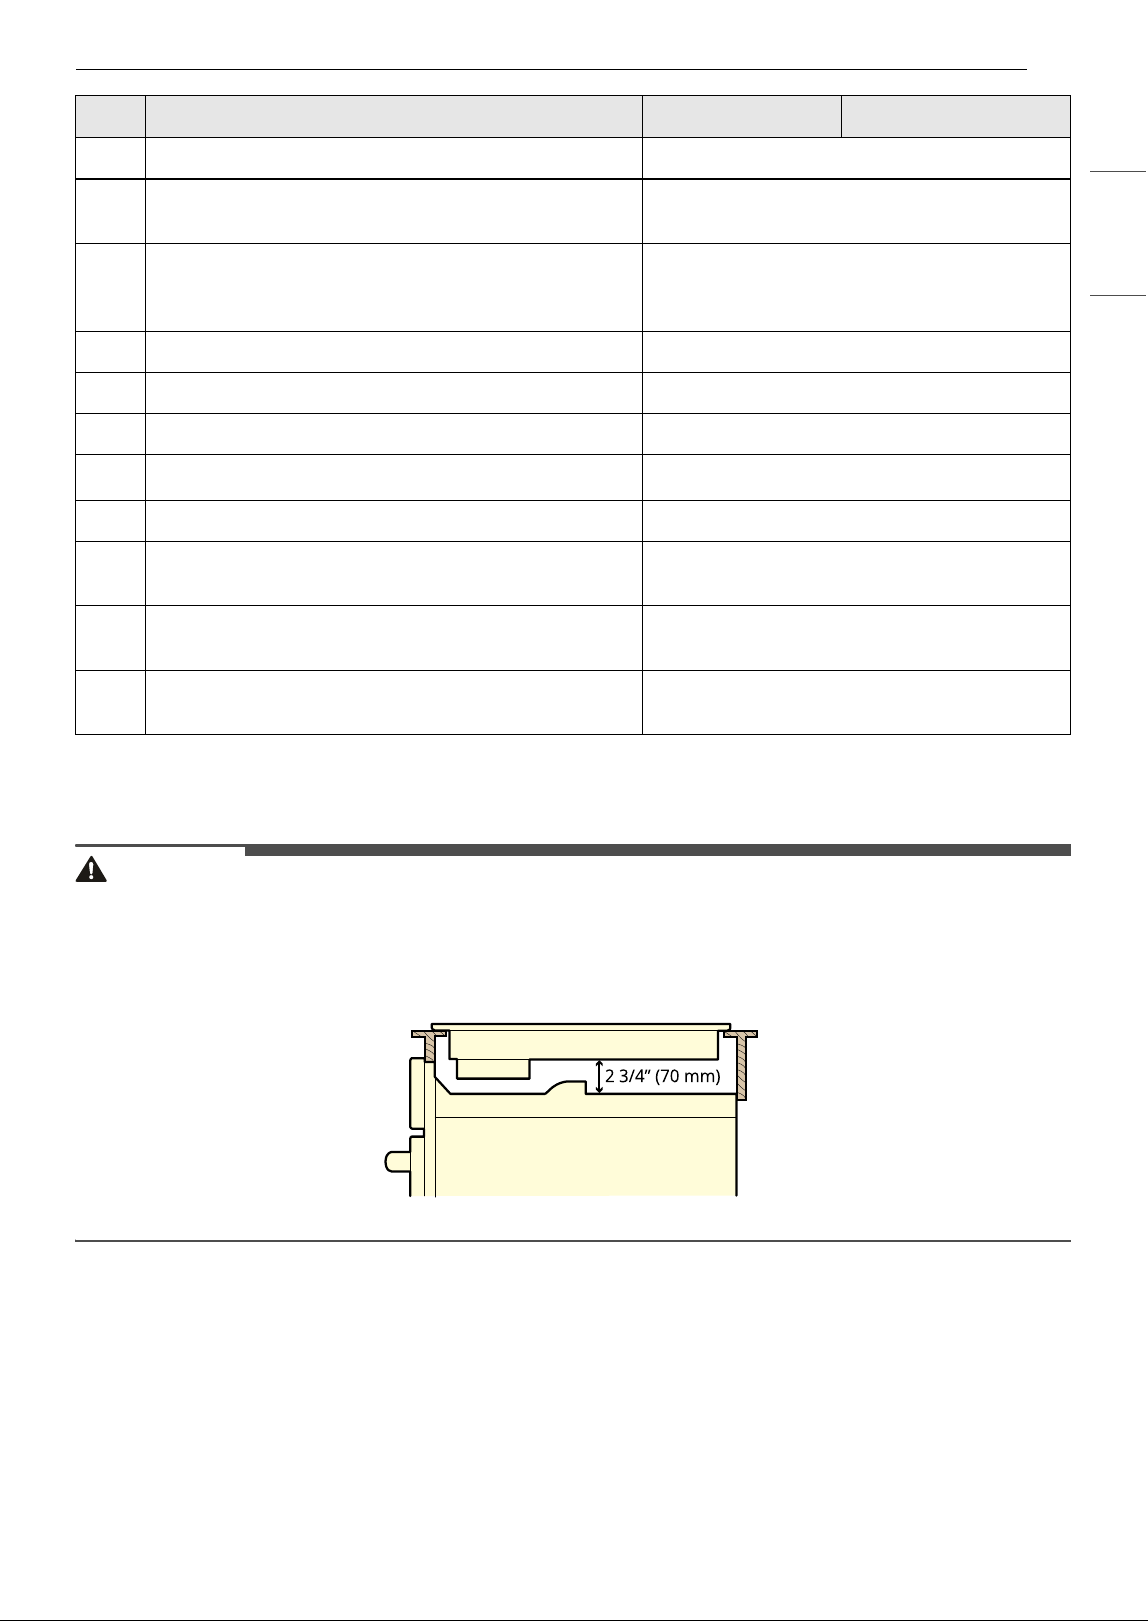
• It is very important to keep 2 3/4" (70 mm) distance between the cooktop and an oven installed below it.
Installing the Cooktop
Electrical Connections
Important Safety Instructions
• Be sure the cooktop is installed and grounded
properly by a qualified installer or service
technician.
• This cooktop must be electrically grounded in
accordance with local codes or, in their absence,
with the National Electrical Code ANSI/NFPA No.
70, latest edition in the United States.
H Distance from side edge of cutout to side of counter 13/16" (20 mm)
I Distance from edge of cooktop to nearest
combustible wall (either side of unit)
23 3/4" (95 mm)
J Height below cutout
(Empty space is needed underneath the cooktop for
installation purposes.)
2 5 23/32" (145 mm)
K Distance from front of counter to front edge of cutout 2 1/2" (64 mm)
L Junction box (approximate location) 10" (254 mm)
M Junction box (approximate location) 12" (305 mm)
N Depth of overhead cabinets
1 13" (330 mm)
O Depth of bottom cabinets 24" (610mm)
P Clearance from top of cooking surface to bottom of
overhead cabinets
230" (762 mm)
Q Distance between rear edge of cutout and nearest
combustible surface.
236" (914 mm)
R Clearance from countertop to bottom of adjacent
cabinets
218" (457 mm)
- Dimension/Clearance LSCE305STE LSCE365STE
14 INSTALLATION
WARNING
• The electrical power to the cooktop must be shut
off while line connections are being made.
Failure to do so could result in serious injury or
death.
Providing the Electrical Connection
• Install the junction box under the cabinet and
run 120/240 or 120/208 Volt, AC wire from the
main circuit panel.
NOTE
• DO NOT connect the wire to the circuit panel at
this time.
Electrical Requirements
Observe all governing codes and local ordinances
1 A 3-wire or 4-wire single-phase 120/240 or
120/208 Volt, 60 Hz AC-only electrical supply is
required on a separate circuit fused on both
sides of the line (time-delay fuse or circuit
breaker is recommended). DO NOT fuse
neutral. The fuse size must not exceed the
circuit rating of the appliance specified on the
nameplate.
2 36" Radiant cooktop can consume up to
10500 W at 240 VAC. A 50 Amp circuit breaker
with #8 AWG must be used. 30" Radiant
cooktop can consume up to 7700 W at 240
VAC. A 40 Amp circuit breaker with #8 AWG
must be used.
WARNING
• Do not use an extension cord with this
appliance. Doing so may result in a fire, electrical
shock, or other personal injury.
NOTE
• Wire sizes and connections must conform to the
fuse size and rating of the appliance in
accordance with the National Electrical Code
ANSI/NFPA No. 70, latest edition, and local codes
and ordinances.
3 The appliance should be connected to the
fused disconnect (or circuit breaker) box
through flexible armored or nonmetallic
sheathed cable. The flexible armored cable
extending from this appliance should be
connected directly to the grounded junction
box. The junction box should be located as
shown in Dimensions and Clearances with
as much slack as possible remaining in the
cable between the box and the appliance, so it
can be moved if servicing is ever necessary.
4 A suitable strain relief must be provided to
attach the flexible armored cable to the
junction box.
Electrical Connection
Connect the flexible armored cable that extends
from the surface unit to the junction box using a
suitable strain relief at the point the armored cable
enters the junction box. Then make the electrical
connection as follows.
Electrical ground is required on this appliance.
This appliance is manufactured with a supply wire
and a frame-connected green or bare copper
grounding wire.
NOTE
TO ELECTRICIAN:
• The armored cable leads supplied with the
appliance are UL-listed for connection to larger
gauge household wiring. The insulation of the
leads is rated at temperatures much higher than
the temperature rating of household wiring. The
current-carrying capacity of the conductor wire
is governed by the temperature rating of the
insulation around the wire, rather than the wire
gauge alone.
WARNING
• DO NOT ground to a gas supply pipe. DO NOT
connect to electrical power supply until
appliance is permanently grounded. Connect the
ground wire before turning on the power.
• This appliance is equipped with a copper
conductor flexible cable. If connection is made to
aluminum house wiring, use only special
connectors which are approved for joining
copper and aluminum wires in accordance with
the National Electrical Code and local codes and
ordinances. Improper connection of aluminum
house wiring to copper leads can result in a
short circuit or fire. Follow the connector
manufacturer’s recommended procedure
closely.
15INSTALLATION
ENGLISH
Where Local Codes Permit Connecting
the Appliance-Grounding Conductor to
the Neutral (White) Wire
Observe all governing codes and local ordinances.
1 Disconnect the power supply.
2 At the circuit breaker box, fuse box or junction
box, connect appliance and power supply
cable wires as shown.
WARNING
• You may not ground the cooktop through the
neutral (white) wire if cooktop is used in a new
branch circuit installation (1996 NEC), mobile
home, recreational vehicle, or where local codes
do not permit grounding to the neutral (white)
wire. When grounding to the neutral (white) wire
is prohibited, you must use a 4-wire power
supply cable. Failure to heed this warning may
result in electrocution or other serious personal
injury.
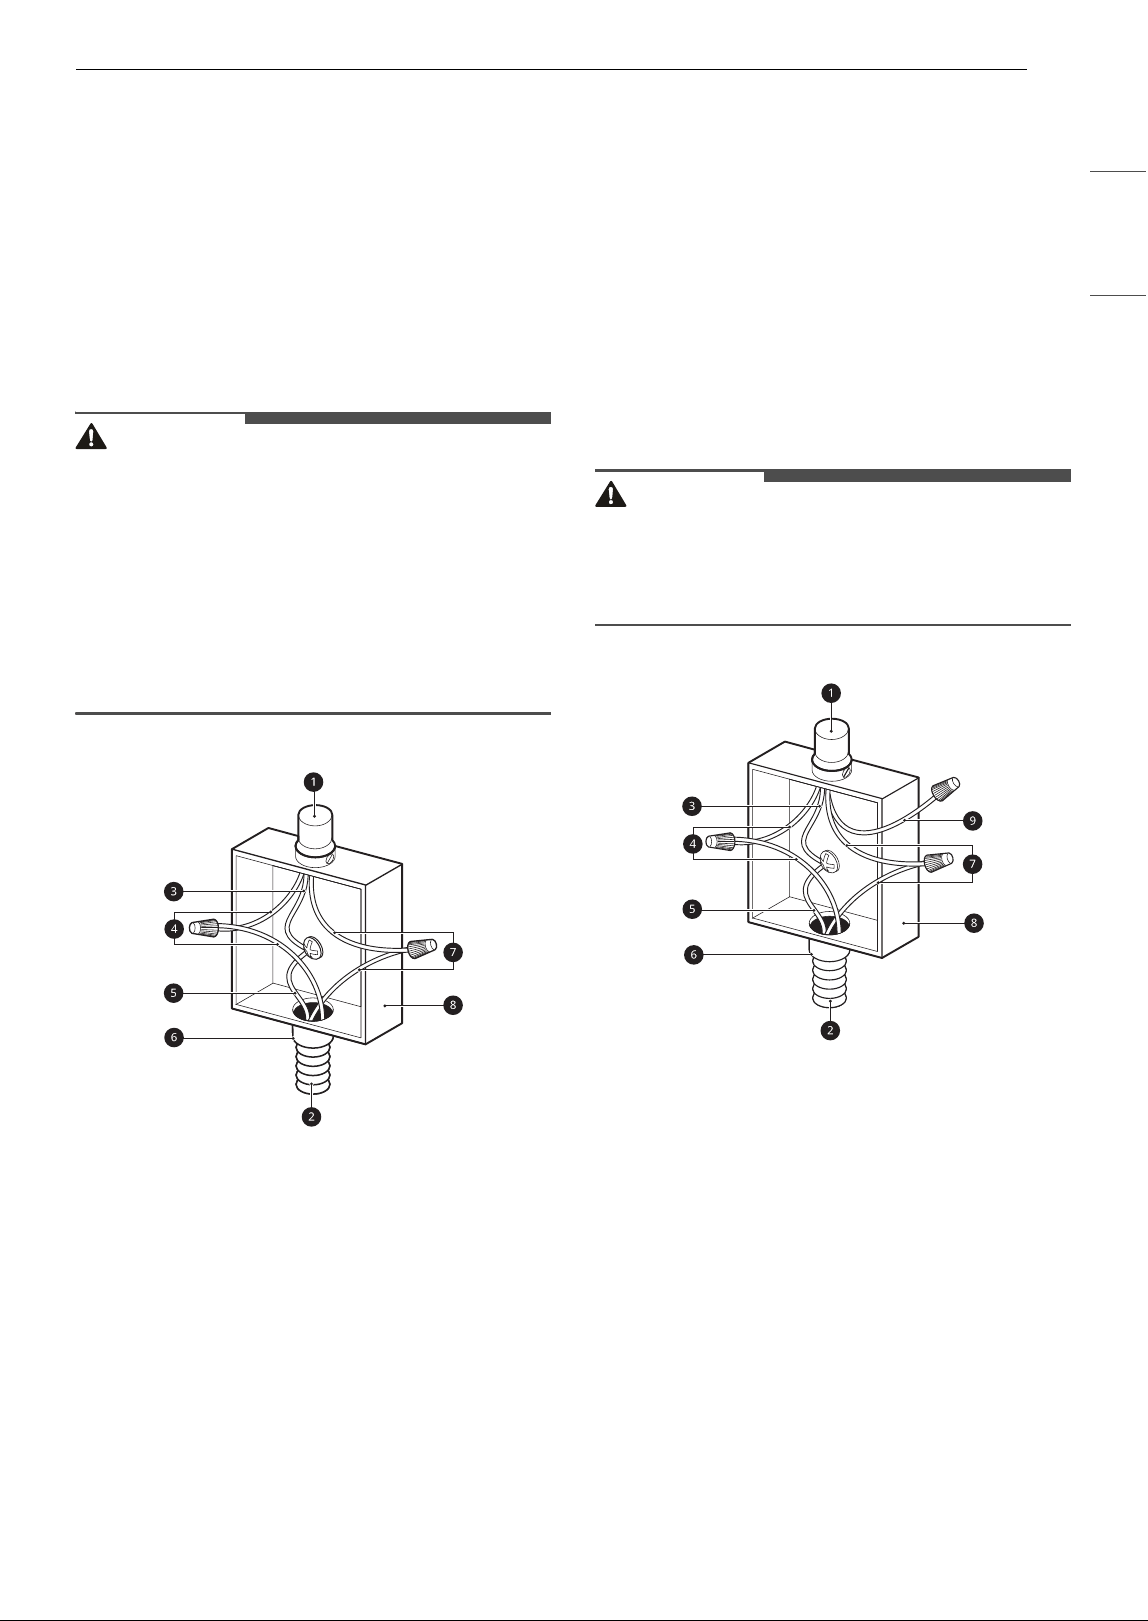
3-Wire Grounded Junction Box
a Cable from Power Supply
b Cable from Cooktop
c White Wire (Neutral)
d Red Wires
e Green Wire (Ground)
f UL-listed Conduit Connector
g Black Wires
h Junction Box
If Cooktop is Used in a New Branch
Circuit Installation (1996 NEC), Mobile
Home, Recreational Vehicle, or where
Local Codes Do Not Permit Grounding
to the Neutral (White) Wire
Observe all governing codes and local ordinances.
1 Disconnect the power supply.
2 At the circuit breaker box, fuse box or junction
box, connect appliance and power supply
cable wires as shown.
WARNING
• If connecting to a 4-wire power supply cable
electrical system, the appliance frame connected
ground wire MUST NOT be connected to the
neutral wire of the 4-wire electrical system.
4-Wire Grounded Junction Box
a Cable from Power Supply
b Cable from Cooktop
c Ground Wire
d Red Wires
e Green Wire (Ground)
f UL-listed Conduit Connector
g Black Wires
h Junction Box
i White Wire (No Connection)
16 INSTALLATION
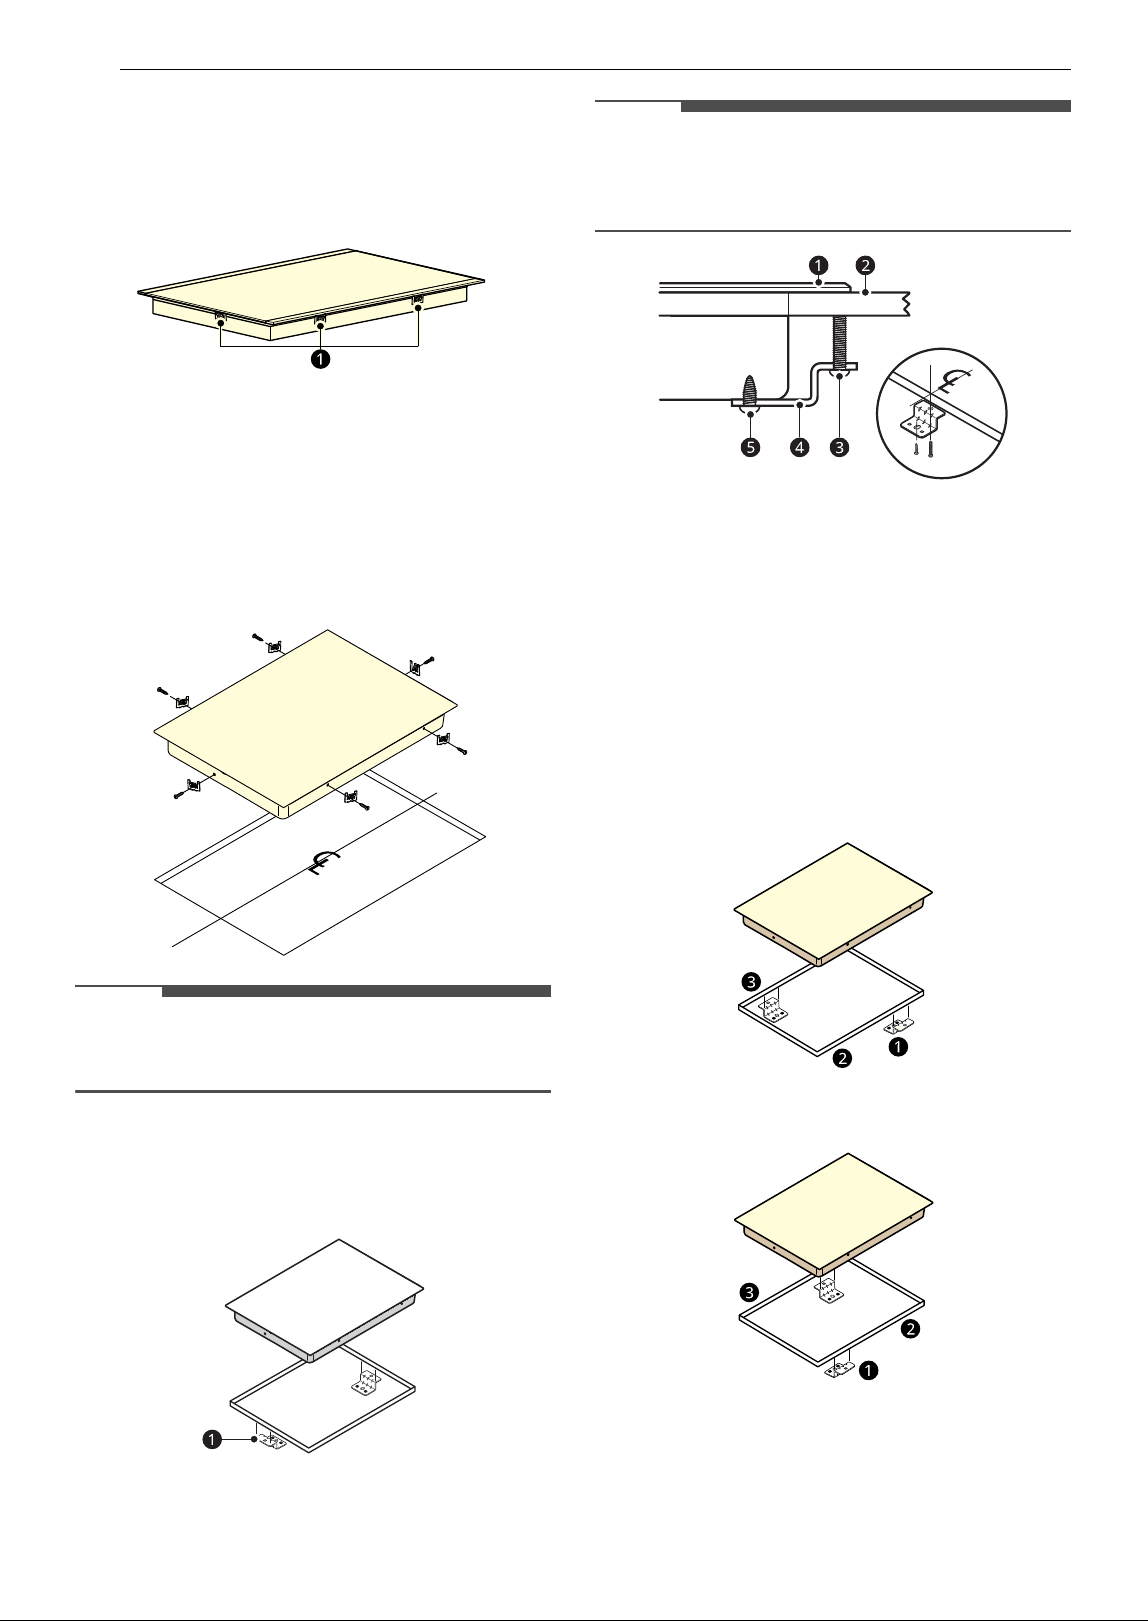
Installing the Cooktop Unit
1 Visually inspect the cooktop for damage.
Make sure all cooktop screws
a are tight (see
below for locations).
2 Check and prepare the installation location.
•See Dimensions and Clearances.
3 Carefully lower the cooktop into the
countertop cutout, making sure not to trap
any wires.
NOTE
• Do not use caulking compound. The cooktop
must be removable, should service be required.
4 Attach the retainer brackets a to the bottom
of the cooktop; then snug the bolts against
the bottom of the countertop as shown.
NOTE
• The retainer brackets MUST be installed to meet
local codes or, in their absence, with the National
Electrical Code ANSI/NFPA No. 70, latest edition.
a Cooktop
b Countertop
c Bolt
d Retainer Brackets
e Type A Screw
Alternative installation
LSCE305STE
LSCE365STE
a
Retainer Brackets
b Front
c Rear

17INSTALLATION
ENGLISH
Final Check
Perform a final operational check of the cooktop,
making sure the cooktop powers on properly and
that each cooking zone operates correctly. Refer to
the Operating Instructions in this guide for details.
18 OPERATION
OPERATION
Cookware
Selecting Cookware
Pots and Pans
The better the pot, the better the cooking results.
• You can recognize good pots and pans by their
bases. The base should be as thick and flat as
possible.
• Pots with aluminum or copper bases can cause
metallic discoloring on the ceramic glass surface
which is very difficult or impossible to remove.
• Be very careful when using cast iron pots or pots
with damaged bases which are rough and or
have burrs on them. Scratches can occur if they
are slid across the surface.
• When cold, pot bases are normally bowed
slightly inwards (concave). They should never be
bowed outwards (convex).
• When using specialty cookware such as pressure
cookers, simmering pans, or woks, follow the
manufacturer’s instructions and do not use a
very thin pan.
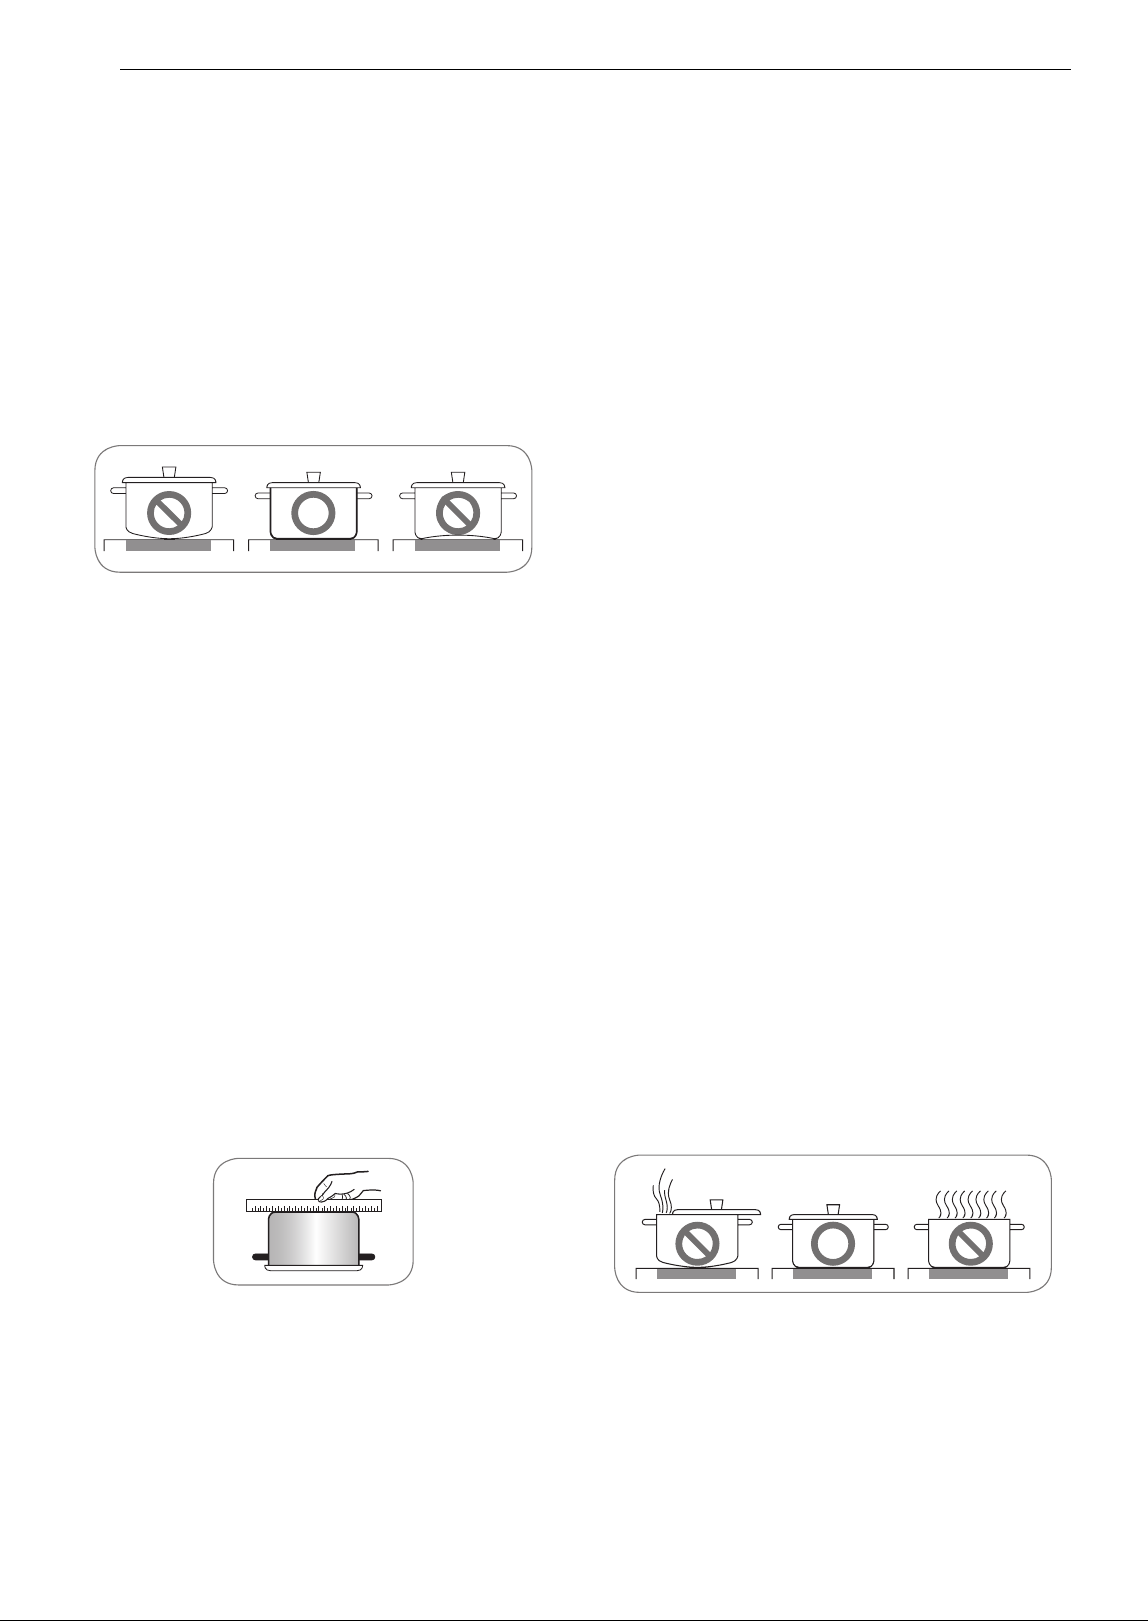
Use Flat-Bottomed Cookware
Cookware must fully contact the surface of the
cooking element. Use flat-bottomed pans sized to
fit the cooking element and amount of food being
prepared. Check for flatness by rotating a ruler
across the bottom of the cookware.
Avoiding Scratches
Use heavier gauge stainless steel cookware on
your ceramic cooktop surface. This will help reduce
the possibility of developing scratches on the
ceramic surface.
Low-quality cookware can scratch the cooktop
surface.
Cookware should always be lifted over the ceramic
cooktop surface to prevent scratching. Over time,
sliding ANY type of cookware over the ceramic
cooktop may alter the overall appearance of the
cooktop. Eventually, the buildup of scratches can
make cleaning the surface difficult and degrade
the overall appearance of the cooktop.
Scratches can also result from grains of sand (for
example, after washing vegetables) which are
dragged with the pot across the cooking surface.
Using Cookware
Always follow the recommendations for proper
cookware type and size. In addition:
• Do not use dirty pans with grease buildup.
Always use pans that are easy to clean after
cooking, and make sure that the bottoms of the
pans are clean and dry.
• When cooking with large amounts of liquid, use
large pots so that nothing can boil over.
• Do not let pans boil dry. This may cause
permanent damage in the form of breakage,
fusion, or marring that can affect the ceramic
cooktop. (This type of damage is not covered by
your warranty.)
• Match the pan size and element to the amount
of food being prepared.
Tips for Saving Energy
• Always position pots and pans before you switch
on the element.
• Dirty elements and cookware use more
electricity.
• Whenever possible, always have the lid firmly
placed on the pots and pans so that they are
completely covered.
• Switch off the elements before the end of the
cooking time to use the residual heat for
keeping food warm or for melting.

19OPERATION
ENGLISH
• The base of the pot should be the same size as
the element.
• Using a pressure cooker shortens cooking times
by up to 50%.
20 OPERATION
Control Panel
Control Panel Features
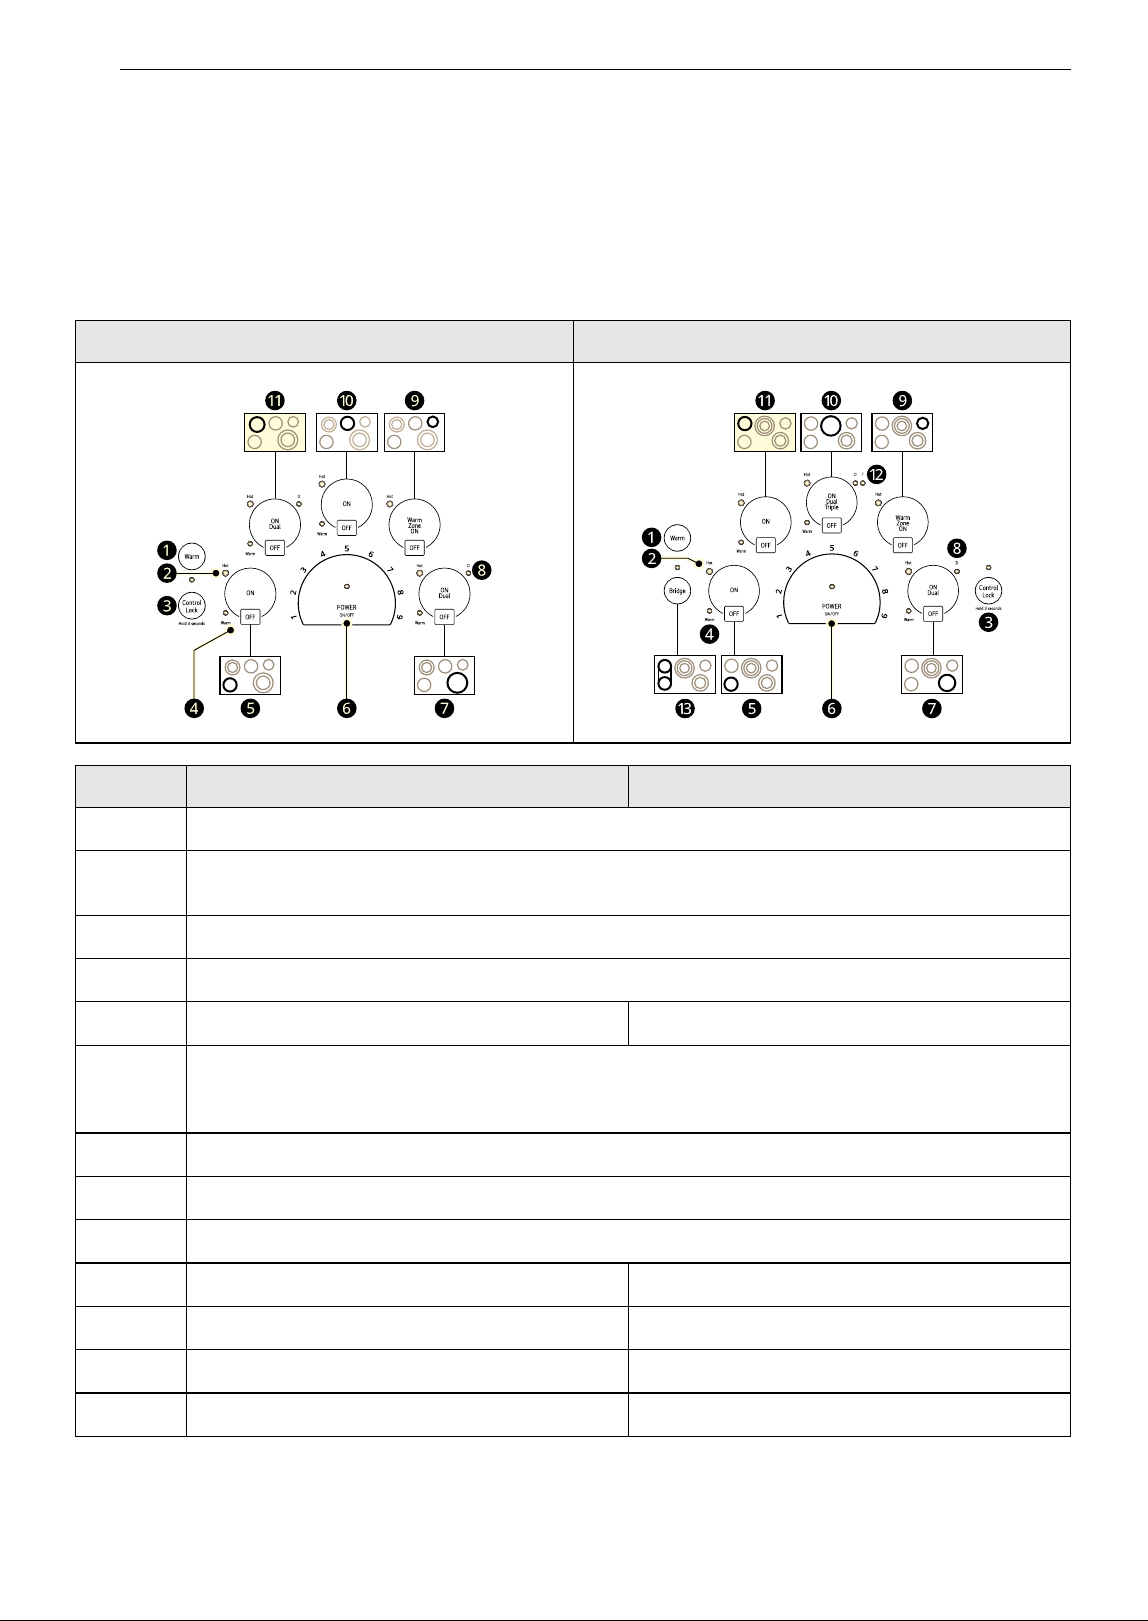
Locations of Surface Elements and Controls
The surface burner elements are positioned in the same locations on the cooktop and the control panel for
ease of use.
Before Using the Cooktop
Before using the cooktop for the first time, clean it
thoroughly with the included cleaner or ceramic
cooktop cleaner according to the Care and
LSCE305STE LSCE365STE
LSCE305STE LSCE365STE
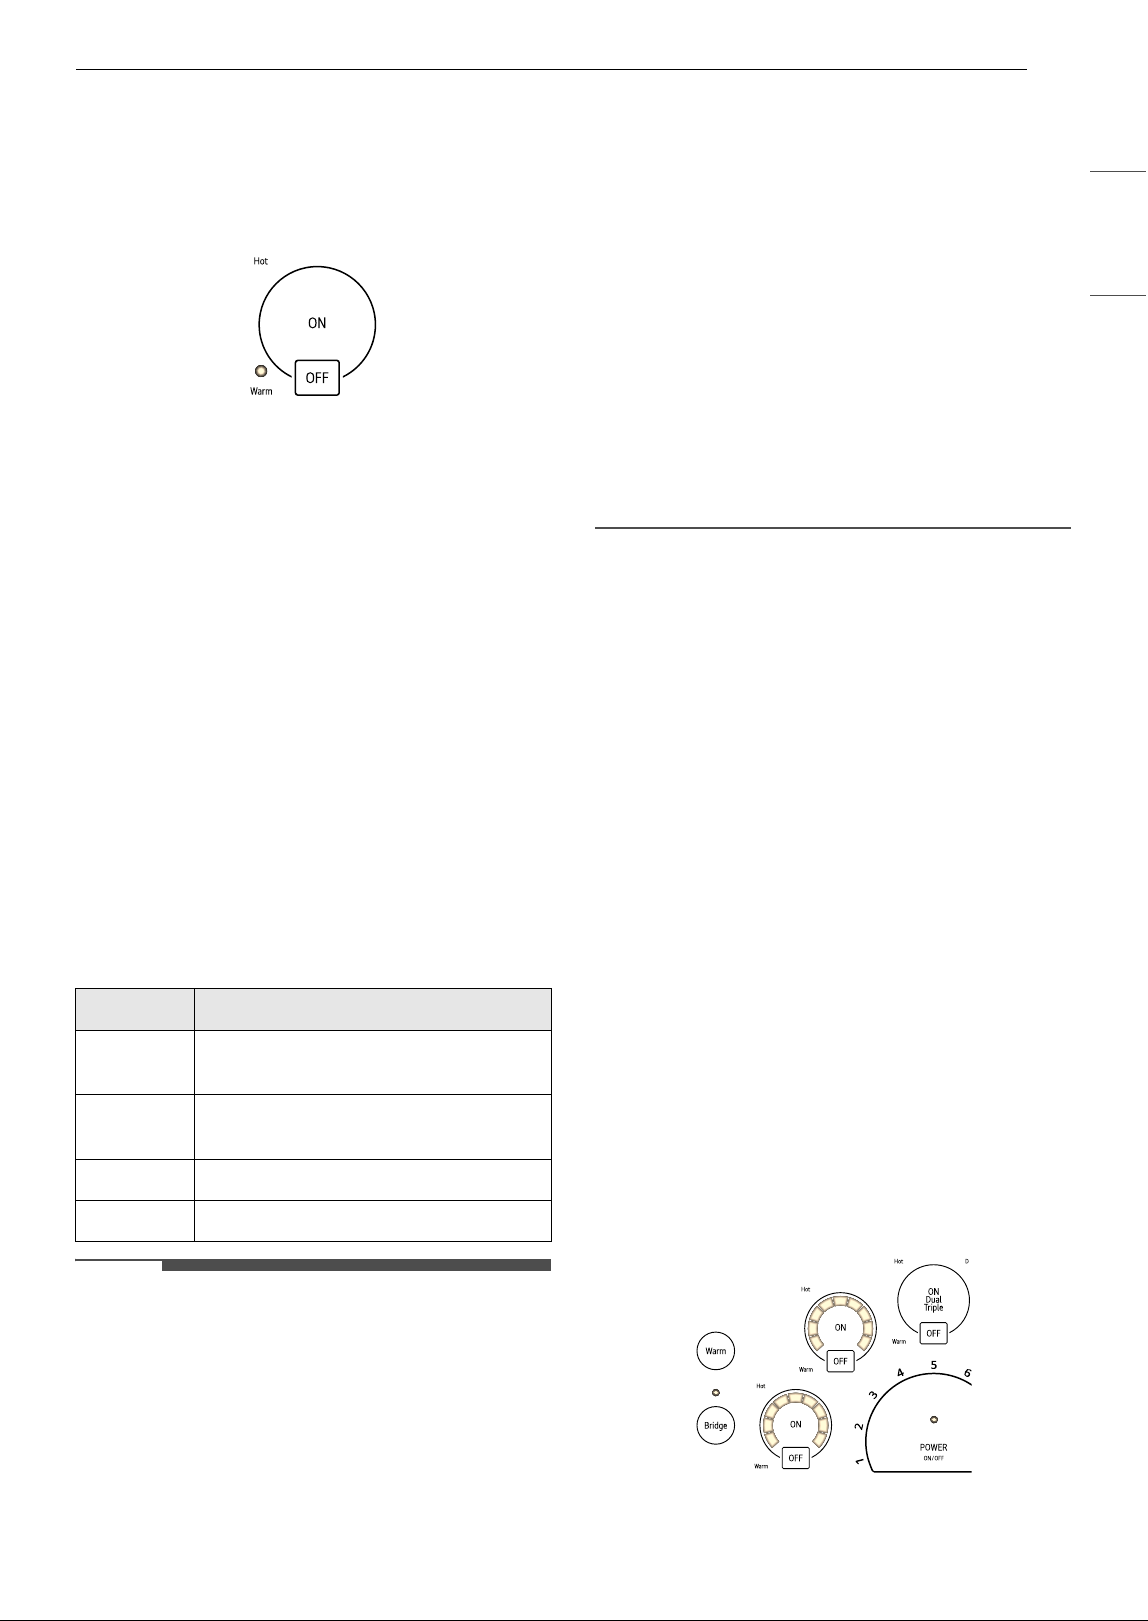
a
Warm: Lowers the selected active element to the lowest setting.
b
Hot surface indicator: The indicator light below Hot will illuminate when the cooking area is hot. It
will remain on, even after the control is turned off, until the area has cooled.
c
Control Lock: Press and hold for 3 seconds to activate and deactivate the Control Lock function.
d
Warm: Indicates that a surface burner has been set to Warm.
e
Single element, left front element Bridge element, left front element
f
POWER ON/OFF: Press POWER ON/OFF to turn the entire cooktop ON and OFF. When it is ON,
the cooktop is in standby mode until an element is activated. Set the power level for an element
by selecting a number from 1 to 9 in the element power settings.
g
Dual element, right front element
h
Dual element indicator
i
Warming zone
j
Single element, center rear element Triple element, center rear element
k
Dual element, left rear element Bridge element, left rear element
l
- Triple element indicator
m
- Bridge element, left element
21OPERATION
ENGLISH
Cleaning instructions in this guide. This will help
protect the ceramic surface and make future
cleanup easier.
CAUTION
• Never use abrasive scrubbing pads or cleaners.
They can cause permanent damage to the
cooktop surface.
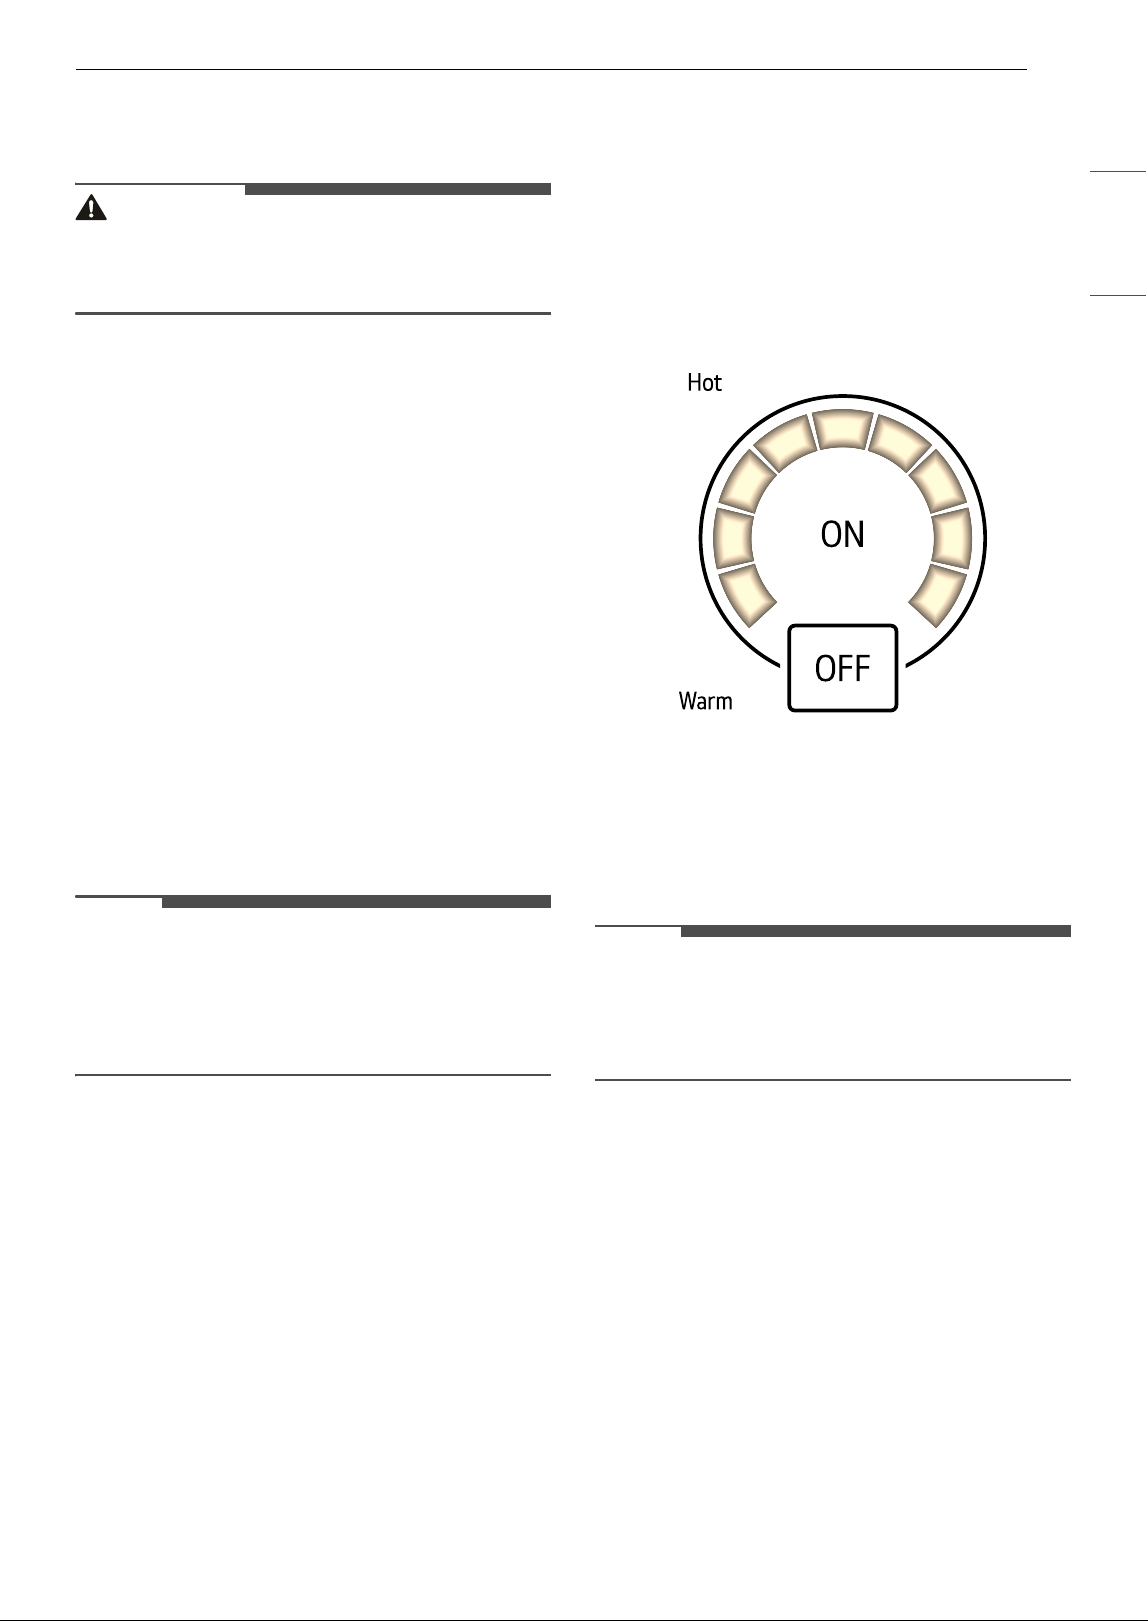
Setting the Controls
To operate the control panel, press firmly with the
flat part of your fingertip.
First Use
The first time that power is supplied to the
cooktop, the display for the controls lights for 1
second.
If you don't turn on the cooktop within 1 hour after
power is supplied to the cooktop, the display for
the controls flashes.
Activating the Cooktop
To turn on the cooktop, press POWER ON/OFF for
approximately 2 seconds. The indicator above the
control will light.
To turn off the cooktop, press POWER ON/OFF.
The indicator light above the control will turn off.
NOTE
• After turning on the cooktop with the POWER
ON/OFF control, you must select one of the
elements within 15 seconds using the element
ON controls. If no selection is made, the cooktop
will turn off for safety.
Selecting the Element
To select the desired element, press the ON
control for that element.
The display for the selected element will light. The
power level indicator lights flash, but no power
level is set.
NOTE
• Once the element has been selected with the ON
control, the power level must be selected within
10 seconds with the element power settings.
Otherwise, the element will turn off for safety.
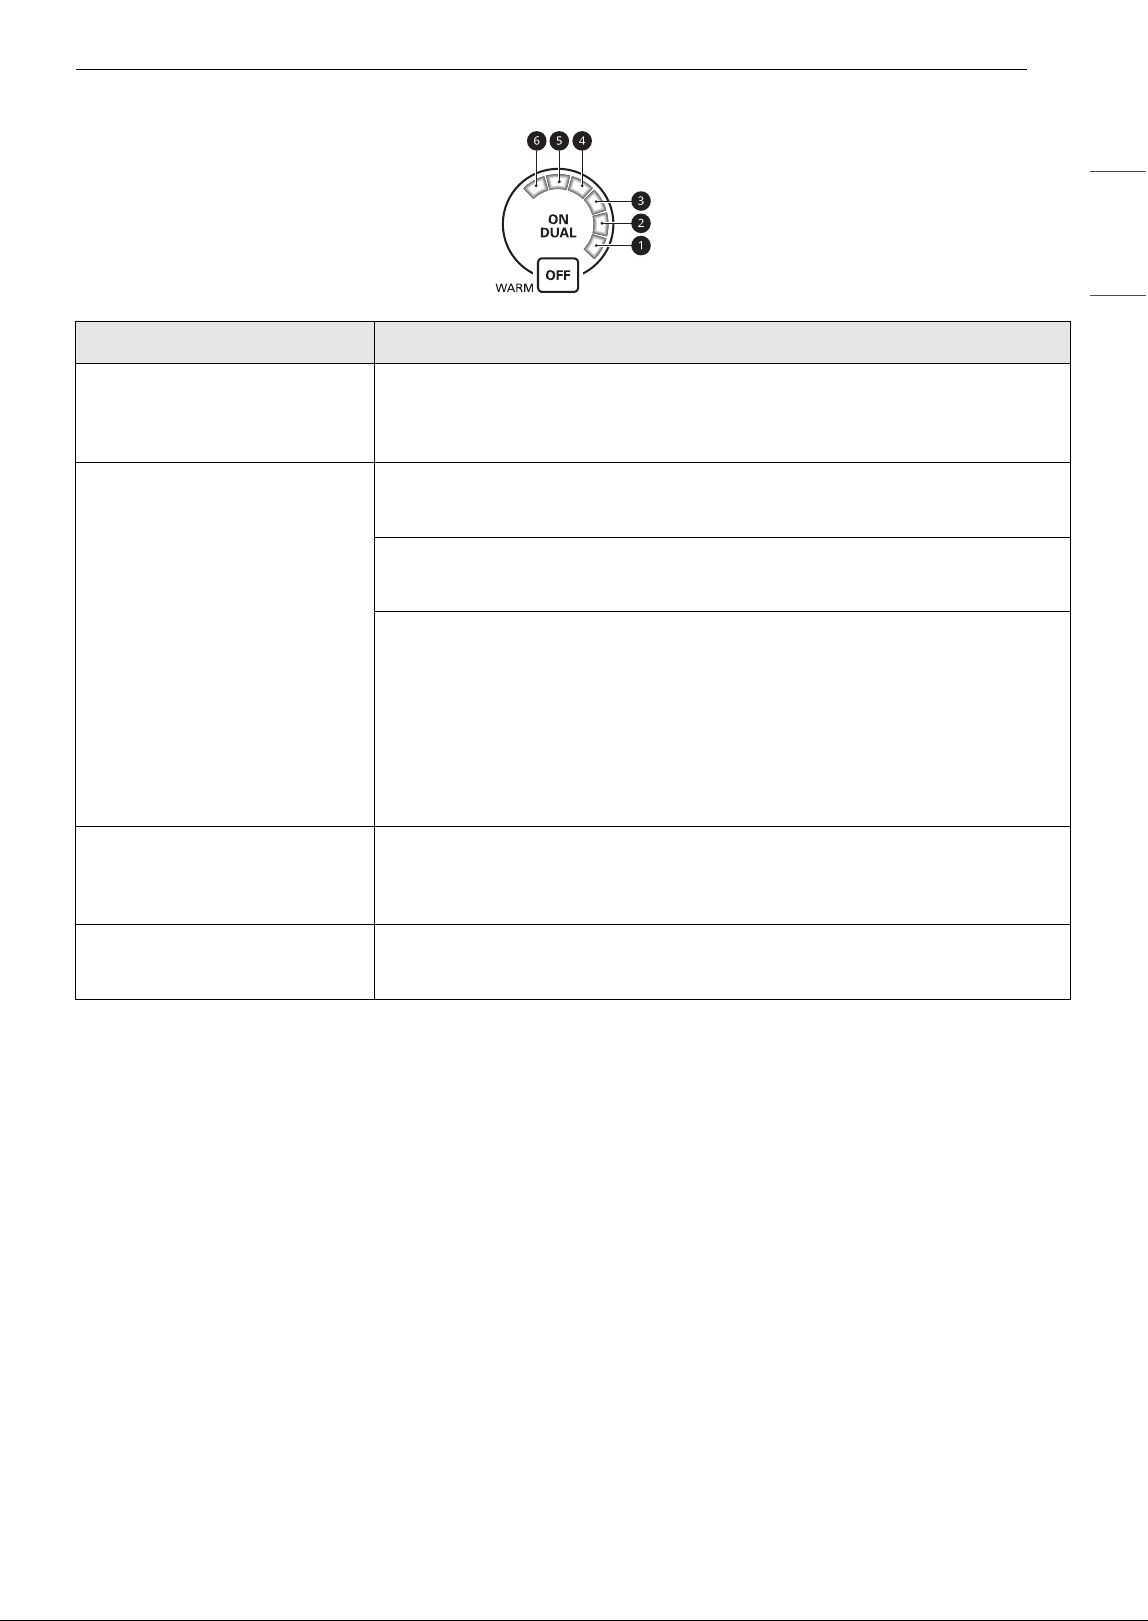
Setting the Power Level
The power level for the selected element can be
set from 1 to 9.
To select the power level:
1 Select the number on the element power
settings for the active element to adjust the
power level from 1 to 9
22 OPERATION
2 Selecting a number on the element power
settings activates the element. The indicator
lights flash once and lock in your selection.
NOTE
• If a power level is not selected, the element will
turn off after 10 seconds.
To adjust the power level:
1 Select ON for the desired element.
2 Select a number in the element power
settings to adjust the power level. If a power
level is not selected after 10 seconds, the
element's power level remains the same.
To turn off the element:
1 After cooking is complete, press OFF for the
selected element.
2 The display for the corresponding element
turns off.
3 If the POWER ON/OFF control is selected, all
elements are turned off.
WARNING
• Your cooktop has a residual heat indicator for
each element. This indicator will warn that this
area has been used and is still giving off enough
heat to cause burns. Avoid touching the element
when this indicator is on. Although the cooktop
is off, the light will stay lit until the cooktop has
cooled down.
NOTE
• These settings are recommended guidelines for
cooking. You may need to adjust the power level
for the type of food and pan.
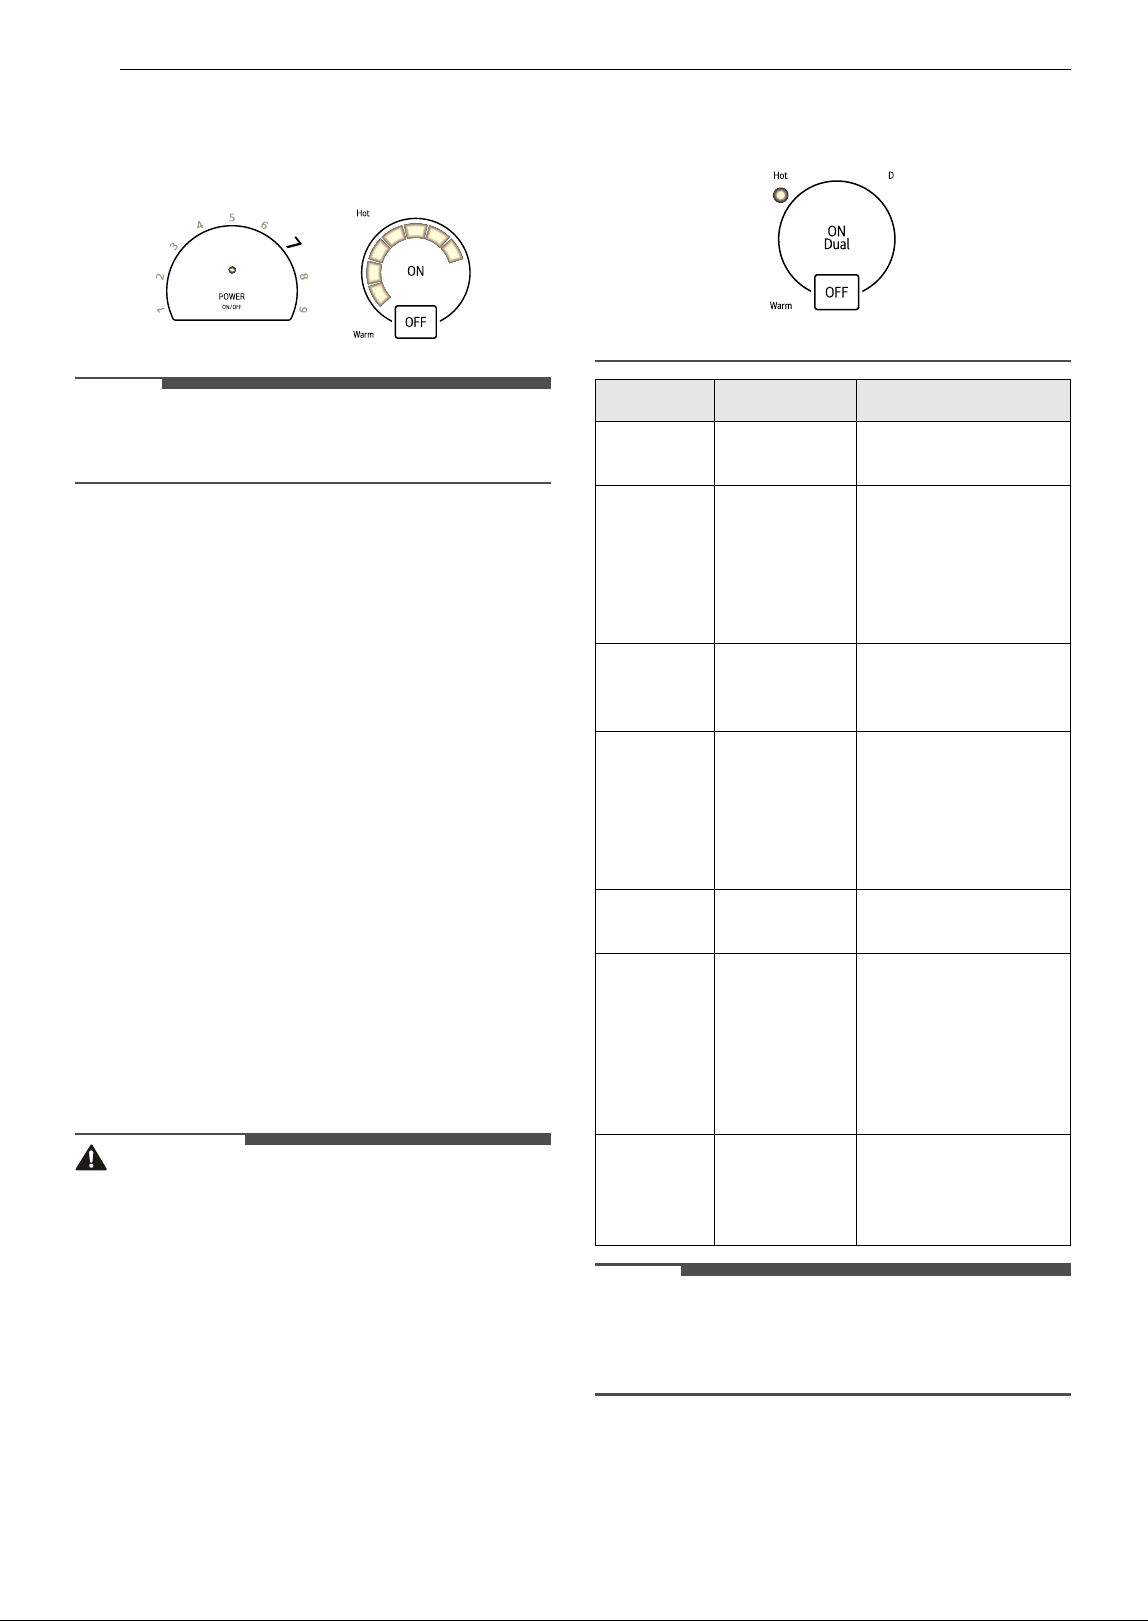
Warm
The cooktop has a Warm setting feature that can
be used on all elements except the warming zone
element.
Setting Function Used for
9 Fast heating Bringing liquids to a
boil.
7-9 Heating,
browning,
deep fat
frying
Browning meats,
heating oil for deep-
fat frying, sautéing,
maintaining a fast
boil for large
amounts of liquids.
6-7 Roasting,
frying
Frying meats, chops,
pancakes, sausages,
eggs.
4-5 Boiling,
general
cooking
Cooking larger
quantities, soups and
stews, steaming
potatoes, cooking
meat stock or
bouillon.
3-4 Steaming Steaming vegetables,
braising meats.
2-3 Simmering Simmering rice or
milk-based dishes,
steaming smaller
quantities of
potatoes and
vegetables, heating
ready-to-serve meals.
1-2 Warm Melting Fluffy omelettes,
keeping dishes
warm, melting butter
or chocolate.
23OPERATION
ENGLISH
To activate:
Press the ON control to activate the desired
element and press the Warm control. The selected
element is set to the LOW setting. The indicator
light above Warm turns on.
To change the power level:
Press the element's ON control and select a new
number on the element power settings. The
indicator light above Warm turns off.
Using the Warming Zone
Use the warming zone to keep cooked foods
warm, such as vegetables, gravies and oven-safe
dinner plates.
Do not use the warming zone to cook food.
Attempting to cook uncooked or cold food on the
warming zone could result in a food-borne illness
To activate the warming zone:
Press the WARMING ZONE ON control. Set the
desired power level on the element power
settings.
Warming Level Guide
NOTE
• All foods should be covered with a lid or
aluminum foil to maintain food quality.
• When warming pastries and bread, the cover
should have an opening to allow moisture to
escape.
• Do not use plastic wrap to cover foods. Plastic
may melt onto the cooktop surface and be very
difficult to clean.
• Use only cookware and dishes recommended as
safe for cooktop use.
• Always use potholders when removing food
from the warming zone as cookware and plates
will be hot.
• Never warm food for longer than one hour (eggs
for 30 minutes), as food quality may deteriorate.
• Do not heat cold food on the warming zone.
• The quantity and type of food being held may
affect the required heat setting
• Do not use large cookware or large amounts of
food as this may cause uneven heating.
• Always hold food at proper food temperatures.
USDA recommends food temperatures between
140 8 - 170 8 (except pastries).
Using the Bridge Elements
This feature is only available on some models.
The three left cooking zones can be used together
as a single cooking zone using the bridge function.
This allows you to cook with larger oblong pans.
The bridge function can only be activated when
the left front cooking zone and the left rear
cooking zones are OFF.
To activate the bridge element:
1 Press the Bridge control. The indicator above
the control turns on.
2 The power level indicator lights for the left
front and left rear bridge elements flash.
Select the desired power level.
To adjust the power level:
1 Select ON or Bridge for one of the left
elements.
Settings Used
1-2 Pastries, breads, breakfast foods,
eggs, delicate foods
3-5 Cream-based soups, stews,
vegetables, meats
6-8 Sauces, gravies
9 Hot beverages, soups
24 OPERATION
2 Select a number in the element power
settings to adjust the power level. If a power
level is not selected after 10 seconds, the
element's power level remains the same.
To turn off the bridge element:
1 After cooking is complete, press OFF for one
of the left elements.
2 The display for the corresponding element
turns off.
3 If the POWER ON/OFF control is selected, all
elements are turned off.
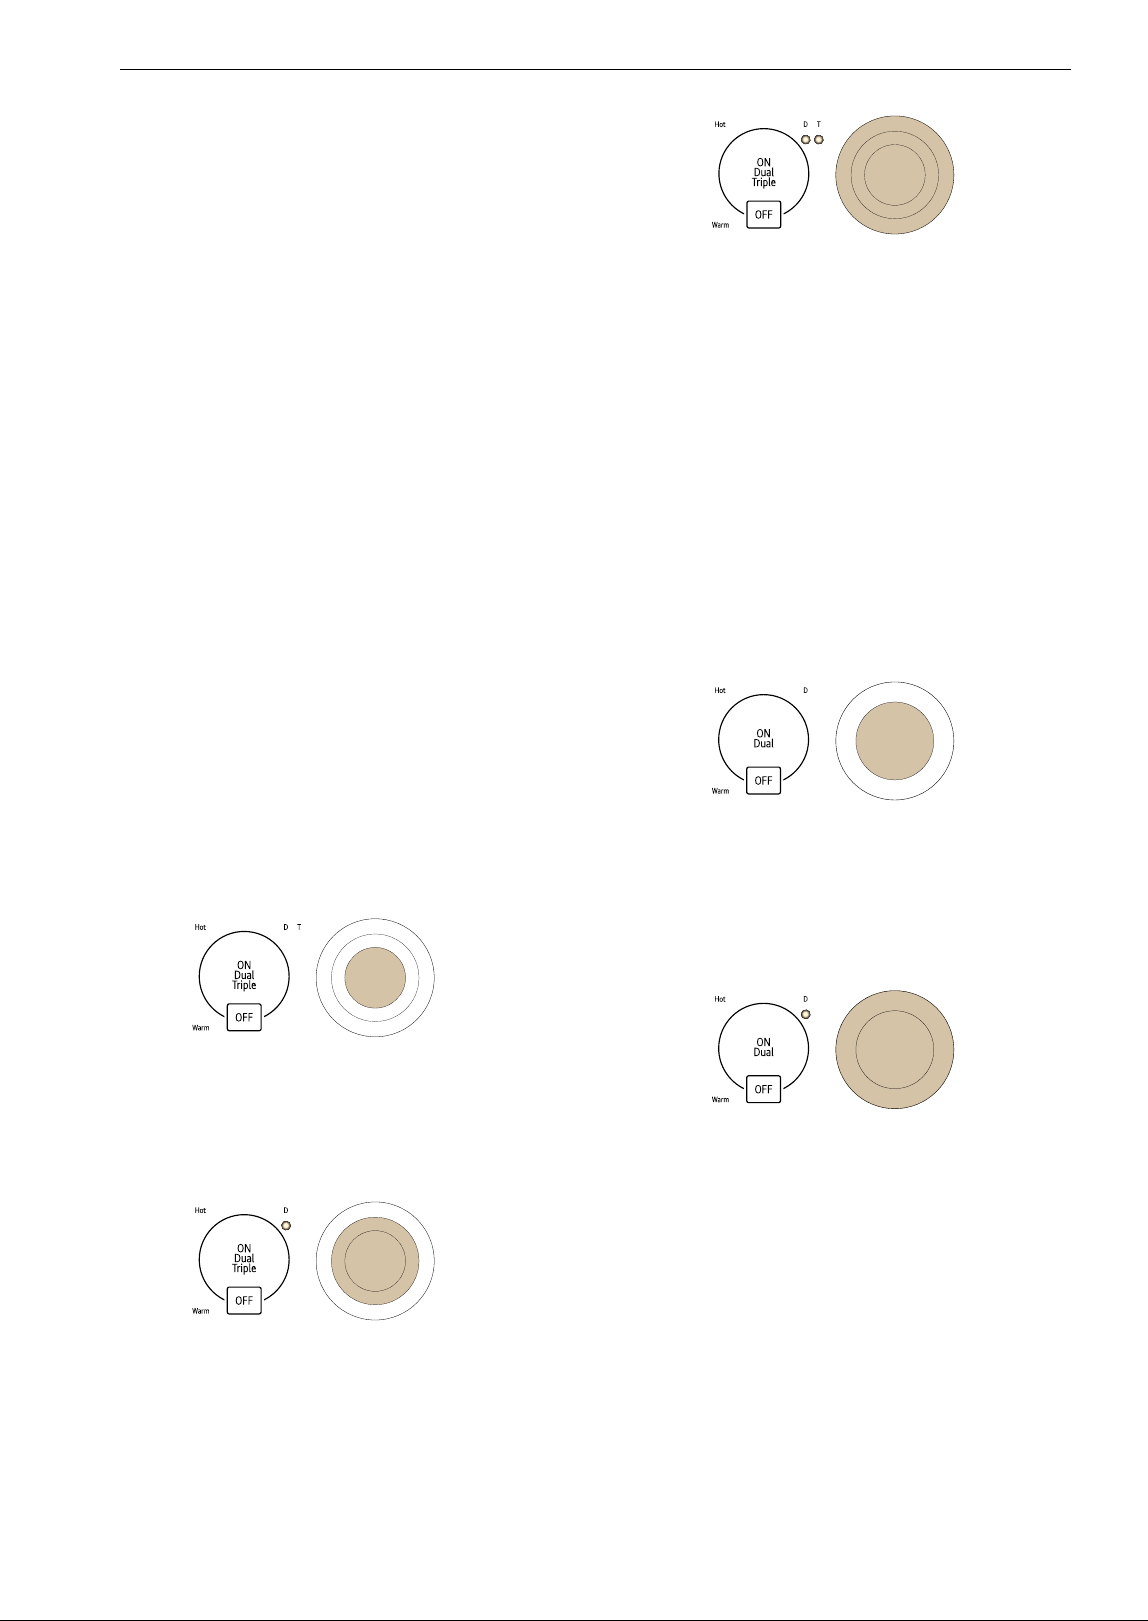
Using the Triple Elements
This feature is only available on some models.
The triple element, located in the center position,
offers three different sized elements to
accommodate different pan sizes.
To activate the triple element:
1 Press the ON control. The inner element will
activate.
2 Press the ON control again to activate the
dual element. The indicator light below the D
(Dual) turns on.
3 Press the ON control again to activate the
entire triple element. The indicator lights
below the D (Dual) and T (Triple) turn on.
4 Select the desired power level.
Using the Dual Elements
The dual element, located in the right front
position, offers two different sized elements to
accommodate different pan sizes. Use one or two
sections of the element to accommodate different
pan sizes.
To activate the dual element:
1 Press the ON control. The innermost element
activates.
2 Press the ON control again to activate the
entire dual element.
The indicator light below the D (Dual) turns
on.
3 Select the desired power level.
Using Control Lock
You can lock the entire cooktop at any time when it
is not in use. Locking the cooktop will prevent
elements from being turned on accidentally.
Setting Control Lock
1 The cooktop must be off to set the Control
Lock function. If it is not off, press and hold
POWER ON/OFF for approximately 2 seconds.
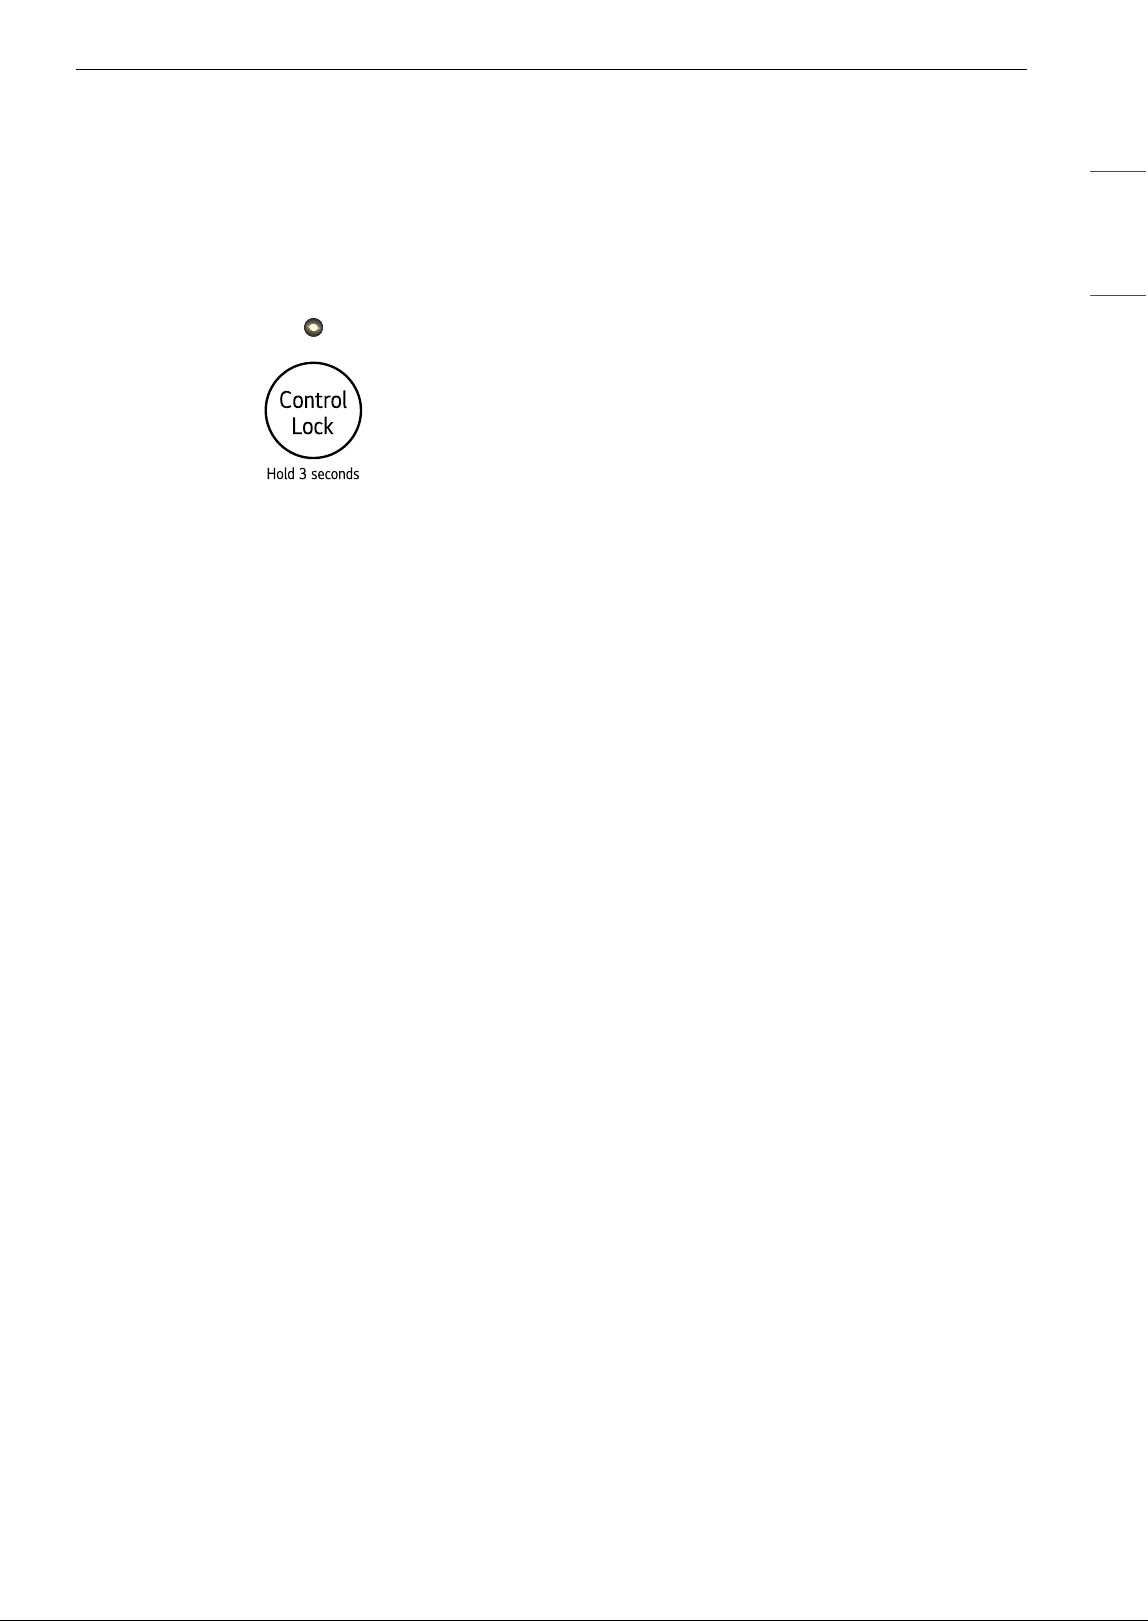
25OPERATION
ENGLISH
The indicator above the POWER ON/OFF
control turns off.
2 Press and hold the Control Lock control for 3
seconds. The indicator light above the
Control Lock control will turn on to indicate
that the cooktop is locked.
Canceling Control Lock
To unlock the cooktop, press and hold the Control
Lock control for 3 seconds. The indicator light
turns off and the cooktop can now be used
normally.
Other Functions
Automatic Shutoff
If an element is in constant use for more than 17
hours and the control setting is not changed, the
element will shut off automatically.
Automatic Power Level Control
The power level displayed may be different from
the actual power level at the high temperature
range. To prevent the cooktop from overheating,
the power level is controlled automatically.
26 MAINTENANCE
MAINTENANCE
Care and Cleaning
Make sure that the electrical power is off and all
surfaces are cool before cleaning any part of the
cooktop.
Cleaning the Cooktop
Normal Daily Use Cleaning
CAUTION
• If any sugar or food containing sugar spills, or
plastic or foil melts on the cooktop, remove the
material IMMEDIATELY with a metal razor
scraper while the cooking surface is still hot to
avoid the risk of damage to the glass-ceramic
surface. When used correctly, the scraper will
not damage the cooktop surface. For your
safety, please use an oven mitt or pot holder
while scraping the hot cooking surface.
• If water or food containing water spills, remove
the spill IMMEDIATELY with a dry paper towel.
• Do not use scrub pads or abrasive cleaning pads.
They may damage your cooktop surface.
• For your safety, wear an oven mitt or pot holder
while cleaning the hot cooking surface.
Use ceramic cooktop cleaner on the glass cooktop.
Other creams may not be as effective or may
scratch, damage or stain the cooktop surface.
To maintain and protect the surface of the glass
cooktop, follow these steps:
1 Before using the cooktop for the first time,
clean it with a ceramic cooktop cleaner. This
helps protect the top and makes cleanup
easier.
2 Use ceramic cooktop cleaner regularly to help
keep the cooktop looking new. Always allow
the cooktop to cool before using ceramic
cooktop cleaner.
3 Shake the cleaning cream well. Apply a few
drops of cleaner directly to the cooktop.
4 Use a paper towel to clean the entire cooktop
surface.
5 Rinse with clear water and use a dry cloth or
paper towel to remove all cleaning residue.
NOTE
• Any damage or failure of the product resulting
from the items below may not be covered under
the LIMITED WARRANTY.
- Sugary spillovers (such as preserves, ketchup,
tomato sauce, jellies, fudge, candy, syrups, or
chocolate) or melted plastics can cause pitting
on the surface of your cooktop.
- If food or water containing calcium (such as
baking powder, wine, milk, spinach, or
broccoli) is spilled on the cooktop, it can
permanently stain or discolor the surface.
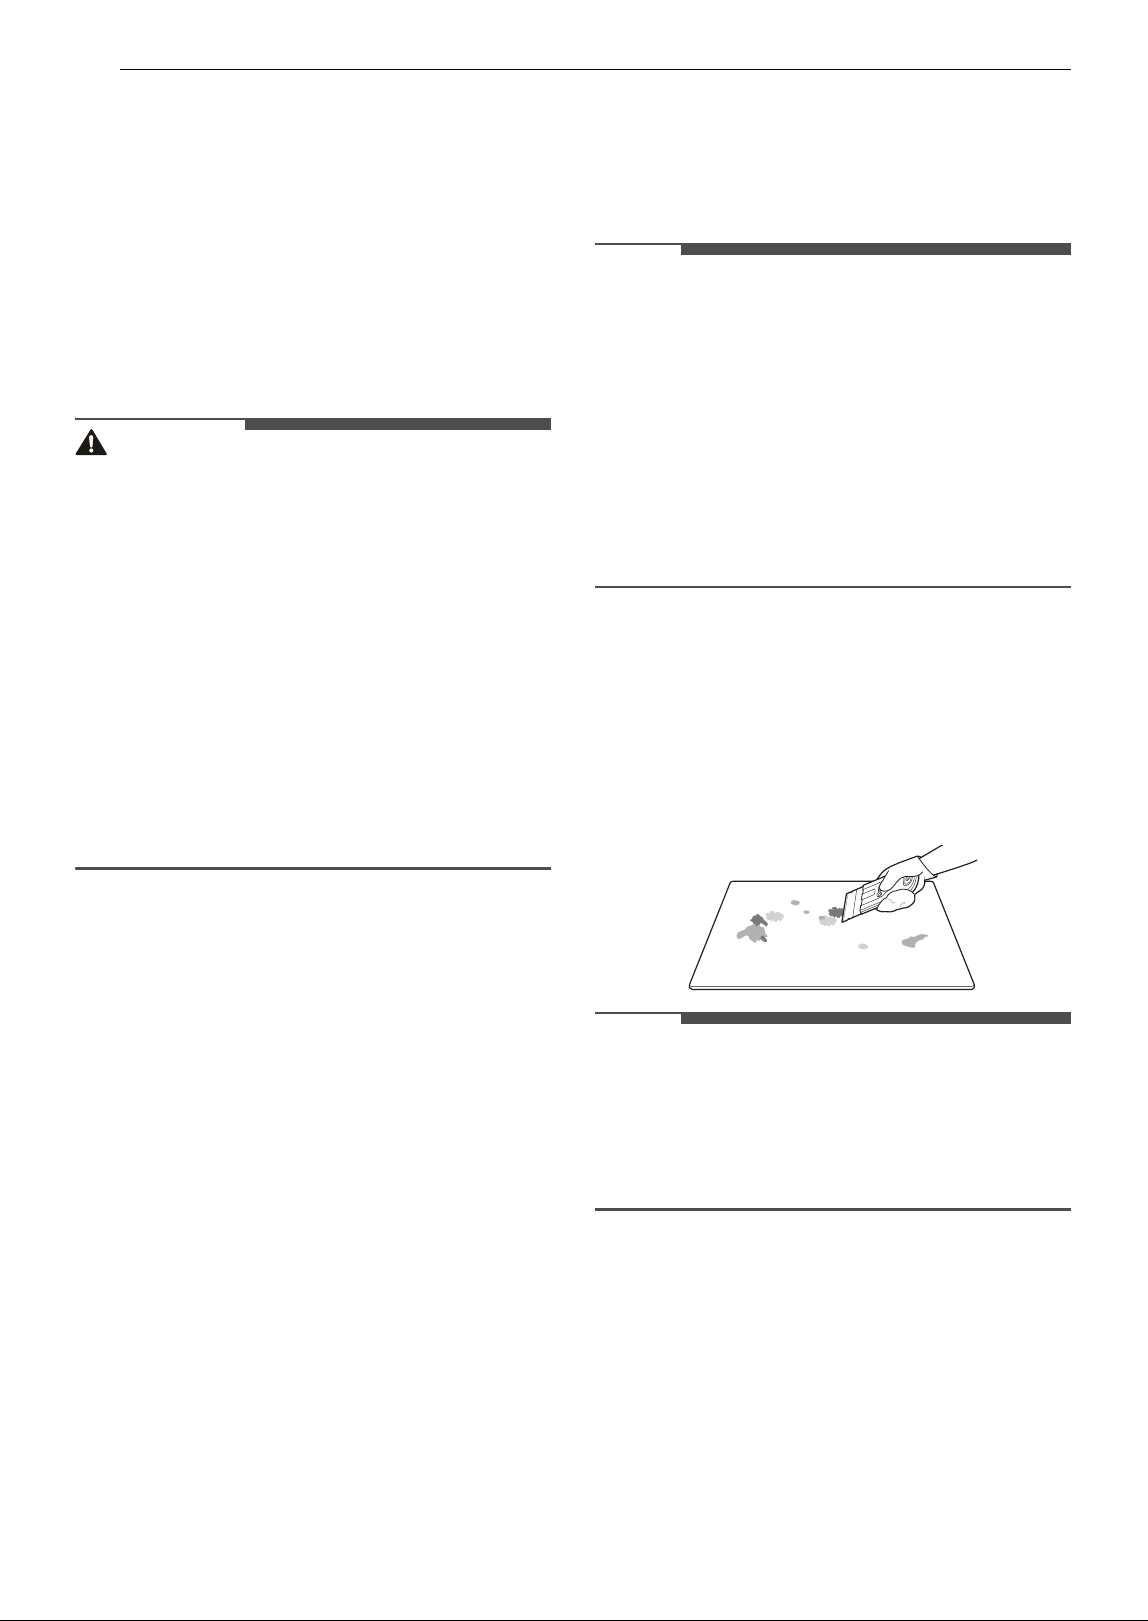
Burned-On Residue
1 While the cooktop is still warm, remove any
burnt on deposits or spilled food from the
glass-ceramic cooking surface with a suitable
metal razor scraper. To prevent burns, wear
an oven mitt or pot holder while using the
metal scraper.
NOTE
• Do not use a dull or nicked blade.
• Hold the scraper at approximately a 30° angle to
the cooktop.
• The razor scraper will not damage the markings
on the cooking surface.
2 When the cooking surface has completely
cooled, apply a few fingertip-sized dabs of a
glass-ceramic cooktop cleaner in each burner
area. Work the cleaning cream over the
cooktop surface with a damp paper towel.
Leave the cleaner on for 10 minutes before
rinsing it off.
27MAINTENANCE
ENGLISH
3 Rinse with clean water and wipe the cooktop
surface with a clean, dry cloth.
Maintaining the Cooktop
CAUTION
• Do not use chlorine bleach, ammonia, or other
cleaners not specifically recommended for use
on glass-ceramic cooktops.
• Let your glass-ceramic cooking surface cool off
before cleaning.
NOTE
• For additional product information, visit our
website at www.lg.com
Metal Marks and Scratches
CAUTION
• Cookware with rough or uneven bottoms can
mark or scratch the cooktop surface.
• Do not slide metal or glass across the cooktop
surface.
• Do not use cookware with any dirt build-up on
the bottom.
• Do not use cookware if there is foreign matter
on the cooktop surface. Always clean the
cooktop surface before cooking.
NOTE
• Any damage or failure of the product resulting
from the items below may not be covered under
the LIMITED WARRANTY.
- Be careful not to slide pots and pans across
the cooktop. Doing so will leave metal
markings on the cooktop surface. To help
remove these marks, use a ceramic cooktop
cleaner with a cleaning pad for ceramic
cooktops.
- If pots with a thin overlay of aluminum or
copper are allowed to boil dry, the overlay may
leave a black discoloration on the cooktop.
This should be removed immediately before
heating again or the discoloration may be
permanent.
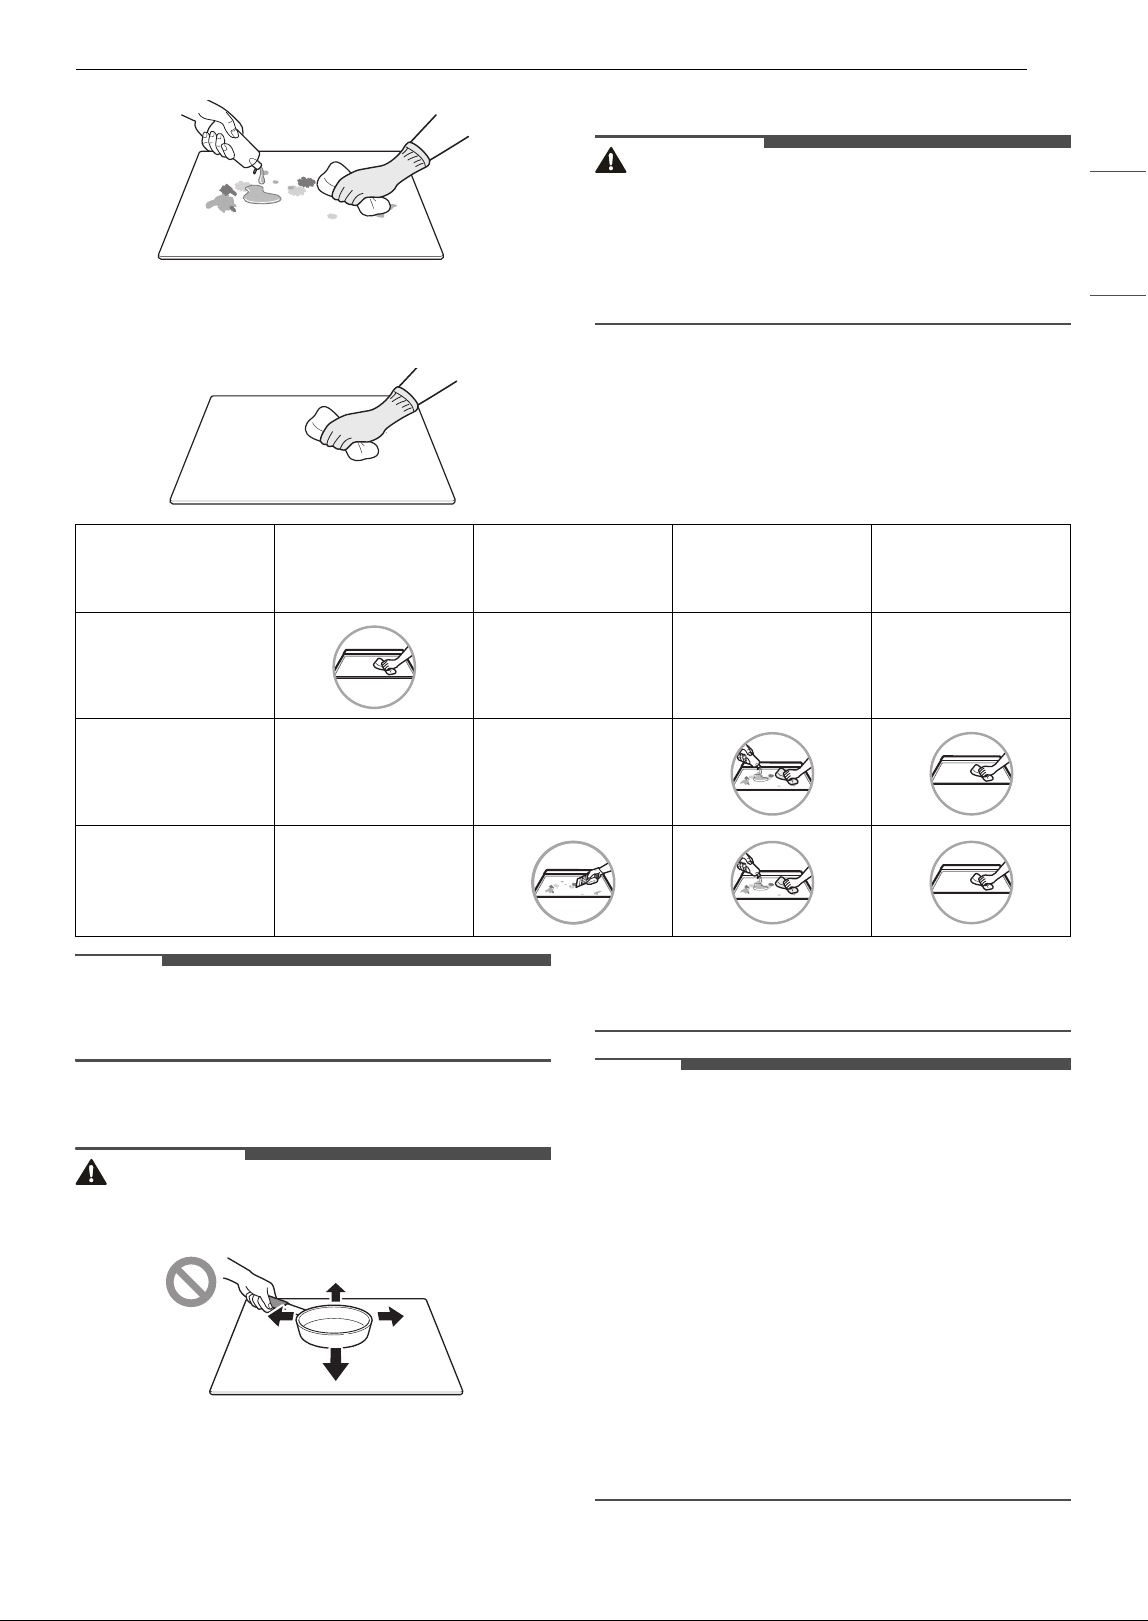
Wipe off with a
damp towel and
mild detergent
Use a metal scraper
Apply cooktop
cleaning cream.
Rub with a towel.
Rinse with a damp
towel, then wipe
dry.
Regular
(Recommended
after each use)
Occasional
(Recommended
every week)
Thorough
(Recommended for
tough stains or
burnt-on food)

28 TROUBLESHOOTING
TROUBLESHOOTING
Before Calling for Service
Before calling for service, review this list. It may save you time and expense. This list includes common
occurrences that are not the result of a defect in workmanship or materials.
Parts and Features
Problem Possible Cause & Solution
Cooktop does not
work
Cooktop controls are locked.
• See Using Control Lock to turn off the Control Lock feature.
Circuit breaker has tripped or fuse is blown.
• Reset the circuit breaker.
Power outage.
• Check house lights to confirm power outage.
Installation wiring not complete.
• Contact the installer or dealer.
Cooktop does not
heat
Incorrect element selected.
• Make sure the correct control is ON for the element being used.
No power to cooktop.
• See “Cooktop does not work” above.
Elements turn off
while cooking.
Cooktop inner temperature is too high.
• Check that cooktop has been installed according to the installation instructions.
Elements do not get
hot enough.
Control panel may not be set properly.
• Check the power level.
Cookware may not be the correct size or may have a flat bottom.
• Use the recommended cookware. See Cookware section.
A fan sound can be
heard.
Cooktop inner temperature is high.
• This is normal.
The cooling fan will run when any element is turned on. With heavy use the fan may
continue to run after the controls are turned off until the cooktop has cooled.
29TROUBLESHOOTING
ENGLISH
Control Panel
Problem Possible Cause & Solution
Flashing a
Flashing a, b
Flashing a, b, c
There is a fault with the thermistor or micom.
• Turn the cooktop off using the POWER ON/OFF. Turn cooktop back on
using the POWER ON/OFF.
Flashing a, b, c, d
Food spill/soil on the control panel
• Clean the surface.
Object placed on the control panel
• Remove object from the control panel.
Controls pressed for too long.
• If any one of the controls is pressed for more than 10 seconds
continuously, this error is displayed.
• If water or a metal object is placed on the control panel, this error is
displayed.
• Turn the cooktop off using the POWER ON/OFF. Turn cooktop back on
using the POWER ON/OFF.
Flashing a, b, c, d, e
There is a fault with the display.
• Turn the cooktop off using the POWER ON/OFF. Turn cooktop back on
using the POWER ON/OFF.
Flashing a, b, c, d, e, f
Low voltage detection
• This indicates low voltage to the cooktop. Call a licensed electrician.
30 LIMITED WARRANTY
LIMITED WARRANTY
USA
TERMS AND CONDITIONS
ARBITRATION NOTICE: THIS LIMITED WARRANTY CONTAINS AN ARBITRATION PROVISION THAT
REQUIRES YOU AND LG ELECTRONICS (“LG”) TO RESOLVE DISPUTES BY BINDING ARBITRATION
INSTEAD OF IN COURT, UNLESS YOU CHOOSE TO OPT OUT. IN ARBITRATION, CLASS ACTIONS AND
JURY TRIALS ARE NOT PERMITTED. PLEASE SEE THE SECTION TITLED “PROCEDURE FOR RESOLVING
DISPUTES” BELOW.
Should your LG Radiant Cooktop (“Product”) fail due to a defect in materials or workmanship under normal
and proper use, during the warranty period set forth below, LG will, at its option, repair or replace the
Product. This limited warranty is valid only to the original retail purchaser of the Product (“You”) and
applies only when purchased lawfully and used within the United States including U.S. Territories.
• Replacement Products and parts are warranted for the remaining portion of the original warranty period
or ninety (90) days, whichever is greater.
• Replacement Products and parts may be new, reconditioned, refurbished, or otherwise factory
remanufactured.
• Replaced Product or part(s) will be the property of LG.
• Proof of original retail purchase specifying the Product model and date of purchase is required to obtain
warranty service under this limited warranty.
EXCEPT TO THE EXTENT PROHIBITED BY APPLICABLE LAW, ANY IMPLIED WARRANTY OF
MERCHANTABILITY OR FITNESS FOR A PARTICULAR PURPOSE ON THE PRODUCT IS LIMITED IN
DURATION TO THE DURATION OF THE ABOVE LIMITED WARRANTY. UNDER NO CIRCUMSTANCES
SHALL LG OR ITS U.S. DISTRIBUTORS/DEALERS BE LIABLE FOR ANY INDIRECT, INCIDENTAL,
CONSEQUENTIAL, SPECIAL, OR PUNITIVE DAMAGES, INCLUDING, WITHOUT LIMITATION, LOST
GOODWILL, LOST REVENUES OR PROFITS, WORK STOPPAGE, IMPAIRMENT OF OTHER GOODS, COST OF
REMOVAL AND REINSTALLATION OF THE PRODUCT, LOSS OF USE, OR ANY OTHER DAMAGES WHETHER
BASED IN CONTRACT, TORT, OR OTHERWISE. LG’S TOTAL LIABILITY, IF ANY, SHALL NOT EXCEED THE
PURCHASE PRICE PAID BY YOU FOR THE PRODUCT.
SOME STATES DO NOT ALLOW THE EXCLUSION OR LIMITATION OF INCIDENTAL OR CONSEQUENTIAL
DAMAGES OR LIMITATIONS ON HOW LONG AN IMPLIED WARRANTY LASTS, SO THE ABOVE
EXCLUSIONS OR LIMITATIONS MAY NOT APPLY TO YOU. THIS LIMITED WARRANTY GIVES YOU
SPECIFIC LEGAL RIGHTS AND YOU MAY ALSO HAVE OTHER RIGHTS THAT VARY FROM STATE TO STATE.
THIS LIMITED WARRANTY DOES NOT COVER:
• Service trips to deliver, pick up, or install, educate how to operate, correct wiring, or correct
unauthorized repairs.
• Damage or failure of the Product to perform during power failures and interrupted or inadequate
electrical service.
• Damage or failure of the Product caused by leaky or broken water pipes, frozen water pipes, restricted
drain lines, inadequate or interrupted water supply or inadequate supply of air.
• Damage or failure of the Product resulting from operating the Product in a corrosive atmosphere or
contrary to the Product owner’s manual.
Warranty Period Scope of Warranty HOW SERVICE IS HANDLED
Two (2) years from date
of original retail
purchase
Parts and Labor (internal
/ functional parts only)
LG will provide, free of charge, all labor and in-home
service to replace defective part(s).

31LIMITED WARRANTY
ENGLISH
• Damage or failure of the Product caused by accidents, pests and vermin, lightning, wind, fire, floods, acts
of nature, or any other causes beyond the control of LG.
• Damage or failure of the Product caused by unauthorized modification or alteration, or if the Product is
used for other than the intended purpose, or any water leakage where the Product was not properly
installed.
• Damage or failure of the Product caused by incorrect electrical current, voltage, or plumbing codes.
• Damage or failure of the Product caused by transportation, storage, and/or handling, including
scratches, dents, chips, and/or other damage to the finish of the Product, unless such damage is
reported within one (1) week of delivery.
• Damage or failure of the Product resulting from misuse, abuse, improper installation, repair, or
maintenance. Improper repair includes the use of parts not authorized by LG. Improper installation or
maintenance includes installation or maintenance contrary to the Product owner’s manual.
• Damage or failure of the Product caused by the use of parts, components, accessories, consumable
cleaning products, or any other products or services that were not authorized by LG.
• Damage or missing items to any display or open box Product.
• Refurbished Product or any Product sold “As Is”, “Where Is”, “With all Faults”, or similar disclaimer.
• Products with original serial numbers that have been removed, altered, or cannot be readily determined.
• Increases in utility costs and additional utility expenses.
• Any noises associated with normal operation.
• Products used for other than normal and proper household use (e.g., commercial or industrial use) or
contrary to the Product owner’s manual.
• Costs associated with removal and reinstallation of the Product for repairs, or the removal and
reinstallation of the Product if it is installed in an inaccessible location or not installed in accordance with
the Product Owner's manual.
• Accessories, removable components, or consumable parts (e.g. Shelves, door bins, drawers, water/air
filters, racks, light bulbs, batteries, etc., as applicable), except for internal/functional parts covered under
this limited warranty.
The cost of repair or replacement under these excluded circumstances shall be borne by You.
TO OBTAIN WARRANTY SERVICE AND ADDITIONAL INFORMATION
Call 1-800-243-0000 and select the appropriate option from the menu.
Or visit our website at http://www.lg.com
Or by mail: LG Electronics Customer Service P.O. Box 240007 Huntsville, AL 35813 ATTN: CIC
PROCEDURE FOR RESOLVING DISPUTES:
ALL DISPUTES BETWEEN YOU AND LG ARISING OUT OF OR RELATING IN ANY WAY TO THIS LIMITED
WARRANTY OR THE PRODUCT SHALL BE RESOLVED EXCLUSIVELY THROUGH BINDING ARBITRATION, AND
NOT IN A COURT OF GENERAL JURISDICTION. BINDING ARBITRATION MEANS THAT YOU AND LG ARE EACH
WAIVING THE RIGHT TO A JURY TRIAL AND TO BRING OR PARTICIPATE IN A CLASS ACTION.
Definitions. For the purposes of this section, references to “LG” mean LG Electronics U.S.A., Inc., its
parents, subsidiaries and affiliates, and each of their officers, directors, employees, agents, beneficiaries,
predecessors in interest, successors, assigns and suppliers; references to “dispute” or “claim” shall include
any dispute, claim or controversy of any kind whatsoever (whether based in contract, tort, statute,
regulation, ordinance, fraud, misrepresentation or any other legal or equitable theory) arising out of or
relating in any way to the sale, condition or performance of the product or this Limited Warranty.
Notice of Dispute. In the event you intend to commence an arbitration proceeding, you must first notify
LG in writing at least 30 days in advance of initiating the arbitration by sending a letter to LG at LG
Electronics, USA, Inc. Attn: Legal Department- Arbitration 111 Sylvan Avenue, Englewood Cliffs, NJ 07632.
You and LG agree to engage in good faith discussions in an attempt to amicably resolve your claim. The
notice must provide your name, address, and telephone number; identify the product that is the subject of

32 LIMITED WARRANTY
the claim; and describe the nature of the claim and the relief being sought. If you and LG are unable to
resolve the dispute within 30 days, either party may proceed to file a claim for arbitration.
Agreement to Binding Arbitration and Class Action Waiver. Upon failure to resolve the dispute during
the 30 day period after sending written notice to LG, you and LG agree to resolve any claims between us
only by binding arbitration on an individual basis, unless you opt out as provided below. Any dispute
between you and LG shall not be combined or consolidated with a dispute involving any other person’s or
entity’s product or claim. More specifically, without limitation of the foregoing, any dispute between you
and LG shall not under any circumstances proceed as part of a class or representative action. Instead of
arbitration, either party may bring an individual action in small claims court, but that small claims court
action may not be brought on a class or representative basis.
Arbitration Rules and Procedures. To begin arbitration of a claim, either you or LG must make a written
demand for arbitration. The arbitration will be administered by the American Arbitration Association
(“AAA”) and will be conducted before a single arbitrator under the AAA’s Consumer Arbitration Rules that
are in effect at the time the arbitration is initiated (referred to as the “AAA Rules”) and under the
procedures set forth in this section. The AAA Rules are available online at www.adr.org/consumer. Send a
copy of your written demand for arbitration, as well as a copy of this provision, to the AAA in the manner
described in the AAA Rules. You must also send a copy of your written demand to LG at LG Electronics,
USA, Inc. Attn: Legal Department- Arbitration 111 Sylvan Avenue, Englewood Cliffs, NJ 07632. If there is a
conflict between the AAA Rules and the rules set forth in this section, the rules set forth in this section will
govern. This arbitration provision is governed by the Federal Arbitration Act. Judgment may be entered on
the arbitrator’s award in any court of competent jurisdiction. All issues are for the arbitrator to decide,
except that issues relating to the scope and enforceability of the arbitration provision and to the
arbitrability of the dispute are for the court to decide. The arbitrator is bound by the terms of this
provision.
Governing Law. The law of the state of your residence shall govern this Limited Warranty and any
disputes between us except to the extent that such law is preempted by or inconsistent with applicable
federal law.
Fees/Costs. You do not need to pay any fee to begin an arbitration. Upon receipt of your written demand
for arbitration, LG will promptly pay all arbitration filing fees to the AAA unless you seek more than $25,000
in damages, in which case the payment of these fees will be governed by the AAA Rules. Except as
otherwise provided for herein, LG will pay all AAA filing, administration and arbitrator fees for any
arbitration initiated in accordance with the AAA Rules and this arbitration provision. If you prevail in the
arbitration, LG will pay your attorneys’ fees and expenses as long as they are reasonable, by considering
factors including, but not limited to, the purchase amount and claim amount. Notwithstanding the
foregoing, if applicable law allows for an award of reasonable attorneys’ fees and expenses, an arbitrator
can award them to the same extent that a court would. If the arbitrator finds either the substance of your
claim or the relief sought in the demand is frivolous or brought for an improper purpose (as measured by
the standards set forth in Federal Rule of Civil Procedure 11(b)), then the payment of all arbitration fees will
be governed by the AAA Rules. In such a situation, you agree to reimburse LG for all monies previously
disbursed by it that are otherwise your obligation to pay under the AAA Rules. Except as otherwise
provided for, LG waives any rights it may have to seek attorneys’ fees and expenses from you if LG prevails
in the arbitration.
Hearings and Location. If your claim is for $25,000 or less, you may choose to have the arbitration
conducted solely on the basis of (1) documents submitted to the arbitrator, (2) through a telephonic
hearing, or (3) by an in-person hearing as established by the AAA Rules. If your claim exceeds $25,000, the
right to a hearing will be determined by the AAA Rules. Any in-person arbitration hearings will be held at a
location within the federal judicial district in which you reside unless we both agree to another location or
we agree to a telephonic arbitration.
Opt Out. You may opt out of this dispute resolution procedure. If you opt out, neither you nor LG can
require the other to participate in an arbitration proceeding. To opt out, you must send notice to LG no
later than 30 calendar days from the date of the first consumer purchaser’s purchase of the product by
either: (i) sending an e-mail to opto[email protected], with the subject line: “Arbitration Opt Out” or (ii) calling 1-
800-980-2973. You must include in the opt out e-mail or provide by telephone: (a) your name and address;
(b) the date on which the product was purchased; (c) the product model name or model number; and (d)
the serial number (the serial number can be found (i) on the product; or (ii) online by accessing https://
www.lg.com/us/support/repair-service/schedule-repair-continued and clicking on “Find My Model & Serial
Number”).

33LIMITED WARRANTY
ENGLISH
You may only opt out of the dispute resolution procedure in the manner described above (that is, by e-mail
or telephone); no other form of notice will be effective to opt out of this dispute resolution procedure.
Opting out of this dispute resolution procedure will not affect the coverage of the Limited Warranty in any
way, and you will continue to enjoy the full benefits of the Limited Warranty. If you keep this product and
do not opt out, then you accept all terms and conditions of the arbitration provision described above.

34 Memo

35Memo
LG Customer Information Center
Register your product Online!
www.lg.com
For inquiries or comments,
visit www.lg.com or call:
1-800-243-0000
U.S.A.
1-888-542-2623
CANADA