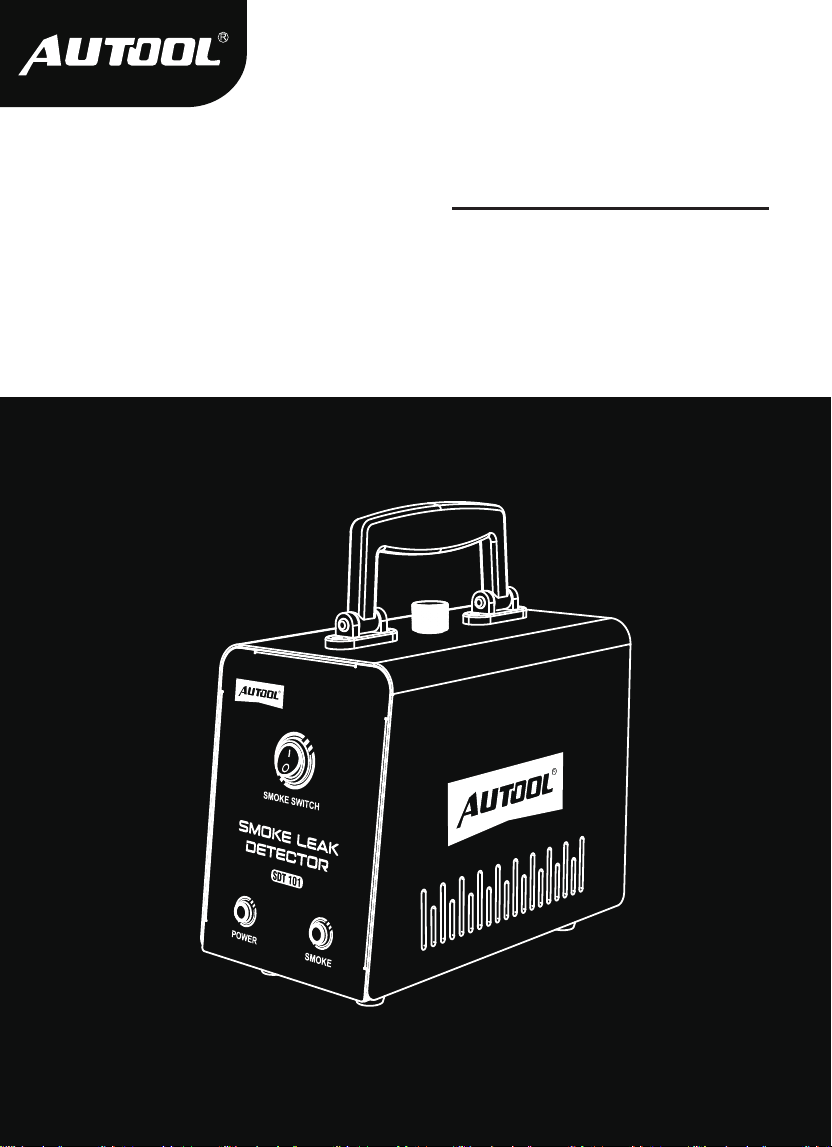
Smoke Leak Detector
AUTOOL SDT101
User Manual
www.autooltech.com
企业标准 / Corporate standard: Q/OR 006-2023

EN
LANGUAGE
AUTOOL SDT101 Instruction Manual
1
DE
AUTOOL SDT101 Bedienungsanleitung
12
RU
Руководство по эксплуатации AUTOOL SDT101
23
FR
AUTOOL SDT101 - Mode d’emploi en français
34

COPYRIGHT INFORMATION
Copyright
Trademark
Manual are either trademarks, registered trademarks, service
marks, domain names, logos, company names or are otherwise
the property of AUTOOL or its affiliates. In countries where any of
the AUTOOL trademarks, service marks, domain names, logos
and company names are not registered, AUTOOL claims other
rights associated with unregistered trademarks, service marks,
domain names, logos, and company names. Other products or
company names referred to in this manual may be trademarks of
their respective owners. You may not use any trademark, service
mark, domain name, logo, or company name of AUTOOL or any
third party without permission from the owner of the applicable
trademark, service mark, domain name, logo, or company name.
You may contact AUTOOL by visiting AUTOOL at https://www.au-
tooltech.com, or writing to aftersale@autooltech.com, to request
written permission to use materials on this manual for purposes or
for all other questions relating to this manual.
●
●
●
●
All rights reserved by AUTOOL TECH. CO., LTD. No part of this
publication may be reproduced, stored in a retrieval system, or
transmitted in any form or by any means, electronic, mechanical,
photocopying, recording or otherwise, without the prior written
permission of AUTOOL. The information contained herein is
designed only for the use of this unit. AUTOOL is not responsi-
ble for any use of this information as applied to other units.
Neither AUTOOL nor its affiliates shall be liable to the purchaser
of this unit or third parties for damages, losses, costs, or
expenses incurred by the purchaser or third parties as a result
of: accident, misuse, or abuse of this unit, or unauthorized modi-
fications, repairs, or alterations to this unit, or failure to strictly
comply with AUTOOL operating and maintenance instructions.
AUTOOL shall not be liable for any damages or problems
arising from the use of any options or any consumable products
other than those designated as original AUTOOL products or
AUTOOL approved products by AUTOOL.
Other product names used herein are for identification purpos-
es only and may be trademarks of their respective owners.
AUTOOL disclaims any and all rights in those marks.
CAUTIONS
Warning
If you are not a technician, please do not change, disassemble
or repair the product; otherwise all the losses shall be borne by
the user.
This product is powered by electricity and should not be used
as a toy for children.
To avoid a short circuit, do not put the product in water or other
liquid.
Please use the power source and power cord supplied by the
manufacturer according to the standards.
Please do not expose the product to intense light or high
temperature when it’s not used.
When doing leak detection test, keep away from the smoke
sensitive parts like the headlight.
Replace the oil in the detector regularly. Before adding the new
oil, please drain out the remaining used oil in the detector.
Selection of the detector oil: liquid paraffin and baby oil are
both usable.
Please make sure there is no water in it, and please do not use
any sticky liquid.
Before using the instrument, please read this manual careful-
ly for proper operation.

1
TABLE OF CONTENTS
Product Introduction.......................................................................................... 2
Overview......................................................................................................... 2
Working theory................................................................................................ 2
Features.......................................................................................................... 2
Technical parameter........................................................................................ 3
Product Structure............................................................................................... 4
Structure diagram............................................................................................ 4
Operations Instruction....................................................................................... 5
Preparation before use.................................................................................... 5
Detail operation during use ............................................................................. 5
Operation guidelines for automobile pipeline inspection................................. 6
About smoke test oil........................................................................................ 6
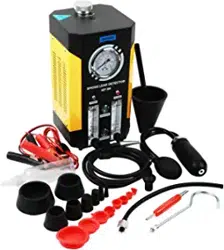
Description Of Accessories............................................................................... 8
Maintenance Service.......................................................................................... 9
Maintenance.................................................................................................... 9
Warranty .............................................................................................................. 10
Warranty access.............................................................................................. 10
Disclaimer ....................................................................................................... 10
Return & Exchange Service .............................................................................. 11
Return & Exchange......................................................................................... 11
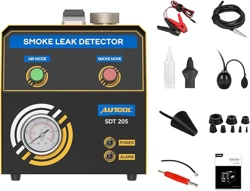
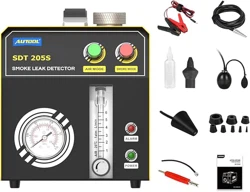
Low oxygen combustion
Built-in Air Pump
Overheat Protection
Pressure Gauge
Fault Indicator
Flow Meter
Flow Adjustment Knob
Oil Drain Valve
Liquid Level Gauge
Air Control Switch
Smoke Control Switch
Adjustable Pressure
None
Yes
None
None
None
None
None
None
None
Yes
None
Intelligent Digital Display
None
2
AUTOOL SDT101 automotive smoke leak detector is a dedicated
tool for EVAP system pipeline leak detection, which can accurate-
ly detect various leaks in EVAP system and help automotive
mechanics to find and solve problems quickly.
The AUTOOL smoke leak detector employs a forced combus-
tion smoke generation method in a low oxygen environment. It
is energized by a conductive column to the heating wire, which
rapidly heats up to more than 300°C so that the mineral oil
reaches the ignition point and enters the state of combustion.
Due to the small intake of air flow, it is insufficient to provide
sufficient oxygen to maintain full combustion, thus the combus-
tion mainly occurs on the surface of the heating wire. Subject
to high-temperature heating, the mineral oil retention object
can continue to burn insufficiently around the heating wire,
thus producing a large amount of smoke.
PRODUCT INTRODUCTION
Overview
Features
Working
theory
●
3
Power Supply
Test Oil Filling Volume
Rated Output Pressure
Rated Output Flow
Rated Power
Product Size
Package Size
Product Weight
Gross Weight
DC 12 V
10-20 ml
<32 mbar
>10 L/min
48 W
180*100*135 mm
260*200*180 mm
1.6 kg
2.4 kg
Technical
parameter
4
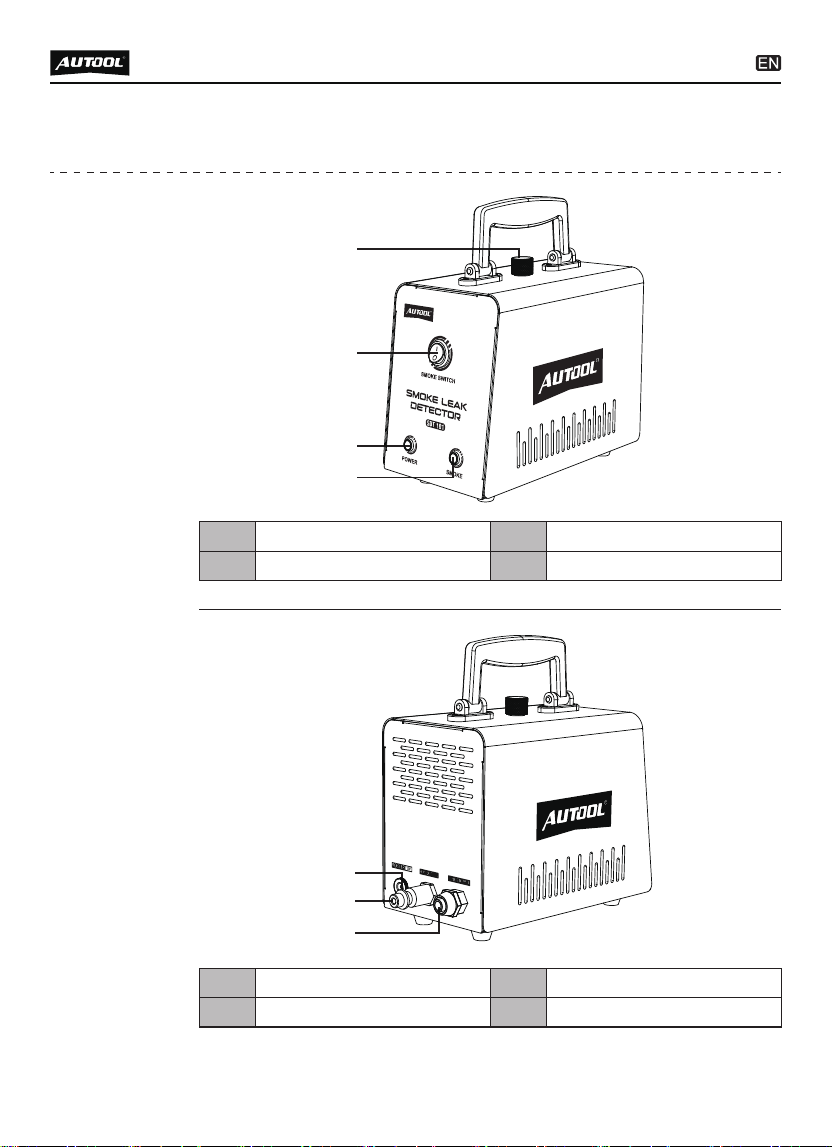
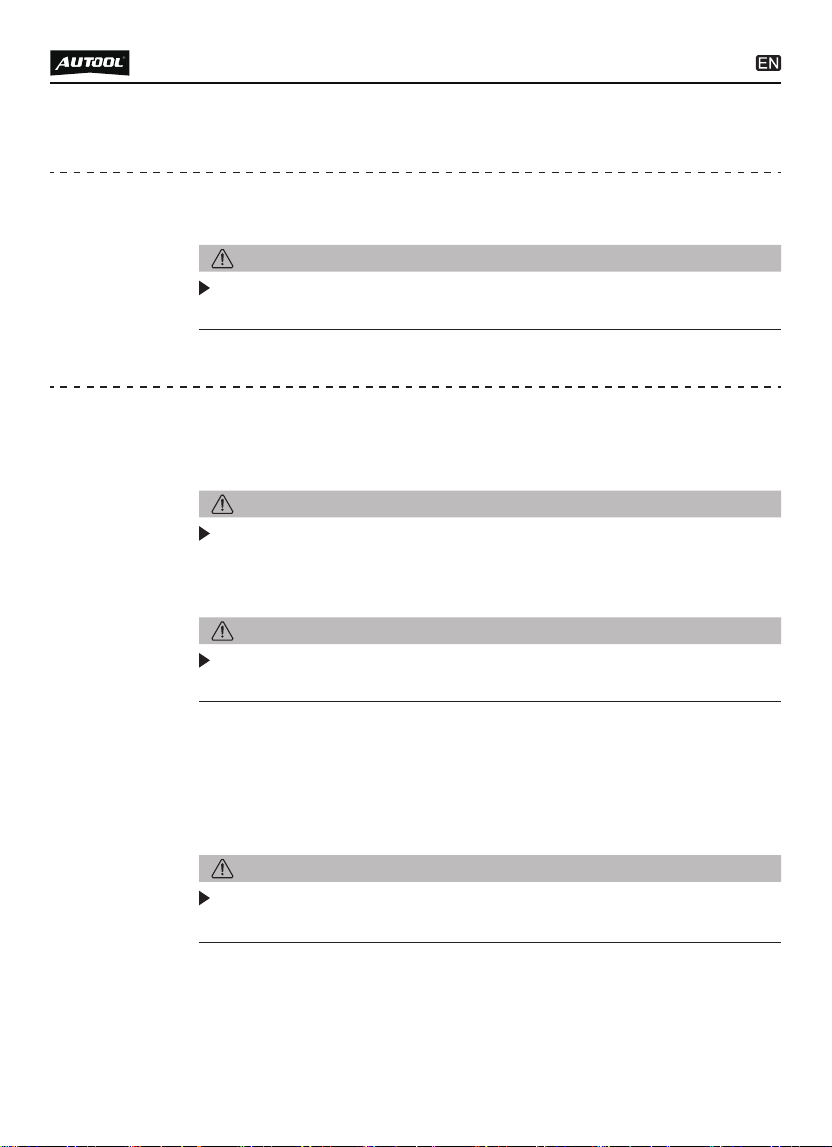
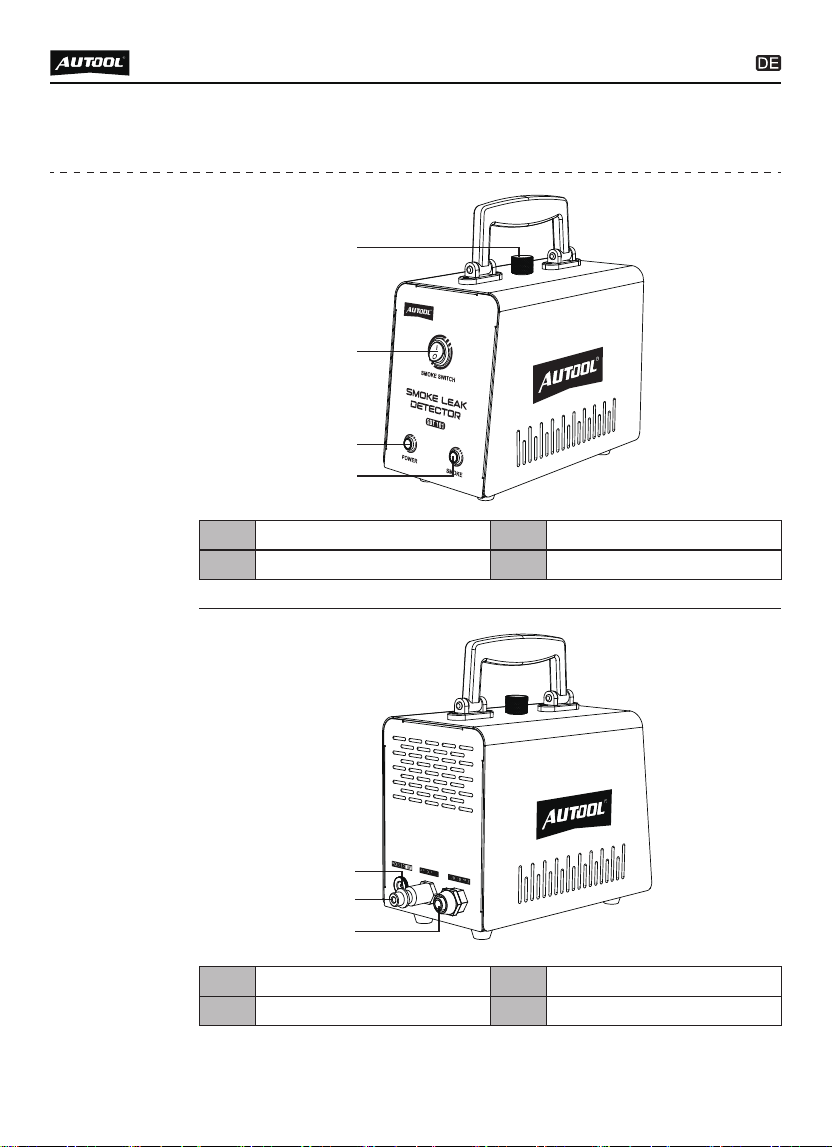
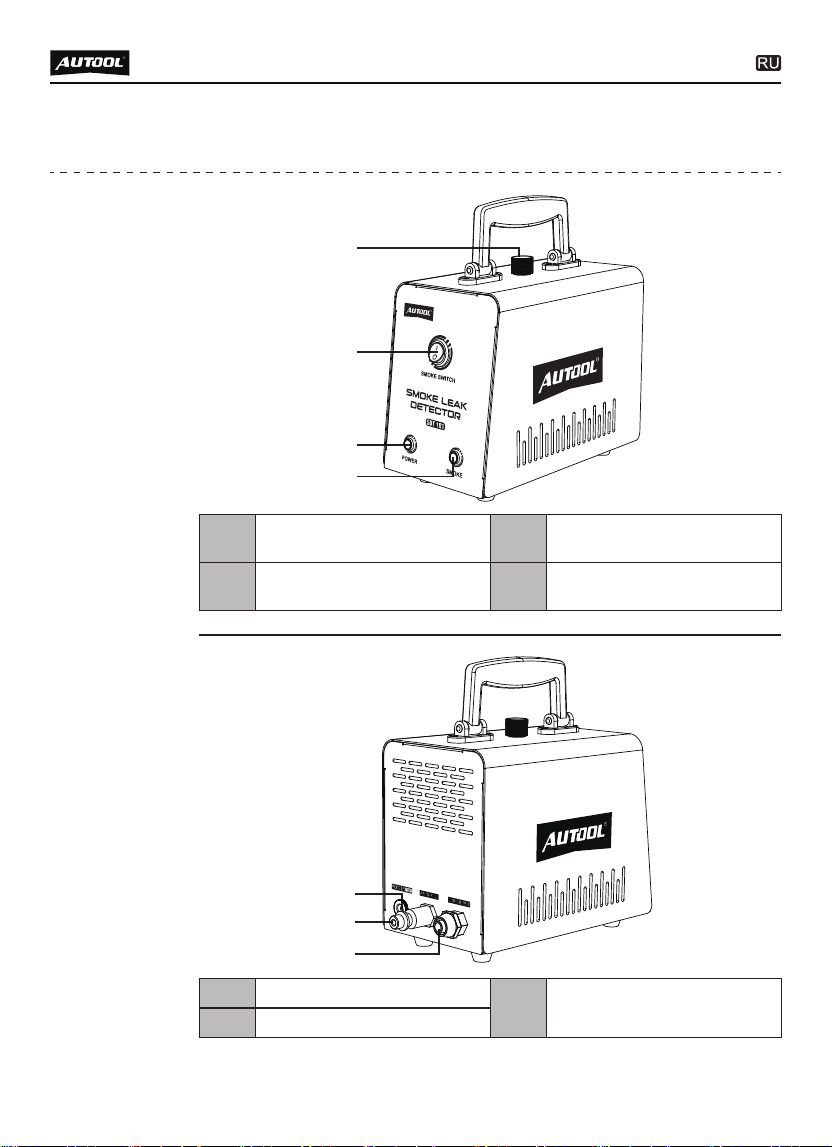
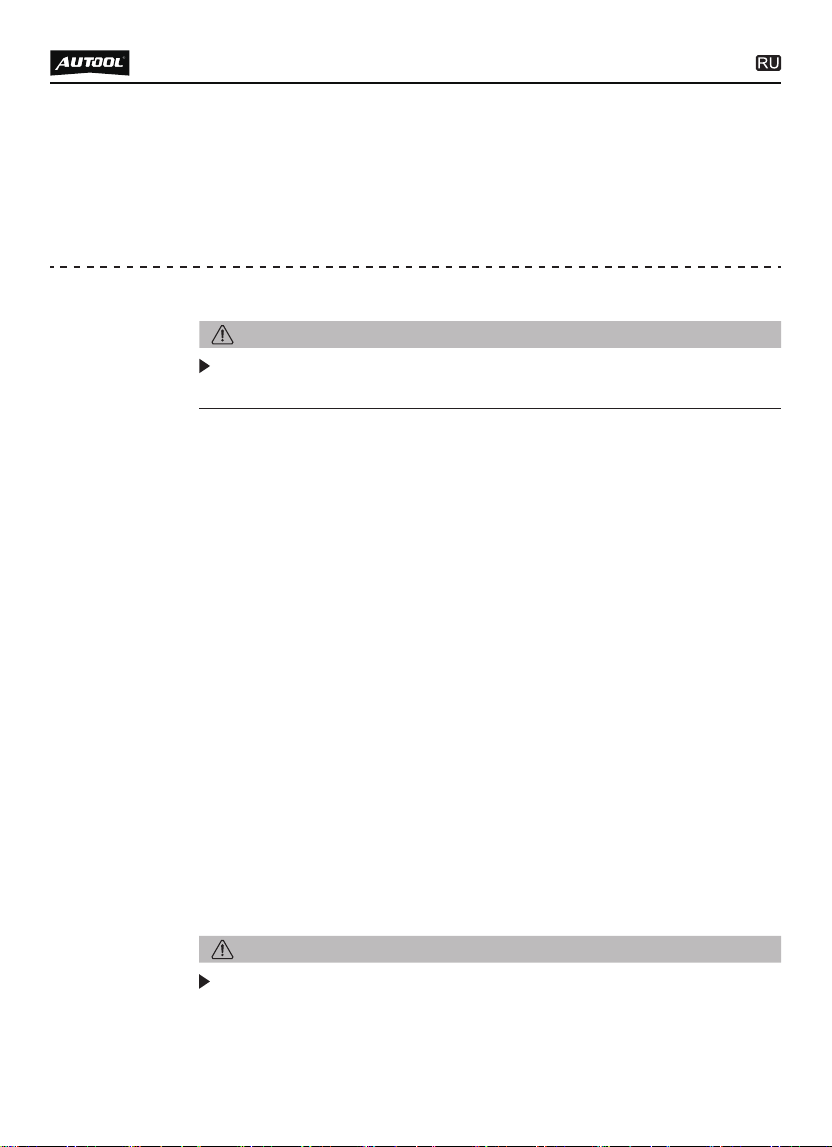
PRODUCT STRUCTURE
Structure
diagram
Oil filling port
Power indicator
A
C
Smoke mode switch
Smoke indicator
B
D
Power socket
Smoke outlet
E
G
Air source interface
F
A
B
C
D
E
F
G
5
OPERATIONS INSTRUCTION
Preparation
before use
Detail
operation
during use
Open the filling cap and drain 10ml of test liquid into the filling
port (A).
If the test oil is overfilled, turn the device upside down to drain
some oil.
Start using the SDT101.
Fit the smoke hose to the smoke outlet (G) and the power cord
to the power socket (E).
Connect the power clip to the DC 12V car battery.
The red clip is connected to the positive terminal (+) and the
black clip is connected to the negative terminal (-). For optimum
performance of the smoke leak detector, the car battery should
be fully charged in advance.
This detector only allows to use DC 12V car battery as power
source.
Connect the external air source port to compressed air, and
the access pressure range is 2-15 bar. Adjust the flowmeter to
the maximum, and the smoke outlet will output a constant
pressure of no more than 32 mbar.
Press the smoke control switch (B), the LED indicator (C) lights
up, the detector starts to work and generates smoke.
When the internal temperature reaches 75°C, the product will
start self-protection function and stop working automatically.
Press the smoke control switch (B) to stop the smoke output.
It is recommended to drain out the remaining test oil for next
use in case the detector is not used for a long time.
●
●
●
●
●
●
●
●
NOTE
NOTE
NOTE
NOTE
6
About
smoke
test oil
Turn off the engine ignition switch.
All leak detection of automobile piping systems must be
performed with the engine turned off.
Remove the intake air filter, while some models need to
remove the throttle valve.
Clean the inner wall of the test pipe and install the conical
adapter of the air inlet on the test pipe.
The smoke leak detector is powered by DC 12V car battery
only.
After the air source is connected, the cone head on the smoke
outlet pipe will output air pressure.
Press the smoke control switch, the indicator lights on, wait for
about 10 seconds, insert the cone head on the smoke outlet
pipe into the air inlet cone adapter when the smoke becomes
thick.
Wait for about 1 to 2 minutes, you can use a flashlight with
strong light to help find the leaks in the pipeline and diagnose
the leakage status.
After the test is completed, turn off all switches, recycle and
save the remaining test oil, put away all accessories, and
confirm that there is no omission.
If only part of the system needs to be tested or if the system
being tested has other openings that need to be sealed, a plug
kit can be used, which can also be used to seal the intake
manifold.
When the internal temperature reaches 75°C, the detector will
start self-protection function and stop working automatically.
This product needs to use special test oil. It’s recommend to
purchase liquid paraffin or baby oil as test oil if you cannot find
special test oil locally.
●
●
●
●
●
●
●
●
●
NOTE
NOTE
WARNING
Operation
guidelines for
automobile
pipeline
inspection

7
●
●
●
It is recommended to use the filling bottle with the capacity
mark in the accessories of the packing to fill in new oil.
Too much test oil in the machine can affect smoke output,
please turn the product upside down to drain out some test oil.
If the product is not used for a long time, it is recommended to
drain out the remaining test oil for preservation.
8
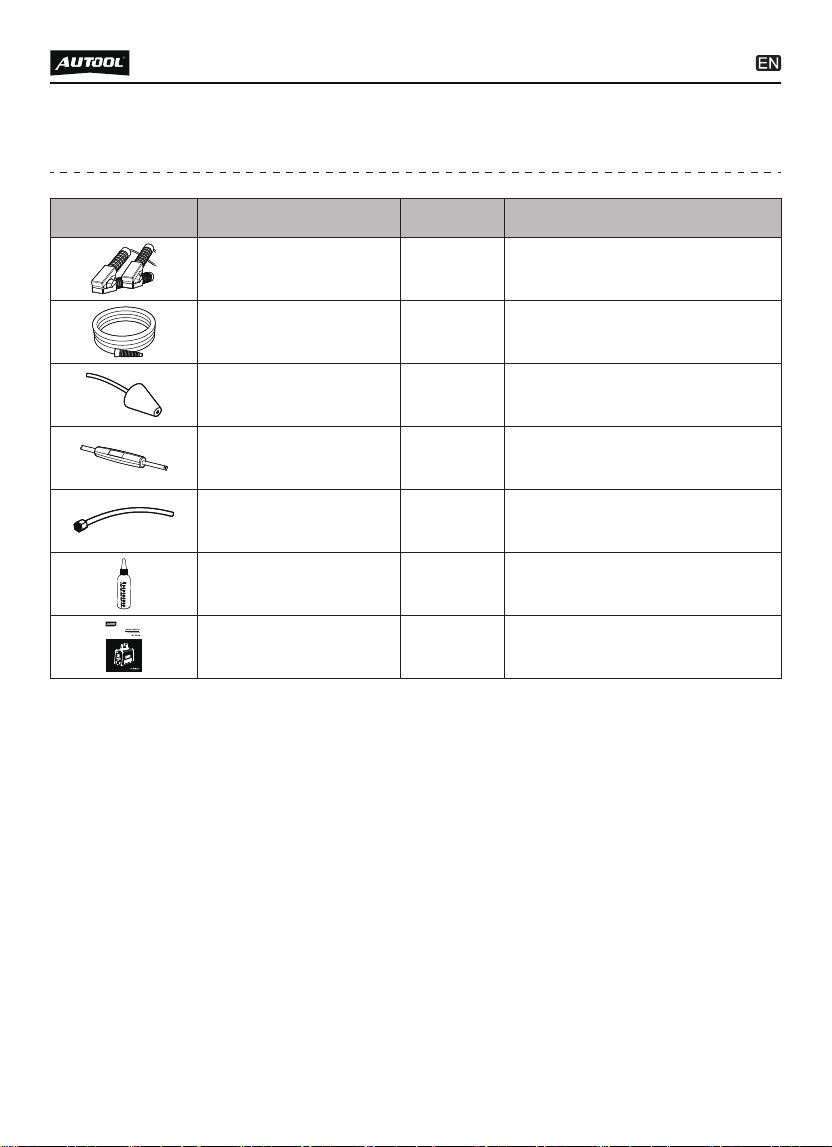
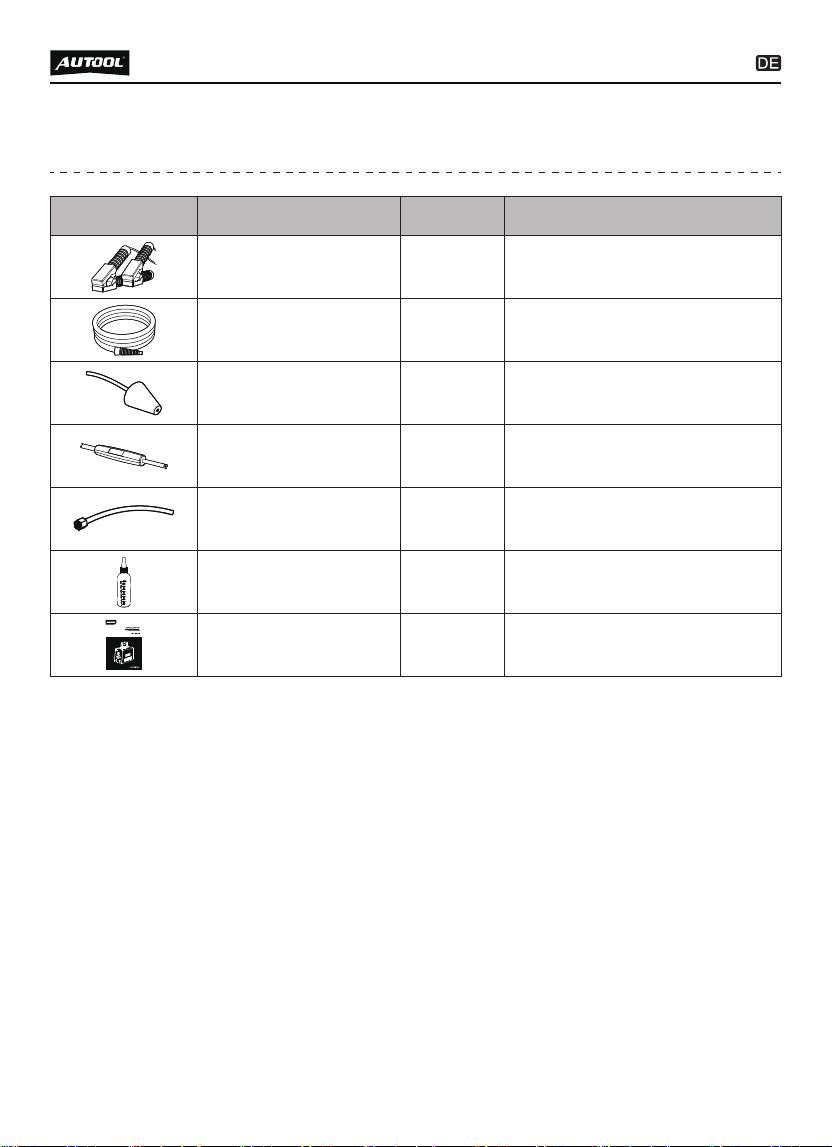
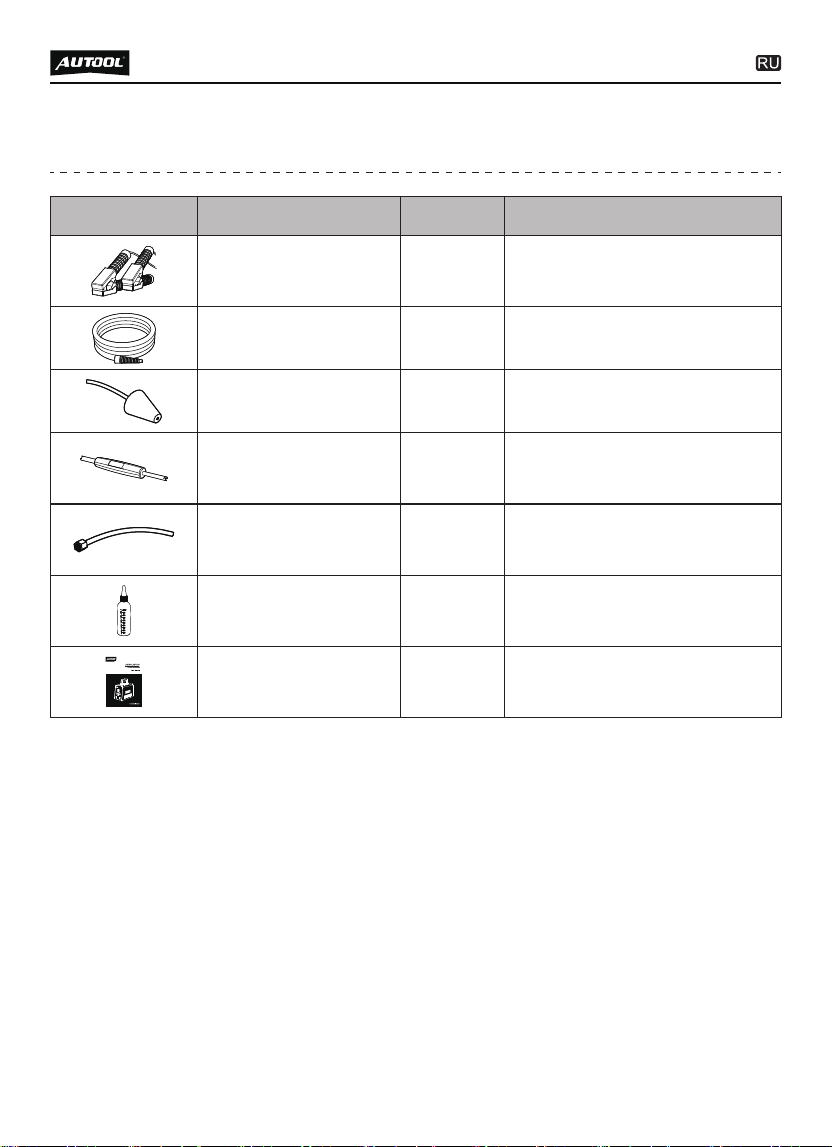
DESCRIPTION OF ACCESSORIES
Name Quantity Remark
Power cord 1 pc
Smoke outlet hose 1 pc
Cone adapter 1 pc
Valve core wrench 1 pc
EVAP connector 1 pc
Connected to car battery
Connecting adapter
Installed on the detected
pipeline
Removing the valve core
For connecting EVAP
service port
User manual 1 pc
Filling bottle 1 pc
Accessories
Product related operation
instructions
There is a volume scale
for checking filling amount

9
Be careful not to rub the product against rough surfaces or
wear the product, especially the sheet metal housing.
Please regularly check the product parts that need to be
tightened and connected. If found loose, please tighten it in
time to ensure the safe operation of the equipment. The exter-
nal and internal parts of the equipment in contact with various
chemical media should be frequently treated with anti-corrosion
treatment such as rust removal and painting to improve the
corrosion resistance of the equipment and extend its service
life.
Comply with the safe operating procedures and do not
overload the equipment. The safety guards of the products
are complete and reliable.
Unsafe factors are to be eliminated in time. The circuit part
should be checked thoroughly and the aging wires should be
replaced in time.
Regularly clean and replace consumable parts such as oil
pump and oil filter; adjust the clearance of various parts and
replace worn (broken) parts. Avoid contact with corrosive
liquids.
When not in use, please store the product in a dry place. Do
not store the product in hot, humid, or non-ventilated places.
Our products are made of long-lasting and durable materials, and
we insist on perfect production process. Each product leaves the
factory after 35 procedures and 12 times of testing and inspec-
tion work, which ensures that each product has excellent quality
and performance.
To maintain the performance and appearance of the product, it is
recommended that the following product care guidelines be read
carefully:
●
●
●
●
●
●
MAINTENANCE SERVICE
Maintenance

10
WARRANTY
The repair or replacement of products is determined by the
actual breakdown situation of product.
It is guaranteed that AUTOOL will use brand new component,
accessory or device in terms of repair or replacement.
If the product fails within 90 days after the customer receives
it, the buyer should provide both video and picture, and we will
bear the shipping cost and provide the accessories for the
customer to replace it free of charge. While the product is
received for more than 90 days, the customer will bear the
appropriate cost and we will provide the parts to the customer
for replacement free of charge.
The product is not purchased through official or authorized
channels.
The product breakdown because the user does not follow
product instructions to use or maintain the product.
From the date of receipt, we provide a three-year warranty for the
main unit and all the accessories included are covered by a
one-year warranty.
We AUTOOL pride ourselves on superb design and excellent
service. It would be our pleasure to provide you with any further
support or services.
All information, illustrations, and specifications contained in this
manual, AUTOOL resumes the right of modify this manual and the
machine itself with no prior notice. The physical appearance and
color may differ from what is shown in the manual, please refer to
the actual product. Every effort has been made to make all
descriptions in the book accurate, but inevitably there are still
inaccuracies, if in doubt, please contact your dealer or AUTOOL
after-service centre, we are not responsible for any consequences
arising from misunderstandings.
●
●
●
●
●
These conditions below shall not be in warranty range
Warranty
access
Disclaimer
11
If you are an AUTOOL user and are not satisfied with the
AUTOOL products purchased from the online authorized
shopping platform and offline authorized dealers, you can
return the products within seven days from the date of receipt;
or you may exchange it for another product of the same value
within 30 days from the date of delivery.
Returned and exchanged products must be in fully saleable
condition with documentation of the relevant bill of sale, all
relevant accessories and original packaging.
AUTOOL will inspect the returned items to ensure that they
are in good condition and eligible. Any item that does not pass
inspection will be returned to you and you will not receive a
refund for the item.
You can exchange the product through the customer service
center or AUTOOL authorized distributors; the policy of return
and exchange is to return the product from where it was
purchased. If there are difficulties or problems with your return
or exchange, please contact AUTOOL Customer Service.
●
●
●
●
RETURN & EXCHANGE SERVICE
Return &
Exchange
China
Oversea Zone
E-mail
Facebook
YouTube
400-032-0988
+86 0755 23304822
aftersale@autooltech.com
https://www.facebook.com/autool.vip
https://www.youtube.com/c/autooltech

12
INHALTSVERZEICHNIS
Produktbeschreibung ........................................................................................ 13
Überblick ......................................................................................................... 13
Merkmale ........................................................................................................ 13
Technische Parameter .................................................................................... 13
Produktstruktur .................................................................................................. 14
Strukturdiagramm............................................................................................ 14
Bedienungsanleitung......................................................................................... 15
Zubereitung vor der Anwendung..................................................................... 15
Detaillierte Bedienung während des Gebrauchs............................................. 15
Betriebsanleitung für die Inspektion von Automobilleitungen.......................... 16
Über Rauchöl .................................................................................................. 17
Teileliste .............................................................................................................. 18
Wartungsservice................................................................................................. 19
Wartungs ......................................................................................................... 19
Garantie............................................................................................................... 20
Garantiemethode ............................................................................................ 20
Haftungsausschluss........................................................................................ 20
Rückgabe- und Umtauschservice..................................................................... 21
Rückgabe........................................................................................................ 21
Eingebaute Luftpumpe
Überhitzungsschutz
Manometer
Fehlfunktionsanzeige
Durchflussmesser
Regler für die Durchflussregulierung
Ölablassventil
Füllstandsanzeige
Luftregelschalter
Rauchschutzschalter
Einstellbarer Druck
Keine
Ja
Keine
Keine
Keine
Keine
Keine
Keine
Keine
Ja
Keine
Intelligentes digitales Display (TFT)
Keine
Stromversorgung
Füllmenge der Testflüssigkeit
Nennausgangsdruck
Nennleistung
Nennleistung
Produktgröße
Packungsgröße
Produktgewicht
Brutogewicht
DC 12 V
10-20 ml
<32 mbar
>10 L/min
48W
180*100*135mm
260*200*180mm
1.6kg
2.4 kg
13
AUTOOL SDT101 Automobilrauchleckmelder ist ein spezielles
Werkzeug zum Erkennen von Rohrleitungslickern des Automo-
bil-EVAP-Systems. Es kann verschiedene Lecks des Automo-
bil-EVAP-Systems genau erkennen und Kfz-Wartungstechnikern
helfen, Probleme schnell zu finden und zu lösen.
Produktbeschreibung
Überblick
Merkmale
Technische
Parameter
A
B
C
D
Öleinfüllstutzen
Leistungsanzeige
A
C
Rauchkontrollschalter
Rauchanzeige Licht
B
D
Steckdose
Rauchauslass
E
G
Air Source-Schnittstelle
F
14
Produktstruktur
Strukturdia-
gramm
E
F
G

15
Bedienungsanleitung
Öffnen Sie die Füllkappe und injizieren Sie 10 ml Rauchöl in
den Ölfüller (A).
Wenn das Rauchöl überfüllt ist, drehen Sie das Produkt bitte
auf den Kopf, um das überschüssige Rauchöl abzulassen.
Nachdem Sie die ersten beiden Schritte abgeschlossen haben,
beginnen Sie mit SDT101.
Installieren Sie den Rauchschlauch am Rauchauslass (G) und
das Netzkabel an der Steckdose (E).
Schließen Sie den Netzkabelclip an die DC12V-Autobatterie an.
Der rote rote Clip ist mit dem positiven (+) und der schwarze
Clip mit dem Negativ (-) verbunden. Um die beste Leistung des
Rauchleckmelders zu erhalten, sollte die Autobatterie im
Voraus vollständig aufgeladen werden.
Nur 12V-Bordbatterie darf als Stromversorgung verwendet
werden.
Schließen Sie den externen Luftquellenanschluss mit Druck-
luft an, und der Zugangsdruckbereich ist 2-15bar. Nach dem
Anschließen gibt der Rauchaustritt einen konstanten Druck
von maximal 32mbar aus.
Drücken Sie den Rauchsteuerschalter (B), die LED-Anzeige (C)
leuchtet auf, und das Produkt beginnt zu arbeiten und Rauch zu
erzeugen.
Wenn die interne Temperatur 75°C erreicht, beginnt das Produkt
Selbstschutz und stoppt automatisch.
Drücken Sie den Rauchsteuerschalter (B), um den Rauchaus-
gang zu stoppen.
●
●
●
●
●
●
●
Zubereitung
vor der
Anwendung
Detaillierte
Bedienung
während des
Gebrauch
Hinweis
Hinweis
Hinweis
Hinweis
16
Wenn das Produkt längere Zeit nicht verwendet wird, wird
empfohlen, das verbleibende Rauchöl zur Lagerung abzulassen.
Schalten Sie die Motorzündung aus.
Alle Dichtheitsprüfungen von Rohrleitungssystemen für Kraft-
fahrzeuge müssen bei ausgeschaltetem Motor durchgeführt
werden.
Entfernen Sie den Ansaugluftfilter. Einige Modelle müssen die
Drosselklappe entfernen.
Reinigen Sie die Innenwand der Prüfpipeline und installieren
Sie den konischen Adapter des Lufteinlasses auf der Prüfpipe-
line.
Die Maschine wird von die DC12V-Autobatterie angetrieben.
Wenn die Stromversorgung eingeschaltet ist, hat der Konus
auf dem Rauchaustrittsrohr Luftdruckausgang.
Drücken Sie den Rauchkontrollschalter, die Anzeige leuchtet
auf und warten Sie etwa zehn Sekunden. Wenn der Rauch
dick wird, stecken Sie den Konus auf dem Rauchaustrittsrohr
in den konischen Adapter des Lufteinlasses.
Warten Sie etwa 1 bis 2 Minuten und verwenden Sie eine
starke Taschenlampe, um den Leckpunkt der Pipeline zu
finden und den Leckage-Zustand zu beurteilen.
Nachdem der Test abgeschlossen ist, schalten Sie alle Schal-
ter aus, recyceln und speichern Sie das verbleibende Rauchöl,
legen Sie alle Zubehörteile weg und bestätigen Sie, dass es
keine Auslassung für den nächsten Gebrauch gibt.
Wenn nur ein Teil des zu prüfenden Systems oder andere
Öffnungen des zu prüfenden Systems abgedichtet werden
müssen, kann der Steckersatz verwendet werden und der Steck-
ersatz kann auch verwendet werden, um den Ansaugkrümmer
abzudichten.
Wenn das Produkt für eine lange Zeit arbeitet, was dazu führt,
●
●
●
●
●
●
●
●
●
Hinweis
Hinweis
Warnung
Betriebsan-
leitung für
die Inspek-
tion von
Automobil-
leitungen

●
●
●
●
17
dass die Innentemperatur 75°C erreicht, startet das Produkt
die Überhitzungsschutzfunktion, und das Produkt Raucherze-
ugungsgerät hört auf zu arbeiten.
Dieses Produkt erfordert spezielles Rauchöl. Wenn Sie es nicht
vor Ort kaufen können, verwenden Sie bitte ,,flüssiges Paraffin
“ oder ,,Babymassageöl“ anstelle von Rauchöl für den Notfall.
Es wird empfohlen, neues Öl mit der Füllflasche mit der
Kapazitätsnummer im Produktzubehör zu füllen.
Wenn der Rauch durch übermäßige Betankung beeinträchtigt
wird, drehen Sie das Produkt bitte auf den Kopf, um das
überschüssige Rauchöl auszuschütten.
Wenn das Produkt längere Zeit nicht verwendet wird, wird
empfohlen, das verbleibende Rauchöl zur Lagerung auszu-
gießen.
Über
Rauchöl
18
Teileliste
Name Anzahl Anmerkung
Netzkabel 1 Stück
Rauchabzugsrohr 1 Stück
Konischer Adapter 1 Stück
1 Stück
EVAP-Connector 1 Stück
angeschlossen an
Autobatterie
Anschlussadapter
installiert auf dem geprüften
Rohr
Demontage und Montage
des Ventilelements
schließen Sie das spezielle
Zugangsloch vom EVAP an
Bedienungsanleitung 1 Stück
Füllflasche 1 Stück
Zubehör
produktbezogene
Bedienungsanleitung
mit Kapazitätsskala kann die
Füllmenge bestätigt werden
Ventilele-
mentschlüssel

19
Achten Sie darauf, das Produkt nicht mit rauen Oberflächen
zu reiben oder zu reiben, insbesondere die Blechschale.
Überprüfen Sie häufig die Teile des Produkts, die befestigt
und verbunden werden müssen, und befestigen Sie sie recht-
zeitig im Falle von Lockerheit, um den sicheren Betrieb des
Produkts zu gewährleisten. Die äußeren und inneren Teile
des Produkts, die mit verschiedenen chemischen Medien in
Kontakt kommen, müssen einer Korrosionsschutzbehandlung
wie Entrosten und Lackieren unterzogen werden, um die
Korrosionsbeständigkeit des Produkts zu verbessern und die
Lebensdauer des Produkts zu verlängern.
Beachten Sie die Sicherheitsbetriebsverfahren, überlasten
Sie das Produkt nicht, die Sicherheitsschutzeinrichtungen
des Produkts sind vollständig und zuverlässig, und die
unsicheren Faktoren werden rechtzeitig beseitigt. Der Kreis-
lauf ist gründlich zu inspizieren und die alternden Drähte
rechtzeitig zu ersetzen.
Reinigen und ersetzen Sie die Ölpumpe, den Ölfilter und
andere Verbrauchsmaterialien regelmäßig; Vermeiden Sie
beim Einstellen des Passspiels verschiedener Teile und beim
Austausch verschlissener (beschädigter) Teile den Kontakt
des Produkts mit korrosiven Flüssigkeitsobjekten.
Lagern Sie das Produkt bei Nichtgebrauch an einem trock-
enen Ort. Lagern Sie das Produkt nicht an einem heißen,
feuchten oder unbelüfteten Ort.
Die autool Produkte, die Sie besitzen, bestehen aus langlebigen
Materialien und halten sich an den Produktionsprozess der
Exzellenz. Jedes Produkt hat 35-Prozesse und 12-Qualitätskon-
trollen durchlaufen, bevor es die Fabrik verlässt, um sicherzustel-
len, dass jedes Produkt ausgezeichnete Qualität und Leistung
hat. Daher lohnt es sich Ihre regelmäßige Wartung, damit Ihr
Autool-Produkt lange stabil arbeitet.
Wartung um die Produktleistung und das Aussehen aufrechtzu-
erhalten, empfehlen wir Ihnen, die folgenden Produktwartungs-
richtlinien sorgfältig zu lesen:
●
●
●
●
●
Wartungsservice
Wartungs

20
Garantie
Reparieren oder ersetzen Sie das Produkt kostenlos entspre-
chend den spezifischen Fehlerbedingungen.
Wir garantieren, dass alle ersetzten Teile, Zubehör oder
Produkte brandneu sind.
Wenn das Produkt innerhalb von 90 Tagen ausfällt, nachdem
der Kunde das Produkt erhalten hat, stellen wir Video und
Bilder zur Verfügung. Wenn das Produkt länger als 90-Tage
erhalten wird, trägt der Kunde die entsprechenden Kosten,
und wir stellen dem Kunden Ersatzteile zum kostenlosen
Austausch zur Verfügung.
Kauf von AUTOOL-Produkten über informelle Kanäle.
Schäden, die durch Verwendung und Wartung verursacht
werden, die nicht den Anforderungen des Produkthandbuchs
entsprechen.
Die AUTOOL-Maschine hat Anspruch auf eine 3-jährige Garan-
tie ab dem Tag des Eingangs beim Kunden. Das darin enthaltene
Zubehör hat eine einjährige Gewährleistungsfrist ab dem Tag
des Eingangs beim Kunden.
Bei AUTOOL sind wir stolz auf unser exquisites Design und
exzellenten Service. Gerne stellen wir Ihnen weitere Unterstützu-
ng oder Dienstleistungen zur Verfügung.
Alle in dieser Bedienungsanleitung enthaltenen Informationen,
Abbildungen und technischen Daten beruhen auf den zum
Zeitpunkt der Veröffentlichung verfügbaren neuesten Informa-
tionen. Der Hersteller behält sich das Recht vor, diese Bedienung-
sanleitung und das Gerät selbst ohne vorherige Ankündigung zu
ändern.
●
●
●
●
●
Garantie-
methode
Die folgenden Bedingungen sind nicht von der kosten-
losen Garantie abgedeckt
Haftung-
sauss-
chluss

21
Wenn Sie mit den von der autorisierten Online-Shopping-Plat-
tform und den autorisierten Offline-Händlern gekauften
AUTOOL-Produkten nicht zufrieden sind, können Sie die
Produkte innerhalb von sieben Tagen nach Erhalt gemäß den
globalen AUTOOL - Verkaufsbedingungen zurücksenden.
Oder tauschen Sie andere gleichwertige Produkte innerhalb
von 30 Tagen ab dem Datum der Produktlieferung um.
Die zurückgegebenen und umgetauschten Produkte müssen
sich in einem vollständig marktfähigen Zustand befinden und
den entsprechenden Verkaufsaufträgen, allen relevanten
Zubehörteilen und Papierrechnungen (falls vorhanden) beige-
fügt werden.
AUTOOL prüft die zurückgegebenen Waren, um sicherzustel-
len, dass sie in gutem Zustand sind und die Bedingungen
erfüllen. Einzelheiten zu den Bedingungen entnehmen Sie
bitte den globalen Verkaufsbedingungen von AUTOOL. Alle
Artikel, die die Inspektion nicht bestehen, werden an Sie
zurückgeschickt und Sie erhalten keine Rückerstattung.
Sie können Produkte über das Kundendienstzentrum oder
autorisierte AUTOOL-Händler austauschen. Das Prinzip der
Rückgabe und des Umtauschs besteht darin, Waren
zurückzugeben und auszutauschen, wo sie gekauft wurden.
Sollten Sie Schwierigkeiten oder Hindernisse bei der Rück-
sendung oder dem Umtausch von Waren haben, wenden Sie
sich bitte an das AUTOOL- Kundendienstzentrum. Bei Rück-
sendung oder Umtausch von Waren über das Kundendienstz-
entrum empfehlen wir Ihnen, dies auf folgende Weise zu tun.
●
●
●
●
Rückgabe- und Umtauschservice
Rückkehr
Aufruf für
Chinagebiet
E-mail
Facebook
YouTube
400-032-0988
+86 0755 23304822
aftersale@autooltech.com
https://www.facebook.com/autool.vip
https://www.youtube.com/c/autooltech
Aufruf für Über-
seegebiete

22
Wenn Ihre Rückgabe- und Umtauschservice bestätigt wird,
erhalten Sie eine Bestätigungsnachricht und E-Mail.
●

23
ОГЛАВЛЕНИЕ
Описание продукта .......................................................................................... 24
Введение........................................................................................................ 24
Функции .......................................................................................................... 24
Технический параметр .................................................................................. 24
Структура продукции....................................................................................... 25
Cтруктура ....................................................................................................... 25
Инструкция по эксплуатации.......................................................................... 26
Подготовка к использованию........................................................................ 26
Подробные операции во время использования.......................................... 26
Руководство по проверке автомобильных труб .......................................... 27
Масло для теста ............................................................................................ 28
Список деталей ................................................................................................. 29
Техническое обслуживание ............................................................................ 30
Обслуживание ............................................................................................... 30
гарантии ............................................................................................................. 31
Варианты гарантии........................................................................................ 31
Отказ от ответственности ............................................................................. 31
Служба возврата и обмена ............................................................................. 32
Bозврата и обмена ........................................................................................ 32

Встроенный воздушный насос
Защита от перегрева
Манометр
Лампа аварийной сигнализации
Расходомер
Ручка регулировки воздушного потка
Клапан отвода масла
Указатель уровня жидкости
Контрольный переключатель воздуха
Контрольный переключатель дыма
Регулируемое давление
нет
есть
нет
нет
нет
нет
нет
нет
нет
есть
нет
Интеллигентный цифровой дисплей (TFT)
нет
Источник питания
Мера заполнения раствором для теста
Номинальное выходное давление
Номинальное вытекающий поток
Номинальная мощность
Размеры продукции
Увязочный размер
Вес продукции
Вес в упаковке
DC 12 V
10-20 ml
<32 mbar
>10 L/min
48W
180*100*135mm
260*200*180mm
1.6kg
2.4 kg
24
Автомобильный детектор утечки дыма AUTOOL SDT101 - это
специализированный прибор для обнаружения утечек в
системе EVAP, который точно определяет все виды утечек в
системе EVAP, помогает автомеханикам быстро находить и
устранять проблемы.
Описание продукта
Введение
Функции
Технический
параметр
A
B
C
D
25
Структура продукции
отверстие для
заливки масла
индикатор
электропитания
A
C
контрольный
переключатель дыма
Индикатор дыма
B
D
выход дыма
G
розетка питания
E
Интерфейс
источника воздуха
F
Cтруктура
E
F
G

Ещё раз нажмите контрольный переключатель дыма (B)
можно остановить выход дыма.
Если прибор не будет использоваться в течение
длительного времени, рекомендуется вылить оставшееся
масло для теста и убрать его на хранение
Выключите зажигание двигателя
Все испытания на утечку системы автомобильных труб
должны проводиться при выключенном двигателе.
Снимите фильтр впускного воздуха, в некоторых моделях
автомашины требуется снять заслонку.
Очищайте внутреннюю поверхность испытательной трубы,
установите конусообразный адаптер впускного воздуха в
испытательной трубе.
Питание главного устройства осуществляется от
автомобильного аккумулятора DC12V.
При включении питания выпускает давления воздуха из
конусообразная головка конусообразнойголовки
газоспускательной трубы.
Нажмите на контрольный переключатель дыма,
загорится индикатор, подождите около 10 секунд, когда
дым станет гуще, вставьте конусообразную головку на
газоспускательной трубе в конусообразный адаптер
впускного воздуха.
Подождите около 1-2 минут, можно через сильного
факела обнаружить место утечки в трубе и определить ее
состояние.
После завершения испытания выключите все выключатели,
утилизируйте оставшееся масло для хранения и уберите
все принадлежности, чтобы убедиться, что ничего не
пропало для следующего использования.
Если только проверить часть системы или необходимо
герметизировать другие отверстия проверяемой системы,
можно использовать комплект заглушек, который также
26
Инструкция по эксплуатации
Откройте заправочный люк и залейте в отверстие для
заливки масла (A) 10 мл масла для теста.
При переполнении маслом, переверните продукцию вверх
дном, чтобы слить излишки масла для теста.
После выполнения вышеуказанных двух шагов начните
использовать SDT101.
Установите дымовой шланг на выходе дыма (G), а кабель
питания - в розетку питания (E).
Подключите зажимы кабеля питания к автомобильному
аккумулятору DC 12V.
Красный зажим - положительный (+), черный зажим -
отрицательный (-). Для достижения наилучшего
эксплуатационного качества детектора утечки дыма
необходимо предварительно полностью зарядить
автомобильный аккумулятор.
В качестве источника питания для данного прибора
разрешается использовать только автомобильные
аккумуляторы DC12V.
Подключите порт подачи внешнего воздуха к сжатому
воздуху, диапазон давления 2-15 бар. После подключения
на выходе дыма будет создаваться постоянное давление
не более 32 мбар.
Нажмите включатель дымового режима (B), загорится LED
световой индикатор (C), продукция начинает производить
дым.
когда внутренняя температура достигает 75°C, прибор
включит самозащиту и автоматически остановится.
●
●
●
●
●
●
можно использовать для герметизации впускного
коллектора
Если продукция работает слишком долго, в результате
чего внутренняя температура достигает 75 , продукция
активирует функцию защиты от перегрева, и дымовой
генератор прекратит работу.
Данная продукция требуется специальное масло для
теста. Если его на местном рынке невозможно закупать,
используйте "жидкий парафин" или "детское массажное
масло" вместо масла для экстренного использования
Для наливки свежего масла рекомендуется использовать
бутылку с маркировкой емкости, входящую в комплект
продукции.
При переполнении маслом, переверните продукцию
вверх дном, чтобы слить излишки масла для теста.
Если прибор не будет использоваться в течение
длительного времени, рекомендуется вылить
оставшееся масло для теста и убрать его на хранение.
Внимание
Внимание
Внимание
Внимание
Подготовка к
использован
ию
Подробны
е операции
во время
использов
ания
27
Ещё раз нажмите контрольный переключатель дыма (B)
можно остановить выход дыма.
Если прибор не будет использоваться в течение
длительного времени, рекомендуется вылить оставшееся
масло для теста и убрать его на хранение.
Выключите зажигание двигателя.
Все испытания на утечку системы автомобильных труб
должны проводиться при выключенном двигателе.
Снимите фильтр впускного воздуха, в некоторых моделях
автомашины требуется снять заслонку.
Очищайте внутреннюю поверхность испытательной трубы,
установите конусообразный адаптер впускного воздуха в
испытательной трубе.
Питание главного устройства осуществляется от
автомобильного аккумулятора DC12V.
При включении питания выпускает давления воздуха из
конусообразная головка конусообразнойголовки
газоспускательной трубы.
Нажмите на контрольный переключатель дыма,
загорится индикатор, подождите около 10 секунд, когда
дым станет гуще, вставьте конусообразную головку на
газоспускательной трубе в конусообразный адаптер
впускного воздуха.
Подождите около 1-2 минут, можно через сильного
факела обнаружить место утечки в трубе и определить ее
состояние.
После завершения испытания выключите все выключатели,
утилизируйте оставшееся масло для хранения и уберите
все принадлежности, чтобы убедиться, что ничего не
пропало для следующего использования.
Если только проверить часть системы или необходимо
герметизировать другие отверстия проверяемой системы,
можно использовать комплект заглушек, который также
Откройте заправочный люк и залейте в отверстие для
заливки масла (A) 10 мл масла для теста.
При переполнении маслом, переверните продукцию вверх
дном, чтобы слить излишки масла для теста.
После выполнения вышеуказанных двух шагов начните
использовать SDT101
Установите дымовой шланг на выходе дыма (G), а кабель
питания - в розетку питания (E).
Подключите зажимы кабеля питания к автомобильному
аккумулятору DC 12V
Красный зажим - положительный (+), черный зажим -
отрицательный (-). Для достижения наилучшего
эксплуатационного качества детектора утечки дыма
необходимо предварительно полностью зарядить
автомобильный аккумулятор
В качестве источника питания для данного прибора
разрешается использовать только автомобильные
аккумуляторы DC12V
Подключите порт подачи внешнего воздуха к сжатому
воздуху, диапазон давления 2-15 бар. После подключения
на выходе дыма будет создаваться постоянное давление
не более 32 мбар.
Нажмите включатель дымового режима (B), загорится LED
световой индикатор (C), продукция начинает производить
дым
когда внутренняя температура достигает 75°C, прибор
включит самозащиту и автоматически остановится
●
●
●
●
●
●
●
●
●
●
можно использовать для герметизации впускного
коллектора
Если продукция работает слишком долго, в результате
чего внутренняя температура достигает 75 , продукция
активирует функцию защиты от перегрева, и дымовой
генератор прекратит работу.
Данная продукция требуется специальное масло для
теста. Если его на местном рынке невозможно закупать,
используйте "жидкий парафин" или "детское массажное
масло" вместо масла для экстренного использования
Для наливки свежего масла рекомендуется использовать
бутылку с маркировкой емкости, входящую в комплект
продукции.
При переполнении маслом, переверните продукцию
вверх дном, чтобы слить излишки масла для теста.
Если прибор не будет использоваться в течение
длительного времени, рекомендуется вылить
оставшееся масло для теста и убрать его на хранение.
Внимание
Внимание
Руководст
во по
проверке
автомобил
ьных труб

Ещё раз нажмите контрольный переключатель дыма (B)
можно остановить выход дыма.
Если прибор не будет использоваться в течение
длительного времени, рекомендуется вылить оставшееся
масло для теста и убрать его на хранение
Выключите зажигание двигателя
Все испытания на утечку системы автомобильных труб
должны проводиться при выключенном двигателе.
Снимите фильтр впускного воздуха, в некоторых моделях
автомашины требуется снять заслонку.
Очищайте внутреннюю поверхность испытательной трубы,
установите конусообразный адаптер впускного воздуха в
испытательной трубе.
Питание главного устройства осуществляется от
автомобильного аккумулятора DC12V.
При включении питания выпускает давления воздуха из
конусообразная головка конусообразнойголовки
газоспускательной трубы.
Нажмите на контрольный переключатель дыма,
загорится индикатор, подождите около 10 секунд, когда
дым станет гуще, вставьте конусообразную головку на
газоспускательной трубе в конусообразный адаптер
впускного воздуха.
Подождите около 1-2 минут, можно через сильного
факела обнаружить место утечки в трубе и определить ее
состояние.
После завершения испытания выключите все выключатели,
утилизируйте оставшееся масло для хранения и уберите
все принадлежности, чтобы убедиться, что ничего не
пропало для следующего использования.
Если только проверить часть системы или необходимо
герметизировать другие отверстия проверяемой системы,
можно использовать комплект заглушек, который также
Откройте заправочный люк и залейте в отверстие для
заливки масла (A) 10 мл масла для теста.
При переполнении маслом, переверните продукцию вверх
дном, чтобы слить излишки масла для теста.
После выполнения вышеуказанных двух шагов начните
использовать SDT101
Установите дымовой шланг на выходе дыма (G), а кабель
питания - в розетку питания (E).
Подключите зажимы кабеля питания к автомобильному
аккумулятору DC 12V
Красный зажим - положительный (+), черный зажим -
отрицательный (-). Для достижения наилучшего
эксплуатационного качества детектора утечки дыма
необходимо предварительно полностью зарядить
автомобильный аккумулятор
В качестве источника питания для данного прибора
разрешается использовать только автомобильные
аккумуляторы DC12V
Подключите порт подачи внешнего воздуха к сжатому
воздуху, диапазон давления 2-15 бар. После подключения
на выходе дыма будет создаваться постоянное давление
не более 32 мбар.
Нажмите включатель дымового режима (B), загорится LED
световой индикатор (C), продукция начинает производить
дым
когда внутренняя температура достигает 75°C, прибор
включит самозащиту и автоматически остановится
●
●
●
●
28
можно использовать для герметизации впускного
коллектора.
Если продукция работает слишком долго, в результате
чего внутренняя температура достигает 75°C, продукция
активирует функцию защиты от перегрева, и дымовой
генератор прекратит работу.
Данная продукция требуется специальное масло для
теста. Если его на местном рынке невозможно закупать,
используйте "жидкий парафин" или "детское массажное
масло" вместо масла для экстренного использования.
Для наливки свежего масла рекомендуется использовать
бутылку с маркировкой емкости, входящую в комплект
продукции.
При переполнении маслом, переверните продукцию
вверх дном, чтобы слить излишки масла для теста.
Если прибор не будет использоваться в течение
длительного времени, рекомендуется вылить
оставшееся масло для теста и убрать его на хранение.
Масло для
теста
Внимание
29
Список деталей
имя Примечание
Питательный
провод
1 шт
Газоспускательная
труба
1 шт
Конусообразный
адаптер
1 шт
1 шт
Соединитель EVAP 1 шт
для подключения
автомобильного
аккумулятора
для соединения с
адаптером
устанавливается в
испытываемую трубу
для сборки и разбора
сердечника клапана
для соединения с особым
смотровым отверстием
EVAP
Руководство
пользователя
1 шт
Бутылка для
заправки топливом
1 шт
Аксессуары
инструкция по
эксплуатации,
связанная с продукцией
имеет шкала емкости для
подтверждения объема
заполнения
Гаечный ключ для
сердечника
клапана
количес
тво

30
Не трите продукцию о грубые поверхности, особенно
корпуса из листового металла.
Часто проверяются детали, которые должны быть
закреплены и соединены, при обнаружении ослабления
должны быть своевременно подтянуты, чтобы обеспечить
безопасную работу продукции. Внешние и внутренние
части продукции, контактирующие с различными химическими
средами, должны часто подвергаться антикоррозийной
обработке, такой как удаление ржавчины и покраска, чтобы
повысить коррозионную стойкость продукции и продлить срок
их службы.
Соблюдайте правила техники безопасности при
эксплуатации, не используйте продукцию при перегрузке,
защитные ограждения должны быть полными и надежными,
своевременно устраняйте небезопасные факторы.
Тщательно проверьте участок электрической цепи и
своевременно замените отслужившие свой срок провода.
Регулярная очистка и замена расходных деталей, таких
как масляные насосы и масляные фильтры, избегайте
контакта с агрессивными жидкостями при регулировке
зазоров между различными даталями и при замене
изношенных (сломанных) деталей.
При перерывах в эксплуатации продукций, храните его в
сухом месте. Не храните продукцию в жарких, влажных
или непроветриваемых помещениях.
Продукция AUTOOL, которой вы владеете, изготовлена из
прочных материалов и производится по самым высоким
стандартам качества: каждая продукция проходит 35 процессов
и 12 проверок качества, чтобы гарантировать превосходное
качество и производительность каждого продукта. Поэтому
стоит регулярно ухаживать за продукцей AUTOOL, чтобы они
работали стабильно в течение длительного времени.
Уход и обслуживание: Для поддержания характеристики
продукции и внешнего вида, мы рекомендуем вам
ознакомиться со следующими рекомендациями по уходу за
продукцией:
●
●
●
●
●
Техническое обслуживание
Обслужива
ние

31
гарантии
Бесплатный ремонт или замена продукции в зависимости
от конкретной неисправности.
Мы гарантируем, что все запасные части, аксессуары или
продукции являются новыми.
Если продукция не работает в течение 90 дней после
получения Заказчиком, пожалуйста, предоставьте видео и
фотографии, мы возьмем на себя транспортные расходы
и предоставим соответствующие детали Заказчику для
замены бесплатно. Если вне 90 дней после получения,
Заказчик несет соответствующие транспортные расходы, а
мы бесплатно предоставлим запасные части для замены.
Продукции AUTOOL, не приобретенные по формальным
каналам.
Повреждения, вызванные несоблюдением правил
использования и обслуживания продукции в соответствии
инструкциями.
Заказчик пользуется гарантийным сроком 3 года с момента
расписки в получении основного устройства AUTOOL.
Гарантийный срок на детали составляет 1 год после
расписки в получении Заказчиком.
В AUTOOL мы гордимся превосходным дизайном и
отличным обслуживанием. Мы будем рады оказать вам
дальнейшую поддержку или обслуживание.
Вся информация, иллюстрации и технические характеристики,
содержащиеся в данном руководстве, основаны на
последней информации, доступной на момент публикации.
Производитель оставляет за собой право вносить изменения
в данное руководство и саму машину без предварительного
уведомления.
●
●
●
●
●
Варианты
гарантии
Бесплатная гарантия не распространяется на
следующие условия
Отказ от
ответстве
нности

32
Если вы не удовлетворены продукциями AUTOOL,
приобретенным на авторизованной торговой интернет-
площадке или у авторизованного офлайн-дилера, в
соответствии с Глобальными условиями продажи AUTOOL,
Вы можете вернуть товар в течение 7 дней с момента его
получения, или обменять его на другой товар эквивалентной
стоимости в течение 30 дней с даты доставки.
Возвращаемые и обмениваемые товары должны быть в
полностью пригодном для продажи состоянии и
сопровождаться соответствующими накладными, всеми
соответствующими аксессуарами, бумажными счетами-
фактурами (если таковые имеются).
AUTOOL проверит возвращаемые товары, чтобы убедиться,
что они находятся в хорошем состоянии и соответствуют
условиям, подробные условия см. в Глобальных условиях
продажи AUTOOL. Товары, которые не прошли проверку,
будут возвращены вам, и вы не получите возмещение за
товар.
Вы можете обменять товар через Центр обслуживания
клиентов или через авторизованного дилера AUTOOL;
принцип возврата заключается в возврате товара оттуда,
где он был приобретен. Если у вас возникли трудности или
препятствия при возврате товара, пожалуйста, свяжитесь
со службой поддержки клиентов AUTOOL. При возврате
или обмене товаров через Центр обслуживания клиентов
мы рекомендуем делать это следующим образом.
●
●
●
●
Служба возврата и обмена
Bозврата и
обмена
В материковом
Китае Позвоните
E-mail
Facebook
YouTube
400-032-0988
+86 0755 23304822
aftersale@autooltech.com
https://www.facebook.com/autool.vip
https://www.youtube.com/c/autooltech
Зарубежные
регионы Позвоните

33
Если ваш запрос на возврат товара подтвержден, будете
получать подтверждающее сообщение и электронную
почту.
●

34
TABLE DES MATIÈRES
Description du produit....................................................................................... 35
Introduction ..................................................................................................... 35
Fonctionnalités................................................................................................ 35
Paramètres techniques ................................................................................... 35
Structure du produit........................................................................................... 36
structure .......................................................................................................... 36
Instruction d'opérations .................................................................................... 37
Préparation avant l’utilisation .......................................................................... 37
Fonctionnement détaillé pendant l'utilisation .................................................. 37
Mode d’emploi pour la détection des fuites dans les tuyaux de l’automobile.. 38
À propos de l'huile de test............................................................................... 39
Liste des pièces.................................................................................................. 40
Service de maintenance .................................................................................... 41
Maintenance.................................................................................................... 41
Garantie............................................................................................................... 42
Mise en œuvre de garantie ............................................................................. 42
Clause de non-responsabilité.......................................................................... 42
Service de retour et d'échange ......................................................................... 43
Retour et d'échange........................................................................................ 43
Pompe à air intégrée
Protection contre la surchauffe
Manomètre
Indicateur de défaut
Débitmètre
Bouton de réglage du débit
Vanne de vidange d’huile
Indicateur du niveau de l’huile de test restante
Interrupteur de commande d'air
Interrupteur de contrôle de la fumée
Pression réglable
aucun
oui
aucun
aucun
aucun
aucun
aucun
aucun
aucun
oui
aucun
Affichage numérique intelligent (TFT)
aucun
Alimentation
Volume de remplissage de liquide de test
Pression nominale de sortie
Débit de sortie nominal
Puissance nominale
Taille du produit
Taille d'emballage
Poids du produit
Poids de l’emballage
12V CC
10-20 ml
<32 mbar
>10 L/min
48W
180*100*135mm
260*200*180mm
1.6kg
2.4kg
35
AUTOOL SDT10 1 est un outil spécial pour la détection des fuites
des tuyaux du système automobile EVAP. Il peut détecter avec
précision de divers genres de fuites du système EVAP de l’auto-
mobile et aider les techniciens de maintenance automobile à
trouver et résoudre rapidement les problèmes.
Description du produit
Introduction
Paramètres
techniques
Fonction-
nalités
A
B
C
D
Port pour le remplissage
Indicateur d'alimentation
électrique
A
C
Interrupteur de
contrôle de fumée
Voyant de fumée
B
D
Sortie de fumée
G
Prise d'alimentation
électrique
E
Interface de source d'air
F
36
Structure du produit
structure
E
F
G

37
Instruction d'opérations
Ouvrez le bouchon du réservoir et versez 10 ml de l’huile de
test dans le port pour le remplissage (A).
Si l’huile de test est trop remplie, retournez le produit pour
évacuer l'excédent d’huile de test.
Après avoir terminé les deux premières étapes, vous pouvez
commencer à utiliser le SDT101.
Raccordez le tuyau des fumées à la sortie de fumée (G) et le
cordon d'alimentation à la prise d'alimentation électrique (E).
Connectez le clip du cordon d'alimentation avec la batterie de
voiture 12V CC.
La pince rouge est connectée au pôle positif (+) et la pince
noire est connectée au pôle négatif (-). Pour des performances
optimales du détecteur de fuites de fumée, la batterie de la
voiture doit être complètement chargée à l'avance.
Il est uniquement autorisé d’utiliser cette machine avec une
batterie de véhicule 12V CC comme source d'alimentation.
Connectez le port externe de la source d'air à l'air comprimé et
la plage de pression d'accès est de : 2-15 bar. Après la connex-
ion, la sortie de fumée produira une pression constante de pas
plus de 32 mbar.
Appuyez sur l'interrupteur de contrôle de fumée (B), l’indica-
teur LED (C) s'allume, la machine commence à fonctionner et
commence à produire de la fumée.
Lorsque la température interne atteint 75 degrés Celsius, le
produit démarre l'autoprotection et s'arrête automatiquement.
●
●
●
●
●
●
Remarque
Remarque
Remarque
Remarque
Préparation
avant
l’utilisation
Fonctionne
ment
détaillé
pendant
l'utilisation
38
Appuyez à nouveau sur l'interrupteur de contrôle de fumée (B)
pour arrêter la sortie de fumée.
Si le produit n'est pas utilisé pendant une longue période, il est
recommandé de verser l'huile de test restante dans un récipi-
ent pour le stockage.
Éteignez l’interrupteur d'allumage du moteur.
Toutes les détections de fuites dans le système des tuyaux de
l’automobile doivent être effectuées avec le moteur éteint.
Retirez le filtre à air d’entrée, pour certains modèles, il faut
retirer le papillon des gaz.
Nettoyez la paroi intérieure du tuyau testé et installez l’adapta-
teur conique d'entrée d'air sur le tuyau testé.
L'appareil est alimenté par une batterie de voiture 12V CC.
Lorsque l’appareil est mis sous tension, la tête conique de la
sortie de fumée a une sortie de pression d'air.
Appuyez sur l'interrupteur de contrôle de la fumée, l’indicateur
s’allume, attendez environ 10 secondes et lorsque la fumée
devient épaisse, insérez la tête conique sur le tuyau de sortie
de fumée dans l'adaptateur conique d'entrée d'air.
Attendre environ 1 à 2 minutes. Vous pouvez utiliser une
lampe de poche à lumière forte pour aider à trouver le point de
fuite et avoir une idée plus précise de la situation de fuite.
Une fois le test terminé, veuillez éteindre tous les interrupteurs,
recycler et conserver l'huile de test restante, ranger tous les
accessoires et confirmer qu'il n'y a pas d'omission pour la
prochaine utilisation.
Si seule une partie du système doit être testée ou si le système
testé comporte d'autres ouvertures qui doivent être scellées,
un kit de bouchons peut être utilisé, qui peut également être
utilisé pour sceller le collecteur d'admission.
Lorsque le temps de travail du produit est trop long et la
●
●
●
●
●
●
●
●
●
●
Remarque
Remarque
Mode d’em-
ploi pour la
détection des
fuites dans
les tuyaux de
l’automobile
Avertissement

●
●
●
●
39
température interne atteint 75 degrés Celsius, le produit
démarre la fonction de protection contre la surchauffe et le
dispositif générateur de fumée du produit cesse de fonction-
ner.
Ce produit doit utiliser une huile de test spéciale. Si vous ne la
trouvez pas dans votre magasin près de chez vous, veuillez
utiliser de la « paraffine liquide » ou de « l'huile de massage
pour bébé » au lieu de l'huile de test en cas d'urgence.
Il est recommandé d'utiliser la bouteille de ravitaillement avec
échelle de volume dans les accessoires du produit pour ajout-
er de l'huile neuve.
Lorsqu'un ravitaillement excessif affecte la sortie de fumée,
veuillez retourner le produit pour vider l'excès d'huile de test.
Si le produit n'est pas utilisé pendant une longue période, il est
recommandé de verser l'huile de fumée restante pour le stock-
age.
À propos
de l'huile
de test
40
Liste des pièces
Nom Remarque
Cordon
d'alimentation
1 pièce
Tuyau de sortie de
fumée
1 pièce
Adaptateur conique 1 pièce
1 pièce
Connecteur EVAP
1 pièce
connectée à la batterie de
la voiture
connexion avec l’adaptateur
installée sur le tuyau examiné
démontage et assemblage
du noyau de valve
port de visite uniquement
pour connecter EVAP
Mode d’emploi 1 pièce
Bouteille de
ravitaillement
1 pièce
Accessoires
instructions pour l’utilisation
avec échelle de volume, vous
pouvez confirmer la quantité
de remplissage
Clé à noyau de valve
Quantité

41
Attention à ne pas frotter le produit contre des surfaces rugueus-
es, notamment la tôle du boîtier. Ne pas courber le produit.
Vérifiez régulièrement les pièces qui doivent être fixées et
connectées. Si elles sont desserrées ou déconnectées, elles
doivent être fixées à temps pour assurer le bon fonctionne-
ment. Les parties externes et internes de l’appareil qui sont en
contact avec les produits chimiques doivent être fréquemment
soumises à un traitement anti-corrosion tel que l'élimination
de la rouille et la peinture pour améliorer la capacité anti-cor-
rosion de l’appareil et prolonger sa durée de vie.
Veuillez respecter les consignes de sécurité, ne pas surcharg-
er le produit, vous assurer que les dispositifs de sécurité du
produit restent complets et fiables pour que les facteurs
dangereux peuvent être éliminés à temps. Vérifier attentive-
ment la partie du circuit électrique et remplacer les fils
électriques à temps.
Nettoyez et remplacez régulièrement les pièces consomma-
bles telles que la pompe à huile et le filtre à huile ; lors du
réglage, du nettoyage et du remplacement des pièces usées
(endommagées), évitez tout contact de l’appareil avec des
éléments liquides corrosifs.
Lorsqu'il n'est pas utilisé, stocker l’appareil dans un endroit
sec. Ne le stockez pas dans des endroits chauds, humides ou
non ventilés.
Les produits AUTOOL que vous possédez sont fabriqués à partir
de matériaux durables. Chaque produit quitte l'usine après 35
processus de la production et 12 inspections de qualité, afin de
garantir que chaque produit a une excellente qualité et une
performance perfectionnée. Votre détecteur AUTOOL vaut donc
la peine d’une maintenance régulière, dans le but qu’il fonctionne
de manière stable et durablement.
Pour assurer les meilleures performances du produit, nous vous
recommandons de lire attentivement les consignes d'entretien
suivantes :
●
●
●
●
●
Service de maintenance
Mainte-
nance

42
Garantie
Réparez ou remplacez gratuitement le produit en fonction de
la situation de panne spécifique.
Nous garantissons que toutes les pièces, accessoires ou
produits remplacés sont neufs.
Si le produit tombe en panne dans les 90 jours suivant la
réception du produit par le client et vous fournissez une vidéo
et des images montrant la situation, nous prendrons en
charge les frais du transport et fournirons les accessoires
correspondants pour que le client pourra les remplacer gratu-
itement. Après avoir reçu le produit pendant plus de 90 jours,
le client paye le coût correspondant des frais de transport et
nous fournissons des accessoires gratuits.
Achat des produits AUTOOL par des voies non officielles.
Dommages causés par une utilisation et/ou un entretien qui
ne conforment pas aux exigences du mode d’emploi du
produit.
Votre appareil AUTOOL a une période de garantie de 3 ans à
compter de la date de réception. Les accessoires qu'il contient
ont d'une période de garantie de 1 an à compter de la date de
réception par le client.
Chez AUTOOL, nous sommes fiers d'un superbe design et d'un
excellent service. Nous serons heureux de vous fournir une
assistance ou des services supplémentaires.
Toutes les informations, illustrations et spécifications contenues
dans ce manuel sont basées sur les dernières informations
disponibles au moment de la publication. Le fabricant se réserve
le droit de modifier ce manuel et la machine elle-même sans
préavis.
●
●
●
●
●
Mise en
œuvre de
garantie
Les cas suivants ne sont pas couverts par la garantie
gratuite
Clause de
non-re-
sponsabilité

43
Si vous n'êtes pas satisfait des produits AUTOOL achetés
auprès de la plate-forme d'achat en ligne autorisée et des
revendeurs agréés hors ligne, conformément aux « Condi-
tions générales de vente AUTOOL », vous pouvez retourner le
produit dans les sept jours à compter de la date de réception ;
Échange possible pour les autres produits de valeur équiva-
lente dans un délai de 30 jours à compter de la date de
livraison.
Les produits retournés et échangés doivent être dans un état
entièrement vendable, avec les reçus de vente pertinents, tous
les accessoires pertinents et les factures papier (le cas échéant).
AUTOOL inspectera les produits retournés pour s'assurer
qu'ils sont en bon état et correspondent aux conditions de
retour. S’il vous plait, référez-vous aux « Conditions générales
de vente AUTOOL » pour plus de détails sur les conditions
applicables. Tout article qui échoue à l'inspection vous sera
retourné et vous ne recevrez pas de remboursement pour
l'article dans ce cas.
Vous pouvez échanger des produits via le centre de service
client ou les revendeurs agréés de AUTOOL ; le principe est
de retourner et d'échanger les produits là où ils ont été
achetés. Si vous rencontrez des difficultés ou des obstacles
pour retourner ou échanger, veuillez contacter le centre de
service client AUTOOL. Lors du retour ou de l'échange de
marchandises par l'intermédiaire du centre de service client,
nous vous recommandons de le faire par les moyens suivants.
Une fois votre retour est confirmé, vous recevrez un message
et un e-mail de confirmation.
●
●
●
●
●
Service de retour et d'échange
Retour et
d'échange
Numéro d’appel si
vous êtes en Chine
E-mail
Facebook
YouTube
400-032-0988
+86 0755 23304822
aftersale@autooltech.com
https://www.facebook.com/autool.vip
https://www.youtube.com/c/autooltech
Numéro d’appel si
vous hors de la Chine