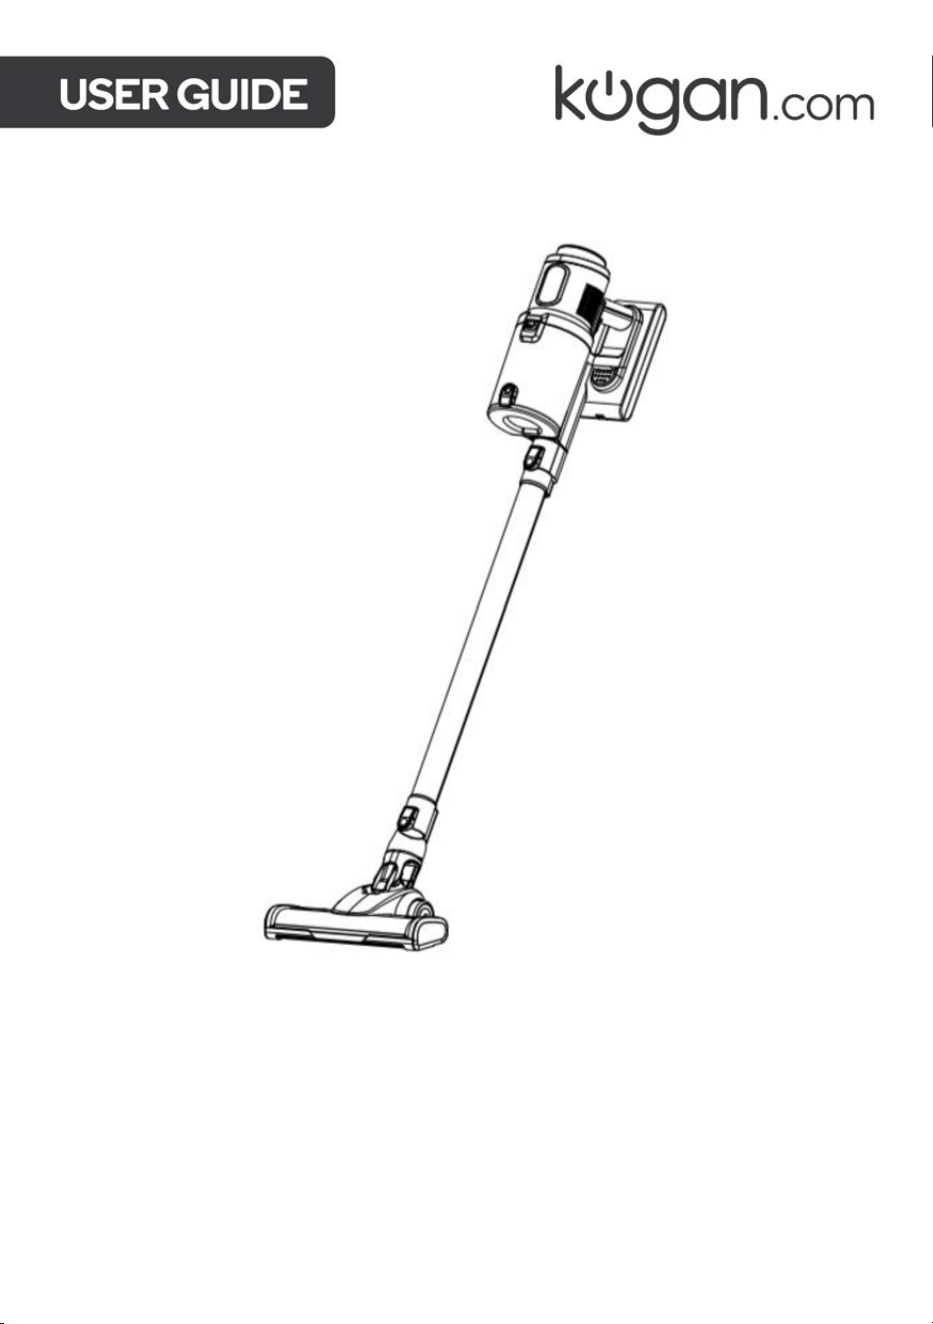
MX10 PRO CORDLESS
STICK VACUUM CLEANER
KAVACSTM10P

2
Safety & Warnings
3
Components
6
Overview
7
Assembly
9
Operation
11
Cleaning and Care
14
Troubleshooting
17
Specifications
18

3
Read all instructions in this guide before using this product. Retain this guide for future
reference. Do not skip, substitute or modify any steps or procedures in this guide, as doing
so could result in personal injury or product damage.
To reduce potential fire risks, electric shock or injury, always observe the basic safety
prevention measures during use, including but not limited to the following:
Power safety:
• Ensure that the power supply voltage matches the voltage marked on the charger.
• Do not store the charger by wrapping the charger wire around the charger.
• The charger wire must be kept away from hot surfaces or sharp objects.
• The charger wire cannot be replaced. If the charger wire shows any signs of damage,
cease use immediately and contact help.Kogan.com for support.
• Do not touch the charger or the appliance with wet hands.
• When cleaning and maintaining the machine, ensure that appliance has been
disconnected from the power supply.
• Always hold by the power plug when connecting and disconnecting to avoid damaging
the cord.
• Never immerse any part of the plug or vacuum cleaner in water or other liquids.
• Never leave while the vacuum cleaner is working.
Battery safety:
• Only use the original battery supplied by Kogan.com. Do not use any other model or
capacity of the battery.
• Do not burn or expose the battery for to high temperatures.
• Only use the original battery. Replacing with a difference battery may cause safety
risks.
• Do not disassemble, expose to impact, squeeze or place the battery into the fire.
• If the battery has any malfunction or abnormality, cease use immediately and contact
help.Kogan.com for support.
• Do not short circuit the metal contacts on the battery. Doing so may cause the battery
to overheat and lead to personal injury.
SAFETY & WARNINGS

4
During use:
• This product is not intended for use by persons (including children over 10 years old)
with reduced physical, sensory or mental capabilities or lack of experience and
knowledge, unless they have been given supervision or instruction concerning use of
the product in a safe way by the person responsible for their safety, and understand the
hazards involved.
• Children over 10 years old must only use this appliance under the supervision of their
guardians.
• Do not allow children under 10 years old to operate or play with this appliance.
• During operation or when performing maintenance, children under 10 years old should
be kept away from the appliance.
• Do not use this machine outdoors or in humid areas or grasp it with wet hands.
• If the machine becomes physically damaged, placed outdoors or falls into water, cease
use immediately and contact help.Kogan.com for support.
• To avoid blockages, don’t place large objects into the suction nozzle of the vacuum
cleaner. Keep the suction nozzle away from lint, hair and other objects that may cause
a blockage and frequently clean the appliance.
• To avoid injury, keep your hair, clothes, fingers and other body parts away from the
suction nozzle and movable parts.
• Avoid sucking in any burning or smoking garbage, such as cigarette ends, matches,
soot and other objects.
• Do not use the vacuum cleaner to clean flammable substances or liquids, such as
gasoline or places where there may be gasoline, kerosene, paint, alcohol, detergent,
etc.
• Keep this appliance away from hot surfaces or sources of heat.
• Do not use the vacuum cleaner before installing the filter.
• Turn off the machine before connecting or replacing any accessories.
• Keep the vacuum cleaner indoors and use it in dry rooms only.
• Do not use it for other purposes unless otherwise specified in this user guide.
• Do not use the vacuum cleaner as a toy. Children nearby must be supervised.
• Be careful when cleaning stairs.
• Only use accessories included with this product and recommended by Kogan.com.
• This vacuum cleaner is not suitable for cleaning water or other liquids. Do not vacuum
water or wet debris.
• Do not use on concrete pavement, asphalt pavement and other rough surfaces.
• The vacuum cleaner is designed for household use only. Do not use it in factories or
commercial environments.
• Do not vacuum construction waste or heavy metal dust.

5
• Pay close attention when pets are near the vacuum cleaner.
• Do not leave the power on when the vacuum is unattended.
• Disconnect the charger when not in use after full charging or before maintenance.
• If the power cord is damaged, cease use immediately and contact help.Kogan.com for
support.
Cleaning & Maintenance:
• To ensure the correct operation of the vacuum, the filter and dust cup will need to be
emptied and cleaned regularly.
• To ensure optimal performance of the vacuum, follow the “Cleaning and Care”
instructions outlined in this user guide.
• To prevent personal injury and avoid irreparable damage, do not modify this product in
any way
• Only use replacement parts or spare parts provided by Kogan.com.
WARNING:
• Do not use water, solvents or polishing agents to clean the surface
of the appliance. Clean with dry cloth.
• Do not to submerge the vacuum cleaner in water or use a
machine to clean it.

6
Vaccum body
Wall bracket
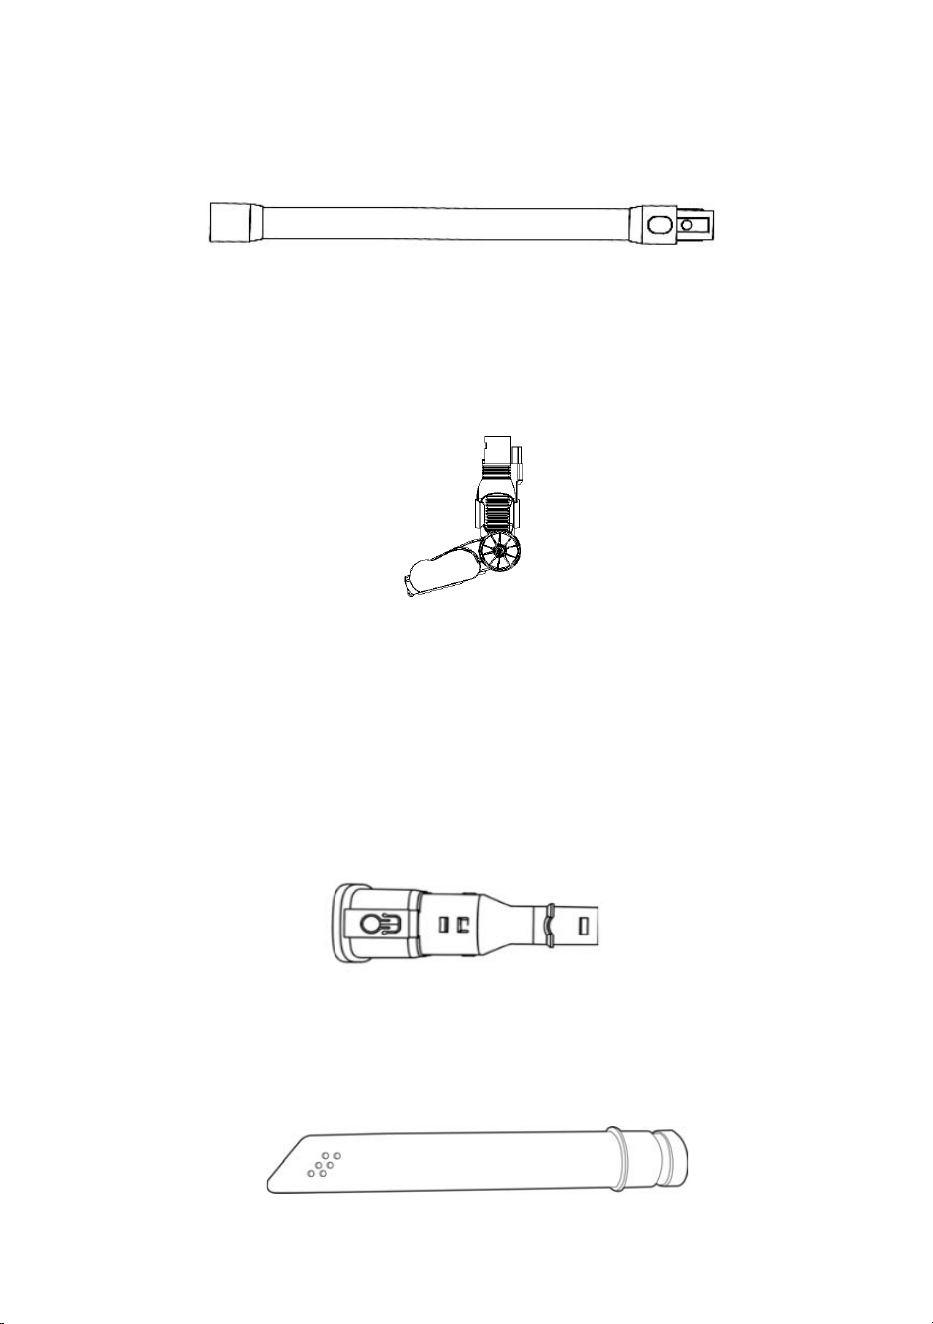
Extension tube
Electric brush
2-in- 1 Bristle Brush
Crevice tool
Battery
Charger
COMPONENTS
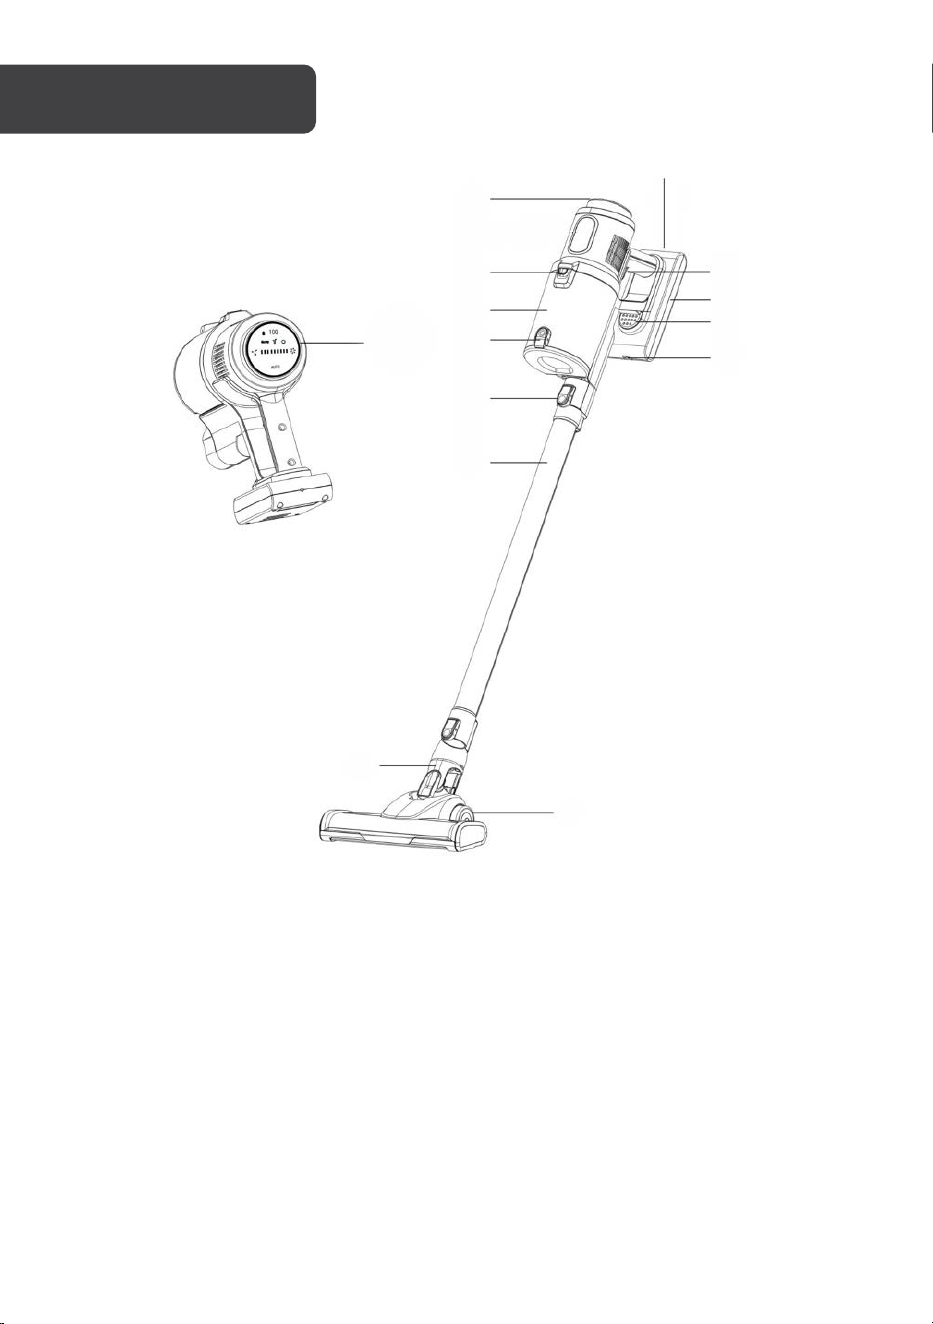
7
1
Display
8
Battery
2
Dust cup lock
9
Battery release button
3
Dust cup
10
Charging input
4
Dust cup release button
11
Brush release button
5
Tube release button
12
Roller brush
6
Extension tube
13
Charging indicator
7
Trigger
OVERVIEW
1
2
3
1
4
5
6
7
8
9
10
11
12
13
8
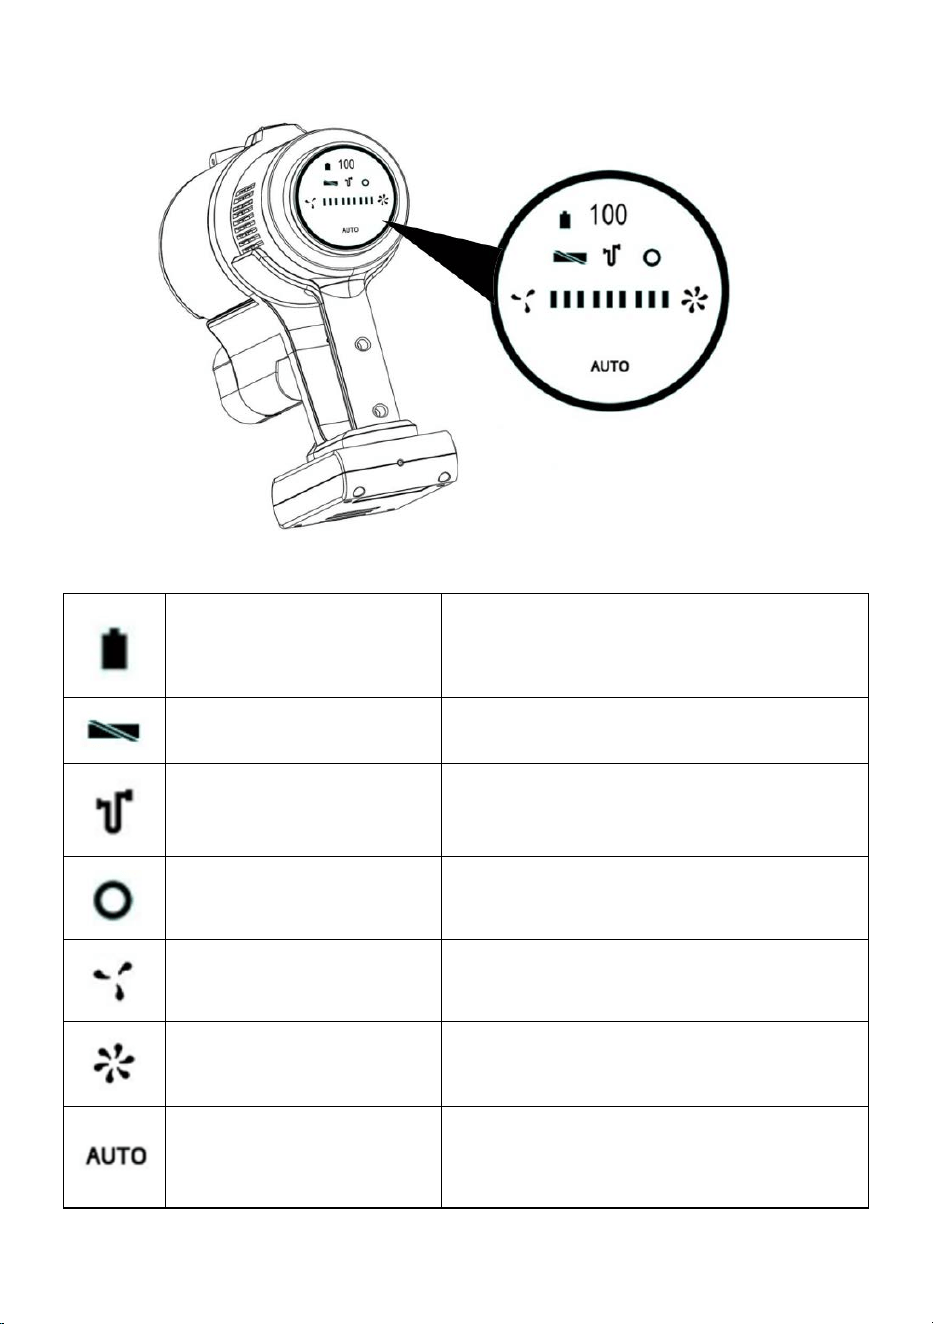
Display
Battery level indicator
Symbol flashes when battery level is less than
10 %.
Brush blockage indicator
Flashes RED when the brush is blocked.
Suction blockage indicator
Flashes RED when the suction tube is
blocked.
Dust sensor failure indicator
Auto mode is not functioning.
Decrease speed
Reduced suction strength leads to less motor
noise and longer running time.
Increase speed
Increased suction strength leads to more
motor noise and shorter running time.
Auto mode
The suction strength is controlled
automatically. The light ring indicates the
strength level: BLUE = low, RED = high.
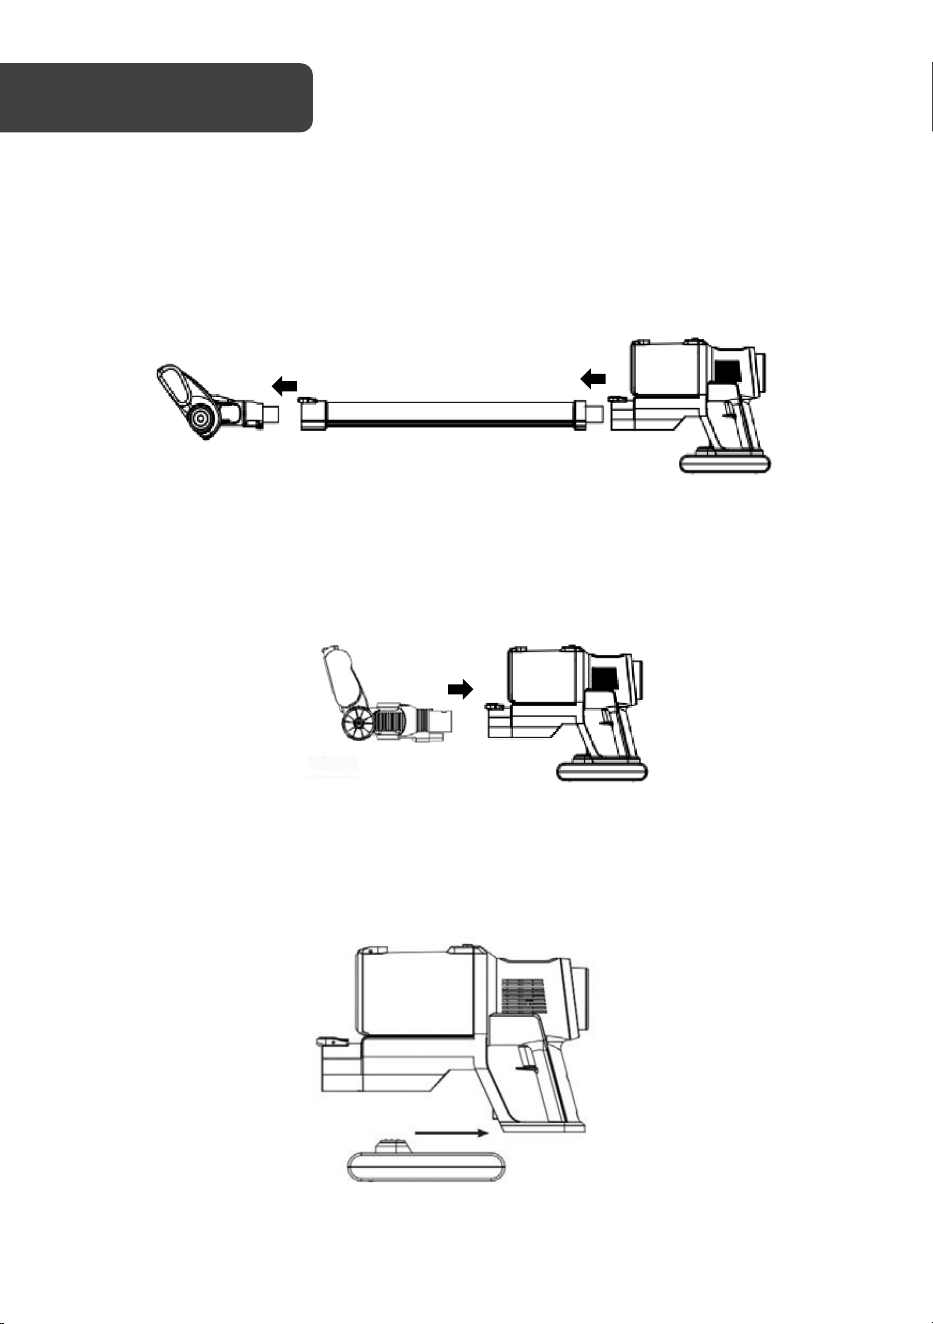
9
1. Align the roller brush to the extension tube and push it gently. It will connect with
an audible click.
2. Align the extension tube with the vacuum cleaner body and push it gently. It will
connect with an audible click.
3. The roller brush and other brush heads can be connected directly to the vacuum
cleaner body when a more compact unit is desired (for example, cleaning a car
interior).
4. Slide the battery along the guide slot towards the rear of the vacuum main body
until it locks firmly in place.
ASSEMBLY
1
2
10
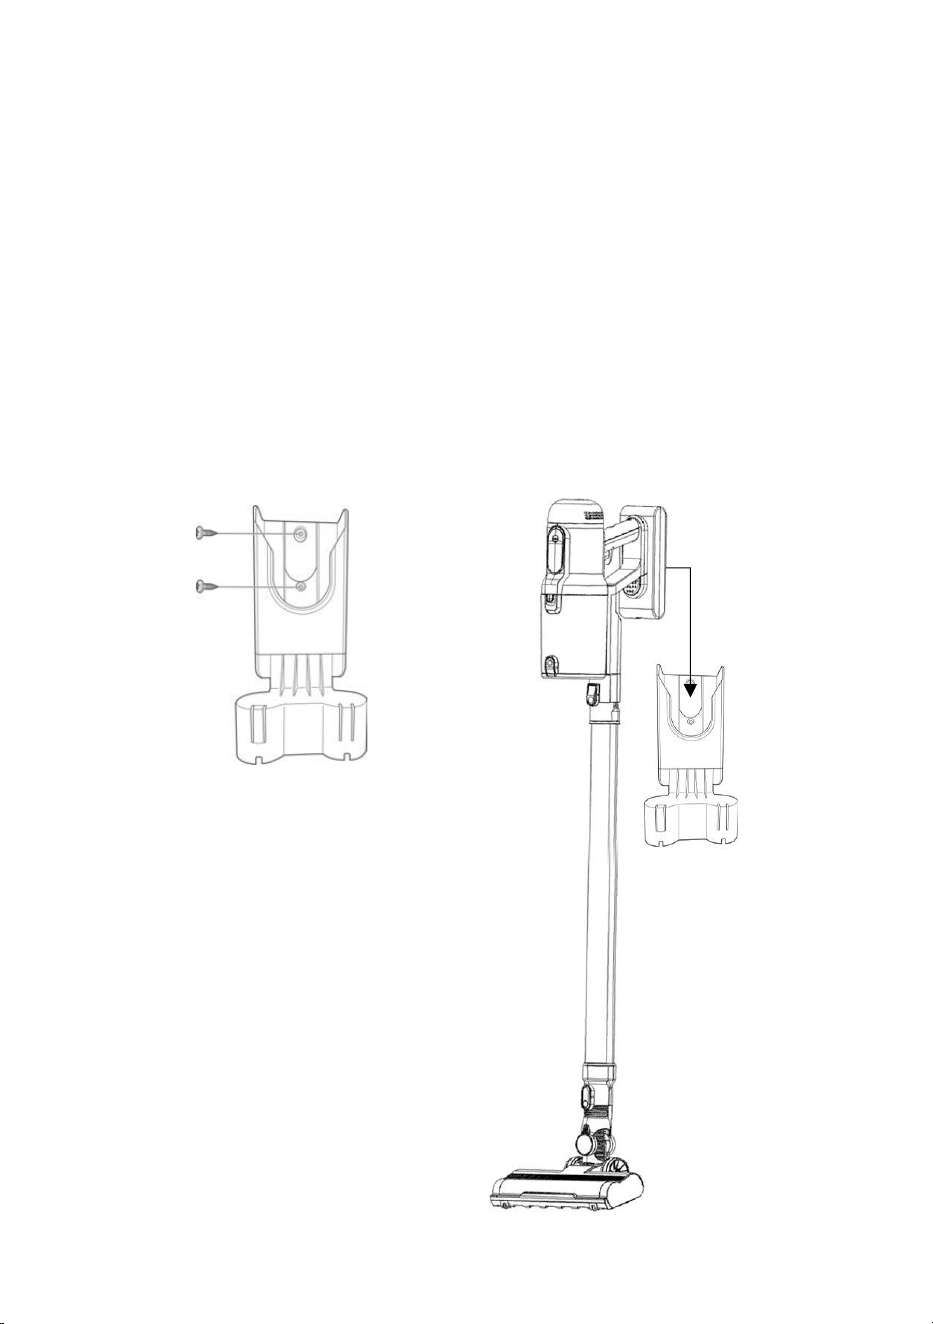
Wall Bracket
1. Select a location that is easily accessible and has enough room for the vacuum to
be mounted vertically. Ensure that the mounting location is close to an electrical
outlet so that you can plug in the vacuum charger.
2. Using the wall bracket as a template, mark the location of the holes that will need
to be drilled.
3. Attach the wall bracket to your chosen location:
o If mounting into a wall stud, use screws to attach the wall bracket to the wall.
o If mounting into plaster or masonry, wall anchors will need to be used for
added support.
Note: Screws and wall anchors not supplied.
4. Once the wall bracket is securely attached to the wall, you can hang the vacuum
cleaner on it.
11
Tu r n i ng the Vacuum On/Off
1. Once assembly is complete, press the trigger to turn on the vacuum.
2. Pressing the trigger a second time will turn the vacuum off.
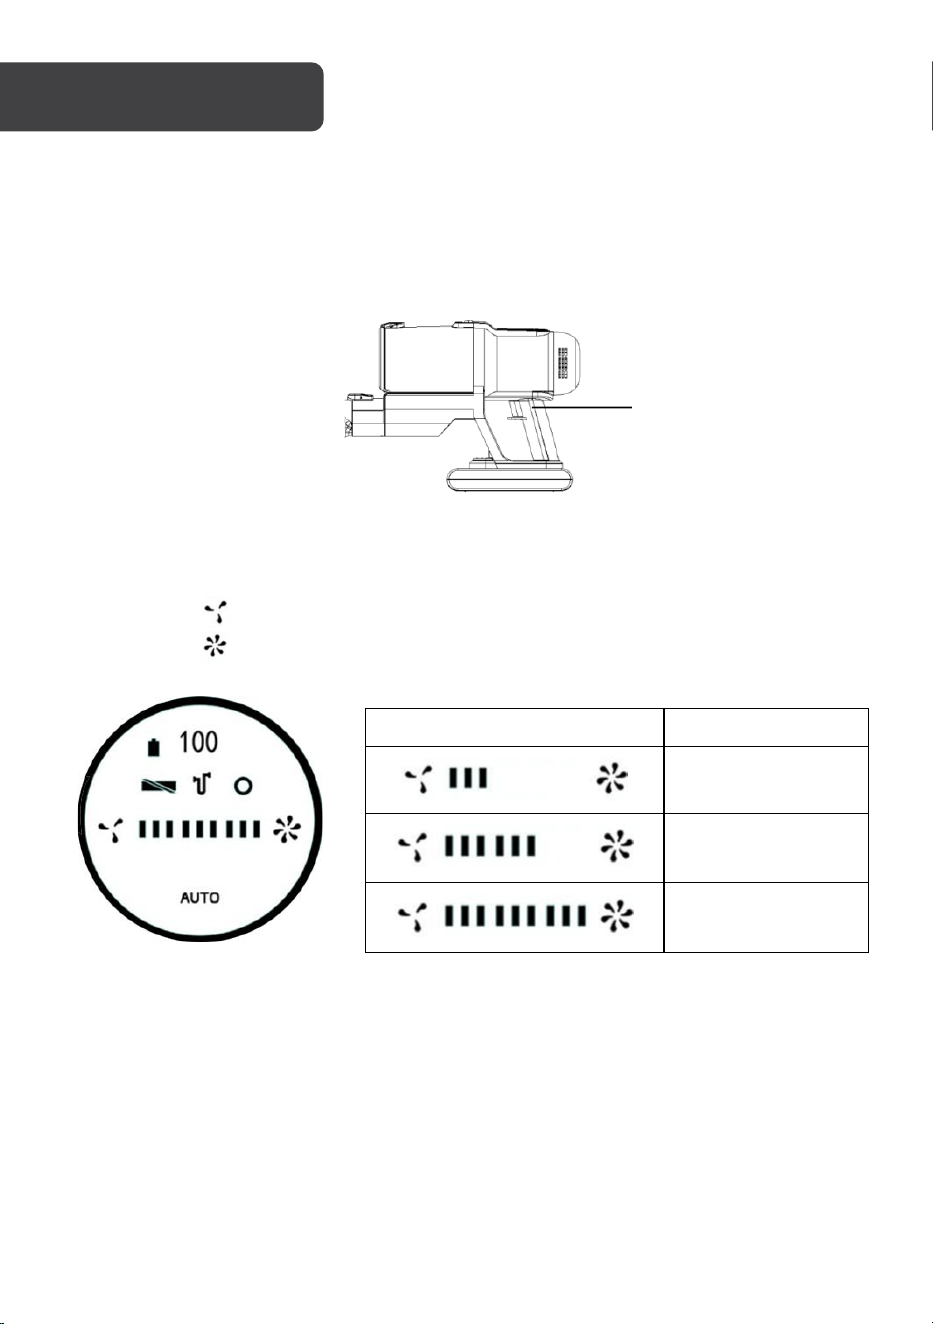
Suction Control
• Suction power can be set to 3 levels (ECO, Normal & High).
• Press the “ ” button to increase the suction power.
• Press the “ ” button to decrease the suction power.
Display
Suction level
ECO
Normal
High
Auto Mode
Press the “Auto” button to place the vacuum into Auto modes. In this mode the vacuum
automatically adjusts the suction power depending on the surface that is being cleaned
Trigger
OPERATION
12
Extension Tu be
Used for cleaning high places such as ceilings, roofs, air conditioners and curtains.
Compatible with the included brush heads.
Electric Brush
Used for cleaning hard floors and carpet.
2-in1 Bristle Brush
• The bristle brush is suitable for cleaning places such as curtains, car interior and air
conditioners or any areas where hair can collect.
• The fine hairbrush can deeply clean small areas such as computer keyboards.
• The retractable brush can suck and clean simultaneously to remove dust efficiently.
Crevice Tool
This is suitable for cleaning various crevices and narrow areas in the household and the car.

13
Charging
1. Hang the vacuum on the wall bracket, connect the charger to an electrical outlet,
and plug the charger into the charging input on the wall bracket. The charger can
also be plugged directly into the charging input on the battery.
2. When charging, the charging indicator will flash GREEN. When the battery is fully
charged the indicator will stay on.
Battery Replacement
1. To replace the battery, press the battery release button and pull the battery away
from the machine body.
2. Attach the replacement battery to the machine body, the battery will “click” into
place when it is correctly installed.
WARNING:
To avoid damaging to the vacuum cleaner, charge only with the
supplied charger.
14
• Only the dust cup, metal filter, 2-in-1 bristle brush and the crevice tool can be washed
with warm soapy water. After cleaning, they must be thoroughly dried before being
reinstalled into the vacuum. Never immerse any other parts in water or other liquids.
• Only use a soft, slightly damp cloth to clean the housing of the vacuum cleaner. Do not
allow any liquid substances to enter the vacuum cleaner.
• Do not clean using any corrosive chemicals or abrasives.
• Do not use when the filter is damaged or worn.
• Use a damp, soft cloth to clean the motor unit, extension tube and nozzles, then dry
with a soft cloth.
• Frequently clear away hair and lint from the brushes and nozzles.
During Operation
• Do not let the unit get close to heaters or any other sources of heat (ovens, radiators
etc.).
• To prevent damage, before vacuuming, remove large and sharp objects from the area
to be cleaned. Do not vacuum any inflammable objects or liquids, such as gasoline,
cigarettes or alcohol.
• Store the machine in a cool and dry place and avoid direct sunlight or humidity.
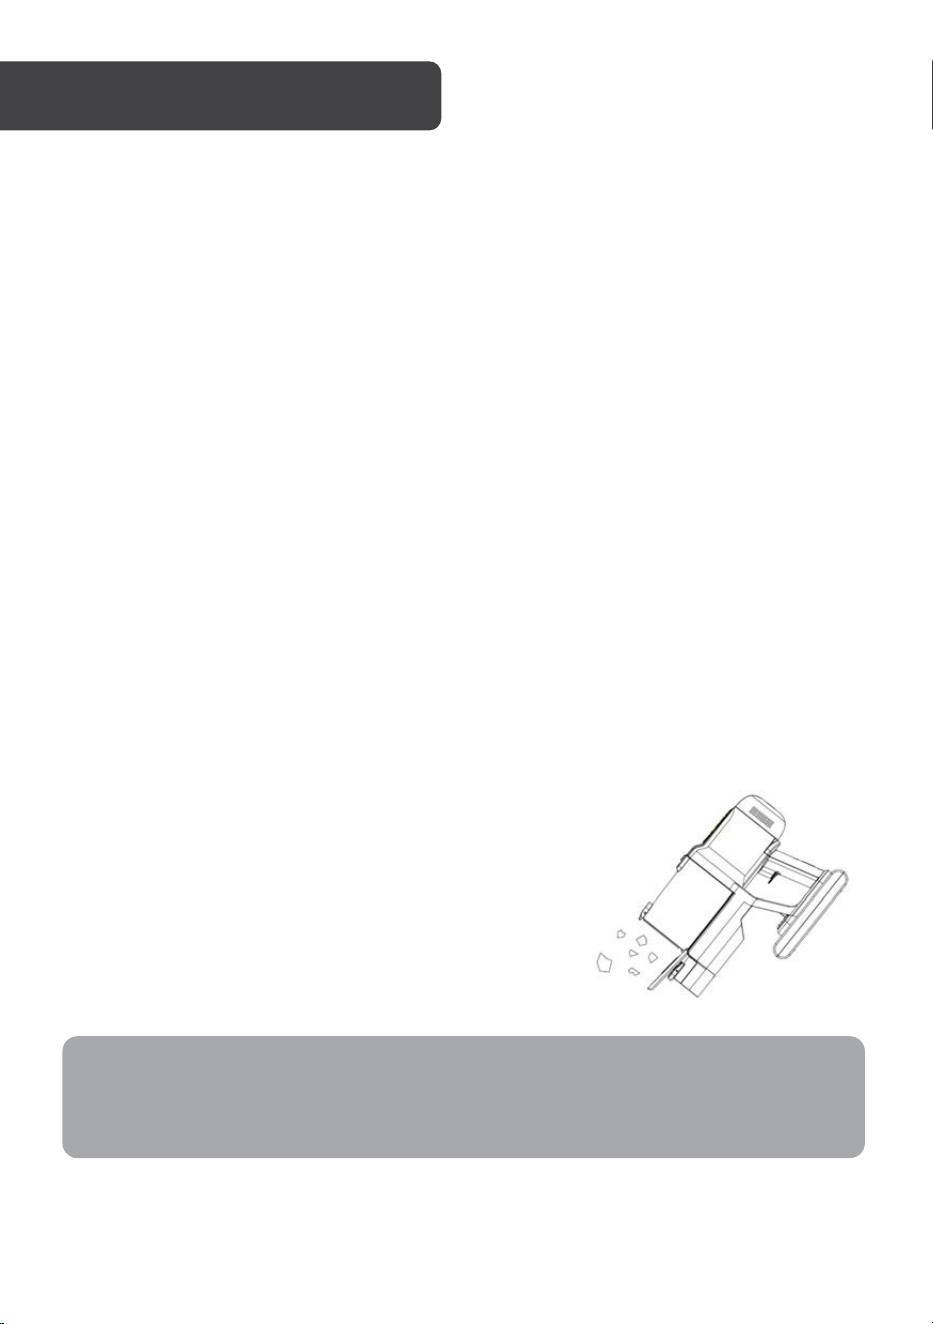
Emptying the Dust Cup
Press the dust cup release button on top of the dust cup.
The bottom cover of the dust cup will open allowing the
contents to be emptied.
CLEANING & CARE
Note:
To maintain proper suction and operation, ensure the dust cup is emptied after each
use and cleaned regularly.
15
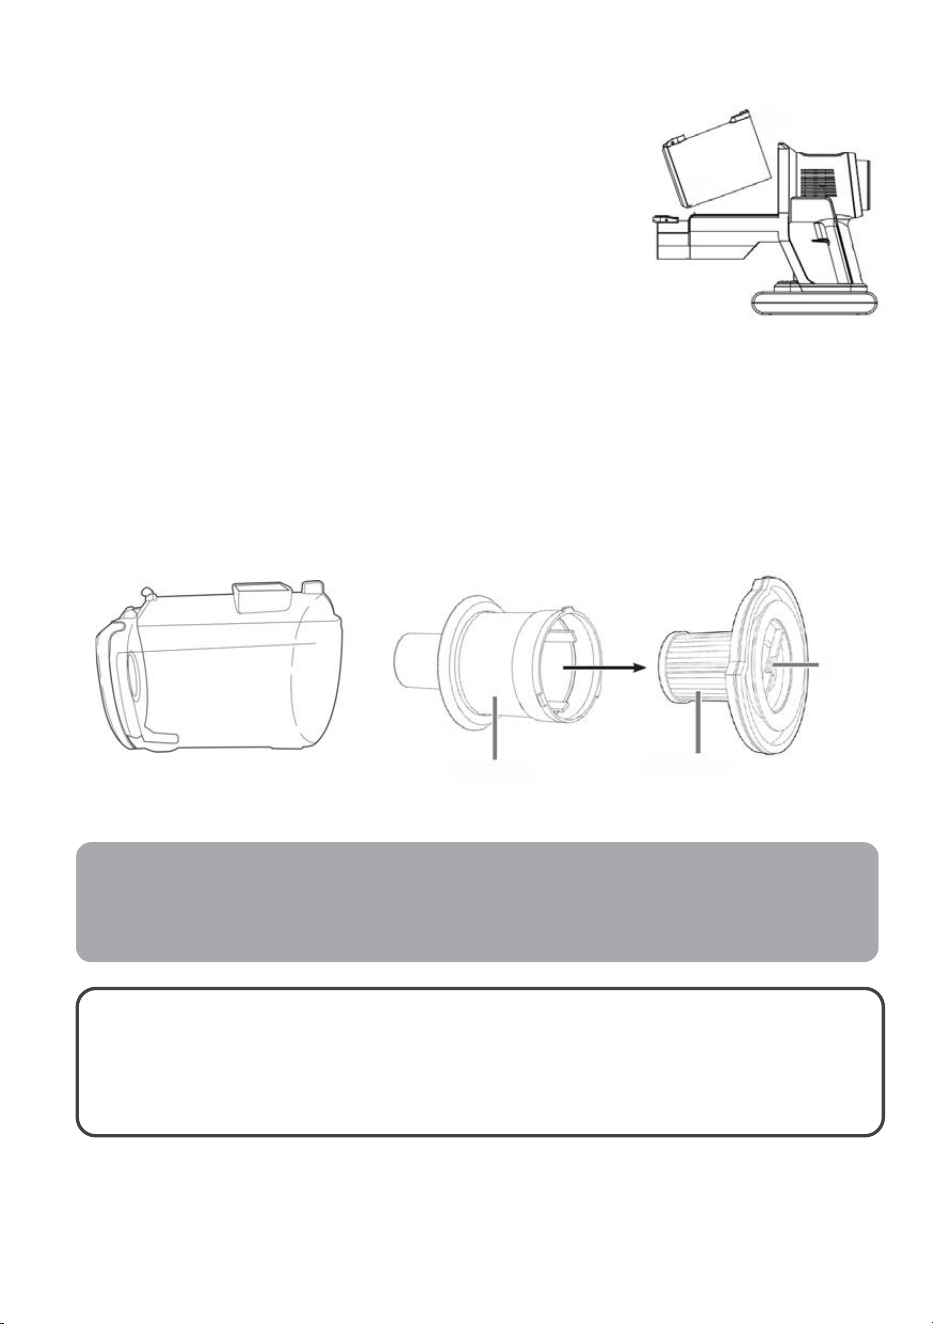
Cleaning the Dust Cup and Filters
1. Press and hold the dust cup lock to separate the
dust cup form the vacuum body.
2. Remove the filter assembly by pulling the handle
away from the dust cup.
3. Separate the HEPA filter from the metal filter by
rotating it counter-clockwise.
4. Use a soft brush to clean the dust from
components.
5. Wipe the dust cup with a damp cloth.
6. Rinse the metal filter with clean water.
Note: Do not clean the HEPA filter with water.
7. Allow the dust cup and filters to thoroughly air dry for 24 hours before reassembly.
Note: Do not use the vacuum filters without the filters installed.
Notes:
To ensure optimal performance, it is recommended to replace the filter every three
months (depending on the usage).
WARNING:
To avoid damaging to the vacuum cleaner, do not use any equipment
to clean or dry the filters. Allow to air dry naturally.
Metal filter
Dust cup
HEPA filter
Handle

16
Cleaning the Roller Brush
To allow for cleaning the roller can be removed from the roller brush by following the below
steps:
1. Move the lock (indicated by lock symbols) on the right side of the roller brush to the
open lock position and take out the retaining bracket.
2. Remove the roller and clean off any debris.
3. Reinstall the roller in reverse order: reinsert the retaining bracket and press it down
until it clicks back into place.
Storage
• Store the vacuum in a cool, dry place that's away from direct sunlight and inaccessible
to children and pets.
• To store the device, hang it on the wall bracket. The 2-in-1 brush and crevice tool can
be attached to the wall bracket for convenient storage.
• If the vacuum is not being used for an extended period, remove the battery from the
vacuum body and recharge it prior to the next use.
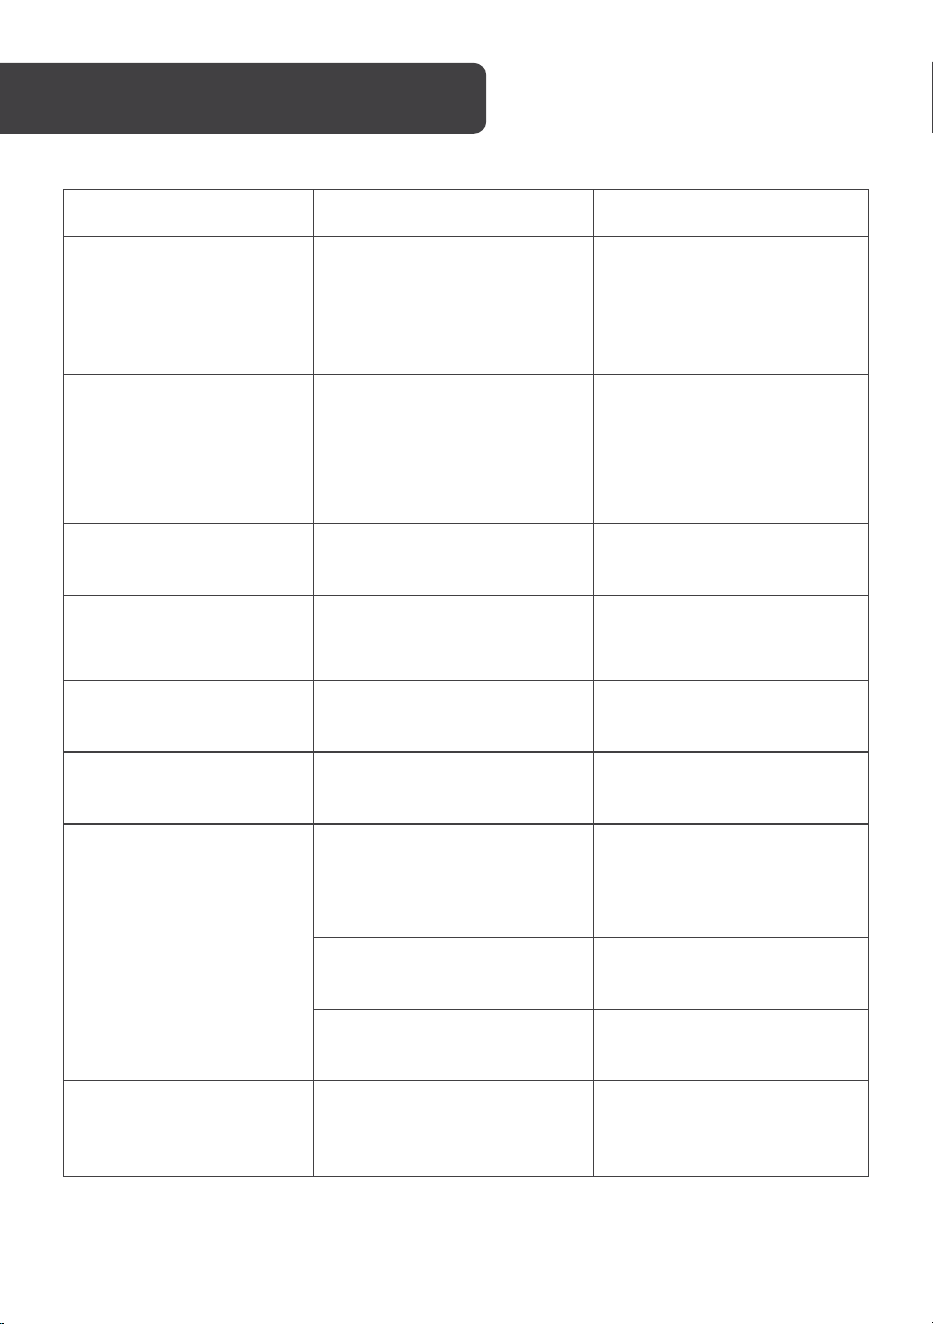
17
Issue
Possible Cause
Solution
Weak suction power.
• Dust cup and filters are
filled with dust.
• The brush head is
blocked by hairs.
• Empty the dust cup and
clean the filters.
• Clean the brush head.
Abnormal sounds.
The extension rod is blocked.
Clear the blockage inside of
the extension rod.
If abnormal noises continue,
cease use and contact
help.Kogan.com for support.
Brush blockage indicator
flashes.
The roller brush head is dirty.
Clean the roller brush.
Air duct blockage
indicator flashes.
Air duct or dust cup is
blocked.
Clear the blockage and
empty the dust cup.
Battery will not charge
Using a third-party charger
to charge the product.
Use the supplied charger.
Roller brush/LEDs is not
working.
Roller brush is wrapped in
hair and debris.
Clean the roller brush.
Vacuum wont power on.
The battery is depleted.
• Charge the battery.
• Replace the battery if
required.
The suction nozzle or air
duct is block.
Clear the blockage.
The suction nozzle is
blocked.
Clear the suction nozzle.
Auto mode failure.
Dust blocking the dust
sensor on the inlet of the
vacuum body.
Clean the roller brush and
extension tube.
TROUBLESHOOTING
18
Voltage supply
25.9V (Li-ion 2000mAh)
Power
250W
Charging time
Approx. 4-5 Hours
Operating time
Up to 50 mins (when the battery is full charged)
Charger
Input
100-240V~, 50/60Hz 0,5A MAX
Output
31V DC / 0.5A
Protection Class
II
Disposal
This marking indicates that this appliance should not be disposed with other
house-hold wastes. To prevent possible harm to the environment or human
health from uncontrolled waste disposal, recycle it responsibly to promote the
sustainable reuse of material resources.
SPECIFICATIONS

19
NOTES

20
Need more information?
We hope that this user guide has given you
the assistance needed for a simple set-up.
For the most up-to-date guide for your product,
as well as any additional assistance you may require,
head online to help.kogan.com