
Dell Dual Charge Dock
User Guide
Regulatory Model: K21A
Regulatory Type: K21A001
May 2023
Rev. A01

Notes, cautions, and warnings
NOTE: A NOTE indicates important information that helps you make better use of your product.
CAUTION: A CAUTION indicates either potential damage to hardware or loss of data and tells you how to avoid
the problem.
WARNING: A WARNING indicates a potential for property damage, personal injury, or death.
© 2022-2023 Dell Inc. or its subsidiaries. All rights reserved. Dell Technologies, Dell, and other trademarks are trademarks of Dell Inc. or its
subsidiaries. Other trademarks may be trademarks of their respective owners.

Chapter 1: Introduction................................................................................................................. 4
Chapter 2: What's in the box......................................................................................................... 5
Chapter 3: Hardware requirements................................................................................................6
Chapter 4: Views of Dell Dual Charge Dock - HD22Q...................................................................... 7
Back........................................................................................................................................................................................ 7
Front....................................................................................................................................................................................... 7
Left..........................................................................................................................................................................................8
Right....................................................................................................................................................................................... 8
Chapter 5: Important Information................................................................................................. 9
Chapter 6: Setting up your docking station..................................................................................10
Charging your phone..........................................................................................................................................................11
Orientations supported for wireless charging........................................................................................................ 11
Charging your wireless earbuds......................................................................................................................................12
Chapter 7: Setting up external monitors...................................................................................... 13
Configuring your Monitors............................................................................................................................................... 13
Video connectors for multiple display setup................................................................................................................14
Display Resolution Table...................................................................................................................................................15
Chapter 8: Technical specifications............................................................................................. 16
Product specifications...................................................................................................................................................... 16
Wireless Qi charging specifications............................................................................................................................... 17
Docking cable specifications............................................................................................................................................17
Power adapter specifications.......................................................................................................................................... 17
LED indicators..................................................................................................................................................................18
Dimensions and weight..................................................................................................................................................... 18
Docking specifications...................................................................................................................................................... 18
Chapter 9: Dell docking station firmware update .........................................................................19
Chapter 10: Troubleshooting the Dell Dual Charge Dock - HD22Q................................................ 22
Symptoms and solutions..................................................................................................................................................22
Chapter 11: Getting help and contacting Dell............................................................................... 26
Contents
Contents 3

Introduction
The Dell Dual Charge Dock - HD22Q is a device that links all your electronic devices to your system using a USB Type-C cable
interface. Connecting the system to the docking station allows you to easily connect multiple peripherals (mouse, keyboard,
stereo speakers, external hard-drives, and high-resolution displays) without having to plug each one into the system.
The dock also supports wireless charging for supported mobile devices.
CAUTION: Update your system’s BIOS, graphic drivers and the Dell docking station drivers to the latest versions
available at www.dell.com/support before using the docking station. Older BIOS versions and drivers could
result in your system not recognizing the docking station or not functioning optimally. Always check if any
recommended firmware is available for your docking station at www.dell.com/support.
1
4 Introduction
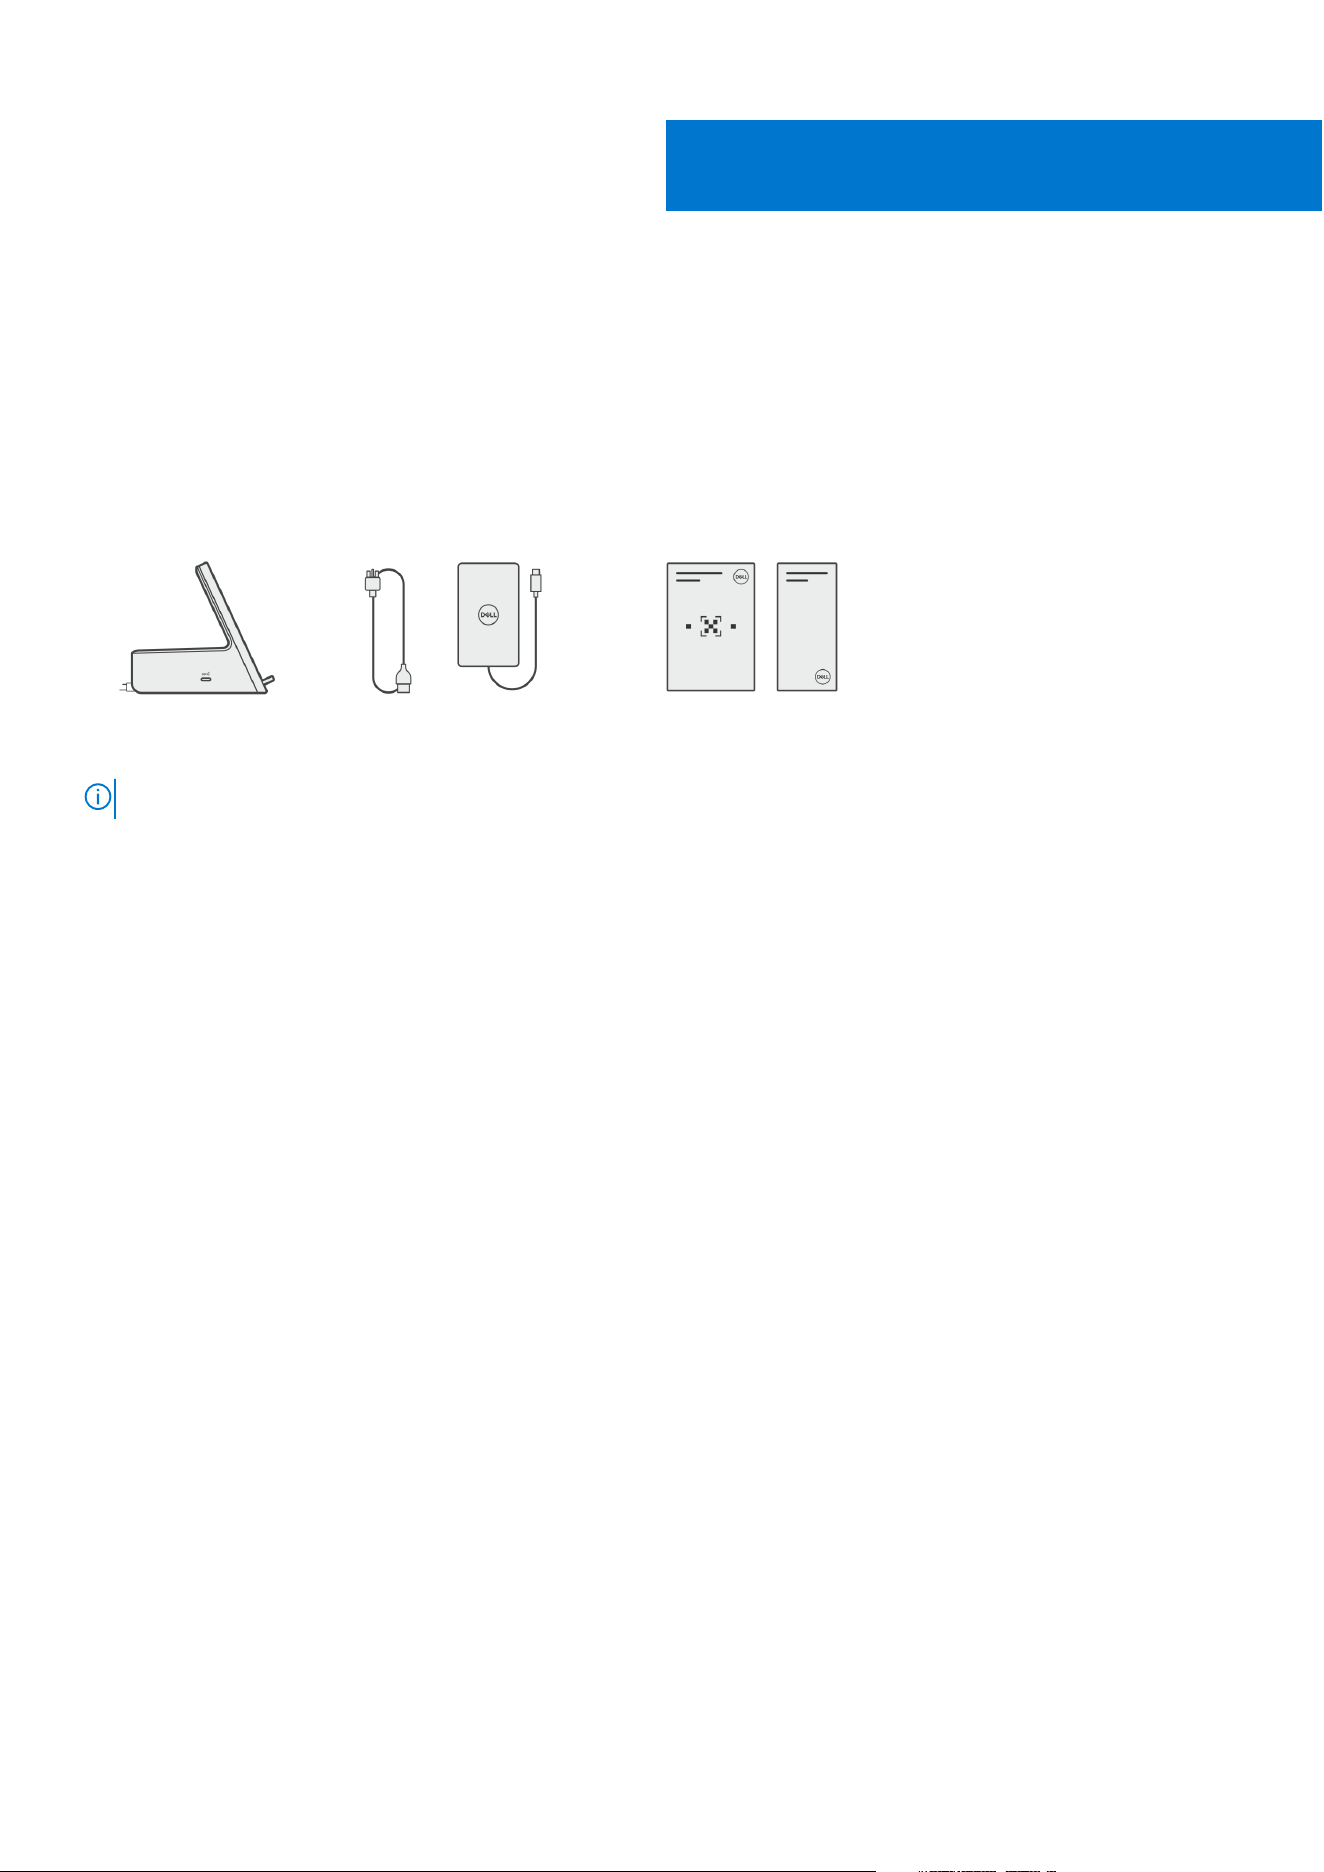
What's in the box
Your docking station ships with the components shown below:
1. Docking station
2. Power cord
3. Power adapter
4. Documentation (Quick Start Guide, Safety, Environmental, and Regulatory Information
NOTE: Contact Dell support if any of the listed items are missing from your box.
2
What's in the box 5

Hardware requirements
Before using the docking station, ensure that your system has a USB Type-C with DisplayPort Alt Mode that is designed to
support the docking station.
3
6 Hardware requirements
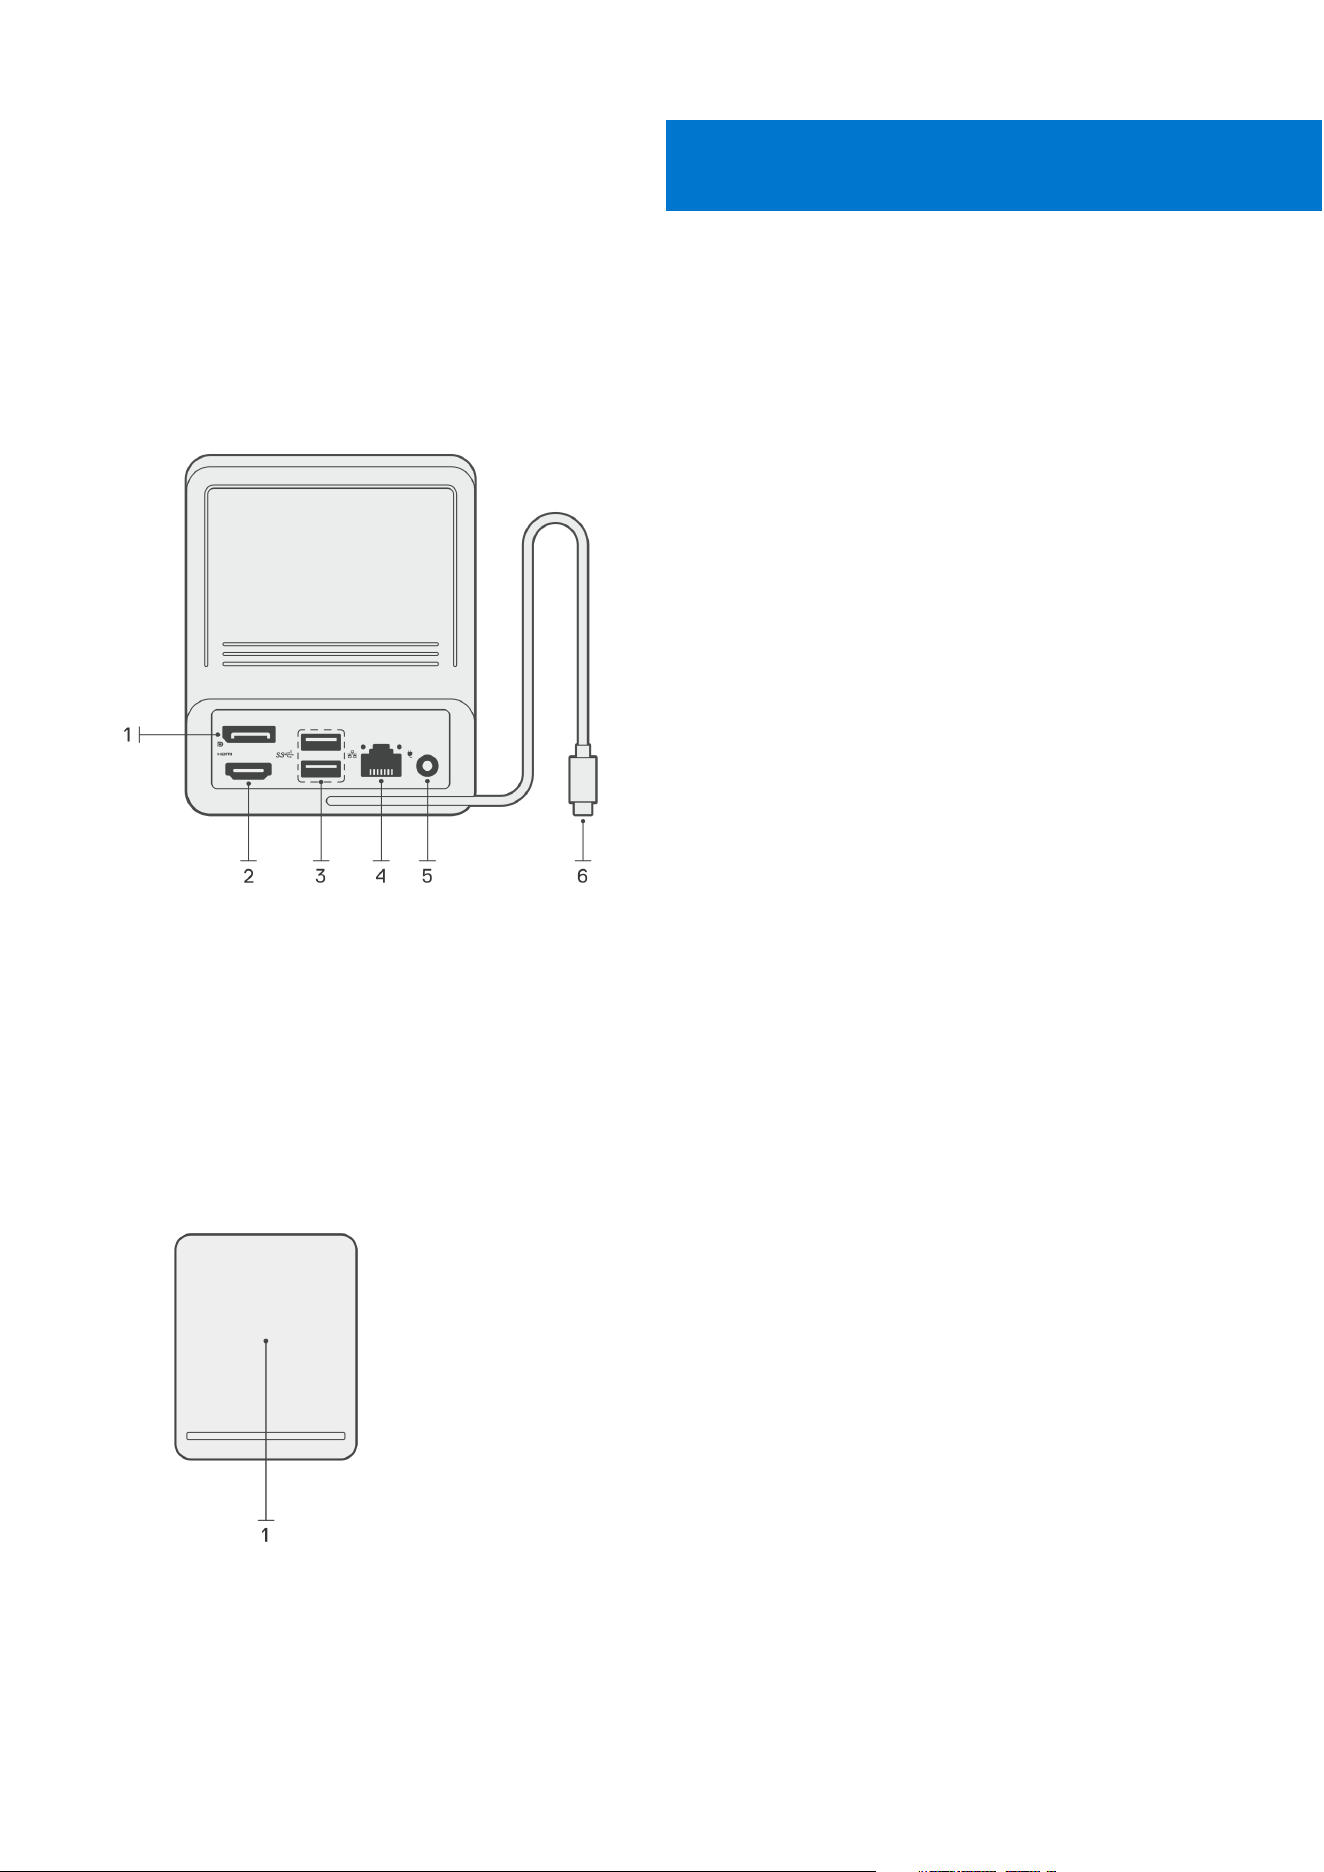
Views of Dell Dual Charge Dock - HD22Q
Back
1. DisplayPort 1.4 port
2. HDMI 2.1 port
3. Two USB 3.2 Gen 1 ports
4. Network connector (RJ-45)
5. Power connector
6. USB Type-C cable
Front
1. Wireless charging pad
4
Views of Dell Dual Charge Dock - HD22Q 7
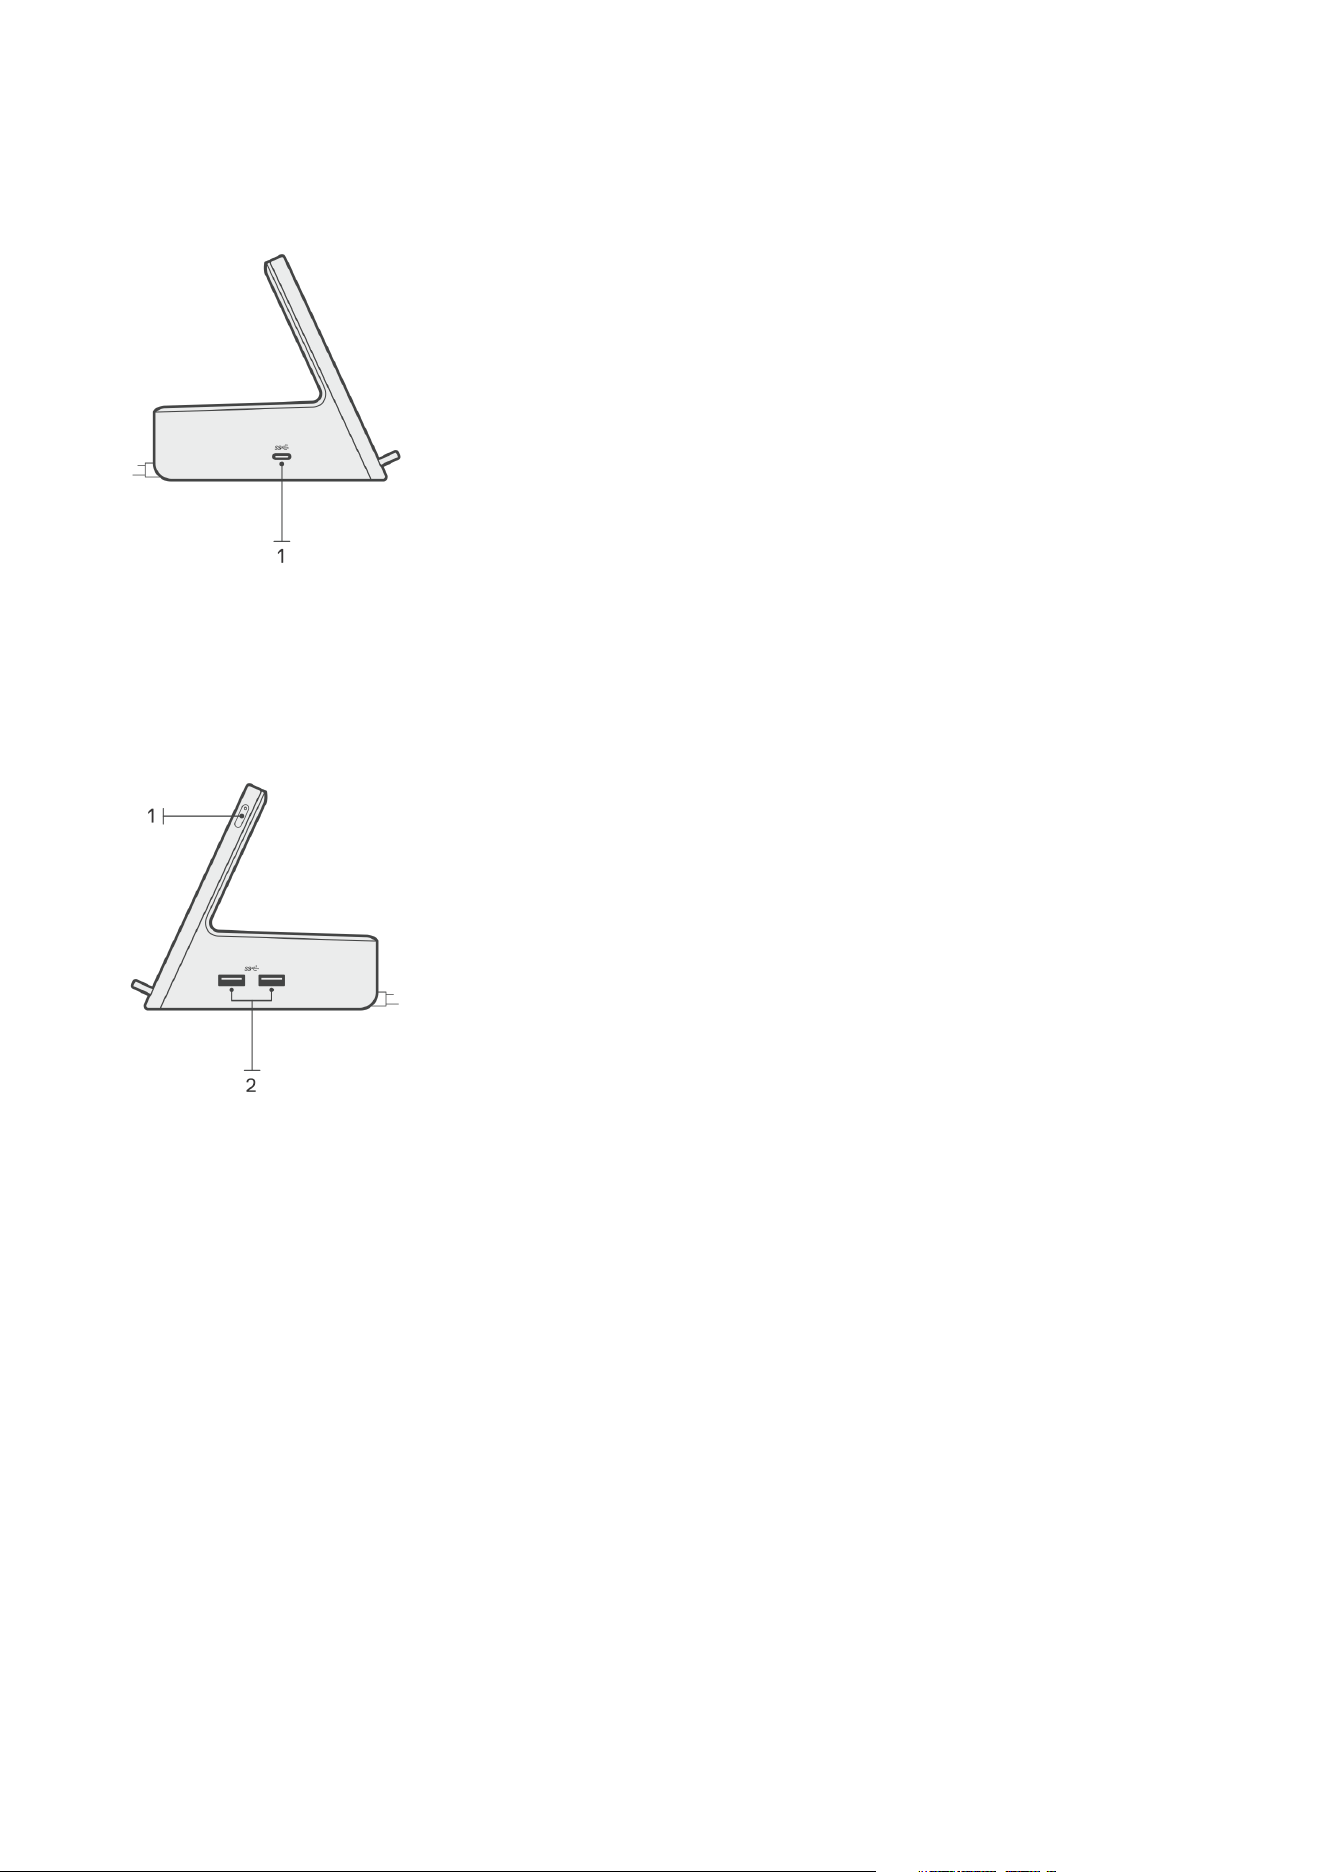
Left
1. USB 3.2 Gen 2 Type-C port with PowerDelivery 3.0 (5 V / 3 A, 15 W)
Right
1. Power button with LED
2. Two USB 3.2 Gen 1 ports
8
Views of Dell Dual Charge Dock - HD22Q

Important Information
Updating drivers on your system
It is recommended to update the following drivers on your system before using the docking station:
1. System BIOS
2. Graphics driver
3. Ethernet driver
CAUTION: Older BIOS versions and drivers could result in the docking station not being recognized by your
system or not functioning optimally.
For Dell systems, you can visit www.dell.com/support and enter the Service Tag or Express Service Code to find all relevant
drivers. For more information on how to find the Service Tag for your computer, see Locate the Service Tag on your computer.
For non-Dell systems, please visit the respective manufacturers support page to find the latest drivers.
Updating the Dell Dual Charge Dock - HD22Q driver set
To ensure that the Dock functions correctly, it is recommends installing the latest firmware available for the HD22Q.
All available drivers can be found on www.dell.com/support.
Drivers and Downloads FAQ
When troubleshooting, downloading or installing drivers it is recommended that you read the Dell Knowledge Based article,
Drivers and Downloads FAQ 000123347.
5
Important Information 9
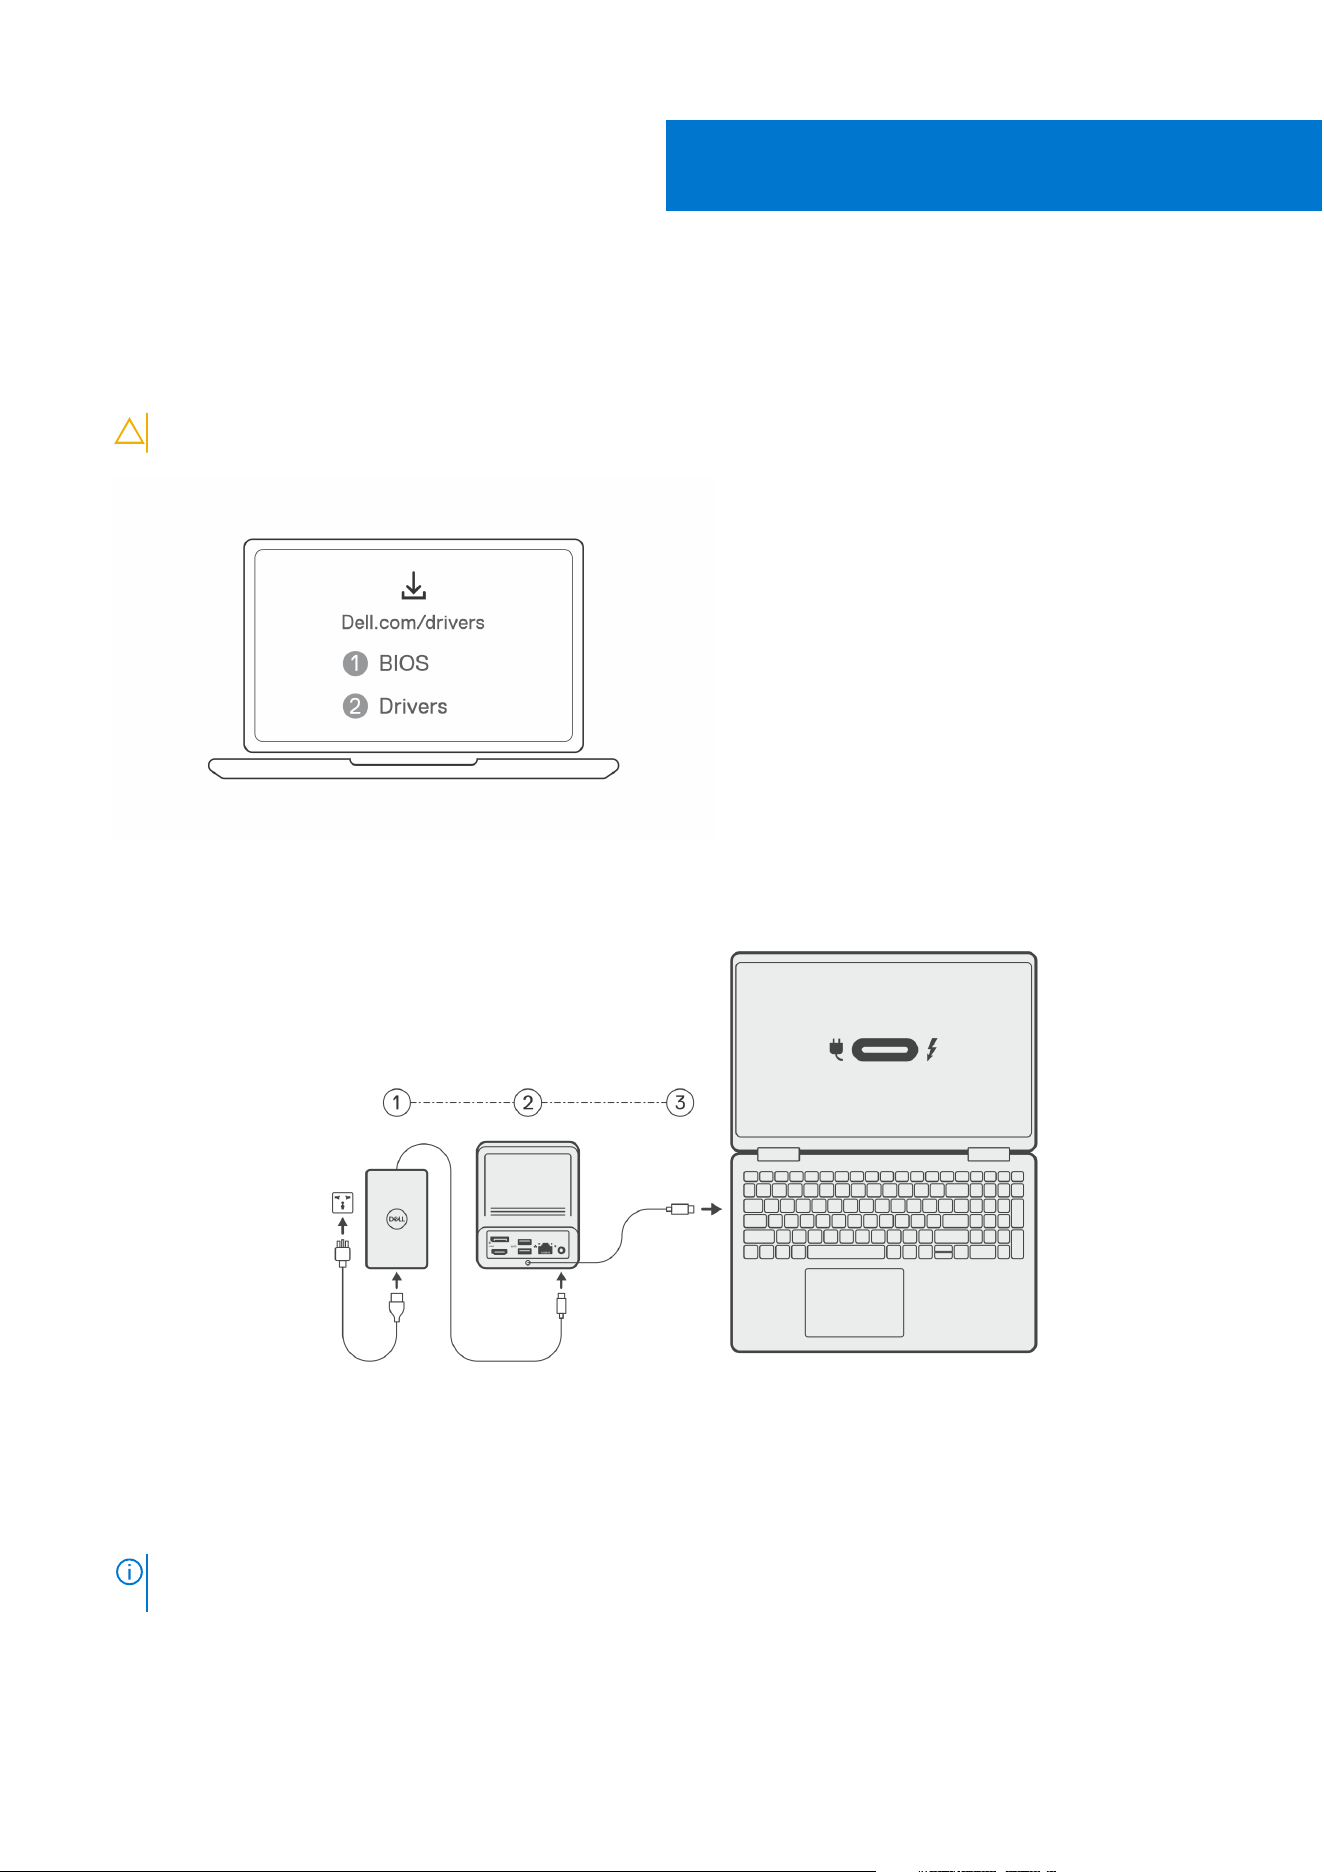
Setting up your docking station
Steps
1. Update your system's BIOS, graphics, and network drivers from www.dell.com/support/drivers.
CAUTION: Ensure that the system is connected to a power source while installing the BIOS and drivers.
2. Connect the AC adapter to a power outlet. Then, connect the AC adapter to the 7.4 mm DC-in power input on the Dell Dual
Charge Dock - HD22Q.
3. Connect the USB Type-C connector to the system.
Update the Dell Dual Charge Dock drivers from www.dell.com/support/drivers.
4. Connect the displays (up to 2 direct connection via DisplayPort and HDMI ports) to the docking station, as needed.
For more details on supported display resolutions and setting up additional displays, please see Display Resolution.
NOTE:
The USB 3.2 Gen 2 Type-C port on the dock is not DisplayPort Alt Mode capable and won't support a video
display.
6
10 Setting up your docking station
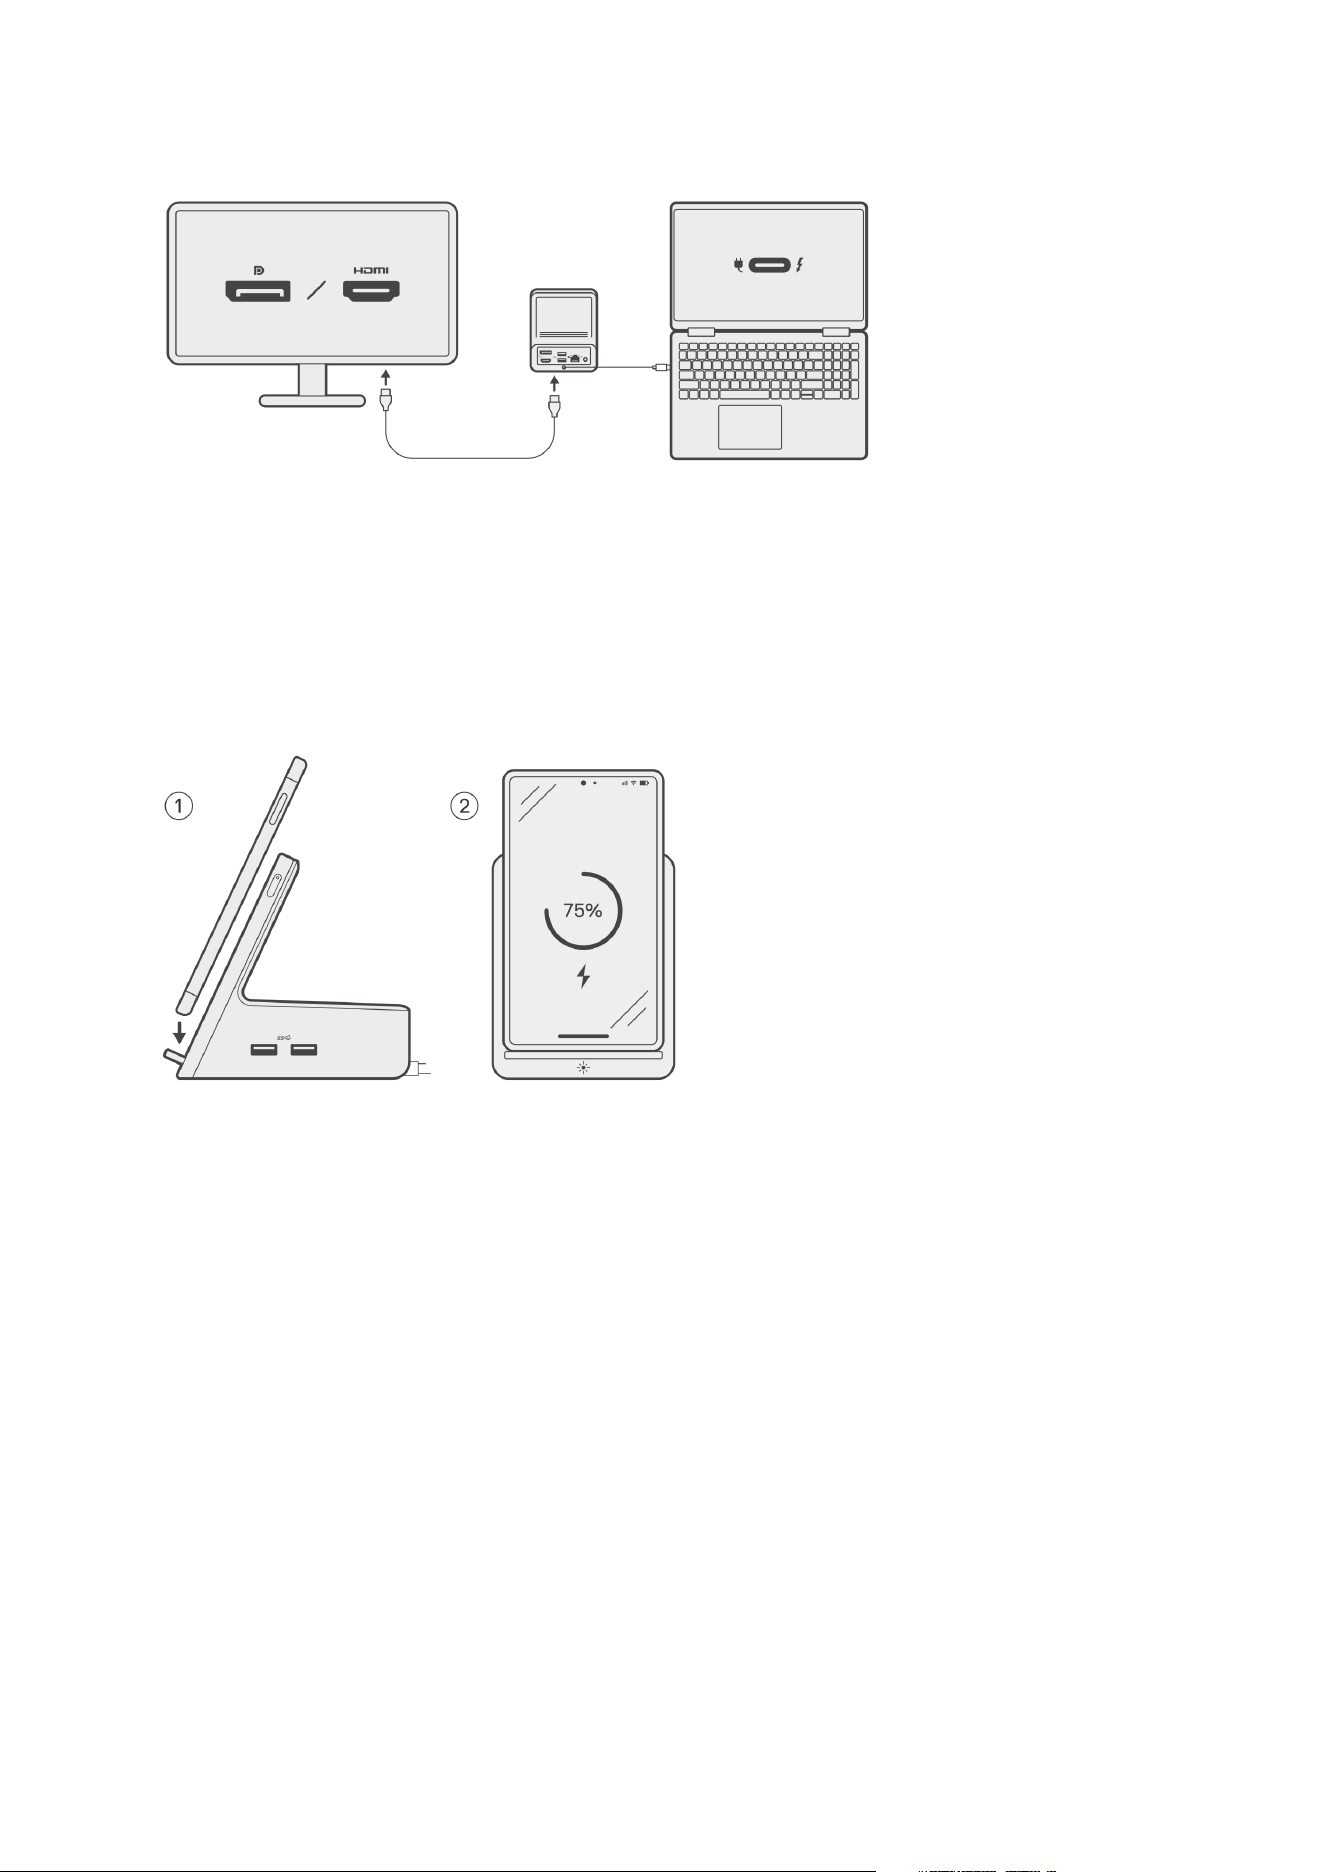
Charging your phone
About this task
The Dell Dual Charge Dock - HD22Q features a wireless charging pad for charging supported mobile devices.
Steps
1. Align and place the phone on the charging pad.
2. The Qi charging LED should turn solid white and the phone should start charging automatically.
Orientations supported for wireless charging
The Dell Dual Charge Dock - HD22Q has a 3-coil design that supports wireless charging on mobile devices of different sizes. You
can charge your mobile device on portrait or landscape mode, based on your device size and preference.
Setting up your docking station
11
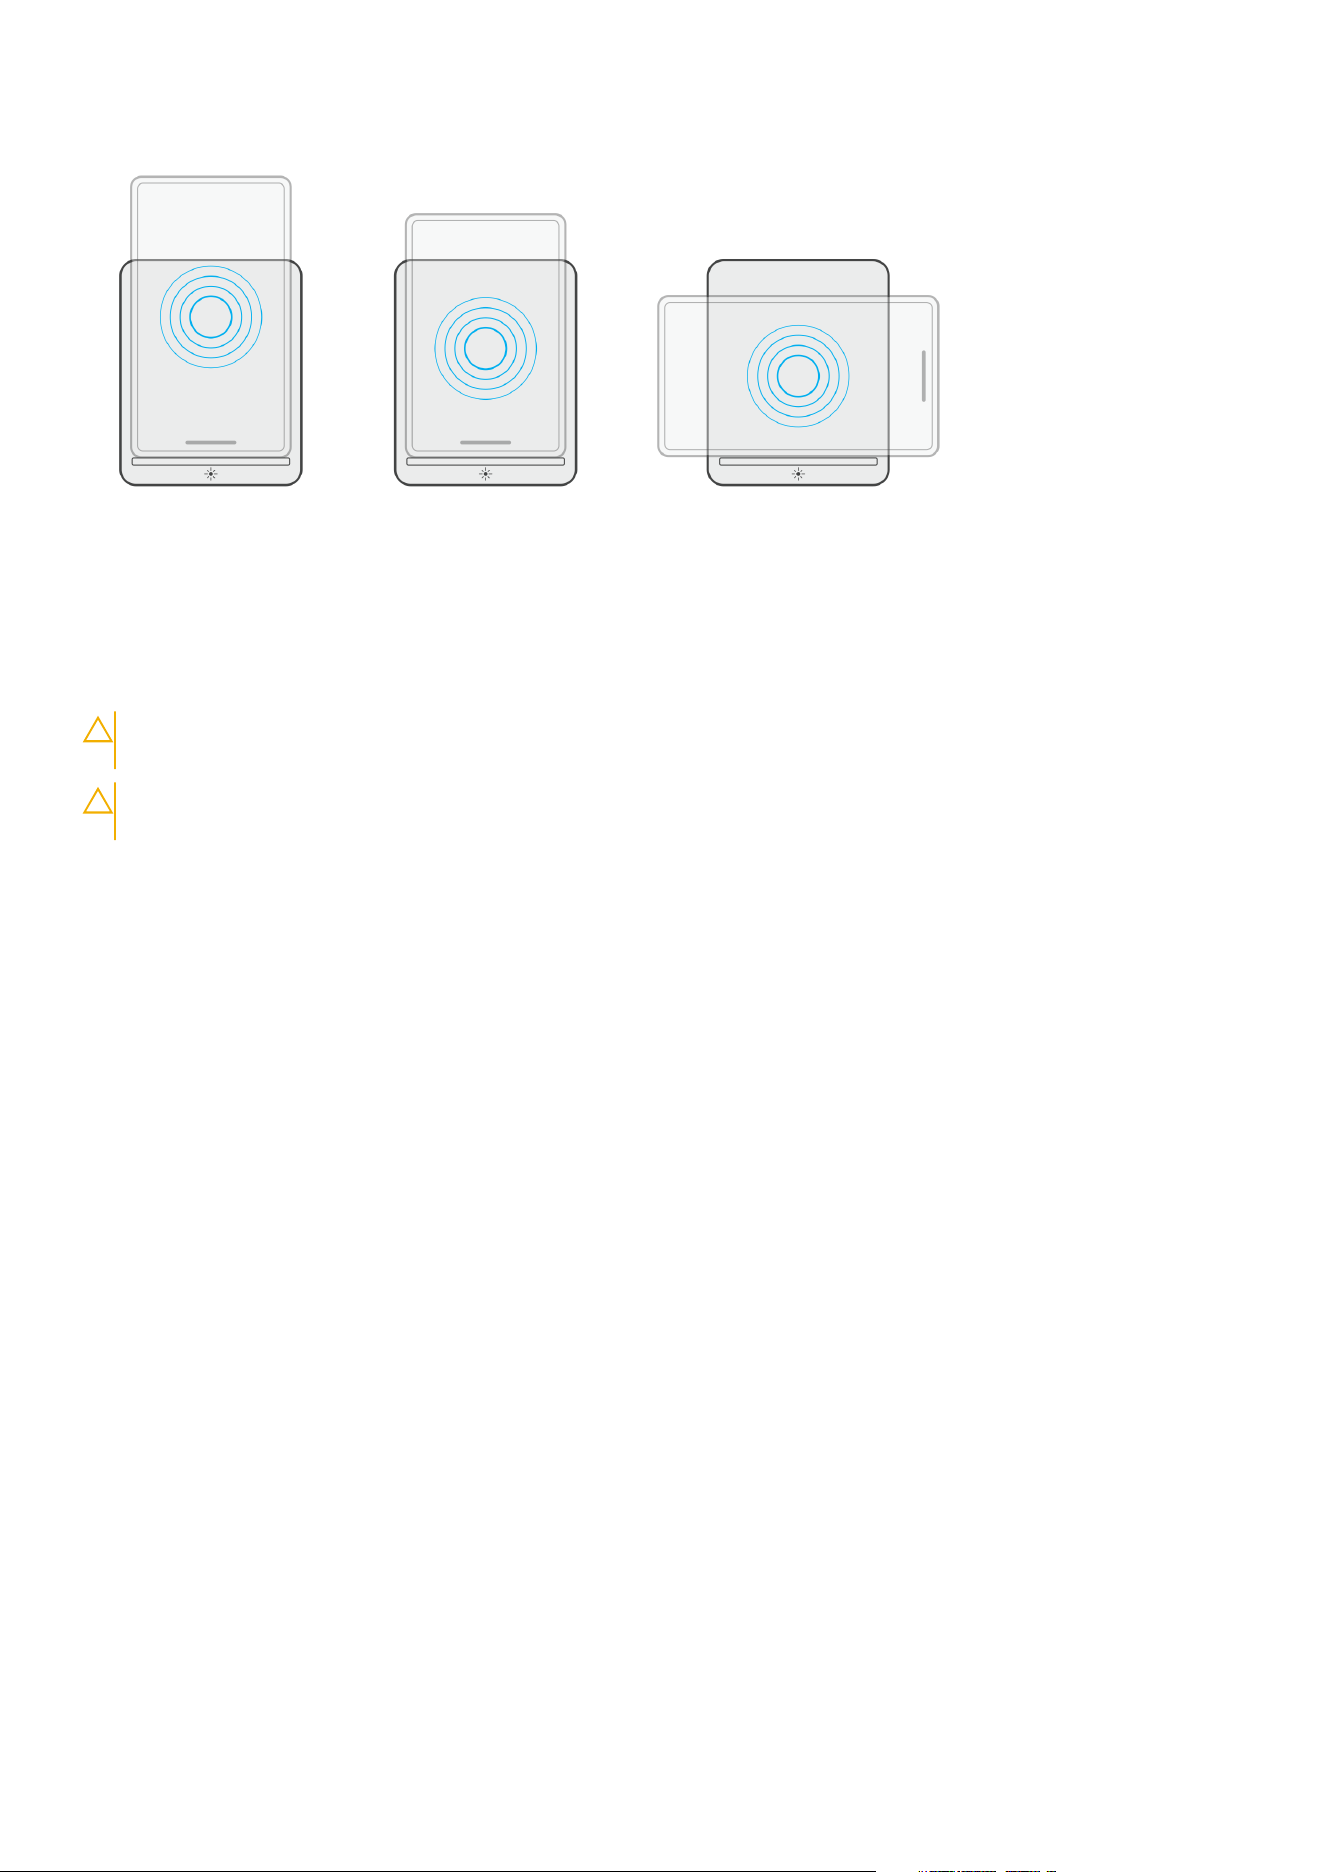
As seen in the images above, the charging coils are spread out to ensure that devices of all sizes have no difficulty charging
when placed on the wireless charging pad.
1. Portrait mode charging on larger phones
2. Portrait mode charging on smaller phones
3. Landscape mode charging
The Qi charging LED helps identify the charging status on the docking station. For more information, please see LED indicators.
CAUTION: Mobile devices without Qi certifications may not charge as expected on the Dell Dual Charge Dock -
HD22Q.
CAUTION: Ensure that there are no metal objects (phone cover, magnetic mobile holder plate etc.) between the
mobile device and the wireless charging pad on the dock.
Charging your wireless earbuds
About this task
The Dell Dual Charge Dock - HD22Q can also be used to charge wireless earbuds. The placement and orientation of the charging
case on the charging pad may vary depending on the type of earbuds and the size of the case.
12
Setting up your docking station

Setting up external monitors
Configuring your Monitors
If connecting two displays, follow these steps:
Steps
1. Click the Start button, and then select Settings.
2. Click System and select Display.
7
Setting up external monitors 13
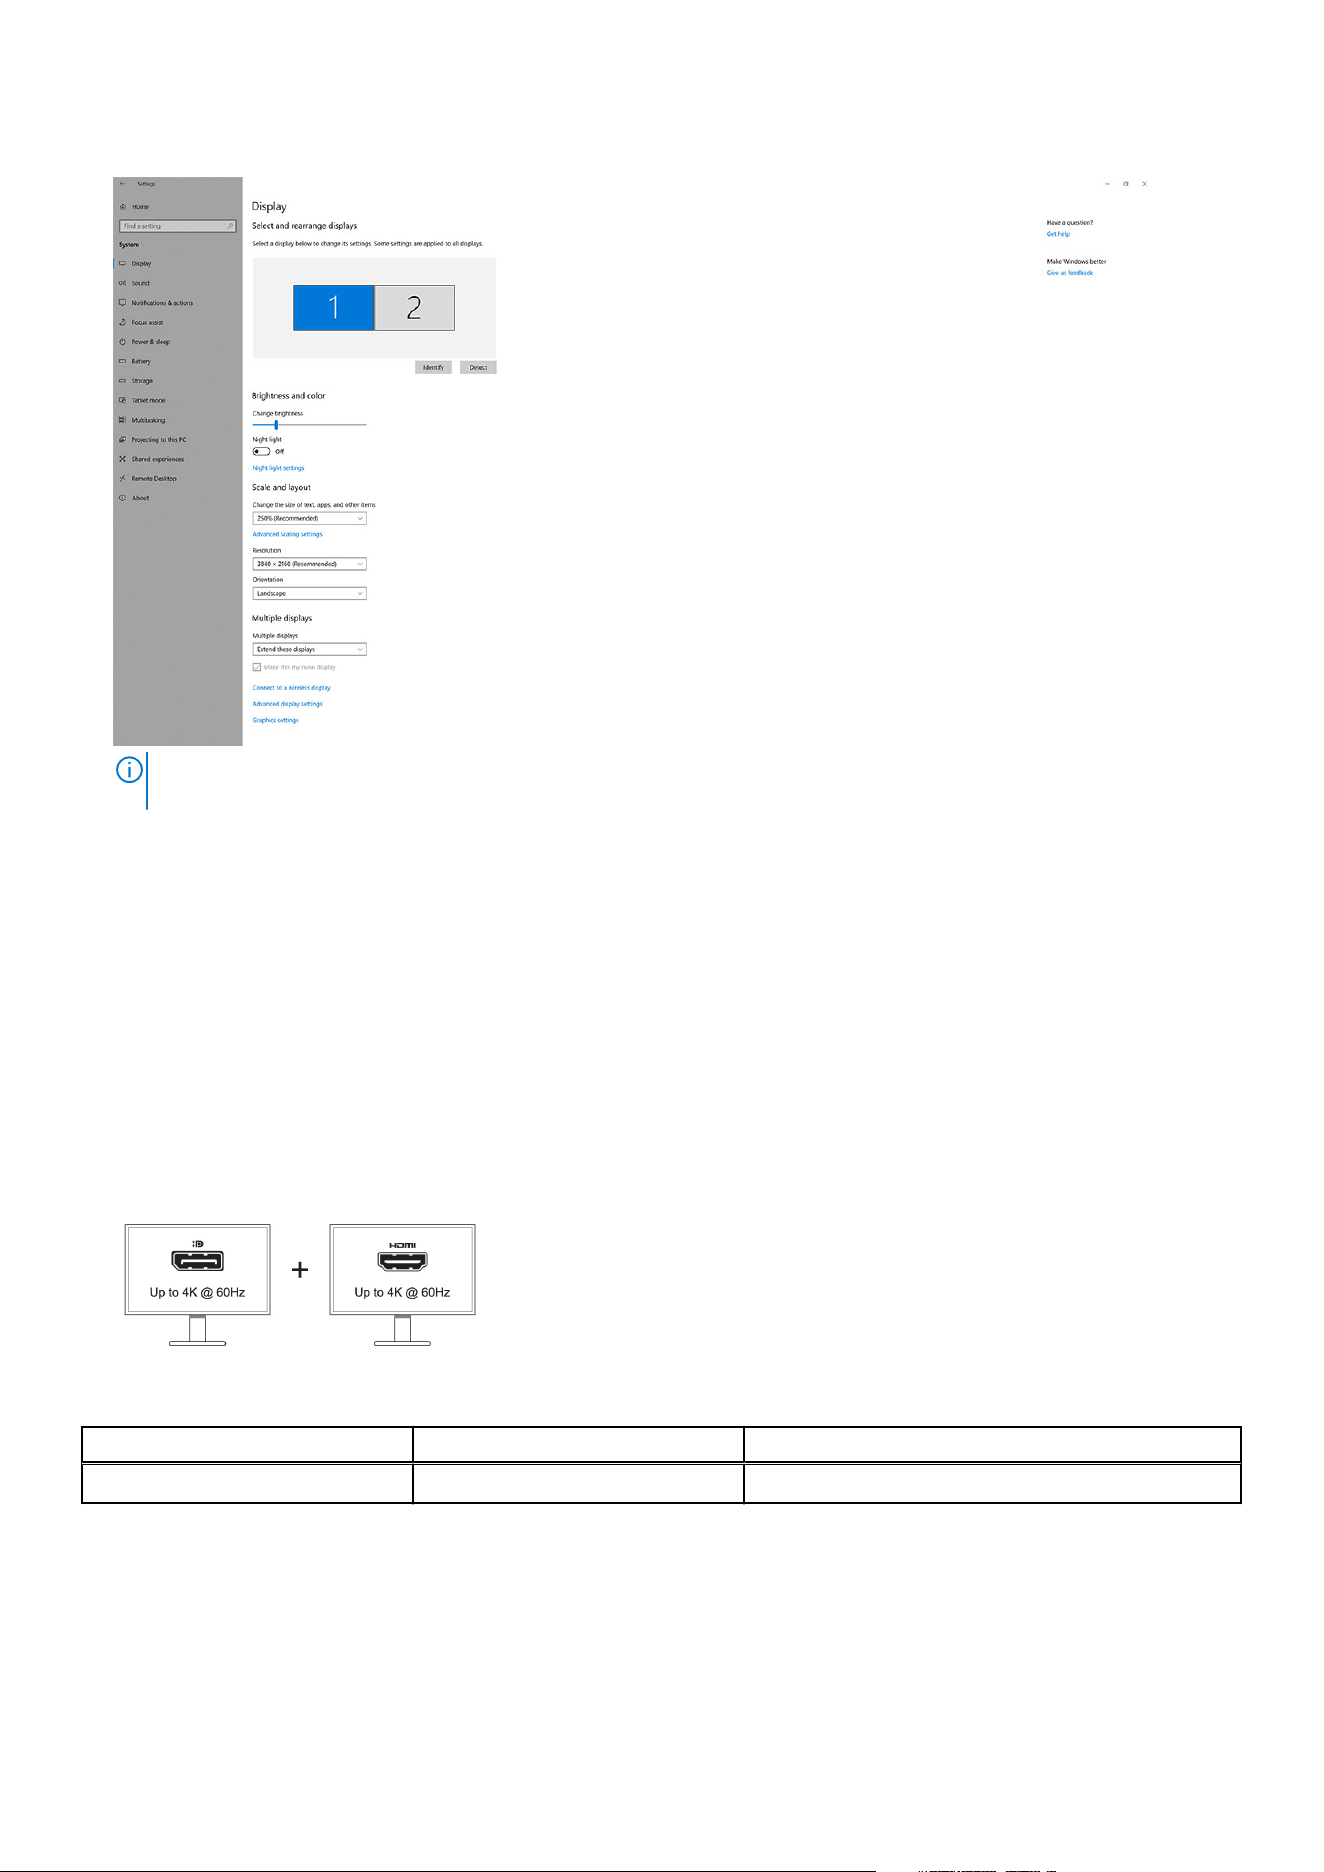
3. Under the Multiplay displays section, modify the display configuration as needed.
NOTE: The display topology can be configured, by moving around the displays in the "Select and rearrange displays"
section, to change where the operating system assumes these monitors are located.
Video connectors for multiple display setup
This topic provides details of the various video output configurations supported by your docking station.
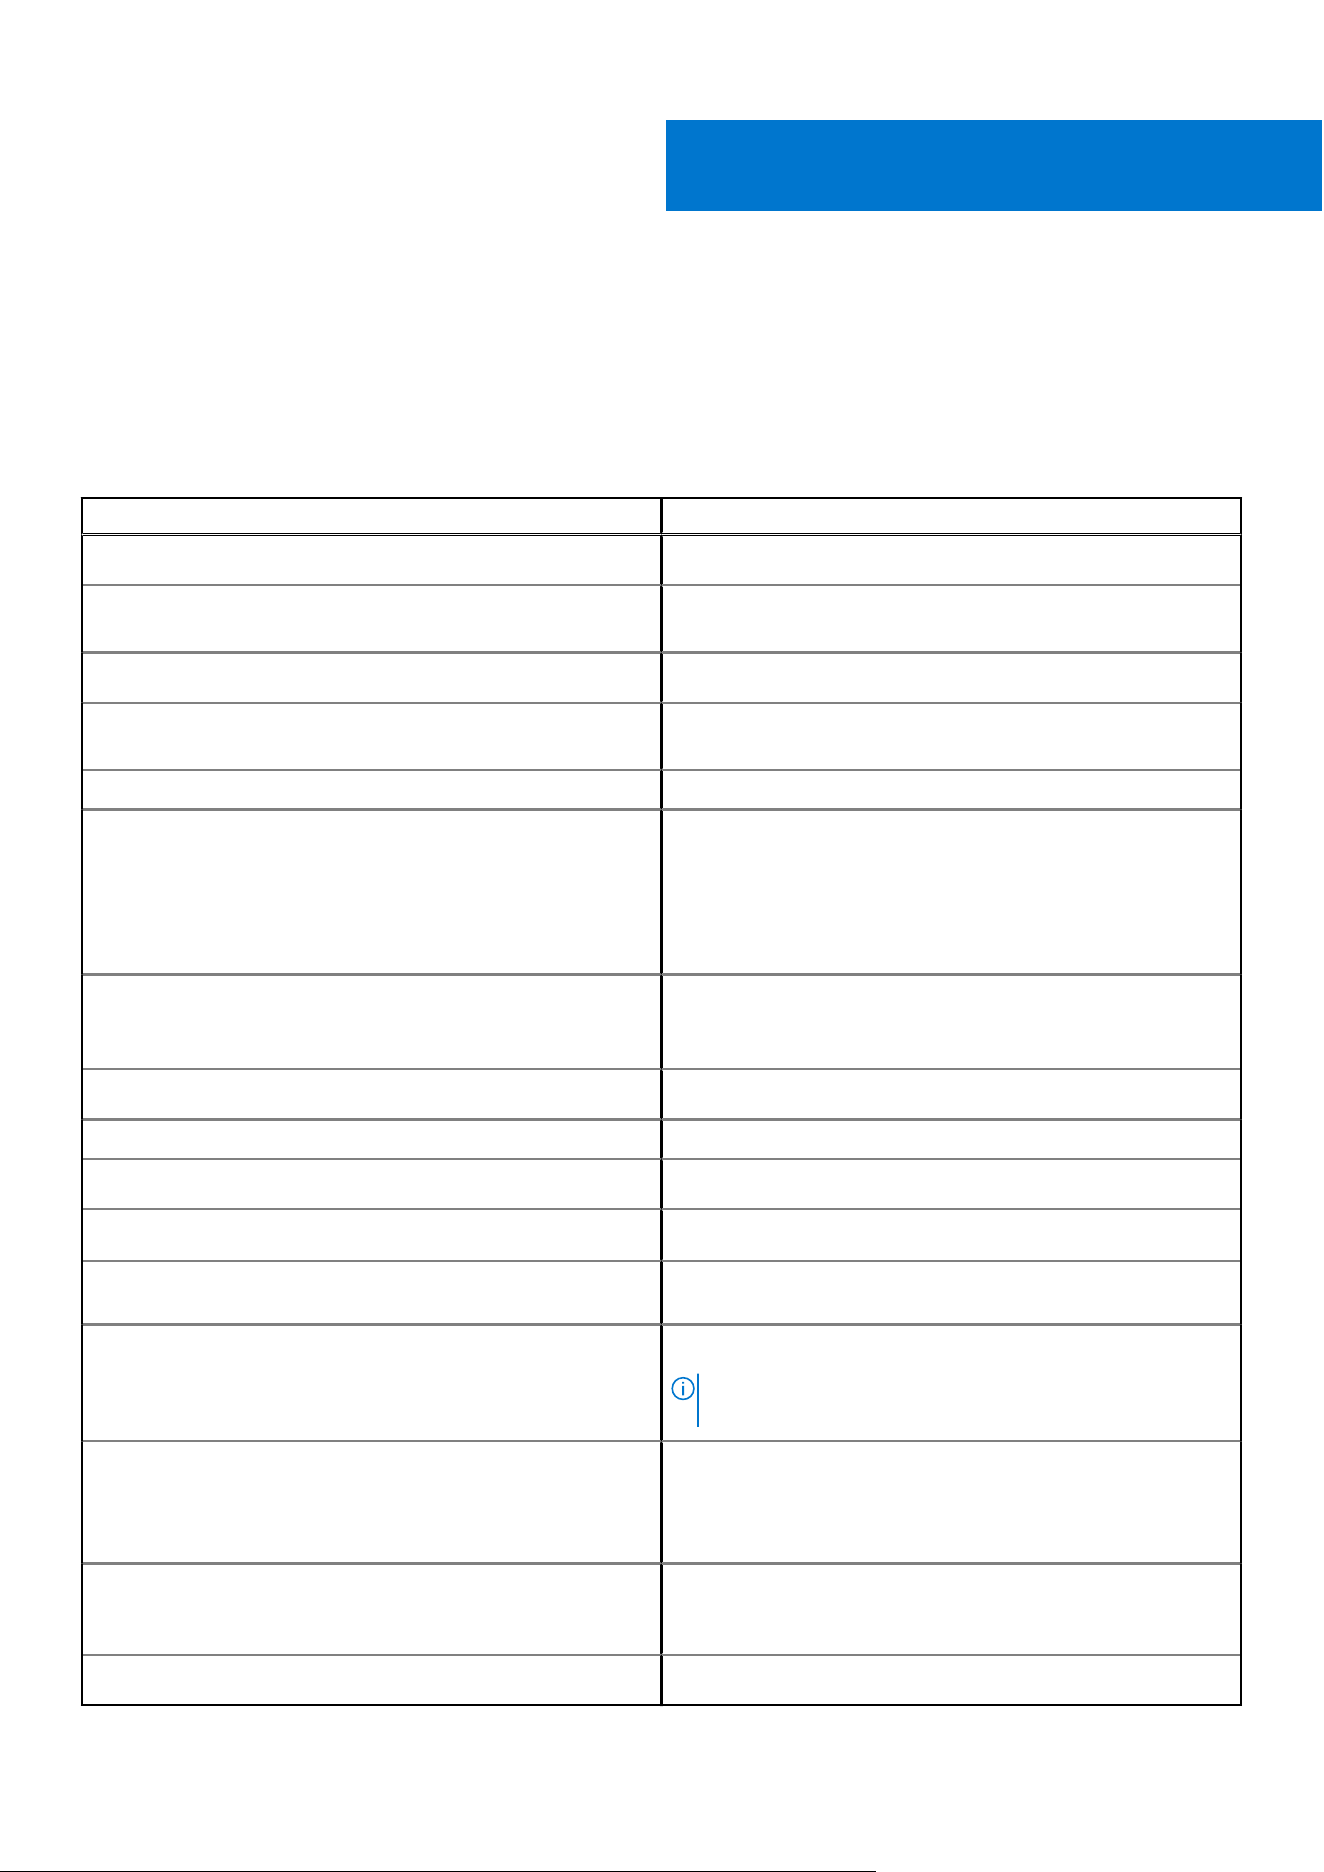
Important information
The Dell Dual Charge Dock HD22Q supports multiple video output configurations with 2 external displays.
Dual-display setup
Table 1. Dual-display connection
Number of displays Connector one Connector two
Two (4K @60Hz) DisplayPort 1.4 HDMI 2.1
14 Setting up external monitors

Display Resolution Table
Display matrix for Dell Dual Charge Dock HD22Q
Table 2. Display matrix for Dell Dual Charge Dock HD22Q
Display Port
Available
Bandwidth
Single Display
(maximum
resolution)
Dual Display
(maximum
resolution)
Triple Display (maximum
resolution)
Quad Display (maximum
resolution)
****
HBR2 (HBR2 x2
lanes - 8.6 Gbps)
DP 1.4/HDMI 2.1: 4K
(3840 x 2160) @30
Hz
DP 1.4 + HDMI 2.1:
FHD (1920 x 1080)
@ 60 Hz
HDMI 2.1: FHD (1920 x
1080) @60 Hz
DP 1.4: 2 x HD (1280 x 720)
@60Hz
**
Not supported
HBR3 (HBR3 x2
lanes - 12.9 Gbps)
DP 1.4/HDMI 2.1: 4K
(3840 x 2160) @30
Hz
DP 1.4 + HDMI 2.1:
QHD (2560 x 1440)
@60 Hz
HDMI 2.1: FHD (1920 x
1080) @60 Hz
DP 1.4: 2 x HD (1280 x 720)
@60Hz
**
HDMI 2.1: FHD (1920 x
1080) @60 Hz
DP 1.4: 3 x HD (1280 x 720)
@60Hz
**
HBR3 with DSC
(Display Stream
Compression)
DP 1.4: 8K (7680 x
4320) @ 30 Hz
OR
HDMI 2.1: 4K (3840
x 2160) @60 Hz or
4K (3840 x 2160)
@120 Hz
***
or 8K
(7680 x 4320) @ 30
Hz ***
DP 1.4 + HDMI 2.1:
4K (3840 x 2160)
@60 Hz
HDMI 2.1: QHD (2560 x
1440) @ 60 Hz
DP 1.4: 2 x QHD (2560 x
1440) @ 60 Hz
**
HDMI 2.1: QHD (2560 x
1440) @ 60 Hz
DP 1.4: 3 x QHD (2560 x
1440) @ 60 Hz
**
**
Third and fourth display must be daisy-chained through the DisplayPort (DP) 1.4 port using Multi-Stream Transport (MST)
monitors connected to the DP 1.4 port. All DisplayPort (DP) connected monitors should have Display Stream Compression
(DSC) support. If non-DSC monitors are used, then maximum resolution (HD: 1280 x 720) is the same as HBR3 non-DSC
(12.9Gbps) offerings.
***
This resolution is supported when using HDMI 2.1 monitor with Fixed Rate Link support for higher video resolution and
refresh rate. An HDMI 2.1 cable is also required for this display resolution.
****
Quad display setup functions only in LCD off mode.
Important
NOTE:
If higher resolution monitors are used, the Graphics driver makes a judgment based on monitor specifications and
display configurations. Some resolutions may not be supported and so will be removed from the Windows Display Control
Panel.
NOTE: Linux operating system is unable to physically turn-off built-in display, the external display numbers will be one less
than the display numbers listed in above tables.
NOTE: Resolution support is also dependent on the monitor’s Extended Display Identification Data (EDID) resolution.
Setting up external monitors 15
Technical specifications
Product specifications
Table 3. Product specifications
Feature Specifications
Model
HD22Q
Video ports
● DisplayPort 1.4 port (rear)
● HDMI 2.1 port (rear)
External displays supported
Up to 4
USB Type-A ports
● Two USB 3.2 Gen 1 (rear)
● Two USB 3.2 Gen 1 (right)
USB Type-C ports
● USB 3.2 Gen 2 Type-C with PowerDelivery 3.0
Network Gigabit Ethernet (RJ-45)
Support Wake On LAN from S0, S3, S4, or S5 sleep state with
select Dell systems. See platform setup guide for more details.
Support MAC Address Pass-Through with select Dell systems.
See platform setup guide for more details.
LED indicators
● Power button LED
● Qi charging LED
● RJ-45 LEDs
AC adapter options
130 W
DC-in Port 7.4 mm
Cable
0.8 m for HD22Q
Power delivery
● 90 W to system with 130 W AC-adapter
System requirements Compatible with USB Type-C systems with DisplayPort Alt
Mode
Power button function
Sleep/Wakeup/Power button
NOTE: For Dell systems, the power button mimics the
host power button behavior.
Operating systems
● Windows 10
● Windows 11
● Ubuntu 20.04 and later version
● Chrome M98 and later
Systems management
● Wireless vPro supported by the notebook, tablet, or
workstation
● Kernel Direct Memory Access (DMA) protection
MAC address
Pass-through MAC address
8
16 Technical specifications

Wireless Qi charging specifications
Table 4. Wireless charging specifications
Type Value
Charger type Qi 1.3 certified
Fast charge Up to 12 W
Docking cable specifications
Table 5. Docking cable specifications
Type USB Type-C
Color Magnetite
Length 800 mm
Signal bandwidth Up to 20 Gbps
Voltage rating 5 V to 20 V
Minimum bend radius 11.2 mm
Notebook/Tablet Connection Types Type-C
Power adapter specifications
Table 6. Power adapter specifications
Dell AC Adapter Specifications 130 W
Input voltage 100 to 240 VAC
Input current (max) 2.5 A
Input frequency 50 to 60 Hz
Output current 6.67 A (continuous)
Rated output voltage 19.5 VDC
Weight (lb) 0.91
Weight (kg) 0.413
Dimensions (in.) 1.0 x 3.0 x 6.1
Dimensions (mm) 25.4 x 76.2 x 154.7
Temperature range operating
0°C to 40°C
32°F to 104°F
Storage
-40°C to 70°C
-40°F to 158°F
Technical specifications 17
LED indicators
Table 7. Docking station LED indicator
State LED behavior
Docking station is receiving power from power adapter Flash three times
Table 8. RJ-45 LED indicator
Link speed indicators Ethernet activity indicator
10 Mb = Green Blinking yellow during network activity
100 Mb = Amber
1 Gb = Green + Amber
Table 9. Qi charging LED indicator
State LED behavior
Docking station is receiving power from power adapter Flashes white light for 3 seconds
Compatible Qi device is placed on the charging pad and the
device is charging
Solid white light
NOTE: The solid white light dims after 10 seconds.
Dock detects abnormal charging behavior, incompatible or
incorrect placement of device on the charging pad
Blinking amber light
For more details on troubleshooting, please see Symptoms and
solutions.
No device placed on charging pad No light
Dimensions and weight
Table 10. Dimensions and weight
Description Value
Height 113.20 mm (4.46 in.)
Width 90.50 mm (3.56 in.)
Depth 117.35 mm (4.62 in.)
Weight 0.67 kg (1.48 lb)
Docking specifications
Table 11. Operating and storage environment
Description Operating Non–operating
Temperature range 0 °C – 35 °C (32 °F – 95 °F) Non–operating : -20 °C to 60 °C (-4 °F
to 140 °F)
Relative humidity (maximum) 10% to 80% (non-condensing) Non–operating : 5% to 90% (non-
condensing)
WARNING: Operating and storage temperature ranges may differ among components, so operating or storing
the device outside these ranges may impact the performance of specific components.
18 Technical specifications
Dell docking station firmware update
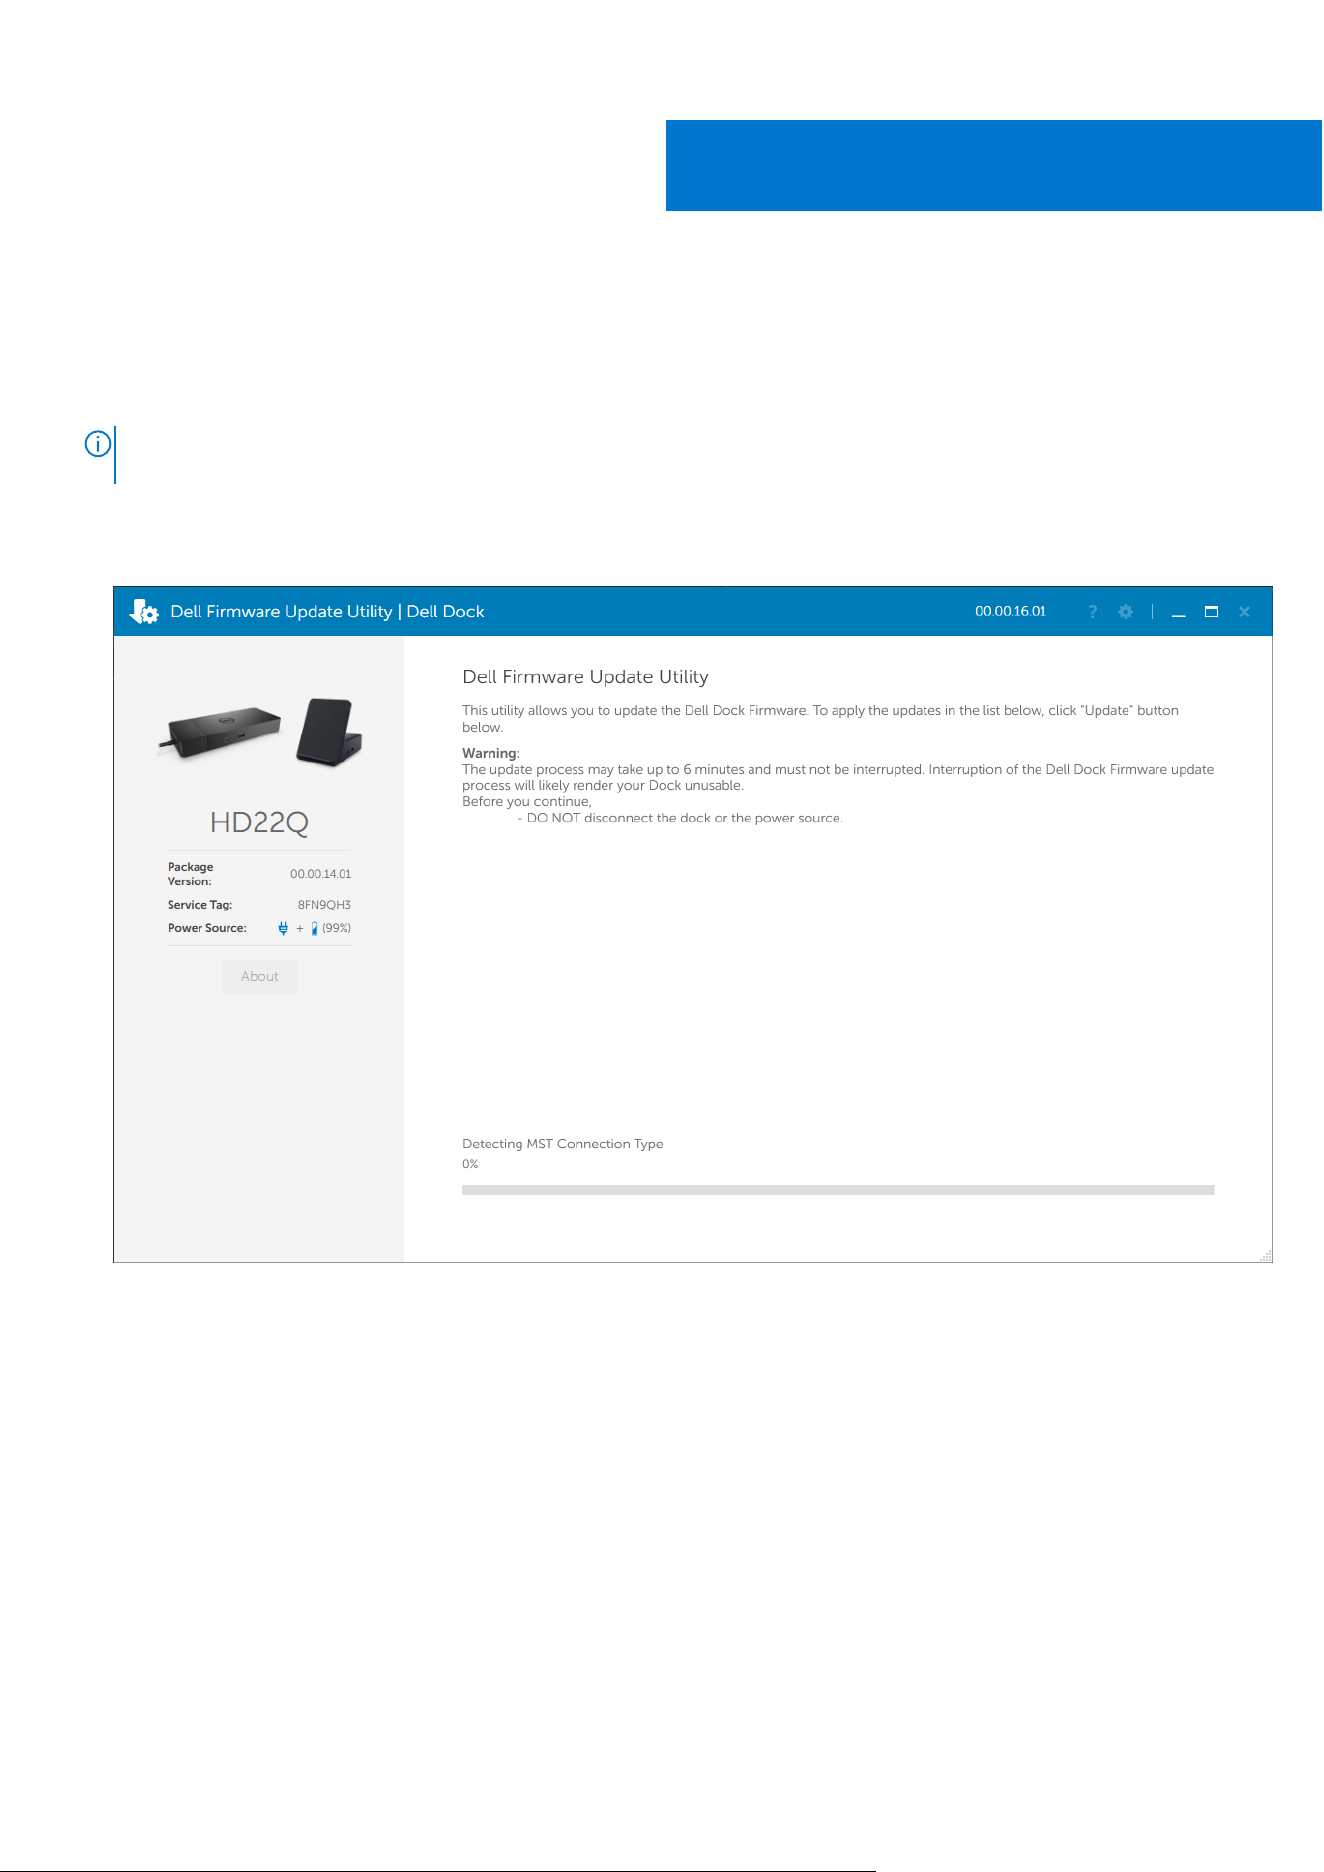
Standalone Dock Firmware Update utility
NOTE: Information that is provided is for Windows users running the executable tool. For other operating systems or
further detailed instructions see the HD22Q admin guide available on www.dell.com/support.
Download the Dell HD22Q dock driver and firmware update from www.dell.com/support. Connect the dock to the system and
start the tool in administrative mode.
1. Wait for all the information to be entered in the various Graphical User Interface (GUI) panes.
2. Update and Exit buttons are displayed in the bottom-right corner. Click the Update button.
9
Dell docking station firmware update 19
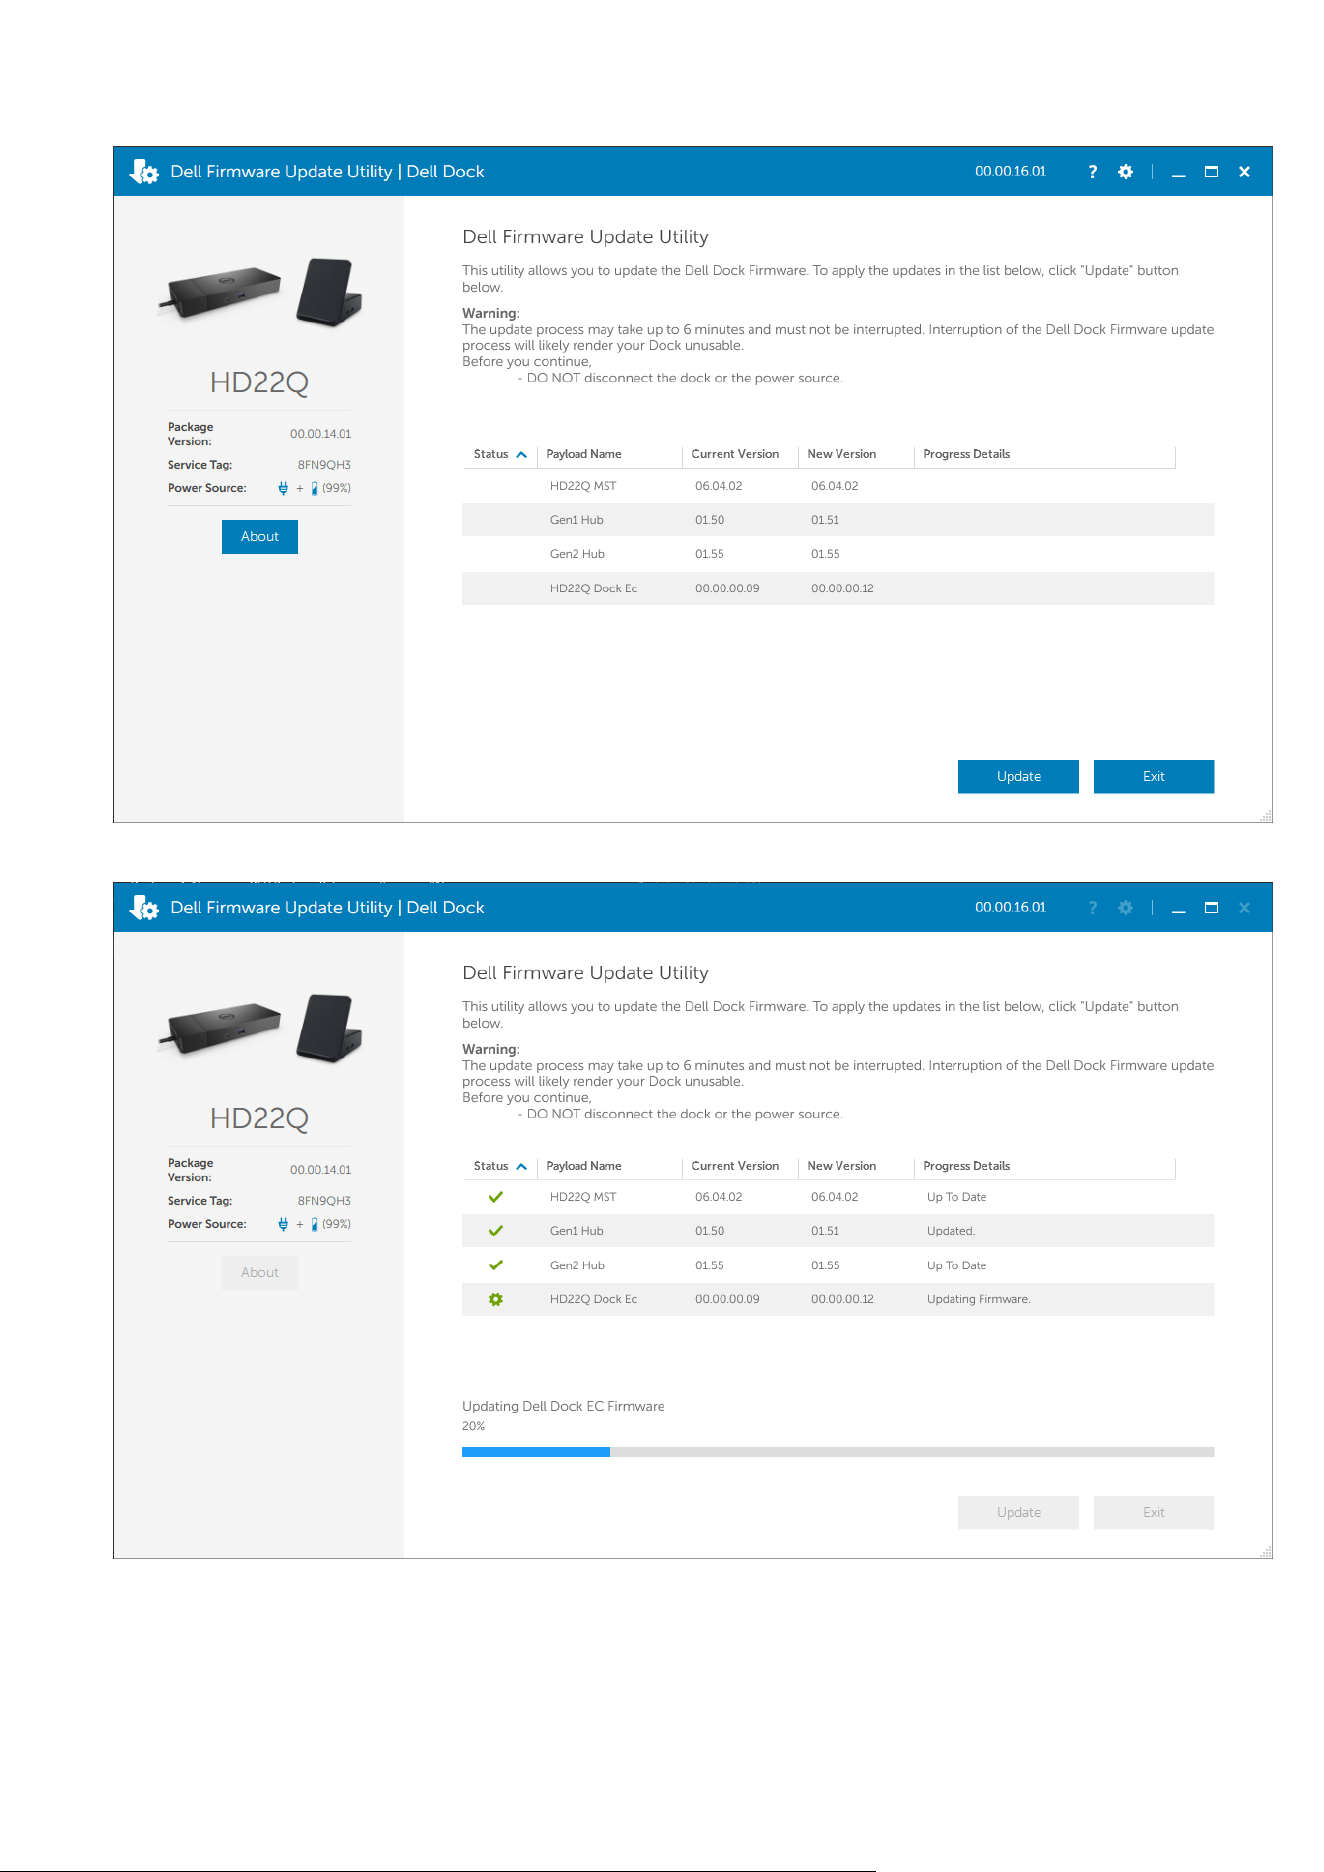
3. Wait for all the component firmware update to complete. A progress bar is displayed in the bottom.
4. The update status is displayed above the payload information.
20
Dell docking station firmware update
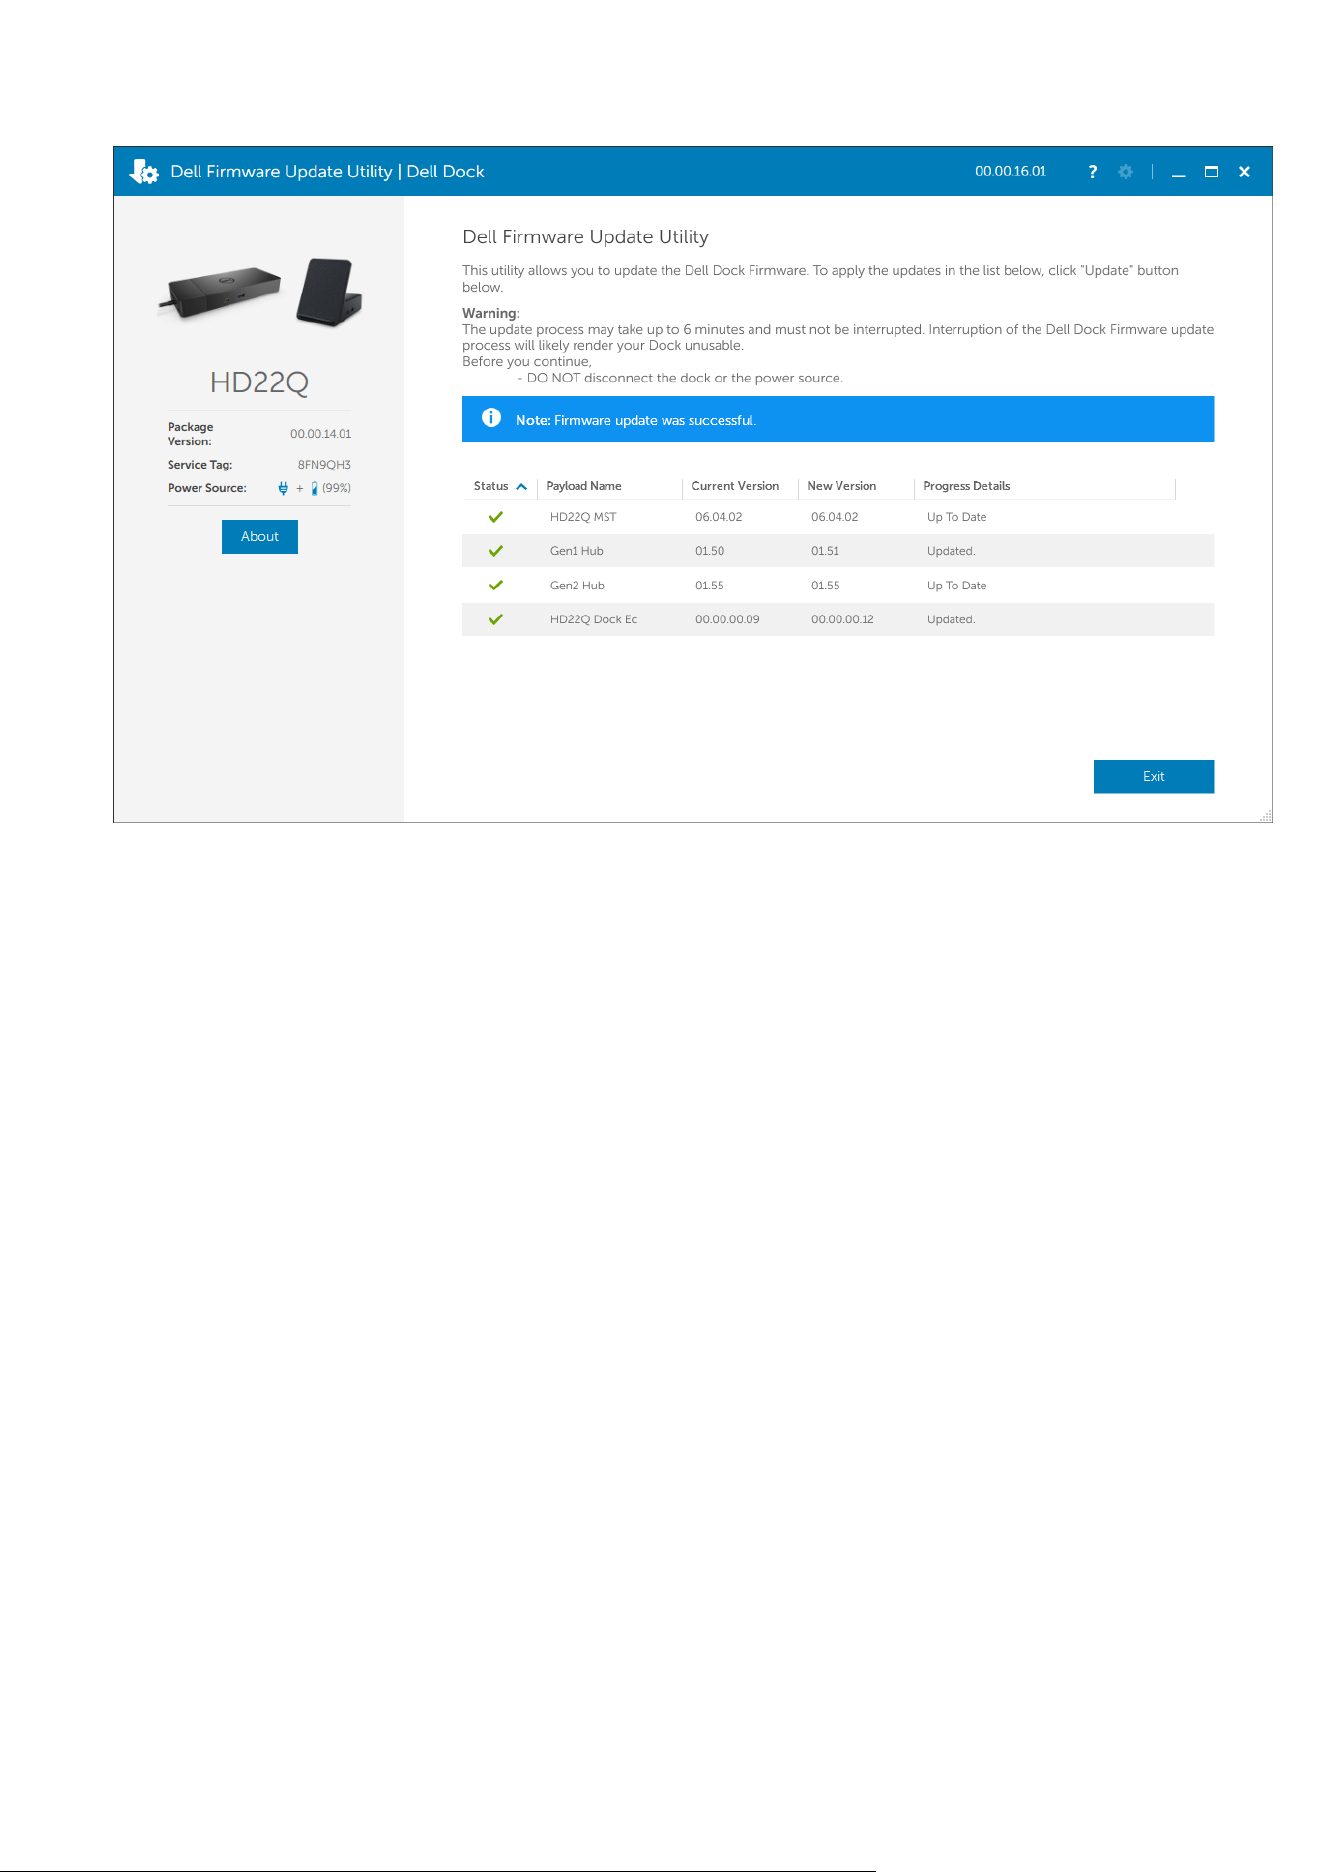
Dell docking station firmware update 21

Troubleshooting the Dell Dual Charge Dock -
HD22Q
Symptoms and solutions
Table 12. Symptoms and solutions
Symptoms Suggested solutions
1. No video on the monitors attached to the High Definition
Multimedia Interface (HDMI), or DisplayPort (DP) port on the
docking station
● Ensure that the latest BIOS and drivers for your computer
and the docking station are installed on your computer.
● Ensure your computer is connected to the docking station
securely. Try to disconnect and reconnect the docking
station to the notebook computer.
● Disconnect both ends of the video cable and check for
damaged/bent pins. Securely reconnect the cable to the
monitor and docking station.
● Ensure the video cable (HDMI, or DisplayPort) is
connected properly to the monitor and the docking
station. Ensure to select the correct video source on your
monitor (refer to your monitor’s documentation for more
information about changing the video source).
● Check the resolution settings on your computer. Your
monitor may support higher resolutions than what the
docking station is able to support. Please see the Display
Resolution Table for more information about maximum
resolution capacity.
● If your monitor is connected to the docking station, the
video output on your computer may be disabled. You can
enable the video output using the Intel Graphics Control
Panel or refer to the User Guide of your computer.
● If only one monitor is shown, while the other is not, go to
Windows Display Properties, and under Multiple Displays,
select the output for the second monitor.
● Using Intel graphics and using the system LCD, only two
displays can be supported.
● For Nvidia or AMD discrete graphics, the dock supports
three external displays plus the system LCD.
● Try with a different monitor and cable that is known to be
good, if possible.
2. The video on the attached monitor is distorted or flickering
● Reset the monitor to Factory Defaults. Refer to the User
Guide of your monitor for more information about how to
reset the monitor to factory defaults.
● Ensure that the video cable (HDMI or DisplayPort) is
connected securely to the monitor and the docking
station.
● Disconnect and reconnect the monitor(s) from the docking
station.
● First power off the docking station by disconnecting
the Type-C cable and then removing the power adapter
from the dock. Then, power on the docking station by
connecting power adapter to the dock before connecting
the Type-C cable to your computer.
10
22 Troubleshooting the Dell Dual Charge Dock - HD22Q

Table 12. Symptoms and solutions(continued)
Symptoms Suggested solutions
● Disconnect the dock and reboot the system if, the above
steps do not work.
3. The video on the attached monitor is not displaying as an
Extended Monitor
● Ensure that the Intel HD Graphics driver is installed in the
Windows Device Manager.
● Ensure that the Nvidia or AMD Graphics driver is installed
in the Windows Device Manager.
● Open the Windows Display Properties and go to Multiple
Displays control to set the display to the extended mode.
4. The USB ports are not functioning on the docking station
● Ensure that the latest BIOS and drivers for your computer
and the docking station are installed.
● If your BIOS Setup has a USB Enabled/Disabled option,
ensure it is set to Enabled.
● Verify if the device is detected in Windows Device
Manager and that the correct device drivers are installed.
● Ensure that the docking station is connected securely to
the notebook computer. Try to disconnect and reconnect
the docking station to the computer.
● Check the USB ports. Try plugging the USB device into
another port.
● First power off the docking station by disconnecting
the Type-C cable and then removing the power adapter
from the dock. Then, power on the docking station
by connecting the power adapter to the dock before
connecting the Type-C cable to your computer.
5. The High-Bandwidth Digital Content Protection (HDCP)
content is not displayed on the attached monitor
● Dell Dock supports HDCP upto HDCP 2.2.
NOTE: User's monitor/display must support HDCP 2.2
6. The LAN port is not functioning
● Ensure that the latest BIOS and drivers for your computer
and the docking station are installed on your computer.
● Ensure that the Ethernet Controller driver is installed in
the Windows Device Manager.
● If your BIOS Setup has a LAN/GBE Enabled/Disabled
option, ensure it is set to Enabled
● Ensure that the Ethernet cable is connected securely on
the docking station and the hub/router/firewall.
● Check the status LED of the Ethernet cable to confirm
connectivity. Reconnect both ends of the Ethernet cable if
the LED is not lit.
● First power off the docking station by disconnecting
the Type-C cable and then removing the power adapter
from the dock. Then, power on the docking station
by connecting the power adapter to the dock before
connecting the Type-C cable to your computer.
7. USB port has no function in a pre-OS environment
● Check the BIOS > Integrated Devices for USB
Configuration options, and ensure the following options are
checked:
● 1. Enable USB Boot Support
● 2. Enable External USB Port
8. PXE boot on dock does not function
● Check the BIOS > System Management for integrated
NIC options, and select Enabled w/PXE.
● If your BIOS Setup on your computer has a USB
Configuration page, please ensure the following options
are checked:
● 1. Enable USB Boot Support
Troubleshooting the Dell Dual Charge Dock - HD22Q 23

Table 12. Symptoms and solutions(continued)
Symptoms Suggested solutions
9. USB Boot does not function
● If your BIOS has a USB Configuration page, please ensure
the following options are checked:
● 1. Enable USB Boot Support
● 2. Enable External USB Port
10. AC Adapter is displayed as “Not Installed” in the Battery
Information page of the Dell BIOS Setup when the Type-C
cable is connected
1. Ensure the dock is connected properly to its own adapter
(130 W).
2. Disconnect and reconnect the dock's power adapter.
3. Disconnect and then reconnect the Type-C cable to your
computer.
11. Peripherals connected to the docking station do not work
in a pre-OS environment
● If the BIOS Setup on your computer has a USB
Configuration page, check the following options to enable
docking station function in a pre-OS environment:
● Enable External USB Port
12. Alert message “You have attached an undersized power
adapter to your system or Undersized adapter” is displayed
when the docking station is connected to your computer
● Ensure the docking station is connected properly to its
own power adapter. Computers that require more than 90
W power input must also be connected to their own power
adapter for charging and optimal performance.
13. Undersized power adapter warning message displayed 1. Ensure the dock is connected properly to its own adapter
(130 W).
2. Disconnect and reconnect the dock's power adapter.
3. Disconnect and then reconnect the Type-C cable to your
computer.
14. No external display. Dock's USB ports are not responding
● The docking connector has disconnected from the
system's USB ports. Please reconnect the docking
connector.
● Undock and reboot the system if the above steps do not
work.
15. With Ubuntu 18.04 LTS, WIFI will be turned off when the
docking station is connected to the system and the WIFI turns
On again after rebooting the system.
● Please uncheck the option Control WLAN radio in BIOS.
● Option is available in - Settings -> Power Management ->
Wireless Radio Control
16. When the dock has no power
● Disconnect USB Type-C from the system and the dock's
power adapter.
● Reconnect the dock's AC adapter.
● Check if the dock LED is on.
17. When the dock is not working even when BIOS, firmware
and drivers are up to date.
● Reconnect the dock's AC adapter
● Restart the dock
● Attempt flashing the firmware on the dock.
● Check if the power LEDs on the dock are functional.
18. Wireless charging does not work
● Ensure that your device supports wireless charging.
● Reconnect the dock's AC adapter.
● Restart the dock.
● Check if the wireless device is placed properly on the
charging pad of the dock.
● Check if the power LEDs on the dock are functional.
19. Qi charging LED flashes amber
This LED blinks amber when the dock detects an abnormal
charging status such as FOD (Foreign Object Detection) or
OTP (Over Temperature Protection).
FOD (Foreign Object Detection):
24 Troubleshooting the Dell Dual Charge Dock - HD22Q

Table 12. Symptoms and solutions(continued)
Symptoms Suggested solutions
1. Check if there are any metal objects in between the
charging pad and the mobile device.
2. Check if the error goes away after removing the phone
case. It is also not recommended to use thick phone cases,
metal finished cases, battery cases, coins or bank cards
placed inside the phone cover etc. when charging your
device.
3. Once cleared, the LED should switch back to solid white
indicating that the device is charging.
OTP (Over Temperature Protection):
1. Check if the mobile device is heating up.
2. Take the phone off the charging pad and place it away to
let it cool down.
3. Once cooled sufficiently, please the phone on the charging
pad and observe the LED.
4. The LED should switch back to a steady white indicating
that the device is charging.
20. Device placed on wireless charging pad is charging slower
than usual
If the battery on the charging device gets too warm, the
device might limit the wireless charging speed. However, it
should start charging normally once the temperature drops:
1. Check if the device is overheating.
2. Remove the device from the charging pad and allow it to
cool down.
3. Move the dock and the device to a cooler location.
21. Device placed on the wireless charging pad charges
intermittently
The dock has a 3-coil design to support different size devices.
Also, the dock only supports wireless charging on one device
at a time:
1. Find the position that works best for your device. Refer to
Orientations supported for wireless charging.
2. Check if the Qi charging LED stays on after the device is
placed on the charging pad to confirm.
Troubleshooting the Dell Dual Charge Dock - HD22Q 25
Getting help and contacting Dell
Self-help resources
You can get information and help on Dell products and services using these self-help resources:
Table 13. Self-help resources
Self-help resources Resource location
Information about Dell products and services www.dell.com
My Dell app
Tips
Contact Support In Windows search, type Contact Support, and press
Enter.
Online help for operating system www.dell.com/support/windows
Access top solutions, diagnostics, drivers and downloads, and
learn more about your computer through videos, manuals and
documents.
Your Dell computer is uniquely identified by a Service Tag or
Express Service Code. To view relevant support resources for
your Dell computer, enter the Service Tag or Express Service
Code at www.dell.com/support.
For more information on how to find the Service Tag for your
computer, see Locate the Service Tag on your computer.
Dell knowledge base articles for a variety of computer
concerns
1. Go to www.dell.com/support.
2. On the menu bar at the top of the Support page, select
Support > Knowledge Base.
3. In the Search field on the Knowledge Base page, type the
keyword, topic, or model number, and then click or tap the
search icon to view the related articles.
Contacting Dell
To contact Dell for sales, technical support, or customer service issues, see www.dell.com/contactdell.
NOTE: Availability varies by country/region and product, and some services may not be available in your country/region.
NOTE: If you do not have an active Internet connection, you can find contact information about your purchase invoice,
packing slip, bill, or Dell product catalog.
11
26 Getting help and contacting Dell