ANTIMICROBIAL AIR
HUMIDIFIER/ HUMIDIFICADOR
DEL AIRE ANTIMICROBIANO
Instruction Manual /
Manual de instrucciones
WSHUJLR2258WH / WSHUJLR2258GY


3
EN
CONTENT
SAFETY INFORMATION
IMPORTANT SAFEGUARDS ....................................................................... 4
BATTERIES ....................................................................................................... 6
INSTALLATION LOCATION ........................................................................ 7
POLARIZED PLUG ......................................................................................... 8
HOW TO USE
DESCRIPTION OF PARTS ........................................................................... 9
BEFORE FIRST USE ...................................................................................... 11
SETTING UP THE REMOTE CONTROL .................................................. 11
OPERATING INSTRUCTIONS..................................................................... 16
CLEANING AND CARE ........................................................................ 20
TROUBLESHOOTING ........................................................................... 23
DISPOSAL ............................................................................................... 24
INFORMATION AND SERVICE ........................................................... 24

4
EN
SAFETY INFORMATION
Read this instruction manual carefully before using the appliance
and keep it for future reference.
1. Use the appliance only for its intended purpose. Improper use
may result in an electric shock, fire or serious injury and may
void the warranty.
2. Before connecting the appliance to the power supply, check
that the voltage indicated on the appliance corresponds with
the voltage in your home. If this is not the case, do not use the
appliance and contact the retail outlet immediately.
3. Only connect the appliance to an earthed wall socket.
4. The power cord has a short design to prevent accidents. Do not
use an extension cord.
5. This appliance is for household use only. It is not suitable for
commercial, industrial or outdoor use.
6. This appliance is intended to be used in households and similar
applications such as:
- sta kitchen areas in shops, oces and other working
environments;
- farm houses;
- by clients in hotels, motels and other residential type
environments;
7. Ensure the water tank cover and mist nozzle are properly
closed before each use. Do not open the mist nozzle or water
tank cover when the appliance is switched on.
8. Do not move the appliance when it is switched on and / or full
of water.
9. Only use the humidifier with the power base supplied.
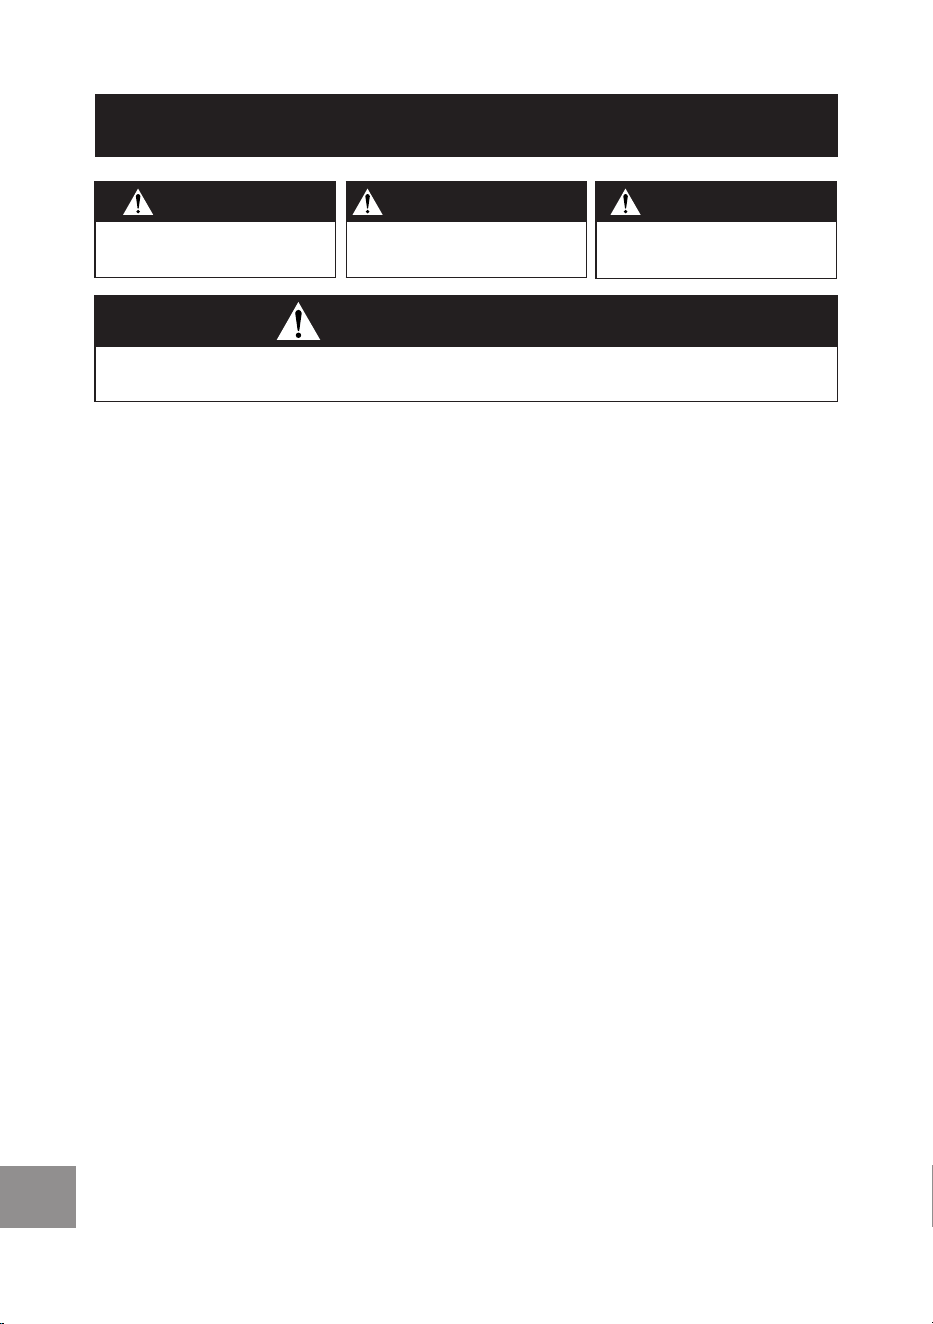
IMPORTANT SAFEGUARDS
DANGER
DANGER – Immediate hazards
which WILL result in severe
personal injury or death
WARNING
WARNING – Hazards or unsafe
practices which COULD result in
severe personal injury or death
WARNING
When using electrical appliances, basic safety precautions
should always be followed, including the following
CAUTION
CAUTION – Hazards or unsafe
practices which COULD result in
minor personal injury

5
EN
SAFETY INFORMATION
10. The use of accessories or fittings other than the original parts
supplied with this appliance may result in an injury, fire or
damages and will void the warranty.
11. Only use aromatherapy or essential oil products with this
humidifier.
12. Do not use water that is more than 40°C to fill the water tank
or to clean the appliance.
13. Only use tap water. Do not use distilled water (demineralized
water). Never add any sanitizer to the water.
14. If the appliance gives o an abnormal odor or makes abnormal
sounds, immediately turn it o and unplug it from the power
supply.
15. Do not use the appliance when the water tank is empty.
16. Do not use the appliance in extreme cold temperatures when
the liquid inside may freeze, as this can cause damage to the
appliance. If frozen, wait until the ice has fully melted before
use.
17. Follow the cleaning and maintenance instructions detailed in
the CLEANING AND CARE section of this instruction manual.
18. Do not immerse the appliance or electrical parts of the
appliance in water or any other liquids. Never place them under
running water (see CLEANING AND CARE).
19. To prevent spillages, do not fill the humidifier above its capacity
of 4L.
20. When the water tank is full of water, use two hands to carry the
humidifier to prevent spillage.
21. This appliance can be used by children aged from eight years
and above and by persons with reduced physical, sensory or
mental abilities, or lack of experience or knowledge, if they are
properly supervised or instructed how to use the appliance
in a safe way and understand the hazards involved. Children
should not play with the appliance. Cleaning, maintenance or
connecting the appliance to the power supply should not be
made by children under the age of eight.
22. KEEP OUT OF REACH OF BABIES AND CHILDREN – Keep the
appliance and its cord out of the reach of children younger
than eight years of age.
23. Children must be supervised to ensure that they do not play
with the appliance.

6
EN
SAFETY INFORMATION
24. Never leave the appliance unattended while it is switched on.
25. Keep the humidifier and the power cord away from the edge of
tables or countertops and out of the reach of children.
26. DANGER OF ELECTROCUTION! Do not touch or operate the
appliance with wet hands or while standing on a wet floor.
27. Do not connect this appliance to an external timer or remote
control system.
28. To unplug, pull the plug out. Do not pull on the cord.
29. If the power cord or plug is damaged, do not use the appliance.
The power cord must be replaced by the manufacturer, an
authorized service agent or a similarly qualified person.
30. Use only spare parts supplied by the manufacturer or an
authorized service center.
31. Do not under any circumstances attempt to repair the
appliance. For servicing and repairs, contact the retail outlet,
the manufacturer, or an authorized service center.
32. RISK OF SUFFOCATION! KEEP OUT OF REACH OF CHILDREN
– Keep all packaging materials out of the reach of babies and
children.
33. CAUTION! To avoid an electric shock, fire, or injury:
- Make sure the appliance cannot be knocked over or upset and
no water spillage can occur when you are connecting it to the
power supply.
- Keep the humidifier and the power cord away from sharp
edges and the edge of tables or countertops and out of the
reach of children.
- Always unplug the appliance before refilling with water,
overfilling, cleaning, storing and immediately after use.
- Do not let water splash into the electric components inside
the base.
BATTERIES
WARNING
1. Keep new and used batteries out of children’s reach.
2. Do not leave batteries lying around; there is a risk that they
could be swallowed by children or pets. If swallowed, consult
adoctor immediately.
3. Leaking or damaged batteries can burn skin. Use a cloth or
protective gloves to remove the batteries and dispose of them

7
EN
SAFETY INFORMATION
in accordance with local regulations. If you do get battery acid
on your skin, wash with soap and water immediately. Neutralize
with lemon juice, vinegar, or other mild acid.
4. If battery acid gets into your eyes, consult a doctor immediately
5. Batteries cannot not be reactivated, disassembled, burned,
buried, or short-circuited. There is a risk of explosion!
6. Do not recharge normal, non-rechargeable batteries. There is
arisk of explosion! Only charge rechargeable batteries that are
intended for this purpose; use suitable rechargeable battery
chargers.
7. The batteries must be replaced correctly using an identical or
equivalent battery.
8. The batteries must be inserted with the correct polarity
(+and-).
9. Dispose of batteries in accordance with local regulations.
10. Do not expose batteries to heat sources such as sunlight or
naked flames. Keep at room temperature.
11. Do not throw batteries into a fire as they could burst or release
toxic substances.
12. If the battery compartment does not close correctly, stop using
the unit and keep it out of children’s reach.
13. Always remove batteries before cleaning, inspecting, or
performing any maintenance on the appliance.
14. Remove used batteries immediately from the unit and discard
them in accordance with local regulations.
15. Remove the batteries when you are not using the unit for
along time.
INSTALLATION LOCATION
• Do not place this appliance close to a heat source, such as
astove, to prevent it from being damaged or causing a fire or
injury.
• Place the appliance at least 20 inches away from the floor or
furniture. Make sure there is at least 50 inches of space above
the appliance and that it is at least 80 inches away from other
household electrical appliances, such as a TV.
• Put the humidifier on a waterproof mat or water-resistant
surface. Do not place it on surfaces that are aected by
moisture, such as wood.

8
EN
• Always place the appliance on a stable, flat, dry, and heat-
resistant surface.
• Never place the humidifier in a closed room, particularly where
a child or person with reduced physical, sensory, or mental
abilities, or lack of experience or knowledge may be playing,
resting, or sleeping.
• Never allow the power cord to touch any hot surface.
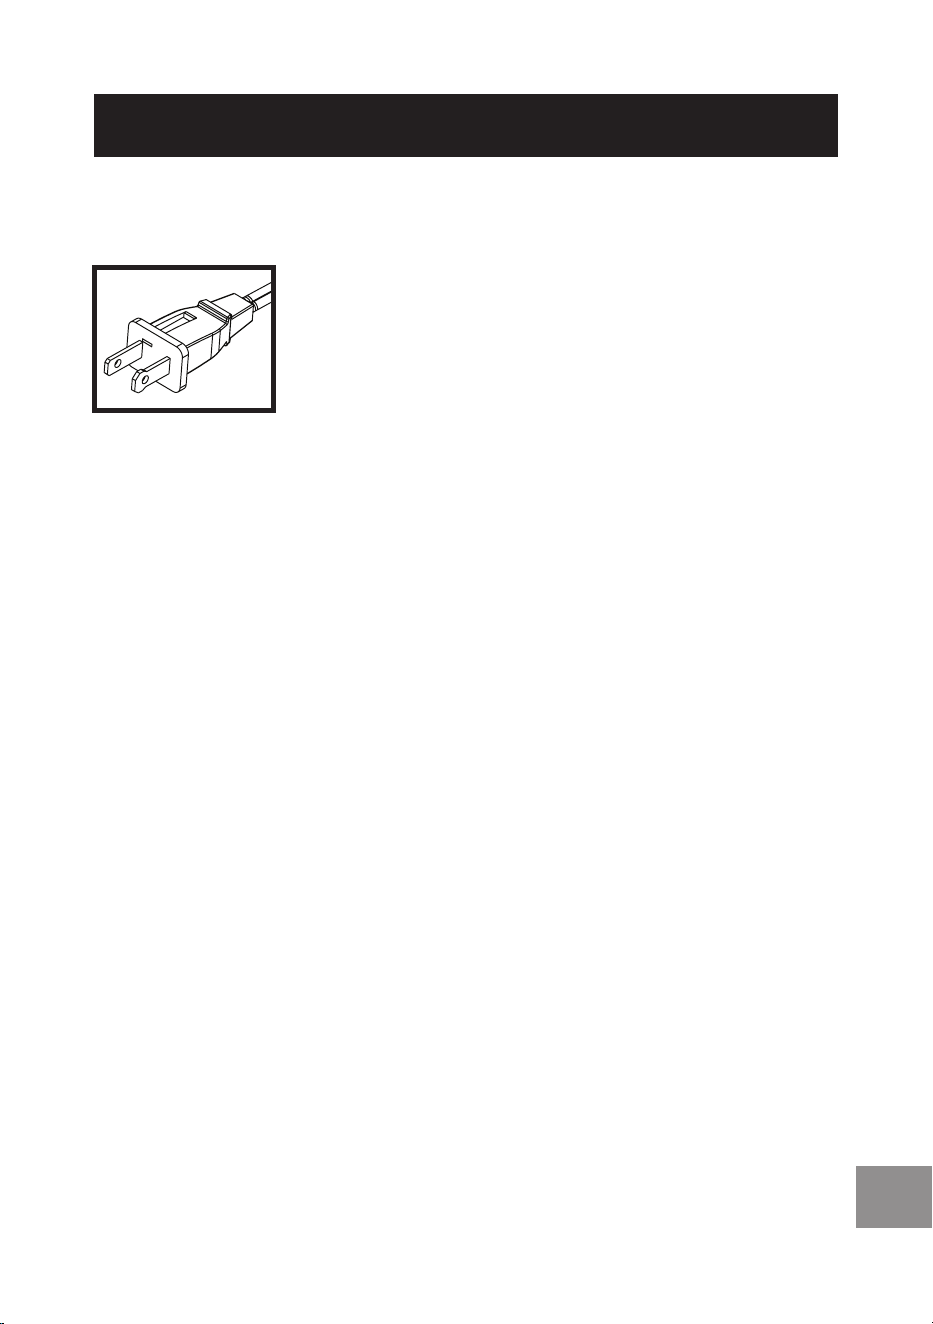
POLARIZED PLUG
The appliance has a polarized plug (one blade
is wider than the other). To reduce the risk of
electric shock, this plug is intended to fit into
apolarized outlet only one way. If the plug does
not fit fully into the outlet, reverse the plug. If it
still does not fit, contact a qualified electrician.
DO NOT ATTEMPT TO MODIFY THIS PLUG OR ATTEMPT TO
DEFEAT ITS SAFETY FEATURE IN ANY WAY.
NOTE: Neither Westinghouse nor the dealer can accept any liability
for damage to the product or personal injury resulting from failure
to observe the correct electrical connection procedures.
RETAIN THESE INSTRUCTIONS
FOR FUTURE REFERENCE
HOUSEHOLD USE ONLY
SAFETY INFORMATION

9
EN
HOW TO USE
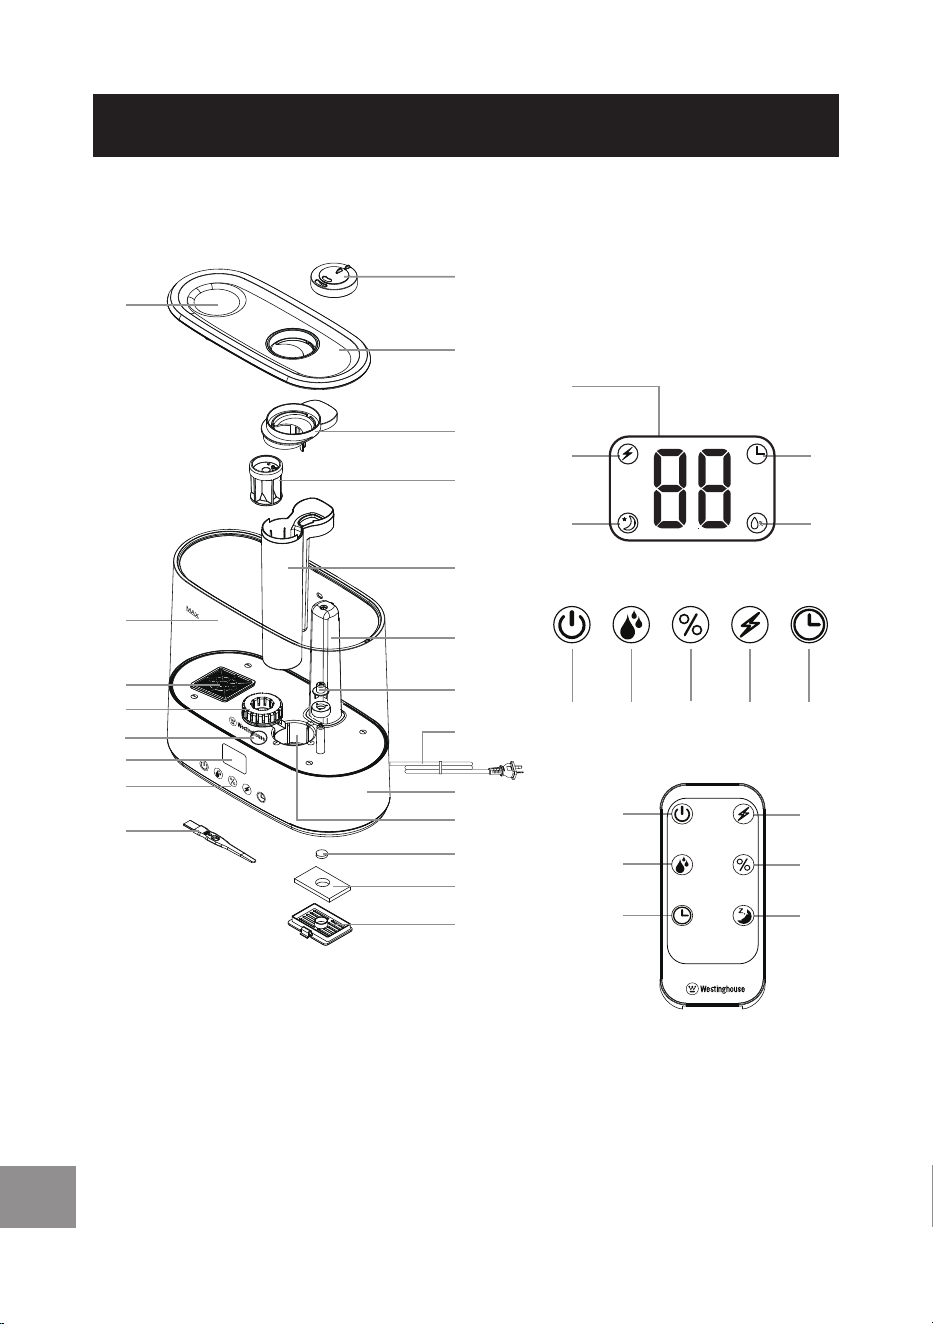
DESCRIPTION OF PARTS
24
23
22
25
26
27 28 29 30 31
2
1
3
30
4
6
9
8
7
27
29
28
32
31
16
20
21
18
17
10
11
15
14
12
13
5
19
LED screen icons
Control panel
Remote control

10
EN
1. Aroma oil tray / air intake
2. Foam filter
3. Aroma oil pad
4. Brush (store on the bottom
of the base)
5. Control panel
6. LED screen
7. LED night light
8. Ceramic ball filter
9. Electrolysis module
10. Water tank
11. Water tank inlet
12. Mist nozzle
13. Water tank cover
14. Mist condenser stopper
15. Mist condenser
16. Mist tube
17. Air intake
18. Float valve
19. Power cord and plug
20. Base
21. Oscillator (at the bottom of
the recess)
LED screen icons
22. Timer / humidity display
23. Electrolysis icon
24. Sleep icon
25. Timer icon
26. Humidity icon
Control panel
27. ON / OFF button
28. MIST button
29. HUMIDITY button
30. ELECTROLYSIS button
31. TIMER button
Remote control
32. SLEEP button
NOTE: All remote control buttons are the same as the control
panel buttons except for the SLEEP button. You can also press the
remote control buttons rather than touch them.
HOW TO USE
11
EN
HOW TO USE
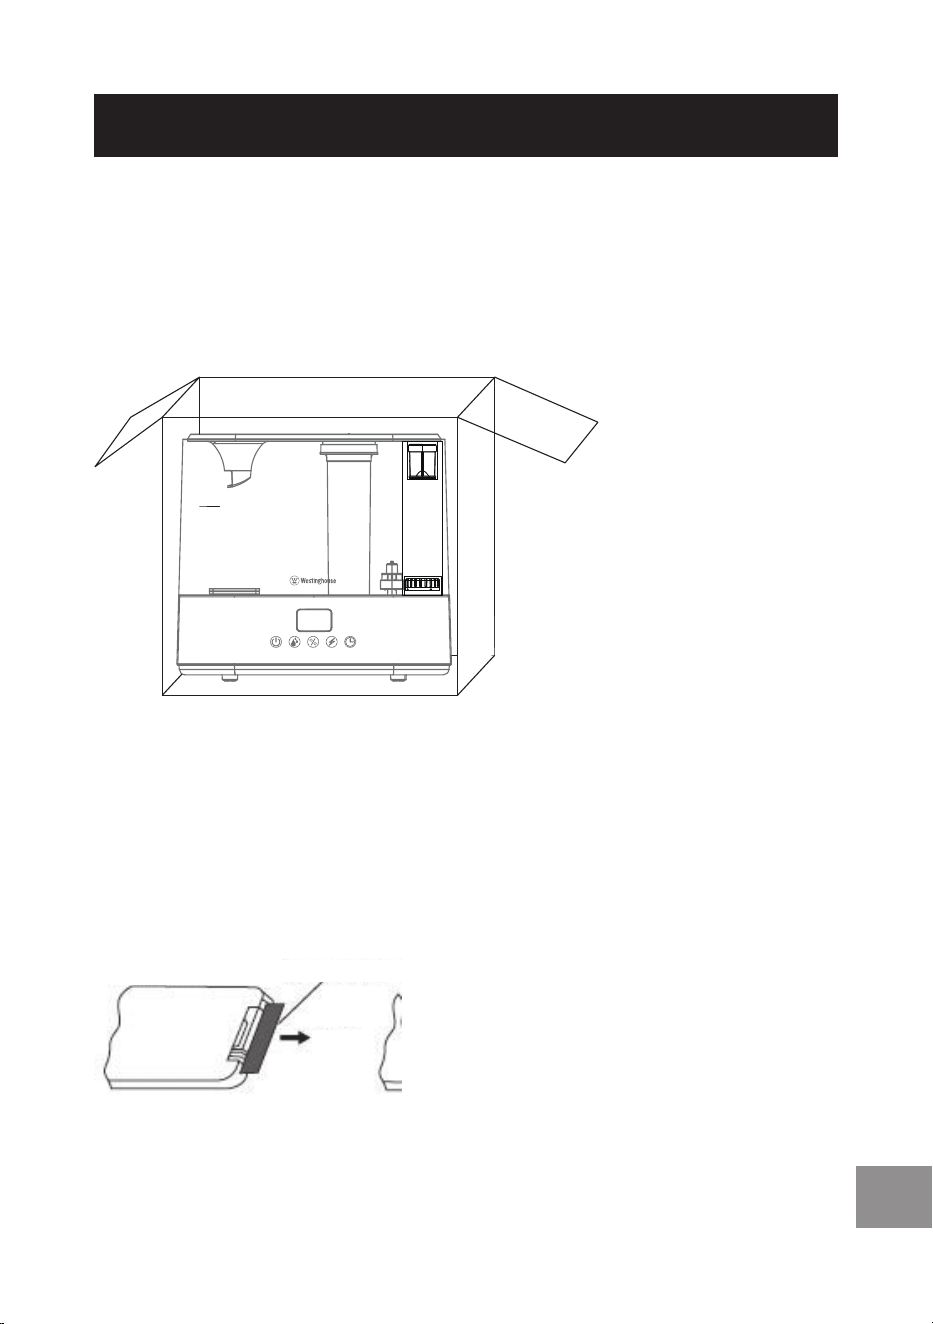
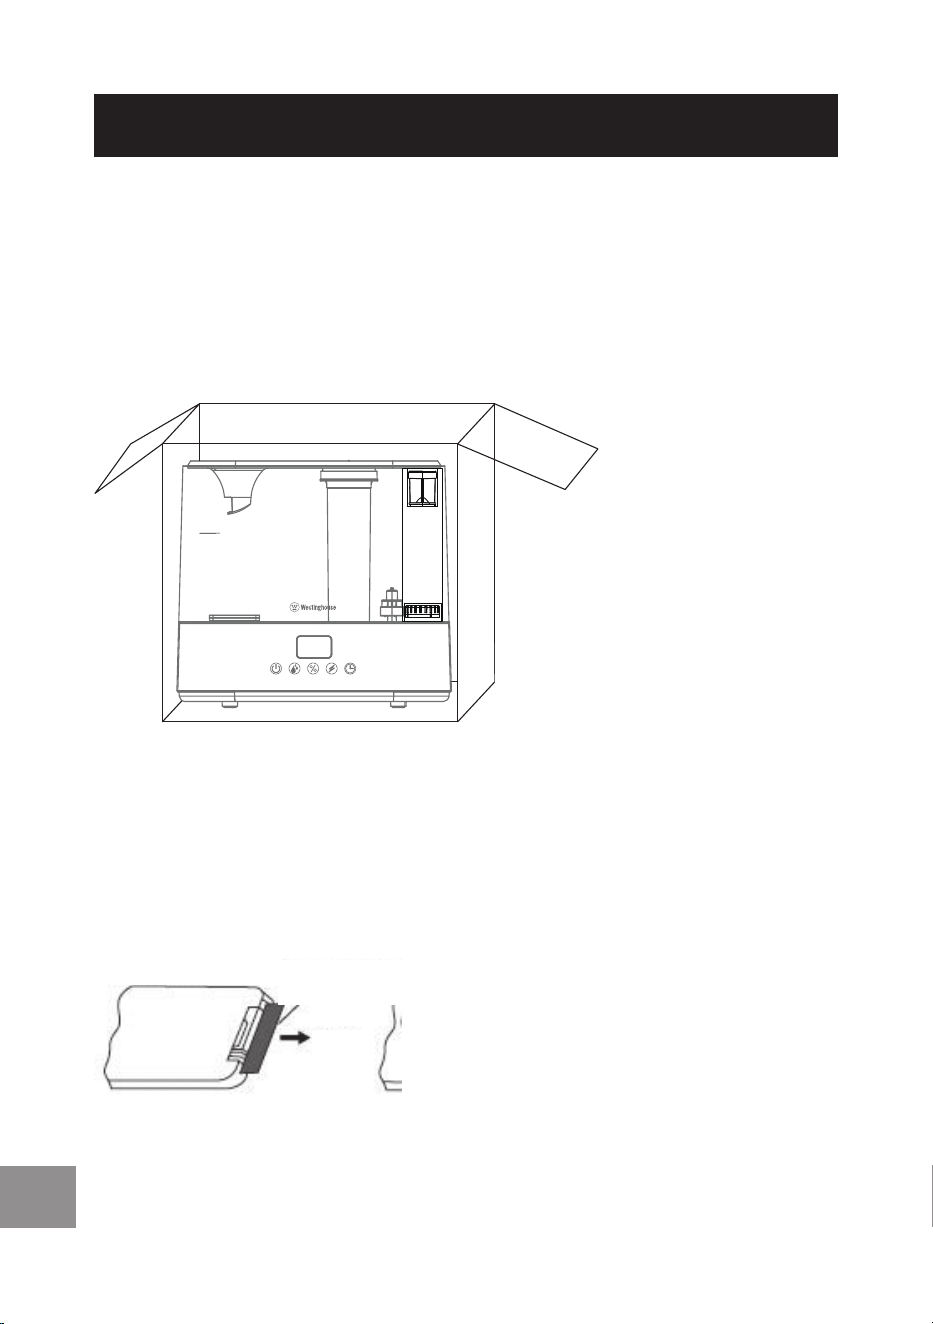
BEFORE FIRST USE
• Remove all packaging from the appliance.
• Unpack all parts and check for damage that may have occurred
during transport. If any parts are damaged or missing, do not
use the appliance and return it to your retail outlet immediately.
MAX
SETTING UP THE REMOTE
CONTROL
Pull the plastic film from the battery compartment. The battery is
now active, and you can use the remote control.
Remote
control
Insulating film
Pull
12
EN
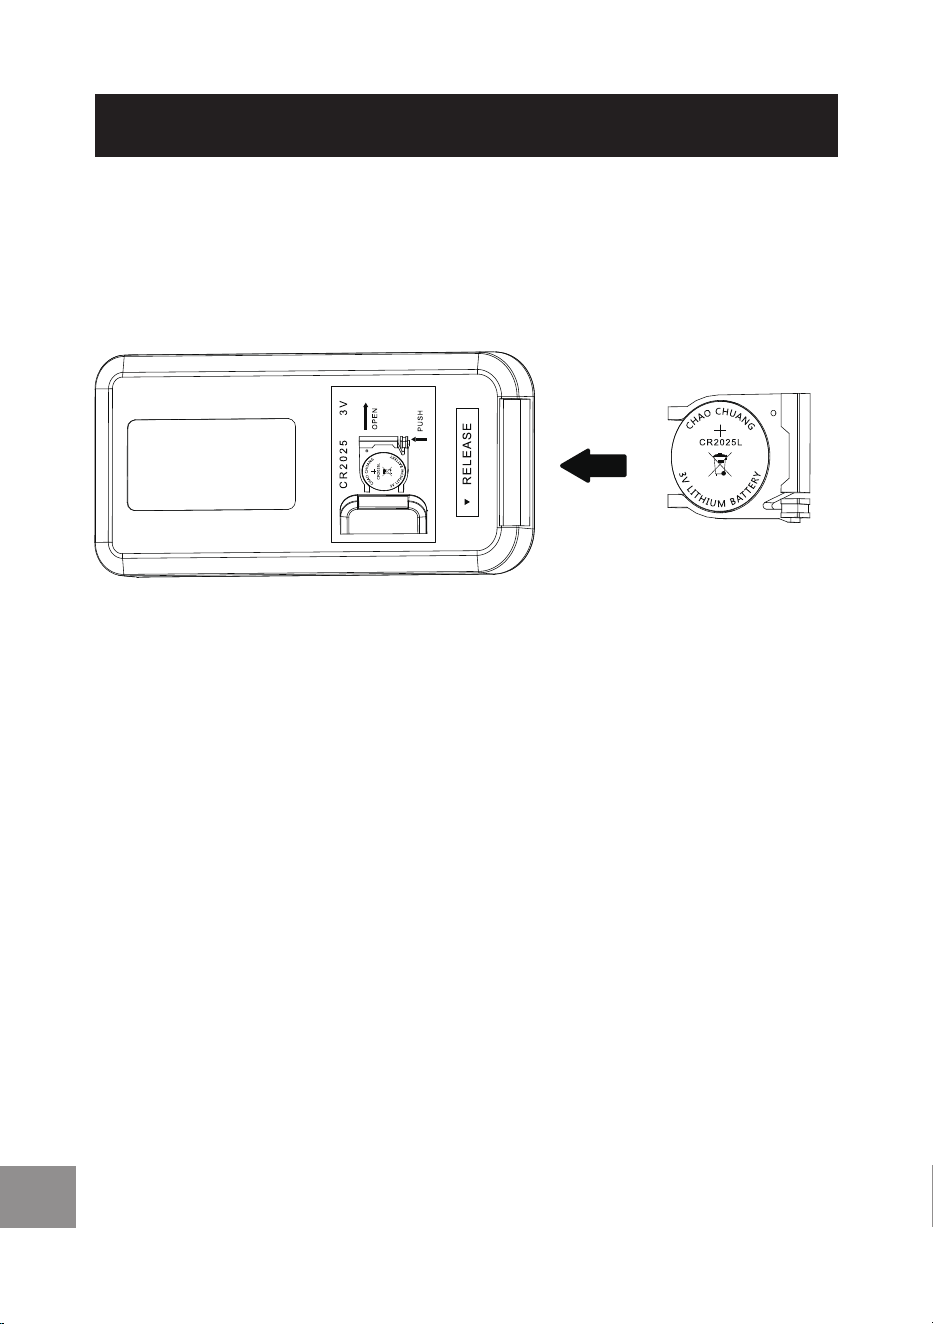
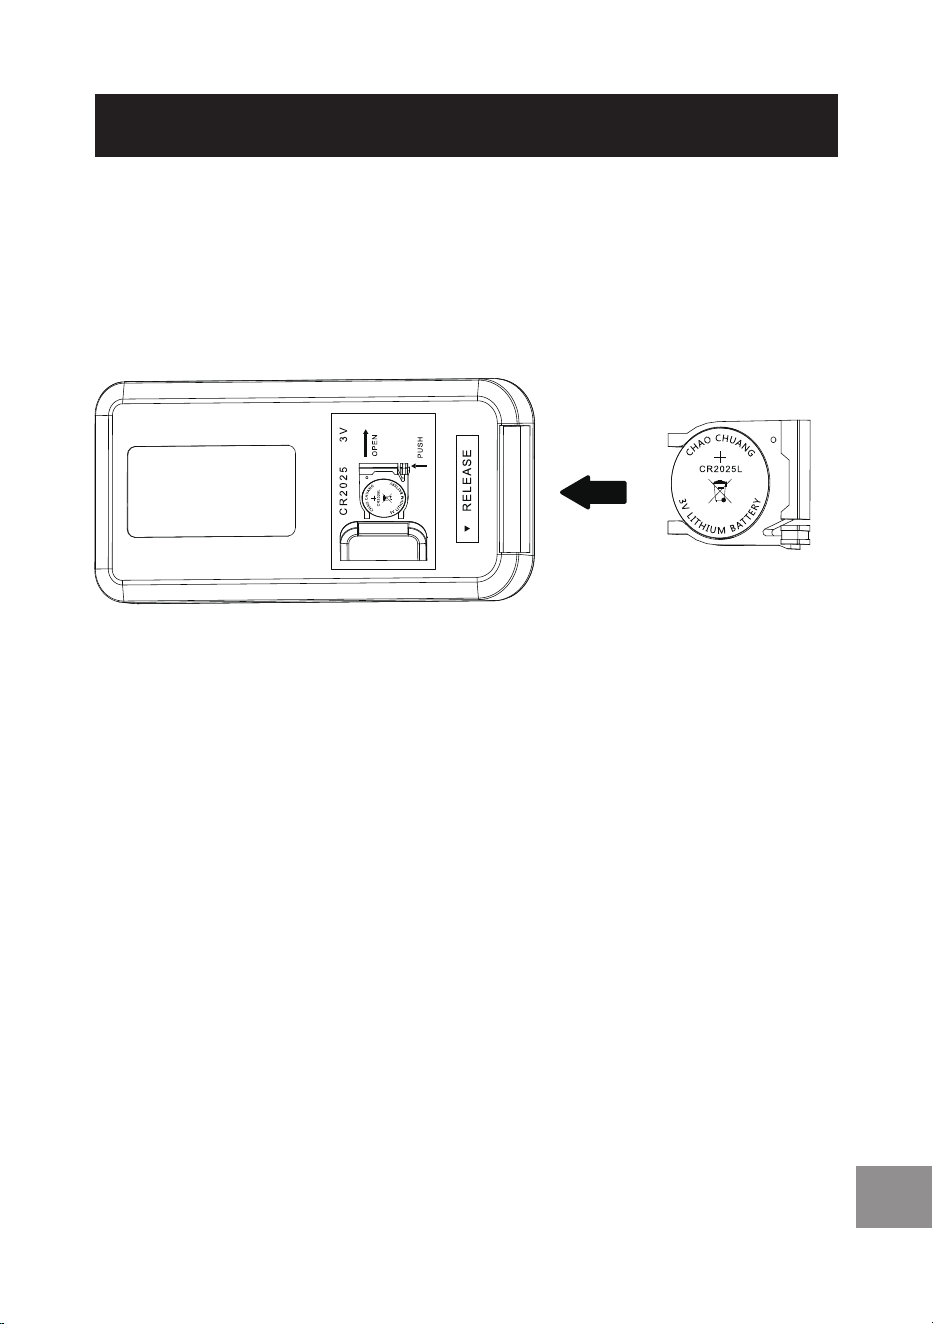
CHANGING THE BATTERY
1. Push the release button inwards and pull the battery casing
out. Remove the old battery.
2. Insert 1 x CR2025 3V battery into the battery casing ensuring
you follow the polarity (+ and -) marked on the casing.
Slide the battery casing back into the remote control until you hear
it click firmly into place.
GETTING TO KNOW YOUR HUMIDIFIER
• The humidifier holds 4L of water, which provides 33 to 67 hours
of humidifying action (depending on the mist level you select).
• The electrolysis module electrolyzes the water into strong
oxidizing ions which can kill airborne viruses
and bacteria.
• There are 3 mist levels to select from – high, medium and low.
• You can set the timer to automatically turn off the humidifier
between 1 to 8 hours.
• The LED night light can be turned on or off.
• An aromatherapy oil or essential oil can be used to gently
perfume the room.
HOW TO USE
13
EN
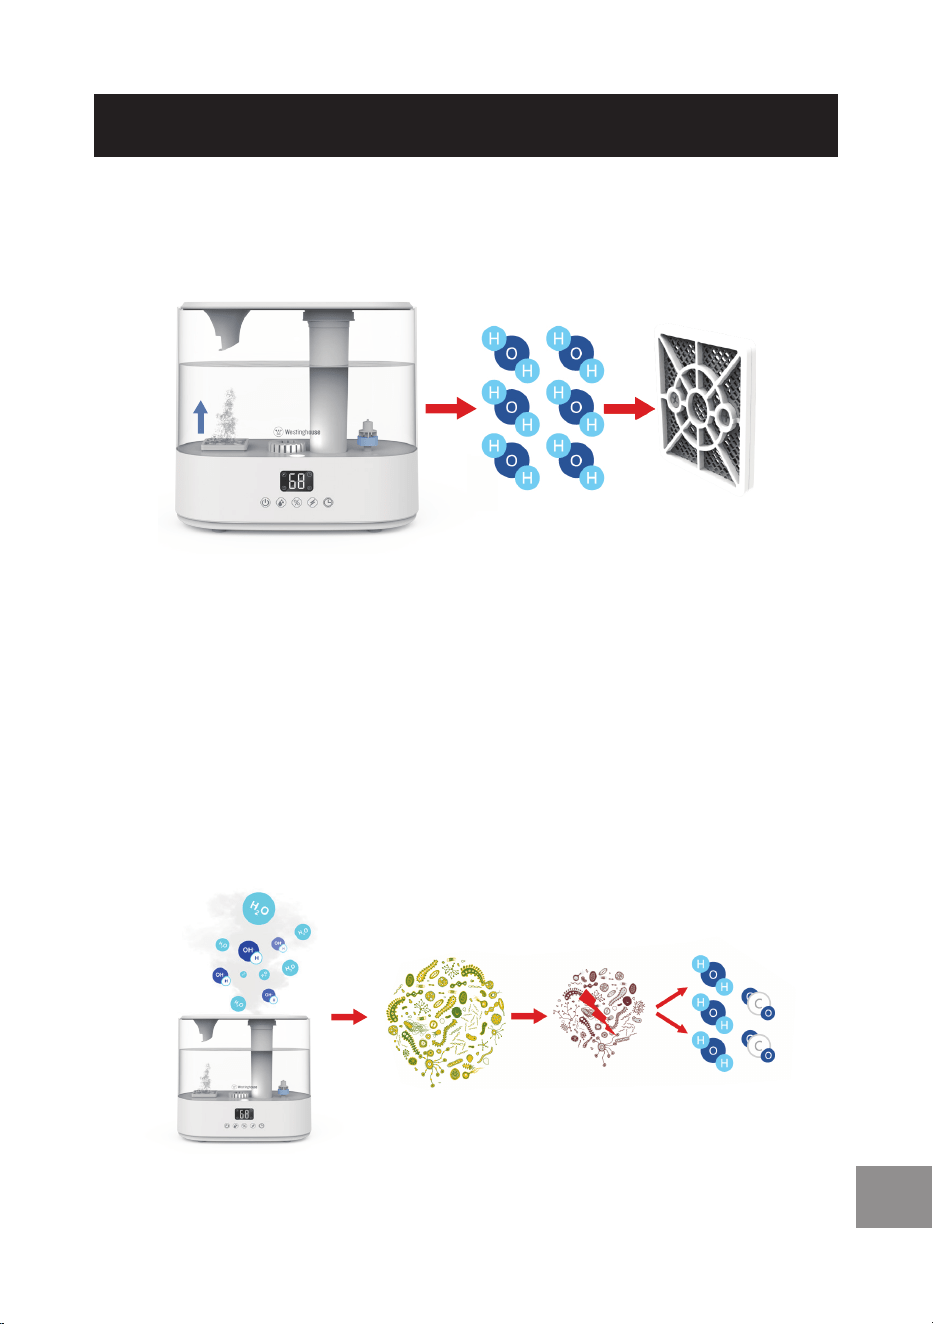
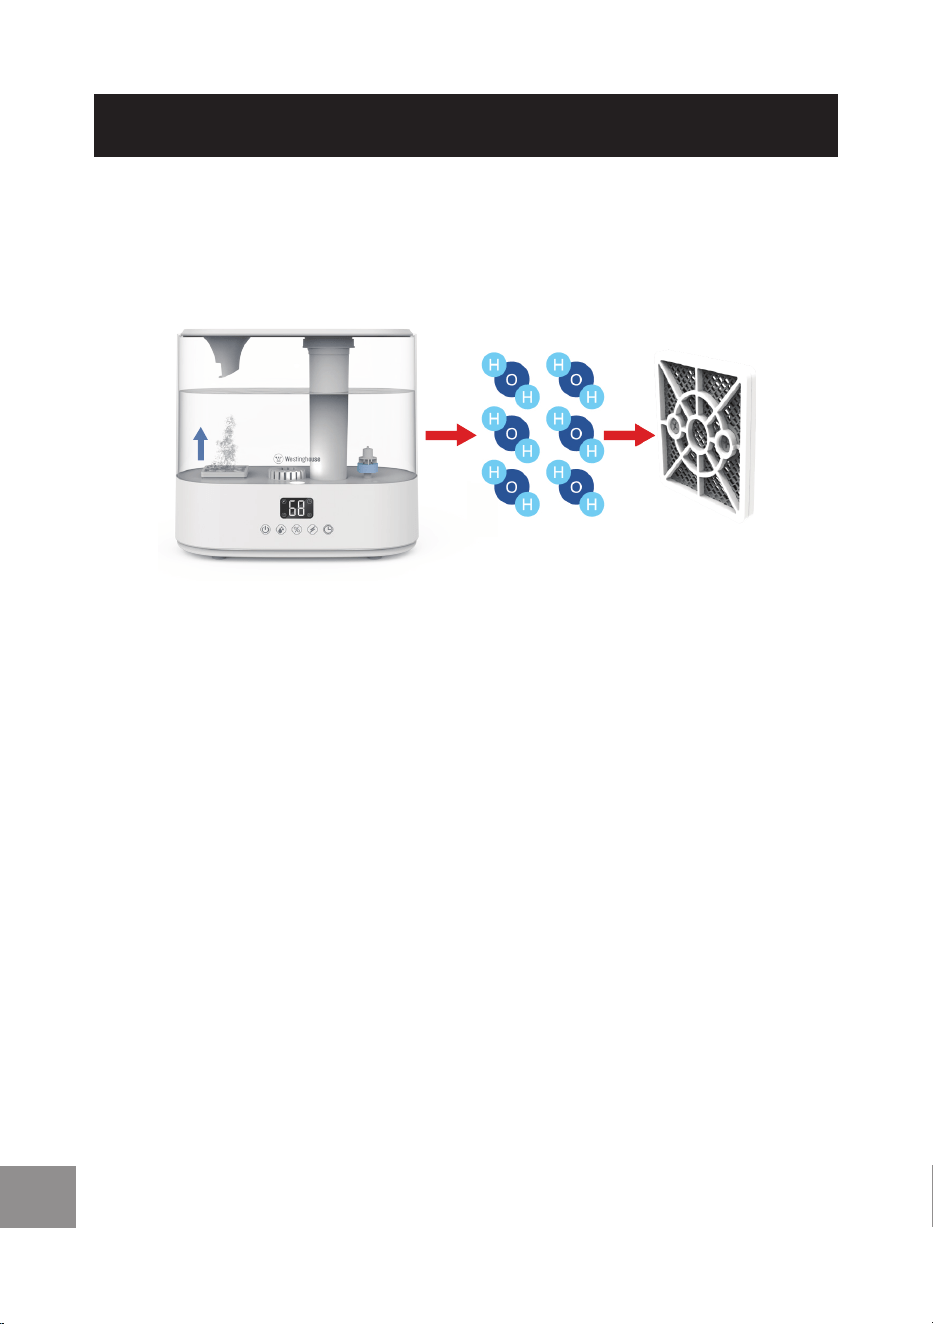
HOW THE ELECTROLYSIS PROCESS WORKS
1. The water (H2O) is pushed up through the electrolysis module.
Water Electrolysis
module
2. Through electrolysis the water is ionized and the chemical
structure of the water is changed into strong oxidizing hydroxyl
radicals (-OH, [O], H+, OH-) that are released into the air via the
mist nozzle. Once released into the air, the strong oxidized ions
breakdown the DNA/RNA of viruses in the air, inhibiting their
growth and ability to reproduce.
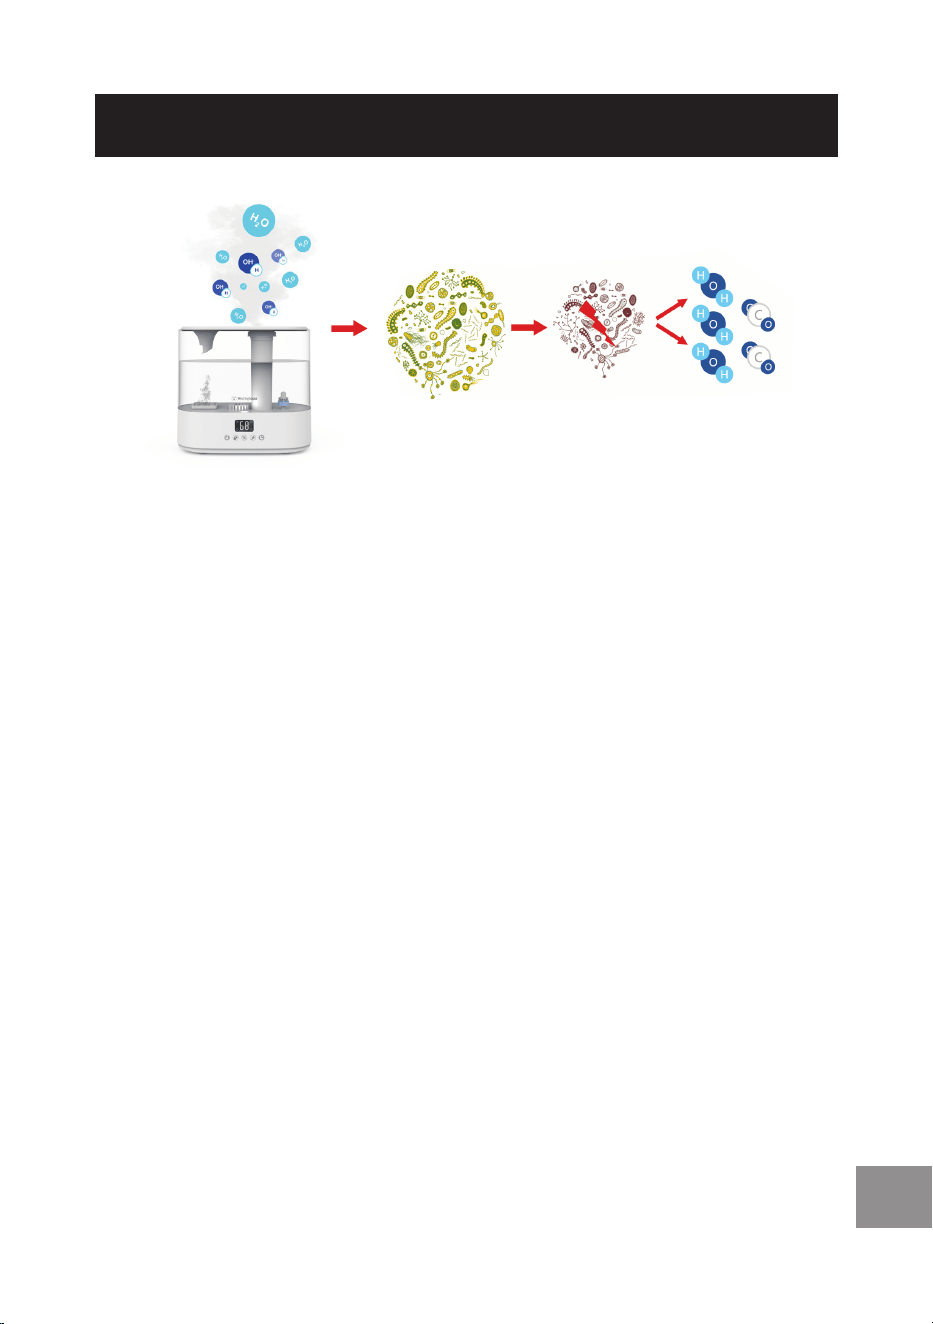
Kills up to 92.19% of Staphylococcus aureus ATCC 6538 bacteria
in 10m
3
test chamber when tested at 120V 60Hz, while running
for 2 hours at the flow rate of 28.3 L/min.
Kills up to 99.99% of Influenza A virus H1N1(ATCC VR-1469) &
Influenza Avirus H3N2(ATCC VR-1679) in 3m
3
test chamber
when tested at 120V 60Hz, while running for 2 hours.
Cells of viruses and bacteria are
attacked and decomposed
Strong oxidizing
hydroxyl radicals are
formed
Cells of
bacteria are
attacked
Bacteria are
decomposed
Carbon
dioxide
formed
HOW TO USE

14
EN
HOW TO USE
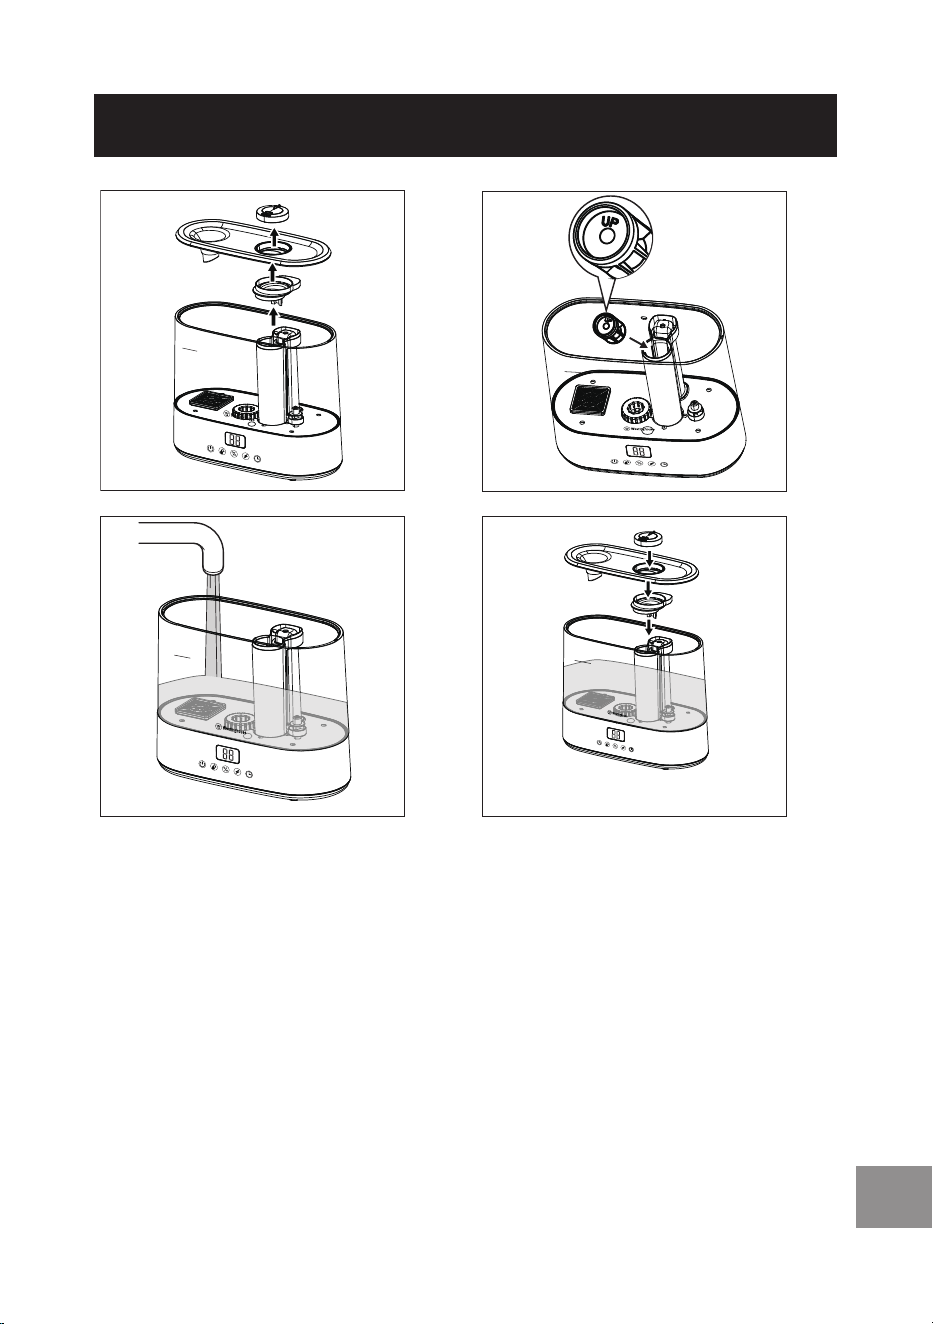
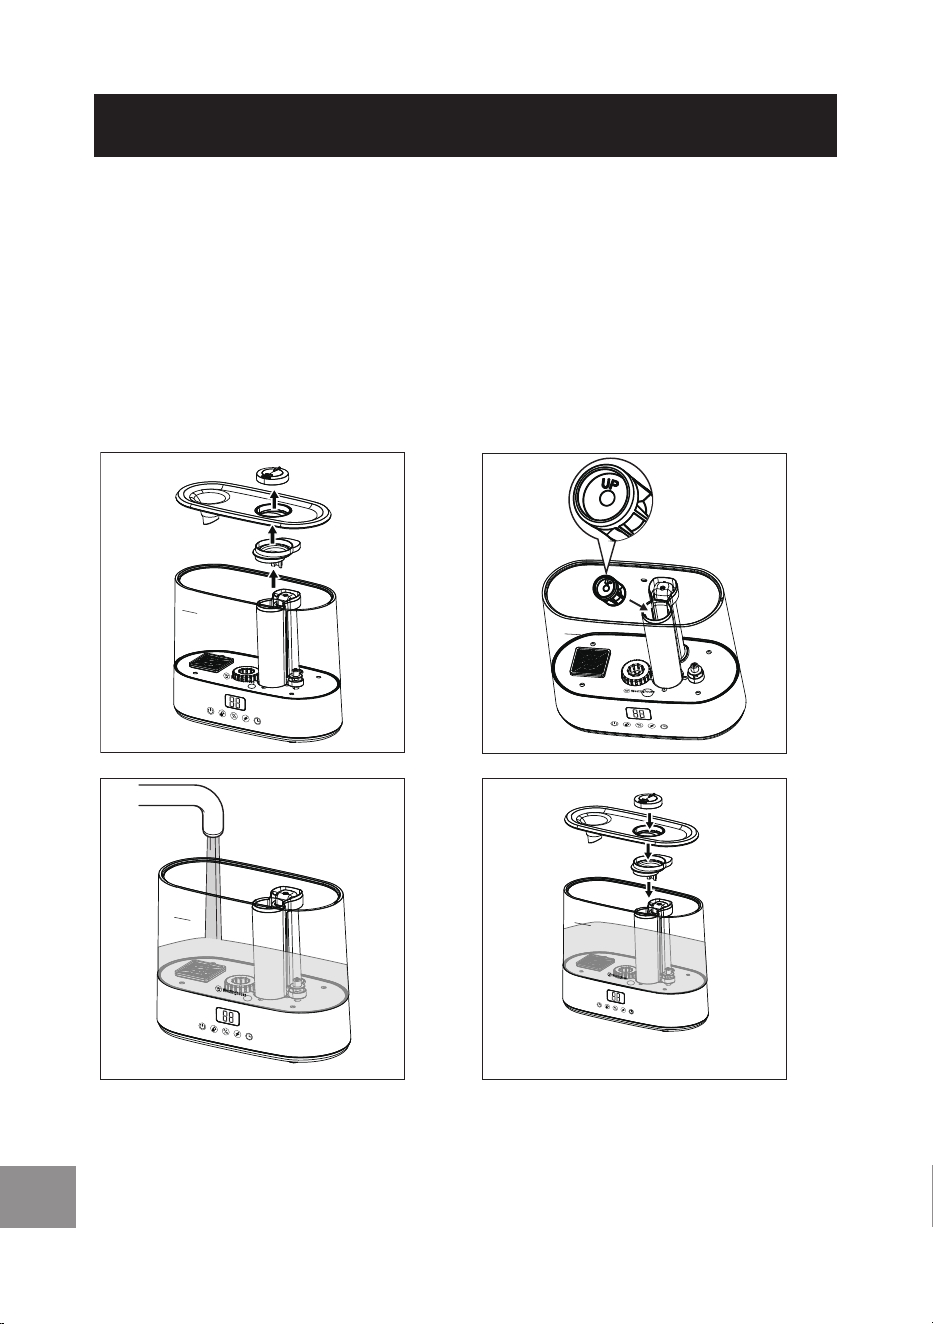
SETTING UP THE HUMIDIFIER
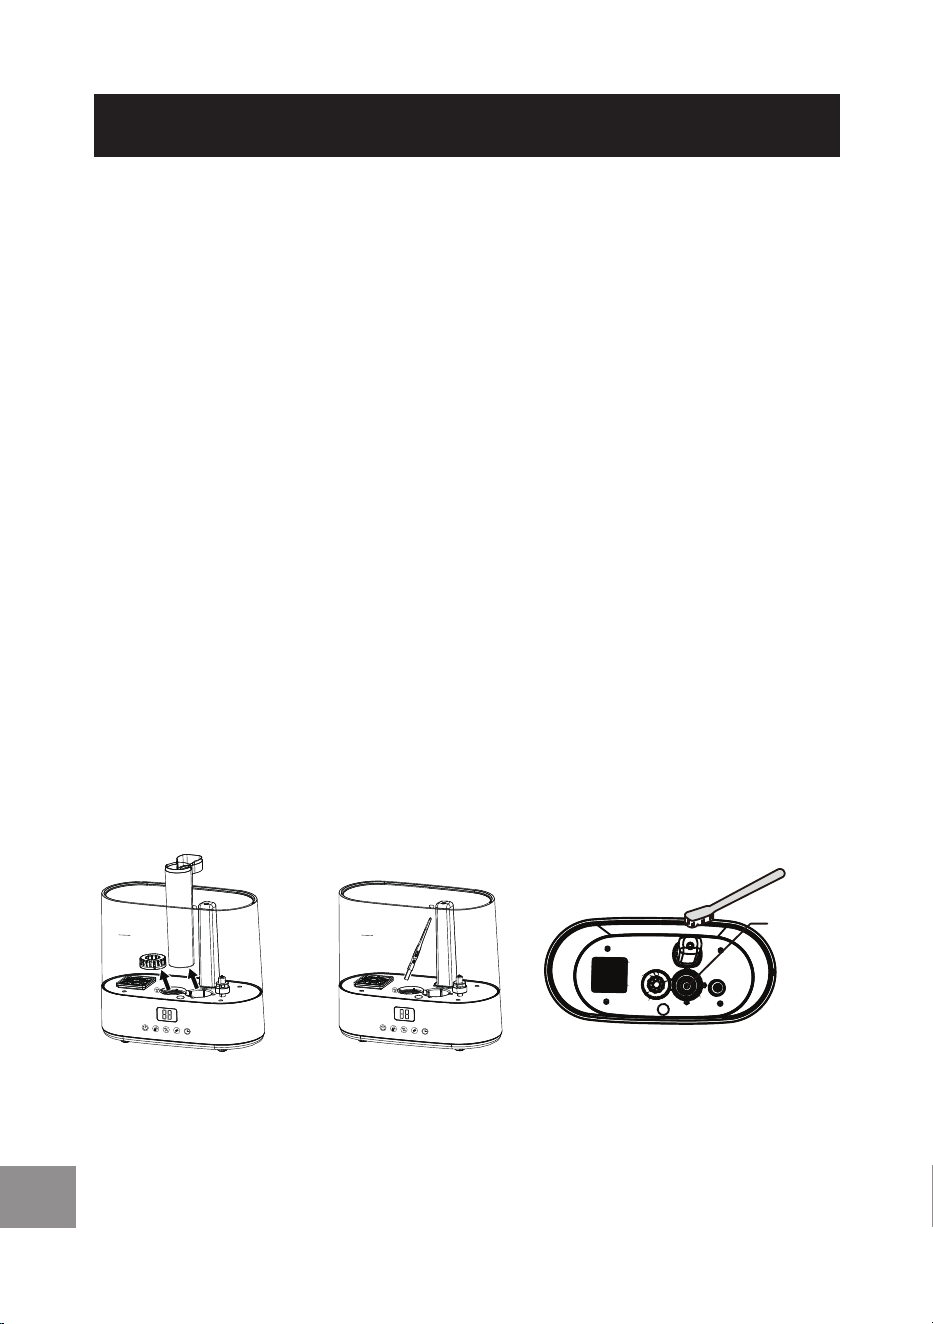
1. Lift o and remove the mist nozzle, water tank cover and mist
condenser stopper.
2. Insert the mist condenser into the mist tube making sure the
UP mark is facing upwards.
NOTE: At the base of the mist tube, water pressure is created
by an ultrasonic atomizer that forces the water upwards to the
top of the mist tube. The mist condenser sits at the top of the
water level in the mist tube and its innovative design changes
the pressurized water into the fine mist that is released through
the mist nozzle. For the mist condenser to work properly, it
must be inserted correctly.
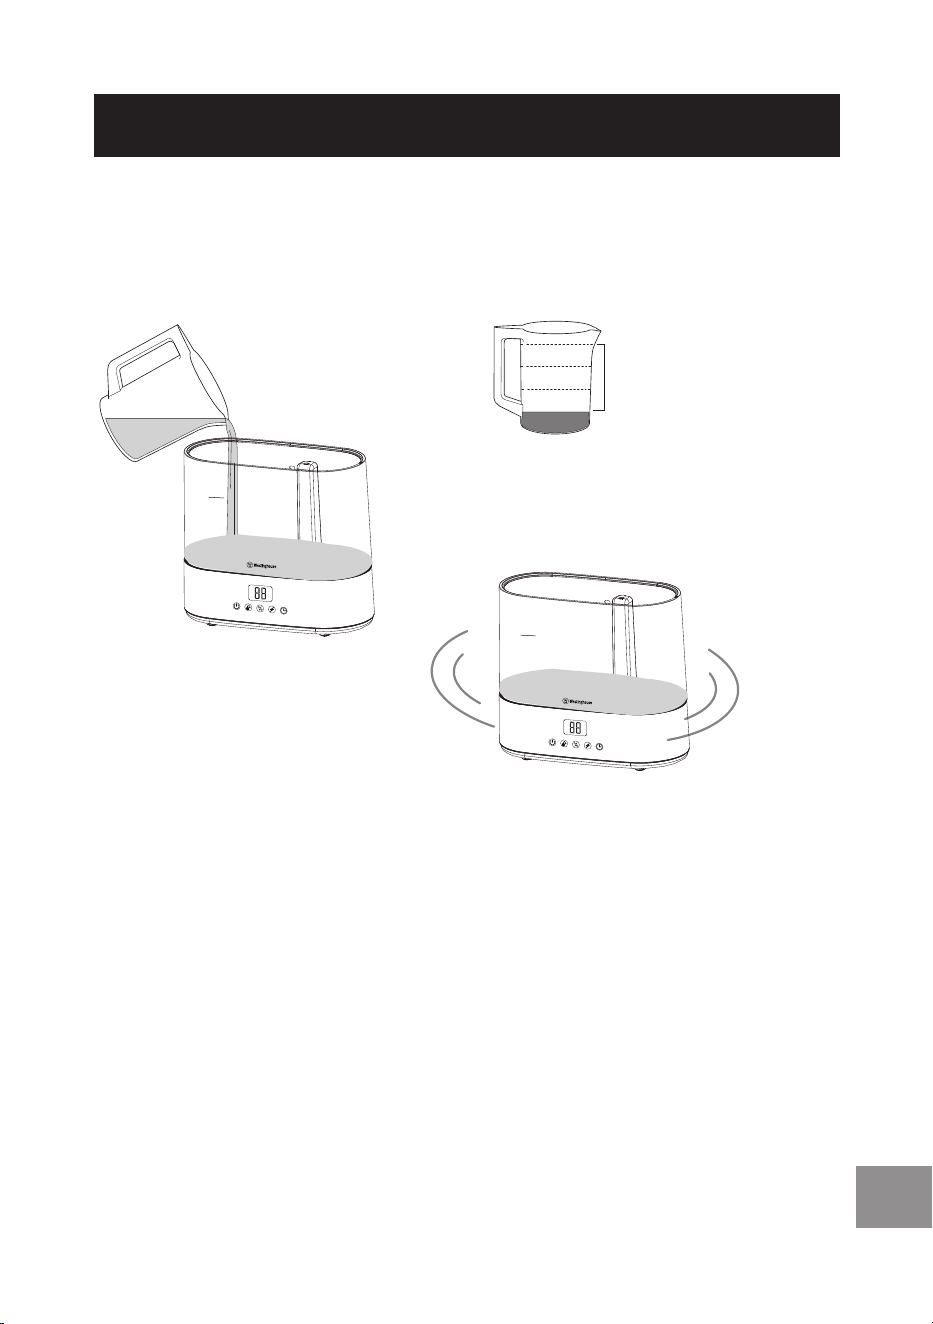
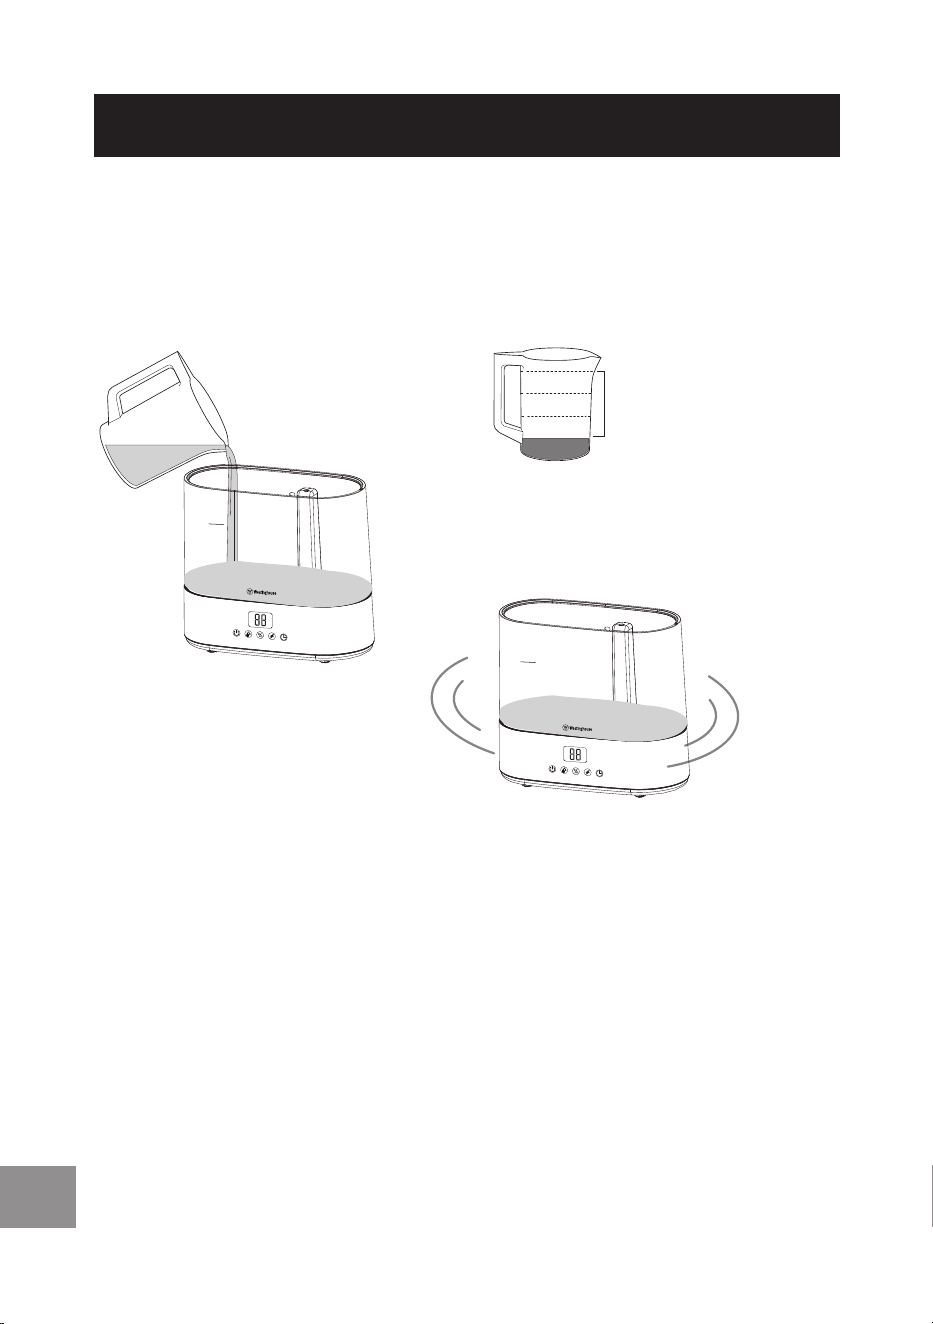
3. Fill the water tank with tap water (no warmer than room
temperature). The tank takes approximately 4L of water. Do
not fill with water above the MAX mark on the water tank or on
the water inlet. Make sure you do not pour water over the mist
tube. Pour it in the water inlet area.
NOTE:
Do not add any sanitizer to the water. Only use tap water in this
humidifier. Do not use distilled water.
4. Reassemble the mist condenser stopper, water tank cover and
mist nozzle.
NOTE: Find a location for the humidifier where the bottom and
sides of the appliance are at least 20 inches away from the
floor, walls, bedding, curtains, furniture, and other objects. Also,
make sure that the top of the humidifier is at least 50 inches of
space above the appliance and that it is at least 80 inches away
from other household electrical appliances, such as a TV.
15
EN
HOW TO USE
MAX
MAX
MAX
MAX
5. Insert the plug into the mains socket. The humidifier will beep,
the display will flash and then enter standby mode.
16
EN
HOW TO USE
OPERATING INSTRUCTIONS
NOTE: The remote control’s buttons function the same way as the
buttons on the humidifier’s control panel except for the SLEEP
button.
1. Touch the ON / OFF button to turn on the humidifier.
NOTE: The first time you turn on the humidifier, the default
high level mist will turn on and the current room’s humidity
will display. The humidifier will remember the last used
settings when you turn it on again. However, if you unplug the
appliance, it will return to the default settings.
2. Touch the MIST button repeatedly to select one of the mist
settings:
Display Indicates Meaning
03 High level mist
02 Medium level mist
01 Low level mist
NOTE: When you are in setting mode the display flashes. To
confirm a setting, do not touch any buttons for a few seconds
and the display will stop flashing.
3. Touch the HUMIDITY button repeatedly to select the humidity
level from 40% to 80% in increments of 5%. The humidity
icon displays. The mist will turn on and o as necessary
to maintain the set humidity level. To turn o the humidity
function, touch the humidity button and select --.
4. Touch the ELECTROLYSIS button to turn on the electrolysis
function. The electrolysis icon displays. The electrolysis
function will turn on for 5 minutes every hour until the function
is turned o. Touch the ELECTROLYSIS button to turn it o.
5. To set the humidifier to turn o in 1 to 8 hours, touch the TIMER
button repeatedly to select:
0H, 1H, 2H, 3H, 4H, 5H, 6H, 7H or 8H. The timer icon
displays and the screen alternately shows the hours remaining
and the current humidity. To turn o timer function, touch the
Timer button and select 0H.

17
EN
HOW TO USE
6. To turn the night light on or o, touch and hold the ON / OFF
button for 3 seconds.
7. To turn on the sleep function, touch and hold the HUMIDITY
button on the control panel or press the SLEEP button on the
remote control. The sleep icon displays. The LED screen will
turn o and the night light will reduce its brightness by 70%.
Touch any button to turn o the sleep function. The night light
will resume full brightness and the sleep icon will turn o.
8. To redirect the mist, manually rotate the mist nozzle on the top
of the humidifier in any direction (360°).
9. When the water level is low, the unit will beep 3 times and the
display will flash. Make sure you refill the water tank or turn o
the appliance.
NOTE: If the water level is too low for a prolonged period,
the humidifier’s inbuilt protection system will turn o the
humidifier.
10. To turn o the humidifier at any time, touch the ON / OFF
button until the LED screen turns o.
11. Remove the plug from the mains socket to fully turn o the
humidifier.
USING THE REMOTE CONTROL
• The remote control’s buttons function the same way as the
buttons on the humidifier’s control panel. Please refer to the
OPERATING INSTRUCTIONS section for more information on
the buttons.
• Point the remote control at the humidifier making sure there
are no obstacles between the remote control and humidifier’s
infrared sensor. The remote control can connect to the
humidifier within 16.5 feet. The operating range may vary
depending if there are any obstructions in the room.
NOTE: Do not expose the infrared remote sensor to direct
sunlight or other strong light, such as a fluorescent light.
18
EN
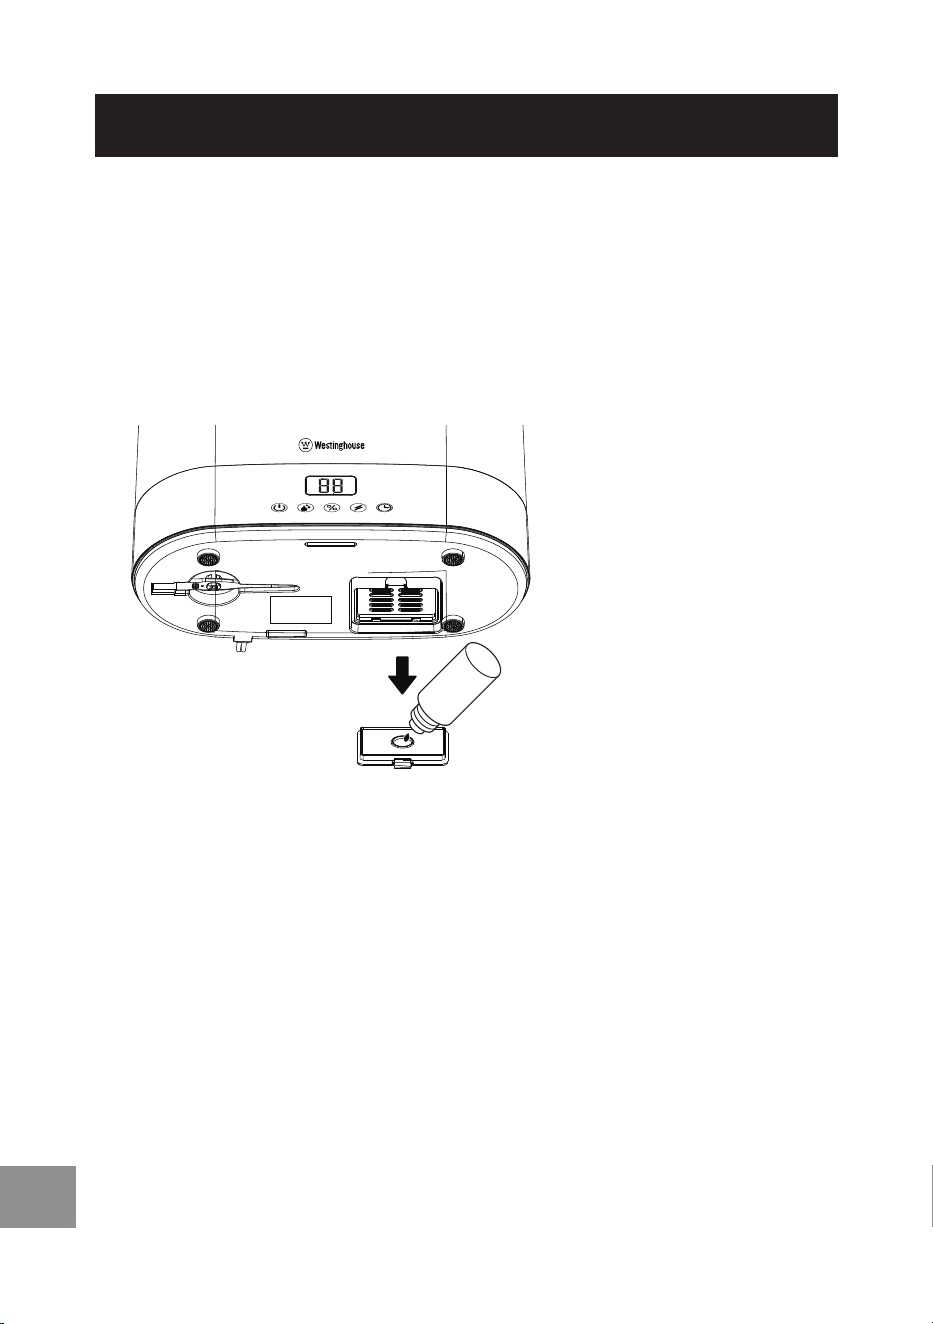
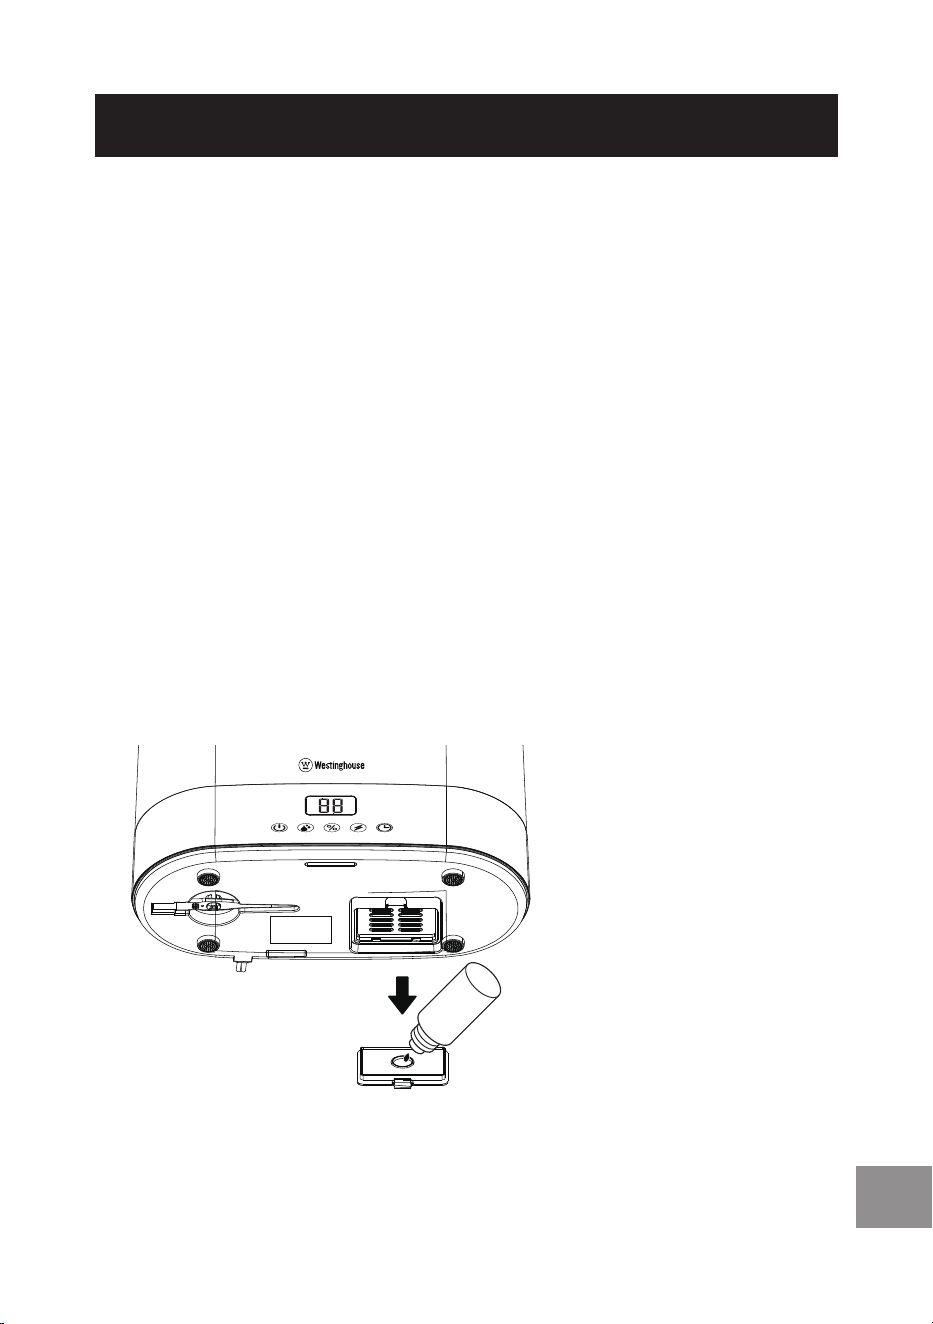
USING THE AROMA OIL DIFFUSER
IMPORTANT – Always make sure the humidifier is turned o and
empty the tank before adding the aromatherapy or essential oil.
1. Unclip the aroma oil tray on the bottom of the appliance’s base.
If not already installed, insert the foam filter and aroma oil pad
onto the inside of the aroma oil tray.
2. Add the aromatherapy or essential oil until the aroma oil pad is
soaked. If some oil spills outside the aroma oil tray, wipe it up
before proceeding.
3. Put the aroma oil tray back into place and turn on the
humidifier.
NOTE: Do not add the aromatherapy or essential oil directly in
the water tank.
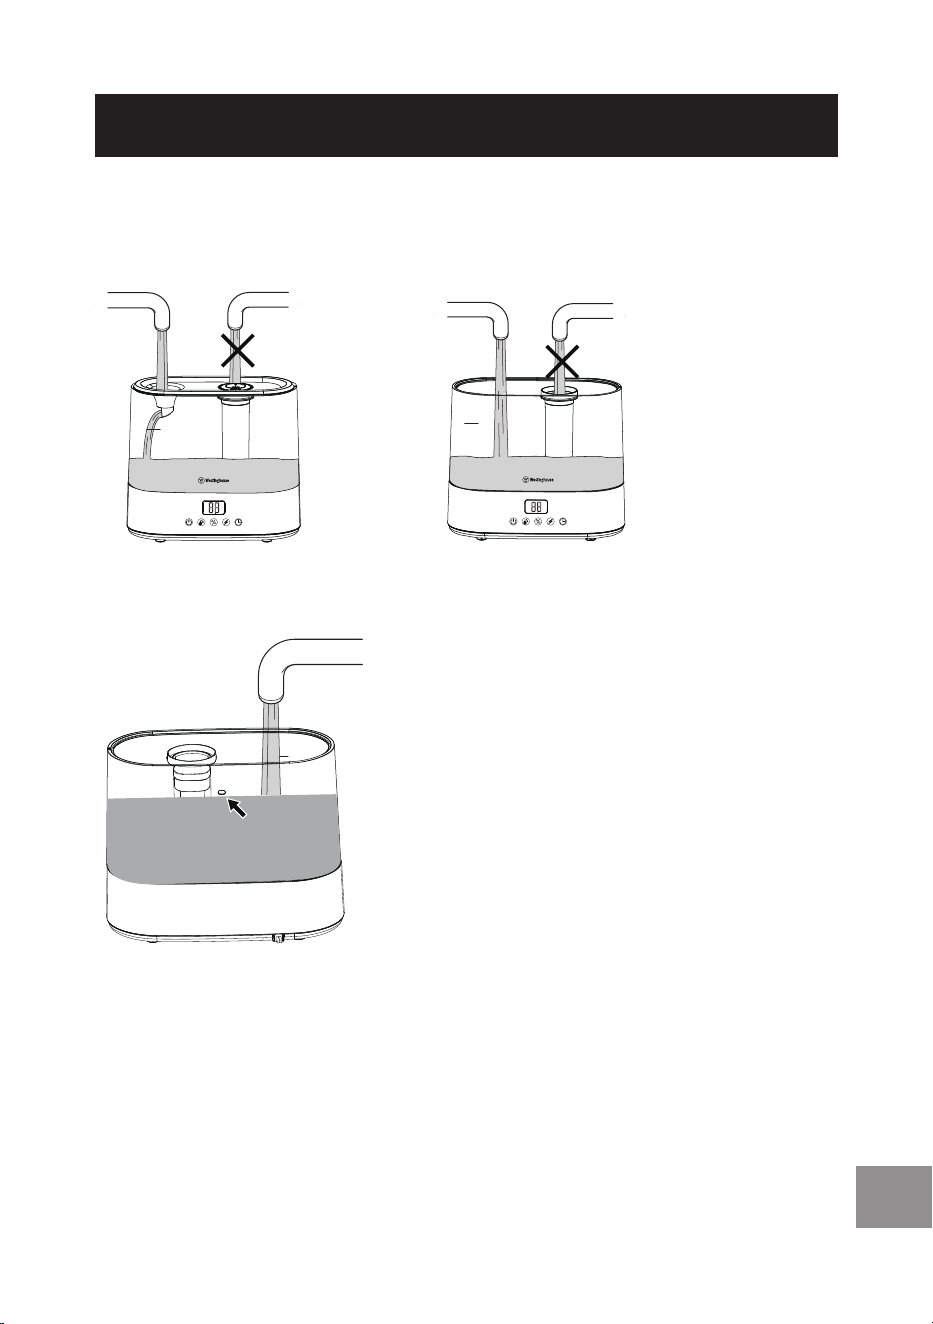
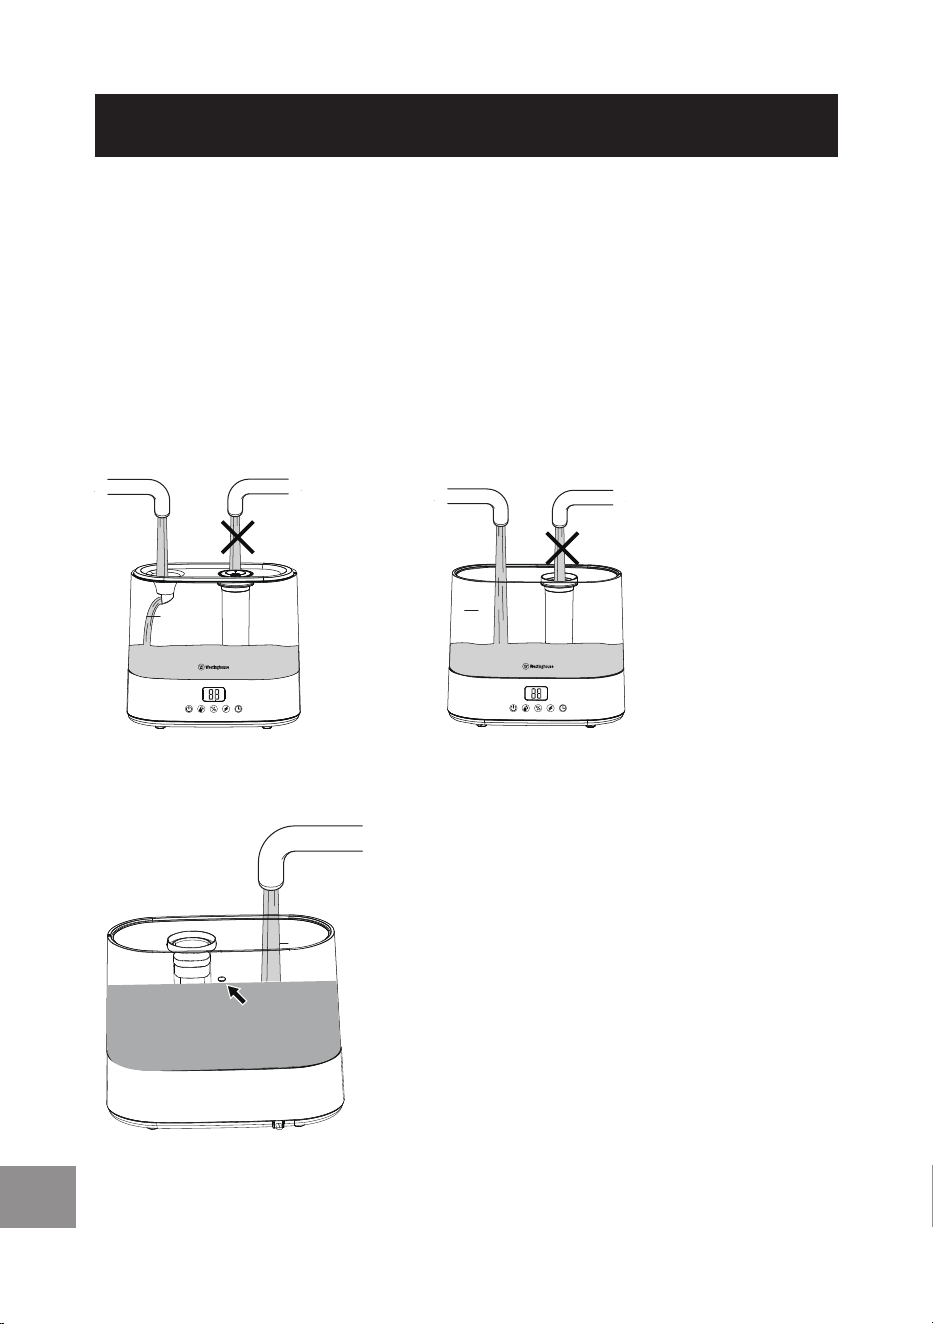
ADDING WATER
There are two ways to add water to the water tank:
• Pour water through the water tank inlet or :
1. Remove the mist nozzle and water tank cover. Then add the
water.
2. When you are facing the control panel, pour the water into the
left-hand side of the humidifier.
HOW TO USE
19
EN
HOW TO USE
3. Make sure you do not fill the water above the MAX mark. If you
put too much water in the water tank, the water will escape via
the overflow hole.
MAX
MAX
MAX
Back
Front
overflow hole
Front
Back
20
EN
CLEANING AND CARE
CAUTION – Always unplug the humidifier from the mains socket
and let it cool down before cleaning.
• Do not immerse the base or power cord in water / liquids or
allow moisture to come into contact with these parts.
• Never use solvents, bacteriostat, chemical or abrasive cleaning
agents, wire brushes, sharp objects or scouring pads to clean
the appliance. Clean the appliance every 2 to 3 days to remove
any film or scale buildup.
• Regular cleaning increases the lifespan of the humidifier.
• Always clean the appliance before storing it for a long time.
• Store the appliance in its original packaging or in a cool, dry &
dust free environment.
• Keep the unit away from direct sunlight.
CLEANING THE AROMA OIL TRAY AND BASE
1. Remove the aroma oil tray, foam filter and aroma oil pad and
wash in warm soapy water.
2. Use a damp cloth to clean the outside of the base.
3. Reassemble only when all parts are thoroughly dry.
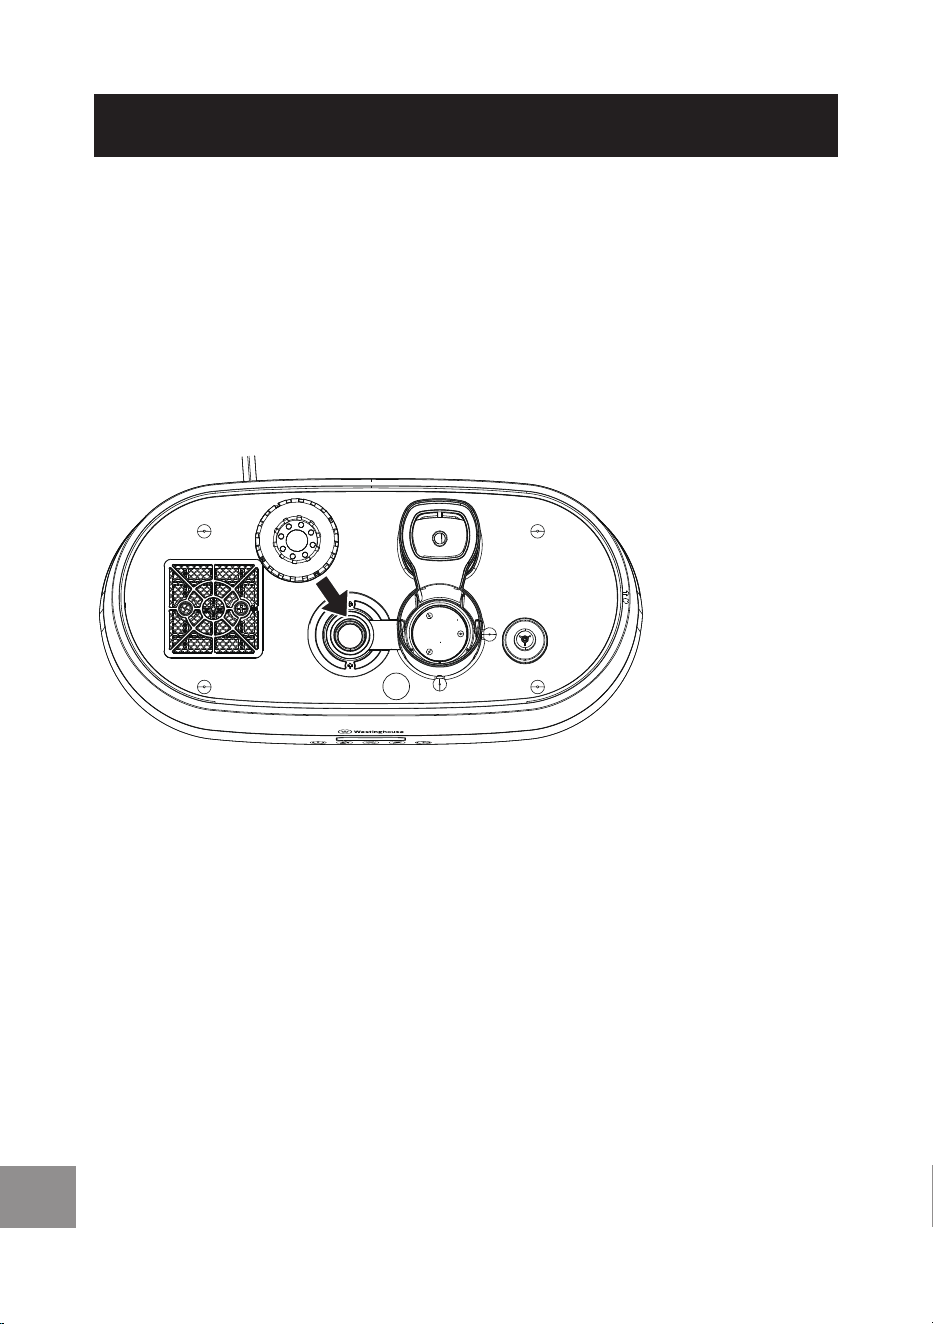
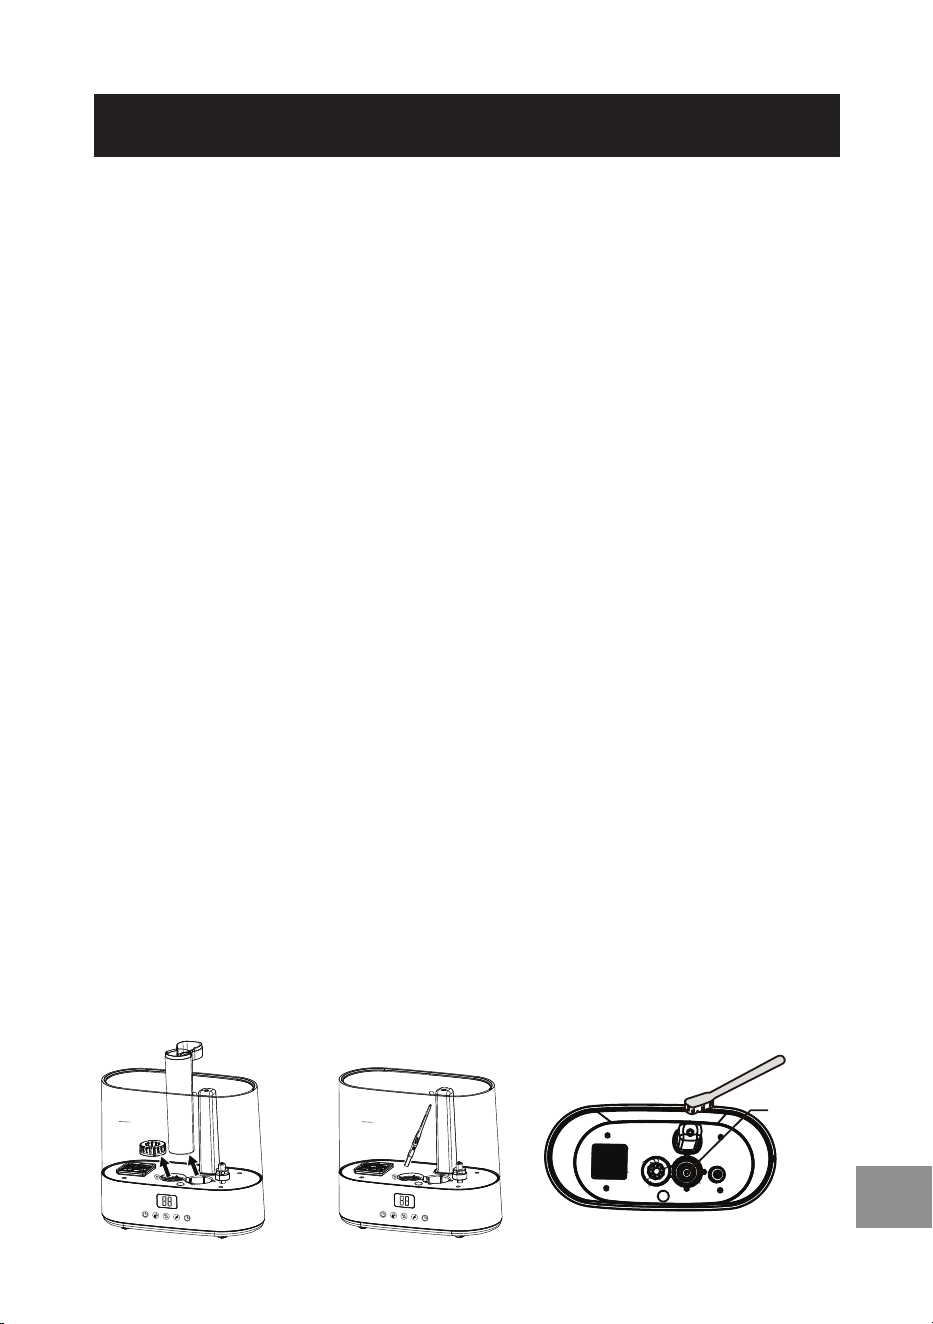
CLEANING THE WATER TANK
1. Remove the mist nozzle and then take o the water tank cover.
2. Pull o the mist condenser stopper. Lift out the mist tube and
slide the mist condenser out of the mist tube.
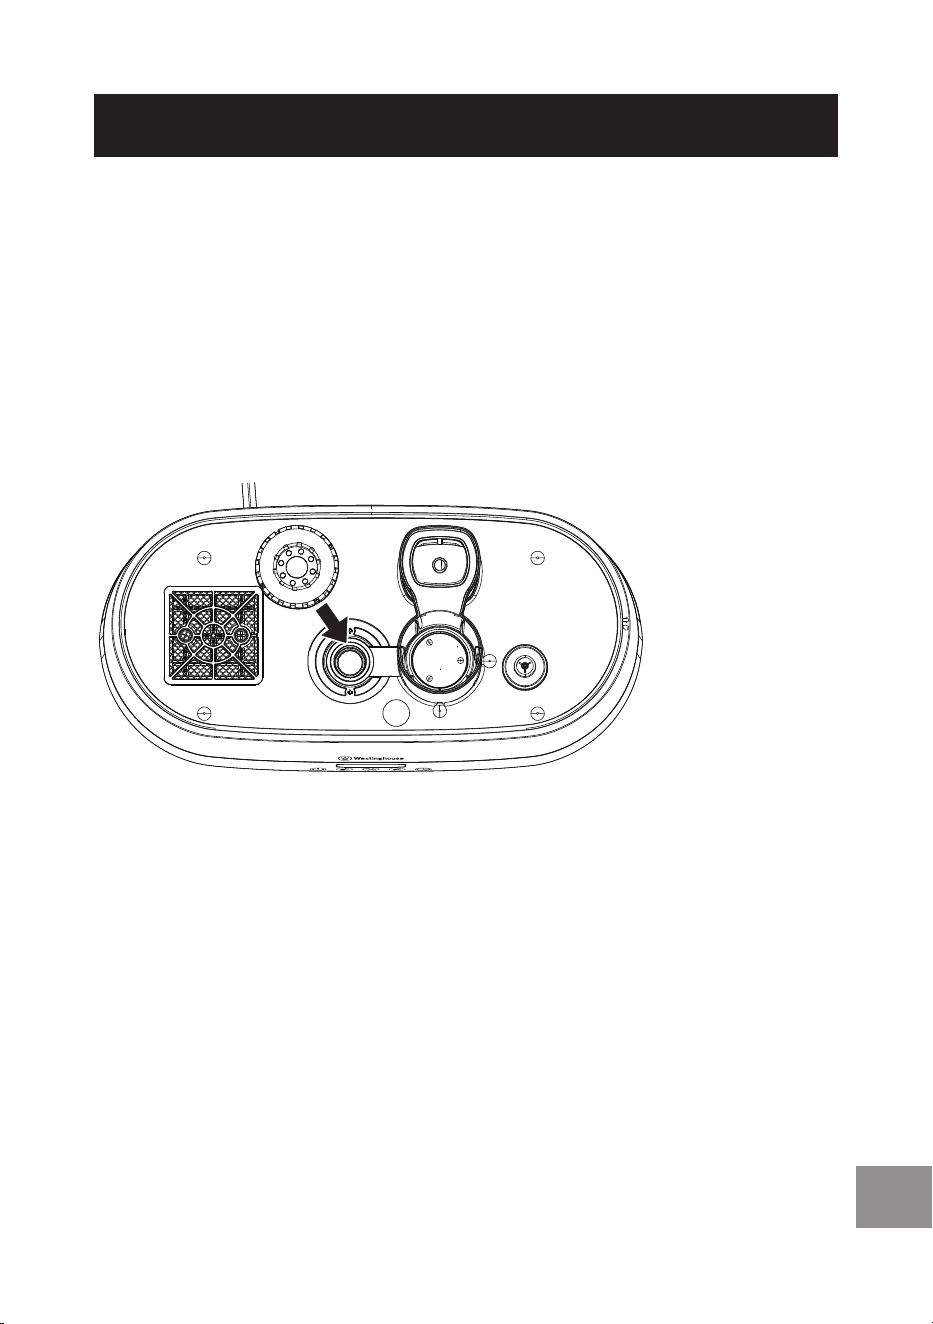
3. Lift out the ceramic ball filter in the bottom of the water tank.
Remove it and rinse well in water.
MAX
MAX
Oscillator
21
EN
CLEANING AND CARE
4. Use a solution of 1 part vinegar to 3 parts water to clean the
mist nozzle and water tank. Clean the ceramic surface of the
oscillator in the base with a soft toothbrush. Make sure you
remove any scale.
MAX
MAX
Water
(3 Parts)
Distilled
Vinegar
(1 Part)
Alternatively, a citric acid (5-10g in 12 oz water) can be used to
clean these parts. Leave the solution in the water tank for
10-15 minutes.
5. Rinse the items thoroughly. Using a clean cloth, wipe any
deposits and excess water from the parts and dry thoroughly.
6. Reassemble the humidifier.
NOTE: Clean the water tank, water tank cover and mist nozzle
with vinegar or citric acid once a week.
22
EN
CLEANING AND CARE
REPLACING THE FILTER
1. Remove the mist nozzle and then take o the water tank cover.
2. Lift the filter out of the water tank.
3. Place the new filter into the bottom of the water tank and then
put the water tank cover and mist nozzle back onto the water
tank.
Note:When you are not using the product, empty and clean it.
Reassemble when thoroughly dry and store in a dry, cool and dust-
free environment away from direct sunlight.
NOTE: We recommend that you replace the filter every 500 hours
under normal circumstances.
Please visit our web site to purchase your replacement filters for
the Westinghouse Humidifier.
Replacement Filter model number: WAHUF010X4
Web Site: https://shop.corehpi.com/
23
EN
TROUBLESHOOTING
Problem Possible Cause Solution
The
appliance
will not turn
on.
The power cord or
plug is loose or not
connected.
Check the power cord and
plug. Make sure they are
firmly connected to the
base and mains socket,
respectively.
The
appliance is
not working.
• There is not
enough water in
the water tank.
• The appliance is
tilting.
• The appliance is
not producing
enough mist.
There is a
buildup of dust
or scale.
• Refill the water tank.
• Place the appliance on a
stable, even surface.
• Touch the MIST button
to increase the mist
level.
• Clean the mist nozzle,
mist condenser stopper,
mist condenser and mist
tube as well as the water
tank (see CLEANING
AND CARE).
• Check the mist
condenser is correctly
installed.
• Check the float valve
and / or oscillator in
the base is working
and not damaged.
Clean if necessary (see
CLEANING AND CARE).
If damaged, take the
appliance to a qualified
service provider for
repair.
The mist has
an odor.
The appliance may
be dirty.
• Clean the water tank
and its parts (see
CLEANING AND CARE).
• Replace the old water in
the tank with fresh tap
water.

24
EN
DISPOSAL
Proper disposal of this product.
This symbol indicates that this appliance may not be treated
as household waste. Instead, it should be taken to the
appropriate collection point for recycling electrical and
electronic equipment.
Please use the return or collections services available in your
community or contact the retailer where you purchased this
product.
INFORMATION AND SERVICE
If you have questions or concerns about your product, please visit
our website: https://info.westinghousehomeware.com/, or contact
our overseas oces/agents.

25
EN
INFORMATION AND SERVICE
In line with our policy of continuous product development,
we reserve the right to change the product, packaging and
documentation specifications without prior notice.
Model: WSHUJLR2258WH / WSHUJLR2258GY
Voltage: 120 V AC, 60 Hz
Power: 29W
Capacity: 4L
Size (W x D x H): 11.81 x 5.66 x 10.59inches
Net Weight: 2.78 lbs
Remote control
Battery: CR2025 3V x 1 (included)
Operating range: 16.5 feet
Size (W x D x H): 1.57 x 0.23 x 3.38 inches
Scan the QR code to watch video showing
how to unbox and use the humidifier

26
EN
Model Number: WSHUJLR2258WH /
WSHUJLR2258GY
This device complies with Part 18 of the FCC Rules.
Soarma Global Inc.
Address: 775 Anita St. Suite F, Chula Vista CA 91911
Tel: (+1) 855 2599539
The information for user
This equipment has been tested and found to comply with the
limits for a Consumer ISM equipment, pursuant to Part 18 of
the FCC Rules. These limits are designed to provide reasonable
protection against harmful interference in a residential
installation. This equipment generates, uses and can radiate radio
frequency energy and, if not installed and used in accordance
with the instructions, may cause harmful interference to radio
communications. However, there is no guarantee that interference
will not occur in a particular installation.”
Please note that changes or modifications of this product is not
expressly approved by the party responsible for compliance could
void the user’s authority to operate the equipment.
If this equipment does cause harmful interference to radio or
television reception, which can be determined by turning the
equipment o and on, the user is encouraged to try to correct the
interference by one or more of the following measures:
- Reorient or relocate the receiving antenna.
- Increase the separation between the equipment and receiver.
- Connect the equipment into an outlet on a circuit dierent
from that to which the receiver is connected.
- Consult the dealer or an experienced radio/TV technician for
help.

27
ES
ÍNDICE
INFORMACIÓN DE SEGURIDAD
INDICACIONES DE SEGURIDAD IMPORTANTES .............................. 28
PILAS .................................................................................................................. 31
LUGAR DE INSTALACIÓN .......................................................................... 32
ENCHUFE POLARIZADO ............................................................................ 33
MODO DE EMPLEO
DESCRIPCIÓN DE LAS PIEZAS ................................................................ 34
ANTES DEL PRIMER USO ........................................................................... 36
AJUSTE DEL CONTROL REMOTO .......................................................... 36
INSTRUCCIONES DE USO .......................................................................... 41
LIMPIEZA Y CUIDADO ......................................................................... 45
SOLUCIÓN DE PROBLEMAS .............................................................. 48
ELIMINACIÓN ........................................................................................ 49
INFORMACIÓN Y MANTENIMIENTO ................................................ 50
28
ES
Lea este manual de instrucciones detenidamente antes de usar el
aparato y consérvelo para consultas futuras.
1. Use el aparato solo para los fines previstos. El uso incorrecto
puede provocar descargas eléctricas, un incendio o lesión
graves y podría anular la garantía.
2. Antes de conectar el equipo a la alimentación eléctrica,
verifique que la tensión indicada en el equipo se corresponda
con la tensión de su vivienda. Si este no es el caso, no use el
equipo y contacte al distribuidor inmediatamente.
3. Conecte el aparato solo a un tomacorriente conectado a tierra.
4. El cable de alimentación está diseñado como un cable corto
para evitar accidentes. No use un cable de extensión.
5. Este aparato es solamente para uso doméstico. No está
diseñado para el uso comercial, industrial o al aire libre.
6. Este equipo debe usarse en aplicaciones domésticas y
similares, tales como:
- áreas de cocina del personal de tiendas, oficinas u otros
entornos laborales;
- casas de granjas;
- por clientes en hoteles, moteles y otros ambientes de tipo
residencial;
- alojamientos de tipo cama y desayuno.
7. Asegúrese de que la tapa del depósito de agua y la boquilla de
nebulización estén bien cerradas antes de cada uso. No abra
la boquilla de nebulización o el depósito de agua cuando el
aparato esté encendido.
INDICACIONES DE SEGURIDAD
IMPORTANTES
INFORMACIÓN DE SEGURIDAD
PELIGRO
PELIGRO: peligros inmediatos
que CAUSARÁN lesiones
personales severas o la muerte
ADVERTENCIA
ADVERTENCIA: peligros o prácticas
poco seguras que PODRÍAN causar
lesiones personales o la muerte
ADVERTENCIA
Cuando use equipos eléctricos, siempre debe seguir las precauciones
básicas de seguridad, incluyendo las siguientes
ATENCIÓN
ATENCIÓN: peligros o prácticas
poco seguras que PODRÍAN causar
lesiones personales menores

29
ES
INFORMACIÓN DE SEGURIDAD
8. No desplace el equipo cuando esté encendido o lleno de agua.
9. Solo use el humidificador con la base eléctrica suministrada.
10. El uso de accesorios o elementos distintos a las piezas
originales suministradas con este aparato puede causar
lesiones, incendios o daños y anulará la garantía.
11. Solo use aceites de aromaterapia o esenciales con este
humidificador.
12. No use agua a más de 40 °C para llenar el depósito de agua o
limpiar el aparato.
13. Use solo agua de la llave. No use agua destilada (agua
desmineralizada). No agregue nunca ningún desinfectante al
agua.
14. Si el equipo despide un olor anómalo o emite sonidos
anómalos, apáguelo de inmediato y desenchúfelo del
tomacorriente.
15. No use el equipo si el depósito de agua está vacío.
16. No use el equipo a temperaturas extremadamente bajas, ya que
el líquido en su interior se puede congelar y causar daños al
equipo. Si el líquido se congela, espere a que se haya derretido
completamente antes de usar el equipo.
17. Siga las instrucciones de limpieza y mantenimiento que se
describen en la sección LIMPIEZA Y MANTENIMIENTO de este
manual de instrucciones.
18. No sumerja el aparato ni sus componentes eléctricos en agua ni
ningún otro líquido. Nunca los coloque bajo un chorro de agua
(ver LIMPIEZA Y CUIDADO).
19. Para evitar derrames, no llene el humidificador por encima de
su capacidad de 4 l.
20. Cuando el depósito de agua esté lleno de agua, utilice las dos
manos para transportar el humidificador y evitar derrames.
21. Este aparato puede ser usado por niños mayores de 8 años
ypersonas con discapacidades físicas, sensoriales o mentales
o que no tengan experiencia ni conocimiento si están bajo
supervisión o si se les dan instrucciones relativas al uso seguro
del aparato y comprenden los peligros relacionados. Los niños
no deben jugar con el aparato. La limpieza, el mantenimiento
o la conexión del aparato al tomacorriente no deben ser
realizados por niños menores de ocho años.

30
ES
INFORMACIÓN DE SEGURIDAD
22. MANTENER FUERA DEL ALCANCE DE NIÑOS Y BEBÉS:
mantenga el equipo y su cable fuera del alcance de los niños
menores de ocho años.
23. Se debe supervisar a los niños para asegurar que estos no
utilicen el equipo para jugar.
24. Nunca deje el equipo desatendido cuando esté encendido.
25. Mantenga el humidificador y el cable de alimentación lejos de
bordes de mesas o mesadas y fuera del alcance de los niños.
26. ¡PELIGRO DE ELECTROCUCIÓN! No toque ni use el equipo con
las manos mojadas ni parado sobre un piso mojado.
27. Nunca conecte este equipo a un temporizador externo o a un
sistema de control remoto.
28. Jale el enchufe para desconectar el equipo. No jale el cable.
29. Si el cable de alimentación o el enchufe están dañados, no use
el equipo. El cable de alimentación debe ser reemplazado por
el fabricante, un agente de servicio autorizado o una persona
similarmente calificada.
30. Use solo piezas de repuesto suministradas por el fabricante o
por un centro de servicio autorizado.
31. Bajo ninguna circunstancia intente reparar el aparato. En caso
de necesitar tareas mantenimiento y reparaciones póngase
en contacto con el distribuidor, el fabricante o un centro de
servicio autorizado.
32. ¡RIESGO DE ASFIXIA! MANTENER FUERA DEL ALCANCE DE
LOS NIÑOS : Mantenga todos los materiales de empaque fuera
del alcance de niños y bebés.
33. ¡ATENCIÓN! Para evitar una descarga eléctrica, un incendio o
una lesión:
- Asegúrese de que el equipo no pueda ser derribado o
volcado y que no pueda ocurrir ningún derrame de agua
cuando lo desconecta del tomacorriente.
- Mantenga el humidificador y el cable de alimentación lejos de
cantos filosos y de bordes de mesas o mesadas y fuera del
alcance de los niños.
- Siempre desconecte el equipo antes de llenarlo de agua,
llenarlo por encima del nivel máximo, limpiarlo, almacenarlo e
inmediatamente después del uso.
- No deje que el agua salpique los componentes eléctricos
dentro de la base.

31
ES
INFORMACIÓN DE SEGURIDAD
PILAS
ADVERTENCIA
1. Mantenga las pilas nuevas y usadas fuera del alance de los
niños.
2. No deje las baterías desatendidas; existe el riesgo de que los
niños o las mascotas las ingieran. Consulte a un médico de
inmediato si las pilas son ingeridas.
3. Las pilas con fugas o dañadas pueden quemar la piel. Use un
paño o guantes de protección para retirar las pilas y elimínelas
siguiendo las regulaciones locales. Si su piel entra en contacto
con ácido, lávese con jabón y agua de inmediato. Neutralice
con jugo de limón u otros ácidos de acción leve.
4. Si le cae ácido en los ojos, consulte a un médico de inmediato.
5. Las pilas no se pueden reactivas, desensamblar, quemar,
enterrar o poner en cortocircuito. ¡Existe el riesgo de explosión!
6. No recargue pilas normales no recargables. ¡Existe riesgo de
explosión! Recargue solo las pilas recargables previstas para
ese fin y use solo cargadores de pilas adecuados.
7. Las pilas se deben cambiar correctamente, utilizando pilas
idénticas o equivalentes.
8. Las pilas se deben insertar con la polaridad correcta (+ y -).
9. Elimine las pilas conforme a las regulaciones locales.
10. No exponga las pilas a fuentes de calor tales como la luz solar
o llamas expuestas. Manténgalas a temperatura ambiente.
11. No lance las pilas al fuego, ya que estas podrían estallar o
liberar sustancias tóxicas.
12. Si el compartimiento de las pilas no cierra correctamente, deje
de usar el equipo y manténgalo lejos del alcance de los niños.
13. Siempre retire las pilas antes de limpiar, inspeccionar o realizar
cualquier mantenimiento en el equipo.
14. Retire de inmediato las pilas usadas del equipo y elimínelas
conforme a las regulaciones locales.
15. Retire las pilas cuando no vaya a usar el aparato durante un
periodo de tiempo prolongado.

32
ES
LUGAR DE INSTALACIÓN
• No coloque este producto en un lugar demasiado cerca de una
fuente de calor, como por ejemplo una hornilla para evitar que
se dañe o que cause un incendio o lesiones.
• Coloque el equipo a una distancia de al menos 20 pulgadas
del suelo o los muebles. Asegúrese de que hay al menos
50pulgadas (1,27 m) de espacio por encima del aparato y
que está al menos a 80 pulgadas (2,03 m) de distancia de
otros aparatos eléctricos del hogar, como por ejemplo, de un
televisor.
• Coloque el humidificador sobre una alfombra impermeable
o una superficie resistente al agua. No lo coloque sobre
superficies que se vean afectadas por la humedad, como la
madera.
• Siempre coloque el equipo sobre una superficie estable, plana,
seca y resistente al calor.
• No coloque nunca el humidificador en una habitación cerrada,
especialmente donde pueda estar jugando, descansando
o durmiendo un niño o una persona con discapacidades
físicas, sensoriales o mentales, o con falta de experiencia o
conocimientos.
• Nunca deje que el cable de alimentación entre en contacto con
superficies calientes.
INFORMACIÓN DE SEGURIDAD
33
ES
CONSERVE ESTAS
INSTRUCCIONES PARA
CONSULTARLAS EN EL FUTURO
SOLO PARA USO DOMÉSTICO
INFORMACIÓN DE SEGURIDAD
ENCHUFE POLARIZADO
El aparato posee un enchufe polarizado (una
espiga es más ancha que la otra). Para reducir el
riesgo de descarga eléctrica, este enchufe debe
introducirse en un tomacorriente polarizado
de una sola manera. Si el enchufe no cabe
completamente en el tomacorriente, invierta
el enchufe. Si aun así no encaja, consulte con un electricista
profesional.
DE NINUNA MANERA INTENTE MODIFICAR ESTE ENCHUFE
ORETIRAR SU ELEMENTO DE SEGURIDAD.
NOTA: Ni Westinghouse ni el distribuidor asumirán ninguna
responsabilidad por daños al productos o lesiones personales que
ocurran por no haberse seguido los procedimientos correctos de
conexión eléctrica.
34
ES
MODO DE EMPLEO
DESCRIPCIÓN DE LAS PIEZAS
24
23
22
25
26
27 28 29 30 31
2
1
3
30
4
6
9
8
7
27
29
28
32
31
16
20
21
18
17
10
11
15
14
12
13
5
19
Iconos de la pantalla LED
Panel de control
Control remoto

35
ES
1. Bandeja de aceite
aromático/ entrada de aire
2. Filtro de espuma
3. Almohadilla de aceite
aromático
4. Cepillo (almacenar en la
parte inferior de la base)
5. Panel de control
6. Pantalla LED
7. Luz LED de noche
8. Filtro de bola de cerámica
9. Módulo de electrólisis
10. Tanque de agua
11. Entrada del depósito de
agua
12. Boquilla de nebulización
13. Cubierta del depósito de
agua
14. Tapón del condensador de
nebulización
15. Condensador de
nebulización
16. Tubo de nebulización
17. Entrada de aire
18. Válvula de flotador
19. Cable de alimentación
yenchufe
20. Base
21. Oscilador (al fondo del
hueco)
Iconos de la pantalla LED
22. Temporizador / pantalla de
humedad
23. Icono de electrólisis
24. Icono de reposo
25. Icono de temporizador
26. Icono de humedad
Panel de control
27. Botón de encendido/
apagado (ON / OFF)
28. Botón de NEBULIZACIÓN
29. Botón de HUMEDAD
30. Botón de ELECTRÓLISIS
31. Botón de TEMPORIZADOR
Control remoto
32. Botón de REPOSO
NOTA: Todos los botones del control remoto son los mismos que
los del panel de control, excepto el botón de REPOSO. También
puede pulsar los botones del control remoto en lugar de tocarlos.
MODO DE EMPLEO
36
ES
MODO DE EMPLEO
ANTES DEL PRIMER USO
• Retire todo el empaque del aparato.
• Desempaque todos los componentes y verifique que no se
hayan dañado durante el transporte. Si algún componente está
dañado o en falta, no use el aparato y regréselo al comercio de
inmediato.
MAX
AJUSTE DEL CONTROL REMOTO
Jale la película de plástico para retirarla del compartimento de
las pilas. La pila está ahora activa y usted puede usar el control
remoto.
Control
remoto
Película de aislamiento
Jalar
37
ES
CAMBIO DE LA PILA
1. Presione el botón de liberación hacia adentro y jale el
compartimento de la batería hacia afuera. Retire la pila usada.
2. Inserte 1 pila CR2025 3V en el compartimento de la pila,
asegurándose de que respetar la polaridad (+ y -) marcada en
el compartimento.
Deslice el compartimento de la pila hacia atrás, al interior del
control remoto, hasta que escuche que encaja firmemente con un
chasquido.
CONOZCA SU HUMIDIFICADOR
• El humidificador admite 4 L de agua, que ofrecen entre 33
y67 horas de acción humidificadora (dependiendo del nivel de
vapor seleccionado).
• El módulo de electrólisis convierte el agua en fuertes iones
oxidantes que pueden eliminar los virus y bacterias presentes
en el aire.
• Se pueden seleccionar 3 niveles de nebulización: alto, medio
y
bajo.
• Puede ajustar el temporizador para que el humidificador se
apague automáticamente al cabo de 1 a 8 horas.
• La luz nocturna LED puede encenderse o apagarse.
• Se puede usar un aceite de aromaterapia o esencial para
perfumar ligeramente la habitación.
MODO DE EMPLEO
38
ES
CÓMO FUNCIONA EL PROCESO DE ELECTRÓLISIS
1. El agua (H2O) es empujada hacia arriba a través del módulo de
electrólisis.
Agua Módulo de
electrólisis
2. Mediante la electrólisis, el agua se ioniza y su estructura
química se transforma en radicales hidroxilos fuertemente
oxidantes (-OH, [O], H+, OH-) que se liberan en el aire a través
de la boquilla de nebulización. Una vez liberados en el aire,
los fuertes iones oxidados descomponen el ADN/ARN de los
virus presentes en el aire, inhibiendo su crecimiento y
capacidad de reproducción.
Elimina hasta el 92,19% de las bacterias Staphylococcus aureus
ATCC 6538 en una cámara de pruebas de 10m
3
cuando se
prueba a 120V 60Hz, mientras funciona durante 2 horas con un
caudal de 28,3 L/min.
Elimina hasta el 99,99% del virus de la gripe A H1N1 (ATCC
VR-1469) y del virus de la gripe A H3N2 (ATCC VR-1679) en
una cámara de test de 3m
3
cuando se prueba a 120V 60Hz, en
funcionamiento durante 2 horas.
MODO DE EMPLEO
39
ES
MODO DE EMPLEO
Las células de los virus y bacterias son
atacadas y descompuestas.
Se forman
radicales hidroxilos
fuertemente
oxidantes.
Las células
de las
bacterias son
atacadas.
Las
bacterias se
descomponen.
Dióxido de
carbono
formado.
INSTALACIÓN DEL HUMIDIFICADOR
1. Levante y retire la boquilla de nebulización, la tapa del depósito
de agua y el tapón del condensador de nebulización.
2. Inserte el condensador de nebulización en el tubo de
nebulización asegurándose de que la marca UP esté orientada
hacia arriba.
NOTA: En la base del tubo de nebulización, se crea una presión
de agua mediante un atomizador ultrasónico que impulsa
el agua hacia la parte superior del tubo de nebulización. El
condensador de nebulización se sitúa en la parte superior
del nivel de agua del tubo de nebulización y su innovador
diseño transforma el agua presurizada en la fina niebla que
se libera através de la boquilla de nebulización. Para que
el condensador de nebulización funcione bien, debe estar
correctamente insertado.
3. Llene el depósito de agua con agua de la llave (no más caliente
que la temperatura ambiente). El depósito admite 4 L de
agua aproximadamente. No llene con agua por encima de la
marca MAX en el depósito de agua o en la entrada de agua.
Asegúrese de no verter agua sobre el tubo de nebulización.
Viértala en la zona de entrada de agua.
NOTA:
No agregue nunca ningún desinfectante al agua. Use solo agua
de la llave con este humidificador. No use agua destilada.
40
ES
MODO DE EMPLEO
4. Vuelva a montar el tapón del condensador de nebulización, la
tapa del depósito de agua y la boquilla de nebulización.
NOTA: Coloque el humidificador en un lugar en que la parte
inferior y los lados del aparato queden separados al menos
20pulgadas del piso, paredes, ropa de cama, cortinas, muebles
y otros objetos. Además, asegúrese de que la parte superior del
humidificador tenga al menos 50 pulgadas (1,27 m) de espacio
por encima del aparato y que esté al menos 80 pulgadas
(2,03m) de distancia de otros aparatos eléctricos del hogar,
como un televisor.
MAX
MAX
MAX
MAX
5. Inserte el enchufe en el tomacorriente. El humidificador emitirá
una señal acústica, la pantalla parpadeará y luego entrará en
modo de standby.
41
ES
MODO DE EMPLEO
INSTRUCCIONES DE USO
NOTA: Los botones del control remoto funcionan de la misma
manera que los botones del panel de control del humidificador,
excepto el botón de REPOSO.
1. Presione el botón de encendido/apagado para encender el
humidificador.
NOTA: La primera vez que encienda el humidificador, se
encenderá la nebulización de alto nivel por defecto y se
mostrará la humedad actual de la habitación. El humidificador
recordará los últimos ajustes utilizados cuando lo encienda
de nuevo. Sin embargo, si desenchufa el aparato, volverá a la
configuración por defecto.
2. Toque el botón de NEBULIZACIÓN repetidamente para
seleccionar uno de los ajustes de nebulización:
La pantalla indica Significado
03 Nivel de nebulización alto
02 Nivel de nebulización medio
01 Nivel de nebulización bajo
NOTA: Cuando está en modo de ajuste, la pantalla parpadea.
Para confirmar un ajuste, no toque ningún botón durante unos
segundos y la pantalla dejará de parpadear.
3. Toque el botón de HUMEDAD repetidamente para seleccionar
el nivel de humedad de 40% a 80% en incrementos de 5%. El
icono de humedad aparece. La nebulización se activará
y desactivará según sea necesario para mantener el nivel de
humedad establecido. Para desactivar la función de humedad,
toque el botón de humedad y seleccione --.
4. Pulse el botón ELECTRÓLISIS para activar la función de
electrólisis. Aparece el icono de electrólisis . La función de
electrólisis se activará durante 5 minutos cada hora hasta que
se apague la función. Toque el botón de ELECTRÓLISIS para
apagarla.

42
ES
MODO DE EMPLEO
5. Para ajustar el humidificador para que se apague al cabo de 1a
8 horas, toque el botón del TEMPORIZADOR repetidamente
para seleccionar:
0H, 1H, 2H, 3H, 4H, 5H, 6H, 7H o 8H. Aparece el icono del
temporizador y la pantalla muestra alternativamente las
horas restantes y la humedad actual. Para desactivar la función
de temporizador, toque el botón de temporizador y seleccione
0H.
6. Para encender o apagar la luz nocturna, mantenga pulsado el
botón de encendido/apagado durante 3 segundos.
7. Para activar la función de reposo, mantenga pulsado el botón
de HUMEDAD del panel de control o pulse el botón de REPOSO
del control remoto. Aparece el icono de reposo . La pantalla
LED se apagará y la luz nocturna reducirá su brillo en un 70%.
Pulse cualquier botón para desactivar el modo de reposo. La
luz nocturna volverá a brillar al máximo y el icono de reposo se
apagará.
8. Para reorientar la nebulización, gire manualmente la boquilla de
nebulización en cualquier dirección (360°), en la parte superior
del humidificador.
9. Cuando el nivel de agua es bajo, el aparato emitirá 3 señales
acústicas y la pantalla parpadeará. Asegúrese de llenar el
depósito de agua o de apagar el aparato.
NOTA: Si el nivel de agua se mantiene demasiado bajo durante
un periodo de tiempo prolongado, el sistema de protección
integrado apagará el humidificador.
10. Para apagar el humidificador en cualquier momento, toque el
botón de encendido (ON/OFF) hasta que la pantalla LED se
apague.
11. Para apagar el aparato, desenchufe el cable de alimentación del
tomacorriente.
USO DEL CONTROL REMOTO
• Los botones del control remoto funcionan de la misma manera
que los botones del panel de control del humidificador.
Consulte la sección INSTRUCCIONES DE OPERACIÓN para
obtener más información sobre los botones.
43
ES
• Dirija el control remoto hacia el humidificador asegurándose
que no haya obstáculos entre el control remoto y el sensor
infrarrojo del humidificador. El control remoto se puede
conectar al humidificador en un radio de 16.5 pies. El rango de
operación puede variar dependiendo de las obstrucciones que
haya en la habitación.
NOTA: No exponga el sensor remoto infrarrojo a la luz directa
del sol o a otra luz fuerte, como una luz fluorescente.
USO DEL DIFUSOR DE ACEITE AROMÁTICO
IMPORTANTE: Asegúrese siempre de que el humidificador esté
apagado y vacíe el depósito antes de añadir el aceite esencial o de
aromaterapia.
1. Desenganche la bandeja de aceite aromático ubicada en la
parte inferior del aparato. Si no está ya instalado, inserte el filtro
de espuma y la almohadilla de aceite aromático en el interior
de la bandeja de aceite aromático.
2. Añada aceite de aromaterapia o esencial hasta que la
almohadilla esté empapada. Si se derrama aceite fuera de la
bandeja de aceite aromático, elimínelo con un paño antes de
proceder.
3. Deslice la bandeja hasta que quede en su lugar y encienda el
humidificador.
NOTA: No añada el aceite de aromaterapia o esencial
directamente en el depósito de agua.
MODO DE EMPLEO
44
ES
MODO DE EMPLEO
AGREGAR AGUA
Hay dos métodos para agregar agua al depósito de agua:
• Vierta agua a través de la entrada del depósito de agua o:
1. Retire la boquilla de nebulización y la cubierta del depósito de
agua. Luego añada el agua.
2. Cuando esté frente al panel de control, vierta el agua en el lado
izquierdo del humidificador.
3. No llene el depósito de agua por encima de la marca MAX.
Si echa demasiada agua en el depósito de agua, el agua se
escapará por el orificio de desbordamiento.
MAX
MAX
MAX
Back
Parte frontal
Orificio de
desbordamiento
Parte frontal
Parte posterior
45
ES
LIMPIEZA Y CUIDADO
ATENCIÓN: siempre desconecte el humidificador del tomacorriente
y deje que se enfríe completamente antes de limpiarlo.
• No sumerja la base o el cable de alimentación en agua u otro
líquido, ni permita que la humedad entre en contacto con estos
componentes.
• Nunca use solventes, sustancias bacteriostáticas o químicas
o agentes de limpieza abrasivos, cepillos de alambre, objetos
afilados o estropajos metálicos para limpiar el aparato. Limpie
el aparato cada 2 o 3 días para eliminar cualquier película o
acumulación de sarro.
• La limpieza regular aumenta la vida útil del humidificador.
• Limpie siempre el aparato antes de almacenarlo por un largo
periodo de tiempo.
• Guarde el aparato en su empaque original o en un lugar fresco,
seco y sin polvo.
• Mantenga el aparato alejado de la luz solar directa.
LIMPIEZA DE LA BANDEJA DE ACEITE AROMÁTICO Y DE LA
BASE
1. Retire la bandeja de aceite aromático, el filtro de espuma y la
almohadilla de la base y lávelos con agua jabonosa tibia.
2. Limpie la parte exterior de la base con un paño húmedo.
3. Vuelva a ensamblar cuando todos los componentes estén bien
secos.
LIMPIEZA DEL DEPÓSITO DE AGUA
1. Retire la boquilla de nebulización y luego saque la cubierta del
depósito de agua.
2. Saque el tapón del condensador de nebulización Levante el
tubo de nebulización y deslice el condensador de nebulización
fuera del tubo de nebulización.
3. Levante el filtro de bola de cerámica, situado en la parte inferior
del depósito de agua. Retírelo y enjuáguelo bien con agua.
MAX
MAX
Oscilador
46
ES
LIMPIEZA Y CUIDADO
4. Use una solución de 1 parte de vinagre por 3 partes de agua
para limpiar la boquilla de nebulización y el depósito de agua.
Limpie la superficie de cerámica del oscilador situado en la
base, con un cepillo de dientes de cerdas suaves. Elimine todo
el sarro.
MAX
MAX
Agua
(3 Partes)
Destilada
Vinagre
(1 Parte)
Alternativamente, se puede utilizar un ácido cítrico (5-10 g en 12 oz
de agua) para limpiar estas partes. Dejar la solución en el depósito
de agua durante 10-15 minutos.
5. Enjuague bien los componentes. Use un paño limpio
para eliminar cualquier depósito y exceso de agua de los
componentes y séquelos bien.
6. Vuelva a ensamblar el humidificador.
NOTA: Limpie el depósito de agua, la cubierta del depósito de
agua y la boquilla de nebulización con vinagre o ácido cítrico
una vez a la semana.
47
ES
LIMPIEZA Y CUIDADO
CAMBIO DEL FILTRO
1. Retire la boquilla de nebulización y luego saque la cubierta del
depósito de agua.
2. Levante el filtro y retírelo del depósito de agua.
3. Coloque el nuevo filtro en el fondo del depósito de agua y, a
continuación, vuelva a colocar la cubierta del depósito de agua
y la boquilla de nebulización en el depósito de agua.
Nota: Cuando no utilice el aparato, vacíelo y límpielo. Vuelva a
montarlo cuando esté completamente seco y guárdelo en un lugar
seco, fresco y sin polvo, alejado de la luz solar directa.
NOTA: Le recomendamos que reemplace el filtro cada 500 horas
de uso en condiciones normales.
Visite nuestra página web para comprar filtros de repuesto para el
humidificador Westinghouse.
Número de modelo del filtro de repuesto: WAHUF010X4
Web Site: https://shop.corehpi.com/

48
ES
SOLUCIÓN DE PROBLEMAS
Problema Posible causa Solución
El aparato
no se
enciende.
El cable de
alimentación oel
enchufe están
flojos o no están
conectados.
Revise el cable de alimentación
y el enchufe. Asegúrese de
que estén bien conectados
a la base y al tomacorriente
respectivamente.
El aparato
no funciona.
• No hay
suficiente
agua en el
depósito de
agua.
• El aparato
está inclinado.
• El aparato
no produce
suficiente
nebulización.
Hay
acumulación
de polvo
osarro.
• Rellene el depósito de
agua.
• Coloque el aparato sobre
una superficie estable
ynivelada.
• Toque el botón de
NEBULIZACIÓN para
aumentar el nivel de
nebulización.
• Limpie la boquilla de
nebulización, el tapón
del condensador
de nebulización,
el condensador de
nebulización y el tubo de
nebulización, así como el
depósito de agua (véase
LIMPIEZA Y CUIDADO).
• Compruebe que el
condensador de niebla está
correctamente instalado.
• Compruebe si la válvula
de flotador o el oscilador
de la base funcionan
y no están dañados.
Límpielos si es necesario
(consulte la sección
LIMPIEZA Y CUIDADO).
Si están dañados, lleve el
aparato a un proveedor de
servicio calificado para su
reparación.
49
ES
SOLUCIÓN DE PROBLEMAS
Problema Posible causa Solución
La
nebulización
desprende
un cierto
olor.
El aparato podría
estar sucio.
• Limpie el depósito de
agua y sus piezas (véase
LIMPIEZA Y CUIDADO).
• Reemplace el agua usada
en el depósito por agua
limpia de la llave.
ELIMINACIÓN
Eliminación correcta de este producto.
Este símbolo indica que este artefacto no se debe tratar
como desecho doméstico. En su lugar, debe llevarse a un
centro de recogida apropiado para el reciclaje de artefactos
eléctricos y electrónicos.
Use los servicios de devolución o recogida disponibles en su
comunidad o contacte al distribuidor minorista que le vendió este
producto.

50
ES
INFORMACIÓN Y
MANTENIMIENTO
Si tiene preguntas o inquietudes sobre su producto, visite nuestro
sitio web: https://info.westinghousehomeware.com/, o contacte
anuestras oficinas/agentes en el extranjero.
Conforme a nuestra política de desarrollo continuo de productos,
nos reservamos el derecho de cambiar las especificaciones del
producto, el envase y la documentación sin previo aviso.
Modelo: WSHUJLR2258WH / WSHUJLR2258GY
Voltaje: 120 V CA, 60 Hz
Potencia: 29W
Capacidad: 4L
Dimensiones (An x Pr x Al): 11,81 x 5,66 x 10,59 pulgadas
Peso neto: 2,78 lb
Control remoto
Pila: CR2025 3V x 1 (incluida)
Rango de operación: 16.5 pies
Dimensiones (An x Pr x Al): 1,57 x 0,23 x 3,38 pulgadas
Escanee el código QR para ver el video
que muestra cómo desempacar y utilizar el
humidificador.

51
ES
Número de modelo: WSHUJLR2258WH /
WSHUJLR2258GY
Este dispositivo cumple con la Parte 18 de las Reglas
de la FCC.
Soarma Global Inc.
Dirección: 775 Anita St. Suite F, Chula Vista CA 91911
Tel: (+1) 855 2599539
Información para el usuario
Este equipo ha sido probado y se ha determinado que cumple con
los límites para un equipo ISM de consumo, de conformidad con
la Parte 18 de las normas de la FCC. Estos límites están diseñados
para ofrecer una protección razonable contra la interferencia
dañina en una instalación residencial. Este equipo genera, usa y
puede irradiar energía de radiofrecuencia y, en caso de no haberse
instalado y de no usarse de conformidad con las instrucciones,
podría causar una interferencia dañina a las comunicaciones de
radio. No obstante, no hay garantía de que la interferencia no
ocurra en una instalación particular.
Cambios o modificaciones que no se autoricen expresamente por
la parte responsable de cumplimiento podrían anular la autoridad
del usuario para operar el producto.
Si el equipo causa interferencia dañina a la recepción de radio o
televisión, que puede determinarse apagando y encendiendo el
equipo, se anima al usuario a que trate de corregir la interferencia
adoptando una o más de las siguientes medidas:
- Reoriente o reubique la antena receptora.
- Separe aún más el equipo y el receptor.
- Conecte el equipo en una toma de un circuito distinto del
circuito al que esté conectado el receptor.
- Consulte con el vendedor o un técnico experto en radio/TV.
¼
and Westinghouse are trademarks of Westinghouse Electric Corporation,
aUSA company. Used under license by Westinghouse Homeware (HK) Co.
AllRightsReserved.
WSHUJLR2258WH / WSHUJLR2258GY • 06/22