
H1S375
ICE MAKER
KIM26-SS-AU
User Manual
Please Read These Instructions Carefully Before Use!4/2023-v1-AU
WARRANTY
Koolatron Corporation warrants that this product will be free from defects in materials or
workmanship under normal household use for a period of 1 year from the date of retail
purchase. During this time, defective products will be repaired or replaced at the discretion
of the retailer and/or Koolatron Corporation.
This warranty covers normal household usage and does not cover damage which occurs
in shipment or results from accident, misuse or abuse, unauthorized repair or alteration,
improper maintenance, commercial use, or use with a voltage converter or aftermarket
accessories. A Koolatron Master Service Centre must perform all warranty work.
WARRANTY AND SERVICE PROCEDURE
Keep your original, dated, sales receipt with this manual. If this product proves to be
defective within the warranty period, please contact Koolatron Corporation by email
[email protected] for assistance.
Register online at koolatron.com.au and add another 6 months of warranty protection.
koolatron.com.au
©2023 Koolatron, Inc. All rights reserved.
All specification are subject to change without notice.
Made in China

When using electrical appliances, basic safety precautions should always be followed,
including the following:
1. Read all instructions carefully.
2. DANGER! To protect against risk of electric shock, do not immerse cord, plug or any
parts of the unit in water or other liquids.
3. Close supervision is necessary when using this appliance near children. This appliance
is not suitable for use by children.
4. Never leave an appliance unattended while in use.
5. Do not place an appliance on or near a hot gas or electric burner, or in a heated oven.
Do not place on top of any other appliance.
6. Do not let the power cord of an appliance hang over the edge of a table or countertop
or touch any hot surface.
7. Do not operate any electrical appliance with a damaged cord or plug or after the appliance
malfunctions or has been dropped or damaged in any manner. If damage is suspected,
contact the nearest authorized service center for examination, repair or electrical or
mechanical adjustment.
8. Unplug from power outlet when not in use, before putting on or taking off attachments,
and before cleaning.
9. The use of accessory attachments that are not recommended by the appliance
manufacturer may cause fire, electric shock or injury.
10. Avoid contact with moving parts when the unit is in operation.
11. Never touch the cooling elements when the unit is in operation.
12. Do not use outdoors.
13. Do not use appliance for other than its intended use.
IMPORTANT SAFEGUARDS
ELECTRICAL REQUIREMENTS
WIRING AND GROUNDING INSTRUCTIONS
• This appliance must be plugged into at least a 15 AMP 220-240 VOLT 50 Hz GROUNDED
OUTLET.
• This appliance must be grounded. It is equipped with a 3-wire cord having a grounding
plug.
• The plug must be plugged into an outlet that is properly installed and grounded.
Avoid the use of an extension cord because it may overheat and cause a risk of fire.
However, if it is necessary to use an extension cord:
A. Use only 3-wire extension cords with 3-blade grounding plug.
B. The marked rating of an extension cord must be be equal to or greater than the rating
of this appliance.
C. It should be positioned such that it does not drape over the counter or tabletop where
it can be pulled on by children intentionally.
To minimize the possibility of electric shock, unplug this appliance from the power suply
or disconnect at the household distribution panel by removing the fuse or switching off
the circuit breaker before attempting any maintenance or cleaning.
IMPORTANT SAFEGUARDS
2 3
SAVE THESE INSTRUCTIONS
WARNING! Improper use of grounded wire can result in the risk of electric
shock. Do not attempt to defeat this safety feature by modifying the plug.
NOTE - Pressing the Power ON/OFF button to an off position
does NOT disconnect the appliance from the power supply.
FEATURES
4 5
E F
B C
A
D
1
5
8
2
4
6
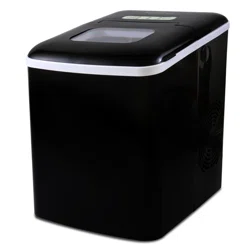
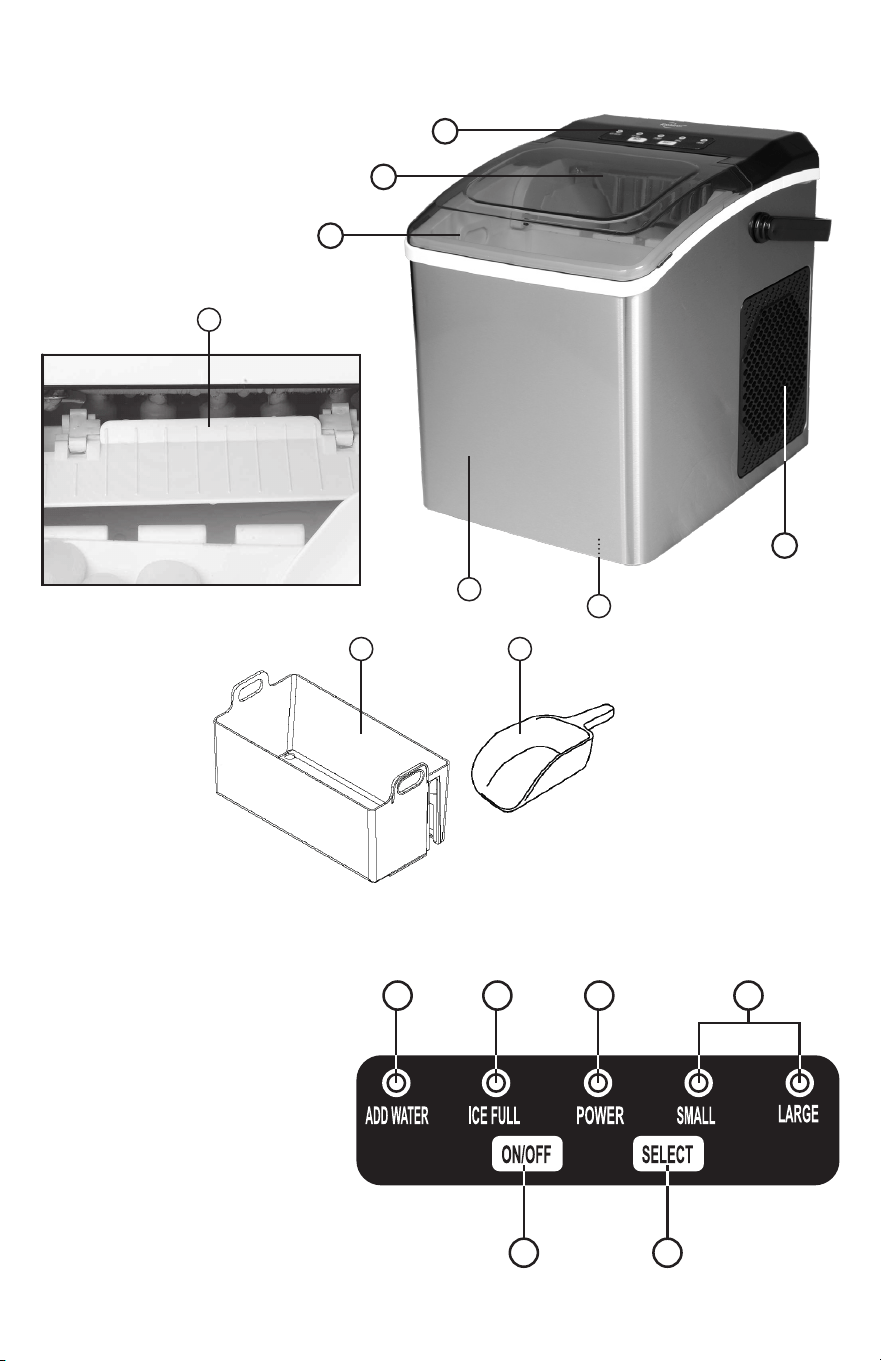
1. Cover with transparent window
2. Ice maker and pusher
3. Water reservoir
4. Control panel
5. Water drain cap
6. Compressor cooling fan
7. Ice scoop
8. Ice basket
CONTROL PANEL
A. Power ON LED indicator light
B. Power ON/OFF button
C. Ice cube SELECT SIZE button
D. Selected ice size LED light indicator
S for small, and L for large ice cubes
E. "ADD WATER" alert indicator
F. "ICE FULL" LED indicator
3
7
2
This portable ice maker uses a fully automatic control system, with an advanced microcomputer for
easy and convenient ice making. Making ice is simple and fast. Just add water, plug into an outlet,
and press the ON button. You can select one of the two ice cube sizes with the touch of a button.
When first turning on the unit or during icemaking cycles, the compressor will stay idle for 3 minutes,
while energizing.
There are warning indicators that alert you to fill water when the reservoir is empty and to remove
ice when the storage basket is full. The icemaker also has built-in safeguards that can limit accidental
damage, automatically shutting down the system when necessary.
PRE-OPERATING INSTRUCTIONS
Please read carefully.
1. The incline angle of the icemaker cabinet should not exceed 45° during transportation or use.
Do not turn the icemaker upside down. Doing so could cause the compressor or refrigerating system
to operate incorrectly. When the icemaker is moved or transported, please allow time for the fluids
in the compressor to settle. Before using the icemaker for the first time, please wait 2 hours after
the unit has been leveled and positioned in its proper place.
2. Please ensure the icemaker is level and on a stable table or platform to avoid malfunction.
The machine must be placed on a dry and level surface with sufficient ventilation, far from heat
sources such as ovens, heaters and corrosive gases. Leave an 8-inch clearance on all sides of
the ice maker for proper ventilation.
3. Do not fill the water reservoir with hot water. This may damage the icemaker. It is best to fill
the water reservoir with water of room temperature or lower.
OPERATING PROCESS
1. Water is pumped from the water storage tank to the water box, which may take up to 1 minute.
2. The icemaking cycle begins when the evaporator rods are dipped into the water box. You will hear
the compressor working.
3. It will take approximately 5-13 minutes for each icemaking cycle, depending on the size selected.
The larger the size, the more time is needed to make the ice. After the cycle is finished, the water box
will tilt forward and the remaining water will flow back into the water storage tank. The evaporator
rods will then release the ice cubes.
NOTE - If the room ambient temperature is below 60° F, then small ice cube sizes are suggested
to prevent ice cubes from fusing together.
4. Approximately 60 seconds later, the water box will tilt backwards and the ice pusher will push
the ice into the ice storage basket. After the water box flips back to its original position, the next
icemaking cycle will begin.
OPERATING INSTRUCTIONS

FEATURES
4 5
E F
B C
A
D
1
5
8
2
4
6
1. Cover with transparent window
2. Ice maker and pusher
3. Water reservoir
4. Control panel
5. Water drain cap
6. Compressor cooling fan
7. Ice scoop
8. Ice basket
CONTROL PANEL
A. Power ON LED indicator light
B. Power ON/OFF button
C. Ice cube SELECT SIZE button
D. Selected ice size LED light indicator
S for small, and L for large ice cubes
E. "ADD WATER" alert indicator
F. "ICE FULL" LED indicator
3
7
2
This portable ice maker uses a fully automatic control system, with an advanced microcomputer for
easy and convenient ice making. Making ice is simple and fast. Just add water, plug into an outlet,
and press the ON button. You can select one of the two ice cube sizes with the touch of a button.
When first turning on the unit or during icemaking cycles, the compressor will stay idle for 3 minutes,
while energizing.
There are warning indicators that alert you to fill water when the reservoir is empty and to remove
ice when the storage basket is full. The icemaker also has built-in safeguards that can limit accidental
damage, automatically shutting down the system when necessary.
PRE-OPERATING INSTRUCTIONS
Please read carefully.
1. The incline angle of the icemaker cabinet should not exceed 45° during transportation or use.
Do not turn the icemaker upside down. Doing so could cause the compressor or refrigerating system
to operate incorrectly. When the icemaker is moved or transported, please allow time for the fluids
in the compressor to settle. Before using the icemaker for the first time, please wait 2 hours after
the unit has been leveled and positioned in its proper place.
2. Please ensure the icemaker is level and on a stable table or platform to avoid malfunction.
The machine must be placed on a dry and level surface with sufficient ventilation, far from heat
sources such as ovens, heaters and corrosive gases. Leave an 8-inch clearance on all sides of
the ice maker for proper ventilation.
3. Do not fill the water reservoir with hot water. This may damage the icemaker. It is best to fill
the water reservoir with water of room temperature or lower.
OPERATING PROCESS
1. Water is pumped from the water storage tank to the water box, which may take up to 1 minute.
2. The icemaking cycle begins when the evaporator rods are dipped into the water box. You will hear
the compressor working.
3. It will take approximately 5-13 minutes for each icemaking cycle, depending on the size selected.
The larger the size, the more time is needed to make the ice. After the cycle is finished, the water box
will tilt forward and the remaining water will flow back into the water storage tank. The evaporator
rods will then release the ice cubes.
NOTE - If the room ambient temperature is below 60° F, then small ice cube sizes are suggested
to prevent ice cubes from fusing together.
4. Approximately 60 seconds later, the water box will tilt backwards and the ice pusher will push
the ice into the ice storage basket. After the water box flips back to its original position, the next
icemaking cycle will begin.
OPERATING INSTRUCTIONS

6 7
Before using your icemaker, it is strongly recommended that you clean the icemaker thoroughly.
1. When cleaning, please make sure the power has been turned off and the plug is disconnected from
the power outlet. When plugging or unplugging the unit from the outlet, pull directly on the plug.
Never pull on the power cord.
2. Remove the ice storage basket.
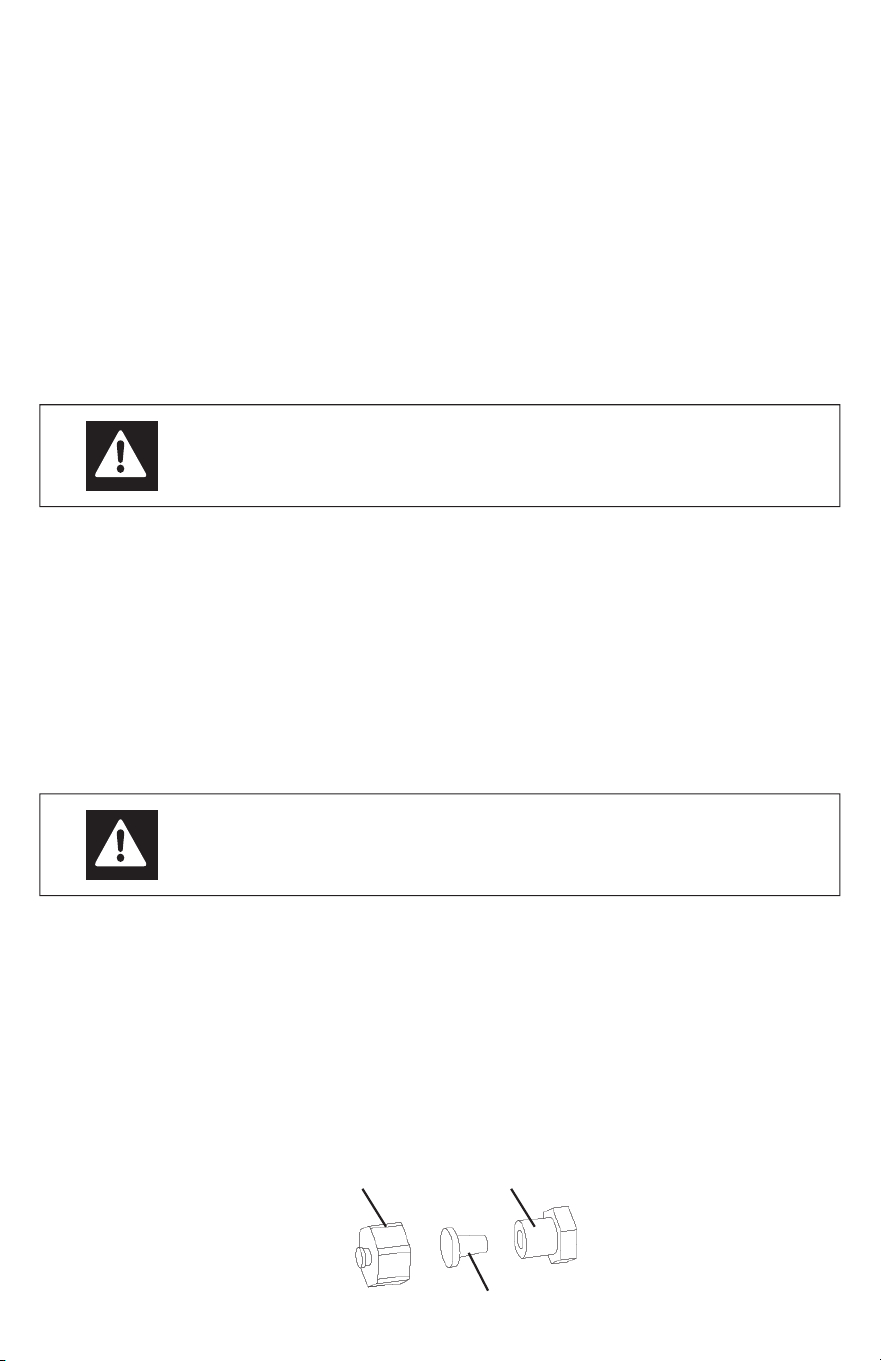
3. Drain remaining water from unit. Remove the cap, then the rubber plug from the spout. When
assembling back together, the rubber plug must be inserted first into the spout, and then capped.
Otherwise, the icemaker will leak.
4. Use a mild detergent diluted in warm water and wipe with a soft towel or sponge.
5. Wipe the inner parts, such as the ice storage basket, water reservoir, water box, ice pusher, and
evaporator rods.
6. The outside of the icemaker should be cleaned regularly with a mild detergent solution, warm
water, and a soft cloth.
7. Dry the interior and exterior with a soft cloth.
8. To begin making ice once the unit has been cleaned, pour clean water into the water reservoir and
fill up to the level line follow operating instructions.
9. To ensure the cleanliness of the ice cubes, the water in the water storage tank should be replaced
every 24 hours.
10. When the machine is not in use or will not be used for an extended period of time, unscrew the
drain cap, then remove the rubber plug behind the unit to empty the remaining water in the water
reservoir completely. Follow the instructions in number 4 above.
Be sure to clean the icemaker regularly. To keep the ice tasting fresh, it is recommended to clean
the ice maker once per week.
CLEANING AND MAINTENANCE
drain spoutdrain cap
rubber plug
TECHNICAL SPECIFICATIONS
Electrical Shock Protection Class 1
Power 220 V / 50 Hz
Ice Making Current 1.5 A
Ice Harvest Current 2.0 A
Refrigerant R600a / 28g (1oz.)
Pressure High Side 290 Psig
Pressure Low Side 138 Psig
Dimensions 9.5" x 14.1" x 12.9"
Weight 20.5 lbs.
Enclosure ABS plastic
OPERATING PROCESS (continued)
5. When the maximum capacity of ice cubes is collected and the ice reaches the temperature sensor,
the icemaker will automatically stop operating. The “ICE FULL” LED indicator will light up. If more
ice is needed, remove the ice from the ice storage basket; then replace the basket into the machine,
making sure that the basket is placed back to its original position.
NOTE - When replacing the basket, ensure that the temperature sensor is above the basket so that
the machine operates properly.
6. To continue making ice, check that there is water in the water storage tank. If there is no water in
the water storage tank, then no water will be pumped into the water box, and the operation will stop.
The "Add Water" LED display will light up. Press the “OFF” button. Fill the water storage tank with
water, and then press the “ON” button for the icemaker to begin operating again. Allow the refrigerant
inside the compressor at least 3 minutes to settle before restarting.
OPERATING INSTRUCTIONS
WARNING! If the compressor stops for any reason such as water shortage,
too much ice, power off, etc., do not restart the machine right away.
Wait at least 3 minutes before restarting the machine.
WARNING! Solvents, detergents and abrasives must never be used for cleaning.
WARNING! Never tilt or place the icemaker on its side, otherwise you must wait
10 hours for compressor coolant to settle.
6 7
Before using your icemaker, it is strongly recommended that you clean the icemaker thoroughly.
1. When cleaning, please make sure the power has been turned off and the plug is disconnected from
the power outlet. When plugging or unplugging the unit from the outlet, pull directly on the plug.
Never pull on the power cord.
2. Remove the ice storage basket.
3. Drain remaining water from unit. Remove the cap, then the rubber plug from the spout. When
assembling back together, the rubber plug must be inserted first into the spout, and then capped.
Otherwise, the icemaker will leak.
4. Use a mild detergent diluted in warm water and wipe with a soft towel or sponge.
5. Wipe the inner parts, such as the ice storage basket, water reservoir, water box, ice pusher, and
evaporator rods.
6. The outside of the icemaker should be cleaned regularly with a mild detergent solution, warm
water, and a soft cloth.
7. Dry the interior and exterior with a soft cloth.
8. To begin making ice once the unit has been cleaned, pour clean water into the water reservoir and
fill up to the level line follow operating instructions.
9. To ensure the cleanliness of the ice cubes, the water in the water storage tank should be replaced
every 24 hours.
10. When the machine is not in use or will not be used for an extended period of time, unscrew the
drain cap, then remove the rubber plug behind the unit to empty the remaining water in the water
reservoir completely. Follow the instructions in number 4 above.
Be sure to clean the icemaker regularly. To keep the ice tasting fresh, it is recommended to clean
the ice maker once per week.
CLEANING AND MAINTENANCE
drain spoutdrain cap
rubber plug
TECHNICAL SPECIFICATIONS
Electrical Shock Protection Class 1
Power 220 V / 50 Hz
Ice Making Current 1.5 A
Ice Harvest Current 2.0 A
Refrigerant R600a / 28g (1oz.)
Pressure High Side 290 Psig
Pressure Low Side 138 Psig
Dimensions 9.5" x 14.1" x 12.9"
Weight 20.5 lbs.
Enclosure ABS plastic
OPERATING PROCESS (continued)
5. When the maximum capacity of ice cubes is collected and the ice reaches the temperature sensor,
the icemaker will automatically stop operating. The “ICE FULL” LED indicator will light up. If more
ice is needed, remove the ice from the ice storage basket; then replace the basket into the machine,
making sure that the basket is placed back to its original position.
NOTE - When replacing the basket, ensure that the temperature sensor is above the basket so that
the machine operates properly.
6. To continue making ice, check that there is water in the water storage tank. If there is no water in
the water storage tank, then no water will be pumped into the water box, and the operation will stop.
The "Add Water" LED display will light up. Press the “OFF” button. Fill the water storage tank with
water, and then press the “ON” button for the icemaker to begin operating again. Allow the refrigerant
inside the compressor at least 3 minutes to settle before restarting.
OPERATING INSTRUCTIONS
WARNING! If the compressor stops for any reason such as water shortage,
too much ice, power off, etc., do not restart the machine right away.
Wait at least 3 minutes before restarting the machine.
WARNING! Solvents, detergents and abrasives must never be used for cleaning.
WARNING! Never tilt or place the icemaker on its side, otherwise you must wait
10 hours for compressor coolant to settle.

H1S375
ICE MAKER
KIM26-SS-AU
User Manual
Please Read These Instructions Carefully Before Use!4/2023-v1-AU
WARRANTY
Koolatron Corporation warrants that this product will be free from defects in materials or
workmanship under normal household use for a period of 1 year from the date of retail
purchase. During this time, defective products will be repaired or replaced at the discretion
of the retailer and/or Koolatron Corporation.
This warranty covers normal household usage and does not cover damage which occurs
in shipment or results from accident, misuse or abuse, unauthorized repair or alteration,
improper maintenance, commercial use, or use with a voltage converter or aftermarket
accessories. A Koolatron Master Service Centre must perform all warranty work.
WARRANTY AND SERVICE PROCEDURE
Keep your original, dated, sales receipt with this manual. If this product proves to be
defective within the warranty period, please contact Koolatron Corporation by email
[email protected] for assistance.
Register online at koolatron.com.au and add another 6 months of warranty protection.
koolatron.com.au
©2023 Koolatron, Inc. All rights reserved.
All specification are subject to change without notice.
Made in China