
USER’S OPERATION MANUAL
Before operating this unit, please read this manual
thoroughly, and retain for future reference.
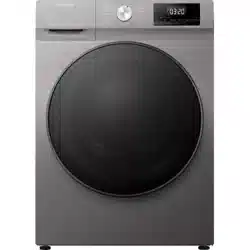
WF7S1247BW WF7S1247B*
English
EN
This washing machine is intended solely for household use.
Please do not use it for any laundry labelled as not suitable for machine washing.
The following symbols used in the manual have the following meanings:
Information, advice, tip, or recommendation
Warning - general danger
Warning - danger of electric shock
Warning - danger of hot surface
Warning - danger of fire
It is important to read the instructions carefully.

3
&217(176
6$)(7<35(&$87,216
,1752'8&7,21
:$6+,1*0$&+,1('(6&5,37,21
13 Specifications
,167$//$7,21$1'&211(&7,21
15 Removing the transport screws/rods
16 Moving and transport after installation
17 Location
17 Adjusting feet
18 Installation clearances
19 Connecting to water supply
19 Aquastop
20 Connecting and securing drain hose
22 Connecting power supply
35(3$5,1*%()25(
),56786(
%()25(7+(),56786(
:$6+,1*352&(6667(3%<67(3
24 Step 1: Heed the labels on the laundry
25 Step 2: Preparing the washing process
32 Step 3: Choosing washing programme
34 Step 4: Selecting additional settings and functions
41 Step 5: Starting a washing program
42 Step 6: End of washing program
67(362)7+(
:$6+,1*352&(66
,17(55837,216$1'&+$1*,1*352*5$0
(0(5*(1&<'22523(1,1*
0$,17(1$1&(&/($1,1*
45 Cleaning detergent compartment
46 Cleaning water hose, detergent dispenser housing, and rubber door
gasket
47 Cleaning pump filter
48 Cleaning exterior
&/($1,1*$1'
0$,17(1$1&(
7528%/(6+227,1*
49 What to do...?
50 Error codes and troubleshooting
7528%/(6+227,1*
52
0,6&(//$1(286
5(&200(1'$7,216$1'(&2120,&86(
Stain removal tips
',6326$/
Connecting your appliance to the application ConnectLife
7<3,&$/&2168037,217$%/(
56

4
6$)(7<35(&$87,216
&DUHIXOO\UHDGWKHLQVWUXFWLRQVIRUXVHEHIRUHXVLQJWKH
ZDVKLQJPDFKLQH
3OHDVHGRQRWXVHWKHZDVKLQJPDFKLQHZLWKRXWUHDGLQJDQG
XQGHUVWDQGLQJWKHVHLQVWUXFWLRQVRUXVHILUVW
7KHVHLQVWUXFWLRQVIRUXVHRIDZDVKLQJPDFKLQHDUH
VXSSOLHGZLWKGLIIHUHQWW\SHVRUPRGHOVRIZDVKLQJPDFKLQH
7KHUHIRUHWKH\PD\LQFOXGHGHVFULSWLRQVRIVHWWLQJVRU
HTXLSPHQWWKDWDUHQRWDYDLODEOHLQ\RXUZDVKLQJPDFKLQH
Failure to observe the instructions for use or inappropriate use
of the washing machine may result in damage to the laundry or
the appliance, or injury to the user. Keep the instruction manual
handy, near the washing machine.
7KLVDSSOLDQFHLVLQWHQGHGWREHXVHGLQKRXVHKROG If the
washing machine is used for professional, for-profit purpose or
purpose exceeding normal use in a household, or if the washing
machine is used by a person who is not a consumer, the
warranty period shall be equal to the shortest warranty period
required by relevant legislation.

5
Follow the instructions for correct installation of the washing
machine and connection to the water and power mains (see
chapter »INSTALLATION AND CONNECTION«).
Connection to water and power supply has to be executed by an
adequately trained technician or expert.
Any repair and maintenance pertaining to safety or performance
should be done by trained experts.
To avoid danger, DGDPDJHGSRZHU cord may only be replaced
by the manufacturer, a service technician, or an authorized
person.
%HIRUHFRQQHFWLQJWKHZDVKLQJPDFKLQHWRWKHSRZHUPDLQV
ZDLWIRUDWOHDVWKRXUVXQWLOLWUHDFKHVURRPWHPSHUDWXUH
7KLVSURGXFWPXVWEHVHUYLFHGE\DQDXWKRUL]HG6HUYLFH
&HQWHURQO\XVHDSSURYHGVSDUHSDUWVE\DXWKRUL]HG
PDQXIDFWXUHUV
8QGHUQRFLUFXPVWDQFHVVKRXOG\RXDWWHPSWWRUHSDLUWKH
DSSOLDQFH\RXUVHOI5HSDLUVFDUULHGRXWE\LQH[SHULHQFHG
SHUVRQVPD\FDXVHLQMXU\RUPRUHVHULRXVPDOIXQFWLRQLQJ
5HIHUWR\RXUORFDO6HUYLFH&HQWHUDQGDOZD\VLQVLVWRQ
JHQXLQHVSDUHSDUWV
In case of incorrect washing machine connection, incorrect use,
or servicing by an unauthorized person, the user shall bear the
cost of any damage as such damage shall not be covered by
warranty.
The washing machine may not be connected to the power mains
using an extension cord.
Do not connect the washing machine to power mains using an
external switching device such as a programme timer, or connect
it to power mains that is regularly switched on and off by the
power supply provider.

6
Do not connect the washing machine to an electrical outlet
intended for an electric shaver or hair dryer.
The power socket has to be safely earthed, and the water supply
should be unimpeded.
'RQRWLQVWDOOWKHZDVKLQJPDFKLQHLQDURRPZKHUHWKH
WHPSHUDWXUHFDQGURSWREHORZ& as washing machine parts
may be damaged in case of water freezing.
Place the washing machine on a level and stable solid (concrete)
base.
If the washing machine is placed on an elevated stable base, the
washing machine has to be additionally secured against tipping.
%HIRUHWKHILUVWXVHRIWKHZDVKLQJPDFKLQHUHPRYHWKH
WUDQVSRUWVFUHZV as switching on a blocked washing machine
can result in serious damage (see chapter »INSTALLATION AND
CONNECTION/Removing the transport screws/rods«). Warranty
shall be void in cases of such damage.
7RFRQQHFWWKHZDVKLQJPDFKLQHWRZDWHUVXSSO\ make
sure to use the supplied water supply hose and gaskets. Water
pressure has to be between 0.1-1 MPa (1-10 bar; 1-10 kp/cm
2
;
10-100 N/cm
2
).
Always use a new water supply hose to connect the washing
machine to water supply; do not reuse an old water supply hose.
The end of the water discharge hose should reach into a water
drain line.

7
Before the start of the washing cycle, press the door on the
indicated spot until it locks into place. The door cannot be opened
during washing machine operation.
$IWHUWKHZDVKLQJF\FOHFORVHWKHZDWHUWDSDQGSXOORXWWKH
ZDVKLQJPDFKLQHSOXJIURPWKHSRZHUVRFNHW
Only use agents for washing machine and care of laundry. We
shall not be responsible for any damages or discolouration of
gaskets and plastic parts resulting from incorrect use of bleaching
or colouring agents.
:KHQGHVFDOLQJ only use descaling agents with added anti-
corrosion protection. (Only use non-corrosive descaling agents.)
Follow the manufacturer's instructions. Finish the descaling
process with several rinse cycles or by running the'UXPFOHDQ
(Self cleaning programme) in order to remove any residual acid
(e.g. vinegar etc.).
Do not use detergents that contain solvents as this could lead
to release of poisonous gases, damage to the washing machine,
and risk of fire and explosion.

8
The washing machine is not intended for use by persons
(including children) with physical or mental impairments, or
persons with lacking experience and knowledge. These persons
should be instructed about the use of the washing machine by a
person responsible for their safety.
7KHZDUUDQW\GRHVQRWFRYHU consumables, minor deviations in
colour, increased noise that results from appliance age and which
does not affect the functionality of the appliance, and aesthetic
defects on components, which do not affect the functionality and
safety of the appliance.
&+,/'6$)(7<
Before closing the washing machine door and running the
programme, make sure there is nothing except laundry in the
drum (e.g. if a child climbed into the washing machine drum and
closed the door from the inside).
Keep the detergent and conditioner out of reach of children.
$FWLYDWHWKHFKLOGORFN. See chapter »SELECTING
ADDITIONAL SETTINGS AND FUNCTIONS/Child lock«.
'RQRWOHWFKLOGUHQ\RXQJHUWKDQWKUHH\HDUVFRPHQHDUWKH
DSSOLDQFHXQOHVVWKH\DUHXQGHUFRQVWDQWVXSHUYLVLRQ
7KHZDVKLQJPDFKLQHLVPDGHLQFRPSOLDQFHZLWKDOO
UHOHYDQWVDIHW\VWDQGDUGV
This washing machine may be used by children aged 8 years
and above and by persons with reduced physical, sensory or
mental capabilities or lack of experience and knowledge, but only
if they are supervised during the use of the washing machine,

9
if they have been provided relevant instructions regarding safe
use of the washing machine, and if they understand the hazards
of inappropriate use. Make sure children do not play with the
appliance.
Children may not clean the washing machine or perform any
maintenance tasks without supervision.
'$1*(52)+27685)$&(
At higher washing temperatures, the door glass will heat up. Be
careful to avoid burns. Make sure children do not play near the
door glass.
:$7(529(5)/2:3527(&7,21:,7+:$6+,1*
0$&+,1(6:,7&+('21
If the water level in the appliance rises above normal level, then
the excess water level protection will be activated. It will shut off
the water supply and start pumping out the water. The program is
interrupted and an error is reported.
75$16325775$163257$)7(5,167$//$7,21
If you intend to move the washing machine after it has been
installed, then it should be blocked by inserting the transport
screws (see chapter »INSTALLATION AND CONNECTION/
Moving and transport after installation«). Before inserting the
transport screws, disconnect the washing machine from the
power mains!
If the supply cord is damaged, it must be replaced by the
manufacturer, its service agent or similarly qualified persons in
order to avoid a hazard.

10
Water drained during a high-temperature wash or drying cycle is
hot. Do not touch the water.
Do not open the washing machine door by force while it is
operating(high-temperature washing/drying/spinning).
That the washing machine is not to be used if industrial
chemicals have been used for cleaning;
That lint must not to be allowed to accumulate around the tumble
dryer;
That adequate ventilation has to be provided to avoid the back
flow of gases into the room from appliances burning other fuels,
including open fires.
Items that have been soiled with substances such as
cooking oil, acetone,alcohol, petrol,kerosene, spot removers,
turpentinewaxes and wax removers should be washed in hot
water with an extra amount of detergent before being washed in
the machine.
Items such as foam rubber (latex foam), shower caps, waterproof
textiles,rubber backed articles and clothes or pillows fitted with
foam rubber pads should not be washed in the machine.
Fabric softeners, or similar products, should be used as specified
by the fabric softener instructions.
Remove all objects from pockets such as lighters and matches.

11
:$51,1* The appliance must not be supplied through an
external switching device, such as a timer, or connected to a
circuit that is regularly switched on and off by a utility.
For appliances with ventilation openings in the base, a carpet
must not obstruct the openings.
The appliance must not be installed behind a lockable door, a
sliding door or a door with a hinge on the opposite side to that of
the tumble dryer, in such a way that a full opening of the tumble
dryer door is restricted.
Exhaust air must not be discharged into a flue that is used for
exhausting fumes from appliances burning gas or other fuels.

12
:$6+,1*0$&+,1('(6&5,37,21
FRONT
1 Control unit
2 Programme selector knob
3 Detergent compartment
4 Door
5 Rating plate
6 Pump filter cover
BACK
The illustrations in this manual are for reference purpose only. As our products are subject to
continual improvement, the appearance, color and functional parts of your actual product may vary
from the illustrations.
1 Water hose
2 Power cord
3 Drain hose
4 Adjustable feet
5 Transport screws/rods
13
63(&,),&$7,216
'(3(1',1*2102'(/
The rating plate is fitted on the front wall of the appliance door (see chapter "WASHING
MACHINE DESCRIPTION").
Rating plate
Dimensions (mm)
Index Dimension(mm)
A 595
B 845
C 610
D 640
E 670
F 1150
%HIRUHFRQQHFWLQJWKHZDVKLQJPDFKLQHWRWKHSRZHUPDLQVZDLWIRUDWOHDVWKRXUV
XQWLOLWUHDFKHVURRPWHPSHUDWXUH
0D[LPXPORDG
12 kg
:HLJKW
73 kg
5DWHG9ROWDJH
220-240 V~
5DWHGSRZHU
1750 W
)UHTXHQF\
50 Hz
:DVKLQJ0DFKLQH
;;;;;;;;;
;;NJ
;;;;;;9a;;+];;;;:,3;
14
,167$//$7,21$1'&211(&7,21
Remove all packaging (see chapter »DISPOSAL«). When removing the packaging, make sure
not to damage the appliance with a sharp object. Keep the packaging material (plastic bags, other
plastic parts etc.) out of reach of children.
Check for any damage on the appliance. If you suspect the appliance is damaged, do not use it
and immediately contact the After-sale Service.
The appliance is supplied with a support set that includes:
Instructions for use;
4 plastic plugs;
Supply hose;
Drain hose holder;
Wrench;
Noise reduction board.
Make sure all parts listed above are supplied.
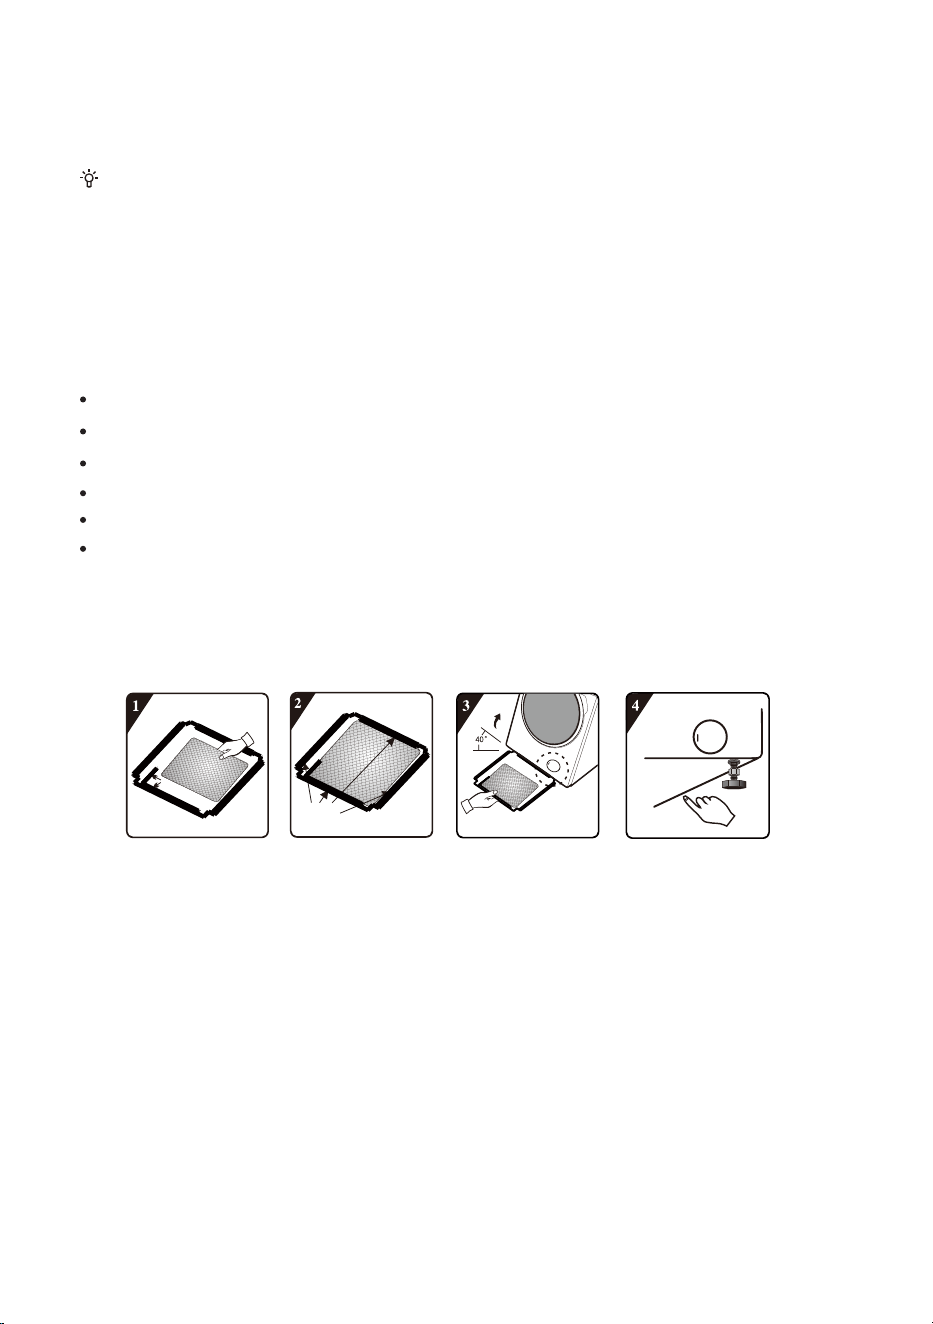
+2:72,167$//7+(12,6(5('8&7,21%2$5'
3. Incline the machine to an angle of 40° and
let the side with right-angle notch face
towards front of the washing machine, as
shown in the figure. Insert the side with
oblique-angle notch between two foot
screws at back of the washing machine
completely in place. Then, install the noise
reduction board and ensure that it contacts
with bottom of the washing machine closely.
1.
Before installing the noise reduction board,
align and paste the acoustic absorption wool
with and along the right-angle impression on
noise reduction board (this procedure is
unnecessary for some of the models without
acoustic abs orption wool).
2. Remove surface paper on double sided
tape at four sides of the noise reduction
board.
4. Press the double sided tape on four sides
manually to secure the noise reduction
board to the machine body firmly.
Right-angle impression
Pump
Double sided tape
15
5(029,1*7+(75$1632576&5(:652'6
Before the first use of the appliance, transport screws/rods must be removed. A blocked
appliance may be damaged when it is switched on for the first time. Warranty shall be void in
cases of such damage.
Save the transport screws/rods in case you have to transport the appliance again later (to
reinstall the blocking screws/rods, follow the above procedure in reverse order).
Move aside the
hoses and use a
fitting spanner to
loosen the 4 screws
on the back of the
appliance by turning
them counter
clockwise, as
indicated by the
arrow. Loosen them
by approximately
30 mm (not
completely).
Pull all 4 shipping
bolts/screws
horizontally.
Pull out the
shipping bolts/
screws together with
the rubber and the
plastic part.
Cover the screw
holes with the
plastic caps. The
plastic caps are
supplied in the
accessory bag (the
support set) together
with the instruction
manual.
A power cord clip
is provided here,
which should also
be removed.

16
029,1*$1'75$163257$)7(5,167$//$7,21
If you wish to move the washing machine after it has been installed, the blocking screws/rods
have to be re-installed to prevent vibration damage to the washing machine during transport (see
chapter »INSTALLATION AND CONNECTION/Removing the transport screws/rods«). If you lost
the blocking screws/rods, they can be ordered from the manufacturer.
$IWHUWUDQVSRUWWKHZDVKLQJPDFKLQHVKRXOGEHOHIWWRVWDQGVWLOOIRUDWOHDVWWZRKRXUV
EHIRUHLWLVFRQQHFWHGWRWKHSRZHUPDLQVVRWKDWLWFDQUHDFKURRPWHPSHUDWXUH7KH
DSSOLDQFHVKRXOGEHLQVWDOOHGDQGFRQQHFWHGE\DWUDLQHGWHFKQLFLDQ
&DUHIXOO\UHDGWKHLQVWUXFWLRQVIRUXVHEHIRUHFRQQHFWLQJWKHZDVKLQJPDFKLQH5HSDLU
RUDQ\ZDUUDQW\FODLPUHVXOWLQJIURPLQFRUUHFWFRQQHFWLRQRUXVHRIWKHZDVKLQJPDFKLQH
VKDOOQRWEHFRYHUHGE\WKHZDUUDQW\
17
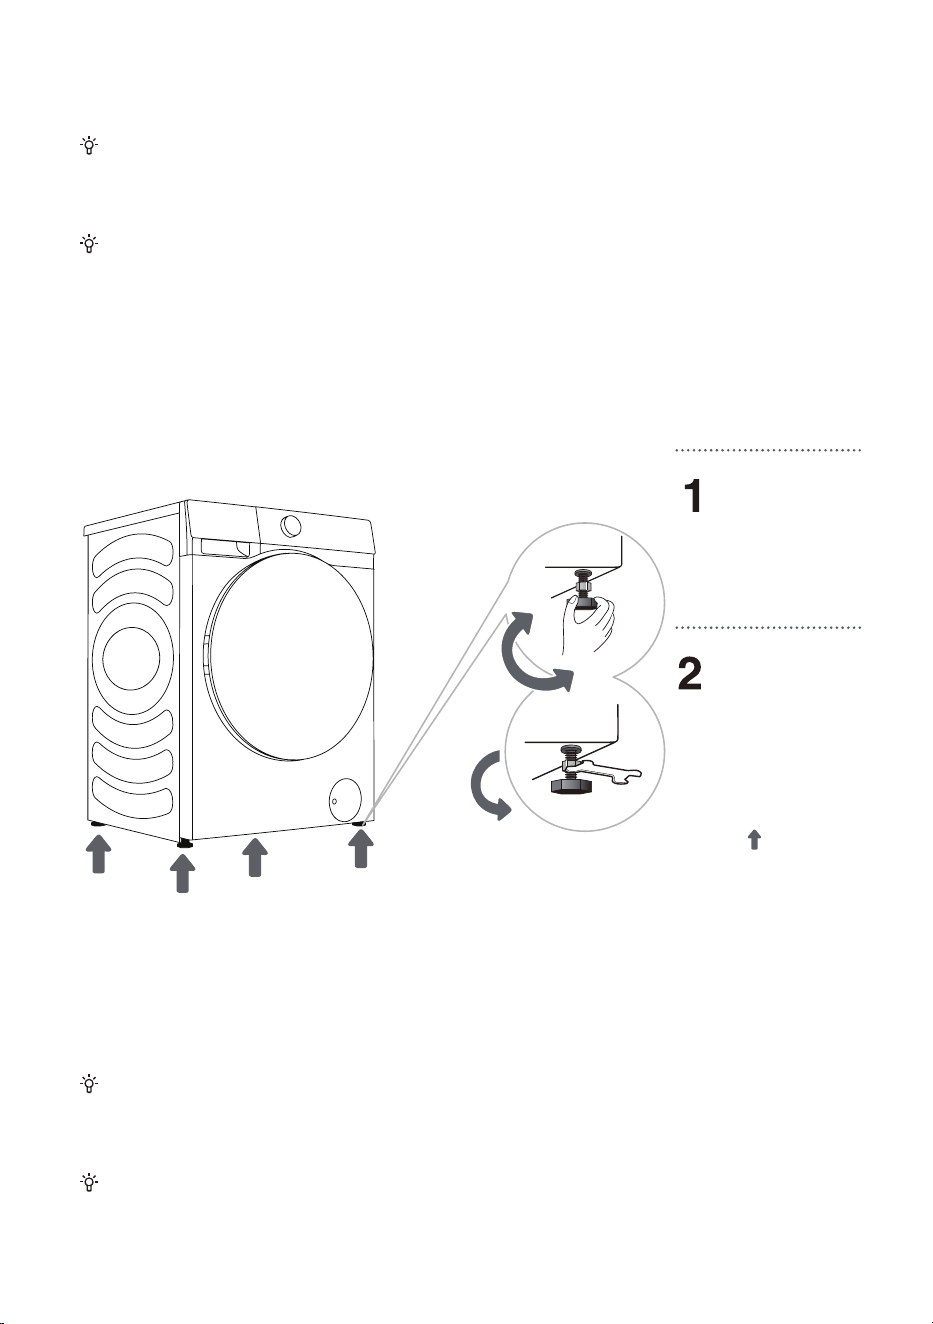
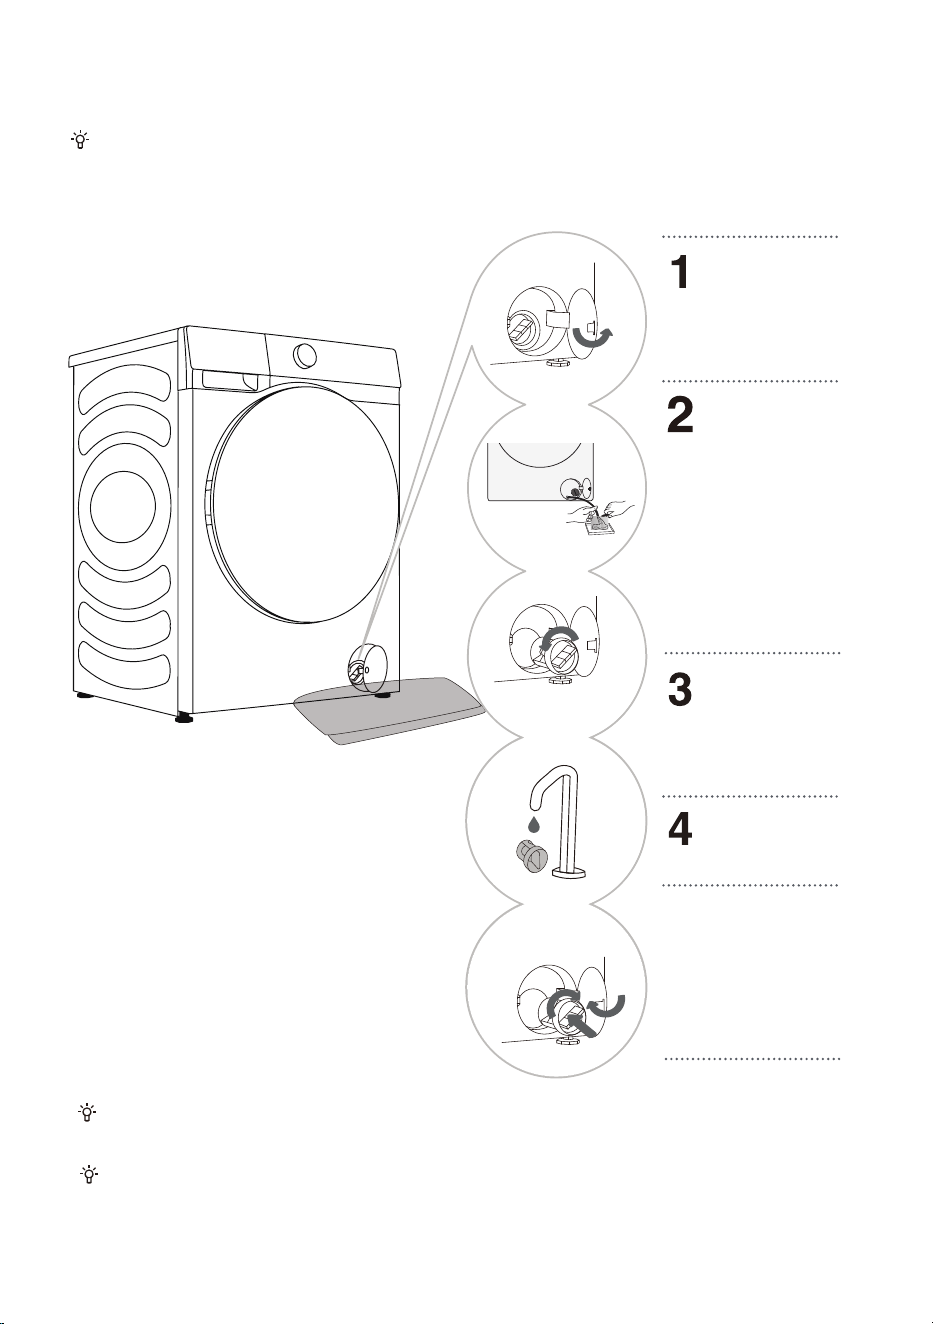
/2&$7,21
$'-867,1*)((7
Use a spirit level and the supplied spanner.
Floor on which the washing machine is placed must have a concrete base. It should be clean
and dry; otherwise, the washing machine may slide. Also, clean the bottom surface of adjustable
feet.
The washing machine must stand level and stable on a solid base.
Incorrect levelling of the washing machine with the adjustable legs may cause vibration,
appliance sliding across the room, and loud operation. Incorrect levelling of the washing machine is
not subject to warranty.
Sometimes, unusual or louder noise may appear during appliance operation; these are mostly
the result of improper installation.
Rotate the
adjustable feet to
level the washing
machine. The feet
allow levelling by
+/- 2 cm.
After adjusting the
height of the feet,
firmly tighten the jam
nuts (counter nuts) by
turning them towards
the bottom of the
washing machine
using the supplied
spanner (see
figure).
18
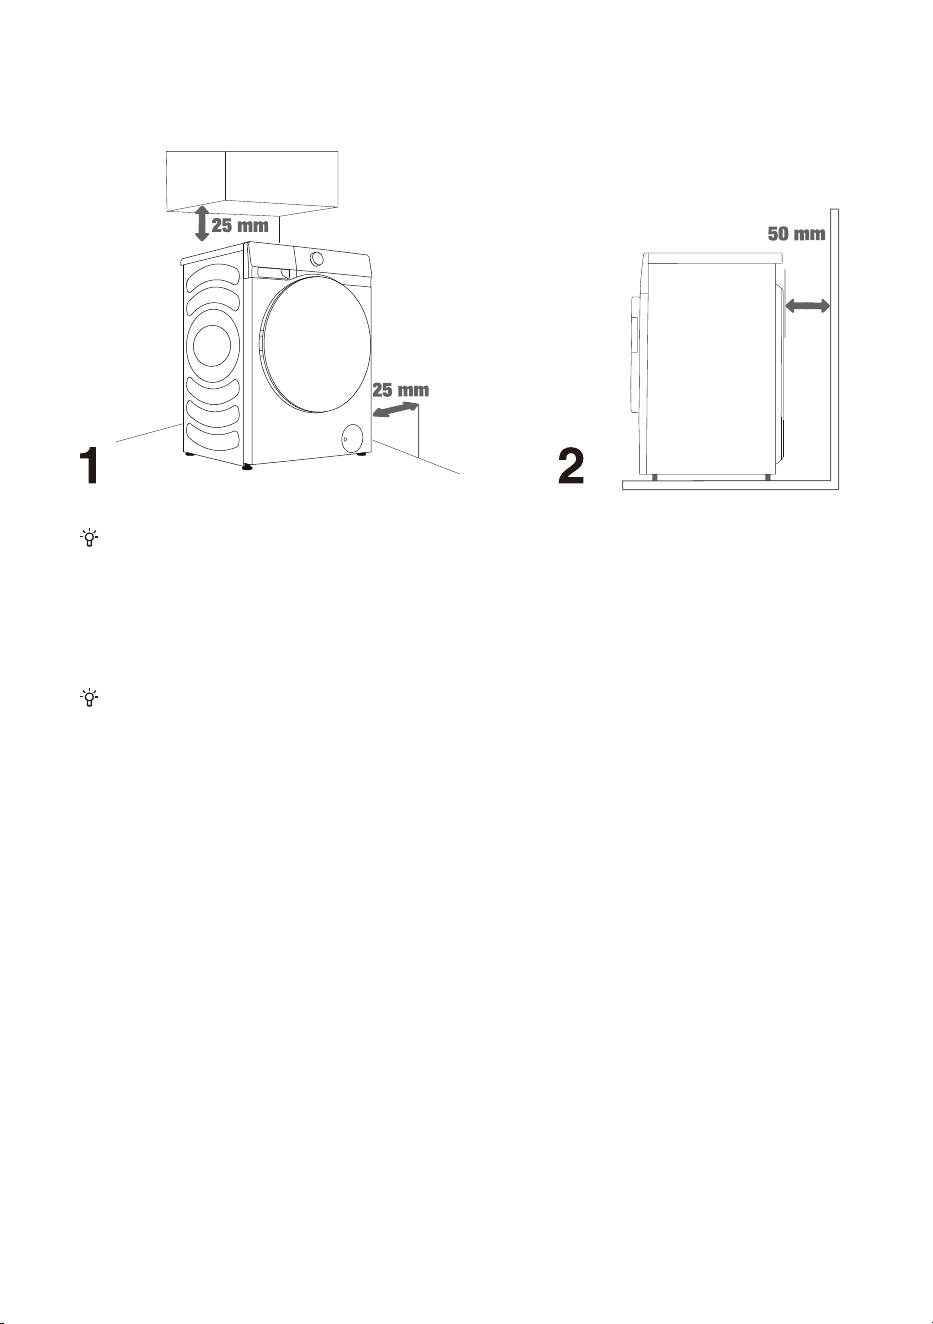
,167$//$7,21&/($5$1&(6
The washing machine may not be in contact with a wall or adjacent furniture. For optimum
washing machine operation, we recommend observing the clearances from the walls as indicated in
the figure.
In case of failure to observe the minimum required clearances, safe and correct washing machine
operation cannot be ensured. Moreover, overheating can also occur (figures 1 and 2).
Installing the washing machine under a countertop is not recommended.
19
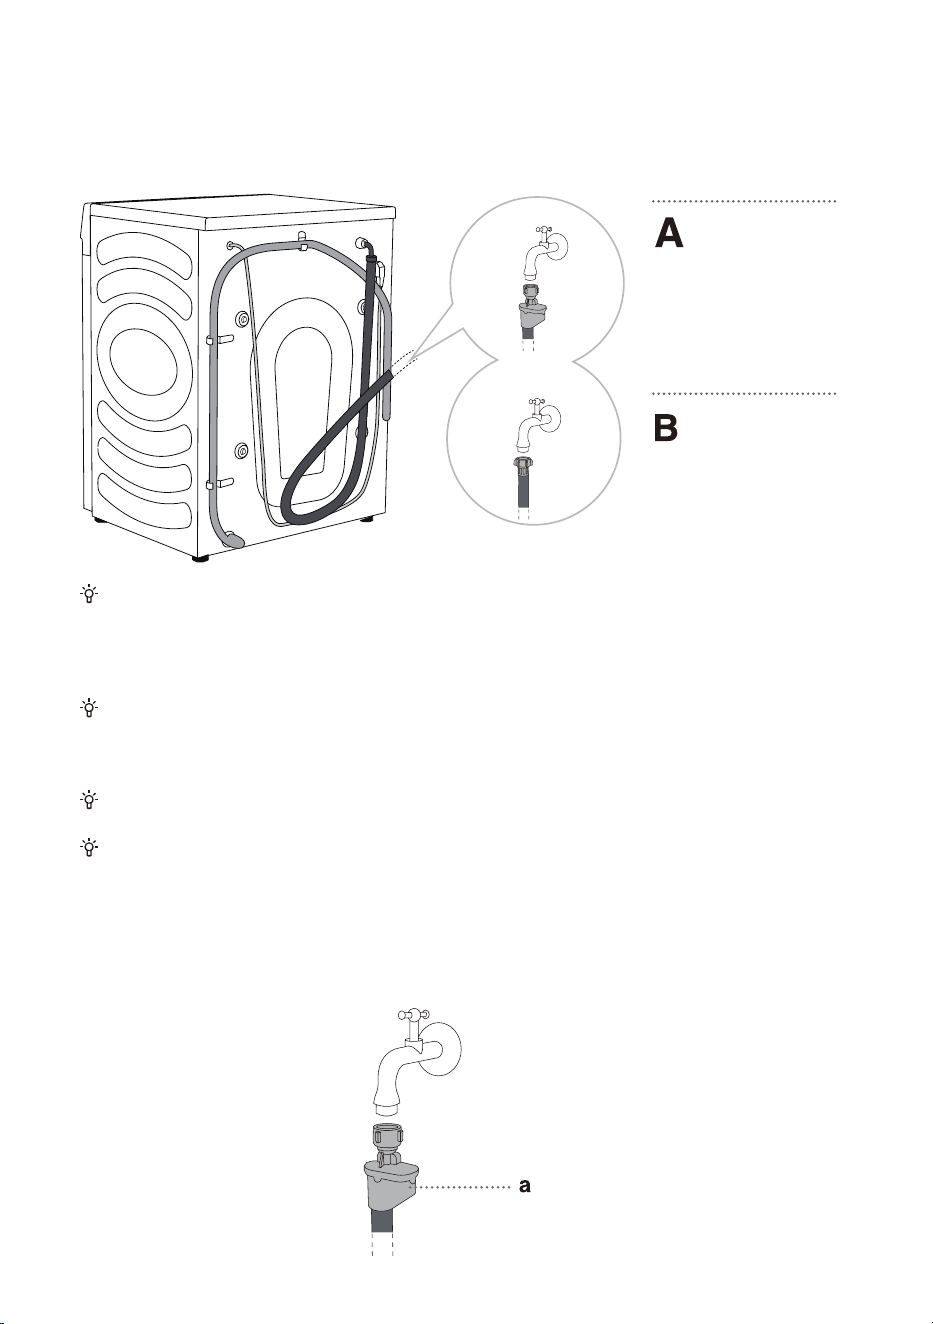
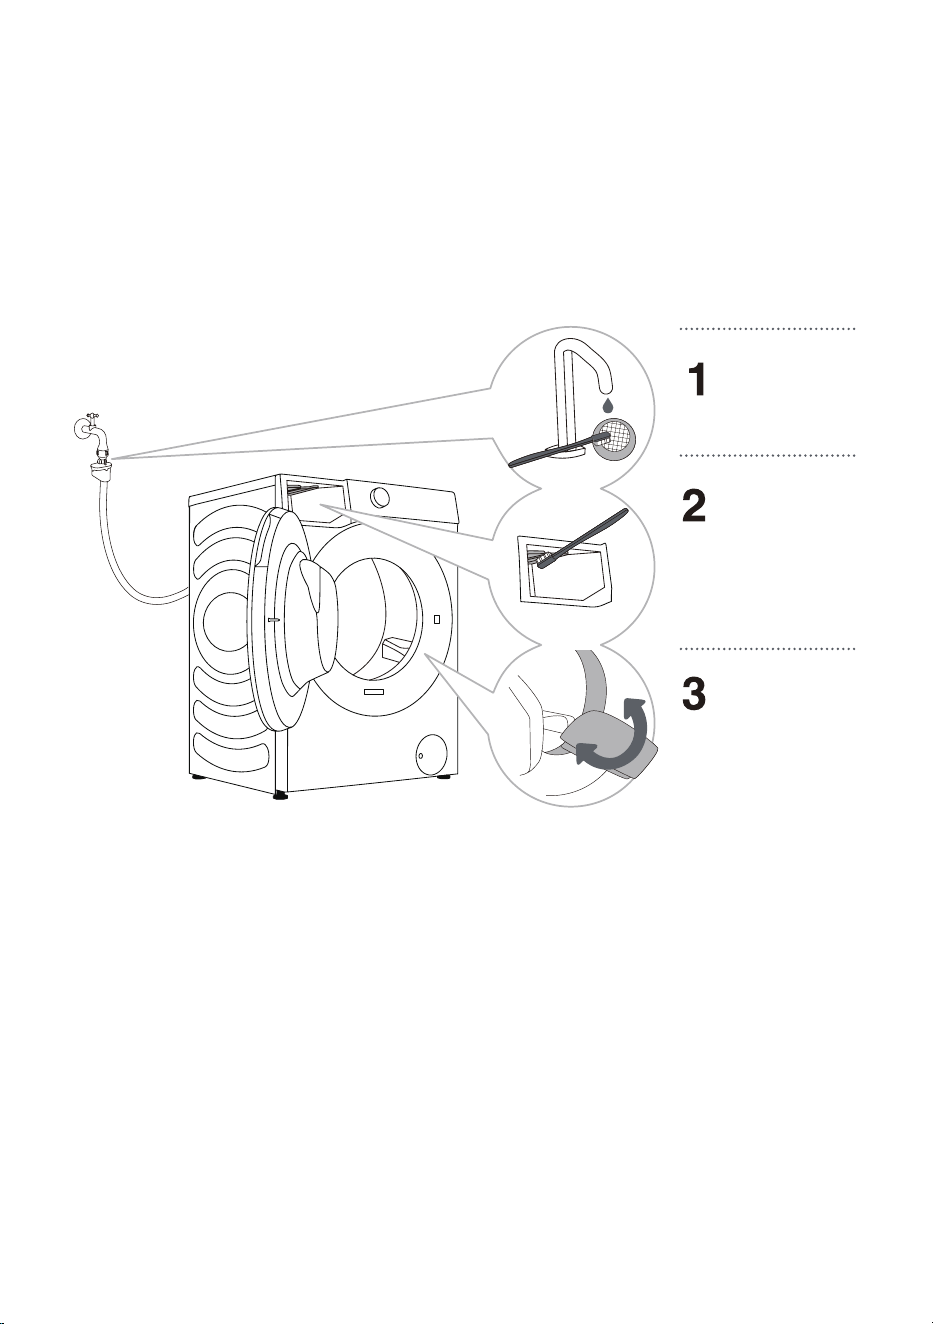
&211(&7,1*72:$7(56833/<
Attach the water inlet hose onto the water tap properly.
For normal washing machine operation, the pressure in the water mains should be between
0.1-1 MPa (1-10 bar; 1-10 kp/cm
2
; 10-100 N/cm
2
). Minimum dynamic water pressure can be
determined by measuring the water flow. In 15 seconds, 3 litres of water should flow from a fully
open tap.
Tighten the water supply hose by hand, firmly enough for the hose to have a good seal (max.
2 Nm). After connecting the hose, the seal must be checked for any leaks. Do not use pliers or
similar tools when connecting the hose as this could damage the nut thread.
Only use the water supply hose supplied with the appliance. Do not use any used or other hoses.
Make sure the hose is not damaged. If the hose is degraded, brittle, or cracked, it has to be
replaced.
$TXD6WRS21/<:,7+620(02'(/6
If an internal tube or hose is damaged, a shut-off system is activated that cuts the water supply to
the washing machine. In such case, the control glass (a) will turn red. Replace the water supply
hose.
AquaStop
Regular
Connection
20
Do not dip the water supply hose with the Aqua stop system in water as it contains an electric
valve.
The water supply hose can be connected without a non-return valve.
When connecting the water supply hose, make sure to connect it in a way that allows adequate
and unobstructed water supply.
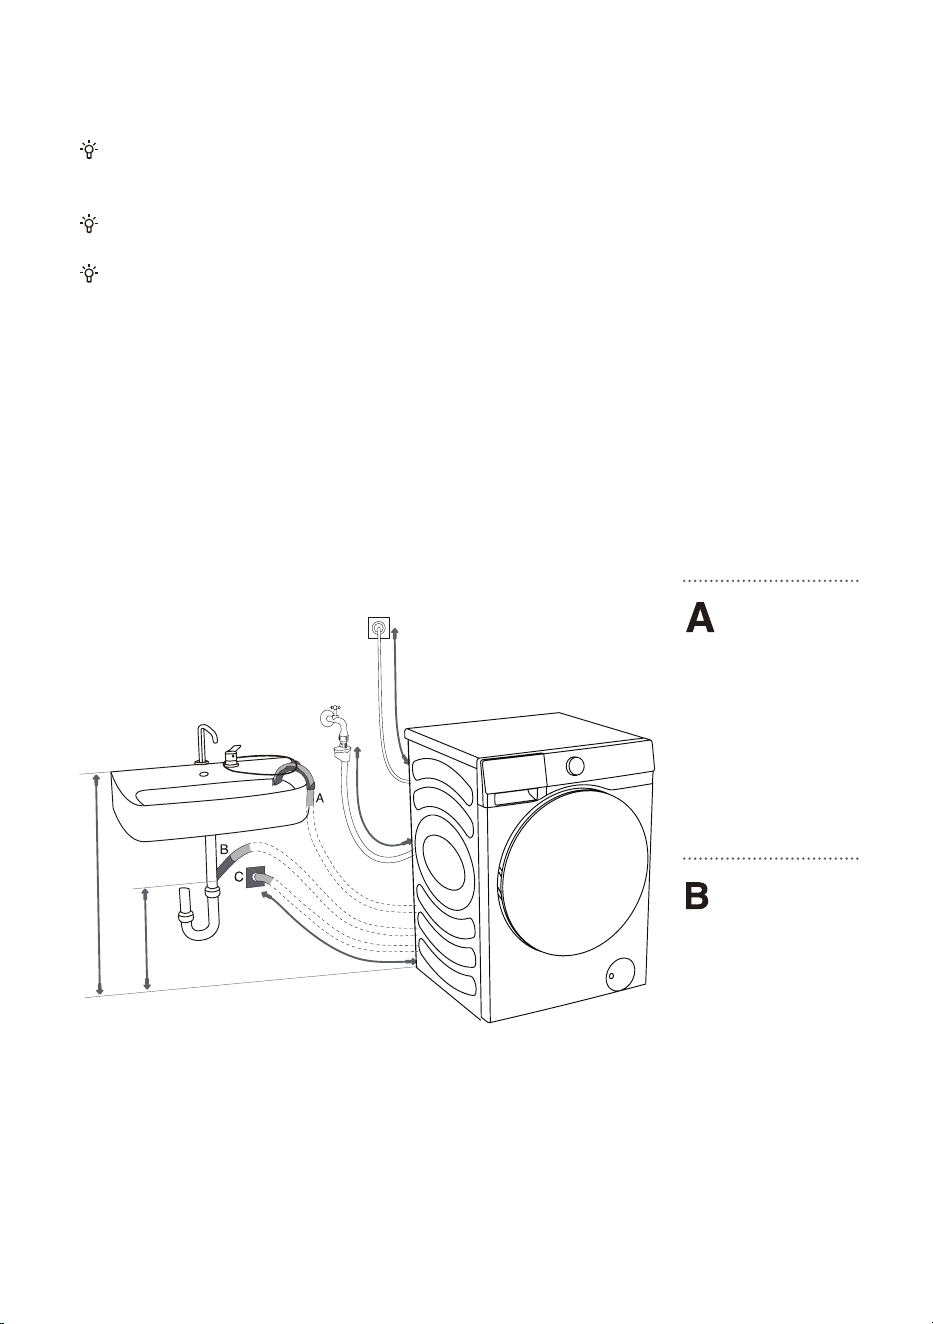
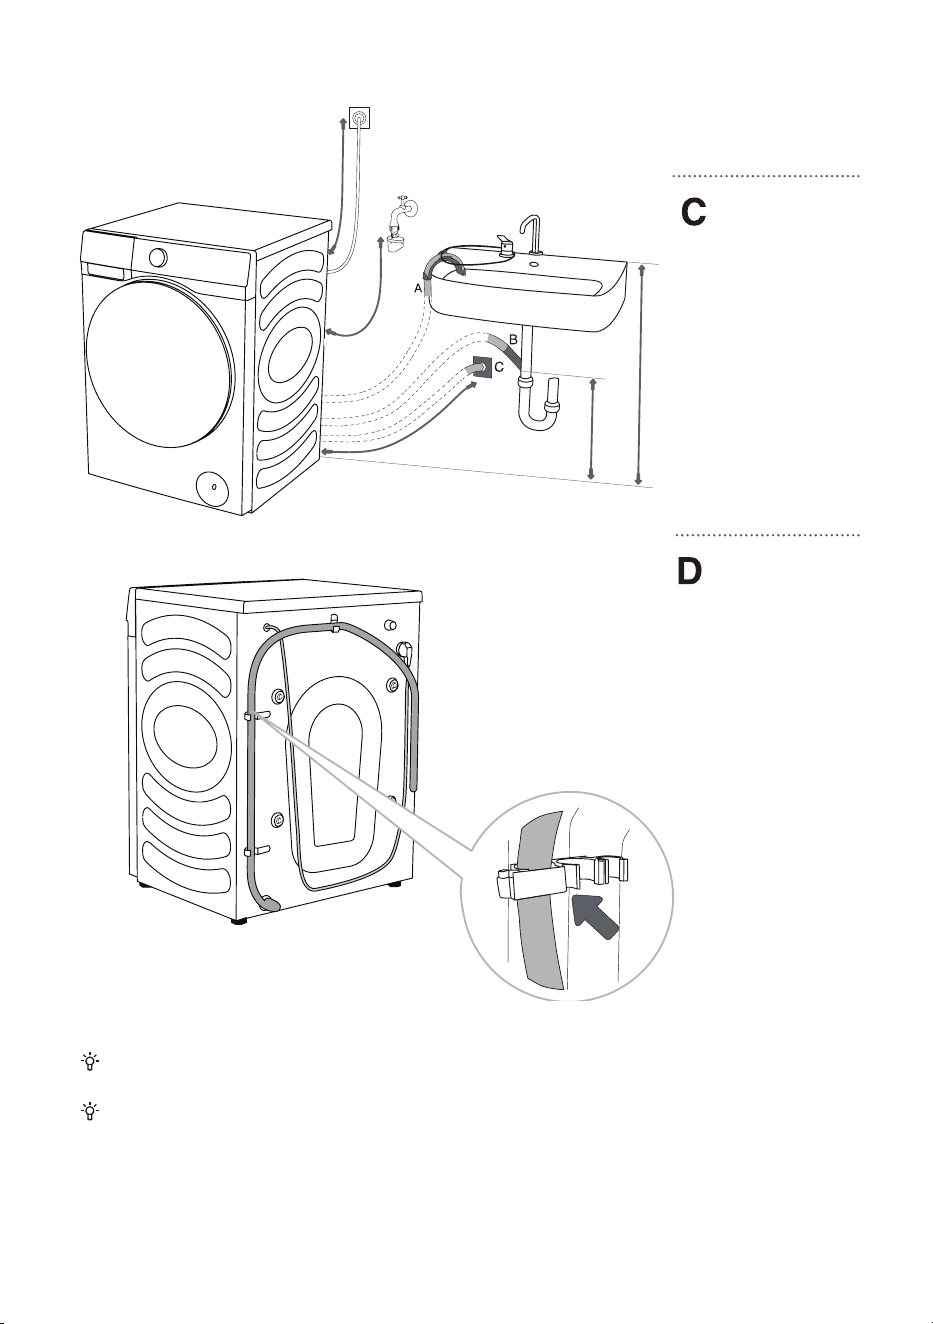
&211(&7,1*$1'6(&85,1*'5$,1+26(
Feed the drain hose into a washbasin or a bathtub, or connect it directly to a drain (minimum drain
hose diameter 4 cm). The vertical distance from the floor to the end of the drain hose should be
60-100 cm. It can be attached in three ways (A, B, C).
The drain hose
end may be
placed over a sink or
a bathtub. Use a tie
strap to secure the
hose through the
elbow support to
prevent it from
slipping.
The drain hose
may also be
attached directly to
the sink drain. Do not
use a small sink. Pay
attention that the
drained water may
be hot.
max. 125 cm
min. 70 cm
max. 90 cm
max. 100 cm
max. 150 cm
21
Drain hose can
also be attached
to a wall drain with a
water trap, which
should be properly
installed to allow
cleaning.
The drain hose
must be attached
to the hooks on the
back of the washing
machine, as shown in
the figure.
Make sure the drain hose is not damaged.
If the discharge hose is not correctly attached, safe and correct washing machine operation
cannot be ensured.
max. 150 cm
max. 100 cm
max. 90 cm
min. 70 cm
max. 125 cm
22
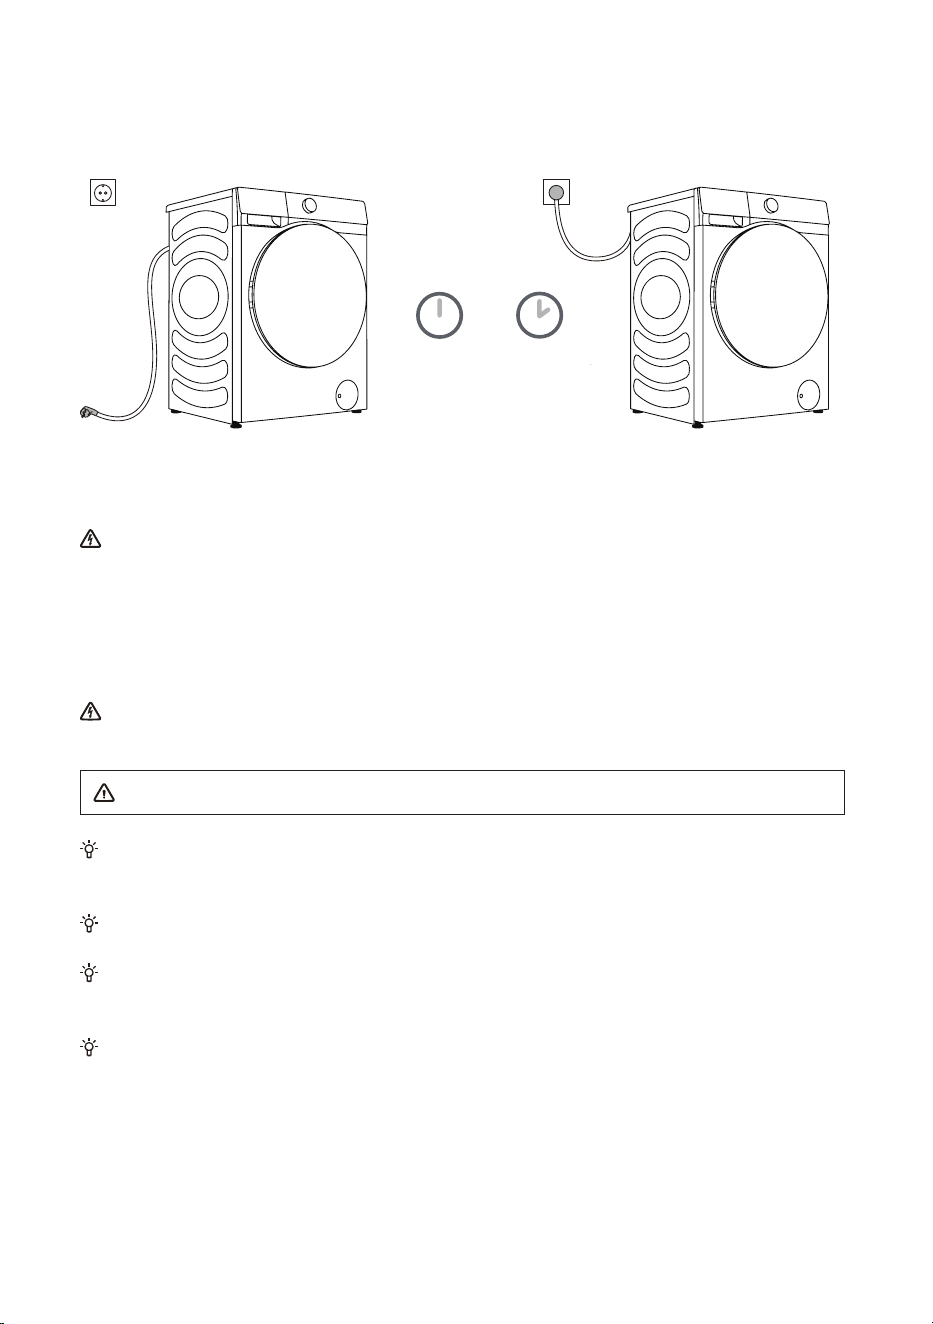
&211(&7,1*32:(56833/<
%HIRUHFRQQHFWLQJWKHZDVKLQJPDFKLQHWRWKHSRZHUPDLQVZDLWIRUDWOHDVWKRXUV
XQWLOLWUHDFKHVURRPWHPSHUDWXUH
Connect the washing machine to a grounded power outlet which should be freely accessible
after installation. The outlet should be fitted with an earth contact (in compliance with the relevant
regulations). Refer to the rating plate for basic information of your washing machine.
:HUHFRPPHQGXVLQJRYHUYROWDJHSURWHFWLRQWRSURWHFWWKHDSSOLDQFHLQFDVHRID
OLJKWQLQJVWULNH
The washing machine may not be connected to the power mains using an extension cord.
Do not connect the washing machine to an electrical outlet intended for an electric shaver or
hair dryer.
Do not plug or unplug the appliance when your hands are wet.
Any repair and maintenance pertaining to safety or performance should be done by trained
experts.
A damaged power cord may only be replaced by a person authorized by the manufacturer.
KRXUV
23
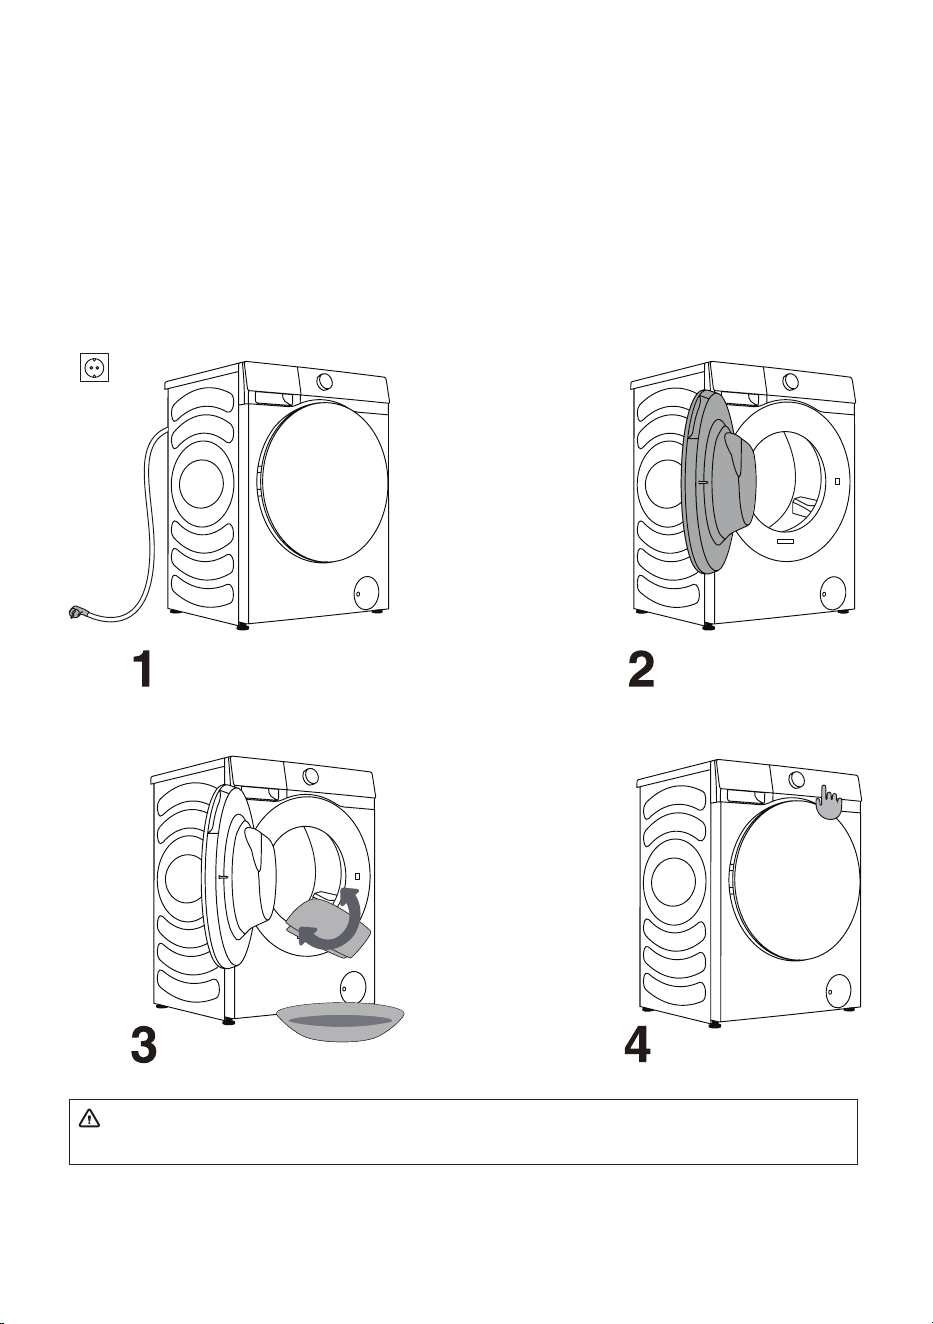
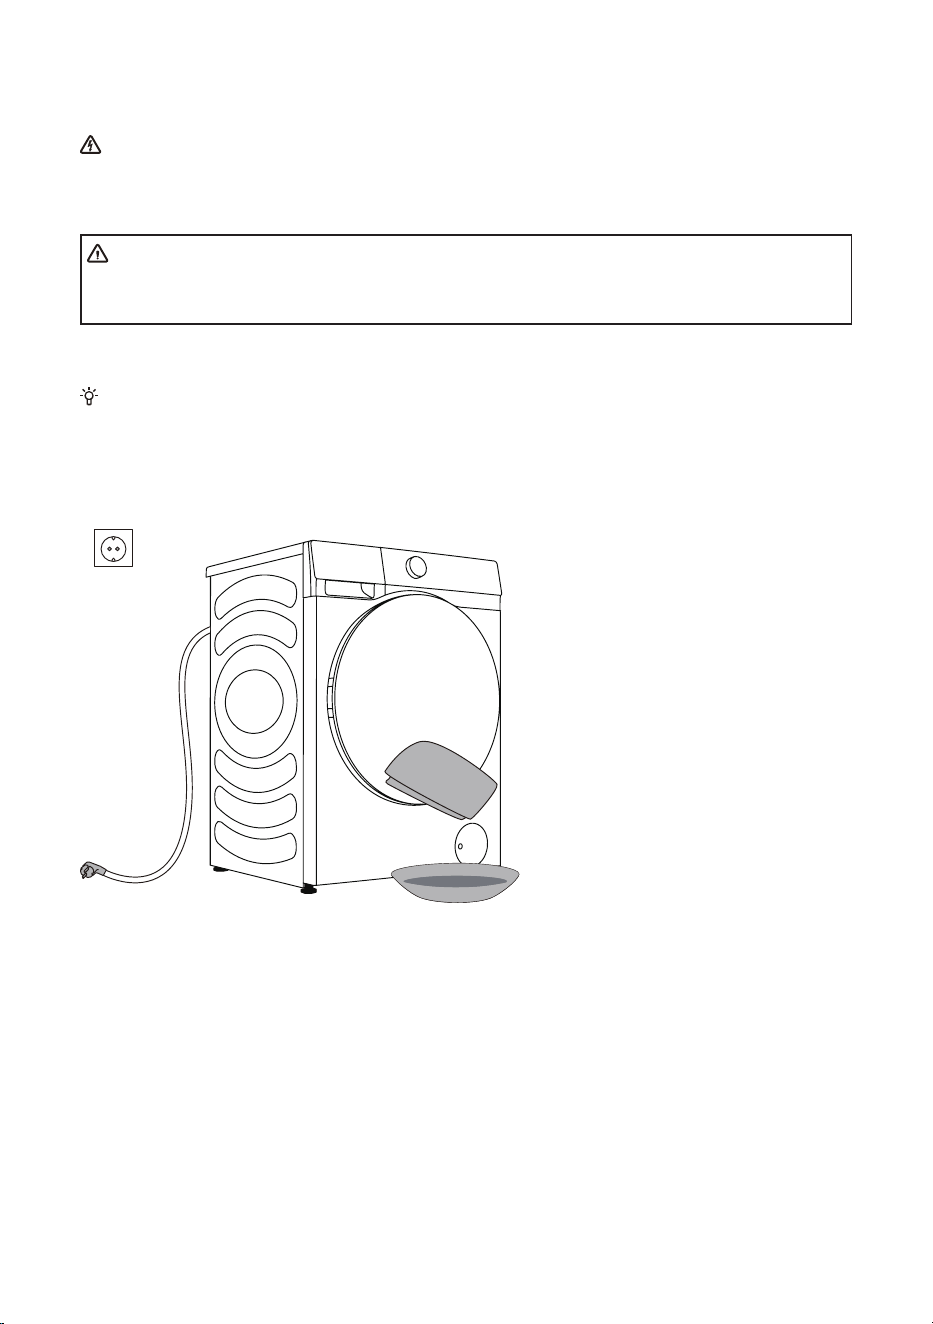
%()25(7+(),56786(
Make sure the washing machine is disconnected from the power supply and then open the door
towards you (figures 1 and 2).
Clean the drum using a soft and moist cloth. You can also use the "Drum Clean" program. In such
case, connect the appliance to the power supply and open the water tap. The drum should be empty
(Figures 3 and 4).
Do not use any solvents or cleaning agents that could damage the washing machine (please
observe the recommendations and warnings provided by the cleaning agent manufacturers).
24
:$6+,1*352&(6667(3%<67(3
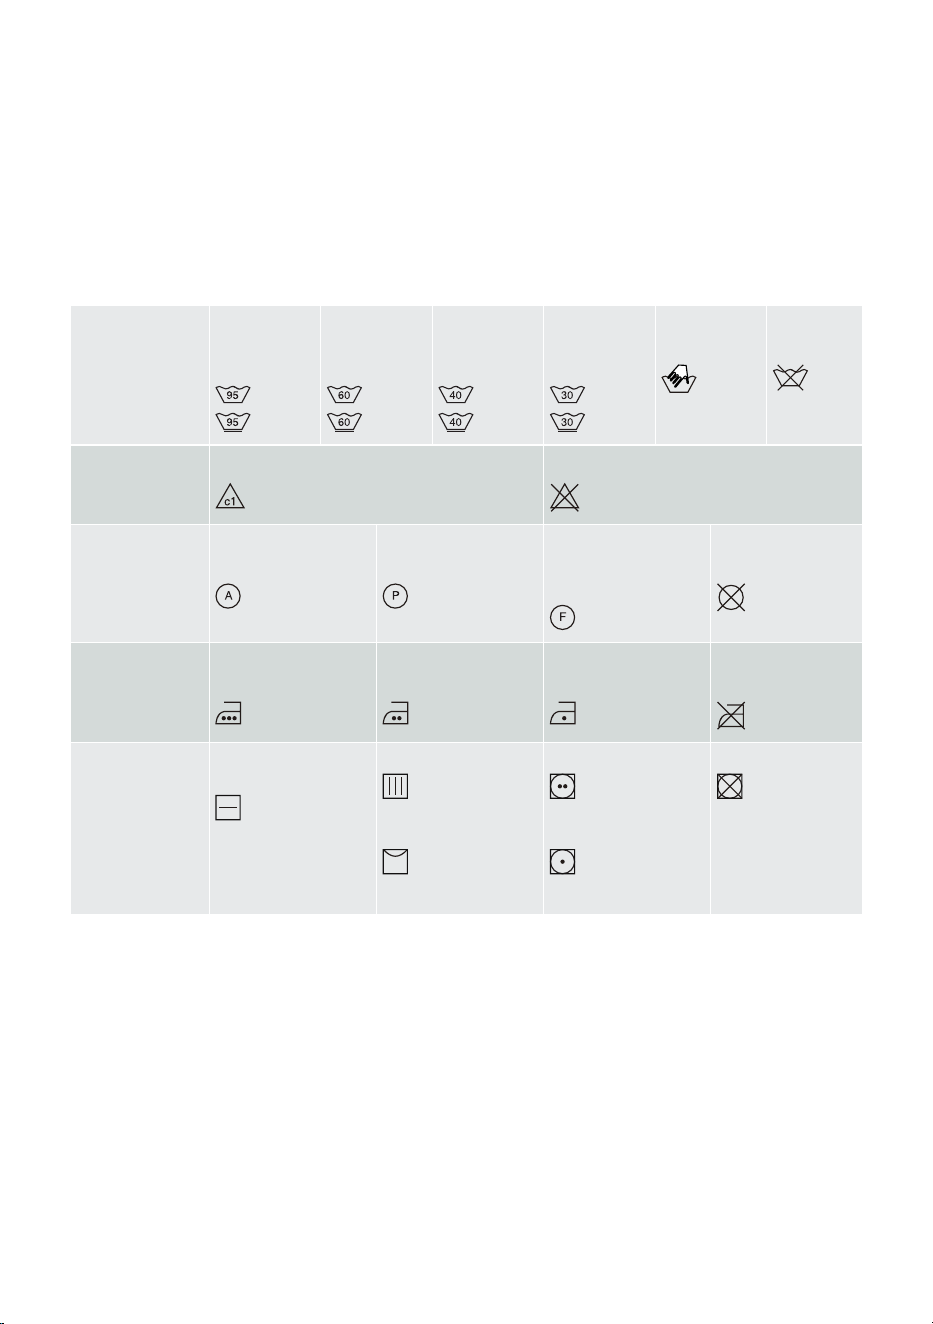
67(3+(('7+(/$%(/6217+(/$81'5<
1RUPDOZDVK
6HQVLWLYH
ODXQGU\
Max.
washing
temp. 95°C
Max.
washing
temp. 60°C
Max.
washing
temp. 40°C
Max.
washing
temp. 30°C
Hand wash
only
Do not
wash
%OHDFKLQJ Bleaching in cool water
Bleaching not allowed
'U\FOHDQLQJ Dry cleaning with
all agents
Petroleum solvent
R11, R113
Dry cleaning in
kerosene, pure
alcohol, and R113
Dry cleaning not
allowed
,URQLQJ Hot ironing, max.
200°C
Hot ironing, max.
150°C
Hot ironing, max.
110°C
Ironing not
allowed
'U\LQJ Dry flat (place on a
flat surface)
Drip dry
Line dry
High temperature
Low temperature
Do not tumble dry
25
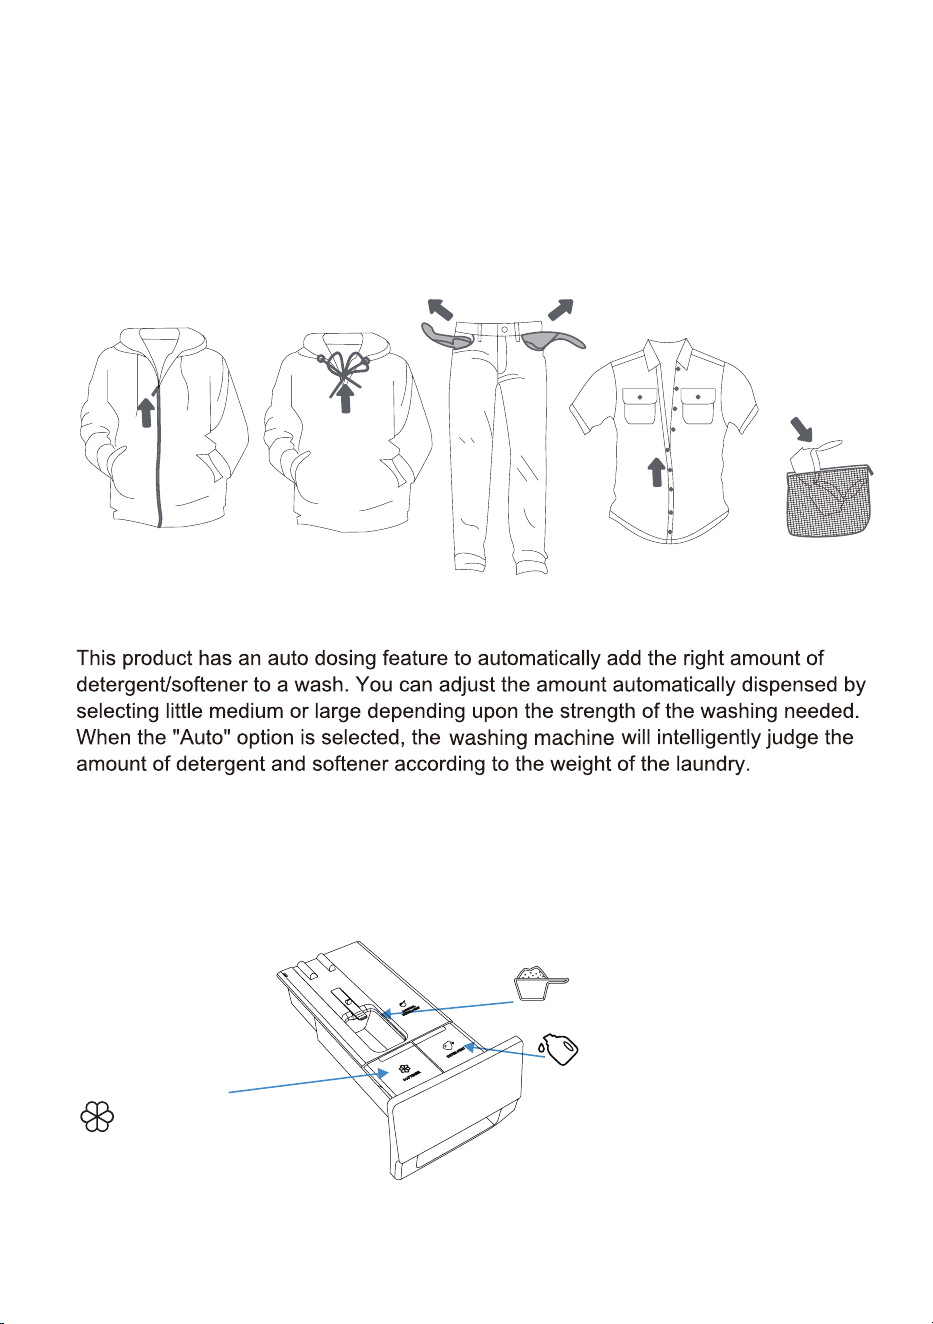
67(335(3$5,1*7+(:$6+,1*352&(66
1. Sort the laundry by type of fabric, colour, soiling, allowed washing temperature, etc.
(see PROGRAMME TABLE).
2. Close the buttons and zippers, tie any ribbons, and turn the pockets inside out;
remove any metal clips that could damage the laundry and appliance interior, or clog
the drain.
3. Place sensitive laundry and small items in a mesh laundry bag.
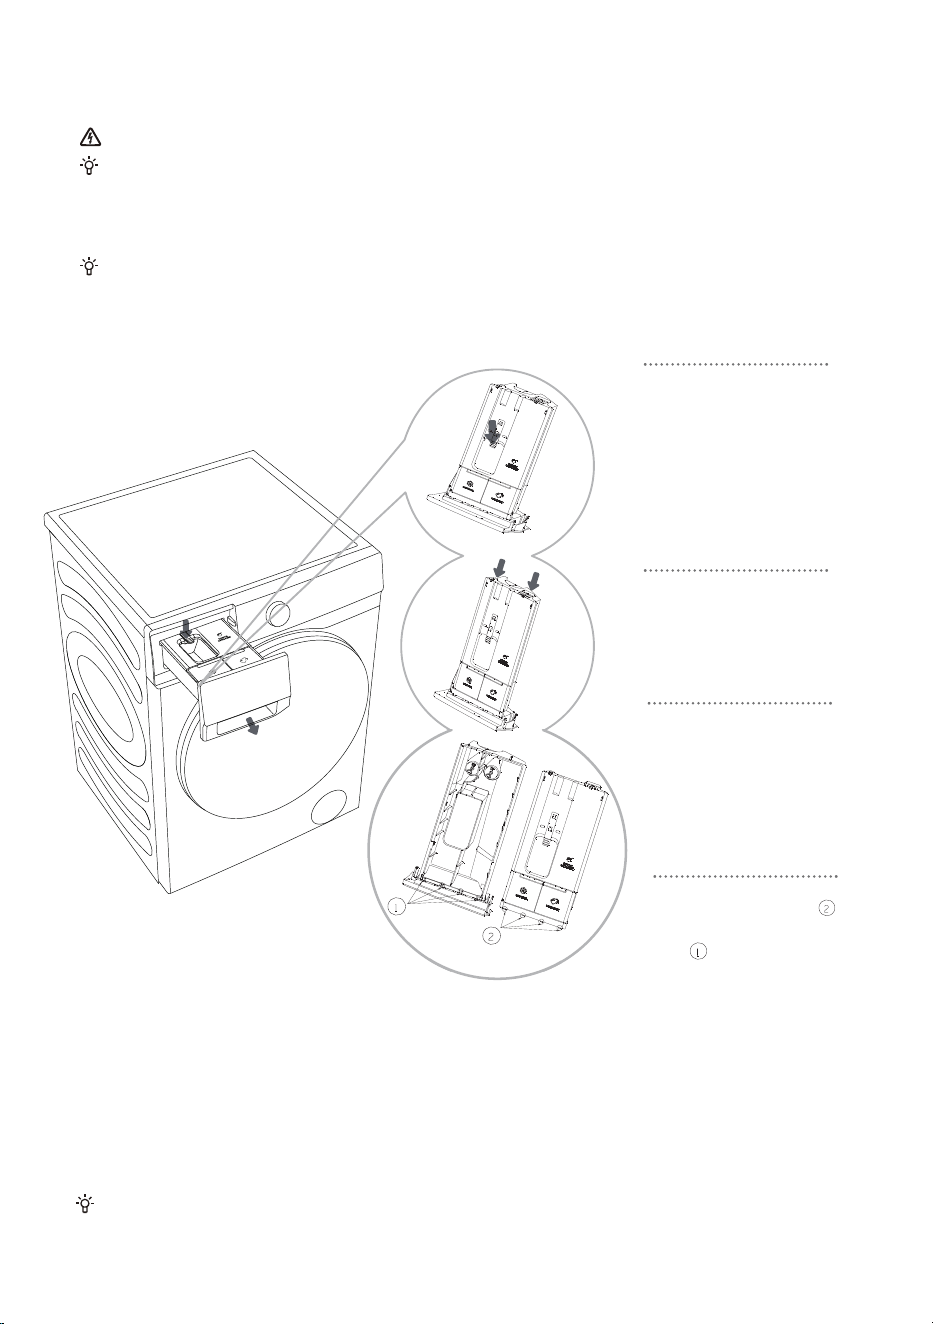
,16758&7,216)25$872'26,1*)81&7,21
Ź $'',1*'(7(5*(1762)7(1(5
Softener compartment
Detergent compartment
Powder detergent compartment
When the auto dosing function is cancelled,
place the detergent into this box.
You can
cancel the auto dosing function in the Settings menu and add detergent
and softener manually during washing.
26
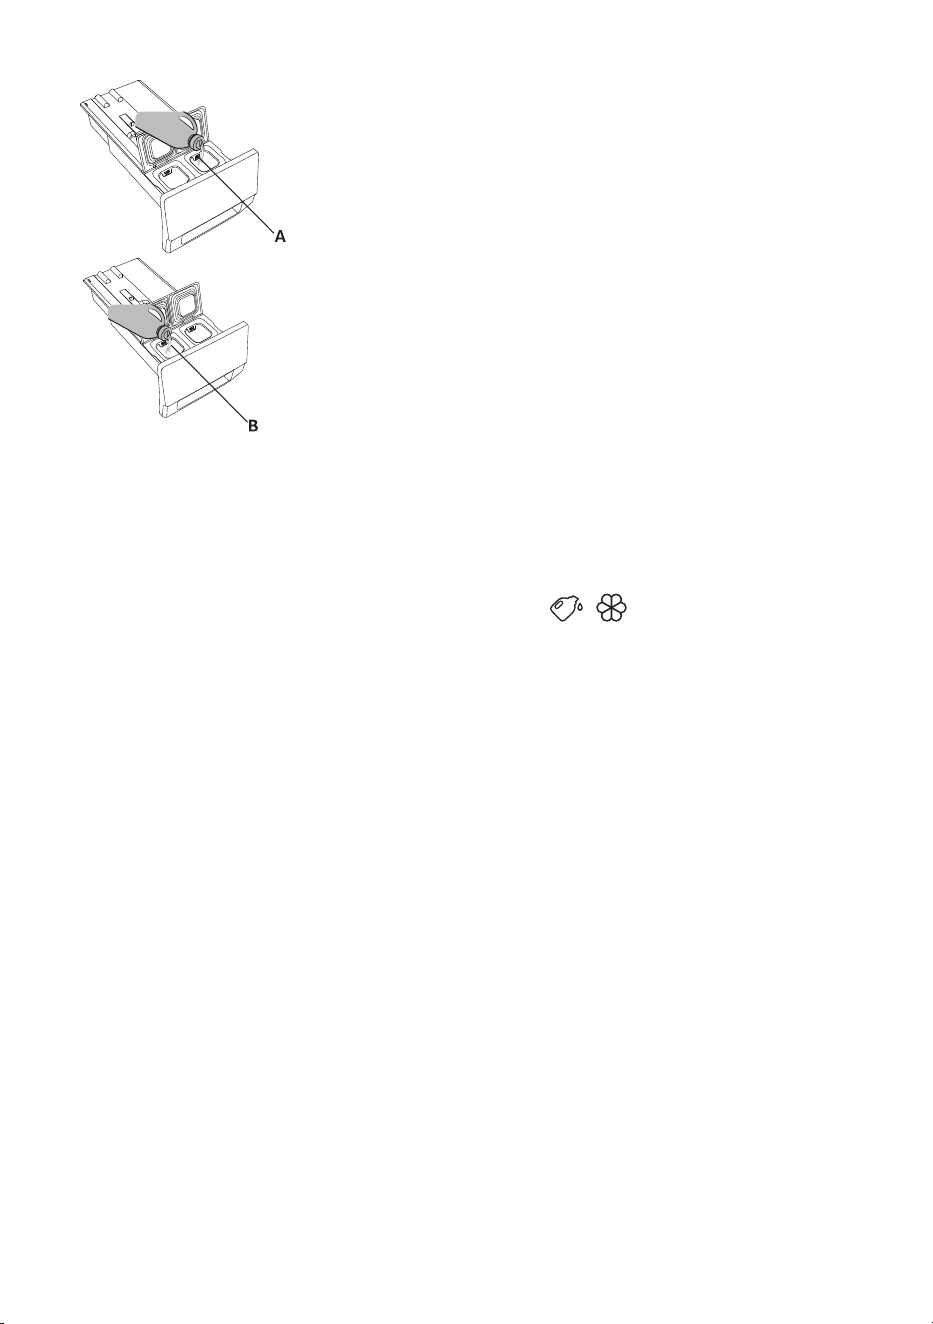
1. Open the detergent drawer.
2. Add detergent to the auto-dosing detergent dispenser
(A).
3. If necessary, add softener to the auto-dosing softener
dispenser (B).
4. Close the auto dosing drawer.
Ź $872'26,1*67(36
• When the washing machine is used for the first time, the auto dosing function of both the
detergent and softener is switched on by default. The washing machine will remember the last
option before shut-down.
• To disable this function, click in the Settings interface to deselect Detergent and Softener.
• If the detergent/softener dispenser is insufficient, the icon
/ will be shown in red, and
the screen will display a reminder asking user to add detergent/softener in time. The maximum
storage volume of detergent is 1 L, and that of softener is 0.5 L. Do not add detergent/softener
above the maximum scale mark.
Ź 35(&$87,216
1. Please always use high-efficiency and low-foam detergent suitable for drum washing
machines. Do not use caked detergent powder.
2. When using the Auto Dosing function, do not further manually add any detergent.
3. Please do not overfill the detergent/softener reservoirs as they may overflow.
After filling, please ensure that the detergent drawer is fully closed before starting the
washing program.
4. Please remove or secure the detergent drawer before installing, moving, handling, and
adjusting the washing machine. This is to avoid the inconvenience caused by an overflow of
the detergent and softener.
5. Disincrustants could damage the machine. Do not use solvents. Do not wash clothes having
been cleaned with solvents or flammable substances.
6. If Manual Dosing is needed, you can disable the Auto Dosing function, and add detergent
manually;
6.1 The detergent dosage depends on the type of clothes, degree of fouling, color of clothes and
washing temperature. Please add detergent appropriately.
6.2 Excessive detergent could result in foaming, further affecting the washing effect. If the
machine detects excessive foam, it may pause to defoam.
6.3 If insufficient detergent is used, it is possible that the washed clothes are not clean.
6.4 When manually adding detergent powder, you are suggested to add it just the moment
before the start of the washing program. If you add detergent powder in advance, please ensure
that the detergent box in the detergent doser tray is dry; otherwise, the detergent powder could
become hardened before the start of the washing program.
7. Please keep the detergent and softener out of reach of children.
8. For more information about dosing, please see "Recommendations and economic use".
27
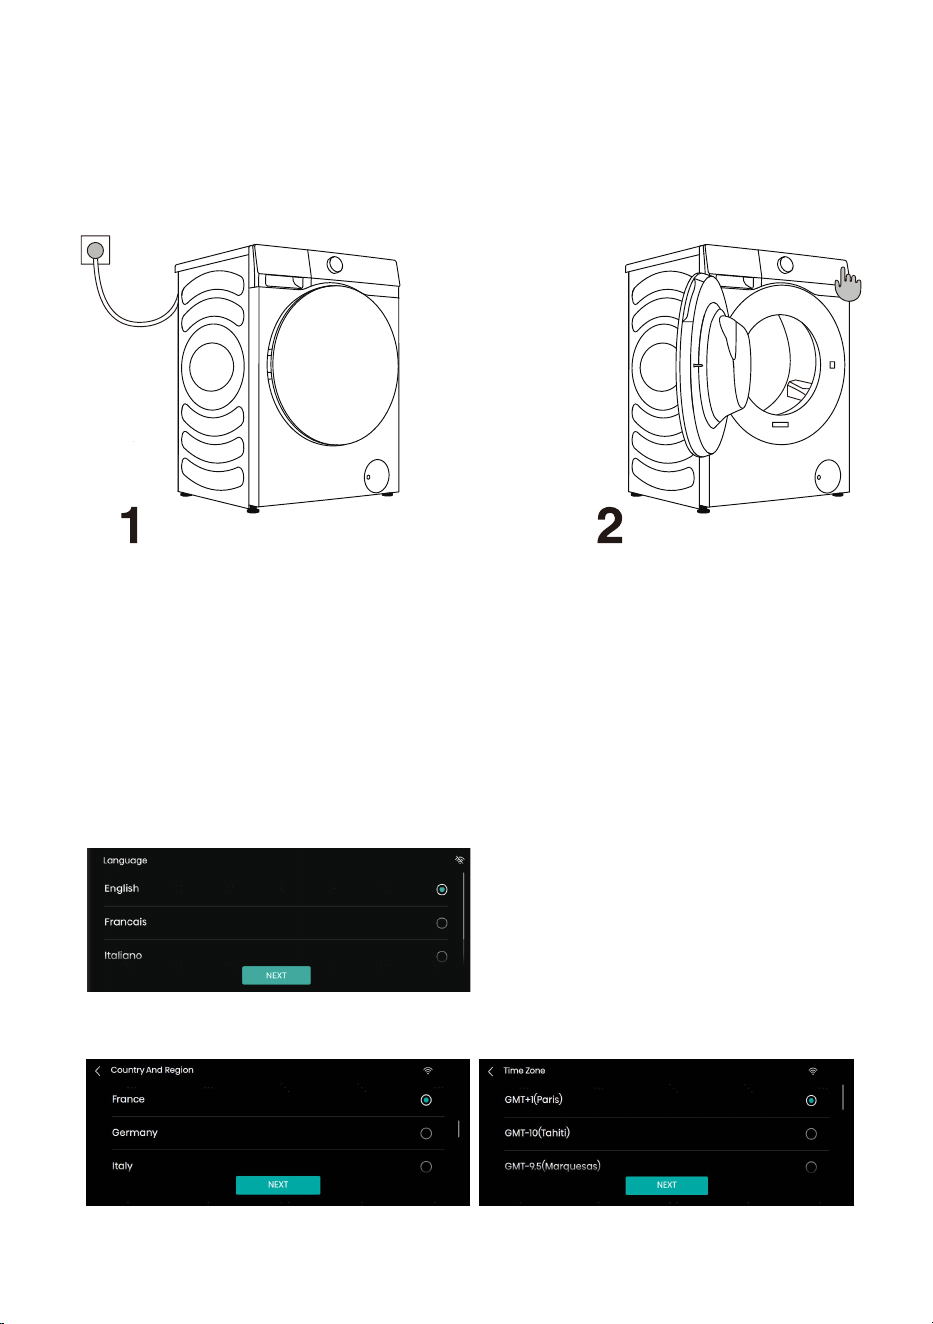
32:(5217+(:$6+,1*0$&+,1(
Use the power cord to connect the washing machine to power supply, and connect the
washing machine to water supply. Turn the appliance on by press the button "POWER"
(figures 1 and 2).
32:(5217+(:$6+,1*0$&+,1(
&21),*85$7,21%()25(),56786(
Before first use, configure the preferences of Language, Time Zone, User License
and Network according to the boot navigation and user’s actual needs. (The energy
efficiency requirement varies with the country and region. If the country/region
selected is inconsistent with reality, the energy efficiency grade and data will be
different.)
1. Configure the language
2. Select the time zone
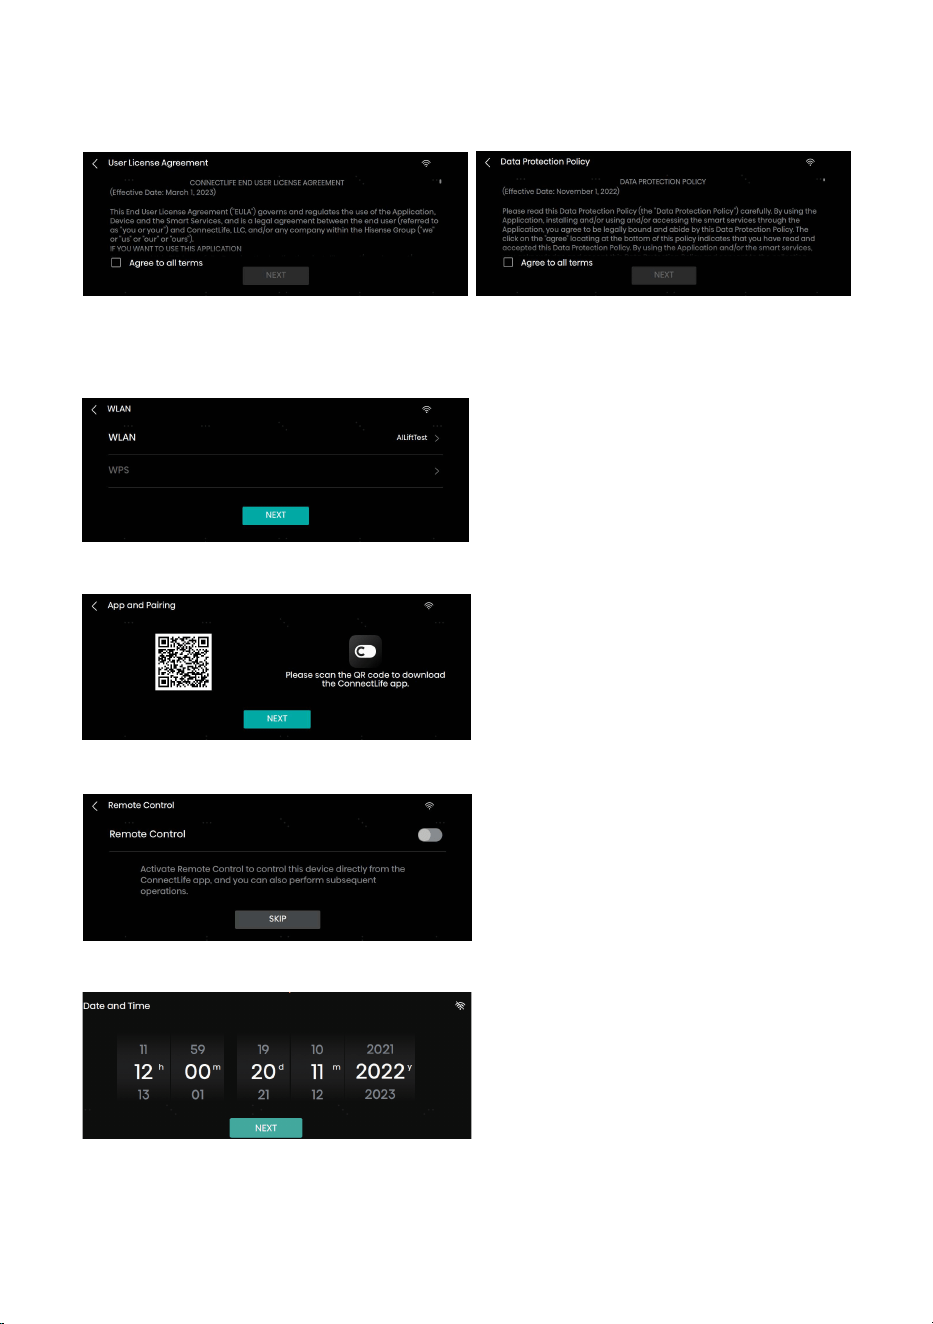
28
3.
User Licence
4.
WLAN
5. App and Pairing
6. Remote Control
7. Set system date and time
If the network is connected, it moves to step 5 and 6;
If network setting is skipped, it moves to step 7.

29
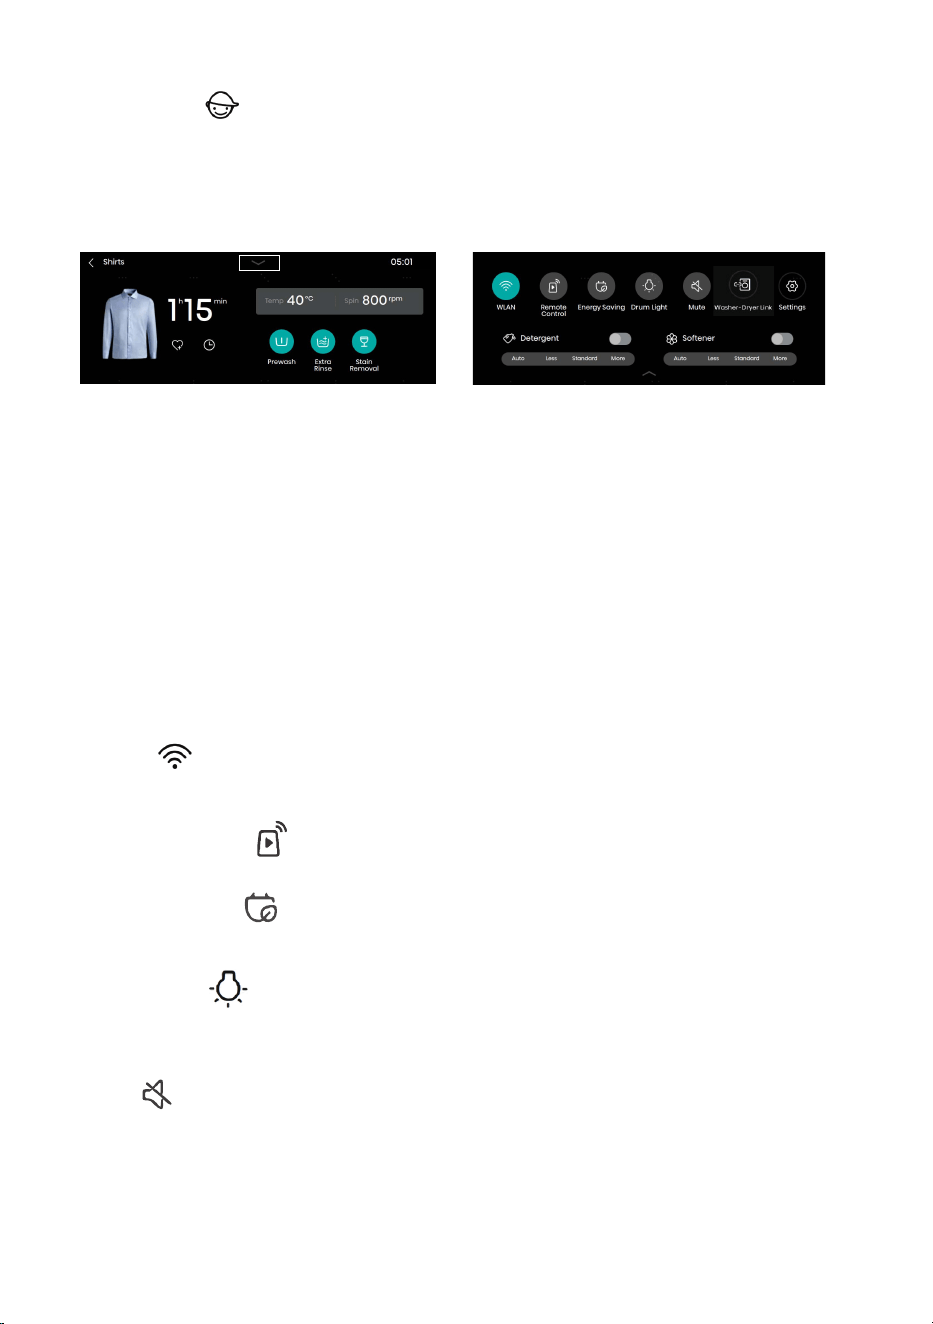
&21752/3$1(/
This machine is controlled by touch + knob. Programs can be selected by touching the screen
or turning the knob. The Power and Start/Pause buttons can be operated by touch. Touch the
highlighted area to enter the program parameter setting.
Icon Name Description
Power button For powering on/off the washing machine.
Start/Pause button For starting/suspending a program.
Back Go back to the previous interface.
Settings
Enter Setting Options to set WLAN, Drum Light, Mute,
Settings, etc.
WLAN WLAN icon of the washing machine.
Child Lock icon
After a program is started, all operations except the Power
button will be locked if the child lock is turned on.
Wash &Dry icon
For combined control of the washing machine and the dryer
in the same home network.
Intelligent Report
Touch this icon to show the local weather, total power
consumption and other data.
Favorites icon Touch this icon to add the current program to your favorites.
Touch screen
Setting Options
Power
Start/Pause
Knob
Delay end icon
Touch this icon to activate Delay end function and enter
Delay end setting screen.

30
32:(5
For powering on/off the washing machine.
When the washing machine is in standby, or after the screen displays the program end
interface, press and hold the Power key for 3s to enter the power-off state.
In standby mode, or in the program end interface or Wash&Dry retry reminder interface,
if no operation is performed within 10min, the washing machine will shut down
automatically.
In power-off state, all displays and outputs will be off, and remote startup is not supported.
For starting a program, or suspending a running program.
After a program is started, or when the pause state is selected, the set functions and parameters
cannot be changed. To change a setting, press the Back button to go back and end the current
program; or press and hold the Power button for 3s to turn off the machine, and then restart it to
reset the parameter.
When the program is suspended in spin state and then restarted, it will run again from the initial
state of spin.
67$573$86(
31
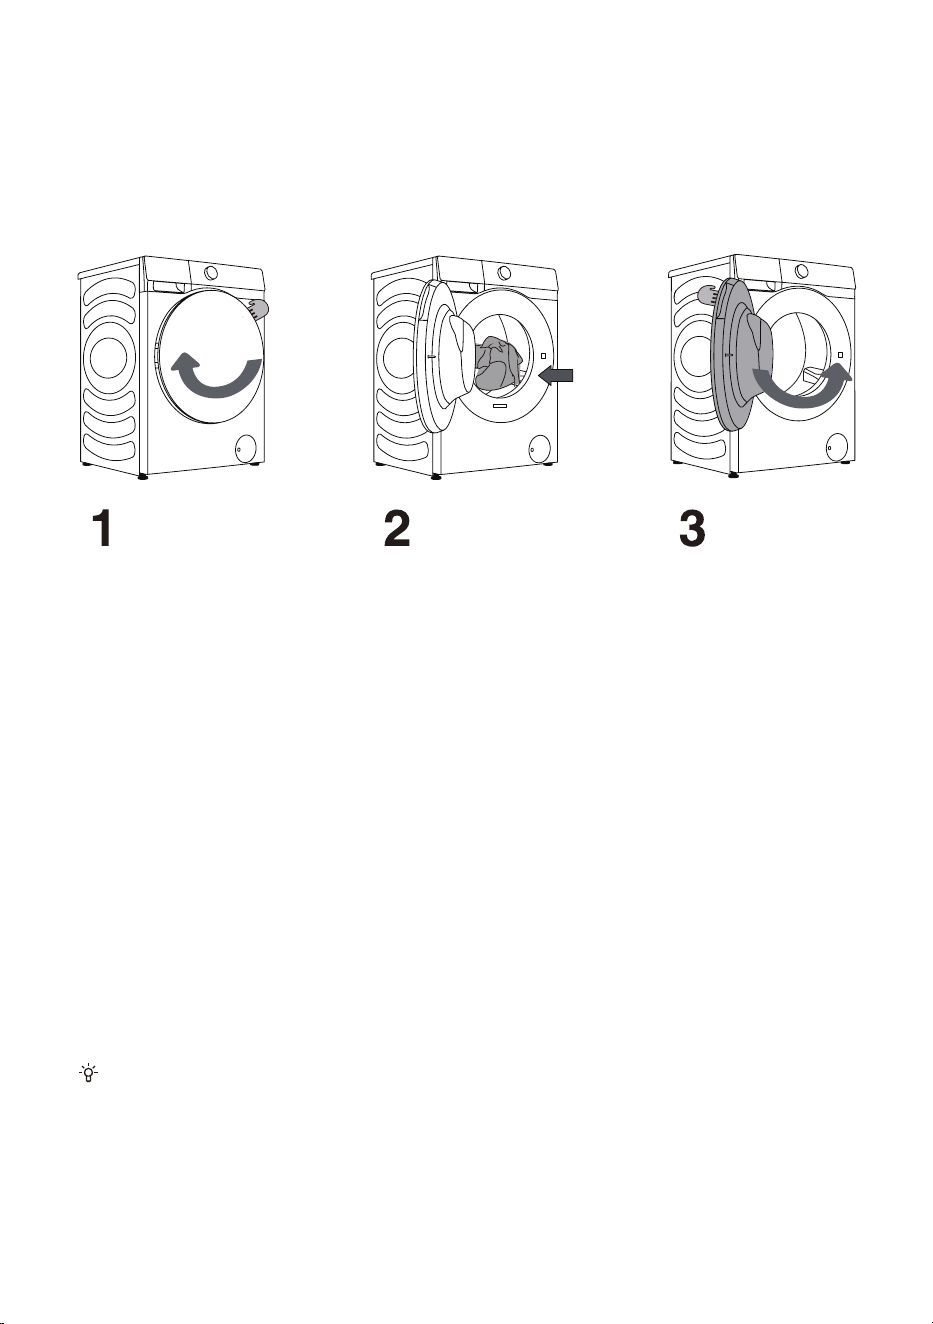
Open the drum door by pulling the handle towards you (figure 1).
Place the laundry into the drum (after making sure the drum is empty) (figure 2).
Close the door (figure 3). The door is locked when you here a click.
/2$',1*7+(:$6+,1*352&(66
Never try to forcefully open the door. Moreover, do not open the door during washing
machine operation.
Do not overload the drum! See PROGRAMME TABLE and observe your nominal load
as indicated on the rating plate.
If the washing machine drum is too full, the laundry will not be washed as thoroughly.

32
After turning on the machine by touching the Power button, turn the knob or touch the program
zone on the screen to select a proper program according to the type and degree of fouling of
clothes. See PROGRAMME TABLE.
67(3&+226,1*:$6+,1*352*5$00(
3URJUDPPH
0D[LPXP
6SHHGUSP
'HVFULSWLRQRI3URJUDP
&RWWRQ
(Cold, 20°C, 30°C, 40°C,
60°C, 90°C)
12 1400
Suitable for cotton or linen fabrics with
moderate/severe degree of fouling.
For clothes with a severe degree of fouling,
please select the "Prewash" function.
6\QWKHWLFV
(Cold, 20°C, 30°C, 40°C,
60°C)
6 1400
Suitable for synthetic fabrics and cotton
fabrics with a moderate degree of fouling.
0L[
(Cold, 20°C, 30°C, 40°C)
6 1400
Suitable for mixed cotton fabrics and
chemical fiber fabrics with a mild degree of
fouling.
'DLO\ZDVK
(Cold, 20°C, 30°C, 40°C)
6 1400 Suitable for wash-fast and unfadable clothes.
%DE\&DUH
(40°C, 60°C, 90°C)
2 1400
Suitable for baby clothes and underwear
which will be disinfected and sterilized under
high-temperature steam.
$OOHUJ\&DUH
(40°C, 60°C)
2 1400 For continuous and effective sterilization.
'UXP&OHDQ
(90°C)
/ 800
Suitable for cleaning the drum, and removing
residual detergent and bacteria accumulating
and breeding during low-temperature
washing.
6SLQ 12 1400 For separate spinning of clothes.
5LQVH6SLQ 12 1400 For separate rinsing and spinning of clothes.
3RZHU6SHHG
(Cold, 20°C, 30°C, 40°C)
4 1200
Suitable for washing a few clothes with
heavy dirt; intensive washing will be
performed within a short period of time.
4XLFN
(Cold, 20°C, 30°C, 40°C)
1 800 For washing clothes with a little or mild dirt.
'DUNZDVK
(Cold, 20°C, 30°C, 40°C,
60°C)
4 1000
Suitable for machine washable clothes of
dark colors.
0D[ORDG
(
NJ)
(FR
12 1400 Normally soiled cotton laundry.

33
3URJUDPPH
0D[ORDG
0D[LPXP
6SHHGUSP
'HVFULSWLRQRI3URJUDP
6KLUWV
(Cold, 20°C, 30°C, 40°C,
60°C)
2 800 Suitable for washing shirts.
-HDQV
(Cold, 20°C, 30°C, 40°C,
60°C)
6 1400 Suitable for washing jeans.
6LON'HOLFDWH
(Cold, 20°C, 30°C, 40°C)
2 600
Suitable for washing soft and delicate fabrics
and machine-washable silk. (See the care
label on the clothes).
:RRO
(Cold, 20°C, 30°C, 40°C)
2 600
Machine-washable wool products can be
washed according to the care instructions on
the care label.
6SRUWVZHDU
(Cold, 20°C, 30°C, 40°C)
4 1000 Suitable for washing sportswear.
%HGGLQJ
(Cold, 20°C, 30°C, 40°C,
60°C)
3 1400
Suitable for washing large items such as bed
sheets and quilt covers.
$,6XSHU:DVK
8 /
Smartly identifying the weight and degree of
fouling of clothes, suitable for washing cotton
and linen, and chemical fiber clothes.
NOTE:
1) Water Temperature: Select the appropriate water temperature for chosen wash programme.
Always follow garment manufacturer's care label or instructions when washing to avoid
damage to clothes.
2) Actual water temperature may differ from the declared cycle temperature.
3) The washing effect depend on water pressure, water hardness, water inlet temperature,
room temperature, type and amount of load, degree of soiling utilized detergent, fluctuations in the
main electricity supply and chosen additional options.
4) Neutral (non sudsing) detergent is recommended.
5) Dry powder detergent should be mixed with warm water before use.
6) Drum Clean: Before using the Drum Clean program, the drum must be emptied. You can add
some white vinegar (about 2 dL) or baking soda (1 tbsp. or 15 g). Run this program at least
once a month.
7) AI Super Wash: When identifying the weight and degree of fouling of clothes, the screen displays
AUTO; after identification, the screen displays the washing time.
(
NJ)
34
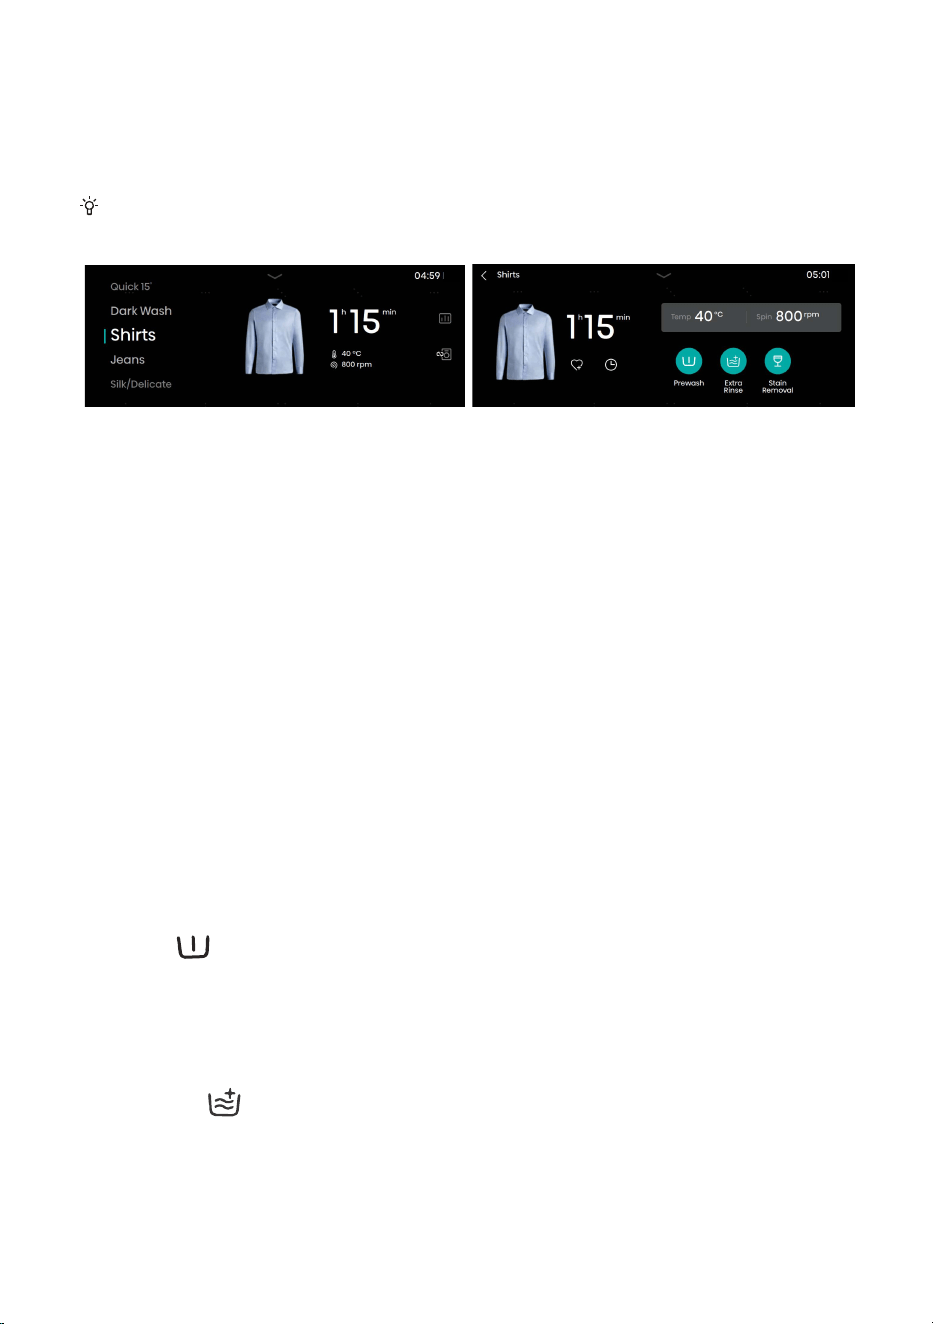
67(36(/(&7,1*$'',7,21$/6(77,1*6$1'
)81&7,216
Touch the selected program time to change the Temp and Spin settings, and to set additional
functions such as Prewash, Extra Rinse, Steam, Quicker, UV, Anti Crease, Intensive, Quiet Mode
and Stain Removal. More additional functions can be displayed by sliding left and right. Additional
functions that can be selected vary with the program.
7HPS
For adjusting the heating temperature during washing.
1. Tap the Temp option to enter the Temp selection interface.
2. Swipe on the screen to select the desired washing temperature among Cold-20°C-30°C-40°C-
60°C-90°C.
Each program has a maximum set temperature, which should not be exceeded when selecting
the temperature.
3. After selection, tap the "OK" button for confirmation, or tap the "CANCEL" button to abandon the
selection.
6SLQ
For adjusting the maximum spin speed.
1. Tap the Spin option to enter the Spin selection interface.
2. Swipe on the screen to select the desired spin speed among: No Spin-400-600-800-1000-1200-
1400. When “No Spin” is selected, the washing machine will only drain the water without spinning.
3. After selection, tap the “OK” button for confirmation, or tap the “CANCEL” button to abandon the
selection.
3UHZDVK
Add a prewash process which will last for a while before the Main Wash phase. Generally, it is
used for dirty clothes.
When Auto Dosing is turned on and Prewash is selected, the detergent dosage in the Prewash
phase is half of that in the Main Wash phase. The detergent dosage in the Prewash phase will not
affect that in the Main Wash phase.
([WUD5LQVH
It is used to add the rinse times.
This function can be selected when the machine is in standby and cannot be changed after start.
User may set the laundry parameters and add additional functions as per need (before pressing
the 6WDUW3DXVH button).
Before starting a program, touch the parameters or functions to be set, and turn ON/OFF the
corresponding settings. A parameter/function is ON if the corresponding icon lights up.
35
$QWLFUHDVH
1. When this function is selected, the machine will enter Anti crease mode upon completion of the
spin program to prevent crease of clothes caused by a long-time stay in the drum;
2.
Anti crease cannot be set when Spin is set to "No Spin" or when Drum Clean is selected;
3. User can turn the knob, tap the Start/Pause button, or short press the Power button to end the
Anti crease mode and enter the End interface. If no operation is performed, the program will end
automatically after the default maximum duration of 12 h.
4XLFNHU
1. This function is used to reduce the washing time of the program, and quicken the washing
process. After pressing this button, the program time will be reduced. After pressing this button
again, the program time will be increased to the initial state;
2. This function can be set only before the start of the appropriate program, and cannot be
selected after the program runs;
3. For programs with the auto weighing function, auto weighing will be canceled after selecting
this function and restored after deselecting this function.
6WHDP
Add the steam wash function during washing.
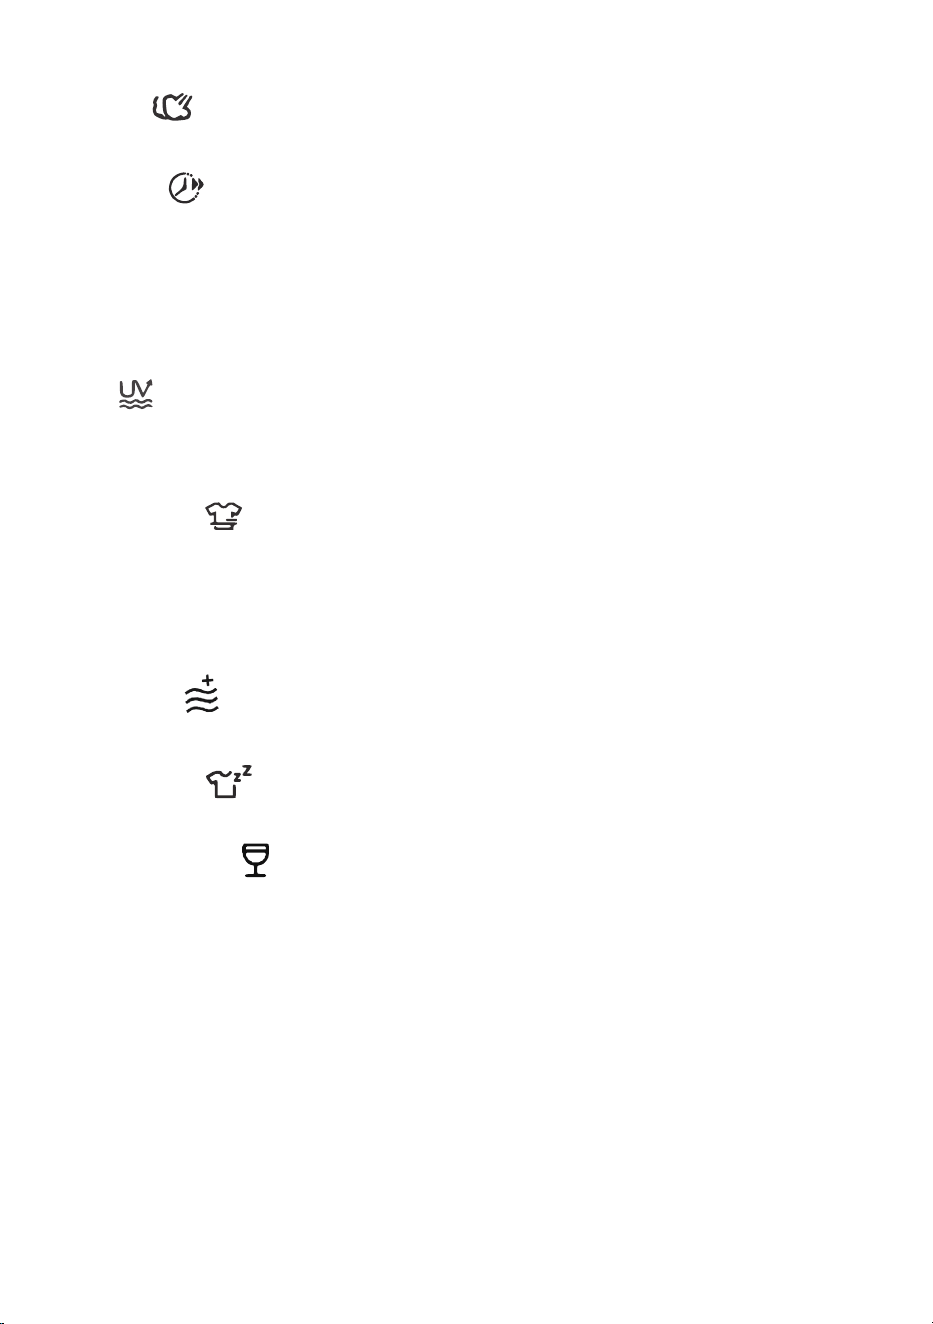
89
The UV function can be selected when the machine is in standby. The UV lamp stays on
throughout the running process except in Reserve, Anti crease, Pause and Alarm states when the
UV lamp is off.
4XLHW0RGH
This function can be used to lower the spin speed, wash the clothes gently, and reduce the noise.
,QWHQVLYH
This function can be used to increase the intensive wash time and enhance the wash intensity.
6WDLQ5HPRYDO
1. This function is for washing clothes with special stains. Different stain types can be selected
after entering this interface. After selecting a stain type, tap the "OK" button for confirmation, or
tap the "CANCEL" button to abandon the selection.
2. If the program is changed, the previously selected stain type will be canceled automatically.

36
,QWHOOLJHQW/DXQGU\5HSRUW
When network is connected, touch this icon to enter the Intelligent Laundry Report interface,
where information such as energy consumption and weather is displayed.
)DYRULWHV
Touch this icon to add the current program to your favorites. The added program will appear at the
top of the program list so that it can be selected with priority during next use.
Delay end
1. The reserved time is the end time, which can be set when the machine is in standby;
2. After reservation, if user switches the program or sets parameters or functions, the reservation
will be canceled automatically;
3. When the reservation is in progress, the screen will display "Delaying" and the End Time; after
the washing program starts, the remaining time will be displayed;
4. The reserved time must be longer than the program running time, and the maximum time
should not exceed 24h.
$GG&ORWKHV
For adding clothes during washing.
If the condition for opening the door during washing is satisfied, touch Add Clothes, and open
the door to add clothes. After adding clothes, close the door, and touch "Start/Pause" to
continue running.
s
s
37
&KLOG/RFN
This machine is designed with the Child Lock function in order to prevent misoperation and keep
children safe. Touch the Child Lock icon to enable the Child Lock function; all buttons except the
Power button will be locked. Touch the Child Lock for 3s to unlock.
When the program is completed, the Child Lock function will be disabled automatically.
After touching the Settings icon, a drop-down list of setting options will appear, for
setting WLAN, Remote Control, Energy Saving, Drum Light, Mute, Washer-Dryer Link,
Settings, Detergent and Softener.
If Detergent/Softener is selected, it indicates the Auto Dosing function is enabled.
For the amount of detergent or softener to be dispensed, there are four levels for selection:
Auto, Less, Standard, and More.
:/$1
This function can be used to turn on/off WLAN. After the washing machine is successfully
connected to WLAN, it can be controlled via the app on your mobile phone.
5HPRWH&RQWURO
This function can be used to remotely control the machine via the app.
(QHUJ\6DYLQJ
This function can be used to set the time for the screen to enter the Energy Saving mode, and the
duration during which the drum light stays on.
'UXP/LJKW
This function can be used to manually turn on/off the Drum Light.
When the machine is in standby, when a program is suspended, or when laundry is ended, the
drum light will turn on automatically.
0XWH
This option can be used to turn on/off the prompt tone of the machine. When it is turned off, all
sounds of the machine except the alarm tone will be disabled.
If neither Detergent nor Softener is selected, it indicates the Auto Dosing function is disabled.
During use, user needs to dispense detergent or softener manually.
When detergent or softener is insufficient, the screen will display a prompt indicating a lack of
detergent or softener to remind user of adding it in time.
'HWHUJHQW6RIWHQHU
6HWWLQJ2SWLRQV

38
:DVKHU'U\HU/LQN
This function can realize intelligent interconnection between the washing machine and the dryer.
Prior to use, both the washing machine and the dryer should be connected to the same WLAN as
the app.
1. In the Program Select main interface, Settings interface, or System Settings interface, you can
touch the Washer-Dryer Link icon to enter the Wash&Dry setting interface;
2. If the dryer has not been paired, touch this icon to enter device scanning, and select
"Automatically scan the dryer" as prompted on the screen;
3. If the dryer has been paired with, touch this icon to enter the Machine List, and select the dryer
to be paired with;
4. After successful pairing, the Wash&Dry function will be enabled; the dryer will automatically match
the corresponding program and starts preheating to raise the temperature in the drum
15min before the end of laundry in the washing machine. When spinning is finished in the washing
machine, directly transfer the spun clothes to the dryer drum. Touch the Start/Pause button to start
drying in the dryer, which is time-saving and efficient.
5. Within 20min before the end of the program on the washing machine, please keep the dryer in
power-on, network-connected and door-closed state to ensure normal linkage;
6. Preheating will be canceled if you open the door, short press the Power button, press the Start/
Pause button or turn the knob when the dryer is preheating.
7. After the Wash&Dry Link function is enabled, the dryer can also change the drying program and
function as per need.
8. The Wash&Dry Link function applies to partial programs.
39
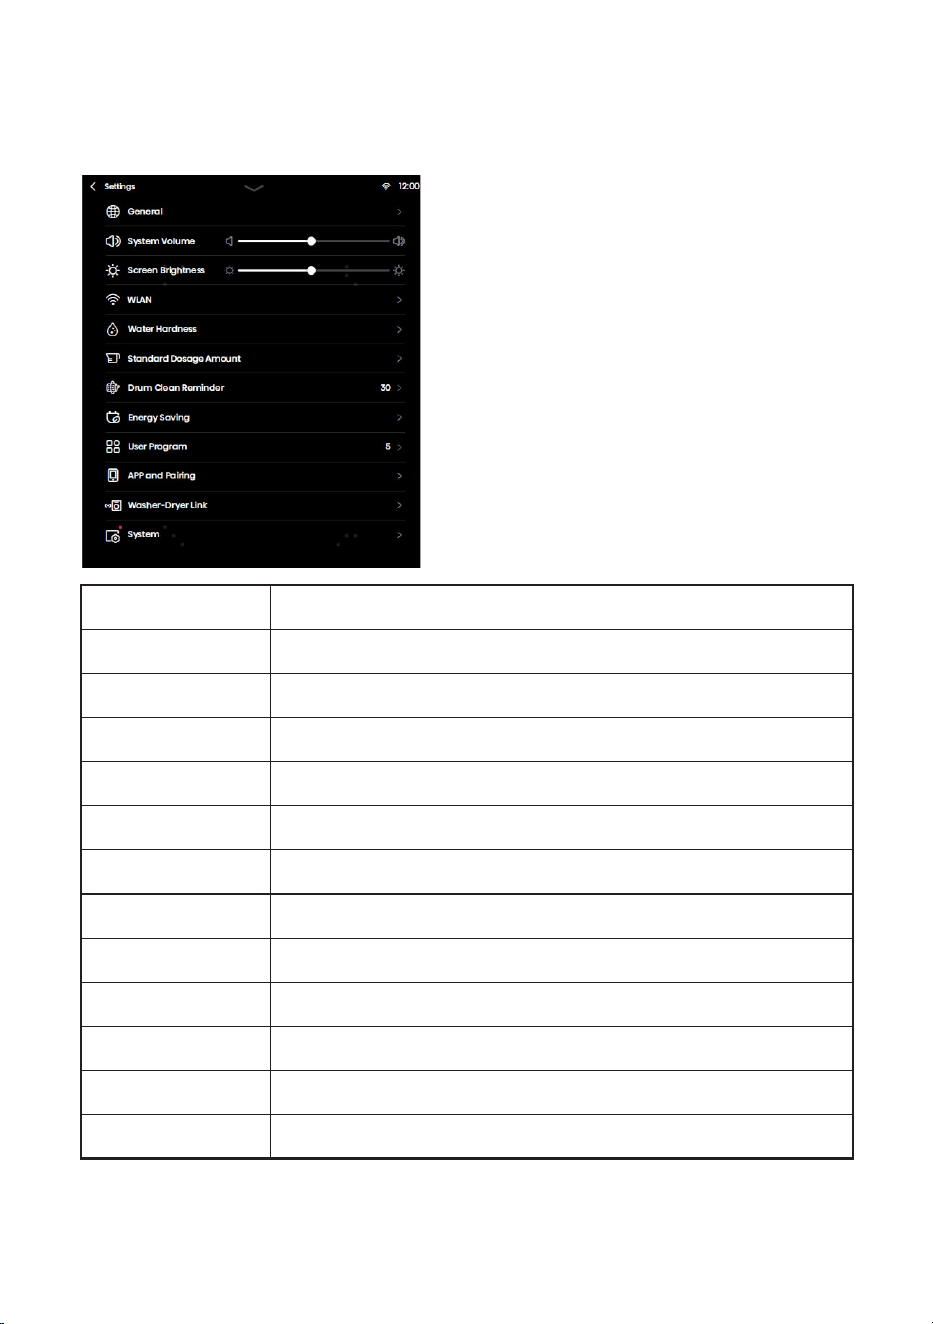
6HWWLQJV
This function allows you to enter the System Settings interface, where you can set General,
System Volume, Screen Brightness, WLAN, Water Hardness, Standard Dosage Amount, Drum
Clean Reminder, Energy Saving, User Program, APP and Pairing, Washer-Dryer Link, and System.
Name Function Description
General Set the language, date and temperature unit.
System Volume Set the system volume.
Screen Brightness Set the screen brightness.
WLAN Configure network connection.
Water Hardness
Standard Dosage Amount The standard detergent/softener dosage amount.
Drum Clean Reminder Set the drum clean reminder cycle.
Energy Saving Turn on Energy Saving.
User Program Users can set the number of programs shown on the home page.
APP and Pairing View the QR code for App downloading and binding.
Washer-Dryer Link
Set Washer-Dryer Link, corresponding to Washer-Dryer Link under the drop-down
settings.
System Turn on system upgrade and restore factory settings.
Test the water hardness.
40
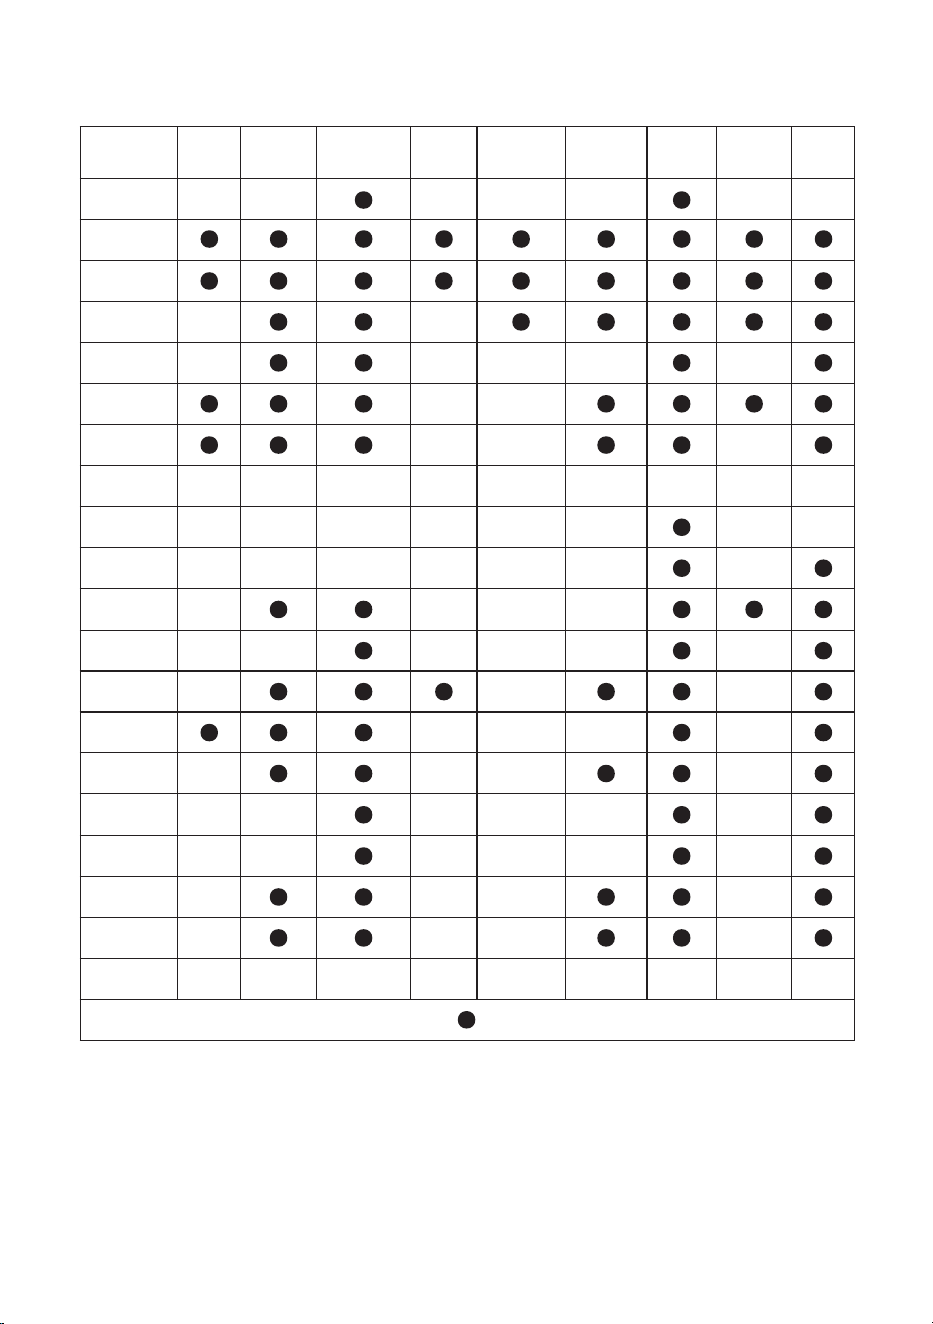
)81&7,217$%/(
Programs Steam Prewash
UV
Sterilization
Quiet
Mode
Stain
Removed
Intensive
Anti
Crease
Quicker
Extra
Rinse
Cotton
Eco40-60
--
-- - --
Synthetics
Mix - -
Daily wash - -- - -
Baby Care --
Allergy
Care
-- -
Drum Clean -- - - - - - --
Spin ------
--
Rinse+Spin ------
-
Power
Speed 39'
-
-- -
Quick 15' --
-- - -
Dark wash - - -
Shirts -- - -
Jeans - -- -
Silk/
Delicate
--
-- - -
Wool --
-- - -
Sportswear - -- -
Bedding - -- -
AI Super
Wash
-- - - - - - --
Note: "-" indicates this function is not optional; " " indicates this function is optional or available.
41
After selecting a program and its function parameters, touch the 6WDUW3DXVH button to
start washing.
1. Washing Process
2. Rinsing process
3. Spinning Process
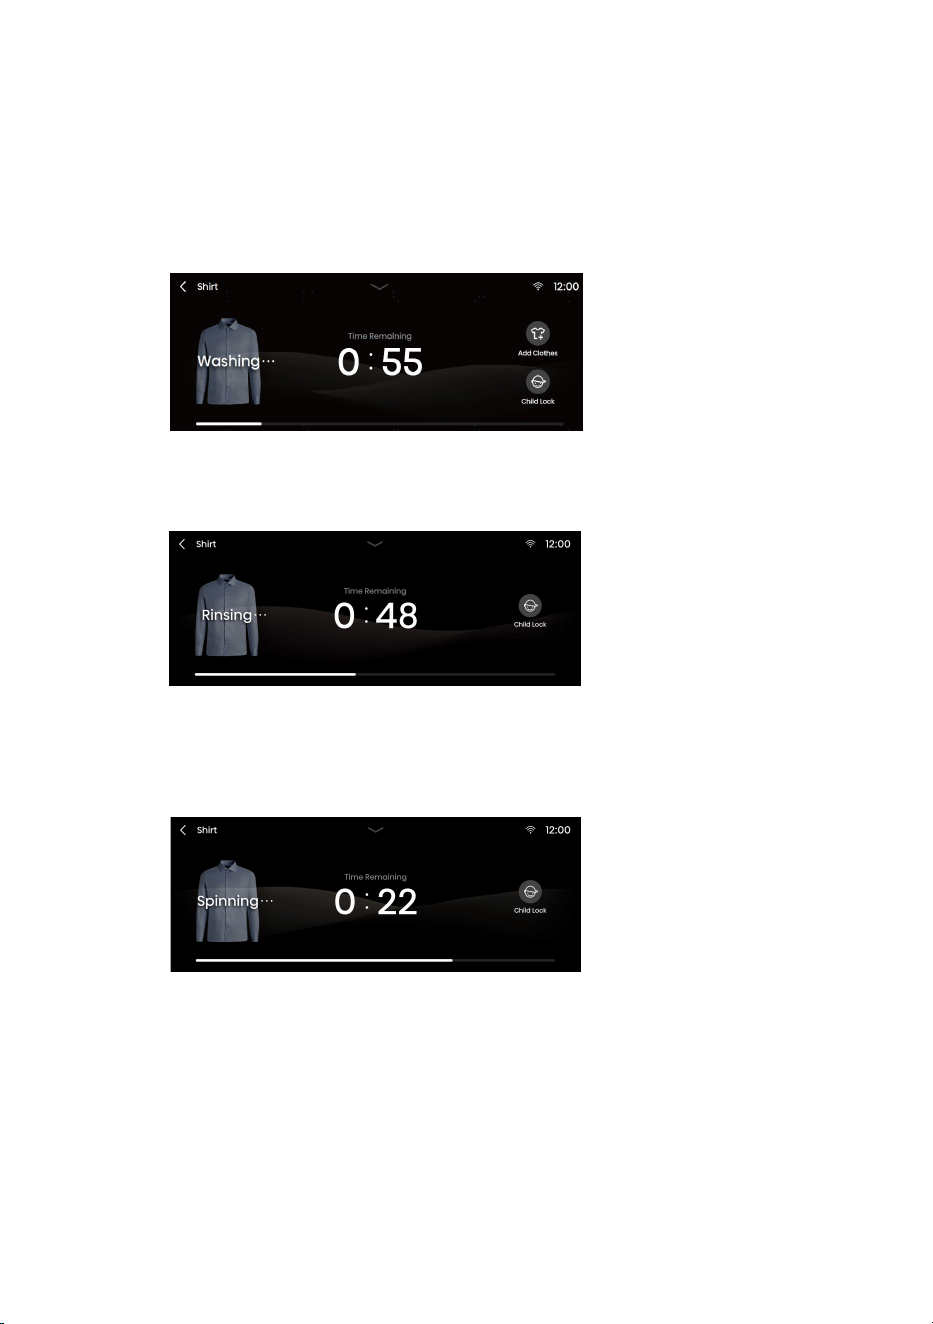
67(367$57,1*$:$6+,1*352*5$0
s
s
s
42
67(3(1'2):$6+,1*352*5$0
5HSRUW
Click it to view the Energy Used, Water Consumption, Time and Rinse Cycles of this
laundry.
)DYRULWHV
Click it to add the program and settings of function parameters of this laundry to your
favorites. The added program will appear at the top of the program list so that it can be
selected with priority during next use.
+RPH
Go back to the home page of the program.
(YDOXDWH
User can evaluate the star level of this laundry to help us in continuous improvement.
At the end of the program, the washing machine produces a prompt tone; the screen
displays the end interface, and you can press the Power button to turn off the machine.
If no operation is performed within 10min, the washing machine will shut down
automatically.

43
,17(55837,216$1'&+$1*,1*
352*5$0
$'',1*5(029,1*/$81'5<'85,1*23(5$7,21
The appliance door can be opened if the water level and water temperature are below a
predefined threshold.
The door will be unlocked automatically if all the following conditions are met:
•
Water temperature in the drum must be suitable.
• Water level in the drum must be below a certain value.
In order to add or remove laundry from the appliance during a washing program, proceed as
follows:
1. Press the Add Clothes button to suspend the laundry program.
2. If all conditions for unlocking the machine door are satisfied, the door will be unlocked. Open
the machine door to add or reduce clothes in the drum.
3. Close the appliance door!
4. Press the 67$57/3$86( button.
If you add a considerable amount of laundry during the wash, the laundry could be washed less
effectively, since the washing machine initially sensed a lower weight of the load of laundry and
added a smaller amount of water. Insufficient amount of water relative to the amount of laundry
could also cause damage to the laundry (rubbing of dry laundry), and washing time can be longer.
Washing time will resume from the point at which the washing programme was interrupted.
0DQXDO,QWHUUXSWLRQRI3URJUDP
To stop and cancel the washing program,
• Touch the Back button (<) at the upper left corner of the screen;
• Long press the “Power” button for 3s to power off the machine;
&KDQJHRI3URJUDP
To change the program during the laundry, first manually interrupt the current program by the
above method, and reselect a program.
(55256
If the machine malfunctions, the program will be interrupted.
In such case, the machine will produce a prompt tone to alert you, and the screen will display a
fault message.
In the case of partial abnormality alarms, click the Start/Pause button to cancel the alarms
and return to the running state. It cannot be switched to the running state in the case of partial
abnormality alarms.
32:(5)$,/85(
In case of a power failure (power outage), the washing program is interrupted. When the power
supply is restored, the program is resumed from the point where it was interrupted.
,IWKHUHLVVWLOOZDWHULQWKHZDVKLQJPDFKLQHDIWHUDSRZHURXWDJHPDNHVXUHQRWWRRSHQ
WKHGRRUEHIRUH\RXPDQXDOO\GUDLQWKHZDWHUIURPWKHZDVKLQJPDFKLQHYLDWKHSXPSILOWHU
44
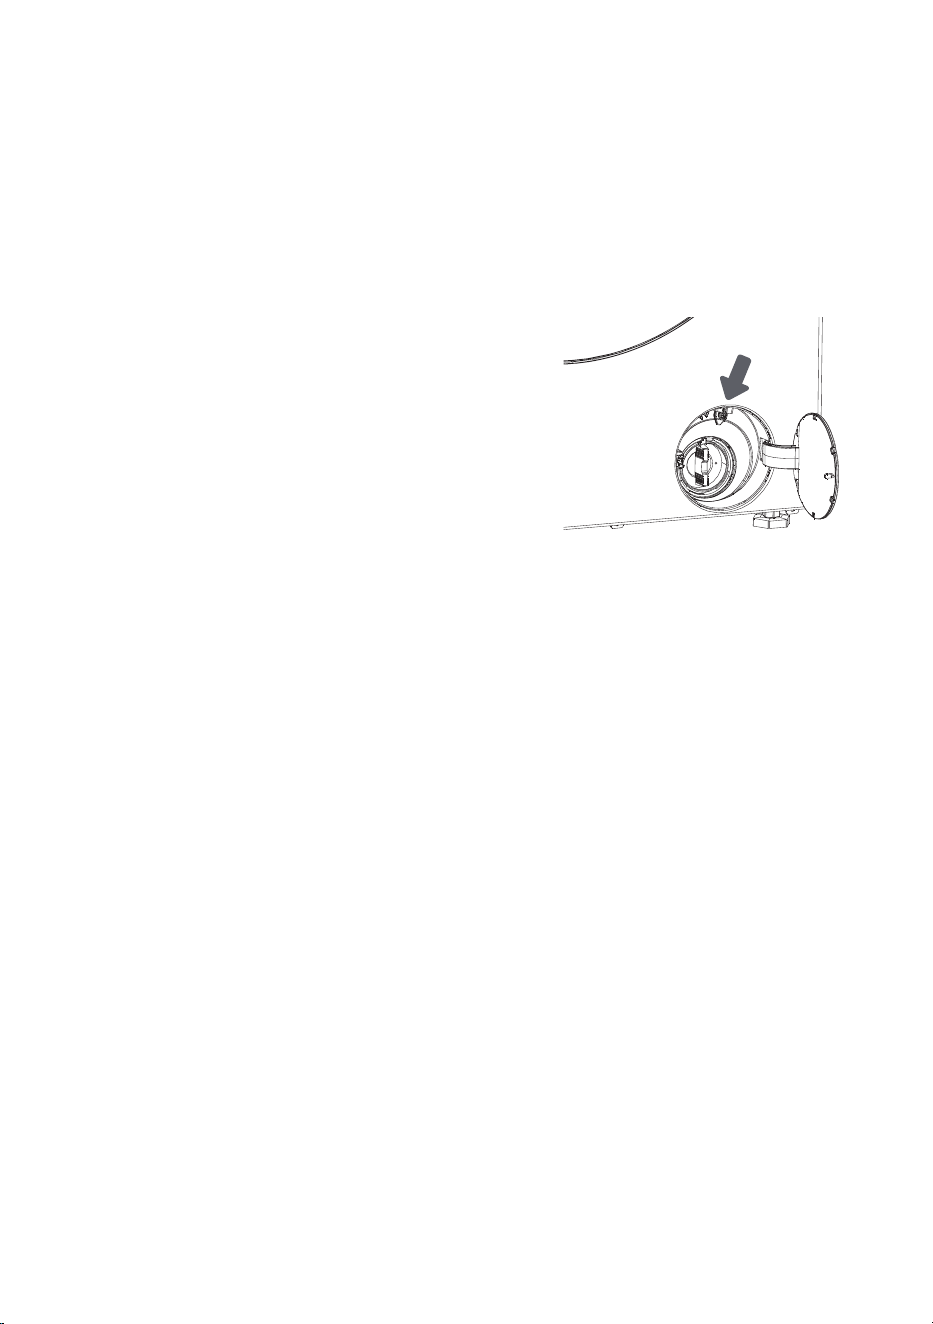
(0(5*(1&<'22523(1,1*
If the machine door cannot be opened for special reasons such as power failure, please use the
lock rod at the drain pump door for emergency opening.
Note:
1. Do not use it when the appliance is working normally.
2. Before operation, make sure that the inner barrel has stopped turning, and that the water is not
hot and the water level is lower than the clothing inlet. If the water level is high, drain the water
through the drain-away pipe (if available) or by slowly unscrewing the pump filter.
3. Operation method: Open the cover of drainage pump door,
pull down the lock lever with the help of a tool, and then
the door can be opened (indicated in the figure).
45
0$,17(1$1&(&/($1,1*
%HIRUHFOHDQLQJXQSOXJWKHZDVKLQJPDFKLQHIURPWKHSRZHUPDLQV
Children should not clean the washing machine or perform maintenance tasks without proper
supervision!
&/($1,1*'(7(5*(17&203$570(17
Clean the detergent compartment regularly.
Do not wash the detergent compartment in a dishwasher.
1. Open the detergent
compartment, press the limit
lever as shown in the figure,
and pull out the detergent
compartment;
2. Open the two limit ribs in
the position shown in the
figure, pull up and remove
the lid;
3. Empty the remaining
detergent and softener in
the dispenser box, clean
the dispenser and lid with
running water, and wipe dry
with a cloth;
4.
Insert the limit ribs of the
lid into the corresponding
slots as shown, and press
down the lid until you hear a
"click" sound, indicating the
flange ribs at the end of the
lid snaps into place. Put the
detergent compartment back
in place.
46
&/($1,1*:$7(5+26('(7(5*(17',63(16(5
+286,1*$1'58%%(5'225*$6.(7
Clean the mesh
filter regularly
under running water.
Use a brush to
clean the rinsing
section, especially
the nozzles on the
upper side of the
rinsing chamber.
After every wash,
wipe the rubber
door seal to extend
its use life.
47
&/($1,1*3803),/7(5
During cleaning, some water may be spilled. It is therefore recommended to place an absorbent
cloth on the floor.
Make sure the water has cooled down before you release it from the appliance.
Also clean the pump filter if the appliance cannot start the spinning cycle or when there is debris
in the pump (buttons, coins, hair pins or clips etc.).
Open the pump
filter cap using a
suitable tool (press
the door cover and
the cap pops open).
filter slowly counter-
clockwise. Pull out the
pump filter to allow the
water to drain slowly.
Clean the pump
filter under running
water.
Replace the pump
filter as shown in
the figure and fasten it
by rotating it clockwise.
For a good seal, the
filter gasket surface
should be clean.
The pump filter must be timely cleaned, especially after washing very fleecy, woolly, or very old
laundry.
Pull out emergency
drain pipe of machine.
Put end of emergency
drain pipe into a container.
Rotate the pump
Rotate emergency drain
pipe plug and remove it
after it becomes loose
Until water runs off
naturally. Reinstall
emergency drain pipe
plug.
48
$OZD\VGLVFRQQHFWWKHZDVKLQJPDFKLQHIURPWKHSRZHUPDLQVEHIRUHFOHDQLQJ
Clean the washing machine exterior and display unit using a soft damp cotton cloth and
water. Then, use a soft dry cloth to dry the appliance.
Do not use any solvents, abrasive cleaners, or cleaning agents that could damage
the appliance (please observe the recommendations and warnings provided by the
cleaning agent).
Wipe the drum door with a damp cloth, and then dry it with a soft dry cloth.
Do not clean the washing machine with a jet of water!
&/($1,1*(;7(5,25

49
:+$772'2"
The washing machine automatically controls the operation during the washing cycle. If any
abnormality is identified, it will be indicated by a fault code (F:XX) on the display. The fault
message will not disappear until the machine is shut down. External factors (e.g. the power grid)
may cause various errors (see TROUBLESHOOTING TABLE). In such case:
• Switch off the washing machine and wait for a few seconds.
• Switch on the washing machine and repeat the washing program.
• Most errors during operation can be resolved by the user.
• If the error persists, call an authorized service unit.
• Repairs may only be carried out by an authorized technician.
• Repair or any warranty claim resulting from incorrect connection or use of the washing
machine shall not be covered by the warranty. In such cases, the costs of repair shall be paid
by the user.
7528%/(6+227,1*
The warranty does not cover the errors or failures resulting from disturbances from the
environment (lightning strike, power grid failures, natural disasters etc.).

50
(5525&2'(6$1'7528%/(6+227,1*
3UREOHPHUURU 'HVFULSWLRQ :KDWWRGR"
) :DWHULQIORZIDXOW Check the following:
• Is the water tap open? Is the pressure too
low?
• Is the water hose pinched?
• Is the filter on the water hose clogged?
• Is the hose frozen?
) 'UDLQDJHIDXOW Check the following:
• Is the hose pinched? Is water flowing
through it?
• Is the filter on the drain hose clogged?
• Is the hose frozen?
))))
)
(OHFWURQLFPRGXOHIDXOW Switch off the appliance by pressing the
"POWER" button for 3 seconds.
Press the "START/PAUSE" button again. If the
error remains, call a service technician.
) :DWHUUHDFKHVRYHUIORZ
OHYHO
Stop the program by pressing the START/
PAUSE button. Restart the program.
If the appliance continues to pump out
water, close the water tap and call a service
technician.
) (UURULQORFNLQJWKHGRRU Door is closed, but it cannot be locked.
Turn off the appliance. Turn it on and restart
the washing program.
If the error remains, call a service technician.
) (UURULQXQORFNLQJWKH
GRRU
Door is closed, but it cannot be unlocked.
Turn off the appliance, then turn it on. If the
error remains, call a service technician.
8QE 8QEDODQFHDODUP Solve Unbalance alarm in the following steps:
1. Laundry winding
If articles have become tangled, press the
"Power" button for 3 seconds to shut down,
open the door, manually redistribute the load,
and then select the single SPIN program to try
again.
2. Too light-weighted laundry
Press the "Power" button for 3 seconds to shut
down the appliance, open the door, and add
additional items, and then select the single
SPIN program to try again.

51
5(&200(1'$7,216$1'
(&2120,&86(
When washing colored clothes for the first time, separate them by color and wash them separately
Wash heavily soiled laundry In smaller amounts, with more powder detergent or with a pre-wash
cycle.
Apply stain remover on stubborn stains before the wash. Refer to STAIN REMOVAL TIPS.
If you often wash laundry at low temperatures and with liquid detergents, bacteria may spawn
which can cause odour in the washing machine. It is recommended to run the "Drum Clean"
program to clean the drum.
Avoid washing very small load of laundry as this will lead to excessive use of energy and poor
cleaning performance.
Loosen any folded laundry before putting it into the drum.
Only use detergents for washing machine.
If water hardness exceeds 14°dH, water softener should be used. Heater damage resulting from
incorrect use of water softeners shall not be covered by the warranty. Check the information on
water hardness with your local water supplier.
Use of chlorine-based bleaches is not recommended as they can damage the heater.
If you use a descaling agent, bleach, or dye, make sure it is suitable for use in the appliance.
Do not use solvents or similar chemicals (paint thinner, turpentine, gasoline, etc.)!
Do not add hardened clumpy powder detergent into the detergent dispenser as this may clog the
piping in the washing machine.
Higher spinning speed will leave less residual moisture in the laundry. So it is more economical
and faster to use a front-loading washing machine.

52
67$,15(029$/7,36
Before using special-purpose stain removers, try using the natural methods that do not harm the
environment to remove less stubborn stains.
Prompt action will make it easier to remove stains! Damp the stain and then rinse with cold
(lukewarm) water - but never with hot water!
6WDLQV 6WDLQUHPRYDO
0XG When the stain is dry, first scrape it off the garment before washing
it in the washing machine. If the stain is stubborn, soak it with
an enzyme-based stain remover before the wash. If the stain is
not stubborn, remove it with liquid detergent or powder detergent
manually before the wash.
$QWLSHUVSLUDQW Before washing in the washing machine, apply liquid detergent
onto the laundry. Apply stain removers on any stubborn stains.
Alternatively, use oxygen-based bleach for the wash.
7HD Soak or rinse the laundry in cold water and add stain remover if
necessary.
&KRFRODWH Soak or rinse the laundry with lukewarm soapy water. Then, apply
lemon juice and rinse.
,QN Before washing in the washing machine, apply stain removers on
the stain. You may also use denatured alcohol. Turn the garment
inside out and place a paper towel under the stain. Use the alcohol
on the back side of the stain. At the end of the process, thoroughly
rinse the garment.
)HOWWLSSHQV Dilute some starch in water and apply it to the stain. When it dries,
scrape it off with a brush; then, wash the garment in the washing
machine.
%DE\IRRG (urine, mud,
food stains)
Before washing in the washing machine, soak the stains in
lukewarm water for at least half an hour. For easier stain removal,
add an enzyme-based stain remover.
*UDVV Before washing in the washing machine, soak the laundry in an
enzyme-based stain remover.
Grass stains can also be removed by soaking (for approx. 1 hour)
in diluted lemon juice or distilled vinegar.
(JJV Soak the garment in an enzyme-based stain remover. Soak in
cold water for at least 30 minutes, or a few hours if the stains are
stubborn. Then, wash in the washing machine.
&RIIHH Soak the garment in salt water. If the stain is not fresh, soak it with
a mixture of glycerine, ammonia and alcohol.
6KRHSROLVK Apply cooking oil to the stain and rinse.

53
6WDLQV 6WDLQUHPRYDO
%ORRG Fresh stain - rinse the garment with cool water and wash it in the
washing machine.
Dried stain - soak the garment in an enzyme-based stain remover.
Then, wash in the washing machine. If the stain does not vanish,
try to remove it with a bleach suitable for your garment.
*OXHFKHZLQJJXP Place the garment in a bag and put it in the freezer until the stain
hardens. Remove it with a blunt knife. Dilute the stain with a
prewash stain remover and rinse thoroughly. Finally, wash in the
washing machine.
0DNHXS Use a stain remover for the prewash; then, wash in the washing
machine.
%XWWHU Before washing in the washing machine, apply stain remover to the
stain. Then, rinse with hot water (as hot as the fabric will allow).
0LON Soak the garment in an enzyme-based stain remover. Soak for at
least 30 minutes, or a few hours if the stains are stubborn. Then,
wash in the washing machine.
)UXLWMXLFH Apply a mixture of salt and water on the stain. Wait for a while and
then rinse. You can also apply sodium bicarbonate, distilled vinegar
or lemon juice on the stain before washing in the washing machine.
For old stains, use glycerine, and after 20 minutes, rinse with cold
water. Finally, wash in the washing machine.
:LQH Soak the laundry in cold water for at least 30 minutes. Also, use a
stain remover. Then, wash in the washing machine.
:D[ Put the garment into the freezer until the wax hardens. Then,
scrape it off. Place a paper towel onto the stain, remove the
remaining wax by heating it with an iron until the paper absorbs the
wax.
6ZHDW Before washing in the washing machine, rub liquid detergent
thoroughly into the stain.
&KHZLQJJXP Put the garment into the freezer until the chewing gum hardens.
Then, scrape it off. Then, wash in the washing machine.

54
',6326$/
7KHSDFNDJLQJ is made of environmentally friendly materials that can be
recycled, disposed of, or destroyed without hazard to the environment. To
this end, packaging materials are labelled appropriately.
7KHV\PERO on the product or its packaging indicates that the product
should not be treated as household waste. Take the product to your local
recycling centre for waste electric and electronic equipment.
When GLVSRVLQJ of the appliance at the end of its use life, remove all
power cords, and destroy the door latch and switch to prevent the door
from locking to ensure child safety.
This appliance is marked according to the European WEEE directive.
Correct GLVSRVDO of the product will help prevent any negative effects
on the environment and health of people, which could occur in case
of improper disposal of the product. For detailed information on waste
disposal, contact The relevant municipal body in charge of waste
management, your waste disposal service, or the store where you bought
the product.
7.
Noise and remaining moisture content are influenced by theVSLQQLQJVSHHGWKHKLJKHUWKH
spinning speed in the spinning phase the higher the noise and thelower the remaining moisture
content.
8. The product information and QR code are reflected in the energy consumption labelthe product
registration information can be obtained by scanning the QR code.
9. The information of standard programmes.
The (co 40-60 programme is able to clean normally soiled cotton laundry declared to be1.
washableabout 40°C to 60°C together in the same cycle, and that this programme is used to
assess thecompliance with the EU ecodesign legislation.
2. The power consumption of the off-mode is 0.49W.
3. The most ecient programmes in terms ofenergy consumption are generally those that perform
at lower temperatures and longer duration.
4. Loading the household washHUGU\HU up to the capacity indicated by the manufacturer for the
respective programmes will contribute to energy and water savings.
5.Correct use of detergent, softeners and other additives. Do not apply excessive detergent.
This may aect the washing results adversely.
6. Periodic cleaning,including optimal frequency, and limescale prevention and procedure.
Programme Instructions
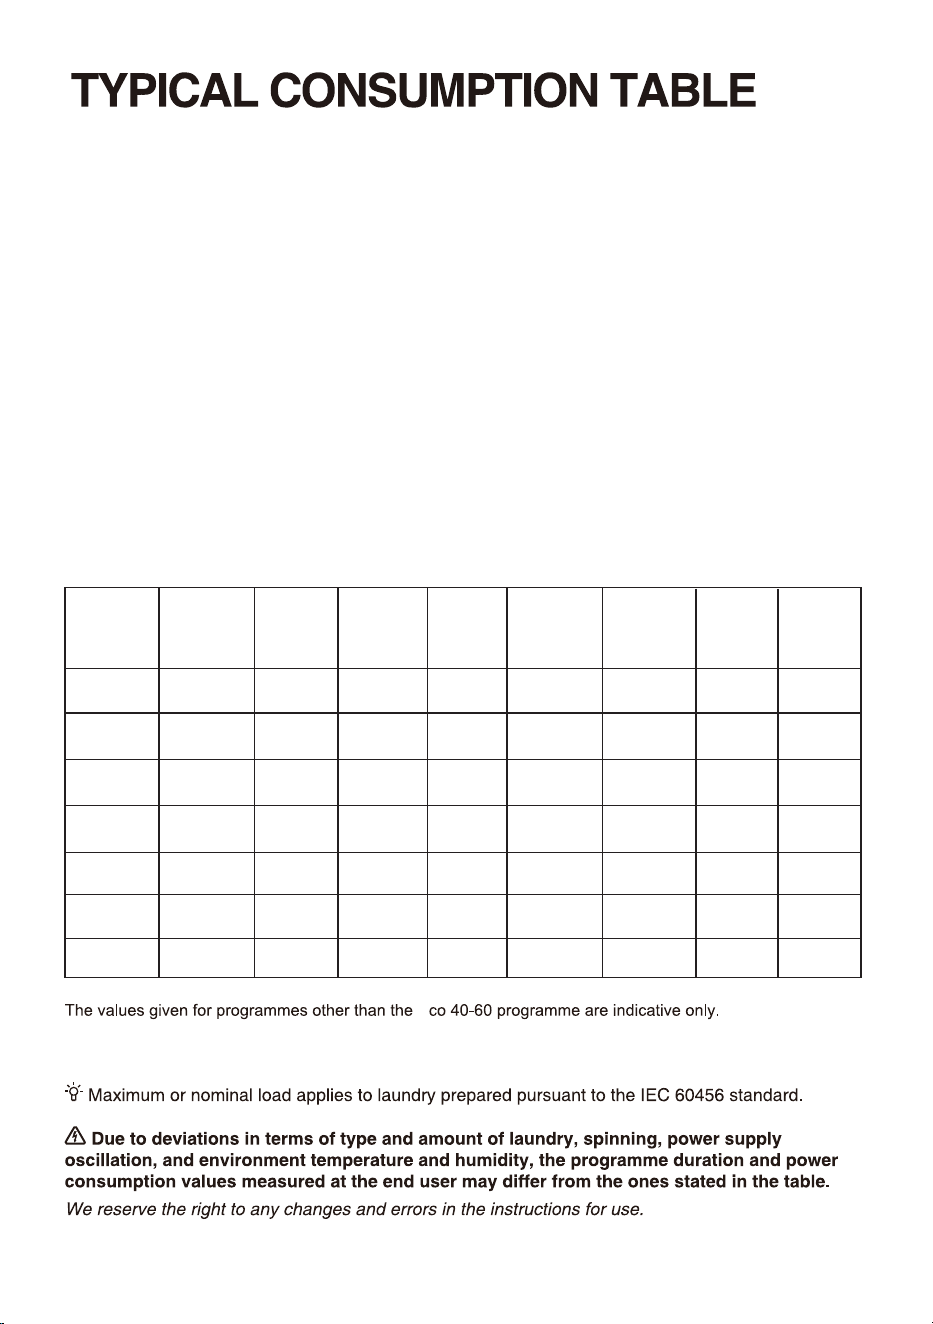
55
Program
Selected
Temperature
Rated
Capacity
(kg)
Maximum
temperature
in drum
Program
duration
(h:min)
Energy
consumption
(kWh/cycle)
Water
consumption
(litres/cycle)
Remaining
moisture
content
(%)
Maximum
speed
reached
(rpm)
Eco40-60
full load
Eco40-60
half load
Eco40-60
1/4 load
Cotton
Synthetics
Quick 15'
-
-
-
20
60
40
20
12.0
6.0
3.0
12.0
12.0
6.0
1.0
35
26
24
20
58
40
20
3:59
3:00
2:20
2:18
3:38
2:39
0:15
0.980
0.430
0.210
0.400
2.140
1.140
0.022
80.0
48.0
34.0
140.0
140.0
115.0
28.0
53.90
53.90
53.90
55.00
55.00
35.00
65.00
1400
1400
1400
1400
1400
1400
800
Cotton
(℃)
(℃)
E
&RQQHFWLQJ\RXUDSSOLDQFHWRWKHDSSOLFDWLRQ
&RQQHFW/LIH
&RQQHFW/LIH
&RQQHFW/LIH is a smart home platform that connects people, devices, and services. The &RQQHFW/LIH
application includes advanced digital services and carefree solutions that allow users to monitor and
control appliances, receive notifications from a smartphone, and update software (supported features
vary depending on your appliance and your region/country).
:/$1
(QDEOLQJ:/$1RQWKHDSSOLDQFH
Click on the ":/$1" button in the top right corner of the dropdown menu to enable or disable the
Wi-Fi Function.
&RQQHFWLRQVHWXS
For first start up: follow the boot to complete device Settings and App account binding
。
If you have reject to finish the WLAN setting and binding ,you can start like below:
1) Click on the "6HWWLQJV" button in the top right corner of the dropdown menu to enter the "6HWWLQJV",
and go to "WLAN" settings to set up the WLAN;
2) Or Long press on the "WLAN" button in the top right corner of the dropdown menu to enter the
"WLAN" directly .
To connect your smart device, you need a home Wi-Fi network and a smartphone with the
application &RQQHFW/LIH.
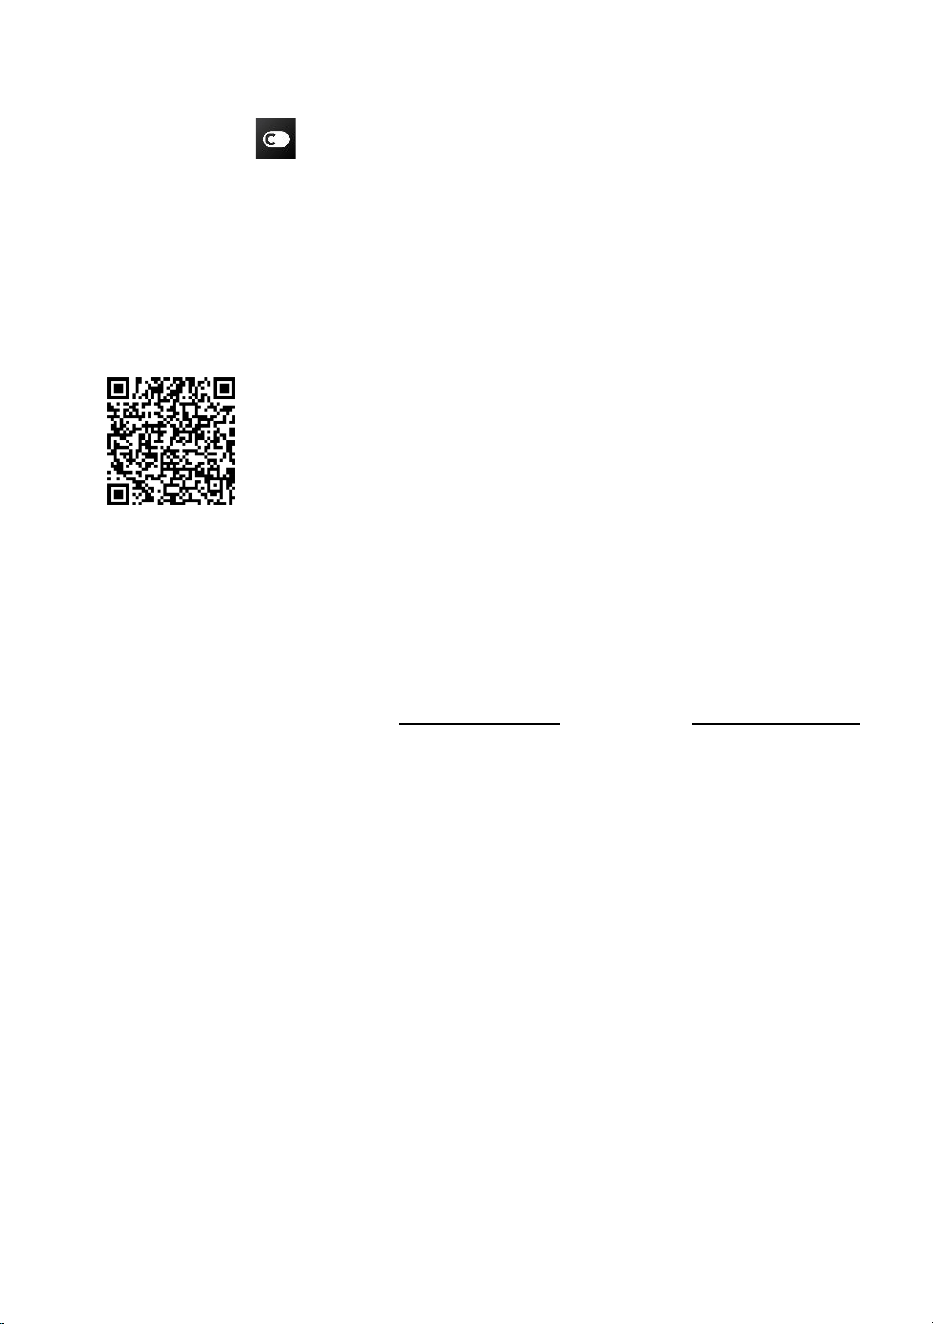
To download the &RQQHFW/LIHapplication, scan the QR code or search
for &RQQHFW/LIH in your favorite app store.
56
1. Install the ConnectLife application and create an account.
2. In the ConnectLife application, go to the "+" menu and select the appropriate type of device. Then
scan the SN code ( it can be found on the upper part of the door frame; you can also enter the SN
code manually ).
3. The application then guides you through the entire process of connecting the appliance to your
smartphone.
4. After a successful connection, the appliance can be operated remotely via the mobile application.
Do you have more questions? Visit us at www.connectlife.io or contact us at hello@connectlife.io.

8QSDLULQJ
1) On the appliance side:
A. Click on the "6HWWLQJV" button in the top right corner of the dropdown menu to enter the "6HWWLQJV"
page.
B. Click on "$SSDQG3DLULQJ" to enter the pairing page.
C. Click on "8QELQG" to unbind the connected account.
D. Tick the accounts that you want to unbind and click "8QELQG" to disconnect.
2) On the smartphone side:
A. Select and click the device you want to unbind in "'HYLFHV" page.
B. Click "6HWWLQJV" to enter the Settings page.
C. Click "5HPRYH'HYLFH" to unbind the device on the &RQQHFW/LIH app.
5HPRWHVWDUW
Click on "5HPRWH&RQWURO" button in the top right corner of the dropdown menu to enable or disable
this function.
6\VWHP8SJUDGH
Click on the "6HWWLQJV" button in the top right corner of the dropdown menu to enter the "6HWWLQJV"
page. Then click to open "6\VWHP" page. Chose "6\VWHP8SJUDGH", then you can check whether new
version have been released or not.
3DLULQJ
Click on the "6HWWLQJV" button in the top right corner of the dropdown menu to enter the "6HWWLQJV"
page.
1) Click on "$SSDQG3DLULQJ" to enter the pairing page.
2) Click on "%LQG$1HZ$FFRXQW" to start the pairing process for a new user.
3) Click "1H[W" and the dedicated QR code will be shown up for device pairing.
57

2376620-X08062536A