To Operate Para operar
6
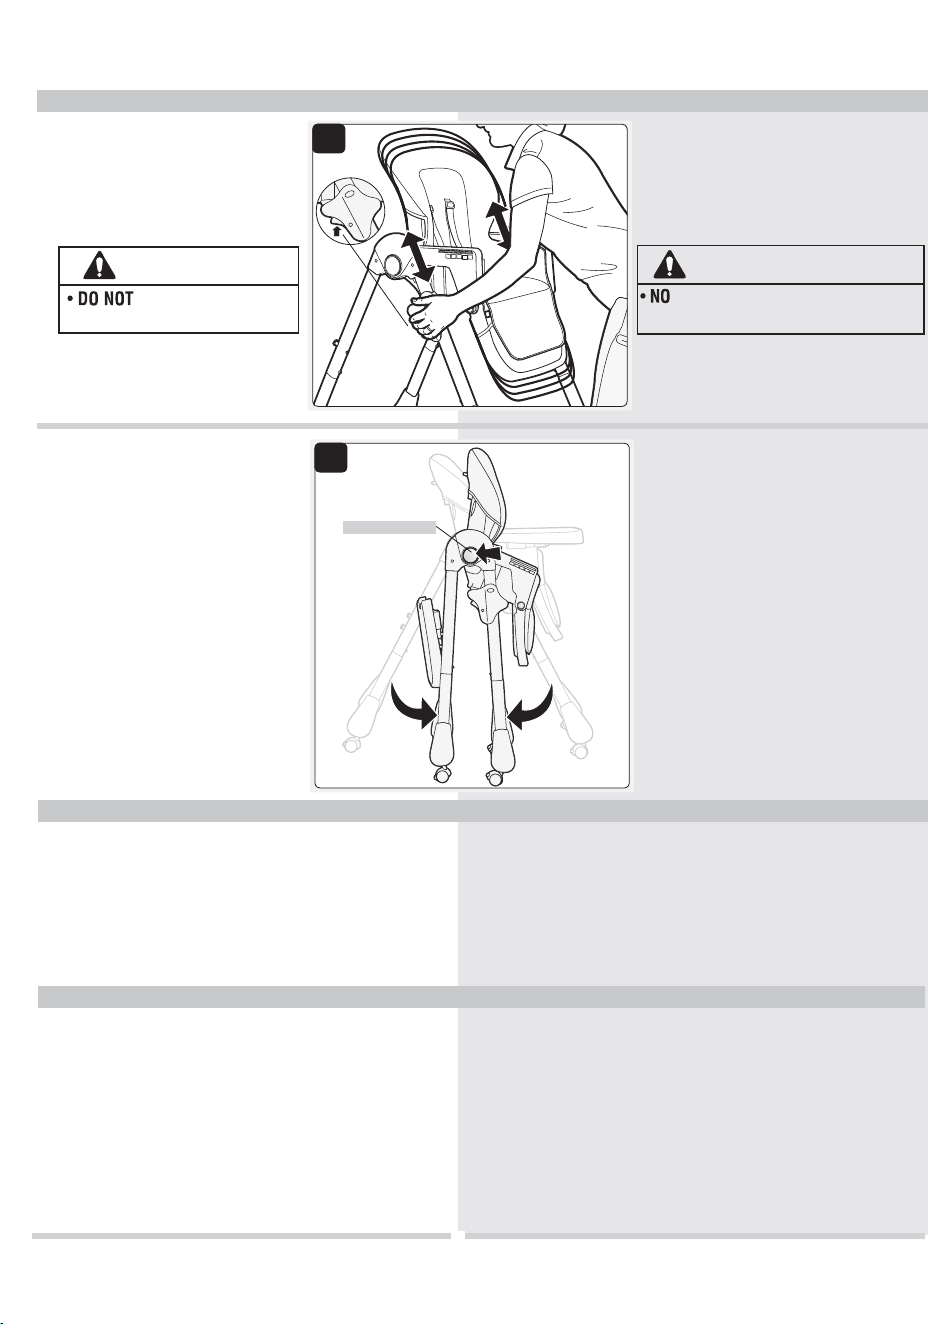
Folding:
Stand behind high chair. Press up on
both fold buttons (one on each side) and
lift to fold legs together (Figure 6).
NOTE: To unfold, press up on both fold
buttons and pull legs apart.
6
Plegado:
Párese detrás de la silla alta. Apriete hacia arriba
ambos botones de plegado (uno a cada lado), y
levante para plegar las patas entre sí (Figura 6).
NOTA: Para desplegar, apriete hacia arriba
ambos botones de plegado y tire de las
patas
para separarlas.
6
5
Adjusting Height:
TIP: Rest your foot on the lower leg
while you adjust the height.
Grasp both height adjustment handles
on sides underneath the tray, lift up and
then squeeze handles. Adjust height to
any of six positions (Figure 5).
5
Ajuste de la altura:
CONSEJO: Apoye el pie en la pata inferior
mientras ajusta la altura.
Sujete ambas manijas de ajuste de altura a los
costados, debajo de la charola. Luego, levante
las manijas y apriételas. Ajuste la altura a
cualquiera de las seis posiciones (Figura 5).
High Chair Care and Maintenance
Cuidado y mantenimiento de la silla alta
One (1) Year Limited Warranty
Garantía limitada de un año (1)
La firma Dorel Juvenile Group, Inc. asegura al comprador original que este producto (Silla alta “3-in-1 Grow
and Go”), está garantizado contra materiales defectuosos o mano de obra deficiente durante un (1) año
a partir de la fecha de compra, si se utiliza en condiciones normales. Si el producto presentara materiales
defectuosos o mano de obra deficiente, Dorel Juvenile Group, Inc. reparará o sustituirá el producto, a
nuestra discreción, de manera gratuita. El comprador cubrirá todos los costes relacionados con el envase
y envío del producto al Departamento de Relaciones con el Consumidor de Dorel Juvenile Group, a la
dirección que aparece al inicio de este documento, y los demás costes de transportación o aseguramiento
relacionados con el envío. Dorel Juvenile Group cubrirá los costes de devolución al comprador del producto
reparado o sustituido. El producto debe enviarse en su envase original junto con una prueba documental
de la compra, ya sea el recibo de venta u otro medio demostrativo de que el producto aún esté dentro
del período de garantía. Esta garantía quedará anulada si el propietario hubiera reparado o modificado el
producto, o si éste se hubiera dañado como consecuencia del uso incorrecto.
Esta garantía excluye cualesquiera otras responsabilidades ajenas a la expresada más arriba, entre otras los
daños incidentales o consecuentes.
EN ALGUNOS ESTADOS NO SE PERMITEN LAS EXCLUSIONES O LIMITACIONES REFERENTES A LOS
DAÑOS INCIDENTALES O CONSECUENTES, DE MODO QUE LA LIMITACIÓN O EXCLUSIÓN ANTES
EXPUESTA QUIZÁS NO SE APLIQUE EN SU CASO PARTICULAR.
ESTA GARANTÍA LE OTORGA DERECHOS LEGALES ESPECÍFICOS Y ES POSIBLE QUE USTED TAMBIÉN
CUENTE CON OTROS DERECHOS QUE PUDIERAN VARIAR EN DISTINTOS ESTADOS.
Dorel Juvenile Group, Inc. warrants to the original purchaser that this product (3-in-1 Grow
and Go High Chair), is free from material and workmanship defects when used under normal
conditions for a period of one (1) year from the date of purchase. Should the product contain
defects in material or workmanship Dorel Juvenile Group, Inc., will repair or replace the
product, at our option, free of charge. Purchaser will be responsible for all costs associated
with packaging and shipping the product to Dorel Juvenile Group Consumer Relations
Department at the address noted on front page and all other freight or insurance costs
associated with the return. Dorel Juvenile Group will bear the cost of shipping the repaired
or replaced product to the purchaser. Product should be returned in its original package
accompanied by a proof of purchase, either a sales receipt or other proof that the product is
within the warranty period. This warranty is void if the owner repairs or modifies the product
or the product has been damaged as a result of misuse.
This warranty excludes any liability other than that expressly stated previously, including but
not limited to, any incidental or inconsequential damages.
SOME STATES DO NOT ALLOW THE EXCLUSION OR LIMITATION OF INCIDENTAL OR
CONSEQUENTIAL DAMAGES, SO THE ABOVE LIMITATION OR EXCLUSION MAY NOT
APPLY TO YOU.
THIS WARRANTY GIVES YOU SPECIFIC LEGAL RIGHTS, AND YOU MAY ALSO HAVE
OTHER RIGHTS THAT MAY VARY FROM STATE TO STATE.
High chair and trays:
Wipe with soft, damp cloth and warm, soapy
water and allow to drip dry.
Insert tray:
Dishwasher safe - top rack only.
Seat pad:
Surface wash and drip dry only. Do not place in washing
machine or dryer.
Restraint system:
Restraint and crotch straps should be surface washed
and drip dried only. Do not place in washing machine or dryer.
Silla alta y charolas:
Límpielas con un paño suave húmedo y jabonosa y
enjuáguelo con agua tibia y permita deje que se seque.
Insert tray:
Puede lavarse en lavavajillas - sólo en canasta superior.
Almohadilla del asiento:
Superficie lave y solo secado por goteo. No coloque en
lavadora o secadora.
Sistema de retención:
Las correas de retención deben limpiarse en su
superficie únicamente y solo secado por goteo. No colocar en la lavadora ni en la secadora.
ADVERTENCIA
:
ajuste la posición del asiento cuando
el niño esté sentado.
WARNING:
adjust seat position
with child in it.
5
Fold Button
Botón de plegado
©2019 Dorel Juvenile Group, Inc. Safety 1st™ and the Safety 1st logo and design are trademarks of Dorel Juvenile Group, Inc. Safety 1st™ y el
logotipo de Safety 1st y su diseño son marcas comerciales de Dorel Juvenile Group, Inc. (800) 544-1108 www.safety1st.com. Styles and colors
may vary. Los estilos y los colores pueden variar. Made in CHINA. Hecho en CHINA. Distributed by (distribuido por) Dorel Juvenile Group, Inc.,
2525 State St., Columbus, IN 47201-7494. Dorel Juvenile Canada, 2855 Argentia Road, Unit 4, Mississauga, ON L5N 8G6. Importado y Distri-
buido en Chile por: Comercial e Industrial Silfa S.A. - San Ignacio 0201 / Parque Industrial Portezuelo Quilicura, Santiago Chile. Fono (562) 2339
9000. En Perú por: Comexa S.A. - Los Libertadores 455 – San Isidro, Lima – Perú. Fono (511) 4469014. En Centro América, Caribe y Ecuador
por: Best Brands Group S.A. – Av. Balboa, Bay Mall Plaza, Planta Baja, local 9, Panamá. - Fono: (507) 300 2884. En Colombia por: Baby Universe
S.A.S. - Vía 40 No. 77-29, Barranquilla, Colombia - Fono: (575) 353 1110 Importador: DJGM, S.A. DE C.V. Gabriel Mancera No. 1041 Col. Del
Valle, Benito Juárez C.P. 03100 México, Ciudad de México R.F.C. DJG140305GN9 Tel. (55) 67199202 09/16/19 4358-7829
3-in-1 Grow and Go High Chair
HC267
User Guide
Weight: up to 50 lbs (22.7 kg) Peso: hasta 22.7 kg (50 libras)
Silla Alta “3-in-1 Grow and Go”
HC267 Guía del Usuario
READ all instructions before assembly and use of high chair.
KEEP instructions for future use.
LEA todas las instrucciones antes de armar y usar la silla alta.
GUARDE instrucciones para su uso futuro.
Children have suffered severe head injuries
happen suddenly if child is not restrained properly.
ALWAYS
Stay near and watch child during use.
The child should be secured in the high chair at all times by the
The tray is not designed to hold the child in the chair.
capable of sitting upright unassisted.
lift or move high chair with child in it.
NEVER use near stairs.
ALWAYS
adjust seat position with child in it.
allow child to sleep in product.
high chair in fully reclined position when child is
able to sit upright unassisted or weighs more than 20 lbs.
Algunos niños han sufrido lesiones graves en la
caídas pueden producirse repentinamente si el niño no está sujetado
adecuadamente.
SIEMPRE use las correas de retención y ajústelas para que queden firmes.
Permanezca cerca y observe al niño mientras se utiliza la silla.
recta.
Se recomienda que sólo utilicen la silla alta los niños que puedan
permanecer sentados sin asistencia.
levante o mueva la silla alta cuando el niño esté en ella.
NUNCA usar cerca de escaleras.
SIEMPRE trabe las ruedas mientras el niño esté en la silla alta.
ajuste la posición del asiento cuando el niño esté sentado.
permita que el niño quede allí dormido.
la silla alta en la posición de reclinado total cuando el niño
Keep small parts away from children during assembly.
alcance de los niños.
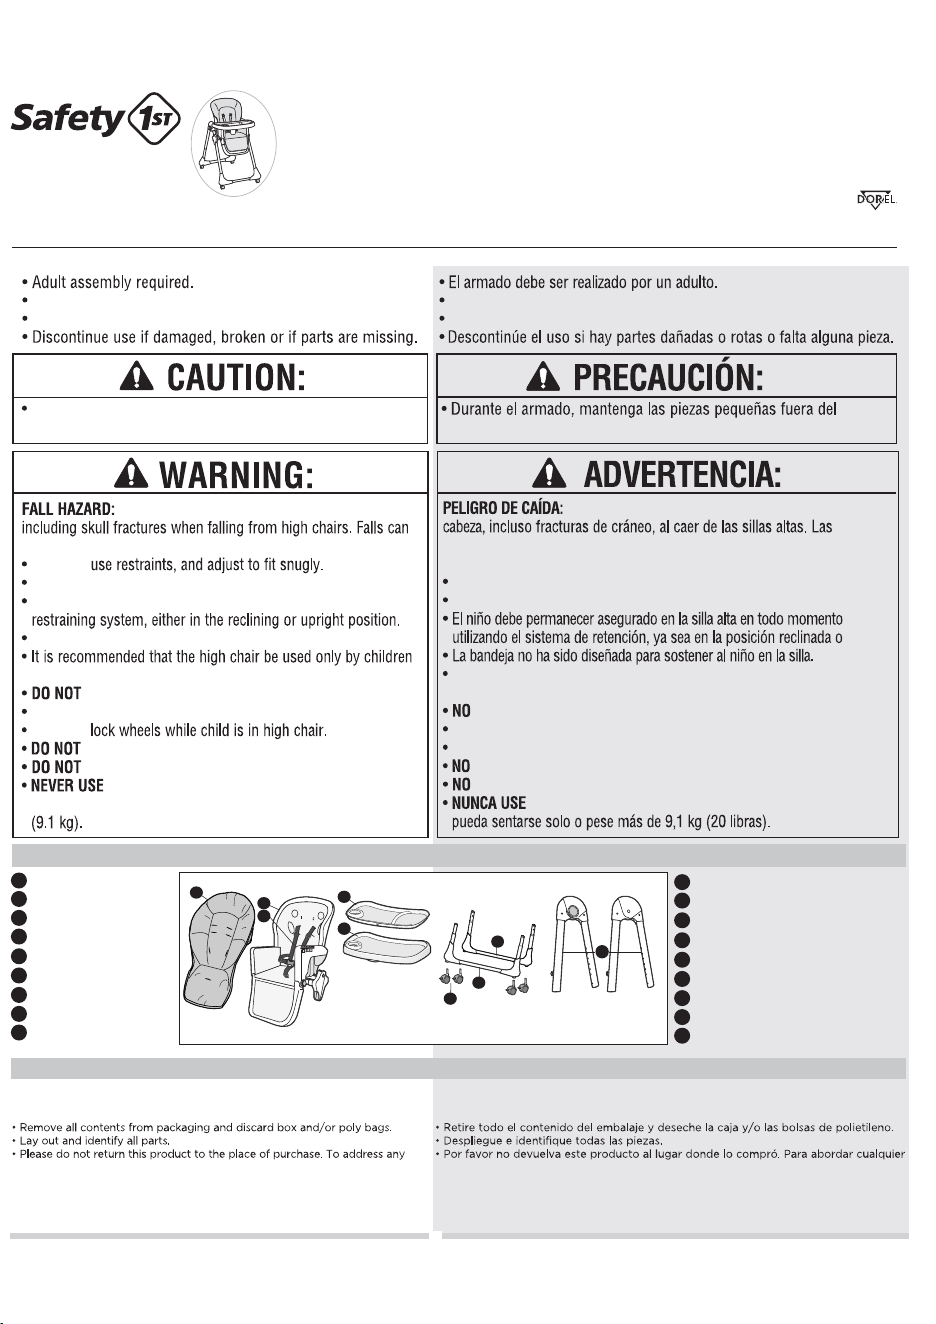
Parts List Lista de piezas
Seat pad
Seat bucket
Restraint belt
Insert tray
Tray
Upper leg assembly (left & right)
Rear lower leg assembly
Front lower leg assembly
Casters (4)
E
Almohadilla del asient
o
Butaca del asiento
Cinturón de retención
Charola
de inserción
Charola
Conjunto de patas superiores
(izquierdo y derecho)
Conjunto de patas inferiores traseras
Conjunto de patas inferiores delanteras
Ruedas (4)
A
B
C
A
B
C
G
D
E
F
H
A
B
C
G
D
E
F
H
D
I
I
F
G
H
I
Read all instructions before assembly and use of
high chair.
issues, please visit us at www.safety1st.com to chat with us there, text us at
(812) 652-2525 or call Consumer Care at (800) 544-1108. To help you, we
would need the model number (HC267) and the manufacture date (located
on back of seat).
Before Assembly: Wipe down trays with a soft cloth and warm soapy water.
Antes de armar y usar la silla alta, lea detenidamente
todas las instrucciones.
problema, visítenos en www.safety1st.com o chatee con nosotros para sacarse dudas,
enviarnos un mensaje al (812) 652-2525 o llamar al Servicio de Atención al Cliente al
(800) 544-1108. Para ayudarlo, necesitaremos el número de modelo (HC267) y la
fecha de fabricación (que se encuentran en la parte posterior del cesto asiento).
Antes de armar: Limpie las charolas con un paño suave y agua jabonosa tibia.
Keep These Instructions For Future Use Guarde estas instrucciones para su uso futuro
4 1
2
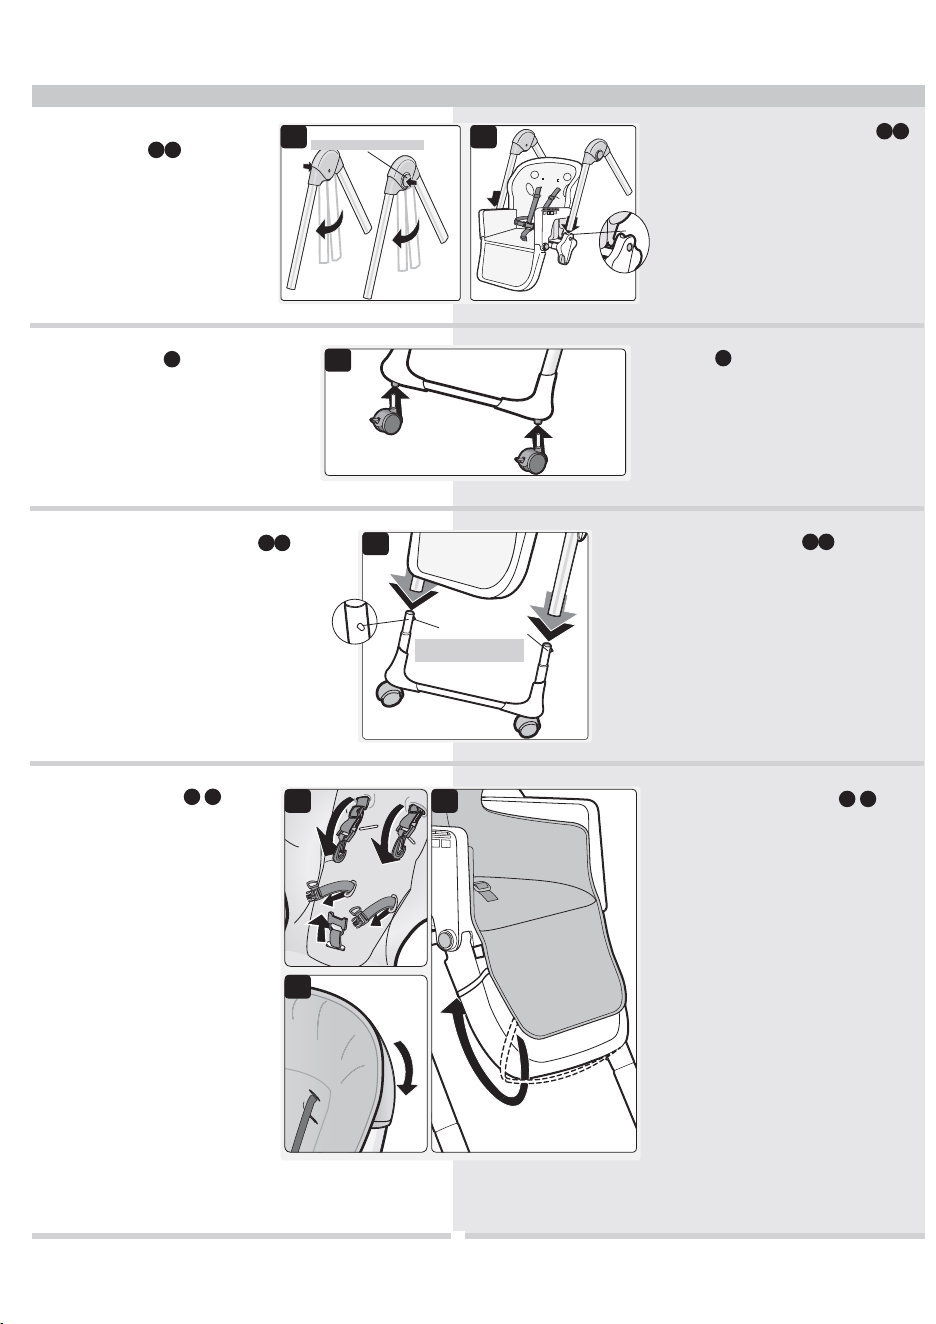
Attach Wheels
I
:
Insert 4 casters into front and rear lower leg
assemblies (Figure 2).
3
Attach Lower Leg Assemblies
G H
:
Evenly slide both legs of upper leg assembly
over lower legs. Do not click into place until
both legs have been partially inserted, then
push lower legs until they click into
place (Figure 3).
Confirm pins emerge completely through holes.
Repeat for other lower leg assembly.
2
Ruedas:
I
:
Inserte las 4 rueditas en los conjuntos de patas
delantero y trasero (Figura 2).
3
Conjuntos de patas inferior
G H
:
Deslice uniformemente ambas patas del conjunto
de patas superiores sobre las patas inferiores. No las
encaje en posición hasta tanto ambas patas se hayan
insertado parcialmente; luego, empuje las patas
inferiores hasta que se encajen en posición (Figura 3).
Confirme que las clavijas sobresalgan completamente
por los orificios.
Repita el proceso para el otro conjunto de pata
inferior.
2
To Assemble Armado
1a1
1
Attach Upper Leg
Assemblies
B
F
:
To unfold, press in on both fold
buttons and pull legs apart until
(Figure 1).
Slide front legs into left and right
seat height adjusters, (Figure 1a)
then slide seat assembly up the front
legs until it locks.
1
Conjuntos de patas superiores
F B
:
Para desplegar, presione ambos botones de
plegado y tire de las patas para separarlas
(Figura 1).
Deslice las patas frontales en los ajustadores
de altura del asiento izquierdo y derecho;
(Figura 1a) luego deslice el conjunto del asiento
hacia arriba en las patas frontales hasta que se
trabe.
4b
4
4a
4
Attach Seat Pad
A
C
:
Feed restraint straps (2 shoulder, 2
waist, and 1 crotch) through slots in
seat pad (Figure 4).
Pull back of seat pad over top of seat
back (Figure 4a).
Wrap elastic strap around the back of
leg rest (Figure 4b).
4
Almohadilla del asiento
A
C
:
Pase las correas de retención
(2 hombros, 2 cintura y 1 entrepierna) a
través de las ranuras en la almohadilla del
asiento (Figura 4).
Tire de la parte posterior de la almohadilla
para colocarla sobre el respaldo del asiento
(Figura 4a).
Coloque la correa elástica alrededor del
reposapiernas (Figura 4b).
2 3
Fold Button
Botone de plegado
Click both pins at once
Encaje ambas clavijas
al mismo tiempo
3
3
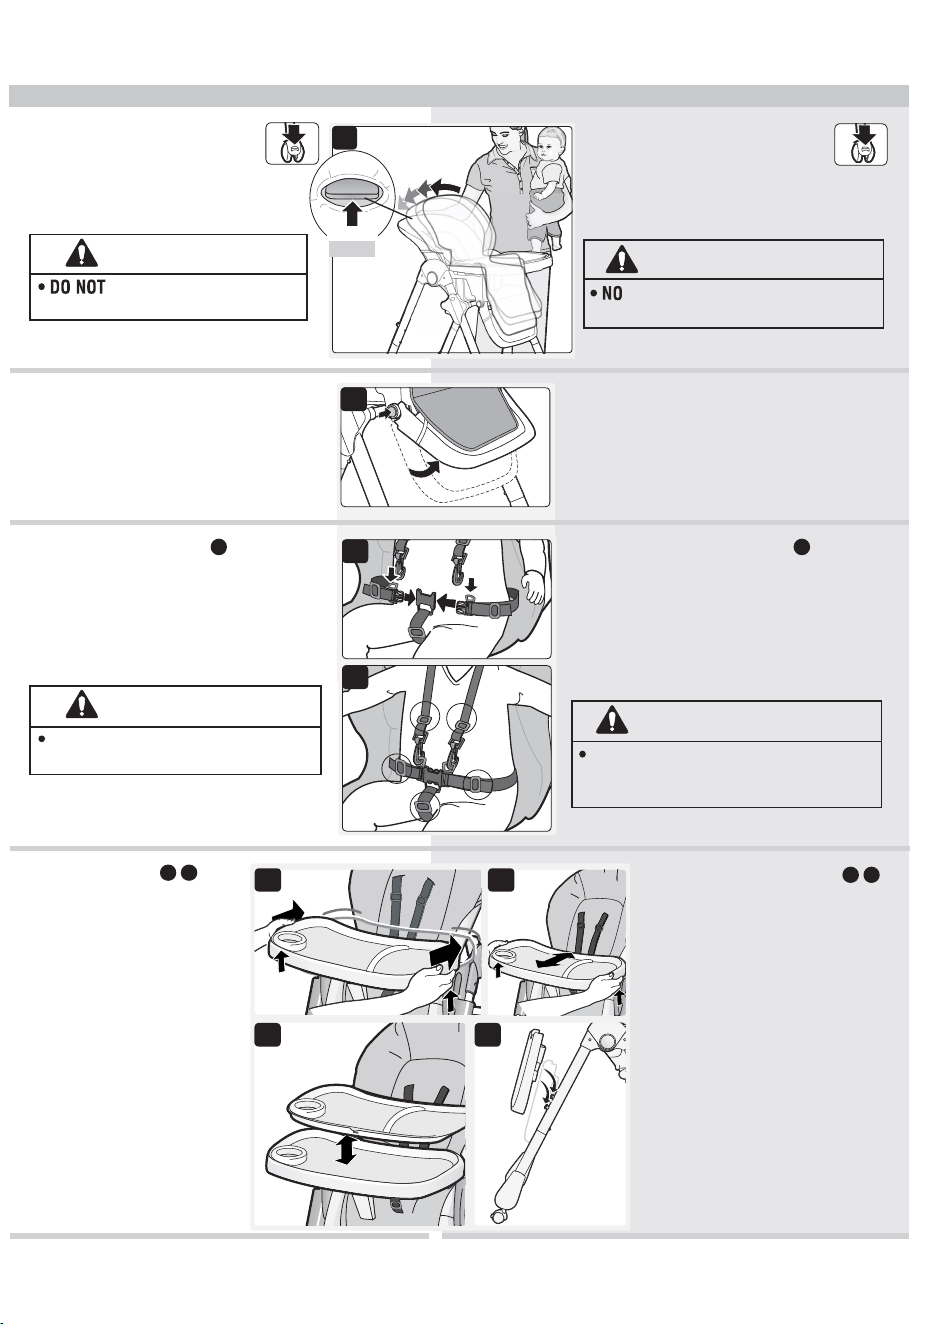
Using Restraint System
C
:
Place child in the seat with the crotch strap between
the child’s legs and fasten both buckles (Figure 3).
Adjust straps (at five buckles) to tighten snugly such
that you can comfortably slide your finger between
the strap and your child (Figure 3a).
NOTE: Shoulder straps are optional. If not used,
remove shoulder straps completely.
2
Adjusting Leg Rest:
Press leg rest buttons on both sides of lower seat
and raise or lower leg rest as desired (Figure 2).
1
Adjusting Recline:
Grasp handle at back of seat. Squeeze handle to
adjust recline angle (Figure 1).
3
Uso del sistema de retención
C
:
Siente al niño en la silla alta y coloque
la correa de entrepierna entre las piernas del niño y
enganche ambas hebillas (Figura 3). Ajuste las
correas (en las 5 hebillas) para tensarlas, de modo que
se pueda deslizar cómodamente un dedo entre cada
correa y el niño (Figura 3a).
NOTA: Las correas de hombro son opcionales. Si no
utiliza las correas de hombro, retírelas por completo.
2
Ajuste de reposapiernas:
Presione los botones a ambos lados del asiento y
levante o baje el reposapiernas a la posición deseada
(Figura 2).
1
Ajuste de la reclinación:
Sujete la manija en el respaldo del asiento. Apriete la
manija para ajustar el ángulo de reclinación (Figura 1).
3
2
3a
Squeeze
Apriete
TIP: Lock wheels to keep high
chair from sliding.
CONSEJO: Para evitar que la silla alta
se deslice, trabe las ruedas.
ADVERTENCIA
:
ajuste el ángulo cuando el niño esté en
el asiento.
WARNING:
adjust recline when child is
in seat.
ADVERTENCIA
:
Asegure SIEMPRE al niño utilizando el
sistema de retención. Ajústelo para que
quede firme.
1
WARNING:
ALWAYS secure child in the
restraint belt. A
djust to fit snugly.
4a
4c
4
4b
4
Attaching Trays
D
E
:
Squeeze buttons underneath both
sides of tray and slide tray onto sides
of snack tray (Figure 4).
Adjust tray: Squeeze buttons on
both sides and slide tray forward or
backward (Figure 4a).
Remove tray: Squeeze buttons on
both sides and pull toward you.
Use insert tray: Align on main tray,
inserting the front first then press
down at rear (Figure 4b).
Store tray: Conveniently hang tray
on rear legs, fitting pegs to keyhole
openings on underside of tray (Figure
4c).
4
Colocación de las charolas
D
E
:
Presione los botones debajo de cada lado
de la charola y deslice la charola sobre los
lados de la charola de alimentos (Figura 4).
Cómo ajustar la charola:
Apriete los botones
a ambos lados y deslice la charola hacia
delante o hacia atrás (Figura 4a).
Para retirar la charola:
Presione los botones a
ambos lados y tire hacia usted.
Para usar charola de inserción:
Alinéela con
la charola principal, insertando primero la
parte delantera y presionando hacia abajo la
parte trasera después (Figura 4b).
Almacenamiento de charola:
Cuelgue
convenientemente la charola en las patas
traseros, encajando las clavijas en el orificios
situado en la parte inferior de la charola
(Figura 4c).
To Operate Para operar
2
Attach Wheels
I
:
Insert 4 casters into front and rear lower leg
assemblies (Figure 2).
3
Attach Lower Leg Assemblies
G H
:
Evenly slide both legs of upper leg assembly
over lower legs. Do not click into place until
both legs have been partially inserted, then
push lower legs until they click into
place (Figure 3).
Confirm pins emerge completely through holes.
Repeat for other lower leg assembly.
2
Ruedas:
I
:
Inserte las 4 rueditas en los conjuntos de patas
delantero y trasero (Figura 2).
3
Conjuntos de patas inferior
G H
:
Deslice uniformemente ambas patas del conjunto
de patas superiores sobre las patas inferiores. No las
encaje en posición hasta tanto ambas patas se hayan
insertado parcialmente; luego, empuje las patas
inferiores hasta que se encajen en posición (Figura 3).
Confirme que las clavijas sobresalgan completamente
por los orificios.
Repita el proceso para el otro conjunto de pata
inferior.
2
To Assemble Armado
1a1
1
Attach Upper Leg
Assemblies
B
F
:
To unfold, press in on both fold
buttons and pull legs apart until
(Figure 1).
Slide front legs into left and right
seat height adjusters, (Figure 1a)
then slide seat assembly up the front
legs until it locks.
1
Conjuntos de patas superiores
F B
:
Para desplegar, presione ambos botones de
plegado y tire de las patas para separarlas
(Figura 1).
Deslice las patas frontales en los ajustadores
de altura del asiento izquierdo y derecho;
(Figura 1a) luego deslice el conjunto del asiento
hacia arriba en las patas frontales hasta que se
trabe.
4b
4
4a
4
Attach Seat Pad
A
C
:
Feed restraint straps (2 shoulder, 2
waist, and 1 crotch) through slots in
seat pad (Figure 4).
Pull back of seat pad over top of seat
back (Figure 4a).
Wrap elastic strap around the back of
leg rest (Figure 4b).
4
Almohadilla del asiento
A
C
:
Pase las correas de retención
(2 hombros, 2 cintura y 1 entrepierna) a
través de las ranuras en la almohadilla del
asiento (Figura 4).
Tire de la parte posterior de la almohadilla
para colocarla sobre el respaldo del asiento
(Figura 4a).
Coloque la correa elástica alrededor del
reposapiernas (Figura 4b).
2 3
Fold Button
Botone de plegado
Click both pins at once
Encaje ambas clavijas
al mismo tiempo
3
3
Using Restraint System
C
:
Place child in the seat with the crotch strap between
the child’s legs and fasten both buckles (Figure 3).
Adjust straps (at five buckles) to tighten snugly such
that you can comfortably slide your finger between
the strap and your child (Figure 3a).
NOTE: Shoulder straps are optional. If not used,
remove shoulder straps completely.
2
Adjusting Leg Rest:
Press leg rest buttons on both sides of lower seat
and raise or lower leg rest as desired (Figure 2).
1
Adjusting Recline:
Grasp handle at back of seat. Squeeze handle to
adjust recline angle (Figure 1).
3
Uso del sistema de retención
C
:
Siente al niño en la silla alta y coloque
la correa de entrepierna entre las piernas del niño y
enganche ambas hebillas (Figura 3). Ajuste las
correas (en las 5 hebillas) para tensarlas, de modo que
se pueda deslizar cómodamente un dedo entre cada
correa y el niño (Figura 3a).
NOTA: Las correas de hombro son opcionales. Si no
utiliza las correas de hombro, retírelas por completo.
2
Ajuste de reposapiernas:
Presione los botones a ambos lados del asiento y
levante o baje el reposapiernas a la posición deseada
(Figura 2).
1
Ajuste de la reclinación:
Sujete la manija en el respaldo del asiento. Apriete la
manija para ajustar el ángulo de reclinación (Figura 1).
3
2
3a
Squeeze
Apriete
TIP: Lock wheels to keep high
chair from sliding.
CONSEJO: Para evitar que la silla alta
se deslice, trabe las ruedas.
ADVERTENCIA
:
ajuste el ángulo cuando el niño esté en
el asiento.
WARNING:
adjust recline when child is
in seat.
ADVERTENCIA
:
Asegure SIEMPRE al niño utilizando el
sistema de retención. Ajústelo para que
quede firme.
1
WARNING:
ALWAYS secure child in the
restraint belt. A
djust to fit snugly.
4a
4c
4
4b
4
Attaching Trays
D
E
:
Squeeze buttons underneath both
sides of tray and slide tray onto sides
of snack tray (Figure 4).
Adjust tray: Squeeze buttons on
both sides and slide tray forward or
backward (Figure 4a).
Remove tray: Squeeze buttons on
both sides and pull toward you.
Use insert tray: Align on main tray,
inserting the front first then press
down at rear (Figure 4b).
Store tray: Conveniently hang tray
on rear legs, fitting pegs to keyhole
openings on underside of tray (Figure
4c).
4
Colocación de las charolas
D
E
:
Presione los botones debajo de cada lado
de la charola y deslice la charola sobre los
lados de la charola de alimentos (Figura 4).
Cómo ajustar la charola:
Apriete los botones
a ambos lados y deslice la charola hacia
delante o hacia atrás (Figura 4a).
Para retirar la charola:
Presione los botones a
ambos lados y tire hacia usted.
Para usar charola de inserción:
Alinéela con
la charola principal, insertando primero la
parte delantera y presionando hacia abajo la
parte trasera después (Figura 4b).
Almacenamiento de charola:
Cuelgue
convenientemente la charola en las patas
traseros, encajando las clavijas en el orificios
situado en la parte inferior de la charola
(Figura 4c).
To Operate Para operar
To Operate Para operar
6
Folding:
Stand behind high chair. Press up on
both fold buttons (one on each side) and
lift to fold legs together (Figure 6).
NOTE: To unfold, press up on both fold
buttons and pull legs apart.
6
Plegado:
Párese detrás de la silla alta. Apriete hacia arriba
ambos botones de plegado (uno a cada lado), y
levante para plegar las patas entre sí (Figura 6).
NOTA: Para desplegar, apriete hacia arriba
ambos botones de plegado y tire de las
patas
para separarlas.
6
5
Adjusting Height:
TIP: Rest your foot on the lower leg
while you adjust the height.
Grasp both height adjustment handles
on sides underneath the tray, lift up and
then squeeze handles. Adjust height to
any of six positions (Figure 5).
5
Ajuste de la altura:
CONSEJO: Apoye el pie en la pata inferior
mientras ajusta la altura.
Sujete ambas manijas de ajuste de altura a los
costados, debajo de la charola. Luego, levante
las manijas y apriételas. Ajuste la altura a
cualquiera de las seis posiciones (Figura 5).
High Chair Care and Maintenance
Cuidado y mantenimiento de la silla alta
One (1) Year Limited Warranty
Garantía limitada de un año (1)
La firma Dorel Juvenile Group, Inc. asegura al comprador original que este producto (Silla alta “3-in-1 Grow
and Go”), está garantizado contra materiales defectuosos o mano de obra deficiente durante un (1) año
a partir de la fecha de compra, si se utiliza en condiciones normales. Si el producto presentara materiales
defectuosos o mano de obra deficiente, Dorel Juvenile Group, Inc. reparará o sustituirá el producto, a
nuestra discreción, de manera gratuita. El comprador cubrirá todos los costes relacionados con el envase
y envío del producto al Departamento de Relaciones con el Consumidor de Dorel Juvenile Group, a la
dirección que aparece al inicio de este documento, y los demás costes de transportación o aseguramiento
relacionados con el envío. Dorel Juvenile Group cubrirá los costes de devolución al comprador del producto
reparado o sustituido. El producto debe enviarse en su envase original junto con una prueba documental
de la compra, ya sea el recibo de venta u otro medio demostrativo de que el producto aún esté dentro
del período de garantía. Esta garantía quedará anulada si el propietario hubiera reparado o modificado el
producto, o si éste se hubiera dañado como consecuencia del uso incorrecto.
Esta garantía excluye cualesquiera otras responsabilidades ajenas a la expresada más arriba, entre otras los
daños incidentales o consecuentes.
EN ALGUNOS ESTADOS NO SE PERMITEN LAS EXCLUSIONES O LIMITACIONES REFERENTES A LOS
DAÑOS INCIDENTALES O CONSECUENTES, DE MODO QUE LA LIMITACIÓN O EXCLUSIÓN ANTES
EXPUESTA QUIZÁS NO SE APLIQUE EN SU CASO PARTICULAR.
ESTA GARANTÍA LE OTORGA DERECHOS LEGALES ESPECÍFICOS Y ES POSIBLE QUE USTED TAMBIÉN
CUENTE CON OTROS DERECHOS QUE PUDIERAN VARIAR EN DISTINTOS ESTADOS.
Dorel Juvenile Group, Inc. warrants to the original purchaser that this product (3-in-1 Grow
and Go High Chair), is free from material and workmanship defects when used under normal
conditions for a period of one (1) year from the date of purchase. Should the product contain
defects in material or workmanship Dorel Juvenile Group, Inc., will repair or replace the
product, at our option, free of charge. Purchaser will be responsible for all costs associated
with packaging and shipping the product to Dorel Juvenile Group Consumer Relations
Department at the address noted on front page and all other freight or insurance costs
associated with the return. Dorel Juvenile Group will bear the cost of shipping the repaired
or replaced product to the purchaser. Product should be returned in its original package
accompanied by a proof of purchase, either a sales receipt or other proof that the product is
within the warranty period. This warranty is void if the owner repairs or modifies the product
or the product has been damaged as a result of misuse.
This warranty excludes any liability other than that expressly stated previously, including but
not limited to, any incidental or inconsequential damages.
SOME STATES DO NOT ALLOW THE EXCLUSION OR LIMITATION OF INCIDENTAL OR
CONSEQUENTIAL DAMAGES, SO THE ABOVE LIMITATION OR EXCLUSION MAY NOT
APPLY TO YOU.
THIS WARRANTY GIVES YOU SPECIFIC LEGAL RIGHTS, AND YOU MAY ALSO HAVE
OTHER RIGHTS THAT MAY VARY FROM STATE TO STATE.
High chair and trays:
Wipe with soft, damp cloth and warm, soapy
water and allow to drip dry.
Insert tray:
Dishwasher safe - top rack only.
Seat pad:
Surface wash and drip dry only. Do not place in washing
machine or dryer.
Restraint system:
Restraint and crotch straps should be surface washed
and drip dried only. Do not place in washing machine or dryer.
Silla alta y charolas:
Límpielas con un paño suave húmedo y jabonosa y
enjuáguelo con agua tibia y permita deje que se seque.
Insert tray:
Puede lavarse en lavavajillas - sólo en canasta superior.
Almohadilla del asiento:
Superficie lave y solo secado por goteo. No coloque en
lavadora o secadora.
Sistema de retención:
Las correas de retención deben limpiarse en su
superficie únicamente y solo secado por goteo. No colocar en la lavadora ni en la secadora.
ADVERTENCIA
:
ajuste la posición del asiento cuando
el niño esté sentado.
WARNING:
adjust seat position
with child in it.
5
Fold Button
Botón de plegado
©2019 Dorel Juvenile Group, Inc. Safety 1st™ and the Safety 1st logo and design are trademarks of Dorel Juvenile Group, Inc. Safety 1st™ y el
logotipo de Safety 1st y su diseño son marcas comerciales de Dorel Juvenile Group, Inc. (800) 544-1108 www.safety1st.com. Styles and colors
may vary. Los estilos y los colores pueden variar. Made in CHINA. Hecho en CHINA. Distributed by (distribuido por) Dorel Juvenile Group, Inc.,
2525 State St., Columbus, IN 47201-7494. Dorel Juvenile Canada, 2855 Argentia Road, Unit 4, Mississauga, ON L5N 8G6. Importado y Distri-
buido en Chile por: Comercial e Industrial Silfa S.A. - San Ignacio 0201 / Parque Industrial Portezuelo Quilicura, Santiago Chile. Fono (562) 2339
9000. En Perú por: Comexa S.A. - Los Libertadores 455 – San Isidro, Lima – Perú. Fono (511) 4469014. En Centro América, Caribe y Ecuador
por: Best Brands Group S.A. – Av. Balboa, Bay Mall Plaza, Planta Baja, local 9, Panamá. - Fono: (507) 300 2884. En Colombia por: Baby Universe
S.A.S. - Vía 40 No. 77-29, Barranquilla, Colombia - Fono: (575) 353 1110 Importador: DJGM, S.A. DE C.V. Gabriel Mancera No. 1041 Col. Del
Valle, Benito Juárez C.P. 03100 México, Ciudad de México R.F.C. DJG140305GN9 Tel. (55) 67199202 09/16/19 4358-7829
3-in-1 Grow and Go High Chair
HC267
User Guide
Weight: up to 50 lbs (22.7 kg) Peso: hasta 22.7 kg (50 libras)
Silla Alta “3-in-1 Grow and Go”
HC267 Guía del Usuario
READ all instructions before assembly and use of high chair.
KEEP instructions for future use.
LEA todas las instrucciones antes de armar y usar la silla alta.
GUARDE instrucciones para su uso futuro.
Children have suffered severe head injuries
happen suddenly if child is not restrained properly.
ALWAYS
Stay near and watch child during use.
The child should be secured in the high chair at all times by the
The tray is not designed to hold the child in the chair.
capable of sitting upright unassisted.
lift or move high chair with child in it.
NEVER use near stairs.
ALWAYS
adjust seat position with child in it.
allow child to sleep in product.
high chair in fully reclined position when child is
able to sit upright unassisted or weighs more than 20 lbs.
Algunos niños han sufrido lesiones graves en la
caídas pueden producirse repentinamente si el niño no está sujetado
adecuadamente.
SIEMPRE use las correas de retención y ajústelas para que queden firmes.
Permanezca cerca y observe al niño mientras se utiliza la silla.
recta.
Se recomienda que sólo utilicen la silla alta los niños que puedan
permanecer sentados sin asistencia.
levante o mueva la silla alta cuando el niño esté en ella.
NUNCA usar cerca de escaleras.
SIEMPRE trabe las ruedas mientras el niño esté en la silla alta.
ajuste la posición del asiento cuando el niño esté sentado.
permita que el niño quede allí dormido.
la silla alta en la posición de reclinado total cuando el niño
Keep small parts away from children during assembly.
alcance de los niños.
Parts List Lista de piezas
Seat pad
Seat bucket
Restraint belt
Insert tray
Tray
Upper leg assembly (left & right)
Rear lower leg assembly
Front lower leg assembly
Casters (4)
E
Almohadilla del asient
o
Butaca del asiento
Cinturón de retención
Charola
de inserción
Charola
Conjunto de patas superiores
(izquierdo y derecho)
Conjunto de patas inferiores traseras
Conjunto de patas inferiores delanteras
Ruedas (4)
A
B
C
A
B
C
G
D
E
F
H
A
B
C
G
D
E
F
H
D
I
I
F
G
H
I
Read all instructions before assembly and use of
high chair.
issues, please visit us at www.safety1st.com to chat with us there, text us at
(812) 652-2525 or call Consumer Care at (800) 544-1108. To help you, we
would need the model number (HC267) and the manufacture date (located
on back of seat).
Before Assembly: Wipe down trays with a soft cloth and warm soapy water.
Antes de armar y usar la silla alta, lea detenidamente
todas las instrucciones.
problema, visítenos en www.safety1st.com o chatee con nosotros para sacarse dudas,
enviarnos un mensaje al (812) 652-2525 o llamar al Servicio de Atención al Cliente al
(800) 544-1108. Para ayudarlo, necesitaremos el número de modelo (HC267) y la
fecha de fabricación (que se encuentran en la parte posterior del cesto asiento).
Antes de armar: Limpie las charolas con un paño suave y agua jabonosa tibia.
Keep These Instructions For Future Use Guarde estas instrucciones para su uso futuro
4 1