ADVERTENCIA:
Algunos niños han sufrido lesiones en la cabeza, incluso fracturas de
cráneo, por caer con o de asientos elevadores.
• Compruebe que el asiento elevador esté bien firme en la silla para
adultos antes de usarlo.
• SIEMPRE use las correas de retención hasta que el niño pueda
subirse o bajarse del asiento elevador sin ayuda. Ajústelas para que
queden firmes.
• NUNCA permita que el niño se aleje empujando de la mesa.
• NUNCA levante ni traslade al niño en el asiento elevador.
• Permanezca cerca y observe al niño mientras se utiliza.
• SIEMPRE retire al niño antes de ajustar el asiento elevador.
• SIEMPRE sujete firmemente las correas del asiento y del respaldo a
una silla para adultos.
• SIEMPRE asegúrese de que las almohadillas protectoras del asiento
estén bien ubicadas sobre la superficie de las sillas para adultos.
• Este asiento elevador sólo puede utilizarse sobre sillas estándares o
de comedor. NUNCA utilice este producto como autoasiento o asiento
para baño ni sobre una mesa, banqueta, silla giratoria o cualquier
otra superficie donde no se puedan sujetar firmemente las correas del
asiento.
• Hasta que el niño pueda subirse o bajarse del asiento elevador sin
ayuda (alrededor de los dos años y medio), asegúrelo siempre al
asiento con el sistema de retención. La charola no ha sido diseñada
para sostener al niño en la silla.
• Use este producto solo para niños capaces de sentarse derechos sin
ayuda.
Prevenga lesiones graves o muertes. NO use en vehículos motorizados.
ADVERTENCIA:
PELIGROS DE CAÍDA:
Algunos niños han sufrido lesiones graves en la
cabeza, incluidas fracturas de cráneo, al caerse.
• Permanezca cerca y vigile al niño durante el uso.
• Recomendado solo para uso en interiores.
• Nunca levante ni mueva el taburete para niños con un niño encima.
• Nunca permita que el niño se pare en el taburete para niños.
• Úselo solo para un niño que pueda sentarse y levantarse de el taburete
sin ayuda.
Al usar el modo de asiento elevado
Al usar el taburete
• READ all instructions before assembly and use of the product.
Keep instructions for future reference.
• Adult assembly required.
• Discontinue use if damaged, broken or if parts are missing.
Note: Actual fit may vary. Not all children will comfortably fit in the seat for the full
weight and height ranges listed.
• LEA todas las instrucciones antes de ensamblar y usar el producto.
Guarde las instrucciones para referencia futura.
• El armado debe ser realizado por un adulto.
• Descontinúe el uso si hay partes dañadas o rotas o falta alguna pieza.
Nota: El ajuste real puede variar. No todos los niños caben cómodamente en el asiento para
todos los rangos de peso y altura indicados.
WARNING:
FALL HAZARD: Children have suffered severe head injuries
including skull fractures when falling from high chairs. Falls can
happen suddenly if child is not restrained properly.
•
ALWAYS use restraints, and adjust to fit snugly.
•
Tray is not designed to hold the child in the chair.
•
Stay near and watch child during use.
•
Stay
near and watch baby during use. This product is not safe
for sleep or unsupervised use. If baby falls asleep, remove
baby as soon as possible and place baby on a firm, flat sleep
surface such as a crib or bassinet.
•
Discontinue use of high chair in reclined positions when child is
able to sit upright unassisted or weighs more than 20 lb (9.1 kg).
• The child should be secured in the high chair at all times by the
restraint system, both in the reclined and upright positions.
• It is recommended that the high chair be used in the upright
position only by children capable of sitting upright unassisted.
•
DO NOT lift or move high chair with child in it.
• DO NOT adjust seat position with child in it.
•
ALWAYS keep fingers away from moving parts, when folding or
unfolding to prevent finger entrapment.
• NEVER place more than 3 lb (1.36 kg) in storage pocket to
prevent tipping.
ADVERTENCIA:
PELIGRO DE CAÍDA: Algunos niños han sufrido lesiones graves en
la cabeza, incluso fracturas de cráneo, al caer de las sillas altas. Las
caídas pueden producirse repentinamente si el niño no está sujetado
adecuadamente.
•
SIEMPRE use las correas de retención y ajústelas para que queden firmes.
•
La bandeja no ha sido diseñada para sostener al niño en la silla.
•
Permanezca cerca y observe al niño mientras se utiliza la silla.
• Permanezca cerca y observe al bebé mientras se utiliza la silla. Este
producto no es seguro para dormir o usarse sin supervisión. Si el bebé
se duerme, retírelo lo antes posible y colóquelo sobre una superficie para
dormir firme y plana, como una cuna o un moisés.
•
Suspender el uso de la silla alta en las posicións de reclinado cuando el
niño pueda sentarse solo o pese más de 9,1 kg (20 libras).
• El niño debe permanecer asegurado en la silla alta en todo momento
utilizando el sistema de retención, tanto en la posición reclinada o recta.
• Se recomienda que sólo utilicen la silla alta en posición vertical los niños
que puedan permanecer sentados sin asistencia.
•
NO levante o mueva la silla alta cuando el niño esté en ella.
• NO ajuste la posición del asiento cuando el niño esté sentado.
•
SIEMPRE mantenga los dedos alejados de las piezas movibles, al plegar,
desplegar o ajustar la carriola, con el fin de evitar que se atrapen los dedos.
• NUNCA lleve más de 1,36 kg (3 libras) en el bolsillo de almacenamiento
para impedir que se vuelque.
1
WARNING:
Children have suffered head injuries, including skull fractures,
after falling with or from booster seats.
• Check that booster seat is securely attached to adult chair
before each use.
• ALWAYS use restraints until child is able to get in and out of
booster seat without help. Adjust to fit snugly.
• NEVER allow child to push away from table.
• NEVER lift and carry child in booster seat.
• Stay near and watch your child during use.
• ALWAYS remove child before adjusting booster seat.
• ALWAYS fasten seat and back straps securely to adult chair.
• ALWAYS ensure that all chair protector pads are located
completely on the adult chair surface.
• This booster seat is only to be used with standard kitchen or
dining room chairs. NEVER use this product as a car seat or
bath seat, on a tabletop, stool, swivel chair, or any other seating
surface where the straps cannot secure it properly.
• Until child is able to get in and out of the booster seat without
help (about 2½ years old), the child should be secured in the
booster seat at all times by the restraining system. The tray is not
designed to hold the child in the chair.
• Use this product only for children capable of sitting upright
unassisted.
Prevent serious injury or death. DO NOT use in motor vehicles.
WARNING:
FALL HAZARDS:
Children have suffered severe head injuries
including skull fractures when falling.
• Stay near and watch child during use.
• Recommend for indoor use only.
• Never lift or move stool with child on it.
• Never allow child to stand on stool.
• Only use for a child that is able to get in and out of stool unassisted.
2
When using High Chair
When using Booster Seat Mode
When using Stool
Al usar la silla alta
CONTINÚA EN LA SIGUIENTE PÁGINA
CONTINUED ON NEXT PAGE
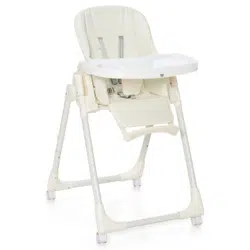
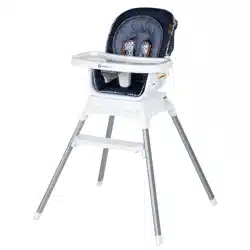
High Chair Mode
• Suitable for children up to 3 years old. Maximum weight
40 lb (18.1 kg).
• Stop using recline positions when child can sit up unassisted or
is more than 20 lb (9.1 kg).
Booster Seat Mode
• Suitable for children who can sit up unassisted (approximately 6
months) up to 5 years old. Maximum weight 50 lb (22.7 kg).
• Always use booster seat mode in the upright position.
• Booster seat fits most kitchen and dining room chairs with a
minimum measurement of 12" W x 16.25" D and backrest
height of 12.5" H.
Low Stool and Table Mode
• Suitable for children 3 years and older, up to 50 lb (22.7 kg).
Tall Stool Mode
• Suitable for children 3 years and older, up to 50 lb (22.7 kg).
Modo silla alta
• Apto para niños de hasta 3 años. Peso máximo 40 libras (18,1 kg).
• Deje de usar las posiciones de reclinado cuando el niño pueda sentarse sin
ayuda o pese más de 20 libras (9,1 kg).
Modo de asiento elevado
• Apto para niños que pueden sentarse sin ayuda (aproximadamente
6 meses) hasta los 5 años. Peso máximo 50 libras (22,7 kg).
• Utilice siempre el modo de asiento elevador en posición vertical.
• El asiento elevador se adapta a la mayoría de las sillas de cocina
y comedor con una medida mínima de 12" de ancho x 16,25" de
profundidad y una altura de respaldo de 12,5" de alto.
Taburete bajo y mesa
• Apto para niños a partir de 3 años, hasta 22,7 kg (50 lb).
Modo taburete alto
• Apto para niños a partir de 3 años, hasta 22,7 kg (50 lb).
Do Not Use This Way No lo uses de esta manera
©2023 Dorel Juvenile Group, Inc. Safety 1st™ and the Safety 1st logo and design are trademarks of Dorel Juvenile Group, Inc. (800) 544-1108 www.safety1st.com. Styles, colors, and labeling may vary. Los estilos, colores
y etiquetado pueden variar. Made in CHINA. Hecho en CHINA. Distributed by (distribuido por) Dorel Juvenile Group, Inc., 2525 State St., Columbus, IN 47201-7494. Dorel Juvenile Canada, 2233 Argentia Road, Suite 110,
Mississauga, ON L5N 2X7. Representante exclusivo en Chile: DOREL JUVENILE CHILE S.A. Av. del Parque 4161, oficina 602 A, Huechuraba, Santiago, Chile - Fono: 56 2 24971500 - www.infanti.cl - www.dorel.cl. Importado y
distribuido en Perú por: COMEXA COMERCIALIZADORA EXTRANJERA S.A. SUCURSAL DEL PERÚ - Los Libertadores 455, San Isidro, Lima 27, Lima, Perú RUC 20431062870 – Fono: 4413029 – www.infanti.com.pe. En Centro
América, Caribe y Ecuador por: Best Brands Group S.A. – Av. Balboa, Bay Mall Plaza, Planta Baja, local 9, Panamá. - Fono: (507) 300 2884. En Colombia por: Baby Universe S.A.S. - Vía 40 No. 77-29, Barranquilla, Colombia -
Fono: (575) 353 1110 Importador: DJGM, S.A. DE C.V. Gabriel Mancera No. 1041 Col. Del Valle, Benito Juárez C.P. 03100 México, Ciudad de México R.F.C. DJG140305GN9 Tel. (55) 67199202 12/23 4358-8507B
Grow and Go
TM
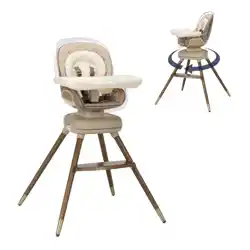
Rotating High Chair / Silla Alta
(HC287)

ADVERTENCIA:
Algunos niños han sufrido lesiones en la cabeza, incluso fracturas de
cráneo, por caer con o de asientos elevadores.
• Compruebe que el asiento elevador esté bien firme en la silla para
adultos antes de usarlo.
• SIEMPRE use las correas de retención hasta que el niño pueda
subirse o bajarse del asiento elevador sin ayuda. Ajústelas para que
queden firmes.
• NUNCA permita que el niño se aleje empujando de la mesa.
• NUNCA levante ni traslade al niño en el asiento elevador.
• Permanezca cerca y observe al niño mientras se utiliza.
• SIEMPRE retire al niño antes de ajustar el asiento elevador.
• SIEMPRE sujete firmemente las correas del asiento y del respaldo a
una silla para adultos.
• SIEMPRE asegúrese de que las almohadillas protectoras del asiento
estén bien ubicadas sobre la superficie de las sillas para adultos.
• Este asiento elevador sólo puede utilizarse sobre sillas estándares o
de comedor. NUNCA utilice este producto como autoasiento o asiento
para baño ni sobre una mesa, banqueta, silla giratoria o cualquier
otra superficie donde no se puedan sujetar firmemente las correas del
asiento.
• Hasta que el niño pueda subirse o bajarse del asiento elevador sin
ayuda (alrededor de los dos años y medio), asegúrelo siempre al
asiento con el sistema de retención. La charola no ha sido diseñada
para sostener al niño en la silla.
• Use este producto solo para niños capaces de sentarse derechos sin
ayuda.
Prevenga lesiones graves o muertes. NO use en vehículos motorizados.
ADVERTENCIA:
PELIGROS DE CAÍDA:
Algunos niños han sufrido lesiones graves en la
cabeza, incluidas fracturas de cráneo, al caerse.
• Permanezca cerca y vigile al niño durante el uso.
• Recomendado solo para uso en interiores.
• Nunca levante ni mueva el taburete para niños con un niño encima.
• Nunca permita que el niño se pare en el taburete para niños.
• Úselo solo para un niño que pueda sentarse y levantarse de el taburete
sin ayuda.
Al usar el modo de asiento elevado
Al usar el taburete
• READ all instructions before assembly and use of the product.
Keep instructions for future reference.
• Adult assembly required.
• Discontinue use if damaged, broken or if parts are missing.
Note: Actual fit may vary. Not all children will comfortably fit in the seat for the full
weight and height ranges listed.
• LEA todas las instrucciones antes de ensamblar y usar el producto.
Guarde las instrucciones para referencia futura.
• El armado debe ser realizado por un adulto.
• Descontinúe el uso si hay partes dañadas o rotas o falta alguna pieza.
Nota: El ajuste real puede variar. No todos los niños caben cómodamente en el asiento para
todos los rangos de peso y altura indicados.
WARNING:
FALL HAZARD: Children have suffered severe head injuries
including skull fractures when falling from high chairs. Falls can
happen suddenly if child is not restrained properly.
•
ALWAYS use restraints, and adjust to fit snugly.
•
Tray is not designed to hold the child in the chair.
•
Stay near and watch child during use.
•
Stay
near and watch baby during use. This product is not safe
for sleep or unsupervised use. If baby falls asleep, remove
baby as soon as possible and place baby on a firm, flat sleep
surface such as a crib or bassinet.
•
Discontinue use of high chair in reclined positions when child is
able to sit upright unassisted or weighs more than 20 lb (9.1 kg).
• The child should be secured in the high chair at all times by the
restraint system, both in the reclined and upright positions.
• It is recommended that the high chair be used in the upright
position only by children capable of sitting upright unassisted.
•
DO NOT lift or move high chair with child in it.
• DO NOT adjust seat position with child in it.
•
ALWAYS keep fingers away from moving parts, when folding or
unfolding to prevent finger entrapment.
• NEVER place more than 3 lb (1.36 kg) in storage pocket to
prevent tipping.
ADVERTENCIA:
PELIGRO DE CAÍDA: Algunos niños han sufrido lesiones graves en
la cabeza, incluso fracturas de cráneo, al caer de las sillas altas. Las
caídas pueden producirse repentinamente si el niño no está sujetado
adecuadamente.
•
SIEMPRE use las correas de retención y ajústelas para que queden firmes.
•
La bandeja no ha sido diseñada para sostener al niño en la silla.
•
Permanezca cerca y observe al niño mientras se utiliza la silla.
• Permanezca cerca y observe al bebé mientras se utiliza la silla. Este
producto no es seguro para dormir o usarse sin supervisión. Si el bebé
se duerme, retírelo lo antes posible y colóquelo sobre una superficie para
dormir firme y plana, como una cuna o un moisés.
•
Suspender el uso de la silla alta en las posicións de reclinado cuando el
niño pueda sentarse solo o pese más de 9,1 kg (20 libras).
• El niño debe permanecer asegurado en la silla alta en todo momento
utilizando el sistema de retención, tanto en la posición reclinada o recta.
• Se recomienda que sólo utilicen la silla alta en posición vertical los niños
que puedan permanecer sentados sin asistencia.
•
NO levante o mueva la silla alta cuando el niño esté en ella.
• NO ajuste la posición del asiento cuando el niño esté sentado.
•
SIEMPRE mantenga los dedos alejados de las piezas movibles, al plegar,
desplegar o ajustar la carriola, con el fin de evitar que se atrapen los dedos.
• NUNCA lleve más de 1,36 kg (3 libras) en el bolsillo de almacenamiento
para impedir que se vuelque.
1
WARNING:
Children have suffered head injuries, including skull fractures,
after falling with or from booster seats.
• Check that booster seat is securely attached to adult chair
before each use.
• ALWAYS use restraints until child is able to get in and out of
booster seat without help. Adjust to fit snugly.
• NEVER allow child to push away from table.
• NEVER lift and carry child in booster seat.
• Stay near and watch your child during use.
• ALWAYS remove child before adjusting booster seat.
• ALWAYS fasten seat and back straps securely to adult chair.
• ALWAYS ensure that all chair protector pads are located
completely on the adult chair surface.
• This booster seat is only to be used with standard kitchen or
dining room chairs. NEVER use this product as a car seat or
bath seat, on a tabletop, stool, swivel chair, or any other seating
surface where the straps cannot secure it properly.
• Until child is able to get in and out of the booster seat without
help (about 2½ years old), the child should be secured in the
booster seat at all times by the restraining system. The tray is not
designed to hold the child in the chair.
• Use this product only for children capable of sitting upright
unassisted.
Prevent serious injury or death. DO NOT use in motor vehicles.
WARNING:
FALL HAZARDS:
Children have suffered severe head injuries
including skull fractures when falling.
• Stay near and watch child during use.
• Recommend for indoor use only.
• Never lift or move stool with child on it.
• Never allow child to stand on stool.
• Only use for a child that is able to get in and out of stool unassisted.
2
When using High Chair
When using Booster Seat Mode
When using Stool
Al usar la silla alta
CONTINÚA EN LA SIGUIENTE PÁGINA
CONTINUED ON NEXT PAGE
High Chair Mode
• Suitable for children up to 3 years old. Maximum weight
40 lb (18.1 kg).
• Stop using recline positions when child can sit up unassisted or
is more than 20 lb (9.1 kg).
Booster Seat Mode
• Suitable for children who can sit up unassisted (approximately 6
months) up to 5 years old. Maximum weight 50 lb (22.7 kg).
• Always use booster seat mode in the upright position.
• Booster seat fits most kitchen and dining room chairs with a
minimum measurement of 12" W x 16.25" D and backrest
height of 12.5" H.
Low Stool and Table Mode
• Suitable for children 3 years and older, up to 50 lb (22.7 kg).
Tall Stool Mode
• Suitable for children 3 years and older, up to 50 lb (22.7 kg).
Modo silla alta
• Apto para niños de hasta 3 años. Peso máximo 40 libras (18,1 kg).
• Deje de usar las posiciones de reclinado cuando el niño pueda sentarse sin
ayuda o pese más de 20 libras (9,1 kg).
Modo de asiento elevado
• Apto para niños que pueden sentarse sin ayuda (aproximadamente
6 meses) hasta los 5 años. Peso máximo 50 libras (22,7 kg).
• Utilice siempre el modo de asiento elevador en posición vertical.
• El asiento elevador se adapta a la mayoría de las sillas de cocina
y comedor con una medida mínima de 12" de ancho x 16,25" de
profundidad y una altura de respaldo de 12,5" de alto.
Taburete bajo y mesa
• Apto para niños a partir de 3 años, hasta 22,7 kg (50 lb).
Modo taburete alto
• Apto para niños a partir de 3 años, hasta 22,7 kg (50 lb).
Do Not Use This Way No lo uses de esta manera
©2023 Dorel Juvenile Group, Inc. Safety 1st™ and the Safety 1st logo and design are trademarks of Dorel Juvenile Group, Inc. (800) 544-1108 www.safety1st.com. Styles, colors, and labeling may vary. Los estilos, colores
y etiquetado pueden variar. Made in CHINA. Hecho en CHINA. Distributed by (distribuido por) Dorel Juvenile Group, Inc., 2525 State St., Columbus, IN 47201-7494. Dorel Juvenile Canada, 2233 Argentia Road, Suite 110,
Mississauga, ON L5N 2X7. Representante exclusivo en Chile: DOREL JUVENILE CHILE S.A. Av. del Parque 4161, oficina 602 A, Huechuraba, Santiago, Chile - Fono: 56 2 24971500 - www.infanti.cl - www.dorel.cl. Importado y
distribuido en Perú por: COMEXA COMERCIALIZADORA EXTRANJERA S.A. SUCURSAL DEL PERÚ - Los Libertadores 455, San Isidro, Lima 27, Lima, Perú RUC 20431062870 – Fono: 4413029 – www.infanti.com.pe. En Centro
América, Caribe y Ecuador por: Best Brands Group S.A. – Av. Balboa, Bay Mall Plaza, Planta Baja, local 9, Panamá. - Fono: (507) 300 2884. En Colombia por: Baby Universe S.A.S. - Vía 40 No. 77-29, Barranquilla, Colombia -
Fono: (575) 353 1110 Importador: DJGM, S.A. DE C.V. Gabriel Mancera No. 1041 Col. Del Valle, Benito Juárez C.P. 03100 México, Ciudad de México R.F.C. DJG140305GN9 Tel. (55) 67199202 12/23 4358-8507B
Grow and Go
TM
Rotating High Chair / Silla Alta
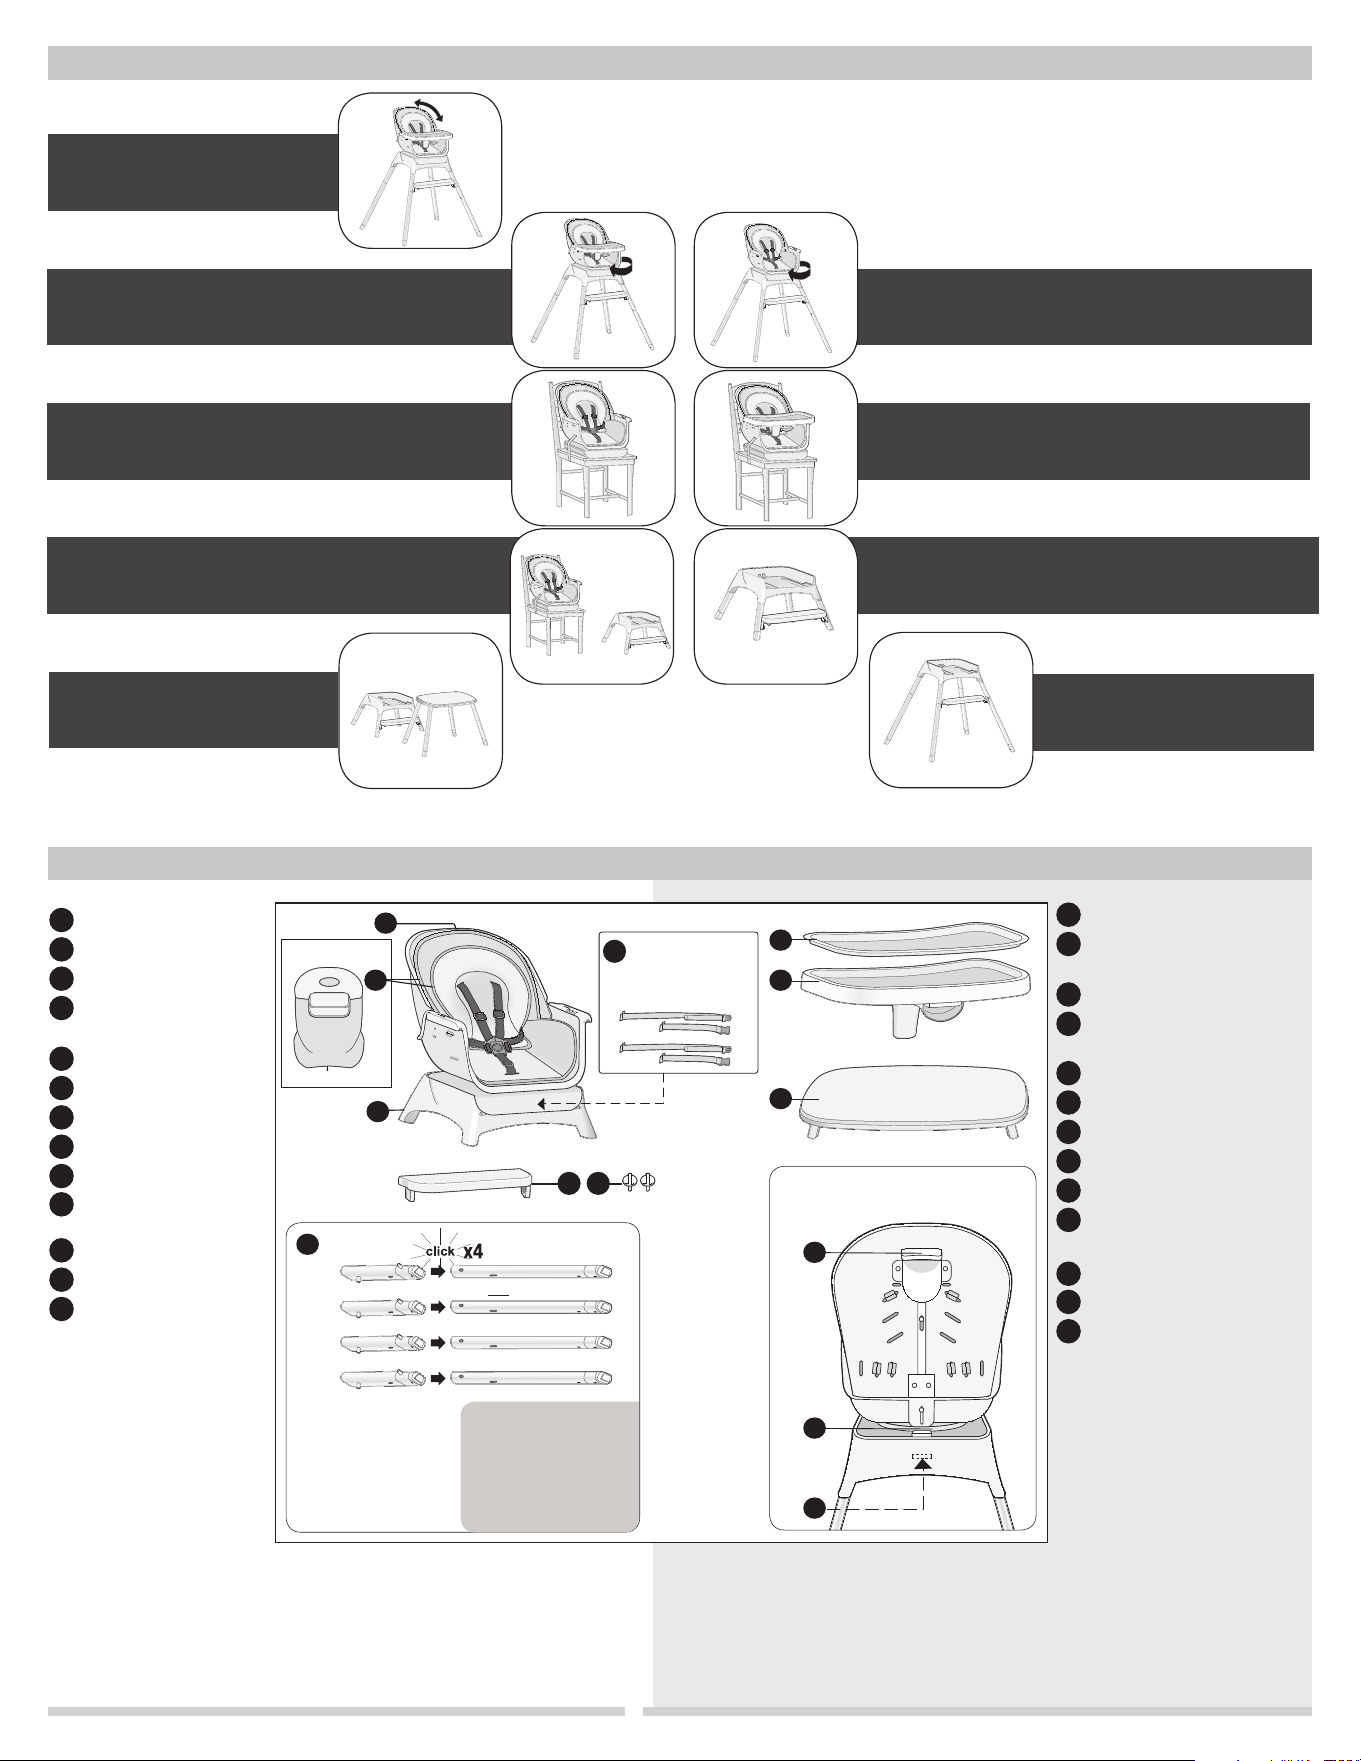
(HC287)
Pocket/Bolsillo
Rear View/ Vista
trasera
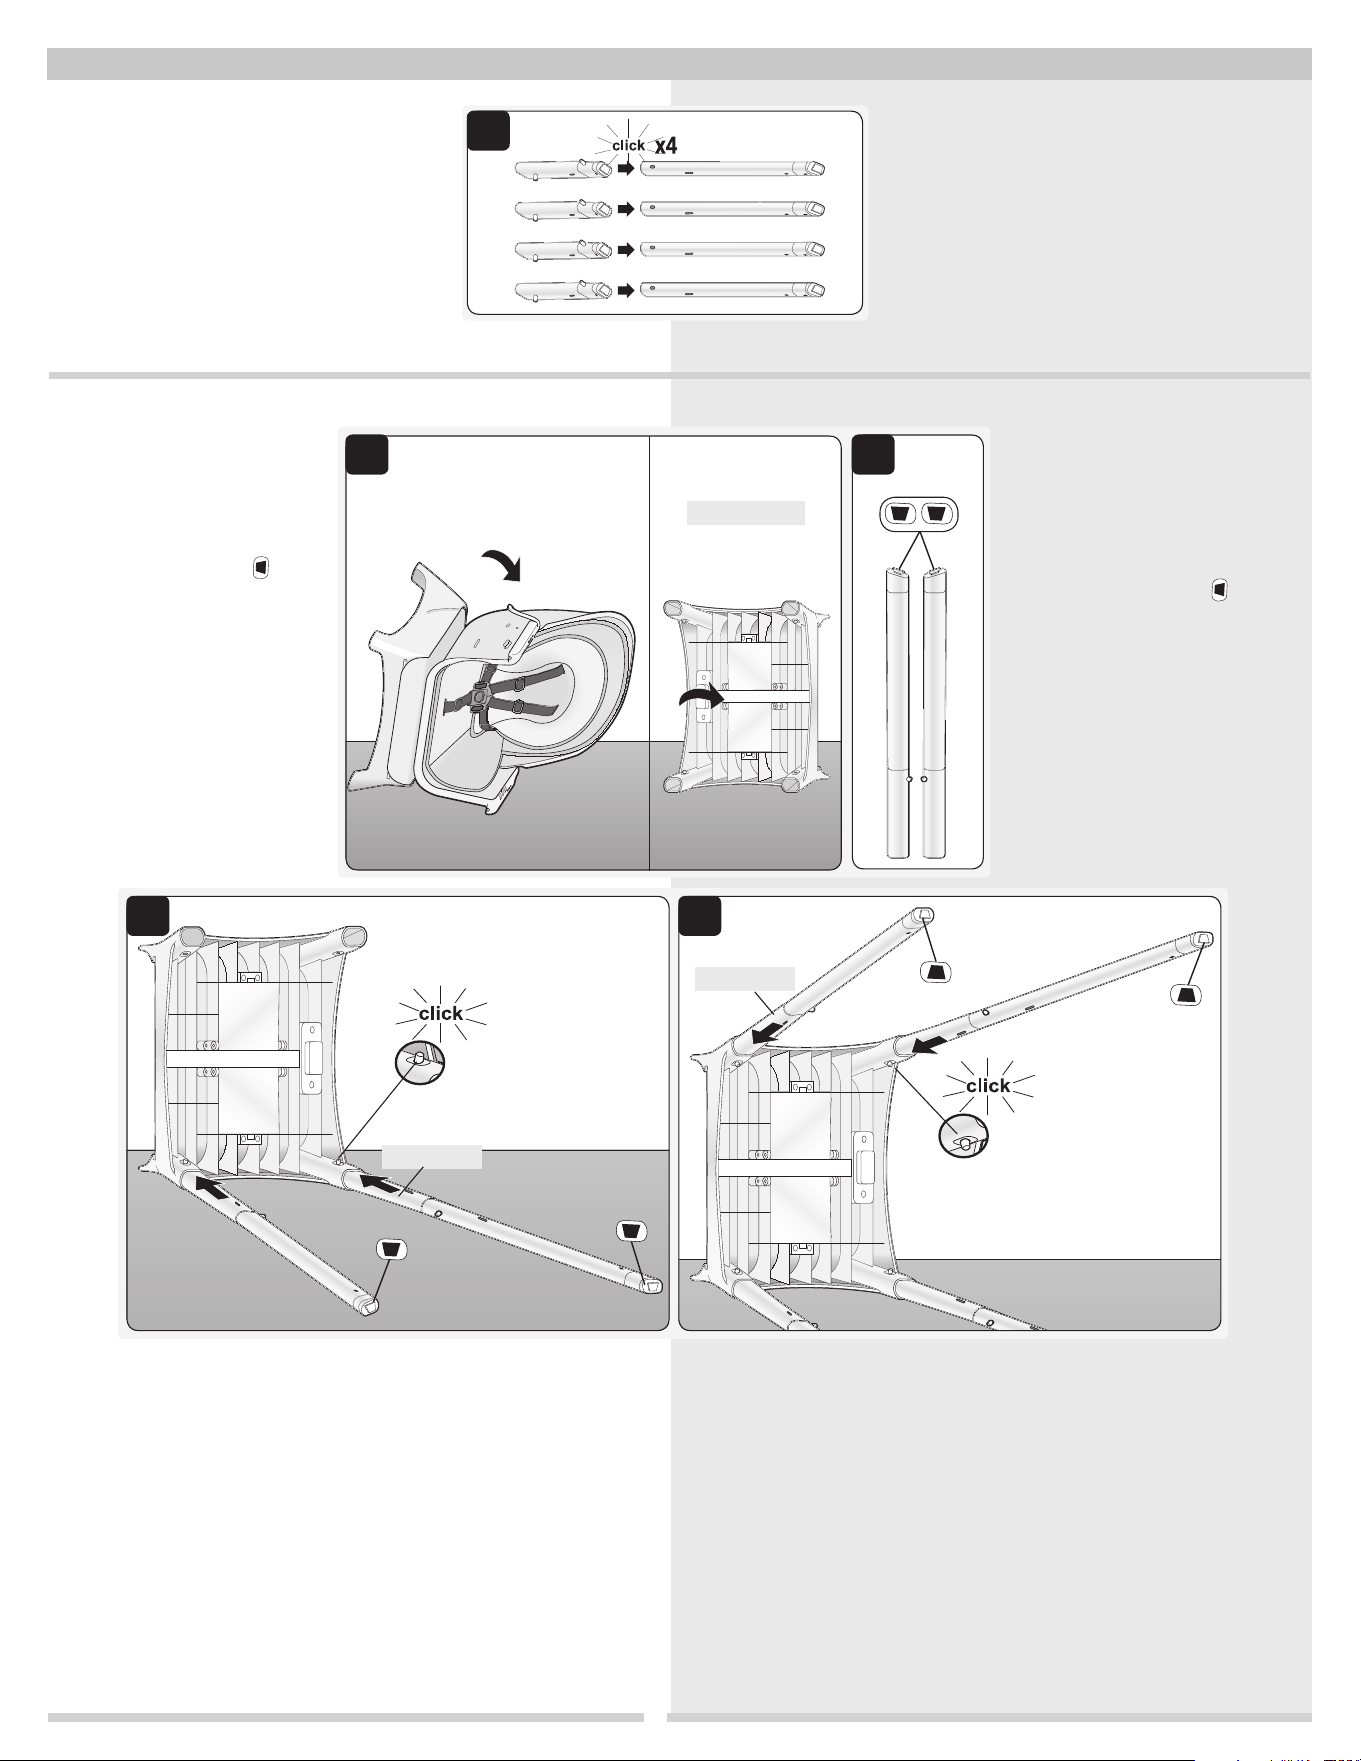
1
*
Para ensamblar más
fácilmente la silla alta,
ensamble cada juego
de patas a medida que
las desenvuelve.
*
For easier assembly
of high chair, assemble
each set of legs as you
unwrap them.
Parts and Features Piezas y características
9 Modes of Use 9 modos de uso
Seat with restraint belt
Seat pad and infant insert
Stool seat
Chair straps for booster seat
mode (2 sets)
Tray insert
Main tray
Tabletop
Footrest with brackets
Thumbscrews (2)
4 Sets of legs (1 short,
1 long)
*
Recline button
Rotate seat button
Remove seat button
Asiento con cinturón de seguridad
Almohadilla de asiento e inserto
para bebés
Asiento taburete
Correas para sillas para modo
asiento elevado (2 juegos)
Inserto de charola
La charola principal
Mesa
Reposapiés con soportes
Tornillos de mariposa (2)
4 Juegos de patas (1 corta,
1 larga)
*
Botón de reclinación
Botón de girar el asiento
Retire el botón del asiento
K
L
M
A
A
G
G
B
B
H
H
C
C
I
I
D
D
J
J
M
M
E
E
K
K
F
F
L
L
• Remove all contents from packaging and discard box and/or poly bags.
• Lay out and identify all parts.
• Please do not return this product to the place of purchase. To address any issues, please visit
us at www.safety1st.com to chat with us there, text us at (812) 652-2525 or call Consumer
Care at (800) 544-1108. To assist you, we need the model number (HC287) and the
manufacture date (located on back of seat).
Before Assembly: Wipe down trays with a soft cloth and warm soapy water.
• Retire todo el contenido del embalaje y deseche la caja y/o las bolsas de polietileno.
• Despliegue e identifique todas las piezas.
• No devuelva este producto al lugar donde lo compró. Para abordar cualquier problema, visítenos en
www.safety1st.com o chatee con nosotros para sacarse dudas, enviarnos un mensaje al (812) 652-2525
o llamar al Servicio de Atención al Cliente al (800) 544-1108. Para ayudarlo, necesitaremos el número de
modelo (HC287) y la fecha de fabricación (que se encuentran en la parte posterior del cesto asiento).
Antes de armar: Limpie las charolas con un paño suave y agua jabonosa tibia.
3
Back of seat
Vista trasera del asiento
4
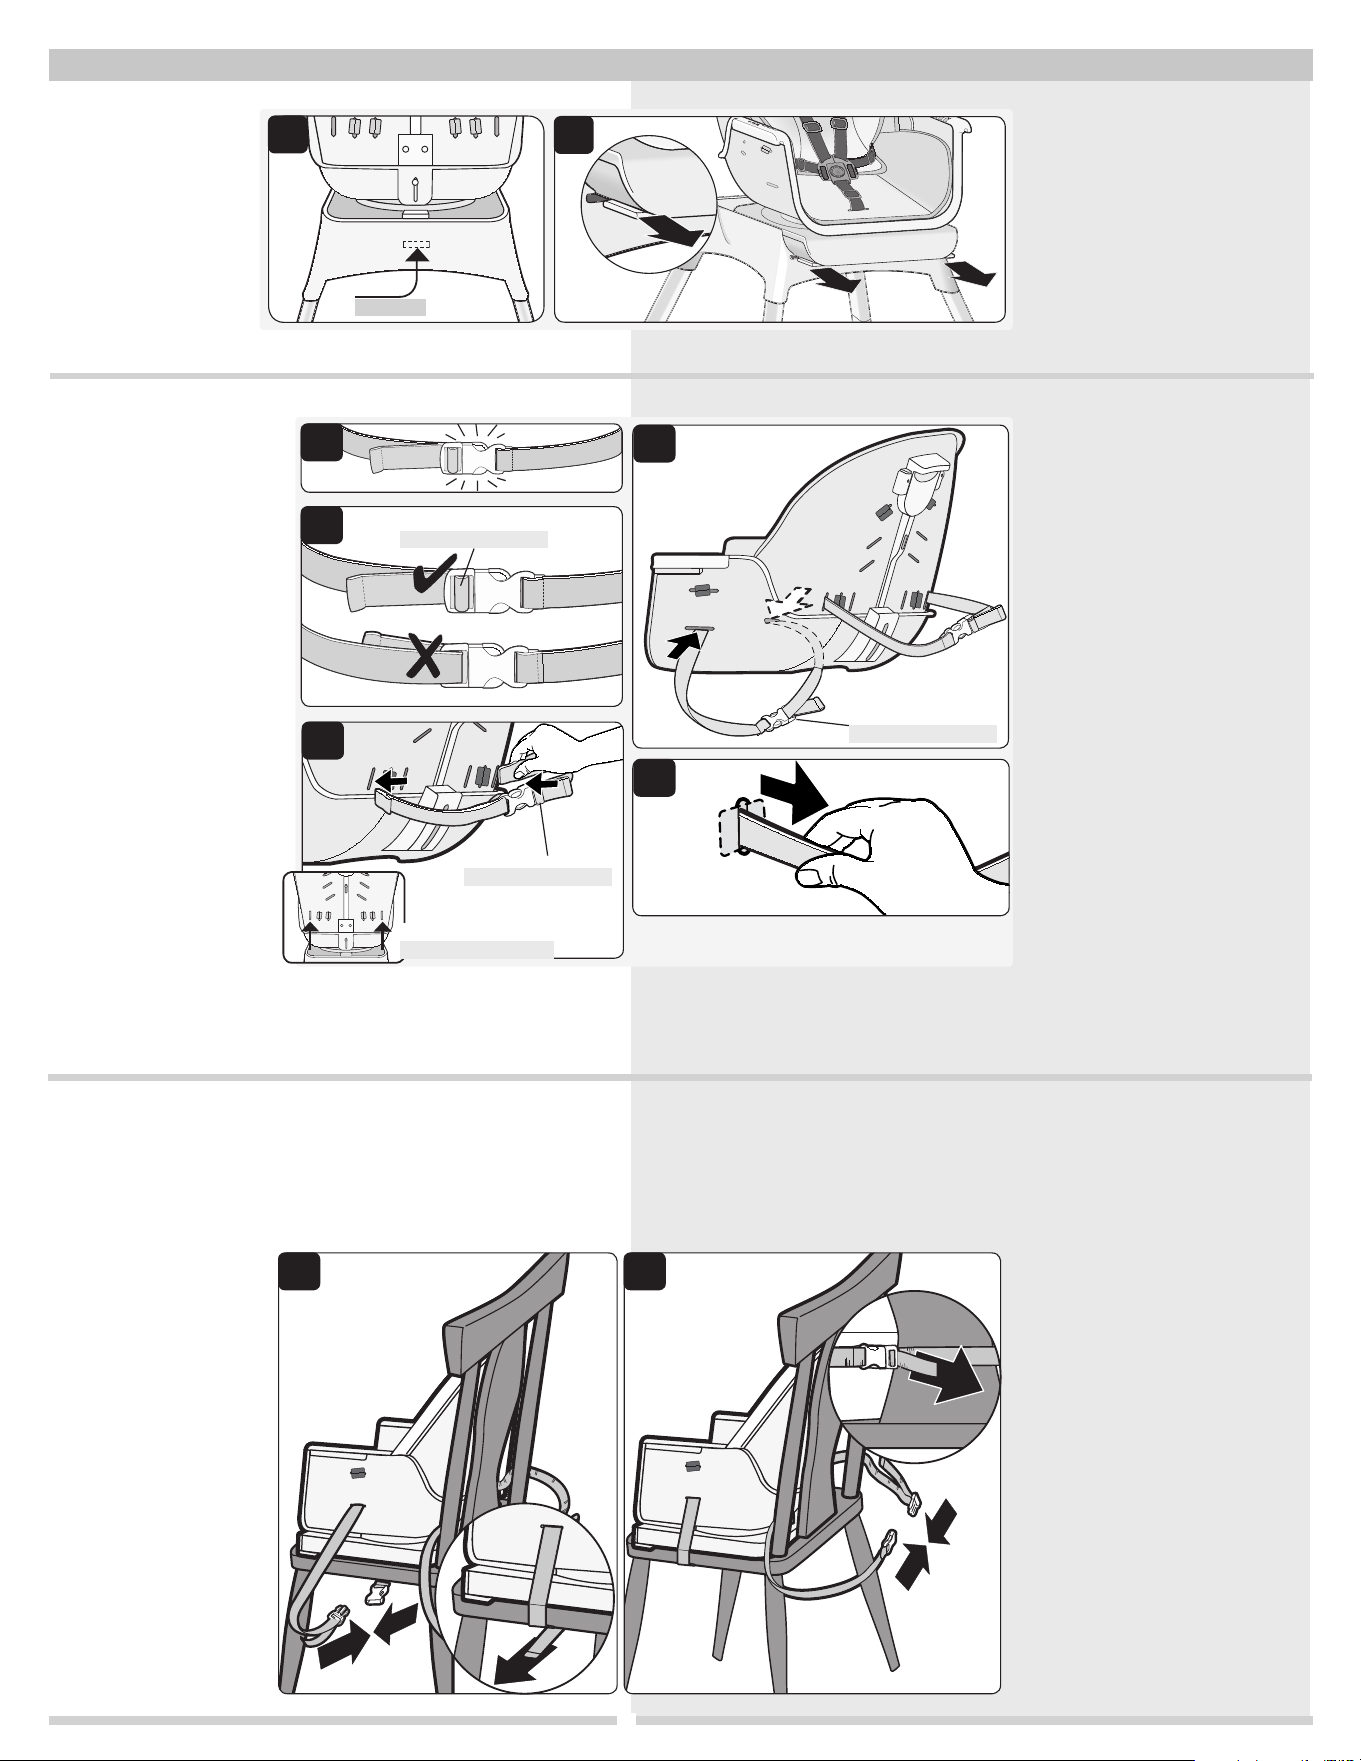
2 Attach Legs to Stool Seat:
Turn seat on its side with the bottom
toward you (Figure 2a).
Take 2 legs and orient them as shown
(Figure 2b):
• the wide part of the shape on the
bottom of the foot facing each other
• the feet are pointing at an angle
away from each other (Figure 2b).
Insert the short portion of the leg
into stool seat until each pin “clicks”
and pins protrude through holes
(Figure 2c).
Repeat for other 2 legs (Figure 2d).
TIP: Squeeze pins while sliding legs in.
1 Assemble the Legs:
Press pin on the short leg and slide into the long leg until pin
clicks (Figure 1). Repeat for the other 3 sets of legs.
2 Coloque las patas en el asiento
del taburete:
Gire el asiento de lado con la parte inferior
hacia usted (Figura 2a).
Tome 2 patas y oriéntelas como se
muestra (Figura 2b):
• la parte ancha de la forma en la
parte inferior del pie una frente a la otra
• los pies están apuntando en un ángulo
alejado uno del otro.
Inserte la porción corta de la pata en
el asiento del taburete hasta que cada
pasador haga clic y las clavijas se asomen
por el orificio (Figura 2c).
Repita para las otras 2 patas
(Figura 2d).
CONSEJO: Presione las clavijas al mismo
tiempo que desliza las patas hacia
adentro.
1 Montar las patas:
Presione el pasador en la pata corta y deslícelo dentro de
la pata larga hasta que la clavija (Figura 1). Repita para
otros 3 conjuntos de patas.
2a
2d
2b
To Assemble High Chair Para armar la silla alta
x2
Upright with Tray (seat can rotate 360°)
Posición recta con charola (el asiento puede girar 360°)
Upright Without Tray (seat can rotate 360°)
Posición recta sin charola (el asiento puede girar 360°)
High Chair with Infant Recline
Silla alta reclinable para bebés
High Stool
Taburete alto
Toddler Booster Seat (no tray)
Asiento elevador para niños pequeños (sin charola)
Infant Booster Seat
Asiento elevado para bebés
Low Stool and Table
Taburete bajo y mesa
2 Kids at Once: Booster & Low Stool
2 niños a la vez: asiento elevado y taburete bajo
Stool
Taburete bajo
A
E
B F
G
I
C
H
Bottom view
Short leg
Vista inferior
Pata corta
D
See Page 7, Step 2.
Consulte la página 7,
paso 2.
J
2c
x2
Short leg
Pata corta
Pocket/Bolsillo
Rear View/ Vista
trasera
1
*
Para ensamblar más
fácilmente la silla alta,
ensamble cada juego
de patas a medida que
las desenvuelve.
*
For easier assembly
of high chair, assemble
each set of legs as you
unwrap them.
Parts and Features Piezas y características
9 Modes of Use 9 modos de uso
Seat with restraint belt
Seat pad and infant insert
Stool seat
Chair straps for booster seat
mode (2 sets)
Tray insert
Main tray
Tabletop
Footrest with brackets
Thumbscrews (2)
4 Sets of legs (1 short,
1 long)
*
Recline button
Rotate seat button
Remove seat button
Asiento con cinturón de seguridad
Almohadilla de asiento e inserto
para bebés
Asiento taburete
Correas para sillas para modo
asiento elevado (2 juegos)
Inserto de charola
La charola principal
Mesa
Reposapiés con soportes
Tornillos de mariposa (2)
4 Juegos de patas (1 corta,
1 larga)
*
Botón de reclinación
Botón de girar el asiento
Retire el botón del asiento
K
L
M
A
A
G
G
B
B
H
H
C
C
I
I
D
D
J
J
M
M
E
E
K
K
F
F
L
L
• Remove all contents from packaging and discard box and/or poly bags.
• Lay out and identify all parts.
• Please do not return this product to the place of purchase. To address any issues, please visit
us at www.safety1st.com to chat with us there, text us at (812) 652-2525 or call Consumer
Care at (800) 544-1108. To assist you, we need the model number (HC287) and the
manufacture date (located on back of seat).
Before Assembly: Wipe down trays with a soft cloth and warm soapy water.
• Retire todo el contenido del embalaje y deseche la caja y/o las bolsas de polietileno.
• Despliegue e identifique todas las piezas.
• No devuelva este producto al lugar donde lo compró. Para abordar cualquier problema, visítenos en
www.safety1st.com o chatee con nosotros para sacarse dudas, enviarnos un mensaje al (812) 652-2525
o llamar al Servicio de Atención al Cliente al (800) 544-1108. Para ayudarlo, necesitaremos el número de
modelo (HC287) y la fecha de fabricación (que se encuentran en la parte posterior del cesto asiento).
Antes de armar: Limpie las charolas con un paño suave y agua jabonosa tibia.
3
Back of seat
Vista trasera del asiento
4
2 Attach Legs to Stool Seat:
Turn seat on its side with the bottom
toward you (Figure 2a).
Take 2 legs and orient them as shown
(Figure 2b):
• the wide part of the shape on the
bottom of the foot facing each other
• the feet are pointing at an angle
away from each other (Figure 2b).
Insert the short portion of the leg
into stool seat until each pin “clicks”
and pins protrude through holes
(Figure 2c).
Repeat for other 2 legs (Figure 2d).
TIP: Squeeze pins while sliding legs in.
1 Assemble the Legs:
Press pin on the short leg and slide into the long leg until pin
clicks (Figure 1). Repeat for the other 3 sets of legs.
2 Coloque las patas en el asiento
del taburete:
Gire el asiento de lado con la parte inferior
hacia usted (Figura 2a).
Tome 2 patas y oriéntelas como se
muestra (Figura 2b):
• la parte ancha de la forma en la
parte inferior del pie una frente a la otra
• los pies están apuntando en un ángulo
alejado uno del otro.
Inserte la porción corta de la pata en
el asiento del taburete hasta que cada
pasador haga clic y las clavijas se asomen
por el orificio (Figura 2c).
Repita para las otras 2 patas
(Figura 2d).
CONSEJO: Presione las clavijas al mismo
tiempo que desliza las patas hacia
adentro.
1 Montar las patas:
Presione el pasador en la pata corta y deslícelo dentro de
la pata larga hasta que la clavija (Figura 1). Repita para
otros 3 conjuntos de patas.
2a
2d
2b
To Assemble High Chair Para armar la silla alta
x2
Upright with Tray (seat can rotate 360°)
Posición recta con charola (el asiento puede girar 360°)
Upright Without Tray (seat can rotate 360°)
Posición recta sin charola (el asiento puede girar 360°)
High Chair with Infant Recline
Silla alta reclinable para bebés
High Stool
Taburete alto
Toddler Booster Seat (no tray)
Asiento elevador para niños pequeños (sin charola)
Infant Booster Seat
Asiento elevado para bebés
Low Stool and Table
Taburete bajo y mesa
2 Kids at Once: Booster & Low Stool
2 niños a la vez: asiento elevado y taburete bajo
Stool
Taburete bajo
A
E
B F
G
I
C
H
Bottom view
Short leg
Vista inferior
Pata corta
D
See Page 7, Step 2.
Consulte la página 7,
paso 2.
J
2c
x2
Short leg
Pata corta
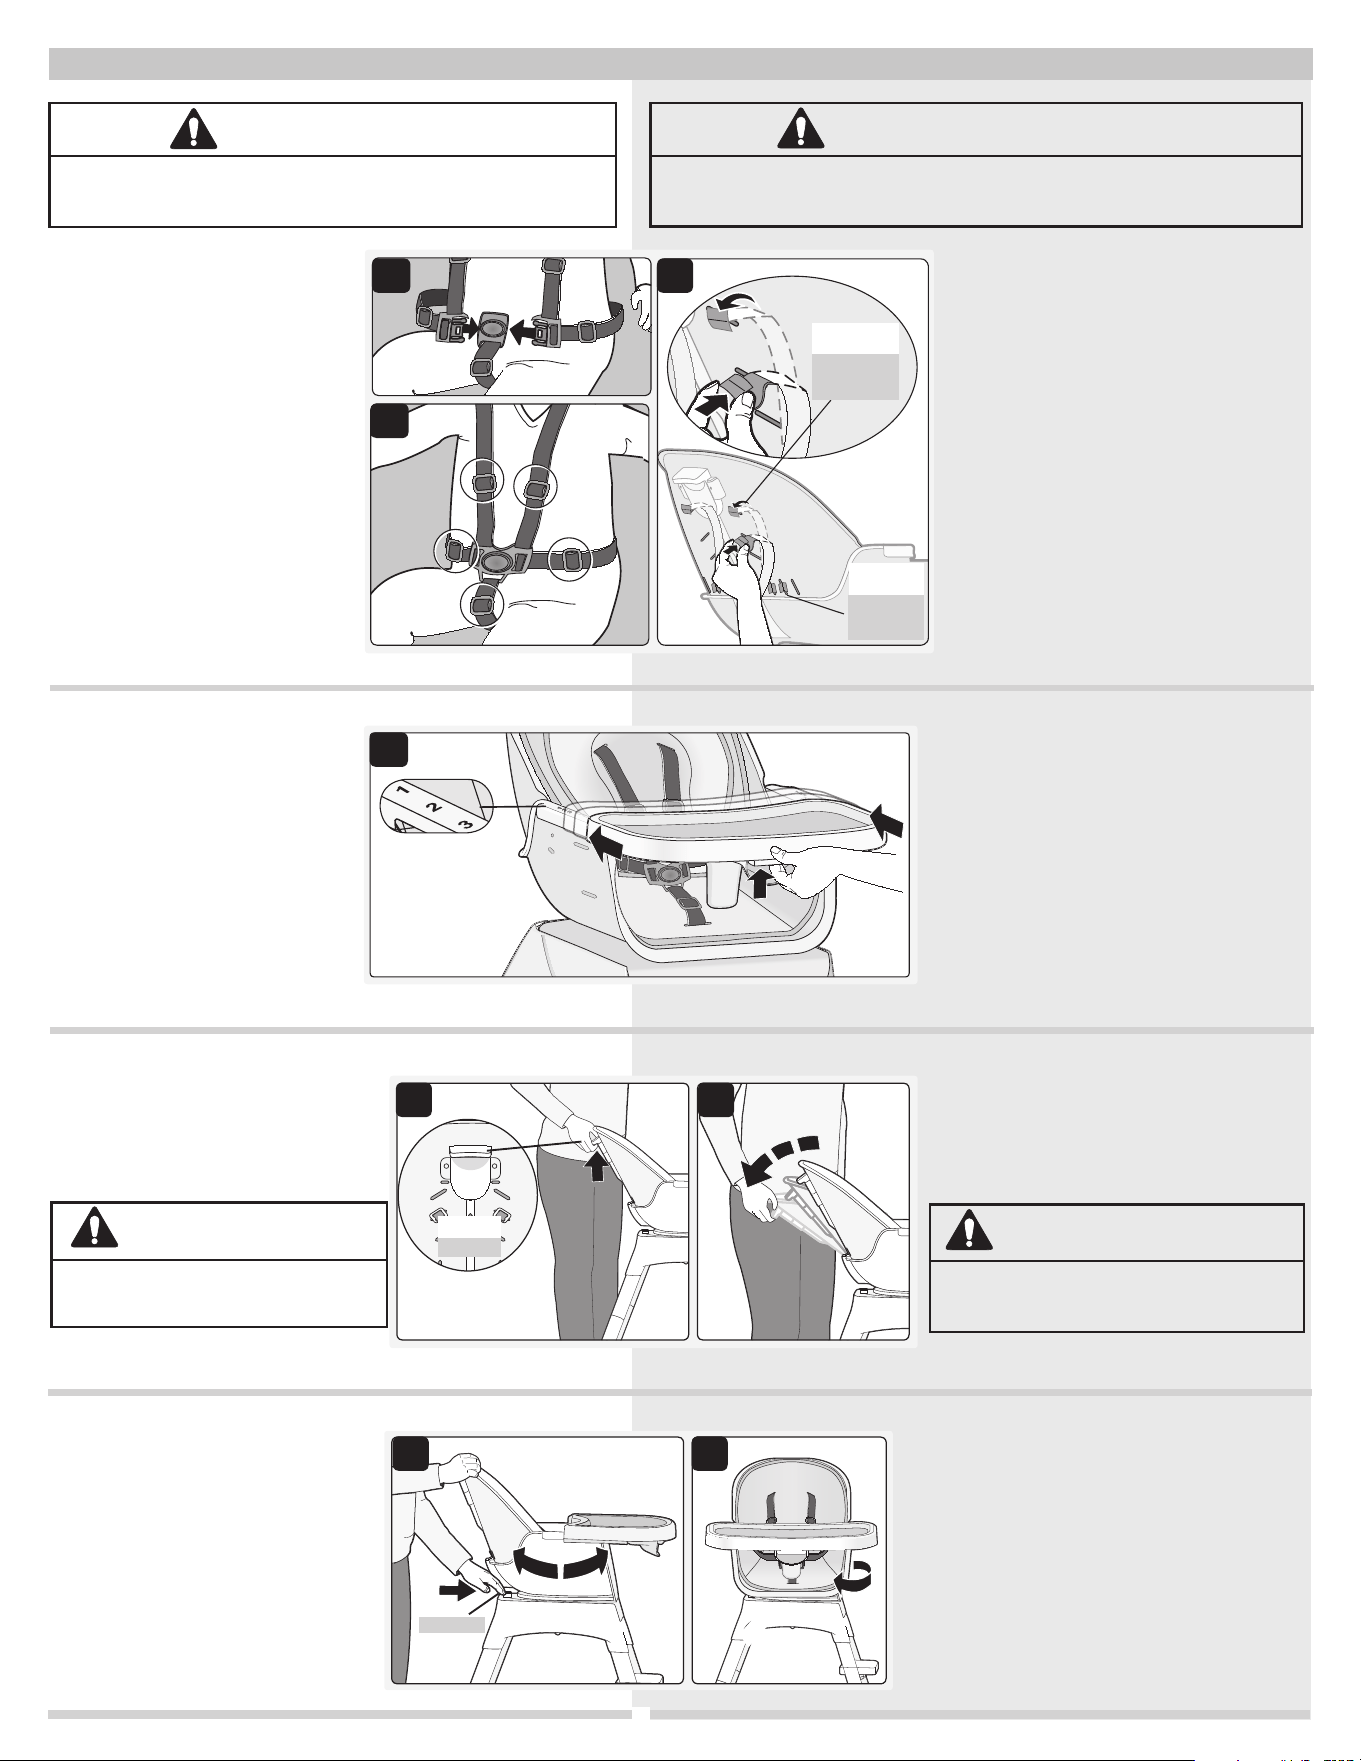
3 Adjusting Recline:
Grasp handle at back of seat. Squeeze handle
upward to adjust recline angle (Figure 3a).
There are three positions.
4 Rotate Seat:
Push rotate button at back of seat and turn
the chair (Figure 4a). The chair stops every
90° and clicks into place (Figure 4b).
3 Ajuste de la reclinación:
Sujete la manija en el respaldo del asiento. Apriete la
manija para ajustar el ángulo de reclinación (Figura
3a). Hay tres posiciones.
4 Rotar asiento:
Presione el botón de rotación en la parte posterior del
asiento y gire la silla (Figura 4a). La silla se detiene
cada 90° y hace clic en su lugar (Figura 4b).
Squeeze
Apriete
ADVERTENCIA:
• NO ajuste el ángulo cuando el niño esté
en el asiento.
WARNING:
• DO NOT adjust recline when
child is in seat.
3a
4a
3b
4b
1a
1b
2
2 Attaching Tray:
Squeeze button underneath front of tray
and slide tray onto high chair (Figure 2).
Place insert tray on top of main tray.
Adjust tray: There are three tray positions.
Squeeze button underneath front of tray
and slide tray forward or backward.
Remove tray: Squeeze button on front of
tray and pull toward you.
2 Colocación de la charola:
Apriete el botón debajo del frente de la bandeja
y deslice la charola sobre la silla alta (Figura 2).
Coloque la charola de inserción encima de la bandeja
principal.
Cómo ajustar la charola: Hay tres posiciones de
la charola. Presione el botón debajo de la parte
delantera de la charola y deslice la charola hacia
delante o hacia atrás.
Para retirar la charola: Apriete el botón en el frente
de la charola y tire hacia usted.
ADVERTENCIA:
• Asegure SIEMPRE al niño utilizando el sistema de retención. Ajústelo
para que quede firme.
WARNING:
• ALWAYS secure child in the restraint belt. Adjust to fit
snugly.
1 Using Restraint System:
Place child in the seat with the crotch strap
between the child’s legs and fasten both
buckles (Figure 1a).
Adjust straps (at five buckles) to tighten
snugly such that you can comfortably slide
your finger between the strap and your
child (Figure 1b).
As your child grows, you may need to
adjust the shoulder strap height or waist
strap width. Push the strap anchors through
seat back and seat pad (Figure 1c). Push
back through into the upper slot.
1 Uso del sistema de retención:
Siente al niño en la silla alta y coloque la correa de
entrepierna entre las piernas del niño y enganche
ambas hebillas (Figura 1a).
Ajuste las correas (en las cinco hebillas) para
tensarlas, de modo que se pueda deslizar
cómodamente un dedo entre cada correa y el niño
(Figura 1b).
A medida que su hijo crezca, tendrá que ajustar
la altura de las correas de los hombros o el ancho
de la correa para la cintura. Quite los dos anclajes
de las correas por el respaldar y la almohadilla del
asiento (Figura 1c). Coloque nuevamente en la
ranura que está más arriba.
Using High Chair Cómo usar la silla alta
1c
Waist Slot
(center)
3 Shoulder
Slots
Ranura
de cintura
(centro)
3 ranuras
para hombros
6
Push
Presiona
3b
3a
4
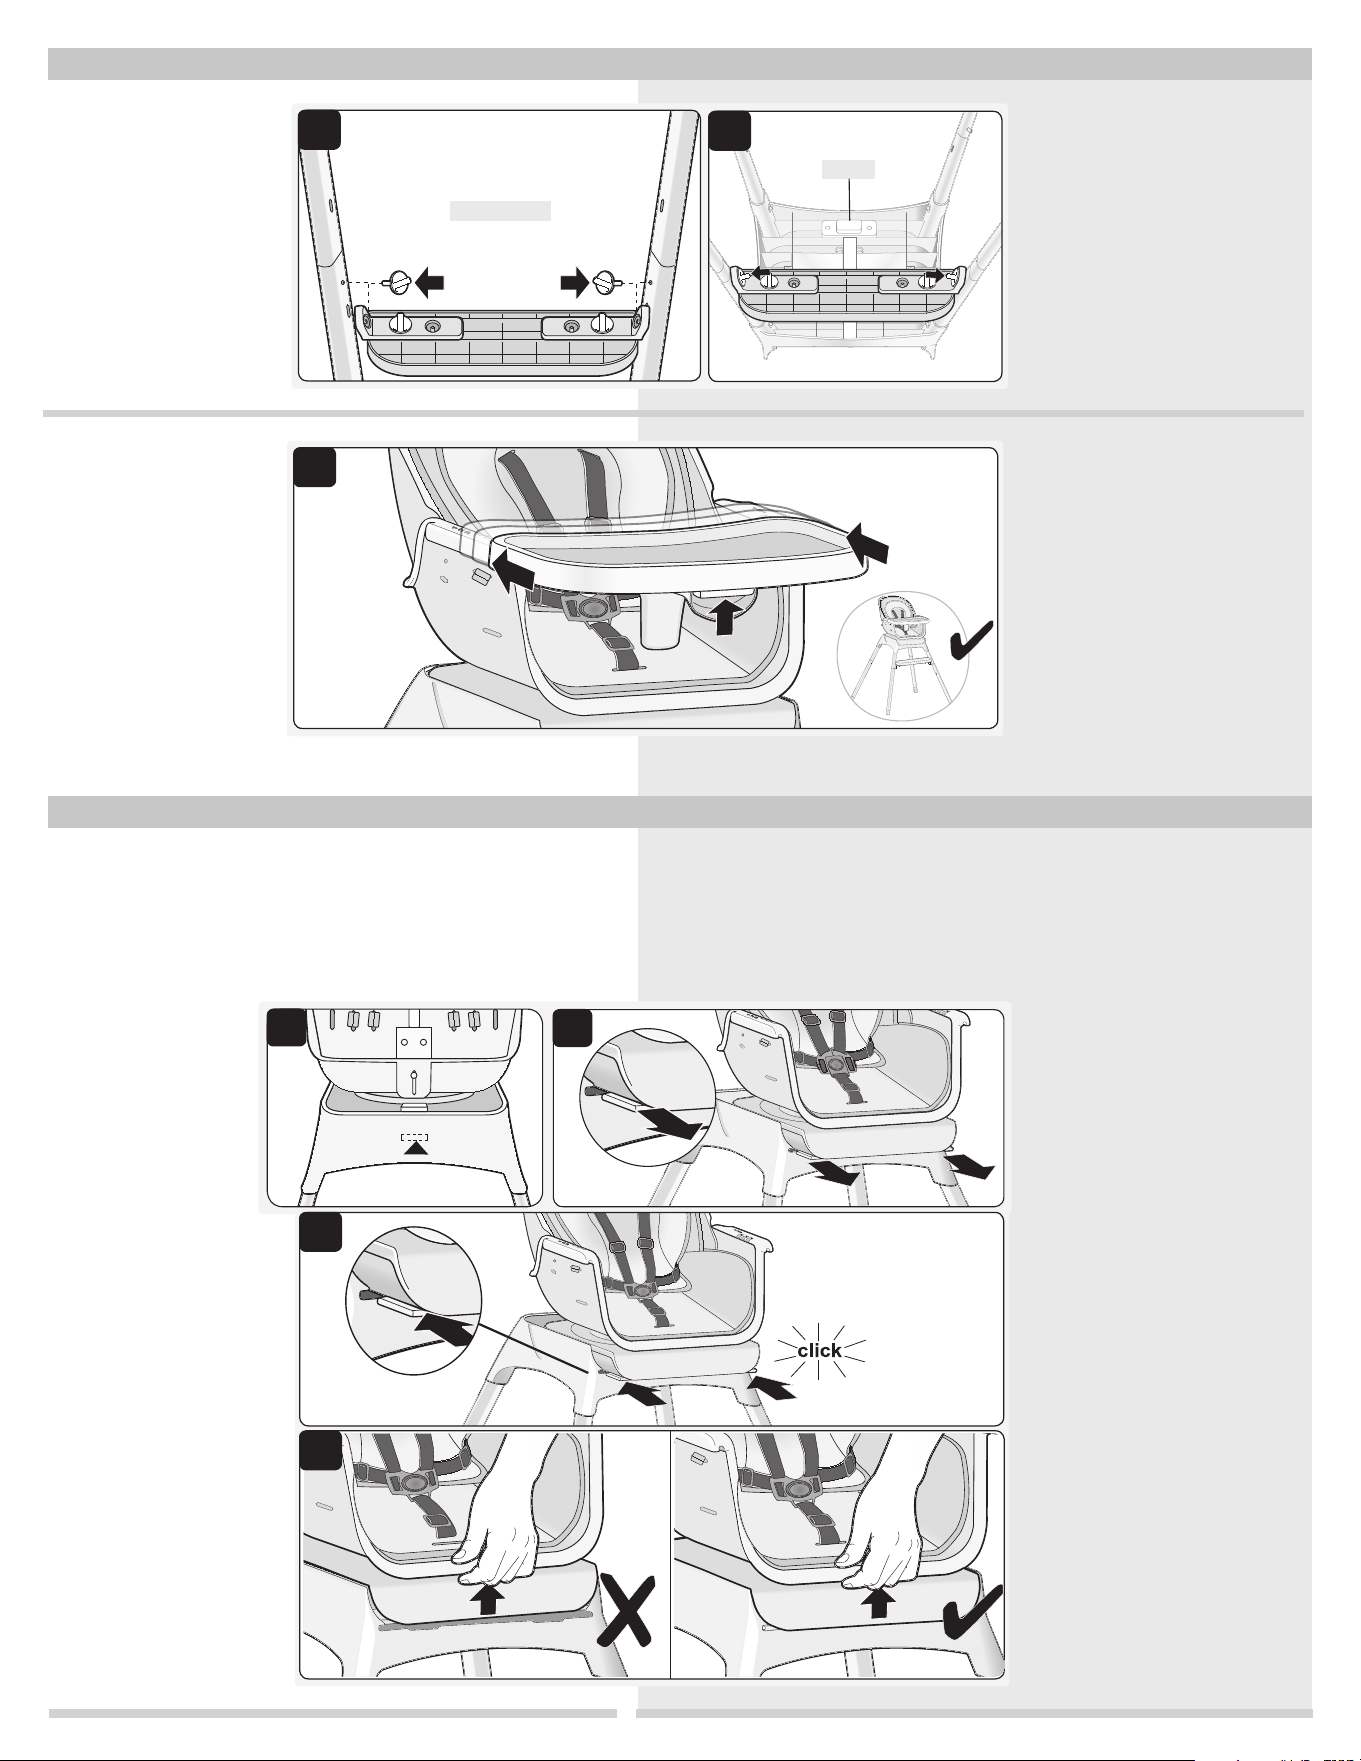
3 Footrest:
The brackets are pre-installed
(Figure 3a). Use 2 thumbscrews
to attach footrest to the round
holes on the short portion of the
leg.
NOTE: Install footrest on the side
without the button (Figure 3b).
3 Reposapiés:
Los soportes están pre-instalados
(Figura 3a). Utilice 2 tornillos mariposa
para fijar el reposapiés a los orificios
redondos de la parte corta de la pata.
NOTA: Instalar el reposapiés en el lado
sin el botón (Figura 3b).
4 Trays:
Squeeze button underneath
front of tray and slide tray onto
high chair
(Figure 4).
Place insert tray on top of
main tray.
High chair assembly is complete.
4 Charolas:
Apriete el botón debajo del frente de
la charola y deslice la charola sobre la
silla alta
(Figura 4)
.
Coloque la charola de inserción
encima de la charola principal.
El montaje de la silla alta está
completo.
Underside view
Button
Vista inferior
Botón
5
To Assemble High Chair Para armar la silla alta
To Remove and Attach Seat Para armar la silla alta
5c
Attach Seat:
Carefully align seat tabs to
slots on the front of the stool
seat
(Figure 5c). Slide tabs into
slots and push seat back until it
“clicks” into place.
5 Seat will need to be removed when:
• using booster seat mode
• using high stool mode
• using low stool mode
Seat will need to be reattached when:
• changing back to high chair mode
Asiento:
Alinee con cuidado las lengüetas del
asiento con las ranuras en la parte
delantera del asiento del taburete
(Figura 5c).
Deslice las pestañas en
las ranuras y empuje el respaldo del
asiento hasta que encaje en su lugar
con un “clic”.
5 Será necesario retirar el asiento cuando:
• usar el modo de asiento elevado
• usar el modo de taburete alto
• usar el modo de taburete bajo
Será necesario volver a colocar el asiento cuando:
• volver al modo de silla alta
Lift gently on the front of the seat
base to ensure that it is properly
installed
(Figure 5d).
The seat base should not lift or tilt
back from the stool seat.
Levante suavemente la parte delantera
de la base del asiento para asegurarse
de que esté instalada correctamente
(Figura 5d)
.
El base del asiento no debe levantarse
ni inclinarse hacia atrás desde el asiento
del taburete.
5d
Remove Seat:
The release seat button is
under the stool, toward the
back of the stool. Press seat
release button (Figure 5a)
and slide seat off (Figure
5b).
Para quitar el asiento:
El botón de liberación del asiento está
debajo del taburete, hacia la parte
trasera del taburete. Presione el botón
de liberación del asiento (Figura 5a) y
deslice el asiento hacia afuera (Figura
5b).
5b
5a
3 Adjusting Recline:
Grasp handle at back of seat. Squeeze handle
upward to adjust recline angle (Figure 3a).
There are three positions.
4 Rotate Seat:
Push rotate button at back of seat and turn
the chair (Figure 4a). The chair stops every
90° and clicks into place (Figure 4b).
3 Ajuste de la reclinación:
Sujete la manija en el respaldo del asiento. Apriete la
manija para ajustar el ángulo de reclinación (Figura
3a). Hay tres posiciones.
4 Rotar asiento:
Presione el botón de rotación en la parte posterior del
asiento y gire la silla (Figura 4a). La silla se detiene
cada 90° y hace clic en su lugar (Figura 4b).
Squeeze
Apriete
ADVERTENCIA:
• NO ajuste el ángulo cuando el niño esté
en el asiento.
WARNING:
• DO NOT adjust recline when
child is in seat.
3a
4a
3b
4b
1a
1b
2
2 Attaching Tray:
Squeeze button underneath front of tray
and slide tray onto high chair (Figure 2).
Place insert tray on top of main tray.
Adjust tray: There are three tray positions.
Squeeze button underneath front of tray
and slide tray forward or backward.
Remove tray: Squeeze button on front of
tray and pull toward you.
2 Colocación de la charola:
Apriete el botón debajo del frente de la bandeja
y deslice la charola sobre la silla alta (Figura 2).
Coloque la charola de inserción encima de la bandeja
principal.
Cómo ajustar la charola: Hay tres posiciones de
la charola. Presione el botón debajo de la parte
delantera de la charola y deslice la charola hacia
delante o hacia atrás.
Para retirar la charola: Apriete el botón en el frente
de la charola y tire hacia usted.
ADVERTENCIA:
• Asegure SIEMPRE al niño utilizando el sistema de retención. Ajústelo
para que quede firme.
WARNING:
• ALWAYS secure child in the restraint belt. Adjust to fit
snugly.
1 Using Restraint System:
Place child in the seat with the crotch strap
between the child’s legs and fasten both
buckles (Figure 1a).
Adjust straps (at five buckles) to tighten
snugly such that you can comfortably slide
your finger between the strap and your
child (Figure 1b).
As your child grows, you may need to
adjust the shoulder strap height or waist
strap width. Push the strap anchors through
seat back and seat pad (Figure 1c). Push
back through into the upper slot.
1 Uso del sistema de retención:
Siente al niño en la silla alta y coloque la correa de
entrepierna entre las piernas del niño y enganche
ambas hebillas (Figura 1a).
Ajuste las correas (en las cinco hebillas) para
tensarlas, de modo que se pueda deslizar
cómodamente un dedo entre cada correa y el niño
(Figura 1b).
A medida que su hijo crezca, tendrá que ajustar
la altura de las correas de los hombros o el ancho
de la correa para la cintura. Quite los dos anclajes
de las correas por el respaldar y la almohadilla del
asiento (Figura 1c). Coloque nuevamente en la
ranura que está más arriba.
Using High Chair Cómo usar la silla alta
1c
Waist Slot
(center)
3 Shoulder
Slots
Ranura
de cintura
(centro)
3 ranuras
para hombros
6
Push
Presiona
3b
3a
4
3 Footrest:
The brackets are pre-installed
(Figure 3a). Use 2 thumbscrews
to attach footrest to the round
holes on the short portion of the
leg.
NOTE: Install footrest on the side
without the button (Figure 3b).
3 Reposapiés:
Los soportes están pre-instalados
(Figura 3a). Utilice 2 tornillos mariposa
para fijar el reposapiés a los orificios
redondos de la parte corta de la pata.
NOTA: Instalar el reposapiés en el lado
sin el botón (Figura 3b).
4 Trays:
Squeeze button underneath
front of tray and slide tray onto
high chair
(Figure 4).
Place insert tray on top of
main tray.
High chair assembly is complete.
4 Charolas:
Apriete el botón debajo del frente de
la charola y deslice la charola sobre la
silla alta
(Figura 4)
.
Coloque la charola de inserción
encima de la charola principal.
El montaje de la silla alta está
completo.
Underside view
Button
Vista inferior
Botón
5
To Assemble High Chair Para armar la silla alta
To Remove and Attach Seat Para armar la silla alta
5c
Attach Seat:
Carefully align seat tabs to
slots on the front of the stool
seat
(Figure 5c). Slide tabs into
slots and push seat back until it
“clicks” into place.
5 Seat will need to be removed when:
• using booster seat mode
• using high stool mode
• using low stool mode
Seat will need to be reattached when:
• changing back to high chair mode
Asiento:
Alinee con cuidado las lengüetas del
asiento con las ranuras en la parte
delantera del asiento del taburete
(Figura 5c).
Deslice las pestañas en
las ranuras y empuje el respaldo del
asiento hasta que encaje en su lugar
con un “clic”.
5 Será necesario retirar el asiento cuando:
• usar el modo de asiento elevado
• usar el modo de taburete alto
• usar el modo de taburete bajo
Será necesario volver a colocar el asiento cuando:
• volver al modo de silla alta
Lift gently on the front of the seat
base to ensure that it is properly
installed
(Figure 5d).
The seat base should not lift or tilt
back from the stool seat.
Levante suavemente la parte delantera
de la base del asiento para asegurarse
de que esté instalada correctamente
(Figura 5d)
.
El base del asiento no debe levantarse
ni inclinarse hacia atrás desde el asiento
del taburete.
5d
Remove Seat:
The release seat button is
under the stool, toward the
back of the stool. Press seat
release button (Figure 5a)
and slide seat off (Figure
5b).
Para quitar el asiento:
El botón de liberación del asiento está
debajo del taburete, hacia la parte
trasera del taburete. Presione el botón
de liberación del asiento (Figura 5a) y
deslice el asiento hacia afuera (Figura
5b).
5b
5a
7
Using Booster Seat Cómo usar asiento elevado
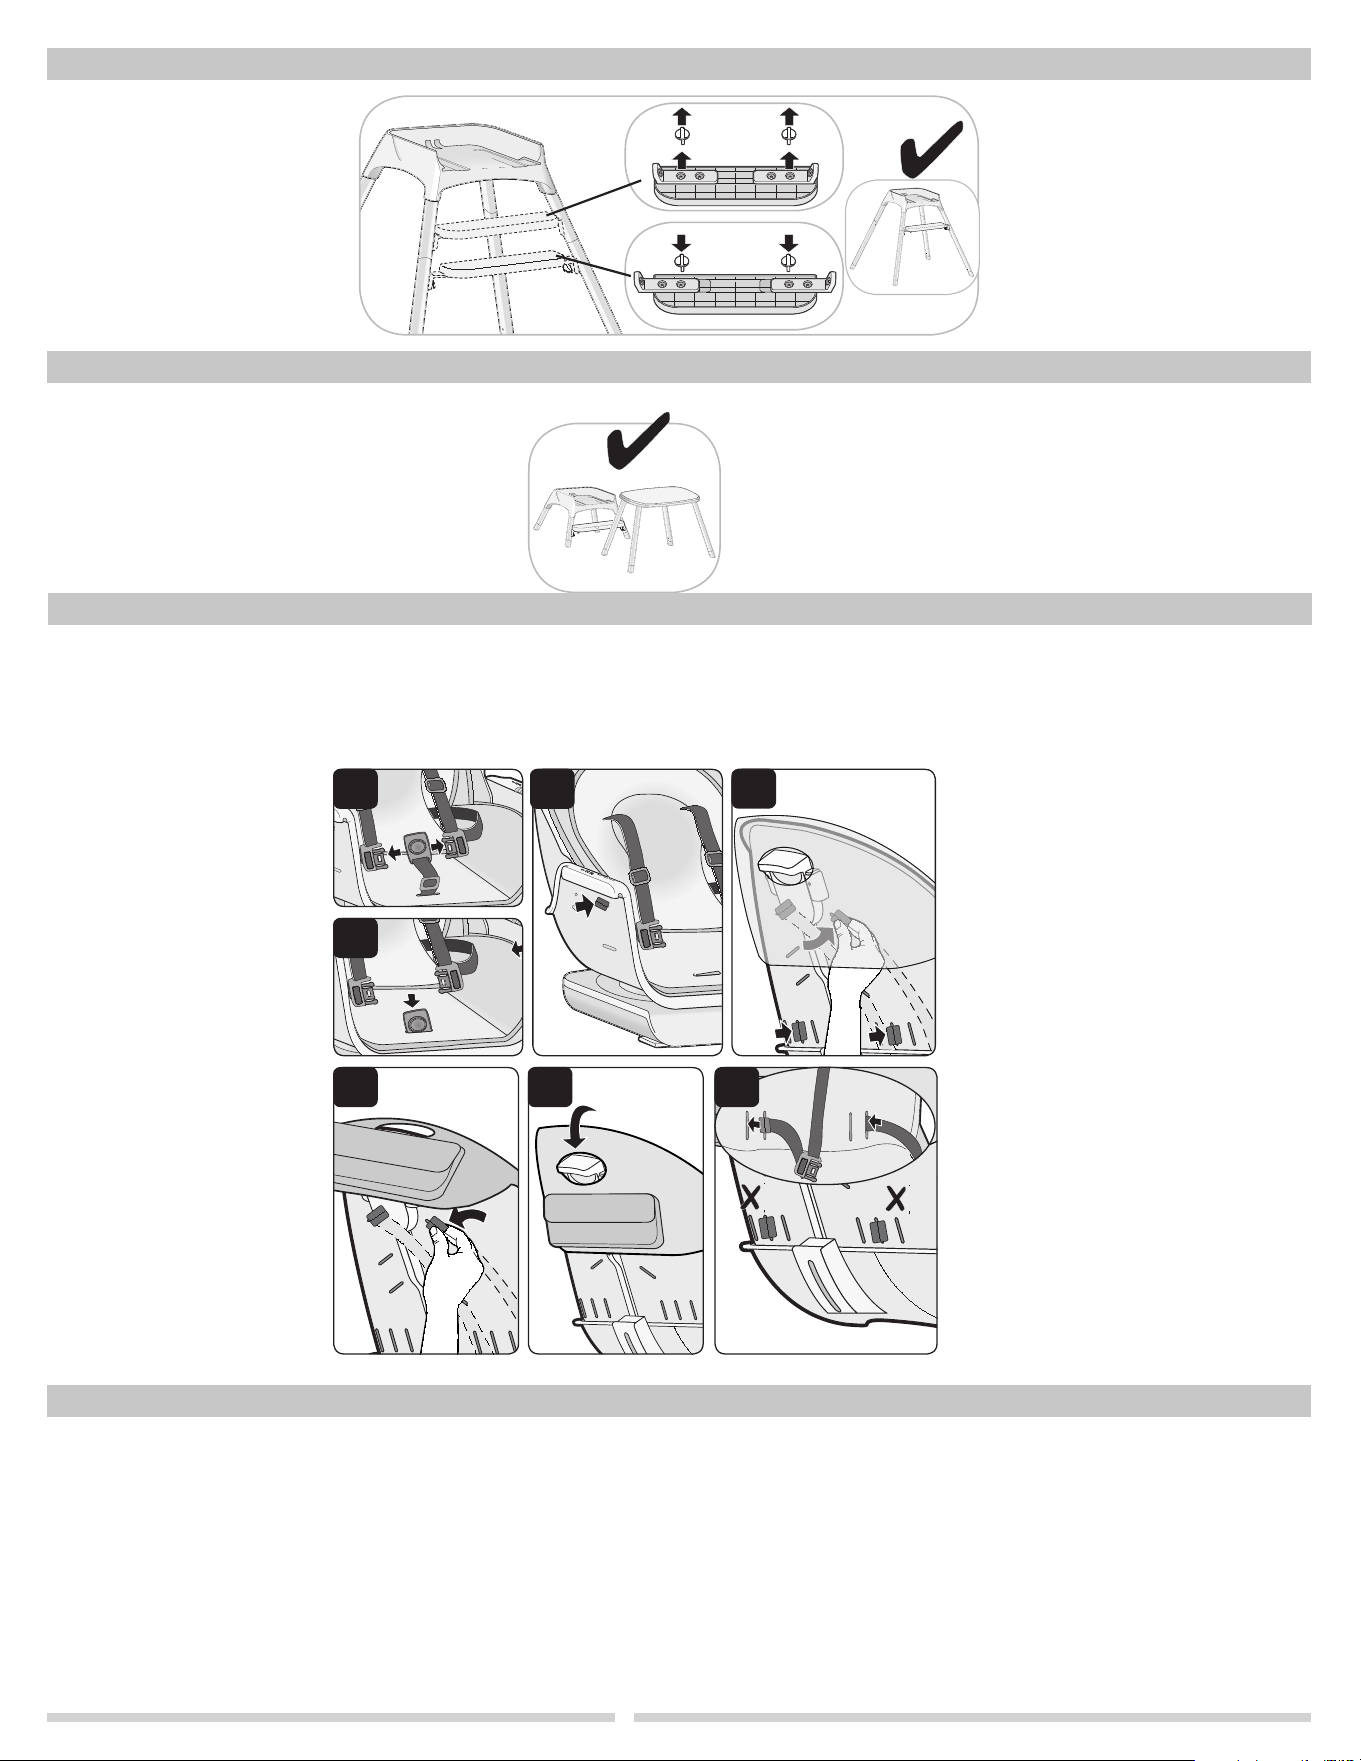
3 Secure Booster Seat
to Chair:
Pass the bottom chair
strap under base of chair
and secure buckle (Figure
3a). Tighten chair strap for
security.
Pass rear chair strap around
back of chair and secure
buckle (Figure 3b). Tighten
chair strap for security.
3 Conecte el asiento elevador
a la silla:
Pase la correa inferior de la silla debajo
de la base de la misma y ajuste la hebilla
(Figura 3a). Ajuste la correa de la silla
por seguridad.
Pase la correa trasera de la silla
alrededor del respaldo de la misma y
ajuste la hebilla (Figura 3b). Ajuste la
correa de la silla por seguridad.
3a
2c
2d
2b
2a
2 Chair Straps (2 sets):
Locate chair straps in the
compartment under the seat.
Snap buckles together
(Figure 2a).
Orient chair straps with “loop”
facing outward threaded in
buckle as shown (Figure 2b).
Unbuckle the chair straps. With
“loop” facing outward, insert
sewn ends of chair straps into
outer slots at back of booster
(Figure 2c).
With “loop” facing outward,
insert sewn ends of chair straps
into slots at sides of booster
(Figure 2d).
Pull each strap to ensure strap
is secure. Chair straps should
not come out when pulled
(Figure 2e).
2 Correas de la silla
(2 conjuntos):
Ubique las correas de la silla en el
compartimiento debajo del asiento.
Abroche las hebillas (Figura 2a).
Oriente las correas para silla con el
“lazo” hacia afuera enlazado en la hebilla
como se muestra (Figura 2b).
Desabroche las correas de la silla. Con el
“lazo” hacia afuera, inserte los extremos
cosidos de las correas para silla en las
ranuras exteriores ubicadas en la parte
posterior del asiento elevador (Figura
2c).
Con el “lazo” hacia abajo, inserte los
extremos cosidos de las correas para
silla en la ranuras ubicadas en los
laterales del asiento elevador (Figura
2d).
Tire de cada correa para asegurarse de
que estén bien aseguradas. Las correas
para silla no deben salirse al tirar de
ellas (Figura 2e).
2e
4x
NOTE: Seat must be in upright position for booster seat
mode.
Booster seat fits most kitchen and dining room chairs with a minimum measurement of
12” W x 16.25” D and backrest height of 12.5” H.
NOTA: El asiento debe estar en posición vertical para el modo de
asiento elevado.
El asiento elevador se adapta a la mayoría de las sillas de cocina y comedor con una medida mínima de
12” de ancho x 16,25” de profundidad y una altura de respaldo de 12,5” de alto.
1 Remove Seat:
The release seat button is
under the stool, toward the
back of the stool. Press seat
release button (Figure 1a)
and slide seat off (Figure
1b). Set aside stool.
1 Para quitar el asiento:
El botón de liberación del asiento está
debajo del taburete, hacia la parte
trasera del taburete. Presione el botón
de liberación del asiento (Figura 1a) y
deslice el asiento hacia afuera (Figura
1b). Ponga a un lado el taburete.
1b
Press
Presiona
1a
3b
Loop faces outward
Lazo hacia afuera
Loop faces outward
Lazo hacia afuera
Loop faces outward
Lazo hacia afuera
Outer slots
Ranuras exteriores
• Beginning in high chair mode, follow
“Using Booster” step 1 to convert to
tall stool.
• Remove all 4 thumbscrews from footrest.
• Reassemble brackets on footrest in wider
stool mode.
• Attach footrest to lower holes on
lower legs.
• Comenzando en el modo de silla alta, siga el
paso 1 de “Cómo usar asiento elevado” para
convertirlo en un taburete alto.
• Retire los 4 tornillos de mariposa del
reposapiés.
• Vuelva a montar los soportes en el
reposapiés en modo taburete (más ancho).
• Fije el reposapiés a los orificios inferiores de
las patas inferiores.
• Begin in high stool mode.
• Turn stool upside down.
• Press each lower leg pin and remove four lower legs from tall stool.
Child stool is complete.
• Turn tabletop upside down.
• Insert each lower leg into opening on tabletop until pin “clicks” into
place. The table is complete.
• Comience en el modo de taburete alto.
• Voltee el taburete.
• Presione cada pasador de la parte inferior de la pata y retire las cuatro patas inferiores
del taburete alto. El taburete del niño está completo.
• Dé la vuelta al tablero de la mesa.
• Inserte cada pata inferior en la abertura de la mesa hasta que el pasador haga clic en
su lugar. La tabla está completa.
Convert to High Stool Convertir en taburete alto
Convert to Child Stool and Table Convertir en taburete y mesa para niños
8
Care and Maintenance Cuidado y mantenimiento
One (1) Year Limited Warranty Garantía limitada de un año (1)
La firma Dorel Juvenile Group, Inc. asegura al comprador original que este producto (Silla Alta), está garantizado contra materiales
defectuosos o mano de obra deficiente durante un (1) año a partir de la fecha de compra, si se utiliza en condiciones normales. Si el
producto presentara materiales defectuosos o mano de obra deficiente, Dorel Juvenile Group, Inc. reparará o sustituirá el producto,
a nuestra discreción, de manera gratuita. El comprador cubrirá todos los costes relacionados con el envase y envío del producto al
Departamento de Relaciones con el Consumidor de Dorel Juvenile Group, a la dirección que aparece al inicio de este documento, y
los demás costes de transportación o aseguramiento relacionados con el envío. Dorel Juvenile Group cubrirá los costes de devolución
al comprador del producto reparado o sustituido. El producto debe enviarse en su envase original junto con una prueba documental de
la compra, ya sea el recibo de venta u otro medio demostrativo de que el producto aún esté dentro del período de garantía. Esta
garantía quedará anulada si el propietario hubiera reparado o modificado el producto, o si éste se hubiera dañado como consecuencia
del uso incorrecto.
Esta garantía excluye cualesquiera otras responsabilidades ajenas a la expresada más arriba, entre otras los daños incidentales
o consecuentes.
EN ALGUNOS ESTADOS NO SE PERMITEN LAS EXCLUSIONES O LIMITACIONES REFERENTES A LOS DAÑOS INCIDENTALES
O CONSECUENTES, DE MODO QUE LA LIMITACIÓN O EXCLUSIÓN ANTES EXPUESTA QUIZÁS NO SE APLIQUE EN SU CASO
PARTICULAR.
ESTA GARANTÍA LE OTORGA DERECHOS LEGALES ESPECÍFICOS Y ES POSIBLE QUE USTED TAMBIÉN CUENTE CON OTROS
DERECHOS QUE PUDIERAN VARIAR EN DISTINTOS ESTADOS.
High chair and trays: Wipe with soft, damp cloth and warm, soapy water and allow to
drip-dry. Tray insert is dishwasher safe.
Restraint system: Restraint and crotch straps should be surface washed and drip-dried
only. Do not place in washing machine or dryer.
Dorel Juvenile Group, Inc. warrants to the original purchaser that this product (High Chair), is free from material
and workmanship defects when used under normal conditions for a period of one (1) year from the date of
purchase. Should the product contain defects in material or workmanship Dorel Juvenile Group, Inc., will repair or
replace the product, at our option, free of charge. Purchaser will be responsible for all costs associated with packaging
and shipping the product to Dorel Juvenile Group Consumer Relations Department at the address noted on front page
and all other freight or insurance costs associated with the return. Dorel Juvenile Group will bear the cost of shipping
the repaired or replaced product to the purchaser. Product should be returned in its original package accompanied by
a proof of purchase, either a sales receipt or other proof that the product is within the warranty period. This warranty is
void if the owner repairs or modifies the product or the product has been damaged as a result of misuse.
This warranty excludes any liability other than that expressly stated previously, including but not limited to, any
incidental or inconsequential damages.
SOME STATES DO NOT ALLOW THE EXCLUSION OR LIMITATION OF INCIDENTAL OR CONSEQUENTIAL
DAMAGES, SO THE ABOVE LIMITATION OR EXCLUSION MAY NOT APPLY TO YOU.
THIS WARRANTY GIVES YOU SPECIFIC LEGAL RIGHTS, AND YOU MAY ALSO HAVE OTHER RIGHTS THAT MAY
VARY FROM STATE TO STATE.
Silla alta y charolas: Límpielas con un paño suave húmedo y jabonosa y enjuáguelo con agua tibia
y permita deje que se seque. La charola puede lavarse en lavavajillas.
Sistema de retención: Las correas de retención deben limpiarse en su superficie únicamente y solo
secado por goteo. No colocar en la lavadora ni en la secadora.
To Remove Seat Pad:
Unbuckle restraints (Figure 1a).
Slide crotch strap through slot in seat pad
(Figure 1b). The crotch strap remains
attached to the seat. Detach seat pad tabs
at the sides (Figure 1c). Detach waist strap
tabs at the back (Figure 1d). Reach under
seat pad to detach shoulder strap tabs
(Figure 1d). Lift pad off seat.
Machine wash seat pad in cold water on
gentle cycle. Do not bleach. Drip-dry.
Para quitar la almohadilla del asiento:
Desabroche las correas de sujeción (Figura 1a).
Deslice la correa de la entrepierna a través de la ranura
en la almohadilla del asiento (Figura 1b). La correa
de la entrepierna permanece unida al asiento.
Separe las lengüetas de la almohadilla del asiento.
Busque debajo del almohadilla del asiento para separar
las lengüetas superiores (Figura 1c). Levante la
almohadilla del asiento (Figura 1d).
Lave a máquina la almohadilla del asiento en agua
fría en un ciclo suave. No usa blanqueador. Seca
al aire.
To Reassemble Seat Pad:
Confirm straps are untwisted. First, push
shoulder strap tabs through shoulder slots
according to your child’s size (Figure 2a).
Then, pull top of seat pad over the seat
(Figure 2b).
Push ends of waist straps through waist
slots according to your child’s size (Figure
2c). Outer slots are reserved for chair
straps.
Attach seat pad tabs through each side of
seat. Pull crotch strap through front slot.
Para volver a montar la almohadilla del asiento:
Confirme que las correas estén desenroscadas.
Primero, empuje las lengüetas de las correas
para los hombros a través de las ranuras para los
hombros según el tamaño de su hijo (Figura 2a).
Luego, coloque la parte superior de la almohadilla
del asiento sobre el asiento (Figura 2b).
Empuje los extremos de las correas de la cintura a
través de las ranuras de la cintura según el tamaño
de su hijo (Figura 2c). Las ranuras exteriores
están reservadas para las correas de las sillas.
Coloque las lengüetas de la almohadilla del asiento
a cada lado del asiento. Pase la correa de la
entrepierna a través de la ranura frontal.
1a 1c
1b
2b2a 2c
1d
7
Using Booster Seat Cómo usar asiento elevado
3 Secure Booster Seat
to Chair:
Pass the bottom chair
strap under base of chair
and secure buckle (Figure
3a). Tighten chair strap for
security.
Pass rear chair strap around
back of chair and secure
buckle (Figure 3b). Tighten
chair strap for security.
3 Conecte el asiento elevador
a la silla:
Pase la correa inferior de la silla debajo
de la base de la misma y ajuste la hebilla
(Figura 3a). Ajuste la correa de la silla
por seguridad.
Pase la correa trasera de la silla
alrededor del respaldo de la misma y
ajuste la hebilla (Figura 3b). Ajuste la
correa de la silla por seguridad.
3a
2c
2d
2b
2a
2 Chair Straps (2 sets):
Locate chair straps in the
compartment under the seat.
Snap buckles together
(Figure 2a).
Orient chair straps with “loop”
facing outward threaded in
buckle as shown (Figure 2b).
Unbuckle the chair straps. With
“loop” facing outward, insert
sewn ends of chair straps into
outer slots at back of booster
(Figure 2c).
With “loop” facing outward,
insert sewn ends of chair straps
into slots at sides of booster
(Figure 2d).
Pull each strap to ensure strap
is secure. Chair straps should
not come out when pulled
(Figure 2e).
2 Correas de la silla
(2 conjuntos):
Ubique las correas de la silla en el
compartimiento debajo del asiento.
Abroche las hebillas (Figura 2a).
Oriente las correas para silla con el
“lazo” hacia afuera enlazado en la hebilla
como se muestra (Figura 2b).
Desabroche las correas de la silla. Con el
“lazo” hacia afuera, inserte los extremos
cosidos de las correas para silla en las
ranuras exteriores ubicadas en la parte
posterior del asiento elevador (Figura
2c).
Con el “lazo” hacia abajo, inserte los
extremos cosidos de las correas para
silla en la ranuras ubicadas en los
laterales del asiento elevador (Figura
2d).
Tire de cada correa para asegurarse de
que estén bien aseguradas. Las correas
para silla no deben salirse al tirar de
ellas (Figura 2e).
2e
4x
NOTE: Seat must be in upright position for booster seat
mode.
Booster seat fits most kitchen and dining room chairs with a minimum measurement of
12” W x 16.25” D and backrest height of 12.5” H.
NOTA: El asiento debe estar en posición vertical para el modo de
asiento elevado.
El asiento elevador se adapta a la mayoría de las sillas de cocina y comedor con una medida mínima de
12” de ancho x 16,25” de profundidad y una altura de respaldo de 12,5” de alto.
1 Remove Seat:
The release seat button is
under the stool, toward the
back of the stool. Press seat
release button (Figure 1a)
and slide seat off (Figure
1b). Set aside stool.
1 Para quitar el asiento:
El botón de liberación del asiento está
debajo del taburete, hacia la parte
trasera del taburete. Presione el botón
de liberación del asiento (Figura 1a) y
deslice el asiento hacia afuera (Figura
1b). Ponga a un lado el taburete.
1b
Press
Presiona
1a
3b
Loop faces outward
Lazo hacia afuera
Loop faces outward
Lazo hacia afuera
Loop faces outward
Lazo hacia afuera
Outer slots
Ranuras exteriores
• Beginning in high chair mode, follow
“Using Booster” step 1 to convert to
tall stool.
• Remove all 4 thumbscrews from footrest.
• Reassemble brackets on footrest in wider
stool mode.
• Attach footrest to lower holes on
lower legs.
• Comenzando en el modo de silla alta, siga el
paso 1 de “Cómo usar asiento elevado” para
convertirlo en un taburete alto.
• Retire los 4 tornillos de mariposa del
reposapiés.
• Vuelva a montar los soportes en el
reposapiés en modo taburete (más ancho).
• Fije el reposapiés a los orificios inferiores de
las patas inferiores.
• Begin in high stool mode.
• Turn stool upside down.
• Press each lower leg pin and remove four lower legs from tall stool.
Child stool is complete.
• Turn tabletop upside down.
• Insert each lower leg into opening on tabletop until pin “clicks” into
place. The table is complete.
• Comience en el modo de taburete alto.
• Voltee el taburete.
• Presione cada pasador de la parte inferior de la pata y retire las cuatro patas inferiores
del taburete alto. El taburete del niño está completo.
• Dé la vuelta al tablero de la mesa.
• Inserte cada pata inferior en la abertura de la mesa hasta que el pasador haga clic en
su lugar. La tabla está completa.
Convert to High Stool Convertir en taburete alto
Convert to Child Stool and Table Convertir en taburete y mesa para niños
8
Care and Maintenance Cuidado y mantenimiento
One (1) Year Limited Warranty Garantía limitada de un año (1)
La firma Dorel Juvenile Group, Inc. asegura al comprador original que este producto (Silla Alta), está garantizado contra materiales
defectuosos o mano de obra deficiente durante un (1) año a partir de la fecha de compra, si se utiliza en condiciones normales. Si el
producto presentara materiales defectuosos o mano de obra deficiente, Dorel Juvenile Group, Inc. reparará o sustituirá el producto,
a nuestra discreción, de manera gratuita. El comprador cubrirá todos los costes relacionados con el envase y envío del producto al
Departamento de Relaciones con el Consumidor de Dorel Juvenile Group, a la dirección que aparece al inicio de este documento, y
los demás costes de transportación o aseguramiento relacionados con el envío. Dorel Juvenile Group cubrirá los costes de devolución
al comprador del producto reparado o sustituido. El producto debe enviarse en su envase original junto con una prueba documental de
la compra, ya sea el recibo de venta u otro medio demostrativo de que el producto aún esté dentro del período de garantía. Esta
garantía quedará anulada si el propietario hubiera reparado o modificado el producto, o si éste se hubiera dañado como consecuencia
del uso incorrecto.
Esta garantía excluye cualesquiera otras responsabilidades ajenas a la expresada más arriba, entre otras los daños incidentales
o consecuentes.
EN ALGUNOS ESTADOS NO SE PERMITEN LAS EXCLUSIONES O LIMITACIONES REFERENTES A LOS DAÑOS INCIDENTALES
O CONSECUENTES, DE MODO QUE LA LIMITACIÓN O EXCLUSIÓN ANTES EXPUESTA QUIZÁS NO SE APLIQUE EN SU CASO
PARTICULAR.
ESTA GARANTÍA LE OTORGA DERECHOS LEGALES ESPECÍFICOS Y ES POSIBLE QUE USTED TAMBIÉN CUENTE CON OTROS
DERECHOS QUE PUDIERAN VARIAR EN DISTINTOS ESTADOS.
High chair and trays: Wipe with soft, damp cloth and warm, soapy water and allow to
drip-dry. Tray insert is dishwasher safe.
Restraint system: Restraint and crotch straps should be surface washed and drip-dried
only. Do not place in washing machine or dryer.
Dorel Juvenile Group, Inc. warrants to the original purchaser that this product (High Chair), is free from material
and workmanship defects when used under normal conditions for a period of one (1) year from the date of
purchase. Should the product contain defects in material or workmanship Dorel Juvenile Group, Inc., will repair or
replace the product, at our option, free of charge. Purchaser will be responsible for all costs associated with packaging
and shipping the product to Dorel Juvenile Group Consumer Relations Department at the address noted on front page
and all other freight or insurance costs associated with the return. Dorel Juvenile Group will bear the cost of shipping
the repaired or replaced product to the purchaser. Product should be returned in its original package accompanied by
a proof of purchase, either a sales receipt or other proof that the product is within the warranty period. This warranty is
void if the owner repairs or modifies the product or the product has been damaged as a result of misuse.
This warranty excludes any liability other than that expressly stated previously, including but not limited to, any
incidental or inconsequential damages.
SOME STATES DO NOT ALLOW THE EXCLUSION OR LIMITATION OF INCIDENTAL OR CONSEQUENTIAL
DAMAGES, SO THE ABOVE LIMITATION OR EXCLUSION MAY NOT APPLY TO YOU.
THIS WARRANTY GIVES YOU SPECIFIC LEGAL RIGHTS, AND YOU MAY ALSO HAVE OTHER RIGHTS THAT MAY
VARY FROM STATE TO STATE.
Silla alta y charolas: Límpielas con un paño suave húmedo y jabonosa y enjuáguelo con agua tibia
y permita deje que se seque. La charola puede lavarse en lavavajillas.
Sistema de retención: Las correas de retención deben limpiarse en su superficie únicamente y solo
secado por goteo. No colocar en la lavadora ni en la secadora.
To Remove Seat Pad:
Unbuckle restraints (Figure 1a).
Slide crotch strap through slot in seat pad
(Figure 1b). The crotch strap remains
attached to the seat. Detach seat pad tabs
at the sides (Figure 1c). Detach waist strap
tabs at the back (Figure 1d). Reach under
seat pad to detach shoulder strap tabs
(Figure 1d). Lift pad off seat.
Machine wash seat pad in cold water on
gentle cycle. Do not bleach. Drip-dry.
Para quitar la almohadilla del asiento:
Desabroche las correas de sujeción (Figura 1a).
Deslice la correa de la entrepierna a través de la ranura
en la almohadilla del asiento (Figura 1b). La correa
de la entrepierna permanece unida al asiento.
Separe las lengüetas de la almohadilla del asiento.
Busque debajo del almohadilla del asiento para separar
las lengüetas superiores (Figura 1c). Levante la
almohadilla del asiento (Figura 1d).
Lave a máquina la almohadilla del asiento en agua
fría en un ciclo suave. No usa blanqueador. Seca
al aire.
To Reassemble Seat Pad:
Confirm straps are untwisted. First, push
shoulder strap tabs through shoulder slots
according to your child’s size (Figure 2a).
Then, pull top of seat pad over the seat
(Figure 2b).
Push ends of waist straps through waist
slots according to your child’s size (Figure
2c). Outer slots are reserved for chair
straps.
Attach seat pad tabs through each side of
seat. Pull crotch strap through front slot.
Para volver a montar la almohadilla del asiento:
Confirme que las correas estén desenroscadas.
Primero, empuje las lengüetas de las correas
para los hombros a través de las ranuras para los
hombros según el tamaño de su hijo (Figura 2a).
Luego, coloque la parte superior de la almohadilla
del asiento sobre el asiento (Figura 2b).
Empuje los extremos de las correas de la cintura a
través de las ranuras de la cintura según el tamaño
de su hijo (Figura 2c). Las ranuras exteriores
están reservadas para las correas de las sillas.
Coloque las lengüetas de la almohadilla del asiento
a cada lado del asiento. Pase la correa de la
entrepierna a través de la ranura frontal.
1a 1c
1b
2b2a 2c
1d