
OWNER’S MANUAL
Washing Machine
Read This Manual
Use all instructions and explanation on
installation before use. Follow the
instructions carefully. Keep the operation
instructions handy for later use. If the
washing machine is sold or passed on,
ensure that the new owner always receives
this manual.
FP-90LTL065GETM-N2
FP-90LTL075GETM-N2

1
CONTENTS
SAFETY INSTRUCTIONS
Safety instructions .....................................................................
INSTALLATION
Product description .................................................................
Installation area ........................................................................
Unpacking the washing machine ......................................
Installation of drain hose ......................................................
Levelling the washing machine ............................................
Selection of tap ..........................................................................
Connection of inlet hose, tap and washing machine....
Preparation before washing...................................................
Washing
........................................................................................
After washing................................................................................
Washing matters needing attention ..................................
The usage of detergent and washing powder...............
Control pane ................................................................................
Options ..........................................................................................
Personalized setting of washing program........................
Operations of washing process.............................................
Washing program table ..........................................................
Maintenances
Cleaning and care ......................................................................
Cleaning the cabinet..................................................................
Trouble shooting.........................................................................
Technical information ..............................................................
2
8
9
9
9
10
11
11
12
12
12
13
13
14
15
16
16
17
18
18
19
20
OPERATIONS

SAFETY INSTRUCTIONS
For your safety, the information in this manual must be
followed to minimize the risk of fire or explosion, electric
shock, or to prevent property damage, personal injury or loss
of life.
2
SAFETY INSTRUCTIONS
• This appliance is not intended for use by persons
(including children) with reduced physical, sensory or
mental capabilities or lack of experience and knowledge
unless they have been given supervision or instruction
concerning use of the appliance by a person responsible
for their safety.
•
•
•
• The openings must not be obstructed by a carpet.
• This appliance is intended to be used in household
and similar applications such as:
− staff kitchen areas in shops, offices and other working
environments;
− farm houses;
− by clients in hotels, motels and other residential type
environments;
− bed and breakfast type environments;
− areas for communal use in blocks of apartments and
laundry shops.
Children should be supervised to ensure that they do
not play with the appliance.
The new hose-sets supplied with the appliance are to
be used and that old hose-sets should not be reused.
If the supply cord is damaged, it must be replaced by
the manufacturer, its service agent or similarly qualified
persons in order to avoid a hazard.

SAFETY INSTRUCTIONS
3
Model
Washing Capacity
Standard Water Pressure
Warning!
This combination of symbol and signal
descriptive indicates a potentially dangerous
situation which may result in death or serious
injuries unless it is avoided.
Explanation of the symbols:
Caution!
This combination of symbol and descriptive
word indicates a potentially dangerous situation
which may result in slight or minor injuries or
damage to property and the environment.
FP-90LTL065GETM-N2
6.5kg 0.03MPa~0.8MPa
FP-90LTL075GETM-N2
7.5kg 0.03MPa~0.8MPa
4
SAFETY INSTRUCTIONS
Electric shock!
Warning!
Note!
This combination of symbol and descriptive word
indicates a potentially dangerous situation which
may result in slight or minor injuries.
•
• Do not put washing machine humid place.
• Hands not be inserted into .
• Before maintenance the , unplug the
appliance from the
• Always unplug the machine and turn off the water supply
after use. Be aware of the maximum and minimum inlet
water pressure which is in megapascals (M a)
• To ensure your safety, power plug must be inserted into
an earthed three-pole socket. Check carefully and make
sure that your socket is properly and reliably earthed.
• Make sure that the water and electrical devices
are connected by a qualified technician in accordance with
the manufacturer's instructions and l
ocal safety regulations
・This product is for domestic use only.
This is for indoor use only.washing machine
this in a
should the rotating drum
doing any unit
electrical source.
provisions
P

5
SAFETY INSTRUCTIONS
• he appliance used by children
with reduced physical sensory or mental capabilities or
lack of experience and knowledge if they have been
given supervision or instruction concerning use of the
appliance in a safe way and understand the hazards
involved. Children shall not play with the appliance.
Cleaning and user maintenance shall not be by
children without supervision.
• Animals and children
Check the machine before every operation.
• should be supervised that they do not play with
the appliance.
• Keep children and far away from the machine
during operation.
T
done
may climb into the machine.
can not be
Children
animals
and persons
Risk of explosion!
•
washed in, soaked in, or dabbed with combustible or
explosive substances( such as wax, oil, paint, gasoline,
degreasers, dry-cleaning solvents, kerosene, etc.) This may
result in re or explosion.
• Rinse the clothes or wash articles thoroughly by hand
putting them in the appliance .
Do not wash or dry articles that have been cleaned in,
.
before
Risk to children!

6
SAFETY INSTRUCTIONS
Caution
• This washing machine is for indoor use only.
• built-in installation.It is not intended for
• The openings must not be obstructed by a carpet.
• ashing machine shall not be installed in bath room
or very wet rooms as well as in the rooms with explosive
The w s
or caustic gases.
• Remove all before using
Otherwise, serious damage may result.
packaging materials the appliance.
• The washing machine with single inlet valve may only
connected to a cold water supply. be
• The plug must be accessible after installation.
• Avoid place where the machine is exposed to direct
sunlight .Plastic parts may become deformed or discolored
and where the machine may become frozen during
cold weather.
Risk of damaging appliance!
Installing the product!
• Your product is only for home use and is only designed
fo extiles suitable for machine washing.
• Do not climb up and sit on top cover of the machine.
• Cautions during Machine Handling and transport:
1.The accumulated water shall be drained out of the
machine.
2.Handle the machine carefully. Never hold
part the machine while lifting.
r t
the
protruding
s of
3.This appliance is heavy, it should be transported carefully.

7
SAFETY INSTRUCTIONS
Operating the appliance!
• Before washing the clothes first time, the product for the
shall be operated without clothes using tub clean as the
recommended program
• Flammable and explosive or toxic solvents are forbidden.
Gasoline and alcohol etc. shall not be used as detergents.
Please only select the detergents suitable for machine
washing, especially for top-loading fully automatic washing
machines.
• Make sure that all pockets are emptied. Sharp and rigid
items such as coins,
may cause serious to this machine.
brooches, nails, screws or ston s etc.
damage
e
• Never rell the water by hand during washing.

INSTALLATION
Product Description
Note!
Accessories
spring clamper drain hoseInlet hose ass manual
screw
cabinet baseboard
• Note: if the drain hose is already installed on the machine, then there
is no spring clamper and drain hose in the accessories.
Note!
Frame
Top lid
Drain hose
Handle
Power cord and plug
Control panel
Cabinet
Adjustable foot knob
Water inlet valve
8
• ll illustrations in this manual are for reference only.
lease refer to the product ,for actual appearance of the parts
A
P .

Installation of drain hose
1. Completely sleeve the drain hose over the water outlet.
2. Fix and tighten it with the spinning clamper.
( As shown in the figure )
INSTALLATION
9
Installation Area
Before installing the machine, the location characterized
follows shall be selected:
1.Rigid, dry, and level surface
2.Avoid direct sunlight
3.Sufficient ventilation
4.Room temperature is above 0 C
5.Keep far away from such as coal or gas
as
fuel sources
Unpacking The Washing Machine
1. Remove the cardboard box and styrofoam packing.
2. Lift the washing machine and remove the base packing.
3. Remove the tape securing the power supply cord and
drain hose.
4. the inlet hose from the drum.Pick up
•
•
the
Stability is important to prevent the product
from !
Make sure that the product not stand on
power cord.
moving
dose
Warning!
•
be
•
Packaging material (e.g. Films, Styrofoam) can
dangerous for children.
There is a risk of suffocation ! Keep all packaging
well away from children. materials
Warning!
w
w
W> 20mm

INSTALLATION
10
How to place the end of drain hose:
•
• Position drain hose properly otherwise
water leakage.
Do not kink, protract or compress the drain hose.
, ,
• If drain hose is too long, do not force it into washing machine as this will
cause abnormal noises.
the improper position may
result in
Warning!
water trough
Less than 3m
Less than 15cm
1. Check if the are properly attached
the cabinet. If not, please rotate them to
their original position and tighten the nuts.
2. Check alignment of the product with a
leveler and do the succeeding steps if
necessary.
3. Loosen the lock nut and
feet to
4.
rotate the foot
either clockwise or counter clockwise ,
until it closely contacts with the floor.
Assure that the lock is secure and then
alternately press the four top corners of the
machine, to check if the proper adjustment
has been done.
• The lock nuts on all four feet must be screwed tightly against the housing.
Levelling the washing machine
Warning!
Lock nut
foot
Raise
Lower
lockloosen
correct
wrong
Drain direction
Left or right
Illustration
Left
Right
INSTALLATION
11
Wall
Slide bushing
1:Connection between ordinary tap and inlet hose.
2:Connection between screw tap and inlet hose.
• To prevent leakage or water damage, follow the instructions
Do not kink, crush, modify or cut the .
above-mentioned !
• water inlet hose
Warning!
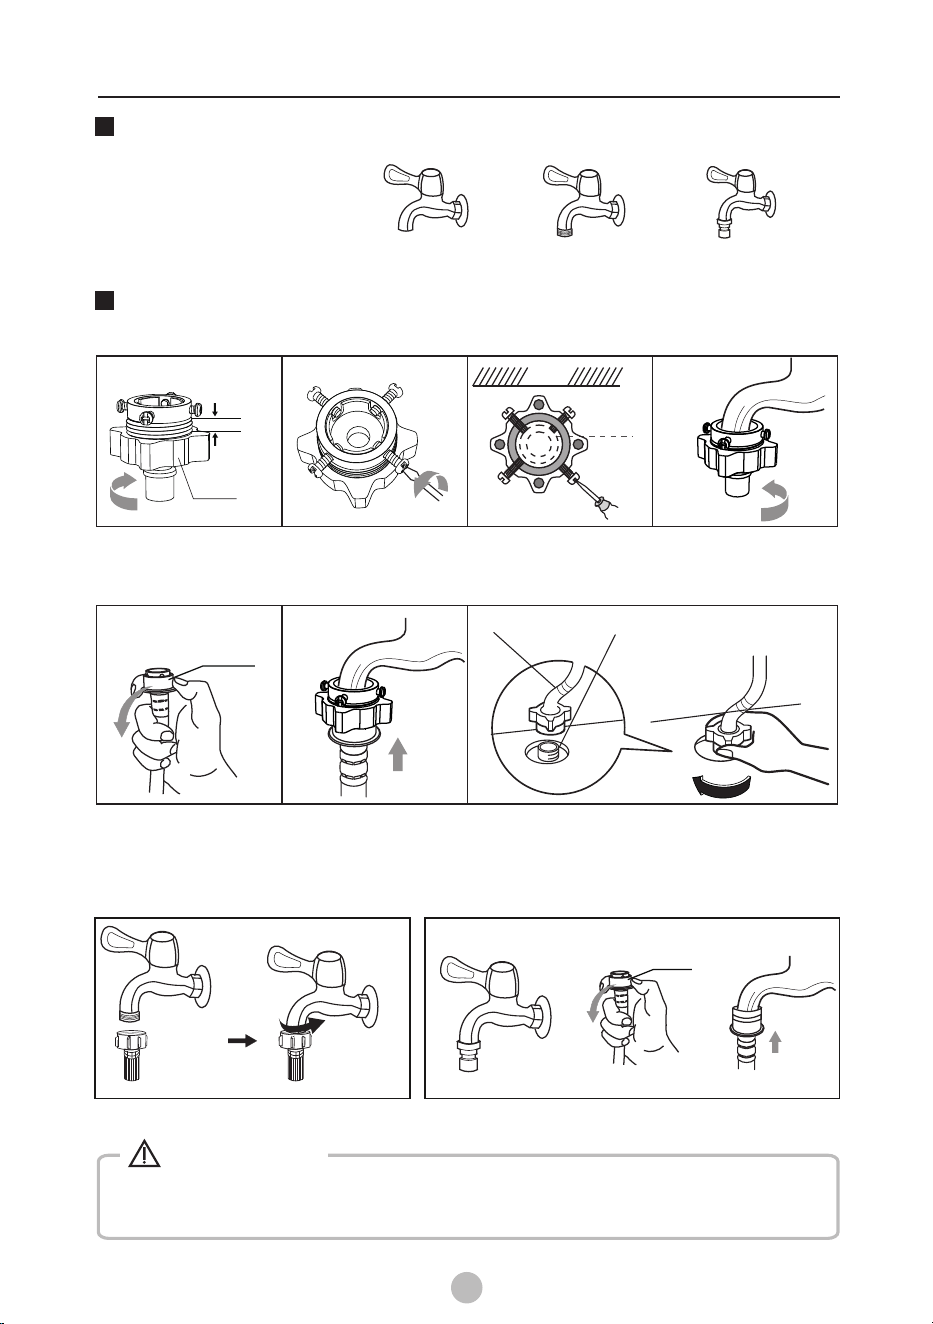
Selection of tap
Please select
tap.
appropriate
Connection of inlet hose, tap and washing machine
clamp nut
tap
1.Loosen clamp nut
to show 5mm groove
2.Loosen four
screws
3.Set connecting base
on tap and tighten
evenly screws
4.Tighten clamp nut
inlet valve
inlet hose
slide bushing
5.Press slide bushing,
insert inlet hose into
connecting base
6. onnection nishedC 7.After connection and installation,
check if there is water leakage
tap with threads and inlet hose
special tap for washing machin
e
Screw tap
Special washing
machine tap
Ordinary tap
5mm
Caution!
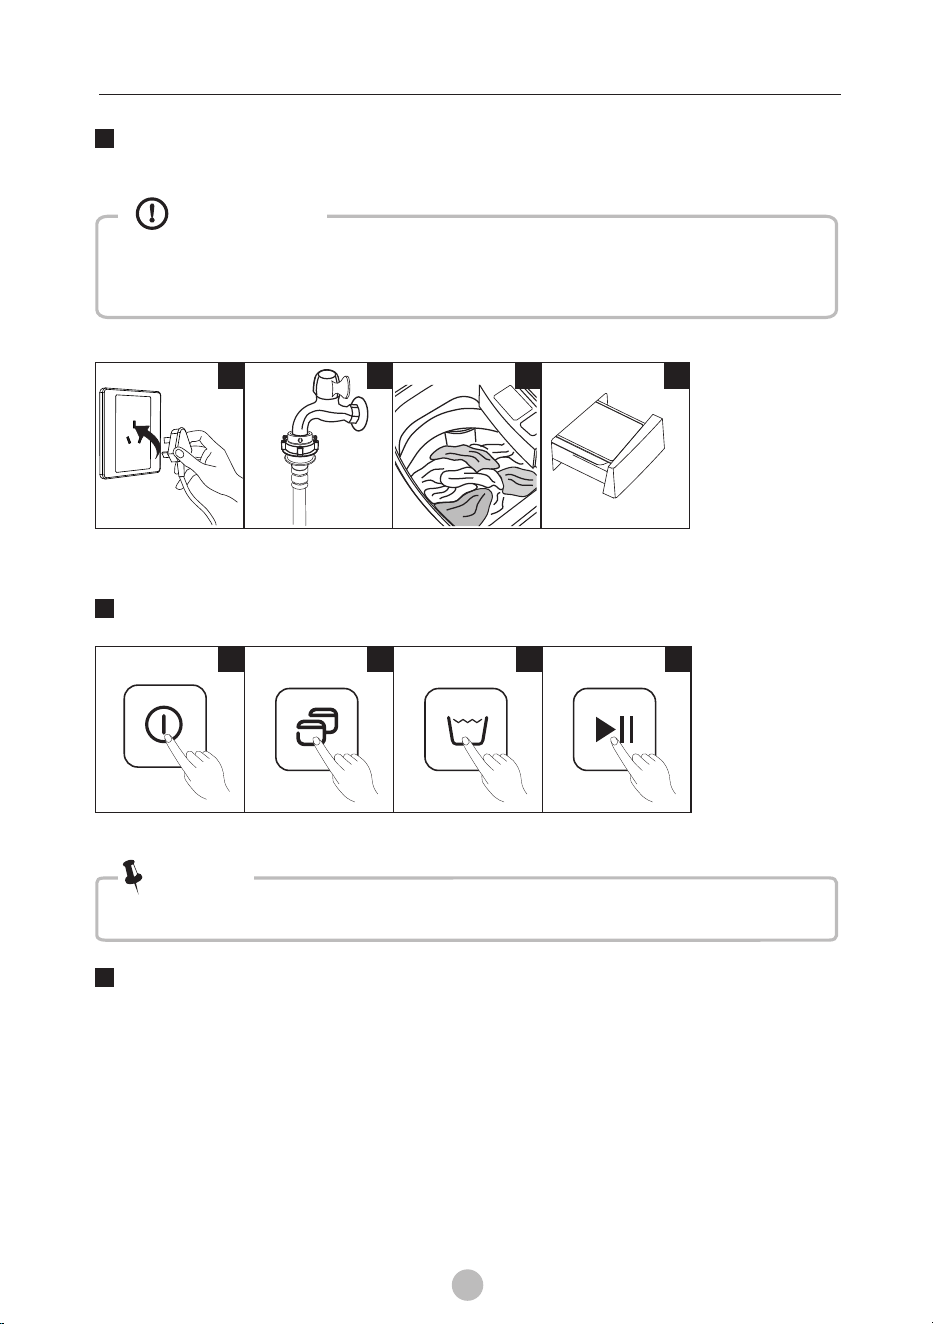
Open tap
Plug in
Add detergent
1 2 3 4
Washing
Power On
Start up
1 2
• & 3 may be skipped. If default is selected, step 2
Note!
load and Close lid
3 4
Select Program Select Level
Preparation Before Washing
OPERATION
12
Before washing, please make sure installed properly.
Before washing first time, the washing machine shall be operated
•
•
that the unit is
for the
without clothes using tub clean as the recommended course.
After Washing
The buzzer will beep after washing is nished and the power supply will be
cut o automatically . At this point , you may unload the laundry.

OPERATIONS
13
Tie tassels into a knot,
fasten zippers and buttons
• Washing a single piece of clothing may cause , severe unbalance and
consequently sound an alarm. In this case, it is suggested to add one or two
more pieces of clothing to the wash load that will also make smoother.
• Do not wash clothes stained with kerosene ,touching gasoline, alcohol and
other flammable materials.
spinning
• Before washing , lease check the clothes labels and the detergent usage
instructions. se low-density detergent before wash suitable for washing
machines .
p
U
Take items out
of the pockets
Put small clothes into a
laundry net
Check the label
Washing matters needing attention
Turn the following clothes
inside out: those that easily
form ber on its surface
and those with long strands
of ber
Segregate clothes with
varying textures or materials
Warning!
• As for powder detergent that can form into clusters or masses, it is suggested
to dilute the detergent some water ,before pouring into the detergent
box, this will prevent the inlet of the detergent box from clogging and water
from over flowing during the filling process
• Choose the suitable type of detergent for the various washing temperature
to get the best washing effect with less water and energy consumption.
with
.
The usage of detergent and ashing powder w
OPERATION
14
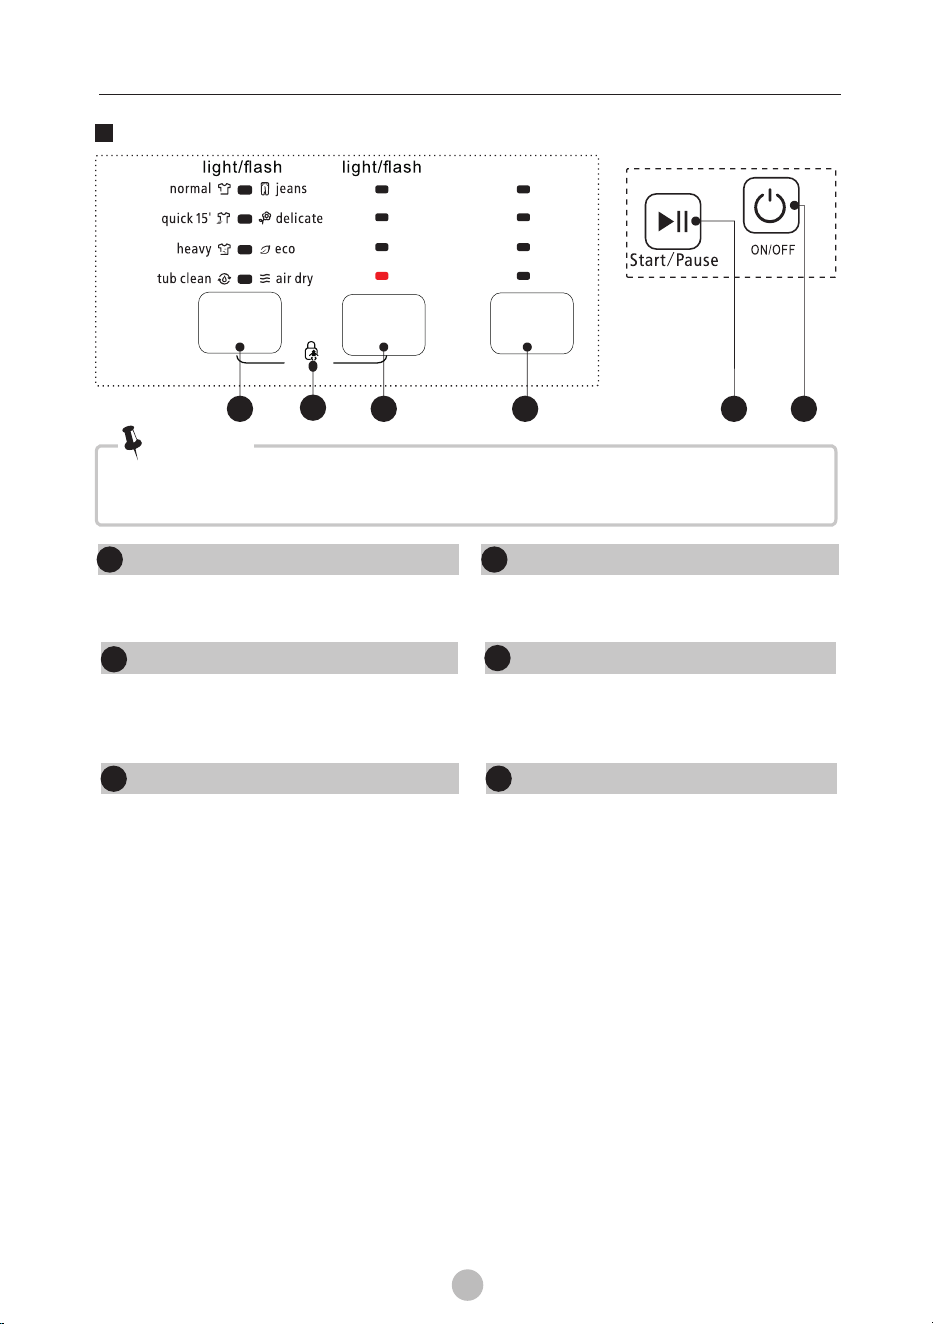
Control Panel
On/Off
Turn the unit on or off.
Start/Pause
Press the button to start or pause the
washing cycle.
Programmes
Select based on the laundry type.
Note!
1
1
4
1
2
3
5
Process
Child Lock
Wash
Rinse
Spin
Soak
Program
Water level
Process
The lights will indicate the
process/processes included in the
program.
Water level
There are eight water levels to choose
from (lowest to highest).
Child Lock
To activate, press the Program &
Water level buttons, at the same time.
All buttons, except the power buttons,
will be disabled. To de-activate, press
again the Program & Water level
buttons, at the same time
6
3 12
4
6
5
1
3
5
7
2
4
6
8
This is for reference only. Please refer to the product ,for
actual appearance.
• illustration

Water Level
Option
15
Allows you to select the water level, depending on the clothing category,
degree of soiling, and washing habits.
You can choose from the following: wash only, spin only, number of rinses,
with or without soaking, and other settings.
OPERATION
Process
10
16
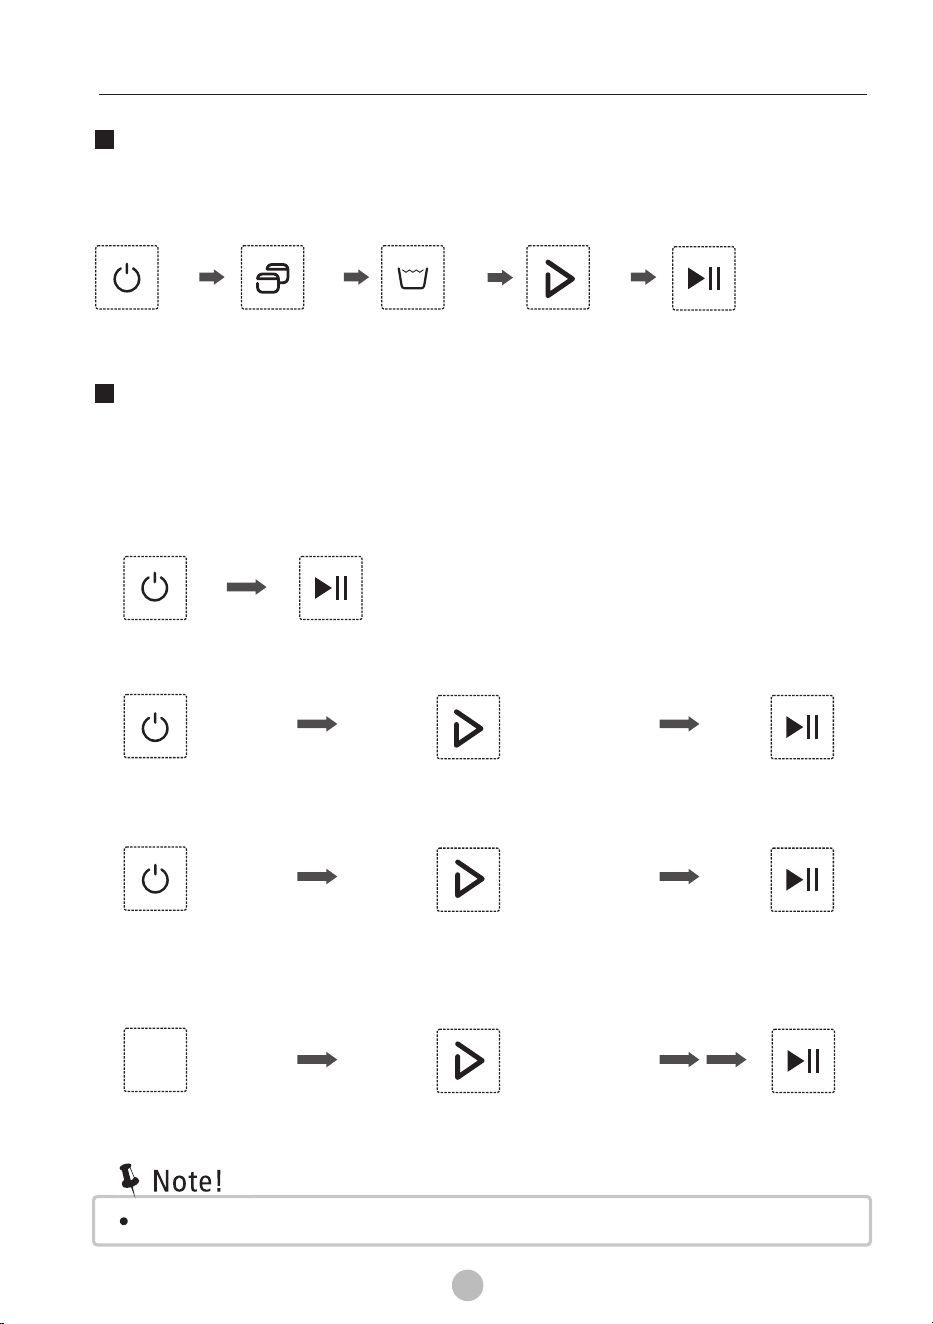
Process
On Start
Water Level
Program
Personalized setting of washing program
Operations of washing process
OPERATION
(Power)
Wash Spin+Rinse+
One Touch Smart Wash
Spin
Start
On
Start
Start
Note: Other process combinations are similarly set, as the above examples.
Wash
Start
keep pressing the Process
button until only the Wash
light is on.
keep pressing the Process
button until only the spin
light is on.
keep pressing the Process
button until the Wash, Rinse,
& Spin lights are on.
Customers can select the washing program according to actual need, and set
washing, rinsing & spinning & water volume function function
On
(Power)
On
(Power)
On
(Power)
The user can set a single process or combinations of washing, rinsing and
spinning freely according to the need. Detailed operations are as follows
for different models:
Washing Program Table
10
17
OPERATION
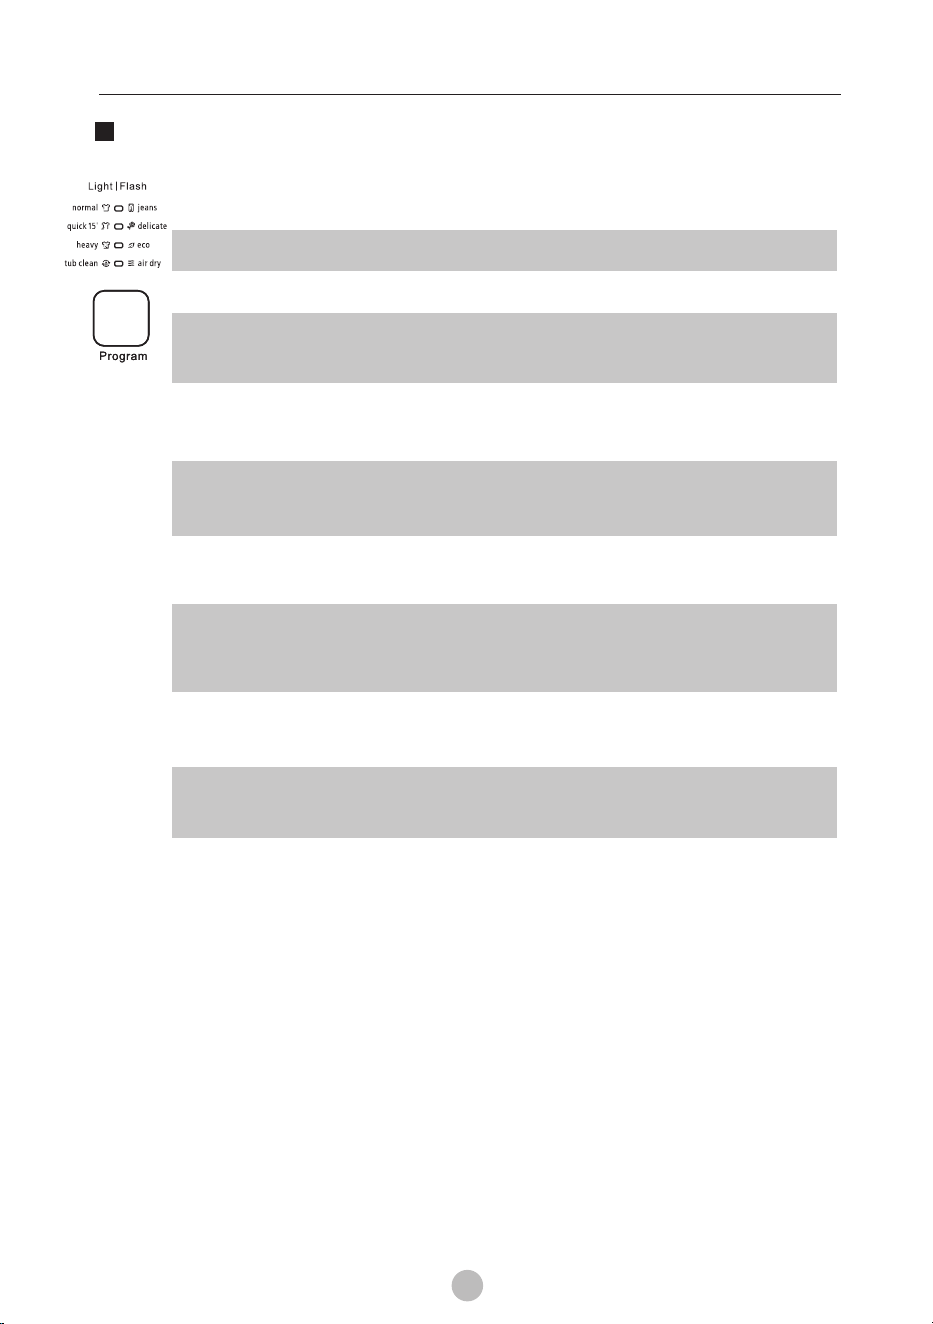
Air dry
Spins the clothes, to extract water, without heat application.
Simulates the result of drying clothes in a room.
Program
The washing machine will select the water level automatically
according to the load weight.
1. When there's water in the tub, this function is not available;
2. Before pressing [Start/Pause] button, if the user selects the
water level, there will be no fuzzy weighing function;
3. After pressing [Start/Pause] button, the washing machine
will run the fuzzy weighing function. The user can also select
the water level as needed.
Standard fabric washing program, suitable to wash cotton
fabric. Washing is done once, twice for rinsing and the spin
time is a bit long.
Quick:
(Quick 15’)
Suitable to wash lightly - stained clothes and clothes
for summer.
Delicate:
Mid/High/Low water level selection, the tempo is soft,
slow washing and spinning speed, for minimal wear
and deformation.
Jeans:
Suitable to wash heavily-stained/ thick clothes.
Fuzzy
weighing:
Normal
Heavy The washing ability is strong, thereby, washing heavily-soiled
clothes better
For lightly- soiled clothes, rinsing is done once, in order to
save water
Tub clean
Programs are available according to the laundry type.
Only for washers having these functions
Cleans the inner and outer surface of the tub, by running a
program (wash, rinse, & spin) with water only (no clothes).
ECO
10
18
.
MAINTENANCE
• Before your maintenance starts, please unplug the machine and close the tap.
Cleaning the cabinet
Proper maintenance the washing machine can extend its
working life. The surface can be cleaned with diluted
non-abrasive neutral detergents when necessary. If there is
any water overflow, use wet cloth to wipe it off immediately.
No sharp items are allowed.
of
a
Formic acid and its diluted solvents or equivalent are forbidden, such as
solvents or chemical products ,etc.
•
alcohol,
Warning!
Note!
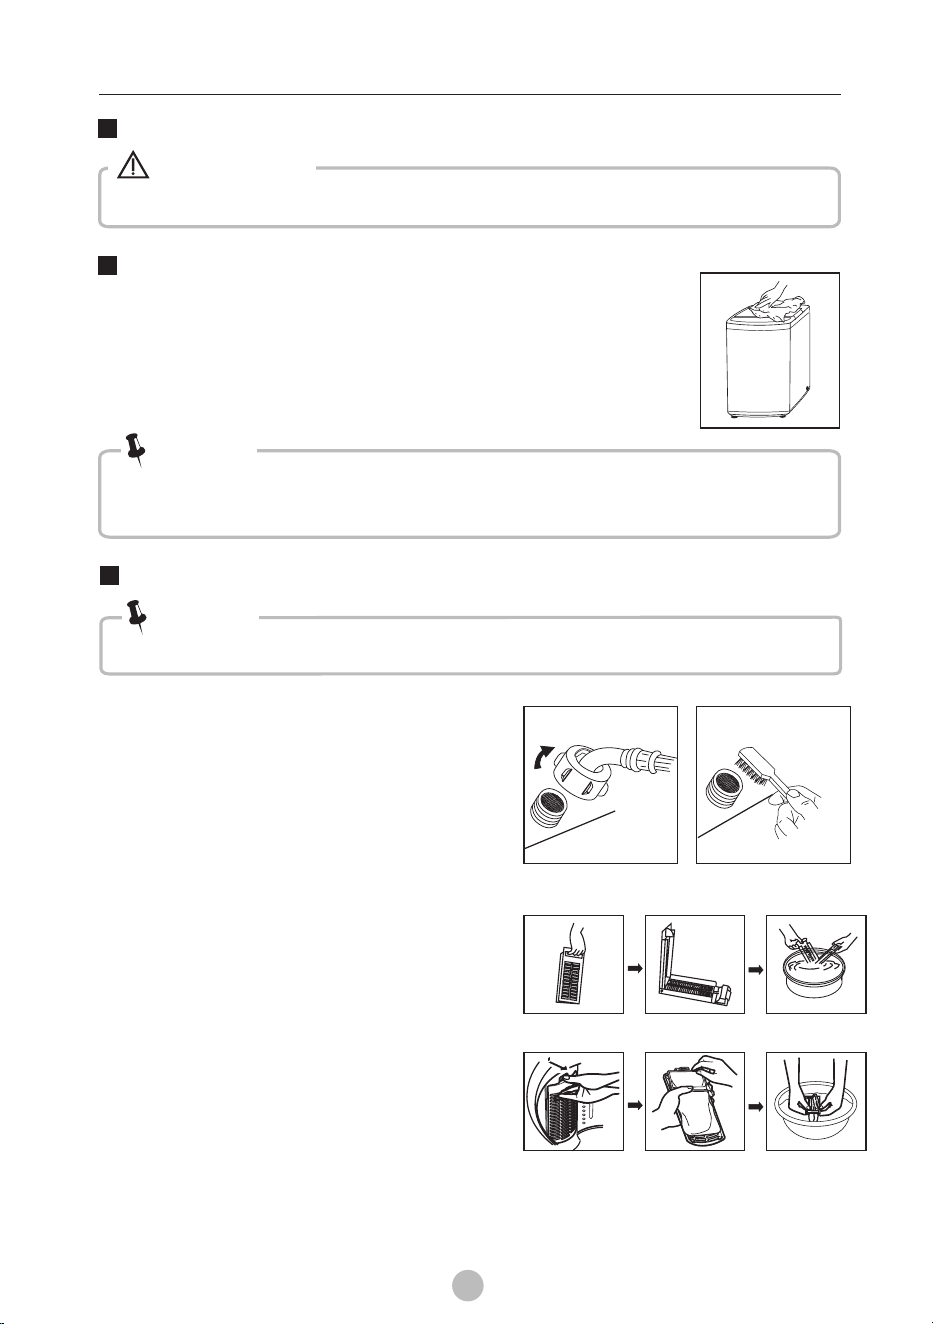
Cleaning And Care
Cleaning the inlet filter
• Inlet filter must be cleaned if pressure of water from the inlet drops.
Washing the filter in washing machine:
1.
Screw off the inlet pipe from the of the
machine.
2.Pull out the filter with ong nose
pliers and reinstall it back after being
washed.
3.Use to clean the filter.
4.Reconnect the inlet pipe.
the
back
a pair of l
a brush
Note!
1.There is a built-in lint lter in your washer. It
can help to collect lint during washing cycle.
2.It is suggested to clean the lint filter every
10 cycles.
3.Take it out and clean the filter with water.
Then place it back into the washer.
Lint lter cleaning
10
19
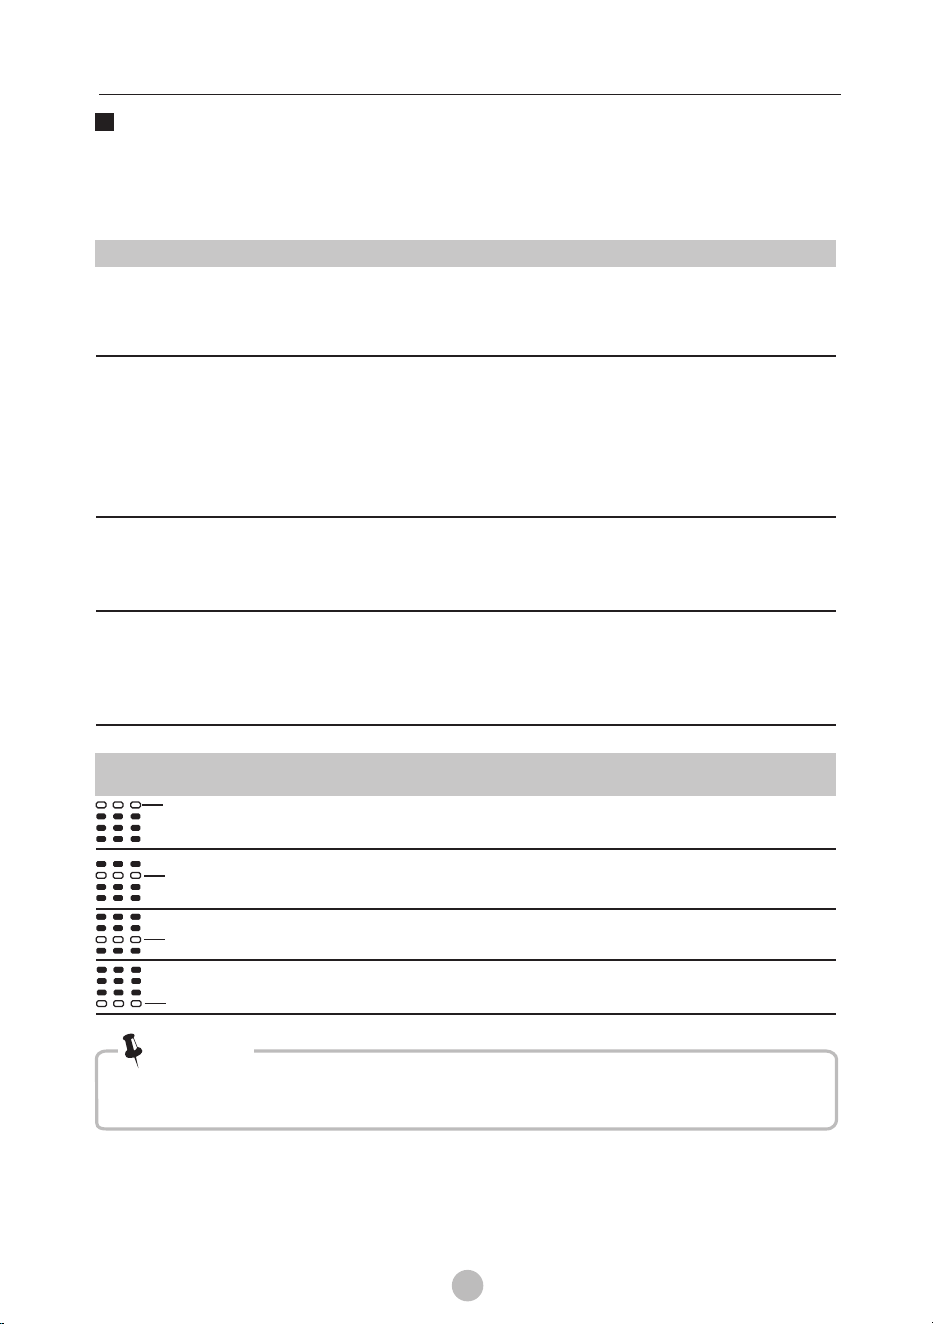
Troubleshooting
• After checking, try to use the appliance again. If the problem persists
or the display shows other alarm codes again, contact the service center.
Note!
Description
Reason
Solution
Check the water tap is
opened or not.
Alarm for abnormal
water filling.
Alarm for lid not closed
before wash and spin.
Close the lid.
MAINTENANCE
flashes/
blinks
flashes/
blinks
Description
No washing
Inspection Items
If the power is o or the fuse is burned out.
If the water reache required water level.(The washer will
not work if the water amount does not reach the required water level)
The power supply volteg is too low.
volume the
No water flows in
If the power is o or the fuse is burned out.
If the water supply is cut o or the water pressure is too low.
If the inlet hose is properly connected and the water tap is opened.
If the ltering screen of inlet valve is blocked by dirt.
If the coil of the inlet valve is damaged.
If the "Start / Hold" button is pressed after the power switch is pressed.
Abnormal draining
If the end of the water drain hose is placed very high.If the end of
water drain hose is immersed in and blocked by a pool of water.
If the internal rubber ring of drain valve is blocked by dirt.
Abnormal spin
If the lid is closed.
If
If the washer is not placed in stable condition or it is placed
state. (The ground is not at).
top
most of the clothing are at one side of the drum or if too many
clothes are loaded in the machine.
an inclined
If the appliance does not start or it stops during the operation, initially try to
nd a solution to the problem based on the table below. Otherwise, contact
the service center.
flashes/
blinks
flashes/
blinks
Unbalanced wash load
during spinning
Evenly distribute the clothes in
the drum by hand.
Check the water level
sensor and drain pump.
Alarm for water
unfinished water draining

10
20
Technical Specifications
MAINTENANCES
Standard Water
Pressure
Power Supply
Dimension
(W*D*Hmm)
Rated
Power
Net
Weight
Washing
Capacity
Model
0.03MPa~0.8MPa
0.03MPa~0.8MPa
FP-90LTL065GETM-N2
FP-90LTL075GETM-N2
6.5kg 515 x 525 x 915
515 x 525 x 915
29kg
29kg
400W
450W
220-230V AC, 60Hz
220-230V AC, 60Hz
7.5kg