Loading ...
Loading ...
Loading ...
38 49-3000368 Rev 0
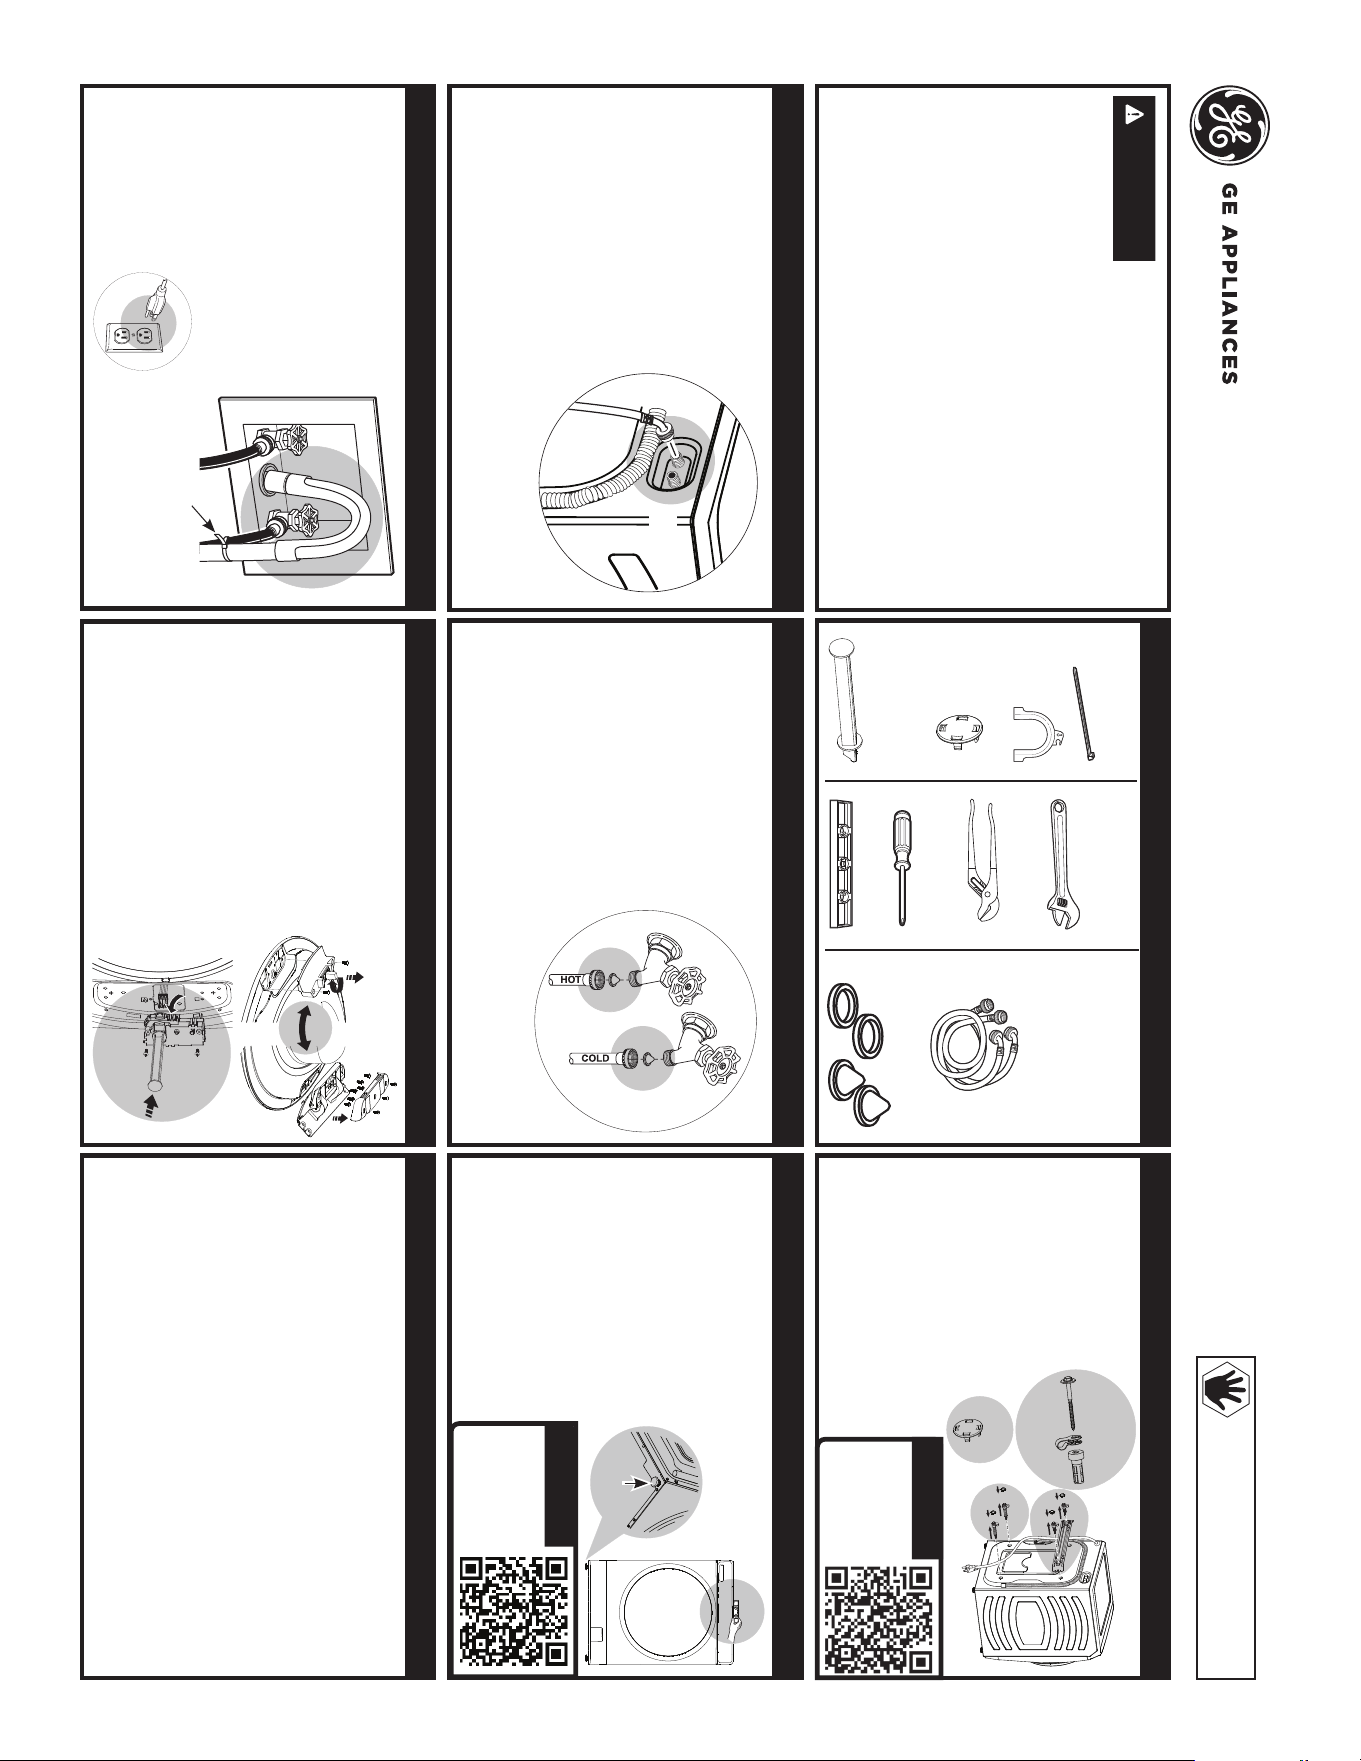
Water Hoses with
90° elbows (2)
Rubber washers (2)
and strainer screens
(2)
TOOLS NEEDED
Adjustable
wrench
Channel-lock
pliers
Phillips
Screwdriver
Level
PARTS SUPPLIED
Cable tie
Hose
guide
1 Unpack your washer
4 Shipping bolt
covers
Once the washer is within
4 feet of its destination, use
a 1/2” wrench or socket to
remove the following from
the back side:
• 4 shipping bolts
• 4 plastic spacers (including
power cord retainers and
rubber grommets)
• 1 bracket
Insert the hole caps in the bolt holes
once the shipping bolts and spacers
have been removed. Save all shipping
support hardware for future use.
Recycle or destroy the carton
after the washer is unpacked.
2 Remove shipping hardware
PARTS REQUIRED
(Sold separately or
included with the
GFW510 model)
GE Appliances recommends inlet hoses that have a 90° bend at one end.
The 90° bend should be installed at the washer as shown above.
• Run water from both faucets
to flush the lines and remove
particles that might clog the water
valve screens.
• Ensure that a rubber washer is
in the end of the hot and cold
hoses.
• Connect the inlet hoses to the hot
“H” outlet and cold “C” outlet.
• Hand-tighten and then tighten
them another 2/3 turn with pliers.
Do not crossthread or over-tighten
these connections.
3 Connect hoses to washer
Scan this
code to watch
a video on
Step 2.
• Ensure that a screen washer is
inserted into the faucet end of
both hoses with protruded side
facing the faucet. If a rubber
washer is already inserted,
remove before inserting screen
washer.
• Connect the inlet hose from
the “H” outlet to the hot faucet
and the inlet hose from the “C”
outlet to the cold faucet.
• Hand-tighten and then tighten
them another 2/3 turn with
pliers.
• Turn on the water and check
for leaks.
4 Connect hoses to water supply
• Gently rock the washer into
final location, ensuring inlet
hoses do not become kinked.
• Do not use door or dispenser
drawer to lift the washer.
• Place level on top.
• Adjust the front leveling legs
up or down to ensure the
washer is resting solidly.
• Turn the lock nuts on each
leg up toward the base of
the washer and snug with a
wrench.
• Level washer both side-to-side
and front-to-back.
5 Level your washer
• Attach U-shaped hose guide to
end of drain hose.
• Place hose in laundry tub or
standpipe and secure with cable
tie.
• If placed in standpipe, the end
of the drain hose should extend
only 4 to 7 inches down the pipe.
6 Install drain hose and plug
• Plug washer into
a grounded outlet.
Do not use an
extension cord or
adaptor plug.
7 Optional: Reverse the washer door 8 Final installation checklist
Video
QUICK INSTALLATION GUIDE
DO NOT DISCARD
KEEP FOR FUTURE USE
STOP
Lock Bar (For
Reversing the
Door Swing)
Remove
Install
Leveling
Leg
L
e
v
e
l
Cable
Tie
• If you desire to reverse the door,
perform step 7 now.
Main power is turned on. The washer is plugged in.
Faucets are turned on. Water hoses are connected securely
ZLWKQRඇHDNVDWERWKHQGV
Unit is level and all legs are on the floor.
Shipping bolts and spacers are removed and stored for future
use.
Drain hose is placed in tub or standpipe and secured with a
cable tie.
Run a load of clothes using the Quick Wash cycle. Check for
leaks.
When the load is spinning at high speed, ensure that the
washer and leveling legs are stable.
• While supporting the open door,
remove the screws from the hinge.
• Remove the door hinge and cover.
• Remove the door striker assembly,
reverse the striker and replace the
assembly on the opposite side.
• Replace the door hinge and cover
on the opposite side.
• Remove the terminal holder and
disconnect the pin connector.
• Remove lock assembly and install
on opposite side.
• Reconnect pin connector and
replace the holder.
• Replace the door assembly.
H
(Hot)
C
(Cold)
For your safety
• To reduce the risk of fire, electric shock, or injury
to persons, read the IMPORTANT SAFETY
INFORMATION before operating this appliance.
• Do not install or store appliance in an area where it
will be exposed to dripping water or outside weather
conditions. See Location of Your Washer section.
• NOTE: This appliance must be properly grounded
and installed as described in this manual.
Electrical service to the washer must conform with
local codes and ordinances and the latest edition
of the national Electrical Code, ANSI/NFPA 70.
WARNING
Scan this
code to watch
a video on
Step 5.
Video
Loading ...
Loading ...
Loading ...