
140519
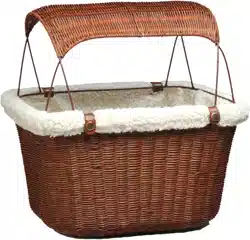
Deluxe Tagalong™ Bicycle Basket
Care & Use Guide
Thank you for purchasing the Solvit Deluxe Tagalong™ Bicycle Basket. The carton should contain: the main basket section;
two side panels; one padded bottom panel, one sewn-in safety leash, one shoulder strap, one removable sunshade and a
mounting bracket assembly.
Assembly of the basket: The front and back interior
hard panels are pre-installed in the basket. Install the
side panels and bottom panel as follows:
1) Lift the four padded flaps to make it easier to insert
the side panels into the basket.
2) Insert one side panel with one edge fitted snugly in
the corner of the basket, with the hook tape strip at the
top of the panel and facing to the inside
(figure A).
3) Push the panel so it fits flat along the side of the
basket and is snug in both corners. Repeat with the
other side panel. When both side panels are inserted
correctly, the basket should resemble figure B. The side panels
are designed to fit tightly – be sure to push firmly into the corners
and against the sides of the basket.
4) Insert the padded bottom panel, pad side up, into the bottom
of the basket. The small “pull tab” on the edge of the panel
should face the front. Again, this is intended to be a tight fit
when in the correct position. Hold the safety leash when
inserting the bottom panel so that it will be accessible after the
bottom panel is inserted. When the bottom and side panels are
firmly pushed in place, the basket should resemble figure C.
5) Pull the four padded fabric panels along the top into place
matching the loop tape on each padded section to the hook tape
on the inside walls of the basket, as in figure D.
Assembly and installation of the mounting bracket: (Use Figures E, F, and G for reference). A Phillips screwdriver is
required for assembly. The mounting system consists of one left and one right UPPER handlebar mount (marked L & R); two
LOWER handlebar mount pieces, four long screws, four short screws (use only one set of screws depending on your handlebar
size) and four nuts for fastening the handlebar mounts; one adjustable bottom strut with nut and bolt; and one wire bracket.
1) The
UPPER and LOWER handlebar mounts are fastened
together in the package – begin by
removing the nuts and screws and
separating the pieces (fig E).
2) The UPPER handlebar mounts
must be snapped on to the steel
wire bracket. First, insert the bent
section of the “L” side of the
bracket into the short channel at
the top of the “L” UPPER
handlebar mount and slide into the
hole at the end of the short
channel. Rotate the mount down
90 degrees until the wire stem
snaps into the channel on the side
of the mount. You will hear and
feel a definite “snap” when this
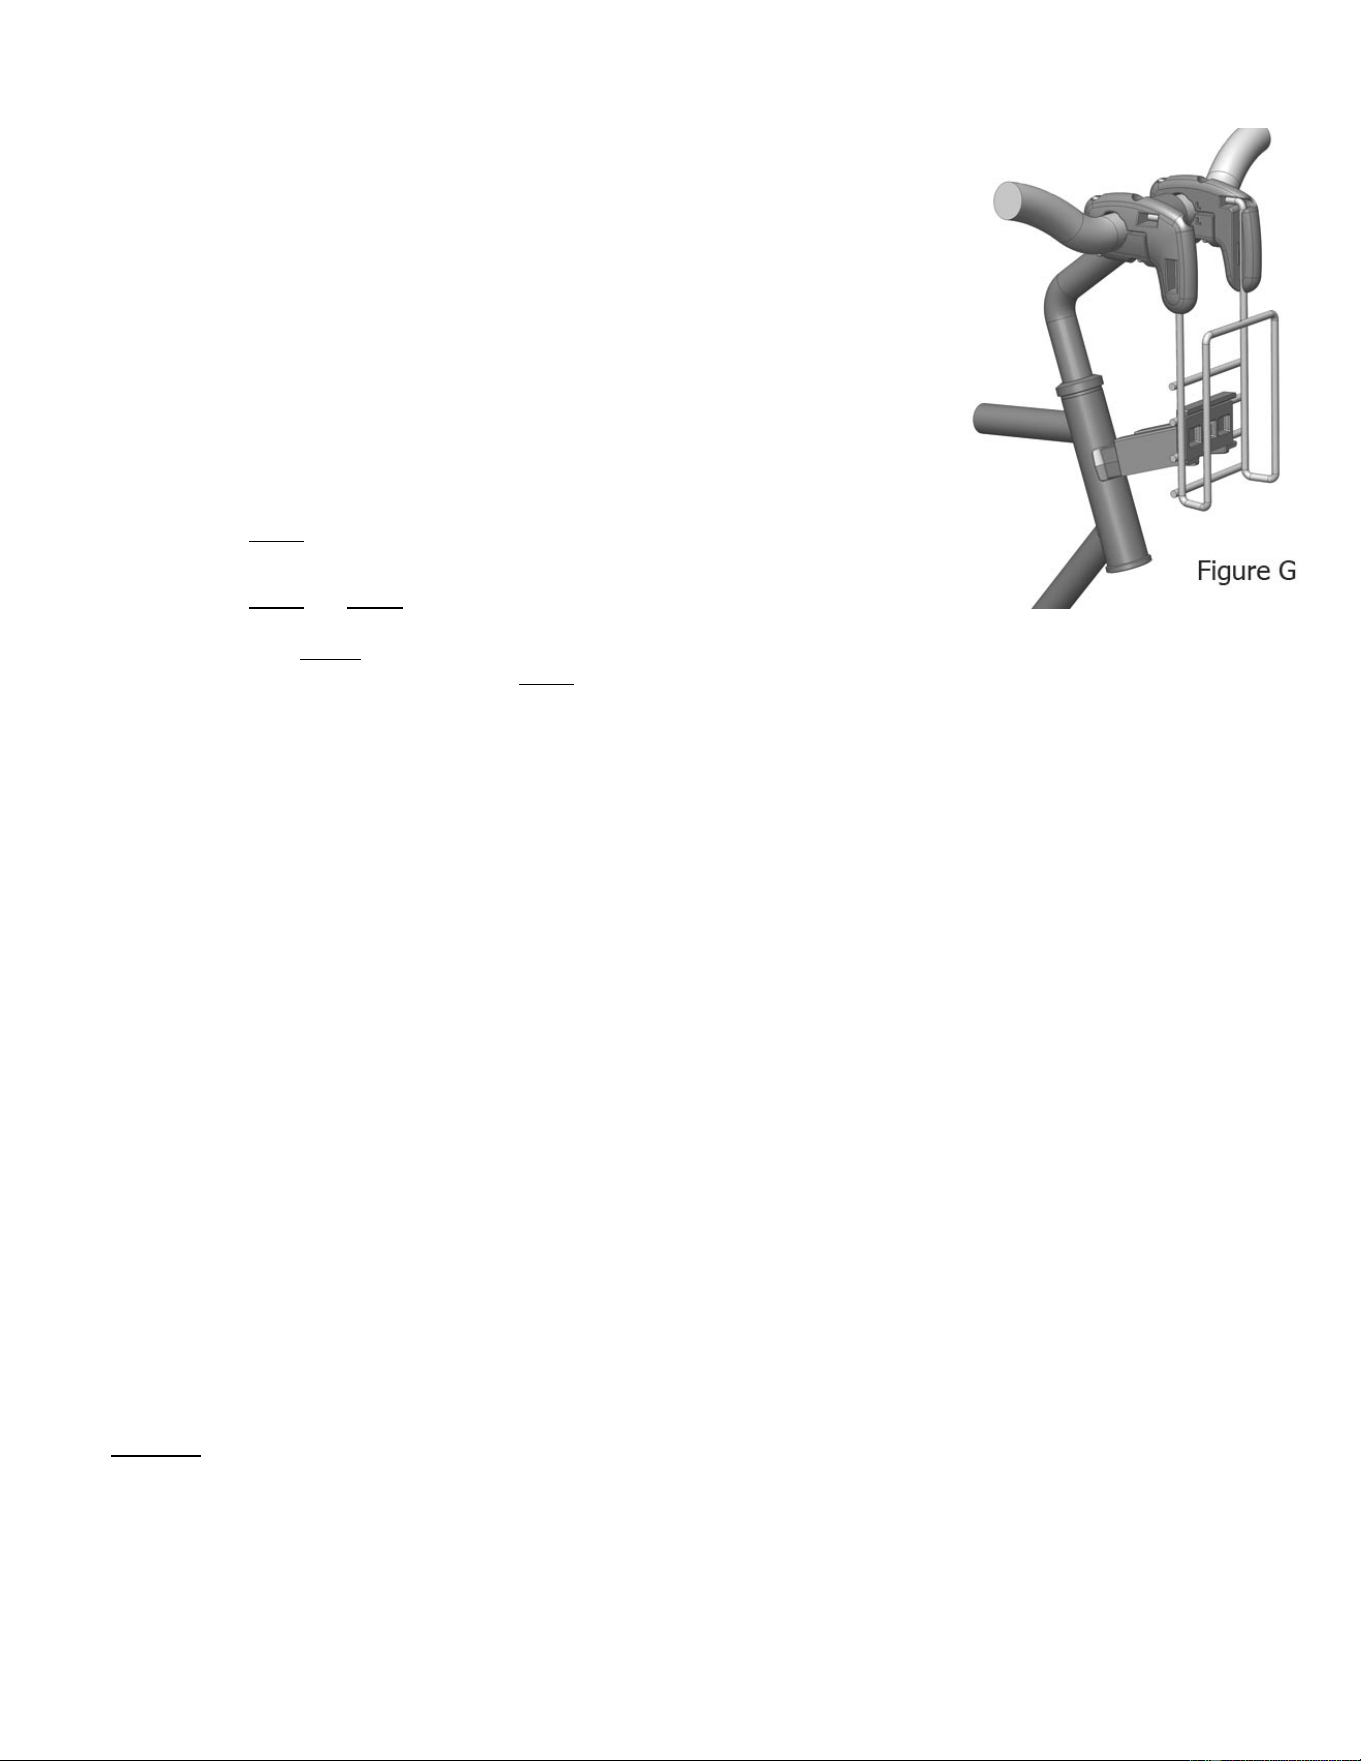
co
nnection is made to the steel bracket. Repeat for the “R” UPPER handlebar mount (figure F).
3) Attach the
bottom strut piece to the wire bracket by positioning the rear
clamp piece behind the wires, then pass the screw through this piece and
into the main section; tighten with the provided nut (Fig E).
4) Hang this partially-assembled bracket on the handlebars, taking care to route the brake
cables through and around the bracket to avoid unnecessarily bending or pinching your
cables. This is important, as bending the cables reduces their effectiveness and
longevity.
5) Carefully align one of the LOWER handlebar mount pieces to the corresponding
UPPER handlebar mount pieces and insert the screws down through both pieces. The
kit contains four long and four short screws. Determine which length screws will pass
completely through the LOWER mount piece. When fully tightened, the nuts should
fit into the hexagonal cavities on the underside of the LOWER handlebar mount, but do
not fully tighten the nuts at this time.
6) Attach the empty basket to the handlebar mounting system by sliding the pocket on the
back of the basket over the wire bracket.
7) Adjust the height and length of the bottom strut (as explained below) so the semi-circle
member rests firmly on the bicycle fork tube, and the basket tilts up slightly
at the front. The height
of the bottom strut can be adjusted by locating it on
any two adjacent wire cross-braces. The length
of the strut can be adjusted
by moving the nut/screw onto any of the four available holes. When you
are happy with the basket position, tighten all nuts and screws.
The basket can now be attached and removed from the bicycle quickly and easily (additional brackets are available for
mounting on a second bicycle). Before riding with the basket, connect the two side safety straps around the handlebars and
adjust the strap length to achieve a snug (not overly tight) fit. NOTE: Never ride with pets without fastening the safety straps.
Installation of the sunshade: The two shorter “legs” on the sunshade face to the front of the basket. To install, insert about
one inch of one of the shorter legs into the narrow, slanted pocket on the front face of the basket and insert the corresponding
longer leg into the narrow pocket on the back face of the basket. Repeat this step for the other longer and shorter legs. Once
all four legs are slightly inserted into their pockets, insert the legs further to achieve the desired height of the sunshade (all legs
should be inserted at least half-way into each pocket). When not in use, the sunshade can be stored underneath the padded
floor panel in the basket.
The Tagalong™ comes with an adjustable safety leash sewn into the bottom interior of the basket. Attach the safety leash to
your pet’s collar or harness. Make sure the safety leash is set short enough to prevent pets hopping over the side of the basket.
The basket can also be used as a carrier by connecting the shoulder strap to the D–rings located on each side of the basket.
Practice riding with the empty basket before riding with pets. We recommend short trips at first to allow pets to become
comfortable riding in the basket. Use caution, obey all traffic laws and always wear a helmet when riding! The basket is not
meant for use with extreme riding styles such as mountain biking. We hope you enjoy your Tagalong™ bicycle basket and the
added companionship it provides for you and your pet.
WARNING:
The additional weight of the basket adds weight to the handlebars and may make the bicycle less stable when parked
with the kickstand.
Always connect safety straps to handlebars before riding
Never leave pets unattended in the basket. Never walk away from a bicycle with a pet in the basket.
Warranty:
The Tagalong Deluxe Bicycle Basket is warranted to be free from defects in materials or workmanship for a period
of one (1) year from date of purchase. A copy of the original sales receipt is required for warranty issues.
SOLVIT Products, LP 1
114 W Harris Rd, Suite 101 Arlington, TX 76001
Tel: 866-6-SOLVIT (866-676-5848) Fax: (817) 466-2291
Email: customerservice@solvitproducts.com www.solvitproducts.com