
此页不印刷
共152页
封面150铜版纸覆哑膜
内页70g双胶纸
胶装
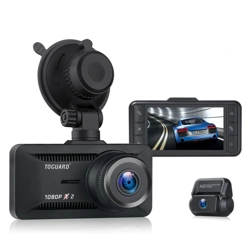
4K UHD
Dash Camera
Instruction Manual


contents
English-------------------------------------------------------------------------
Deutsch-----------------------------------------------------------------------
Français-----------------------------------------------------------------------
日本语--------------------------------------------------------------------------
Español--------------------------------------------------------------------------
Italiano--------------------------------------------------------------------------
1-21
25-45
49-70
73-93
97-118
122-142
V20230414

English
English


Important Notice
1. This product is intended for use in motor vehicle only. Don't install the
camera where it might block the driver's view of road (including the
mirrors) or the deployment of the airbag.
2. Then insert the memory card first, and format the memory card in
camera menu.
3. This camera records video at high resolution, Be sure to use U3 high
speed Micro SD card, 32GB or 256GB cards are recommended.
4. Make sure the camera lens is clean and there is nothing blocking the
lens.
5. Don't leave the camera in direct sunlight for a long period of time or
where the temperature could go above 149°F (65°C)
6. The camera is equipped with internal GPS function.
· 2 ·

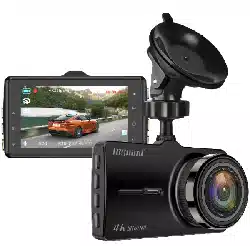
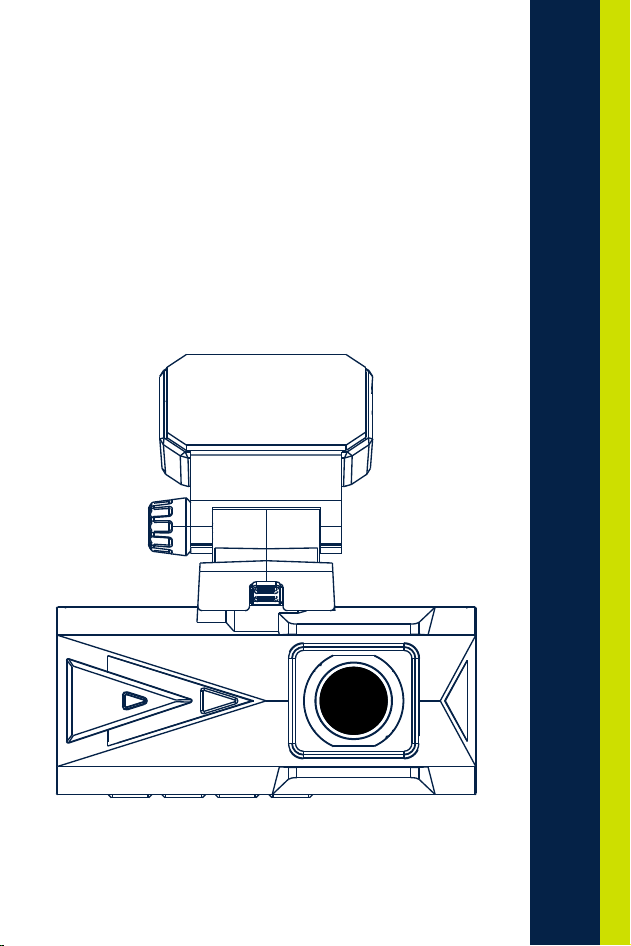
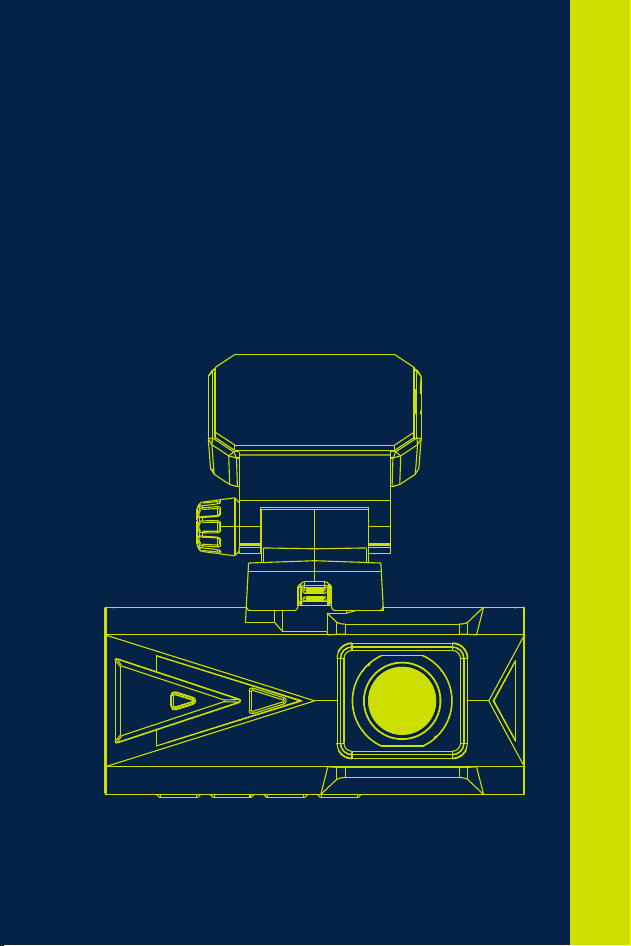
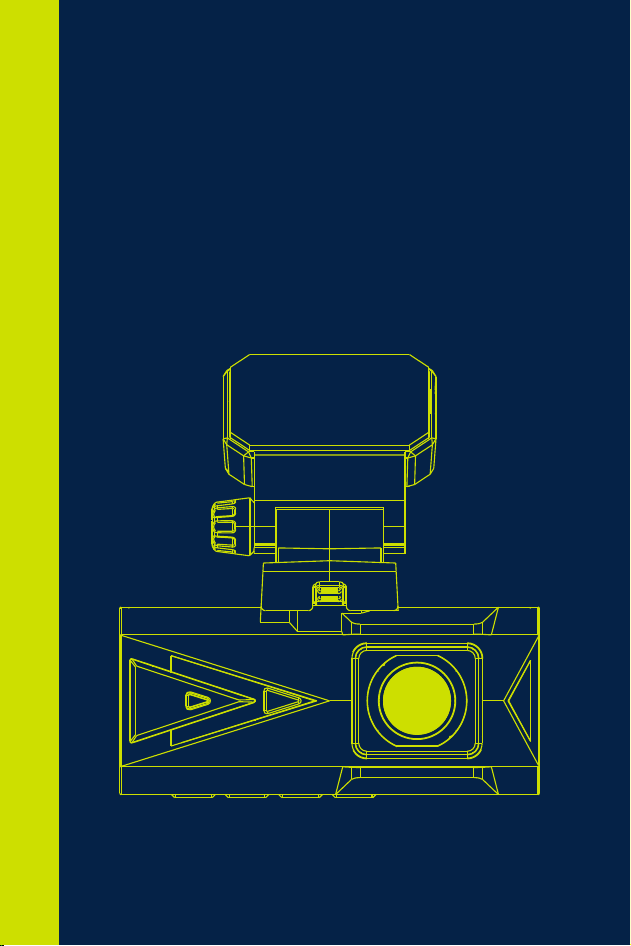
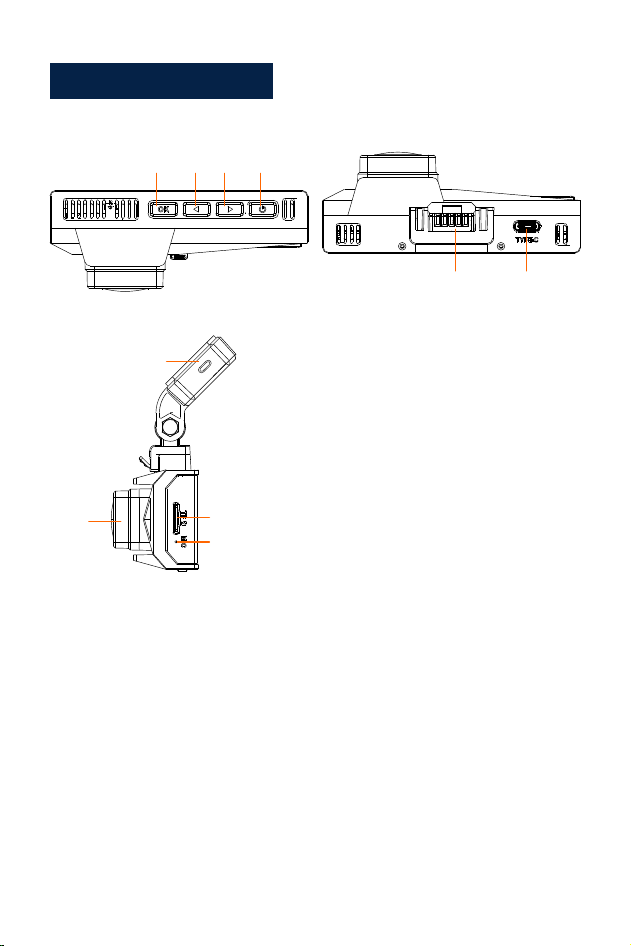
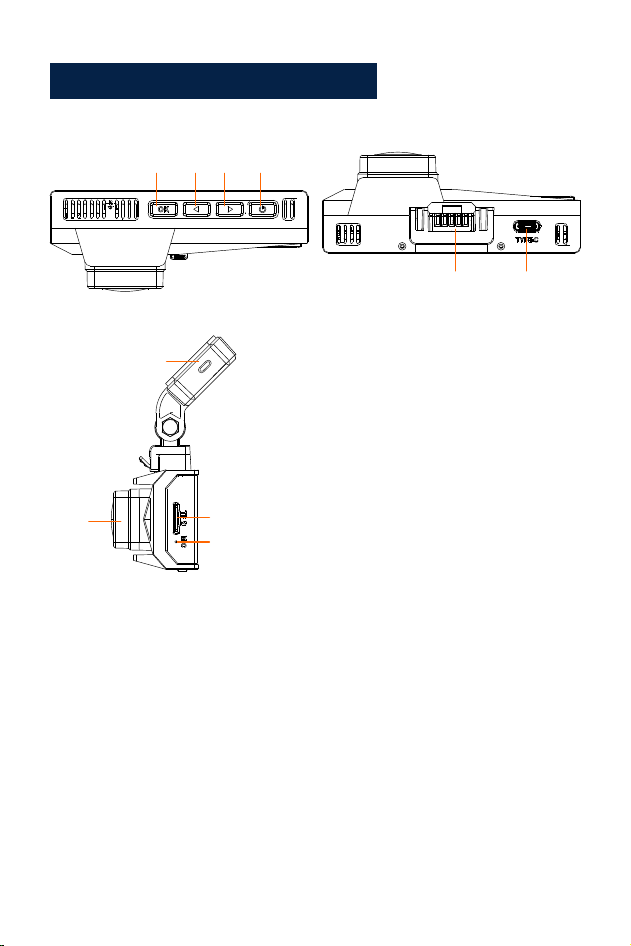
Product Diagram
1
2
3
4
5
6
1. Power/Menu
2. Down Button/WIFI/On-screen display
3. Up Button/Audio Recording/Take Photo
4. OK/playback
5. 3M sticker bracket interface
6. Rear/Data interface
7. Type-c/Power port 1
8. Micro SD Card Slot
9. Mic
10. Lens
7
8
9
10
· 3 ·
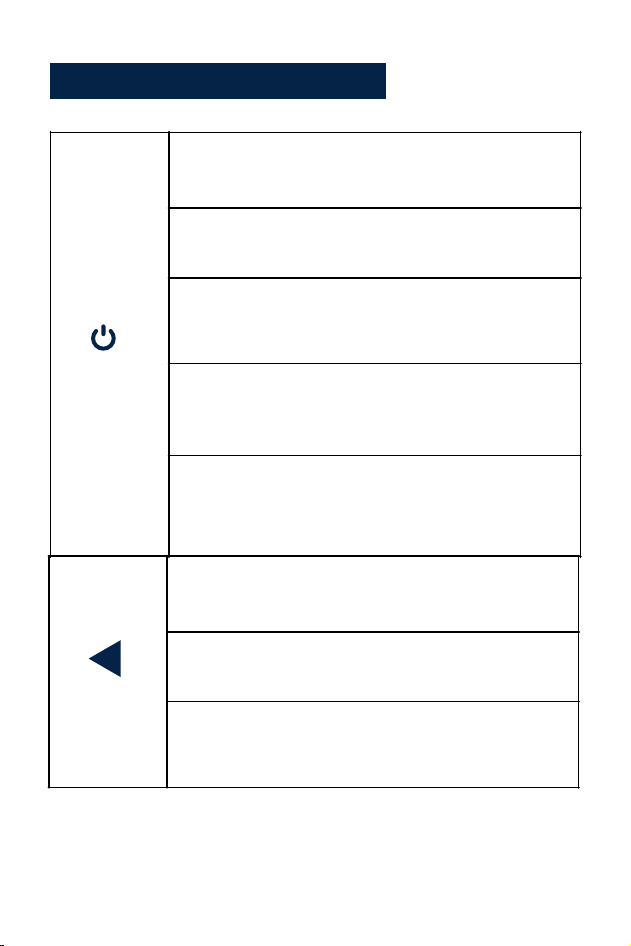
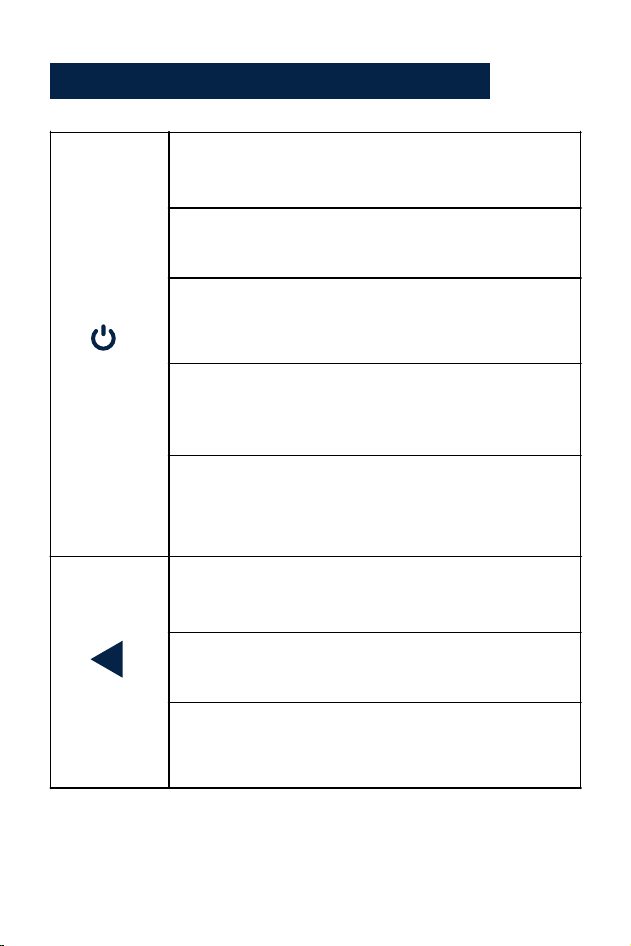
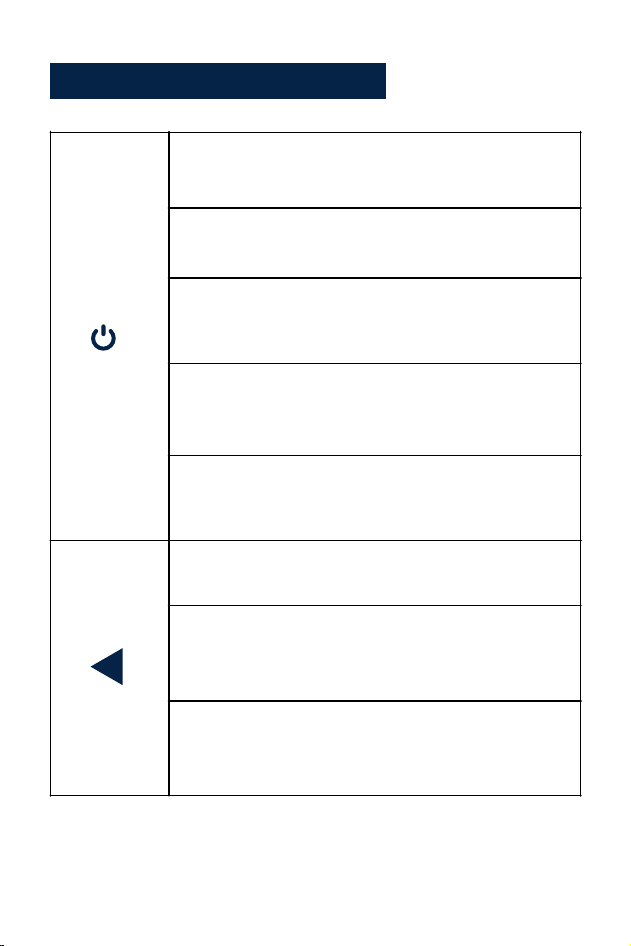
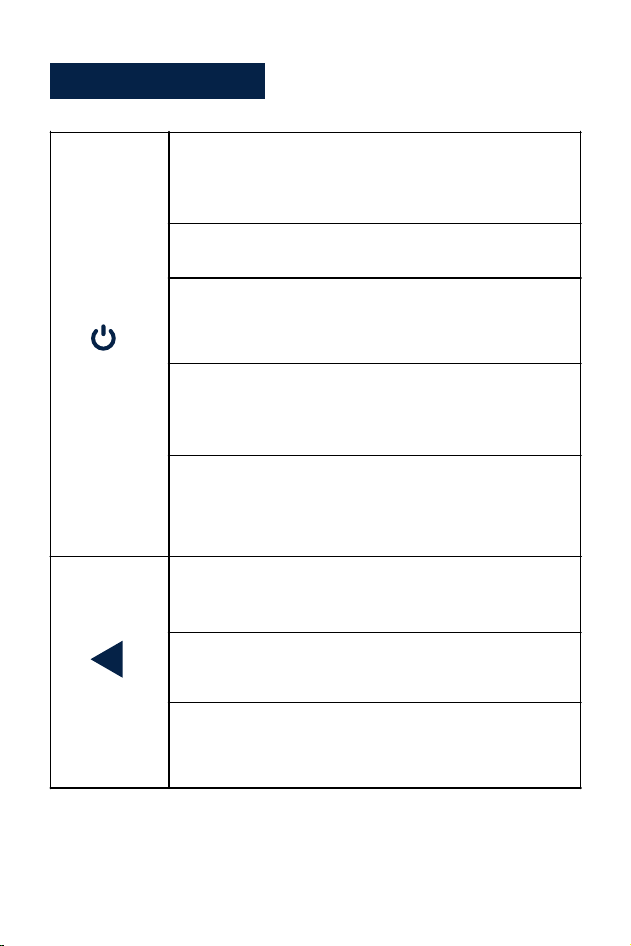
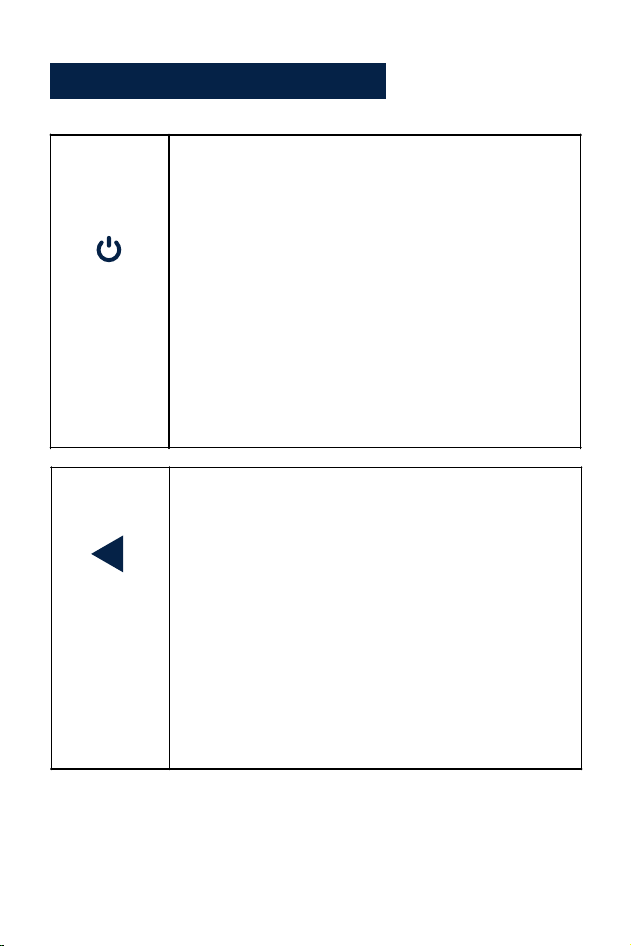
Button Function Explanation
Power/
Menu
1. In standby state, long press to turn off, in shutdown
state, long press to turn on
2. In standby mode, short press to enter/exit the
menu
3. In the menu, menu function options, short press to
return to the previous menu
4. In playback mode, short press to open the
operation interface
5. In the recording state, short press to lock the video
Up Button/
Recording
1. In standby and recording state, short press to turn
on/off the microphone
2. In the menu and function options, short press
left/up to select functions and options
3. In the recording state, long press the screenshot
· 4 ·

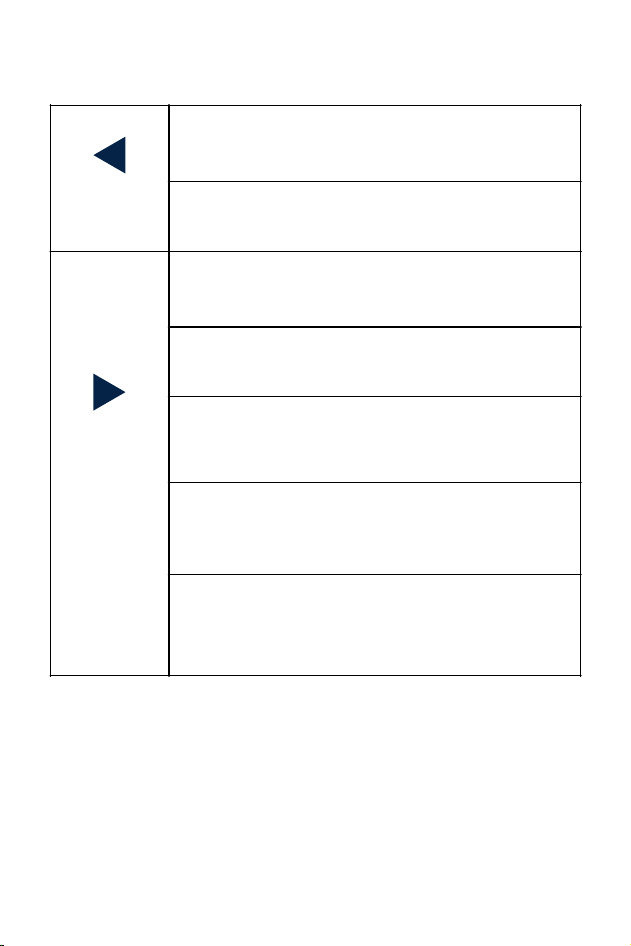
1. In standby and recording state, short press to
switch the screen (pre-record-back-pull-split screen)
Up Button/
Recording
4. In the state of playing video, short press to go
backward
5. In the state of browsing photos, short press to view
the previous one
Down
Button/WIFI
2. Long press to turn on/off WIFI
3. In the menu and function options, short press
right/down to select functions and options
4. In the state of playing video, short press to fast
forward
5. In the browsing state, short press to view the
next one
· 5 ·

1. In standby mode, short press to start recording
OK/
Playback
2. In recording state, short press to stop recording
3. In the menu, short press to enter the next level
4. In the function options, short press to confirm the
option
5. In standby mode, long press to enter playback
mode (folder)
When the camera is powered on, it will record video automatically, if you
want to end or stop recording, please press OK button.
· 6 ·
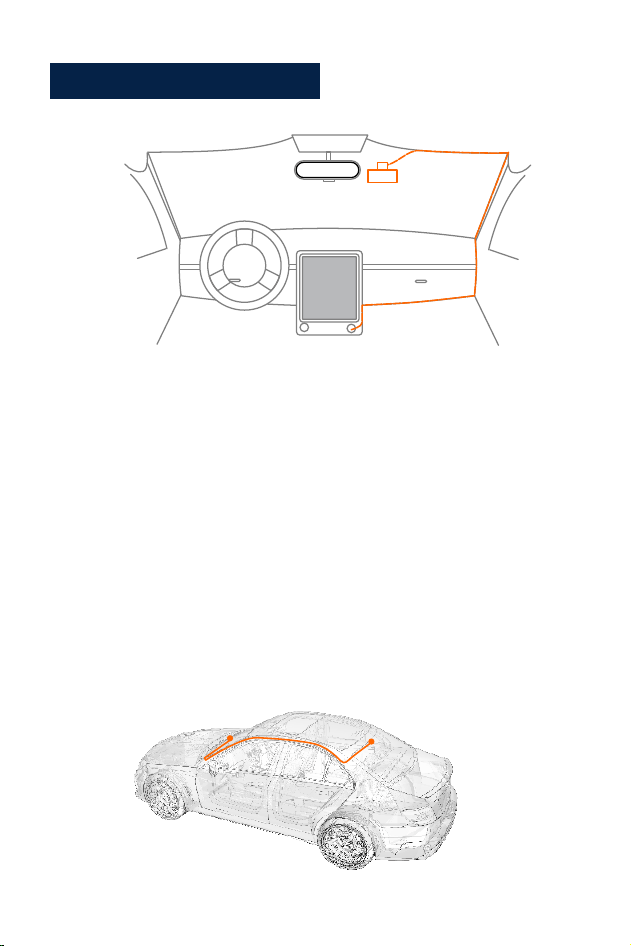
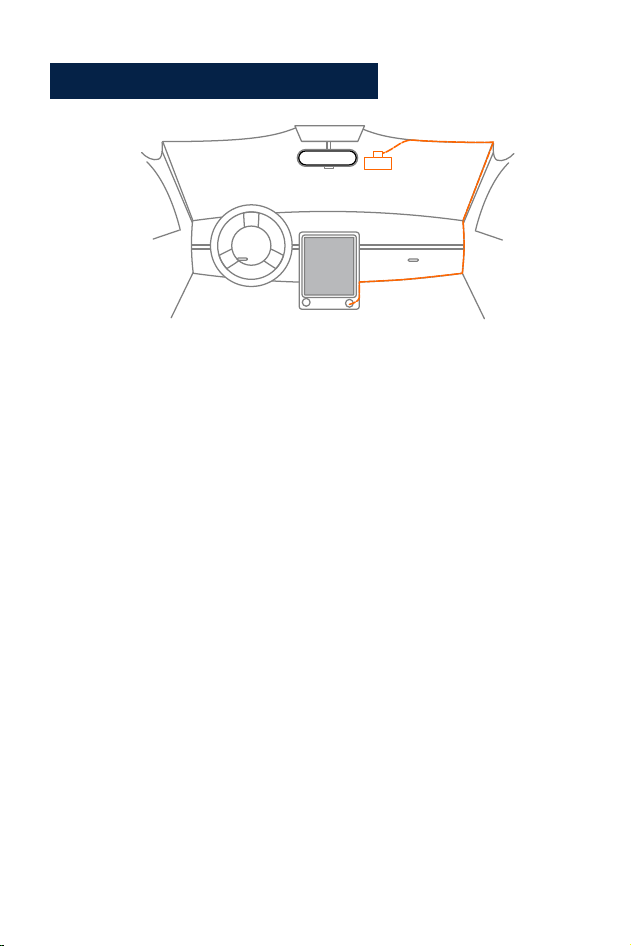
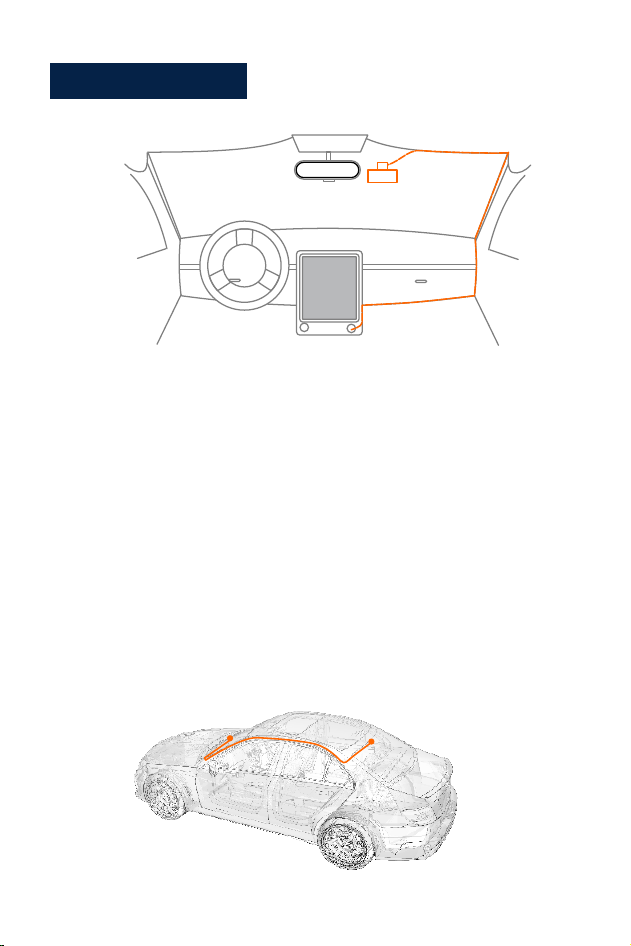
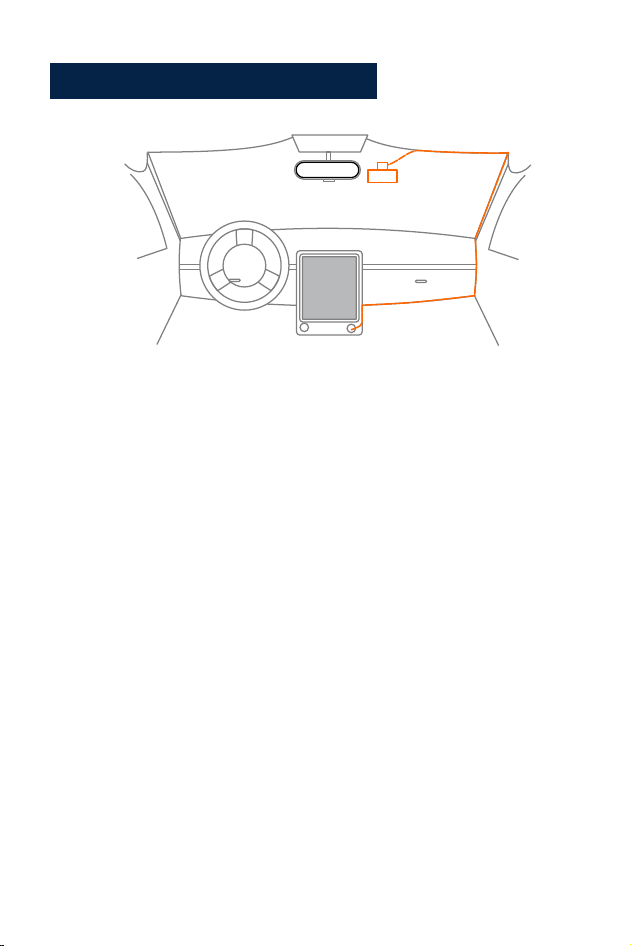
Set up and Installation
1. Use the 3M holder sticker mount to install the dash cam on the
windshield, recommended position is near the rear view mirror near the
passenger seat, adjust both lens angle for best coverage.
2. Plug the included power adapter into the car cigarette lighter socket,
the indicator will light up, which means the power is on.
3. Connect the power adapter and the dash cam, and route the excess
cable alongside the interior trim for better looking.
4.Install the rear camera on the back of the car's rear on the windshield,
adjust the lens angle for the best coverage, and then connect the rear
camera connector to the main engine.
5.Start your car, the camera will automatically power on, check the lens
angle and coverage, make sure all functions works well before going
on the road.
· 7 ·

Function Description
1. Power on: The device will automatically enter video recording mode
when press the Power Button or connect it to the cigarette lighter
using the car charger.
2. Power off: long press power off.
After the car breaks down, the device will automatically power off when
the car charger stops supplying power
Power on/off:
· 8 ·
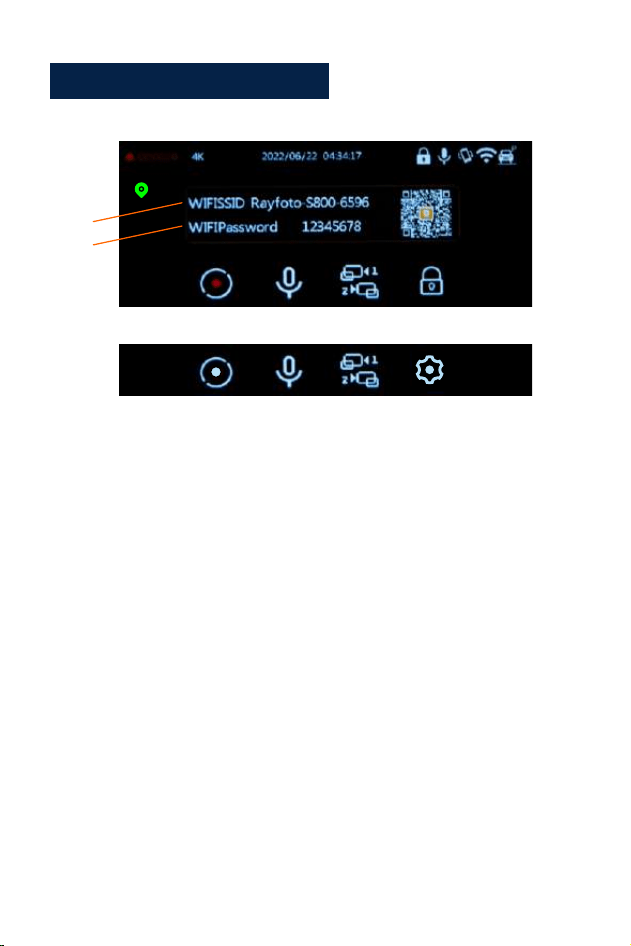
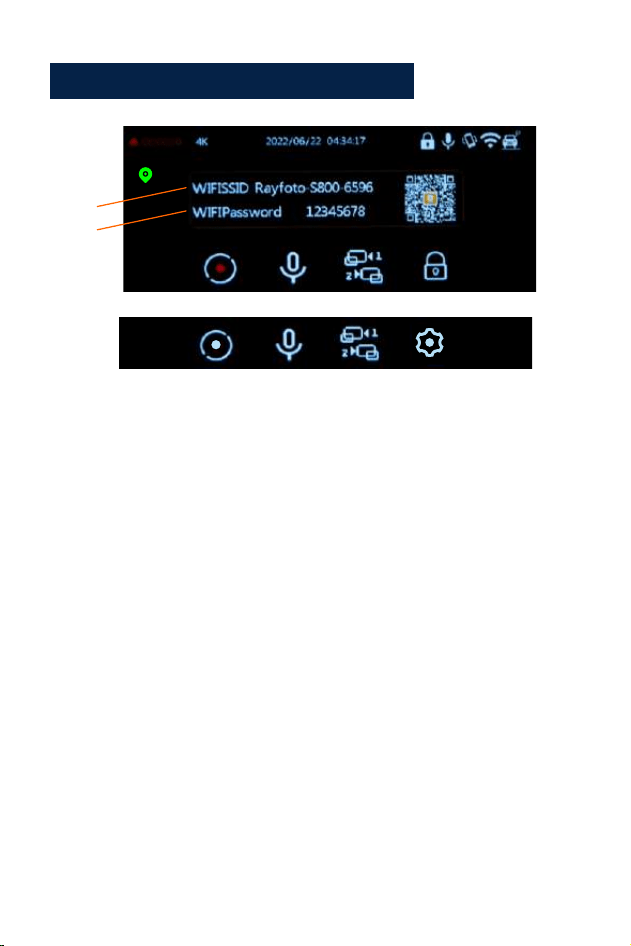
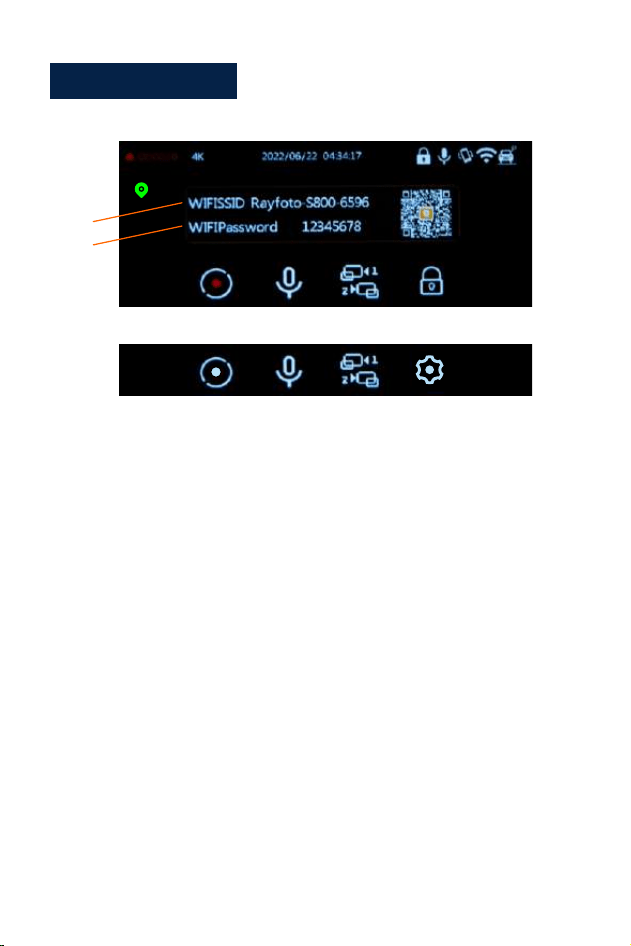
Video Recording mode:
1. Video recording duration
2.R esolution
3.D ate&Time
4. Locked icon
5.M ic Icon
6.G -Sensor Icon
7.W IFI Icon
8. Parking monitor Icon
9. start/stop recording
10. Audio recording
11. Screen switching
12. Setting/Lock
13.G PS Icon
14. WIFI name
15. WIFI password
1.When the camera is in video recording, the blue indicator light in the
upper right corner of the camera will keep blinking, and there is a red
indication icon in the upper right corner of the LCD screen that will keep
blinking.
2. Pressing the OK button will stop recording.
• The Blue Indicator in the upper right corner of the camera will stop
blinking.
• The Red icon will disappear, it means the device has stopped recording.
3. Pressing the OK button again will start the device recording again.
1
2
3
4
5 6
7
8
9
10
11
12
13
14
15
9
12
· 9 ·
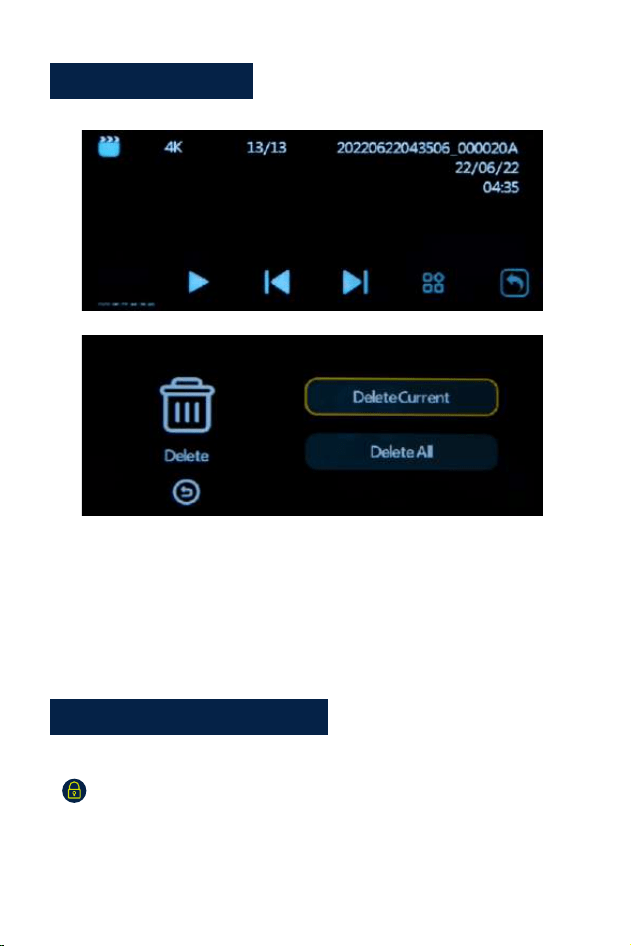
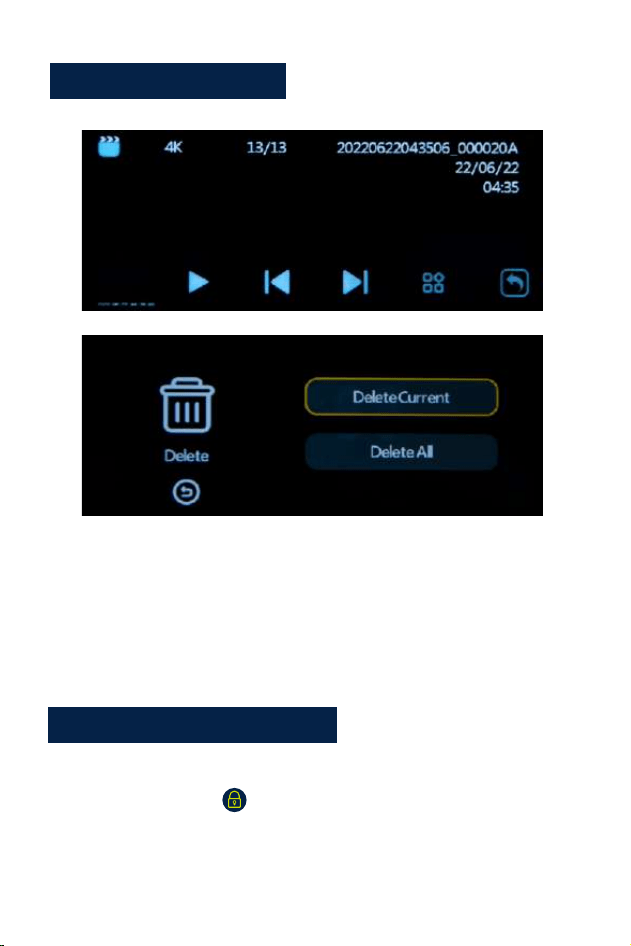
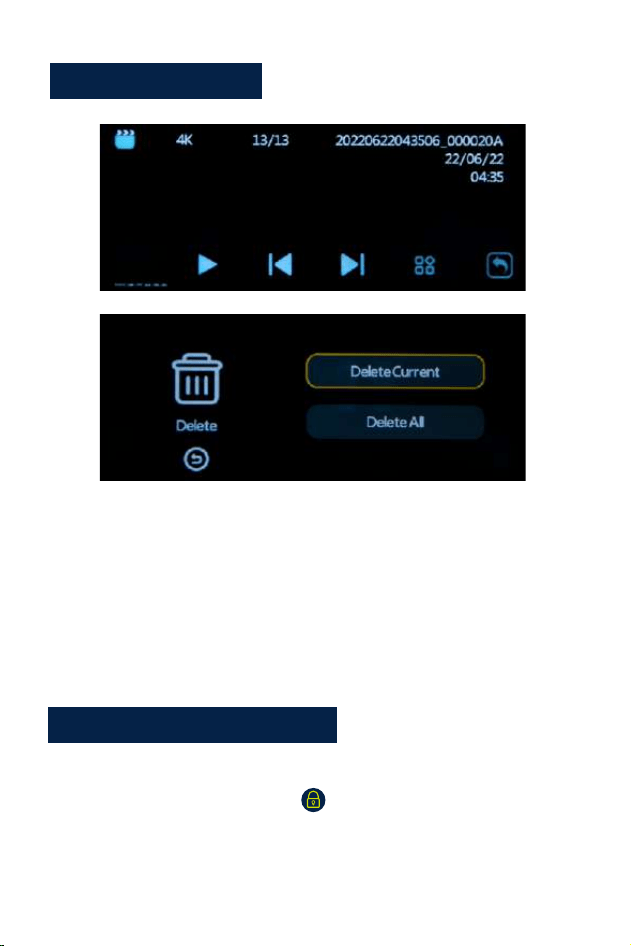
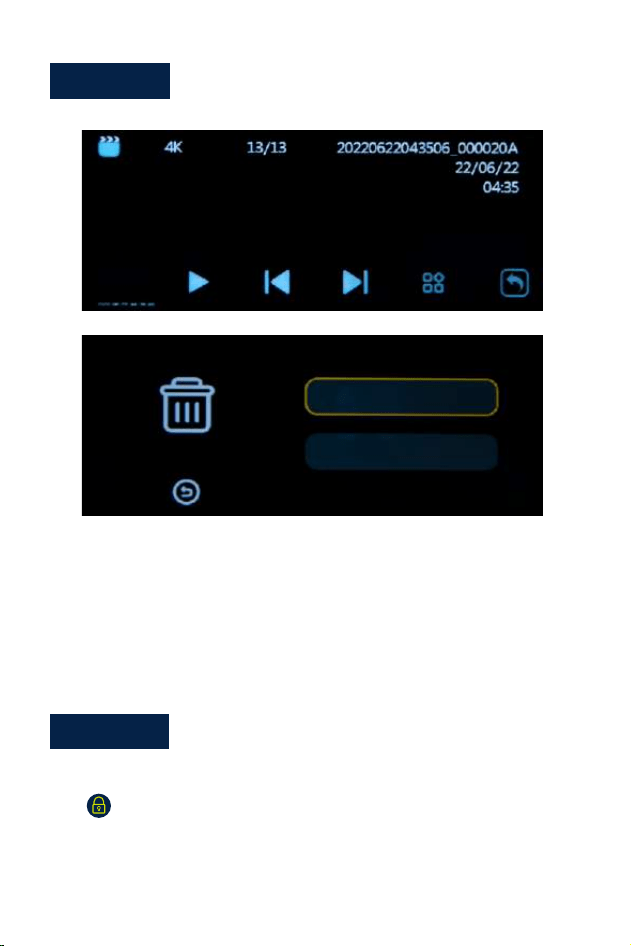
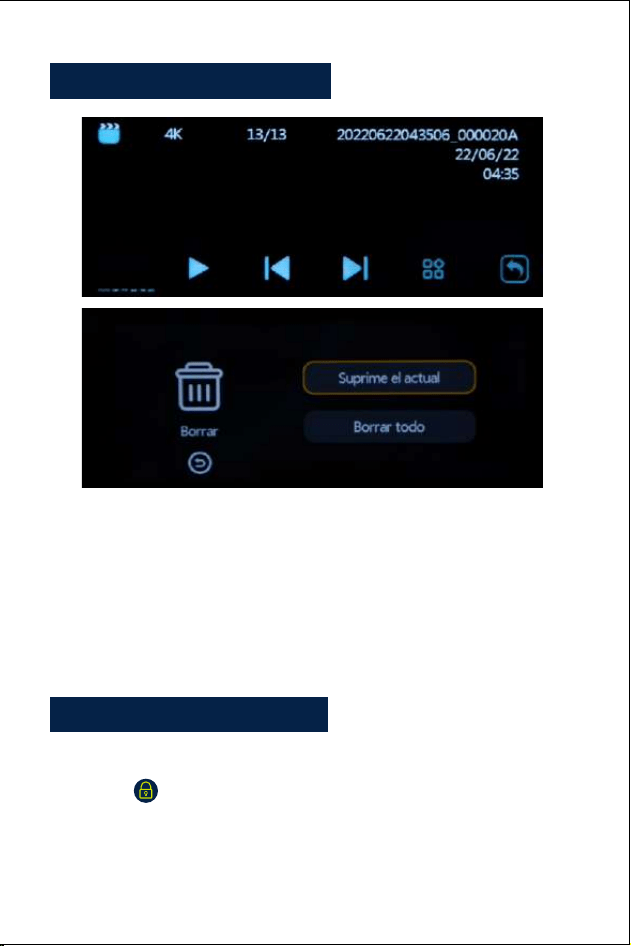
Playback Mode:
1. When the device is in the standby status (when recording is stopped),
press the OK button about 2 seconds until go to the folder, it means
the device is in the playback mode.
2. Press the up/down button to select your desired file. If you want to play
a video file, please press the power button to play video.
•When recording video, press menu button to lock the current file. The
icon will appear on the LCD Display. The locked file cannot be
deleted when looping recording
•Press UP button , the microphone will be closed, press it again will open
microphone.
Recording adjustments:
· 10 ·

Setting
Video:
1. Press the menu button to enter the Video settings menu.
2. Using the Up/Down Buttons to select and highlight the function you
would like to adjust. Press the OK button to enter the subsequent menus.
3. Press menu button again to exit the menu interface.
4. Press the OK button to enter or confirm the settings.
Settings:
• Resolution (To set or reset the resolution of the video):
Options: With Rear Camera:4K+2K/2KP60+2K/2K+2K/1080P60+2K
Without Rear Camera:4K/2KP60/2K/1080P60
• Loop Recording
Options: Off/1min/3mins/ 5mins
Save the video for the setting time. When the card is full, the oldest video
will be automatically overwritten.
• Language
Options:English/Français/Español/Português/Deutsch/ltaliano/ 简体中文/繁體
中文/Pyccкий/日本語
• WIFI
Option:On/Off
Turn WIFI on and off(For details, please go to page 14 to view)
• Dual Cam Display
Options: Front/Rear/Front&Rear
Select different screen displays as needed
· 11 ·

• Record Audio
Options: On/Off
You can set it to On or Off accordingly. If set to Off, the camera will not
record the audio.
• G-sensor
Options: Off/ Low/ Medium/ High
If the G Sensor is activated, when over limitation braking/ shocking/vibration
occurring during recording, the existing recording video file will be
automatically locked.
• Date Stamp
Options: On/Off
Set to On or Off as desire. If On is selected, the date and time will imprint
and record on video.
• Screen Saver
Options: Off/30 Sec/1 min/3min
If you set the screen saver time, the screen will enter blank screen
according to the setting time to protect screen.
• Time Display
Options:On/Off
Turn on/off the time display of the screen saver
• Time System
Options: 12-hour System/24-hour System
• Date/Time
Set or reset the actual time and day.
• Beep Sound
Options: On/Off
Turn on/off beep sound when press the buttons.
· 12 ·

• Parking monitor
Option: Off/On (Need to connect Hardwire kit. You can contact our
after-sale support to get the hardwire kit.)
If the parking monitoring function is turned on, and the device is power off.
When the vehicle is impacted by a certain amount of force, the device will
automatically start for 15 seconds locked recording, then automatically
power off again. And it will start recording again at the next collision, and
so on. When the car starts, the recording will become normal loop
recording.
• Voice Cammands
Options: On/Off
Use your voice to control the camera on commands
1.turn on screen 2.turn off screen 3.turn on audio 4.turn off audio
5.take photo 6.lock the video 7.turn on wifi 8.turn off wifi
• Frequency
Options: 50Hz/60Hz
To set or reset the frequency of the AC power to reduce interference of
fluorescent lights (In the USA and Canada, set it to 60Hz).
• Time zone
Options: GMT12:OO/GMT-11:OO/GMT-1O:OO/GMT-O9:OO/ GMT-08:00/
GMT-07:00/GMT-06:00/GMT-05:00/GMT-04:00/ GMT-03:00/GMT-02:00/
GMT-01:00/
GMT+OO:OO/ GMT+01:00/ GMT+02:00/ GMT+03:00/
GMT+04:00/ GMT+05:00/GMT+06:00/ GMT+07:00/
GMT+08:00/ GMT+09:00/ GMTT+1O:00/ GMT+11:00/ GMT+12:00
Select a time zone based on the user's region. When the machine receives
a GPS signal, the machine will automatically update the system time to
the latest time in the current time zone.
· 13 ·

• GPS Information
Check GPS signal strength
• Format
This function will format (erase aJI data) the Micro SD Card.
Warning: When formatting the card, all files will be erased. Upload all files
you would like to save to your PC BEFORE you start to format the card.
• Default Setting
Reset all settings to factory preset. Please set it carefully, the original
personalized setting parameters will not exist after setting.
• Version
check the device version.
Playback Settings:
• Delete: Delete Current/Delete All
You can choose delete the current file or all of the files.
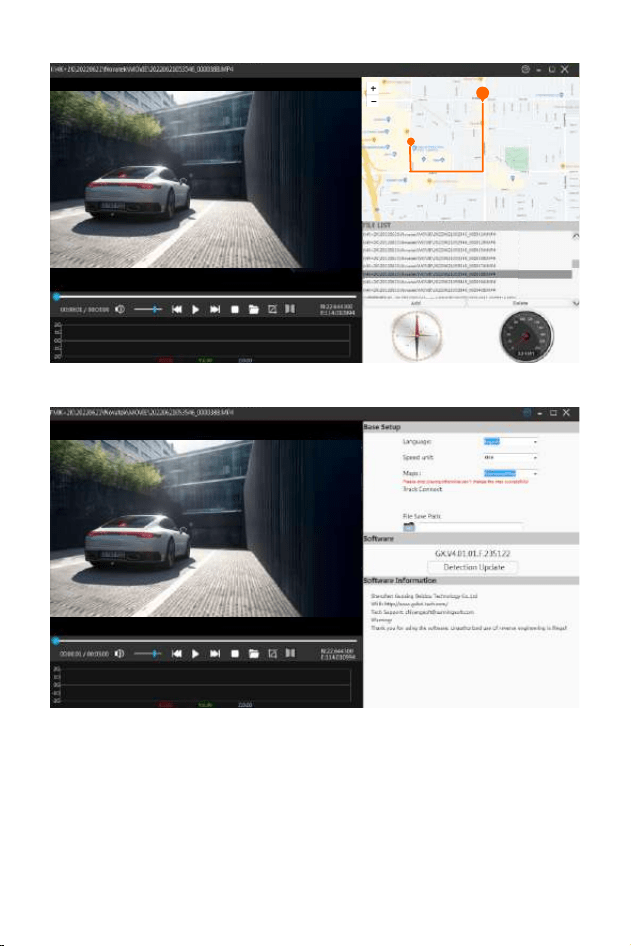
Install and use GPS player:
To view the GPS map using a mobile phone APP, you need to download
the video file in the Dash Camera to the mobile phone for normal viewing.
Download the player from below link and install 《gxplayerv1.3.3》
then open GPS video, with the downloaded player to play it.
GPS player download address. http://www.sunningsoft.com/en/
pcgps.html
· 14 ·

E
· 15 ·

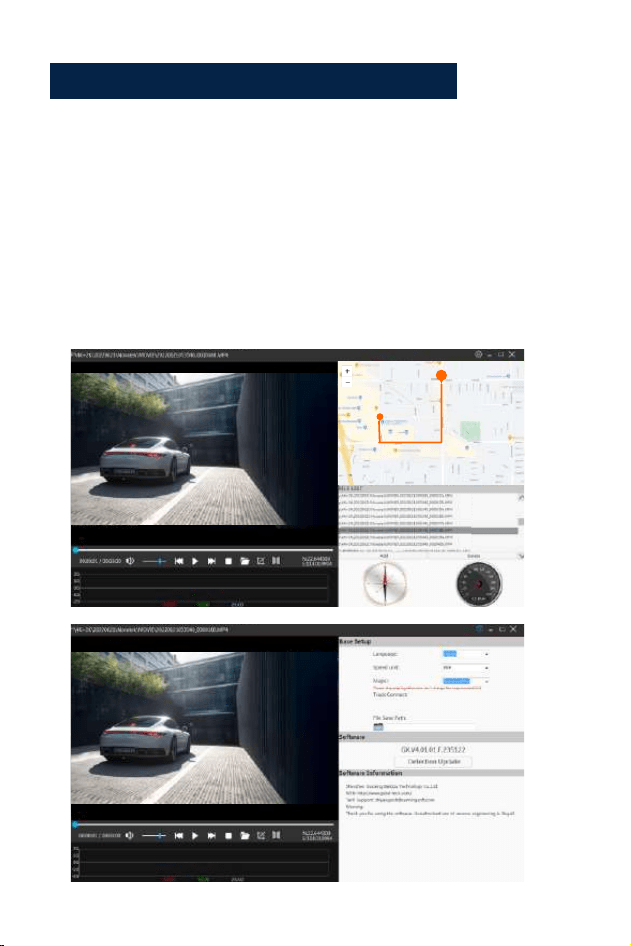
Connect Computer:
1. Connect the supplied TYPE-C Connection Cable to the TYPE-C Port on the
side of the unit.
2. Connect the full size USB end of the cable to a USB Port on the
Computer.
3. The unit will automatically power on and display USB modes: "Mass
Storage".
4. Wait a few moments, the storage folder for the unit will appear on the
computer screen.
5. Follow the on-screen instructions to view, watch, upload or save the
files to the PC.
NOTE:
Compatible computer operation system: Windows XP;
Windows Vista; Windows 7; Windows 8 and Windows 10.
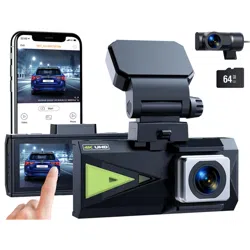
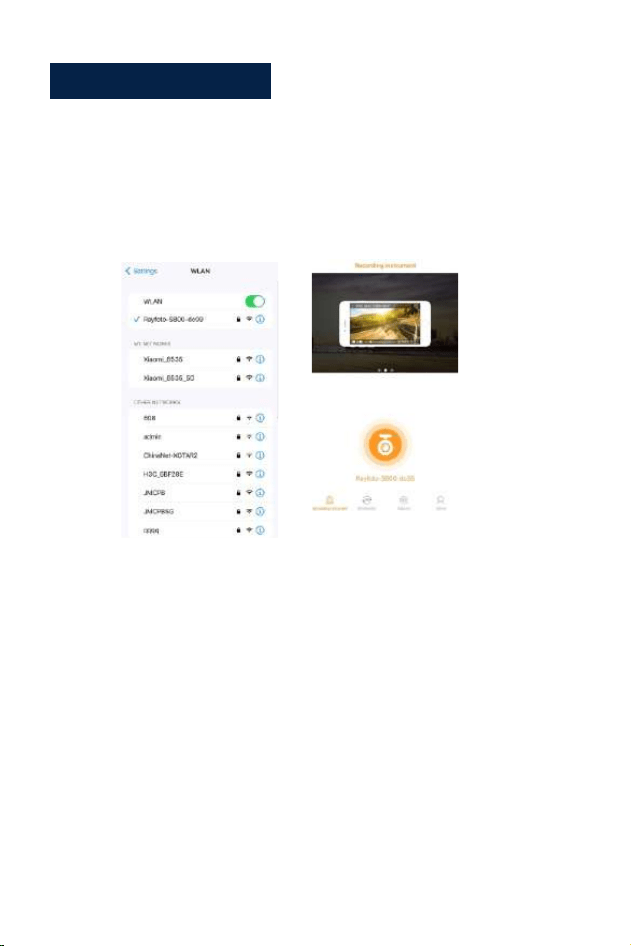
WI-FI
APP download address:
IOS system download address:
https://apps.apple.com/cn/app/roadcam/id1119500688
Android-Download-Address:
https://play.google.com/store/apps/details?id=com.lg.aroadcams
QR code:
· 16 ·

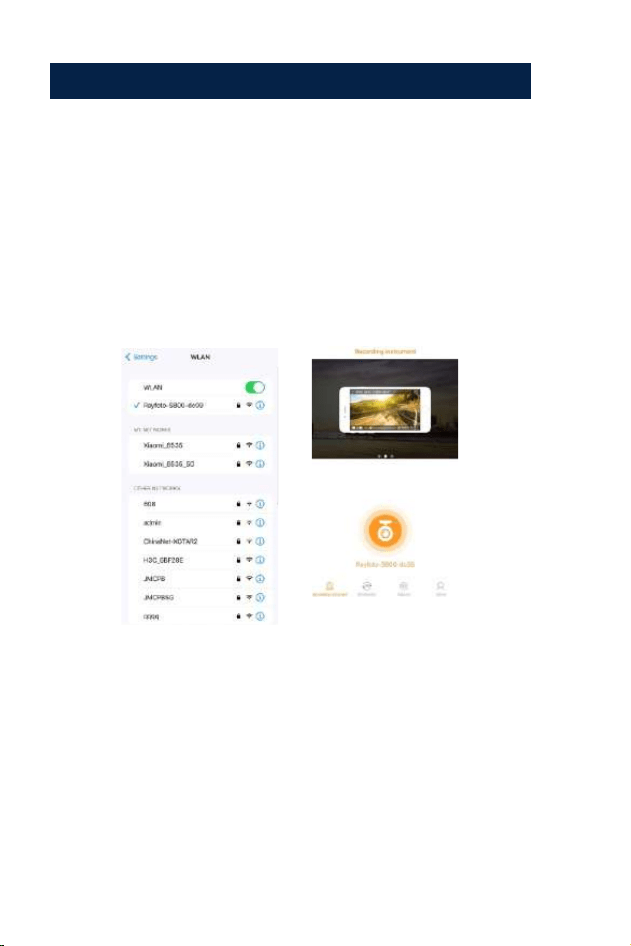
Download the RoadCam app from your smartphone or tablet in Google
Play or Apple App Store.The Wi-Fi application allows you to control your
dash camera remotely on a smartphone or tablet.
You can view the video or pictures and download the recordings on your
phone.
How to turn on/off the wifi Function?
1.Enter the system setting menu, find the wifi function, and turn on /off
the wifi by selecting the wifi function option On/Off.
2.Short press the Down button to turn on the wifi, and long press the UP
button to turn off the wifi.
When the wifi function is turned on, the wifi name and wifi password will
be displayed in the upper left corner of the screen.
How to connect to wifi?
First find the wifi name of the driving recorder in the wifi list on the
smartphone, enter the wifi password displayed on the screen of the dash
cam, and connect to the wifi
Then open the APP, find the device name on the device list on the home
page of the APP and click it to enter the operation interface.
· 17 ·
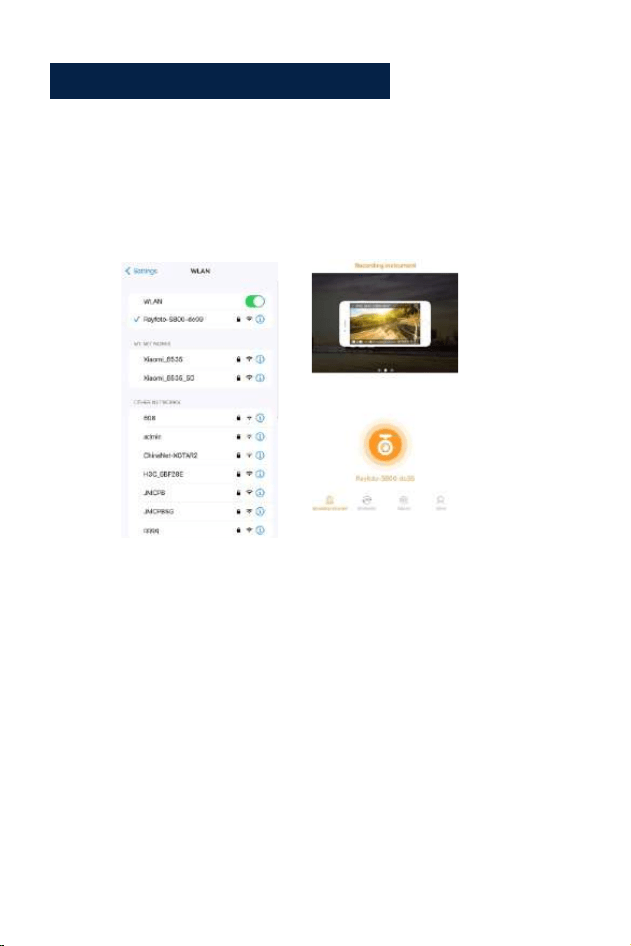
Step 1:
Tum on wifi on the dash cam.
Steps to connect to the app:
Step 2:
Open smartphone setting menu and find wifi list.
Step 3:
Open the app on your smartphone, click "Rayfoto-S800-XXXX"
2
3
· 18 ·

Specification:
Video Resolution
Display Screen
Video Format
Video Coding
Video mode
Picture Format
Memory Card
G-Sensor- Lock
Parking Motion
GPS
Working temperature
Storage temperature
Operation Humidity
Power Supply
Front:3840*2160P Rear:2560*1440P
3.16 inch color IPS HD display
MP4
H.265
Loop Recording
JPG
U3 Micro SD card up to 256GB
Built-in
Supports (Need to Connect the Hardwire kit)
Built-in GPS
Built-in 5G WIFI
-20°C ~ 65°C ( -4°F ~ 149°F)
-30°C ~ 70°C ( -22°F ~ 158T)
15~85%RH°
5V-3.5A DC
WIFI
· 19 ·

Common Problem and Solution
Q:Recorder shows memory full, unable to loop video, etc.
A:
1.First, When a new memory card is used for the first time on the
machine, please format the memory card to FAT32 format on PC then
format it in the camera. Second, if the memory card is previously used
on another type of device, it needs to be formatted when it's used on
this camera.Third, change another new Micro SD CARD.
2.Check the sensitivity of G-sensor, If the sensitivity is too high, the
bumping and shaking of the camera will activate the G-sensor, and the
files will be locked. Locked files cannot be overwritten. If the locked files
is accumulated, there will be no memory space to loop record. When the
parking monitor is turned on, shaking will also cause too many stray files,
which will also affect the reading and writing of cards.
Q:The device will automatically turn on or turn off.
A:
1.Please format the memory card to FAT32 format on PC then format it
in the camera.
2 .Check the car charger connection status, if the connection is loose, the
power supply is not stable, the camera will automatically tum on and off.
Q:The rear camera dose not display image.
A:
1. Please switch the camera display mode to double check the rear
camera status.
2. Please check whether the TYPE-C plug is in place and the cable is
connected correctly.
3. Try to disconnect the camera and clean the connector with some
Medical alcohol and connect it again.
· 20 ·

Q:When shooting video,it will stop automatically or the button
operation is slow.
A:
1.First, please reset the device to factory default.
2. Please check whether the memory card is a U3 high-speed card, and
please format the momery card on the camera or PC before use.
Q:Even though set the screen saver, but the screen will randomly.
A: The power supply might not be stable, please change another car
charger to try.
Q: Why dash cam drain car battery?
A: Please check whether the cigarette lighter still be on after you turn off
car engine.
Q: The camera keeps starting and off?
A: That could be the parking monitor function being triggered, check the
setup menu.
Q: If the video played on the computer is somehow not fluent or
jammed.
A:
1 .Try to play the video with other video players, like : Pot player or GX
player.
2. Format your Micro SD card in the camera.
3. Run speed test on the memory card to make sure the memory card fits
the requirement: Write Speed is over 30MB/S.
Q: There are stripes interference in the image.
There should be wrong light frequency.
A: According to the local main frequency, make the appropriate settings
· 21 ·


Deutsch

Deutsch

Wichtiger Hinweis
1. Dieses Produkt ist nur für die Verwendung in Kraftfahrzeugen vorgesehen.
Installieren Sie die Kamera NICHT dort, wo sie die Sicht des Fahrers auf die
Straße blockieren könnte (einschließlich der Spiegel) oder das Auslösen
des Airbags.
2. Und setzen Sie dann den Speicher ein Karte zuerst und formatieren Sie
die Speicherkarte im Kameramenü.
3.Diese Kamera zeichnet Videos mit hoher Auflösung auf. Verwenden Sie
unbedingt U3 High Speed Micro SD-Karte, 32-GB- oder 256-GB-Karten
werden empfohlen.
4. Stellen Sie sicher, dass das Kameraobjektiv sauber ist und nichts blockiert
Linse.
5. Lassen Sie die Kamera NICHT für längere Zeit in direktem Sonnenlicht
oder wo die Temperatur über 65°C (149°F) steigen könnte.
6.Die Kamera ist mit einer internen GPS-Funktion ausgestattet.
· 25 ·

Produktdiagramm
1. Ein/Aus/Menü
2. Abwärtstaste/WIFI/Bildschirmanzeige
3. Aufwärtstaste/Audioaufnahme/Foto
aufnehmen
4. OK/Wiedergabe
5. Schnittstelle für 3MAufkleberhalterung
6. Rückseite/Datenschnittstelle
7. Type-c-/Stromanschluss 1
8. Micro-SD-Kartensteckplatz
9. Mikrofon
10. Linse
1
2
3
4
5
6
7
8
9
10
· 27 ·
Erläuterung der Schaltflächenfunktion
Leistung/
Speisekarte
1. IIm Standby-Zustand lange drücken, um
auszuschalten, imShutdown-Zustand lange drücken,
um einzuschalten
Aufwärts-Taste/
Aufzeichnung
1. In standby and recording state, short press to turn
on/off the microphone
2. In the menu and function options, short press
left/up to select functions and options
3. In the recording state, long press the screenshot
2. Im Standby-Modus kurz drücken, um das Menü
aufzurufen/zu verlassen
3. Im Menü Menüfunktionsoptionen kurz drücken,
um zum vorherigen Menü zurückzukehren
4. Drücken Sie im Wiedergabemodus kurz, um die
Bedienoberfläche zu öffnen
5. Drücken Sie im Aufnahmezustand kurz, um das
Video zu sperren
· 28 ·

1. Im Standby- und Aufnahmezustand kurz drücken
, um den Bildschirm umzuschalten (Pre-Record-
Back-Pull-Split Screen)
Aufwärts-
Taste/
Aufzeichnung
4. Während der Videowiedergabe kurz drücken,
um rückwärts zu gehen
5. Beim Durchsuchen von Fotos kurz drücken, um das
vorherige anzuzeigen
Runter
Taste/WIFI
2.Lange drücken, um WLAN ein-/auszuschalten
3.Drücken Sie in den Menü- undFunktionsoptionen
kurz rechts/unten, um Funktionen und Optionen
auszuwählen
4. Drücken Sie während der Videowiedergabe
kurz, um vorzuspulen
5. Drücken Sie im Browsermodus kurz, um das
nächste anzuzeigen
· 29 ·

1. Im Standby-Modus kurz drücken, um die Aufnahme
zu starten
OK/
Wiedergabe
2. Im Aufnahmezustand kurz drücken, um die
Aufnahme zu stoppen
3. Drücken Sie im Menü kurz, um zur nächsten Ebene
zu gelangen
4. Drücken Sie in den Funktionsoptionen kurz, um die
Option zu bestätigen
5. Im Standby-Modus lange drücken, um in den
Wiedergabemodus (Ordner) zu gelangen
Wenn die Kamera eingeschaltet ist, nimmt sie automatisch Videos auf.
Wenn Sie die Aufnahme beenden oder stoppen möchten, drücken Sie
bitte die OKTaste.
· 30 ·

Einrichtung und Installation
1. Verwenden Sie die 3M-Halter-Aufkleberhalterung, umdie Dashcamauf
demzu installieren Windschutzscheibe, empfohlene Position ist in derNähe
des Rückspiegels in derNähe der Beifahrersitz, passen Sie beide
Linsenwinkel für die beste Abdeckung an.
2. Stecken Sie dasmitgelieferteNetzteil in die Zigarettenanzünderbuchse
des Autos. Die Anzeige leuchtet auf,was bedeutet, dass das Gerät
eingeschaltet ist.
3.Schließen Sie das Netzteil und die Dashcaman und leiten Sie den
Überschussweiter Kabel neben der Innenverkleidung für besseres Aussehen.
4. Installieren Sie die Rückfahrkamera auf der Rückseite des Autos an
derWindschutzscheibe. Passen Sie den Objektivwinkel für die beste
Abdeckung an und schließen Sie dann die Rückseite an Kamerastecker
zumHauptmotor.
5. Starten Sie Ihr Auto, die Kamera schaltet sich automatisch ein,
überprüfen Sie den Objektivwinkel und die Abdeckung, stellen Sie sicher,
dass alle Funktionen gut funktionieren, bevor Sie auf die Straße gehen.
· 31 ·

Bedienungsanleitung
1. Einschalten: Das Gerät wechselt automatisch in den
Videoaufnahmemodus wenn Sie die Power-Taste drücken oder an den
Zigarettenanzünder anschließen über das Autoladegerät.
2.Ausschalten: lange Druckleistung aus.
Nachdem das Auto eine Panne hat, schaltet sich das Gerät
automatisch aus, wenn das Autoladegerät liefert keinen Strom mehr
Einschalten / Ausschalten:
· 32 ·

Videoaufnahmemodus:
1.Videoaufnahmedauer
2.Auflösung
3.Datum und Uhrzeit
4. Gesperrt-Symbol
5. Mikrofon-Symbol
6. G-Sensor-Symbol
7.WIFI-Symbol
8.Parkmonitor-Symbol
9.Aufzeichnung starten/
stoppen
10. Audioaufnahme
11.Bildschirmumschaltung
12.Einstellung/Sperre
13.GPS-Symbol
14.WIFI-Name
15.WIFI-Passwort
1
2
3
4
5 6
7
8
9
10
11
12
13
14
15
•Die blaue Anzeige in der oberen rechten Ecke des Geräts leuchtet und
blinkt.
•Das Aufnahmesymbol wird rot und blinkt, was bedeutet, dass das Gerät
normal Videos aufzeichnet.
2. Durch Drücken der OK-Taste wird die Aufnahme beendet.
•Die blaue Anzeige in der oberen rechten Ecke des Geräts hört auf zu
blinken.
•Das rote Symbol verschwindet, was bedeutet, dass das Gerät die
Aufnahme beendet hat.
3. Durch erneutes Drücken der OK-Taste wird die Geräteaufnahme
erneut gestartet.
9 12
· 33 ·
Wiedergabemodus:
1.Wenn sich das Gerät im Standby-Status befindet (bei gestoppter
Aufnahme), Drücken Sie die OK-Taste etwa 2 Sekunden lang, bis Sie zum
Ordner gehen, heißt es das Gerät befindet sich im Wiedergabemodus.
2.Drücken Sie die Aufwärts-/Abwärtstaste, um die gewünschte Datei
auszuwählen. Wenn Sie eine Videodatei abspielen möchten, drücken Sie
bitte die Ein/Aus-Taste, um das Video abzuspielen.
•Drücken Sie während der Videoaufnahme die Menütaste, um die aktuelle
Datei zu sperren. Das erscheint auf dem LCD-Display. Die gesperrte
Datei kann nicht gelöscht werden.
•Drücken Sie die UP-Taste, das Mikrofon wird geschlossen, drücken Sie sie
erneut, um das Mikrofon zu öffnen.
Aufnahmeanpassungen:
· 34 ·

Einstellung
Video:
1.Drücken Sie die Menütaste, um das Videoeinstellungsmenü aufzurufen.
2.Verwenden Sie die Auf-/Ab-Tasten, um die gewünschte Funktion
auszuwählen und hervorzuheben anpassen möchte. Drücken Sie die
OK-Taste, um die nachfolgenden Menüs aufzurufen.
3.Drücken Sie die Menütaste erneut, um die Menüoberfläche zu verlassen.
4.Drücken Sie die OK-Taste, um die Einstellungen einzugeben oder zu
bestätigen.
Einstellungen:
•Auflösung (Um die Auflösung des Videos einzustellen oder
zurückzusetzen):
Optionen: Mit Rückfahrkamera: 4K+2K/2KP60+2K/2K+2K/1080P60+2K
Ohne Rückfahrkamera: 4K/2KP60/2K/1080P60
•Daueraufnahme
Optionen: Aus/1 Min./3 Min./ 5 Min
Speichern Sie das Video für die Einstellzeit. Wenn die Karte voll ist, wird
das älteste Video automatisch überschrieben.
•Sprache
Optionen:English/Français/Español/Português/Deutsch/ltaliano/ 简体中文/繁
體中文/Pyccкий/日本語
•WIFI
Option: Ein/Aus
WLAN ein- und ausschalten (Details finden Sie auf Seite 14)
•Dual-Cam-Display
Optionen: Vorne/Hinten/Vorne und Hinten
Wählen Sie nach Bedarf verschiedene Bildschirmanzeigen aus
· 35 ·

•Ton aufnehmen
Optionen: Ein/Aus
Sie können es entsprechend auf Ein oder Aus stellen. Bei Einstellung
auf Aus nimmt die Kamera kein Audio auf.
•G-sensor
Optionen: Aus/ Niedrig/ Mittel/ Hoch
Wenn der G-Sensor aktiviert ist und während der Aufnahme Bremsen/
Erschütterungen/Vibrationen überschritten werden, wird die vorhandene
Aufnahmevideodatei gelöscht automatisch gesperrt.
•Datumsstempel
Optionen: Ein/Aus
Nach Wunsch auf Ein oder Aus einstellen. Wenn Ein ausgewählt ist,
werden Datum und Uhrzeit auf das Video gedruckt und aufgezeichnet.
•Bildschirmschoner
Optionen: Aus/30 Sek./1 Min./3 Min
Wenn Sie die Bildschirmschonerzeit einstellen, wird der Bildschirm gemäß
der eingestellten Zeit zum Schutz des Bildschirms leer.
•Zeitanzeige
Optionen: Ein/Aus
Schalten Sie die Zeitanzeige des Bildschirmschoners ein/aus
•Zeitsystem
Optionen: 12-Stunden-System/24-Stunden-System
•Terminzeit
Stellen Sie die aktuelle Uhrzeit und den Tag einoder zurück.
•Piepton
Optionen: Ein/Aus
Schalten Sie den Piepton ein/aus, wenn Sie die Tasten drücken.
· 36 ·

•Parkwächter
Option: Aus/Ein
Wenn die Parküberwachungsfunktion eingeschaltet ist und das Gerät
ausgeschaltet ist. Wenn das Fahrzeug einer bestimmten Kraft ausgesetzt
wird, startet das Gerät automatisch für 15 Sekunden gesperrte Aufnahme,
dann automatisch wieder ausschalten. Und es wird bei der nächsten
Kollision wieder mit der Aufnahme beginnen, und demnächst. Wenn das
Auto startet, wird die Aufnahme zur normalen Schleife Aufzeichnung.
•Frequenz
Optionen: 50Hz/60Hz
Zum Einstellen oder Zurücksetzen der Frequenz des Wechselstroms, um
Störungen durch Leuchtstofflampen zu reduzieren (in den USA und Kanada
auf 60 Hz einstellen).
•Zeitzone
Options: GMT12:OO/GMT-11:OO/GMT-1O:OO/GMT-O9:OO/ GMT-08:00/
GMT-07:00/GMT-06:00/GMT-05:00/GMT-04:00/ GMT-03:00/GMT-02:00/
GMT-01:00/
GMT+OO:OO/ GMT+01:00/ GMT+02:00/ GMT+03:00/
GMT+04:00/ GMT+05:00/GMT+06:00/ GMT+07:00/
GMT+08:00/ GMT+09:00/ GMTT+1O:00/ GMT+11:00/ GMT+12:00
Wählen Sie eine Zeitzone basierend auf der Region des Benutzers aus.
Wenn das Gerät ein GPS-Signal empfängt, aktualisiert das Gerät die
Systemzeit automatisch auf die neueste Zeit in der aktuellen Zeitzone
•GPS-Informationen
Überprüfen Sie die GPS-Signalstärke
· 37 ·

•Format
Diese Funktion formatiert (löscht aJI-Daten) die Micro-SD-Karte.
Achtung: Beim Formatieren der Karte werden alle Dateien gelöscht.
Laden Sie alle Dateien, die Sie speichern möchten, auf Ihren PC hoch,
BEVOR Sie mit dem Formatieren der Karte beginnen.
•Voreinstellung
Alle Einstellungen auf Werkseinstellung zurücksetzen. Bitte stellen Sie es
sorgfältig ein, die ursprünglichen personalisierten Einstellungsparameter
sind nach der Einstellung nicht mehr vorhanden.
•Ausführung
Überprüfen Sie die Geräteversion.
Wiedergabeeinstellungen:
• Löschen: Aktuelle löschen/Alle löschen
Sie können die aktuelle Datei oder alle Dateien löschen.
Installieren und verwenden Sie den GPS-Player:
Um die GPS-Karte mit einer Handy-APP anzuzeigen, müssen Sie sie
herunterladen die Videodatei in der Dash Camera zur normalen
Betrachtung auf das Mobiltelefon. Laden Sie den Player über den
folgenden Link herunter und installieren Sie 《gxplayerv1.3.3》Öffnen Sie
dann das GPS-Video mit dem heruntergeladenen Player, um es
abzuspielen.
Download-Adresse des GPS-Players:
http://www.sunningsoft.com/en/pcgps.html
· 38 ·

E
· 39 ·

Rechner anschließen
1.Schließen Sie das mitgelieferte TYPE-C -Verbindungskabel an den TYPE-C
Anschluss an der Seite des Geräts an.
2.Schließen Sie das USB-Ende des Kabels in voller Größe an einen
USB-Port des anComputer.
3. Das Gerät schaltet sich automatisch ein und zeigt die USB-Modi an: ?
Mass Lagerung".
4.Warten Sie einen Moment, bis der Speicherordner für das Gerät auf dem
erscheint Computer-Bildschirm.
5.Folgen Sie den Anweisungen auf dem Bildschirm, um die anzuzeigen,
anzusehen, hochzuladen oder zu speichern Dateien auf den PC.
HINWEIS:
Kompatibles Computerbetriebssystem: Windows XP;Windows Vista;
Windows 7; Windows 8 und Windows 10.
WI-FI
APP-Download-Adresse:
Download-Adresse des IOS-Systems:
https://apps.apple.com/cn/app/roadcam/id1119500688
Android-Download-Adresse:
https://play.google.com/store/apps/details?id=com.lg.aroadcams
QR code:
· 40 ·

Laden Sie die RoadCam-App von Ihrem Smartphone oder Tablet in Google
herunter Play oder Apple App Store. Mit der Wi-Fi-Anwendung können Sie
Ihre Dashcam auf einem Smartphone oder Tablet fernsteuern. Sie können
das Video oder die Bilder ansehen und die Aufzeichnungen auf Ihr Telefon
herunterladen.
Wie schalte ich die Wi-Fi-Funktion ein/aus?
1. Rufen Sie das Systemeinstellungsmenü auf, ?nden Sie die WLANFunktion
und schalten Sie sie ein/aus das WLAN, indem Sie die
WLAN-Funktionsoption Ein/Aus auswählen.
2.Drücken Sie kurz die Down-Taste, um das WLAN einzuschalten, und
drücken Sie lange die UP-Taste Taste, um das WLAN auszuschalten.
Wenn die WLAN-Funktion eingeschaltet ist, werden der WLAN-Name
und das WLAN-Passwort in der oberen linken Ecke des Bildschirms
angezeigt.
Wie verbinde ich mich mit dem WLAN?
Suchen Sie zuerst den Wi-Fi-Namen des Fahrtenschreibers in der Wi-Fi
-Liste auf dem Smartphone, geben Sie das Wi-Fi-Passwort ein, das auf
dem Bildschirm der Dashcam angezeigt wird, und verbinden Sie sich
mit dem Wi-Fi Öffnen Sie dann die APP, finden Sie den Gerätenamen in
der Geräteliste auf der Startseite der APP und klicken Sie darauf, um die
Bedienoberfläche aufzurufen.
· 41 ·
Schritt 1:
Schalten Sie WLAN auf der Dashcam ein.
Schritt 2:
ÖffnenSiedasEinstellungsmenüdesSmartphonesundsuchenSie
dieWLAN-Liste.
Schritte zum Verbinden mit der App:
Schritt 3:
Öffnen Sie die App auf Ihrem Smartphone, klicken Sie auf
"Rayfoto-S800-XXXX”
2
3
· 42 ·

Spezifikation:
Video Auflösung
Anzeigebildschirm
Videoformat
Videocodierung
Video Modus
Bildformat
Memory Card
G-Sensor-Sperre
Parkbewegung
GPS
WIFI
Arbeitstemperatur
Lagertemperatur
Betriebsfeuchtigkeit
Energieversorgung
Vorderseite:3840*2160P Rückseite:2560*1440P
3,16-Zoll-Farb-IPS-HD-Display
MP4
H.265
Daueraufnahme
JPG
U3 Micro-SD-Karte bis zu 256 GB
Eingebaut
Eingebaut
Eingebaut GPS
Eingebautes 5g wifi
-20°C ~ 65°C ( -4°F ~ 149°F)
-30°C ~ 70°C ( -22°F ~ 158T)
15~85%RH°
5V-3.5A DC
· 43 ·

Common Problem and Solution
Q:Rekorder zeigt Speicher voll an, Video kann nicht geloopt werden
usw.
A:
1.Erstens,wenn eine neue Speicherkarte zumersten Mal auf demverwendet
wird Bitte formatieren Sie die Speicherkarte dann auf demPC
imFAT32-Format formatieren Sie es in der Kamera. Zweitens,wenn die
Speicherkarte bereits verwendetwurde Auf einemanderen Gerätetypmuss
es formatiertwerden,wenn es verwendet wird
Q:Das Gerät schaltet sich automatisch ein oder aus.
A:
1.Bitte formatieren Sie die Speicherkarte auf demPC imFAT32-Format und
formatieren Sie sie dann in der Kamera.
2. Überprüfen Sie den Verbindungsstatus des Autoladegeräts, wenn die
Verbindung locker ist Stromversorgung nicht stabil ist, schaltet sich die
Kamera automatisch ein und aus.
Q:Die hintere Kamera zeigt kein Bild an.
A:
1. Bitte schalten Sie den Kameraanzeigemodus um, um die Rückseite zu
überprüfen Kamerastatus.
2. Bitte überprüfen Sie, ob der TYPE-C-Stecker vorhanden und das Kabel
richtig angeschlossen ist.
3. Versuchen Sie, die Kamera zu trennen, reinigen Sie den Stecker mit
etwas medizinischem Alkohol und schließen Sie ihn erneut an.
· 44 ·

Q:Wenn Sie ein Video aufnehmen, stoppt es automatisch oder die
Taste Der Betrieb ist langsam.
A:
1.Bitte setzen Sie das Gerät zuerst auf dieWerkseinstellungen zurück.
2.Bitte überprüfen Sie, ob es sich bei der Speicherkarte umeine U3-
Hochgeschwindigkeitskarte handelt, und formatieren Sie die Speicherkarte
vor der Verwendung auf der Kamera oder demPC.
Q:Stellen Sie zwar den Bildschirmschoner ein, aber der Bildschirm
wird zufällig angezeigt.
A: Die Stromversorgung ist möglicherweise nicht stabil, bitte
wechseln Sie ein anderes Autoladegerät, um es zu versuchen.
Q: Warum Dash Cam Autobatterie entleeren?
A: Bitte überprüfen Sie, ob der Zigarettenanzünder noch
eingeschaltet ist, nachdem Sie den Automotor abgestellt haben.
Q: Die Kamera startet und schaltet sich immer wieder aus?
A: Das könnte die Parküberwachungsfunktion sein, die ausgelöst
wird, überprüfen Sie das Setup-Menü.
Q: Wenn das auf dem Computer abgespielte Video irgendwie nicht
flüssig oder verklemmt ist.
A: 1. Versuchen Sie, das Video mit anderen Videoplayern wie Potpla
yer oder GX-Player abzuspielen.
2.Formatieren Sie Ihre Micro-SD-Karte in der Kamera.
3. Führen Sie einen Geschwindigkeitstest auf der Speicherkarte durch, um
sicherzustellen, dass die Speicherkarte die Anforderungen erfüllt: Die
Schreibgeschwindigkeit beträgt über 30MB/s.
Q: Es gibt Streifenstörungen im Bild. Es sollte eine falsche
Lichtfrequenz vorliegen.
A: Nehmen Sie entsprechend der lokalen Hauptfrequenz die
entsprechenden Einstellungen vor.
· 45 ·

Français

Français

Avis important
1.Ce produit est destiné à être utilisé uniquement dans un véhicule à
moteur. N' INSTALLEZ PAS la caméra à un endroit où elle pourrait obstruer
la vue du conducteur sur la route (y compris rétroviseurs) ou le
déploiement de l'airbag.
2.Puis insérez la mémoire d'abord la carte mémoire, puis formatez la carte
mémoire dans le menu de l' appareil photo.
3.Cette caméra enregistre la vidéo en haute résolution, assurez-vous
d'utiliser U3 high Une carte Micro SD, des cartes de 32 Go ou 256 Go sont
recommandées.
4.Assurez-vous que l'objectif de la caméra est propre et que rien ne
bloque lelentille.
5. NE PAS laisser l'appareil photo en plein soleil pendant une longue
période ou où la température peut dépasser 149 °F (65 °C)
6. L'appareil photo est équipé d'une fonction GPS interne.
· 49 ·

Si vous avez des questions sur notre caméra de tableau de
bord, veuillez nous contacter
nous pouvons fournir une solution que vous pouvez accepter.
DC@yooomail.com
· 50 ·
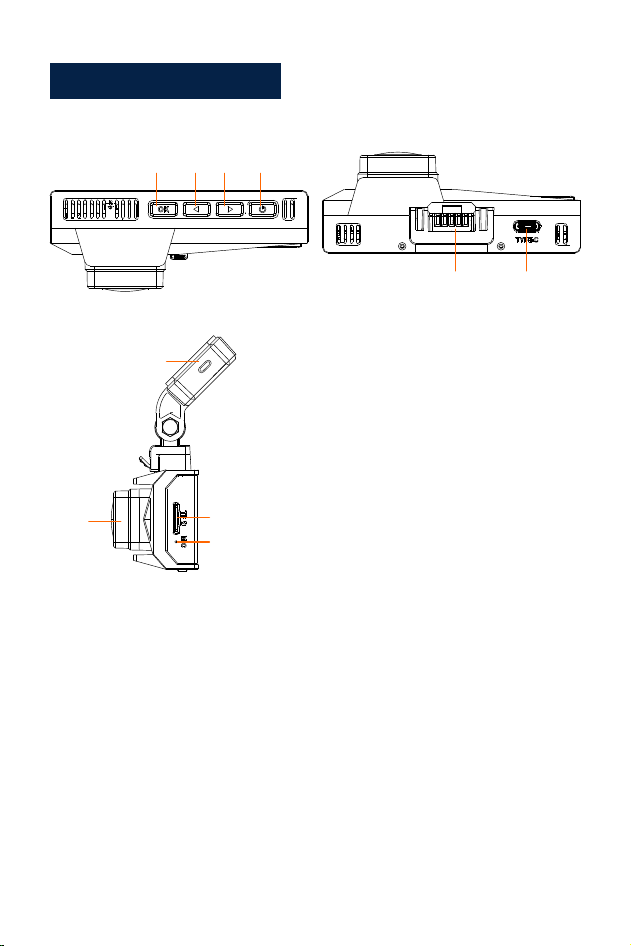
Schéma du produit
1. Alimentation/Menu
2. Bouton Bas/WIFI/Affichage à l'écran
3. Bouton Haut/Enregistrement audio/
Prendre une photo
4. OK/lecture
5. Interface de support d'autocollant
6. Interface arrière / données
7. Type-c/alimentation 1
8. Fente pour carte Micro SD
9. Micro
10.Lentille
1
2
3
4
5
6
7
8
9
10
· 51 ·
Bouton Fonction Explication
Du pouvoir
/
Menu
1. IEn état de veille, appuyez longuement pour
éteindre, en état d'arrêt, appuyez longuement pour
allumer
Bouton Haut/
Enregistrement
1. En mode veille et enregistrement, appuyez
brièvement pour allumer/éteindre le microphone
2. Dans le menu et les options de fonction,
appuyez brièvement sur la gauche/le haut pour
sélectionner les fonctions et les options
3. Dans l'état d'enregistrement, appuyez
longuement sur la capture d'écran
2. En mode veille, appuyez brièvement pour entrer/
sortir du menu
3. Dans le menu, options de fonction de menu,
appuyez brièvement pour revenir au menu précédent
4. En mode lecture, appuyez brièvement pour ouvrir l'
interface de fonctionnement
5. Dans l'état d'enregistrement, appuyez brièvement
pour verrouiller la vidéo
· 52 ·
1. En mode veille et enregistrement, appuyez
brièvement pour changer d'écran (écran
préenregistrement-retour-pull-split)
Bouton Haut/
Enregistrement
4. Dans l'état de lecture de la vidéo, appuyez
brièvement pour revenir en arrière
5. Dans l'état de navigation des photos, appuyez
brièvement pour afficher la précédente
Runter
Taste/WIFI
2. Appuyez longuement pour activer/désactiver le WIFI
3. Dans les options de menu et de fonction,
appuyez brièvement sur la droite/le bas pour
sélectionner les fonctions et les options
4. Dans l'état de lecture de la vidéo, appuyez
brièvement pour avancer rapidement
5. Dans l'état de navigation, appuyez brièvement
pour afficher le suivant
· 53 ·

1.En mode veille, appuyez brièvement pour
commencer l'enregistrement
OK/
Lecture
2. En état d'enregistrement, appuyez
brièvement pour arrêter l'enregistrement
3. Dans le menu, appuyez brièvement pour
accéder au niveau suivant
4. Dans les options de la fonction, appuyez
brièvement pour con?rmer l'option
5. En mode veille, appuyez longuement pour
entrer en mode de lecture (dossier)
Lorsque la caméra est allumée, elle enregistrera automatiquement la
vidéo, si vous souhaitez terminer ou arrêter l'enregistrement, veuillez
appuyer sur le bouton OK.
· 54 ·
Configuration et installation
1. Utilisez le support autocollant 3M pour installer la caméra de tableau de
bord sur le parebrise,la position recommandée est près du rétroviseur près
dusiège passager, ajustez l'angle des deux lentilles pour unemeilleure
couverture.
2.Branchez l'adaptateur secteur inclus dans la prise allume-cigare de la
voiture, le voyant s'allume, ce qui signifie que l'appareil est sous tension.
3. Connectez l'adaptateur secteur et la caméra de tableau de bord, et
acheminez l'excédent câble le long de la garniture intérieure pour
unemeilleure apparence.
4. Installez la caméra arrière à l'arrière de la voiture sur le pare-brise,
réglez l'angle de l' objectif pour obtenir lameilleure couverture, puis
connectez le connecteur de la caméra arrière aumoteur principal.
5. Démarrez votre voiture, la caméra s'allumera automatiquement, vérifiez
l'angle et la couverture de l'objectif, assurez-vous que toutes les fonctions
fonctionnent bien avant de prendre la route.
· 55 ·

Description de la fonction
1.Mise sous tension : l'appareil passe automatiquement en mode
d'enregistrement vidéo lorsque vous appuyez sur le bouton d'alimentation
ou connectez-le à l'allume-cigare en utilisant le chargeur de voiture.
2.Mise hors tension : Appuyez et maintenez l'alimentation éteinte.
Après que la voiture tombe en panne, l'appareil s'éteint automatiquement
lorsque le chargeur de voiture cesse de fournir de l'énergie
Marche / arrêt:
· 56 ·
Mode d'enregistrement vidéo :
1. Durée d'enregistrement vidéo
2. Résolution
3.Date et heure
4. Icône verrouillée
5. Icône dumicro
6. Icône du capteur G
7. IcôneWi-Fi
8. Icône dumoniteur de
stationnement
9. Démarrer/arrêter l'
enregistrement
10. Enregistrement audio
11. Commutation d'écran
12.Réglage/Verrouillage
13. Icône GPS
14.WIFI nom
15. Mot de passeWi-Fi
1
2
3
4
5 6
7
8
9
10
11
12
13
14
15
•L'indicateur bleu dans le coin supérieur droit de l'appareil s'allume et
clignote.
•L'icône d'enregistrement deviendra rouge et clignotante, cela signifie
que l'appareil enregistre normalement la vidéo.
2.Appuyer sur le bouton OK arrêtera l'enregistrement.
•L'indicateur bleu dans le coin supérieur droit de l'appareil cessera de
clignoter.
•L'icône rouge disparaîtra, cela signifie que l'appareil a arrêté d'
enregistrer.
3.Appuyez à nouveau sur le bouton OK pour relancer l'enregistrement de
l'appareil.
9
12
· 57 ·
Mode de lecture :
1. Lorsque l'appareil est en mode veille (lorsque l'enregistrement est
arrêté), appuyez sur le bouton OK environ 2 secondes jusqu'à aller dans
le dossier, cela signifie l'appareil est en mode de lecture.
2.Appuyez sur le bouton haut/bas pour sélectionner le ?chier souhaité. Si
vous souhaitez lire un ? chier vidéo, veuillez appuyer sur le bouton
d'alimentation pour lire la vidéo.
•Lors de l'enregistrement d'une vidéo, appuyez sur le bouton de menu
pour verrouiller le ?chieractuel. La apparaîtra sur l'écran LCD. Le
fichier verrouillé ne peut pas être supprimé.
•Appuyez sur le bouton UP, le microphone sera fermé, appuyez à nouveau
dessus pour ouvrir le microphone.
Aufnahmeanpassungen:
· 58 ·

Paramètre
Vidéo:
1.Appuyez sur le bouton de m enu pour accéder au menu des paramètres
vidéo.
2.Utilisez les boutons Haut/Bas pour sélectionner et mettre en surbrillance
la fonction que vous souhaitez régler. Appuyez sur le bouton OK pour
accéder aux menus suivants.
3.Appuyez à nouveau sur le bouton menu pour quitter l'interface du menu.
4.Appuyez sur le bouton OK pour entrer ou con?rmer les paramètres.
Réglages:
•Résolution (Pour définir ou réinitialiser la résolution de la vidéo) :
Choix : Avec caméra arrière : 4K+2K/2KP60+2K/2K+2K/1080P60+2K
Sans caméra arrière : 4K/2KP60/2K/1080P60
•Enregistrement en boucle
Choix : Arrêt/1min/3min/ 5min
Enregistrez la vidéo pour le temps de réglage. Lorsque la carte est pleine,
la vidéo la plus ancienne sera automatiquement écrasée.
•Langue
Choix:English/Français/Español/Português/Deutsch/ltaliano/ 简体中文/繁體
中文/Pyccкий/日本語
•WIFI
Choix : Marche/Arrêt
Activer et désactiver le Wi-Fi (pour plus de détails, veuillez consulter
la page 14)
•Affichage à double came
Choix : avant/arrière/avant et arrière
Sélectionnez différents affichages d'écran selon vos besoins
· 59 ·

•Enregistrement audio
Choix : Activé/Désactivé
Vous pouvez le régler surOn ouOff en conséquence. S'il est réglé surOff, la
caméra n'enregistrera pas le son.
•G-sensor
Choix : Désactivé/ Faible/ Moyen/ Élevé
Si le capteur G est activé, lorsqu'un freinage/choc/vibration excessif se
produit pendant l'enregistrement, le fichier vidéo d'enregistrement existant
sera verrouillé automatiquement.
•Timbre dateur
Choix : Activé/Désactivé
Réglez sur On ou Off comme vous le souhaitez. Si Activé est sélectionné,
la date et l'heure seront imprimées et enregistrées sur la vidéo.
•Économiseur d'écran
Choix : Arrêt/30 s/1min/3min
Si vous réglez la durée de l'économiseur d'écran, l'écran entrera dans un
écran vide en fonction de la durée de réglage pour protéger l'écran.
•Affichage de l'heure
Choix : Activé/Désactivé
Activer/désactiver l'affichage de l'heure de l'économiseur d'écran
•Système horaire
Choix : Système 12 heures/Système 24 heures
•Date/Heure
Réglez ou réinitialisez l'heure et le jour réels.
•Bip sonore
Choix : Activé/Désactivé
Activer/désactiver le bip sonore lorsque vous appuyez sur les boutons.
· 60 ·

•Moniteur de stationnement
Choix :Désactivé/Activé
Si la fonction de surveillance du stationnement est activée et que l'appareil
est éteint. Lorsque le véhicule est impacté par une certaine force, l'appareil
démarre automatiquement pendant 15 secondes d'enregistrement
verrouillé, puis automatiquement. éteignez à nouveau. Et il recommencera
à enregistrer à la prochaine collision, et bientôt. Lorsque la voiture
démarre, l'enregistrement deviendra une boucle normale enregistrement.
•La fréquence
Choix : 50Hz/60Hz
Pour régler ou réinitialiser la fréquence de l'alimentation CA afin de réduire l
es interférences des lampes ?uorescentes (aux États-Unis et au Canada,
réglezla sur 60 Hz).
•Fuseau horaire
Choix: GMT12:OO/GMT-11:OO/GMT-1O:OO/GMT-O9:OO/ GMT-08:00/GMT-
07:00/GMT-06:00/GMT-05:00/GMT-04:00/ GMT-03:00/GMT-02:00/GMT-01:00/
GMT+OO:OO/ GMT+01:00/ GMT+02:00/ GMT+03:00/
GMT+04:00/ GMT+05:00/GMT+06:00/ GMT+07:00/
GMT+08:00/ GMT+09:00/ GMTT+1O:00/ GMT+11:00/ GMT+12:00
Sélectionnez un fuseau horaire en fonction de la région de l'utilisateur.
Lorsque la machine reçoit un signal GPS, la machine met
automatiquement à jour l'heure du système à la dernière heure du fuseau
horaire actuel
•Informations GPS
Vérifier la force du signal GPS
· 61 ·

•Format
Cette fonction formatera (effacera les données aJI) la carte Micro SD.
Avertissement : Lors du formatage de la carte, tous les fichiers seront
effacés. Téléchargez tous les ?chiers que vous souhaitez sauvegarder sur
votre PC AVANT de commencer à formater la carte.
•Paramètres par défaut
Réinitialisez tous les paramètres aux préréglages d'usine. Veuillez le régler
avec soin, les paramètres de réglage personnalisés d'origine n'existeront
pas après le réglage.
•Version
vérifiez la version de l'appareil.
Paramètres de lecture :
• Supprimer : Supprimer l'actuel/Supprimer tout
Vous pouvez choisir de supprimer le fichier actuel ou tous les fichiers.
Installer et utiliser le lecteur GPS :
Pour afficher la carte GPS à l'aide d'une application de téléphone mobile,
vousdevez télécharger le f i chier vidéo de la caméra embarquée sur le
téléphone mobile pour une visualisation normale. Téléchargez le lecteur à
partir du lien ci-dessous et installez 《gxplayerv1.3.3》
puis ouvrez la vidéo GPS, avec le lecteur téléchargé pour la lire.
Adresse de téléchargement du lecteur GPS :
http://www.sunningsoft.com/en/pcgps.html
· 62 ·

E
· 63 ·

Connecter l'ordinateur :
1.Connectez le câble de connexion TYPE-C fourni au port TYPE-C sur le
côté de l' appareil.
2.Connectez l'extrémité USB pleine taille du câble à un port USB de
l'ordinateur.
3.L'appareil s'allumera automatiquement et affichera les modes USB :
"Mass Stockage".
4.Attendez quelques instants, le dossier de stockage de l'appareil
apparaîtra sur l'écran de l'ordinateur.
5.Suivez les instructions à l'écran pour afficher, regarder, télécharger ou
enregistrer le fichiers vers le PC.
REMARQUE:
Système d'exploitation informatique compatible : Windows XP ;
Windows Vista; Windows 7; Windows 8 et Windows 10.
WI-FI
Adresse de téléchargement APP :
Adresse de téléchargement du système IOS :
https://apps.apple.com/cn/app/roadcam/id1119500688
Adresse de téléchargement Android :
https://play.google.com/store/apps/details?id=com.lg.aroadcams
QR code:
· 64 ·

Téléchargez l'application RoadCamdepuis votre smartphone ou tablette
dans Google Play ou Apple App Store. L'application Wi-Fi vous permet de
contrôler votre caméra de tableau de bord à distance sur un smartphone
ou une tablette. Vous pouvez visionner la vidéo ou les images et
télécharger les enregistrements survotre téléphone.
Comment activer/désactiver la fonction Wi-Fi ?
1. Accédez aumenu de configuration du système, recherchez la fonction
Wi-Fi et activez/ désactivez lewifi en sélectionnant l'option de fonctionwi?
Marche/Arrêt.
2. Appuyez brièvement sur le bouton Bas pour allumer leWi-Fi, et appuyez
longuement sur le bouton UP bouton pour désactiver lewifi. Lorsque la
fonctionwi? est activée, le nomwi? et lemot de passewi? s' affichent dans
le coin supérieur gauche de l'écran.
Comment se connecter au wifi ?
Trouvez d'abord le nomwif i de l'enregistreur de conduite dans la listewif i
sur le smartphone, entrez lemot de passewif i affiché sur l'écran de la
dash camet connectezvous auwifi
Ouvrez ensuite l'APP, recherchez le nomde l'appareil dans la liste des
appareils sur la page d 'accueil de l'APP et cliquez dessus pour accéder à
l'interface de fonctionnement.
· 65 ·
Étape 1:
Activez le Wi-Fi sur la caméra de tableau de bord.
Étape 2:
Ouvrez le menu des paramètres du smartphone et recherchez la lis
te Wi-Fi.
Étapes pour se connecter à l'application :
Étape 3:
Ouvrez l'application sur votre smartphone, cliquez sur "Rayfoto-S800
-XXXX"
2
3
· 66 ·

Spezifikation:
Résolution vidéo
Écran d'affichage
Format v idéo
Codage vidéo
Mode vidéo
Format d'image
Cartemémoire
G-Capteur-Verrouillage
Mouvementdestationnement
GPS
WIFI
Températuredefonctionnement
Température de stockage
Humiditédefonctionnement
Source de courant
Avant : 3840*2160P arrière : 2560*1440P
Écran couleur IPS HD de 3,16 pouces
MP4
H.265
Enregistrement en boucle
JPG
U3 Micro SD card up to 256GB
Intégré
Intégré
Intégré GPS
Intégré 5G WiFi
-20°C ~ 65°C ( -4°F ~ 149°F)
-30°C ~ 70°C ( -22°F ~ 158T)
15~85%RH°
5V-3.5A DC
· 67 ·

Problème courant et solution
Q:L'enregistreur indique que la mémoire est pleine, impossible de
boucler la vidéo, etc.
A:
1.Tout d'abord, lorsqu'une nouvelle carte mémoire est utilisée pour la
première fois sur l'appareil, veuillez formater la carte mémoire au format
FAT32 sur PC, puis formatez-la dans l'appareil photo. Deuxièmement, si la
carte mémoire a déjà été utilisée sur un autre type d'appareil, elle doit être
formatée lorsqu'elle est utilisée sur cet appareil photo. Troisièmement,
changez une autre carte Micro SD neuve.
2.Vérifiez la sensibilité du capteur G. Si la sensibilité est trop élevée, les
chocs et les secousses de l 'appareil photo activeront le capteur G et les
chiers seront verrouillés. Les chiers verrouillés ne peuvent pas être écrasés.
Si les chiers verrouillés sont accumulés, il n'y aura pas d'espace mémoire
pour l'enregistrement en boucle. Lorsque le moniteur de stationnement
est activé, le tremblement entraînera également trop de chiers errants, ce
qui affectera également la lecture et l'écriture des cartes.
Q:L'appareil s'allumera ou s'éteindra automatiquement.
A:
1.Veuillez formater la carte mémoire au format FAT32 sur PC, puis
formatez-la dans l'appareil photo.
2. Vérifiez l'état de la connexion du chargeur de voiture, si la connexion
est lâche , l'alimentation n'est pas stable, la caméra s'allumera et s'éteindra
automatiquement.
Q:La caméra arrière n'affiche pas d'image.
A:
1. Veuillez changer le mode d'affichage de la caméra pour vérifier l'état
de la caméra arrière.
2. Veuillez vérifier si la prise TYPE-C est en place et si le câble est
correctement connecté.
· 68 ·

3. Essayez de déconnecter la caméra et nettoyez le connecteur avec de l'
alcool médical et reconnectez-le.
Q:Lors de la prise de vue vidéo, il s'arrête automatiquement ou le
fonctionnement du bouton est lent.
A:
1.Tout d'abord, veuillez réinitialiser l'appareil aux paramètres d'usine.
2.Veuillez vérifier si la carte mémoire est une carte U3 haute vitesse et
veuillez formater la carte mémoire sur l'appareil photo ou le PC avant
utilisation.
Q:Même si définir l'économiseur d'écran, mais l'écran sera aléatoire.
A: L'alimentation peut ne pas être stable, veuillez changer un autre
chargeur de voiture pour essayer.
Q: Pourquoi dash cam vider la batterie de la voiture ?
A: Veuillez vérifier si l'allume-cigare est toujours allumé après avoir
éteint le moteur de la voiture.
Q: L'appareil photo n'arrête pas de démarrer et de s'éteindre ?
A: Cela pourrait être la fonction de surveillance du stationnement
déclenchée, vérifiez le menu de configuration.
Q:Si la vidéo lue sur l'ordinateur n'est pas fluide ou brouillée.
A:
1 .Essayez de lire la vidéo avec d'autres lecteurs vidéo, comme : Potplayer
ou GX player.
2.Formatez votre carte Micro SD dans l'appareil photo.
3.Exécutez un test de vitesse sur la carte mémoire pour vous assurer que
la carte mémoire répond aux exigences : la vitesse d'écriture est
supérieure à 30 Mo/s.
· 69 ·

Q: Il y a des interférences de bandes dans l'image.
Il devrait y avoir une mauvaise fréquence lumineuse.
A: Selon la fréquence principale locale, effectuez les réglages
appropriés
· 70 ·
⽇本语
⽇本语

こちらは24時間以内に返信して、問題をできるだけ早く解決するために
全⼒を尽くします。お客様は弊店の製品にご不満のところがございました
ら、ご感想をお聞かせてください。こちらが是⾮誠⼼誠意で対応させてい
ただきます!どうぞよろしくお願い申し上げます。
DC@yooomail.com
· 73 ·

重要なお知らせ:
1.本製品は⾃動⾞のみでの使⽤を⽬的としています。本製品を運転者の前⽅視界
を妨げるところ(ミラーを含む)やエアバッグの作動に影響する位置には絶対に取り
付けないでください。
2.本体の設定メニューでMicroSdカードをフォーマットしてください。
3.本製品は⾼解像度カメラを搭載することにより、必ず⾼速MicroSDカードを使⽤
してください。U3以上のMicroSDカードが推奨されます。32GBまたは256GBの容
量のSDカードがオススメになります。
4.本体を⾞両に取り付ける前に、ベンチマークテストを実⾏し、本体が正常に機能
しているかを確認することをオススメします。
5.カメラ(レンズ部)に汚れなどが付着しているか、またはレンズに遮るものがないか
を確認してください。※ウエスや柔らかい布等でレンズ部を拭いてください。本体に
電⼒を供給するには、メーカー付属の専⽤電源アダプターを使⽤してください。
6.本機を⻑時間直射⽇光にさらしたり、温度が149°F(65°C)を超える可能性のある
場所には置いたりしないでください。
7.本製品のGPS機能は内蔵します。
· 74 ·
インターフェイスと各ボタン機能
1.メ ニュー/パワー
2.ダ ウン/WIFI/前後カメラ画⾯切り替え
3.ア ップ/録⾳/写真を撮る
4.O K/再⽣
5.3Mシールホルダーコネクタ
6.リア/データインターフェース
7.Type-c電源ジャック1
8.メモリカードジャック
9.M IC
10.フ ロントカメラ
1
2
3
4
5
6
7
8
9
10
· 75 ·
ボタンと機能の説明
パワー/
メニュー
1.カメラが閉まると、電源ボタンを⻑押してカメラを開けます。
どのモードでも、電源ボタンを⻑押したままにしてカメラの
電源を切ります。
2.待機状態で、短押してメニューをオン/オフにします;
3.メニュー機能オプションインターフェイスで、短押しして前
のメニューに戻ります;
4.再⽣モードで、短押しして操作インターフェースを開きます;
5.録画状態で、短押ししてビデオをロックします;
アップ/録⾳
1.スタンバイおよび録⾳状態で、短押しして録⾳のオン/オフを
切り替えます。
2.メニューと機能オプションで、左/上を短く押して機能とオプ
ションを選択します。
3.録画状態で、スクリーンショットを⻑押しします。
· 76 ·

1.スタンバイ状態と録画状態で、短押しして画⾯(フロントカ
メラ画⾯/リアカメラ画⾯/前後カメラ画⾯)を切り替えます;
4.ビデオを再⽣している状態で、短押しして戻ります。
5.写真を閲覧している状態で、短く押すと前の写真が表⽰さ
れます;
ダウン/WIFI
2.⻑押ししてWIFI機能をオン/オフにします;
メニューと機能オプションで、右/下を短く押して機能とオプシ
ョンを選択します;
2.ビ デオを再⽣している状態で、短く押すと早送りします;
2.写真を閲覧している状態で、短押しすると次の写真が表⽰
されます;
アップ/録⾳
· 77 ·

1.スタンバイモードでは、短押しして録画をオン/オフにします;
OK/再⽣モード
2.録画状態で、短押しして録画を停⽌します;
3.メニューで、短押しして次のレベルに⼊ります;
4.機能オプションで、確認オプションを短く押す;
5.スタンバイモードでは、⻑押しして再⽣モード(フォルダ)
に⼊ります;
ドライブレコーダーの電源を⼊れると、ビデオが⾃動的に録画されます。録画を終了
または停⽌する場合は、[OK]ボタンを押してください。
· 78 ·
設定とインストール
1.3Mラベルを使⽤して、ドライビングレコーダーをフロントガラスに取り付けます。
推奨される場所は、バックミラーに近く、前⽅を向き、レンズの⻆度を調整して最適
なカバレッジを実現します。
2.電 源をドライブレコーダーと付属シガーアダプタに接続し、インジケーターライトが
点灯し、電源がオンになっていることを⽰します。
3.残りのケーブルを内部のトリムパネルの隙間に隠します。
4.リアカメラを⾞の後部のフロントガラスに取り付け、レンズの⻆度を調整してカバー
範囲を最適化し、リアカメラコネクタを本体に接続します。
5.⾞を始動すると、カメラが⾃動的にオンになり、レンズの⻆度とカバレッジをチェッ
クし、正常に運転する前にすべての機能が正常であることを確認します。
· 79 ·

機能紹介
1.電源オン:ドライブレコーダーが正常に電源に接続されている場合、ドライブレコー
ダーは⾃動的にオンになり、⾃動的に記録モードに⼊ります。
2.電源オフ:電源ボタンを⻑押します。
Ps:⾞が故障したとき、または⾞の充電器が電⼒の供給を停⽌したとき、デバイスは
⾃動的にシャットダウンします。
Power on/off:
· 80 ·
ビデオ録画モード:
1.録画時間
2.解像度
3.⽇付と時間
4.ロックアイコン
5.マイクアイコン
6.Gセンサー
7.WIFIアイコン
8.駐⾞監視
9.録画オン/オフ
10.録⾳
11.画⾯切换
12.設定/ロック
13.GPSアイコン
14.WIFI名前
15.WIFIパスワード
1.レコーダーの右上隅にある⻘いインジケーターライトが点灯し、電源を⼊れると点
滅します。
2.録画アイコンが⾚く点滅し、ドライブレコーダーがビデオを正常に録画していること
を⽰します。
3.OKボタンを押して、録⾳を停⽌します。
4.デバイスの右上隅にある⻘いライトの点滅が⽌まります。
5.⾚いアイコンが消え、ドライブレコーダーは録画を停⽌したことを⽰します。
6.Okボタンをもう⼀度押すと、ドライブレコーダーは録画を再開します。
1
2
3
4
5 6
7
8
9
10
11
12
13
14
15
9
12
· 81 ·
再⽣モード
1. デバイスがスタンバイ状態のとき(記録が停止しているとき)、フォルダに入るま
でOKボタンを約2秒間押して、デバイスが再生モードになっていることを示します。
2.上/下ボタンを押して、目的のファイルを選択します。 ビデオファイルを再生す
る場合は、電源ボタンを押してビデオを再生します。
•ビデオを録画するときは、メニューキーを押して現在のファイルをロックします。アイ
コンがLCDディスプレイに表⽰されます。ロックされたビデオは、ループ録画機
能によって上書きされません。
•Upボタンを短押すとマイクがオフになります。もう⼀度押すとマイクがオンになります。
录像调整
削除
現在の削除
すべて削除
· 82 ·

設定:
ビデオ:
1.メ ニューキーを押して、ビデオ設定メニューに⼊ります。
2.上/下ボタンを使⽤して、調整する機能を選択して強調表⽰します。OKボタンを
押して次のメニューに⼊ります。
3.メニューキーをもう⼀度押して、メニューインターフェイスを終了します。
4.Okボタンを押して、設定を⼊⼒または確認します。
•解像度(ビデオ解像度の設定またはリセット)
オプション:リアカメラあり:4K+2K/2KP60+2K/2K+2K/1080P60+2K
リアカメラ:4K/2KP60/2K/1080P60
•ループ録画
この機能を使⽤すると、ビデオファイルの⻑さを1/3/5分に設定できます。
設定値を選択してループ録画を有効にし、ストレージがいっぱいになると、⾃動的に
最も古いデータから削除されていきます。
•⾔語
オプション:English/Français/Español/Português/Deutsch/ltaliano/简体中⽂/
繁體中⽂/Pyccкий/⽇本語;
•WI-FI
オプション:WIFIのオンとオフを切り替えます(詳細については、88ページを参照し
てください);
•前後カメラの画⾯表⽰
オプション:フロント/バック/フロントとリアは必要に応じて異なる画⾯表⽰を選択し
ます;
· 83 ·

•録⾳:
録⾳機能はオンとオフを選択でき、デフォルトではオフになります。
•Gセンサー:
オフ/ロー/中/⾼
重⼒センサーの感度をオンにして調整します。⾛⾏中、あなたの⾞がぶつかった後、ビ
デオを⾃動的にロックします。この録画ビデオはループ録画機能では削除されません。
•⽇付スタンプ:
ビデオ透かしのオン/オフを切り替えます;
•スクリーンセーバー:
30秒/1分/3分をオフにして、設定した時間に応じて画⾯が黒くなり、消費電⼒を節約
できます。
•時間表⽰
オプション:スクリーンセーバーの時間表⽰をオン/オフにします。
•時間システムオプション:12時間/24時間。
•⽇付/時刻
実際の時刻と⽇付を設定またはリセットします。
•キートーンオプション:
ボタンが押されたときにキートーンをオン/オフにします。
· 84 ·

•駐⾞監視
駐⾞監視は、駐⾞後に愛⾞を監視するために使⽤されます。Gセンサーに従って感知
できます,この機能をオンにすると、⾞のエンジンがOFFになった後でも待機状態
になり、⼤きな衝撃があった時、⾃動的にオンになり、15秒ほど録画し、その後⾃動
的にシャットダウンします。駐⾞監視モードで録画されたビデオは保護され、ループ
録画によって上書きされることはありません。
•周波数
地域の規則に従って、周波数を50Hzまたは60Hzに設定します。
•GPS情報
GPS信号強度を確認します;
· 85 ·

フォーマット:MicroSDカードをフォーマットします。
警告:カードがフォーマットされると、すべてのファイルが削除されます。カードのフォー
マットを開始する前に、必要なファイルをPCに保存してください。
•リセット
リセットをクリックすると、⼯場出荷時の設定を復元するか、確認するか、キャンセルす
るかを確認するメッセージが表⽰されます。
•バージョン
デバイスのバージョンを確認します。
再⽣設定:
•削除:現在のファイルを削除/すべて削除現在のファイルまたはすべてのファイルを
削除することを選択できます。
Install and use GPS player:
GPSプレーヤーをインストールして使⽤するには:
携帯電話APPを使⽤してGPSマップを表⽰するには、ドライブレコーダーのビデオファ
イルを携帯電話にダウンロードして正常に表⽰する必要があります。
以下のリンクからプレーヤーをダウンロードして「gxplayerv1.3.3」をインストールし、
GPSビデオを開いて、ダウンロードしたプレーヤーで再⽣します。
GPSプレーヤーのダウンロードアドレス:
http://www.sunningsoft.com/en/pcgps.html
· 86 ·
E
· 87 ·

コンピューターに接続⽅法:
1.付属のTYPE-Cケーブルをドライブレコーダー側⾯のミニTYPE-Cポートに接続します。
2.USBインターフェースをコンピューターのUSBポートに接続します。
3.マシンの電源が⾃動的にオンになり、USBモード「マスストレージ」が表⽰されます。
4.しばらくすると、マシンのストレージフォルダがコンピュータの画⾯に表⽰されます。
5.画⾯の指⽰に従って、ファイルをPCに表⽰、監視、アップロード、または保存します。
注:
互換性のあるコンピューターのオペレーティングシステム:WindowsXP;
WindowsVista;Windows7;Windows8andWindows10;
WI-FI
APPダウンロードアドレスは以下:
IOSダウンロードアドレス:https://apps.apple.com/cn/app/roadcam/id1119500688
Android-ダウンロードアドレス:https://play.google.com/store/apps/details?id
=com.lg.aroadcams
Qrコード
· 88 ·

スマホやタブレット上のGooglePlayまたはAppleAppStoreからRoadCamアプリケ
ーションをダウンロードします。Wi-Fiアプリでは、スマートフォンやタブレットでドライブ
レコーダーを遠隔制御できます。
あなたの携帯電話でビデオや写真を表⽰したり、録画をダウンロードしたりできます。
Wi-Fi機能をオン/オフにする⽅法は?
1.システム設定メニューに⼊り、wifi機能を⾒つけ、wifi機能オプションのオン/オフを
選択します。
2.下キーを短く押してWi-Fiをオンにし、上キーを⻑押ししてWi-Fiをオフにします。
Wi-Fi機能をオンにすると、画⾯の左上隅にWi-Fi名とWi-Fiパスワードが表⽰されます。
Wi-Fiに接続する⽅法は?
まず、スマホのwifiリストでダッシュカムのwifi名を⾒つけ、ダッシュカム画⾯に表⽰さ
れるwifiパスワードを⼊⼒し、wifiに接続してから、APPを開き、スマホのデバイスリス
トでデバイス名を⾒つけます電話をクリックし、クリックして操作インターフェースに⼊
ります。
· 89 ·
アプリに接続する⽅法
ステップ1:
ダッシュカムのwifiをオンにします。
ステップ2:
スマートフォンの設定メニューを開き、wifiリストを⾒つけます。
ステップ3:
スマートフォンでアプリを開き「、Rayfoto-S800-XXXX」をタッチします。
2
3
· 90 ·

規格:
画⾯サイズ
解像度
レンズ
ビデオフォーマット
ビデオエンコード
画像フォーマット
ループ録画
駐⾞監視
Gセンサー
WIFI
マイクロフォン
スピーカー
ストレージ
操作温度
保管温度
操作湿度
電源供給
3.16インチ
フロントカメラ:3840*2160p;リアカメラ:2560*1440p
前後広⻆レンズ
MP4
H.265
JPG
対応
対応(降圧ケーブルを接続して使⽤する必要がある)
対応
対応
対応
最⼤256GBのマイクロSDカード、U3以上のMicroSD
カードが推奨されます。
20~65℃(-4°F~149°F)
-30~70℃C(-22°F~158T)
15~85%RH
DC5V/3.5A
内蔵5GWIFI
· 91 ·

よくある質問と対策:
Q:新品のMicroSDカードを使⽤する場合は、必ずパソコンなどでMicroSDカード
をFAT32フォーマットしてから、本体の設定メニューでフォーマットを⾏ってください。
A:
1.他のデバイスで使⽤された旧SDカードでも本機で使⽤する前には、フォーマット
する必要があります。上記で問題が改善しない場合、別の新しい32GBMicroSdカー
ドを使⽤することをおすすめします。
2.Gセンサーの検知感度設定をご確認ください。検知感度が⾼すぎる場合、⾞がぶ
つかったり揺れたりするとGセンサーがトリガーされ、ファイルがロックされます。ロッ
クされたファイルは上書きされていきませんので、蓄積されていると、ループ録画の
データがメモリーカードの容量をなくなります。駐⾞監視がオンになっている場合、
揺れによってロックファイルが多すぎて、カードの読み取りと書き込みにも影響します。
Q:本機の電源が勝⼿にオン/オフします。
A:
1.メモリカードをPCでFAT32フォーマットをしてから、設定メニューでフォーマット
してください。
2.⾞の充電器の接続状態を確認してください。接続が不安定になる場合は、勝⼿
にオン/オフすることがあります。
Q:バックカメラに画像が表⽰されない。
A:
1.カメラの表⽰モードを切り替えて、バックカメラのステータスを再確認してください。
2.TYPE-Cプラグが正しく接続され、ケーブルが正しく差し込まれているかを確認
してください。
3.カメラを取り外し、医療⽤アルコールでコネクタをきれいにして、もう⼀度接続し
てみてください。
· 92 ·

Q:録画中の画⾯操作やボタンの操作反応が遅い。
A:
1.ご使⽤のメモリーカードが⾼速カード(Class10)であるかご確認ください。⾼速
でないカードをご使⽤の場合、秒数⽋落、動画の再⽣ジャム、画⾯表⽰に⾊むら、
クラッシュなどが発⽣する場合があります。
2.必要に応じて本機をリセットしてください。
Q:スクリーンセーバーを設定しても、画⾯がランダムに戻る。
A:電源が安定しない可能性があります。別の⾞の充電器と交換してみてください。
Q:ドライブレコーダーが⾞のバッテリーを消耗するのはなぜですか?
A:⾞の電源を切った後も、シガレットライターがまだオンになっているかどうかを確認
してください。
Q:カメラが起動とオフを続けますか?
A:駐⾞監視機能がトリガされたかもしれません。設定メニューを確認してください。
Q:コンピューターで再⽣されるビデオがスムーズでないかフリーズする場合。
A:
1.PotplayerやPotplayerなど、他のビデオプレーヤーを使⽤してビデオを再⽣して
みてください。
2.カメラでMicroSDカードをフォーマットします。
3.メモリカードで速度テストを実⾏して、メモリカードが要件を満たしていることを確
認します。書き込み速度が30MB/Sを超えています。
Q:画像にストライプ⼲渉があります。間違った光周波数があるはずです。
A:ローカルの主周波数に応じて、適切に50HZまたは60HZに設定します。
· 93 ·


Español

Español


Noticia importante
1. Este producto está diseñado para usarse únicamente en vehículos
motorizados. NO instale la cámara donde pueda bloquear la vista del
conductor de la carretera (incluidos los espejos) o el despliegue de la
bolsa de aire.
2. Antes de usar esta cámara, formatee el cable de memoria en la
computadora (seleccione un tamaño de unidad de 32 KB para
formatearlo), luego inserte primero la tarjeta de memoria y formatee la
tarjeta de memoria en el menú de la cámara.
3. Esta cámara graba video en alta resolución. Asegúrese de usar la
tarjeta Micro SD de alta velocidad U3, se recomiendan tarjetas de
32 GB o 256 GB.
4.Asegúrese de que la lente de la cámara esté limpia y que no haya nada
bloqueando la lente.
5. NO deje la cámara expuesta a la luz solar directa durante un período
prolongado o donde la temperatura pueda superar los 65 °C (149 °F).
6. La cámara está equipada con función GPS interna.
· 98 ·
Diagrama del producto
1
2
3
4
5
6
1. Encendido/Menú
2. Botón Arriba/Grabación de audio/
Tomar foto
3. Botón Abajo/WIFI/Visualización en
pantalla
4.Aceptar/reproducir
Interfaz de soporte adhesivo de 5,3 M
6. Interfaz trasera/datos
7.Tipo-c/Puerto de alimentación 1
8. Ranura para tarjeta Micro SD
9. Micrófono
10. Lente
7
8
9
10
· 99 ·
Botón Función Explicación
Encendido/
Menú
1. En estado de espera, presione prolongadamente
para apagar, en estado de apagado, presione
prolongadamente para encender
2. En modo de espera, presione brevemente para
ingresar/salir del menú
3.En el menú, opciones de función de menú, presione
brevemente para volver al menú anterior
4. En el modo de reproducción, presione brevemente
para abrir la interfaz de operación
5. En el estado de grabación, presione brevemente
para bloquear el video
Botón Arriba/
Grabación
1. En estado de espera y grabación, presione
brevemente para encender/apagar el micrófono
2. En el menú y las opciones de función, presione
brevemente hacia la izquierda/arriba para
seleccionar funciones y opciones
3. En el estado de grabación, mantenga presionada
la captura de pantalla
4. En el estado de reproducción de video, presione
brevemente para retroceder
5. En el estado de búsqueda de fotos, presione
brevemente para ver la anterior
· 100 ·

1. En estado de espera y grabación, presione
brevemente para cambiar la pantalla (pantalla
dividida previa a la grabación)
2. Mantenga pulsado para encender/apagar WIFI
3. En el menú y las opciones de función, presione
brevemente hacia la derecha/abajo para seleccionar
funciones y opciones
4. En el estado de reproducción de video, presione
brevemente para avanzar rápidamente
5. En el estado de navegación, presione brevemente
para ver el siguiente
Botón/WIFI
abajo
· 101 ·

1. En modo de espera, presione brevemente para
comenzar a grabar
2. En estado de grabación, presione brevemente para
detener la grabación
3.En el menú, presione brevemente para ingresar al
siguiente nivel
4. En las opciones de función, presione brevemente
para confirmar la opción
5. En modo de espera, mantenga presionado para
ingresar al modo de reproducción (carpeta)
OK/
Reproducir
Cuando la cámara está encendida, grabará video automáticamente, si
desea finalizar o detener la grabación, presione el botón OK.
· 102 ·
Configuración e instalación
1.Utilice el soporte adhesivo 3M para instalar la cámara del tablero en el
parabrisas, la posición recomendada es cerca del espejo retrovisor cerca
del asiento del pasajero, ajuste el ángulo de ambos lentes para una
mejor cobertura.
2. Enchufe el adaptador de corriente incluido en el enchufe del encendedor
de cigarrillos del automóvil, el indicador se iluminará, lo que significa que
la alimentación está encendida.
3.Conecte el adaptador de corriente y la cámara del tablero, y dirija el
exceso de cable a lo largo de la moldura interior para una mejor
apariencia.
4. Instale la cámara trasera en la parte trasera del automóvil en el
parabrisas, ajuste el ángulo de la lente para obtener la mejor cobertura
y luego conecte el conector de la cámara trasera al motor principal.
5. Encienda su automóvil, la cámara se encenderá automáticamente,
verifique el ángulo de la lente y la cobertura, asegúrese de que todas
las funciones funcionen bien antes de salir a la carretera.
· 103 ·

Función descriptiva
1. Encendido: el dispositivo ingresará automáticamente al modo de
grabación de videocuando presione el botón de encendido o conéctelo
al encendedor de cigarrillos utilizando el cargador de coche.
2. Apagado: Mantenga presionado el botón de encendido hasta que
aparezca ""Adiós"" en la pantalla.
Después de que el automóvil se averíe, el dispositivo se apagará
automáticamente cuando el cargador del coche deja de suministrar
energía
Encendido / apagado:
· 104 ·

Modo de grabación de vídeo:
1. Duración de la grabación de video
2. Resolución
3. Fecha y hora
4. Icono bloqueado
5. Icono de micrófono
6. Icono G-Sensor
7. Ícono WIFI
8. Ícono de monitor de estacionamiento
9. iniciar/detener la grabación
10. Grabación de audio
11. Cambio de pantalla
12. Configuración/Bloqueo
13. Ícono de GPS
14. Nombre WIFI
15. Contraseña WIFI
1. Cuando la cámara está en grabación de video, la luz indicadora azul
en el esquina superior derecha de la cámara seguirá parpadeando, y
hay un rojo icono de indicación en la esquina superior derecha de la
pantalla LCD que mantendrá parpadeo.
2. Al presionar el botón OK, se detendrá la grabación.
• El indicador azul en la esquina superior derecha de la cámara se
detendrá parpadeo.
• El icono rojo desaparecerá, significa que el dispositivo ha dejado de
grabar.
3. Al presionar el botón OK nuevamente, el dispositivo comenzará a
grabar nuevamente.
1
2
3
4
5 6
7
8
9
10
11
12
13
14
15
12
· 105 ·
Modo de reproducción:
1. Cuando el dispositivo está en estado de espera (cuando se detiene la
grabación), presione el botón OK unos 2 segundos hasta ir a la carpeta,
significa el dispositivo está en el modo de reproducción.
2. Pulse el botón arriba/abajo para seleccionar el archivo deseado. si
quieres jugar un archivo de video, presione el botón de encendido para
reproducir el video.
•Al grabar video, presione el botón de menú para bloquear el archivo
actual. El Aparecerá el icono en la pantalla LCD. El archivo
bloqueado no puede ser borrado al repetir la grabación
•Presione el botón ARRIBA, el micrófono se cerrará, presione nuevamente
para abrir micrófono.
Ajustes de grabación:
· 106 ·

Ajuste
Video:
1. Presione el botón de menú para ingresar al menú de configuración de
video.
2. Usando los botones Arriba/Abajo para seleccionar y resaltar la función
que quisiera ajustar. Pulse el botón OK para acceder a los menús siguientes.
3. Pulse el botón de menú de nuevo para salir de la interfaz de menú.
4. Presione el botón OK para ingresar o confirmar la configuración.
Ajustes:
• Resolución (Para establecer o restablecer la resolución del video):
Opciones: Con cámara trasera: 4K+2K/2KP60+2K/2K+2K/1080P60+2K
Sin cámara trasera: 4K/2KP60/2K/1080P60
• Grabación continua
Opciones: Apagado/1min/3mins/ 5mins
Guarde el video para el ajuste de tiempo. Cuando la tarjeta está llena,
el video más antiguo se sobrescribirá automáticamente.
• Idioma
Opciones:English/Français/Español/Português/Deutsch/ltaliano/ 简体中文/繁體
中文/Pyccкий/日本語
• WIFI
Opción: encendido/apagado
Encienda y apague WIFI (para obtener más detalles, vaya a la página 14
para ver)
• Visualizacion delapantalla
Opciones: delantero/trasero/delantero y trasero
Seleccione diferentes visualizaciones de pantalla según sea necesario
· 107 ·

• Audio de registro
Opciones: Activar/Desactivar
Puede establecerlo en Activado o Desactivado según corresponda. Si se
establece en Apagado, la cámara no
grabar el audio.
• G-sensor
Opciones: Desactivado/ Bajo/ Medio/ Alto
Si el sensor G está activado, cuando se sobrelimite el frenado/choque/
vibración que ocurra durante la grabación, el archivo de video de
grabación existente será bloqueado automáticamente.
• Impresion Fecha
Opciones: Activar/Desactivar
Establézcalo en Encendido o Apagado según desee. Si se selecciona On,
la fecha y la hora se imprimirán y grabar en video.
• Protector de pantalla
Opciones: Apagado/30 seg/1 min/3 min
Si configura el tiempo del protector de pantalla, la pantalla entrará en
pantalla en blanco de acuerdo con el tiempo de configuración para
proteger la pantalla.
• Sistema de tiempo
Opciones: Sistema de 12 horas/Sistema de 24 horas
• Fecha y hora
Configure o restablezca la hora y el día reales.
· 108 ·

• Monitor de estacionamiento
Opción: Apagado/Encendido (Necesita conectar el kit de cableado. Puede
comunicarse con nuestro soporte posventa para obtener el kit de cableado).
Si la función de monitoreo de estacionamiento está activada y el
dispositivo está apagado.Cuando el vehículo es impactado por una cierta
cantidad de fuerza, el dispositivo comienza automáticamente durante 15
segundos la grabación bloqueada, luego automáticamente apagar de
nuevo. Y comenzará a grabar de nuevo en la próxima colisión, y pronto.
Cuando el coche arranque, la grabación se convertirá en un bucle normal.
grabación.
• Frecuencia
Opciones: 50Hz/60Hz
Para establecer o restablecer la frecuencia de la alimentación de CA para
reducir la interferencia de luces fluorescentes (en EE. UU. y Canadá,
ajústelo a 60 Hz).
Sonido de pitido Opciones:
Apagado/1/2/3 Activa/desactiva el pitido al pulsar los botones
• Pitido
Opciones: Activar/Desactivar
Encender/apagar el pitido al pulsar los botones.
· 109 ·

• Información GPS
Comprobar la intensidad de la señal GPS
• Formato
Esta función formateará (borrará datos aJI) la tarjeta Micro SD.
Advertencia: Al formatear la tarjeta, se borrarán todos los archivos. Subir
todos los archivos desea guardar en su PC ANTES de comenzar a
formatear la tarjeta.
• Configuración por defecto
Restablezca todas las configuraciones a los valores predeterminados de
fábrica. Por favor, configúralo con cuidado, el original. Los parámetros de
configuración personalizados no existirán después de la configuración.
• Versión
comprobar la versión del dispositivo.
Configuración de reproducción:
• Borrar: Borrar actual/Borrar todo
Puede elegir eliminar el archivo actual o todos los archivos.
• Huso horario
Opciones: GMT12:OO/GMT-11:OO/GMT-1O:OO/GMT-O9:OO/ GMT-08:00/
GMT-07:00/GMT-06:00/GMT-05:00/GMT-04:00/ GMT-03:00/GMT-02:00/
GMT-01:00/
GMT+OO:OO/ GMT+01:00/ GMT+02:00/ GMT+03:00/
GMT+04:00/ GMT+05:00/GMT+06:00/ GMT+07:00/
GMT+08:00/ GMT+09:00/ GMT+1O:00/ GMT+11:00/ GMT+12:00
Seleccione una zona horaria según la región del usuario. Cuando la
máquina recibe una señal de GPS, la máquina actualizará automáticamente
la hora del sistema para la última hora en la zona horaria actual
· 110 ·
E
Instalar y usar el reproductor GPS:
Para ver el mapa GPS usando una aplicación de teléfono móvil, debe
descargar el archivo de video en la Dash Camera al teléfono móvil para
una visualización normal. Descargue el reproductor desde el siguiente
enlace e instale 《gxplayerv1.3.3》
luego abra GPS video, con el reproductor descargado para reproducirlo.
Dirección de descarga del reproductor GPS.
http://www.sunningsoft.com/en/pcgps.html
· 111 ·

Conectar computadora:
1. Conecte el cable de conexión TIPO-C suministrado al puerto mini TIPO-C
del lado de la unidad.
2. Conecte el extremo USB de tamaño completo del cable a un puerto
USB en el Computadora.
3. La unidad se encenderá automáticamente y mostrará los modos USB:
""Mass Almacenamiento"".
4. Espere unos momentos, la carpeta de almacenamiento de la unidad
aparecerá en la pantalla de la computadora
5. Siga las instrucciones en pantalla para ver, ver, cargar o guardar el
archivos a la PC.
NOTA:Sistema operativo de computadora compatible: Windows XP;
Windows Vista; ventanas 7; Windows 8 y Windows10.
WI-FI
Dirección de descarga de la aplicación:
Dirección de descarga del sistema IOS:
https://apps.apple.com/cn/app/roadcam/id1119500688
Dirección de descarga de Android:
https://play.google.com/store/apps/details?id=com.lg.aroadcams
Código QR:
· 112 ·

Descarga la aplicación RoadCam desde tu smartphone o tablet en Google
Play o Apple App Store. La aplicación Wi-Fi le permite controlar su
dash camera de forma remota en un teléfono inteligente o tableta.
Puede ver el video o las imágenes y descargar las grabaciones en su
teléfono.
¿Cómo encender/apagar la función wifi?
1. Ingrese al menú de configuración del sistema, busque la función wifi y
encienda / apague el wifi seleccionando la opción de función wifi On/Off.
2. Presione brevemente el botón Abajo para encender el wifi y mantenga
presionado el botón ARRIBA botón para apagar el wifi.
Cuando la función wifi está activada, el nombre wifi y la contraseña wifi
se mostrará en la esquina superior izquierda de la pantalla.
¿Cómo conectarse a wifi?
Primero busque el nombre wifi de la grabadora de conducción en la lista
wifi en el teléfono inteligente, ingrese la contraseña wifi que se muestra
en la pantalla del tablero cámara, y conéctese al wifi
Luego abra la aplicación, busque el nombre del dispositivo en la lista de
dispositivos en el hogar página de la aplicación y haga clic en él para
entrar en la interfaz de operación.
· 113 ·
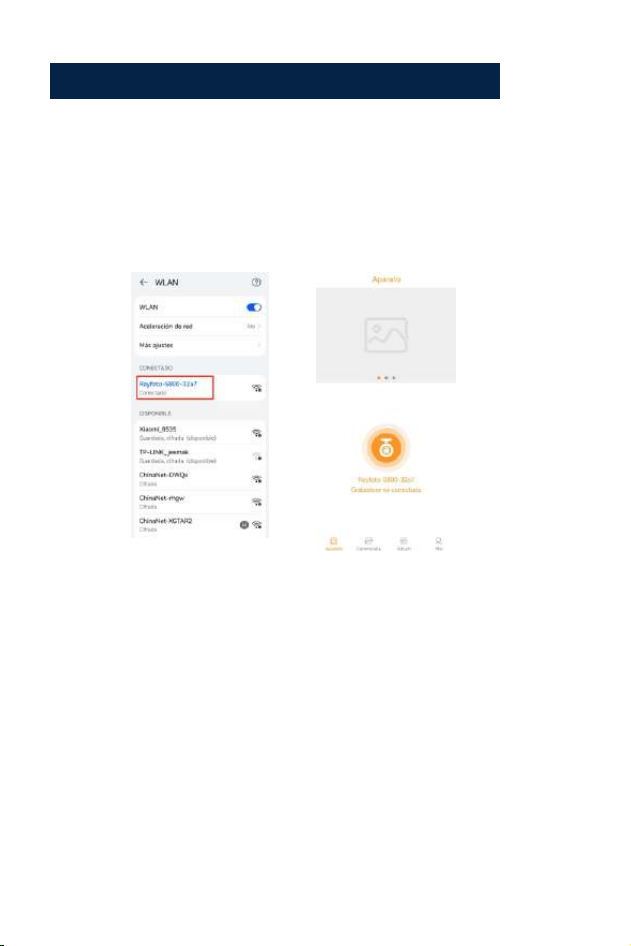
Pasos para conectarse a la aplicación:
Paso 1:
Encienda wifi en la cámara del tablero.
Pasos para conectarse a la aplicación:
Paso 2:
Abra el menú de configuración del teléfono inteligente y busque la lista wifi.
Paso 3:
Abra la aplicación en su teléfono inteligente, haga clic en “
“Rayfoto-S800-XXXX""
2
3
· 114 ·

Specification:
Pantalla de visualización
Formato de video
Codificación de vídeo
Modo de vídeo
Formato de imagen
Tarjeta de memoria
G-Sensor-bloqueo
Movimiento de
estacionamiento
GPS
Temperatura de trabajo
Temperatura de
almacenamiento
Operación Humedad
Fuente de alimentación
Resolución de video
Front:3840*2160P Rear:2560*1440P
Pantalla IPS HD a color de 3,0 pulgadas
MP4
H.265
Grabación en bucle
JPG
Tarjeta Micro SD U3 de hasta 256GB
Incorporado
Soportes (necesita conectar el kit de cableado)
GPS incorporado
5G WIFI incorporado
-20 °C ~ 65 °C (-4 °F ~ 149 °F)
-30°C ~ 70°C (-22°F ~ 158T)
15~85%HR°
5V-3.5A CC
WIFI
· 115 ·

Problema común y solución
P: La grabadora muestra la memoria llena, no puede reproducir vídeo en
bucle, etc.
A:
1.En primer lugar, cuando una nueva tarjeta de memoria se utiliza por
primera vez en el máquina, por favor, formatee la tarjeta de memoria a
formato FAT32 en el PC y luego formatearla en la cámara. En segundo
lugar, si la tarjeta de memoria se utiliza previamente en otro tipo de
dispositivo, es necesario formatear cuando se utiliza en este camera.Third,
cambiar otro nuevo Micro SD CARD.
2.Compruebe la sensibilidad del sensor G. Si la sensibilidad es demasiado
alta, los golpes y las sacudidas de la cámara activarán el sensor G y los
archivos se bloquearán. Los archivos bloqueados no se pueden sobrescribir.
Si se acumulan los files bloqueados, no habrá espacio de memoria para
grabar en bucle. Cuando se enciende el monitor de aparcamiento, las
sacudidas también provocarán demasiados archivos extraviados, lo que
también afectará a la lectura y escritura de tarjetas.
P: El dispositivo se encenderá o apagará automáticamente.
A:
1.Por favor, formatee la tarjeta de memoria a formato FAT32 en el PC y
luego formatéela en la cámara.
2.Compruebe el estado de la conexión del cargador del coche, si la
conexión está floja, la fuente de alimentación no es estable, la cámara
se encenderá y apagará automáticamente.
· 116 ·

P: La cámara trasera no muestra imagen.
A:
1.Por favor, cambie el modo de visualización de la cámara para comprobar
el estado de la cámara trasera.
2.Por favor, compruebe si el enchufe TIPO-C está en su lugar y el cable
está conectado correctamente.
3.Trate de desconectar la cámara y limpiar el conector con un poco de
alcohol médico y conectarlo de nuevo.
P: Al grabar vídeo, se detendrá automáticamente o el funcionamiento de
los botones es lento.
A:
1.En primer lugar, reinicie el dispositivo a los valores predeterminados de
fábrica.
2.Por favor, compruebe si la tarjeta de memoria es una tarjeta de alta
velocidad U3, y por favor, formatee la tarjeta momery en la cámara o
PC antes de su uso.
P: A pesar de configurar el salvapantallas, la pantalla se enciende de
forma aleatoria.
A:
La fuente de alimentación podría no ser estable, por favor, cambie
otro cargador de coche para probar.
P: ¿Por qué la dash cam descarga la batería del coche?
A:
Por favor, compruebe si el encendedor sigue encendido después de
apagar el motor del coche.
P: ¿La cámara se enciende y se apaga?
A:
Eso podría ser la función de monitor de aparcamiento se activa,
compruebe el menú de configuración.
· 117 ·

P: Si el vídeo reproducido en el ordenador es de alguna manera no fluent
o atascado.
A:
1.Intente reproducir el video con otros reproductores de video, como : Pot
player o GX player.
2.Formatee su tarjeta Micro SD en la cámara.
3.Ejecute la prueba de velocidad en la tarjeta de memoria para asegurarse
de que la tarjeta de memoria cumple con los requisitos: La velocidad
de escritura es superior a 30MB/S.
P: Hay interferencia de rayas en la imagen. Debe haber una frecuencia
de luz incorrecta.
A:
De acuerdo con la frecuencia principal local, realice los ajustes
apropiados.
· 118 ·

Italiano
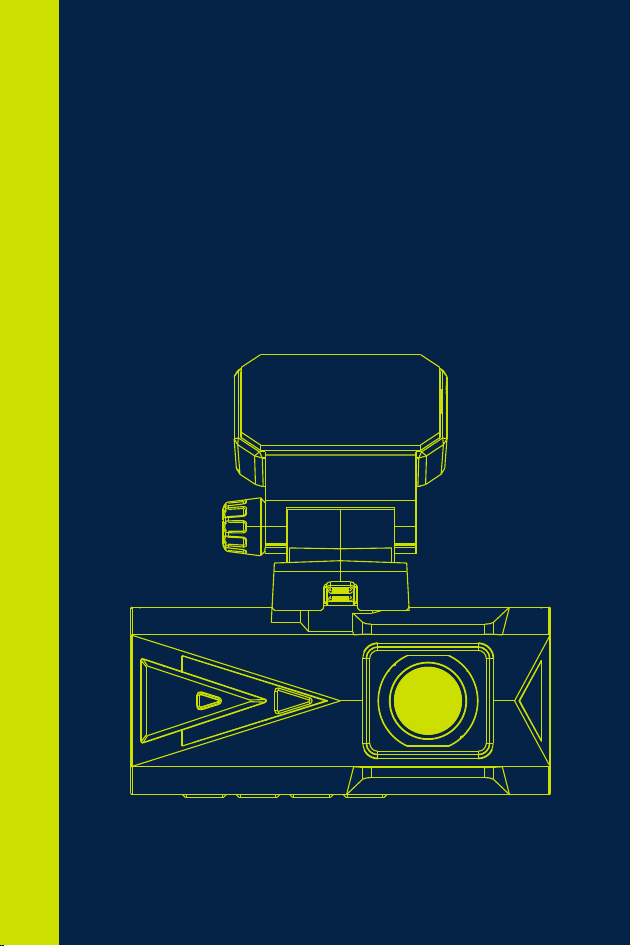
Italiano

Avviso IMPORTANTE
1. Questo prodotto è destinato esclusivamente all'uso su veicoli a motore.
Non installare la telecamera dove potrebbe bloccare la visuale della strada
del conducente (inclusi gli specchietti) o l'apertura dell'airbag.
2. Quindi inserire prima la scheda di memoria e formattare la scheda di
memoria nel menu della fotocamera.
3. Questa fotocamera registra video ad alta risoluzione, assicurarsi di
utilizzare la scheda Micro SD ad alta velocità U3, si consigliano schede da
32 GB o 256 GB.
4. Assicurarsi che l'obiettivo della fotocamera sia pulito e che non ci sia
nulla che blocchi l'obiettivo.
5. Non lasciare la fotocamera alla luce diretta del sole per un lungo periodo
di tempo o dove la temperatura potrebbe superare i 65 °C (149 °F)
6. La fotocamera è dotata di funzione GPS interna.
· 121 ·

Se hai qualche domanda sulla nostra dash cam, ti preghiamo
di contattarci
DC@yooomail.com
· 122 ·
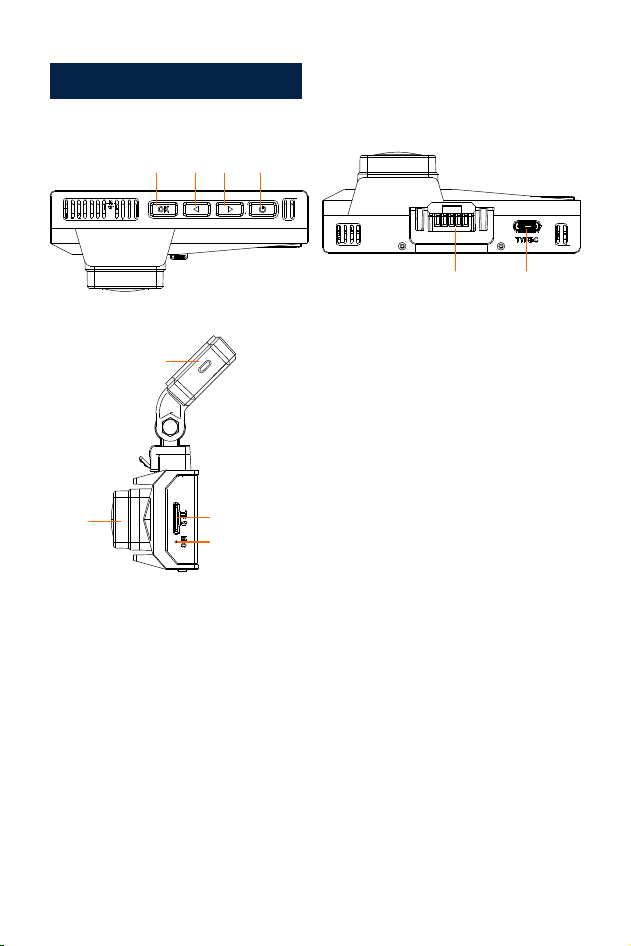
Schema del Prodotto
1. Accensione/Menu
2. Pulsante Giù/WIFI/Visualizzazione su
schermo
3. Pulsante Su/Registrazione audio/Scatta
foto
4. OK/riproduzione
5. Interfaccia staffa adesiva 3M
6. Interfaccia posteriore/dati
7. Porta di tipo c/alimentazione
8. Slot per scheda micro SD
9. Microfono
10. Obiettivo
1
2
3
4
5
6
7
8
9
10
· 123 ·
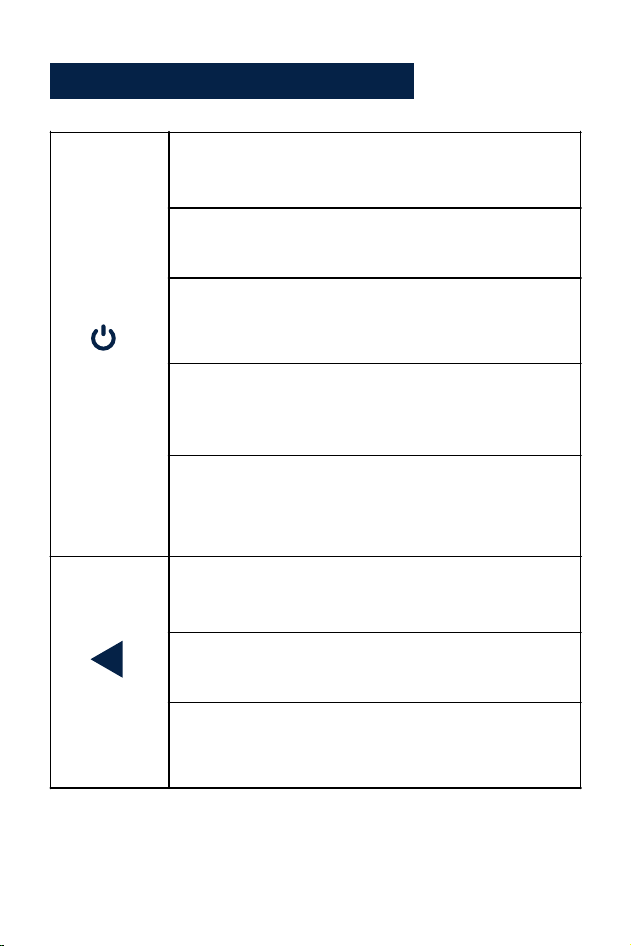
Pulsante Funzione Spiegazione
Accens
ione/
Menù
1. In stato di standby, premere a lungo per spegnere,
in stato di spegnimento, premere a lungo per
accendere
Pulsante
Su/Registr
azione
1. In stato di standby e registrazione, premere
brevemente per accendere/spegnere il microfono
2. Nel menu e nelle opzioni delle funzioni, premere
brevemente a sinistra/su per selezionare le funzioni e
le opzioni
3. Nello stato di registrazione, premere a lungo lo
screenshot
2. In modalità standby, premere brevemente per
entrare/uscire dal menu
3. Nel menu, opzioni delle funzioni del menu, premere
brevemente per tornare al menu precedente
4. In modalità riproduzione, premere brevemente per
aprire l'interfaccia operativa
5. Nello stato di registrazione, premere brevemente
per bloccare il video
· 12 4·

1. Nello stato di standby e di registrazione, premere
brevemente per cambiare lo schermo (schermo
pre-record-back-pull-split)
Pulsante
Su/Registr
azione
4. Nello stato di riproduzione del video, premere
brevemente per tornare indietro
5. Nello stato di ricerca delle foto, premere
brevemente per visualizzare quella precedente
Pulsante
Giù/WIFI
2. Premere a lungo per attivare/disattivare il WIFI
3. Nel menu e nelle opzioni delle funzioni, premere
brevemente a destra/in basso per selezionare le
funzioni e le opzioni
4. Nello stato di riproduzione del video, premere
brevemente per avanzare rapidamente
5. Nello stato di navigazione, premere brevemente
per visualizzare quello successivo
· 125 ·

1. In modalità standby, premere brevemente per
avviare la registrazione
OK/
Riproduzione
2. Nello stato di registrazione, premere brevemente
per interrompere la registrazione
3. Nel menu, premere brevemente per accedere al
livello successivo
4. Nelle opzioni della funzione, premere brevemente
per confermare l'opzione
5. In modalità standby, premere a lungo per accedere
alla modalità di riproduzione (cartella)
Quando la fotocamera è accesa, registrerà automaticamente il video, se
si desidera terminare o interrompere la registrazione, premere il pulsante
OK.
· 126 ·
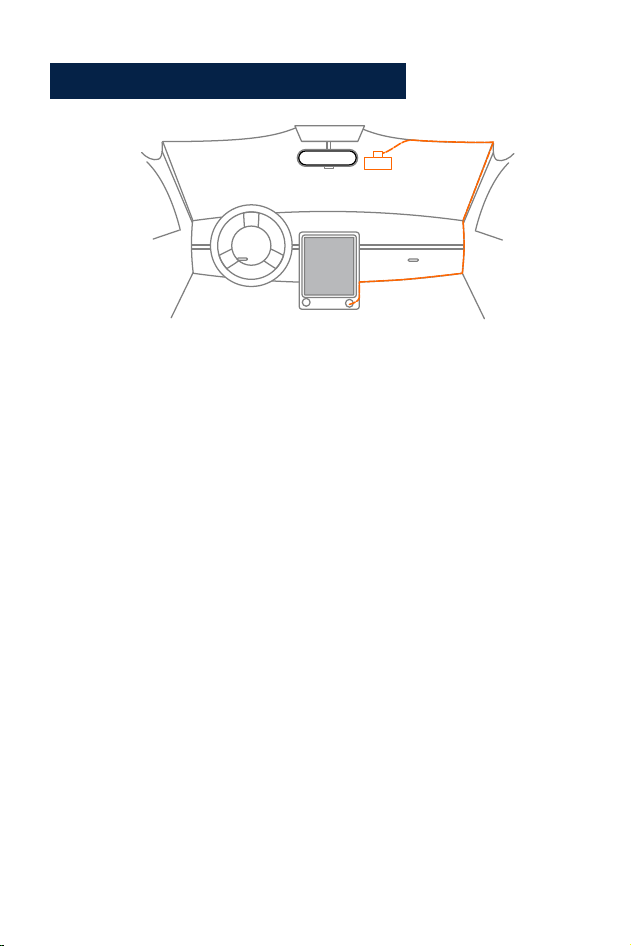
Configurazione e Installazione
1. Utilizzare il supporto adesivo 3M per installare la dash cam sul
parabrezza, la posizione consigliata è vicino allo specchietto retrovisore
vicino al sedile del passeggero, regolare entrambi gli angoli dell'obiettivo
per la migliore copertura.
2. Inserire l'adattatore di alimentazione incluso nella presa
dell'accendisigari dell'auto, l'indicatore si illuminerà, il che significa
che l'alimentazione è accesa.
3. Collegare l'alimentatore e la dash cam e far passare il cavo in
eccesso lungo il rivestimento interno per un aspetto migliore.
4. Installare la telecamera posteriore sul retro della parte posteriore
dell'auto sul parabrezza, regolare l'angolo dell'obiettivo per la migliore
copertura, quindi collegare il connettore della telecamera posteriore
al motore principale.
5. Avvia la tua auto, la fotocamera si accenderà automaticamente,
controlla l'angolo e la copertura dell'obiettivo, assicurati che tutte le
funzioni funzionino bene prima di andare in viaggio.
· 127 ·

Descrizione della funzione
1. Accensione: il dispositivo entrerà automaticamente in modalità di
registrazione video quando si preme il pulsante di accensione o lo si
collega all'accendisigari utilizzando il caricabatteria per auto.
2. Spegnimento: premere a lungo per spegnere.
Dopo che l'auto si è guastata, il dispositivo si spegnerà automaticamente
quando il caricabatteria per auto smette di fornire alimentazione
Accensione/spegnimento:
· 128 ·
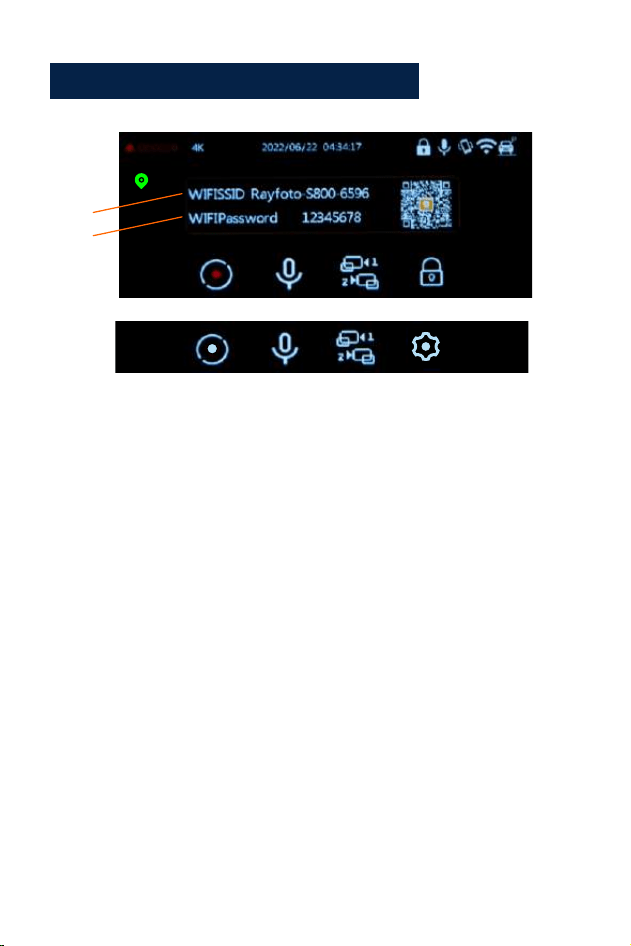
Modalità di registrazione video:
1.Durata della registrazione video
2.Risoluzione
3.Data e ora
4.Icona di blocco
5.Icona del microfono
6.Icona del sensore G
7.Icona Wi-Fi
8.Icona del monitor di parcheggio
9.Avviare/arrestare la
registrazione
10. Registrazione audio
11.Cambio di schermata
12.Impostazione/blocco
13.Icona GPS
14.Nome Wi-Fi
15.Password Wi-Fi
1
2
3
4
5 6
7
8
9
10
11
12
13
14
15
1.Quando la videocamera è in registrazione video, l'indicatore luminoso
blu nell'angolo in alto a destra della videocamera continuerà a lampeggiare
e nell'angolo in alto a destra dello schermo LCD è presente un'icona di
indicazione rossa che continuerà a lampeggiare.
2.Premere il pulsante OK per interrompere la registrazione.
•L'indicatore blu nell'angolo in alto a destra della fotocamera smetterà di
lampeggiare.
•L'icona rossa scomparirà, significa che il dispositivo ha interrotto la
registrazione.
3.Premendo nuovamente il pulsante OK, la registrazione del dispositivo
verrà riavviata.
9 12
· 129 ·
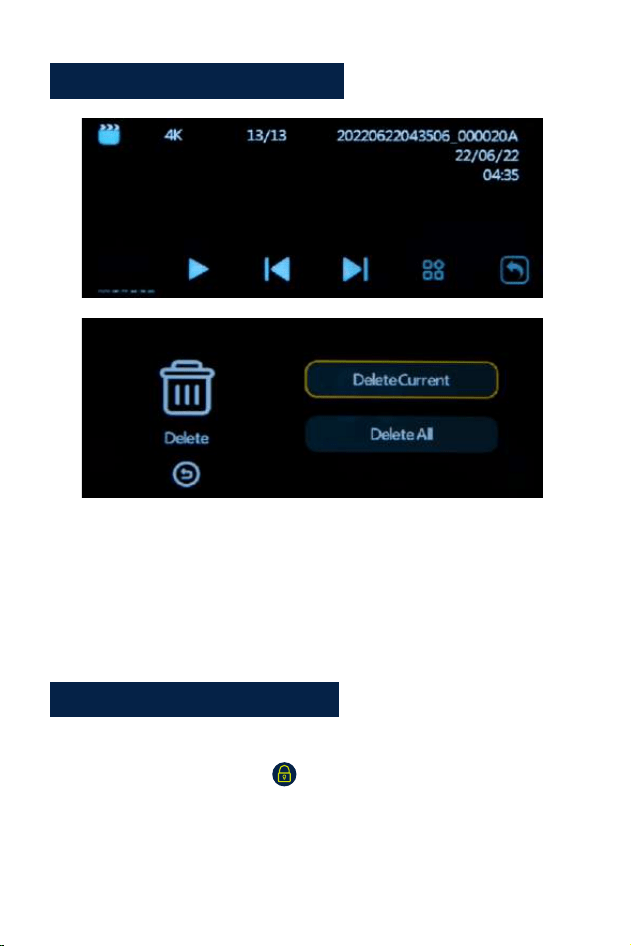
Modalità di riproduzione:
1.Quando il dispositivo è in stato di standby (quando la registrazione è
interrotta), premere il pulsante OK per circa 2 secondi fino a quando non
si passa alla cartella, significa che il dispositivo è in modalità di riproduzione.
2.Premere il pulsante su/giù per selezionare il file desiderato. Se si
desidera riprodurre un file video, premere il pulsante di accensione per
riprodurre il video.
•Durante la registrazione di un video, premere il pulsante menu per
bloccare il file corrente. L'icona apparirà sul display LCD. Il file bloccato
non può essere.
•cancellato durante la registrazione in loop.
•Premere il pulsante SU , il microfono si chiuderà, premerlo di
nuovo si aprirà il microfono.
Aufnahmeanpassungen:
· 130 ·

Collocamento
Video:
1.Premere il pulsante menu per accedere al menu Impostazioni video.
2.Utilizzare i pulsanti Su/Giù per selezionare ed evidenziare la funzione
che si desidera regolare. Premere il pulsante OK per accedere ai menu
successivi.
3.Premere nuovamente il pulsante menu per uscire dall'interfaccia
del menu.
4.Premere il pulsante OK per accedere o confermare le impostazioni.
Impostazioni:
•Risoluzione (per impostare o reimpostare la risoluzione del video):
Opzioni: Con telecamera posteriore: 4K+2K/2KP60+2K/2K+2K/1080P60+2K
Senza telecamera posteriore: 4K/2KP60/2K/1080P60
•Registrazione in loop
Opzioni: Off/1min/3min/5min
Salva il video per il tempo di impostazione. Quando la scheda è piena,
il video più vecchio verrà automaticamente sovrascritto.
•Opzioni lingua:
inglese/francese/spagnolo/portoghese/tedesco/italiano/cinese
semplificato/cinese tradizionale/pyccкий/giapponese
•WIFI
Opzione: acceso/spento
Accendi e spegni il Wi-Fi (per i dettagli, vai a pagina 14 per visualizzare)
•Display a doppia camma
Opzioni: anteriore/posteriore/anteriore e posteriore
Selezionare diverse schermate in base alle esigenze
· 131 ·

•Registra audio
Opzioni: On/Off
Puoi impostarlo su On o Off di conseguenza. Se impostato su Off, la
videocamera non registrerà l'audio.
•Sensore G
Opzioni: Off/ Basso/ Medio/ Alto
Se il sensore G è attivato, quando durante la registrazione si verificano
frenate/urti/vibrazioni oltre il limite, il file video di registrazione esistente
verrà bloccato automaticamente.
•Il timbro della data
Opzioni: On/Off
Impostare su On o Off come desiderato. Se si seleziona On, la data e
l'ora verranno impresse e registrate sul video.
•Salvaschermo
Opzioni: Off/30 sec/1 min/3 min
Se si imposta il tempo del salvaschermo, lo schermo entrerà in una
schermata vuota in base al tempo impostato per proteggere lo schermo.
•Visualizzazione dell'ora
Opzioni: On/Off
Attiva/disattiva la visualizzazione dell'ora del salvaschermo
•Sistema orario
Opzioni: Sistema 12 ore/Sistema 24 ore
•Appuntamento
Impostare o reimpostare l'ora e il giorno effettivi.
•Segnale acustico
Opzioni: On/Off
Attiva/disattiva il segnale acustico quando si premono i pulsanti.
· 132 ·

•Monitor di parcheggio
Opzione: Off/On (è necessario collegare il kit Hardwire. È possibile
contattare il nostro supporto post-vendita per ottenere il kit hardwire.)
Se la funzione di monitoraggio del parcheggio è attivata e il dispositivo è
spento. Quando il veicolo viene colpito da una certa quantità di forza, il
dispositivo si avvierà automaticamente per 15 secondi di registrazione
bloccata, quindi si spegnerà automaticamente di nuovo. E ricomincerà a
registrare alla prossima collisione, e così via. Quando l'auto si avvia, la
registrazione diventerà una normale registrazione in loop.
•Frequenza
Opzioni: 50Hz/60Hz
Per impostare o reimpostare la frequenza dell'alimentazione CA per
ridurre l'interferenza delle luci fluorescenti (negli Stati Uniti e in Canada,
impostarla su 60Hz).
•Fuso orario
Opzioni: GMT12:OO/GMT-11:OO/GMT-1O:OO/GMT-O9:OO/ GMT-08:00/
GMT-07:00/GMT-06:00/GMT-05:00/GMT- 04:00/GMT-03:00/GMT-02:00/
GMT-01:00/GMT+OO:OO/ GMT+01:00/ GMT+02:00/ GMT+03:00/
GMT+04:00/ GMT+05:00/GMT+06:00/ GMT+07:00/ GMT+ 08:00/
GMT+09:00/ GMTT+1O:00/ GMT+11:00/ GMT+12:00
Seleziona un fuso orario in base alla regione dell'utente. Quando
la macchina riceve un segnale GPS, la macchina aggiornerà
automaticamente l'ora del sistema all'ultima ora del fuso orario corrente.
•Informazioni GPS
Controlla la potenza del segnale GPS
· 133 ·

•Formato
Questa funzione formatterà (cancellerà i dati aJI) la scheda Micro SD.
Avvertenza: durante la formattazione della scheda, tutti i file verranno
cancellati. Carica tutti i file che desideri salvare sul tuo PC PRIMA
di iniziare a formattare la scheda.
•Impostazione predefinita
Ripristina tutte le impostazioni alle impostazioni di fabbrica.
Si prega di impostarlo con attenzione, i parametri di impostazione
personalizzati originali non esisteranno dopo l'impostazione.
•Versione
controllare la versione del dispositivo.
Impostazioni di riproduzione:
• Elimina: Elimina corrente/Elimina tutto
È possibile scegliere di eliminare il file corrente o tutti i file.
Installa e usa il lettore GPS:
Per visualizzare la mappa GPS utilizzando un'APP per telefono cellulare,
è necessario scaricare il file video nella Dash Camera sul telefono
cellulare per la visualizzazione normale. Scarica il lettore dal link
sottostante e installa 《gxplayerv1.3.3》quindi apri il video GPS, con il
lettore scaricato per riprodurlo.
Indirizzo di download del lettore GPS.
http://www.sunningsoft.com/en/pcgps.html
· 134 ·

E
· 135 ·

Collega il computer:
1.Collegare il cavo di connessione TYPE-C in dotazione alla porta TYPE-C
sul lato dell'unità.
2.Collegare l'estremità USB full size del cavo a una porta USB del computer.
3.L'unità si accenderà automaticamente e visualizzerà le modalità
USB: "Mass Storage".
4.Attendere alcuni istanti, la cartella di archiviazione dell'unità apparirà
sullo schermo del computer.
5.Seguire le istruzioni sullo schermo per visualizzare, guardare, caricare o
salvare i file sul PC.
NOTA:
Sistema operativo del computer compatibile: Windows XP;
Windows Vista; Windows 7; Windows 8 e Windows 10.
WI-FI
Indirizzo di download dell'APP:
Indirizzo di download del sistema IOS:
https://apps.apple.com/cn/app/roadcam/id1119500688
Indirizzo di download Android:
https://play.google.com/store/apps/details?id=com.lg.aroadcams
QR code:
· 136 ·

Scarica l'app RoadCam dal tuo smartphone o tablet in Google Play o
Apple App Store. L'applicazione Wi-Fi ti consente di controllare la tua
dash cam da remoto su uno smartphone o tablet. È possibile visualizzare
il video o le immagini e scaricare le registrazioni sul telefono.
Come attivare/disattivare la funzione wifi?
1.Entrare nel menu delle impostazioni di sistema, trovare la funzione
Wi-Fi e attivare/disattivare il Wi-Fi selezionando l'opzione della funzione
Wi-Fi On/Off.
2.Premere brevemente il pulsante Giù per attivare il Wi-Fi e premere a
lungo il pulsante SU per disattivare il Wi-Fi. Quando la funzione Wi-Fi è
attivata, il nome Wi-Fi e la password Wi-Fi verranno visualizzati
nell'angolo in alto a sinistra dello schermo.
Come connettersi al wifi?
Innanzitutto trova il nome Wifi del registratore di guida nell'elenco WiFi
sullo smartphone, inserisci la password WiFi visualizzata sullo schermo
della dash cam e connettiti al WiFi
Quindi aprire l'APP, trovare il nome del dispositivo nell'elenco dei
dispositivi sulla home page dell'APP e fare clic per accedere
all'interfaccia operativa.
· 1 37·
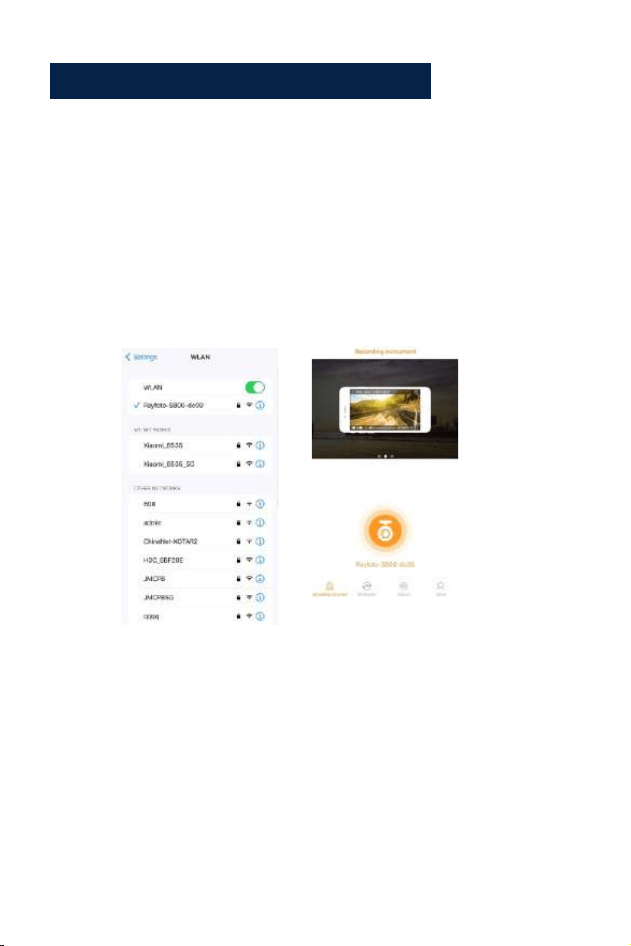
Passo 1:
Attiva il Wi-Fi sulla dash cam.
Passo 2:
Apri il menu delle impostazioni dello smartphone e trova l'elenco Wi-Fi.
Passaggi per connettersi all'app:
Passaggio 3:
Apri l'app sul tuo smartphone, fai clic su "Rayfoto-S800-XXXX"
2
3
· 138 ·

Specifica:
· 139 ·
Risoluzione video
Schermo
Formato video
Codifica video
Modalità video
Formato immagine
Scheda di memoria
G-Sensor-Blocco
Movimento di parcheggio
GPS
WIFI
Temperatura di lavoro
Temperatura di conservazione
Funzionamento Umidità
Alimentazione elettrica
Anteriore: 3840*2160 P Posteriore: 2560*1440 P
Display IPS HD a colori da 3,16 pollici
MP4
H.265
Registrazione in loop
JPG
Scheda micro SD U3 fino a 256 GB
Integrato
Supporti (è necessario collegare il kit Hardwire)
GPS integrato
WIFI 5G integrato
-20°C ~ 65°C (-4°F ~ 149°F)
-30°C ~ 70°C (-22°F ~ 158T)
15~85%UR°
5 V-3,5 A CC

Problema comune e soluzione:
Domanda: il registratore mostra che la memoria è piena, non è
possibile riprodurre il video in loop, ecc.
Risposta:
1.In primo luogo, quando una nuova scheda di memoria viene utilizzata
per la prima volta sul macchina, formattare la scheda di memoria in
formato FAT32 sul PC, quindi formattarla nella fotocamera. In secondo
luogo, se la scheda di memoria è stata utilizzata in precedenza su un
altro tipo di dispositivo, deve essere formattata quando viene utilizzata
su questa fotocamera. In terzo luogo, sostituire un'altra nuova scheda
Micro SD.
2.Controllare la sensibilità del sensore G, se la sensibilità è troppo alta,
l'urto e l'agitazione della fotocamera attiveranno il sensore G e i file
verranno bloccati. I file protetti non possono essere sovrascritti. Se i file
bloccati vengono accumulati, non ci sarà spazio di memoria per la
registrazione in loop. Quando il monitor di parcheggio è acceso, lo
scuotimento causerà anche troppi file vaganti, che influenzeranno anche
la lettura e la scrittura delle carte.
Domanda:Il dispositivo si accenderà o si spegnerà
automaticamente.
Risposta:
1. Formattare la scheda di memoria in formato FAT32 sul PC, quindi
formattarla nella fotocamera.
2. Controllare lo stato della connessione del caricabatteria per auto, se
la connessione è allentata, l'alimentazione non è stabile, la fotocamera
si accenderà e si spegnerà automaticamente.
· 140 ·

Domanda: La dose della fotocamera posteriore non
visualizza l'immagine.
Risposta:
1.Si prega di cambiare la modalità di visualizzazione della fotocamera
per ricontrollare lo stato della fotocamera posteriore.
2. Verificare che la spina TYPE-C sia inserita e che il cavo sia collegato
correttamente.
3.Provare a scollegare la fotocamera e pulire il connettore con alcool
medico e ricollegarlo.
Domanda: Durante la ripresa di un video, si interromperà
automaticamente o il funzionamento del pulsante è lento.
Risposta:
1.Per prima cosa, ripristinare il dispositivo alle impostazioni di fabbrica.
2.Verificare se la scheda di memoria è una scheda ad alta velocità U3 e
formattare la memory card sulla fotocamera o sul PC prima dell'uso.
Domanda: Anche se imposta lo screen saver, ma lo schermo
sarà casuale.
Risposta:
L'alimentatore potrebbe non essere stabile, cambiare un altro
caricabatteria per auto per provare.
Domanda: Perché la dash cam scarica la batteria dell'auto?
Risposta:
Si prega di verificare se l'accendisigari è ancora acceso dopo
aver spento il motore dell'auto.
Domanda: La fotocamera continua ad accendersi e spegnersi?
Risposta:
Potrebbe essere la funzione del monitor di parcheggio attivata,
controllare il menu di configurazione.
· 141 ·

· 142 ·
Domanda: se il video riprodotto sul computer non è in qualche
modo fluido o disturbato.
Risposta:
1. Prova a riprodurre il video con altri lettori video, come: Pot player o GX
giocatore.
2.Formattare la scheda Micro SD nella fotocamera.
3. Eseguire il test della velocità sulla scheda di memoria per assicurarsi
che la scheda di memoria soddisfi i requisiti: la velocità di scrittura è
superiore a 30 MB/s.
Domanda: ci sono strisce che interferiscono nell'immagine.
Dovrebbe esserci una frequenza della luce sbagliata.
Risposta:
In base alla frequenza principale locale, effettuare le impostazioni
appropriate