
User's Guide
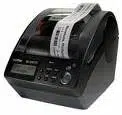
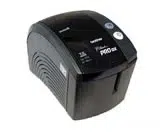
TD-2310D
TD-2320D
TD-2350D
TD-2320DF
TD-2350DF
TD-2350DSA
© 2024 Brother Industries, Ltd. All rights reserved.

Table of Contents
Before You Use Your Printer ................................................................................................................ 1
Definitions of Notes ........................................................................................................................................ 2
General Precautions ...................................................................................................................................... 3
Trademarks and Licenses.............................................................................................................................. 5
Open Source Licensing Remarks .................................................................................................................. 6
Important Note ............................................................................................................................................... 7
Set Up Your Printer ............................................................................................................................... 8
Parts Description............................................................................................................................................ 9
LED Patterns and Indications....................................................................................................................... 15
LCD Overview .............................................................................................................................................. 19
Install the Label Support ............................................................................................................................. 26
Set the Date and Time ................................................................................................................................. 27
Restrict Access to Administration Menu Items ............................................................................................ 28
Set the Menu Security.................................................................................................................................. 29
Load Media Roll .......................................................................................................................................... 30
Change the Media Roll Holder to Use a Custom Size Roll ................................................................ 31
Load a Media Roll ............................................................................................................................. 33
Load Fanfold Labels .......................................................................................................................... 36
Load a Large Diameter Roll .............................................................................................................. 39
Load a Roll in a Printer with a Peeler Unit.......................................................................................... 42
Load a Roll in a Printer with a Cutter Unit ......................................................................................... 46
Load a Linerless Roll ......................................................................................................................... 49
Adjust the Sensor Position ........................................................................................................................... 52
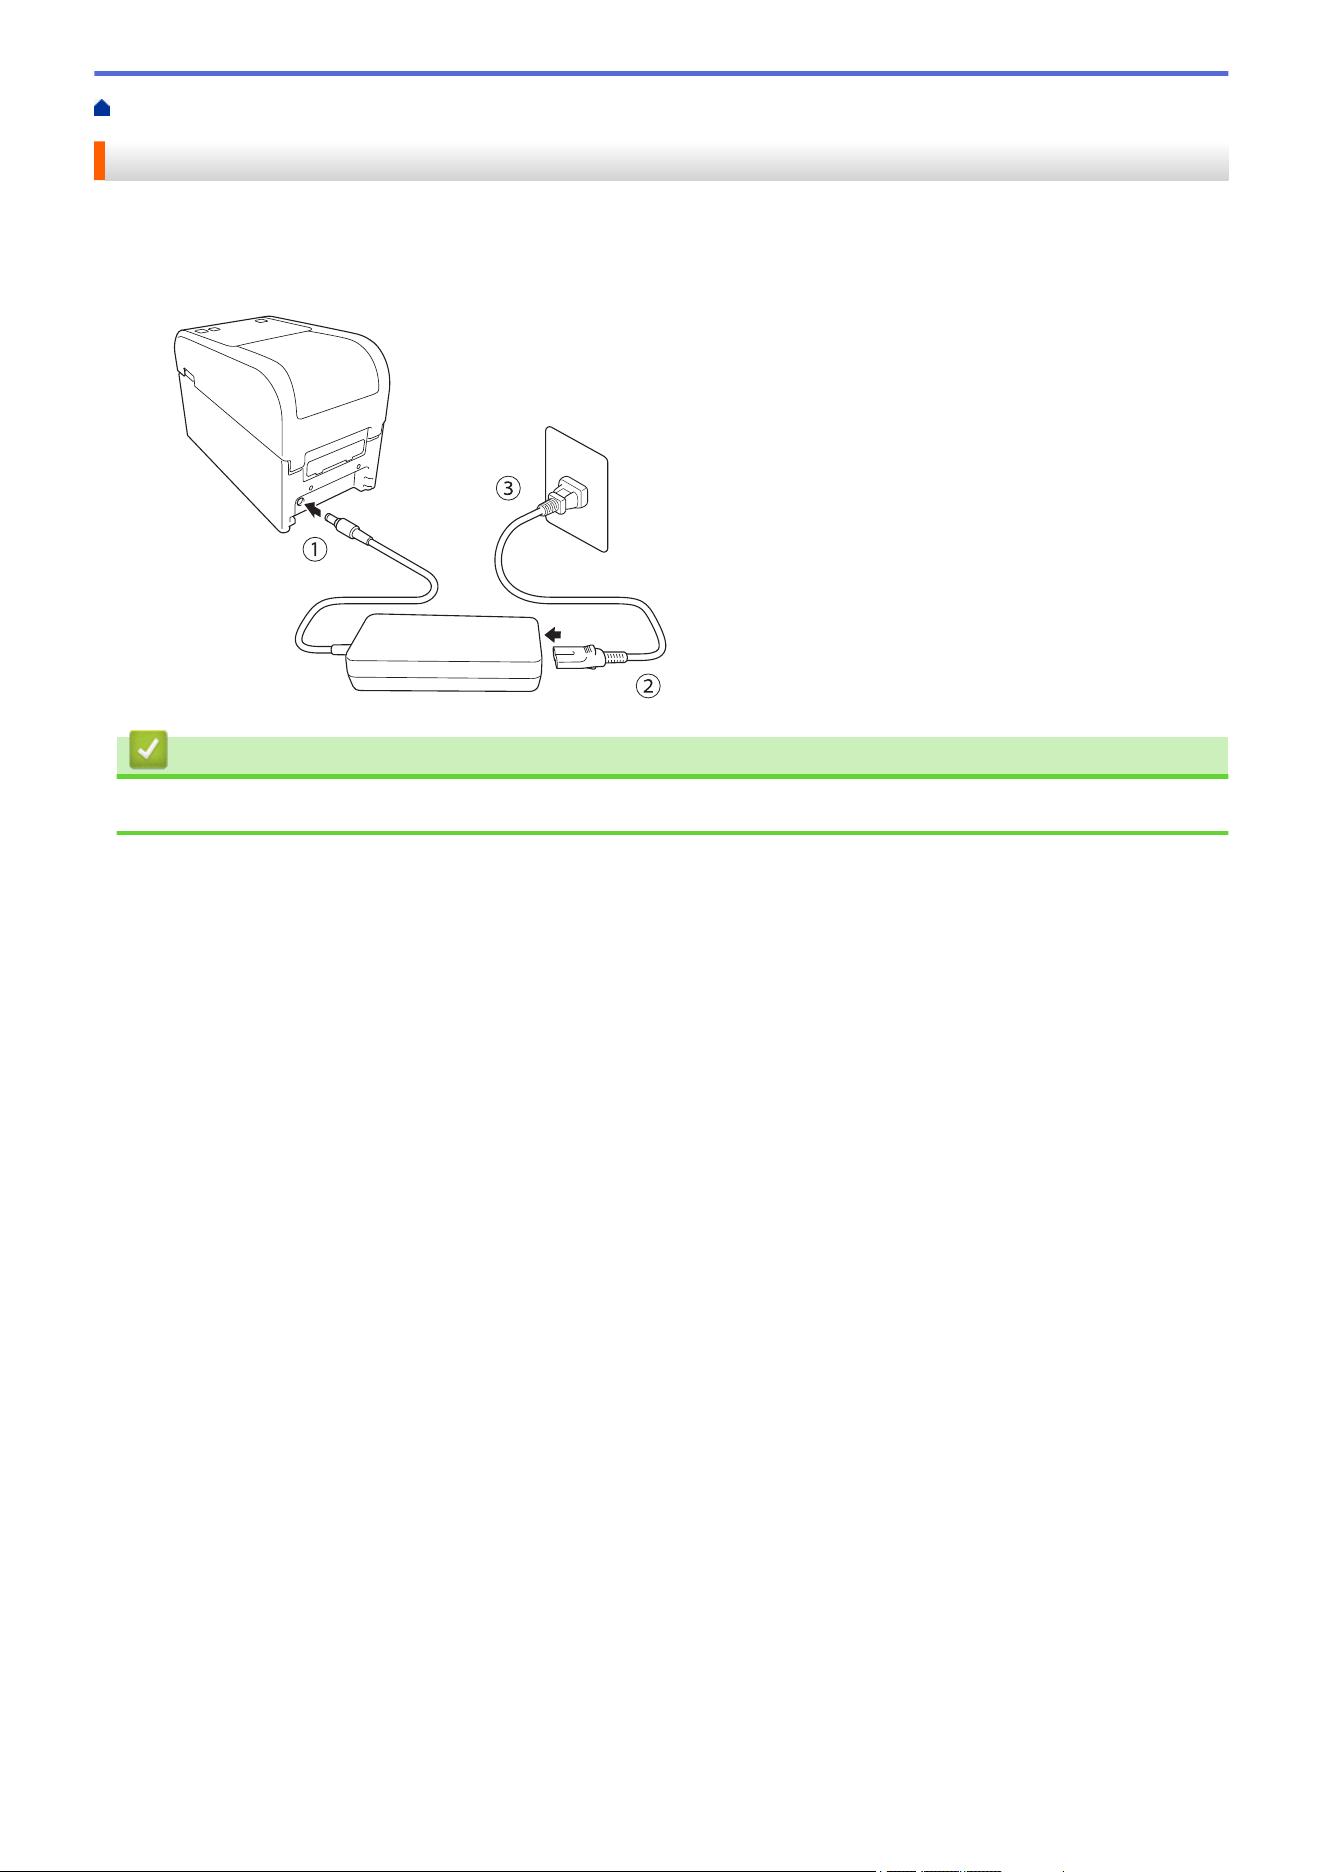
Connect the Power Cord.............................................................................................................................. 55
Turn Power On/Off ....................................................................................................................................... 56
Use the Printer's Power Supply Function..................................................................................................... 57
Install Software.................................................................................................................................... 58
Install Printer Drivers and Software on a Computer..................................................................................... 59
Available Applications......................................................................................................................... 60
Connect the Printer to a Computer .............................................................................................................. 61
Connect the Printer to a Computer Using a USB Cable..................................................................... 62
Connect the Printer to a Computer Using Wi-Fi ................................................................................. 63
Connect the Printer to a Computer Using a Wired LAN ..................................................................... 66
Connect the Printer to a Computer Using a Bluetooth Connection .................................................... 67
Connect the Printer to a Computer Using RS-232C........................................................................... 68
Create and Print Labels Using Your Computer ................................................................................ 69
Create Labels Using P-touch Editor (Windows)........................................................................................... 70
Main Window of P-touch Editor Express Mode (Windows) ................................................................ 71
Main Window of P-touch Editor Professional Mode (Windows) ......................................................... 72
Main Window of P-touch Editor Snap Mode (Windows)..................................................................... 73
Create Label Layouts Using Your Computer................................................................................................ 74
Tips for Better Printing Results When Using P-touch Editor .............................................................. 75
Create a Template Using P-Touch Editor (Windows) ......................................................................... 76
Insert the Date and Time in a Label Using P-Touch Editor (Windows)............................................... 78
Link a Database to a Template Using P-Touch Editor (Windows) ...................................................... 79
Home > Table of Contents
i

Print Labels Using P-touch Editor (Windows) .............................................................................................. 81
Create Labels and Print without Installing Software and Drivers ................................................................. 82
Print Using a USB Interface (Mass Storage Mode)............................................................................ 83
Notes on Printing Images without Using the Printer Driver ................................................................ 84
Print Labels Distributed to Multiple Printers to Reduce Printing Time (Windows)........................................ 85
Print Barcode Labels Using Crop Print (Windows, 300 DPI Printer Only) .................................................. 87
Barcodes Compatible with Crop Print (Windows) .............................................................................. 88
Barcode Document Compatible with Crop Print (Windows)............................................................... 89
Print Barcode Labels Using Crop Print (Windows, 300 DPI Printer Only) ......................................... 90
Print Labels Using the Printer Driver (Windows).......................................................................................... 92
Print Labels Using Mobile Devices.................................................................................................... 93
Compatible Printing Apps............................................................................................................................. 94
AirPrint Overview ......................................................................................................................................... 95
Transfer Templates Created on a Computer to the Printer Using a Mobile Device ..................................... 96
Standalone Printing ............................................................................................................................ 97
Create Labels Using P-touch Editor (Windows)........................................................................................... 98
Transfer a Template to P-touch Transfer Manager (Windows) .................................................................... 99
Transfer Templates or Other Data from the Computer to the Printer (Windows) ....................................... 100
Transfer the Label Layout to the Printer .................................................................................................... 104
Call Up the Transferred Template on the Printer's LCD and Print.............................................................. 105
Print a Template That is Not Linked to a Database ......................................................................... 106
Print a Template Linked to a Database ............................................................................................ 109
Use the Search Function to Find a Template or Database in Template List Mode........................... 112
Edit Template Objects Before Printing.............................................................................................. 113
Change the Screen Display in Template Touch Mode .............................................................................. 114
Print Labels Using Barcode Scanner or Other Devices (P-touch Template) ................................115
P-touch Template Operations Overview..................................................................................................... 116
Create Labels Using P-touch Editor (Windows)......................................................................................... 117
Transfer a Template to P-touch Transfer Manager (Windows) .................................................................. 118
Transfer Templates or Other Data from the Computer to the Printer (Windows) ....................................... 119
Specify the Barcode Scanner Settings (Windows)..................................................................................... 123
Connect the Printer to a Barcode Scanner Using Bluetooth (Windows) .................................................... 125
Connect the Printer to a Barcode Scanner Using USB Host Interface ...................................................... 126
Try the P-touch Template Function Using the Barcode List ....................................................................... 127
Recall and Print the Template Transferred to the Printer (Recall Printing) ...................................... 128
Insert Information into a Template Transferred to the Printer and Print It (Merge Printing) ............. 132
Print the Template Linked to the Database (Database Lookup Printing).......................................... 136
Print Transferred Templates in Serialized (Numerical) Order (Numbered (Serialized Number)
Printing) ............................................................................................................................................ 140
Barcodes Used for Specifying Settings ............................................................................................ 144
Transfer Templates to the Printer (P-touch Transfer Manager) (Windows) ................................. 147
Transfer Templates to the Printer Using P-touch Transfer Manager (Windows)........................................ 148
Notes on Using P-touch Transfer Manager (Windows) .................................................................... 149
About Transferring Templates from the Computer to the Printer (Windows).................................... 150
Back up Templates or Other Data Saved in the Printer (Windows).................................................. 158
Delete Printer Data (Windows)......................................................................................................... 159
Create Transfer Files and Transfer Package Files (Windows) ......................................................... 160
Home > Table of Contents
ii

Distribute Templates to be Transferred to Users Without Using P-touch Transfer Manager (Windows) ... 162
Store and Manage Templates (P-touch Library)............................................................................. 166
Edit Templates Using P-touch Library (Windows) ...................................................................................... 167
Print Templates Using P-touch Library (Windows)..................................................................................... 168
Search Templates Using P-touch Library (Windows)................................................................................. 169
Network .............................................................................................................................................. 171
Important Information for Security.............................................................................................................. 172
Wireless Network Settings ......................................................................................................................... 173
Use the Wireless Network ................................................................................................................ 174
Enable/Disable Wi-Fi........................................................................................................................ 176
Network Features....................................................................................................................................... 177
Synchronize Time with the SNTP Server Using Web Based Management ..................................... 178
Brother Management Tools ........................................................................................................................ 182
Security .............................................................................................................................................. 183
Before Using Network Security Features ................................................................................................... 184
Configure Certificates for Device Security ................................................................................................. 185
Security Certificate Features Overview ............................................................................................ 186
How to Create and Install a Certificate............................................................................................. 187
Create a Self-signed Certificate ....................................................................................................... 188
Create a Certificate Signing Request (CSR) and Install a Certificate from a Certificate Authority
(CA) .................................................................................................................................................. 189
Import and Export the Certificate and Private Key ........................................................................... 193
Import and Export a CA Certificate................................................................................................... 196
Manage Multiple Certificates ............................................................................................................ 199
Use SSL/TLS ............................................................................................................................................. 200
Introduction to SSL/TLS ................................................................................................................... 201
Manage Your Network Machine Securely Using SSL/TLS............................................................... 204
Print Documents Securely Using SSL/TLS ...................................................................................... 209
Use SNMPv3.............................................................................................................................................. 211
Manage Your Network Machine Securely Using SNMPv3 ............................................................... 212
Use IEEE 802.1x Authentication for Your Network .................................................................................... 213
What Is IEEE 802.1x Authentication? .............................................................................................. 214
Configure IEEE 802.1x Authentication Using Web Based Management (Web Browser) ................ 215
IEEE 802.1x Authentication Methods............................................................................................... 217
Update ................................................................................................................................................ 218
Update P-touch Editor................................................................................................................................ 219
Update the Firmware.................................................................................................................................. 220
Printer Settings ................................................................................................................................. 221
Change Printer Settings Using the Printer Setting Tool (Windows) ........................................................... 222
Printer Setting Tool: Communication Settings (Windows).............................................................. 224
Printer Setting Tool (Windows): Device Settings .............................................................................. 231
Printer Setting Tool (Windows): P-touch Template Settings ............................................................. 238
Printer Setting Tool (Windows): Paper Size Setup ........................................................................... 240
Apply Setting Changes to Multiple Printers (Windows).............................................................................. 245
Change Printer Settings Using Web Based Management ......................................................................... 246
Change the Login Password Using Web Based Management ........................................................ 247
Confirm Printer Settings ............................................................................................................................. 248
Home > Table of Contents
iii

Details of Printer Settings Report............................................................................................................... 250
Print and Confirm Dump Data ................................................................................................................... 260
Change Printer Settings Using the Printer ................................................................................................. 262
Settings Tables ................................................................................................................................. 263
Settings Tables ................................................................................................................................. 267
Routine Maintenance ........................................................................................................................ 271
Clean Your Printer ...................................................................................................................................... 272
Replace the Coin Cell Battery .................................................................................................................... 277
Replace the Parts....................................................................................................................................... 280
Check the Print Head ................................................................................................................................. 281
Troubleshooting ................................................................................................................................ 282
If You Are Having Difficulty with Your Machine .......................................................................................... 283
Error and Maintenance LEDs..................................................................................................................... 284
Error and Maintenance Messages ............................................................................................................. 291
Printing Problems....................................................................................................................................... 292
Version Information .................................................................................................................................... 299
Reset the Printer ........................................................................................................................................ 300
Reset All Settings to the Factory Settings Using the Printer Buttons ............................................... 301
Reset Settings Using the LCD Menu................................................................................................ 302
Reset Data Using the Printer Setting Tool........................................................................................ 303
Appendix............................................................................................................................................ 304
Specifications ............................................................................................................................................. 305
Software Development Kit.......................................................................................................................... 308
LabelCLT.................................................................................................................................................... 309
LabelCLT Overview .......................................................................................................................... 310
Transfer the Template Data File with LabelCLT ............................................................................... 311
Transferring a PDZ Firmware File via USB: Example ...................................................................... 312
Product Dimensions ................................................................................................................................... 318
Auto Media Configuration........................................................................................................................... 327
Auto Media Configuration Overview................................................................................................. 328
Use the Auto Media Configuration Function..................................................................................... 329
Options....................................................................................................................................................... 330
Recommended Tightening Torque When Installing Optional Parts .................................................. 331
Change the Label Peeler Options (Windows) .................................................................................. 332
Change the Cutting Options (Windows) ........................................................................................... 333
Brother Help and Customer Support.......................................................................................................... 334
Home > Table of Contents
iv

Home > Before You Use Your Printer > Definitions of Notes
Definitions of Notes
We use the following symbols and conventions throughout this User's Guide:
DANGER
DANGER indicates an imminently hazardous situation which, if not avoided, will
result in death or serious injuries.
WARNING
WARNING indicates a potentially hazardous situation which, if not avoided, could
result in death or serious injuries.
CAUTION
CAUTION indicates a potentially hazardous situation which, if not avoided, may
result in minor or moderate injuries.
IMPORTANT
IMPORTANT indicates a potentially hazardous situation which, if not avoided, may
result in damage to property or loss of product functionality.
NOTE
NOTE specifies the operating environment, conditions for installation, or special
conditions of use.
The tips icon indicates helpful hints and supplementary information.
Bold Bold style identifies buttons on the machine's control panel or computer screen.
Italics Italicized style emphasizes an important point or refers you to a related topic.
Courier New
Courier New font identifies messages shown on the machine's LCD.
Related Information
• Before You Use Your Printer
2

Home > Before You Use Your Printer > General Precautions
General Precautions
Media Rolls
• Use Brother accessories and supplies.
• Some Media Rolls cannot be used with this printer due to their width or diameter. Be sure to check the types
of compatible rolls before purchasing them.
• If the label is affixed to a wet, dirty, or oily surface, it may peel off easily. Before affixing the label, clean the
surface to which the label is affixed.
• Store the Media Roll in a cool and dark place and use it soon after opening the package.
• DO NOT expose the Media Roll to direct sunlight, high temperature, high humidity, wind, or dust as it may
cause labels to peel off or discolor.
• Scratching the printed surface of the label with your fingernails or metal objects, or touching the printed
surface with wet hands, can cause the color to change or fade.
• The displayed label length may differ from the actual length of the printed label.
• Depending on the location, material, and environmental conditions, labels may unpeel or become
irremovable, or the color may change or be transferred to other objects. Before applying labels, check the
environmental conditions and the material.
• Small text may not be printed as clearly as it is displayed on your device’s or computer’s screen.
• Printed characters may differ from the ones displayed on your device’s or computer’s screen as it may
support a resolution higher than that of the label printer.
• DO NOT use folded, wet or damp paper, otherwise a paper misfeed or a malfunction may result.
• DO NOT affix labels to people, animals, or plants. Never affix labels to public or private property without
permission.
• As the last label of the Media Roll may not be printed correctly, each roll contains more labels than is
indicated on the package.
• When a label is removed after being affixed to a surface, a portion of the label may remain.
• When a label is affixed, it may be difficult to remove the label.
• DO NOT leave a Media Roll in the printer for long periods of time. When printer is left unused for a long
period of time, remove the roll before storing the printer.
- Store Linerless Label Rolls in a cool, dark place, away from direct sunlight and any liquids. Keep it free
from dust and dirt, as dust and dirt may increase friction during printing and shorten the life of the Print
Head.
- Store Media Rolls with the roll core vertically. Storing them horizontally, with the label surface down, may
cause quality deterioration.
• For warnings and safety precautions, see the Product Safety Guide.
Machine
• DO NOT insert or remove the AC Adapter or battery pack during printing. This may cause product failure.
• Observe all applicable regulations when disposing of the printer and its accessories.
• DO NOT pull the tape while printing or feeding; it will damage the tape and the printer.
• Any data stored in memory will be lost due to failure, or repair of the printer, or if the battery discharges
completely.
• DO NOT remove the labels affixed to the printer. These labels provide operational information and indicate
the printer’s model number.
• DO NOT install the printer near any device that will cause electromagnetic interference. The machine may
malfunction if left near such a device, such as a television, radio, or microwave oven.
• DO NOT transport the printer while cables are connected to the AC connector and USB port. The connector
and ports could be damaged.
• The serial port is specifically designed only for the RJ25 to DB9M adapter optional accessories. Do not
connect a telephone line or cash drawer.
3

• The printer's power supply function can cause it to get hot when use the function. If you unplug the USB
cable and start printing when the printer is hot, the printer may temporarily enter Cooling Mode to cool it
down.
• DO NOT expose the printer to direct sunlight, high air temperature, or steam. If printing for a long time, the
printer may not enter to Cooling Mode and become hot, which may cause malfunctions.
• For warnings and safety precautions, see the Product Safety Guide.
Others
• Dispose of batteries at an appropriate collection point. Be sure to observe all applicable local regulations.
• If the printer can only be used for a short period of time, even though the rechargeable battery is fully
charged, the rechargeable battery may have reached the end of its service life. Replace the rechargeable
battery with a new one.
Related Information
• Before You Use Your Printer
4

Home > Before You Use Your Printer > Trademarks and Licenses
Trademarks and Licenses
• Apple, App Store, Mac, Safari, AirPrint, the AirPrint logo, iPad, iPhone, iPod touch, macOS, and iPadOS are
trademarks of Apple Inc., registered in the United States and other countries.
• Android, Google Chrome, Google Play, and the Google Play logo are trademarks of Google LLC.
• The Bluetooth
®/MD
word mark and logos are registered trademarks owned by Bluetooth SIG, Inc. and any
use of such marks by Brother Industries, Ltd. is under license. Other trademarks and trade names are those
of their respective owners.
• QR Code is a registered trademark of DENSO WAVE INCORPORATED.
• Epson ESC/P is a registered trademark of Seiko Epson Corporation.
• Wi-Fi
®
is a registered trademark of Wi-Fi Alliance
®
.
• Wi-Fi Protected Setup
™
is a trademark of Wi-Fi Alliance
®
.
• Adobe
®
and Reader
®
are either registered trademarks or trademarks of Adobe Systems Incorporated in the
United States and/or other countries.
• QR Code Generating Program Copyright © 2008 DENSO WAVE INCORPORATED.
• BarStar Pro Encode Library (PDF417, Micro PDF417, DataMatrix, MaxiCode, AztecCode, GS1 Composite,
GS1 Databar, Code93, MSI/Plessey, POSTNET, Intelligent Mail Barcode)
Copyright © 2007 AINIX Corporation. All rights reserved.
• Blue SDK
Copyright © 1995-2021 OpenSynergy GmbH.
All rights reserved. All unpublished rights reserved.
• Portions of this software are copyright © 2014 The FreeType Project (
www.freetype.org). All rights reserved.
• USB Type-C
®
and USB-C
®
are registered trademarks of USB Implementers Forum.
Any trade names and product names of companies appearing on Brother products, related documents
and any other materials are all trademarks or registered trademarks of those respective companies.
Related Information
• Before You Use Your Printer
5

Home > Before You Use Your Printer > Open Source Licensing Remarks
Open Source Licensing Remarks
This product includes open source software.
To see the Open Source Licensing Remarks, go to your model's Manuals page on the Brother support website
at support.brother.com/manuals.
Related Information
• Before You Use Your Printer
6

Home > Before You Use Your Printer > Important Note
Important Note
• The contents of this document and the specifications of this product are subject to change without notice.
• Brother reserves the right to make changes without notice in the specifications and materials contained
herein and shall not be responsible for any damages (including consequential) caused by the reliance on the
materials presented, including, but not limited to, typographical and other errors relating to the publications.
• Screen images in this document may differ depending on your computer's operating system, your product
model, and software version.
• Before using the printer, make sure you read all the documents included with it for information about safety
and operation.
• The printer shown in the illustrations may be different from your printer.
• The available supplies may vary depending on your country or region.
• We recommend using the latest version of P-touch Editor compatible with your printer. For the latest version,
go to your model's Downloads page at
support.brother.com/downloads.
• To keep your printer's performance up to date, visit
support.brother.com to check for the latest firmware
updates. Otherwise, some of your printer's functions may not be available.
• Before giving your machine to anyone else, replacing it, or disposing of it, we strongly recommend resetting it
to its factory settings to remove all personal information.
Related Information
• Before You Use Your Printer
7

Home > Set Up Your Printer
Set Up Your Printer
• Parts Description
• LED Patterns and Indications
• LCD Overview
• Install the Label Support
• Set the Date and Time
• Restrict Access to Administration Menu Items
• Set the Menu Security
• Load Media Roll
• Adjust the Sensor Position
• Connect the Power Cord
• Turn Power On/Off
• Use the Printer's Power Supply Function
8
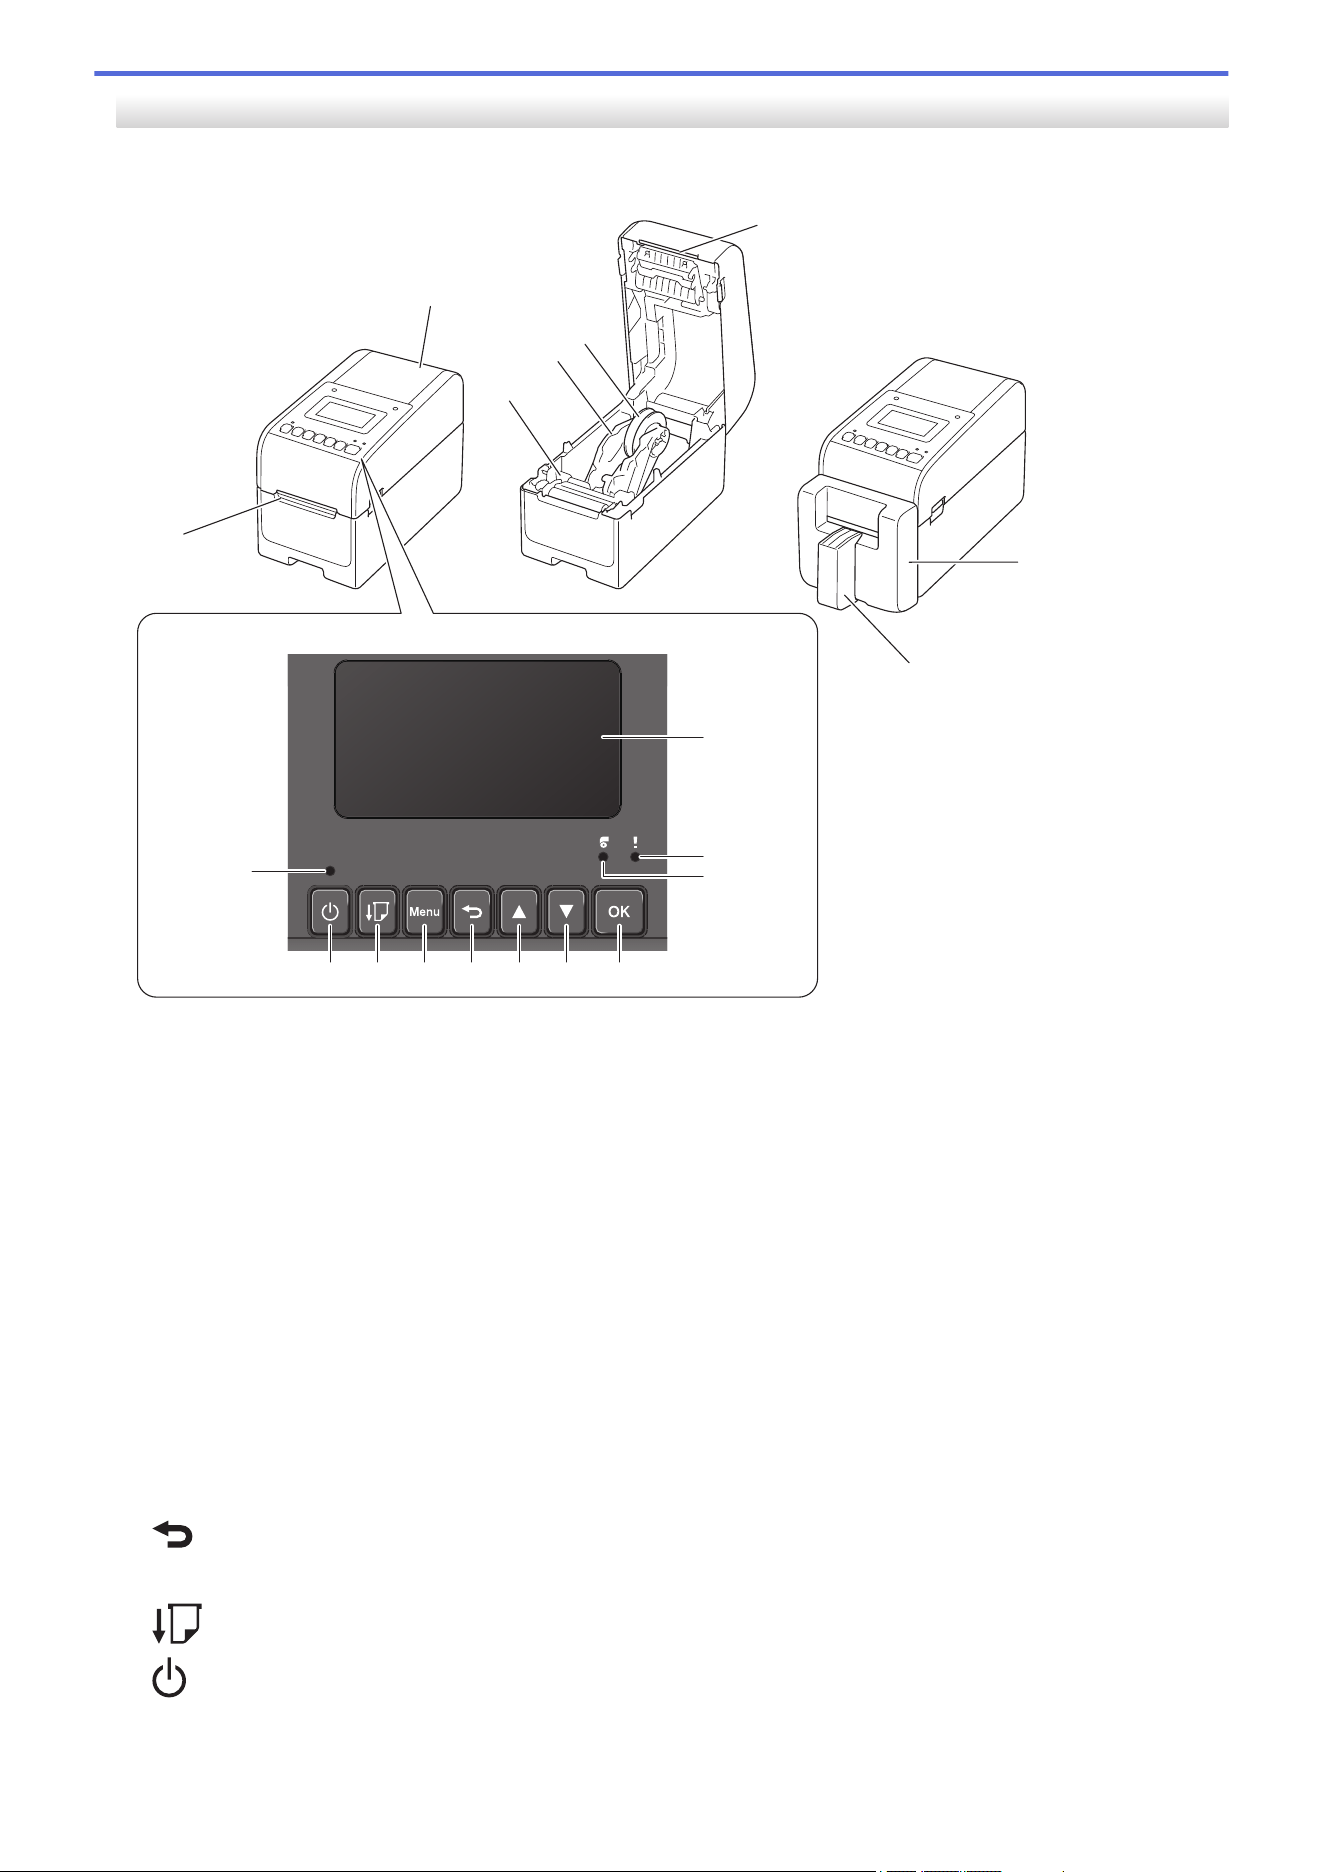
Home > Set Up Your Printer > Parts Description
Parts Description
>> TD-2310D/TD-2320D/TD-2320DF
>> TD-2350D/TD-2350DF
>> TD-2350DSA
TD-2310D/TD-2320D/TD-2320DF
Front
2
6
1
13
14
12 11
9
10
7
8
3
4
5
1. Label Exit Slot
2. Roll Compartment Cover
3. Adjuster Dial
4. Roll Guide
5. Media Roll Holder
6. Tear Bar
7. Linerless Cutter Unit (TD-2320DF)
8. Label Support (TD-2320DF)
9. Status LED
10. Roll LED
11.
(Function) Button
12.
(Feed) Button
13. (Power) Button
14. Power LED
To pause printing, press any button except (Power), a (Up), or b (Down). Press the button again to
resume printing. Printing can be paused only after each full page has been printed and cannot be paused
on the final page or between pages.
9
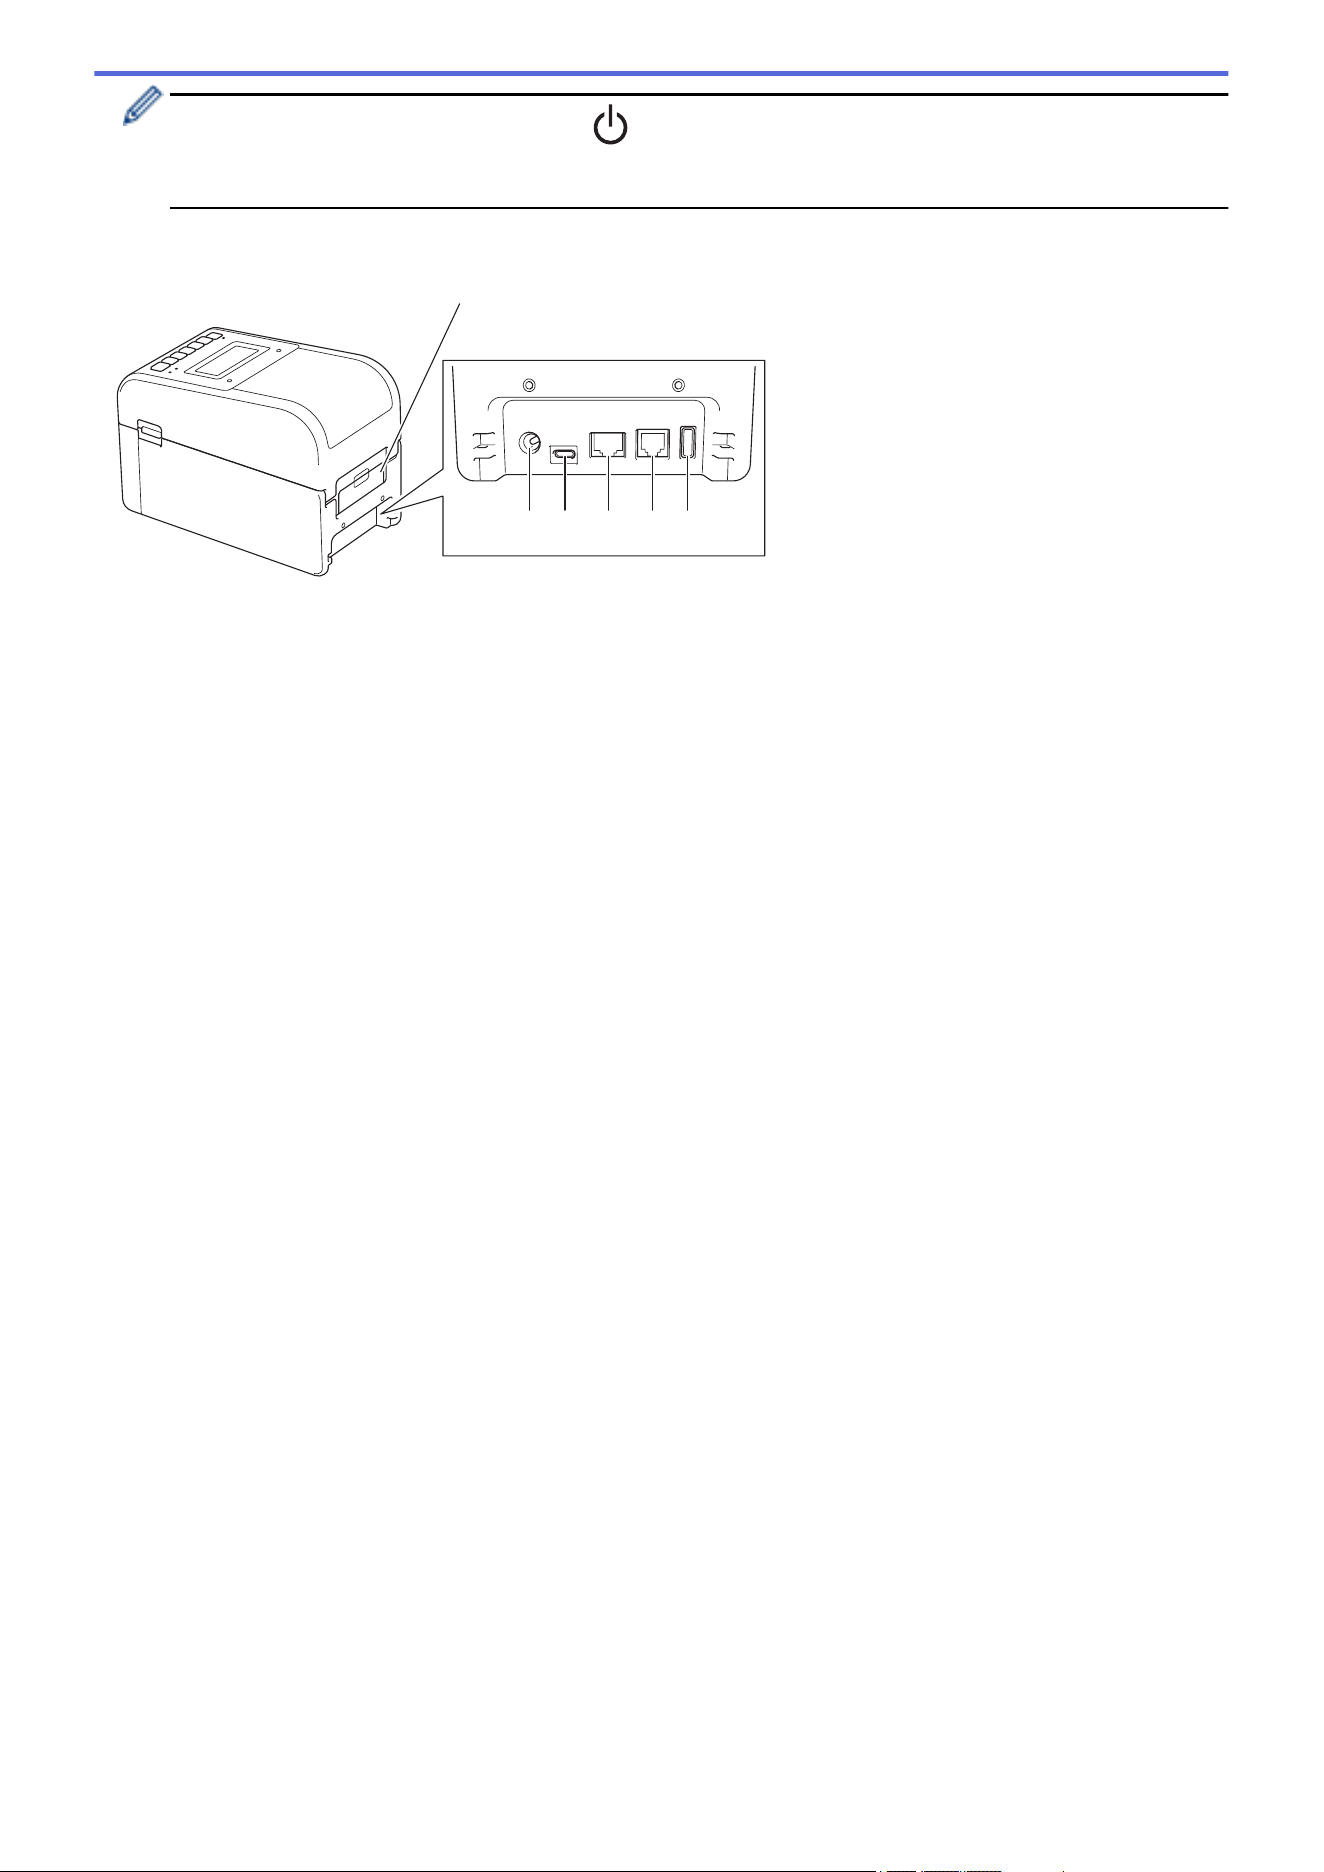
Rear
TD-2310D
432
1
1. Rear Feed Port Cover
2. Power Port
3. USB Port (Type-C)
4. Serial Port (RJ25)
TD-2320D/TD-2320DF
5432 6
1
1. Rear Feed Port Cover
2. Power Port
3. USB Port (Type-C)
4. LAN Port
5. Serial Port (RJ25)
6. USB Host Port (Type-A)
10
TD-2350D/TD-2350DF
Front
18
19
14 12
10
11
9
13151617
6
1
7
8
2
3
4
5
1. Label Exit Slot
2. Roll Compartment Cover
3. Adjuster Dial
4. Roll Guide
5. Media Roll Holder
6. Tear Bar
7. Linerless Cutter Unit (TD-2350DF)
8. Label Support (TD-2350DF)
9. LCD
10. Status LED
11. Roll LED
12. OK Button
13. b (Down) Button
14. a (Up) Button
15.
(Back) Button
16. Menu Button
17.
(Feed) Button
18. (Power) Button
19. Power LED
11
To pause printing, press any button except (Power), a (Up), or b (Down). Press the button again to
resume printing. Printing can be paused only after each full page has been printed and cannot be paused
on the final page or between pages.
Rear
2 5 63 4
1
1. Rear Feed Port Cover
2. Power Port
3. USB Port (Type-C)
4. LAN Port
5. Serial Port (RJ25)
6. USB Host Port (Type-A)
12
TD-2350DSA
Front
22
21
20
19
13
14
15
16
17
18
8
12
11
10
9
3
7
1
2
4
5
6
1. Label Exit Slot
2. Touchscreen Tilt Release Lever
When folding the Touchscreen, gently press the screen with one hand while pressing this lever toward the
back of the machine.
3. Roll Compartment Cover
4. Adjuster Dial
5. Roll Guide
6. Media Roll Holder
7. Tear Bar
8. Touchscreen
9. d (Left) Button
10. a (Up) Button
13
11. c (Right) Button
12. (Feed) Button
13. Menu Button
14. b (Down) Button
15. (Delete) Button
16.
(Space) Button
17. Character Input Mode Switching Button
18. OK Button
19. Numerical / Letter Buttons
20.
(Back) Button
21.
(Power) Button
22. Power LED
To pause printing, press any button except (Power), a (Up), or b (Down). Press the button again to
resume printing. Printing can be paused only after each full page has been printed and cannot be paused
on the final page or between pages.
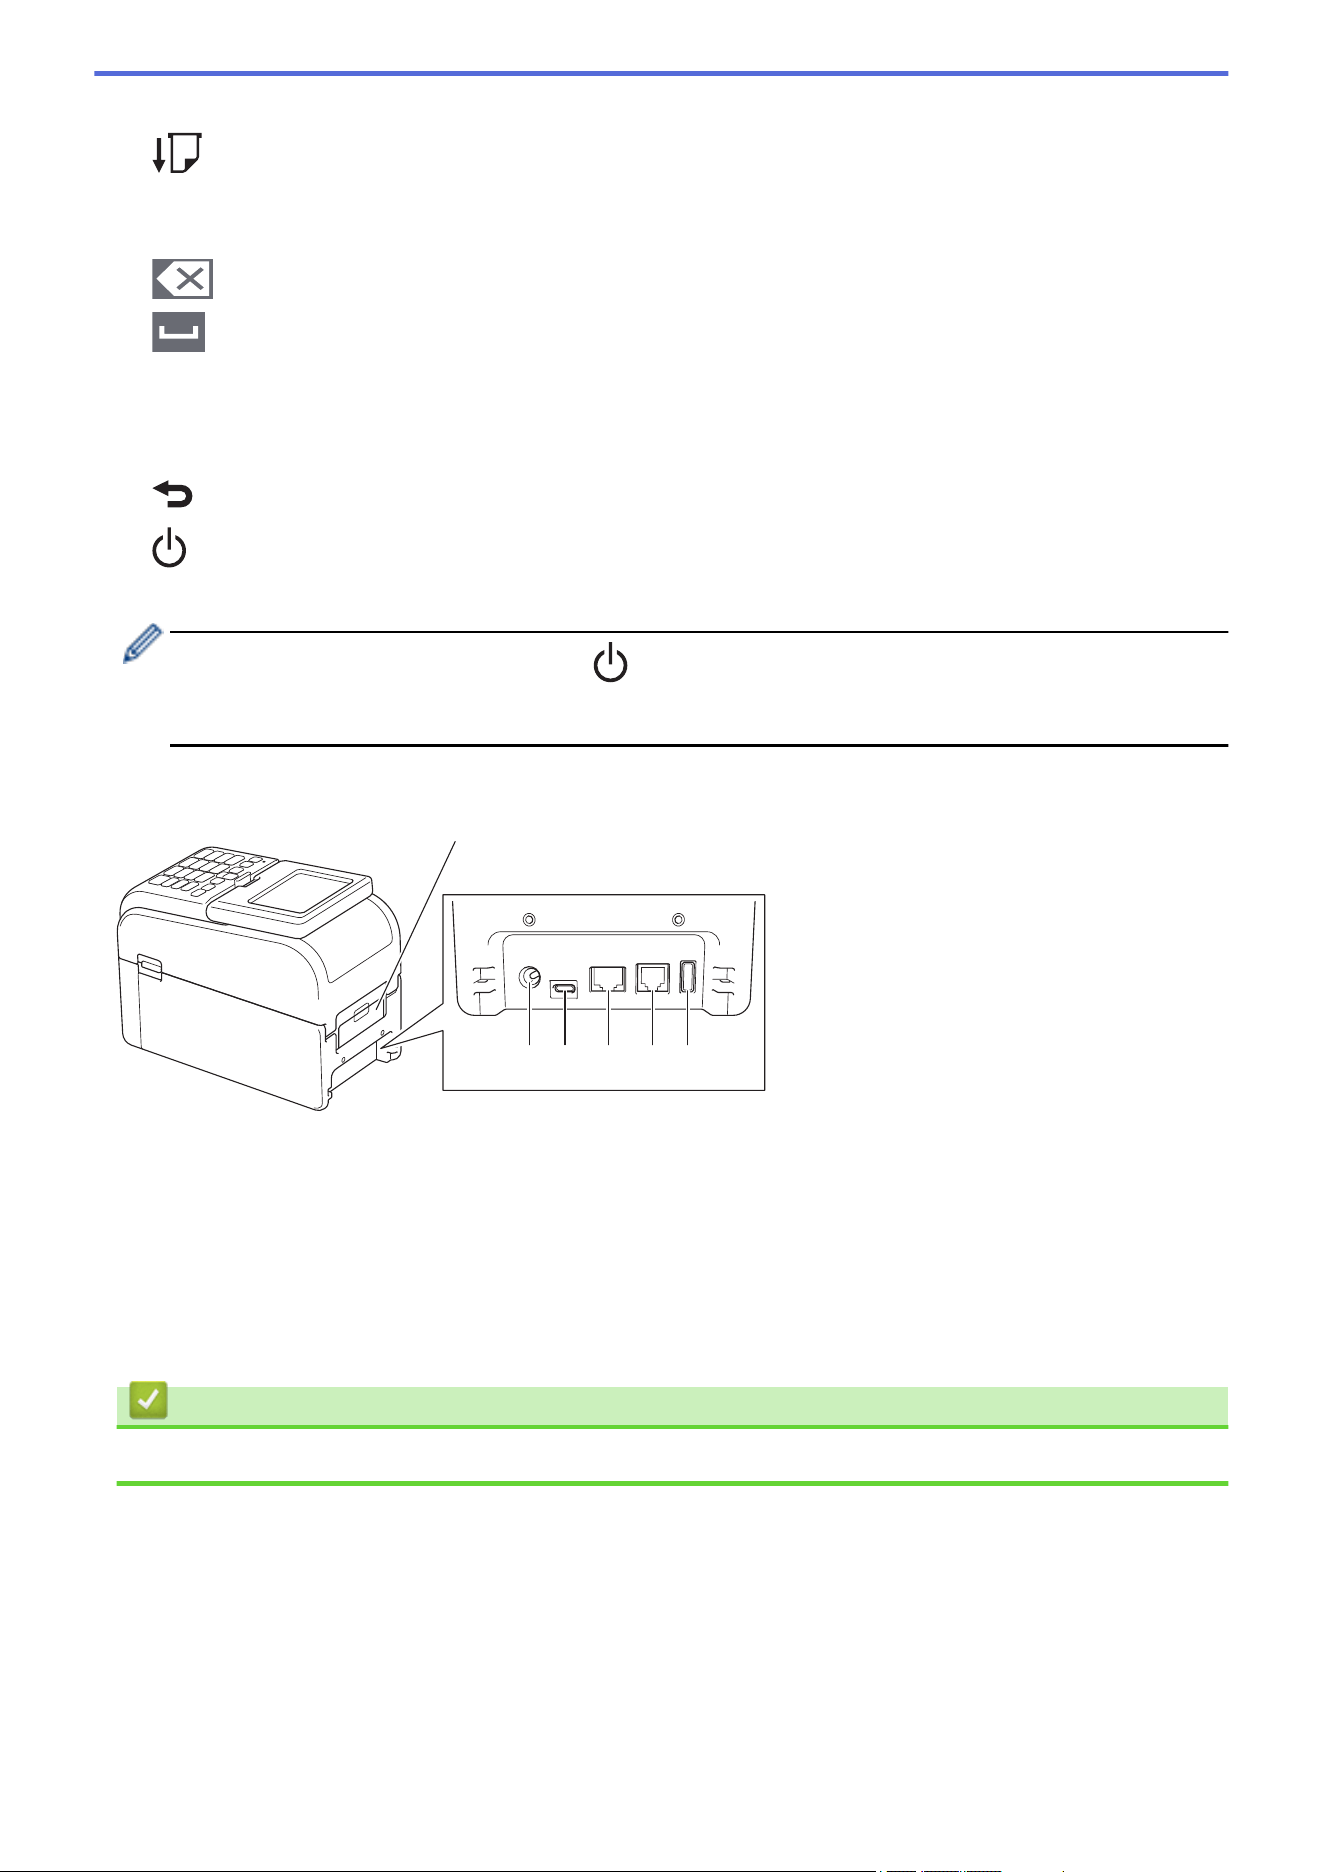
Rear
2 5 63 4
1
1. Rear Feed Port Cover
2. Power Port
3. USB Port (Type-C)
4. LAN Port
5. Serial Port (RJ25)
6. USB Host Port (Type-A)
Related Information
• Set Up Your Printer
14
Home > Set Up Your Printer > LED Patterns and Indications
LED Patterns and Indications
The LEDs light and flash to indicate the printer's status.
For information about errors, see Related Topics: Error and Maintenance LEDs.
or or
LED is lit in the color shown.
or or
LED is flashing in the color shown.
LED can be off, lit, or flashing in any color.
LED is off.
>> TD-2310D/TD-2320D/TD-2320DF
>> TD-2350D/TD-2350DF
>> TD-2350DSA
TD-2310D/TD-2320D/TD-2320DF
Power LED
Roll LED Status LED Condition
Power is off.
The printer is in Feeding mode.
The printer is in Printing mode.
The printer is in Cutting mode.
or
Depends on cover condition.
The printer is in Idle mode.
The printer is in Mass Storage
Mode.
Detecting the paper size.
Repeat (0.5 seconds off, 0.5
seconds on)
The printer is in Print preparation
mode.
The printer is in Downloading
mode.
Canceling the print job.
Once (0.5 seconds off, 0.5
seconds on)
Processing in Mass Storage Mode.
Repeat (1 second off, 1 second
on)
Receiving data.
The printer is in Dump mode.
The printer is in Transferring mode.
Repeat (2 seconds off, 1 second
on)
Printing is paused.
Repeat (0.5 seconds off, 0.5
seconds on)
The printer is in Cooling mode.
15
Power LED Roll LED Status LED Condition
Repeat (3 seconds off,
0.3 second on)
The printer is in Sleep mode.
Repeat (0.5 seconds
off, 0.5 seconds on)
The printer is in Data Rewriting
mode.
Three times (0.5
seconds off, 0.5
seconds on)
Three times (0.5 seconds off, 0.5
seconds on)
Switching to Mass Storage Mode.
The printer is in Initializing mode.
The printer is in System Off mode.
Three times (0.5
seconds off, 0.5
seconds on)
Three times (0.5 seconds off, 0.5
seconds on)
Numbering initialization is complete.
Once (0.5 seconds off,
0.5 seconds on)
Once (0.5 seconds off, 0.5
seconds on)
Initialization is complete.
The printer is in Boot mode.
The printer is in Reset mode.
The printer is in Reset mode.
The printer is in Reset mode.
Flashes three times
(0.3 seconds off, 0.3
seconds on) , and then
on
Flashes three
times (0.3
seconds off, 0.3
seconds on) , and
then on
Flashes three times (0.3 seconds
off, 0.3 seconds on) , and then on
The printer is in Data Rewriting
mode.
1 second off and then
Repeat (0.5 seconds
on, 1 second off)
1 second off and
then Repeat (0.5
seconds on, 1
second off)
1 second off and then Repeat (0.5
seconds on, 1 second off)
The printer is in Reset mode.
The Roll Compartment Cover is
open.
TD-2350D/TD-2350DF
Power LED
Roll LED Status LED Condition
Power is off.
The printer is in Feeding mode.
The printer is in Printing mode.
The printer is in Cutting mode.
16
Power LED Roll LED Status LED Condition
or
Depends on cover condition.
The printer is in Idle mode.
The printer is in Mass Storage Mode.
The printer is in Template selection
mode.
Detecting the paper size.
Repeat (0.5 seconds off, 0.5 seconds
on)
The printer is in Print preparation mode.
The printer is in Downloading mode.
Canceling the print job.
Once (0.5 seconds off, 0.5 seconds
on)
Processing in Mass Storage Mode.
Repeat (1 second off, 1 second on)
Receiving data.
The printer is in Dump mode.
The printer is in Transferring mode.
Repeat (2 seconds off, 1 second on)
Printing is paused.
Repeat (0.5 seconds off, 0.5 seconds
on)
The printer is in Cooling mode.
Repeat (3 seconds off,
0.3 second on)
The printer is in Sleep mode.
Repeat (0.5 seconds
off, 0.5 seconds on)
The printer is in Data Rewriting mode.
The printer is in Initializing mode.
The printer is in System Off mode.
Three times (0.5
seconds off, 0.5
seconds on)
Three times (0.5 seconds off, 0.5
seconds on)
Notifying completion of numbering
initialization.
Once (0.5 seconds off,
0.5 seconds on)
Once (0.5 seconds off, 0.5 seconds
on)
Notifying completion of initialization.
The printer is in Boot mode.
The Roll Compartment Cover is open.
TD-2350DSA
Power LED
Condition
Power is off.
17
Power LED Condition
The printer is in Feeding mode.
The printer is in Printing mode.
The printer is in Cutting mode.
The printer is in Idle mode.
The printer is in Mass Storage Mode.
The printer is in Template selection mode.
The printer is in Template touch mode.
The printer is in Label ID input mode.
Detecting the paper size.
The printer is in Print preparation mode.
The printer is in Downloading mode.
Canceling the print job.
Processing in Mass Storage Mode.
Receiving data.
The printer is in Dump mode.
The printer is in Transferring mode.
Printing is paused.
The printer is in Cooling mode.
Repeat (3 seconds off, 0.3 second on)
The printer is in Sleep mode.
Repeat (0.5 seconds off, 0.5 seconds on)
The printer is in Data Rewriting mode.
The printer is in Initializing mode.
The printer is in System Off mode.
Three times (0.5 seconds off, 0.5 seconds on)
Notifying completion of numbering initialization.
Once (0.5 seconds off, 0.5 seconds on)
Notifying completion of initialization.
The printer is in Boot mode.
The Roll Compartment Cover is open.
Related Information
• Set Up Your Printer
Related Topics:
• Error and Maintenance LEDs
18
Home > Set Up Your Printer > LCD Overview
LCD Overview
Related Models: TD-2350D/TD-2350DF/TD-2350DSA
A protective clear plastic film is placed over the display during manufacturing and shipping. This film should
be removed prior to use.
>> TD-2350D/TD-2350DF
>> TD-2350DSA
TD-2350D/TD-2350DF
10
11
1 2 3 54 6 7 8 9
12
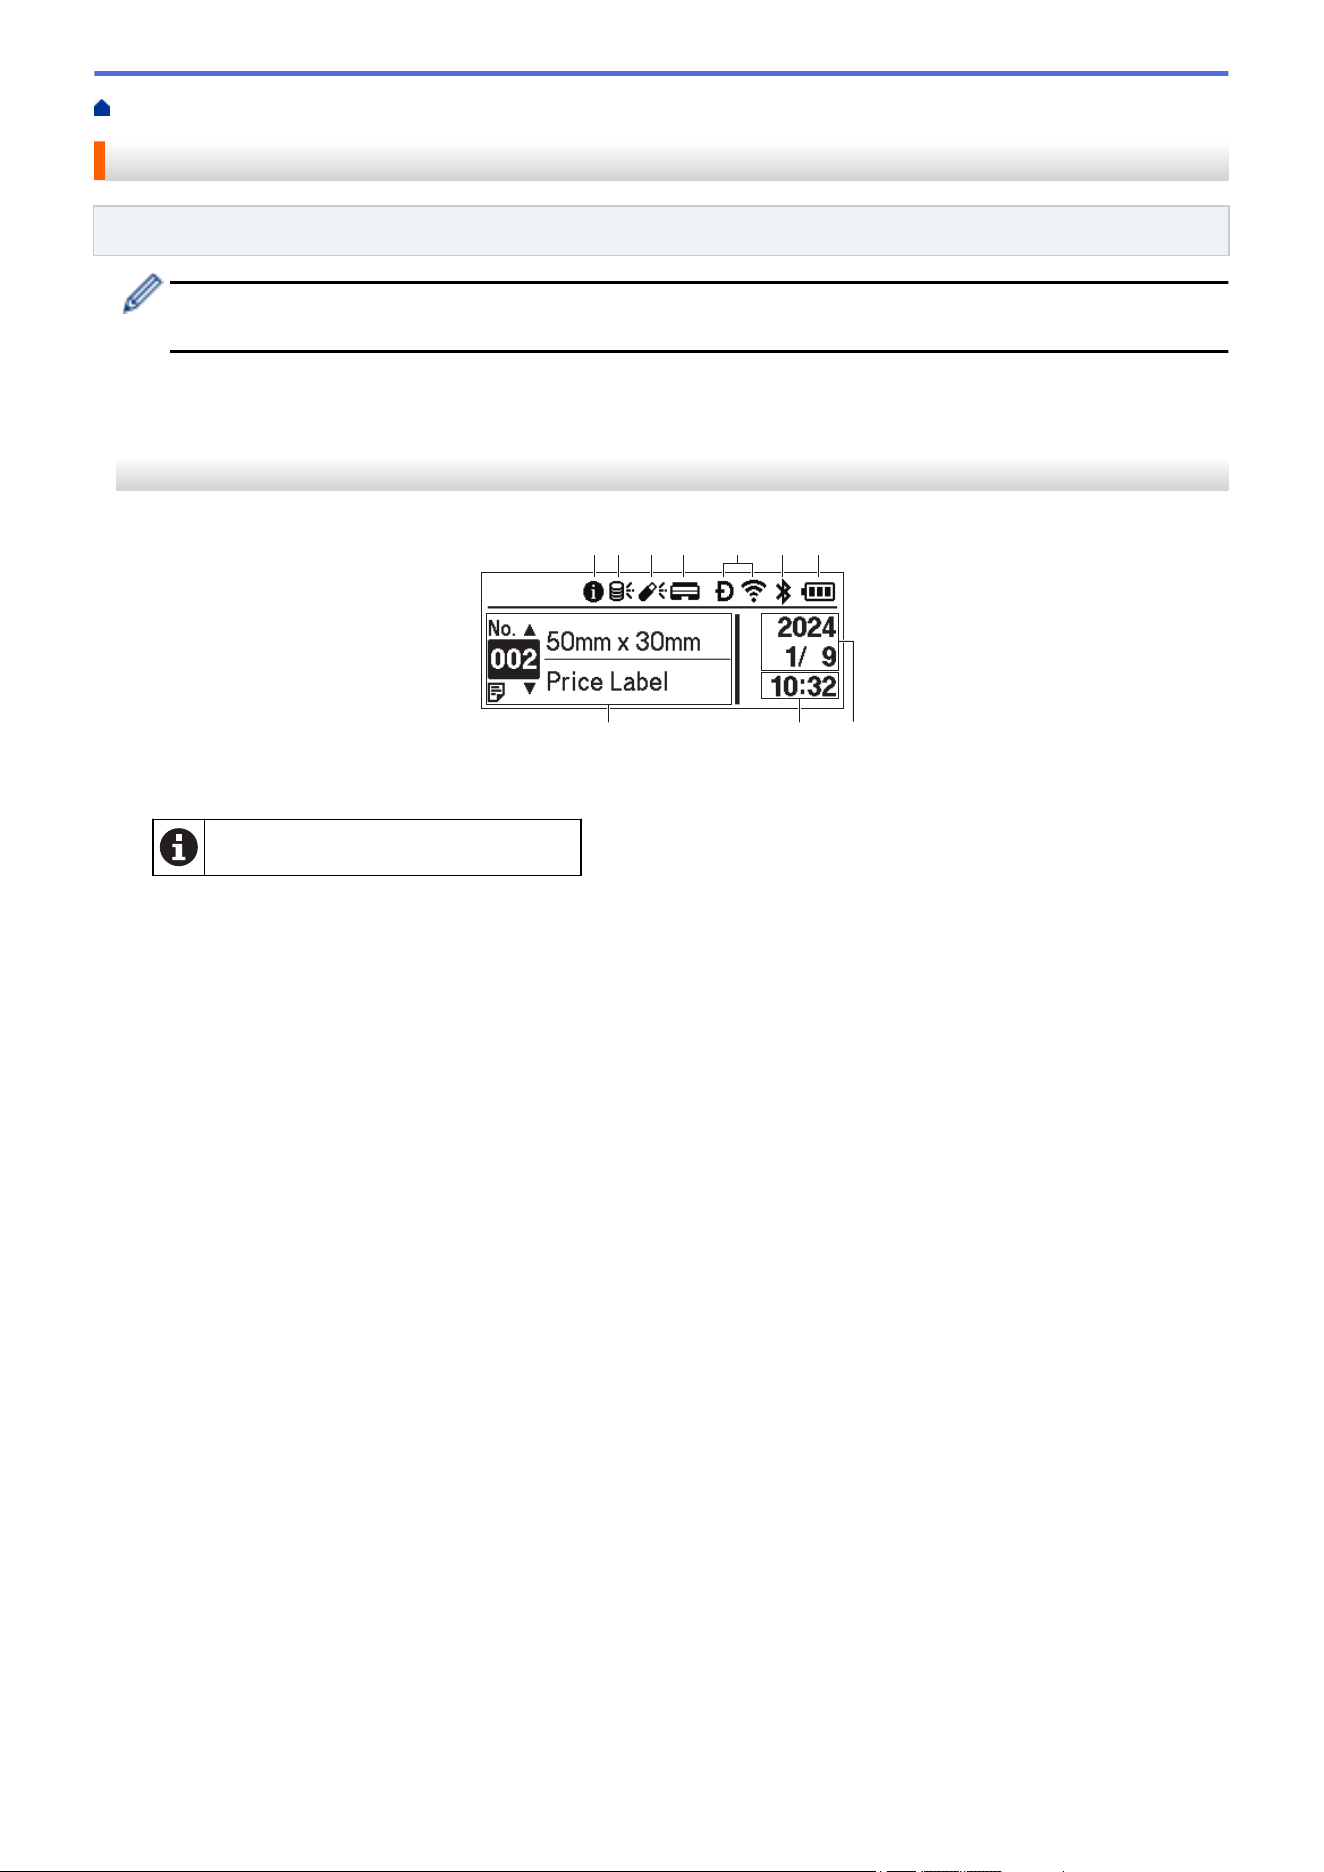
1. Information icon
There is a notification you should read.
19
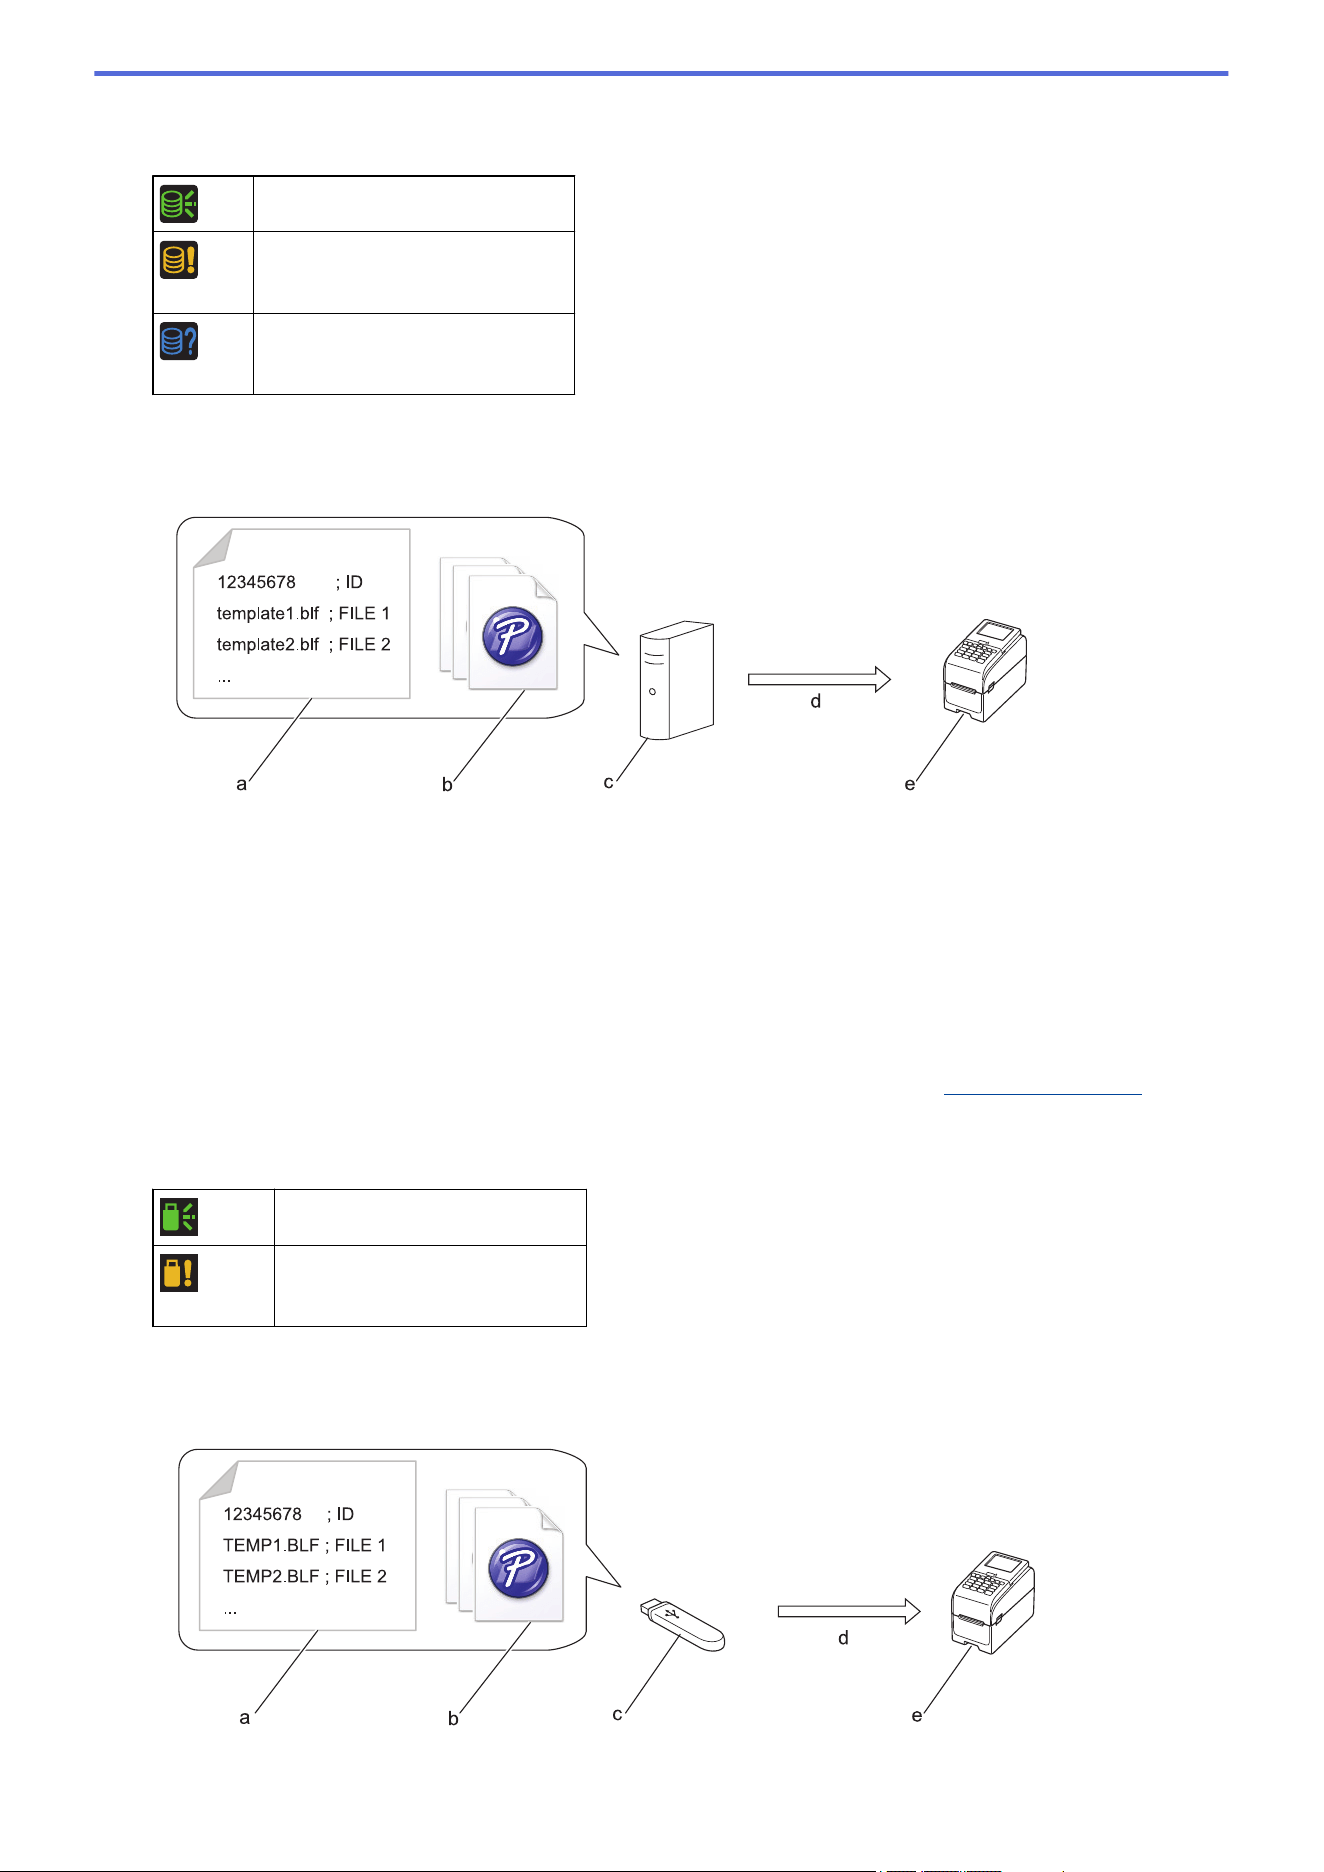
2. Update icon (Network)
Indicates that updated templates, databases, and other data are available.
There is new data.
(flashing)
There is incomplete update data.
(flashing)
Cannot connect to the server.
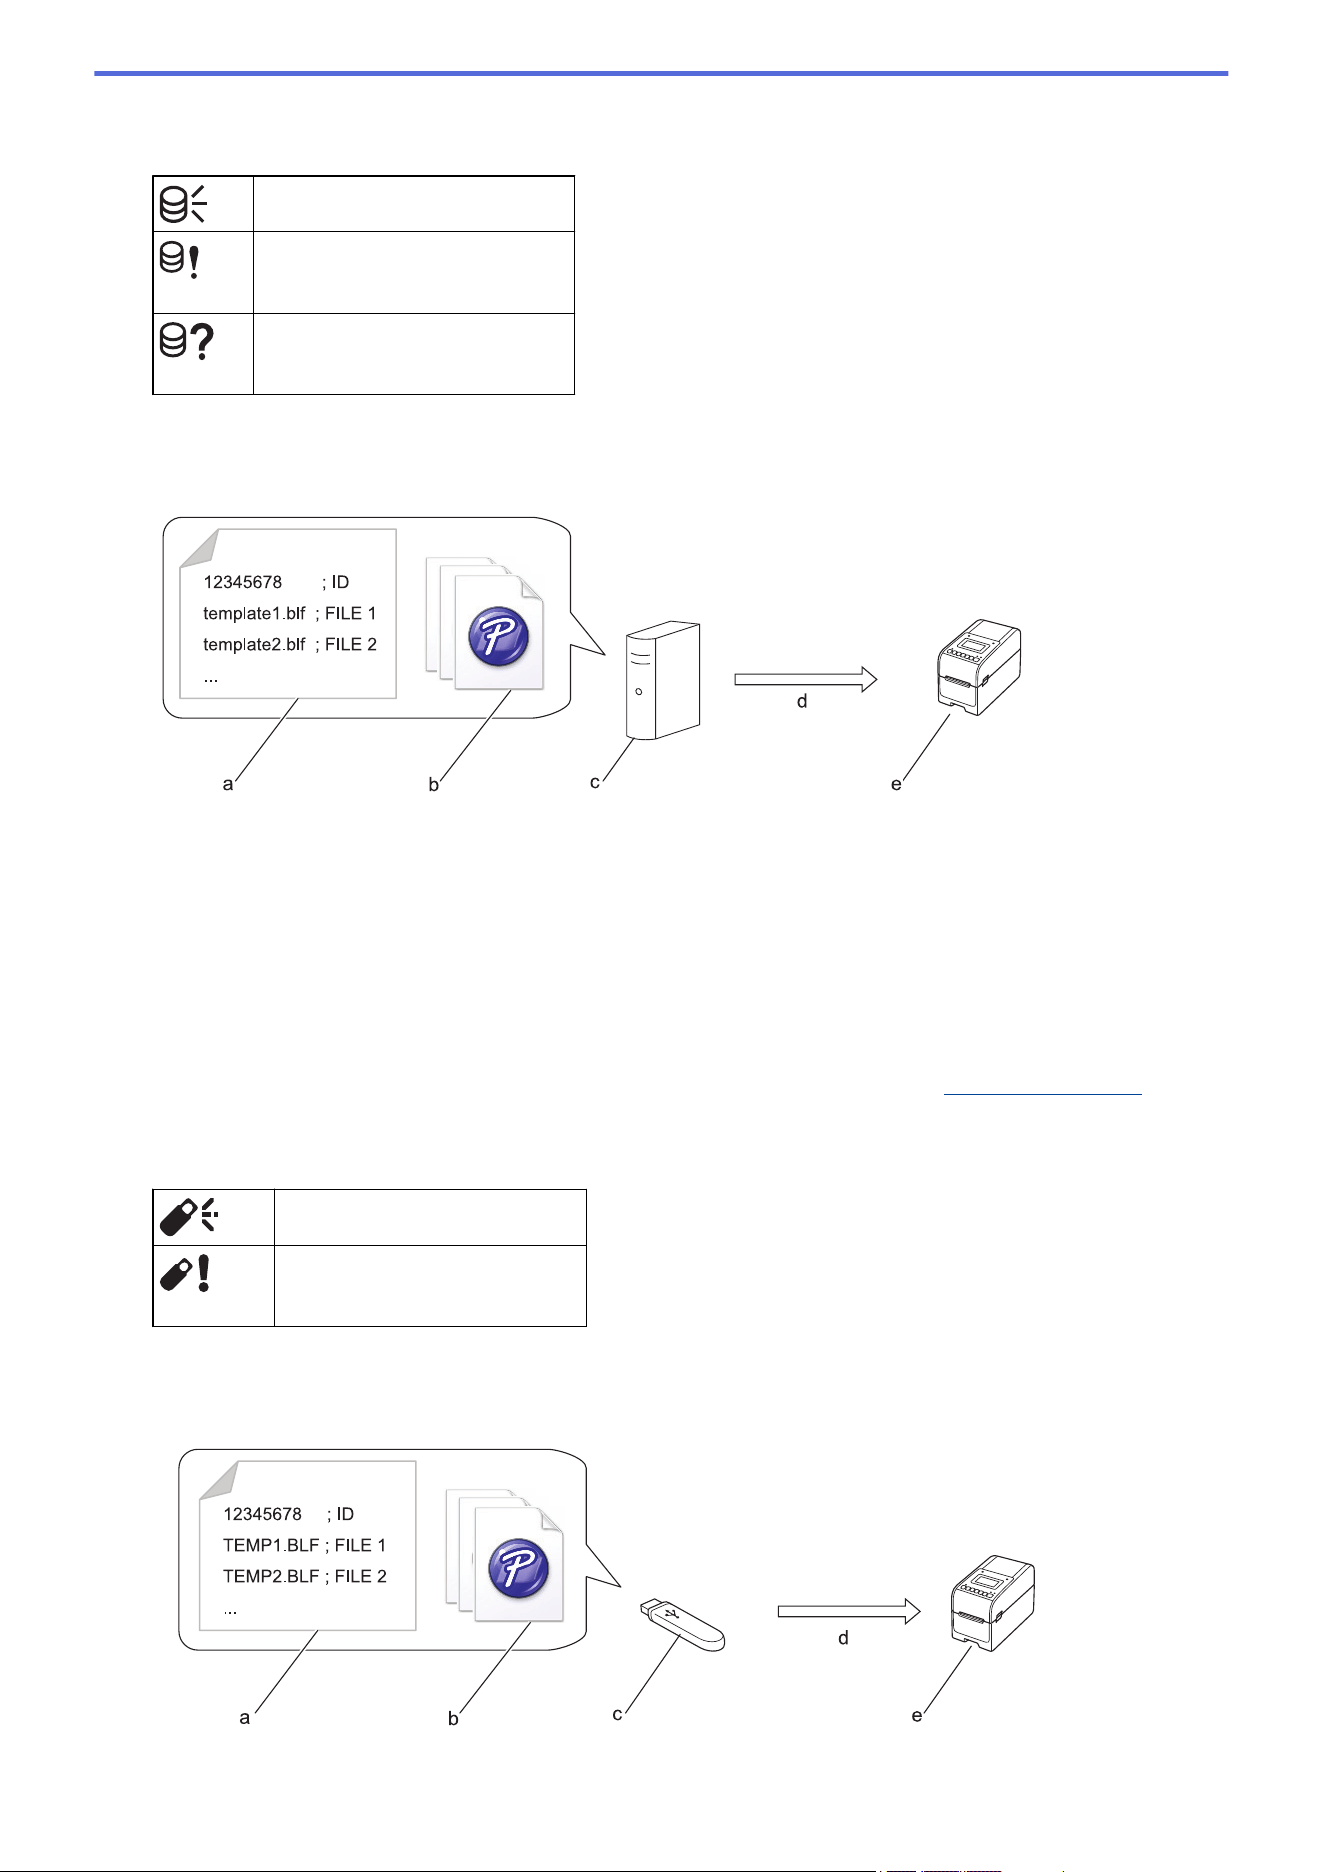
Remote Data Update (FTP)
Allows you to connect your printer to the FTP server to perform template and database updates, and to
execute commands to distribute update data among multiple printers connected to a network.
a. Settings file (updateinfo.ini)
b. Files you want to update, such as template and database files (BLF/BIN files)
To convert a label file (LBX) or database file (Excel, CSV) to a BLF file, use Save Transfer File in P-touch
Transfer Manager.
c. FTP Server
d. Retrieval of update data from the FTP server
e. Printer (FTP Client)
For more information on how to update data, visit the Brother support website at
support.brother.com.
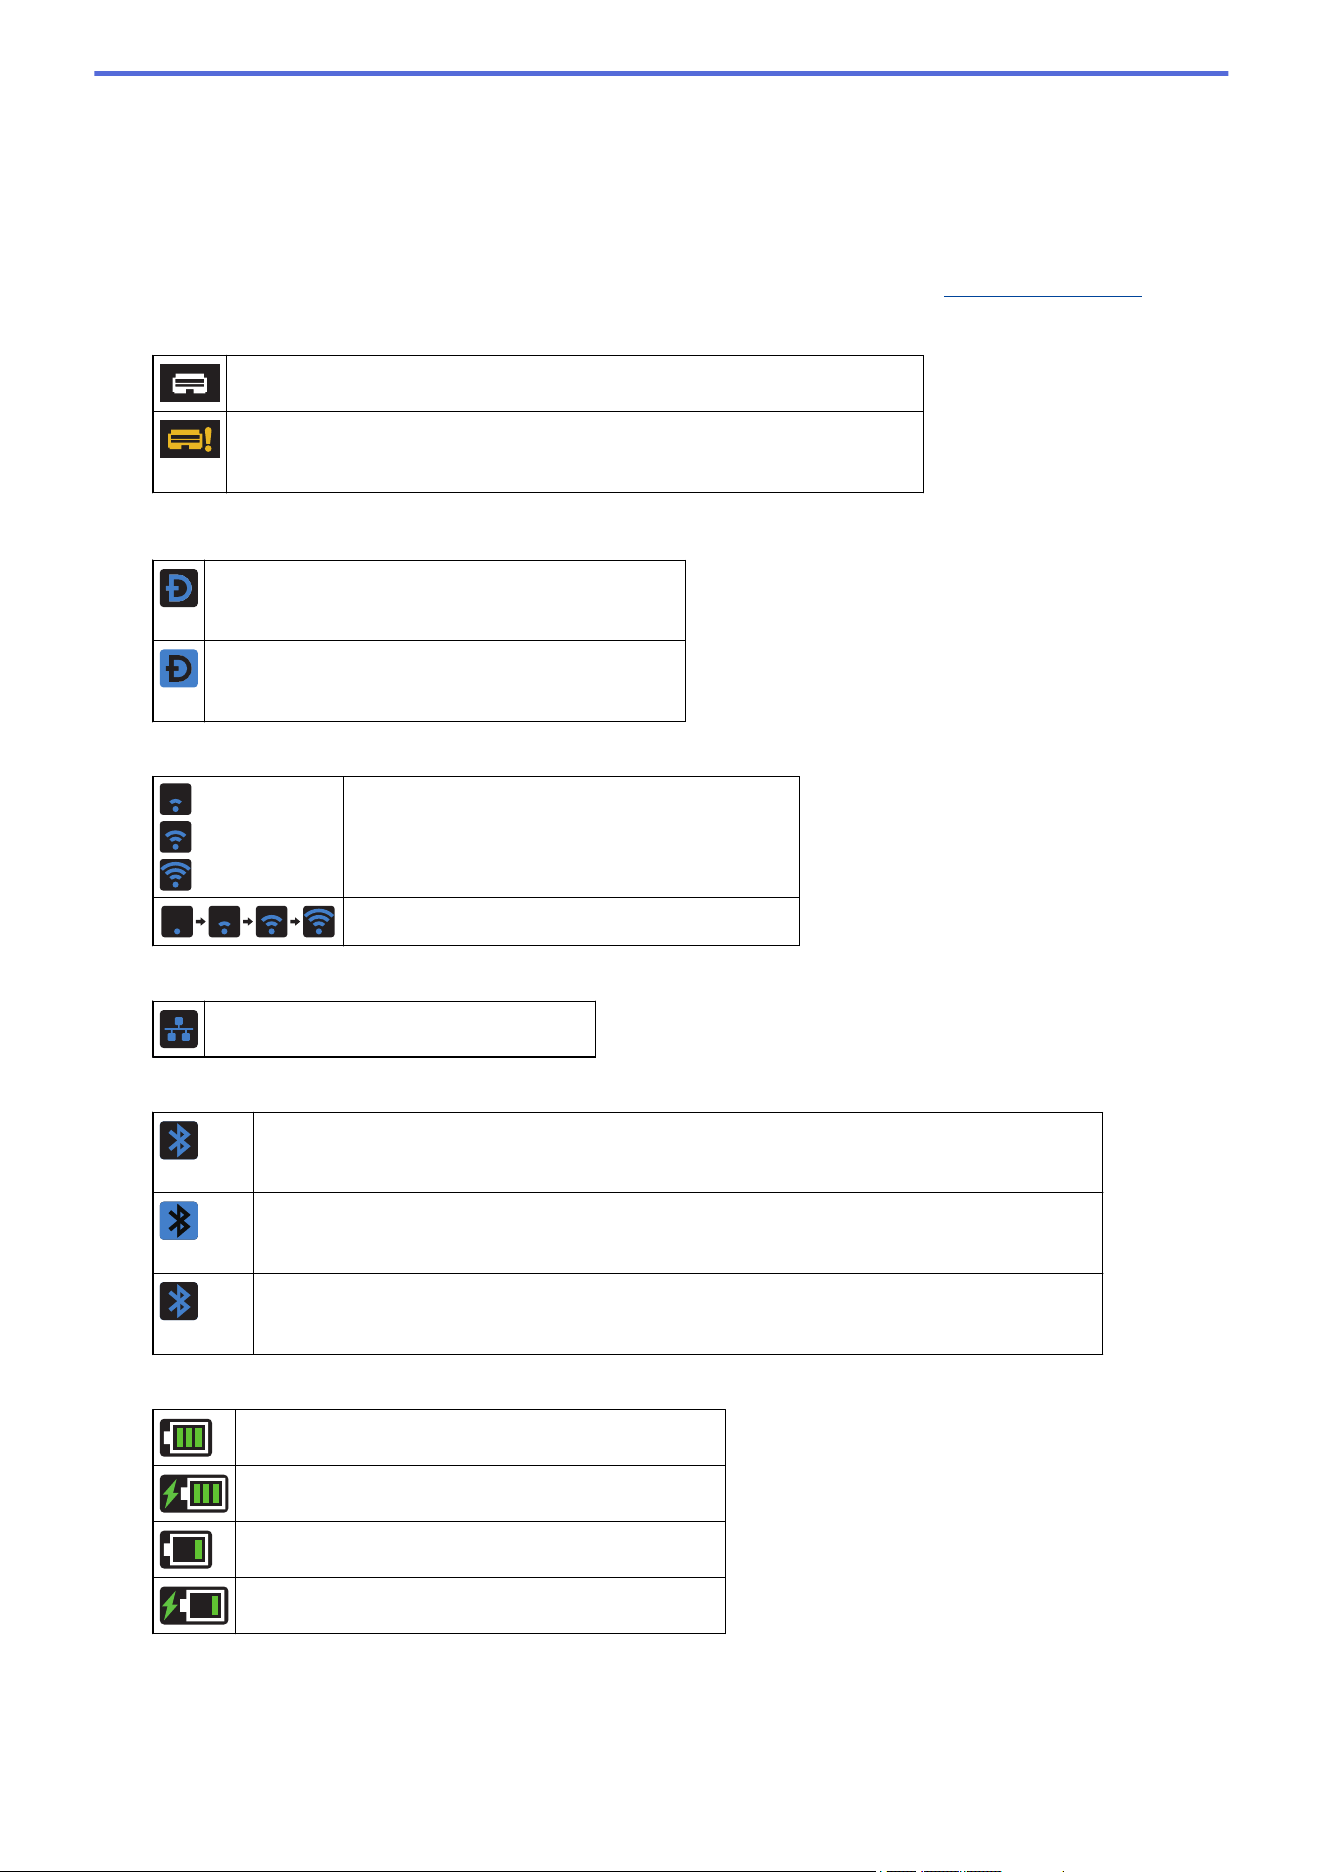
3. Update icon (USB Flash Drive)
Indicates that updated templates, databases, and other data are available.
There is new data.
(flashing)
There is remaining update data.
Local Data Update (USB Flash Drive)
Allows you to perform template and database updates and execute commands after reading the files from a
USB Flash Drive connected to the printer.
20
a. Settings file (UPDATE.INI)
b. Files you want to update data, such as template and database files (BLF/BIN files)
c. USB Flash Drive
d. Retrieval of update data
e. Printer
For more information on how to update data, visit the Brother support website at support.brother.com.
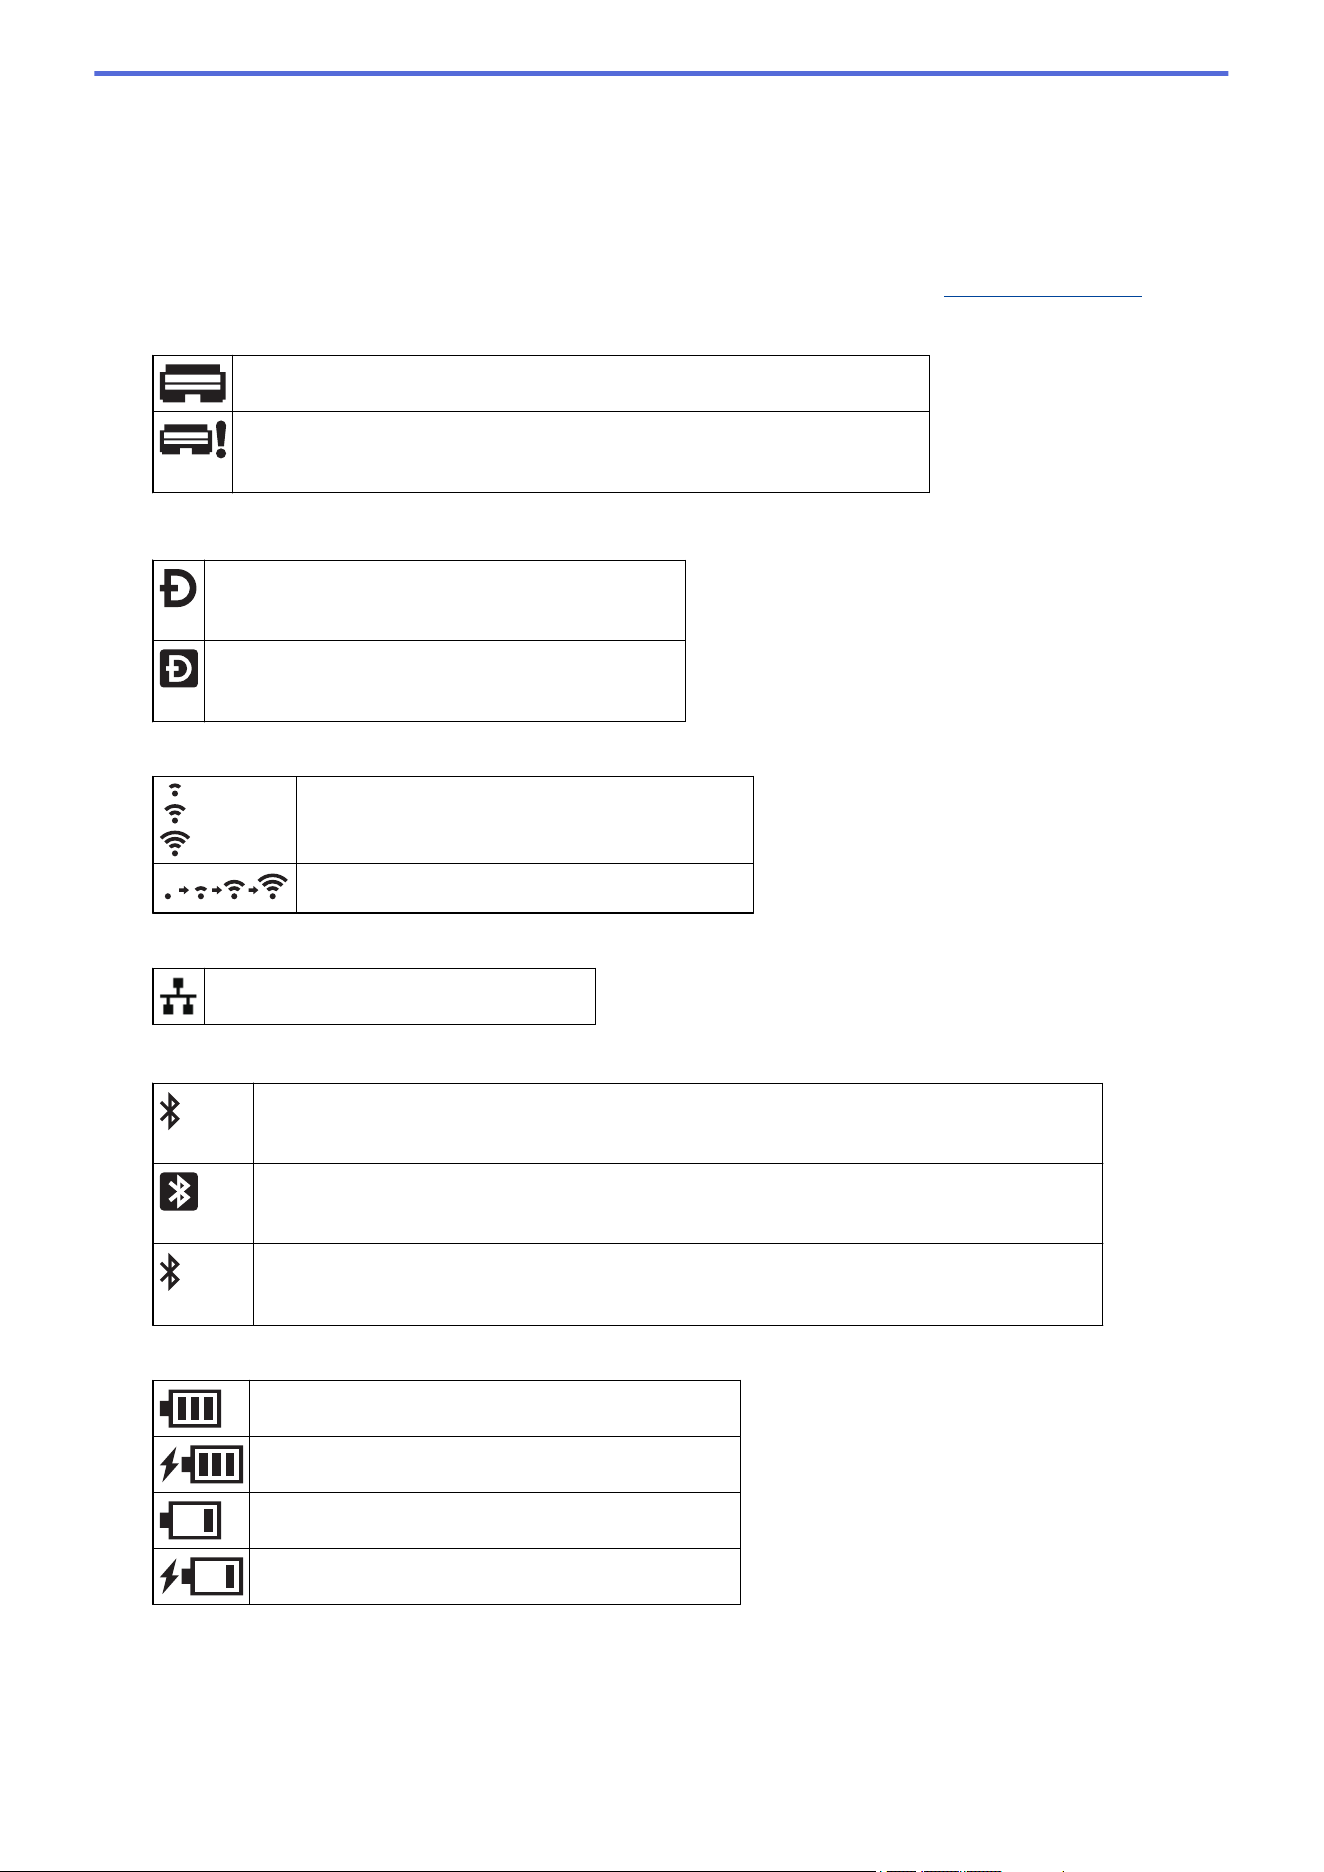
4. Print Head Status icon
Normal state.
The Print Head is disconnected or there is a problem with the Print Head.
5. Wireless Direct icon
Wireless Direct mode is on.
Your printer is not connected to the mobile device.
Wireless Direct mode is on.
Your printer is connected to the mobile device.
6. WLAN icon
Your printer is connected to the network.
Your printer is searching for a wireless network.
7. Wired LAN icon
Your printer is connected to the network.
8. Bluetooth
®/MD
icon
Bluetooth mode is on.
Your printer is not connected to the mobile device.
Bluetooth mode is connected.
Your printer is connected to the mobile device.
(flashing)
The Auto Reconnect function is on, but your printer is not connected to the mobile device.
9. Battery icon
The battery is fully or almost fully charged.
The battery is charging and is almost fully charged.
The battery level is low.
The battery level is low but is being charged.
10. Date display
11. Time display
12. Template
21
NOTE
The printer may malfunction if you try to configure it while it is processing or printing a print job.
TD-2350DSA
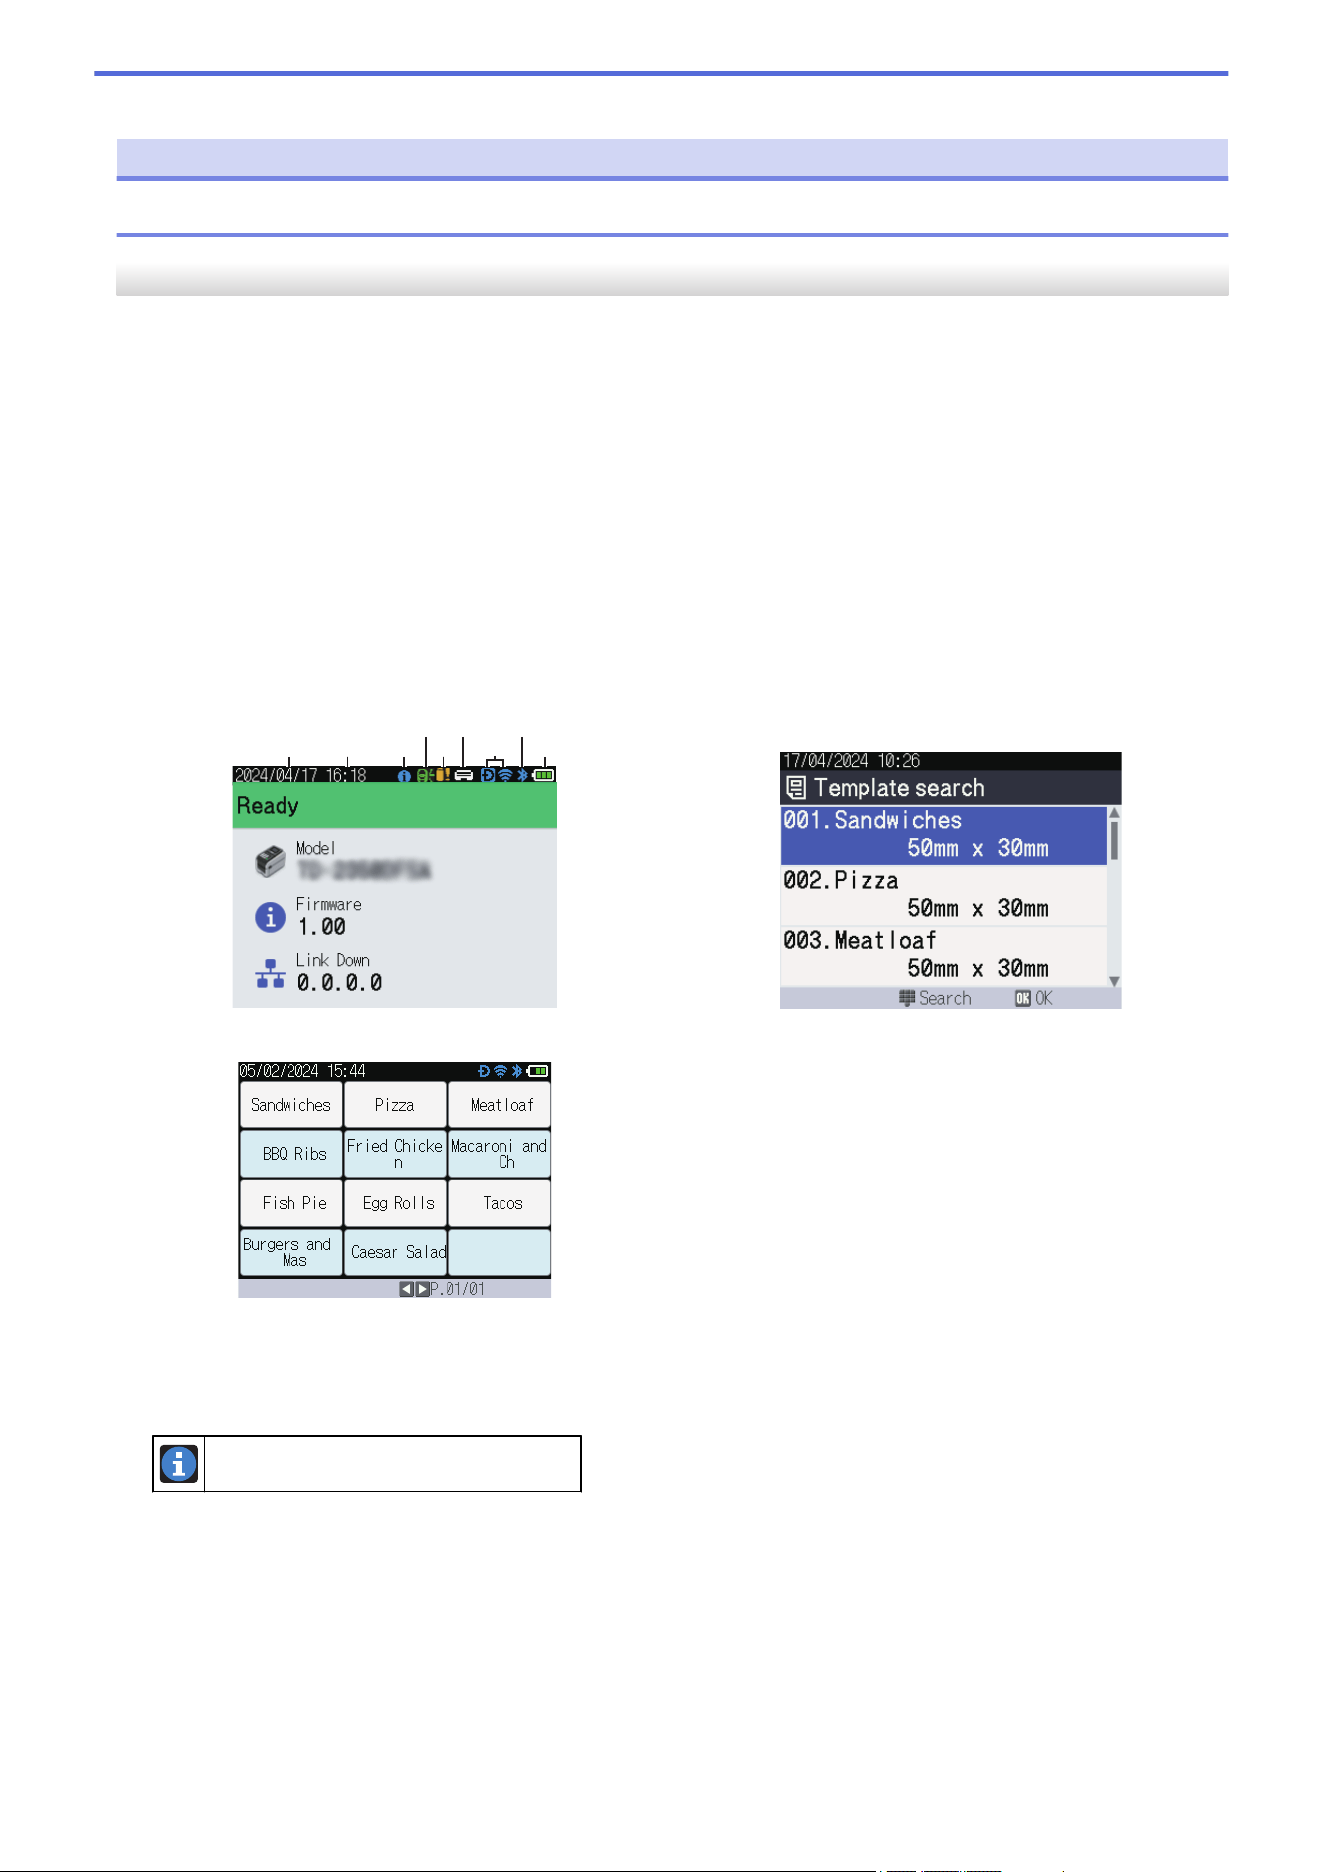
Three different screen types are available to set as your Home Screen. Select the style you prefer by going to
[Settings] > [Home Screen]:
• Status Screen
Displays the printer's status.
• Template List Screen
Displays all templates, in list format, that have been transferred to the printer. This screen features a Search
function so you can find specific templates and databases.
• Template Touch Screen
Displays all templates, in tile format, that have been transferred to the printer.
Select the template or database you want to use by tapping it.
Status Screen
Template List Screen
1 2 3
4
5
6
7,8,9
10
11
Template Touch Screen
1. Date display
2. Time display
3. Information icon
There is a notification you should read.
22
4. Update icon (Network)
Indicates that updated templates, databases, and other data are available.
There is new data.
(flashing)
There is incomplete update data.
(flashing)
Cannot connect to the server.
Remote Data Update (FTP)
Allows you to connect your printer to the FTP server to perform template and database updates, and to
execute commands to distribute update data among multiple printers connected to a network.
a. Settings file (updateinfo.ini)
b. Files you want to update, such as template and database files (BLF/BIN files)
To convert a label file (LBX) or database file (Excel, CSV) to a BLF file, use Save Transfer File in P-touch
Transfer Manager.
c. FTP Server
d. Retrieval of update data from the FTP server
e. Printer (FTP Client)
For more information on how to update data, visit the Brother support website at
support.brother.com.
5. Update icon (USB Flash Drive)
Indicates that updated templates, databases, and other data are available.
There is new data.
(flashing)
There is remaining update data.
Local Data Update (USB Flash Drive)
Allows you to perform template and database updates and execute commands after reading the files from a
USB Flash Drive connected to the printer.
23
a. Settings file (UPDATE.INI)
b. Files you want to update data, such as template and database files (BLF/BIN files)
c. USB Flash Drive
d. Retrieval of update data
e. Printer
For more information on how to update data, visit the Brother support website at support.brother.com.
6. Print Head Status icon
Normal state.
The Print Head is disconnected or there is a problem with the Print Head.
7. Wireless Direct icon
Wireless Direct mode is on.
Your printer is not connected to the mobile device.
Wireless Direct mode is on.
Your printer is connected to the mobile device.
8. WLAN icon
Your printer is connected to the network.
Your printer is searching for a wireless network.
9. Wired LAN icon
Your printer is connected to the network.
10. Bluetooth icon
Bluetooth mode is on.
Your printer is not connected to the mobile device.
Bluetooth mode is connected.
Your printer is connected to the mobile device.
(flashing)
The Auto Reconnect function is on, but your printer is not connected to the mobile device.
11. Battery icon
The battery is fully or almost fully charged.
The battery is charging and is almost fully charged.
The battery level is low.
The battery level is low but is being charged.
12. Template
24

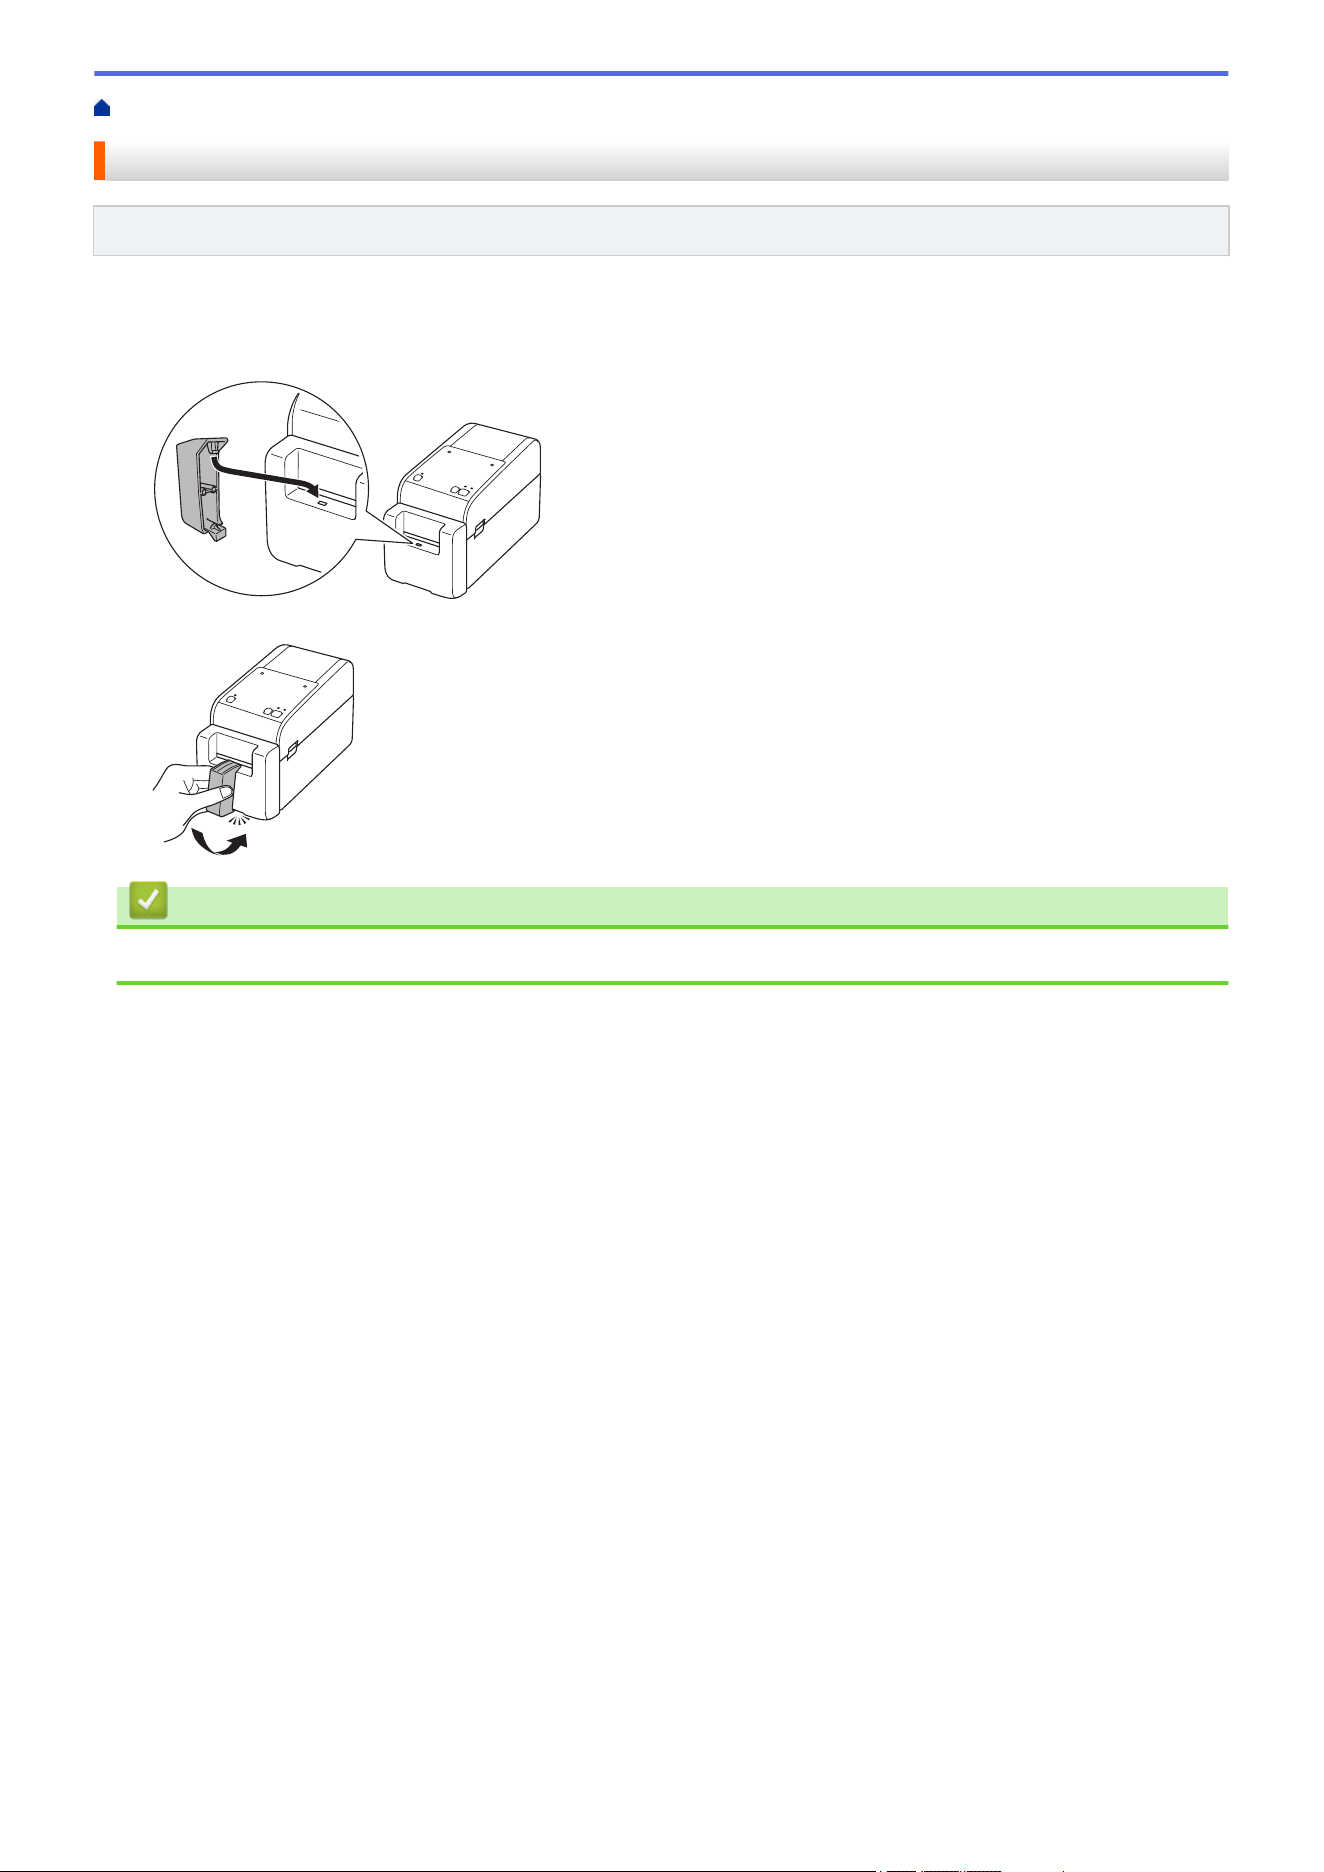
Home > Set Up Your Printer > Install the Label Support
Install the Label Support
Related Models: TD-2320DF/TD-2350DF
These linerless models require the Label Support, which keeps the label's adhesive from sticking to unwanted
surfaces like the desk or the floor.
1. Insert the Label Support into the center of the Label Exit Slot.
2. Gently press the Label Support until it locks into position.
Related Information
• Set Up Your Printer
26

Home > Set Up Your Printer > Set the Date and Time
Set the Date and Time
Related Models: TD-2350D/TD-2350DF/TD-2350DSA
>> TD-2350D/TD-2350DF
>> TD-2350DSA
TD-2350D/TD-2350DF
1. Press Menu.
2. Press a or b to select the following:
a. Select [Administration]. Press OK.
b. Select [Time & date]. Press OK.
c. Select [Set Clock]. Press OK.
3. Press a or b to set the year, and then press OK. Repeat this step for setting the month and day.
4. Press a or b to set the hour, and then press OK. Repeat this step for setting the minute.
5. Press a or b to select [AM], [PM], or [24], and then press OK.
To change the date and time format, select [Administration] > [Date Format] or
[Administration] > [Time Format], and then specify the settings.
TD-2350DSA
1. Press Menu.
2. Press a or b to select the following:
a. Select [Administration]. Press OK.
b. Select [Time & date]. Press OK.
c. Select [Clock Manual Setup]. Press OK.
3. Select [Date], and then press OK.
Enter the year using numerical buttons and press OK. Repeat this step for setting the month and day.
4. Select [Time], and then press OK.
5. Select [AM], [PM], or [24], and then press OK.
6. Enter the hour and minute using numerical buttons, and then press OK.
To change the date and time format, select [Administration] > [Date Format] or
[Administration] > [Time Format], and then specify the settings.
7. Press .
Related Information
• Set Up Your Printer
27

Home > Set Up Your Printer > Restrict Access to Administration Menu Items
Restrict Access to Administration Menu Items
Related Models: TD-2350D/TD-2350DF/TD-2350DSA
Access restrictions can be set for every item in the Administration Menu.
1. Press Menu.
2. Press a or b to select the following:
a. Select [Administration]. Press OK.
b. Select [Menu Lock]. Press OK.
3. Press a, b, or OK to select the menu items you want.
4. Press a or b to select [Finish], and then press OK to complete the settings.
Related Information
• Set Up Your Printer
Related Topics:
• Printer Setting Tool (Windows): Device Settings
28

Home > Set Up Your Printer > Set the Menu Security
Set the Menu Security
Related Models: TD-2350D/TD-2350DF/TD-2350DSA
When setting the menu security, access to the Administration menu can be restricted by setting a passcode.
>> TD-2350D/TD-2350DF
>> TD-2350DSA
TD-2350D/TD-2350DF
1. Press Menu.
2. Press a or b to select the following:
a. Select [Administration]. Press OK.
b. Select [Menu Security]. Press OK.
3. Press a or b to select [On]. Press OK.
4. Press a or b to specify the first number of the four-digit security passcode, and then press OK.
Repeat this step for the remaining three numbers.
• If a passcode has already been set, the passcode input screen appears whenever the [Administration]
menu is selected. Press a or b and OK after each number to enter the specified four-digit passcode, and then
press OK.
• To cancel Menu Security and turn off the passcode input screen, select the [Administration] menu and
enter the passcode. Then, select [Menu Security] > [Off].
• If you do not remember the passcode, use the Device Settings in the Printer Setting Tool to return all settings
to their factory values and set the passcode again.
TD-2350DSA
1. Press Menu.
2. Press a or b to select the following:
a. Select [Administration]. Press OK.
b. Select [Menu Security]. Press OK.
3. Press a or b to select [On]. Press OK.
4. Press the numerical buttons, d, and c to specify the first number of the four-digit security passcode, and then
press OK. Repeat this step to specify the remaining three numbers.
• If a passcode has already been set, the passcode input screen appears whenever the [Administration]
menu is selected. Enter the four-digit passcode using numerical buttons, d, and c, and then press OK.
• To cancel Menu Security and turn off the passcode input screen, select the [Administration] menu and
enter the passcode. Then, select [Menu Security] > [Off].
• If you do not remember the passcode, use the Device Settings in the Printer Setting Tool to return all settings
to their factory values and set the passcode again.
Related Information
• Set Up Your Printer
Related Topics:
• Printer Setting Tool (Windows): Device Settings
29

Home > Set Up Your Printer > Load Media Roll > Change the Media Roll Holder to Use a Custom Size Roll
Change the Media Roll Holder to Use a Custom Size Roll
If the convex part of the Media Roll Holder fits within the inner diameter of the roll paper core, the roll is usable.
Using a Media Roll Holder close to the inner diameter of the roll paper core provides more stable media feeding.
1
1
1
2
1. Media Roll Holder convex outer diameter
2. Media Roll paper core inner diameter
Your printer is pre-installed with two Media Roll Holders that have a core diameter of 1" (25.4 mm) on one side
and 1.5" (38.1 mm) on the other side.
• A set of two smaller Media Roll Holders designed for core diameters of 0.5" (12.7 mm) or 0.75" (19 mm)
are included with your machine. Contact Brother Customer Service if you need Media Roll Holders
compatible with other core diameters.
• The roll core sizes are marked on the Media Roll Holders.
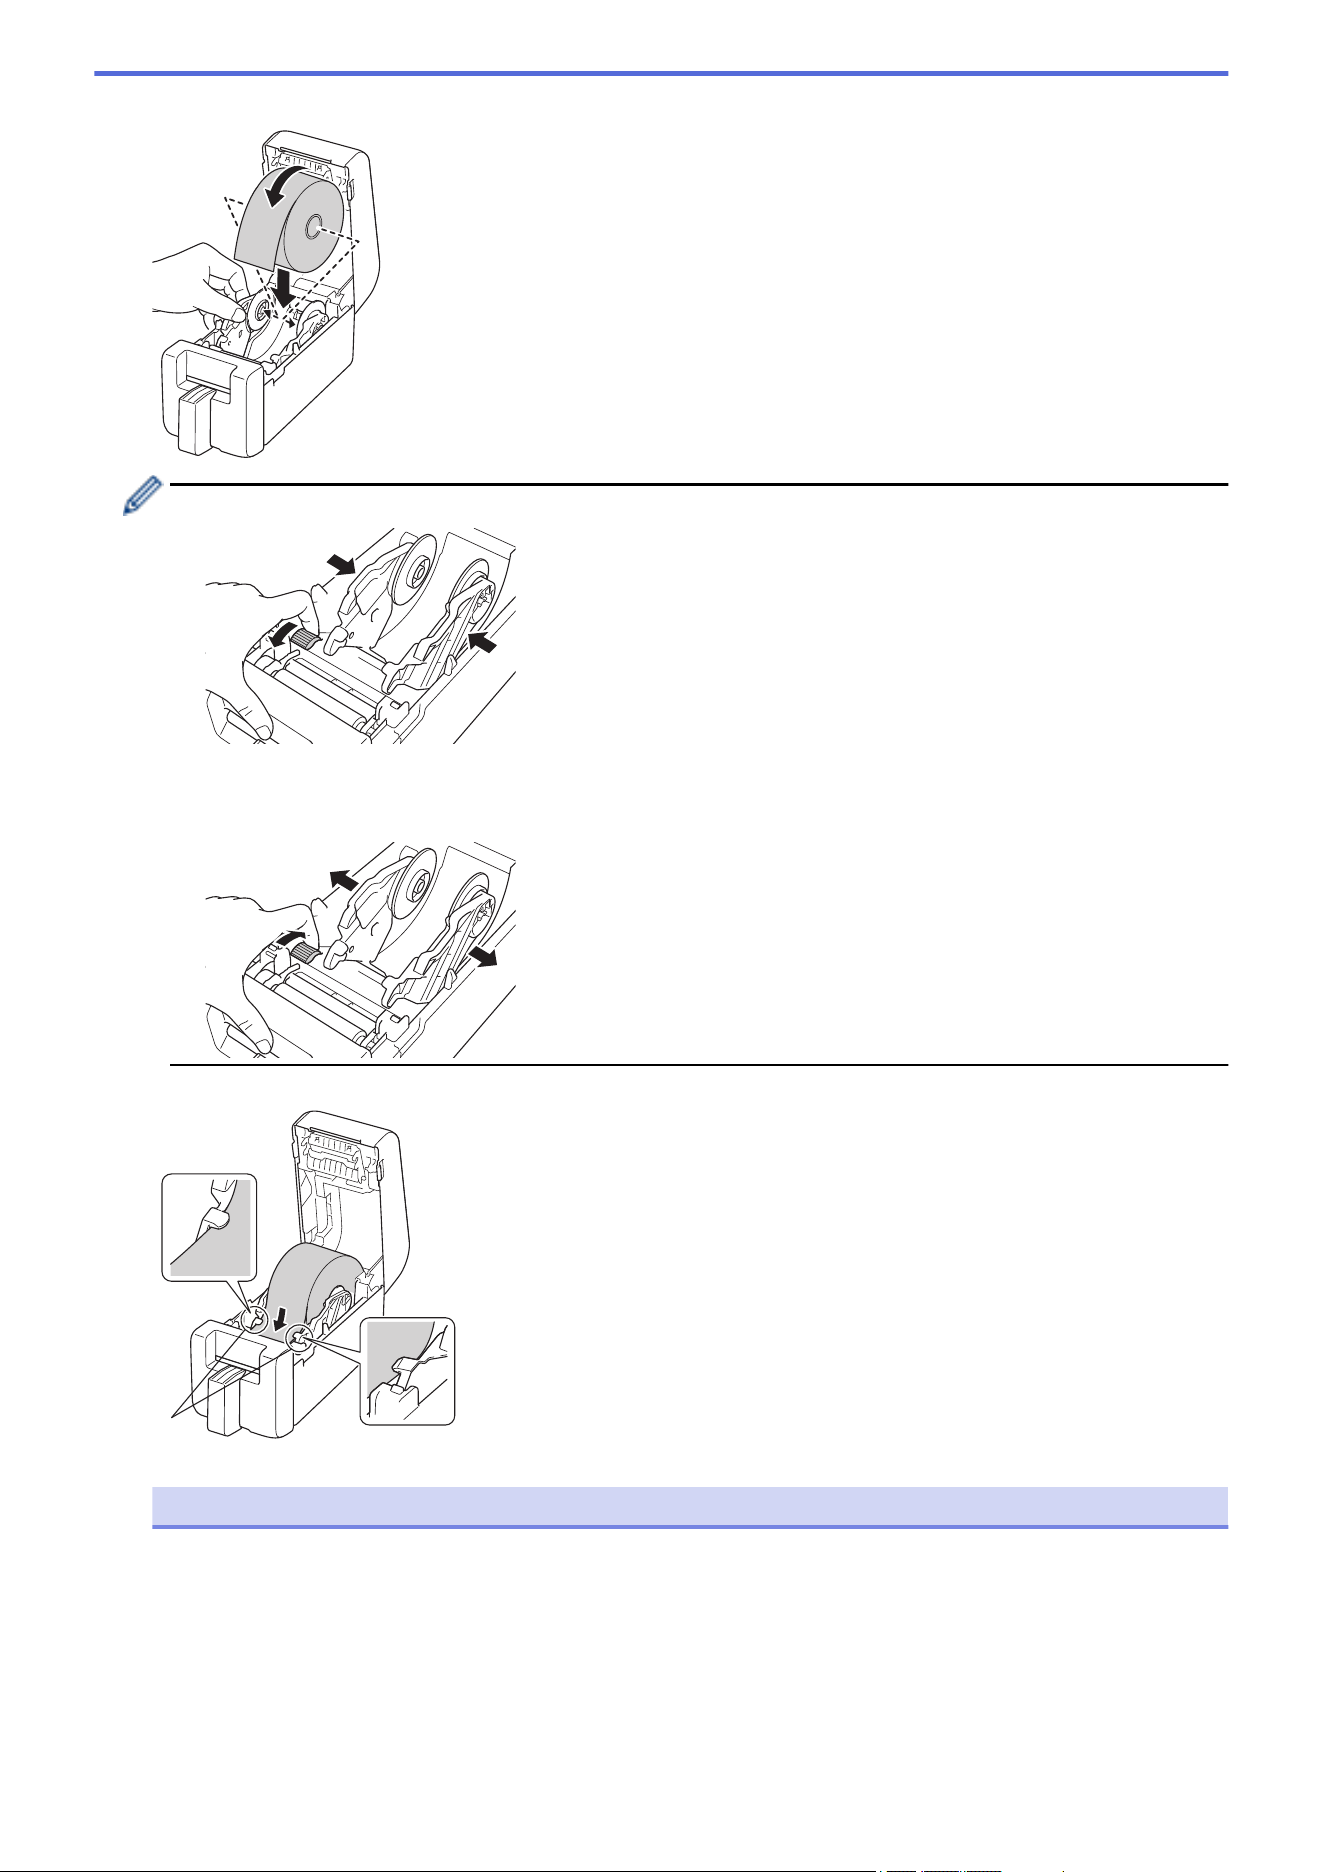
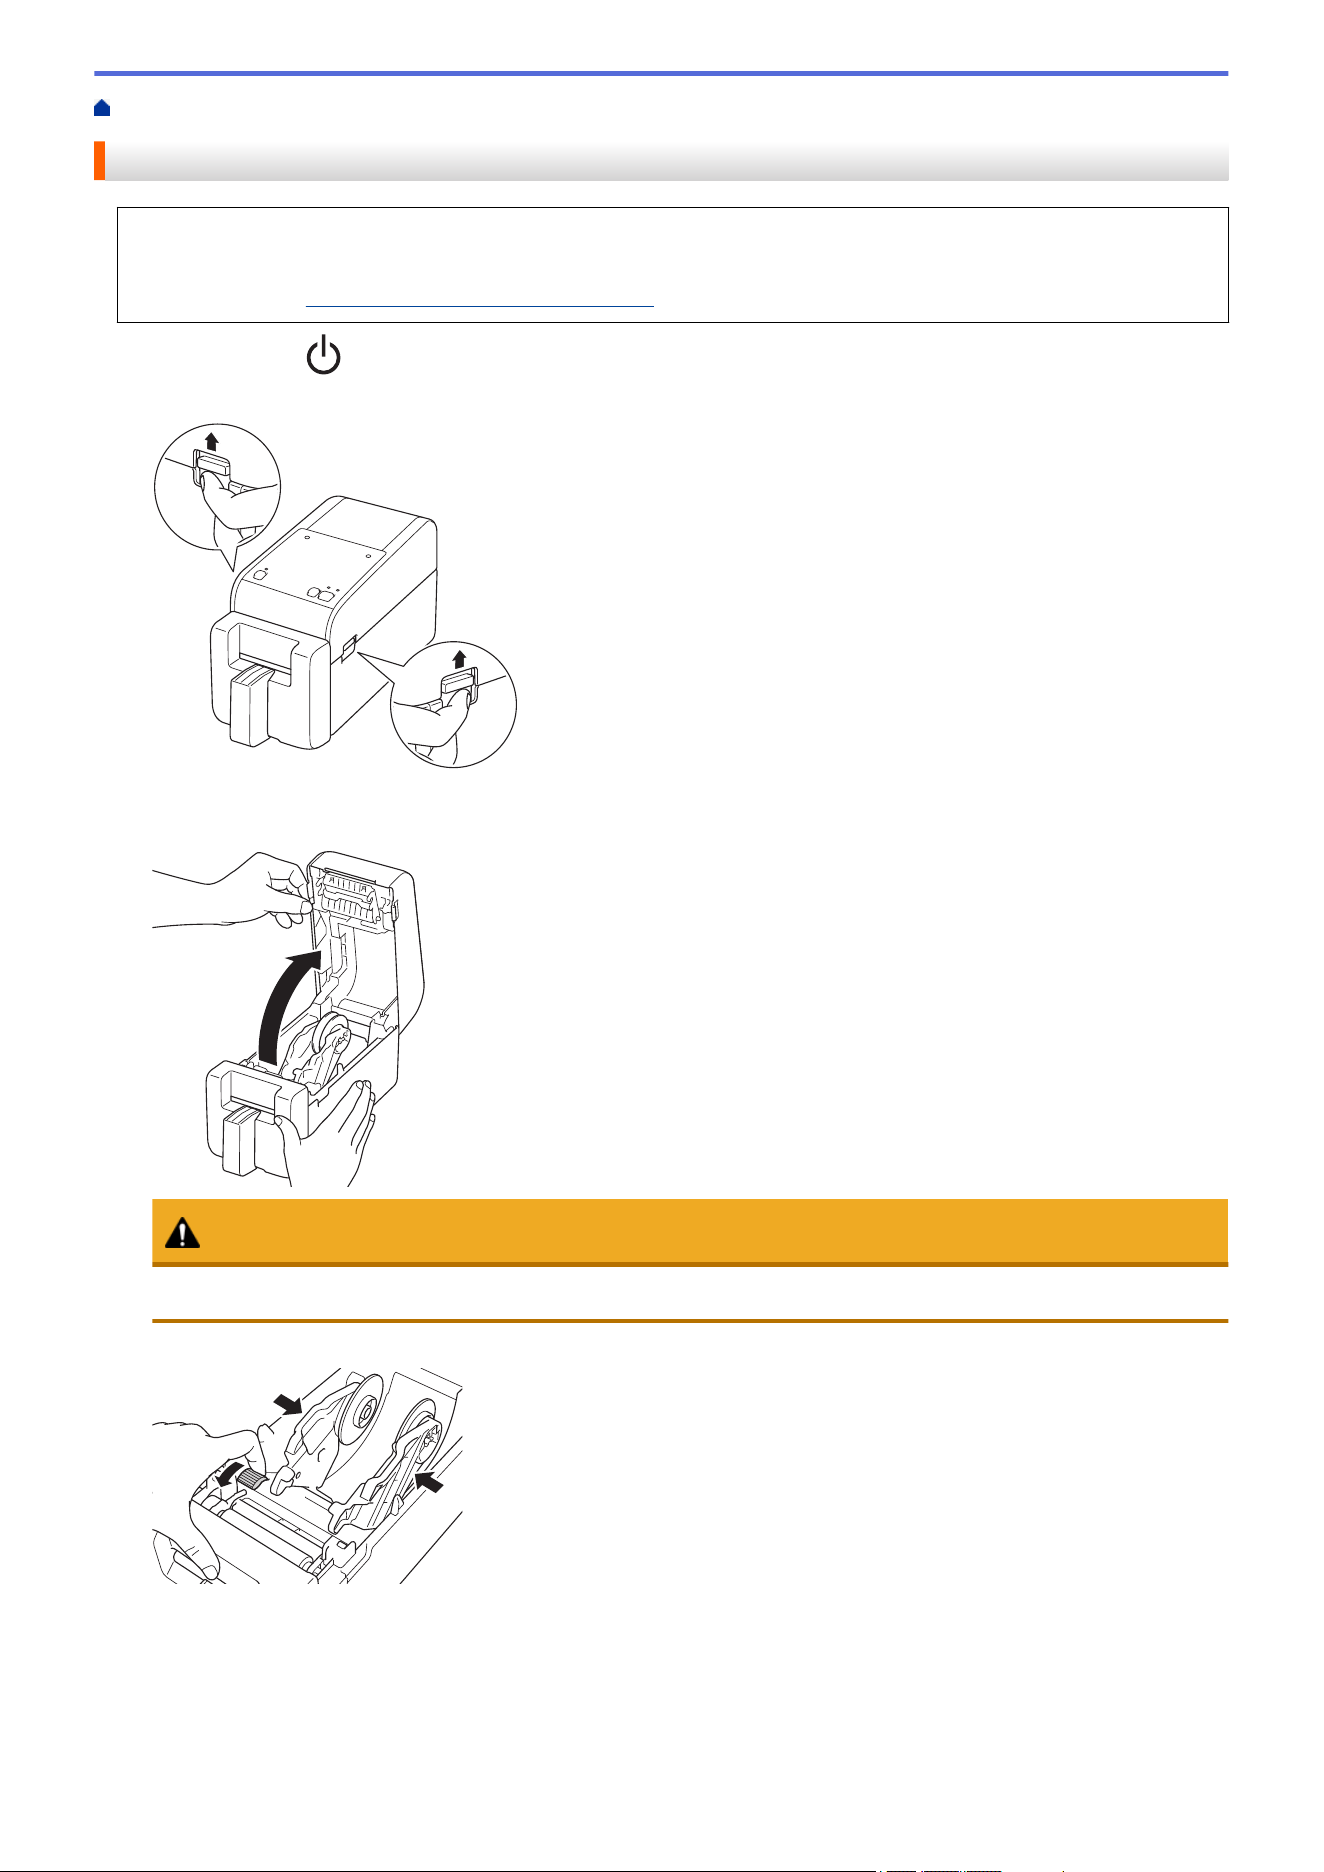
1. Press and hold to turn the printer off.
2. Pull up the release levers on both sides of the printer to unlock the Roll Compartment Cover.
3. Hold the front of the printer, and firmly lift the Roll Compartment Cover to open it.
31
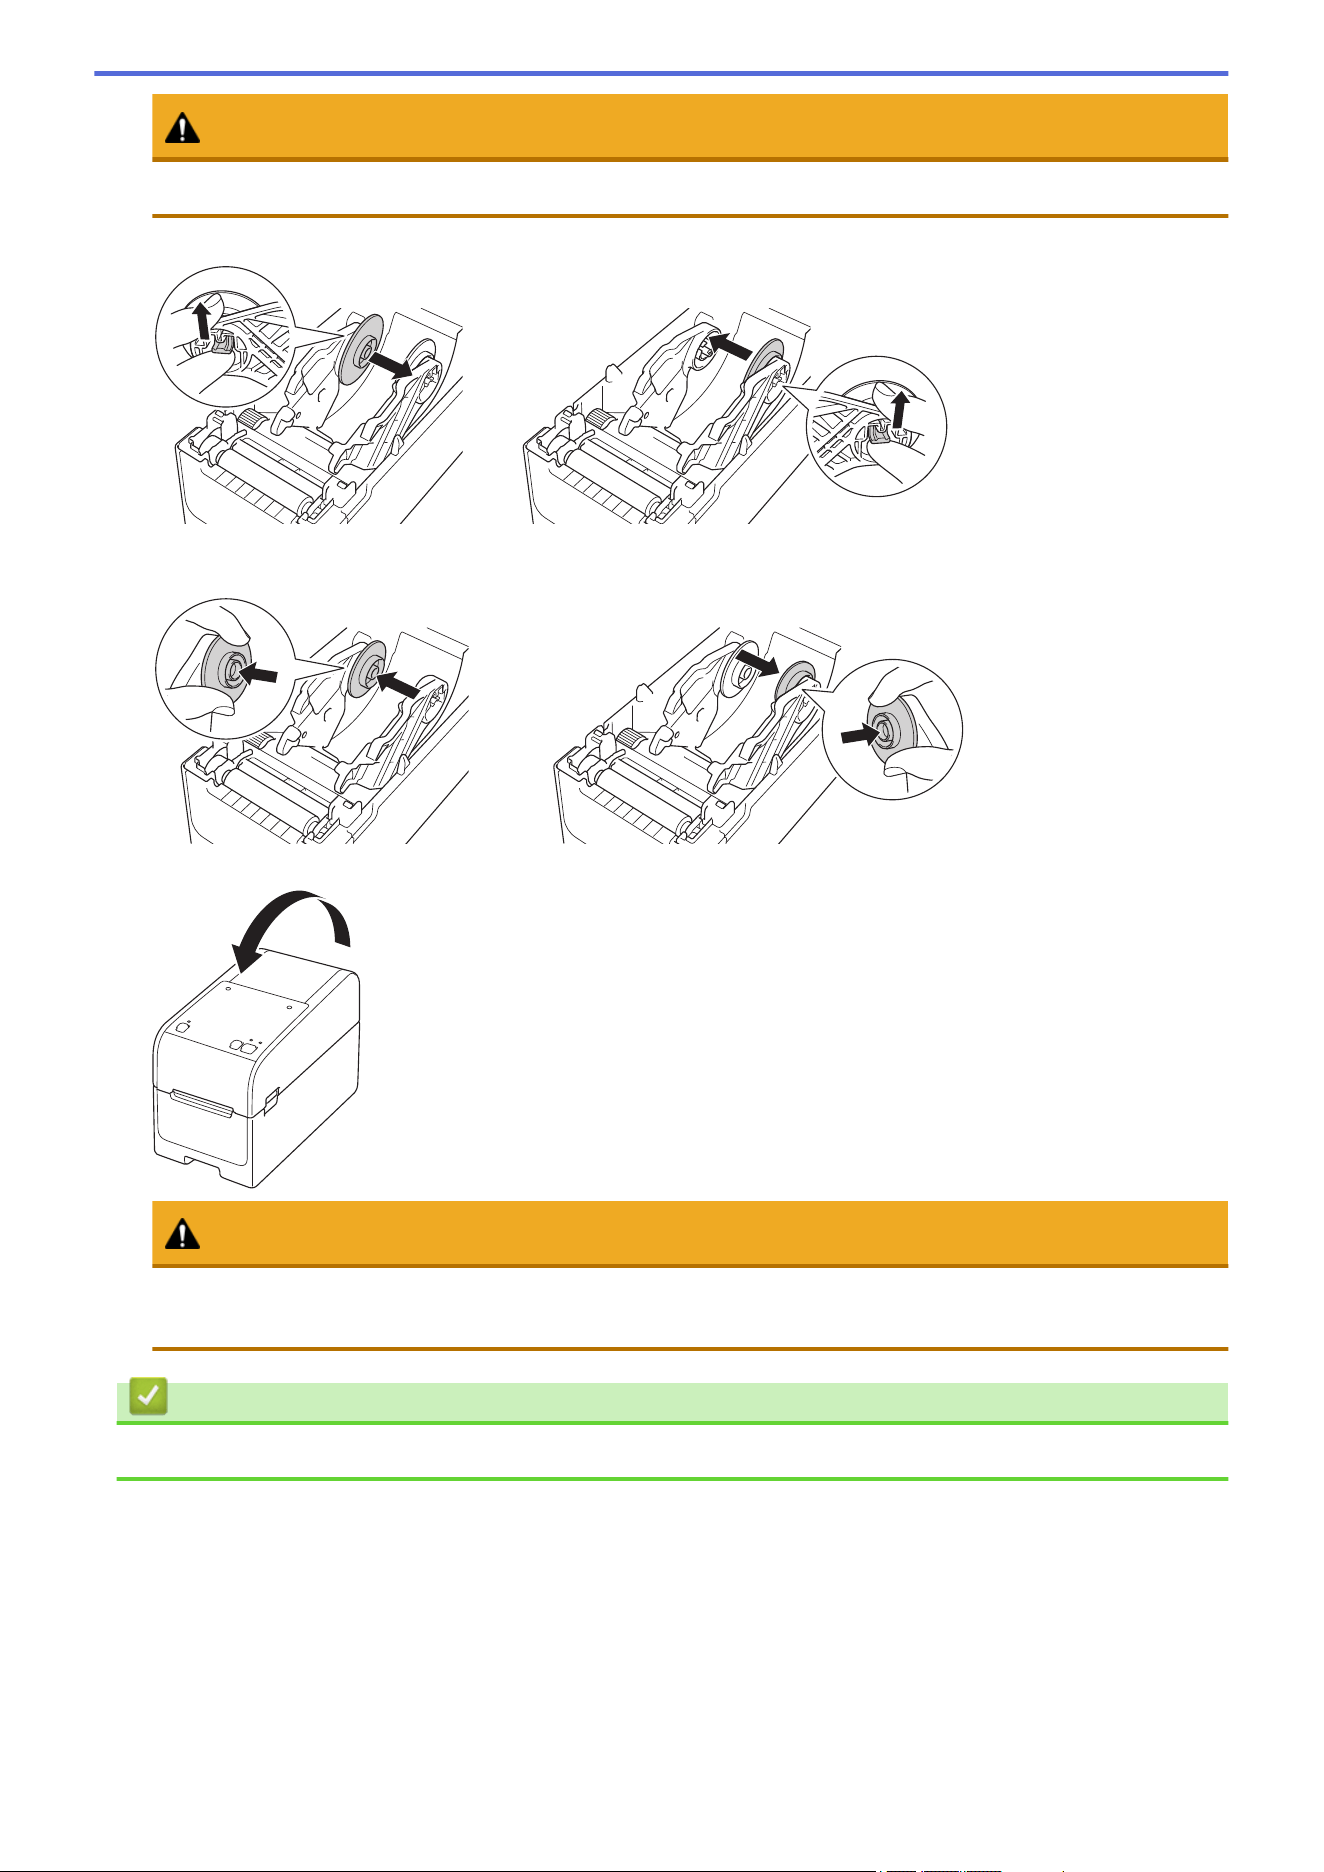
CAUTION
Do not touch the Tear Bar with your hands. Doing so may result in injury.
4. Pull up the lever on the Roll Guide to remove the Media Roll Holder. Do this for the both Roll Guides.
5. Align the center pin of the Roll Guide with the hole in the Media Roll Holder, then push the Media Roll Holder
onto the Roll Guide for installation. Do this for the both Roll Guides.
6. Close the Roll Compartment Cover until it locks into place.
CAUTION
Be careful when closing the Roll Compartment Cover. There is a risk of injury if your finger gets pinched
between the upper and lower parts of the cover.
Related Information
• Load Media Roll
32
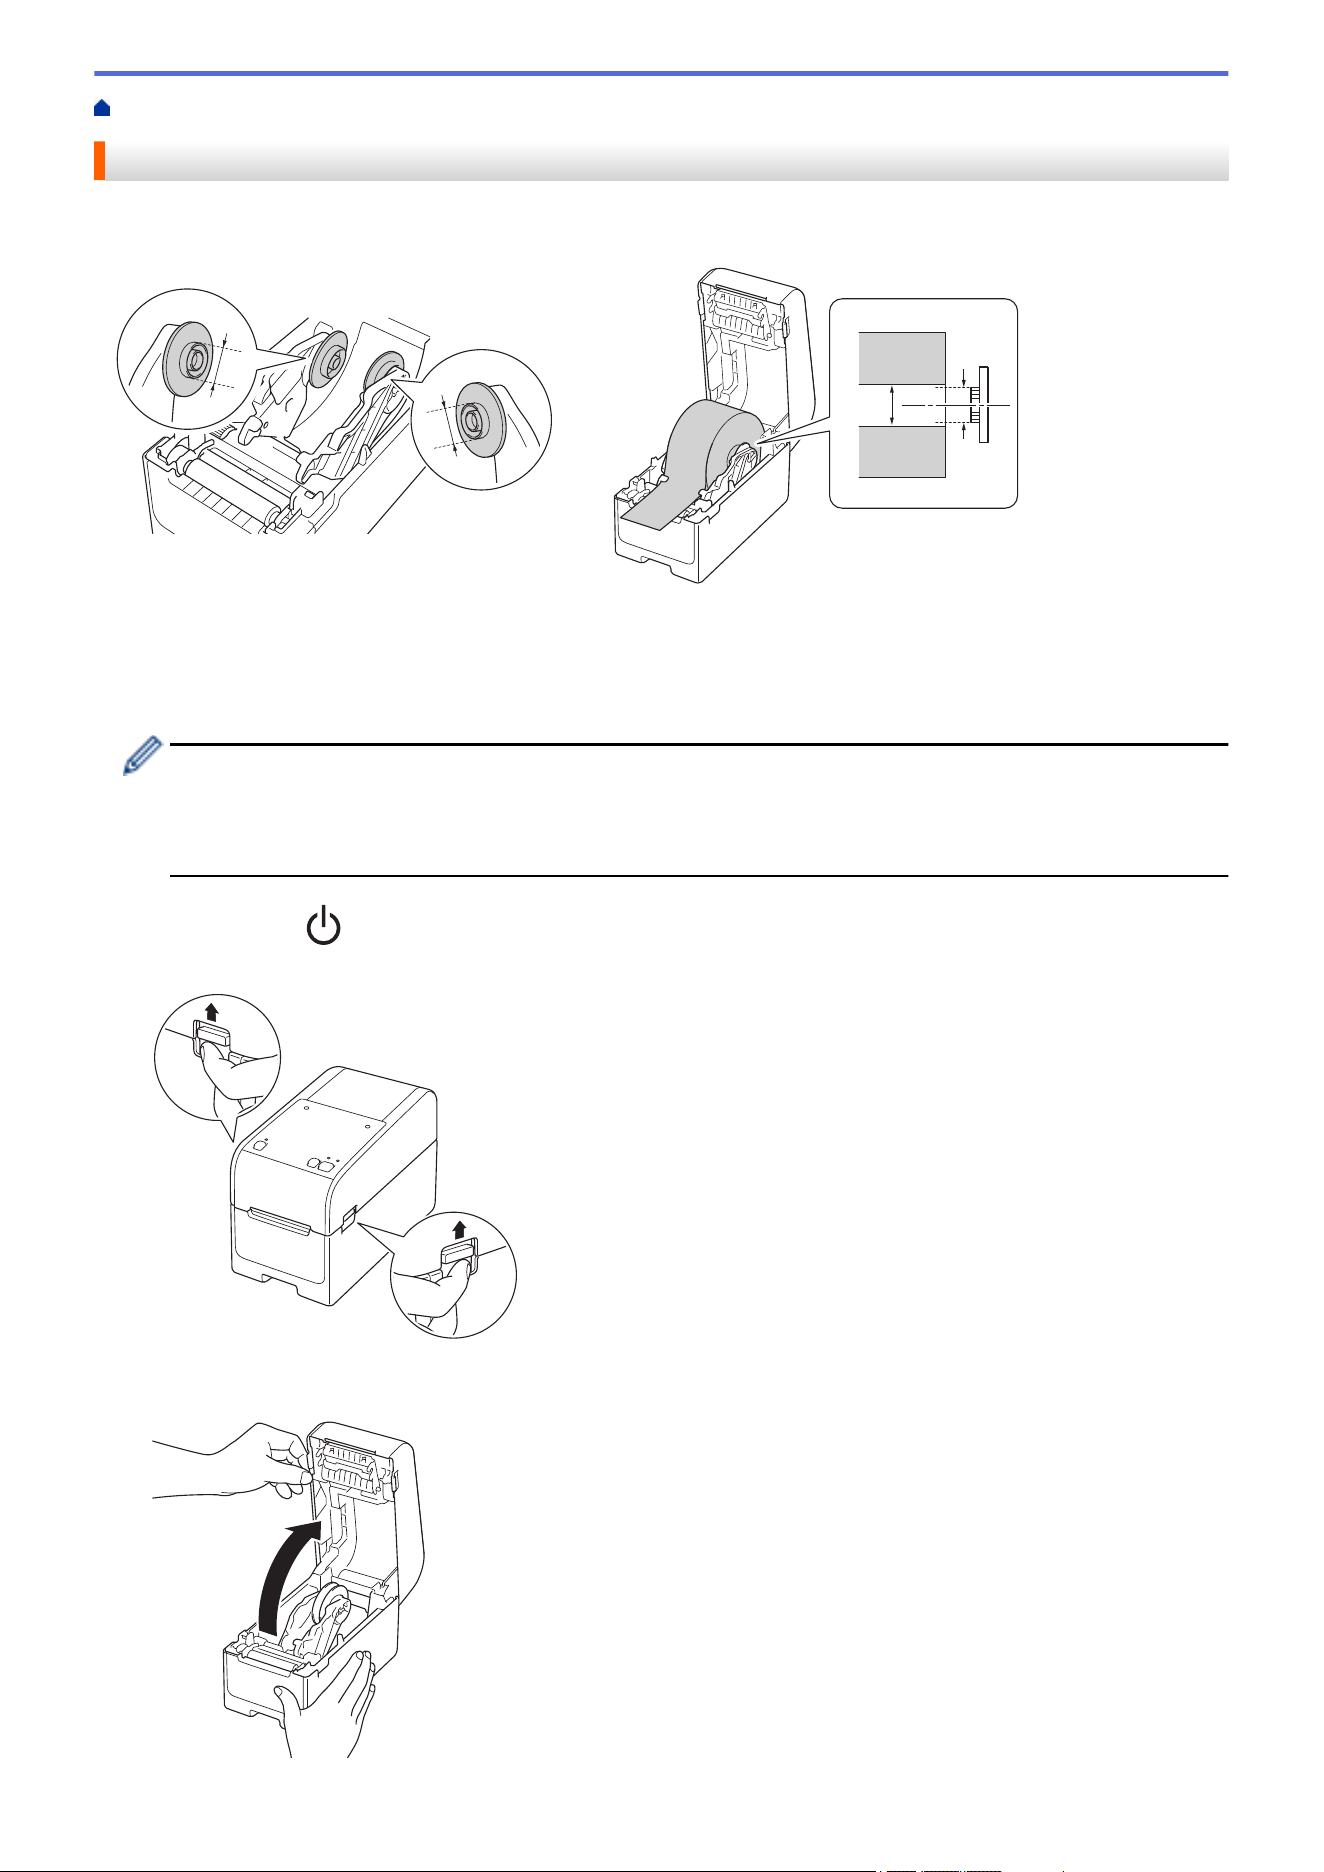
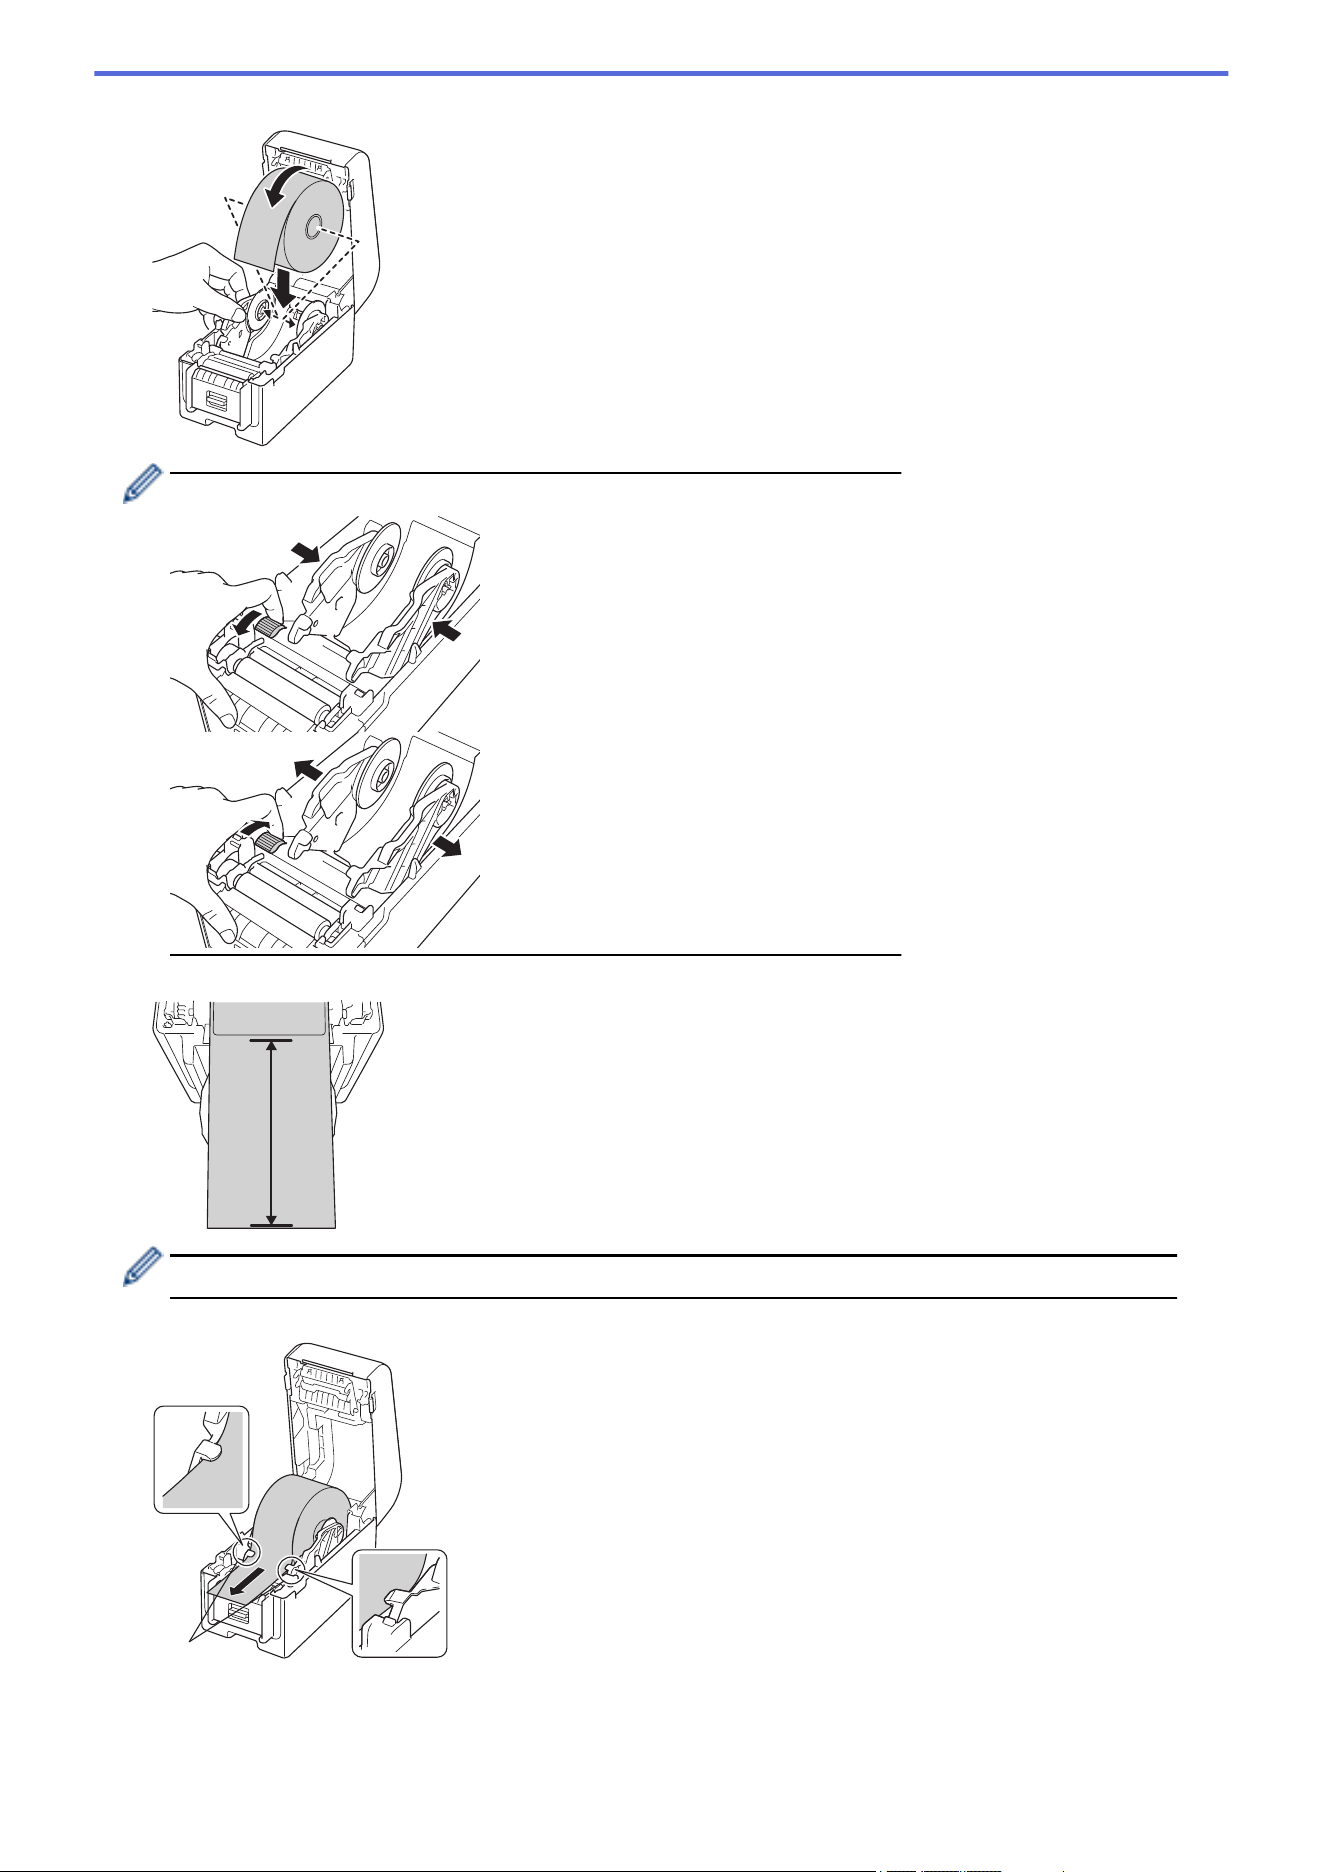
Home > Set Up Your Printer > Load Media Roll > Load a Media Roll
Load a Media Roll
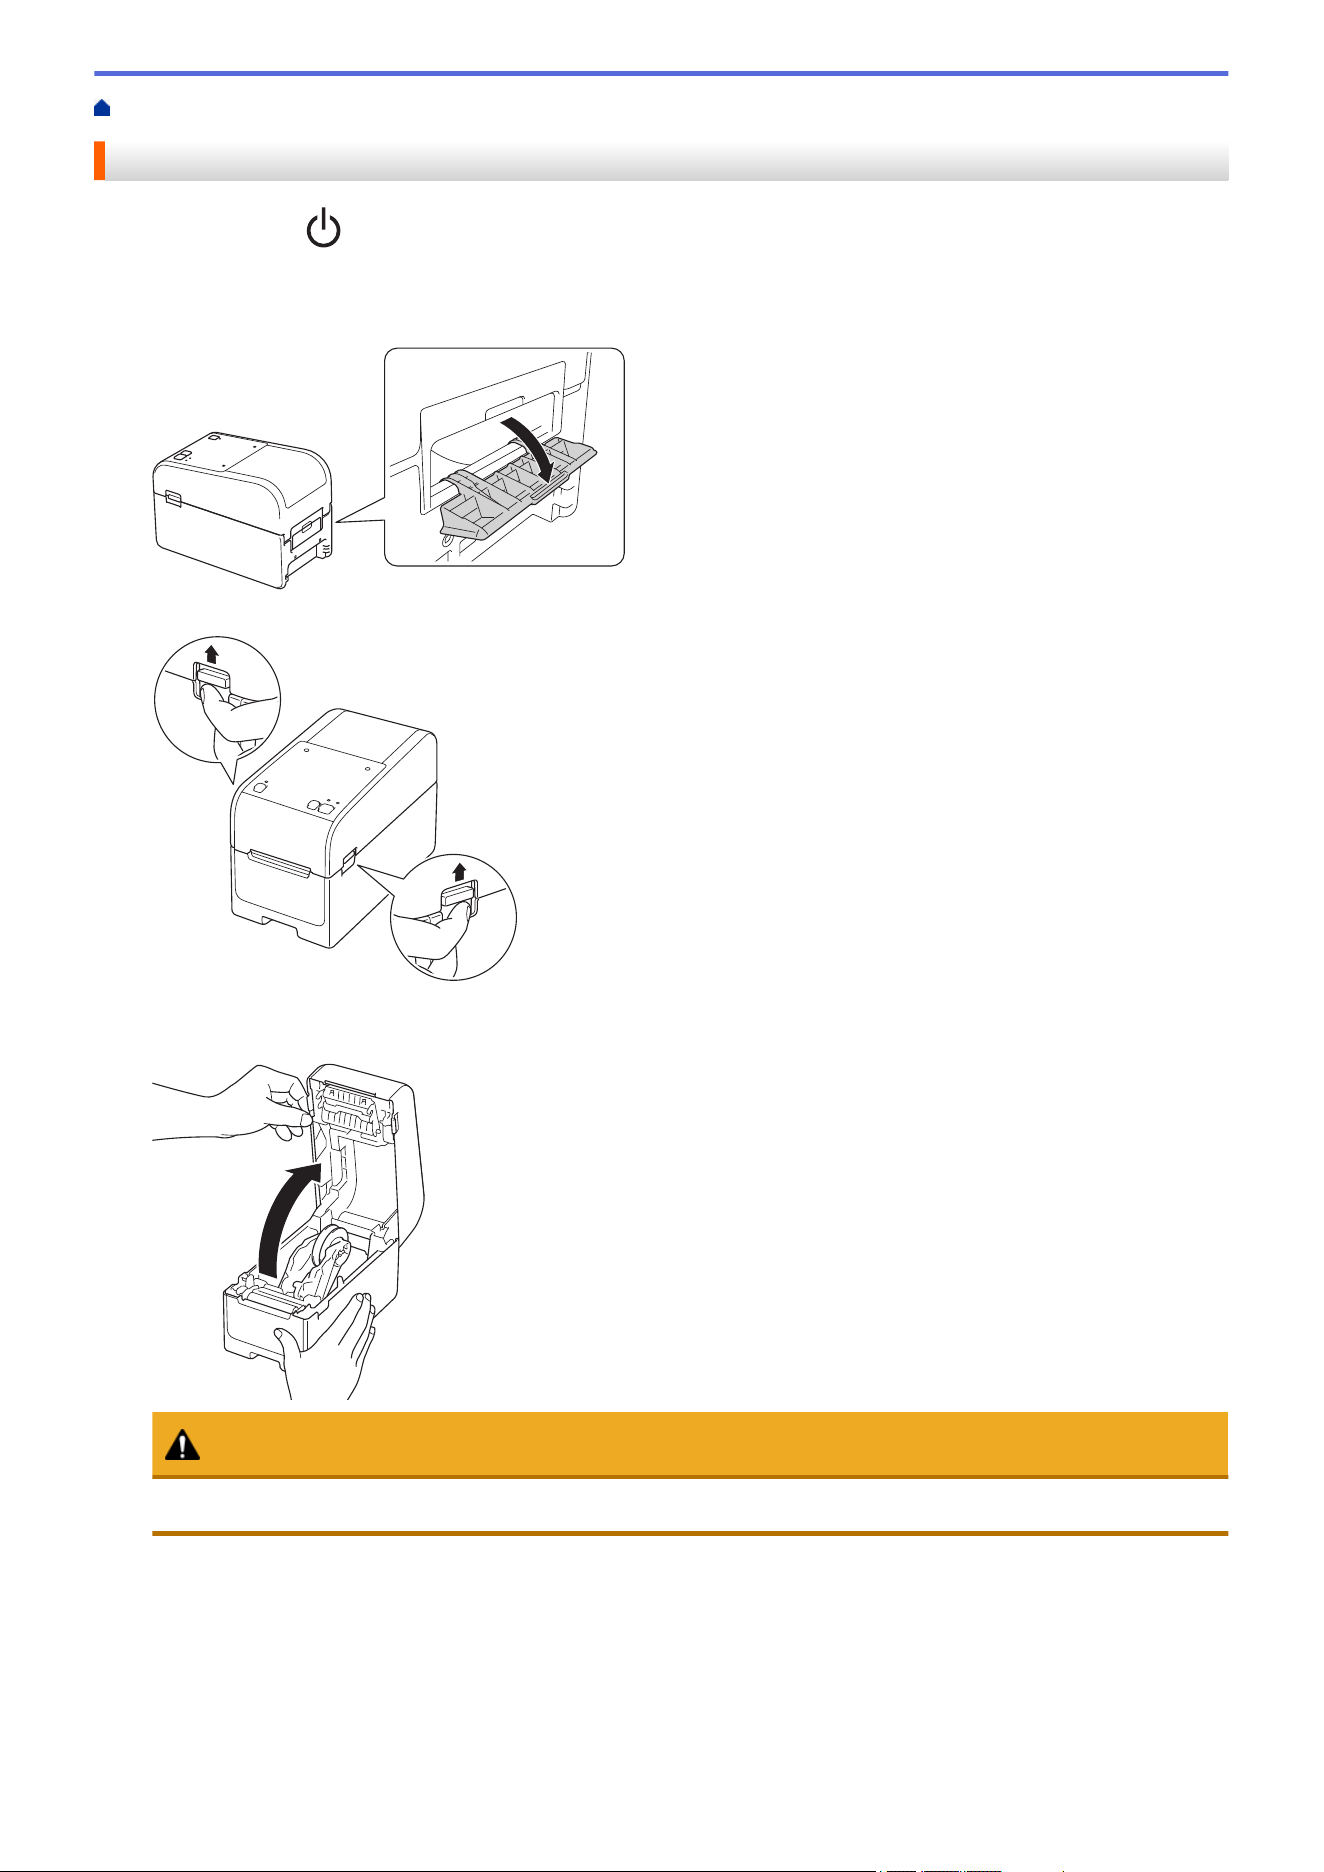
1. Press and hold to turn the printer off.
2. Pull up the release levers on both sides of the printer to unlock the Roll Compartment Cover.
3. Hold the front of the printer, and firmly lift the Roll Compartment Cover to open it.
CAUTION
Do not touch the Tear Bar with your hands. Doing so may result in injury.
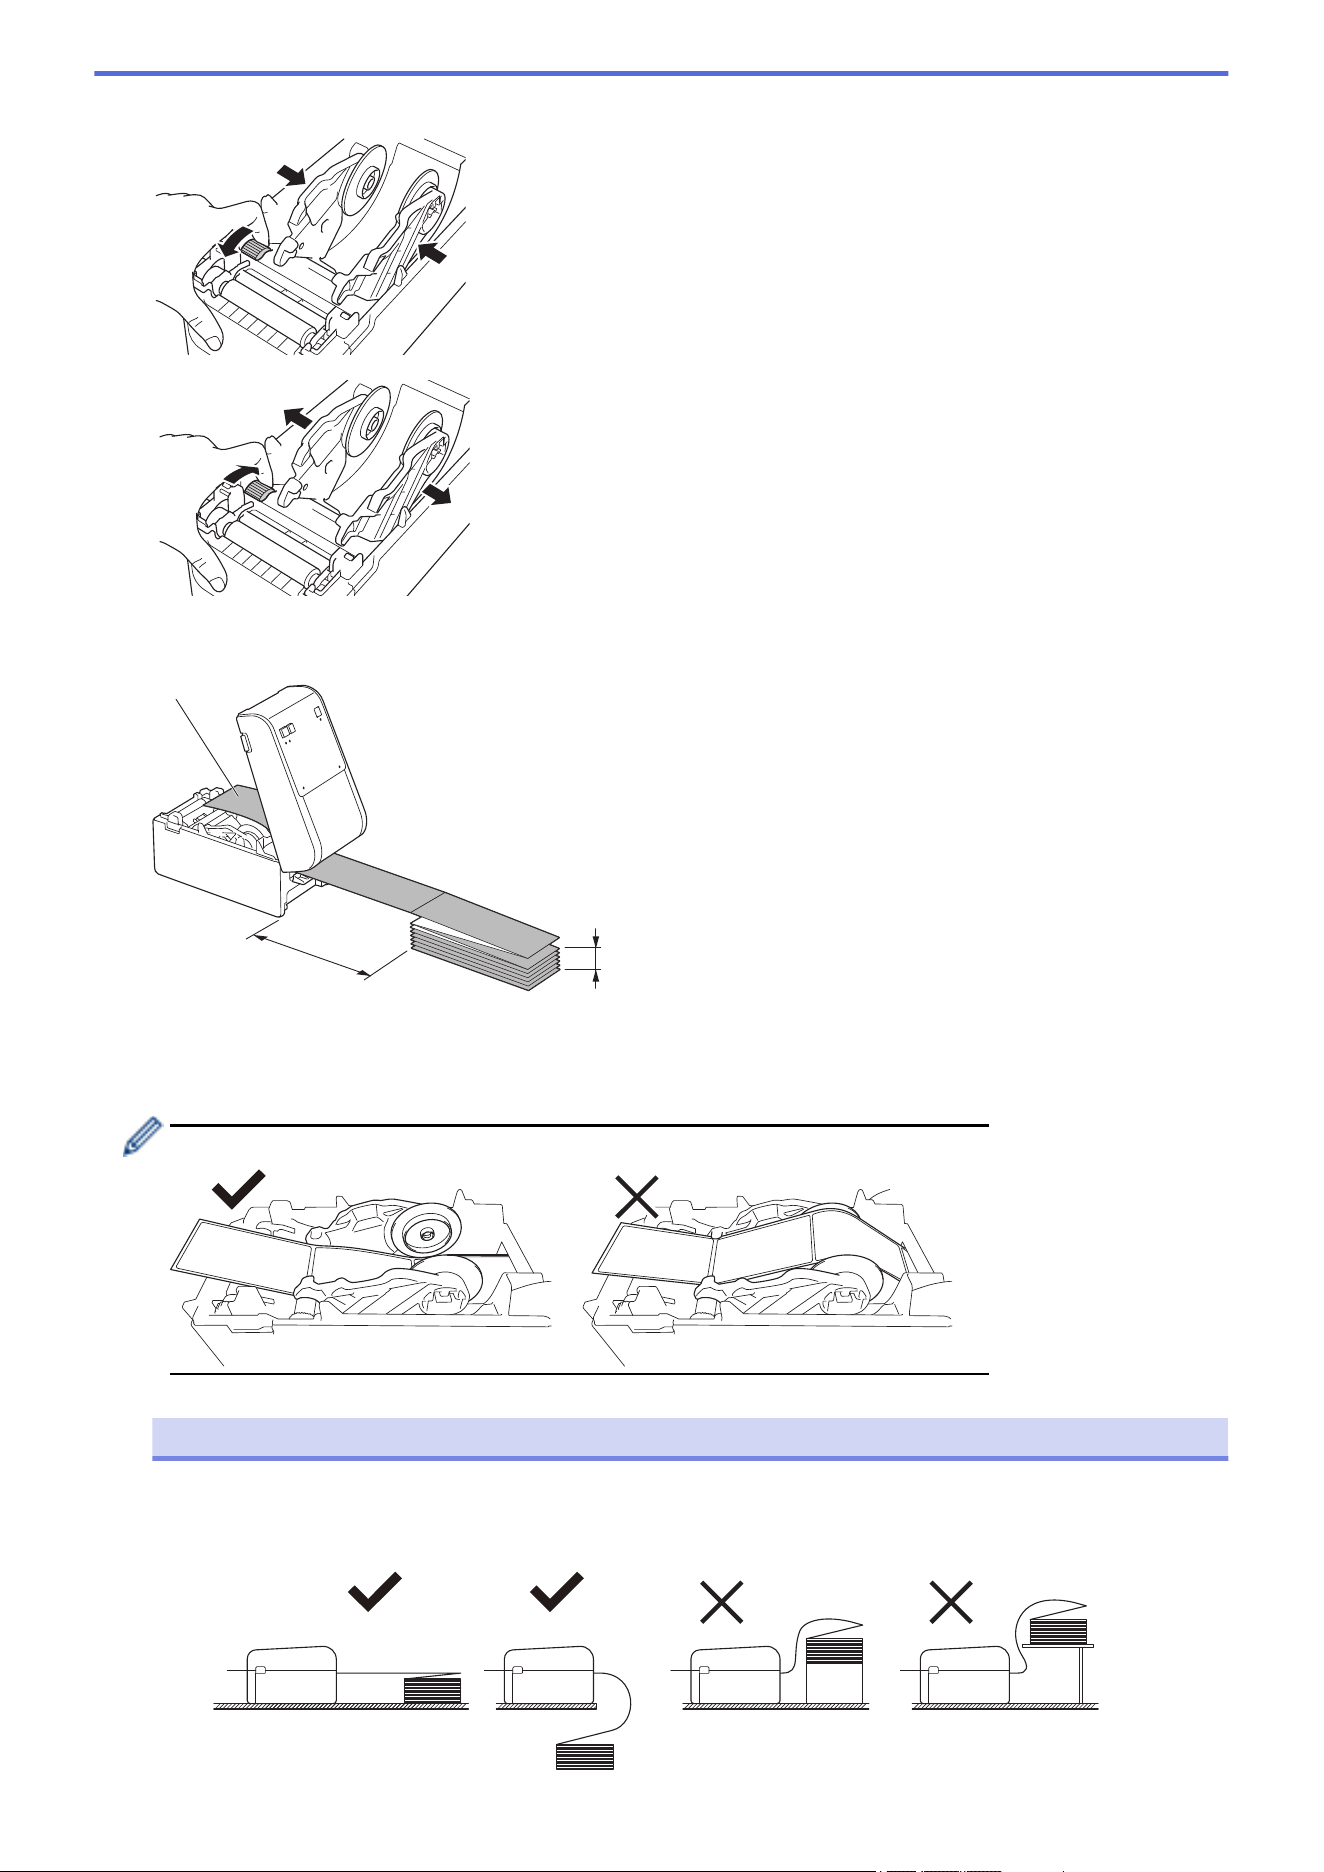
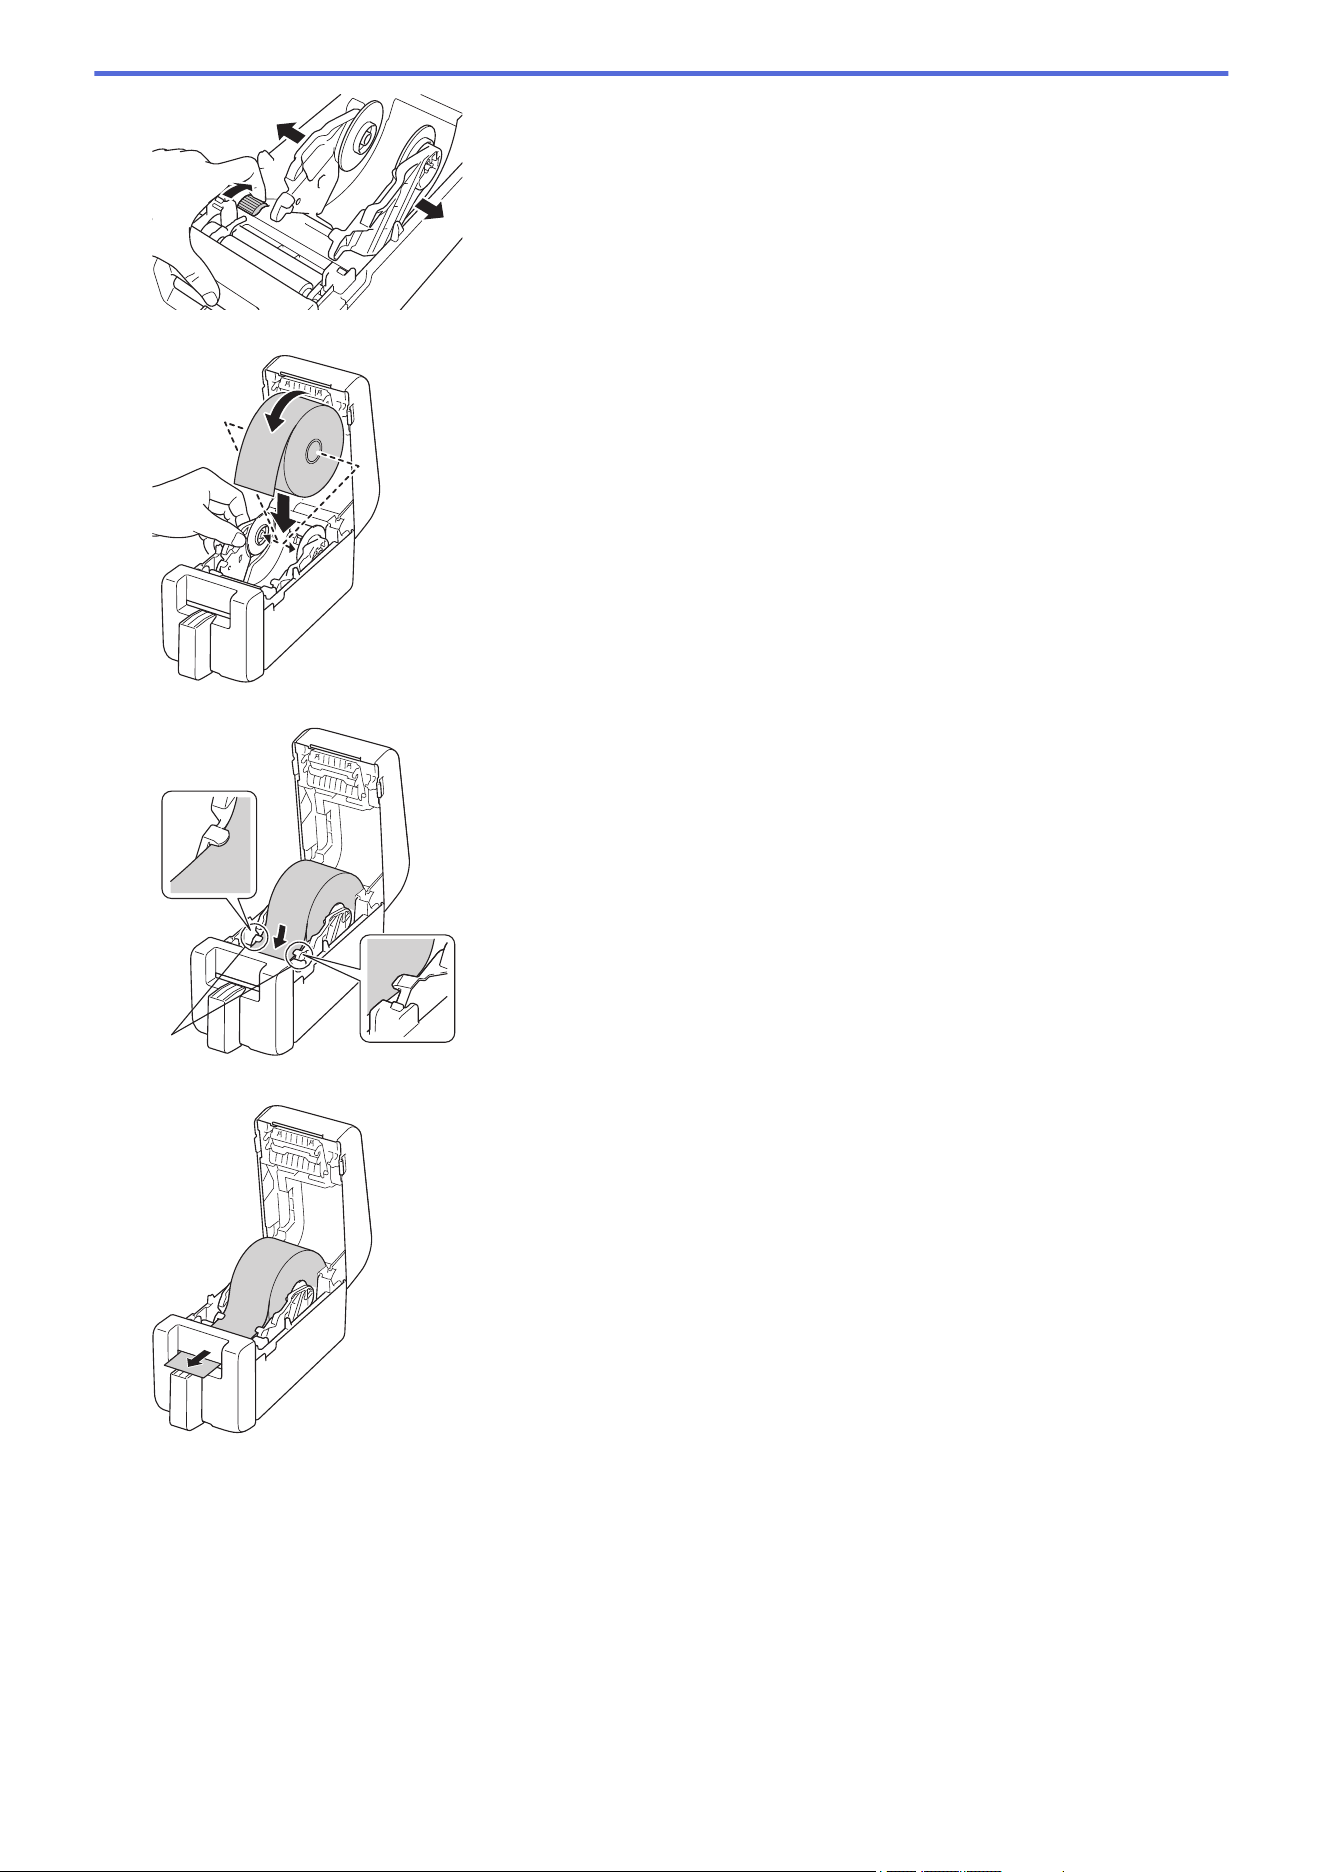
4. Slide both Roll Guides outwards.
33
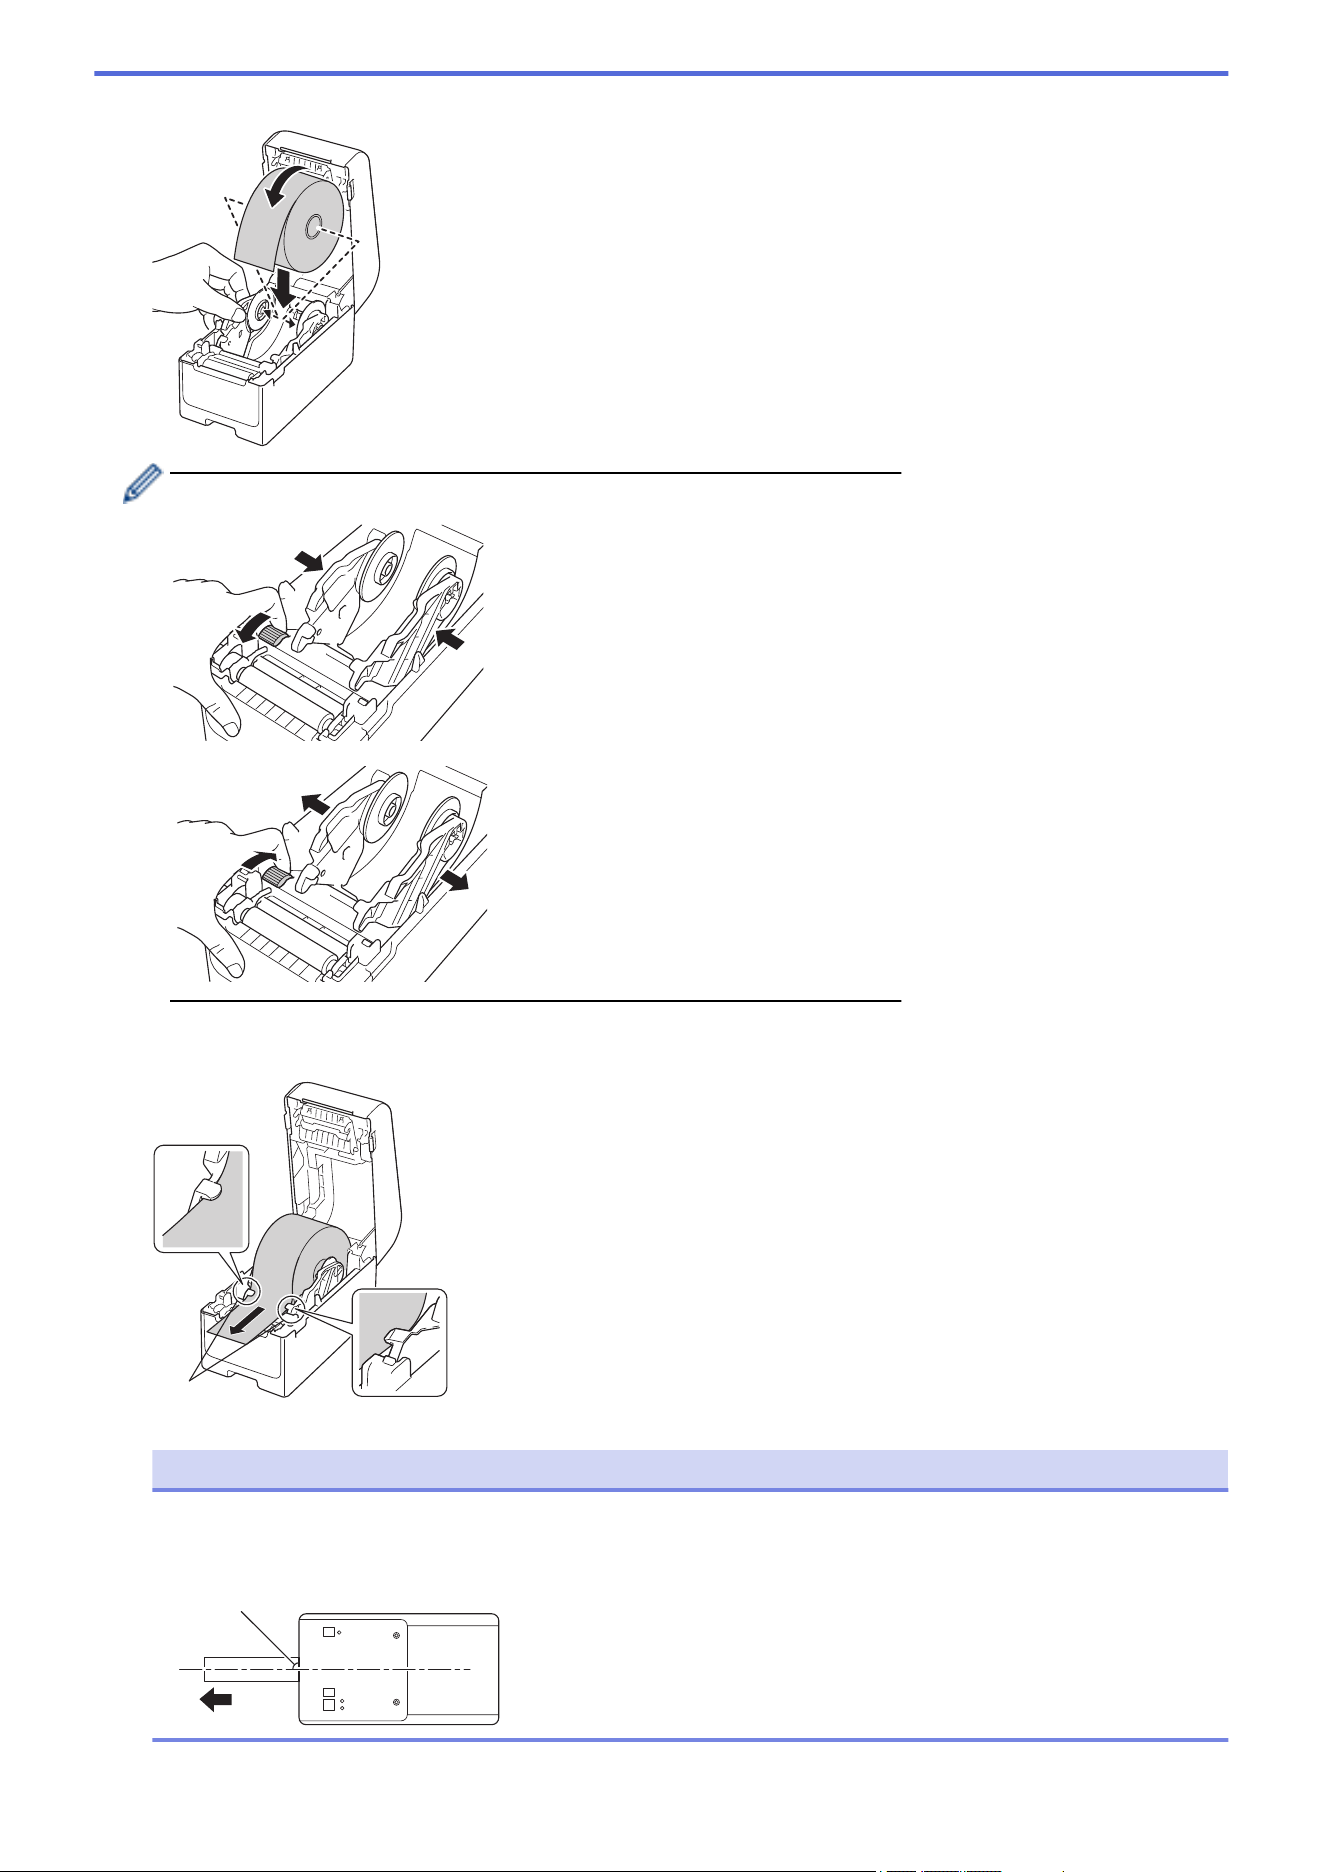
5. Insert the roll so that the label's printing surface is facing up, as shown in the illustration.
Rotate the Adjuster Dial to lock the Roll Guides in the appropriate position.
6. Feed the end of the backing paper under the Media Guide Tips (1).
Make sure the label extends slightly out of the Label Exit Slot.
1
NOTE
To avoid labels being fed diagonally when using media with a width of 0.9" (22.9 mm) or less, make sure
the media exiting from the Label Exit Slot is coming directly out and is not at an angle.
Top View
90°
34
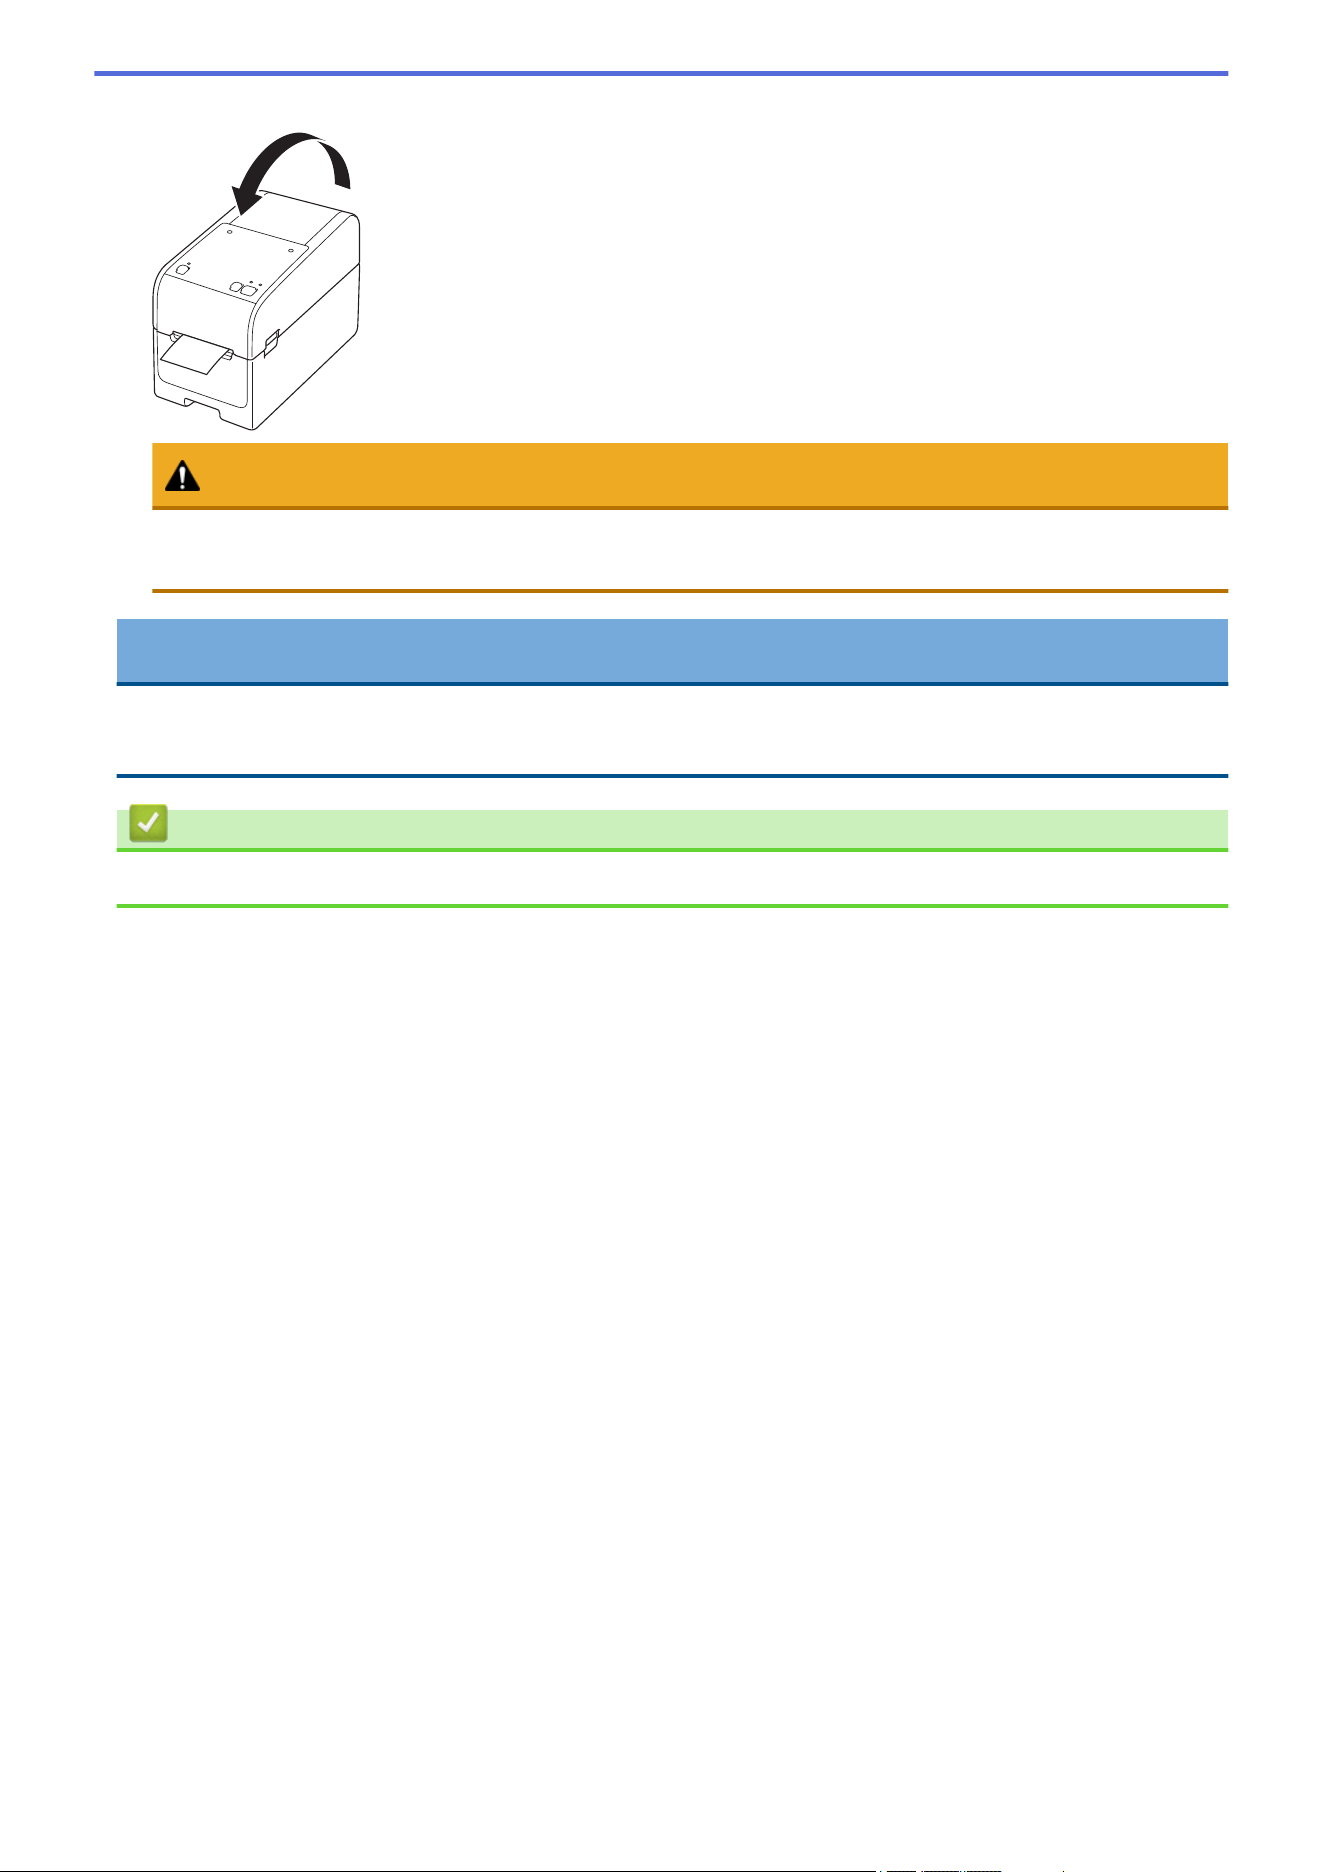
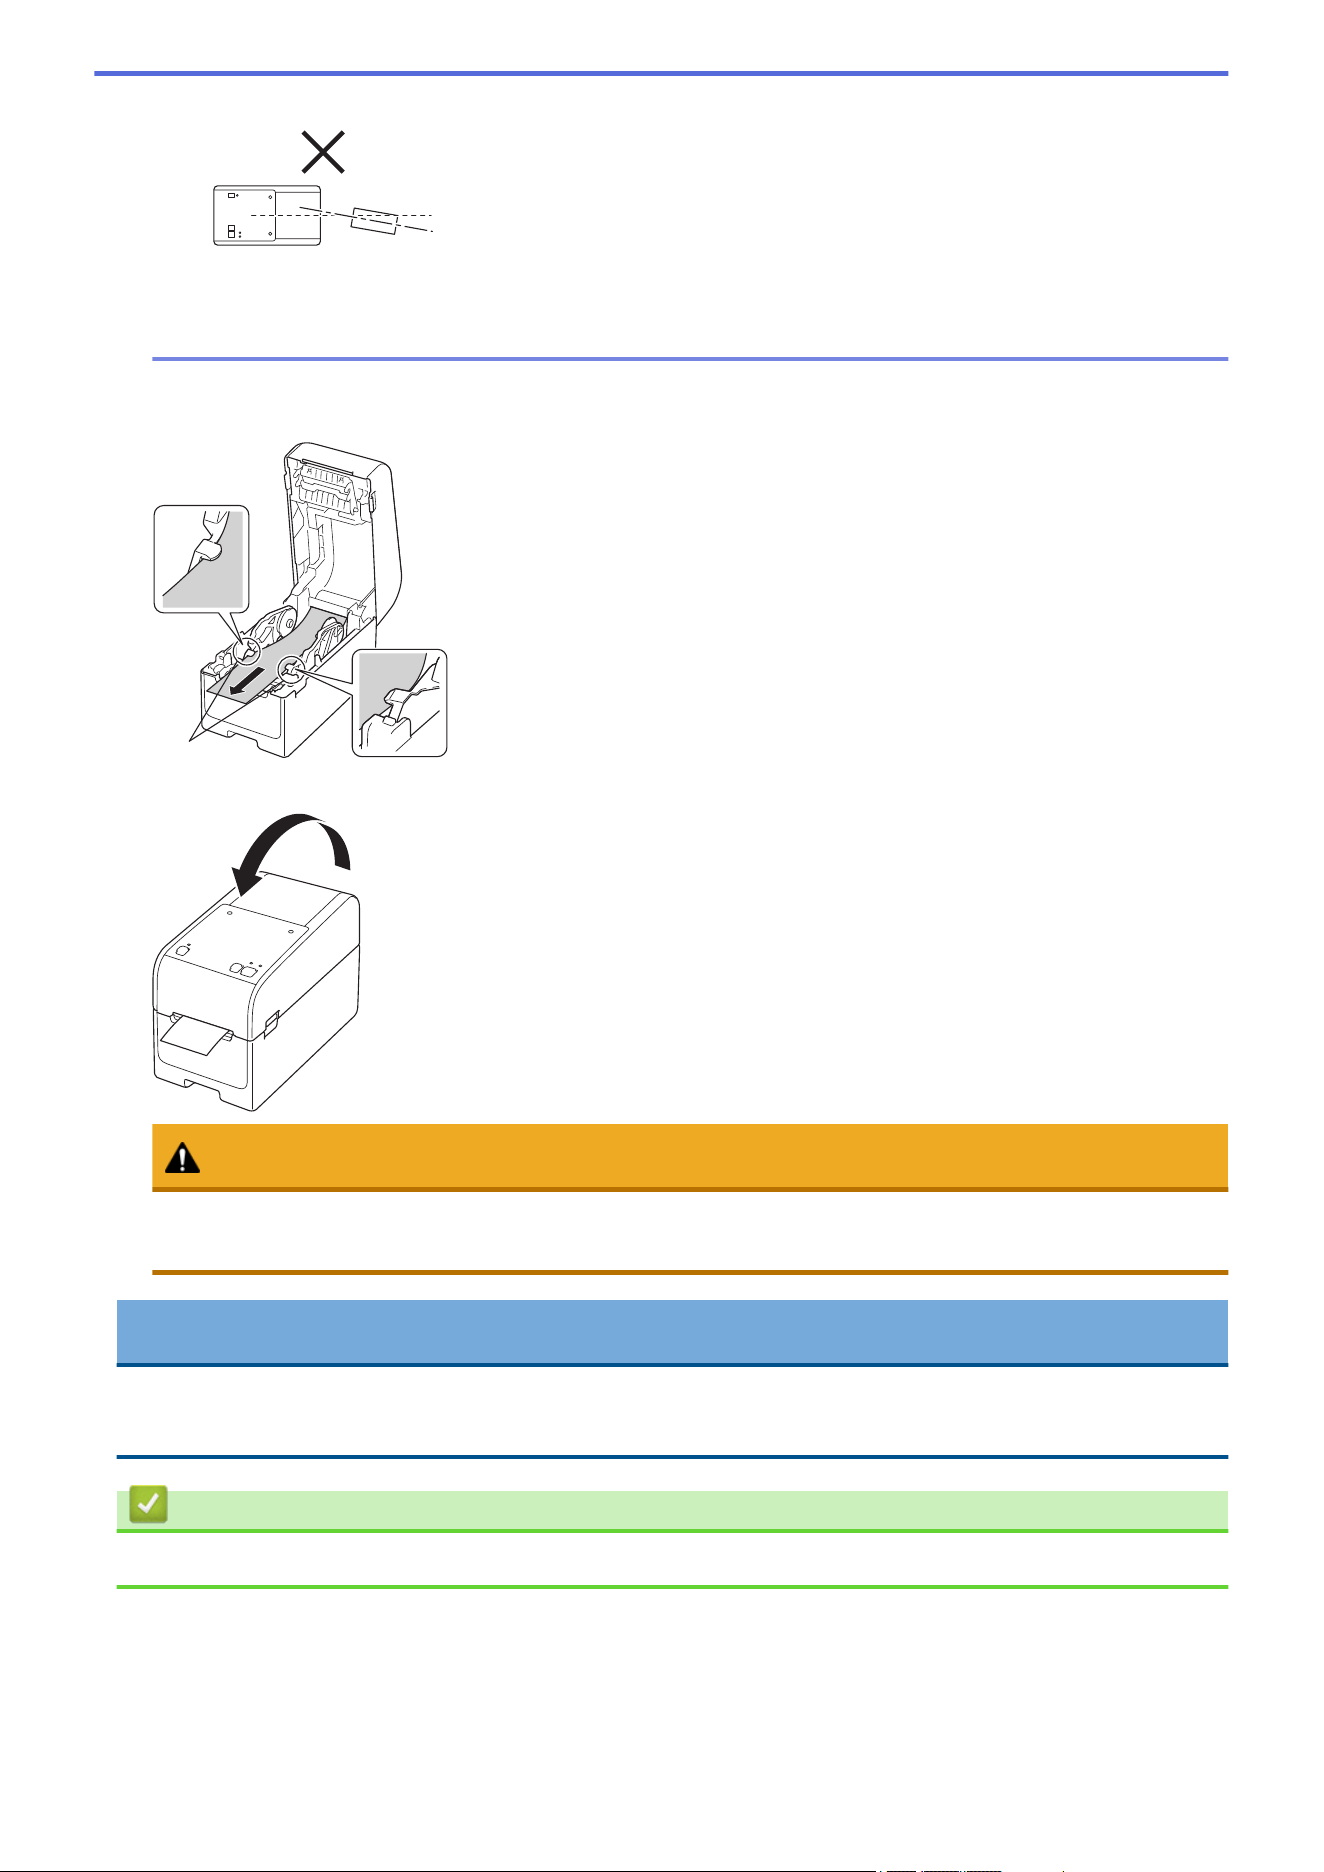
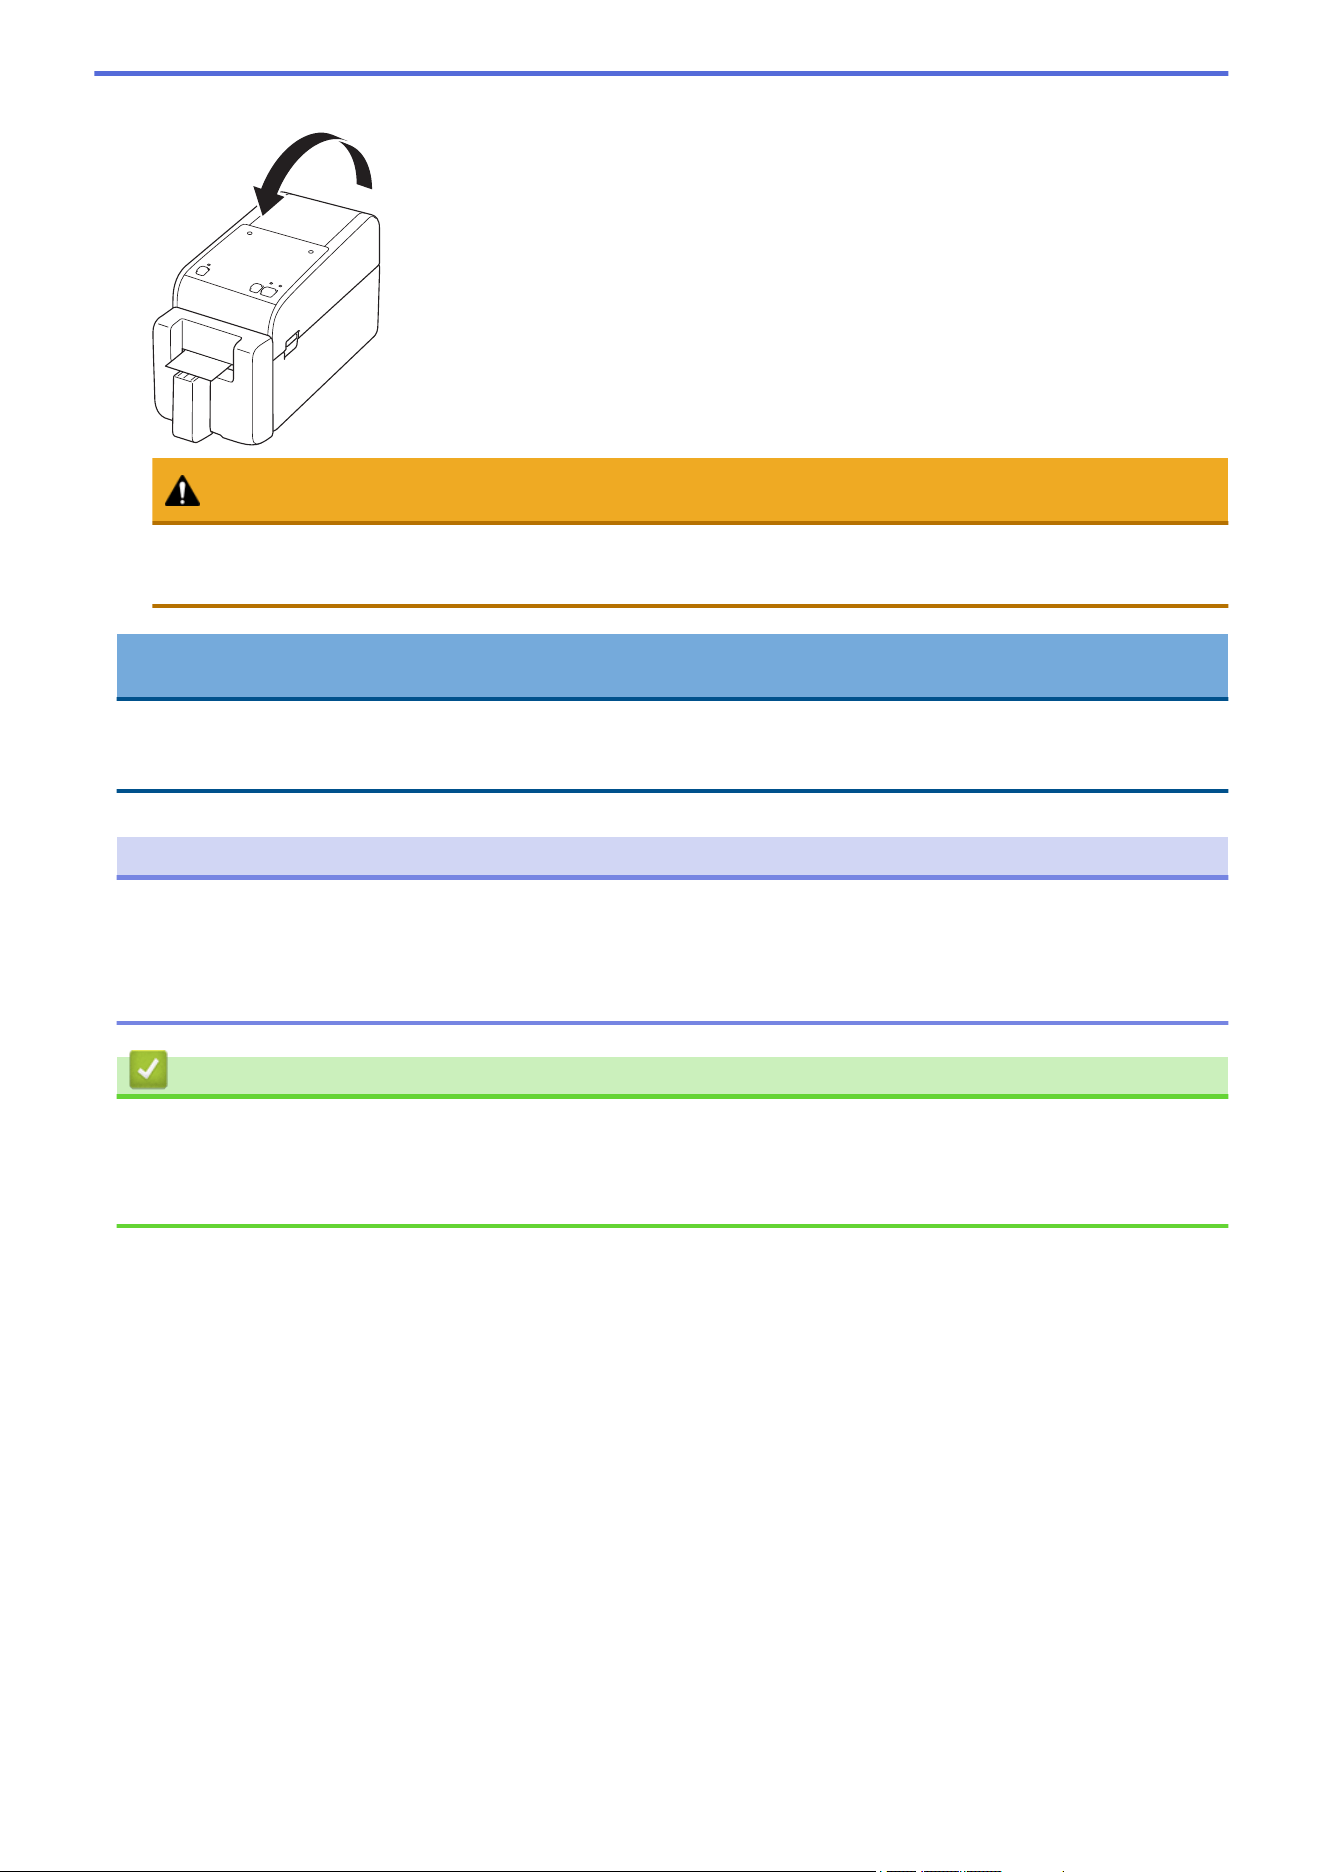
7. Close the Roll Compartment Cover until it locks into place.
CAUTION
Be careful when closing the Roll Compartment Cover. There is a risk of injury if your finger gets pinched
between the upper and lower parts of the cover.
IMPORTANT
• Do not leave any printed labels in the printer. Doing so will cause label jams.
• When the printer is not in use, remove any rolls from it and close the Roll Compartment Cover.
Related Information
• Load Media Roll
35
Home > Set Up Your Printer > Load Media Roll > Load Fanfold Labels
Load Fanfold Labels
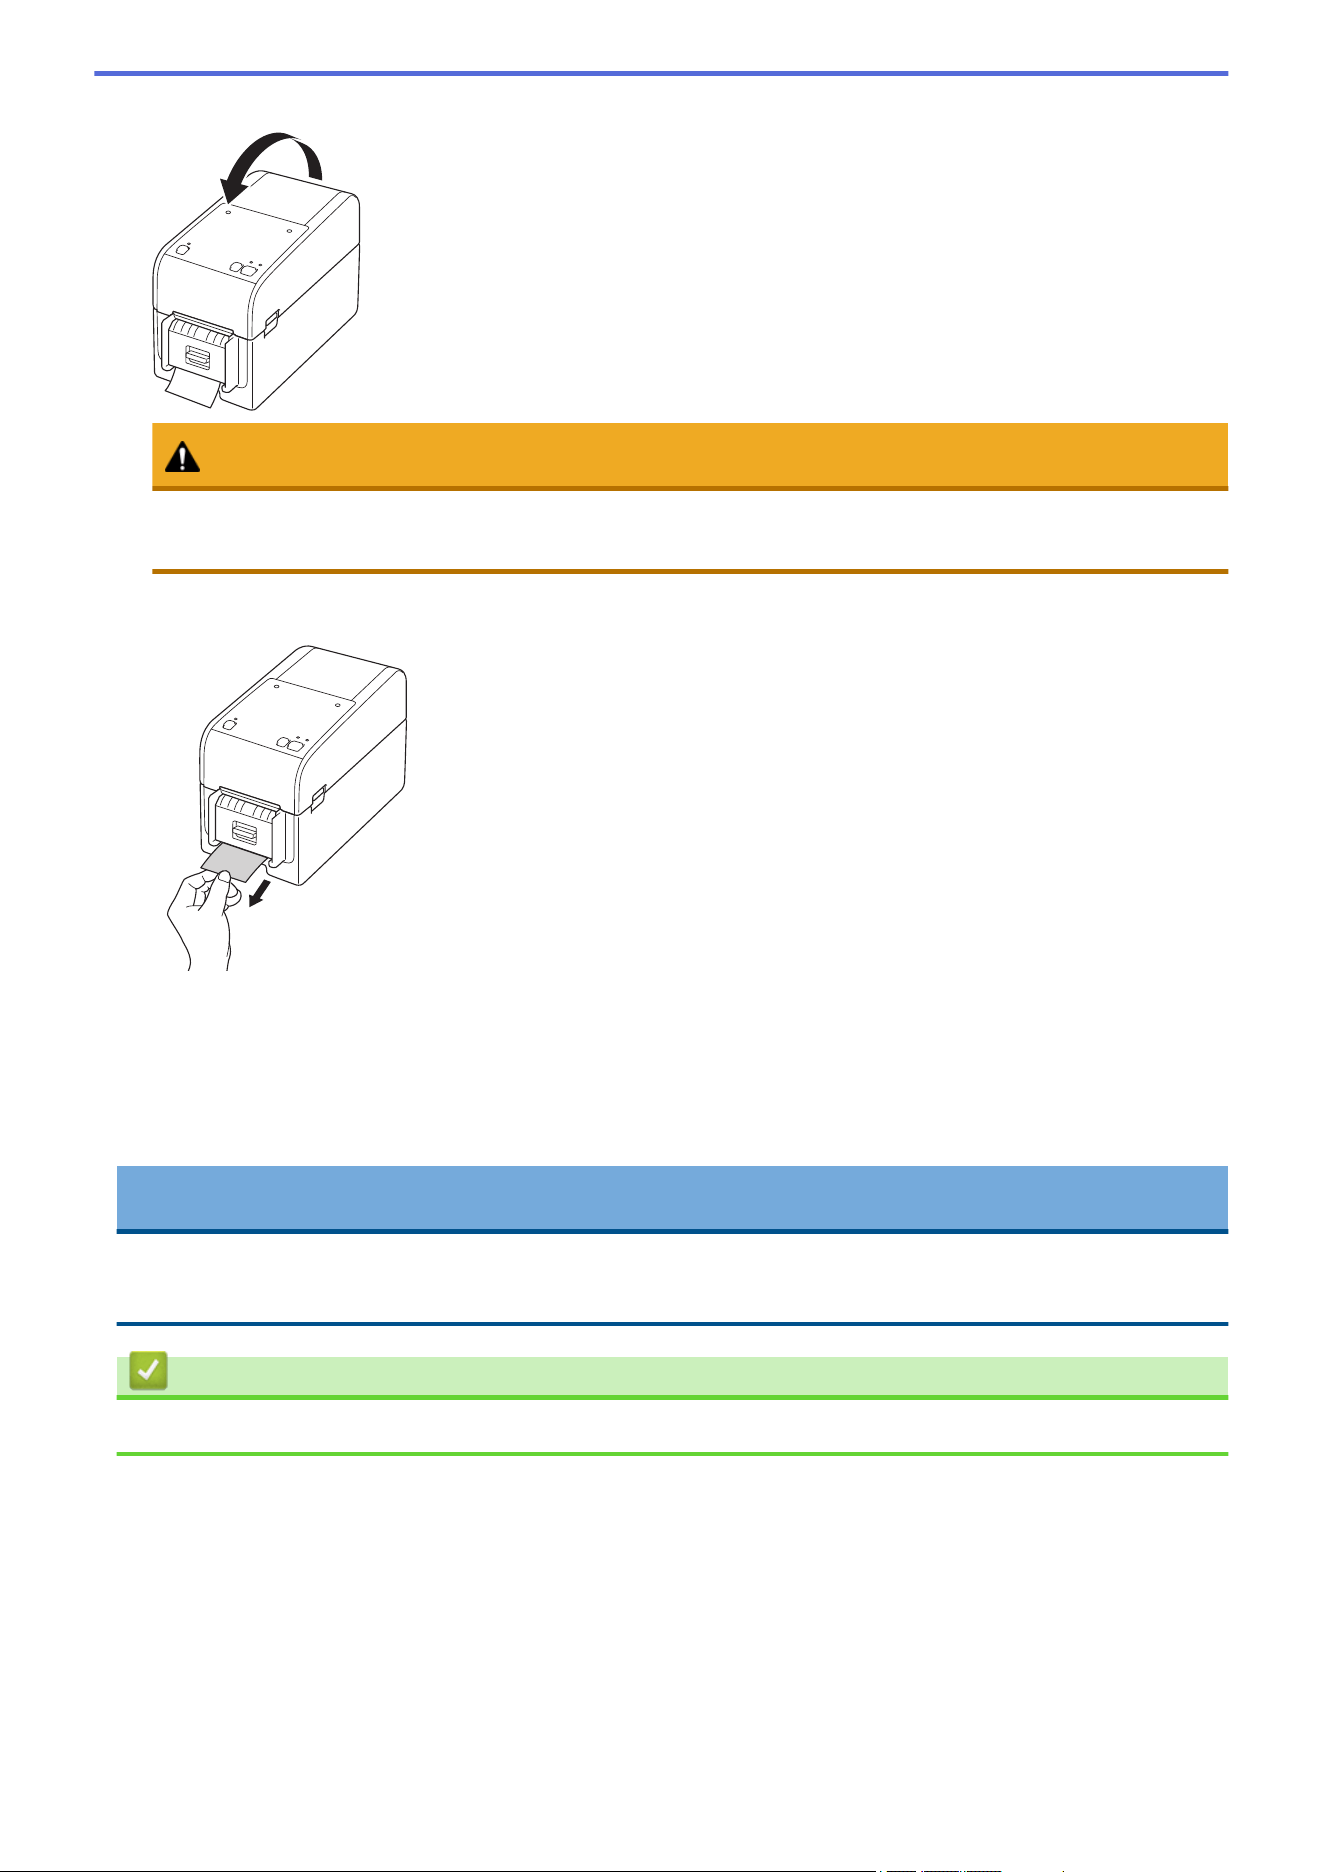
1. Press and hold to turn the printer off.
2. Open the Rear Feed Port Cover.
3. Pull up the release levers on both sides of the printer to unlock the Roll Compartment Cover.
4. Hold the front of the printer, and firmly lift the Roll Compartment Cover to open it.
CAUTION
Do not touch the Tear Bar with your hands. Doing so may result in injury.
36
5. Rotate the Adjuster Dial to lock the Roll Guides in the appropriate position.
6. Place the fanfold labels at least one label's length away from the printer and feed the first fanfold label
through the Rear Feed Port with the printing surface facing up.
㼎
㼏
㼍
a. Printing surface
b. Maximum height of fanfold label stack: 4" (100 mm)
c. Minimum distance between the printer and the fanfold labels: 6" (150 mm)
Make sure the labels pass under the Media Roll Holder, as shown in the illustration.
NOTE
• Feed the fanfold label with the printing surface facing up.
• If there is not enough room behind the printer to place the fanfold labels at the correct distance, you
can rest the stack below the back of the printer, but not above.
37
• Make sure the fanfold label stack is aligned precisely with the printer's Rear Feed Port.
• Do not allow fanfold labels to touch any cables attached to the printer.
• If you encounter any label feeding problems, increase the distance between the printer and the
fanfold label stack.
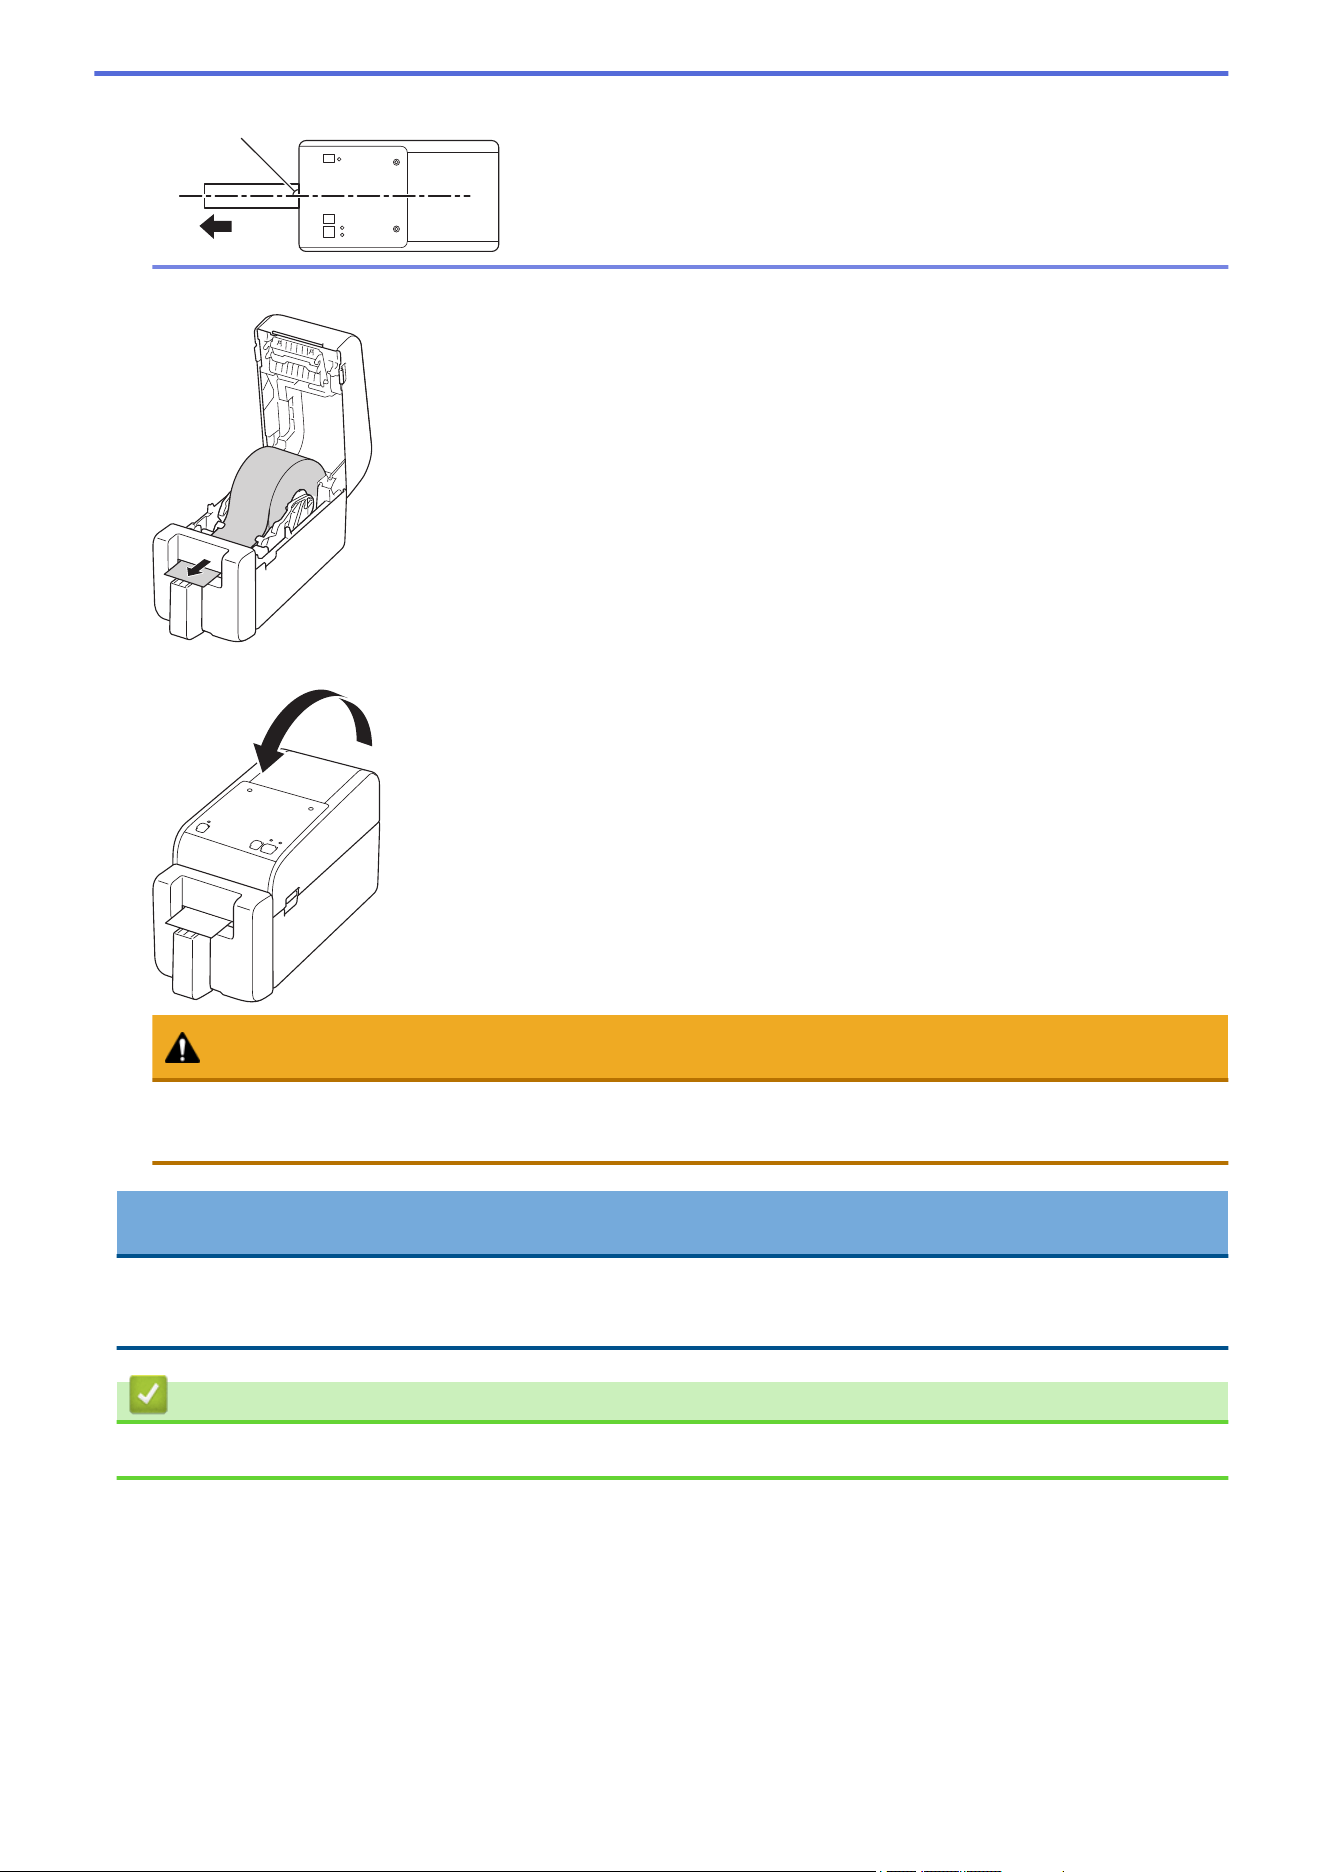
7. Feed the end of the backing paper under the Media Guide Tips (1).
Make sure the label extends slightly out of the Label Exit Slot.
1
8. Close the Roll Compartment Cover until it locks into place.
CAUTION
Be careful when closing the Roll Compartment Cover. There is a risk of injury if your finger gets pinched
between the upper and lower parts of the cover.
IMPORTANT
• Do not leave any printed labels in the printer. Doing so will cause label jams.
• When the printer is not in use, remove any media from it and close the Roll Compartment Cover.
Related Information
• Load Media Roll
38

Home > Set Up Your Printer > Load Media Roll > Load a Large Diameter Roll
Load a Large Diameter Roll
1. Press and hold to turn the printer off.
2. Open the Rear Feed Port Cover.
3. Pull up the release levers on both sides of the printer to unlock the Roll Compartment Cover.
4. Hold the front of the printer, and firmly lift the Roll Compartment Cover to open it.
CAUTION
Do not touch the Tear Bar with your hands. Doing so may result in injury.
39
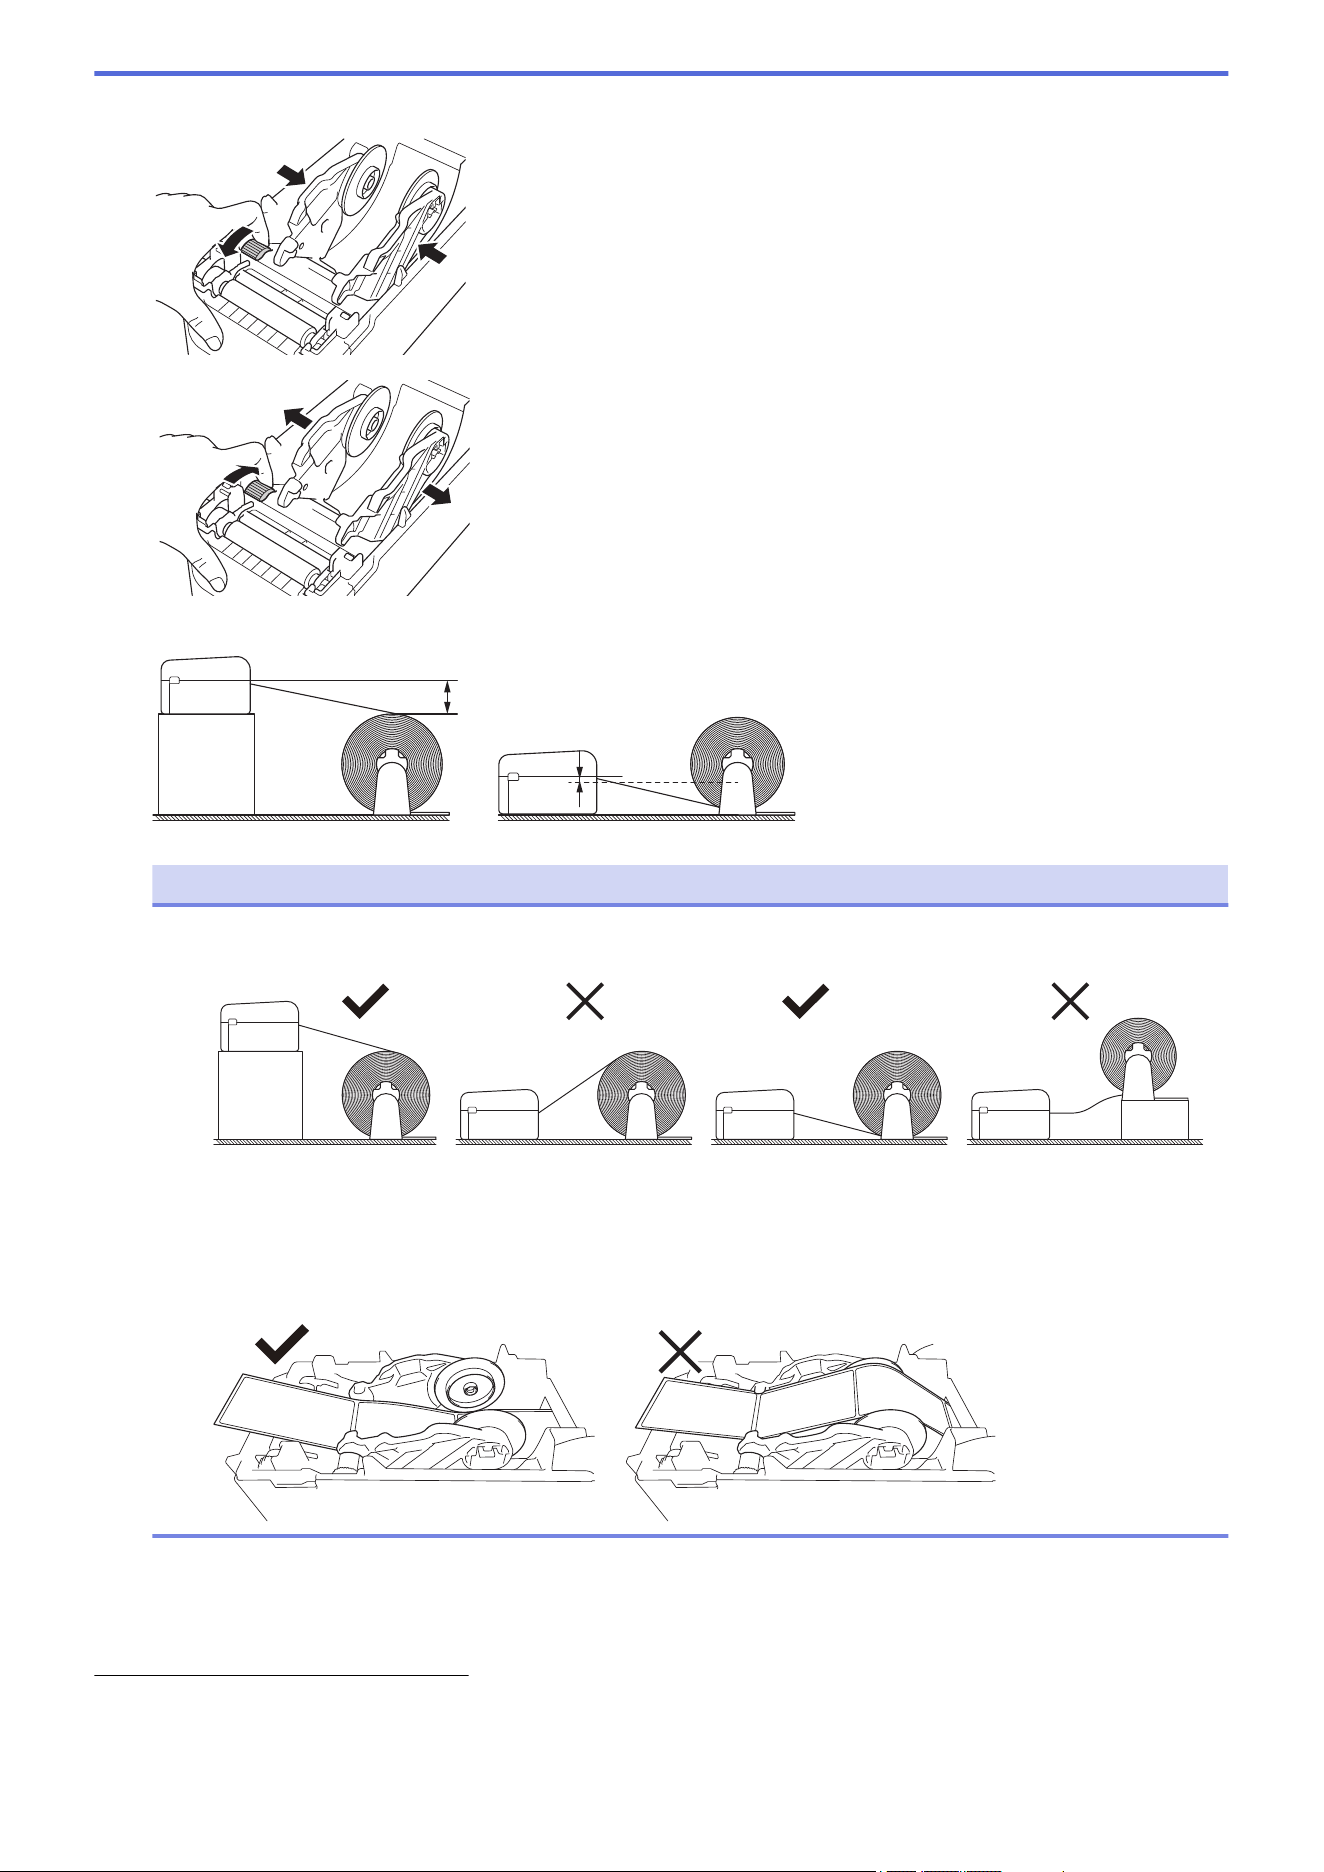
5. Rotate the Adjuster Dial to lock the Roll Guides in the appropriate position.
6. Insert the first label, printing surface facing up, through the Rear Feed Port.
1
NOTE
• Position the printer and the external roll holder so that the top of the printer's Rear Feed Port is higher
than the media roll's pull-out position.
• Place the roll with the printing surface facing up.
• Do not allow external roll to touch any cables attached to the printer.
• Depending on the roll size and installation method, the roll may become overloaded and cannot feed
labels/media. If this happens, reduce the printing speed.
• Make sure the labels pass under the Media Roll Holder, as shown in the illustration.
7. Feed the end of the backing paper under the Media Guide Tips (1).
Make sure the label extends slightly out of the Label Exit Slot.
1 When printing die-cut labels, make sure that the label pull-out position is lower than the Rear Feed Port. If fed from above, the front edge of a
die-cut label could catch on the upper part of the Rear Feed Port, peel from its backing, and jam the printer.
We recommend checking the roll each time you print die-cut labels to confirm the correct label pull-out position and the Rear Feed Port
height, as shown in the illustration.
40
1
8. Close the Roll Compartment Cover until it locks into place.
CAUTION
Be careful when closing the Roll Compartment Cover. There is a risk of injury if your finger gets pinched
between the upper and lower parts of the cover.
IMPORTANT
• Do not leave any printed labels in the printer. Doing so will cause label jams.
• When the printer is not in use, remove any media from it and close the Roll Compartment Cover.
Related Information
• Load Media Roll
41
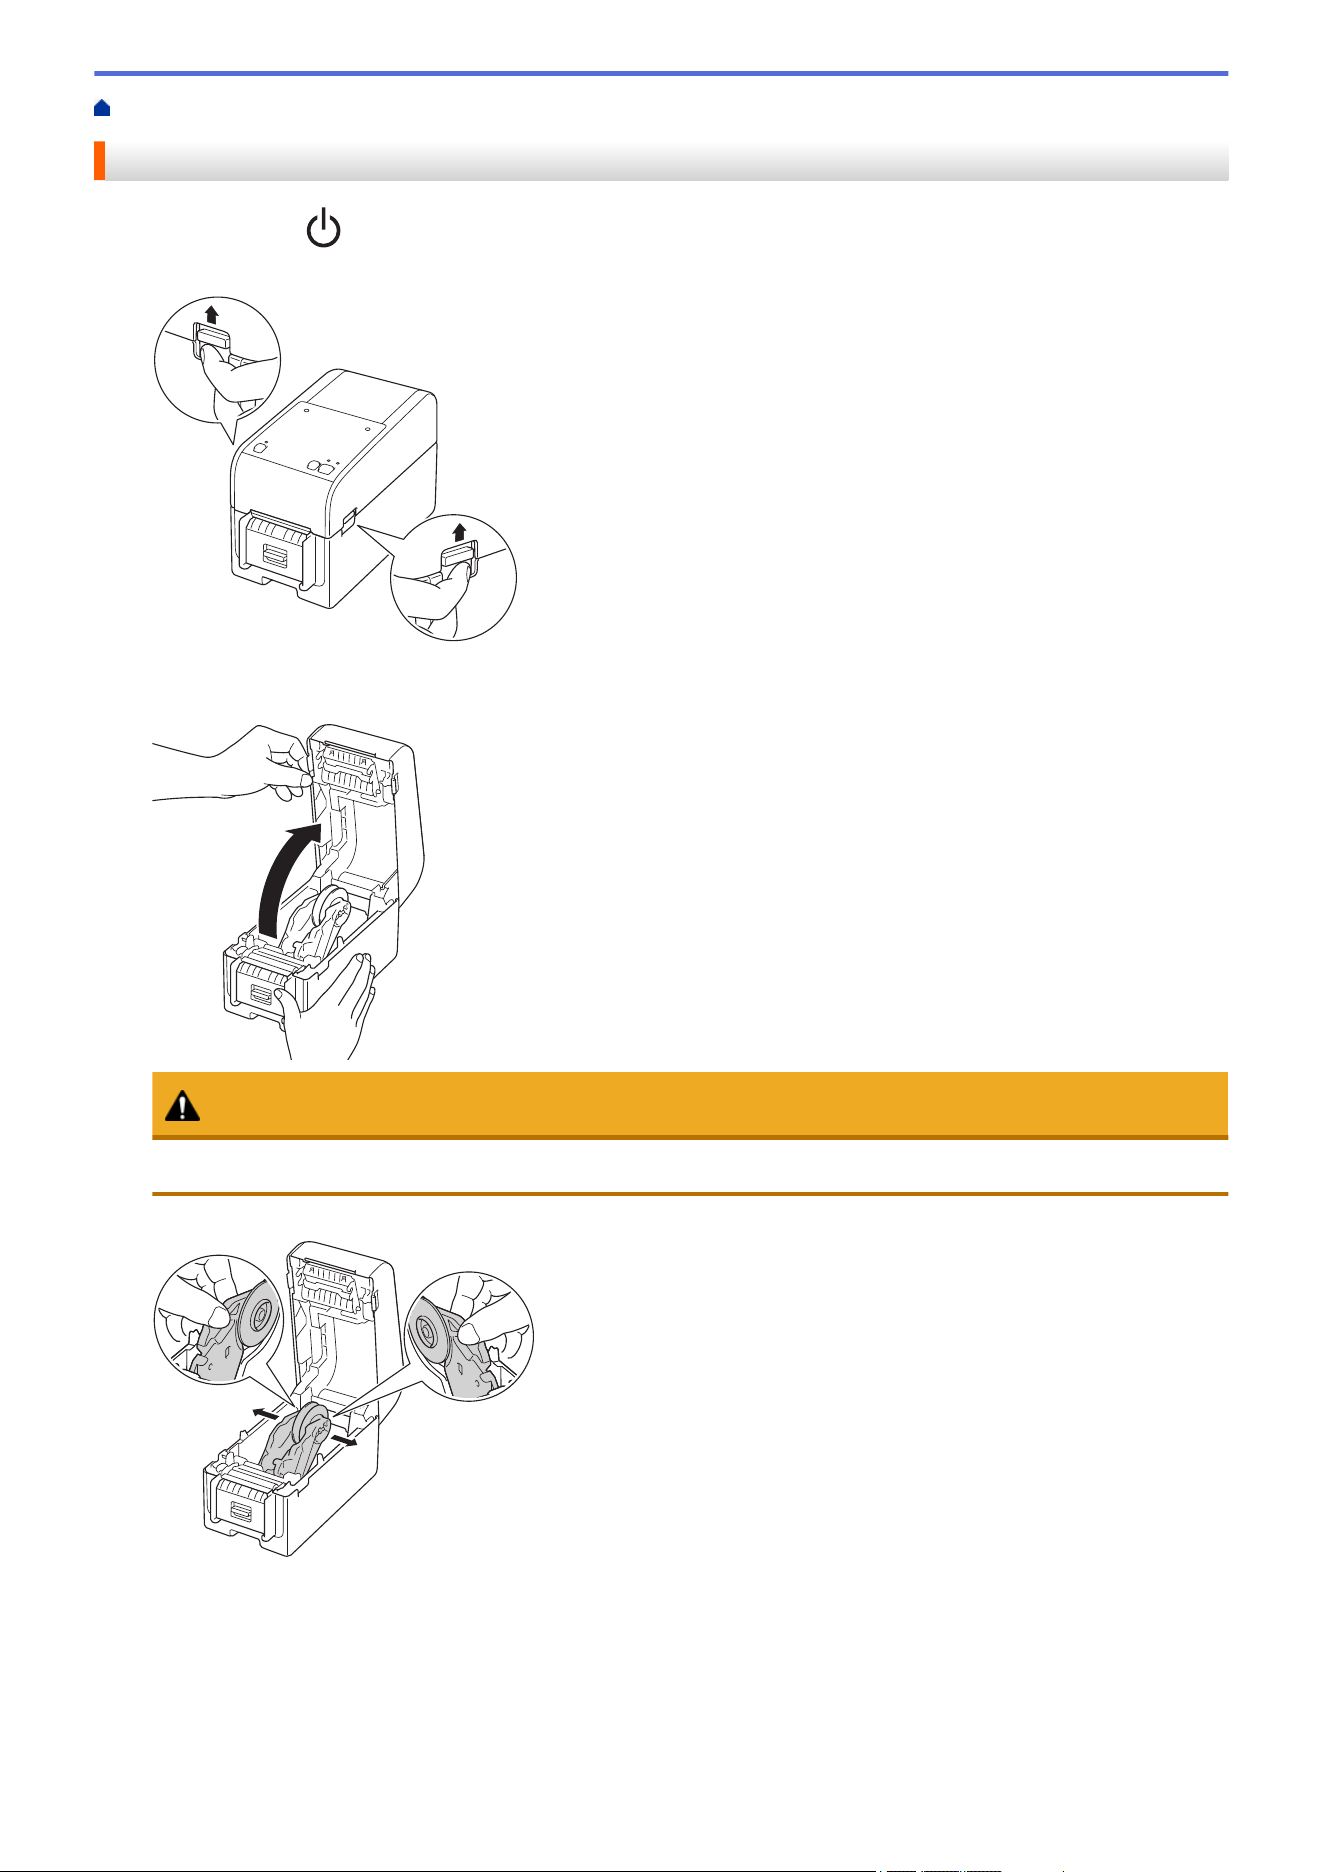
Home > Set Up Your Printer > Load Media Roll > Load a Roll in a Printer with a Peeler Unit
Load a Roll in a Printer with a Peeler Unit
1. Press and hold to turn the printer off.
2. Pull up the release levers on both sides of the printer to unlock the Roll Compartment Cover.
3. Hold the front of the printer, and firmly lift the Roll Compartment Cover to open it.
CAUTION
Do not touch the Tear Bar with your hands. Doing so may result in injury.
4. Slide both Roll Guides outwards.
42
5. Insert the roll so that the label's printing surface is facing up, as shown in the illustration.
Rotate the Adjuster Dial to lock the Roll Guides in the appropriate position.
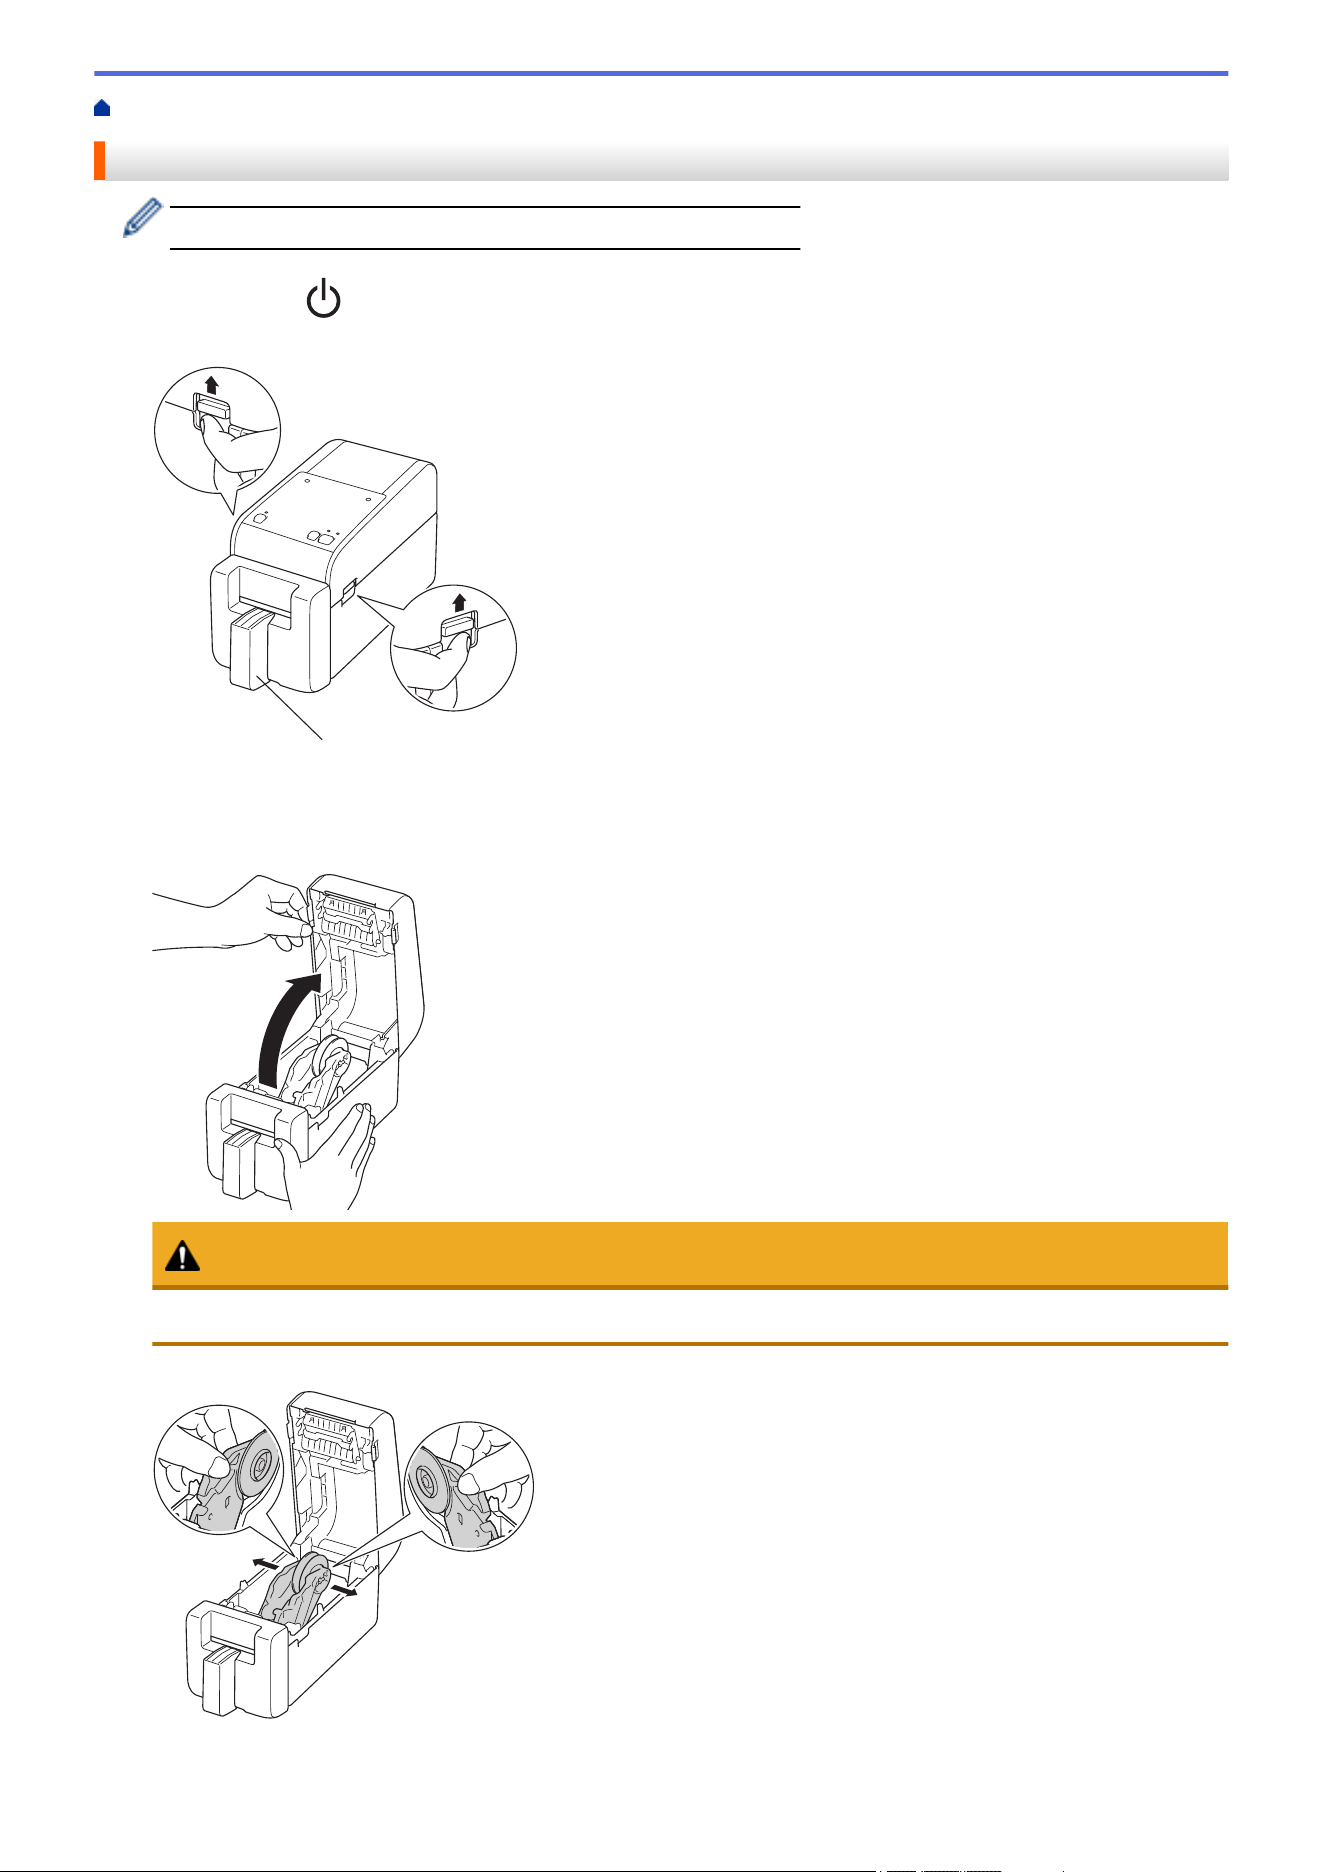
6. Peel off the first label from front to back.
Make sure there is at least 4" (100 mm) from the end of the backing paper to the start of the next label.
7. Feed the end of the backing paper under the Media Guide Tips (1).
1
43
NOTE
To avoid labels being fed diagonally when using media with a width of 0.9" (22.9 mm) or less, make sure
the media exiting from the Label Exit Slot is coming directly out and is not at an angle.
Top View
90°
8. Open the Peeler Door.
a
a. Peeler Door
9. Pass the edge of the backing paper through the Peeler Door slot.
10. Close the Peeler Door.
44
11. Close the Roll Compartment Cover until it locks into place.
CAUTION
Be careful when closing the Roll Compartment Cover. There is a risk of injury if your finger gets pinched
between the upper and lower parts of the cover.
12. Gently pull the backing paper coming out of the Release Paper Outlet until it stops. This minimizes slack in
the roll.
13. Set the printer driver peeler option on your computer.
a. Click Start > Settings > Devices > Printers & scanners. Select the printer you want to set up, and then
click Open queue. Click Printer > Printing Preferences.
b. Select the Use Peeler Function checkbox.
c. Click OK.
IMPORTANT
• Do not leave any printed labels in the printer. Doing so will cause label jams.
• When the printer is not in use, remove any rolls from it and close the Roll Compartment Cover.
Related Information
• Load Media Roll
45
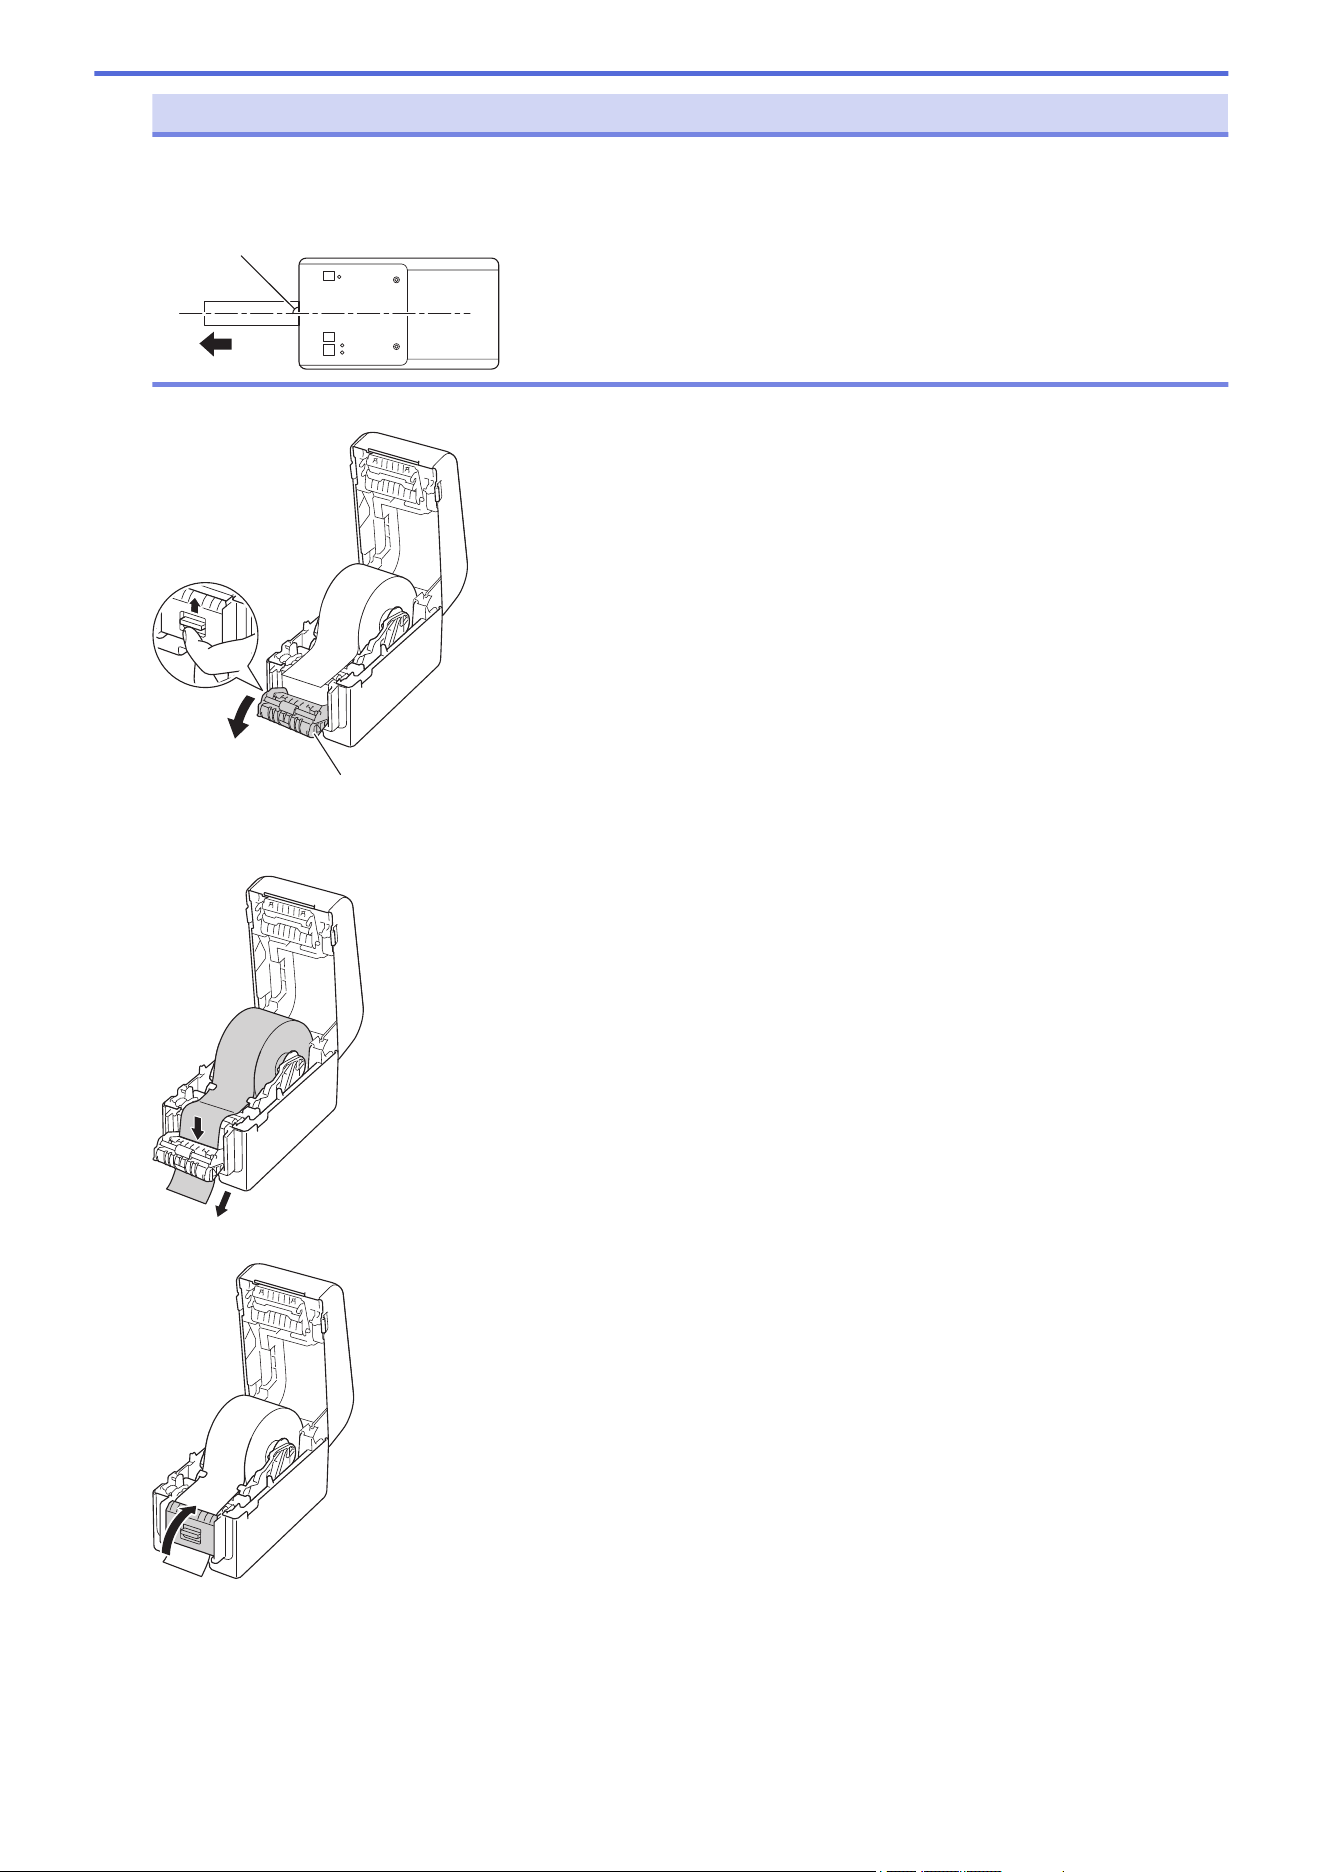
Home > Set Up Your Printer > Load Media Roll > Load a Roll in a Printer with a Cutter Unit
Load a Roll in a Printer with a Cutter Unit
For labels longer than 3.94" (100 mm), install the Label Support.
1. Press and hold to turn the printer off.
2. Pull up the release levers on both sides of the printer to unlock the Roll Compartment Cover.
a
a. Label Support
3. Hold the front of the printer, and firmly lift the Roll Compartment Cover to open it.
CAUTION
Do not touch the Tear Bar with your hands. Doing so may result in injury.
4. Slide both Roll Guides outwards.
46
5. Insert the roll so that the label's printing surface is facing up, as shown in the illustration.
• Rotate the Adjuster Dial to lock the Roll Guides in the appropriate position.
• When printing on continuous labels, wrinkles may occur, depending on the Roll being used and on the
printing environment. If this happens, rotate the Adjuster Dial toward the rear of the printer to increase
the space between the Roll Guides.
6. Feed the end of the backing paper under the Media Guide Tips (1).
1
NOTE
To avoid labels being fed diagonally when using media with a width of 0.9" (22.9 mm) or less, make sure
the media exiting from the Label Exit Slot is coming directly out and is not at an angle.
47
Top View
90°
7. Feed the end of the roll through the Cutter Slot.
8. Close the Roll Compartment Cover until it locks into place.
CAUTION
Be careful when closing the Roll Compartment Cover. There is a risk of injury if your finger gets pinched
between the upper and lower parts of the cover.
IMPORTANT
• Do not leave any printed labels in the printer. Doing so will cause label jams.
• When the printer is not in use, remove any rolls from it and close the Roll Compartment Cover.
Related Information
• Load Media Roll
48
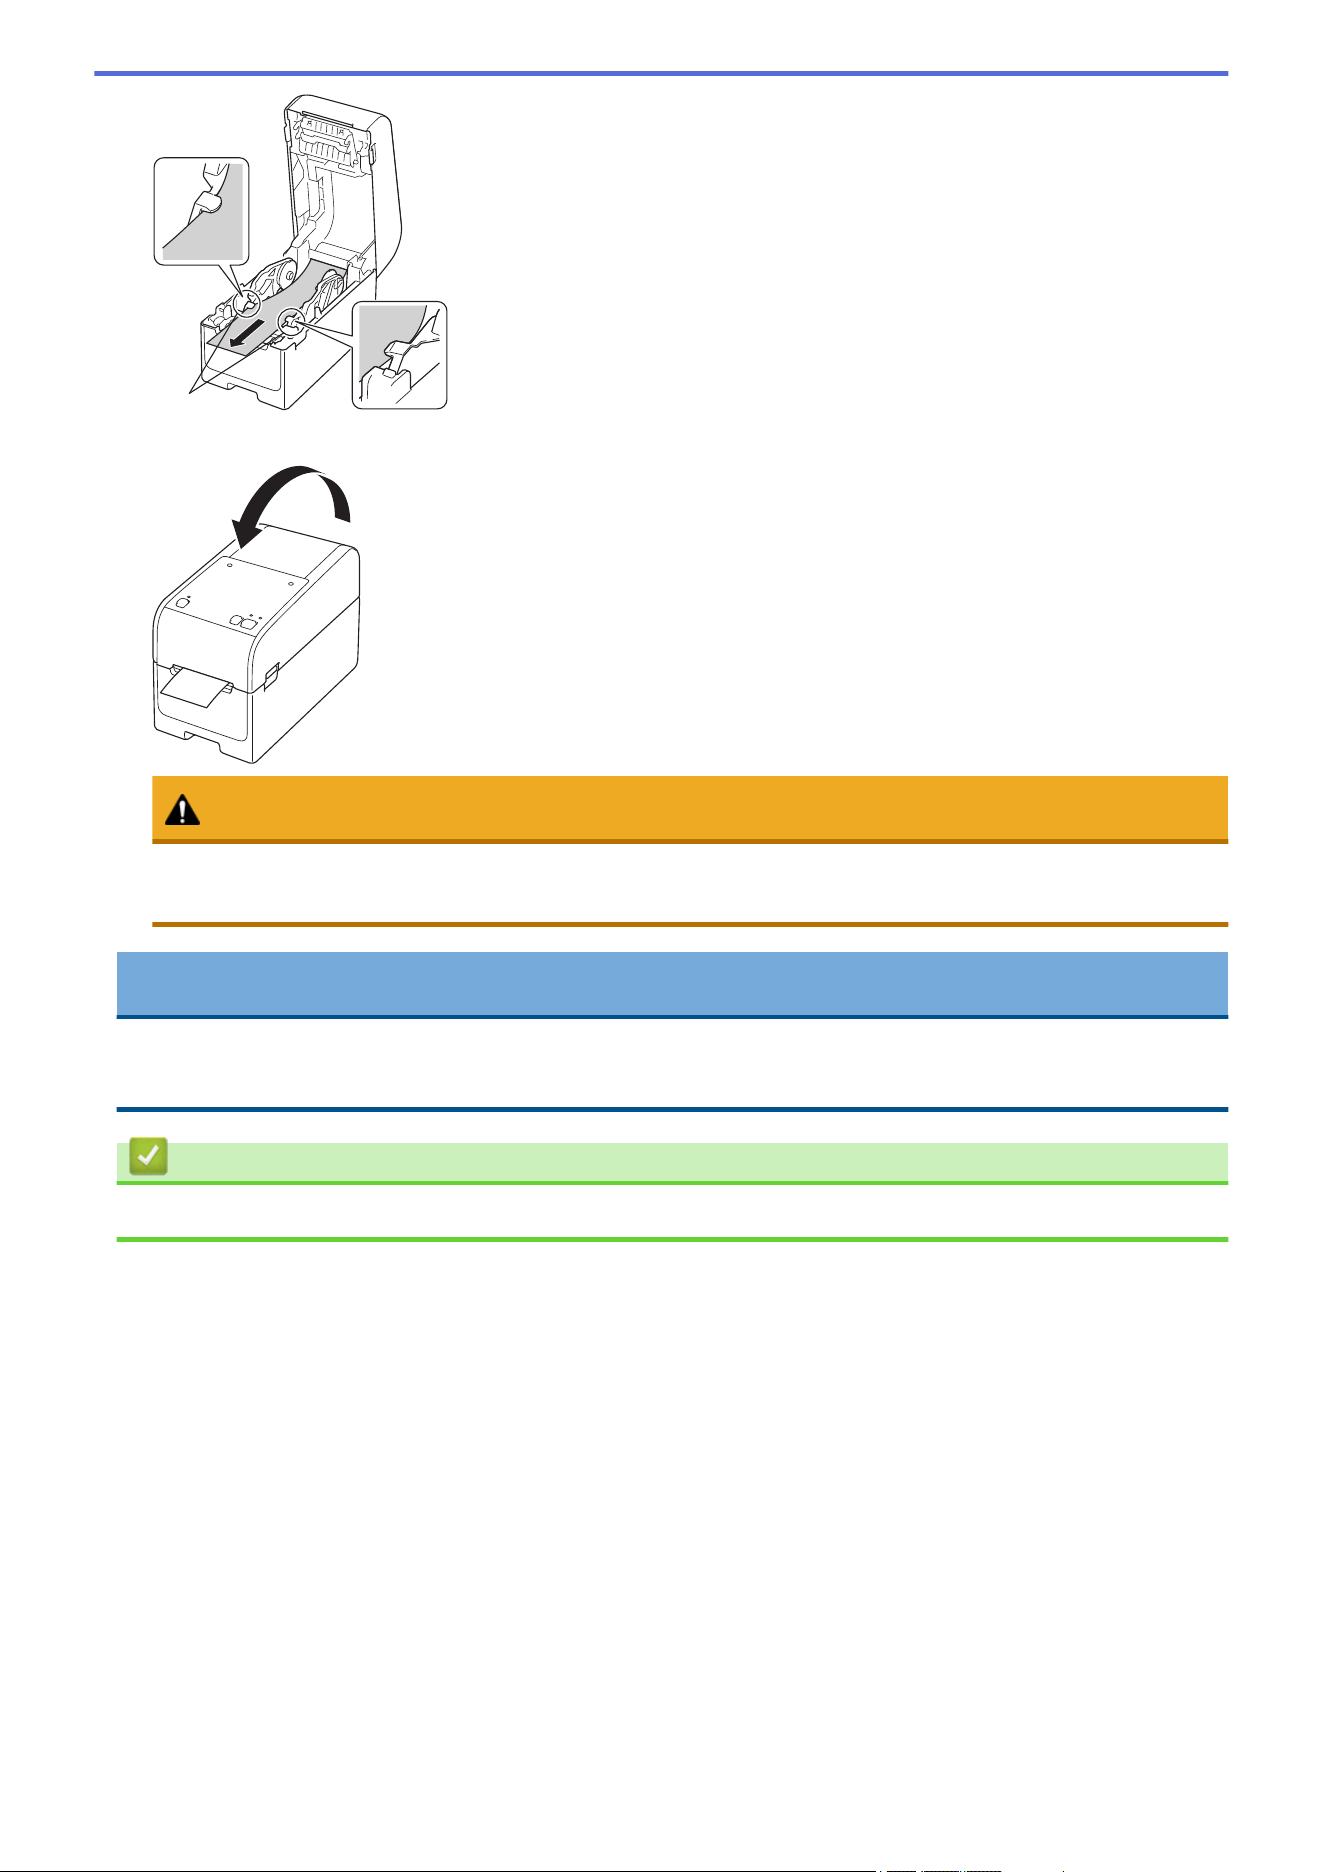
Home > Set Up Your Printer > Load Media Roll > Load a Linerless Roll
Load a Linerless Roll
To view all supported media rolls, import the Supported Lierless Roll list from Paper Size Setup in the Printer
Setting Tool. For more information, see Related Topics: Printer Setting Tool (Windows): Paper Size Setup.
You can also visit https://support.brother.com/g/d/f4fi/l to download the Supported Linerless Roll list.
1. Press and hold to turn the printer off.
2. Pull up the release levers on both sides of the printer to unlock the Roll Compartment Cover.
3. Hold the front of the printer, and firmly lift the Roll Compartment Cover to open it.
CAUTION
Do not touch the Tear Bar with your hands. Doing so may result in injury.
4. Rotate the Adjuster Dial to lock the Roll Guides in the appropriate position.
49
5. Insert the roll so that the label's printing surface is facing up, as shown in the illustration.
6. Feed the end of the backing paper under the Media Guide Tips (1).
1
7. Feed the end of the roll through the Cutter Slot.
50
8. Close the Roll Compartment Cover until it locks into place.
CAUTION
Be careful when closing the Roll Compartment Cover. There is a risk of injury if your finger gets pinched
between the upper and lower parts of the cover.
IMPORTANT
• Do not leave any printed labels in the printer. Doing so will cause label jams.
• When the printer is not in use, remove any rolls from it and close the Roll Compartment Cover.
NOTE
• When printing multiple labels, always remove the most recently-printed label to allow the next label to
print.
• If roll paper is jammed inside the Printer, open the Roll Compartment Cover and gently remove the paper.
Do not use force to pull the paper out of the machine.
Related Information
• Load Media Roll
Related Topics:
• Printer Setting Tool (Windows): Paper Size Setup
51
Home > Set Up Your Printer > Adjust the Sensor Position
Adjust the Sensor Position
When using any media, you must adjust the printer's sensor position based on the type of media you are using.
You can use other types of rolls in addition to the Media Rolls described in this guide.
>> Sensor Position For Die-cut Labels without Black Marks
>> Sensor Position For Die-cut Labels with Black Marks
>> Sensor Position For Receipt Paper without Black Marks
>> Sensor Position For Medias with Black Marks
>> Sensor Position for Media With Holes
>> Sensor Position for Wristbands
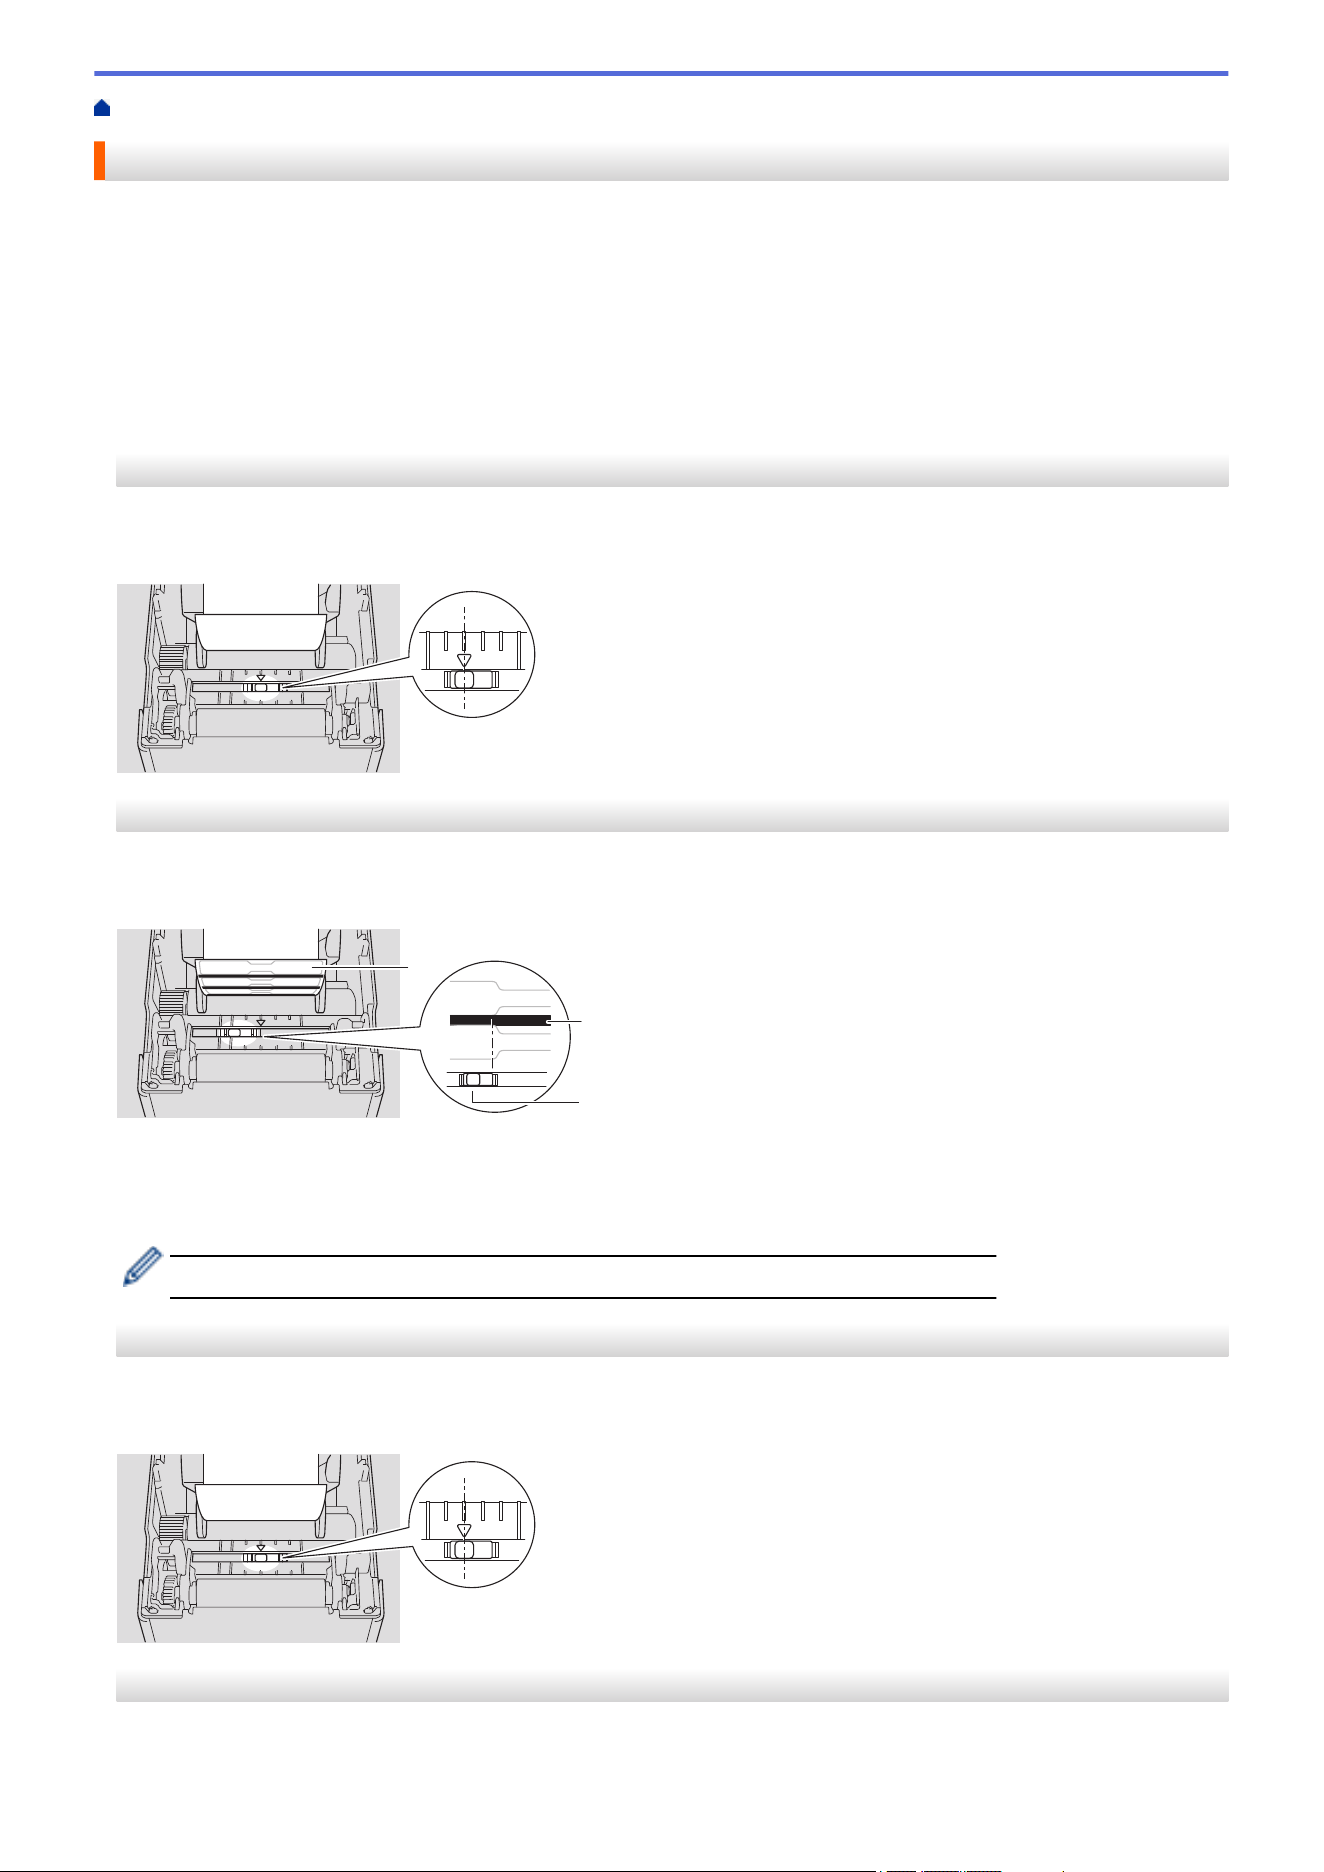
Sensor Position For Die-cut Labels without Black Marks
The transmissive/gap sensor detects the beginning of the label and feeds the label to the correct position.
Align the slider with b on the printer. When it is set in the correct position, you will hear a click.
Sensor Position For Die-cut Labels with Black Marks
The reflective/black mark sensor detects the mark and feeds the media to the correct position.
Align the slider as shown in the illustration.
2
3
1
1. Back of media
2. Black mark
3. Reflective/black mark sensor
Make sure the reflective/black mark sensor is not set to the gap position of the label.
Sensor Position For Receipt Paper without Black Marks
The reflective/black mark sensor detects if paper roll is finished.
Align the slider with b on the printer. When it is set in the correct position, you will hear a click.
Sensor Position For Medias with Black Marks
The reflective/black mark sensor detects the mark and feeds the media to the correct position.
52
Align the slider with the middle of the black, as shown in the illustration.
1
2
3
4
5
1. Back of media
2. Black mark
3. 0.16" (4 mm) or more
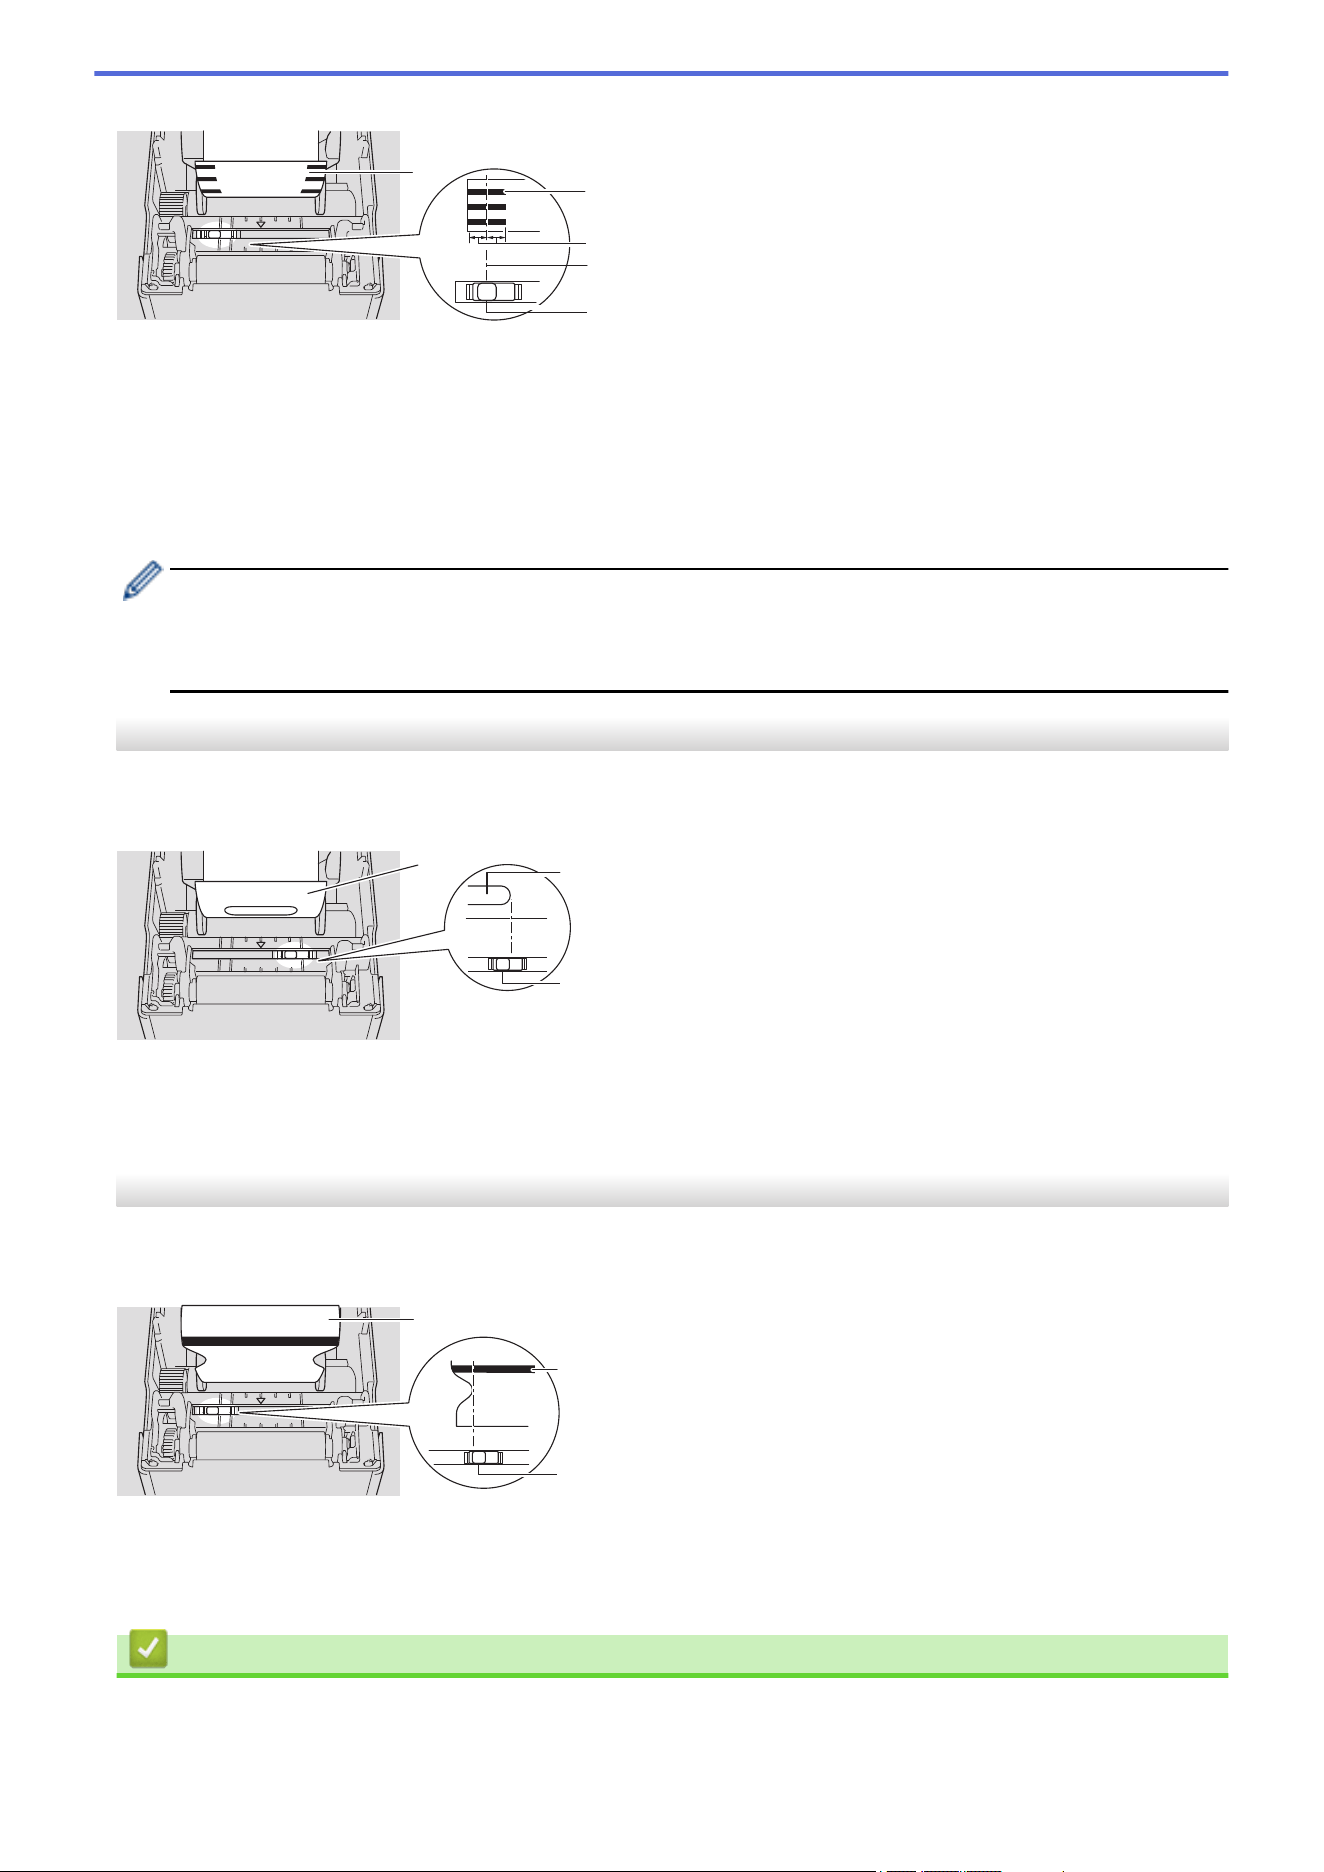
Make sure there is at least 0.16" (4 mm) on the left and right of the center of the black mark.
4. Center alignment of the black mark
5. Reflective/black mark sensor
When using media with the maximum width of 2.48" (63 mm), make sure there is a black mark at least
0.39" (10 mm) long in from either the left or right edge of the paper so that the reflective/black mark sensor
can detect the black mark. If the black mark is too short, it cannot be detected by the reflective/black mark
sensor.
Sensor Position for Media With Holes
The reflective/black mark sensor detects the hole and feeds the media to the correct position.
Align the slider as shown in the illustration.
2
3
1
1. Back of media
2. Hole in media
3. Reflective/black mark sensor
Sensor Position for Wristbands
The reflective/black mark sensor detects the mark and feeds the media to the correct position.
Align the slider as shown in the illustration.
3
1
2
1. Back of media
2. Black mark
3. Reflective/black mark sensor
Related Information
• Set Up Your Printer
53

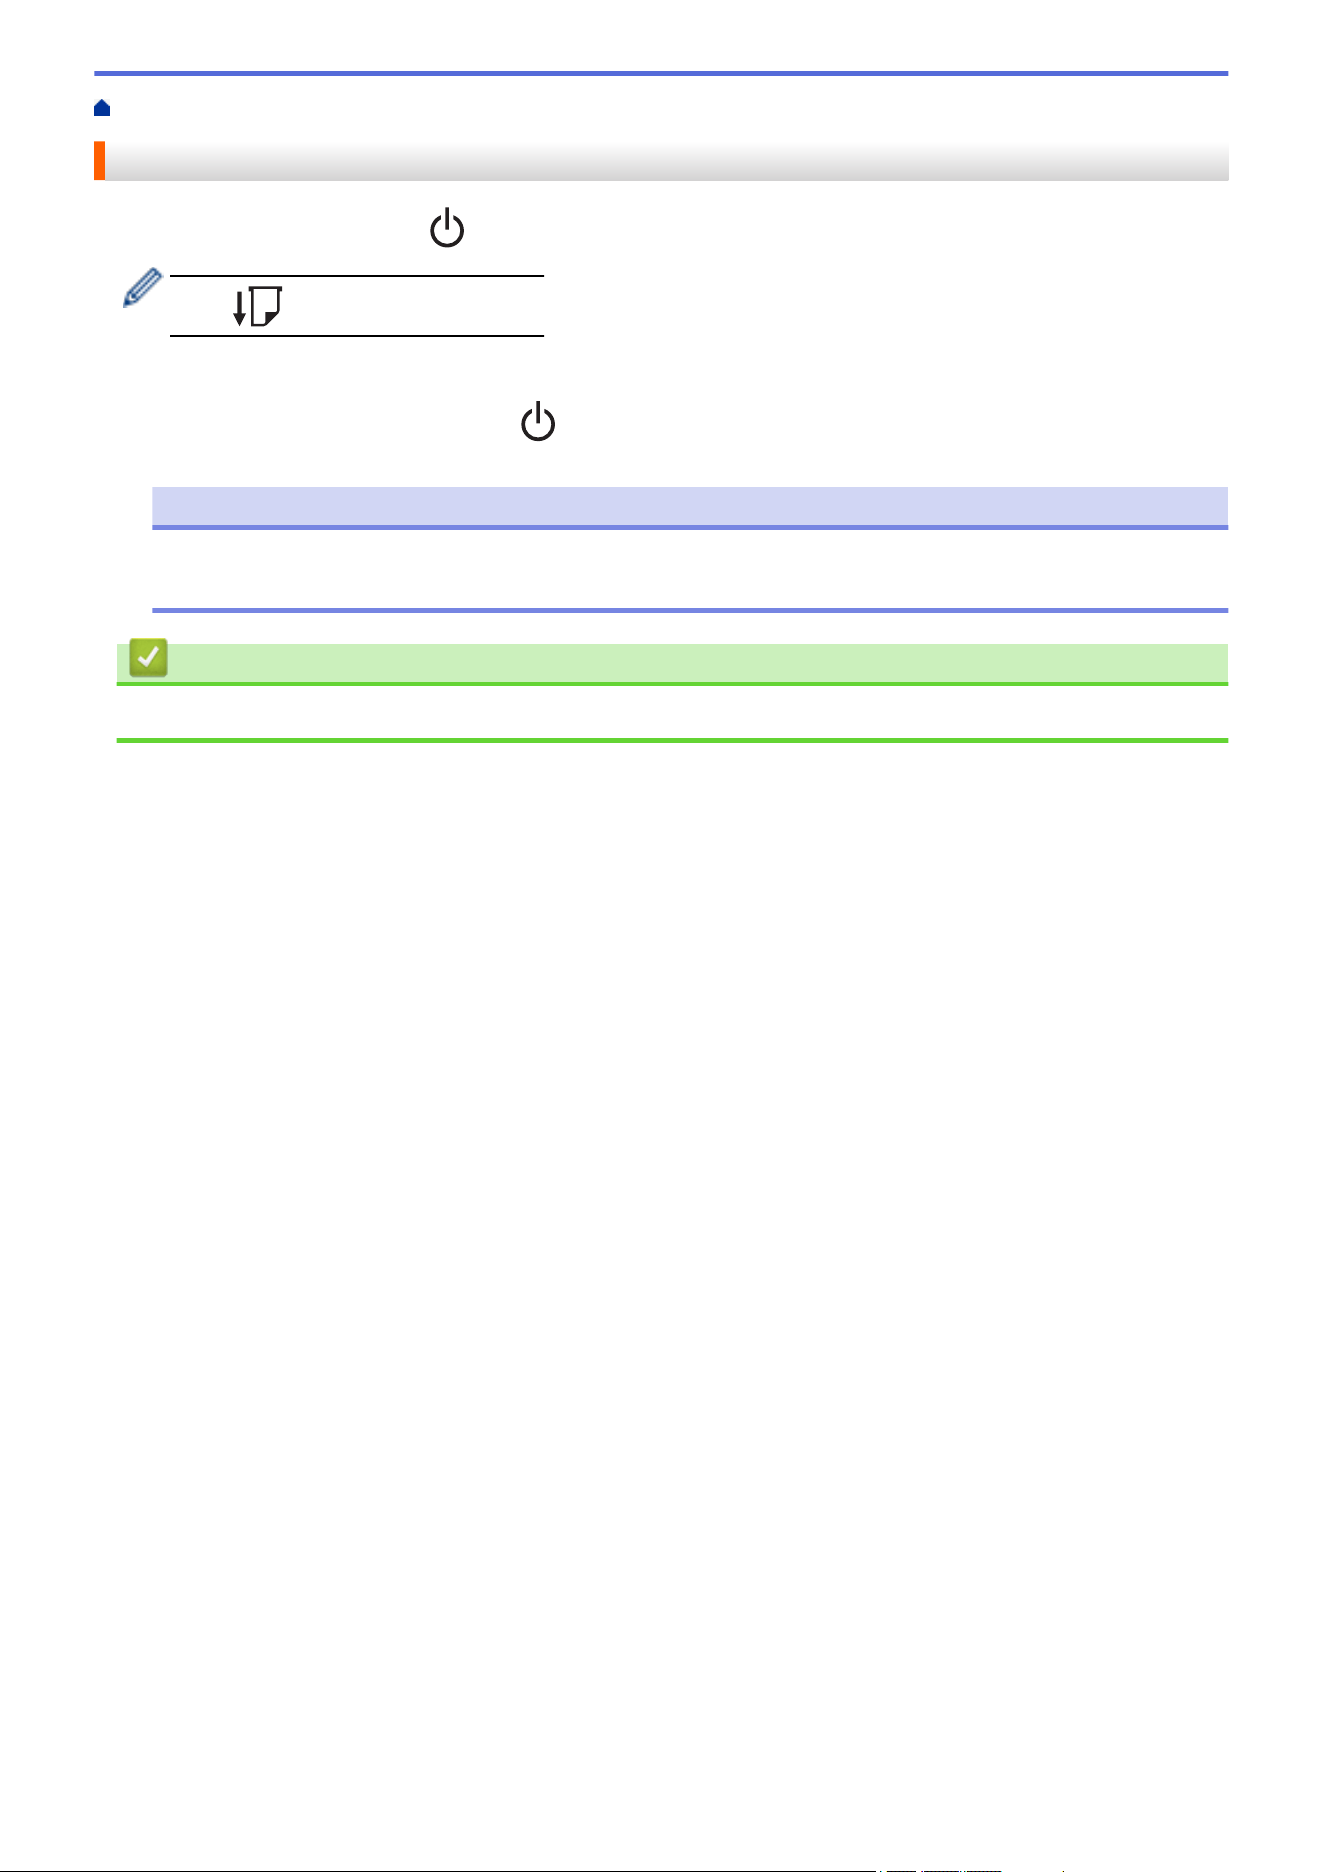
Home > Set Up Your Printer > Turn Power On/Off
Turn Power On/Off
• To turn the printer on, press .
Press to align the end of the roll.
The Power LED turns green.
• To turn the printer off, press and hold until the Power LED turns off.
NOTE
When turning the printer off, do not disconnect the AC Adapter and AC Power Cord until the Power LED
turns off.
Related Information
• Set Up Your Printer
56
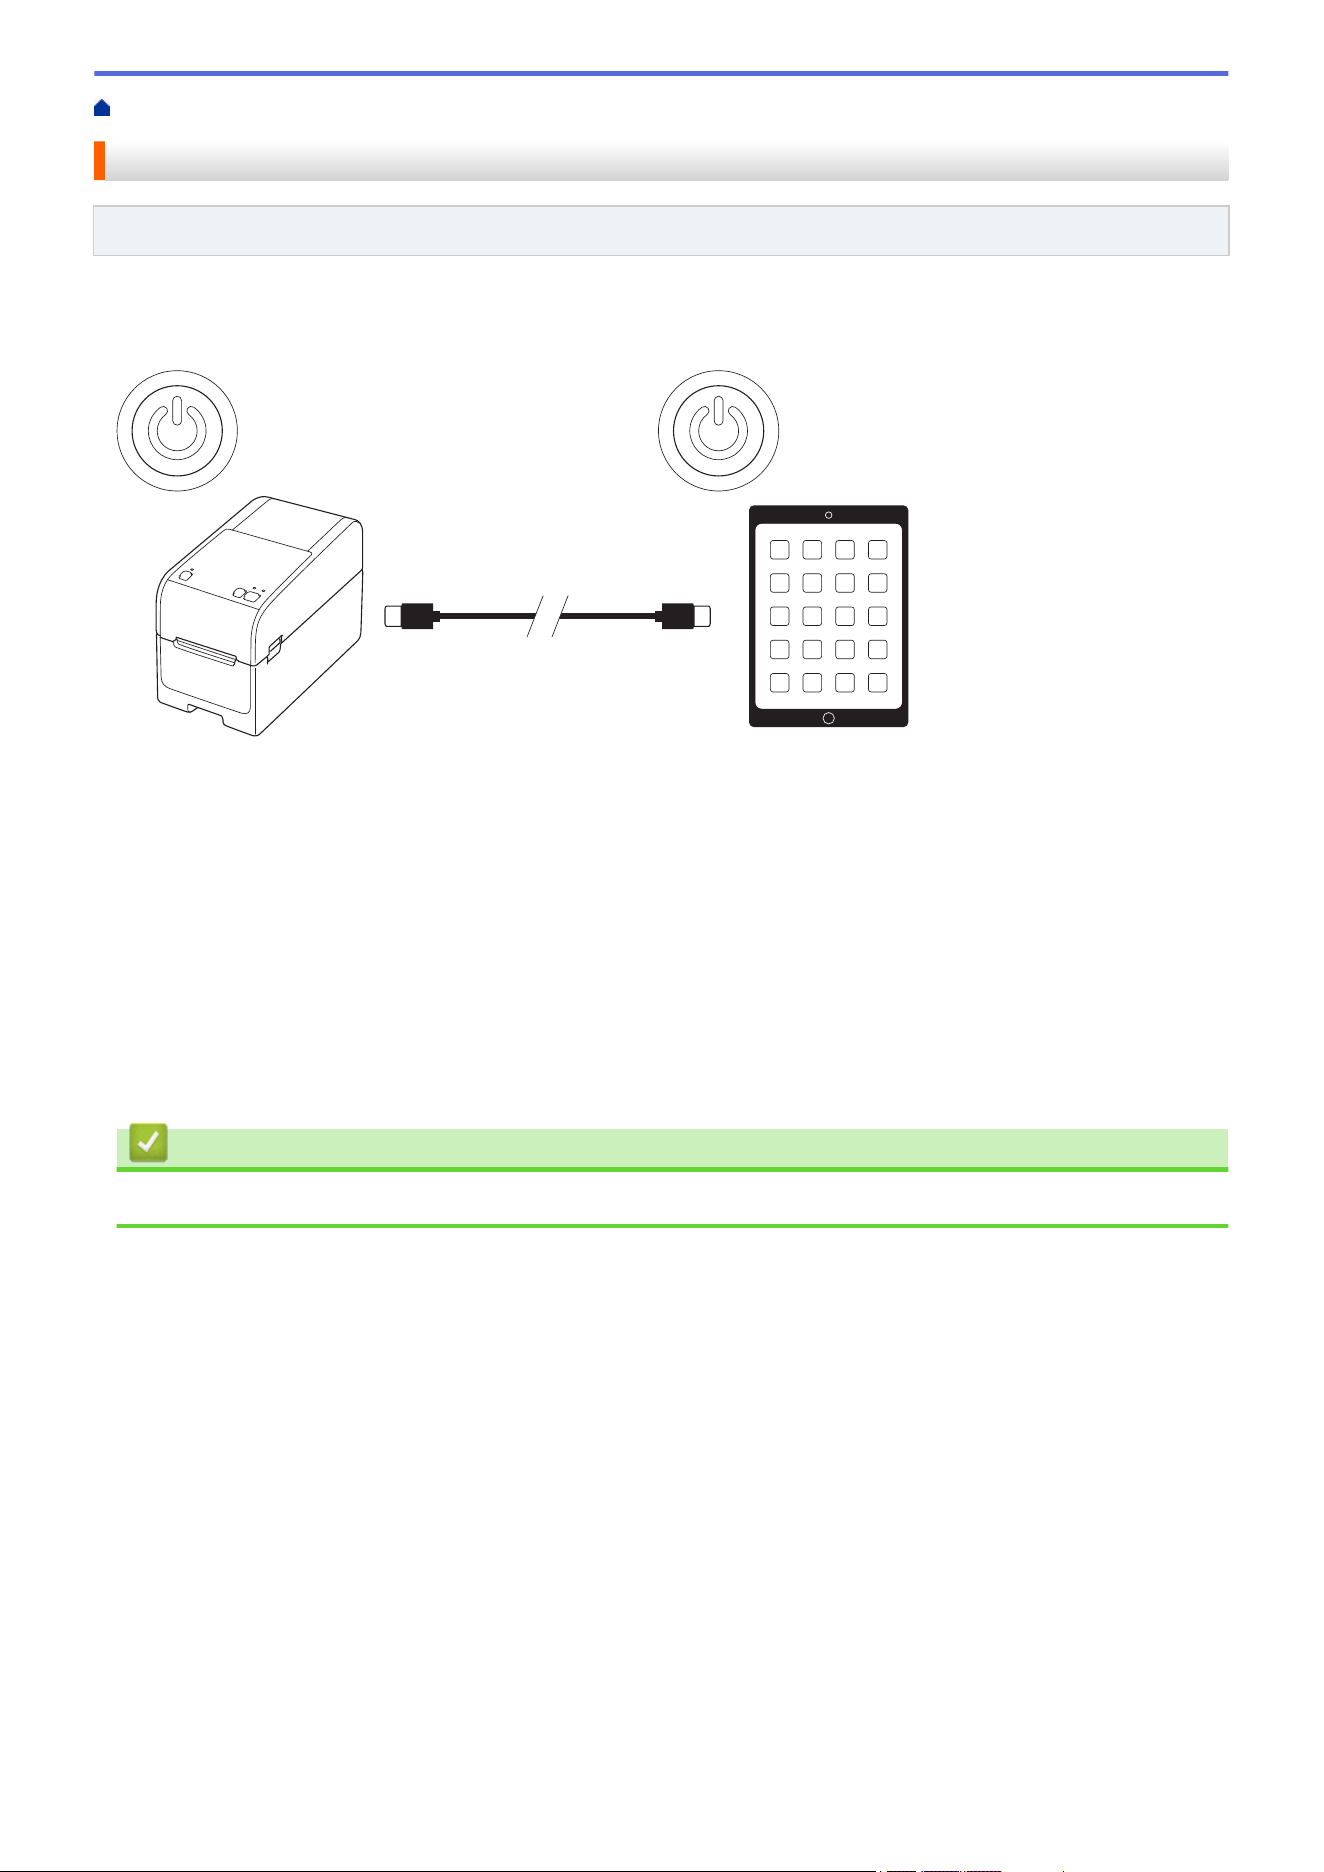
Home > Set Up Your Printer > Use the Printer's Power Supply Function
Use the Printer's Power Supply Function
Related Models: TD-2320D/TD-2350D/TD-2320DF/TD-2350DF/TD-2350DSA
This printer offers USB Power Delivery (USB PD) powering when you connect other devices to its USB port. The
power supply function should not be used in place of an actual power charger. It is designed only to keep devices
that you connect to the printer powered on while connected.
• Turn on both the printer and the device you want to supply power to, then connect them using a USB PD
cable.
• This printer's power supply function powers compatible USB PD devices up to 15W.
• The USB cable provided with this product is meant for communication use only, and cannot power other
devices. To use the power supply function, use a compatible USB PD cable (not included).
• When using this product to provide power to an iOS/iPadOS device, use the cable that comes with the iOS/
iPadOS device.
• This function does not guarantee the powering of all USB PD-compatible devices. Make sure the connected
device is receiving power when use.
• Some USB cables may not be able to supply sufficient power to connected devices.
• Use a USB-C
®
to USB-C cable with a length of 6' 7" (2m) or less. (Not included)
Related Information
• Set Up Your Printer
57

Home > Install Software > Install Printer Drivers and Software on a Computer
Install Printer Drivers and Software on a Computer
To print from your computer, install the printer driver and P-touch Editor to your computer.
1. In the address bar, type install.brother and download the Software/Documentation installer.
http://install.brother
2. Double-click the downloaded installer, and follow the on-screen instructions.
NOTE
• To use your printer's advanced features, select the additional software you want during installation.
• When you connect the printer to your computer using Bluetooth, make sure you set the Bluetooth
data transfer setting in your operating system to bi-directional.
TD-2350D/TD-2350DF/TD-2350DSA:
To connect the printer to a computer using a wireless connection, we recommend the following:
• When you turn the printer on for the first time after purchasing it or resetting it, the printer automatically
enters wireless settings mode. Start the software download and installation when the printer enters this
mode.
• Make a note of the SSID (network name) and password (network key) of the wireless network in
advance. If you cannot find this information, contact your network administrator or wireless access
point/router manufacturer.
• To connect the printer to a computer using Wireless Direct, select USB connection during the
installation. At the end of the installation, click the link for Wireless Direct.
TD-2320D/TD-2350D/TD-2320DF/TD-2350DF/TD-2350DSA:
To use the printer with a different connection method than the one selected during installation, use the
installer again to reinstall the software and printer drivers, and select the new connection method.
Related Information
• Install Software
• Available Applications
59

Home > Install Software > Install Printer Drivers and Software on a Computer > Available Applications
Available Applications
Windows
Application Features
P-touch Editor Allows you to design and print custom labels using built-in drawing tools to create various font
and text styles, and to import images and insert barcodes.
P-touch Transfer
Manager
Allows you to transfer templates and other data to the printer and save backups of your data on
the computer.
This application is installed with P-touch Editor.
P-touch Library Manages and prints P-touch Editor templates.
You can use P-touch Library to print templates.
This application is installed with P-touch Editor.
P-touch Transfer
Express
Allows you to transfer documents to the printer.
To download the installer, go to your model's Downloads page on the Brother support website
at support.brother.com.
P-touch Update
Software
Updates software and firmware to the latest version.
Printer Setting Tool Allows you to configure the printer's settings from a computer.
• Communication Settings
• Device Settings
• P-touch Template Settings
• Paper Size Setup
BRAdmin
Professional
Finds the printer on your network and allows you to configure advanced settings and updates
from your computer.
Font Manager Allows you to transfer fonts to the printer and delete fonts from the printer. Use various print
commands to access and print using transferred fonts.
A Font Manager is available from the Brother Developer Center (https://
support.brother.com/g/s/es/dev/en/index.html).
Font Permissions
When using fonts, you must abide by all the terms and conditions set forth by each
rightful font owner. Before downloading fonts, you must confirm that you have legitimate
licences to use the fonts and comply with their terms and conditions.
Status Monitor
(TD-2320D/
TD-2350D/
TD-2320DF/
TD-2350DF/
TD-2350DSA)
Allows you to check the machine status from your computer.
The Status Monitor utility is installed automatically when you install the printer driver.
LabelCLT
(Command Line
Tool)
Allows you to transfer firmware to a USB-connected or networked printer. Templates and
configuration files saved by each tool can be transferred to the printer.
To download LabelCLT, go to your model's Downloads page on the Brother support website at
support.brother.com.
Related Information
• Install Printer Drivers and Software on a Computer
60

Home > Install Software > Connect the Printer to a Computer
Connect the Printer to a Computer
• Connect the Printer to a Computer Using a USB Cable
• Connect the Printer to a Computer Using Wi-Fi
• Connect the Printer to a Computer Using a Wired LAN
• Connect the Printer to a Computer Using a Bluetooth Connection
• Connect the Printer to a Computer Using RS-232C
61
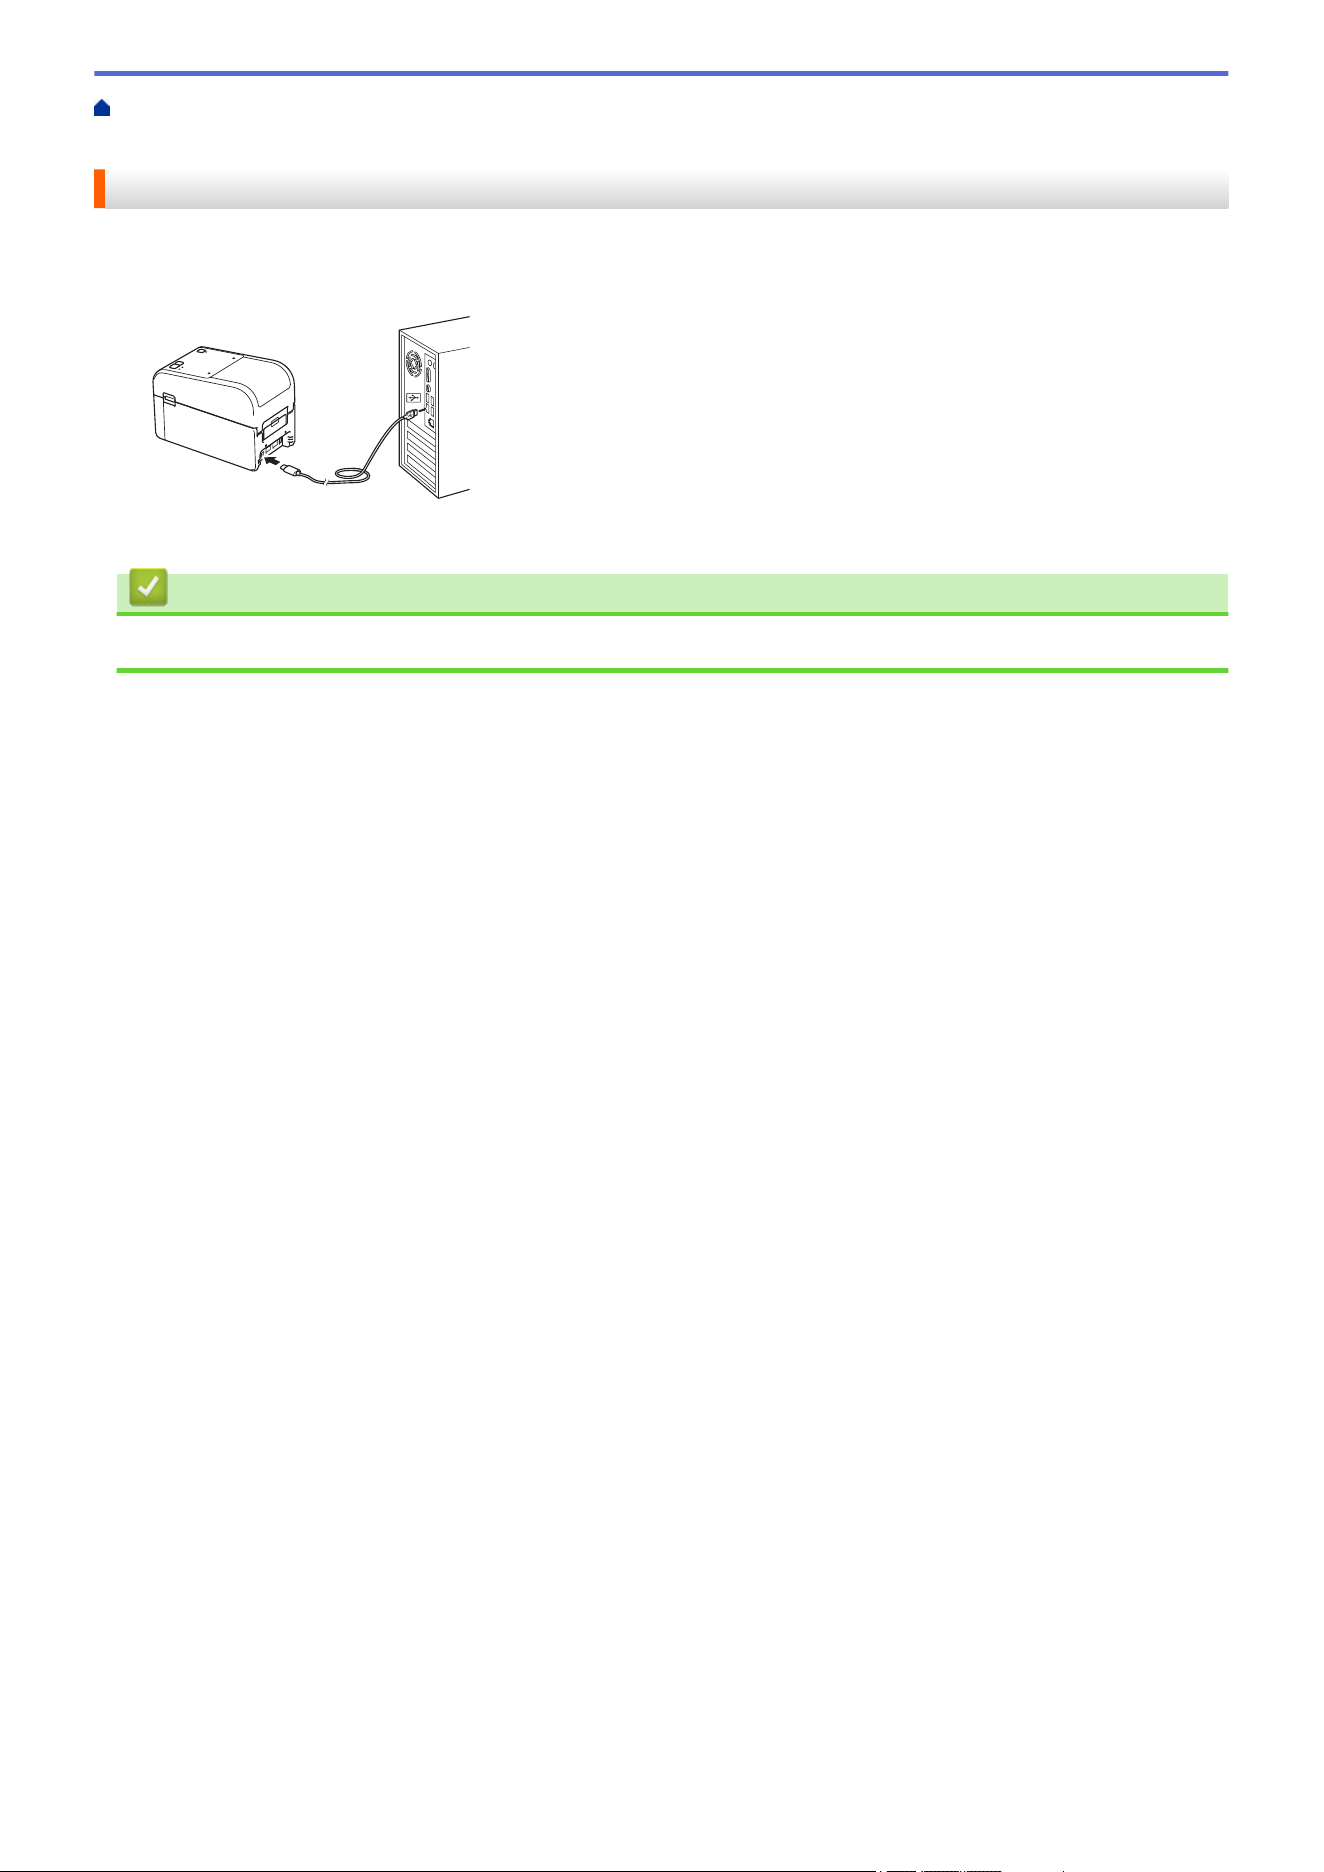
Home > Install Software > Connect the Printer to a Computer > Connect the Printer to a Computer Using a
USB Cable
Connect the Printer to a Computer Using a USB Cable
1. Make sure the printer is turned off before connecting the USB cable.
2. Connect the USB cable to the USB Port on the printer, and then to your computer.
3. Turn on the printer.
Related Information
• Connect the Printer to a Computer
62

Home > Install Software > Connect the Printer to a Computer > Connect the Printer to a Computer Using
Wi-Fi
Connect the Printer to a Computer Using Wi-Fi
Related Models: TD-2350D/TD-2350DF/TD-2350DSA
The following Wi-Fi
®
connection methods are available:
>> Using a Wi-Fi Router/Access Point (Infrastructure Mode)
>> Without Using a Wi-Fi Router/Access Point (Wireless Direct)
>> Using WPS (Wi-Fi Protected Setup
™
)
Using a Wi-Fi Router/Access Point (Infrastructure Mode)
Infrastructure Mode allows you to connect the printer to a computer or mobile device via a Wi-Fi router/access
point.
Before You Begin
First, configure the printer's Wi-Fi settings to communicate with your Wi-Fi router/access point. After the printer is
configured, the computers and mobile devices on your network will have access to the printer.
- Before connecting the printer to your network, contact your system administrator to confirm your Wi-Fi
network settings.
- To reconfigure the Wi-Fi settings, or if the status of the printer's Wi-Fi connection is unknown, reset the
printer's Wi-Fi settings.
To reset the printer's Wi-Fi settings, see Related Topics: Reset the Printer.
- For best results with everyday printing, put the printer as close to the Wi-Fi router/access point as possible
with minimal obstructions. Large objects and walls between the two devices and interference from other
electronic devices can affect the transfer speed of print data.
1. Write down your Wi-Fi router/access point's SSID (Network Name) and Password (Network Key).
2. On the printer, press Menu, and then press a or b to select the following:
a. Select [WLAN]. Press OK.
b. Select [WLAN (On/Off)]. Press OK.
c. Select [On]. Press OK.
3. Configure the printer's Infrastructure Mode settings:
On the printer, press the Menu, and then press a or b to select the following:
a. Select [WLAN]. Press OK.
b. Select [Network Mode]. Press OK.
c. Select [Infrastructure Mode]. Press OK.
d. Select [WLAN]. Press OK.
e. Select [Infra Manual Setup]. Press OK, and follow the on-screen instructions.
When the connection between the printer and your Wi-Fi router/access point is established, the (Wi-
Fi) icon appears on the printer's LCD. Computers and mobile devices that are on the same network as
the printer now have access to the printer.
Without Using a Wi-Fi Router/Access Point (Wireless Direct)
Wireless Direct allows you to connect the printer to your computer or mobile device directly, without a Wi-Fi
router/access point. The printer serves as a Wi-Fi access point.
1. Confirm the printer's Wireless Direct settings:
On the printer, press Menu, and then press a or b to select the following:
a. Select [WLAN]. Press OK.
63
b. Select [Network Mode]. Press OK.
c. Select [Direct Mode]. Press OK.
The Wireless Direct icon, or appears on the LCD.
2. On the printer, press Menu, and then press a or b to select the following:
a. Select [WLAN]. Press OK.
b. Select [WLAN (On/Off)]. Press OK.
c. Select [On]. Press OK.
d. Select [WLAN]. Press OK.
e. Select [WLAN Status]. Press OK.
f. Select [Direct Mode]. Press OK.
The Printer's SSID and the password appear on the LCD.
3. Use your computer or mobile device to select the printer's SSID and enter the password, if required.
SSID: DIRECT-*****_TD-2350###
Password: 235*****
Where ***** is the last five digits of the printer's serial number.
NOTE
• The serial number is located on the base of the printer and inside the printer next to the Roll
compartment. You can also find the serial number by printing the Printer Settings Report. For more
information, see Related Topics.
• The Printer Setting Tool also allows you to apply the network settings to multiple printers.
• You cannot connect to the Internet via Wi-Fi while using Wireless Direct. To use the Internet, connect
using a Wi-Fi router/access point (Infrastructure Mode).
• We recommend setting a new Wireless Direct password using the Printer Setting Tool to protect your
printer from unauthorized access.
Using WPS (Wi-Fi Protected Setup
™
)
1. Confirm that your Wi-Fi router/access point features the WPS symbol.
2. Place the printer within range of your Wi-Fi router/access point.
The range may differ depending on your environment. See the instructions provided with your Wi-Fi router/
access point.
3. Press the WPS button on your Wi-Fi router/access point.
4. On the printer, press Menu, and then press a or b to select the following:
a. Select [WLAN]. Press OK.
b. Select [WPS Button Push] or [WPS PIN Code]. Press OK.
c. If the Selection Menu appears, select [Start].
d. Press OK.
When a connection is established, the WLAN icon appears on the printer's LCD. Computers and mobile
devices that are on the same network as the printer will have access to the printer.
• The printer will try to connect using WPS for two minutes. If you press OK during that time, the printer
will continue trying to connect for an additional two minutes.
• If your computer or mobile device supports the PIN authentication method, select [WPS PIN Code] for
better security.
64


Home > Install Software > Connect the Printer to a Computer > Connect the Printer to a Computer Using a
Wired LAN
Connect the Printer to a Computer Using a Wired LAN
Related Models: TD-2320D/TD-2350D/TD-2320DF/TD-2350DF/TD-2350DSA
To use a static IP address to connect your printer with a wired LAN connection, install the printer drivers and
Printer Setting Tool, and then specify the wired LAN connection settings.
Network Cable
Use a straight-through Category 5 (or greater) twisted-pair cable for 10BASE-T or 100BASE-TX Fast Ethernet
Network.
IMPORTANT
Do not connect this product to any LAN connection that is subject to overvoltages.
1. Make sure the Wireless LAN setting on your printer is turned off.
2. If on-screen instructions appear during the installation, make sure the printer is turned off before connecting
the LAN cable.
3. Connect the LAN cable to the LAN Port on the back of the printer.
4. Turn the printer on.
Related Information
• Connect the Printer to a Computer
66
Home > Install Software > Connect the Printer to a Computer > Connect the Printer to a Computer Using a
Bluetooth Connection
Connect the Printer to a Computer Using a Bluetooth Connection
Related Models: TD-2350D/TD-2350DF/TD-2350DSA
1. On the printer, press the Menu, and then press a or b to select the following:
a. Select [Bluetooth]. Press OK.
b. Select [Bluetooth (On/Off)]. Press OK.
2. Press a or b to select [On]. Press OK.
appears on the LCD.
3. Use your device's Bluetooth management software to discover the printer. Select the printer's name.
4. When your printer is connected successfully, the icon colors change from
to .
Depending on your model, the Bluetooth icons will appear as for and for .
Related Information
• Connect the Printer to a Computer
67
Home > Install Software > Connect the Printer to a Computer > Connect the Printer to a Computer Using
RS-232C
Connect the Printer to a Computer Using RS-232C
Connection using RS-232C requires the use of a dedicated conversion cable (PA-SCA-002).
1. Start the Printer Setting Tool.
Click Start > Brother > Printer Setting Tool.
2. Click P-touch Template Settings > Communication Settings.
3. Set parameters in the Communication Settings window as follows:
Baud rate
From 4800 bps to 115200 bps
Bit Length 7 bits or 8 bits
Parity None, Odd, or Even
Busy Control DTR or XON/XOFF
Other settings, such as the baud rate, must be changed in order to use a RS-232C connection. The
settings for this printer's serial port are shown in the table above.
4. Click the Set button to save the parameters.
Related Information
• Connect the Printer to a Computer
68

Home > Create and Print Labels Using Your Computer
Create and Print Labels Using Your Computer
• Create Labels Using P-touch Editor (Windows)
• Create Label Layouts Using Your Computer
• Print Labels Using P-touch Editor (Windows)
• Create Labels and Print without Installing Software and Drivers
• Print Labels Distributed to Multiple Printers to Reduce Printing Time (Windows)
• Print Barcode Labels Using Crop Print (Windows, 300 DPI Printer Only)
• Print Labels Using the Printer Driver (Windows)
69
Home > Create and Print Labels Using Your Computer > Create Labels Using P-touch Editor (Windows)
Create Labels Using P-touch Editor (Windows)
Before using your printer with your Windows computer, you must install P-touch Editor and the latest printer
driver on your computer.
For the latest drivers and software, go to your model's Downloads page on the Brother support website at
support.brother.com.
1. Start P-touch Editor
.
Click Start > Brother P-touch > P-touch Editor, or double-click the P-touch Editor icon on the desktop.
NOTE
Depending on your computer's operating system, the Brother P-touch folder may or may not be created.
2. Do one of the following:
• To open an existing layout, click Open (1).
• To connect a preset layout to a database, select the Connect Database checkbox (2).
• To create a new layout, double-click the New Layout pane (3), or click the New Layout pane (3) and then
click →.
• To create a new layout using a preset layout, double-click a category button (4), or select a category
button (4), and then click →.
2
1
3
4
Related Information
• Create and Print Labels Using Your Computer
• Main Window of P-touch Editor Express Mode (Windows)
• Main Window of P-touch Editor Professional Mode (Windows)
• Main Window of P-touch Editor Snap Mode (Windows)
70
Home > Create and Print Labels Using Your Computer > Create Labels Using P-touch Editor
(Windows) > Main Window of P-touch Editor Express Mode (Windows)
Main Window of P-touch Editor Express Mode (Windows)
Express mode allows you to quickly create layouts including text and images.
1 12
3
4
1. Edit Buttons
2. Print Button
3. Operation Mode Selection Buttons
4. Property Palettes
Related Information
• Create Labels Using P-touch Editor (Windows)
71

Home > Create and Print Labels Using Your Computer > Create Labels Using P-touch Editor
(Windows) > Main Window of P-touch Editor Professional Mode (Windows)
Main Window of P-touch Editor Professional Mode (Windows)
Professional mode allows you to create layouts using a wide-range of advanced tools and options.
1 2
3
4
3
1. Print Menu
2. Property Palettes
3. Sidebar
4. Operation Mode Selection Buttons
Related Information
• Create Labels Using P-touch Editor (Windows)
72
Home > Create and Print Labels Using Your Computer > Create Labels Using P-touch Editor
(Windows) > Main Window of P-touch Editor Snap Mode (Windows)
Main Window of P-touch Editor Snap Mode (Windows)
Snap mode allows you to capture all or a portion of your computer screen and print it as an image.
Related Information
• Create Labels Using P-touch Editor (Windows)
73

Home > Create and Print Labels Using Your Computer > Create Label Layouts Using Your Computer
Create Label Layouts Using Your Computer
• Tips for Better Printing Results When Using P-touch Editor
• Create a Template Using P-Touch Editor (Windows)
• Insert the Date and Time in a Label Using P-Touch Editor (Windows)
• Link a Database to a Template Using P-Touch Editor (Windows)
74

Home > Create and Print Labels Using Your Computer > Create Label Layouts Using Your Computer > Tips
for Better Printing Results When Using P-touch Editor
Tips for Better Printing Results When Using P-touch Editor
1. Font Substitution
When creating a label template in P-touch Editor, if you use a font that the printer does not support, the
printer will substitute one of its built-in fonts, and the print result will be different from the label image shown in
P-touch Editor.
To prevent font substitution, select a font already installed in the printer, or transfer the font you want to use to
the printer.
For information on how to transfer fonts, visit your model's FAQs & Troubleshooting page at
support.brother.com.
2. Other Factors
There are other factors that may cause printing results to differ from the label image displayed in P-touch
Editor. For more information, visit your model's FAQs & Troubleshooting page on
support.brother.com.
Related Information
• Create Label Layouts Using Your Computer
75
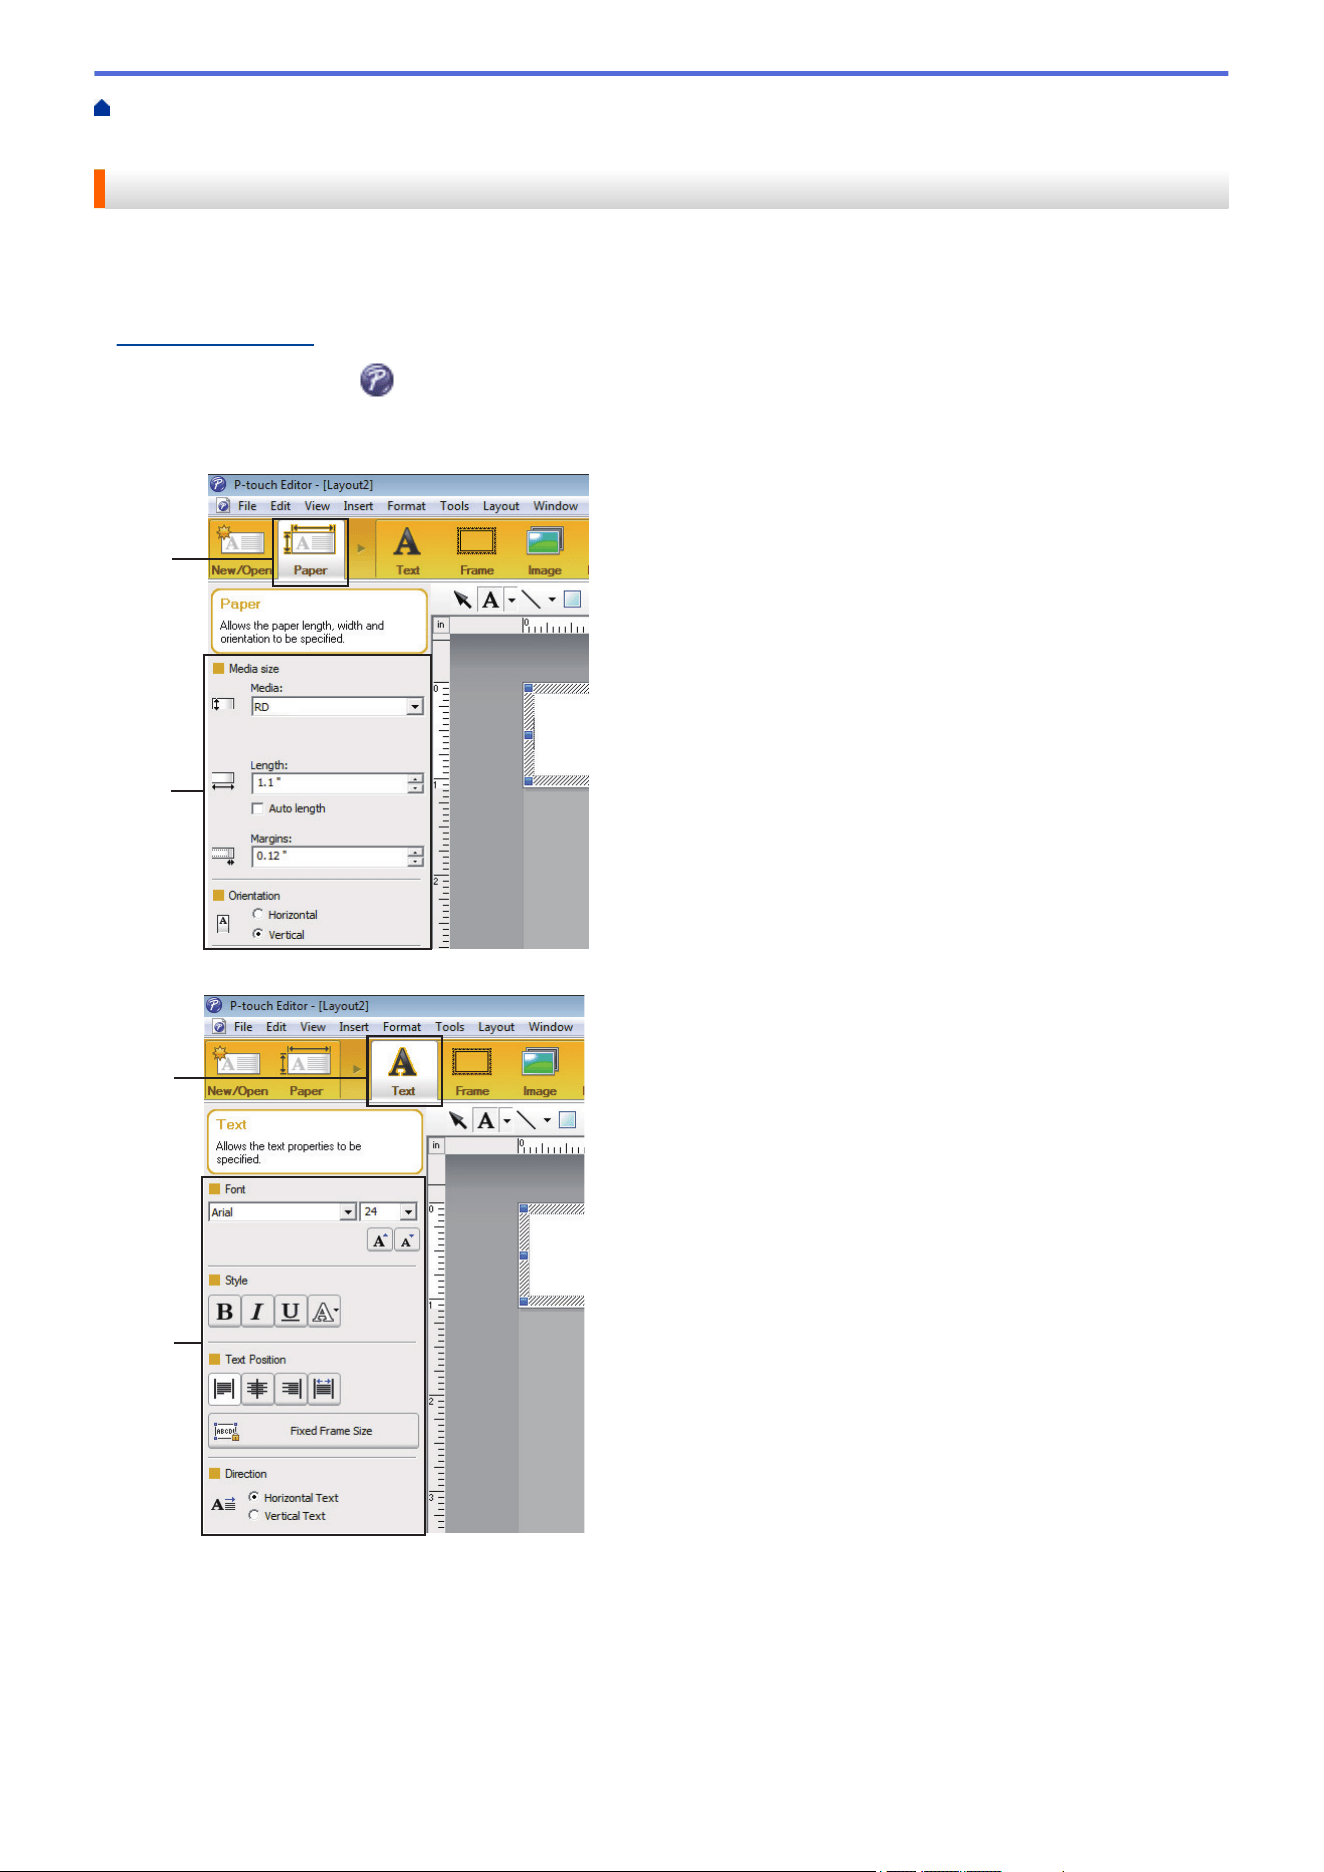
Home > Create and Print Labels Using Your Computer > Create Label Layouts Using Your
Computer > Create a Template Using P-Touch Editor (Windows)
Create a Template Using P-Touch Editor (Windows)
Before using your printer with your Windows computer, you must install P-touch Editor and the latest printer
driver on your computer.
For the latest drivers and software, go to your model's Downloads page on the Brother support website at
support.brother.com.
1. Start P-Touch Editor
.
2. Click Paper (1), and then specify the Media size and Orientation (2). (This window appears in Express
mode.)
1
2
3. Click Text (1), and then specify the Font, Style, and other information (2).
1
2
76

4. Click to display the cursor and to type in text.
5. After typing, click the text box to move it within the template.
6. Continue to add text and adjust the layout until you are satisfied with your template.
7. Click File > Save as, and then specify the file name for your template.
Related Information
• Create Label Layouts Using Your Computer
77
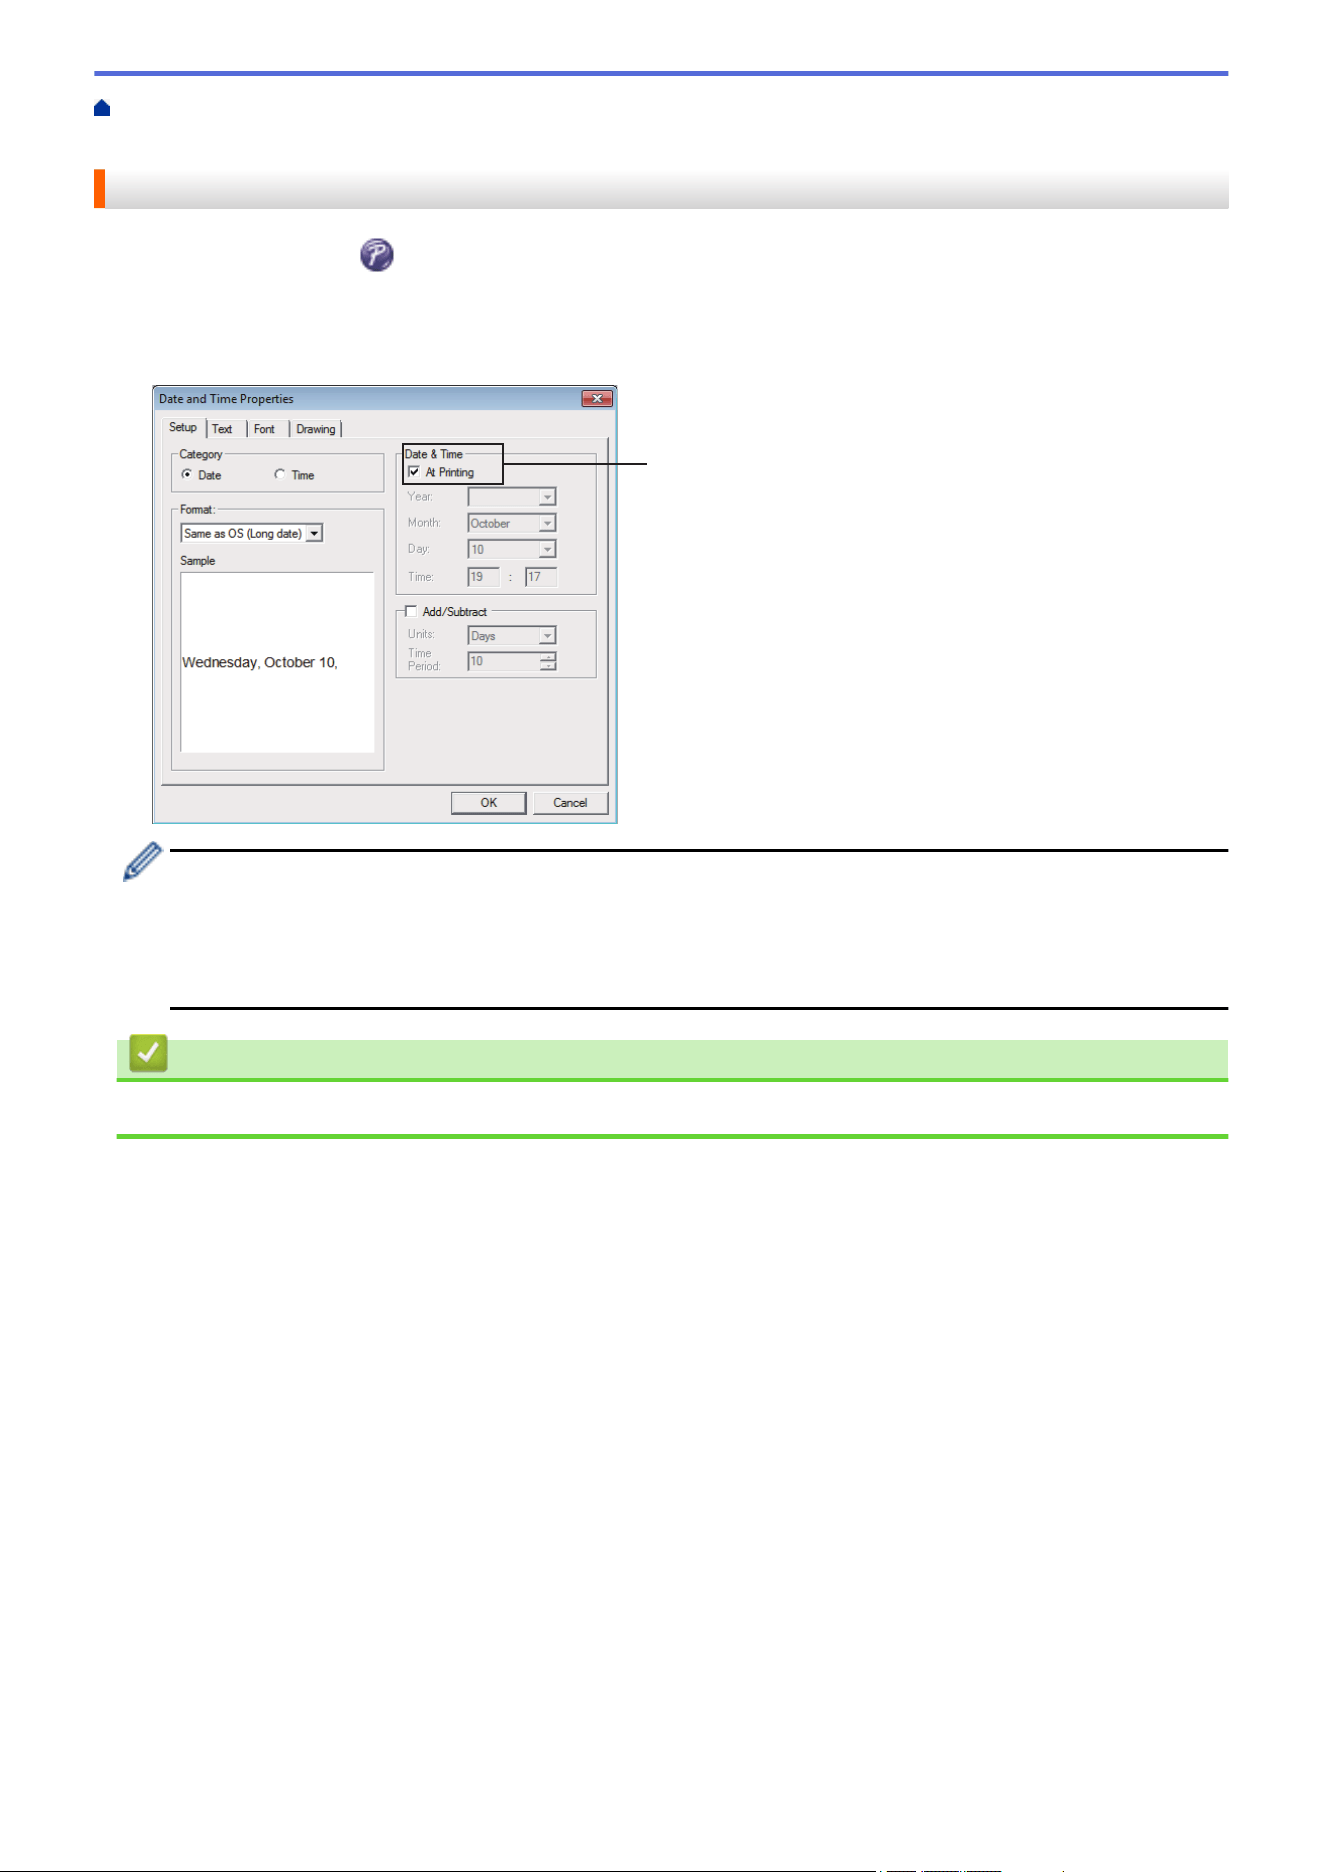
Home > Create and Print Labels Using Your Computer > Create Label Layouts Using Your
Computer > Insert the Date and Time in a Label Using P-Touch Editor (Windows)
Insert the Date and Time in a Label Using P-Touch Editor (Windows)
1. Start P-Touch Editor .
2. Open the label layout.
3. Click Insert > Date/Time to display the Date and Time Properties dialog box. Select format settings for the
date and time text.
1
2024
2024
• If the At Printing checkbox (1) is selected, the date and time of printing will be inserted. If the checkbox
is cleared, the current date and time will be inserted but will not be updated.
• The date and time inserted into the label will be printed in the printer’s built-in character size. Since the
character size is determined by the date and time object size, adjust the object to the desired size in P-
touch Editor before transferring the label layout to the printer.
Related Information
• Create Label Layouts Using Your Computer
78
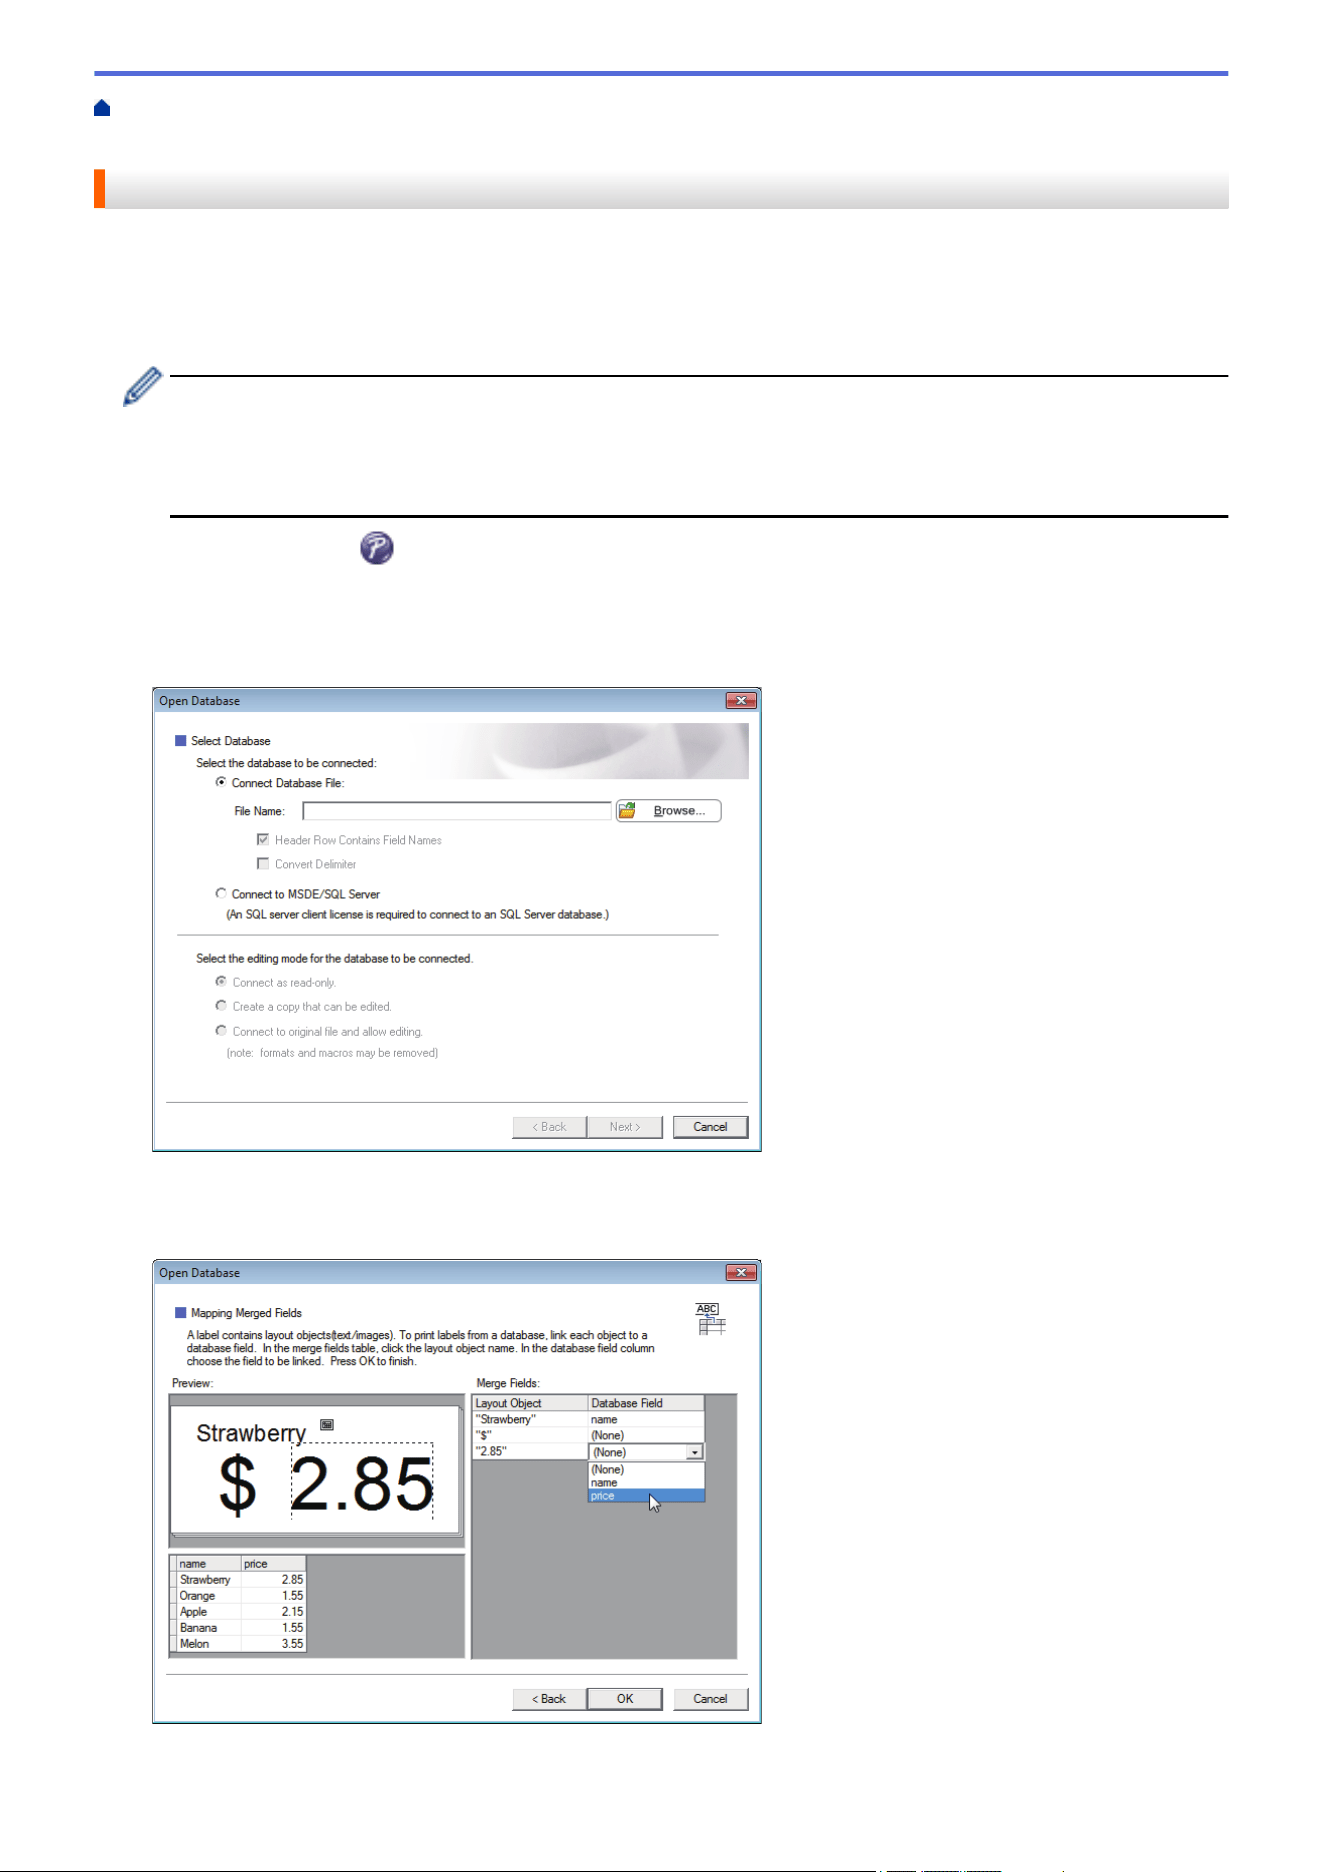
Home > Create and Print Labels Using Your Computer > Create Label Layouts Using Your Computer > Link
a Database to a Template Using P-Touch Editor (Windows)
Link a Database to a Template Using P-Touch Editor (Windows)
You can link a database to any templates created in P-Touch Editor. Text in the template can be replaced with
text from the database, so you can print multiple labels using a single template. For information on specifying
database settings, refer to the P-touch Editor Help menu.
1. Prepare a database file in advance.
• Files saved in XLS, MDB, CSV, and TXT formats can be used as databases.
• Only one database can be linked to a single template. A maximum of 65,000 records can be created in
that database.
(The total size of templates and databases: 8 MB for TD-2310D, 32 MB for other models.)
2. Start P-Touch Editor .
3. Open the template you want to link to the database.
4. Click File > Database > Connect. The Open Database dialog box appears.
5. Select Connect Database File, click Browse, and then select the database to be linked.
6. Click Next.
7. In the Merge Fields section, click the Database Field drop-down arrow for each field that you want to link to
the template's Layout Object. When finished, click OK.
The template and the database will link, and the merged editing window appears.
79
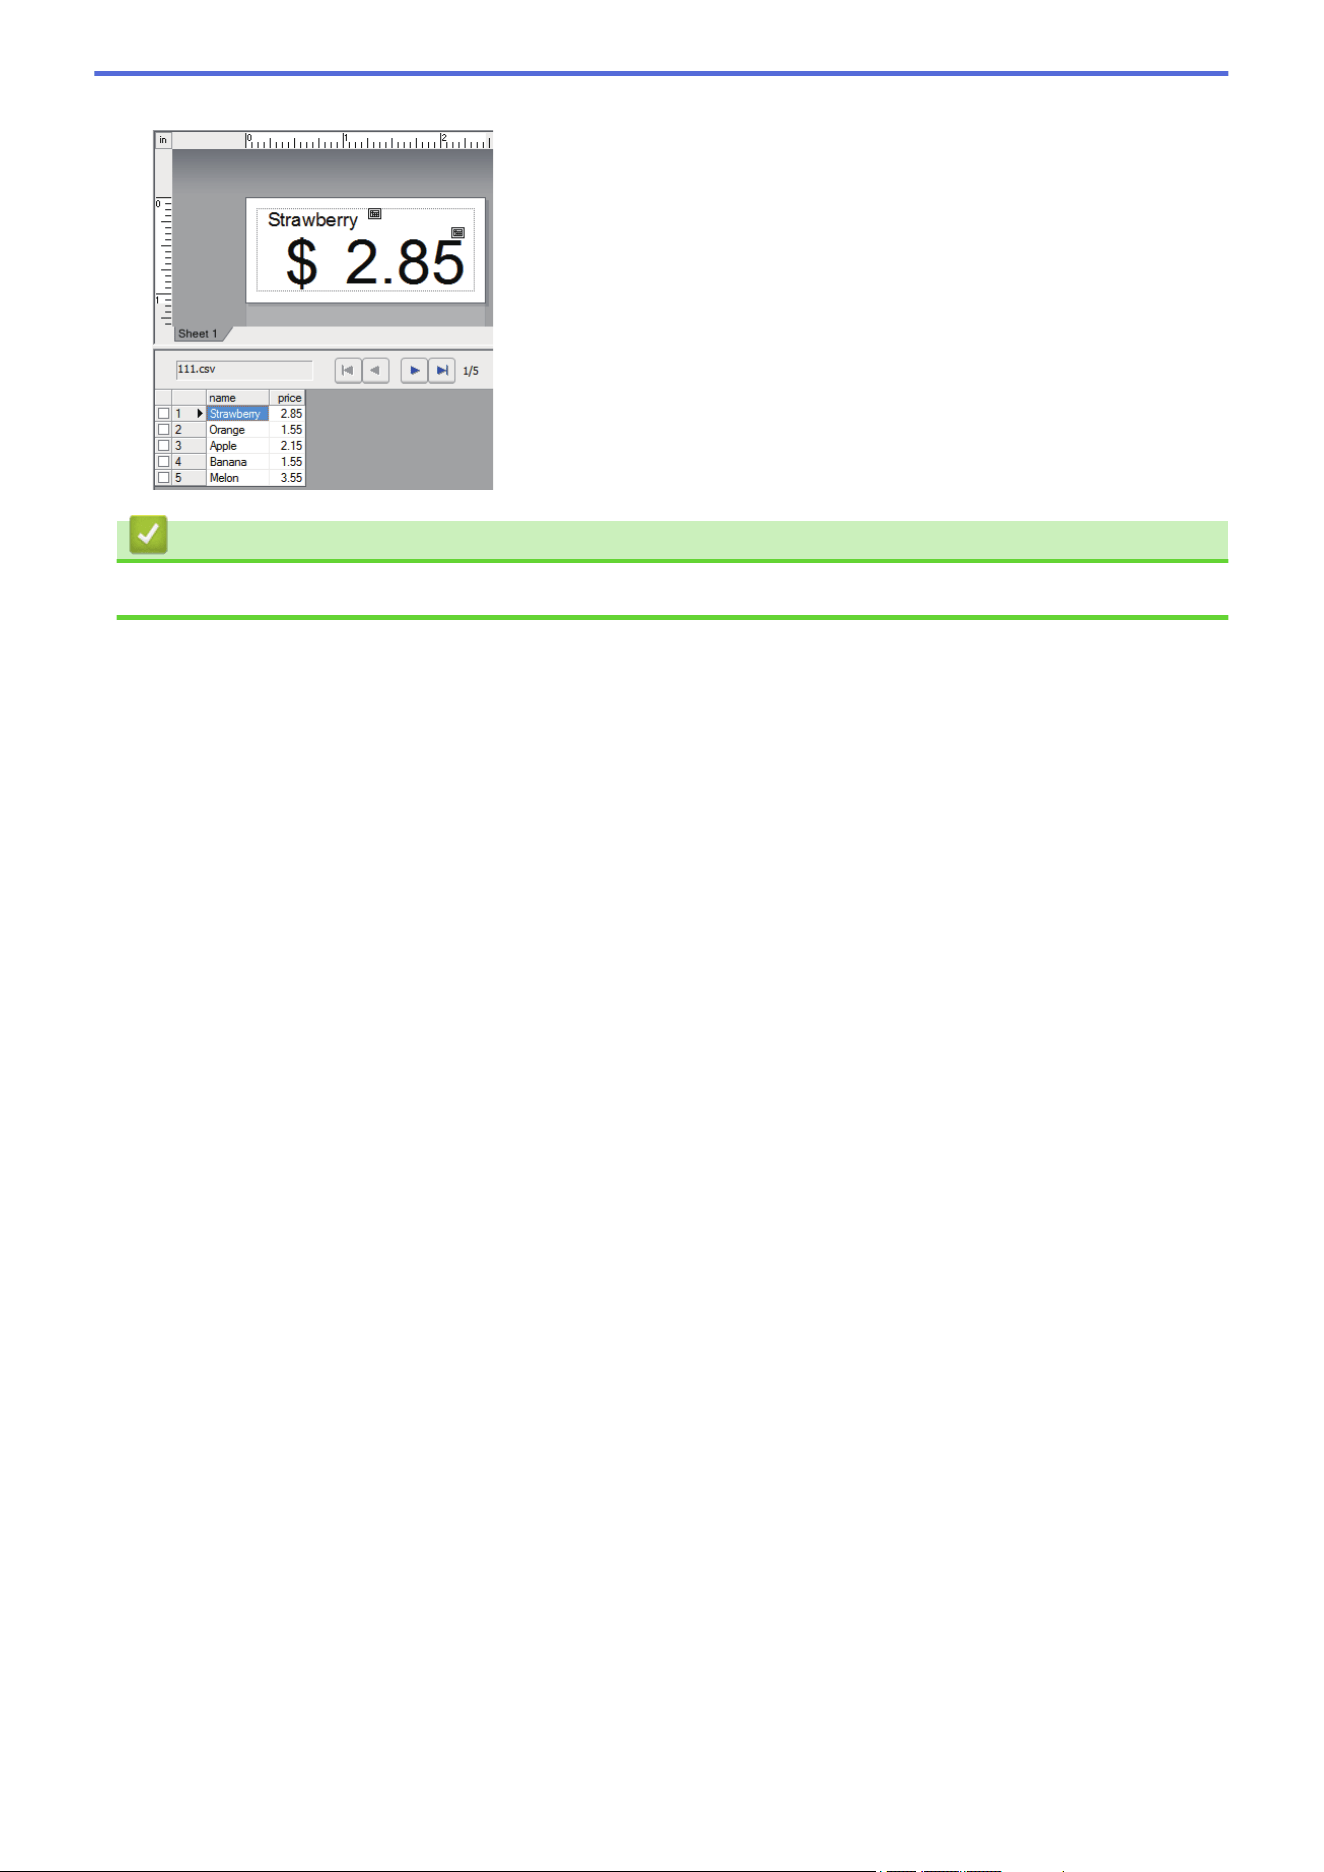
Home > Create and Print Labels Using Your Computer > Print Labels Using P-touch Editor (Windows)
Print Labels Using P-touch Editor (Windows)
>> Express Mode
>> Professional Mode
>> Snap Mode
Express Mode
Configure the settings in the Print screen before printing.
Click File > Print from the menu bar, or click (Print).
Professional Mode
Configure the settings in the Print screen before printing.
Click File > Print from the menu bar, or click .
Click to start printing without changing the settings.
Snap Mode
Enter the text, and then click .
Related Information
• Create and Print Labels Using Your Computer
81

Home > Create and Print Labels Using Your Computer > Create Labels and Print without Installing Software
and Drivers > Print Using a USB Interface (Mass Storage Mode)
Print Using a USB Interface (Mass Storage Mode)
The mass storage feature allows you to send a file to the printer using the USB interface, without installing a
printer driver.
This feature is useful for:
• Applying printer settings saved in a command file (BIN file format) and adding templates (BLF file format) into
your printer without using any software tools. Both types of files must be distributed by an administrator.
• Executing commands without installing the printer driver.
• Using a device with an operating system (including non-Windows operating systems) supporting a USB host
feature to print and transmit data.
1. Confirm that the printer is turned off.
2. Do one of the following:
• TD-2350D/TD-2350DF/TD-2350DSA: Press and hold OK and
at the same time until the Power LED
lights in green and [Mass Storage Mode] appears on the LCD.
• TD-2310D/TD-2320D/TD-2320DF: Press and hold and at the same time until the Power LED
lights in green.
3. Connect the computer or mobile device to the printer via USB.
The printer’s mass storage area appears as a folder on the computer or device's screen.
If the mass storage area does not appear automatically, see the instructions for the operating system of
your computer or mobile device for information about accessing the mass storage area.
4. Drag and drop the file you want to copy to the mass storage area.
5. Do one of the following:
• TD-2350D/TD-2350DF/TD-2350DSA: Press OK.
The commands in the command file are executed, and the Status LED flashes once in green. When
finished, the Power LED lights in green.
• TD-2310D/TD-2320D/TD-2320DF: Press
.
The commands in the command file are executed, and the Status LED flashes once in green. When
finished, the Power LED lights in green.
6. To turn Mass Storage Mode off, turn the printer off.
NOTE
• When the printer is turned off, Mass Storage Mode is deactivated and any files in the mass storage area
are deleted.
• This feature supports only BIN, BLF and JPG files.
• Do not create folders in the mass storage area. If a folder is created, files in the folder cannot be
accessed.
• Mass Storage maximum capacity is 16 MB.
• If multiple files are copied, the commands may not be executed.
• Only USB connection is available while the printer is in Mass Storage Mode.
• Do not access other files in the mass storage area when executing a copied file.
Related Information
• Create Labels and Print without Installing Software and Drivers
83
Home > Create and Print Labels Using Your Computer > Create Labels and Print without Installing Software
and Drivers > Notes on Printing Images without Using the Printer Driver
Notes on Printing Images without Using the Printer Driver
Mass Storage Mode supports JPEG image printing. The printer converts color JPEG files to black and white
using the dithering process, which could result in fuzzy images. To improve image quality, avoid or turn off any
functions that preprocess images.
TD-2350D/TD-2350DF/TD-2350DSA:
Your printer supports an Object Push Profile (OPP) when printing via Bluetooth.
• Only JPEG images can be printed; this function is limited to files with the .jpg extension.
• The maximum file size is 16 MB (2 MB when the Mass Storage feature is used).
• The maximum resolutions are as follows:
- Printers with 203 dpi print resolution:
Height × Width = 24,000 × 472 dots
- Printers with 300 dpi print resolution:
Height × Width = 36,000 × 696 dots
If these limits are exceeded, the printer will reject the data and will not print the image.
• Print is at 1 pixel = 1 dot.
• The printer performs binary processing (simple binary) to print the image.
• Images are printed using the original data's height-to-width proportions.
Related Information
• Create Labels and Print without Installing Software and Drivers
84
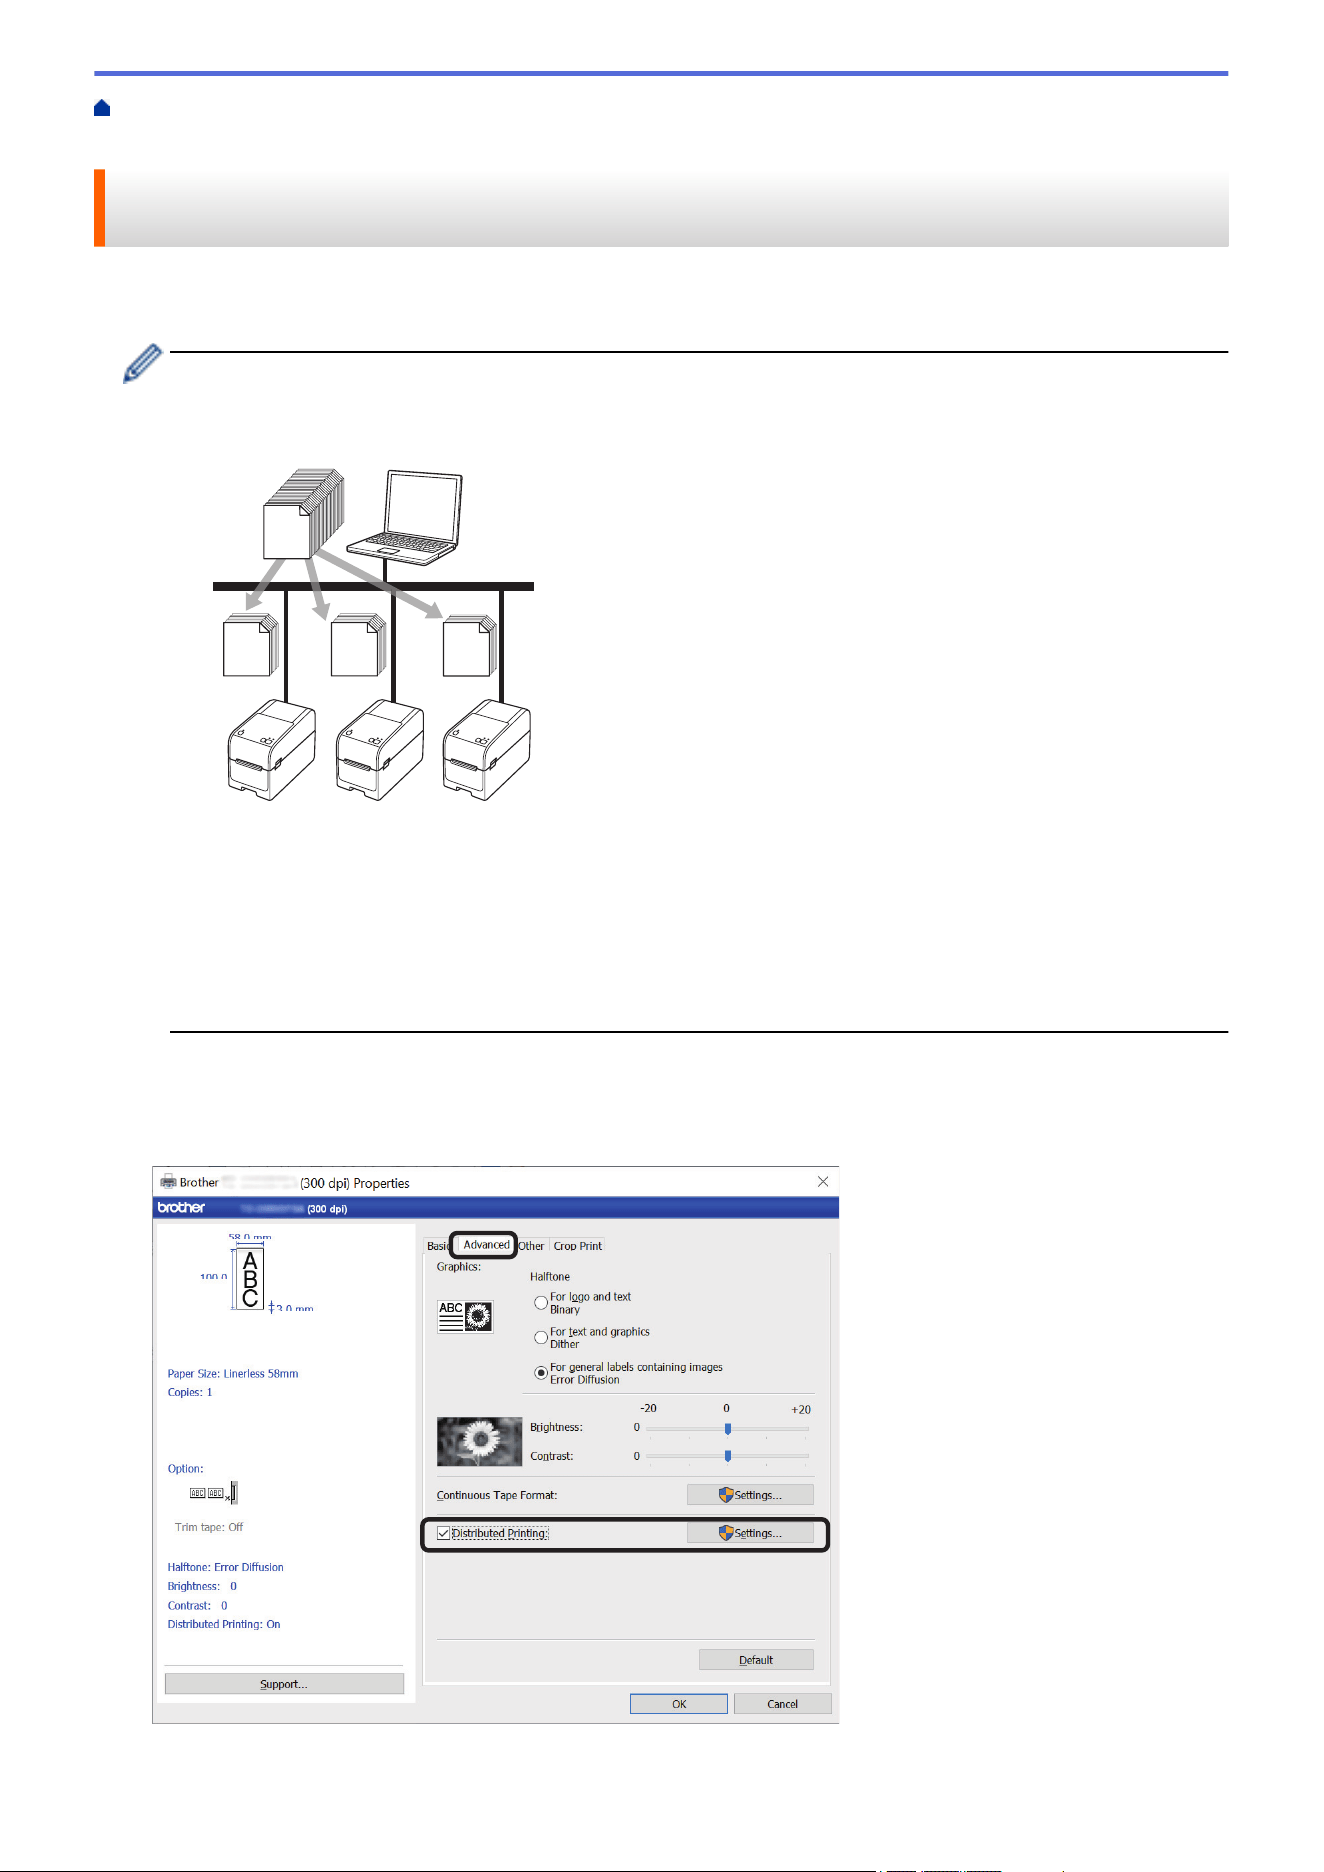
Home > Create and Print Labels Using Your Computer > Print Labels Distributed to Multiple Printers to
Reduce Printing Time (Windows)
Print Labels Distributed to Multiple Printers to Reduce Printing Time
(Windows)
When printing a large number of labels, printing can be distributed among multiple printers to reduce printing
time.
• The Distributed Printing function can only be used with printers of the same model number.
• The number of pages is divided among the selected printers. If the specified number of pages cannot
be evenly divided among the printers, it is divided in the order of the printers as shown.
67 67
66
200
• It may not be possible to detect information for a printer connected via a USB hub or print server. Before
printing, enter the settings manually, and check if the printer can be used for printing.
• TD-2320D/TD-2350D/TD-2320DF/TD-2350DF/TD-2350DSA:
Depending on whether a router is used and the security features in use, such as a firewall, it may not be
possible to use this function.
• We recommend performing a connection test for your operating environment. Contact your information
technology manager or administrator for assistance.
1. In P-touch Editor, click File > Print.
2. Click Properties.
3. Click the Advanced tab, select the Distributed Printing checkbox, and then click Settings.
The Distributed Printing Settings dialog box appears.
85
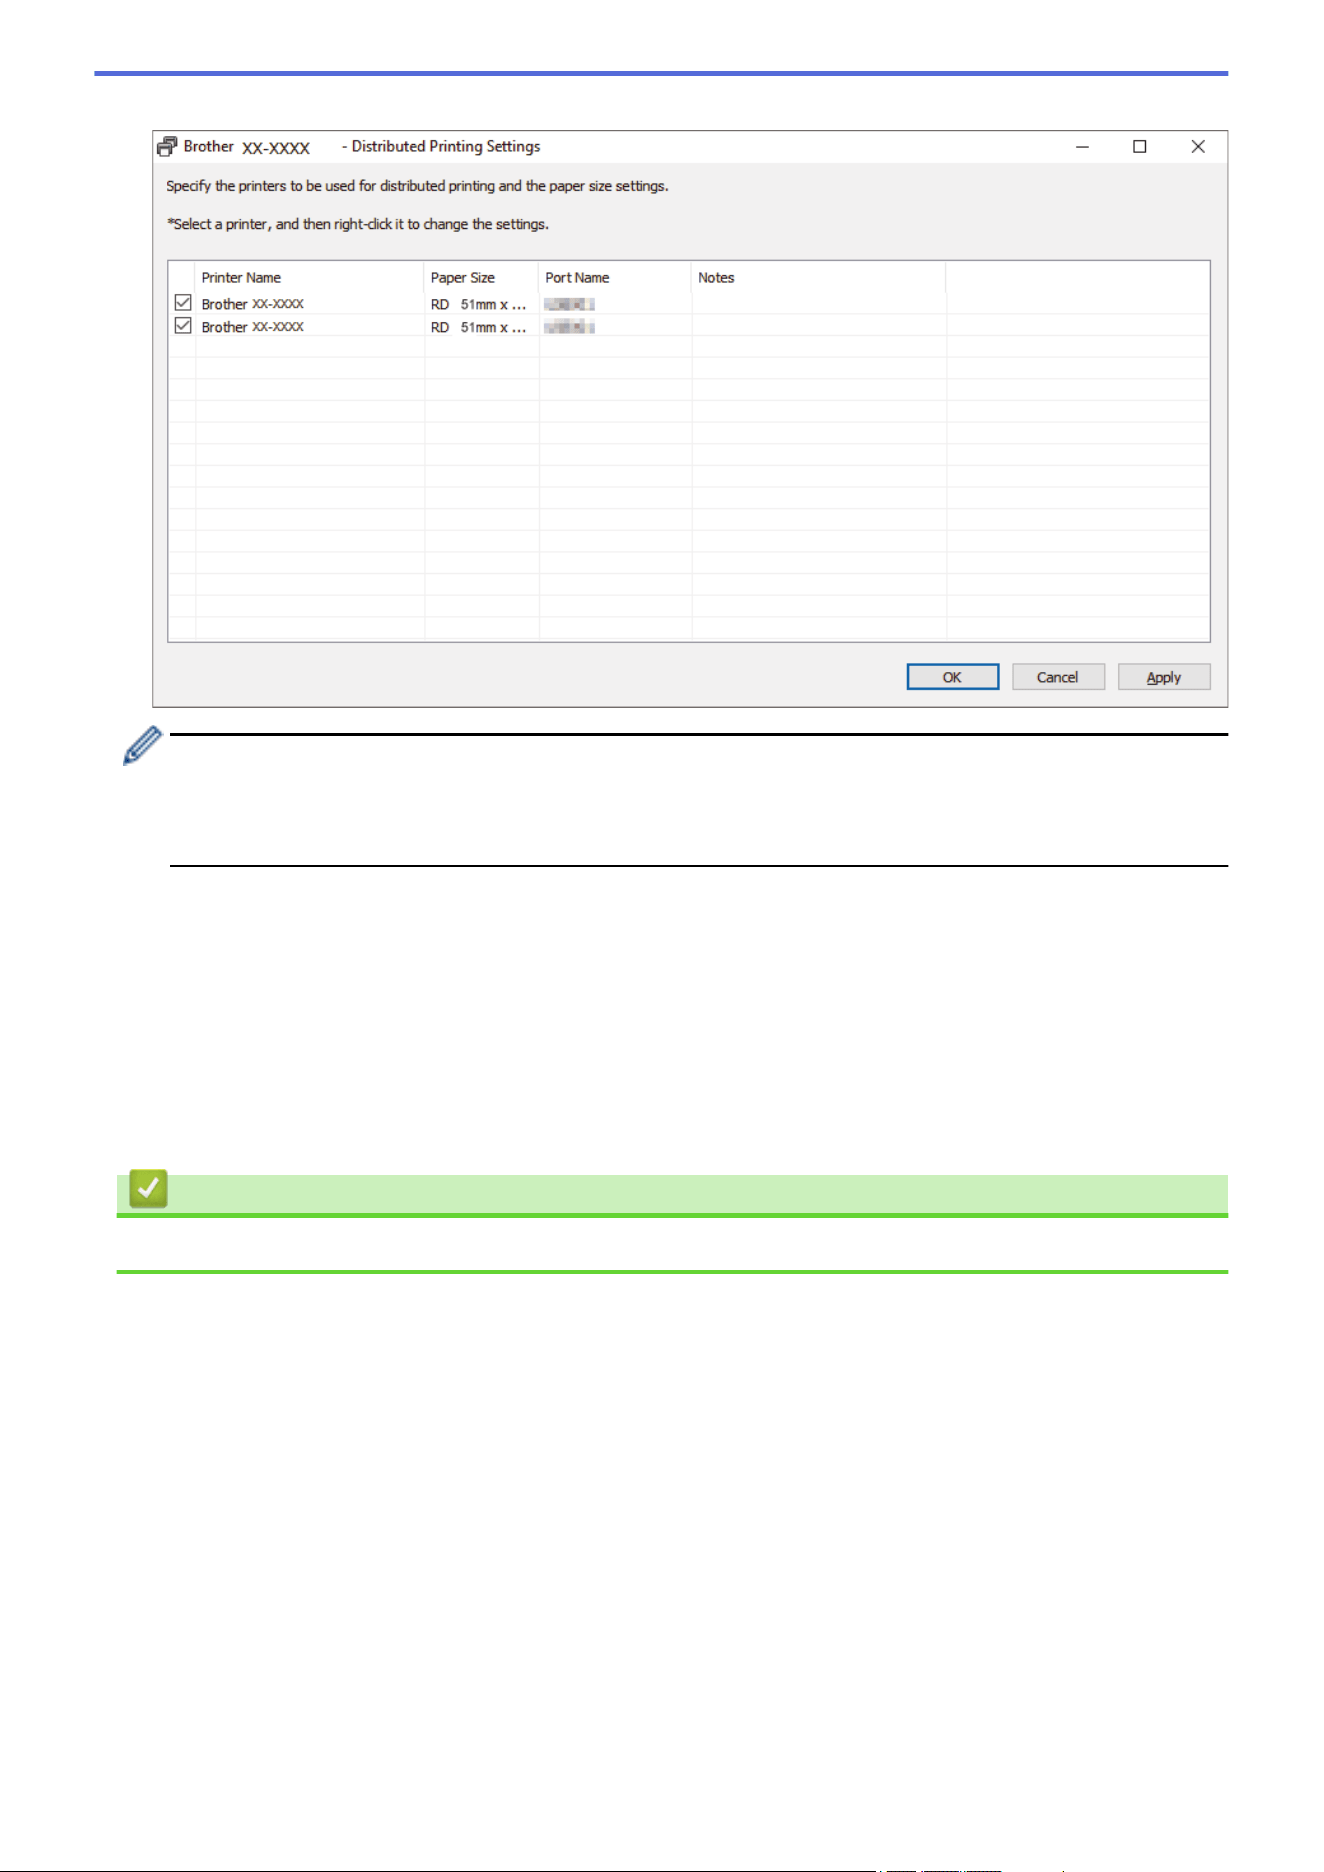
4. Select the printers you want to use for distributed printing.
TD-2320D/TD-2350D/TD-2320DF/TD-2350DF/TD-2350DSA:
If multiple printers are connected, you can find the printer you want using its port name. The 123456abcdef
in BRN123456abcdef in the port name indicates the MAC address/Ethernet address of the printer. The
MAC address/Ethernet address can be checked by printing the printer setup information.
5. Right-click the selected printer or printers, and then click Settings. From the Paper Size drop-down list,
select the label size.
If multiple printers have been selected, the same label size setting is applied to all selected printers.
6. Click OK to close the label size setting dialog box.
7. Click OK to close the Distributed Printing Settings dialog box.
The setup is completed.
8. Click OK to close the Properties dialog box.
9. Start printing.
Related Information
• Create and Print Labels Using Your Computer
86
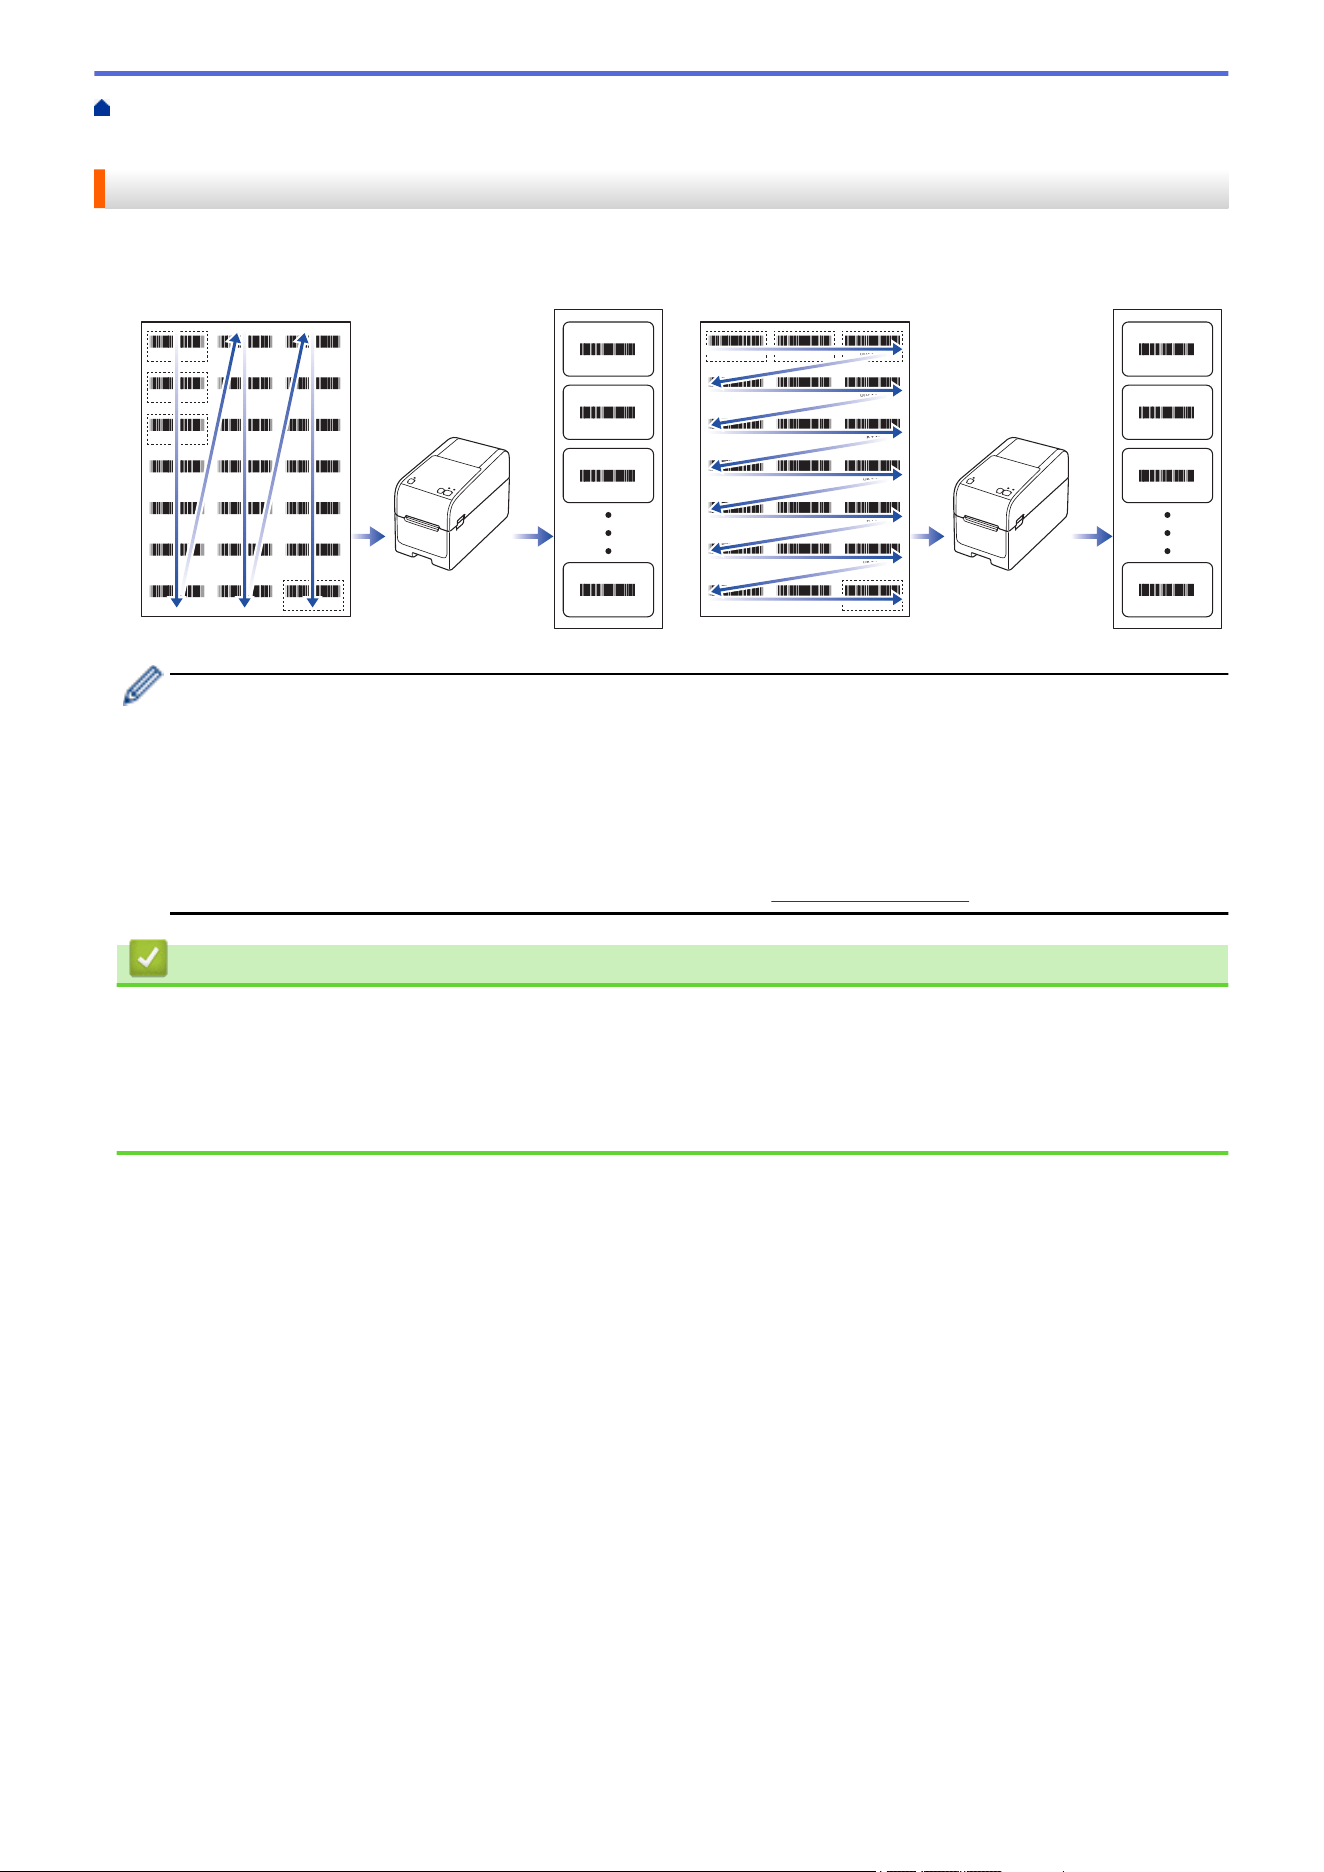
Home > Create and Print Labels Using Your Computer > Print Barcode Labels Using Crop Print (Windows,
300 DPI Printer Only)
Print Barcode Labels Using Crop Print (Windows, 300 DPI Printer Only)
You can print one or multiple barcodes from an A4 or Letter size PDF file. The Crop Print feature automatically
identifies and then individually crops and prints the barcodes you specify.
A
A
B
A
B
C
Z
C
D00XXU001 D00VXY004 D00ZXX003
D00XXU002 D00X0X001 D00ZXX004
D00XXU003 D00X0X002 D00KYX001
D00XXU004 D00X0X003 D00KYX002
D00VXY001 D00X0X004 D00KYX003
D00VXY002 D00ZXX001 D00KYX004
D00VXY003 D00ZXX002 D00XXX001
D00XXU001
D00XXU002
D00XXU003
D00XXX001
Z
A
B
C
Z
D00XXU001 D00VXY004 D00ZXX003
D00XXU002 D00X0X001 D00ZXX004
D00XXU003 D00X0X002 D00KYX001
D00XXU004 D00X0X003 D00KYX002
D00VXY001 D00X0X004 D00KYX003
D00VXY002 D00ZXX001 D00KYX004
D00VXY003 D00ZXX002 D00XXX001
D00XXU001
D00XXX001
Z
B C
D00VXY004
D00ZXX003
• The Crop Print function is available only when printing from the Windows printer driver, and cannot be
executed using P-touch Editor.
• The accuracy of the Crop Print feature depends on the user's environment, printing material, and label
content.
• Clear, black-and-white barcodes are recommended.
• Some labels may not print correctly or may differ from the original data if the conditions are not optimal.
• For more information, visit the Brother support website at
support.brother.com.
Related Information
• Create and Print Labels Using Your Computer
• Barcodes Compatible with Crop Print (Windows)
• Barcode Document Compatible with Crop Print (Windows)
• Print Barcode Labels Using Crop Print (Windows, 300 DPI Printer Only)
87
Home > Create and Print Labels Using Your Computer > Print Barcode Labels Using Crop Print (Windows,
300 DPI Printer Only) > Barcodes Compatible with Crop Print (Windows)
Barcodes Compatible with Crop Print (Windows)
Barcode Specification
Property
Specification
Vertical width 0.2" (5 mm) (minimum)
Horizontal width The narrowest bar: 0.02" (0.5 mm) (minimum)
Margin 10 times the narrowest bar width (minimum)
Color Black
Background color White
Cell width (widest bar) 0.02" (0.5 mm) (minimum)
• Code 39/ Code 3 of 9
• ITF/ ITF-14/ Interleaved 2 of 5
• GS1-128 (UCC/ EAN-128)
• Codabar (Code 2 of 7, NW-7)
• CODE 93
• CODE 128
• UPC-A
• UPC-E
• JAN-8/ EAN-8
• JAN-13/ EAN-13
• QR code
• PDF417
• MaxiCode
Related Information
• Print Barcode Labels Using Crop Print (Windows, 300 DPI Printer Only)
88
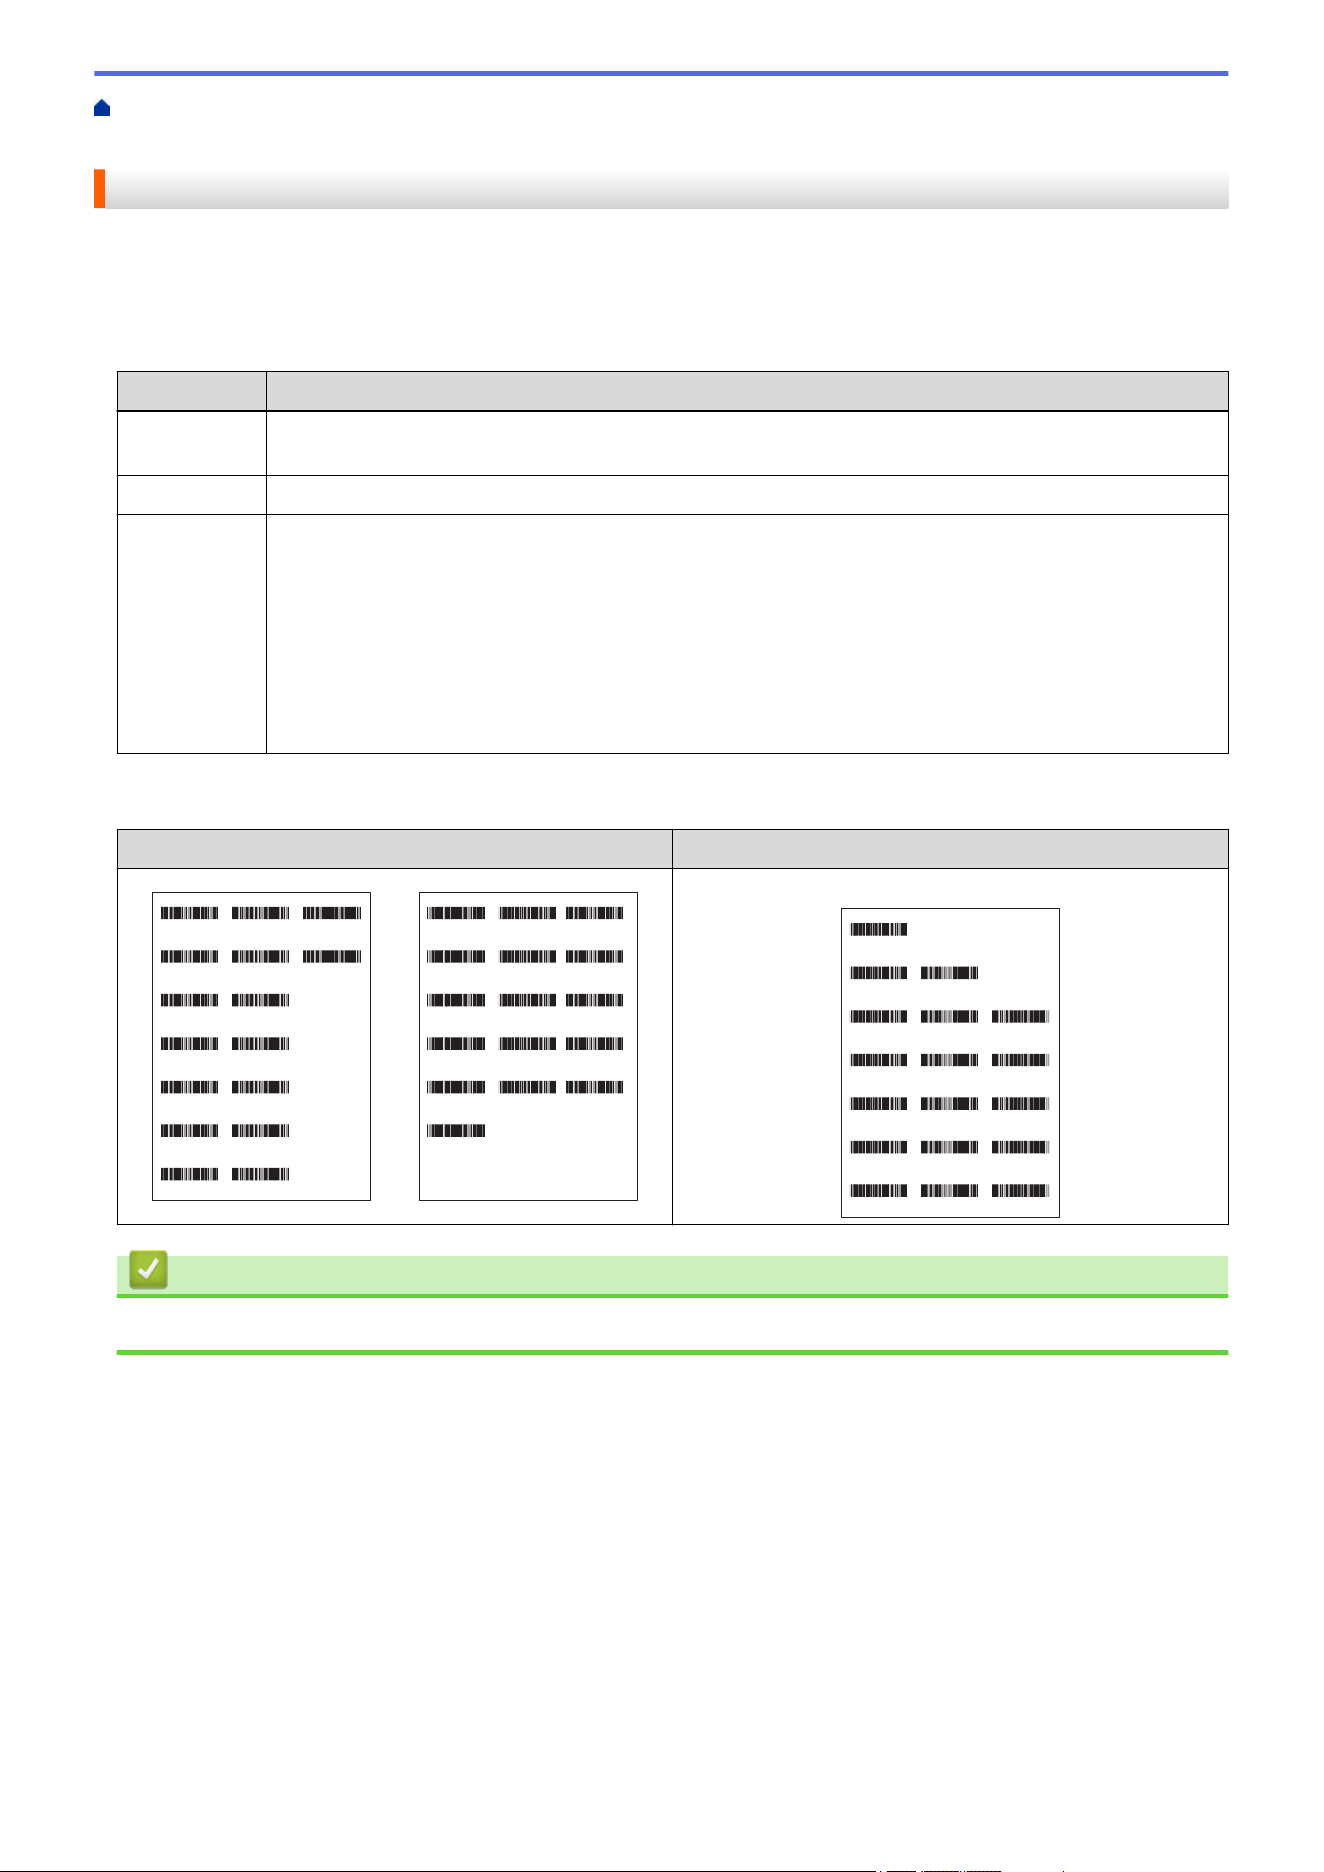
Home > Create and Print Labels Using Your Computer > Print Barcode Labels Using Crop Print (Windows,
300 DPI Printer Only) > Barcode Document Compatible with Crop Print (Windows)
Barcode Document Compatible with Crop Print (Windows)
To use the Crop Print function, create a barcode document and save it as a PDF file.
Make sure the final barcode PDF meets the following requirements:
Barcode Conditions for Product Labels
Item
Condition
Total barcode
number
Between 1-99 barcodes
Barcode type Use only barcodes compatible with the Crop Print feature.
Barcode
position
Make sure barcodes are not tilted or on an angle. They must be parallel with the top and bottom of
each page.
There are two ways to arrange bar codes: one that prioritizes the vertical direction, and the other that
prioritizes the horizontal direction.
• In vertical direction priority, barcodes start in the top left corner and run down the column to the
bottom, continuing at the top of the next column to the right.
• In horizontal direction priority, barcodes start in the top left corner and run down the row to the
right, continuing at the left end of the next row.
Barcode Layout for Product Labels
Correct Barcode Layout
Incorrect Barcode Layout
D00XXU001 D00VXY004 D00ZXX003
D00XXU002 D00X0X001
D00XXU003 D00X0X002
D00XXU004 D00X0X003
D00VXY001 D00X0X004
D00VXY002 D00ZXX001
D00VXY003 D00ZXX002
D00XXU001
D00VXY004
D00ZXX003
D00XXU002
D00X0X001
D00XXU003
D00X0X002
D00XXU004
D00X0X003
D00VXY001
D00X0X004
D00VXY002
D00ZXX001
D00VXY003
D00ZXX002
D00ZXX004
D00ZXX004
(not aligned along the top margin)
D00XXU001
D00XXU002 D00X0X001
D00XXU003 D00X0X002 D00KYX001
D00XXU004 D00X0X003 D00KYX002
D00VXY001 D00X0X004 D00KYX003
D00VXY002 D00ZXX001 D00KYX004
D00VXY003 D00ZXX002 D00XXX001
Related Information
• Print Barcode Labels Using Crop Print (Windows, 300 DPI Printer Only)
89
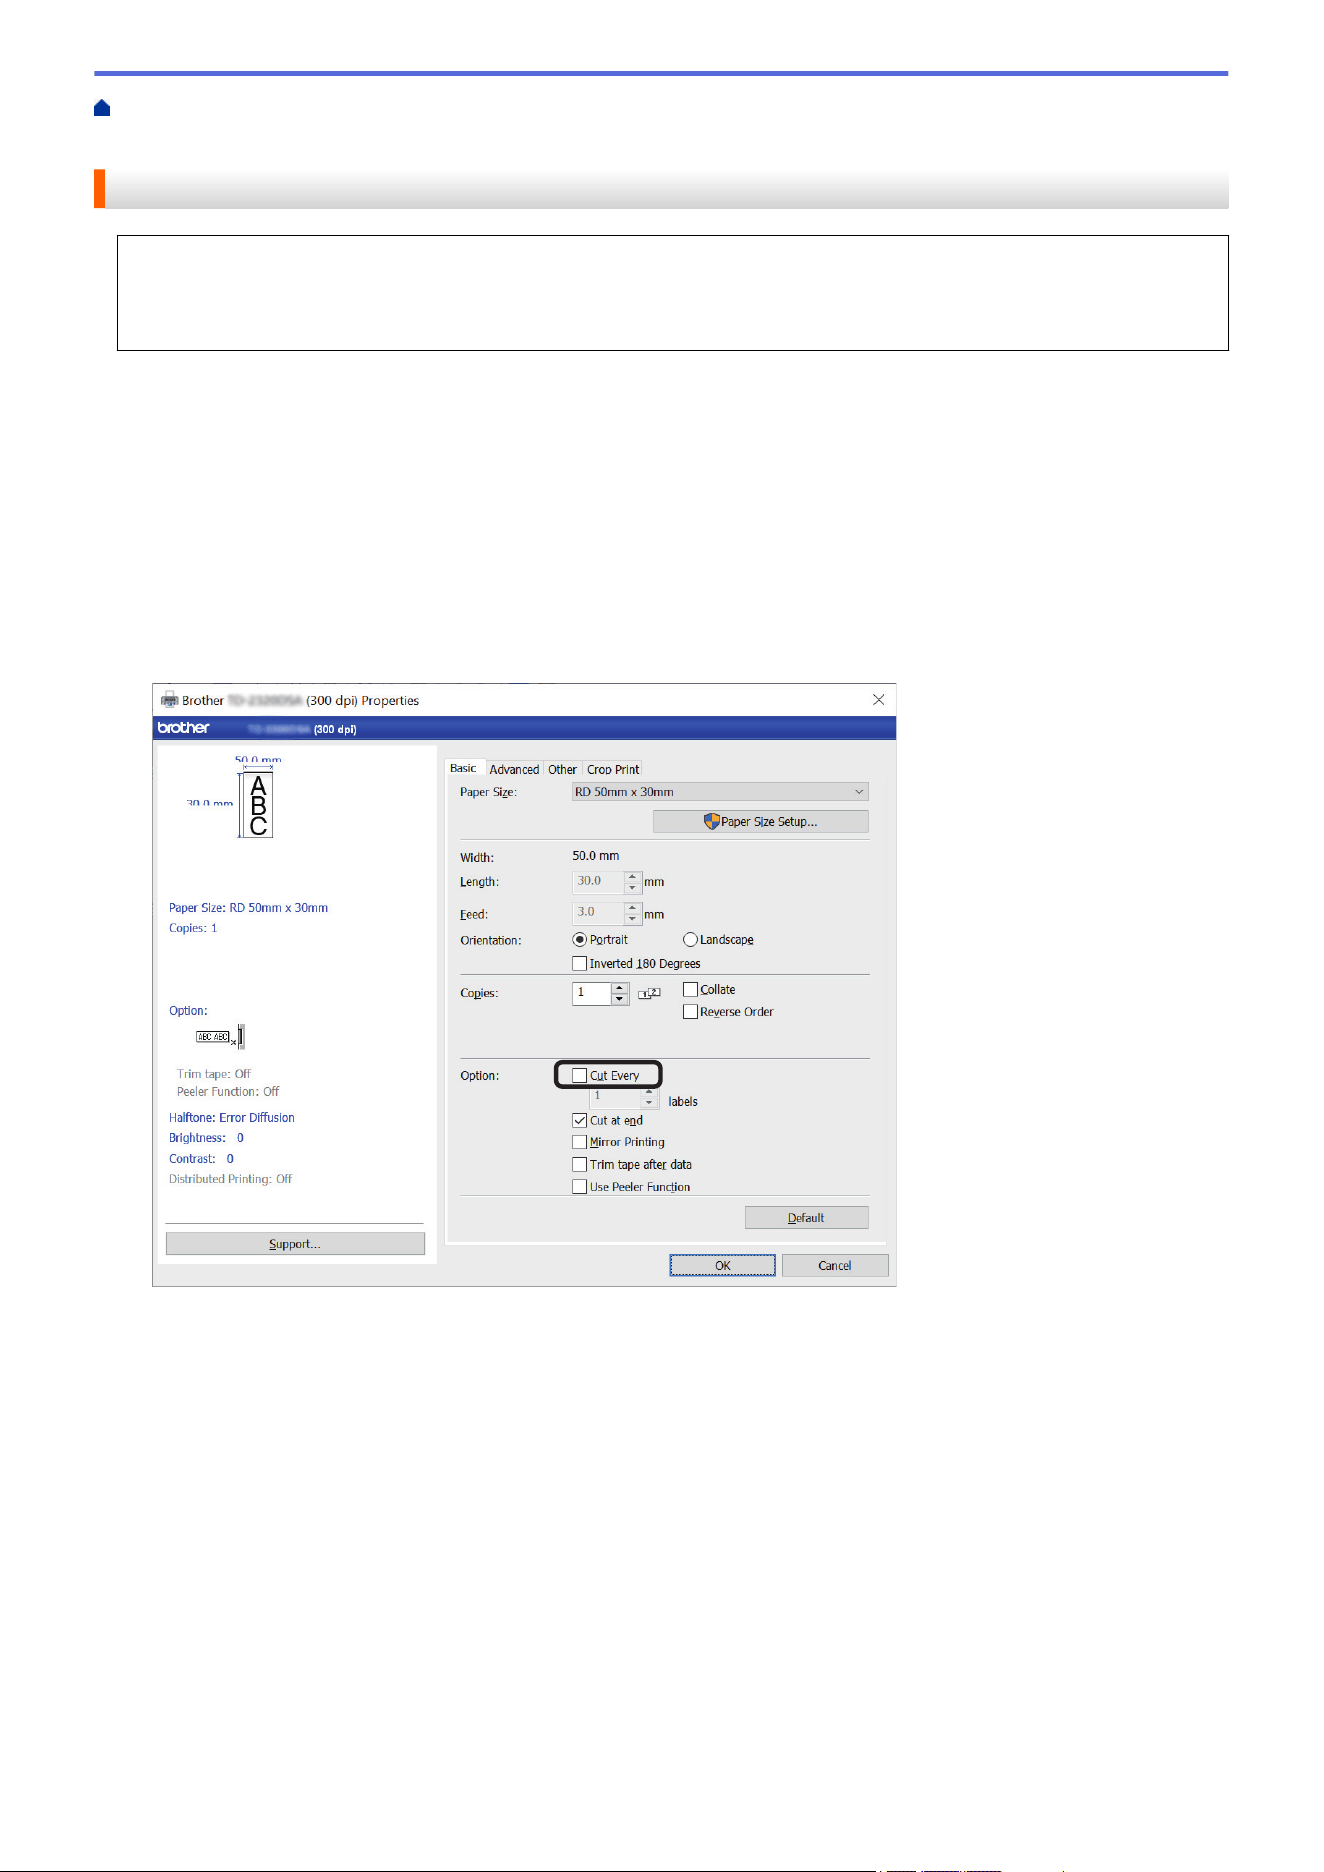
Home > Create and Print Labels Using Your Computer > Print Barcode Labels Using Crop Print (Windows,
300 DPI Printer Only) > Print Barcode Labels Using Crop Print (Windows, 300 DPI Printer Only)
Print Barcode Labels Using Crop Print (Windows, 300 DPI Printer Only)
TD-2320D/TD-2350D/TD-2320DF/TD-2350DF/TD-2350DSA: Make sure your printer is connected to a
computer or mobile device via a USB cable or network connection.
TD-2310D: Make sure your printer is connected to a computer or mobile device via a USB cable.
1. Open the barcode document PDF file you want to print.
2. Click File > Print.
3. Click the Printer drop-down list, and then select your printer.
4. In the Page Sizing & Handling section, select the Actual Size radio button.
5. Under Orientation, select the Portrait radio button.
6. Click Properties.
7. Click the Basic tab, and do one of the following:
• For Die-cut labels, clear the Cut Every checkbox.
• For Continuous Rolls, select the Cut Every checkbox.
90
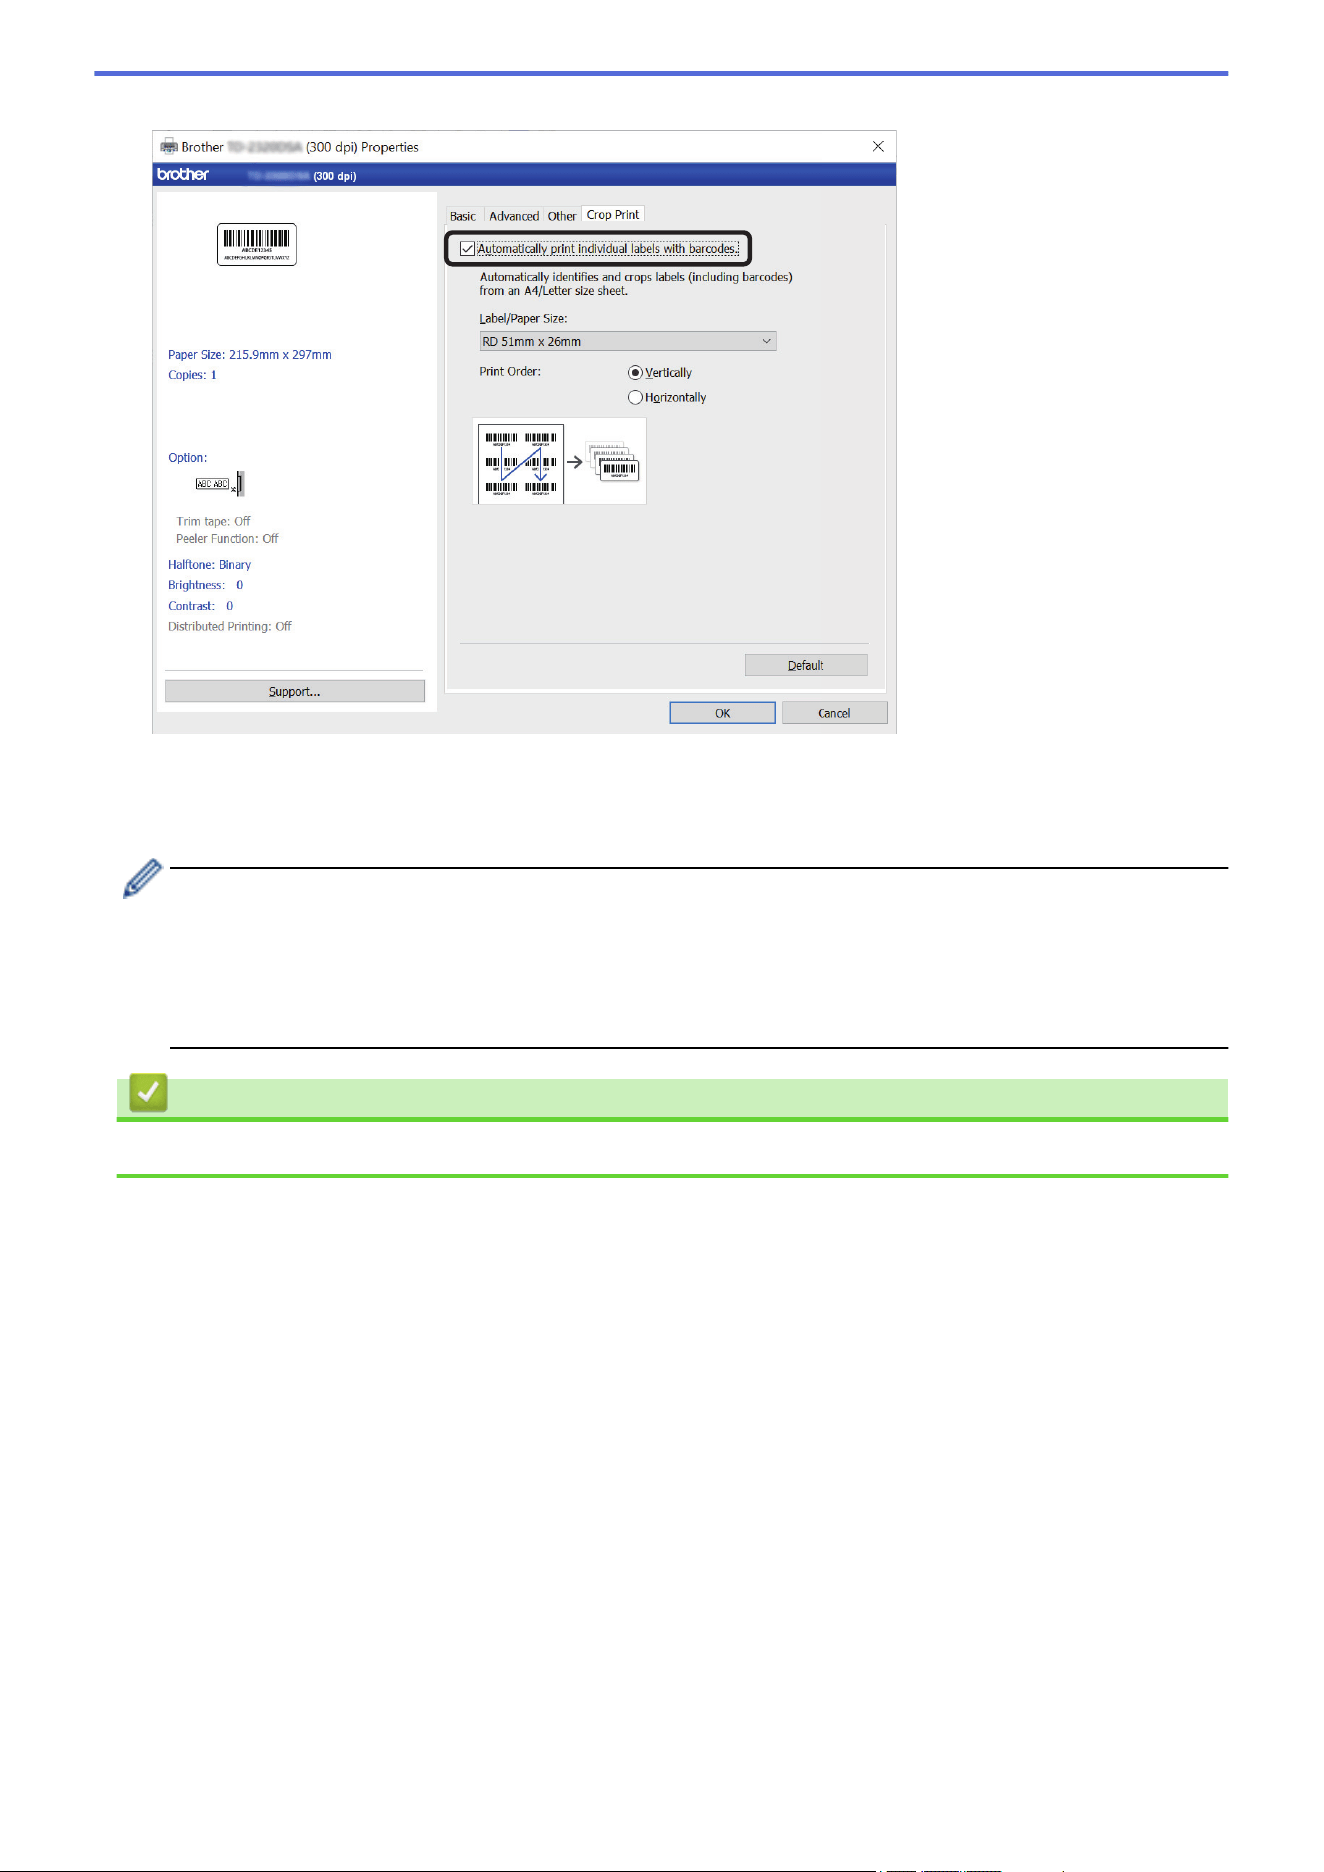
8. Click the Crop Print tab, and select the Automatically print individual labels with barcodes. checkbox.
9. Click the Label/Paper Size drop-down list, and then select your label or paper size.
10. Click OK.
11. Print from the application's print screen.
• Do not enlarge or reduce the size of the barcode sheet. The barcodes may not be identified correctly.
• When printing from Acrobat Reader
®
, do the following:
- In the Page Sizing & Handling section, clear the Choose paper source by PDF page size
checkbox.
- Under Orientation, select the Portrait radio button.
Related Information
• Print Barcode Labels Using Crop Print (Windows, 300 DPI Printer Only)
91
Home > Create and Print Labels Using Your Computer > Print Labels Using the Printer Driver (Windows)
Print Labels Using the Printer Driver (Windows)
1. Open the document you want to print.
2. Connect the printer to a computer using USB, Bluetooth, Wired LAN, or Wi-Fi.
3. Load paper.
4. Select the print command in your application.
5. Select your printer, and then click the printing properties or preferences button.
The printer driver window appears.
6. Change the printer driver settings, if needed.
7. Click OK.
8. Complete your print operation.
• If the paper is skewed after the printer pulls it into the starting position, open the Release Cover
completely, remove the paper, and then close the cover and load the paper again.
• To print a JPEG image without using the printer driver, see Related Topics: Notes on Printing Images
without Using the Printer Driver.
Making Prints Lighter or Darker
You can make prints lighter or darker by adjusting the print density setting in the printer driver’s dialog box, or in
the Printer Setting Tool.
For more information, see Related Topics: Change Printer Settings Using the Printer Setting Tool (Windows).
Related Information
• Create and Print Labels Using Your Computer
Related Topics:
• Notes on Printing Images without Using the Printer Driver
• Change Printer Settings Using the Printer Setting Tool (Windows)
92

Home > Print Labels Using Mobile Devices > Compatible Printing Apps
Compatible Printing Apps
Brother offers various applications for use with your printer, including applications to print directly from your
iPhone, iPad, iPod touch, and Android
™
mobile devices, and applications to transfer data wirelessly, such as
templates, symbols, and databases created using a computer, to your printer.
Download these free Brother apps from Google Play
™
or App Store:
iOS Devices
Software
Features
Print SDK Download the Software Development Kit (SDK) from the Brother Developer Center
(https://support.brother.com/g/s/es/dev/en/index.html).
Mobile Transfer Express This app allows you to use a mobile device to download databases and layouts,
created on a computer using P-touch Editor and saved to a cloud service, and send
them to your printer. Download this Brother app from the App Store.
AirPrint AirPrint allows you to print from an Apple device (iPad, iPhone, or iPod touch)
without installing additional software.
Mobile Deploy Use this software to perform updates for the settings and firmware of printers using a
mobile device.
This software will send printer update files uploaded to Google Drive, OneDrive,
DropBox, or an HTTP(S) server to target printers. Download this Brother app from
the App Store.
Smooth Print Use this app to print labels or receipts from iOS mobile devices to Brother printers.
Smooth Print works from a user's own web app or mobile app via a URL scheme.
Android Devices
Software
Features
Print SDK Download the Software Development Kit (SDK) from Brother Developer Center
(https://support.brother.com/g/s/es/dev/en/index.html).
Mobile Transfer Express This application allows you to use a mobile device to download databases and
layouts, which were created on a computer using P-touch Editor and saved to a
cloud service, and send them to your printer. Download this Brother app from Google
Play.
Print Service Plugin Allows you to print from an Android device.
Mobile Deploy Allows you to perform updates for the settings and firmware of printers using a
mobile device.
This software will send printer update files uploaded to Google Drive, OneDrive,
DropBox, or an HTTP(S) server to target printers. Download this Brother app from
Google Play.
Smooth Print Smooth Print is an app for printing labels or receipts from Android mobile devices to
Brother printers.
It works from a user's own web app or mobile app via a URL scheme.
Related Information
• Print Labels Using Mobile Devices
94

Home > Print Labels Using Mobile Devices > AirPrint Overview
AirPrint Overview
AirPrint is a printing solution for Apple operating systems that allows you
to wirelessly print photos, email, web pages and documents from your
iPad, iPhone and iPod touch without the need to install a driver.
For more information, visit Apple’s website.
Use of the Works with Apple badge means that an accessory has been
designed to work specifically with the technology identified in the badge
and has been certified by the developer to meet Apple performance
standards.
Related Information
• Print Labels Using Mobile Devices
95
Home > Print Labels Using Mobile Devices > Transfer Templates Created on a Computer to the Printer
Using a Mobile Device
Transfer Templates Created on a Computer to the Printer Using a
Mobile Device
Make sure Mobile Transfer Express is installed on your mobile device.
Use P-touch Transfer Manager to save template data created using P-touch Editor in either BLF or PDZ format.
Use Mobile Transfer Express to send the saved file from your mobile device to the printer and print it.
1. Save the template data using P-touch Transfer Manager.
For more information, see Related Information.
2. Do one of the following:
• Save the file using a cloud storage service, and then use the sharing function of the mobile device to
share the file.
• Send the file as an email attachment from the computer to the mobile device, and then save the file to the
mobile device.
3. Connect the printer to your mobile device, and then start Mobile Transfer Express.
The template data appears.
4. Select the template you want to print, and then transfer the template to the printer.
To download a file from a cloud storage service to your mobile device, you must connect your mobile device
using Infrastructure Mode. By connecting your mobile device to the printer using Infrastructure Mode, you
can also quickly transfer downloaded files (BLF files only).
Related Information
• Print Labels Using Mobile Devices
Related Topics:
• Create Transfer Files and Transfer Package Files (Windows)
96

Home > Standalone Printing
Standalone Printing
Related Models: TD-2350D/TD-2350DF/TD-2350DSA
• Create Labels Using P-touch Editor (Windows)
• Transfer a Template to P-touch Transfer Manager (Windows)
• Transfer Templates or Other Data from the Computer to the Printer (Windows)
• Transfer the Label Layout to the Printer
• Call Up the Transferred Template on the Printer's LCD and Print
• Change the Screen Display in Template Touch Mode
97

Home > Standalone Printing > Create Labels Using P-touch Editor (Windows)
Create Labels Using P-touch Editor (Windows)
Before using your printer with your Windows computer, you must install P-touch Editor and the latest printer
driver on your computer.
For the latest drivers and software, go to your model's Downloads page on the Brother support website at
support.brother.com.
1. Start P-touch Editor
.
Click Start > Brother P-touch > P-touch Editor, or double-click the P-touch Editor icon on the desktop.
NOTE
Depending on your computer's operating system, the Brother P-touch folder may or may not be created.
2. Do one of the following:
• To open an existing layout, click Open (1).
• To connect a preset layout to a database, select the Connect Database checkbox (2).
• To create a new layout, double-click the New Layout pane (3), or click the New Layout pane (3) and then
click →.
• To create a new layout using a preset layout, double-click a category button (4), or select a category
button (4), and then click →.
2
1
3
4
Related Information
• Standalone Printing
98
Home > Standalone Printing > Transfer a Template to P-touch Transfer Manager (Windows)
Transfer a Template to P-touch Transfer Manager (Windows)
1. Start P-touch Editor .
Click Start > Brother P-touch > P-touch Editor, or double-click the P-touch Editor icon on the desktop.
NOTE
Depending on your computer's operating system, the Brother P-touch folder may or may not be created.
2. Open the template you want or create a layout.
3. Click File > Transfer Template > Transfer.
The P-touch Transfer Manager window appears. The template is transferred to the Configurations folder.
Related Information
• Standalone Printing
99
Home > Standalone Printing > Transfer Templates or Other Data from the Computer to the Printer
(Windows)
Transfer Templates or Other Data from the Computer to the Printer
(Windows)
To transfer templates from a mobile device to the printer, see Related Information.
1. Connect the printer to the computer using a USB cable, and then turn the printer on.
The printer model name appears next to a printer icon in the folder view.
If you select the printer in the folder view, the current templates and other data stored in the printer appear.
If a printer is disconnected or offline, it does not appear in the folder view.
2. Select the printer to which you want to transfer the template or other data.
100

3. Right-click the Configurations folder, select New, and then create a new folder.
4. Do one of the following:
• Drag the template or other data you want to transfer and place it in the new folder.
• To transfer multiple templates or other data, drag the files you want to transfer, and then place them in the
new folder. Each file is assigned a Key Assign number (memory location in the printer) when it is placed
in the new folder.
Data Type
Maximum Number of
Transferable Items
Restriction Details
Template 255 • Each template can contain a maximum of 255
objects.
• Each object can contain a maximum of seven lines.
Database 255 • Only CSV files can be transferred.
• Each CSV file can contain a maximum of 100
columns and 65000 records.
101

Data Type Maximum Number of
Transferable Items
Restriction Details
Image (transferred
symbols)
255 • Only *.bmp files can be transferred.
• Monochrome *.bmp files are recommended.
• The size limit is 1296 x 1296 pixels.
• Wide images may be cropped.
• You can confirm the available space in the transfer file memory by printing Printer Settings Report. See
Available memory in the report for the available space. The available space appearing in Available
memory: ****B may be different from the actual available space.
• You can view the templates and other data by selecting:
- The folder in the Configurations folder
- All Contents
- One of the categories under Filter, such as Layouts
5. To change the Key Assign number assigned to an item, right-click the item, select the Key Assign menu, and
then select the Key Assign number you want.
• Except for the data in databases, all data transferred to the printer is assigned a key number.
• If the template or other data transferred to the printer has the same key number as another template
already saved in the printer, the new template overwrites the old one. You can confirm the assigned
template numbers saved in the printer by backing up the templates or other data.
• If the printer memory is full, remove one or more templates from the printer's memory.
6. To change the template names or other data you want to transfer, click the item you want, and then type the
new name.
The number of characters used for the template names may be limited depending on the printer model.
7. Make sure that either the Template List Screen or the Template Touch Screen is selected on your printer
under [Settings] > [Home Screen] > [Template List Screen] (or [Template Touch Screen]).
Select the folder containing the templates or other data you want to transfer, and then click Transfer.
102
A confirmation message appears.
• You can also transfer individual items to the printer without adding them to a folder. Select the template
or other data you want to transfer, and then click Transfer.
• Multiple items and folders can be selected and transferred in one operation.
8. Click OK.
The selected items are transferred to the printer.
Related Information
• Standalone Printing
• Print Labels Using Barcode Scanner or Other Devices (P-touch Template)
• About Transferring Templates from the Computer to the Printer (Windows)
Related Topics:
• Transfer Templates Created on a Computer to the Printer Using a Mobile Device
• Confirm Printer Settings
103
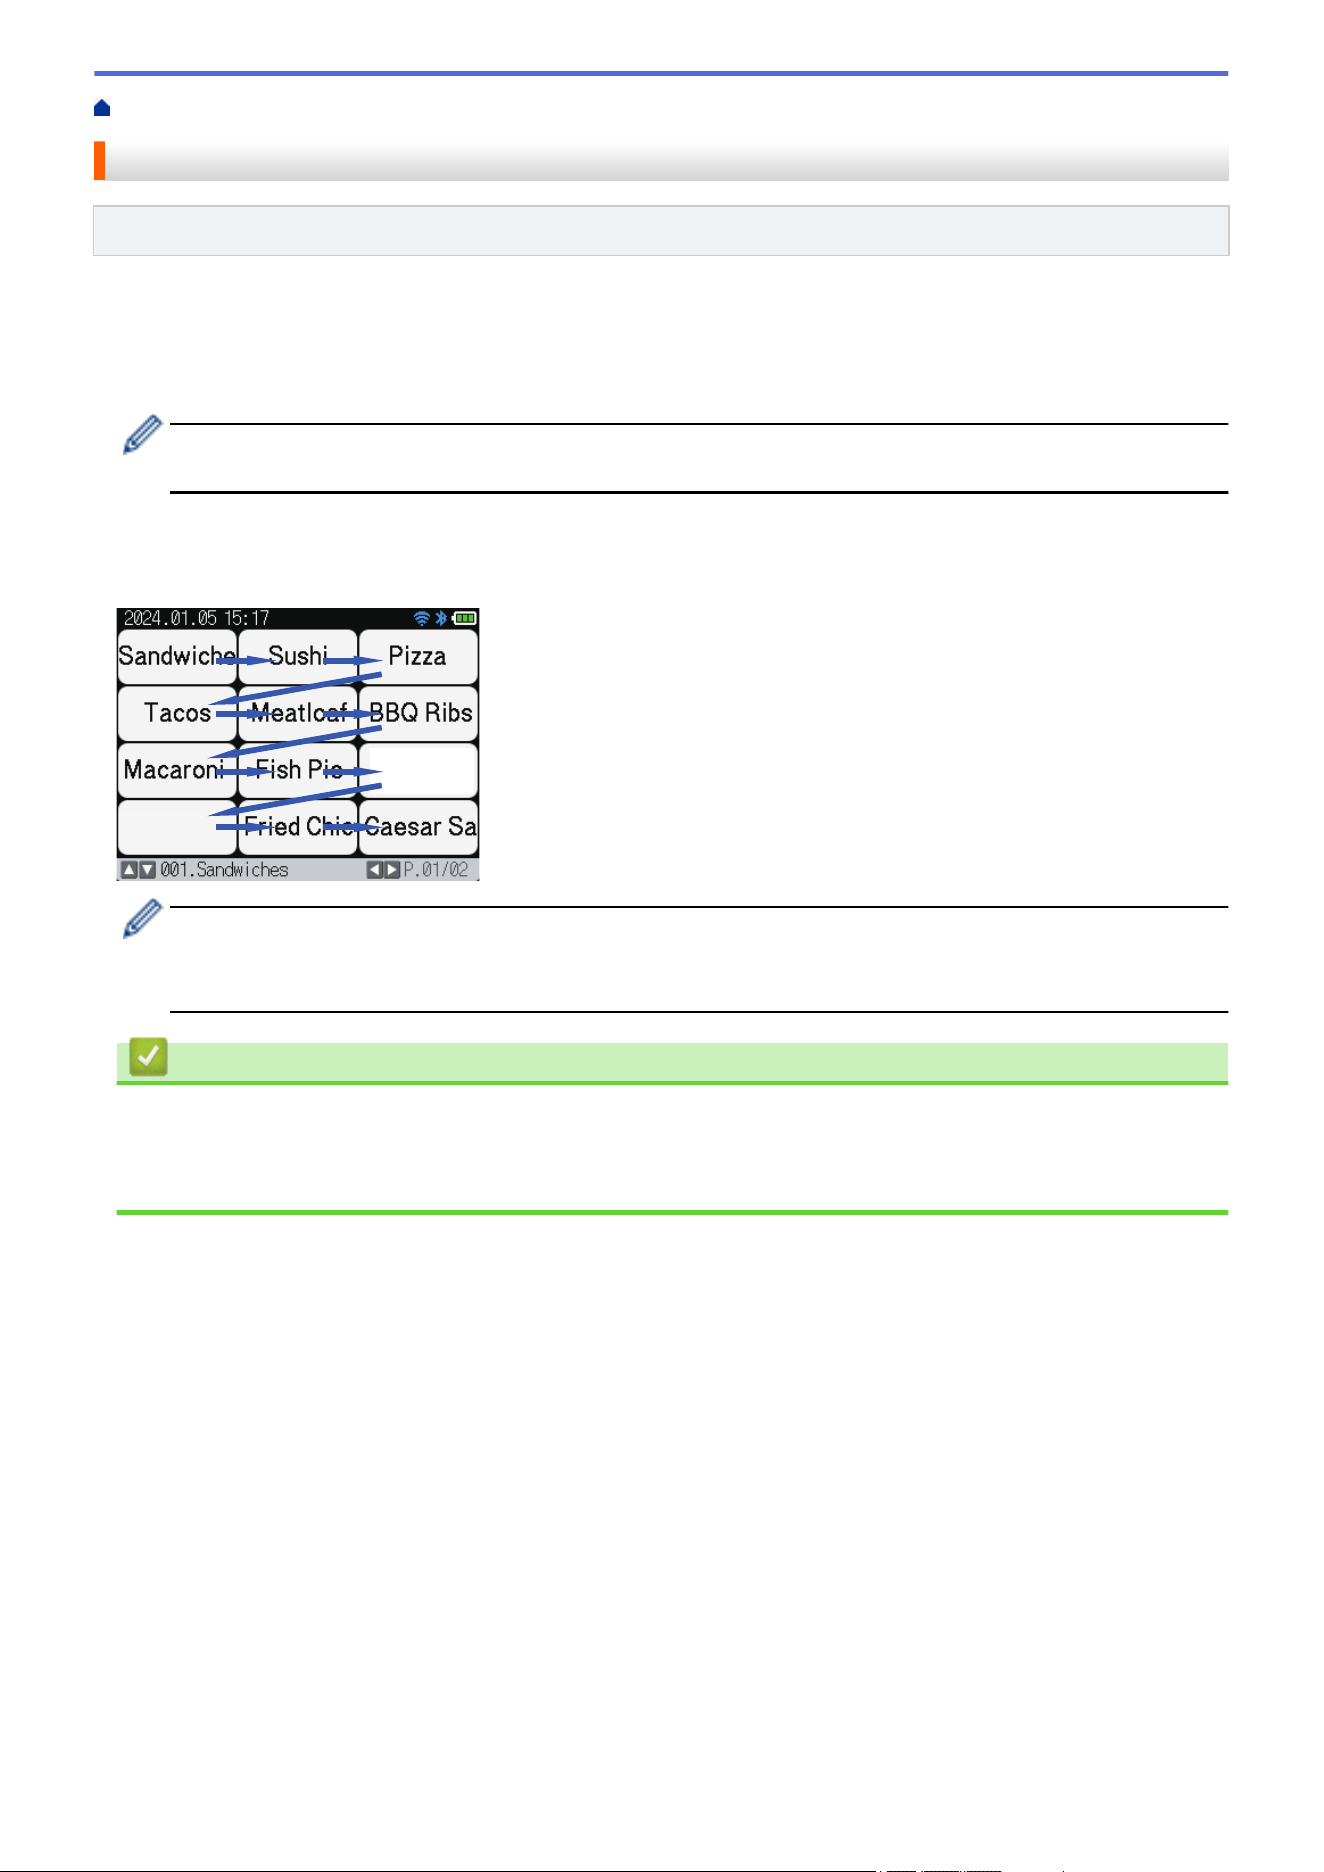
Home > Standalone Printing > Transfer the Label Layout to the Printer
Transfer the Label Layout to the Printer
Related Models: TD-2350DSA
Transfer a label created on your computer to your printer if you want to use the printer's LCD to print as many
labels as required.
You must use P-touch Transfer Manager to transfer data. For more information, see Related Topics:Transfer
Templates to the Printer (P-touch Transfer Manager) (Windows).
Before transferring data, make sure printer's LCD displays the Home screen (either the Template List
Screen or the Template Touch Screen).
When templates are transferred to the printer, the transferred templates appear on the LCD as shown in the
illustration. This display order corresponds to the P-touch Transfer Manager's Key Assign number, and absent
Key Assign numbers are displayed as blanks on the LCD.
• You can transfer up to 255 templates to your printer.
• If a new template is transferred with the same Key Assign number as another template already on the
printer, the new template will overwrite the old one.
Related Information
• Standalone Printing
Related Topics:
• Transfer Templates to the Printer (P-touch Transfer Manager) (Windows)
104

Home > Standalone Printing > Call Up the Transferred Template on the Printer's LCD and Print
Call Up the Transferred Template on the Printer's LCD and Print
Related Models: TD-2350D/TD-2350DF/TD-2350DSA
You can print transferred or preset templates from the printer's LCD, without connecting the printer to a computer
or a mobile device.
• Print a Template That is Not Linked to a Database
• Print a Template Linked to a Database
• Use the Search Function to Find a Template or Database in Template List Mode
• Edit Template Objects Before Printing
105
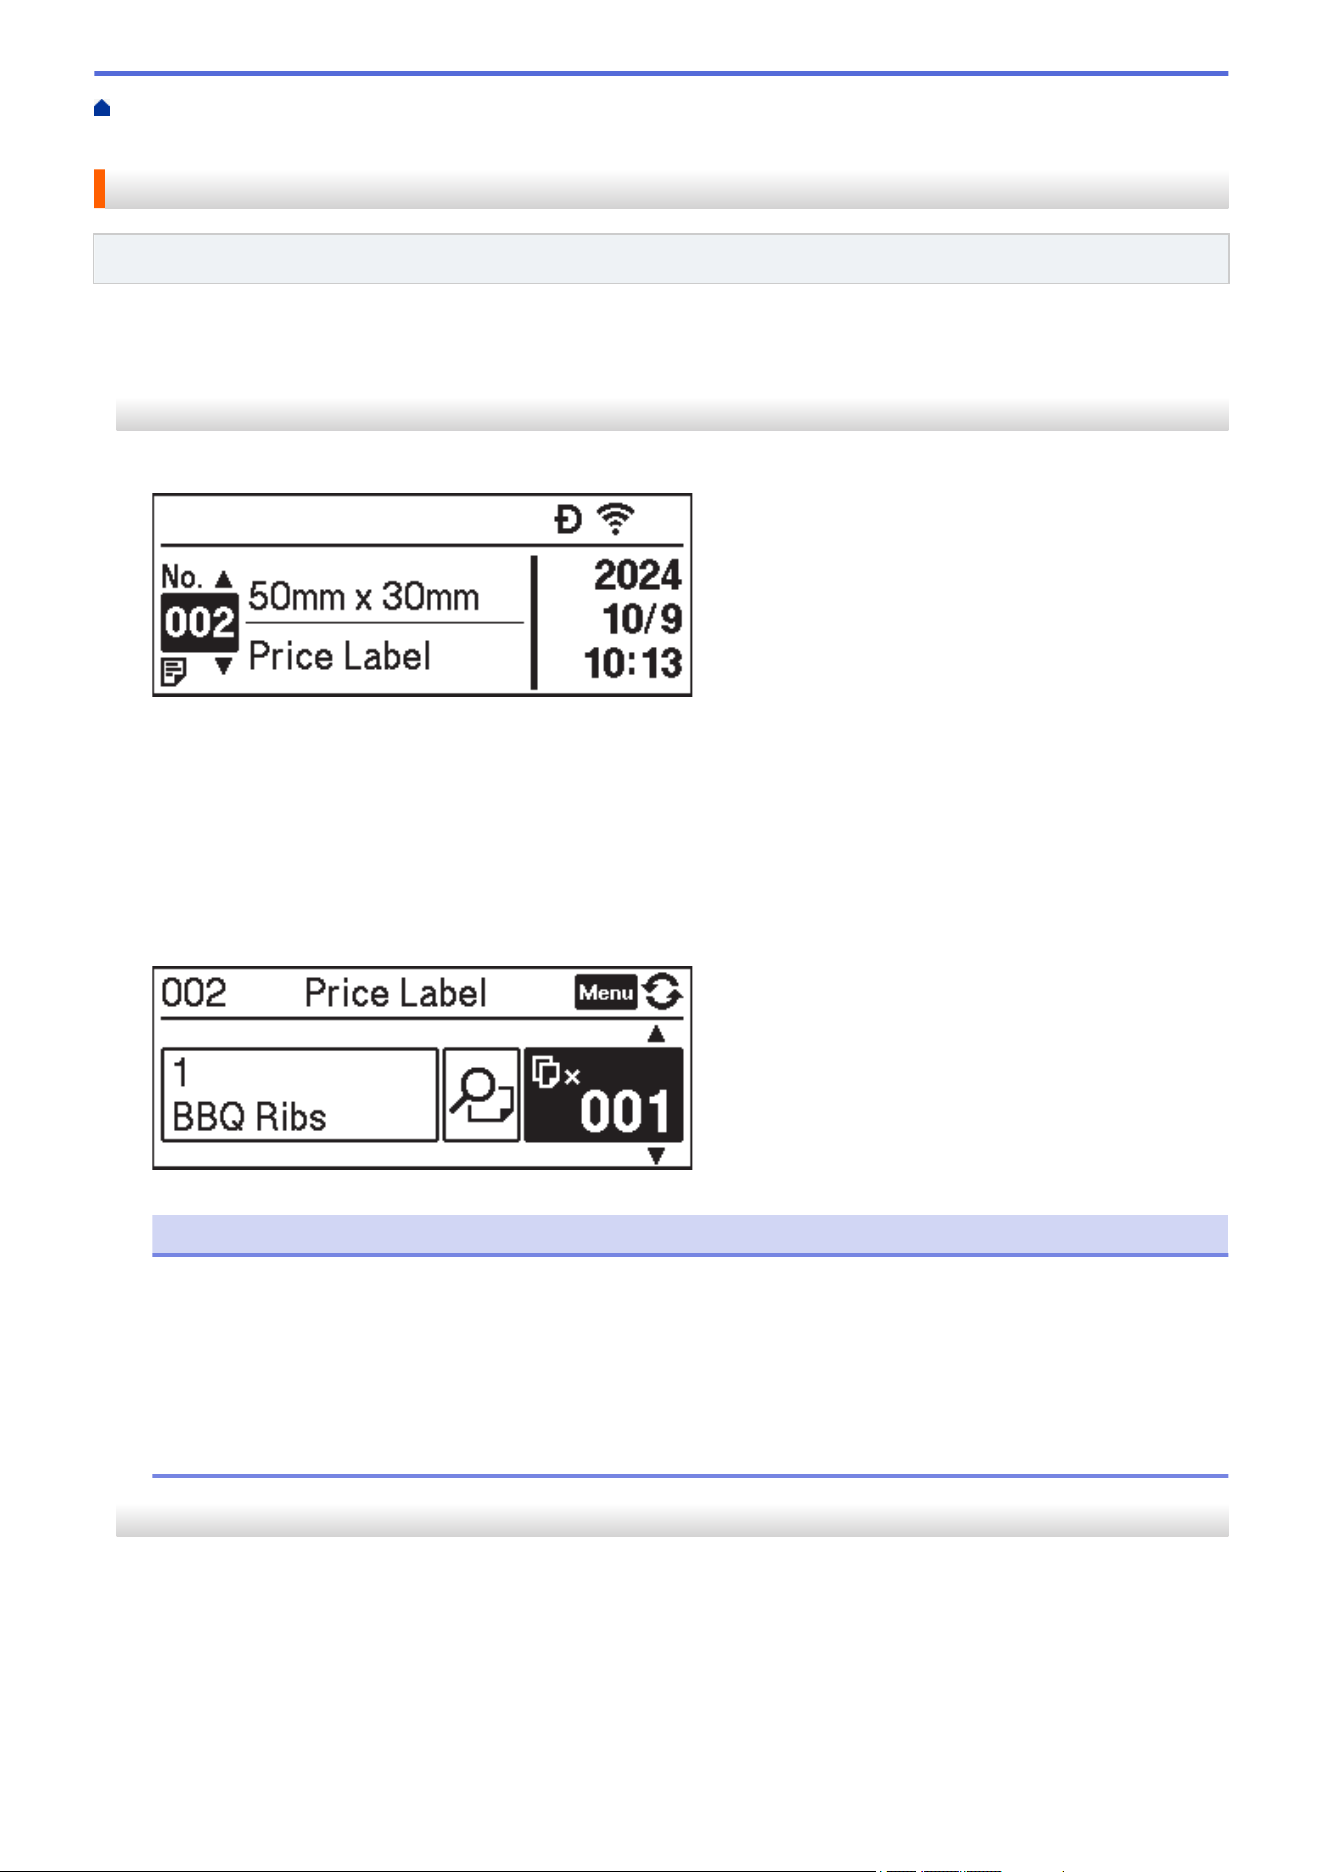
Home > Standalone Printing > Call Up the Transferred Template on the Printer's LCD and Print > Print a
Template That is Not Linked to a Database
Print a Template That is Not Linked to a Database
Related Models: TD-2350D/TD-2350DF/TD-2350DSA
>> TD-2350D/TD-2350DF
>> TD-2350DSA
TD-2350D/TD-2350DF
1. Make sure the LCD is in the Template List Screen as shown below.
If it is not, set it to the Template List Screen.
a. Press Menu.
b. Press a or b to select [Settings]. Press OK.
c. Press a or b to select [Home Screen]. Press OK.
d. Press a or b to select [Template List Screen]. Press OK.
2. Press a or b to select a template, and then press OK.
3. Press a and b to set the number of labels you want to print.
NOTE
• To change print number of labels for future use, press Menu and go to [Template Settings] and
set the [Confirm Print] option to [On].
The next time you print using this template, the print settings screen appears, allowing you to change
the number of labels using a and b.
• To display a print preview, press Menu twice, and then press OK.
• To display the object in the template, press Menu once, and then press OK.
TD-2350DSA
1. If the LCD is not in Template List Screen or in Template Touch Screen, as shown, follow the steps below:
106
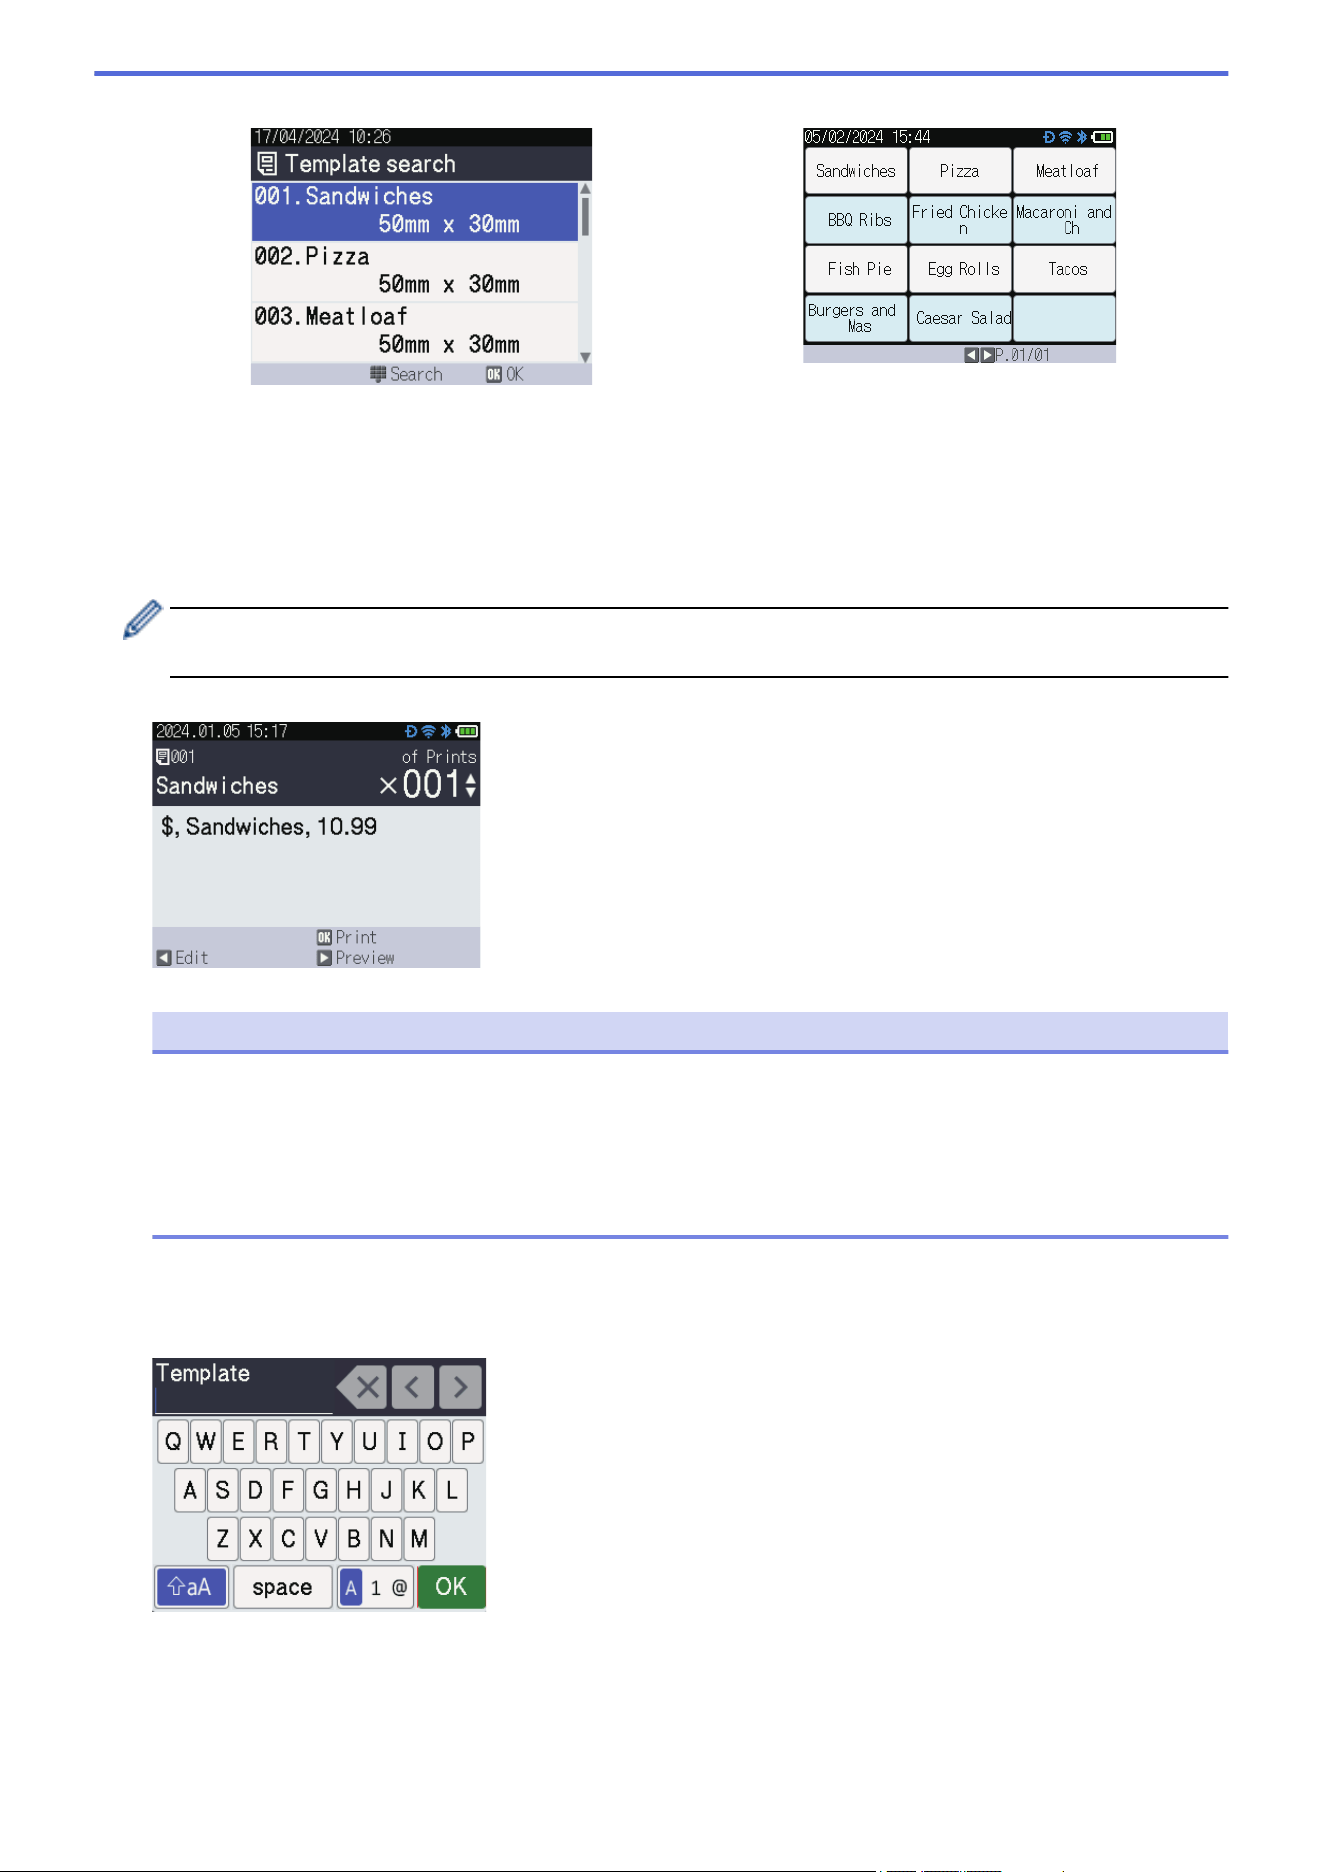
Template List Screen Template Touch Screen
a. Press Menu.
b. Press a or b to select [Settings]. Press OK.
c. Press a or b to select [Home Screen]. Press OK.
d. Press a or b to select [Template List Screen] or [Template Touch Screen]. Press OK.
2. Press a or b to select a template, and then press OK.
The search function helps you select the template and the database. For more information, see Related
Topics: Use the Search Function to Find a Template or Database in Template List Mode.
3. Press a and b to set the number of labels you want to print.
NOTE
• To change print number of labels for future use, press Menu and go to [Template Settings] and
set the [Confirm Print] option to [On].
The next time you print using this template, the print settings screen appears, allowing you to change
the number of labels using a and b.
• To display a print preview, press c.
4. To display and edit the objects in the template, press d.
5. Use the a, b, and OK to select an object.
6. Touch the on-screen button or press the printer's numerical keys to edit the object, and then press OK.
107

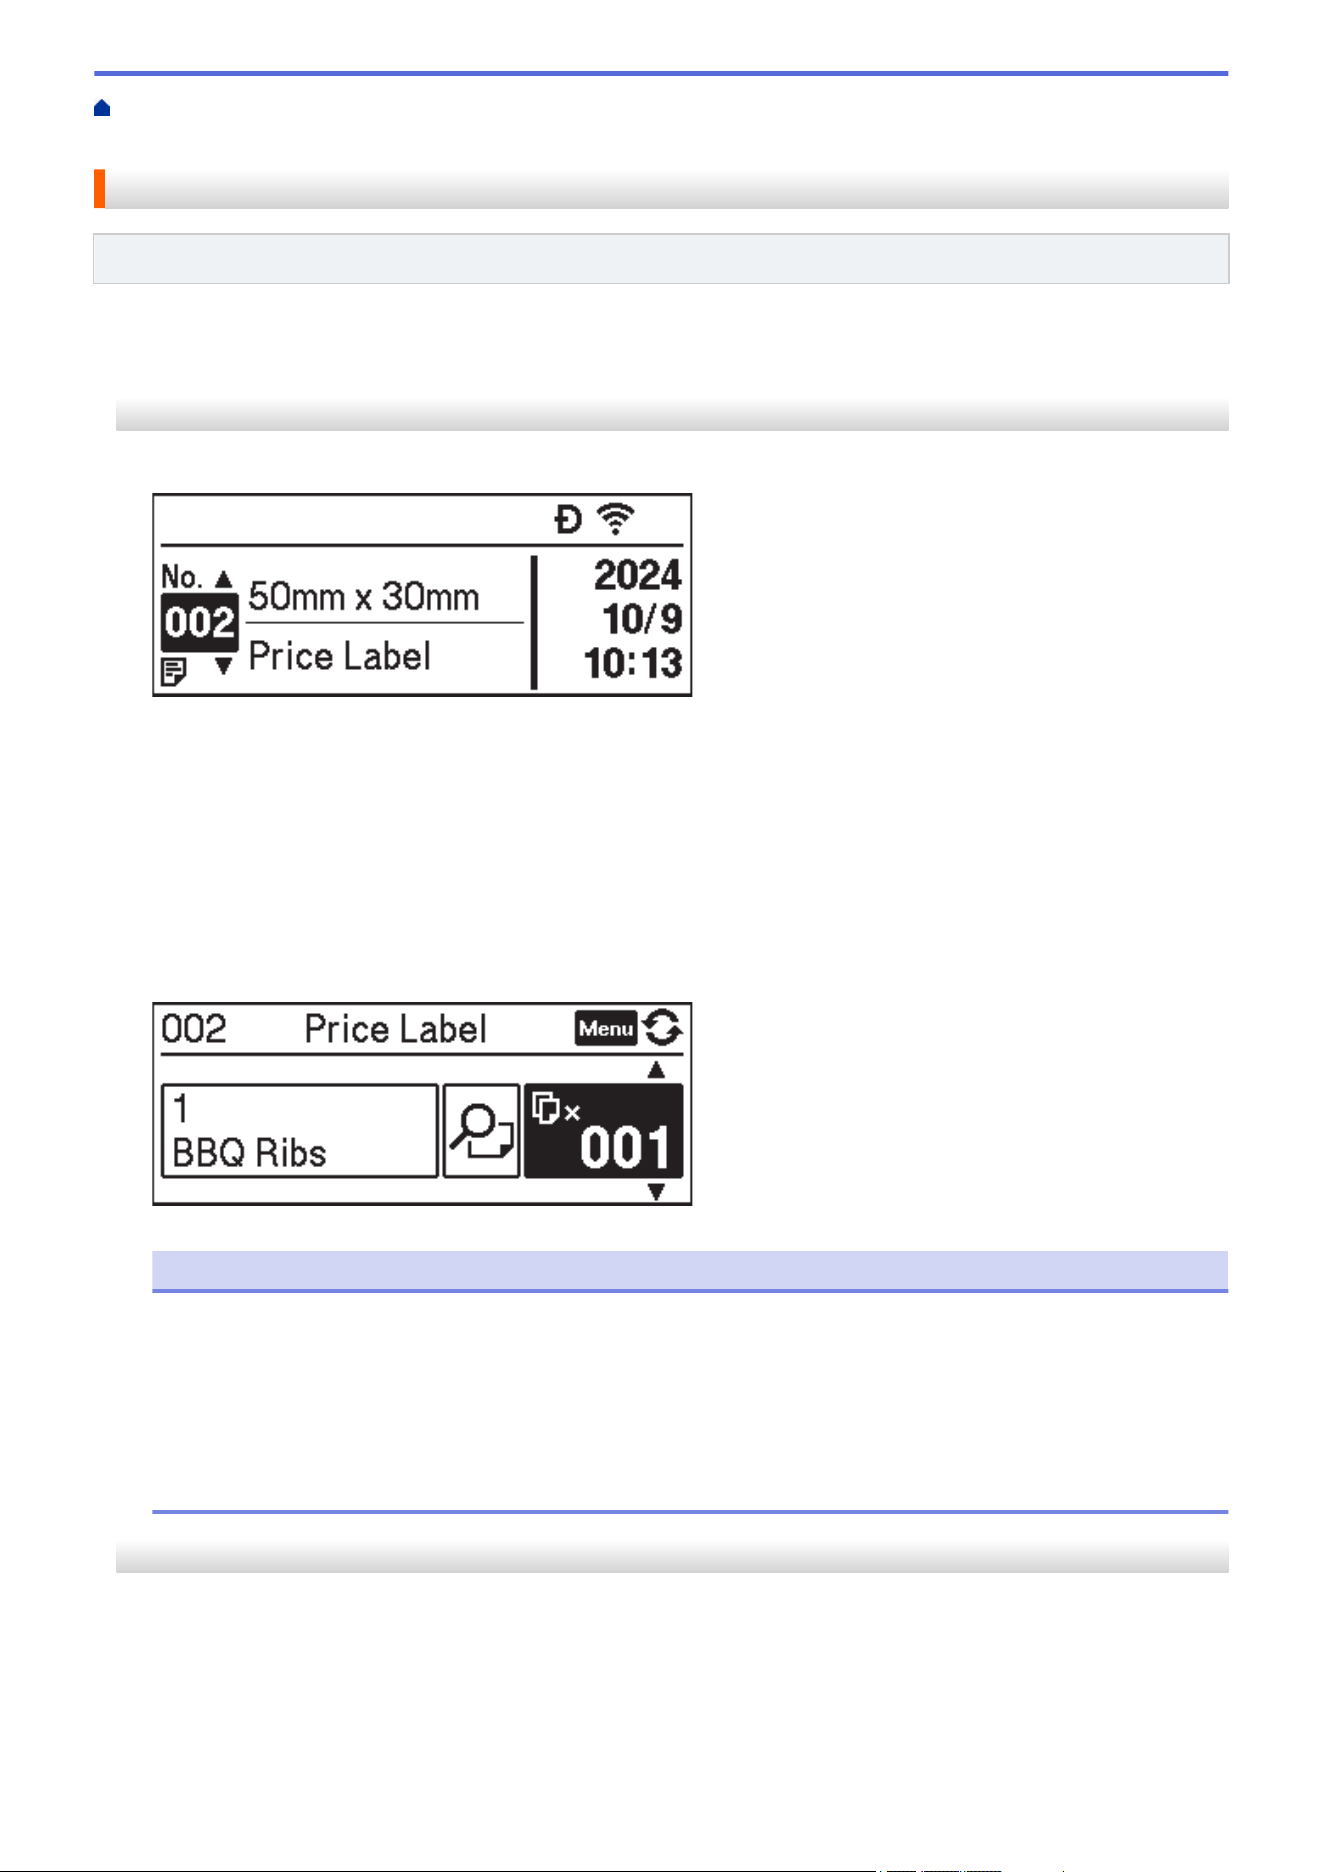
Home > Standalone Printing > Call Up the Transferred Template on the Printer's LCD and Print > Print a
Template Linked to a Database
Print a Template Linked to a Database
Related Models: TD-2350D/TD-2350DF/TD-2350DSA
>> TD-2350D/TD-2350DF
>> TD-2350DSA
TD-2350D/TD-2350DF
1. Make sure the LCD is in the Template List Screen as shown below.
If it is not, set it to the Template List Screen.
a. Press Menu.
b. Press a or b to select [Settings]. Press OK.
c. Press a or b to select [Home Screen]. Press OK.
d. Press a or b to select [Template List Screen]. Press OK.
2. Press a or b to select a template, and then press OK.
3. Press a or b to select the database record, and then press OK.
4. Press a and b to set the number of labels you want to print.
NOTE
• To change print number of labels for future use, press Menu and go to [Template Settings] and
set the [Confirm Print] option to [On].
The next time you print using this template, the print settings screen appears, allowing you to change
the number of labels using a and b.
• To display a print preview, press Menu twice, and then press OK.
• To display the object in the template, press Menu once, and then press OK.
TD-2350DSA
1. If the LCD is not in Template List Screen or in Template Touch Screen, as shown, follow the steps below:
109
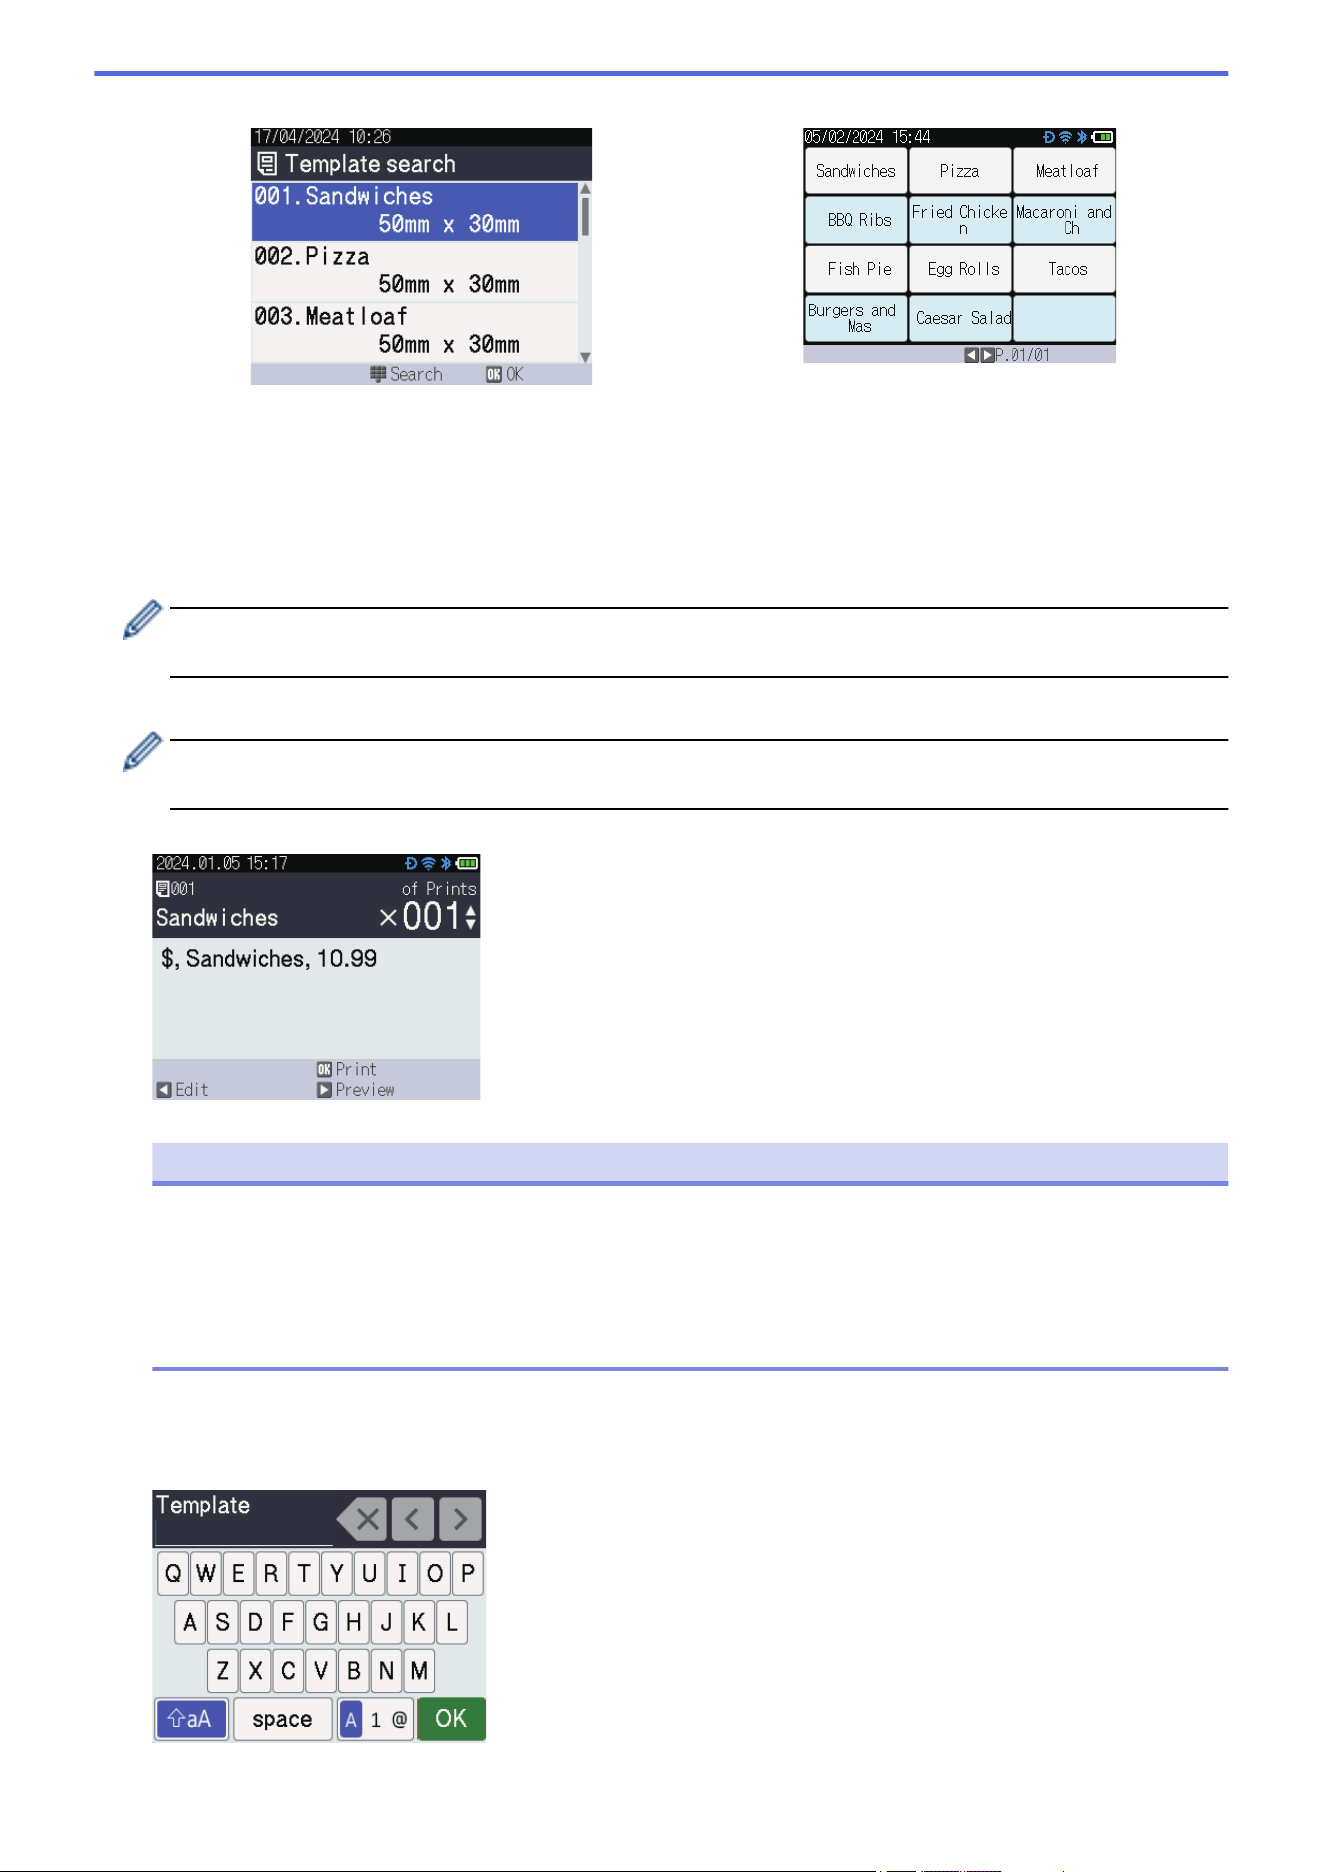
Template List Screen Template Touch Screen
a. Press Menu.
b. Press a or b to select [Settings]. Press OK.
c. Press a or b to select [Home Screen]. Press OK.
d. Press a or b to select [Template List Screen] or [Template Touch Screen]. Press OK.
2. Press a or b to select a template, and then press OK.
The search function helps you select the template and the database. For more information, see Related
Topics: Use the Search Function to Find a Template or Database in Template List Mode.
3. Press a or b to select the database record, and then press OK.
The search function helps you select the template and the database. For more information, see Related
Topics: Use the Search Function to Find a Template or Database in Template List Mode.
4. Press a and b to set the number of labels you want to print.
NOTE
• To change print number of labels for future use, press Menu and go to [Template Settings] and
set the [Confirm Print] option to [On].
The next time you print using this template, the print settings screen appears, allowing you to change
the number of labels using a and b.
• To display a print preview, press c.
5. To display and edit the objects in the template, press d.
6. Press a, b, and OK to select an object.
7. Touch the on-screen button or press the printer's numerical keys to edit the object, and then press OK.
110

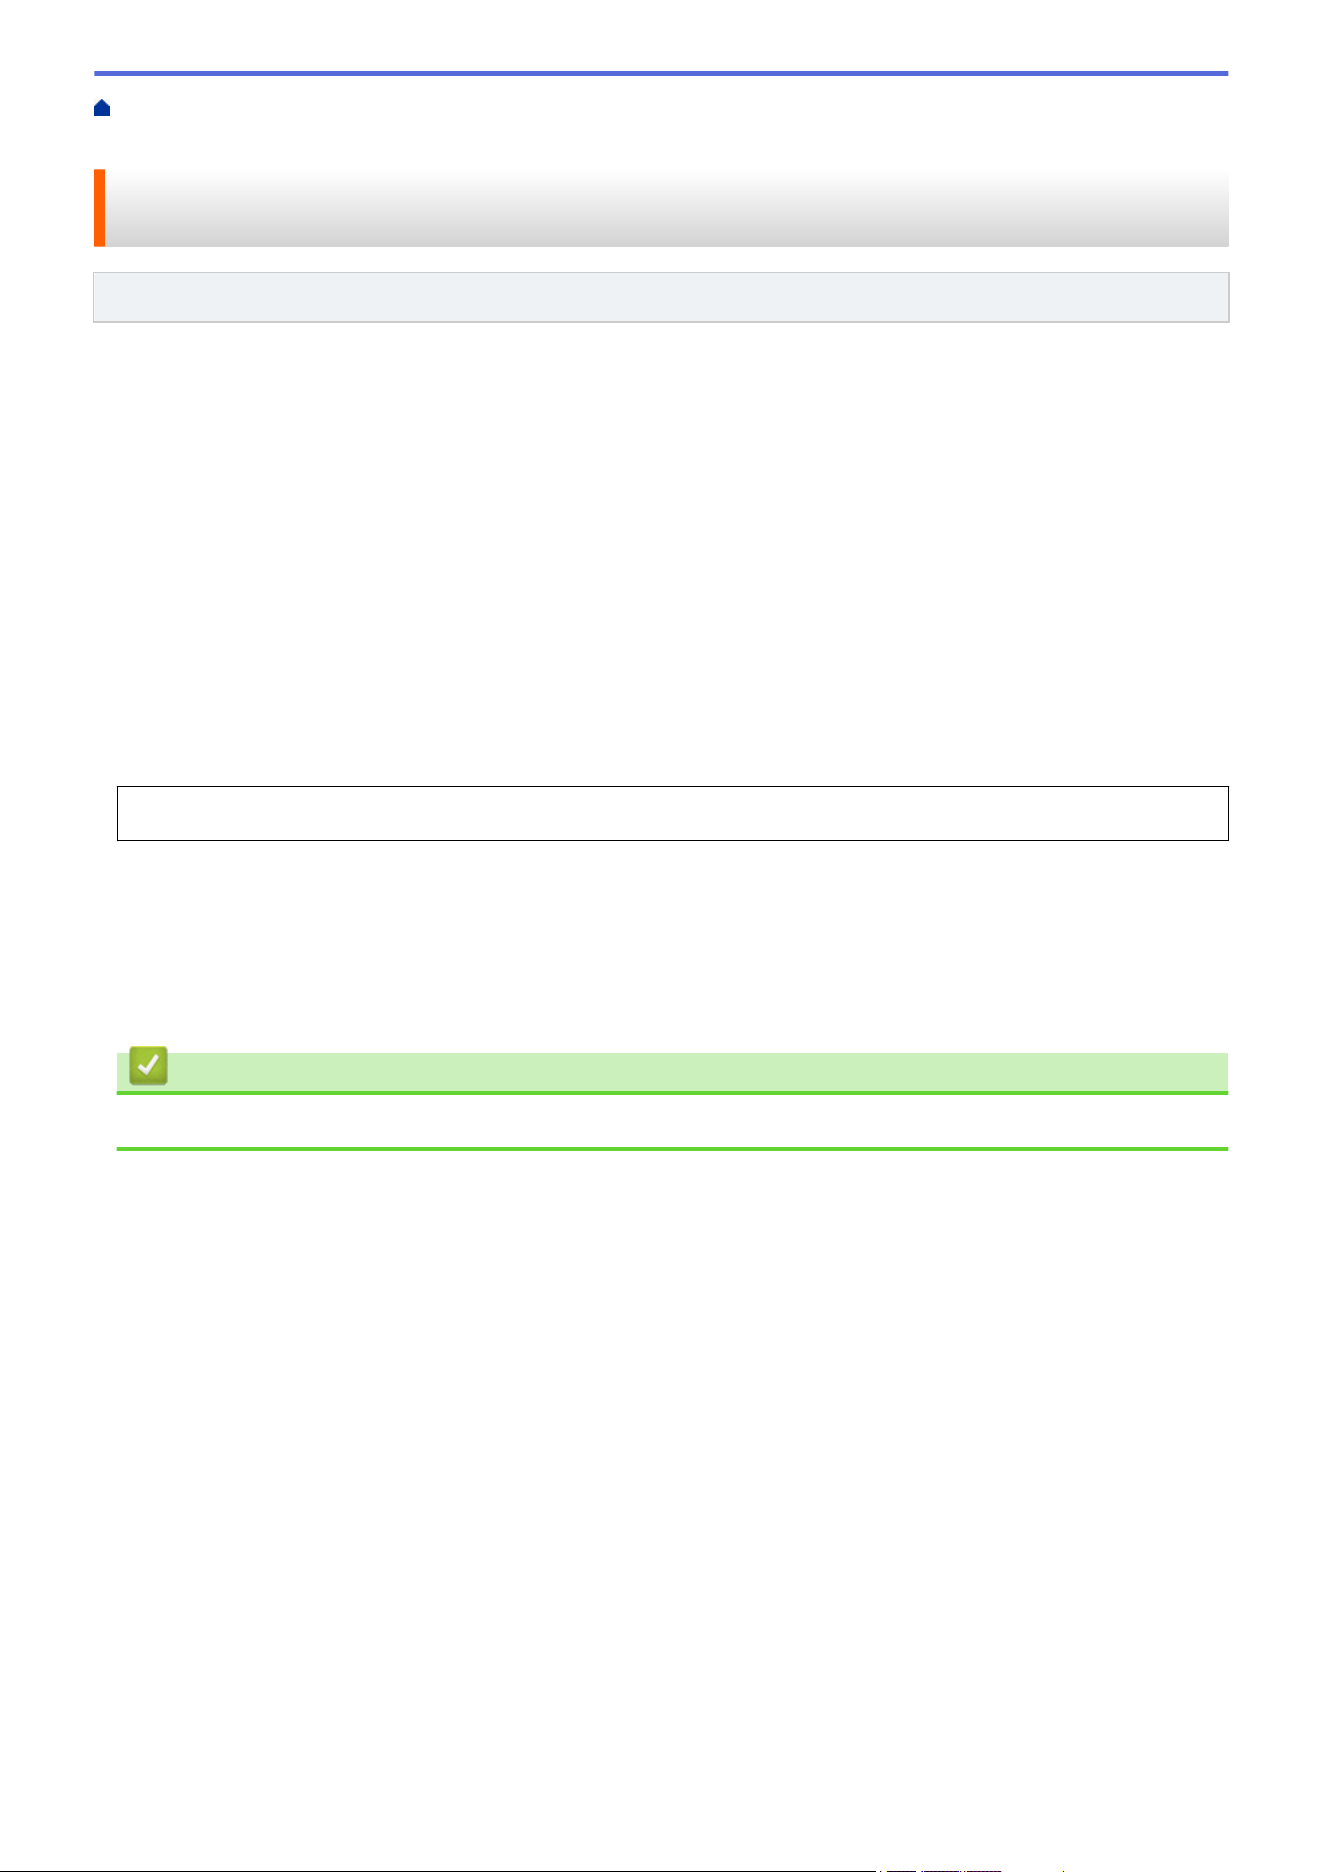
Home > Standalone Printing > Call Up the Transferred Template on the Printer's LCD and Print > Use the
Search Function to Find a Template or Database in Template List Mode
Use the Search Function to Find a Template or Database in Template
List Mode
Related Models: TD-2350DSA
In addition to using the a and b keys to search for templates and databases in Template List Screen, you can
also use the printer's Search function.
There are two search methods:
• Numerical search:
- In the case of a template search, it searches for templates containing the entered number in the template
number.
- In the case of a database record search, it searches for database records containing the entered number
in the database record number.
• Alphanumeric search:
- In the case of a template search, it searches for templates containing the entered characters in the
template name, and displays the corresponding templates.
- In the case of a database record search, it searches for database records containing the characters in the
entire database record, and displays the corresponding database records.
Set the search method in advance in [Search Settings] under [Template Settings].
1. With templates or databases displayed in a list, press any key on the numerical keypad to enter search
mode.
2. Touch the on-screen button to enter the text you want to search. Press OK.
3. When the search results appear, press a or b to select desired item. Press OK.
The required template or database is now detected and selected.
Related Information
• Call Up the Transferred Template on the Printer's LCD and Print
112
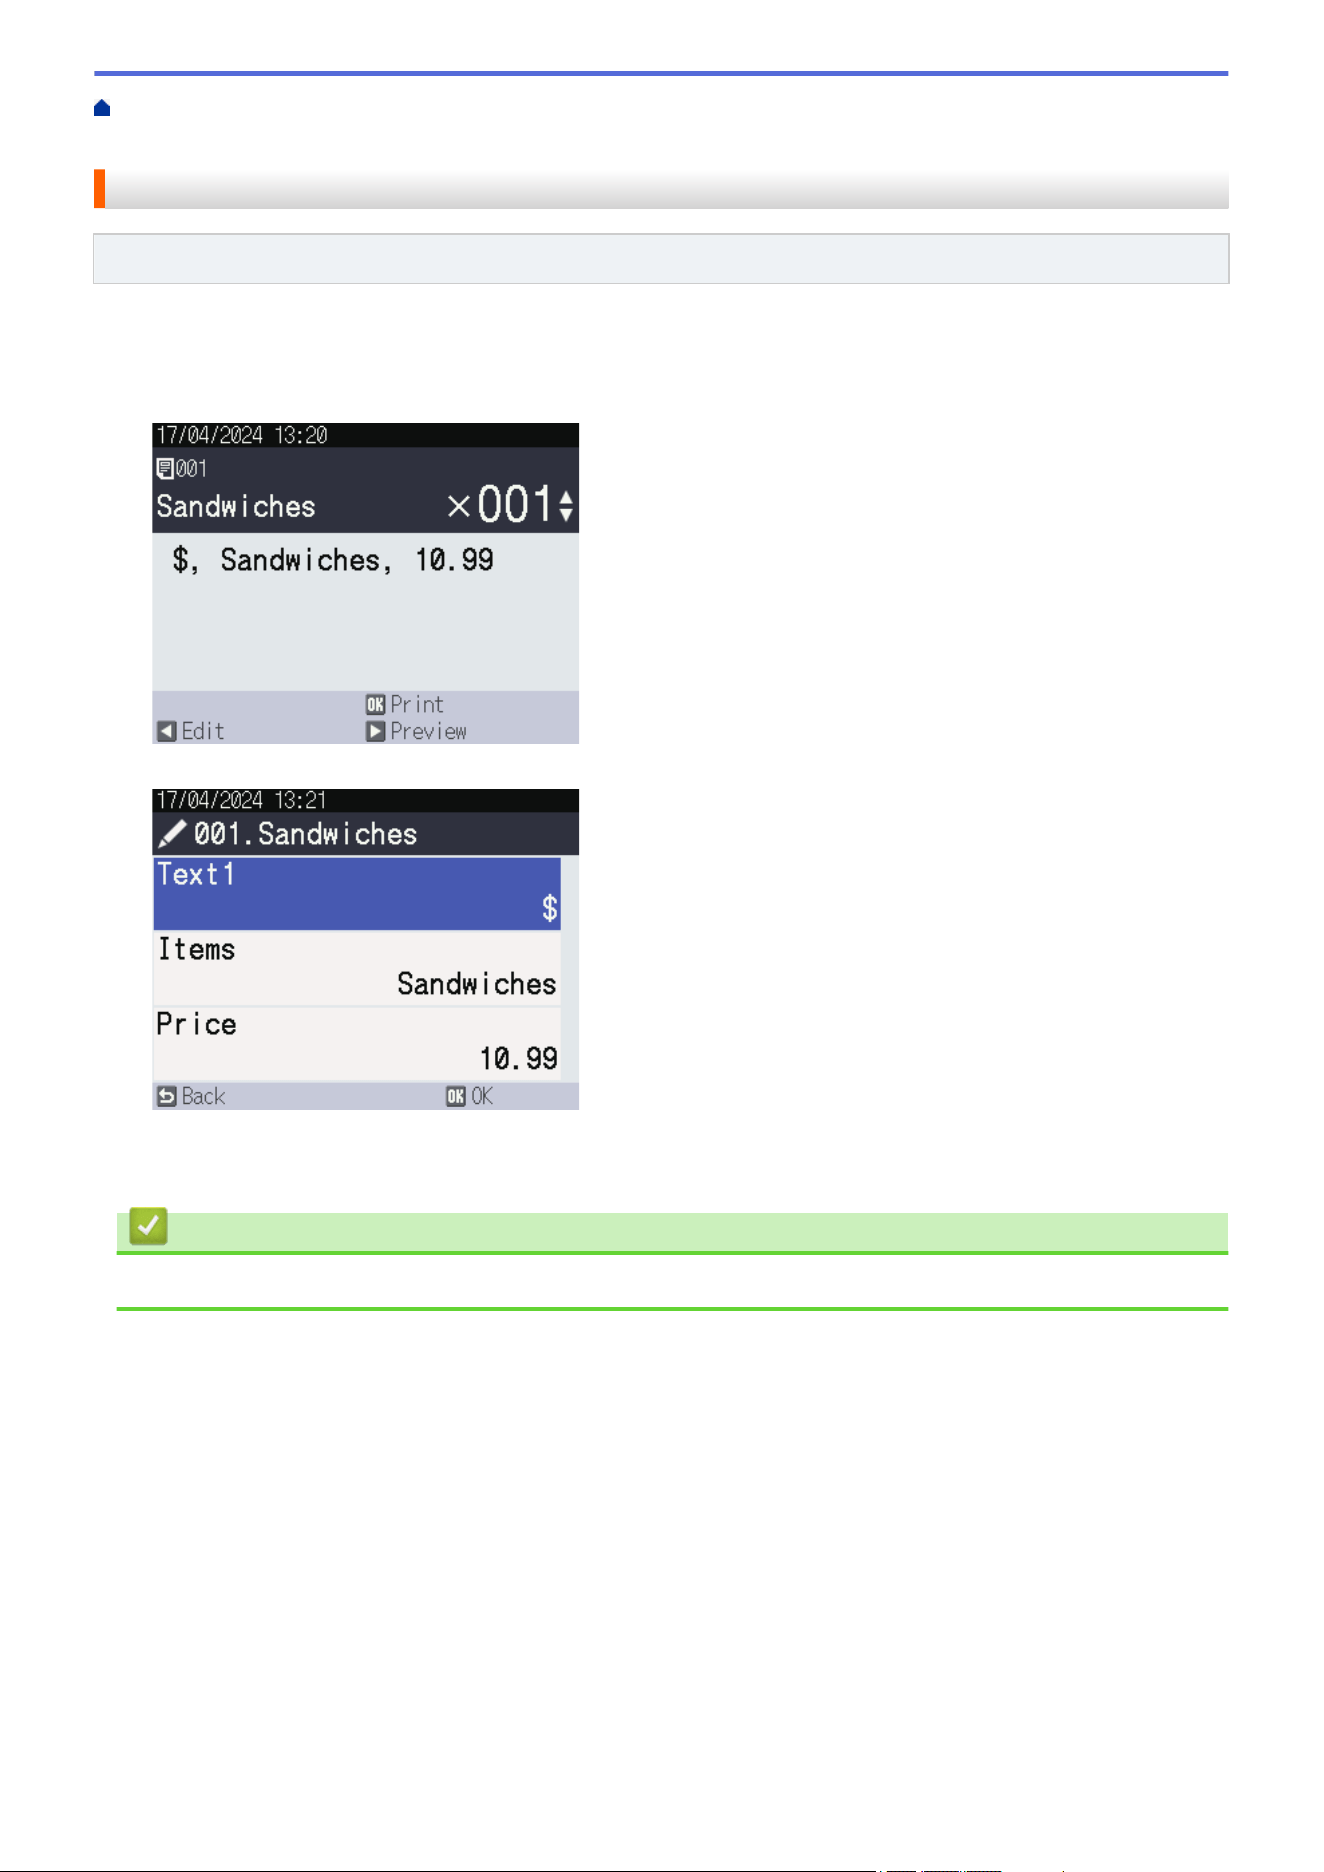
Home > Standalone Printing > Call Up the Transferred Template on the Printer's LCD and Print > Edit
Template Objects Before Printing
Edit Template Objects Before Printing
Related Models: TD-2350DSA
After you select a template or a template and database, you can edit the objects contained in the template.
1. After selecting a template or selecting a template and database, press d on the copy number entry screen to
enter Object edit mode.
2. Press a or b to select the object. Press OK.
3. When the search results appear, press a or b to select desired item. Press OK.
4. Touch the on-screen button to edit the object, and then press OK.
Related Information
• Call Up the Transferred Template on the Printer's LCD and Print
113
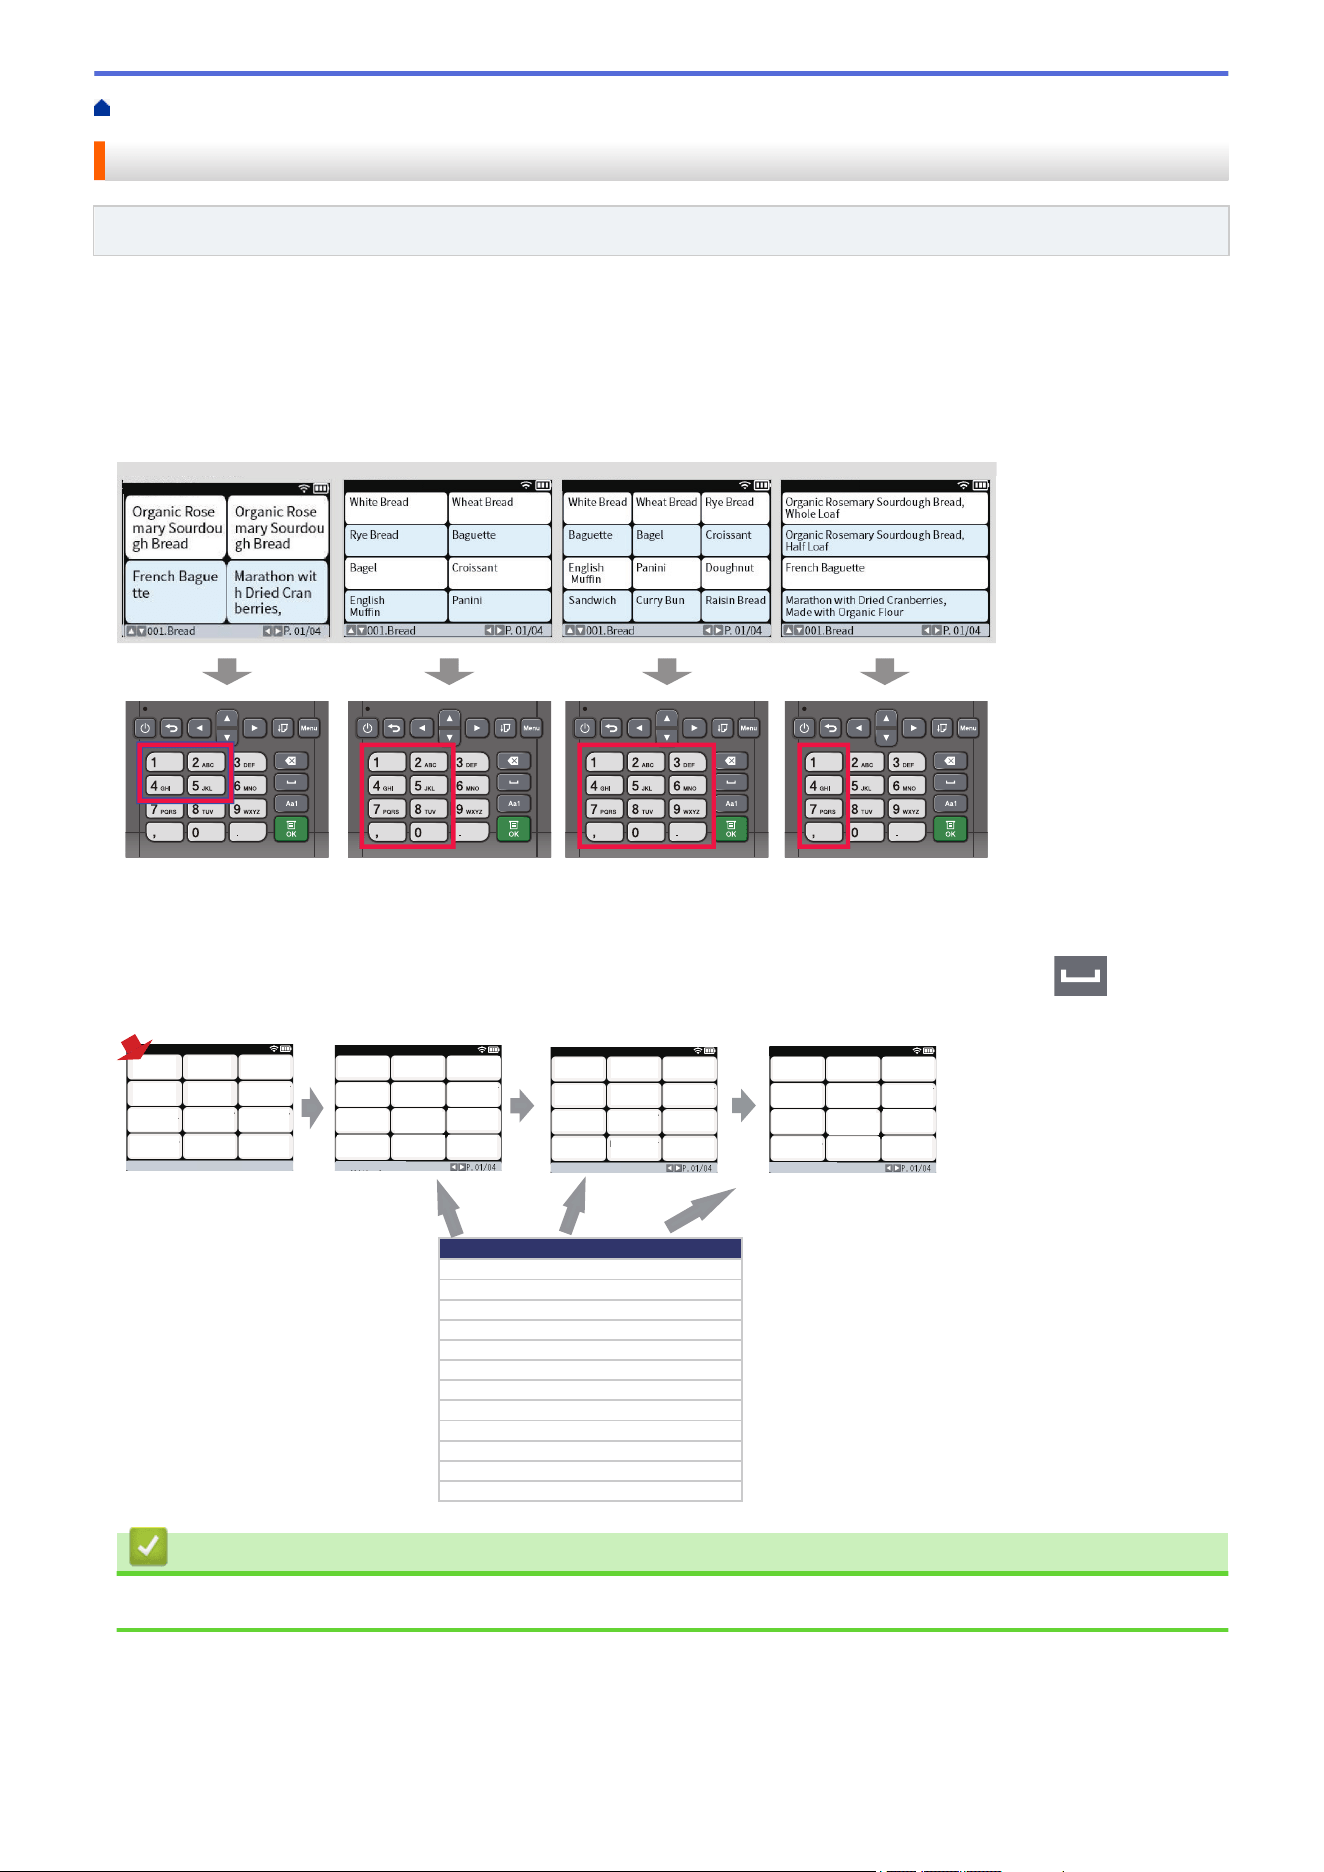
Home > Standalone Printing > Change the Screen Display in Template Touch Mode
Change the Screen Display in Template Touch Mode
Related Models: TD-2350DSA
Change the number of templates and databases displayed
The display styles in Template Touch Screen include 4x3, 4x2, 4x1, and 2x2.
Select your display style from the [Touch Mode Setting] in the [Template Settings] menu.
The printer's Numerical / Letter buttons correspond to each entry on the screen as shown in the illustrations
below.
Change the Columns of the Database Table to be Displayed on the Screen.
If you select one database table while viewing databases, the contents of the columns in the selected database
table will be displayed. Database tables typically have multiple columns, and you can press the (Space)
button to change which column is displayed.
䝟䞁ᘚᙜ㣧ᩱ
㡯┠
㡯┠
000011
000021 000031
000041 000051 000061
000071
000081
000091
000101 000111 000121
㡯┠
350 300 250
280 100 180
200
230
260
340 190 190
P.01/01
౯᱁ၟရྡ
Item code
350
ᒣᙧ㣗䝟䞁
000011
300
ゅ㣗䝟䞁
000021
250
䝭䝑䜽䝇䝃䞁䝗
000031
280
㔝⳯䝃䞁䝗
000041
100
䠄䝏䞊䝈䠅
000051
180
∵⫗䜹䝺䞊䝟䞁
000061
200
䝤䝸䜸䝑䝅䝳
000071
230
⦎ங䝭䝹䜽䝣䝷䞁䝇
000081
260
䝙䝳䞊䝶䞊䜽
000091
340
䝞䝍䞊䝻䞊䝹
000101
190
䝺䞊䝈䞁䝟䞁
000111
190
䛟䜛䜏䝟䞁
000121
Bread A
Bread B
Bread C
Bread D
Bread E
Bread F
Bread G
Bread H
Bread I
Bread J
Bread K
Bread L
Bread A Bread B Bread C
Bread D Bread E Bread F
Bread G Bread H Bread I
Bread J Bread K Bread L
Bread Lunch Box Beverage
Product PriceItem code
Related Information
• Standalone Printing
114

Home > Print Labels Using Barcode Scanner or Other Devices (P-touch Template)
Print Labels Using Barcode Scanner or Other Devices (P-touch
Template)
Related Models: TD-2320D/TD-2350D/TD-2320DF/TD-2350DF/TD-2350DSA
• P-touch Template Operations Overview
• Create Labels Using P-touch Editor (Windows)
• Transfer a Template to P-touch Transfer Manager (Windows)
• Transfer Templates or Other Data from the Computer to the Printer (Windows)
• Specify the Barcode Scanner Settings (Windows)
• Connect the Printer to a Barcode Scanner Using Bluetooth (Windows)
• Connect the Printer to a Barcode Scanner Using USB Host Interface
• Try the P-touch Template Function Using the Barcode List
115
Home > Print Labels Using Barcode Scanner or Other Devices (P-touch Template) > P-touch Template
Operations Overview
P-touch Template Operations Overview
P-touch Template Mode allows you to insert data into text and barcode objects on templates transferred to the
printer using other devices connected to the printer.
• P-touch Template Mode is also compatible with other input devices like scales, testing machines,
controllers, or a programmable logic devices.
• For more information, see the P-touch Template Manual/Command Reference (English only). You can
download the latest version from the Brother support website at support.brother.com/manuals.
Basic Operations
Standard Template Printing
Transfer frequently used templates and images to the printer in advance. Prepare a barcode containing
numbers for template selection and information to start printing. Read the barcode with a barcode scanner
connected to the printer to select the template and start printing.
Advanced Template Printing
Download a template and scan a barcode to print a copy or to insert the scanned data into a different
template.
Database Lookup Printing
Download a database linked to a template and scan a barcode to find a record to insert into the template and
print.
See Related Information.
Advanced Operations
Numbered (Serialized Number) Printing
Increment printed text or barcodes in any downloaded template.
See Related Information.
Related Information
• Print Labels Using Barcode Scanner or Other Devices (P-touch Template)
Related Topics:
• Recall and Print the Template Transferred to the Printer (Recall Printing)
• Insert Information into a Template Transferred to the Printer and Print It (Merge Printing)
• Print the Template Linked to the Database (Database Lookup Printing)
• Print Transferred Templates in Serialized (Numerical) Order (Numbered (Serialized Number) Printing)
116
Home > Print Labels Using Barcode Scanner or Other Devices (P-touch Template) > Create Labels Using
P-touch Editor (Windows)
Create Labels Using P-touch Editor (Windows)
Before using your printer with your Windows computer, you must install P-touch Editor and the latest printer
driver on your computer.
For the latest drivers and software, go to your model's Downloads page on the Brother support website at
support.brother.com.
1. Start P-touch Editor
.
Click Start > Brother P-touch > P-touch Editor, or double-click the P-touch Editor icon on the desktop.
NOTE
Depending on your computer's operating system, the Brother P-touch folder may or may not be created.
2. Do one of the following:
• To open an existing layout, click Open (1).
• To connect a preset layout to a database, select the Connect Database checkbox (2).
• To create a new layout, double-click the New Layout pane (3), or click the New Layout pane (3) and then
click →.
• To create a new layout using a preset layout, double-click a category button (4), or select a category
button (4), and then click →.
2
1
3
4
Related Information
• Print Labels Using Barcode Scanner or Other Devices (P-touch Template)
117
Home > Print Labels Using Barcode Scanner or Other Devices (P-touch Template) > Transfer a Template to
P-touch Transfer Manager (Windows)
Transfer a Template to P-touch Transfer Manager (Windows)
1. Start P-touch Editor .
Click Start > Brother P-touch > P-touch Editor, or double-click the P-touch Editor icon on the desktop.
NOTE
Depending on your computer's operating system, the Brother P-touch folder may or may not be created.
2. Open the template you want or create a layout.
3. Click File > Transfer Template > Transfer.
The P-touch Transfer Manager window appears. The template is transferred to the Configurations folder.
Related Information
• Print Labels Using Barcode Scanner or Other Devices (P-touch Template)
118

Home > Print Labels Using Barcode Scanner or Other Devices (P-touch Template) > Transfer Templates or
Other Data from the Computer to the Printer (Windows)
Transfer Templates or Other Data from the Computer to the Printer
(Windows)
To transfer templates from a mobile device to the printer, see Related Information.
1. Connect the printer to the computer using a USB cable, and then turn the printer on.
The printer model name appears next to a printer icon in the folder view.
If you select the printer in the folder view, the current templates and other data stored in the printer appear.
If a printer is disconnected or offline, it does not appear in the folder view.
2. Select the printer to which you want to transfer the template or other data.
119
3. Right-click the Configurations folder, select New, and then create a new folder.
4. Do one of the following:
• Drag the template or other data you want to transfer and place it in the new folder.
• To transfer multiple templates or other data, drag the files you want to transfer, and then place them in the
new folder. Each file is assigned a Key Assign number (memory location in the printer) when it is placed
in the new folder.
Data Type
Maximum Number of
Transferable Items
Restriction Details
Template 255 • Each template can contain a maximum of 255
objects.
• Each object can contain a maximum of seven lines.
Database 255 • Only CSV files can be transferred.
• Each CSV file can contain a maximum of 100
columns and 65000 records.
120

Data Type Maximum Number of
Transferable Items
Restriction Details
Image (transferred
symbols)
255 • Only *.bmp files can be transferred.
• Monochrome *.bmp files are recommended.
• The size limit is 1296 x 1296 pixels.
• Wide images may be cropped.
• You can confirm the available space in the transfer file memory by printing Printer Settings Report. See
Available memory in the report for the available space. The available space appearing in Available
memory: ****B may be different from the actual available space.
• You can view the templates and other data by selecting:
- The folder in the Configurations folder
- All Contents
- One of the categories under Filter, such as Layouts
5. To change the Key Assign number assigned to an item, right-click the item, select the Key Assign menu, and
then select the Key Assign number you want.
• Except for the data in databases, all data transferred to the printer is assigned a key number.
• If the template or other data transferred to the printer has the same key number as another template
already saved in the printer, the new template overwrites the old one. You can confirm the assigned
template numbers saved in the printer by backing up the templates or other data.
• If the printer memory is full, remove one or more templates from the printer's memory.
6. To change the template names or other data you want to transfer, click the item you want, and then type the
new name.
The number of characters used for the template names may be limited depending on the printer model.
7. Make sure that either the Template List Screen or the Template Touch Screen is selected on your printer
under [Settings] > [Home Screen] > [Template List Screen] (or [Template Touch Screen]).
Select the folder containing the templates or other data you want to transfer, and then click Transfer.
121

A confirmation message appears.
• You can also transfer individual items to the printer without adding them to a folder. Select the template
or other data you want to transfer, and then click Transfer.
• Multiple items and folders can be selected and transferred in one operation.
8. Click OK.
The selected items are transferred to the printer.
Related Information
• Standalone Printing
• Print Labels Using Barcode Scanner or Other Devices (P-touch Template)
• About Transferring Templates from the Computer to the Printer (Windows)
Related Topics:
• Transfer Templates Created on a Computer to the Printer Using a Mobile Device
• Confirm Printer Settings
122

Home > Print Labels Using Barcode Scanner or Other Devices (P-touch Template) > Specify the Barcode
Scanner Settings (Windows)
Specify the Barcode Scanner Settings (Windows)
Before connecting the barcode scanner to the printer, specify the barcode scanner settings using the P-touch
Template Settings (in the Printer Setting Tool).
To include multiple object data on a label, search the database and print, or print immediately after reading
a barcode, you must adjust P-touch Template settings. By customizing barcode scanner settings, you can
attach a command to the string read by the scanner that the barcode scanner sends to the printer.
• To put multiple object data on a label, or if you want to search the database and print: Enter "\09" in the
Data Delimiter for P-touch Template: field.
• To print immediately after reading a barcode: Enter "^FF" in the Trigger for P-touch Template Printing
field as Command Character.
1. Connect the printer and the computer via a USB cable, and then turn the printer on.
2. Start the Printer Setting Tool.
Click Start > Brother > Printer Setting Tool.
3. Click the P-touch Template Settings button.
4. Select the settings you want, and then click Set.
(A)
• By default, printing begins when the code "^FF" is scanned from a barcode using a barcode scanner.
(This can be changed with the settings highlighted by (A) in the previous image.)
If the Received Data Size option is selected with the number of bytes setting, the template is printed
after the specified number of bytes have been scanned.
• Because the print mode setting returns to raster mode each time you print from the computer, you must
change the setting to template mode again.
• If you turn off the printer and then turn it on again, the printer starts up in template mode.
123

Home > Print Labels Using Barcode Scanner or Other Devices (P-touch Template) > Connect the Printer to
a Barcode Scanner Using Bluetooth (Windows)
Connect the Printer to a Barcode Scanner Using Bluetooth (Windows)
Related Models: TD-2350D/TD-2350DF/TD-2350DSA
We recommend using a reliable high-quality barcode scanner and checking the barcode scanner specifications
before selecting a model.
Recommended barcode scanner selection criteria: Bluetooth Version 2.1 + EDR (Class 1) models supporting
SPP or OPP profiles
• For P-touch Template mode, templates must first be downloaded from a computer to the printer using
P-touch Transfer Manager.
• The barcode scanner should be programmed to use the English keyboard. For beginners, we
recommend programming your barcode scanner with no prefix and no suffix characters. For advanced
users, the prefix and suffix characters can be scanned and used as commands with the printer for
creating customized templates.
• Contact the manufacturer for more information on how to use and program a specific barcode scanner
model.
• Follow the recommendations of the manufacturer of your Bluetooth-equipped devices, such as barcode
scanners, and install any necessary hardware and software.
• The Bluetooth connection settings are saved even after the printer is turned off.
1. Press Menu.
2. Press a or b to select the following:
a. Select [Bluetooth]. Press OK.
b. Select [Bluetooth (On/Off)]. Press OK.
3. Press a or b to select [On]. Press OK.
appears on the LCD.
Depending on your model, may appear instead of .
4. Pair the printer with the barcode scanner via Bluetooth.
If the PIN of the printer is required, the default PIN is the last four digits of the product serial number. You can
change the PIN using the Communication Setting Tool.
• If the Request Secure Simple Pairing (SSP) settings during pairing checkbox is not selected in the
Bluetooth tab of Communication Settings, a Bluetooth pass key for a Bluetooth device appears on the
LCD and the Bluetooth connection is made.
• If the Request Secure Simple Pairing (SSP) settings during pairing checkbox is selected in the
Bluetooth tab of Communication Settings, a Bluetooth pass key appears on the LCD. Press OK on the
printer. As the displayed Bluetooth pass key is entered to the Bluetooth device, the Bluetooth connection
is made.
When a connection has been established, the printer remains connected until it is turned off, preventing it from
connecting to another device.
Related Information
• Print Labels Using Barcode Scanner or Other Devices (P-touch Template)
125
Home > Print Labels Using Barcode Scanner or Other Devices (P-touch Template) > Connect the Printer to
a Barcode Scanner Using USB Host Interface
Connect the Printer to a Barcode Scanner Using USB Host Interface
Related Models: TD-2320D/TD-2350D/TD-2320DF/TD-2350DF/TD-2350DSA
We recommend using a reliable high-quality barcode scanner and checking the barcode scanner specifications
before selecting a model.
Recommended barcode scanner selection criteria: HID-class models identified as a keyboard
• For P-touch Template mode, templates must first be downloaded from a computer to the printer using
P-touch Transfer Manager.
• The barcode scanner should be programmed to use the English keyboard. For beginners, we
recommend programming your barcode scanner with no prefix and no suffix characters. For advanced
users, the prefix and suffix characters can be scanned and used as commands with the printer for
creating customized templates.
• Contact the manufacturer for more information on how to use and program a specific barcode scanner
model.
Connect a barcode scanner to the printer's USB host port.
Related Information
• Print Labels Using Barcode Scanner or Other Devices (P-touch Template)
126

Home > Print Labels Using Barcode Scanner or Other Devices (P-touch Template) > Try the P-touch
Template Function Using the Barcode List
Try the P-touch Template Function Using the Barcode List
• Recall and Print the Template Transferred to the Printer (Recall Printing)
• Insert Information into a Template Transferred to the Printer and Print It (Merge Printing)
• Print the Template Linked to the Database (Database Lookup Printing)
• Print Transferred Templates in Serialized (Numerical) Order (Numbered (Serialized
Number) Printing)
• Barcodes Used for Specifying Settings
127
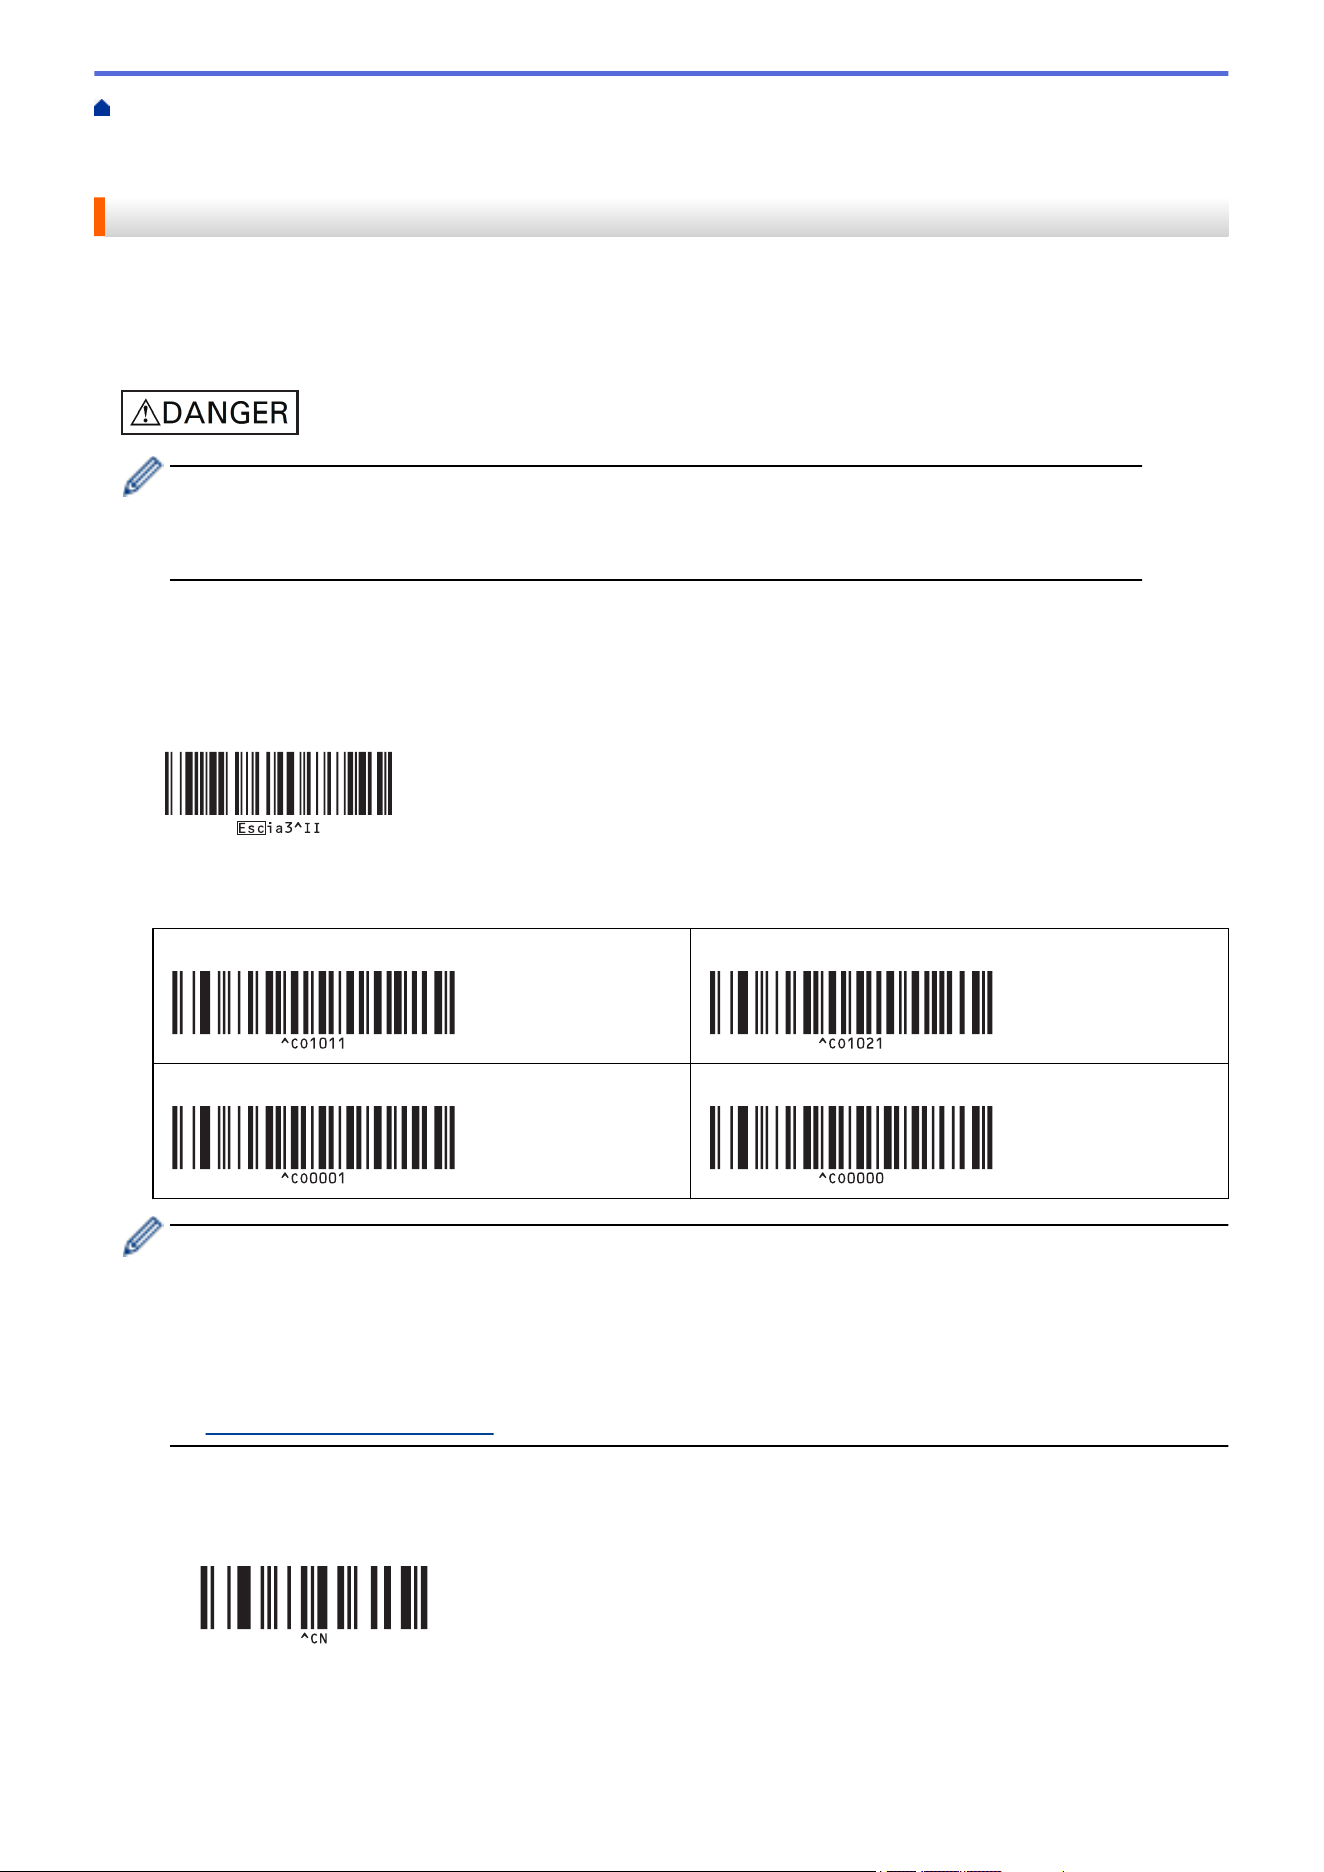
Home > Print Labels Using Barcode Scanner or Other Devices (P-touch Template) > Try the P-touch
Template Function Using the Barcode List > Recall and Print the Template Transferred to the Printer (Recall
Printing)
Recall and Print the Template Transferred to the Printer (Recall Printing)
Transfer frequently used templates and images to the printer in advance. Prepare a barcode containing numbers
for template selection and information to start printing. Read the barcode with a barcode scanner connected to
the printer to select the template and start printing.
Example:
• For more information on the barcodes scanned using various settings, see Related Information.
• Grouped objects are converted and sent as an image.
• The following these barcodes may not be available depending on the model.
1. Use P-touch Transfer Manager to transfer a template or label layout from the computer to the printer.
For more detailed information, see Related Information.
2. Scan the following barcode:
P-touch template command (Initialize + begin specifying settings)
3. From the following barcode list, scan each barcode to send a command or setting to the printer:
Basic settings
Auto cut on (Cut every one label) + Cut at end on
Auto cut on (Cut every two labels) + Cut at end on
Auto cut off + Cut at end on Auto cut off + Cut at end off
• Settings can be made with multiple commands.
• If no settings have been made by scanning the barcode commands, a template is printed using the P-
touch Template settings. The default P-touch Template settings are to print a single copy with Auto Cut
turned on.
For more information on P-touch Template Settings, see the P-touch Template Manual/Command
Reference (English only). You can download the latest version from the Brother support website at
support.brother.com/manuals.
4. Specify the number of copies you want.
a. Scan the following barcode:
Number of copies
b. Scan the following barcodes to specify a three-digit number:
Example:
128
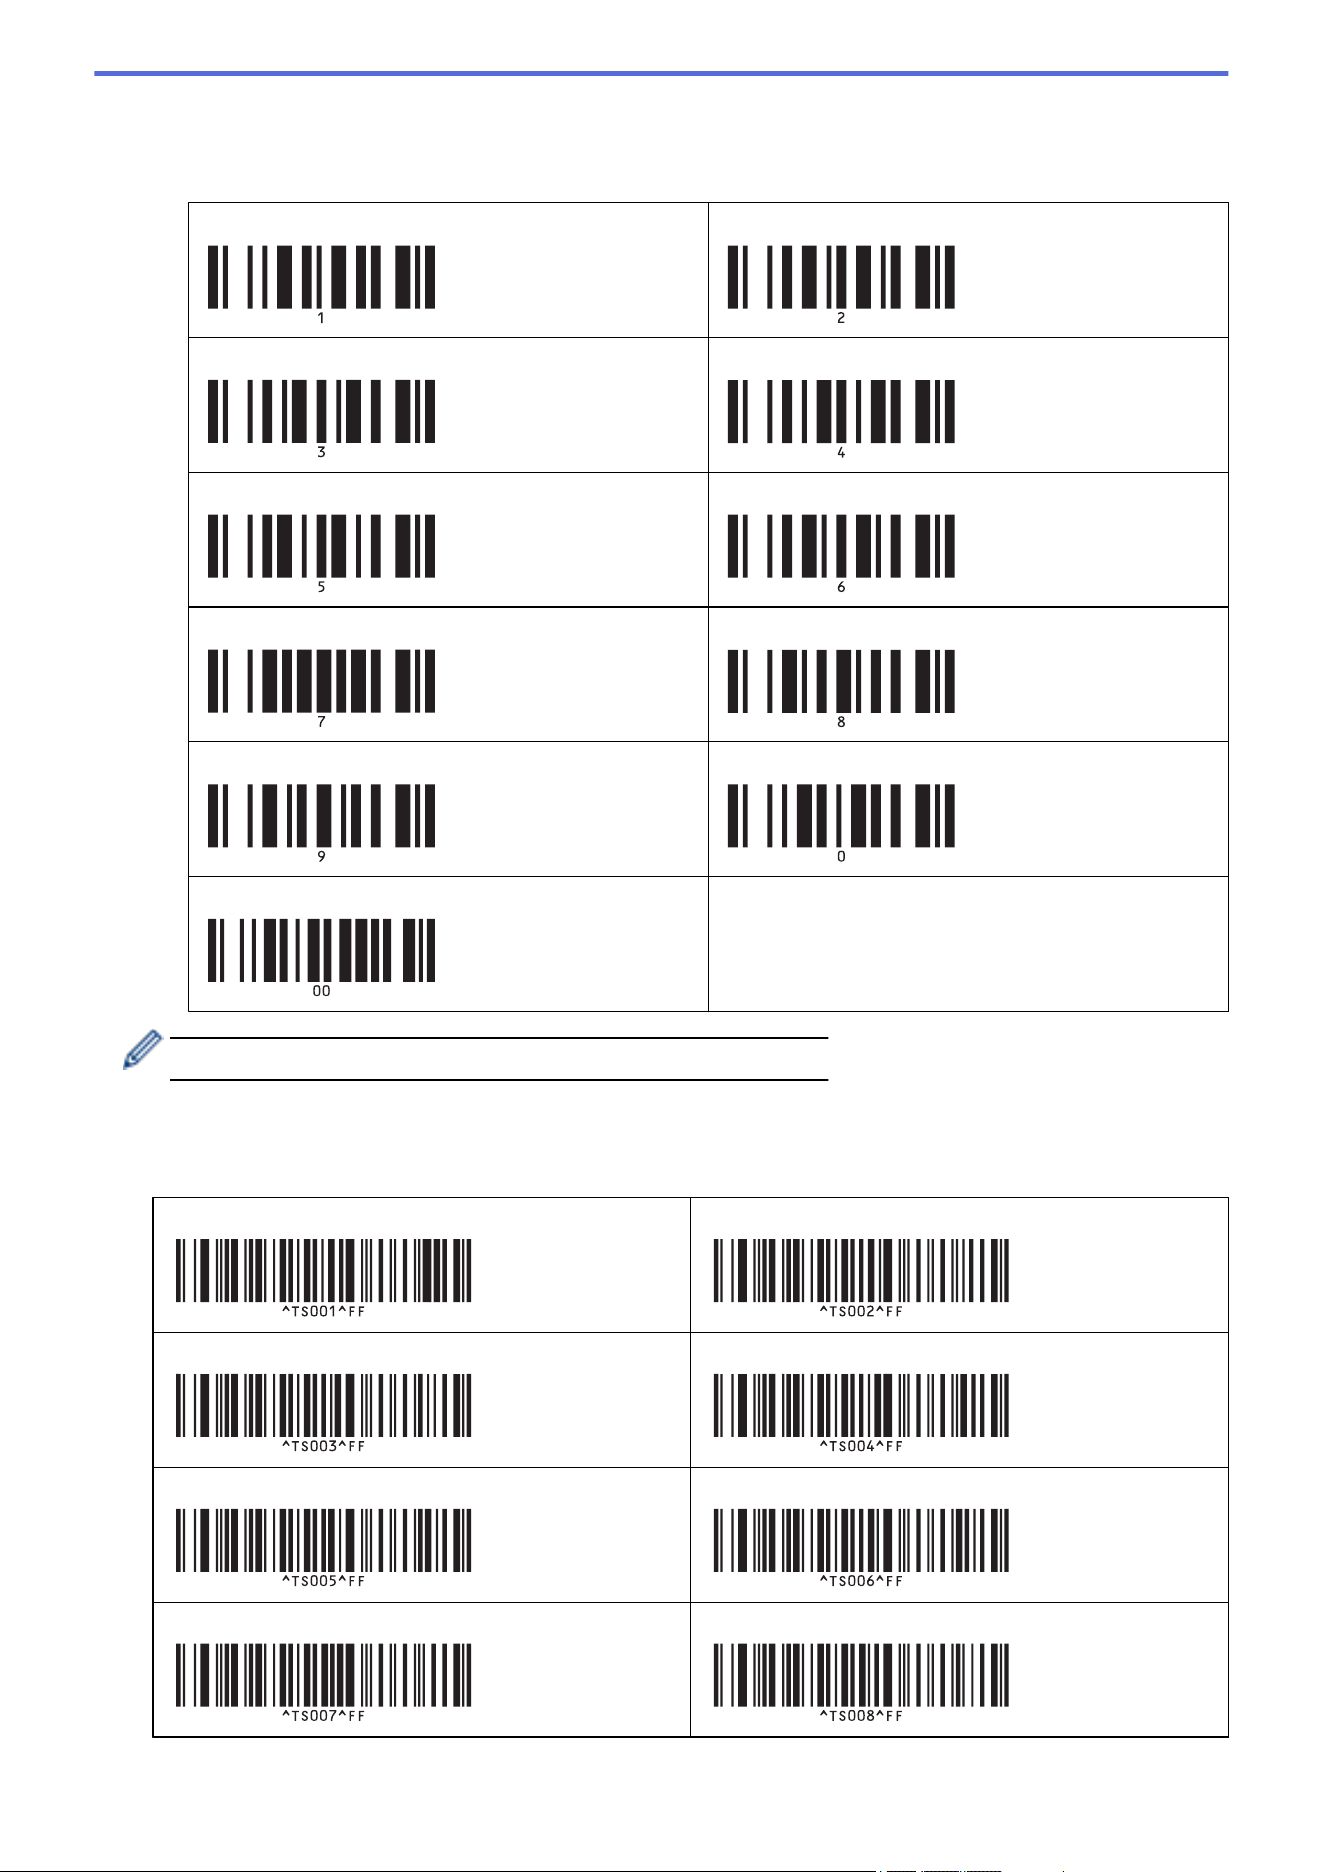
Specify numbers by scanning the following barcodes: when printing 7 sheets; [0][0][7], when printing 15
sheets; [0][1][5]
For entering numbers
1 2
3 4
5 6
7 8
9 0
00
To change the setting for the number of copies, repeat these steps.
5. Scan one of the following barcodes with the same number as the Key Assign number for the label layout you
want:
Preset template number
Preset template 1
Preset template 2
Preset template 3 Preset template 4
Preset template 5 Preset template 6
Preset template 7 Preset template 8
129

Preset template 9 Preset template 10
The specified label is printed.
Related Information
• Try the P-touch Template Function Using the Barcode List
• Lock Labels for Editing
Related Topics:
• Barcodes Used for Specifying Settings
• About Transferring Templates from the Computer to the Printer (Windows)
130
Home > Print Labels Using Barcode Scanner or Other Devices (P-touch Template) > Try the P-touch
Template Function Using the Barcode List > Recall and Print the Template Transferred to the Printer (Recall
Printing) > Lock Labels for Editing
Lock Labels for Editing
To protect frequently used templates from unwanted edits, convert a text object in the label layout to an image.
After converting the label layout to an image, the text cannot be changed.
1. In the P-touch Editor Layout window, right-click the text object, and then click Properties.
2. Click the Expanded tab, and then select the Text Cannot Be Edited checkbox.
• If the Expanded tab does not appear, click Tools > Options > General, and then select the Display
Expanded Tabs of Object Properties checkbox in the Others section.
• When the Text Cannot Be Edited checkbox is cleared, the object is converted back to editable text.
Related Information
• Recall and Print the Template Transferred to the Printer (Recall Printing)
131
Home > Print Labels Using Barcode Scanner or Other Devices (P-touch Template) > Try the P-touch
Template Function Using the Barcode List > Insert Information into a Template Transferred to the Printer and
Print It (Merge Printing)
Insert Information into a Template Transferred to the Printer and Print It
(Merge Printing)
Transfer a template to the printer. Print the transferred template by inserting the information read from the
barcode scanner connected to the printer.
• For more information on the barcodes scanned using various settings, see Related Information.
• If a barcode has a different protocol than the barcode template already registered with the printer, you
may be unable to create or print the barcode.
• Depending on the barcode scanner model, some barcode symbols and protocols may not be supported
by this printer.
1. Use P-touch Transfer Manager to transfer a template or label layout from the computer to the printer.
For more detailed information, see Related Information.
NOTE
It is important to design a template to meet the barcode symbology or protocol requirements, especially
for the label size and barcode position in the label to fit the maximum number and type of characters
being inserted from the barcode scanner. A barcode in the template cannot be created or scanned if the
barcode with the inserted data does not fit entirely within the label printable image area.
2. When you transfer data to the Configurations folder in P-touch Transfer Manager, select the folder
containing the data you want to transfer.
You can add a custom folder under Configurations, and drag-and-drop a transferred template into the
custom folder to manage different sets of templates.
When a template is transferred to the Configurations folder in P-touch Transfer Manager, the Key Assign
number is automatically assigned.
You can specify a Key Assign number between 1 and 10 for any templates downloaded into the printer.
3. Select the transferred template, and then click Transfer to download the template to the Key Assign number
in the printer.
4. Scan the following barcode:
P-touch template command (Initialize + begin specifying settings)
5. From the following barcode list, scan each barcode to send a command or setting to the printer:
Basic settings
132
Auto cut on (Cut every one label) + Cut at end on Auto cut on (Cut every two labels) + Cut at end on
Auto cut off + Cut at end on Auto cut off + Cut at end off
Number of copies
• Settings can be made with multiple commands.
• If no settings have been made by scanning the barcode commands, a template is printed using the P-
touch Template settings. The default P-touch Template settings are to print a single copy with Auto Cut
turned on.
For more information on P-touch Template Settings, see the P-touch Template Manual/Command
Reference (English only). You can download the latest version from the Brother support website at
support.brother.com/manuals.
6. Specify the number of copies you want.
a. Scan the following barcode:
Number of copies
b. Scan the following barcodes to specify a three-digit number:
Example:
Specify numbers by scanning the following barcodes: when printing 7 sheets; [0][0][7], when printing 15
sheets; [0][1][5]
For entering numbers
1
2
3 4
5 6
7 8
133

9 0
00
To change the setting for the number of copies, repeat these steps.
7. Scan the following barcode:
Select template
8. Scan the following barcodes with the same number (three digits) as the Key Assign number used for the
downloaded template to be printed:
Example:
Specify numbers by scanning the following barcodes: when printing number 7; [0][0][7], when printing number
15; [0][1][5]
For entering numbers
1
2
3 4
5 6
7 8
9 0
00
The downloaded template is selected after the three digit numbers have been scanned.
134
You can use P-touch Editor to create and print a label with a single barcode.
Example:
9. Scan a barcode containing the data you want inserted into the barcode object in the selected downloaded
template.
Example:
10. Scan the following barcode to send the command to start printing:
Begin printing
The barcode in the printed template contains the data from the barcode scanned.
Example:
Related Information
• Try the P-touch Template Function Using the Barcode List
Related Topics:
• Barcodes Used for Specifying Settings
• About Transferring Templates from the Computer to the Printer (Windows)
135
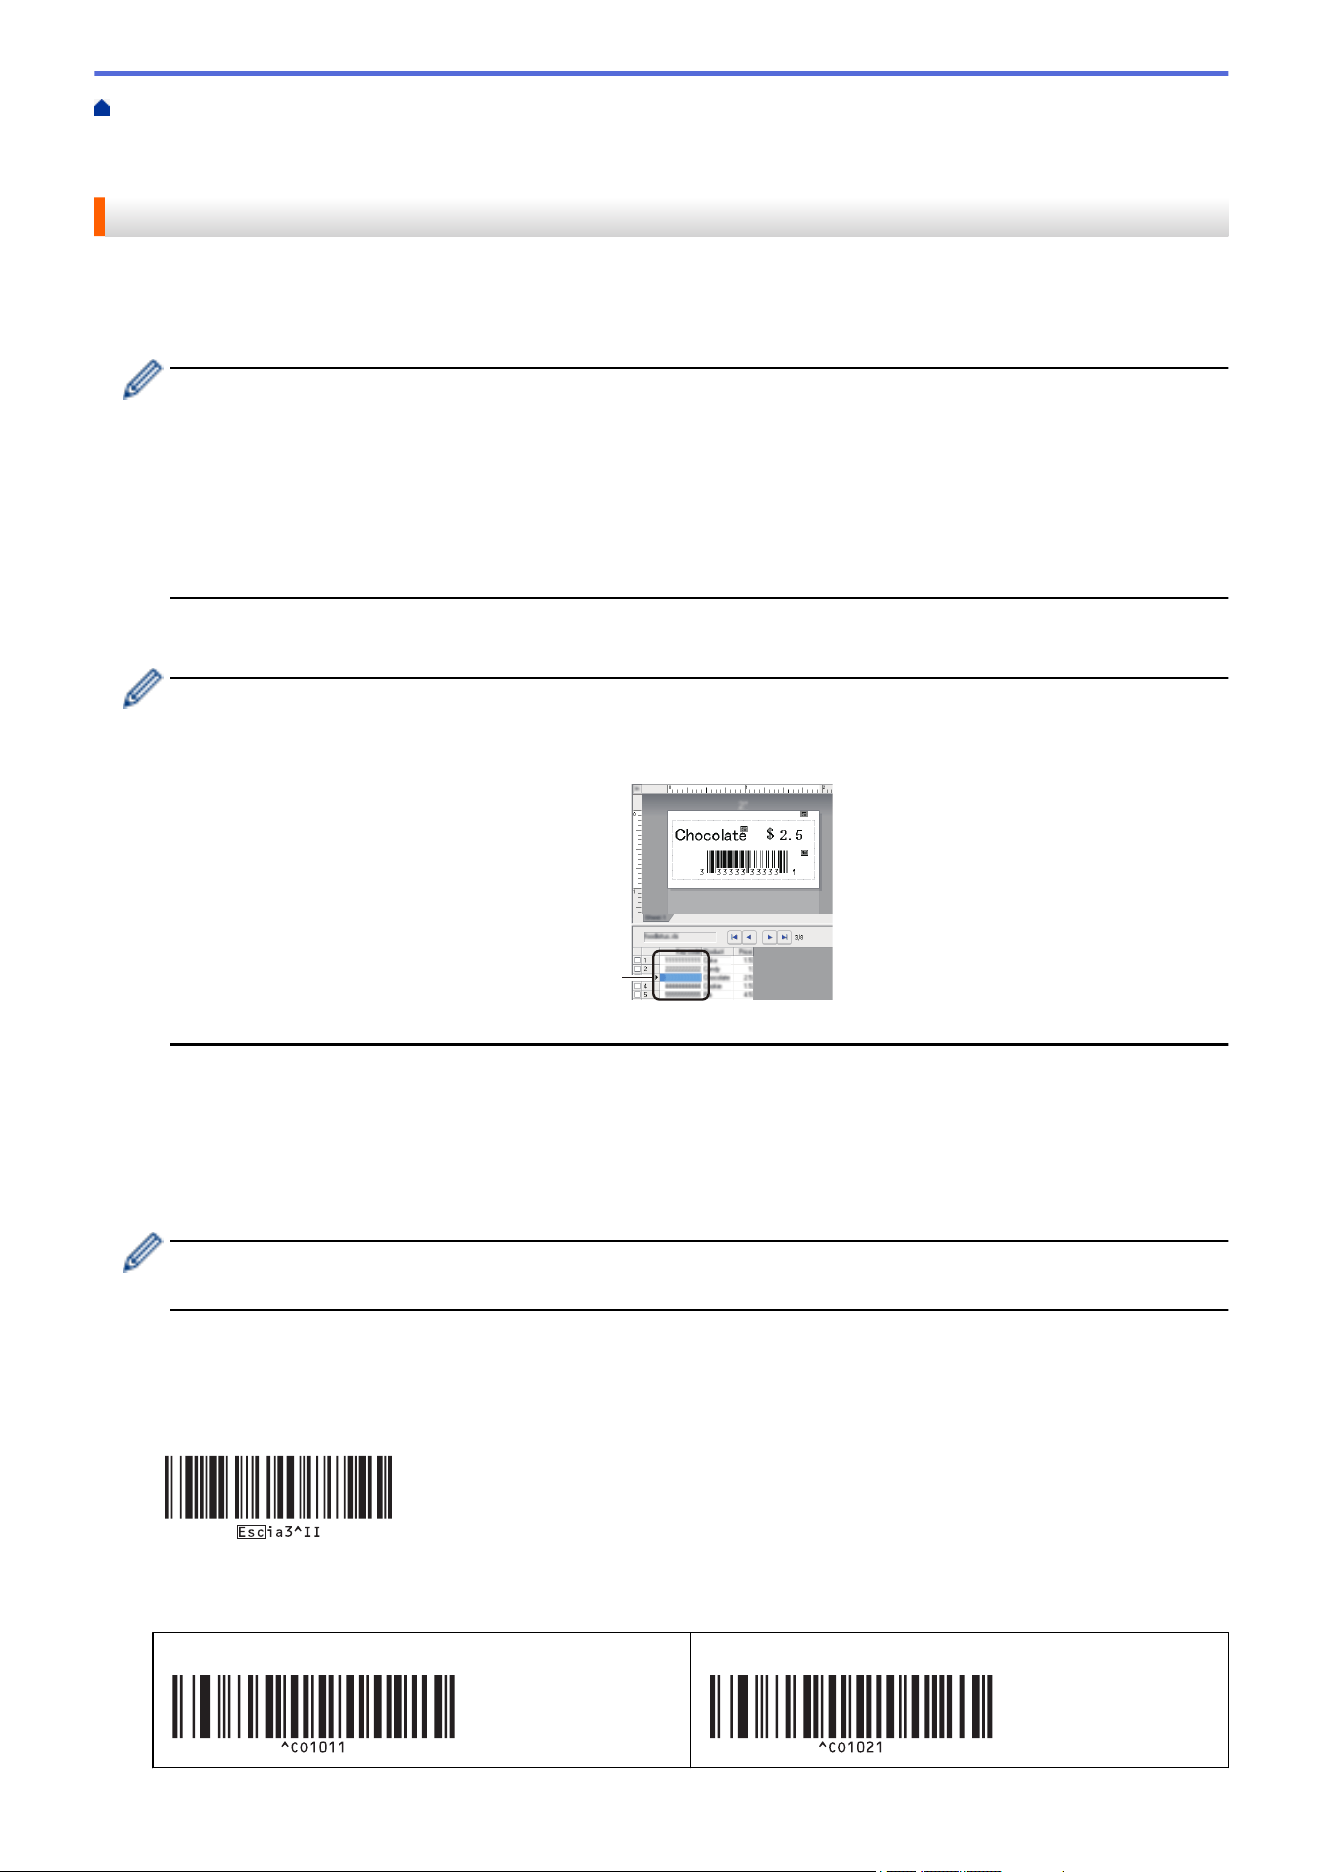
Home > Print Labels Using Barcode Scanner or Other Devices (P-touch Template) > Try the P-touch
Template Function Using the Barcode List > Print the Template Linked to the Database (Database Lookup
Printing)
Print the Template Linked to the Database (Database Lookup Printing)
Transfers the template and the database linked to the template to the printer. By using the barcode as a keyword,
it is possible to search the database for records containing the keyword and to print the template with the search
result merged into it.
• For more information on the barcodes scanned using various settings, see Related Information.
• The printer has reserved the leftmost column (A) of a downloaded linked database for this operation,
therefore the keyword scanned from a barcode must be in this column of the database.
• For the printer to find keywords successfully, the data in the leftmost column (A) must exactly match the
keywords scanned from a barcode.
• P-touch Editor and the printer can read only one line of data in each field of a linked database so we do
not recommend using databases with two or more lines of data in the leftmost column (A).
1. Use P-touch Editor to create a template and connect to a database file.
• You can link as many columns to a text and barcode objects in the template as needed.
• Make sure the keywords are included in the leftmost column (A) but do not link any text or barcode
object in the template with field (A) if you do not need the data on the printed label.
A
• For more information on specifying the settings, refer to the P-touch Editor Help menu.
2. Use P-touch Transfer Manager to transfer a template or label layout from the computer to the printer.
For more information, see Related Information.
The linked database file will also be transferred.
When a template is transferred to the Configurations folder in P-touch Transfer Manager, the Key Assign
number is automatically assigned.
You can add a custom folder under Configurations, and drag-and-drop a transferred template into the
custom folder to manage different sets of templates.
3. Select the transferred template, and then click Transfer to download the template to the Key Assign number
in the printer.
4. Scan the following barcode:
P-touch template command (Initialize + begin specifying settings)
5. From the following barcode list, scan each barcode to send a command or setting to the printer:
Basic settings
Auto cut on (Cut every one label) + Cut at end on
Auto cut on (Cut every two labels) + Cut at end on
136
Auto cut off + Cut at end on Auto cut off + Cut at end off
Number of copies
• Settings can be made with multiple commands.
• If no settings have been made by scanning the barcode commands, a template is printed using the P-
touch Template settings. The default P-touch Template settings are to print a single copy with Auto Cut
turned on.
For more information on P-touch Template Settings, see the P-touch Template Manual/Command
Reference (English only). You can download the latest version from the Brother support website at
support.brother.com/manuals.
6. Specify the number of copies you want.
a. Scan the following barcode:
Number of copies
b. Scan the following barcodes to specify a three-digit number:
Example:
Specify numbers by scanning the following barcodes: when printing 7 sheets; [0][0][7], when printing 15
sheets; [0][1][5]
For entering numbers
1
2
3 4
5 6
7 8
9 0
137
00
To change the setting for the number of copies, repeat these steps.
7. Scan the following barcode:
Select template
8. Scan the following barcodes with the same number (three digits) as the Key Assign number used for the
downloaded template to be printed:
Example:
Specify numbers by scanning the following barcodes: when printing number 7; [0][0][7], when printing number
15; [0][1][5]
For entering numbers
1
2
3 4
5 6
7 8
9 0
00
The downloaded template is selected after the three digit numbers have been scanned.
You can use P-touch Editor to create and print a label with a single barcode.
Example:
9. Scan a barcode containing the keyword to look up in the downloaded database.
138
Example:
10. Scan the following barcode to send the command to start searching the downloaded database for the
scanned keyword:
Delimiter
11. Scan the following barcode to send the command to start printing:
Begin printing
You can use P-touch Editor to create and print a label with a single barcode.
Example:
The printer prints the template with the data inserted from the database record, found with the scanned
keyword.
Related Information
• Try the P-touch Template Function Using the Barcode List
Related Topics:
• Barcodes Used for Specifying Settings
• About Transferring Templates from the Computer to the Printer (Windows)
139
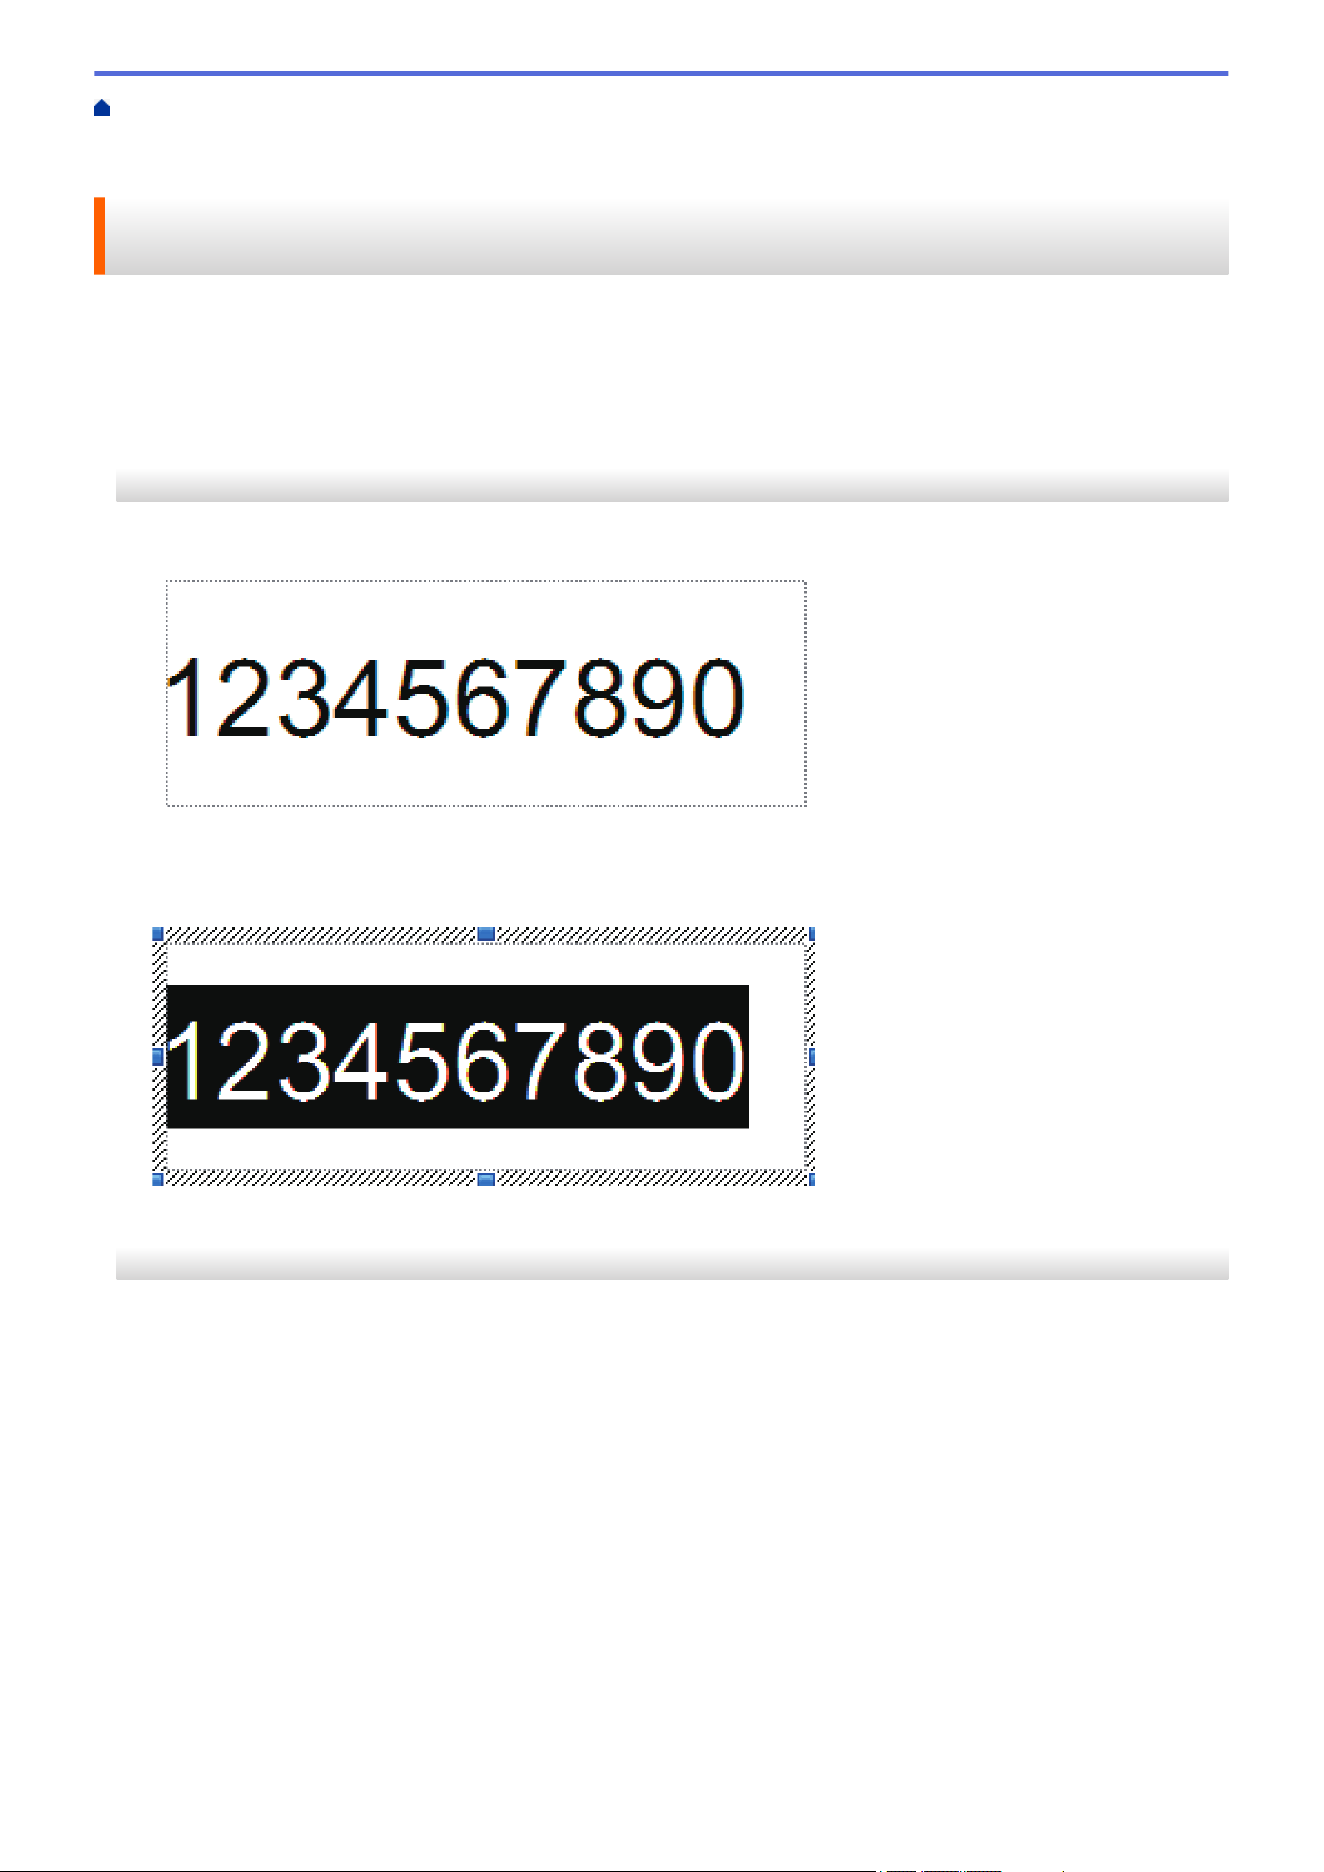
Home > Print Labels Using Barcode Scanner or Other Devices (P-touch Template) > Try the P-touch
Template Function Using the Barcode List > Print Transferred Templates in Serialized (Numerical) Order
(Numbered (Serialized Number) Printing)
Print Transferred Templates in Serialized (Numerical) Order (Numbered
(Serialized Number) Printing)
You can increase text numbers or barcodes up to 999 when printing downloaded templates. Select text or
barcode objects to increment while printing.
>> Text Numbering (Serializing)
>> Barcode Numbering (Serializing)
>> Use the Numbering (Serializing) Advanced Operation
Text Numbering (Serializing)
1. Use P-touch Editor to create or open a template and select a text object you want to increment while printing.
2. Highlight or drag the cursor over a group of numbers and letters within the text object you want to increment
(maximum of 15).
The selected group is called the Numbering field.
3. Right-click the Numbering field, and select the Numbering option.
Barcode Numbering (Serializing)
1. Use P-touch Editor to create or open a template and select a barcode object you want to increment while
printing.
2. Right-click the barcode object, and select the Properties option.
The Bar Code Properties window appears.
140
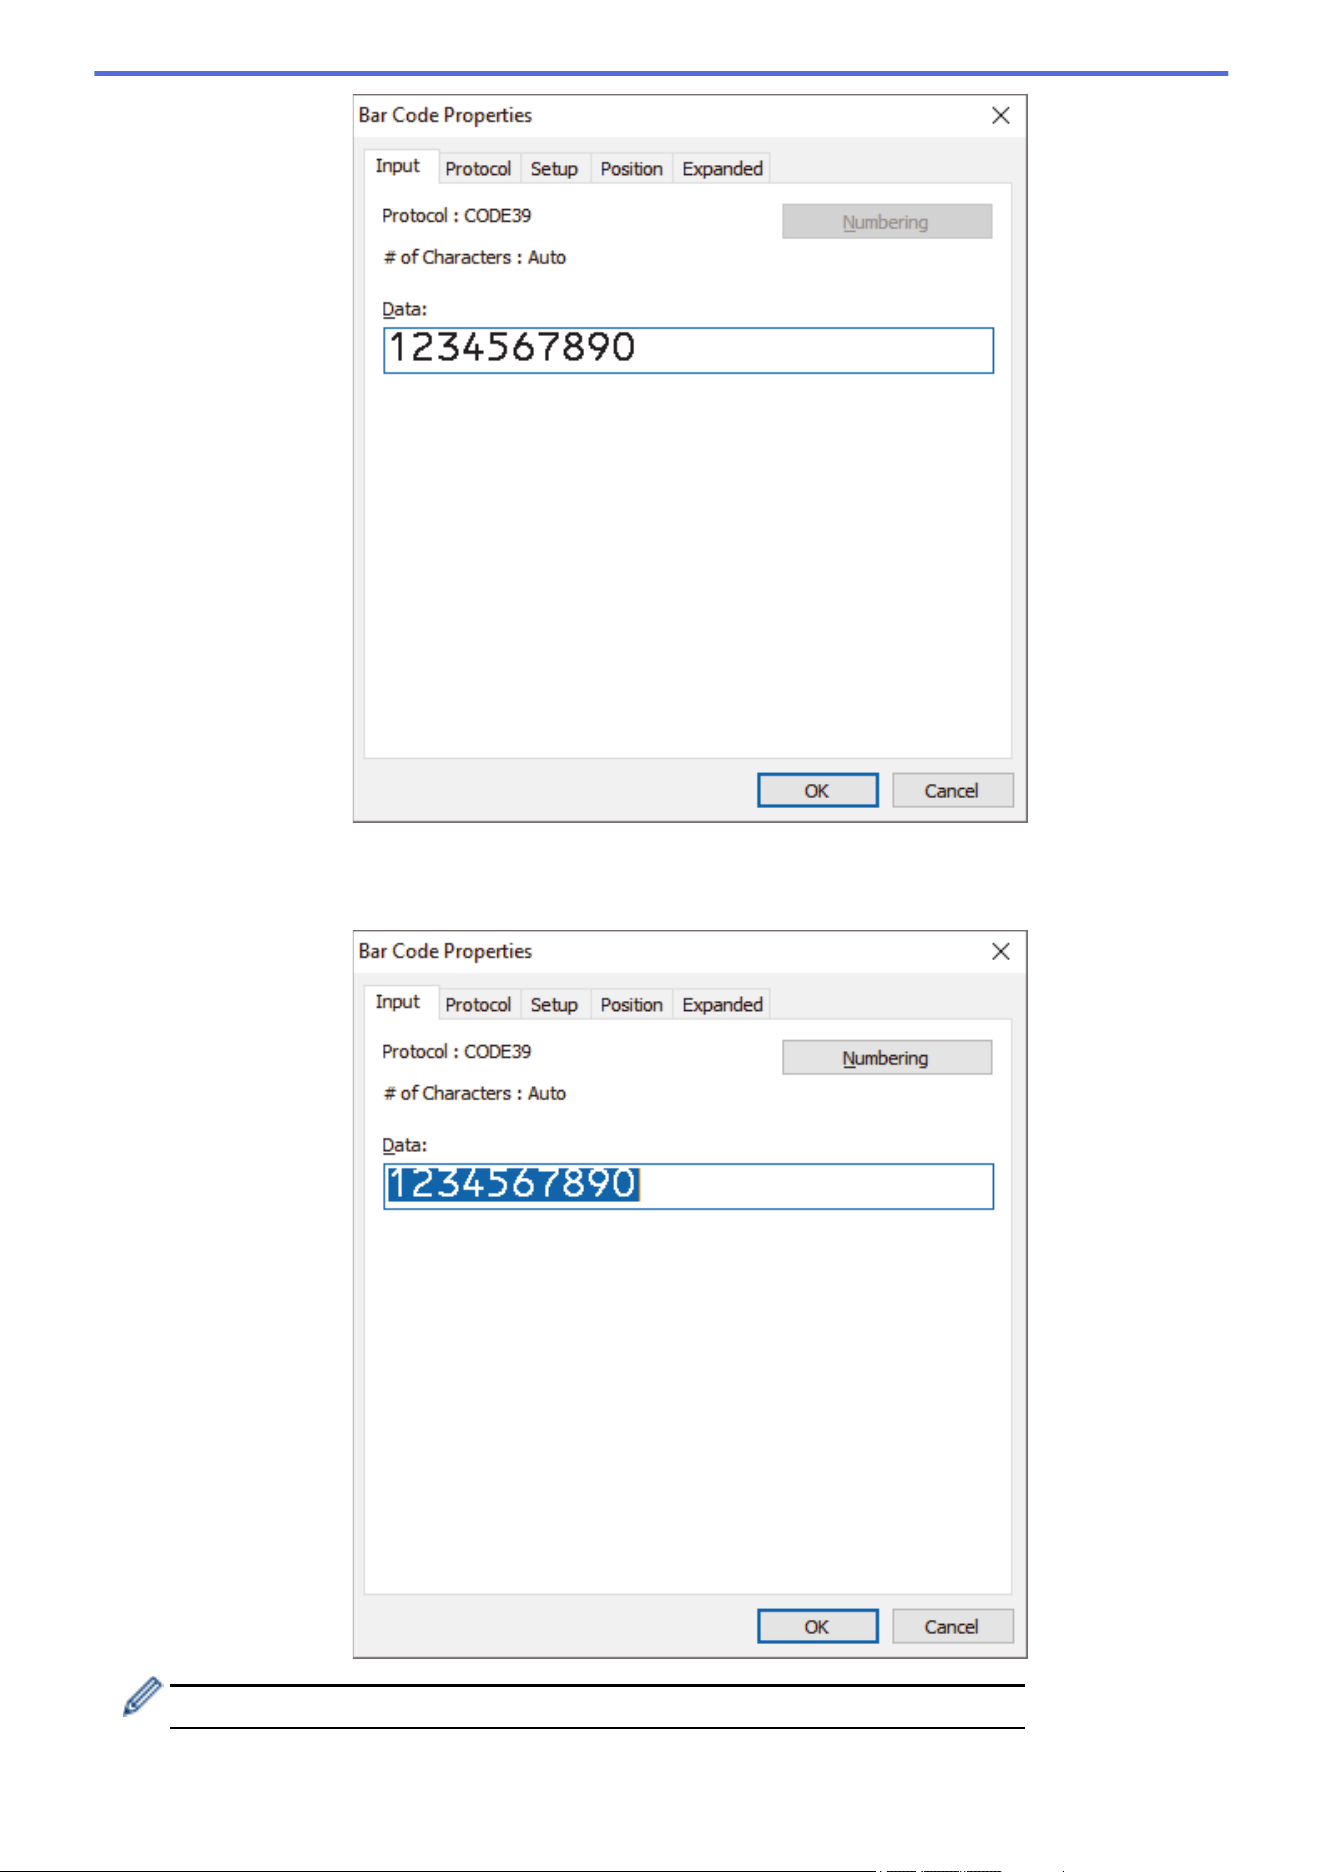
3. Highlight or drag the cursor over a group of numbers and letters within the barcode object you want to
increment (maximum of 15).
The selected group is called the Numbering field.
The Numbering button is enabled after a group of numbers and letters are highlighted.
4. Click the Numbering button, and then click OK.
141
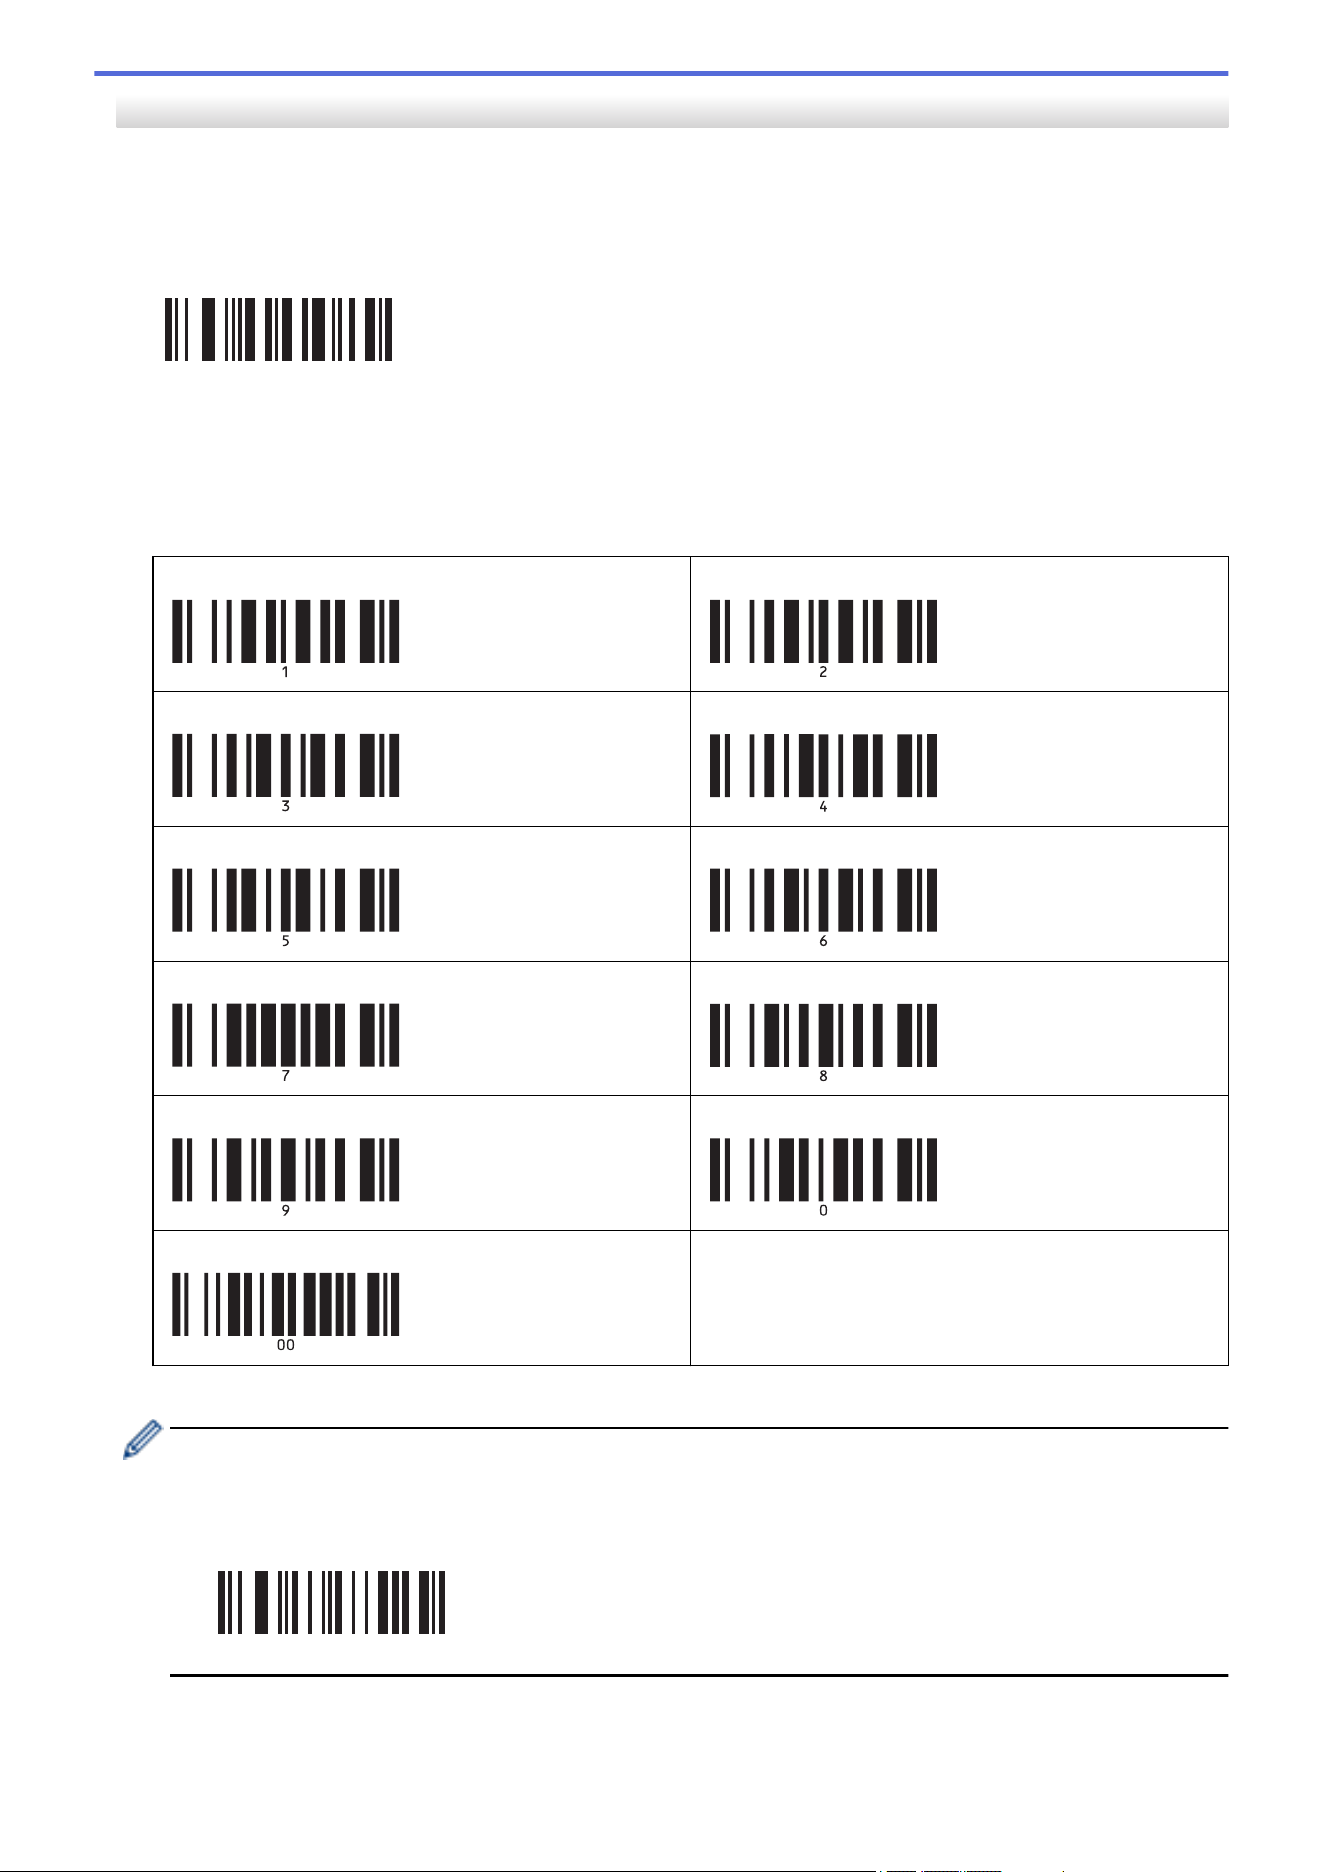
Use the Numbering (Serializing) Advanced Operation
1. Use P-touch Transfer Manager to transfer a template or label layout from the computer to the printer.
For more information, see Related Information.
2. Scan the following barcode:
Number of serialized copies
^NN
3. Scan the following barcodes with the number of copies you want to print (three digits):
Example:
For five copies, specify the three digit numbers by scanning barcodes for [0][0][5]
For entering numbers
1
2
3 4
5 6
7 8
9 0
00
4. Follow the P-touch Template mode basic operation procedures to start printing.
• The Numbering field increments by one number or letter with each printed label, and the count is
permanently saved in the printer.
• To reset a text or barcode object back to the original value, scan the following barcode:
Initialize template data
^ID
142

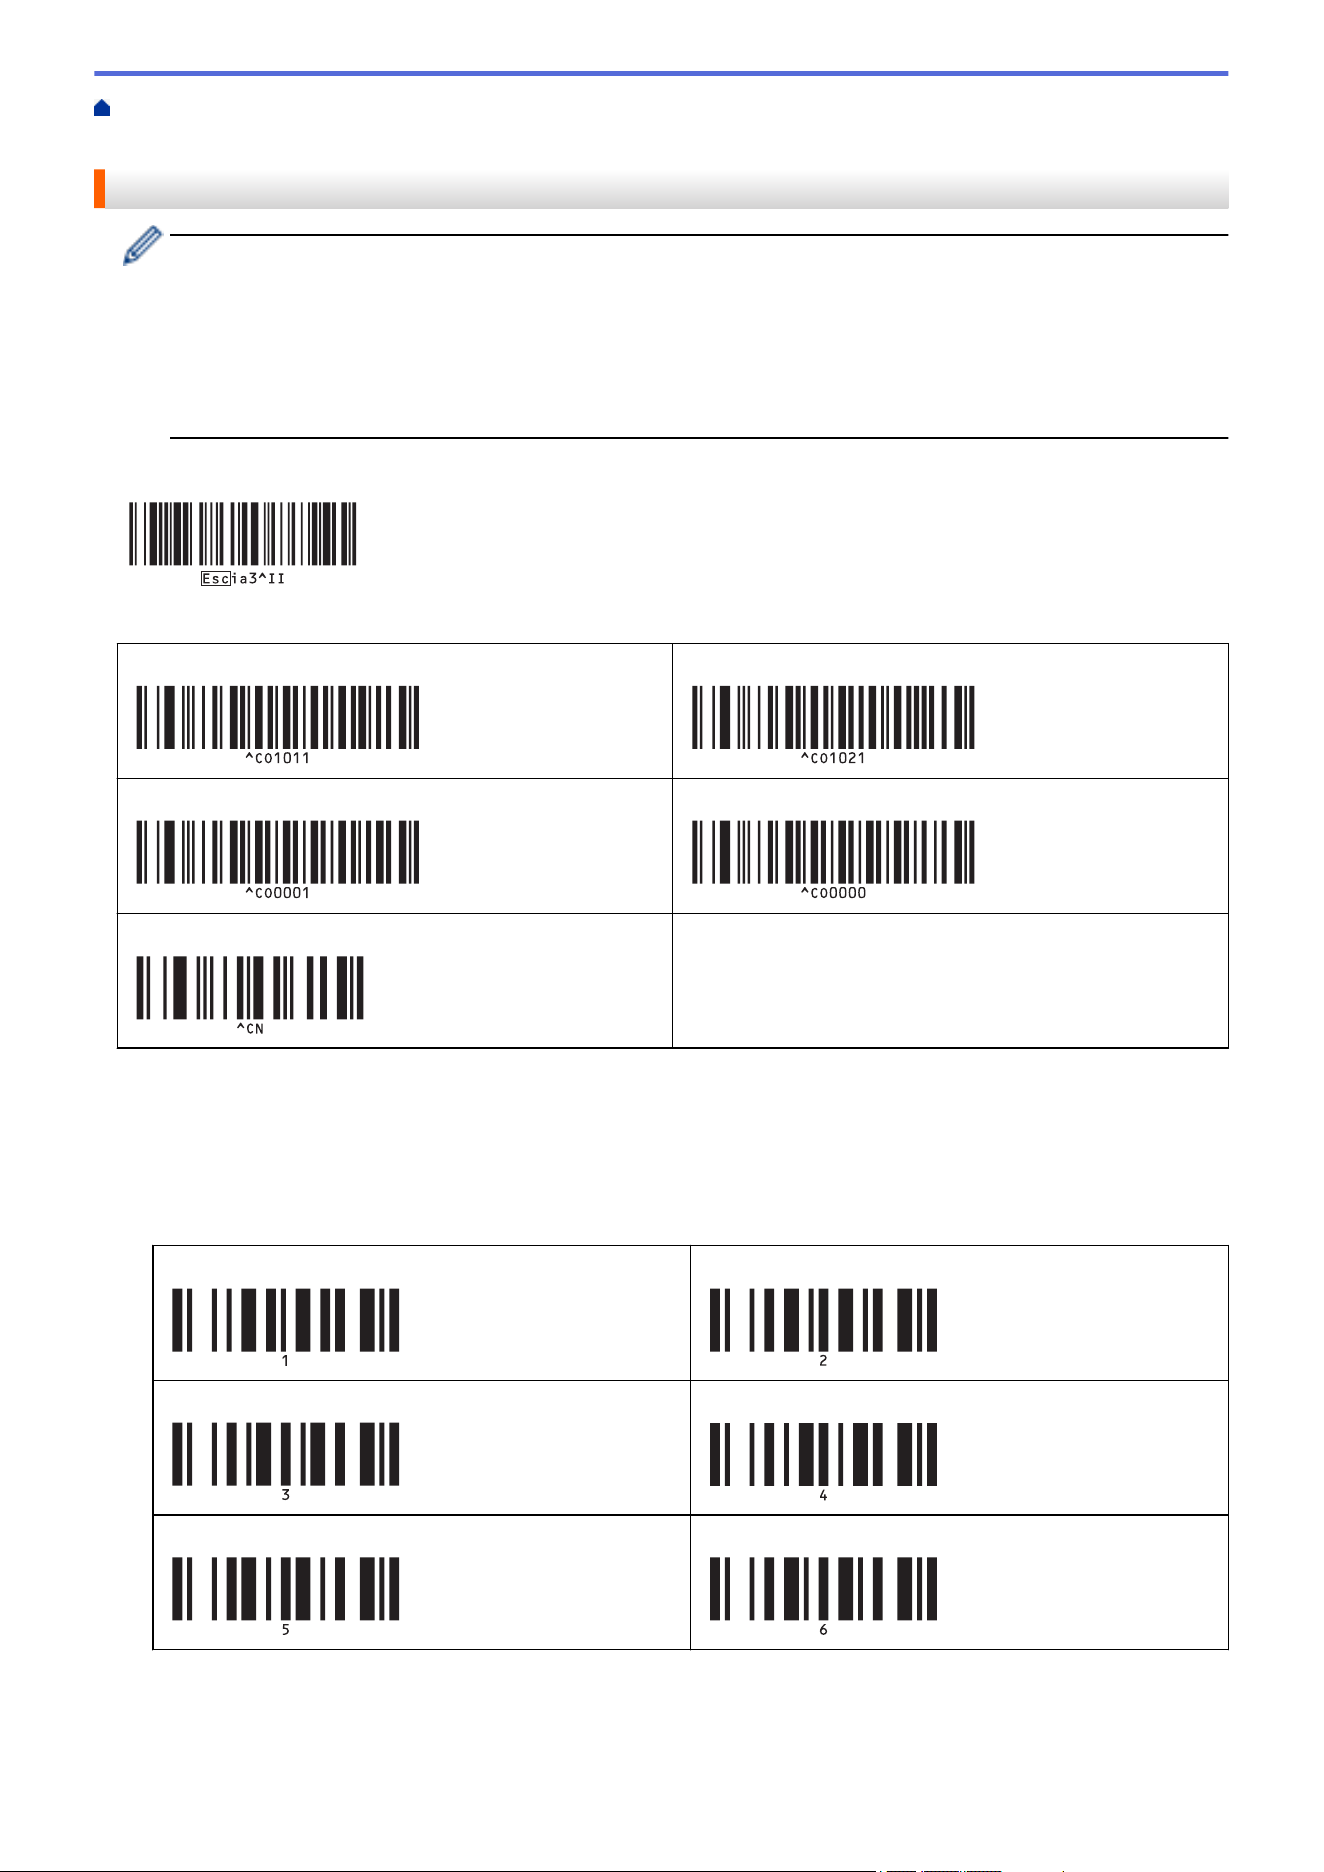
Home > Print Labels Using Barcode Scanner or Other Devices (P-touch Template) > Try the P-touch
Template Function Using the Barcode List > Barcodes Used for Specifying Settings
Barcodes Used for Specifying Settings
• When using the barcodes in this list, make the following settings.
- Printer: Set the Trigger for P-touch Template Printing and Command Prefix Character options to
the factory settings in the P-touch Template Settings tool.
- Barcode Scanner: Remove any prefix and suffix characters.
• Make sure you print the barcodes at a high resolution so that the barcode scanner can read them
correctly to print the labels you want.
P-touch template command (Initialize + begin specifying settings)
Basic settings
Auto cut on (Cut every one label) + Cut at end on
Auto cut on (Cut every two labels) + Cut at end on
Auto cut off + Cut at end on Auto cut off + Cut at end off
Number of copies
• For entering numbers
These are used when specifying the number of copies printed and when selecting a template number. Scan
barcodes to specify a three-digit number, such as [0][0][7] or [0][1][5]. The setting is applied when three digits
have been specified. To change settings, scan the “Number of copies” barcode again when changing the
number of copies or scan the “Select template” barcode again when changing the template number, and then
scan the barcodes for the new three-digit number.
1
2
3 4
5 6
144
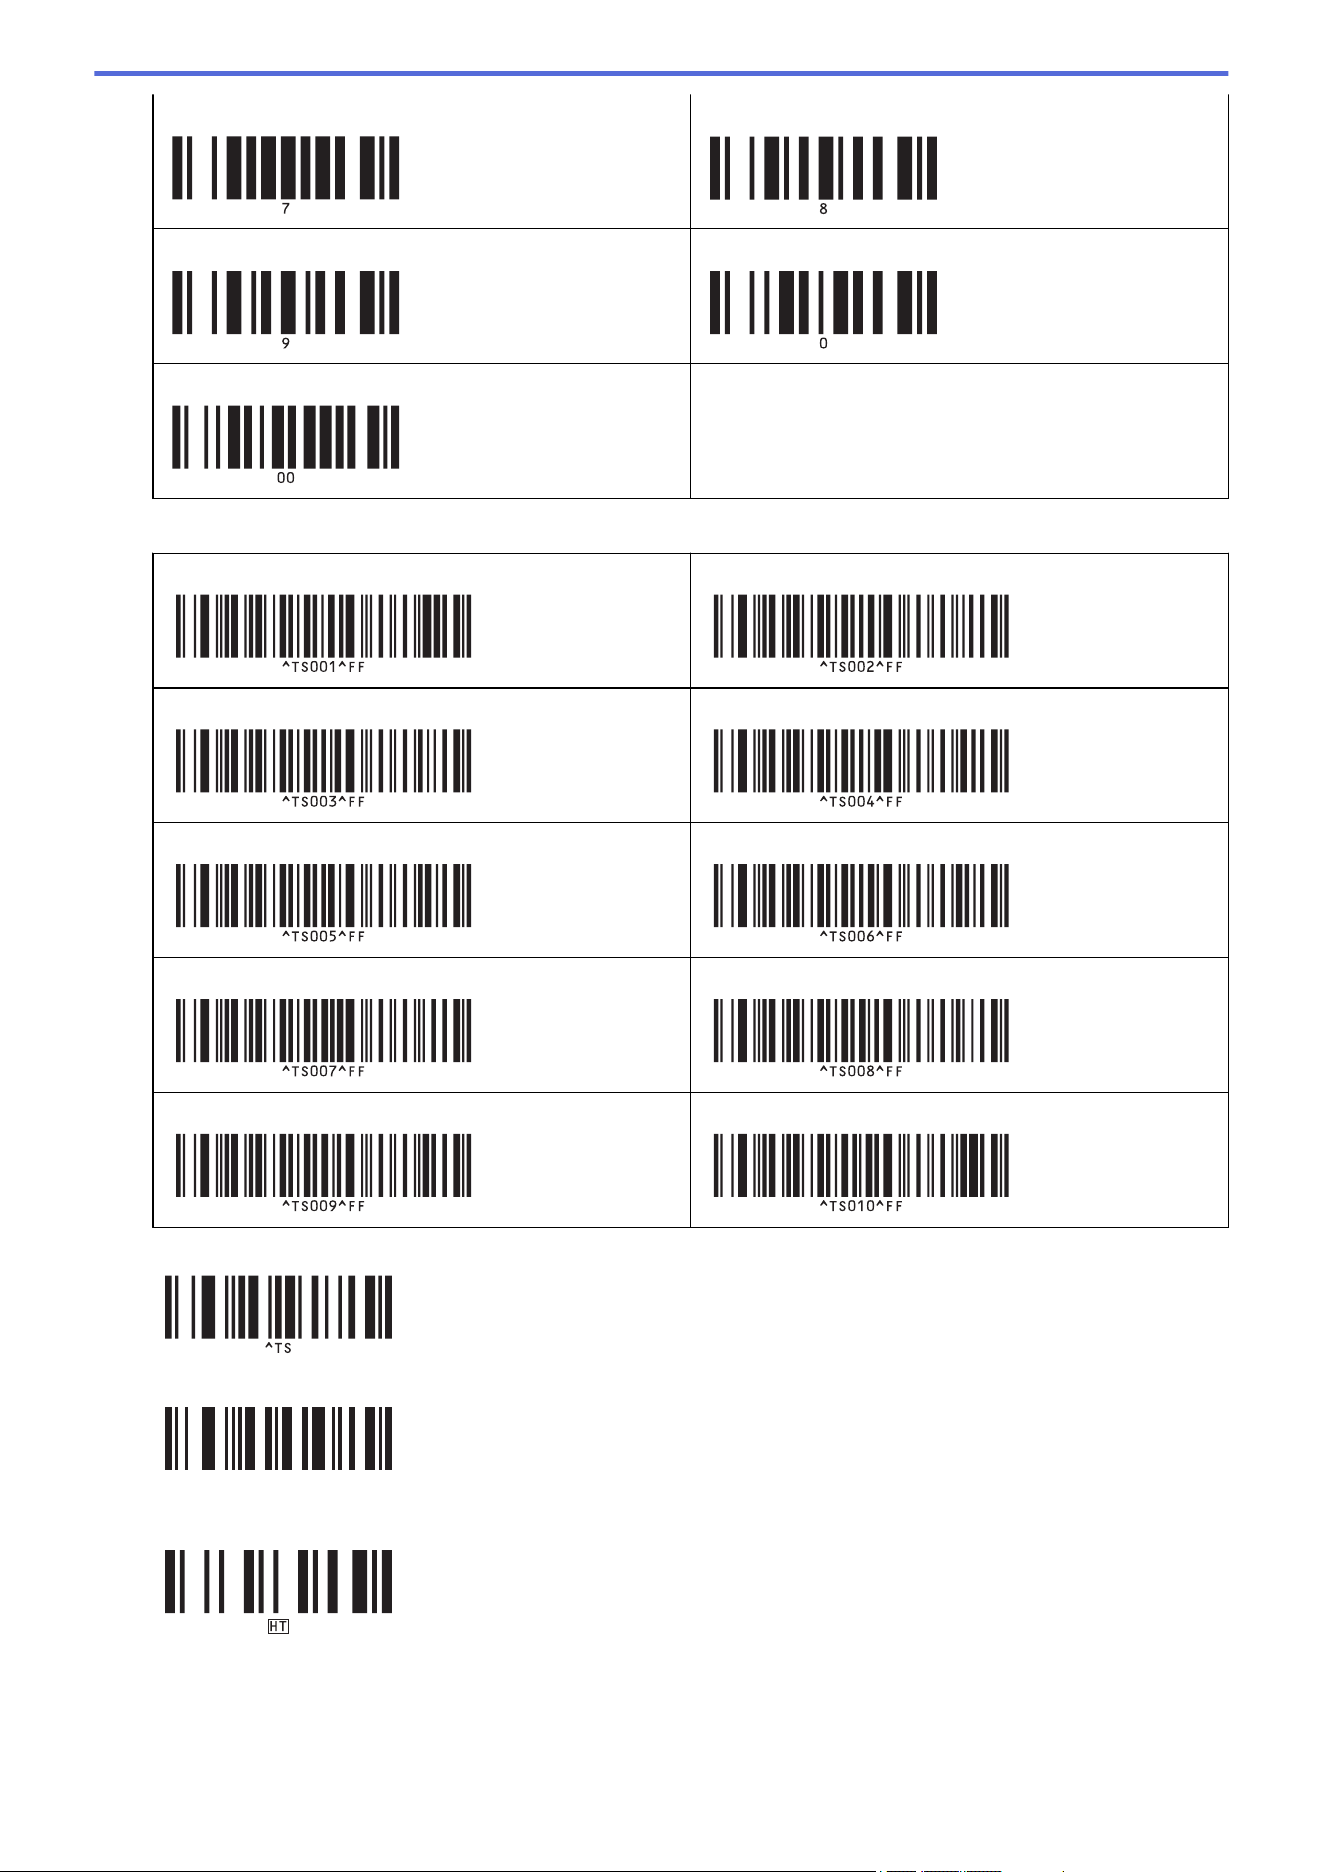
7 8
9 0
00
• Preset template number
Preset template 1
Preset template 2
Preset template 3 Preset template 4
Preset template 5 Preset template 6
Preset template 7 Preset template 8
Preset template 9 Preset template 10
• Select template
• Number of serialized copies
^NN
• Delimiter
• Initialize template data
145


Home > Transfer Templates to the Printer (P-touch Transfer Manager) (Windows)
Transfer Templates to the Printer (P-touch Transfer Manager) (Windows)
• Transfer Templates to the Printer Using P-touch Transfer Manager (Windows)
• Distribute Templates to be Transferred to Users Without Using P-touch Transfer Manager
(Windows)
147

Home > Transfer Templates to the Printer (P-touch Transfer Manager) (Windows) > Transfer Templates to
the Printer Using P-touch Transfer Manager (Windows)
Transfer Templates to the Printer Using P-touch Transfer Manager
(Windows)
• Notes on Using P-touch Transfer Manager (Windows)
• About Transferring Templates from the Computer to the Printer (Windows)
• Back up Templates or Other Data Saved in the Printer (Windows)
• Delete Printer Data (Windows)
• Create Transfer Files and Transfer Package Files (Windows)
148

Home > Transfer Templates to the Printer (P-touch Transfer Manager) (Windows) > Transfer Templates to
the Printer Using P-touch Transfer Manager (Windows) > Notes on Using P-touch Transfer Manager
(Windows)
Notes on Using P-touch Transfer Manager (Windows)
Some P-touch Editor functions are not available with the printer, so keep the following points in mind when using
P-touch Editor to create templates.
You can preview created templates before they are transferred to the printer.
Creating templates
• Some of the text in the templates transferred to the printer may be printed using similar fonts and character
sizes loaded in the printer. As a result, the printed label may differ from the image of the template created in
P-touch Editor.
To prevent font substitution, select a font already installed in the printer, or transfer the font you want to use to
the printer.
For information on how to transfer fonts, visit
support.brother.com and go to your model's FAQs &
Troubleshooting page.
• Depending on the text object setting, the character size may be automatically reduced or some of the text
may not be printed. If this occurs, change the Text Object setting.
• Although character styles can be applied to individual characters in P-touch Editor, styles can be applied to a
block of text only from the printer. In addition, some character styles are not available on the printer.
• In addition to the above cases, there are other factors that may cause different printing results from the label
image on the P-touch Editor. For more information, visit
support.brother.com to see FAQs &
Troubleshooting.
• Backgrounds specified in P-touch Editor are not compatible with the printer.
• The P-touch Editor layout using the split printing function (enlarging the label and printing it on two or more
labels) cannot be transferred.
• Only the portion of the label within the printable area is printed.
Transferring templates
• The printed label may differ from the image appearing in the preview area of P-touch Transfer Manager.
• If a two-dimensional barcode other than a QR code not loaded on the printer is transferred to the printer, the
barcode is converted into an image. The image of the converted barcode cannot be edited.
• All transferred objects that cannot be edited by the printer are converted into images.
• Grouped objects are converted into a single bitmap.
Transferring data other than templates
If the number or order of fields in a database is changed and only the database (CSV file) is transferred to
update it, the database may not link correctly with the template. In addition, the first line of data in the transferred
file must be recognized by the printer as "field names."
Related Information
• Transfer Templates to the Printer Using P-touch Transfer Manager (Windows)
149

Home > Transfer Templates to the Printer (P-touch Transfer Manager) (Windows) > Transfer Templates to
the Printer Using P-touch Transfer Manager (Windows) > About Transferring Templates from the Computer to
the Printer (Windows)
About Transferring Templates from the Computer to the Printer
(Windows)
You can transfer templates and other data to the printer and save backups of your data on the computer.
To use P-touch Transfer Manager, you must first transfer templates created in P-touch Editor to P-touch Transfer
Manager.
Related Information
• Transfer Templates to the Printer Using P-touch Transfer Manager (Windows)
• Transfer a Template to P-touch Transfer Manager (Windows)
• Main Window of P-touch Transfer Manager (Windows)
• Transfer Templates or Other Data from the Computer to the Printer (Windows)
150
Home > Transfer Templates to the Printer (P-touch Transfer Manager) (Windows) > Transfer Templates to
the Printer Using P-touch Transfer Manager (Windows) > About Transferring Templates from the Computer to
the Printer (Windows) > Transfer a Template to P-touch Transfer Manager (Windows)
Transfer a Template to P-touch Transfer Manager (Windows)
1. Start P-touch Editor .
Click Start > Brother P-touch > P-touch Editor, or double-click the P-touch Editor icon on the desktop.
NOTE
Depending on your computer's operating system, the Brother P-touch folder may or may not be created.
2. Open the template you want or create a layout.
3. Click File > Transfer Template > Transfer.
The P-touch Transfer Manager window appears. The template is transferred to the Configurations folder.
Related Information
• About Transferring Templates from the Computer to the Printer (Windows)
151
Home > Transfer Templates to the Printer (P-touch Transfer Manager) (Windows) > Transfer Templates to
the Printer Using P-touch Transfer Manager (Windows) > About Transferring Templates from the Computer to
the Printer (Windows) > Main Window of P-touch Transfer Manager (Windows)
Main Window of P-touch Transfer Manager (Windows)
2
4
1
3
5
6
1. Menu Bar
Provides access to various commands grouped under each menu title (the File, Edit, View, Tool, and Help
menus) according to their functions.
2. Printer Selector
Allows you to select a printer to transfer the data to. When you select a printer, only the data that can be sent
to the selected printer appears in the data list.
3. Template List
Displays a list of templates in the selected folder.
4. Preview
Displays a preview of the templates in the templates list.
5. Folder List
Displays a list of folders and printers. When you select a folder, the templates in the selected folder appear in
the template list. If you select a printer, the current templates and other data stored in the printer appear.
6. Toolbar
Provides access to frequently used commands.
Toolbar Icons
Icon
Button name Function
Transfer Transfers templates and other data from the computer to the
printer.
Save Transfer File
(When not connected to a
printer)
Changes the file type of the data to be transferred to other
applications.
Select BLF for the filename extension when printing labels
using Mass Storage Mode (USB), or when transferring the
data using BRAdmin Professional (LAN or Wi-Fi),
MobileDeploy (LAN or Wi-Fi), LabelCLT (LAN or Wi-Fi), or
Mobile Transfer Express (Wi-Fi). Select PDZ when transferring
the data using Transfer Express (USB).
The available interfaces may differ depending on your model.
152
Icon Button name Function
Backup Retrieves the templates and other data saved in the printer
and saves it on the computer.
Open Opens the selected template.
Search Allows you to search for templates or other data registered to
P-touch Library.
Display Style Changes the file display style.
Related Information
• About Transferring Templates from the Computer to the Printer (Windows)
153
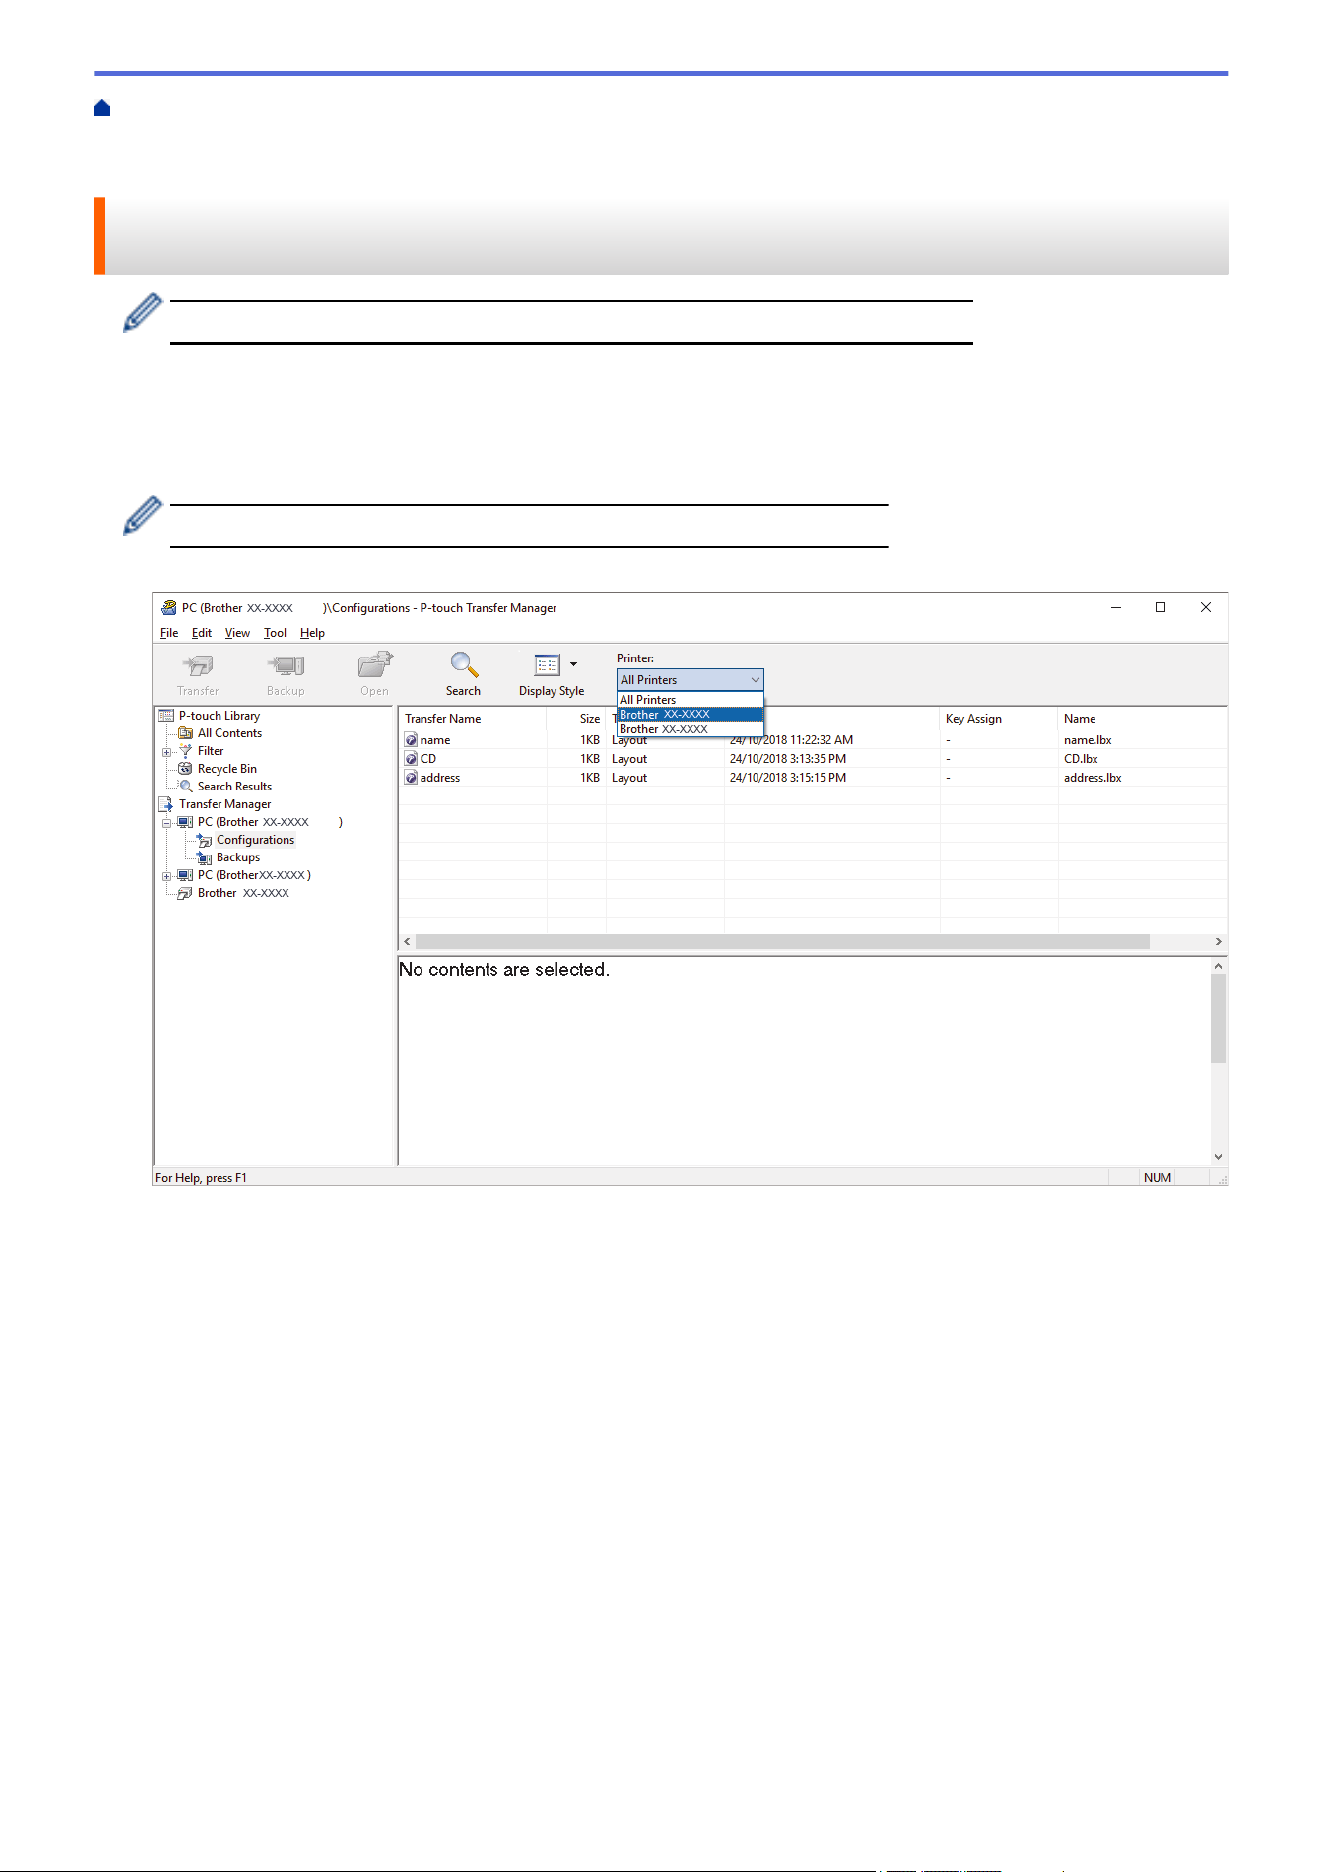
Home > Transfer Templates to the Printer (P-touch Transfer Manager) (Windows) > Transfer Templates to
the Printer Using P-touch Transfer Manager (Windows) > About Transferring Templates from the Computer to
the Printer (Windows) > Transfer Templates or Other Data from the Computer to the Printer (Windows)
Transfer Templates or Other Data from the Computer to the Printer
(Windows)
To transfer templates from a mobile device to the printer, see Related Information.
1. Connect the printer to the computer using a USB cable, and then turn the printer on.
The printer model name appears next to a printer icon in the folder view.
If you select the printer in the folder view, the current templates and other data stored in the printer appear.
If a printer is disconnected or offline, it does not appear in the folder view.
2. Select the printer to which you want to transfer the template or other data.
154

3. Right-click the Configurations folder, select New, and then create a new folder.
4. Do one of the following:
• Drag the template or other data you want to transfer and place it in the new folder.
• To transfer multiple templates or other data, drag the files you want to transfer, and then place them in the
new folder. Each file is assigned a Key Assign number (memory location in the printer) when it is placed
in the new folder.
Data Type
Maximum Number of
Transferable Items
Restriction Details
Template 255 • Each template can contain a maximum of 255
objects.
• Each object can contain a maximum of seven lines.
Database 255 • Only CSV files can be transferred.
• Each CSV file can contain a maximum of 100
columns and 65000 records.
155

Data Type Maximum Number of
Transferable Items
Restriction Details
Image (transferred
symbols)
255 • Only *.bmp files can be transferred.
• Monochrome *.bmp files are recommended.
• The size limit is 1296 x 1296 pixels.
• Wide images may be cropped.
• You can confirm the available space in the transfer file memory by printing Printer Settings Report. See
Available memory in the report for the available space. The available space appearing in Available
memory: ****B may be different from the actual available space.
• You can view the templates and other data by selecting:
- The folder in the Configurations folder
- All Contents
- One of the categories under Filter, such as Layouts
5. To change the Key Assign number assigned to an item, right-click the item, select the Key Assign menu, and
then select the Key Assign number you want.
• Except for the data in databases, all data transferred to the printer is assigned a key number.
• If the template or other data transferred to the printer has the same key number as another template
already saved in the printer, the new template overwrites the old one. You can confirm the assigned
template numbers saved in the printer by backing up the templates or other data.
• If the printer memory is full, remove one or more templates from the printer's memory.
6. To change the template names or other data you want to transfer, click the item you want, and then type the
new name.
The number of characters used for the template names may be limited depending on the printer model.
7. Make sure that either the Template List Screen or the Template Touch Screen is selected on your printer
under [Settings] > [Home Screen] > [Template List Screen] (or [Template Touch Screen]).
Select the folder containing the templates or other data you want to transfer, and then click Transfer.
156

A confirmation message appears.
• You can also transfer individual items to the printer without adding them to a folder. Select the template
or other data you want to transfer, and then click Transfer.
• Multiple items and folders can be selected and transferred in one operation.
8. Click OK.
The selected items are transferred to the printer.
Related Information
• Standalone Printing
• Print Labels Using Barcode Scanner or Other Devices (P-touch Template)
• About Transferring Templates from the Computer to the Printer (Windows)
Related Topics:
• Transfer Templates Created on a Computer to the Printer Using a Mobile Device
• Confirm Printer Settings
157
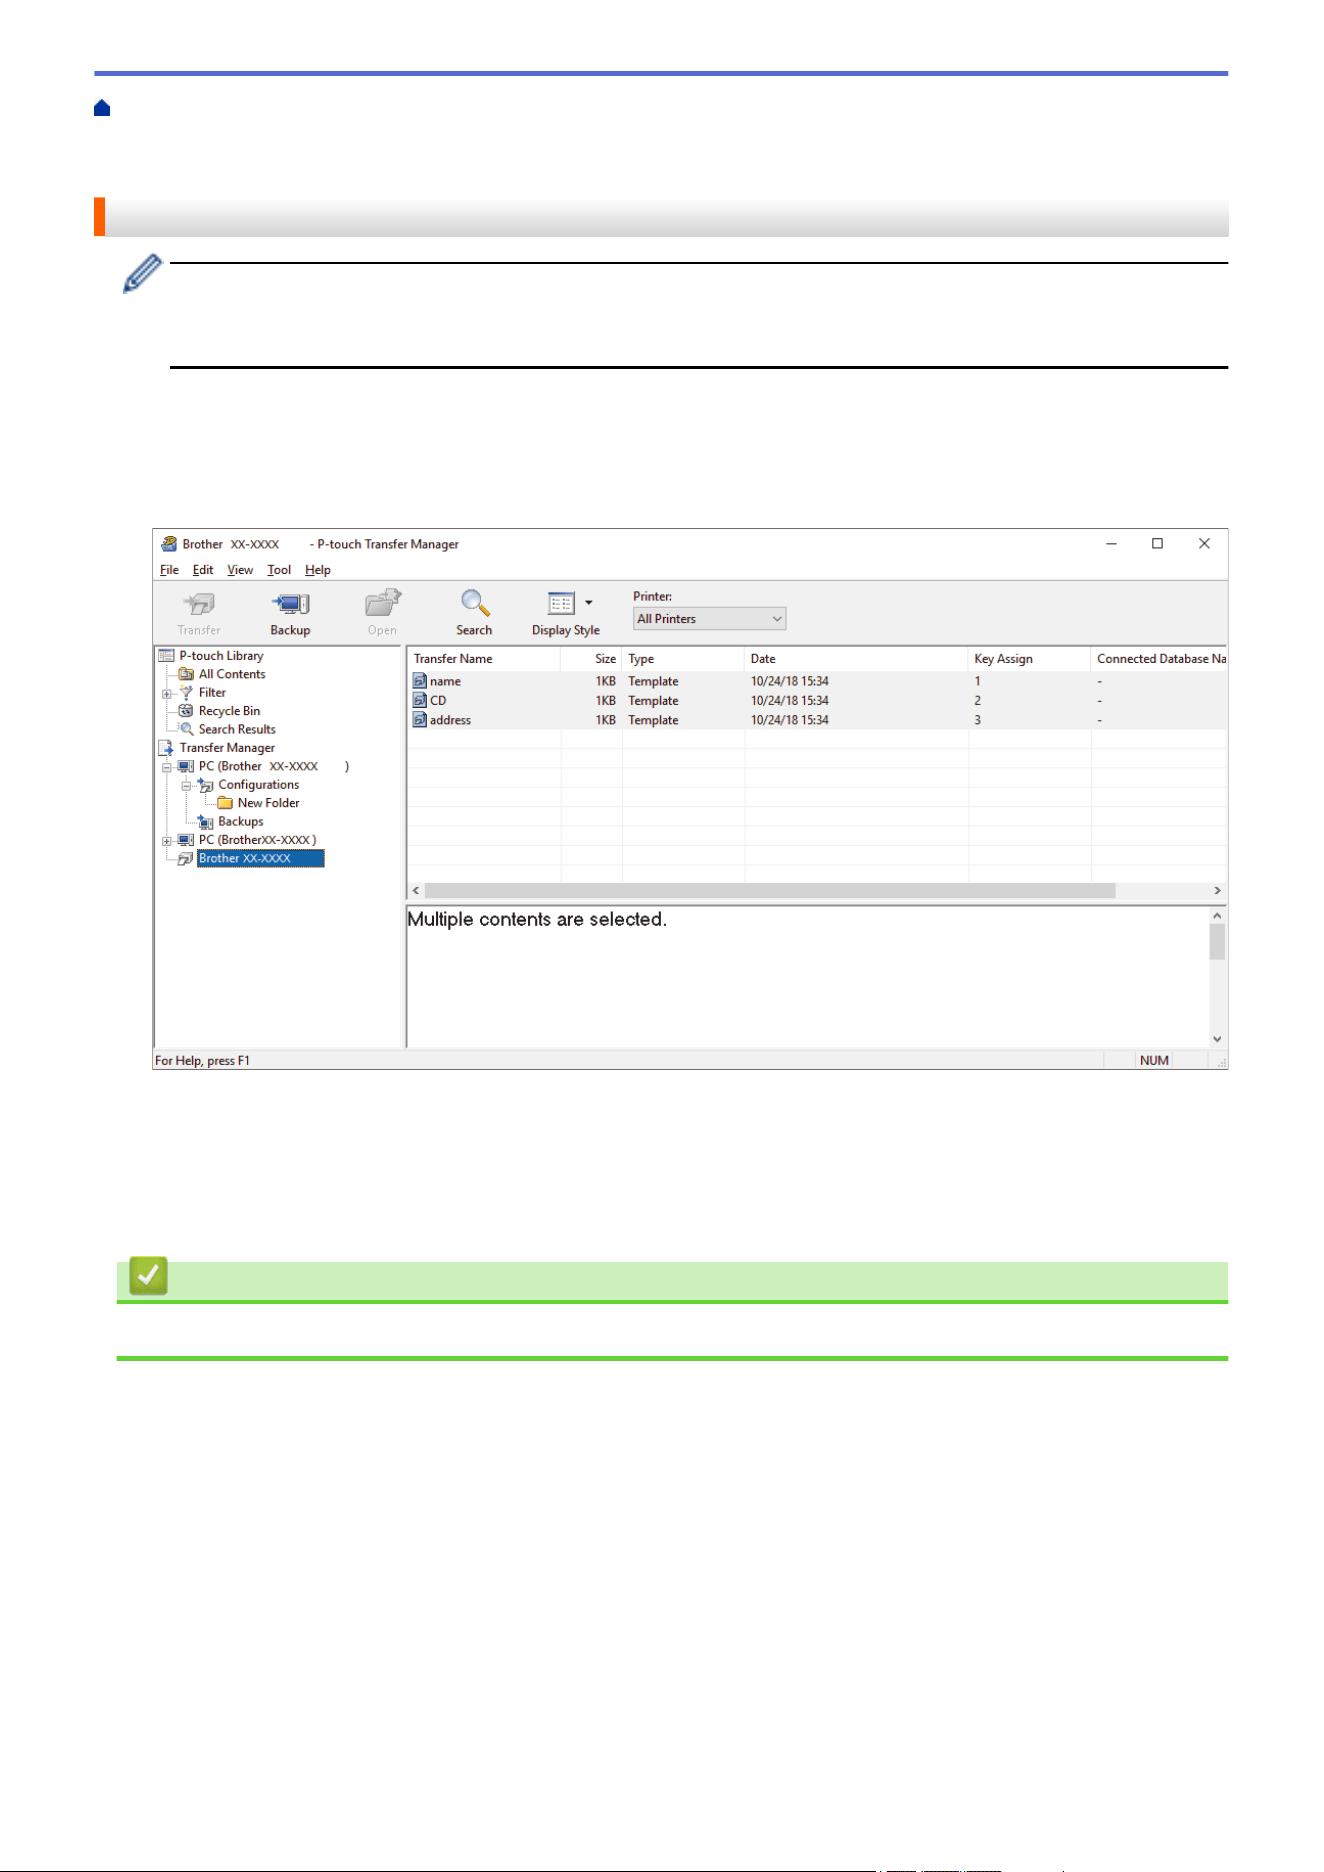
Home > Transfer Templates to the Printer (P-touch Transfer Manager) (Windows) > Transfer Templates to
the Printer Using P-touch Transfer Manager (Windows) > Back up Templates or Other Data Saved in the
Printer (Windows)
Back up Templates or Other Data Saved in the Printer (Windows)
• Backed up templates or other data cannot be edited on the computer.
• Depending on the printer model, backed up templates or data may not be transferable between different
models.
1. Connect your computer to the printer and turn on the printer.
The printer model name appears next to a printer icon in the folder view. If you select the printer in the folder
view, the current templates and other data stored in the printer appear.
2. Select the printer to back up from, and then click Backup.
A confirmation message appears.
3. Click OK.
A new folder is created under the printer in the folder view. The folder name is based on the date and time of
the backup. All of the printer's templates and other data are transferred to the new folder and saved on the
computer.
Related Information
• Transfer Templates to the Printer Using P-touch Transfer Manager (Windows)
158
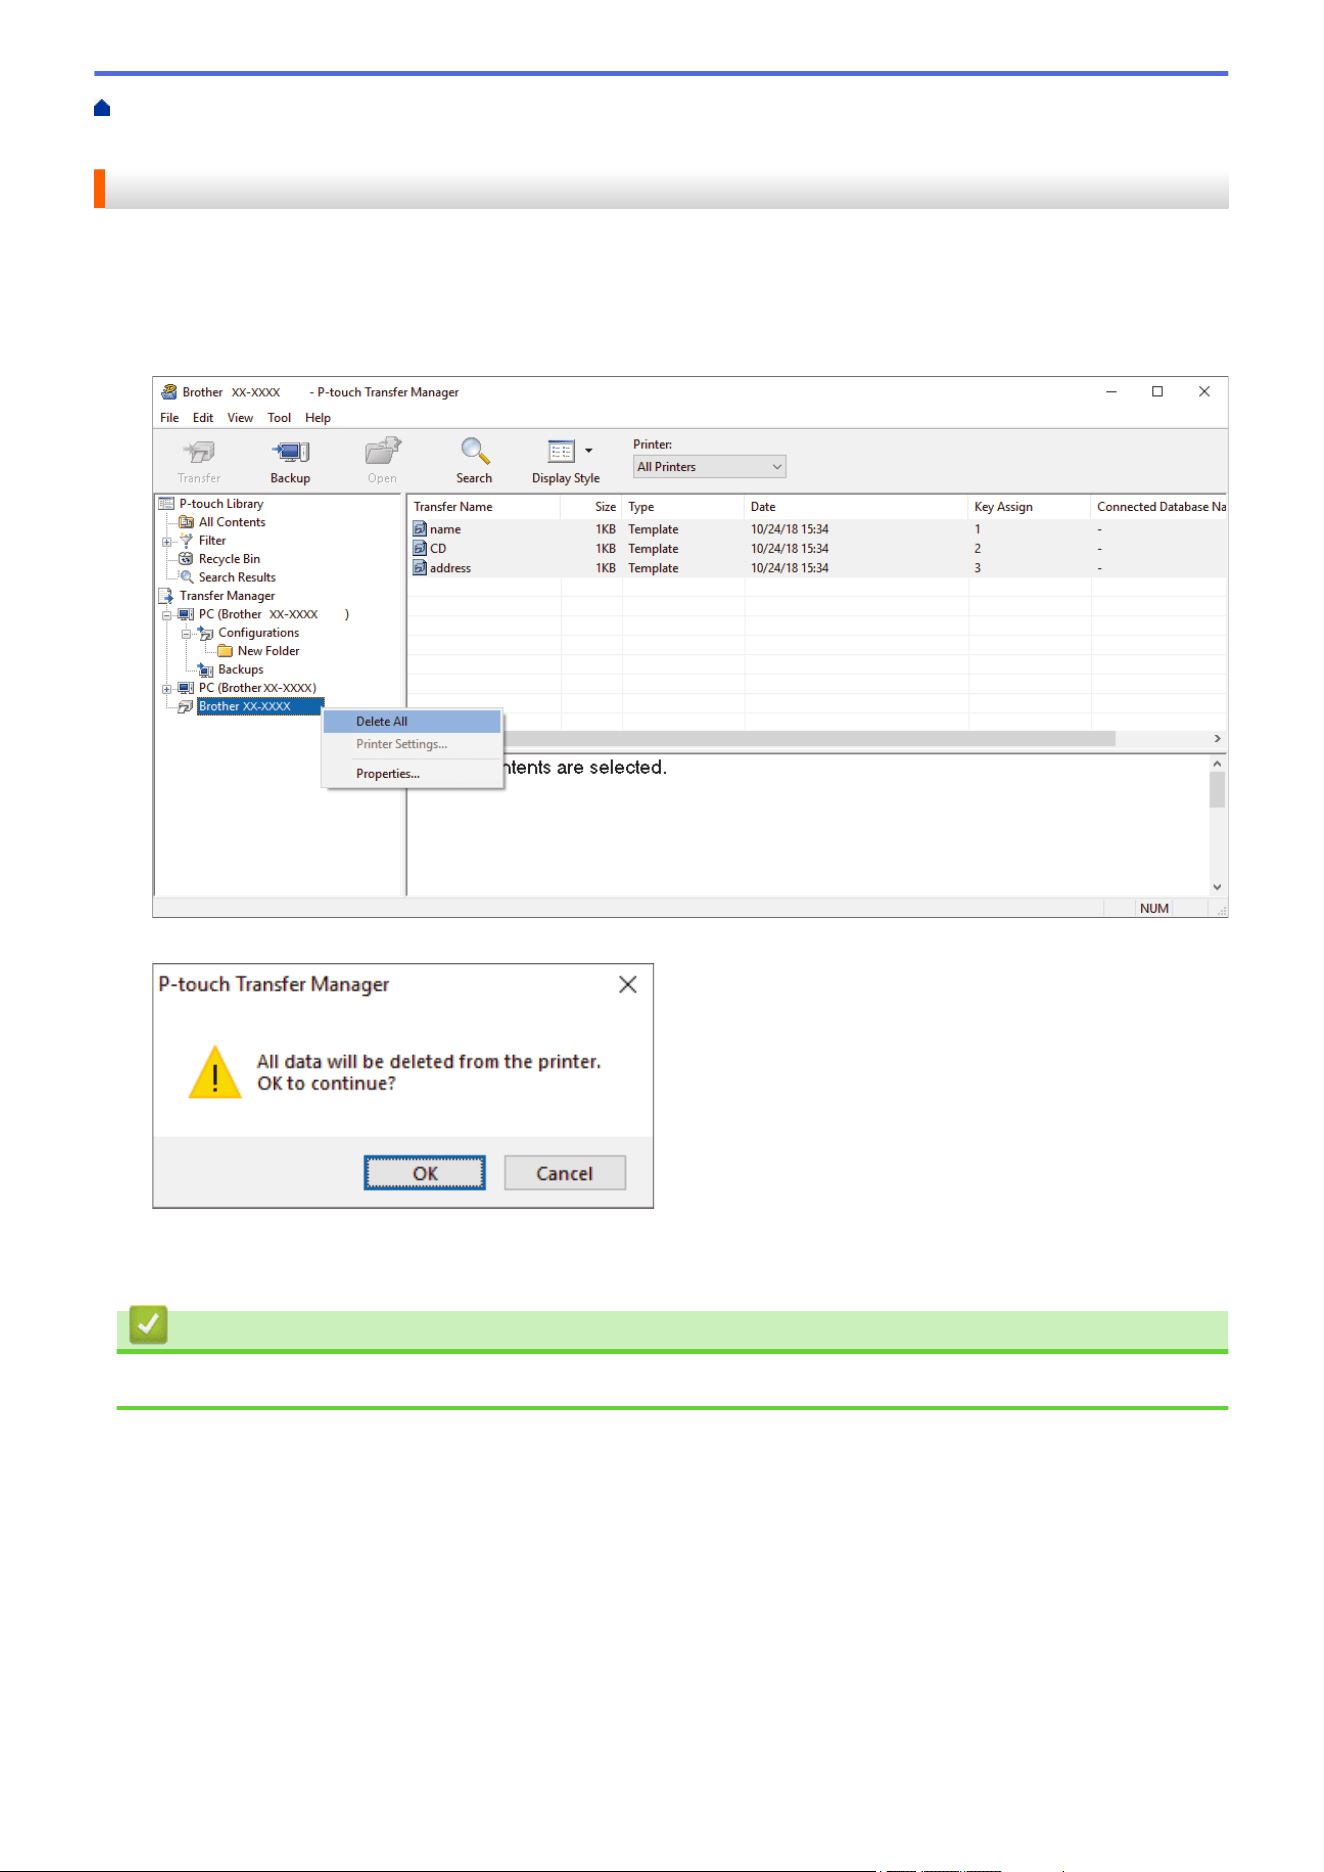
Home > Transfer Templates to the Printer (P-touch Transfer Manager) (Windows) > Transfer Templates to
the Printer Using P-touch Transfer Manager (Windows) > Delete Printer Data (Windows)
Delete Printer Data (Windows)
To delete all templates and other data saved on the printer, do the following:
1. Connect the computer to the printer and turn on the printer.
The printer model name appears next to a printer icon in the folder view.
2. Right-click the printer, and then select the Delete All menu.
A confirmation message appears.
3. Click OK.
All templates and other data saved on the printer are deleted.
Related Information
• Transfer Templates to the Printer Using P-touch Transfer Manager (Windows)
159
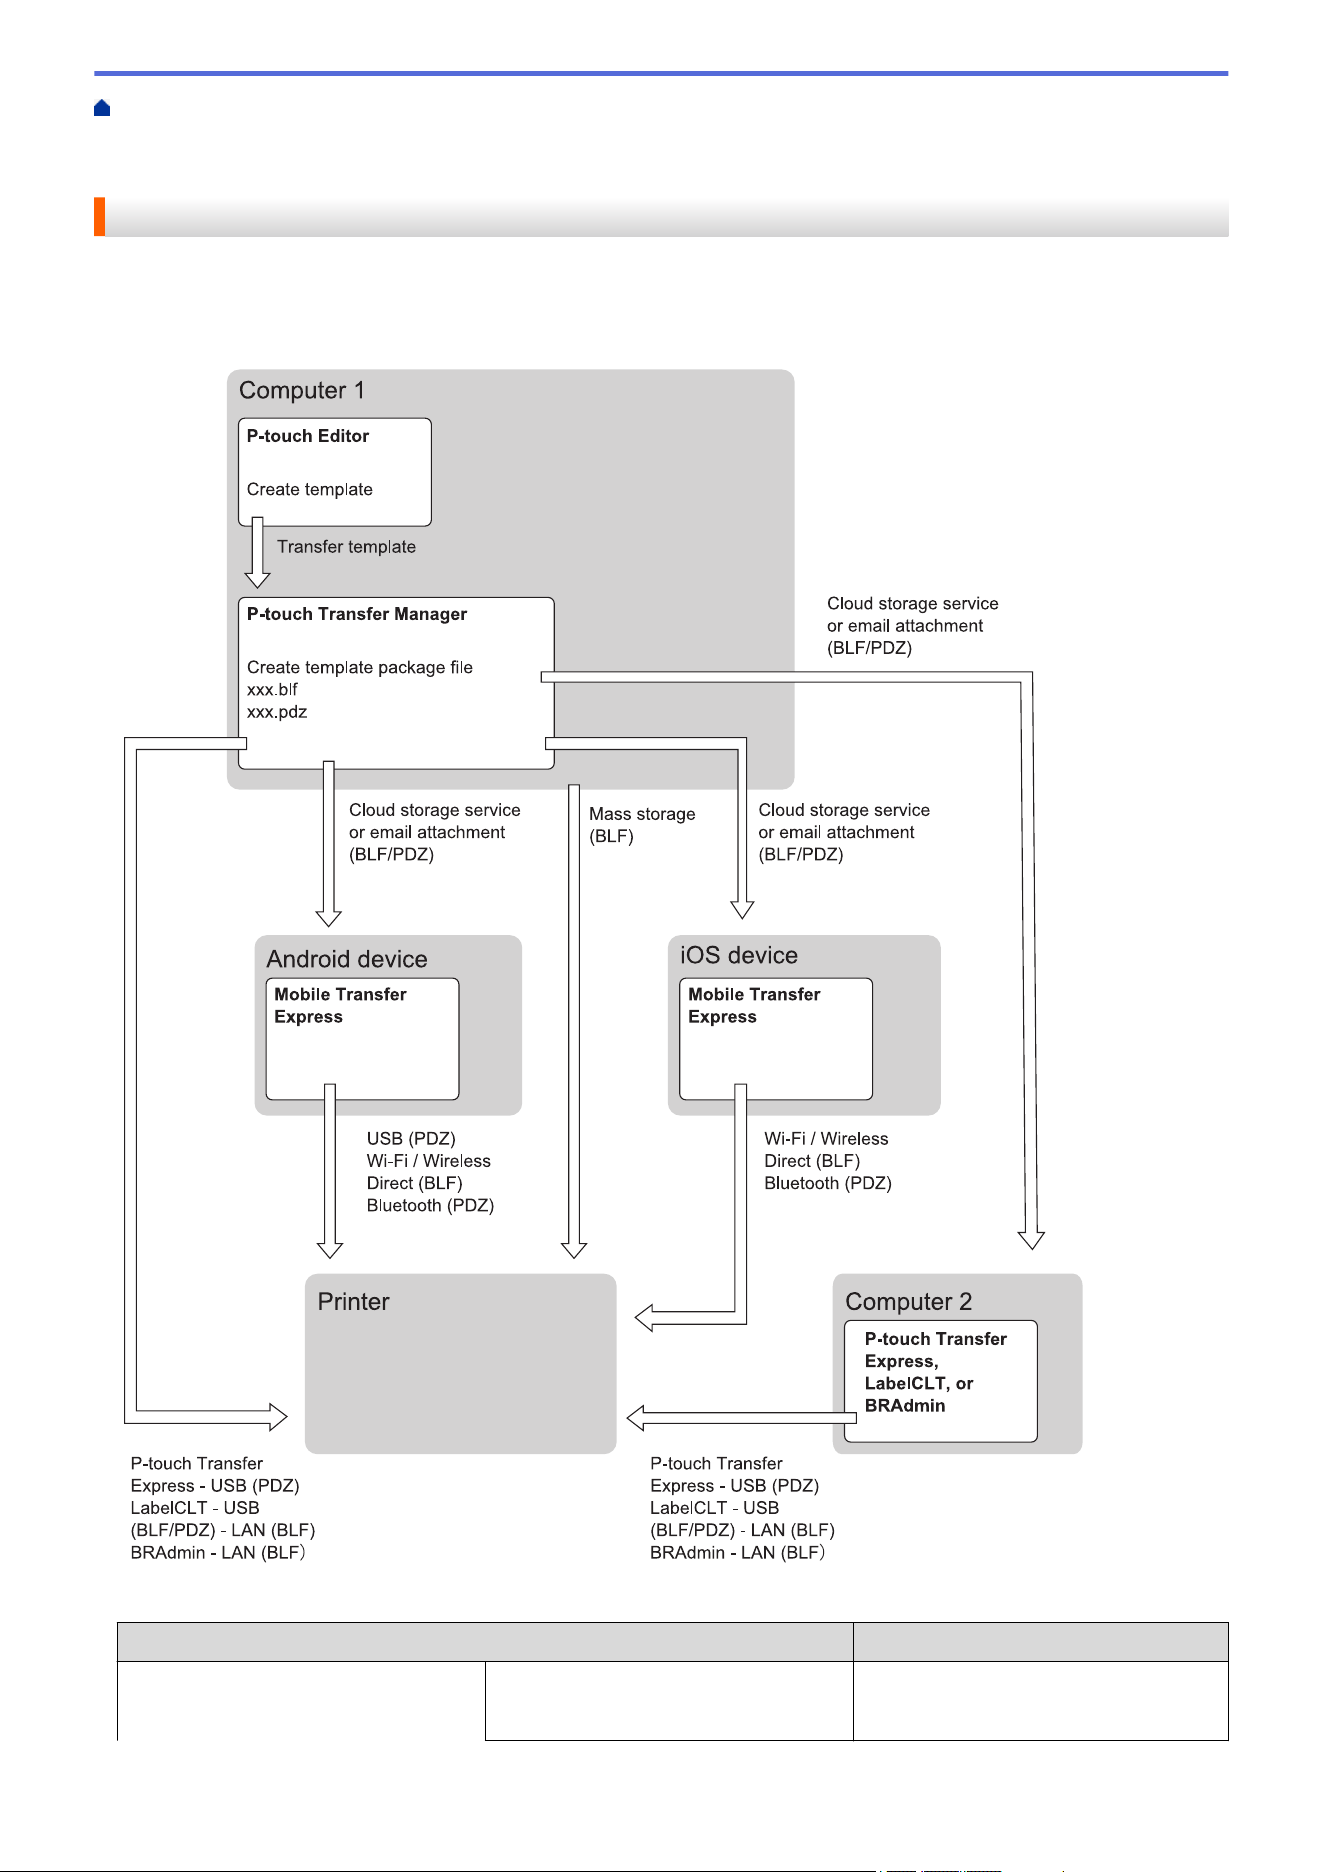
Home > Transfer Templates to the Printer (P-touch Transfer Manager) (Windows) > Transfer Templates to
the Printer Using P-touch Transfer Manager (Windows) > Create Transfer Files and Transfer Package Files
(Windows)
Create Transfer Files and Transfer Package Files (Windows)
Use P-touch Transfer Manager to save template data created using P-touch Editor in BLF or PDZ format, and
transfer the files in this format to a printer from a computer or mobile device.
You can also print files in the BLF format using Mass Storage Mode.
Template Transfer Method
File Format
From a mobile device
(Using Mobile Transfer Express)
via USB PDZ
160
Template Transfer Method File Format
via Wi-Fi (TD-2350D/TD-2350DF/
TD-2350DSA)
BLF
via Wireless Direct (TD-2350D/
TD-2350DF/TD-2350DSA)
BLF
via Bluetooth PDZ
Mass storage BLF
From a computer P-touch Transfer Express PDZ
Mass storage BLF
1. Create the template using P-touch Editor, and then transfer it to P-touch Transfer Manager.
• For more information, see Related Information.
• When transferring a new template, make sure you specify a Key Assign number (in P-touch Transfer
Manager) that is not currently used. If the specified Key Assign number is already being used, the
existing template will be overwritten with the new one.
2. Without connecting the printer to the computer, select the Configurations folder in the P-touch Transfer
Manager window, and then select the template you want to save.
You can select multiple templates at the same time.
3. Click File > Save Transfer File.
NOTE
The Save Transfer File button appears when the printer is disconnected from the computer or it is offline.
• If you click the Save Transfer File button after selecting Configurations, all templates in the folder are
saved as the Transfer file (BLF) or Transfer Package file (PDZ).
• You can combine multiple templates into a single Transfer file (BLF) or Transfer Package file (PDZ).
4. In the Save as type field, select the template format you want, and then type in the name and save the
template.
Related Information
• Transfer Templates to the Printer Using P-touch Transfer Manager (Windows)
Related Topics:
• Transfer a Template to P-touch Transfer Manager (Windows)
161
Home > Transfer Templates to the Printer (P-touch Transfer Manager) (Windows) > Distribute Templates to
be Transferred to Users Without Using P-touch Transfer Manager (Windows)
Distribute Templates to be Transferred to Users Without Using P-touch
Transfer Manager (Windows)
Transfer templates to the printer using P-touch Transfer Express.
To download the latest version of P-touch Transfer Express, go to your model's Downloads page on the Brother
support website at support.brother.com.
• When transferring a new template, make sure you specify a Key Assign number (in P-touch Transfer
Manager) that is not currently used. If the specified Key Assign number is already being used, the
existing template will be overwritten with the new one.
• This function requires a USB connection.
Administrator Users
1.
2. 3. 4. 5.
>> Administrator Tasks
>> User Tasks
Administrator Tasks
>> Preparing P-touch Transfer Express
>> Transfer a Template to P-touch Transfer Manager
>> Save the Template as a Transfer Package File (PDZ)
>> Distribute the Transfer Package File (PDZ) and P-touch Transfer Express to Others
Preparing P-touch Transfer Express
The printer driver must be installed before using P-touch Transfer Express.
P-touch Transfer Express is available only in English.
1. Download P-touch Transfer Express to any location on the computer.
2. Decompress the downloaded file (ZIP).
Transfer a Template to P-touch Transfer Manager
1. Start P-touch Editor .
Click Start > Brother P-touch > P-touch Editor, or double-click the P-touch Editor icon on the desktop.
NOTE
Depending on your computer's operating system, the Brother P-touch folder may or may not be created.
162
2. Open the template you want.
3. Click File > Transfer Template > Transfer.
The template is transferred to P-touch Transfer Manager. P-touch Transfer Manager starts.
Save the Template as a Transfer Package File (PDZ)
To create a file in a format that can be used by P-touch Transfer Express, save the template as a Transfer
Package file (PDZ).
1. Select the Configurations folder in the P-touch Transfer Manager window.
2. Select the templates you want to distribute.
3. Click File > Save Transfer File.
• The Save Transfer File option appears only if the printer is disconnected from the computer or offline.
• If you click the Save Transfer File option after selecting the Configurations folder or a created folder,
all templates in the folder are saved as the Transfer Package file (PDZ).
• You can combine multiple templates into a single Transfer Package file (PDZ).
163
4. Type the name, and then click Save.
The template is saved as a Transfer Package file (PDZ).
Distribute the Transfer Package File (PDZ) and P-touch Transfer Express to Others
If you already downloaded P-touch Transfer Express, it is not necessary for the administrator to send the
Transfer Express folder. In this case, you can simply move the distributed Transfer Package file to the
downloaded folder, and then double-click the PtTrExp.exe file.
1. Move the Transfer Package file (PDZ) to the downloads folder.
2. Distribute all the files in the downloads folder to others.
164
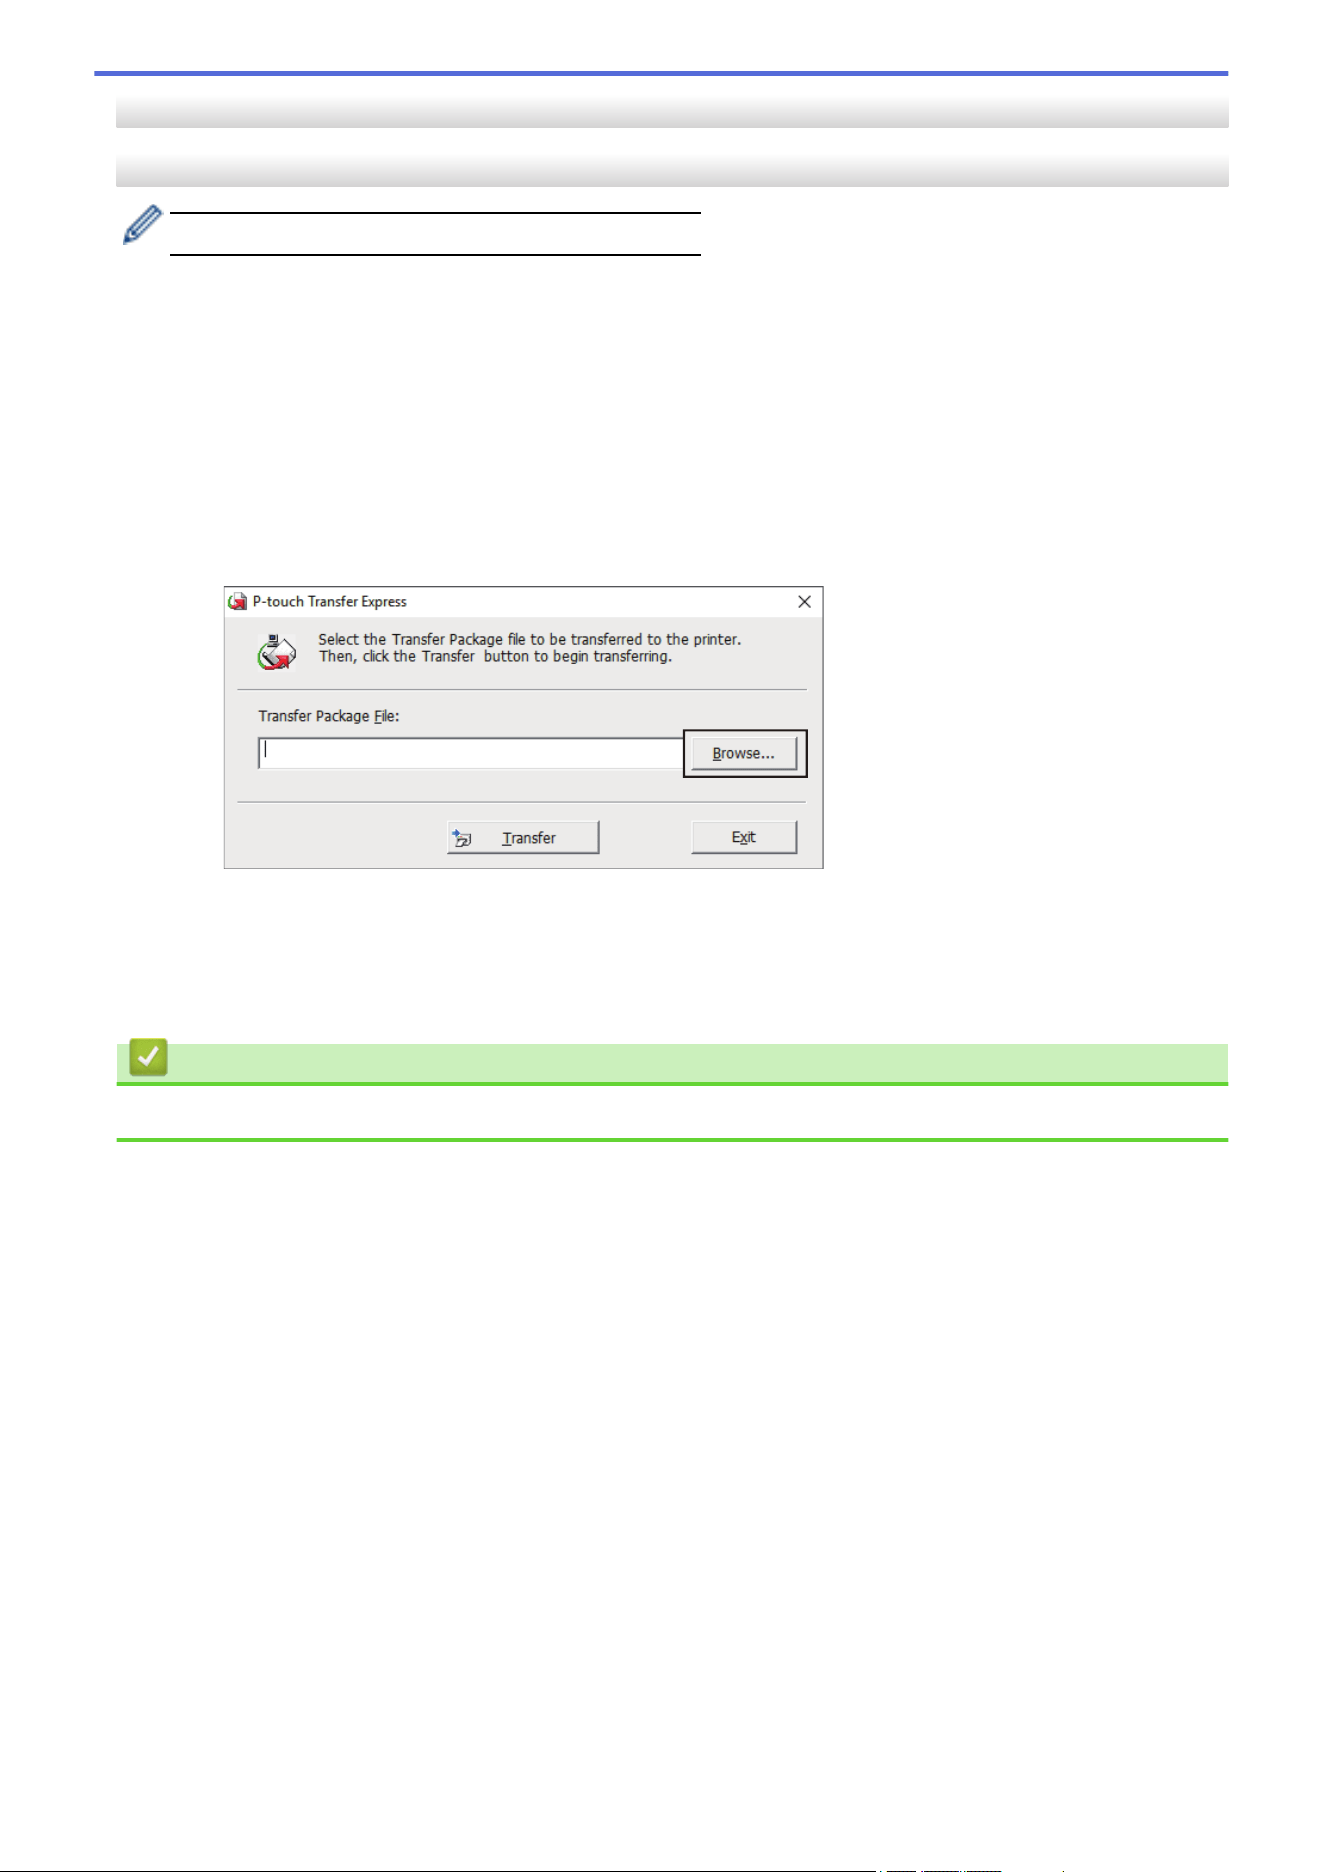
User Tasks
Transfer the Transfer Package File (PDZ) to your printer
Do not turn the power off when transferring templates.
1. Turn the printer on.
2. Connect the printer to the computer using a USB cable.
3. Double-click the PtTrExp.exe file received from the administrator.
4. Do one of the following:
• To transfer a single Transfer Package file (PDZ) within the folder containing the PtTrExp.exe file, click
Transfer.
• To transfer multiple Transfer Package files (PDZ) within the folder containing the PtTrExp.exe file, do the
following:
a. Click Browse.
b. Select the Transfer Package file you want to transfer, and then click Open.
c. Click Transfer.
d. Click Yes.
5. When completed, click OK.
Related Information
• Transfer Templates to the Printer (P-touch Transfer Manager) (Windows)
165

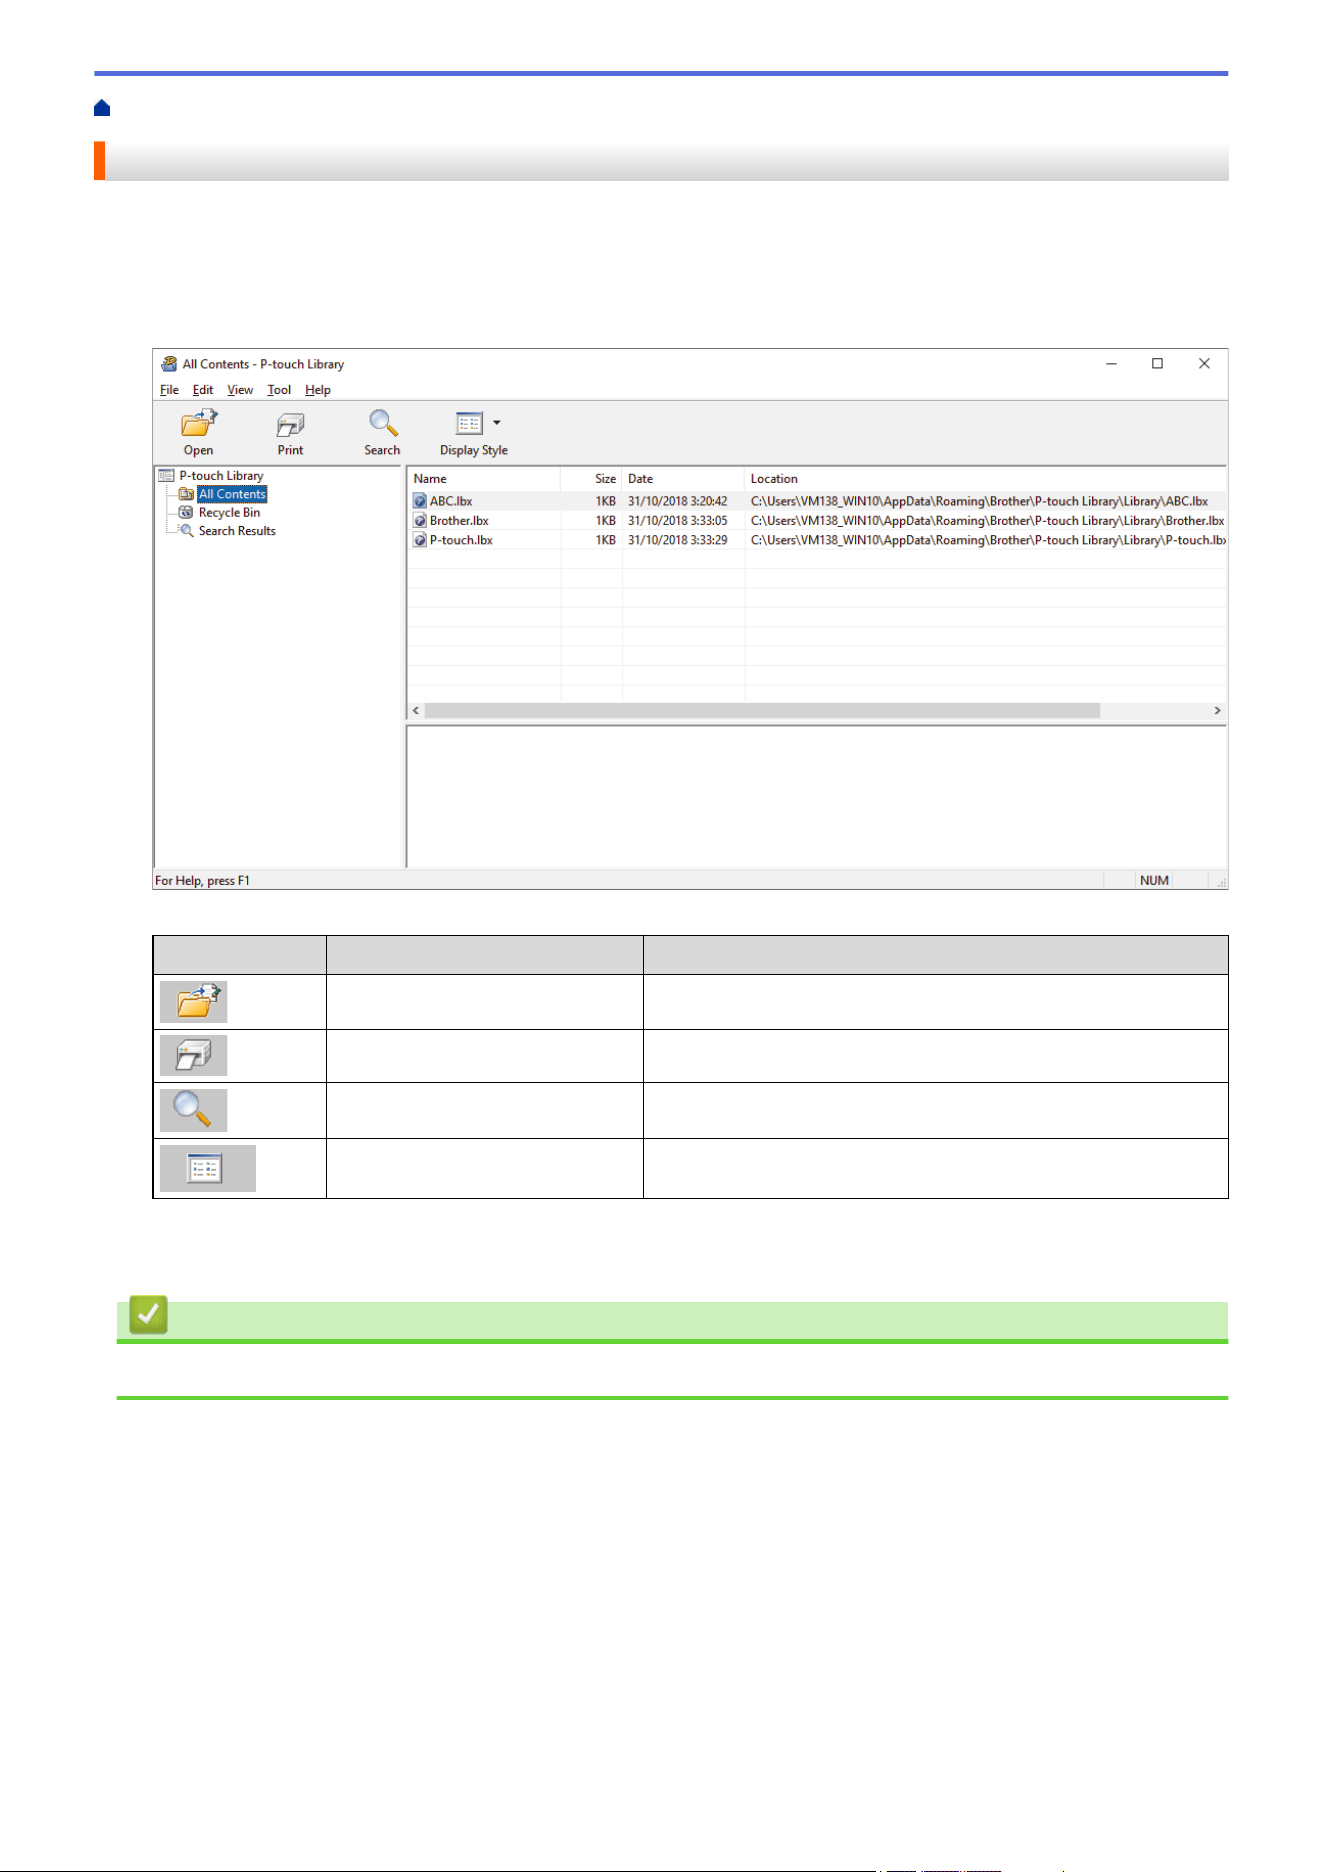
Home > Store and Manage Templates (P-touch Library) > Edit Templates Using P-touch Library (Windows)
Edit Templates Using P-touch Library (Windows)
1. Start the P-touch Library.
Click Start > Brother P-touch > P-touch Library.
*Depending on your computer's operating system, the Brother P-touch folder may or may not be created.
The main window appears.
Overview of the Toolbar Icons
Icon
Button name Function
Open Click to open the selected template.
Print Click to print the selected template.
Search Click to search for templates registered to P-touch Library.
Display Style Click to change the file display style.
2. Select the template you want to edit, and then click Open.
You can now edit the template.
Related Information
• Store and Manage Templates (P-touch Library)
167
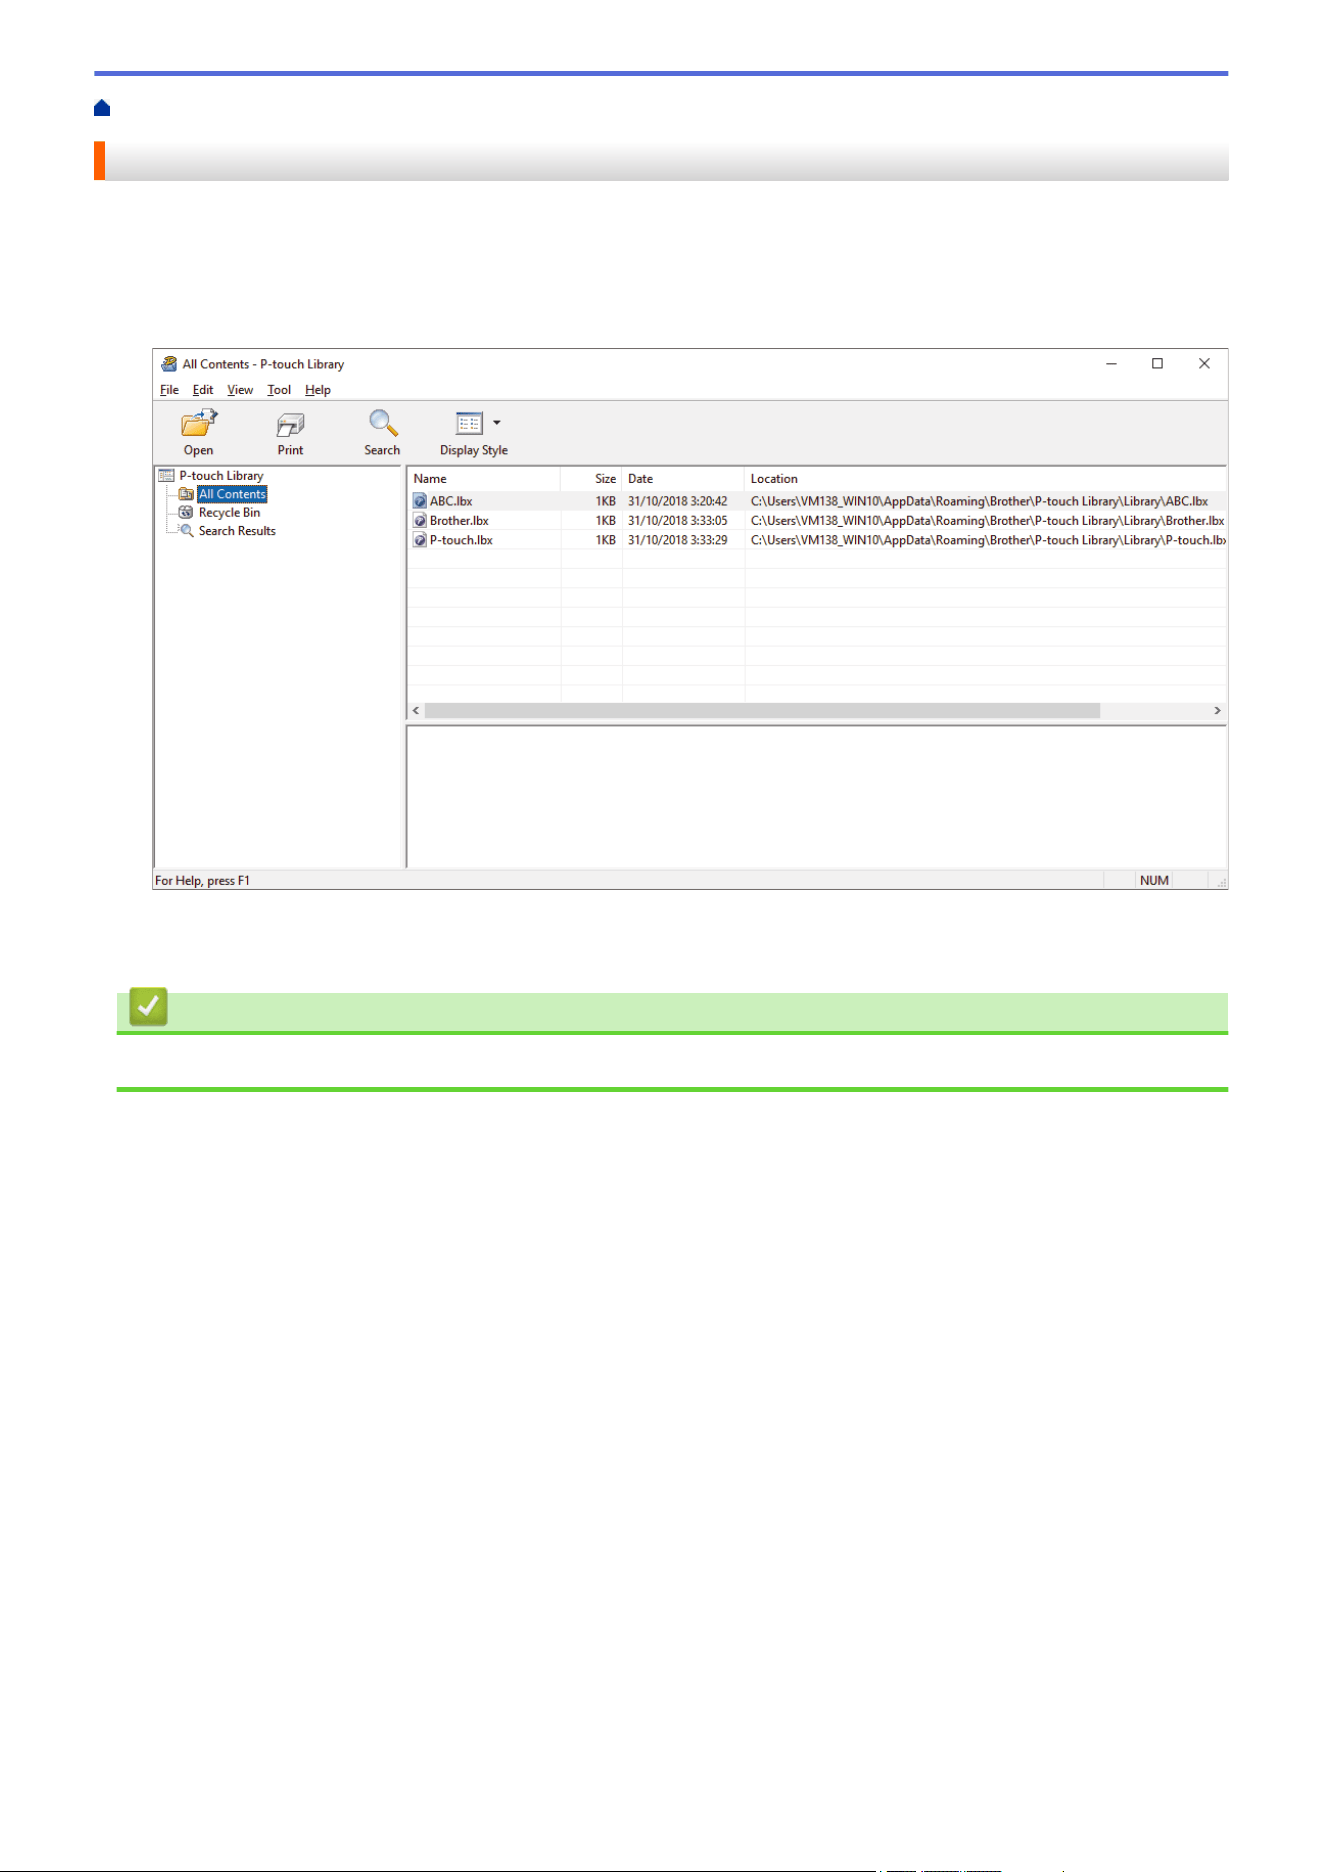
Home > Store and Manage Templates (P-touch Library) > Print Templates Using P-touch Library (Windows)
Print Templates Using P-touch Library (Windows)
1. Start the P-touch Library.
Click Start > Brother P-touch > P-touch Library.
*Depending on your computer's operating system, the Brother P-touch folder may or may not be created.
The main window appears.
2. Select the template you want to print, and then click Print.
The connected printer prints the template.
Related Information
• Store and Manage Templates (P-touch Library)
168
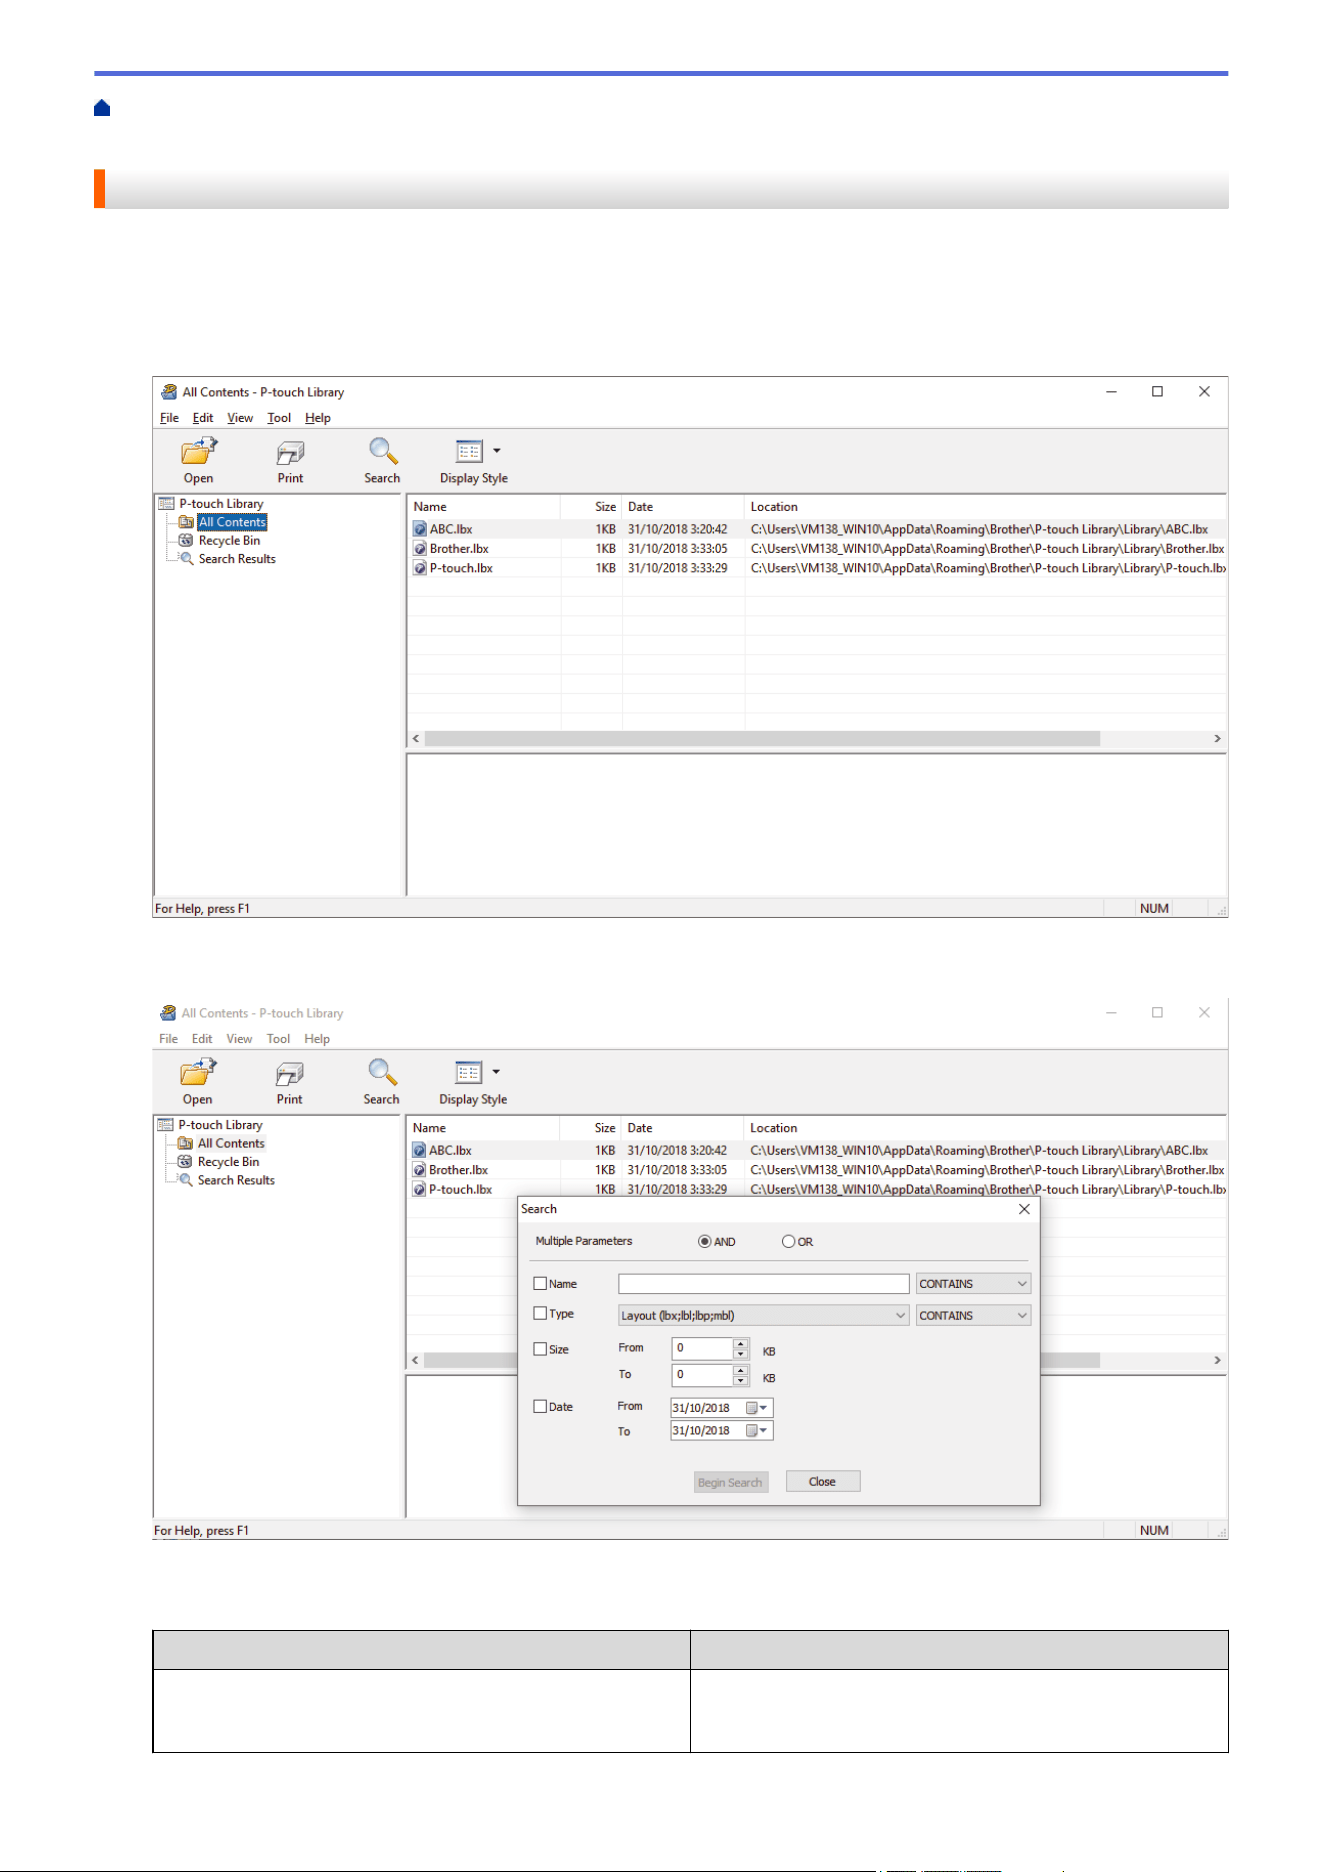
Home > Store and Manage Templates (P-touch Library) > Search Templates Using P-touch Library
(Windows)
Search Templates Using P-touch Library (Windows)
1. Start the P-touch Library.
Click Start > Brother P-touch > P-touch Library.
*Depending on your computer's operating system, the Brother P-touch folder may or may not be created.
The main window appears.
2. Click
Search.
The Search dialog box appears.
3. Specify the search criteria.
The following search criteria are available:
Settings
Details
Multiple Parameters Determines how the program searches when multiple
criteria are specified. If you select AND, the program
searches for files meeting all of the criteria. If you select
169
Settings Details
OR, the program searches for files meeting any of the
criteria.
Name Search for a template by specifying the file name.
Type Search for a template by specifying the file type.
Size Search for a template by specifying the file size.
Date Search for a template by specifying the file date.
4. Click Begin Search.
The search begins and the search results are displayed.
5. Close the Search dialog box.
To confirm the search results, click Search Results in the folder view.
You can register templates to P-touch Library by dragging and dropping them into the All Contents folder
or to the folder list.
Related Information
• Store and Manage Templates (P-touch Library)
170


Home > Network > Important Information for Security
Important Information for Security
• The default password to manage this machine’s settings is located on the bottom of the machine and marked
"Pwd:". We recommend immediately changing the default password to protect your machine from
unauthorized access.
• When connecting your machine to an outside network such as the Internet, make sure your network
environment is protected by a separate firewall or other means in order to prevent information leaks due to
inadequate settings or unauthorized access by malicious third parties.
• If there is a signal in the vicinity, wireless LAN allows you to freely make a LAN connection. However, if
security settings are not correctly configured, the signal may be intercepted by malicious third-parties,
possibly resulting in:
- Theft of personal or confidential information
- Improper transmission of information to parties impersonating the specified individuals
- Dissemination of transcribed communication contents that were intercepted
Related Information
• Network
172


Home > Network > Wireless Network Settings > Use the Wireless Network > Before Configuring Your
Machine for a Wireless Network
Before Configuring Your Machine for a Wireless Network
Related Models: TD-2350D/TD-2350DF/TD-2350DSA
Before attempting to configure a wireless network, confirm the following:
• If you are using an enterprise wireless network, you must know the User ID and Password.
• To achieve optimum results with normal everyday document printing, place your machine as close to the
wireless LAN access point/router as possible with minimal obstructions. Large objects and walls between the
two devices and interference from other electronic devices can affect the data transfer speed of your
documents.
Due to these factors, wireless may not be the best method of connection for all types of documents and
applications.
• If there is a signal in the vicinity, wireless LAN allows you to freely make a LAN connection. However, if
security settings are not correctly configured, the signal may be intercepted by malicious third parties,
possibly resulting in:
- Theft of personal or confidential information
- Improper transmission of information to parties impersonating the specified individuals
- Dissemination of transcribed communication contents that were intercepted
Make sure you know your wireless router/access point's Network Name (SSID) and Network Key
(Password). If you cannot find this information, consult the manufacturer of your wireless router/access
point, your system administrator, or Internet provider. Brother cannot provide this information.
Related Information
• Use the Wireless Network
175
Home > Network > Wireless Network Settings > Enable/Disable Wi-Fi
Enable/Disable Wi-Fi
Related Models: TD-2350D/TD-2350DF/TD-2350DSA
1. Press Menu.
2. Press a or b to select the following:
a. Select [WLAN]. Press OK.
b. Select [WLAN (On/Off)]. Press OK.
3. Press a or b to select one of the following:
• Select [On] to enable Wi-Fi. Press OK.
• Select [Off] to disable Wi-Fi. Press OK.
Related Information
• Wireless Network Settings
176


Home > Network > Network Features > Synchronize Time with the SNTP Server Using Web Based
Management
Synchronize Time with the SNTP Server Using Web Based Management
Related Models: TD-2320D/TD-2350D/TD-2320DF/TD-2350DF/TD-2350DSA
The Simple Network Time Protocol (SNTP) is used to synchronize the time used by the machine for
authentication with the SNTP time server. You can automatically or manually synchronize the machine's time with
the Coordinated Universal Time (UTC) provided by the SNTP time server.
• Configure Date and Time Using Web Based Management
• Configure the SNTP Protocol Using Web Based Management
178
Home > Network > Network Features > Synchronize Time with the SNTP Server Using Web Based
Management > Configure Date and Time Using Web Based Management
Configure Date and Time Using Web Based Management
Related Models: TD-2320D/TD-2350D/TD-2320DF/TD-2350DF/TD-2350DSA
Configure the date and time to synchronize the time used by the machine with the SNTP time server.
This feature is not available in some countries.
1. Start your web browser.
2. Type "https://machine's IP address" in your browser's address bar (where "machine's IP address" is your
machine's IP address).
For example:
https://192.168.1.2
3. If required, type the password in the Login field, and then click Login.
The default password to manage this machine’s settings is located on the bottom of the machine and
marked "Pwd:". Change the default password by following the on-screen instructions when you first log in.
If the Battery Base is installed, uninstall it to confirm the default password.
4. In the left navigation bar, click Administrator > Date&Time.
If the left navigation bar is not visible, start navigating from
.
5. Verify the Time Zone settings.
Select the time difference between your location and UTC from the Time Zone drop-down list. For
example, the time zone for Eastern Time in the USA and Canada is UTC-05:00.
6. Click Submit.
Related Information
• Synchronize Time with the SNTP Server Using Web Based Management
179
Home > Network > Network Features > Synchronize Time with the SNTP Server Using Web Based
Management > Configure the SNTP Protocol Using Web Based Management
Configure the SNTP Protocol Using Web Based Management
Related Models: TD-2320D/TD-2350D/TD-2320DF/TD-2350DF/TD-2350DSA
Configure the SNTP protocol to synchronize the time the machine uses for authentication with the time kept by
the SNTP time server.
1. Start your web browser.
2. Type "https://machine's IP address" in your browser's address bar (where "machine's IP address" is your
machine's IP address).
For example:
https://192.168.1.2
3. If required, type the password in the Login field, and then click Login.
The default password to manage this machine’s settings is located on the bottom of the machine and
marked "Pwd:". Change the default password by following the on-screen instructions when you first log in.
If the Battery Base is installed, uninstall it to confirm the default password.
4. In the left navigation bar, click Network > Network > Protocol.
If the left navigation bar is not visible, start navigating from
.
5. Select the SNTP checkbox to activate the settings.
6. Click Submit.
7. Restart your Brother machine to activate the configuration.
8. Next to the SNTP checkbox, click Advanced Settings.
9. Configure the settings.
Option
Description
Status Displays whether the SNTP protocol is enabled or disabled.
Synchronization Status Confirm the latest synchronization status.
SNTP Server Method Select AUTO or STATIC.
• AUTO
If you have a DHCP server on your network, the SNTP server will
obtain the address from that server automatically.
• STATIC
Type the address you want to use.
Primary SNTP Server Address
Secondary SNTP Server Address
Type the server's address (up to 64 characters).
The secondary SNTP server's address is used as a backup to the
primary SNTP server's address. If the primary server is unavailable,
the machine will contact the secondary SNTP server.
Primary SNTP Server Port
Secondary SNTP Server Port
Type the port number (1-65535).
The secondary SNTP server port is used as a backup to the primary
SNTP server port. If the primary port is unavailable, the machine will
contact the secondary SNTP port.
Synchronization Interval Type the number of hours between server synchronization attempts
(1-168 hours).
10. Click Submit.
180


Home > Network > Brother Management Tools
Brother Management Tools
Related Models: TD-2320D/TD-2350D/TD-2320DF/TD-2350DF/TD-2350DSA
Use one of Brother's management tools to configure your Brother machine's network settings.
Go to your model's Downloads page at support.brother.com/downloads to download the tools.
Related Information
• Network
182


Home > Security > Before Using Network Security Features
Before Using Network Security Features
Related Models: TD-2320D/TD-2350D/TD-2320DF/TD-2350DF/TD-2350DSA
Your machine employs some of the latest network security and encryption protocols available today. These
network features can be integrated into your overall network security plan to help protect your data and prevent
unauthorized access to the machine.
We recommend disabling the FTP and TFTP protocols. Accessing the machine using these protocols is not
secure.
Related Information
• Security
184

Home > Security > Configure Certificates for Device Security
Configure Certificates for Device Security
Related Models: TD-2320D/TD-2350D/TD-2320DF/TD-2350DF/TD-2350DSA
You must configure a certificate to manage your networked machine securely using SSL/TLS. You must use Web
Based Management to configure a certificate.
• Security Certificate Features Overview
• How to Create and Install a Certificate
• Create a Self-signed Certificate
• Create a Certificate Signing Request (CSR) and Install a Certificate from a Certificate
Authority (CA)
• Import and Export the Certificate and Private Key
• Import and Export a CA Certificate
• Manage Multiple Certificates
185
Home > Security > Configure Certificates for Device Security > Security Certificate Features Overview
Security Certificate Features Overview
Related Models: TD-2320D/TD-2350D/TD-2320DF/TD-2350DF/TD-2350DSA
Your machine supports the use of multiple security certificates, which allows secure management, authentication,
and communication with the machine. The following security certificate features can be used with the machine:
• SSL/TLS communication
• IEEE 802.1x authentication
Your machine supports the following:
• Pre-installed certificate
Your machine has a pre-installed self-signed certificate. This certificate enables you to use SSL/TLS
communication without creating or installing a different certificate.
The pre-installed self-signed certificate protects your communication up to a certain level. We recommend
using a certificate that is issued by a trusted organization for better security.
• Self-signed certificate
This print server issues its own certificate. Using this certificate, you can easily use the SSL/TLS
communication without creating or installing a different certificate from a CA.
• Certificate from a Certificate Authority (CA)
There are two methods for installing a certificate from a CA. If you already have a certificate from a CA or if
you want to use a certificate from an external trusted CA:
- When using a Certificate Signing Request (CSR) from this print server.
- When importing a certificate and a private key.
• Certificate Authority (CA) Certificate
To use a CA certificate that identifies the CA and owns its private key, you must import that CA certificate
from the CA before configuring the security features of the Network.
• If you are going to use SSL/TLS communication, we recommend contacting your system administrator
first.
• When you reset the print server back to its default factory settings, the certificate and the private key
that are installed will be deleted. If you want to keep the same certificate and the private key after
resetting the print server, export them before resetting, and then reinstall them.
Related Information
• Configure Certificates for Device Security
186
Home > Security > Configure Certificates for Device Security > How to Create and Install a Certificate
How to Create and Install a Certificate
Related Models: TD-2320D/TD-2350D/TD-2320DF/TD-2350DF/TD-2350DSA
There are two options when choosing a security certificate: use a self-signed certificate or use a certificate from a
Certificate Authority (CA).
Option 1
Self-Signed Certificate
1. Create a self-signed certificate using Web Based Management.
2. Install the self-signed certificate on your computer.
Option 2
Certificate from a CA
1. Create a Certificate Signing Request (CSR) using Web Based Management.
2. Install the certificate issued by the CA on your Brother machine using Web Based Management.
3. Install the certificate on your computer.
Related Information
• Configure Certificates for Device Security
187
Home > Security > Configure Certificates for Device Security > Create a Self-signed Certificate
Create a Self-signed Certificate
Related Models: TD-2320D/TD-2350D/TD-2320DF/TD-2350DF/TD-2350DSA
1. Start your web browser.
2. Type "https://machine's IP address" in your browser's address bar (where "machine's IP address" is your
machine's IP address).
For example:
https://192.168.1.2
• If you are using a Domain Name System or enable a NetBIOS name, you can type another name, such
as "SharedPrinter" instead of the IP address.
For example: https://SharedPrinter
• If you enable a NetBIOS name, you can also use the node name.
For example: https://brn123456abcdef
• The NetBIOS name can be found in the Network Configuration Report.
3. If required, type the password in the Login field, and then click Login.
The default password to manage this machine’s settings is located on the bottom of the machine and
marked "Pwd:". Change the default password by following the on-screen instructions when you first log in.
If the Battery Base is installed, uninstall it to confirm the default password.
4. In the left navigation bar, click Network > Security > Certificate.
If the left navigation bar is not visible, start navigating from
.
5. Click Create Self-Signed Certificate.
6. Enter a Common Name and a Valid Date.
• The length of the Common Name is less than 64 bytes. Enter an identifier, such as an IP address, node
name, or domain name to use when accessing this machine through SSL/TLS communication. The node
name is displayed by default.
• A warning will appear if you use the IPPS or HTTPS protocol and enter a different name in the URL than
the Common Name that was used for the self-signed certificate.
7. Select your setting from the Public Key Algorithm drop-down list.
8. Select your setting from the Digest Algorithm drop-down list.
9. Click Submit.
Related Information
• Configure Certificates for Device Security
188

Home > Security > Configure Certificates for Device Security > Create a Certificate Signing Request (CSR)
and Install a Certificate from a Certificate Authority (CA)
Create a Certificate Signing Request (CSR) and Install a Certificate from
a Certificate Authority (CA)
Related Models: TD-2320D/TD-2350D/TD-2320DF/TD-2350DF/TD-2350DSA
If you already have a certificate from an external trusted Certificate Authority (CA) , you can store the certificate
and private key on the machine and manage them by importing and exporting. If you do not have a certificate
from an external trusted CA, create a Certificate Signing Request (CSR), send it to a CA for authentication, and
install the returned certificate on your machine.
• Create a Certificate Signing Request (CSR)
• Install a Certificate on Your Machine
189
Home > Security > Configure Certificates for Device Security > Create a Certificate Signing Request (CSR)
and Install a Certificate from a Certificate Authority (CA) > Create a Certificate Signing Request (CSR)
Create a Certificate Signing Request (CSR)
Related Models: TD-2320D/TD-2350D/TD-2320DF/TD-2350DF/TD-2350DSA
A Certificate Signing Request (CSR) is a request sent to a Certificate Authority (CA) to authenticate the
credentials contained within the certificate.
We recommend installing a Root Certificate from the CA on your computer before creating the CSR.
1. Start your web browser.
2. Type "https://machine's IP address" in your browser's address bar (where "machine's IP address" is your
machine's IP address).
For example:
https://192.168.1.2
• If you are using a Domain Name System or enable a NetBIOS name, you can type another name, such
as "SharedPrinter" instead of the IP address.
For example: https://SharedPrinter
• If you enable a NetBIOS name, you can also use the node name.
For example: https://brn123456abcdef
• The NetBIOS name can be found in the Network Configuration Report.
3. If required, type the password in the Login field, and then click Login.
The default password to manage this machine’s settings is located on the bottom of the machine and
marked "Pwd:". Change the default password by following the on-screen instructions when you first log in.
If the Battery Base is installed, uninstall it to confirm the default password.
4. In the left navigation bar, click Network > Security > Certificate.
If the left navigation bar is not visible, start navigating from
.
5. Click Create CSR.
6. Type a Common Name (required) and add other information about your Organization (optional).
• Your company details are required so that a CA can confirm your identity and verify it to the outside
world.
• The length of the Common Name must be less than 64 bytes. Enter an identifier, such as an IP
address, node name, or domain name to use when accessing this printer through SSL/TLS
communication. The node name is displayed by default. The Common Name is required.
• A warning will appear if you type a different name in the URL than the Common Name that was used for
the certificate.
• The length of the Organization, the Organization Unit, the City/Locality and the State/Province must
be less than 64 bytes.
• The Country/Region should be a two character ISO 3166 country code.
• If you are configuring an X.509v3 certificate extension, select the Configure extended partition
checkbox, and then select Auto (Register IPv4) or Manual.
7. Select your setting from the Public Key Algorithm drop-down list. The default setting is RSA(2048bit).
8. Select your setting from the Digest Algorithm drop-down list. The default setting is SHA256.
9. Click Submit.
The CSR appears on your screen. Save the CSR as a file or copy and paste it into an online CSR form
offered by a Certificate Authority.
190

10. Click Save.
• Follow your CA's policy regarding the method to send a CSR to your CA.
• If you are using the Enterprise root CA of Windows Server 2012/2012 R2/2016/2019, we recommend
using the Web Server for the certificate template to securely create the Client Certificate. If you are
creating a Client Certificate for an IEEE 802.1x environment with EAP-TLS authentication, we
recommend using User for the certificate template.
For more information, visit support.brother.com, to see the FAQs & Troubleshooting page of your
model.
Search for "SSL".
Related Information
• Create a Certificate Signing Request (CSR) and Install a Certificate from a Certificate Authority (CA)
191
Home > Security > Configure Certificates for Device Security > Create a Certificate Signing Request (CSR)
and Install a Certificate from a Certificate Authority (CA) > Install a Certificate on Your Machine
Install a Certificate on Your Machine
Related Models: TD-2320D/TD-2350D/TD-2320DF/TD-2350DF/TD-2350DSA
When you receive a certificate from a Certificate Authority (CA), follow the steps below to install it on the print
server:
Only a certificate issued with your machine's Certificate Signing Request (CSR) can be installed on your
machine. When you want to create another CSR, make sure that the certificate is installed before creating the
new CSR. Create another CSR only after installing the certificate on the machine, otherwise the CSR created
before installing the new CSR will be invalid.
1. Start your web browser.
2. Type "https://machine's IP address" in your browser's address bar (where "machine's IP address" is your
machine's IP address).
For example:
https://192.168.1.2
• If you are using a Domain Name System or enable a NetBIOS name, you can type another name, such
as "SharedPrinter" instead of the IP address.
For example: https://SharedPrinter
• If you enable a NetBIOS name, you can also use the node name.
For example: https://brn123456abcdef
• The NetBIOS name can be found in the Network Configuration Report.
3. If required, type the password in the Login field, and then click Login.
The default password to manage this machine’s settings is located on the bottom of the machine and
marked "Pwd:". Change the default password by following the on-screen instructions when you first log in.
If the Battery Base is installed, uninstall it to confirm the default password.
4. In the left navigation bar, click Network > Security > Certificate.
If the left navigation bar is not visible, start navigating from
.
5. Click Install Certificate.
6. Browse to the file that contains the certificate issued by the CA, and then click Submit.
The certificate has been created and saved in your machine's memory successfully.
To use SSL/TLS communication, the Root Certificate from the CA must be installed on your computer. Contact
your network administrator.
Related Information
• Create a Certificate Signing Request (CSR) and Install a Certificate from a Certificate Authority (CA)
192

Home > Security > Configure Certificates for Device Security > Import and Export the Certificate and
Private Key
Import and Export the Certificate and Private Key
Related Models: TD-2320D/TD-2350D/TD-2320DF/TD-2350DF/TD-2350DSA
Store the certificate and private key on your machine and manage them by importing and exporting them.
• Import a Certificate and Private Key
• Export the Certificate and Private Key
193
Home > Security > Configure Certificates for Device Security > Import and Export the Certificate and
Private Key > Import a Certificate and Private Key
Import a Certificate and Private Key
Related Models: TD-2320D/TD-2350D/TD-2320DF/TD-2350DF/TD-2350DSA
1. Start your web browser.
2. Type "https://machine's IP address" in your browser's address bar (where "machine's IP address" is your
machine's IP address).
For example:
https://192.168.1.2
• If you are using a Domain Name System or enable a NetBIOS name, you can type another name, such
as "SharedPrinter" instead of the IP address.
For example: https://SharedPrinter
• If you enable a NetBIOS name, you can also use the node name.
For example: https://brn123456abcdef
• The NetBIOS name can be found in the Network Configuration Report.
3. If required, type the password in the Login field, and then click Login.
The default password to manage this machine’s settings is located on the bottom of the machine and
marked "Pwd:". Change the default password by following the on-screen instructions when you first log in.
If the Battery Base is installed, uninstall it to confirm the default password.
4. In the left navigation bar, click Network > Security > Certificate.
If the left navigation bar is not visible, start navigating from
.
5. Click Import Certificate and Private Key.
6. Browse to the file you want to import.
7. Type the password if the file is encrypted, and then click Submit.
The certificate and private key are imported to your machine.
Related Information
• Import and Export the Certificate and Private Key
194
Home > Security > Configure Certificates for Device Security > Import and Export the Certificate and
Private Key > Export the Certificate and Private Key
Export the Certificate and Private Key
Related Models: TD-2320D/TD-2350D/TD-2320DF/TD-2350DF/TD-2350DSA
1. Start your web browser.
2. Type "https://machine's IP address" in your browser's address bar (where "machine's IP address" is your
machine's IP address).
For example:
https://192.168.1.2
• If you are using a Domain Name System or enable a NetBIOS name, you can type another name, such
as "SharedPrinter" instead of the IP address.
For example: https://SharedPrinter
• If you enable a NetBIOS name, you can also use the node name.
For example: https://brn123456abcdef
• The NetBIOS name can be found in the Network Configuration Report.
3. If required, type the password in the Login field, and then click Login.
The default password to manage this machine’s settings is located on the bottom of the machine and
marked "Pwd:". Change the default password by following the on-screen instructions when you first log in.
If the Battery Base is installed, uninstall it to confirm the default password.
4. In the left navigation bar, click Network > Security > Certificate.
If the left navigation bar is not visible, start navigating from
.
5. Click Export shown with Certificate List.
6. Enter the password if you want to encrypt the file.
If a blank password is used, the output is not encrypted.
7. Enter the password again for confirmation, and then click Submit.
8. Click Save.
The certificate and private key are exported to your computer.
You can also import the certificate to your computer.
Related Information
• Import and Export the Certificate and Private Key
195

Home > Security > Configure Certificates for Device Security > Import and Export a CA Certificate
Import and Export a CA Certificate
Related Models: TD-2320D/TD-2350D/TD-2320DF/TD-2350DF/TD-2350DSA
You can import, export, and store CA certificates on your Brother machine.
• Import a CA Certificate
• Export a CA Certificate
196
Home > Security > Configure Certificates for Device Security > Import and Export a CA Certificate > Import
a CA Certificate
Import a CA Certificate
Related Models: TD-2320D/TD-2350D/TD-2320DF/TD-2350DF/TD-2350DSA
1. Start your web browser.
2. Type "https://machine's IP address" in your browser's address bar (where "machine's IP address" is your
machine's IP address).
For example:
https://192.168.1.2
• If you are using a Domain Name System or enable a NetBIOS name, you can type another name, such
as "SharedPrinter" instead of the IP address.
For example: https://SharedPrinter
• If you enable a NetBIOS name, you can also use the node name.
For example: https://brn123456abcdef
• The NetBIOS name can be found in the Network Configuration Report.
3. If required, type the password in the Login field, and then click Login.
The default password to manage this machine’s settings is located on the bottom of the machine and
marked "Pwd:". Change the default password by following the on-screen instructions when you first log in.
If the Battery Base is installed, uninstall it to confirm the default password.
4. In the left navigation bar, click Network > Security > CA Certificate.
If the left navigation bar is not visible, start navigating from
.
5. Click Import CA Certificate.
6. Browse to the file you want to import.
7. Click Submit.
Related Information
• Import and Export a CA Certificate
197
Home > Security > Configure Certificates for Device Security > Import and Export a CA Certificate > Export
a CA Certificate
Export a CA Certificate
Related Models: TD-2320D/TD-2350D/TD-2320DF/TD-2350DF/TD-2350DSA
1. Start your web browser.
2. Type "https://machine's IP address" in your browser's address bar (where "machine's IP address" is your
machine's IP address).
For example:
https://192.168.1.2
• If you are using a Domain Name System or enable a NetBIOS name, you can type another name, such
as "SharedPrinter" instead of the IP address.
For example: https://SharedPrinter
• If you enable a NetBIOS name, you can also use the node name.
For example: https://brn123456abcdef
• The NetBIOS name can be found in the Network Configuration Report.
3. If required, type the password in the Login field, and then click Login.
The default password to manage this machine’s settings is located on the bottom of the machine and
marked "Pwd:". Change the default password by following the on-screen instructions when you first log in.
If the Battery Base is installed, uninstall it to confirm the default password.
4. In the left navigation bar, click Network > Security > CA Certificate.
If the left navigation bar is not visible, start navigating from
.
5. Select the certificate you want to export and click Export.
6. Click Submit.
Related Information
• Import and Export a CA Certificate
198
Home > Security > Configure Certificates for Device Security > Manage Multiple Certificates
Manage Multiple Certificates
Related Models: TD-2320D/TD-2350D/TD-2320DF/TD-2350DF/TD-2350DSA
The multiple certificate feature allows you to use Web Based Management to manage each certificate installed
on your machine. In Web Based Management, navigate to the Certificate or CA Certificate screen to view
certificate content, delete, or export your certificates.
Maximum Number of Certificates Stored on Brother Machine
Self-signed Certificate or
Certificate Issued by a CA
5
CA Certificate 6
We recommend storing fewer certificates than allowed, reserving an empty spot in case of certificate expiration.
When a certificate expires, import a new certificate into the reserved spot, and then delete the expired certificate.
This ensures that you avoid configuration failure.
• When you use HTTPS/IPPS, or IEEE 802.1x, you must select which certificate you are using.
• When you use SSL for SMTP communications, you do not have to choose the certificate. The
necessary certificate will be chosen automatically.
Related Information
• Configure Certificates for Device Security
199


Home > Security > Use SSL/TLS > Introduction to SSL/TLS
Introduction to SSL/TLS
Related Models: TD-2320D/TD-2350D/TD-2320DF/TD-2350DF/TD-2350DSA
Secure Socket Layer (SSL) or Transport Layer Security (TLS) is an effective method of protecting data sent over
a local or wide area network (LAN or WAN). It works by encrypting data, such as a print job, sent over a network,
so anyone trying to capture it will not be able to read it.
SSL/TLS can be configured on both wired and wireless networks and will work with other forms of security such
as WPA keys and firewalls.
Related Information
• Use SSL/TLS
• Brief History of SSL/TLS
• Benefits of Using SSL/TLS
201

Home > Security > Use SSL/TLS > Introduction to SSL/TLS > Brief History of SSL/TLS
Brief History of SSL/TLS
Related Models: TD-2320D/TD-2350D/TD-2320DF/TD-2350DF/TD-2350DSA
SSL/TLS was originally created to secure web traffic information, particularly data sent between web browsers
and servers. SSL is now used with additional applications, such as Telnet, printer, and FTP software, in order to
become a universal solution for online security. Its original design intentions are still being used today by many
online retailers and banks to secure sensitive data, such as credit card numbers, customer records, etc.
SSL/TLS uses extremely high levels of encryption and is trusted by banks all over the world.
Related Information
• Introduction to SSL/TLS
202

Home > Security > Use SSL/TLS > Introduction to SSL/TLS > Benefits of Using SSL/TLS
Benefits of Using SSL/TLS
Related Models: TD-2320D/TD-2350D/TD-2320DF/TD-2350DF/TD-2350DSA
The primary benefit of using SSL/TLS is to guarantee secure printing over an IP network by restricting
unauthorized users from reading data sent to the machine. SSL's most important benefit is that it can be used to
print confidential data securely. For example, a Human Resource (HR) Department in a large company may be
printing wage slips on a regular basis. Without encryption, the data contained on these wages slips can be read
by other network users. However, with SSL/TLS, anyone trying to capture the data will see a page of code and
not the actual wage slip.
Related Information
• Introduction to SSL/TLS
203

Home > Security > Use SSL/TLS > Manage Your Network Machine Securely Using SSL/TLS
Manage Your Network Machine Securely Using SSL/TLS
Related Models: TD-2320D/TD-2350D/TD-2320DF/TD-2350DF/TD-2350DSA
• Configure a Certificate for SSL/TLS and Available Protocols
• Access Web Based Management Using SSL/TLS
• Install the Self-signed Certificate for Windows Users as Administrator
204
Home > Security > Use SSL/TLS > Manage Your Network Machine Securely Using SSL/TLS > Configure a
Certificate for SSL/TLS and Available Protocols
Configure a Certificate for SSL/TLS and Available Protocols
Related Models: TD-2320D/TD-2350D/TD-2320DF/TD-2350DF/TD-2350DSA
Configure a certificate on your machine using Web Based Management before you use SSL/TLS
communication.
1. Start your web browser.
2. Type "https://machine's IP address" in your browser's address bar (where "machine's IP address" is your
machine's IP address).
For example:
https://192.168.1.2
• If you are using a Domain Name System or enable a NetBIOS name, you can type another name, such
as "SharedPrinter" instead of the IP address.
For example: https://SharedPrinter
• If you enable a NetBIOS name, you can also use the node name.
For example: https://brn123456abcdef
• The NetBIOS name can be found in the Network Configuration Report.
3. If required, type the password in the Login field, and then click Login.
The default password to manage this machine’s settings is located on the bottom of the machine and
marked "Pwd:". Change the default password by following the on-screen instructions when you first log in.
If the Battery Base is installed, uninstall it to confirm the default password.
4. In the left navigation bar, click Network > Network > Protocol.
If the left navigation bar is not visible, start navigating from
.
5. Click HTTP Server Settings.
6. Select the certificate you want to configure from the Select the Certificate drop-down list.
7. Click Submit.
8. Click Yes to restart your print server.
Related Information
• Manage Your Network Machine Securely Using SSL/TLS
205

Home > Security > Use SSL/TLS > Manage Your Network Machine Securely Using SSL/TLS > Access
Web Based Management Using SSL/TLS
Access Web Based Management Using SSL/TLS
Related Models: TD-2320D/TD-2350D/TD-2320DF/TD-2350DF/TD-2350DSA
To manage your network machine securely, use Web Based Management with the HTTPS protocol.
• To use HTTPS protocol, HTTPS must be enabled on your machine. The HTTPS protocol is enabled by
default.
• You can change the HTTPS protocol settings using Web Based Management.
1. Start your web browser.
2. Type "https://Common Name" in your browser's address bar (where "Common Name" is the Common Name
that you assigned to the certificate; this could be your IP address, node name, or domain name).
3. If required, type the password in the Login field, and then click Login.
The default password to manage this machine’s settings is located on the bottom of the machine and
marked "Pwd:". Change the default password by following the on-screen instructions when you first log in.
If the Battery Base is installed, uninstall it to confirm the default password.
4. You can now access the machine using HTTPS.
Related Information
• Manage Your Network Machine Securely Using SSL/TLS
206
Home > Security > Use SSL/TLS > Manage Your Network Machine Securely Using SSL/TLS > Install the
Self-signed Certificate for Windows Users as Administrator
Install the Self-signed Certificate for Windows Users as Administrator
Related Models: TD-2320D/TD-2350D/TD-2320DF/TD-2350DF/TD-2350DSA
• The following steps are for Microsoft Edge. If you use another web browser, refer to your web browser's
documentation or online help for instructions on how to install certificates.
• Make sure you have created your self-signed certificate using Web Based Management.
1. Right-click the Microsoft Edge icon, and then click Run as administrator.
If the User Account Control screen appears, click Yes.
2. Type "https://machine's IP address" in your browser's address bar (where "machine's IP address" is your
machine's IP address).
For example:
https://192.168.1.2
• If you are using a Domain Name System or enable a NetBIOS name, you can type another name, such
as "SharedPrinter" instead of the IP address.
For example: https://SharedPrinter
• If you enable a NetBIOS name, you can also use the node name.
For example: https://brn123456abcdef
• The NetBIOS name can be found in the Network Configuration Report.
3. If your connection is not private, click the Advanced button, and then continue to the web page.
4. If required, type the password in the Login field, and then click Login.
The default password to manage this machine’s settings is located on the bottom of the machine and
marked "Pwd:". Change the default password by following the on-screen instructions when you first log in.
If the Battery Base is installed, uninstall it to confirm the default password.
5. In the left navigation bar, click Network > Security > Certificate.
If the left navigation bar is not visible, start navigating from
.
6. Click Export.
7. To encrypt the output file, type a password in the Enter password field. If the Enter password field is blank,
your output file will not be encrypted.
8. Type the password again in the Retype password field, and then click Submit.
9. Click the downloaded file to open it.
10. When the Certificate Import Wizard appears, click Next.
11. Click Next.
12. If required, type a password, and then click Next.
13. Select Place all certificates in the following store, and then click Browse....
14. Select the Trusted Root Certification Authorities, and then click OK.
15. Click Next.
16. Click Finish.
17. Click Yes, if the fingerprint (thumbprint) is correct.
18. Click OK.
207


Home > Security > Use SSL/TLS > Print Documents Securely Using SSL/TLS > Print Documents Using
IPPS
Print Documents Using IPPS
Related Models: TD-2320D/TD-2350D/TD-2320DF/TD-2350DF/TD-2350DSA
To print documents securely with IPP protocol, use the IPPS protocol.
1. Start your web browser.
2. Type "https://machine's IP address" in your browser's address bar (where "machine's IP address" is your
machine's IP address).
For example:
https://192.168.1.2
• If you are using a Domain Name System or enable a NetBIOS name, you can type another name, such
as "SharedPrinter" instead of the IP address.
For example: https://SharedPrinter
• If you enable a NetBIOS name, you can also use the node name.
For example: https://brn123456abcdef
• The NetBIOS name can be found in the Network Configuration Report.
3. If required, type the password in the Login field, and then click Login.
The default password to manage this machine’s settings is located on the bottom of the machine and
marked "Pwd:". Change the default password by following the on-screen instructions when you first log in.
If the Battery Base is installed, uninstall it to confirm the default password.
4. In the left navigation bar, click Network > Network > Protocol.
If the left navigation bar is not visible, start navigating from
.
5. Make sure the IPP checkbox is selected.
If the IPP checkbox is not selected, select the IPP checkbox, and then click Submit.
Restart your machine to activate the configuration.
After the machine restarts, return to the machine's web page, type the password, and then in the left
navigation bar, click Network > Network > Protocol.
6. Click HTTP Server Settings.
7. Select the HTTPS(Port 443) checkbox in the IPP area, and then click Submit.
8. Restart your machine to activate the configuration.
Communication using IPPS cannot prevent unauthorized access to the print server.
Related Information
• Print Documents Securely Using SSL/TLS
210

Home > Security > Use SNMPv3 > Manage Your Network Machine Securely Using SNMPv3
Manage Your Network Machine Securely Using SNMPv3
Related Models: TD-2320D/TD-2350D/TD-2320DF/TD-2350DF/TD-2350DSA
The Simple Network Management Protocol version 3 (SNMPv3) provides user authentication and data
encryption to manage network devices securely.
1. Start your web browser.
2. Type "https://Common Name" in your browser's address bar (where "Common Name" is the Common Name
that you assigned to the certificate; this could be your IP address, node name, or domain name).
3. If required, type the password in the Login field, and then click Login.
The default password to manage this machine’s settings is located on the bottom of the machine and
marked "Pwd:". Change the default password by following the on-screen instructions when you first log in.
If the Battery Base is installed, uninstall it to confirm the default password.
4. In the left navigation bar, click Network > Network > Protocol.
If the left navigation bar is not visible, start navigating from .
5. Make sure the SNMP setting is enabled, and then click Advanced Settings.
6. Configure the SNMPv1/v2c mode settings.
Option Description
SNMP v1/v2c
read-write access
The print server uses version 1 and version 2c of the SNMP protocol. You can use all
of your machine's applications in this mode. However, it is not secure since it will not
authenticate the user and data will not be encrypted.
SNMPv1/v2c
read-only access
The print server uses the read-only access of version 1 and version 2c of the SNMP
protocol.
Disabled Disable version 1 and version 2c of the SNMP protocol.
All applications that use SNMPv1/v2c will be restricted. To allow the use of
SNMPv1/v2c applications, use the SNMPv1/v2c read-only access or SNMP v1/v2c
read-write access mode.
7. Configure the SNMPv3 mode settings.
Option Description
Enabled The print server uses version 3 of the SNMP protocol. To manage the print server securely, use
the SNMPv3 mode.
Disabled Disable version 3 of the SNMP protocol.
All applications that use SNMPv3 will be restricted. To allow the use of SNMPv3 applications,
use the SNMPv3 mode.
8. Click
Submit.
If your machine displays the protocol setting options, select the options you want.
9. Restart your machine to activate the configuration.
Related Information
• Use SNMPv3
212

Home > Security > Use IEEE 802.1x Authentication for Your Network
Use IEEE 802.1x Authentication for Your Network
Related Models: TD-2320D/TD-2350D/TD-2320DF/TD-2350DF/TD-2350DSA
• What Is IEEE 802.1x Authentication?
• Configure IEEE 802.1x Authentication Using Web Based Management (Web Browser)
• IEEE 802.1x Authentication Methods
213

Home > Security > Use IEEE 802.1x Authentication for Your Network > What Is IEEE 802.1x
Authentication?
What Is IEEE 802.1x Authentication?
Related Models: TD-2320D/TD-2350D/TD-2320DF/TD-2350DF/TD-2350DSA
IEEE 802.1x is an IEEE standard that limits access from unauthorized network devices. Your Brother machine
sends an authentication request to a RADIUS server (Authentication server) through your access point or hub.
After your request has been verified by the RADIUS server, your machine can access the network.
Related Information
• Use IEEE 802.1x Authentication for Your Network
214
Home > Security > Use IEEE 802.1x Authentication for Your Network > Configure IEEE 802.1x
Authentication Using Web Based Management (Web Browser)
Configure IEEE 802.1x Authentication Using Web Based Management
(Web Browser)
Related Models: TD-2320D/TD-2350D/TD-2320DF/TD-2350DF/TD-2350DSA
• If you configure your machine using EAP-TLS authentication, you must install the client certificate issued
by a CA before you start configuration. Contact your network administrator about the client certificate. If
you have installed more than one certificate, we recommend writing down the certificate name you want to
use.
• Before you verify the server certificate, you must import the CA certificate issued by the CA that signed the
server certificate. Contact your network administrator or your Internet Service Provider (ISP) to confirm
whether a CA certificate import is necessary.
1. Start your web browser.
2. Type "https://machine's IP address" in your browser's address bar (where "machine's IP address" is your
machine's IP address).
For example:
https://192.168.1.2
• If you are using a Domain Name System or enable a NetBIOS name, you can type another name, such
as "SharedPrinter" instead of the IP address.
For example: https://SharedPrinter
• If you enable a NetBIOS name, you can also use the node name.
For example: https://brn123456abcdef
• The NetBIOS name can be found in the Network Configuration Report.
3. If required, type the password in the Login field, and then click Login.
The default password to manage this machine’s settings is located on the bottom of the machine and
marked "Pwd:". Change the default password by following the on-screen instructions when you first log in.
If the Battery Base is installed, uninstall it to confirm the default password.
4. In the left navigation bar, click Network.
If the left navigation bar is not visible, start navigating from
.
5. Do one of the following:
• For the wired network
Click Wired > Wired 802.1x Authentication.
• For the wireless network
Click Wireless > Wireless (Enterprise).
6. Configure the IEEE 802.1x authentication settings.
• To enable IEEE 802.1x authentication for wired networks, select Enabled for Wired 802.1x status on
the Wired 802.1x Authentication page.
• If you are using EAP-TLS authentication, you must select the client certificate installed (shown with
certificate name) for verification from the Client Certificate drop-down list.
• If you select EAP-FAST, PEAP, EAP-TTLS, or EAP-TLS authentication, select the verification method
from the Server Certificate Verification drop-down list. Verify the server certificate using the CA
certificate, imported to the machine in advance, issued by the CA that signed the server certificate.
Select one of the following verification methods from the Server Certificate Verification drop-down list:
215
Option Description
No Verification The server certificate can always be trusted. The verification is not performed.
CA Cert. The verification method to check the CA reliability of the server certificate, using the
CA certificate issued by the CA that signed the server certificate.
CA Cert. + ServerID The verification method to check the common name
1
value of the server certificate,
in addition to the CA reliability of the server certificate.
7. When finished with configuration, click Submit.
For wired networks: After configuring, connect your machine to the IEEE 802.1x supported network. After a
few minutes, print the Network Configuration Report to check the <Wired IEEE 802.1x> status.
Option Description
Success The wired IEEE 802.1x function is enabled and the authentication was successful.
Failed The wired IEEE 802.1x function is enabled; however, the authentication failed.
Off The wired IEEE 802.1x function is not available.
Related Information
• Use IEEE 802.1x Authentication for Your Network
1 The common name verification compares the common name of the server certificate to the character string configured for the Server ID.
Before you use this method, contact your system administrator about the server certificate's common name and then configure Server ID.
216

Home > Security > Use IEEE 802.1x Authentication for Your Network > IEEE 802.1x Authentication
Methods
IEEE 802.1x Authentication Methods
Related Models: TD-2320D/TD-2350D/TD-2320DF/TD-2350DF/TD-2350DSA
EAP-FAST
Extensible Authentication Protocol-Flexible Authentication via Secured Tunneling (EAP-FAST) has been
developed by Cisco Systems, Inc., which uses a user ID and password for authentication, and symmetric key
algorithms to achieve a tunneled authentication process.
Your Brother machine supports the following inner authentication methods:
• EAP-FAST/NONE
• EAP-FAST/MS-CHAPv2
• EAP-FAST/GTC
EAP-MD5 (Wired network)
Extensible Authentication Protocol-Message Digest Algorithm 5 (EAP-MD5) uses a user ID and password for
challenge-response authentication.
PEAP
Protected Extensible Authentication Protocol (PEAP) is a version of EAP method developed by Cisco
Systems, Inc., Microsoft Corporation and RSA Security. PEAP creates an encrypted Secure Sockets Layer
(SSL)/Transport Layer Security (TLS) tunnel between a client and an authentication server, for sending a user
ID and password. PEAP provides mutual authentication between the server and the client.
Your Brother machine supports the following inner authentication methods:
• PEAP/MS-CHAPv2
• PEAP/GTC
EAP-TTLS
Extensible Authentication Protocol-Tunneled Transport Layer Security (EAP-TTLS) has been developed by
Funk Software and Certicom. EAP-TTLS creates a similar encrypted SSL tunnel to PEAP, between a client
and an authentication server, for sending a user ID and password. EAP-TTLS provides mutual authentication
between the server and the client.
Your Brother machine supports the following inner authentication methods:
• EAP-TTLS/CHAP
• EAP-TTLS/MS-CHAP
• EAP-TTLS/MS-CHAPv2
• EAP-TTLS/PAP
EAP-TLS
Extensible Authentication Protocol-Transport Layer Security (EAP-TLS) requires digital certificate
authentication both at a client and an authentication server.
Related Information
• Use IEEE 802.1x Authentication for Your Network
217

Home > Update > Update P-touch Editor
Update P-touch Editor
Before updating P-touch Editor, install the printer driver.
1. Start P-touch Editor .
Click Start > Brother P-touch > P-touch Editor, or double-click the P-touch Editor icon on the desktop.
NOTE
Depending on your computer's operating system, the Brother P-touch folder may or may not be created.
2. Click the New Layout button to open the main window.
3. Click Help > PE_Check_for_Updates.
4. If the update is available, a confirmation message will appear. Click Download.
Related Information
• Update
219
Home > Update > Update the Firmware
Update the Firmware
• Do not turn off the power when transferring data or updating firmware.
• If any other application is running, exit the application.
Before updating the firmware, you must first install the printer driver.
1. Turn on the printer and connect the USB cable.
2. Start the P-touch Update Software.
Click Start > Brother P-touch > P-touch Update Software, or double-click the P-touch Update Software
icon on the desktop.
3. Click the Firmware update icon.
4. Select the Printer option, make sure the machine is connected correctly, and then click OK.
5. Select Language from the drop-down list.
6. Select the checkbox next to the firmware you want to update, and then click Transfer.
NOTE
Do not turn off the printer or disconnect the cable during the update process and data transfer.
7. Check the content to be updated, and then click Start to begin the update.
The firmware update begins.
Related Information
• Update
220

Home > Printer Settings
Printer Settings
• Change Printer Settings Using the Printer Setting Tool (Windows)
• Apply Setting Changes to Multiple Printers (Windows)
• Change Printer Settings Using Web Based Management
• Confirm Printer Settings
• Details of Printer Settings Report
• Print and Confirm Dump Data
• Change Printer Settings Using the Printer
221
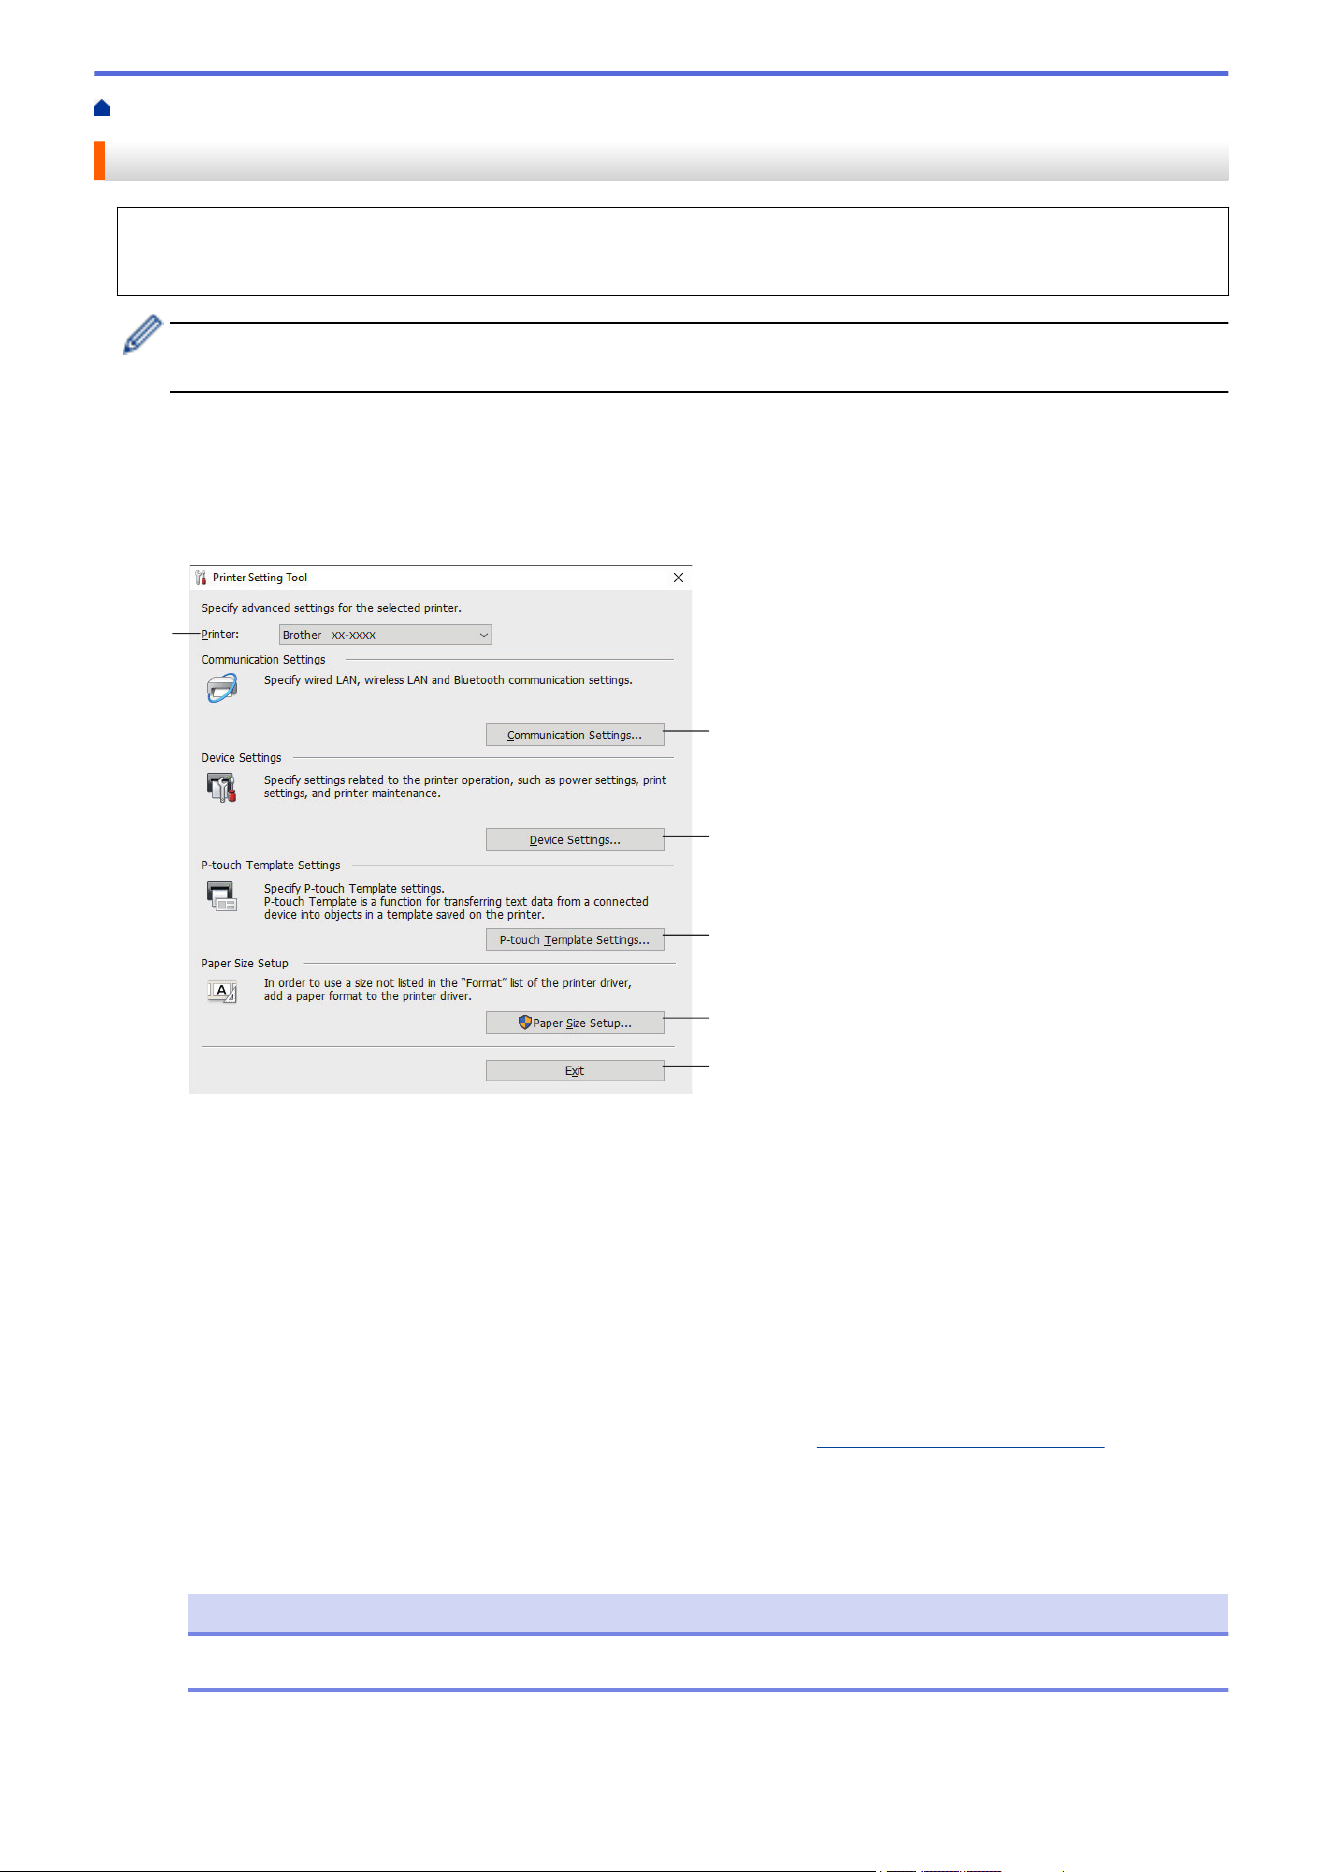
Home > Printer Settings > Change Printer Settings Using the Printer Setting Tool (Windows)
Change Printer Settings Using the Printer Setting Tool (Windows)
• Make sure the printer driver has been installed correctly and you can print.
• Connect the printer to a computer with a USB cable.
The Printer Setting Tool is installed in addition to the printer driver and other software when using the
installer.
1. Connect the printer you want to configure to the computer.
2. Start the Printer Setting Tool.
Click Start > Brother > Printer Setting Tool.
The main window appears.
3
2
4
5
6
1
1. Printer
Lists the connected printers.
2. Communication Settings (TD-2320D/TD-2350D/TD-2320DF/TD-2350DF/TD-2350DSA)
Specify communication settings.
3. Device Settings
Specify device settings.
4. P-touch Template Settings
Specify P-touch Template settings.
For more information, see the P-touch Template Manual/Command Reference (English only). You can
download the latest version from the Brother support website at
support.brother.com/manuals.
5. Paper Size Setup
If the paper size you want is not listed in the Paper Size list, you must add the media information and
settings to the printer driver.
NOTE
To access Paper Size Setup settings, you must be logged on with administrator rights.
6. Exit
Click to close the window.
222

3. Make sure the printer you want to configure appears next to Printer.
If a different printer appears, select the printer you want from the drop-down list.
4. Select the settings you want to change, and then specify or change the settings in the dialog box.
5. Click Apply to apply the settings to the printer.
6. Click Exit in the main window to finish specifying settings.
Use the Printer Setting Tool to configure the printer only when the printer is idle. The printer may
malfunction if you try to configure it while it is processing or printing a print job.
Related Information
• Printer Settings
• Printer Setting Tool: Communication Settings (Windows)
• Printer Setting Tool (Windows): Device Settings
• Printer Setting Tool (Windows): P-touch Template Settings
• Printer Setting Tool (Windows): Paper Size Setup
223
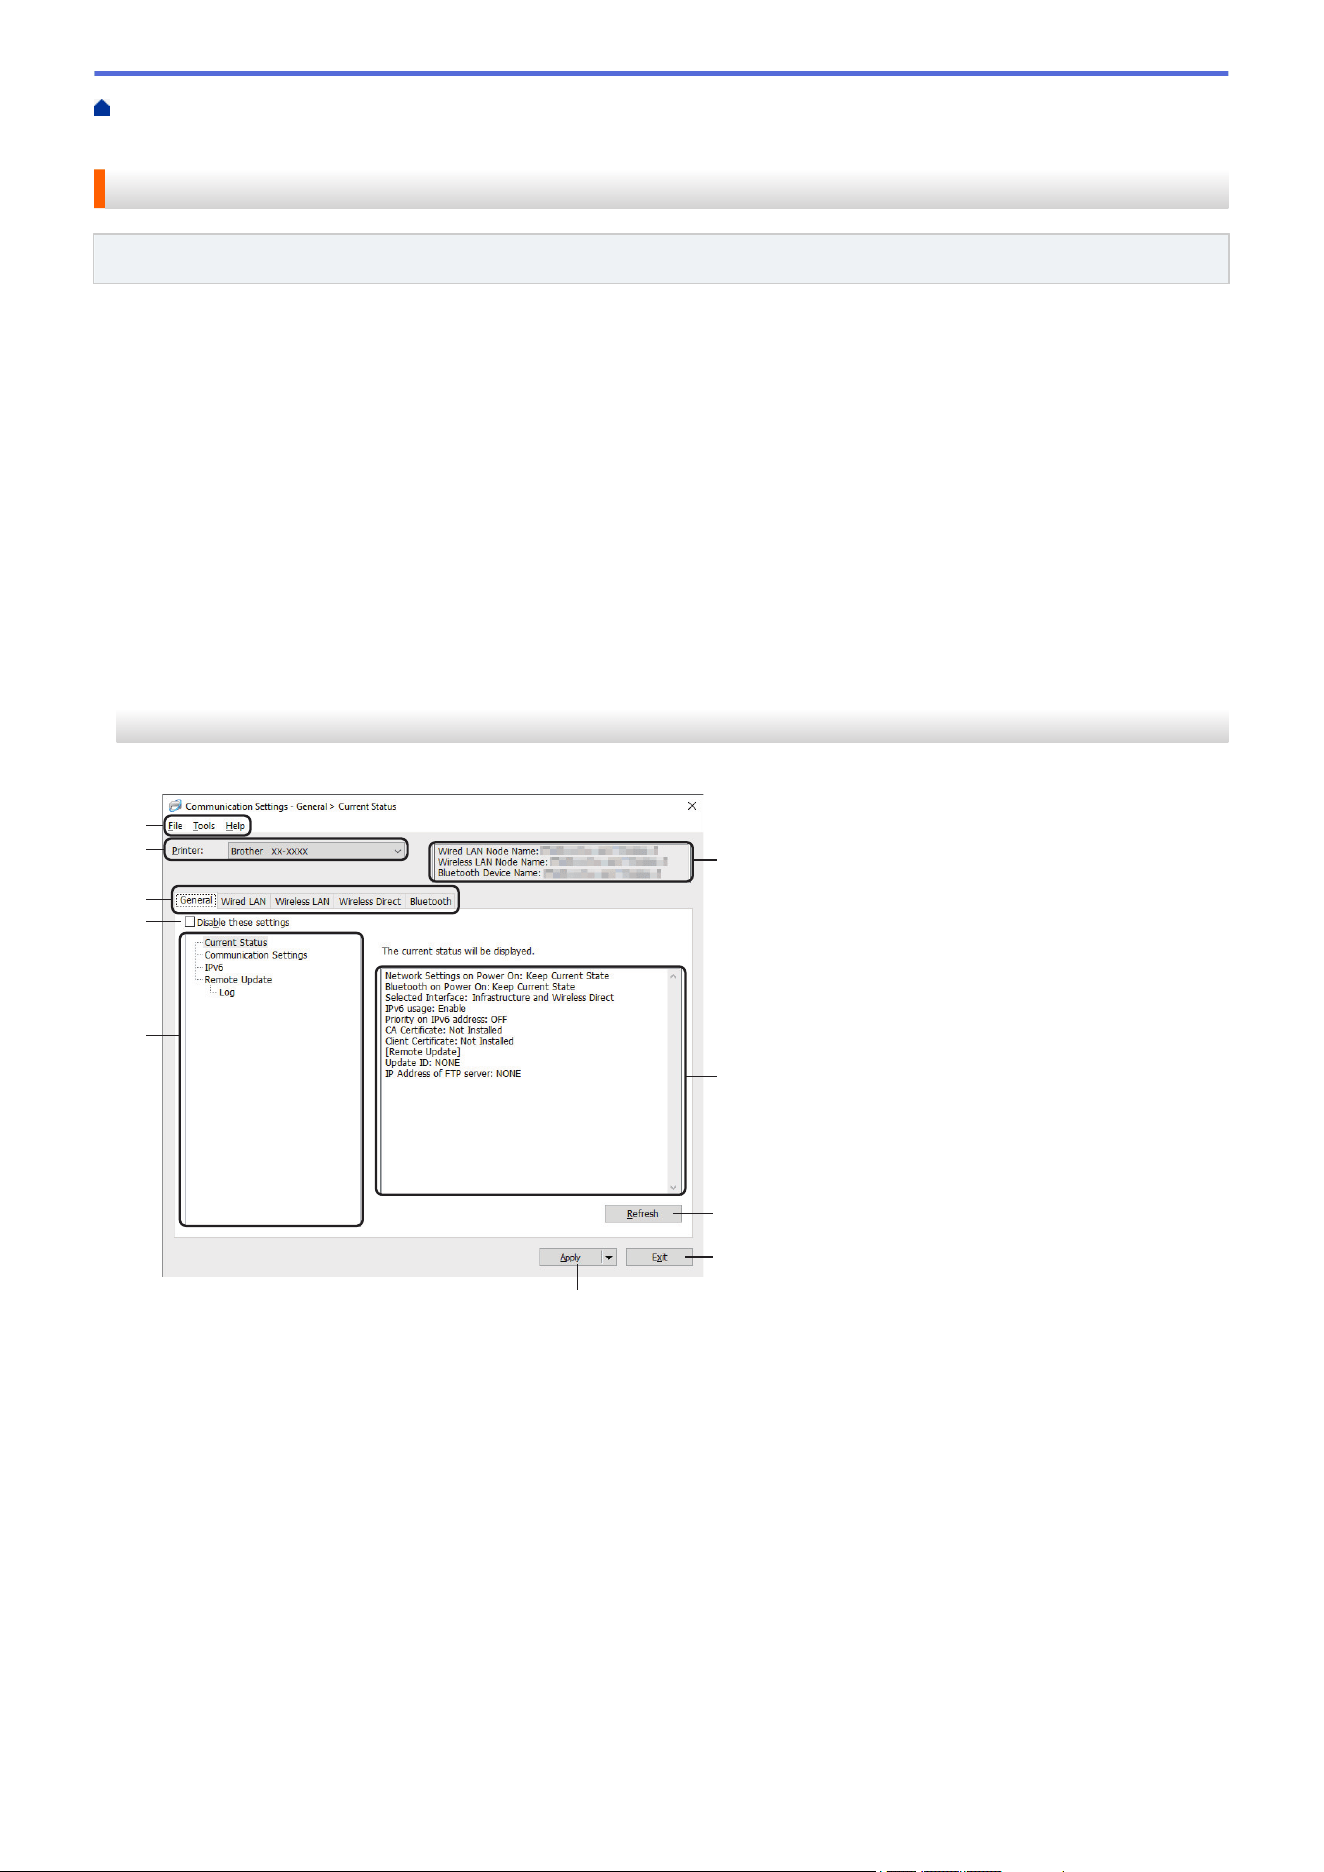
Home > Printer Settings > Change Printer Settings Using the Printer Setting Tool (Windows) > Printer
Setting Tool: Communication Settings (Windows)
Printer Setting Tool: Communication Settings (Windows)
Related Models: TD-2320D/TD-2350D/TD-2320DF/TD-2350DF/TD-2350DSA
TD-2350D/TD-2350DF/TD-2350DSA: Use Communication Settings in the Printer Setting Tool to specify or
change the printer communication method, when connecting the printer and computer with a USB cable or via a
Bluetooth connection.
TD-2320D/TD-2320DF: Use Communication Settings in the Printer Setting Tool to specify or change the printer
communication method, when connecting the printer and computer with a USB cable.
You can change one printer's communication settings for one printer, and then apply these settings to multiple
printers.
>> Settings Dialog Box
>> Menu Bar
>> General Tab
>> Wired LAN/Wireless LAN Tabs (TD-2320D/TD-2350D/TD-2320DF/TD-2350DF/TD-2350DSA)
>> Wireless Direct Tab (TD-2350D/TD-2350DF/TD-2350DSA)
>> Bluetooth Tab (TD-2350D/TD-2350DF/TD-2350DSA)
Settings Dialog Box
1
2
3
4
5
6
7
8
9
10
1. Menu Bar
Provides access to various commands grouped under each menu title (the File, Tools, and Help menus)
according to their functions.
2. Device Name
Displays the device name.
3. Settings Display/Change Area
Displays the current settings for the selected item.
4. Refresh
Click to update the displayed settings with the most recent information.
5. Exit
Click to exit the Communication Settings window and return to the main window of the Printer Setting Tool.
224
Settings are not applied to printers if Exit is clicked without clicking the Apply button after changing the
settings.
6. Apply
Click to apply the settings to the printer. To save the specified settings in a command file, select the Save in
Command File command from the drop-down list. The saved command file can be used with the Mass
Storage Mode to apply the settings to a printer.
Clicking the Apply button applies all settings in all tabs to the printer. If the Disable these settings
checkbox is selected, the settings are not applied.
7. Items
When the Current Status menu is selected, the current settings appear in the settings display/change area.
Select the item for the settings you want to change.
8. Disable these settings
When this checkbox is selected,
appears in the tab, and the settings can no longer be specified or
changed. Settings in a tab where appears are not applied to the printer even if the Apply button is
clicked. In addition, the settings in the tabs are not saved or exported when the Save in Command File or
Export command is used. To apply the settings to the printer, or to save or export them, make sure you clear
the checkbox.
9. Settings Tabs
Contains settings that may be specified or changed. If
appears in the tab, the settings are not applied to
the printer.
10. Printer
Lists the connected printers.
Menu Bar
File Menu Options
Apply Settings to the Printer
Apply the settings to the printer.
Save Settings in Command File
Save the specified settings in a command file. The file extension is BIN. The saved command file can be
used with the Mass Storage Mode to apply the settings to a printer.
• If the Disable these settings checkbox is selected, the settings are not saved.
• The following information is not saved with the command file:
- Node name
- IP address, subnet mask, and default gateway (when the IP address is set to STATIC)
• The saved communication settings commands are intended to be used only for applying settings to a
printer. To apply the settings to the printer using this command file, use the Mass Storage Mode.
• Saved command files contain authentication keys and passwords. Take necessary measures to protect
saved command files, such as saving them in a location that cannot be accessed by other users.
• Do not send command files to a different printer model.
Install Certificates
Some network authentication methods may require a certificate.
Install a certificate on the connected printer or save a certificate as a command file that can be distributed
to the same printer models.
225

Import
Import from the current computer wireless settings (TD-2350D/TD-2350DF/TD-2350DSA)
Imports the settings from the computer.
• When importing the computer's wireless settings, administrator privileges for the computer are required.
• Only personal security authentication settings (open system, public key authentication, WPA/WPA2-
PSK, and WPA3 SAE up to 63 characters) can be imported. Enterprise security authentication (such as
EAP-FAST), WPA2-PSK (TKIP) and WPA-PSK (AES) settings cannot be imported.
• If multiple wireless LANs are enabled for the computer you use, the first detected wireless settings (only
personal settings) are considered for the import data.
• Only the settings from the Wireless LAN tab - Wireless Settings pane can be imported
(communication mode, SSID, authentication method, encryption mode and authentication key).
Select a Profile to import
Imports the exported file and applies the settings to a printer. Click Browse and select the file you want
to import. The settings in the selected file appear in the settings display/change area.
• All settings can be imported, except for node names.
• Only the profiles compatible with the selected printer can be imported.
• If the imported profile’s IP address is set to STATIC, change the IP address of the imported profile, if
needed, so that it does not duplicate the IP address of an existing configured printer on the network.
Export
Save the current settings in a file. If the Disable these settings checkbox is selected, the settings are not
saved.
Exported files are not encrypted.
Tools Menu Options
Option Settings
Automatically restart the printer after applying new settings
If this checkbox is selected, the printer automatically restarts after communication settings are applied. If
this checkbox is cleared, you must restart the printer manually.
When configuring multiple printers, you can reduce the time needed to change the settings by clearing this
checkbox. In this case, we recommend selecting this checkbox when configuring the first printer so that you
can confirm that each setting is working as intended.
Automatically detects the connected printer, and retrieves the current settings
If this checkbox is selected, and the printer is connected to the computer, the printer is automatically
detected and the printer's current settings are displayed in the Current Status pane.
If the connected printer is different from the printer shown in the Printer drop-down list, the settings
available on all tabs change to match the connected printer.
Change Node Name/Bluetooth Device Name
Allows renaming a node name and Bluetooth device name.
Reset to Default Communication Settings
Reset the communication settings to their factory settings.
226

Help Menu Options
Display Help
Displays the Help topics.
General Tab
Communication Settings
Network Settings on Power On
Specify the conditions for connecting via network when the printer is turned on.
Selected Interface (TD-2350D/TD-2350DF/TD-2350DSA)
Select the Infrastructure, Infrastructure and Wireless Direct, or Wireless Direct option.
Bluetooth on Power On (TD-2350D/TD-2350DF/TD-2350DSA)
Specify the conditions for connecting via Bluetooth when the printer is turned on. Select the On by Default,
Off by Default, or Keep Current State option.
Remote Update (TD-2350D/TD-2350DF/TD-2350DSA)
IP Address of FTP server
Type the FTP server address.
Port
Specify the port number used to access the FTP server.
User name
Type a user name that has permission to log in to the FTP server.
Password
Type the password associated with the user name you entered in the User name field.
Path
Type the path to the folder on the FTP server where you want to download the update file from.
Setting file name
Specify the update file name on the FTP server.
Log
Log storage
Select whether to export the update log to the FTP server.
Log storage path of FTP server
Type the path to the folder on the FTP server where you want to export the log data.
AirPrint Settings
Enable or disable AirPrint, and configure the settings.
Wired LAN/Wireless LAN Tabs (TD-2320D/TD-2350D/TD-2320DF/TD-2350DF/
TD-2350DSA)
TCP/IP (Wireless)
Boot Method
Select the AUTO, BOOTP, DHCP, RARP, or STATIC option.
IP Address/Subnet Mask/Gateway
Specify the various networking values. You can enter these settings only when the IP address is set to
STATIC.
227

DNS Server Method
Select the AUTO or STATIC option.
Primary DNS Server IP Address/Secondary DNS Server IP Address
You can enter these settings only when the DNS server is set to STATIC.
IPv6
Static IPv6 Address
Specify a permanent IPv6 address.
Enable this address
Enables the specified static IPv6 address.
Primary DNS Server IPv6 Address/Secondary DNS Server IPv6 Address
Specify the DNS server IPv6 addresses.
IPv6 Address List
Displays the list of IPv6 addresses.
Wired 802.1x Authentication
Configures IEEE 802.1x authentication.
Wired 802.1x Status
Enable or disable IEEE 802.1x authentication for wired network.
Authentication Method
Select the authentication method.
User ID/Password
You can specify settings only when EAP-MD5, EAP-FAST, PEAP, EAP-TTLS, or EAP-TLS is selected as
the authentication method. In addition, with EAP-TLS, it is not necessary to register a password, but a client
certificate must be registered. To register a certificate, connect to the printer from a web browser, and then
select the certificate. Installation of the authentication certificate can also be performed with the Printer
Setting Tool by going to the menu bar: File > Install Certificates.
Display the key and password on-screen
If this checkbox is selected, keys and passwords are displayed in plain (non-encrypted) text.
Wireless Settings (TD-2350D/TD-2350DF/TD-2350DSA)
Communication Mode
Displays communication mode.
SSID(Network Name)
Clicking Search displays the available SSIDs in a separate dialog box.
Channel
Displays the automatically selected channel.
Authentication Method/Encryption Mode
The supported encryption modes for the authentication methods are shown in the table below.
Authentication Method
Encryption Mode
Open System None / WEP
Shared Key WEP
WPA3-SAE AES
WPA/WPA2-PSK/WPA3-SAE TKIP+AES / AES
EAP-FAST/NONE TKIP+AES / AES
228
Authentication Method Encryption Mode
EAP-FAST/MS-CHAPv2 TKIP+AES / AES
EAP-FAST/GTC TKIP+AES / AES
PEAP/MS-CHAPv2 TKIP+AES / AES
PEAP/GTC TKIP+AES / AES
EAP-TTLS/CHAP TKIP+AES / AES
EAP-TTLS/MS-CHAP TKIP+AES / AES
EAP-TTLS/MS-CHAPv2 TKIP+AES / AES
EAP-TTLS/PAP TKIP+AES / AES
EAP-TLS TKIP+AES / AES
To specify higher level security settings: When performing certificate verification with EAP-FAST, PEAP,
EAP-TTLS, or EAP-TLS authentication methods, the certificate cannot be specified from the Printer Setting
Tool. After the printer is configured to connect to the network, specify the certificate by accessing the printer
from a web browser. Installation of the authentication certificate can also be performed with the Printer
Setting Tool by going to the Menu Bar, and clicking File > Install Certificates.
WEP Key
You can specify a setting only when WEP is selected as the encryption mode.
Passphrase
You can specify a setting only when WPA/WPA2-PSK/WPA3-SAE is selected as the authentication method.
User ID/Password
You can specify settings only when EAP-FAST, PEAP, EAP-TTLS, or EAP-TLS is selected as the
authentication method. In addition, with EAP-TLS, it is not necessary to register a password, but a client
certificate must be registered. To register a certificate, connect to the printer from a web browser, and then
specify the certificate.
Display the key and password on-screen
If this checkbox is selected, keys and passwords are displayed in plain (non-encrypted) text.
Wireless Direct Tab (TD-2350D/TD-2350DF/TD-2350DSA)
Wireless Direct Settings
SSID/Network Key Generation
Select the AUTO or STATIC option.
SSID(Network Name)/Network Key
Specify the SSID (25 ASCII characters or fewer) and the network key (63 characters or fewer) you want to
use in the Wireless Direct mode.
• The serial number is located on the base of the printer and inside the printer next to the Roll
compartment.
• The default SSID and password are as follows:
- SSID: "DIRECT-*****_TD-2350D###" where ***** is the last five digits of the product serial number.
- Password: 235***** where ***** is the last five digits of the product serial number.
Channel
Specify the channel to use for the Wireless Direct mode.
229

Bluetooth Tab (TD-2350D/TD-2350DF/TD-2350DSA)
Bluetooth Settings
Bluetooth Mode
Select the control mode when Bluetooth is enabled.
Classic
Visible to Other Devices
Allows the printer to be discovered by other Bluetooth devices.
Change PIN code
Changes the PIN.
Display the PIN code on-screen
Displays the PIN on your computer.
Request Secure Simple Pairing (SSP) settings during pairing
If this checkbox is selected when using Classic Bluetooth mode, it is necessary to perform additional printer
button operations when pairing with devices running Bluetooth 2.1 or later.
Auto re-pairing
Sets whether to automatically reconnect to a previously connected Apple device (iPad, iPhone or iPod
touch).
Low Energy
Minimum Security Mode
Select the minimum security level when using the Low Energy Only mode.
Request Secure Simple Pairing (SSP) settings during pairing
If this checkbox is selected when using the Low Energy Only mode, it is necessary to perform additional
printer button operations when pairing with Low Energy compatible devices.
Related Information
• Change Printer Settings Using the Printer Setting Tool (Windows)
230
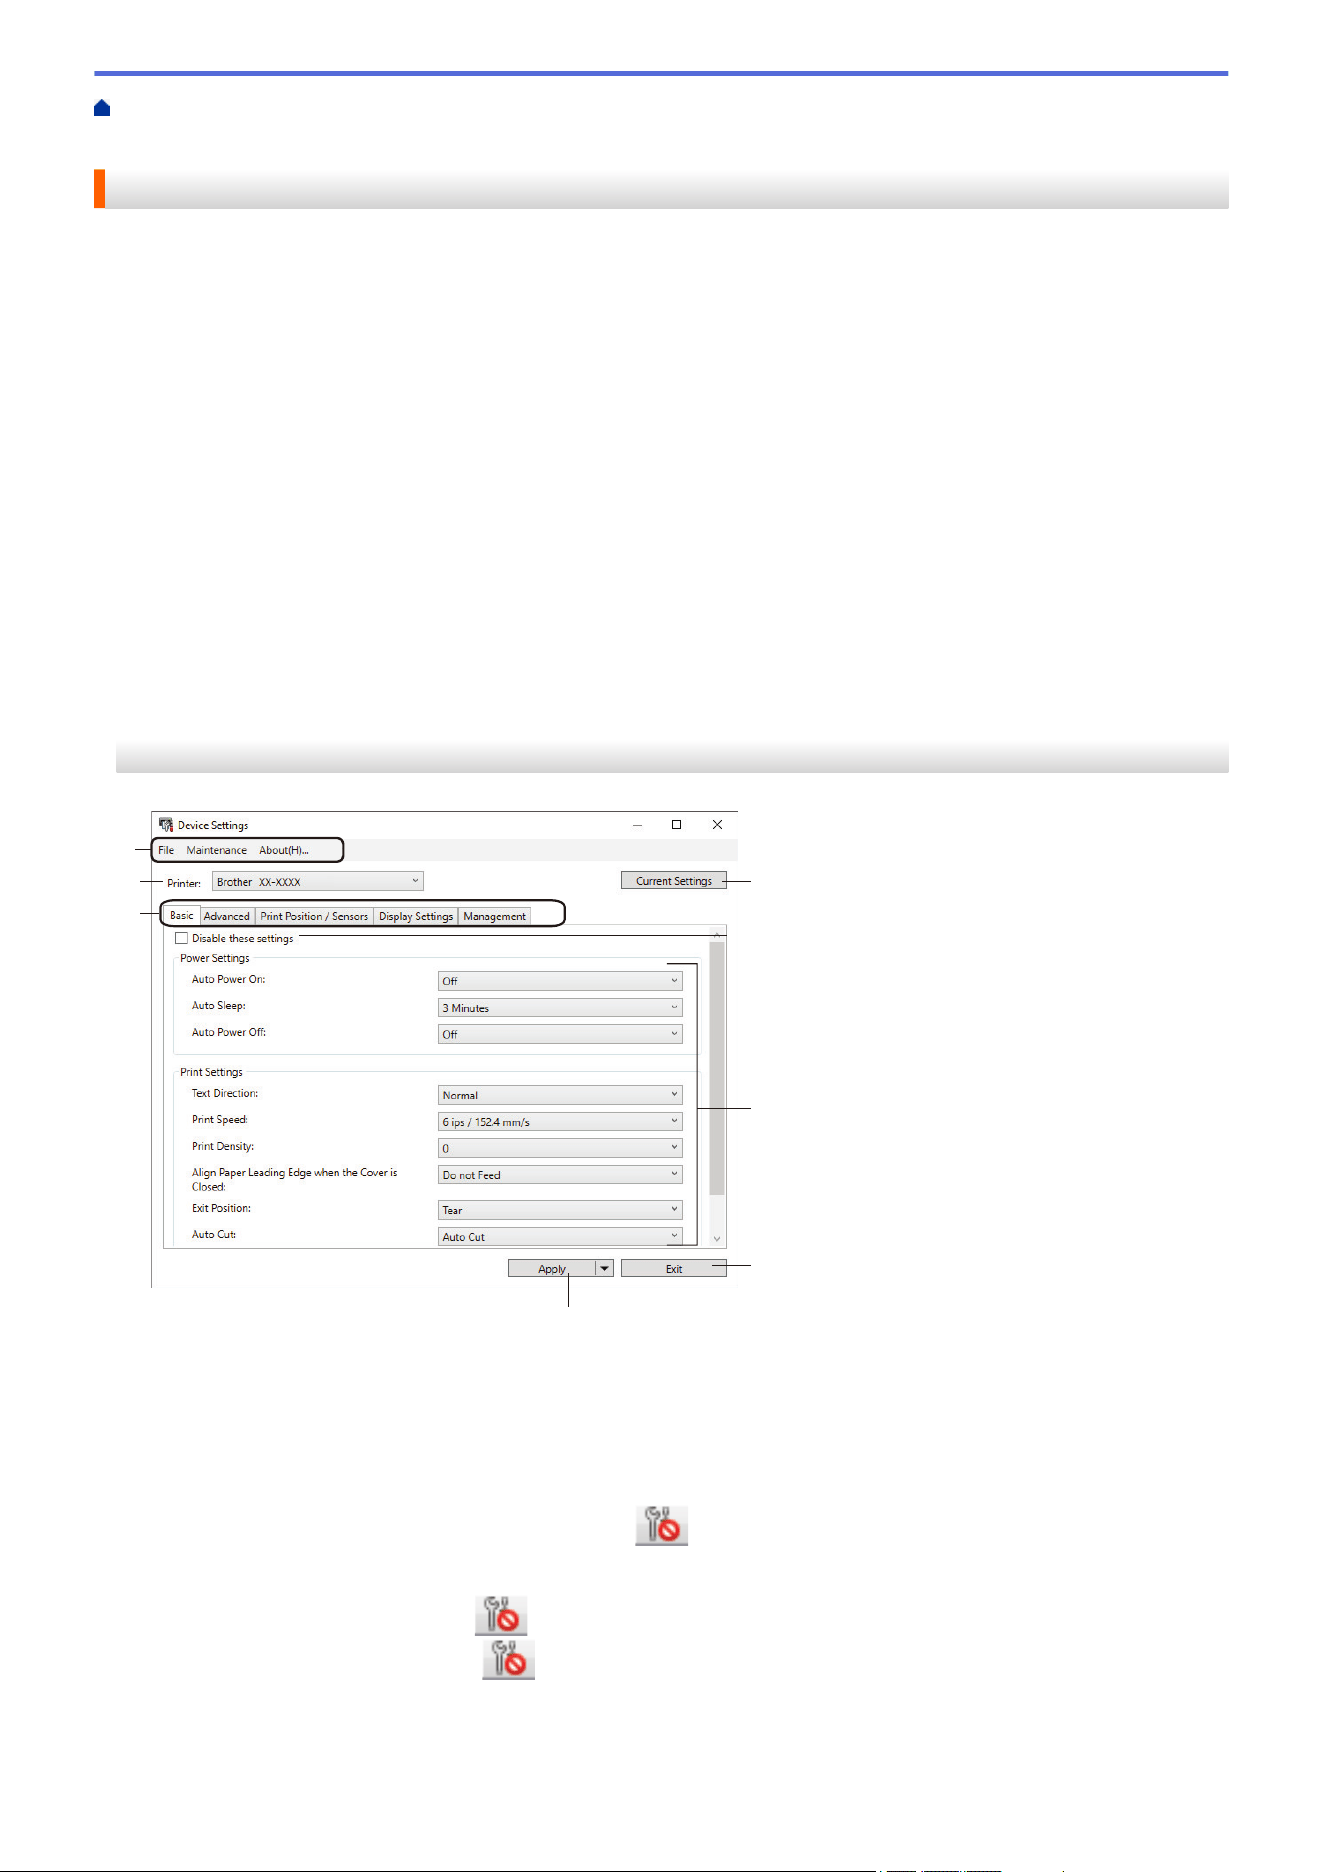
Home > Printer Settings > Change Printer Settings Using the Printer Setting Tool (Windows) > Printer
Setting Tool (Windows): Device Settings
Printer Setting Tool (Windows): Device Settings
TD-2350D/TD-2350DF/TD-2350DSA: Use Device Settings in the Printer Setting Tool to specify or change
printer settings when connecting the printer and computer with a USB cable or via a Bluetooth connection.
TD-2310D/TD-2320D/TD-2320DF: Use Device Settings in the Printer Setting Tool to specify or change printer
settings when connecting the printer and computer with a USB cable.
You can change one printer's device settings for one printer, and then apply these settings to multiple printers.
When printing from a computer application, various printing settings can be specified from the printer driver;
however, using the Device Settings tool in the Printer Setting Tool, more advanced settings can be specified.
When you open the Device Settings window, the printer's current settings are retrieved and displayed. If the
current settings cannot be retrieved, the previous settings are displayed. If the current settings cannot be
retrieved and previous settings were not specified, the machine's factory settings appear.
>> Settings Dialog Box
>> Menu Bar
>> Basic Tab
>> Advanced Tab
>> Print Position / Sensors Tab
>> Display Settings Tab (TD-2320D/TD-2350D/TD-2320DF/TD-2350DF/TD-2350DSA)
>> Management Tab
Settings Dialog Box
1
2
3
4
5
6
7
8
1. Menu Bar
Provides access to various commands grouped under each menu title (the File, Maintenance, and About
menus) according to their functions.
2. Current Settings
Retrieves the settings from the currently connected printer and displays them in the dialog box. Settings can
also be retrieved for the parameters on tabs with
.
3. Disable these settings
When this checkbox is selected,
appears on the tab, and the settings can no longer be specified or
changed. Settings in a tab where appears are not applied to the printer even if Apply is clicked. In
addition, the settings in the tab are not saved or exported when you use the Save in Command File or
Export command.
231
4. Parameters
Displays the current settings.
5. Exit
Exits the Device Settings window and returns to the main window of the Printer Setting Tool.
6. Apply
Applies the settings to the printer. To save the specified settings in a command file, select the Save in
Command File command from the drop-down list.
The saved command file can be used with the Mass Storage Mode to apply the settings to a printer.
7. Settings Tabs
Contains settings that may be specified or changed.
If appears in the tab, the settings cannot be changed. In addition, the settings in the tab are not
applied to the printer even if you click Apply. The settings in the tab are not saved or exported when you
use the Save in Command File or Export commands.
8. Printer
Specifies the printer you want to configure.
Menu Bar
File Menu Options
• Apply Settings to the Printer
Applies the settings to the printer.
• Check Setting
Displays the current settings.
• Save Settings in Command File
Saves the specified settings in a command file.
• Import
Imports an exported file.
• Export
Saves the current settings in a file.
• Exit
Exits the Device Settings window and returns to the main window of the Printer Setting Tool.
Maintenance Menu Options
You must have administrator privileges for the computer or the printer to display some items. Check if you
have administrator privileges for the printer by clicking the Printer properties menu, and then clicking the
Security tab.
• Save Print Log in File
Saves the print log in a file in the CSV format.
• Print Unit Settings
Prints a report containing the current firmware version and device setting information.
When you print this report, we recommend using a 2.4" (58 mm) or wider media.
• Check Printer Information
Checks the status of the printer.
• Switch to Dump Mode
Transfers to the Dump Mode to print and confirm received print data without interpretation of the print
command.
232

• Check Print Head Status
Checks if there are no problems with the Print Head.
• Reset to Factory Defaults
TD-2310D: Resets all the settings to the factory settings, including device settings, and transferred data.
TD-2320D/TD-2350D/TD-2320DF/TD-2350DF/TD-2350DSA: Resets all the settings to the factory settings,
including device settings, transferred data, and network settings.
• Reset only Device Settings
Resets the settings that can be changed in the Device Settings to the factory settings.
• Delete Template and Database
Deletes the templates and databases stored in the printer.
• Delete Print Log
Deletes the print log stored in the printer.
• Option Settings
If the Do not display an error message if the current settings cannot be retrieved at startup checkbox is
selected, a message is not displayed the next time.
Basic Tab
• Auto Power On
Specifies whether the printer turns on automatically when the AC Power Cord is plugged into an AC power
outlet.
• Auto Sleep
Specifies the amount of time to pass before the printer automatically goes into sleep mode.
- The printer will automatically enter sleep mode when the specified time elapses under the following
conditions:
• The printer does not receive data.
• A LAN cable is not connected. (TD-2320D/TD-2350D/TD-2320DF/TD-2350DF/TD-2350DSA)
• In idle mode. (TD-2310D/TD-2320D/TD-2320DF)
• In idle mode or template selection mode. (TD-2350D/TD-2350DF/TD-2350DSA)
• When no device is connected to the USB port. (TD-2320D/TD-2350D/TD-2320DF/TD-2350DF/
TD-2350DSA)
• When not communicating using the serial port.
- Sleep mode is cancelled when the following operations are performed:
• A printer button is pressed.
• The Roll Compartment Cover is opened or closed.
• The printer receives data. Except when receiving data via a serial port.
• The printer receives data.
• The USB cable is disconnected and then reconnected.
• Auto Power Off
233
- The printer will automatically enter power off mode when the specified time elapses under the following
conditions:
• The printer does not receive data.
• A LAN cable is not connected. (TD-2320D/TD-2350D/TD-2320DF/TD-2350DF/TD-2350DSA)
• In idle mode. (TD-2310D/TD-2320D/TD-2320DF)
• In idle mode or template selection mode. (TD-2350D/TD-2350DF/TD-2350DSA)
• When no device is connected to the USB port. (TD-2320D/TD-2350D/TD-2320DF/TD-2350DF/
TD-2350DSA)
• When not communicating using the serial port.
- Power off mode is cancelled when the following operations are performed:
• A printer button is pressed.
• The Roll Compartment Cover is opened or closed.
• The printer receives data. Except when receiving data via a serial port.
• The printer receives data.
• The USB cable is disconnected and then reconnected.
• Battery Charge Level (TD-2320D/TD-2350D/TD-2320DF/TD-2350DF/TD-2350DSA)
Specifies the maximum charge level.
To get the longest life from the rechargeable Li-ion battery, select 80 %. Although the number of print jobs
that can be printed on a single charge will be less when you select 80 %, you can get a longer overall
rechargeable Li-ion battery life.
• Text Direction
Selects the printing orientation.
• Print Speed
Selects the printer’s printing speed.
- If you increase the print speed, the print result may become lighter.
- If the barcode on the printed label is difficult to read, select a slower printing speed.
• Print Density
Adjusts the printer’s printing density.
Changing the Energy Rank setting in the Paper Size Setup can further increase the print density. For more
information, see Related Topics: Printer Setting Tool (Windows): Paper Size Setup.
• Align Paper Leading Edge when the Cover is Closed
Selects whether the paper is automatically fed when the cover is closed.
• Exit Position (TD-2310D/TD-2320D/TD-2350D/TD-2350DSA)
Selects the media output location.
• Auto Cut (TD-2320D/TD-2350D/TD-2350DSA)
Sets the cutting method when printing multiple labels.
Advanced Tab
• Feed Key Function
Selects the operation performed when is pressed. If Program Settings is selected, click File and select
the command file.
• Function Key Function (TD-2310D/TD-2320D/TD-2320DF)
Selects the operation performed when
is pressed. If Program Settings is selected, click File and select
the command file.
If the Cutter is attached, manual cutting can be set using the Function Key.
234

• Print Information Report
Selects the information you want to include in the printer Information Report.
• Beeper (TD-2350DSA)
Selects the beeper volume.
• JPEG Printing Setting
Selects the method of image processing when printing JPEG images.
• Serialize Mode
Specifies the serialize (number) method for your printed labels.
• Save Printer Print Log
Selects whether to save the printer’s print log. If Disable is selected, the Save Print Log in File option
cannot be enabled.
• Print Data after Printing
Specifies whether print data is erased after printing.
Print Position / Sensors Tab
When you use standard media, it is unnecessary to adjust the sensors.
• Printing Reference Point Adjustment
Adjusts the position of the reference point (point of origin for printing). This corrects printing misalignments
resulting from differences in printer models or from the fixed margins of some software.
The reference point cannot be adjusted for raster printing.
• Tear Adjust (TD-2310D/TD-2320D/TD-2350D/TD-2350DSA)
- Adjusts the Tear Bar tear-off position for paper media.
NOTE
Depending on the media type, the cut position and margins may not match your settings. If this
occurs, adjust the Tear Adjust setting, and then try to print again.
- When the Use Peeler Function or Auto Cutter Function is enabled and the peeled labels are jammed or
are not ejected correctly after printing, adjust the Tear Adjust setting, and then try to print again.
• Media Sensor (Transmissive/Gap)
- Detection Sensitivity
Adjusts the sensitivity of gap (spacing) detection for die-cut labels.
- Luminescence Adjustment
Adjusts the amount of light emitted by the transmissive/gap sensor.
• Media Sensor (Reflective/Bar)
- Mark Detection Sensitivity
Adjusts the sensitivity of black mark detection.
- Luminescence Adjustment
Adjusts the amount of light emitted by the reflective/black mark sensor.
• Media Sensor (Peeler/Linerless cutter) (TD-2320D/TD-2350D/TD-2320DF/TD-2350DF/TD-2350DSA)
Specifies the settings when the Label Peeler (optional) is used.
Detection Sensitivity
Adjusts the precision of the sensor that detects whether the label has been peeled.
Display Settings Tab (TD-2320D/TD-2350D/TD-2320DF/TD-2350DF/TD-2350DSA)
• Clock
Sets the clock function.
235

• Synchronize with SNTP server
Synchronizes time with the SNTP server.
• Time Zone
Sets the time zone.
• Set Clock
Sets the date and time.
• LCD Contrast (TD-2350D/TD-2350DF)
Sets the contrast of the LCD.
• Backlight (TD-2350D/TD-2350DF)
Sets the backlight on or off.
• Backlight Timeout (TD-2350D/TD-2350DF)
Sets the period of time before the backlight turns off if the printer is not used.
• Display Brightness (TD-2350DSA)
Sets the display brightness.
• Home Screen Settings (TD-2350D/TD-2350DF/TD-2350DSA)
Specifies whether the printer operates in P-touch Template Mode.
P-touch Template Mode allows you to enter only text and print labels using a previously configured template.
• Template Touchscreen Settings (TD-2350DSA)
Sets the display format for the template touch mode screen.
• Search Type (TD-2350DSA)
Sets the search method when searching for a specific template from the template list.
• Show Preset Templates (TD-2350D/TD-2350DF/TD-2350DSA)
Sets whether or not to display the preset templates on the printer.
• Confirm Print (TD-2350D/TD-2350DF/TD-2350DSA)
Specifies whether a message appears before printing so that the number of copies can be confirmed.
• Default Print (TD-2350D/TD-2350DF/TD-2350DSA)
Specifies the default value for the print quantity.
• QR Code Data (TD-2350D/TD-2350DF/TD-2350DSA)
Creates custom QR code data based on the required text or web page and displays it on the printer's LCD.
The displayed QR code can be read using a mobile device to retrieve information.
Management Tab
To display this tab, you must have administrator privileges for the computer or the printer. Check if you have
administrator privileges for the printer by clicking the Printer properties menu, and then clicking the
Security tab.
• Unit (TD-2350D/TD-2350DF/TD-2350DSA)
Specifies the default unit.
• Language (TD-2350D/TD-2350DF/TD-2350DSA)
Specifies the language displayed on the LCD.
• Airplane Mode (TD-2350D/TD-2350DF/TD-2350DSA)
Allows disabling the Bluetooth or Wi-Fi interfaces. This function is useful when you use the printer in a place
where signal transmissions are not allowed.
• Lock Settings (TD-2350D/TD-2350DF/TD-2350DSA)
Locks the menu settings so that they cannot be changed.
• Admin Password (TD-2350D/TD-2350DF/TD-2350DSA)
Select On to configure administrator mode. Set a four-digit password that must be used change the menu
settings.
236

• Disable Edit (TD-2350D/TD-2350DF/TD-2350DSA)
Selects whether object editing is prohibited or not.
• Command Mode
Selects the command mode type.
• Date Format (TD-2350D/TD-2350DF/TD-2350DSA)
Selects the date format for the clock.
• Time Format (TD-2350D/TD-2350DF/TD-2350DSA)
Selects the time format for the clock.
• Print Head Check When Powered On
Sets whether to check the status of the Print Head when you turn on the printer.
Related Information
• Change Printer Settings Using the Printer Setting Tool (Windows)
237
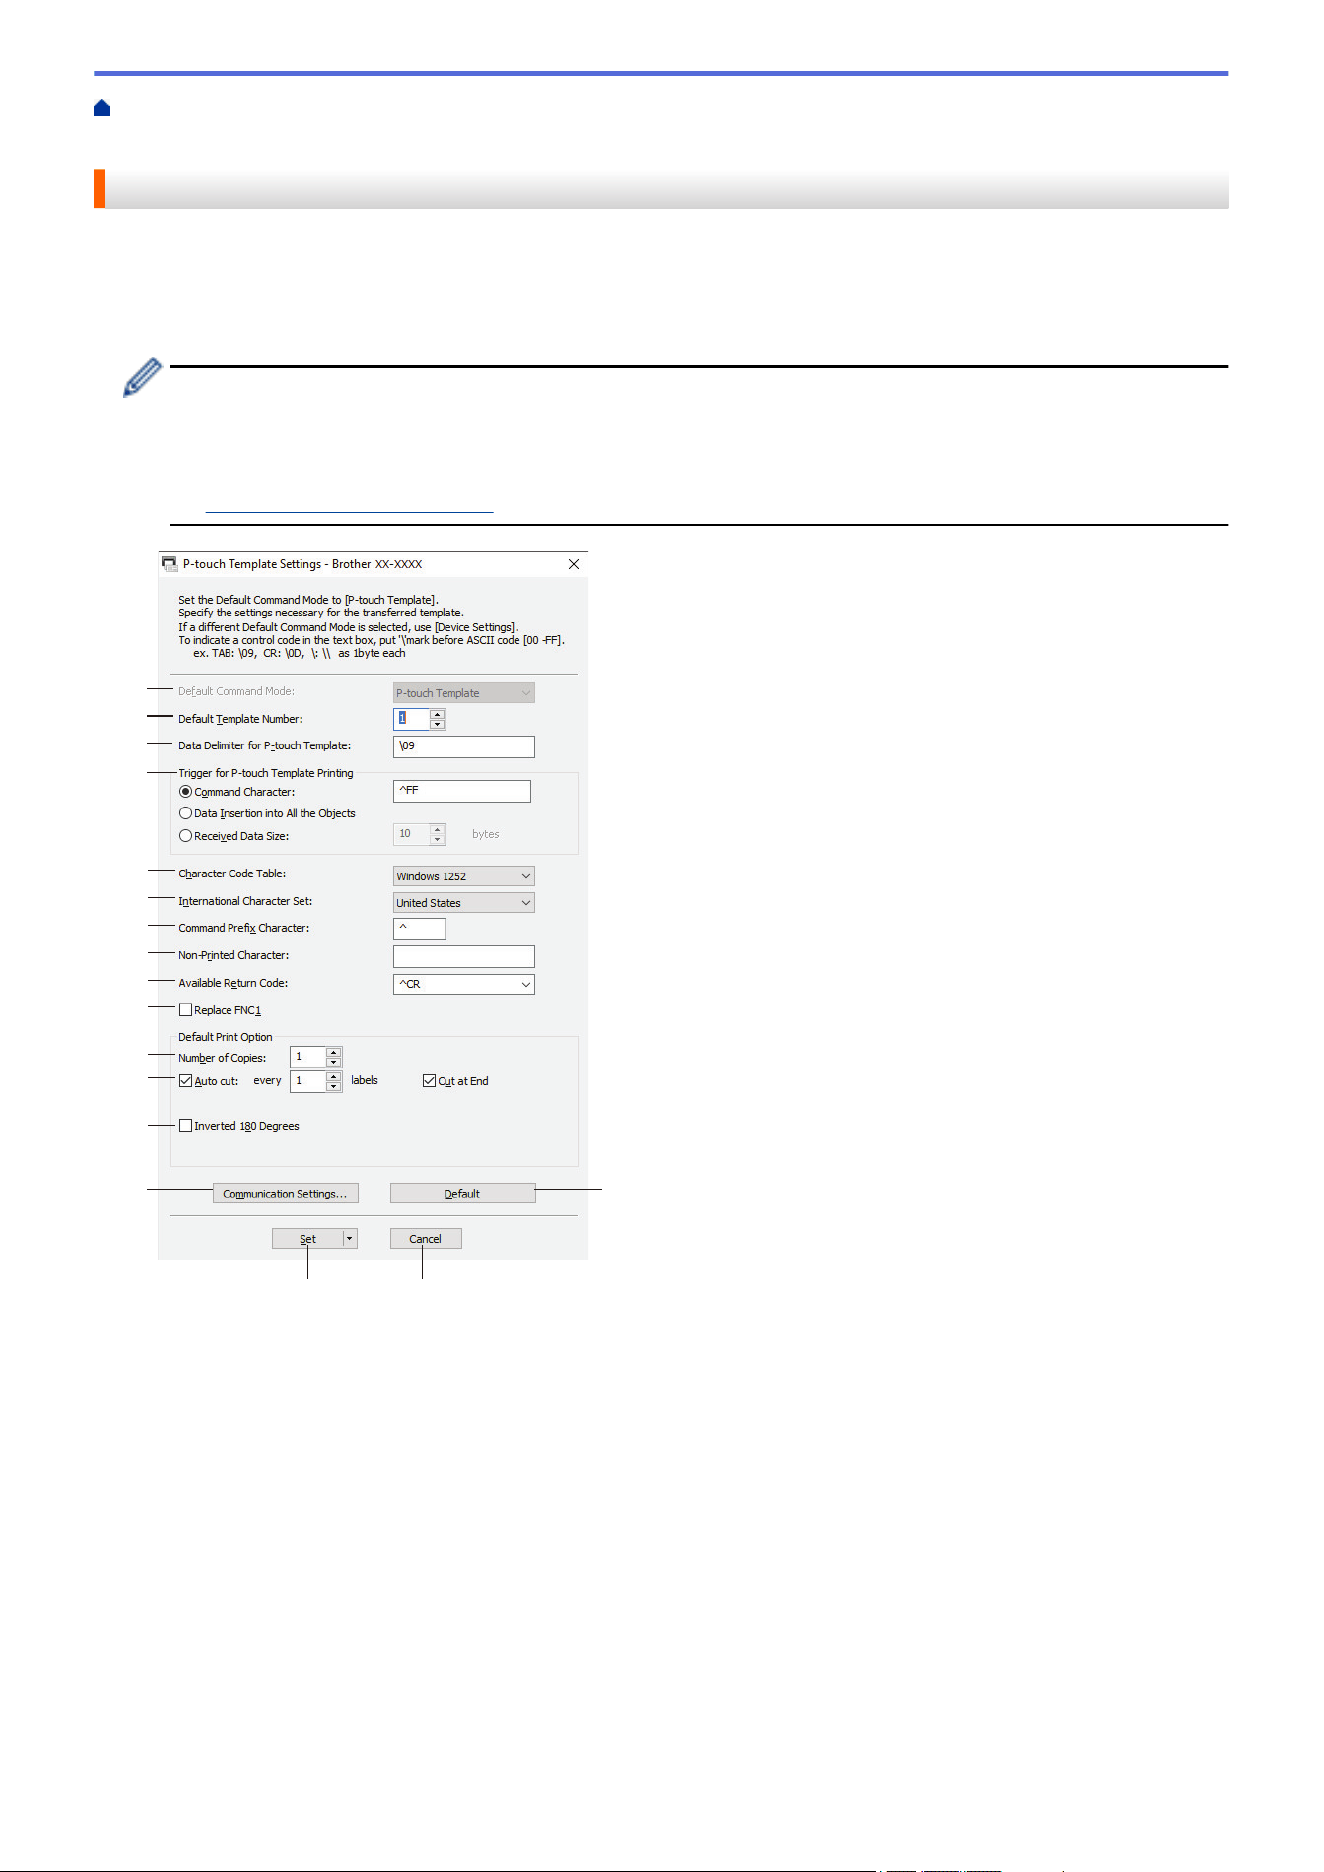
Home > Printer Settings > Change Printer Settings Using the Printer Setting Tool (Windows) > Printer
Setting Tool (Windows): P-touch Template Settings
Printer Setting Tool (Windows): P-touch Template Settings
P-touch Template mode allows you to insert data into text and barcode objects from a downloaded template
using other devices connected to the printer. The available options and supplies may vary depending on your
country. Use P-touch Template Settings in the Printer Setting Tool to specify or change P-touch Template
functions.
• P-touch Template mode is also compatible with other input devices like a scale, testing machine,
controller, or a programmable logic device.
• For more information on P-touch Template Settings, see the P-touch Template Manual/Command
Reference (English only). You can download the latest version from the Brother support website at
support.brother.com/manuals.
1
2
3
5
16
14
4
6
7
8
9
11
12
15
10
17
13
1. Default Command Mode
Specifies the P-touch Template mode as the default mode. To change the mode, select the mode by
accessing the Management tab on the Device Settings window.
2. Default Template Number
Specifies a default template number that the printer sets when it is turned on. If you do not want to transfer a
template to the printer, do not specify a template number.
3. Data Delimiter for P-touch Template
Displays a symbol used to indicate the boundaries between groups of data in a file (maximum of 20
characters).
4. Trigger for P-touch Template Printing
Specifies a trigger to begin printing from a number of options.
• Command Character: Printing starts when the command character specified here is received.
• Data Insertion into All the Objects: Printing starts when the delimiter for the last object is received.
238

• Received Data Size: Printing starts when the number of characters specified here is received. However,
delimiters are not counted in the number of characters.
5. Character Code Table
Selects one of the character code sets.
6. International Character Set
Lists character sets for specific countries. The following codes vary depending on the selected country:
23h 24h 40h 5Bh 5Ch 5Dh 5Eh 60h 7Bh 7Ch 7Dh 7Eh
To change the characters, see the P-touch Template Manual/Command Reference (English only). You can
download the latest version from the Brother support website at
support.brother.com/manuals.
7. Command Prefix Character
Specifies the prefix character code identifying commands used in P-touch Template mode.
8. Non-Printed Character
Characters specified here are not printed when data is received (maximum of 20 characters).
9. Available Return Code
The line feed code is used when feeding data to indicate that the following data should be moved to the next
line in a text object. Select one of four line feed codes or type the line feed code you want (maximum of 20
characters).
10. Replace FNC1
Replaces GS codes with FNC1.
11. Number of Copies
Sets the number of copies (maximum of 99 copies).
12. Auto Cut
Specifies if the printer should cut the labels and how many labels to print before cutting (maximum of 99
labels).
13. Inverted 180 Degrees
If this checkbox is selected, the data will be printed after it has been rotated 180 degrees.
14. Communication Settings
Sets the parameters for serial communication.
For more information on the parameter setting, see Related Topics: Connect the Printer to a Computer Using
RS-232C.
15. Default
Returns all setting values in the P-touch Template Settings dialog box to the default values.
16. Cancel
Cancels the settings and closes the dialog box. The settings remain unchanged.
17. Set
Applies the settings to the printer. To save the specified settings to a command file to reuse in the future,
select the Save in Command File command from the drop-down list.
The saved command file can be used with the mass storage mode to apply the settings to a printer.
Related Information
• Change Printer Settings Using the Printer Setting Tool (Windows)
Related Topics:
• Print Using a USB Interface (Mass Storage Mode)
• Connect the Printer to a Computer Using RS-232C
239
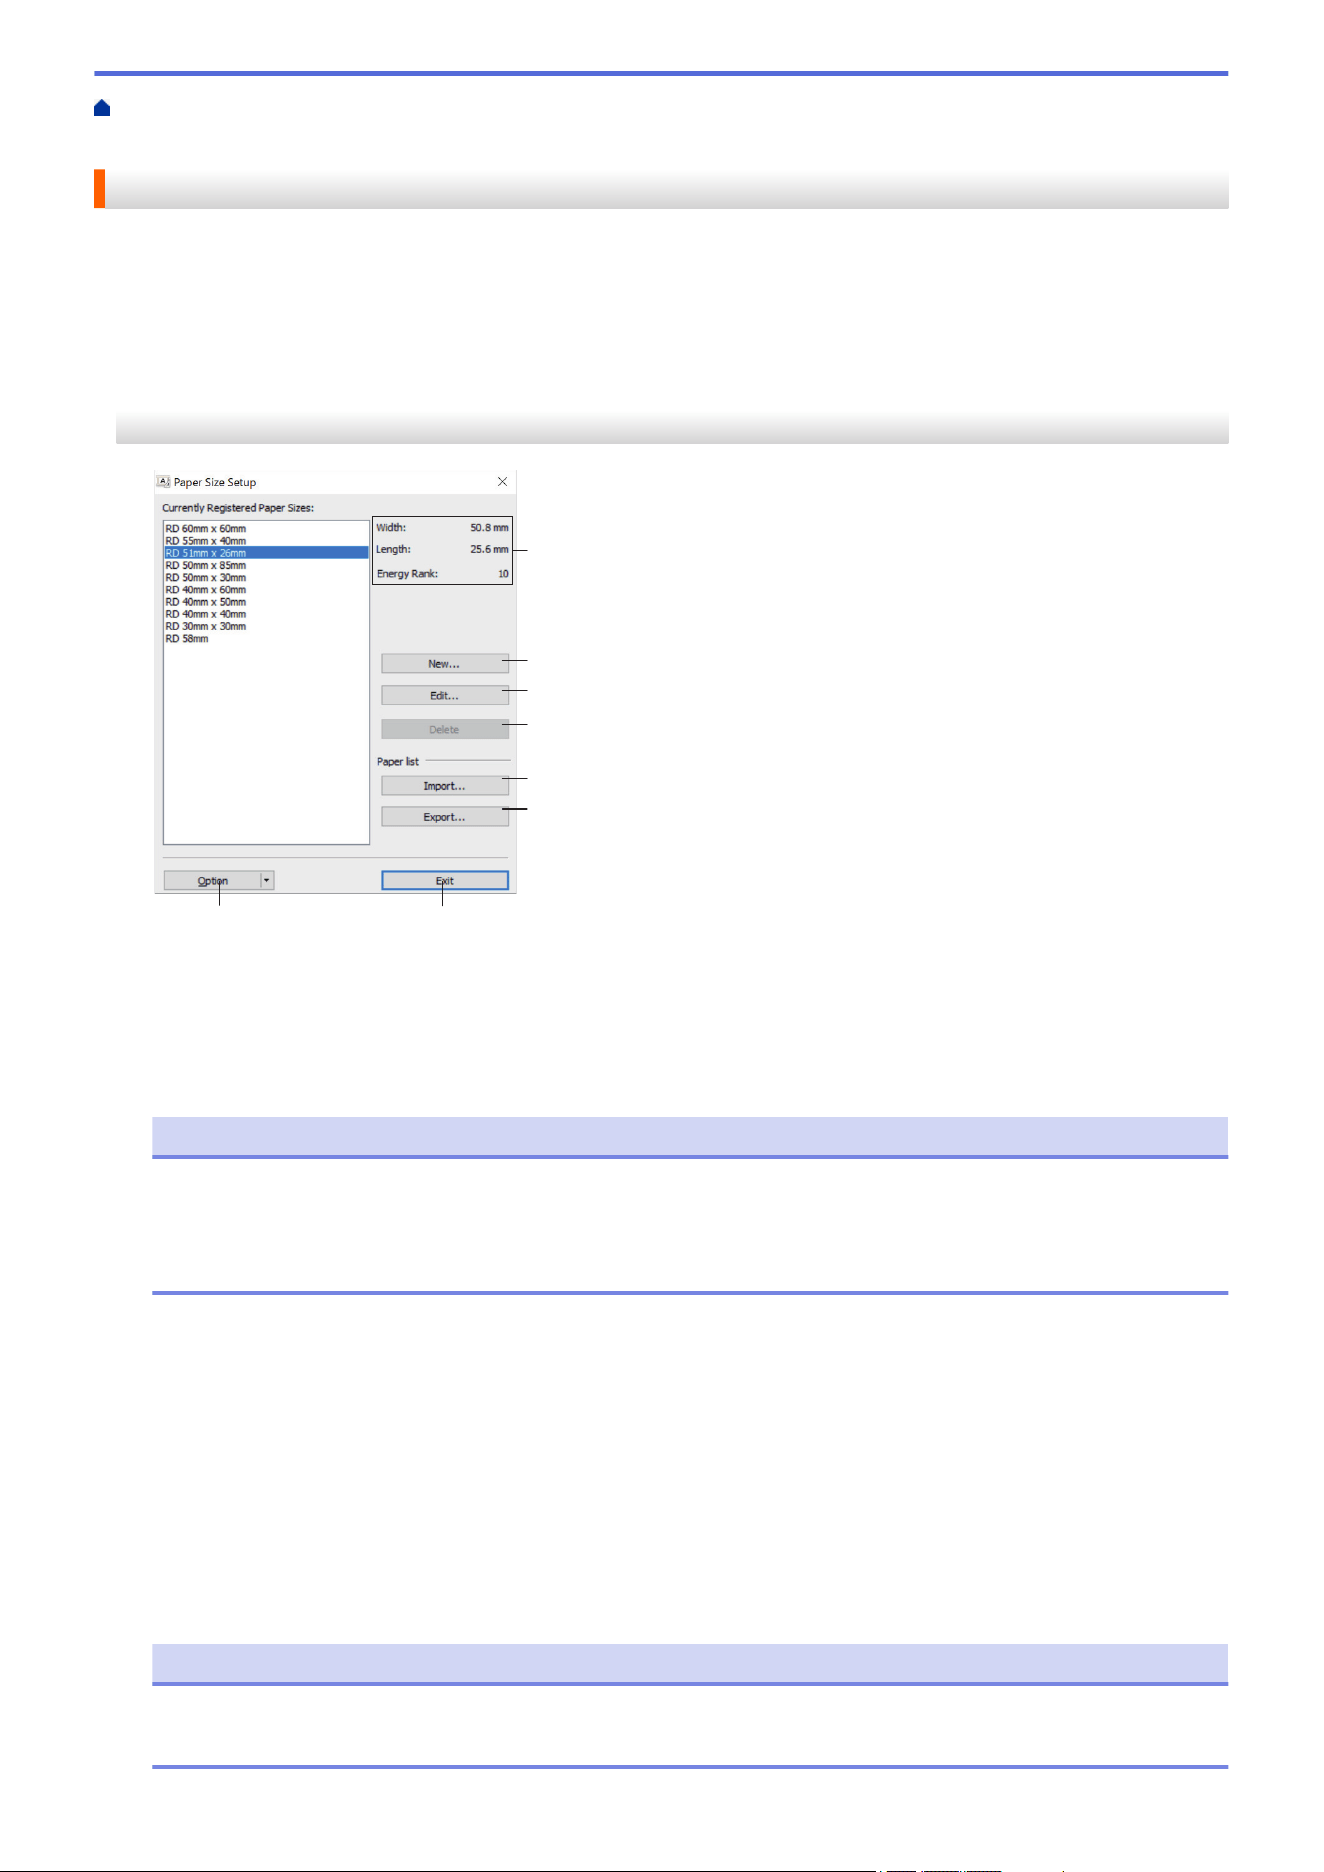
Home > Printer Settings > Change Printer Settings Using the Printer Setting Tool (Windows) > Printer
Setting Tool (Windows): Paper Size Setup
Printer Setting Tool (Windows): Paper Size Setup
Use the Paper Size Setup in the Printer Setting Tool to add paper sizes not available in the Paper Size list of the
printer driver.
Before you print using a paper size other than the available ones, you must register the new paper size by
sending it to the printer.
Printing with a paper size not registered with the printer may produce incorrect print results.
Paper Size Setup Dialog Box
3
2
4
5
6
78
1
1. Current settings
Displays the current settings for the selected paper format.
2. New
Click this button to display the New dialog box and register a new paper size.
NOTE
Do not register a paper size already registered, to avoid incorrect print results. To use paper of the same
size as one that is currently registered, select the size you want from the Currently Registered Paper
Sizes list in the Paper Size Setup dialog box, and then change and overwrite the settings from the Edit
dialog box.
3. Edit
Edits the settings for the selected paper format.
To save the selected paper format with the new settings, click Overwrite. To add a paper format with the new
settings, change the name in the Paper Size Name box, and then click Add.
4. Delete
Deletes the selected paper format. A deleted paper format cannot be restored.
5. Import
Reads the text file containing the paper format settings and uses it to replace the contents of the Currently
Registered Paper Sizes list.
NOTE
When the list is imported, the entire contents of the Currently Registered Paper Sizes list will be
replaced with the imported paper formats.
240
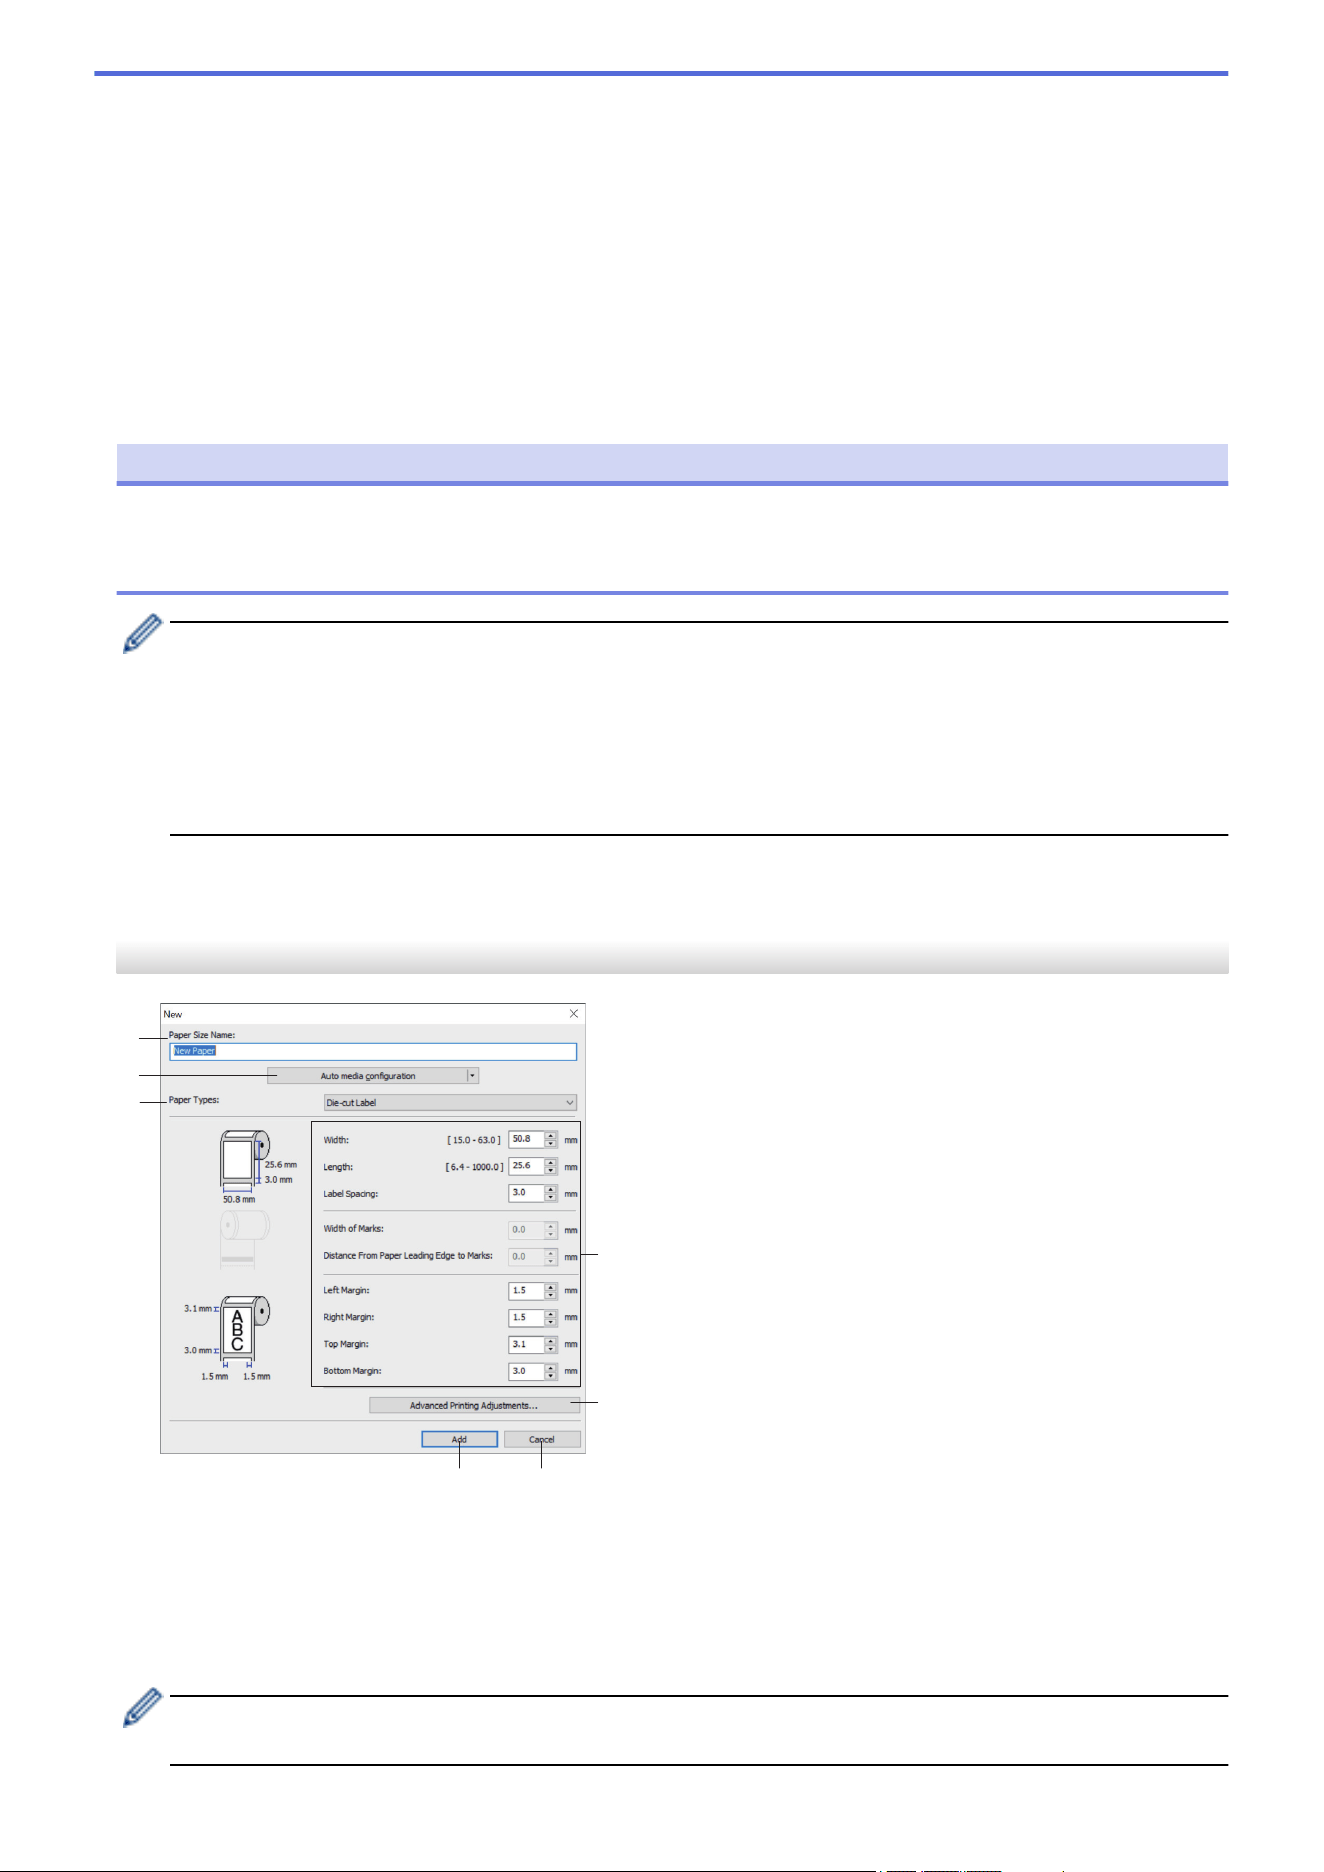
6. Export
Exports the paper formats in the Currently Registered Paper Sizes list to a file. The exported formats can
then be distributed to other computers.
7. Exit
Exits the Paper Size Setup window and returns to the main window of the Printer Setting Tool.
8. Option
Click b, and then select an operation.
Click Register Paper Size With Printer to register the settings for the selected paper format in the printer.
Click Save in Command File to export the paper settings as a command file (The file extension is BIN).
NOTE
When the paper format is registered with the printer and Exit is clicked, the Paper Size Setup dialog box
appears with the added paper size in the Currently Registered Paper Sizes list. If the software is running,
exit the software, and then restart it for the new paper format to appear in the list.
• If the following functions are being used, you can quickly apply their settings to the printer:
- Mass storage feature
- Bluetooth (Object Push Profile (OPP)) (TD-2350D/TD-2350DF/TD-2350DSA)
- Wi-Fi (File Transfer Protocol (FTP)) (TD-2350D/TD-2350DF/TD-2350DSA)
• These commands are only intended to be used to apply settings to a printer. These commands cannot
be imported into the Paper Size Setup.
>> New Dialog Box
>> Advanced Printing Adjustments Dialog Box
New Dialog Box
4
2
5
67
1
3
1. Paper Size Name
Type in the name of the paper format to be added.
2. Auto media configuration
Retrieves and displays the information of the paper set in the printer. For more information, see Related
Information.
Place the printer in idle when using this option. The printer may malfunction if you try to configure it while it
is processing or printing a print job.
241
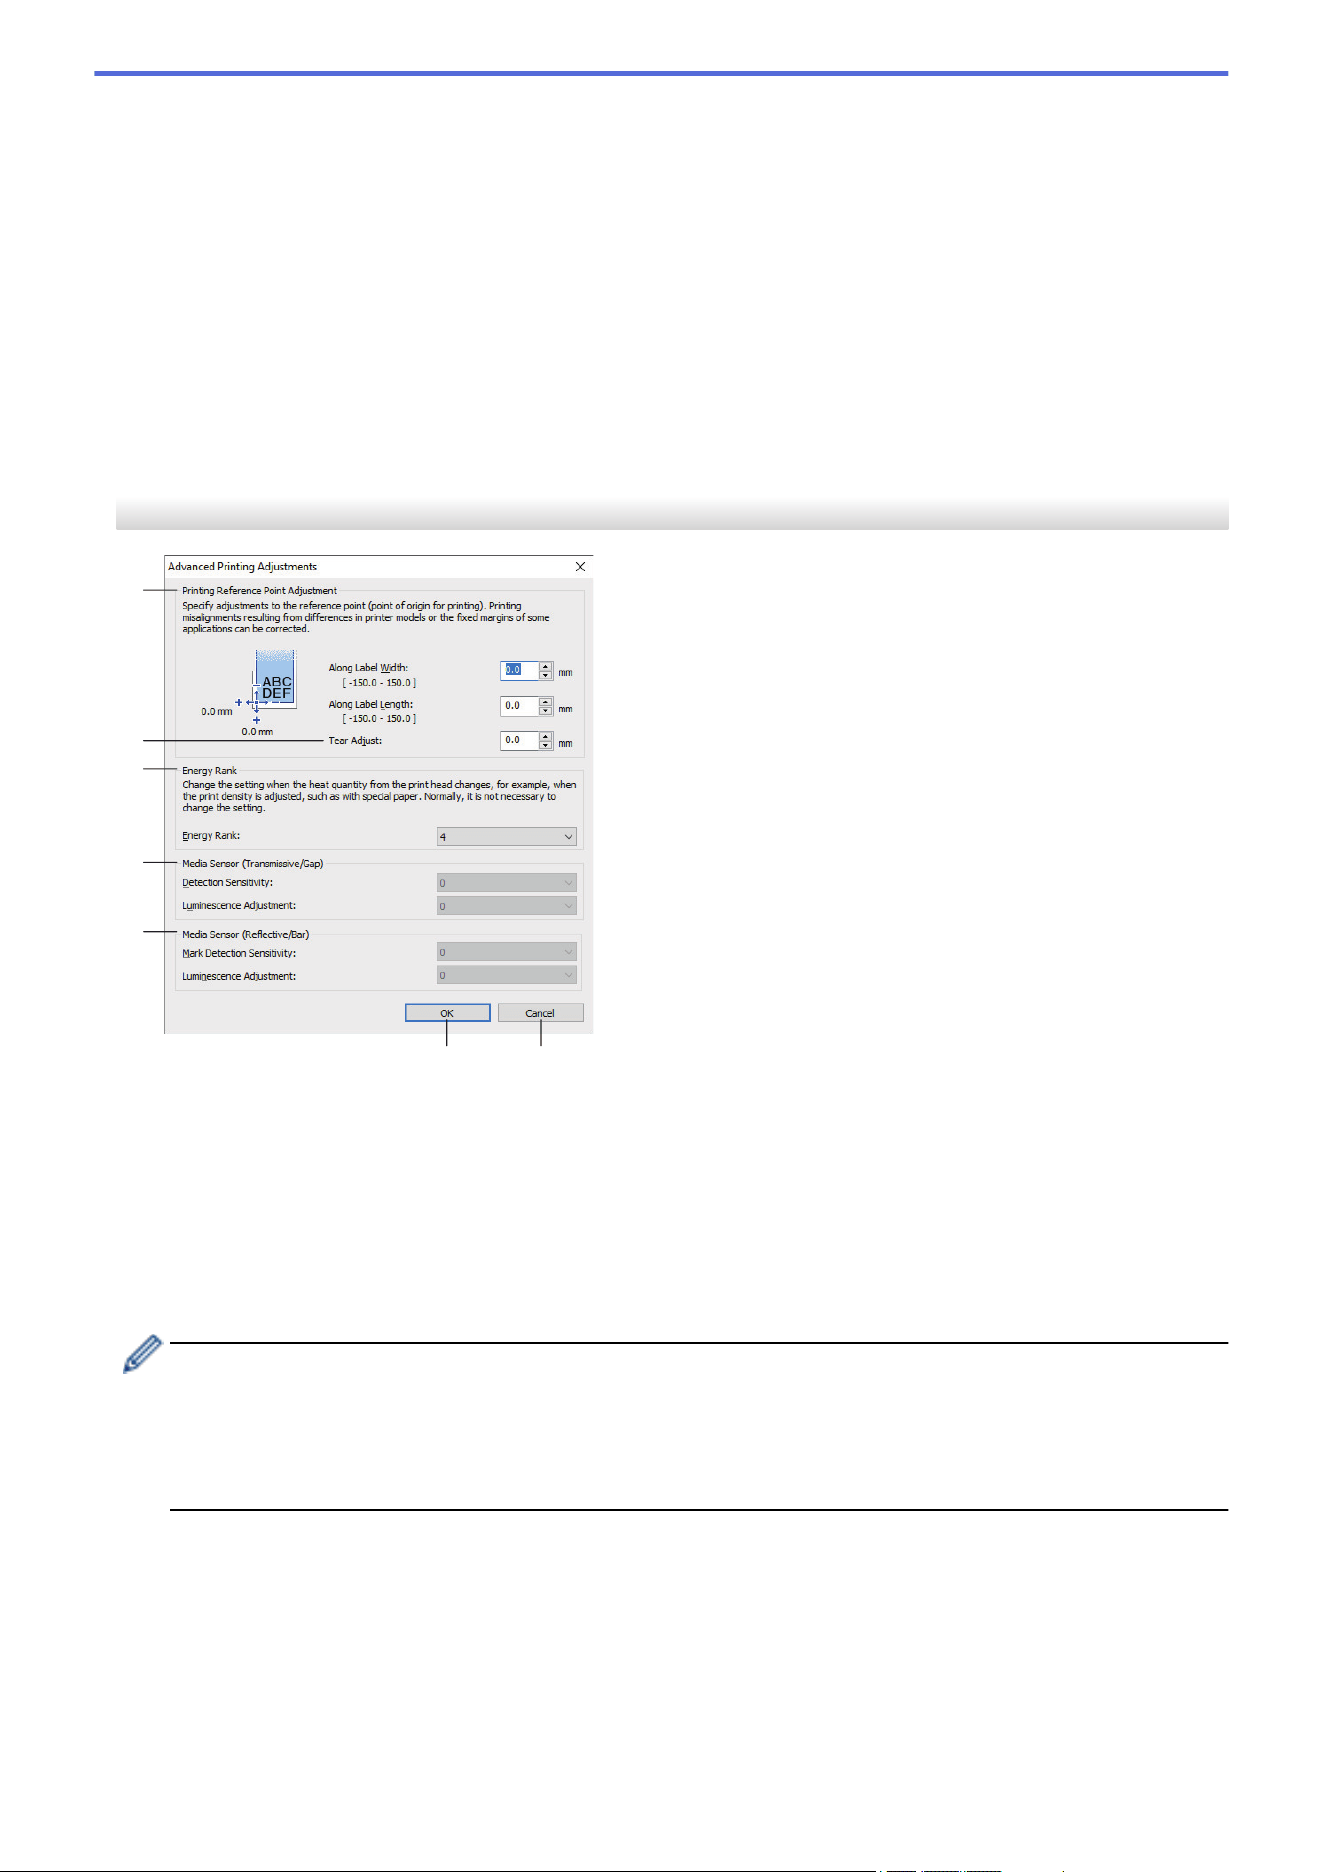
3. Paper Types
Select the paper type.
4. Detailed settings
Specify details for the paper format to be added.
5. Advanced Printing Adjustments
Click this button to display the Advanced Printing Adjustments dialog box and make advanced printing
adjustments for each paper format.
6. Cancel
Cancels the settings and closes the dialog box. The settings will remain unchanged.
7. Add
Click this button to add the paper format and apply the settings.
Advanced Printing Adjustments Dialog Box
3
4
67
1
2
5
1. Printing Reference Point Adjustment
Adjust the position of the reference point (point of origin for printing). This corrects printing misalignments
resulting from differences in printer models or from the fixed margins of some software.
2. Tear Adjust (TD-2310D/TD-2320D/TD-2350D/TD-2350DSA)
Adjust the cutting position when the paper is cut using the Tear Bar.
3. Energy Rank
Adjust the amount of heat (energy) from the Print Head, for example, with special paper.
• There may be contrast variations in the print result due to the operating environment and media used.
Modify the settings as necessary.
• If you increase the Energy Rank setting, the print result will be darker, and the print speed may be
slower.
• If the barcode on the printed label is difficult to read, adjust the Energy Rank setting.
4. Media Sensor (Transmissive/Gap) (TD-2320D/TD-2350D/TD-2350DSA)
Adjust the precision with which the transmissive/gap sensor detects the gaps (spacing) for die-cut labels and
the amount of light emitted by the sensor.
Settings can be specified when Paper Types is set to Die-cut Label.
242
The settings for Media Sensor (Transmissive/Gap) in the Device Settings dialog box can influence the
detection and calibration results. Make sure you specify the appropriate values.
Example settings:
Setting EX1 Setting EX2
Device Settings +2 -2
Paper Size Setup +2 +2
Actual effect 4 0
5. Media Sensor (Reflective/Bar)
Adjust the precision with which the reflective/black mark sensor detects black marks and the amount of light
emitted by the sensor.
The settings for Media Sensor (Reflective/Bar) in the Device Settings dialog box can influence the
detection and calibration results. Make sure you specify the appropriate values.
Example settings:
Setting EX1 Setting EX2
Device Settings +2 -2
Paper Size Setup +2 +2
Actual effect 4 0
6. Cancel
Cancels the settings and closes the dialog box. The settings will remain unchanged.
7. OK
Saves the settings and returns to the previous dialog box.
Related Information
• Change Printer Settings Using the Printer Setting Tool (Windows)
• Distribute Paper Formats to Other Computers (Windows)
Related Topics:
• Printer Setting Tool (Windows): Device Settings
• Auto Media Configuration
243
Home > Printer Settings > Change Printer Settings Using the Printer Setting Tool (Windows) > Printer
Setting Tool (Windows): Paper Size Setup > Distribute Paper Formats to Other Computers (Windows)
Distribute Paper Formats to Other Computers (Windows)
The paper formats exported from the Currently Registered Paper Sizes list in the Paper Size Setup dialog box
can be distributed to other computers. If the printer driver has been installed on the recipient’s computer, only the
paper formats need to be distributed.
1. At the sender’s computer, specify the paper format settings, and then click Export.
The following files are created:
TD-2310D
203 dpi Print Resolution
bst2312ed.ptd
bst2312ed.txt
pdt5435.bin
TD-2310D
300 dpi Print Resolution
bst2313ed.ptd
bst2313ed.txt
pdt5535.bin
TD-2320D
203 dpi Print Resolution
bst2322ed.ptd
bst2322ed.txt
pdt5635.bin
TD-2320D
300 dpi Print Resolution
bst2323ed.ptd
bst2323ed.txt
pdt5735.bin
TD-2320DF
203 dpi Print Resolution
bst232f2ed.ptd
bst232f2ed.txt
pdt5835.bin
TD-2320DF
300 dpi Print Resolution
bst232f3ed.ptd
bst232f3ed.txt
pdt5935.bin
TD-2350D
203 dpi Print Resolution
bst2352ed.ptd
bst2352ed.txt
pdt6235.bin
TD-2350D
300 dpi Print Resolution
bst2353ed.ptd
bst2353ed.txt
pdt6335.bin
TD-2350DF
203 dpi Print Resolution
bst235f2ed.ptd
bst235f2ed.txt
pdt6435.bin
TD-2350DF
300 dpi Print Resolution
bst235f3ed.ptd
bst235f3ed.txt
pdt6535.bin
TD-2350DSA
203 dpi Print Resolution
bst235s2ed.ptd
bst235s2ed.txt
pdt6635.bin
TD-2350DSA
300 dpi Print Resolution
bst235s3ed.ptd
bst235s3ed.txt
pdt6735.bin
2. Save the TXT file in any location on the recipient’s computer.
3. At the recipient’s computer, click Import.
The paper formats are replaced with the imported ones.
Related Information
• Printer Setting Tool (Windows): Paper Size Setup
244
Home > Printer Settings > Apply Setting Changes to Multiple Printers (Windows)
Apply Setting Changes to Multiple Printers (Windows)
>> Communication Settings (TD-2320D/TD-2350D/TD-2320DF/TD-2350DF/TD-2350DSA)
>> Device Settings
Communication Settings (TD-2320D/TD-2350D/TD-2320DF/TD-2350DF/
TD-2350DSA)
1. After applying settings to the first printer, disconnect the printer from the computer, and then connect the
second printer to the computer.
2. Select the newly connected printer from the Printer drop-down list.
If the Automatically detects the connected printer, and retrieves the current settings checkbox in the
Option Settings dialog box is selected, the printer connected with the USB cable is automatically selected.
3. Click Apply.
TD-2350D/TD-2350DF/TD-2350DSA: We recommend selecting the Automatically restart the printer after
applying new settings checkbox when configuring the first printer so that you can confirm that the printer
can be correctly connected to the wireless router/access point with the new settings.
The same settings that were applied to the first printer are applied to the second printer.
4. Repeat these steps for all printers whose settings you want to change.
• If the IP address is set to STATIC, the printer's IP address is changed to the same address as the first
printer. Change the IP address if needed.
• The same settings can be applied to another computer by clicking File > Import, and then selecting the
exported settings file.
Device Settings
1. After applying settings to the first printer, disconnect the printer from the computer, and then connect the
second printer to the computer.
2. Select the newly connected printer from the Printer drop-down list.
3. Click Apply.
The same settings that were applied to the first printer are applied to the second printer.
4. Repeat these steps for all printers whose settings you want to change.
The same settings can be applied to another computer by clicking File > Import, and then selecting the
exported settings file.
Related Information
• Printer Settings
245
Home > Printer Settings > Change Printer Settings Using Web Based Management
Change Printer Settings Using Web Based Management
Related Models: TD-2320D/TD-2350D/TD-2320DF/TD-2350DF/TD-2350DSA
You can use a standard web browser to change your machine's settings using the Hyper Text Transfer Protocol
(HTTP) or Hyper Text Transfer Protocol over Secure Socket Layer (HTTPS).
When using Web Based Management, the following operations are available:
• Displaying your machine status information
• Changing network settings, such as TCP/IP information
• Displaying the machine's software version information
• Changing network and machine configuration details
• We recommend Microsoft Edge for Windows. Make sure that JavaScript and Cookies are always
enabled in whichever browser you use.
• The default login password to manage machine settings is located on your machine and marked "Pwd:".
We recommend you change it to protect your machine from unauthorized access.
To use Web Based Management, your network must use TCP/IP, and the machine and computer must have a
valid IP address.
1. Start your web browser.
2. Type "https://machine's IP address" in your browser's address bar (where "machine's IP address" is the
machine's IP address).
For example:
https://192.168.1.2
If you are using a Domain Name System or enable a NetBIOS name, you can type another name, such as
"SharedPrinter" instead of the IP address.
For example:
https://SharedPrinter
If you enable a NetBIOS name, you can also use the node name.
For example:
https://brnxxxxxxxxxxxx
3. If required, type the password in the Login field, and then click Login.
4. Change the machine settings.
Every time you access Web Based Management, type the password in the Login field, and then click Login.
After configuring the settings, click Logout.
Related Information
• Printer Settings
• Change the Login Password Using Web Based Management
246
Home > Printer Settings > Change Printer Settings Using Web Based Management > Change the Login
Password Using Web Based Management
Change the Login Password Using Web Based Management
Related Models: TD-2320D/TD-2350D/TD-2320DF/TD-2350DF/TD-2350DSA
The default password to manage this machine’s settings is located on the bottom of the machine and marked
"Pwd:". Change the default password by following the on-screen instructions when you first log in. We
recommend immediately changing the default password to protect your machine from unauthorized access. If the
battery base unit is installed, uninstall it to confirm the default password.
1. Start your web browser.
2. Type "https://machine's IP address" in your browser's address bar (where "machine's IP address" is your
machine's IP address).
For example:
https://192.168.1.2
• If you are using a Domain Name System or enable a NetBIOS name, you can type another name, such
as "SharedPrinter" instead of the IP address.
For example: https://SharedPrinter
• If you enable a NetBIOS name, you can also use the node name.
For example: https://brn123456abcdef
• The NetBIOS name can be found in the Network Configuration Report.
3. Do one of the following:
• If you have previously set your own password, type it, and then click Login.
• If you have not previously set your own password, type the default login password, and then click Login.
4. In the left navigation bar, click Administrator > Login Password.
• The default password to manage this machine’s settings is located on the bottom of the machine and
marked "Pwd:".
• If the left navigation bar is not visible, start navigating from .
5. Following the on-screen Login Password guidelines, type your new password in the Enter New Password
field.
6. Retype the new password in the Confirm New Password field.
7. Click Submit.
You can also change the lockout settings in the Login Password menu.
Related Information
• Change Printer Settings Using Web Based Management
247
Home > Printer Settings > Confirm Printer Settings
Confirm Printer Settings
You can print a Printer Settings Report without connecting the printer to a computer or mobile device.
>> TD-2310D/TD-2320D/TD-2320DF
>> TD-2350D/TD-2350DF
>> TD-2350DSA
TD-2310D/TD-2320D/TD-2320DF
1. Turn the printer on.
2. Load a 2.28" (58 mm) or wider Media Roll into the printer.
3. Press and hold
for two seconds.
The report starts printing.
The report includes the model name, serial number, rechargeable Li-ion battery status, error history and
more detailed information on the printer’s configuration and parameter settings.
To read the printed report, see Related Topics: Details of Printer Settings Report.
TD-2350D/TD-2350DF
1. Turn the printer on.
2. Load a 2.28" (58 mm) or wider Media Roll into the printer.
3. Press Menu.
4. Press a or b to select the following:
a. Select [Information]. Press OK.
b. Select [Print Configuration]. Press OK.
5. Press a or b to select one of the following:
• [All], and then press OK.
The report includes all the information provided in the other options.
• [Usage Log], and then press OK.
The report includes version information, received data, usage history, and error history.
• [Printer Settings], and then press OK.
The report includes version information, printer setting information, network setting list, wireless setting
information, and PDL information.
• [Transfer Data], and then press OK.
The report includes the template list and the database list.
6. If the printer shows selection menu, press a or b to select [Start].
7. Press OK.
To read the printed report, see Related Topics: Details of Printer Settings Report.
TD-2350DSA
1. Turn the printer on.
2. Load a 2.28" (58 mm) or wider Media Roll into the printer.
3. Press Menu.
4. Press a or b to select the following:
a. Select [Information]. Press OK.
b. Select [Print Configuration]. Press OK.
248

5. Press a or b to select one of the following:
• [All], and then press OK.
The report includes all the information provided in the other options.
• [Usage Log], and then press OK.
The report includes version information, received data, usage history, and error history.
• [Printer Settings], and then press OK.
The report includes version information, printer setting information, network setting list, wireless setting
information, and PDL information.
• [Transfer Data], and then press OK.
The report includes the template list and the database list.
6. Press OK to start to print.
To read the printed report, see Related Topics: Details of Printer Settings Report.
Related Information
• Printer Settings
Related Topics:
• Replace the Parts
• Details of Printer Settings Report
249
Home > Printer Settings > Details of Printer Settings Report
Details of Printer Settings Report
These tables contain reference information to help you understand the contents of the Printer Settings Report.
Version Information
Title in Print Description
<<PRINTER CONFIGURATION>> Print title (not used in the main unit information acquisition command)
[Printer] Print title (not used in the main unit information acquisition command)
FormVer Version of Main unit information output list
LmDBID ID of the DB where maintenance information is saved
Printer Printer model name
PrintID Printer model ID
SerialNo Serial number
Region Product destination
ProgVer Main program version
BootVer Boot program version
FontVer Font data version
EromVer EEPROM format version
BoardVer Main board version
Region Info Regional information (product status identification code)
Maintenance Reliability Maintenance information reliability
Battery Information
Title in Print
Description
[Battery Status] Print title (not used in the main unit information acquisition command)
Battery Voltage Battery voltage [mV]
If the battery is not connected, "-" will be displayed.
Battery Temperature[deg C] Battery temperature (current) [℃]
If the battery is not connected, "-" will be displayed.
Error History Information
Title in Print
Description
[Error History(PAGES)] Print title (not used in the main unit information acquisition command)
Last Information on the most recent error (error number and error summary message)
#01
#02
#03
#04
#05
#06
#07
#08
#09
#10
Error history (latest 10)
This information includes two items as a set, and prints one line for each error.
• Error number
• The total number of pages printed when the error occurs
#01 is the latest error, #10 is the oldest error, and the oldest error #10 is eliminated every
time a new error occurs.
Media Information
250
Title in Print Description
[Media Settings] Media information (currently set)
Name Paper name
Width Printable width
Length Printable length
Paper Types Type
Energy Rank Energy rank
Top Margin Front margin [dot]
Bottom Margin Back margin [dot]
Label Pitch Label pitch [dot]
Mark Offset Distance to mark [dot]
Position Adj. (H) Print position correction value (horizontal) [dot]
Position Adj. (V) Print position correction value (vertical) [dot]
Sensor Adj. (Lum) Sensor light emission amount adjustment value
Sensor Adj. (Thr) Sensor threshold adjustment value
Paper
Title in Print
Description
[Paper] Print title (not used in the main unit information acquisition command)
Binary Data Print Media information used for printing
Lines 1 to 8: Binary data of media information
Printer Settings
Title in Print
Description
[Printer Settings] Print title (not used in the main unit information acquisition command)
Command Mode Command mode
Print Density Print darkness
Print Speed Printing speed
JPEG Printing JPEG printing
Text Direction Print orientation
Exit Position Issuance method
Auto Cut Cut settings
Cover Closed Action Feed setting when cover is closed
Printer Information Report Contents of main unit information printing
Serialize Mode Sequential number mode
Save Printer Print Log Save print history on main unit
Print Data After Printing Print data after printing
Default Print# Default number of prints
Power On When Plugged In Automatic power on (auto power on)
Auto Sleep Auto sleep
Auto Power Off Auto power off
Battery Charge Level Charging settings (ECO charging)
Feed Key Feed key function settings
Function Key Function key settings
251
Title in Print Description
AirPlane Mode Bluetooth/WLAN are completely disabled mode
PrintReferencePointAdj.(W)[dot] Print base point correction (width direction) [dot]
PrintReferencePointAdj.(L)[dot] Print base point correction (length direction) [dot]
Tear Adjust[mm] Tear bar position correction [mm]
SensitivityAdj.(Transmissive) Separator detection level correction
Correction value of the light receiving sensor that detects gaps in die-cut labels
LuminescenceAdj(Transmissive) Correction of luminescence amount (transmissive type)
SensitivityAdj.(Reflective) Black mark detection level correction
LuminescenceAdj(Reflective) Correction of light emission amount (reflective type)
SensitivityAdj.(Peeler) Peeler detection level correction
Menu Locks Settings Menu lock [Main unit settings] (Locked / Unlocked)
Menu Locks Template Settings Menu lock [Template settings] (Locked / Unlocked)
Menu Locks Information Menu lock [Body information] (Locked / Unlocked)
Menu Locks Wired LAN Menu lock [Wired LAN] (Locked / Unlocked)
Menu Locks WLAN Menu lock [Wireless LAN] (Locked / Unlocked)
Menu Locks Bluetooth Menu lock [Bluetooth] (Locked / Unlocked)
Menu Locks Remote Update Menu lock [Data update] (Locked / Unlocked)
Menu Locks USB Update Menu lock [USB data update] (Locked / Unlocked)
Menu Locks Support URL Menu lock [Support site URL] (Locked / Unlocked)
Admin Password Administrator password (on/off)
LCD Contrast Screen density
Backlight Settings Backlight (on/off)
Backlight Timeout Time until backlight out
Display Brightness Screen brightness
Template Settings Template mode
Confirm Print Check before printing
Date Format Date format
Time Format Time format
Language Language settings
Unit Unit settings
Beeper Beeper volume
Clock Clock function (on/off)
Autotime Sync Automatic time acquisition settings
Time Zone Time zone settings
SNTP Server Method NTP server settings (SNTP Server Method)
Primary SNTP Server Address NTP server settings (Primary SNTP Server Address)
Primary SNTP Server Port NTP server settings (Primary SNTP Server Port)
Secondary SNTP Server Address NTP server settings (Secondary SNTP Server Address)
Secondary SNTP Server Port NTP server settings (Secondary SNTP Server Port)
Synchronization Interval NTP server settings (Synchronization Interval)
Web Based Management EWS on/off settings
Update Notification Firmware update automatic notification
252
Title in Print Description
[P-touch Template Settings] Print title (not used in the main unit information acquisition command)
Touch Mode Settings Template Touch mode display settings
Default Template Number Template number initial value
Data Delimiter Delimiter
Print Start Trigger Print start trigger
Command Character Print start command string
Received Data Size Print start data size
When printing a P-Touch Template: Received data size to start printing when the
print start trigger is "Number Of Character Received".
Character Code Table Character code set
When printing a P-Touch Template: Character code set to use (see command
reference for details).
International Character Set International characters
When printing a P-Touch Template: Some code characters will be replaced
according to this setting. (See command reference for details).
Command Prefix Character Prefix character
Non-Printed Character Discarded string
Available Return Code New line code
Replace FNC1 FNC1 replacement
Virtual Future Date Direct date entry (on/off)
Virtual Future Time Direct time input (on/off)
Search Method Setting Search mode settings
Default Template Built-in template display
[PDL] Print title (not used in the main unit information acquisition command)
FmtPrefix Current ZPL command prefix character
CtrPrefix Current ZPL command prefix character
Delimiter Current ZPL command delimiter
CRC Check CRC check setting in SBPL emulation (enable/disable)
[Option] Print title (not used in the main unit information acquisition command)
Cutter Option Cutter option (with/without)
Label Peeler Peeler option (with/without)
Coin Battery Level Coin battery remaining charge
RS-232C Serial Communication Setting Information
Title in Print
Description
[Serial] Print title (not used in the main unit information acquisition command)
Baud rate(bps) RS-232C baud rate
Data bit RS-232C data bit length
Parity RS-232C parity setting
Flow control RS-232C flow control settings
Bluetooth Setting Information
Title in Print
Description
[Bluetooth] Print title (not used in the main unit information acquisition command)
253
Title in Print Description
Bluetooth Usage Bluetooth activation status (enabled/disabled)
If disabled, all items below will be displayed as '-' (hyphen).
Bluetooth Firmware Ver. Bluetooth HCD file version information
Bluetooth Device Name Bluetooth device name
Bluetooth On Power On Bluetooth status when power is turned on
Visible to Other Devices Search from other devices
Bluetooth Mode Bluetooth control mode
Automatic Reconnection Automatic reconnection (Classic)
Target Address Bluetooth address for automatic reconnection (Classic)
Minimum Security Mode Minimum security (Low Energy)
Bluetooth Address Bluetooth address
Security Mode Bluetooth security mode setting
Bluetooth Server TimeOut Bluetooth automatic reconnection time out
Bluetooth Last Address Bluetooth last connected device address
Bluetooth Last Device Last configured device
AutoMatically Search Automatic search
Bluetooth Address Barcode
Title in Print
Description
(Barcode image) Bluetooth device address barcode
Format: CODE128, bottom character ON, height 79 dots (10 mm), width = very small, thin bar/thick
bar ratio = 3:1, bar lengths not the same
WLAN Configuration Information
Title in Print
Description
[WLAN] Print title (not used in the main unit information acquisition command)
WLAN Region Wireless LAN destination settings
WLAN On Power On Wireless settings at power on (Wireless LAN on/off)
Network Mode Network mode (Infrastructure/Direct/Infra&Direct/Ad hoc)
RSSI Received signal strength (Wireless LAN, Wireless Direct)
Channel Channel
WLAN Status Wireless LAN status (enabled/WLAN off/not connected)
Node Name Wireless LAN node name
MAC Address Wireless LAN MAC address
SSID Connection destination SSID (network name)
Encryption Mode Encryption method
Authentication Method Authentication method
Boot Method Method for setting IP addresses
IP Address Wireless LAN IP address
Subnet Mask Sub-net mask
Gateway Address Gateway address
DNS Address DNS server address (IPv4)
IPv6 Address IPv6 address
254
Title in Print Description
IPv6 DNS Address DNS server address (IPv6)
WFD Status Wireless Direct status (off/group owner active)
WFD SSID Wireless Direct SSID
WFD Channel Channel for Wireless Direct connection
WFD MAC Address Wireless Direct MAC address
WFD IP Address Wireless Direct IP address
Wired LAN Setting Information
Title in Print
Description
[WiredLAN] Print title (not used in the main unit information acquisition command)
WiredLAN Status Wired LAN status (offline/online)
Node Name Node name
MAC Address MAC address
Boot Method Method for setting IP addresses
IP Address IP address
Subnet Mask Sub-net mask
Gateway Address Gateway address
DNS Address DNS server address (IPv4)
IPv6 Address IPv6 address
IPv6 DNS Address DNS server address (IPv6)
Support Site URL QR Code
Title in Print
Description
<<PRODUCT SUPPORT WEBSITE>> Print a QR code with the URL of the support site.
Main Unit Transfer Data List
Title in Print
Description
[Template List] List of template names transferred to the printer
[Database List] List of database names transferred to the printer
[Font List] List of font names downloaded to the printer
Available memory Free space in FlashROM (user area) [bytes]
Main Unit Transfer Data Usage Status
Title in Print
Description
Available memory[per] Free space in FlashROM (user area) [%]
EWS Initial Password
Title in Print
Description
Default Password EWS initial password
Main Unit Usage History (User)
Title in Print
Description
[Usage Information] Print title (not used in the main unit information acquisition command)
Print Count (Total) Print number counter
Print Job Count (Total) Job counter
255
Title in Print Description
Print Distance (Total)[m] Print distance counter (m)
(Conveyance distance when printing in the forward direction only,
excluding margins. White data is included in the print distance)
Print Distance (Total)[dot] Print distance counter (dot)
Feed Distance (Total)[m] Total transport distance counter (m)
(All conveyance distances, including margins, conveying other than
printing (feeding, etc.), and reverse transport, are also included in the
conveyance distance.)
Feed Distance (Total)[dot] Total conveyance distance counter (dot)
Full Cutter Count (Total) Full cut counter
Full Cutter Count (1) Full cut counter updated when replacing cutter (currently)
Head Disconnection dots[dot] Head disconnection count [dots] (recent check results)
Feed Distance (Head1)[m] Conveyance distance counter updated when Print Head replacement is
detected (currently)
Feed Distance (Platen1)[m] Conveyance distance counter updated when Platen Roller replacement is
detected (current)
Feed Count Feed count
Environmental Temperature (Current)
[degC]
Environmental temperature (current) [℃]
Error History Information
Title in Print
Description
[Error Count] Print title (not used in the main unit information acquisition command)
Error Count Total Number of error occurrences
Error Count #[Array:##] Number of occurrences of error [Array:##] (if 1 digit, omit the 2nd digit)
System Error Count #[Array:##] Number of occurrences of system error [Array:##] (if it is 1 digit, the 2nd digit is
omitted)
Main Unit Usage History (Maintenance)
Title in Print
Description
Print Distance (User1)[m] User-resettable print distance counter (currently)
Print Distance (Head1)[m] Printing distance counter updated when head replacement is detected
(currently)
Print Distance (Head2)[m] Printing distance counter updated when detecting head replacement (1
previous)
Print Distance (Head3)[m] Printing distance counter updated when detecting head replacement (2
previous)
Head Replacement Count Number of head replacements [times] (number of times replacement was
detected)
Print Distance (Average)[dot] Average page length (=total printing distance / total number of pages
printed)
Print Count (USB1) Number of prints via USB
Print Count (USB2) Number of prints via USB (via option)
Print Count (USB HOST) Number of prints on USBHOST (Barcode reader, USB memory, etc.)
Print Count (Bluetooth) Number of prints via Bluetooth
Print Count (Bluetooth LE) Number of prints with Bluetooth LE
Print Count (AirPrint) Number of prints with AirPrint
256
Title in Print Description
Print Count (USB MSC) Number of prints with USB Mass Storage
Print Count (Network) Number of prints via network (Wired/Wireless LAN)
Print Count (Standalone) Number of prints on the main unit
Print Count (RS232C) Number of prints with RS-232C
Print Count (Internal) Number of prints when only internal power supply (battery) is installed
Print Count (External) Number of prints when only external power supply (adapter, USB power
supply) is connected
Print Count (Combination) Number of prints when both internal and external power supplies are
connected
Print Count (Other) Print count of other commands
Print Count (Raster) Number of prints in Raster
Print Count (ESCP) Number of prints with ESC/P
Print Count (P-Template) Number of prints with P-touch Template
Print Count (ZPL emulation) Number of prints with ZPL emulation
Print Count (CPCL emulation) Number of prints with CPCL emulation
Print Count (SBPL emulation) Number of prints with SBPL emulation
Print Count (Density [Array:##]) Number of prints at density [Array:##]
Print Count (Duty0-4%) Number of prints with print duty 0 to 4%
Print Count (Duty5-9%) Number of prints with print duty 5 to 9%
Print Count (Duty10-14%) Number of prints with print duty 10 to 14%
Print Count (Duty15-19%) Number of prints with print duty 15 to 19%
Print Count (Duty20-24%) Number of prints with print duty 20 to 24%
Print Count (Duty25-29%) Number of prints with print duty 25 to 29%
Print Count (Duty30-34%) Number of prints with print duty 30 to 34%
Print Count (Duty35-39%) Number of prints with print duty 35 to 39%
Print Count (Duty40-44%) Number of prints with print duty 40 to 44%
Print Count (Duty45-49%) Number of prints with print duty 45 to 49%
Print Count (Duty50-54%) Number of prints with print duty 50 to 54%
Print Count (Duty55-59%) Number of prints with print duty 55 to 59%
Print Count (Duty60-64%) Number of prints with print duty 60 to 64%
Print Count (Duty65-69%) Number of prints with print duty 65 to 69%
Print Count (Duty70-74%) Number of prints with print duty 70 to 74%
Print Count (Duty75-79%) Number of prints with print duty 75 to 79%
Print Count (Duty80-84%) Number of prints with print duty 80 to 84%
Print Count (Duty85-89%) Number of prints with print duty 85 to 89%
Print Count (Duty90-94%) Number of prints with print duty 90 to 94%
Print Count (Duty95-100%) Number of prints with print duty 95 to 100%
Average Coverage (Total)[%] Average printing rate (calculated value) for effective dots [%]
Full Cut Time[msec] Latest full cut time (time from start to end of operation)
Head Temperature (Min.)[degC] Minimum Print Head temperature
Head Temperature (Max.)[degC] Maximum Print Head temperature
Peeler Sensor[AD] Peeler sensor voltage AD value when the LED is off during peeler
operation (recent)
257
Title in Print Description
Peeler Disturbed light[AD][Array:XX] Peeler sensor ambient light AD value when power is turned on (best 3)
Cooling Count (head) Cooling due to Print Head
Cooling Count (motor) Cooling motor
Button Push Count (Power) Button press counter (Power)
Button Push Count (Esc) Button press counter (Esc)
Button Push Count (Menu) Button press counter (Menu)
Button Push Count (Feed) Button press counter (Feed)
Button Push Count (Up) Button press counter (Up)
Button Push Count (Down) Button press counter (Down)
Button Push Count (OK) Button press counter (OK)
Button Push Count (Function) Button press counter (Function)
Cover Open Count Cover open counter
Environmental Temperature (Min.)[degC] Environmental temperature (minimum) [℃]
Environmental Temperature (Max.)[degC] Environmental temperature (maximum) [℃]
Environmental Temperature (Avg.)[degC] Average environmental temperature [℃]
Environmental Temperature (SD)[degC] Standard deviation of environmental temperature [℃]
Media #01 Information on the media with the highest number of prints.
Name: Name
Width:[dot] Media width
Length:[dot] Medium length
Type: Type
Energy: Energy rank
Cut count: Number of cuts
Distance: Print Distance
Count: The number of printed sheets
Sensor Adj. (Lum): Sensor light emission amount adjustment value
Sensor Adj. (Thr); Sensor threshold adjustment value
Media #02 Information on the medium with the second highest number of copies
printed.
Name: Name
Width:[dot] Media width
Length:[dot] Medium length
Type: Type
Energy: Energy rank
Cut count: Number of cuts
Distance: Print Distance
Count: The number of printed sheets
Sensor Adj. (Lum): Sensor light emission amount adjustment value
Sensor Adj. (Thr); Sensor threshold adjustment value
Battery Charge Count (Total) Total number of battery charges [times]
(Number of times the battery has been recharged from an uncharged state
to a charged state)
258
Title in Print Description
Battery Charge Finish Count (Total) Total number of battery charge completions [times]
(Number of times the battery is fully charged and the charge is completed)
Battery Charge Time (Total) Total battery charging time [minutes]
(Accumulated value of charging state time)
Total Power On Time Total power on time [minutes]
Total Power On Count Total number of power on times [times]
Battery Charge Count Level FC Battery charging start voltage level: Full charge
Battery Charge Count Level UV Battery charging start voltage level: Intermediate voltage
Battery Charge Count Level OD Battery charging start voltage level: Low (charging required)
First Setup Date Initial date and time setting (product operation start) (YYYY/MM/DD
notation)
Related Information
• Printer Settings
Related Topics:
• Confirm Printer Settings
259
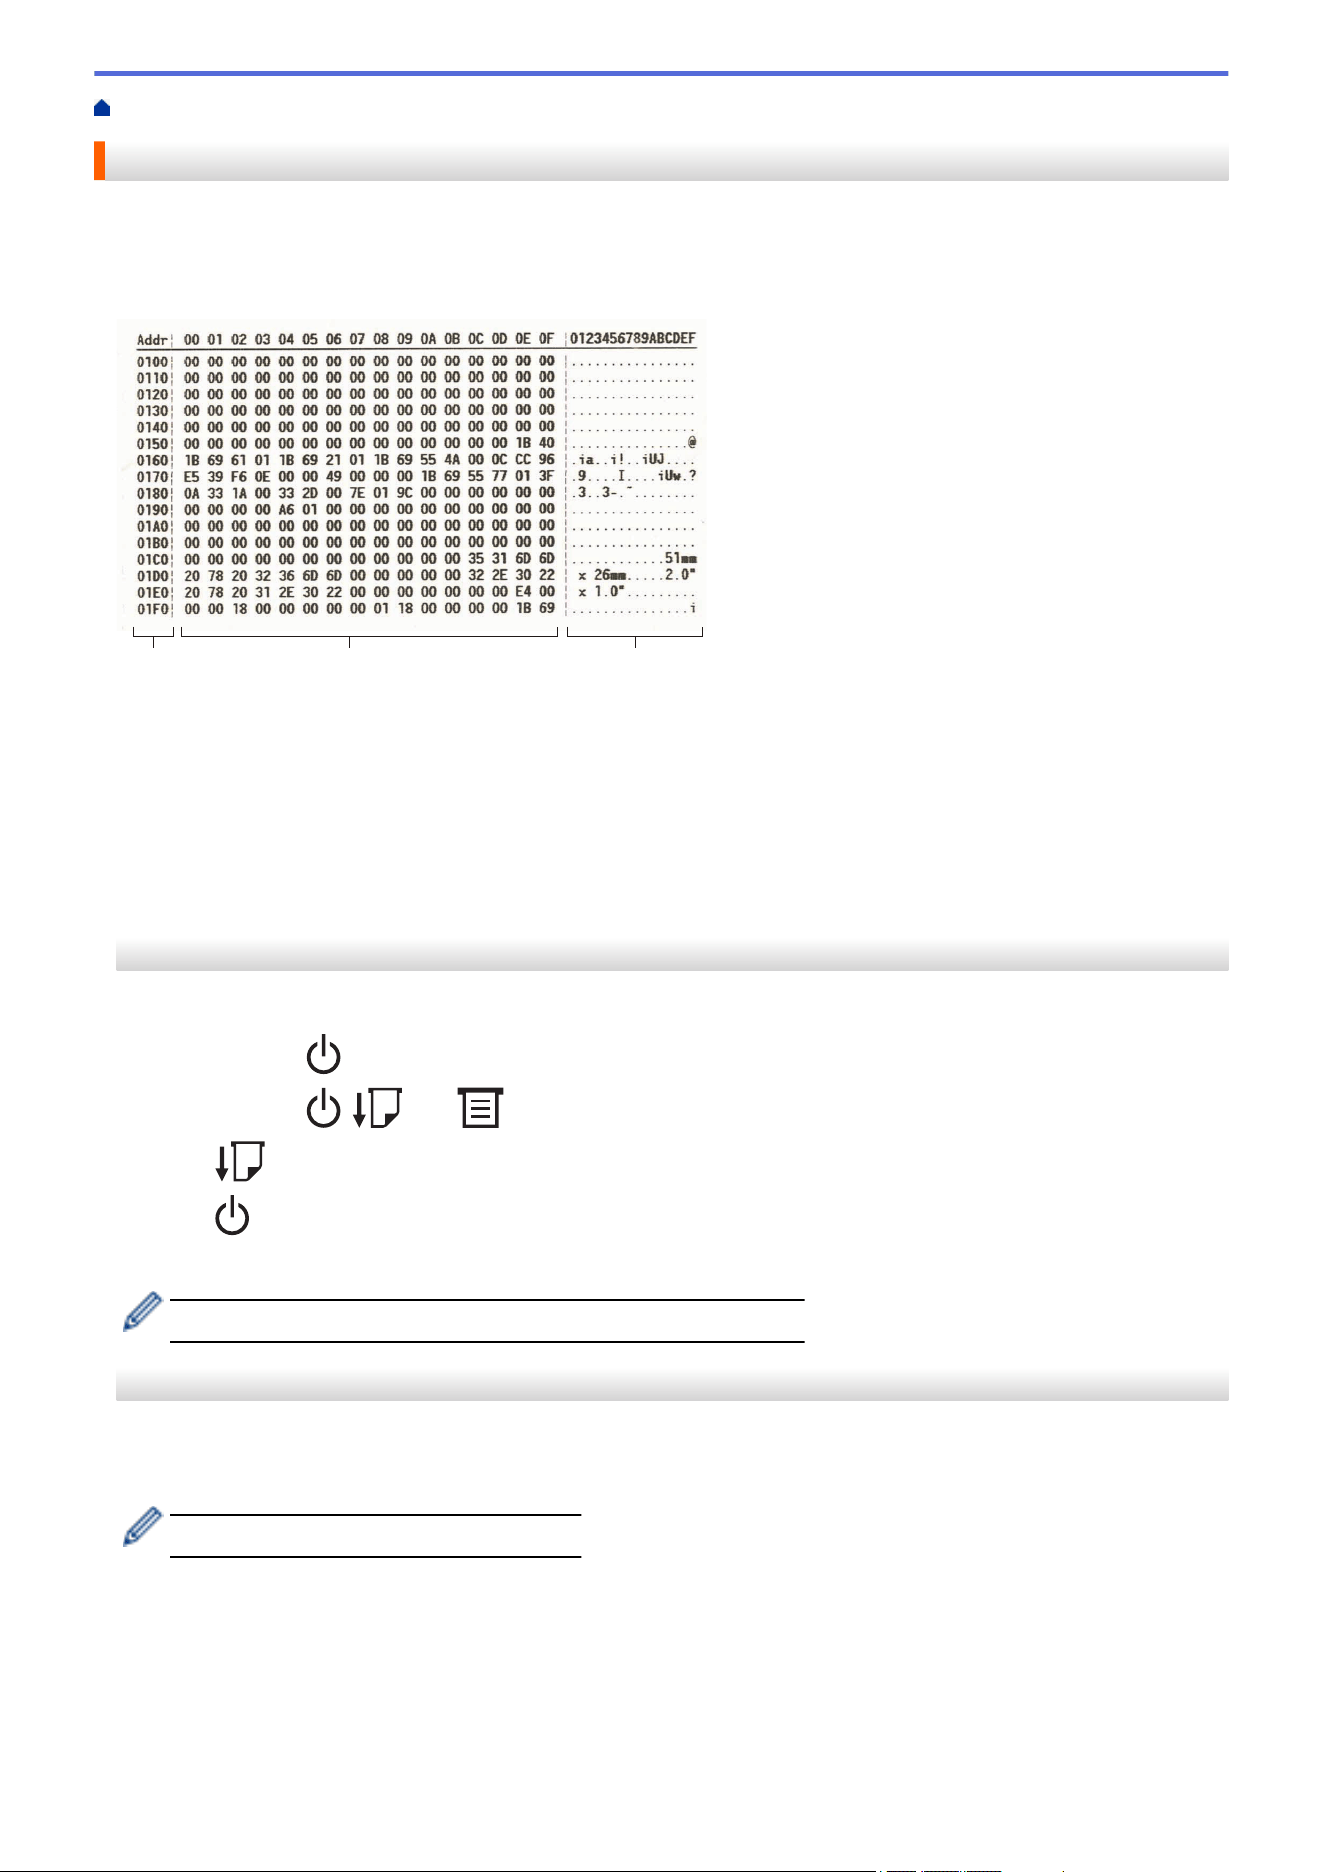
Home > Printer Settings > Print and Confirm Dump Data
Print and Confirm Dump Data
Set your printer to Dump Mode, and then restart it. Dump Mode allows you to print and review the data received
from the printer.
Example:
1 2 3
The layout is landscape orientation and shown in order of Address, Hexadecimal, and ASCII.
1. Address
2. Hexadecimal
3. ASCII
>> TD-2310D/TD-2320D/TD-2320DF
>> TD-2350D/TD-2350DF/TD-2350DSA
>> TD-2310D/TD-2320D/TD-2350D/TD-2320DF/TD-2350DF/TD-2350DSA
TD-2310D/TD-2320D/TD-2320DF
1. Load a 2.28" (58 mm) Media Roll into the printer.
2. Press and hold to turn off the printer.
3. Press and hold
, , and for five seconds.
4. Press two times, and then press OK.
5. Press .
The printer starts printing after rebooting.
To resume normal printing, turn off the printer and then on again.
TD-2350D/TD-2350DF/TD-2350DSA
1. Connect the printer to the computer using a USB cable.
2. Turn the printer on.
Make sure the printer is in Standby Mode.
3. Load a 2.28" (58 mm) Media Roll into the printer.
4. Press Menu.
5. Press a or b to select the following:
a. Select [Administration]. Press OK.
b. Select [Dump Mode]. Press OK.
260
6. Follow the on-screen instructions.
7. After rebooting, press .
The printer starts printing.
To resume normal printing, turn off the printer and then on again.
TD-2310D/TD-2320D/TD-2350D/TD-2320DF/TD-2350DF/TD-2350DSA
To set the printer to Dump Mode using the Printer Setting Tool.
1. Connect the printer to the computer using a USB cable.
2. Press
to turn on the printer.
3. Start the Printer Setting Tool.
Click Start > Brother > Printer Setting Tool.
4. Click Device Settings.
5. Click Maintenance > Switch to Dump Mode.
6. When prompted, click OK to confirm.
The printer switches to Dump Mode.
To resume normal printing, turn off the printer and then on again.
Related Information
• Printer Settings
261
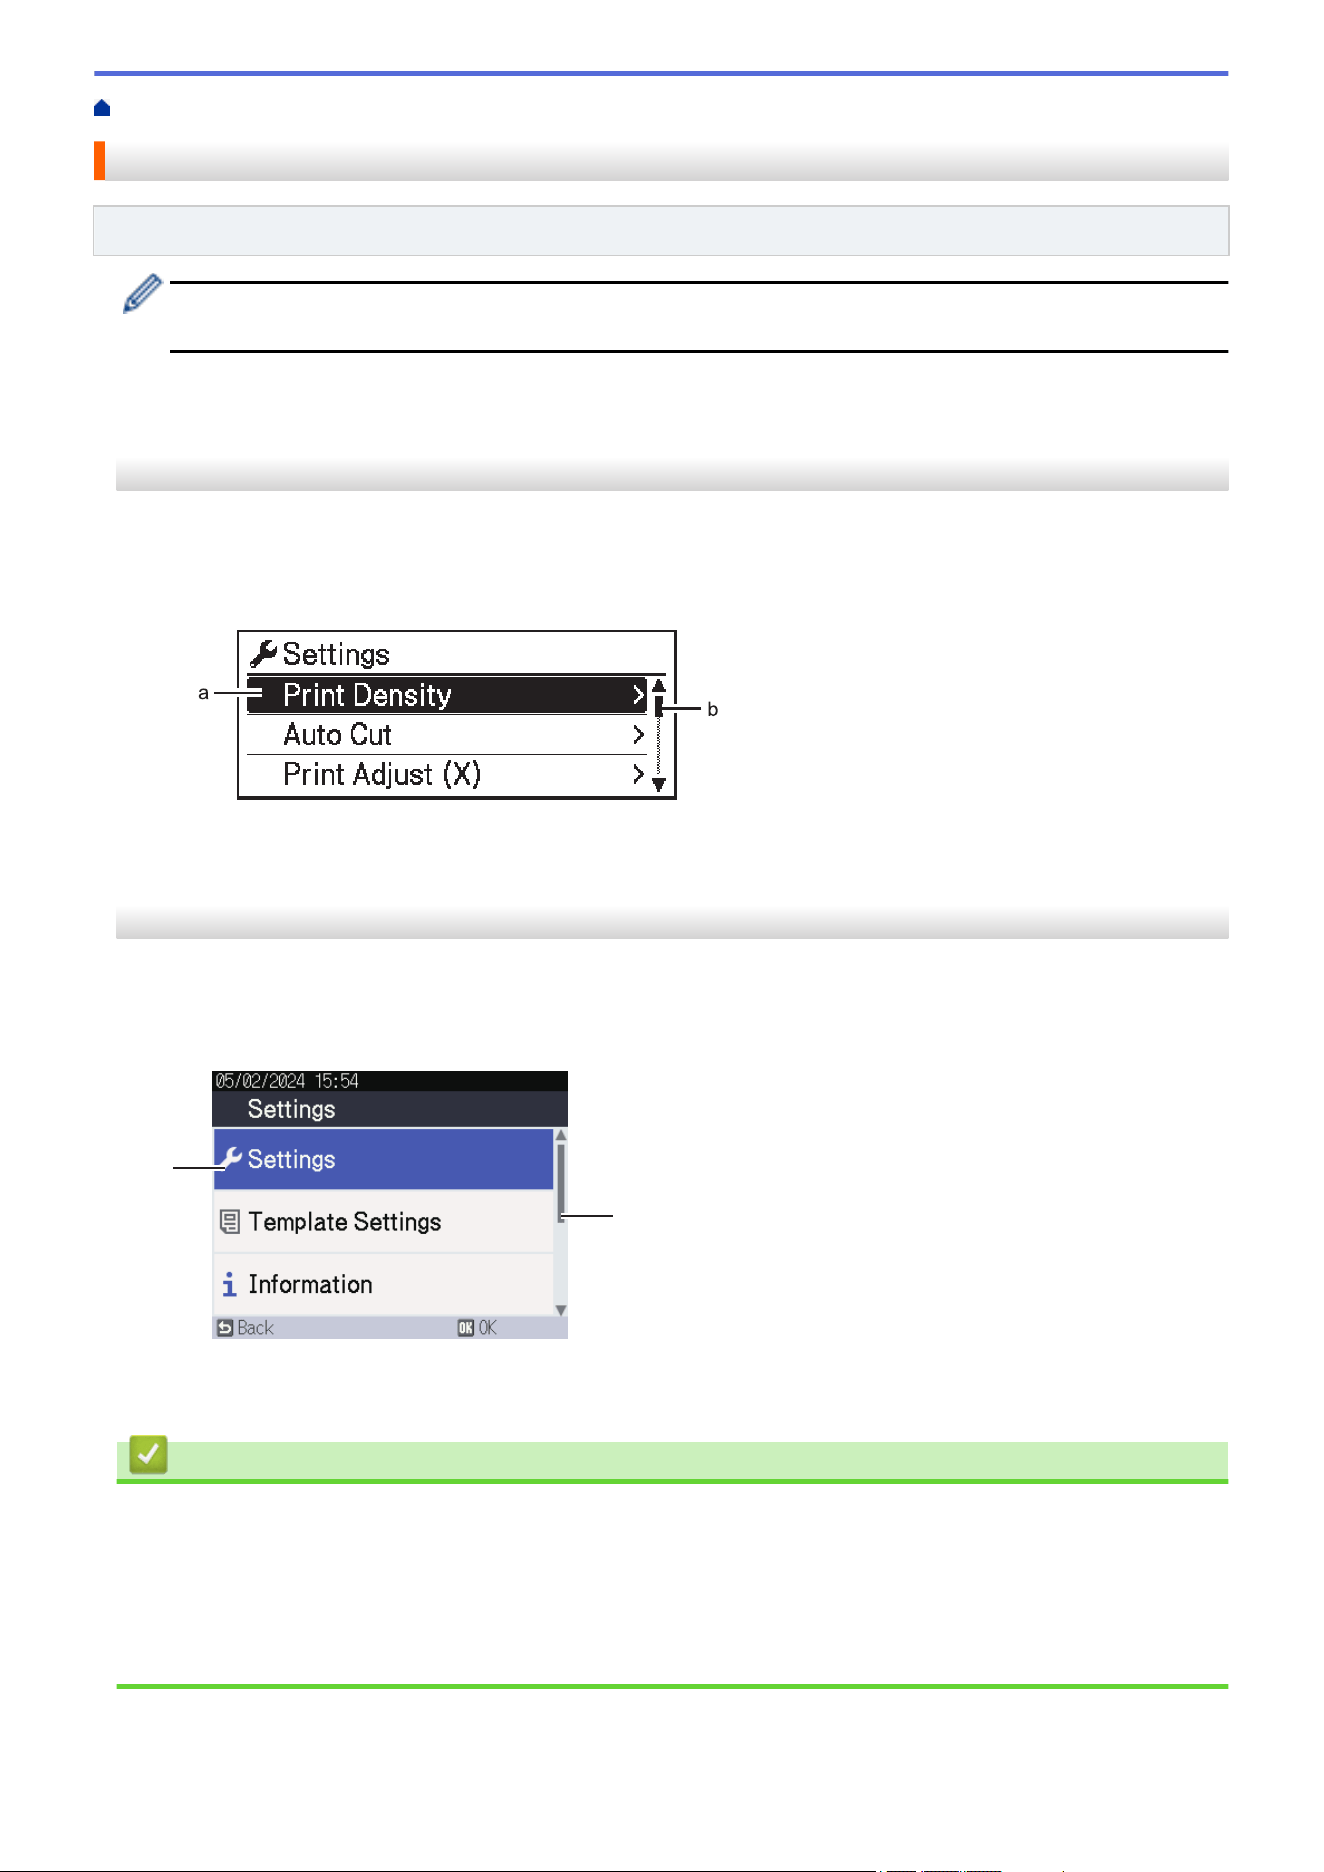
Home > Printer Settings > Change Printer Settings Using the Printer
Change Printer Settings Using the Printer
Related Models: TD-2350D/TD-2350DF/TD-2350DSA
You can also change the printer settings using the Printer Setting Tool on a computer connected to the
printer.
>> TD-2350D/TD-2350DF
>> TD-2350DSA
TD-2350D/TD-2350DF
1. Press Menu.
2. Press a or b to select a menu option, and then press OK.
3. Press a or b to select an option, and then press OK.
a. The current selection is highlighted.
b. The scroll bar shows the position of the highlighted option on the list.
TD-2350DSA
1. Press Menu.
2. Press a or b to select a menu option, and then press OK.
3. Press a or b to select an option, and then press OK.
a
b
a. The current selection is highlighted.
b. The scroll bar shows the position of the highlighted option on the list.
Related Information
• Printer Settings
• Settings Tables
• Settings Tables
Related Topics:
• Change Printer Settings Using the Printer Setting Tool (Windows)
262
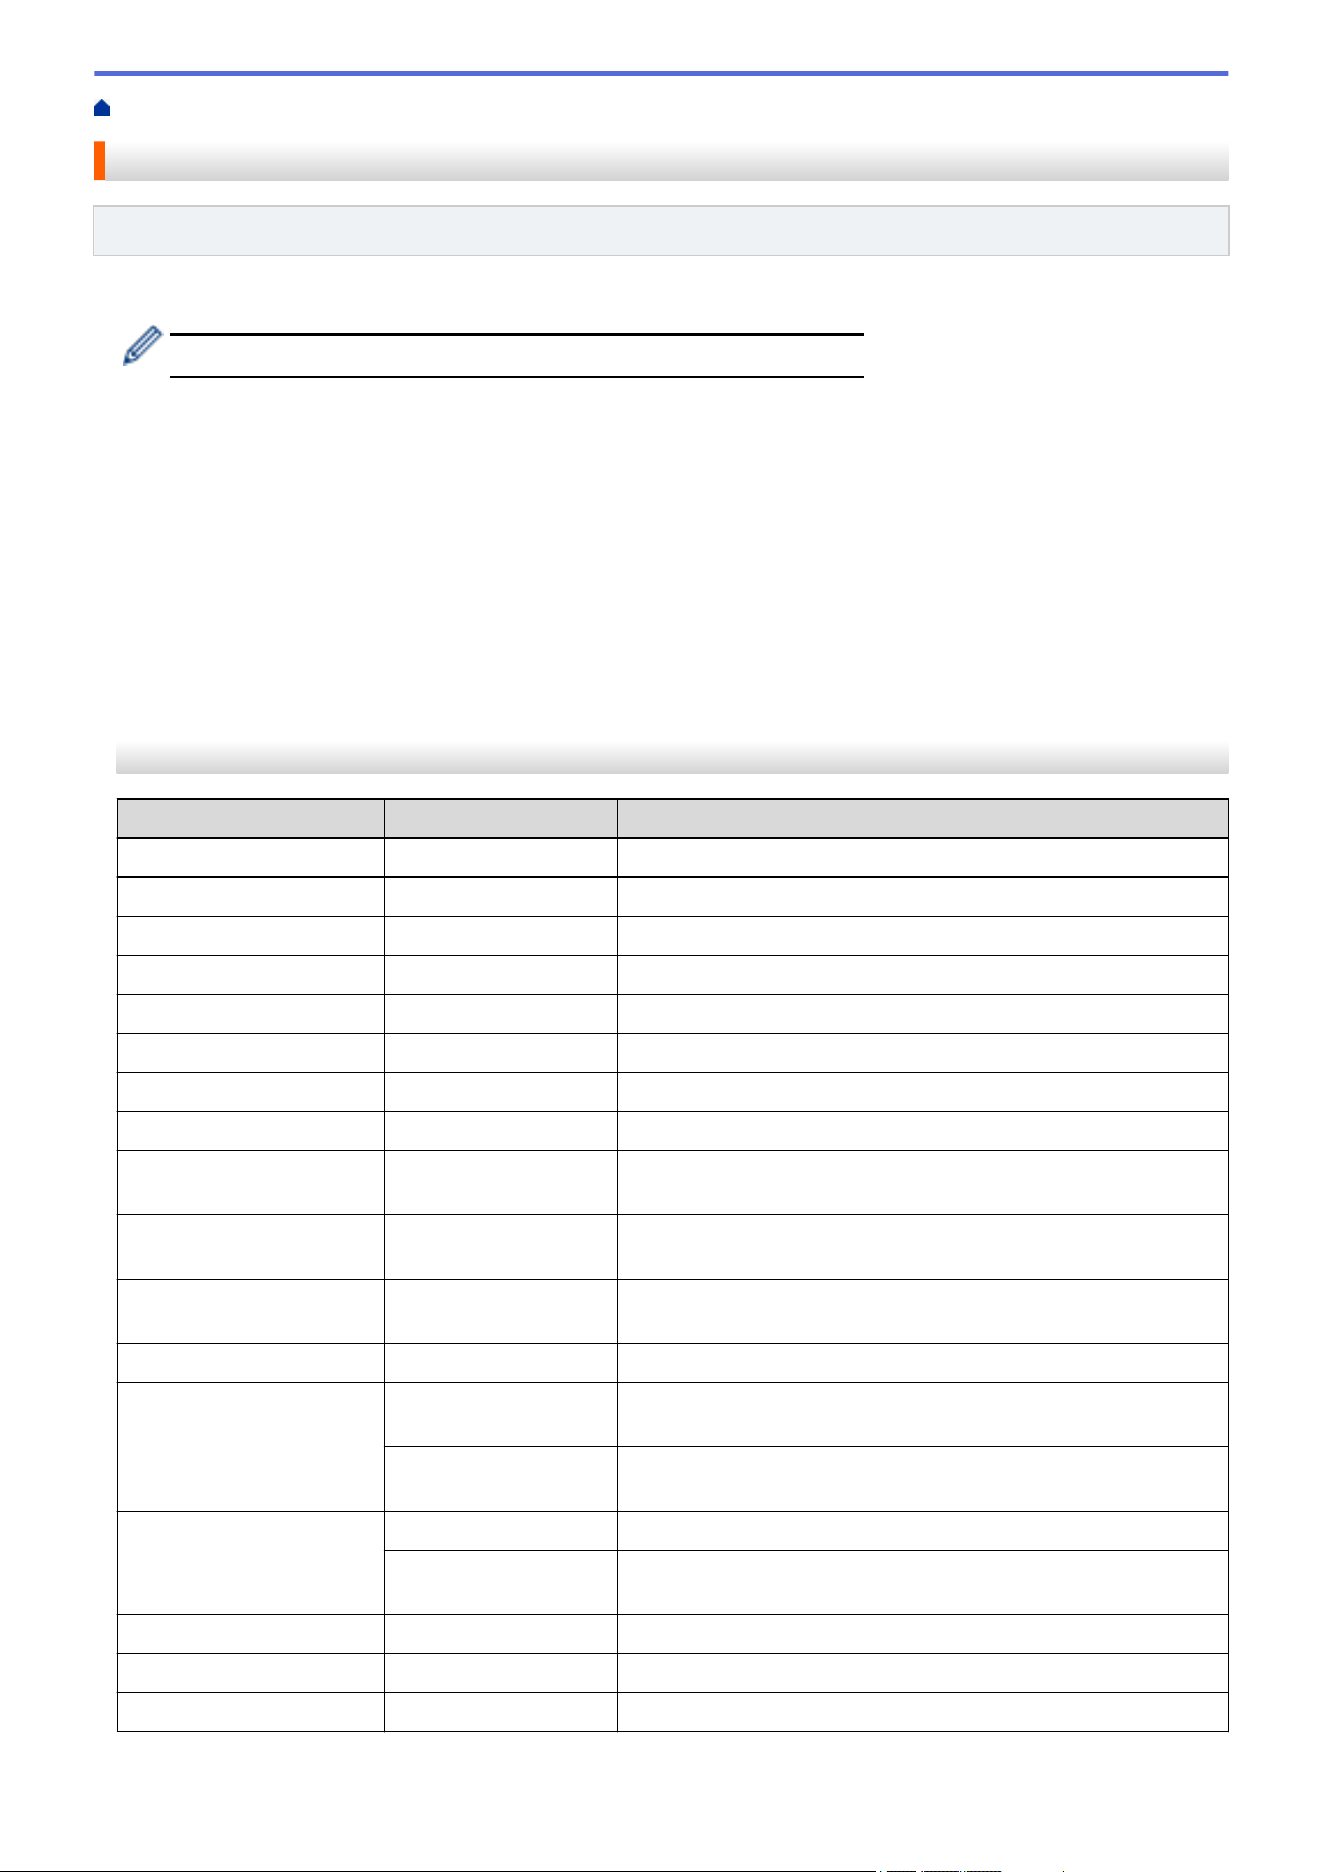
Home > Printer Settings > Change Printer Settings Using the Printer > Settings Tables
Settings Tables
Related Models: TD-2350D/TD-2350DF
The Settings tables will help you understand the menu selections and options.
Some settings may differ depending on the firmware (printer software).
>> [Settings]
>> [Template Settings]
>> [Information]
>> [Administration]
>> [Remote Update] (Network)
>> [Update from USB] (USB Flash Drive)
>> [Wired LAN]
>> [WLAN]
>> [Bluetooth]
>> [Media]
>> [Custom QR Code]
[Settings]
Level 1
Level 2 Descriptions
Print Density
- Adjust the printer’s printing density.
Auto Cut
- Set the cutting method when printing multiple labels.
Print Adjust (X)
- Adjust the print position.
Print Adjust (Y)
- Adjust the print position.
Exit Position
- Select the media exit location.
Tear Position
- Adjust the tear position.
Print Speed
- Select the printer’s printing speed.
Text Direction
- Select the printing orientation.
Auto Power Off
- Specify the period of time that passes before the printer turns
off automatically.
Auto Sleep
- Set the amount of time to pass before the printer automatically
enters sleep mode.
LCD Contrast
- Set the contrast of the LCD. The higher the number, the
stronger the contrast.
Backlight
- Switch the backlight on or off.
Sensor(Transmissive) Detection
Sensitivity
Adjust the sensitivity of the sensor that detects the gaps
(spacing) for die-cut labels.
Luminescence
Adjust the amount of light emitted by the transmissive/gap
sensor.
Sensor(Reflective) Mark Detection
Adjust the precision of the sensor that detects the black marks.
Luminescence
Adjust the amount of light emitted by the reflective/black mark
sensor.
Charge Setting
- Select the charge percentage to stop charging the battery.
Home Screen
- Select the screen displayed in standby mode.
Cover Setting
- Select the action after closing the Roll Compartment Cover.
263
[Template Settings]
Level 1 Level 2 Descriptions
Confirm Print
- Select whether a message appears before printing so that the
number of copies can be confirmed.
Serialize Mode Cont From Last
Select to serialize from the last number printed.
From Starting #
Select to serialize from the default number each time you print.
Serialize Reset
- Reset the sequential number to the default number.
Default Print
Quantity
- Specify the default value for the print quantity.
Temporary Date
- Enter the date directly into the template.
Temporary Time
- Enter the time directly into the template.
Default Templates
- Select whether or not to display preset templates.
[Information]
Level 1
Level 2 Descriptions
Information
- Display information when the information icon is displayed.
Configuration
- Display the printer information.
Print Configuration All
Print the printer setup information (missing dot test pattern, usage
log, printer settings, wireless setting information, and transfer
data).
Usage Log
Print the printer usage log.
Printer Settings
Print the printer settings.
Transfer Data
Print the transfer data.
[Administration]
To prevent date and time changes made by printer operations, set a passcode for the [Administration]
menu to ensure security.
Level 1
Level 2 Descriptions
Command Mode
- Select the type of command mode.
Date Format
- Select the date format.
Time Format
- Select the time format for the clock.
Language
- Select the language of the LCD.
Unit
- Select the measurement units for displayed settings.
Reset Factory Reset
Returns all printer settings, including the communication settings and
device settings, to their default values.
Templates and databases stored in the printer are also deleted.
User Data Reset
Returns all device settings to their default values.
Templates and databases stored in the printer are also deleted.
Network Reset
Returns the communication settings to their default values.
Airplane Mode
- Turn Airplane mode on or off.
When set to on, WLAN and Bluetooth functions are deactivated.
Time & date AutoSync Time
Select whether or not to use the date and time obtained from an NTP
server.
Set Clock
Set the date, time, and display format (12-hour or 24-hour format).
264
Level 1 Level 2 Descriptions
Time & date Clock (On/Off)
Select whether to display the date and time on the LCD.
Print Head Check
- Check the status of the Print Head.
Menu Lock
- Select the checkboxes for any options you want to prevent changes
from the printer's LCD.
After selecting the checkboxes, press a or b to select Finish, and
then press OK to complete the settings.
If the Menu Locks are set, a lock icon is displayed for parameters
that cannot be selected.
Menu Security
- Select if a passcode is required to enter the Administration mode.
When set to on, specify the four-digit password.
Dump Mode
- Print information on data received to date.
Web Based
Management
- Select whether to use Web Based Management.
Firmware Update Check Update
Check for updated firmware and implement the update.
Update
Notification
Set up periodic checks for firmware updates and receive notifications
when updates are available.
[Remote Update] (Network)
Level 1
Level 2 Descriptions
Remote Update
- Available only when the printer is connected to the FTP server and when the templates,
databases, and other files need to be updated.
To set the FTP server information, you must first go to Communication Settings in the Printer Setting Tool.
[Update from USB] (USB Flash Drive)
Level 1
Level 2 Descriptions
Update from USB
- Available only when a USB flash drive containing saved templates, databases, and
other files that need to be updated is connected to the printer.
[Wired LAN]
Level 1
Level 2 Descriptions
TCP/IP Settings
- Specify TCP/IP settings.
Wired LAN Status
- Display the Wired LAN status.
[WLAN]
Level 1
Level 2 Descriptions
WLAN (On/Off)
- Turn the WLAN function on or off.
Network Mode Infrastructure Mode
Select the network mode when you set the WLAN function to
on.
Direct Mode
Infra/Direct Mode
WPS Button Push
- Try to connect to a nearby wireless access point/router.
WPS PIN Code
- Display the printer's eight-digit PIN.
Infra Manual Setup
- Establish a WLAN connection manually in infrastructure mode.
Display the SSID of a nearby wireless access point/router.
After you select the SSID and press OK, the password entry
screen appears.
265
Level 1 Level 2 Descriptions
Direct Manual
Setup
- Establish a WLAN connection manually in wireless direct mode.
Manually enter the SSID and password of a wireless device.
TCP/IP Settings Auto
Specify TCP/IP settings.
Static
WLAN Assistant
- Use the WLAN connection assistant function to configure your
wireless network settings.
WLAN Status Infrastructure Mode
Display the WLAN status.
Direct Mode
[Bluetooth]
Level 1
Level 2 Descriptions
Bluetooth (On/Off)
- Turn the Bluetooth function on or off.
Mode Classic & LE
Select Bluetooth mode.
Classic
Low Energy
Print Barcode
- Print the Bluetooth address and corresponding barcode.
Automatic Reconnection
- Switch to Automatic Reconnection mode (only for Apple
devices: iPad, iPhone, or iPod touch).
Clear History
- Delete automatically paired devices registered in the printer.
View Auth Code
- Select whether to perform confirmation during Bluetooth pairing.
Bluetooth Secure Connect Standard Mode
Select the security mode for Bluetooth connection.
Secure Mode
Bluetooth Status
- Display the status of the Bluetooth function.
[Media]
Level 1
Level 2 Descriptions
Selection
- Select the paper size and paper type.
Calibration
- Detect the size of the set paper.
Detection
- Detect the width of the set paper. Display paper settings in the Selection option that
match the detection results from the paper settings registered with the Printer Setting Tool.
[Custom QR Code]
Display the custom QR code set with the Printer Setting Tool.
Related Information
• Change Printer Settings Using the Printer
266
Home > Printer Settings > Change Printer Settings Using the Printer > Settings Tables
Settings Tables
Related Models: TD-2350DSA
The Settings tables will help you understand the menu selections and options.
Some settings may differ depending on the firmware (printer software).
>> [Settings]
>> [Template Settings]
>> [Information]
>> [Administration]
>> [Remote Update] (Network)
>> [Update from USB device]
>> [Wired LAN]
>> [WLAN]
>> [Bluetooth]
>> [Media]
>> [Custom QR Code]
[Settings]
Level 1
Level 2 Descriptions
Print Density
- Adjust the printer’s printing density.
Auto Cut
- Set the cutting method when printing multiple labels.
Print Adjust (X)
- Adjust the print position.
Print Adjust (Y)
- Adjust the print position.
Exit Position
- Select the media exit location.
Tear Position
- Adjust the tear position.
Print Speed
- Select the printer’s printing speed.
Text Direction
- Select the printing orientation.
Auto Power Off
- Specify the period of time that passes before the printer turns
off automatically.
Auto Sleep
- Set the amount of time to pass before the printer automatically
enters sleep mode.
Display Brightness
- Select the display brightness.
Sensor(Transmissive) Detection
Sensitivity
Adjust the sensitivity of the sensor that detects the gaps
(spacing) for die-cut labels.
Luminescence
Adjust the amount of light emitted by the transmissive/gap
sensor.
Sensor(Reflective) Mark Detection
Adjust the precision of the sensor that detects the black marks.
Luminescence
Adjust the amount of light emitted by the reflective/black mark
sensor.
Charge Setting
- Select the charge percentage to stop charging the battery.
Beeper
- Select the beep volume.
Home Screen
- Select the screen displayed in standby mode.
Cover Setting
- Select the action after closing the Roll Compartment Cover.
267
[Template Settings]
Level 1 Level 2 Descriptions
Touch Mode Setting
- Select the template display style in template touch mode.
Confirm Print
- Select whether a message appears before printing so that the
number of copies can be confirmed.
Serialize Mode Cont From Last
Select to serialize from the last number printed.
From Starting #
Select to serialize from the default number each time you print.
Serialize Reset
- Reset the sequential number to the default number.
Default Print
Quantity
- Specify the default value for the print quantity.
Temporary Date
- Enter the date directly into the template.
Temporary Time
- Enter the time directly into the template.
Search Settings Numerical search
Select the search mode to use.
Alphanumeric search
Default Templates
- Select whether or not to display preset templates.
[Information]
Level 1
Level 2 Descriptions
Information
- Display information when the information icon is displayed.
Configuration
- Display the printer information.
Print Configuration All
Print the printer setup information (missing dot test pattern, usage
log, printer settings, wireless setting information, and transfer
data).
Usage Log
Print the printer usage log.
Printer Settings
Print the printer settings.
Transfer Data
Print the transfer data.
Print History
- View print history on the display.
[Administration]
To prevent date and time changes made by printer operations, set a passcode for the [Administration]
menu to ensure security.
Level 1
Level 2 Descriptions
Command Mode
- Select the type of command mode.
Date Format
- Select the date format.
Time Format
- Select the time format for the clock.
Language
- Select the language of the LCD.
Unit
- Select the measurement units for displayed settings.
Reset Factory Reset
Returns all printer settings, including the communication settings and
device settings, to their default values.
Templates and databases stored in the printer are also deleted.
User Data Reset
Returns all device settings to their default values.
Templates and databases stored in the printer are also deleted.
Network Reset
Returns the communication settings to their default values.
268
Level 1 Level 2 Descriptions
Airplane Mode
- Turn Airplane mode on or off.
When set to on, WLAN and Bluetooth functions are deactivated.
Database
- Select the database stored in the printer and make edits to it.
Time & date AutoSync Time
Select whether or not to use the date and time obtained from an NTP
server.
Clock Manual
Setup
Set the date, time, and display format (12-hour or 24-hour format).
Clock (On/Off)
Select whether to display the date and time on the LCD.
Print Head Check
- Check the status of the Print Head.
Disable Edit
- Disable transition to template editing Mode and prevent template
editing.
Menu Lock
- Select the checkboxes for any options you want to prevent changes
from the printer's LCD.
After selecting the checkboxes, press a or b to select Finish, and
then press OK to complete the settings.
If the Menu Locks are set, a lock icon is displayed for parameters
that cannot be selected.
Menu Security
- Select if a passcode is required to enter the Administration mode.
When set to on, specify the four-digit password.
Dump Mode
- Print information on data received to date.
Web Based
Management
- Select whether to use Web Based Management.
Firmware Update Check Update
Check for updated firmware and implement the update.
Update
Notification
Set up periodic checks for firmware updates and receive notifications
when updates are available.
[Remote Update] (Network)
Level 1
Level 2 Descriptions
Remote Update
- Available only when the printer is connected to the FTP server and when the templates,
databases, and other files need to be updated.
To set the FTP server information, you must first go to Communication Settings in the Printer Setting Tool.
[Update from USB device]
Level 1
Level 2 Descriptions
Update from USB
device
- Available only when a USB flash drive containing saved templates, databases,
and other files that need to be updated is connected to the printer.
[Wired LAN]
Level 1
Level 2 Descriptions
TCP/IP Settings
- Specify TCP/IP settings.
Wired LAN Status
- Display the Wired LAN status.
[WLAN]
Level 1
Level 2 Descriptions
WLAN (On/Off)
- Turn the WLAN function on or off.
269
Level 1 Level 2 Descriptions
Network Mode Infrastructure Mode
Select the network mode when you set the WLAN function to
on.
Direct Mode
Infra/Direct Mode
WPS Button Push
- Try to connect to a nearby wireless access point/router.
WPS PIN Code
- Display the printer's eight-digit PIN.
Infra Manual Setup
- Display the SSID of a nearby wireless access point/router.
After you select the SSID and press OK, the password entry
screen appears.
Direct Manual Setup
- Manually enter the SSID and password of a wireless device.
TCP/IP Settings Auto
Specify TCP/IP settings.
Static
WLAN Assistant
- Use the WLAN connection assistant function to configure your
wireless network settings.
WLAN Status Infrastructure Mode
Display the WLAN status.
Direct Mode
[Bluetooth]
Level 1
Level 2 Descriptions
Bluetooth (On/Off)
- Turn the Bluetooth function on or off.
Mode Classic & LE
Select Bluetooth mode.
Classic
Low Energy
Print Barcode
- Print the Bluetooth address and corresponding barcode.
Automatic Reconnection
- Switch to Automatic Reconnection mode (only for Apple
devices: iPad, iPhone, or iPod touch).
Clear History
- Delete automatically paired devices registered in the printer.
View Auth Code
- Select whether to perform confirmation during Bluetooth pairing.
Bluetooth Secure Connect Standard Mode
Select the security mode for Bluetooth connection.
Secure Mode
Bluetooth Status
- Display the status of the Bluetooth function.
[Media]
Level 1
Level 2 Descriptions
Selection
- Select the paper size and paper type.
Calibration
- Detect the size of the set paper.
Detection
- Detect the width of the set paper. Display paper settings in the Selection option that
match the detection results from the paper settings registered with the Printer Setting Tool.
[Custom QR Code]
Display the custom QR code set with the Printer Setting Tool.
Related Information
• Change Printer Settings Using the Printer
270


Home > Routine Maintenance > Clean Your Printer
Clean Your Printer
We recommend cleaning your printer on a regular basis to maintain its correct performance.
Always disconnect the printer from any power source before cleaning.
>> Cleaning Outside of Unit with Disinfectant Solution
>> Clean the Exterior of the Unit
>> Clean the Label Exit Slot
>> Clean the Label Exit Slot and the Roller of Linerless Models
>> Clean the Roller
>> Clean the Print Head
>> Clean the Print Head of Linerless Models
>> Clean the Roll Guides
>> Clean the Label Support
>> Clean the Label Peeler
Cleaning Outside of Unit with Disinfectant Solution
• Prepare materials:
- Disinfectant solution
We recommend using Hypochlorite water
1
or diluted ethanol
2
.
Avoid using sodium hypochlorite
3
.
- Lint free cloth
• Turn off the printer, unplug the AC Adapter and AC Power Cord, and remove the battery.
Lightly spray a soft, lint-free cloth with disinfectant, and wipe the printer's surfaces gently and quickly. After
wiping, leave the covers open and wait until the moisture dries completely.
After drying, attach the power plug and battery.
IMPORTANT
- Turn off the printer, remove the power plug, and remove the battery before disinfecting.
- DO NOT spray disinfectant directly onto the printer.
- Prevent moisture from entering the heat dissipation holes and gaps around buttons, connectors, and
battery terminals.
- DO NOT use flammable sprays or organic solvents such as benzine or thinner. There is a risk of fire
or electric shock.
- DO NOT use detergents that contain bleach or abrasives.
- When disinfecting handheld items, refrain from holding them in your hand but instead place them on a
table.
- When using diluted ethanol as a disinfectant, move to a well-ventilated room.
- Wash your hands thoroughly after using disinfectants.
Clean the Exterior of the Unit
Wipe any dust and marks from the main unit using a soft, dry cloth. Use a cloth slightly damp with water on
difficult to remove marks.
1 Hypochlorous acid water, an aqueous solution, is used to clean and disinfect food, machinery, and equipment, as well as for hand washing.
2 Dilute in the ratio of anhydrous ethanol: 7, water: 3.
3 There are products with names similar to hypochlorous acid water that contain sodium hypochlorite as an ingredient, but sodium hypochlorite
solutions contain bleach. These products are not suitable for disinfecting the product and should not be used.
272
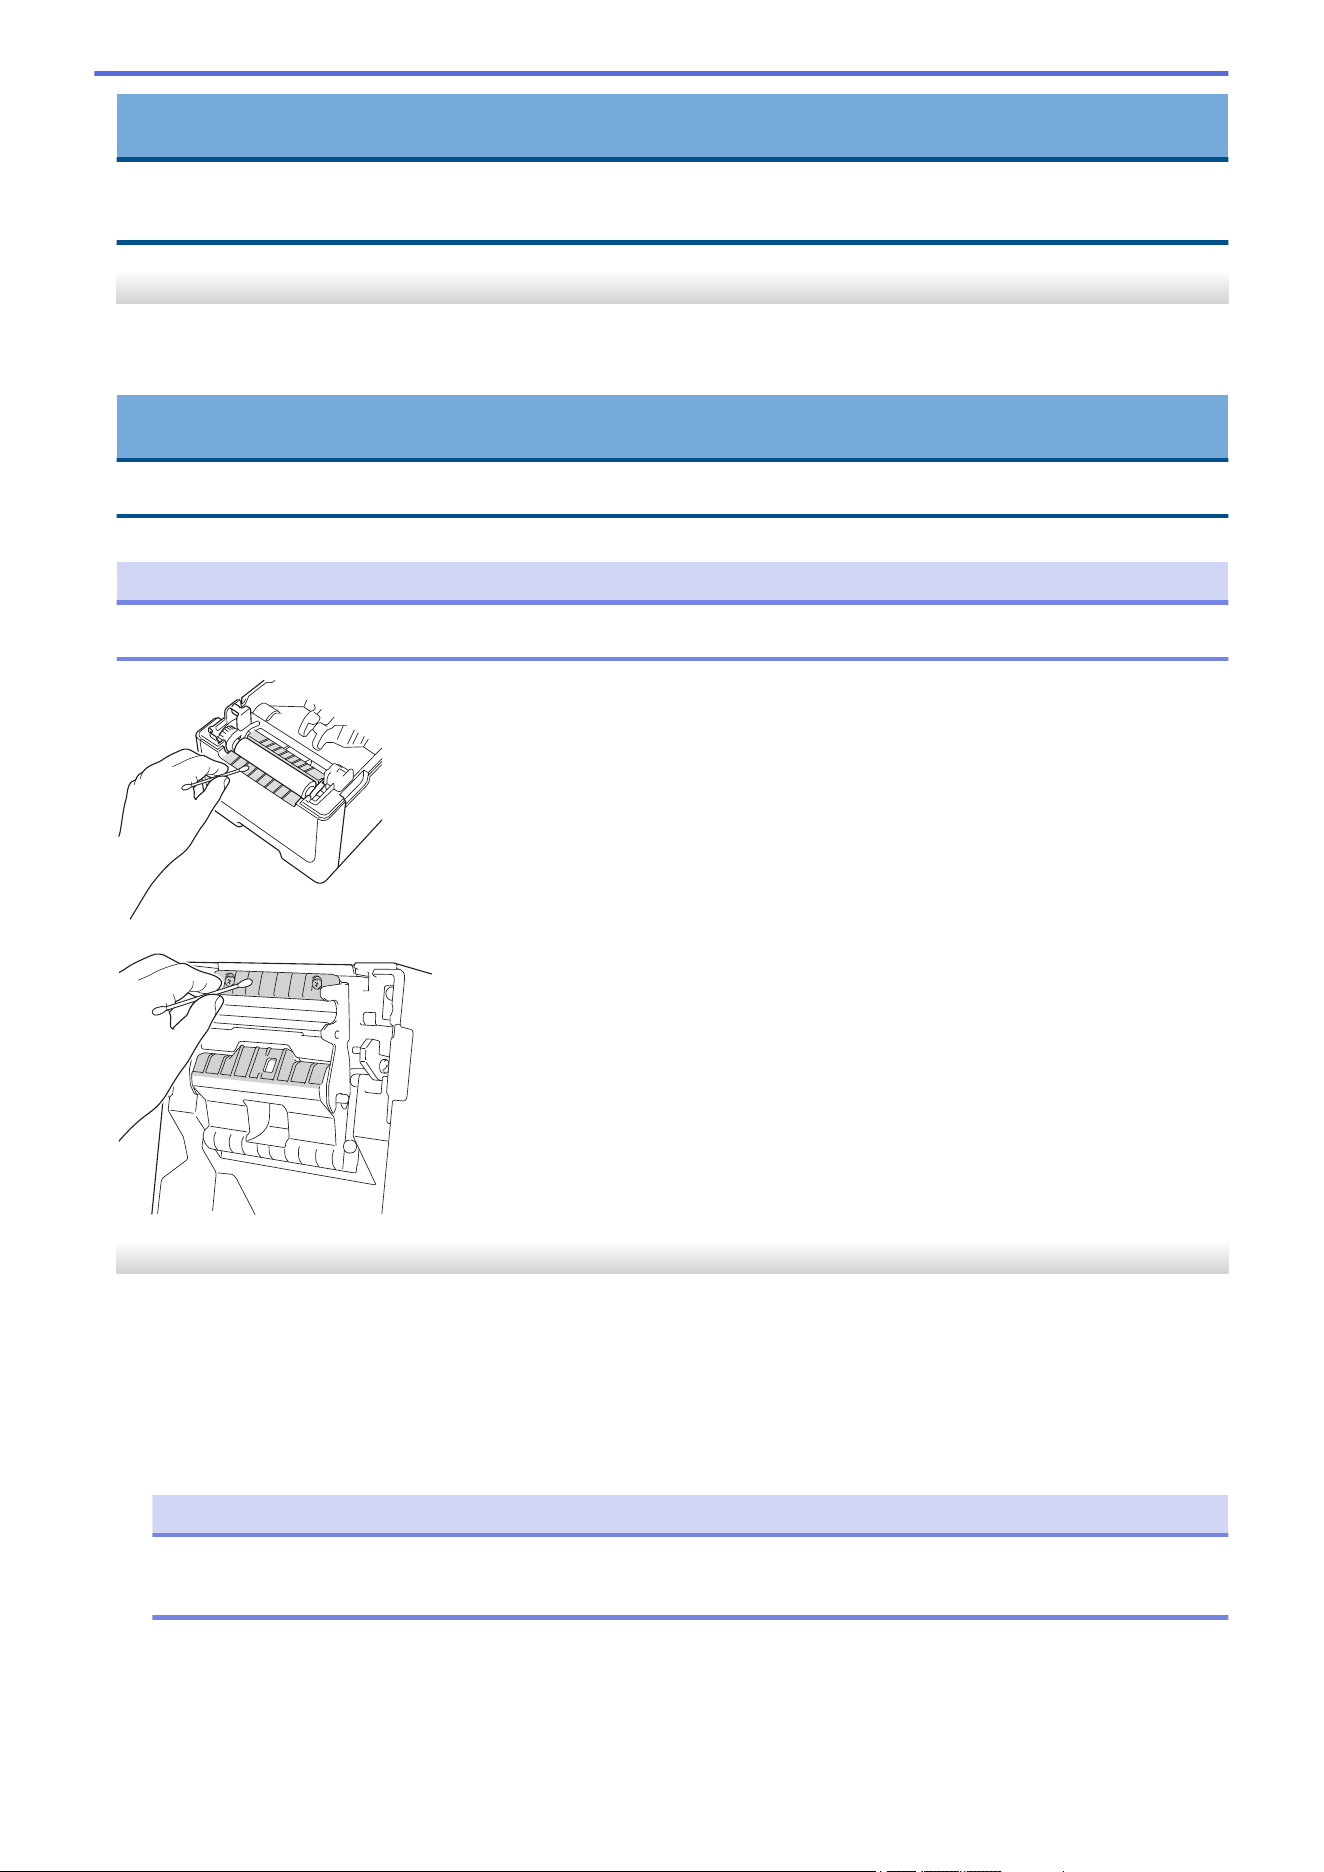
IMPORTANT
DO NOT use paint thinner, benzene, alcohol or any other organic solvent. These may deform or damage the
printer case.
Clean the Label Exit Slot
If adhesive residue gets attached to the Label Exit Slot, it may cause label jams. Clean the Label Exit Slot with a
dry cotton swab.
IMPORTANT
DO NOT use alcohol to clean the Label Exit Slot.
NOTE
Always remove the ejected labels from the Label Exit Slot. If the slot becomes blocked, label jams may occur.
Clean the Label Exit Slot and the Roller of Linerless Models
• If adhesive residue gets attached to the Label Exit Slot, it may cause label jams. Use the adhesive side of a
Label to remove the dust or stains from the Label Exit Slot.
• The Roller may need cleaning if the print quality is poor. Use the adhesive side of a Label to remove the dust
or stains from the Roller.
We recommend cleaning the Label Exit Slot and the Roller when changing the label roll.
NOTE
Always remove the ejected labels from the Label Exit Slot. If the slot becomes blocked, label jams may
occur.
273

Clean the Roller
Wipe the roller with a lint-free cloth lightly moistened with isopropyl alcohol or ethanol. After cleaning the roller,
make sure that no lint or other material remains on the roller.
Use isopropyl alcohol or ethanol according to the manufacturer's safety guidelines, as applicable.
Clean the Print Head
Wipe the Print Head with a lint-free cloth or cotton swab lightly moistened with isopropyl alcohol or ethanol.
We recommend cleaning the Print Head monthly.
(1)
IMPORTANT
DO NOT touch the Print Head directly with bare hands to prevent electrostatic discharge and corrosion.
- Use isopropyl alcohol or ethanol according to the manufacturer's safety guidelines, as applicable.
- DO NOT clean the small clear window on the sensor (1).
- Cleaning the platen roller with solutions or abrasive materials will damage and may shorten the service
life of the platen roller.
Clean the Print Head of Linerless Models
Wipe the Print Head with a lint-free cloth or cotton swab lightly moistened with isopropyl alcohol or ethanol.
We recommend cleaning the Print Head when changing the label roll.
274
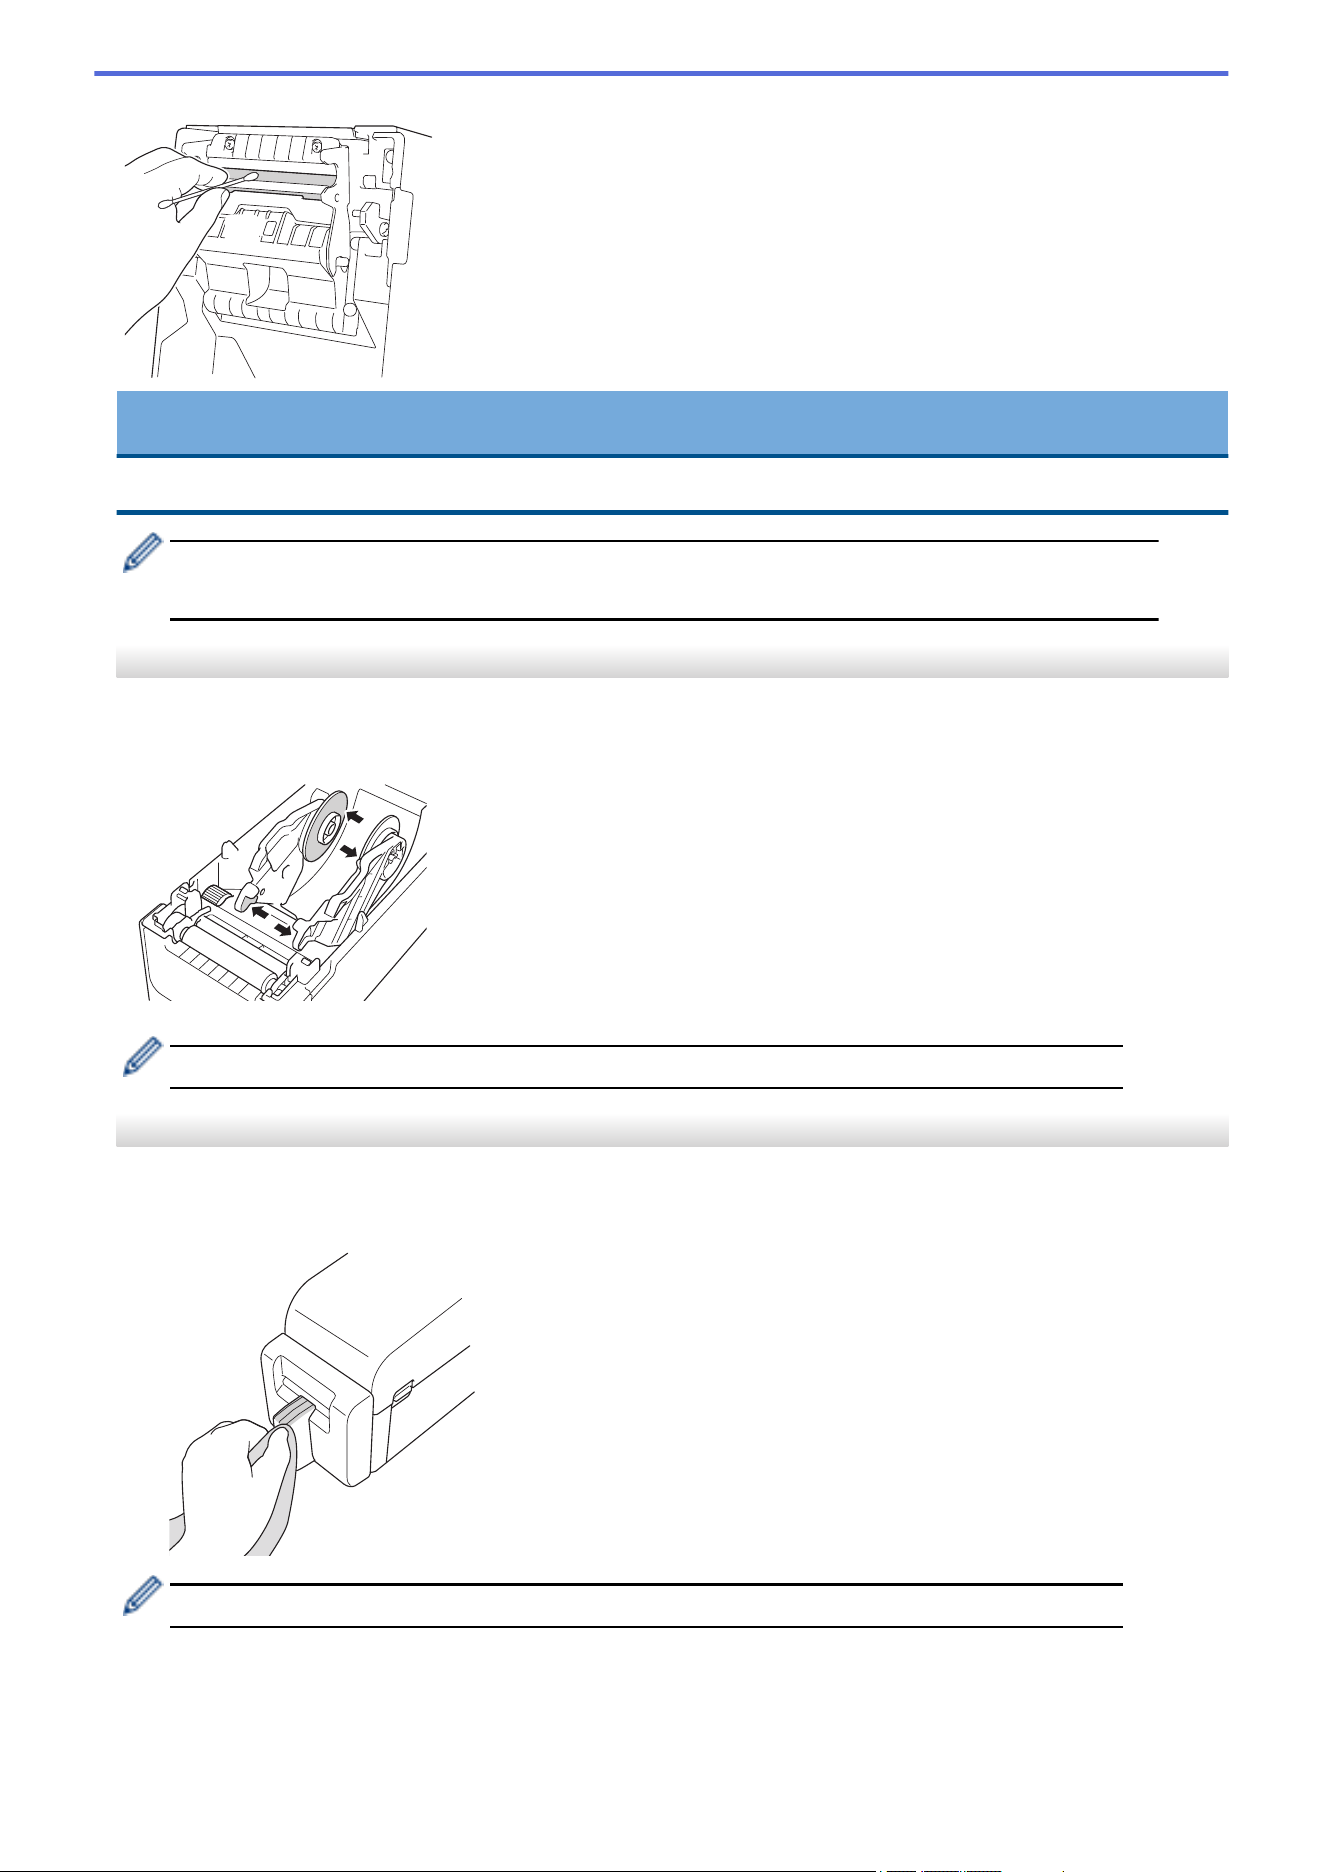
(1)
IMPORTANT
DO NOT touch the Print Head directly with bare hands to prevent electrostatic discharge and corrosion.
- Use isopropyl alcohol or ethanol according to the manufacturer's safety guidelines, as applicable.
- DO NOT clean the small clear window on the sensor (1).
Clean the Roll Guides
Wipe the Roll Guides with a lint-free cloth lightly moistened with isopropyl alcohol or ethanol.
We recommend cleaning the Roll Guides when changing the label roll.
Use isopropyl alcohol or ethanol according to the manufacturer's safety guidelines, as applicable.
Clean the Label Support
Wipe the Label Support with a lint-free cloth lightly moistened with isopropyl alcohol or ethanol.
We recommend cleaning the Label Support when changing the label roll.
Use isopropyl alcohol or ethanol according to the manufacturer's safety guidelines, as applicable.
275
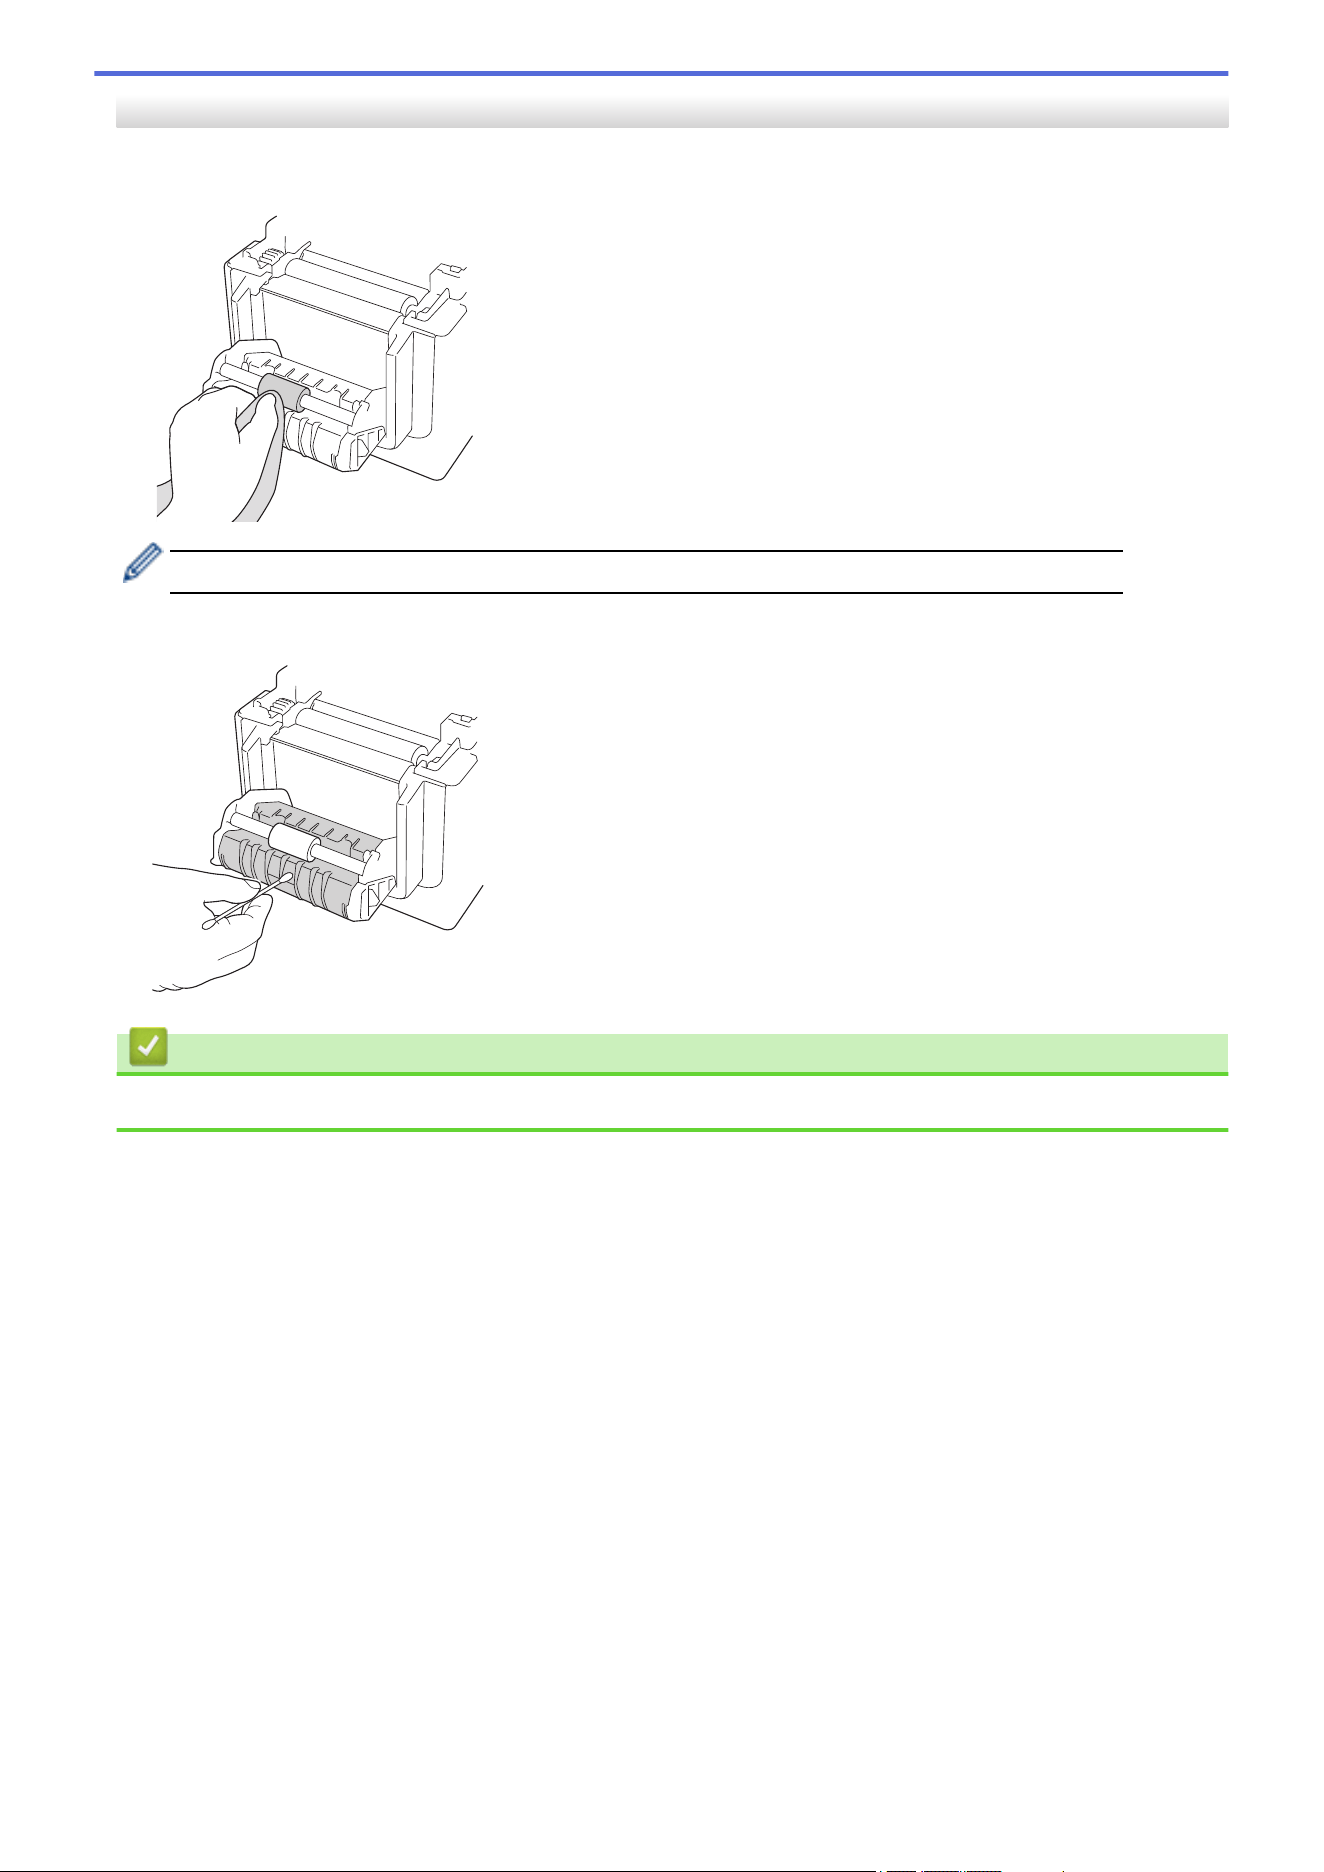
Clean the Label Peeler
1. Wipe the roller with a lint-free cloth lightly moistened with isopropyl alcohol or ethanol. After cleaning the
roller, make sure that no lint or other material remains on the roller.
Use isopropyl alcohol or ethanol according to the manufacturer's safety guidelines, as applicable.
2. If adhesive residue gets on the Label Output Slot, it may cause label jams. Clean the Label Output Slot with a
dry cotton swab.
Related Information
• Routine Maintenance
276
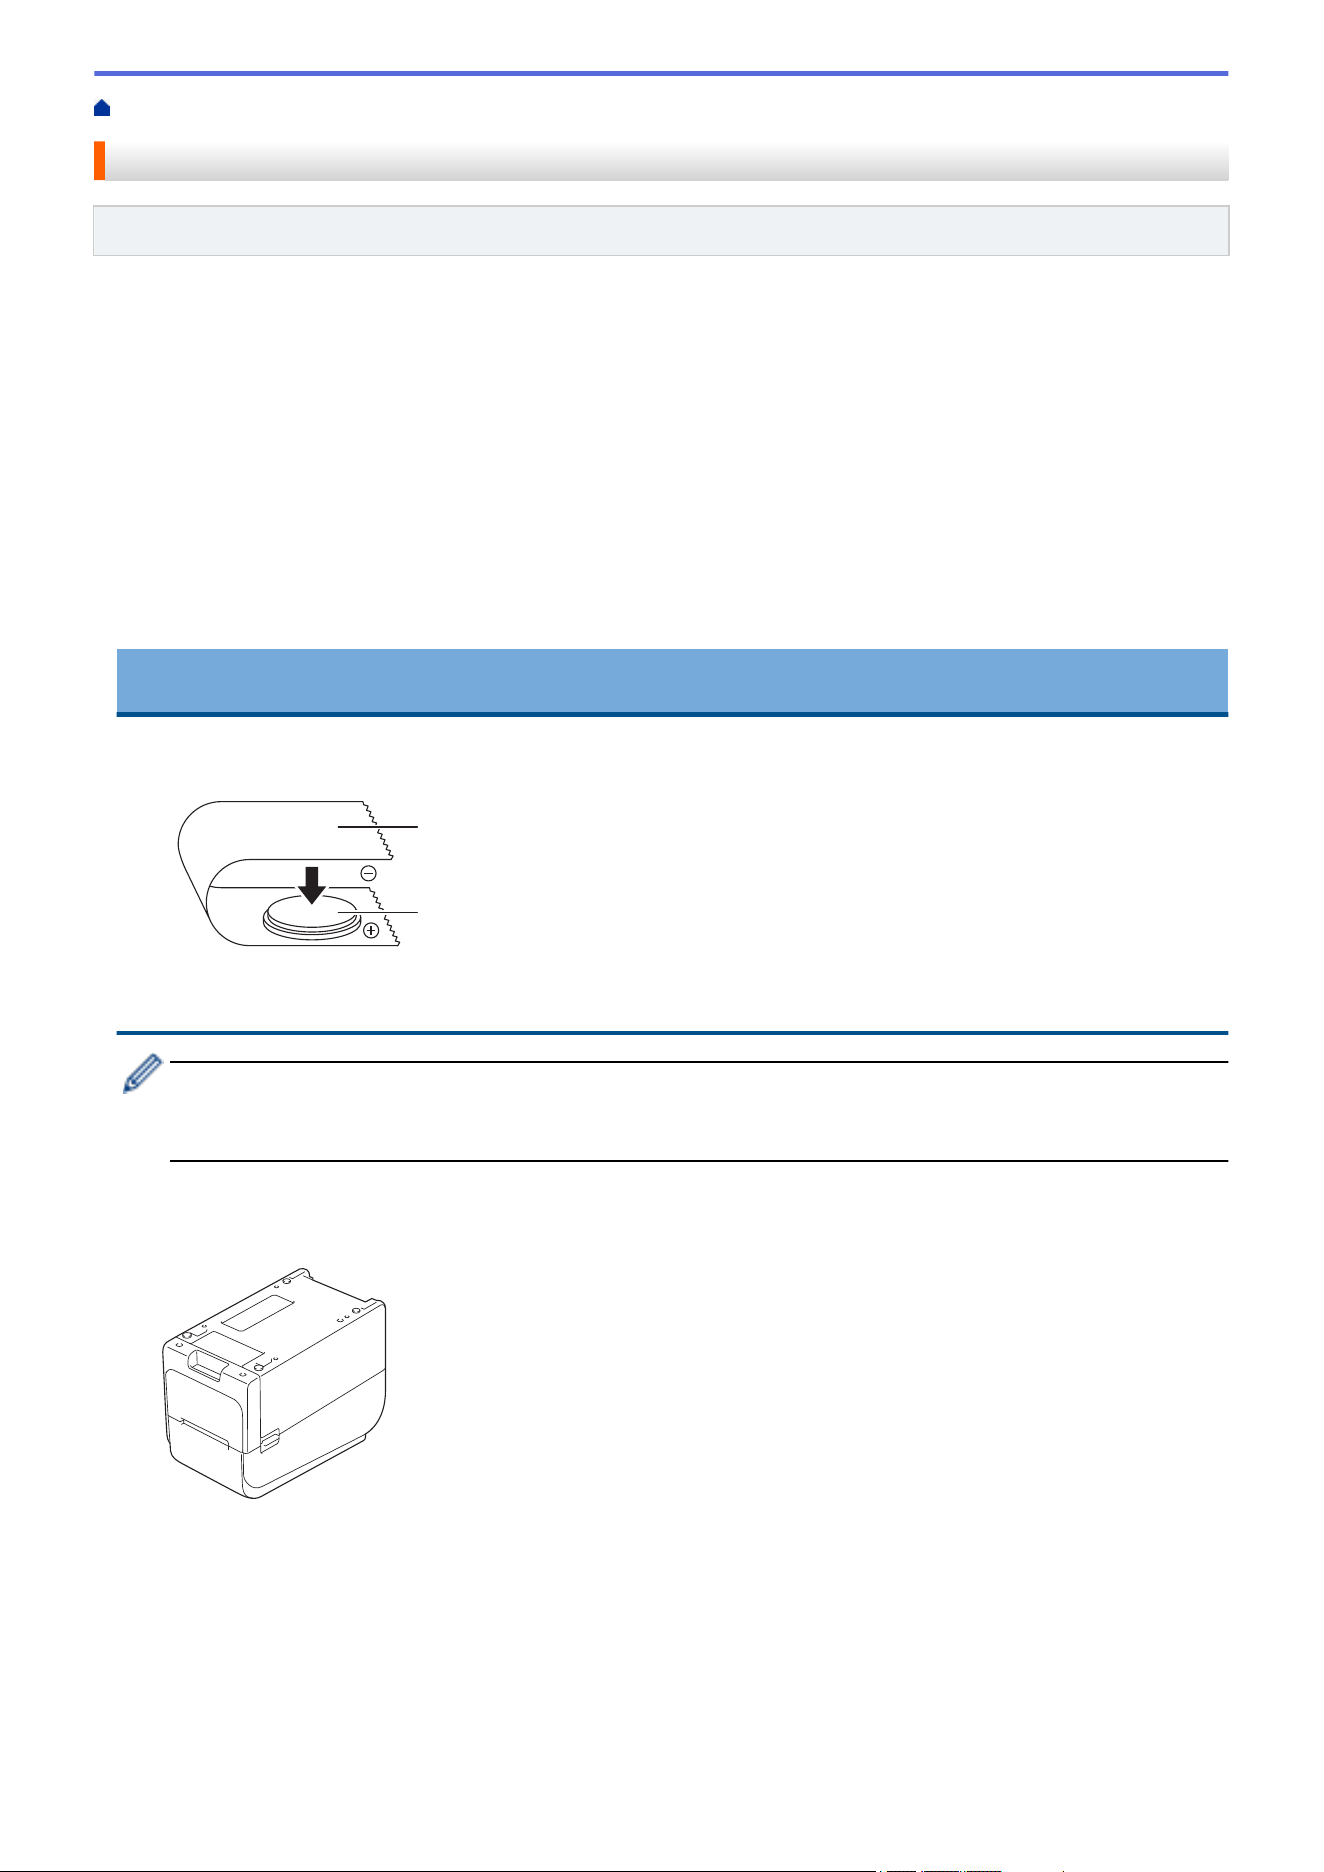
Home > Routine Maintenance > Replace the Coin Cell Battery
Replace the Coin Cell Battery
Related Models: TD-2320D/TD-2350D/TD-2320DF/TD-2350DF/TD-2350DSA
A coin cell battery is used as a backup power supply to maintain the settings for the internal clock. Battery power
is consumed even if the printer is not in use.
• Remove the battery if you do not intend to use the printer for an extended period of time.
• We recommend replacing the battery every two years. Some coin cell batteries have a short life span, and
depending on the battery purchased, you may need to replace it sooner than two years. Replacing the
battery is necessary according to its life span.
• If the coin cell battery runs out, the printer will print an incorrect date and time.
• If the clock is reset while power is supplied to the machine, replace this battery. When replacing the battery,
use a CR2032 Coin Cell battery.
• Dispose of the battery at an appropriate collection point, not in the general waste stream. Be sure to observe
all applicable federal, state, and local regulations.
IMPORTANT
• Use only recommended batteries. Other batteries may cause damage to the printer.
• When storing or discarding a battery, wrap it with cellophane tape to prevent it from short-circuiting.
1
2
1. Cellophane tape
2. Coin cell battery
After a new coin cell battery is installed, the printer may display the message [Button battery low.
The clock will reset soon.] If this message appears, you can continue using the printer. This
message is transient and will not reappear.
1. Disconnect the printer from the AC power outlet.
2. Turn over the printer.
277
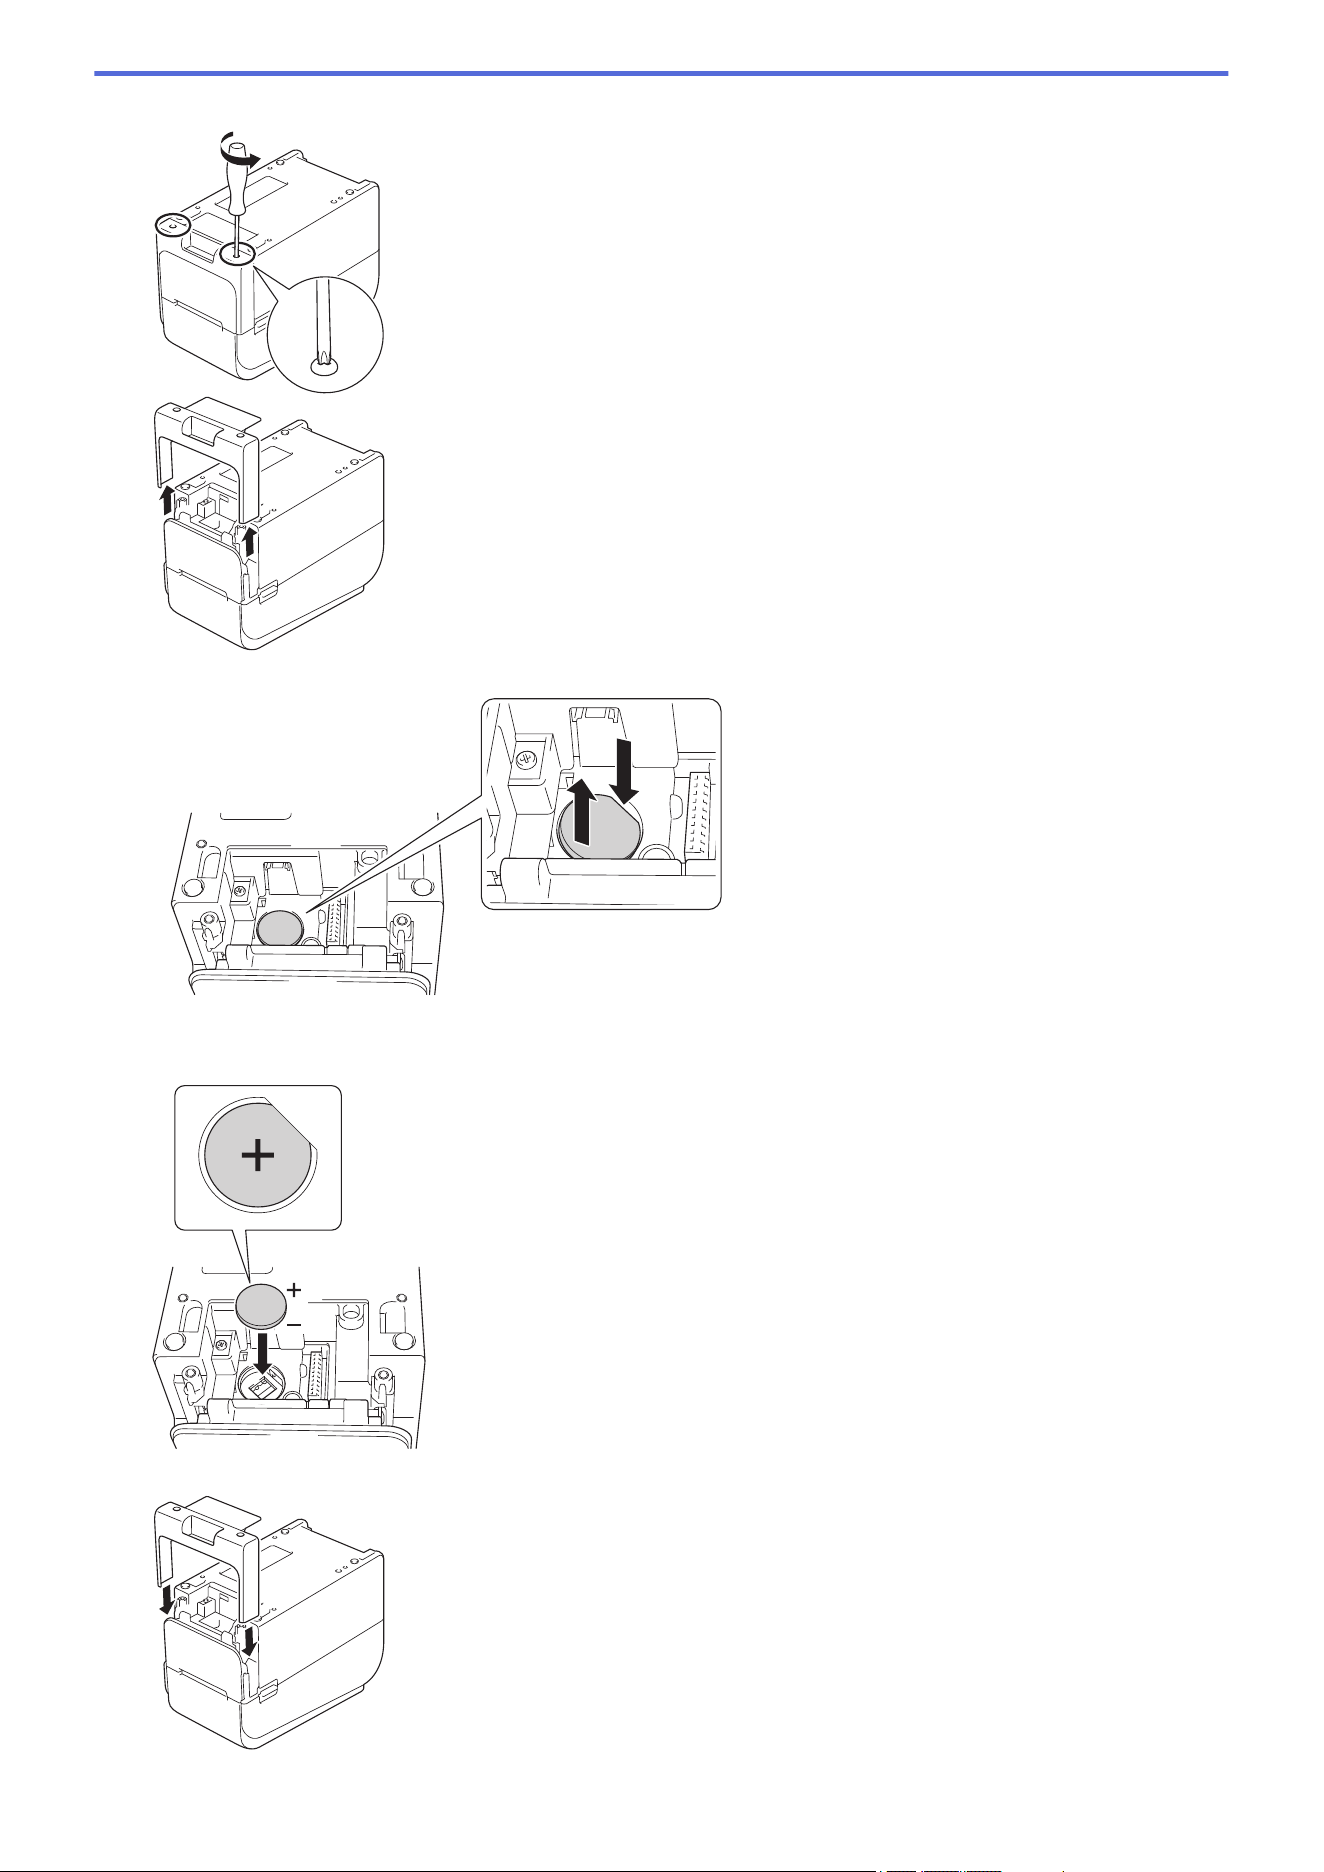
3. Remove the front cover base using a phillips screwdriver.
4. Press the right side of the battery and remove the battery as shown in the illustration.
5. Insert the new battery into the battery slot, making sure the battery is level and its positive side is facing up.
6. Reattach the front cover base using a phillips screwdriver.
278
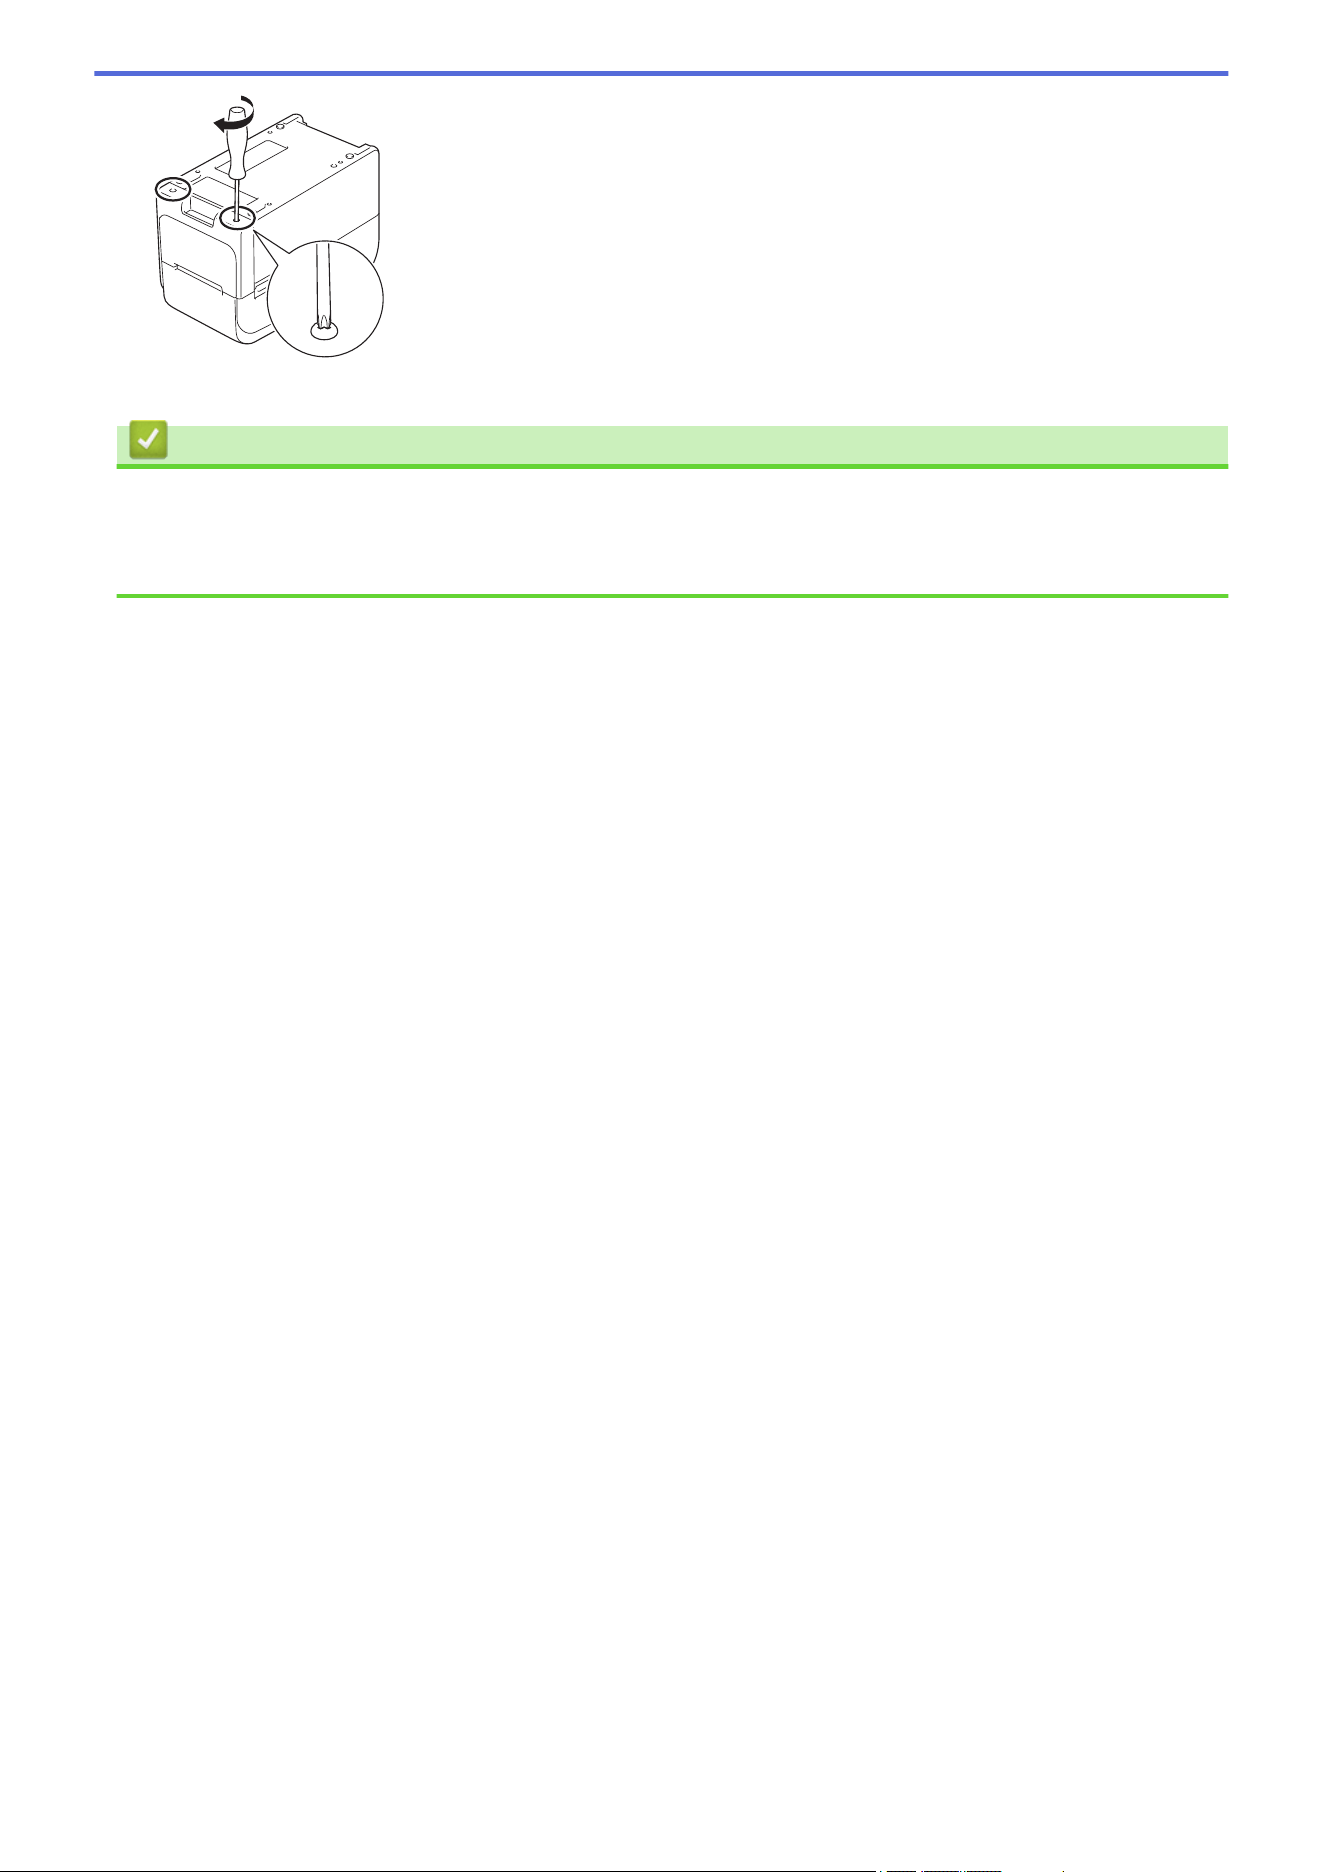

Home > Routine Maintenance > Replace the Parts
Replace the Parts
The Print Head, Platen Roller, and Cutter will wear during the life of the printer and may need replacement
depending on different factors such as media type and volume printed. Tracking the print distance and cutter
counts can be used as a guide for predicting future replacement timing. Cutter sharpness is also affected by
factors other than the number of cuts.
Use the following methods to check the replacement period:
• Print and confirm by printing the Printer Settings Report using keys or menu.
For more information, see Related Topics: Confirm Printer Settings.
• Confirm the printer information using the Printer Setting Tool.
Start the Printer Setting Tool, and then select Device Settings > Maintenance > Check Printer
Information to view the printer information.
• Print and confirm by printing the printer information using the Printer Setting Tool.
Start the Printer Setting Tool, and then select Device Settings > Maintenance > Print Unit Settings to
print.
• Confirm part replacements through BRAdmin Professional.
To download BRAdmin Professional 4 software (Windows only), go to
support.brother.com.
Add the number of cuts and total print length in the information displayed in the device list.
Related Information
• Routine Maintenance
Related Topics:
• Confirm Printer Settings
280
Home > Routine Maintenance > Check the Print Head
Check the Print Head
Regularly checking the Print Head's condition can help maintain good print quality.
>> TD-2310D/TD-2320D/TD-2350D/TD-2320DF/TD-2350DF/TD-2350DSA
>> TD-2350D/TD-2350DF/TD-2350DSA
TD-2310D/TD-2320D/TD-2350D/TD-2320DF/TD-2350DF/TD-2350DSA
To check the Print Head's condition using the Printer Setting Tool (Windows), follow these steps:
1. Start the Printer Setting Tool.
Click Start > Brother > Printer Setting Tool.
2. Click Device Settings.
3. Click Management > Print Head Check When Powered On.
4. Select On.
5. Click Apply.
6. Turn off the printer and then turn on the printer.
7. Start the Printer Setting Tool.
Click Start > Brother > Printer Setting Tool.
8. Click Device Settings.
9. Click Maintenance > Check Printer Information.
10. Check head_disconnection_count in the Check Printer Information window.
11. If the value of head_disconnection_count is other than zero, print the print pattern you are using.
• If there is no problem with the print quality, continue to use it.
• If there is any print quality problem, replace the Print Head.
TD-2350D/TD-2350DF/TD-2350DSA
To check the Print Head's condition, follow these steps:
1. Turn the printer on.
2. Press Menu.
3. Press a or b to select the following:
a. Select [Administration]. Press OK.
b. Select [Print Head Check]. Press OK.
The printer will show the results of the Print Head check.
4. Press OK to return to the menu.
5. If there is any problem with the results, print the print pattern you are using.
• If there is no problem with the print quality, continue to use it.
• If there is any print quality problem, replace the Print Head.
Related Information
• Routine Maintenance
281


Home > Troubleshooting > If You Are Having Difficulty with Your Machine
If You Are Having Difficulty with Your Machine
This chapter explains how to resolve typical problems you may encounter when using the printer. If you have any
problems with the printer, first make sure you have performed the following tasks correctly:
• Connect the printer to an AC power outlet. For more information, see Related Information.
• Connect the AC Adapter. For more information, see Related Information.
• Remove all protective packaging from the printer.
• Install and select the correct printer driver. For more information, see Related Topics.
• Connect the printer to a computer or mobile device. For more information, see Related Information.
• Close the Roll Compartment Cover completely.
• Insert the media correctly. For more information, see Related Information.
If you still have problems, see Related Information. If after reading the topics you are unable to resolve the
problem, visit the Brother support website at
support.brother.com.
Related Information
• Troubleshooting
Related Topics:
• Connect the Power Cord
• Install Printer Drivers and Software on a Computer
• Connect the Printer to a Computer
• Load a Media Roll
283
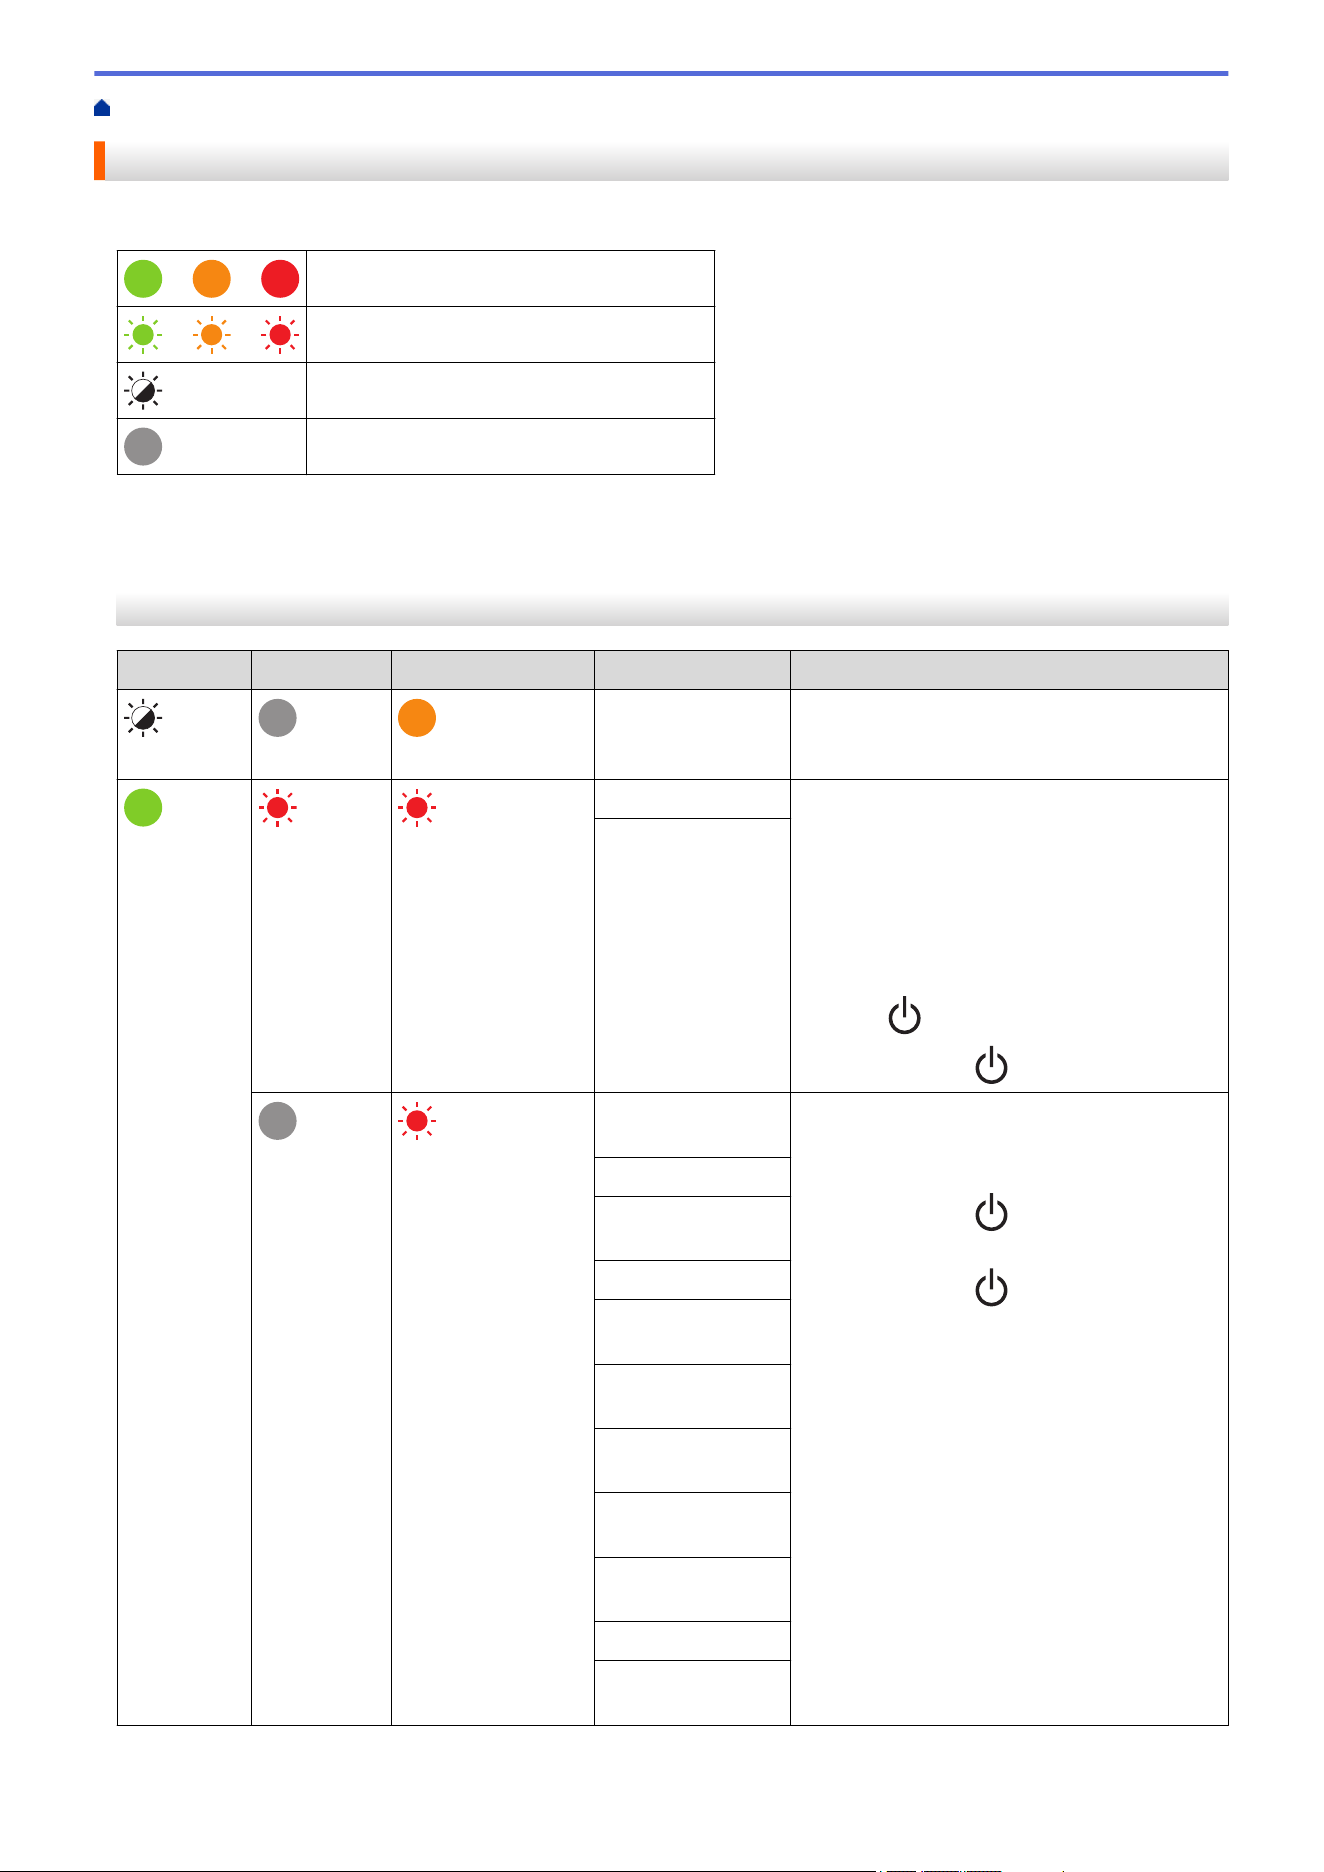
Home > Troubleshooting > Error and Maintenance LEDs
Error and Maintenance LEDs
The LEDs light and flash to indicate the printer's status.
or or
LED is lit in the color shown.
or or
LED is flashing in the color shown.
LED can be off, lit, or flashing in any color.
LED is off.
>> TD-2310D/TD-2320D/TD-2320DF
>> TD-2350D/TD-2350DF
>> TD-2350DSA
TD-2310D/TD-2320D/TD-2320DF
Power LED
Roll LED Status LED Condition Action
The Roll
Compartment
Cover is open.
Close the Roll Compartment Cover until it
locks into place.
Repeat (1
second off, 1
second on)
Repeat (1 second
off, 1 second on)
Feed errors 1. Open the Roll Compartment Cover.
2. Place the correct media in the printer.
3. Confirm the media is correctly placed in
the media path and correctly positioned
relative to the sensors.
4. Close the Roll Compartment Cover until it
locks into place.
5. Press to clear the error.
6. Press and hold to turn off the printer.
Media end error
Repeat (1 second
off, 1 second on)
Communication
command error
Do one of the following:
• Open and close the Roll Compartment
Cover.
• Press and hold . or press any key
other than a and b.
• Press and hold to turn off the printer.
BLF file error
Database search
error
No template error
Time acquisition
error
Access point
search error
Access point
connection error
Maximum print
length over
ESC/P memory full
error
JPEG file error
USB host memory
full error
284
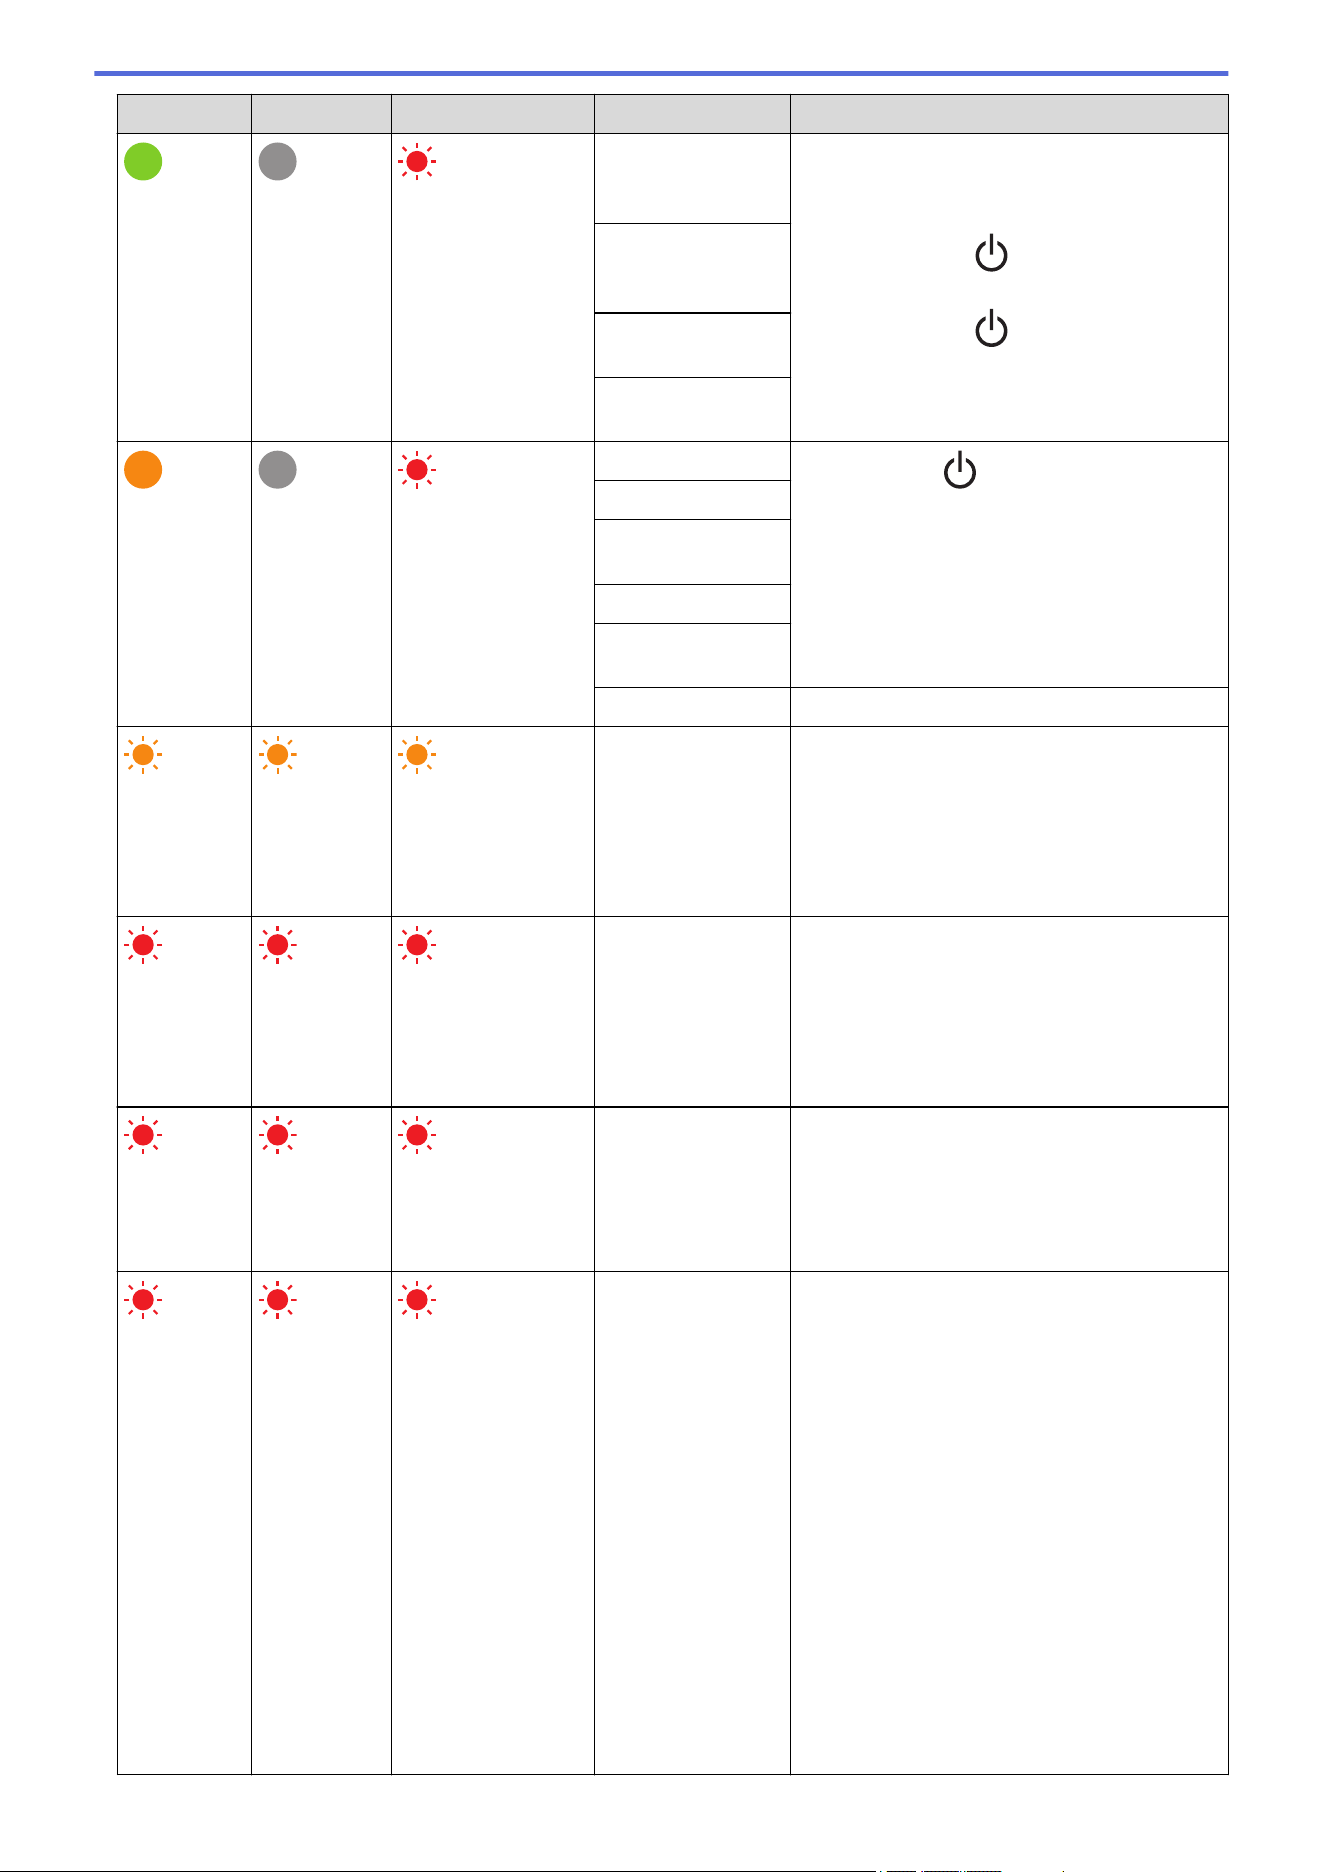
Power LED Roll LED Status LED Condition Action
Repeat (1 second
off, 1 second on)
Data update
incomplete error
(network)
Do one of the following:
• Open and close the Roll Compartment
Cover.
• Press and hold . or press any key
other than a and b.
• Press and hold to turn off the printer.
Data update
incomplete error
(USB)
Firmware update
incomplete error
High temperature
error
Repeat (0.9
seconds off, 0.3
seconds on, 0.3
seconds off, 0.3
seconds on)
Cutter error
Press and hold to turn off the printer.
Mass storage error
Print Head not
detected
Battery error
Incorrect Option
assembled
Charge required Connect the AC Adapter.
Three times
(0.5
seconds off,
0.5 second
on)
Three times
(0.5 seconds
off, 0.5
second on)
Three times (0.5
seconds off, 0.5
second on)
The coin cell
battery has no
charge or is not
installed.
Replace or install the coin cell battery.
Three times
(0.5
seconds off,
0.5 second
on)
Three times
(0.5 seconds
off, 0.5
second on)
Three times (0.5
seconds off, 0.5
second on)
The Print Head is
disconnected.
Print the print pattern you are using.
• If there is no problem with the print
quality, continue to use it.
• If there is any print quality problem,
replace the Print Head.
Repeat (0.3
seconds off,
0.3 second
on)
Repeat (0.3
seconds off,
0.3 second
on)
Repeat (0.3
seconds off, 0.3
second on)
System error Contact Brother Customer Service.
Repeat (0.9
seconds off,
0.3 second
on)
Repeat (0.9
seconds off,
0.3 second
on, 0.3
seconds off,
0.3 second
on, 0.3
seconds off,
0.3 second
on)
Repeat (0.9
seconds off,
0.3 second
Repeat (0.9
seconds off,
0.3 second
on)
Repeat (0.9
seconds off,
0.3 second
on, 0.3
seconds off,
0.3 second
on, 0.3
seconds off,
0.3 second
on)
Repeat (0.9
seconds off,
0.3 second
Repeat (0.9
seconds off, 0.3
second on)
Repeat (0.9
seconds off, 0.3
second on, 0.3
seconds off, 0.3
second on, 0.3
seconds off, 0.3
second on)
Repeat (0.9
seconds off, 0.3
second on, 0.3
seconds off, 0.3
second on, 0.3
seconds off, 0.3
second on, 0.3
System error
Contact Brother Customer Service.
285
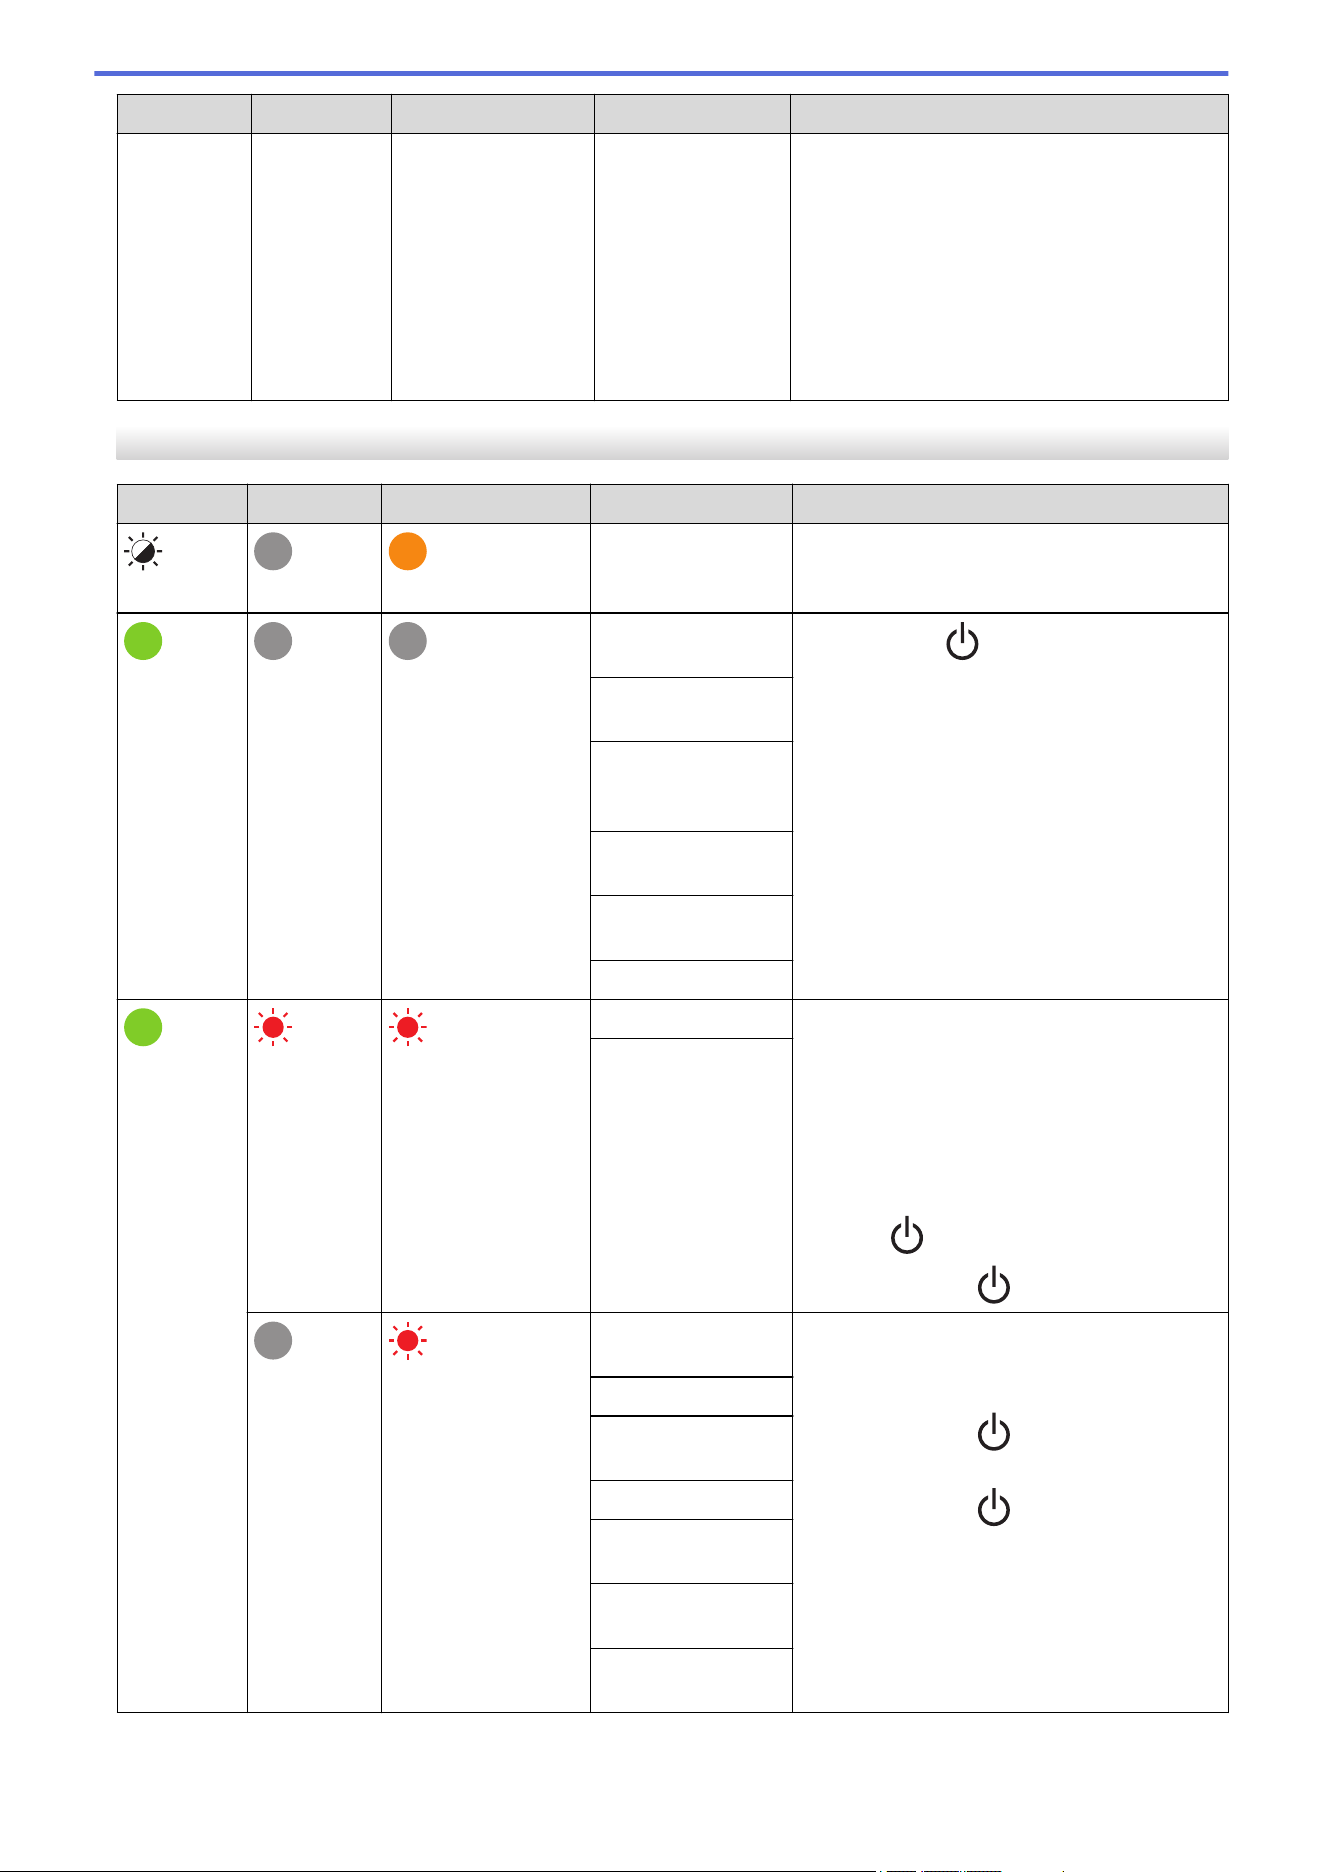
Power LED Roll LED Status LED Condition Action
on, 0.3
seconds off,
0.3 second
on, 0.3
seconds off,
0.3 second
on, 0.3
seconds off,
0.3 second
on)
on, 0.3
seconds off,
0.3 second
on, 0.3
seconds off,
0.3 second
on, 0.3
seconds off,
0.3 second
on)
seconds off, 0.3
second on)
TD-2350D/TD-2350DF
Power LED
Roll LED Status LED Condition Action
The Roll
Compartment
Cover is open.
Close the Roll Compartment Cover until it
locks into place.
Network setting
error
Press and hold to clear the error.
SSID input/out of
setting range error
Password input/out
of setting range
error
Wrong password
error
Out of setting range
error
Database size error
Repeat (1
second off, 1
second on)
Repeat (1 second
off, 1 second on)
Feed errors 1. Open the Roll Compartment Cover.
2. Place the correct media in the printer.
3. Confirm the media is correctly placed in
the media path and correctly positioned
relative to the sensors.
4. Close the Roll Compartment Cover until it
locks into place.
5. Press to clear the error.
6. Press and hold to turn off the printer.
Media end error
Repeat (1 second
off, 1 second on)
Communication
command error
Do one of the following:
• Open and close the Roll Compartment
Cover.
• Press and hold . or press any key
other than a and b.
• Press and hold to turn off the printer.
BLF file error
Database search
error
No template error
Time acquisition
error
Access point
search error
Access point
connection error
286
Power LED Roll LED Status LED Condition Action
Repeat (1 second
off, 1 second on)
Maximum print
length over
Do one of the following:
• Open and close the Roll Compartment
Cover.
• Press and hold . or press any key
other than a and b.
• Press and hold to turn off the printer.
ESC/P memory full
error
JPEG file error
USB host memory
full error
Data update
incomplete error
(network)
Data update
incomplete error
(USB)
Firmware update
incomplete error
High temperature
error
Repeat (0.9 seconds
off, 0.3 seconds on,
0.3 seconds off, 0.3
seconds on)
Cutter error
Press and hold to turn off the printer.
Mass storage error
USB host power
supply over error
USB host non-
compliant device
connection error
Print Head not
detected
Battery error
Incorrect Option
assembled
Charge required Connect the AC Adapter.
Repeat (0.9 seconds
off, 0.3 seconds on,
0.3 seconds off, 0.3
seconds on, 0.3
seconds off, 0.3
seconds on)
USB hub connected
Press and hold to turn the printer off, and
then press restart the printer.
Repeat (0.3
seconds off,
0.3 second
on)
Repeat (0.3
seconds off,
0.3 second
on)
Repeat (0.3 seconds
off, 0.3 second on)
System error Contact Brother Customer Service.
Repeat (0.9
seconds off,
0.3 second
on)
Repeat (0.9
seconds off,
0.3 second
on, 0.3
Repeat (0.9
seconds off,
0.3 second
on)
Repeat (0.9
seconds off,
0.3 second
on, 0.3
Repeat (0.9 seconds
off, 0.3 second on)
Repeat (0.9 seconds
off, 0.3 second on,
0.3 seconds off, 0.3
second on, 0.3
seconds off, 0.3
second on)
System error
Contact Brother Customer Service.
287
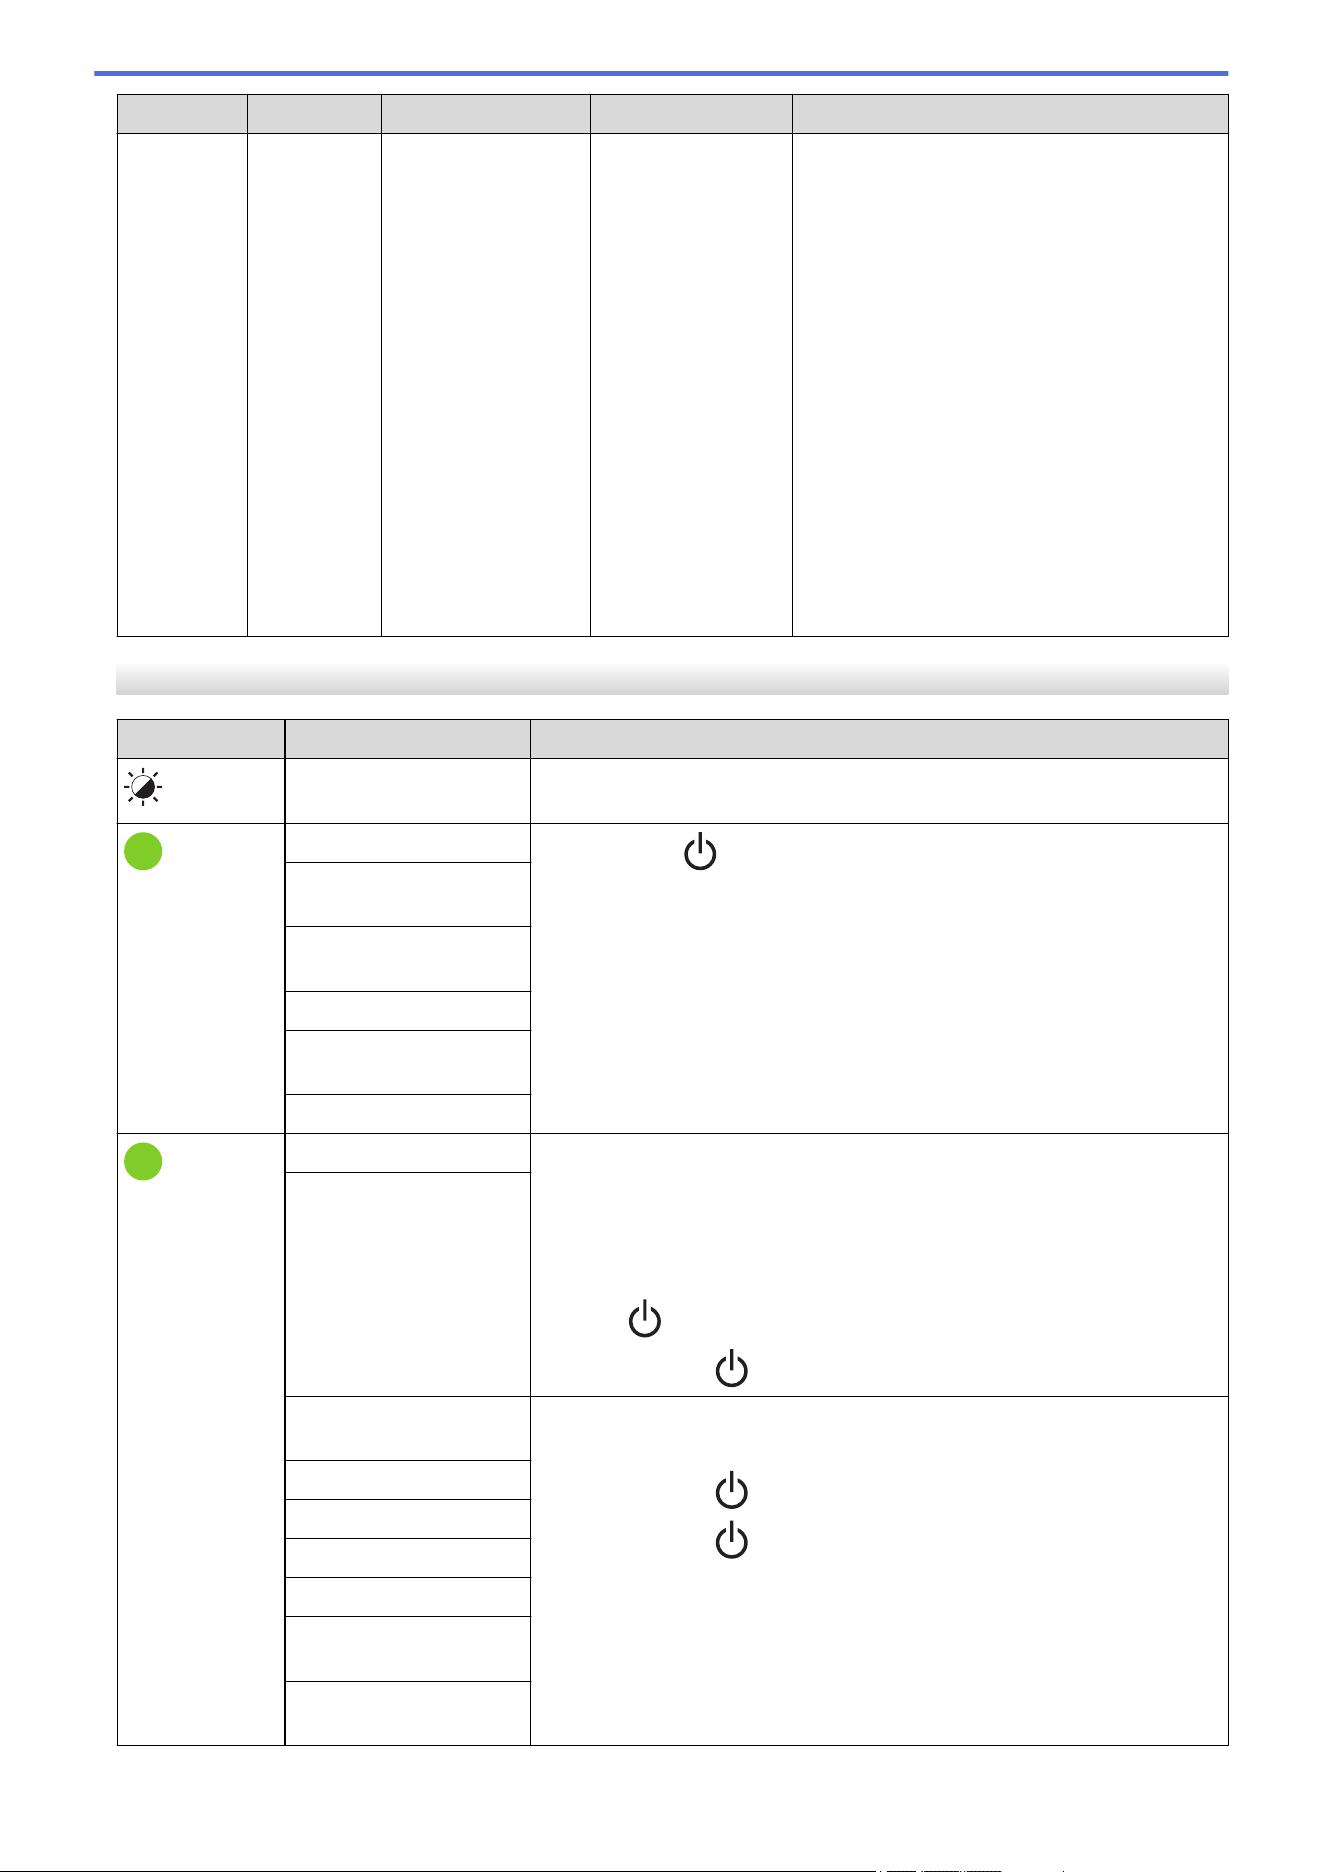
Power LED Roll LED Status LED Condition Action
seconds off,
0.3 second
on, 0.3
seconds off,
0.3 second
on)
Repeat (0.9
seconds off,
0.3 second
on, 0.3
seconds off,
0.3 second
on, 0.3
seconds off,
0.3 second
on, 0.3
seconds off,
0.3 second
on)
seconds off,
0.3 second
on, 0.3
seconds off,
0.3 second
on)
Repeat (0.9
seconds off,
0.3 second
on, 0.3
seconds off,
0.3 second
on, 0.3
seconds off,
0.3 second
on, 0.3
seconds off,
0.3 second
on)
Repeat (0.9 seconds
off, 0.3 second on,
0.3 seconds off, 0.3
second on, 0.3
seconds off, 0.3
second on, 0.3
seconds off, 0.3
second on)
TD-2350DSA
Power LED
Condition Action
The Roll Compartment
Cover is open.
Close the Roll Compartment Cover until it locks into place.
Network setting error
Press and hold to clear the error.
SSID input/out of setting
range error
Password input/out of
setting range error
Wrong password error
Out of setting range
error
Database size error
Feed errors 1. Open the Roll Compartment Cover.
2. Place the correct media in the printer.
3. Confirm the media is correctly placed in the media path and correctly
positioned relative to the sensors.
4. Close the Roll Compartment Cover until it locks into place.
5. Press
to clear the error.
6. Press and hold
to turn off the printer.
Media end error
Communication
command error
Do one of the following:
• Open and close the Roll Compartment Cover.
• Press and hold
. or press any key other than a and b.
• Press and hold
to turn off the printer.
BLF file error
Database search error
No template error
Time acquisition error
Access point search
error
Access point connection
error
288
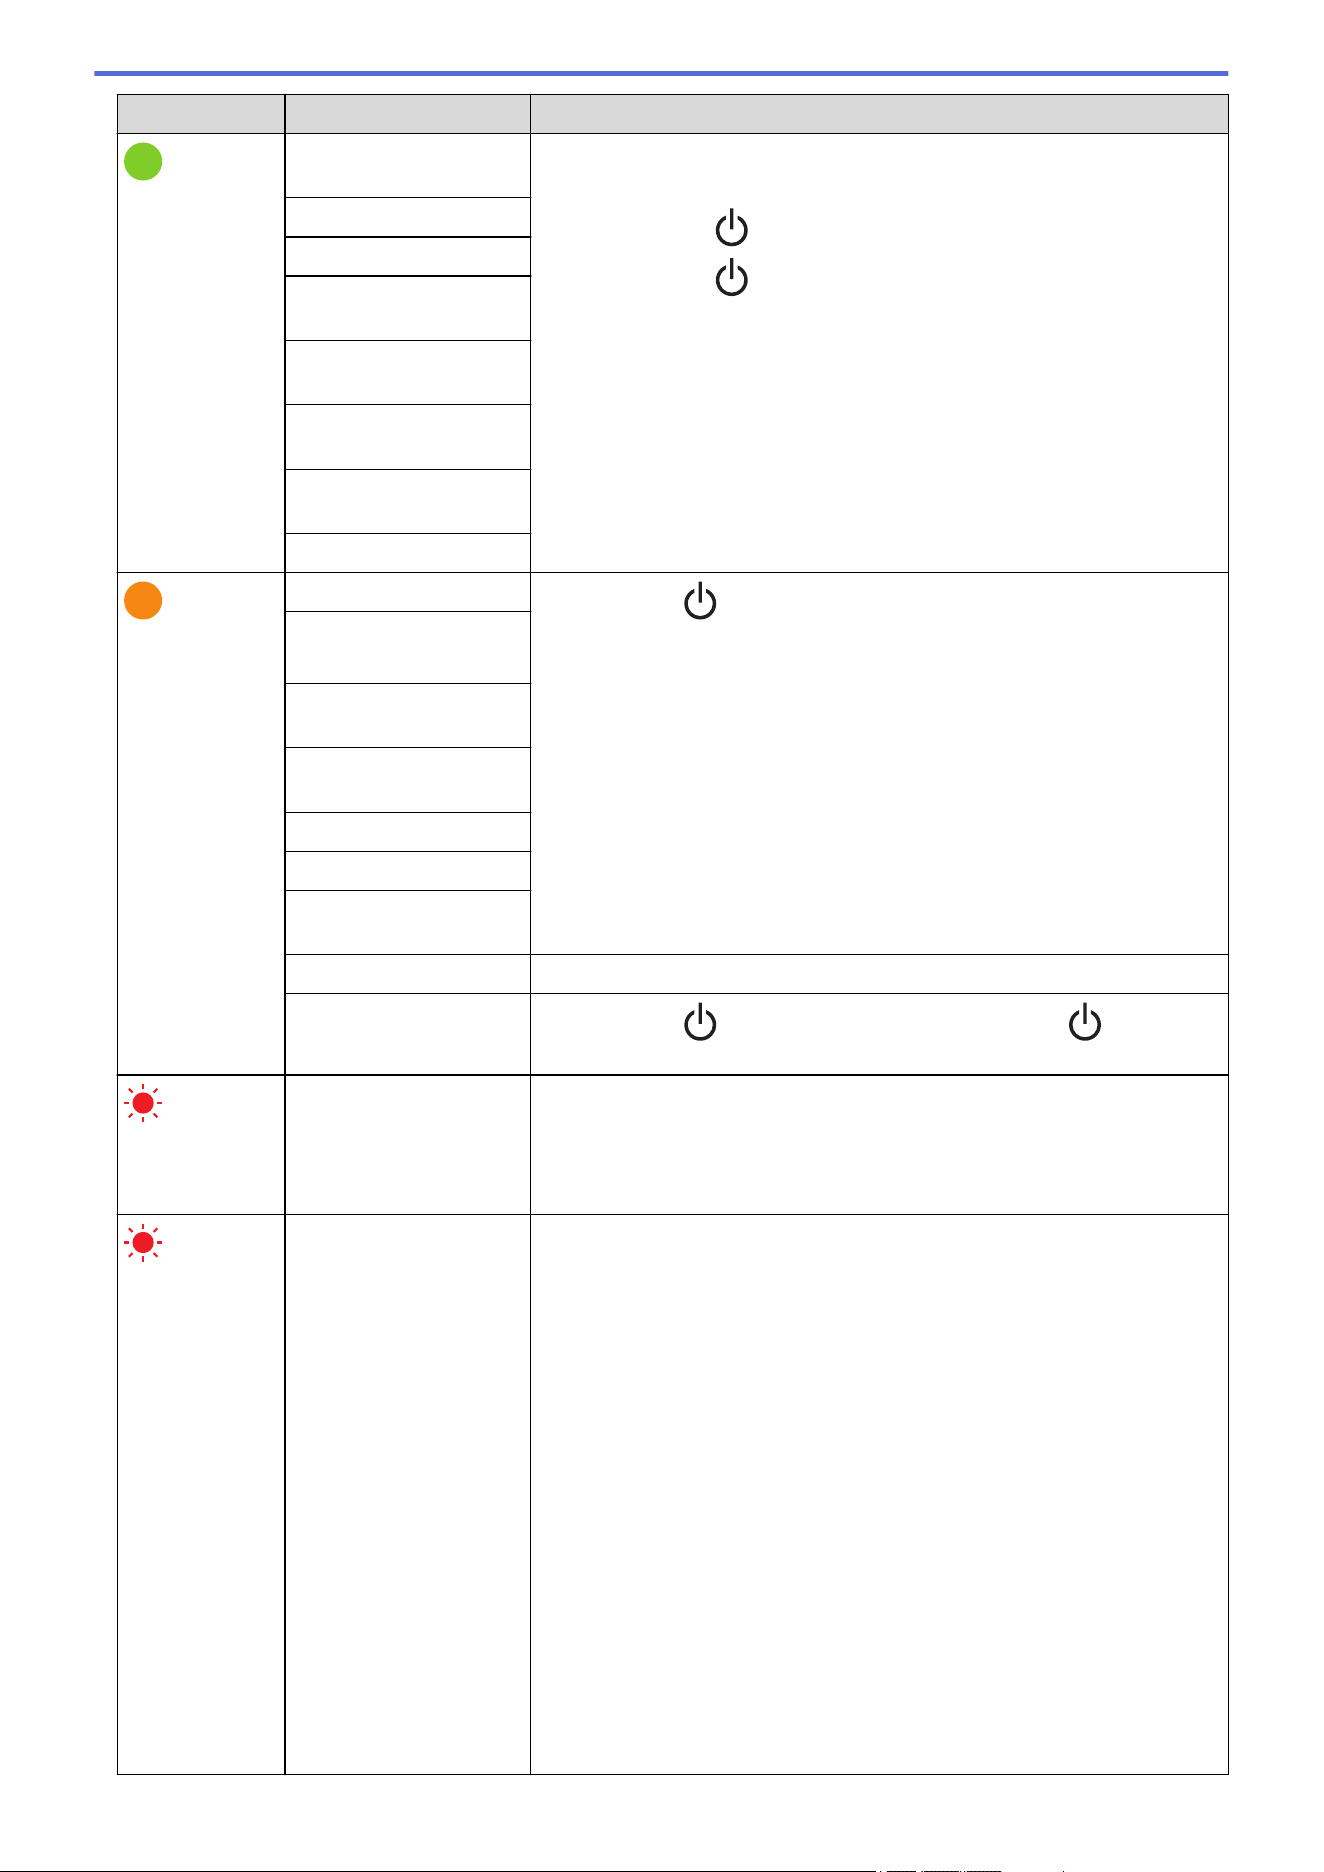
Power LED Condition Action
Maximum print length
over
Do one of the following:
• Open and close the Roll Compartment Cover.
• Press and hold
. or press any key other than a and b.
• Press and hold
to turn off the printer.
ESC/P memory full error
JPEG file error
USB host memory full
error
Data update incomplete
error (network)
Data update incomplete
error (USB)
Firmware update
incomplete error
High temperature error
Cutter error
Press and hold to turn off the printer.
Cutter error
Mass storage error
USB host power supply
over error
USB host non-compliant
device connection error
Print Head not detected
Battery error
Incorrect Option
assembled
Charge required Connect AC Adapter.
USB hub connected
Press and hold to turn the printer off, and then press restart the
printer.
Repeat (0.3
seconds off, 0.3
second on)
System error Contact Brother Customer Service.
Repeat (0.9
seconds off, 0.3
second on)
Repeat (0.9
seconds off, 0.3
second on, 0.3
seconds off, 0.3
second on, 0.3
seconds off, 0.3
second on)
Repeat (0.9
seconds off, 0.3
second on, 0.3
seconds off, 0.3
second on, 0.3
seconds off, 0.3
second on, 0.3
seconds off, 0.3
second on)
System error
Contact Brother Customer Service.
289

Home > Troubleshooting > Error and Maintenance Messages
Error and Maintenance Messages
Related Models: TD-2350D/TD-2350DF/TD-2350DSA
Message Solution
Button battery low. The
clock will reset soon.
Replace the coin cell battery immediately as printing with the correct time will no
longer be possible.
This message may appear after replacing the battery. If this message appears,
you can continue using the printer. This message is transient and will not
reappear.
For more information , see Related Topics: Replace the Coin Cell Battery.
Database size error
The maximum size of an editable database is 500 lines or less and 1MB or less.
Related Information
• Troubleshooting
Related Topics:
• Replace the Coin Cell Battery
291
Home > Troubleshooting > Printing Problems
Printing Problems
Printing Problems
Problem Solution
The LED or the LCD is not lit.
(TD-2350D/TD-2350DF/
TD-2350DSA)
The LED is not lit. (TD-2310D/
TD-2320D/TD-2320DF)
• Is the AC adapter cord connected correctly?
Check the cord is connected correctly.
• TD-2350D/TD-2350DF/TD-2350DSA: If the LED or the LCD still does not light
up, contact Brother Customer Service.
• TD-2310D/TD-2320D/TD-2320DF: If the LED still does not light up, contact
Brother Customer Service.
The printer does not print, or a
printing error is received.
• Is the cable loose?
Make sure the cable is connected securely.
• Is the media roll installed correctly?
If not, remove the media roll and reinstall it.
• Has the media roll run out?
Install a new media roll.
• Is the Roll Compartment Cover open?
Make sure the Roll Compartment Cover is closed.
• Has a print error or transmission error occurred?
Turn off the printer, and then turn it on again. If there is still a problem, contact
Brother Customer Service.
• If the printer is connected via a USB hub, try connecting it directly to the
computer. If not, try connecting it to another USB port.
A data transmission error appears
on the computer.
• Is the correct port selected?
Make sure the correct port is selected.
• Is the printer in cooling mode?
If the Power LED lights in green and the Status LED is flashing in orange, wait
until the Status LED stops flashing, and then try printing again.
• Are there any unfinished print jobs?
If you try to print while other users are printing large amounts of data, the
printer is unable to accept your print job until the current print jobs are
completed. If this occurs, send the print job again after the other jobs are
completed.
I want to cancel the current
printing job.
Press while printing is paused.
The print quality is poor. Is there dust or dirt on the printer parts preventing it from their proper work?
Clean around the Roller, Print Head, the side of Roll Guide, and Label Support.
For more information, see Related Information.
Adjust the Energy Rank from the Paper Size Setup tool or adjust the Print
Speed from the Device Settings tool.
For more information, see Related Information.
I want to increase the print
density.
From the Paper Size Setup tool, go to the New and Advanced Printing
Adjustments, and then increase the Energy Rank.
For more information, see Related Information.
The printer does not feed paper. • Is there dirt or lint on the roller preventing it from rotating freely?
Clean the roller. For more information, see Related Information.
• Make sure the ejection path of the paper is not blocked.
• Remove the media roll and install it again. For more information, see Related
Information.
• Make sure the Roll Compartment Cover is closed completely.
292
Problem Solution
The printer feeds paper
continuously.
• Open the Roll Compartment Cover.
• Press any button to stop feeding.
Press
while printing is paused to cancel the print job.
TD-2350D/TD-2350DF/TD-2350DSA: Press any button except for
, a, or b
while printing is paused to resume printing.
TD-2310D/TD-2320D/TD-2320DF: Press any button except for while
printing is paused to resume printing.
The printer does not pause
between labels.
• Make sure you entered the media information correctly. You can set the media
information using Paper Size Setup in the Printer Setting Tool.
• If the sensor is dirty, wipe it with a dry cotton swab.
• Make sure there are no items blocking the sensor.
An error occurs when the roll
cannot be fed to the beginning of
the printing.
If a feed error occurs, use the Paper Size Setup of the Printer Setting Tool to
assign the correct paper settings to the printer.
TD-2350D/TD-2350DF/TD-2350DSA: Press Menu, and then press Media >
Selection to check whether the correct media is set in the printer when a
Media roll is used.
Head, motor, or Rechargeable Li-
ion Battery is cooling down.
The thermal head, motor, or Rechargeable Li-ion Battery is too hot.
Head:
The printer stops and resumes printing only after the thermal head has cooled
down. The head may become too hot if you are printing a large number of
documents with high text content. If the thermal head becomes too hot, it may
produce imaging on the paper in areas not intended to be printed. To avoid or
delay this condition, print using a lighter density setting, reduce the amount of
black space being printed (for example, remove background shading and colors
in graphs and presentation documents), and make sure that the printer has
adequate ventilation and is not located in an enclosed space.
Motor or Rechargeable Li-ion Battery:
Do not use the printer continuously. If the printer is used continuously, the motor
or Rechargeable Li-ion Battery will become too hot. In this case, the printer will
stop and resume printing after the motor or Rechargeable Li-ion Battery has
cooled down.
NOTE
This condition may occur more often when the printer is used at high
altitude (more than 10,000 ft (3,048 m)) due to a lower air density
available to cool the printer.
I want to reset the printer/delete
the data transferred from the
computer.
See Related Information.
Print Head cannot be attached. The Print Head cannot be attached if the Print Head spring is sticking out. Place
the Print Head spring correctly and try again.
The media is not ejected correctly
when using the optional label
peeler.
Has the sensor of the label peeler been exposed to direct sunlight?
If the sensor of the label peeler has been exposed to direct sunlight, loaded
media may not be detected correctly. Use the printer in a location not exposed to
direct sunlight.
293

Problem Solution
Barcodes printed using
applications other than P-touch
Editor cannot be read.
If the barcode data was created using a landscape orientation, change the
Orientation setting in the Basic tab of the printer driver to Landscape and try
again.
Wrinkles appear on the printed
label. (Linerless models)
Is media roll adhesive adhered to the Roll Guide?
Readjust the position of the Roll Guide using the adjuster dial, following the Load
Media Roll instruction. For more information, see Related Information.
Printed labels are getting jammed.
(Linerless models)
• Is there dirt, lint, or roll adhesive stuck to the printer parts, preventing free roll
feeding?
Clean around the Roller, Print Head, and the side of Roll Guides. For more
information, see Related Information.
• Is the media roll correctly wound?
Remove the media roll and replace it with a new one. If the labels
continuously become stuck or jammed in the printer, the Platen Roller may be
worn and needs to be replaced. For more information, see Related
Information.
294
Problem Solution
The media is entangled around
the Platen Roller.
Remove the media from the Platen Roller.
1. Open the Roll Compartment Cover and unlock the lever of both sides of the
Platen Roller and lift it up.
a
a. Platen Roller
2. Remove the entangled media from the Platen Roller.
3. Put the Platen Roller back and pull down the levers and close the Roll
Compartment Cover.
When printing is executed while
using the USB power delivery
function, the printer enters the
cooling mode and cannot start
printing.
• Make sure that the main unit and the device are connected with a USB-C to
USB-C cable.
• The printer is hot and cooling down. Printing will restart once it cools down.
Printed Image Problems
Problem
Solution
Printed paper contains streaks or
poor quality characters, or paper
is not fed correctly.
Is the Print Head or Roller dirty?
Although the Print Head generally remains clean under normal use, lint or dirt
from the roller may become stuck on the printer head. If this occurs, clean the
roller. For more information, see Related Information.
Printed barcodes cannot be read. • Print labels so that barcodes are aligned with the Print Head as shown below:
1
2
3
1. Print Head
2. Barcodes
3. Printing orientation
• Barcodes may not be read if they are reduced or enlarged.
• TD-2320D/TD-2350D/TD-2320DF/TD-2350DF/TD-2350DSA: Try using
another scanner.
Network Problems (TD-2320D/TD-2350D/TD-2320DF/TD-2350DF/TD-2350DSA)
Problem
Solution
You are using security software. • Confirm your settings in the installation dialog box.
295
Problem Solution
• Allow access when the security software alert message appears during the
printer installation.
Your security settings (SSID/
Network Key) are incorrect.
(TD-2350D/TD-2350DF/
TD-2350DSA)
Recheck and select the correct security settings.
• The manufacturer's name or model number of the wireless access point/
router may be used as the default security settings.
• See the instructions supplied with your wireless access point/router for
information on how to find the security settings.
• Contact the wireless access point/router manufacturer, Internet provider, or
network administrator.
Your printer cannot connect to the
host device using Wi-Fi or
Bluetooth. (TD-2350D/
TD-2350DF/TD-2350DSA)
• Move your printer within about 3.3 feet (one meter) of the mobile device when
you configure the Wi-Fi network settings.
• Move your printer to an obstruction-free area.
• If a wireless computer, Bluetooth-equipped device, microwave oven, digital
cordless phone, or other device is near your printer or the wireless access
point/router, move the device away from your printer or wireless access point/
router.
Your printer cannot print using Wi-
Fi or Bluetooth. (TD-2350D/
TD-2350DF/TD-2350DSA)
There are obstructions (walls or
furniture, for example) between
your printer and the mobile
device. (TD-2350D/TD-2350DF/
TD-2350DSA)
Move your printer to an obstruction-free area.
You are using MAC Address
filtering.
You can confirm the MAC address by printing the Printer Settings Report. For
more information, see Related Information.
Your printer is not connected
correctly to the network.
• Make sure the printer is in the mode you want to connect to.
• If the printer is still not connected, do the following:
- For Wi-Fi connection (TD-2350D/TD-2350DF/TD-2350DSA)
: Your printer is searching for a wireless network. Wait until the search is
complete.
- For Wireless Direct (TD-2350D/TD-2350DF/TD-2350DSA)
If the Wireless Direct icon is displayed on the LCD, search for the printer
from the device you want to connect.
- For Wired LAN
Make sure the LAN cable is connected correctly.
- For Bluetooth (TD-2350D/TD-2350DF/TD-2350DSA)
If the Bluetooth icon is displayed on the LCD, search for the printer from
the device you want to connect.
I have checked and tried all of the
above, but still cannot set the Wi-
Fi/Bluetooth function. (TD-2350D/
TD-2350DF/TD-2350DSA)
Turn off the printer, and then turn it on again. Then, configure the Wi-Fi and
Bluetooth settings again.
Your printer is not connected if the
Bluetooth connection with an
Apple device (iPad, iPhone, or
iPod touch) is lost. (TD-2350D/
TD-2350DF/TD-2350DSA)
Turn on the Auto Reconnect function. You can set it from the Printer Setting Tool.
For more information, see Related Information.
TD-2350D/TD-2350DF/TD-2350DSA: You can also set it using the Bluetooth
menu on the printer's LCD.
296
Problem Solution
Your printer is not assigned with
an available IP address.
• Confirm the IP address and the Subnet Mask. Verify both the IP addresses
and Subnet Masks of your computer and your printer are correct and located
on the same network.
For more information on how to verify the IP address and the Subnet Mask,
contact your network administrator.
• Confirm your IP address, Subnet Mask and other network settings using the
Printer Setting Tool. For more information, see Related Information.
TD-2350D/TD-2350DF/TD-2350DSA: You can also confirm network settings
on the printer's LCD.
Your previous printing job was
unsuccessful.
If an unfinished print job is still in your computer's print queue, delete it.
For example, when using Windows 10:
Click Start > Settings > Devices > Printers & scanners. Click the printer you
want to set up, and then click Open queue. Click Printer > Cancel All
Documents.
I have checked and tried all of the
above, but my printer does not
print.
Uninstall the printer driver and the software, and then reinstall them.
You did not select to allow access
when the security alert dialog box
appeared during the standard
installation, or when printing.
If you did not select to allow access when the security alert dialog box appeared,
the firewall function of your security software may be blocking access. Some
security software may block access without displaying a security alert dialog box.
To allow access, see your security software instructions or contact the
manufacturer.
Other Problems
Problem
Solution
I want to prevent dates and times
from being modified.
Set a passcode for the Administration menu to ensure security.
For more information, see Related Information.
Unable to transfer template to
printer.
The printer driver may not be correctly installed. Re-install the printer driver, and
then try transferring again.
The printer has 8 MB or 32MB of built-in memory available, allowing a maximum
of 255 templates to be saved. When there is no more of the built-in memory
available or when 255 templates have been registered, templates can no longer
be transferred to (be registered with) the printer. Delete unnecessary templates
from the printer.
• Make sure printer's LCD displays the Home screen (either the Template List
Screen or the Template Touch Screen).
• If the Transfer button does not appear in P-touch Transfer Manager, check
the connection between your computer and printer.
Alternatively, save the LBX file you want to transfer, open P-touch Editor, and
then select File > Transfer.
The template has been
transferred, but the date is not
updated automatically.
If the date was not updated, make sure the At Printing check box is selected in
the Date and Time Properties dialog box for the template.
When transferring the template to
the printer, the file size changed.
Since the format of a template file added to P-touch Transfer Manager is different
from the format of a file after it has been transferred to the printer, the file size
changes. This size change is not a problem.
Unable to check the number of
registered templates to the printer
and the related key number.
1. Connect the printer to the computer with a USB cable, and then turn on the
printer.
2. Start P-touch Transfer Manager
3. Click the model name of your printer in the pane on the left side to display the
templates registered with the printer in the pane on the right side. The number
of templates and the key numbers that are being used can be checked.
For more information, see Related Information.
297

Problem Solution
• Make sure printer's LCD displays the Home screen (either the Template List
Screen or the Template Touch Screen).
• If the Transfer button does not appear in P-touch Transfer Manager, check
the connection between your computer and printer.
Alternatively, save the LBX file you want to transfer, open P-touch Editor, and
then select File > Transfer.
Related Information
• Troubleshooting
Related Topics:
• Clean Your Printer
• Printer Setting Tool (Windows): Paper Size Setup
• Printer Setting Tool (Windows): Device Settings
• Load a Media Roll
• Reset the Printer
• Confirm Printer Settings
• Printer Setting Tool: Communication Settings (Windows)
• Set the Menu Security
• Transfer Templates or Other Data from the Computer to the Printer (Windows)
298

Home > Troubleshooting > Version Information
Version Information
Problem Solution
I do not know the version number
of the firmware for the printer.
You can confirm the version number of the firmware by printing the Printer
Settings Report. For more information, see Related Information.
I want to confirm whether I am
using the latest version of the
software.
Use the P-touch Update Software to confirm whether you have the latest version.
For more information about the P-touch Update Software, see Related
Information.
Related Information
• Troubleshooting
Related Topics:
• Confirm Printer Settings
• Update the Firmware
299

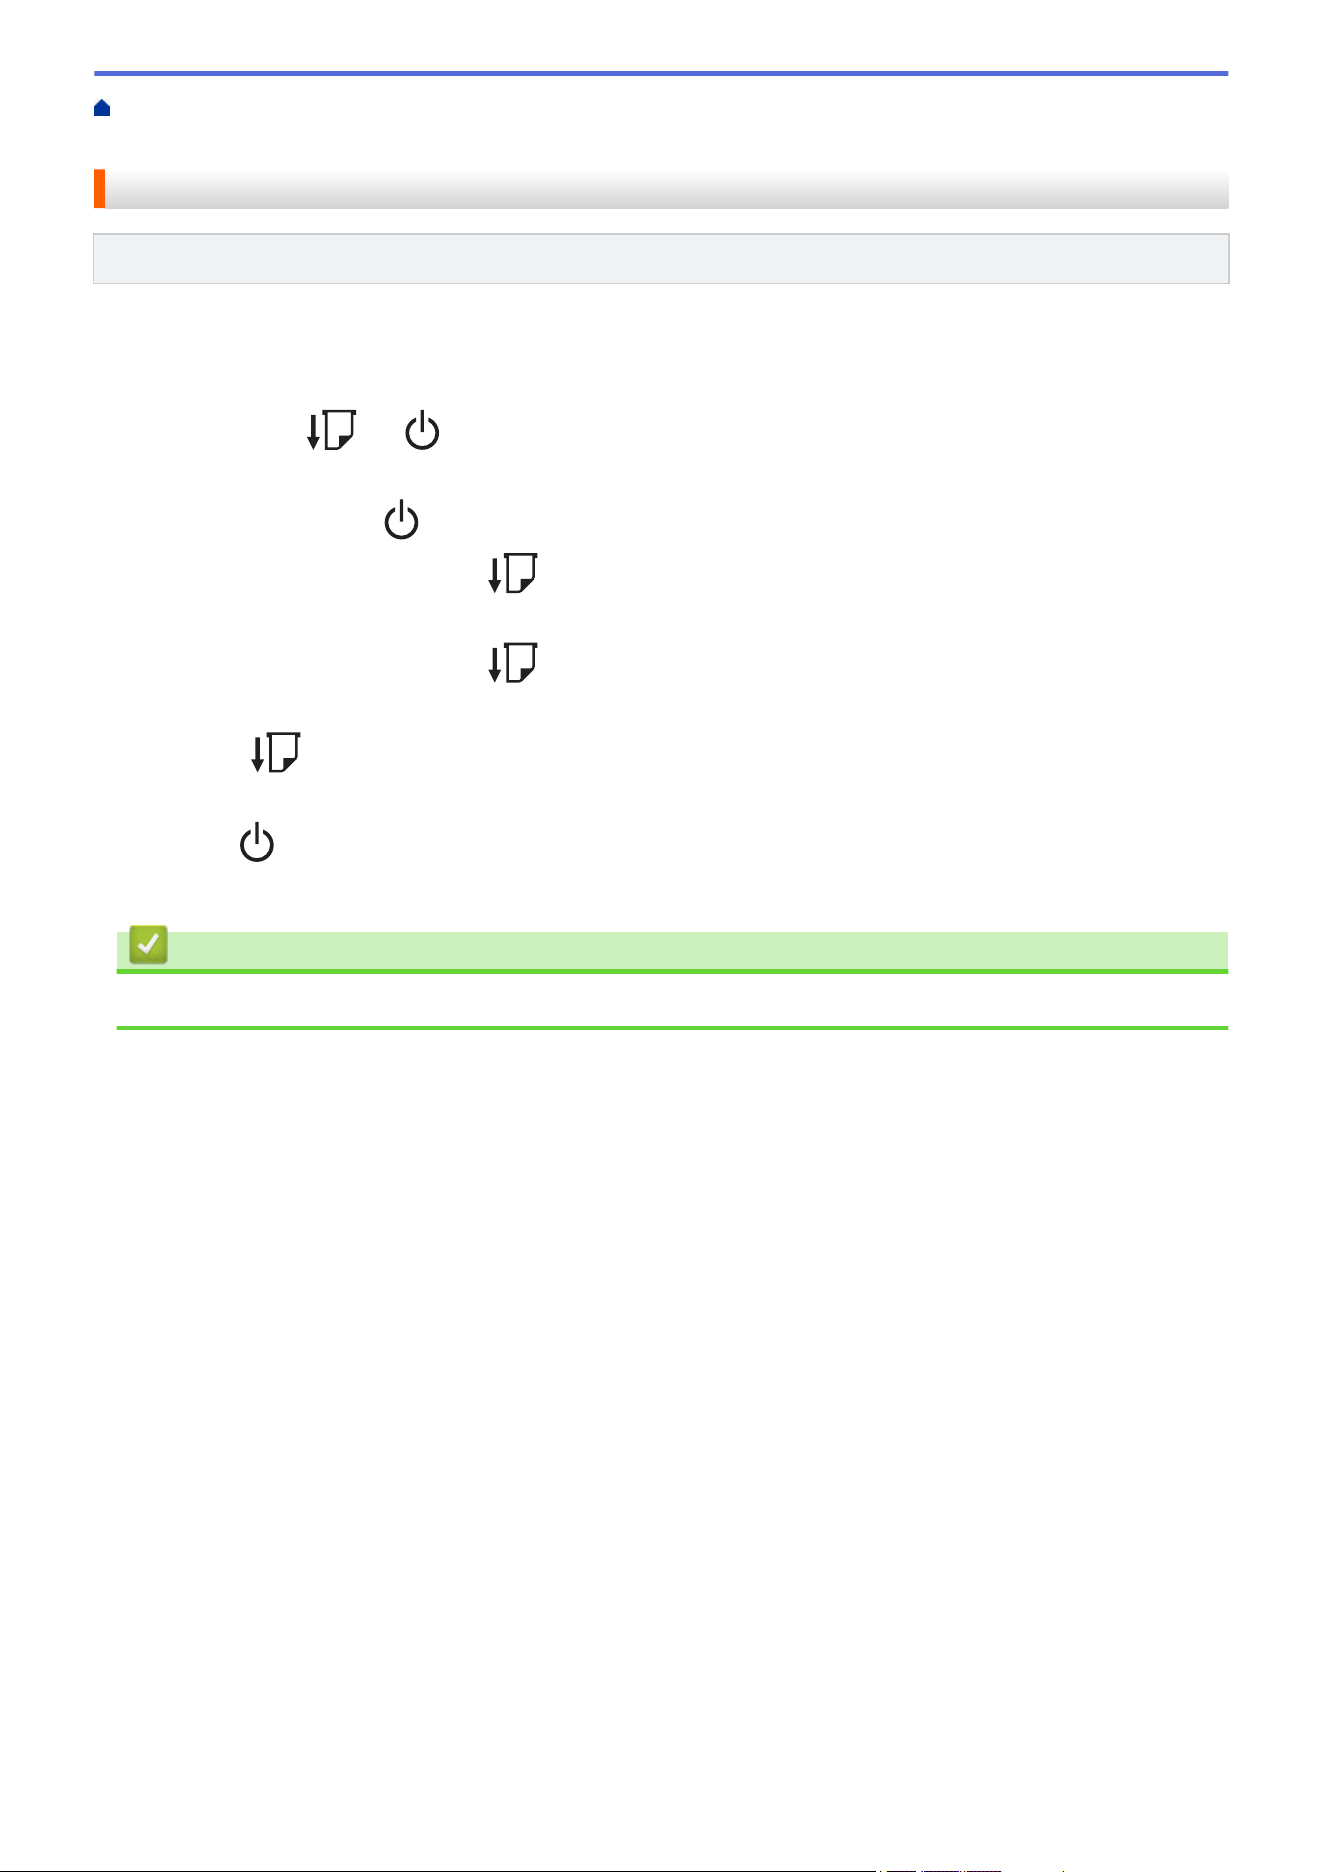
Home > Troubleshooting > Reset the Printer > Reset All Settings to the Factory Settings Using the Printer
Buttons
Reset All Settings to the Factory Settings Using the Printer Buttons
Related Models: TD-2310D/TD-2320D/TD-2320DF
Reset the internal memory of your printer to clear all the saved label files, or if the printer is not operating
correctly.
1. Turn off the printer.
2. Press and hold
and for about three seconds.
All LED indicators flash in red.
3. Continue holding down .
• TD-2320D/TD-2320DF: Press
once to reset the network settings.
The Power LED lights in red.
• TD-2320D/TD-2320DF: Press twice to reset the transferred data and the device settings.
The Roll LED lights in red.
• Press
three times to reset all the settings and device settings to the factory settings.
The Status LED lights in red.
4. Release .
All LED indicators flash red four times, and then light in red.
Related Information
• Reset the Printer
301
Home > Troubleshooting > Reset the Printer > Reset Settings Using the LCD Menu
Reset Settings Using the LCD Menu
Related Models: TD-2350D/TD-2350DF/TD-2350DSA
>> TD-2350D/TD-2350DF
>> TD-2350DSA
TD-2350D/TD-2350DF
You can reset the following settings using the LCD menu:
• Printer settings
• User setting
• Network settings
1. Press Menu.
2. Press a or b to select the following:
a. Select [Administration]. Press OK.
b. Select [Reset]. Press OK.
c. Select the reset option you want. Press OK.
3. Press a or b to select [Reset]. Press OK.
The machine restarts.
TD-2350DSA
You can reset the following settings using the LCD menu:
• Printer settings
• User setting
• Network settings
1. Press Menu.
2. Press a or b to select the following:
a. Select [Administration]. Press OK.
b. Select [Reset]. Press OK.
c. Select the reset option you want. Press OK.
3. Press OK to confirm.
The machine restarts.
Related Information
• Reset the Printer
302

Home > Troubleshooting > Reset the Printer > Reset Data Using the Printer Setting Tool
Reset Data Using the Printer Setting Tool
Reset the internal memory of your printer to clear all the saved label files, or if the printer is not operating
correctly.
You can use the Printer Setting Tool from a computer to perform the following operations for the printer:
• Delete the templates and databases
• TD-2320D/TD-2350D/TD-2320DF/TD-2350DF/TD-2350DSA: Reset communication settings
• Reset printer settings to factory settings
Related Information
• Reset the Printer
303

Home > Appendix > Specifications
Specifications
>> Printing
>> Size
>> Interface
>> Environment
>> Power Supply
>> Media Specification
>> Rechargeable Li-ion Battery: Battery Level and Printed Capacity
>> Compatible Operating Systems
Printing
Printing Technology
Direct Thermal
Print Resolution 203 dpi / 300 dpi
Print Speed (depending on the media used)
Maximum 6 ips (152.4 mm/s)
1
Maximum Print Width 2.32" (59 mm)
Maximum Print Length 118.11" (3000 mm)
1
When using our printing test data <2.28 x 3.94 inches (58 x 100 mm), print coverage 10%> and printing continuously using AC with USB
connection in an environment with a temperature of 73.4°F (23℃).
Size
Weight
• TD-2310D
Approximately 3.22 lb (1.46 kg)
• TD-2320D
Approximately 3.31 lb (1.50 kg)
• TD-2350D
Approximately 3.37 lb (1.53 kg)
• TD-2320DF
Approximately 3.95 lb (1.79 kg)
• TD-2350DF
Approximately 4.01 lb (1.82 kg)
• TD-2350DSA
Approximately 3.90 lb (1.77 kg)
Dimensions
• TD-2310D/TD-2320D/TD-2350D
Approximately 4.7" (W) x 6.2" (H) x 8.8" (D) (119 mm (W) x 158 mm (H) x 224 mm (D))
• TD-2350DSA
Approximately 4.7" (W) x 6.9" (H) x 8.8" (D) (119 mm (W) x 176 mm (H) x 224 mm (D))
• TD-2320DF/TD-2350DF
Approximately 4.7" (W) x 6.2" (H) x 10.0" (D) (119 mm (W) x 158 mm (H) x 255 mm (D))
Interface
USB
USB Ver.2.0 (Full Speed) (Type C)
Serial
RS-232C (RJ25)
1
Wired LAN (TD-2320D/TD-2350D/
TD-2320DF/TD-2350DF/TD-2350DSA)
10/100BASE-TX
USB Host Port (TD-2320D/TD-2350D/
TD-2320DF/TD-2350DF/TD-2350DSA)
USB Ver.2.0 (Full Speed) (Type A)
305
Bluetooth (TD-2350D/TD-2350DF/
TD-2350DSA)
Bluetooth Ver5.2
SPP, OPP, HCRP (Bluetooth Classic), GATT (Bluetooth Low Energy)
Wireless LAN (TD-2350D/TD-2350DF/
TD-2350DSA)
IEEE 802.11 a/b/g/n (Infrastructure Mode)
IEEE 802.11 g/n (Wireless Direct mode)
1
Use a dedicated conversion cable.
Environment
Operating Temperature Printer Between 41°F and 104°F (Between 5°C and 40°C)
Battery Charger Between 50°F and 95°F (Between 10°C and 35°C)
Operating Humidity Printer Between 20% and 80% (without condensation)
Maximum wet bulb temperature: 80.6°F (27°C)
Battery Charger
Power Supply
Adapter
Standard AC Adapter (100 - 240 V 50/60Hz), Medical AC Adapter (100 - 240 V
50/60Hz)
Recharging Time
Printer recharging: Approximately 2.2 hours
1
Battery charger: Approximately 2.0 hours
1
Battery Charge And Discharge
Cycle Count
Approximately 300 cycles
2
1
When the printer is turned off, a new Rechargeable Li-ion Battery is used, and charged at 73.4°F (23℃).
2
At 73.4°F (23℃)
Media Specification
The media material may affect print quality.
Media Type
TD-2310D/TD-2320D/TD-2350D/TD-2350DSA
• Wristbands
1
• Continuous
• Die-Cut
• Fanfold
• Perforated
• Tag
2
TD-2320DF/TD-2350DF
Linerless label
Media Width
TD-2310D/TD-2320D/TD-2350D/TD-2350DSA
From 0.59" to 2.48" (15 mm to 63 mm)
3
Wristbands: From 0.59" to 1.42" (15 mm to 36 mm)
3
4
TD-2320DF/TD-2350DF
2.28" (58mm), 1.54" (39mm)
Media Length Continuous: From 0.25" to 118.11" (6.4 mm to 3,000 mm)
Label Peeler: From 0.67" to 118.11" (17 mm to 3,000 mm)
Cutter: From 0.79" to 118.11" (20 mm to 3,000 mm)
Tear: From 0.71" to 118.11" (18 mm to 3,000 mm)
Thickness TD-2310D/TD-2320D/TD-2350D/TD-2350DSA
From 0.002" to 0.011" (0.058 mm to 0.279 mm)
3
- Peel: From 0.0033" to 0.0051" (0.083 mm to 0.130 mm)
3
4
306
- Tearbar cut: From 0.0023" to 0.0033" (0.058 mm to 0.083 mm)
3
4
- Auto cut: From 0.0030" to 0.011" (0.075 mm to 0.279 mm)
3
4
- Receipt: From 0.0023" to 0.0035" (0.058 mm to 0.083 mm)
3
4
- Label: From 0.0041" to 0.007" (0.104 mm to 0.178 mm)
3
4
- Tag: From 0.0052" to 0.0074" (0.133 mm to 0.190 mm)
3
4
- Wristband: From 0.0042" to 0.011" (0.107 mm to 0.279 mm)
3
4
TD-2320DF/TD-2350DF
0.0027" (0.068 mm), 0.0033" (0.086 mm), 0.0037" (0.095 mm)
Roll Outside Diameter (maximum)
TD-2310D/TD-2320D/TD-2350D/TD-2350DSA
5" (127 mm)
TD-2320DF/TD-2350DF
3.15" (80 mm), 4.02" (102 mm)
Core Diameter (minimum) TD-2310D/TD-2320D/TD-2350D/TD-2350DSA
0.5" (12.7 mm)
TD-2320DF/TD-2350DF
0.98" (25 mm)
Media Sensor Transmissive, Reflective
1
Depending on the shape of the wristband, black marks cannot be detected by the Reflective Sensor.
2
Confirm the media yourself before using it.
3
Based on catalog specifications.
4
Values are based on Brother genuine media rolls and PDC wristbands. When exceeding the specified value, confirm the media yourself.
The media materials may affect print width.
Rechargeable Li-ion Battery: Battery Level and Printed Capacity
The following number of pages can be printed, depending on the battery level.
• Tested at 73.4 °F (23 °C) using Brother’s print test data 1.97" × 1.18" (50 mm × 30 mm) label with default
print density and 11% coverage.
• These numbers represent continuous printing when connected via USB and using a new, fully charged
battery. Note that the details listed below cannot be guaranteed because of the difference in printing
conditions, operating environments, and battery condition.
Battery level: Full
Capable of printing approximately 13,000 sheets
Compatible Operating Systems
For the latest list of compatible software, visit support.brother.com.
Related Information
• Appendix
307

Home > Appendix > Software Development Kit
Software Development Kit
Software Development Kit (SDK) is available from the Brother Developer Center (https://
support.brother.com/g/s/es/dev/en/index.html).
The b-PAC SDK and the SDKs for mobile devices (Android
™
, iPhone, and iPad) can also be downloaded. (The
SDKs available are subject to change without notice.)
Related Information
• Appendix
308

Home > Appendix > LabelCLT > LabelCLT Overview
LabelCLT Overview
Overview
LabelCLT is a command line tool that allows you to transfer files and obtain status from the printer using the
command line.
To download LabelCLT, go to your model's Downloads page on the Brother support website at
support.brother.com.
Operating Environment
Supported Operating Systems
Windows only. For the latest list of supported Windows Operating Systems, visit support.brother.com.
Communication Interface
USB, Wired LAN, or Wireless LAN
File Types
File Type
Generated From Supported
Interfaces
BIN Device Settings, Communication Settings, P-touch Template Settings, and
Paper Size Setup
USB, LAN
PDZ Firmware and P-touch Transfer Manager USB
BLF Device Settings, Communication Settings, P-touch Template Settings, Paper
Size Setup, P-Touch Transfer Manager, and LabelCLT
USB, LAN
CSV Windows applications USB, LAN
OTF Font file types USB
TTF
PEM File format used for security certificates. USB
Related Information
• LabelCLT
310
Home > Appendix > LabelCLT > Transfer the Template Data File with LabelCLT
Transfer the Template Data File with LabelCLT
For supported commands, usage examples, and errors not listed here, see the LabelCLT manual on the Brother
support website at support.brother.com.
>> Install LabelCLT
>> Basic File Transfer Procedure
Install LabelCLT
1. Download LabelCLT to your computer.
2. Type "cmd" in the Windows search box to start the command prompt.
3. Type the drive where LabelCLT is saved and press Enter. (In this example, LabelCLT is saved on the "C"
drive.)
J:\>c:
4. Type cd, add a space, and then copy and paste the path of the folder where the "LabelCLT.exe" file is located
(in this example: cd c:\LabelCLT). Press Enter.
c:\>cd c:\LabelCLT
5. Type
LabelCLT.exe /eula and press Enter to display the License Agreement. If you agree to the terms of the
License Agreement, type "y" (for "yes") on your keyboard and press Enter.
Basic File Transfer Procedure
1. Access the printer using one of the commands below depending on your interface.
Command
Function Example
/ip:"IP Address" LAN: Specify IP or NodeName. /ip:"192.168.0.250" or /ip:"BRW00AABBFF"
/printer:"Printer Name" USB: Specify the printer name. /printer:"Brother TD-2350D (300 dpi)"
2. Transfer files using commands below.
Command
Function Example
/send_pdz:"FilePath" Send the specified PDZ file /printer:"Brother TD-2350D (300 dpi)" /send_pdz:"c:\test
\a.pdz"
/send_blf:"FilePath" Send the specified BLF file /ip:"192.168.0.250" /send_blf:"c:\test\a.blf"
/send_bin:"FilePath" Send the specified BIN file /ip:"192.168.0.250" /send_bin:"c:\a.bin"
/send_csv:"FilePath" Send the specified CSV file /ip:"192.168.0.250" /send_csv:"c:\test\a.csv"
Related Information
• LabelCLT
311

Home > Appendix > LabelCLT > Transferring a PDZ Firmware File via USB: Example
Transferring a PDZ Firmware File via USB: Example
1. Specify the printer with the LabelCLT.exe /printer command, and specify the file to be transferred with the /
send_pdz command, and then press Enter.
c:\LabelCLT>LabelCLT.exe /printer:"Brother TD-2350D (300 dpi)" /send_pdz:"c:\test\a.pdz"
2. The transfer will start, and the transfer progress will be displayed.
3. When the transfer is complete, LabelCLT will wait until the printer finishes writing the firmware.
4. When the printer has finished writing the firmware, it will restart and LabelCLT will reconnect.
5. After reconnection, compare the transferred firmware version with the current printer firmware version.
6. If the update has been successfully completed, Succeeded is displayed.
Integration with the Windows Task Scheduler allows to implement instructions at specified times or on a regular
basis.
1. Prepare a batch file with the command you want to implement - for example, check the firmware version.
cd/d %~dp0
LabelCLT.exe /printer."Brother TD-2350D (203 dpi)" /get_firmwarever
pause
312

2. Start the Windows Task Scheduler.
313
3. Click Create Basic Task.
4. Type the task name in the Name field, and then click Next.
314
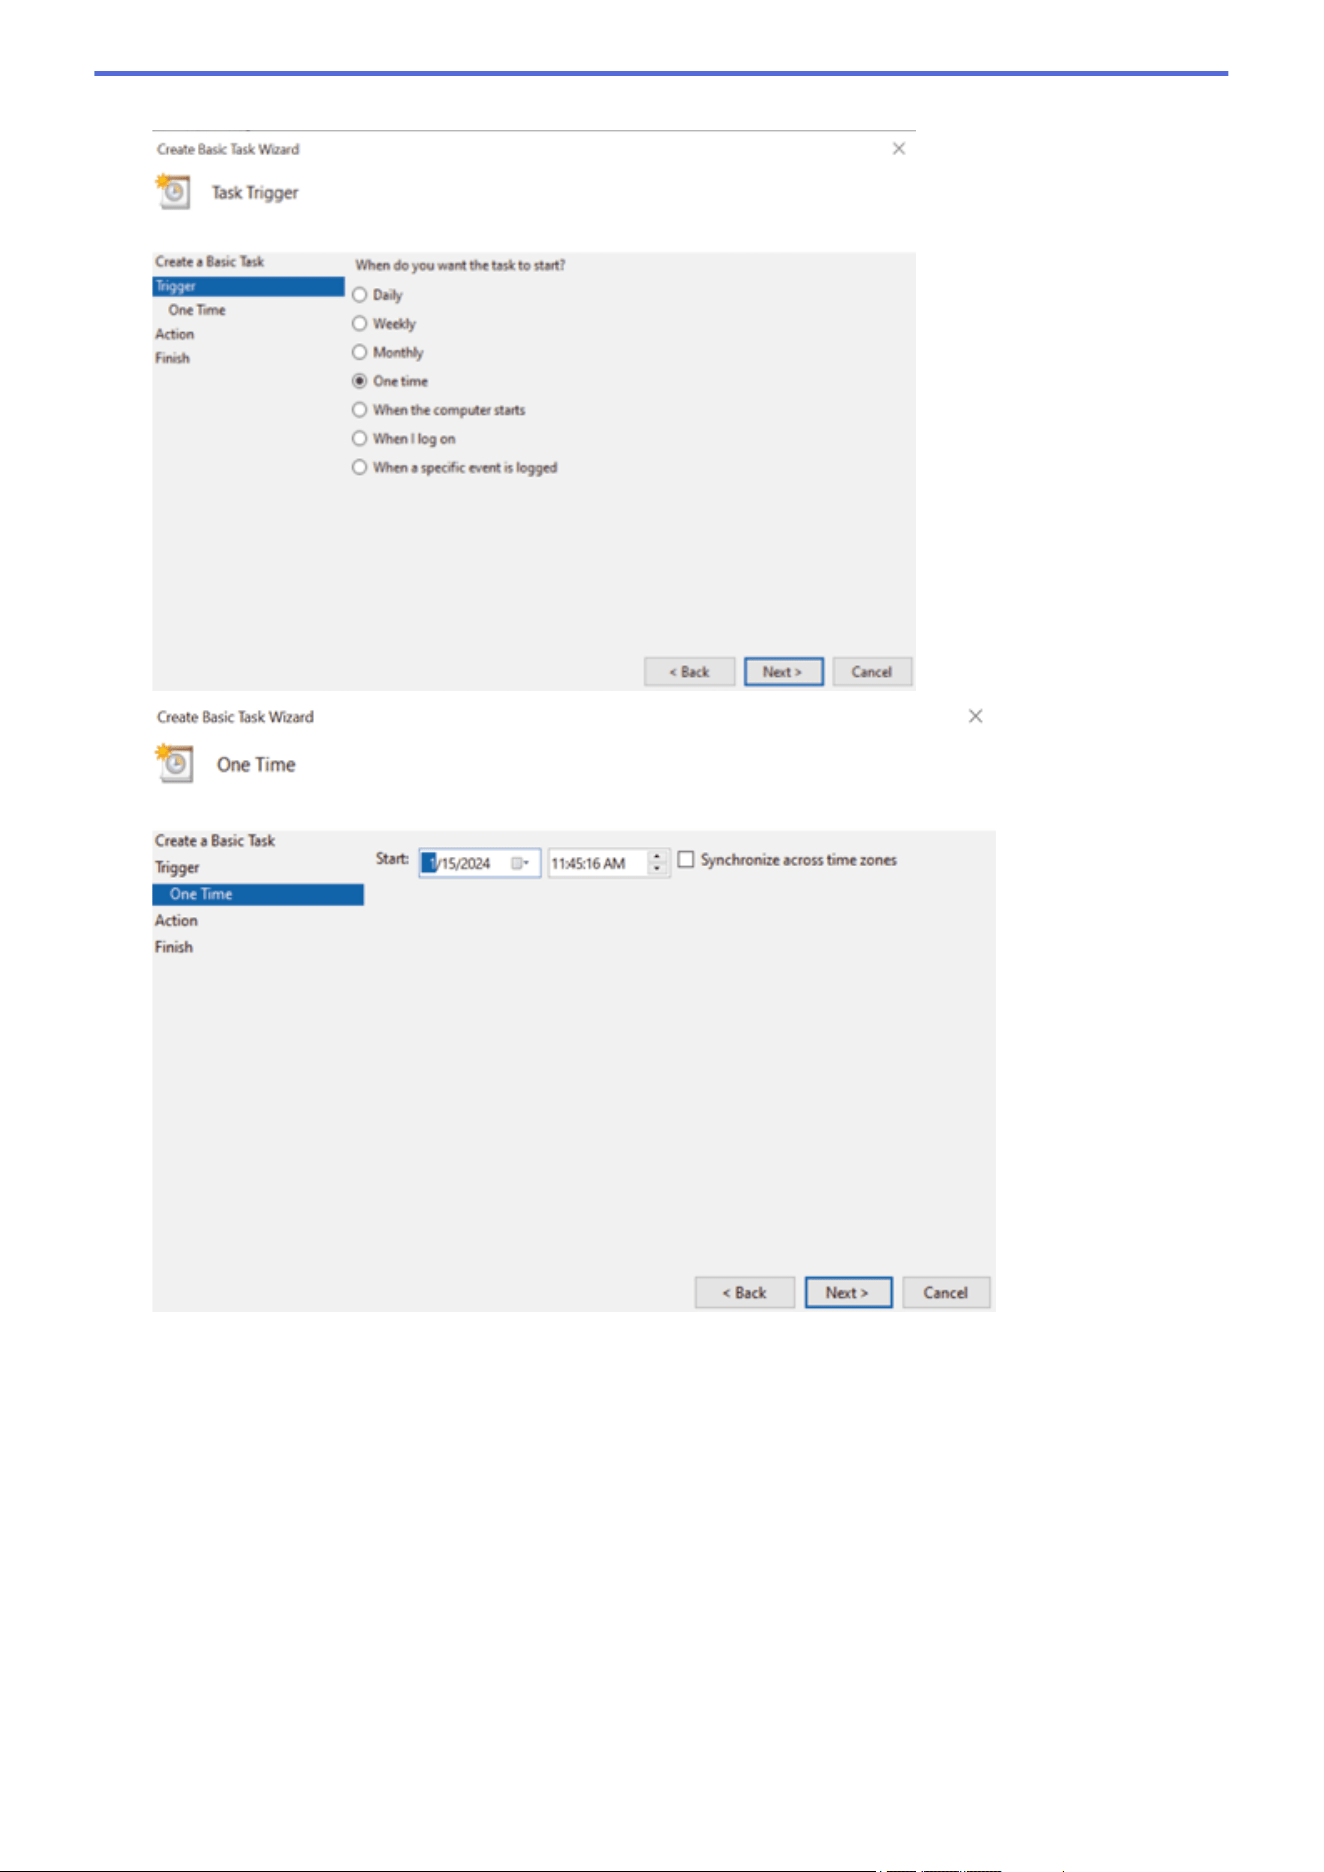
5. Select the trigger for the task.
315
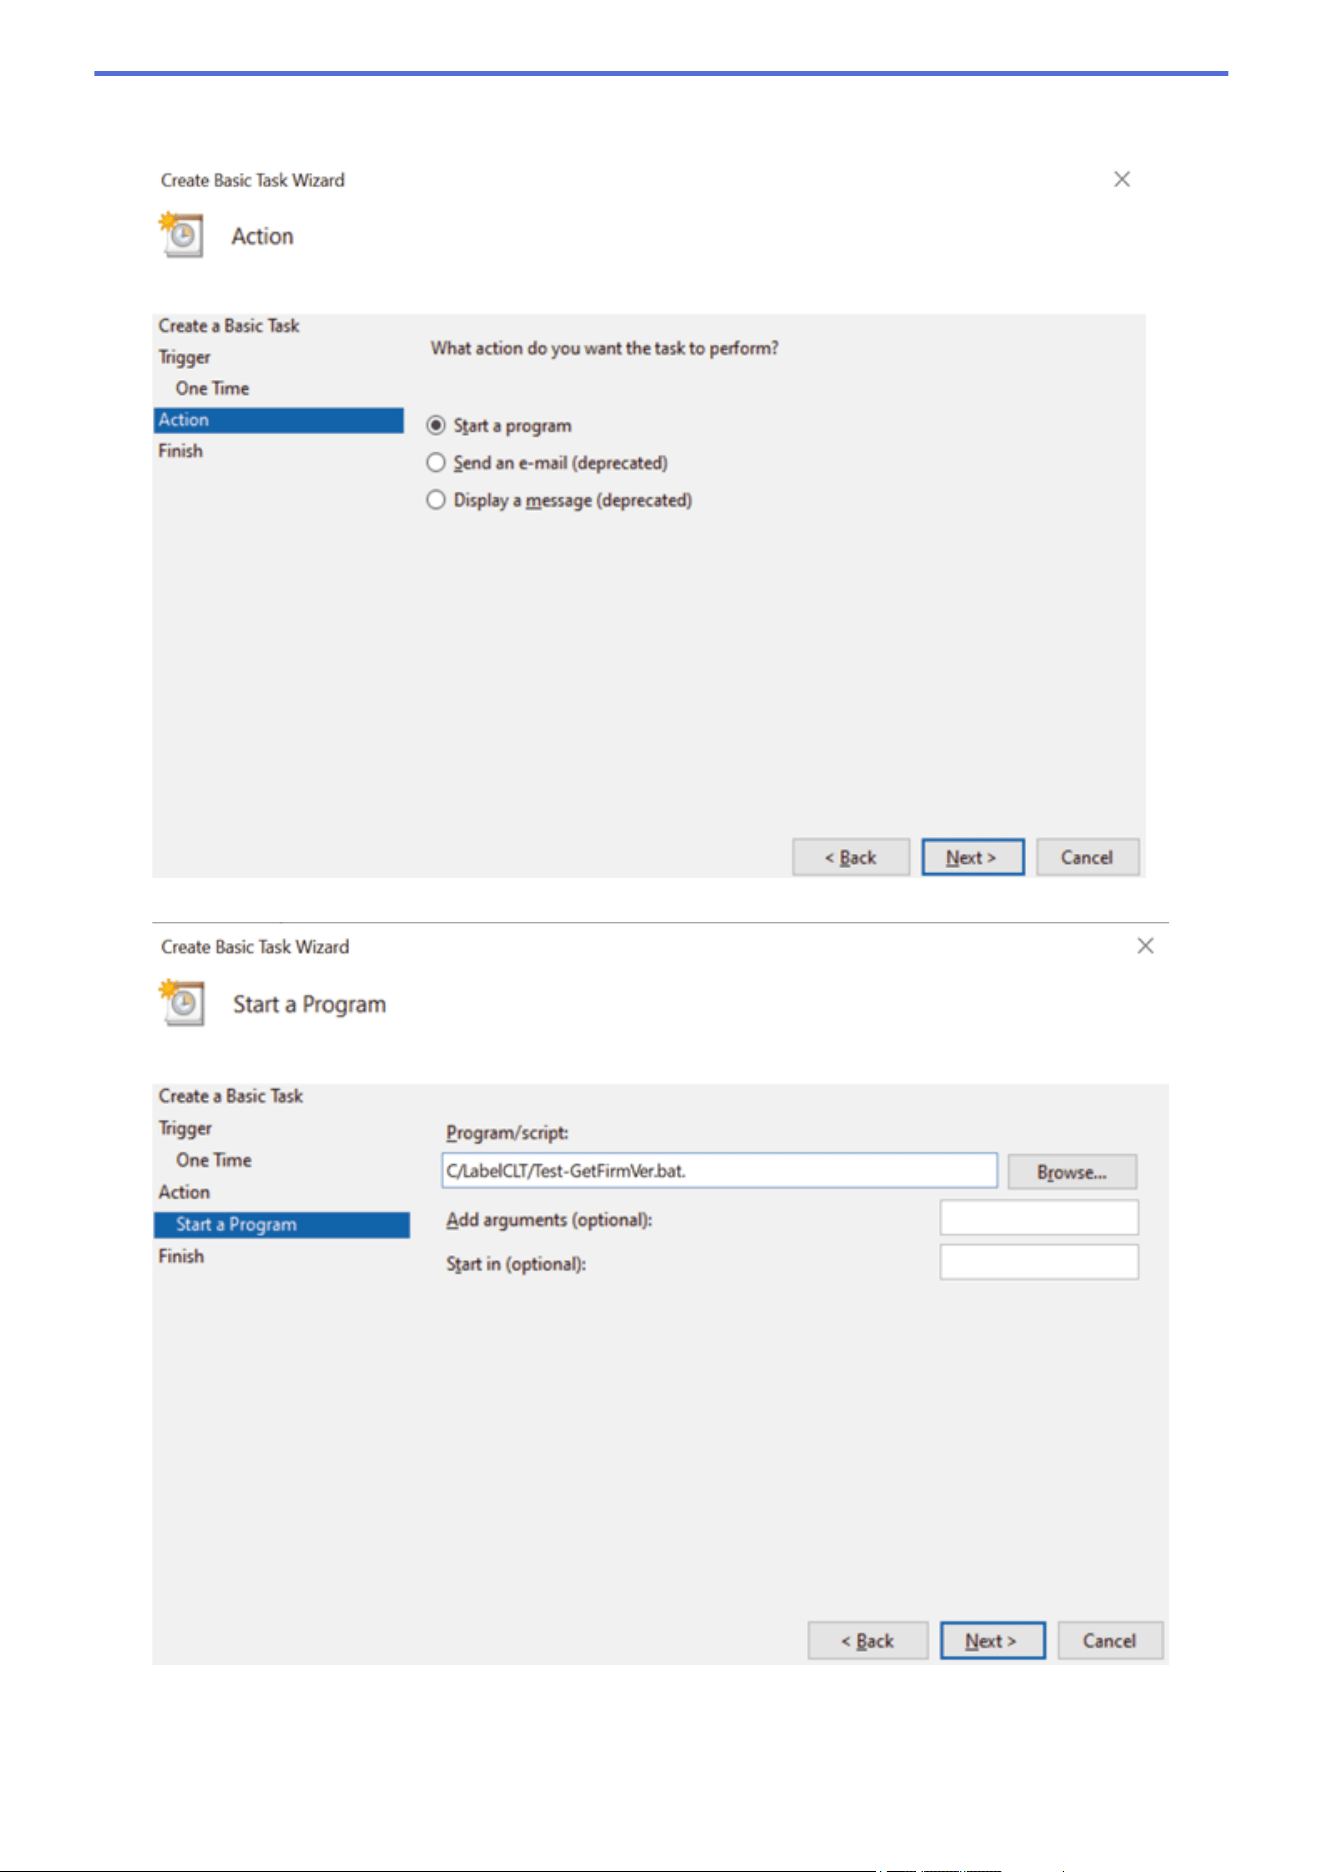
6. Select what you want to perform in the task (in this example, we have selected to Start a program), and then
click Next.
7. Specify the prepared batch file in the Program/script field, and then click Next.
316
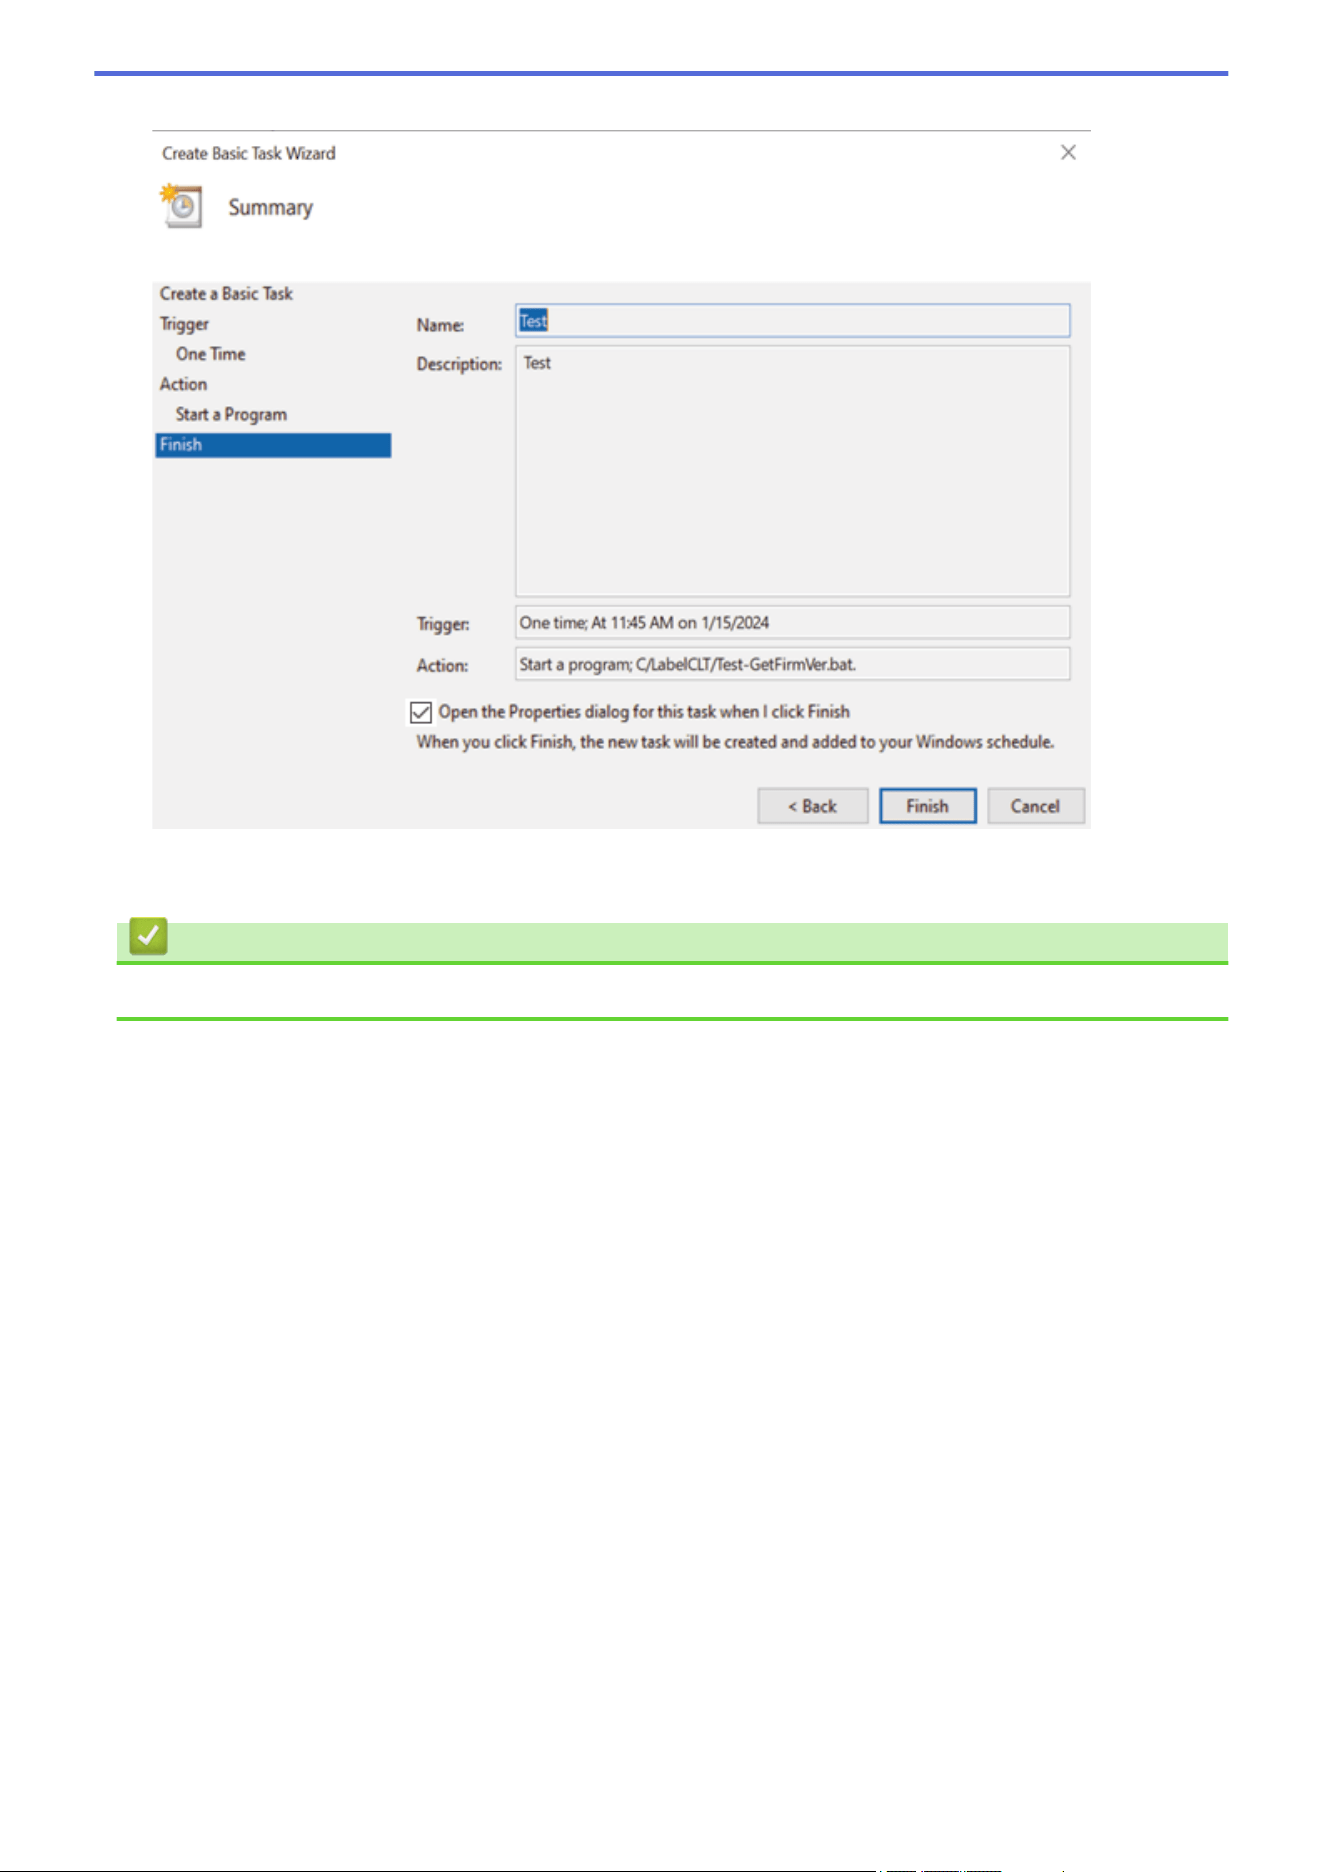
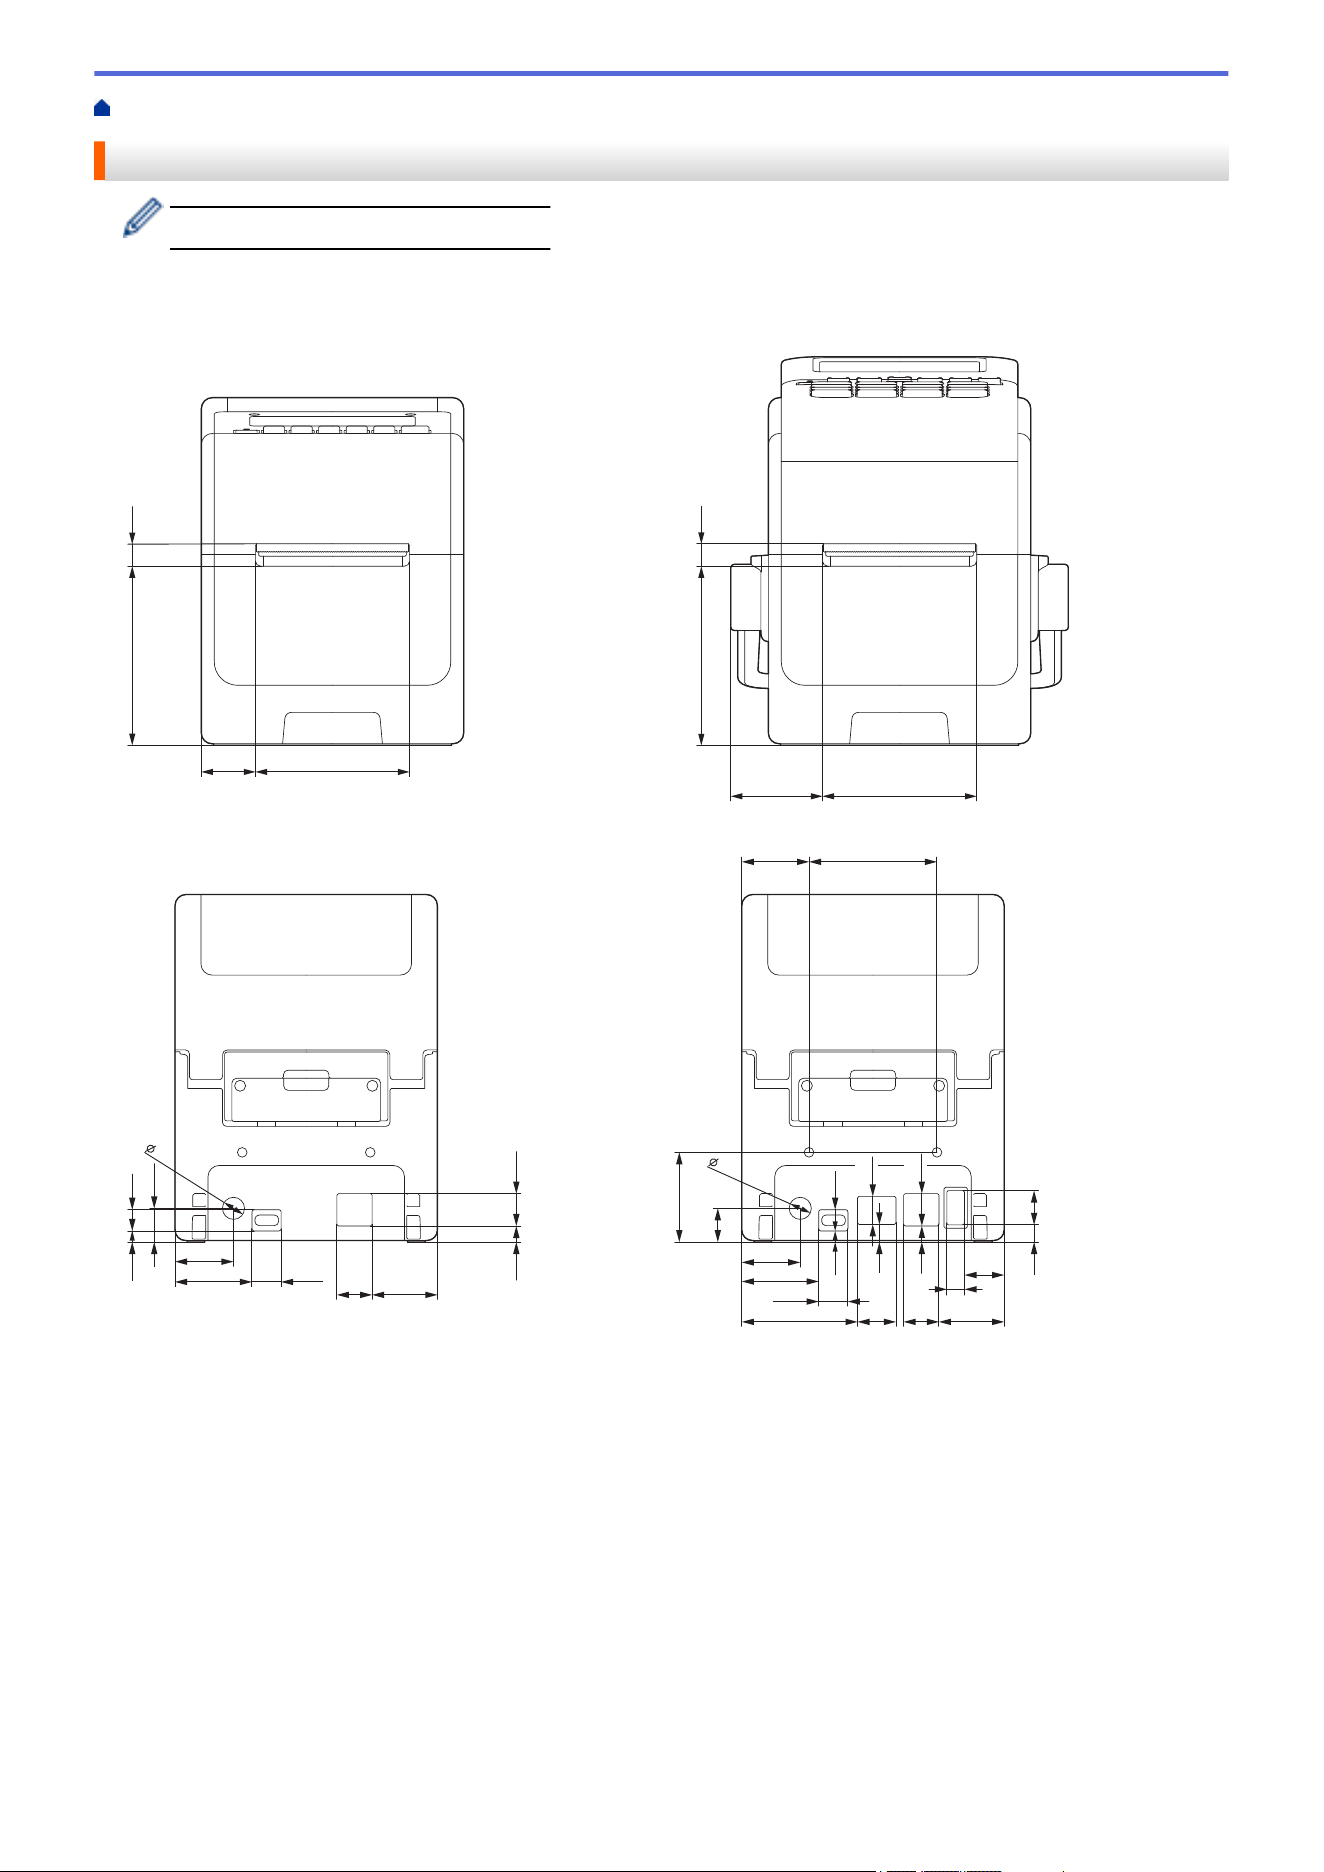

108.8
112.2
153.830.8
35.8
14.2
197.1
13.4
56.5
14
36
24 71
119
9.7
3.9 8.3
106.8 8.3
19.1
9.5
100
99.9
11.1
Side view
157.7
224
280.5
176.1
319
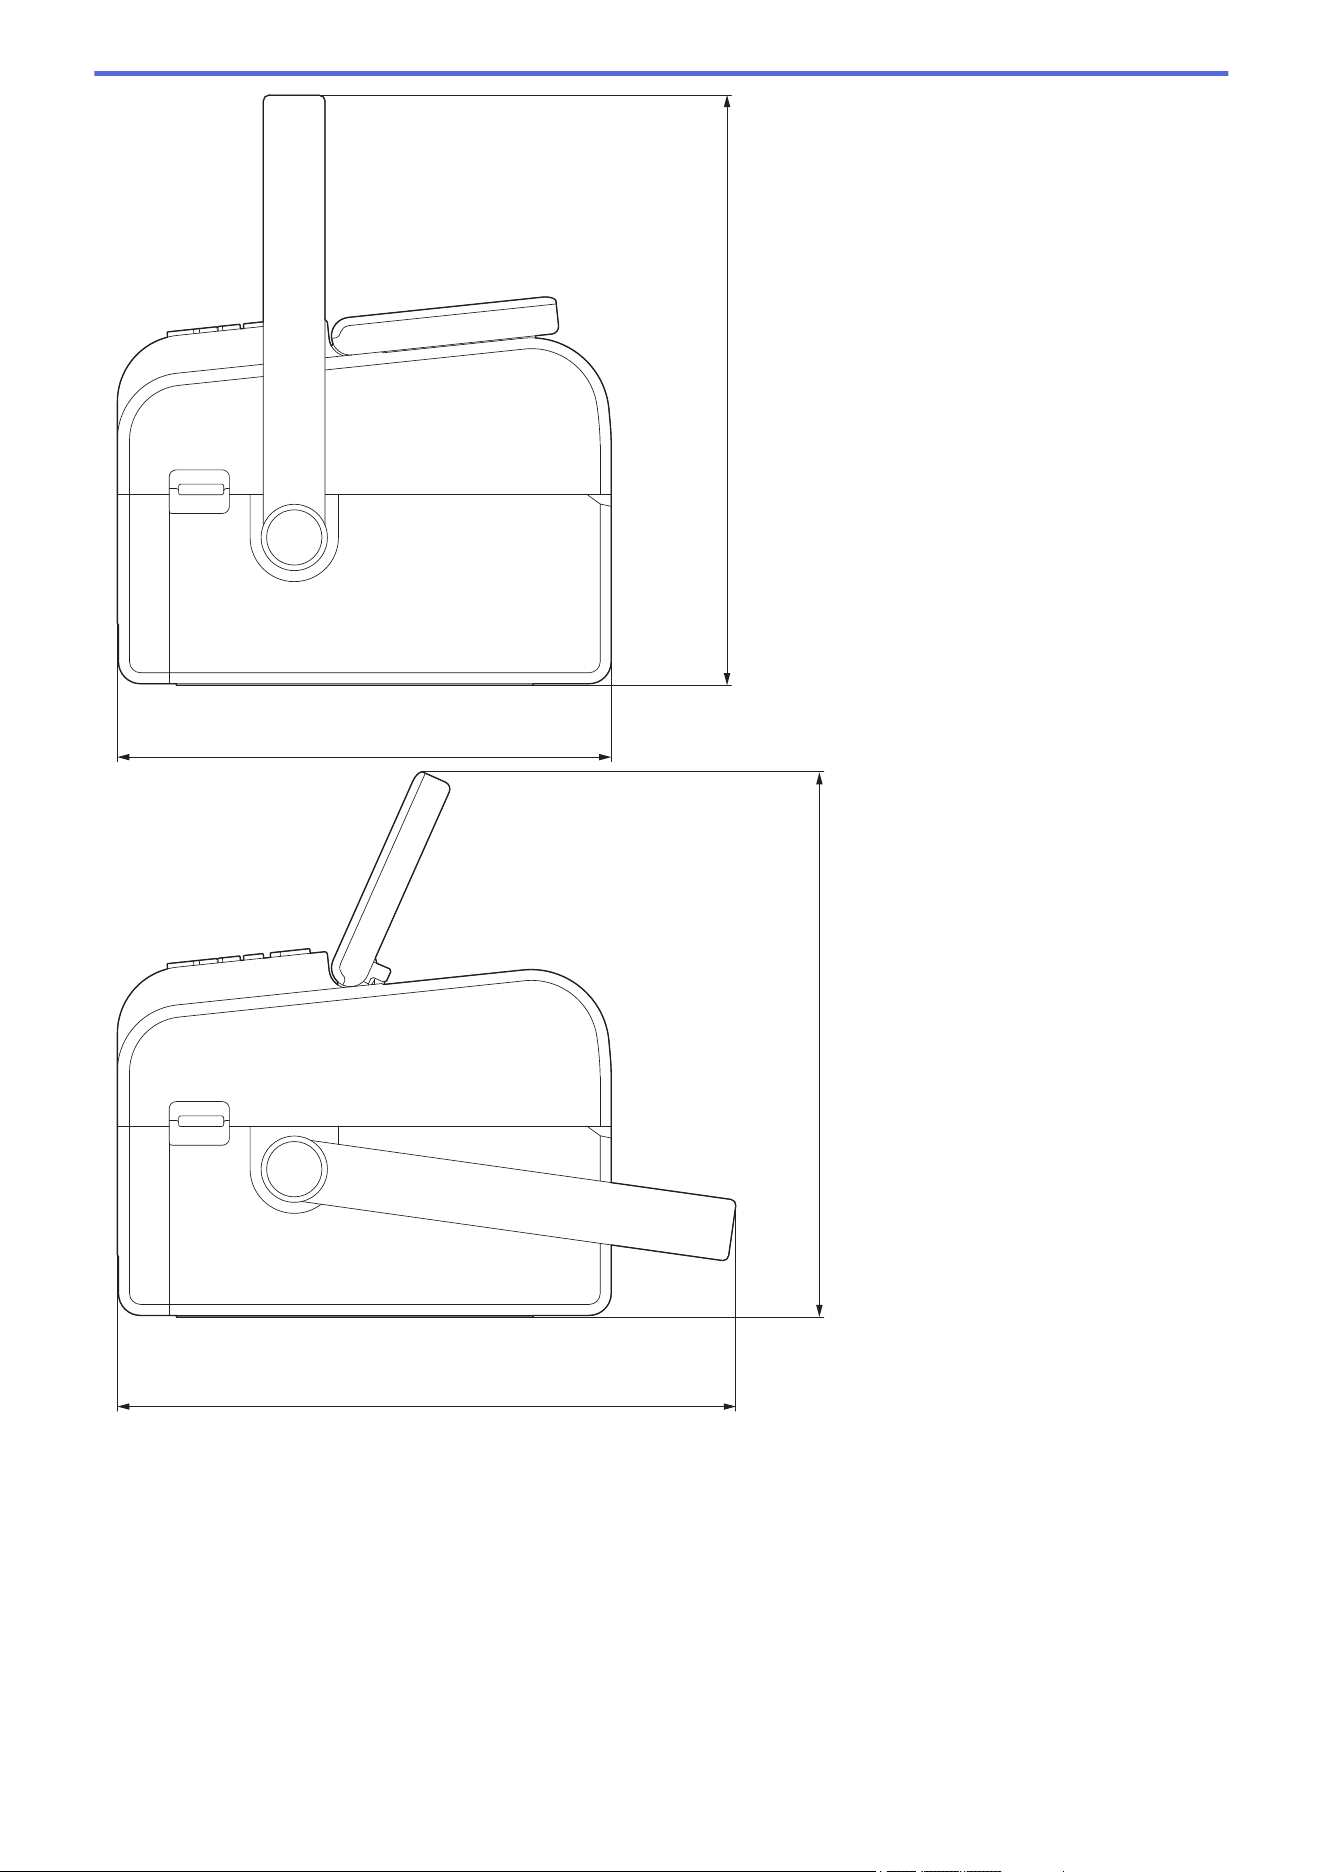
224
267.7
280.5
247.1
320
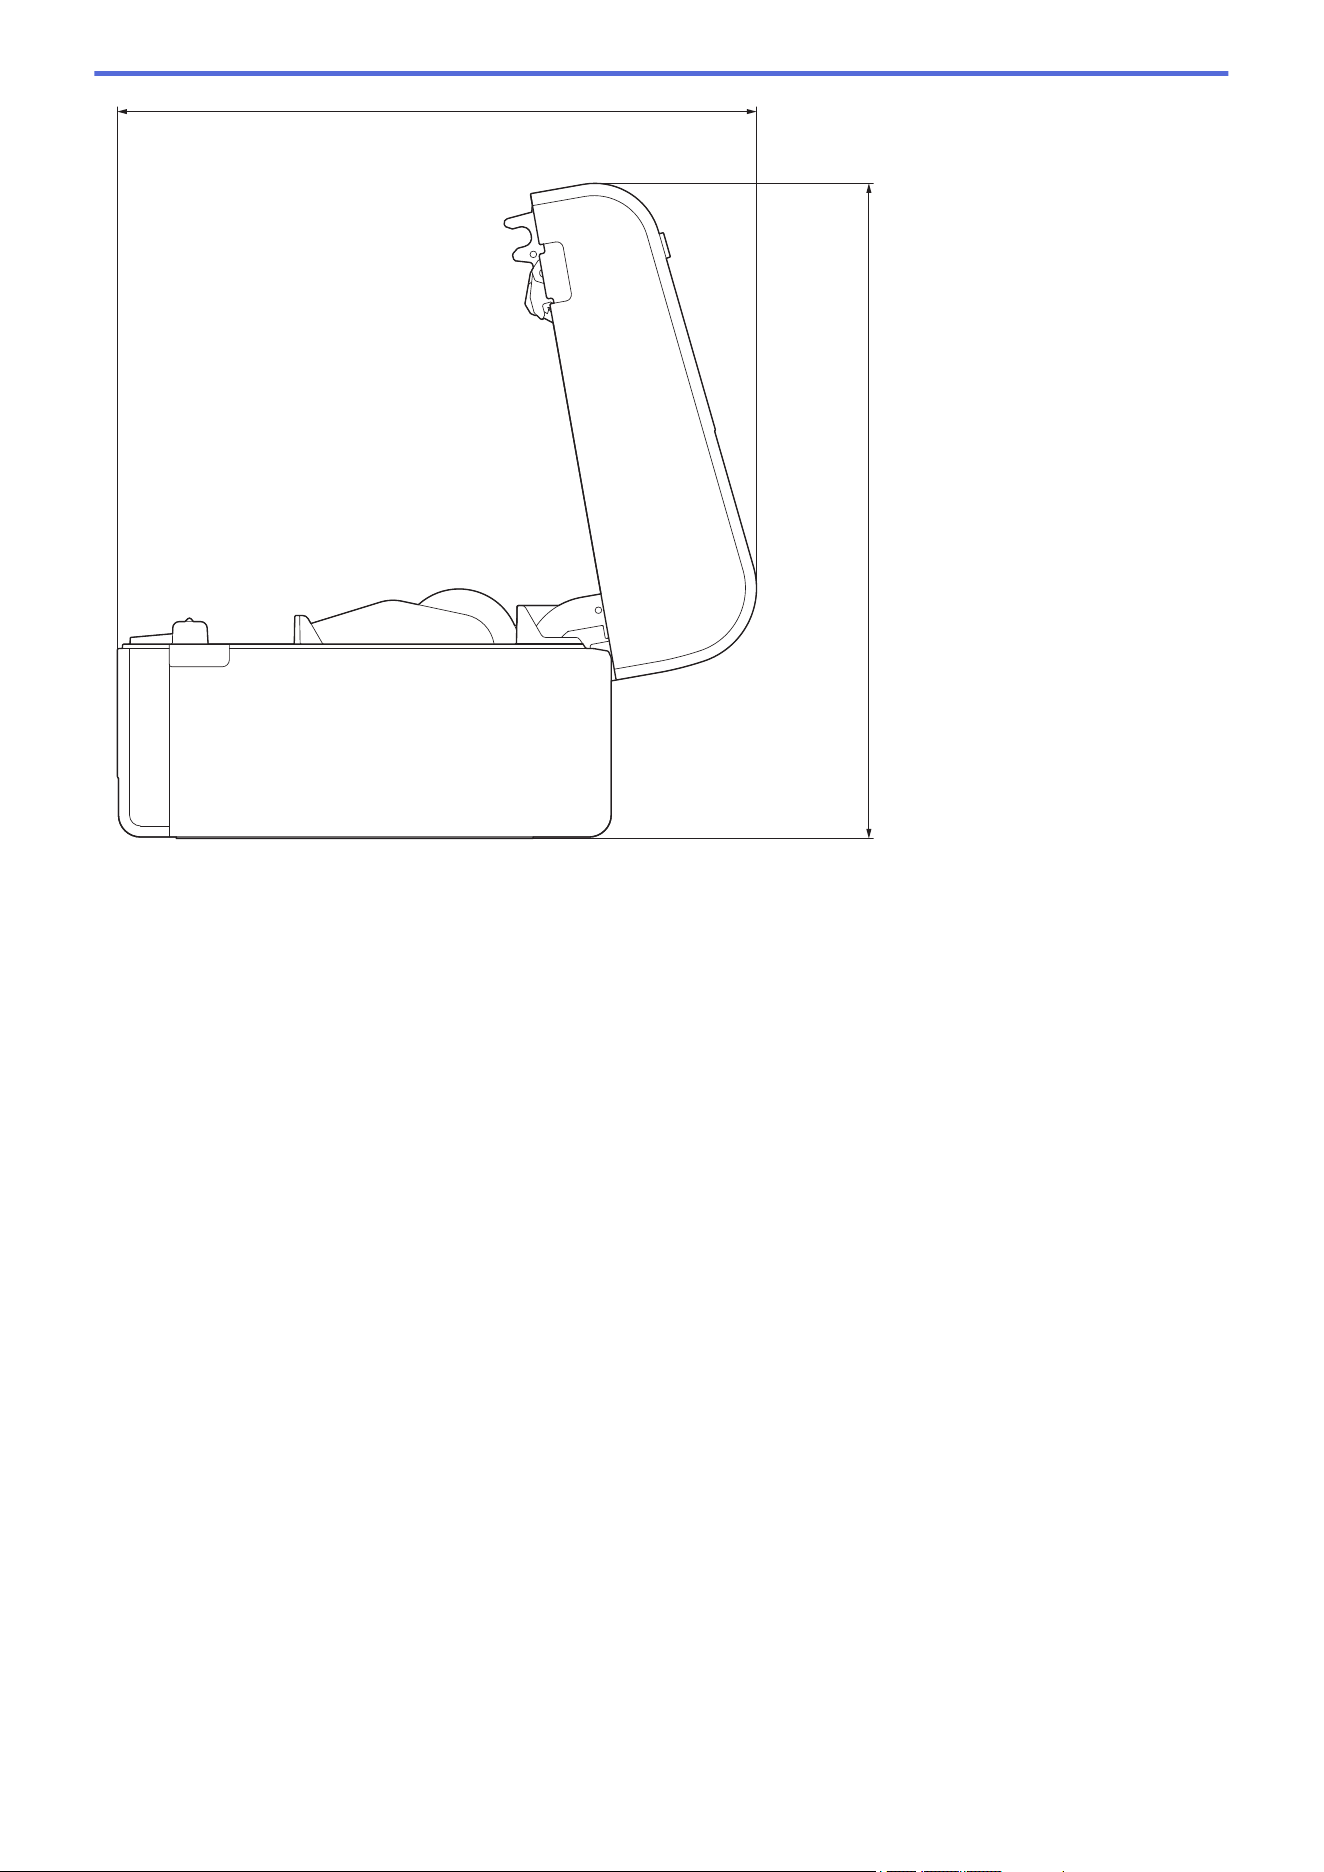
289.9
297.2
Buttons Arrangement / LCD Arrangement
Button Height
• Power: 0 mm
• Others: 2 mm
321
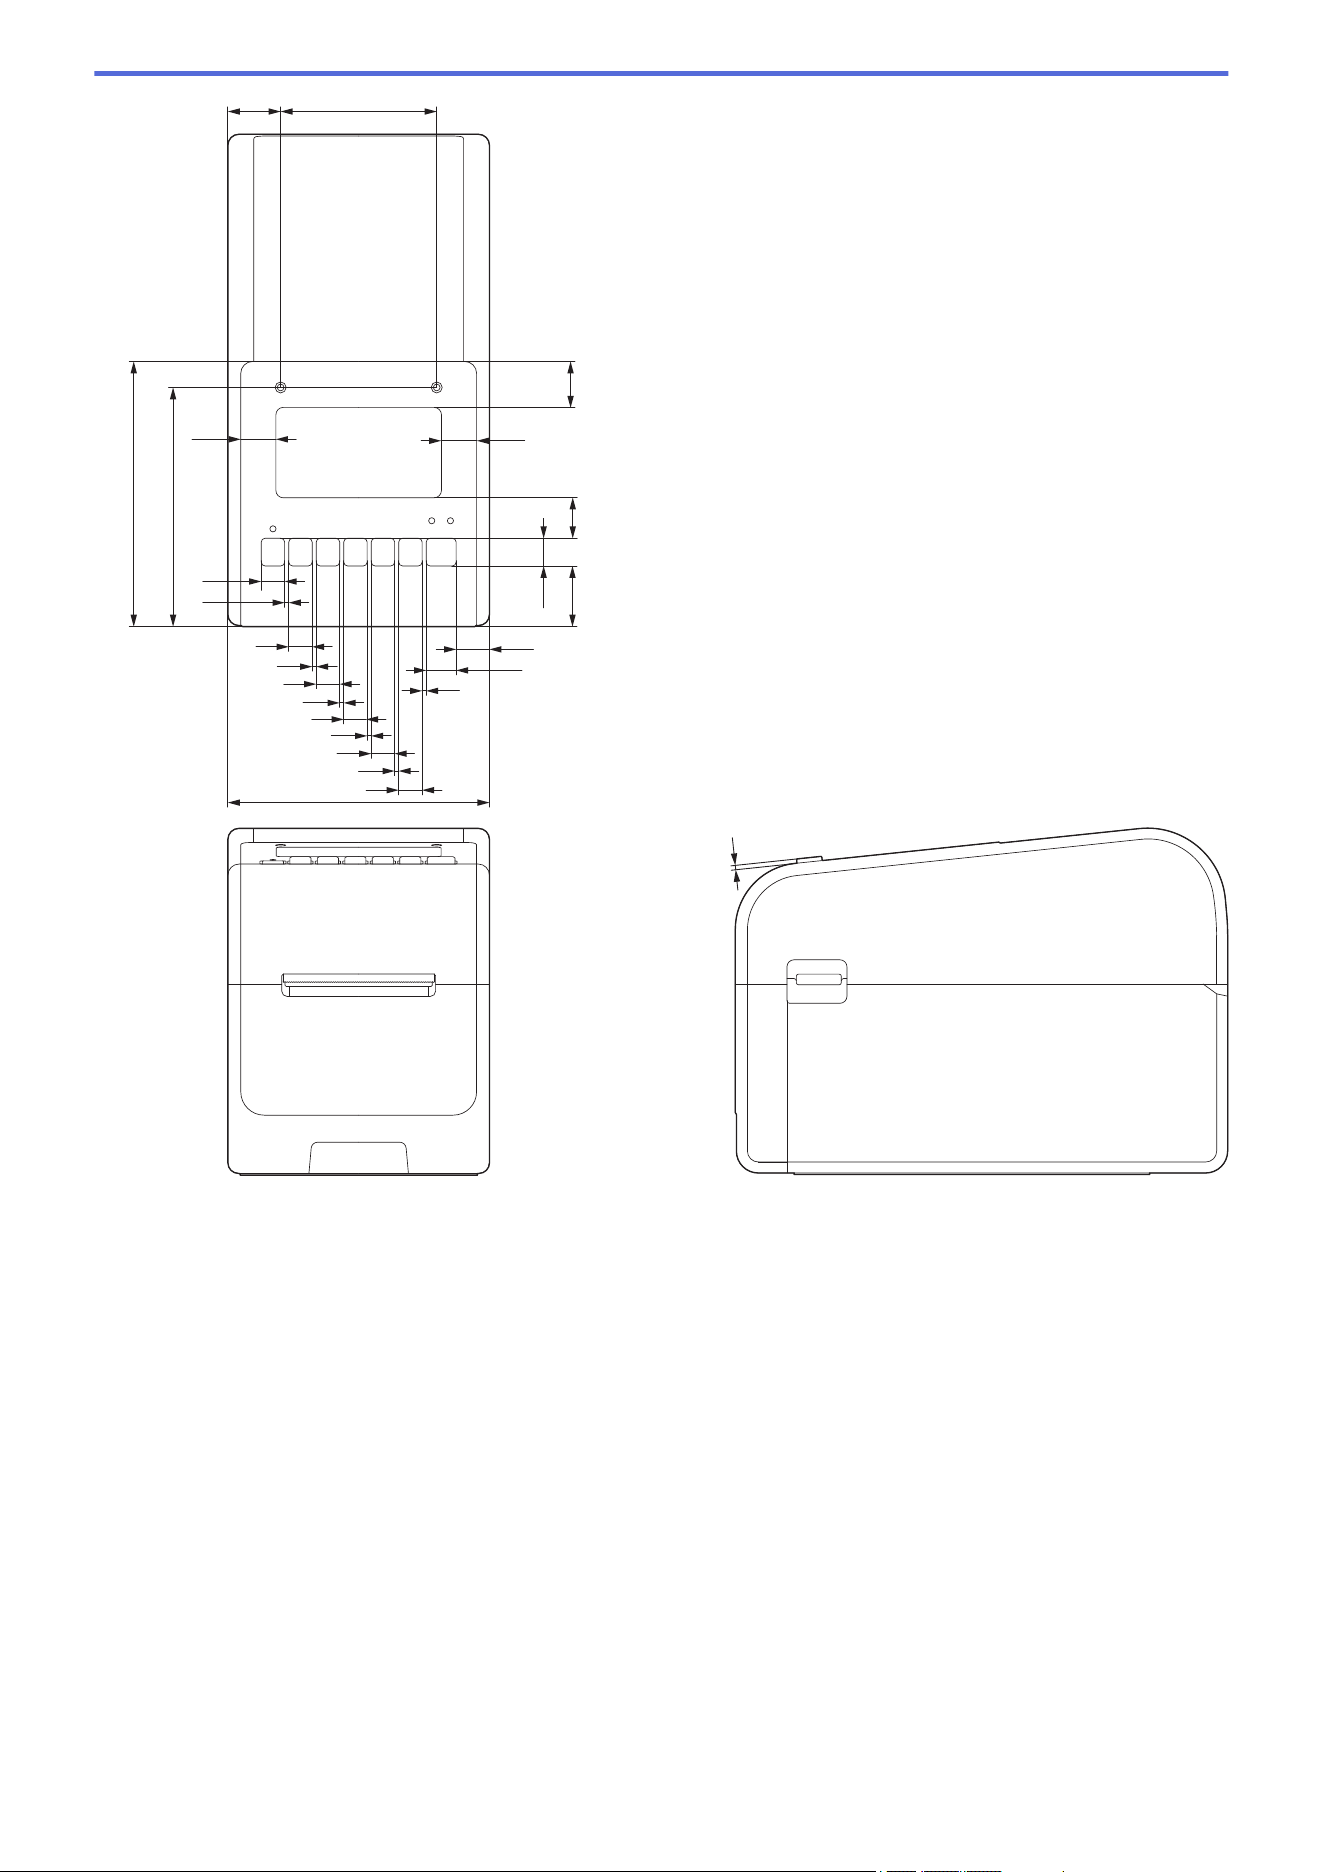
24
16.3
16.3
9.7
9.7
9.7
9.7
9.7
9.7
119
2.8
2.8
2.8
2.8
2.8
2.8
15.6
12.7
120.6
108.8
21.1
18.6
12.3
27.9
2
71
322

12.3
12.3
224
27.9
27.9
15.6 9.7
9.7
2.8
15.6
12.7
52.8
119
Battery Base Unit Installed
Side view
198.6
224
Cutter Unit Installed
Side view
323
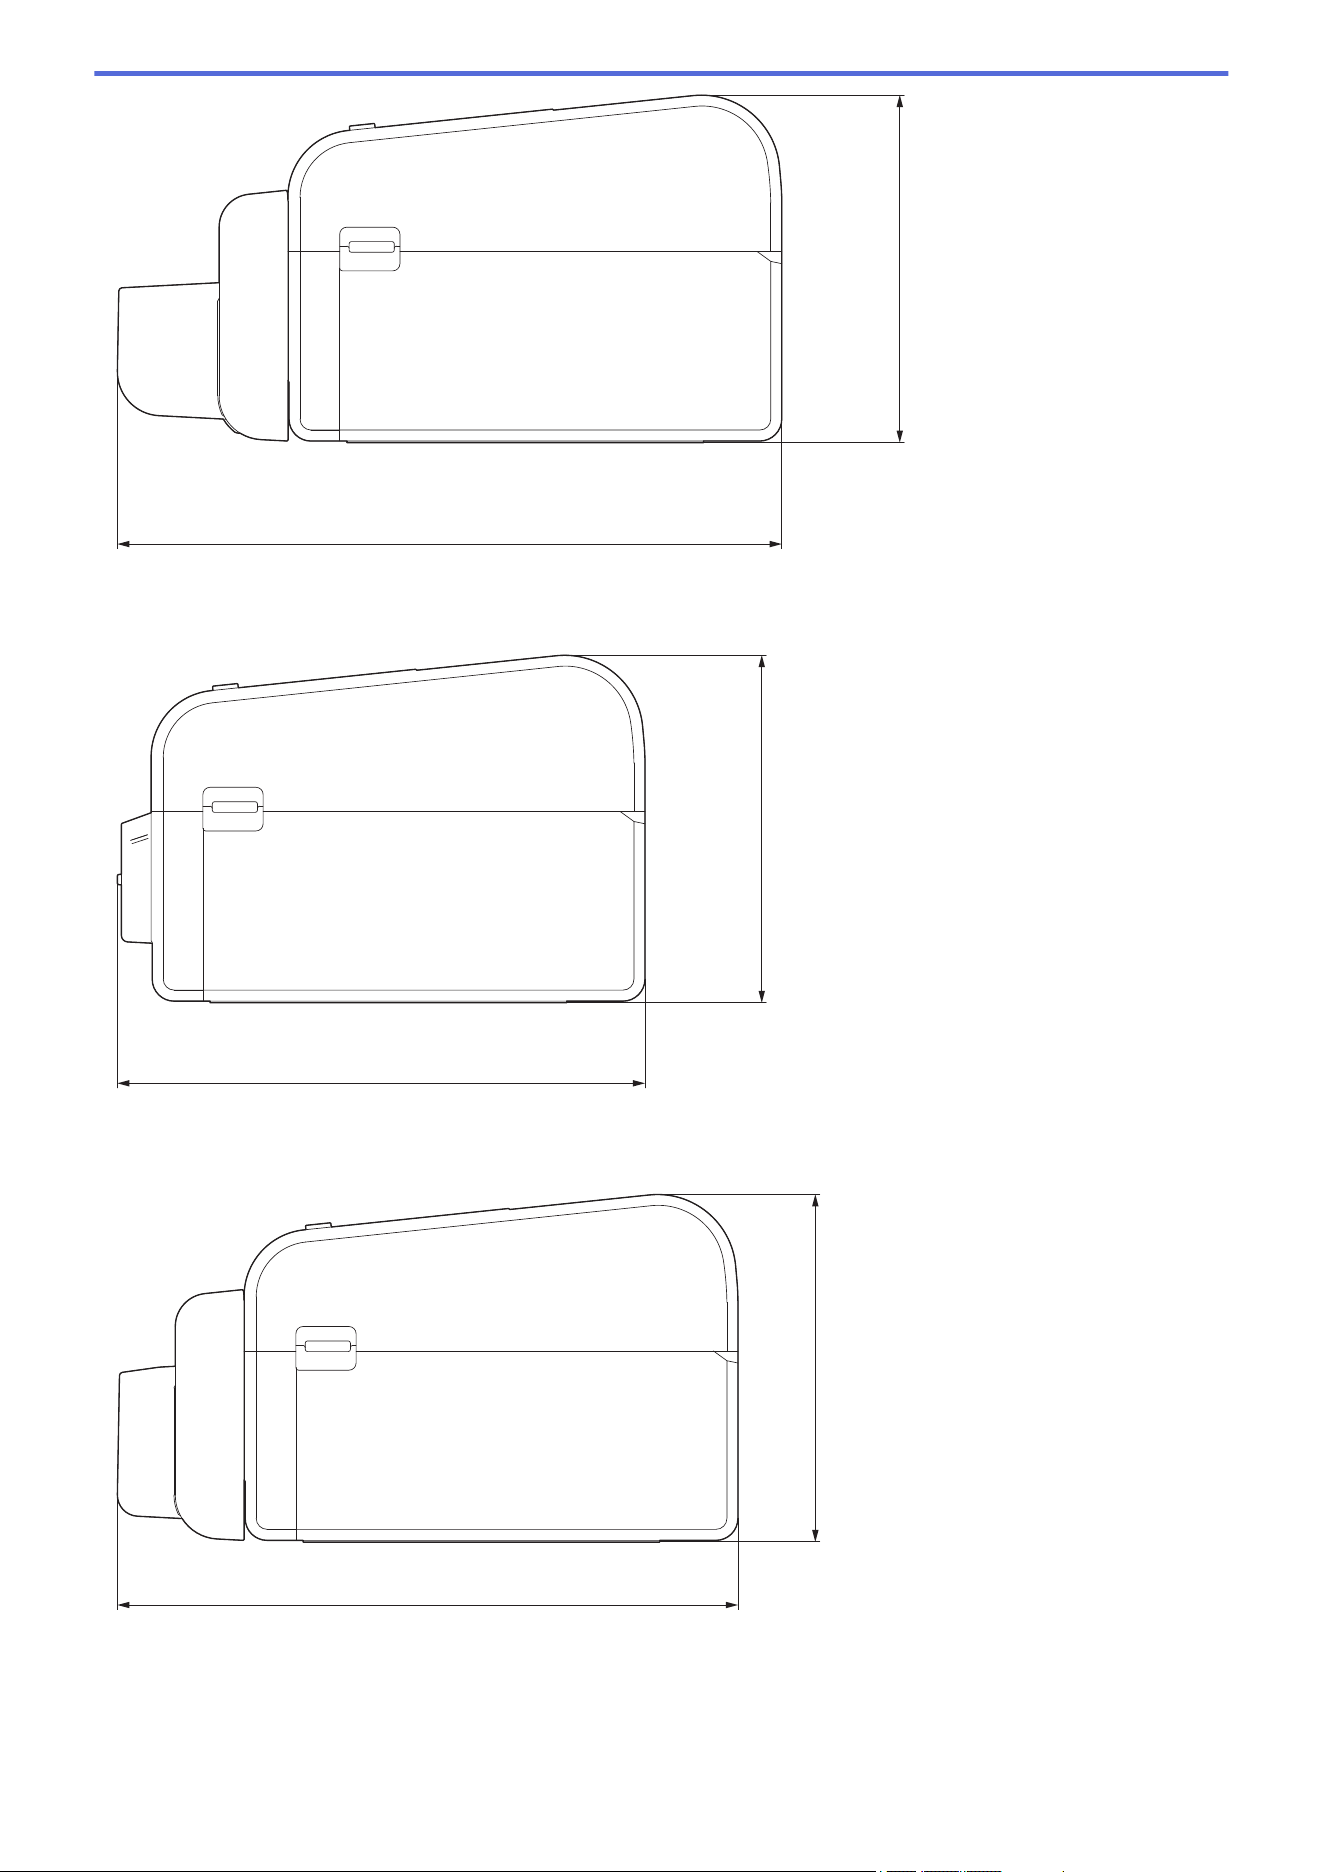
157.7
301.3
Peeler Unit Installed
Side view
157.7
239.3
Linerless Cutter Unit Installed
Side view
157.7
281.5
Installation Location
• Place the printer on a flat, stable surface that is well ventilated, and where there is enough room to
open Covers and plug in any cords or cables.
• Make sure to leave enough space above, behind, and around the printer, as shown in the illustrations.
324

NOTE
• Do not place the printer where it is exposed to:
- direct sunlight
- high temperature and humidity
- rapid temperature changes
- vibrations
- heavy dust
• Do not place the printer near:
- equipment that generates magnetic or electromagnetic waves
- fire or liquids
Doing so may result in fire, electric shock, or injury.
• TD-2350D/TD-2350DF/TD-2350DSA:
Do not place the printer in areas covered by metal (for example, metal shelves and spaces shielded by
metal doors) since it can cause loss of radio communication.
Top View
100 mm
100 mm
100 mm
Side View
100 mm
50 mm
325


Home > Appendix > Auto Media Configuration > Auto Media Configuration Overview
Auto Media Configuration Overview
Auto Media Configuration allows the printer to automatically detect characteristics of the installed paper, and then
select the correct paper size settings.
Model Automatically Detects:
TD-2310D
Length
1
TD-2320D/TD-2350D/TD-2350DSA • Paper type
• Width
• Length
• Label spacing
• Width of marks
• Gap/Black mark detection sensitivity
TD-2320DF/TD-2350DF
• Paper type
• Width
Auto Media Configuration Workflow
When Auto Media Configuration begins, the printer automatically feeds the media so it can detect its
characteristics. By default, the printer uses the continuous feed setting unless:
• The transmissive/gap sensor detects a die-cut label.
• The reflective/black mark sensor detects marked media.
2
• If there is not enough media and it runs out during Auto Media Configuration, the printer will not detect
the media type successfully. The LCD will display an error message. Follow the on-screen instructions
and try again.
• If the media is not aligned correctly, calibration will not be successful.
• Depending on the media's shape and material, media detection may not be possible.
• TD-2310D:
Width defaults to the width of the last media you used.
• TD-2320D/TD-2350D/TD-2320DF/TD-2350DF/TD-2350DSA:
Width is calculated automatically by subtracting 0.07" (2.0 mm) from the left and right of the detected
width.
Related Information
• Auto Media Configuration
1
Available when you select the Paper Size Setup option on the Printer Setting Tool.
2 Depending on the results, you may have to feed the media again.
328
Home > Appendix > Auto Media Configuration > Use the Auto Media Configuration Function
Use the Auto Media Configuration Function
>> TD-2320D/TD-2320DF
>> TD-2350D/TD-2350DF/TD-2350DSA
>> Calibrate Media Information Using the Printer Setting Tool
TD-2320D/TD-2320DF
Calibrate media information using the printer buttons.
Press and hold until the Status LED lights up and then goes off.
After calibration is complete, the detected media information is set on the printer.
TD-2350D/TD-2350DF/TD-2350DSA
Calibrate media information using the LCD menu.
1. Press Menu.
2. Press a or b to select the following:
a. Select [Media]. Press OK.
b. Select [Calibration]. Press OK.
After calibration is complete, the detected media information is set on the printer.
Calibrate Media Information Using the Printer Setting Tool
1. Connect the printer to the computer.
2. Start the Printer Setting Tool.
Click Start > Brother > Printer Setting Tool.
3. Click Paper Size Setup.
4. Click Edit or New.
5. TD-2310D: Click Auto media configuration.
After calibration is complete, the detected media information is set on the printer.
6. TD-2320D/TD-2350D/TD-2320DF/TD-2350DF/TD-2350DSA: Click the Auto media configuration.
A list of detected printers appears.
7. Click Import to apply the results to the paper size settings.
Related Information
• Auto Media Configuration
329


Home > Appendix > Options > Recommended Tightening Torque When Installing Optional Parts
Recommended Tightening Torque When Installing Optional Parts
Applicable screws: Screws for installing the Battery Base, Cutter, Linerless Cutter, and Peeler on the printer.
Recommended tightening torque: 3.10±0.885 in·lbs (0.35±0.1 N·m)
Related Information
• Options
331

Home > Appendix > Options > Change the Label Peeler Options (Windows)
Change the Label Peeler Options (Windows)
After attaching the Label Peeler, set the printer driver peeler option.
1. Click Start > Settings > Devices > Printers & scanners. Select the printer you want to set up, and then
click Open queue. Click Printer > Printing Preferences.
2. Select the Use Peeler Function checkbox.
3. Click OK.
Related Information
• Options
332
Home > Appendix > Options > Change the Cutting Options (Windows)
Change the Cutting Options (Windows)
Related Models: TD-2320D/TD-2350D/TD-2350DSA
The cutting options allow you to specify how labels are fed and cut. If you do not use P-touch Editor, you can
change the cutting options in the printer driver properties.
1. Click Start > Settings > Devices > Printers & scanners. Select the printer you want to set up, and then
click Open queue. Click Printer > Printing Preferences.
2. Select the Cut Every checkbox, and then select where to cut when multiple labels are printed.
3. Select the Cut at End checkbox.
4. Click OK.
Label Cutting Options
Auto Cut (Cut
every one label)
Cut at End Image
Off On
ABCABC
Off Off
ABCABC
On On or Off
ABC
ABC
Related Information
• Options
333
Home > Appendix > Brother Help and Customer Support
Brother Help and Customer Support
IMPORTANT
For technical help, you must call the country where you bought the machine. Calls must be made from
within that country.
>> FAQs (Frequently Asked Questions)
>> For Customer Service
>> Ordering Accessories and Supplies
FAQs (Frequently Asked Questions)
For more information on your Brother machine, visit the Brother support website at support.brother.com. For
additional help and tips, go to your model's FAQs & Troubleshooting page; for the latest drivers and software,
go to your model's Downloads page.
For Customer Service
In USA:
www.brother-usa.com/support (Self-Service/Email/Chat)
1-877-BROTHER (1-877-276-8437)
In Canada:
www.brother.ca/support
(Self-Service Videos, Email, Chat, Facebook and Twitter Help)
Service Center Locator (USA only)
For the location of a Brother authorized service center, call 1-877-BROTHER (1-877-276-8437) or visit
www.brother-usa.com/support.
Service Center Locations (Canada only)
For the location of a Brother authorized service center, visit www.brother.ca/support.
Ordering Accessories and Supplies
We recommend Genuine Brother supplies, which are available at most Brother retailers. If you cannot find the
supplies you need and have a Visa, MasterCard, Discover, American Express credit card, or PayPal account,
you can order directly from Brother. Visit us online for a complete selection of the Brother accessories and
supplies that are available for purchase.
NOTE
In Canada, only Visa and MasterCard are accepted.
In USA:
1-877-BROTHER (1-877-276-8437)
www.brother-usa.com/support
In Canada:
www.brother.ca
334


USA/CAN
Version 0