EN
090013-10005
www.bora.com
Operating and installation instructions XBO
X BO steam oven

54
www.bora.com
EN
7.3 Cleaning the appliance front ...................... 83
7.4 Cleaning food supports ............................... 83
7.5 Cleaning the drain filter .............................. 84
7.6 Cleaning the oven chamber seal ................ 84
7.7 X BO odour filter .......................................... 84
7.7.1 Filter change ..................................................84
8 Troubleshooting 85
9 Installation 86
9.1 Installation information ............................... 86
9.1.1 General information ......................................86
9.1.2 Fitted unit ......................................................86
9.1.3 Fresh water connection .................................86
9.1.4 Waste water connection ................................86
9.2 Scope of delivery ......................................... 87
9.3 Tools and aids .............................................. 87
9.4 Installation dimensions ............................... 87
9.5 BORA X BO frame spacer ............................ 88
9.6 Installation ................................................... 90
9.7 Ventilation .................................................... 93
9.8 Initial operation ............................................ 94
9.9 Handover to user ......................................... 94
10 Decommissioning,
disassembly and disposal 95
10.1 Decommissioning ........................................ 95
10.2 Disassembly ................................................. 95
10.3 Environmentally-friendly disposal .............. 95
11 Warranty, technical service,
spare parts, accessories 96
11.1 BORA manufacturer’s warranty .................. 96
11.1.1 Warranty extension .......................................97
11.2 Service .......................................................... 97
11.3 Spare parts................................................... 97
11.4 Accessories .................................................. 97
Table of Contents
1 General information 55
1.1 Liability ......................................................... 55
1.2 Validity of the operating and installation
instructions .................................................. 55
1.3 Product conformity...................................... 55
1.4 Presentation of information ........................ 55
2 Safety 57
2.1 Intended use ................................................ 57
2.2 People with limited abilities........................ 57
2.3 General safety instructions......................... 58
2.4 Safety information for installation ............. 60
2.5 Safety instructions – operation .................. 62
2.6 Safety instructions – cleaning and
maintenance ................................................ 65
2.7 Safety instructions – repairs,
servicing and spare parts ........................... 66
2.8 Safety instructions – disassembly and
disposal ........................................................ 67
3 Technical data 68
3.1 X BO steam oven XBO ................................. 68
3.2 Appliance dimensions ................................. 68
4 Energy datasheet 70
5 Appliance description 71
5.1 How it works ................................................ 71
5.2 Steam oven .................................................. 71
5.3 Food supports .............................................. 71
5.4 Food thermometer ....................................... 73
5.5 Touch display ............................................... 73
5.5.1 How it works .................................................73
5.6 Switching the appliance on/off ................. 74
5.7 Opening/closing the door .......................... 74
5.8 Updating the appliance software .............. 74
5.9 Demo mode .................................................. 75
6 Functions and operation 76
6.1 Operating the touch display ....................... 76
6.2 Standard functions ...................................... 76
6.3 Global functions ........................................... 77
6.4 Main menu ................................................... 77
6.4.1 General symbols/functions...........................80
6.5 Customising the menu ................................ 81
6.6 Information for testing institutes ............... 81
7 Cleaning and maintenance 82
7.1 Cleaning the cooking chamber ................... 82
7.1.1 Manual cleaning ............................................82
7.1.2 Maintenance programmes ............................82
7.1.3 X BO cleaning cartridge ................................83
7.2 Cleaning the food thermometer ................. 83
55
General information
www.bora.com
EN
1 General information
1.3 Product conformity
Directives
The appliances meet the following EU/EC directives:
2009/125/EC Ecodesign Directive
2011/65/EU RoHS Directive
BORAVertriebsGmbH&CoKG hereby declares that
the X BO radio equipment complies with directive
2014/53/EU. The full text of the EU declaration of
conformity is available at the following address:
https://www.bora.com/at/de/service/download/
The appliance supports the following frequency
bands:
O
2.4 GHz: 100 mW max.
O
5 GHz: 100 mW max.
AD AT BE CH CZ EN DK EE ES
FI FR IE IT LI LU MC MT NL
NO PL PT RO SE SI SK SM UK(NI)
The following applies in the case of 5 GHz Wi-Fi in
the countries below:
For interior use only.
1.4 Presentation of
information
We use standard formatting, numbering, symbols,
safety instructions, terms and abbreviations so that
you can work quickly and safely when using this
manual.
The article described in these instructions is
hereinafter also referred to as an appliance.
Instructions are indicated with an arrow:
X Always follow all instructions in the prescribed
order.
Enumerations are indicated with a bullet point at
the start of the line:
O
Enumeration 1
O
Enumeration 2
i
Information notes point to special features
that must be taken into account.
These instructions contain important information to
protect you from injury and prevent damage to the
appliance.
Please read these instructions carefully before
installing or using the appliance for the first time.
Other documents apply alongside these instructions.
Please by all means adhere to all documents that
form part of the scope of delivery.
Assembly, installation and commissioning must
always occur in line with national laws, regulations
and standards. The work must be performed by
qualified specialists who know and comply with the
additional regulations of the local energy supply
companies.
All safety and warning information as well as
the handling instructions in the accompanying
documents must be observed.
1.1 Liability
BORA Holding GmbH, BORA Vertriebs GmbH & Co
KG, BORA APAC Pty Ltd and BORA Lüftungstechnik
GmbH – hereinafter referred to as BORA – does
not assume any liability for damage arising from
disregard for or non-adherence to the documents
included in the scope of delivery!
Furthermore, BORA shall not be held liable for
damage caused by improper installation or failure to
observe the safety and warning instructions!
1.2 Validity of the operating
and installation
instructions
These instructions apply to several appliance
versions. It is therefore possible that some of the
features described do not apply to your appliance.
The details of the figures contained herein may
differ from some appliance versions and are to be
understood as schematic diagrams.
EN
56
General information
www.bora.com
Safety and warning instructions
The safety and warning instructions in this manual
are emphasised with symbols and signal words.
Safety and warning instructions are structured as
follows:
WARNING SYMBOL AND
SIGNAL WORD!
Type and source of danger
Results of non-compliance
X
Measures to minimise risk
Please note:
O
warning symbols draw attention to a high risk of
injury.
O
The signal word indicates the severity of that risk.
Warning
symbol
Signal
word
Risk
ü
Danger Indicates an immediate,
hazardous situation which
causes death or serious
injury if not respected.
ü
Warning Indicates a potentially
hazardous situation
which can cause death
or serious injury if not
respected.
Caution Indicates a potentially
hazardous situation which
can cause minor injury or
damage to property if not
respected.
Tab. 1.1 Meaning of the warning symbols and signal
words
Figures
All measurements are provided in millimetres.

57
Safety
www.bora.com
EN
2 Safety
The appliance complies with the stipulated safety requirements. The user is responsible
for the safe use of the appliance, cleaning and maintenance.
Improper use can lead to
personal injury and damage to property.
2.1 Intended use
The appliance is solely intended for preparing food in private households.
i
The appliance may only be operated in frostproof rooms.
This appliance is not intended for:
O
professional use (catering)
O
outdoor use
O
heating rooms
O
use in mobile installation sites such as motor vehicles, ships or aeroplanes
O
use at altitudes of over 2000m (metres above sea level)
O
use when not fully installed
Any other use or any use that goes beyond that which is described here is classed as
unintended.
i
BORA does not assume any liability for damages caused by incorrect
installation, improper use or incorrect operation.
All misuse is prohibited!
2.2 People with limited abilities
Children
The appliance can be used by children aged 8 and over if they are supervised or have
been instructed how to use the appliance safely and understand the
resultant risks.
Children must not play with the appliance.
X
Use the child lock in order to prevent children from switching on the appliances or
changing the settings when they are unattended.
X
Supervise children in the vicinity of the appliance.
X
Do not store any items that could be of interest to children in storage spaces
above or behind the appliance or in the oven chamber. Otherwise, they will be
tempted to climb onto the appliance (open door).
i
Any work involving cleaning and maintenance must not be carried out by
children unless they are supervised at all times while doing so.

EN
58
Safety
www.bora.com
People with reduced physical, sensory or mental capacities
The appliance can be used by people with reduced physical, sensory or mental
capacities or a lack of experience and/or knowledge if they are supervised or have
been instructed how to use the appliance safely and understand the resultant risks.
Operation can be restricted using the child lock.
2.3 General safety instructions
DANGER!
Packaging components are a choking hazard
Packaging components (e.g. lm, polystyrene) can be life-threatening for children.
X
Store all packaging components out of reach of children.
X
Dispose of the packaging properly and immediately.
DANGER!
Risk of electric shock or injury from damaged surfaces
The underlying electronics can be exposed or damaged due to ssures, fractures
or cracks in appliance surfaces (e.g. damaged glass), particularly in the vicinity of
the operating unit. This can cause an electrical shock. Furthermore, a damaged
surface can cause injuries.
X
Do not touch the damaged surface.
X
If there are any cracks, fissures or fractures, switch the appliance off
immediately.
X
Securely disconnect the appliance from the mains using the LS switch, fuses,
automatic circuit breakers or contactor.
X
Contact BORA Service.
DANGER!
Risk of injury from overloading the open door
The maximum load capacity of the open door is 22.5 kg.
X
Make sure that children do not stand or sit on or hang from the open door.
X
Do not stand, sit or lean on the open door.
X
Do not place any heavy objects on the open door.

59
Safety
www.bora.com
EN
WARNING!
Risk of injury or damage due to incorrect components or unauthorised
modifications
Incorrect components can lead to personal injury or damage to the appliance.
Modications, additions or alterations to the appliance can lead to safety risks.
X
Only use original components.
X
Do not make any modifications, additions or alterations to the appliance.
WARNING!
Risk of injury due to mechanical damage on the appliance
Mechanical damage (e.g. cracks, deformation, separation of adhesive seals, etc.) to
the appliance, as well as to cables and accessories can cause injuries.
X
Do not operate the appliance.
X
Do not try to repair or replace damaged components yourself.
X
Contact BORA Service.
CAUTION!
Appliance components can cause injury if dropped
Appliance components can cause injury if you drop them (e.g. food supports).
Hold the food supports tight when inserting and removing.
X
Check that the food support is positioned correctly inside the appliance.
X
Place any appliance components that have been removed in a safe place near
the appliances.
X
Ensure that no components removed from the appliances can fall on the floor.
CAUTION!
Risk of injury from heavy lifting
If not handled correctly, carrying and installing appliances can cause injury to the
limbs or torso.
X
If necessary, carry and install the appliance with another person.
X
Use appropriate aids to prevent damage or injury.
CAUTION!
Damage from improper use
The appliance surfaces must not be used as work surfaces. This can damage the
appliances (particularly in the case of hard and sharp objects).
Do not use the appliances as worktops.
X
Keep hard or sharp objects away from the appliance surfaces.

EN
60
Safety
www.bora.com
Faults and errors
X
In the case of faults and errors, follow the instructions on the appliance display
and in the “Troubleshooting” chapter.
X
In the event of any faults or errors that are not mentioned, switch the appliance
off and contact BORA Service.
Pets
X
Keep pets away from the appliance.
2.4 Safety information for installation
i
The appliance must only be installed and assembled by trained specialists
who are familiar with and comply with the standard national regulations and
supplementary regulations of the local utility companies.
i
Work on electrical components must only be conducted by trained electrical
personnel.
i
The appliance may only be installed with the power disconnected.
The electrical safety of the appliance is only guaranteed if it is connected to a
protective conductor system that has been installed in line with regulations. Ensure
that this basic safety precaution is met.
The appliance must be suitable for the regional voltage and frequency.
X
Check the information on the identification plate and in the event of deviations,
do not connect the appliance.
X
Only use the connection cables supplied. Where necessary these are included in
the scope of delivery.
X
Do not use the appliance until installation is complete. This is the only way to
ensure safe operation.
X
Conduct all work extremely attentively and conscientiously and in accordance
with these instructions.
X
Before handing the appliance or system over to the end user, ensure that it has
been correctly installed.

61
Safety
www.bora.com
EN
DANGER!
Risk of electric shock from incorrect mains connection
Connecting the appliance to the mains incorrectly poses a risk of electric shock.
X
Make sure that the appliance has a fixed connection to the mains voltage.
X
Make sure that the appliance is connected to a properly installed protective
conductor system.
X
Make sure that technical equipment is provided to enable all of the appliance’s
poles to be disconnected from the mains with a contact opening width of at
least 3 mm (LS switch, fuses, automatic circuit breakers, contactor).
DANGER!
Risk of electric shock from damaged power supply cable
If the power supply cable is damaged (e.g. during installation), this can cause an
(lethal) electric shock.
X
Make sure that the connection cable does not become trapped or damaged.
DANGER!
Risk of electric shock from damaged appliance
A damaged appliance can cause an electric shock.
X
Check the appliance for visible damage prior to installation.
X
Do not install or connect any damaged appliances.
X
Do not operate any damaged appliances.
Special safety instructions for using the fresh water connection
i
The fresh water connection may be only be fitted by trained specialists who
are familiar with and comply with the local regulations.
i
The quality of the fresh water must comply with the drinking water regulations
in the corresponding country.
WARNING!
Risk to health from unpurified water
The use of unpuried water poses a risk to health.
X
Connect the appliance to the drinking water supply.

EN
62
Safety
www.bora.com
CAUTION!
Damage caused by dirt in the water
Dirt in the water pipe can be deposited in the appliance valve. If this affects the
functioning of the valve, water can leak out.
X
Rinse out the water pipe before connecting the appliance or when work is
carried out on the water pipes.
2.5 Safety instructions – operation
X
Do not use the appliance until installation is complete. This is the only way to
ensure safe operation.
X
Switch off the appliance after use.
X
Ensure that the drain filter is always used when cooking. Large food residues can
block the water outlet pipe and the pump.
X
Never line the oven chamber with aluminium foil or oven liners.
X
Do not place any cookware directly on the floor of the oven chamber.
X
Do not store any flammable objects or liquids in the oven chamber.
X
Keep the door closed during use, as otherwise the controls get very hot.
X
Always catch dripping grease in a suitable container.
Special safety information for the fresh air supply
During cooking and cleaning, moisture is released into the ambient air.
X
Ensure a sufficient supply of fresh air, e.g. by opening a window.
X
Ensure a normal and comfortable room climate (humidity of 45–60%), e.g. by
opening natural ventilation openings or using domestic ventilation systems.
WARNING!
Risk of burns from hot surfaces
The appliance and exposed parts (oven chamber, door, heating elements, food
thermometer, accessories) become hot during use. Touching hot surfaces can
cause serious burns.
X
Do not touch hot surfaces.
X
Please use suitable accessories when needed (pot holders,
oven gloves).
X
Keep children under 8 years of age away from the appliance or ensure they are
supervised at all times.

63
Safety
www.bora.com
EN
WARNING!
Risk of burns from hot food
Food may spill over when inserting or removing the food support. Touching hot
food can cause serious burns.
X
Ensure that no hot food spills over when inserting or removing the food support.
WARNING!
Risk of burns due to power cut
During or after a power cut a cooktop that was previously in operation may still be
hot.
X
Do not touch the appliance while it is still hot.
X
Keep children away from the hot appliance.
DANGER!
Risk of fire from overheated oil or fat
Oil or fat can quickly heat up and ignite.
X
Never leave the appliance unattended when cooking with oil or fat.
X
Never extinguish oil or fat fires with water.
X
Switch off the appliance.
X
Extinguish the fire by keeping the door closed.
DANGER!
Risk of fire from overdrying
When food is overdried there is a risk of re.
X
Do not leave the appliance unattended if you are dessicating or drying herbs,
bread, mushrooms, etc.
X
If you see smoke, keep the appliance closed and switch off the electricity
supply.
X
Do not open the door until the smoke has gone.
DANGER!
Risk of burns or explosion caused by flammable liquids
Flammable liquids (alcohol fumes) can be ignited in the hot oven chamber or
explode and cause serious injuries.
X
Never prepare dishes with large amounts of high-proof alcoholic beverages.
X
Only use small amounts of high-proof beverages.
X
Do not pour flammable liquids (e.g. spirits) over hot food.

EN
64
Safety
www.bora.com
DANGER!
Risk of burns or explosion caused by closed preserve jars
Heating closed preserve jars leads to excessive pressure which can cause the jars
to explode and cause serious injuries.
X
Do not heat closed preserve jars.
WARNING!
Risk of injury from moving appliance parts
There is a risk of injury when opening and closing the door or operating unit.
X
Ensure that nobody reaches into the appliance when the door or operating unit
is being opened or closed (children in particular).
WARNING!
Risk of injury from open door
When the door is open there is a risk of tripping or crushing.
X
Close the door after use.
CAUTION!
Risk of corrosion
Rusting materials (e.g. platters, cutlery)
can cause corrosion in the oven chamber.
X
Only use original accessories in the oven chamber.
WARNING!
Risk of injury from hot steam
Hot steam can escape when the door is opened if the steam has not been extracted
beforehand. Depending on the temperature, steam may be invisible. Hot water may
drip from the door after opening.
X
When opening the door, do not stand too near to the appliance.
X
Open the door carefully.
X
Keep children away from escaping steam.
CAUTION!
Risk of injury from the food thermometer if not used carefully
Failure to take care when inserting the food thermometer in the food can lead to
puncture wounds.
X
Ensure that the food thermometer is correctly positioned.

65
Safety
www.bora.com
EN
2.6 Safety instructions – cleaning and maintenance
The appliance must be cleaned at regular intervals. Dirt can lead to damage,
restriction of functions, or bothersome odours. In the worst case scenario, this can
become a hazard.
X
Please follow all instructions in the “Cleaning and Maintenance” chapter.
X
Remove dirt immediately.
X
When cleaning, only use non-abrasive detergents to prevent scratching and
abrasion on the surface.
X
When cleaning, ensure that no water penetrates the appliance. Use only a slightly
damp cloth. Never spray the appliance with water. Water penetration can cause
damage!
X
Do not use a steam cleaner for cleaning. Steam can cause a short circuit on live
parts and thus lead to property damage.
X
Do not use any highly-abrasive cleaning products or sharp metal scrapers to clean
the oven chamber and glass surfaces (door and operating unit). This can scratch
the surfaces and damage the glass.
X
Use only original BORA cleaning cartridges, as cartridges from other
manufacturers can cause irreparable damage to the appliance.
WARNING!
Risk of burns from hot surfaces
The appliance and exposed parts (oven chamber, door, heating elements, food
thermometer, accessories) become hot during use. Touching hot surfaces can
cause serious burns.
X
Do not touch hot surfaces.
X
Allow the appliance and exposed parts to cool before and after cleaning.
X
Keep children under 8 years of age away from the appliance or ensure they are
supervised at all times.
DANGER!
Risk of fire from overheated oil or fat
Oil or fat can quickly heat up and ignite.
X
Remove any oil or fat residues from the oven chamber before use.
CAUTION!
Risk of corrosion
Food or liquid containing cooking salt which becomes stuck to the stainless steel
walls of the oven chamber can cause corrosion.
X
Remove any such food or liquid from these surfaces.

EN
66
Safety
www.bora.com
WARNING!
Risk of injury from hot steam
Hot steam can escape when the door is opened if the steam has not been extracted
beforehand. Depending on the temperature, steam may be invisible. Hot water may
drip from the door after opening.
X
When opening the door, do not stand too near to the appliance.
X
Open the door carefully.
X
Keep children away from escaping steam.
WARNING!
Risk of injury from hot water and cleaning agents
Opening the door during the cleaning programme may cause burns or eye
irritation.
X
Do not open the door during the cleaning programme.
CAUTION
Eye irritation from cleaning agent residues
Cleaning agent residues in the oven chamber and the empty cleaning cartridge can
cause irritation if it comes into contact with the eyes.
X
Wash your hands after touching cleaning agents or the cleaning cartridge.
2.7 Safety instructions – repairs, servicing and spare parts
i
The appliance must only be repaired and serviced by trained specialists
who are familiar with and comply with the standard national regulations and
supplementary regulations of the local utility companies.
i
Work on electrical components must only be conducted by trained electrical
personnel.
i
Old hose sets must not be reused for connecting the water supply.
X
Before any repair work, safely disconnect the appliance from the mains supply.
DANGER!
Risk of electric shock from residual charge
Electrical components in the appliance can contain residual charge and cause an
electric shock.
X
Do not touch any exposed contacts.
X
Use the discharge adapter before starting work on the appliance.

67
Safety
www.bora.com
EN
WARNING!
Risk of injury or damage from improper repairs
Incorrect components can lead to personal injury or damage to the appliance.
Modications, additions or alterations to the appliance can lead to safety risks.
X
Only use original spare parts for repairs.
X
Do not make any modifications, additions or alterations to the appliance.
i
A damaged power supply cable must be replaced by a suitable power supply
cable. This may only be done by an authorised member of the Customer Care
team.
2.8 Safety instructions – disassembly and disposal
i
The appliance must only be disassembled by trained specialists who
are familiar with and comply with the standard national regulations and
supplementary regulations of the local utility companies.
i
Work on electrical components must only be conducted by trained electrical
personnel.
X
Before disassembly, safely disconnect the appliance from the mains supply.
DANGER!
Risk of electric shock from residual charge
Electrical components in the appliance can contain residual charge and cause an
electric shock.
X
Do not touch any exposed contacts.
X
Use the discharge adapter before starting work on the appliance.

EN
68
Technical data
www.bora.com
3 Technical data
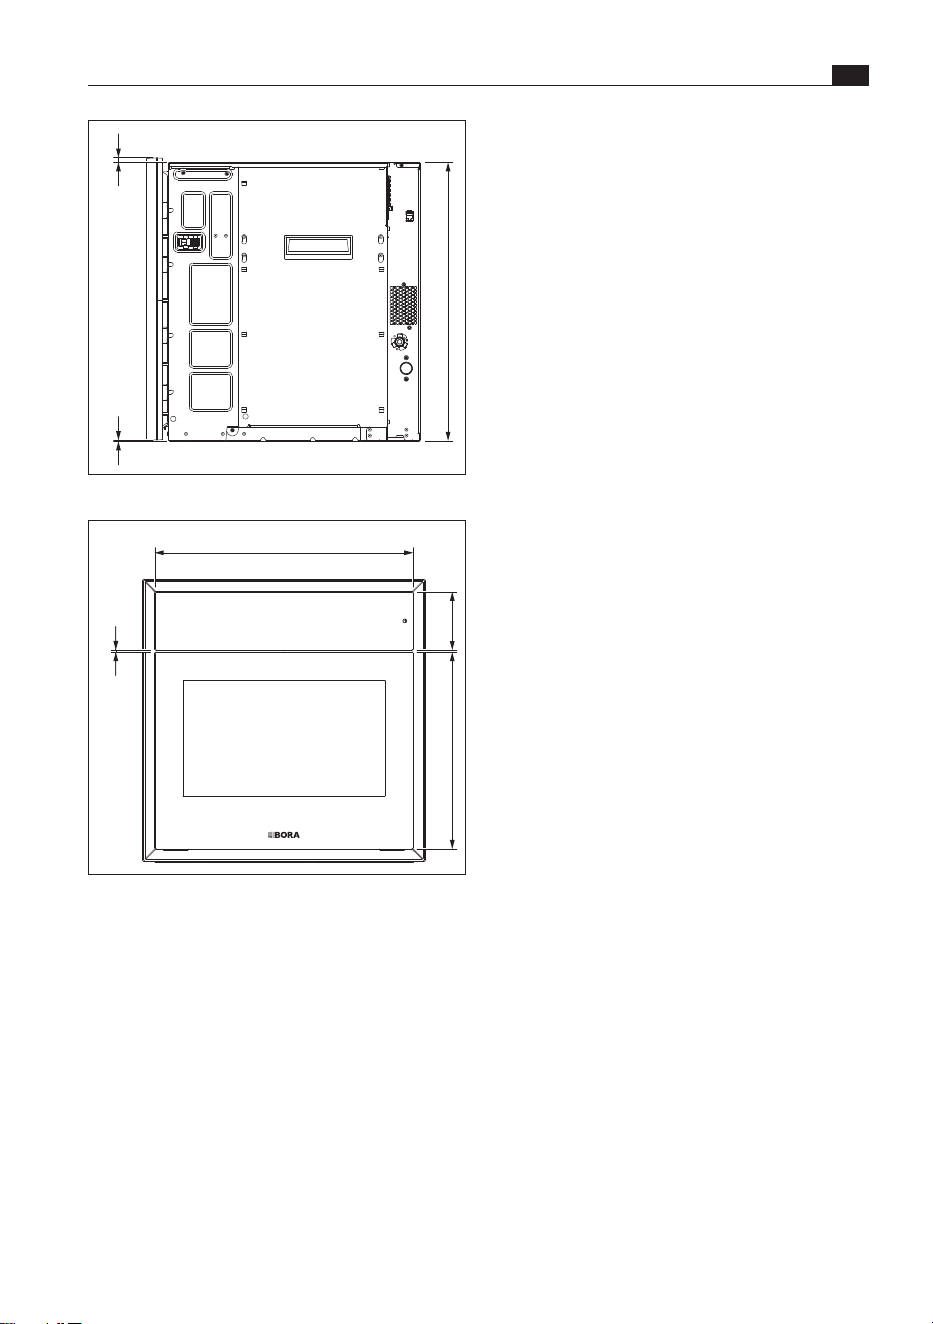
3.2 Appliance dimensions
595
(598)
149
(599)
1,5
1,5
1,5
442
2,5
595
Fig. 3.1 XBO front view
550
580
68
74
21
12
Fig. 3.2 XBO top view
3.1 X BO steam oven XBO
Parameter Value
Multiphase supply voltage
380–415 V 2N
Single-phase supply voltage 220–240
V
Frequency 50
Hz
Maximum power consumption 6100
W
Fuse protection/
two-phase power supply
Fuse protection/
single-phase power supply
2 x 16
A
1 x 16
A
Dimensions
(width x depth x height)
598 x 599 x 580mm
Oven chamber dimensions
(width x depth x height)
480 x 308 x 405
mm
Cooking chamber volume 53
l
Number of shelf levels 3
Weight
(incl. accessories/packaging)
62kg
Weight 47kg
Surface material Glass and plastic
Temperature control range 30–230
°C
Power management Seamless
Water supply hose length 2.5m
Water supply hose connection 3/4"
(wrench size 30)
Water outlet hose length 2.5
m
Internal / external diameter of
water outlet hose
19
mm / 27 mm
Odour filter material Activated charcoal
with ion exchanger
Maximum odour filter service
life
1
year
Tab. 3.1 XBO technical data
69
Technical data
www.bora.com
EN
590
9 1
Fig. 3.3 XBO side view
547
4
124
416,5
Fig. 3.4 XBO glass front view
EN
70
Energy datasheet
www.bora.com
4 Energy datasheet
Product information according to Commission Delegated Regulation (EU) No. 65/2014 and
Regulation (EU) No. 66/2014.
Manufacturer
Model identification
Type of oven
BORA
XBO
Flex oven
Symbol Value Unit
Appliance mass M 47 kg
Number of oven chambers – 1 –
Heat source – Electricity –
Volume of each chamber V 53 l
Power consumption in conventional mode EC
electric cavity
* kWh/cycle
Power consumption in recirculation mode EC
electric cavity
0.74 kWh/cycle
Energy efficiency index of each chamber EEI
cavity
96.1 –
Energy efficiency class – A –
Tab. 4.1 Energy labelling
* Does not apply to this product.
71
Appliance description
www.bora.com
EN
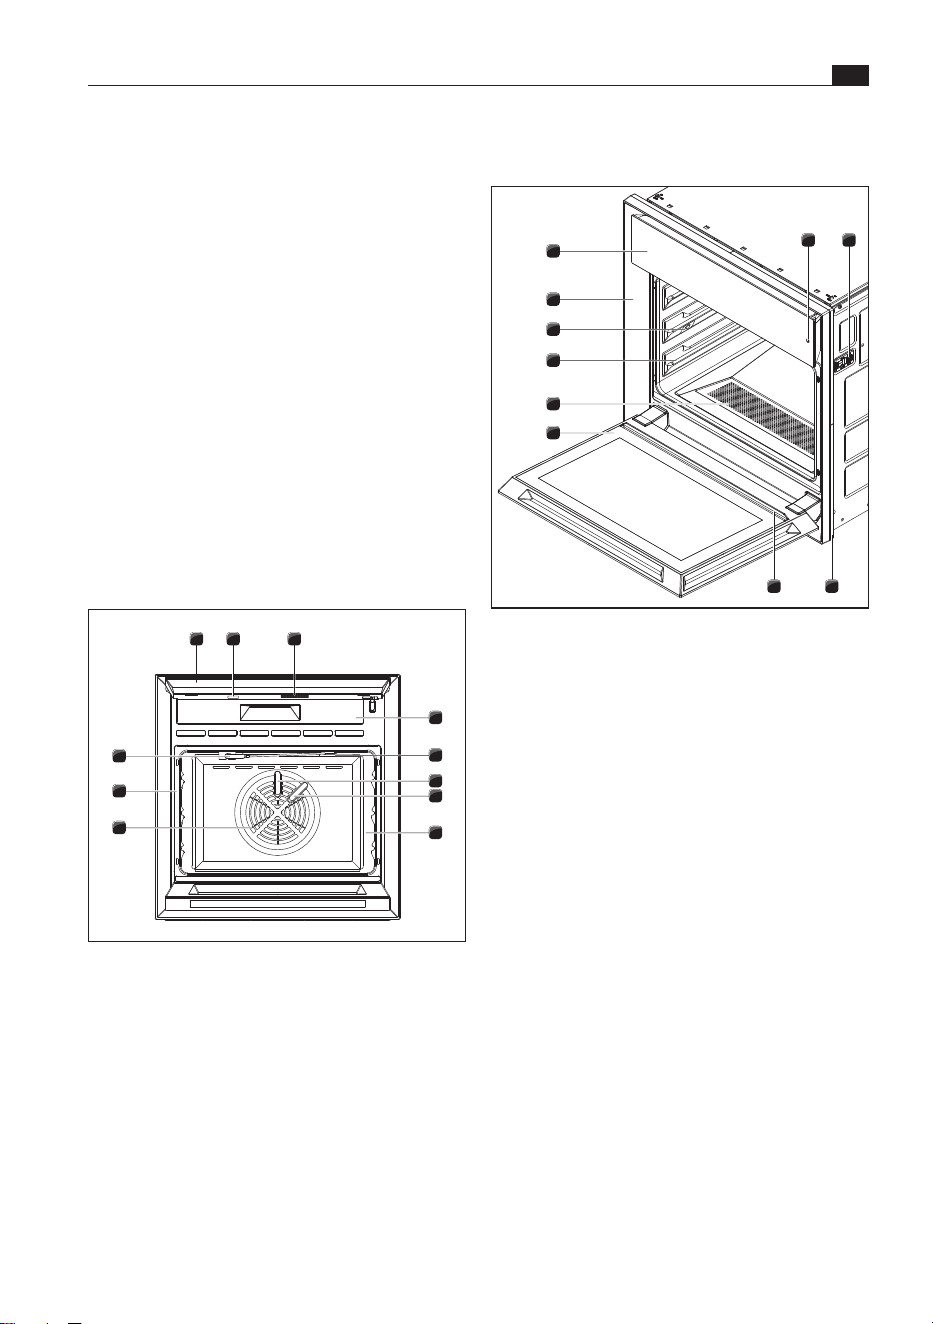
5 Appliance description
7
8
6
2
5
4
3
1
9
10
Fig. 5.2 Door open
[1] On/off sensor button
[2] Levelling shim (x 2)
[3] Frame spacer
[4] Drip channel
[5] Door (open)
[6] Drain filter
[7] Oven chamber shelves (3 shelf levels)
[8] LED oven chamber lighting (x 3)
[9] Inlay frame
[10] Operating unit with touch display (closed)
5.3 Food supports
All food supports can be used on all shelf levels.
The food supports required for a programme are
indicated as accessories in the presets, pro tips and
special programmes.
X Do not use knives on the food supports.
X Do not use any metal or sharp objects to turn or
remove food.
X Only use plastic or wooden kitchen utensils.
Food supports may expand when heated (thermal
behaviour of compounds and materials during
temperature changes). If the tray is heated unevenly,
the metal will expand to different extents.
Observe all safety and warning information
(see “2 Safety”).
5.1 How it works
The X BO steam oven creates the steam in the
oven chamber itself with full heat output by water
being dispensed onto the fan wheel. Unlike external
steam generation, this technology enables rapid
adjustment and therefore the best and uniform
cooking results. In comparison, the BORA X BO
manages with a little less heat as it circulates hot air
at high speed and it is therefore transferred onto the
food faster.
5.2 Steam oven
4
5
11
7
1 32
6
8
9
10
Fig. 5.1 Operating unit and door open
[1] Operating unit with touch display (opened out)
[2] USB interface
[3] Speaker
[4] Filter replacement cover
[5] Food thermometer cable holder
[6] Cleaning water inlet
[7] Steam water inlet
[8] Cooking chamber
[9] Fan wheel
[10] Oven chamber seal
[11] Food thermometer
EN
72
Appliance description
www.bora.com
The holes in the perforated stainless steel tray
enable excellent air and steam circulation, meaning
that food is cooked evenly. Excess grease or liquids
simply drip off and can be caught by placing a
universal tray underneath.
Use:
This food support is suitable for gently cooking all
kinds of foods.
X Try to avoid placing frozen food on the stainless
steel food support.
The perforated stainless steel tray is suitable for
temperature settings up to 120°C.
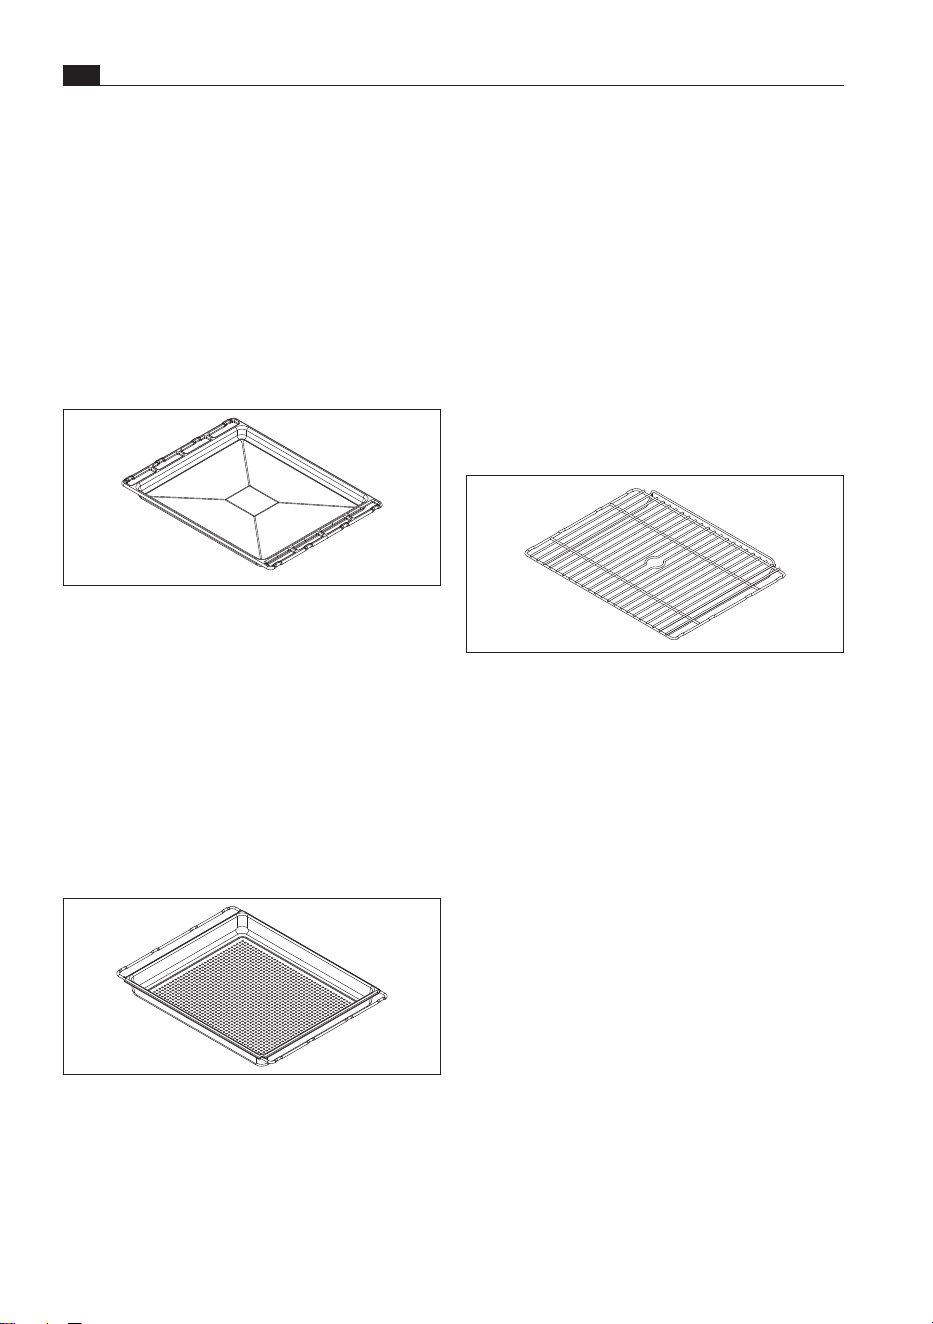
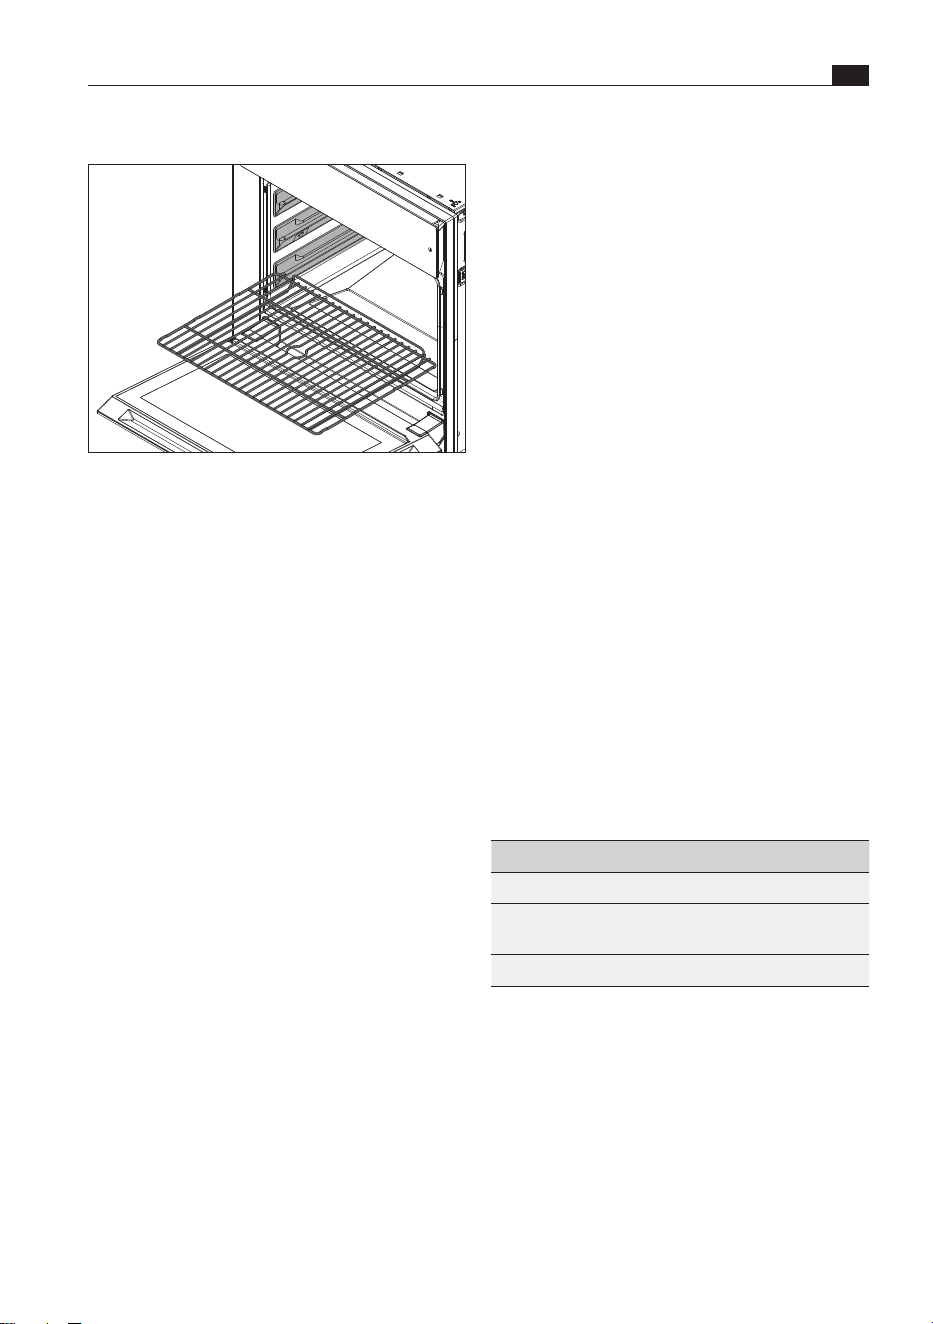
Oven rack
Fig. 5.5 Oven rack
O
Material: stainless steel
O
Size (W x D x H): 469 x 358 x 38.5mm
When running the cleaning programme, the oven
rack is used as a support for the BORA cleaning
cartridge. This is placed in the centre of the oven
rack. The raised edge on the oven rack prevents the
food from sliding off.
X Insert the food support on a shelf level with the
raised edge facing the oven.
The measures below can be taken to prevent
deformation:
X Preheat the X BO without the food supports.
X Load the food supports evenly.
X Use the food supports as instructed.
X Use a suitable tray or tin for pizzas, round cakes
and similar and place this on the oven rack.
X Avoid placing cold food or water directly on the
hot food support.
X Use the universal tray for searing and roasting.
Universal tray
Fig. 5.3 Universal tray
O
Material: coated aluminium
O
Size (W x D x H): 469 x 354 x 25mm
O
Capacity: 3 l
The aluminium core of the universal tray is coated
with extremely hard ceramic. The premium, non-
stick outer coating made of PTFE is PFOA-free.
When placed under the oven rack, the universal tray
catches dripping grease or liquids.
Perforated stainless steel tray
Fig. 5.4 Perforated stainless steel tray
O
Material: stainless steel
O
Size (W x D x H): 469 x 361 x 41.5mm
O
Capacity: 5.2 l
73
Appliance description
www.bora.com
EN
X When you have finished cooking, clean the food
thermometer, put it back in its holder and wrap
the cable around the cable holder.
5.5 Touch display
The appliance is controlled using the touch display.
The touch display simply responds to the touch of
your fingertips, just like a smartphone.
The operating unit can be tilted upwards to make
it easier to use, for example if the oven is installed
lower down.
X Take hold of each side of the touch display.
X Tilt the touch display up or back down.
i
Pointed or sharp objects can scratch the
sensitive surface of the touch display.
X Only touch the display with your fingers.
X Make sure that your fingers are clean and dry
before using the touch controls.
X Ensure that no other parts of your hand are
touching the display when using the controls.
X Keep the contact area as small as possible when
using the touch zones.
X Ensure that no water or dirt gets behind the touch
display.
5.5.1 How it works
Operation Command
Touch a symbol/button Activate function
Long press on a symbol/button Activate additional
options
Swipe Set value, navigation
Tab. 5.2 How it works
Inserting/removing food supports
Fig. 5.6 Inserting food supports
X Place the food support on the left and right shelf
guides of the corresponding shelf level and push
until it comes to a stop in the oven chamber.
The food supports have a protection mechanism
that prevents them from sliding out of the front of
the shelf guide if they are only partly pushed in or
pulled out.
X Lift the food support to take it out.
5.4 Food thermometer
Thanks to the four-point food thermometer, you can
reliably determine the core temperature of the food.
It is located at the top of the oven chamber
and is connected to the appliance by a cable. The
food thermometer is inserted into the food that
is to be cooked. There are four measuring points
along the probe that always detect the coldest
area in the food. Once the food has reached the
pre-programmed target temperature, the cooking
process automatically finishes.
X Take the food thermometer out of the holder.
X Insert the food thermometer into the thickest part
of the food.
O
In the case of food containing bones, insert it
right next to the bone.
O
When cooking whole poultry, insert it along the
breastbone to keep the breast and legs succulent.
EN
74
Appliance description
www.bora.com
5.8 Updating the appliance
software
Using a USB stick
The latest software is available on the BORA website
free of charge (www.bora.com).
i
A USB stick with FAT32 formatting is needed
to save the update file.
X
Load the update file onto the USB stick.
X Touch “Settings” .
X Perform the update under “System and updates”
.
O
After restarting automatically, the appliance will
confirm the update.
Via Wi-Fi
When the latest software version becomes available,
the status message “Update available” appears on
the display.
i
To perform an update via Wi-Fi, the appliance
must be connected to the Internet.
X Touch the status message “Update available”
or
X Touch “Settings”
.
.
X Perform the update under “System and updates”
.
O
After restarting automatically, the appliance will
confirm the update.
Accessing information about the Wi-Fi update
X Touch “Settings” .
X Touch “System and updates” .
X Touch where “Latest SW” is displayed.
5.6 Switching the appliance
on/off
The sensor button
reacts to finger contact.
You switch the appliance on and off with this button.
X Long press on .
O
When turned off, the appliance is temporarily
switched to sleep mode and after 15 minutes the
software is completely shut down.
5.7 Opening/closing the door
Opening the door
X Touch .
O
The door opens slightly.
X Use both hands to open the door as far as it will
go.
i
If you do not do this within 10 seconds of the
door opening, it will close again automatically.
BORA Smart Open
Once the pre-opening system has been activated,
the steam is extracted from the oven chamber. The
door will then open. (BORA Clear View – prevents
steam from escaping when the door is opened).
It is possible to set the steam extraction time
(10 to 20 seconds) and the amount of steam to
be extracted. It is also possible to open the door
manually without steam extraction.
Closing the door
When the door is fully open:
X use both hands to tilt the door upwards until the
automatic function closes the door.
When the door has been pre-opened:
O
do not push the door closed when pre-opened; this
may damage the appliance.
X Use both hands to open the door as far as it will
go.
X use both hands to tilt the door upwards until the
automatic function closes the door.

75
Appliance description
www.bora.com
EN
5.9 Demo mode
There are three demo modes to choose from:
O
No heat or water
O
Water but no heat
O
Video sequence – oven cannot be operated.
Activating demo mode
X Touch “Settings”.
X Touch “System and updates”.
X Touch “Serial number” five times.
X Enter the pin “2007” and confirm.
X Select a demo mode.
X Activate the demo mode.
Deactivating demo mode with limited functions
X Touch “Demo mode” on the display.
X Deactivate the demo mode.
X Enter the pin “2007” and confirm.
i
Before deactivating demo mode, the fresh
water supply must be connected and the
water supply checked.
Deactivating the video sequence
X Long press on the touch display.
X Enter the pin “2007” and confirm
EN
76
Functions and operation
www.bora.com
6 Functions and operation
Touch
command
Contact Time
(contact)
Tap Brief touch 0.065–0.95 s
Long press Longer contact 1–8 s
Swipe Vertical/horizontal
swiping movement
0.15–8 s
Number scroll
wheel
Vertical swiping movement using the
number scroll wheel until the desired
value appears in the middle of the
scroll wheel
Tab. 6.1 Touch commands
6.2 Standard functions
Standard functions are available on every menu level
and are shown at the edge of the display:
a scroll bar on the bottom edge of the display shows
the area that is currently visible in the menu.
X Swipe left or right across the display to show
other areas in the menu.
Symbols/
functions
Meaning
Back one menu level
The display goes back to the
higher-level menu.
Back to the main menu
The display goes back to the
main menu.
Open door
The door is opened
automatically.
Oven chamber lighting
The oven chamber lighting is
switched on or off.
Time Hour:minute
Tab. 6.1 Standard functions
Selecting a standard function
X Touch the symbol.
Observe all safety and warning information
(see “2 Safety”).
The different operating modes and settings are
selected from the main menu.
Further options are shown depending on the
operating mode and settings can be made.
i
The main menu item “First steps” contains
helpful videos with simple explanations on how
to operate and handle the XBO steam oven.
Information and tips
The “Info” button and the symbol in the
corresponding programmes can be used to access
practical information on the most important
functions of the XBO steam oven.
X Touch the “Info” button.
X Touch .
Instructions
If you press the “Instructions” button in the
corresponding programmes, certain actions are
shown step by step using animations (e.g. how to
insert the BORA cleaning cartridge).
X Touch the “Instructions” button.
Status messages
Status messages are shown on the top edge of the
display.
X Please take note of status messages.
6.1 Operating the touch
display
The touch display reacts to finger contact.
It recognises different touch commands:
77
Functions and operation
www.bora.com
EN
6.4 Main menu
Symbols/
functions
Meaning
Manual
Manual cooking
Automatic
Automatic programmes
First steps
Learn how to use the oven
(can be hidden under “Settings”)
Special
Other useful programmes
Favourites
List of favourite automatic
programmes
Classic
Classic cooking
Multi-drawer
BORA multi-drawer control
(only if a multi-drawer is connected)
Maintenance
Maintenance programmes and filter
changes
Settings
Appliance settings
Basics
Simple automatic programmes
(function only found in guest mode –
in the “Settings” menu)
Tab. 6.3 Main menu
Select menu item
X Touch the symbol.
Manual
Manual cooking: the target humidity and
temperature as well as the cooking time can be
precisely preset using two selectable views (slider
or scroll wheel). The optional manual burst of steam
can also be activated separately.
i
Instructions that apply to conventional oven
functions like top/bottom heat and grill and
are not available on the X BO steam oven can
be adapted according to the following rule of
thumb:
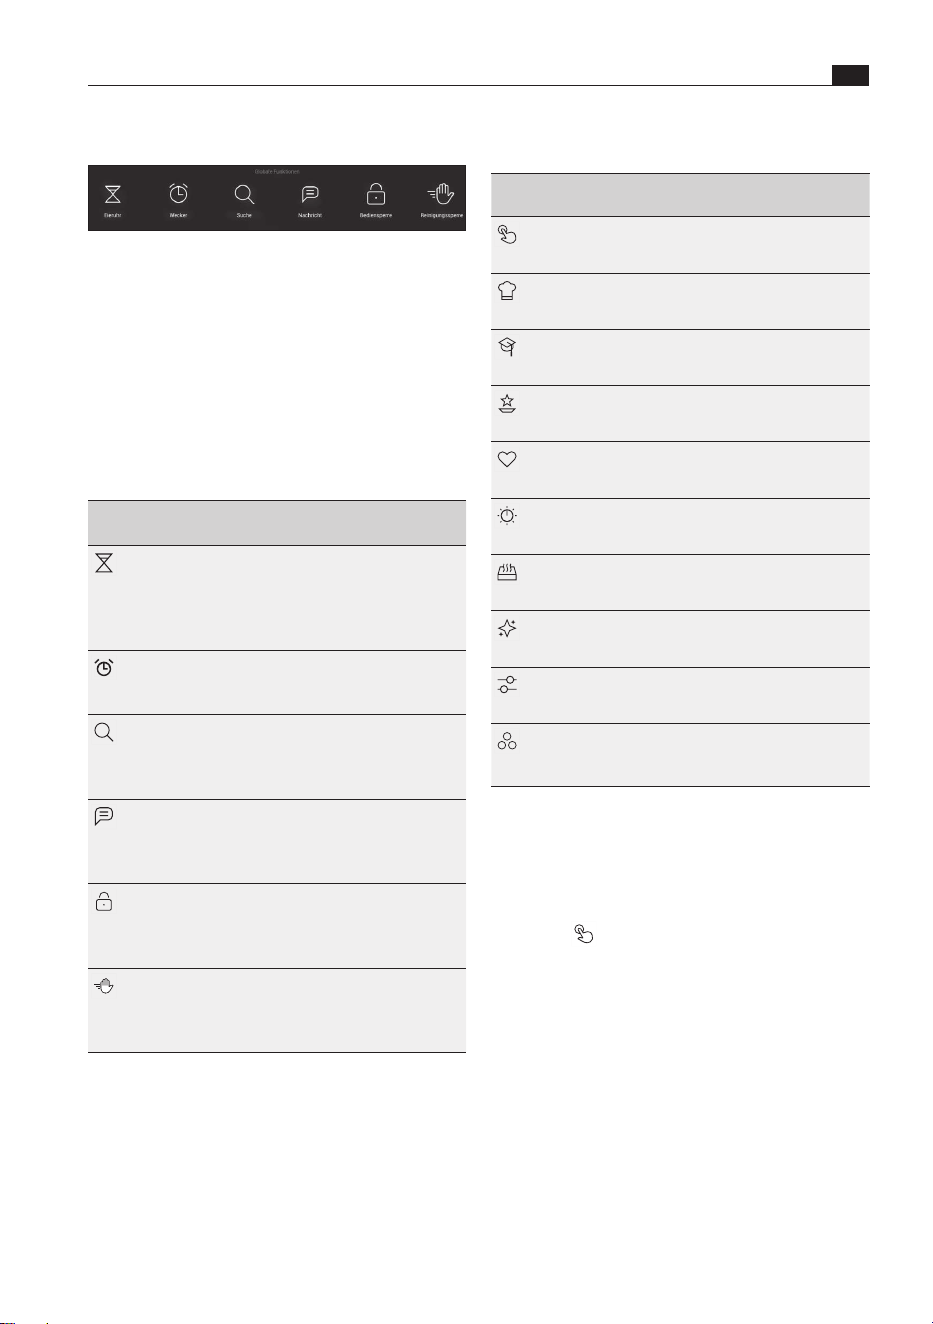
6.3 Global functions
Fig. 6.1 Global functions
Global functions can be used at any time regardless
of the operating mode.
Accessing global functions
X Swipe downwards from the top edge of the
display.
Closing global functions
X Swipe upwards.
Symbols/
functions
Meaning
Egg timer
The egg timer can be used to set a
countdown right down to the second.
When the time is up, an acoustic and
visual signal are emitted and the time
continues to run in minus figures.
Alarm
The alarm emits an acoustic signal at a
preset time. After that, the time runs in
minus figures.
Search
The free text search with a suggestion
function simplifies operation and
makes it quicker to find the desired
function or programme.
Message
When the programme has started, a
message can be left to tell others not
to adjust or stop the current cooking
session.
Control lock
The operating lock prevents the
current settings from being changed
accidentally or without permission
while using the appliance.
Cleaning lock
So that the display can be cleaned
when the oven is in use, this function
locks the display and on/off sensor
button for 10 seconds.
Tab. 6.2 Global functions
Select global function
X Touch the symbol.
EN
78
Functions and operation
www.bora.com
Changing automatic programmes
The values of individual cooking steps can be
changed in the cooking step display.
X Swipe up from the bottom edge of the display in
the automatic programme.
X Select the cooking step.
The modified automatic programme can be saved
when the programme ends.
Starting an automatic programme from a
certain cooking step
X Swipe upwards from the bottom edge of the
display.
X Select the cooking step.
X Touch “Start programme here”
Starting cooking programmes later
In programmes that can be started later, the start
and end time can be changed on the time bar
(see “First steps”).
Automatic programme layout – guide values
O
Standard setting: 4 servings/4 people
O
Traybakes: 1 tray
O
Meat dishes: 800 g to 1000 g raw meat weight
O
Bread, baked goods: approx. 750 g baked goods
O
Rice, risotto: 300 g to 400 dry rice without liquid
i
Place the food in the steam oven at room
temperature. Allow frozen foods to defrost
first.
i
Some automatic programmes in the X BO
use high temperatures (up to 230 degrees)
to finish the dishes. These temperatures
can exceed the smoke point of fats and oils,
meaning that smoke may develop. For this
reason, we recommend using fats and oils
with high smoke points.
First steps
Helpful videos with simple explanations on how to
operate and handle the appliance.
X Touch “First steps” .
X Touch the video.
The videos can be stopped if required.
X Long press on the display.
Temperature range of
conventional ovens
Manual cooking setting
120°C–140°C 5°C lower
140°C–160°C 10°C lower
160°C–180°C 15°C lower
180°C–230°C 20°C lower
Tab. 6.4 Conversion table
Presets
The “Manual” and “Classic” menu items contain
presets (preset programmes) in which the cooking
parameters have been preset accordingly.
The following presets are available:
bake bread rolls, bake pizza, cook au gratin, bake
fruit flan, bake pound cake, bake biscuits, oven-
roasted vegetables, steam vegetables, steam fish,
braise joints, hot air grilling, chips.
As soon as the preset is selected, the cooking
parameters can be changed if necessary. Each
preset contains useful information for the user.
Selecting presets
X Touch “Manual” or “Classic” .
X Touch
.
X Touch the desired preset.
X Change the settings if necessary.
Automatic
Under this menu item you will find a selection of
automatic programmes. These programmes are
set to the optimum temperature, cooking time and
steam usage for the corresponding food types or
dishes. In some programmes, the suggested values
for the degree of browning and done level (e.g.
firm, al dente, soft) can be customised. Automatic
programmes can be changed separately and saved
under new names. Pro tips give useful advice on
how to prepare the dish.
Displaying pro tips
X Touch the “Pro tip” button.
79
Functions and operation
www.bora.com
EN
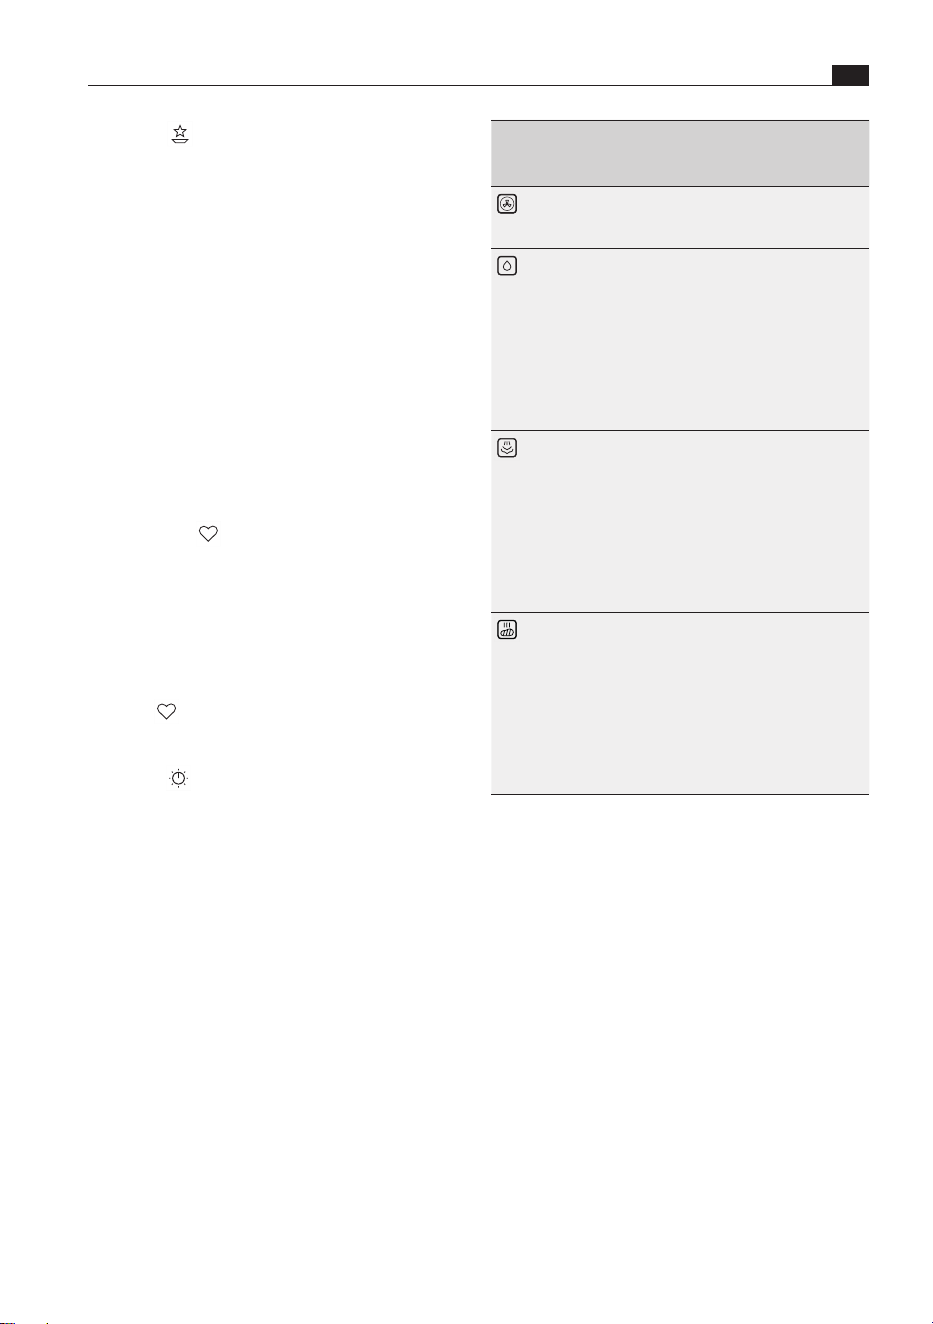
Symbols/
operating
mode
Meaning
Hot air
The ‘hot air’ operating mode evenly
browns dishes thanks to an intensive hot
air flow.
Bake with
humidity
When using the ‘bake with humidity’
operating mode, water is added to the
hot air flow. The water is vaporised and
so creates a humid environment in the
oven chamber. This means that dishes do
not dry out as much and remain moist.
This is especially ideal for casseroles,
meat and fish dishes,
cheesecakes and
dry cakes.
Steam
At temperatures up to 100°C and
maximum humidity, the ‘steam’ operating
mode is a particularly gentle cooking
method. The food is cooked at a lower
temperature and so retains its natural
flavourings, nutrients and vitamins. It
is ideal for vegetables, fish and tender
meat, among others. Dumplings are also
typically steamed.
Hot air grill
Thanks to the targeted removal of moist
air from the oven chamber and the
addition of fresh air in the chamber,
the ‘hot air grilling’ mode intensively
browns food and favours the formation
of cooking residues. It is particularly
suitable for grilling meat, sausages and
vegetables and for cooking dishes au
gratin.
Tab. 6.5 Classic
Special
Other useful programmes can be found under
this menu item: keep warm, defrost, reheat food,
disinfect, warm crockery, sous-vide cooking, dry
mushrooms, dry, melt chocolate, refresh honey,
prove dough, preserve, make yogurt, heat wet
towels, warm up baby food, refresh bread and rolls.
Sous-vide cooking
If you don’t have a vacuum sealer, you can simply
use a zip seal bag instead: place the food in the bag
and close it, leaving a small opening. Immerse the
bag upright in water until the waterline reaches the
zip and the air is pushed out of the bag. Then close
up the opening. The vacuum bag is ready.
Favourites
Favourite automatic programmes can be saved
under this menu item.
Add favourites
X Go to the desired automatic programme.
X Long press on the dish.
X Touch .
Classic
With the Classic function, all conventional cooking
methods can be used: roasting, baking, steaming
and hot air grilling. These work by simply combining
hot air and steam.
i
Where temperatures and times are given on
food packaging, use the lowest values.

EN
80
Functions and operation
www.bora.com
Multi-drawer
If the appliance is installed along with a BORA multi-
drawer, the latter can be controlled and operated
using the touch display.
Maintenance
The appliance has programmes for cleaning and
drying and for changing the odour filter
(see “7 Cleaning and maintenance”).
Settings
Individual settings can be made on the appliance
under this menu item.
i
Standard code for deactivating guest mode
and the child lock: 2021
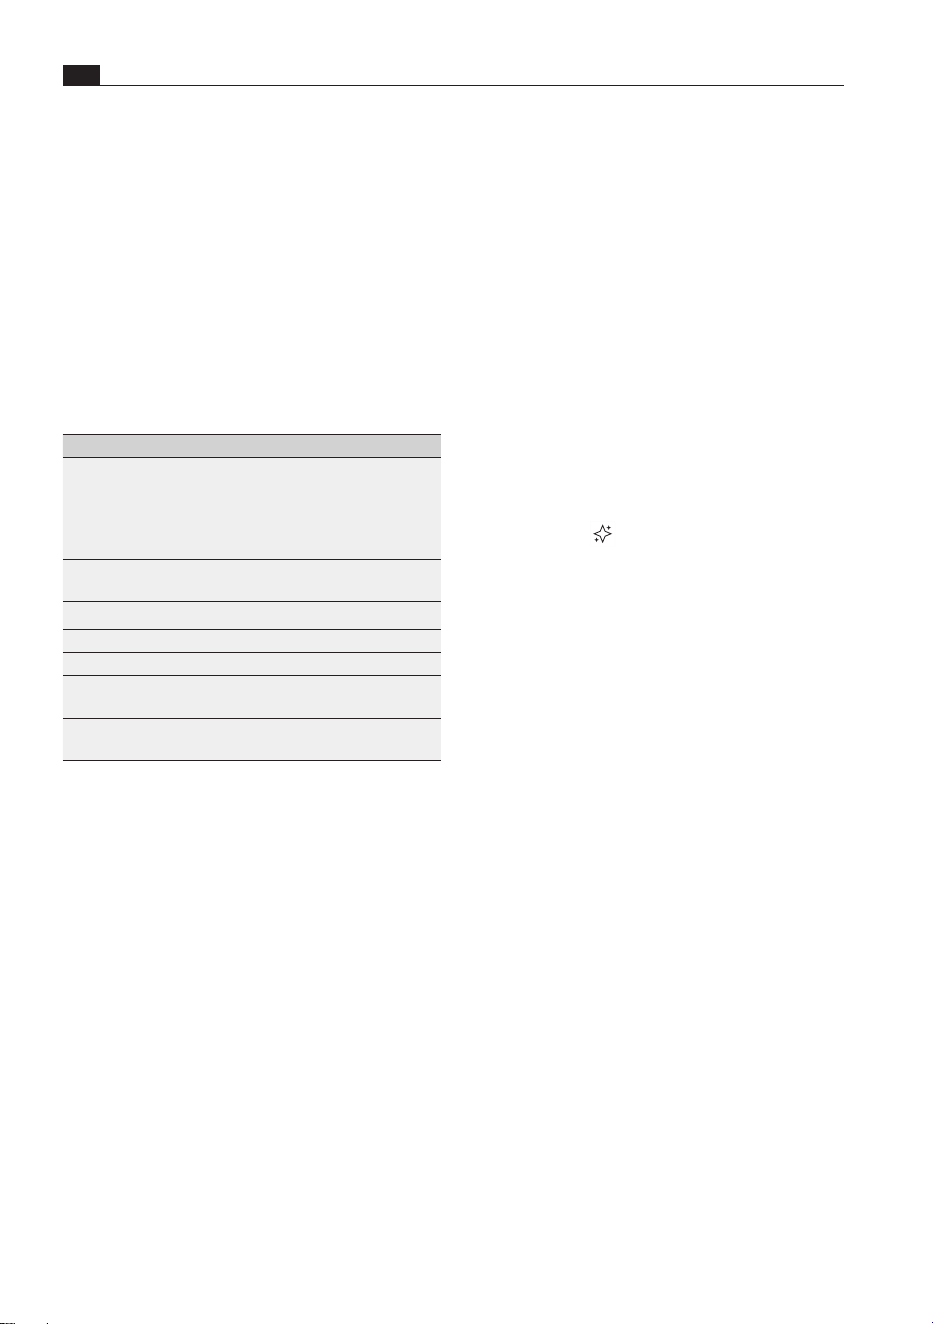
6.4.1 General symbols/functions
Symbols/functions Meaning
BORA Choice
Meets BORAnutrition
guidelines
Action
User action necessary
Plus
Add function
Tick
Confirmation
Next
Go to
End
End function
Stop
Pause function
Timed cooking
Cook for a set time
Core temperature
Cook with food thermometer
No core temperature
No core temperature selected,
set core temperature
Scroll wheel
Change to scroll wheel view
Slider
Change to slider view
Stop steam extraction
Stop steam extraction, open
door immediately
Burst of steam
Add burst of steam
No burst of steam
Not possible to add burst of
steam
Temperature
Temperature settings
Humidity
Humidity settings
Changed
automatic programme
Automatic programme with
changed cooking parameters
Tab. 6.6 General symbols/functions
81
Functions and operation
www.bora.com
EN
6.5 Customising the menu
The symbols in the following menus can be
rearranged according to personal requirements:
O
Main menu
O
Automatic
O
First steps
O
Special
O
Maintenance
How to move symbols
X Press and hold the symbol and drag it to the
desired position.
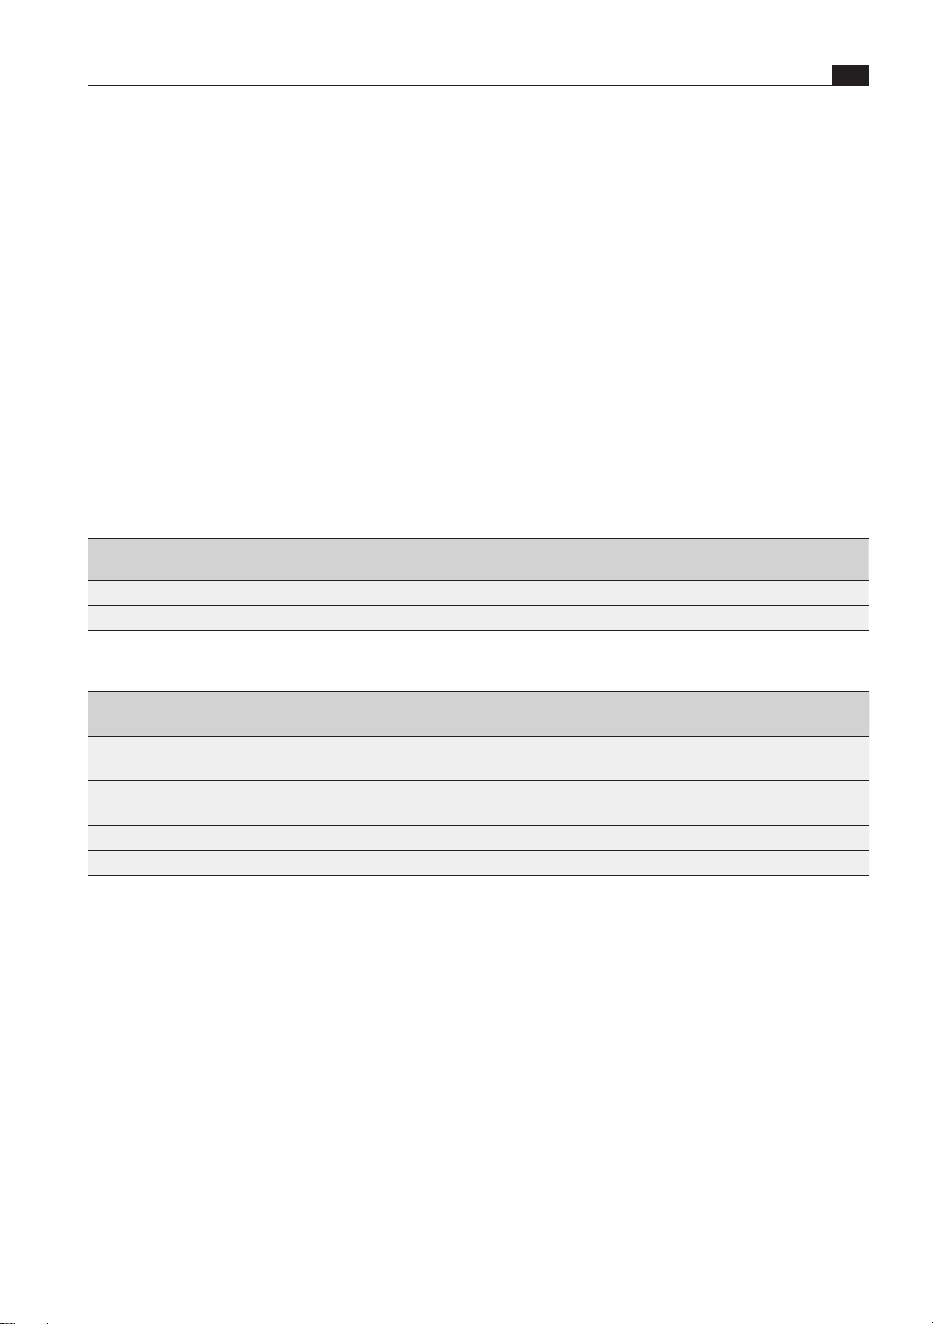
6.6 Information for testing
institutes
Product
standard
Temperature Humidity Time/core
temperature
Food supports Shelf level
Broccoli 98°C 100% 9 min
Perforated stainless steel tray
Middle
Frozen peas 100°C 100% 85°C
Perforated stainless steel tray
Middle
Tab. 6.7 Test food acc. to EN 60350-1
Product
standard
Temperature Humidity Time/core
temperature
Food supports Shelf level
Apple tart (partial
load)
150°C 40% 90°C Oven rack Middle
Apple tart (full
load)
160°C 40% 90°C Oven rack Middle and
bottom
Sponge cake 150°C 20% 35 min Oven rack Middle
Spritz cookies 150°C 20% 20 min Universal tray Middle
Tab. 6.8 Test food acc. to EN 50304/EN 60350-1
EN
82
Cleaning and maintenance
www.bora.com
7 Cleaning and maintenance
7.1.1 Manual cleaning
X Clean the oven chamber with a clean sponge
cloth, washing-up liquid and warm water.
X Dry the oven chamber by hand with a soft cloth.
i
Water must not be poured inside the oven
chamber.
7.1.2 Maintenance programmes
The appliance is equipped with an automatic
cleaning programme and a drying programme.
Intensive clean
The automatic cleaning programme thoroughly
cleans and descales the oven chamber with hot
steam and the environmentally friendly active
ingredients in the XBO cleaning cartridge. To
ensure that the appliance has a long service life, an
intensive clean should be carried out every two to
four weeks, depending on frequency of use.
A bar underneath the “Intensive clean” symbol
shows the time remaining until the next clean is to
be carried out.
i
An intensive clean can only be started when
the appliance has cooled to below 40°C.
Wait for the oven to cool before inserting the
cleaning cartridge.
i
The cleaning time may vary due to a number
of factors (e.g.
fresh water temperature, single-phase
connection).
i
If the power goes off during an intensive
clean, an automatic rinse will be required
when the appliance is restarted and the
cleaning cartridge must be removed.
X Remove all food supports from the oven chamber
before starting the programme.
X Clean the oven rack by hand if it is dirty.
X Observe all safety and warning information
(see “2 Safety”).
Regular cleaning and maintenance ensures long
service life of the product and optimal function.
i
Cleaning intervals must be observed as
otherwise functions may be restricted.
X Adhere to the following cleaning cycles:
Component Cleaning cycle
Oven chamber
Intensive clean
Drying
As required, after a certain period
of use (indicator on the appliance)
If there is moisture in the oven
chamber
Food thermometer Immediately after every soiling
Appliance front Immediately after every soiling
Food supports After every use
Drain filter Immediately after every soiling
Oven chamber
seal
As required, after preparing poultry
Odour filter Replace yearly (indicator on
appliance)
Tab. 7.1 Cleaning cycles
X Never use steam cleaners, abrasive sponges,
scouring pads or chemically aggressive cleaning
agents (e.g. oven cleaner spray).
X Make sure that the cleaning agent does not
contain any sand, soda, acids, lyes or chloride.
X Do not use dishwasher tabs to replace the X BO
cleaning cartridge.
7.1 Cleaning the cooking
chamber
i
The interior is made entirely of stainless steel.
i
The appliance should be cleaned before long
periods of absence (e.g. holiday).
83
Cleaning and maintenance
www.bora.com
EN
i
You can obtain the X BO cleaning cartridge
XBORK
from your specialised retailer or by
contacting BORA via the website at
www.bora.com.
7.2 Cleaning the food
thermometer
Manual cleaning
X Clean the food thermometer with a clean sponge
cloth, washing-up liquid and warm water.
X Dry the food thermometer with a soft cloth.
Automatic cleaning
The food thermometer is also cleaned during an
intensive clean.
7.3 Cleaning the appliance
front
X Clean the appliance front with a clean sponge
cloth, washing-up liquid and warm water or with
a clean, damp microfibre cloth with no cleaning
products.
X Dry the front of the appliance with a soft cloth.
7.4 Cleaning food supports
The food supports can be cleaned by hand or in the
dishwasher.
Manual cleaning
X Use a cleaner and degreaser in one.
X Rinse the food supports with hot water.
X Clean the food supports with a soft brush.
X Rinse the food supports well.
X Dry the food supports with a soft cloth.
Cleaning in the dishwasher
X Lay the food supports face down in the
dishwasher.
X Ensure that no other objects can rub against the
food supports.
X Remove any large residues such as pieces of food
from the oven chamber, e.g. with kitchen roll.
X Touch “Maintenance” .
X Touch “Intensive clean” .
X Proceed as shown when you press the
“Instructions” button.
X Touch .
The intensive clean is completed with the automatic
drying of the oven chamber. After that, stuck-on
cleaning residues may become loose from the
cartridge and fall on the oven floor.
X Remove any cleaning residues from the oven
chamber and oven chamber seal.
X If necessary, remove any stubborn residues
that have not been removed by the cleaning
programme.
X Insert the drain filter in the oven chamber.
X Dry the oven chamber seal by hand with a soft
cloth.
i
After heating up the appliance for the first
time after cleaning, light smoke and odours
may be evident.
Drying
If the oven chamber is not dirty, but merely damp
from steam, the drying programme will suffice. This
uses warm, dry air to remove residual moisture from
the oven chamber.
X Touch “Maintenance” .
X Touch “Dry” .
X Dry the oven chamber seal by hand with a soft
cloth.
7.1.3 X BO cleaning cartridge
The BORA X BO cleaning cartridge is characterised
by its fantastic ease of use. Its two-chamber
system enables cleaning and descaling in a single
process. The cartridge has a wax seal so there is
no need to remove any covers prior to its use. All
active ingredients are environmentally friendly. The
cartridge itself is made from a recyclate, which
can be disposed of as plastic waste after use and
recycled.

EN
84
Cleaning and maintenance
www.bora.com
7.7.1 Filter change
X Touch “Maintenance” .
X Touch “Filter change” .
X Proceed as shown when you press the
“Instructions” button.
Activating the odour filter
After changing the filter, the new odour filter must
be activated.
X Touch the button “Activate new filter”.
X Confirm the filter change.
7.5 Cleaning the drain filter
The drain filter can be cleaned by hand or in the
dishwasher.
Manual cleaning
X Use a cleaner and degreaser in one.
X Rinse the drain filter with hot water.
X Clean the drain filter with a soft brush.
X Rinse the drain filter well.
X Dry the drain filter with a soft cloth.
Cleaning in the dishwasher
X Place the drain filter in the dishwasher.
i
Ensure that the drain filter is always used.
Large food residues can block the water
outlet pipe and the pump.
7.6 Cleaning the oven
chamber seal
X Clean the oven chamber seal and drip channel
with a clean sponge cloth, washing-up liquid and
warm water or with a clean, damp microfibre
cloth with no cleaning products.
X Dry the seal and drip channel with a soft cloth.
i
A soiled oven chamber seal can cause leaks.
7.7 X BO odour filter
The X BO odour filter reduces the odours from the
air expelled from the oven chamber.
So that odours are effectively reduced, the filter
must be replaced on a regular basis.
A bar underneath the “Filter change” symbol shows
the time remaining until the odour filter is to be
changed.
i
You can obtain the X BO odour filter XBOGF
from your specialised retailer or by contacting
BORA via the website at
www.bora.com.
85
Troubleshooting
www.bora.com
EN
8 Troubleshooting
i
In the event of a fault, the appliance immediately informs users via its large display. The user can
then use a smartphone to scan the QR code on the display and obtain further assistance and
suggested solutions. Alternatively, they can consult the Service area at www.bora.com. This makes it
possible to resolve most issues quickly.
i
You can often resolve faults and errors that can occur in day-to-day operation yourself.
That way you save time and money as you don’t need to call out customer services.
X Observe all safety and warning information (see “2 Safety”).
Operating situation Cause Remedy
The appliance cannot
be switched on.
(Power button
not visible)
The fuse or automatic circuit breaker
of the electrical wiring system in the
apartment and/or house is defective.
Replace the fuse.
Switch the automatic circuit breaker
back on.
The fuse/automatic circuit breaker
trips several times.
Contact the BORA Service Team.
The power supply is disconnected. Have a specialist electrician inspect
the power supply.
Steam escapes during use. The oven seal is not in the correct
place.
Check that the oven seal is in the
correct place.
The oven seal is extremely dirty. Clean the oven seal.
The oven seal is damaged. Contact the BORA Service Team.
During use, a gurgling sound can be
heard coming from the trap.
The trap is not correctly ventilated. Clean the outlet pipe.
Contact the pipe cleaning service.
The oven chamber lighting is not
working.
The oven chamber lighting is faulty. Contact the BORA Service Team.
Water is leaking from the appliance. The water supply or outlet hose is
faulty.
Switch off appliance.
Disconnect appliance from the mains.
Close the fresh water supply stopcock.
Contact the BORA Service Team.
The hose connection on the
appliance is faulty.
Tab. 8.1 Troubleshooting
Faults and errors not covered
X Switch off the appliance.
X Contact the BORA Service Team (see “11 Warranty, technical service, spare parts, accessories”) and
enter the error number displayed and the appliance type.

EN
86
Installation
www.bora.com
9 Installation
O
Only use the water supply hose provided. There
must be no kinks in the hose and it must not be
shortened, extended or replaced with another
hose.
O
The water supply hose must not be flush-
mounted.
Inlet water pressure
The inlet water pressure must be between 200kPa
(2bar) and 600kPa (6 bar).
For Denmark, Finland, Norway and Sweden, the
maximum inlet water pressure must be 1 MPa
(10bar).
O
If the pressure is greater than 600kPa (6bar),
a pressure regulator must be installed to ensure
seamless operation.
9.1.4 Waste water connection
O
The water outlet pipe must either be connected to
a surface or flush-mounted trap with a permanent
hose connection, or to the appliance connection
on the sink trap.
O
The waste water temperature can be up to 95°C.
O
The trap must be easily accessible when the
appliance is installed.
O
Only use the water outlet hose provided. There
must be no kinks in the hose and it must not be
shortened or lengthened.
O
The water outlet hose must not be flush-mounted.
X Observe all safety and warning information
(see “2 Safety”).
9.1 Installation information
9.1.1 General information
O
Handle recesses are provided at the sides for
carrying the appliance.
O
The installation height of the appliance must be
such that the contents of the food support on the
top shelf level can be seen.
O
To prevent the appliance from shifting or tipping
over, it must be installed inside a fitted unit.
9.1.2 Fitted unit
O
The back panel of the kitchen unit must not be
fitted behind the appliance.
O
To prevent overheating, the appliance must not be
installed behind a decorative door.
O
An unobstructed ventilation cross-section of at
least 160cm² must be provided in the unit.
O
A minimum distance of 30mm is to be
maintained between the back of the appliance
and any adjacent structure.
O
Where two X BOs are installed one on top of the
other, a stable built-in shelf or appliance mounting
brackets must be provided for.
O
The appliance must not be installed underneath
a hob.
9.1.3 Fresh water connection
O
The appliance must have a mains water
connection.
O
The appliance must be connected to the
fresh water supply (cold water)
(3/4" connection thread).
O
The stopcock for the fresh water supply must be
easily accessible when the appliance is installed.
87
Installation
www.bora.com
EN
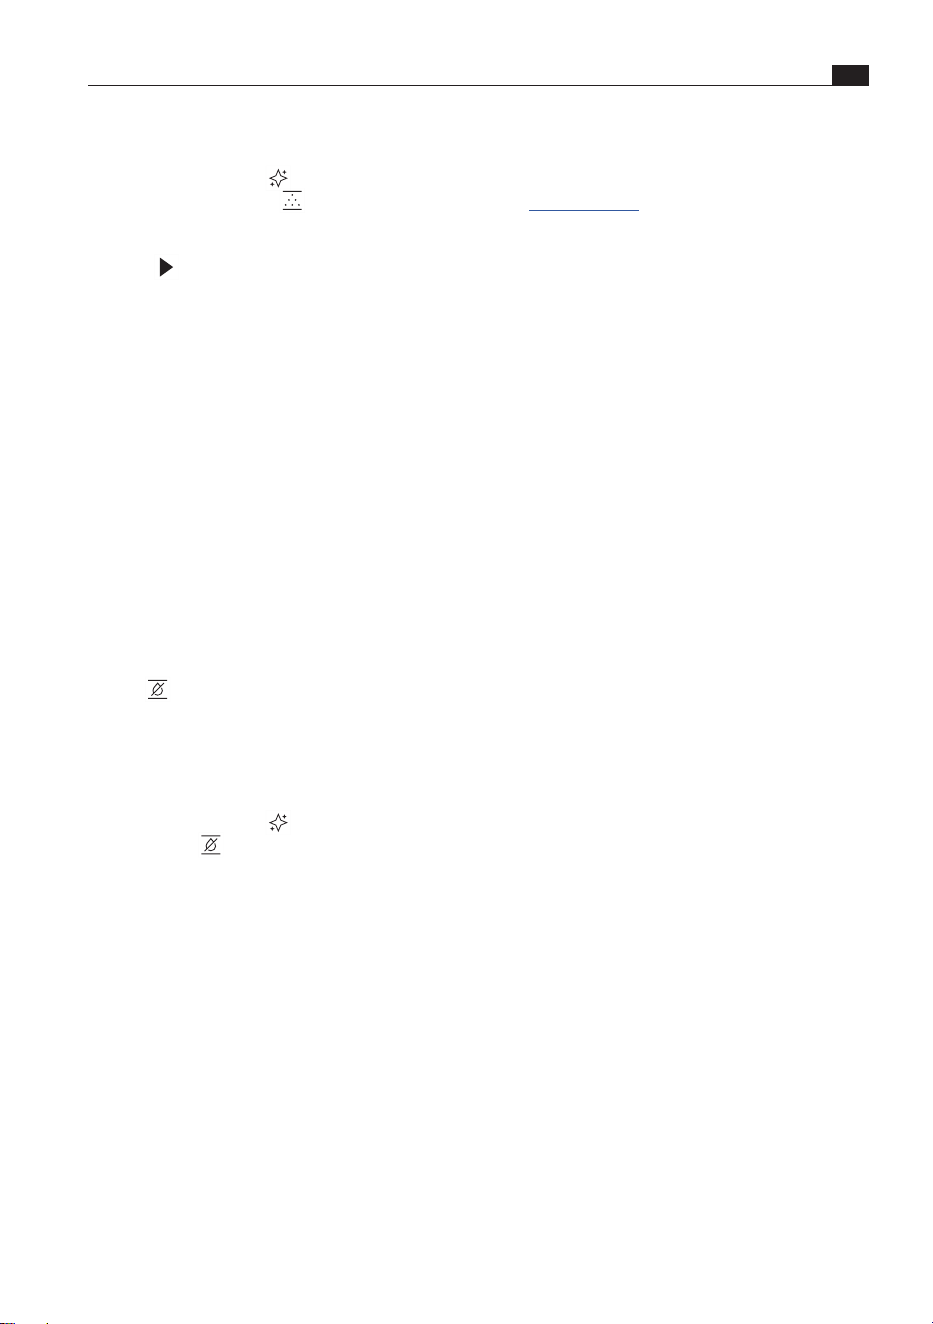
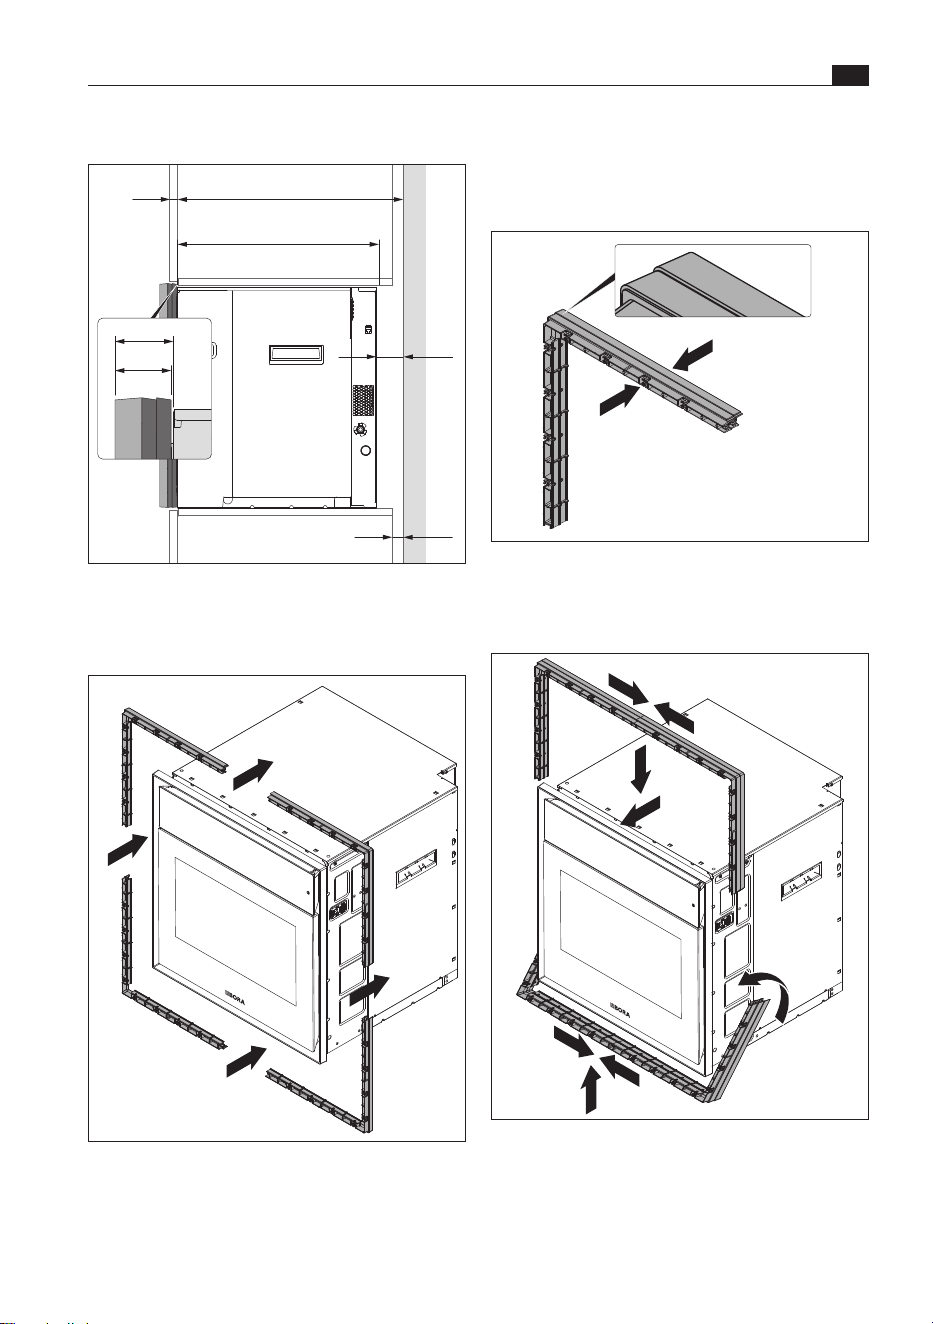
9.4 Installation dimensions
592+8
≥
564
560
+8
3
>30
2
>30
>30
>30
1
Fig. 9.1 Fitted unit
[1] Minimum distance of 30mm
[2] Unobstructed ventilation cross-section of at least
160cm²
[3] Back panel of unit
i
The minimum appliance installation depth
is 564 mm. When using a 560 mm deep
standard unit, you should allow for clearance
from the wall. This generally depends on the
specific installation and/or the number of
XBO frame spacers used
(see “9.5 BORA X BO frame spacer”).
X Prepare the fitted unit taking
into account the dimensions specified.
X Remove the back panel of the unit to the rear of
the appliance.
9.2 Scope of delivery
X BO scope of delivery Quantity
X BO steam oven 1
X BO oven rack 1
X BO perforated stainless steel tray 1
X BO universal tray 2
X BO cleaning cartridge 1
X BO odour filter 1
X BO frame spacer (fitted) 1
Water supply hose 1
Water outlet hose 1
Drain filter 1
Hose clip 2
Carcass mounting plate 2
Installation templates 1
Operating and installation instructions 1
Tab. 9.1 Scope of delivery
Checking the scope of delivery
X Make sure the delivery is complete and check it
for damage.
X If there are any missing or damaged parts, please
notify the BORA After Sales Service immediately.
X Do not under any circumstances install parts
which are damaged.
X Dispose of transport packaging in the proper
manner (see the “Decommissioning, disassembly
and disposal” chapter).
9.3 Tools and aids
The following tools are required to correctly install
the appliance:
O
Spirit level
O
4 mm Allen key
O
Slotted screwdriver
O
Water pump pliers
i
All installation work must be carried out using
hand tools. If electrical tools are used, there
is a risk of exceeding the tightening torque.
EN
88
Installation
www.bora.com
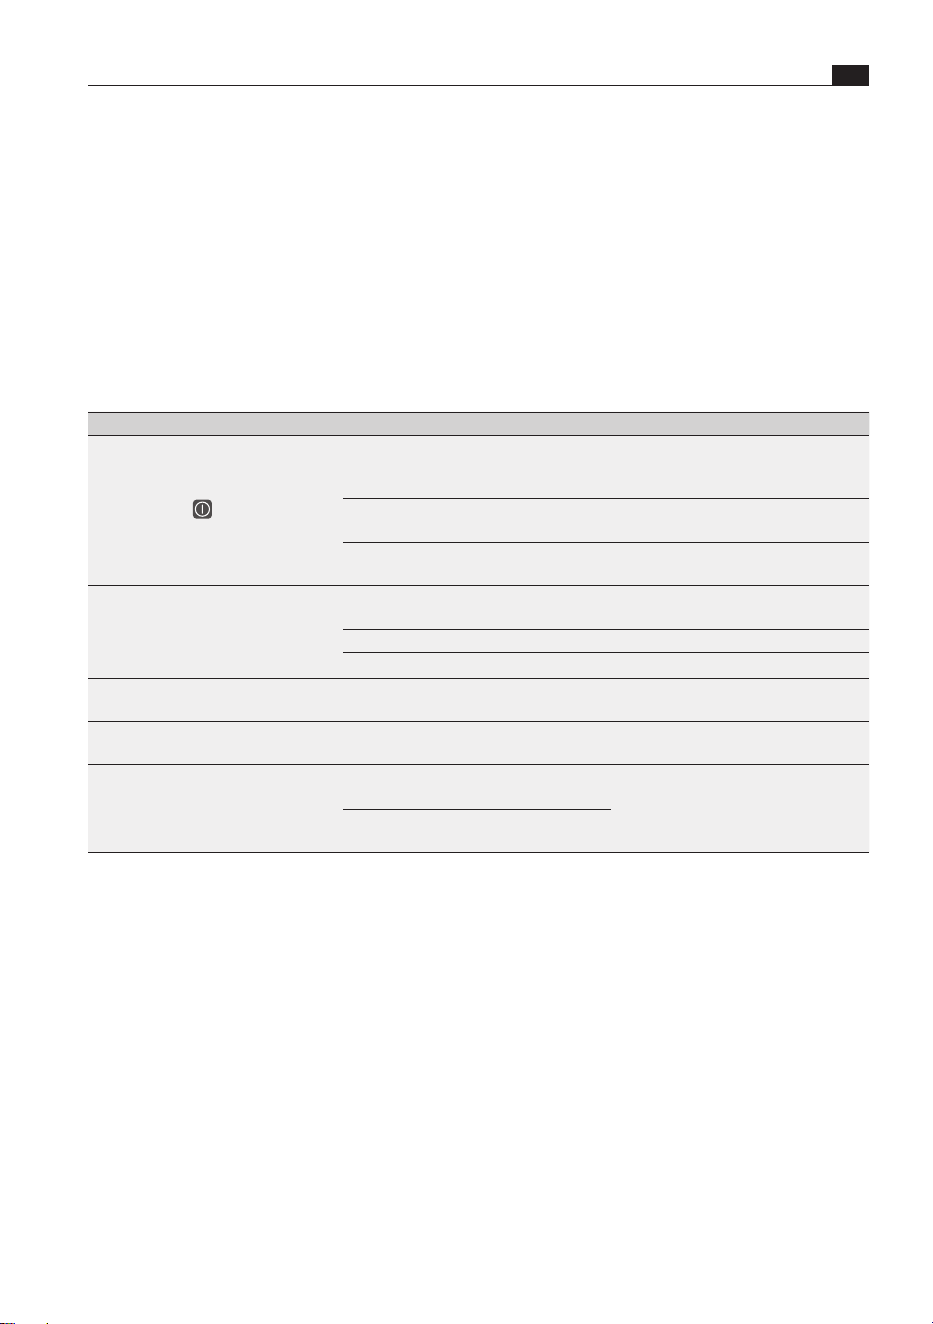
Installation depth without frame spacer
21
46
21
≥30
≥
588
x
558
≥30
Fig. 9.3 Installation dimensions without frame
spacer
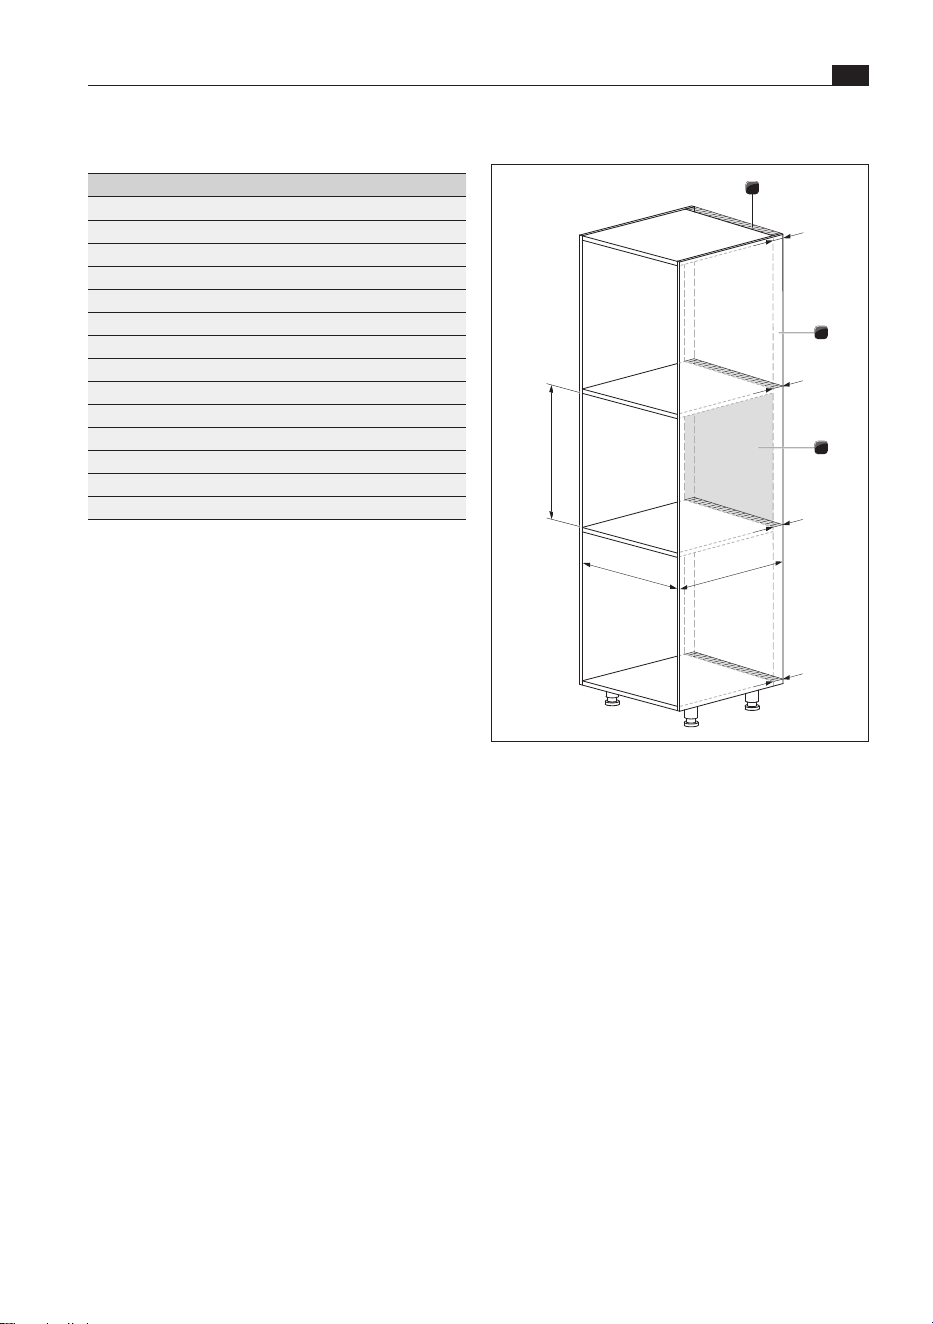
Installation depth with one frame spacer
33
46
546
≥
576
x
≥30
≥30
Fig. 9.4 Installation dimensions with one frame
spacer
X Maintain a minimum distance of 30mm from
the back panel of the unit and the shelves to the
adjacent element (unobstructed ventilation cross-
section). Shorten the shelves if necessary.
X So that the fill level is detected correctly, use a
spirit level to precisely adjust the shelf on which
the appliance is to sit.
9.5 BORA X BO frame spacer
The frame spacers can be used to vary the
appliance installation depth. The appliance is already
fitted with a frame spacer. Depending on where it is
installed, the 4-piece frame spacer can be removed
or an additional one can be fitted (available as
accessory X BO frame spacer XBORS).
i
For greater accessibility, the frame spacer
should be removed/fitted before installing the
appliance.
1,5
1
1
590
580
595
599
1,5
9
46
Fig. 9.2 Appliance dimensions
[1] Frame spacer
89
Installation
www.bora.com
EN
Fitting additional frame spacers
X Remove the frame spacer from the appliance
(see “Removing the frame spacer”).
Fig. 9.7 2 frame spacers
X Attach the corners of the 2 frame spacers to each
other and then join all of the corners together.
Fig. 9.8 Fitting 2 frame spacers
X Fit the frame spacers to the inlay frame.
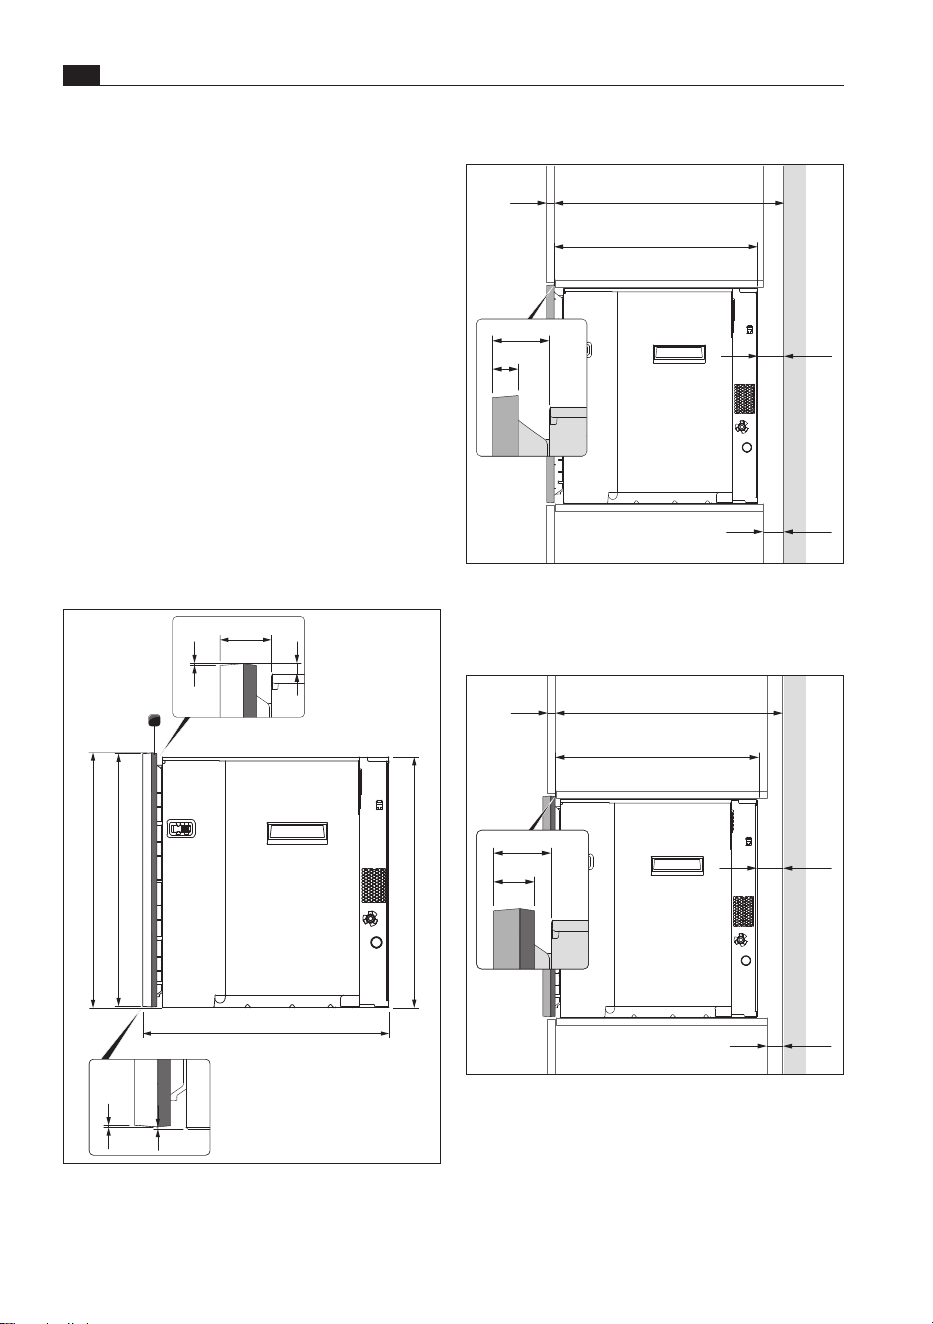
Installation depth with 2 frame spacers
45
46
≥30
≥30
534
≥
564
x
Fig. 9.5 Installation dimensions with 2 frame spacers
Removing the frame spacer
Fig. 9.6 Removing the frame spacer
X Remove the 4 parts of the frame spacer from the
corners of the inlay frame by hand.
EN
90
Installation
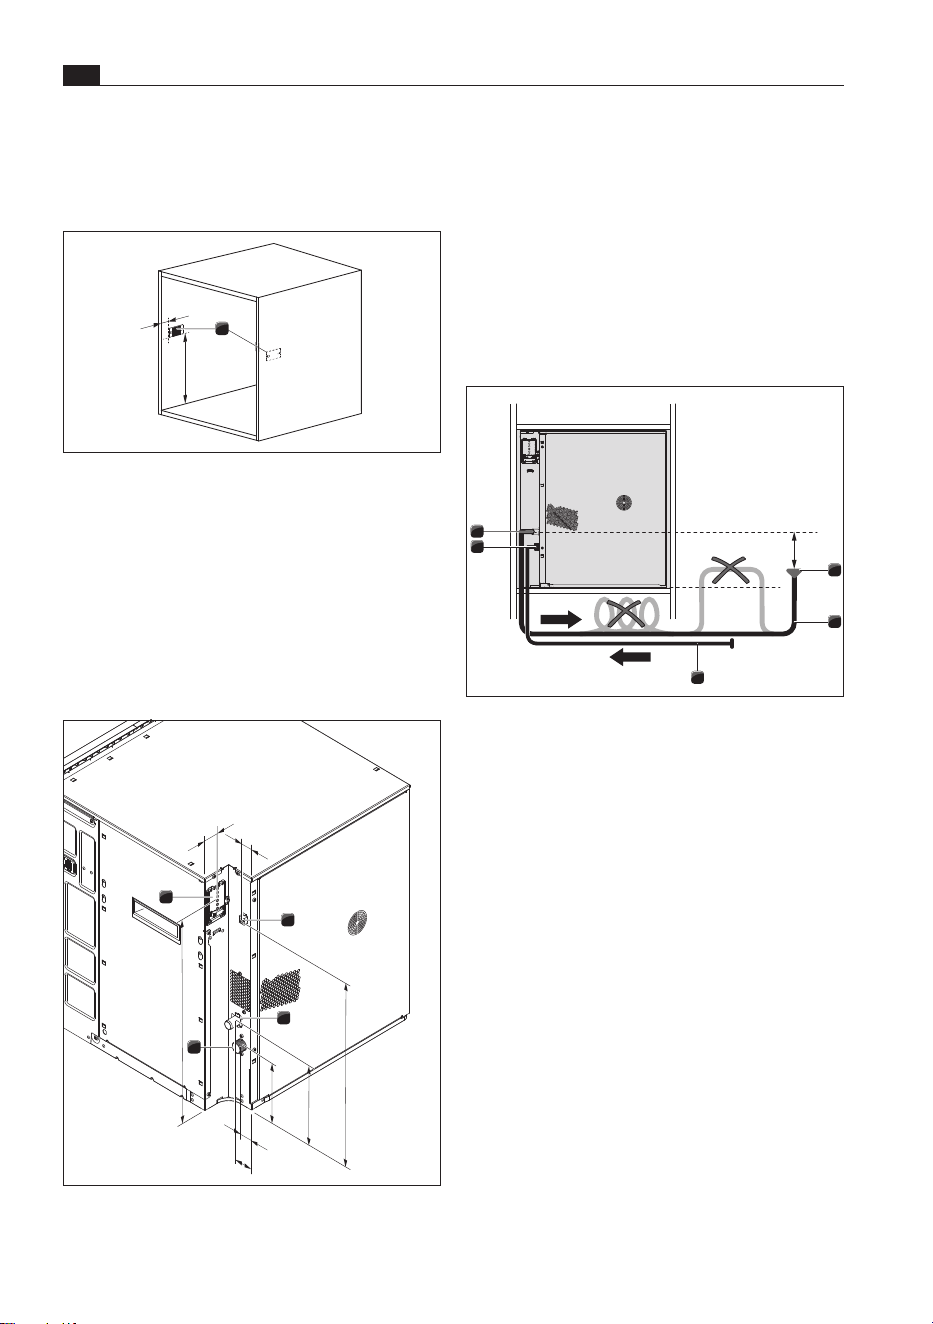
www.bora.com
[1] Power supply
[2] RJ45 connection for BORA multi-drawer
(no mains connection)
[3] Waste water connection
[4] Fresh water connection
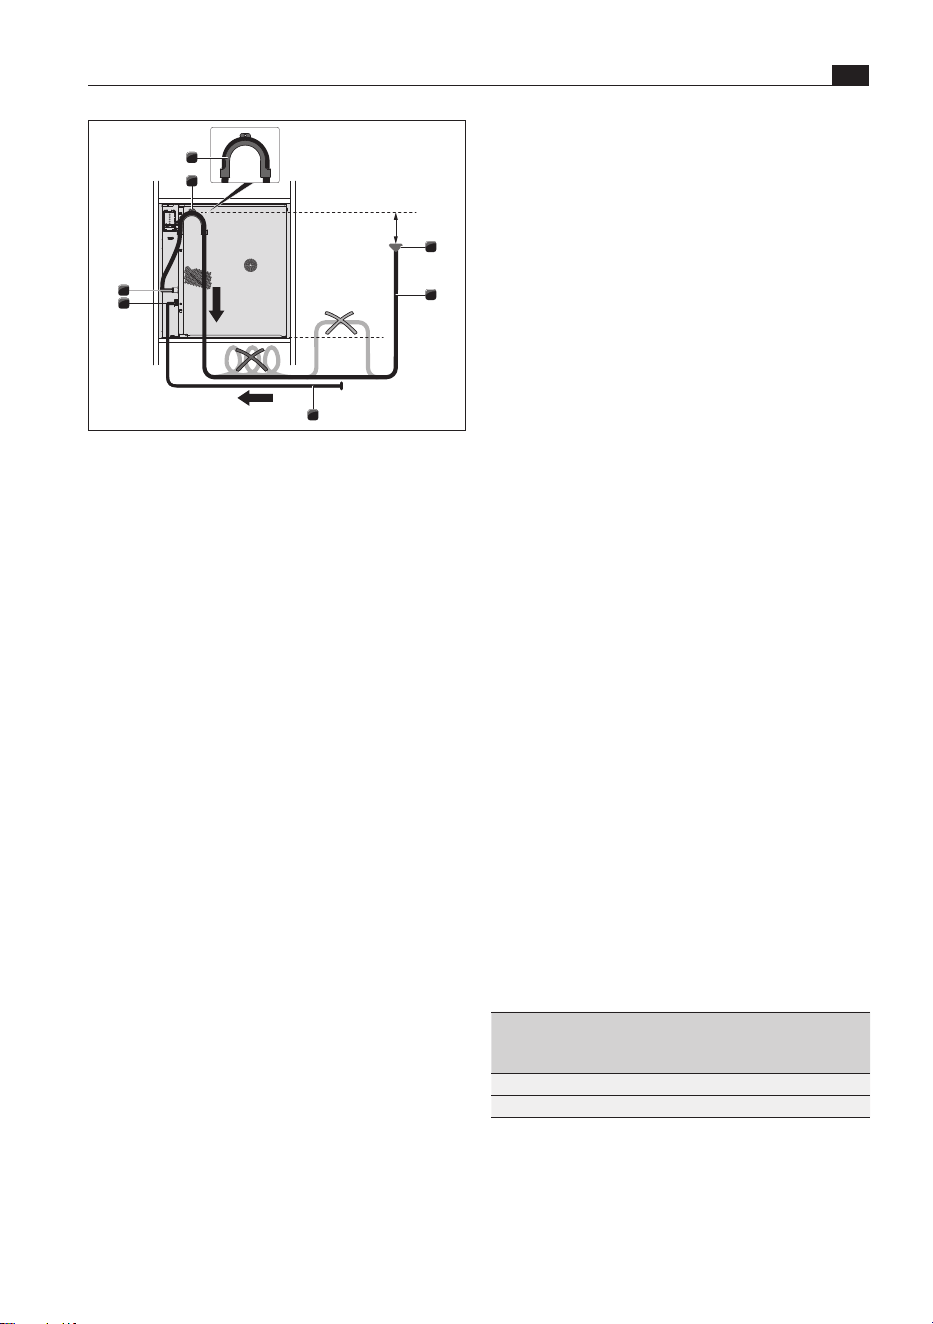
Water drainage
O
The waste water siphon must be installed at least
100mm below the waste water connection.
O
The waste water hose must not be installed above
the bottom edge of the appliance.
1
2
5
4
3
>100
Fig. 9.11 Water drainage
[1] Waste water siphon
[2] Water outlet hose
[3] Water supply hose
[4] Fresh water connection
[5] Waste water connection
i
If the waste water trap is not installed at
least 100mm lower than the waste water
connection, the installation set XBOMSU
(hook) must be used. In doing so, it must
be ensured that the waste water siphon is
installed at least 100 mm lower than the
waste water hose in the fitted hook.
9.6 Installation
Fitting carcass mounting plates
1
44,5
405,5
Fig. 9.9 Installation recess with carcass mounting
plates
[1] Carcass mounting plates
X Using the installation template and the screws
provided, screw the carcass mounting plates
hand-tight to the inside of the installation recess.
Setting up appliance connections
154
29
43
210
477
21
523
33
2
1
3
4
Fig. 9.10 Appliance connections
91
Installation
www.bora.com
EN
is tightly sealed. If necessary, check that the
washer and screw connections are firmly in place.
Power supply
X Observe all safety and warning information (see
“2 Safety”).
X Observe all national and regional laws and
regulations as well as the supplementary
regulations of the local utility companies.
O
The appliances may only be connected to the
mains power supply by certified specialists. The
specialist also assumes responsibility for the
proper installation and commissioning.
O
Connections via plug-in contacts
(Schuko plugs) are not permitted.
O
Single-phase connection
The appliance complies with the requirements of
IEC 61000-3-12.
O
This appliance is intended to be operated on a
supply network with an impedance Zmax at the
transfer point (mains connection) of 0.0416
ohms maximum.
The user is to ensure that the appliance is only
operated on a mains supply network which
meets this requirement. If necessary, ask the
local energy supply company about the system
impedance.
X Switch off the main switch/automatic circuit
breaker before connecting the appliance.
X Secure the main switch/automatic circuit
breaker against being switched back on without
permission.
X Make sure the power to the appliance is
disconnected.
X Connect the appliance exclusively via a fixed
connection to a mains supply cable type H
05 VV-F with corresponding minimum cross-
section (see Table “Fuse protection and minimum
cross-section”).
Connection Fuse
protection
Maximum
power
consumption
Minimum
cross-
section
two-phase 2 x 16A 6100 W 2.5 mm
2
single-phase 1 x 16A 6100 W 2.5 mm
2
Tab. 9.2 Fuse protection and minimum cross-section
2
1
3
7
5
4
6
>100
Fig. 9.12 Water drainage via hook
[1] Waste water siphon
[2] Water outlet hose
[3] Water supply hose
[4] Fresh water connection
[5] Waste water connection
[6] Bore hole for installation
[7] Hook
X Attach the hook to the side of the appliance by
fitting the screw provided through the bore hole.
X Lay the water outlet hose from the waste water
connection so that it goes up over the hook and
then back down.
Fresh and waste water connection
X Check whether there is a washer in each
threaded coupling on the water supply hose. If
necessary, fit a washer.
X Screw the angled end of the water supply hose to
the fresh water connection on the appliance. The
angled end must be facing downwards.
X Check that it is screwed on tight and is firmly in
place.
X Using the hose clip, attach the angled end of the
water outlet hose to the waste water connection
on the appliance. The angled end must be facing
downwards. If the XBOMSU installation set is
required, the angled end must be facing upwards.
The hose clip must only be attached hand-tight.
X Check that the hose clip is firmly in place.
X Ensure that there are no kinks in the hoses.
X Slowly open the stopcock for the fresh water
supply and check that the fresh water connection
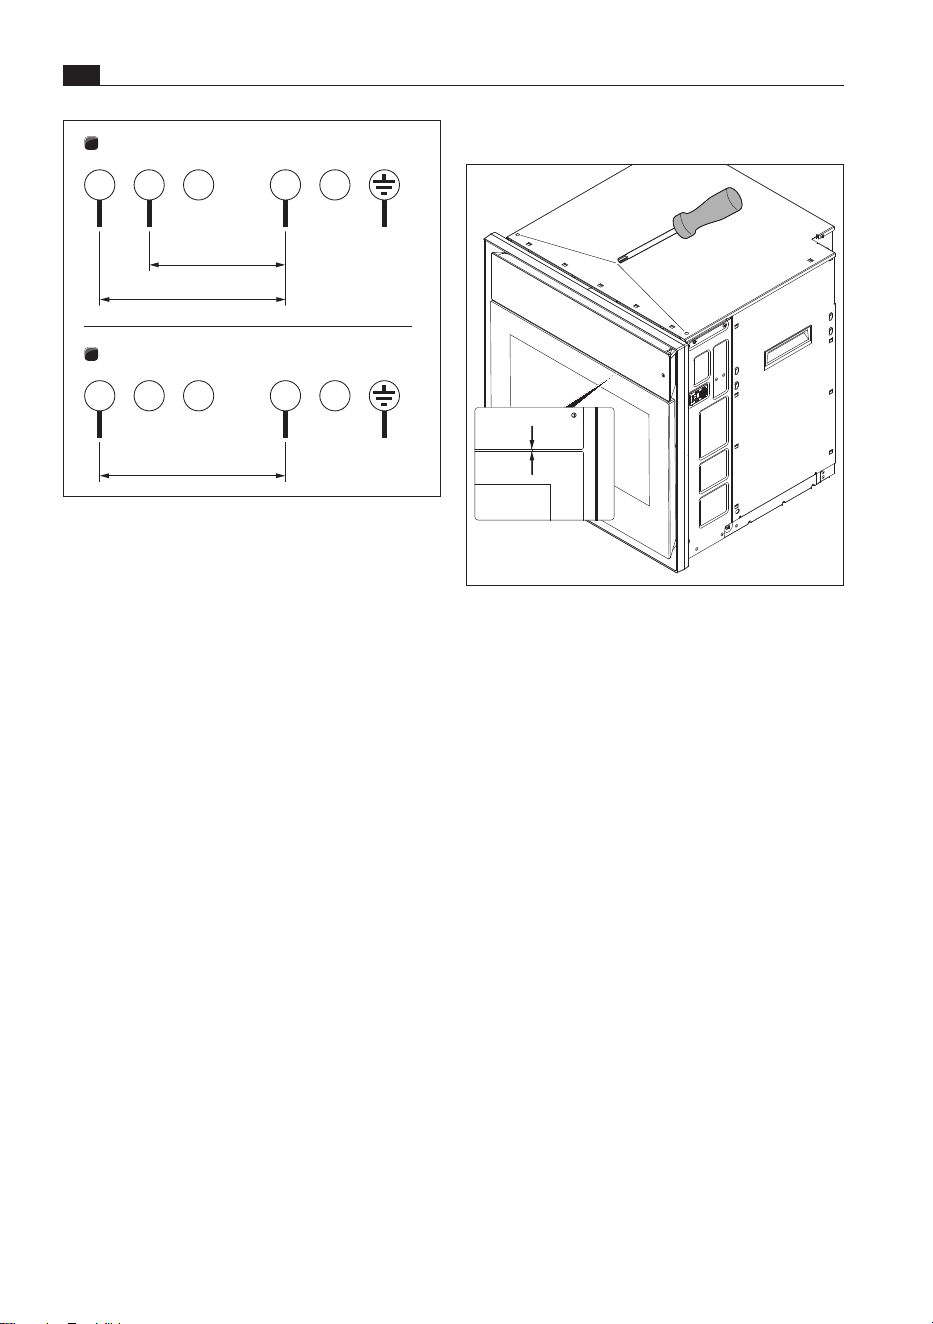
EN
92
Installation
www.bora.com
Positioning the operating unit
4
Fig. 9.14 Adjusting the distance between the
operating unit and door
X Ensure that there is an even distance of 4mm
between the operating unit and the door. To do
this, turn the adjusting screws on the front of the
top of the housing.
Positioning the appliance
X Push the appliance into the desired position in
the installation recess. Ensure that the water
hoses and mains supply cable are not trapped or
damaged in doing so.
X Maintain a minimum distance of 30mm between
the back of the appliance and the adjacent
elements.
X Position the appliance midway between the
interior walls of the installation recess.
1
2
PE
3
220 – 240 V~
L1
1 5
L2
2
220 – 240 V~
N
4
L3
PE
3
220 – 240 V~
L1
1 5
2
N
4
L2 L3
Fig. 9.13 Connection diagrams
[1] Connection diagram – two-phase connection,
16 A
[2] Connection diagram – single-phase connection,
16 A
X Connect the power supply cable to the power
supply of the appliance in accordance with
the relevant connection diagram (see Fig.
“Connection Diagrams”).
X Secure the power supply cable with the strain
relief clamp.
X Close the power supply housing cover.
X Check that installation has been carried out
correctly.
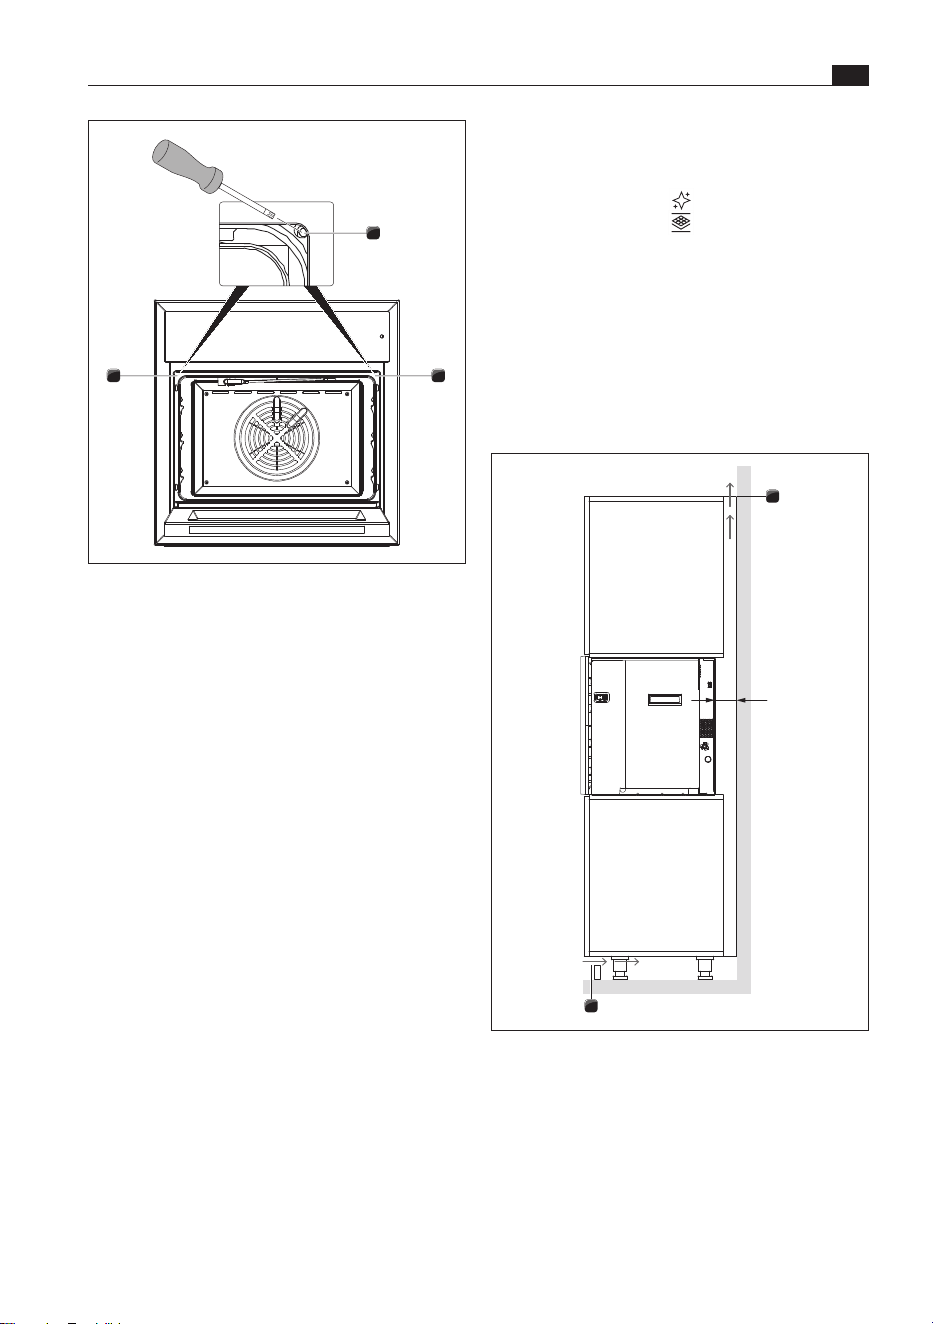
93
Installation
www.bora.com
EN
11
2
Fig. 9.15 Securing the appliance
[1] Oven chamber seal
[2] Fixing screw
X Open the door.
X Pull the oven seal away from the top left and top
right corners so that the fixing screw in each
corner is accessible.
O
Turning the fixing screw (4 mm Allen key) causes
the levelling shim on the corresponding side to
move outwards and press against the locking
plate.
X Tighten the screw until the shim is positioned
correctly.
X Do the same on the other side.
X Moisten the seal with water.
X Press the oven chamber seal back inside the
groove.
X Check that the oven chamber seal is positioned
correctly all the way round.
X Check that the appliance is installed correctly.
Fitter the odour filter
X Take the new odour filter out of its packaging.
X Touch “Maintenance” .
X Touch “Filter change” .
X Proceed as shown when you press the
“Instructions” button
.
9.7 Ventilation
i
Installation must not take place without return
flow apertures of >160cm² in the plinth area
and trim.
1
1
≥30
Fig. 9.16 Ventilation
[1] Return flow aperture >160cm²
X Provide for return flow apertures, each of
>160 cm², in the plinth area and in the trim on
the unit.

EN
94
Installation
www.bora.com
9.8 Initial operation
When the appliance is switched on for the first time,
the following settings can be made:
O
Select language
O
Activate Wi-Fi (for easy installation of a new
software version)
O
Set date and time (time format)
O
Water settings (degree of hardness)
O
Select food preferences
The settings can be changed at a later date.
X Touch “Settings” .
X Insert the drain filter before using for the first
time.
X If necessary, update the appliance software.
In rare cases, there may be residues from
production in the oven chamber.
X Clean the oven chamber by hand or using the
cleaning programme.
i
When heating up the appliance for the first
time, light smoke and odours may be evident
when the door is opened.
9.9 Handover to user
Once installation is complete:
X Explain the main functions to the user.
X Explain all safety-related aspects of operation and
handling to the user.
X Provide the user with the accessories and
operating and installation instructions, which are
to be kept in a safe place.
95
Decommissioning,disassembly and disposal
www.bora.com
EN
10 Decommissioning,
disassembly and disposal
10.3 Environmentally-friendly
disposal
Disposal of transport packaging
i
The packaging protects the appliance from
damage during transport. The packaging
materials have been selected taking into
account the environment and their disposal
and are therefore recyclable.
Recycling the packaging saves raw materials and
reduces waste. Your specialist retailer will take the
packaging back.
X Give the packaging to your specialist retailer
or
X dispose of the packaging correctly observing
regional regulations.
Disposal of accessories
X Dispose of unnecessary or used accessories
(activated charcoal filters, etc.) accordingly taking
into account the regional regulations.
Disposal of the old appliance
Electrical appliances with this mark
must not be disposed of in the
household waste at the end of their
service life. They must be disposed
of at a collection point for the
recycling of electrical or electronic
appliances. Information on this can
be obtained from the city or local
councils.
Waste electrical and electronic appliances often
still contain valuable materials. However, they also
contain harmful substances that were necessary to
make them work and ensure their safety. If placed in
the household waste or handled incorrectly, they may
harm human health and damage the environment.
X Never dispose of your old appliance in the
household waste.
X Take the appliance to a regional collection point for
the return and further processing of electrical and
electronic components and other materials.
X Observe all safety and warning information
(see “2 Safety”).
X Follow the enclosed manufacturer's information.
10.1 Decommissioning
Decommissioning refers to ultimate
decommissioning and disassembly. Following
decommissioning, the appliance can either be
installed in another unit, sold on privately or
disposed of.
i
The electricity and gas connections may
only be disconnected and cut off by certified
specialists.
X Switch the appliance off before decommissioning
(see “6 Functions and operation”)
X Disconnect the appliance from the power supply.
10.2 Disassembly
To be removed, the appliance must be accessible
for disassembly and disconnected from the power
supply.
X Close the fresh water supply stopcock.
X Remove the two fixing screws top left and right
behind the oven chamber seal.
X Move the appliance slightly from side to side to
bring the shims back to their starting position.
X Remove any other accessories.
X Dispose of the old appliance and any soiled
accessories as described under “Environmentally-
friendly disposal”.

EN
96
Warranty, technical service, spare parts, accessories
www.bora.com
11 Warranty, technical service, spare parts,
accessories
BORA will correct defects in BORA products at its
own discretion by repairing or replacing the product.
All costs for the correction of defects under the
manufacturer’s warranty shall be assumed by BORA.
Expressly not covered by the BORA manufacturer’s
warranty are:
O
BORA products that were not sold by authorised
BORA retailers or salespersons trained by BORA
O
Damage caused by non-adherence to the
operating instructions (including product care and
cleaning). This represents improper use.
O
Damage caused by normal use,
O
Damage caused by external influences (such
as transport damage, improper removal and
installation, ingress of condensation, damage
caused by the elements such as a lightning strike)
O
Damage caused by repairs carried out by the
owner, repairs or attempts to repair carried out
by unauthorised BORA staff or companies not
authorised by BORA
O
Damage caused by water or dirt due to missing
covers or elements
O
Damage caused by water placed inside the oven
chamber
O
Damage caused by extending the water supply
and drainage hose without drinking water
certification or by extending non-specified pipes
with an adapter
O
Damage to
- plastic frames
- glass components
- metal components (coated and uncoated)
- touch display
- plastic and other wearable parts
O
Damage caused by electrical voltage fluctuations
O
Secondary damage or claims for damages beyond
the defect
Legal claims, particularly statutory claims for defects
or product liability are not limited by the warranty
and can be asserted free of charge.
If a defect is not covered by the manufacturer’s
warranty, a claim may be made against the BORA
Technical Service.
BORA shall not assume the resulting costs.
X Observe all safety and warning information
(see “2 Safety”).
11.1 BORA
manufacturer’s warranty
BORA provides its end customers with a 2-year
manufacturer’s warranty for its products. The end
customer is entitled to this warranty in addition to the
statutory claims for defects against the sellers of our
products.
The manufacturer’s warranty applies to the BORA
products listed here that are sold by authorised
BORA retailers or salespeople trained by BORA
and are installed in the European Union (excluding
overseas territories), Switzerland, Liechtenstein,
Ukraine, Russia, Norway, Serbia, Israel, the UK,
Iceland, India, Australia and New Zealand, with
the exception of products referred to by BORA as
universal products or accessories:
O
BORA X BO steam oven
O
BORA multi-drawers
The manufacturer’s warranty starts as soon as the
BORA product is handed over to the end customer
and is valid for 2 years. Registering on www.mybora.
com enables the manufacturer’s warranty to be
extended to 3 years.
The manufacturer’s warranty requires expert
installation of the BORA products by an authorised
BORA retailer (in accordance with the valid BORA
ventilation handbook and operating instructions
at the time of installation). During use, the end
customer is to adhere to the specifications and
instructions in the operating manual.
When filing a warranty claim, BORA must be
directly notified of the fault and the receipt must be
presented. Alternatively, proof of purchase can be
provided by registering on www.mybora.com.
BORA guarantees that all BORA products are free
from material and production defects. The defect
must exist prior to delivery of the product to the end
customer. Filing a warranty claim does not interrupt
the warranty period, nor shall the period start anew.

97
Warranty, technical service, spare parts, accessories
www.bora.com
EN
11.4 Accessories
O
X BO cleaning cartridge (6 piece) XBORK/6
O
X BO cleaning cartridge (12 piece) XBORK/12
O
X BO odour filter XBOGF
O
X BO perforated stainless steel tray XBOGBG
O
X BO oven rack XBOBGR
O
X BO universal tray XBOUB
O
X BO Silicone baking mat XBOSBM
O
X BO frame spacer XBORS
O
X BO installation set XBOMSU
The laws of the Federal Republic of Germany apply
to these warranty conditions.
You can contact us at:
BORA Vertriebs GmbH & Co KG, Innstraße 1,
6342Niederndorf, Austria
O
Telephone: +49 800 7890 0987
Monday to Thursday from 08:00–18:00 and
Friday from 08:00–17:00
O
Email: [email protected]
11.1.1 Warranty extension
You can extend the warranty by registering on www.
bora.com/registration.
11.2 Service
BORA Service:
see reverse side of the operating and assembly
instructions
+800 7890 0987
X In the case of faults you cannot fix yourself,
contact your BORA specialised retailer or the
BORA Service Team.
The BORA Service Team will require the type
designation and serial number of your appliance
(FD number).
You can find both details on the nameplate on the
welcome card and in the main “Settings” menu
under “System and updates”.
11.3 Spare parts
X Only use original spare parts for repairs.
X Repairs may only be carried out by the BORA
Service Team.
i
Spare parts can be obtained from your BORA
dealer, the BORA online service website at
www.bora.com/service or by calling the
service number provided.
+800 7890 0987
Operating and installation instructions: Original Translation
Manufacturer: BORA Vertriebs GmbH & Co KG
The distribution and duplication of this document, as well as the use and
disclosure of its contents are prohibited unless expressly authorised.
These operating and installation instructions have been drawn up with the greatest of care. But it cannot be
ruled out that subsequent technical modifications have not yet been incorporated or the relevant content has
not yet been adapted. Please accept our apologies in this eventuality. An updated version can be requested
from the BORA Service Team. Subject to printing errors and mistakes.
© BORA Vertriebs GmbH & Co KG All rights reserved.
AU
NZ
BORA APAC Pty Ltd
100 Victoria Road
Drummoyne NSW 2047
Australia
T +61 2 9719 2350
F +61 2 8076 3514
www.bora-australia.com.au
D
BORA Lüftungstechnik GmbH
Rosenheimer Str. 33
83064 Raubling
Germany
T +49 (0) 8035 / 9840-0
F +49 (0) 8035 / 9840-300
www.bora.com
A
BORA Vertriebs GmbH & Co KG
Innstraße 1
6342 Niederndorf
Austria
T +43 (0) 5373 / 62250-0
F +43 (0) 5373 / 62250-90
www.bora.com
INT
BORA Holding GmbH
Innstraße 1
6342 Niederndorf
Austria
T +43 (0) 5373 / 62250-0
F +43 (0) 5373 / 62250-90
www.bora.com