
1
Owner’s Manual
Español 18
Français 34
Deutsch 50
Italiano 67
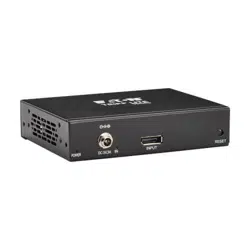
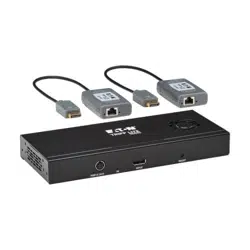
Models:
(DisplayPort Out)
B156E-002-8K-K,
B156E-003-8K-K
(HDMI Out)
B156E-002-H8K-K,
B156E-003-H8K-K
DisplayPort v1.4 Multi-Stream
Transport Hubs over Cat6
Extender Kits

2
Product Features
• Connect multiple monitors via the DisplayPort output
on your computer to display the same image on each
monitor, extend the desktop across monitors, or
combine as one enlarged monitor in video wall mode.
• Extends up to 230 ft. (70 m) from the source to remote
receiver via Cat6 UTP cable with zero latency.
• DisplayPort v1.4 and Multi-Stream Transfer (MST)
compliant.
• DisplayPort and HDMI output models support UHD 4K
resolutions up to 3840 x 2160 (60 Hz). See System
Requirements for more information.
• Supports HDMI 2.0, HDCP 1.4 & 2.3, HDR, EDID and
DDC.
• Supports DTS-HD, Dolby True HD and 7.1-channel
surround sound audio.
• Pigtail receiver features built-in equalization (EQ)
control and auto EDID image adjustment.
• Power over Cable (PoC) technology means no external
power is required for the receiver.
• 5V power adapter with screw-type connector allows
attachment to MST hub.
• Rugged metal enclosure includes patented detachable
surface-mounting brackets.

3
System Requirements
• A computer with a DisplayPort v1.4 compatible
graphics card (e.g., AMD Radeon with AMD Eyefinity
Technology). Backward compatible with most
DisplayPort 1.1a equipment running current graphics
drivers. The feature set is limited to that of the
attached equipment (e.g., you may be limited to
displaying in Clone/Mirror mode only). Compatibility
with older graphics cards is not guaranteed.
• macOS X does not support MST for NVIDIA and Intel
Graphics Processor Units, limiting video display on the
connected monitors to mirror mode.
• DisplayPort 1.4 bandwidth is 32.4 Gbps. Higher-
resolution monitors take up more bandwidth.
• Although DisplayPort and HDMI monitors support
video resolutions up to 3840 x 2160 on individual
monitors, the number of 4K monitors connected at the
same time is limited. For example, when connecting 4
monitors simultaneously, you will be limited to
connecting 1080p monitors. Higher resolutions are
possible when displaying in video wall mode (e.g., 3840
x 6480 in a 1x3 video wall, 11520 x 2160 in a 3x1 video
wall, etc.)
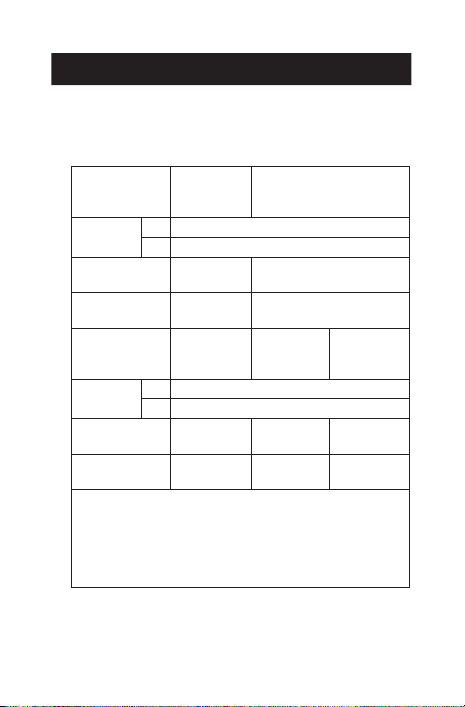
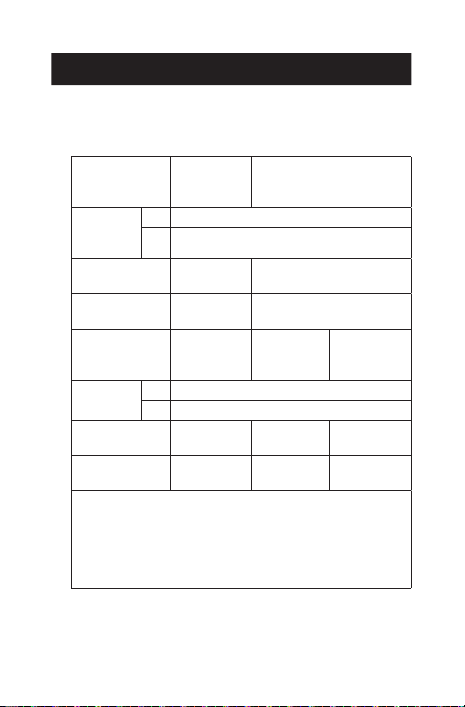
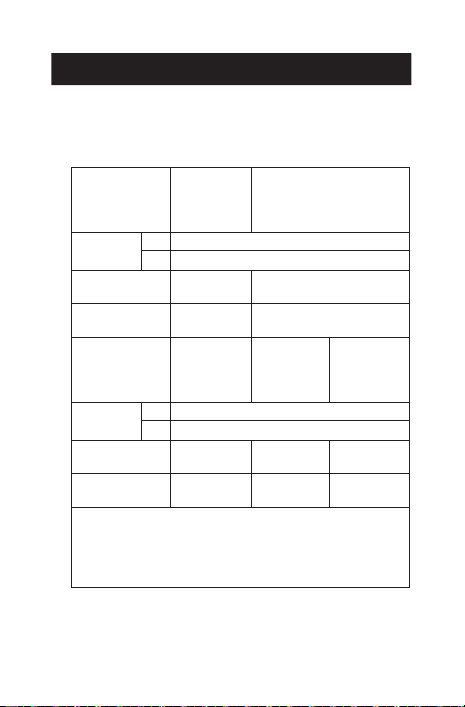
4
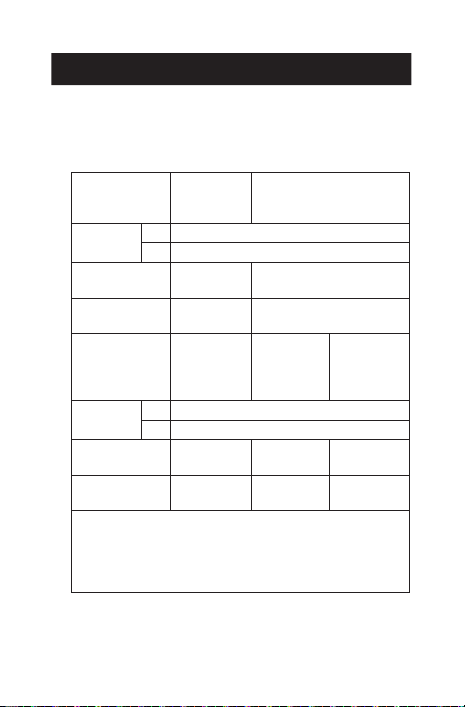
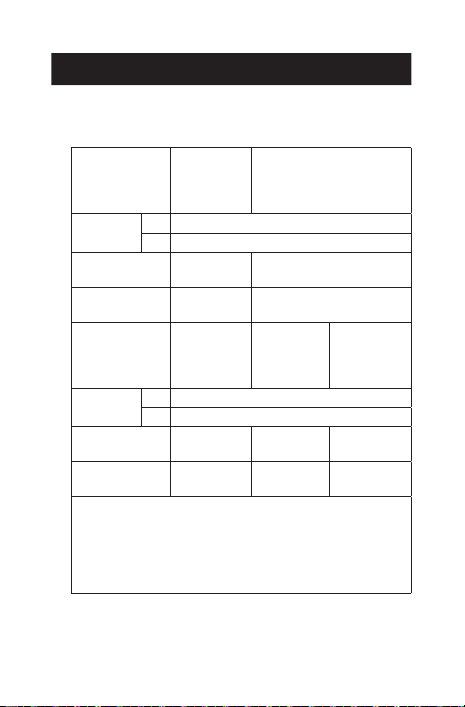
System Requirements
• Maximum Resolution: The following chart explains the
maximum resolution of both models. Source equipment
(PC) requires a DisplayPort 1.4 compatible video card.
Mode (output
for Display-
Port or HDMI) Display 1 Display 2
Video Wall
Mode
1x2 3840 x 4320@ 60 Hz
2x1 7680 x 2160@ 60 Hz
Extended
Desktop Mode
3840 x 2160
@ 60 Hz
3840x2160 @ 60 Hz
Mirror Mode 3840 x 2160
@ 60 Hz
3840x2160 @ 60 Hz
Mode (output
for Display-
Port or HDMI) Display 1 Display 2 Display 3
Video Wall
Mode
1x3 3840 x 6480@ 60 Hz
3x1 11520 x 2160@ 60 Hz
Extended
Desktop Mode
3840 x 2160
@ 60 Hz
3840x2160
@ 60 Hz
3840x2160
@ 60 Hz
Mirror Mode 3840x2160
@ 60 Hz
3840x2160
@ 60 Hz
3840x2160
@ 60 Hz
Notes:
• When in Mirror Mode, the same content may only
display on 2 screens.
• Under the circumstance of removing the graphics card
driver software, it is possible to achieve the requirement
of mirroring 3 screens.
• When utilizing an 8K source with 8K display(s)
connected to the output ports, there may be bandwidth
issues that limit the capability of individual output ports.

5
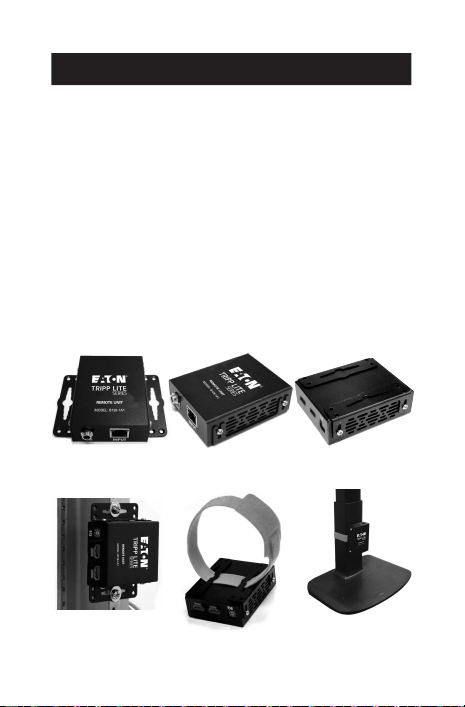
Package Contents
• DisplayPort MST Transmitter Hub
• DisplayPort or HDMI Pigtail Receiver
• External Power Supply (Input: 100–240V, 50/60 Hz,
0.6A; Output: 24V 1A)
• Quick Start Guide
Optional Accessories
• P568-0XX-8K6 8K @ 60 Hz HDMI Cables
• P569-XXX-CERT or P568-XXX-2A Series HDMI 2.0 Cables
• P580-Series DisplayPort 1.4 Cables
• N202-Series Cat6 24 AWG Solid-Wire Cables

6
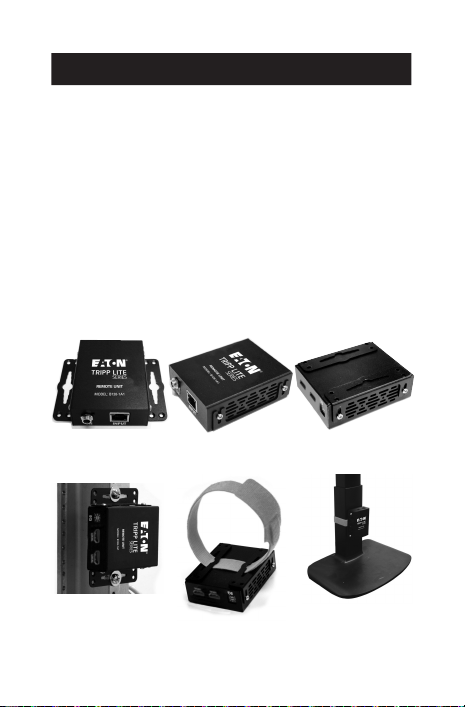
Mounting Instructions
The following images illustrate how the included mounting
brackets can be attached for different installations.
Notes:
• The models shown below are for illustrative purposes
only. Your product may vary by model number, size or
port orientation.
• Only the DisplayPort MST Hub can be mounted. The
receiver is a pigtail-type unit that connects directly to the
display.
Wall-mount
19” Rack-mount

7
Before Installation
Before installation, please check the following settings of
your source(s) and display(s):
• Set display to 60 Hz. Double-check factory settings, as
default can be set to a lower frequency (Hz) than
advertised.
• Ensure the input setting of your monitor is set at HDMI
2.0. Some displays may have default setting at HDMI
1.4.
• Verify your monitor has the HDR feature enabled.
Some displays may have this feature disabled as a
factory setting.
• Check if the Ultra HD (UHD) Deep Color setting is
enabled on your display. Confirm with your display’s
manufacturer which HDMI ports support UHD Deep
Color. Note: To connect a local monitor to your
installation, the UHD Deep Color setting may need to be
disabled on your local display to achieve 4K @ 60 Hz
resolution.

8
Installation
Notes:
• Test to ensure the entire installation works properly
before pulling cables through ceilings/walls.
• To achieve maximum distance and performance, use 24
AWG solid-wire Cat6 cable. Using stranded-wire Cat6
cable or cable with a gauge (AWG) size higher than 24
AWG will result in shorter extension distance. Higher-
gauge cabling, such as 26 AWG, has a more limited
transmission capability than lower-gauge cabling. N202-
Series Cat6 cables are made with 24 AWG solid-wire
cabling.
• External power is not required for pigtail receivers due to
Power over Cable (PoC) technology incorporated in the
transmitters.
• Before installation, ensure your graphics driver is up-to-
date by installing the latest driver available. The MST hub
is backward compatible with most DisplayPort 1.1a
equipment running current graphics drivers. Feature set
is limited to the attached equipment’s capabilities (e.g.,
you may be limited to displaying in Clone/Mirror mode
only). Compatibility with older graphics cards is not
guaranteed.

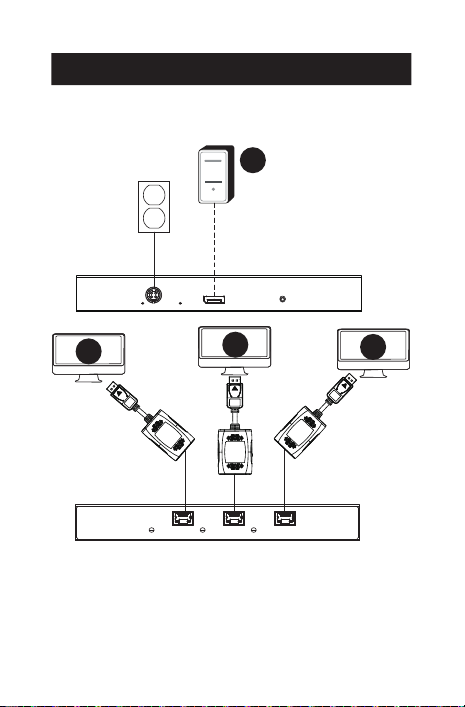
9
Installation
1. Make sure all equipment in the installation is powered
OFF.
2. Using a DisplayPort 1.4 cable, connect the DisplayPort
source with the DisplayPort input on the MST
transmitter OR using an HDMI cable, connect the HDMI
source with the HDMI input on the MST transmitter.
3. Using Cat6 cable, connect the RJ45 port on the MST
transmitter to the RJ45 port on the pigtail receiver.
4. Repeat Step 3 for each additional display you are
connecting.
5. Connect the pigtail receiver to the display.
6. Turn on the power to your connected displays.
7. Connect the external power supply to the MST
transmitter. Plug it into an available wall outlet or a
surge protector, power distribution unit (PDU) or
uninterruptible power supply (UPS). The POWER
(green) LED on the MST transmitter will illuminate to
indicate the unit is receiving power from the external
power supply. The POWER (green) LED on the pigtail
receiver will illuminate to indicate the unit is receiving
power from the local transmitter unit through PoC
technology.
8. Turn on the power to the DisplayPort source.
9. The orange RJ45 LED will illuminate on both the MST
transmitter and pigtail receiver to indicate a signal is
being received from the source to the display. The
screen should now appear on the connected display(s).
10. Use your video card’s display settings screen to adjust
how video is displayed on the connected displays.

10
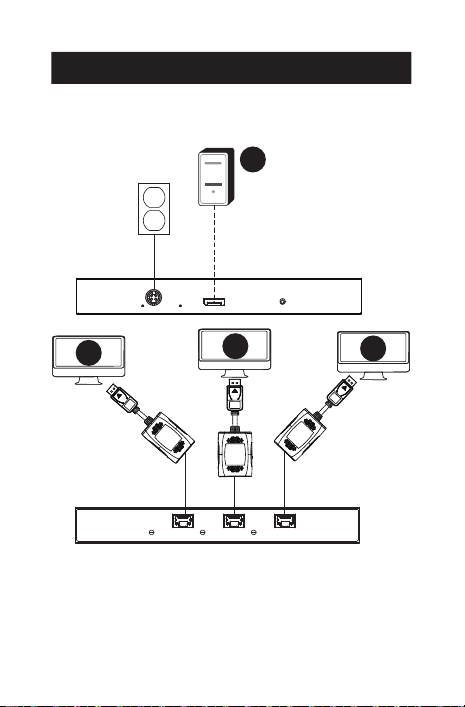
Installation Diagrams
INPUT
RESETIN
POWER
DC 24V,1A
OUTPUT 2 OUTPUT 3OUTPUT 1
INPUT
RESETIN
POWER
DC 24V,1A
OUTPUT 2 OUTPUT 3OUTPUT 1
Note: B156E-002-8K-K is the same as B156E-003-8K-K except
it has only two outputs.
11 1111
33
A
B
B
B
B156E-003-8K-K

11
Installation Diagrams
Note: B156E-002-H8K-K is the same as B156E-003-H8K-K
except it has only two outputs.
INPUT
RESETIN
POWER
DC 24V,1A
OUTPUT 2 OUTPUT 3OUTPUT 1
INPUT
RESETIN
POWER
DC 24V,1A
OUTPUT 2 OUTPUT 3OUTPUT 1
22
11 1111
B
B
B
A
B156E-003-H8K-K

12
Troubleshooting
If you are unable to get an acceptable image after following
the installation instructions, try the troubleshooting tips
below.
1. Is your equipment running the latest graphics
driver? If not, download the latest graphics drivers for
your equipment. The MST hub is backward compatible
with most DisplayPort 1.1a equipment running current
graphics drivers. The feature set is limited to the
attached equipment’s capabilities (e.g., you may be
limited to displaying in Clone/Mirror mode only).
Compatibility with older graphics cards is not
guaranteed.
2. Press the hub’s reset button to reset the signal
being sent to the connected displays.
Installation Diagrams
Cable connections
1 Up to 230 ft. (70 m) Cat6 solid cable at 4K / 60 Hz
2 Up to 15 ft. (4.5 m) HDMI 2.0 cable at 4K / 60 Hz
3 Up to 15 ft. (4.5 m) DisplayPort cable at 4K / 60 Hz
Connected components
A
DisplayPort or HDMI Source
B
4K Display

13
Troubleshooting
3. Is the included external power supply connected
and plugged into a working power source? For the
product to function properly, it must be connected to and
receiving power from the included external power supply.
4. Was the power to the DisplayPort source and
connected monitors turned off prior to
installation? If not, restart your computer.
5. What resolution are you trying to attain on each
monitor? DisplayPort 1.4 has a bandwidth of
32.4 Gbps with higher-resolution monitors taking up
more bandwidth. Although DisplayPort and HDMI
monitors support video resolutions up to 3840 x 2160
on individual monitors, the number of 4K monitors
connected at the same time is limited. For example,
when connecting 4 monitors simultaneously, you will
be limited to connecting 1080p monitors. Higher
resolutions are possible when displaying in video wall
mode (e.g., 3840 x 6480 in a 1x3 video wall, 11520 x
2160 in a 3x1 video wall, etc.)
6. What cable lengths are you using? The maximum
cable length between the hub and the connected
monitors should not exceed 15 ft. (4.6 m).
7. What type of cabling are you using? Inferior cabling
can result in poor performance. It is important to use
cables that support the video resolution you are trying
to attain. It is recommended you use the cables listed
in the Optional Accessories section, as they have been
tested to work with these MST Hubs.
8. Test your cables to ensure they are working
properly. For example, connect your DisplayPort or HDMI
cables between a source and display setup you know
works to determine if the cable is functioning properly.

14
Specifications
Maximum Distance
to Display
230 ft. (70 m)
Maximum Supported
Color Depth
12-bit Deep Color
HDR Support Yes
HDMI Specication 2.0
DisplayPort Specication 1.4
Chroma Subsampling RGB, YCC444, YCC422,
YCC420
HDCP 1.4 and 2.3
3D Video Support Yes
Audio 2-channel LPCM, AC3, DTS,
Bit depth up to 24 bits,
Sample rate up to 192 KHz
Chipset Yes
IR or RS-232 Extension
Support
No
Consumer Electronic
Control (CEC) Support
No
Drivers Required None
Operating Temperature
Range
32° to 104°F / 0° to 40° C
Storage Temperature Range 5° to 122°F / -15° to 50°C
Relative Humidity 0% to 85% Non-Condensing
Construction Material ABS Plastic
Connector/Contact Plating Nickel/Gold

15
Warranty
1-YEAR LIMITED WARRANTY
We warrant our products to be free from defects in materials
and workmanship for a period of one (1) year from the date of
initial purchase. Our obligation under this warranty is limited to
repairing or replacing (at its sole option) any such defective
products. Visit Tripplite.Eaton.com/support/product-returns
before sending any equipment back for repair. This warranty
does not apply to equipment which has been damaged by
accident, negligence or misapplication or has been altered or
modified in any way.
EXCEPT AS PROVIDED HEREIN, WE MAKE NO WARRANTIES,
EXPRESS OR IMPLIED, INCLUDING WARRANTIES OF
MERCHANTABILITY AND FITNESS FOR A PARTICULAR PURPOSE.
Some states do not permit limitation or exclusion of implied
warranties; therefore, the aforesaid limitation(s) or exclusion(s)
may not apply to the purchaser.
EXCEPT AS PROVIDED ABOVE, IN NO EVENT WILL WE BE LIABLE
FOR DIRECT, INDIRECT, SPECIAL, INCIDENTAL OR
CONSEQUENTIAL DAMAGES ARISING OUT OF THE USE OF THIS
PRODUCT, EVEN IF ADVISED OF THE POSSIBILITY OF SUCH
DAMAGE. Specifically, we are not liable for any costs, such as lost
profits or revenue, loss of equipment, loss of use of equipment,
loss of software, loss of data, costs of substitutes, claims by third
parties, or otherwise.

16
Warranty
FCC Notice, Class B
This device complies with part 15 of the FCC Rules. Operation is
subject to the following two conditions: (1) This device may not
cause harmful interference, and (2) this device must accept any
interference received, including interference that may cause
undesired operation.
Note: This equipment has been tested and found to comply with
the limits for a Class B digital device, pursuant to part 15 of the
FCC Rules. These limits are designed to provide reasonable
protection against harmful interference in a residential installation.
This equipment generates, uses and can radiate radio frequency
energy and, if not installed and used in accordance with the
instructions, may cause harmful interference to radio
communications. However, there is no guarantee that interference
will not occur in a particular installation. If this equipment does
cause harmful interference to radio or television reception, which
can be determined by turning the equipment off and on, the user
is encouraged to try to correct the interference by one or more of
the following measures:
• Reorient or relocate the receiving antenna.
• Increase the separation between the equipment and receiver.
• Connect the equipment into an outlet on a circuit different
from that to which the receiver is connected.
• Consult the dealer or an experienced radio/TV technician
for help.
Any changes or modifications to this equipment not expressly
approved by Eaton could void the user’s authority to operate this
equipment.
Eaton has a policy of continuous improvement. Specifications are
subject to change without notice.


18
Manual del Propietario
English 1
Français 34
Deutsch 50
Italiano 67
Modelos: (Salida
DisplayPort)
B156E-002-8K-K,
B156E-003-8K-K
(Salida HDMI)
B156E-002-H8K-K,
B156E-003-H8K-K
Hubs DisplayPort v1.4 Multi-
Stream Transport sobre kits
extensores Cat6

19
Características del Producto
• Conecte varios monitores a través de la salida
DisplayPort de su computadora para mostrar la misma
imagen en cada monitor, extender el escritorio a través
de los monitores o combinarlo como un monitor
ampliado en modo muro de video.
• Se extiende hasta 70 m [230 pies] desde la fuente al
receptor remoto a través de un cable UTP Cat6 con
latencia cero.
• Compatible con DisplayPort v1.4 y Multi-Stream
Transfer (MST).
• Los modelos con salida DisplayPort y HDMI admiten
resoluciones UHD 4K de hasta 3840 x 2160 (60 Hz).
Consulte los requisitos del sistema para obtener más
información.
• Admite HDMI 2.0, HDCP [High Definition Copy Protocol]
1.4 y 2.3, HDR, EDID y DDC.
• Compatible con sonido envolvente de 7.1 canales,
audio de DTS-HD y Dolby True HD
• El receptor Pigtail dispone de control de ecualización
(EQ) incorporado y ajuste automático de la imagen
EDID.
• La tecnología de alimentación por cable (PoC) significa
que el receptor no necesita alimentación externa.
• El adaptador de corriente de 5 V con conector roscado
permite acoplarlo al hub de MST
• La robusta carcasa metálica incluye soportes de
montaje en superficie desmontables patentados.

20
Requisitos del Sistema
• Una computadora con una tarjeta gráfica compatible
con DisplayPort v1.4 (por ejemplo, AMD Radeon con
tecnología AMD Eyefinity). Compatible con versiones
anteriores en la mayoría de los equipos con
DisplayPort 1.1a funcionando con los controladores
gráficos actuales. El conjunto de funciones está
limitado al del equipo conectado (por ejemplo, puede
estar limitado a mostrarse únicamente en modo clon o
espejo). No está garantizada la compatibilidad con
tarjetas gráficas anteriores.
• macOS X no es compatible con MST para las unidades
de procesamiento gráfico NVIDIA e Intel, lo que limita
la visualización de videos en los monitores conectados
al modo espejo.
• El ancho de banda DisplayPort 1.4 es 32.4 Gbps. Los
monitores de mayor resolución ocupan más ancho de
banda.
• Aunque los monitores DisplayPort y HDMI admiten
resoluciones de video de hasta 3840 x 2160 en
monitores individuales, el número de monitores 4K
conectados al mismo tiempo es limitado. Por ejemplo,
cuando conecte 4 monitores simultáneamente, estará
limitado a conectar monitores 1080p. Son posibles
resoluciones más altas cuando se visualiza en modo
muro de video (por ejemplo, 3840 x 6480 en un muro
de video de 1x3, 11520 x 2160 en un muro de video
de 3x1, etc.)
21
Requisitos del Sistema
• Resolución máxima: La siguiente tabla explica la resolución
máxima de ambos modelos. El equipo fuente (PC) requiere
una tarjeta de video compatible con DisplayPort 1.4.
Modo (salida
para Display-
Port o HDMI) Pantalla 1 Pantalla 2
Modo
Muro de
video
1x2 3840 x 4320 a 60 Hz
2x1 7680 x 2160 a 60 Hz
Modo Escritorio
extendido
3840 x 2160
a 60 Hz
3840 x 2160 a 60 Hz
Modo Espejo 3840 x 2160
a 60 Hz
3840 x 2160 a 60 Hz
Modo (salida
para Display-
Port o HDMI) Pantalla 1 Pantalla 2 Pantalla 3
Modo Muro
de video
1x3 3840 x 6480 a 60 Hz
3x1 11520 x 2160 a 60 Hz
Modo Escritorio
extendido
3840 x 2160
a 60 Hz
3840 x 2160
a 60 Hz
3840 x 2160
a 60 Hz
Modo Espejo 3840 x 2160
a 60 Hz
3840 x 2160
a 60 Hz
3840 x 2160
a 60 Hz
Notas:
• Cuando esté en modo espejo, es posible que el mismo
contenido solo se muestre en 2 pantallas.
• En caso de eliminar el software del controlador de la
tarjeta gráca, es posible conseguir el requisito de reejar
en 3 pantallas.
• Cuando utilice una fuente 8K con pantalla(s) 8 K
conectada(s) a los puertos de salida, puede haber
problemas de ancho de banda que limiten la capacidad
de los puertos de salida individuales.

22
Contenido del Empaque
• Hub transmisor DisplayPort MST
• Receptor Pigtail DisplayPort o HDMI
• Fuente de alimentación externa (Entrada: 100-240 V,
50/60 Hz, 0,6 A; Salida: 24 V 1 A)
• Guía de Inicio Rápido
Accesorios Opcionales
• Cables HDMI P568-0XX-8K6 8K a 60 Hz
• Cables HDMI 2.0 serie P569-XXX-CERT o P568-XXX-2A
• Cables DisplayPort 1.4 serie P580
• Cables de alambre sólido Cat6 de AWG 24 serie N202

23
Instrucciones de Instalación
Las siguientes imágenes ilustran cómo pueden fijarse los
soportes de instalación incluidos para las diferentes
instalaciones.
Notas:
• Los modelos que se muestran a continuación son
meramente ilustrativos. El producto puede variar según
el número de modelo, tamaño u orientación del puerto.
• Solo se puede montar el hub DisplayPort MST. El
receptor es una unidad tipo pigtail que se conecta
directamente a la pantalla.
Instalación en Pared
Instalación en Rack de 19”

24
Antes de la instalación
Antes de la instalación, compruebe los siguientes ajustes
de su(s) fuente(s) y pantalla(s):
• Configure la pantalla a 60 Hz. Verifique dos veces la
configuración de fábrica, ya que el valor
predeterminado puede estar configurado a una
frecuencia (Hz) menor que la anunciada.
• Asegúrese de que la configuración de entrada de su
monitor esté ajustada en HDMI 2.0. Algunas pantallas
pueden tener la configuración predeterminada en
HDMI 1.4.
• Verifique que su monitor tenga habilitada la función
HDR. Algunas pantallas pueden tener esta función
desactivada como configuración de fábrica.
• Compruebe si el parámetro Color verdadero Ultra HD
(UHD) está activado en su pantalla. Confirme con el
fabricante de su pantalla qué puertos HDMI admiten
Color verdadero UHD. Nota: Para conectar un monitor
local a su instalación, puede que sea necesario
desactivar el parámetro Color verdadero UHD en su
pantalla local para conseguir la resolución 4K a 60 Hz.

25
Instalación
Notas:
• Pruebe para asegurarse de que toda la instalación
funcione correctamente antes de hacer pasar los cables
a través de techos y paredes.
• Para conseguir la distancia y rendimiento máximos, use
un cable Cat6 con conductores de alambre sólido AWG
24. El uso de cable Cat6 de alambre trenzado o cable
con un número de calibre [AWG] mayor a 24 AWG,
resultará en una distancia de extensión más corta. Un
cableado de número mayor de calibre, como AWG 26,
tiene capacidad de transmisión más limitada que el
cableado de menor calibre. Los cables Cat6 serie N202
están fabricados con cableado de alambre sólido
AWG 24.
• Los receptores pigtail no necesitan alimentación externa
gracias a la tecnología de alimentación por cable (PoC)
incorporada en los transmisores.
• Antes de la instalación, asegúrese de que su controlador
gráfico esté actualizado instalando el último controlador
disponible. El hub MST es compatible con versiones
anteriores de equipos DisplayPort 1.1a funcionando con
controladores gráficos actuales. El conjunto de funciones
está limitado a las capacidades del equipo conectado
(por ejemplo, puede estar limitado a mostrarse
únicamente en modo Clon o Espejo). No está
garantizada la compatibilidad con tarjetas gráficas
anteriores.

26
Instalación
1. Asegúrese de que todos los equipos en la instalación
estén apagados.
2. Utilizando un cable DisplayPort 1.4, conecte la fuente
DisplayPort con la entrada DisplayPort del transmisor
MST O utilizando un cable HDMI, conecte la fuente
HDMI con la entrada HDMI del transmisor MST.
3. Con un cable Cat6, conecte el puerto RJ45 del
transmisor MST al puerto RJ45 del receptor pigtail.
4. Repita el paso 3 para cada pantalla adicional que vaya
a conectar.
5. Conecte el receptor pigtail a la pantalla.
6. Encienda sus pantallas conectadas.
7. Conezcte la fuente de alimentación externa al
transmisor MST. Conéctela en una toma en la pared
disponible o en un protector contra sobretensiones,
unidad de distribución de energía (PDU) o fuente de
alimentación ininterrumpida (UPS). La LED POWER
(verde) del transmisor MST se iluminará para indicar
que la unidad está recibiendo alimentación de la
fuente de alimentación externa. La LED POWER (verde)
del receptor pigtail se iluminará para indicar que la
unidad está recibiendo alimentación de la unidad
transmisora local a través de la tecnología PoC.
8. Encienda la fuente de DisplayPort.
9. La LED naranja RJ45 se iluminará tanto en el
transmisor MST como en el receptor pigtail para
indicar que se está recibiendo una señal de la fuente a
la pantalla. La pantalla debería aparecer ahora en la(s)
pantalla(s) conectada(s).
10. Utilice la pantalla de configuración de pantalla de su
tarjeta de video para ajustar cómo se muestra el video
en las pantallas conectadas.

27
Diagramas de Instalación
INPUT
RESETIN
POWER
DC 24V,1A
OUTPUT 2 OUTPUT 3OUTPUT 1
INPUT
RESETIN
POWER
DC 24V,1A
OUTPUT 2 OUTPUT 3OUTPUT 1
Nota: B156E-002-8K-K es igual que B156E-003-8K-K excepto
que solo tiene dos salidas.
11 1111
33
A
B
B
B
B156E-003-8K-K
ALIMENTACIÓN CC de 24 V, 1A IN ENTRADA RESTAURAR
Salida 1 Salida 2 Salida 3
28
Diagramas de Instalación
Nota: B156E-002-H8K-K es igual que B156E-003-H8K-K
excepto que solo tiene dos salidas.
INPUT
RESETIN
POWER
DC 24V,1A
OUTPUT 2 OUTPUT 3OUTPUT 1
INPUT
RESETIN
POWER
DC 24V,1A
OUTPUT 2 OUTPUT 3OUTPUT 1
22
11 1111
B
B
B
A
B156E-003-H8K-K
ALIMENTACIÓN CD de 24 V, 1A IN ENTRADA RESTAURAR
Salida 1 Salida 2 Salida 3

29
Resolución de Problemas
Si no consigue una imagen aceptable después de seguir las
instrucciones de instalación, pruebe los consejos de
Resolución de problemas que aparecen a continuación.
1. ¿Su equipo está ejecutando el controlador gráfico
más reciente? Si no es así, descargue los
controladores gráficos más recientes para su equipo.
El hub MST es compatible con versiones anteriores de
equipos DisplayPort 1.1a funcionando con
controladores gráficos actuales. El conjunto de
funciones está limitado a las capacidades del equipo
conectado (por ejemplo, puede estar limitado a
mostrarse únicamente en modo Clon o Espejo). No
está garantizada la compatibilidad con tarjetas gráficas
anteriores.
2. Pulse el botón Restaurar de hub para restaurar la
señal que se envía a las pantallas conectadas.
Diagramas de Instalación
Conexiones de cables
1 Cable sólido Cat5 de hasta 70 m [230 pies] a 4K / 60 Hz
2 Cable HDMI 2.0 de hasta 4.5 m [15 pies] a 4 K / 60 Hz
3 Cable DisplayPort de hasta 4.5 m [15 pies] a 4K / 60 Hz
Componentes conectados
A
Fuente DisplayPort o HDMI
B
Pantalla 4K

30
Resolución de problemas
3. ¿La fuente de alimentación externa incluida está
conectada y enchufada a una fuente de
alimentación que funciona? Para que el producto
funcione correctamente, debe estar conectado y
recibir alimentación de la fuente de alimentación
externa incluida.
4. ¿Se apagó la alimentación a la fuente DisplayPort
y los monitores conectados antes de la
instalación? Si no, reinicie la computadora.
5. ¿Qué resolución está tratando de obtener en
cada monitor? El DisplayPort 1.4 tiene un ancho de
banda de 32.4 Gbps, los monitores de mayor
resolución ocupan más ancho de banda. Aunque los
monitores DisplayPort y HDMI admiten resoluciones de
video de hasta 3840 x 2160 en monitores individuales,
el número de monitores 4K conectados al mismo
tiempo es limitado. Por ejemplo, cuando conecte 4
monitores simultáneamente, estará limitado a conectar
monitores 1080p. Son posibles resoluciones más altas
cuando se visualiza en modo Muro de video (por
ejemplo, 3840 x 6480 en un muro de video 1x3, 11520
x 2160 en un muro de video 3x1, etc.)
6. ¿Qué longitudes de cables está usando? La
longitud máxima del cable entre el hub y los monitores
conectados no debe exceder de 4.57 m [15 pies].
7. ¿Qué tipo de cableado está usando? Un cableado
inferior puede resultar en un rendimiento deficiente.
Es importante utilizar cables que admitan la resolución
de video que está intentando obtener. Se recomienda
utilizar los cables que figuran en la sección Accesorios
opcionales, ya que se ha comprobado que funcionan
con estos hubs MST.
8. Pruebe sus cables para confirmar que funcionan
correctamente. Por ejemplo, conecte sus cables de
DisplayPort o HDMI entre una configuración de fuente
y pantalla que sepa que funciona para determinar si el
cable funciona correctamente.

31
Especificaciones
Distancia máxima
a la pantalla
70 m [230 pies]
Profundidad de
color máxima admitida
Color Verdadero de 12 bits
Compatibilidad con HDR Sí
Especicación HDMI 2.0
Especicación DisplayPort 1.4
Submuestreo cromático RGB, YCC444, YCC422,
YCC420
HDCP [High Denition
Copy Protocol]
1.4 y 2.3
Compatibilidad con videos
en 3D
Sí
Audio LPCM de 2 canales, AC3,
DTS, Profundidad de bits de
hasta 24 bits, Frecuencia de
muestreo de hasta 192 KHz
Chipset Sí
Soporte de extensión IR
o RS-232
No
Compatibilidad con Control
de Productos Electrónicos
de Consumo (CEC)
No
Controladores requeridos Ninguno
Rango de Temperatura de
Operación
0 ° a 40 ° C / 32 ° a 104 °F
Rango de Temperatura de
Almacenamiento
-15 ° a 50 °C / 5 ° a 122 °F
Humedad Relativa
De 0 % a 85 %, Sin Condensación
Material de la estructura Plástico ABS
Recubrimiento de
conectores/contactos
Níquel/Oro

32
Garantía
GARANTÍA LIMITADA DE 1 AÑO
Garantizamos por un (1) año a partir de la fecha de compra
inicial que nuestros productos no presentan defectos de
materiales ni de mano de obra. Nuestra obligación bajo esta
garantía está limitada a la reparación o reemplazo (a nuestra
entera discreción) de cualquier producto defectuoso. Antes de
devolver cualquier equipo para reparación, visite Tripplite.
Eaton.com/support/product-returns. Esta garantía no se
aplica a equipos que hayan sido dañados por accidente,
negligencia o mal uso, o hayan sido alterados o modificados de
alguna manera.
SALVO POR LO QUE SE INDICÓ AQUÍ, NO OTORGAMOS
GARANTÍAS EXPRESAS O IMPLÍCITAS, INCLUIDAS GARANTÍAS DE
COMERCIABILIDAD Y ADECUACIÓN PARA UN PROPÓSITO
PARTICULAR. Algunos estados no permiten la limitación o
exclusión de garantías implícitas; por lo tanto, las limitaciones o
exclusiones antes mencionadas pueden no aplicarse al
comprador.
SALVO POR LO QUE SE INDICÓ ANTERIORMENTE, EN NINGÚN
CASO SEREMOS RESPONSABLES POR DAÑOS DIRECTOS,
INDIRECTOS, ESPECIALES, INCIDENTALES O CONSECUENTES
QUE SURJAN DEL USO DE ESTE PRODUCTO, INCLUSO SI SE
ADVIERTE SOBRE LA POSIBILIDAD DE TAL DAÑO.
Específicamente, no somos responsables por ningún costo,
como pérdidas de ganancias o ingresos, pérdidas de equipos,
pérdidas en el uso de equipos, pérdidas de software, pérdidas
de datos, costos de sustituciones, reclamos de terceros o
cualquier otro.
Eaton tiene una política de mejora continua. Las especificaciones
están sujetas a cambio sin previo aviso.


34
Manuel de l'utilisateur
English 1
Español 18
Deutsch 50
Italiano 67
Modèles: (sortie
DisplayPort)
B156E-002-8K-K,
B156E-003-8K-K
(sortie HDMI)
B156E-002-H8K-K,
B156E-003-H8K-K
Hubs de transport multiflux
DisplayPort v1.4 sur kits
d'extension Cat6

35
Caractéristiques du produit
• Connecte les moniteurs multiples via la sortie
DisplayPort de votre ordinateur pour afficher la même
image sur chaque moniteur, pour prolonger le bureau
sur plusieurs moniteurs ou combiner les moniteurs en
un seul écran agrandi en mode mur d'images.
• Prolonge jusqu'à 70m (230pi) la distance entre la
source et le récepteur distant via un câble UTP Cat6
sans latence.
• Compatible avec DisplayPort v1.4 et Multi-Stream
Transfer (MST).
• Les modèles de sortie DisplayPort et HDMI prennent
en charge les résolutions UHD 4K jusqu'à 3840 x 2160
(60Hz). Pour plus d'informations, reportez-vous à la
section Configuration système requise.
• Prend en charge HDMI 2.0, HDCP 1.4 et 2.3, HDR, EDID
et DDC.
• Prend en charge le son surround DTS-HD, Dolby True
HD et 7.1 canaux.
• Le récepteur Pigtail est doté d'un contrôle d'égalisation
intégré (EQ) et d'un réglage automatique de l'image
EDID.
• Alimentation électrique par câble (PoC), signifie
qu'aucune alimentation externe n'est nécessaire pour
le récepteur.
• L'adaptateur d'alimentation 5V avec connecteur à vis
permet un branchement au Hub MST.
• Le boîtier métallique robuste comprend des supports
de montage en surface amovibles brevetés.

36
Configuration système requise
• Un ordinateur équipé d'une carte graphique
compatible DisplayPort v1.4 (par exemple, AMD
Radeon avec la technologie AMD Eyefinity).
Rétrocompatible avec la plupart des équipements
DisplayPort 1.1a utilisant les pilotes graphiques actuels.
Le jeu de caractéristiques est limité à celui de
l'équipement connecté (par exemple, vous pouvez être
limité à l'affichage en mode Clone/Miroir uniquement).
La compatibilité avec les cartes graphiques plus
anciennes n'est pas garantie.
• macOS X ne prend pas en charge MST pour les
processeurs graphiques NVIDIA et Intel, ce qui limite
l'affichage vidéo sur les moniteurs connectés en mode
Miroir.
• La bande passante de DisplayPort 1.4 est de
32,4Gbit/s. Les moniteurs à haute résolution
consomment plus de bande passante.
• Bien que les moniteurs DisplayPort et HDMI prennent
en charge des résolutions vidéo allant jusqu'à 3840 x
2160 sur des moniteurs individuels, le nombre de
moniteurs 4K connectés en même temps est limité.
Par exemple, lorsque vous connectez simultanément
des 4moniteurs, vous ne pouvez connecter que des
moniteurs 1080p. Des résolutions plus élevées sont
possibles en mode mur d'images (par exemple, 3840 x
6480 dans un mur d'images de 1x3, 11520 x 2160
dans un mur d'images de 3x1, etc.)
37
Configuration système requise
• Résolution maximale: le tableau suivant explique la
résolution maximale des deux modèles. L'équipement
source (PC) nécessite une carte vidéo compatible
DisplayPort 1.4.
Mode (sortie
pour Display-
Port ou HDMI) Écran1 Écran2
Mode Mur
d'images
1x2 3840 x 4320 @ 60Hz
2x1 7680 x 2160 @ 60Hz
Mode Prolongé
bureau
3840 x 2160
@ 60Hz
3840x2160 @ 60Hz
Mode Miroir 3840 x 2160
@ 60Hz
3840x2160 @ 60Hz
Mode (sortie
pour Dis-
playPort ou
HDMI) Écran1 Écran2 Écran3
Mode Mur
d'images
1x3 3840 x 6480 @ 60Hz
3x1 11520 x 2160@ 60Hz
Mode Prolongé
bureau
3840 x 2160
@ 60Hz
3840x2160
@ 60Hz
3840x2160
@ 60Hz
Mode Miroir 3840x2160
@ 60Hz
3840x2160
@ 60Hz
3840x2160
@ 60Hz
Remarques:
•EnmodeMiroir,lemêmecontenupeuts'acher
uniquementsur2écrans.
•
Ensupprimantlepilotedeslogicielsdelacartegraphique,
ilestpossibledesatisfaireàl'exigencede3écransmiroirs.
• Lorsque vous utilisez une source 8K avec un ou des
écrans 8K connectés aux ports de sortie, il peut y avoir
des problèmes de bande passante qui limitent la
capacité des ports de sortie individuels.

38
Contenu de l'emballage
• Hub émetteur DisplayPort MST
• Récepteur DisplayPort ou HDMI Pigtail
• Alimentation électrique externe (entrée: 100-240V,
50/60Hz, 0,6 A; sortie: 24V 1 A)
• Guide de démarrage rapide
Accessoires disponibles en option
• Câbles HDMI P568-0XX-8K6 8K @ 60Hz
• Câbles HDMI 2.0 de la série P569-XXX-CERT ou P568-
XXX-2A
• Câbles DisplayPort de la série P580 1.4
• Câbles à âme pleine de la série N202 Cat6 24AWG
39
Instructions de montage
Les images suivantes illustrent la manière dont les supports
de montage inclus peuvent être fixés pour différentes
installations.
Remarques:
• Lesmodèlesprésentésci-dessousnesontdonnésqu'à
titred'exemple.Votreproduitpeutvarierenfonctiondu
numérodumodèle,desatailleoudel'orientationdu
port.
• SeulleHubDisplayPortMSTpeutêtremonté.Le
récepteurestuneunitédetypePigtailquiseconnecte
directementàl'écran.
Montage mural
Montage en rack 19pouces

40
Avant l'installation
Avant l'installation, veuillez vérifier les paramètres suivants
de votre (vos) source(s) et de votre (vos) écran(s):
• Réglez l'affichage sur 60Hz. Vérifiez les réglages
d'usine, car la fréquence (Hz) par défaut peut être
inférieure à celle annoncée.
• Assurez-vous que le réglage d'entrée de votre
moniteur est défini sur HDMI 2.0. Certains écrans
peuvent avoir un réglage par défaut sur HDMI 1.4.
• Vérifiez que votre moniteur a la fonction HDR activée.
Sur certains écrans, cette fonction est désactivée en
réglage usine.
• Vérifiez si le réglage Ultra HD (UHD) couleur profonde
est activée sur votre écran. Demandez au fabricant de
votre écran quels sont les ports HDMI qui prennent en
charge l'UHD de couleur profonde. Remarque: pour
connecterunmoniteurlocalàvotreinstallation,ilpeut
êtrenécessairededésactiverlafonctionUHDdecouleur
profondesurvotreécranlocalafind'obtenirlarésolution
4K@60Hz.

41
Installation
Remarques:
• Avantdetirerlescâblesautraversdesplafonds/murs,
testezd'abordl'ensembledel'installationpourvous
assurerqu'ellefonctionnecorrectement.
• Pouravoirunedistanceetdesperformancesmaximales,
utilisezlecâbleàâmepleineCat624AWG.L'utilisation
d'uncâbleCat6àfilstorsadésoud'uncâbledontle
calibre(AWG)estsupérieurà24AWGentraîneraune
réductiondeladistanced'extension.Lescâblesdehaut
calibre,telsque26AWG,ontunecapacitéde
transmissionpluslimitéequelescâblesdebascalibre.
LescâblesCat6delasérieN202sontfabriquésàpartir
de24AWG.
• L'alimentationexternen'estpasnécessairepourles
récepteursPigtailenraisondelatechnologiede
l'alimentationélectriqueparcâble(PoC)incorporéedans
lesémetteurs.
• Avantl'installation,assurez-vousquevotrepilote
graphiqueestàjoureninstallantledernierpilote
disponible.LeHubMSTestrétrocompatibleavecla
plupartdeséquipementsDisplayPort1.1autilisantles
pilotesgraphiquesactuels.L'ensembleestlimitéaux
capacitésdel'équipementconnecté(parexemple,vous
pouvezêtrelimitéàl'affichageenmodeClone/Miroir
uniquement).Lacompatibilitéaveclescartesgraphiques
plusanciennesn'estpasgarantie.

42
Installation
1. Assurez-vous que tous les équipements de l'installation
sont hors tension.
2. À l'aide d'un câble DisplayPort 1.4, connectez la source
DisplayPort à l'entrée DisplayPort de l'émetteur MST
OU à l'aide d'un câble HDMI, connectez la source HDMI
à l'entrée HDMI de l'émetteur MST.
3. À l'aide d'un câble Cat6, connectez le port RJ45 de
l'émetteur MST au port RJ45 du récepteur Pigtail.
4. Répétez l'étape3 pour chaque écran supplémentaire
que vous connectez.
5. Branchez le récepteur Pigtail sur l'écran.
6. Mettez sous tension les écrans connectés.
7. Connectez l'alimentation externe au transmetteur MST.
Branchez-le à une prise murale disponible ou un
parasurtenseur, une unité de distribution d'énergie
(PDU) ou une alimentation électrique sans interruption
(UPS). Le voyant POWER (vert) de l'émetteur MST
s'allume pour indiquer que l'appareil est alimenté par
la source d'alimentation externe. Le voyant POWER
(vert) du récepteur Pigtail s'allume pour indiquer que
l'unité reçoit de l'énergie de l'unité émettrice locale par
le biais de la technologie PoC.
8. Mettez la source DisplayPort sous tension.
9. Le voyant orange RJ45 s'allume à la fois sur l'émetteur
MST et sur le récepteur pigtail pour indiquer qu'un
signal est reçu de la source à l'écran. L'écran doit
maintenant apparaître sur le(s) écran(s) connecté(s).
10. Utilisez l'écran des paramètres d'affichage de votre
carte vidéo pour régler l'affichage de la vidéo sur les
écrans connectés.

43
Diagrammes d'installation
INPUT
RESETIN
POWER
DC 24V,1A
OUTPUT 2 OUTPUT 3OUTPUT 1
INPUT
RESETIN
POWER
DC 24V,1A
OUTPUT 2 OUTPUT 3OUTPUT 1
Note:B156E-002-8K-KestidentiqueàB156E-003-8K-Ksauf
qu'iln'aquedeuxsorties.
11 1111
33
A
B
B
B
B156E-003-8K-K
ALIMENTATION CC 24V,1A IN ENTRÉE RÉINITIALISATION
SORTIE1 SORTIE2 SORTIE3

44
Diagrammes d'installation
Note:B156E-002-H8K-KestidentiqueàB156E-003-H8K-K
saufqu'iln'aquedeuxsorties.
INPUT
RESETIN
POWER
DC 24V,1A
OUTPUT 2 OUTPUT 3OUTPUT 1
INPUT
RESETIN
POWER
DC 24V,1A
OUTPUT 2 OUTPUT 3OUTPUT 1
22
11 1111
B
B
B
A
B156E-003-H8K-K
ALIMENTATION CC 24V,1A IN ENTRÉE RÉINITIALISATION
SORTIE1 SORTIE2 SORTIE3

45
Dépannage
Si vous ne parvenez pas à obtenir une image acceptable
après avoir suivi les instructions d'installation, essayez les
conseils de dépannage ci-dessous.
1. Votre équipement utilise-t-il le dernier pilote
graphique? Si ce n'est pas le cas, téléchargez les
derniers pilotes graphiques pour votre équipement. Le
Hub MST est rétrocompatible avec la plupart des
équipements DisplayPort 1.1a utilisant les pilotes
graphiques actuels. L'ensemble des caractéristiques
est limité aux capacités de l'équipement connecté (par
exemple, vous pouvez être limité à l'affichage en mode
Clone/Miroir). La compatibilité avec les cartes
graphiques plus anciennes n'est pas garantie.
2. Appuyez sur le bouton Réinitialiser du hub pour
réinitialiser le signal envoyé aux écrans connectés.
3. Le bloc d'alimentation externe fourni est-il
connecté et branché sur une source d'alimentation
en état de marche? Pour que le produit fonctionne
correctement, il doit être connecté à l'alimentation
externe fournie et recevoir du courant de celle-ci.
Diagrammes d'installation
Connexions des câbles
1Jusqu'à 70m (230ft.), câble solide Cat6 à 4K / 60Hz
2 Jusqu'à 4,5m (15ft.), câble HDMI 2.0 à 4K / 60Hz
3 Jusqu'à 4,5m (15ft.), câble DisplayPort à 4K / 60Hz
Composants connectés
A
Source DisplayPort ou HDMI
B
Affichage 4K

46
Dépannage
4. La source DisplayPort et les moniteurs connectés
ont-ils été mis hors tension avant l'installation?
Si ce n'est pas le cas, redémarrez votre ordinateur.
5. Quelle résolution essayez-vous d'atteindre sur
chaque moniteur? DisplayPort 1.4 dispose d'une
bande passante de 32,4Gbit/s, les moniteurs à haute
résolution consommant davantage de bande passante.
Bien que les moniteurs DisplayPort et HDMI prennent
en charge des résolutions vidéo allant jusqu'à 3840 x
2160 sur des moniteurs individuels, le nombre de
moniteurs 4K connectés en même temps est limité.
Par exemple, lorsque vous connectez simultanément
des 4moniteurs, vous ne pouvez connecter que des
moniteurs 1080p. Des résolutions plus élevées sont
possibles en mode mur d'images (par exemple, 3840 x
6480 dans un mur d'images de 1x3, 11520 x 2160
dans un mur d'images de 3x1, etc.)
6. Quelles sont les longueurs de câble utilisées? La
longueur maximale du câble entre le Hub et les
moniteurs connectés ne doit pas dépasser 4,6m.
7. Quel type de câblage utilisez-vous? Un câblage de
qualité inférieure peut entraîner des performances
médiocres. Il est important d'utiliser des câbles qui
prennent en charge la résolution vidéo que vous
essayez d'atteindre. Il est recommandé d'utiliser les
câbles énumérés dans la section Accessoires
disponibles en option, car ils ont été testés pour
fonctionner avec ces concentrateurs MST.
8. Testez vos câbles pour vous assurer qu'ils
fonctionnent correctement. Par exemple, connectez
vos câbles DisplayPort ou HDMI entre une source et
une configuration d'affichage dont vous savez qu'elle
fonctionne, afin de déterminer si le câble fonctionne
correctement.

47
Caractéristiques
Distance maximale
de l'écran
70 m (230 pi)
Profondeur de couleur
maximale prise en charge
12bits de couleur profonde
Prise en charge HDR Oui
Caractéristiques HDMI 2.0
Caractéristiques Displayport 1.4
Sous-échantillonnage
chromatique
RGB, YCC444, YCC422,
YCC420
HDCP 1.4 et 2.3
Prise en charge de la vidéo 3D Oui
Audio LPCM à 2canaux, AC3,
DTS, profondeur de bits
jusqu'à 24bits, fréquence
d'échantillonnage jusqu'à
192KHz
Jeu de puces Oui
Prise en charge extension
IR ou RS-232
Non
Compatible CEC (Consumer
Electronics Control)
Non
Pilotes requis Aucun
Plage de température de
fonctionnement
0 à 40 °C (32 à 104 °F)
Plage de température de
stockage
-15 à 50 °C (5 à 122 °F)
Humidité relative 0% à 85% sans condensation
Matériaux de construction Plastique ABS
Placage des connecteurs/
contacts
Nickel/or

48
Garantie
GARANTIE LIMITÉE D'UN AN
Nous garantissons que nos produits sont exempts de défauts de
matériaux et de fabrication pendant une période d'un (1) an à
compter de la date d'achat initial. Notre obligation au titre de
cette garantie est limitée à la réparation ou au remplacement (à
notre seule discrétion) de tout produit défectueux. Veuillez
consulter le site Tripplite.Eaton.com/support/product-
returns avant d'envoyer un produit pour le faire réparer. Cette
garantie ne s'applique pas aux équipements qui ont été
endommagés par accident, négligence ou par une mauvaise
utilisation, ni à ceux qui ont été altérés ou modifiés d'une façon
quelconque.
SAUF MENTION CONTRAIRE DANS LE PRÉSENT DOCUMENT,
NOUS NE FOURNISSONS AUCUNE GARANTIE, EXPLICITE OU
IMPLICITE, Y COMPRIS LES GARANTIES DE QUALITÉ MARCHANDE
ET DE VOCATION À UN BUT PARTICULIER. Certains États ne
permettent ni la limitation ni l'exclusion de garanties implicites;
ainsi, la/les limitation(s) ou exclusion(s) mentionnée(s) ci-dessus
peut/peuvent ne pas s'appliquer à l'acquéreur.
SAUF DANS LES CAS PRÉVUS CI-DESSUS, NOUS NE SERONS EN
AUCUN CAS RESPONSABLES DES DOMMAGES DIRECTS,
INDIRECTS, SPÉCIAUX, ACCESSOIRES OU CONSÉCUTIFS
RÉSULTANT DE L'UTILISATION DE CE PRODUIT, MÊME SI NOUS
AVONS ÉTÉ INFORMÉS DE LA POSSIBILITÉ DE TELS DOMMAGES.
En particulier, nous ne sommes pas responsables des coûts tels
que les pertes de profits ou de revenus, les pertes d'équipement,
les pertes d'utilisation de l'équipement, les pertes de logiciels, les
pertes de données, les coûts des produits de remplacement, les
réclamations de tiers ou autres.
Eaton mène une politique d'amélioration continue. Les
caractéristiques peuvent être modifiées sans préavis.


50
Betriebsanleitung
English 1
Español 18
Français 34
Italiano 67
Modelle:
(DisplayPort-
Ausgang)
B156E-002-8K-K,
B156E-003-8K-K
(HDMI-Ausgang)
B156E-002-H8K-K,
B156E-003-H8K-K
DisplayPort v1.4 Multi-Stream
Transport Hubs über Cat6-
Extender-Kits

51
Produktmerkmale
• Schließen Sie mehrere Monitore über den DisplayPort-
Ausgang Ihres Computers an, um das gleiche Bild auf
jedem Monitor anzuzeigen, den Desktop über mehrere
Monitore zu erweitern oder im Videowandmodus
mehrere Bildschirme zu einem einzigen großen
Monitor zu kombinieren.
• Entfernung von bis zu 70 m (230 ft.) von der Quelle
zum externen Empfänger über Cat6-UTP-Kabel bei null
Latenz.
• Entspricht den Anforderungen von DisplayPort v1.4
und Multi-Stream Transfer (MST).
• DisplayPort- und HDMI-Ausgangsmodelle unterstützen
UHD-4K-Auflösungen von bis zu 3840 x 2160 (60 Hz).
Weitere Informationen finden Sie unter
„Systemanforderungen“.
• Unterstützt HDMI 2.0, HDCP 1.4 & 2.3, HDR, EDID und
DDC.
• Unterstützt DTS-HD, Dolby True HD und 7.1-Kanal-
Surround-Sound
• Der Pigtail-Empfänger verfügt über eine integrierte
Equalizer-Steuerung (EQ) und eine automatische EDID-
Bildanpassung.
• Dank der Power over Cable (PoC)-Technologie ist keine
externe Stromversorgung für den Empfänger
erforderlich.
• 5V-Netzadapter mit Schraubverbinder zum Anschluss
an den MST-Hub.
• Robustes Metallgehäuse mit patentierten
abnehmbaren Halterungen für die
Oberflächenmontage.

52
Systemanforderungen
• Ein Computer mit einer DisplayPort v1.4-kompatiblen
Grafikkarte (z.B. AMD Radeon mit AMD-Eyefinity-
Technologie). Abwärtskompatibel mit den meisten
DisplayPort 1.1a-Geräten mit aktuellen Grafiktreibern.
Der Funktionsumfang ist auf den des angeschlossenen
Geräts beschränkt (z. B. ist möglicherweise nur eine
Anzeige im Klon-/Spiegelmodus möglich). Die
Kompatibilität mit älteren Grafikkarten ist nicht
gewährleistet.
• macOS X unterstützt MST für NVIDIA- und Intel-
Grafikprozessoreinheiten nicht und beschränkt die
Videoanzeige auf den angeschlossenen Monitoren auf
den Spiegelmodus.
• Die DisplayPort 1.4-Bandbreite beträgt 32,4 Gbit/s.
Monitore mit höherer Auflösung beanspruchen mehr
Bandbreite.
• DisplayPort- und HDMI-Monitore unterstützen zwar
Videoauflösungen von bis zu 3840 x 2160 auf
einzelnen Monitoren, doch die Anzahl der gleichzeitig
angeschlossenen 4K-Monitore ist begrenzt. Wenn Sie
zum Beispiel 4 Monitore gleichzeitig anschließen,
können Sie nur 1080p-Monitore anschließen. Bei der
Anzeige im Videowandmodus sind höhere Auflösungen
möglich (z. B. 3840 x 6480 bei einer 1x3-Videowand,
11520 x 2160 bei einer 3x1-Videowand usw.)
53
Systemanforderungen
• Maximale Auflösung: Die folgende Tabelle erläutert die
maximale Auflösung beider Modelle. Das Quellgerät (PC)
benötigt eine mit DisplayPort 1.4 kompatible Grafikkarte.
Modus
(Ausgang für
DisplayPort
oder HDMI) Display 1 Display 2
Videowand-
modus
1x2 3840 x 4320 bei 60 Hz
2x1 7680 x 2160 bei 60 Hz
Erweiterter
Desktop-Modus
3840x2160
bei 60 Hz
3840 x 2160 bei 60 Hz
Spiegelmodus 3840x2160
bei 60 Hz
3840 x 2160 bei 60 Hz
Modus
(Ausgang für
DisplayPort
oder HDMI) Display 1 Display 2 Display 3
Videowand-
modus
1x3 3840 x 6480 bei 60 Hz
3x1 11520 x 2160 bei 60 Hz
Erweiterter
Desktop-Modus
3840x2160
bei 60 Hz
3840 x 2160
bei 60 Hz
3840 x 2160
bei 60 Hz
Spiegelmodus 3840 x 2160
bei 60 Hz
3840 x 2160
bei 60 Hz
3840 x 2160
bei 60 Hz
Hinweise:
• Im Spiegelmodus kann der gleiche Inhalt nur auf 2
Bildschirmen angezeigt werden.
• Durch das Entfernen der Treibersoftware für die
Grakkarte können Sie die Anforderung der Spiegelung
von 3 Bildschirmen erfüllen.
• Bei Verwendung einer 8K-Quelle mit 8K-Display(s), die
an die Ausgangsports angeschlossen sind, kann es zu
Bandbreitenproblemen kommen, die die Leistungsfähigkeit
einzelner Ausgangsports einschränken.

54
Lieferumfang
• DisplayPort MST-Sender-Hub
• DisplayPort- oder HDMI-Pigtail-Empfänger
• Externes Netzteil (Eingang: 100-240V, 50/60 Hz, 0,6A;
Ausgang: 24V 1A)
• Quick Start Guide
Optionales Zubehör
• P568-0XX-8K6 8K bei 60 Hz HDMI-Kabel
• HDMI 2.0-Kabel der P569-XXX-CERT- oder P568-XXX-
2A-Serie
• DisplayPort 1.4-Kabel der P580-Serie
• Cat6-24 AWG-Volldrahtkabel der N202-Serie

55
Montageanleitung
Die folgenden Abbildungen zeigen, wie die mitgelieferten
Montagehalterungen für unterschiedliche Installationen
angebracht werden können.
Hinweise:
• Die unten abgebildeten Modelle dienen nur zur
Veranschaulichung. Ihr Produkt kann je nach
Modellnummer, Größe oder Ausrichtung des Anschlusses
variieren.
• Es kann nur der DisplayPort-MST-Hub montiert werden.
Der Empfänger ist ein Pigtail-Gerät, das direkt an das
Display angeschlossen wird.
Wandmontage
19"-Rack-Montage

56
Vor der Installation
Bitte überprüfen Sie vor der Installation die folgenden
Einstellungen Ihrer Quelle(n) und Ihres Bildschirms bzw.
Ihrer Bildschirme:
• Stellen Sie die Anzeige auf 60 Hz ein. Überprüfen Sie
die Werkeinstellungen, da die Standardeinstellungen
auf eine niedrigere Frequenz (Hz) als angegeben
eingestellt sein können.
• Stellen Sie sicher, dass die Eingangseinstellung Ihres
Monitors auf HDMI 2.0 eingestellt ist. Bei einigen
Bildschirmen kann die Standardeinstellung HDMI 1.4
lauten.
• Vergewissern Sie sich, dass auf Ihrem Monitor die HDR-
Funktion aktiviert ist. Bei einigen Bildschirmen ist diese
Funktion möglicherweise werkseitig deaktiviert.
• Prüfen Sie, ob die Einstellung Ultra HD (UHD) Deep
Color auf Ihrem Bildschirm aktiviert ist. Erkundigen Sie
sich beim Hersteller Ihres Displays, welche HDMI-
Anschlüsse UHD Deep Color unterstützen. Hinweis:
Wenn Sie einen lokalen Monitor an Ihre Installation
anschließen möchten, muss die UHD Deep Color-
Einstellung auf Ihrem lokalen Display möglicherweise
deaktiviert werden, um eine 4K bei 60 Hz-Auflösung zu
erzielen.

57
Installation
Hinweise:
• Prüfen Sie, dass die gesamte Installation ordnungsgemäß
funktioniert, bevor Sie Kabel durch Decken/Wände ziehen.
• Verwenden Sie ein 24 AWG Cat6-Volldrahtkabel, um die
maximale Entfernung und Leistung zu erreichen. Die
Verwendung von Cat6-Litzenkabeln oder Kabeln mit
einem höheren Querschnitt (AWG) als 24AWG führt zu
einer kürzeren Verlängerungsstrecke. Kabel mit höherem
Querschnitt, z. B. 26 AWG, haben eine geringere
Übertragungsfähigkeit als Kabel mit niedrigerem
Querschnitt. Die Cat6-Kabel der N202-Serie bestehen aus
24 AWG-Volldrahtkabeln.
• Dank der in den Sendern integrierte Power over Cable
(PoC)-Technologie ist für Pigtail-Empfänger keine externe
Stromversorgung erforderlich.
• Stellen Sie vor der Installation sicher, dass Ihr
Grafiktreiber auf dem neuesten Stand ist, indem Sie den
neuesten verfügbaren Treiber installieren. Der MST-Hub
ist mit den meisten DisplayPort 1.1a-Geräten mit
aktuellen Grafiktreibern abwärtskompatibel. Der
Funktionsumfang ist auf die Fähigkeiten des
angeschlossenen Geräts beschränkt (z. B. ist vielleicht nur
eine Anzeige im Klon-/Spiegelmodus möglich). Die
Kompatibilität mit älteren Grafikkarten ist nicht
gewährleistet.

58
Installation
1. Stellen Sie sicher, dass alle Geräte in der Installation
ausgeschaltet sind.
2. Verbinden Sie die DisplayPort-Quelle über ein DisplayPort
1.4-Kabel mit dem DisplayPort-Eingang am MST-Sender
ODER verbinden Sie die HDMI-Quelle über ein HDMI-
Kabel mit dem HDMI-Eingang am MST-Sender.
3. Verbinden Sie mit einem Cat6-Kabel den RJ45-Anschluss
des MST-Senders mit dem RJ45-Anschluss des Pigtail-
Empfängers.
4. Wiederholen Sie Schritt 3 für jeden weiteren BIldschirm,
den Sie anschließen möchten.
5. Schließen Sie den Pigtail-Empfänger an den Bildschirm an.
6. Schalten Sie die angeschlossenen Bildschirme ein.
7. Schließen Sie die externe Stromversorgung an den MST-
Sender an. Schließen Sie sie an eine verfügbare
Steckdose oder einen Überspannungsschutz, eine
Stromverteilungseinheit (PDU) oder eine
unterbrechungsfreie Stromversorgung (USV) an. Die
(grüne) POWER-LED am MST-Sender leuchtet auf, um
anzuzeigen, dass das Gerät von der externen
Stromversorgung mit Strom versorgt wird. Die (grüne)
POWER-LED am Pigtail-Empfänger leuchtet auf, um
anzuzeigen, dass das Gerät über die PoC-Technologie
Strom von der lokalen Sendeeinheit erhält.
8. Schalten Sie die Stromzufuhr zur DisplayPort-Quelle ein.
9. Die orangefarbene RJ45-LED leuchtet sowohl am MST-
Sender als auch am Pigtail-Empfänger auf, um
anzuzeigen, dass ein Signal von der Quelle auf dem
Bildschirm empfangen wird. Die Bildschirmanzeige sollte
nun auf dem/den angeschlossenen Display/s erscheinen.
10. In den Anzeigeeinstellungen Ihrer Videokarte können Sie
steuern, wie das Video auf den angeschlossenen Displays
angezeigt wird.
59
Installationsdiagramme
INPUT
RESETIN
POWER
DC 24V,1A
OUTPUT 2 OUTPUT 3OUTPUT 1
INPUT
RESETIN
POWER
DC 24V,1A
OUTPUT 2 OUTPUT 3OUTPUT 1
Hinweis: B156E-002-8K-K gleicht dem B156E-003-8K-K, hat
aber nur zwei Ausgänge.
11 1111
33
A
B
B
B
B156E-003-8K-Kl
STROMVERSORGUNG DC 24 V, 1 A IN EINGANG Zurücksetzen
AUSGANG 1 AUSGANG 2 AUSGANG 3

60
Installationsdiagramme
Hinweis: B156E-002-H8K-K gleicht dem B156E-003-H8K-K,
hat aber nur zwei Ausgänge.
INPUT
RESETIN
POWER
DC 24V,1A
OUTPUT 2 OUTPUT 3OUTPUT 1
INPUT
RESETIN
POWER
DC 24V,1A
OUTPUT 2 OUTPUT 3OUTPUT 1
22
11 1111
B
B
B
A
B156E-003-H8K-Kl
STROMVERSORGUNG DC 24 V, 1 A IN EINGANG Zurücksetzen
AUSGANG 1 AUSGANG 2 AUSGANG 3

61
Fehlerbehebung
Wenn Sie nach Befolgung der Installationsanweisungen kein
akzeptables Bild erhalten, versuchen Sie es mit folgenden
Tipps zur Fehlerbehebung.
1. Ist Ihr Gerät mit dem neuesten Grafiktreiber
ausgestattet? Falls nein, laden Sie die neuesten
Grafiktreiber für Ihr Gerät herunter. Der MST-Hub ist
mit den meisten DisplayPort 1.1a-Geräten mit aktuellen
Grafiktreibern abwärtskompatibel. Der
Funktionsumfang ist auf die Fähigkeiten des
angeschlossenen Geräts beschränkt (z. B. ist vielleicht
nur eine Anzeige im Klon-/Spiegelmodus möglich). Die
Kompatibilität mit älteren Grafikkarten ist nicht
garantiert.
2. Drücken Sie die Reset-Taste des Hubs, um das an
die angeschlossenen Displays gesendete Signal
zurückzusetzen.
Installationsdiagramme
Kabelverbindungen
1Bis zu 70 m (230 ft.) Cat6-Volldrahtkabel bei 4K / 60 Hz
2 Bis zu 4,5 m (15 ft.) HDMI 2.0-Kabel bei 4K / 60 Hz
3 Bis zu 4,5 m (15 ft.) DisplayPort-Kabel bei 4K / 60 Hz
Verbundene Komponenten
A
DisplayPort- oder HDMI-Quelle
B
4 K -Display

62
Fehlerbehebung
3. Ist das mitgelieferte externe Netzteil
angeschlossen und mit einer funktionierenden
Stromquelle verbunden? Damit das Produkt
ordnungsgemäß funktioniert, muss es an das
mitgelieferte externe Netzteil angeschlossen sein und
von diesem mit Strom versorgt werden.
4. Wurden die DisplayPort-Quelle und die
angeschlossenen Monitore vor der Installation
ausgeschaltet? Falls nicht, starten Sie Ihren Computer
neu.
5. Welche Auflösung möchten Sie auf den einzelnen
Monitoren erzielen? DisplayPort 1.4 hat eine
Bandbreite von 32,4 Gbit/s; wobei Monitore mit
höherer Auflösung benötigen eine größere Bandbreite.
DisplayPort- und HDMI-Monitore unterstützen zwar
Videoauflösungen von bis zu 3840 x 2160 auf
einzelnen Monitoren, doch die Anzahl der gleichzeitig
angeschlossenen 4K-Monitore ist begrenzt. Wenn Sie
zum Beispiel 4 Monitore gleichzeitig anschließen,
können Sie nur 1080p-Monitore anschließen. Bei der
Anzeige im Videowandmodus sind höhere Auflösungen
möglich (z. B. 3840 x 6480 bei einer 1x3-Videowand,
11520 x 2160 bei einer 3x1-Videowand, usw.)
6. Welche Kabellängen verwenden Sie? Die maximale
Kabellänge zwischen dem Hub und den
angeschlossenen Monitoren sollte 4,6 m (15 ft.) nicht
überschreiten.

63
Fehlerbehebung
7. Welche Art von Verkabelung verwenden Sie? Eine
mangelhafte Verkabelung kann zu einer schlechten
Performance führen. Sie sollten stets Kabel, die die von
Ihnen angestrebte Videoauflösung unterstützen,
verwenden. Es wird empfohlen, die im Abschnitt
„Optionales Zubehör“ aufgeführten Kabel zu
verwenden, da diese für den Einsatz zusammen mit
diesen MST-Hubs getestet wurden.
8. Testen Sie Ihre Kabel, um sicherzustellen, dass sie
einwandfrei funktionieren. Schließen Sie zum
Beispiel Ihre DisplayPort- oder HDMI-Kabel an eine
Quelle und ein Display an, von denen Sie wissen, dass
sie funktionieren, um festzustellen, ob das Kabel
ordnungsgemäß funktioniert.

64
Technische Daten
Maximale Entfernung
zum Display
70 m (230 ft.)
Maximal unterstützte
Farbtiefe
12-Bit Deep Color
HDR-Unterstützung Ja
HDMI-Spezikation 2.0
DisplayPort-Spezikation 1.4
Farbunterabtastung RGB, YCC444, YCC422,
YCC420
HDCP 1.4 und 2.3
3D-Video-Unterstützung Ja
Audio 2-Kanal-LPCM, AC3, DTS,
Bittiefe bis zu 24 Bits,
Abtastrate bis zu 192 KHz
Chipsatz Ja
IR- oder RS-232-
Erweiterungsunterstützung
Nein
Unterstützung von
Consumer Electronic
Control (CEC)
Nein
Treiber erforderlich Keine
Betriebstemperaturbereich 32 ° bis 104 °F / 0 ° bis
40 ° C
Lagertemperaturbereich 5 ° bis 122 °F / -15 ° bis
50 °C
Relative Feuchtigkeit 0 % bis 85 % nicht-
kondensierend
Baumaterial ABS-Kunststo
Stecker/
Kontaktbeschichtung
Nickel/Gold

65
Garantie
1 JAHR EINGESCHRÄNKTE GARANTIE
Wir garantieren, dass unsere Produkte für einen Zeitraum von
einem (1)Jahr ab dem Datum des Erstkaufs frei von Material-
und Verarbeitungsfehlern sind. Unsere Verpflichtung im Rahmen
dieser Garantie beschränkt sich auf die Reparatur oder den
Ersatz (nach eigenem Ermessen) der fehlerhaften Produkte.
Gehen Sie auf Tripplite.Eaton.com/support/product-returns,
bevor Sie Geräte zur Reparatur zurücksenden. Diese Garantie gilt
nicht für Geräte, die durch Unfall, Fahrlässigkeit oder falsche
Anwendung beschädigt wurden oder in irgendeiner Weise
geändert oder modifiziert wurden.
MIT AUSNAHME DER HIERIN ENTHALTENEN BESTIMMUNGEN
GEBEN WIR KEINE GARANTIEN, WEDER AUSDRÜCKLICH NOCH
STILLSCHWEIGEND, EINSCHLIESSLICH GARANTIEN DER
MARKTGÄNGIGKEIT UND EIGNUNG FÜR EINEN BESTIMMTEN
ZWECK. Einige Staaten gestatten keine Beschränkung oder
keinen Ausschluss stillschweigender Gewährleistungen; daher
kann es sein, dass die oben genannten Beschränkungen oder
Ausschlüsse auf den Käufer nicht zutreffen.
MIT AUSNAHME DER OBIGEN BESTIMMUNGEN SIND WIRUNTER
KEINEN UMSTÄNDEN HAFTBAR FÜR DIREKTE, INDIREKTE,
SPEZIELLE, ZUFÄLLIGE ODER FOLGESCHÄDEN, DIE SICH AUS
DER VERWENDUNG DIESES PRODUKTES ERGEBEN, SELBST
WENN AUF DIE MÖGLICHKEIT SOLCHER SCHÄDEN
HINGEWIESEN WURDE. Insbesondere haften wir nicht für Kosten
wie entgangene Gewinne oder Einnahmen, Verlust von Geräten,
Nutzungsausfall von Geräten, Verlust von Software, Datenverlust,
Kosten für Ersatzprodukte, Ansprüche Dritter oder sonstige.
Eaton verfolgt eine Strategie der kontinuierlichen Verbesserung.
Spezifikationen können ohne Ankündigung geändert werden.


67
Manuale utente
English 1
Español 18
Français 34
Deutsch 50
Modelli: (Uscita
DisplayPort)
B156E-002-8K-K,
B156E-003-8K-K
(Uscita HDMI)
B156E-002-H8K-K,
B156E-003-H8K-K
Hub di trasporto multi-stream
DisplayPort v1.4 su kit di
estensione Cat6

68
Caratteristiche del prodotto
• Collega diversi monitor tramite l'uscita DisplayPort del
computer per visualizzare la stessa immagine su
ciascun monitor, estendere il desktop su tutti i monitor
o combinarli come un unico grande monitor in
modalità video wall.
• Estende il segnale fino a 230 piedi (70 m) dalla
sorgente al ricevitore remoto tramite cavo UTP Cat6
con latenza zero.
• Compatibile con DisplayPort v1.4 e Multi-Stream
Transfer (MST).
• I modelli con uscita DisplayPort e HDMI supportano
risoluzioni UHD 4K fino a 3840 x 2160 (60 Hz). Vedere
Requisiti di sistema per maggiori informazioni.
• Supporta HDMI 2.0, HDCP 1.4 e 2.3, HDR, EDID e DDC.
• Supporta DTS-HD, Dolby True HD e audio surround a
7.1 canali.
• Il ricevitore pigtail ha il controllo dell'equalizzazione
(EQ) e la regolazione automatica dell'immagine EDID
integrati.
• La tecnologia PoC (Power over Cable) significa che non
è necessaria alcuna alimentazione esterna per il
ricevitore.
• L'adattatore di alimentazione da 5V con connettore a
vite consente il collegamento all'hub MST.
• Il robusto involucro metallico include staffe per il
fissaggio rimovibili brevettate.

69
Requisiti di sistema
• Un computer con una scheda grafica compatibile con
DisplayPort v1.4 (ad es. AMD Radeon con Tecnologia
AMD Eyefinity). Retrocompatibile con la maggior parte
dei dispositivi DisplayPort 1.1a che funzionano con
driver grafici attuali. Il set di funzionalità è limitato a
quello dei dispositivi collegati (ad es. potrebbe essere
limitato alla sola visualizzazione in modalità Clone/
Mirror). La compatibilità con vecchie schede grafiche
non è garantita.
• macOS X non supporta MST per i processori grafici
NVIDIA e Intel, limitando la visualizzazione video alla
modalità mirror sui monitor collegati.
• La larghezza di banda del DisplayPort 1.4 è di 32,4
Gbps. I monitor ad alta risoluzione occupano una
larghezza di banda maggiore.
• Sebbene i monitor DisplayPort e HDMI supportino
risoluzioni video fino a 3840 x 2160 sui singoli monitor,
il numero di monitor 4K collegabili
contemporaneamente è limitato. Ad esempio, se si
collegano contemporaneamente 4 monitor, la
risoluzione sui monitor collegati verrà limitata a 1080p.
Sono possibili risoluzioni più elevate in modalità video
wall (ad es. 3840 x 6480 in un video wall 1x3, 11520 x
2160 in un video wall 3x1, ecc).
70
Requisiti di sistema
• Risoluzione massima: la seguente tabella spiega la
risoluzione massima di entrambi i modelli. Il dispositivo
sorgente (PC) richiede una scheda video compatibile
con DisplayPort 1.4.
Modalità
(uscita per
DisplayPort o
HDMI) Display 1 Display 2
Modalità
Video Wall
1x2 3840 x 4320 a 60 Hz
2x1 7680 x 2160 a 60 Hz
Modalità
Desktop Esteso
3840 x 2160
a 60 Hz
3840 x 2160 a 60 Hz
Modalità
Mirror
3840 x 2160
a 60 Hz
3840 x 2160 a 60 Hz
Modalità
(uscita per
DisplayPort o
HDMI) Display 1 Display 2 Display 3
Modalità
Video Wall
1x3 3840 x 6480 a 60 Hz
3x1 11520 x 2160 a 60 Hz
Modalità
Desktop Esteso
3840 x 2160
a 60 Hz
3840 x 2160
a 60 Hz
3840 x 2160
a 60 Hz
Modalità
Mirror
3840 x 2160
a 60 Hz
3840 x 2160
a 60 Hz
3840 x 2160
a 60 Hz
Note:
• In modalità Mirror, lo stesso contenuto può essere
visualizzato solo su 2 schermi.
•Rimuovendoilsoftwaredeldriverdellaschedagraca,
è possibile ottenere il mirroring su 3 schermi.
• Se si utilizza una sorgente 8K con display 8K
connessi alle porte di uscita, potrebbero insorgere
problemi di larghezza di banda che limitano la capacità
delle singole porte di uscita.

71
Contenuto della confezione
• Hub trasmettitore MST DisplayPort
• Ricevitore pigtail DisplayPort o HDMI
• Alimentazione esterna (Ingresso: 100-240V, 50/60 Hz,
0,6A; Uscita: 24V 1A)
• Guida rapida
Accessori opzionali
• Cavi HDMI 8K a 60 Hz P568-0XX-8K6
• Cavi HDMI 2.0 serie P568-XXX-2A o P569-XXX-CERT
• Cavi DisplayPort 1.4 serie P580
• Cavi Cat6 24 AWG a filo solido serie N202
72
Istruzioni di montaggio
Le immagini che seguono illustrano come fissare le staffe di
montaggio in dotazione per le diverse installazioni.
Note:
• I modelli mostrati di seguito sono solo a scopo
illustrativo. Il prodotto può variare a seconda del numero
di modello, delle dimensioni o dell'orientamento delle
porte.
• Solo l'Hub MST DisplayPort può essere montato. Il
ricevitore è un'unità di tipo pigtail che si collega
direttamente al display.
Montaggio a parete
Montaggio su rack da 19 pollici

73
Prima dell'installazione
Prima dell'installazione, si prega di verificare le seguenti
impostazioni delle sorgenti e dei display:
• Impostare il display a 60 Hz. Ricontrollare le
impostazioni di fabbrica, potrebbe essere impostata
una frequenza (Hz) predefinita inferiore rispetto a
quella pubblicizzata.
• Accertarsi che l'ingresso del monitor sia impostato su
HDMI 2.0. Alcuni display potrebbero essere impostati
di default su HDMI 1.4.
• Verificare che il monitor abbia la funzionalità HDR
attivata. Alcuni display possono avere questa
funzionalità disattivata come impostazione di fabbrica.
• Verificare se l'impostazione Ultra HD (UHD) Deep Color
è abilitata sul display. Confermare col produttore del
display quali porte HDMI supportano UHD Deep Color.
Nota: per collegare un monitor locale all' installazione,
potrebbe essere necessario disabilitare l'impostazione
UHD Deep Color sul display locale per poter raggiungere
la risoluzione 4K a 60 Hz.

74
Installazione
Note:
• Eseguire un test per assicurarsi che l'intera installazione
funzioni correttamente prima di tirare i cavi attraverso i
soffitti/le pareti.
• Per raggiungere la massima distanza e le massime
prestazioni, utilizzare un cavo Cat6 24 AWG a filo solido.
L'utilizzo di un cavo Cat6 a fili intrecciati o con un calibro
(AWG) superiore a 24 AWG avrà come risultato una
minore distanza di estensione. I cavi di calibro superiore,
ad esempio 26 AWG, hanno una capacità di trasmissione
più limitata rispetto ai cavi di calibro inferiore. I cavi Cat6
della serie N202 sono fabbricati con cavi 24 AWG a filo
solido.
• Grazie alla tecnologia PoC (Power over Cable) integrata
nei trasmettitori, non è necessaria l'alimentazione
esterna per i ricevitori pigtail.
• Prima dell'installazione, accertarsi che il driver grafico sia
aggiornato installando l'ultimo driver disponibile. L'Hub
MST è retrocompatibile con la maggior parte dei
dispositivi DisplayPort 1.1a che funzionano con driver
grafici attuali. Il set di funzionalità è limitato a quello dei
dispositivi collegati (ad es. potrebbe essere limitato alla
sola visualizzazione in modalità Clone/Mirror). La
compatibilità con vecchie schede grafiche non è
garantita.

75
Installazione
1. Assicurarsi che tutte le apparecchiature
dell'installazione siano spente.
2. Utilizzando un cavo DisplayPort 1.4, collegare la
sorgente DisplayPort all'ingresso DisplayPort del
trasmettitore MST, OPPURE, utilizzando un cavo HDMI,
collegare la sorgente HDMI all'ingresso HDMI del
trasmettitore MST.
3. Utilizzando un cavo Cat6, collegare la porta RJ45 del
trasmettitore MST alla porta RJ45 del ricevitore pigtail.
4. Ripetere il passaggio 3 per ogni display aggiuntivo da
collegare.
5. Collegare il ricevitore pigtail al display.
6. Accendere i display collegati.
7. Collegare l'alimentazione elettrica esterna al
trasmettitore MST. Collegarlo a una presa a muro o a un
dispositivo di protezione da sovratensione, un'unità di
distribuzione dell'alimentazione (PDU) o un gruppo di
continuità (UPS). Il LED (verde) POWER sul trasmettitore
MST si accenderà per indicare che l'unità sta ricevendo
energia dall'alimentazione elettrica esterna. Il LED
(verde) POWER sul ricevitore pigtail si accenderà per
indicare che l'unità sta ricevendo energia dall'unità
trasmittente locale attraverso la tecnologia PoC.
8. Accendere la sorgente DisplayPort.
9. Il LED RJ45 arancione si accenderà sia sul trasmettitore
MST che sul ricevitore pigtail per indicare che il segnale
della sorgente viene ricevuto dal display. La schermata
dovrebbe ora apparire sul display collegato.
10. Utilizzare la schermata delle impostazioni di
visualizzazione della scheda video per regolare il video
sui display collegati.

76
Schemi di installazione
INPUT
RESETIN
POWER
DC 24V,1A
OUTPUT 2 OUTPUT 3OUTPUT 1
INPUT
RESETIN
POWER
DC 24V,1A
OUTPUT 2 OUTPUT 3OUTPUT 1
Nota: il B156E-002-8K-K è identico al B156E-003-8K-K, tranne
per il fatto che ha solo due uscite.
11 1111
33
A
B
B
B
B156E-003-8K-K
ALIMENTAZIONE 24V CC, 1A IN INGRESSO RESET
USCITA 1 USCITA 2 USCITA 3

77
Schemi di installazione
Nota: il B156E-002-H8K-K è identico al B156E-003-H8K-K,
tranne per il fatto che ha solo due uscite.
INPUT
RESETIN
POWER
DC 24V,1A
OUTPUT 2 OUTPUT 3OUTPUT 1
INPUT
RESETIN
POWER
DC 24V,1A
OUTPUT 2 OUTPUT 3OUTPUT 1
22
11 1111
B
B
B
A
B156E-003-H8K-K
ALIMENTAZIONE 24V CC, 1A IN INGRESSO RESET
USCITA 1 USCITA 2 USCITA 3

78
Risoluzione dei problemi
Se non si riuscisse a ottenere un'immagine accettabile
dopo aver seguito le istruzioni di installazione, provare a
seguire questi suggerimenti per la risoluzione dei problemi.
1. I dispositivi utilizzano i driver grafici più recenti?
In caso contrario, scaricare gli ultimi driver grafici per i
dispositivi. L'Hub MST è retrocompatibile con la
maggior parte dei dispositivi DisplayPort 1.1a che
funzionano con driver grafici attuali. Il set di
funzionalità è limitato a quello dei dispositivi collegati
(ad es. potrebbe essere limitato alla sola
visualizzazione in modalità Clone/Mirror). La
compatibilità con vecchie schede grafiche non è
garantita.
2. Premere il pulsante reset dell'hub per resettare il
segnale inviato ai display collegati.
Schemi di installazione
Collegamenti dei cavi
1 Cavo Cat6 a filo solido fino a 230 piedi (70 m) a 4K / 60 Hz
2 Cavo HDMI 2.0 fino a 15 piedi (4,5 m) a 4K / 60 Hz
3 Cavo DisplayPort fino a 15 piedi (4,5 m) a 4K / 60 Hz
Componenti collegati
A
Sorgente DisplayPort o HDMI
B
Display 4K

79
Risoluzione dei problemi
3. L'alimentatore esterno in dotazione è collegato a
una fonte di alimentazione funzionante? Affinché il
prodotto funzioni correttamente, deve essere collegato e
ricevere energia dall'alimentatore esterno in dotazione.
4. La sorgente DisplayPort e i monitor collegati
erano spenti prima dell'installazione? In caso
contrario, riavviare il computer.
5. Che risoluzione si vuole raggiungere su ciascun
monitor? DisplayPort 1.4 ha una larghezza di banda di
32,4 Gbps e i monitor ad alta risoluzione occupano
una larghezza di banda maggiore. Sebbene i monitor
DisplayPort e HDMI supportino risoluzioni video fino a
3840 x 2160 sui singoli monitor, il numero di monitor
4K collegabili contemporaneamente è limitato. Ad
esempio, se si collegano contemporaneamente 4
monitor, la risoluzione sui monitor collegati verrà
limitata a 1080p. Sono possibili risoluzioni più elevate
in modalità video wall (ad es. 3840 x 6480 in un video
wall 1x3, 11520 x 2160 in un video wall 3x1, ecc).
6. Che lunghezza ha il cavo che si sta utilizzando? La
lunghezza massima del cavo tra l'hub e i monitor
collegati non deve superare i 15 piedi (4,6 m).
7. Che tipo di cavi si stanno utilizzando? Un cavo
inferiore può portare ad avere prestazioni scadenti. È
importante utilizzare cavi che supportino la risoluzione
video che si vuole raggiungere. Si raccomanda di
utilizzare i cavi elencati nella sezione Accessori
opzionali, in quanto sono stati testati per funzionare
con questi Hub MST.
8. Testare i cavi per assicurarsi che funzionino
correttamente. Per esempio, collegare i cavi DisplayPort
o HDMI tra una sorgente e una configurazione di display
che si sa essere funzionante per determinare se il cavo
funziona correttamente.

80
Specifiche
Distanza massima
dal display
230 piedi (70 m)
Massima profondità di
colore supportata
12-bit Deep Color
Supporto HDR Sì
Speciche HDMI 2.0
Speciche DisplayPort 1.4
Sottocampionamento
della crominanza
RGB, YCC444, YCC422, YCC420
HDCP 1.4 e 2.3
Supporto video 3D Sì
Audio LPCM a 2 canali, AC3, DTS,
profondità no a 24 bit,
frequenza di campionamento
no a 192 KHz
Chipset Sì
Supporto estensione IR
o RS-232
No
Supporto CEC (Consumer
Electronic Control)
No
Driver necessari Nessuno
Intervallo temperatura di
funzionamento
Da 32° a 104°F / Da 0° a 40°C
Intervallo temperatura di
stoccaggio
Da 5° a 122°F / Da -15 ° a 50°C
Umidità relativa Da 0% a 85% senza
condensazione
Materiale struttura Plastica ABS
Placcatura connettori/
contatti
Nichel/Oro

81
Garanzia
GARANZIA LIMITATA DI 1 ANNO
Garantiamo che i nostri prodotti sono privi di difetti nei materiali
e di fabbricazione per un periodo di un anno (1) dalla data di
acquisto iniziale. I nostri obblighi ai sensi della presente garanzia
sono limitati alla riparazione o sostituzione (a nostra esclusiva
discrezione) di eventuali prodotti che presentino tali difetti.
Visitare Tripplite.Eaton.com/support/product-returns prima
di rimandare indietro qualsiasi apparecchiatura per la
riparazione. La presente garanzia non si applica alle
apparecchiature che sono state danneggiate da incidenti,
negligenza o applicazione errata o che sono state alterate o
modificate in qualsiasi modo.
AD ECCEZIONE DI QUANTO PREVISTO NEL PRESENTE
DOCUMENTO, NON FORNIAMO ALCUNA GARANZIA, ESPRESSA O
IMPLICITA, INCLUSE LE GARANZIE DI COMMERCIABILITÀ E DI
IDONEITÀ PER UNO SCOPO PARTICOLARE. Alcuni stati non
consentono la limitazione o l'esclusione delle garanzie implicite;
pertanto, le suddette limitazioni o esclusioni potrebbero non
essere applicabili all'acquirente.
AD ECCEZIONE DI QUANTO PREVISTO SOPRA, IN NESSUN CASO
SAREMO RESPONSABILI PER DANNI DIRETTI, INDIRETTI, SPECIALI,
INCIDENTALI O CONSEQUENZIALI DERIVANTI DALL'USO DI
QUESTO PRODOTTO, ANCHE SE AVVISATI DELLA POSSIBILITÀ DI
TALI DANNI. In particolare, non siamo responsabili di alcun costo,
come la perdita di profitti o ricavi, la perdita di attrezzature, la
perdita di utilizzo di attrezzature, la perdita di software, la perdita
di dati, i costi dei sostituti, i reclami di terzi o altro.
Eaton persegue una politica di miglioramento continuo. Le
specifiche tecniche sono soggette a modifiche senza alcun
preavviso.

82

83