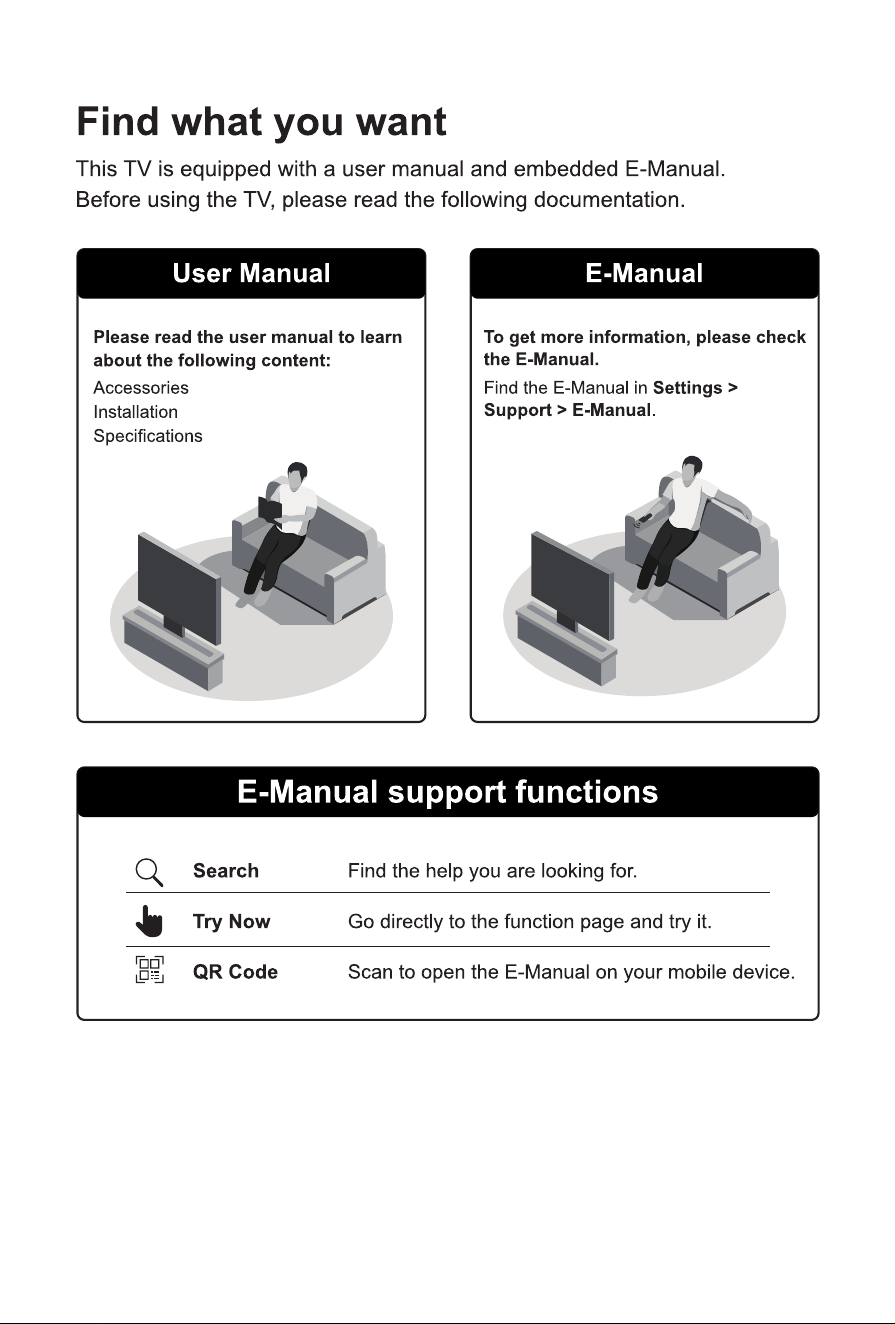


4
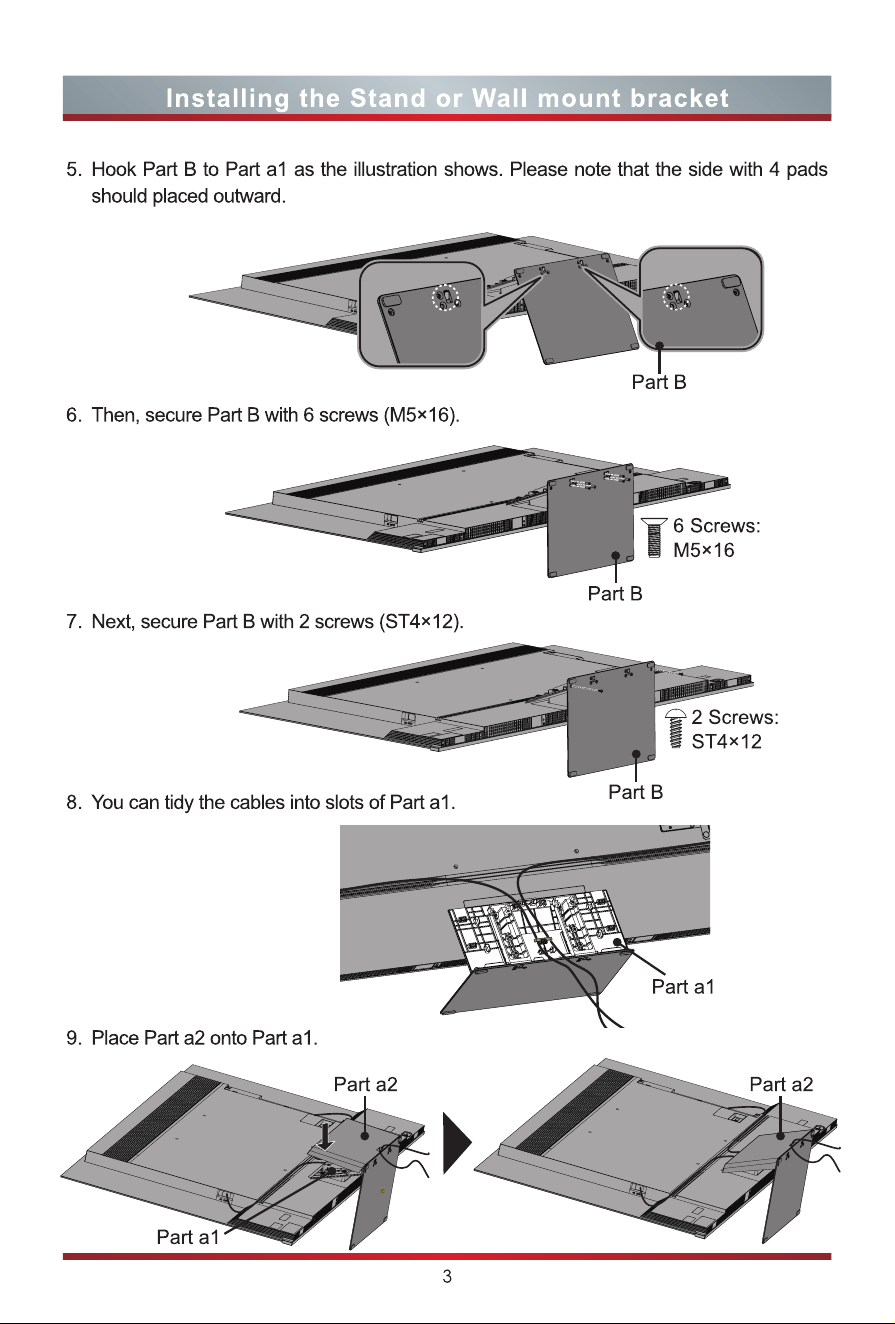
10. Slightly push the centre of the Part a2, then slightly pinch the both sides.
11. Now, you can place the TV on a surface, and tear off all protective film on TV.
Installing the Stand or Wall mount bracket
Wall mount hole pattern (mm) 300 × 400
Wall mount screw size M6
20.0 - 23.0 mm
Wall Mount Bracket
Wall Mount Screw
Wall Mount Spacer
Rear cover of the TV
Installing the wall mount bracket
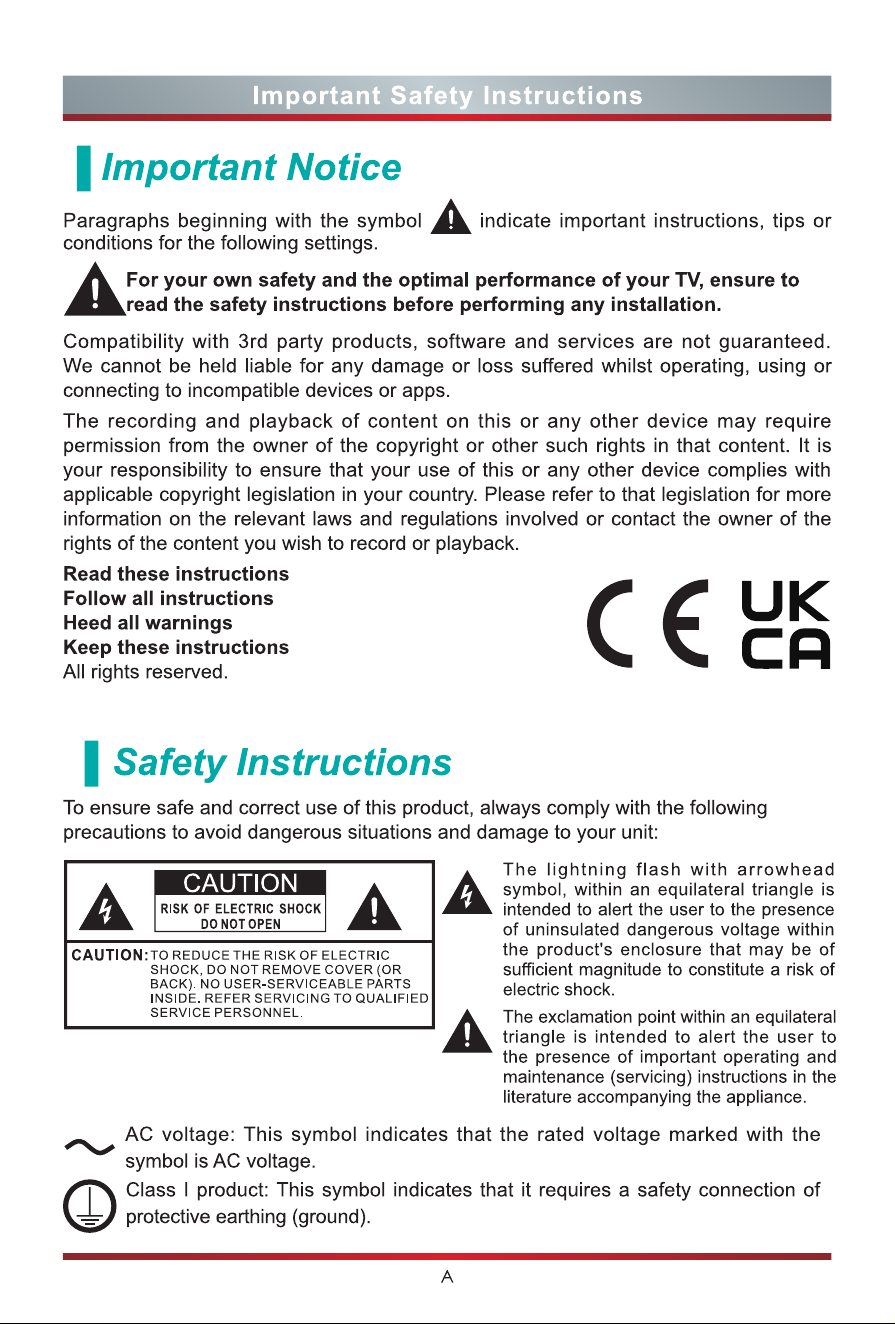
CAUTION
When mounting the TV on a wall, follow instructions provided with the wall mount bracket. If
it is not correctly mounted, the TV may fall and cause property damage or personal injury.
NOTES
The diameter and length of the screws differ depending on the wall mount bracket
model.
Wall mount bracket is optional. Your TV may not have wall mount bracket. Please
refer to the actual accessories.
Before mounting the TV, remove the TV stand if you have already attached it, and make
sure the wall mount bracket supports the weight of your TV.
Place spacers between the TV and bracket.
Standard dimensions are shown below.
We do not recommend hanging the TV on a slanted wall, and
when wall mounting make sure your television remains parallel to
the wall and does not lean forward.
TV
screen
Vertical
surface
Part a2
Part a2
5
TV Front
TV Front
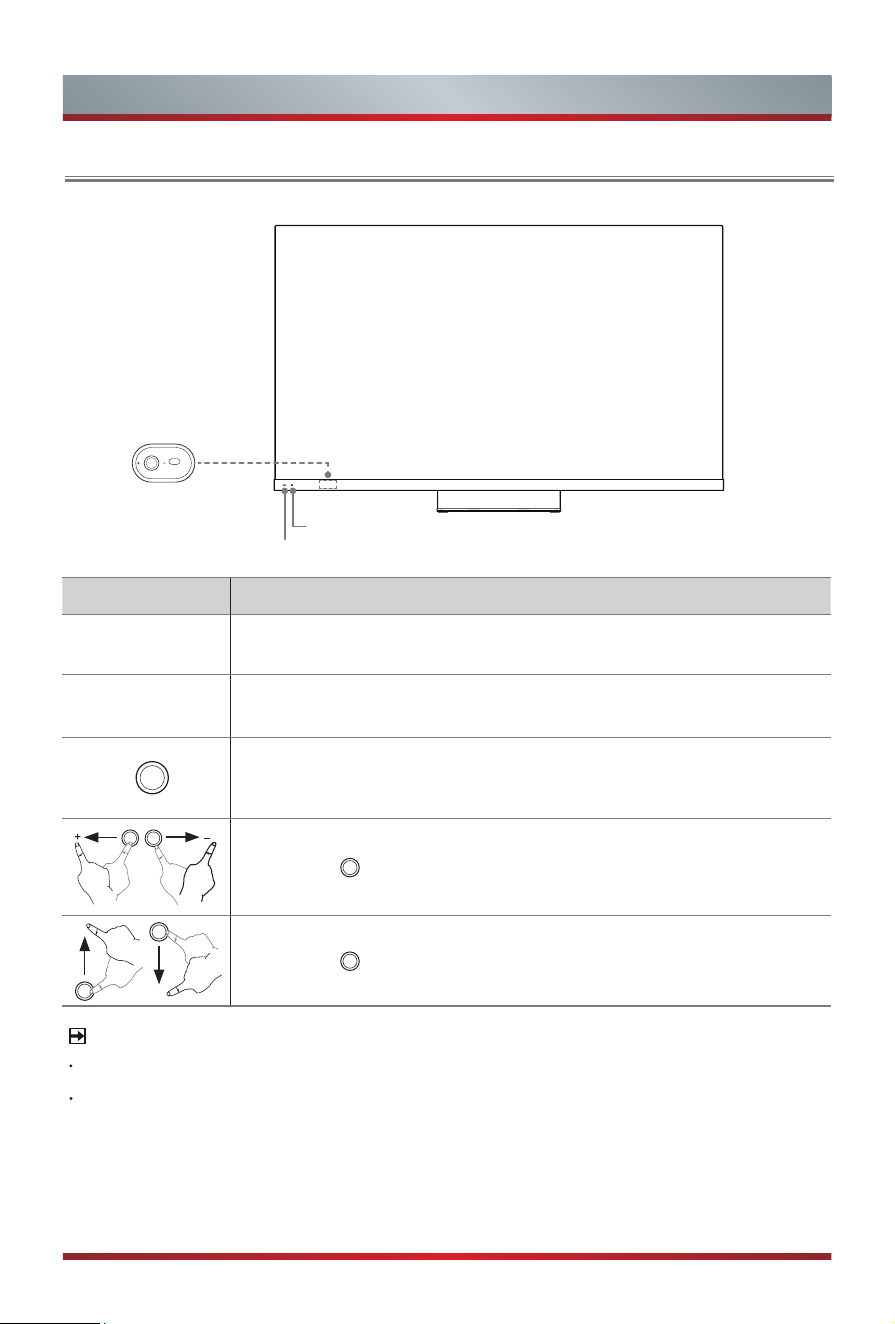
NOTE
The picture is only for reference.
Powering on the TV requires several seconds to load programmes. Do not rapidly
turn the TV off as it may cause the TV work abnormally.
TV back view
Joystick button
Remote sensor/Light sensor
Power indicator
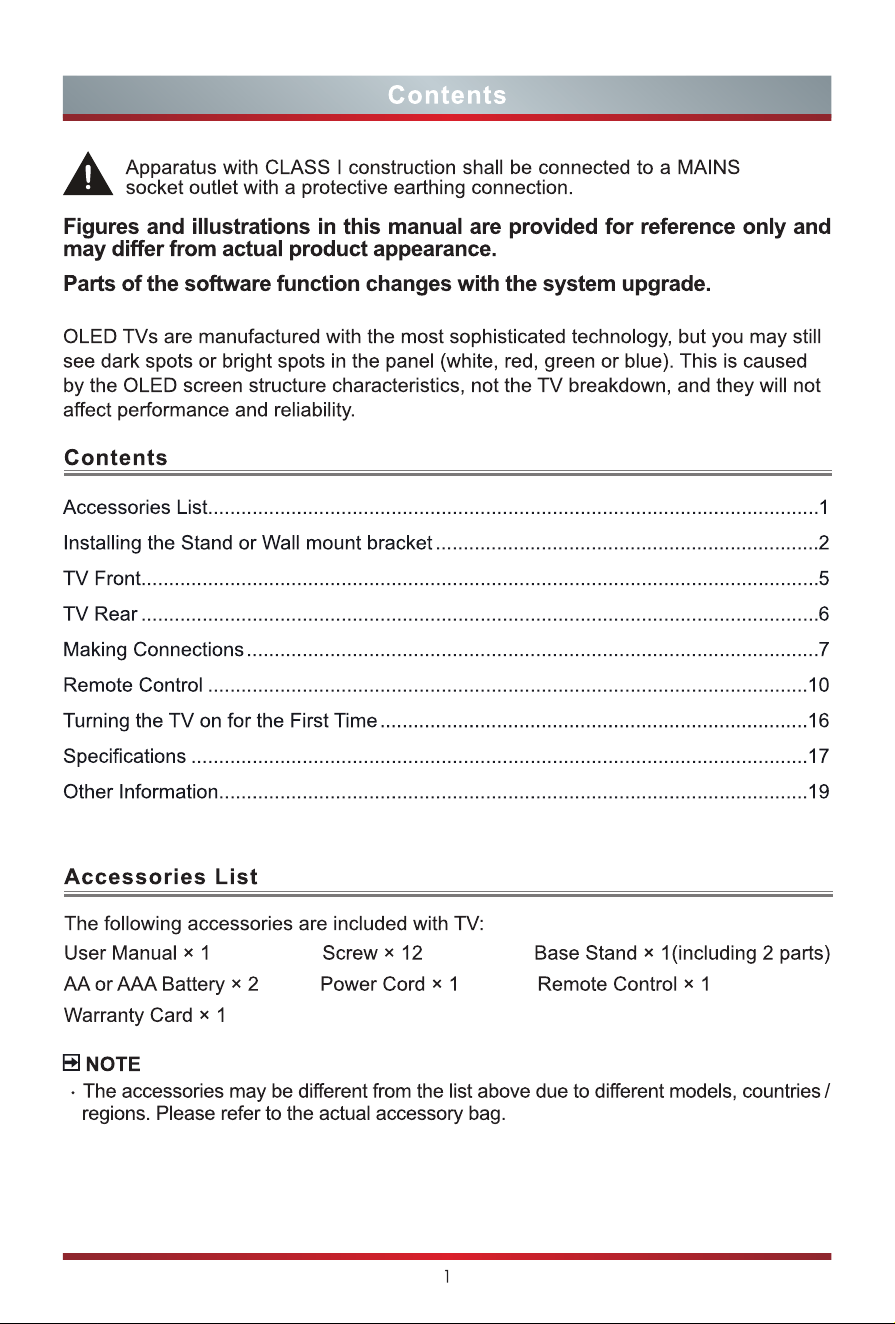
Item Description
Remote sensor
Receives remote signals from the remote control.
Do not put anything near the sensor, as its function may be affected.
Power indicator
The light is off when the TV is turned on. The light is white in
standby mode.
Select among the different input signal sources or put the TV in
standby mode, or you can turn on the TV when the TV in standby
mode.
Toggle the button left and right to adjust the volume.
Toggle the button up and down to select the channel.
6
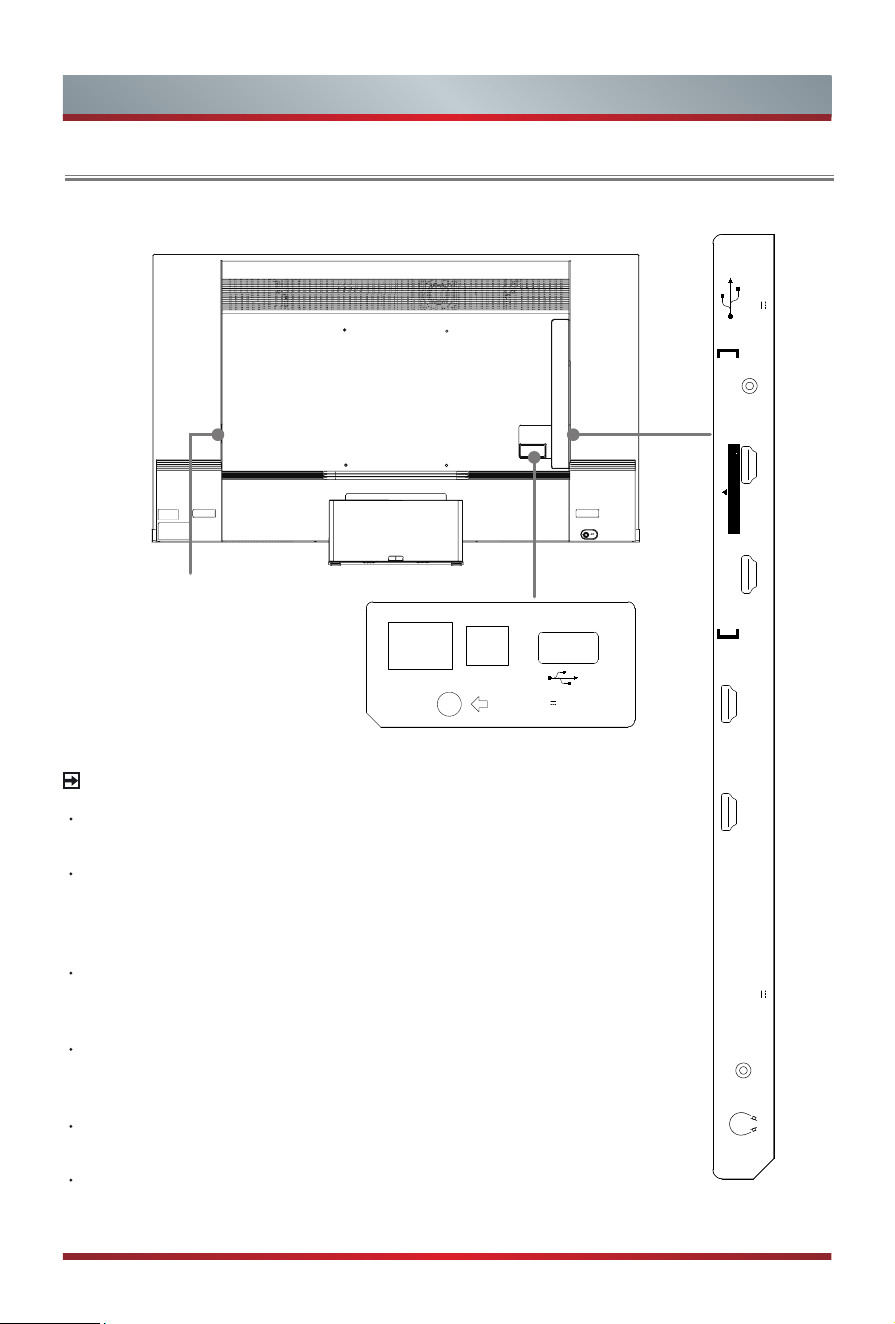
TV Rear
TV Rear
NOTE
ANT2 Jack supports power supply for satellite antenna
(13/18V, 0.5A max.)
Check the jacks for position and type before making any
connections. Loose connections can result in image or
colour problems. Make sure that all connections are tight and
secure.
Not all A/V devices have the ability to connect to a TV. Please
refer to the user’s manual of your A/V device for compatibility
and connections procedure.
Before connecting external equipment, remove the mains
plug from the wall socket. Otherwise, it may cause electric
shock.
When terminal connection is nished, take out the Coverplate
from accessory bag and install it to cover terminals.
Service jack is not available for you to connect an external
device. It can only be used by our factory for testing
purposes.
AC INPUT
LAN
DIGITAL
AUDIO OUT
S
USB 2
DC 5V 0.5A(MAX)
USB 1
DC 5V 1A(MAX)
SERVICE
HDMI 1 (4K@60Hz)HDMI 2 (4K@60Hz)
HDMI 3(eARC)
4K@120Hz
HDMI 4
4K@120Hz
ANT 1
DVB-T/T2/C
ANT 2
DVB-S/S2
13/18V 0.5A
AV IN
COMMON INTERFACE
7
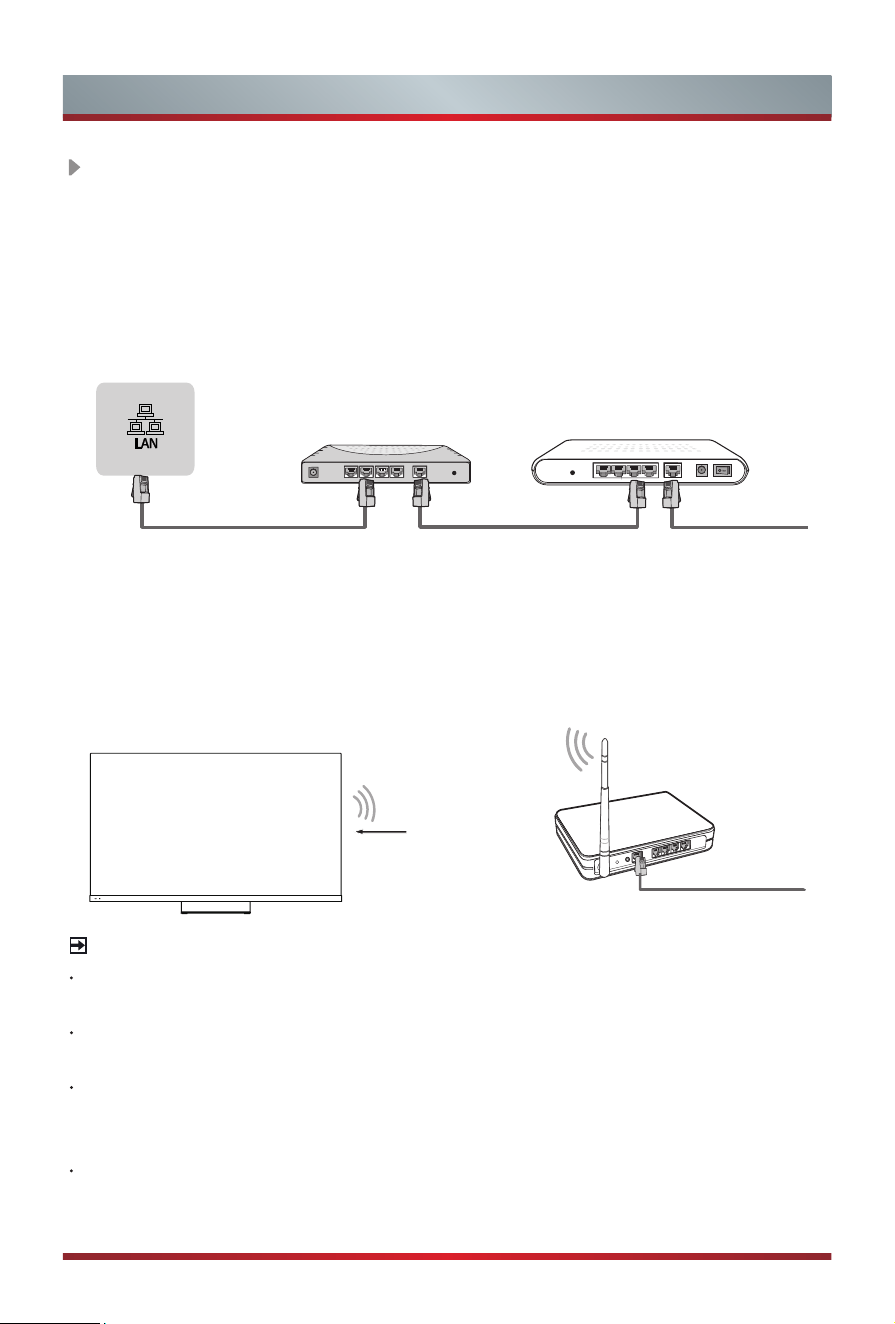
Making Connections
Wireless router with DHCP
LAN Cable
Wireless LAN Adapter
built-in TV set
TV JACK
Modem CableLAN CableLAN Cable
External Modem
(ADSL / VDSL / Cable TV)
IP Sharer (Router)
(with DHCP server)
NOTE
You must use the built-in Wireless LAN Adapter to use a wireless network because
the set doesn’t support external USB network adapters.
If the wireless router supports DHCP, your TV can connect with more ease to the
wireless network.
If you apply a security system other than the systems listed below, it will not work with
the TV.
Security system: WPA, WEP, WPA2.
In order to guarantee smooth network, the distance between router and TV should be
less than 10 metres.
Wireless setup
To connect your TV to your network wirelessly, you need a wireless router or
modem. See the illustration below.
·
The built-in Wireless LAN Adapter supports the IEEE 802.11 a/b/g/n/ac/ax
communication protocols. It is recommended to use IEEE 802.11ax router. Low
transfer rates for b/g may have the influence on the quality of streamed videos
and other media.
LAN (
Wired setup
)
Connect your TV to your network by connecting the LAN port on the back of your
TV to an external modem or router using a LAN (Ethernet/Cat 5) cable. See the
illustration below.
·
It is recommended to use a modem or router that supports Dynamic Host
Configuration Protocol (DHCP). Modems and routers that support DHCP
automatically provide the IP address, subnet mask, gateway, and DNS, so you
don’t have to enter them manually. Most home networks already have DHCP.
8
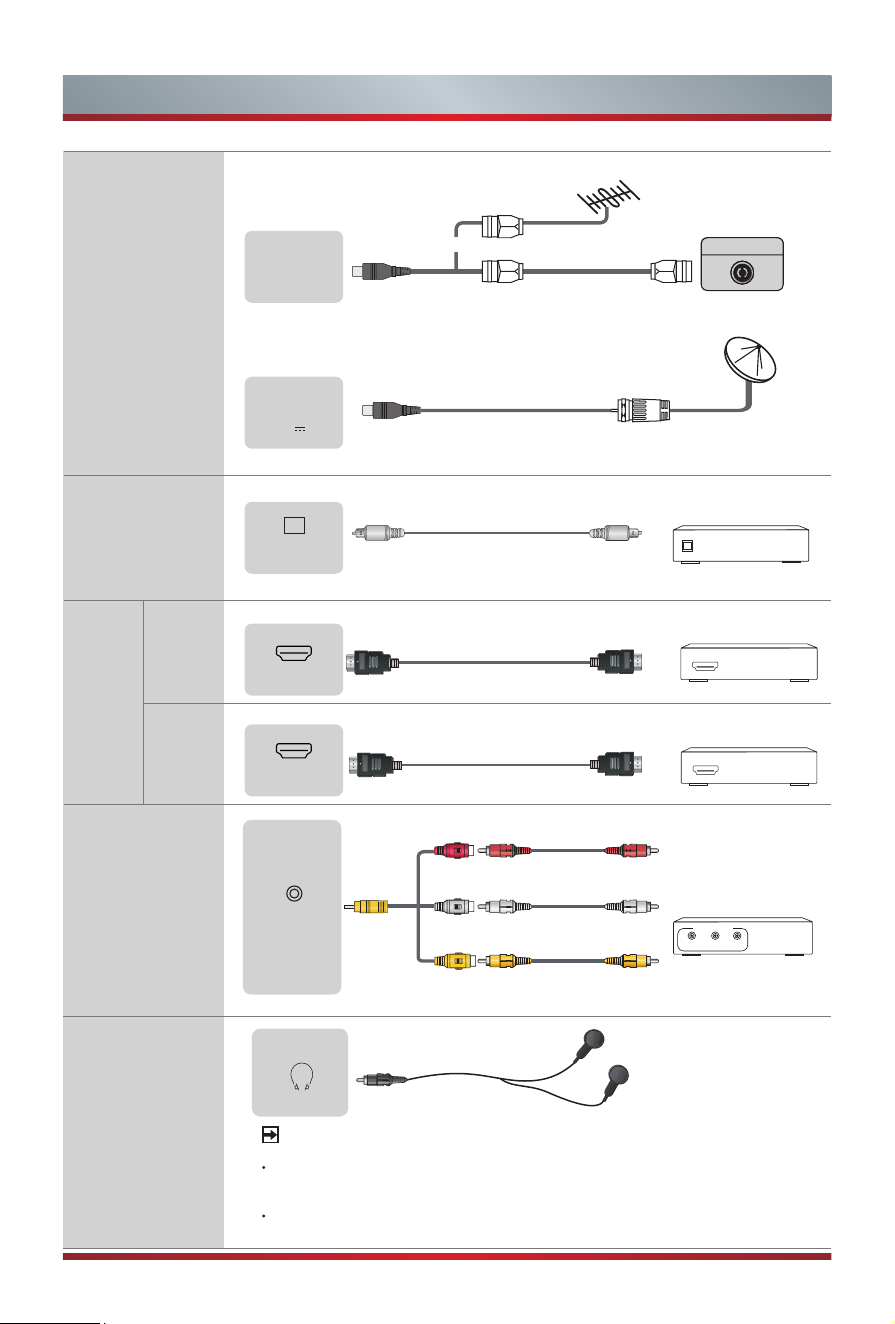
Making Connections
Outdoor
Antenna
Antenna Cable (75Ω)
or
ANT OUT
Cable
VHF/UHF Antenna
Satellite antenna
ANT 1
DVB-T/T2/C
DIGITAL AUDIO cable (not included)
Audio Amplier/Speaker
HDMI cable (not included)
HDMI cable (not included)
HDMI
Audio Amplier/Speaker
HDMI
DVD/Blu-Ray/AV receiver/
Set-top Box
(not included)
(not included)
DIGITAL
AUDIO OUT
HDMI (eARC)
HDMI
ANT 2
DVB-S/S2
13/18V 0.5A
ANT
AV IN
DIGITAL
AUDIO OUT
HDMI
HDMI
(eARC)
HDMI
HEADPHONE
Headphone (not included)
White(L)
Red(R)
Yellow(Video)
VCR/DVD Player/
Recorder/Set-top box/
Satellite Receiver/
Video Camera
Video
L
A/V OUT
R
AV IN
(Cables are not included)
NOTE
Excessive sound pressure from earphones and headphones
can cause hearing loss.
The built-in speakers' audio performance meets the Hi-Res
Audio logo requirement, but the headphones' jack doesn't.
9
Making Connections
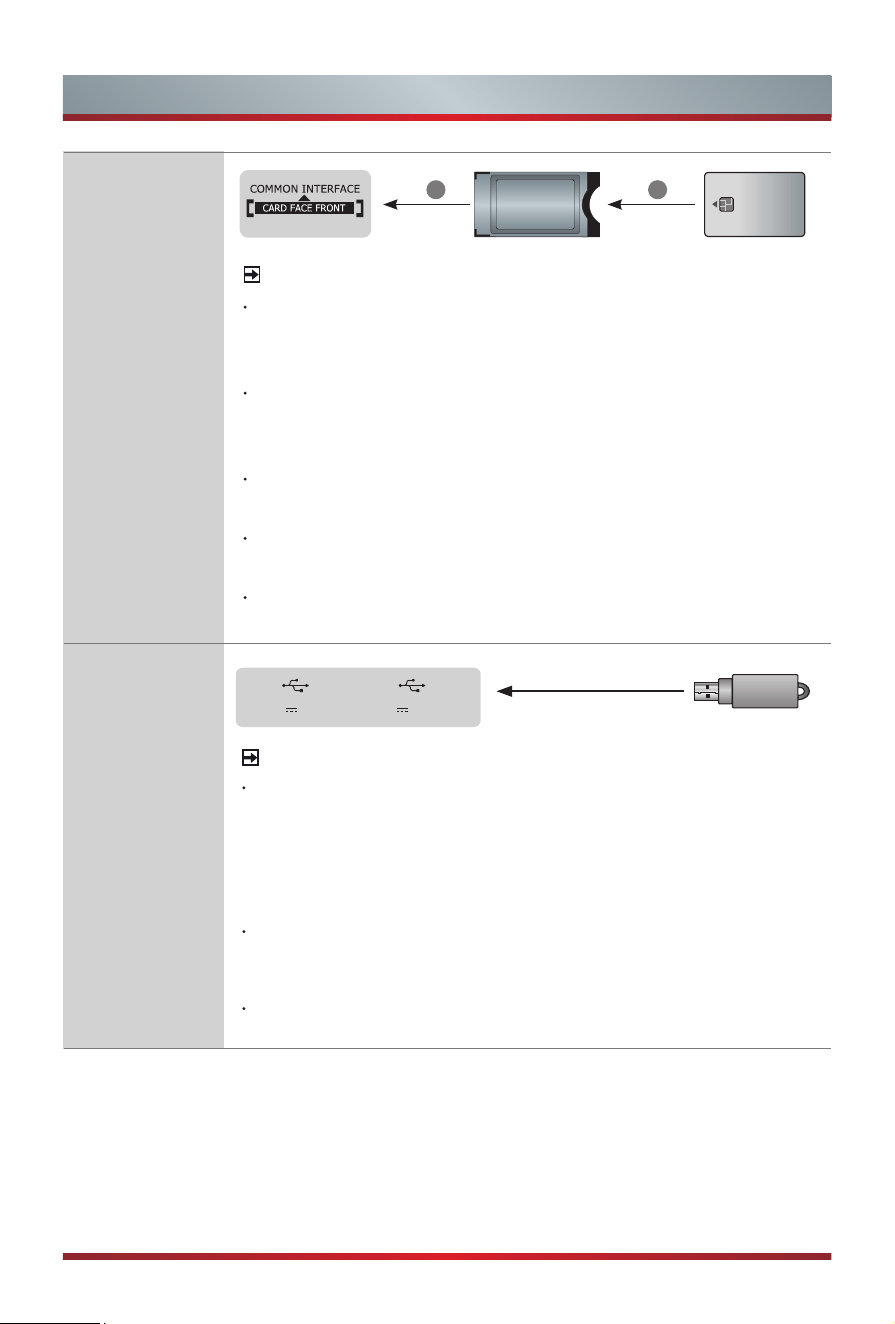
SMART CARD
CAM CARD
1 2
NOTE
Before you insert/remove the CI+ module, ensure that the TV
is switched off. Then insert the CI card into the CI+ module in
accordance with the Service Provider's instructions.
Do not repeatedly insert or remove the Common Access
Module as this may damage the interface and cause a
malfunction.
You must obtain a CI+ module and card from the service
provider of the channels you want to watch.
Insert the CI+ module with the SmartCard in the direction
marked on the module and SmartCard.
CI+ is not supported in some countries and regions; check with
your authorized dealer.
COMMON
INTERFACE
USB
NOTE
When connecting a hard disk or a USB hub, always connect
the mains adapter of the connected device to the power
supply. Exceeding a total current consumption may result in
damage. The USB 1.1 and USB 2.0 devices maximum current
consumption are 500mA.
The USB 3.0 device maximum
current consumption is 1A.
For individual non-standard high-capacity mobile hard disk, if
its impulse current is greater than or equal 1A, it may cause
TV-rebooting or self-locking. So the TV does not support it.
The USB port supports a voltage of 5V.
USB
DC 5V 1A(MAX) DC 5V 0.5A(MAX)
USB
10
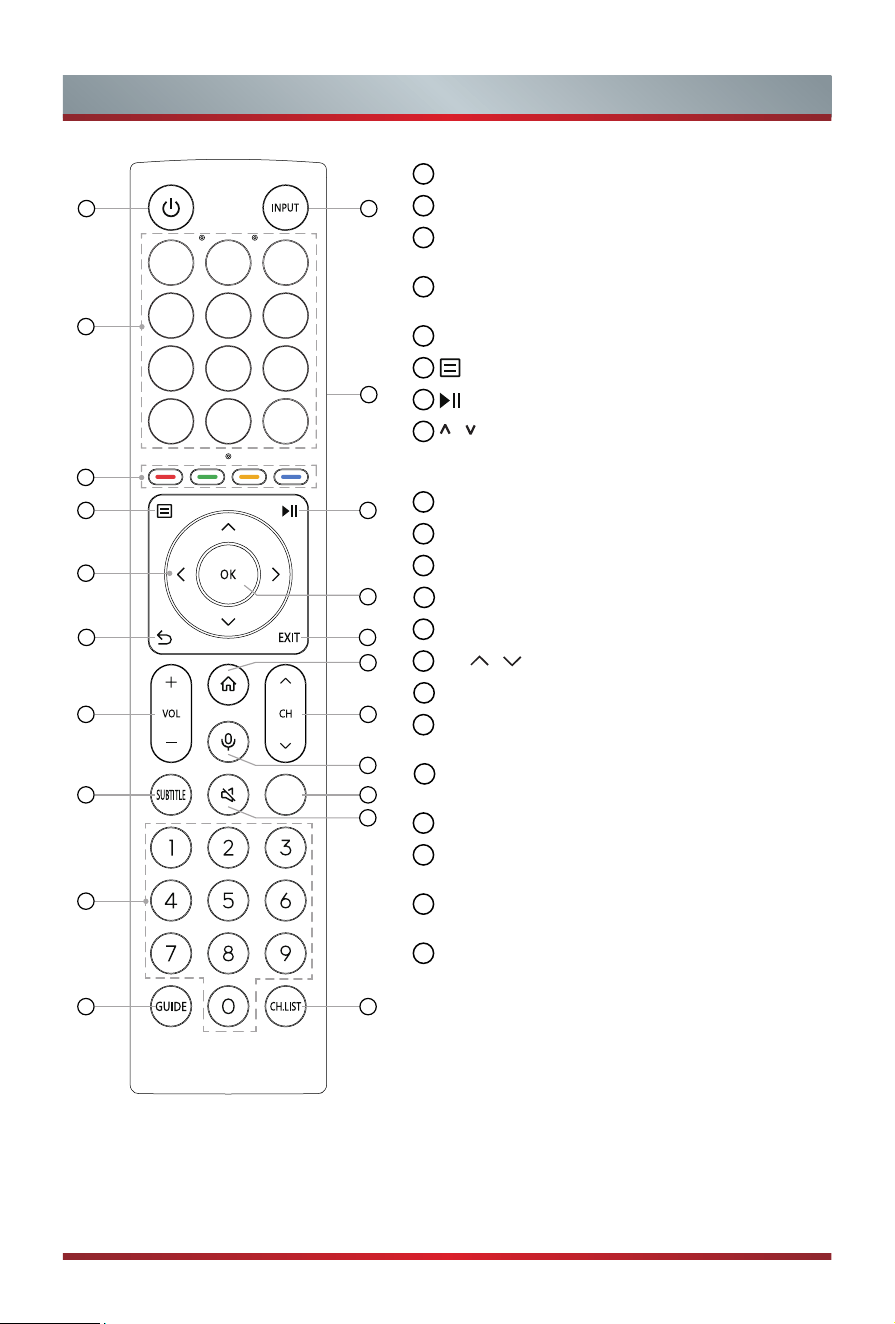
Remote Control
1
POWER: Switch the TV on or into standby mode
2
INPUT: Select input sources
3
APP: Quick access buttons to apps
EDIT: Custom to launch input or app
4
Physical Switch (Side view): Turn on to activate
hands-free wake-up feature*
5
Special function buttons
6
: Display the Quick setup menu
7
: Media content control function button
8
/ / < / >: Allow you to navigate the on-screen
menus and adjust the system settings to your
preference
9
OK: Confirm the selection in the on-screen menus
10
BACK: Return to previous menu
11
EXIT: Exit the menu
12
HOME: Enter the Home screen
13
VOL
+
/
-
: Adjust the volume
14
CH / : Switch channel
15
MIC: Activate the microphone
16
SUBTITLE: Activate or deactivate the subtitle
mode
17
INFO: Display the present programme information
TEXT: Turn on/off the teletext function
18
MUTE: Mute or restore the TV sound
19
Number buttons: Direct channel selection or
numbers input
20
GUIDE: Display the Electronic Programme Guide
(DTV mode)
21
CH.LIST: Display the Channel List on the screen
1 2
3
4
5
6 7
8
9
10
11
13
14
15
12
16
17
19
18
20
21
NOTE: The included remote control will vary depending on model, countries/regions.
Check
information according to the actual remote control in the accessory bag.
Bluetooth remote control module specifications
XF2472C
Frequency Range: 2.400GHz~2.4835GHz
Output Power(Max.): +4dBm
*
When you do not use hands-free wake-up, please turn off the physical switch to lengthen
the battery life.
11
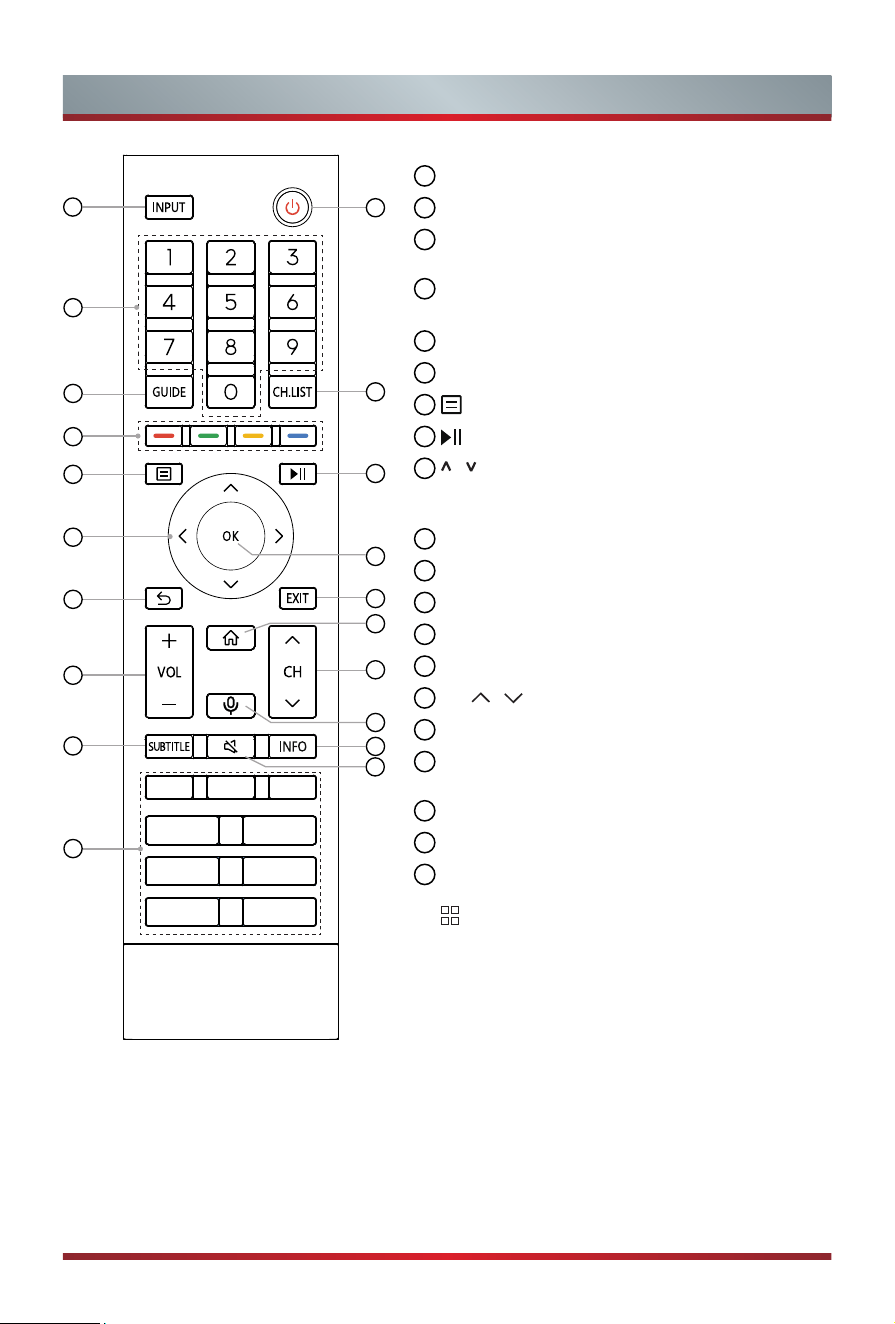
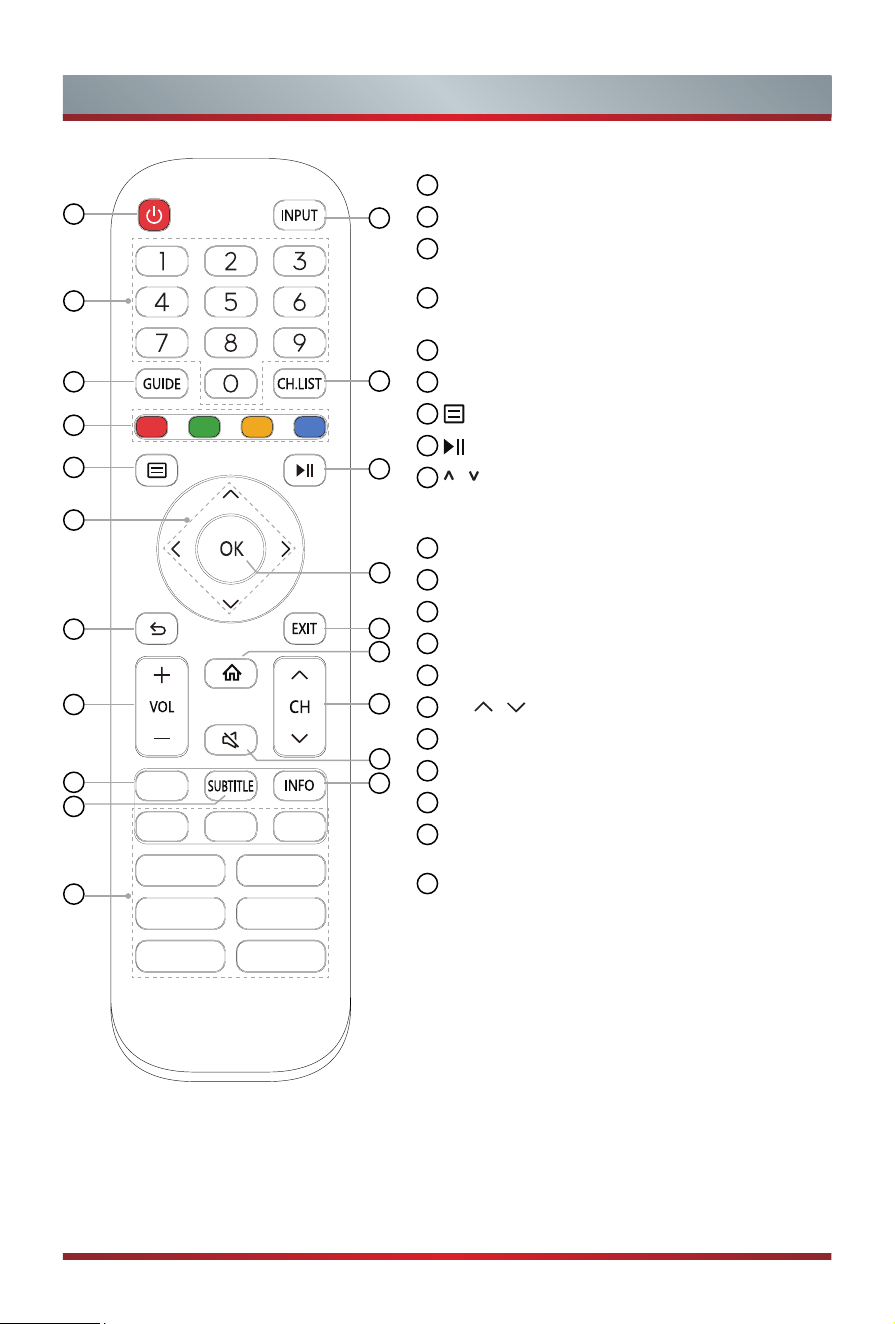
Remote Control
NOTE: The included remote control will vary depending on model, countries/regions.
Check
information according to the actual remote control in the accessory bag.
1
INPUT: Select input sources
2
POWER: Switch the TV on or into standby mode
3
Number button: Direct channel selection or
numbers input
4
GUIDE: Display the Electronic Programme Guide
(DTV mode)
5
CH.LIST: Display the Channel List on the screen
6
Special function buttons
7
: Display the Quick setup menu
8
: Media content control function buttons
9
/ / < / >: Allow you to navigate the on-screen
menus and adjust the system settings to your
preference
10
OK: Confirm the selection in the on-screen menus
11
BACK: Return to previous menu
12
EXIT: Exit the menu
13
HOME: Enter the Home screen
14
VOL
+
/
-
: Adjust the volume
15
CH / : Switch channel
16
MIC: Activate the microphone
17
SUBTITLE: Activate or deactivate the subtitle
mode
18
INFO: Display the present programme information
19
MUTE: Mute or restore the TV sound
20
APP: Quick access to the app
MEDIA: Enter the media mode
:
All Apps
BROWSER: Enter into BROWSER
1
4
5
7
11
15
14
2
8
10
12
16
19
9
6
13
17
18
3
20
Bluetooth remote control module specifications
XF2472C
Frequency Range: 2.400GHz~2.4835GHz
Output Power(Max.): +4dBm
12
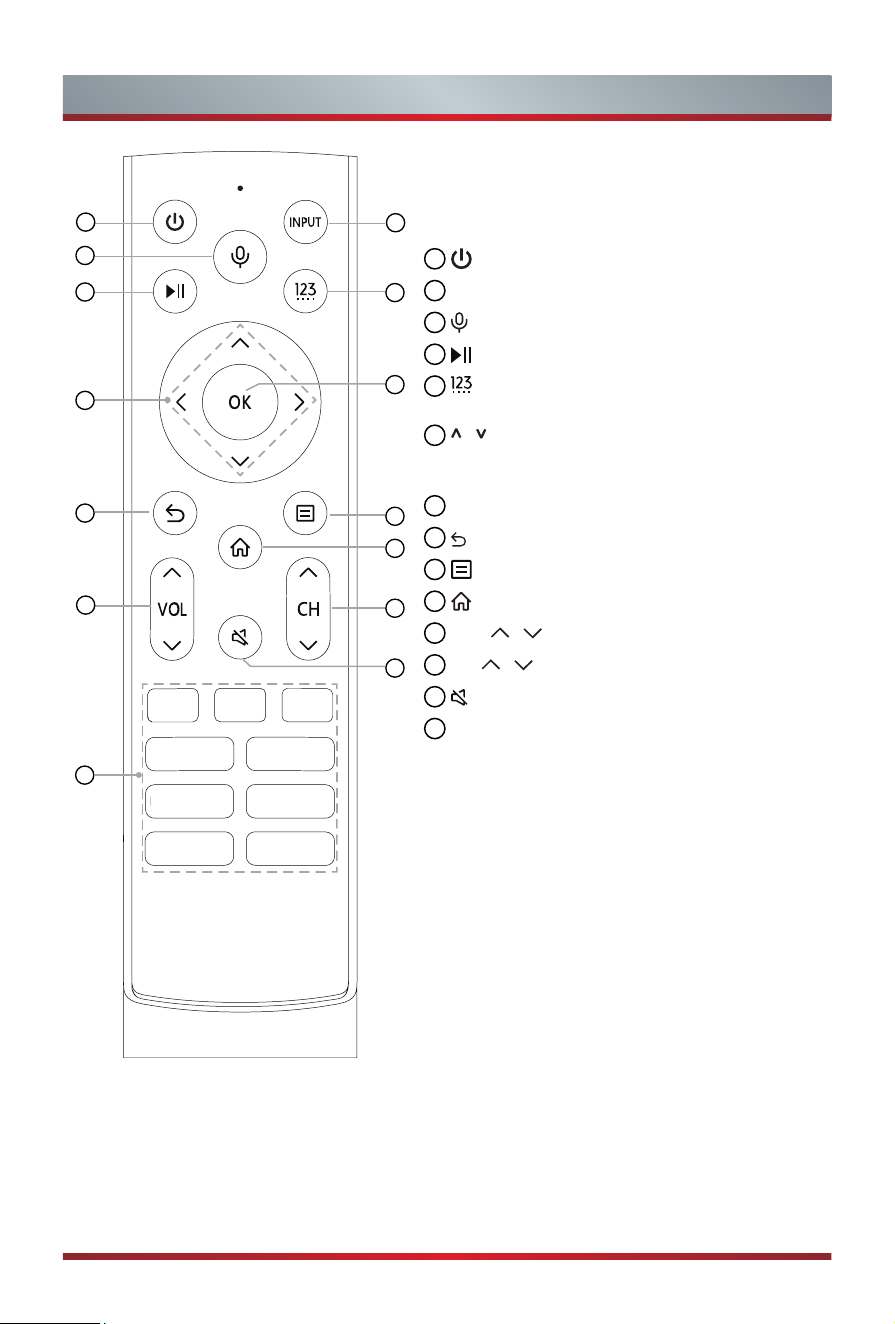
Remote Control
Bluetooth remote control module specifications
WNF171
Frequency Range: 2.400GHz~2.4835GHz
Output Power(Max.): +4.5dBm
NOTE: The included remote control will vary depending on model, countries/regions.
Check
information according to the actual remote control in the accessory bag.
1
2
3
4
5
6
7
8
9
10
11
12
13
14
1
: Switch the TV on or into standby mode
2
INPUT: Select input sources
3
: Activate the microphone
4
: Media content control function buttons
5
: Enter Channels / input numbers and special
function buttons (Red/Green/Yellow/Blue)
6
/ / < / >: Allow you to navigate the on-screen
menus and adjust the system settings to your
preference
7
OK: Confirm the selection in the on-screen menus
8
: Return to previous menu
9
: Display the Quick setup menu
10
: Enter the Home screen
11
VOL / : Adjust the volume
12
CH / : Switch channel
13
:
Mute and restore sound
14
APP: Quick access buttons to apps
MEDIA: Enter the media mode
13
Remote Control
NOTE: The included remote control will vary depending on model, countries/regions.
Check
information according to the actual remote control in the accessory bag.
1
4
6
7
11
14
17
20
19
3
9
2
5
8
12
15
18
13
10
16
1
POWER: Switch the TV on or into standby mode
2
INPUT: Select input sources
3
Number button: Direct channel selection or
numbers input
4
GUIDE: Display the Electronic Programme Guide
(DTV mode)
5
CH.List: Display the Channel List on the screen
6
Special function buttons
7
: Display the Quick setup menu
8
: Media content control function buttons
9
/ / < / >: Allow you to navigate the on-screen
menus and adjust the system settings to your
preference
10
OK: Confirm the selection in the on-screen menus
11
BACK: Return to previous menu
12
EXIT: Exit the menu
13
HOME: Enter the Home screen
14
VOL
+
/
-
: Adjust the volume
15
CH / : Switch channel
16
MUTE: Mute or restore the TV sound
17
TXT/TEXT: Turn on/off the teletext function
18
INFO: Display the present programme information
19
SUBTITLE: Activate or deactivate the subtitle
mode
20
APP: Quick access buttons to apps
MEDIA: Enter the media mode
14
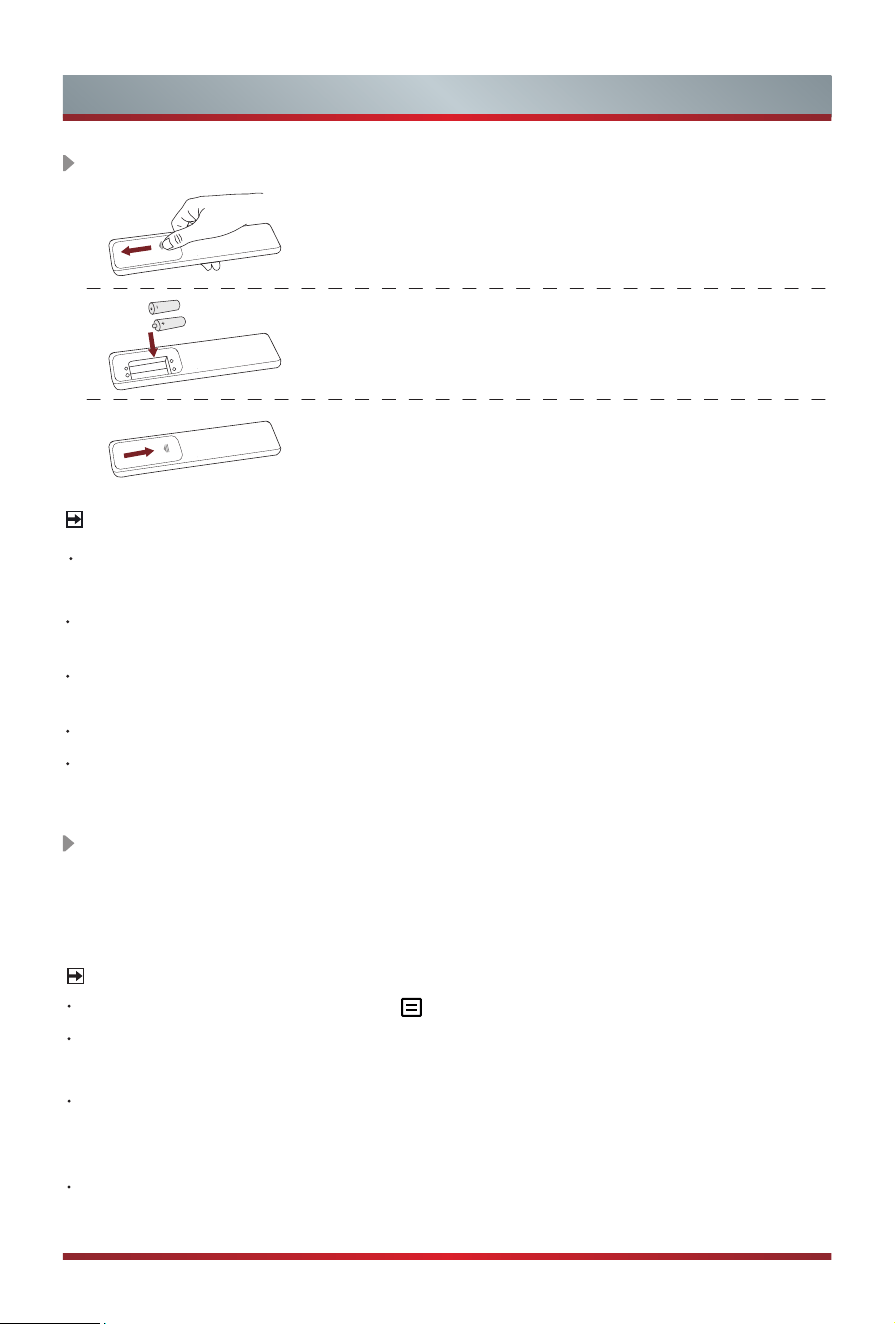
Remote Control
1. Slide the back cover to open the battery compartment
of the remote control.
2. Insert two AA or AAA size batteries. Make sure
to match the (+) and ( - ) ends of the batteries
with the (+) and ( - ) ends indicated in the battery
compartment.
3. Close the battery compartment with the cover.
Installing Batteries in the Remote Control
NOTES
Product image is only for reference, actual product may vary in appearance.
Handling the Batteries
Incorrect use of batteries may cause corrosion or battery leakage, which could
cause fire, personal injury or damage to property.
Only use the battery type indicated in this manual
.
Whether to use AA or AAA size
batteries, please refer to the actual remote control.
Do not mix old and new batteries or different types of batteries.
Do not dispose of used batteries as domestic waste. Dispose of them in
accordance with local regulations.
Pairing the Remote Control (only for Bluetooth remote control)
Pair the remote to the TV after you power it on. Keep the remote control within 3
metres from the TV. Press any button (except power and mic button) to pair.
NOTES
In special cases, press and hold [ ] button to pair.
If an unknown error occurred with the remote, then it could have been caused by
interference. Try to remove what's causing the interference and pair it again.
If an unknown error occurred in the remote control while the battery power is
normal, you can take out the batteries, press any key for 1~2 seconds, and insert
them back. Then the remote control will work normally.
The remote cannot be paired to the TV while the TV is in standby mode.
15
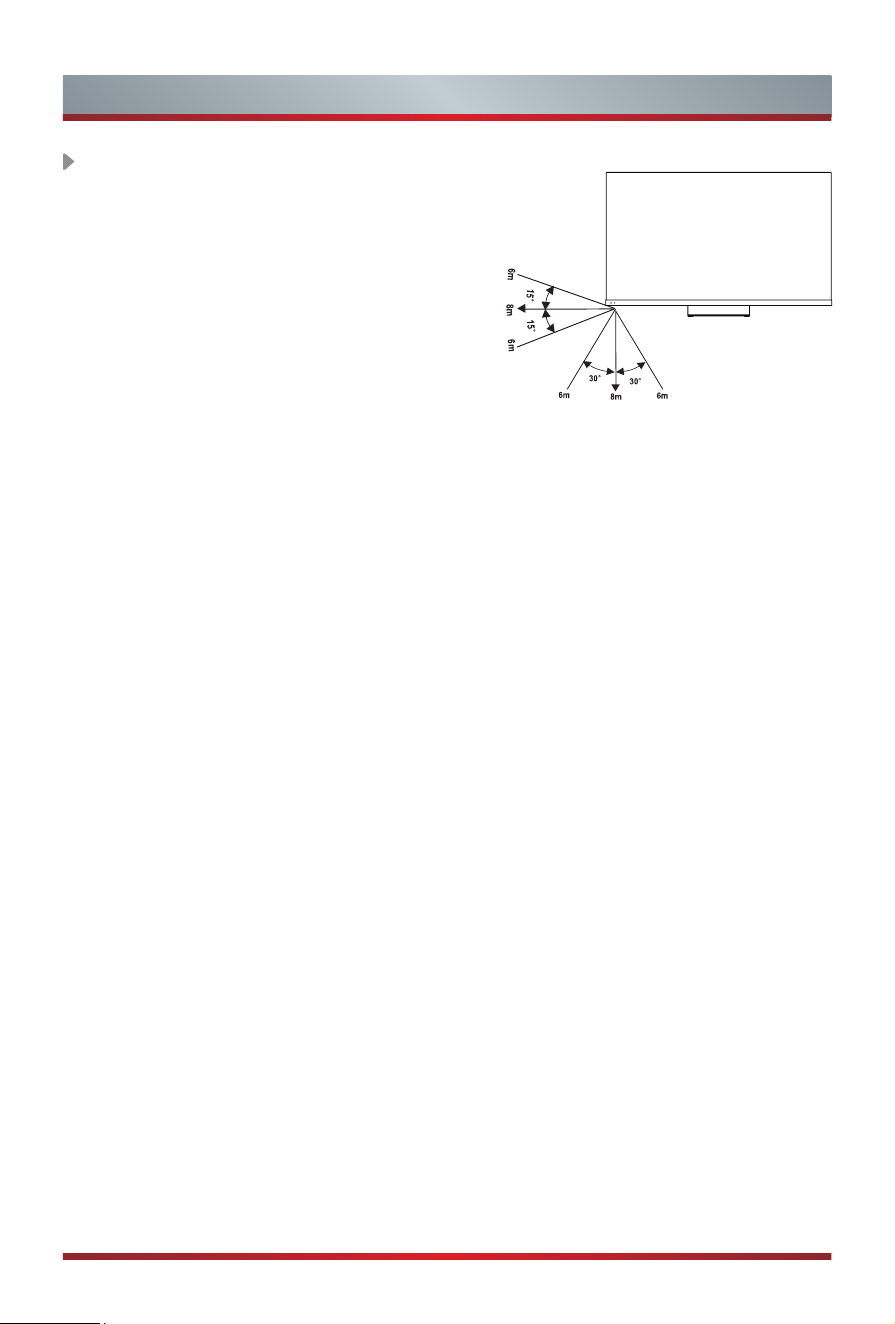
Remote Control
Remote Control Operation Range
1. The remote control can work at a distance of
up to 8 metres in
front of the TV set.
2. The remote control angle: taking the remote
sensor as an apex, 6 metres away, its
controlled horizontal angle is within ±30°, while
the vertical angle is within ±15°.
3. The operating distance may vary depending on
the brightness of the room.
Disposal of this unit
Product should not be damaged, dismantled or thrown in municipal waste.
It should be packed and handed over to authorised re-cycler.

16
Turning the TV on for the First Time
Turning the TV on for the First Time
1. Connect the mains cable to the mains socket after you have completed all the
connections.
2. The first time you turn the TV on, it will go straight into the Installation Guide.
3. Press the [
/ / < / > ] buttons to navigate the menu and change the settings.
Press the [OK] button to confirm.
Select your
Language
Select your desired language to be displayed on the menu.
Press menu button to set up your TV for store mode.
Set up on
Mobile or Set
up on TV
Set up with the smart device by scanning the QR code to
download the mobile app, or continue on TV.
Connect to
the Internet
Connect you to your favourite apps, movies, and programmes on
the Internet through WLAN.
Select your
Location
Knowing your location will help us tailor recommended contents
for you.
Terms &
Conditions,
Privacy Policy
Your use of this device is subject to the End User License
Agreement, and lack of your acceptance of the End User License
Agreement will turn off all smart features of this device. Please
read the details carefully before you choose.
Sign in to
your VIDAA
Account
With a VIDAA account, you can manage your content
preferences, subscriptions and more.
Select
your Voice
Assistant
Select your voice assistant you want to use on the TV.
Name your TV
Give your TV a unique name to help identify it when casting or
connecting to it from other devices.
Welcome to
VIDAA
Congratulations, you have finished the set-up. Choose from the
selections on screen to get started according to your preferences.
NOTE: The Guide above is for referencing purpose and may differ depending on models/
countries/regions.
17
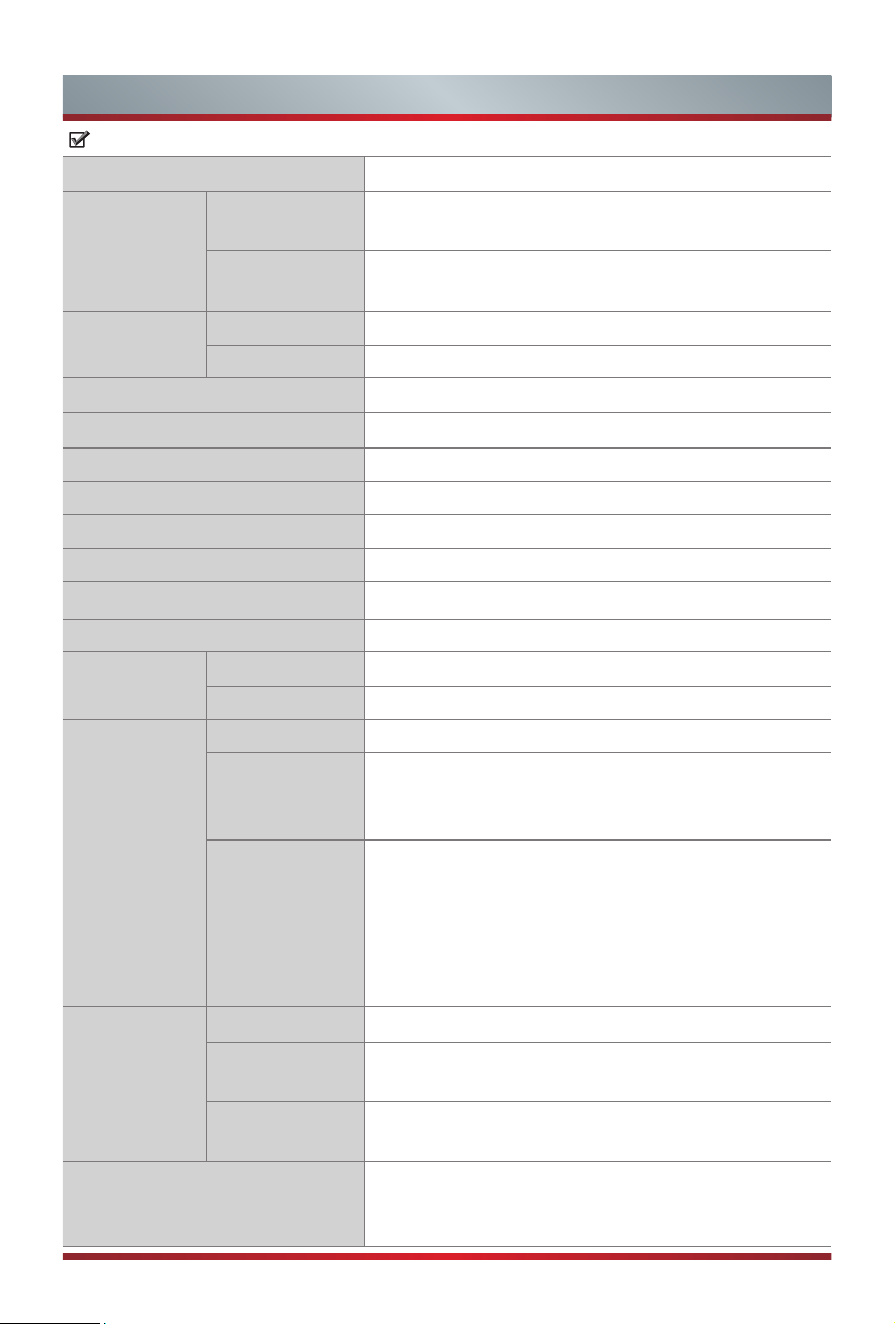
Specifications
Features, appearance and specifications are subject to change without notice.
Item
65"
Dimension
(W × H × D)
Without Stand
57.0 × 33.7 × 1.9 inches
(1447 × 857 × 49 mm)
With Stand
57.0 × 36.5 × 11.3 inches
(1447 × 927 × 286 mm)
Weight
Without Stand 60.0 lbs (27.2 kg)
With Stand 72.1 lbs (32.7 kg)
Active Screen Size (Diagonal) 164 cm
Screen resolution 3840 × 2160
Audio power 4×10W + 10W + 2×5W + 20W
Operating mode power density 0.040 Watts/cm²
Power consumption when turned off
N.A.
Power consumption in standby mode
0.5 W
Power consumption Please refer to the rating label.
Power supply Please refer to the rating label.
Receiving
systems
Analog PAL-D/K, B/G, I SECAM-D/K, B/G
Digital DVB-T/T2, DVB-C, DVB-S/S2
Wireless
LAN Module
specifications
Model TX7921AU64T
Frequency Range
2.4-2.4835GHz
5.15-5.85GHz
5.9-6.425GHz
Output Power
(Max.)
2.4-2.4835GHz 17dBm
5.15-5.25GHz 14dBm
5.25-5.35GHz(DFS Band) 14dBm
5.49-5.71GHz(DFS/TPC Band) 14dBm
5.725-5.85GHz(for Non EU) 14dBm
5.9-6.425GHz 14dBm
Bluetooth
Module
specifications
Model TX7921AU64T
Frequency
Range
2.4-2.4835GHz
Output Power
(Max.)
2.4-2.4835GHz,Class1,6dBm
Environmental conditions
Temperature: 41°F - 95°F (5°C - 35°C)
Humidity: 20% - 80% RH
Atmospheric pressure: 86 kPa - 106 kPa

18
Specifications
HDMI Input
RGB / 60Hz (640×480, 800×600, 1024×768)
YUV / 60Hz (480i, 480p, 720p, 1080i, 1080p)
YUV / 50Hz (576i, 576p, 720p, 1080i, 1080p)
3840×2160 / 24Hz, 3840×2160 / 25Hz,
3840×2160 / 30Hz, 3840×2160 / 50Hz,
3840×2160 / 60Hz
For HDMI 3, 4:
3840×2160 / 120Hz, 2560×1440 / 120Hz,
1920×1080 / 120Hz
19
Other Information
Recycling/Licenses
WEEE (Waste Electronic Electric Equipment)
European Directive 2012/19/EU
This symbol on the product or on its packaging indicates that this product
must not be disposed of with your household waste. Instead, it is your
responsibility to dispose of your waste equipment by handing it over to
a designated collection point for the recycling of waste electrical and
electronic equipment. The separate collection and recycling of your waste
equipment at the time of disposal will help to conserve natural resources
and ensure that it is recycled in a manner that protects human health
and the environment. For more information about where you can drop off
your waste equipment for recycling, please contact your local city ofce,
your household waste disposal service or the shop where you purchased the
product.
Batteries
In accordance with the Battery Directive, used batteries should not
be disposed of in the domestic waste. Dispose your batteries in the
collection containers specic for this purpose in retail stores.
ROHS (Restriction of Hazardous Substance)
European Directive 2011/65/EU
This European directive limits the use of dangerous and hazardous
substances which are difcult to recycle.
This allows recycling easily the EEE and contributes to the safeguard
of the environment.
Substances included in this product match to the RoHS directive.
Dolby, Dolby Vision, Dolby Atmos, and the double-D symbol are registered trademarks of Dolby
Laboratories Licensing Corporation. Dolby Vision IQ is a trademark of Dolby Laboratories
Licensing Corporation. Manufactured under license from Dolby Laboratories. Condential
unpublished works. Copyright © 2012-2021 Dolby Laboratories. All rights reserved.
The terms HDMI and HDMI High-Denition Multimedia Interface, and
the HDMI Logo are trademarks or registered trademarks of HDMI
Licensing Administrator, Inc. in the United States and other countries.
20
Other Information
For DTS patents, see http://patents.dts.com. Manufactured under license from DTS Licensing
Limited. DTS, DTS-HD Master Audio, DTS-HD, Virtual:X, and the DTS-HD logo are registered
trademarks or trademarks of DTS, Inc. in the United States and other countries. © 2021 DTS, Inc.
ALL RIGHTS RESERVED.
Manufactured under license from IMAX Corporation. IMAX
®
is a registered trademark of IMAX
Corporation in the United States and/or other countries. For DTS patents, see http://patents.dts.
com. Manufactured under license from DTS Licensing Limited. DTS and the DTS logo are registered
trademarks or trademarks of DTS, Inc. in the United States and other countries. © 2020 DTS, Inc. ALL
RIGHTS RESERVED.
EPREL Registration Information
Model identier Eprel registration number Model identier Eprel registration number
65A9H 1133544 65A99H 1133575
65A90H 1133561 65A96HCH 1133577
65A91H 1133563 65A97HCH 1133578
65A92H 1133565 65A99HNE 1133580
65A9HCH 1133566 65A9HTUK 1133581
65A90HCH 1133567 65A90HTUK 1133582
65A98HNE 1133569 65A96HTUK 1133585
65A96H 1133570 65A97HTUK 1133587
65A97H 1133572
65A98H 1133574

21
Other Information
For Great Britain:
SIMPLIFIED UK DECLARATION OF CONFORMITY
Hereby, Hisense Visual Technology Co., Ltd. declares that the radio equipment type [ERF3A86
/
ERF3B86H / ERF3C86H / ERF3D86H / ERF3E86H / ERF3F86H / ERF3G86H / ERF3N80H
/ ERF3M80H / ERF3F90H / 65A9H / 65A90H / 65A91H / 65A92H / 65A9HCH / 65A90HCH /
65A98HNE / 65A96H / 65A97H / 65A98H / 65A99H / 65A96HCH / 65A97HCH / 65A99HNE
/ 65A9HTUK / 65A90HTUK / 65A96HTUK / 65A97HTUK] is in compliance with Radio
Equipment Regulations 2017. The full text of the UK declaration of conformity is available at
the following internet address: https://global.hisense.com/support/certificate-download/.
SIMPLIFIED EU DECLARATION OF CONFORMITY
Hereby, Hisense Visual Technology Co., Ltd. declares that the radio equipment type [ERF3A86
/
ERF3B86H / ERF3C86H / ERF3D86H / ERF3E86H / ERF3F86H / ERF3G86H / ERF3N80H
/ ERF3M80H / ERF3F90H / 65A9H / 65A90H / 65A91H / 65A92H / 65A9HCH / 65A90HCH /
65A98HNE / 65A96H / 65A97H / 65A98H / 65A99H / 65A96HCH / 65A97HCH / 65A99HNE
/ 65A9HTUK / 65A90HTUK / 65A96HTUK / 65A97HTUK] is in compliance with Directive
2014/53/EU. The full text of the EU declaration of conformity is available at the following
internet address: https://global.hisense.com/support/certificate-download/
.