HAF-49
PRO
RANGE HOOD
Instruction Manual
Your satisfaction is guaranteed. If you are not completely
satisfied with our PRO RANGE HOOD, please let us know. We’ll
help make it work for you, or we’ll refund your money.

TABLE OF CONTENTS
SPECIFICATIONS:
SPECIFICATIONS________________________________________________1
IMPORTANT SAFETY INSTRUCTIONS_______________________________2
INSTALLATION REQUIREMENTS____________________________________3
Parts Supplied ________________________________________________3
Location Requirements _________________________________________4
Ventilation Requirements ________________________________________5
Electrical Requirements _________________________________________5
INSTALLATION INSTRUCTIONS_____________________________________5
Prepare Location_______________________________________________5
Install the Range Hood__________________________________________6
RANGE HOOD USE ______________________________________________9
Range Hood Controls ___________________________________________9
Operating the Hood _____________________________________________9
RANGE GOOD CARE____________________________________________10
Cleaning & Maintenance________________________________________10
WARNING: TO REDUCE THE RISK OF FIRE, ELECTRIC SHOCK, OR INJURY TO
PERSONS, READ THE FOLLOWING:
• Use this unit only in the manner intended by the manufacturer. If you have any
questions, please contact the manufacturer.
• Make sure that the voltage indicated on the rating plate of the appliance corresponds
to your outlet voltage.
• Do not attempt to alter the technical features of the range hood as this poses a safety
risk.
• Installation work and electrical wiring must be done by a qualified professional(s) in
accordance with all applicable codes, standards, and fire-rated constructions.
• The manufacturer does not accept any liability for any damage or injury caused by
improper installation.
• ATTENTION! This range hood is for wall-mounting ONLY.
• When cutting or drilling into walls or ceilings, be aware of electrical wires, piping, and
other utilities.
• To prevent back draft, sufficient air is needed for proper combustion.
CAUTION: To reduce the risk of fire and to properly exhaust air, be sure to duct air
outside - DO NOT vent exhaust air into attics, crawl spaces, garages, or within walls
and ceilings.
CAUTION: For general ventilation use only. Do not use to exhaust hazardous or
explosive materials and vapors.
• Do not operate the range hood with a damaged cord or plug. Discard the hood or
return to an authorized service facility for further examination and/or repair.
• Before servicing or cleaning the unit, switch the power off, and lock the electrical
panel. This will prevent the power from accidentally turning on. If the electrical panel
does not lock, secure a warning label, such as a tag, to the electrical panel.
• The appliance is not intended to be used or cleaned by children or persons with
reduced physical, sensory, or mental capabilities or lack of experience and knowledge
of the hazards involved.
WARNING: TO REDUCE THE RISK OF A COOKTOP GREASE FIRE, READ THE
FOLLOWING:
• Never leave cooking elements unattended at high settings. Boilovers can cause
smoke and grease to spill over that may ignite. Heat oils slowly on low or medium
settings.
• Always turn hood ON when cooking at high heat or when flambéing food.
• Clean ventilation fans frequently. Grease should not be allowed to accumulate on the
fan or filter.
1
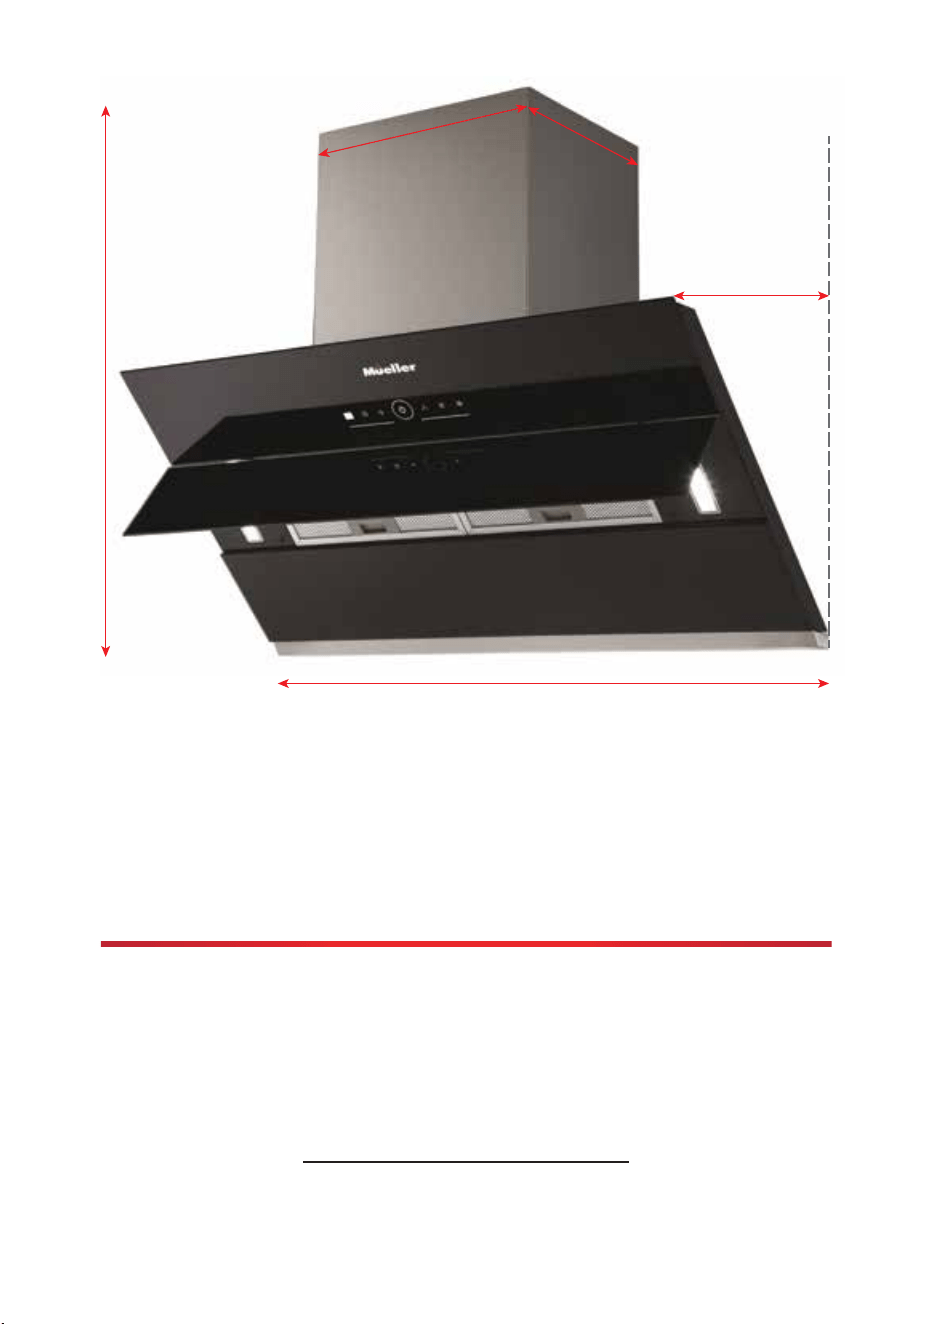
Dimensions: 35.4/16.3/28.7 in; (900/415/730 mm)
Weight: 59.5lbs / 27kg
Filter size: 12/5.4 in; (305/138 mm)
CFM: Low 550m3/h; Medium 720m3/h; High 900m3/h

IMPORTANT SAFETY INSTRUCTIONS
WARNING: TO REDUCE THE RISK OF FIRE, ELECTRIC SHOCK, OR INJURY TO
PERSONS, READ THE FOLLOWING:
• Use this unit only in the manner intended by the manufacturer. If you have any
questions, please contact the manufacturer.
• Make sure that the voltage indicated on the rating plate of the appliance corresponds
to your outlet voltage.
• Do not attempt to alter the technical features of the range hood as this poses a safety
risk.
• Installation work and electrical wiring must be done by a qualified professional(s) in
accordance with all applicable codes, standards, and fire-rated constructions.
• The manufacturer does not accept any liability for any damage or injury caused by
improper installation.
• ATTENTION! This range hood is for wall-mounting ONLY.
• When cutting or drilling into walls or ceilings, be aware of electrical wires, piping, and
other utilities.
• To prevent back draft, sufficient air is needed for proper combustion.
CAUTION: To reduce the risk of fire and to properly exhaust air, be sure to duct air
outside - DO NOT vent exhaust air into attics, crawl spaces, garages, or within walls
and ceilings.
CAUTION: For general ventilation use only. Do not use to exhaust hazardous or
explosive materials and vapors.
• Do not operate the range hood with a damaged cord or plug. Discard the hood or
return to an authorized service facility for further examination and/or repair.
• Before servicing or cleaning the unit, switch the power off, and lock the electrical
panel. This will prevent the power from accidentally turning on. If the electrical panel
does not lock, secure a warning label, such as a tag, to the electrical panel.
• The appliance is not intended to be used or cleaned by children or persons with
reduced physical, sensory, or mental capabilities or lack of experience and knowledge
of the hazards involved.
WARNING: TO REDUCE THE RISK OF A COOKTOP GREASE FIRE, READ THE
FOLLOWING:
• Never leave cooking elements unattended at high settings. Boilovers can cause
smoke and grease to spill over that may ignite. Heat oils slowly on low or medium
settings.
• Always turn hood ON when cooking at high heat or when flambéing food.
• Clean ventilation fans frequently. Grease should not be allowed to accumulate on the
fan or filter.
2
INSTALLATION REQUIREMENTS
WARNING: TO REDUCE THE RISK OF FIRE, ELECTRIC SHOCK, OR INJURY TO
PERSONS, READ THE FOLLOWING:
• Use this unit only in the manner intended by the manufacturer. If you have any
questions, please contact the manufacturer.
• Make sure that the voltage indicated on the rating plate of the appliance corresponds
to your outlet voltage.
• Do not attempt to alter the technical features of the range hood as this poses a safety
risk.
• Installation work and electrical wiring must be done by a qualified professional(s) in
accordance with all applicable codes, standards, and fire-rated constructions.
• The manufacturer does not accept any liability for any damage or injury caused by
improper installation.
• ATTENTION! This range hood is for wall-mounting ONLY.
• When cutting or drilling into walls or ceilings, be aware of electrical wires, piping, and
other utilities.
• To prevent back draft, sufficient air is needed for proper combustion.
CAUTION: To reduce the risk of fire and to properly exhaust air, be sure to duct air
outside - DO NOT vent exhaust air into attics, crawl spaces, garages, or within walls
and ceilings.
CAUTION: For general ventilation use only. Do not use to exhaust hazardous or
explosive materials and vapors.
• Do not operate the range hood with a damaged cord or plug. Discard the hood or
return to an authorized service facility for further examination and/or repair.
• Before servicing or cleaning the unit, switch the power off, and lock the electrical
panel. This will prevent the power from accidentally turning on. If the electrical panel
does not lock, secure a warning label, such as a tag, to the electrical panel.
• The appliance is not intended to be used or cleaned by children or persons with
reduced physical, sensory, or mental capabilities or lack of experience and knowledge
of the hazards involved.
WARNING: TO REDUCE THE RISK OF A COOKTOP GREASE FIRE, READ THE
FOLLOWING:
• Never leave cooking elements unattended at high settings. Boilovers can cause
smoke and grease to spill over that may ignite. Heat oils slowly on low or medium
settings.
• Always turn hood ON when cooking at high heat or when flambéing food.
• Clean ventilation fans frequently. Grease should not be allowed to accumulate on the
fan or filter.
• Use proper pan size. Always use cookware appropriate for the size of the surface
element.
WARNING: TO REDUCE THE RISK OF INJURY, IN THE EVENT OF A COOKTOP
GREASE FIRE, READ THE FOLLOWING:
• SMOTHER FLAMES with a close-fitting lid, cookie sheet, or metal tray, then turn off
the burner. BE CAREFUL TO PREVENT BURNS. If the flames do not go out
immediately, EVACUATE AND CALL THE FIRE DEPARTMENT.
• NEVER PICK UP A FLAMING PAN - you may be burned.
• DO NOT USE WATER, including wet dishcloths or towels - a violent steam explosion
will result.
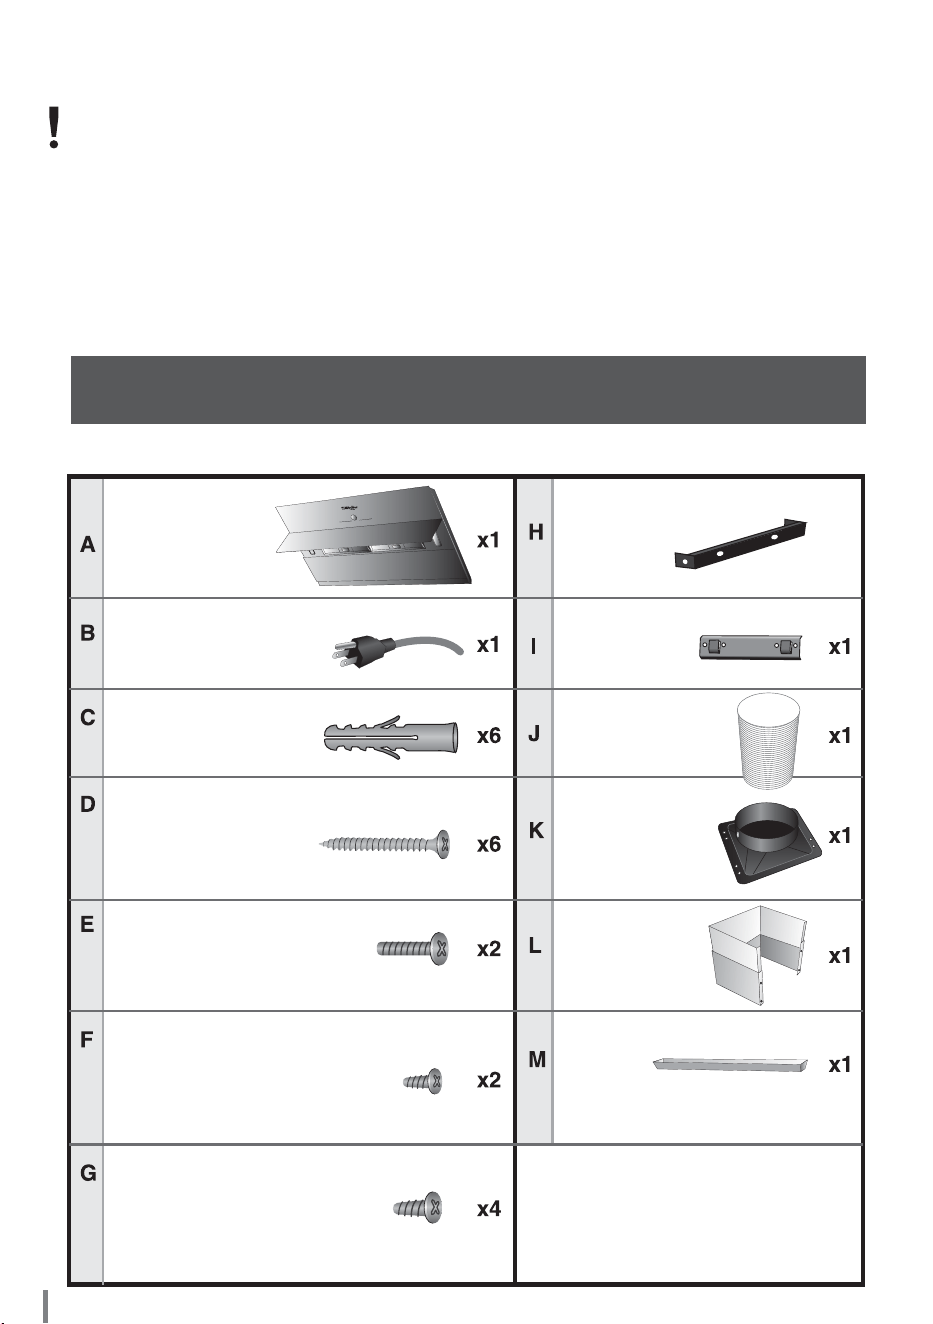
PARTS SUPPLIED
Power cord (attached
to the Range Hood)
Wall Anchor
(for the Wall Mount)
Wall Anchor Screw 4x40
(to screw the Wall
Mount to the wall)
Flat Head Screw 4x18
(to fasten the Range
Hood Mount to the Cover)
Pan Head Tapping Screw
4x8 (to fasten the Exhaust
Duct to the Exhaust Duct
Base)
Taptite Screw 4x10
(to fasten the Exhaust
Duct Cover to the Hood’s
main body)
Range Hood
Mount
Wall Mount
Exhaust Duct
Exhaust Duct
Base
Exhaust Duct
Cover
Grease
Collector
6.3"/160mm Diameter
Range Hood
3
X1
WARNING: TO REDUCE THE RISK OF FIRE, ELECTRIC SHOCK, OR INJURY TO
PERSONS, READ THE FOLLOWING:
• Use this unit only in the manner intended by the manufacturer. If you have any
questions, please contact the manufacturer.
• Make sure that the voltage indicated on the rating plate of the appliance corresponds
to your outlet voltage.
• Do not attempt to alter the technical features of the range hood as this poses a safety
risk.
• Installation work and electrical wiring must be done by a qualified professional(s) in
accordance with all applicable codes, standards, and fire-rated constructions.
• The manufacturer does not accept any liability for any damage or injury caused by
improper installation.
• ATTENTION! This range hood is for wall-mounting ONLY.
• When cutting or drilling into walls or ceilings, be aware of electrical wires, piping, and
other utilities.
• To prevent back draft, sufficient air is needed for proper combustion.
CAUTION: To reduce the risk of fire and to properly exhaust air, be sure to duct air
outside - DO NOT vent exhaust air into attics, crawl spaces, garages, or within walls
and ceilings.
CAUTION: For general ventilation use only. Do not use to exhaust hazardous or
explosive materials and vapors.
• Do not operate the range hood with a damaged cord or plug. Discard the hood or
return to an authorized service facility for further examination and/or repair.
• Before servicing or cleaning the unit, switch the power off, and lock the electrical
panel. This will prevent the power from accidentally turning on. If the electrical panel
does not lock, secure a warning label, such as a tag, to the electrical panel.
• The appliance is not intended to be used or cleaned by children or persons with
reduced physical, sensory, or mental capabilities or lack of experience and knowledge
of the hazards involved.
WARNING: TO REDUCE THE RISK OF A COOKTOP GREASE FIRE, READ THE
FOLLOWING:
• Never leave cooking elements unattended at high settings. Boilovers can cause
smoke and grease to spill over that may ignite. Heat oils slowly on low or medium
settings.
• Always turn hood ON when cooking at high heat or when flambéing food.
• Clean ventilation fans frequently. Grease should not be allowed to accumulate on the
fan or filter.
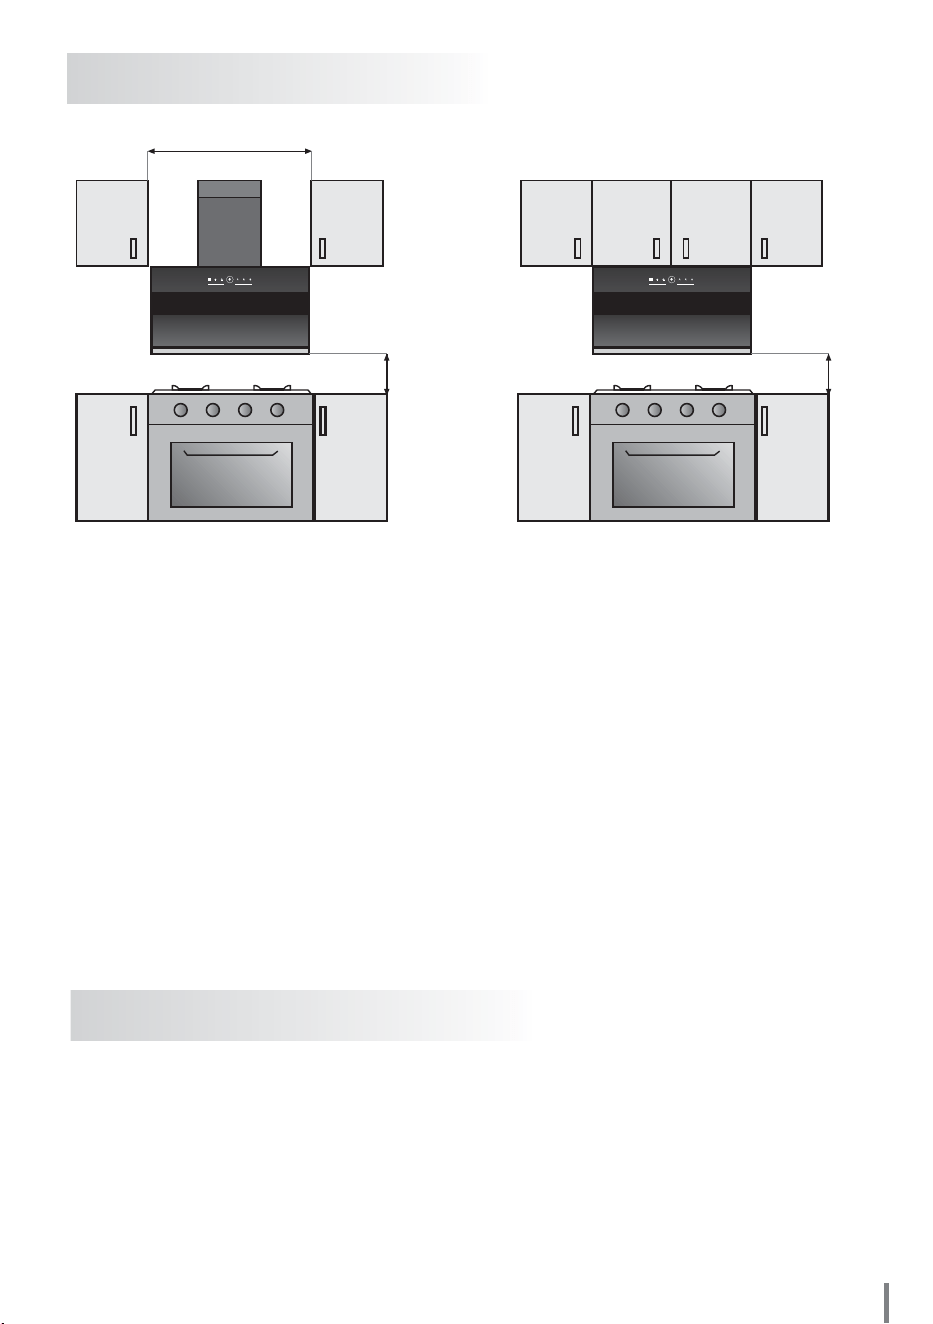
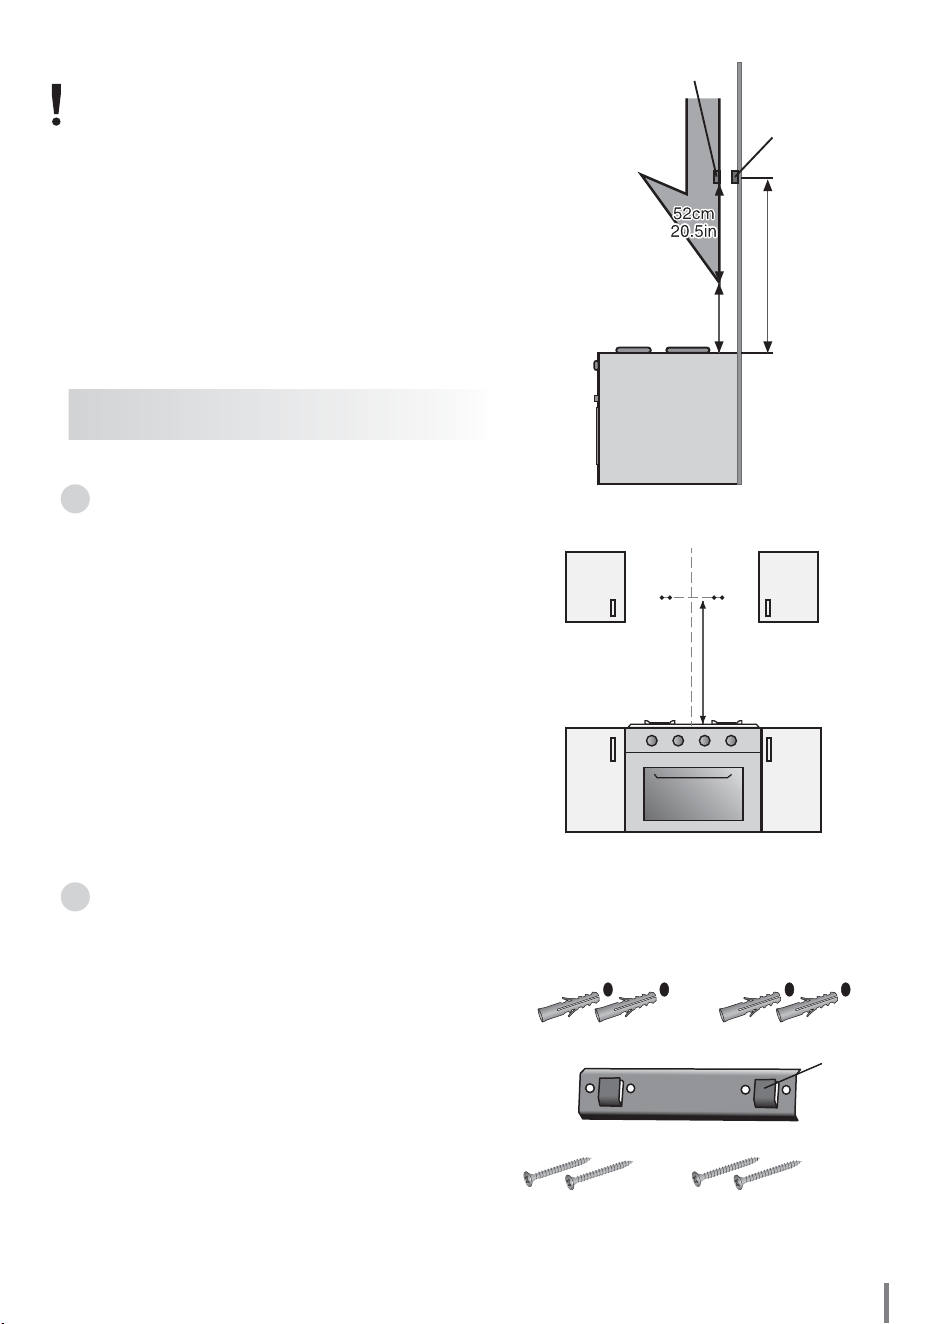
LOCATION REQUIREMENTS
Pic. 1-A:
Installation Type – STAND ALONE
Pic. 1-B:
Installation Type - EMBEDDED
35-45cm
13.8-17.7 in
35-45cm
13.8-17.7 in
90cm /35.4in
This range hood has been designed to be wall‐mounted above a Gas stove/Hob.
Before starting the installation, consideration should be given to how the
installation is to be carried out, ensuring adequate space and clearances above
the Gas stove/Hob.
When installed, the range hood must be positioned at least 13.8 in (35 cm)
above the gas stove.
If the exhaust pipe is too long or there are too many bends, please select a
suitable position to install the Range Hood to make the appliance reach its perfect
sucking-in smoke mode.
PRIOR TO INSTALLATION:
- Unpack range hood and ensure all listed parts are in the box.
- It is recommended for the vent system to be installed before the hood is installed.
- Before making cutouts, make sure there is proper clearance within the ceiling or
walls for the exhaust vent.
- It is recommended that a professional installer performs the range hood
installation.
4

INSTALLATION INSTRUCTIONS
- It is recommended for the vent system to be installed before hood is installed.
- Before making cutouts, make sure there is proper clearance within the ceiling or
walls for the exhaust vent.
- Disconnect the power.
IMPORTANT:
This installation is for mounting the product to a wall. Ensure your wall has the
proper support to hold the range hood weight (27 kg / 59.5 lbs).
These instructions are general guidelines; please consult your installation
specialist regarding the best type of mounting hardware and support system
based on your wall construction. All wall-mounted range hoods, if possible,
should be installed and supported by studs behind the wall (hardware not
included). In the event studs are not in alignment with the wall mount mounting
plate holes, a wooden cross support system will need to be retrofitted to your
existing studs. All homes are different, and installations will vary.
PREPARE LOCATION:
VENTILATION REQUIREMENTS:
• This range hood must be ventilated to the outdoors.
• Do not ventilate the range hood into an attic or other enclosed areas.
• It is recommended that the range hood be vented vertically through the roof
through a minimum of 6" or larger round metal/aluminum vent work.
• Use no more than three 90° elbows. The length of the vent system and number
of elbows should be kept to a minimum to provide efficient performance.
• Use silver tape or duct tape to seal all joints in the vent system.
• Use caulking to seal exterior wall or roof opening once installed.
ELECTRICAL REQUIREMENTS:
Ensure there is availability of an electrical power socket to power the range hood
before fixing to the wall.
Observe all governing codes and ordinances. Ensure that the electrical installation
is adequate and in accordance with the National Electrical Codes, ANSI/NFPA 70
(latest edition), all local codes, and ordinances.
- A 120-volt, 60 Hz., AC only, fused electrical circuit is required.
5
INSTALL THE RANGE HOOD
1. Find the center of the wall where you
are installing the hood. Mark your center
line to the ceiling and measure out from
the center to mark the position of your
four mounting points. The (4) mounting
holes will be found on the Wall Mount
(part I).
Make sure your mounting points are
leveled when you mark them. It is
recommended to install the hood
directly into wood supports.
2. Mark the mounting points, use the 8
drill bit to drill four holes, then insert the
four Wall Anchors (part C) directly into
the wall.
Position the Wall Mount (part I) over the
wall anchors and secure with four
mounting screws provided (part D).
Hanging
Lip
Upward
87cm
34.25in
87cm
34.25in
35-45cm
13.8-17.7 in
Stove
Range
Hood
Install
Wall Mount
Wall
Mount
Rack
NOTE:
The distance between the stove and
the Wall Mount should be at least 87
cm (34.25 in) to maintain the minimum
distance requirement of 35cm (13.8 in)
between the stove and the bottom of
the Range Hood.
6
NOTE:
Make sure that the hanging lips of the
Wall Mount are pointed upward because
you will need to hang the Hood on them.
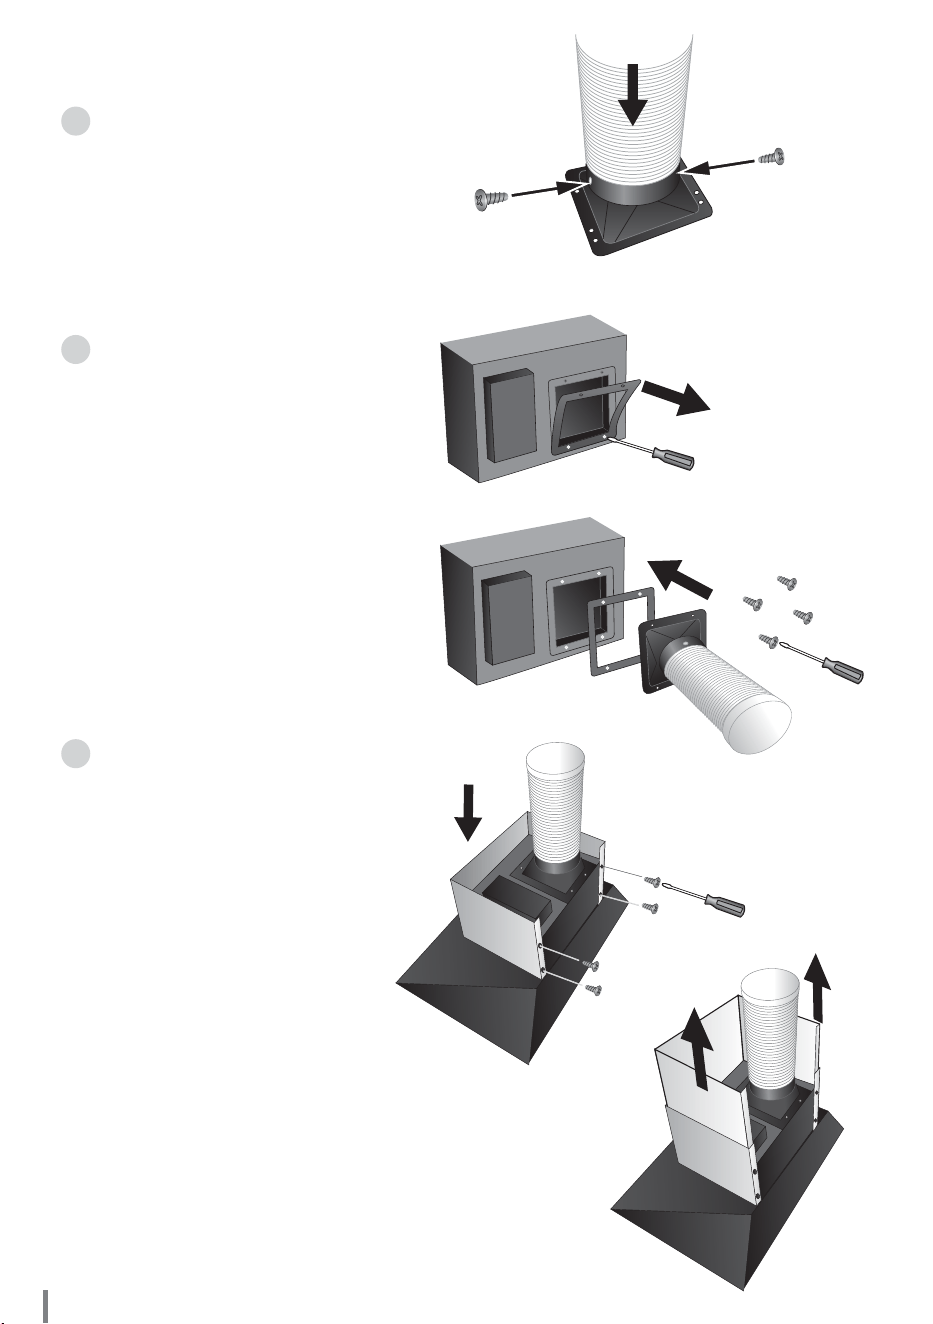
3. Attach the Exhaust Duct
Base (part K) to the Exhaust
Duct (part J) using the two
screws provided (part F).
7
4. Unscrew the square Rubber
Pad at the exhaust opening of
the range hood.
Align the Rubber Pad with the
bottom of the Exhaust Duct
Base (part K), and then
reattach to the opening of the
range hood with the same 4
screws.
5. Carefully stand the Range
Hood in the upright position.
Align the stainless steel
finished Exhaust Duct Cover
(part L) around the face of the
range hood main body. Secure
this cover with four Taptite
Screws (part G) to fasten the
cover to the range hood’s main
body.
Once secure, carefully lift up
the secondary inner cover
located behind the stainless
steel finished face, so that the
cover doubles in height.
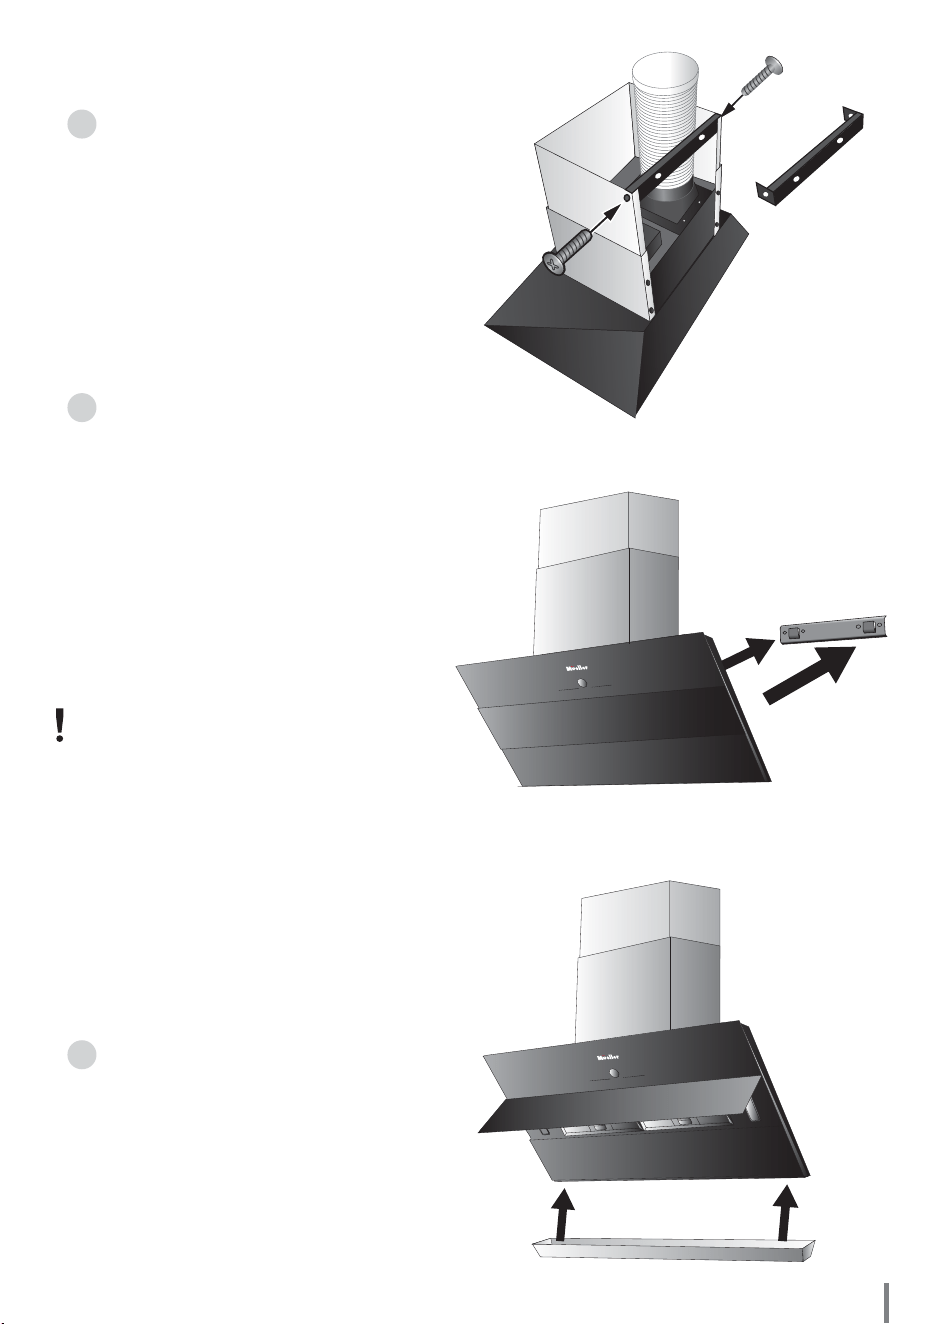
6. Fasten the Range Hood
Mount (part H) to the upper half
of the Exhaust Cover (part L).
Ensure the flat side of the Range
Hood Mount is facing externally so
that it can be mounted securely.
7. Carefully hang the Range Hood
by positioning the Range Hood
Mount onto the hanging lips of the
installed Wall Mount.
Connect the Open end of the
Exhaust Duct to the vent and
ensure it is appropriately sealed.
Connect the Power Cord to the
electrical socket.
Important: When the POWER
On/Off button is pressed the front
panel will automatically open to
reveal the filters (Refer to image in
No. 8 below). Do not manually
close as this may damage the unit.
Always use the POWER On/Off
button.
8. Once the Range Hood is
securely mounted, attach the
Grease Collector (part M). Align
with the tabs located at the base of
the face of the Range Hood and
lock into position.
8
RANGE HOOD USE
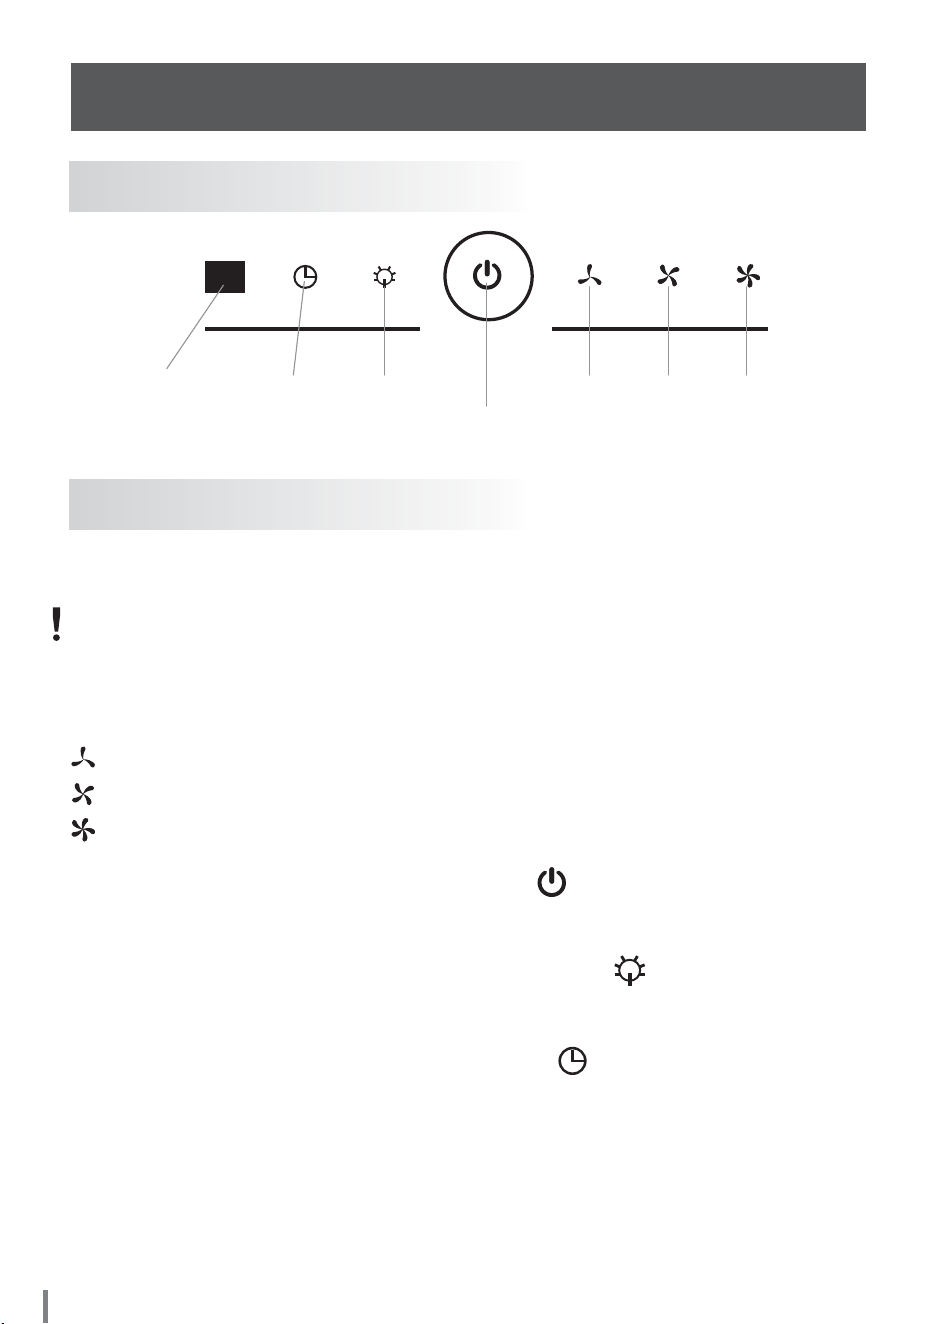
RANGE HOOD CONTROLS:
OPERATING THE HOOD:
Timer
Speed &
Timer Indicator
Low Medium High
Light
On/Off
Power
On/Off
Exhaust
To operate the Range Hood press the Power On/Off Button. The front panel of the
range hood will automatically open up.
WARNING: Never push or pull the glass panel to manually close as this may
damage the unit. Only the Power Button should be used to open or close the
panel.
Fan Speed Options:
Low (Speed/Timer Indicator shows F1)
Medium (Speed/Timer Indicator shows F2)
High (Speed/Timer Indicator shows F3)
- To turn the fan OFF, press the Power button.
The glass panel will close automatically.
- To operate light on/off press the Light On/Off button
(Note: The fan and light operate independently of each other).
- For automatic shut-off, press the Timer button
• 1 min – press once,
• 3 min – press twice,
• 5 min – press three times,
• 15 min – press four times.
Pressing the Timer button once again will deactivate the timer.
9
RANGE HOOD CARE
CLEANING & MAINTENANCE:
IMPORTANT: Clean the hood and panel filters frequently according to the
following instructions.
Exterior Surfaces:
To avoid damage to the exterior surface, do not use steel wool or soap-filled
scouring pads. Always wipe dry to avoid water marks.
Cleaning Method:
- Liquid detergent soap and water, or all-purpose cleaner.
- Wipe with a soft damp cloth or non-abrasive sponge, rinse with clean water, and
wipe dry.
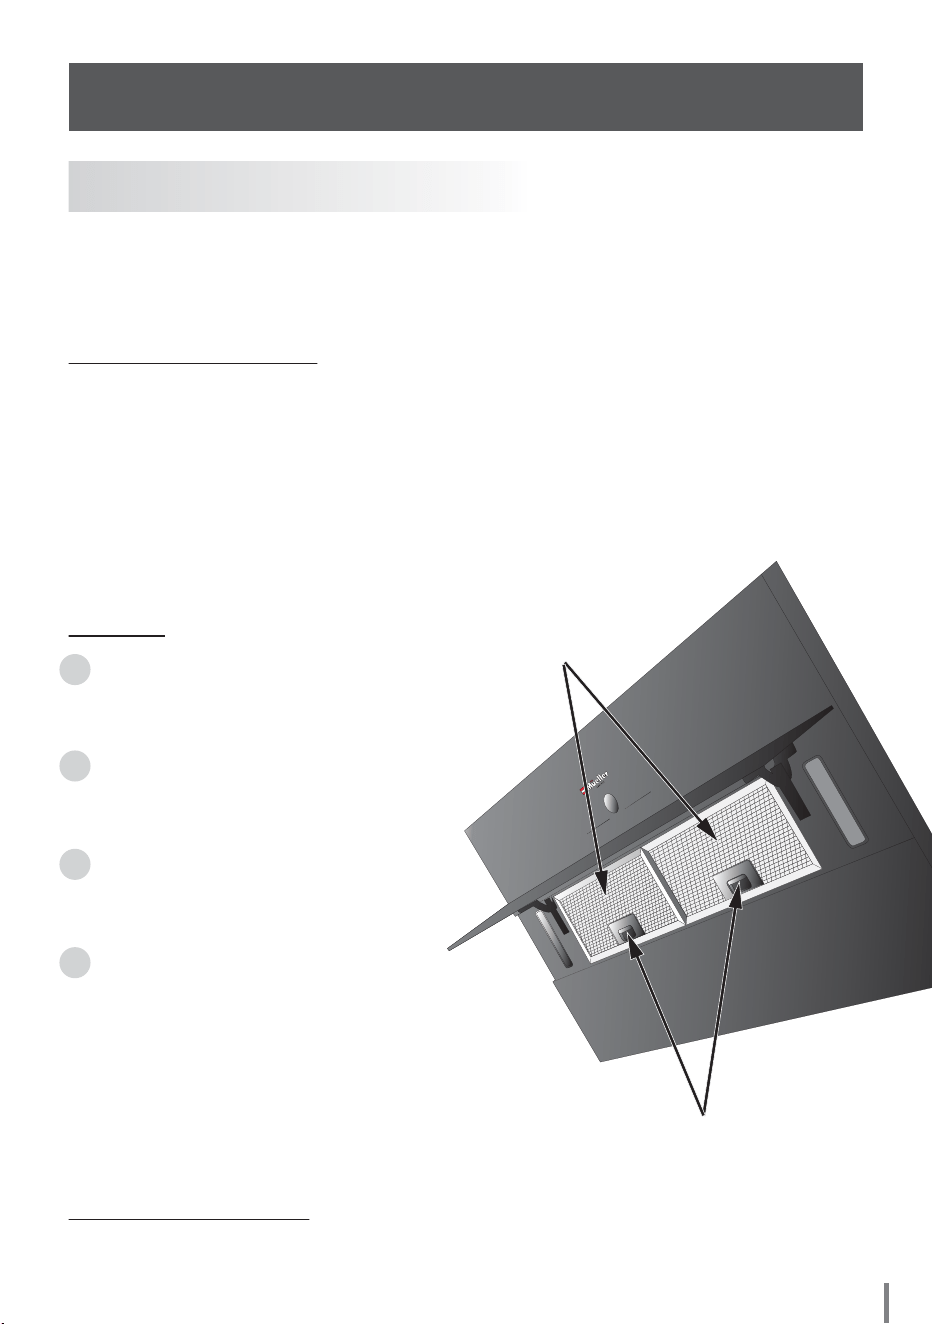
1. Remove the filter by pushing in the tab
of the spring release handles and then
pulling down the filters.
2. Wash filters with hot detergent solution.
Cleaning in the dishwasher is not
recommended. Tarnishing may occur.
3. Make sure the filters are
completely dry before reinserting
into the range hood.
4. Reinstall the filters one by one,
making sure that spring release handles
are located towards the back of the range
hood.
NOTE: Replace the panel filters before
operating hood.
10
Grease Collector:
Periodically remove the grease tray and clean build up grease collection.
Filters:
Release handles
Filters
If you are not happy with the product for any reason, please
contact us at [email protected] with your feedback or
questions, and we will do our best to make things right for you!
Your purchase comes with a 100%
satisfaction guarantee from Müeller
168 Mason Way Unit #4A, City of Industry, CA 91746
E-mail: [email protected]
Web: www.muellerhome.us
Müeller USA
