Ladeanzeige
Manuel du produit
FR
Manuel du produit
FR
Electric Fly Swatter
Elektrische Fliegenklatsche
Durable
LithiumBattery
1200mAh
Capacity
4000V
High Voltage
LED
Spotlight
2-Layers
Safety Grid
Quick Charge
Product Manual
● Vorstellung von Bestandteile
● Spezifikation
● Bedienungsanleitung
BEDIENUNGSANLEITUNG
Modell
Eingangsspannung
Leistung
Batteriekapazität
Max. Ausgangsspannung
Abmessung
Nettogewicht
Ladezeit
4000V
550 x 225 x 30 mm
320g
3-5h
OZW19P01L
5V
2W
1200mAh
1.Wichtig: Vor dem ersten Gebrauch laden Sie vollständig bitte auf.
2. Moskitos töten:
2.1. Bitte schieben Sie die Taste auf Position ON, das Produkt befindet
sich im Standby-Zustand.
2.2. Drücken und halten Sie die Taste, um die Moskitos zu töten. Der
Anzeiger ist jetzt eingeschaltet. Beim Loslassen kehrt die Fliegenklatsche in
Standby-Zustand zurück.
2.3. Wenn Sie die Fliegenklatsche ausschalten möchten, schieben Sie die
Taste auf Position OFF.
3. In der Nacht Moskitos töten:
3.1. Bitte schieben Sie die Taste auf , vorne LED-Lampe
eingeschaltet wird. Dann wiederholen Sie den 2.2 Schritt
4. Taschenlampe-Funktion:
4.1. Bitte schieben Sie die Taste, um die Taschenlampe einzuschalten.
Diese Taschenlampe ist abziehbar.
Hinweis: ●Wenn die Fliegenklatsche aufgeladen ist, leuchtet der Ladesanzeiger
rot. Nach vollständiger Aufladung leuchtet es blau.
●Wenn die Netzspannung niedrig ist, funktioniert der LED-Strahler
möglicherweise noch. Sie werden von einem separaten Stromkreis gesteuert.
Abziehbarer Griff
Schalter von Taschenlampe
Schalter von Fliegenklatsche
ON/OFF
Schalter
(Beleuchtungsmodi)
ON(Mücke töten)
OFF(Fliegenklatsche
ausschalten)
Lithiumbatterie
enthalten
Untere LED-Lampe Vorne LED-Lampe
Anzeiger
Metallgitter
● Structure du produit
● Spécifications du produit
● Utilisation
Poignée amovible
Projecteur LED
Bouton "Zap"
Interrupteur
d'éclairage
Bouton
MARCHE/ARRÊT
Modèle
Tension
Puissance
Capacité de la batterie
Tension de fonctionnement
Taille
Poids net
Temps de charge
4000V
550 x 225 x 30 mm
320g
3-5h
OZW19P01L
5V
2W
1200mAh
Bouton du Projecteur
1. Veuillez recharger le produit complètement avant la première utilisation.
2. Poussez le bouton sur “ON” pour allumer, le produit est en mode stand-by.
Maintenez le bouton enfoncé, puis le témoin rouge s'allume, la tapette
est fin prête à éliminer tout insecte. Relâchez le bouton et repassez en mode
stand-by, le voyant lumineux s'éteint.
3. Poussez la touche vers le haut, le voyant LED Avant s'allumera et vous
permettra de l'utiliser dans l'obscurité. Maintenez le bouton enfoncé
pour éliminer les insectes.
4. Poussez le bouton en bas pour éteindre le produit.
5. Poussez le bouton du projecteur en bas pour allumer le projecteur LED
situé en dessous. Ceci peut fonctionner comme une torche électrique pour votre
occasion.
Remarque: ●l'indicateur de charge est rouge lorsque la tapette est en charge;
la lumière devient bleue après une charge complète.
●Lorsque la tension du réseau est faible, le projecteur LED peut toujours
fonctionner. Ils sont contrôlés par un circuit électrique séparé.
Interrupteur
Voyant Avant LED
Indicateur de travail Grille
DE
Indicatore
di carica
Indicador
de carga
Indicateur
de charge
Manual del Instrucciones
● Estructura del Producto
● Especificaciones del Producto
● Uso
Manija Desmontable
Foco LED
Botón de
“Ataque”
Interruptor
de Luz
Interruptor
On/Off
Batería de litio
incorporada
Modelo
Voltaje
Potencia
Capacidad de batería
Voltaje de funcionamiento
Tamaño
Peso net
Tiempo de carga
4000V
550 x 225 x 30 mm
320g
3-5h
OZW19P01L
5V
2W
1200mAh
Interruptor de Foco
1. Cargue completamente el producto antes del primer uso.
2. Empuje hacia arriba el botón al centro para encender, el producto
estará en el modo de espera. Mantenga pulsado el botón , la luz
indicadora está encendida, la raqueta matamoscas eléctrica está lista para
atacar los mosquitos. Suelte el botón y regrese al estado de espera, la luz
indicadora se apaga.
3. Empuje el Interruptor hacia la cima, la Luz LED Frontal se encenderá y
le permite utilizarlo en la oscuridad. Mantenga pulsado el botón para
atacar los mosquitos.
4. Empuje el Interruptor a la parte inferior, el producto detiene el
funcionamiento.
5. Empuje hacia abajo el Interruptor de Foco para encender el foco
LED en la parte inferior. Puede utilizarlo como una linterna de acuerdo con
sus necesidades.
Nota: ●el indicador de carga es rojo cuando el matamoscas está a cargo; la
luz se vuelve azul después de estar completamente cargada.
●Cuando el voltaje de la red es bajo, el reflector LED aún podría funcionar.
Están controlados por un circuito eléctrico separado.
Botón de Encendido Luz LED Frontal
Indicador de trabajo Red
ESES
● Precauciones
● Características
Manual del Instrucciones
Protective net
Protective net
ABS insulation
net
ABS insulation
net
Voltage grid
1. Cuando la raqueta matamoscas eléctrica está funcionando, la rejilla de
metal se generará 4000 V de alto voltaje, ¡no lo toque con mano o objeto
metálico! No es un juguete, mantenga alejado de los niños.
2. No lo use en los ambientes malos o en lugares con gases o líquidos inflamables,
como graneros y cobertizos para ganado.
3. Cuando no lo usa, gire el interruptor de alimentación a “OFF” y colóquelo en
un lugar seco.
4. No lo limpie con agua, toalla húmeda o aerosol, que podría causar circuito o
daño. Mantenga que la raqueta matamoscas eléctrica sea seca para evitar los
daños a los componentes internos.
5. No golpee en objetos duros para evitar los daños a la rejilla de metal.
6. Por favor cárguelo a tiempo después de agotarse la energía. No use el producto
al cargar. El tiempo máximo de carga no debe exceder 12 horas.
7. Si no planifica usar el producto durante un período largo, cárguelo durante
8 horas cada 3 meses, de lo contrario, acortará la vida útil de la batería.
1. Con la luz LED frontal, puede utilizar
la raqueta matamoscas eléctrica
para atacar los mosquitos fácilmente,
e incluso en la oscuridad.
2. Hay redes protectoras de dual capa en la parte
delantera y trasera de la raqueta matamoscas
eléctrica. Sin peligro de descargas eléctricas,
seguro para usar. (Rejilla protectora, rejilla aislante
ABS, red de voltaje, rejilla aislante ABS, rejilla
protectora)
3. Con la textura diseñada en la manija,
es elegante, funcional y antideslizante.
4. La manija es desmontable para un
almacenamiento conveniente.
También puede utilizarse como un
foco LED.
Manuale di Istruzioni
● Struttura del Prodotto
● Specifiche Tecniche
● Istruzioni per l'uso
Manico rimovibile
Faretto LED
Pulsante di
“Colpo”
Interruttore di
illuminazione
Interruttore
On/Off
Batteria al litio
integrata
Modello
Tensione
Potenza
Capacità della batteria
Tensione di funzionamento
Dimensioni
Peso netto
Tempo di carica
4000V
550 x 225 x 30 mm
320g
3-5h
OZW19P01L
5V
2W
1200mAh
Interruttore di Faretto
1. Caricare completamente il prodotto prima di procedere al primo utilizzo.
2. Spingere l'Interruttore verso l'alto fino al centro per accendere il prodotto,
il prodotto entrerà in modalità standby. Tenere premuto il pulsante , la
spia rossa si accende, la racchetta scacciamosche è pronta per colpire gli
insetti. Rilasciare il pulsante e il prodotto torna alla modalità standby, la spia
luminosa si spegne.
3. Spingere l'Interruttore verso l'alto, la Luce LED Anteriore si accenderà e
consentirà di utilizzare il prodotto al buio. Tenere premuto il pulsante per
colpire gli insetti.
4. Spingere l'Interruttore verso il basso, il prodotto smette di funzionare.
5. Spingere verso il basso l'Interruttore di Faretto per accendere il faretto
LED nella parte inferiore. Questo può funzionare come torcia elettrica in base
alle tue esigenze.
Nota:● l'indicatore di carica è rosso quando lo swatter è in carica; la luce diventa
blu dopo essere completamente carica.
●Quando la tensione di rete è bassa, il faretto a LED potrebbe ancora
funzionare. Sono controllati da un circuito elettrico separato.
Pulsante di accensione Luce anteriore LED
Indicatore di
funzionamento
Griglia
ITIT
● Precauzioni
● Caratteristiche
Manuale di Istruzioni
Rete protettiva
Rete protettiva
Rete isolante
in ABS
Rete isolante
in ABS
Griglia di
tensione
1. Mentre la racchetta scacciamosche è in funzione, la griglia metallica
genererà un'alta tensione di 4000V, non toccarla con mani od oggetti metallici!
Non è un giocattolo, tenerlo fuori dalla portata dei bambini.
2. Non utilizzare il prodotto in condizioni ambientali avverse o in luoghi con gas o
liquidi infiammabili, come fienili e stalle.
3. Mentre il prodotto non è in uso, portare l'Interruttore On/Off su "OFF" e riporlo in
un luogo asciutto.
4. Non pulire il prodotto con acqua, asciugamano bagnato o spray per evitare
cortocircuito o danni. Mantenere asciutta la racchetta antizanzare elettrica per
evitare danni ai componenti interni.
5. Non colpire oggetti duri per evitare danni alla griglia metallica.
6. Ricaricare il prodotto in tempo dopo che la batteria è esaurita. Non utilizzare il
prodotto durante la ricarica. Il tempo massimo di carica non deve essere
superiore a 12 ore.
7. Se si prevede di lasciare il prodotto inutilizzato per un lungo periodo, ricaricarlo
per 8 ore ogni 3 mesi, altrimenti diminuisce la vita utile della batteria.
1. Con questa luce LED anteriore,
puoi usare la racchetta fulmina
insetti per eliminare facilmente i
gli insetti anche al buio.
2. Ci sono reti di protezione a doppio
strato sulle parti anteriore e posteriore
della racchetta. Nessun pericolo di
scosse elettriche, sicuro da usare.
3. Con texture progettata sul manico,
elegante e funzionale per la
resistenza allo scivolamento.
4. Il manico è rimovibile per una
comoda conservazione. Può anche
funzionare come faretto.
● Avertissements
● Caractéristiques
Grille de protection
Grille de protection
Couche protectrice
d'isolation en ABS
Couche protectrice
d'isolation en ABS
Réseau de tension
1. Lors du fonctionnement de la tapette, la grille métallique génère une haute
tension de 4000V, évitez tout contact avec les mains ou tout objet métallique !
Ce produit n'est pas un jouet, veuillez le conserver hors de portée des enfants.
2. Ne pas utiliser dans des zones dangereuses ou celles renfermant des gaz ou des
liquides inflammables, tels que les granges et les étables à bétail.
3. En cas de non-utilisation, veuillez mettre l'interrupteur sur " OFF " et ranger le
produit dans un endroit sec.
4. Ne le nettoyez pas avec de l'eau, une serviette mouillée ou un vaporisateur, car
cela pourrait causer un court-circuit ou des dommages. Conservez la tapette à
moustiques électrique au sec pour éviter d'endommager les composants internes.
5. Veuillez ne pas frapper sur un objet dur pour éviter d'endommager la grille
métallique.
6. Veuillez recharger à temps une fois la charge entièrement consommée. N'utilisez
pas l'appareil pendant le chargement. La durée maximale de charge ne doit
pas dépasser 12 heures.
7. En cas de non-utilisation prolongée, rechargez l'appareil pendant 8 heures tous
les 3 mois pour préserver la durée d'utilisation de la batterie.
1. Avec ce témoin LED avant, vous
pouvez utiliser la tapette pour
éliminer facilement les insectes,
même dans l'obscurité.
2. La tapette à mouche dispose de
grilles de protection à double couche
sur ses faces avant et arrière. Sans
risque d'électrocution, utilisation sûre.
3. Dotée de texture graphique au
niveau de la poignée, elle est très
élégante et très pratique pour une
protection antidérapante.
4. La poignée peut être retirée pour
faciliter le rangement. Elle peut
également servir de projecteur
● ACHTUNG
● Besonderheiten
BEDIENUNGSANLEITUNG
1. Während der Arbeit hat Metallgitter eine stärke Spannung. Berühren Sie das
Metallgitter NICHT.
2. Es ist kein Spielzeug. Halten Sie Kinder von der elektrischen Fliegenklatsche fern.
3. NICHT in gefährlichen Bereichen mit brennbaren und explosiven Materialien
verwenden. (z.B. Tankstelle, Feuerwerk-Fabrik, LPG-Station)
4. Wenn Sie es nicht verwenden, schieben Sie die Taste auf Position OFF.
5. Verwenden Sie keine Fliegenklatsche, dass Wände oder andere harte
Gegenstände schlagen, um das Metallgitter nicht zu beschädigen.
6. Verwenden Sie das Produkt nicht während des Ladevorgangs, und laden Sie
nicht mehr als 12 Stunden auf.
7. Wenn Sie den Fliegenklatsche längere Zeit nicht verwenden, laden ihn alle 3
Monate auf, um Lebensdauer der Batterie zu verlängern.
Schutznetz
Schutznetz
ABS-Isoliernetz
ABS-Isoliernetz
elektrischer
Stacheldraht
DE
1. Vorne LED-Lampe: Sie können
Moskitos an schwach beleuchteten
Orten deutlich sehen.
2. Vor und nach dem Fliegenklatsche
wird eines doppeltes Schutznetz
eingebaut, sicherer zu verwenden.
3. Welle am Griff hinzugefügt, rutschfest,
schön und bequem.
4. Abziehbarer Griff, einfach zu lagern
und Sie können es als Taschenlampe
verwenden.
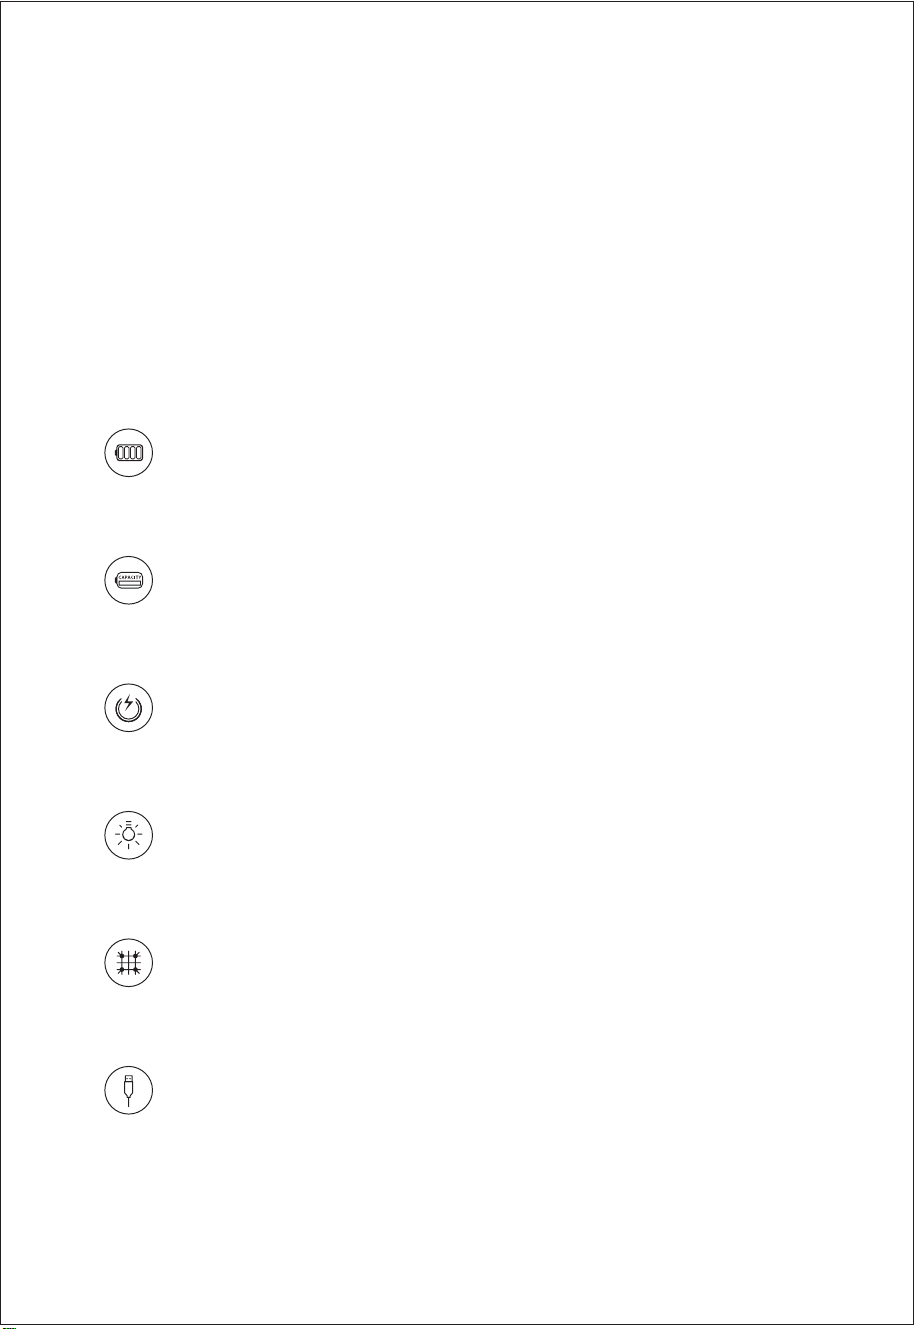
What's in the package Product Manual
Product Structure
Product specifications
Usage
Cautions
Features
1
1
1
2
2
Catalogue EN
Vorstellung von Bestandteile
Spezifikation
Bedienungsanleitung
ACHTUNG
Besonderheiten
3
3
3
4
4
Katalog DE
Structure du produit
Spécifications du produit
Utilisation
Avertissements
Caractéristiques
5
5
5
6
6
Catalogue FR
Struttura del Prodotto
Specifiche Tecniche
Istruzioni per l'uso
Precauzioni
Caratteristiche
7
7
7
8
8
Catalogare IT
Estructura del Producto
Especificaciones del Producto
Uso
Precauciones
Características
9
9
9
10
10
Catalogar ES
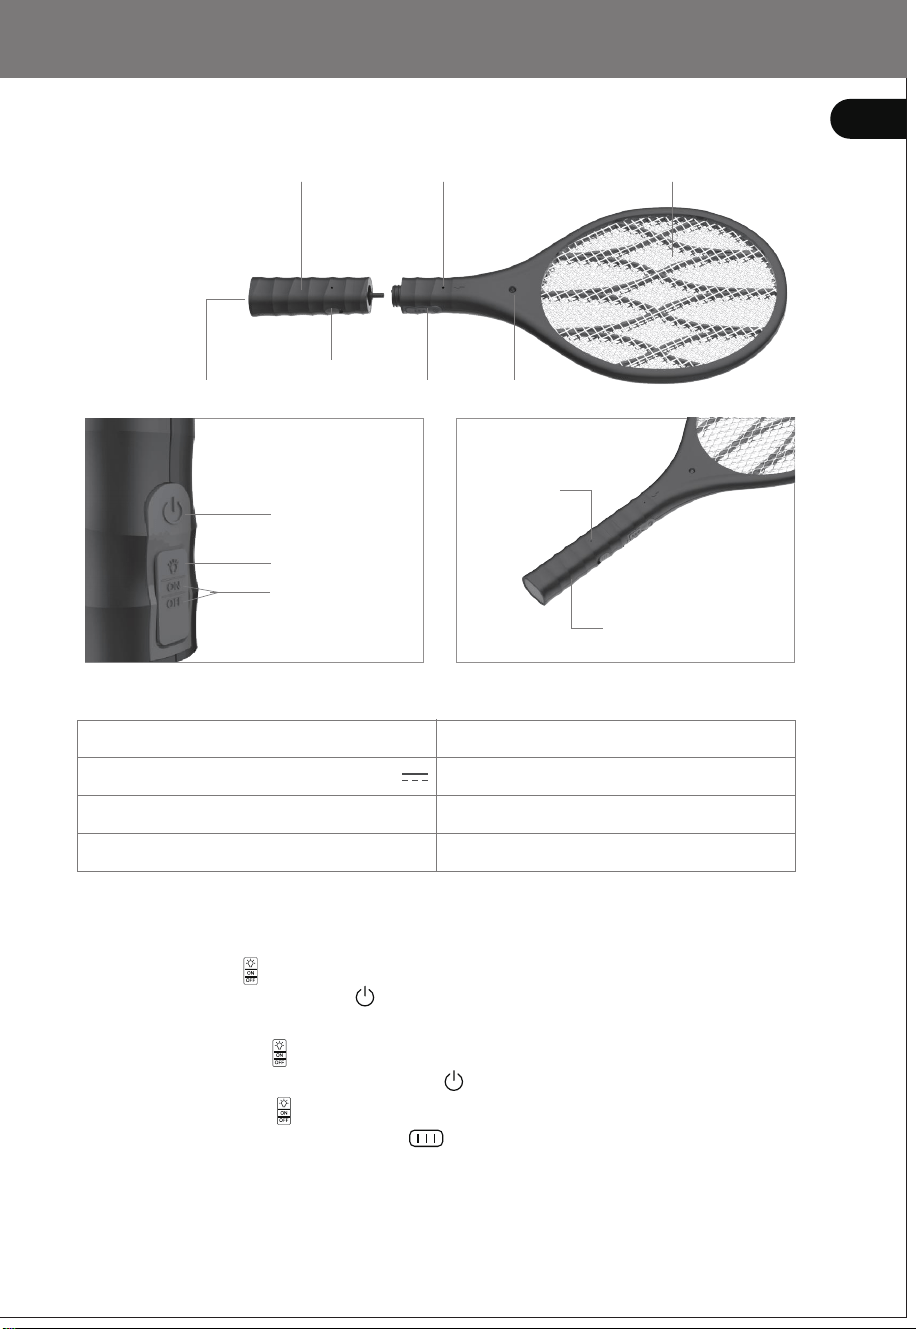
Product Manual
● Product Structure
● Product specifications
● Usage
Removable handle
LED spotlight
“Zap” Button
Lighting switch
On/Off Switch
Charging
Indicator
Model
Voltage
Power
Battery Capacity
Working voltage
Size
Net weight
Charging time
4000V
550 x 225 x 30 mm
320g
3-5h
OZW19P01L
5V
2W
1200mAh
spotlight switch
1.Please fully charge before use for the first time.
2. Push upward Switch to the middle to turn on, the product is in the standby
status. Keep pressing the button, red indicator light on, the swatter is ready
to zap the bugs. Release the button and back to standby status, indicator light off.
3. Push the Switch to the top, the Front LED Light will turn on and allows you
to use it in dark. Keep pressing the button to zap the bugs.
4. Push the Switch to the bottom, the product stops working.
5. Push down the Spotlight Switch to turn on the LED spotlight on the bottom.
This can function as an electric torch for your occasion need.
Note: ●The charging indicator is red when the swatter is in charge; the light turns blue
after fully charged.
●When the grid voltage is low, the LED spotlight might still work. They are
controlled by seperate electric circuit.
Switch button Front LED light
Working Indicator Grid
ENEN
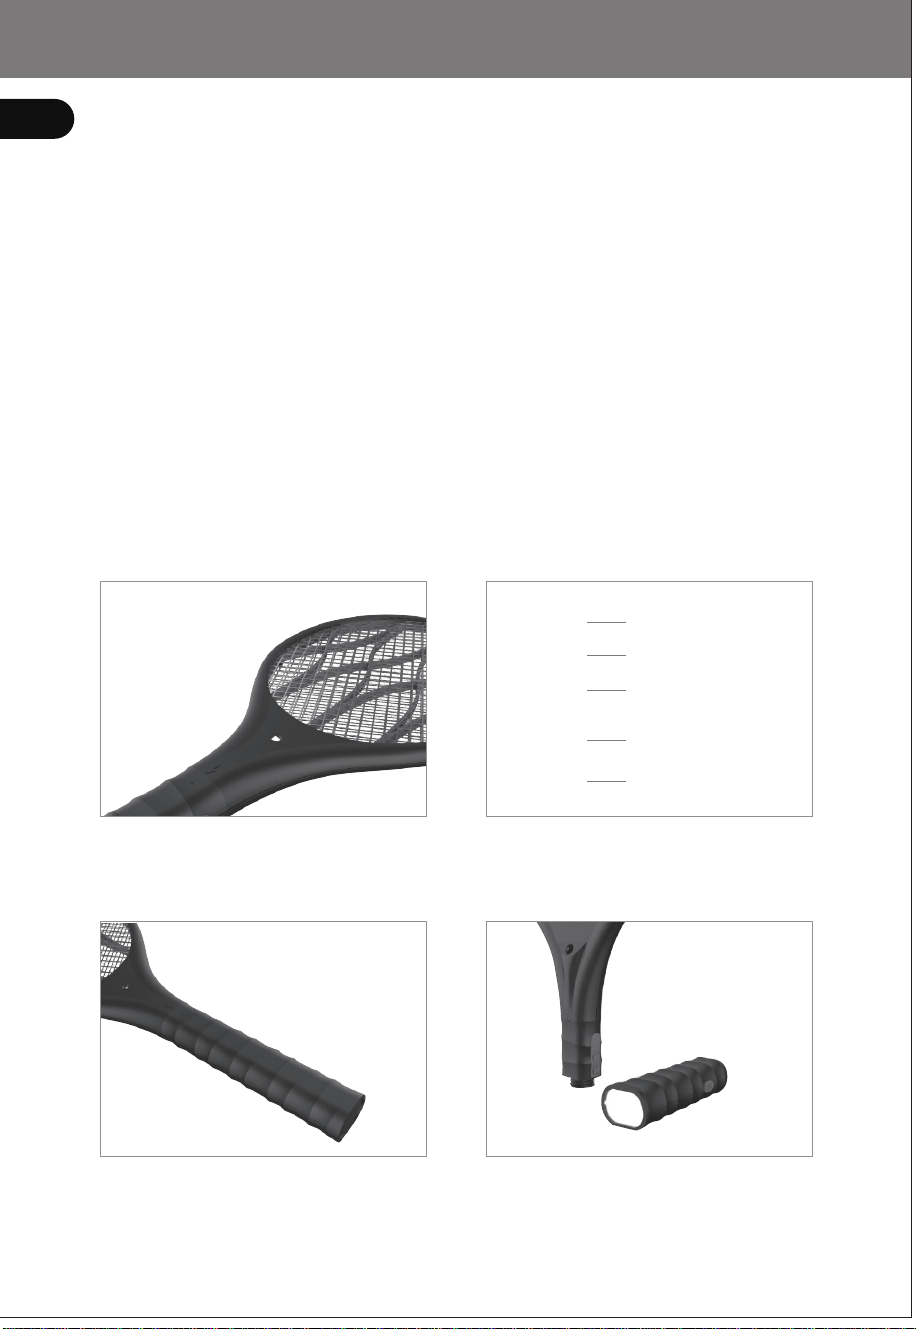
● Cautions
● Features
Product Manual
Protective net
Protective net
ABS insulation
net
ABS insulation
net
Voltage grid
1. When the swatter is working, the metal grid will generate up to 4000V high
voltage, please do not touch it with hand or metal object! It's not a toy,
please keep it out of touch of children.
2. Do not use in harsh environments or in places with flammable gases or liquids,
such as barns and livestock sheds.
3. When not in use, please turn the power switch to “ OFF ” and place it in a dry
place.
4. Do not clean it with water, wet towel or spray, which might cause short-circuit
or damage. Keep the electric mosquito swatter dry to avoid damage to
internal components.
5. Please do not flap on hard object to avoid damage to the metal grid.
6. Please charge in time after the power is used up. Do not use the product when
charging. The maximum charging time should not exceed 12 hours.
7. If the product is not being used for a long period, please recharge it for 8 hrs
every 3 months, otherwise it will reduce the service time of battery.
1. With this front LED light , you can
use the swatter to zap bugs easily
even in dark.
2. There are double-layer protective
nets on the front and back of the
swatter. No electric shock harzard,
safe for use.
3. With designed texture on the handle,
stylish and functional for anti-slip.
4. The handle can be removed for
convenient storage.It can also
function as a spotlight.
Lithium battery
inside
Batterie au
lithium intégrée
11
Warranty
1 2
3 4 5 6 7 8
9 10
Ladeanzeige
Manuel du produit
FR
Manuel du produit
FR
Electric Fly Swatter
Elektrische Fliegenklatsche
Durable
LithiumBattery
1200mAh
Capacity
4000V
High Voltage
LED
Spotlight
2-Layers
Safety Grid
Quick Charge
Product Manual
● Vorstellung von Bestandteile
● Spezifikation
● Bedienungsanleitung
BEDIENUNGSANLEITUNG
Modell
Eingangsspannung
Leistung
Batteriekapazität
Max. Ausgangsspannung
Abmessung
Nettogewicht
Ladezeit
4000V
550 x 225 x 30 mm
320g
3-5h
OZW19P01L
5V
2W
1200mAh
1.Wichtig: Vor dem ersten Gebrauch laden Sie vollständig bitte auf.
2. Moskitos töten:
2.1. Bitte schieben Sie die Taste auf Position ON, das Produkt befindet
sich im Standby-Zustand.
2.2. Drücken und halten Sie die Taste, um die Moskitos zu töten. Der
Anzeiger ist jetzt eingeschaltet. Beim Loslassen kehrt die Fliegenklatsche in
Standby-Zustand zurück.
2.3. Wenn Sie die Fliegenklatsche ausschalten möchten, schieben Sie die
Taste auf Position OFF.
3. In der Nacht Moskitos töten:
3.1. Bitte schieben Sie die Taste auf , vorne LED-Lampe
eingeschaltet wird. Dann wiederholen Sie den 2.2 Schritt
4. Taschenlampe-Funktion:
4.1. Bitte schieben Sie die Taste, um die Taschenlampe einzuschalten.
Diese Taschenlampe ist abziehbar.
Hinweis: ●Wenn die Fliegenklatsche aufgeladen ist, leuchtet der Ladesanzeiger
rot. Nach vollständiger Aufladung leuchtet es blau.
●Wenn die Netzspannung niedrig ist, funktioniert der LED-Strahler
möglicherweise noch. Sie werden von einem separaten Stromkreis gesteuert.
Abziehbarer Griff
Schalter von Taschenlampe
Schalter von Fliegenklatsche
ON/OFF
Schalter
(Beleuchtungsmodi)
ON(Mücke töten)
OFF(Fliegenklatsche
ausschalten)
Lithiumbatterie
enthalten
Untere LED-Lampe Vorne LED-Lampe
Anzeiger
Metallgitter
● Structure du produit
● Spécifications du produit
● Utilisation
Poignée amovible
Projecteur LED
Bouton "Zap"
Interrupteur
d'éclairage
Bouton
MARCHE/ARRÊT
Modèle
Tension
Puissance
Capacité de la batterie
Tension de fonctionnement
Taille
Poids net
Temps de charge
4000V
550 x 225 x 30 mm
320g
3-5h
OZW19P01L
5V
2W
1200mAh
Bouton du Projecteur
1. Veuillez recharger le produit complètement avant la première utilisation.
2. Poussez le bouton sur “ON” pour allumer, le produit est en mode stand-by.
Maintenez le bouton enfoncé, puis le témoin rouge s'allume, la tapette
est fin prête à éliminer tout insecte. Relâchez le bouton et repassez en mode
stand-by, le voyant lumineux s'éteint.
3. Poussez la touche vers le haut, le voyant LED Avant s'allumera et vous
permettra de l'utiliser dans l'obscurité. Maintenez le bouton enfoncé
pour éliminer les insectes.
4. Poussez le bouton en bas pour éteindre le produit.
5. Poussez le bouton du projecteur en bas pour allumer le projecteur LED
situé en dessous. Ceci peut fonctionner comme une torche électrique pour votre
occasion.
Remarque: ●l'indicateur de charge est rouge lorsque la tapette est en charge;
la lumière devient bleue après une charge complète.
●Lorsque la tension du réseau est faible, le projecteur LED peut toujours
fonctionner. Ils sont contrôlés par un circuit électrique séparé.
Interrupteur
Voyant Avant LED
Indicateur de travail Grille
DE
Indicatore
di carica
Indicador
de carga
Indicateur
de charge
Manual del Instrucciones
● Estructura del Producto
● Especificaciones del Producto
● Uso
Manija Desmontable
Foco LED
Botón de
“Ataque”
Interruptor
de Luz
Interruptor
On/Off
Batería de litio
incorporada
Modelo
Voltaje
Potencia
Capacidad de batería
Voltaje de funcionamiento
Tamaño
Peso net
Tiempo de carga
4000V
550 x 225 x 30 mm
320g
3-5h
OZW19P01L
5V
2W
1200mAh
Interruptor de Foco
1. Cargue completamente el producto antes del primer uso.
2. Empuje hacia arriba el botón al centro para encender, el producto
estará en el modo de espera. Mantenga pulsado el botón , la luz
indicadora está encendida, la raqueta matamoscas eléctrica está lista para
atacar los mosquitos. Suelte el botón y regrese al estado de espera, la luz
indicadora se apaga.
3. Empuje el Interruptor hacia la cima, la Luz LED Frontal se encenderá y
le permite utilizarlo en la oscuridad. Mantenga pulsado el botón para
atacar los mosquitos.
4. Empuje el Interruptor a la parte inferior, el producto detiene el
funcionamiento.
5. Empuje hacia abajo el Interruptor de Foco para encender el foco
LED en la parte inferior. Puede utilizarlo como una linterna de acuerdo con
sus necesidades.
Nota: ●el indicador de carga es rojo cuando el matamoscas está a cargo; la
luz se vuelve azul después de estar completamente cargada.
●Cuando el voltaje de la red es bajo, el reflector LED aún podría funcionar.
Están controlados por un circuito eléctrico separado.
Botón de Encendido Luz LED Frontal
Indicador de trabajo Red
ESES
● Precauciones
● Características
Manual del Instrucciones
Protective net
Protective net
ABS insulation
net
ABS insulation
net
Voltage grid
1. Cuando la raqueta matamoscas eléctrica está funcionando, la rejilla de
metal se generará 4000 V de alto voltaje, ¡no lo toque con mano o objeto
metálico! No es un juguete, mantenga alejado de los niños.
2. No lo use en los ambientes malos o en lugares con gases o líquidos inflamables,
como graneros y cobertizos para ganado.
3. Cuando no lo usa, gire el interruptor de alimentación a “OFF” y colóquelo en
un lugar seco.
4. No lo limpie con agua, toalla húmeda o aerosol, que podría causar circuito o
daño. Mantenga que la raqueta matamoscas eléctrica sea seca para evitar los
daños a los componentes internos.
5. No golpee en objetos duros para evitar los daños a la rejilla de metal.
6. Por favor cárguelo a tiempo después de agotarse la energía. No use el producto
al cargar. El tiempo máximo de carga no debe exceder 12 horas.
7. Si no planifica usar el producto durante un período largo, cárguelo durante
8 horas cada 3 meses, de lo contrario, acortará la vida útil de la batería.
1. Con la luz LED frontal, puede utilizar
la raqueta matamoscas eléctrica
para atacar los mosquitos fácilmente,
e incluso en la oscuridad.
2. Hay redes protectoras de dual capa en la parte
delantera y trasera de la raqueta matamoscas
eléctrica. Sin peligro de descargas eléctricas,
seguro para usar. (Rejilla protectora, rejilla aislante
ABS, red de voltaje, rejilla aislante ABS, rejilla
protectora)
3. Con la textura diseñada en la manija,
es elegante, funcional y antideslizante.
4. La manija es desmontable para un
almacenamiento conveniente.
También puede utilizarse como un
foco LED.
Manuale di Istruzioni
● Struttura del Prodotto
● Specifiche Tecniche
● Istruzioni per l'uso
Manico rimovibile
Faretto LED
Pulsante di
“Colpo”
Interruttore di
illuminazione
Interruttore
On/Off
Batteria al litio
integrata
Modello
Tensione
Potenza
Capacità della batteria
Tensione di funzionamento
Dimensioni
Peso netto
Tempo di carica
4000V
550 x 225 x 30 mm
320g
3-5h
OZW19P01L
5V
2W
1200mAh
Interruttore di Faretto
1. Caricare completamente il prodotto prima di procedere al primo utilizzo.
2. Spingere l'Interruttore verso l'alto fino al centro per accendere il prodotto,
il prodotto entrerà in modalità standby. Tenere premuto il pulsante , la
spia rossa si accende, la racchetta scacciamosche è pronta per colpire gli
insetti. Rilasciare il pulsante e il prodotto torna alla modalità standby, la spia
luminosa si spegne.
3. Spingere l'Interruttore verso l'alto, la Luce LED Anteriore si accenderà e
consentirà di utilizzare il prodotto al buio. Tenere premuto il pulsante per
colpire gli insetti.
4. Spingere l'Interruttore verso il basso, il prodotto smette di funzionare.
5. Spingere verso il basso l'Interruttore di Faretto per accendere il faretto
LED nella parte inferiore. Questo può funzionare come torcia elettrica in base
alle tue esigenze.
Nota:● l'indicatore di carica è rosso quando lo swatter è in carica; la luce diventa
blu dopo essere completamente carica.
●Quando la tensione di rete è bassa, il faretto a LED potrebbe ancora
funzionare. Sono controllati da un circuito elettrico separato.
Pulsante di accensione Luce anteriore LED
Indicatore di
funzionamento
Griglia
ITIT
● Precauzioni
● Caratteristiche
Manuale di Istruzioni
Rete protettiva
Rete protettiva
Rete isolante
in ABS
Rete isolante
in ABS
Griglia di
tensione
1. Mentre la racchetta scacciamosche è in funzione, la griglia metallica
genererà un'alta tensione di 4000V, non toccarla con mani od oggetti metallici!
Non è un giocattolo, tenerlo fuori dalla portata dei bambini.
2. Non utilizzare il prodotto in condizioni ambientali avverse o in luoghi con gas o
liquidi infiammabili, come fienili e stalle.
3. Mentre il prodotto non è in uso, portare l'Interruttore On/Off su "OFF" e riporlo in
un luogo asciutto.
4. Non pulire il prodotto con acqua, asciugamano bagnato o spray per evitare
cortocircuito o danni. Mantenere asciutta la racchetta antizanzare elettrica per
evitare danni ai componenti interni.
5. Non colpire oggetti duri per evitare danni alla griglia metallica.
6. Ricaricare il prodotto in tempo dopo che la batteria è esaurita. Non utilizzare il
prodotto durante la ricarica. Il tempo massimo di carica non deve essere
superiore a 12 ore.
7. Se si prevede di lasciare il prodotto inutilizzato per un lungo periodo, ricaricarlo
per 8 ore ogni 3 mesi, altrimenti diminuisce la vita utile della batteria.
1. Con questa luce LED anteriore,
puoi usare la racchetta fulmina
insetti per eliminare facilmente i
gli insetti anche al buio.
2. Ci sono reti di protezione a doppio
strato sulle parti anteriore e posteriore
della racchetta. Nessun pericolo di
scosse elettriche, sicuro da usare.
3. Con texture progettata sul manico,
elegante e funzionale per la
resistenza allo scivolamento.
4. Il manico è rimovibile per una
comoda conservazione. Può anche
funzionare come faretto.
● Avertissements
● Caractéristiques
Grille de protection
Grille de protection
Couche protectrice
d'isolation en ABS
Couche protectrice
d'isolation en ABS
Réseau de tension
1. Lors du fonctionnement de la tapette, la grille métallique génère une haute
tension de 4000V, évitez tout contact avec les mains ou tout objet métallique !
Ce produit n'est pas un jouet, veuillez le conserver hors de portée des enfants.
2. Ne pas utiliser dans des zones dangereuses ou celles renfermant des gaz ou des
liquides inflammables, tels que les granges et les étables à bétail.
3. En cas de non-utilisation, veuillez mettre l'interrupteur sur " OFF " et ranger le
produit dans un endroit sec.
4. Ne le nettoyez pas avec de l'eau, une serviette mouillée ou un vaporisateur, car
cela pourrait causer un court-circuit ou des dommages. Conservez la tapette à
moustiques électrique au sec pour éviter d'endommager les composants internes.
5. Veuillez ne pas frapper sur un objet dur pour éviter d'endommager la grille
métallique.
6. Veuillez recharger à temps une fois la charge entièrement consommée. N'utilisez
pas l'appareil pendant le chargement. La durée maximale de charge ne doit
pas dépasser 12 heures.
7. En cas de non-utilisation prolongée, rechargez l'appareil pendant 8 heures tous
les 3 mois pour préserver la durée d'utilisation de la batterie.
1. Avec ce témoin LED avant, vous
pouvez utiliser la tapette pour
éliminer facilement les insectes,
même dans l'obscurité.
2. La tapette à mouche dispose de
grilles de protection à double couche
sur ses faces avant et arrière. Sans
risque d'électrocution, utilisation sûre.
3. Dotée de texture graphique au
niveau de la poignée, elle est très
élégante et très pratique pour une
protection antidérapante.
4. La poignée peut être retirée pour
faciliter le rangement. Elle peut
également servir de projecteur
● ACHTUNG
● Besonderheiten
BEDIENUNGSANLEITUNG
1. Während der Arbeit hat Metallgitter eine stärke Spannung. Berühren Sie das
Metallgitter NICHT.
2. Es ist kein Spielzeug. Halten Sie Kinder von der elektrischen Fliegenklatsche fern.
3. NICHT in gefährlichen Bereichen mit brennbaren und explosiven Materialien
verwenden. (z.B. Tankstelle, Feuerwerk-Fabrik, LPG-Station)
4. Wenn Sie es nicht verwenden, schieben Sie die Taste auf Position OFF.
5. Verwenden Sie keine Fliegenklatsche, dass Wände oder andere harte
Gegenstände schlagen, um das Metallgitter nicht zu beschädigen.
6. Verwenden Sie das Produkt nicht während des Ladevorgangs, und laden Sie
nicht mehr als 12 Stunden auf.
7. Wenn Sie den Fliegenklatsche längere Zeit nicht verwenden, laden ihn alle 3
Monate auf, um Lebensdauer der Batterie zu verlängern.
Schutznetz
Schutznetz
ABS-Isoliernetz
ABS-Isoliernetz
elektrischer
Stacheldraht
DE
1. Vorne LED-Lampe: Sie können
Moskitos an schwach beleuchteten
Orten deutlich sehen.
2. Vor und nach dem Fliegenklatsche
wird eines doppeltes Schutznetz
eingebaut, sicherer zu verwenden.
3. Welle am Griff hinzugefügt, rutschfest,
schön und bequem.
4. Abziehbarer Griff, einfach zu lagern
und Sie können es als Taschenlampe
verwenden.
What's in the package Product Manual
Product Structure
Product specifications
Usage
Cautions
Features
1
1
1
2
2
Catalogue EN
Vorstellung von Bestandteile
Spezifikation
Bedienungsanleitung
ACHTUNG
Besonderheiten
3
3
3
4
4
Katalog DE
Structure du produit
Spécifications du produit
Utilisation
Avertissements
Caractéristiques
5
5
5
6
6
Catalogue FR
Struttura del Prodotto
Specifiche Tecniche
Istruzioni per l'uso
Precauzioni
Caratteristiche
7
7
7
8
8
Catalogare IT
Estructura del Producto
Especificaciones del Producto
Uso
Precauciones
Características
9
9
9
10
10
Catalogar ES
Product Manual
● Product Structure
● Product specifications
● Usage
Removable handle
LED spotlight
“Zap” Button
Lighting switch
On/Off Switch
Charging
Indicator
Model
Voltage
Power
Battery Capacity
Working voltage
Size
Net weight
Charging time
4000V
550 x 225 x 30 mm
320g
3-5h
OZW19P01L
5V
2W
1200mAh
spotlight switch
1.Please fully charge before use for the first time.
2. Push upward Switch to the middle to turn on, the product is in the standby
status. Keep pressing the button, red indicator light on, the swatter is ready
to zap the bugs. Release the button and back to standby status, indicator light off.
3. Push the Switch to the top, the Front LED Light will turn on and allows you
to use it in dark. Keep pressing the button to zap the bugs.
4. Push the Switch to the bottom, the product stops working.
5. Push down the Spotlight Switch to turn on the LED spotlight on the bottom.
This can function as an electric torch for your occasion need.
Note: ●The charging indicator is red when the swatter is in charge; the light turns blue
after fully charged.
●When the grid voltage is low, the LED spotlight might still work. They are
controlled by seperate electric circuit.
Switch button Front LED light
Working Indicator Grid
ENEN
● Cautions
● Features
Product Manual
Protective net
Protective net
ABS insulation
net
ABS insulation
net
Voltage grid
1. When the swatter is working, the metal grid will generate up to 4000V high
voltage, please do not touch it with hand or metal object! It's not a toy,
please keep it out of touch of children.
2. Do not use in harsh environments or in places with flammable gases or liquids,
such as barns and livestock sheds.
3. When not in use, please turn the power switch to “ OFF ” and place it in a dry
place.
4. Do not clean it with water, wet towel or spray, which might cause short-circuit
or damage. Keep the electric mosquito swatter dry to avoid damage to
internal components.
5. Please do not flap on hard object to avoid damage to the metal grid.
6. Please charge in time after the power is used up. Do not use the product when
charging. The maximum charging time should not exceed 12 hours.
7. If the product is not being used for a long period, please recharge it for 8 hrs
every 3 months, otherwise it will reduce the service time of battery.
1. With this front LED light , you can
use the swatter to zap bugs easily
even in dark.
2. There are double-layer protective
nets on the front and back of the
swatter. No electric shock harzard,
safe for use.
3. With designed texture on the handle,
stylish and functional for anti-slip.
4. The handle can be removed for
convenient storage.It can also
function as a spotlight.
Lithium battery
inside
Batterie au
lithium intégrée
11
Warranty
1 2
3 4 5 6 7 8
9 10
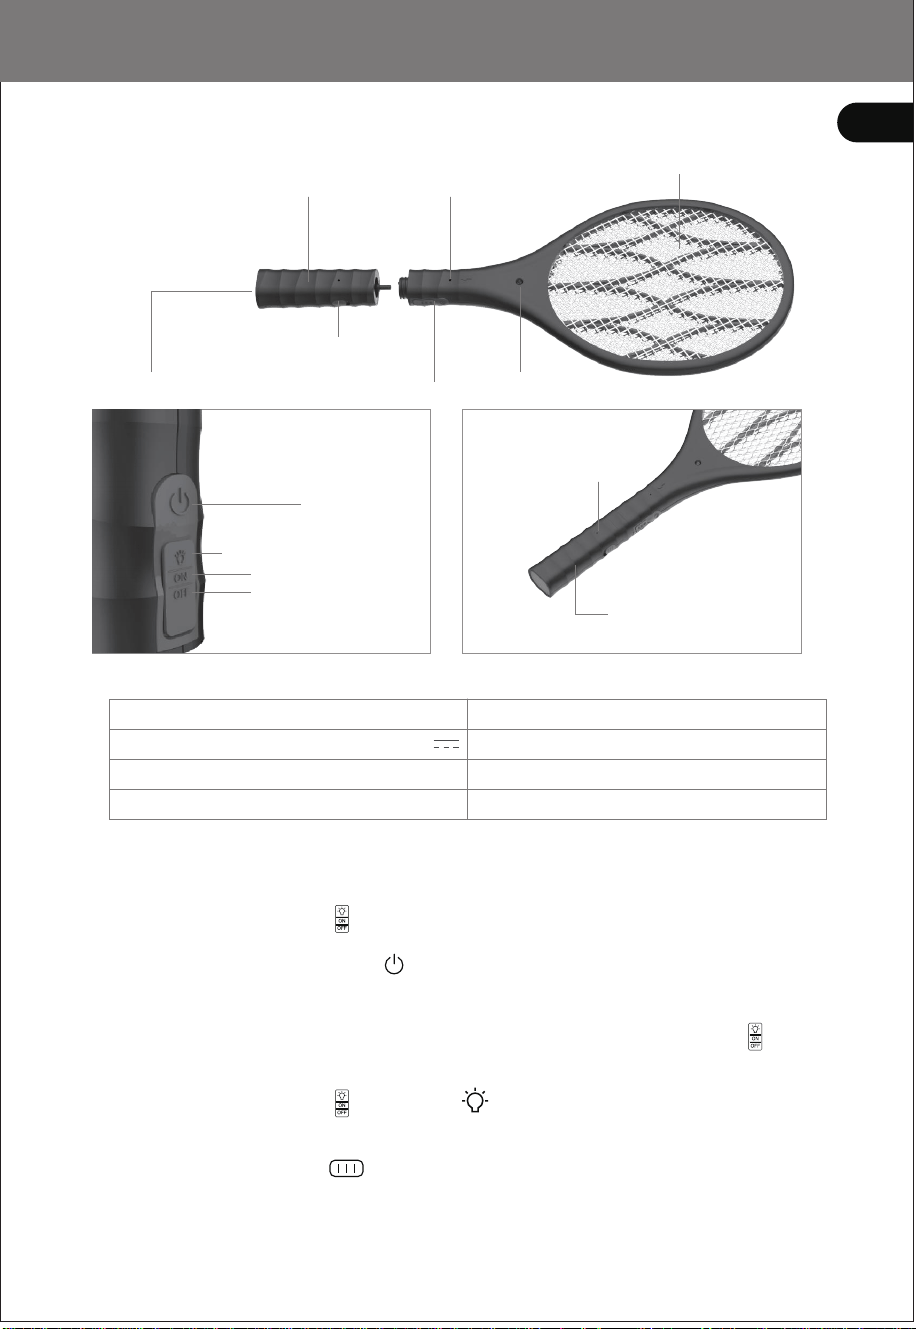
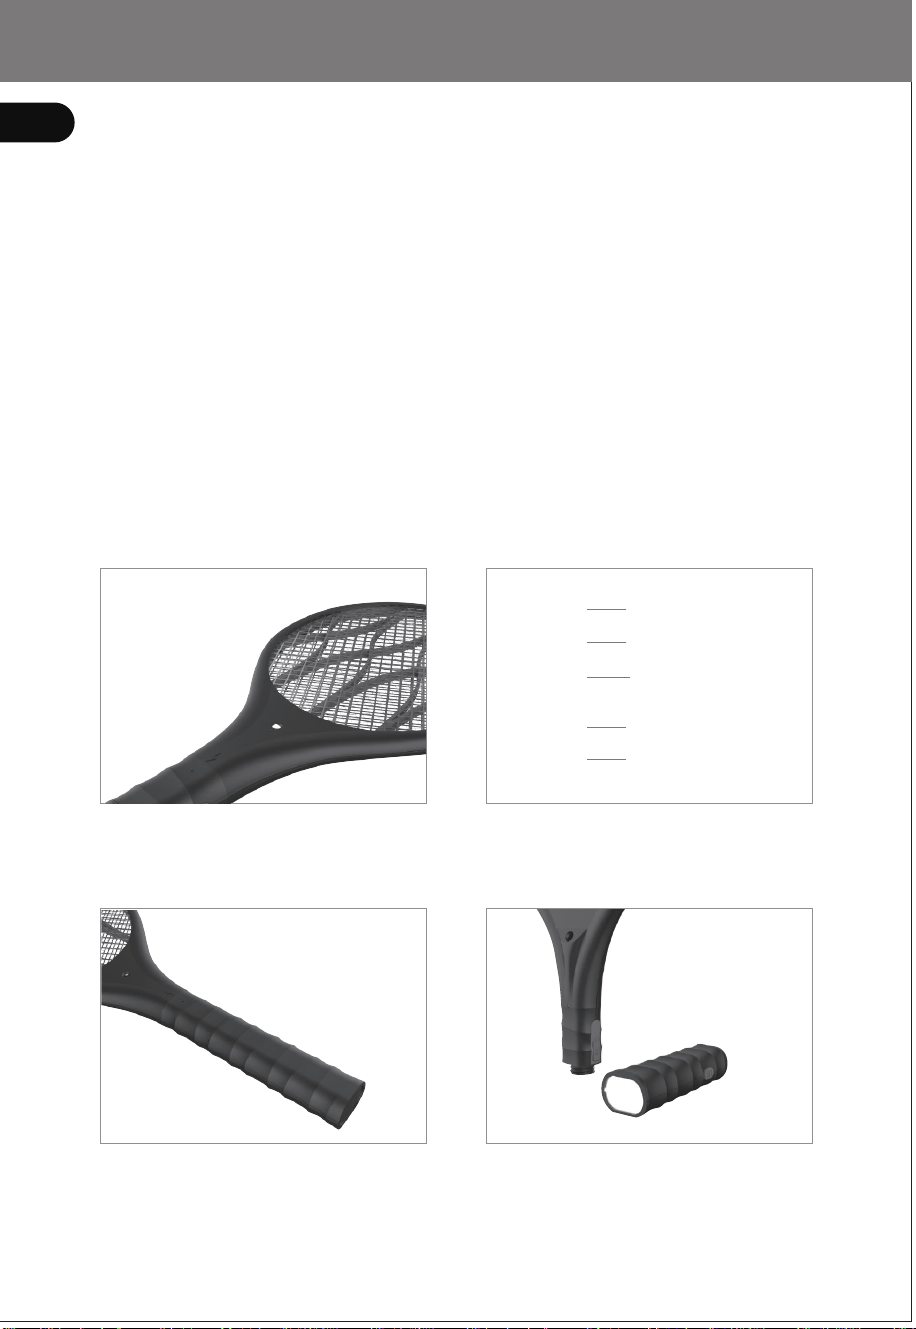
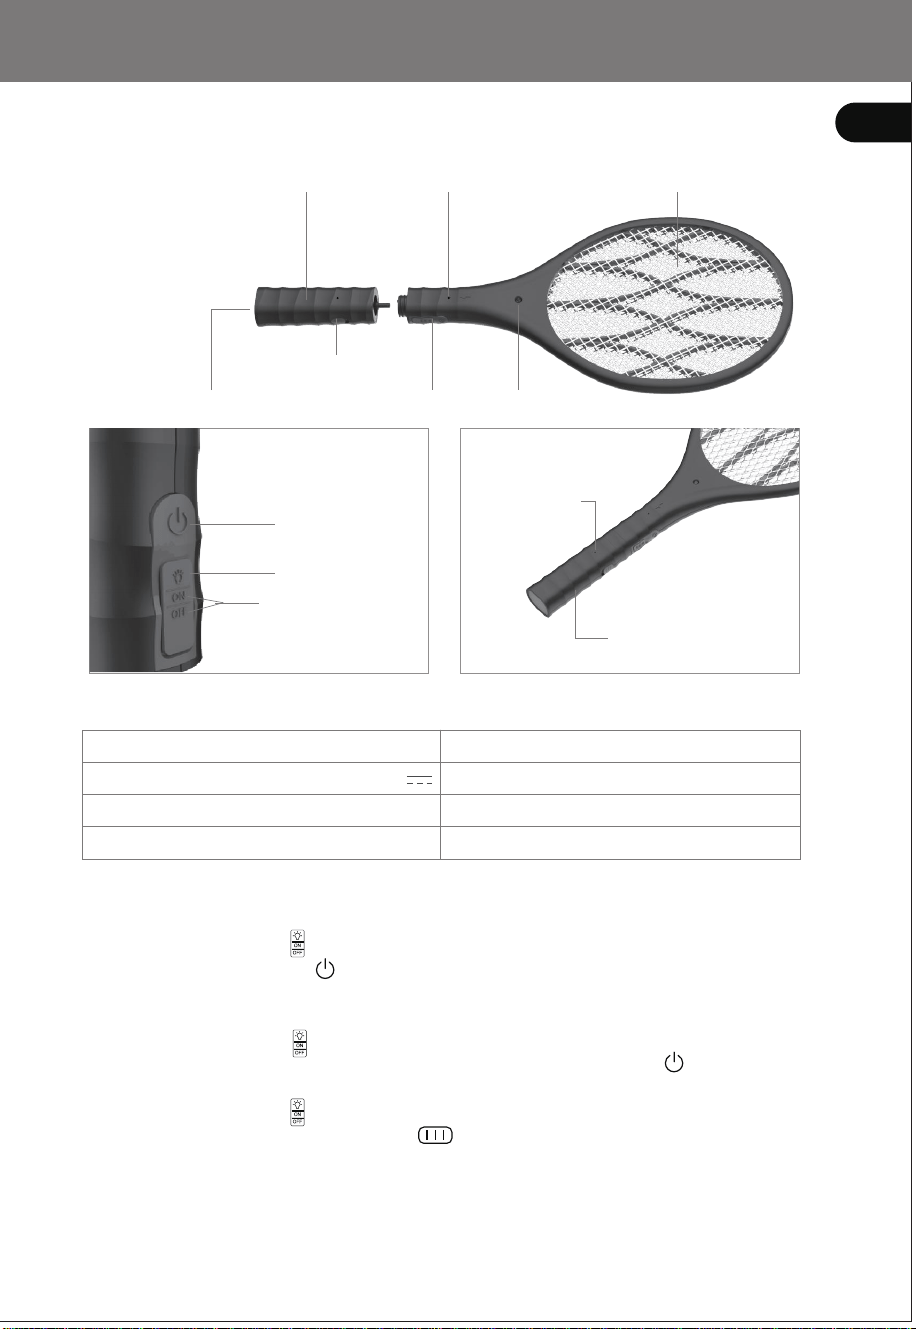
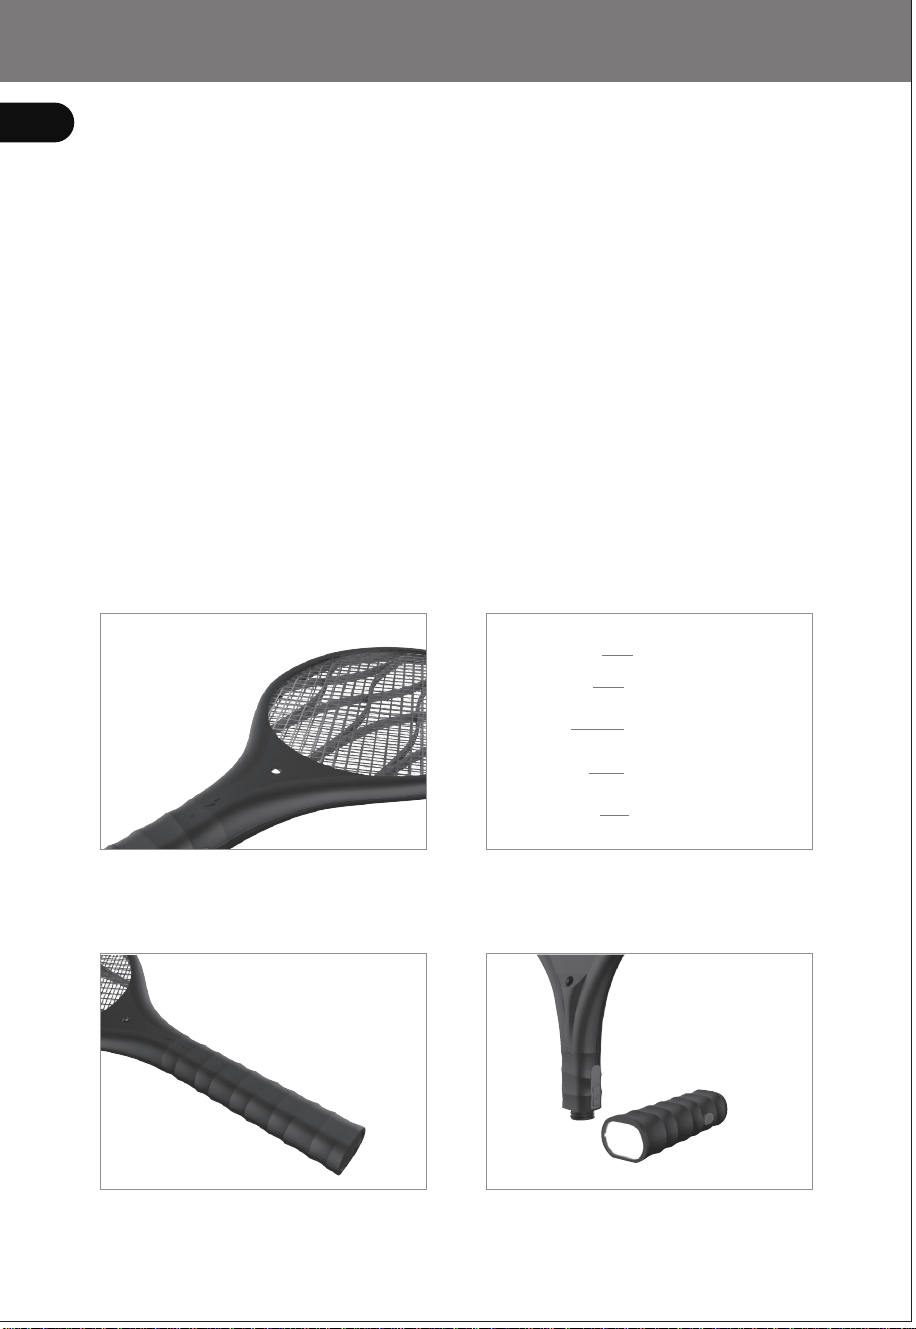
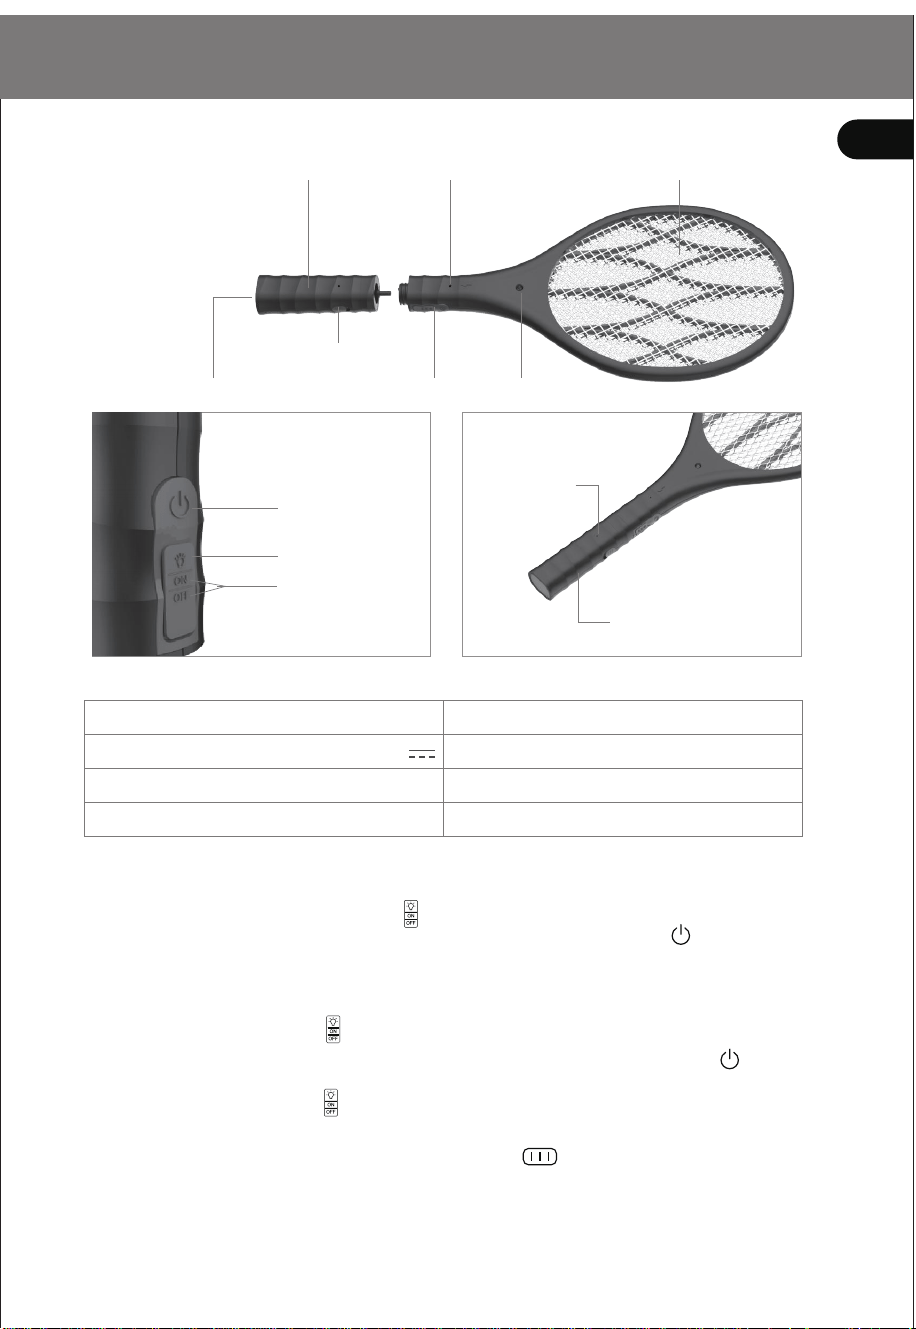
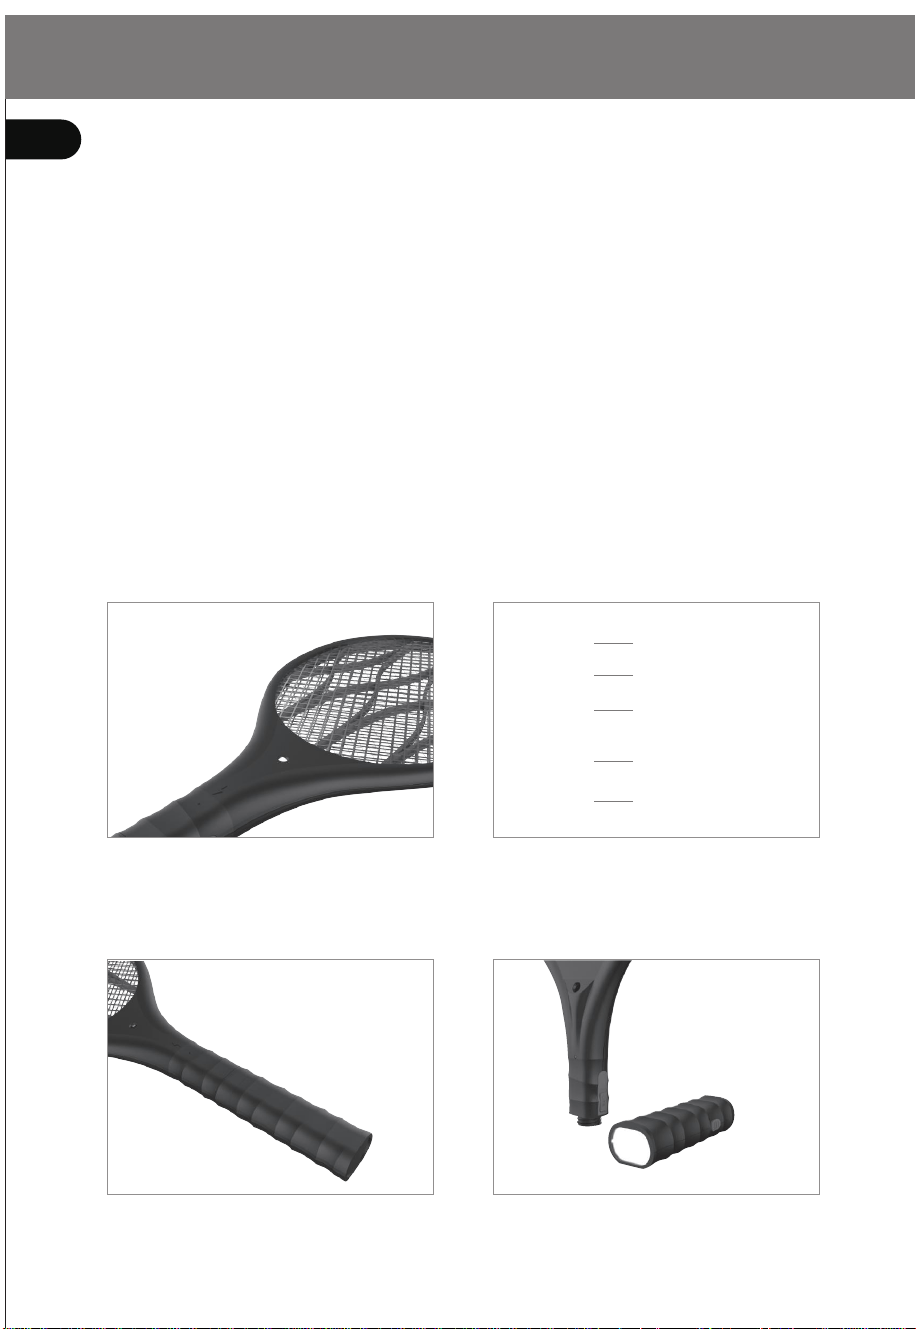
